User Manual
F
Before Initial Use: Connect battery in battery compartment and charge the
battery for at least 6-8 hrs. before initial use.
For better RF performance, it is recommended to place the fixed wireless
phone at an appropriate location where the signal strength is good.
The battery consumption varies according to the network signal strength. So
for better Standby Time & Talk Time it is recommended to place the fixed
wireless phone at an appropriate location where the signal strength is good.
F
F

1. FEATURES....................................................................................... 01
2. THINGS TO BE TAKE CARE OF...................................................... 01
3. IMPORTANT SAFETY INSTRUCTIONS.......................................... 02
4. INSTALLING YOUR PHONE ........................................................... 03
5. PHONE LAYOUT ........................................................................ 04-06
6. LCD DESCRIPTION ........................................................................... 07
7. MENU STRUCTURE .......................................................................... 08
8. PHONE OPERATION ..................................................................... 09-12
CONTENTS

1. Caller-Line Identification Function
2. LCD Display with Backlight
3. Supports Quad Band GSM (Voice Only) -
850MHz / 900MHz / 1800MHz / 1900MHz
4. Receive & Send SMS-Maxim urn 300
SMS can be stored
5. Phone Book to Store 300 Nos with Name
6. Speed Dialling Function for dial out of pre-
stored phone numbers
7. Call Log to store Missed, Dialled &
Received Calls - 20 each latest calls
8. 3-One Touch Memory
9. Pre-dialling and Clearing Function
10. Battery Standby Time - 50 Hrs
11. Battery Talk-Time - 3 Hrs
12. Two-Way Speakerphone with Adjustable
Receive Volume
13. Handset Receive Volume Control
14. Selectable Ring Melodies with
Adjustable Ring Volume
15. Alarm Function
16. Basic Calculator Function
17. Last Number Redial
18. Battery Capacity, Signal Strength,
Date & Time Display on LCD Display
19. Power ON/OFF with Selectable Tone
20. High performance fixed antenna
21. Supports Phone Lock Function for
Security
22. FM Radio
23. Call Settings (Call divert, Call waiting
etc)
Read the User Manual carefully before using the phone.
Switching Adaptor:
Use only switching adaptor (5V, 1000mA) that comes with the product. Using other make
adaptor may damage your phone or may deteriorate the performance of your phone.
Battery:
It Is recommended to use 3.7V 800mAh Li-ion rechargeable battery supplied with the
product. Using non-confirming battery can damage the product.
Phone Placement:
For better RF performance, Stand-by Time and Talk Time, it is recommended to place the
phone at an appropriate location where the signal strength is good.
Use of this phone may interfere with nearby medical equipment with poor shielding such as
heart Pacemaker etc.
As the phone emits radio signal which could interfere with other electronic equipment
such as TV, Radio, Telephones etc.It is recommended that a distance of at least 1 meter
should be maintained with other electronic equipment. This will minimize the risk of such
interferences.
Antenna:
For best RF performance, keep the antenna free from obstructions.
Keep the antenna position straight-up. This will ensure best communication quality.
Do not hold the antenna. This may affect the communication quality.
FEATURES
THINGS TO BE TAKEN CARE OF

When using your fixed wireless phone, basic safety precautions should always be followed to
reduce the risk of fire, electric shock and injury, including the followings;
Read and understand all the instructions mentioned in the User Manual.
Follow all instructions and warnings marked on the product, battery and adaptor.
Unplug the adaptor (if connected to phone) and Power off the product before cleaning.
Do not use liquid cleaners or aerosol cleaners. Use a damp cloth for cleaning.
Only use switching adaptor and battery that comes with the product. Using other adaptor
and battery may damage your phone or may deteriorate the performance of your phone.
Do not attempt to change the security codes or components. It may temporarily block
your phone or damage your phone.
Do not use the phone during lightening /thunder storming.
During lightening do not touch power plug and external antenna. This can cause
electrical shock to body.
Your phone is designed to work with AC input: 100-240V, DC output: 5V, 800 mA
switching adaptor. Check the adaptor voltage rating before connecting. Other rating
adaptor may damage the phone.
Insert or remove the SIM card only after “Power off” the phone (i.e. when LCD display is
blank).
Plug-in the battery in phone first and then connect the adaptor to the phone for charging
it.
Do not use damaged antenna with the product. It may affect the RF performance of the
product.
Do not install the phone at wet places. This may cause damage to the phone.
IMPORTANT SAFETY INSTRUCTIONS
Coil
Cable
Jack
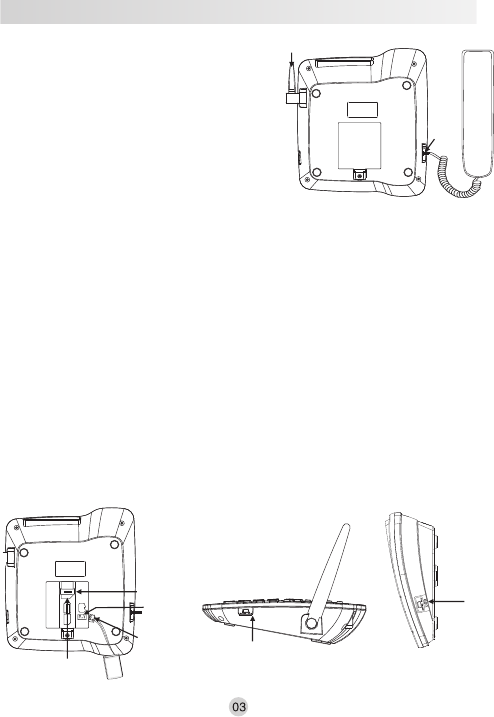
Install the SIM and Battery:
Slide out the battery compartment cover.
Insert the SIM card with correct direction in the
SIM tray in battery compartment (Refer Figure
2).
Insert the supplied 3.7V Li-ion battery in to the
battery connector in battery compartment (Refer
Figure 2).
Slide the battery compartment cover back.
Connect the Phone:
Connect the handset with base unit by using coil cord (Refer Figure 1).
Plug the switching adaptor in to the Mini USB DC 5V port on the base rear side (Refer
Figure 3).
Charge the battery for 6-8 hrs. before initial use.
Press and hold the “Power ON/OFF”key to switch “ON” the Fixed Wireless Phone.
After that service provider name will appear on the LCD display which indicates that now
your phone is ready to receive and make calls. (If signal strength is very poor at the
location of phone and “Emergency” appears on the LCD display then it is recommended
to install the phone at some other location where there is better signal strength).
Set the time and date manually:
For setting the time and date on LCD display refer page
Figure 1
Connect Switching
Adaptor Here
Figure 3 Figure 4
Mini USB
DC 5V
Port
Insert SIM here
with correct
direction
INSTALLING YOUR PHONE
Fixed Antenna
Battery
Cover
SIM
SIM
SD
SIM Tray
Battery
Connector
Connect 3.7V
Li-ion Battery
connector here
Figure 2
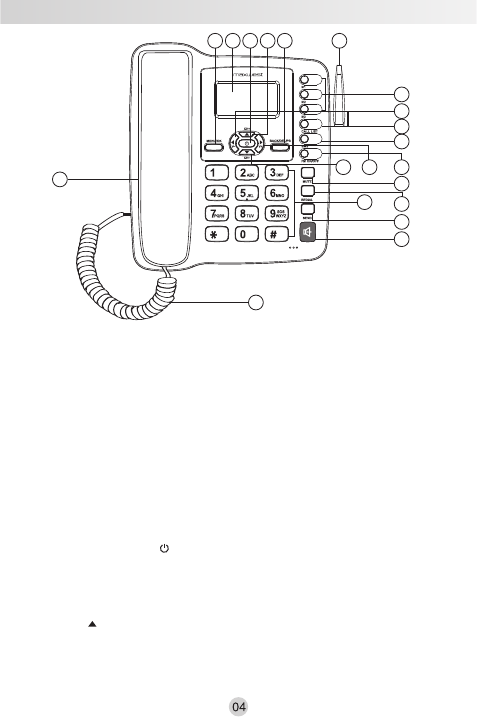
PHONE LAYOUT
1. MENU/OK KEY(LEFT SOFT KEY):
Press to go in to the main menu in idle mode.
In sub Menu mode: Press to confirm the selection.
Press to answer the incoming calls (if wants to attend the call).
2. BACK/DEL/PB KEY (RIGHT SOFT KEY):
Press to access the Phonebook in idle mode.
In sub Menu mode: Press to go back to previous level.
In editing /pre-dialling mode: Press to clear a character/ digit.
In editing /pre-dialling mode: Long press to clear all character/ digits.
Press to reject the incoming calls (if do not wants to attend it).
3. LCD DISPLAY:
Displays signal strength, battery status, date and time in idle mode.
4. POWER ON/OFF KEY ( ):
When the phone is POWER OFF: Press and hold to POWER ON the phone in idle mode.
Press and hold to POWER OFF the phone in idle mode.
In menu/editing mode: Press to go back to the idle mode.
During a call: Press to end a call and go back to idle mode.
5. UP KEY ( ) /CH+:
In menu mode: Press to scroll up the menu items.
In phonebook list/missed calls list / received calls list/ dialled calls list: Press to scroll up
the list.
2 183 4 51
67
9
17
20
19
8
10
11
12
13
14
15
16

Press to access the FM Radio.
Press to scroll up the channel from FM Radio channel list.
Press to access ‘+’ sign during calculator function
6. DOWN KEY( ) /CH- :
Press to access the received calls list in idle mode.
In menu mode: Press to scroll down the menu items.
In phonebook list/missed calls list/ received calls list/ dialled calls list: Press to scroll down
the list.
Press to scroll down the channel from FM Radio channel list.
Press to access ‘-’ sign during calculator function.
7. RIGHT KEY ( ) / V+:
Press to access the SMS message writing in SMS message input mode (messaging in the
menu) in idle mode.
During a call: Press to increase the receive volume in handset and speaker mode.
During edit mode (Message/Phonebook): Press this key to move the cursor from left to
right.
Press to access ‘ ’ sign during calculator function.
8. LEFT KEY ( ) / V-:
Press to access the dialled calls list in idle mode.
During a call: Press to decrease the receive volume in handset and speaker mode.
During edit mode (Message/Phonebook): Press this key to move the cursor from right to
left.
Press to access ‘x’ sign during calculator function
9. ALPHANUMERIC KEY PAD, * (STAR), # (HASH):
Press to insert a digit /character/*/# key in idle mode.
Press “0” key for inserting space between two characters/words during SMS writing and
phonebook name entry.
Press “*” key for inserting symbols during SMS writing and phonebook name entry.
Press “#” key for inserting the decimal (.) during use of calculator.
Press “#” key during editing mode (Message/Phonebook) to choose different input
methods.
10. ONE TOUCH MEMORY (M1, M2, M3):
Pressing these keys can call the saved number directly.
11. CALL LIST:
Press to access call history (Missed calls, Dialled calls and Received calls) in idle mode.
12. SMS KEY:
Press to access the SMS Inbox messages list directly in Idle mode.
13. FM ON/OFF KEY:
Press to access the FM Radio function in idle mode.
14. MUTE:
Press this key to mute call (transmit) during conversation in handset and speakerphone
mode
15. REDIAL KEY:
Press to dial out the last dialled number.

16. SEND KEY:
Press to dial out the desired number from phonebook/missed calls/received calls/dialled
calls list.
After dialling phone number, press SEND KEY the number will be dialled out.
Press to access ALL CALLS LIST (missed calls, received calls and dialled calls) in idle
mode.
17. SPEAKER KEY ( ):
During a call: Press to turn on / off the speaker phone.
18. EXTERNAL ANTENNA:
Detachable TNC antenna for better RF signal.
19. CORDED HANDSET:
For communication between two parties.
20. COILED CORD:
To connect corded handset with base unit.
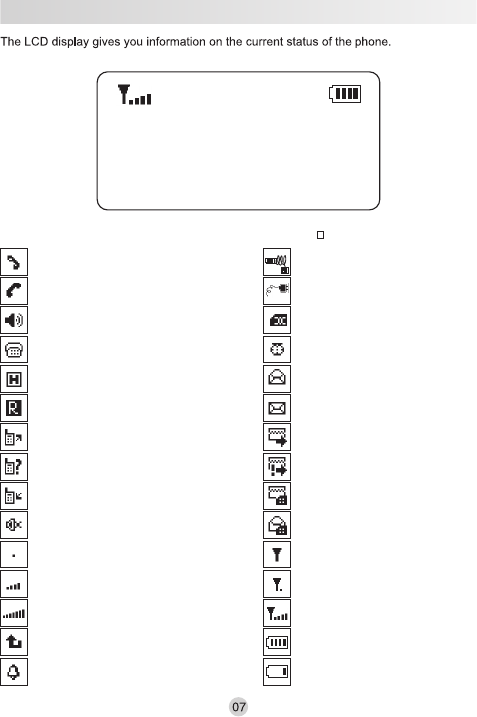
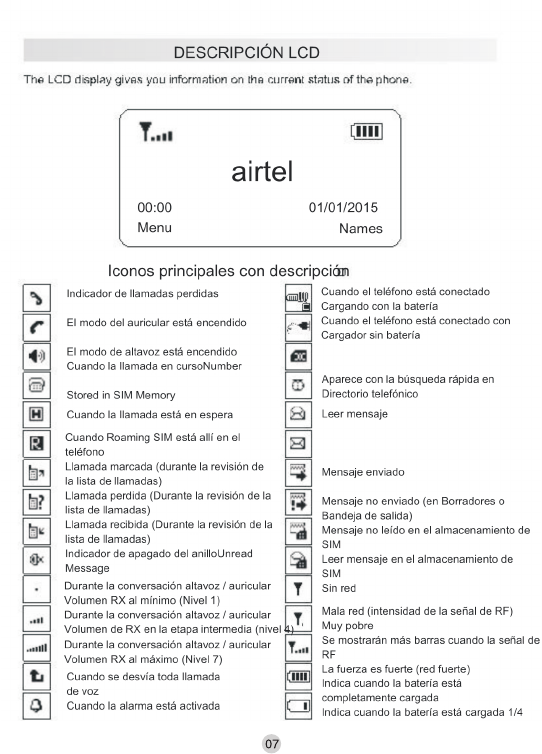
LCD DESCRIPTION
00:00
Menu
01/01/2015
Names
Main Icons with Description
Missed Call Indicator
Handset mode is on
Speaker mode is on
When Call in progress
When Call is on hold
When Roaming SIM is there in Phone
Dialled Call (During review of Call list)
Missed Call (During review of Call list)
Received Call (During review of Call list)
Ring Off Indicator
During Conversation Speaker/Handset
RX Volume at minimum (Level 1)
During Conversation Speaker/Handset
RX Volume at Intermediate Stage (Level 4)
During Conversation Speaker/Handset
RX Volume at maximum (Level 7)
When all voice call is diverted
When phone is connected in
charging with battery
When phone is connected with
charger without battery
Number Stored in SIM Memory
Appears with quick search in
Phone book
Read Message
Unread Message
Sent Message
Unsent Message (In Drafts or Outbox)
No network
Poor Network (RF signal strength
very poor)
Unread Message in SIM storage
Read Message in SIM storage
More bars will show when the RF signal
strength is strong (Strong Network)
Indicates when battery is fully charged
Indicates when battery is 1/4 charged
When Alarm is activated
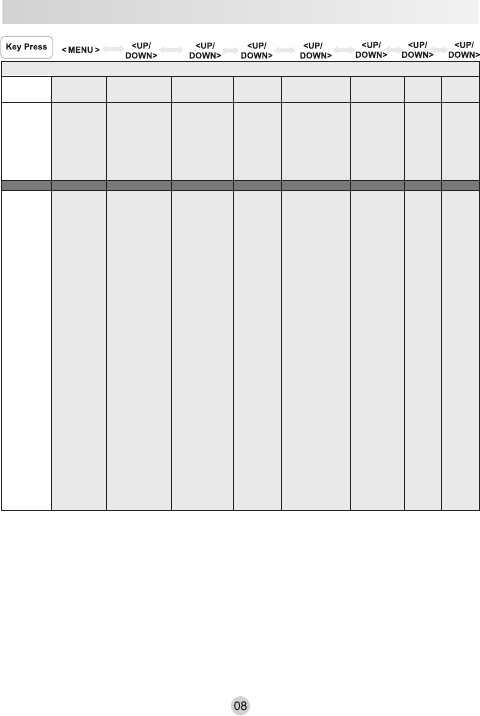
• Write message
• Inbox
• Drafts
• Outbox
• Sent messages
• SMS templates
• SMS settings
• Missed calls
• Received calls
• Dialled calls
• Delete call logs
• Call timers
•
• Call settings
• Network settings
• Security settings
• Restore settings
Phone settings
Phone Settings
• Time and date
• Language
• Pref. input method
• Show date and
time
• Screen auto lock
• Dedicated keys
• Contrast
• Backlight time
setting (sec)
Call Settings
• Call divert
• Call waiting
• Call barring
• Advanced settings
Network Settings
• Network selection
Security Settings
• SIM security
• Phone security
Restore Settings
• Input phone
password (0000)
General
• Activate
• Customize
• Reset
Silent
• Activate
Customize
• Ring type
• Ringtone
• Ringtone
volume
• Message
tone
• Message
volume
• Keypad tone
• Keypad
volume
• Power on
tone
• Power off
tone
• Power on/off
volume
• System alert
on/off
• Alarm
volume
• Power on
• Power off
• Channel
list
• Manual
list
• Auto
search
• General
• Silent
Add new
contact
With
Phonebook
Empty
• Select
• Phonebook
settings
With
Phonebook
Entries
• View
• Send text
message
• Call
• Edit
• Delete
• Copy
• Add to
blacklist
• Phonebook
settings
Sub
Menu 2
• Calendar
• Alarm
• Calculator
• Service
provider
services
MAIN
MENU
PHONE
BOOK
MESSAGING CALL HISTORY
ORGANIZER
SETTINGS PROFILES FM
RADIO
• FM
radio
(FM
Band
for selec-
ection)
SERVICES
Sub
Menu 1
MENU STRUCTURE

PHONE OPERATION
Switch the phone on/off
If your phone is powered off before, press and hold “POWER ON/OFF KEY” to turn
on the phone.
You can press and hold “POWER ON/OFF KEY” again to power off the phone.
Making a call
Pick-up the Handset or press the Speaker key and listen for dial tone.
Dial the number you want to call, LCD will display the dialled number. After
finishing the number input, press “SEND” key. The input number will be dialled out
automatically.
OR
Make sure the phone is in idle mode (not in talk mode).Bring the desired number
that you want to call on the LCD display from Phonebook, Missed calls, Dialled
calls and Received call list, press “SEND” key. The number displayed on the LCD
will be dialled out automatically.
When conversation is finished, put the handset on the base unit or press the
Speaker key to end the call.
Receiving a call
When somebody calls you the phone rings and the Caller ID number shall be
displayed on the LCD display.
Pick up the Handset or press the Speaker key to receive the call.
When conversation is finished, put the handset on the base unit or press the
Speaker key to end the call.
Note:
Default receive volume in handset mode is at level 4.
Default receive volume in speaker mode is at level 4.
Adjust the receive volume in handset or speaker mode by pressing the LEFT/RIGHT key
during the conversation.
Press “Speaker” key to alternate between speaker phone and normal handset mode.
During making or receiving a call, the built in call timer will automatically display the call
time. It is shown in Hour, Minutes and Seconds formal (HH:MM:SS). The call timer gives
you approximate idea about the call length.
If you do not want to attend the received call, press the “RIGHT SOFT KEY”, phone busy
message will go to other party end.
Pre-dialling
Make sure the phone is in idle mode (not in talk mode).
Enter the telephone number that you want to dial (if any mistake is committed

during entering the telephone number, it can be corrected by using
“BACK/DEL/PB” key). The telephone number which has to be dialled out is
displayed on the LCD display.
Lift the handset or press Speaker key or press SEND key, the displayed number
will be dialled out automatically.
When conversation is finished, put the handset on the base unit or press the
SPEAKER key to end the call.
Last Number Redial
You can redial the last dialled number.
Lift the handset or press SPEAKER key.
Hear the dial tone, press the REDIAL key.
The last dialled number will be dialled out automatically.
Mute a call
During conversation, press “LEFT SOFT KEY” and then press the UP/DOWN
key to select the option “Mute”.
Press “LEFT SOFT KEY” to mute the call. When the call is muted (Mute the
microphone) , mute icon will be displayed on the LCD.
To unmute the call, during conversation, press “LEFT SOFT KEY” and then press
the UP/DOWN key to select the option “Unmute”.
OR
During conversation, press “MUTE” key to mute the call. When the call is muted
(Mute the microphone), mute icon will be displayed on the LCD.
To unmute the call, during conversation, press “MUTE” key again.
Note:
Only transmit/sending is muted while using Mute function.
Call Waiting
During call waiting service when you are on a call and a new call comes, you will
hear a beep tone.
The caller ID information of the third party is also displayed on the LCD along with
beep tone.
Press “LEFT SOFT KEY” to answer the third party call and put the current call on
hold.
Press “LEFT SOFT KEY” and select the option “Swap”.
Press the “LEFT SOFT KEY” again to call the current party in conversation and
put the third party on hold. In this way you can alternate the call between current
party and third party whenever it is required.

For 3 party conference with current party and third party, press the “LEFT SOFT
KEY” and select the option “Conference”
Note:
This feature is related to service provider. Please activate the same from the call settings
option in Menu setting.
Call Divert
This feature allows you not to receive the call at your phone for a period of time.
If you do not want to attend any call on your phone, you can select for divert an
incoming call to any assigned number according to the status which you want to
set i.e. divert all voice calls, divert if you are unreachable, divert if no answer, divert
if busy etc.
This feature can be selected and deselected from Menu in Call settings.
Note:
This feature is related to service provider. Please activate the same from the call settings
option in Menu setting.
“Divert all data calls” option is not applicable for this phone.
During call divert function is activated on your phone, you cannot receive a call and only a
“Call divert” symbol will appear on the LCD display.
Call Barring
This feature allows you to set the phone in Call Barred mode after activating this
feature from Menu in Call settings.
After the Call Barring function is activated, it can prevent in making the outgoing
voice calls and receiving the incoming voice calls as per requirement.
Note:
This feature is related to service provider. Please activate the same from the call settings
option in Menu setting.
One Touch Memory (M1, M2, M3)
Pressing these keys can call the saved numbers directly in the one touch memory M1,
M2 & M3.
Store a Phone number in One Touch Memory (M1, M2, M3)
Press the “One Touch Memory” key M1 OR M2 OR M3, “Empty” will be
displayed on the LCD display for the memory location which is empty.
Press “LEFT SOFT KEY” and type the phone number to be stored at the empty
memory location.
Press the “LEFT SOFT KEY” to save the phone number at the empty memory
location.
Edit Phone number stored in One Touch Memory (M1, M2, M3)
11

Press and hold “One Touch Memory” key M1 OR M2 OR M3 for 3.0 second. The
stored phone number will be displayed on the LCD display.
Press “LEFT SOFT KEY” and select the option “Edit” by pressing the UP/DOWN
key.
Press “LEFT SOFT KEY” again. The stored phone number will be displayed on
the LCD display with cursor blinking at the last digit.
Press “RIGHT SOFT KEY” to edit the already stored number.
Press the “LEFT SOFT KEY” to save the edited phone number at the same
memory location.
Remove Phone number stored in One Touch Memory (M1, M2, M3)
Press and hold “One Touch Memory” key M1 OR M2 OR M3 for 3.0 second. The
stored phone number will be displayed on the LCD display.
Press “LEFT SOFT KEY” and select the option “Remove” by pressing the
UP/DOWN key.
Press “LEFT SOFT KEY” again. The stored phone number will be removed from
that memory location.
Call Phone number stored in One Touch Memory (M1, M2, M3)
Press “One Touch Memory” key M1 OR M2 OR M3 to call the saved number
directly from the one touch memory M1, M2 & M3.
Note:
If the phone number stored at the One Touch Memory location M1, M2 & M3 is also stored in
the phone book with name, then only the name of called party displays on LCD display during
call phone number stored in one touch memory M1, M2 & M3.
12

to correct the interference by one or more of the following
encouraged to try
determined by turning the equipment of
ortelevision reception, which can be
does cause harmful interference to radio
particular installation. lfthis equipment does
interference will not
, there is no guarantee that
against harmful interferen ce in a residential installation.
reasonable protection
the FCC
found to
that may cause
accept any interference received, including interference
Warning:
Any Changes or modifications not expressly approved by the party responsible
for compliance could void the user's authority to operate the equipment.
This device complies with part 15 of the FCC Rules. Operation is subject to the
following two conditions: (1) This device may not cause harmful interference,
and(2) this device must
undesired operation. Note: This equipment has been tested and
Rules. Theselimits are designed to provide
This
equipmentgenerates, uses and can radiate radio frequencyenergyand, if not
installed and used in accordance with the instructions, may cause harmful
interference to radio
communications. However
occur in a
and on, the user is
measures:
-Reorient or relocate the receiving antenna.
-lncrease the separation between the equipment and receiver.
-Connect the equipment into an outlet on a circuit different from that to which
the receiver is connected.
-Consult the dealer or an experienced radio/TV technician for help.
FCC Radiation Exposure Statement:
This equipment complies with FCC radiation exposure limits set forth for an
uncontrolled environment .
This transmitter must not be co-located or operating in conjunction with any
other antenna or transmitter.
This equipment should be installed and operated with minimum distance 20cm
between the radiator &you body.
13
comply with thelimits for a Class B digital device, pursuantto part 15 of
f


1. de la línea llamantefunciones
2. de la pantalla LCD conretroiluminación
3. Soportabanda cuádruple GSM (voz
solamente) - 850MHz / 900MHz /
1800MHz / 1900MHz
4. Recibir y Enviar SMS-Maxim urna 300
SMS se pueden almacenar
5. libro teléfono para almacenar 300
números con el nombre de
6. función de marcación rápida para la
marcación de pre-almacenado números
de teléfono
7. de llamadas Entrar para almacenar
perdidas, realizadas y las llamadas
recibidas - 20 cada uno últimas llamadas
8. 3-One Touch memoria
9. de pre-marcado y borrado de la función
10. de la batería Tiempo en espera - 50 Horas
11. batería Tiempo de conversación - 3 Horas
12. altavoz de dos vías con ajustable Recibir
volumen
Leer el manual del usuario antes de utilizar el teléfono.
Adaptador de la conmutación:
. Uso del adaptador interruptor situado (5V, 1000mA) que viene con el producto. El uso
de otro adaptador de maquillaje puede dañar el teléfono o se puede deteriorar el
rendimiento de su teléfono.
PILAS:
. Se recomienda el uso de 3.7V 800mAh batería recargable de iones de litio suministrada
con el producto. El uso de baterías no puede confirmar dañar el producto.
Colocación de teléfono:
. Para un mejor rendimiento de RF, Stand-by tiempo y el tiempo de conversación, se
recomienda colocar el teléfono en un lugar apropiado, donde la intensidad de la señal es
buena.
. El uso de este teléfono puede interferir con el funcionamiento de equipos médicos con
apantallamiento deficiente, como marcapasos, etc.
. A medida que el teléfono emite señales de radio que podría interferir con otros equipos
electrónicos tales como TV, radio, teléfono etc.It se recomienda mantener una distancia de
al menos 1 metro debe mantenerse con otros equipos electrónicos. Esto minimizará el
riesgo de tales interferencias.
Antena:
. Para un mejor rendimiento de RF, mantenga la antena libre de obstrucciones.
. Mantenga la posición de la antena recto-para arriba. Esto asegurará la mejor calidad de
la comunicación.
. No sostenga la antena. Esto puede afectar la calidad de la comunicación.
CARACTERISTICAS
COSAS A TENER CUIDADO DE
13. del auricular Recibir control de Volumen
14. Las melodías de llamada seleccionables
con el anillo ajustable del volumen de
15. la alarma Función
16. calculadora funciónbásica
17. rellamada del último número
18. Capacidadde la batería, intensidad de la
señal, fecha y hora de visualización en la
pantalla LCD
19. dealimentación ON / OFF con tono
seleccionable
20. de alta p antena fija endimiento
21. Soporta la función de bloqueo del teléfono
parade Seguridad
22. de radio FM
23. Ajustes de llamada(Desvío de llamadas,
llamada en espera, etc.)

02
Cuando utilice un teléfono inalámbrico fijo, medidas básicas de seguridad
deben seguirse para reducir el riesgo de incendio, descarga eléctrica y
lesiones, incluyendo los siguientes;
.Lea y comprenda todas las instrucciones descritas en el manual del usuario.
.Siga todas las instrucciones y advertencias indicadas en el producto, la
batería y el adaptador.
.Desenchufe el adaptador (si está conectado al teléfono) y Apagar el producto
antes de limpiarlo. No usar limpiadores líquidos o en aerosol. Utilice un paño
húmedo para limpiarlo.
.Sólo use el adaptador de la conmutación y la batería que viene con el
producto. El uso de otro adaptador y la batería puede dañar el teléfono o se
puede deteriorar el rendimiento de su teléfono.
.No trate de cambiar los códigos de seguridad o componentes. Se puede
bloquear temporalmente el teléfono o dañar el teléfono.
.No utilice el teléfono durante aligerar asalto / trueno.
.Durante aligeramiento no toque el enchufe de potencia y una antena externa.
Esto puede causar una descarga eléctrica al cuerpo.
.El teléfono está diseñado para trabajar con la entrada de CA: 100-240V,
salida de CC: 5 V, 800 mA adaptador de conmutación. Controlar el valor de
tensión antes de conectar el adaptador. Otro adaptador de calificación puede
dañar el teléfono.
.Insertar o extraer la tarjeta SIM sólo después de “Apagar” el teléfono (es
decir, cuando la pantalla LCD está en blanco).
.Plug-in de la batería en el teléfono antes de conectar el adaptador al teléfono
para cargarlo.
.No utilice la antena dañada con el producto. Puede afectar al rendimiento de
RF del producto.
. No instale el teléfono en lugares húmedos. Esto puede causar daños en el
teléfono..

Coil
Cable
Jack
Instalar la tarjeta SIM y la batería:
Deslice la tapa del compartimiento de la batería.
Inserte la tarjeta SIM con la dirección correcta en
la bandeja de SIM en el compartimiento de la
batería (Consulte la Figura 2).
Inserte la batería Li-ion 3.7V suministrado al
conector de batería en el compartimiento de la
batería (Consulte la Figura 2).
Deslice la tapa de la batería.
Conectar el teléfono:
conectar el teléfono con la unidad base mediante el uso de cable de bobina (Consulte la
Figura 1).
Enchufe el adaptador de conmutación en al puerto DC 5V Mini USB en el lado trasero de
base (Consulte la Figura 3).
Cargar la batería durante 6-8 horas. antes del primer uso.
Mantenga pulsada la tecla “Encendido / Apagado” para cambiar “ON”, el teléfono
inalámbrico fijo.
Después de que el servicio aparecerá el nombre del proveedor en la pantalla LCD que
indica que ahora el teléfono está preparado para recibir y realizar llamadas. (Si
intensidad de la señal es muy pobre en la ubicación del teléfono y “emergencia” aparece
en la pantalla LCD, entonces es recomendable instalar el teléfono en algún otro lugar
donde haya una mejor intensidad de la señal).
Ajustar la hora y la fecha manualmente:
Para ajustar la fecha y la hora en la pantalla LCD se refieren página
Figure 1
Connect Switching
Adaptor Here
Figure 3 Figure 4
Mini USB
DC 5V
Port
Insert SIM here
with correct
direction
INSTALLING YOUR PHONE
Fixed Antenna
Battery
Cover
SIM
SIM
SD
SIM Tray
Battery
Connector
Connect 3.7V
Li-ion Battery
connector here
Figure 2

DISPOSICION DEL TELÉFONO
1. MENÚ / OK (tecla suave izquierda):
Pulse para entrar al menú principal en el modo inactivo.
En el modo de menús substitución: Pulse para confirmar la selección.
Pulse para contestar las llamadas entrantes (si quiere asistir a la llamada).
2. VOLVER / DEL / PB (tecla programable derecha):
Pulse para acceder a la agenda en el modo inactivo.
En el modo de menús substitución: Pulse para volver al nivel anterior.
En el modo de edición / pre-marcación: Pulse para borrar un carácter / dígito.
En la edición / modo de pre-marcación: Mantener pulsado para borrar todos los
caracteres / dígitos. Pulse para rechazar las llamadas entrantes (si hacerlo no quiere
asistir a la misma).
3. Pantalla LCD:
Muestra la intensidad de la señal, estado de la batería, la fecha y hora en el modo
inactivo.
4. POWER ON / OFF ( ):
Cuando el teléfono está apagado energía: pulse y mantenga pulsado para activar el
teléfono en el modo inactivo. Mantenga pulsado para apagar el teléfono en el modo
inactivo.
En el modo / edición de menús: Pulse para volver al modo inactivo. Durante una
llamada: Pulse para finalizar una llamada y volver al modo inactivo.
5. Tecla Arriba ( ) / CH +:
En el modo de menú: Pulse para desplazarse hacia arriba los elementos de menú.
En la lista de la agenda / lista de llamadas perdidas / llamadas recibidas de lista de
llamadas marcadas /: Pulse para desplazarse hasta la lista.
2 183 4 51
67
9
17
20
19
8
10
11
12
13
14
15
16

02
Pulse para acceder a la radio FM.
Pulse para desplazarse hasta el canal de la lista de canales de radio FM. Pulse para
acceder signo '+' durante la función de calculadora
6. TECLA ( ) / CH-:
Pulse para acceder a la lista de llamadas recibidas en el modo inactivo. En el modo de
menú: Pulse para desplazarse por las opciones del menú.
En la lista de la agenda / lista de llamadas perdidas / llamadas recibidas de lista de
llamadas marcadas /: Pulse para desplazarse por la lista.
Pulse para desplazarse por el canal de la lista de canales de radio FM. Pulse para
acceder signo '-' durante la función de calculadora.
7. Tecla derecha ( ) / V +:
Pulse para acceder al mensaje SMS escrito en el modo de entrada de mensajes SMS
(mensajes en el menú) en el modo inactivo.
Durante una llamada: Pulse para aumentar el volumen de recepción en el modo de
auricular y altavoz.
Durante el modo de edición (Mensaje / guía telefónica): Pulse esta tecla para mover el
cursor de izquierda a derecha.
Pulse para acceder ' ' firman en función de calculadora.
8. Tecla hacia la izquierda ( ) / V:
Pulse para acceder a la lista de números marcados en el modo inactivo.
Durante una llamada: Pulse para disminuir el volumen de recepción en el modo de
auricular y altavoz.
Durante el modo de edición (Mensaje / guía telefónica): Pulse esta tecla para mover el
cursor de derecha a izquierda.
Pulse para acceder a 'x' en función de calculadora
9. Teclado alfanumérico, * (asterisco), # (almohadilla):
Pulse para insertar un carácter / * / # tecla de dígito / en modo inactivo.
Pulse la tecla “0” para insertar el espacio entre dos caracteres / palabras durante la
escritura de SMS y entrada de nombre de directorio telefónico.
Pulse la tecla “*” clave para la inserción de símbolos durante la escritura de SMS y
entrada de nombre de directorio telefónico. Pulse la tecla “#” para insertar el decimal (.)
Durante el uso de la calculadora.
Pulse la tecla “#” durante el modo de edición (Mensaje / guía telefónica) para elegir
diferentes métodos de entrada.
10. ONE TOUCH MEMORIA (M1, M2, M3):
Al pulsar estas teclas puede llamar directamente al número guardado.
11. LISTA DE LLAMADAS:
Pulse para acceder historial de llamadas (llamadas perdidas, llamadas marcadas y
Llamadas recibidas) en modo inactivo.
12. SMS CLAVE:
Pulse para acceder a la lista de mensajes de la bandeja de entrada SMS directamente
en la pantalla de inicio.
13. FM ON / OFF:
Pulse para acceder a la función de radio FM en el modo inactivo.
14. MUTE:
Pulse esta tecla para silenciar la llamada (transmisión) durante la conversación en el
auricular y el modo de altavoz

15. tecla de rellamada:
Pulse para marcar el último número marcado.
16. ENVIAR CLAVE:
Pulse para marcar el número deseado del directorio telefónico / llamadas perdidas /
llamadas recibidas lista de llamadas / marcado.
Después de marcar el número de teléfono, pulse la tecla SEND el número se marcará.
Pulse para acceder a lista Todas las llamadas (llamadas perdidas, llamadas recibidas y
llamadas marcadas) en modo inactivo.
17. Tecla de altavoz
Durante una llamada: Pulse para encender / apagar el altavoz del teléfono.
18. Antena externa:
TNC Antena desmontable para una mejor señal de RF.
19. Auricular con cable:
Para la comunicación entre dos partes.
20. Cable en espiral:
Para conectar teléfono con cable con la unidad base.

08
•mensajeEscribir
•Bandeja de entrada
•Borradores
•Bandeja de salida
•enviado mensajes
•plantillas de SMS
configuración de SMS
•llamadas
perdidas
•llamadas
recibidas
•llamadas
realizadas
•Eliminar registros
de llamadas
Duración de las
llamadas
•ajustes del
teléfono
•llamada
configuración
•ajustes
dedela red
•configuración de
seguridad
a cabo el ajuste
delteléfonocon
figuración
•Hora y fecha
•idioma
•Pref. métodos de
entrada
•Mostrar fecha yel
tiempo de
•concesionarios
pantallabloqueo
•Teclas dedicadas
•Contraste
•Tiempo de
iluminación de
ajuste (s)
de llamada
•desvío dellamadas
•Llamada en espera
•La restricción de
llamadas
•deconfiguración
avanzada
de red Configuración
•selecciónlade la red
•Configuración de
seguridad
•de seguridadSIM
•de seguridad del
teléfono
•Configuración de
restauración
contraseña del
teléfono de
entrada (0000)
general
•Activar
•Personalizar
•Restablecer
Vibración
•Activar
Personalizar
•tipo deAnillo
•tonovolumen
•tonode
mensajes
•volumen
deldelMensaje
•tono del
teclado
•volumen del
teclado
•tono de
encendido
•Apagar el
tono
•de encendido
/ apagado
volumen
•de alerta
Sistema de /
volumen de
alarma
• encendido
apagado:
Encendido
•apagado
•lista de
canales
•lista
Manual de
Búsqueda
automática
•Normal
•Silencio
con laguía
telefónica
vacíos
•seleccione
•ajustes de la
guía telefónica
conentradas
de laagenda
•Ver
•Enviar
mensaje de
texto
•de llamada
•Editar
•Borrar
•Copiar
•Añadia la
lista negra
configuración
de la agenda
telefónica
Sub
Menu 2
•Calendario
•alarma
Calculadora
• servicios
de
proveedor
de
servicio
Menú
principal
PHONE
delibreta
De mensajería llamadas
HISTORIA
ORGANIZADOR
Configuración
la
PERFILES FM
RADIO
•de radio
FM (FM
banda
de
reflexión)
selec-
SERVICIOS
Sub
Menu 1
ESTRUCTURA DEL MENÚ
Añadirnuevo
contacto

CONFIGURACIÓN INICIAL
No encienda el teléfono encendido / apagado
Si el teléfono está apagado antes, mantenga pulsada la tecla “POWER ON / OFF”
para encender el teléfono.
Usted puede presionar y mantener“teclade encendido / apagado” de nuevo
para apagar el teléfono.
Realización de una llamada
. de recogida en el auricular o pulse la altavoz tecla dey escuche el tono de
. marcación.Marque el número al que desea llamar, pantalla LCD mostrará el
. número marcado. Después de terminar la introducción del número
. pulse “Enviar”. clave, El número de entrada se marcará automáticamente.
. Asegúrese de que el teléfono está en modo inactivo (no en modo hablar) Traiga el
número deseado que desea llamar en la pantalla LCD de la Agenda, Llamadas
perdidas, Llamadas realizadas y la lista de llamadas recibidas, pulse “ENVIAR” llave.
El número que aparece en la pantalla LCD se marcará automáticamente.
. Cuando se termina la conversación, poner el auricular en la unidad base o pulse
. La Altavoz teclapara finalizar la llamada.
Recibir una llamada
Cuando alguien le llama, suena el teléfono y el número de identificación del llamante
se visualiza en la pantalla LCD.
. Levante el auricular o pulse la altavoz tecla depara recibir la llamada.
. Cuando se termina la conversación, poner el auricular en la unidad base o pulse
. La Altavoz teclapara finalizar la llamada.
Nota:
. Por defecto volumen de recepción en el modo de teléfono está en el nivel 4.
. Por defecto volumen de recepción en el modo de altavoz está en el nivel 4.
. Ajuste el volumen de recibir en modo auricular o altavoz pulsando la tecla izquierda /
derecha durante la conversación.
. Pulse la tecla “altavoz” para alternar entre el altavoz del teléfono y el modo de teléfono
normal.Durante hacer o recibir una llamada, el construido en el contador de llamadas
mostrará automáticamente la duración de la llamada. Se muestra en horas, minutos y
segundos formales (HH: MM: SS). El temporizador de llamada que da idea aproximada
acerca de la duración de la llamada.

Si no desea asistir a la llamada recibida, pulse la “tecla de función derecha”, teléfono
mensaje de ocupado irá al otro extremo del partido.
Pre-marcación
Asegúrese de que el teléfono está en modo inactivo (no en modo hablar).
Introduce el número de teléfono que desea marcar (si lo hay error se comete?
durante la introducción del número de teléfono, se puede corregir mediante el uso
de “BACK / DEL / PB” llave). El número de teléfono que ha de ser marcado a cabo
se visualiza en la pantalla LCD.
Levante el auricular o pulse la tecla de altavoz o laprensa, SEND tecla el número
que se muestra se marcará automáticamente.
Cuando se termina la conversación, poner el auricular en la unidad base o pulse
La Altavoz teclapara finalizar la llamada.
Rellamada al último número
Usted puede remarcar el último número marcado.
Levante ladel auricular o del altavoz teclapresione.
Oír el tono de marcación, pulse la RLL. tecla
El último número marcado se marcará automáticamente.
Silenciar una llamada
Durante una conversación, pulse “la tecla programable izquierda” y luego
presionar la ARRIBA / ABAJO
teclapara seleccionar la opción “Silencio”.
Pulse “tecla de función izquierda” para silenciar la llamada. Cuando se silencia la
llamada (Silenciar el micrófono), silenciar icono se mostrará en la pantalla LCD.
Para restaurar el sonido, durante la conversación, pulse “tecla de función
izquierda” y luego presionar la ARRIBA / ABAJO teclapara seleccionar la opción
“Activarsonido”.
durante la conversación, pulse la “MUTE” teclapara silenciar la llamada. Cuando
se silencia la llamada (Silenciar el micrófono), silenciar icono se mostrará en la
pantalla LCD.
Para restaurar el sonido, durante la conversación, pulse la tecla“MUTE”.
Nota:
Sólo transmitir / enviar se silencia durante el uso de la función de silencio.

11
Llamada en espera
Durante llamada de servicio en espera cuando se está en una llamada y recibe
una nueva llamada, oirá un pitido.
La información de identificación de llamada del tercero también se visualiza en la
pantalla LCD junto con el pitido.
Pulse“teclade función izquierda” para responder a la llamada tercera parte y
poner la llamada actual en espera.
Pulse“teclade función izquierda” y seleccionar la opción “Cambio”.
Pulse la tecla “IZQUIERDA” de nuevo para llamar a la actual partido en la
conversación y poner la tercera llamada. De esta manera se puede alternar la
llamada entre el actual partido y tercero siempre que se requiera.Para 3
conferencia del partido con el partido actual y tercero, pulse la “tecla programable
izquierda” y seleccionar la opción “Conferencia”
Nota:
Esta función está relacionada con el proveedor de servicios. Por favor, active el mismo
desde la opción de configuración de llamadas en la configuración del menú.
Desvío de llamadas
Esta característica permite a no recibir la llamada en el teléfono durante un
período de tiempo.
Si no desea asistir a cualquier llamada en su teléfono, puede seleccionar para el
desvío de una llamada entrante a cualquier número asignado de acuerdo con el
estado de la que desea establecer es decir, desviar todas las llamadas de voz,
Desvío si usted no está disponible, desviar si no hay respuesta , Desvío si
ocupado, etc.
Esta función se puede activar y desactivar y desde el menú de configuración de
llamadas.
Nota:
Esta función está relacionada con el proveedor de servicios. Por favor, active el mismo
desde la opción de configuración de llamadas en la configuración del menú.
Opción “Desvío de todas las llamadas de datos” no es aplicable para este teléfono.
Durante la función de desvío de llamadas está activada en el teléfono, no se puede
recibir una llamada y sólo un símbolo “Desvío de llamadas” aparecerá en la pantalla
LCD.
La restricción de llamadas
Esta función le permite configurar el teléfono en de llamadas bloqueadas el
mododespués de activar esta función desde el menú de Configuración de
llamadas.

12
Despuésla derestricción de se activafunción llamadas,se puede prevenir
en la fabricación de las llamadas de voz salientes y la recepción de las
llamadas de voz entrantes según el requisito.
Nota:
Esta función está relacionada con el proveedor de servicios. Por favor, active el
mismo desde la opción de configuración de llamadas en la configuración del
menú.
Un tacto de la memoria (M1, M2, M3)
Al pulsar estas teclas puede llamar a los números guardados directamente
en la memoria de un solo toque M1, M2 y M3.
Almacenar un número de teléfono en un tacto de la memoria (M1, M2, M3)
Pulse el botón “One Touch memoria” clave M1 o M2 oM3, “vacío” se
mostrará en la pantalla LCD para la posición de memoria que está vacío.
Pulse “tecla de función izquierda” y escriba el número de teléfono para
ser almacenados en la posición de memoria vacía.
Pulse la tecla “IZQUIERDA” para guardar el número de teléfono en la
posición de memoria vacía.
Editar número de teléfono almacenado en una memoria táctil (M1, M2,
M3)Mantenga pulsado “un tacto de memoria” tecla M1 o M2 o M3 de 3,0
segundos. El número de teléfono almacenado se mostrará en la pantalla
LCD.
Pulse “tecla de función izquierda” y seleccionar la opción “Editar”
pulsando la ARRIBA / teclaABAJO.
Pulse “tecla de función izquierda” de nuevo. El número de teléfono
almacenado se mostrará en la pantalla LCD con el cursor parpadeante
en el último dígito.
Pulse “tecla de función derecha” para editar el número ya almacenado.
Pulse la tecla “IZQUIERDA” para guardar el número de teléfono editado
en la misma posición de memoria.
Eliminar el número de teléfono almacenado en una memoria táctil (M1, M2,
M3)
Pulse y mantenga “un tacto de memoria” tecla M1 o M2 o M3 de 3,0
segundos. El número de teléfono almacenado se mostrará en la pantalla
LCD.
Pulse “tecla de función izquierda” y seleccione la opción “Eliminar”
pulsando la
ARRIBA / teclaABAJO.
Pulse “tecla de función izquierda” de nuevo. El número de teléfono
almacenado se eliminará de la localización de memoria.
Número de llamada de teléfono almacenados en una memoria táctil (M1, M2,
M3)
Pulse “Memoria de un toque” tecla M1 o M2 o M3 para llamar al número
guardado directamente de la memoria de un solo toque M1, M2 y M3.
Nota:
Si el número de teléfono almacenado en la ubicación de memoria One Touch
M1, M2 y M3 también se almacena en el directorio telefónico con el nombre, a
continuación, sólo el nombre de llamadas pantallas del partido en la pantalla
LCD durante el número de teléfono de llamada almacenada en una memoria de
contacto M1, M2 y M3.
13
Declaración de exposición a la radiación de la FCC:
Este equipo cumple con los límites de exposición a la radiación de la FCC
establecidos para un entorno no controlado.
Este transmisor no debe ubicarse ni funcionar conjuntamente con ninguna otra
antena o transmisor.
Este equipo debe instalarse y operarse con una distancia mínima de 20 cm
entre el radiador y su cuerpo.