User Manual

BioStampRCTM User Manual
PL-0036 Revision B DRAFT
2
www.mc10inc.com
BioStampRCsupport@mc10inc.com
Table of Contents
1. Welcome ......................................................................................................................................................... 3
1.1. Intended Use ............................................................................................................................................. 5
1.2. Safety Notices .......................................................................................................................................... 5
2. Getting Started ................................................................................................................................................ 7
3. BioStampRC Hardware .................................................................................................................................. 7
3.1. Sensors ..................................................................................................................................................... 8
3.1.1. Inspect and Clean Sensors ................................................................................................................ 9
3.1.2. Power On and Power Off .................................................................................................................. 9
3.2. Charging ................................................................................................................................................... 9
3.3. Sensor Application ................................................................................................................................. 10
3.3.1. Applying Sensors to Subjects ......................................................................................................... 11
3.3.2. Removing Sensors from Subjects ................................................................................................... 12
3.4. Tablet ...................................................................................................................................................... 12
3.5. Wear Locations ...................................................................................................................................... 12
3.5.1. Recording Modes ............................................................................................................................ 13
4. Technical Specifications ............................................................................................................................... 14
5. Troubleshooting ............................................................................................................................................ 15

BioStampRCTM User Manual
PL-0036 Revision B DRAFT
3
www.mc10inc.com
BioStampRCsupport@mc10inc.com
1. Welcome
The BioStamp Research ConnectTM system (also known as the BioStampRCTM system) is an incredibly wearable,
easy to use biometric sensing platform. With the tools provided, you can go from a study concept to collecting
data in just a few minutes. This powerful system also helps you organize and analyze your data, freeing you to
spend more time doing research.
Thin, body-conforming BioStampRCTM Sensors can be placed nearly anywhere on the body to capture
accelerometer, gyroscope, and surface biopotential signals which can be used to measure body motion, muscle,
and heart activity. The Sensors adhere directly to the skin, capturing biometrics of targeted body locations.
Because the Sensors store data locally, your subjects are free to move normally in natural environments.
This manual provides an introduction to help you understand the capabilities of your BioStampRC system, and
provides necessary information for configuring and operating your BioStampRC system. The latest version of
this manual is available at the MC10 web site.
For support, service, maintenance or further information on this product contact the manufacturer:
MC10, Inc.
10 Maguire Rd., Building 3, Floor 1, Lexington, MA 02421, USA
Phone: +1 (857) 214-5600
Fax: +1 (781) 538-6641
Web: www.mc10inc.com
Email: BioStampRCsupport@mc10inc.com

BioStampRCTM User Manual
PL-0036 Revision B DRAFT
4
www.mc10inc.com
BioStampRCsupport@mc10inc.com
FCC Compliance Notification
The BioStampRC Sensors and the included wireless charger have been found to satisfy the FCC radiation
exposure limits set forth in Part 2 of the FCC’s Rules for portable devices operating in an uncontrolled
environment. To ensure exposure to RF radiation falls below those limits during operation, users must follow
the specific operating instructions for these devices and must not co-locate or operate these devices with any other
antenna or transmitter.
The BioStampRC Sensors comply with Part 15 of the FCC Rules. The included wireless Charger complies with
Part 18 of the FCC Rules. Operation of each device is subject to the following two conditions: (1) this device may
not cause harmful interference, and (2) this device must accept any interference received, including interference
that may cause undesired operation.
NOTE: The BioStampRC Sensors have been tested and found to comply with the limits for a Class B digital
device, pursuant to Part 15 of the FCC Rules. These limits are designed to provide reasonable protection against
harmful interference in a residential installation. This equipment generates, uses and can radiate radio frequency
energy and, if not installed and used in accordance with the instructions, may cause harmful interference to radio
communications. However, there is no guarantee that interference will not occur in a particular installation. If this
equipment does cause harmful interference to radio or television reception, which can be determined by turning
the equipment off and on, the user is encouraged to try to correct the interference by one or more of the following
measures:
- Reorient or relocate the receiving antenna.
- Increase the separation between the equipment and receiver.
- Connect the equipment into an outlet on a circuit different from that to which the receiver is connected.
- Consult the dealer or an experienced radio/TV technician for help.
The included wireless battery charger has been tested and found to comply with the applicable limits under Part
18 of the FCC Rules. These limits are designed to provide reasonable protection against harmful interference to
licensed radio services. However, the charger generates, uses and can radiate radio frequency energy and, if not
installed and used in accordance with the instructions, may cause harmful interference to radio communications.
There is no guarantee that interference will not occur in a particular installation. If this equipment does cause
harmful interference to radio or television reception, or to another authorized radio service, which can be
determined by turning the charger off and on, the user is encouraged to try to correct the interference by one or
more of the measures described immediately above.
CAUTION: Changes or modifications to either the Sensors or the included charger not expressly approved by the
party responsible for compliance could void the user’s authority to operate the equipment.
Responsible Party: MC10, Inc.
Phone: +1 (857) 214-5600
Fax: +1 (781) 538-6641
Web: www.mc10inc.com
Email: BioStampRCsupport@mc10inc.com

BioStampRCTM User Manual
PL-0036 Revision B DRAFT
5
www.mc10inc.com
BioStampRCsupport@mc10inc.com
NOTE: This device complies with Industry Canada’s licence-exempt RSSs. Operation is subject to the following
two conditions: (1) This device may not cause interference; and (2) This device must accept any interference,
including interference that may cause undesired operation of the device.
AVIS : Le présent appareil est conforme aux CNR d’Industrie Canada applicables aux appareils radio exempts
de licence. L’exploitation est autorisée aux deux conditions suivantes: (1) l’appareil ne doit pas produire de
brouillage; (2) l’appareil doit accepter tout brouillage radioélectrique subi, même si le brouillage est susceptible
d’en compromettre le fonctionnement.
1.1. Intended Use
The BioStampRC system is designed to collect certain physiological data in research studies. The system is
intended to capture raw data about movements and biopotentials. The data collected by the BioStampRC
system can provide quantifiable analysis of physical motion and electrophysiology. BioStampRC Sensors are
research tools and are not intended for use in the diagnosis, cure, mitigation, treatment, or prevention of any
disease or condition in humans or animals.
1.2. Safety Notices
Carefully read this manual before using the BioStampRC system.
BioStampRC Sensors and adhesive stickers are non-sterile. Adhesive stickers are for a single use on a
single subject.
BioStampRC Sensors are only for use on intact, unbroken and non-diseased skin.
Upon BioStampRC Sensor removal, slight redness of skin may be observed and is typically resolved
within 2 days. If serious skin reactions occur, discontinue use of BioStampRC Sensors on that person.
BioStampRC Sensors may be susceptible to RF interference from other equipment used in their vicinity.
BioStampRC Sensors are water resistant up to 1 m depth. Long term immersion in fluids may permanently
damage the BioStampRC Sensors. Dry Sensors immediately after exposure to fluids.
BioStampRC Sensors have not been tested on individuals who have a pacemaker or other sensitive
medical device. To the extent that you opt to include individuals with pacemakers or other sensitive
medical devices in any Study, you agree to instruct the individual to speak with his/her doctor before
wearing the BioStampRC Sensors and obtain confirmation of the same. In addition, you must obtain
informed consent from the individual indicating that the individual has been advised that the product has
not been tested on individuals with pacemakers or other sensitive medical devices and agrees to participate
anyway.
BioStampRC Sensors have not been tested on pregnant women. To the extent that you opt to include
pregnant women in any Study, you agree to instruct the individual to speak with her doctor before wearing
the BioStampRC Sensors and obtain confirmation of the same. In addition, you must obtain informed
consent from the individual indicating that the individual has been advised that the product has not been
tested on pregnant women and agrees to participate anyway.
You agree to assume all liability relating to any claims brought by individuals who have pacemakers or
other sensitive medical devices or women who wore the device while pregnant.
BioStampRCTM User Manual
PL-0036 Revision B DRAFT
6
www.mc10inc.com
BioStampRCsupport@mc10inc.com
Individuals having an allergy to adhesives or silicone should not wear the BioStampRC Sensors. You
agree to assume all liability relating to any claims brought by individuals who have an allergy to adhesives
or silicone who wore the BioStampRC Sensors.
Data privacy: data captured and provided by BioStampRC Sensors is not automatically anonymized,
encrypted, or otherwise privacy-protected. It is your responsibility to assume any data security and privacy
risks and to convey these risks to your subjects.
BioStampRC systems that have reached end-of-life should be disposed of properly. BioStampRC Sensors are
rechargeable electronic units that contain lithium-polymer batteries. Such batteries are classified as hazardous
substances in certain jurisdictions, and should be disposed of according to local laws and regulations.
Modification or disassembly of BioStampRC Sensors or chargers poses a risk
of electric shock. Do not use BioStampRC Sensors or chargers if internal
circuitry is exposed or encapsulation is compromised in any way.
BioStampRCTM User Manual
PL-0036 Revision B DRAFT
7
www.mc10inc.com
BioStampRCsupport@mc10inc.com
2. Getting Started
The best way to get started with the BioStampRC system is to follow the Quick Start Guide available at
http://www.mc10inc.com/ and included in your kit. The Quick Start Guide walks you through the process of
applying the Sensors, capturing and downloading data, and completing Activities and Diaries using an example
Study. This process will show you how the different system components work together. Later, you can use the
Investigator Portal to design your own Studies.
3. BioStampRC Hardware
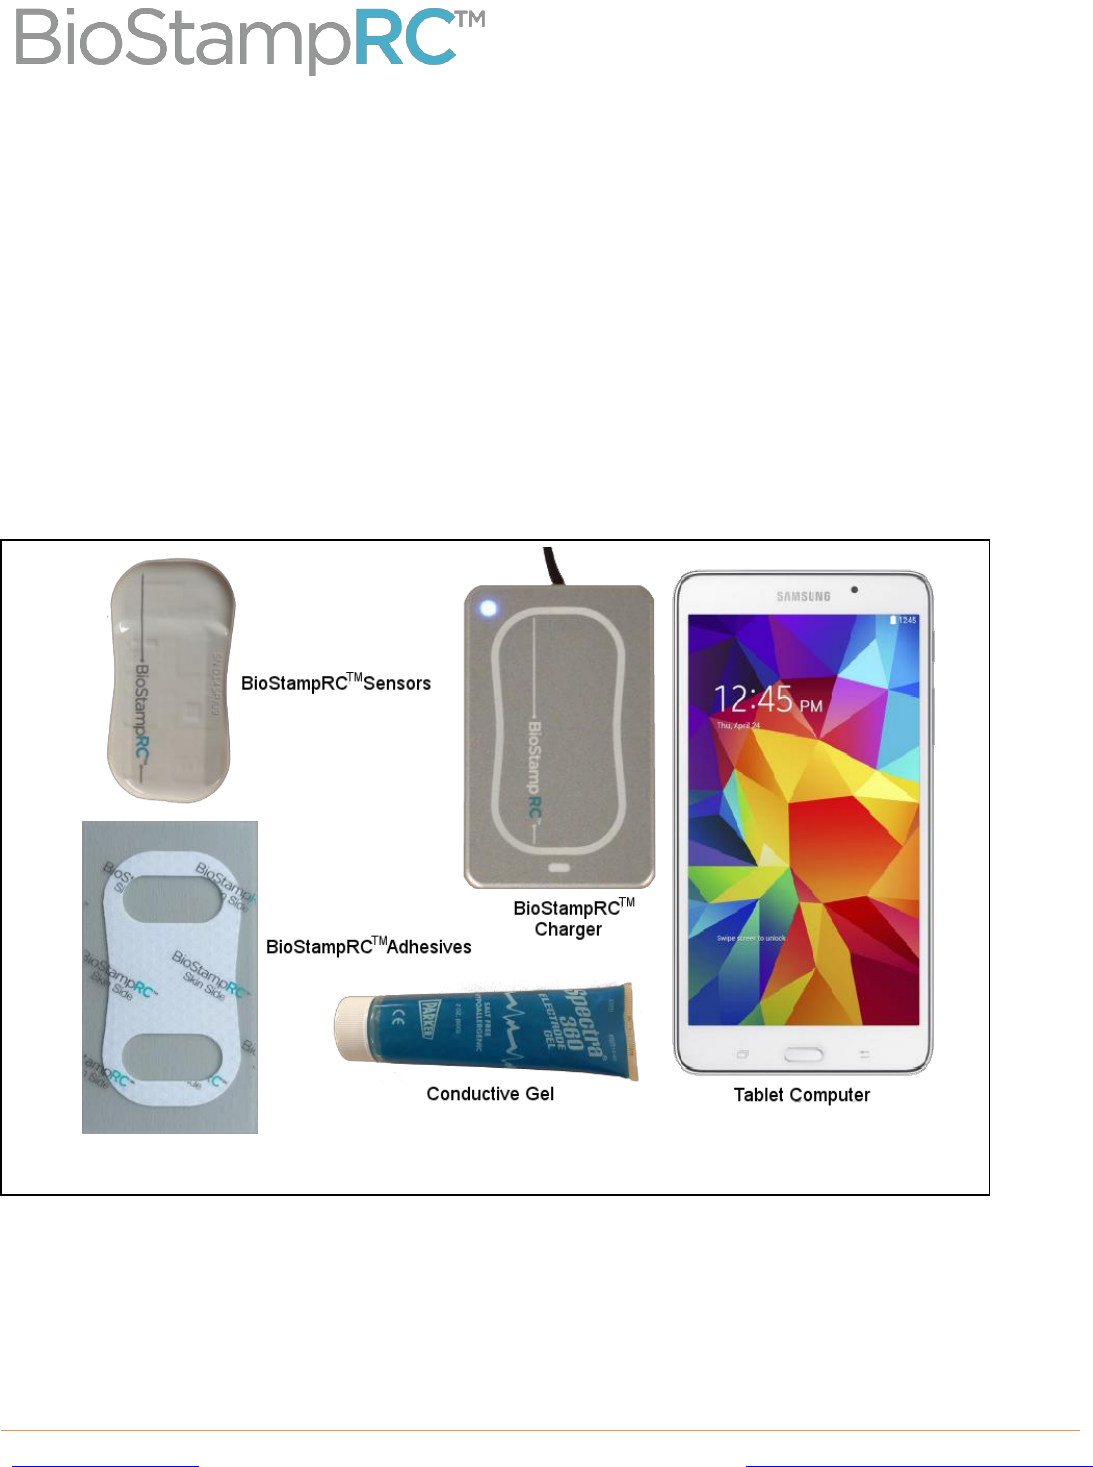
Figure 1 shows a representative BioStampRC system. The pictured configuration has 3 Sensors, 21 adhesives,
conductive gel, a single charger, and a single tablet. This configuration is sufficient for a 7-day study with three
Subjects wearing one Sensor each, or one Subject wearing three Sensors. The number of Sensors, adhesives,
chargers, and tablets in the system can vary based on the size of your study.
Figure 1. Example contents of a BioStampRC System.
BioStampRCTM User Manual
PL-0036 Revision B DRAFT
8
www.mc10inc.com
BioStampRCsupport@mc10inc.com
In general, each BioStampRC kit contains one or more:
BioStampRC Sensors (Model BRCS01)
Single-unit Chargers (Model BRCC01)
Adhesive packs
Tubes of conductive gel
Tablet with AndroidTM and the BioStampRC Investigator App
Quick Start Guide
This User Manual
Other system components, such as the Investigator Portal, are available at the MC10 web site.
3.1. Sensors
The BioStampRC Sensor is an extremely thin, skin-wearable system designed to measure and record
biometric signals. The Sensor is optimized for small size and low power operation. The Sensor contains the
following sensing modules:
Low-power 3-axis accelerometer (±2, 4, or 8 G range; 50, 100, or 200 Hz sample rate; 12 bit operation)
High-range 6-axis gyroscope + accelerometer (±250, 500, 1000, 2000°/sec gyroscope range; ±2, 4, 8,
or 16 G accel range; 25, 50, 100, 250 Hz sample rate; 16 bit operation)
Analog front end (AFE) for sEMG and electro-cardiac activity measurement (±0.2V range at the
electrodes; 125 and 250 Hz sample rate; 16 bit operation)
In addition, the Sensor has a microprocessor, Bluetooth® Smart connectivity, 32 MB of low-power, non-
volatile memory, and a 15 mAh rechargeable battery with wireless inductive charging capability. The
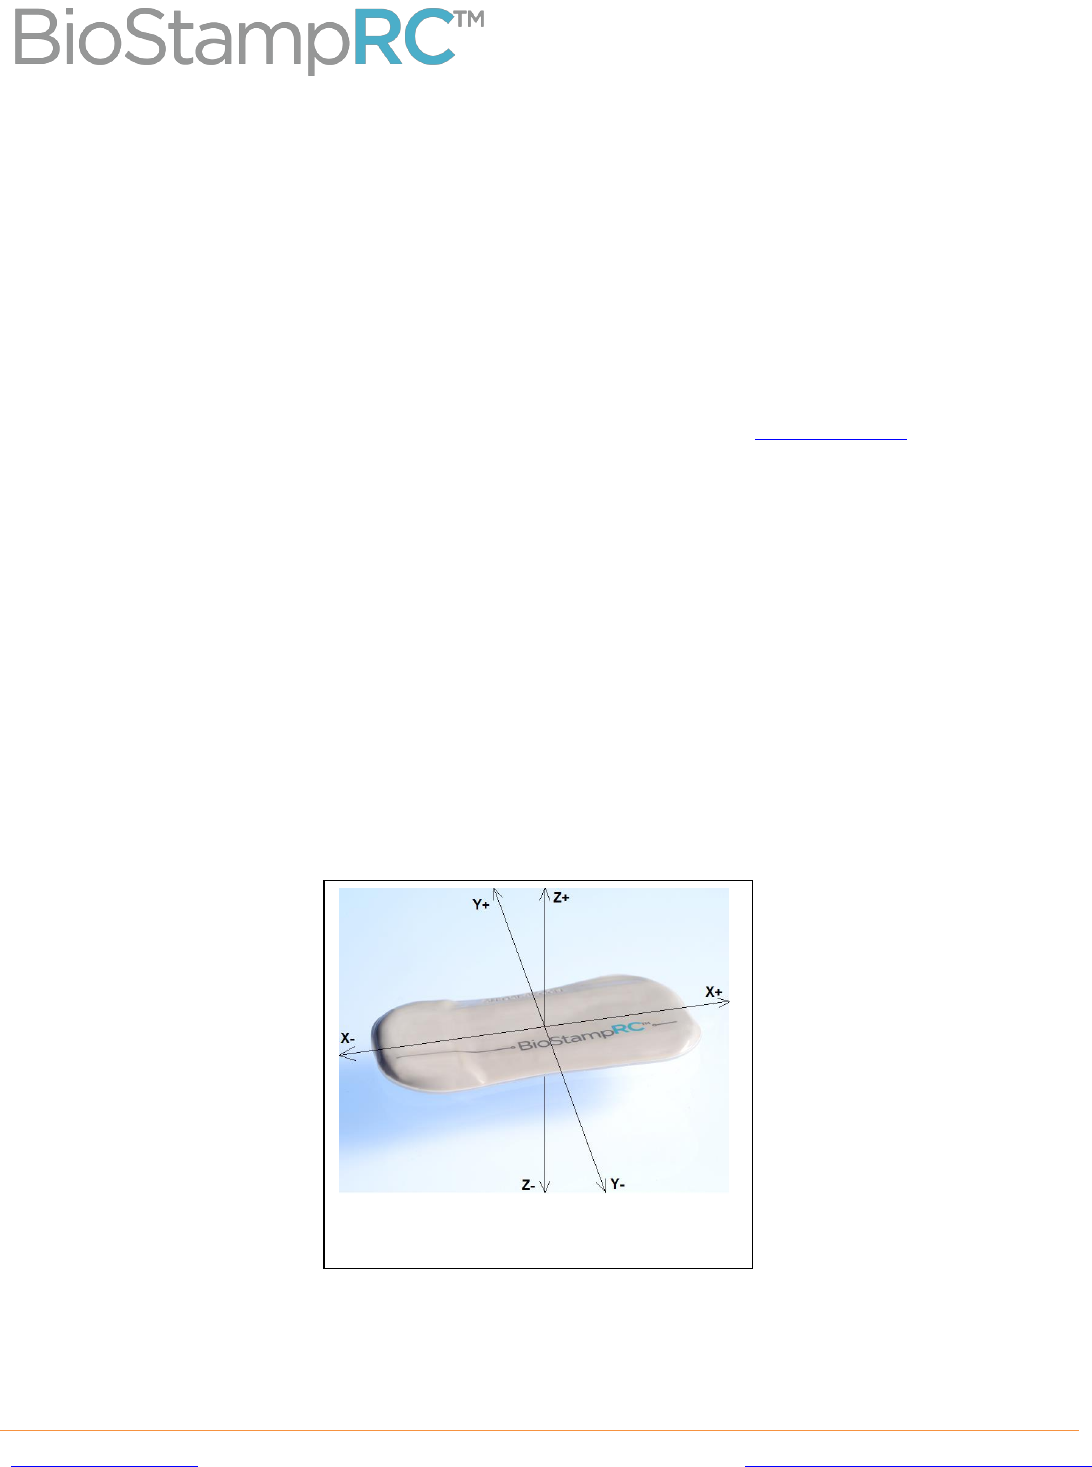
BioStampRC Sensor is shown in Figure 2, with the sensing axes for reference.
The BioStampRC Sensor can be placed in various body locations, and multiple Sensors can be placed on a
single person. Once configured using the Investigator App, the Sensor operates independently, storing data in
Figure 2. BioStampRC Sensor coordinate system.
The Sensor axes are as shown in the diagram.

BioStampRCTM User Manual
PL-0036 Revision B DRAFT
9
www.mc10inc.com
BioStampRCsupport@mc10inc.com
its local memory. The data can then be transferred wirelessly for display and subsequent analysis. The
BioStampRC Sensor is designed for use cases involving up to 24 hours of continuous wear.
3.1.1. Inspect and Clean Sensors
Inspect all Sensors for damage prior to use. Damage includes cracked, split, or broken encapsulation;
exposed electronics other than the electrodes; tears or splits in the device; or any other deviation from the
manufactured state that might impair functionality. Do not use Sensors that have visible damage.
BioStampRC Sensors are shipped clean, and do not require cleaning before use. If you remove a Sensor
from a subject and plan to replace it later, clean the Sensor before re-use. We recommend cleaning the
Sensor prior to recharging. To clean, simply remove and dispose of the adhesive sticker, wash the Sensor
by hand with soap and water, and pat dry. BioStampRC Sensors tolerate exposure to 70% isopropyl
alcohol. The adhesives may interact with residual alcohol, however. Be sure to allow alcohol-exposed
Sensors to dry thoroughly before applying adhesives.
DO NOT expose Sensors to heat above 60°C, dishwashers, clothes dryers, autoclaves, or other industrial
cleaning processes.
3.1.2. Power On and Power Off
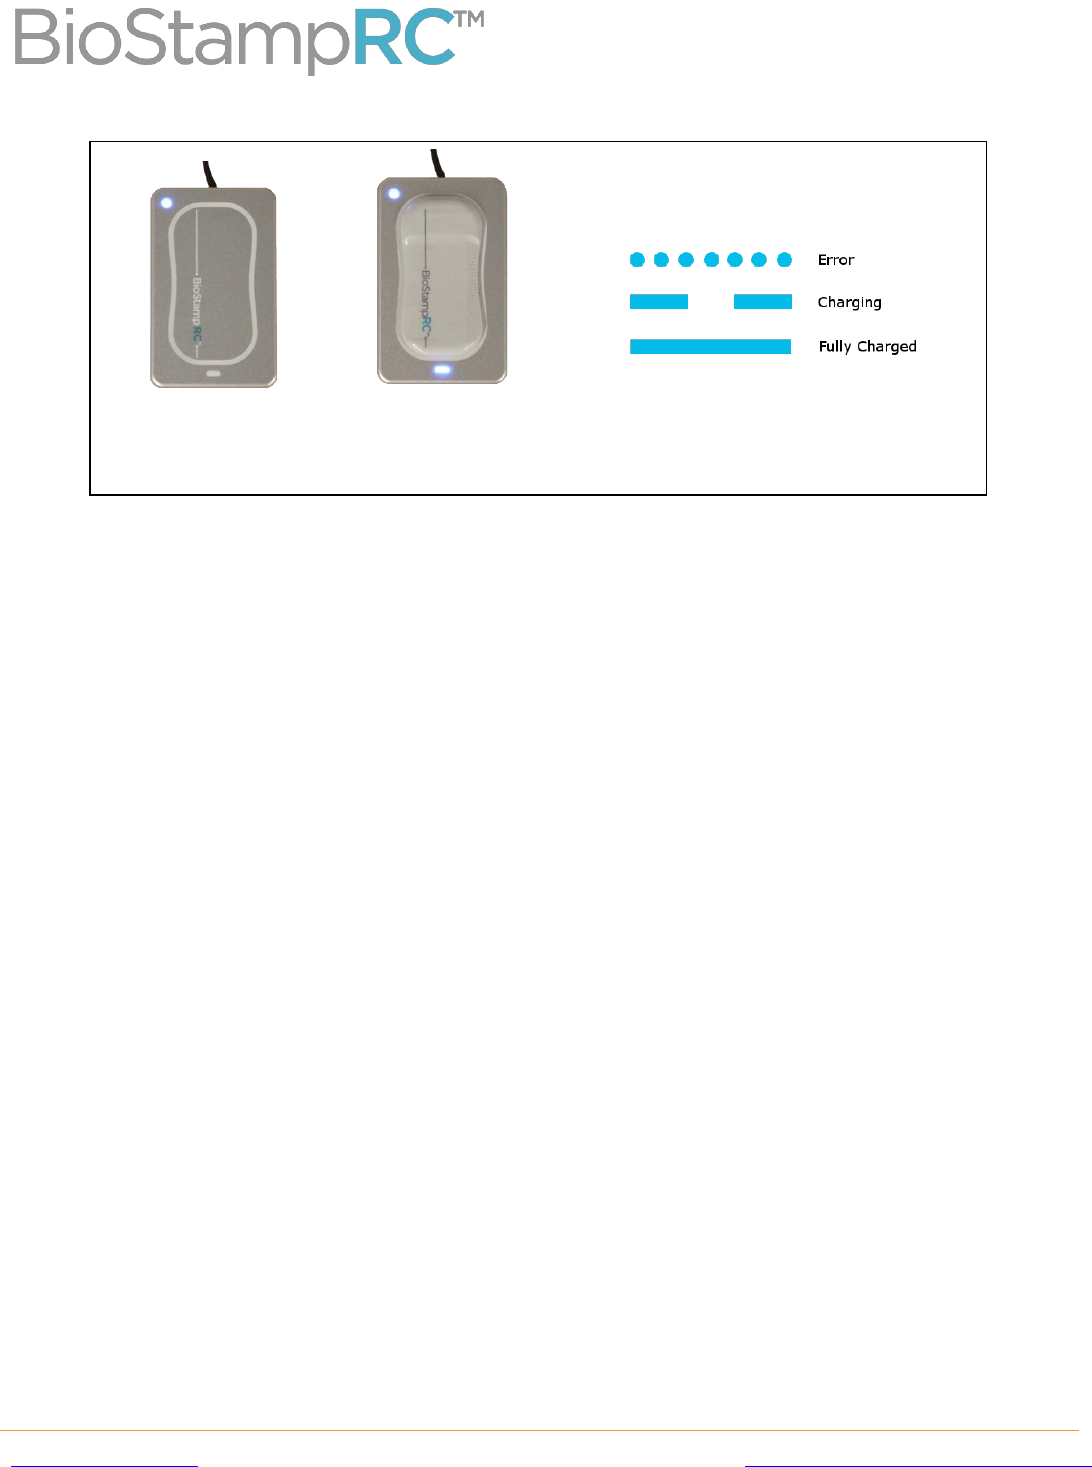
BioStampRC Sensors are shipped in a powered-off state. To power them on, simply place the Sensor on
the charger as shown in Figure 3. Be sure to align the logo on the Sensor with that on the charger, and
place the Sensor within the outline on the charger.
When the Sensor is powered on, a green light in the lower right corner of the Sensor blinks intermittently.
Every ten seconds, the light will rapidly blink twice. Watch for this light to verify that the Sensor is
powered on.
For long-term storage, Sensors should be powered off. Sensors can be powered off using the Investigator
App. Consult the BioStampRC Software Manual for details. If the Sensor is on a charger, powering it off
will have no effect.
3.2. Charging
BioStampRC Sensors are equipped with a rechargeable battery. The Charger included with your kit is
designed to recharge the Sensors wirelessly. The Charger is designed to be plugged into the included voltage
adapter. A suitable power outlet must be available near the location of installation and be easily accessible.
BioStampRCTM User Manual
PL-0036 Revision B DRAFT
10
www.mc10inc.com
BioStampRCsupport@mc10inc.com
When the Charger is plugged into a wall outlet, the power light in the upper left corner comes on (Figure 3,
Left). The charging light near the bottom of the charger should be off. If this light is blinking rapidly (Figure
3, Right), the charger experienced an error and must be restarted.
Place a Sensor on the Charger to charge it, being sure to align the logos as shown (Figure 3, Center). The
charging lights at the bottom of the Sensor should pulse slowly while the Sensor is charging. When the Sensor
is fully charged, the charging lights will stay on. To check the current charging state of the Sensors, use the
Investigator App.
The BioStampRC charger is designed for indoor use only. Connect the charger to the included adapter and
plug it into a wall outlet. The charger is designed for use at 20-40 °C. Clean the charger as needed with 70%
isopropyl alcohol or soap and water. No other maintenance is required.
3.3. Sensor Application
Sensors are applied to the body using disposable adhesives for attachment and conductive gel for the
electrodes. Adhesives come in packs of 7 or 21. These double-sided adhesives have an opaque liner on one
side and a clear liner on the other. The side with the shiny liner adheres to the Sensor, while the side with the
clear liner adheres to the skin. The adhesives and liners have holes to allow electrodes on the Sensor to contact
the skin.
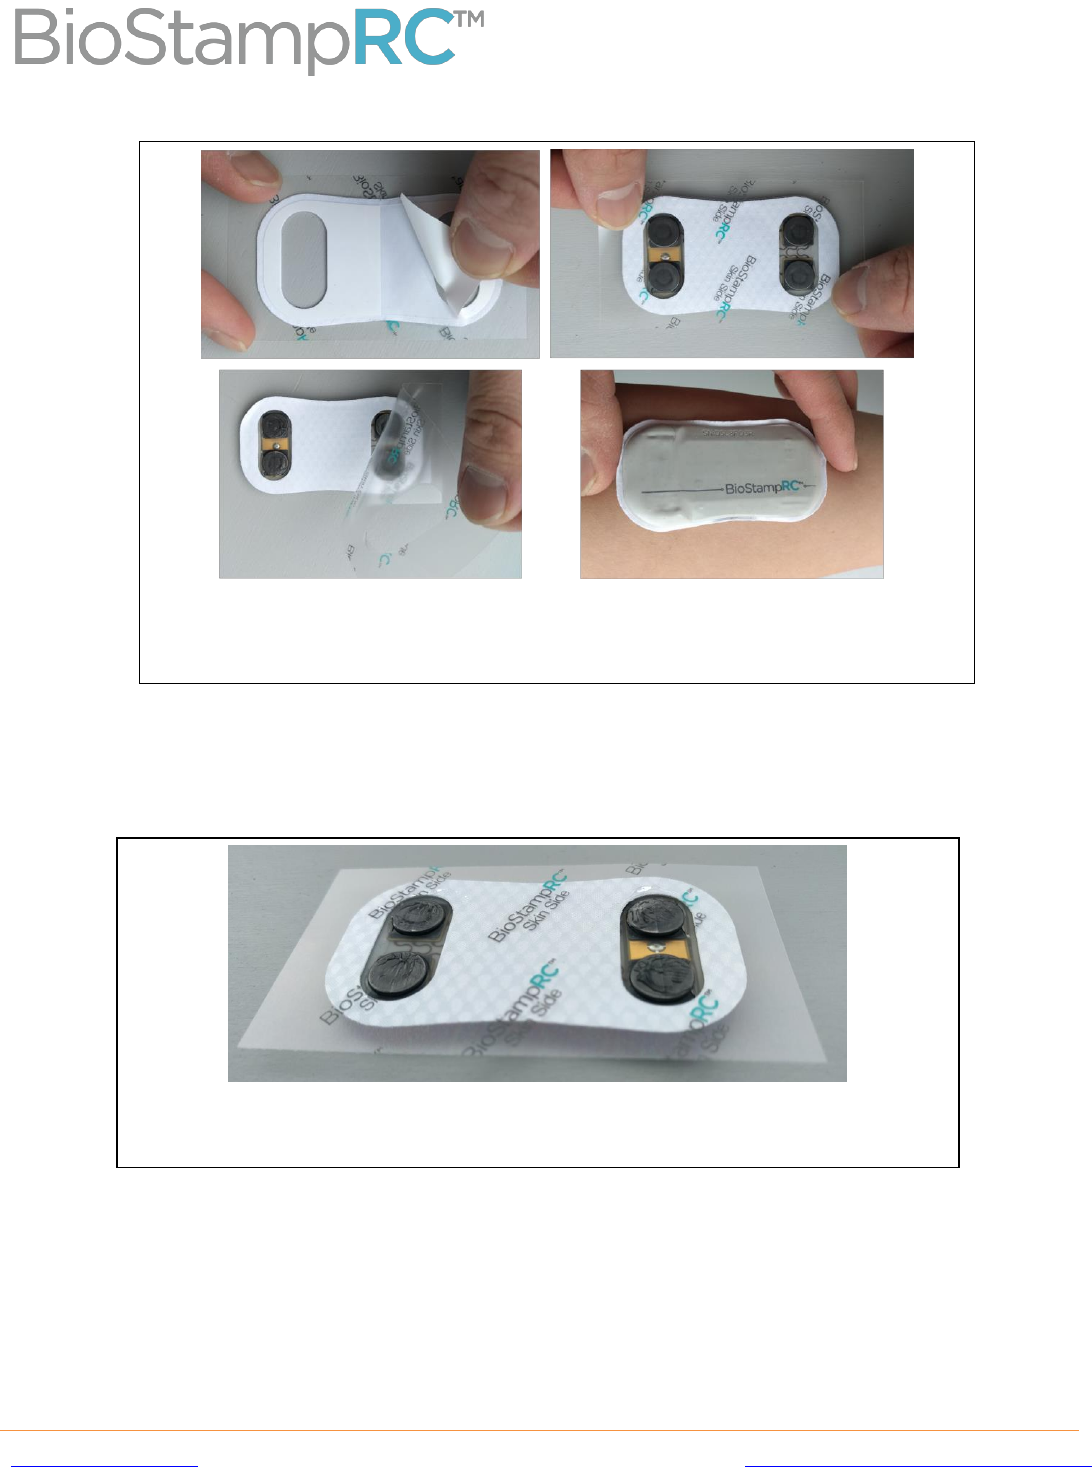
To use the adhesives, first place the Sensor electrode-side up on a flat surface. Remove the opaque liner and
lower the newly-exposed adhesive surface onto the Sensor, pressing firmly for ten seconds. Make sure the
electrodes are exposed through the holes in the adhesive (Figure 4). The bond between the Sensor and adhesive
will grow stronger over the next few minutes. Meanwhile, apply conductive gel to the electrodes as described
in the next paragraph.
Figure 3. (Left) Single-unit Charger. (Center) The charging light at the bottom comes on when a Sensor is placed
on the Charger. Note the alignment of the Sensor logo with the logo printed on the Charger. (Right) Charging
light blinking patterns.
BioStampRCTM User Manual
PL-0036 Revision B DRAFT
11
www.mc10inc.com
BioStampRCsupport@mc10inc.com
The BioStampRC system comes with a tube of conductive gel for use in facilitating electrode measurements.
The use of this gel is essential for obtaining the highest quality electrical signals from the BioStampRC system.
Apply a small amount to each electrode as shown in Figure 5. Only a thin coating is needed; wipe off any
excess gel. Excessive use of gel may adversely affect Sensor adhesion.
3.3.1. Applying Sensors to Subjects
This process should be done in conjunction with performing a Study using the Investigator App. It is
essential to note the ID of the Sensor applied to each body location. The Sensor ID is visible on the front
of each Sensor.
Figure 4. Sensor application. Top Left: remove opaque liner from Sensor side of adhesive. Top right:
place adhesive on electrode side of Sensor. Bottom left: after applying gel (see Figure 5), remove clear
liner. Bottom right: Place Sensor on skin and apply firm pressure.
Figure 5. Electrodes after applying conductive gel. The gel gives the electrodes a shiny appearance.

BioStampRCTM User Manual
PL-0036 Revision B DRAFT
12
www.mc10inc.com
BioStampRCsupport@mc10inc.com
3.3.1.1. Prepare Skin
Proper skin preparation improves Sensor adhesion and signal quality. Before applying the Sensor,
prepare the skin of the subject:
1. Choose the location to apply the Sensor.
2. Trim any excess hair at the Sensor application site. Shaving is not required and may at times impair
comfort.
3. Clean the site thoroughly with soap and water, a non-alcohol wipe, or a 4 x 4 gauze pad. Alcohol
wipes are not recommended as they dry the skin, which reduces adhesion and electrode signal
quality.
4. Dry the skin vigorously.
3.3.1.2. Apply Sensor
1. Remove the Sensor and adhesive from the clear liner. Be careful not to touch the adhesive or
electrodes.
2. Place the Sensor in the chosen location, being careful to use the same location and Sensor
orientation for each subject.
3. Apply firm pressure to the Sensor for at least 10 seconds.
The Sensor should stay in place by itself. If necessary, it can be secured by a secondary method such
as an adherent wrap or tape.
3.3.2. Removing Sensors from Subjects
To remove Sensors, simply grab them from the thicker end and peel the Sensor and adhesive off of the
subject. The Sensor and adhesive should peel off cleanly. Adhesive residue on the subject can be removed
with baby oil or alcohol-based solvents. Remove the adhesive from the Sensor by peeling it away, starting
from the thicker part of the Sensor. Dispose of the adhesive after use.
3.4. Tablet
The BioStampRC system comes with a tablet running the Android operating system. This tablet comes with
the Investigator App pre-installed. For full functionality, the tablet must be connected to a WiFi network and
have Bluetooth turned on. The BioStampRC User account on the tablet allows you to control these settings in
addition to running the Investigator App. If the tablet asks for a PIN, tap on the BioStampRC User icon in the
upper right to switch to the correct account.
3.5. Wear Locations
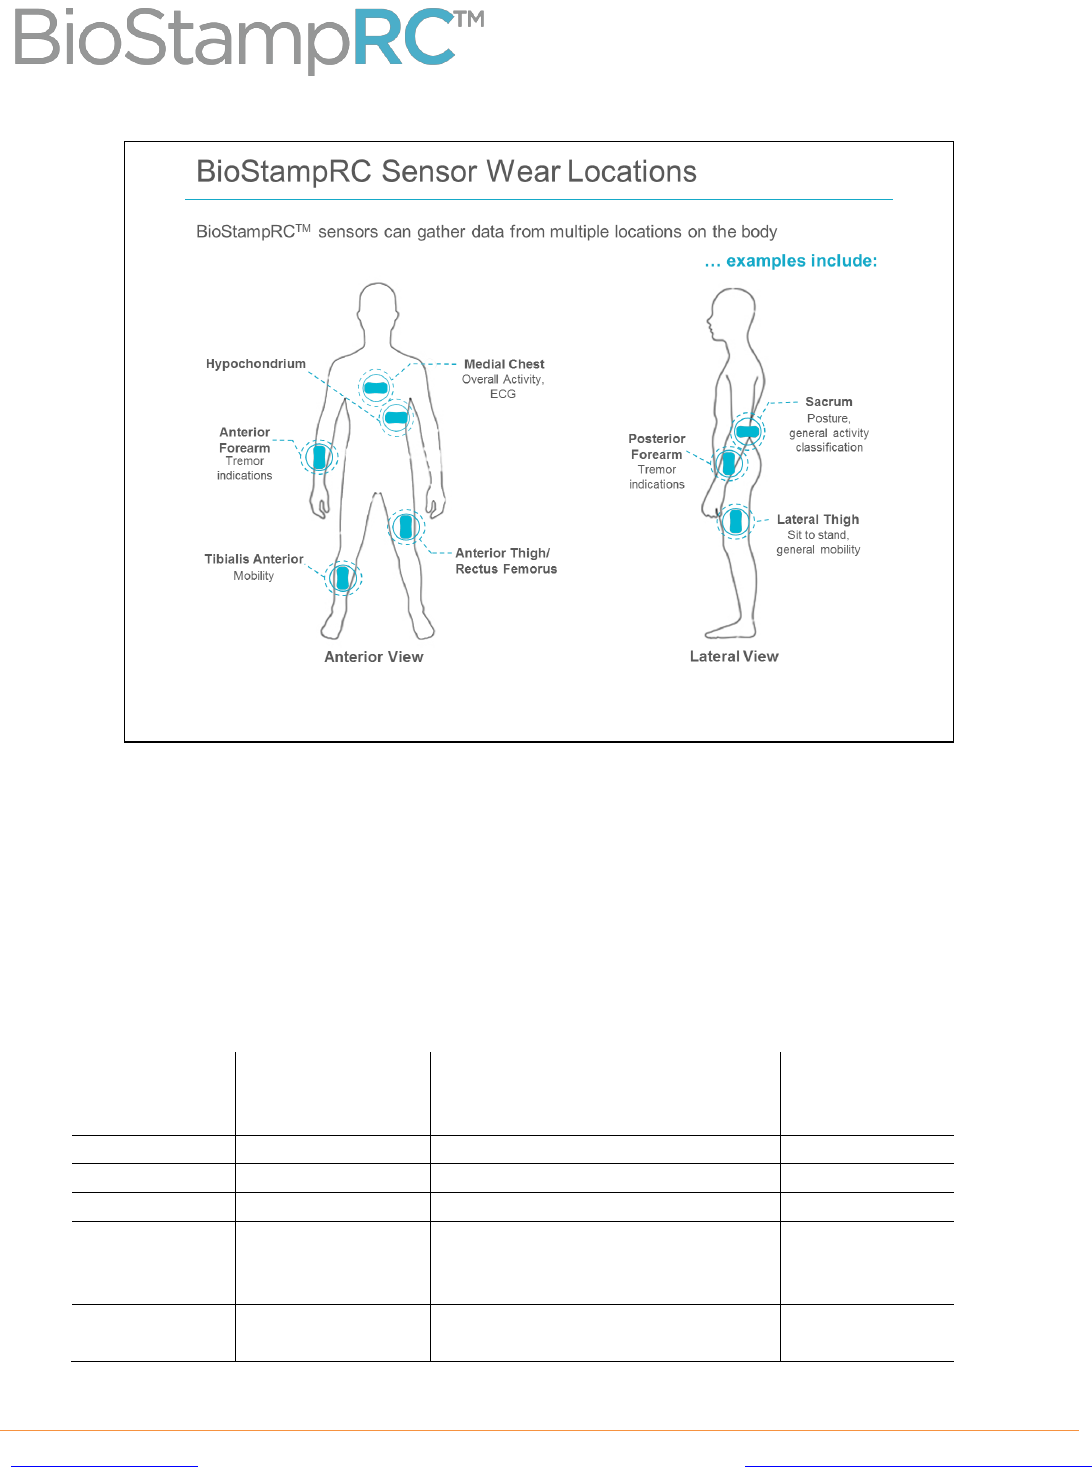
Figure 6 shows some examples of recommended body locations for BioStampRC Sensors. This list is updated
as new locations are validated. For most locations, Sensors can be placed on either side of the body. We
recommend placing Sensors horizontally on trunk locations, and vertically on limbs. Consult Figure 2 for
Sensor reference orientations, and choose a consistent placement location and orientation for all subjects.
BioStampRCTM User Manual
PL-0036 Revision B DRAFT
13
www.mc10inc.com
BioStampRCsupport@mc10inc.com
Locations that are not on the list are not recommended. In particular, Sensors will not adhere properly to bony
joints such as knees and elbows.
3.5.1. Recording Modes
The BioStampRC Sensor has multiple sensing modes with differing functionality. Different modes use
different combinations of a three-axis accelerometer, a six-axis accelerometer+gyroscope, and a single-
lead (two-electrode) analog voltage sensor. Table 1 lists the supported recording modes. The recording
lifetime depends on both the recording mode and sampling rate chosen.
Table 1. Recording modes supported by BioStampRC
Mode
Sampling Rate
Dynamic Range
Recording
Time
(Approximate)
Accelerometer
50, 100, 200 Hz
±2, ±4, or ±8 G
8-35 hours
ECG
125, 250 Hz
±0.2 V
17-35 hours
EMG
250 Hz
±0.2 V
17 hours
Accel+ECG
50 Hz (accel)
125, 250 Hz
(ECG)
±2, ±4, or ±8 G (accel)
±0.2 V (ECG)
11-22 hours
Accel+EMG
50 Hz (accel)
250 Hz (EMG)
±2, ±4, or ±8 G (accel)
±0.2 V (ECG)
11 hours
Figure 6. Example body locations for Sensors. This is not intended to be a comprehensive list.
BioStampRCTM User Manual
PL-0036 Revision B DRAFT
14
www.mc10inc.com
BioStampRCsupport@mc10inc.com
Gyro+Accel
25, 50, 100, 250
Hz
±2, ±4, ±8, ±16 G (accel)
Off, ±250, ±500, ±1000, ±2000
°/sec (gyro)
2-4 hours
4. Technical Specifications
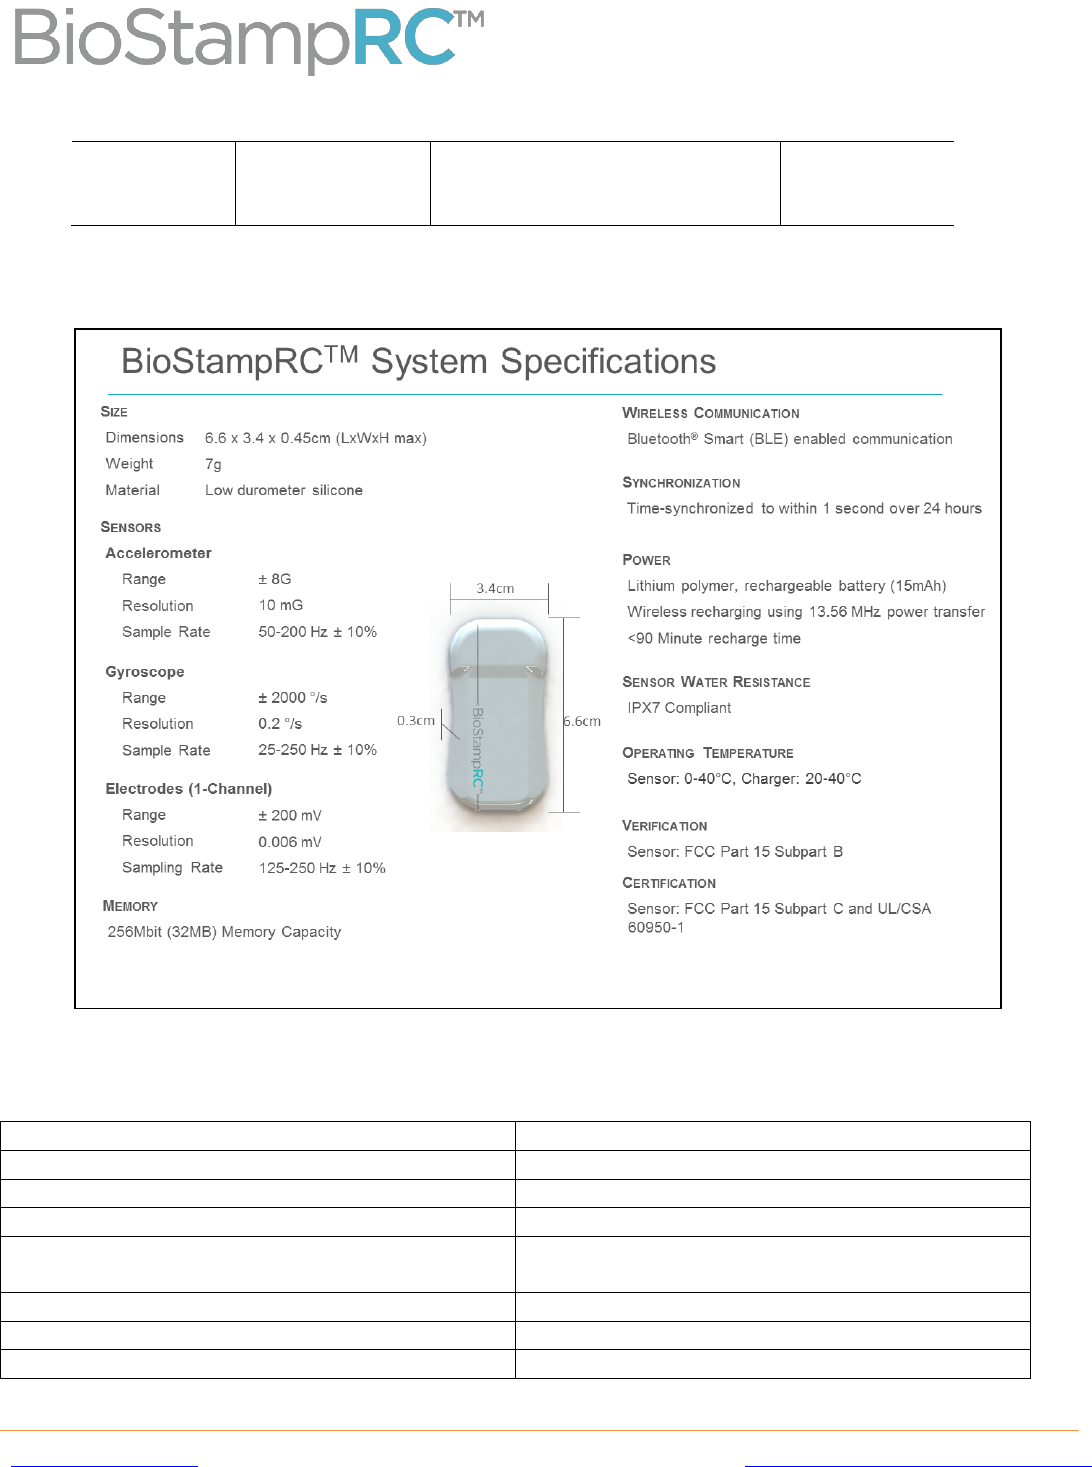
Figure 7 shows the technical specifications of the BioStampRC Sensors (FCC ID 2AGYUBRCS01).
The technical specifications for the charger are listed below.
Table 2. Charger specifications.
Dimensions
8.6 x 5.5 x 1.1 cm (LxWxH)
Weight
48.5 g
Material
Polycarbonate with Clear Coat
Cable Length
150 ± 1.2 cm
Certifications
FCC Part 18 Declaration of Conformity and
UL/CSA 60950-1
Power
5V DC, 1A
Charging Frequency
13.56 MHz
IEC Protection Class
II
Figure 7. Technical specifications for the BioStampRC Sensors.

BioStampRCTM User Manual
PL-0036 Revision B DRAFT
15
www.mc10inc.com
BioStampRCsupport@mc10inc.com
5. Troubleshooting
1. My Sensors are not charging.
• Make sure the Charger is plugged into a wall socket using the provided adapter. One power light comes on
when the Charger is correctly powered.
• Align the Sensor with the outline on the charger. Make sure the orientation matches. When the Sensor is
correctly aligned, the charging lights on the Charger should pulse slowly.
2. My Charger has quickly blinking lights.
• The Charger is designed for use with the provided adapter. Do not use it with any other adapter, or with
any other electronic system having USB ports.
3. Some of my Sensors don’t show up on the list.
• Power on the Sensors before use by placing them on the charger.
4. The electrical signal looks noisy.
• The provided gel is required to ensure good electrical contact for bioelectric signal recording.
5. My Sensors keep falling off.
• The adhesives provided with the BioStampRC system are intended for single-day use while performing
typical life activities. Vigorous activities may require additional methods of securing the Sensors (tapes,
wraps, etc.).
6. My Sensors cause mild redness after multiple days of wear.
• Skin sensitivity varies widely among wearers. Mild redness may occur for some Subjects, but is typically
not harmful. If Subjects experience significant irritation, discontinue use of BioStampRC Sensors on those
Subjects.
7. Other questions?
• Please contact MC10, Inc. for support at BioStampRCsupport@mc10inc.com or 857-214-5630.
AndroidTM and Bluetooth® are trademarks of their respective owners.
