MD Consumer Electric SMART601 Electric Pressure Cooker User Manual Instant Pot IP DUO English
Guangdong MD Consumer Electric Manufacturing Co., Ltd Electric Pressure Cooker Instant Pot IP DUO English
User Manual.
Programmable Smartcooker
User Manual
Model: IP-Smart
(Pictures in the text are for reference only. Please refer to the actual product.)
Thank you for purchasing the mul-funconal Instant Pot. Please read the User Manual
carefully before use and keep it in a convenient place for future reference.

2
IMPORTANT SAFEGUARDS ........................................................................................ 3
Precauons .......................................................................................................... 4
Special Cord Set Instrucons ................................................................................ 4
Product Introducon................................................................................................. 5
Features ............................................................................................................... 5
Specicaons ....................................................................................................... 5
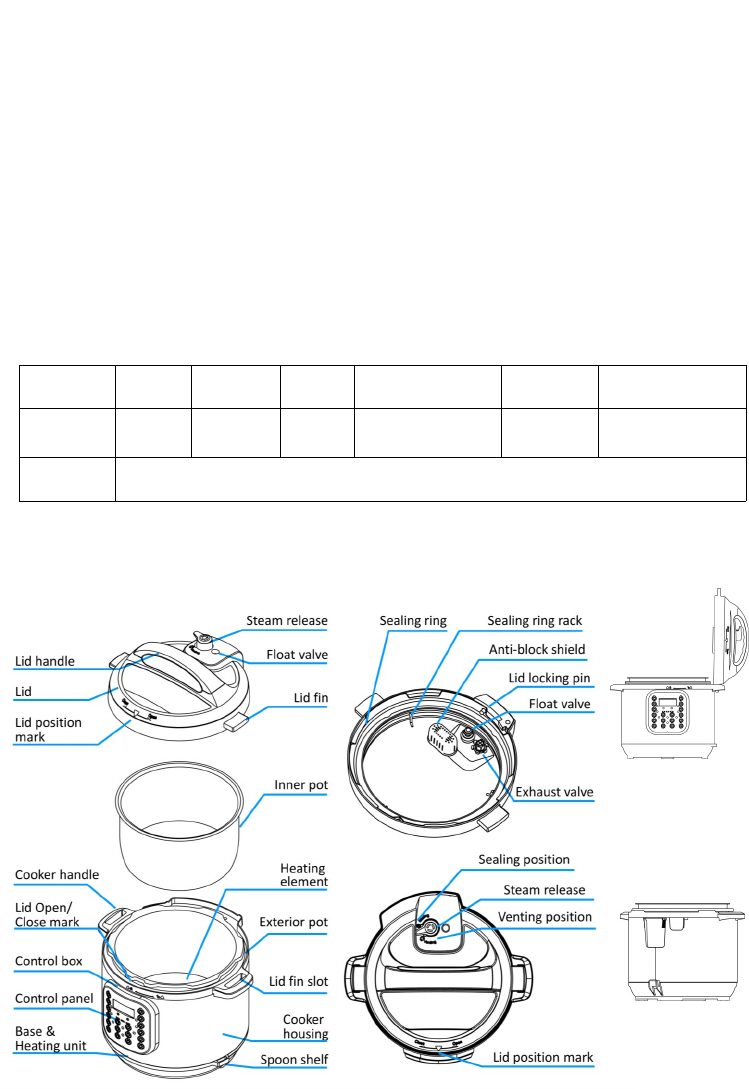
Product Structure ................................................................................................. 6
Before the First Use .................................................................................................. 7
Install the Condensaon Collector ....................................................................... 7
Remove and Install the An-Block Shield ............................................................. 7
Remove and Install the Sealing Ring .................................................................... 7
Safe Lid Opening................................................................................................... 8
Cooking Preparaon ............................................................................................. 8
Controls and States of the Cooker .......................................................................... 10
Control Panel ...................................................................................................... 10
States of the Cooker ........................................................................................... 10
Operaon Keys ................................................................................................... 11
Funcon Keys ..................................................................................................... 11
Wireless Operaons ............................................................................................... 13
Pairing Your Smartphone/Tablet with Instant Pot .............................................. 13
Erase Pairing Informaon ................................................................................... 13
Turn O Bluetooth ............................................................................................. 14
Operang your Smartcooker Wirelessly ............................................................. 14
Wring Recipe Script and Sharing it with Friends .............................................. 14
Cooking with Your Instant Pot ................................................................................. 16
Pressure Cooking ................................................................................................ 16
Slow Cooking ...................................................................................................... 17
Delayed Cooking with Timer .............................................................................. 17
Sautéing ............................................................................................................. 18
Warming ............................................................................................................. 19
Making Yogurt .................................................................................................... 19
Making Jiu Niang ................................................................................................ 19
Inial Test Run .................................................................................................... 20
Care and Maintenance ............................................................................................ 21
Cleaning ............................................................................................................. 21
Troubleshoong ...................................................................................................... 21
Limited Warranty .................................................................................................... 24

3
Your Instant Pot cooks with pressure. When using pressure cookers, basic safety precauons
should always be followed.
PLEASE READ ALL INSTRUCTIONS.
1. Do not touch hot surfaces. Use handles or knobs.
2. Close supervision is necessary when the pressure cooker is used near children.
3. Do not place the pressure cooker in a heated oven.
4. Extreme cauon must be used when moving a pressure cooker containing hot liquids.
5. Do not use pressure cooker for other than intended use.
6. This appliance cooks under pressure. Improper use may result in scalding injury. Make
certain unit is properly closed before operang. Please see “Cooking Preparaon”.
7. Do not ll the unit over 2/3 full. When cooking foods that expand during cooking such as
rice or dried vegetables, do not ll the unit over 1/2 full. Over lling may cause a risk of
clogging the vent pipe and developing excess pressure. Please see “Food Preparaon
Instrucons”.
8. Be aware that certain foods, such as applesauce, cranberries, pearl barley, oatmeal or
other cereals, split peas, noodles, macaroni, rhubarb, or spaghe can foam, froth, and
spuer, and clog the pressure release device (the steam release handle). These foods should
not be cooked in a pressure cooker.
9. Always check the pressure release devices (the steam release handle) for clogging before
use.
10. Do not open the pressure cooker unl the unit has cooled and all internal pressure has
been released. If the handles are dicult to push apart, this indicates that the cooker is sll
pressurized – do not force it open. Any pressure in the cooker can be hazardous. Please see
“Cooking Preparaon”.
11. Never deep fry or pressure fry in the unit with oil. It is dangerous and may cause a re or
serious damage.
12. To protect against electrical shock, do not immerse cord, plugs, or appliance in water or
other liquid.
13. Unplug from outlet when not in use and before cleaning. Allow to cool before pung on
or taking o parts, and before cleaning.
14. Do not operate any appliance with a damaged cord or plug or aer the appliance
malfuncons or has been damaged in any manner. Return appliance to the service center for
examinaon repair or adjustment. See Warranty secon.
15. The use of accessory aachments not recommended by the appliance manufacturer may
cause injuries.
16. This product is for household use only. Do not use outdoors.
17. Do not let cord hang over edge of table or counter, or touch hot surfaces.
18. Do not place the unit on or near a hot gas or electric burner, or in a heated oven.
19. Extreme cauon must be used when moving the unit containing hot oil or other hot
liquids.
20. Cauon: to reduce the risk of electric shock, cook only in the provided removable
container (cooking pot).

4
21. Do not use incompable removable container (cooking pot) or sealing ring (gasket) to
avoid pressure leakage.
22. To disconnect, turn any control to "o", then remove plug from wall outlet.
23. Do not place the unit on an unstable locaon it is strictly prohibited to use it on a
newspaper, foam or other object that may easily block the vent holes at the boom.
24. Do not use it in a place which is near splash water or re. Do not use it in a place exposed
to directly to sunshine or oil splash. Put it in a place out of the reach of children.
25. Before use each me, be sure to check the an-block shield, oat valve and exhaust valve
(steam release handle) for obstrucon, wipe the surface of the inner pot and the heang
plate to conrm they are free of any foreign object; make sure the steam release handle is in
sealing posion.
26. Do not move this product or force to remove the lid when the unit is in operaon.
27. Do not place your hands or face over the exhaust valve (steam release handle) or oat
valve to avoid scald when the unit is in operaon.
28. To reduce the risk of re or electric shock, only authorized personnel should do repairs.
29. Do not cover the pressure valves.
30. This appliance is not intended for use by persons (including children) with reduced
physical, sensory or mental capabilies, or lack of experience and knowledge, unless they are
accompanied by a person responsible for their safety.
31. Do not use this product on any electrical system other than voltage: 110-120V~/60Hz.
PLEASE SAVE THESE INSTRUCTIONS.
And keep the user manual in a convenient place for future reference.
Before each use, please make sure to inspect the following:
1. The an-block shield, oat valve and exhaust valve are not blocked by food debris.
2. The boom surface of the inner pot and the heang plate are free of any foreign objects.
3. The steam release handle is in the "Sealing" posion for all pressure cooking.
Aer cooking, wait unl the cooker cools down for a while and release the pressure using the
steam release handle. Use extreme cauon when opening the lid. Scald and serious burns can be
caused by the steam inside the unit.
If all LED lights are ashing on the control panel, unplug the power cord immediately and consult
the “Troubleshoong” secon.
Care must be taken with the sealing ring to avoid deformaon. Failure to do so may prevent the
product from working properly.
A short power supply cord is provided to reduce the hazards resulng from entanglement and
tripping. An extension cord may be used if care is exercised in its use. If an extension cord is used,
the electrical rang of the cord must be at least 12 amps and 120 volts. The extended cord must

5
be arranged so that it will not drape over edge of table or counter where it can be pulled by
children or tripped over accidentally.
This appliance has a polarized plug (one blade is wider than the other). To reduce the risk of
electric shock, this plug is intended to t into a polarized outlet in only one way. If the plug does
not t fully into the outlet, ip the plug. If it sll does not t, contact a qualied electrician. Do not
aempt to modify the plug in any way.
Instant Pot® Smart is a new generaon of smart kitchen appliances. It is a mul-funconal
smartcooker combining the benets of a Pressure Cooker, Slow Cooker, Rice Cooker, Porridge
Maker, Steamer, Sous Vide water oven, Sauté pan, Yogurt Maker, Food Warmer and more. It is
Bluetooth® enabled allowing connecons from smartphones/tablets. Complex cooking steps can
be easily programmed in recipe scripts and uploaded to the cooker to produce consistent results
every me. This capability allows the cooker’s funcons to be upgraded and expanded aer
purchase, and the recipe scripts can be shared with friends.
Instant Pot® is a convenient and kitchen-friendly me saver. Together with mulple sensors, its
micro-processor controlled intelligent programs make your everyday cooking as easy as pressing a
buon. It brings your green thinking right into the kitchen by saving up to 70% of energy
compared with convenonal cooking. In most cases, your Instant Pot reduces the cooking me by
70%, and preserves more vitamins and minerals in the natural ingredients.
Instant Pot has been designed to avoid the common errors and safety hazards of old stove-top
pressure cookers using 10 proven safety mechanisms and patented technologies. They include lid
posion monitoring, locking the lid under pressure, electronic pressure and temperature control,
dry burn detecon with automac shuto, over-pressure protecon, and temperature and
electrical current liming fuse. Instant Pot® has earned the entrusted UL cercaon by going
through the rigorous UL lab tesng.
High safety standard: 10 safety mechanisms and UL safety cercaon. Please visit
www.InstantPot.com for detailed informaon.
Bluetooth® Smart compliant (Bluetooth 4.0) to connect to smartphones/tablets, providing
easy to use interfaces to control and monitor cooking progress in graphics. The cooker’s
funcons can be upgraded and expanded aer purchase. Cooking procedures can be
wrien in recipe script and shared with friends.
Mul-funcon: Braising, pressure cooking, stewing, steaming, simmering, slow cooking,
sauté/browning, fermenng, making yogurt and keeping warm.
14 convenient cooking programs controlled by a microprocessor: Simply press one of
the funcon keys to start cooking. The microprocessor controls the me, cooking
pressure and temperature eliminang the need to watch over the cooker in the kitchen.
Clean and pleasant: Instant Pot produces very lile noise and leaks almost no steam.
This keeps the aromas and avor of ingredients in the food and avoids messy spills,
splashes or spaers to clean up.
Dual pressure sengs for fast and exible cooking: Cooking with the high pressure
reduces cooking me by up to 70% and low pressure avoids overcooking delicate food.
Up to 24-hour delayed cooking: Long 24 hour mer. Perfect for meal planning.
Up to 120 minutes of manual cooking me selecon.
Auto keep warm: Aer cooking, the keep-warm funcon starts automacally for 10 hours.
Dishwasher safe stainless steel inner pot and steam rack.
6
Working pressure: High 10.2 ~ 11.6psi (70 ~ 80kPa); Low 5.8 ~7.2 psi (40 ~ 50kpa)
Steam release pressure limit: 15.22psi (105kPa)
Working temperature: 115°C ~ 118°C (239°F ~ 244°F) at high pressure seng; 110°C ~
112°C (229 ~ 233°F) at low pressure seng.
“Keep warm” funcon: up to 99 hours 50 minutes, 63 ~ 78°C (145 ~ 172°F);
“Slow Cook” funcon: 0.5 ~ 20 hours, at 88 ~ 99°C (190 ~ 210°F)
“Sauté” funcon: “Normal” mode: 160 ~ 176°C (320 ~ 349°F); “More” mode: 175 ~ 210°C
(347 ~ 410°F); “Less” mode: 135 ~ 150°C (275 ~ 302°F).
“Yogurt” funcon: up to 99 hours 30 minutes. “Normal” mode for making yogurt: 36 ~ 43°
C (96.8 ~ 109.4°F); “Less” mode for making Jiu Niang (fermented glunous rice): 30 ~ 34°C
(86 ~ 93.2°F); “More” for pasteurizing milk: ~83°C (~180°F).
Baery: Li-ion CR2477, 3V. Baery life: 5 years.
Model Power
Supply
Rated
Power
Vol-
ume
Caliber of inner
pot
Weight Dimension
IP-Smart 120V~
60Hz
1000W 6 Qt 16x22x24 cm
6.3x8.66x9.45 in
6.61kg
(14.57lb)
33x31x32 cm
13x12.2x12.6 in
Accesso-
ries
Rice paddle, Soup spoon, Measuring cup, Steam rack, Condensaon water collec-
tor, User manual and Recipe booklet.
Lid n slot on the
cooker handle
can hold the open
lid on either le
or right.
Condensaon
collector and the
power cord holder.
7
Before the rst use, please take out all accessories from the package and read this manual
carefully. Please pay parcular aenon to operaonal instrucons and cauons to avoid any
injury or property damage. Please wash the inside of the lid and the inner pot with warm soapy
water, rinse and dry thoroughly. Wipe the outer housing with a clean damp cloth. Never immerse
the cooker housing in water or any other liquid. The inner pot, sealing ring and steam release
handle and all accessories are dishwasher safe. But never clean the lid and housing in a
dishwasher.
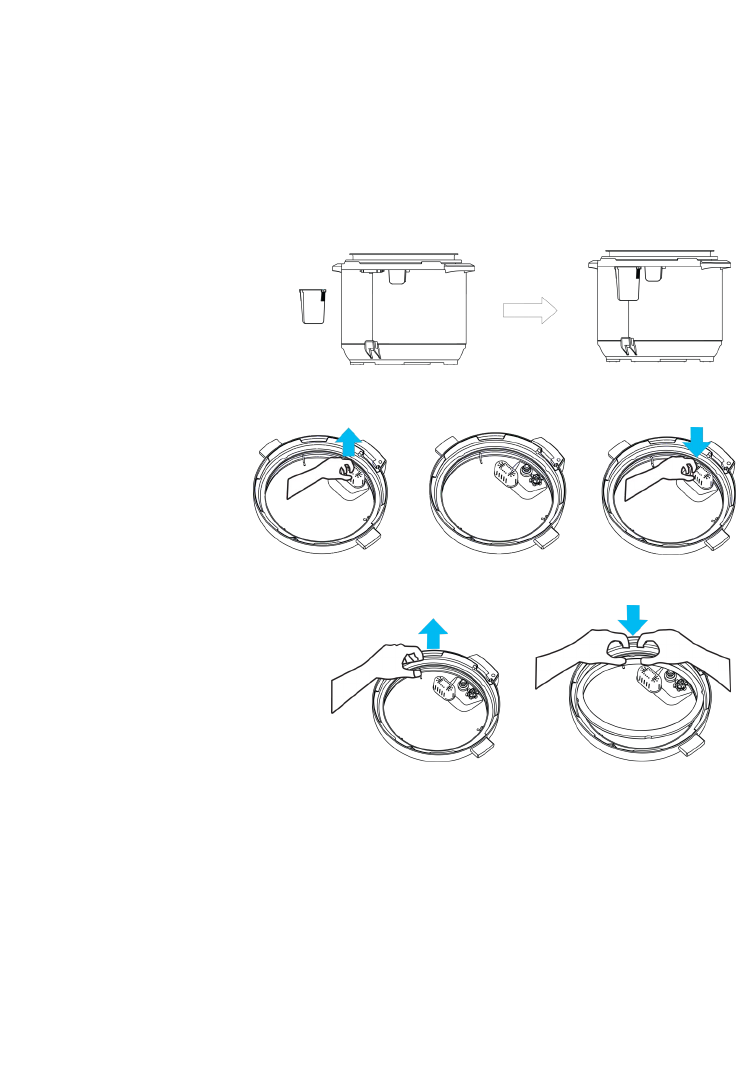
Install the Condensaon Collector
To install the condensaon collector,
slide it into the slot on the cooker
housing. Follow the reverse order to
remove it for cleaning.
Remove and Install the An-Block Shield
The an-block shield can be
removed by pushing it on the
side to li it up. To install the
an-block shield, posion it in
place and press it down. The
an-block shield can be installed
on either direcon lengthwise.
Remove and Install the Sealing Ring
The sealing ring can be removed by pulling
upwards from the sealing ring rack in
secons. To reinstall the sealing ring,
pressing it down into the rack secon by
secon. The sealing ring can be installed on
either side facing up.
Please note the following:
Prior to each use, inspect to make sure the sealing ring is well seated in the sealing ring
rack and the an-block shield is mounted properly on the steam release pipe. A properly
seated sealing ring can be shied, with a bit of eort, clockwise or an-clockwise inside
the sealing ring rack.
Aer use, remove any foreign objects from the sealing ring and an-block shield.
Keep the sealing ring clean to avoid odor. Washing the sealing ring in warm soapy water or
dishwasher can remove odor. However, it is normal for the sealing ring to absorb the smell
of certain acidic foods. That's why it is always a good idea to have more than one sealing
ring on hand. You can purchase addional sealing rings from www.InstantPot.com.
Never pull the sealing ring by force, as the pulling may cause deformaon and aect its
funcon in sealing the pressure.
A sealing ring with cracks, cuts or other damages should not be used. A new sealing ring
replacement should be used. Please choose authenc parts from Instant Pot Company.

8
1. Make sure the pressure cooking program has completed or press “Keep-Warm/Cancel” to
terminate the program.
2. Releasing pressure in one of the following approaches.
Quick Release:
Slide the steam release handle to the "Venng" posion to let out steam unl the oat
valve drops down.
Cauon:
Please keep hands and face away from the hole on the top of the steam release handle
when using Quick Release. The escaping steam is very hot and can cause scalding.
Never pull out the steam release handle when it is leng out steam.
Please be aware that Quick Release is not suitable for food in large liquid volume or with
high starch content (e.g. porridge, congee, scky liquids, soup, etc.). Food content may
splaer out with steam. Use Natural Release instead.
Natural Release:
Allow the cooker to cool down naturally unl the oat valve drops down. This may take 10
to 15 minutes aer cooking is nished and the cooker is in Keep-Warm mode.
Pung a wet towel on the lid can speed up cooling.
3. Open the lid: Hold the lid handle, turn the lid counterclockwise to the open posion, and li
the lid up to open. To avoid vacuum sucon on the lid, turn the steam release to “Venng”
posion to let in air when liing the lid.
Cauon: Do not open the lid unl pressure inside the pot is completely released. As a
safety feature, unl the oat valve drops down, the lid is locked and cannot be opened.
If the oat valve is stuck due to food debris or sckiness, you can push it down with a pen
or chopscks when you are certain the pressure has been released by moving the steam
release handle in the venng posion.
1. Open the lid
Holding the lid handle with your hand, rotate approximately 30 degrees counterclockwise
unl the mark on the lid is aligned with the “Open” mark on the cooker
housing rim.
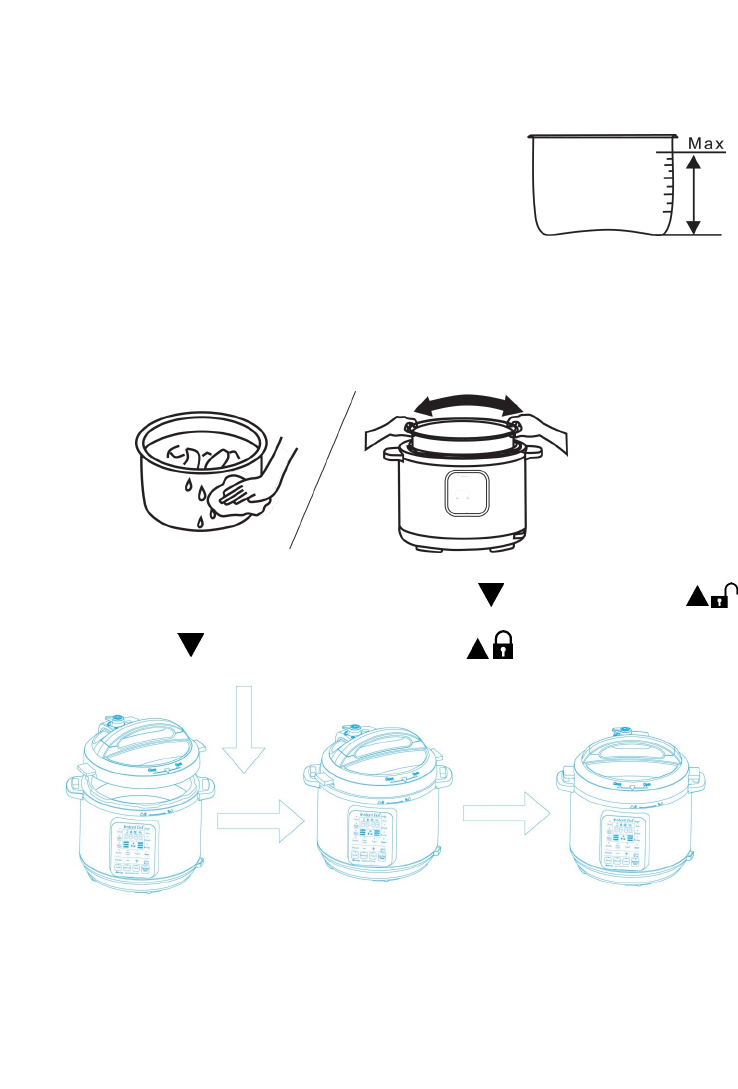
9
2. Check whether all parts on the lid are assembled properly
Check the oat valve and exhaust valve for obstrucons. Make sure that the sealing ring is
well seated inside its holding rack, the an-block shield is installed properly and the oat
valve can move up and down easily.
3. Take out the inner pot, and put in food and liquid
The total amount of food and water should NEVER exceed the
maximum level marking of the inner pot. It is recommended that
you do not ll the unit over 2/3 full. When cooking foods that
expand during cooking such as rice, beans or dried vegetables,
do not ll the unit over 1/2 full. Over lling may risk clogging the
vent pipes and developing excess pressure. This could also cause
spillage and may damage to the unit.
4. Place the inner pot inside the cooker housing
Before that, be sure to remove foreign objects and wipe dry the outside of the inner pot and
the heang element inside of the cooker.
Aer pung the inner pot inside the housing, rotate the inner pot slightly to ensure good
contact between the inner pot and the heang element.
5. Close the lid completely
Hold the lid handle and put the lid on the cooker, with the mark on the lid and the
“Open” marks on the housing rim are aligned. Rotate the lid clockwise approximately 30
degrees unl the mark on the lid is aligned with the “Close” mark on the
housing rim.
Instant Pot has a safety feature to disable the cooker and the display ashes "Lid" if the lid is
not posioned correctly. When using "Soup", "Poultry", "Meat/Stew", "Bean/Chili",
"Mulgrain", "Rice", "Steam", "Porridge" and "Yogurt", the lid should be fully closed. When
using "Sauté", the lid should be open. "Keep Warm" and “Slow Cook” works with the lid
either opened or closed.
6. Posion the steam release handle properly
Please note that it is perfectly normal and necessary for the steam release handle to be

10
loose. It works by weight and simply rests on top of the
exhaust pipe. It can also be removed for washing if
necessary by pulling it straight out.
In operaon of the cooker for any funcons except "Keep
-Warm", "Sauté" or "Slow Cook", align the pointed end of
the steam release handle poinng to "Sealing", indicang
that the pressure cooker is in the sealed posion.
The "Sauté" funcon must be used without the lid. The
"Slow Cook" and “Keep-Warm” can operate with or
without the lid, or using an oponal glass lid available at
www.InstantPot.com.
The control panel of your Instant Pot consists of an LED display, 2 pressure indicators, 3 mode
indicators, 4 operaon keys and 14 funcon keys. Each funcon key has a funcon indicator light.
Operaon keys do not have indicator lights.
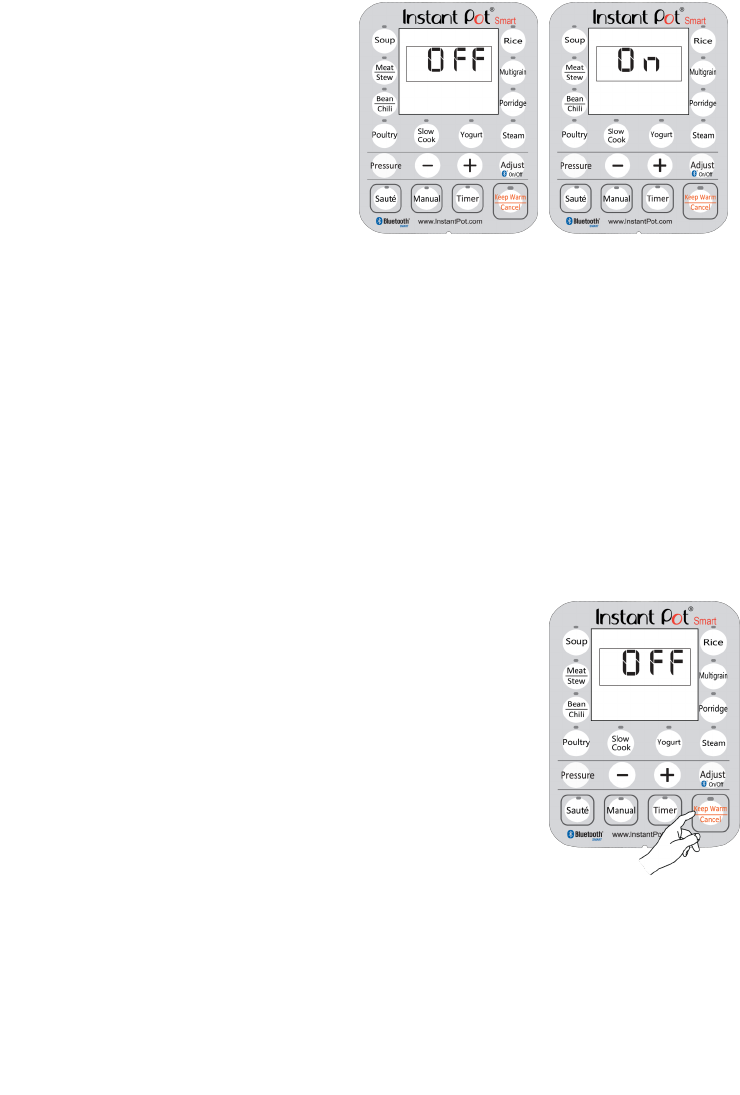
Your Instant Pot has 3 states which are shown on the LED display and funcon indicators.
11
Standby state: the LED display shows
“OFF”.
Pre-heang state: the LED display shows
“On” and the acvated funcon
indicator lights up.
Program operang state: the acvated
funcon indicator lights up and the LED
display shows me. For pressure
cooking, slow cooking and mer
funcons, the me counts down. For
“Keep Warm” and “Yogurt” funcons,
the me counts up.
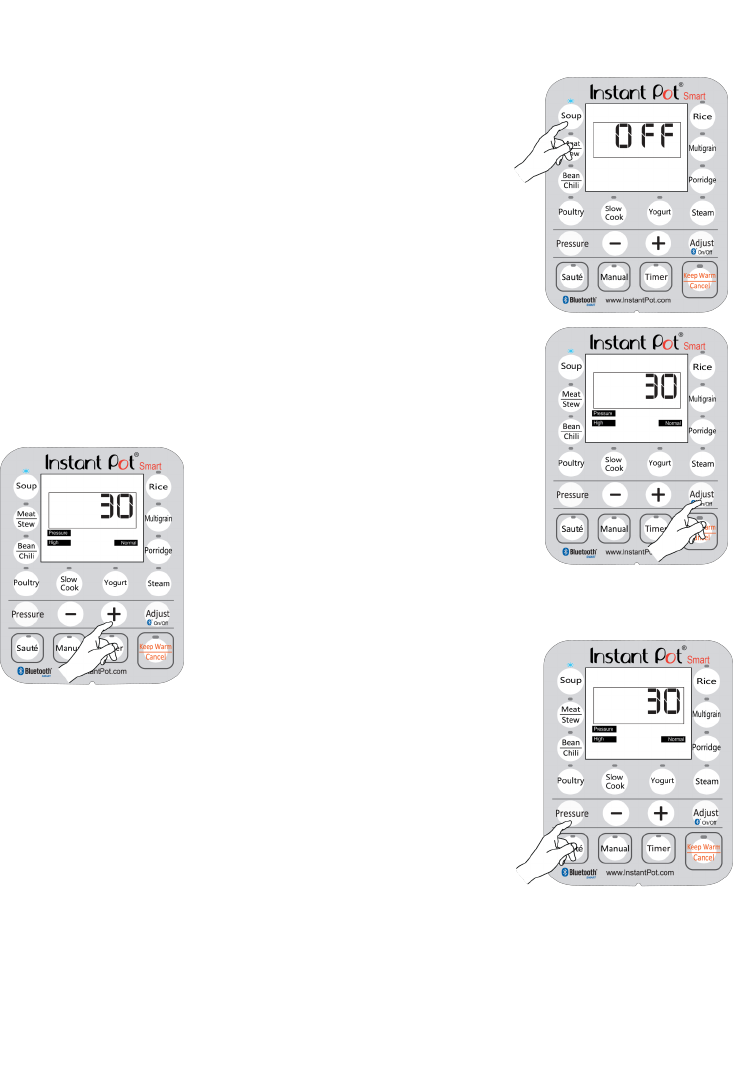
The 4 operaons keys include “+”, “-“, “Pressure” and “Adjust” keys. The “+” and “-“ are used to
change the me value.
The "Pressure" key toggles the pressure seng between “High Pressure” and “Low Pressure” for
the pressure cooking funcons which include "Soup", "Bean/Chili", "Poultry", "Meat/Stew",
"Mulgrain", "Porridge", "Steam", “Rice" and “Manual” funcons. The “Pressure” key has no
eect on non-pressure cooking funcons: “Slow Cook”, “Sauté” and “Yogurt”.
The "Adjust" key can make 3 types of adjustments:
1. Changing the pressure keeping me for pressure cooking funcons, except "Manual"
and "Rice" funcons. "Rice" is fully automac.
2. Switching the temperature of "Slow Cook" and "Sauté".
3. Selecng programs in “Yogurt”.
The most important key is “Keep Warm/Cancel”. When Instant Pot is
being programmed or any program is in eect, press this key will cancel
the program and take the cooker to standby state. When the cooker is in
standby state, pressing this key acvates the “Keep-Warm” program. You
can use “Adjust” key to select the mode of dierent temperatures: Less
(~56°C/133°F), Normal (~63°C/145°F), and More (75°C/145°F).
The “Soup” key is for making various soups and broth. You can use the
“Adjust” key to select a shorter or longer cooking duraon, depending
on the intended cooking result. Instant Pot controls the pressure and
temperature to a level that the liquid never goes into the heavy
boiling state. For example, making chicken broth with the "Soup"
funcon, the broth is clear and the chicken remains intact aer
cooking. If you need the food content to be fully broken down, please
sr and mix the soup before serving.
The “Porridge” key is to make porridge of various grains. You can use the “Adjust” key to select a
cooking duraon. The “Normal” duraon is for rice porridge. For a mixture various grains and
beans, please choose the "More" duraon. Sr the Porridge before serving. Please note, aer
the “Porridge” program is nished, do NOT put steam release handle in venng posion;
otherwise the porridge will splaer through the steam release. Please use Natural Release.
The “Poultry” key is programmed to make poultry dishes. You may use the "Adjust" key to change
the poultry cooking me from "Normal" to "More" or "Less" depending on your preference of
the texture and the amount of poultry you put into the pot. Poultry meat is generally easier to
cook than pork, lamb and beef. Hence the poultry cooking me is adjusted within a shorter

12
me range when using the "Poultry" funcon key.
The “Meat/Stew” key is for cooking meat and stew. The “Adjust” key can be used to change the
cooking me to achieve the desired texture of the meat. In general, "More" duraon is for
bone-stripping eect on meat.
The “Bean/Chili” key is specically for cooking beans and making Chili. If you want the beans well
cooked, please use the “Adjust” key to select "More" duraon.
The “Rice” key is a fully automated smart program for cooking regular rice or parboiled rice. The
cooking duraon is adjusted automacally depending on the amount of food content. To cook
2 cups of rice, it takes about 12 minute pressure keeping me; for 3~5 cups of rice, it takes
about 14 minute pressure keeping me; more cups will take longer me accordingly. Total
cooking me is not displayed, whereas the pressure keeping me will be shown when working
pressure is reached. The “Adjust” key has no eect on this program. Please note: You can cook
as lile as one cup of rice with the correct rao of water.
The "Mulgrain" key is a program to cook mixed grains of wild rice, hard brown rice, mung beans,
etc. There are three “Adjust” opons for mulgrain rice cooking. The "Normal" seng has 40
minutes of pressure cooking me. The "Less" seng has 20 minutes of pressure cooking me.
The "More" seng has 45 minutes of warm water soaking me and 60 minutes of pressure
cooking me. The "More" seng is suitable for harder grains such as dry split corn.
The “Steam” key is designed for steaming purposes. You can steam vegetables, seafood or
reheang with the enclosed steam rack. When steaming vegetables and seafood, please note
that using the “Natural Release” method for releasing the steam will likely overcook the food.
You will need to release the steam as soon as the cooking me has expired using the “Quick
Release” method.
Using 1~2 cups (160ml) of water is sucient for steaming fresh or frozen vegetables, with 1~2
minute pressure keeping me. Please use “+” or “-“ keys to change the steaming me. Please
note that unlike other pressure cooking funcons, the “Steam” funcon heats at full power
connuously. This may burn food in direct contact with the boom of the inner pot. Please
use the trivet provided to elevate the food above the water. Use a metal basket or (oven safe)
glass/ceramic container that ts into the inner pot to contain the food.
The “Manual” key allows manual seng of cooking me. The me set in this mode is pressure
cooking me which will begin to count down when working pressure is reached. The
maximum pressure cooking me is 120 minutes.
The "Sauté" key is used for open lid sautéing, browning or simmering inside the inner pot.
"Adjust" can be used to change the operang temperature in 3 modes. Please see the
“Sautéing” secon for details.
The “Slow Cook" key allows you to use your Instant Pot as a common slow cooker. The user can
change the cooking duraon by pressing the "+" or "-" key between 0.5 and 20 hours. The
"Adjust" key allows you to adjust the level of heang as in tradional slow cookers. Please see
the “Slow Cooking” secon for its usage.
The “Yogurt” key has 3 programs: make yogurt, pasteurize milk and making Jiu Niang (aka
fermented glunous rice). Please see the “Making Yogurt” and “Making Jiu Niang ” secons.
The “Timer” key is for delayed cooking. To start delayed cooking, rst select the desired cooking
funcon (all program funcons except “Sauté” and “Yogurt”), and then press the “Timer” key.
Use “+” and “-“ to set the delayed hours. Press "Timer" key again to change the minutes. The
me you are seng is the delayed me before the program starts. Please allow sucient
cooking me and cooling down me before serving. The me delay can be adjusted with “+”
or “-“ keys for up to 24 hours . Please see the “Delayed Cooking with Timer” secon for
details.

13
Your Instant Pot Smart is equipped with a Bluetooth® Low Energy (Bluetooth® 4.x) chip and
has been cered as Bluetooth® Smart compliant. This allows your Instant Pot to wirelessly con-
nect to Bluetooth® Smart Ready smartphones and tablets which support Bluetooth® 4.x. Such
devices include iPhone 4S/5/5C/5S, iPad 3/4/Air, iPad mini/mini2, iPod touch 5 or later, and An-
droid devices with Bluetooth® 4.x chip running Android 4.3 or later, such as Samsung Galaxy S4/S5,
Nexus 5/7, etc.
To connect to Instant Pot Smart, you need to download the “Smart Cooker” app. For Apple
devices, the “Smart Cooker” app can be downloaded from iTunes App Store. For Android devices,
it can be downloaded from Google Play Store (to be released later). Windows Mobile, Blackberry,
Symbian and other mobile OSes are not supported. There are three ways to download the “Smart
Cooker” app to your mobile device:
1. Scan the QR code on the right. It takes you directly to iTunes App Store or
Google Play store depending on the type of your mobile device.
2. Type in the URL: hp://instantpot.com/smartcooker/ on your smartphone/
tablet Internet browser.
3. Launch the “App Store” app on Apple devices or Google Play app on An-
droid devices, and search for “Smart Cooker”.
Once you have installed the “Smart Cooker” app on your mobile device,
launch it, go to “Sengs” and tap “Add a Smartcooker”. When the message
changes from “None” to “Searching”, “Discovering”, and then to “IP-Smart”,
press and hold the “Adjust” buon on Instant Pot control panel for 3 second
unl you hear a short beep sound. This indicates a pairing request being sent
to your mobile device. A window “Bluetooth Pairing Request” pops up on
your mobile device. Please select “Pair”. The two can now communicate with
each other securely, and the clock on Instant Pot is set to the me on the
mobile device. Pairing only needs to be done once and will be stored for fu-
ture uses.
When your mobile device is connected to the Instant Pot Smart, the
cellphone icon on the display lights up. When it’s disconnected, the icon
turns o. The cooker can only connect to one mobile device at a me.
If you have reasons to believe that your Instant Pot Smart has been paired up with an unauthor-
ized mobile device, you can verify this on your “Smart Cooker” app aer connecng to the Instant
Pot. In the “Seng” secon, the “Paired Device Count” shows the number of devices paired with
your Instant Pot Smart. If the number of devices is more than what you expect, you can erase all
the pairing informaon from the “Smart Cooker” app. Note that this operaon erases the pairing

14
The Bluetooth is turned on by default out of factory. When you power up your Instant Pot
Smart, the Bluetooth icon on the LCD lights up indicaon Bluetooth is on. If you want to turn
o Bluetooth, you can press and hold “Adjust” buon for 10 seconds unl you hear a long beep
sound. The Bluetooth icon disappears to indicate Bluetooth being o. No mobile device can
connect to your Instant Pot Smart when the Bluetooth is turned o. When you need to turn on
the Bluetooth, you can press and hold “Adjust” buon for 10 seconds unl you hear a beep sound.
The Bluetooth icon lights up to indicate Bluetooth being on.
When your smartphone/table is connected to your Instant Pot
Smart, you can do the following operaons from your smartphone/
tablet.
Issue cooking command or send recipe script to the Smartcooker,
and Cancel a cooking command or recipe script. To send a
recipe script in a recipe to the cooker, tap the sign on the top
-right corner and tap the “Start” in the next screen, see illus-
traons on right. When Instant Pot Smart is running recipe
script, the smart program icon on the LCD display, see the
gure on le, lights up and is animated.
Obtain the current status (temperature, pressure, heang level,
etc.) and historic operaon data on the Smartcooker
Examine the error code on the Smartcooker
You can write your own DIY reci-
pe script, save it for future use and
share with your friends. To do so,
please following the following steps.
1. Tap the “Add” buon to start a
new recipe script. See screen-
shot on right.
2. Tap the “+” on the top-right
corner to add cooking tasks.

15
3. The available program modules
show up as a list, see screenshot
on the right. Select a program
module, e.g. “Hold the tempera-
ture” as the rst cooking task.
4. You can then congure this task
with the parameters of me,
temperature, heang level, and
oponally a message to be dis-
played, a sound when the task
starts and the LED light to turn
on. Tap “Done” on the top-right
corner when nished.
5. When a task is added, you can
add addional tasks by tapping
“+” on the top-right corner. The
new task will be added to the
end of the task list. Aer adding
all the tasks, you can save the
recipe script with a name. This
saved script will be shown in the
“DIY Recipes” on the app’s home
screen. Note the “DIY Recipes”
scrolls side ways.
6. If your recipe script is a great
success and you want to share
the joy with friends, you can tap
the “Export”, see rightmost
screenshot. This allows you
email the recipe script to your
friends. It aaches a le with
“.cooker” extension. If your
friends also has the “Smart
Cooker” app on their mobile
device, trying to open the
“.cooker” aachment imports
your recipe script into your
friends’ device and they can now
reproduce exactly the same reci-
pe as you enjoyed.
16
The following procedure is for “Rice”, "Soup", "Poultry", "Meat/
Stew", "Bean/Chili", "Mulgrain", "Porridge", "Steam" and
“Manual” funcons.
1. Follow steps in the "Cooking Preparaon" secon of this
manual.
2. Connect power cord. The LED display shows “OFF”
indicang that it’s in standby state.
3. Select a cooking funcon, e.g. “Soup”. Once a funcon key
is pressed, its indicator lights up.
Within 10 seconds aer pressing a funcon key, you
can sll select any other funcon keys and adjust cooking
duraon.
4. Select cooking me.
You may use the "Adjust" key (except the “Manual” and
“Rice” funcons) to adjust cooking duraon.
Press the "Adjust" key repeatedly to change
between “Normal”, “Less" and “More" modes
which will light up on the display.
If necessary, change the cooking me with
“+” and “-“. Press and hold the “+” or “-“ key for
faster changes.
The built-in cooking me is suitable for general purpose food. Please
use the cooking me table in the recipe book to determine the
appropriate cooking me based on the specic food, the quanty of food
and your texture preference.
5. Select cooking pressure.
All funcons except “Rice” defaults
to High Pressure. For “Rice” funcon, the default is
Low Pressure. Low Pressure operates at half of the
regular working pressure (around 5.8psi or 40kpa). It
is used to avoid overcooking tender food materials
such as vegetables and for certain recipes that may
call for using low pressure seng.
6. Cooking starts automacally in 10 seconds aer the last
key press.
Three audible beeps will sound to indicate the cooking
process has begun. The LED display shows "On"
indicang that the pre-heang state is in progress. Please note: Depending on the food
content, the quanty and its temperature (frozen or not), the preheat cycle can range
between 10 to 40 minutes.
As the pressure increases inside the cooker, it is perfectly normal for traces of steam to
escape from the oat valve unl the oat valve pops up.
Once the cooker reaches working pressure, the LED display changes from “On" to the
programmed cooking me. The cooking me counts down to indicate the remaining
17
me in minutes. During this pressurized state you should not see any steam gushing out
anywhere from the lid. However, from me to me you may see a small smoke eect
coming from the steam release handle and occasionally a lile spuering. This is
perfectly normal.
During the cooking operaon, the cooker makes low clicking sounds. This comes from
normal operaon in switching the heang element on and o.
At any me, you can cancel the cooking program in progress and return to standby
mode by pressing the “Keep-Warm/Cancel” key.
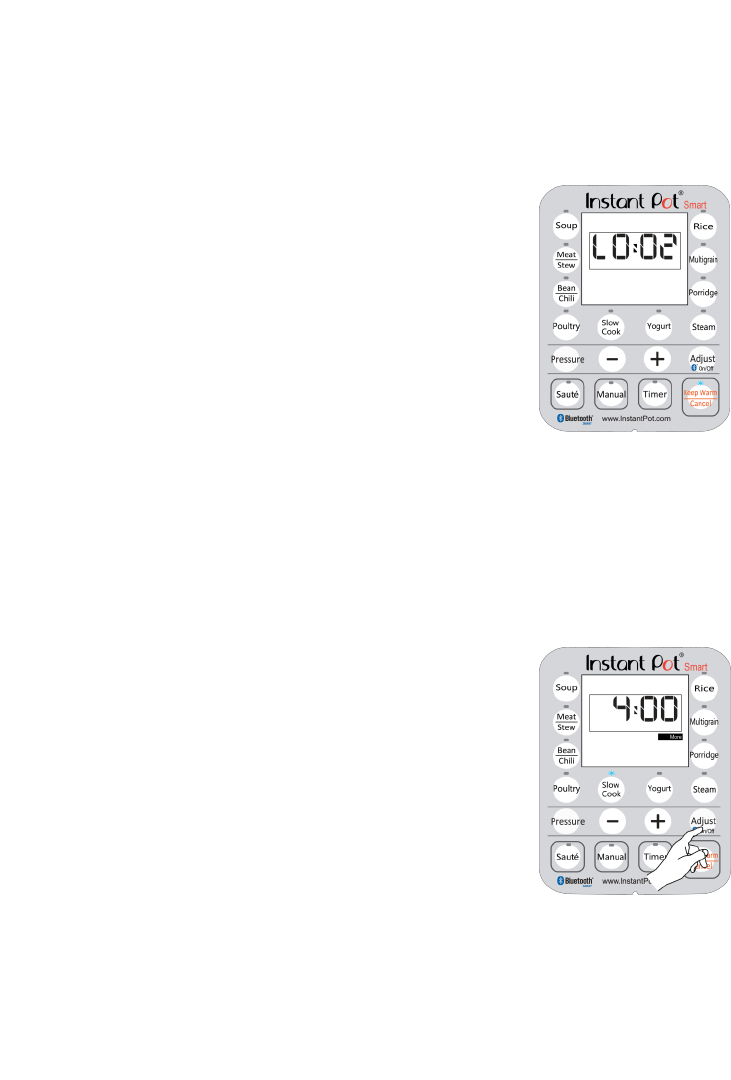
7. When the pressure cooking cycle nishes, the cooker beeps and
automacally goes into the "Keep Warm" cycle, called Auto “Keep
Warm” Cycle. The LED display shows an “L” on the rst digit, such as
"L0:02", to indicate the “Keep Warm” cycle and me duraon. The
clock counts up for 10 hours. If the 10 hour Auto “Keep Warm” cycle
nishes, the cooker goes into standby state.
It is not recommended to leave cooked rice in “Keep-Warm”
state for too long as it may aect the texture or the taste of
the food.
8. To serve the food, press “Keep-Warm/Cancel” to stop the keep-
warm cycle and open the lid according to the “Safe Lid Opening”
secon of this manual.
When opening the lid, the inner pot may appear to be stuck on the lid by vacuum. This
is caused by contracon of air due to cooling. Please turn the steam release handle to
“Venng” to let in air to release the vacuum.
1. Follow steps in the "Cooking Preparaon" secon of this manual. The steam release handle
can be at either "Venng" or “Sealing” posions. An oponal glass lid can also be used.
2. Connect power cord. The LED display shows “OFF” indicang that it’s in standby state.
3. Press “Slow Cook” key.
4. Change cooking duraon between 0.5 and 20 hours by pressing
the "+" or "-" key.
5. Select the desired cooking mode with the “Adjust” key. By pushing
the "Adjust" key repeatedly, you can adjust the cooking mode to
“Normal”, “More” and “Less” modes, which correspond to
medium, high and low in a common slow cooker.
6. Cooking starts automacally in 10 seconds aer the last key is
pressed.
7. When the cooking nishes, the cooker beeps and goes into the
Auto "Keep Warm" cycle for 10 hours.
Your Instant Pot has a mer funcon to delay the start of cooking for up to 24 hours. Timer
funcon does not apply to the “Keep Warm”, “Yogurt” and "Sauté" funcons. The following shows
how to program for delayed cooking.
1. Follow steps in the previous “Pressure Cooking” and “Slow Cooking” secons to set a
cooking program.
18
2. Within 10 seconds aer program selecon, press the “Timer” key to
set the hours and minutes to be delayed. Use “+” and “-“ to set the
delayed hours. Press "Timer" key again to change the minutes. The
me is the delayed me before the program starts. Please allow
sucient cooking me and cooling down me before serving.
3. 10 seconds aer last key press, the “Timer” funcon starts, the me
on LED display counts down, and the ashing green indicator on the
“Timer” key changes to solid green.
4. To cancel the Timer operaon, press the “Keep-Warm/Cancel” key
at any me.
5. Your Instant Pot starts cooking when the delay mer counts down to
0. Aer cooking, the cooker will then enter the Auto “Keep Warm”
cycle for 10 hours. Please Note:
We highly discourage using the Timer funcon for perishable
foods, such as meat and sh, which may go bad when le at room temperature for hours.
Cooked rice may yield overly so texture due to long soaking me. It may also cause a
layer of burned rice at the boom of the pot if it is le in Keep-Warm mode for too long.
The Timer funcon is not recommended for porridge, oatmeal or other foamy and scky
foods. Because of the possibility of these foods gumming up the oat valve causing it to
never seal and leading to overowing food content, it is highly recommended that your
Instant Pot not be le unaended during the preheat cycle. Since the delay funcon
implies leaving the unit unaended, we strongly recommend not using the mer funcon
for these types of food.
1. Follow steps in the "Cooking Preparaon" secon of this manual.
Keep the lid open to avoid pressure from building up inside the
cooker. An oponal glass lid can also be used.
2. Connect power cord. The LED display shows “OFF” indicang that
it’s in standby state.
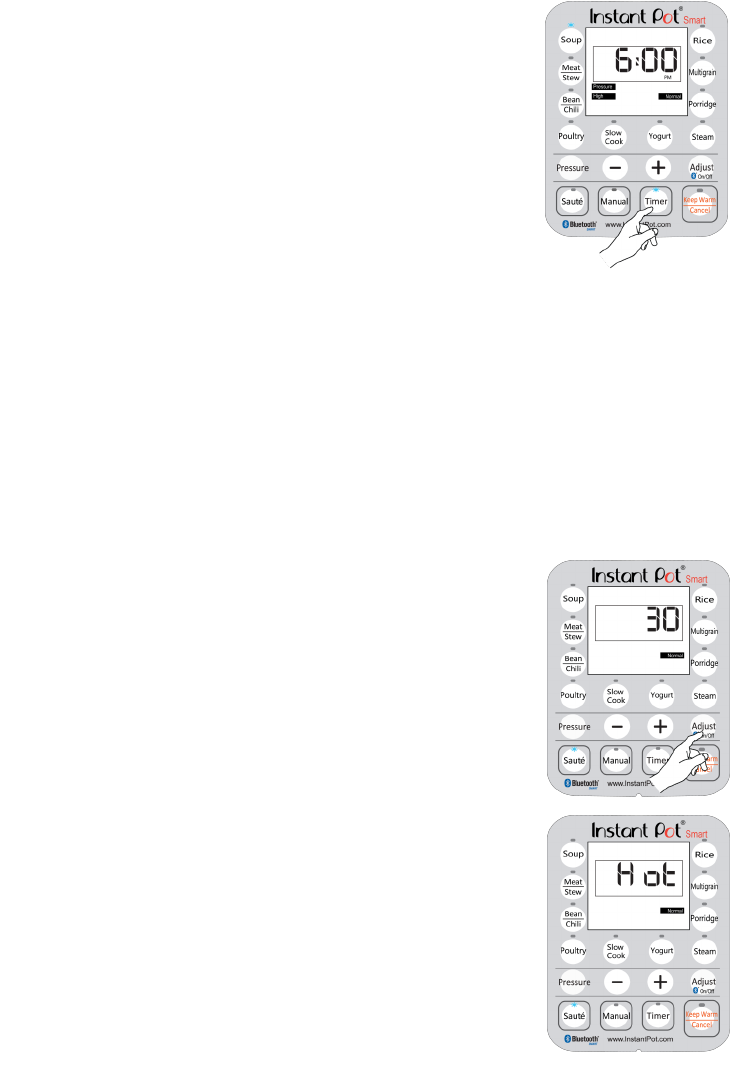
3. Press “Sauté” key. For safety reasons, the maximum operaon me
of one “Sauté” cycle is 30 minutes.
4. Change the cooking temperature among “Normal”, “More” and
“Less” modes with the “Adjust” key. The "Normal" mode is suited
for regular sauté or browning. The "More" mode is for sr-frying or
blackening meat at higher temperature. The "Less" mode is
suitable for simmering, reducing juices or thickening sauce. To
avoid pressure building up, the lid cannot be closed. If you
accidentally close the lid, ashing "Lid" is displayed to warn about
wrong lid posion.
Cauon: parally closing the lid during sautéing could cause
the pressure to build up in the cooker. This can be hazardous.
5. Heang starts automacally in 10 seconds aer the last key is
pressed. The “Sauté” program can be cancelled at any me by
pressing “Keep Warm/Cancel” key.
6. When the designated temperature is reached, the LED display
shows “Hot”.
7. When cooking nishes, the cooker beeps and goes to standby
state. If you need more me, simply press the “Sauté” key again.
19
Pressing the “Keep-Warm/Cancel” key in the standby state acvates the “Keep Warm” funcon.
You can use “+” and “-“ to change the me between 10 minutes and 99 hours and 50 minutes.
When “Keep Warm” funcon starts, the me counts up by minutes. The "Keep Warm" funcon
can be used with or without the lid closed. You can also use an oponal glass lid for this funcon.
When it nishes, the cooker beeps and goes to standby state.
You can make yogurt either with the inner pot or use glass boles. The process to make yogurt
involves two steps. The rst step is to pasteurize the milk by heang it
to 180° F/83° C. This serves two purposes: (1) killing pathogens and
harmful bacteria which can grow during the fermentaon period, and
(2) denaturaon of milk proteins, which prevents curding of milk and
makes the proteins easier to absorb.
Instant Pot provides two convenient ways to heat your milk. If you use
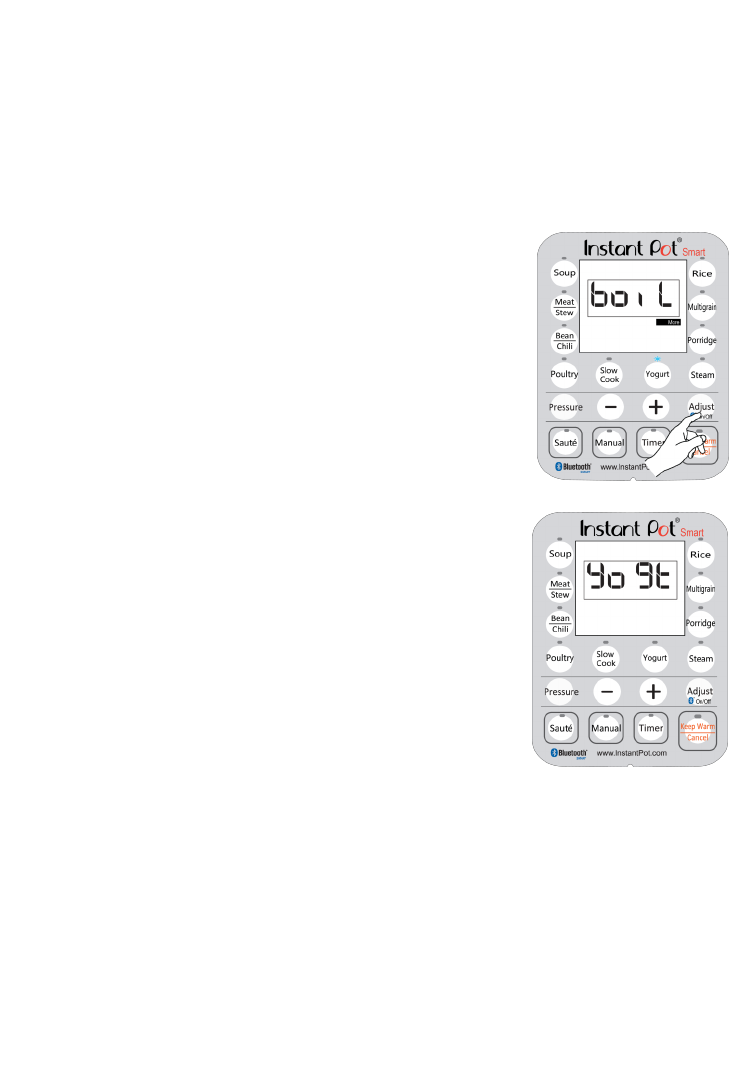
the inner pot to make yogurt, press “Yogurt” then “Adjust” to “More”
mode when you will see the word “boil” on the display. Instant Pot will
then boil the milk to 180° F/83° C. When it’s done, it beeps and displays
“yogt”.
If you use a container or boles to make yogurt, you can steam the milk
by: adding 1 cup of water in the inner pot, pung in the steam rack and
placing your container or boles on top of the rack. Select the “Steam”
funcon and set the me for 1 minute. Once the process is over, use
the “Natural Release” method to release the steam.
The second step aer heang the milk is to let it cool to below 115°
F/46°C, then add an adequate amount of yogurt starter or fresh yogurt.
If you use a container or boles, you can place them in the inner pot
without adding any addional water. Press the “Yogurt” funcon key,
and adjust the me using the “+” and “-“ keys based on the
instrucons of the yogurt starter. The program automacally starts in
10 seconds. When the program completes, Instant Pot beeps, displays
“yogt” and goes to standby state.
The yogurt can be served plain together with other dishes (e.g. curry),
or mixed with honey or jam to make a fruit yogurt.
Jiu Niang, also known as fermented glunous rice, is a sweet and mildly alcoholic delicacy of Asia.
It is highly nutrious and easy to digest, commonly used to make desserts in China, Japan, Korean
and other Asian countries. Glunous rice, also known as scky rice, is used in making Jiu Niang.
Glunous rice contains high concentraon of starch which is converted to sugars during
fermentaon.
1. Soak two cups of glunous rice in cold water for at least 5 hours unl the rice grains can
easily be broken with ngers.
2. Drain the water and wrap the soaked rice with cheese cloth and put it into a steaming
basket. Place the basket on top of the steam rack (trivet) and add 2 cups of water into the
inner pot. Run the “Steam” funcon for 30 minutes. Use Natural Release method.
3. Prepare 1 cup of cold boiled water, (normally at a water-to-dry-rice rao of 1:2), starter yeast
powder, and a glass or ceramic container with lid. Make sure that all tools are clean and free
from bacteria, oil and salt.

20
4. Aer the steamed rice cool down to below 35°C/95°F, mix the cold water and yeast powder
with the rice thoroughly in the container. Make sure that each rice grain is separated, rather
than stuck together. Gently press the rice mixture together and leave a hole in the middle of
the mixture.
5. Add water to the 3rd mark in the inner pot. Lower the container into the inner pot with the
steam rack. Water should submerge about 1cm/0.5in of the boom of the container for even
heat conducon. Make sure to close the lid of the container to avoid excess evaporaon
from the rice.
6. Press the “Yogurt” funcon key and then press the “Adjust” key
twice to “Less” mode for Jiu Niang funcon. The default
fermentaon me is 24 hours. You may need to change this
following the instrucon of the yeast.
7. Jiu Niang will be ready when the program nishes. A well-made
fermented glunous rice has transparent liquid and some small gas
bubbles with an aromac smell of liquor and is very sweet. If there
are some white fungi on surface, this is normal. If it has black fungi,
the rice was contaminated during the process and it should not be
consumed. Avoid running the fermentaon for too long, which
causes the rice to turn sour.
8. When the program completes, Instant Pot beeps, displays “yogt”
and goes to standby state.
In order to get a feel for your Instant Pot before jumping in with your favorite recipe, it’s a great
idea to take it for a test run. This will help you to become familiar with your Instant Pot, make sure
that your unit is working perfectly and also clean the unit of possible residues in the process. This
test run can be accomplished in about 15 minutes. It’s oponal but recommended.
1. Make sure the steam release handle and oat valve are unobstructed and clean and that the
sealing ring is properly seated.
2. Insert the inner pot in the cooker base and add water to the “3”
mark on the inner pot.
3. Close the lid. Make sure that the steam release handle is poinng
to "Sealing" mark on the lid.
4. Press the "Steam" buon, and press the “-“ buon to change the
me to 2 minutes.
5. In 10 seconds, your Instant Pot will go into the preheang cycle
(display showing “On”). Within a few minutes steam will start
coming out for a minute or two unl the Float Valve pops up and
seals the cooker. Within another minute or two the working
pressure will be reached and the countdown mer will begin.
Once the countdown is nished, your Instant Pot will beep and
automacally go into the “Keep Warm” mode.
That’s it. The test is complete. Press the “Keep-Warm/Cancel” buon and/or unplug the unit.
Once the pot cools down, you can open it and are ready to try your favorite recipe.

21
Regular care or maintenance is essenal in ensuring that this product is safe for use. If any of
the following circumstances take place, please stop using the appliance immediately and contact
Instant Pot support team.
Power cord and plug suer from expansion, deformaon, discoloraon, damages, etc.
A poron of power cord or the plug gets hoer than usual.
Electric pressure cooker heats abnormally, eming a burnt smell.
When powered on, there are unusual sounds or vibraons.
If there is dust or dirt on the plug or socket, please remove dust or dirt with a dry brush.
Cauon: please make sure the appliance has cooled down and is unplugged before cleaning.
1. Clean the product aer each use. Wipe the black inner housing rim and slot dry with cloth to
prevent rusng on the exterior pot rim.
2. Remove the lid and take out the inner pot, wash them with detergent, rinse with clear water
and then wipe dry with a so cloth. The stainless steel inner pot is also dishwasher safe.
3. Use water to clean the lid, including the sealing ring (which can be removed), exhaust valve,
an-block shield, and wipe them clean with dry so cloth. Do not take apart the steam
release pipe assembly.
4. Clean the cooker body with clean damp cloth. Do not immerse the cooker into water. Do not
use a wet cloth to clean the pot while the power cord is plugged into the power outlet.
If you experience any problem with the appliance, please DO NOT
return the product to the retail store or online merchant. For
technical assistance and product return informaon, please:
Create a support cket at www.InstantPot.com/support/
Email to support@instantpot.com. You can request support
from your mobile device in “Sengs” -> “Request Support”.
See screenshot on the right.
Or call 1800 828-7280 for Instant Pot customer care team
The cases in the following tables do not always indicate a faulty
cooker. Please examine the cooker carefully before contacng the
support for repair. You can also nd help videos and FAQ on
www.InstantPot.com/faq/

22
Problem Possible Reason Soluon
1
Dicult to close the lid
Sealing ring not installed
properly
Posion the sealing ring
well
Float valve in the popped-up
posion
Press the oat valve lightly
downwards
2
Dicult to open the lid
Pressure exists inside the
cooker
Use the steam release han-
dle to reduce the internal
pressure. Open the lid aer
the pressure is completely
released.
Float valve stuck at the
popped-up posion
Press the oat valve lightly
with a pen or chopsck.
3
Steam leaks from the
side of the lid
No sealing ring Install the sealing ring
Sealing ring damaged Replace the sealing ring
Food debris aached to the
sealing ring
Clean the sealing ring
Lid not closed properly Open then Close the lid
again
4
Steam leaks from oat
valve for over 2 minutes
Food debris on the oat valve
silicone seal
Clean the oat valve sili-
cone seal
Float valve silicone ring worn-
out
Replace the oat valve sili-
cone ring
5
Float valve unable to
rise
Too lile food or water in
inner pot
Add water according to the
recipe
Float valve obstructed by the
lid locking pin
Close the lid completely,
see “Cooking Preparaon”
secon
6
Steam comes out from
exhaust valve non-stop
Steam release handle not in
sealing posion
Turn the release handle to
the sealing posion
Pressure control fails Contact support online
7
Display ashes “Lid” Lid is not at the correct posi-
on for the selected program
Close lid for pressure cook-
ing or open the lid for sau-
téing
8
Display shows “noPr” Working pressure is not
reached during pre-heang
cycle.
If the lid leaks steam,
please see Problems 3, 4, 5
and 6. If there is no steam
leaking and you have frozen
food in the cooker, please
run the current program
again.
9
Display shows “Ovht” Overheang is detected on
the inner pot
Please stop the program
and check if the food at the
boom of the inner pot is
burnt.
Troubleshoong Table

23
10
Display remains blank
aer connecng the
power cord
Bad power connecon or no
power.
Inspect the power cord to
ensure a good connecon,
check the power outlet is
acve.
Cooker’s electrical fuse was
blown
Contact support online
11
All LEDs
ash with
a code
appearing
on screen
C1 code Faulty temperature sensor
(cannot be detected)
Contact support online
C2 code Faulty temperature sensor
(short circuited)
Contact support online
C5 code Temperature is too high be-
cause inner pot is not placed
Put in the inner pot properly
Temperature is too high be-
cause there is no water in
inner pot
Put food and water in the
inner pot
C6 code Faulty pressure sensor Contact support online
12
Rice half cooked or too
hard
Too lile water Adjust dry-rice and water
rao according to recipe
Cover opened prematurely Aer cooking cycle com-
pletes, leave the cover on
for 5 more minutes
13 Rice too so Too much water Adjust dry-rice and water
rao according to recipe
14
Intermient beeping
aer the cooker starts
for a while
Indicaon of overheang.
The cooker has reduced the
heang temperature, and
may not reach cooking pres-
sure
Possibly starch deposits at
the boom of the inner pot,
which have clogged heat
dissipaon. Stop the cooker
and inspect the boom of
the inner pot
Occasional cking or
light cracking sound
The normal sound of power
switching and expanding
pressure board in changing
temperature
Nothing to be worried about
15
Wet inner pot boom. Wipe inner pot boom dry
before cooking
Troubleshoong Table (Cont… )
Problem Possible Reason Soluon

24
Instant Pot Company (the “IPC”) warrants this appliance to be free from defects in workmanship
and material, under normal residenal use, for a period of one (1) year from the date of purchase.
This warranty extends only to the original purchaser and use in USA and Canada. A purchase
receipt, purchase order number or other proof of date of original purchase is required before
warranty service is performed. IPC’s obligaon under this warranty is limited to replacing or
repairing, or assisng in the repair at IPC’s opon. All repairs for which warranty claims are made
must be pre-authorized by IPC.
This appliance comes equipped with many safety features. Any aempt to interfere with their
operaon may result in serious injury/damages and void this warranty. No warranty service will be
provided to any appliance that has been tampered with, unless directed by an IPC representave.
This warranty does not cover normal wear of parts or damage resulng from negligent use or
misuse of the appliance, use contrary to the operang instrucons, failure to provide reasonable
and necessary maintenance, or disassembly, repair or alteraon by anyone unless directed by an
Instant Pot Representave. This warranty does not cover units that are used outside of US and
Canada. Further, the warranty does not cover damage resulng from Acts of God, such as re,
ood, hurricanes and tornadoes. IPC is not responsible for shipping cost for warranty service.
Limitaon and Exclusions
To the extent permied by applicable law, the liability of IPC, if any, for any allegedly defecve
appliance or part shall be limited to repair or replacement of the appliance or part and shall not
exceed the purchase price of a comparable replacement appliance or part. THE PROVISIONS OF
THIS WARRANTY ARE YOUR SOLE AND EXCLUSIVE REMEDY WITH RESPECT TO THE PRODUCT(S)
COVERED BY THIS WARRANTY. ALL IMPLIED WARRANTIES WITH RESPECT TO THE APPLIANCES(S)
INCLUDING, BUT NOT LIMITED TO, IMPLIED WARRANTIES OF MERCHANTABILITY AND FITNESS FOR
A PARTICULAR PURPOSE, ARE HEREBY EXPRESSLY EXCLUDED.
IPC is not responsible or liable for indirect, special or consequenal damages arising out of or in
connecon with the use or performance of the appliance or damages with respect to any
economic loss, loss of property, loss of revenues or prots, loss of enjoyment or use, costs of
removal, installaon or other consequenal damages of whatsoever nature. Some provinces/
states do not allow the exclusion or limitaon of incidental or consequenal damages.
Accordingly, the above limitaon may not apply to you.
You the buyer may have other rights and remedies under your state's or province’s applicable
laws, which are in addion to any right or remedy which may be available under this limited
warranty.
Warranty Service
If the appliance should become defecve within the warranty period, please contact Instant Pot
Customer Service team by
Create a support cket at www.InstantPot.com/support/
Email to support@instantpot.com
Or call 1800 828-7280 for Instant Pot customer service representave
To facilitate speedy service, please provide:
Your name, email address or phone number
A copy of the original purchase receipt with order number, the model and serial number
Descripon of the product defect, pictures or video if possible

FCC Cauon: The user is cauoned that changes or modicaons not expressly approved by the
party responsible for compliance could void the user's authority to operate the equipment.
NOTE: This equipment has been tested and found to comply with the limits for a Class B digital
device, pursuant to Part 15 of the FCC Rules. These limits are designed to provide reasonable
protecon against harmful interference in a residenal installaon. This equipment generates,
uses and can radiate radio frequency energy and, if not installed and used in accordance with the
instrucons, may cause harmful interference to radio communicaons. However, there is no
guarantee that interference will not occur in a parcular installaon.
If this equipment does cause harmful interference to radio or television recepon, which can
be determined by turning the equipment o and on, the user is encouraged to try to correct the
interference by one or more of the following measures:
Reorient or relocate the receiving antenna.
Increase the separaon between the equipment and receiver.
Connect the equipment into an outlet on a circuit dierent from that to which the receiver
is connected.
Consult the dealer or an experienced radio/TV technician for help.
FCC Radiaon Exposure Statement:
This equipment complies with FCC radiaon exposure limits set forth for an uncontrolled
environment. This equipment should be installed and operated with a minimum distance of 20cm
between the radiator and your body. This transmier must not be co-located or operang in
conjuncon with any other antenna or transmier.
Standards: UL 1026, Fih Edion
CAN/CSA-C22.2 No. 1335.1-93 No.1335.2.15-93
Instant Pot Company
11 – 300 Earl Grey Dr., #383 Telephone: +1 800 828-7280
Oawa, Ontario Fax: +1 (613) 800-0726
Canada K2T 1C1 Web: hp://www.InstantPot.com
E-mail: support@instantpot.com
© 2014 Instant Pot Company, All Rights Reserved.
All contents in this document have been checked carefully. Instant Pot Company
reserves the right to interpret any prinng mistake or misunderstanding of content.
For any technical improvement or change in appearance or name plate, changes
shall be placed in the revised manual without further noce. In case of changes in ap-
pearance and color, please refer to the actual product for detailed informaon.
Apple, iPhone, iPad, iPod, iTunes and App Store are trademarks owned by Apple
Inc. Google, Android, Nexus and Google Play are trademarks of Google Inc. SAMSUNG
and Galaxy S are trademarks of SAMSUNG Group and Samsung Electronics. The Blue-
tooth® word mark and logos are registered trademarks owned by Bluetooth SIG, Inc. and
any use of such marks by Ace Sensor Inc. is under license. Other trademarks and trade
names are those of their respecve owners.