MEILOON IDS3TX Powered Speaker with Wireless Subwoofer for iPhone/iPod User Manual manual part 1
Meiloon Industrial Co., Ltd. Powered Speaker with Wireless Subwoofer for iPhone/iPod manual part 1
MEILOON >
Contents
- 1. manual part 1
- 2. manual part 2
- 3. manual part 3
manual part 1
OWNER’S MANUAL / SAFETY INSTRUCTIONS / COMPLIANCE INFORMATION A Boston P.O.P. Product Make it your own...
i-DS3
Powered Speaker with Wireless Subwoofer for iPhone/iPod
Powerful performance sound from your iPhone or iPod
Español
Parlante de potencia con
subwoofer inalámbrico para
iPhone/iPod
Sonido con desempeño de gran potencia
de su iPhone o iPod
MANUAL DEL PROPIETARIO/
INSTRUCCIONES DE SEGURIDAD/
INFORMACIÓN DE CUMPLIMIENTO
Français
Haut-parleur amplié avec caisson
de basse sans l pour iPhone/iPod
Un son haute performance pour votre
iPhone ou iPod
MANUEL DE L’UTILISATEUR/CONSIGNES
DE SÉCURITÉ/INFORMATIONS SUR LA
CONFORMITÉ
Italiano
Altoparlante dotato di subwoofer
senza li per iPhone/iPod
Potenti prestazioni sonore dal vostro iPhone
o iPod.
MANUALE DELL'UTENTE/ISTRUZIONI
DI SICUREZZA/INFORMAZIONI SULLA
CONFORMITÀ
Svenska
Eekthögtalare med trådlös
subwoofer för iPhone/iPod
Kraftfullt kvalitetsljud från din iPhone eller
iPod
BRUKSANVISNING/
SÄKERHETSANVISNINGAR/INFORMATION
OM ÖVERENSSTÄMMELSE
Deutsch
Elektrische Lautsprecher mit
drahtlosem Subwoofer für iPhone/
iPod
Kraftvolle Soundleistung von Ihrem iPhone
oder iPod
BEDIENUNGSANLEITUNG/
SICHERHEITSHINWEISE/
KONFORMITÄTSERKLÄRUNG
142-003544-0_i-DS3 Manual A4.indd 1 11/3/08 2:13:18 PM

2
E
N
G
L
I
S
H
This symbol found on the apparatus
indicates that the apparatus must
be placed in a separate collection
facility for electronic waste and not
disposed with household waste.
This symbol found on the apparatus
indicates double insulation.
Warning! To reduce the risk of fire or
electrical shock, do not expose this
apparatus to rain or moisture.
This symbol found on the apparatus
indicates hazards arising from
dangerous voltages.
This symbol found on the apparatus
indicates the user should read all
safety statements found in the user
manual.
American Users:
Note: This equipment has been tested and found
to comply with the limits for a Class B digital
device, pursuant to Part 15 of the FCC Rules.
These limits are designed to provide reasonable
protection against harmful interference in a
residential installation. This equipment generates,
uses and can radiate radio frequency energy
and, if not installed and used in accordance with
the instructions, may cause harmful interference
to radio communications. However, there is no
guarantee that interference will not occur in a
particular installation. If this equipment does
cause harmful interference to radio or television
reception, which can be determined by turning
the equipment off and on, the user is encouraged
to try to correct the interference by one or more
of the following measures:
• Reorientorrelocatethereceivingantenna.
• Increasetheseparationbetweenthe
equipment and receiver.
• Connecttheequipmentintoanoutleton
a circuit different from that to which the
receiver is connected.
• Consultthedealeroranexperiencedradio/
TV technician for help.
Caution: Unauthorized changes or
modifications to the receiver could void the
user’s authority to operate the equipment.
This equipment complies with FCC RF radiation
exposure limits set forth for an uncontrolled
environment. It should be installed and operated
with a minimum distance of 20 centimeters
between the radiator and your body.
The transmitter must be used exclusively for
fixed, point-to-point operations. It must not be
co-located or operated in conjunction with any
other antenna or transmitter.
IMPORTANT SAFETY INSTRUCTIONS
1. Read these instructions.
2. Keep these instructions.
3. Heed all warnings.
4. Follow all instructions.
5. Do not use this apparatus near water.
6. Clean only with dry cloth.
7. Do not block any ventilation openings.
Install in accordance with the
manufacturer’s instructions.
8. Do not install near any heat sources such
as radiators, heat registers, stoves, or other
apparatus (including amplifiers) that
produce heat.
9. Do not defeat the safety purpose of
the polarized or grounding type plug.
A polarized plug has two blades with
one wider than the other. A grounding-
type plug has two blades and a third
grounding prong. The wide blade or the
third prong is provided for your safety.
If the provided plug does not fit into
your outlet, consult an electrician for
replacement of the obsolete outlet.
10. Protect the power cord from being
walked on or pinched particularly at
plugs, convenience receptacles, and the
point where they exit from the apparatus.
11. Onlyuseattachments/accessories
specified by the manufacturer.
12. Unplug this apparatus during lightning
storms or when unused for long periods
of time.
13. Refer all servicing to qualified service
personnel. Servicing is required when
the apparatus has been damaged in any
way, such as power-supply cord or plug
is damaged, liquid has been spilled or
objects have fallen into the apparatus, the
apparatus has been exposed to rain or
moisture, does not operate normally, or
has been dropped.
14. Maintain a minimum distance of 2”
(50mm) around the front, rear, and sides
of the apparatus for sufficient ventilation.
The ventilation should not be impeded
by covering the ventilation openings or
placing on or around the apparatus items
such as newspapers, table-cloths, curtains,
etc.
15. No open flame sources, such as lighted
candles, should be placed on the
apparatus.
16. The apparatus shall not be exposed to
dripping or splashing. No objects filled
with liquids, such as vases, shall be placed
on the apparatus.
17. Either the power inlet connector on the
rear of the apparatus or the power plug
at the wall must remain accessible, to
be able to disconnect power from the
apparatus.
18. To completely disconnect this apparatus
from the AC Mains, disconnect the power
supply cord plug from the AC receptacle.
19. The mains plug of the power supply cord
`shall remain readily operable.
Canadian Users
This class B digital apparatus complies with
Canadian ICES-003.
Cet appareil numérique de classe B est conforme
á la norme NMB-003 du Canada.
Operation is subject to the following two
conditions:
(1) this device may not cause interference, and
(2) this device must accept any interference,
including interference that may cause undesired
operation of the device.
L’utilisation de ce dispositif est autorisée
seulement aux deux conditions suivantes:
(1) il ne doit pas produire de brouillage, et
(2) l’utilisateur du dispositif doit être prêt à
accepter tout brouillage radioélectrique reçu,
même si ce brouillage est susceptible de
compromettre le fonctionnement du dispositif.
To prevent radio interference to the licensed
service, this device is intended to be operated
indoors and away from windows to provide
maximum shielding. Equipment that is installed
outdoors is subject to licensing.
Pour empêcher que cet appareil cause du
brouillage au service faisant l’objet d’une licence,
il doit être utilisé à l’intérieur et loin des fenêtres
afin de fournir un écran de blindage maximal. Le
matériel doit faire l’objet d’une licence s’il est
installé à l’extérieur.
European Users
RLAN - Radio Local Area Network Equipment
AT CZ FI IS LT PT SE FR
BE DK DE IE MT SK CH IT
EE GR LV NL SI TR LU
CY HU PL ES GB NO
The use of this equipment requires a license in RO.
This equipment may only be used indoors in BG, FR.
This equipment may only be used in one’s own premises in IT.
This equipment is for private use only in LU.
Operation is not allowed within a radius of 20 km from the centre of Ny-Ålesund in NO.
Hereby, Boston Acoustics, Inc. 300 Jubilee Drive, Peabody, MA 01960 USA, declares that this i-DS3 is in
compliancewiththeessentialrequirementsandotherrelevantprovisionsofDirective1999/5/EC.A
copy of the Declaration of Conformity (DOC) may be obtained from:
Oliver Kriete
Boston Acoustics, Division of D&M Europe B.V.
Beemdstraat 11
5653 MA Eindhoven
The Netherlands
142-003544-0_i-DS3 Manual A4.indd 2 11/3/08 2:13:19 PM

3
E
N
G
L
I
S
H
Introduction
Thank you for choosing Boston Acoustics and congratulations on your purchase of the i-DS3poweredspeaker/
subwoofer system. If you own other Boston products, the outstanding audio performance and ease-of-use of the
i-DS3 should come as no surprise. If you’re new to Boston, welcome – we think you’ve made a great choice. The i-DS3
combines a high performance amplified speaker system with a powerful amplified subwoofer. Simply put, the i-DS3 lets
your iPhone or iPod deliver unsurpassed sound. The compact main speaker system delivers room filling sound thanks to
special stereo separation enhancing electronics. The subwoofer pumps out powerful bass and can be placed anywhere
in the room thanks to its wireless connection.
Features
• IntegrateduniversaliPhone/iPoddock.ControlsandchargesalldockableiPhone/iPodmodels.
• 100Wattstotalsystempowerforoutstandingaudioperformance.
• Dualhighperformancemidrangedriversanddualhighperformancetweeters.Powerful6”woofer.
• Intuitive,easytousecontrols
• RemotecontrolputsbasiciPodcontrolfunctionsatyourngertips.
• Playwirelessly!Wirelesssubwoofercanbeplacedanywhereinyourroom!
• BassTrac®audioprocessingforcleanbassatalllisteninglevels.
• PlayiPodvideosonyourTV!S-VideoandCompositeVideoOutputfromallvideo-capableiPhone/iPodmodels.
• Auxiliaryaudioinputforconnectingotheraudiodevices.
• PlayinColor!Customizeyourmainspeakerwithoptionalinterchangeablemetalgrilles.
142-003544-0_i-DS3 Manual A4.indd 3 11/3/08 2:13:19 PM
4
E
N
G
L
I
S
H
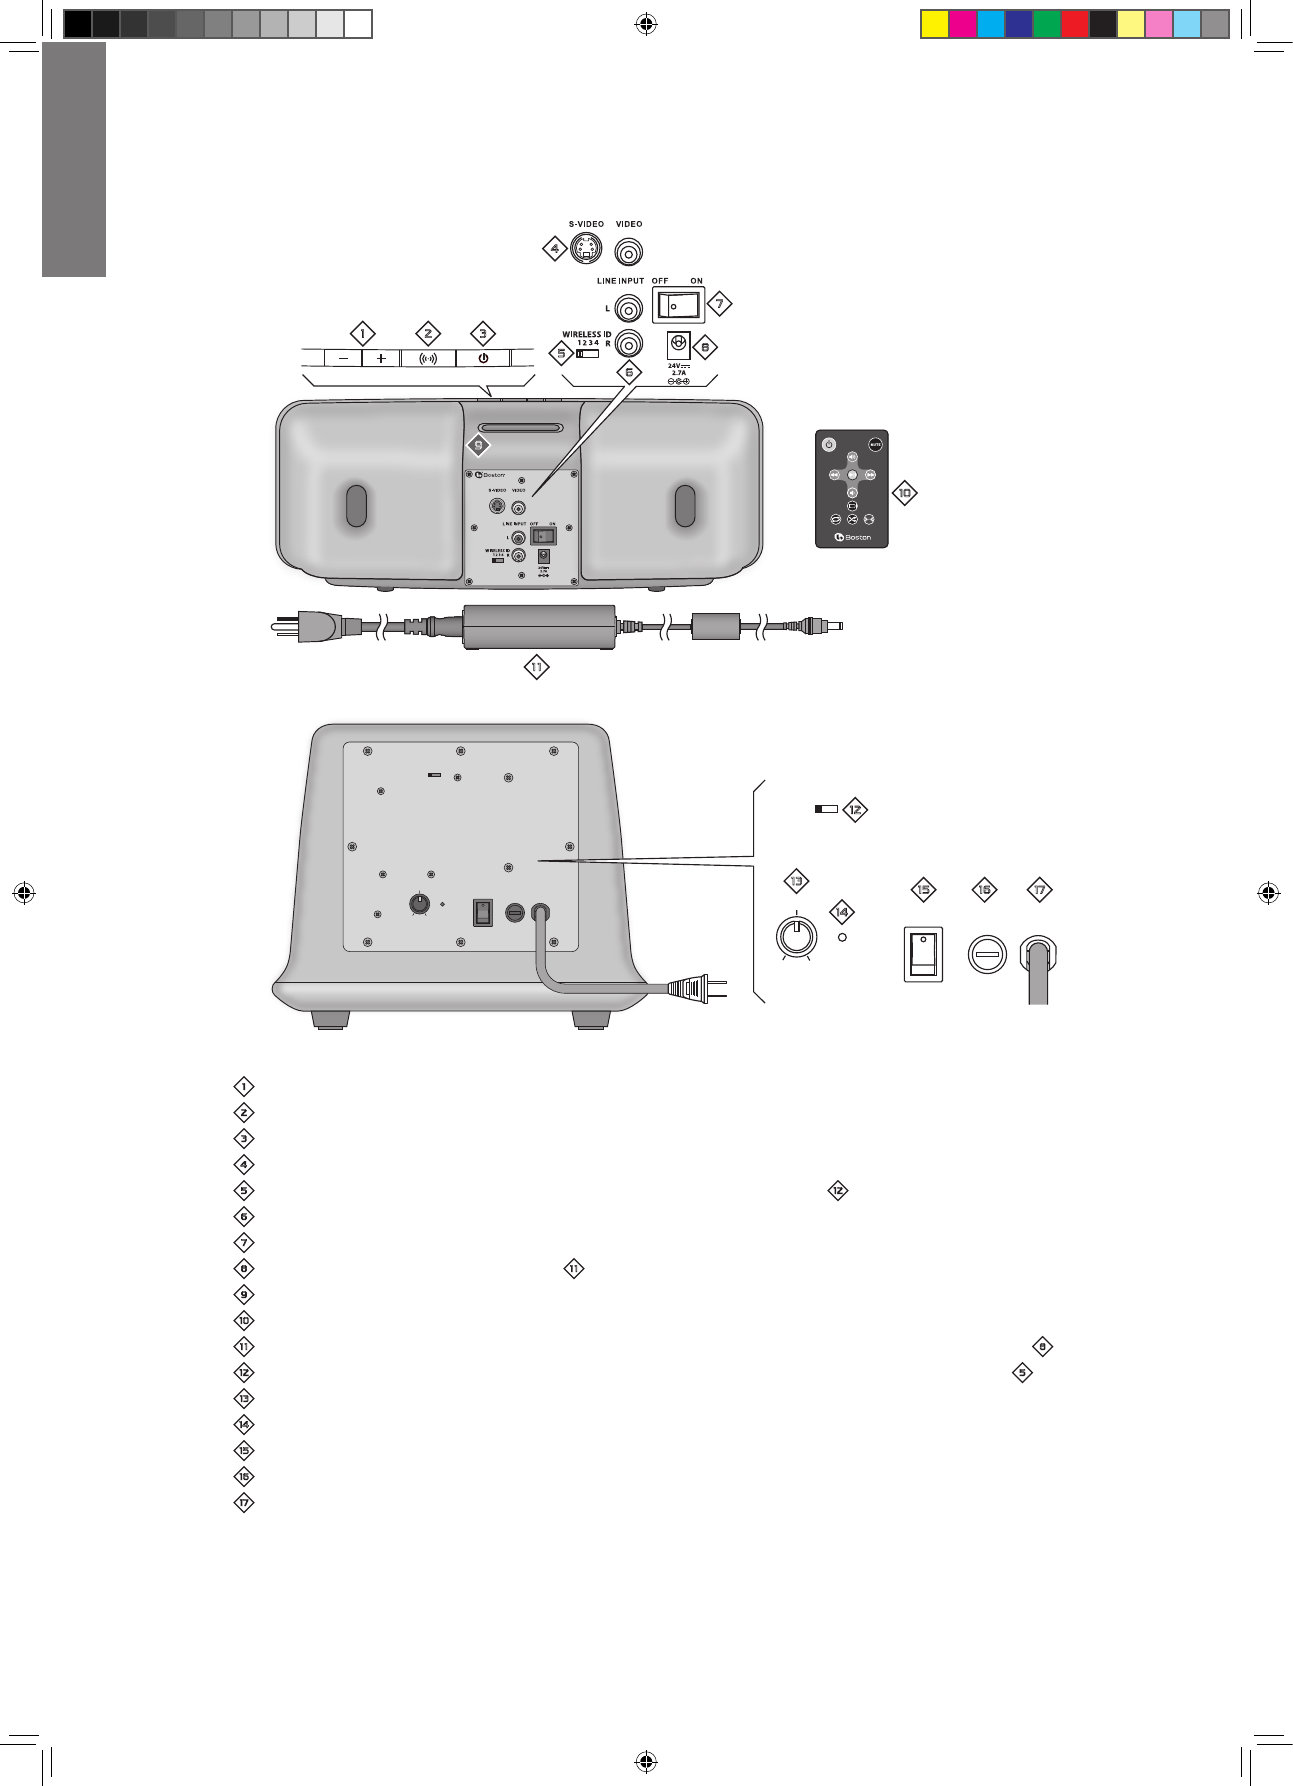
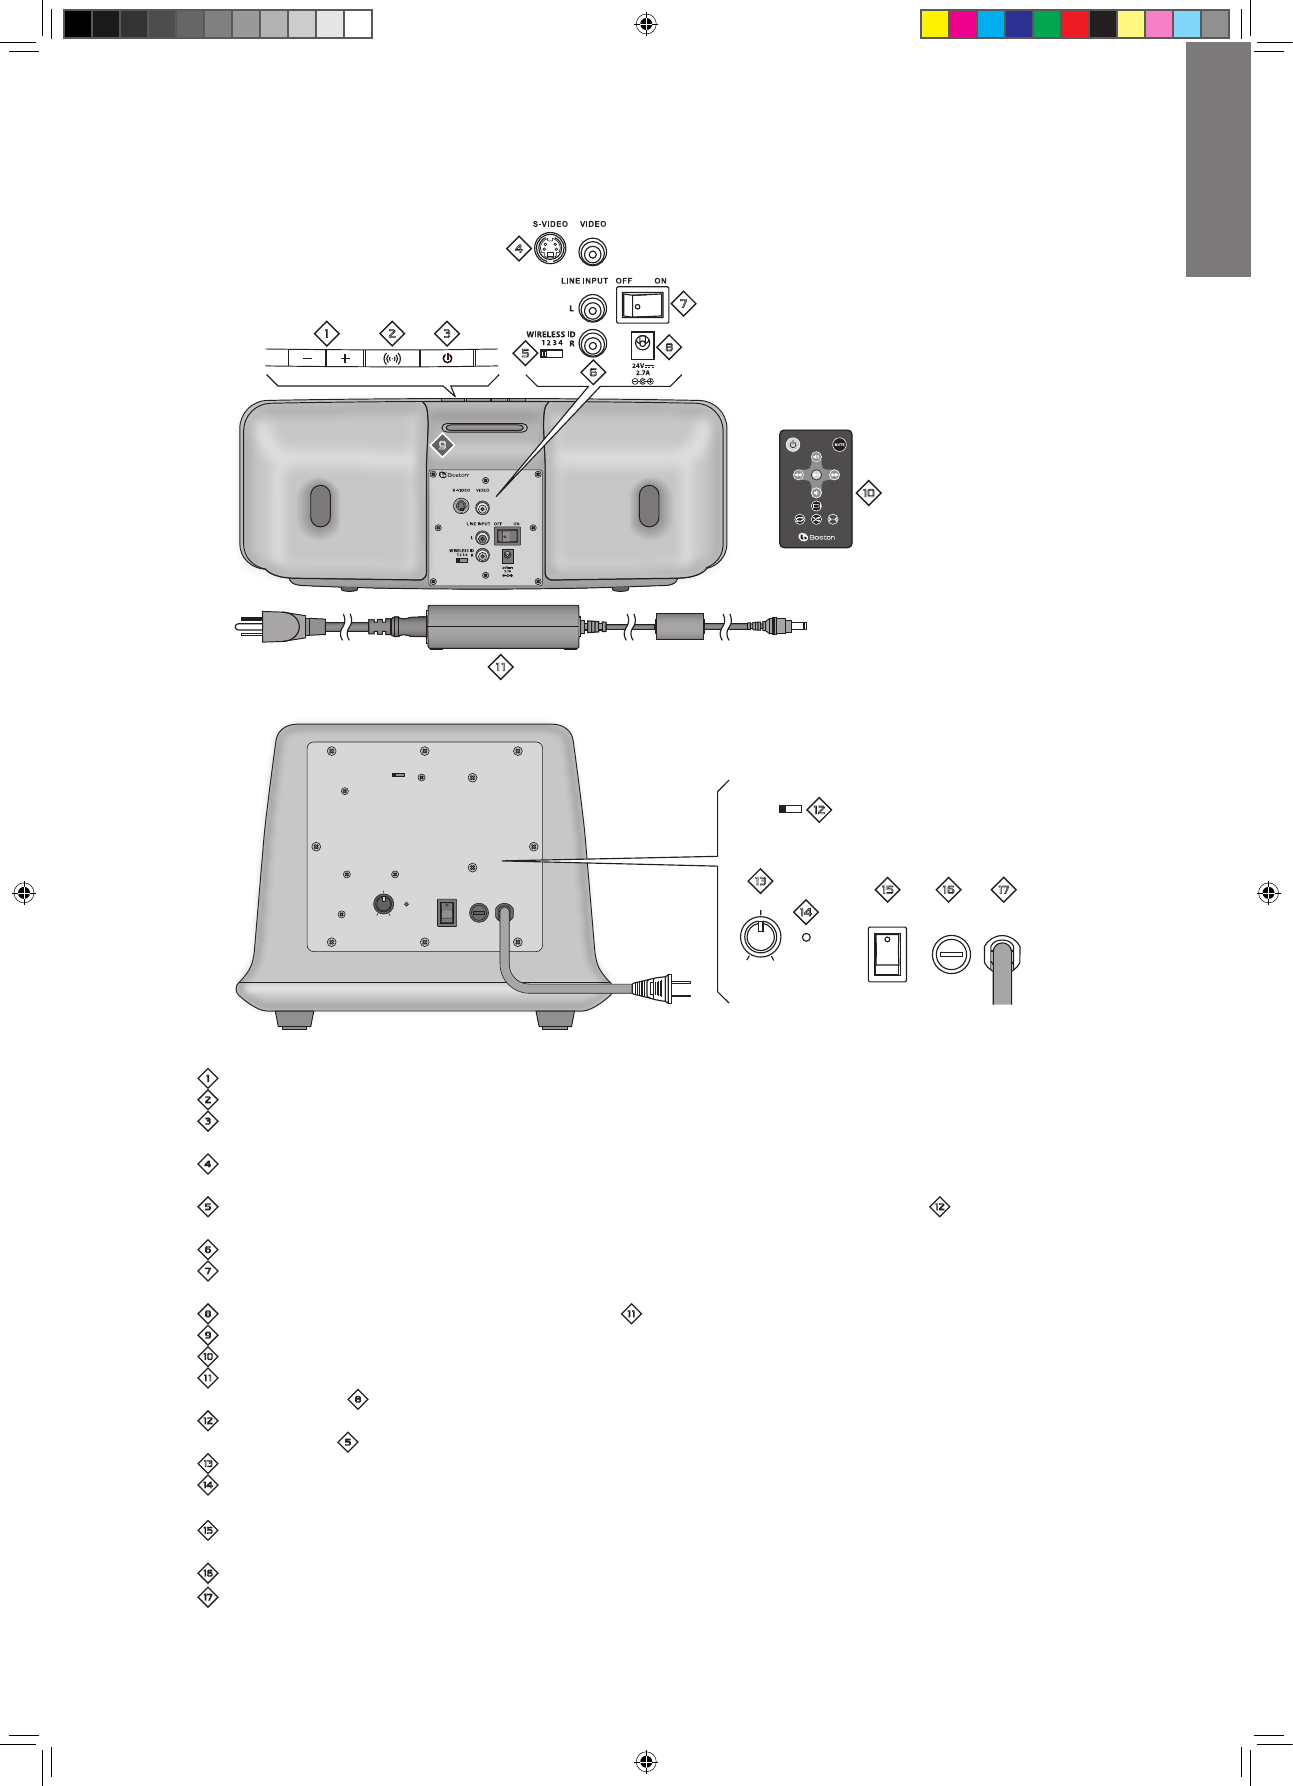
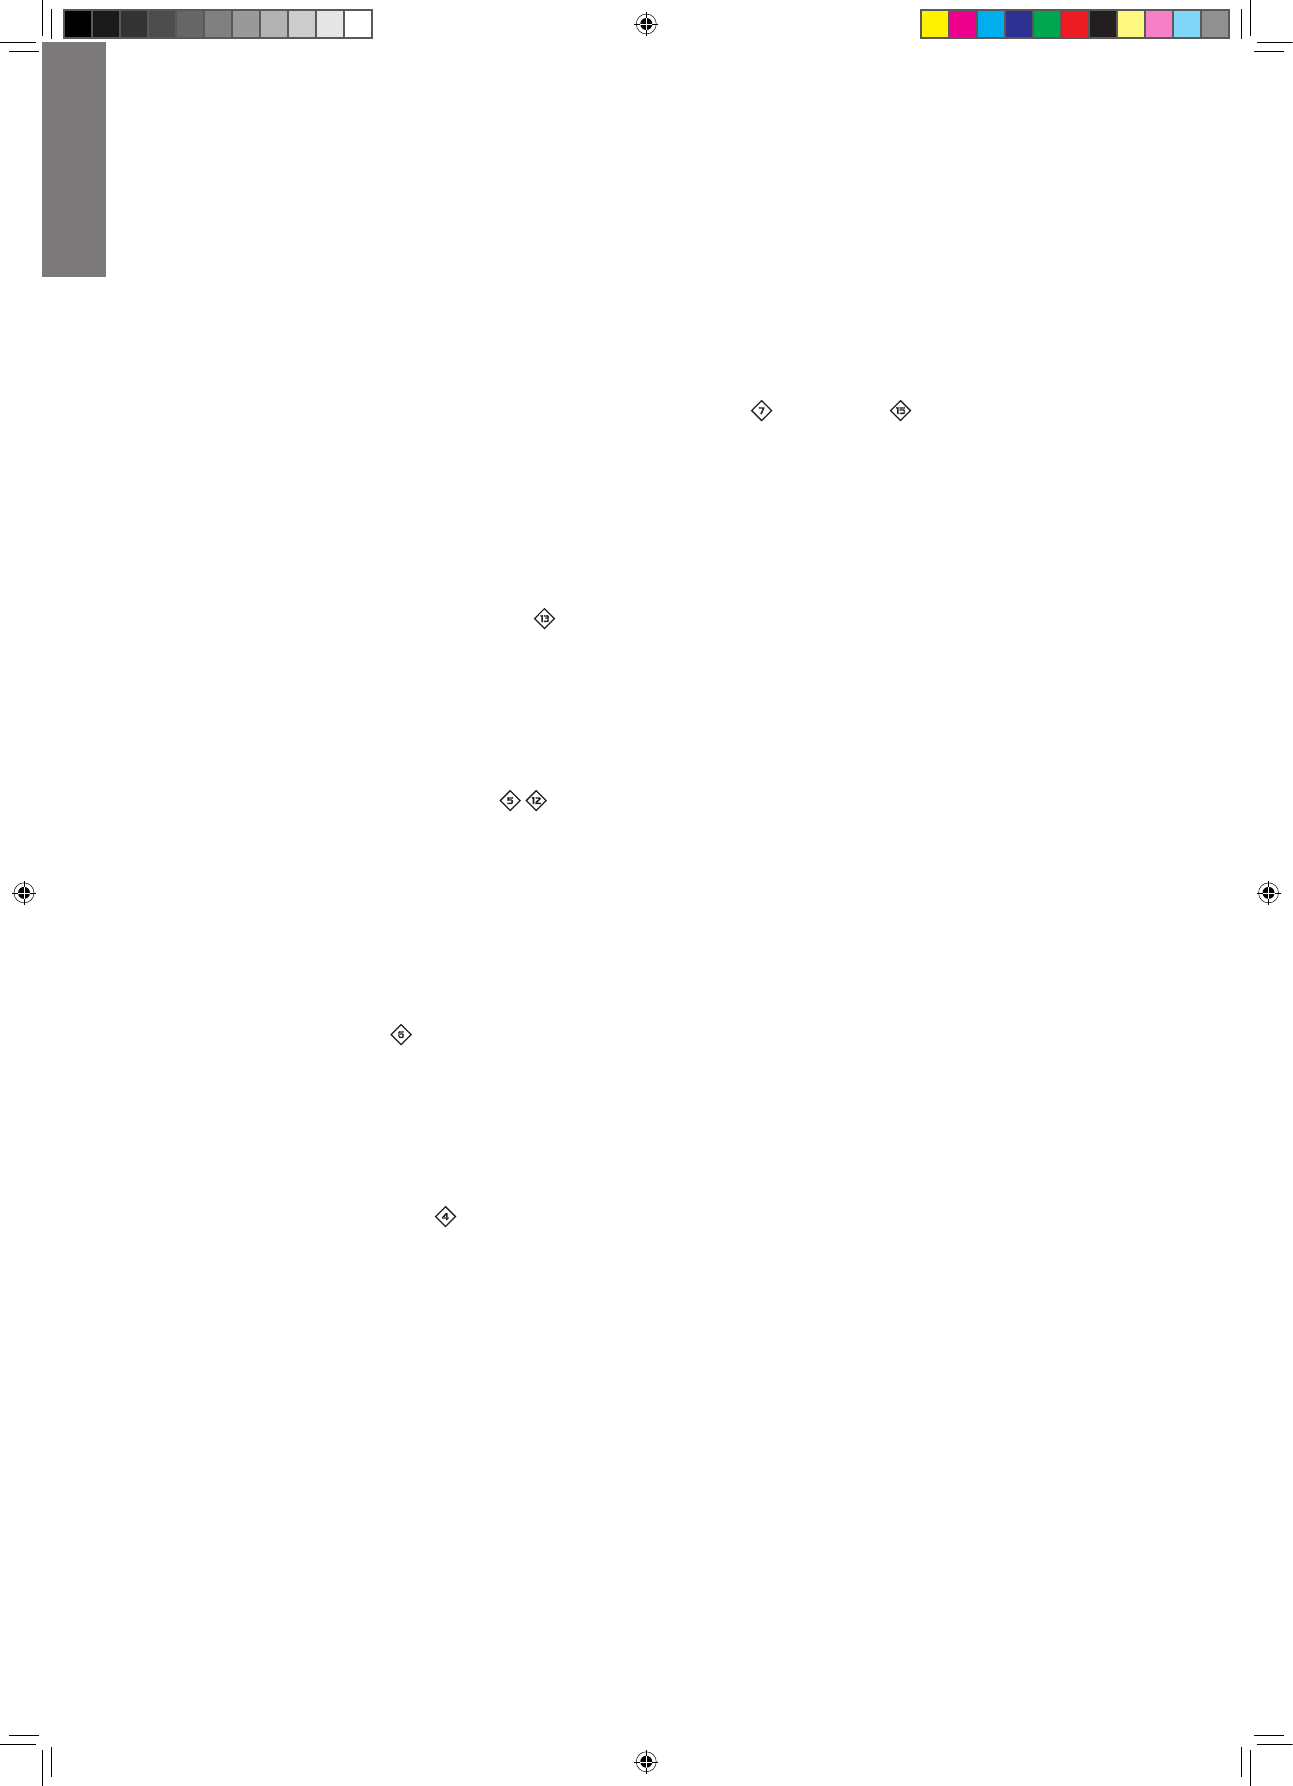
The Parts of the i-DS3
1 Volume Up and Down Buttons
2
Wide Stereo Button – Increase stereo separation. Lights orange when active.
3Power/StandbyButton–Lightsbluewhenmainspeakerisactive;blinkswhenthesoundismuted.
4VideoOutputs–CompositeandS-videooutputsletyouwatchvideoprogramsstoredonyouriPhone/iPodonaTV.
5 Wireless ID Switch – Selects the “channel” for the wireless subwoofer signal. Set = to the same channel.
6 Line Inputs – Let you connect other sources, such as a portable CD player to the i-DS3.
7 Power Switch – Used to turn the main speaker off when it won’t be used for an extended period of time.
8 Power Input – Connect the power supply - here.
9iPhone/iPoddock
0
Remote Control
- Power Supply – Provides power to the main speaker. Plug it into the wall and connect it to the power input 8.
= Wireless ID Switch – Selects the “channel” for the wireless Subwoofer signal. Set it to the same channel as 5.
q Volume – Adjusts the volume of the subwoofer to balance with the main speakers.
w Status Indicator – Lights red when the subwoofer is active and green when it is in standby mode.
e Power Switch – Used to turn the subwoofer off when it won’t be used for an extended period of time.
r Power Fuse – Protects the subwoofer.
t Power Cord – Plug it into an AC outlet.
WIRELESS ID
4321
VOLUME
POWER FUSE
T1A/250V AC120V/60HZ
MIN MAX
i-DS3
WIRELESS ID
4321
VOLUME
POWER FUSE
T1A/250V AC120V/60HZ
MIN MAX
1 2 3
4
5
7
68
=
-
0
9
q
we r t
142-003544-0_i-DS3 Manual A4.indd 4 11/3/08 2:13:21 PM
5
E
N
G
L
I
S
H
Unpacking and Setting Up i-DS3
Carefully unpack the i-DS3 components. If there is any sign of damage from transit, report it immediately to your dealer
and/ordeliveryservice.Keeptheshippingcartonandpackingmaterialsforfutureuse.Besuretokeepyourpurchase
receipt in a safe place, as it may be required for warranty purposes.
In the box you should find the main speaker, the main speaker power supply and power cord, the powered subwoofer,
theremotecontrolandseveniPhone/iPoddockadapters.
Placement
The i-DS3 will sound great just about anywhere. If you want to hear a traditional stereo image you should position
the main speaker so it faces your typical listening location. The subwoofer can be placed anywhere. It gets its signal
wirelessly, you don’t need to worry about connections. You just need an AC outlet. Corner placement can help reinforce
bass output.
Avoid placing the i-DS3 components where they will be in direct sunlight.
Power Connection
The main speaker has an external power supply -. Connect its power cord to a wall outlet. Connect the power output
cord to the connector in the back of the main speaker labeled DC 24V 8. Connect the subwoofer power cord t
directly to a wall power outlet.
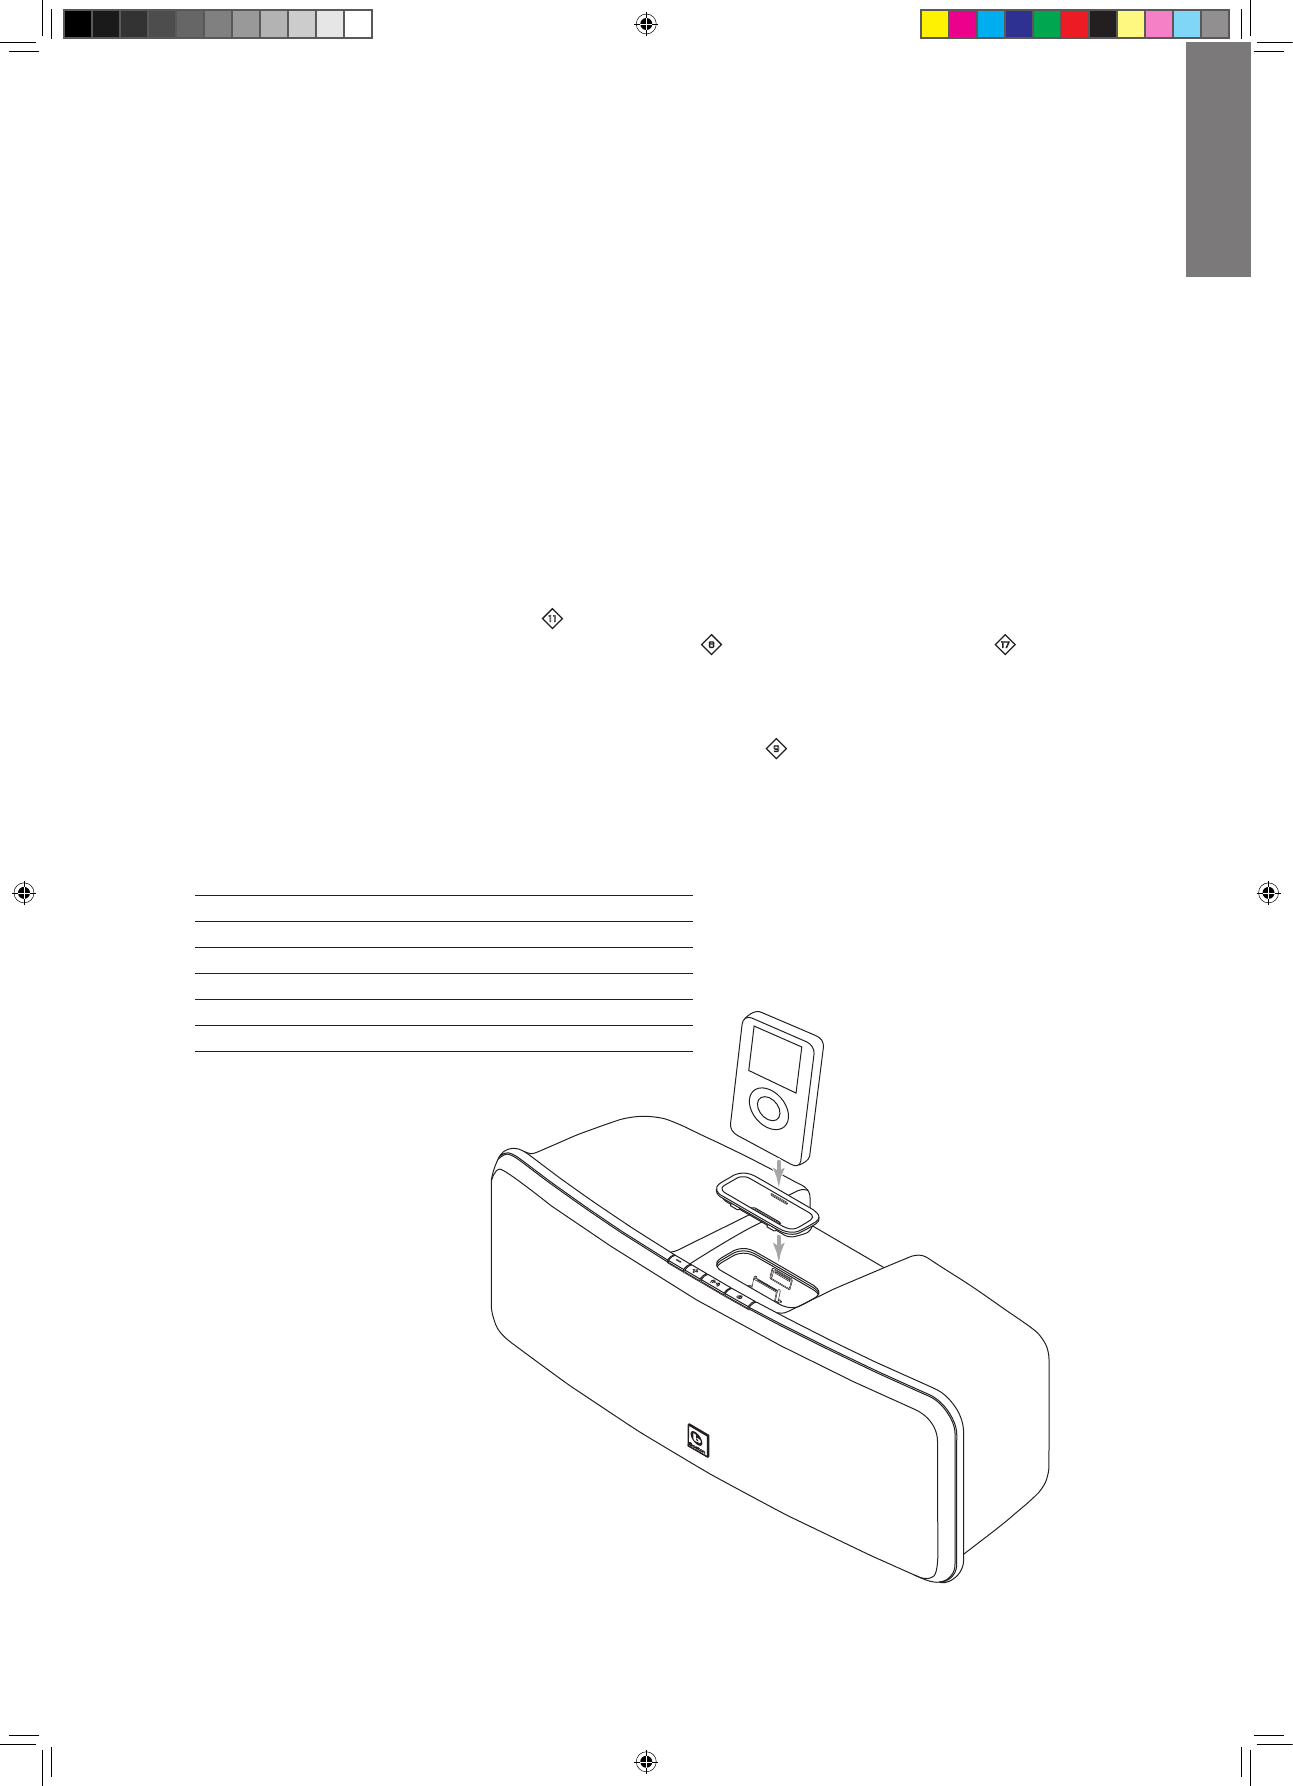
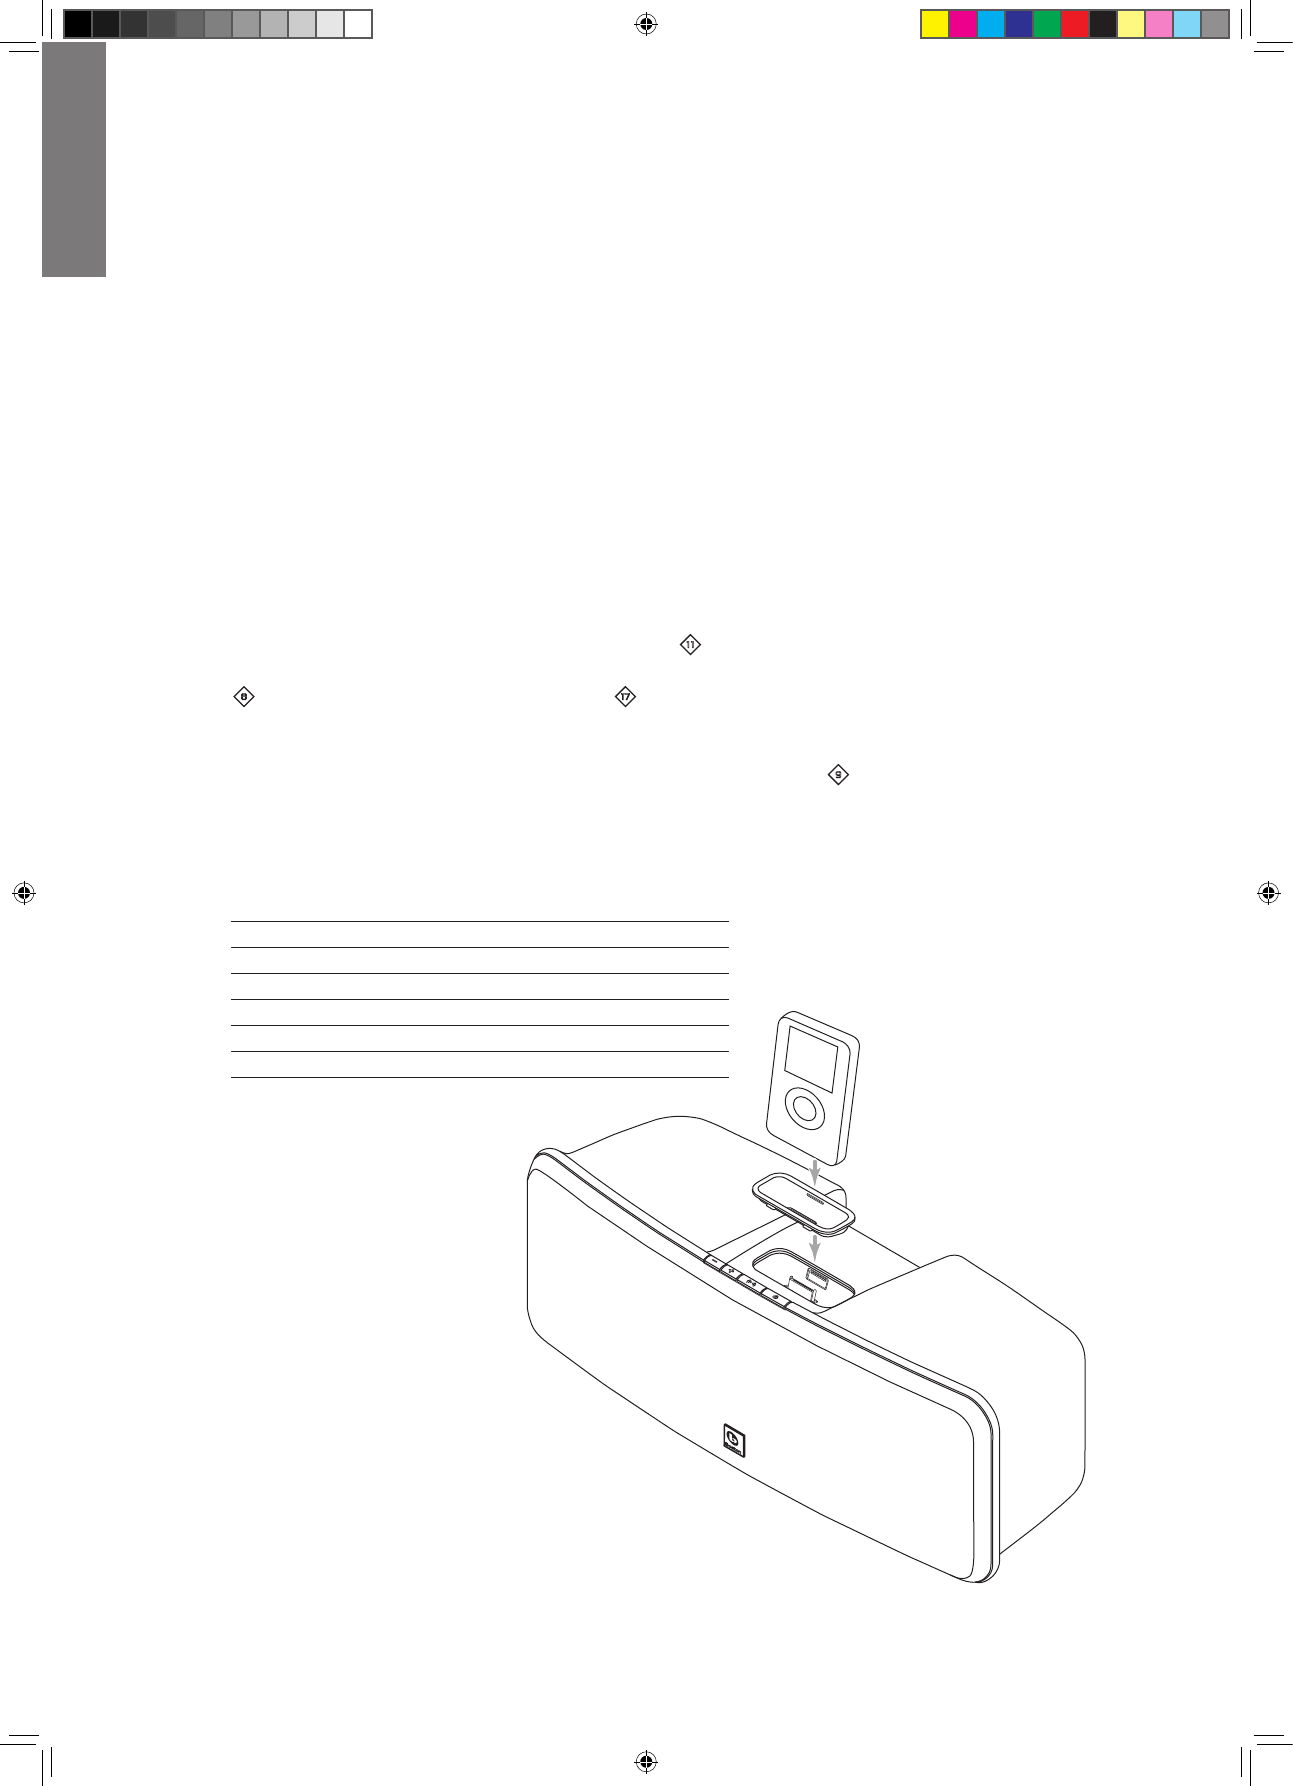
Docking Your iPod
The i-DS3 is supplied with seven docking adapters. These fit in the docking well 9 in the top of the i-DS3 to support
variousiPhone/iPodmodels.ThetablebelowliststheiPhone/iPodmodelsandthedockingadapterstousewiththem.
The number of the docking adapter is molded into the back of the part. Place the appropriate adapter in the docking
wellandplugyouriPhone/iPodintothedock.
Docking Adapter
iPod Model (Capacity) Adapter Number
iPodnano(2/4GB) 8
5G and U2 iPod (30GB with video), iPod classic (80GB) 9
5GiPodwithvideo(60GB/80GB),iPodclassic(160GB) 10
iPodnano-2ndgeneration(2/4/8GB) 11
iPhone (3G) 12
iPodnano-3rdgeneration(4/8GB) 13
iPod touch 8GB, 16GB and 32GB 14
Docking adapter
142-003544-0_i-DS3 Manual A4.indd 5 11/3/08 2:13:21 PM
6
E
N
G
L
I
S
H
Using i-DS3
Getting Started
Once your i-DS3 is set up and plugged in, turn on the power switches on the back of the main speaker 7 and the
subwoofer w. Turn the subwoofer volume control = up about half way. (You may want to adjust this later, but use this
setting to start.)
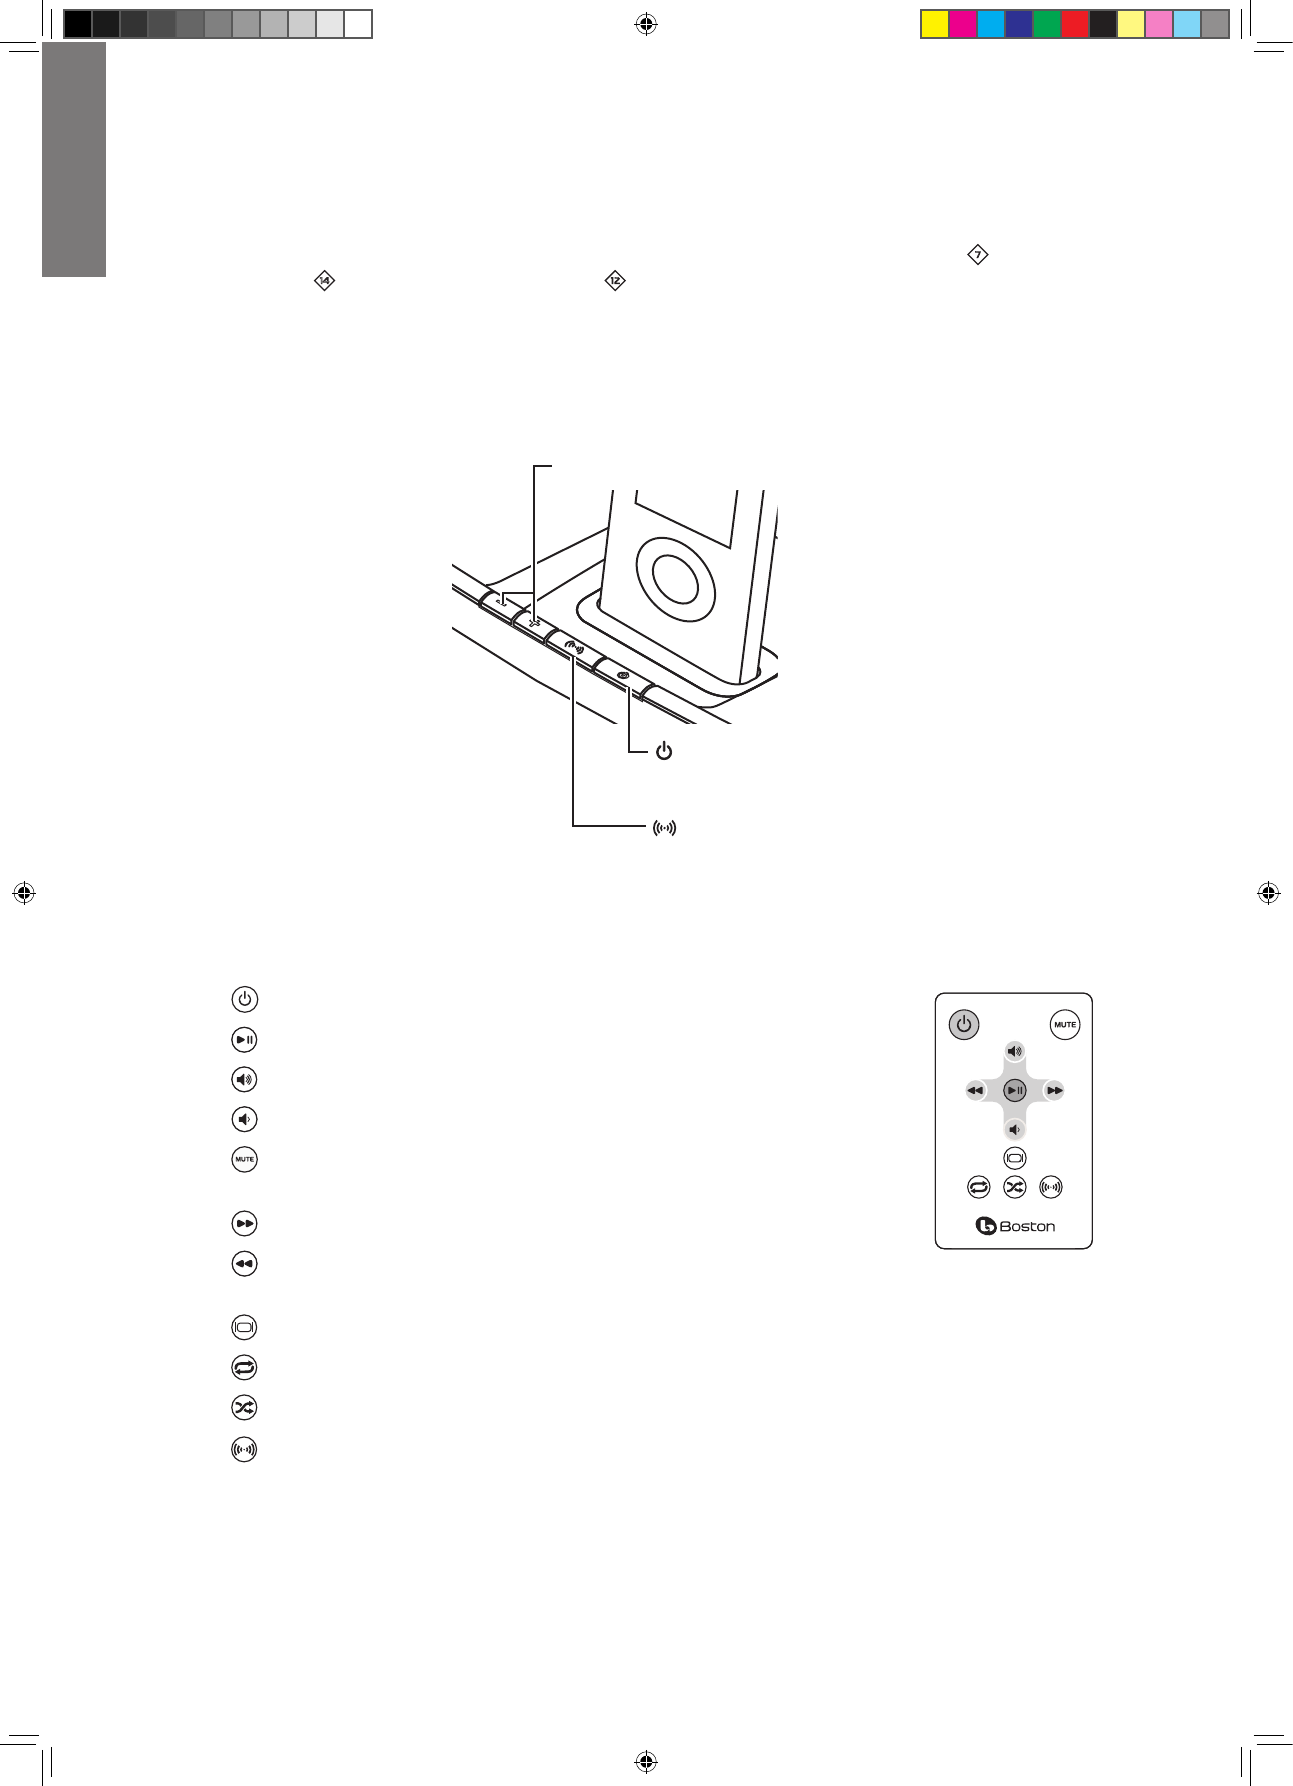
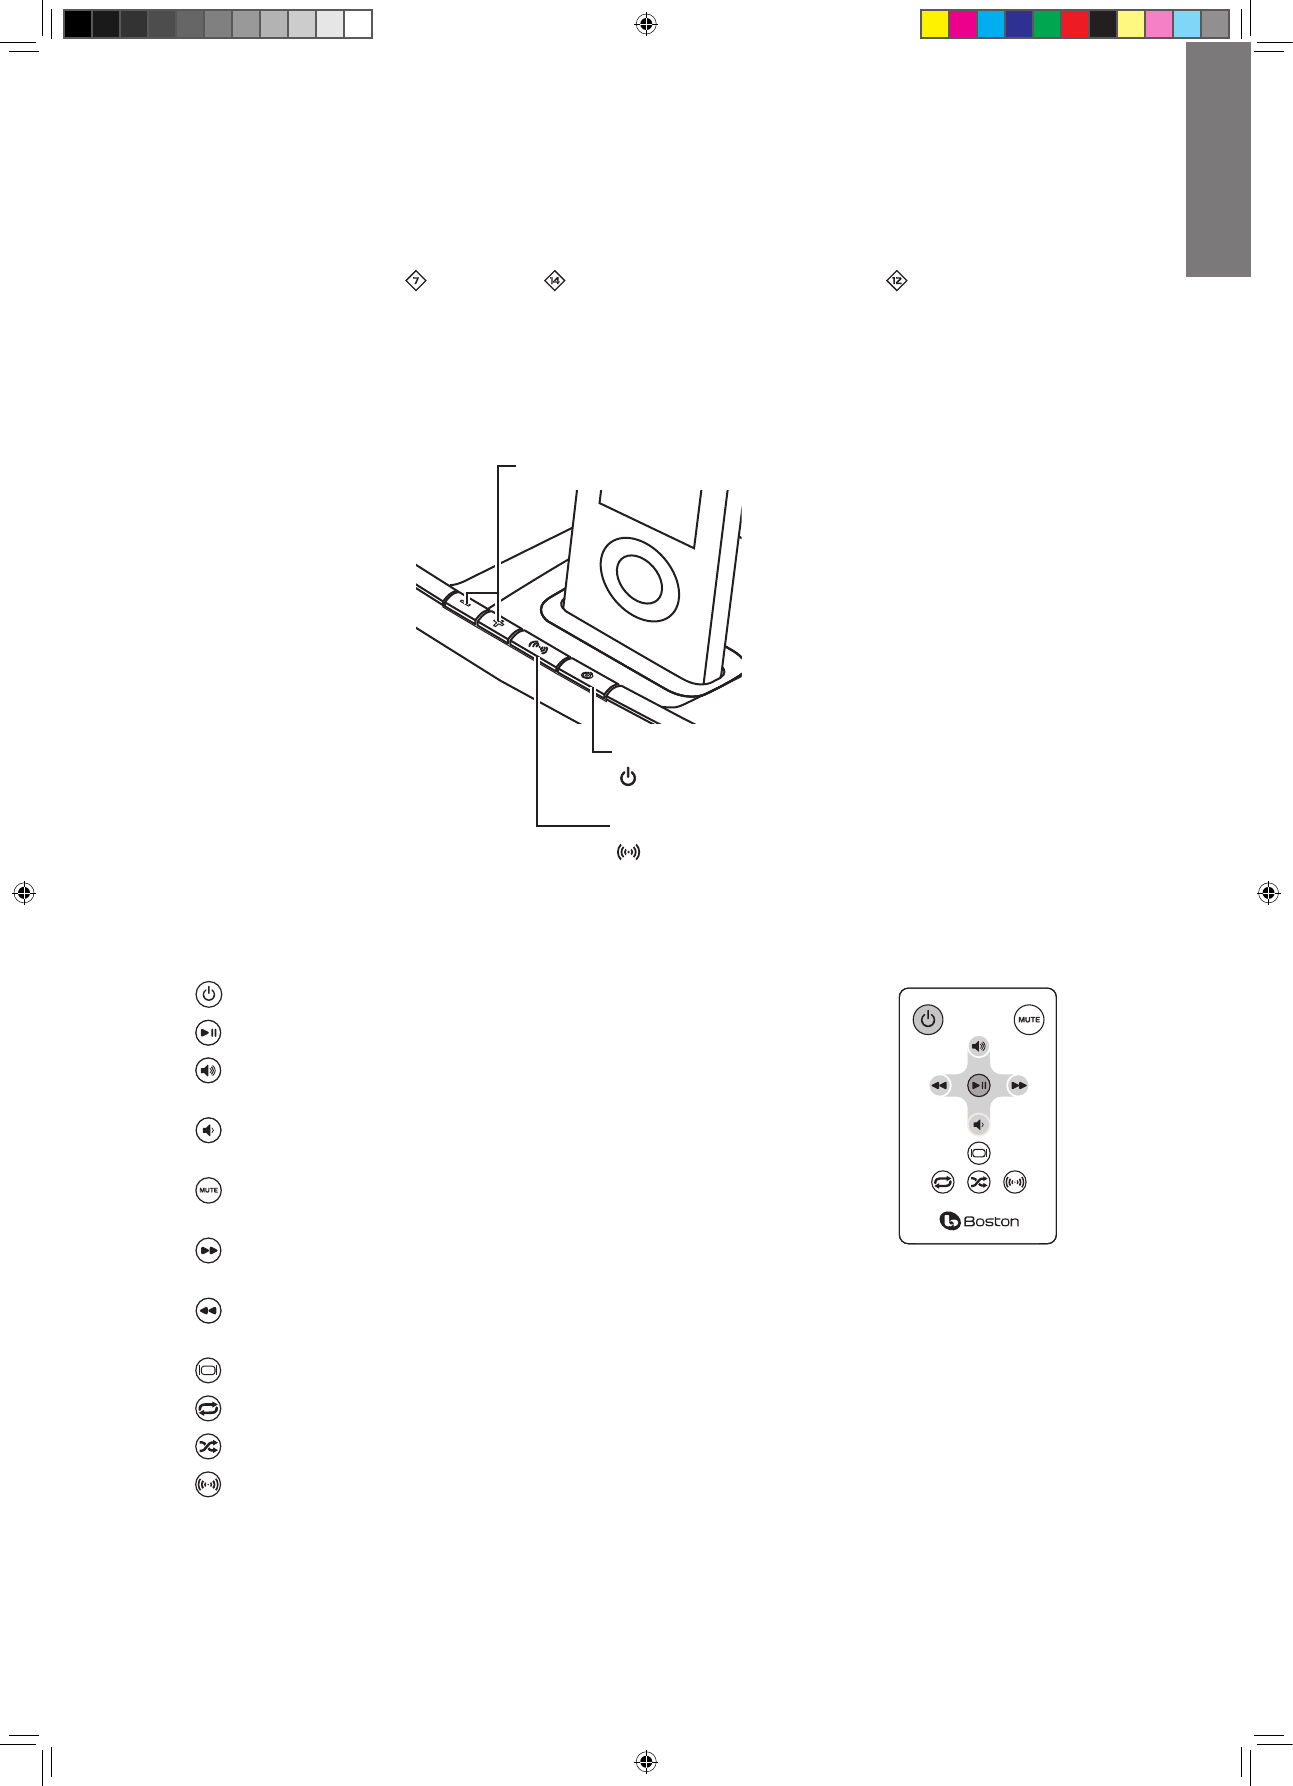
i-DS3 Controls
WhenyouriPhone/iPodisdockedinthei-DS3.Usethe“+/–”buttonstoadjustthevolume.TheiPhone/iPodnavigation
controls >, ,, { and } work as they usually do.
+/– Increases or decrease the volume level.
On/O Button – The button is lit when
the i-DS3 is on. The button blinks when the
sound is muted.
Wide Stereo Button – Activates the Wide
Stereo effect. The button is lit when the
effect is active .
About the Remote Control
Turns the i-DS3 on or returns it to standby mode.
Startsplay,orpausesplay,ofyouriPhone/iPod.
Press to increase sound volume. Press and hold for faster adjustment.
Press to decrease sound volume. Press and hold for faster adjustment.
Press to mute, or un-mute the sound. When the sound is muted the light on the main
power button blinks.
Press once to skip to the next track. Press and hold to scan forward within a track.
Press once to return to the beginning of the current track. Press twice to skip to the
beginning of the previous track. Press and hold to scan backward within a track.
Turns the video output on or off.
Turns the repeat track feature on or off.
Turns the shuffle track feature on or off.
Turns the wide stereo feature on or off. When wide stereo is active, the button on the main speaker is lit.
Note: When you unpack your remote control there will be a plastic insulation tab extending from the battery
compartment. Pull out this tab before using the remote control.
142-003544-0_i-DS3 Manual A4.indd 6 11/3/08 2:13:24 PM

7
E
N
G
L
I
S
H
There must be an unobstructed line of sight to the front of the i-DS3 main speaker when using the remote control. Point
the remote control at the front panel of the main speaker when pressing the buttons. For best results you should be
within 20 feet of the unit and no more than 45° off axis. Being in a brightly lit room can reduce the sensitivity of the i-DS3
to remote control commands.
Note: Eventually you’ll need to replace the remote battery. If the remote doesn’t reliably operate the i-DS3, put in a new
CR2025 3V lithium coin type battery.
Automatic Activation and Standby
The power switches on the back of the main speaker 7 and the subwoofer e can be left on. i-DS3 has an automatic
power standby system. After a few minutes of inactivity the amplifiers go into standby mode. As soon as i-DS3 receives a
signal from the iPod the amplifiers automatically turn on again. If the i-DS3 won’t be used for an extended period of time,
turn the power switches off.
Other Adjustments
Subwoofer Volume Control Adjustment q
You may need to make further adjustments to the subwoofer volume control to produce a better blend with the main
speaker and produce a balanced, natural sound. Start with the subwoofer volume control at the middle of its rotation
range. Play a variety of source material —some music, a movie sound track with dynamic special effects, some spoken
dialog. Adjust the subwoofer volume control up and down a bit from the starting point until you have a setting that
produces a natural sound with all the various types of program material.
Wireless ID Switches 5=
Both the main speaker and the subwoofer have Wireless ID switches. The various switch settings change the frequency of
the wireless signal the main speaker sends to the subwoofer. The two switches must be set to the same channel. Typically
you’ll never need to adjust these switches. What are they for? If you have more than one i-DS3 system in your house you
can use different wireless ID Switch settings so the systems won’t interfere with each other.
Connecting Other Equipment
Line Inputs 6
Other audio equipment, such as a portable CD player or older iPod models that do not have the universal docking
adapter, can be connected to the i-DS3 through the Line inputs on the back of the main speaker. Typically you’ll need a
cablethathasastereo1/8-inchplugononeendtoconnecttotheoutputofthedeviceyouareconnectingtothei-DS3.
The other end of the cable should have two RCA plugs that will connect to the i-DS3 line inputs.
Using the Video Output 4
IfyouriPhone/iPodcanstorevideoorphotosyoucanviewthemonanexternaltelevisionwhenitisdockedtothe
i-DS3. There are two outputs – a composite output and an S-video output. Use which ever one is compatible with your
television. For the composite output, connect a standard RCA plug cable between the i-DS3 and the composite video
input of your television. Typically the composite video input of a television is color coded yellow. To use the S-video
output you will need a special S-video cable to connect the i-DS3 to the corresponding input on your television. Refer to
the manual for your television for information on this input and how to use it.
Maintenance and Service
The i-DS3 enclosures may be cleaned using a soft cloth to remove fingerprints or to wipe off dust. All wiring connections
should be inspected and remade at least once a year.
In the event that your i-DS3 ever needs service, contact your local Boston Acoustics dealer or visit
www.bostonacoustics.com/dealersforalistofdealersinyourarea.
142-003544-0_i-DS3 Manual A4.indd 7 11/3/08 2:13:25 PM
8
E
N
G
L
I
S
H
Limited Warranty
Boston Acoustics warrants to the original purchaser of the i-DS3 that it will be free of defects in materials and
workmanship in its mechanical parts for a period of one year from the date of purchase.
Your responsibilities are to install and use the i-DS3 according to the instructions supplied, to provide safe and secure
transportation to an authorized Boston Acoustics service representative, and to present proof of purchase in the form of
your sales slip when requesting service.
Excluded from this warranty is damage that results from abuse, misuse, improper installation, accidents, shipping, or
repairs/modicationsbyanyoneotherthananauthorizedBostonAcousticsservicerepresentative.
This warranty is limited to the Boston Acoustics product and does not cover damage to any associated equipment. This
warranty does not cover the cost of removal or reinstallation. This warranty is void if the serial number has been removed
or defaced. This warranty gives you specific legal rights, and you may also have other rights which vary from state to
state.
If Service Seems Necessary
First, contact the dealer from whom you purchased the product. If that is not possible, write to:
Boston Acoustics, Inc.
100 Corporate Drive
Mahwah, NJ 07430 USA
Or contact us via e-mail at:
US: support@bostona.com
Japan: ba_info@dm-holdings.com
Asia Pacific: service@dm-singapore.com
We will promptly advise you of what action to take. If it is necessary to return your i-DS3 to the factory, please ship it
prepaid. After it has been repaired, we will return it freight prepaid in the United States and Canada.
For EU Customers Only
This symbol found on the product indicates that the product must not be disposed of with household
waste. Instead, it may be placed in a separate collection facility for electronic waste or returned to a retailer
when purchasing similar product. The producer paid to recycle this product. Doing this contributes to reuse
and recycling, minimizes adverse effects on the environment and human health and avoids any fines for
incorrect disposal.
142-003544-0_i-DS3 Manual A4.indd 8 11/3/08 2:13:25 PM

9
E
S
P
A
ñ
O
L
Este símbolo que aparece en el
aparato indica que el aparato se
debe colocar en un punto de
recolección separada para desechos
electrónicos y no debe ser arrojado
junto con los residuos domésticos.
Este símbolo que aparece en el
aparato indica doble aislación.
¡Advertencia! Para reducir el riesgo
de incendio o choque eléctrico, no
exponga el aparato a la lluvia o a la
humedad.
Este símbolo que aparece en el
aparato indica peligros derivados de
tensiones peligrosas.
Este símbolo que aparece en el
aparato indica que el usuario debe
leer todos los avisos de seguridad
del manual del usuario.
Usuarios estadounidenses:
Nota: Este equipo se ha probado y se ha
determinado que cumple con los límites para
un dispositivo digital Clase B, de acuerdo con
la Parte 15 del Reglamento de la FCC. Estos
límites fueron diseñados para ofrecer protección
razonable contra la interferencia perjudicial en
una instalación residencial. Este equipo genera,
usa y puede irradiar energía de radiofrecuencia
y, si no se instala y utiliza según las instrucciones,
puede ocasionar interferencia perjudicial a las
radiocomunicaciones. Sin embargo, no hay
garantía de que no se producirá interferencia
en una instalación en particular. Si este equipo
efectivamente ocasiona interferencia perjudicial
a la recepción de radio o televisión, lo que se
puede determinar apagando y encendiendo el
equipo, se recomienda al usuario intentar corregir
la interferencia implementando una o más de las
siguientes medidas.
• Reorientaroreubicarlaantenareceptora.
• Aumentarlaseparaciónentreelequipoyel
receptor.
• Conectarelequipoauncircuitodistintoal
que está conectado el receptor.
• Consultaraldistribuidoroauntécnicode
radio/televisión.
Precaución: Los cambios o modificaciones
no autorizados al receptor podrían anular la
autoridad del usuario para utilizar el equipo.
Este equipo cumple con los límites de
exposición a radiaciones de FCC RF establecidas
para un ambiente no controlado. Debe instalarse
y operarse con una distancia mínima de 20
centímetros entre el radiador y su cuerpo.
El transmisor debe utilizarse exclusivamente
para funciones fijas y punto a punto. No debe
situarse o operar junto con otra antena o
transmisor.
INSTRUCCIONES DE SEGURIDAD IMPORTANTES
1. Lea estas instrucciones.
2. Guarde estas instrucciones.
3. Preste atención a todas las advertencias.
4. Siga todas las instrucciones.
5. No use este aparato cerca de agua.
6. Limpie únicamente con una tela seca.
7. No obstruya las aberturas para ventilación.
Instale de acuerdo con las instrucciones
del fabricante.
8. No instale cerca de fuentes de calor como
radiadores, rejillas de calefacción, estufas
u otros aparatos (incluidos amplificadores)
que emitan calor.
9. No anule el propósito de seguridad del
enchufe polarizado o de puesta a tierra.
Un enchufe polarizado tiene dos patas,
una más ancha que la otra. Un enchufe
de puesta a tierra tiene dos patas y una
tercera de puesta a tierra. La pata ancha
o la tercera pata es para su seguridad. Si
el enchufe provisto no encaja en el toma,
consulte a un electricista para reemplazar
el toma obsoleto.
10. Proteja el cable de alimentación para que
no se pise ni se apriete, especialmente en
los enchufes, en los receptáculos, y en el
punto donde salen del aparato.
11. Utilice únicamente aditamentos o
accesorios especificados por el fabricante.
12. Desenchufe el aparato durante tormentas
eléctricas o cuando no se lo utilice
durante períodos largos.
13. Todas las actividades de servicio técnico
deben ser realizadas por personal de
servicio calificado. Se requiere servicio
técnico cuando el aparato se ha dañado
de cualquier manera, por ejemplo por
daño del cable de alimentación o del
enchufe, derrame de un líquido o caída
de objetos en el aparato, exposición
del aparato a lluvia o humedad, o mal
funcionamiento o caída del aparato.
14. Mantenga una distancia mínima de 2”
(50mm) en el frente, la parte posterior
y los lados del aparato, para que reciba
suficiente ventilación. La ventilación
no debe ser impedida cubriendo las
aberturas para ventilación ni colocando
sobre o alrededor del aparato elementos
como periódicos, manteles, cortinas, etc.
15. No se deben colocar fuentes de llama
abierta, como velas encendidas, sobre el
aparato.
16. El aparato no se debe exponer a goteos ni
salpicaduras. No se deben colocar objetos
llenos de líquido, como floreros, sobre el
aparato.
17. Ya sea el conector de entrada de potencia
en la parte posterior del aparato o el
enchufe de la pared debe permanecer
accesible, para poder desconectar la
potencia del aparato.
18. Para desconectar el aparato por completo
de la red de CA, desconecte el cable de
alimentación del receptáculo de CA.
19. El enchufe del cable de alimentación
debe permanecer listo para funcionar.
Usuarios canadienses
Este aparato digital clase B cumple con la norma
canadiense ICES-003.
Cet appareil numérique de classe B est conforme
á la norme NMB-003 du Canada.
El funcionamiento está sujeto a las siguientes
dos condiciones:
(1) este dispositivo puede no causar interferencia
y
(2) este dispositivo debe aceptar cualquier
interferencia, incluso la interferencia que puede
causar el uso no deseado del dispositivo.
L’utilisation de ce dispositif est autorisée
seulement aux deux conditions suivantes:
(1) il ne doit pas produire de brouillage, et
(2) l’utilisateur du dispositif doit être prêt à
accepter tout brouillage radioélectrique reçu,
même si ce brouillage est susceptible de
compromettre le fonctionnement du dispositif.
Para evitar la interferencia de radio al servicio
con permiso, este dispositivo debe funcionar en
interiores y lejos de las ventanas para brindar la
máxima protección. El equipo que se instale al
aire libre está sujeto a los permisos.
Pour empêcher que cet appareil cause du
brouillage au service faisant l’objet d’une licence,
il doit être utilisé à l’intérieur et loin des fenêtres
afin de fournir un écran de blindage maximal. Le
matériel doit faire l’objet d’une licence s’il est
installé à l’extérieur.
Usuarios europeos
RLAN - Radio Local Area Network Equipment (Equipo de red radioeléctrica de área local)
AT CZ FI IS LT PT SE FR
BE DK DE IE MT SK CH IT
EE GR LV NL SI TR LU
CY HU PL ES GB NO
El uso de este equipo requiere un permiso en RO.
Este equipo solo puede usarse en interiores en BG, FR.
Este equipo sólo puede usarse en sus propias instalaciones en IT.
Este equipo es sólo para uso privado en LU.
No se permite utilizarlo dentro de un radio de 20 km del centro de Ny-Ålesund en NO.
Por la presente, Boston Acoustics, Inc. 300 Jubilee Drive, Peabody, MA 01960 USA, declara que este
equipo i-DS3cumpleconlosrequerimientosesencialesyotrasnormasdelaDirectiva1999/5/EC.Se
puede obtener una copia de la Declaración de conformidad (Declaration of Conformity, DOC) de:
Oliver Kriete
Boston Acoustics, División de of D&M Europe B.V.
Beemdstraat 11
5653 MA Eindhoven
Países Bajos
142-003544-0_i-DS3 Manual A4.indd 9 11/3/08 2:13:26 PM

10
E
S
P
A
ñ
O
L
Introducción
GraciasporelegirBostonAcousticsyfelicitacionesporsucompradelsistemadepotenciadeparlante/subwooferAM/
FM/CDi-DS3. Si posee otros productos Boston, el excelente desempeño del audio y la facilidad de uso de i-DS3 no
deberíasorprenderlo.SiesnuevoenBoston,bienvenido;creemosquehahechounagranelección.El sistema i-DS3
combina un sistema de parlantes amplificados de alto desempeño con un subwoofer amplificado de gran potencia.
Con solo instalarlo, el sistema i-DS3 permite que su iPhone o iPod suministre un sonido insuperable. El sistema de
parlante principal compacto suministra un sonido de ambiente gracias a su separación estéreo especial de la electrónica
mejorada. El subwoofer emite bajos de potencia y puede colocarse en cualquier lugar de la habitación gracias a su
conexión inalámbrica.
Características
• BasedeiPhone/iPoduniversalintegrada.ControlesycargasparatodoslosmodelosiPhone/iPodparalabase.
• Potenciadesistematotalde100vatiosparaunexcelentedesempeñodelaudio.
• Controlesdoblesdemediorangodealtodesempeñoybaesdeagudosdoblesdealtodesempeño.baedebajosde6”
de alta potencia.
• Controlesintuitivosyfácilesdeusar
• ElcontrolremotocolocalasfuncionesbásicasdeliPodalalcancedesusdedos.
• ¡Reproduccióndeformainalámbrica!¡Elsubwooferinalámbricopuedecolocarseencualquierlugardesuhabitación!
• ProcesamientodeaudioBassTrac®paralograrbajoslimpiosacualquiervolumen
• ¡ReproduzcavideosdesuiPodensutelevisor!SalidadevideocompuestayS-videodesdetodoslosmodelosdeiPhone/
iPod que reproducen videos.
• Entradadeaudioauxiliarparaconectarotrosdispositivosdeaudio.
• ¡Reproducciónencolores!Personalicesuparlanteprincipalconrejillasdemetalintercambiablesopcionales.
142-003544-0_i-DS3 Manual A4.indd 10 11/3/08 2:13:26 PM
11
E
S
P
A
ñ
O
L
Las piezas del i-DS3
1 Botones para subir y bajar el volumen
2
Botón estéreo amplio: Aumenta la separación estéreo. Muestra una luz naranja cuando está activo.
3BotóndeEncendido/Mododeahorrodeenergía:Laluzazulindicaqueelparlanteprincipalestáactivo;laluz
parpadea cuando el sonido está apagado.
4 Salidas de video: Las salidas compuestas y de S-video le permiten mirar programas de video guardados en su iPhone
/iPodenuntelevisor.
5 Interruptor ID inalámbrico: Selecciona el "canal" para la señal de subwoofer inalámbrica. Selecciona = al mismo
canal.
6 Entradas de línea: le permite conectarse con otras fuentes, como un reproductor de CD portátil, al i-DS3.
7 Interruptor de encendido: Se utiliza para apagar el parlante principal cuando no será utilizado por un período de
tiempo prolongado.
8 Entrada de energía: Conecte la fuente de alimentación - aquí.
9BasedeiPhone/iPod
0
Control remoto
- Fuente de alimentación: Brinda energía para el parlante principal. Enchúfelo a la pared para conectarlo a la entrada
de alimentación 8.
= Interruptor ID inalámbrico: Selecciona el "canal" para la señal de subwoofer inalámbrica. Lo selecciona para el mismo
canal como en 5.
q Volumen: Ajusta el volumen del subwoofer para lograr el equilibrio con los parlantes principales.
w Indicador de estado: La luz roja indica que el subwoofer está activo y la luz verde indica que está en modo de ahorro
de energía.
e Interruptor de encendido: Se utiliza para apagar el subwoofer cuando no será utilizado por un período de tiempo
prolongado.
r Fusible de alimentación: Protege el subwoofer.
t Cable de alimentación: Enchúfelo a una salida de CA.
WIRELESS ID
4321
VOLUME
POWER FUSE
T1A/250V AC120V/60HZ
MIN MAX
i-DS3
WIRELESS ID
4321
VOLUME
POWER FUSE
T1A/250V AC120V/60HZ
MIN MAX
1 2 3
4
5
7
68
=
-
0
9
q
we r t
142-003544-0_i-DS3 Manual A4.indd 11 11/3/08 2:13:27 PM
12
E
S
P
A
ñ
O
L
Desembalaje e instalación de i-DS3.
Desembale cuidadosamente los componentes i-DS3. Si hay alguna señal de daños ocasionados por el transporte,
comuníqueseloinmediatamenteasudistribuidory/oasuserviciodeentrega.Conservelacajadeenvíoylosmateriales
de embalaje para una futura utilización. Asegúrese de guardar su recibo de compra en un lugar seguro, ya que puede ser
requerido a los efectos de la garantía.
En la caja debería encontrar el parlante principal, la fuente de alimentación del parlante principal y el cable de
alimentación,elsubwooferdepotencia,elcontrolremotoysieteadaptadoresdebasedeiPhone/iPod.
Colocación
El sonido de su i-DS3 será excelente en cualquier lugar. Si desea escuchar una imagen estéreo tradicional, debe colocar
el parlante principal de manera que esté frente a su ubicación donde suele escuchar. El subwoofer puede colocarse en
cualquier lugar. Capta su señal de forma inalámbrica, no necesita preocuparse por las conexiones. Sólo necesita una
salida de CA. La ubicación en una esquina puede servir para reforzar la salida de los graves.
Evite colocar los componentes i-DS3 donde recibirán la luz directa del sol.
Conexión de alimentación
El parlante principal tiene una fuente de alimentación externa -. Enchufe el cable de alimentación al tomacorriente de
la pared. Conecte el cable de salida de alimentación al conector de la parte trasera del parlante principal llamado DC 24V
8. Enchufe el cable de alimentación del subwoofer t directamente al tomacorriente de la pared.
Colocar su iPod en la base
El i-DS3 se suministra con siete adaptadores de base. Estos encajan bien en la base 9 en la parte superior del i-DS3
yaceptanvariosmodelosdeiPhone/iPod.LatablasiguientemencionamodelosdeiPhone/iPodylosadaptadoresde
base que se utilizan con ellos. El número de adaptador de base se encuentra en la parte posterior de la pieza. Coloque el
adaptadoradecuadoenlabaseyenchufesuiPhone/iPodalabasecorrespondiente.
Docking Adapter
Modelo de iPod (Capacidad) Número de adaptador
iPodnano(2/4GB) 8
5G y U2 iPod (30GB con video), iPod classic (80GB) 9
5GiPodconvideo(60GB/80GB),iPodclassic(160GB) 10
iPodnano-2dageneración(2/4/8GB) 11
iPhone (3G) 12
iPodnano-3rageneración(4/8GB) 13
iPod touch 8GB, 16GB y 32GB 14
Adaptador para base
142-003544-0_i-DS3 Manual A4.indd 12 11/3/08 2:13:28 PM
13
E
S
P
A
ñ
O
L
Uso del i-DS3
Comenzar a utilizar el sistema
Una vez que su sistema de i-DS3 está instalado y enchufado, encienda los interruptores de alimentación en la parte
trasera del parlante principal 7 y el subwoofer w. Suba el control de volumen del subwoofer = aproximadamente
hasta la mitad. (Tal vez desee ajustar esto más adelante, pero use esta configuración para empezar).
Controles del i-DS3
CuandosuiPhone/iPodestéubicadoenlabasedeli-DS3, la rueda de selección no cambia el volumen. Use los botones
“+/–”deli-DS3paraajustarelvolumen.LoscontrolesdenavegacióndeliPhone/iPod>, , { y} funcionan como
siempre.
+/– Sube o baja el volumen.
Botón On / O :(encendido/apagado)Elbotón
tiene una luz cuando el i-DS3 está encendido. El
botón parpadea cuando el sonido está apagado.
Botón estéreo amplio: Activa el efecto estéreo
amplio. El botón tiene una luz cuando el efecto
está activo.
Sobre el control remoto
Enciende el i-DS3 o regresa al modo de ahorro de energía.
ComienzalareproducciónopausalareproduccióndesuiPhone/iPod.
Presione para aumentar el volumen del sonido. Presione y mantenga para un ajuste más
rápido.
Presione para bajar el volumen del sonido. Presione y mantenga para un ajuste más
rápido.
Presione para quitar el sonido, o volver a colocarlo. Cuando el sonido está apagado, la luz
del botón de alimentación principal parpadea.
Presione una vez para saltar a la siguiente pista. Presione y mantenga para buscar una
pista hacia adelante.
Presione una vez para regresar al comienzo de la pista actual. Presione dos veces para saltar al comienzo de la pista
anterior Presione y mantenga para buscar una pista hacia atrás.
Enciende o apaga la salida de video.
Activa o desactiva la función para repetir una pista.
Activa o desactiva la función para repetir pistas aleatoriamente.
Activa o desactiva la función de sonido estéreo amplio. Cuando el estéreo amplio está activo, el botón del parlante
principal está encendido.
Nota: Cuando desembale su control remoto, encontrará una lengüeta plástica de aislación que se extiende desde el
compartimiento de la batería. Tire de esta lengüeta antes de utilizar el control remoto.
142-003544-0_i-DS3 Manual A4.indd 13 11/3/08 2:13:30 PM
14
E
S
P
A
ñ
O
L
La línea de vista hacia el frente del parlante principal del i-DS3 debe estar libre cuando se utilice el control remoto.
Apunte el control remoto al panel frontal del parlante principal cuando presione los botones. Para lograr mejores
resultados, deberá estar a no más de 20 pies de la unidad y a no más de 45º del eje. Estar en un ambiente bien iluminado
puede reducir la sensibilidad del control remoto del i-DS3.
Nota: Finalmente, necesitará reemplazar la batería remota. Si el control remoto no funciona correctamente con el i-DS3,
coloque una batería nueva de litio CR2025 3V.
Activación automática y modo de ahorro de energía (standby)
Los interruptores de encendido en la parte trasera del parlante principal 7 y el subwoofer e pueden dejarse
encendidos. i-DS3 tiene un sistema de modo de ahorro de energía automático. Luego de algunos minutos de inactividad
los amplificadores pasan al modo de ahorro de energía. Tan pronto como el i-DS3 reciba una señal del iPod los
amplificadores se encenderán nuevamente de forma automática. Si el i-DS3 no será utilizado por un período de tiempo
prolongado, apague los interruptores de encendido.
Otros ajustes
Ajustes del control del subwoofer q
Tal vez necesite realizar más ajustes al control de volumen del subwoofer para producir una mejor combinación con el
parlante principal y producir un sonido natural y equilibrado. Comience con el control de volumen del subwoofer en
la mitad de su rango de rotación. Reproduzca diferentes fuentes: música, una pista de sonido de película con efectos
especiales dinámicos, algún diálogo. Ajuste el volumen del subwoofer hacia arriba y hacia abajo un poco desde el punto
de partida hasta que consiga una configuración que produzca un sonido natural con todos los tipos de fuentes.
Interruptores ID inalámbricos 5=
Tanto el parlante principal como el subwoofer tiene interruptores ID inalámbricos. Las diversas configuraciones
de interruptor cambian la frecuencia de la señal inalámbrica que el parlante principal envía al subwoofer. Los dos
interruptores deben seleccionarse al mismo canal. Es frecuente que nunca necesite ajustar estos interruptores. ¿Para qué
sirven? Si tiene más de un sistema i-DS3 en su casa, puede usar diferentes configuraciones de Interruptor ID inalámbrico
de manera que los sistemas no interferirán entre ellos.
Conectar otro equipo
Entradas de línea 6
Otros equipos de audio, como el reproductor de CD portátil o modelos más antiguos de iPod que no tienen el adaptador
de base universal, pueden conectarse al i-DS3 a través de las entradas de línea en la parte trasera del parlante principal. Es
frecuentequenecesiteuncablequetengaunenchufede1/8pulgadasestéreoenunextremoparaconectaralasalida
del dispositivo que está conectando al i-DS3. El otro extremo del cable debe tener dos enchufes que se conectarán a las
entradas de línea del i-DS3.
Usar la salida de video 4
SisuiPhone/iPodpuedealmacenarvideosofotospuedemirarlasenuntelevisorexternocuandoestéenlabasedei-DS3.
Existen dos salidas: una salida compuesta y una salida de S-video. Utilice cualquiera de ellas que sea compatible con su
televisión. Para la salida compuesta, conecte un cable con enchufe RCA entre el i-DS3 y la entrada de video compuesta de
su televisión. En general la entrada de video compuesta de un televisor es de color amarillo. Para usar una salida de S-video
necesitará un cable de S-video especial para conectar el i-DS3 a la entrada correspondiente de su televisor. Consulte el
manual de su televisor para obtener más información sobre esta entrada y cómo utilizarla.
Mantenimiento y servicio
Las cajas de i-DS3 se pueden limpiar con un trapo suave para quitar las huellas de los dedos o el polvo. Todas las
conexiones de cableado deben inspeccionarse y establecerse de nuevo por lo menos una vez al año.
En el caso de que su sistema i-DS3 necesite servicio de reparaciones, póngase en contacto con su distribuidor local de
BostonAcousticsovisitewww.bostonacoustics.com/dealersparaconseguirunlistadodelosdistribuidoresdesuzona.
142-003544-0_i-DS3 Manual A4.indd 14 11/3/08 2:13:31 PM
15
E
S
P
A
ñ
O
L
Garantía Limitada
Boston Acoustics garantiza al comprador original de i-DS3 que no tendrá defectos de materiales ni de mano de obra en
sus piezas mecánicas durante un período de un año desde la fecha de compra.
Es responsabilidad suya instalar y utilizar el i-DS3 de acuerdo con las instrucciones suministradas, proporcionar un
transporte seguro hasta un representante de servicio autorizado de Boston Acoustics, y presentar la prueba de compra
en forma de recibo de compra cuando sea necesario este servicio.
Quedan excluidos de esta garantía los daños que resulten del uso incorrecto, del mal uso, de una instalación inadecuada,
deaccidentes,deltransporte,odereparaciones/modicacionesquenoseanrealizadasporelrepresentantedeservicio
autorizado de Boston Acoustics.
Esta garantía se limita al producto de Boston Acoustics y no cubre daños de equipos afines. Esta garantía no cubre los
costos de desinstalación o reinstalación. Esta garantía será nula cuando se haya retirado o borrado el número de serie.
Esta garantía le otorga derechos legales específicos y también le podrían corresponder otros derechos que varían de un
estado a otro.
Si cree que necesita servicio técnico
Primero, póngase en contacto con el distribuidor al cual ha comprado el producto. Si esto no es posible, escriba a:
Boston Acoustics, Inc.
100 Corporate Drive
Mahwah, NJ 07430 USA
O póngase en contacto con nosotros por correo electrónico a:
En EE.UU.: support@bostona.com
En Japón: ba_info@dm-holdings.com
En Asia Pacífico: service@dm-singapore.com
Le indicaremos de inmediato qué acción tomar. Si fuera necesario devolver su i-DS3 a fábrica, le pedimos que lo envíe
con gastos de transporte pagados por adelantado. Después de la reparación, lo devolveremos con costos de transporte
pagados sólo en Estados Unidos y Canadá.
Sólo para clientes de la UE
Este símbolo que aparece en el producto indica que el producto no debe ser eliminado junto con los
residuos domésticos. Debe colocarse en un punto de recolección separada para desechos electrónicos
o devuelto a un establecimiento minorista al comprar un producto similar. El fabricante ha pagado para
que este producto se recicle. Esta práctica contribuye a la reutilización y el reciclado, minimiza los efectos
adversos sobre el medio ambiente y la salud humana y evita la imposición de multas por eliminación
incorrecta de residuos.
142-003544-0_i-DS3 Manual A4.indd 15 11/3/08 2:13:31 PM