MEILOON WS-100 5.1 Home Theater System User Manual
Meiloon Industrial Co., Ltd. 5.1 Home Theater System Users Manual
MEILOON >
Users Manual
Delivering new performance standards in digital audio video connectivity
5.1 Speaker System Quick Start
(This is Quick guide for setting up 5.1 system to DW-804 DVD
player and to the WS-100 wirless speaker stand.)
(DVD Player “DW-804”not included in this box)
Pixa, Inc.
7020 Koll Center Parkway, Suite 138., Pleasanton, CA 94566
Phone: (925) 426-9100, Fax: (925) 426-8200, web: www.pixainc.com
F
E
D
E
R
A
L
C
O
M
M
U
N
I
C
A
T
I
O
N
C
O
M
M
I
S
S
I
O
N
U
A
S
List of components.
----------------------------------p.2
----------------------------------p.2
Connecting Wireless system.
Connecting Wireless system.
----------------p.3
Connecting a None Wireless system.
Connecting a None Wireless system.
----p.4
Content
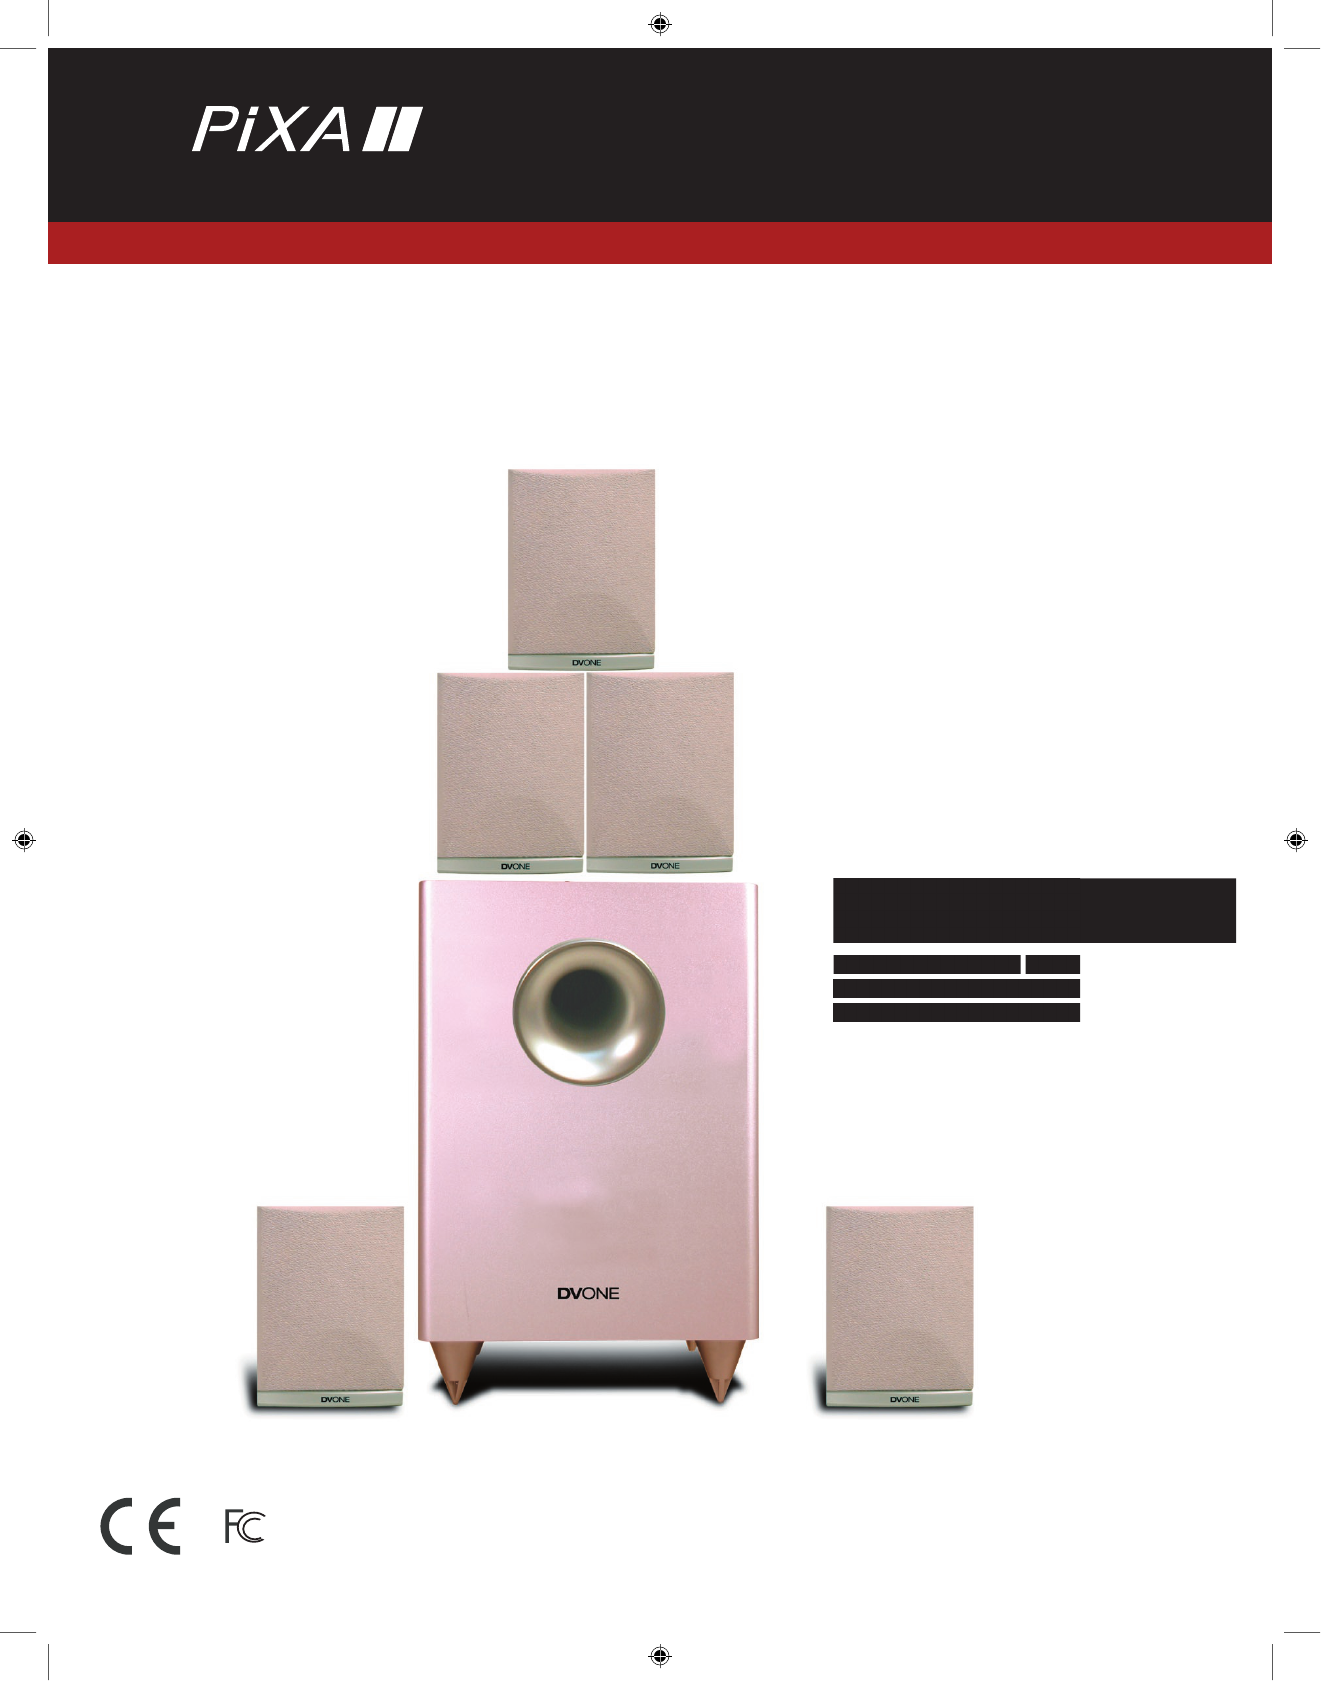
Speakers For (WS-100)
5.1 Speaker System
2
2
Speakers For (WS-100)
5.1 Speaker System
Thank you for choosing this product!
Please read this manual before installing.
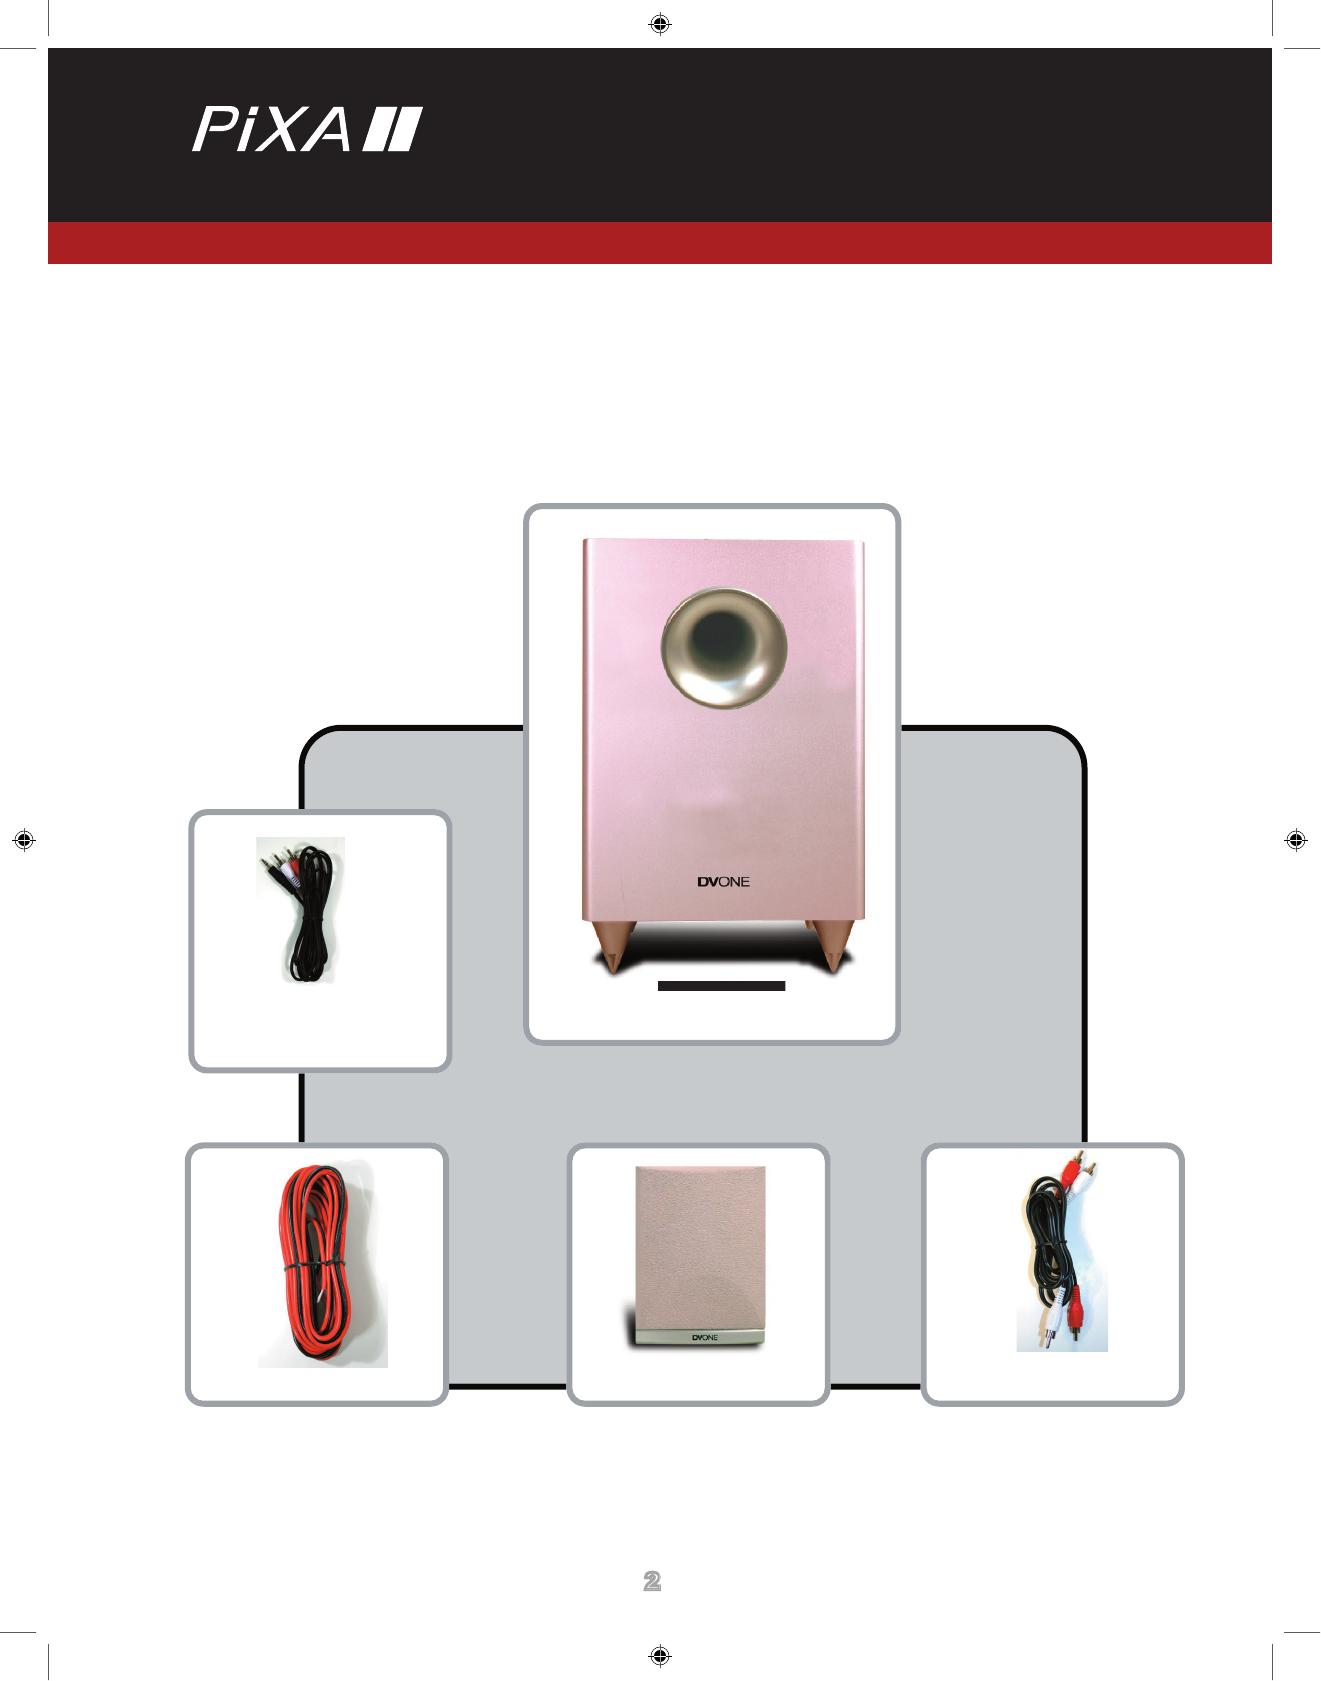
Part 1.
List of components.
Speaker Wires x 5
Speaker x 5
RCA Cables x 2
Subwoofer x1
Subwoofer x1
3.5mm Audio Cables x1
Speakers For (WS-100)
5.1 Speaker System
33
Speakers For (WS-100)
5.1 Speaker System
Part 2.
Connecting Wireless system.
VIDEO
S-VIDEO S-VIDEO
OUT
TV 76HERTZ
ANTENA
VIDEO
AUDIO
INPUT VIDEO
OUTPUT COMPONET
SUBWOOFER CENTER
L
R
L
R
L
R
R
L
FRONT
SURROUND
Y
Cb/Pb
Cr/Pr
COAXIAL OPTICAL
DIGITAL AUDIO
OUTPUT
SCART OUTPUT (CVBS/RGB)
(Center)
(FRONT RIGHT)
(FRONT LEFT)
Transmiter to Rear Speakers
Rear of Subwoofer
Rear of DW-804
To TV Set
S-Video Cable
3.5 mm Video Cable
Speaker Wires
RCA Cable
WARNING: SHOCK HA ZA RD -D O NOT OPEN
AVIS: RISQUE DE CHOC ELECTRIQUE-NE PAS OU VR IR .
(
(
(
(
( (
)
)
)
)
)
)
)
)
)
)
)
)
Speakers For (WS-100)
5.1 Speaker System
44
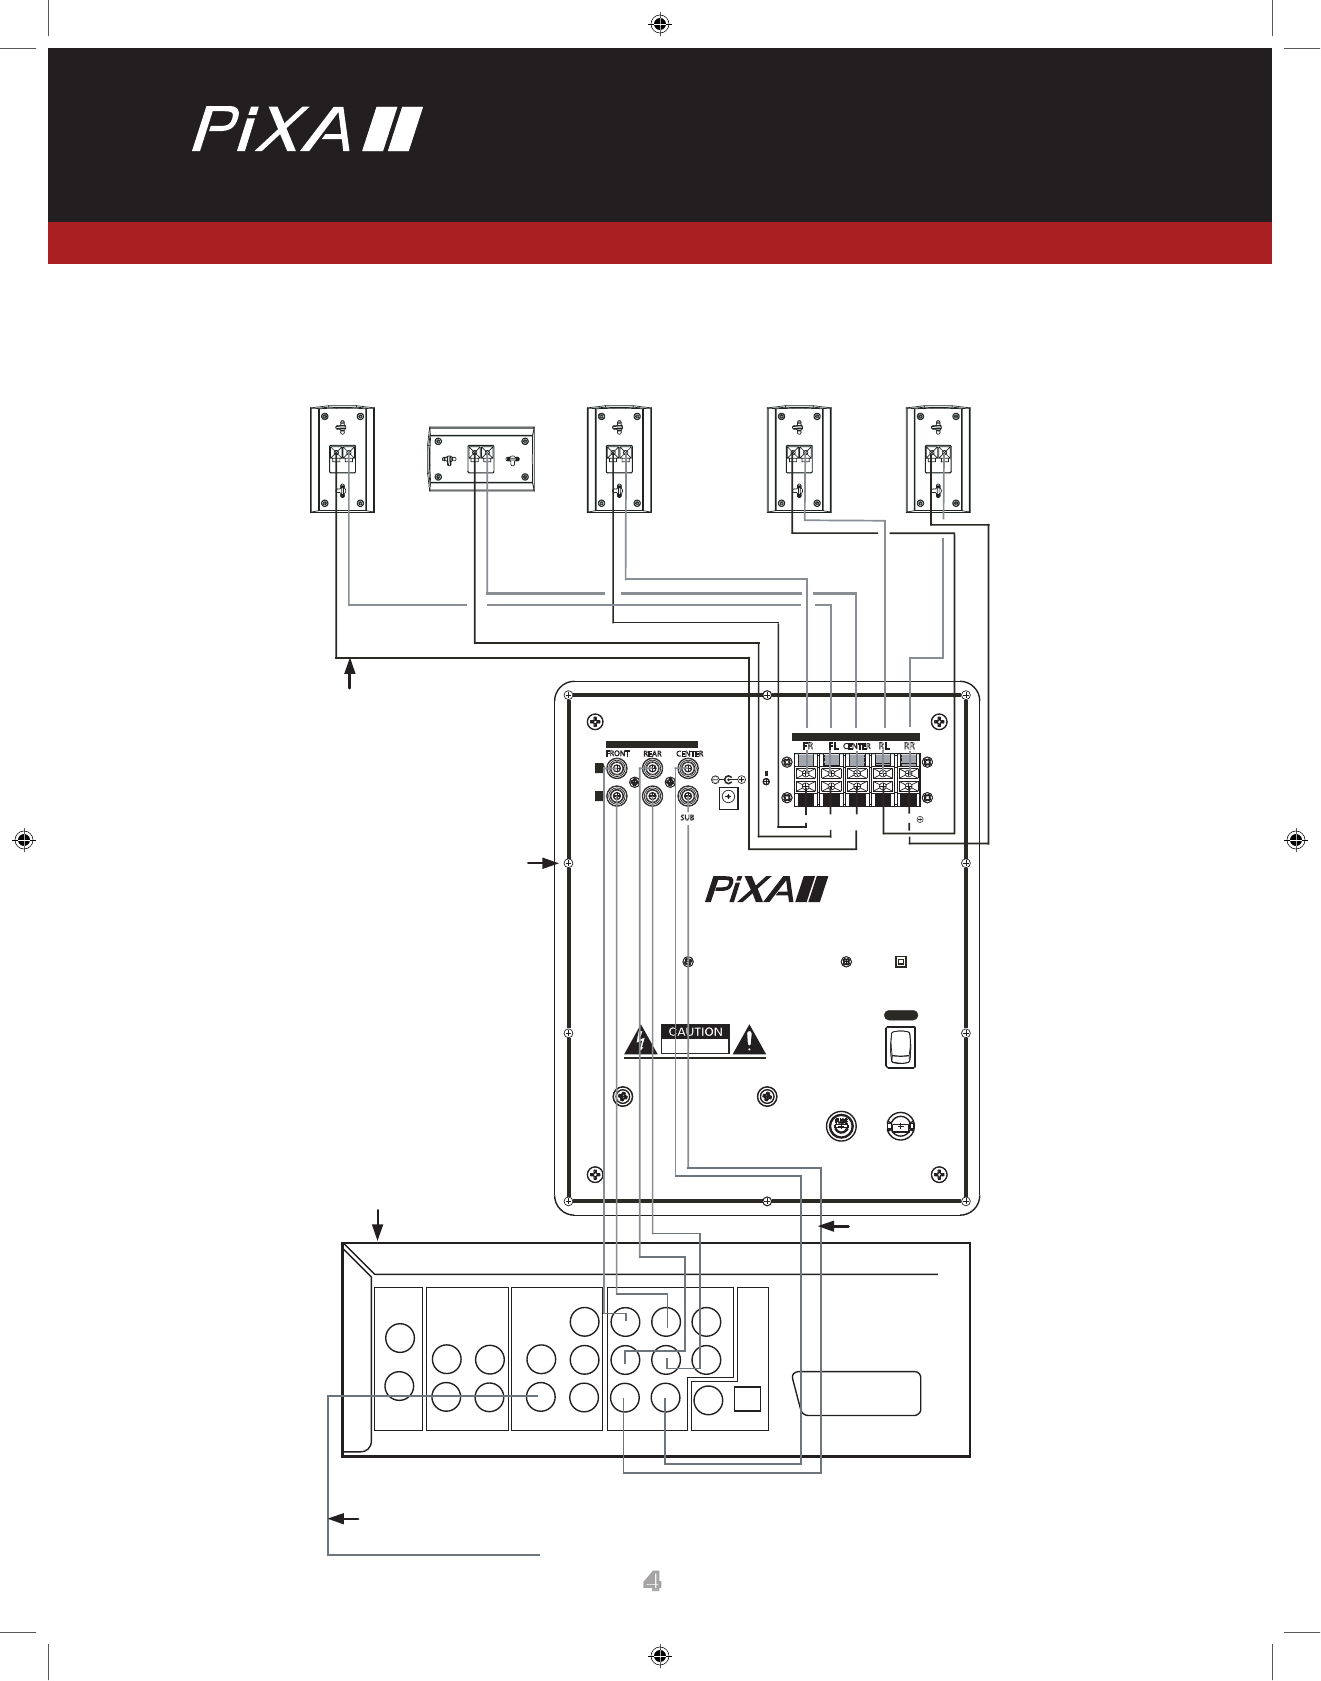
Part 3.
Connecting a None Wireless system.
VIDEO
S-VIDEO S-VIDEO
OUT
TV 76HERTZ
ANTENA
VIDEO
AUDIO
INPUT VIDEO
OUTPUT COMPONET
SUBWOOFER CENTER
L
R
L
R
L
R
R
L
FRONT
SURROUND
Y
Cb/Pb
Cr/Pr
COAXIAL OPTICAL
DIGITAL AUDIO
OUTPUT
SCART OUTPUT (CVBS/RGB)
(Center)
(FRONT RIGHT)
(FRONT LEFT)
Rear of Subwoofer
Rear of DW-804
To TV Set
S-Video Cable
Speaker Wires
RCA Cable
(REAR RIGHT)
(REAR LEFT)
WARNING: SHO CK HAZARD-DO NOT OPEN
AVIS: RI SQ UE D E CHOC ELECTR IQ UE-NE PAS OU VR IR.
Delivering new performance standards in digital audio video connectivity
WS-100 User Manual
2.4 GHz Wireless speaker system
Pixa, Inc.
7020 Koll Center Parkway, Suite 138., Pleasanton, CA 94566
Phone: (925) 426-9100, Fax: (925) 426-8200, web: www.pixainc.com
F
E
D
E
R
A
L
C
O
M
M
U
N
I
C
A
T
I
O
N
C
O
M
M
I
S
S
I
O
N
U
A
S
List of components.
List of components.
----------------------------------
p.2
How to assemble WS-100.
How to assemble WS-100.
-------------p.3
How to connect components.
How to connect components.
------p.4
The perfect opposite position.
The perfect opposite position.
------p.4
How to operate the transmitter.
How to operate the transmitter.
----p.5
Company information.
Company information.
---------------------p.5
Content
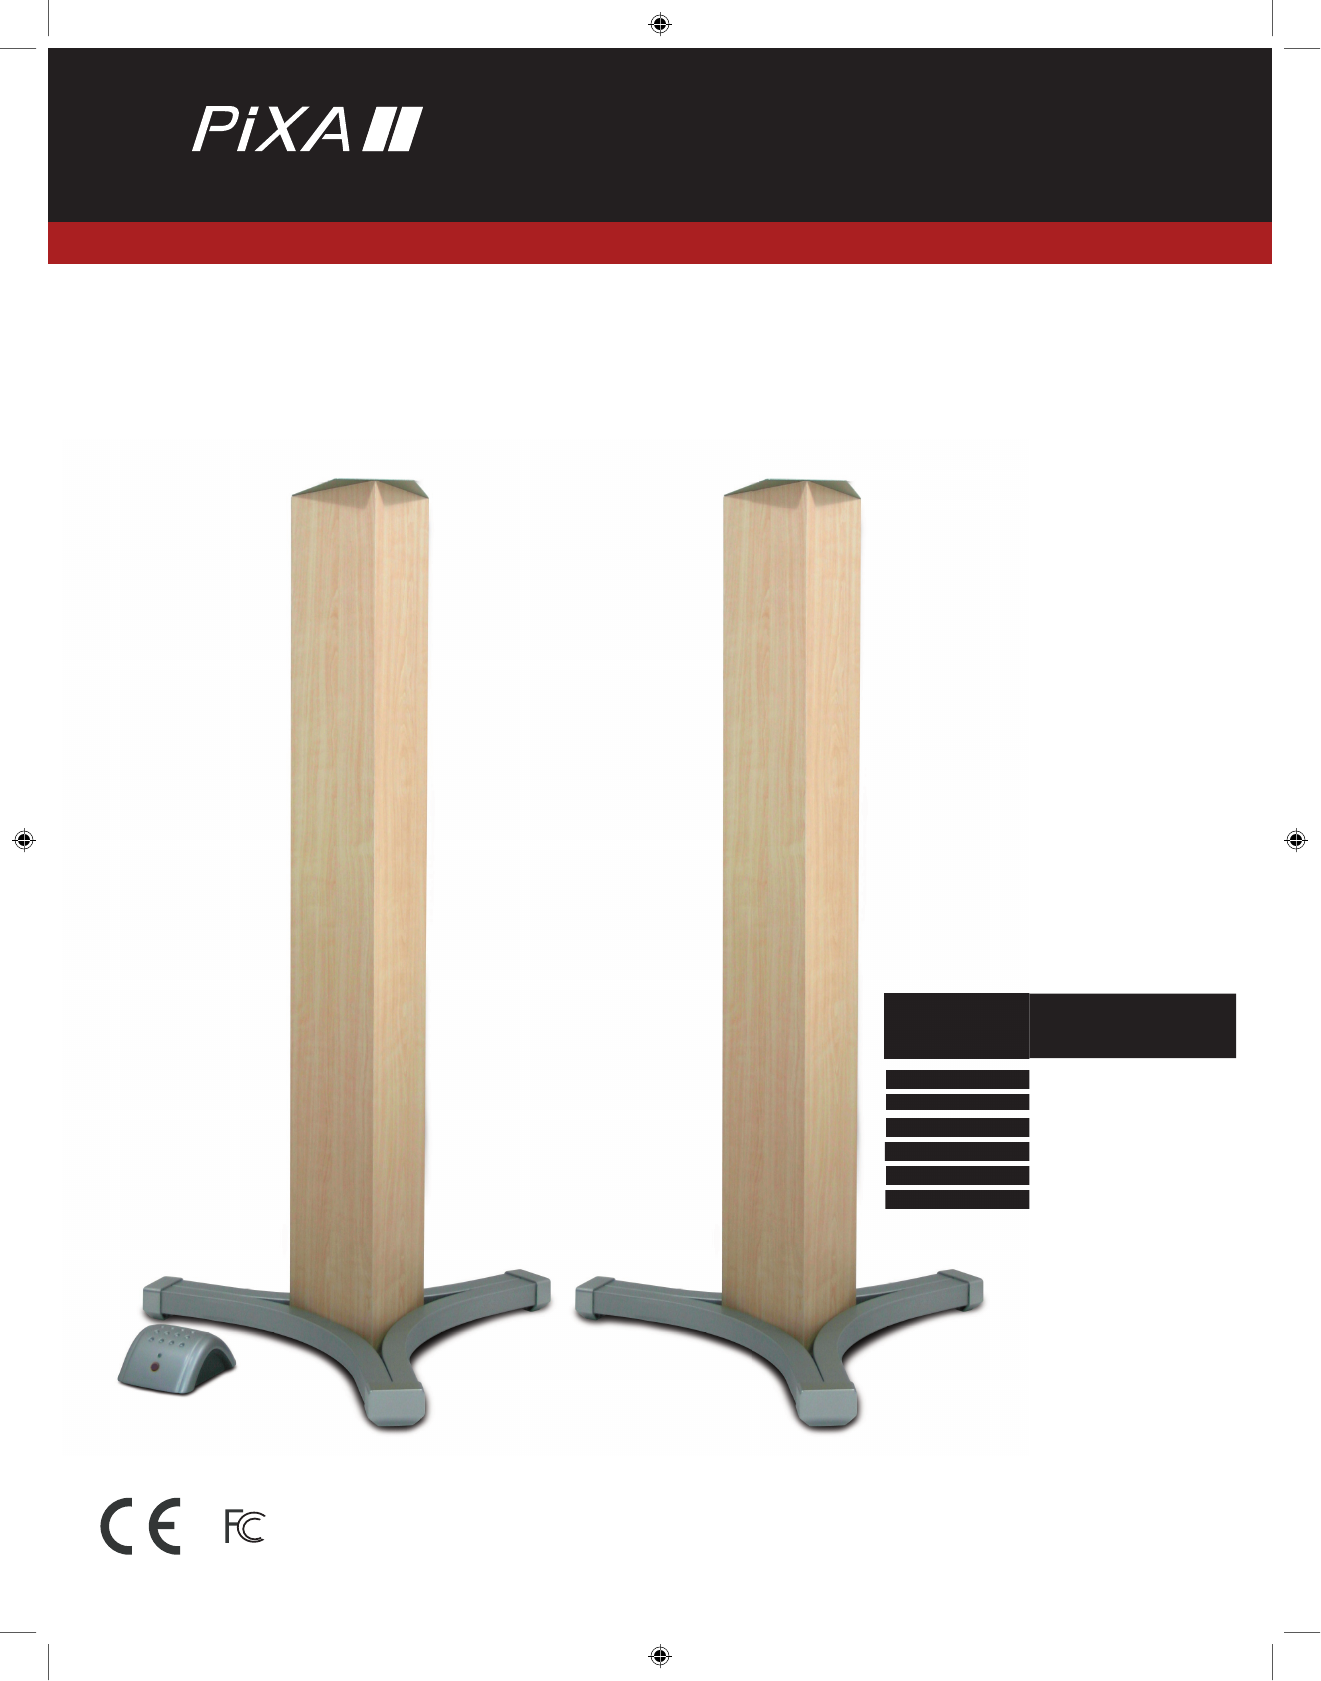
WS-100
2.4 GHz Wireless speaker system
2
2
WS-100
2.4 GHz Wireless speaker system
Thank you for choosing this product!
Please read this manual before installing WS-100.
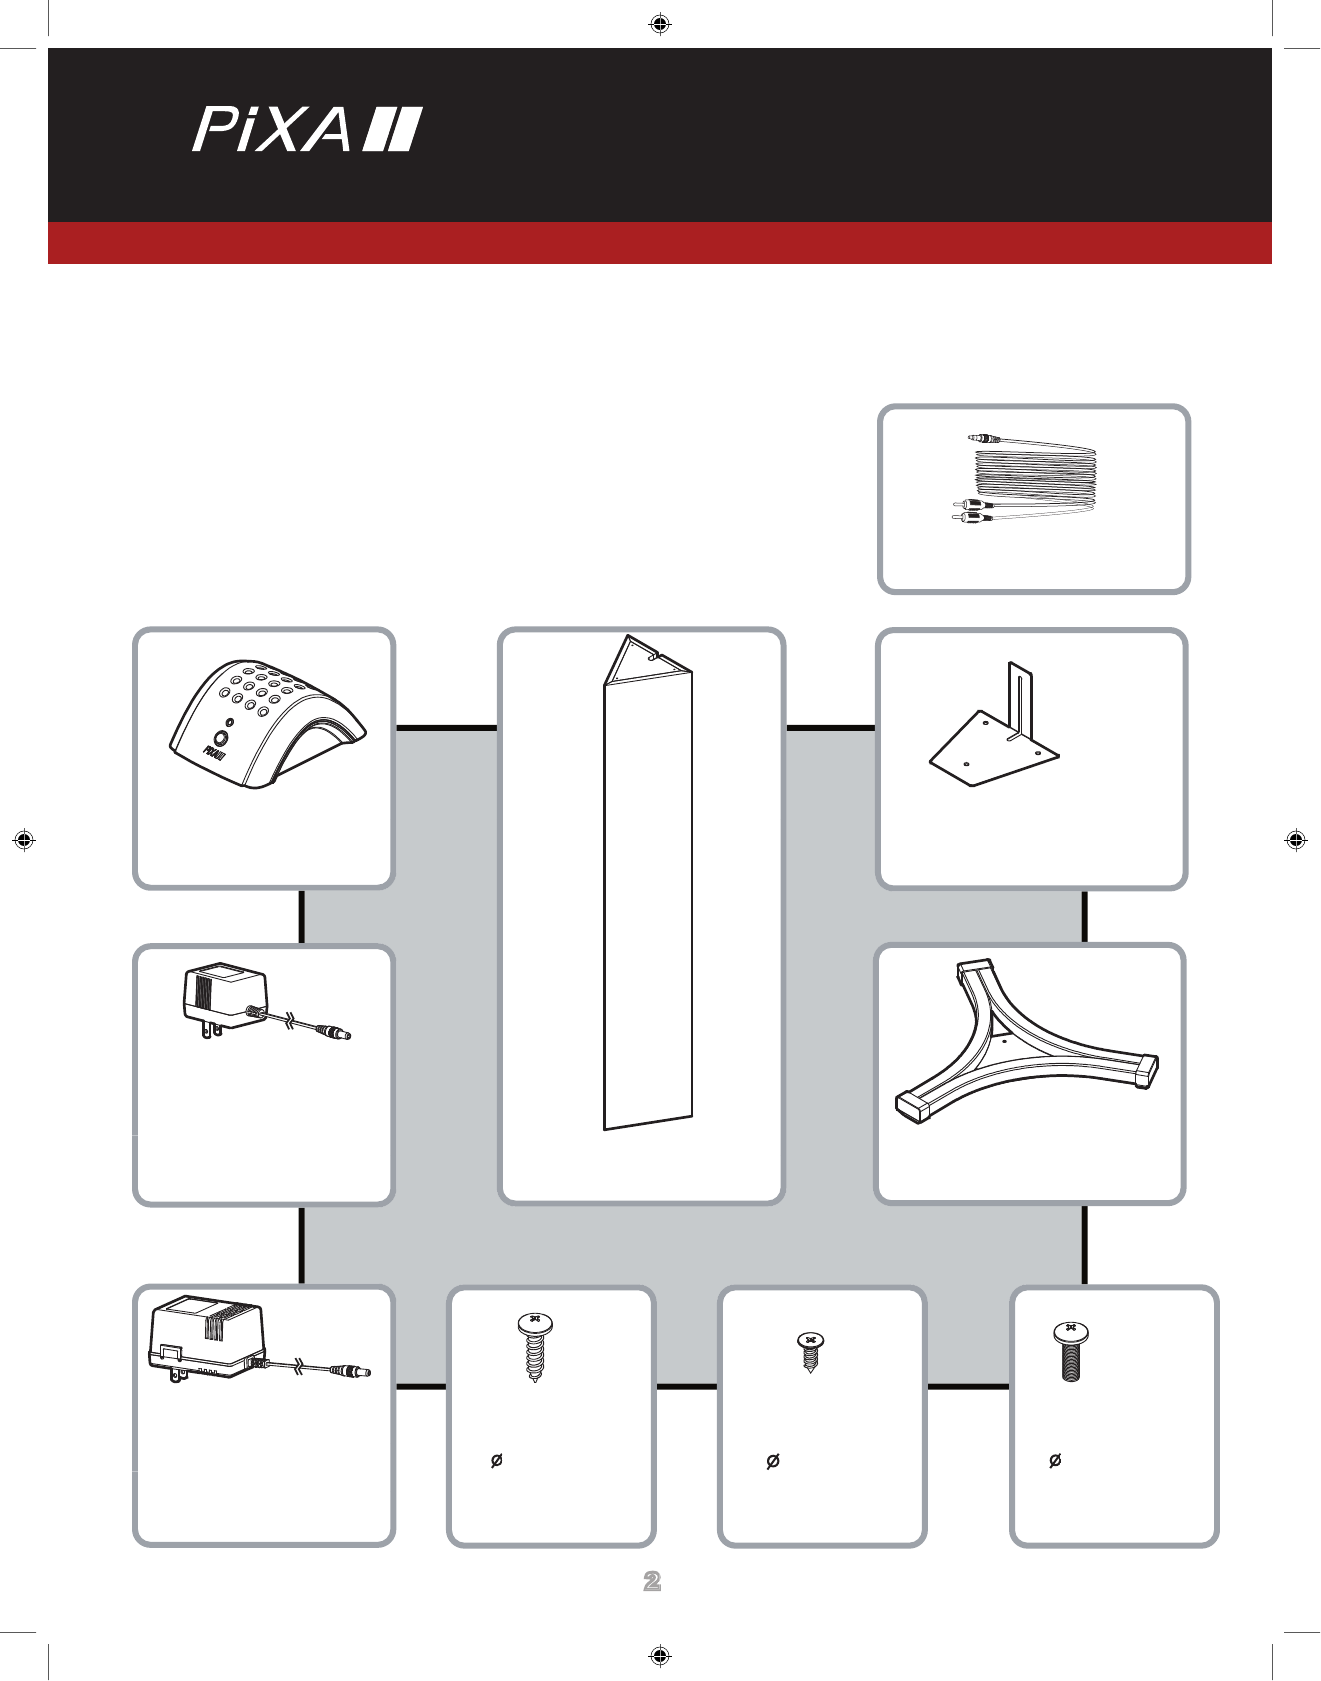
Part 1.
List of components.
Transmitter x1
Speaker Holder x2
Adapter A x1
(For Transmitter)
(For Transmitter)
(For Transmitter)
7V DC 200 mA
7V DC 200 mA
7V DC 200 mA
Wood Stand x2
Base x2
Adapter B x1
Screw(i) x6
Screw(ii) x6
Screw(iii) x2
(For Receiver)
(For Receiver)
(For Receiver)
5x20mm
4x10mm
5x20mm
14V DC 200 mA
14V DC 200 mA
14V DC 200 mA
5x20mm
4x10mm
5x20mm
3.5 mm Audio Cable
WS-100
2.4 GHz Wireless speaker system
WS-100
2.4 GHz Wireless speaker system
33
Part 2.
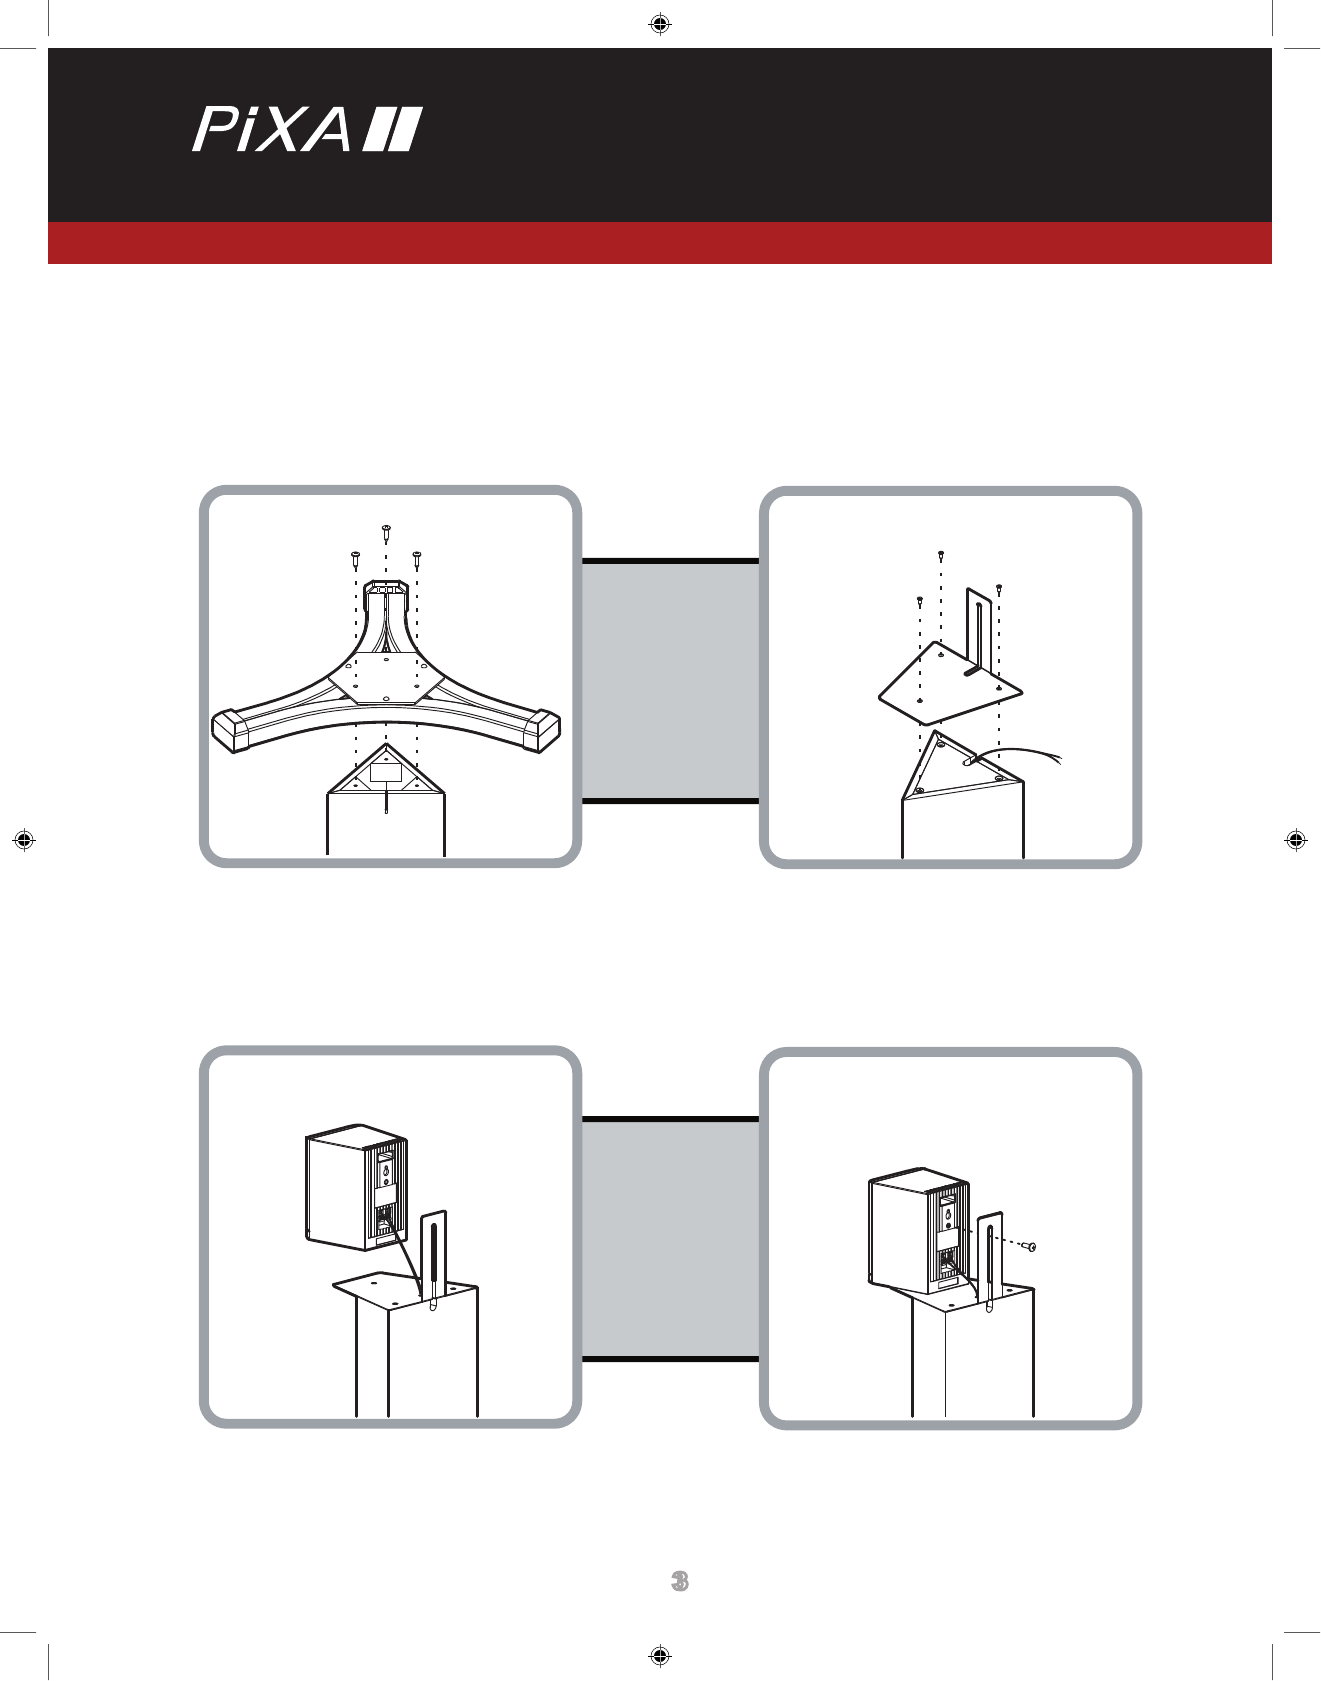
How to assemble WS-100.
Use screws (i) to x base
Use screws (ii) to x speaker
on wood stand.
holder on wood stand.
Connect line to speaker.
Use screws (iii) to x speaker
on speaker holder.
STEP I
STEP III
STEP II
STEP IV
WS-100
2.4 GHz Wireless speaker system
44
WS-100
2.4 GHz Wireless speaker system
Part 3.
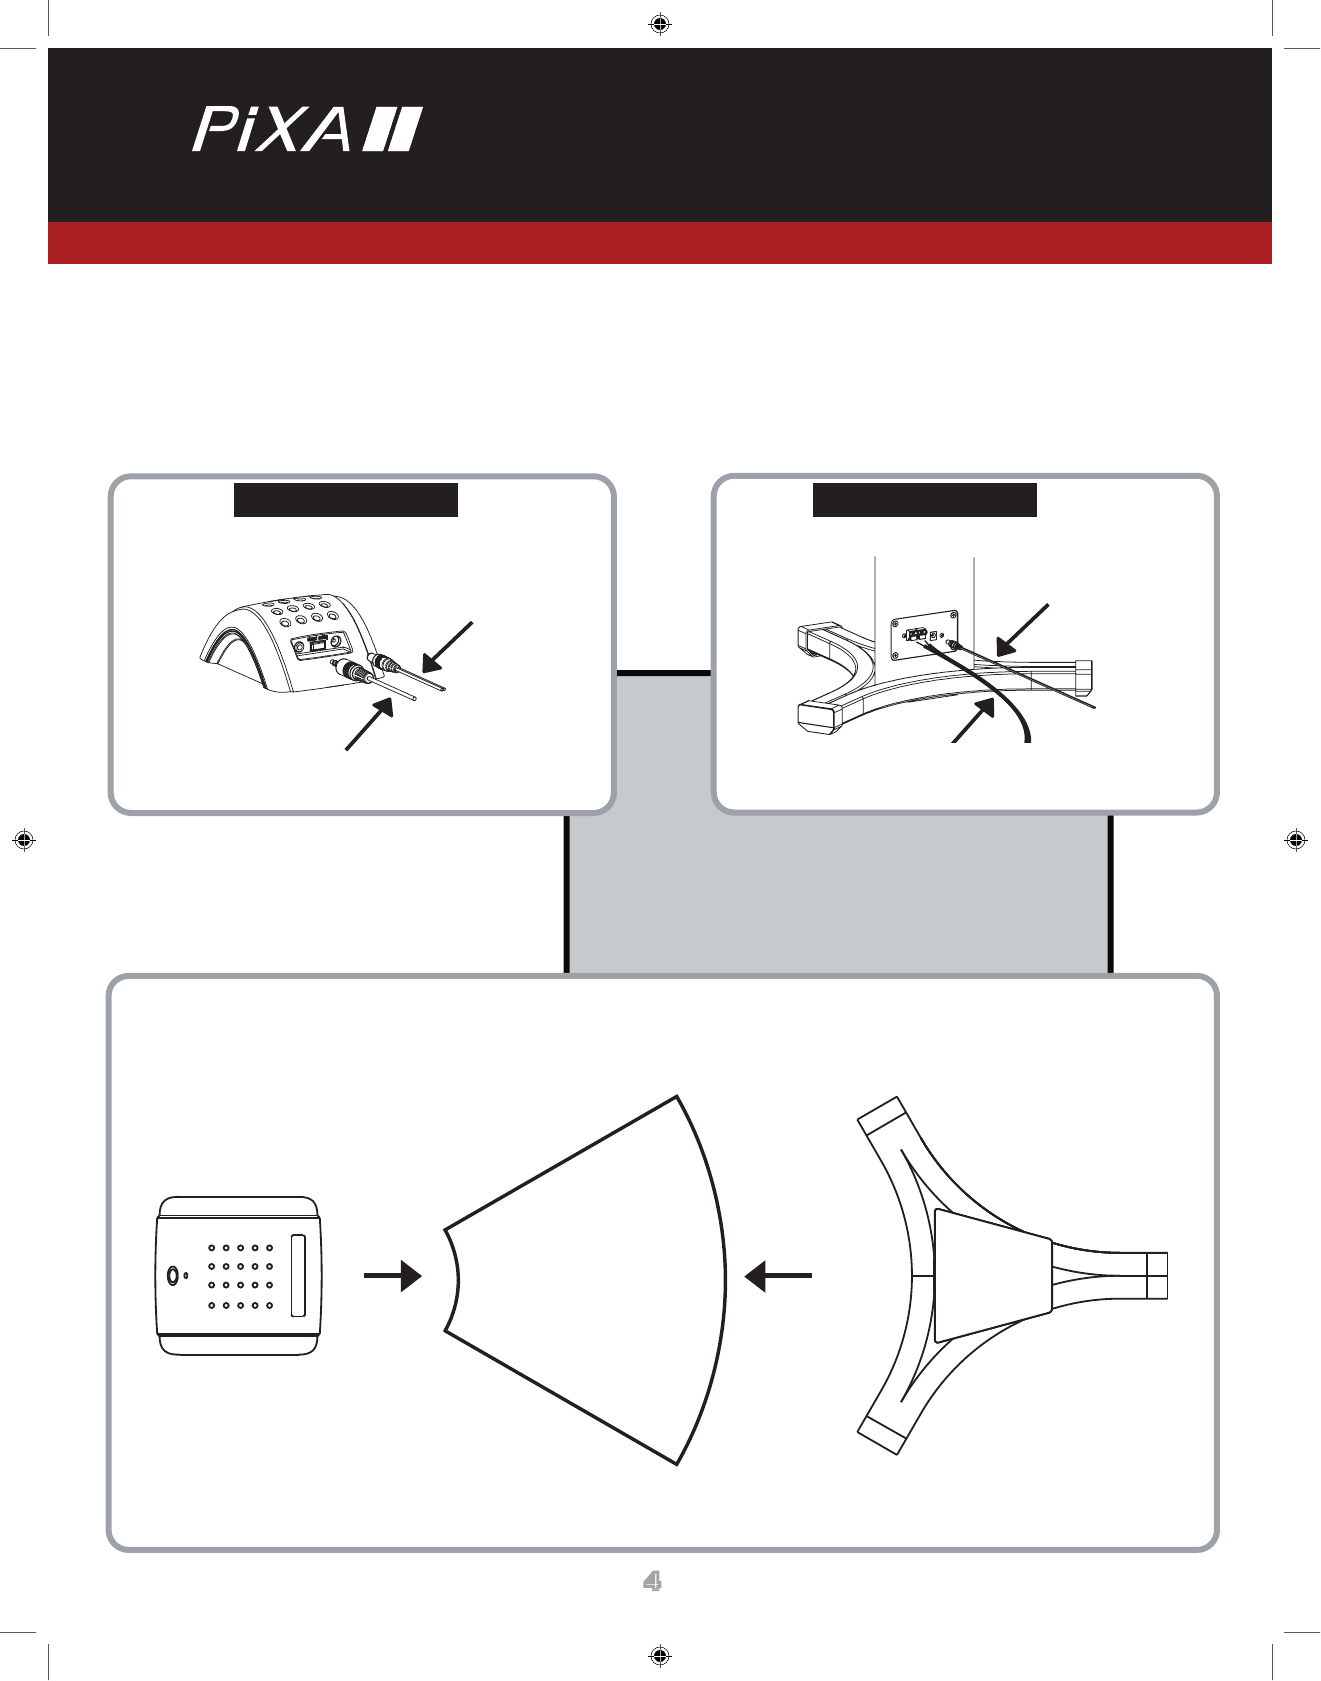
How to connect components.
Part 4.
The perfect opposite position.
Signal Input
Adapter A (7V)
TRANSMITTER RECEIVER
Adapter B (14V)
Speaker Signal output
to another stand
WS-100
2.4 GHz Wireless speaker system
WS-100
2.4 GHz Wireless speaker system
55
Part 5.
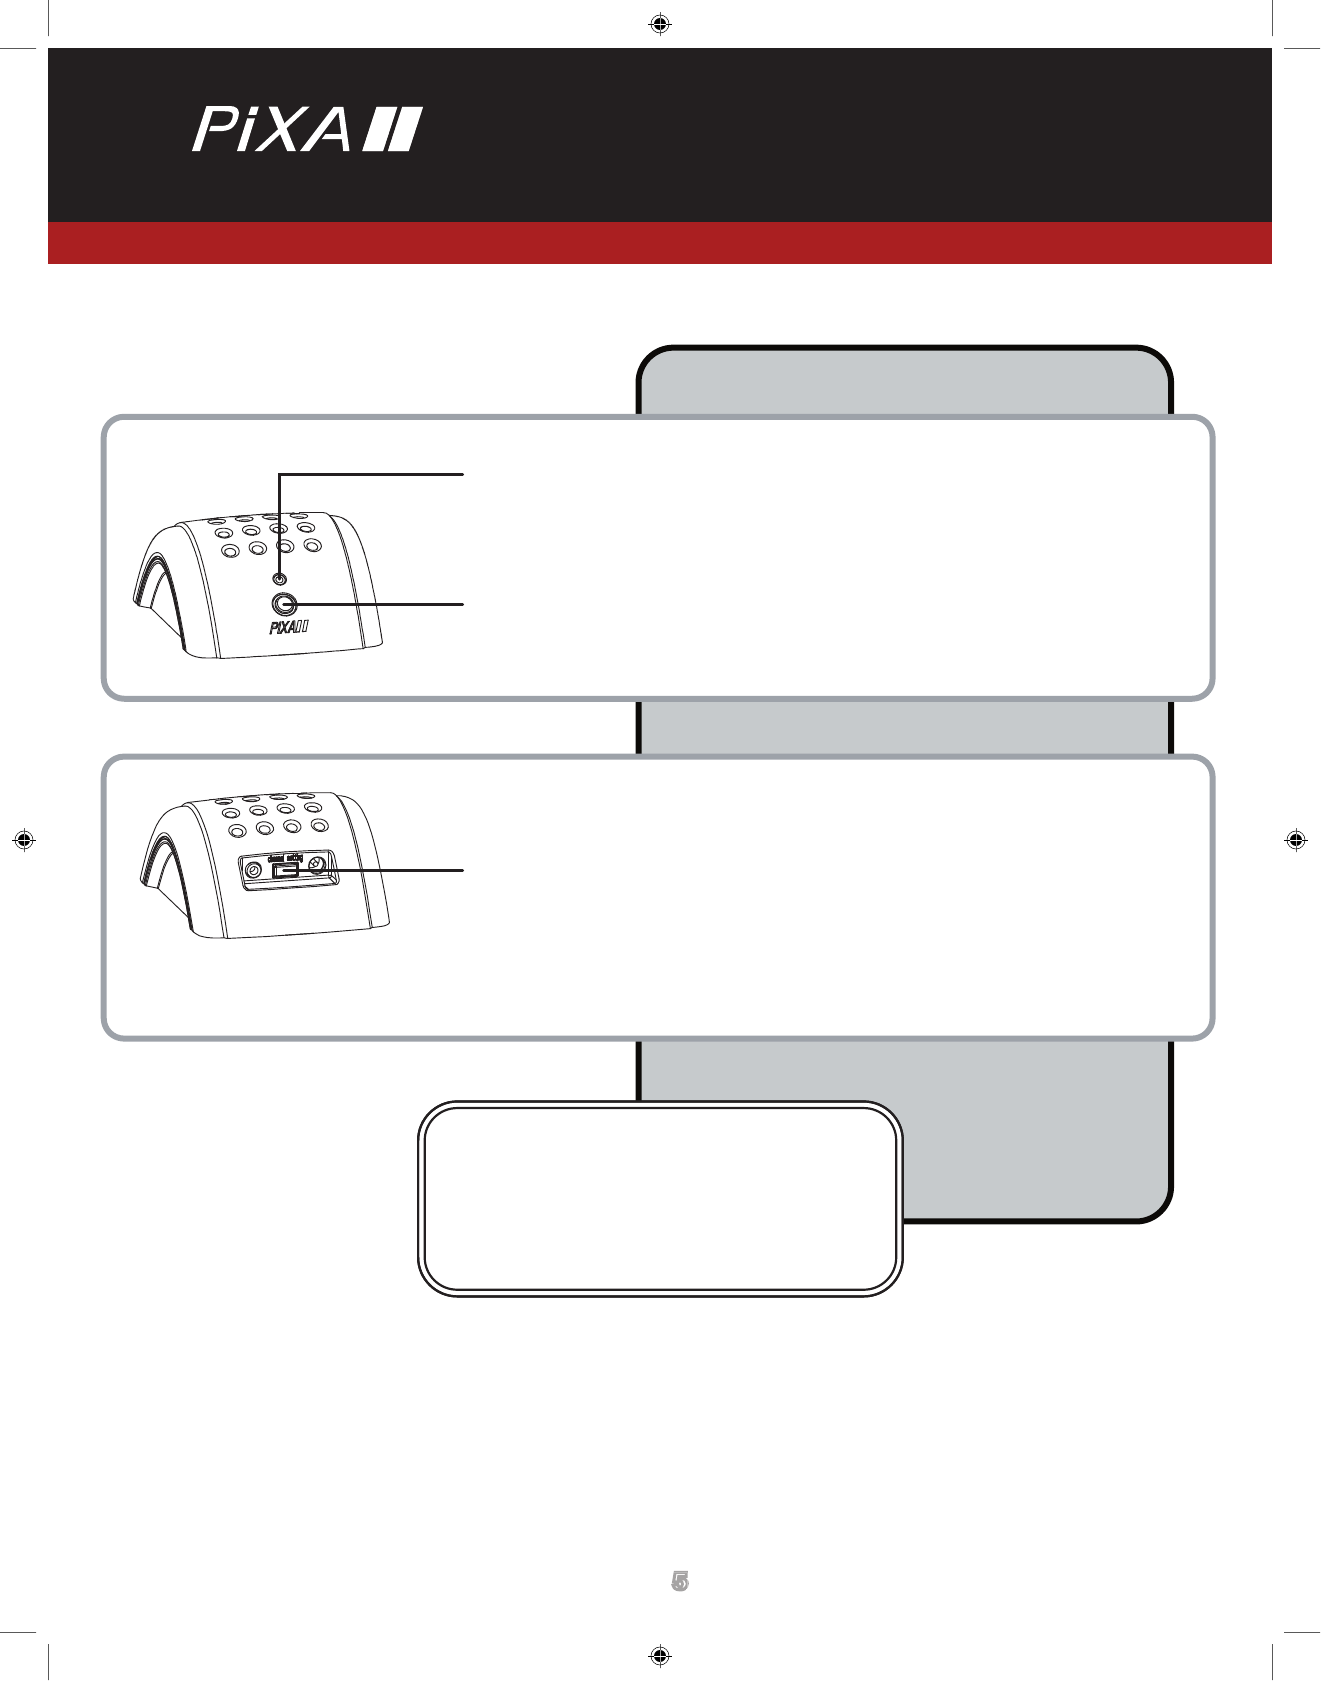
How to operate the transmitter.
CAUTION!
Power Button - Push to turn on or turn off
the power.
Channel setting Button - Push to change
the channel when the signal be jammed.
EXP: Bluetooth, Wlan, 2.4G wireless device.
Power Indicator
Plece Receiver module far away from
to prevent interference problem.
Bluetooth, Wlan, 2.4G wireless device
Part 6.
Company information.
Pixa, Inc.
7020 Koll Center Parkway, Suite 138., Pleasanton, CA 94566
Phone: (925) 426-9100, Fax: (925) 426-8200, web: www.pixainc.com
CAUTION!
Plece Receiver module far away from
to prevent interference problem.
Bluetooth, Wlan, 2.4G wireless device
IMPORTANT SAFETY INSTRUCTIONS
1. Read instructions- Read all the safety and operating instructions before
operating the unit.
2. Retain Instructions- Retain the safety and operating instructions for future
reference.
3. Heed Warnings-Adhere to all warnings on the unit and in the operating
instructions.
4. Follow Instructions- Follow all operating instructions.
5. Cleaning- Unplug the unit from the power outlet before cleaning. Do not use
liquid cleaners or aerosol cleaners. Use a damp cloth for cleaning.
6. Attachments- Do not use attachments that are not recommended by the unit’s
manufacturer because they may cause Hazards.
7. Water and Moisture- Do not use this unit near water; for example near a
bathtub, sink, laundry tub, in a wet basement, near a swimming pool, in an
unprotected outdoor installation or any other wet location.
8. Accessories-Do not place this unit on an unstable stand, tripod, bracket or
mount. The unit may fall, seriously injuring a person or seriously damaging the
unit. Use only with stands, tripods, brackets or mounts
recommended by the manufacturer or sold with the unit. Follow
manufacturer’s instructions when mounting the unit and only
use mounting accessories recommended by the manufacturer.
Anytime a unit is on a cart, it should be moved with care.
Sudden stops, excessive force and uneven surfaces may
cause the appliance and cart combination to overturn.
9. Ventilation- Openings in the enclosure, if any, are provided for the ventilation
to ensure reliable operation of the unit and to protect it from overheating.
These openings must not be blocked or covered. The unit should never be
placed in a built-in installation unless proper ventilation is provided or the
manufacturer’s instructions have been followed.
10. Heat- Do not install near any heat sources such as radiators, heat registers,
stoves or other apparatus (including amplifiers that produce heat.
11. Power Sources- This unit should be operated using only the type of power
source indicated on the label. If you do not know the specifications of your
power supply, consult your appliance dealer or local power company. For
units powered by batteries or other sources, refer to the operating instructions.
12. Grounding or Polarizing- This unit may be equipped with a polarized power
plug (a plug with one blade wider than the other). This plug will fit into the
power outlet only one direction and is a safety feature. If you are unable to
insert the plug fully into the outlet, try reversing the plug. If the plug still fails to
fit, have a qualified electrician to replace the obsolete outlet. Do not modify the
plug, which defeats the safety purpose of the polarized plug. Alternately, this
unit may be equipped with a three-prong plug, having a grounding pin. This
plug will only fit into a grounding type power outlet. This is a safety feature. If
you are unable to insert the plug in the
outlet, have a qualified electrician replace the obsolete outlet. So not
modify the plug, which will defeat the safety purpose of the plug.
13. Power-Cord Protection- Route power cords so that they are not likely to be
walked on or pinched by items placed upon them or against them. Pay
particular attention to cords, plugs, receptacles and the point where cords exit
the appliance.
14. Power Lines-An outdoor system should not be located near overhead power
lines or other power circuits, or where it can fall into such power lines or
circuits. WARNING: WHEN INSTALLING AN OUTDOOR SYSTEM, USE
EXTRME CAUTION TO AVOID TOUCHING POWER LINES OR CIRCUITS.
CONTACT WITH THESE CAN CAUSE SERIOUS INJURY OR DEATH. In
the United States, refer to the National Electrical Code Article 820 regarding
installation of CATV systems.
15. Overloading- Do not overload outlets and extension cords as this can result
in a risk of fire or electrical shock.
16. Object and Liquid Entry- Do not push objects of any kind into the unit
through openings as the objects may touch dangerous voltage points or
short-out parts resulting in a fire or electrical shock. Never spill liquid of any
kind on the unit.
17. Servicing- Do not attempt to service this unit. Opening or removing covers
may expose you to dangerous voltage or other hazards. Refer all servicing to
qualified personnel.
18. Damage Requiring Service- Unplug the unit from the power outlet and refer
servicing to qualified service personnel under the following conditions:
a. When the power-supply cord or plug is damaged.
b. If liquid has been spilled or objects have fallen into the unit.
c. If the unit has been exposed to rain and water.
d. If the unit does not operate normally when following the operating
instructions. Adjust only those controls that are discussed in the operating
instructions. Adjusting other controls may result in damage and will often
require extensive work by a qualified technician to restore the unit to its
normal operation.
e. If the unit has been dropped or the cabinet has been damaged.
f. When the unit exhibits a distinct change in performance, this indicates a
need for service.
19. Replacement Parts- When replacement parts are required, be sure the
service technician uses replacement parts specified by the manufacturer or
that have the same characteristics as the original parts. Unauthorized
substitutions may result in fire, electrical shock or other hazards.
20. Safety Check- Upon competition of any service or repairs to this unit, ask the
service technician to perform safety checks to determine that the unit is in
proper operating condition.
21. Lighting-Unplug the power cord for added protection of this unit during
lightning storms or when it is left unattended and unused for a long time.
Caution-Use of any controls or adjustments or performance of procedures other
then those specified herein may result in hazardous radiation exposure.
Federal Communication Commission Interference Statement
This equipment has been tested and found to comply with the limits for a Class B digital
device, pursuant to Part 15 of the FCC Rules. These limits are designed to provide
reasonable protection against harmful interference in a residential installation.
This equipment generates, uses and can radiate radio frequency energy and, if not
installed and used in accordance with the instructions, may cause harmful interference to
radio communications. However, there is no guarantee that interference will not occur in
a particular installation. If this equipment does cause harmful interference to radio or
television reception, which can be determined by turning the equipment off and on, the
user is encouraged to try to correct the interference by one of the following measures:
. Reorient or relocate the receiving antenna.
. Increase the separation between the equipment and receiver.
. Connect the equipment into an outlet on a circuit different from that to which the
receiver is connected.
.Consult the dealer or an experienced radio/TV technician for help.
FCC Caution :To assure continued compliance, any changes or modifications not
expressly approved by the party responsible for compliance could void the user's
authority to operate this equipment. (Example - use only shielded interface cables when
connecting to computer or peripheral devices).
FCC Radiation Exposure Statement
This equipment complies with FCC RF radiation exposure limits set forth for an
uncontrolled environment. This equipment should be installed and operated with a
minimum distance of 20 centimeters between the radiator and your body.