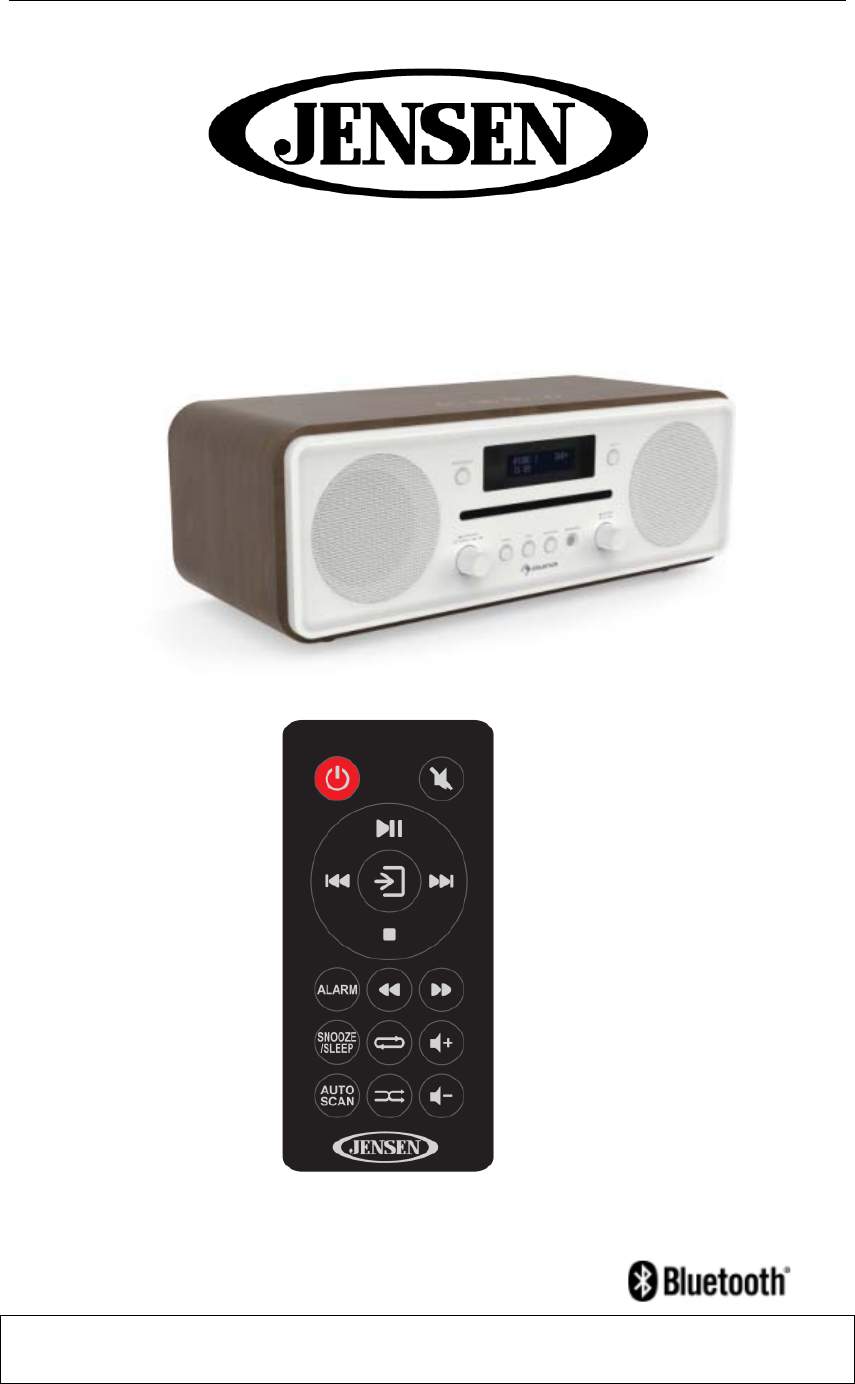
MET JBS-600 Bluetooth Digital Music System with CD User Manual Noah for USA
MET INDUSTRIAL LTD Bluetooth Digital Music System with CD Noah for USA
MET >
User Manual
- 1 -
CD DIGITAL MUSIC SYSTEM
With Bluetooth and ALARM CLOCK RADIO
USER MANUAL
JBS-600
PLEASE READ THIS USER MANUAL COMPLETELY BEFORE OPERATING THIS UNIT
AND RETAIN THIS BOOKLET FOR FUTURE REFERENCE.
- 2 -
Dear Customer,
Congratulations on purchasing JBS-600 music system. Please read and follow these instructions,
in order to avoid damaging the item. We do not cover any damages that may arise from improper
use of the item or the disregard of the safety instructions.
Important Safety Advice
Read all instructions before using.
• To protect against a fire, electric shock or personal injury, do not immerse cord, electric plugs
or device in water or other liquids.
• Do not expose the appliance to extreme temperatures. The appliance shall be used in moderate
climates.
• The use of attachments that are not recommended by the appliance manufacturer may result in
fire,electric shock or personal injury.
• Do not open the unit by removing any cover parts. Do not attempt to repair the unit. Any
repairs or servicing should be done by qualified personell only.
• Only qualified persons may perform technical work on the product. The product may not be
opened or changed. The components cannot be serviced by the user. The manufacturer is not
responsible for any radio or TV interference caused by unauthorized modifications.
• The appliance is not a toy. Do not let children play with it. Never let children insert foreign
objects into the appliance.
• Never clean the surface of the device with solvents, paint thinners, cleansers or other chemical
products. Instead, use a soft, dry cloth or soft brush.
• Save these instructions.
• Small objects: Keep small objects (i.e. screws, mounting material, memory cards etc.) and
packaging out of the range of children. Do not let Children play with foil. Choking hazard.
Transporting the device: Please keep the original packaging. To gain sufficient protection of
the device while shipment or transportation, make sure to put it back in its original
packaging.
• Cleaning the surface: Do not use any volatile liquids, detergents or the like. Use a clean dry
- 3 -
cloth
SAVE THESE INSTRUCTIONS
Follow the advice below for safe operations.
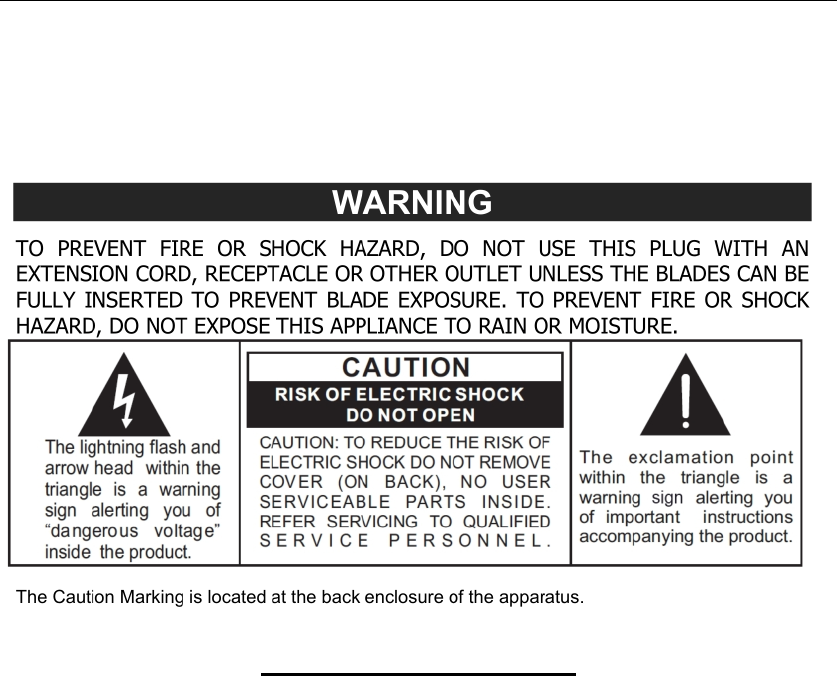
ON PROTECTION AGAINST LASER ENERGY EXPOSURE
• As the laser beam used in this compact disc player is harmful to the eyes, do not attempt to
disassemble the casing.
• Stop operation immediately if any liquid or solid object should fall into the cabinet.
• Do not touch the lens or poke at it. If you do, you may damage the lens and the player may
not operate properly.
• Do not put anything in the safety slot. If you do, the laser diode will be ON when the CD
door is still open.
• This unit employs a laser. The use of controls or adjustment or performance of procedures
other than those specified here may result in exposure to hazardous radiation.
ON SAFETY
• When connecting and disconnecting the AC power, grip the AC cord plastic plug and not the
cord itself. Pulling the cord may damage it and create hazard.
• When you are not going to use the unit for a long period of time, disconnect the AC power
cord from the AC outlet.
ON AC VOLTAGE
• Before use, check that the rated voltage of your unit matches your local voltage.
ON CONDENSATION
• When left in a heated room where it is warm and damp, water droplets or condensation

- 4 -
may form inside the CD player.
• When there is condensation inside the unit, the unit may not function normally.
• Let it stand for 1 to 2 hours before turning the power on, or gradually heat the room up and
dry the unit before use.
Should any trouble occur, disconnect the AC power cord and refer servicing to qualified
personnel.
COMPLIANCE WITH FCC REGULATIONS
This device complies with Part 15 of the FCC Rules. Operation is subject to the following two
Conditions:
1) This device may not cause harmful interference.
2) This device must accept any interference received, including interference that may cause
undesired operation
This equipment has been tested and found to comply with the limits for a Class B Digital
Device,pursuant to Part 15 of the FCC Rules. These limits are designed to provide reasonable
protection against harmful interference in a residential installation. This equipment generates, uses
and can radiate radio frequency energy and, if not installed and used in accordance with the
instructions,may cause harmful interference to radio communications. However, there is no
guarantee that interference will not occur in a particular installation. If this equipment does cause
harmful interference to radio or television reception, which can be determined by turning the
equipment off and on, the user is encouraged to try to correct the interference by one or more of
the following measures:
- Reorient or relocate the receiving antenna.
- Increase the separation between the equipment and receiver.
- Connect the equipment into an outlet on a circuit different from that to which the receiver is
connected.
- Consult the dealer or an experienced radio/TV technician for help
CAUTION: Changes or modifications not expressly approved by the party responsible for
compliance could void the user’s authority to operate the equipment.
General Information
• CD Digital Music System.
• Bluetooth 4.1
• NFC for easy pairing.
• FM/AM receiver with 20 presets .
• Dual alarm clock function, wake to alarm from CD or FM or Beeper
• Supports Aux in , Headphone output.
• Multi function LCD display.
• Supports Remote control (CR2032 battery included)
• Output power: 2 x 15W RMS
- 5 -
• Comply with ETL, DOE level VI, FCC ID, FCC VoC, FCC DoC, DHHS
• Accessories: Main unit, Remote control, AC power cord, Loop
antenna, User Manual, Warranty.
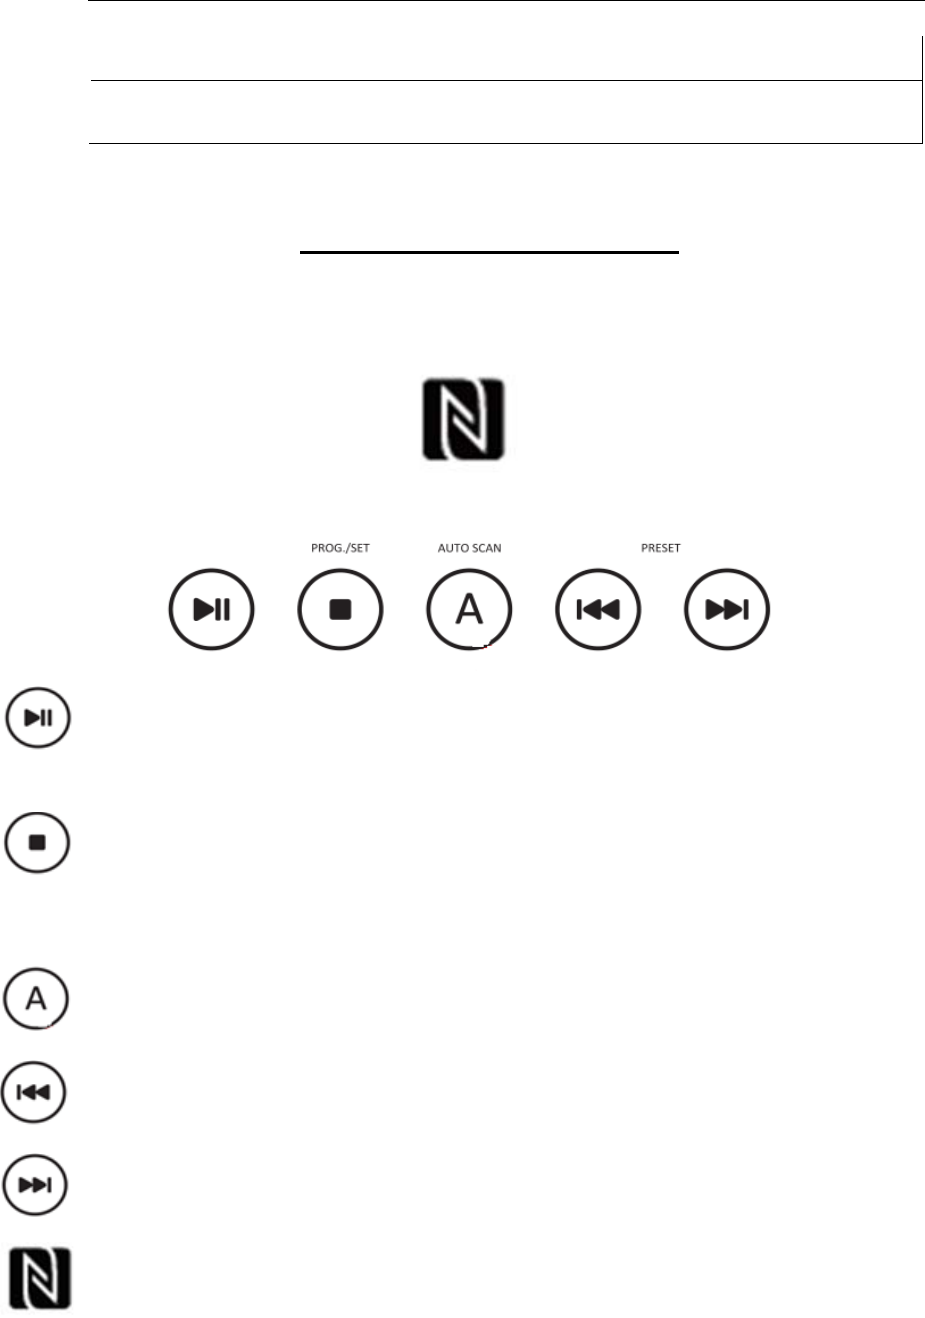
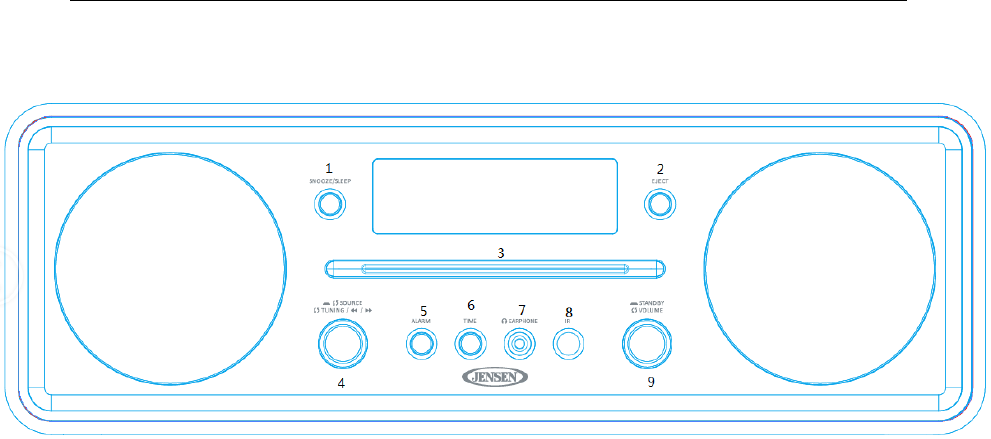
LOCATON OF CONTROL
MAIN UNIT
TOP SILK
1) On C D / BT mode, touch this button to play, touch again to pause playing.
2) On RADIO /AUX mode, touch this button to mute, touch again to release muting.
1) On C D mode, touch this button to stop playing.
2) On C D and stop mode, touch this button﹥2 second to program setup.
3) On RADIO model, touch this button﹥2 second to preset radio staton by “manually”
On RADIO mode, touch this button to auto scan radio stations, touch again to stop scan.
On C D/BT/RADIO mode, touch this button to skip previous song or radio station.
On C D/BT/RADIO mode, touch this button to skip next song or radio station.
NFC LINKING POINT.
- 6 -
FRONT SILK
1. SNOOZE/SLEEP.
• Press this button to set snooze time when the alarm sounds.
• Press this button to set sleep time when turn the unit on.
2. EJECT.
• Press this button to eject the inserted C D.
3. Slot-In CD drive.
4. SOURCE/ TUNING.
• Rotate this button to select mode CD/BT/FM/AM/AUX or to fine tuning or fast playbacd
forward/backward.
• Press this button to confirm function.
5. ALARM.
• Press this button to setup the alarm.
6. TIME.
• In standby mode press this button to setup time.
• In operated mode press this button to view time.
7. EARPHONE.
• Connect headphones with 3.5mm audio jack here, the internal speakers will be muted
automatically.
8. IR.
• Remote sensor.
9. STANDBY/ VOLUME
• Press this button to turn the unit on or off.
• Rotate this button to adjust volume level.
- 7 -
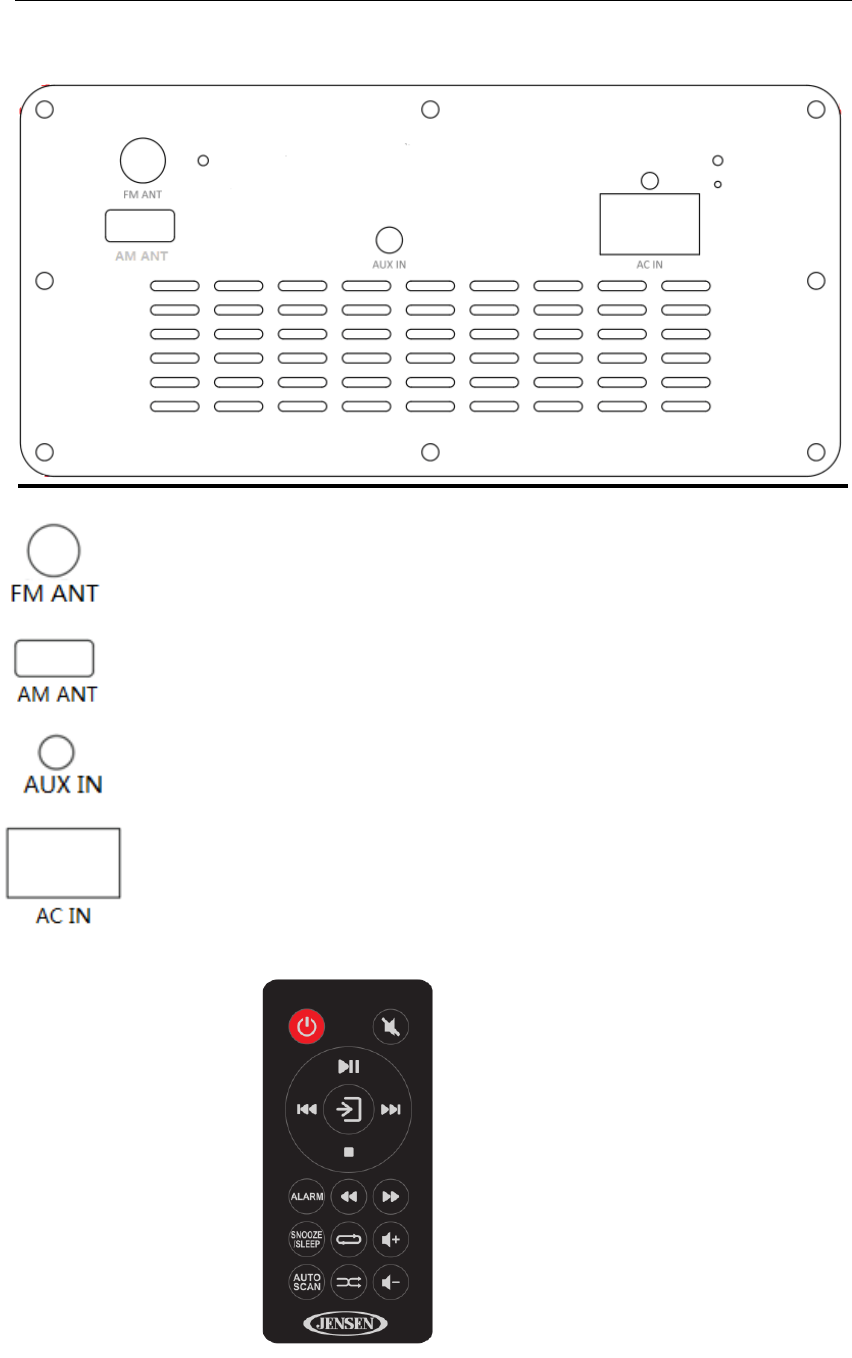
BACK SILK
:FM telescopic antenna.
:Connect to the loop antenna
:Connecting external audio devices
:Connecting AC POWER CORD.
REMOTE CONTROL

- 8 -
. Press this button to turn the unit on or off.
. Press this button to mute, press again to release muting.
.• On C D / BT mode, press this button to play, press again to pause playing.
• On RADIO /AUX mode, press this button to mute, press again to release muting.
On C D/BT/RADIO mode, press this button to skip previous song or radio station.
Press this button select mode CD/BT/FM/AM/AUX.
On C D/BT/RADIO mode, press this button to skip next song or radio station.
On C D mode, press this button to stop playing.
Press this button to setup the alarm.
On C D mode, press this button to fast playback backward.
On C D mode, press this button to fast playback forward.
• Press this button to set snooze time when alarm sounds.
• Press this button to set sleep time when turn the unit on.
On CD mode, press this button to select replay mode (REP1: replay one song , REPA :replay
all song, REP OFF: Cancel replay function).
Press this button to increase volume.
Press this button to auto scan radio stations.
- 9 -
Press this button to play random.
Press this button to decrease volume
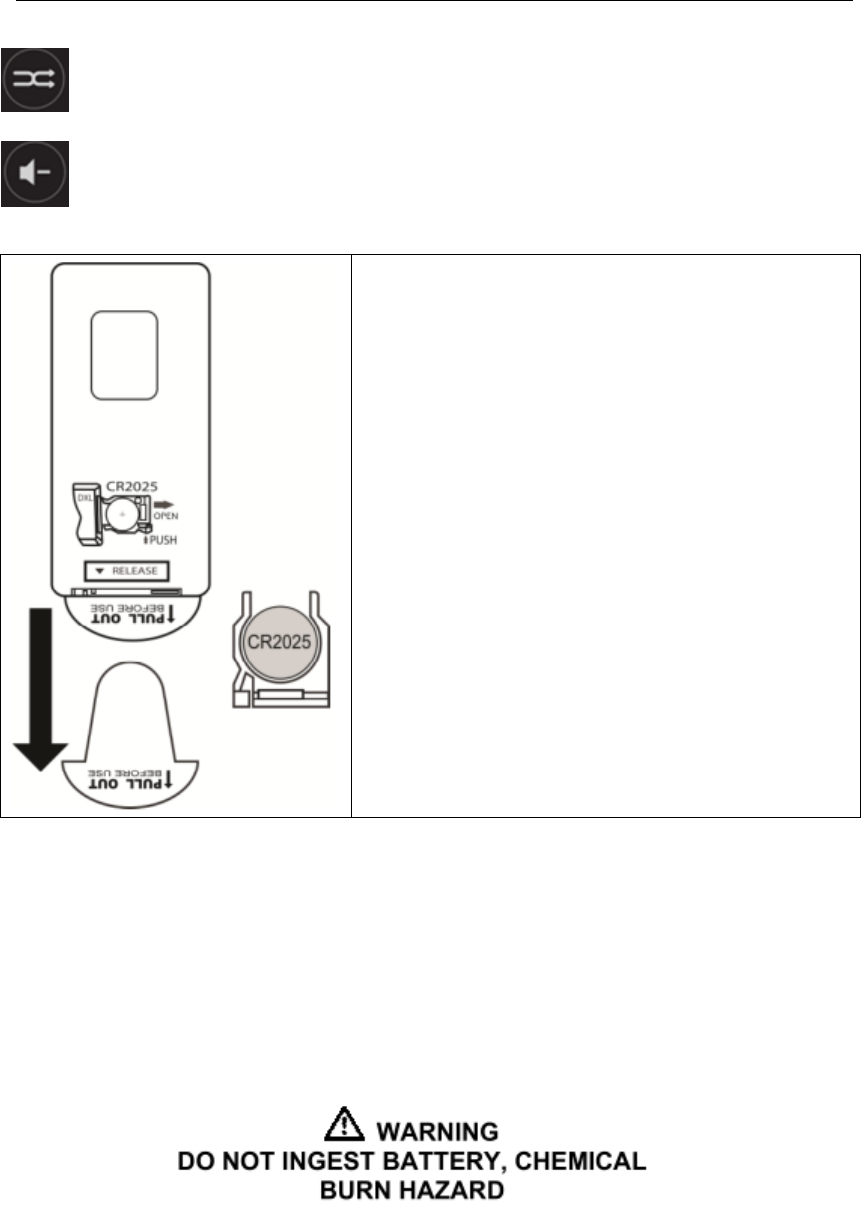
STARTED TO USE REMOTE CONTROL
The remote control operates on one CR2025 battery
(included). To activate the remote control, remove the
insulation tab inserted in the battery compartment.
When the operation of the remote control becomes
intermittent or unsatisfactory, replace the original battery
with a new 3-volt lithium battery.
1. Press down on the compartment cover, slide out the
battery holder from the remote control case.
2. Replace the 3V CR2025 battery. Be sure the battery is
installed correctly. The remote will not work if the
battery is installed with the wrong polarity.
CAUTION:
1.Danger of explosion if the battery is replaced
incorrectly.
2.Replace only with the same or equivalent type
battery.
NOTE: Only use a well-known brand of battery to ensure
the longest life and best performance.
Battery Precautions
• Replacement of batteries must be done by an adult.
• The supply terminals are not to be short-circuited.
• Non-rechargeable batteries are not to be recharged.
• Exhausted batteries are to be removed.
• Only batteries of the equivalent type are to be used.
• Batteries are to be inserted with the correct polarity.
• Dispose of batteries properly. Do not dispose of batteries in fire. The batteries may explode
or leak.
The remote control supplied with this product contains a coin/button cell battery. If the
coin/button cell battery is swallowed, it can cause severe internal burns in just 2 hours and
can lead to death.
Keep new and used batteries away from children. If the battery compartment does not close
securely, stop using the product and keep it away from children.
If you think batteries might have been swallowed or placed inside any part of the body, seek

- 10 -
immediate medical attention.
NOTE: ON NON-MAGNETICALLY SHIELDED SPEAKERS.
This unit is not magnetically shielded and may cause color distortion on the screen of some
TVs or video monitors. To avoid this, you may need to move the unit further away from the
TV or monitor if unnatural color shifts or image distortion occurs.
TURNING THE UNIT POWER ON/OFF
POWER SOURCE
AC100V-240V/50-60Hz SMPS POWER is used for the main unit and one 3V type CR2025
Lithium battery (included) for remote control. Do not attempt to operate the unit from any
other power source. You could cause damage to the unit and void your warranty.
AC Power Connection
• Firmly and securely insert the terminal of the power cord to the AC IN port of the unit back.
• Firmly and securely insert the AC plug of the power cord into a power outlet rated at 120
VAC/60Hz.
• Turn on the POWER of AC power outlet,then the unit go in standby mode and the LCD
DISPLAY dim and show the current time (reference to “24:00”).
TURNING THE POWER ON/OFF
• To turn the unit on , when the unit is standby mode, press the STANDBY Button on main unit
or remote control to turn the unit ON. The unit will turn on, and the last selected input mode
icon will show on LCD display(default mode is CD).
• To turn the unit OFF , when the unit is power on , press the STANDBY Button again on main
unit or remote control , The LCD DISPLAY will dim and show the current time.
CD PLAYER OPERATION
PLEASE READ THIS IMPORTANT INFORMATION:
CD mechanisms used in devices like this are designed to read all commercial CDs. It will also
read self-compiled CD-R/CD-RW discs, but it may take up to 10 seconds for the actual playback
to begin. If playback does not start, it is likely due to the quality of the CD-R/RW disc and/or the
compatibility of the CD compilation software. The manufacturer is not responsible for the
playback quality of CD-R/RW discs.
Do not attach a label or seal to either side of the CD-R/RW disc. It may cause a malfunction.
PLAYING A CD
• Press the STANDBY Button on main unit or remote control to turn on the unit.
• Rotate and press the SOURCE Button on main unit or remote control to select CD mode. “C D”
icon turns on, the display will show “C D” form flashing to steadily.
• Press the EJECT Button to insert an audio CD.
• the unit starts to read the disc, “LOAD” shows in display and flashing. After few seconds, the
total number of tracks show on the LCD display.
• Touch the PLAY/PAUSE Button on main unit or remote control to play, play indicator icon
shows in display, the CD will start playing from first track.
• To pause playback, press touch the PLAY/PAUSE Button on main unit or remote control. The
track time will be paused and pause indicator icon will show in display. To resume playing,
please touch the PLAY/PAUSE Button again.

- 11 -
• You can select to play your favorite track directly by touch either the skip next Button or skip
previous Button. The LCD Display will indicate the correct track number selected.
• You can playback fast backward or fast forward by rotate SOURCE Button or remote control.
• To stop playing, press touch the STOP Button then the total number of tracks show on the LCD
display.
• Rotae the Volume Button on main unit or remote control to adjust the volume to the desired
volume level.
• Turn off the JBS-600 when you are done listening.
DIFFERENT PLAY MODES (REMOTE CONTROL ONLY)
• Press the PLAY MODE Button on remote control repeatedly to select different of play modes
when CD or MP3 CD is playing.
• When playing CD, press the REPEAT Button repeatedly on remote control, the play modes are
shown as below:
REP1 → REPA →REP OFF
REP1 - the track being played and will repeat continuously
REPEA - all tracks will repeat continuously.
REP OFF- cancel repeatedly playback function.
• When playing CD, press the RAND Button repeatedly on remote control, the RAND play
modes are shown as below:
RAND→ RAND OFF
RAND-- playback the track random
RAND OFF--cancel playback function random
PLAY TRACK SEQUENCE PROGRAMMING
This function allows the tracks to be played in a programmed sequence.
NOTE: Program can only be set in STOP mode.
1) Touch the Button ﹥2 seconds on the main unit, the program track number “P01” show
in the display.
2) Use the or Button on main unit or remote control to select the desired track. The
track number will be shown in display.
3) Touch the Button on the main unit to store the selected track in the memory, then the
next program number (i.e.“P02”) show in the display.
4) Repeat steps 2 to 3 to store more tracks in the memory.
5) Touch the Button on main unit or remote control to start playing the CD or MP3 CD in
the programmed sequence.
6) To stop playing , touch the Button on main unit or remote control.
7) To cancel the program play, touich the Button on main unit or remote control twice.
BLUETOOTH OPERATION
CONNECTING YOUR BLUETOOTH DEVICE USING NFC
ABOUT NFC
NFC (Near Field Communication) is a technology enabling short-range wireless communication
between various devices, such as mobile phones and IC tags Thanks to the NFC function, data
communication can be achieved easily just by touching the relevant symbol or designated location
on NFC compatible devices.

- 12 -
• Make sure your Smartphone or Bluetooth device has the NFC feature, and it is turned ON
(enabled).
• Turn on the JBS-600 power, rotate the source Button on main unit select Bluetooth mode, the
Bluetooth “BT” message will be shown in display and flashing.
• Use the back of your smartphone touch the NFC linking point icon located on the top of the
unit (Check the owner’s manual of your Bluetooth device to locate the NFC touch point if
you are not sure where it is).
• If the JBS-600 is in pairing mode, it will turn on and enter Bluetooth mode automatically and
pair with your smartphone. Display will change show “BT” steadily.
• Some smartphones may ask you to confirm the pairing if they are not paired before.
NOTE: If you have multiple NFC compatible devices to link, just touch the smartphone to a
different device to switch the connection to that device. For example, when your
smartphone is connected to the JBS-600, just touch the linked smartphone to the system to
disconnect it and then touch another smartphone you want to change the Bluetooth
connection to (one touch connection switching). The connection will automatically be
transferred from your smartphone to the new device.
PAIRING (Linking) a BLUETOOTH ENABLED cell phone OR OTHER BLUETOOTH
ENABLED DEVICE to the JBS-600
If the JBS-600 has never been paired with a Bluetooth device before. You need to follow the
pairing instructions below to link the JBS-600 with your Bluetooth device.
• Turn on the JBS-600 power, rotate the source Button on main unit to select Bluetooth mode, the
Bluetooth “BT” message will be shown in display and flashing.
• If the JBS-600 has never been paired with a Bluetooth device before or cannot find the last
paired device, the flashing “BT” on LCD will indicate the JBS-600 is in search mode. You need
to follow the pairing instructions below to link the JBS-600 with your Bluetooth device.
1) Turn on the Bluetooth function of your Bluetooth device and enable the search or scan
function to find the JBS-600.
2) Select "JBS-600" from the device list when it appears on your device screen.
• After successfully pairing (linking), display will change to show “BT” steadily, You can begin
playing music from your Bluetooth device wirelessly to the speaker.
• After selecting your favorite song, touch the Button on the unit or remote
control to play or pause the song.
• Rotate STANDBY Button on main unit or remote control to adjust to the desired volume level.
• Touch the or Button on main unit or remote control to skip to previous or next song
Notes:
1) Refer to the manual of your cell phone, tablet PC, computer or other Bluetooth enabled
devices for Bluetooth operation since it may vary from model to model.
2) If your Bluetooth enabled device does not support A2DP profile, it will not play the music
through the speaker, even if paired (linked).
3) If you are pairing (linking) your computer to the unit using Bluetooth, you may need to set
the speaker as your computer’s default sound device.
AUXILIARY INPUT OPERATION

- 13 -
This unit features an auxiliary audio signal input jack for connecting external audio devices like
MP3 players, Digital Audio Device and listen to them through the speakers of this unit.
• Use an audio cable (not included) with one 3.5 mm stereo plug on each end of the cable.
• Plug one end into the AUX IN port on main unit and the other end of the cable into the Line-
out Jack or Headphone Jack of your external audio device.
• Turn on the unit and external audio device.
• Rotate the source Button on main unit or remote control to select AUX mode, the “AUX” icon
turns on, display will show “AUX” form flashing to steadily.
• The volume level can now be controlled through the main unit. Operate all other functions on
the auxiliary device as usual.
• Touch the Button on main unit or remote control to mute the sound output from the speaker
temporarily,The “MUTE” icon will appear in display.
Note:
1) If you connect this unit to the Line-Out Jack of your external device then you only need to
adjust the volume control of this unit. If you connect the Headphone Jack of your external
device then you may need to adjust both the volume controls of your external device and
this unit to obtain the desirable volume setting.
2) Press the STANDBY Button on main unit or remote control to turn off the unit when you
have finished listening. Don't forget to switch off the power of your external device as
well.
RADIO OPERATION
• Press the STANDBY Button on main unit or remote control to turn on the unit.
• Rotate the Source Button on main unit or remote control to select FM/AM mode, the FM/AM
radio frequency appear in display.
• To manually tune to a specific radio station, rotate SOURCE Button on main unit to tune to a
specific frequency radio station, Use the manual tuning method to tune in weaker stations that
are bypassed during Automatic Tuning.
• To automatically tune to the next available radio station, Touch the or Button﹥2
seconds on main unit then release the button, The tuner will stop scanning when it receives the
next broadcasting station of adequate signal strength.
• Rotae the Volume Button on main unit or remote control to adjust the volume control to the
desired volume level.
• Touch the Button on main unit or remote control to mute the sound output from the speaker
temporarily,The “MUTE” icon will appear in display.
FM & FM-Stereo reception:
When listening to the FM radio, The FM stereo icon “ST” will appear automatic on the display
if the unit is in stereo mode and receiving a strong station . It is preferable to receive the
program in mono when you are receiving a weak station then The FM mono icon “MONO” will
appear automatic on the display.
HINTS FOR BEST RECEPTION:
The receiver have built a FM telescopic antenna and AM loop antenna, hanging from the back
of the cabinet. This antenna should be totally unwrapped and fully extended for the best

- 14 -
reception.
NOTE: Automatic tuning depends on the signal strength of the broadcasting station, so weak
stations may be skipped. You can manually tune to find the weak stations if a station gets
skipped. With strong signals, the tuner may stop before it reaches the actual broadcast
frequency, so you may need to manually tune for the best reception.
PRESET RADIO STATIONS BY MANUALLY
1) Press the STANDBY Button on main unit or remote control to turn on the unit.
2) Rotate the SOURCE Button on main unit or remote control to select FM/AM radio mode.
3) Tune to the desired radio station either by “manually” or “automatically” tuning method.
4) Touch the PROG./SET Button on main unit ﹥2 seconds, the next available preset
memory number will be shown in display and flashing (Note:”P01” will blink in the display
if you are programming preset for first time).
5) Rotate the SOURCE Button change to the desired memory number(for example P01/P02…).
6) Press the SOURCE Button to confirm the setting.
7) Repeat above steps 3 - 6 to preset up to 20 FM/AM stations
PRESET RADIO STATIONS BY AUTOMATICALLY :
Touch the AUTO/SCAN Button on main unit to start auto scan and preset programming, touch
again to stop auto scan radio stations.
• start from start of FM 88MHz/AM 530KHz.
• after a station is tuned, preset all stations from P01.
• stop and go to P01 if :
1) finish searching for whole band FM 88 – 108MHz /AM 530-1710KHz
2) all preset stations (total 20 presets for this model) are programmed. No more space for
further station to be saved.
• If no any station can be found, stop at FM 88MHz
RECALLING PRESET MEMORY CHANNELS
In radio mode, recall the pre-set channels by touch the or Button on main unit or remote
controller.
NOTE:
The clock and FM radio station presets will need to be reset if the power is interrupted or in
the event of a power outage. “12:00”or“24:00” will appear on the display to notify you that
the power was interrupted and the clock will need to be reset. Please follow steps 1-7 above
to resave the preset stations.
SETTING THE CLOCK
After plugging in the AC power, “12:00”or“24:00” will appear on the LCD display.
1) In Power Off (Standby) mode, press the TIME Button on main unit. The “24H” format will
show in display and digit “24” will keep blinking.
2) Rotate the SOURCE Button on main unit to select 24H or 12H format if necessary.
Otherwise press the SOURCE Button to confirm clock format and enter clock setup mode,
Hour digits will be flashing.
3) Rotate the SOURCE Button on main unit to adjust the hour.
4) Press the SOURCE Button to confirm the hour setting, the minute digits will flash to prompt

- 15 -
for input.
5) Rotate the SOURCE Button on main unit to adjust the minute.
6) Press the SOURCE Button again to complete the setting.
NOTE: The clock and radio station presets will need to be reset if the power is interrupted or in
the event of a power outage. “12:00” or“24:00” will appear on the LCD display then the
clock will need to be reset. Please follow steps 1-6 above to reset the clock..
CHECKING THE CLOCK
To check the current time in power ON mode,please press the TIME Button on the main unit , the
current time will show for 3 seconds and then return to the previous screen.
SLEEP OPERATIONS
The sleep timer allows you to turn the unit off after a designated time is reached.
• To activate the sleep timer, pleae turn on the unit.
• Press the SLEEP Button on main unit, the sleep character appears on the display.
• Repeatedly press the SLEEP button to select a sleep time, The unit will turn off after
120,090,060,045.030,or 015 minutes,Wait for 3-5 seconds for the unit to confirm the selection
automatically then the unit will play for the selected length of time then automatically turn off.
• To cancel the sleep timer, please press the SLEEP Button repeatedly until timer shows
“000”,then after wait for 3-5 seconds the unit to confirm the selection, the sleep character
disappears on the display.
• To turn the unit off before the selected length of time, press the POWER button at any time.
Notes: To check the remaining sleep time, please the SLEEP button once.
ALARM OPERATION
SETTING THE ALARM CLOCK
This function allows the system to turn on automatically and wake you using a beeping alarm, the
CD or the FM radio.
• In standby mode, press the ALARM Button on main unit, the “alarm-1” icon appears on the
display and flashing.
• Rotate the SOURCE Button to select the “alarm-1” or “alarm-2”
• Press the ALARM Button to confirm, then the alarm wake up source will appear in display.
• Rotate the SOURCE Button to select wake to C D,FM,BUZZ
• Press the ALARM Button again to confirm, then the alarm volume “VOL” will appear in
display.
• Rotate the SOURCE Button to preset the wake up alarm volume level.
• Press the ALARM Button again to confirm, then the alarm wake up time long “1 MIN” will
appear in display.
• Rotate the SOURCE Button to preset the time long (1-5MIN).
• Press the ALARM Button again to confirm, then alarm time “12:00”or “24:00” will appear in
display and Hour digits of alarm clock start flashing.
• Rotate the SOURCE Button to set the hour .
• Press the ALARM Button again to confirm, Minute digits will be flashing.
• Rotate the SOURCE Button to set the minute .

- 16 -
• Press the ALARM Button again to confirm and finish alarm setup.
NOTE:
1) If “Wake to CD” is selected but a CD is not inserted, the alarm will default to the Beeping
Alarm automatically when the alarm wake time is reached.
2) For ‘Wake to Radio”, the system will default to the last radio station listened to before
switching off.
CANCEL ALARM FUNCTION
To cancel ALARM function:
1) Press the ALARM Button, the preset “alarm-1”or “alarm-1” appears on the display and
flashing.
2) Rotate the SOURCE Button to select the preset “alarm-1” or “alarm-2”
3) Press the ALARM Button again then the alarm icon “alarm-1”or “alarm-1 goes off.
SNOOZE FUNCTION
To activate the snooze function
1) When the alarm sounds, Press the SNOOZE Button to stops sound then the snooze time
“10” appears on the display and flashing.
2) Repeatedly press the SNOOZE Button to select the snooze time
(10/20/30/40/50/60/70/80/90/00).
3) Wait for 3-5 seconds for the unit to confirm the selection automatically and finish the
snooze function setup.
NOTE:
1) After activate the snooze function, the alarm sounds will stops for the snooze time then
come again.
2) To stop the alarm immediately after it sounds, please press the STANDBY Button on main
unit
RESETTING
If the system does not respond or has erratic operation, you may have experienced an electrostatic
discharge (ESD) or a power surge that triggered the internal computer to shut down automatically.
If this occurs, unplug the AC power cord from power source, wait for 60 seconds, then plug the
AC power cord to power source again. The unit will be reset, you need to setup the clock, alarm
and preset radio channels.
MUTE BUTTON
• Press the Button on remote control to mute the sound output from the speaker
temporarily. The “MUTE” icon will appear in display.
• Press the Button again to resume to normal speaker playback.
CARE AND MAINTENANCE
1. Do not subject the unit to excessive force, shock, dust or extreme temperature.
2. Do not tamper the internal components of the unit.
3. Clean your unit with a dry cloth. Solvent or detergent should never be used.

- 17 -
4. Avoid leaving your unit in direct sunlight or in hot, humid or dusty places
5. Keep your unit away from heating appliances and sources of electrical noise such as fluorescent
lamps or motors.
6. If drop-outs or interruptions occur in the music during CD play, or if the CD fails to play at all,
its bottom surface may require cleaning.Before playing, wipe the disc from the center outwards
with a good soft cleaning cloth.
CLEANING THE UNIT
• To prevent fire or shock hazard, disconnect your unit from the AC power source when cleaning.
• The finish on the unit may be cleaned with a dust cloth and cared for as other furniture, Use
caution when cleaning and wiping the plastic parts
• If the cabinet becomes dusty wipe it with a soft dry dust cloth. Do not use any wax or polish
sprays on the cabinet.
• If the front panel becomes dirty or smudged with fingerprints it may be cleaned with a soft cloth
slightly dampened with a mild soap and water solution. Never use abrasive cloths or polishes as
these will damage the finish of your unit.
CAUTION: Never allow any water or other liquids to get inside the unit while cleaning.
TROUBLESHOOTING GUIDE
If you experience difficulties in the use of this music system, please check the following
Symptom Possible Cause Solution
The unit does not
respond (no power)
The unit is disconnected from the
AC outlet.
Reconnect to the AC outlet.
Try the unit on another outlet.
The AC outlet has not power.
Unit is ON but there is
low or no volume
Volume set too low. Rotate the STANDBY Button
on main unit or remote control
to turn the sound level up
Noise or sound
distorted on FM/AM
broadcast
Station not tuned properly.
FM/AM antenna is not fully
extended.
Fine tune the FM broadcast
station.
Fully extend the FM/AM
antenna.
Adjust the antenna location be
put
CD player will not
play
• The unit not is in CD function mode.
• CD is installed incorrectly.
• If the CD is self-compiled, the media
used may not be compatible with the
player.
Select CD function mode.
Insert CD with label facing to up
Use better quality blank media
and retest.
CD skips while
playing
Disc is dirty or scratched. Wipe CD with clean cloth or
use another disc.

- 18 -
Intermittent sound
from CD Player
Dirty or defective disc.
Dirty pick up lens.
Player is subject to excessive
shock or vibratio
Clean or replace the
defective disc.
Use a CD-lens cleaning disc
to clean the lens.
Relocate the player away
from shock or vibration.
Sound is distorted Volume level is set too high. Decrease the volume.
Sound is distorted Sound source is distorted. Try a different sound
source.
If you are using an external
sound source like older
generation of iPod, try
reducing the output volume
on the device itself.
SPECIFICATIONS
Power requirement:
Main unit : AC IN 100-240V~50/60Hz 40W
Remote control: 1 x 3V CR2025 Lithium Battery
Frequency Range:
Radio Band: FM 88 ~108MHz
AM 530KHz~1710KHz
BLUETOOTH: 2402MHz~2480MHz

FCC Statement
This equipment has been tested and found to comply with the limits for a Class B digital device,
pursuant to Part 15 of the FCC Rules. These limits are designed to provide reasonable
protection against harmful interference in a residential installation. This equipment generates
uses and can radiate radio frequency energy and, if not installed and used in accordance with
the instructions, may cause harmful interference to radio communications. However, there is
no guarantee that interference will not occur in a particular installation. If this equipment does
cause harmful interference to radio or television reception, which can be determined by turning
the equipment off and on, the user is encouraged to try to correct the interference by one or
more of the following measures:
-- Reorient or relocate the receiving antenna.
-- Increase the separation between the equipment and receiver.
-- Connect the equipment into an outlet on a circuit different from that to which the receiver is
connected.
-- Consult the dealer or an experienced radio/TV technician for help.
This device complies with part 15 of the FCC Rules. Operation is subject to the following two
conditions:(1) This device may not cause harmful interference, and (2) this device must accept
any interference received, including interference that may cause undesired operation.
Changes or modifications not expressly approved by the party responsible for compliance
could void the user's authority to operate the equipment.
This equipment complies with FCC radiation exposure limits set forth for an uncontrolled
environment. This equipment should be installed and operated with minimum distance 20cm
between the radiator & your body.