MET METYH110BT BLUETOOTH PORTABLE CD RADIO BOOMBOX User Manual
MET INDUSTRIAL LTD BLUETOOTH PORTABLE CD RADIO BOOMBOX
MET >
Users Manual
/1&'.0154%&$6
OWNER'S MANUAL
$.7'6116*2146#$.'%&4#&+1$11/$1:
PLEASE READ BEFORE USING THIS UNIT
1
T
This equipment is a Class II or
double insulated electrical
appliance. It has been designed in
such a way that it does not
require a safety connection to
electrical earth.
,03257$176$)(7<,16758&7,216
2
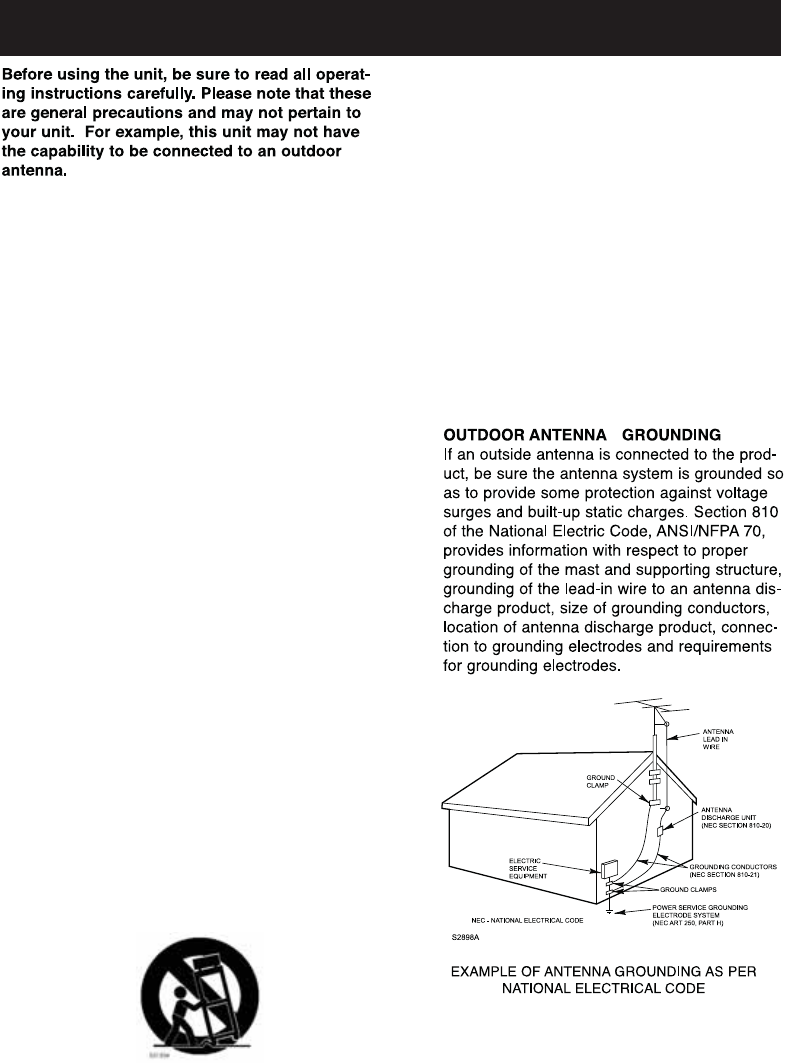
7UGQPN[YKVJVJGECTVUVCPFVTKRQFDTCEMGVQT
VCDNGURGEKHKGFD[VJGOCPWHCEVWTGTQTUQNF
YKVJVJGCRRCTCVWU9JGPCECTVKUWUGFWUG
ECWVKQPYJGPOQXKPIVJGECTVCRRCTCVWU
EQODKPCVKQPVQCXQKFKPLWT[HTQOVKRQXGT
4GCFVJGUGKPUVTWEVKQPUŌ#NNVJGUCHGV[CPF
QRGTCVKPIKPUVTWEVKQPUUJQWNFDGTGCFDGHQTG
VJKURTQFWEVKUQRGTCVGF
-GGRVJGUGKPUVTWEVKQPUŌ6JGUCHGV[CPF
QRGTCVKPIKPUVTWEVKQPUUJQWNFDGTGVCKPGFHQT
HWVWTGTGHGTGPEG
*GGFCNNYCTPKPIUŌ#NNYCTPKPIUQPVJG
CRRNKCPEGCPFKPVJGQRGTCVKPIKPUVTWEVKQPU
UJQWNFDGCFJGTGFVQ
(QNNQYCNNKPUVTWEVKQPUŌ#NNQRGTCVKPICPFWUG
KPUVTWEVKQPUUJQWNFDGHQNNQYGF
&QPQVWUGVJKUCRRCTCVWUPGCTYCVGTŌ6JG
CRRNKCPEGUJQWNFPQVDGWUGFPGCTYCVGTQT
OQKUVWTGŌHQTGZCORNGKPCYGVDCUGOGPVQT
PGCTCUYKOOKPIRQQNCPFVJGNKMG
%NGCPQPN[YKVJFT[ENQVJ
&QPQVDNQEMCP[XGPVKNCVKQPQRGPKPIU+PUVCNNKP
CEEQTFCPEGYKVJVJGOCPWHCEVWTGŏUKPUVTWEVKQPU
&QPQVKPUVCNNPGCTCP[JGCVUQWTEGUUWEJCU
TCFKCVQTUJGCVTGIKUVGTUUVQXGUQTQVJGT
CRRCTCVWUKPENWFKPICORNKHKGTUVJCVRTQFWEG
JGCV
&QPQVFGHGCVVJGUCHGV[RWTRQUGQHVJG
RQNCTK\GFQTITQWPFKPIV[RGRNWI#RQNCTK\GF
RNWIJCUVYQDNCFGUYKVJQPGYKFGTVJCPVJG
QVJGT#ITQWPFKPIV[RGRNWIJCUVYQDNCFGU
CPFCVJKTFITQWPFKPIRTQPI6JGYKFGDNCFGQT
VJGVJKTFRTQPICTGRTQXKFGFHQT[QWTUCHGV[+H
VJGRTQXKFGFRNWIFQGUPQVHKVKPVQ[QWTQWVNGV
EQPUWNVCPGNGEVTKEKCPHQTTGRNCEGOGPVQHVJG
QDUQNGVGQWVNGV
2TQVGEVVJGRQYGTEQTFHTQODGKPIYCNMGFQPQT
RKPEJGFRCTVKEWNCTN[CVRNWIUEQPXGPKGPEG
TGEGRVCENGUCPFVJGRQKPVYJGTGVJG[GZKVHTQO
VJGCRRCTCVWU
1PN[WUGCVVCEJOGPVUCEEGUUQTKGUURGEKHKGFD[
VJGOCPWHCEVWTGT
7PRNWIVJKUCRRCTCVWUFWTKPINKIJVPKPIUVQTOUQT
YJGPWPWUGFHQTNQPIRGTKQFUQHVKOG
4GHGTCNNUGTXKEKPIVQSWCNKHKGFUGTXKEGRGTUQPPGN
5GTXKEKPIKUTGSWKTGFYJGPVJGCRRCTCVWUJCU
DGGPFCOCIGFKPCP[YC[UWEJCURQYGTUWRRN[
EQTFQTRNWIKUFCOCIGFNKSWKFJCUDGGPURKNNGF
QTQDLGEVUJCXGHCNNGPKPVQVJGCRRCTCVWUVJG
CRRCTCVWUJCUDGGPGZRQUGFVQTCKPQTOQKUVWTG
FQGUPQVQRGTCVGPQTOCNN[QTJCUDGGPFTQRRGF
6JKUCRRCTCVWUUJCNNPQVDGGZRQUGFVQFTKRRKPI
QTURNCUJKPIYCVGTCPFVJCVPQQDLGEVHKNNGFYKVJ
NKSWKFUUWEJCUXCUGUUJCNNDGRNCEGFQPVJG
CRRCTCVWU
/CKPRNWIKUWUGFCUFKUEQPPGEVFGXKEGCPFKV
UJQWNFTGOCKPTGCFKN[QRGTCDNGFWTKPIKPVGPFGF
WUG+PQTFGTVQFKUEQPPGEVVJGCRRCTCVWU
EQORNGVGN[VJGOCKPRNWIUJQWNFDG
FKUEQPPGEVGFHTQOVJGOCKPUQEMGVQWVNGV
EQORNGVGN[
$CVVGT[UJCNNPQVDGGZRQUGFVQGZEGUUKXGJGCV
UWEJCUUWPUJKPGHKTGQTVJGNKMG
,
,03257$176$)(7<,16758&7,216
3
$IBOHFTPSNPEJGJDBUJPOTUPUIJTVOJUOPU
FYQSFTTMZBQQSPWFECZUIFQBSUZ
SFTQPOTJCMFGPSDPNQMJBODFDPVMEWPJEUIF
VTFSTBVUIPSJUZUPPQFSBUFUIFFRVJQNFOU
/PUF5IJTFRVJQNFOUIBTCFFOUFTUFEBOE
GPVOEUPDPNQMZXJUIUIF
MJNJUTGPSB$MBTT#EJHJUBMEFWJDFQVSTVBOUUP
1BSUPGUIF'$$3VMFT
5IFTFMJNJUTBSFEFTJHOFEUPQSPWJEF
SFBTPOBCMFQSPUFDUJPOBHBJOTU
IBSNGVMJOUFSGFSFODFJOBSFTJEFOUJBM
JOTUBMMBUJPO5IJTFRVJQNFOUHFOFSBUFT
VTFTBOEDBOSBEJBUFSBEJPGSFRVFODZFOFSHZ
BOEJGOPUJOTUBMMFEBOEVTFE
JOBDDPSEBODFXJUIUIFJOTUSVDUJPOTNBZ
DBVTFIBSNGVMJOUFSGFSFODFUPSBEJP
DPNNVOJDBUJPOT)PXFWFSUIFSFJTOP
HVBSBOUFFUIBUJOUFSGFSFODFXJMMOPU
PDDVSJOBQBSUJDVMBSJOTUBMMBUJPO*GUIJT
FRVJQNFOUEPFTDBVTFIBSNGVMJOUFSGFSFODF
UPSBEJPPSUFMFWJTJPOSFDFQUJPOXIJDIDBOCF
EFUFSNJOFECZUVSOJOHUIFFRVJQNFOU
PGGBOEPOUIFVTFSJTFODPVSBHFEUPUSZUP
DPSSFDUUIFJOUFSGFSFODFCZPOFPSNPSF
PGUIFGPMMPXJOHNFBTVSFT
Ɣ 5HRULHQWRUUHORFDWHWKHUHFHLYLQJDQWHQQD
Ɣ ,QFUHDVHWKHVHSDUDWLRQEHWZHHQWKHHTXLSPHQW
DQGUHFHLYHU
Ɣ &RQQHFWWKHHTXLSPHQWLQWRDQRXWOHWRQD
FLUFXLWGLIIHUHQWIURPWKDWWRZKLFKWKH
UHFHLYHULVFRQQHFWHG
Ɣ &RQVXOWWKHGHDOHURUDQH[SHULHQFHGUDGLR79
WHFKQLFLDQIRUKHOS
,03257$176$)(7<,16758&7,216
1MFBTFSFGFSUIFJOGPSNBUJPOPOFYUFSJPS
CPUUPNFODMPTVSFGPSFMFDUSJDBMBOETBGFUZ
JOGPSNBUJPOCFGPSFJOTUBMMJOHPSPQFSBUJOH
UIFBQQBSBUVT
8BSOJOH
Ɣ
Ɣ
5IJTFRVJQNFOUDPNQMJFTXJUI'$$3'
SBEJBUJPOFYQPTVSFMJNJUTTFUGPSUIGPSBO
VODPOUSPMMFEFOWJSPONFOU
5IJTFRVJQNFOUTIPVMECFJOTUBMMFEBOE
PQFSBUFEXJUIBNJOJNVNEJTUBODFPG
DFOUJNFUFSTCFUXFFOUIFSBEJBUPSBOEZPVS
CPEZ
Ɣ
Ɣ
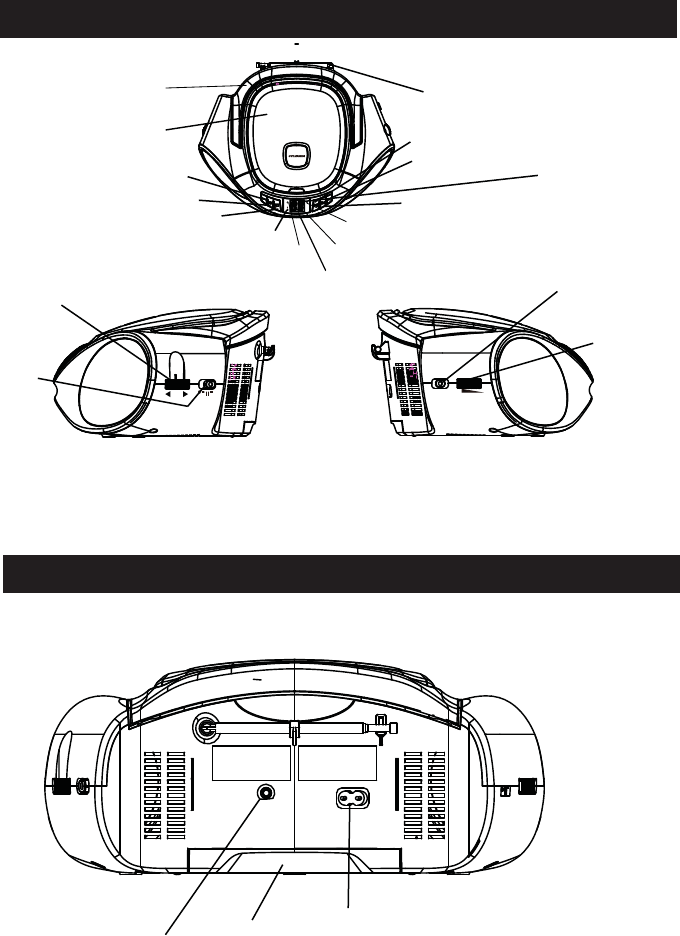
Control Location (Top Views)
Control Location (RearView)
HANDLE
CD DOOR
AUX IN JACK
VOLUME KNOB
67$1'%< BUTTON
FM ROD ANTENNA
TUNING KNOB
AC SOCKET
BATTERIES
COMPARTMENT
4
PROGRAM BUTTON
REPEAT BUTTON
PLAY/PAUSE BUTTON
STOP/BLUETOOTH PAIR BUTTON
SKIP BACKWARD BUTTON
BLUETOOTH INDICATOR
67$1'%< INDICATOR
TRACK DISPLAY (CD ONLY)
PROG
RPT
PAIR
POWER
TUNING
CD FM
AM
FUNCTION
VOLUME
STANDBY
FUNCTION SWITCH
(AM/FM/CD/BLUETOOTH)
AUX IN
AC IN~
FM ANT.
352*5$0 INDICATOR
5(3($7 INDICATOR
3$/<3$86( INDICATOR
6.,3)25:$5'%87721

Connecting AC Power
Connect the small end of AC cord to the socket at the back of the main unit and insert the
plug of AC cord into standard AC wall outlet.
Battery Operation
Before installing batteries (not included), ensure
that the unit is disconnected from the mains
supply.
Remove the battery compartment cover on the
bottom of the unit by sliding the battery cover with
the opening direction indicated on the battery
cover.
Install 6 pieces of 1.5V (UM2) batteries (not
included) by following the polarity markings and
then replace the cover.
For battery operation, unplug the AC cord from
the AC wall outlet first and then remove the AC cord from the socket at the back of the main
unit.
Caution:
The unit is designed to operate from mains supply of AC 120V~60Hz. If the plug of
AC cord does not fit properly, try to turn it over and try again. Do not force it.
When the unit is intended for being unused for along period of the time. Please press
the67$1'%<button toturn off the unit and unplug the power cord from the AC wall
outlet.AC
Power Connection
5
AUX IN
AC IN~
FM ANT.
6

Switching On for the first time
Plug into AC power or install batteries by following instructions on the previous Power
C
the unit. The STANDBY indicator will be lighted off.
To turn the unit off, press the STANDBY button again to turn the unit off.
onnection section. The STANDBY indicator willl lit. Press the STANDBY button to turn on
Switching between different sources (AM/FM/CD/BLUETOOTH)
After turning on the unit, press and toggle FUNCTION switch to select different sound
sources.
Adjusting sound volume level
After turning on the unit, turn the VOLUME knob to adjust the level of sound volume.
Adjusting the rod antenna
The aerial should be extended to ensure good reception in both FM radio modes. It may be
necessary to adjust the position of the unit and /or aerial position to achieve the best signal
reception.
Main Operation
Caution:
There is a danger of explosion if batteries are replaced incorrectly.
Replace batteries with the same type and same brand only.
When the unit is intended for being unused for a long period of the time, press the
67$1'%< button to turn OFFthe unit and remove all batteri
esfrom the main unit
6
The unit is designed to play normal music CD disc bearing the correct
identification logo. If the disc does not confirm tothe standard, it may not
be played back properly.
Loading disc
1. Press and toggle the FUNCTION button to switch to CD mode.
2. Press down the OPEN/CLOSE AREA on the CD door on the top of the unit to unlock
and open the CD door.
3. Hold the CD disc by its edge with CD graphical side facing up and put it onto the CD
compartment after the CD door is opened. Make sure that the disc label is facing up.
4. Close the CD door and make sure the VOLUME knob is not in minimum position.
CD playback
After loading the disc, the disc will begin spinning and the total number of the tracks on the
disc will be shown on the display and the first track/file on the CD will be played back
automatically.
Play/Pause Control
To pause playback temporarily by pressing the PLAY/PAUSE button. Music playback will
be paused and the current elapsed track number will be shown on the display and the play
icon will be blinking. Press the PLAY/PAUSE button again to resume playback.
Stop playback
To stop playback, press the STOP button on the unit. The total number of tracks of the disc
will be displayed.
Caution:
Playback of CD-R / CD-RW may depend on recording conditions.
Do not attach a seal or label to either side (the recordable side or the labeled side) of a
CD-R/ RW disc. It may cause malfunction.
Do not load a blank CD-R/ RW disc. It will take over 1 minute to read the disc. The disc
may be damaged if you try to open the CD Door while reading the disc.
CD-ROM
,
CD-I
,
CDV
,
VCD
,
DVD or com
p
uter CDs are not
p
ossible to be read.
Remark:
If there is no disc in the unit, “NO” will be indicated on the display.
If the CD cannot be read
,
“NO” will be indicated on the display.
CD Operation
Skip track
During playback, press the forward or backward SKIP buttons to skip to the next or
previous tracks.
High-speed music search
During playback, press and hold the forward or backward SKIP buttons to skip/search
through the current track at high speed in forward or backward directions. When the SKIP
buttons are released, normal playback speed will be resumed immediately.
7

Repeat playback modes (Repeat 1 / Repeat all)
Repeat the Current Track
Repeat All Tracks
During playback, press the REPEAT button twice to repeat the entire album.
Return to normal playback
Press the REPEAT button until NO repeat indicator is displayed. The normal playback
will be resumed.
During playback, press the REPEAT button once to repeat the current CD track.
Programmed CD playback
This unit can be programmed to play up to 20 tracks in CD mode. Load the music CD disc
onto the CD compartment (without pressing the “PLAY/PAUSE” button)
1. Press PROGRAM button once in the stop mode. “P01” will be shown on the display
and blinking.
2. Press the SKIP buttons to select the desired track to be programmed.
3. Press PROGRAM button again to save the selected track/files.
4. Repeat steps 2-3 to program up to 20 tracks.
5. Press the PLAY/PAUSE button to play the programmed tracks after programming is
completed. The “PROG” indicator will lit.
6. To clear program and resume normal playback, press the STOP button twice during
playback, or open the CD door, or change to next mode to clear the programmed tracks.
Remark:
The unit can store up to 20 tracks in the programmable memories. During the
pro
g
rammed pla
y
back, user can still select the “repeat 1 / repeat all” functions.
CD Operation-Continued
8

sPress the POWER button to turn on the unit.
sPress and toggle the FUNCTION button to select Bluetooth mode. The unit will
search the paired device with the “BLUETOOTH” Indicator lit.
sPress and hold the STOP/PAIR Button for 4~5 seconds. Then the “BLUETOOTH”
Indicator is flashing, the unit will goes into Pairing/Discoverable mode.
sTurn on the Bluetooth function of your Bluetooth device and enable the search or
scan function to find the unit.
sSelect "SRCD1063BT " from the device list when it appears on your device screen. If
required, enter the pass code “0000” to pair (link) the unit with your device.
sAfter successfully pairing (linking) the Bluetooth enabled device the “BLUETOOTH”
Indicator steadily and a short beep will heard.
Note: If you can’t pair the unit with your Bluetooth enabled device, you can try to turn Off &
On the power of your unit to solve the problem.
The unit is designed to receive FM Stereo / FM and AM radio bands.
1. Switch and toggle the FUNCTION button on the top of the unit to switch to AM
or FM mode.
2. Adjust the TUNING knob on the top of unit to tune the frequency of desired radio
station.
3. To turn off the unit power, press the 67$1'%< button to switch off the unit.
Remark:
The unit has built-in AM ferrite bar antenna, which can provide adequate reception in
most areas. If the AM reception is weak, try to adjust the location of the unit or
relocate the unit to improve the reception. If the FM reception is weak, try to adjust the
length and the angle of the FM antenna to improve the signal reception.
1. If the unit has never been paired with a Bluetooth device before, you need to follow the
pairing instructions below to link the SRCD1063BT with your Bluetooth device.
Bluetooth Operation
Radio Operation
9

1. Plug into a 3.5mm audio cable (not included) into your external music player and
connect the other end (3.5mm jack) into the AUX IN jack on the top of the unit.
2. Make sure your external music player is turned on and start music playback on the
music player
3. Adjust VOLUME knob to control the sound level of music playback from the speakers
on the unit.
Power Output. . . . . . . . . . . . . . . . . . 1. watt RMS x2channels
AC Power . . . . . . . . . . . . AC120V~60Hz
BatterySize . . . . . . . . . . . . . . . .UM- or &-Size batteries x 6PCS
Radio Frequency. . . . . . . . . . . . . . . FM: 87.5 – 108MHz , AM: 520- 1710 kHz
Setting up (AUX IN) connection
AUX-IN jack will allow you to connect external music player or external sound source to the
main unit.
AUX IN Operation
Specifications
10