MGA Entertainment 305132 Wireless Telephone User Manual 6323 2
MGA Entertainment (HK) Ltd. Wireless Telephone 6323 2
Users Manual

2.4GHZ CORDLESS TELEPHONE
WITH CALL WAITING CALLER ID
INSTALLATION AND OPERATING GUIDE
IMPORTANT: To receive Caller ID information on incoming telephone calls, you must
subscribe to the Caller ID service provided by your local telephone company; there is
a fee for this service and it may not be available in all areas.
TM

NTP-6323 TABLE OF CONTENTS
1
Important Safety Instructions ....................2
FCC Regulations....................................3-4
Battery Cautionary Instructions ............5
NTP-6323 Parts Checklist ......................6
Location of Controls and Features.......7-10
Handset ..............................................7-8
Base ..................................................9-10
Choosing a Location .................................11
Telephone Setup.................................12-14
Connecting the Base ...........................12
1
Tone/Pulse Switch ...............................13
Handset Volume ..................................13
Battery Installation...................................14
Battery Duration ...................................1
4
When the Battery Needs Charging ......14
When to Purchase a New
Battery Pack ........................................14
Basic Displays.........................................15
Basic Operation ..................................16-17
Making Calls .........................................16
Receiving Calls.....................................16
Redialing..............................................17
Additional Options ..............................17
Caller ID ............................................30-34
When You Receive a Call .....................30
Viewing the Caller ID List ....................30
Caller ID Displays ................................31
Caller ID with Call Waiting Service .......32
Storing Caller ID Records ....................32
Deleting Caller ID Records ..................33
Returning Caller ID Calls .....................34
Message Waiting ...................................35
Using One-Touch Voice Mail Dialing ....35
Other Features ......................................36
Using the Handset Finder (PAGE) ......36
Channel Changing ...............................36
Care and Maintenance............................37
Troub leshooting.......................................38
Glossary ...................................................39
Settings.................................................18-24
Handset Settings...............................18-19
Changing the Language.........................19
Muting the First Ring On or Off..............20
Setting the Time and Date......................20
Setting the Ringer Level.........................21
Adjusting the Contrast............................21
Changing the Flash Time......................22
Changing the Pause Time.....................23
Programming One-Touch
Voice Mail Dialing..................................23
Deleting Message Waiting
Indication...............................................24
Speed Dialing..............................25-29
Storing Phone Numbers..................25
Letter Table....................................26
Viewing the Phone Book................ .26
Making Calls From the Phone
Book..............................................27
Editing a Stored Number.................27
Deleting a Stored Number...............28
Deleting All Stored numbers............28
Preferred Calls...............................29
Blocked Calls.................................29
Setting the Area Code...........................22
......
.....
Warranty...................................................40
MGA
1 Year Limited Warranty
This limited warranty sets forth all MGA responsibilities regarding your product.
There are no other expressed or implied warranties from MGA
Warranty Service Provided
If you purchased the telephone new from a retail vendor, MGA warrants the
telephone against defects in material and workmanship for a period of one(1) year
from the original date of purchase. This warranty is in lieu of all other expressed
warranties. This warranty begins when you purchase the telephone and continues
for one (1) year unless you sell or rent the telephone, in which event the warranty
stops.
MGA disclaims any implied warranty, including the warranty of merchantability
and the warranty of fitness for a particular purpose, as of the date of one year from
your original purchase of the telephone. MGA assumes no responsibility for any
special, incidental, or consequential damages.
This warranty gives you specific legal rights and you may have other rights, which
vary from state to state. Some states do not allow the exclusion or limitation of
special, incidental or consequential damages or limitations on how long a warranty
lasts, so the above exclusion and limitation may not apply to you.
Warranty service not provided
This warranty does not cover damage resulting from accident, misuse, abuse,
improper installation or operation, lack of reasonable care, unauthorized modification,
the affixing of any attachment not provided by MGA with the telephone and or loss
of parts. This warranty is voided in the event any unauthorized person opens, alters or
repairs the telephone. All MGA products being returned for repair must be suitably
packaged.
Telephone companies use different types of equipment and offer various types of
services to customers. MGA does not warrant that this telephone is compatible
with the type of equipment of any particular telephone company or the services
provided by it.
What to do for warranty service
During the first thirty (30) days, a defective product is eligible for over the counter
exchange at the retailer from whom it was purchased. After thirty (30) days the
defective product should be returned to the authorized service center.
40
Warranty

SAVE THESE INSTRUCTIONS
This symbol is to alert you to important operating or servicing instructions that may appear in
the user's manual. Always follow basic safety precautions when using this product to reduce the
risk of injury, fire, or electrical shock.
When using this product, basic safety precautions should always be followed to reduce the risk of fire, electric shock
and injury to persons, including the following:
1. Read and understand all instructions.
2. Follow all warnings and instructions marked on the product.
3. Use only with class 2 power source DC 9V 300mA.
4. Unplug this product from the wall outlet before cleaning. Do not use liquid cleaners or aerosol cleaners. Use a damp cloth
for cleaning.
5. Do not use this product near water; for example, near a bathtub, wash bowl, kitchen sink or laundry tub, in a wet basement
or near a swimming pool.
6. Do not place this product on an unstable cart, stand, or table. The product may fall, causing serious damage to the product.
7. Slots and openings in the cabinet back or bottom are provided for ventilation. To protect it from overheating, these openings
must not be blocked or covered. The openings should never be blocked by placing the product on the bed, sofa, rug, or
other similar surface. This product should never be placed near or over a radiator or heat register. This product should not
be placed in an enclosed environment unless proper ventilation is provided.
8. Do not allow anything to rest on the power cord. Do not locate this product where the cord will be abused by animals or
persons walking on it.
9. Do not overload wall outlets and extension cords as this can result in risk of fire or electrical shock.
10. Never push objects of any kind into this product through cabinet slots as they may touch dangerous voltage points or short
out parts that could result in a risk of fire or electrical shock. Never spill liquid of any kind on the product.
11. To reduce the risk of electrical shock, do not disassemble this product. Instead take it to a qualified service person when
service or repair work is required. Opening or removing covers may expose you to dangerous voltages or other risks.
Incorrect reassembly can cause electrical shock when the appliance is subsequently used.
12. Unplug all cords and refer servicing to qualified service personnel under the following conditions:
A. When the power supply cord or plug is damaged or frayed.
B. If liquid has been spilled into the product.
C. If the product has been exposed to rain or water.
D. If the product does not operate normally by following the operating instructions. Adjust only those controls covered in
the operating instructions. Improper adjustment of other controls may result in damage and require work by a qualified
technician to restore the product to normal operation.
13. Avoid using a telephone (other than a cordless type) during an electrical storm. There may be a remote risk of electric
shock from lightning.
14. Do not use a telephone to report a gas leak in the vicinity of the leak.
IF YOUR PRODUCT UTILIZES BATTERIES, THE FOLLOWING ADDITIONAL PRECAUTIONS SHOULD BE OBSERVED:
1. Use only the type and size of batteries specified in the user's manual.
2. Do not dispose of batteries in a fire; the cells may explode. Check with local codes for possible special disposal locations.
3. Do not open or mutilate the batteries. Released electrolyte is corrosive and may cause damage to the eyes or skin. It may
be toxic if swallowed.
4. Exercise care in handling batteries in order not to short the battery with conducting materials such as rings, bracelets and
keys. The battery or conductor may overheat and cause burns.
5. Do not attempt to recharge the batteries with or identified for use with this product. The batteries may leak corrosive
electrolyte or explode.
6. Do not attempt to rejuvenate the batteries provided with or identified for use with this product by heating them. Sudden
release of the battery electrolyte may cause burns or irritation to eyes or skin.
7. When replacing batteries, all batteries should be replaced at the same time. Mixing fresh and discharged batteries could
increase internal cell pressure and rupture the discharged batteries.
8. When inserting the batteries into this product, the proper polarity or direction must be observed. Reverse insertion of
batteries can cause charging, which may result in leakage or explosion.
9. Remove the batteries from this product if the product will not be used for a long period of time (several months or more)
since during this time the batteries could leak, damage the product.
10. Discard "dead" batteries as soon as possible since they are more likely to leak in a product.
11. Do not store this product, or the batteries provided with or for identified use with this product, in high temperature areas.
12. If your product uses a rechargeable battery, charge the battery(ies) only in accordance with the instructions and limitation
specified in the User Manual.
2
IMPORTANT SAFETY INSTRUCTIONS GLOSSARY
39
Useful Features and Terms
PBX ( Private Branch Exchange) -- A small, central, privately owned, switching telephone
system where a digit (like 9 ) must be dialed first in order to access an outside line.
Calendar/Clock---- Visual display of date, day and time.
Caller ID--Enables users to view name and number of callers. Contact your local telephone
company to subscribe to Caller ID Service.
Caller ID Log--- Stores up to 80 Caller ID entries.
Call Timer--- Allows timing of phone conversations.
Data/FAX Port--- Allows connection of a PC orFAX machine directly into the phone
versus a wall outlet.
Dial from Display ---One-button dialing from the Caller ID log.
Display---The Liquid Crystal Display (LCD) shows clock and calendar, number dialed, low
battery indicator, Caller ID information and call timer.
Flash---A signal sent by the phone to the local telephone company supporting services such
as call waiting.
Message Waiting Indicator --- A visual indicator that there are new messages in your
voice mail box. Requires FSK signaling by phone company. Contact your local telephone
company to subscribe to Voice Mail Service.
New Calls Indicator ---- A visual indicator that new calls have been received.
Redial --- Performs single button dialing of last number dialed.
Ringer Lever Control --- Permits adjustment of the ringer volume level.
Speed Dialing ---- Allows programming of frequently dialed numbers so that they can be
dialed with the two touch speed dial button (64 entries).
Tone/Pulse Option--- Enables you to switch from pulse (rotary) to tone dialing.
Volume Level Control ---- Permits volume adjustment of the handset and headset during
a conversation.
FSK type Signaling --- A signal used to turn on and off the message waiting indicator,
can be sent by the telephone company with a ringing signal or without.

FCC REGULATIONS
3
Warning: Modifying or tampering with the telephone's internal components can cause a
malfunction and might invalidate the telephone's warranty and void your FCC authorization
to operate it. If the trouble is harming the telephone lines, the telephone company might ask
you to disconnect the telephone until you have resolved the problem.
As it complies with Part 68 of the FCC rules and the technical requirements for connection
to telephone networks published by ACTA, your unit has been registered with the FCC.
The FCC requires us to provide you with the following information:
1. Connection and use with the nationwide telephone network:
The FCC requires that you connect to a nationwide telephone network through a modular
telephone outlet which is TIA/EIA-IS-968 compliant. It is USOC jack type RJ11C.
This equipment may not be used on coin service provided by the telephone company.
Connection to party lines is subject to state tariffs. Check with your local telephone com-
pany.
2. Notification to the telephone company:
FCC rules require that upon request you provide the following information to the phone
company.
A. The line (telephone number) to which you will connect the telephone equipment, and
B. The Registration Number and Ringer Equivalence Number (REN). These numbers are
found on the back or bottom of your telephone equipment.
The REN is useful to determine the quantity of devices you may connect to your telephone
line and still have those entire devices ring when your telephone number is called. In most,
but not all areas, the sum all RENs should be 5 or less. To determine the number of
devices permitted in your area, contact your local telephone company.
3. Repair instructions:
If it is determined that your telephone equipment is malfunctioning, the FCC requires that
it not be used and be unplugged from the modular outlet until the problem has been corr-
ected. Repairs to this telephone equipment can be made only by the manufacturer or its
authorized agents, or by others who may be authorized by the FCC. Unauthorized repairs
void registration and warranty.
4. Rights of the telephone company:
If your product is causing harm to the telephone network, the telephone company may
temporarily discontinue your service. If possible, they will notify you in advance. But if
advance notice isn't practical; you will be notified as soon as possible. You will be given
the opportunity to correct the problem, and you will be informed of your right to file a co-
mplaint with the FCC. Your telephone company may make changes in its facilities, equi-
pment, operations or procedures that could affect the proper functioning of your teleph-
one equipment. If such changes are planned, you will be notified in advance.
5. This product is compatible with inductively coupled hearing aids.
Note: This applies only if this product is equipped with a corded or cordless handset.
6. Programming/testing emergency numbers:
When programming emergency numbers and/or making test calls to emergency numbers
A. Remain on the line and briefly explain to the dispatcher the reason for the call before
hanging up.
B. Perform such activities in the off-peak hours, such as early morning or late evening.
38
TROUBLESHOOTING
No dial tone/phone will not dial out.
Check that the AC power adapter is plugged into a working AC power outlet.
Check all telephone cord connections or try another wall jack.
Do a basic reset of the phone: Disconnect the phone from the wall and remove the
battery. Leave for 30 minutes and then re-install as instructed by the manual.
All the display segments stay on when the handset is in the base.
Verify that the battery is properly installed.
Remove the battery and clean the battery contacts using a pencil eraser.
Can't hear the ring signal.
Check the ringer volume controls; at the lowest level the ring may not be heard.
While on a call, you hear another call on the line or experience radio
frequency interference.
Switch channels to a clear channel.
Check the wiring for bad connections.
Do not use this phone within 20 feet of a working microwave. The microwave
produces frequencies in this range which may cause interference. This
interference is normal for all 2.4GHz phones and should not be considered a
product defect.
The caller's name and/or phone number does not appear on the display.
Make sure you have subscribed to Caller ID service (from local telephone
company).
Caller ID service may not work when the phone is connected to a Private Branch
Exchange (PBX).
The caller has requested that their phone number be suppressed from Caller ID
service, or caller ID service is not available in their area. "Private" or
"OUT OF AREA" will appear on the display.
You answered the call before Caller ID data was displayed, which usually occurs
after the first ring.
New Call/Message Waiting Indicator doesn't work properly.
Make sure you have subscribed to voice mail compatible with "FSK" type
signaling (check with your local phone company). Verify that both the "On" and
"Off" signals are activated. If your voice mail product from the local phone
company does not support "FSK" signaling, you may use this feature as a New
Call Indicator only.
Can't receive or make phone calls.
Make sure the phone is set to the correct type of service, either Tone or Pulse.

INTERFERENCE INFORMATION: PART 15 OF FCC RULES
Some telephone equipment generates and uses radio frequency energy which if not
properly installed, may cause interference to radio and television reception.
This unit has been tested and found to comply with the limits for a Class B computing
device in accordance with the specifications in subpart J of Part 15 of the FCC rules.
These specifications are designed to provide reasonable protection against such inter-
ference in a residential installation. However, there is no guarantee that interference will
not occur in a particular installation.
If this equipment does cause interference to radio or television reception, when it's in use,
the user is encouraged to try to correct the interference by one or more of the following
measures:
A. Where it can be done safely, reorient the radio or TV receiving antenna.
B. To the extent possible, relocate the television, radio, or other receiver with respect
to the telephone equipment.
C. If your telephone product runs on AC power, plug your product into an AC outlet
that's not on the same circuit as the one used by the radio or television.
4
FCC REGULATIONS
Your NTP-6323telephone has been designed to give years of trouble-free service.
It is a sensitive electronic instrument. To assure its longevity, please read the
following maintenance instructions.
1. Keep the NTP-6323 away from heat as high temperatures can shorten the life of
the electrical components and distort or melt its plastic parts.
2. The NTP-6323 should be kept free of dust and moisture. If it gets wet, wipe it dry
immediately. Liquids can contain minerals that can corrode electronic circuits.
3. Handle your NTP-6323 gently and carefully. Dropping it can cause serious
damage to circuitry, or the plastic case, which may result in malfunction.
4. Do not use any type of chemical or any abrasive powder to clean the cabinet.
Use only mild detergents on a soft, damp cloth to clean the NTP-6323 telephone.
5. The NTP-6323 has built-in surge protection circuits that meet or exceed FCC
requirements. However, an incident such as a lightning strike at or near the
telephone lines, could cause serious damage.
6. If the NTP-6323 is installed in an area with frequent or severe electrical storms,
it is suggested that the telephone be disconnected during these storms or that
additional surge suppression equipment be added to the installation.
7. In the case of trouble with the telephone, do not attempt to repair the telephone
yourself. It is the responsibility of users requiring service to report the need for
service to our Service Department. They will make the necessary arrangements
for repair or replacement.
37
CARE AND MAINTENANCE

BATTERIES: CAUTION
To reduce the risk of fire or injury to persons, read and follow these instructions:
For the cordless handset, use only a 3.6V600mAh Nickel Metal Hydride (Ni-MH) cordless
telephone battery pack (included).
Do not dispose of the batteries in a fire. The cells may explode. Check with local codes for
possible special disposal instructions.
Do not open or mutilate the batteries. Released electrolyte is corrosive and may cause
damage to the eyes or skin. It may be toxic if swallowed.
Exercise care in handling batteries in order not to short the battery with conducting
materials such as rings, bracelets, and keys. The battery or conductor may overheat and
cause burns.
Do not attempt to rejuvenate the batteries identified for use with this product by heating
them. Sudden release of the battery electrolyte may occur causing burns or irritation to
eyes or skin.
When inserting batteries into this product, the proper polarity or direction must be
observed. Reverse insertion of batteries can cause charging, and that may result in
leakage or explosion.
Remove the batteries from this product if the product will not be used for a long period of
time (several months or more) since during this time the battery could leak in the product.
Do not store this product, or the batteries identified for use with this product, in high
temperature areas. Batteries that are stored in a freezer or refrigerator for the purpose of
extending shelf life should be protected from condensation during storage and defrosting.
Batteries should be stabilized at room temperature prior to use after cold storage.
5
BATTERY CAUTIONARY INSTRUCTIONS
Using the Handset Finder (PAGE)
1. Press on the base and the phone will beep.
2. Press any key on the handset, or place the handset in the base to stop the
page/find feature.
Channel Changing
If you are experiencing interference during a telephone call, press the
key. The NTP-6323 will scan up to 40 channels and select the clearest one to
provide the best possible reception.
36
Del / Scan
OTHER FEATURES
PAGEPAGE
If the handset is within
range, it will beep until
a key is pressed.
PM NEW
#
TOTAL
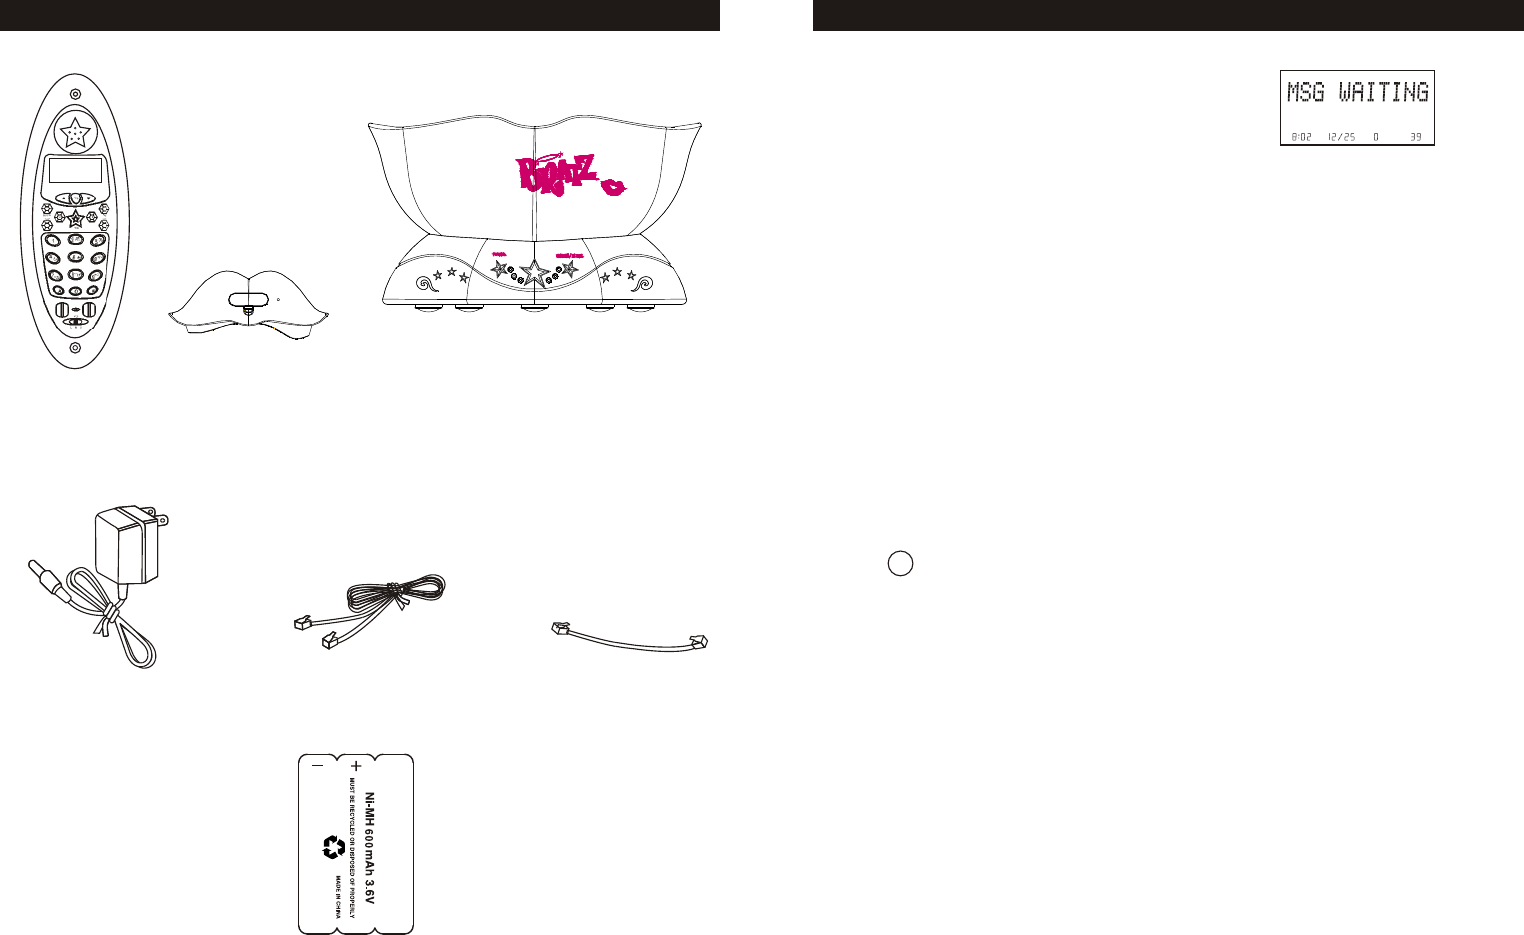
1. Handset
3. A C po w e r adapter
6.Ni-MH battery pack
6. Shor t line cord f o r
w all installation
5.Short line cord for
wall installation
4.7-foot line
cord for desk use
NTP-6323 PARTS CHECKLIST
6
2. Base
35
Using the One-Touch Voice Mail Dialing
When the setting is programmed in the options menu (see "Programming One-
Touch Voice Mail Dialing" on page 23) you can dial out a programmed number at
the touch of a button. This feature is specifically designed to easily check voice
mail when you have that service through your telephone company.
1. Press Tal k to access the telephone line.
2. Press .
3. The phone will begin dialing the number.
If you subscribe to voice mail from the telephone
company and if there are voice messages that
have been left in your voice mailbox, the display
will show "MSG WAITING."
Note: This function requires voice mail subscription from the local telephone
company. Furthermore, the local phone company must provide a type of
voice mail signaling called "FSK " (Frequency Shift Key). Not all telephone
companies have the visual message waiting feature available.
Please contact your local telephone company to check if this is available in
your area.
Tip: If you wish to delete the "Message Waiting" message, delete them as described
in the handset settings section "Deleting the Message Waiting Indication" (see
page 24).
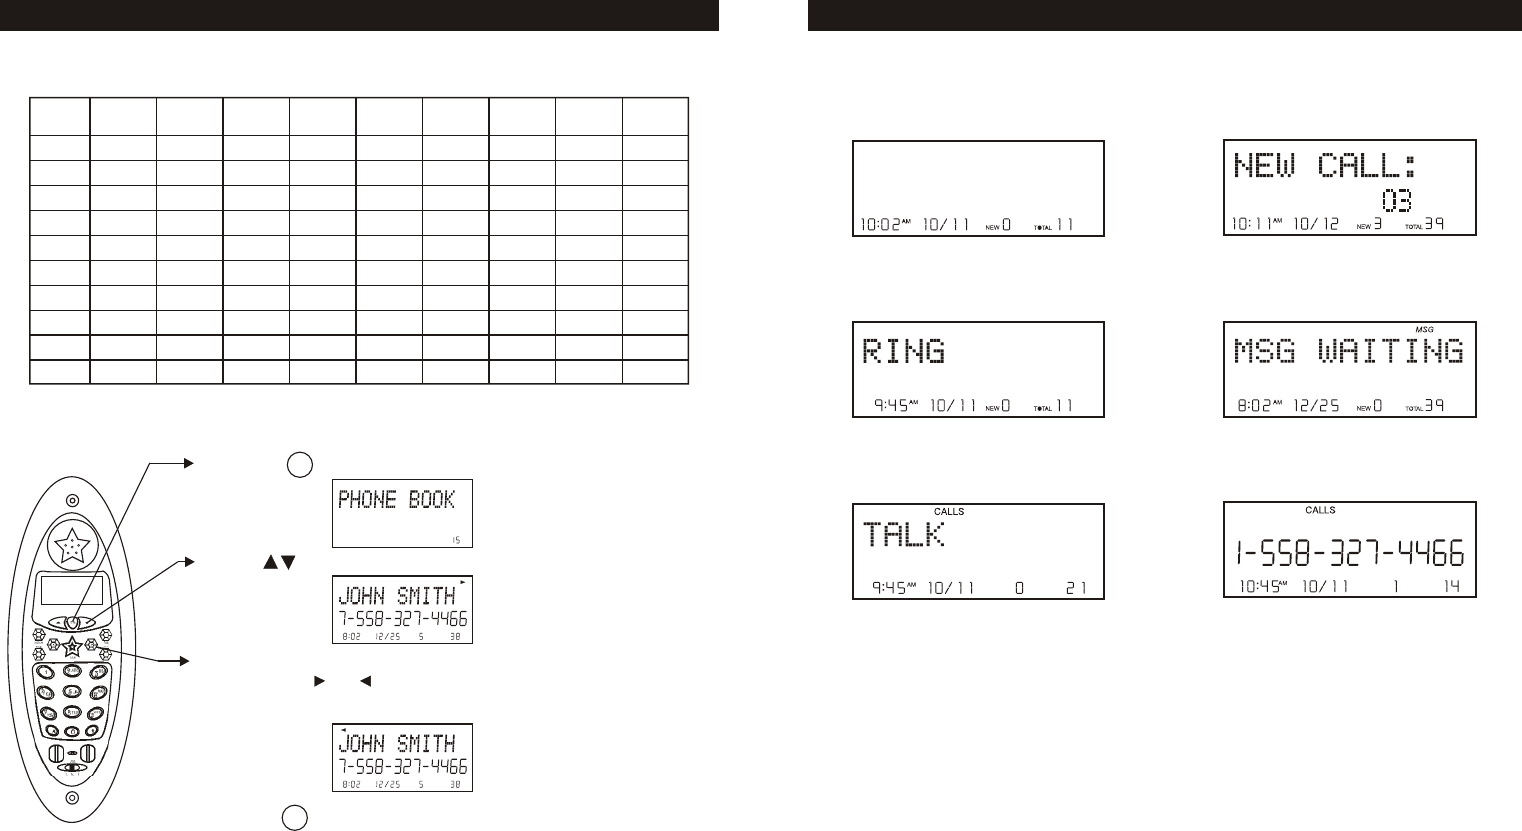
MESSAGE WAITING
MSG
AM
NEW TOTAL
Func
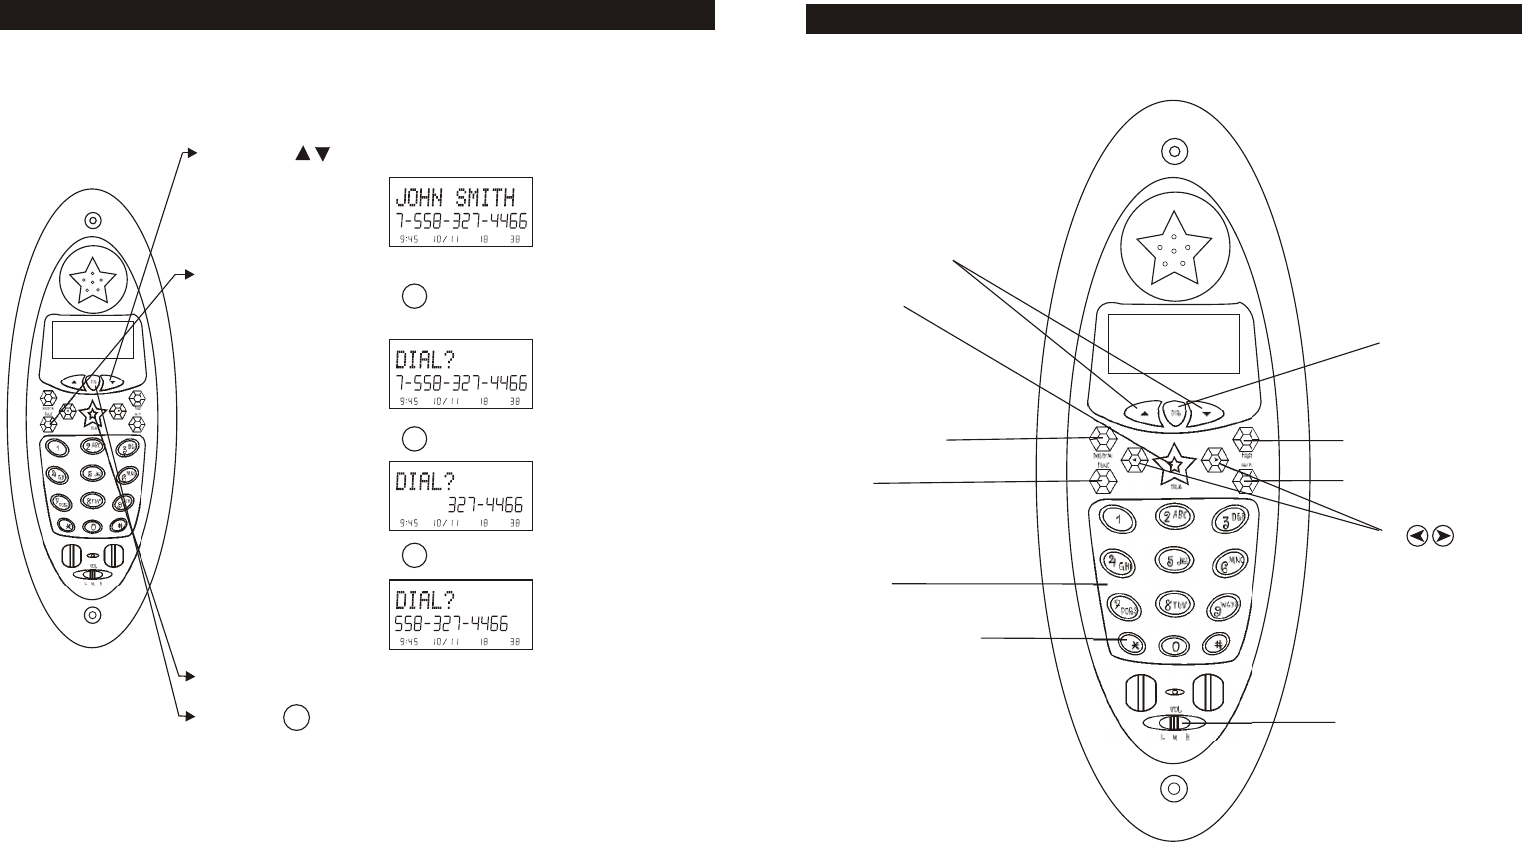
LOCATION OF CONTROLS AND FEATURES
7
6.Flash button
button
1.Talk button
5.Keypad
3.Scan/Del button
4.Func
7.Dir button
2.Redial/Pause button
9.volume control switch
10.Up and Down button
11.
8.Temporary Tone Key
34
1. Use the to scroll to the call record you wish to
call back.
2. If the number displayed is not correct (needing 7, 10,
or 11 digits), use the key to toggle the
number to display the correct number of digits to be
dialed.
3. Press Tal k to dial out the displayed number.
4. Press to cancel dialing.
5. To end the call, press Tal k, or place the handset back
in the base.
Press
Press
PM NEW
#
TOTAL
PM NEW
#
TOTAL
PM NEW
#
TOTAL
Dir
Returning Caller ID Calls
You can return calls by using the Caller ID callback feature.
CALLER ID
PM NEW
#
TOTAL
Func
Func
Func
Talk
The Talk key is used to access the telephone line or end a call.
Redial Key
When the phone is idle or off-hook, press to redial the last number dialed.
Is also used to insert a measured pause into a number stored in the phone book.
Scan/Del key
The key, When viewing or editing menus and logs, the key is used to erase
digits on the display, and single or multiple entries from the phone book and Caller ID
directories. The key, when pressed while the phone is off-hook, will scan up
to 40 channels and select the clearest one to provide the best possible reception.
Func key
The key is used to access the handset settings. The key
can be programmed to do two-touch dialing of a single number, such as your voice
mail service number. Press and hold at Standby Mode, enter the main menu.
The key can also be used to change the 7/10/11 digit dialing mode during caller ID
callback.
Dial Pad
Numeric keys are used in the conventional manner for dialing.
Flash Key
The key is used to access telephone company services, such as call waiting.
Directory Key
Use to program and retrieve the numbers in the speed dial Phone Book.
Temporary Tone Key
If the base is set to pulse dialing, pressing causes subsequent digits to be dialed
out using tone until the line is put back on hook.
When you receive a Caller ID message, voice mail message, or when the phone
is ringing, the New Call light will flash accordingly.
Volume Control Switch
The Volume Control switch is used to adjust the handset volume level between Hi, Mid
and Low.
LOCATION OF CONTROLS AND FEATURES
8
RE/PA
RE/PA
RE/PA
Del / Scan
Del / Scan
Func
Flash
Flash
Dir
Dir
*
*
1.
2.
3.
4.
5.
6.
7.
8.
9.
10.
11.
12.
button
The button lets you scroll through menus and logs.
If the name or number is more than 11 characters, press the or button to view the
rest of the display.
button
33
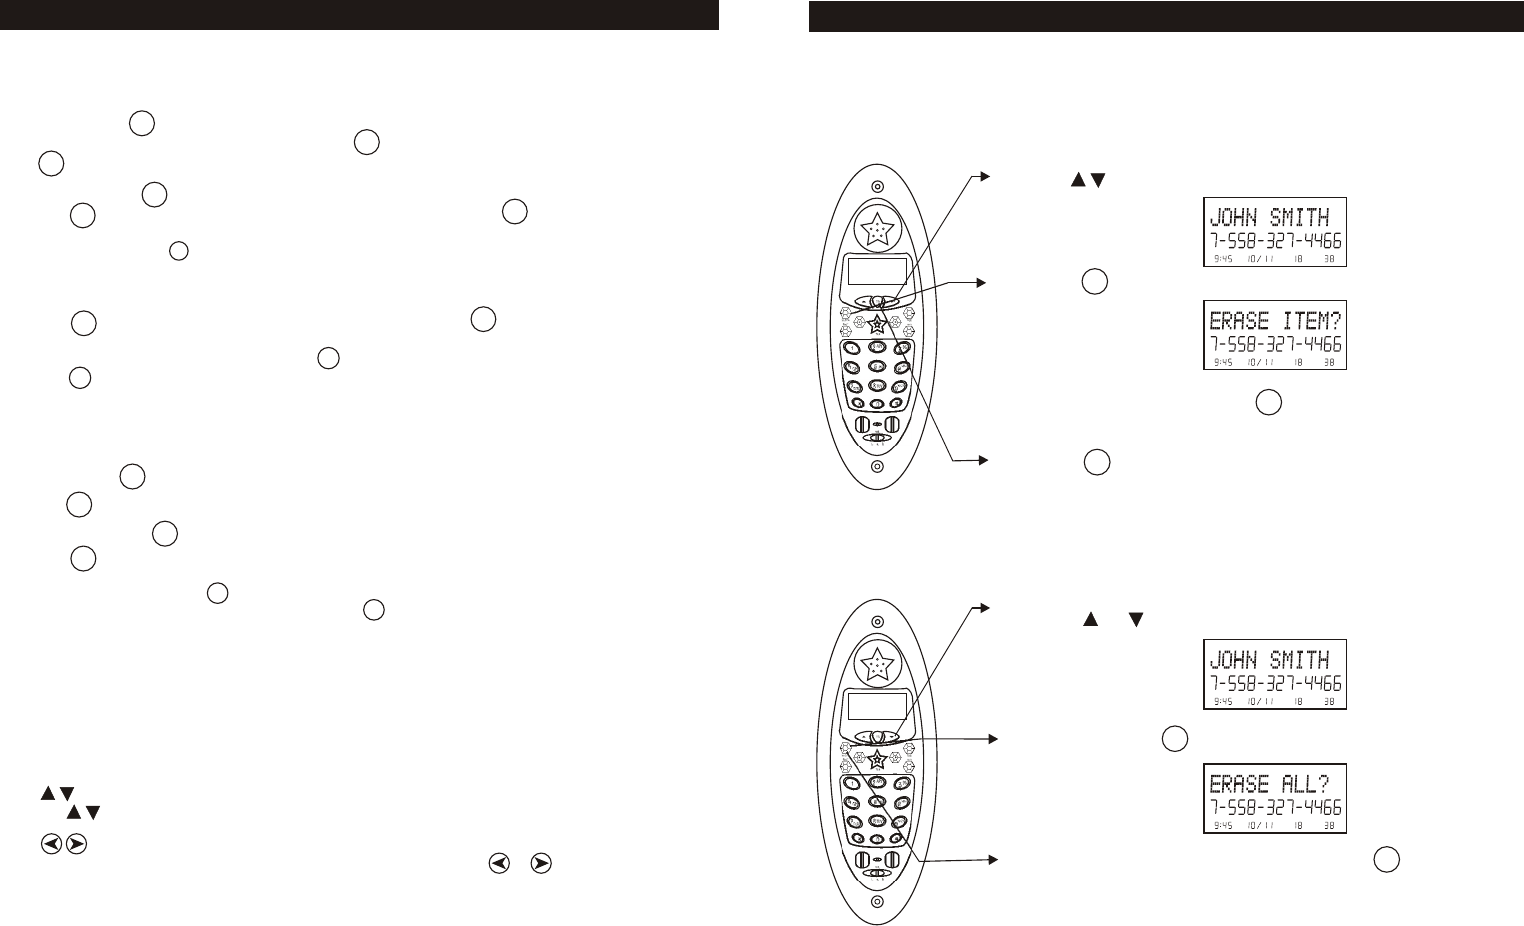
To Delete a Single Record
1. Use to scroll to the call record you wish to delete.
2. Press .
3. To delete the record press . The display will
show next records.
4. Press to exit the Caller ID log.
Deleting Caller ID Records
When viewing the Caller ID, information you can delete a single call record or all
the call records.
To Delete All Records
1. Press or .
2. Press and hold .
3. To delete all the Caller ID records press . The
display will show "ALL ERASED" and then return to
the idle display.
CALLER ID
PM NEW
#
TOTAL
PM NEW
#
TOTAL
PM NEW
#
TOTAL
PM NEW
#
TOTAL
Del / Scan
Del / Scan
Del / Scan
Del / Scan
Dir
Del / Scan
Del / Scan
Func
Func
Func
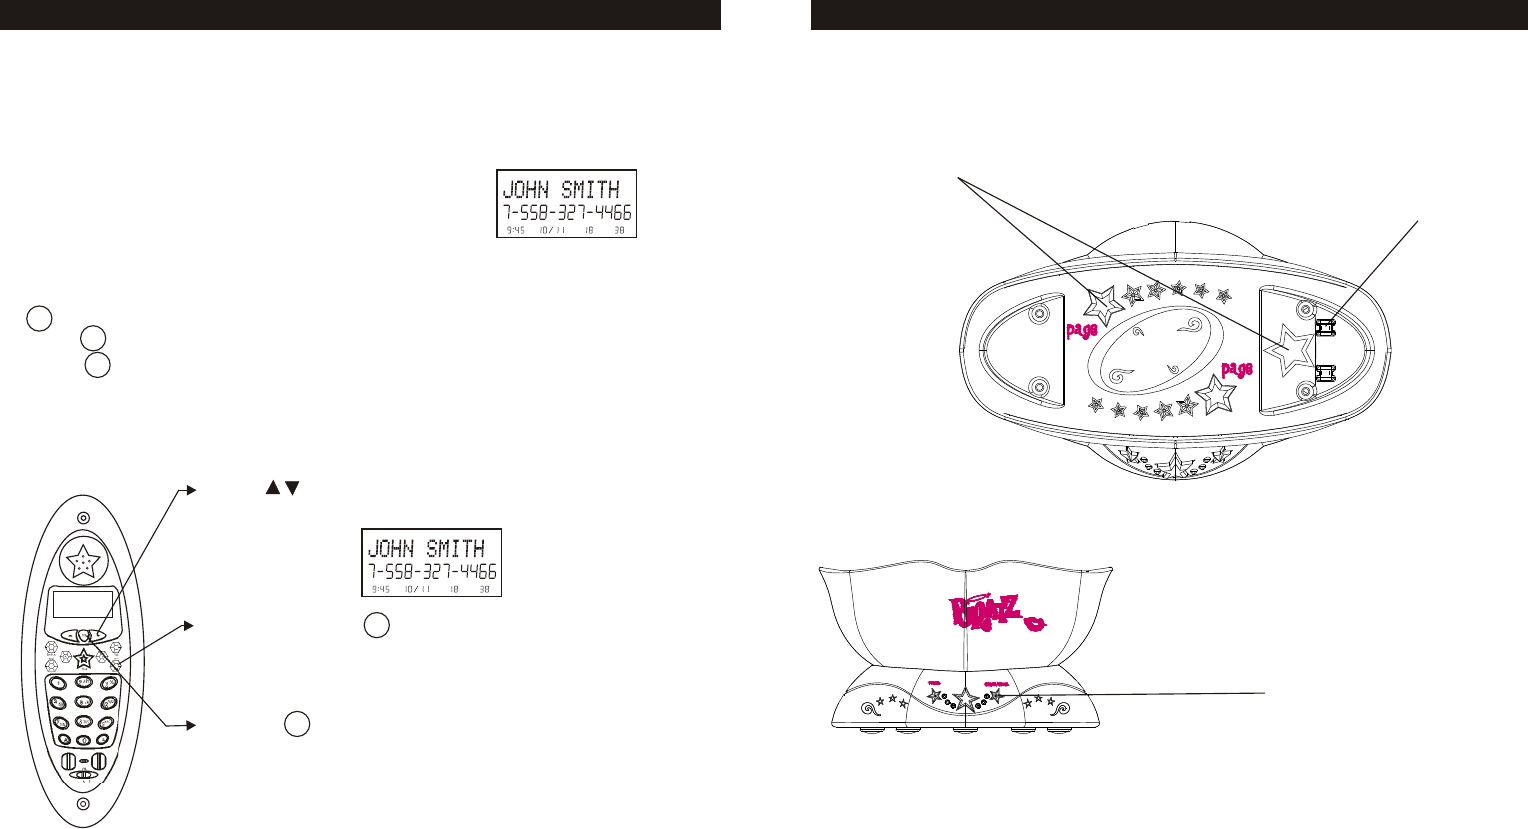
Base
Page
- Used to initiate a handset page .
In Use / Charge LED -
Charging Contacts - Used to recharge battery and reset the security code in
the handset.
- Lights when the handset is on the cradle being charged. Lights
when the handset is in use. Flashes when the phone is ringing.
LOCATION OF CONTROLS AND FEATURES
Use to page
a handset(s).
In Use LED
Charge LED
9
Charge Contacts
32
Caller ID with Call Waiting Service
In order to use the "Call Waiting Caller ID" service you must subscribe to a
telephone company that offers Caller ID service combined with "call waiting"
service.
When a new call comes in while you are talking, you
will hear a notification beep from the handset and
the volume is momentarily muted. The new caller's
name and phone number, if available, appears on
the display.
1. When you receive a "call waiting" call and you want to connect the call, press
. The active call will be placed on hold and the new call will be active.
2. Press to alternate between calls.
3. Press to end the call or place the handset back on the base.
Storing Caller ID Records
1. Use to scroll to the call record you wish to store
into the phone book.
2. Press and hold .
3. If you wish to edit the newly stored number, edit it in
the phone book (page 29, Editing a Stored Number ).
4. Press to return to the idle display.
Note: When numbers are stored into the phone book, a 1
is inserted in front of the number. If you must dial a
10-digit number for local calls, you must edit the
number to exclude that digit to dial out correctly.
PM NEW
#
TOTAL
PM NEW
#
TOTAL
RE/PA
Dir
Flash
Flash
CALLER ID
Flash
Tel Jack
Base Bottom View
Tel jack
Used for connecting a telephone or fax machine.
Tone/Pulse Switch
Used to set the dialing method for tone or pulse dialing.
10
LOCATION OF CONTROLS AND FEATURES
Tone/Pulse Switch
MSG
AM
NEW TOTAL L2
L1
31
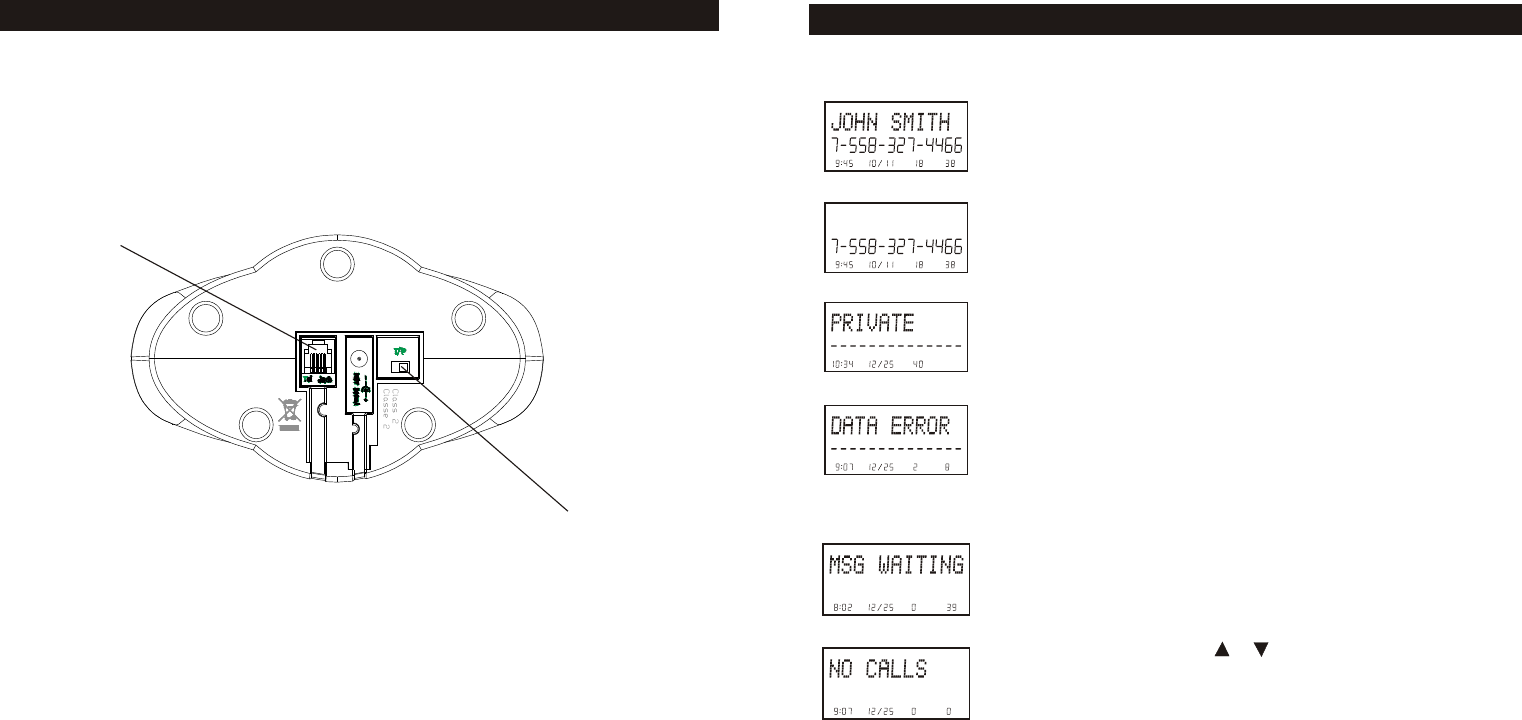
Display shows name and number, time and date of the
call.
Display shows number-only service.
"PRIVATE" will be shown when a call is received from a
blocked number. For privacy reasons, some states allow
callers the option to prevent their telephone data from
being displayed on the other party's Caller ID display.
Display shows when the Caller ID information was received
incorrectly or only part of the data was received.
Note: When an error is received, none of the data from
this call is saved in memory.
Display shows when a voice mail message has been
received and is stored by message waiting service
provided by the phone company.
This is displayed when or is pressed and there is no
Caller ID data stored.
Caller ID Displays
PM NEW
#
TOTAL
PM NEW
#
TOTAL
AM #
TOTAL
AM
NEW TOTAL
AM
NEW TOTAL L2
L1
CALLER ID
11
CHOOSING A LOCATION
Do the following:
Choose the best location
Connect the phone
Choose the dialing mode
Where you place the phone affects the reception quality of the handset:
Away from another cordless telephone
Place the base near an AC electrical outlet and near telephone line jack.
Place the base away from metal walls and metal file cabinets
CAUTION: The cordless telephone operates at a frequency that may cause
Interference to nearby TVs and VCRs; the base phone should not be
placed near, or on top of a TV or VCR. If interference is experienced,
Moving the cordless telephone farther away from the TV or VCR will
often reduce or eliminate the interference.
Note: While the 2.4GHz frequency is inherently clearer, we suggest that
you do not use this phone within 20 feet of a working microwave.
The microwave produces frequencies in this r ange which may
cause interference. This interference is normal for all 2.4GHz
phones and should not be considered a product defect.
Away from noise sources such as a
window by a street with heavy traffic
Away from VCRs and TV sets and
other electronic equipment
Away from heat sources, such as
radiators, air ducts, and sunlight
Away from a microwave oven
Away from excessive
moisture, extremely low
temperatures, dust,
mechanical vibration, or
shock
Away from a
personal computer
Near a central
location and on a
level surface
30
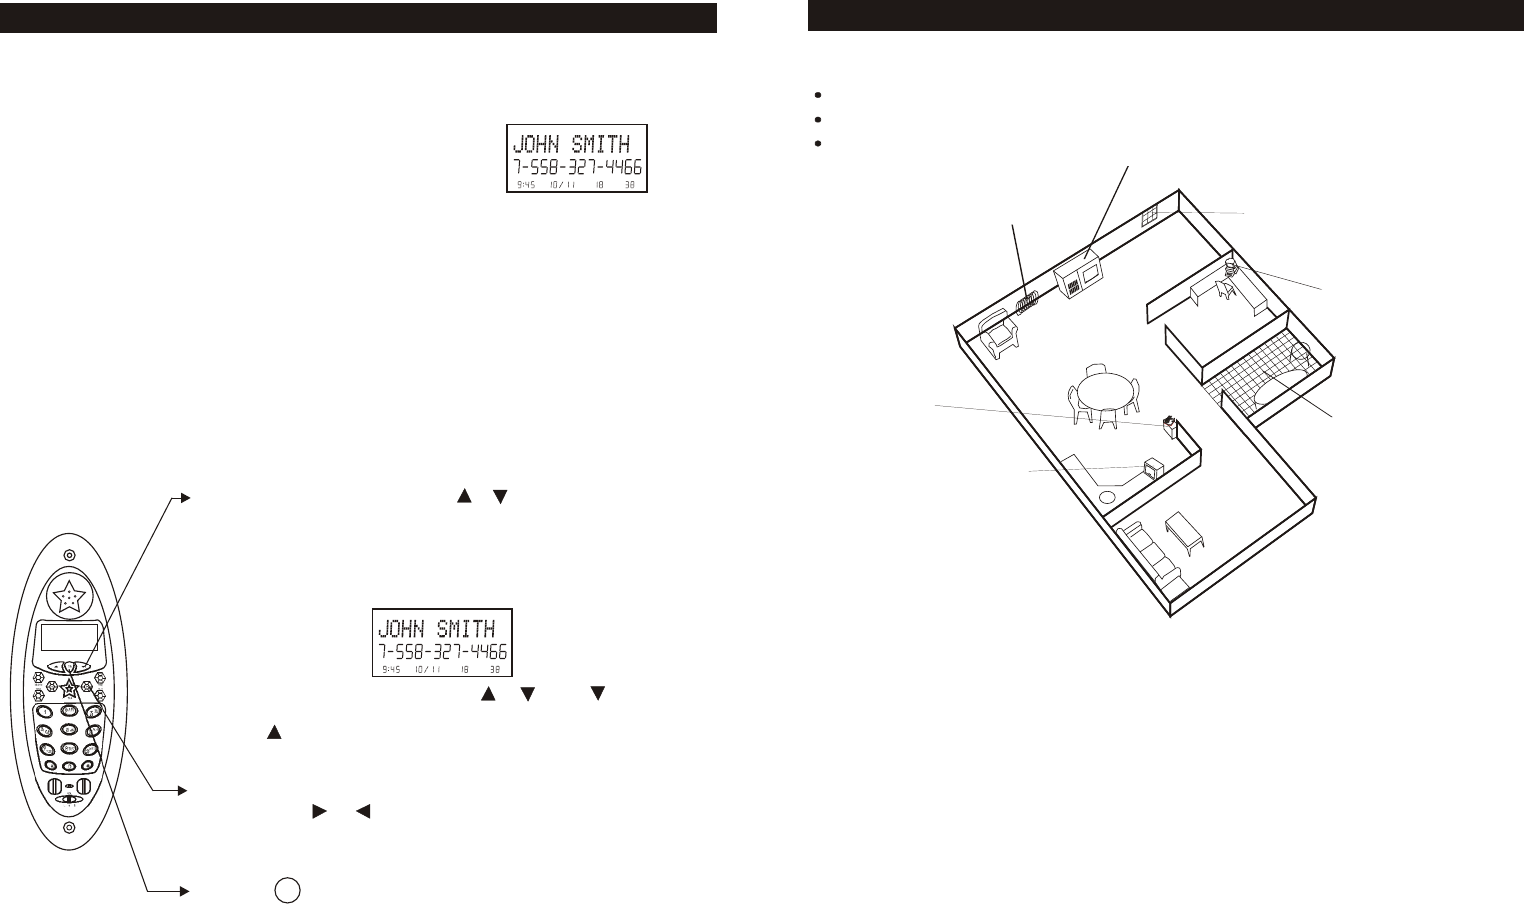
Caller ID allows the caller's name and phone number to be shown on the display
before you answer the call. In order to use this feature you must first subscribe
to Caller ID service with your telephone company.
When You Receive a Call
1. When the telephone rings, the caller's name and
phone number appears on the display.
2. The new Caller ID record includes the name and number of the caller and
the time and date the record is received. The New Call light will flash to
indicate that you have a new Caller ID call stored in memory.
Note: When the Caller ID information is received, it is stored in memory so that
this information can be recalled for later use. Up to 80 Caller ID calls
can be stored.
Viewing the Caller ID List
This phone automatically stores the last 80 calls received. If a call is received
from the same number more than once since the records were last viewed, no
new entry is made, but the repeat call icon ( "RPT" ) is displayed.
1. With the handset idle press or .
2. Any unviewed (new) calls will be displayed first. The
most recent call will be displayed. The information on
the call will be displayed with the name, number, date,
and time that the call was received.
3. To scroll to the next call, press or . The will go
through the calls from the last call received to the first.
The will allow you to view the calls from the first call
received to the last.
4. If the name or number is more than 11 characters,
press the or button to view the rest of the display
(as indicated by the arrows in the top line of the
display).
5. Press to return to the idle display.
PM NEW
#
TOTAL
PM NEW
#
TOTAL
Dir
CALLER ID
12
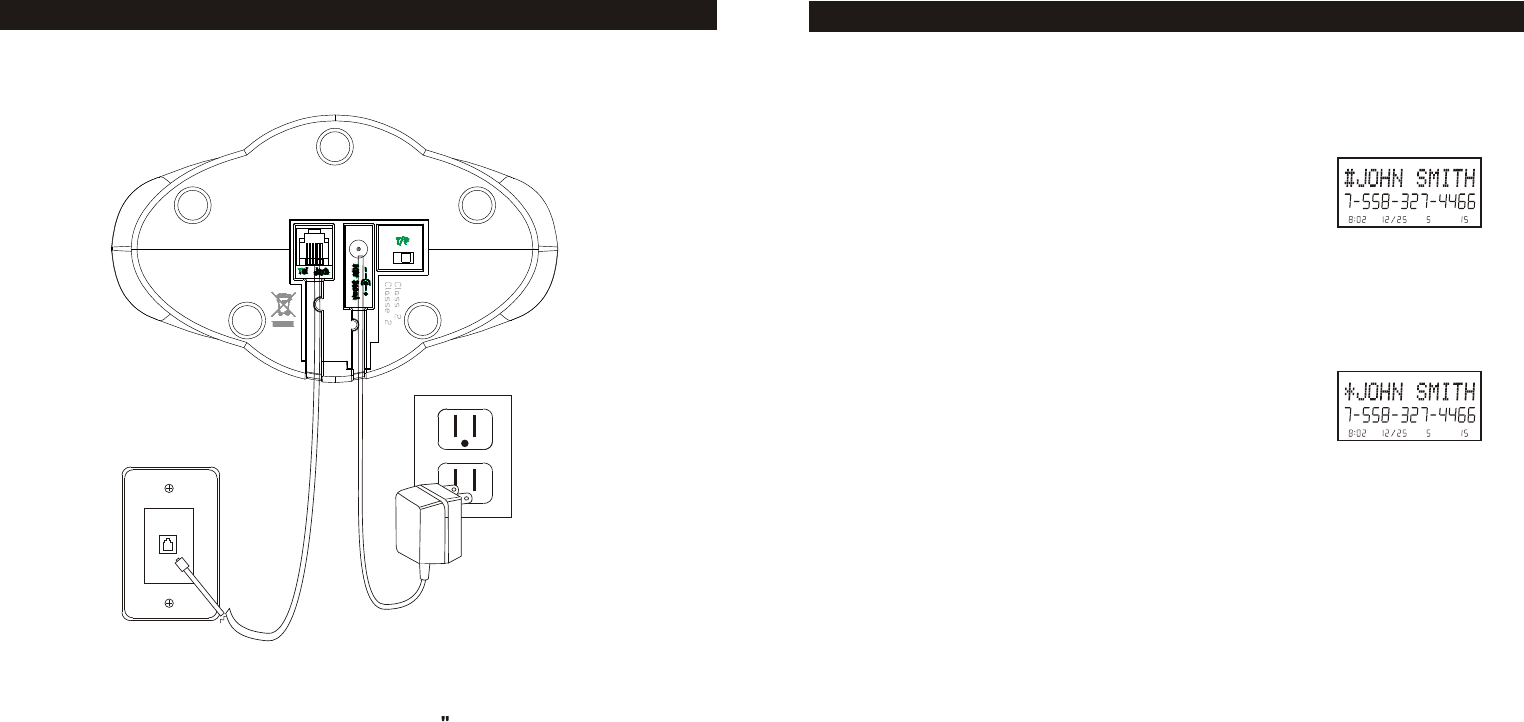
TELEPHONE SETUP
Connecting the Base
1. Connect the telephone line cord to the "Tel jack And to a telephone outlet.
2. Connect the AC Power adapter to the 9V DC jack and to an AC outlet.
Note: Use only the supplied AC power adapter. Do not use any other AC
power adapter. Connect the AC power adapter to a continuous power
supply. Place the phone close to the AC outlet so that you can plug in
the AC power adapter easily.
Tip: If your telephone outlet is not modular, contact your telephone company for
assistance.
Preferred Calls
You can assign stored numbers as preferred calls. When an incoming call is
matched to a stored number designated as preferred, the phone will generate a
special ring sound after caller ID information is received.
To mark a phone book entry as preferred, add a "#" mark at
the beginning of the name during programming or editing.
Blocked Calls
If you do not want to have the phone ring when a specific number calls, you can
store that number in the phone book and assigned it as blocked. When an
incoming call is matched to a stored number designated as blocked, the phone
will not ring after caller ID information is received.
To mark a phone book entry as blocked add a " " mark at
the beginning of the name during programming or editing.
29
SPEED DIALING
AM #
TOTAL
AM #
TOTAL
*

T/P Switch
1. Choose the correct dialing mode.
2. Select the dialing mode Tone or Pulse by
setting the switch on the bottom of the
base unit.
Note: Changes to the switch position
during a call do not tak e effect until
the call has ended.
Tip: If you are unsure of the proper dialing mode, Make a trial call with the dial
mode setting to TONE If the call connects,leave the switch as is (TONE
mode),otherwise, set to PULSE..
NOTE: Pulse dialing works for direct dialing and redialing only, not for memory
dialing.
Handset Volume
Adjust the receiver volume of the handset using
the volume control switch on the r ight side of
the handset.
13
TELEPHONE SETUP
Volume Control
Switch
T/P
Switch
1. Press .
2. Locate the number you wish to delete using .
3. Press . The display will show
4. Press to delete the phone book memory.
5. When you are finished press .
1. Press the button (If the phone book is not full, the LCD
screen will display "PHONE BOOK"). Press the to
locate the phone book list.
2. Press and hold down the , The display will show.
3. Press again, the LCD Screen will display
"ALL ERASED" and then return to the idle display.
Deleting All Stored number
28
Del / Scan
Dir
Dir
Del / Scan
Del / Scan
Del / Scan
PM NEW
#
TOTAL
PM NEW
#
TOTAL
PM
#
TOTAL
AM #
TOTAL
Deleting a Stored Number
SPEED DIALING
Dir
To install the cordless Ni-MH handset battery pack:
1. Slide the battery pack up into the compartment at the
bottom of the handset. Make sure that the end of the
battery with the contacts is inserted first.
2. Snap the battery compartment cover into place.
3. Place the handset on the charging cradle.
4. Once you have installed the battery pack and placed
the handset on the cradle, you will hear a tone
Indicating the handset has connected with the charging
contacts and will successfully charge.
5. IMPORTANT : Charge the battery pack for at least 12
hours before using the handset the first time.
6. The IN USE/CHARGE LED on the charging cradle will
light when the handset is properly making contact with
the charge terminals.
Battery Duration
A fully charged battery lasts for approximately:
4 hours when you use the handset continuously (talk
time).
5 days when the handset is not in use (standby).
When the Battery Needs Char ging
The phone will beep.
The display will show the Low Battery icon.
When to Purchase a New Battery Pack
If the battery lasts only a few minutes even after a full charge, the usable life of the
battery has expired and needs to be replaced.
14
BATTERY INSTALLATION
BATT
AM
NEW TOTAL
1. To make a call from the phone book, press .
2. Use to locate the exact number you wish
to dial.
3. Press Tal k . The display will show the directory name,
and begin dialing the number.
4. When you are finished with your call, press Tal k, or
place the handset back on the base.
Making Calls From the Phone Book
1. Press .
2. Locate the number you wish to edit using or keys .
3. Press . The entry will display with a flashing
prompt over the first character.
4. Move the cursor to the section you wish to edit using
the , , , and keys. Characters or numbers will
be inserted in front of the cursor.
5. To erase a character or digit, press the key.
6. When the entry is edited as you desire, press and hold
to store the edited entry.
Editing a Stored Number
#
#
27
SPEED DIALING
Dir
Dir
Flash
RE/PA
Del / Scan
Handset ldle (after time is set ) New CID Received
Line Ringing Message Waiting
Off- hook Call Timer
15
BASIC DISPLAYS
1 Space
& ' Space
2 A B C
3 D E
4 G H
5 J K
6 M N
7 P Q
8 T U
9 W X
0 0 0
F
I
L
O
R
V
Y
0
d
g
j
m
S
t
Z
0
(
a
e
h
k
n
p
u
w
0
)
b
.
c
f
i
l
o
q
v
x
0
2
D
G
J
M
S
T
z
0
A
0
1
B
E
H
K
N
7
U
9
1
3
4
5
6
r
8
y
0
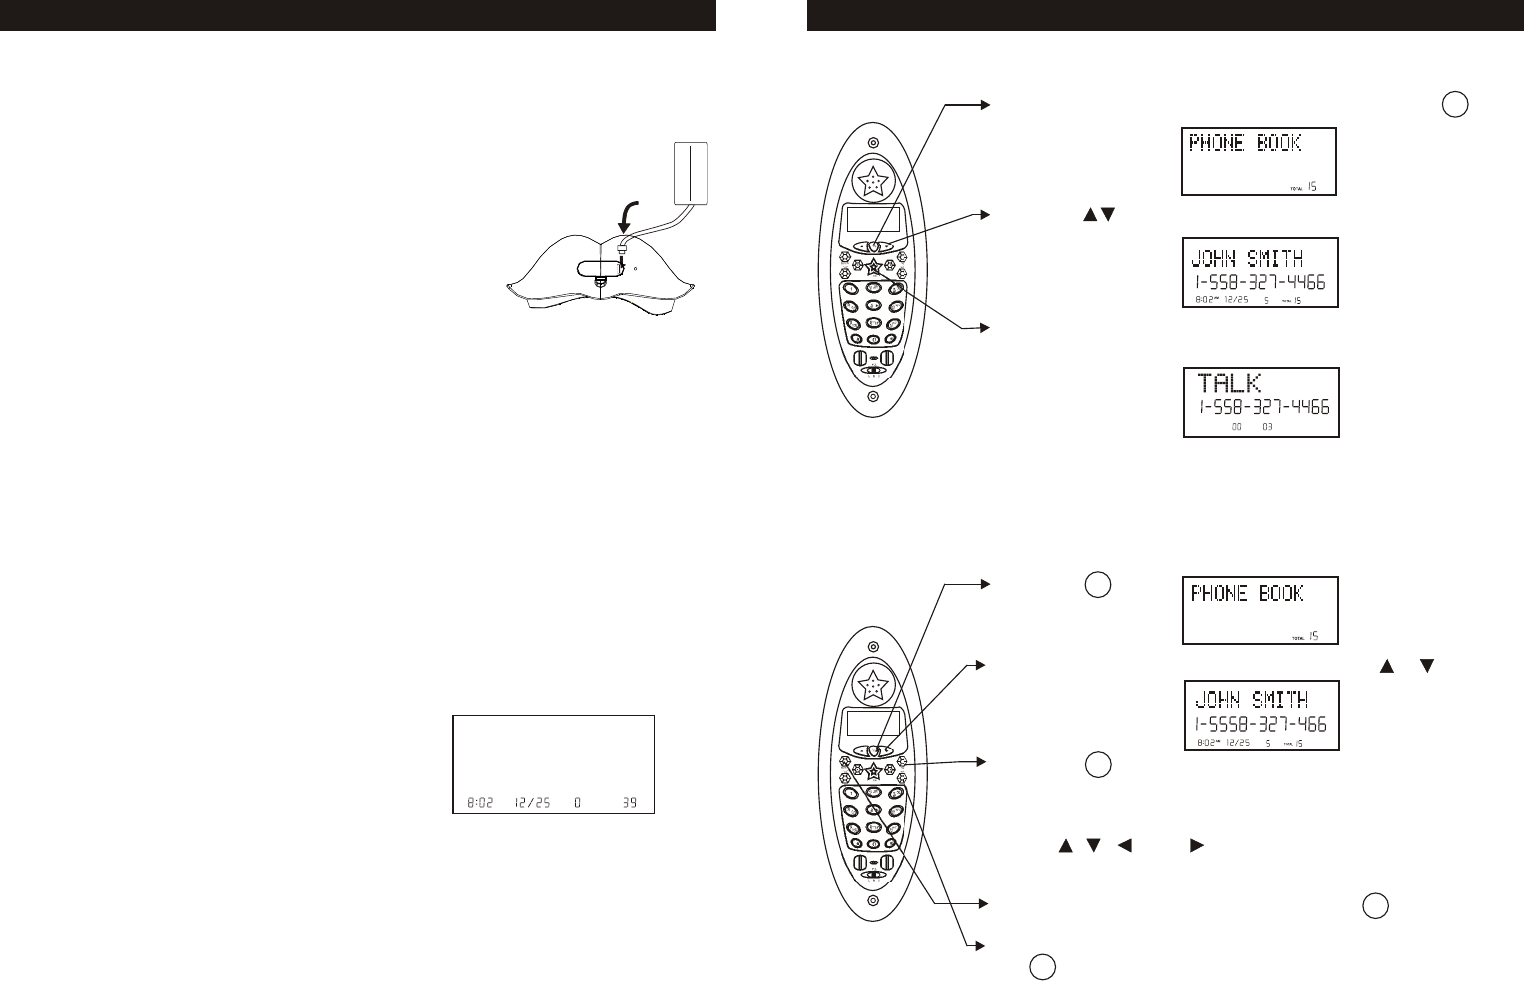
1. Press to enter the phone book.
2. Use to locate the exact number you wish to view.
3. If the name or number is more than 11 characters,
press the or button to view the rest of the display
(as indicated by the arrows in the top line of the
display).
4. Press to exit the phone book, or let the phone
book time out.
Viewing the Phone Book
26
PM NEW
#
TOTAL
AM #TOTAL
AM #TOTAL
Dir
Dir
Key
Press Press Press Press Press Press Press Press
1st 2nd 3rd 4th 5th 6th 7th 8th
Press
9th
Letter Table
SPEED DIALING
Note: If you mis-type entering the phone number, you can move through the
number and edit it by pressing or . To delete a character or number
inside the cursor, press the key.
The NTP-6323 will store up to 64 speed dial numbers in alphabetical order. No
duplicate numbers can be stored.
Storing Phone Numbers
1. With the handset in the idle state, press .
2. Press to create a new phone book entry.
3. Enter the name you wish to store using the dial pad to
enter the letters (up to 16 letters). See the following
letter table for how to program the letters using the
number pad. To move the cursor to the right, such as
to enter a new letter, press .
Example: For JOHN SMITH dial this sequence:
4. Press , and dial the number you wish to store (up to
16 digits). Press to insert a dialing pause into the
number.
5. Press and hold when finished to store the number
into memory.
5
J
666
0
44
H
66
N
1
space
7777
S
6
M
444
I
8
T
44
H
SPEED DIALING
PM NEW
#
TOTAL
AM
NEW TOTAL
AM
NEW TOTAL
Dir
Flash
RE/PA
RE/PA
Del / Scan
25
Making Calls 1. Pick up the handset and press Talk .
2. Wait until you hear a dial tone and then dial the
number you wish to dial. The call timer will begin.
Tip: It is also possible to pre-dial the number, by dialing
the number prior to pressing the Talk key. The number
displayed will be dialed once Talk is pressed.
3. When you are finished talking, press the Talk key or
place the unit back into the base to end the call.
PM
When you hear the phone ring:
1. The display will show "RING". If you have Caller ID,
the display will show the Caller ID information after the
first ring.
2. With the handset off the base, press Talk . The call timer
will start.
3. When you are finished, press Talk or place the handset
back on the base.
Receiving Calls
16
BASIC OPERATION

1. Press and hold the key to enter the menu.
2. Press to go to the message waiting programming
option.
3. Press to reset the message waiting indication.
4. Press and hold to delete the indication.
A long beep will sound to confirm.
5. Continue with programming or press to return
to the idle screen.
Deleting Message Waiting Indication
24
SETTINGS
PM
#
TOTAL
Dir
Flash
RE/PA
0
Redialing 1. Press Talk.
2. Wait until you hear the dial tone and then press
to redial the number last dialed .
PM
Adjust the volume control switch on the right side of the
handset to the desired volume level.
Press the key after the phone is in use. The phone will
remain in tone dialing mode for the duration of the call.
Receive a call waiting call
Press again to go back to the original caller.
To: Do This:
Additional Options
Adjust the volume in the earpiece
Switch to temporary tone dialing
Press to go to the new caller.
17
BASIC OPERATION
RE/PA
Flash
Flash
*
NOTE:To receive Caller ID information on incoming telephone calls, you must subscribe to the
Caller ID service provided by your local telephone company.
Func
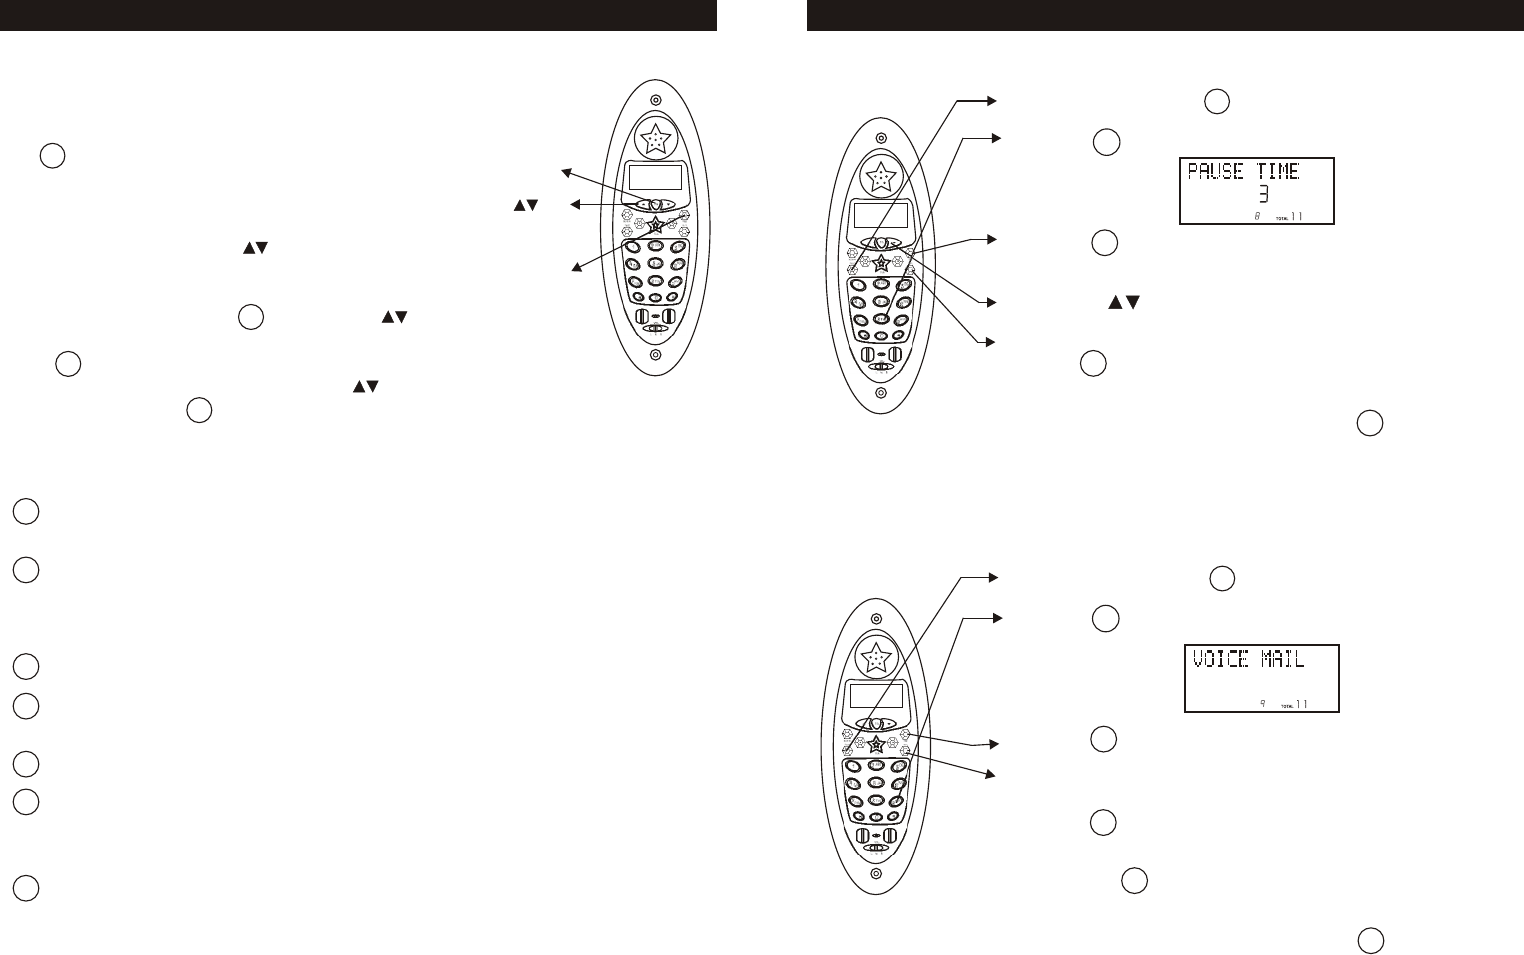
1. Press and hold the key to enter the menu.
2. Press to go to the pause time programming
option.
3. Press to change the setting. "3" will begin
flashing.
4. Use the key to select the desired dialing delay.
5. When the setting you desire is displayed, press and
hold to save the setting. A long beep will sound to
confirm the setting has been saved.
6. Continue with programming or press to return to
the idle screen.
Changing the Pause Time
#
1. Press the key to enter the menu.
2. Press to go to the auto answer programming
option.
3. Press to enter your voice mail speed dial number.
4. Use the dial pad to enter the phone number used to
access your voice mail messages (up to 16 digits).
Press to insert a dialing pause.
5. When the phone number you desire is displayed, press
to save the setting. A long beep will sound
to confirm the number has been saved.
6. Continue with programming or press to return to
the idle screen.
and hold
and hold
Programming One-Touch Voice Mail Dialing
#
23
SETTINGS
Dir
Flash
8
tuv
RE/PA
9
wxyz
Flash
RE/PA
RE/PA
Dir
You can change the setting on the handset in the options
menu. Access the options menu by pressing and holding
the key.
There are 10 settings in the options menu which can be
changed. You can scroll through the option menu in the
listed order by pressing the key. Settings can be
reached directly by pressing that number on the keypad.
To edit a setting, press the key, use the key to
toggle between the setting options, and then press and
hold to save changes. You can continue programming
options by using the dial pad keys or the key to go to
a new setting. Press to exit the options menu.
Handset Settings
key
Dir key
Flash/Edit
key
Language: Change the language that appears on the display. Choose
between English, French, and Spanish.
First Ring On/Off: Turn the first ring of the phone off so that it does not
ring until caller ID information has been displayed. Particularly useful
when using the priority and blocked call features or the private and
unavailable ring settings.
Time Set: Change the time and date.
Ring Hi/Low/Off: Change the volume of the ringer on the handset or turn
the ringer off.
Contrast: Adjust the brightness of the display for optimum viewing.
Area code: At any time during options programming of a home area code
where 7-digit dialing is used for ease of callback and other features
(do not program if you use 10-digit dialing to call numbers in your area).
Key Function
Flash Time: Allows you to adjust the flash time to accommodate the
phone service in your area.
18
SETTINGS
Dir
Flash
RE/PA
1
2
abc
3
def
4
ghi
5
jkl
6
mno
7
pqrs
Func
Func
Func
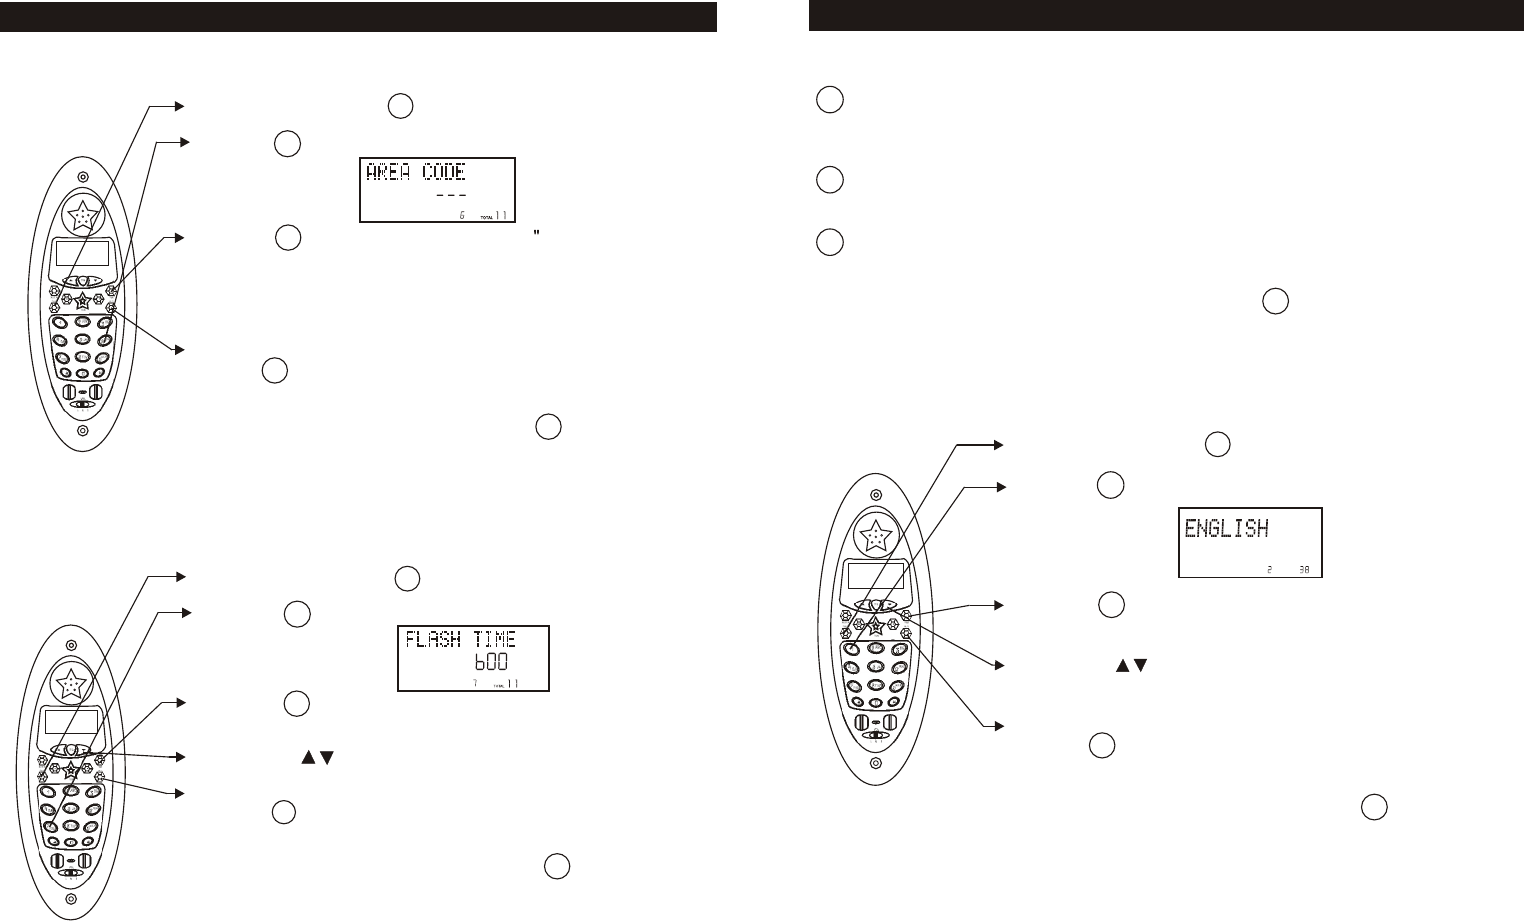
Setting the Area code
1. Press and hold the key to enter the menu.
2. Press to go to the AREA CODE programming
option.
3. Press to change the setting. "--- will begin
flashing.
4. Use the dial pad to enter the three digit area code there
your phone numbers begins with.
5. When the setting you desire is displayed, press and
hold to save the setting. A long beep will sound to
confirm the setting has been saved.
6. Continue with programming or press to return
to the idle screen.
#
Changing the Flash Time
1. Press and hold the key to enter the menu.
2. Press to go to the flash time programming
option.
3. Press to change the setting. "600" will begin
flashing.
4. Use the key to select the desired dialing delay.
5. When the setting you desire is displayed, press and
hold to save the setting. A long beep will sound to
confirm the setting has been saved.
6. Continue with programming or press to return
to the idle screen.
Note: The standard and default flash time setting is 600ms.
This is the setting you should use to access standard
telephone services such as call waiting. This setting is
adjustable to allow for PBX and other special uses.
#
Tip: Do not use the AREA CODE programming if you are required
_
_
to dial 10 digits (xxx xxx xxxx)to dial a local number.
22
6
mno
Flash
RE/PA
Dir
7
pqrs
Flash
Dir
RE/PA
SETTINGS
Pause Time: Allows you to adjust the number of seconds that a pause
lasts such as during programmed pauses in your speed dial numbers or
after your PBX number is dialed.
Voice Mail: The programmed one-touch number designed to enable easy
access to voice mail service provided by your telephone company.
MSG Waiting Delete: Clears any current message waiting indication.
Note: At any time during options programming you can quit and the settings
that you have changed will be saved. Press to quit the options
menu or let the options programming time out by not pressing any keys
for 20 seconds.
Key Function
1. Press and hold the key to enter the menu.
2. Press to go to the language programming option.
3. Press /Edit to change the setting. "ENGLISH" will
begin flashing.
4. Use the key to toggle between ENGLISH,
ESPANOL, and FRANCAIS.
5. When the setting you desire is displayed, press and
hold /Save to save the setting. A long beep will sound
to confirm the setting has been saved.
6. Continue with programming or press to return to
the idle screen.
Changing the Language
19
SETTINGS
8
tuv
9
wxyz
0
Dir
1
PM
#
TOTAL
Flash
Dir
RE/PA
Func
Func
Func
1. Press and hold the key to enter the menu.
2. Press to go to the silent programming option.
3. Press to change the setting. "On" will begin
flashing.
4. Use the key to toggle between On and Off.
5. When the setting you desire is displayed, press and
hold to save the setting. A long beep
will sound to confirm the setting has been saved.
6. Continue with programming or press to return
to the idle screen.
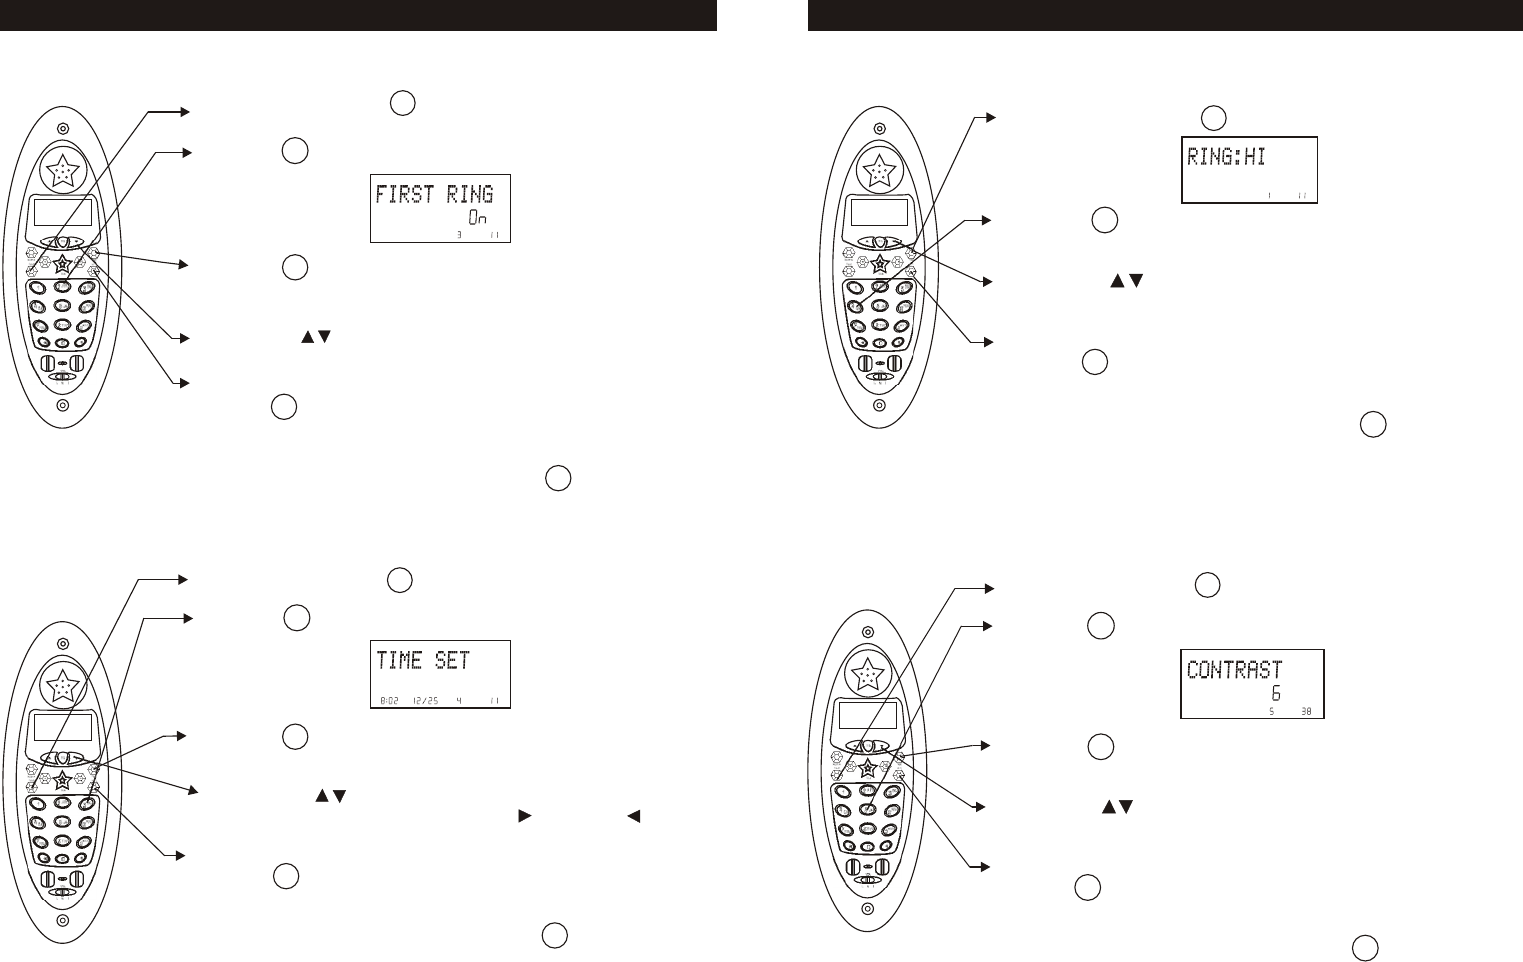
muting the First Ring On or Off
1. Press the key to enter the menu.
2. Press to go to the time set programming option.
3. Press to change the setting. The hour will
begin flashing.
4. Press the key to enter the month, date, hour and
minute. To move cursor, press the key or the key.
5. When the setting you desire is displayed, press and
hold to save the setting. A long beep will sound
and you are returned to the options menu.
6. Continue with programming or press to return to
the idle screen.
and hold
Setting the Time and Date
20
SETTINGS
2
abc
Flash
Dir
RE/PA
3
def
Flash
RE/PA
Dir
PM
#
TOTAL
AM #
TOTAL
1. Press the key to enter the menu.
2. Press to change the setting. "HI" will begin
flashing.
3. Use the key to toggle between HI, LOW, and
OFF.
4. When the setting you desire is displayed, press and
hold to save the setting. A long beep will sound
to confirm the setting has been saved.
5. Continue with programming or press to return
to the idle screen.
and hold
Setting the Ringer Level
1. Press and hold the key to enter the menu.
2. Press to go to the contrast programming option.
3. Press to change the setting. "6" will
begin flashing.
4. Use the key to toggle between the eight levels of
contrast.
5. When the setting you desire is displayed, press and
hold to save the setting. A long beep
will sound to confirm the setting has been saved.
6. Continue with programming or press to return
to the idle screen.
Adjusting the Contrast
21
SETTINGS
4
Dir
RE/PA
PM
#
TOTAL
5
jkl
PM
#
TOTAL
Flash
Dir
RE/PA
Func
Func
Func
Func