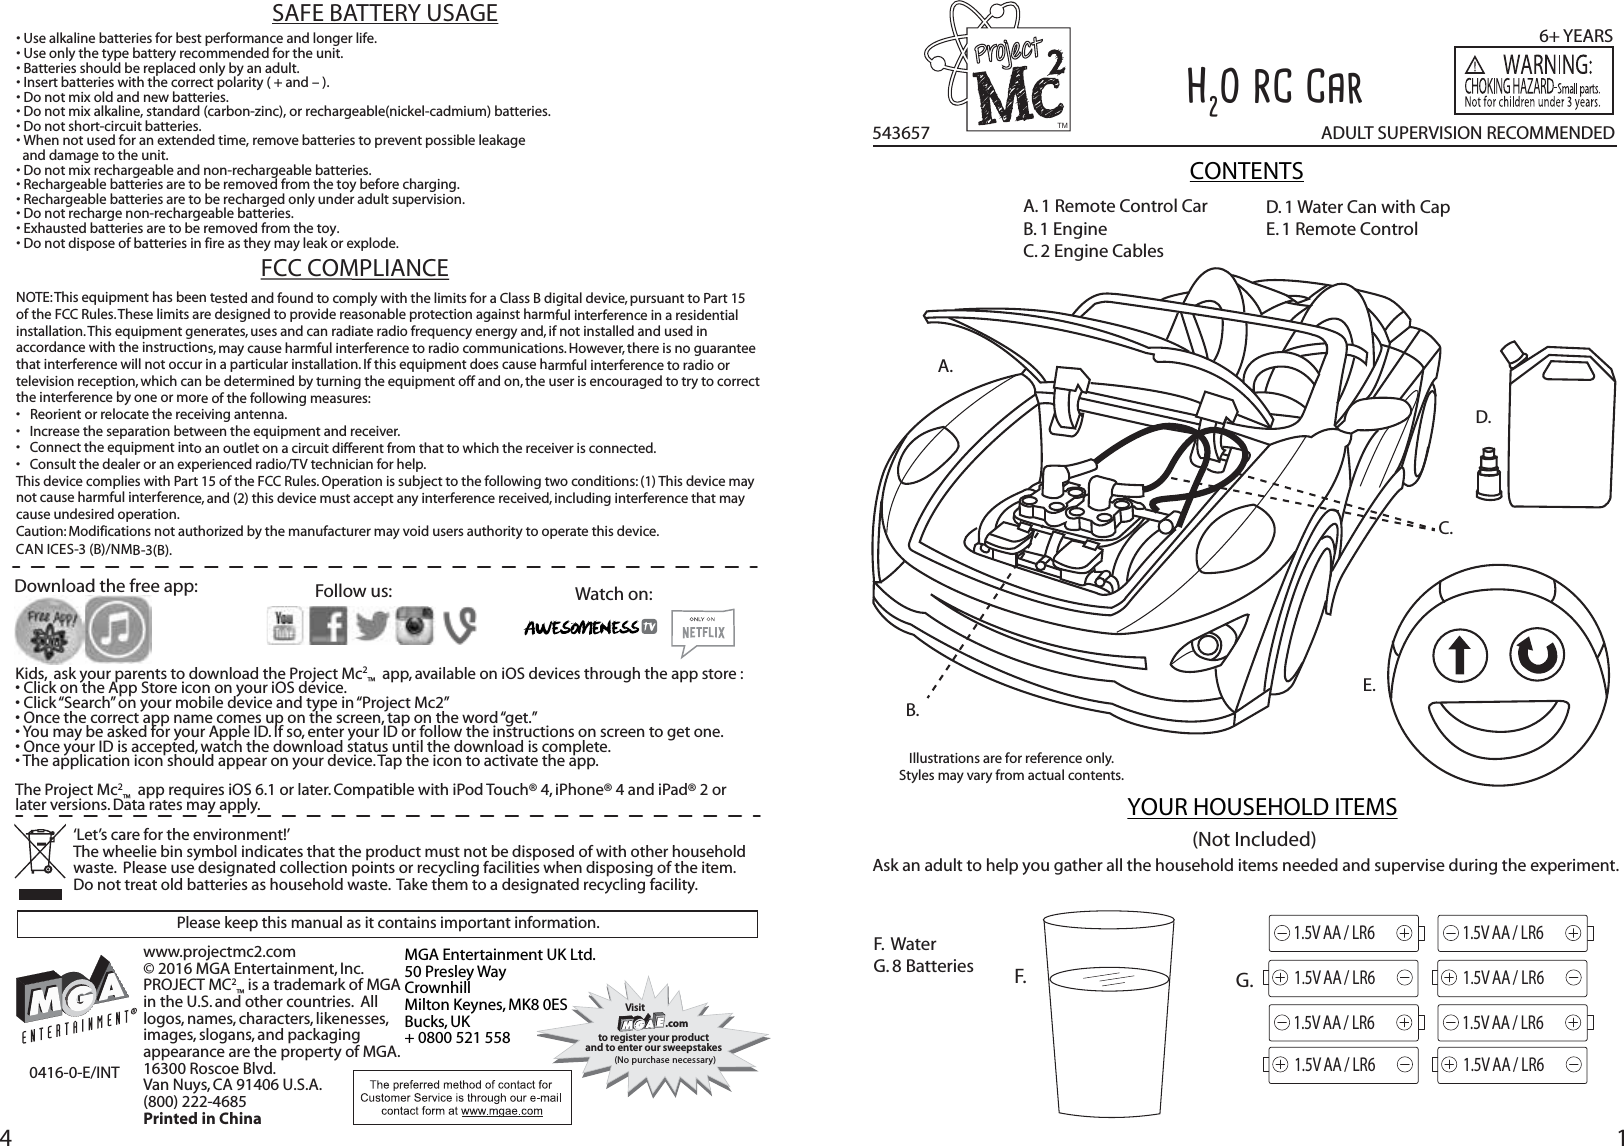
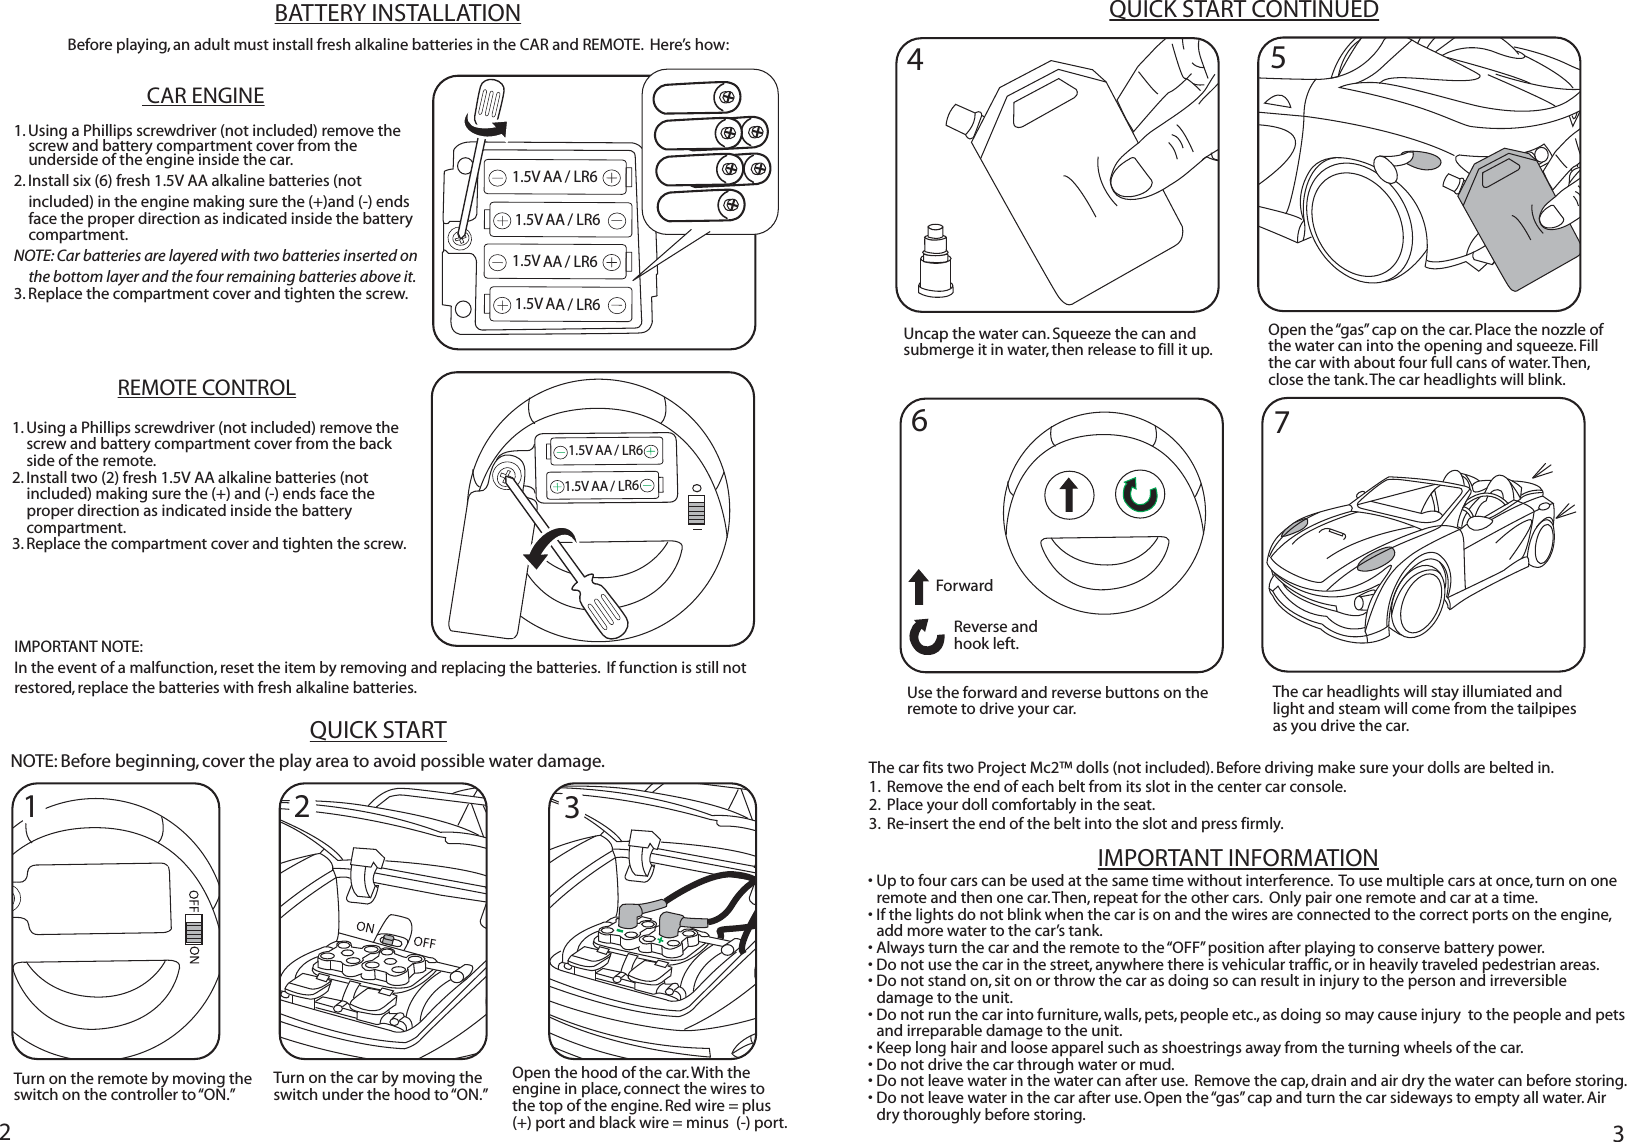
MGA Entertainment 542469TX Project Mc2 H2O Powered RC Car User Manual 542469 Project MC2 H2O RC Car IM 1 4

MGA Entertainment (HK) Ltd. Project Mc2 H2O Powered RC Car 542469 Project MC2 H2O RC Car IM 1 4

User Manual

14543657Illustrations are for reference only.  Styles may vary from actual contents.CONTENTSTMA. 1 Remote Control CarB. 1 EngineC. 2 Engine CablesF.  WaterG. 8 Batteries A.B.C.D.E.YOUR HOUSEHOLD ITEMS(Not Included)ADULT SUPERVISION RECOMMENDED6+ YEARSH2O RC CarF.Ask an adult to help you gather all the household items needed and supervise during the experiment.Please keep this manual as it contains important information.www.projectmc2.com© 2016 MGA Entertainment, Inc.PROJECT MC2™ is a trademark of MGA in the U.S. and other countries.  All logos, names, characters, likenesses, images, slogans, and packaging appearance are the property of MGA. 16300 Roscoe Blvd. Van Nuys, CA 91406 U.S.A. (800) 222-4685Printed in ChinaMGA Entertainment UK Ltd.50 Presley WayCrownhillMilton Keynes, MK8 0ESBucks, UK+ 0800 521 558Visit .comto register your productand to enter our sweepstakes(No purchase necessary)Watch on:Download the free app: Kids,  ask your parents to download the Project Mc2™  app, available on iOS devices through the app store :• Click on the App Store icon on your iOS device.• Click “Search” on your mobile device and type in “Project Mc2”• Once the correct app name comes up on the screen, tap on the word “get.”• You may be asked for your Apple ID. If so, enter your ID or follow the instructions on screen to get one.• Once your ID is accepted, watch the download status until the download is complete.• The application icon should appear on your device. Tap the icon to activate the app.The Project Mc2™  app requires iOS 6.1 or later. Compatible with iPod Touch® 4, iPhone® 4 and iPad® 2 or later versions. Data rates may apply.0416-0-E/INTFollow us:‘Let’s care for the environment!’  The wheelie bin symbol indicates that the product must not be disposed of with other household waste.  Please use designated collection points or recycling facilities when disposing of the item.Do not treat old batteries as household waste.  Take them to a designated recycling facility.FCC COMPLIANCENOTE: This equipment has been tested and found to comply with the limits for a Class B digital device, pursuant to Part 15 of the FCC Rules. These limits are designed to provide reasonable protection against harmful interference in a residential installation. This equipment generates, uses and can radiate radio frequency energy and, if not installed and used in accordance with the instructions, may cause harmful interference to radio communications. However, there is no guarantee that interference will not occur in a particular installation. If this equipment does cause harmful interference to radio or television reception, which can be determined by turning the equipment off and on, the user is encouraged to try to correct the interference by one or more of the following measures:•  Reorient or relocate the receiving antenna. •  Increase the separation between the equipment and receiver. •  Connect the equipment into an outlet on a circuit different from that to which the receiver is connected. •  Consult the dealer or an experienced radio/TV technician for help. This device complies with Part 15 of the FCC Rules. Operation is subject to the following two conditions: (1) This device may not cause harmful interference, and (2) this device must accept any interference received, including interference that may cause undesired operation.Caution: Modifications not authorized by the manufacturer may void users authority to operate this device.CAN ICES-3 (B)/NMB-3(B). G.1.5V AA / LR61.5V AA / LR61.5V AA / LR61.5V AA / LR61.5V AA / LR61.5V AA / LR61.5V AA / LR61.5V AA / LR6D. 1 Water Can with Cap E. 1 Remote Control• Use alkaline batteries for best performance and longer life.• Use only the type battery recommended for the unit.• Batteries should be replaced only by an adult.• Insert batteries with the correct polarity ( + and – ).• Do not mix old and new batteries.• Do not mix alkaline, standard (carbon-zinc), or rechargeable(nickel-cadmium) batteries.• Do not short-circuit batteries.• When not used for an extended time, remove batteries to prevent possible leakage   and damage to the unit.• Do not mix rechargeable and non-rechargeable batteries.• Rechargeable batteries are to be removed from the toy before charging.• Rechargeable batteries are to be recharged only under adult supervision.• Do not recharge non-rechargeable batteries.• Exhausted batteries are to be removed from the toy.• Do not dispose of batteries in fire as they may leak or explode. SAFE BATTERY USAGE
223IMPORTANT INFORMATION1. Using a Phillips screwdriver (not included) remove the screw and battery compartment cover from the underside of the engine inside the car.  2. Install six (6) fresh 1.5V AA alkaline batteries (not included) in the engine making sure the (+)and (-) ends face the proper direction as indicated inside the battery compartment.  NOTE: Car batteries are layered with two batteries inserted on the bottom layer and the four remaining batteries above it. 3. Replace the compartment cover and tighten the screw.BATTERY INSTALLATIONBefore playing, an adult must install fresh alkaline batteries in the CAR and REMOTE.  Here’s how:  CAR ENGINEREMOTE CONTROL1. Using a Phillips screwdriver (not included) remove the screw and battery compartment cover from the back side of the remote. 2. Install two (2) fresh 1.5V AA alkaline batteries (not included) making sure the (+) and (-) ends face the proper direction as indicated inside the battery compartment.  3. Replace the compartment cover and tighten the screw.IMPORTANT NOTE:  In the event of a malfunction, reset the item by removing and replacing the batteries.  If function is still not restored, replace the batteries with fresh alkaline batteries.QUICK STARTQUICK START CONTINUEDNOTE: Before beginning, cover the play area to avoid possible water damage.• Up to four cars can be used at the same time without interference.  To use multiple cars at once, turn on one remote and then one car. Then, repeat for the other cars.  Only pair one remote and car at a time.• If the lights do not blink when the car is on and the wires are connected to the correct ports on the engine, add more water to the car’s tank. • Always turn the car and the remote to the “OFF” position after playing to conserve battery power.• Do not use the car in the street, anywhere there is vehicular traffic, or in heavily traveled pedestrian areas.• Do not stand on, sit on or throw the car as doing so can result in injury to the person and irreversible damage to the unit.• Do not run the car into furniture, walls, pets, people etc., as doing so may cause injury  to the people and pets and irreparable damage to the unit.• Keep long hair and loose apparel such as shoestrings away from the turning wheels of the car.    • Do not drive the car through water or mud.• Do not leave water in the water can after use.  Remove the cap, drain and air dry the water can before storing.• Do not leave water in the car after use. Open the “gas” cap and turn the car sideways to empty all water. Air dry thoroughly before storing. 4Turn on the car by moving the switch under the hood to “ON.”67Uncap the water can. Squeeze the can and submerge it in water, then release to fill it up.Open the “gas” cap on the car. Place the nozzle of the water can into the opening and squeeze. Fill the car with about four full cans of water. Then, close the tank. The car headlights will blink. The car headlights will stay illumiated and light and steam will come from the tailpipes as you drive the car. Open the hood of the car. With the engine in place, connect the wires to the top of the engine. Red wire = plus (+) port and black wire = minus  (-) port. Use the forward and reverse buttons on the remote to drive your car.  The car fits two Project Mc2™ dolls (not included). Before driving make sure your dolls are belted in.1.  Remove the end of each belt from its slot in the center car console.2.  Place your doll comfortably in the seat.3.  Re-insert the end of the belt into the slot and press firmly.Reverse and hook left.Forward51.5V AA / LR61.5V AA / LR61.5V AA / LR61.5V AA / LR61.5V AA / LR61.5V AA / LR6123Turn on the remote by moving the switch on the controller to “ON.”

Navigation menu