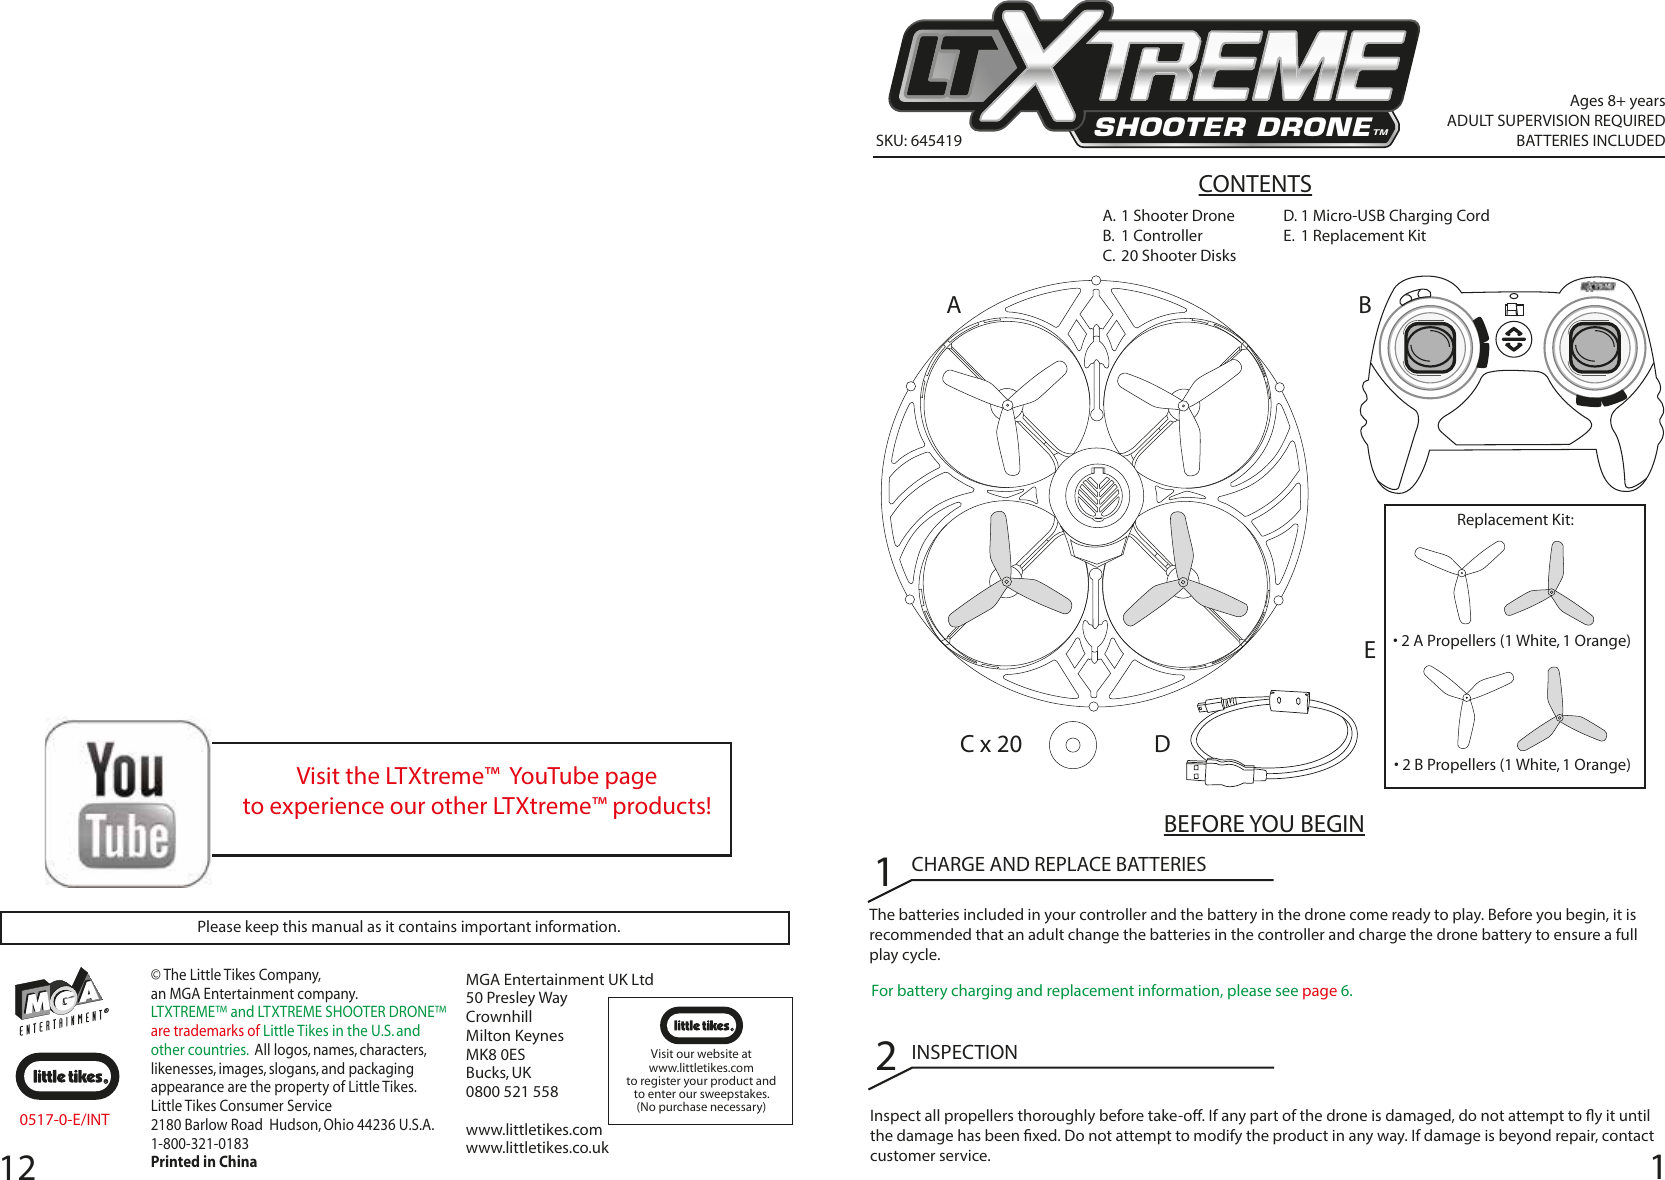
MGA Entertainment 645419RX LXTreme Shooter Drone User Manual 645419 Little Tikes LTXtreme Shooter Drone 170504

MGA Entertainment (HK) Ltd. LXTreme Shooter Drone 645419 Little Tikes LTXtreme Shooter Drone 170504

User Manual

112Ages 8+ yearsADULT SUPERVISION REQUIREDBATTERIES INCLUDEDSKU: 645419CONTENTSABEFORE YOU BEGINThe batteries included in your controller and the battery in the drone come ready to play. Before you begin, it is recommended that an adult change the batteries in the controller and charge the drone battery to ensure a full play cycle. For battery charging and replacement information, please see page 6. 1CHARGE AND REPLACE BATTERIES2INSPECTIONInspect all propellers thoroughly before take-o. If any part of the drone is damaged, do not attempt to y it until the damage has been xed. Do not attempt to modify the product in any way. If damage is beyond repair, contact customer service. Visit the LTXtreme™  YouTube page to experience our other LTXtreme™ products!1 Shooter Drone1 Controller20 Shooter DisksBEC x 20 DA.B.C.Please keep this manual as it contains important information.MGA Entertainment UK Ltd50 Presley WayCrownhillMilton KeynesMK8 0ESBucks, UK0800 521 558www.littletikes.comwww.littletikes.co.uk © The Little Tikes Company,an MGA Entertainment company.  LTXTREME™ and LTXTREME SHOOTER DRONE™are trademarks of Little Tikes in the U.S. and other countries.  All logos, names, characters, likenesses, images, slogans, and packaging appearance are the property of Little Tikes.  Little Tikes Consumer Service  2180 Barlow Road  Hudson, Ohio 44236 U.S.A.1-800-321-0183Printed in China0517-0-E/INTVisit our website at www.littletikes.com to register your product and to enter our sweepstakes. (No purchase necessary)Replacement Kit:• 2 A Propellers (1 White, 1 Orange)• 2 B Propellers (1 White, 1 Orange)D.E.1 Micro-USB Charging Cord1 Replacement KitSHOOTER DRONETM
211QUICK STARTThe red and green lights under the drone and the red pairing light on the controller will remain solid when the drone is ready. If the lights are blinking, either the drone or the controller is not ON (I).1TURN ON THE DRONE AND CONTROLLER2PRESS THE AUTO TAKE OFF BUTTON AND FLYPlace the drone on a flat surface. Stand 3 feet from the drone and press the auto take off button to launch it. Then, use the joysticks to maneuver it.Press the center auto landing button to land the drone on a flat surface. Let the drone propellers come to a full stop before touching the drone. 3SHOOT DISKSPress the disk shooting button on the controller once to shoot a disk at a target or press the button repeatedly to rapidly fire all loaded disks. The drone holds 10 disks at a time. 4LAND THE DRONEThe Little Tikes Company makes fun, high quality toys. We warrant to the original purchaser that this product is free of defects in materials or workmanship for one year * from the date of purchase (dated sales receipt is required for proof of purchase). At the sole election of The Little Tikes Company, the only remedies available under this warranty will be the replacement of the defective part or replacement of the product. This warranty is valid only if the product has been assembled and maintained per the instructions. This warranty does not cover abuse, accident, cosmetic issues such as fading or scratches from normal wear, or any other cause not arising from defects in material and workmanship. *The warranty period is three (3) months for daycare or commercial purchasers.  U.S.A and Canada: For warranty service or replacement part information, please visit our website at www.littletikes.com, call 1-800-321-0183 or write to: Consumer Service, The Little Tikes Company, 2180 Barlow Road, Hudson OH 44236, U.S.A. Some replacement parts may be available for purchase after warranty expires—contact us for details.  Outside U.S.A and Canada: Contact place of purchase for warranty service. This warranty gives you specific legal rights, and you may also have other rights, which vary from country/state to country/state. Some countries/states do not allow the exclusion or limitation of incidental or consequential damages, so the above limitation or exclusion may not apply to you.LIMITED WARRANTY3 ft.Pairing lightPower ON (I) / OFF (O) O/Pairing lightsON/OFFPower ON (I) / OFF (O/   )
10 3FLYING PRACTICE + FLYING TIPSFlying a drone takes practice and skill and should be learned under adult supervision.slowerlevel 1: learning (slow)level 2: mediumlevel 3: fastfasterKeep receiver pointed at the drone during flight.  Set the speed to level 1 (learning mode) until you are comfortable going faster.Practice hovering about 5 feet off the ground.Practice tapping the joysticks in any direction. Do not hold the joysticks in any single direction until you have a feel for how quickly the drone will move.Keep the drone 3 feet away from walls and ceilings to prevent crashes and damage.If you crash, immediately press and hold the landing / emergency stop button for two seconds. 5 ft.3 ft.3 ft.WARNING:IMPORTANT INFORMATION• Before each use, examine the drone, propellers, controller and other parts for damage. Never operate this product if it has damaged parts. Replace broken or missing propellers before use.• Flying drones takes skill and should be learned under direct supervision of an experienced adult.• Always launch the drone from a flat, level surface and do not hold the drone during take off. • For best results, use the drone in a large, open room without obstacles such as lamps, loose objects, etc.• Always keep your eyes on the drone during use.• Do not land or crash the drone near your head, your body or other people or pets. • Stand up while flying the drone to get out of the way quickly if necessary.• Always switch the controller and drone to the OFF (O) position after use.• Before recharging, allow the LiPo battery in the drone to cool for at least 10 minutes after use.• Keep the product out of direct sunlight and avoid using in direct heat. • Wipe the product with a damp cloth to clean. Air dry thoroughly in a well-ventilated area before storing.• Illustrations are for reference only. Styles may vary from actual contents.• Adult supervision required. • Do not touch the spinning propellers. Keep fingers, hands, hair and loose clothing like shoestrings away from moving parts to avoid injury.• Never hold or throw any objects into the spinning propellers.• Risk of eye injuries. Keep a safe distance of at least 3 feet between you and the drone when flying.• Do not fly the drone around people or pets.• Use indoors only. Do not fly the drone in the vicinity of water or near power lines or ceiling fans. • Do not submerge the drone or controller in water.• Never make modifications to the product.• The operators are responsible for safe product use. Injuries or damage from improper usage are the sole responsibility of the user.• Press the AUTO TAKE OFF / LANDING button and discontinue drone use immediately if the drone exits the line of sight. • Never leave the drone unattended while the controller or drone are ON (I).
9CONTROLLING DRONE FLIGHTAuto Take o / Auto Landing/ Emergency Stop(press and hold for 2 seconds to emergency stop)Pairing lightSpeed control slow fastPower ON (I) / OFF (O) UPDOWNFORWARDBACKWARDON/OFFForward trimBackward trimLeft trimRight trimShoot Disks 4‘Let’s care for the environment!’  The wheelie bin symbol indicates that the product must not be disposed of with other household waste.  Please use designated collection points or recycling facilities when disposing of the item. Do not treat old batteries as household waste.  Take them to a designated recycling facility.FCC COMPLIANCEThe drone is equipped with a LiPo rechargeable battery. Please pay attention to the following cautions for safety use:- Before recharging, allow the LiPo battery in the drone to cool for at least 10 minutes after use.- Do not dispose of the battery in fire or extreme heat.- Do not use or leave the battery near a heat source such as a fire or a heater.- Do not strike or throw the battery against hard surfaces.- Do not immerse the battery in water, and keep the battery in a cool, dry place.- When recharging, only use the battery charger specifically included for that purpose.- Do not over-charge the battery.- Do not directly solder the battery and pierce the battery with a nail or other sharp object.- Do not disassemble or alter the battery.- Charge the battery every 6 months and as necessary. - Do not transport or store the battery with metal objects such as necklaces, hairpins, etc.- Please recycle a used battery after covering the battery terminals with insulation tape or inserting it into an individual poly bag. Check local laws and regulations for recycling and/or disposal information.- Under the environment with electrostatic discharge, the product may malfunction and require the user to reset the product by turning it off and back on again.LiPo BATTERY SAFE USAGENOTE: This equipment has been tested and found to comply with the limits for a Class B digital device, pursuant to Part 15 of the FCC Rules. These limits are designed to provide reasonable protection against harmful interference in a residential installation. This equipment generates, uses and can radiate radio frequency energy and, if not installed and used in accordance with the instructions, may cause harmful interference to radio communications. However, there is no guarantee that interference will not occur in a particular installation. If this equipment does cause harmful interference to radio or television reception, which can be determined by turning the equipment off and on, the user is encouraged to try to correct the interference by one or more of the following measures:  • Reorient or relocate the receiving antenna.  • Increase the separation between the equipment and receiver. • Connect the equipment into an outlet on a circuit different from that to which the receiver is connected. • Consult the dealer or an experienced radio/TV technician for help. This device complies with Part 15 of the FCC Rules. Operation is subject to the following two conditions: (1) This device may not cause harmful interference, and (2) this device must accept any interference received, including interference that may cause undesired operation.Caution: Modifications not authorized by the manufacturer may void users authority to operate this device.This device complies with Industry Canada’s license-exempt RSSs. Operation is subject to the following two conditions:(1) This device may not cause interference, and (2) This device must accept any interference, including interference that may cause undesired operation of the device. CAN ICES-3 (B)/NMB-3(B). ALKALINE BATTERY SAFETY INFORMATION• Use only size “AAA” (LR03) alkaline batteries (3 required). • Charging of rechargeable batteries should only be done under adult supervision.• Remove rechargeable batteries from the product before recharging.• Do not mix old and new batteries. • Do not mix alkaline, standard (carbon-zinc), or rechargeable batteries.• Be sure to insert the batteries correctly and follow the toy and battery manufacturer’s instruction.• Always remove exhausted or dead batteries from the product.• Dispose of dead batteries properly: do not burn or bury them.• Do not attempt to recharge non-rechargeable batteries.• Avoid short-circuiting battery terminals.• Remove batteries before placing the unit into storage for a prolonged period of time.
REPLACING BROKEN OR MISSING PROPELLERS851234Turn the drone OFF (       ).• Note which propeller(s) need(s) to be replaced.• Note the letter (A, B) under the broken propeller(s).• If a propeller is missing, refer to the diagram to see where each propeller belongs.• Remove the broken propeller if it is still attached.• Use a Phillips screwdriver (not included)   to unscrew the propeller.• Pull o the propeller and discard if broken.• Place a new propeller on the drone collet.• Securely fasten with a Phillips screwdriver     (not included).•  Do not y the drone with broken propellers as it may cause damage or injury.•  Do not attempt to replace propellers with propellers of a dierent letter. The drone will not y if propellers are not installed properly.  •  If the propellers stop rotating or become jammed, immediately press and hold the landing / emergency stop button for two seconds. When the drone is fully landed and stopped, turn OFF (       ) the drone and remove any interference. WARNING:BAAB5Loose hair or other debris may get caught in the propellers over time. To remove, turn the drone OFF (       ),  take o the propeller, remove the debris, and reinstall the propeller. O/O/O/TROUBLESHOOTING• Conrm that the drone and controller are both in the ON (I) position. The lights on the drone and the controller    should be solid. • Point the controller towards the drone when ying and stay within 50 feet of the drone at all times. • Check the drone thoroughly for any damage or missing parts. • The drone may shut down on its own if it detects a problem.          • To restart, turn OFF (       ) the drone and controller for 30 seconds              and then turn them back ON (I). •  If the drone seems unstable after a crash, recalibrate it.          1. Place the drone horizontally.           2. Push and hold joysticks to the center of the controller               for several seconds.         3. The red drone light will blink for several seconds.         4. The lights will remain solid when calibration is complete.1Drone is not ying or is ying erratically: 2The propellers move, but the drone does not y:• The propellers may be broken. Check for broken or missing propellers and replace as necessary.• The propellers may be installed incorrectly. Make sure the propellers are in the proper location on the drone and    reinstall. Never screw the propellers too tightly onto the drone to prevent binding. 3The drone will not shoot disks:• With the drone turned off, open the disk lid and remove all loaded disks.    Ensure they are completely flat before reloading to prevent jamming in the drone.• Press them against a flat surface until they return to their original, flat shape. 5The drone crashes unexpectedly:• The drone may need to be recharged. Follow the charging directions and allow the drone to charge fully before    operating. Each full charge will lend approximately 5 minutes of play time.• Confirm the propellers are properly attached to the drone in their respective locations.4The drone drifts when hovering:• Try adjusting the trim if the drone is off balance.adjust forwardadjust backwardadjust to the leftadjust to the rightO/CALIBRATION
REPLACING CONTROLLER BATTERIESAn adult must install fresh alkaline batteries in the controller should the included batteries need replacing. Here’s how: 1. Using a Phillips screwdriver (not included) remove the screws and battery compartment cover from the back of the controller.2. Install three (3) fresh 1.5V AAA (LR03) alkaline batteries (not included) in the controller making sure the (+)and (-) ends face the proper direction as indicated inside the battery compartment. 3. Replace the compartment cover and tighten the screw.76CHARGING THE DRONE BATTERYTurn the drone OFF/CHARGING (       ). Plug charging cord into a computer (not included) that is turned on or wall adapter (not included). NOTE: Wall adapters may result in faster charge time. Plug the charging cord into the drone until the battery is fully charged. • Blinking red LED at the bottom of drone indicates charging.   • When the green LED at the bottom of drone lights up,    charging is complete. Unplug the charging cord from the drone and charging source. Then, turn the drone ON (I).NOTE: Fully charged drones will operate for about 5 minutes.O/O/O/3 x AAA Batteries1.5V AAA/LR031.5V AAA/LR031.5V AAA/LR031OPEN THE DISK LID3CLOSE THE DISK LID2RELOAD SHOOTER DISKSRELOADING THE SHOOTER DISKSThe drone holds 10 disks at a time. Disks must be completely flat before reloading them to prevent jamming. x10

Navigation menu