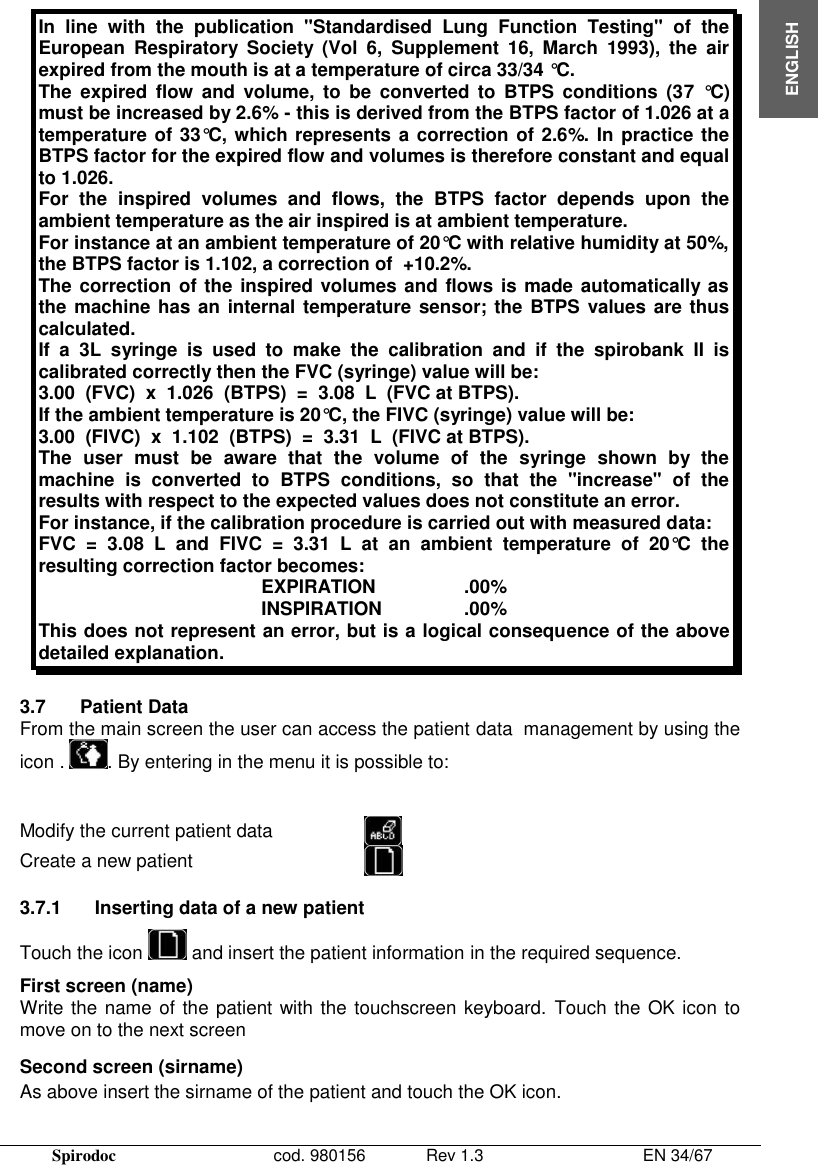
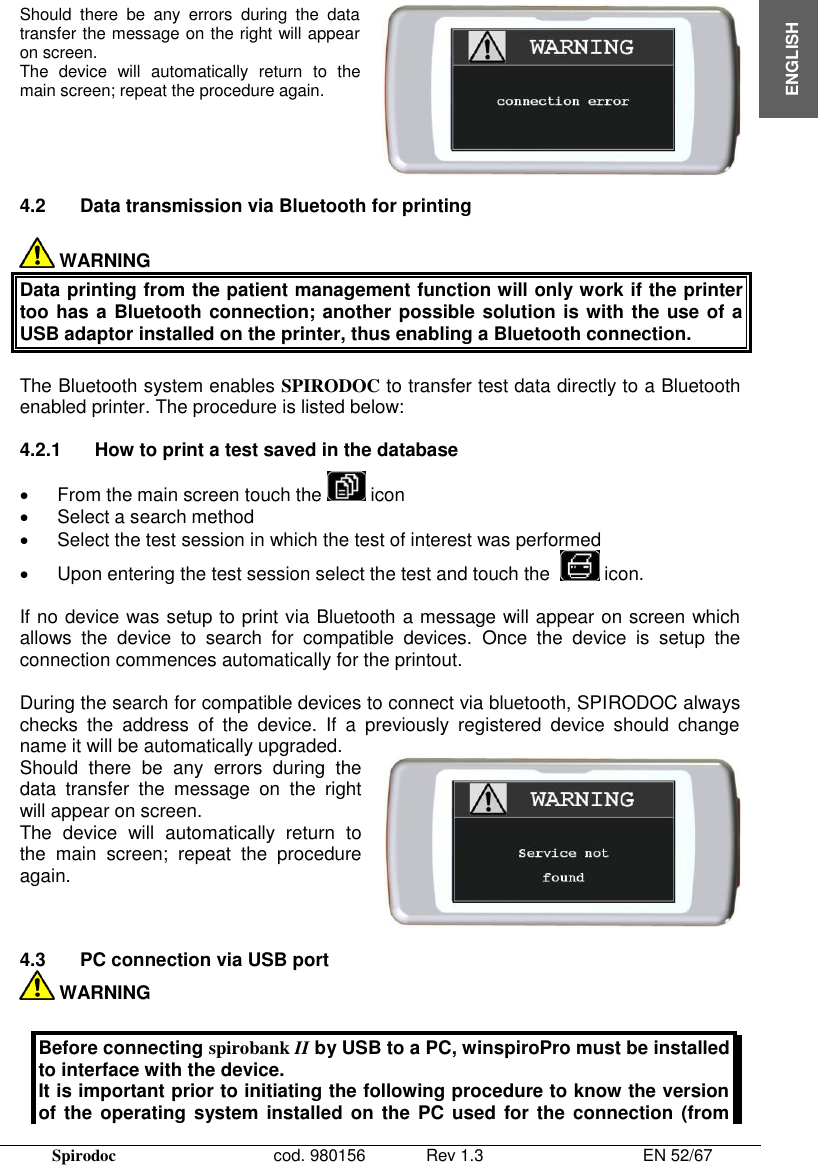
MIR Medical Research MIR040 Portable multipurpose and multifunction spirometer User Manual spiro
MIR Medical International Research Portable multipurpose and multifunction spirometer spiro
UserManual.wiki
>
MIR Medical Research
>
MIR040 User Manual
UserMan
Navigation menu
Upload a User Manual
Namespaces
Wiki Guide
HTML
PDF
Info
Views
User Manual
Discussion / Help
Navigation

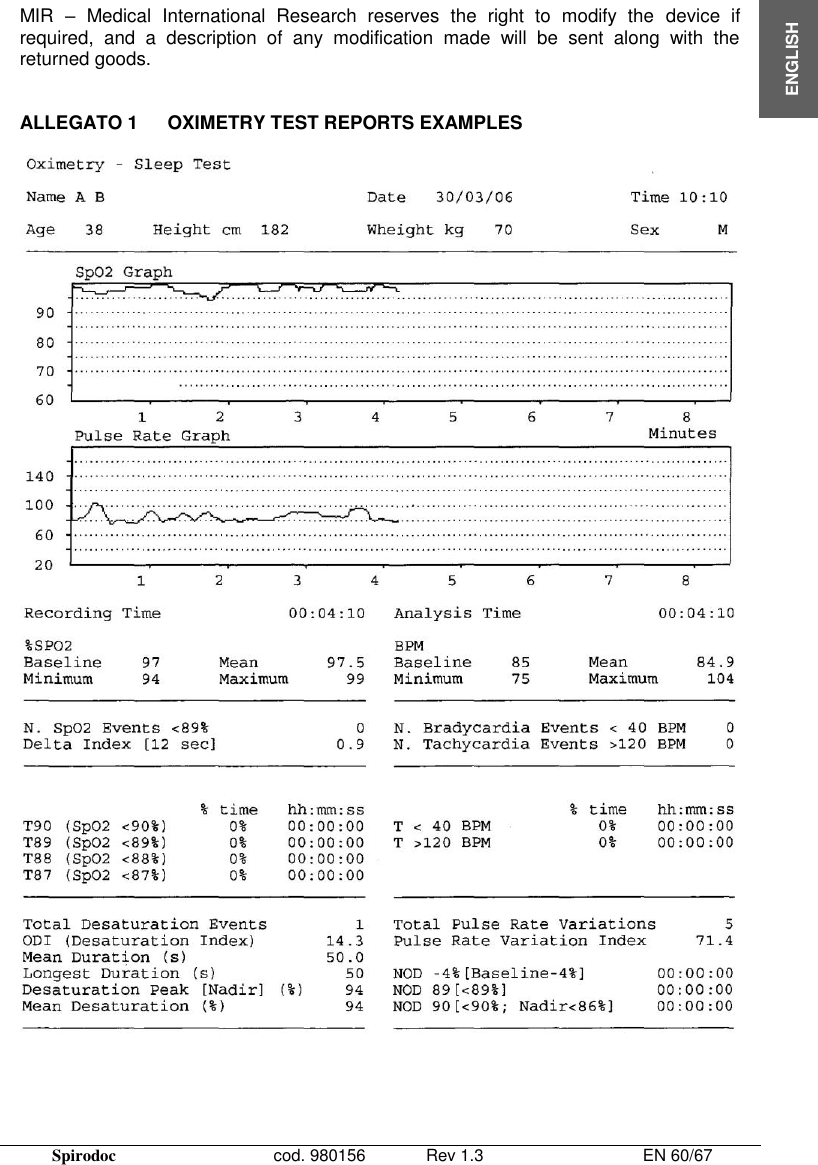
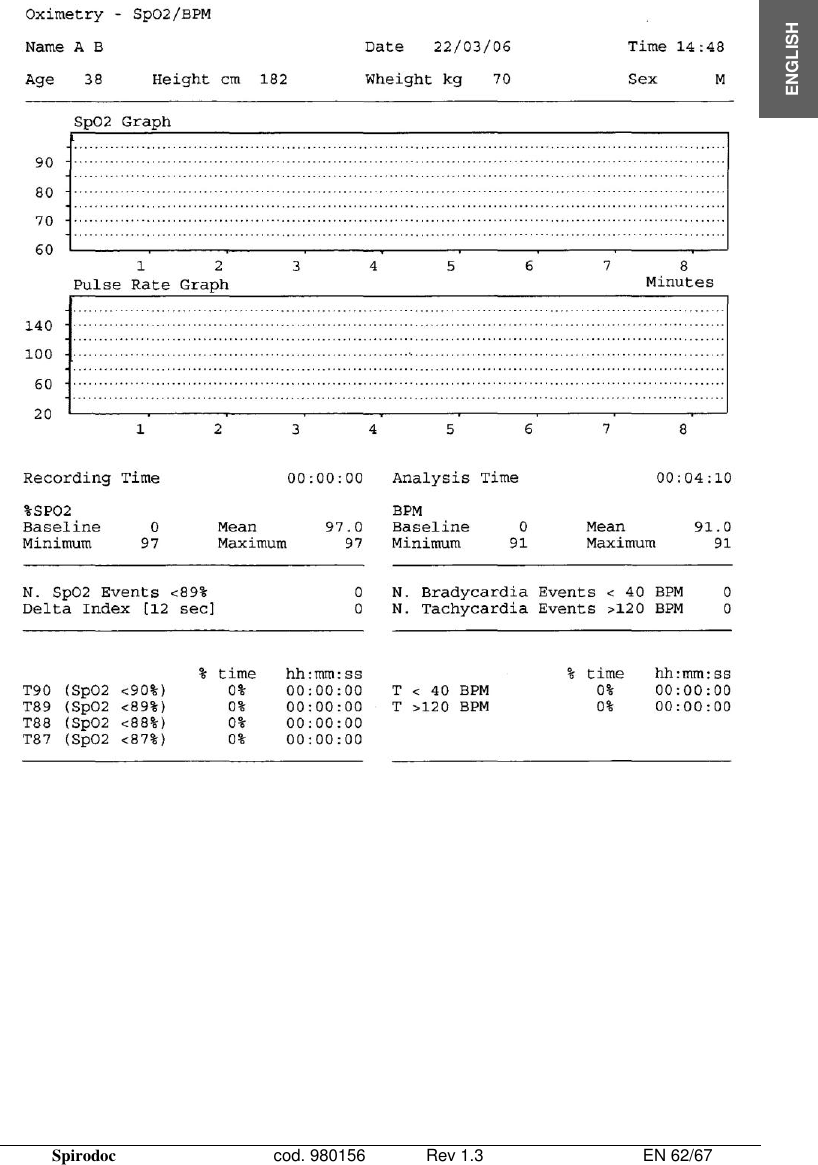
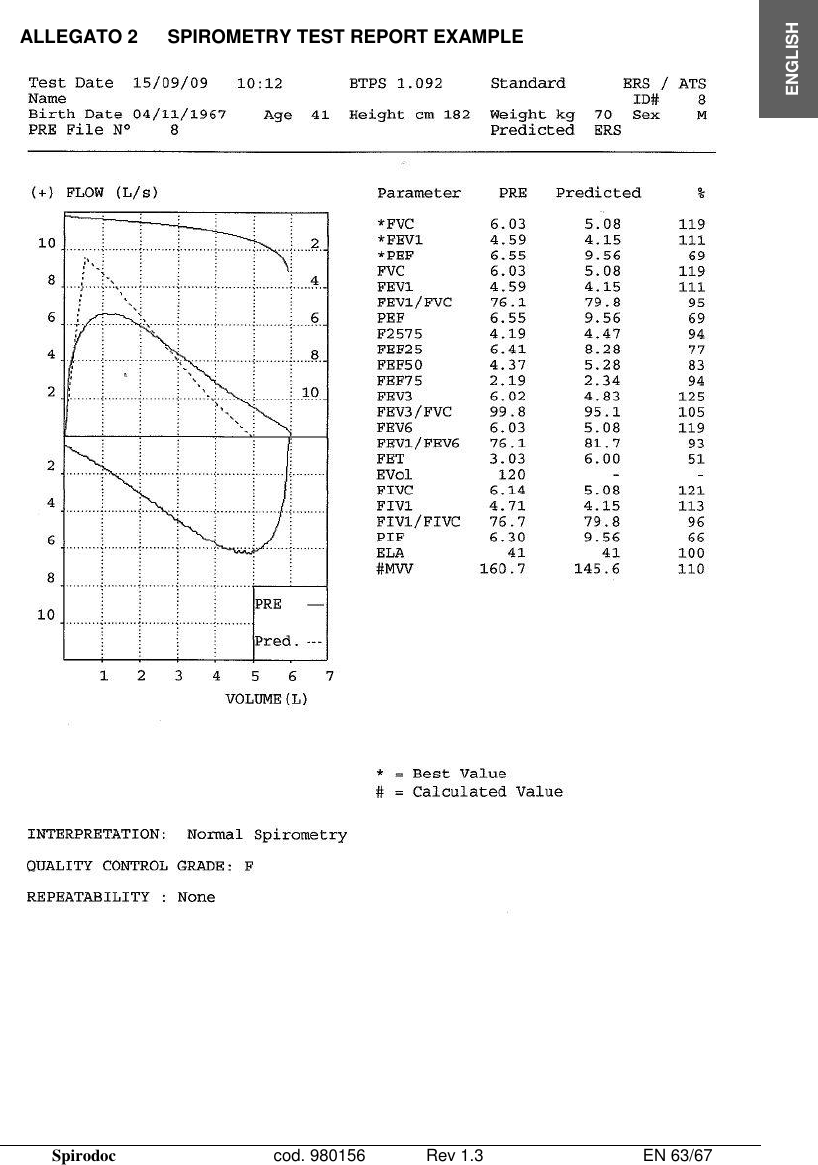
![Spirodoc cod. 980156 Rev 1.3 EN 19/67 ENGLISH TV/tI Average flow of inspiration, at rest L/min tI/Ttot tE/(tI+tE) \ MVV Maximum voluntary ventilation L/min ELA Estimated lung age year *= best values Flow/volume measurement system Bi-directional digital turbine Temperature sensor semiconductor (0-45°C) Measurement principle Infrared interruption Volume range 10 L Flow range 16 L/s Volume accuracy 3% or 50 mL Flow accuracy 5% or 200 mL/s Dynamic resistance at 12 L/s <0.5 cmH2O/L/s 2.6.2 Oximeter features Definitions: Desaturation Event Desaturation events SpO2 fall 4% in a limited period of 8-40 sec and successive rise 2% within a total period of 150 sec. Total Pulse rate Variation Pulse rate rise 10 BPM in limited period of 8-40 sec and successive fall 8 BPM during a total period of 150 sec. Parameters measured during sleep oximetry: SYMBOL DESCRIPTION Units SpO2 Baseline SpO2 Average in first three minutes % SpO2 Min SpO2 Minimum during period of analysis % SpO2 Max SpO2 Maximum during period of analysis % SpO2 Mean SpO2 Average during period of analysis % BPM Baseline Average pulse frequency in the first 3 minutes BPM BPM Min Minimum pulse frequency during the period of analysis BPM BPM Max Maximum pulse frequency during the period of analysis BPM BPM Mean Average pulse frequency during the period of analysis BPM Recording time Total time measure of SpO2 hh:mm:ss T < 90% Time passed with SpO2 < 90 % % hh:mm:ss T < 89% Time passed with SpO2 < 89 % % hh:mm:ss T < 88% Time passed with SpO2 < 88 % % hh:mm:ss T < 87% Time passed with SpO2 < 87 % % hh:mm:ss N° Events SpO2 <89% Fall of SpO2 below 89% for at least 20 seconds \ Index [12s] Index of SpO2 fluctuation calculated in intervals of 12 seconds \ T< 40 BPM Time passed with pulse frequency < 40 BPM % hh:mm:ss T> 120 BPM Time passed with pulse frequency > 120 BPM % hh:mm:ss N° Events < 40 BPM Bradycardia events during the entire period of analysis \](https://usermanual.wiki/MIR-Medical-Research/MIR040/User-Guide-1332663-Page-19.png)
![Spirodoc cod. 980156 Rev 1.3 EN 20/67 ENGLISH N° Events > 120 BPM Tachycardia events during the entire period of analysis \ Tot. Desat. Events Desaturation events during the entire period of the analysis \ ODI Desaturation events by hour of analysis 1/h Mean Duration Average duration of desaturation events s Longest Duration Longest duration of desaturation events s Desaturation Peak Minimum Sp02 during desaturation events % Mean Desaturation Average duration of desaturation events % Mean Drop ∆SpO2 Average SpO2 fall with respect to baseline during the desaturation events % Max Drop ∆SpO2 Maximum fall of SpO2 with respect of baseline during the desaturation events % N° Pulse Variations Variation of pulse frequency events during the entire period of the analysis \ Pulse Index Variation of pulse frequency by hour of analysis 1/h NOD 4% Time passed with SpO2 < 4 % with respect to SpO2 base for continual periods above 5 minutes \ hh:mm:ss NOD 89% Time passed with SpO2 < 89 % for continued periods above 5 minutes \ hh:mm:ss NOD 90% Time passed with SpO2 < 90 % for continued periods above 5 minutes with minimum value < 86 % (Nadir) \ hh:mm:ss =DELTA Parameters measured for six minute walk test analysis: SYMBOL DESCRIPTION Units SpO2 Baseline SpO2 average before walking % SpO2 End SpO2 after walking % SpO2 Min SpO2 minimum during walking % SpO2 Max SpO2 maximum during walking % SpO2 Mean SpO2 average during walking % BPM Vaseline Average pulse frequency before walking BPM BPM End Pulse frequency after walking BPM BPM Min Pulse frequency minimum during walking BPM BPM Max Pulse frequency maximum during walking BPM BPM Mean Pulse frequency average during walking BPM T < 90% Time passed with SpO2 < 90 % % hh:mm:ss T < 89% Time passed with SpO2 < 89 % % hh:mm:ss T < 88% Time passed with SpO2 < 88 % % hh:mm:ss T < 87% Time passed with SpO2 < 87 % % hh:mm:ss T2 [SpO2≥ 2%] Time passed during walking test with SpO2 < 2 % with respect to SpO2 base hh:mm:ss T4 [SpO2 ≥ 4%] Time passed during SpO2 walking test < 4 % with respect to SpO2 base hh:mm:ss T< 40 BPM Time passed with pulse frequency < 40 BPM hh:mm:ss T> 120 BPM Time passed with pulse frequency > 120 BPM hh:mm:ss N° Events < 40 BPM Bradycardia events during the entire period of analysis \](https://usermanual.wiki/MIR-Medical-Research/MIR040/User-Guide-1332663-Page-20.png)
![Spirodoc cod. 980156 Rev 1.3 EN 22/67 ENGLISH BPM Baseline Average pulse frequency in the first 3 minutes BPM BPM Min Minimum pulse frequency during the period of analysis BPM BPM Max Maximum pulse frequency during the period of analysis BPM BPM Mean Average pulse frequency during the period of analysis BPM Recording time Total time measure of SpO2 hh:mm:ss T < 90% Time passed with SpO2 < 90 % % hh:mm:ss T < 89% Time passed with SpO2 < 89 % % hh:mm:ss T < 88% Time passed with SpO2 < 88 % % hh:mm:ss T < 87% Time passed with SpO2 < 87 % % hh:mm:ss N° Events SpO2 < 89% Fall of SpO2 below 89 % for at least 20 seconds \ Index [12s] Index of SpO2 fluctuation calculated in intervals of 12 seconds \ T< 40 BPM Time passed with pulse frequency < 40 BPM % hh:mm:ss T> 120 BPM Time passed with pulse frequency > 120 BPM % hh:mm:ss N° Events < 40 BPM Bradycardia events during the entire period of analysis \ N° Events > 120 BPM Tachycardia events during the entire period of analysis \ =DELTA Measurement method: Red and infrared absorption Range of measurement %SpO2: 0 – 100% (with 1% increments) SpO2 Resolution 1% %SpO2 accuracy: 2% between 70-100% SpO2 Average number of heart beats for the %SpO2 calculation: 8 beats Range of measurement of cardiac pulse: 20 – 300 BPM (with 1 BPM increments) Cardiac pulse relolution 1 BPM Accuracy of cardiac pulse: 2 BPM or 2% whichever is greater Average interval for the calculation of cardiac pulse: 8 seconds Signal quality indication: 0 - 8 segments on display Acoustic signals: “Beep” with frequency of the cardiac pulse Continuous beep in the case of either %SpO2 or cardiac pulse going outside of the programmed levels of alarm Continuous beep during oximetry measurement in the case of a low battery level. If the patient‟s finger is not inserted correctly or the connecter is not properly attached there will be an intermittent beeping sound for 10 seconds If the test has been interrupted due to low battery power an intermittent beeping will be heard for 10 seconds when the device is switched on again The specifications for both the oximetry and for the cardiac pulse are the same regardless of which of the above mentioned oximetry sensors is used.](https://usermanual.wiki/MIR-Medical-Research/MIR040/User-Guide-1332663-Page-22.png)


![Spirodoc cod. 980156 Rev 1.3 EN 65/67 ENGLISH Guidance and manufacturer’s declaration – electromagnetic immunity The spirobank II is intended for use in the electromagnetic environment specified below. The customer or the user of the spirobank II should assure that it is used in such an environment. Immunity test IEC 60601 test level Compliance level Electromagnetic environment – guidance Electrostatic discharge (ESD) IEC 61000-4-2 6 kV contact 8 kV air6 kV contact 8 kV airFloors should be wood, concrete or ceramic tile. If floors are covered with synthetic material, the relative humidity should be at least 30 %. In the event of disruption due to ESD during oximetry test, the device recovers from any disruption within 30 s. (according to ISO 9919). Electrical fast transient/burst IEC 61000-4-4 ±1 kV for input/output lines Mains power quality should be that of a typical commercial or hospital environment. Surge IEC 61000-4-5 1 kV differential mode 2 kV common modeNot Applicable Mains power quality should be that of a typical commercial or hospital environment. Voltage dips, short interruptions and voltage variations on power supply input lines IEC 61000-4-11 <5 % UT (>95 % dip in UT) for 0,5 cycle 40 % UT (60 % dip in UT) for 5 cycles 70 % UT (30 % dip in UT) for 25 cycles <5 % UT (>95 % dip in UT) for 5 sec Not Applicable Power frequency (50/60 Hz) magnetic field IEC 61000-4-8 3 A/m 3 A/m Power frequency magnetic fields should be at levels characteristic of a typical location in a typical commercial or hospital environment. Conducted RF IEC 61000-4-6 Radiated RF IEC 61000-4-3 3 Vrms 150 kHz to 80 MHz 3 V/m 80 MHz to 2,5 GHz [3 ] V [3 ] V/m Portable and mobile RF communications equipment should be used no closer to any part of the spirobank II, including cables, than the recommended separation distance calculated from the equation applicable to the frequency of the transmitter. Recommended separation distance d=[ 3.5 ] √P 3 d=[ 3.5 ] √P 80 MHz to 800 GHz 3 d=[ 7 ] √P 800 MHz to 2,5 GHz 3 where P is the maximum output power rating of the transmitter in watts (W) according to the transmitter manufacturer and d is the recommended separation](https://usermanual.wiki/MIR-Medical-Research/MIR040/User-Guide-1332663-Page-65.png)
![Spirodoc cod. 980156 Rev 1.3 EN 66/67 ENGLISH distance in metres (m). Field strengths from fixed RF transmitters, as determined by an electromagnetic site survey, should be less than the compliance level in each frequency range. Interference may occur in the vicinity of equipment marked with the following symbol: NOTE UT is the a.c. mains voltage prior to application of the test level. NOTE 1 At 80 MHz and 800 MHz, the higher frequency range applies. NOTE 2 These guidelines may not apply in all situations. Electromagnetic propagation is affected by absorption and reflection from structures, objects and people. a) Field strengths from fixed transmitters, such as base stations for radio (cellular/cordless) telephones and land mobile radios, amateur radio, AM and FM radio broadcast and TV broadcast cannot be predicted theoretically with accuracy. To assess the electromagnetic environment due to fixed RF transmitters, an electromagnetic site survey should be considered. If the measured field strength in the location in which the spirobank II is used exceeds the applicable RF compliance level above, the spirobank II should be observed to verify normal operation. If abnormal performance is observed, additional measures may be necessary, such as reorienting or relocating the spirobank II. b) Over the frequency range 150 kHz to 80 MHz, field strengths should be less than [3] V/m.](https://usermanual.wiki/MIR-Medical-Research/MIR040/User-Guide-1332663-Page-66.png)
![Spirodoc cod. 980156 Rev 1.3 EN 67/67 ENGLISH Recommended separation distances between portable and mobile RF communications equipment and the spirobank II The spirobank II is intended for use in an electromagnetic environment in which radiated RF disturbances are controlled. The customer or the user of the spirobank II can help prevent electromagnetic interference by maintaining a minimum distance between portable and mobile RF communications equipment (transmitters) and the spirobank II as recommended below, according to the maximum output power of the communications equipment. Rated maximum output power of transmitter W Separation distance according to frequency of transmitter m 150 kHz to 80 MHz d=[ 3.5 ] √P 3 80 MHz to 800 MHz d=[ 3.5 ] √P 3 800 MHz to 2,5 GHz d=[ 7 ] √P 3 0.01 0.12 0.24 0.24 0.1 0.37 0.37 0.74 1 1.17 1.17 2.34 10 5.28 5.28 1.056 100 11.66 11.66 23.32 For transmitters rated at a maximum output power not listed above, the recommended separation distance d in metres (m) can be estimated using the equation applicable to the frequency of the transmitter, where P is the maximum output power rating of the transmitter in watts (W) according to the transmitter manufacturer. NOTE 1 At 80 MHz and 800 MHz, the separation distance for the higher frequency range applies. NOTE 2 These guidelines may not apply in all situations. Electromagnetic propagation is affected by absorption and reflection from structures, objects and people.](https://usermanual.wiki/MIR-Medical-Research/MIR040/User-Guide-1332663-Page-67.png)