MITSUBISHI VCR Manual 97110142
User Manual: MITSUBISHI MITSUBISHI VCR Manual MITSUBISHI VCR Owner's Manual, MITSUBISHI VCR installation guides
Open the PDF directly: View PDF ![]() .
.
Page Count: 68
MITSUBISHI
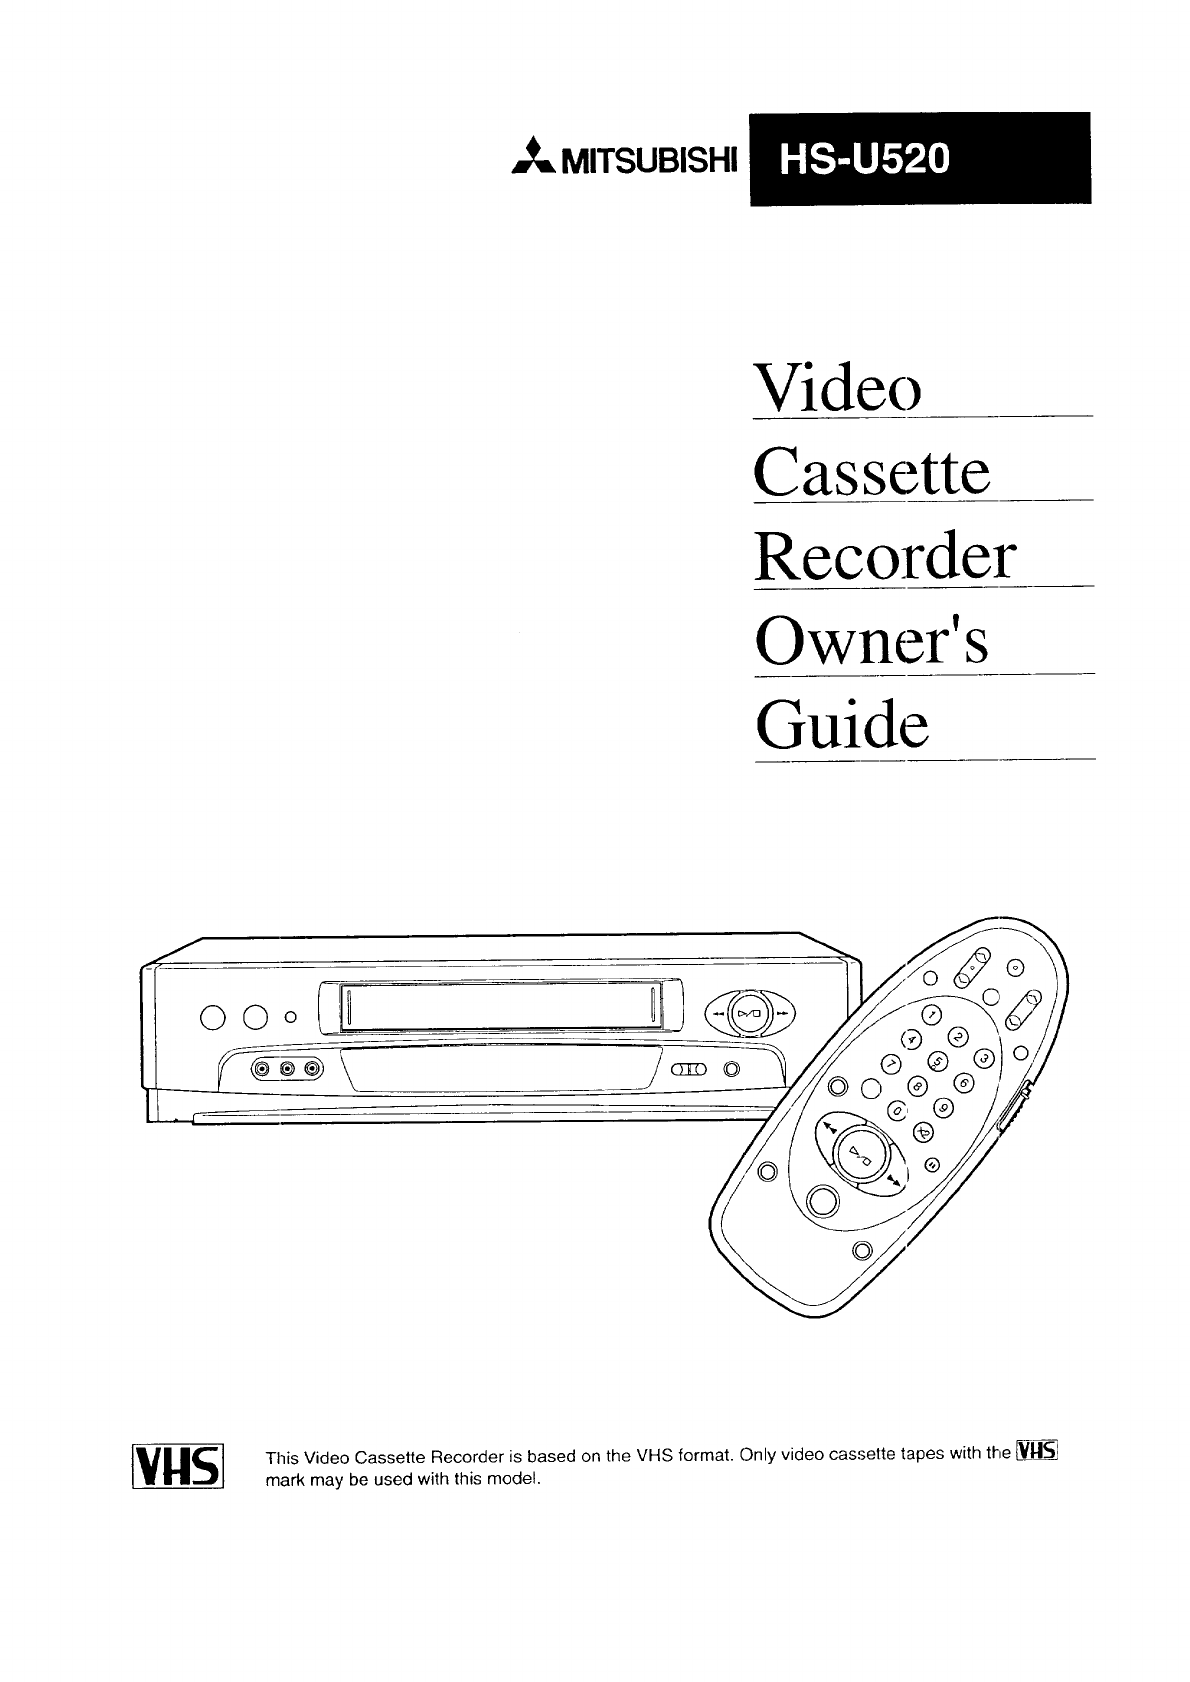
Vide()
Cassette
Recorder
Owner's
Guide
)
This Video Cassette Recorder is based on the VHS format. Only video cassette tapes with the _H-_
mark may be used with this model.
RISKOFELECTRICSHOCK
DONOTOPEN o
CAUTION: TO REDUCE THE RISK OF ELECTRIC SHOCK,
DO NOT REMOVE COVER (OR P,ACK).
NO USER-SERVICEABLE PARTS INSIDE.
REFER SERVICING TO QUALIFIED SERVICE PERSONNEl...
The lightning flash with arrowhead symbol, within
an equilateral triangle, is intended to alert the user
to the presence of uninsulated "dangerous wfltage"
within the product's enclosure that may be (:,f
sufficient magnitude to constitute a risk of electric
shock to persons.
The exclamation point within an equilateral
triangle is intended to alert the user to the presence
of important operating and maintenance (servicing)
instructions in the literature accompanying the
product.
IMPORTANT:
RECORDING OF COPYRIGHTED TELEVISION PROGRAMS MAY VIOLATE COPYRIGHT LAW.
WARNING:
TO REDUCE THE RISK OF FIRE OR ELECTRIC SHOCK, DO NOT EXPOSE THIS PRODUCT TO RAIN
OR MOISTURE.
CAUTION:
TO PREVENT ELECTRIC SHOCK HAZARD, DO NOT USF, THIS (POLARIZED) PLUG WITH AN
EXTENSION CORD, RECEPTACLE OR OTHER OUTLET UNLESS THE BLADES CAN BE FULLY
INSERTED TO PREVENT BLADE EXPOSURE.
NOTE TO CATV SYSTEM INSTALLER:
THIS REMINDER IS PROVIDED TO CALL THE CATV SYSTEM INSTALLER'S A'FIENTION TO
SECTION 820-40 OF THE NEC WHICH PROVIDES GUIDELINES :FOR PROPER G]E_OUNDING AND, IN
PARTICULAR, SPECIFIES THAT THE CABLE GROUND SHALL E,E CONNECTED TO THE
GROUNDING SYSTEM OF THE BUILDING, AS CLOSE TO THE POINT OF CABLE ENTRY AS
PRACTICAL.
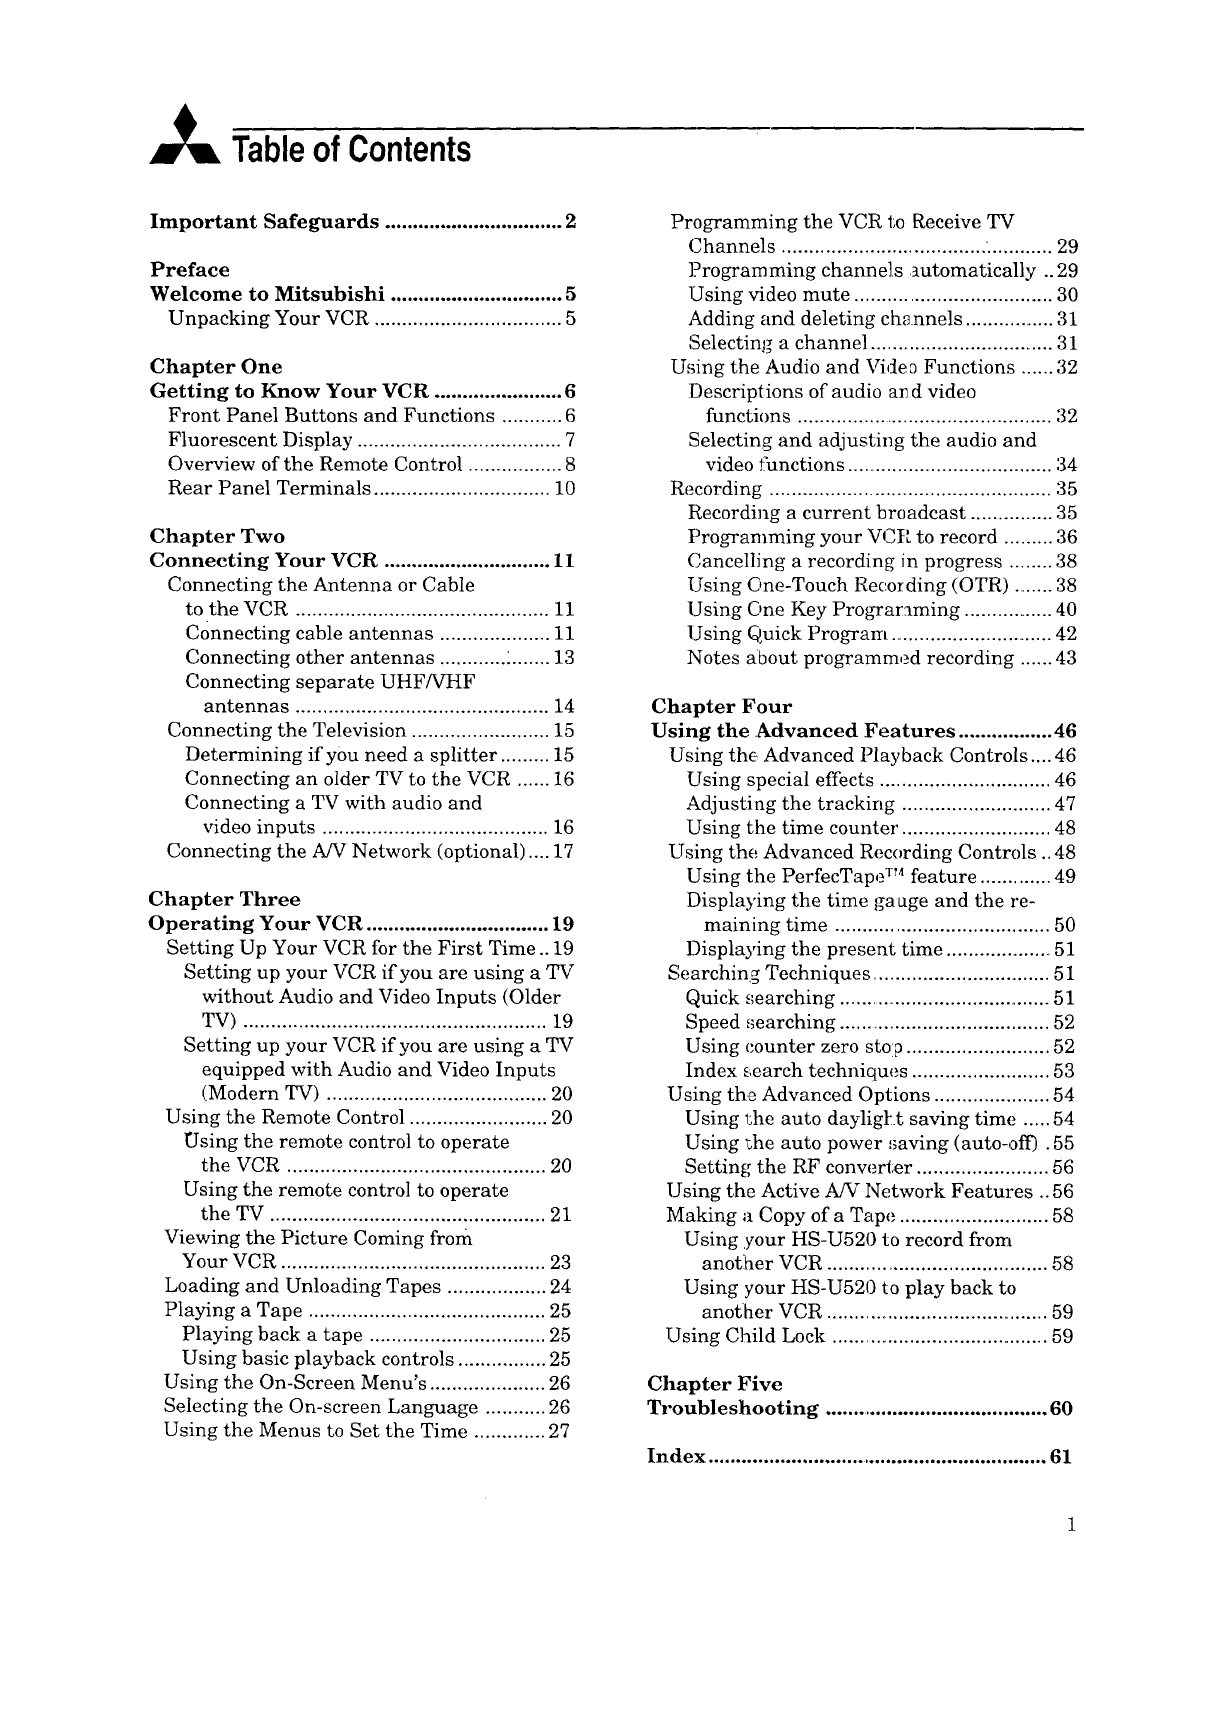
TableofContents
Important Safeguards ................................ 2
Preface
Welcome to Mitsubishi ............................... 5
Unpacking Your VCR .................................. 5
Chapter One
Getting to Know Your VCR ....................... 6
Front Panel Buttons and Functions ........... 6
Fluorescent Display ..................................... 7
Overview of the Remote Control ................. 8
Rear Panel Terminals ................................ 10
Chapter Two
Connecting Your VCR .............................. 11
Connecting the Antenna or Cable
to the VCR .............................................. 11
Connecting cable antennas .................... 11
Connecting other antennas ............ :....... 13
Connecting separate UHF/VHF
antennas .............................................. 14
Connecting the Television ......................... 15
Determining ify0u need a splitter ......... 15
Connecting an older TV to the VCR ...... 16
Connecting a TV with audio and
xddeo inputs ......................................... 16
Connecting the A/V Network (optional) .... 17
Chapter Three
Operating Your VCR ................................. 19
Setting Up Your VCR for the First Time .. 19
Setting up your VCR if you are using a TV
without Audio and Video Inputs (Older
TV) ....................................................... 19
Setting up your VCR if you are using a TV
equipped with Audio and Video Inputs
(Modern TV) ........................................ 20
Using the Remote Control ......................... 20
Using the remote control to operate
the VCR ............................................... 20
Using the remote control to operate
the TV .................................................. 21
Viewing the Picture Coming from
Your VCR ................................................ 23
Loading and Unloading Tapes .................. 24
Playing a Tape ........................................... 25
Playing back a tape ................................ 25
Using basic playback controls ................ 25
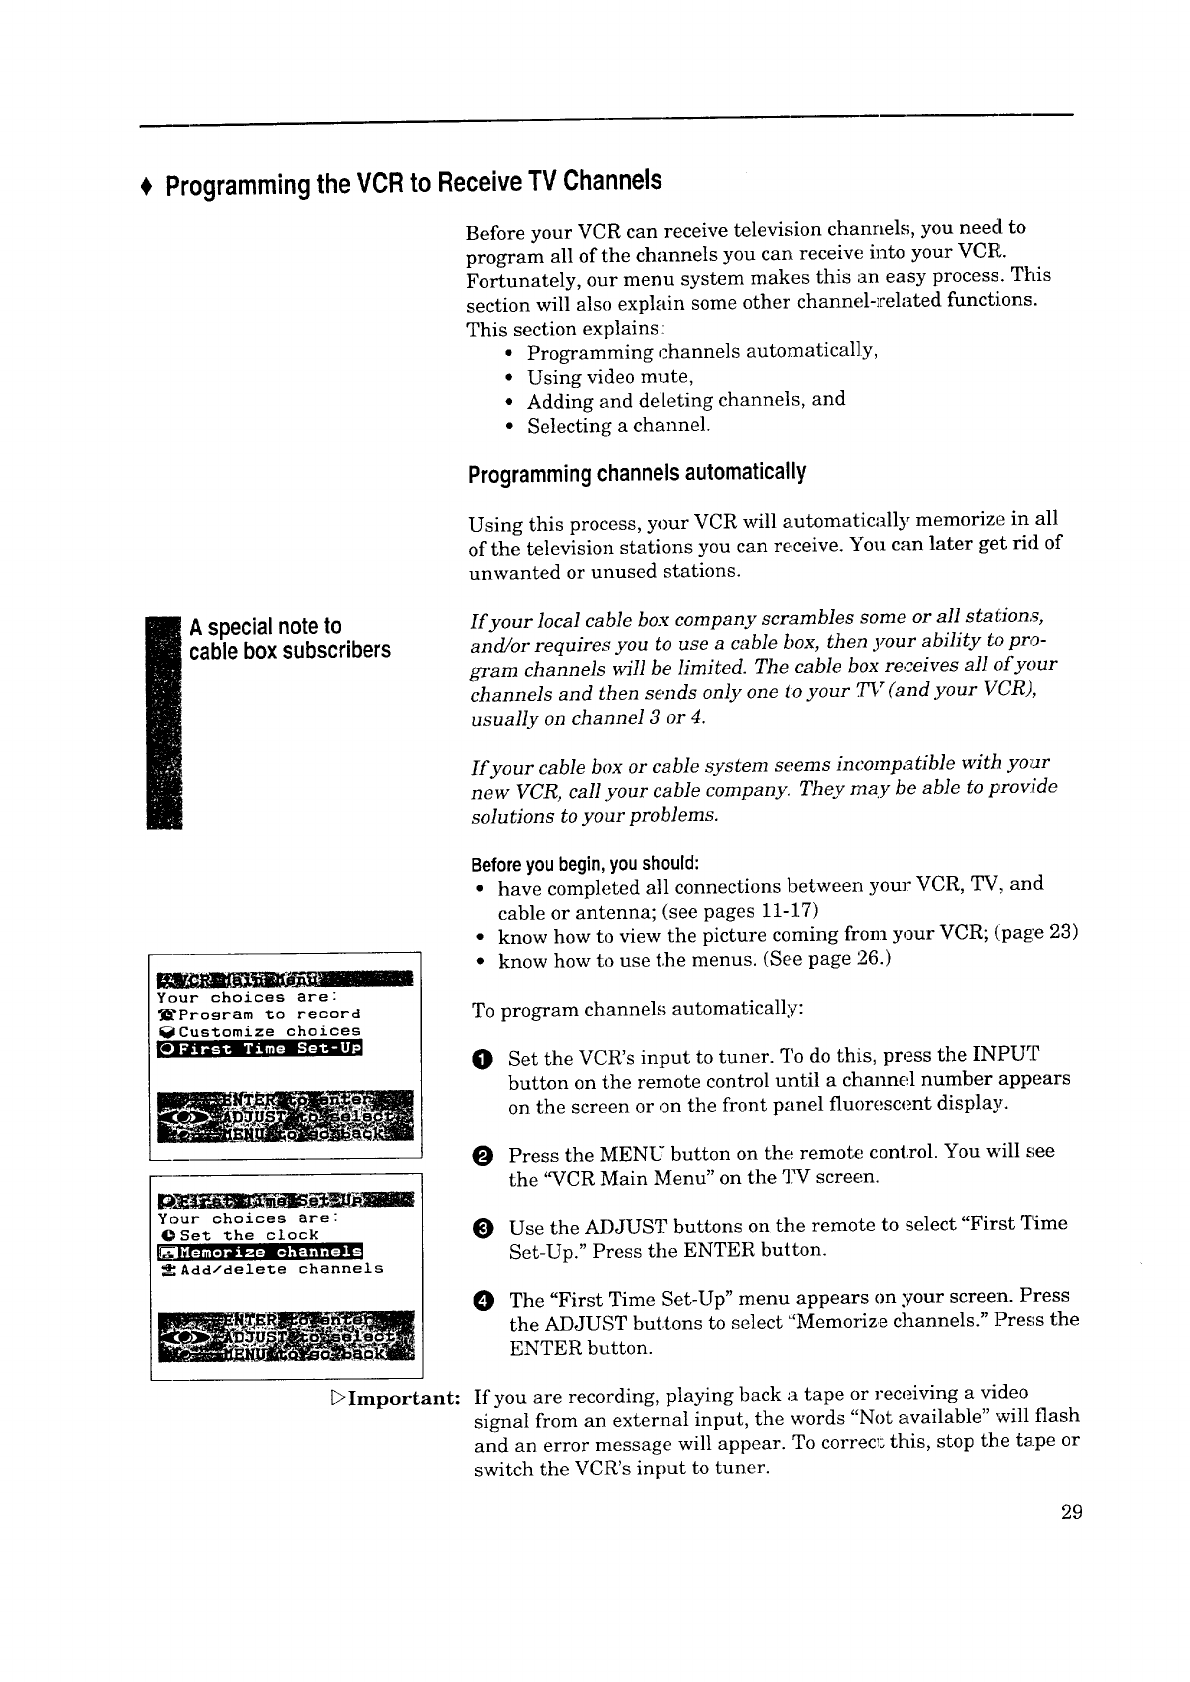
Using the On-Screen Menu's ..................... 26
Selecting the On-screen Language ........... 26
Using the Menus to Set the Time ............. 27
Programming the VCR to Receive TV
Channels ..................................... ............ 29
Programming channels automatically .. 29
Using video mute .................................... 30
Adding and deleting channels ................. 31
Selecting a channel ................................... 31
Using the Audio and Vide_ Functions ...... 32
Descriptions of audio aT d video
functions ............................................... 32
Selecting and adjusting the audio and
video functions ..................................... 34
Recording ................................................... 35
Recording a current broadcast ............... 35
Programming your VCt_ to record ......... 36
Cancelling a recording in progress ........ 38
Using One-Touch Recording (OTR) ........ 38
Using One Key Prograraming ................. 40
Using Quick Program ............................... 42
Notes about programmed recording ...... 43
Chapter Four
Using the Advanced Features ................. 46
Using the Advanced Playback Controls .... 46
Using special effects ............................... 46
Adjusting the tracking ........................... 47
Using the time counter. .......................... 48
Using thE; Advanced Recording Controls.. 48
Using the PerfecTape TM feature ............. 49
Displaying the time gauge and the re-
maining time ....................................... 50
Displaying the present time .................... 51
Searching Techniques .................................. 51
Quick _,;earching ......................................... 51
Speed ,;earching ...................................... 52
Using counter zero stop .......................... 52
Index search techniques ......................... 53
Using the Advanced Options ..................... 54
Using the auto dayligl: t saving time ..... 54
Using r,he auto power saving (auto-off) . 55
Setting the RF conw_rter ........................ 56
Using the Active A/V Network Features .. 56
Making a Copy of a Tape ........................... 58
Using :your HS-U520 to record from
another VCR ........................................ 58
Using your HS-U520 to play back to
another VCR .......................................... 59
Using Child Lock ........................................ 59
Chapter Five
Troubleshooting ......................................... 60
Index .............................................................. 61
IMPORTANTSAFEGUARDS
PLEASE READ ALL THESE INSTRUCTIONS REGARDING YOUR VCR AND RETAIN FOR
FUTURE REFERENCE. FOLLOW ALL WARNINGS AND INSTRUCTIONS MARKED ON THE
VCR.
.Read Instructions
All the safety and operating instructions
should be read before the product is
operated.
2. Retain Instructions
The safety and operating instructions
should be retained for future reference.
.
.
.
.
.
.
.
Heed Warnings
All warnings on the product and in the
operating instructions should be adhered
to.
Follow Instructions
All operating and use instructions should
be followed.
Cleaning
Unplug this product from the wall outlet
before cleaning. Do not use liquid cleaners
or aerosol cleaners. Use a damp cloth for
cleaning.
Attachments
Do not use attachments not recommended
by the product manufacturer as they may
cause hazards.
10. Ventilation
Slots and openings in the cabinet are
provided for ventilation and to ensure
reliable operation of the product and to
protect it from overheating, and these
openings must not be blocked or covered.
The openings should never be blocked by
placing the product on a bed, sofa, rug, or
other similar surthce This product should
not be placed in a built-in installation
such as a bookcase or rack unless proper
venti]_ation is provided or the
manufacturer's instructions have been
adhered to.
Water and Moisture
Do not use this product near water -- for
example, near a bath tub, wash bowl,
kitchen sink, or laundry tub, in a wet
basement, or near a swimming pool, and
the like.
Accessories
Do not place this product on an unstable
•cart, stand, tripod, bracket, or table. The
product may fall, causing serious injury to
a child or adult, and serious damage to
the product. Use only with a cart, stand,
tripod, bracket, or table recommended by
the manufacturer, or sold with the prod-
uct. Any mounting of the product should
follow the manufacturer's instructions,
and should use a mounting accessory
recommended by the manufacturer.
A product and cart combination should be
moved with care. Quick stops, excessive
force, and uneven surfaces may cause the
product and cart combination to overturn.
1_l.
12.
Power Sources
This product should be operated only from
the type of power source indicated on the
marking label. If you are not sure of the
type of power supply to your home,
consult your product dealer or local power
company. For products intended to
operate from battery power or other
sources, refer to the operating instruc-
tions.
Grounding or Polarization
This product may be equipped with a
polarized alternating-current line plug (a
plug ihaving one blade wider than the
other). This plug will fit into the power
outlet only one way. This is a safety
feature. If you are u_:able to insert the
plug fully into the outlet, try reversing
the plug. If the plug should still fail to fit,
contact your electrician to replace your
obsolete outlet. Do not defeat the safety
purpose of the polarized plug.
13.
14.
Power-CordProtection
Power-supplycordsshouldberoutedso
that theyarenotlikely tobewalkedonor
pinchedbyitemsplaceduponoragainst
them,payingparticularattentiontocords
at plugs,conveniencereceptacles,andthe
pointwheretheyexitfromtheproduct.
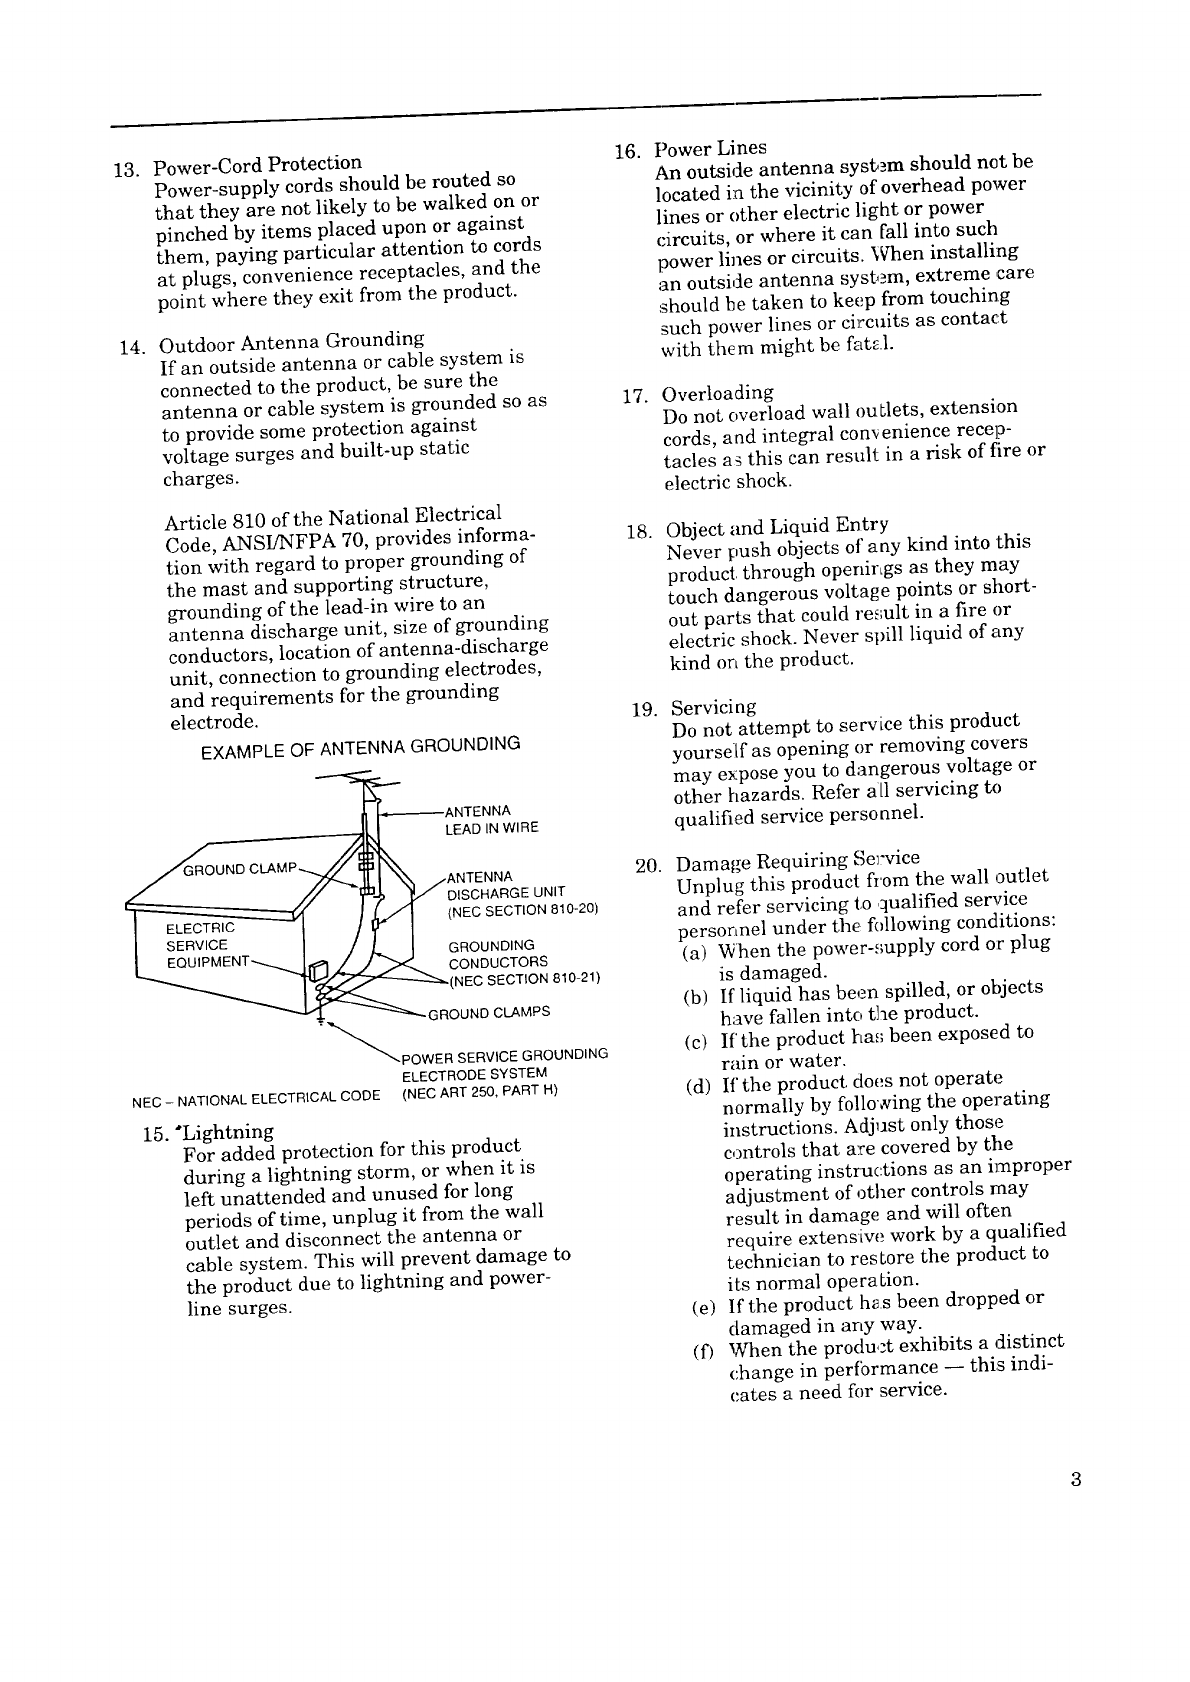
OutdoorAntennaGrounding
If anoutsideantennaorcablesystemis
connectedtotheproduct,besurethe
antennaor cablesystemisgroundedsoas
to providesomeprotectionagainst
voltagesurgesandbuilt-upstatic
charges.
Article810oftheNationalElectrical
Code,ANSI/NFPA70,providesinforma-
tionwith regardtopropergroundingof
themastandsupportingstructure,
groundingofthelead-inwireto an
antennadischargeunit, sizeofgrounding
conductors,locationofantenna-discharge
unit, connectionto groundingelectrodes,
andrequirementsforthegrounding
electrode.
EXAMPLE OF ANTENNA GROUNDING
LEAD IN WIRE
DISCHARGE UNIT
{NEC SECTION 810-20)
GROUNDING
CONDUCTORS
•(NEC SECTIONS10-21)
GROUND CLAMPS
_'_POWERSERVICE GROUNDING
ELECTRODE SYSTEM
NEC-NATIONALELECTRICALCODE (NEC ART250, PART H)
15. "Lightning
For added protection for this product
during a lightning storm, or when it is
left unattended and unused for long
periods of time, unplug it from the wall
outlet and disconnect the antenna or
cable system. This will prevent damage to
the product due to lightning and power-
line surges.
16.
17.
18.
19.
20.
Power Lines
An outside antenna system should not be
located in the vicinity of overhead power
lines or other electric light or power
circuits, or where it can fall into such
power lines or circuits. When installing
an outside antenna sysb_m, extreme care
should be taken to keep from touching
such power lines or circuits as contact
with them might be fatal.
Overloading
Do not overload wall ouLlets, extension
cords, and integral convenience recep-
tacles as this can result in a risk of fire or
electric shock.
Object and Liquid Entry
Never push objects of any kind into 'Lhis
product through openirLgs as they may
touch dangerous voltage points or short-
out parts that could re_;ult in a fire or
electric shock. Never spill liquid of any
kind on the product.
Servicing
Do not attempt to service this product
yourself as opening or removing covers
may e_:pose you to dangerous voltage or
other hazards. Refer all servicing to
qualified service personnel.
Damage Requiring Se_'vice
Unplug this product from the wall outlet
and refer servicing to qualified service
personnel under the following conditions:
(a) When the power-.,_upply cord or plug
is damaged.
(b) [f liquid has been spilled, or objects
have fallen into the product.
(c) If' the product ha.';been exposed to
rain or water.
(d) If the product, does not operate
normally by following the operating
instructions. Adjust only those
controls that a:_e covered by the
operating instructions as an improper
adjustment of other controls may
result in damage and will often
require extensiw_ work by a qualified
technician to resLore the product to
its normal operaLion.
(e) If the product has been dropped or
damaged in any way.
(f) When the product exhibits a distinct
change in perfbrmance -- this indi-
cates a need for service.
ImportantSafeguards
21.
22.
23.
Replacement Parts
When replacement parts are required, be
sure the service technician has used
replacement parts specified by the manu-
facturer or have the same characteristics
as the original part. Unauthorized substi-
tutions may result in fire, electric shock
or other hazards.
Safety Check
Upon completion of any service or repairs
to this product, ask the service technician
to perform safety checks to determine
that the product is in proper operating
condition.
Heat
The product should be situated away from
heat sources such as radiators, heat
registers, stoves, or other products (in-
cluding amplifiers) that produce heat.
PROTECTTHE POWERCORD
Do not damage the power cord. Damage to the
power cord may cause a fi re or shock hazard.
When unplugging the power cord, please hold
it by the plug and remove it carefully.
DONOT PLACEHEAVYOBJECTSON THE
RECORDER
Heavy objects placed on tile recorder will
cause damage. (This does not include your
cable box). The top of the recorder is also
slotted to provide ventilation. Do not obstruct
these ventilation slots.
WHENNOT IN USE
When you finish operatini_, the recorder,
always unload the cassette and turn OFF the
VCR POWER.
CONDENSATION
Leave the VCR on, without a tape in it, for 2
hours if the VCR has been exposed to sudden
changes in temperature. Sudden temperature
changes cause moisture to form on the metal
parts inside the VCR. This moisture can cause
the tape to stick and damage the head.
Leaving the VCR on for a 2 hour period will
dry the inside of the VCR.
CARE OFTHE VIDEOCASSETTETAPES
• Avoid violent vibration or shock.
• Do not place in a locat:on where strong
magnetic fields exist, (near a motor, trans-
former or magnet).
• Never place or store in direct sunlight.
• Avoid ,lusty places.
• Place the cassette in the cassette case and
store vertically.
• Never store tape in a high humidity loca-
tion.
INFORMATION
This equipment has been tested and found to comply with the limits for a Class B digital device,
pursuant to Part 15 of the FCC Rules. These limits are designed to provide reasonable protection
against harmful interference in a residential installation. This equipment generates, uses, and
can radiate radio frequency energy and, if not installed and used in accordance with the instruc-
tions, may cause harmful interference to radio communications. However, the re is no guarantee
that interference will not occur in a particular installation. If this equipment does cause harmful
interference to radio or television reception, which can be determined by turning the equipment
off and on, the user is encouraged to try to correct the interference by one or more of the following
measures:
• Reorient or relocate the receiving antenna;
• Increase the separation between the equipment and receiver;
• Connect the equipment into an outlet on a circuit different from that to which the
receiver is connected;
• Consult the dealer or an experienced radio/TV technician for help.
Changes or modifications not expressly approved by the party responsible for compliance could
void the user's authority to operate the equipment.
If necessary, the user should consult the dealer or an experienced radio/televi,;ion technician for
additional suggestions. The user may find the following booklet prepared by' the Federal Commu-
nications Commission helpful:
"How to Identify and Resolve Radio-TV Interference Prob]ems."
This booklet is available from the US Government Printing Office, Washington, D.C., 20402,
Stock No. 004-000-00345-4.
PREFACE
Welcometo Mitsubishi
Congratulations on your purchase of this Mitsubishi Video
Cassette Recorder. Your new VCR produces superior sound and a
high resolution VHS picture available. It includes VHS Hi-Fi
audio recording and playback, delivering comp_!ct disc-quality
audio.
Your owner's guide has been designed with easy-to-follow expla-
nations and directions. In addition, your VCR comes with
• ®
Mitsubishi's exclusive _[[_ on-screen operating system. This
system has been developed to s!_mplify the operation of your VCR
with clear, understandable language and design.
Thank you for selecting: our product and welcorae to Mitsubishi.
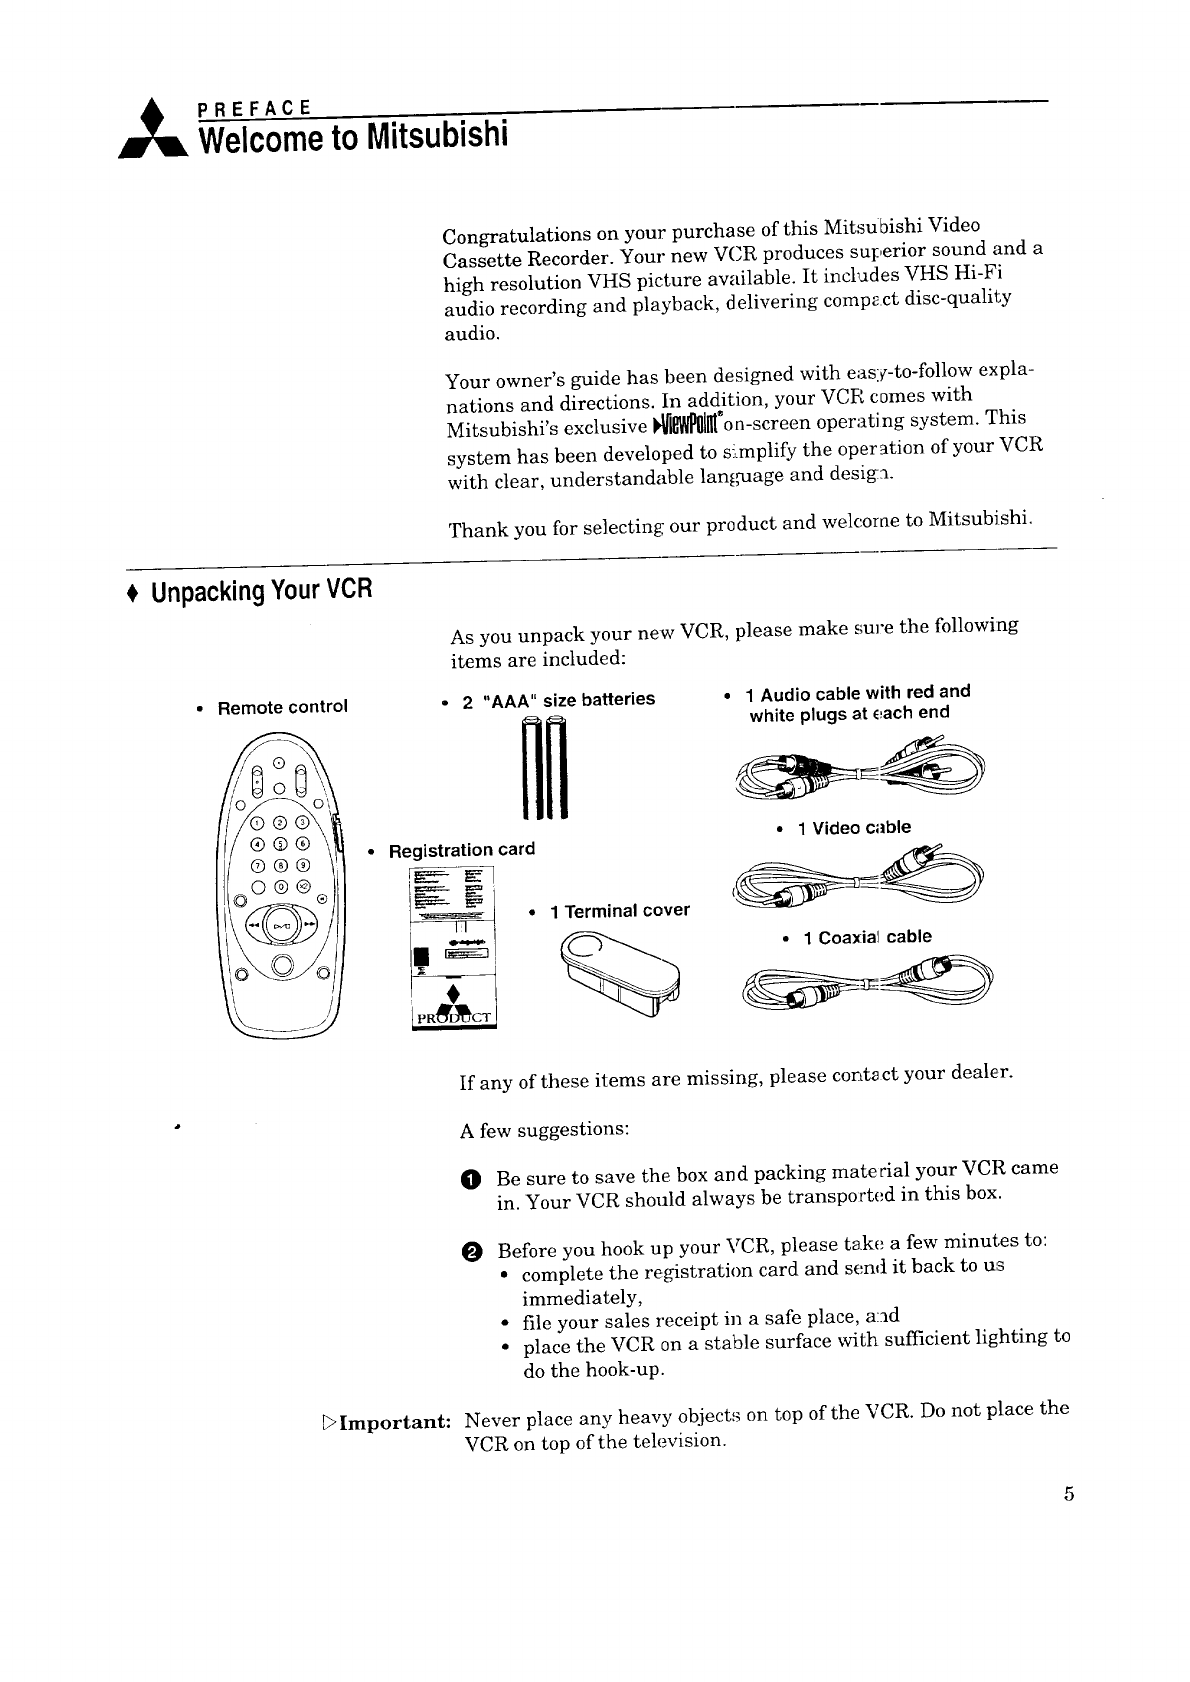
UnpackingYourVCR
As you unpack your new VCR, please make sure the following
items are included:
Remote control 2 "AAA" size batteries
Registration card
.
vf 1 Terminal cover
•1 Audio cable with red and
white plugs at each end
•1 Video cable
• 1 Coaxial cable
F>Important:
If any of these items are missing, please cont_ ct your dealer.
A few suggestions:
OBe sure to save the box and packing material your VCR came
in. Your VCR should always be transported in this box.
OBefore you hook up your VCR, please take a few minutes to:
• complete the registration card and send it back to us
immediately,
•file your sales receipt in a safe place, a:_d
• place the VCR on a stable surface with sufficient lighting to
do the hook-up.
Never place any heavy object_s on top of the VCR. Do not place the
VCR on top of the television.
ACHAPTER ONE
Gettingto KnowYourVCR
Now that you have unpacked your player and read through the
safety information, it's time to become famili._r with the buttons
and controls.
If you are experienced with using VCRs, you may just want to
glance at this section and refer to it later If VCRs are new to you,
you may want to take your time and become familiar with the
locations of all the controls.
On the following pages, you'll find informaticn on:
$FrontPanelButtonsand Functions
$FluorescentDisplay
$Overviewof the RemoteControl
$Rear PaneITerminals
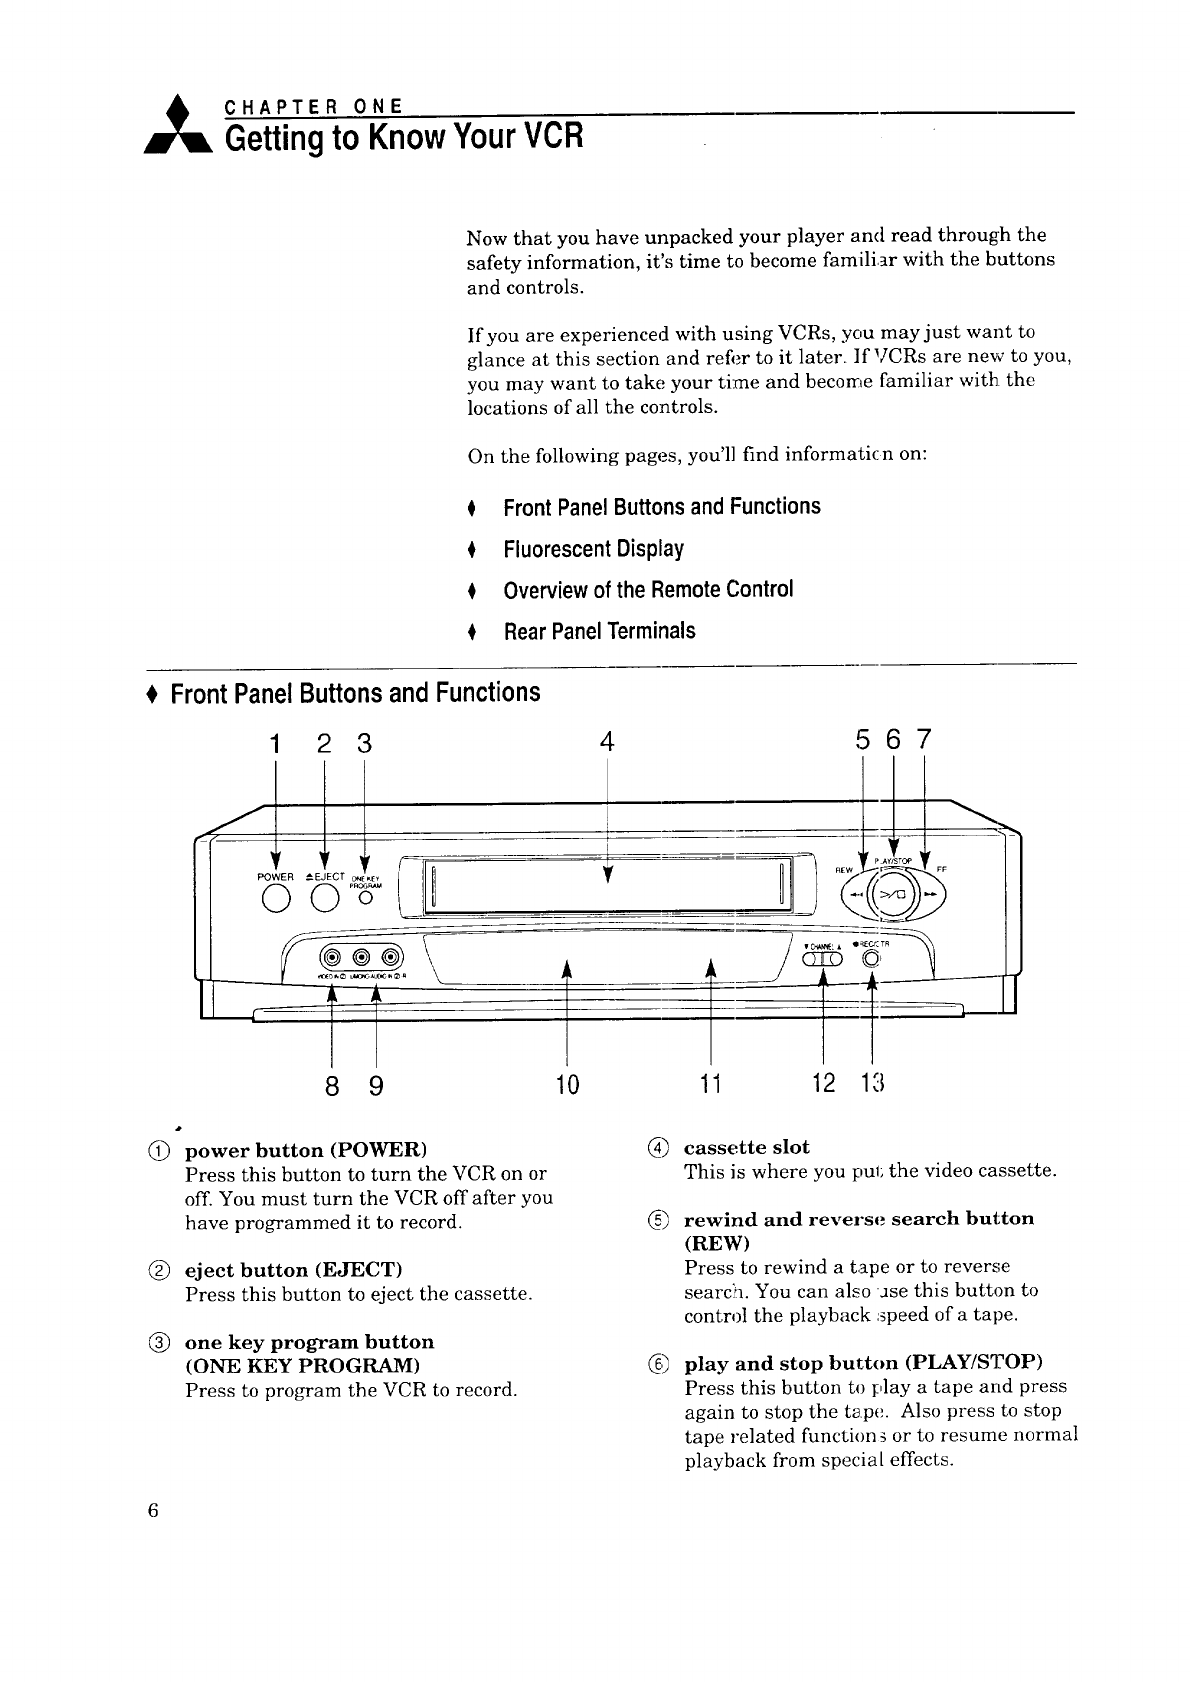
FrontPanelButtonsand Functions
1 2 3
8 9 10
4567
11 12 13
(j_) power button (POWER)
Press this button to turn the VCR on or
off. You must turn the VCR off after you
have programmed it to record.
(_) eject button (EJECT)
Press this button to eject the cassette.
(_) one key program button
(ONE KEY PROGRAM)
Press to program the VCR to record.
cassette slot
This is where you pul; the video cassette.
rewind and reverse search button
(REW)
Press to rewind a tape or to reverse
search. You can also Jse this button to
control the playback _peed of a tape.
play and stop button (PLAY/STOP)
Press this button to play a tape and press
again to stop the tape. Also press to stop
tape related function _ or to resume normal
playback from special effects.
®
®
®
fast forward and fast forward search
button (FF)
Press this button to fast forward a tape or
to fast forward search. You can also use to
control the playback speed of a tape.
video input 2 terminal
If you want to record or dub video from
another source (such as a VCR or
camcorder), you can plug the source in
here.
audio input 2 terminals
If you want to record or dub audio from
another source (such as a VCR or
camcorder), you can plug the source in
here.
When you are not using these input
terminals, make sure you attach the
supplied terminal cover.
(_) fluorescent display
See the next section.
®
@
@
remote control sensor
This receives signals from the remote
control Do not block it.
channel buttons (CI-La,NNEL)
Press these buttons to change channels.
Also use these buttons ';o adjust tracking
and pic'_ure vibration.
record button (REC/OTR)
Press this button once 1;orecord until the
end of the tape. Pres,; repeatedly to set the
time for One-Touch Recording (OTR).
6)
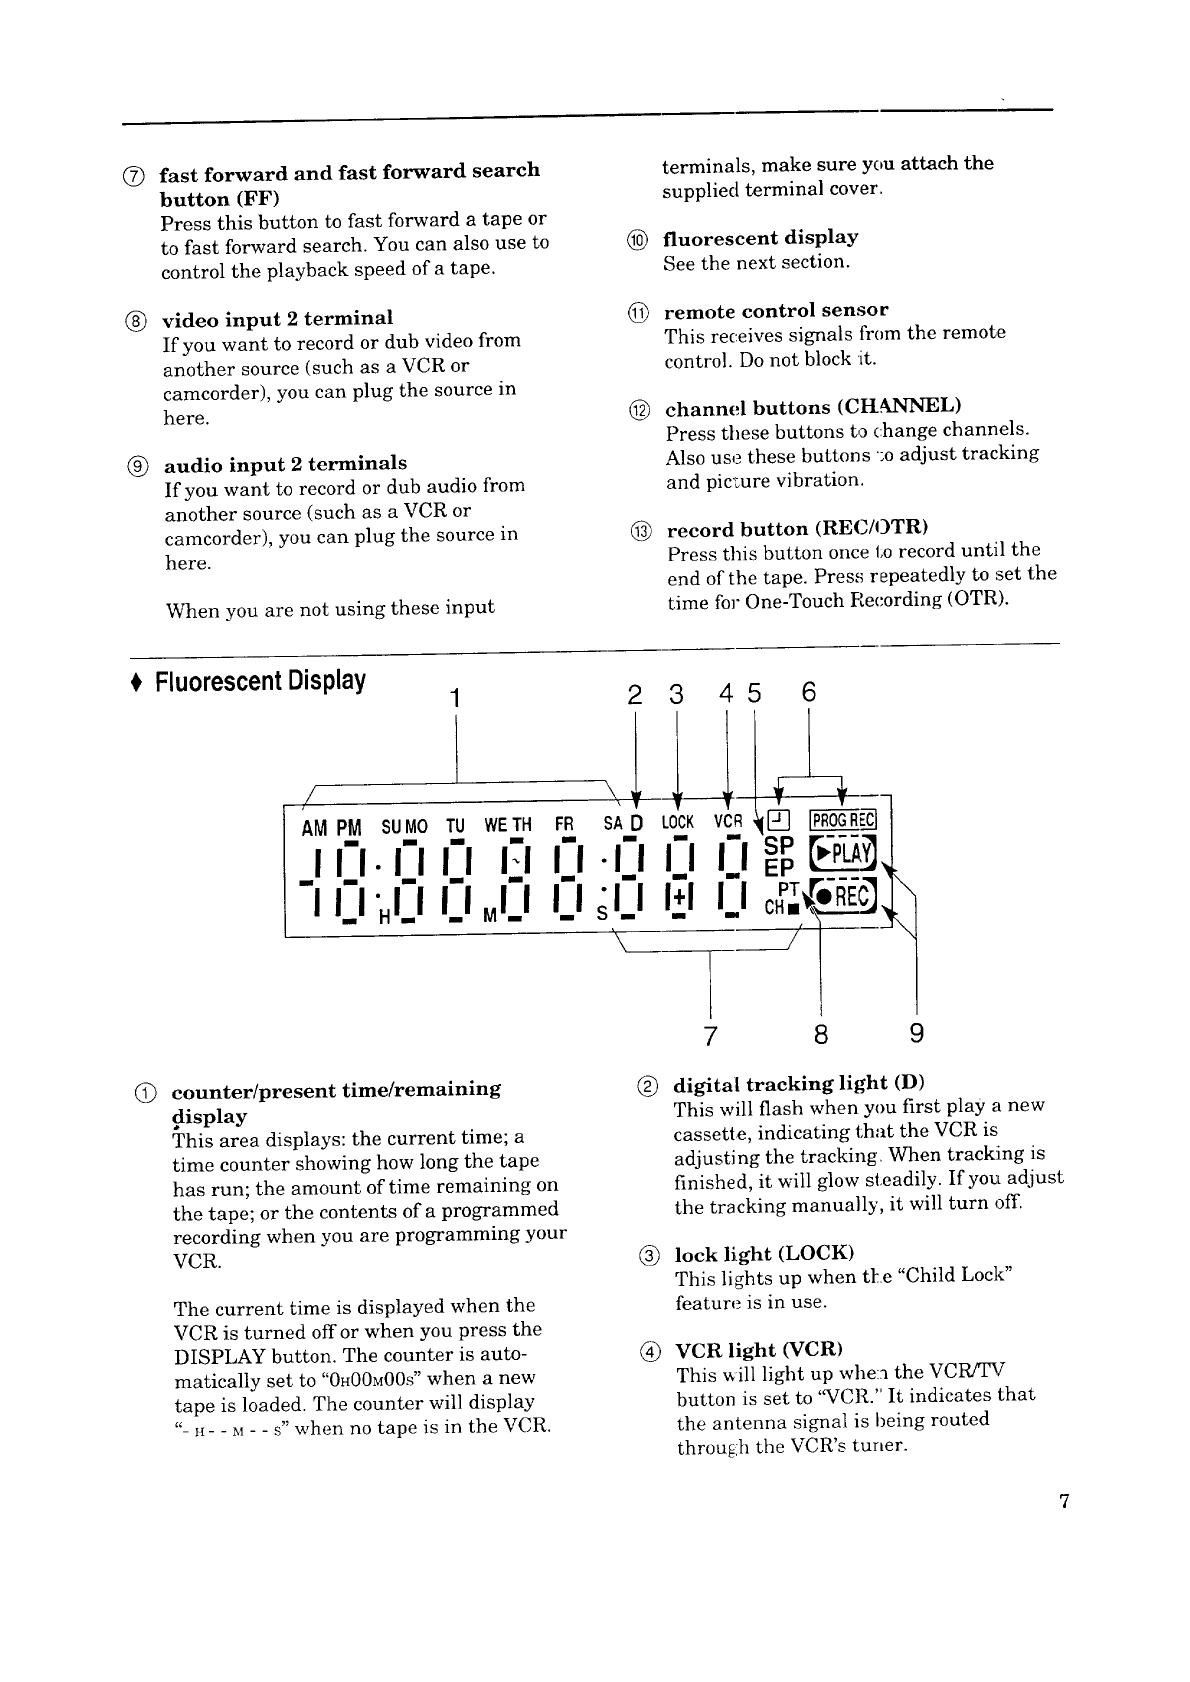
FluorescentDisplay 234 5 8
counter/present time/remaining (_)
display
This area displays: the current time; a
time counter showing how long the tape
has run; the amount of time remaining on
the tape; or the contents of a programmed
recording when you are programming your
VCR. ®
The current time is displayed when the
VCR is turned off or when you press the
DISPLAY button. The counter is auto-
matically set to "0H00M00S" when a new
tape is loaded. The counter will display
"- _- - M- - S" when no tape is in the VCR.
digital tracking light (D)
This will flash when you first play a new
cassette, indicating that the VCR is
adjusting the tracking When tracking is
finished, it will glow steadily. If you adjust
the tracking manually, it will turn off.
lock light (LOCK)
This lights up when tke "Child Lock"
feature is in use.
VCR light (VCR)
This _ill light up whe:a the VCR/_f
button is set to '%CR." It indicates that
the antenna signal is being routed
throu_h the VCR's tuner.
Chapter1: Gettingto KnowYourVCR FluorescentDisplay(cont.)
®
®
®
tape speed lights (SP, EP)
This will light to indicate the tape speed
you are using when playing or recording.
"SP" indicates standard play; "EP" indi-
cates extended play.
programmed recording light
This lights up when the VCR is off and
you have programmed the VCR to record.
channel display
This displays the cable channel, broadcast
channel, or input you have selected. The
cable tuning light (m) will light up when
your VCR is set to receiving cable broad-
casts.
®
®
Perh_cTape TM light (PT)
This will flash when the PerfecTape TM test
is in progress. It will light steadily when
the test is completed.
play and record light and cassette
status symbol
These light up when Lhe VCR is playing a
tape or recording ]?he symbol ([-"-]) will
light up when a tape is in the VCR. The
dashes in the center of the symbol simu-
late the movement of the tape when
playing and recording.
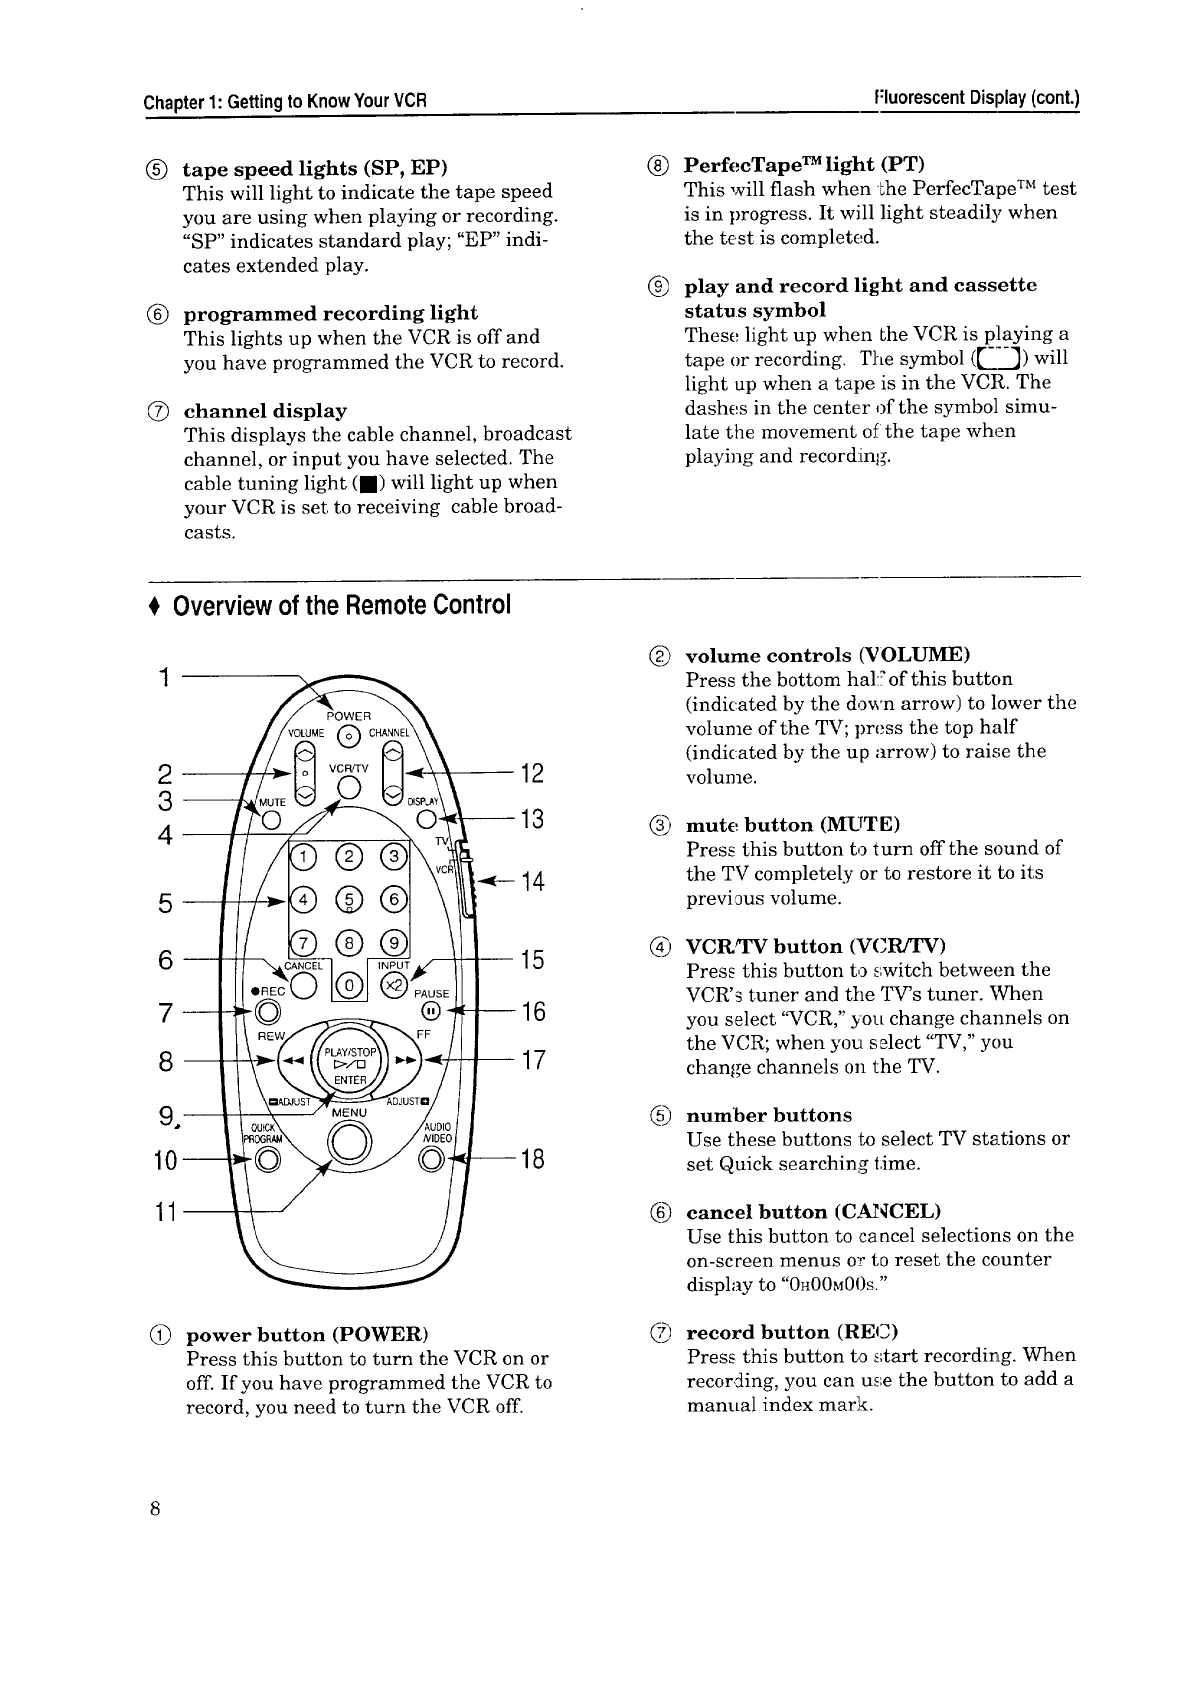
Overviewofthe RemoteControl
Gpower button (POWER)
Press this button to turn the VCR on or
off. If you have programmed the VCR to
record, you need to turn the VCR off.
®volume controls (VOLUME)
Press the bottom hal:_ of this button
(indicated by the down arrow) to lower the
volume of the TV; press the top half
(indicated by the up arrow) to raise the
volume.
®mute button (MUTE)
Press this button to turn off the sound of
the TV completely or to restore it to its
previous volume.
®VCRWV button (VCRfFV)
Press this button to _;witch between the
VCR's tuner and the TV's tuner. When
you select "VCR," you change channels on
the VCR; when yo_ select "TV," you
change channels on the TV.
@_2 number buttons
Use these buttons to select TV stations or
set Quick searching time.
@cancel button (CANCEL)
Use this button to cancel selections on the
on-screen menus or to reset the counter
display to "0H00M00S."
record button (REC)
Press this button to _;tart recording. When
recor,Jing, you can u_;e the button to add a
manual index mark.

®
®
®
@
@
rewind, reverse search and adjust
- button (REW, ADJUST)
Press this button to rewind a tape or to
reverse search. You can also use this
button to control the playback speed of a
tape. When using the on-screen menus,
use this button to select or adjust items.
play, stop and enter button (PLAY/
STOP, ENTER)
Press this button to play a tape and press
again to stop the tape. Also press to stop
tape related functions or to resume normal
playback from special effects. When using
the on-screen menus, use this button enter
selections.
quick program button (QUICK PRO-
GRAM)
This button allows you to program your
VCR more quickly and easily. When you
press this button, you will immediately
see the "Program to record" screen, where
you can begin programming your VCR to
record.
menu button (MENU)
Press this button to display the menus,
which are lists of features and instruc-
tions, on your television screen. Also press
the button to exit the menus.
channel buttons (CHANNEL)
Press these buttons to change channels.
display button (DISPLAY)
Press this button to display the following
information on the television:
• how much time has elapsed on the
current tape,
• the channel number and the audio
reception mode you are watching,
• the audio channel(s) you selected,
• the source that is supplying the VCR
with a signal,
• the present time,
• whether the VCR is stopped, playing,
or recording, and
• how much time is left on the tape.
This button can also be used to turn on
and off the "Child Lock" feature.
@TV/VCR slide switch.
In addition to operating your VCR, your
VCR remote control can be used to ,operate
most of the functions (:f many brands of
televisions. Set to the VCR position to use
the reraote to operate ';he VCR. After
setting: up your remote for your particular
brand of television, set to the TV position
to use the remote to operate your televi-
sion. See your TV owner's guide for more
inform ation about operating your _i'v'.
®input button (INPUF)
Press 'this button to sdect between the
antenna and any other video equipment
that may be connected. Also use this
buttor_ to begin two times playback with
sound
_) pause button (PAUSE)
Press this button _o pause a tape when
recording or to freeze a frame when
viewing a tape.
@fast forward, fast fc,rward search and
adjust + button (FF, ADJUST)
Press this button to fast forward a tape or
to fast forward search. You can also use
this batton to control the playback speed
of a tape. When using the on-screen
menus, use these but_;ons to select or
adjust items.
_) function button (AUDIO/VIDEO)
Press this button to adjust the VCR's
audio and video functions.
9
Chapter1:Gettingto KnowYourVCR
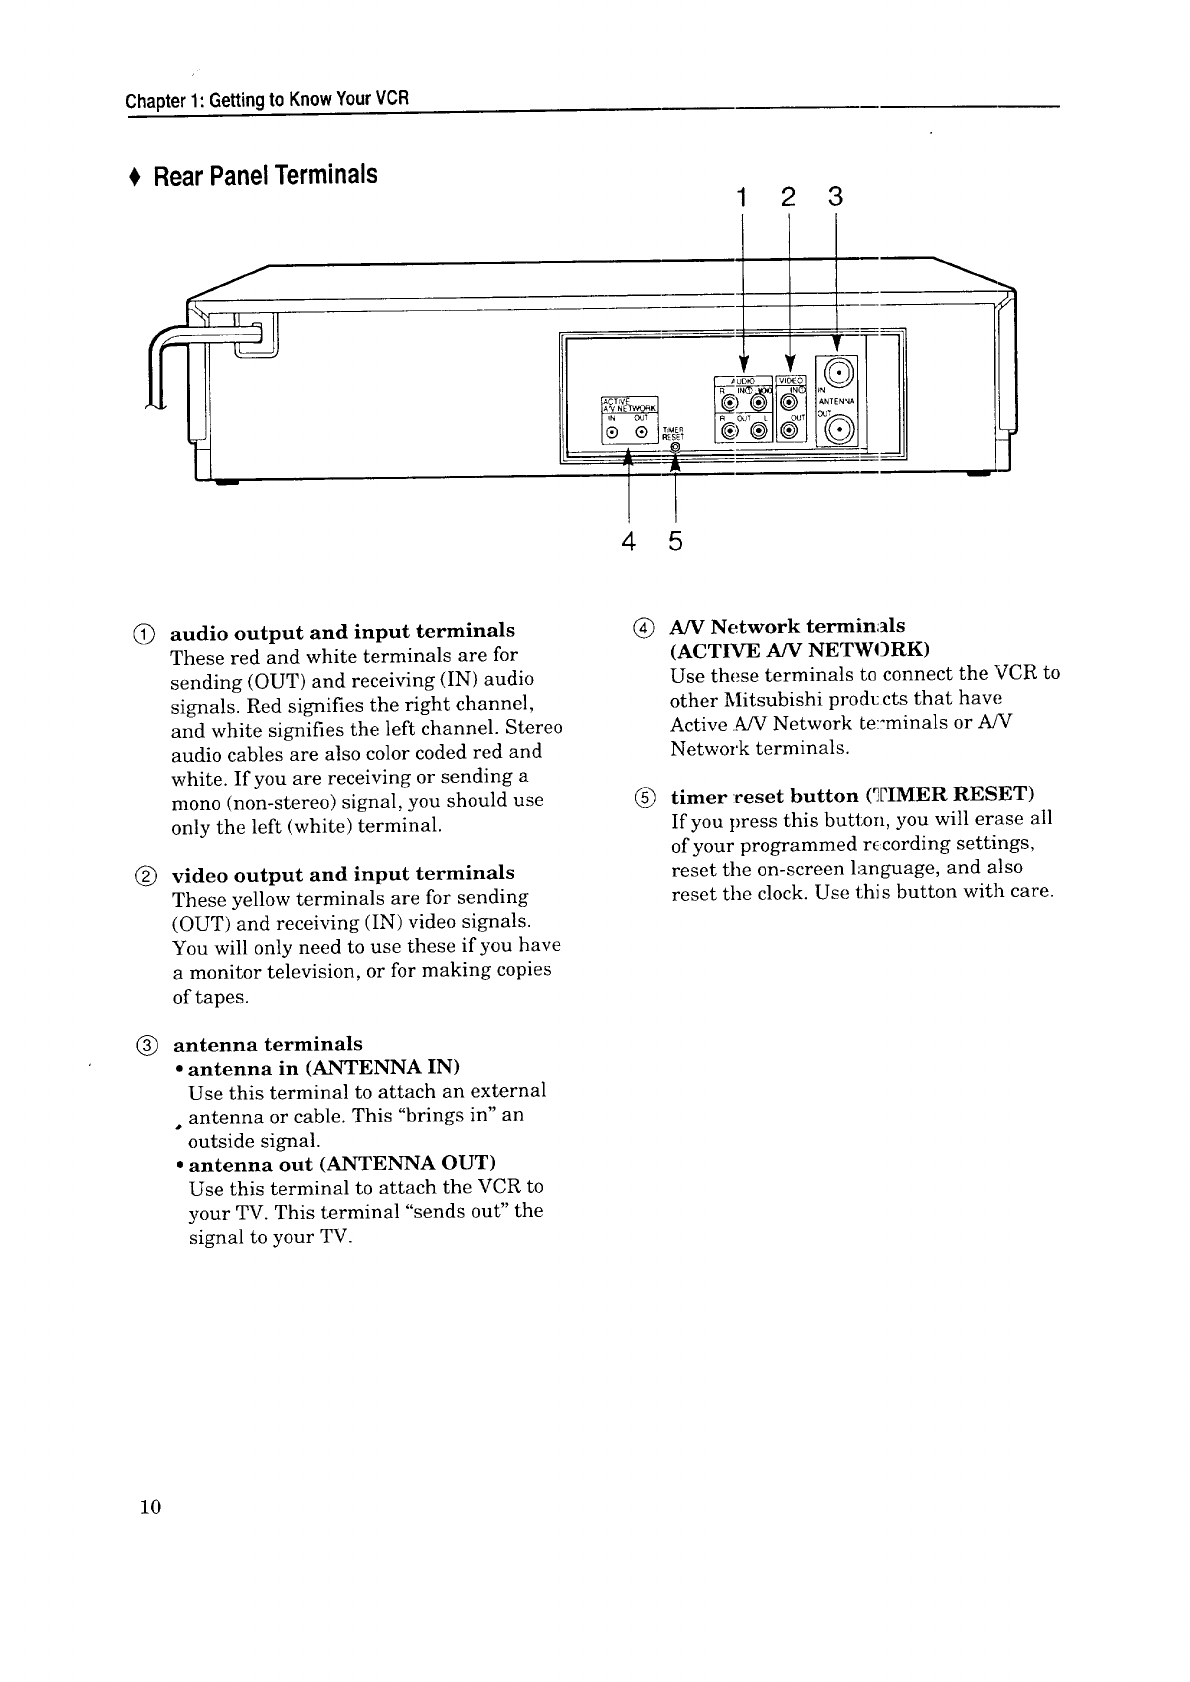
RearPanelTerminals 23
45
® ®
!
Q
®
®
audio output and input terminals
These red and white terminals are for
sending (OUT) and receiving (IN) audio
signals. Red signifies the right channel,
and white signifies the left channel. Stereo
audio cables are also color coded red and
white. If you are receiving or sending a
mono (non-stereo) signal, you should use
only the left (white) terminal.
video output and input terminals
These yellow terminals are for sending
(OUT) and receiving (IN) video signals.
You will only need to use these if you have
a monitor television, or for making copies
of tapes.
antenna terminals
•antenna in (ANTENNA IN)
Use this terminal to attach an external
•antenna or cable. This "brings in" an
outside signal.
• antenna out (ANTENNA OUT)
Use this terminal to attach the VCR to
your TV. This terminal "sends out" the
signal to your TV.
®A/V Network terminals
(ACTIVE AN NETWORK)
Use these terminals to connect the VCR to
other Mitsubishi prods: cts that have
Active AfV Network te:'minals or A/V
Network terminals.
®timer reset button (_['IMER RESET)
If you press this button, you will erase all
of your programmed r(z:cording settings,
reset the on-screen language, and also
reset the clock. Use this button with care.
10
,_CHAPTER TWO
ConnectingYourVCR
Now that you're familiar with some of your VCR's features, you're
ready to connect the antenna and the television. You won't have
to complete all of the connections you see in this chapter -- make
only those connections that apply to your eqmpment.
You should keep in mind that there are two s_eps you need to
take to connect your VCR: first, connect the antenna or cable to
the VCR, then connect the VCR to the television.
Connecting the Antennaor Cable to the V,3R
$ Connecting the Television
Connecting the AN Network(optional)
$ConnectingtheAntennaor Cableto the VCR
The first thing you need to do is connect the antenna or cable.
Because there are at least three different tyt:es of antennas, this
chapter will show how to connect all of them. You don't need to
make all the connections. First, find out what kind of antenna you
have. Then, make the connection for that type of antenna. You
can then go to the next sectic,n, "Connecting Lhe Television."
This section shows you:
•Connecting cable antennas,
• Connecting other antennas, and
• Connecting separate UHF/VHF antennas.
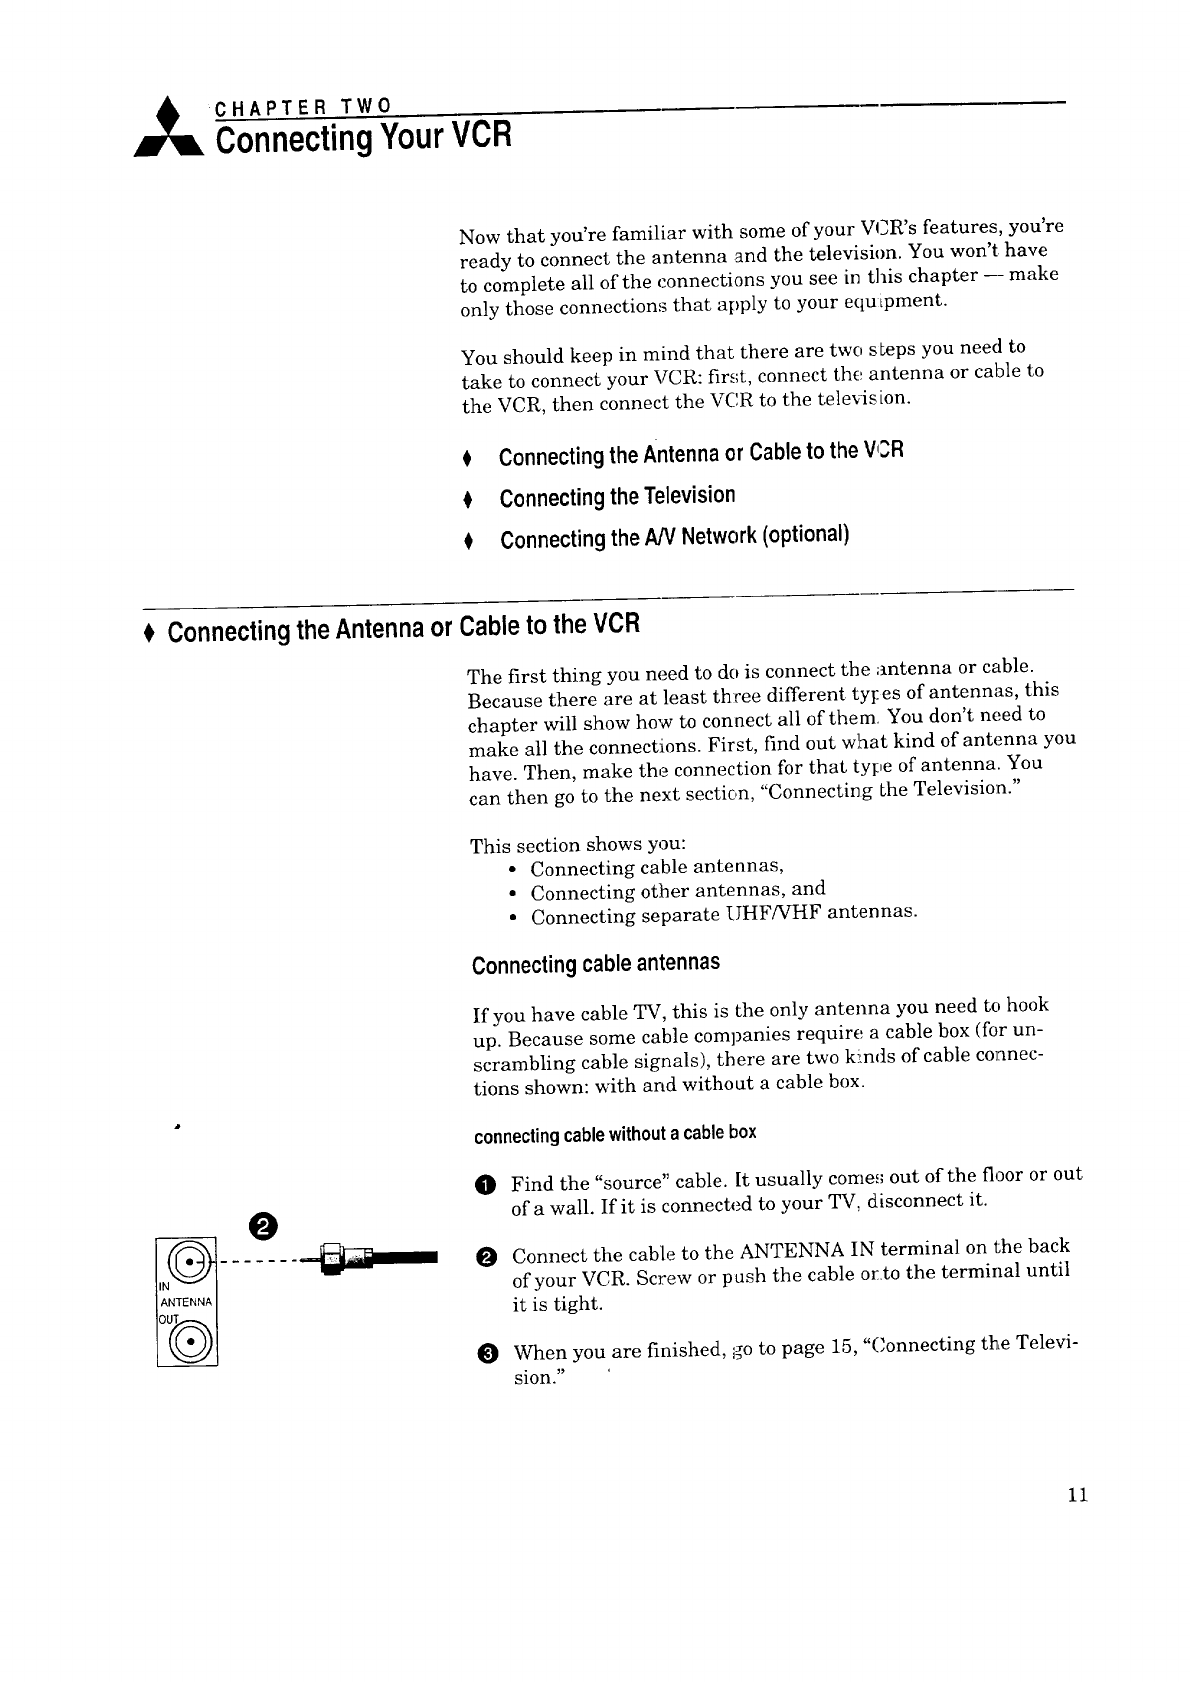
Connectingcableantennas
If you have cable TV, this is the only antenna you need to hook
up. Because some cable companies require a cable box (for un-
scrambling cable signals), there are two ki:nds of cable connec-
tions shown: with and without a cable box.
connectingcablewithoutacablebox
0
0
Find the "source" cable. [t usually come,; out of the floor or out
of a wall. If it is connected to your TV, disconnect it.
Connect the cable to the ANTENNA IN terminal on the back
of your VCR. Screw or posh the cable or=to the terminal until
it is tight.
When you are finished, go to page 15, "C'onnecting the Televi-
sion."
11
Chapter2:ConnectingYourVCR ConnectingtheAntennaorCableto theVCR(cont.)
connectingcablewitha cablebox,if all channelsarescrambled
If your cable system scrambles all of its channels, follow the
directions below to connect your cable box to ygur VCR:
q[]) Disconnect the cable box from the TV.
Connect the cable coming from the cable b_x to the AN-.
TENNA IN terminal on the back of your VCR. Screw oz' push
the cable onto the terminal until it is tight.
When finished, go to page 15, "Connecting the Television."
If your cable company scrambles all of its channels, you cannot
record one channel while watching another.
connectingcablewitha cablebox,if onlysomechannelsarescrambled
If your cable company only requires the use of a cable box tbr
some channels, we suggest using the following connections. This
connection will allow you to watch one non-scrambled channel
while you record another non-scrambled channel.
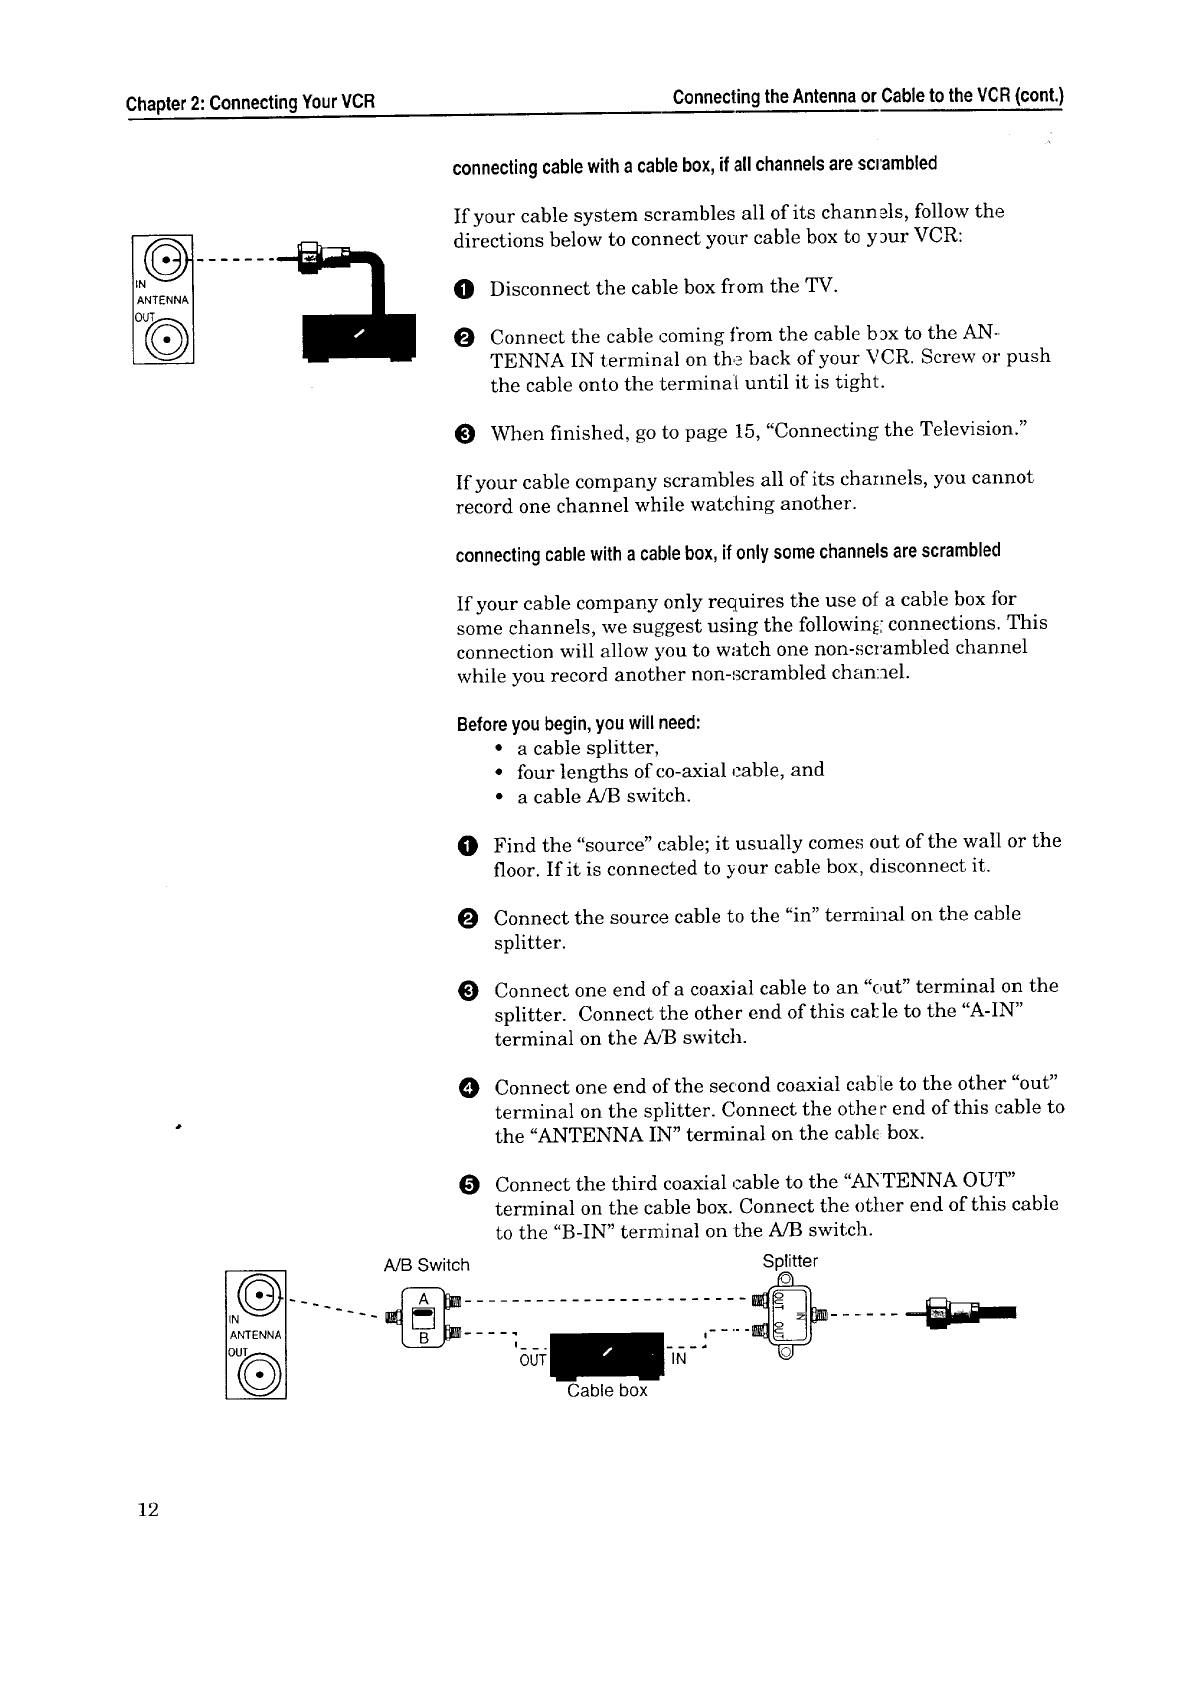
Beforeyoubegin,youwillneed:
•a cable splitter,
• four lengths of co-axial ,:able, and
• a cable A/B switch.
O Find the "source" cable; it usually comes out of the wall[ or the
floor. If it is connected to your cable box, disconnect it.
Connect the source cable to the "in" terminal on the cable
splitter.
O Connect one end of a coaxial cable to an "out" terminal on the
splitter. Connect the other end of this cat:le to the "A-IN"
terminal on the AJ]3 switch.
Connect one end of the second coaxial cable to the other "out"
terminal on the splitter. Connect the other end of this cable to
the "ANTENNA IN" terminal on the cabl_ box.
Connect the third coaxial ,:able to the "ANTENNA OUT"
terminal on the cable box. Connect the other end of this cable
to the "B-IN" terminal on the A/B switch.
A/B Switch
Cable box
Splitter
,_.... .......
12

F>Important:
O Connectthefourthcoaxialcableto the"OUT"terminalonthe
A/Bswitch.Connecttheotherendofthis ,.'ableto the"AN-
TENNAIN" terminalonyourVCR.
I_ Whenyouarefinished,goto page15,"Connectingthe 'Televi-
sion."
With this connection, :you should set the A/B switch to "B" only
when you are recording a scrambled channel. In that case, you
should set your VCR to record channel 3 (or 4), and manually set
the cable box to the channel you wish to record.
You should leave the A/B switch set to "A" fbr all other situations.
If you have questions concerning your cable system, please
contact your cable company.
With this connection, you cannot record a scrambled channel and
watch a non-scrambled channel at the same time. You also cannot
watch a scrambled channel and record a non-scrambled channel
at the same time.
Connectingotherantennas
If you don't have cable TV, you'll need to connect a regular an-
tenna. Your antenna may have one of two different kind of ends
(called "leads") on it.
The two kinds of leads are:
300-ohm flat twin leads
that look like this ... :
... or a 75.-o1-rn round lead
that looks like this:
Follow the procedures for connecting the kin3 of leads your
antenna has, then go to page 15, "Connecting the Television."
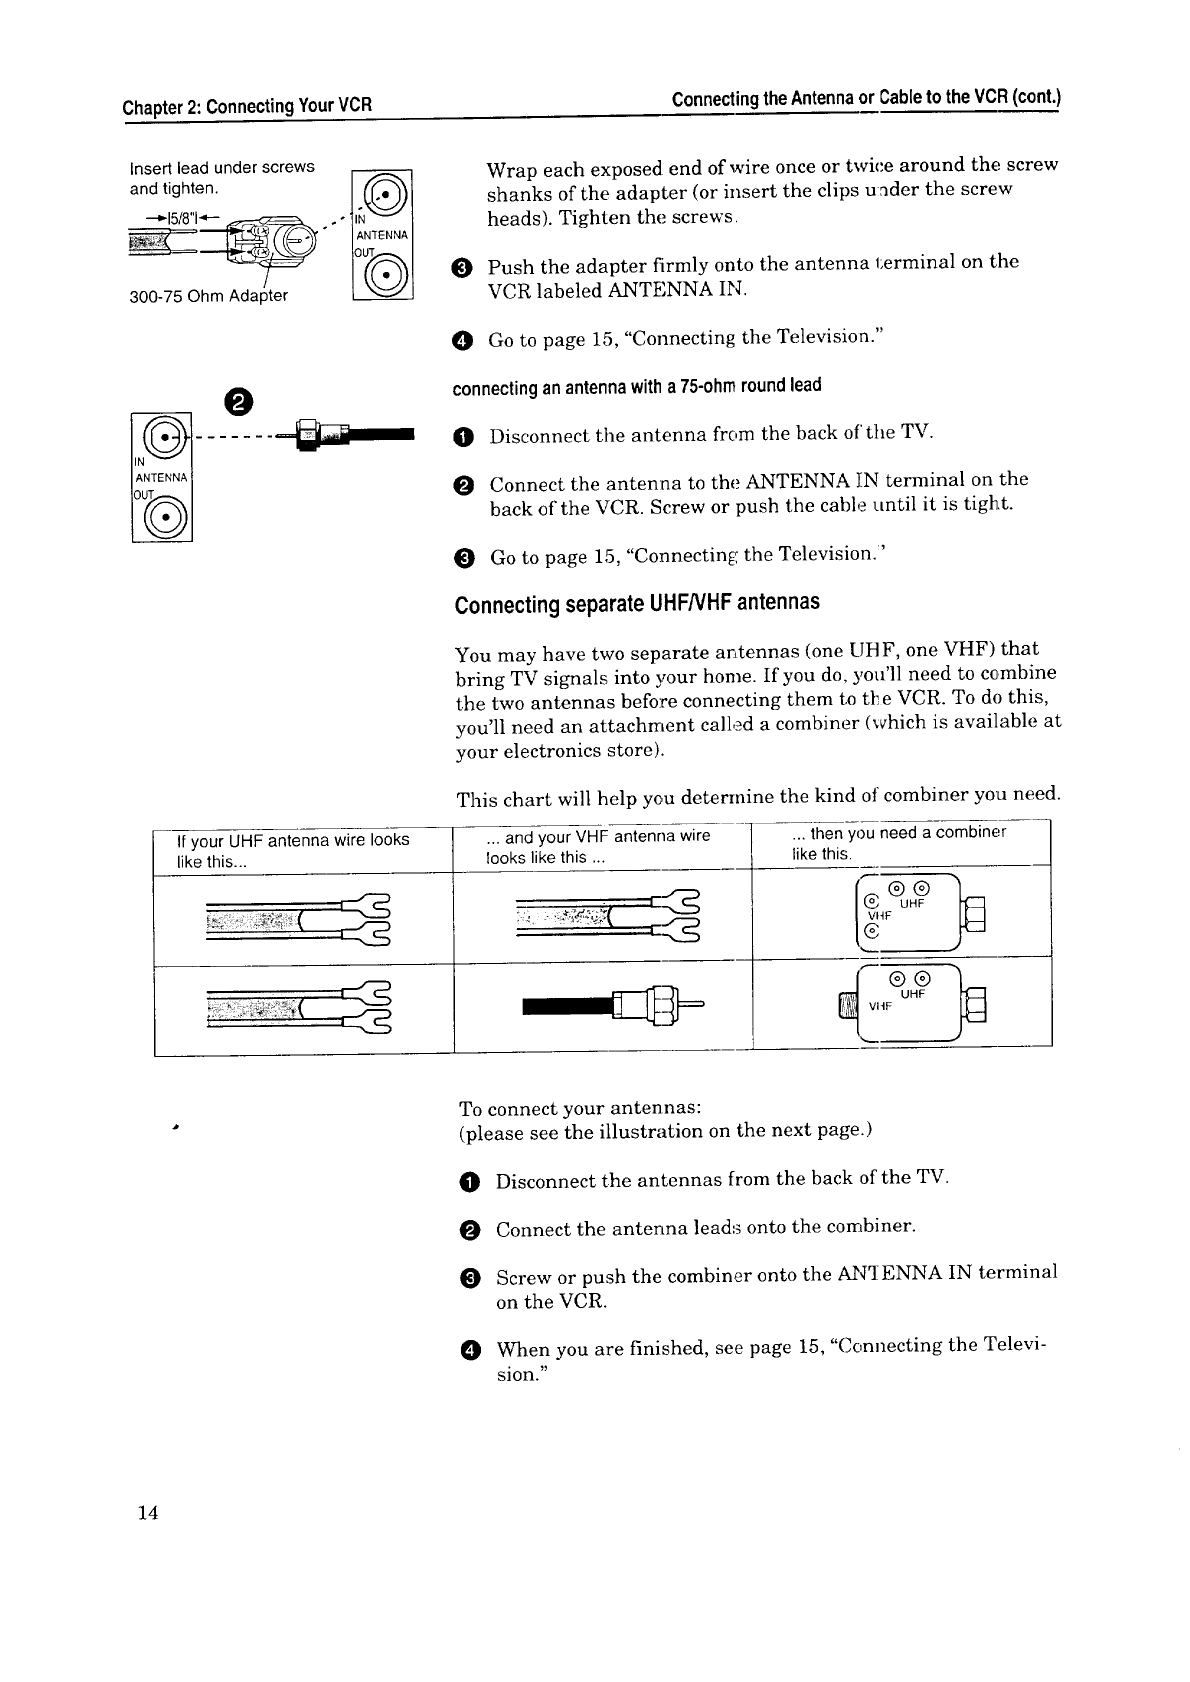
connectingan antennawitha300-ohrnflat twin lead
(If you have a 300-ohm flat twin lead, you will need to purchase a
300-75 ohm adapter at your local hardware or electronics store.)
0 Disconnect the antenna t_om the back of the TV.
0Before you can attach the antenna leads to the adapter, you
need to expose a 5/8 inch segment of each lead by scraping off
the plastic covering. Sometimes these leads have "U" shaped
clips that fit around the screw, in which case you will not
need to peel back the plastic.
13
Chapter2:ConnectingYourVCR ConnectingtheAntennaor Cableto theVCR(cont.)
Insert lead under screws
and tighten.
300-75 Ohm Adapter
Wrap each exposed, end of wire once or twice around the screw
shanks of the adapter (or insert the clips u:_der the screw
heads). Tighten the screws.
0 Push the adapter firmly onto the antenna terminal on the
VCR labeled ANTENNA IN.
O Go to page 15, "Connecting the Television."
connectingan antennawitha 75-ohmroundlead
O Disconnect the antenna from the back of'tim TV.
O Connect the antenna to the ANTENNA TN terminal on the
back of the VCR. Screw or push the cable until it is tight.
Go to page 15, "Connecting: the Television.'
Connectingseparate UHFNHF antennas
You may have two separate ar_tennas (one UHF, one VHF) that
bring TV signals into your home. If you do, you'll need to combine
the two antennas before connecting them to tt_e VCR. To do this,
you'll need an attachment called a combiner (which is available at
your electronics store).
This chart will help you determine the kind ot: combiner you need.
If your UHF antenna wire looks ... and your VHF antenna wire
like this.., looks like this ...
4* '" "' " _"
... then you need a combiner
like this.
2_
UHF
VHF
To connect your antennas:
(please see the illustration on the next page.)
{]} Disconnect the antennas from the back of the TV.
Connect the antenna leads onto the combiner.
Screw or push the combiner onto the AN1-ENNA IN terminal
on the VCR.
O When you are finished, see page 15, "Connecting the Televi-
sion."
14
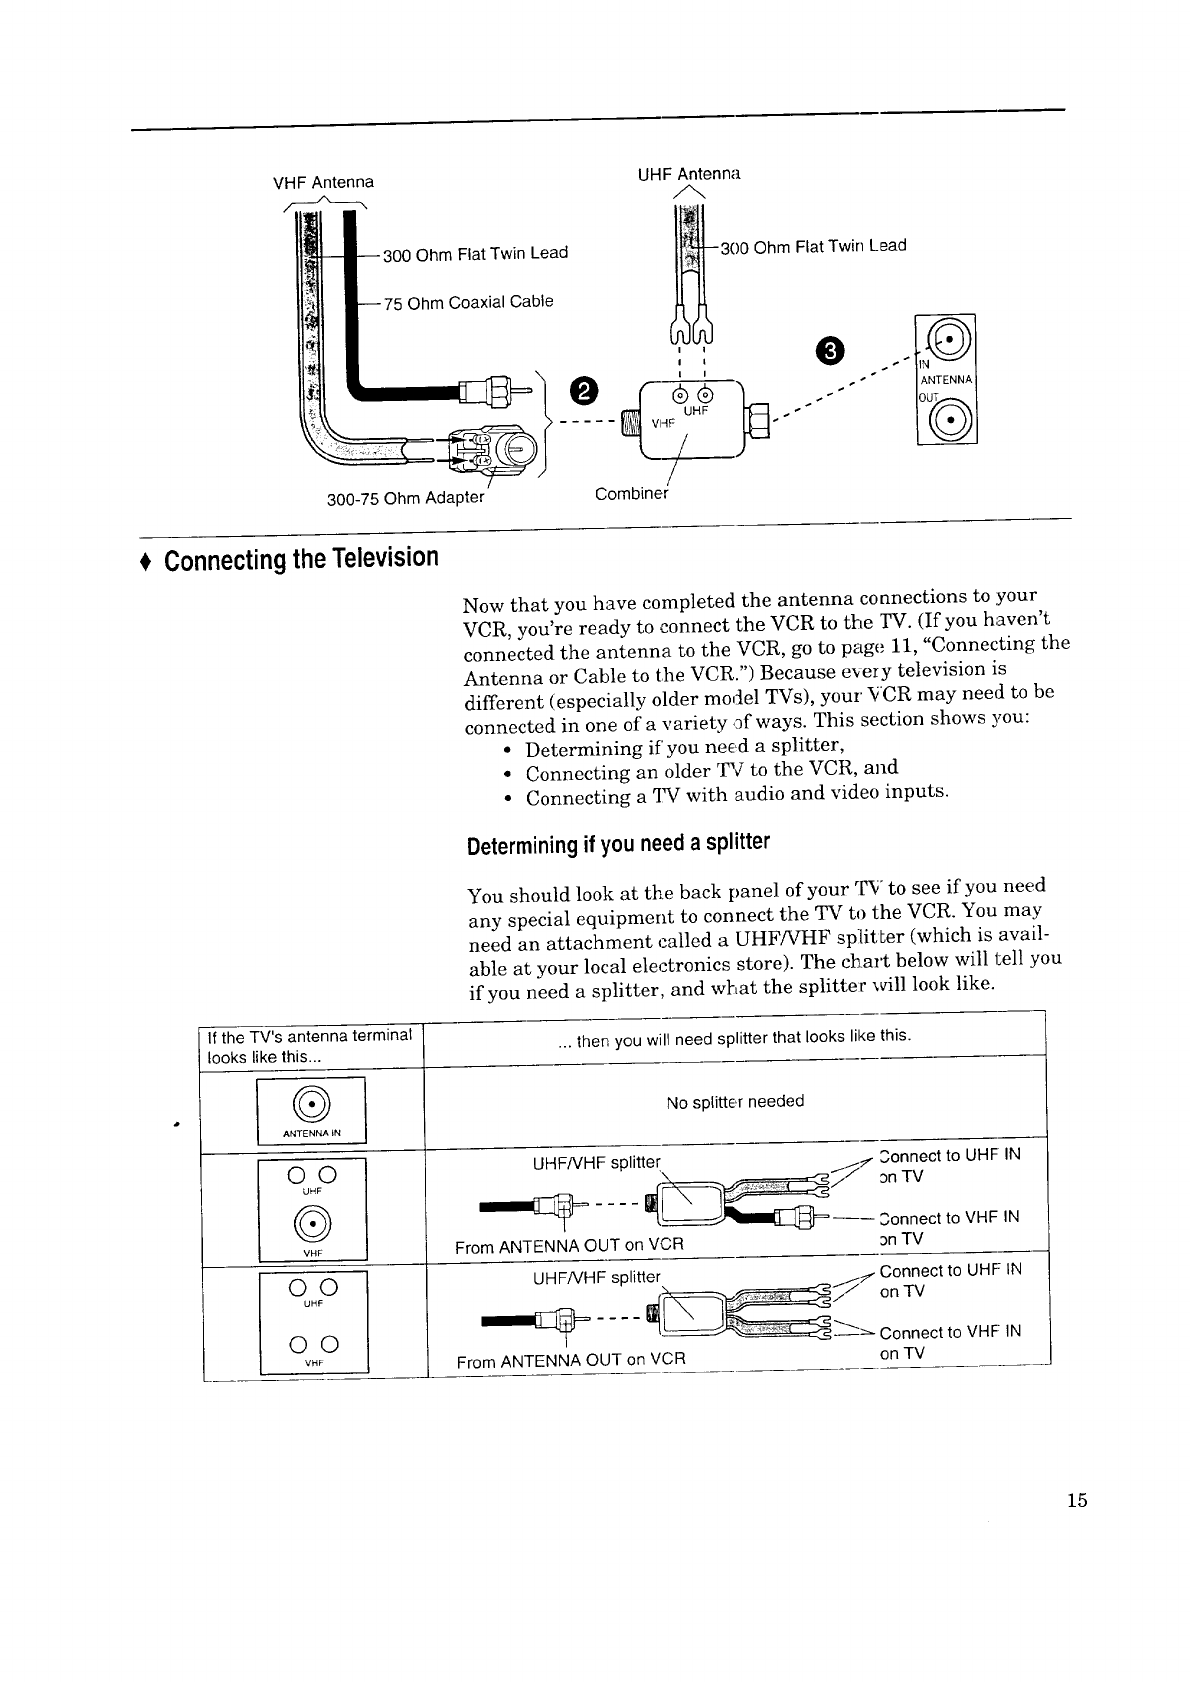
VHF Antenna
Ohm Flat Twin Lead
Ohm Coaxial Cable
300-75 Ohm Adapter
UHF Antenna
300 Ohm Flat Twin Lead
Combiner
Connecting the Television
Now that you have completed the antenna connections to your
VCR, you're ready to connect the VCR to the ]_V. (If you haven't
connected the antenna to the VCR, go to page 11, "Connecting the
Antenna or Cable to the VCR.") Because e_e_y television is
different (especially older model TVs), your ¥CR may need to be
connected in one of a variety of ways. This section shows you:
• Determining if'you need a splitter,
• Connecting an older TV to the VCR, and
• Connecting a _ with audio and video inputs.
Determiningif you need asplitter
You should look at the back panel of your rFV to see if you need
any special equipment to connect the TV to the VCR. You may
need an attachment called a UHF/VHF splitter (which is avail-
able at your local electronics store). The chart below will tell you
if you need a splitter, and what the splitter will look like.
If the TV's antenna terminal
looks like this... ... then you will need splitter that looks like this.
®
ANTENNA tN
oo
UHF
®
VHF
O0
UHF
©O
VHF
No splitter needed
UHF/VHF splitter
From ANTENNA OUT on VCR
,_onnect to UHF IN
an TV
__-- _,onnect to VHF IN
3n TV
UHF/VHF splitter ._I Connect to UHF IN
_.r _/ on TV
II(_ - ! -_- Connect to VHF IN
I i
From ANTENNA OUT on VCR on TV
15
Chapter2:ConnectingYourVCR Connecti_gtheTelevision(cont.)
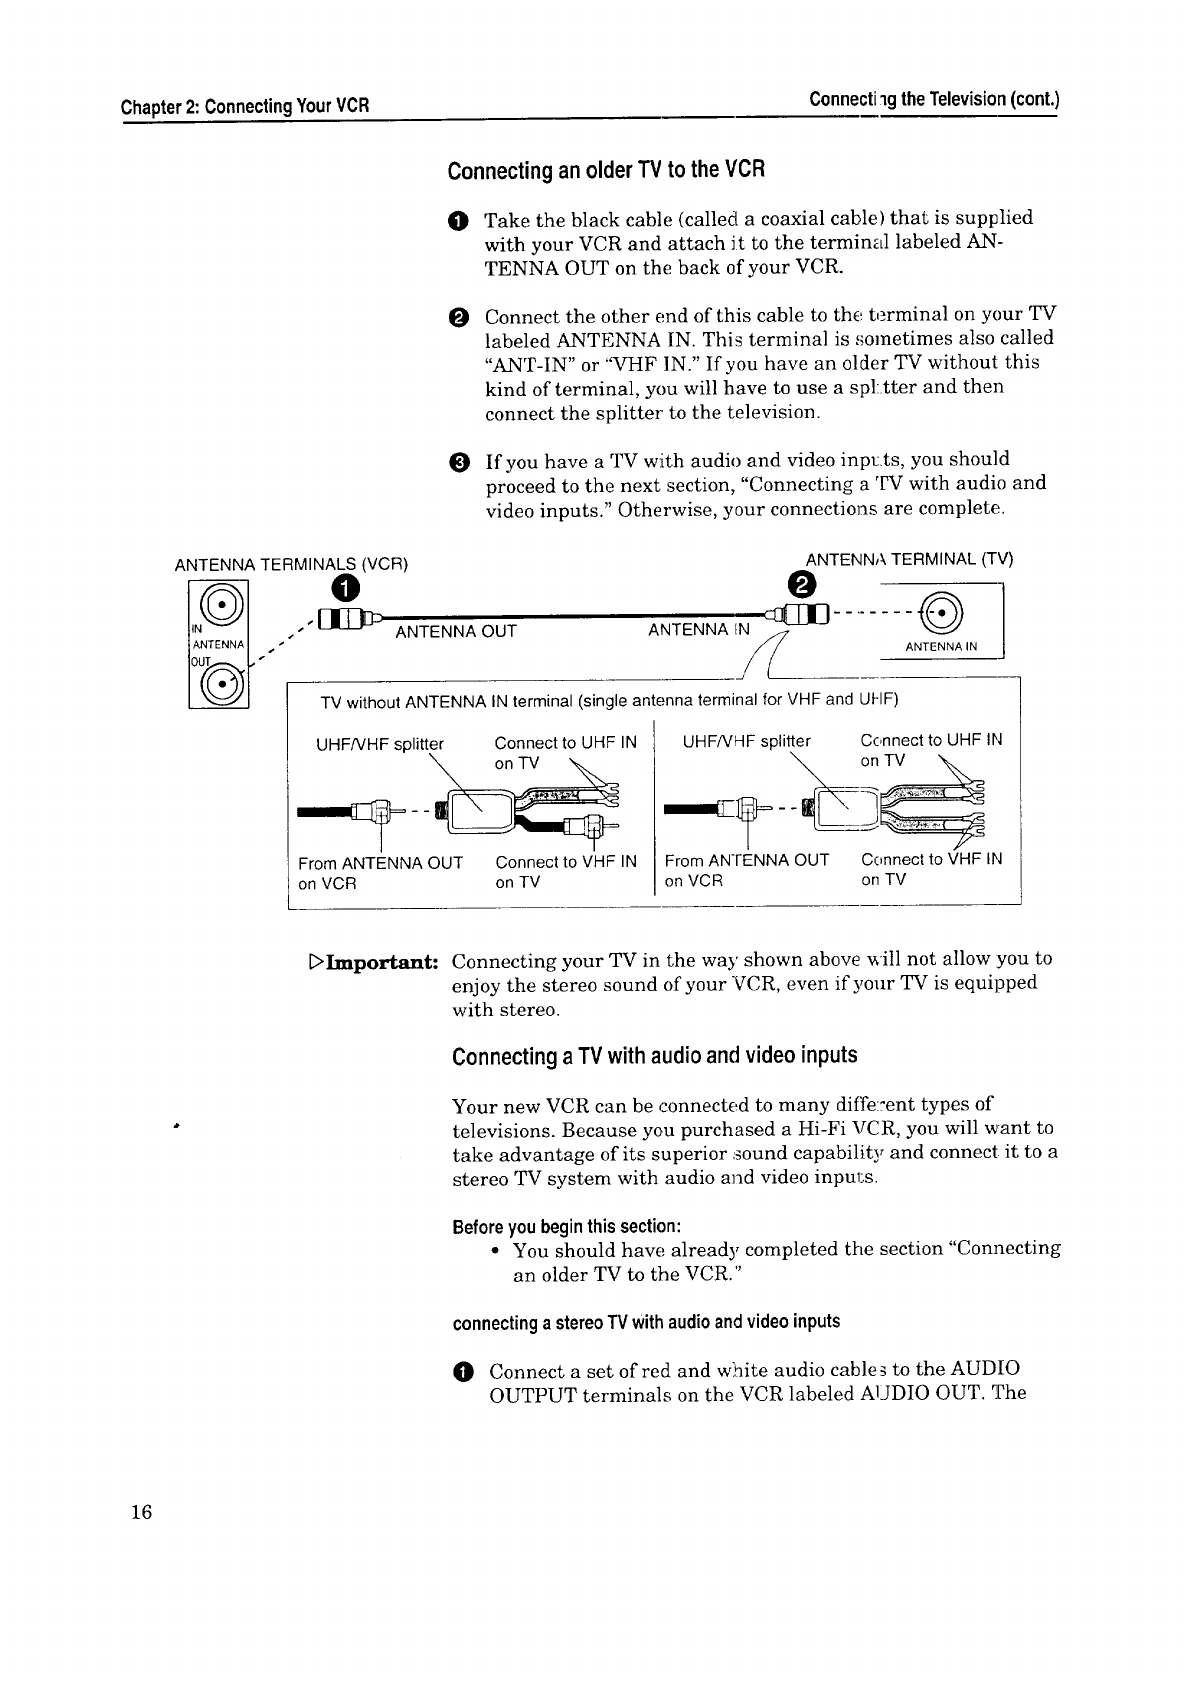
Connectingan olderTV to the VCR
O Take the black cable (called a coaxial cable) that is supplied
with your VCR and attach Jt to the termin_,l labeled AN-
TENNA OUT on the back of your VCR.
OConnect the other end of this cable to the terminal on your TV
labeled ANTENNA IN. This terminal is sometimes also called
"ANT-IN" or 'WHF IN." If you have an older TV without this
kind of terminal, you will have to use a spl:tter and then
connect the splitter' to the television.
O If you have a TV with audio and video inpt:ts, you should
proceed to the next section, "Connecting a TV with audio and
video inputs." Otherwise, your connections are complete.
ANTENNA TERMINALS (VCR)
"@ ANTENNA OUT
ANTENNA TERMINAL (TV)
. O O
ANTENNA ........ @
ANTENNA IN
TVwithout ANTENNAINterminal (single antenna terminal for VHFand UHF)
UHF/VHF splitter Connect to UHF IN
From ANTENNA OUT Connect to VHF IN
on VCR on TV
UHF/VHF splitter Connect to UHF IN
From ANTENNA OUT Connect to VHF IN
on VCR on TV
[:>Important: Connecting your TV in the way shown above will not allow :you to
enjoy the stereo sound of your VCR, even if your TV is equipped
with stereo.
Connecting aTV with audioandvideo inputs
Your new VCR can be connected to many diffe::ent types of
televisions. Because you purchased a Hi-Fi VCR, you will want to
take advantage of its superior sound capability and connect it to a
stereo TV system with audio and video inputs.
Before you begin this section:
• You should have already completed the section "Connecting
an older TV to the VCR."
connectingastereoTV withaudioandvideoinputs
O Connect a set of red and white audio cable_ to the AUDIO
OUTPUT terminals on the VCR labeled AUDIO OUT. The
16
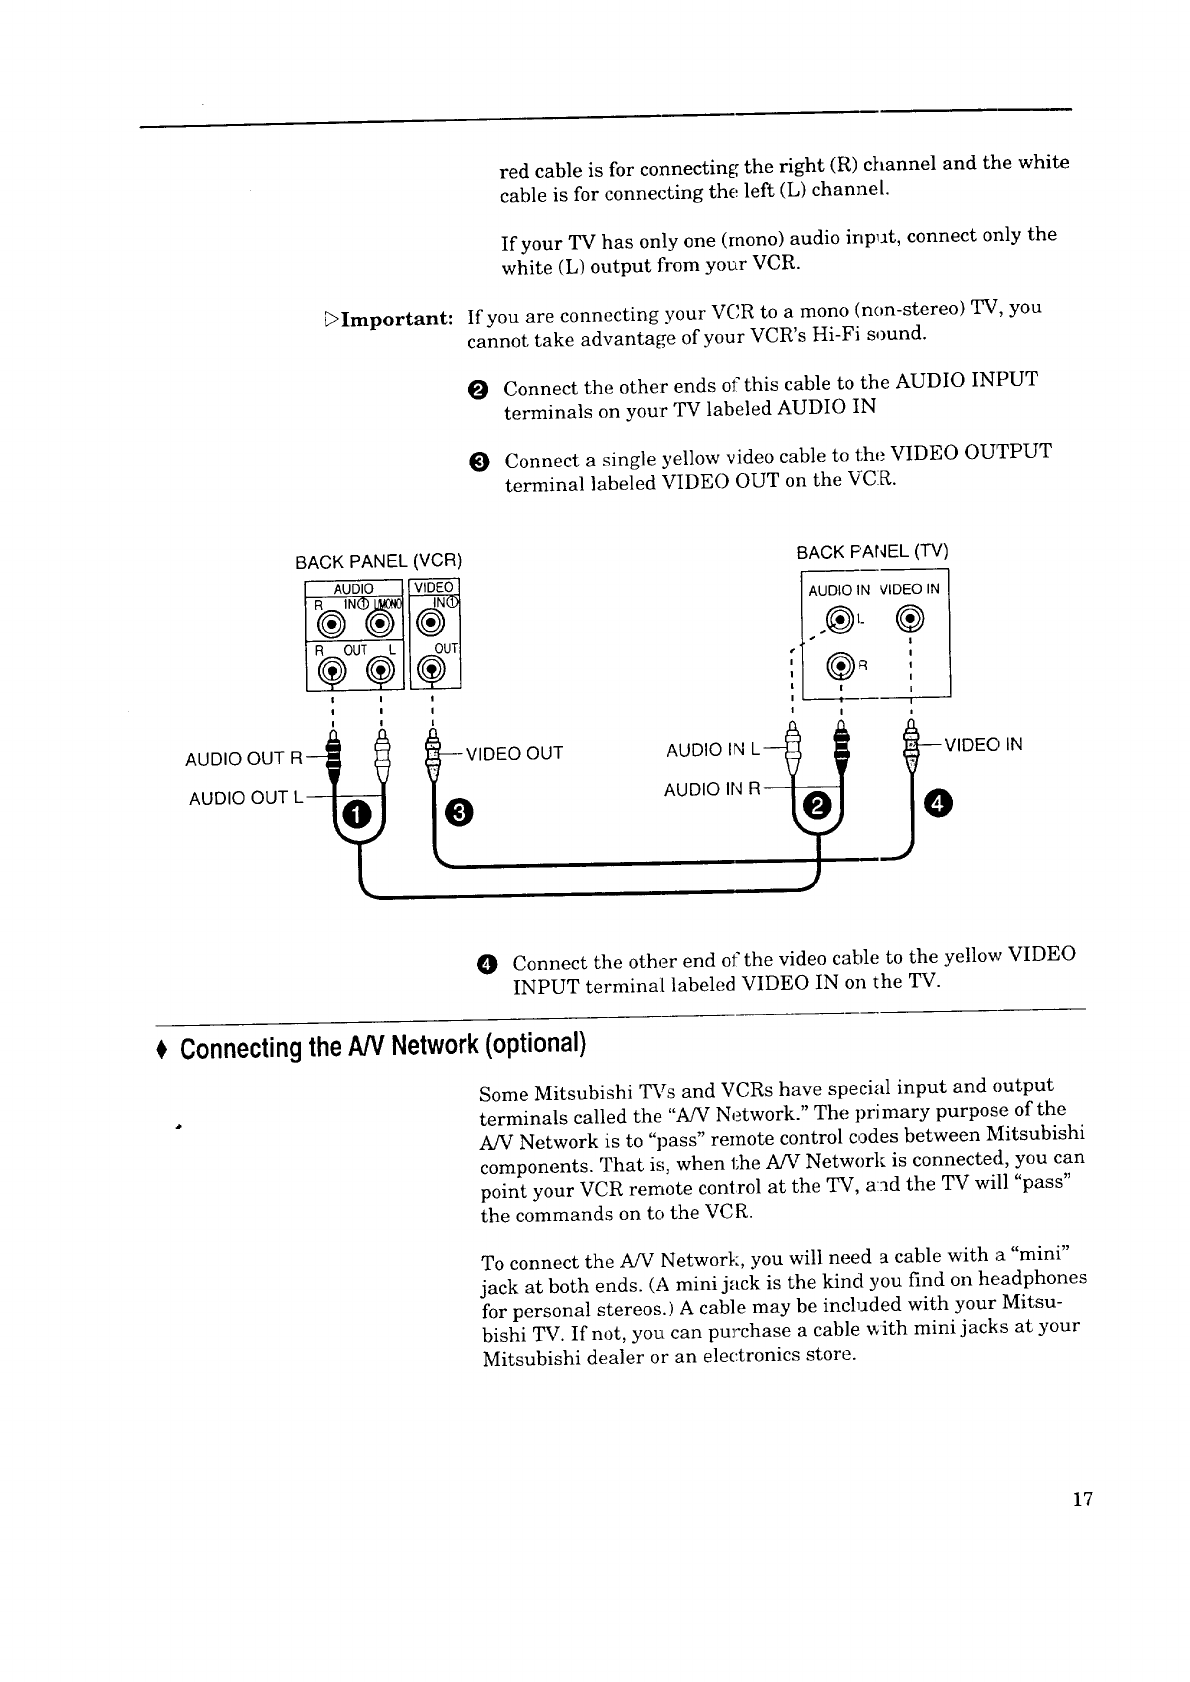
_Important:
redcableisfor connecting the right (R) channel and the white
cable is for connecting the left (L) channel.
If your TV has only one (mono) audio inp_lt, connect only the
white (L) output from yo_r VCR.
If you are connecting your VCR to a mono (non-stereo) TV, you
cannot take advantage of your VCR's Hi-Fi sound.
Connect the other ends of this cable to the AUDIO INPUT
terminals on your TV labeled AUDIO IN
Connect a single yellow video cable to the VIDEO OUTPUT
terminal labeled VIDE() OUT on the VC:[_.
BACK PANEL (VCR)
AUDIO VIDEO
R OUT L OU[
®®®
AUDIO OUT R-- --VIDEO OUT AUDIO IN L-_
AUDIO OUT L-- AUDIO Ir,,IR
BACK F'AI'.,IELCFV)
__.AUDIOIN VIDEO IN
)--VIDEO IN
0
O Connect the other end of the video cable to the yellow VIDEO
INPUT terminal labeled VIDEO IN on the TV.
)Connectingthe A/V Network(optional)
Some Mitsubishi TVs and VCRs have special input and output
terminals called the "A/V Network." The primary purpose of the
A/V Network is to "pass" remote control codes between Mitsubishi
components. That is, when the A/V Network is connected, you can
point your VCR remote control at the TV, a:ad the TV will "pass"
the commands on to the VCR.
To connect the A/V Network, you will need a cable with a "mini"
jack at both ends. (A mini jack is the kind you find on headphones
for personal stereos.) A cable may be included with your Mitsu-
bishi TV. If not, you can purchase a cable _ith mini jacks at your
Mitsubishi dealer or an electronics store.
17
Chapter2: ConnectingYourVCR ConnectingtheAN Network(optional)(cont.)
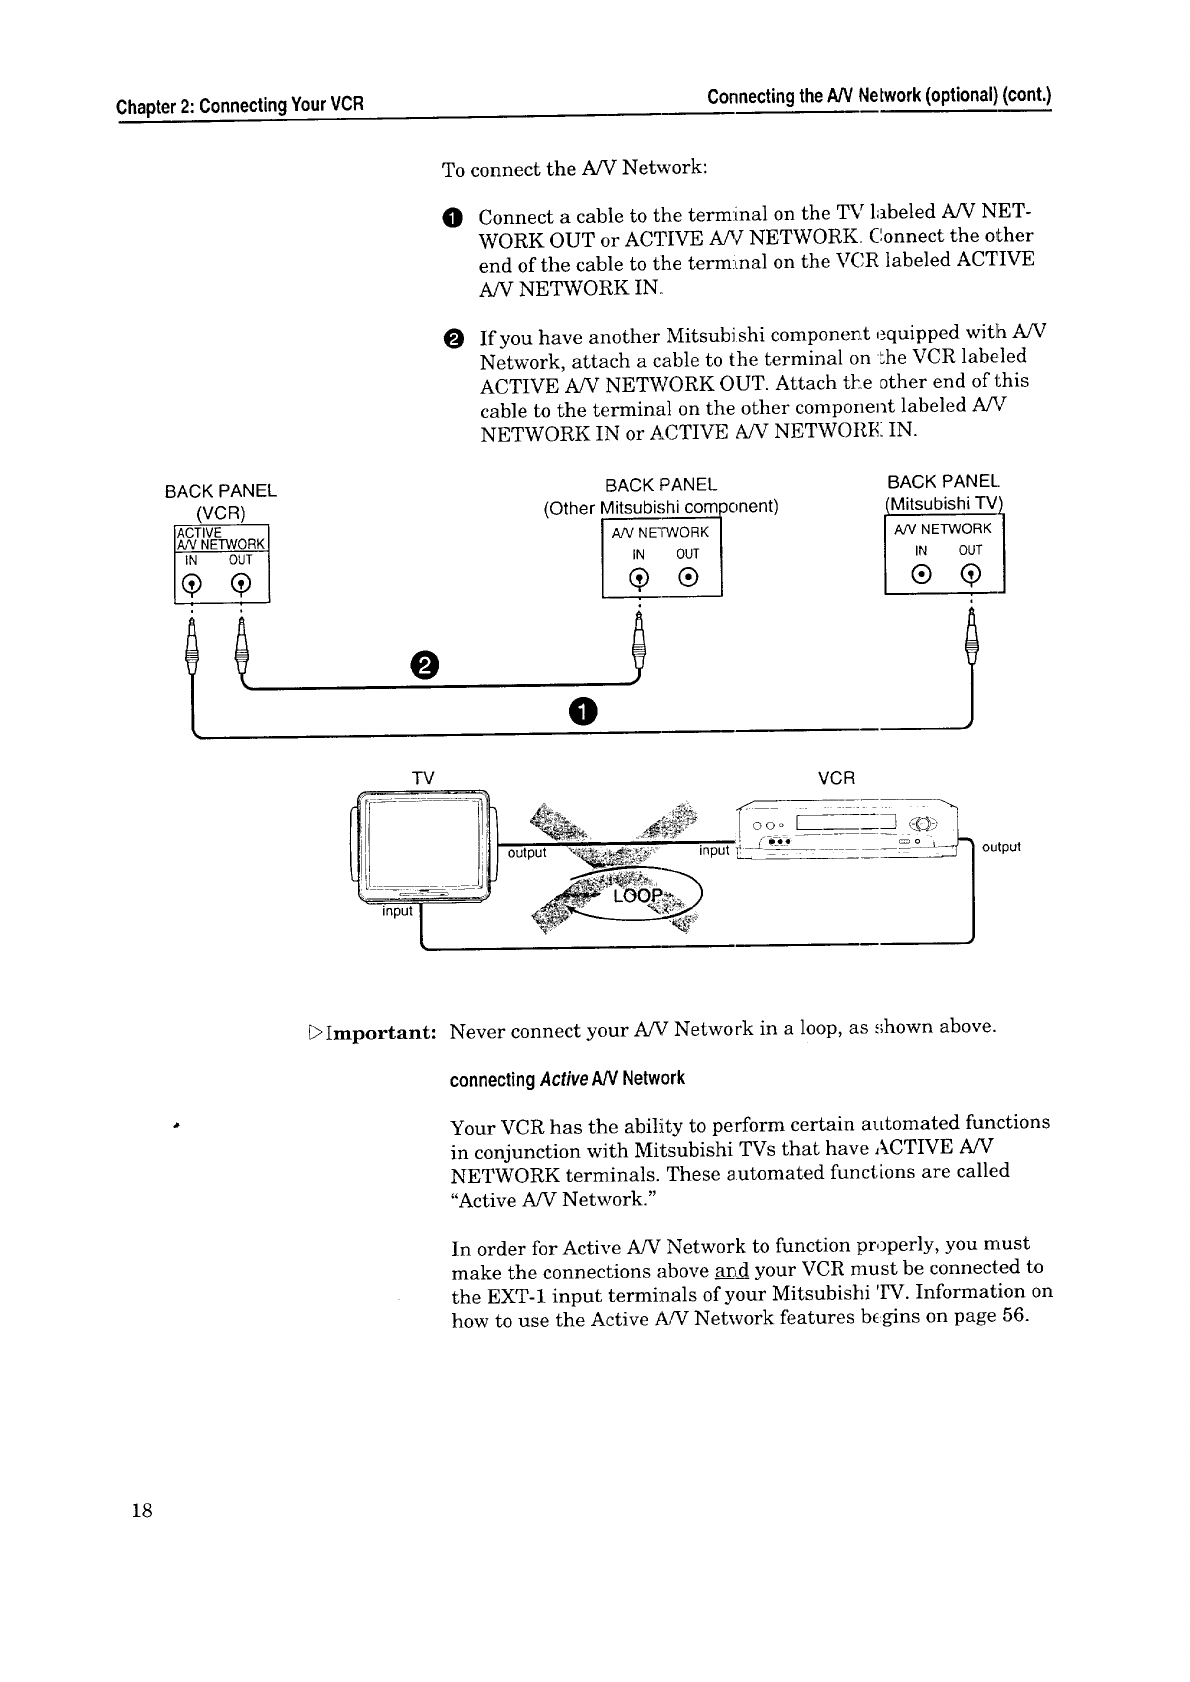
To connect the A/V Network:
OConnect a cable to the terminal on the TV labeled A/V NET-
WORK OUT or ACTIVE A/V NETWORK. Connect the other
end of the cable to the term:thai on the VCR labeled ACTIVE
A/V NETWORK IN.
OIf you have another Mitsubishi componer:t equipped with A/V
Network, attach a cable to the terminal on _oheVCR labeled
ACTIVE A/V NETWORK OUT. Attach the other end of this
cable to the terminal on the other component labeled A/V
NETWORK IN or ACTIVE A!V NETWORI4: IN.
BACK PANEL
(VCR)
ACTIVE
IAN. NETWO___.RK4
[; ;/
0
BACK PANEL BACK PANEL.
(Other Mitsubishi component) (Mitsubishi TV)
I;;/ I;;J
°i I
TV VCR
,II ; i output input 'f -_ _'-'°_ ..... _ output
____j
_>Important: Never connect your A/V Network in a loop, as shown above.
connectingActiveAN Network
Your VCR has the ability to perform certain automated functions
in conjunction with Mitsubishi TVs that have ACTIVE A/V
NETWORK terminals. These automated functions are called
"Active A/V Network."
In order for Active A/V Network to function properly, you must
make the connections above arid your VCR must be connected to
the EXT-1 input terminals of your Mitsubishi 'IW. Information on
how to use the Active A/V Network features b_!:gins on page 56.
18
ACHAPTER THREE
OperatingYourVCR
Now that you've completed your antenna, VCP, and TV connec-
tions, you're ready to start enjoying your equipment. To get, the
most satisfaction out of your VCR, you shou_Ld carefully read the
two sections, "Setting Up Your VCR for the Fi:st Time" and
'%iewing the Picture Coming from Your VCR." Then you can start
exploring what your new VCR can do.
In this chapter, you'll learn:
Setting Up YourVCR for the FirstTime
Usingthe RemoteControl
Viewingthe PictureComingfrom YourVCR
$Loadingand UnloadingTapes
$ Playing a Tape
Selectingthe On-screenLanguage
Usingthe Menusto Setthe Time
Programmingthe VCRto ReceiveTV Chafmels
$UsingtheAudioand Video Functions
$Recording
Setting UpYourVCRfor the FirstTime
It's important that your VCR is set up correctly before you try to
use it. If you carefully read this section, you will avoid confusion
later and get the most out of operating your _ystem.
This section teaches you about:
• Setting up your VCR if you are using a TV without Audio
and Video Inputs.(Older TV), and
• Setting up your VCR if you are using an TV with Audio and
Video Inputs (Modern TV).
Before you begin, you should:
• have completed your antenna, VCR, and TV connections.
Settingup yourVCR if youare usingaTV wilhoutAudio andVideo
inputs(OlderTV)
0 Turn on your TV and tune it to channel 3 or 4, whichever is
NOT used for broadcast in your area.
19
Chapter3: OperatingYourVCR SettingUpYourVCRlor the FirstTime(cont.)
Important:
0If you tuned the TV to charmel 4 in step O, press the CHAN-
NEL A button and the ONE KEY PROGRAM button on the
front panel at the same time with the VCR turned off. The
word "Ant ch4" will display on the front panel display and the
VCR will send signals on channel 4. (Ifyo_ tuned the TV to
channel 3, you don't need to do this.)
O Turn the VCR on by pressing the POWER button.
The VCR will return to its initial setting (channel 3) if you press
the CHANNEL • button and the ONE KEY FROGRAM button
on the front panel at the same time with the VCR turned off.
Settingupyour VCRif you are using a TV equippedwithAudio and
Video Inputs(ModernTV)
0Turn on your TV and switch it to the correct external input.
(For most Mitsubishi TVs, this means pres sing the TV's
INPUT button until you see the words "Ext-l" or "Input-l" on
the screen.)
Turn the VCR on by pressing the POWER button.
Usingthe RemoteControl
In this section, you'll learn how to set up and use your remote
control. This section includes:
• Using the remote control to operate tile VCR, and
• Using the remote control to operate the TV.
Usingthe remotecontrolto operatethe VCR
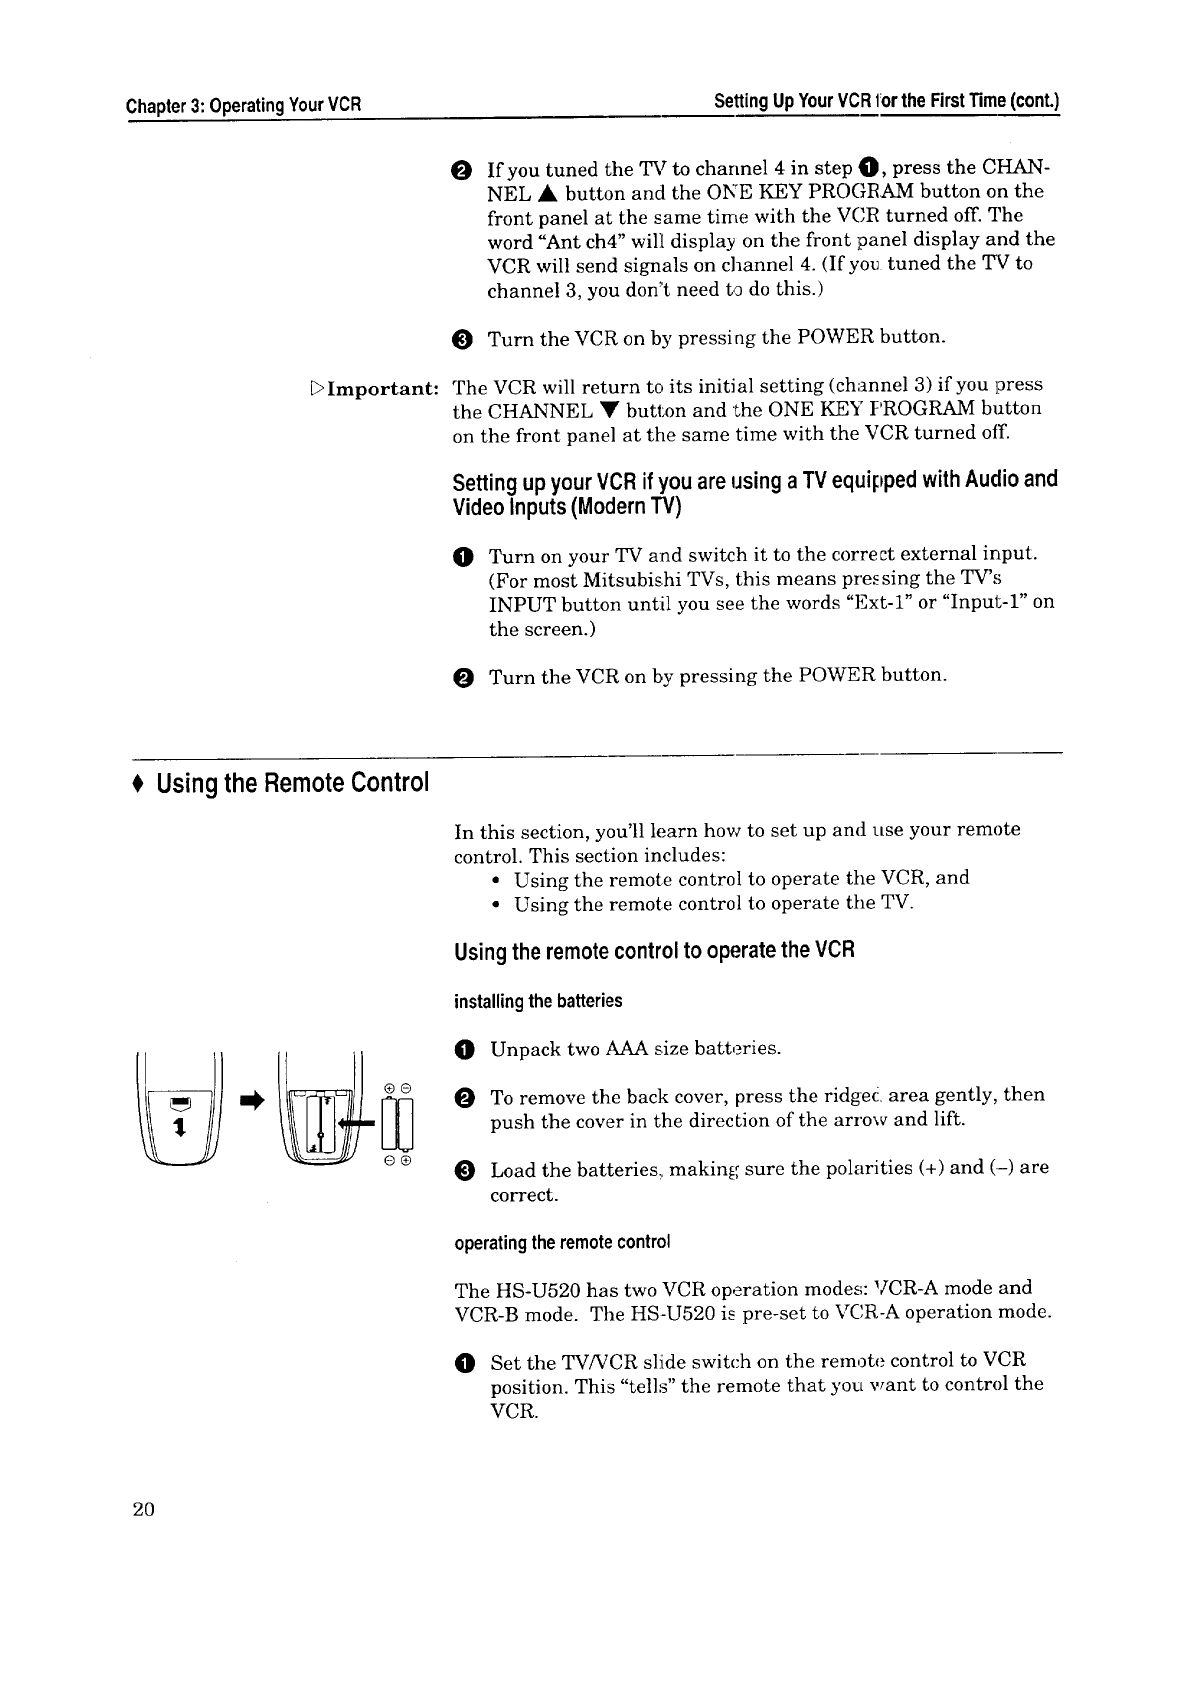
installingthebatteries
0 Unpack two AAA size batteries.
O To remove the back cover, press the ridged area gently, then
push the cover in the direction of the arrow and lift.
O Load the batteries:, making sure the polarities (+) and (-) are
correct.
operatingthe remotecontrol
The HS-U520 has two VCR operation modes: VCR-A mode and
VCR-B mode. The HS-U520 is pre-set to VCR-A operation mode.
0 Set the TV/VCR slide switch on the remote control to VCR
position. This "tells" the remote that you want to control the
VCR.
20
_Important:
O PresstheDISPLAYbuttonandthenumberbutton"1"onthe
remotecontrolat thesametime. Nowyourremoteis readyto
operateyourHS-U520.
O Whilewithin 23feetoftheVCR,pointtheremotecontrol
towardtheVCRandpressthebuttonsyoudesire.
usingone remoteto operatetwoMitsubishiVCRs
If you have another Mitsubishi VCR in addition to your HS-U520,
you can use the HS-U520 remote control to operate both. You will
need to do some preparation to operate the two VCRs separately
with one remote.
OSet the remote mode on the HS-U520 to "VCR-B" operation
mode. With the VCR turned off, press the ONE KEY PRO-
GRAM button and REW button on the front panel at the same
time. (The letter "b" will appear on the front panel display to
indicate that the HS-U520 becomes the VCR-B mode.)
OSet the remote mode on the other Mitsub!shi VCR to '°VCR-A"
operation mode. With the VCR turned off, press the ONE
KEY PROGRAM button and FF button on the front panel at
the same time. (The letter "A" will appear on the front panel
display to indicate that the other Mits_.bishi VCR becomes
VCR-A mode.)
If the other Mitsubishi VCR has a REMC_TE switch, you only
set the switch to '_VCR-A" or "ON" positicn. If it does not have
a REMOTE switch, do not change any seLtings.
For some older Mitsubishi VCRs the set up procedure is different.
If the above procedure does _ ot allow you to operate your second
VCR with this unit's remote, please refer to your second VCR's
owners manual for an alternate procedure
OTo operate the HS-U520, set the TV/VCI:_ slide switch to VCR
position on the remote control and then press the DISPLAY
button and the number button "2" at the same time. The
remote will be set to control the HS-U520.
OTo operate the other VCR, set the TV/VCR slide switch to
VCR position on the remote control and _hen press the DIS-
PLAY button and the number button "1" at the same time.
The remote will be set to control the other VCR.
If the other Mitsubishi VCR has a VCR button, you can use
the VCR button instead of using the TV/VCR slide switch.
Usingthe remotecontrolto operatethe TV
The HS-U520 remote control can operate many of the frequently-
used functions ofyo'_r TV. This way, you need to use only one
remote to operate both your VCR and TV.
21
Chapter3: OperatingYourVCR UsingtheRemoteControU(cont.)
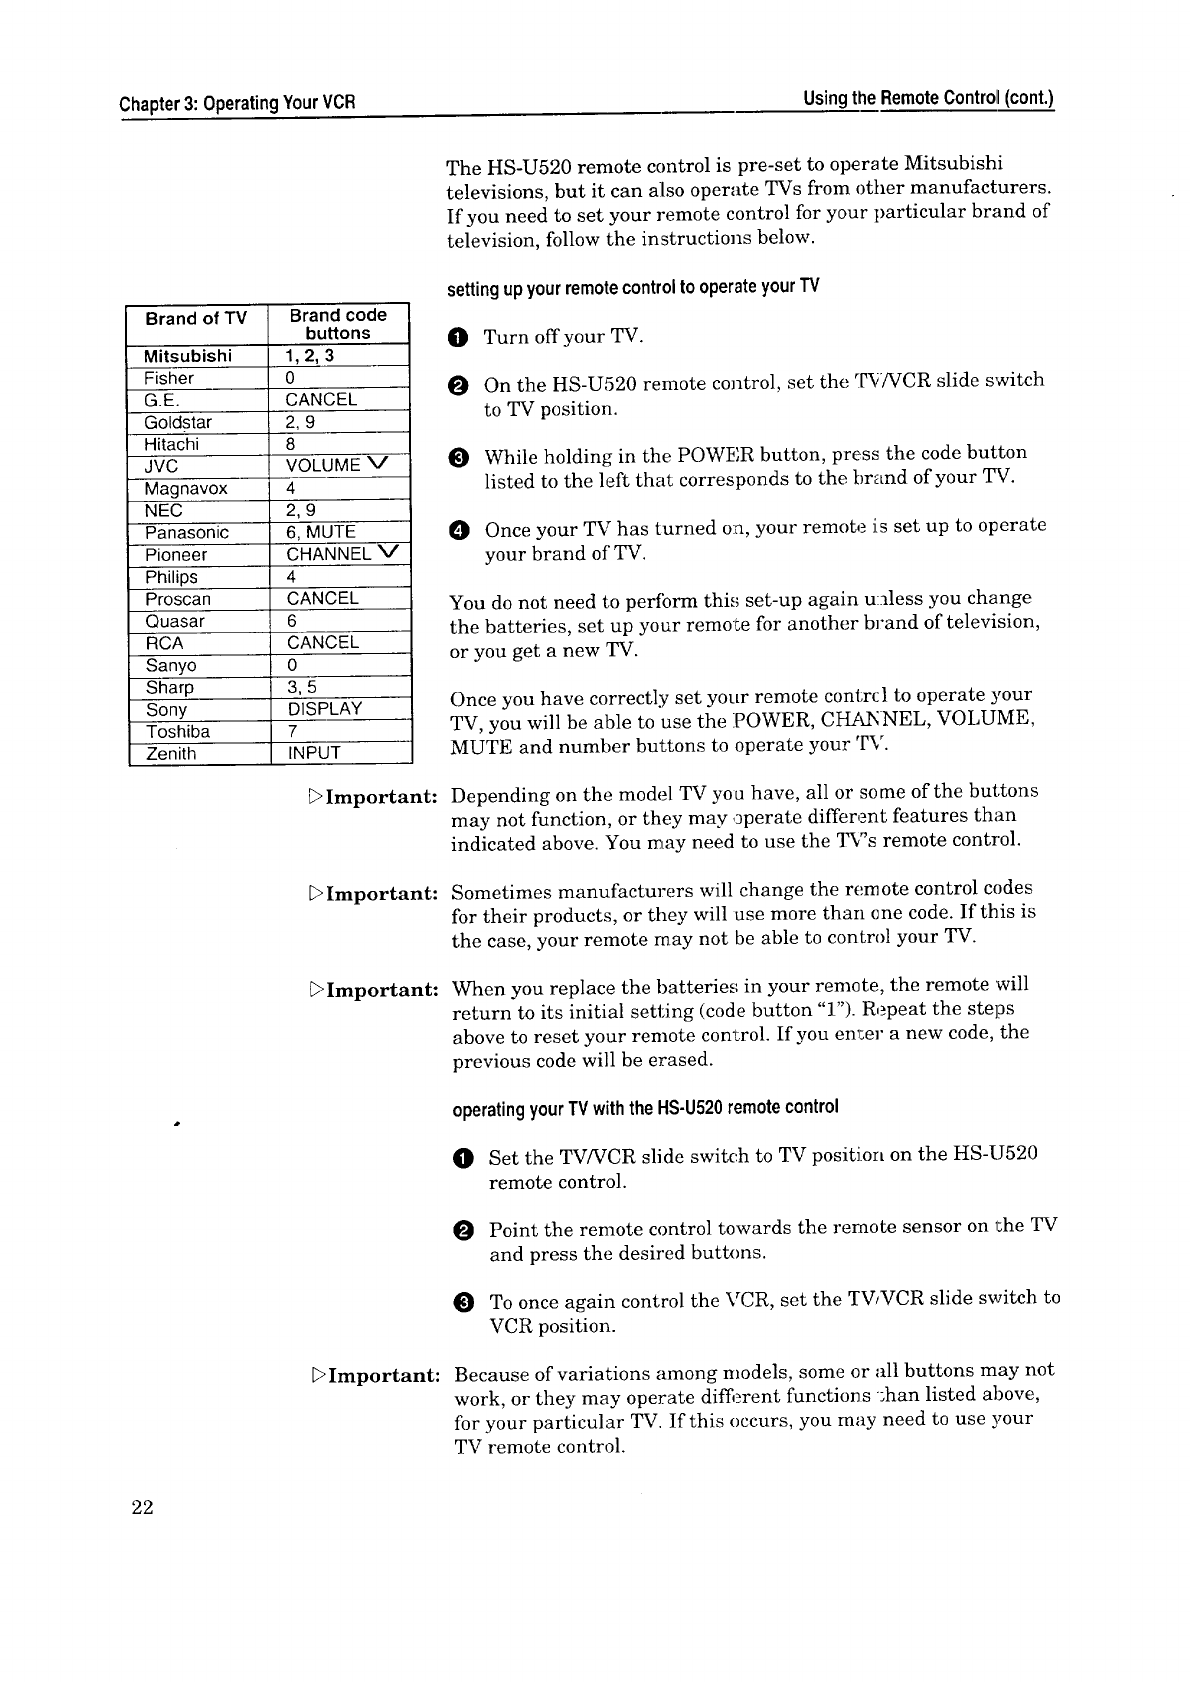
Brand of TV
Mitsubishi
Fisher
G.E.
Goldstar
Hitachi
JVC
Magnavox
NEC
Panasonic
Pioneer
Philips
Proscan
Quasar
RCA
Sanyo
Sharp
Sony
Toshiba
Zenith
Brand code
buttons
1,2,3
0
CANCEL
2,9
8
VOLUME V
4
2,9
6, MUTE
CHANNEL V
4
CANCEL
6
CANCEL
0
3,5
DISPLAY
7
INPUT
Important:
Important:
_Important:
Important:
The HS-U520 remote control is pre-set to operate Mitsubishi
televisions, but it can also operate TVs from other manufacturers.
If you need to set your remote control for your particular brand of
television, follow the instructions below.
settingupyourremotecontrolto operateyourTV
O Turn off your TV.
On the HS-U520 remote co_trol, set the r[_;/VCR slide switch
to TV position.
While holding in the POWER button, pre_ss the code button
listed to the left that corresponds to the brand of your TV.
O Once your TV has turned o:a, your remote is set up to operate
your brand of TV.
You do not need to perfbrm thi_; set-up again u:_less you change
the batteries, set up your remote for another brand of television,
or you get a new TV.
Once you have correctly set your remote contrcl to operate ),our
TV, you will be able to use the POWER, CH!C_NEL, VOLUME,
MUTE and number buttons to operate your TV.
Depending on the model TV you have, all or some of the but:tons
may not function, or they may operate differ,._nt features than
indicated above. You may need to use the T_'s remote control.
Sometimes manufacturers will change the remote control codes
for their products, or they will use more than (me code. If this is
the case, your remote may not be able to control your TV.
When you replace the batteries in your remote, the remote will
return to its initial setting (code button "1"). Repeat the steps
above to reset your remote con*_rol. If you en_;er a new code, the
previous code will be erased.
operatingyourTV withthe HS-U520remotecontrol
O Set the TV/VCR slide switch to TV position on the HS-U520
remote control.
Point the remote control towards the remote sensor on l_he TV
and press the desired buttons.
To once again control the VCR, set the [rv_vcR slide switch to
VCR position.
Because of variations among models, some or all buttons may not
work, or they may operate different functions ;han listed above,
for your particular TV. If this occurs, you may need to use ),our
TV remote control.
22
Viewingthe PictureComingfromYourVCR
This is the most important part of using your VCR, but often the
most confusing: how do you view a picture coraing from the VCR?
Beforeyou begin, you should know:
• whether you are viewing an "Older TV" or a "Modern TV".
(See pages 19-20)
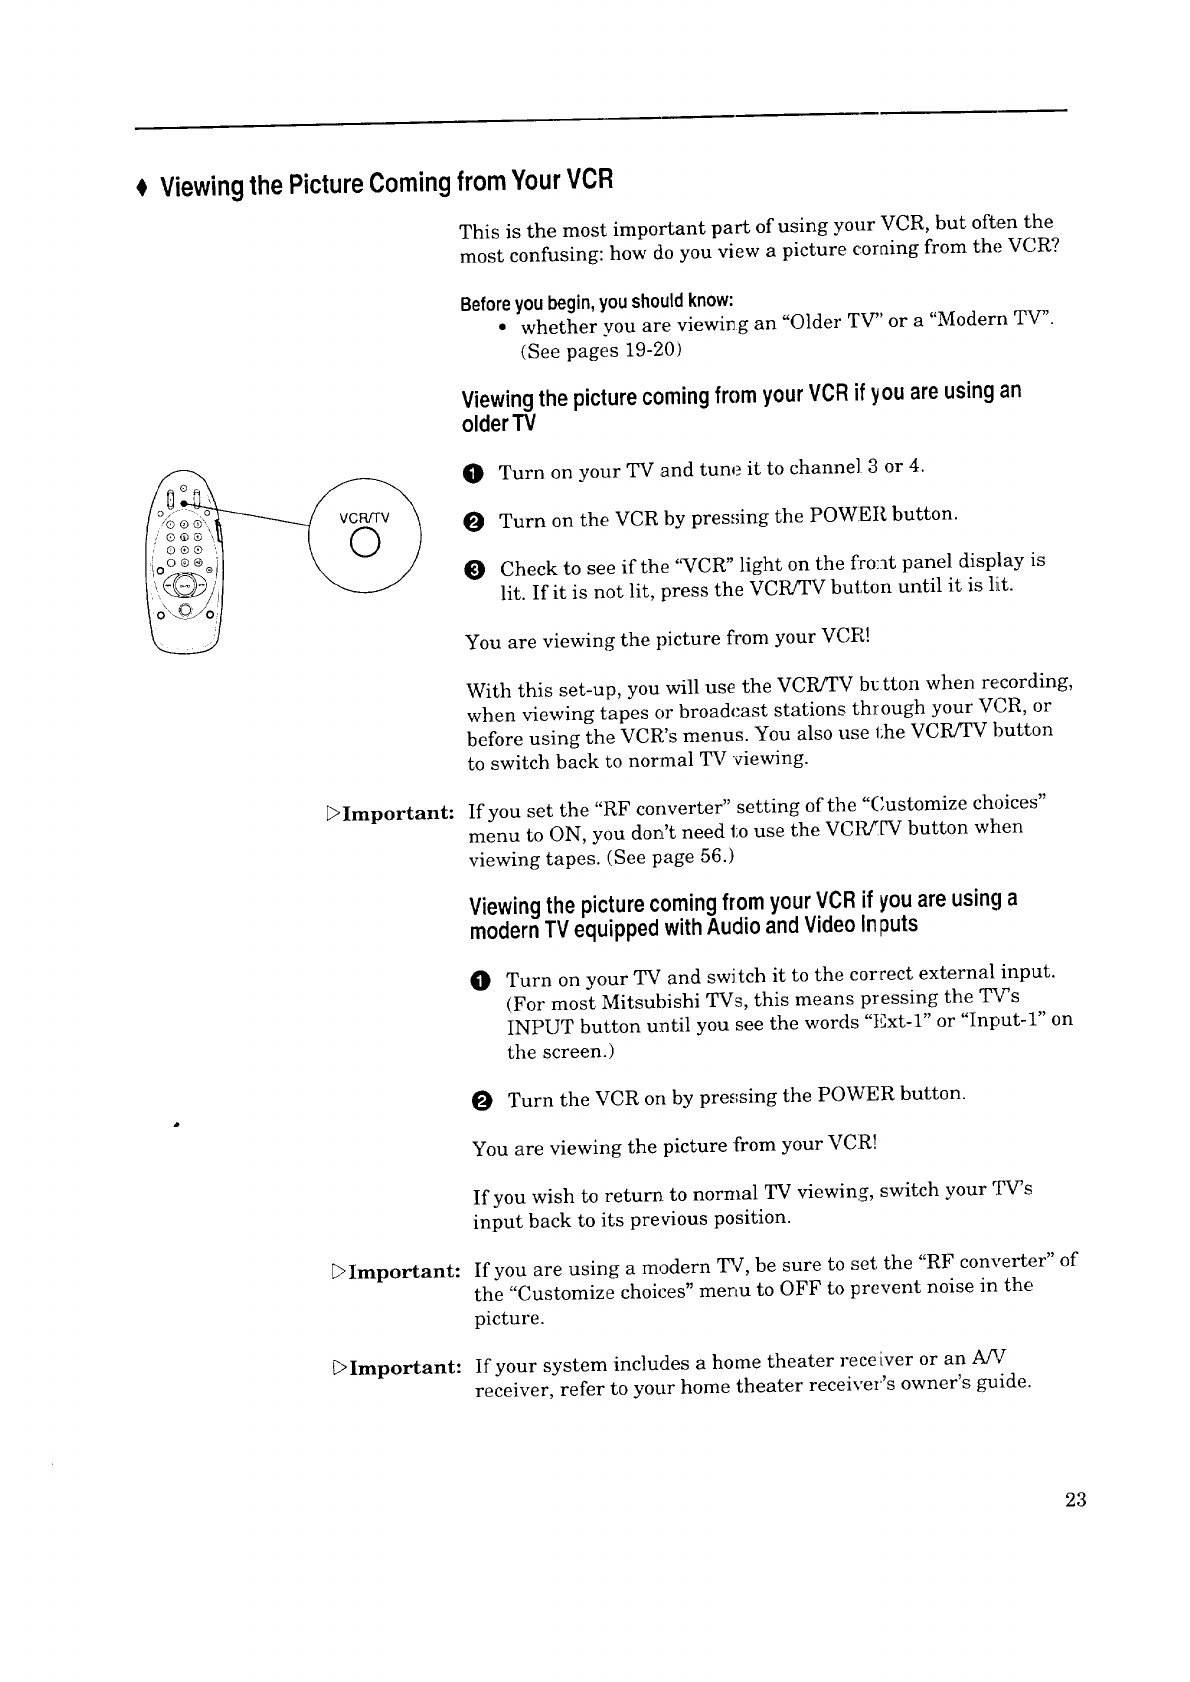
Viewingthe picturecomingfrom yourVCR if youare usingan
olderTV
O Turn on your TV and tune it to channel 3 or 4.
Turn on the VCR by pres,;ing the POWER button.
l_ Check to see if the '_VCR" light on the front panel display is
lit. If it is not lit, press the VCR!TV button until it is lilt.
You are viewing the picture from your VCP!
With this set-up, you will use the VCR/TV bl: tton when recording,
when viewing tapes or broadcast stations through your VCR, or
before using the VCR's menus. You also use the VCPJTV tmtton
to switch back to normal TV viewing.
DImportant: If you set the "RF converter" setting of the "C,ustomize choices"
menu to ON, you don't need to use the VCIL_gV button when
viewing tapes. (See page 56.)
Viewingthe picturecomingfrom yourVCR if you are usinga
modernTV equippedwithAudio andVideoInputs
0Turn on your TV and switch it to the correct external input.
(For most Mitsubishi TVs, this means pressing the T¥'s
INPUT button until you see the words "Ext-l" or "Input-l" on
the screen.)
Turn the VCR on by pressing the POWER button.
You are viewing the picture from your VCR!
If you wish to return to normal TV viewing, switch your _.[W's
input back to its previous position.
[;>Important: If you are using a modern TV, be sure to set the "RF converter" of
the "Customize choices" menu to OFF to Frevent noise in the
picture.
_Important: If your system includes a home theater receiver or an A/V
receiver, refer to your home theater receiver's owner's guide.
23
Chapter3: OperatingYourVCR
Loadingand UndloadingTapes
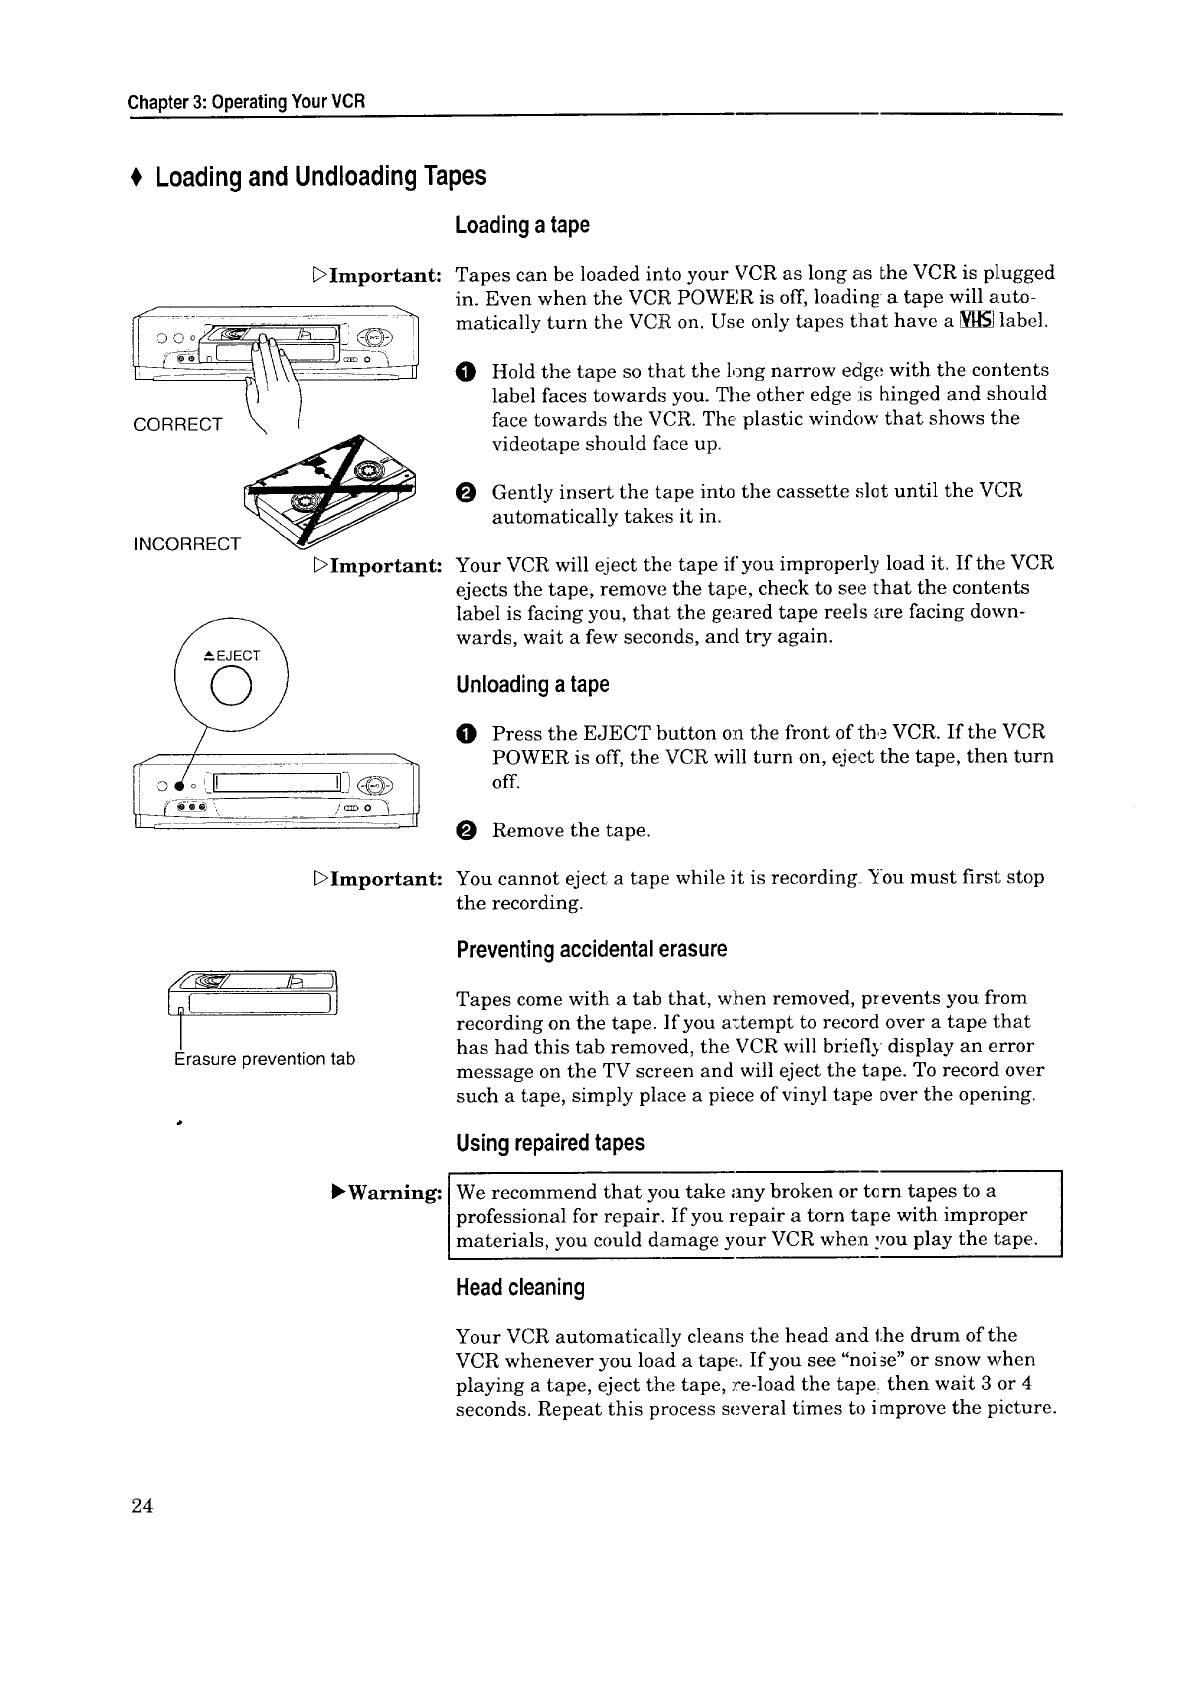
Loadinga tape
_>Important:
o
CORRECT
INCORRECT_ 0
Tapes can be loaded into your VCR as long as Lhe VCR is plugged
in. Even when the VCR POWF, R is off, loadin_ a tape will auto-
matically turn the VCR on. Use only tapes tlhat have a _ label.
Hold the tape so that the long narrow edge with the contents
label faces toward,_ you. The other edge :is hinged and slhould
face towards the VCR. The plastic window that shows the
videotape should face up.
Gently insert the tape into the cassette slot until the VCR
automatically takes it in.
_>Important: Your VCR will eject thE: tape if' you improperly load it. If the VCR
ejects the tape, remow_ the tape, check to see that the contents
label is facing you, that, the geared tape reels are facing down-
wards, wait a few seconds, and try again.
Unloadinga tape
0Press the EJECT button on the front of th,_ VCR. If the VCR
!l__)_"_ off.POWERis off, the VCR will turn on, eject the tape, then turn
Remove the tape.
DImportant: You cannot eject a tape while it is recording. You must first stop
the recording.
)J
Erasure prevention tab
Preventing accidentalerasure
Tapes come with a tab that, wlhen removed, prevents you from
recording on the tape. If you a:;tempt to record over a tape that
has had this tab removed, the VCR will briefly display an error
message on the TV screen and will eject the tape. To record over
such a tape, simply place a piece of vinyl tape over the opening.
Using repairedtapes
_Warning: IWe recommend that you take any broken or tern tapes to a
Iprofessional for repair. If you repair a torn tape with improper
Imaterials, you could damage your VCR when you play the tape.
Headcleaning
Your VCR automatically cleans the head and the drum of t:he
VCR whenever you load a tape. If you see "noise" or snow when
playing a tape, eject the tape, re-load the tape then wait 3 or 4
seconds. Repeat this process several times to improve the picture.
24
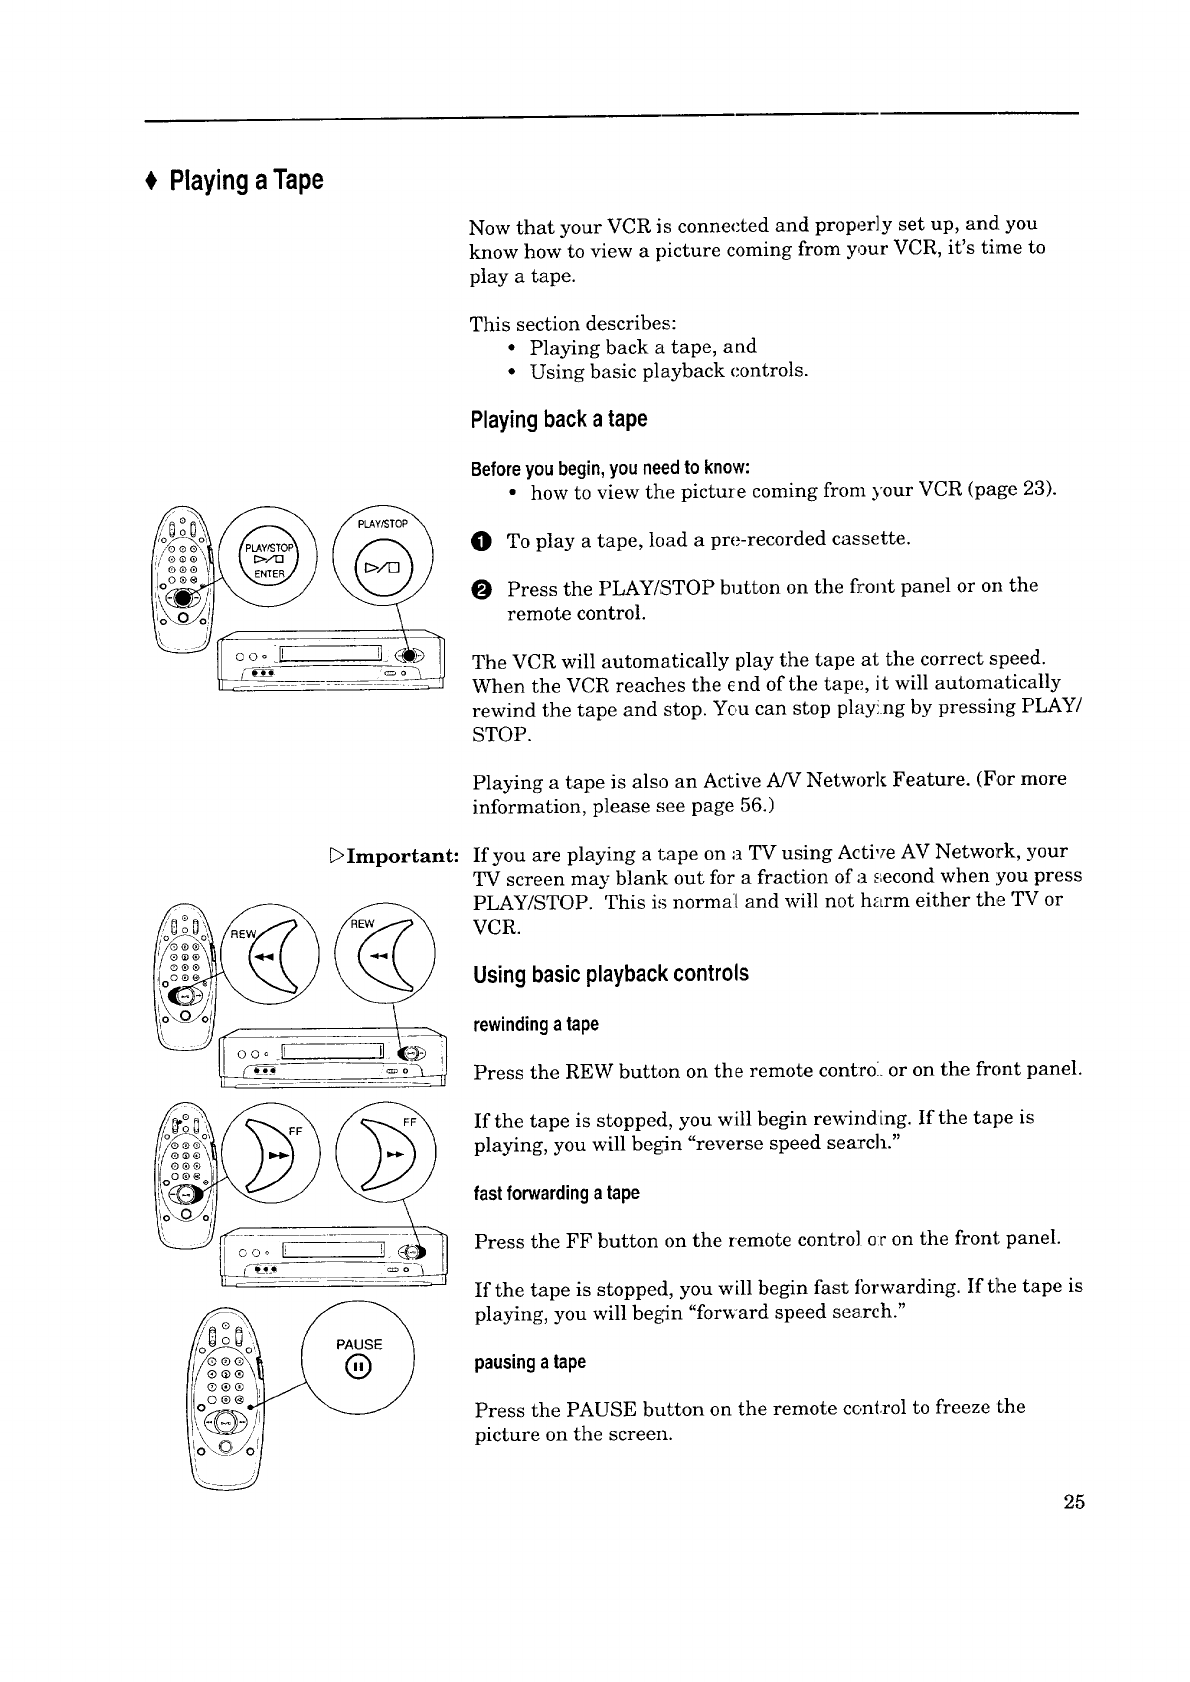
PlayingaTape
Now that your VCR is connected and properly set up, and you
know how to view a picture coming from your VCR, it's time to
play a tape.
This section describes:
• Playing back a tape, and
• Using basic playback controls.
Playingback a tape
Before you begin, you need to know:
• how to view the picture coming from your VCR (page 23).
(/f_/ O To play a tape, load a pre-recorded cassette.
O Press the PLAY/STOP button on the front panel or on the
remote control.
_ __ _o_____[_- __ The VCR will automatically play the tape at the correct speed.
When the VCR reaches the end of the tape, it will automatically
rewind the tape and stop. Yc,u can stop play!rig by pressing PLAY/
STOP.
Playing a tape is also an Active A/V Network Feature. (For more
information, please see page 56.)
_Important: If you are playing a tape on a TV using Active AV Network, your
TV screen may blank out for a fraction of a _;econd when you press
PLAY/STOP. This i,_ normal and will not harm either the TV or
VCR.
Using basicplaybackcontrols
rewindingatape
Press the REW button on the remote controi_ or on the front panel.
If the tape is stopped, you will begin rewind rag. If the tape is
playing, you will begin "reverse speed search."
fastforwardinga tape
Press the FF button on the remote control o_ron the front panel.
If the tape is stopped, you will begin fast ibrwarding. If the tape is
playing, you will be_,dn "for_ard speed search."
pausingatape
Press the PAUSE button on the remote control to freeze the
picture on the screen.
25
Chapter3: OperatingYourVCR PlayingaTape(cont.)
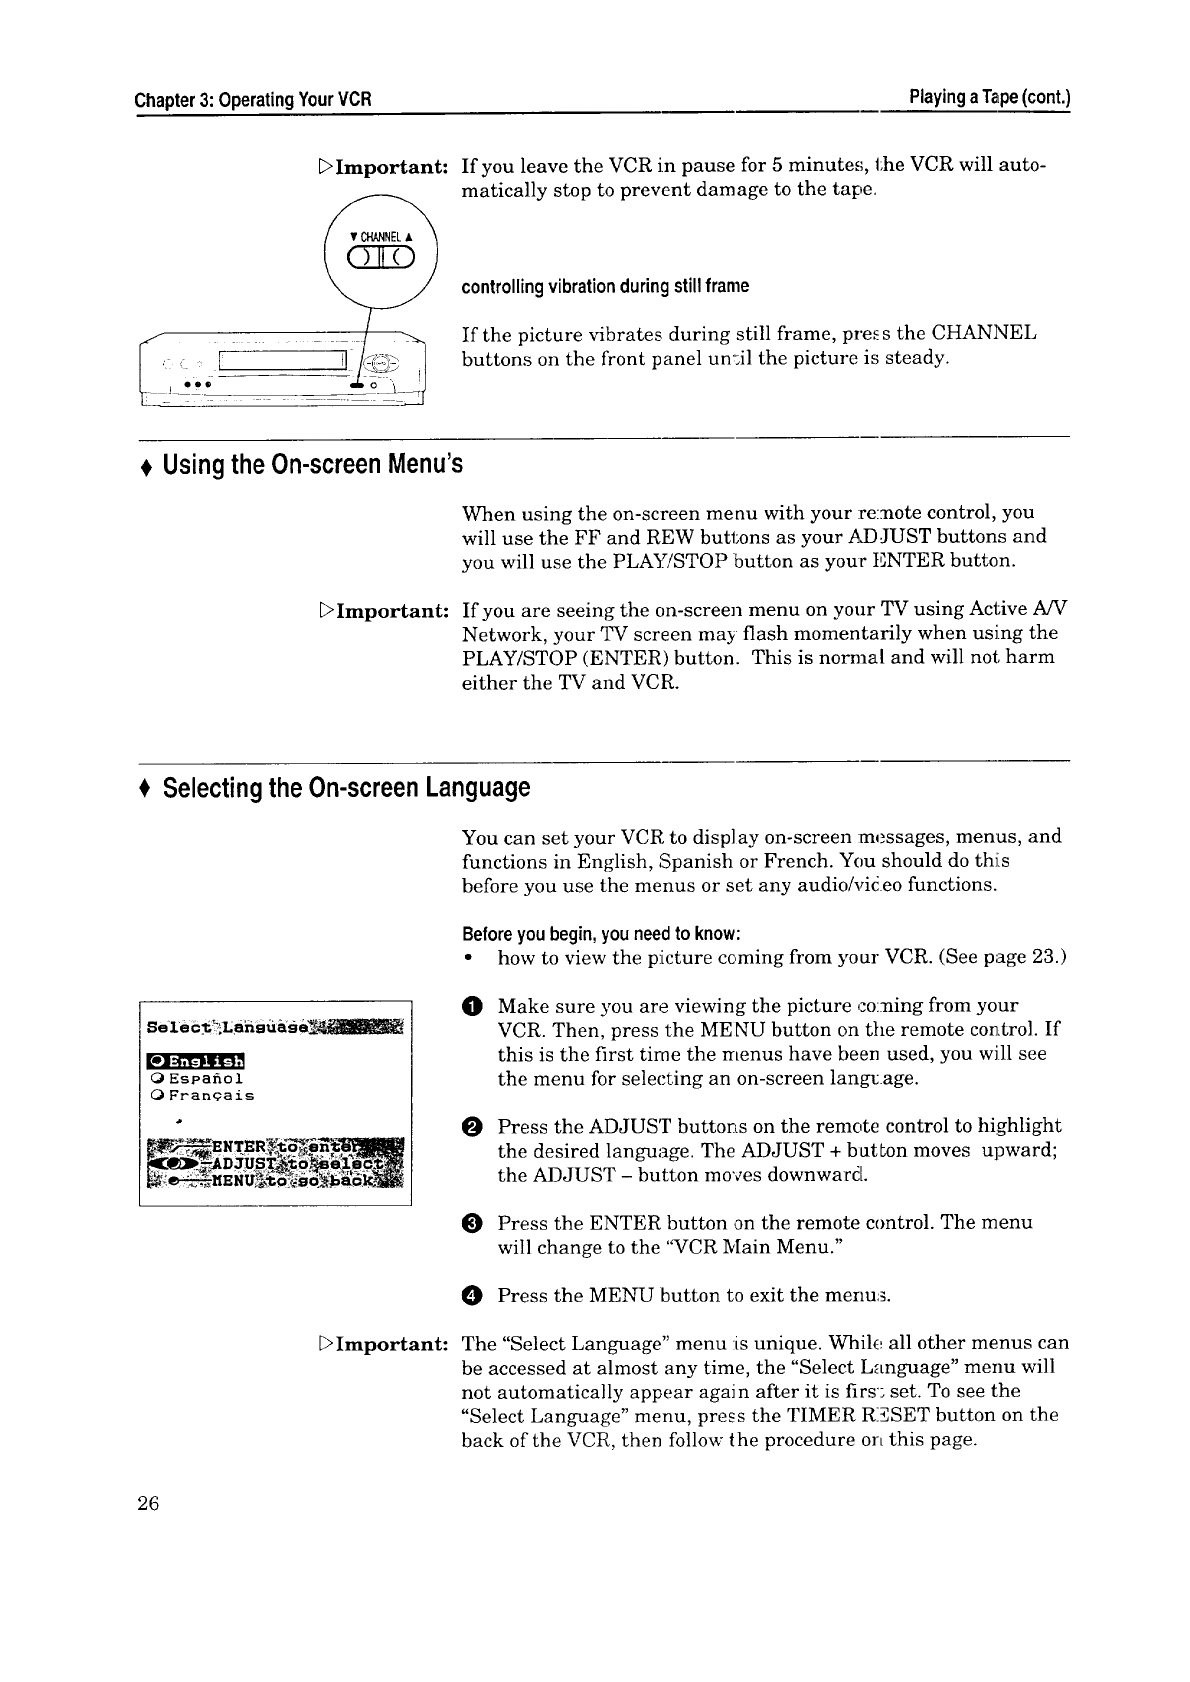
_>Important: If you leave the VCR in pause for 5 minute,,;, the VCR will auto-
matically stop to prevent damage to the tape.
controllingvibrationduringstillframe
If the picture vibrates during still frame, pre_ s the CHANNEL
buttons on the front panel un;il the picture is steady.
Usingthe On-screenMenu's
When using the on-screen menu with your remote control, you
will use the FF and REW buttons as your ADJUST buttons and
you will use the PLAY/STOP button as youc ENTER button.
L>Important: If you are seeing the on-screen menu on your TV using Active A/V
Network, your TV screen may flash momentarily when using the
PLAY/STOP (ENTER) button. This is normal and will not, harm
either the TV and VCR.
Selectingthe On-screen Language
You can set your VCR to disp]ay on-screen messages, menus, and
functions in English, Spanish or French. You should do this
before you use the menus or set any audio/video functions.
Before you begin, you need to know:
• how to view the picture cc,ming from your VCR. (See page 23.)
OEspafiol
OFran_ais
O
O
Make sure you are viewing the picture coming from your
VCR. Then, press the MENU button on the remote control. If
this is the first tirae the menus have been used, you will see
the menu for selecting an on-screen lang,:age.
Press the ADJUST buttons on the remote control to highlight
the desired language. The ADJUST + butLon moves upward;
the ADJUST - button moves downward.
Press the ENTER button an the remote control. The menu
will change to the '_CR Main Menu."
O Press the MENU button to exit the menus.
_>Important: The "Select Language" menu :is unique. While all other menus can
be accessed at almost any time, the "Select Language" menu will
not automatically appear again after it is firs'; set. To see the
"Select Language" metro, press the TIMER RESET button on the
back of the VCR, then follow the procedure on this page.
26
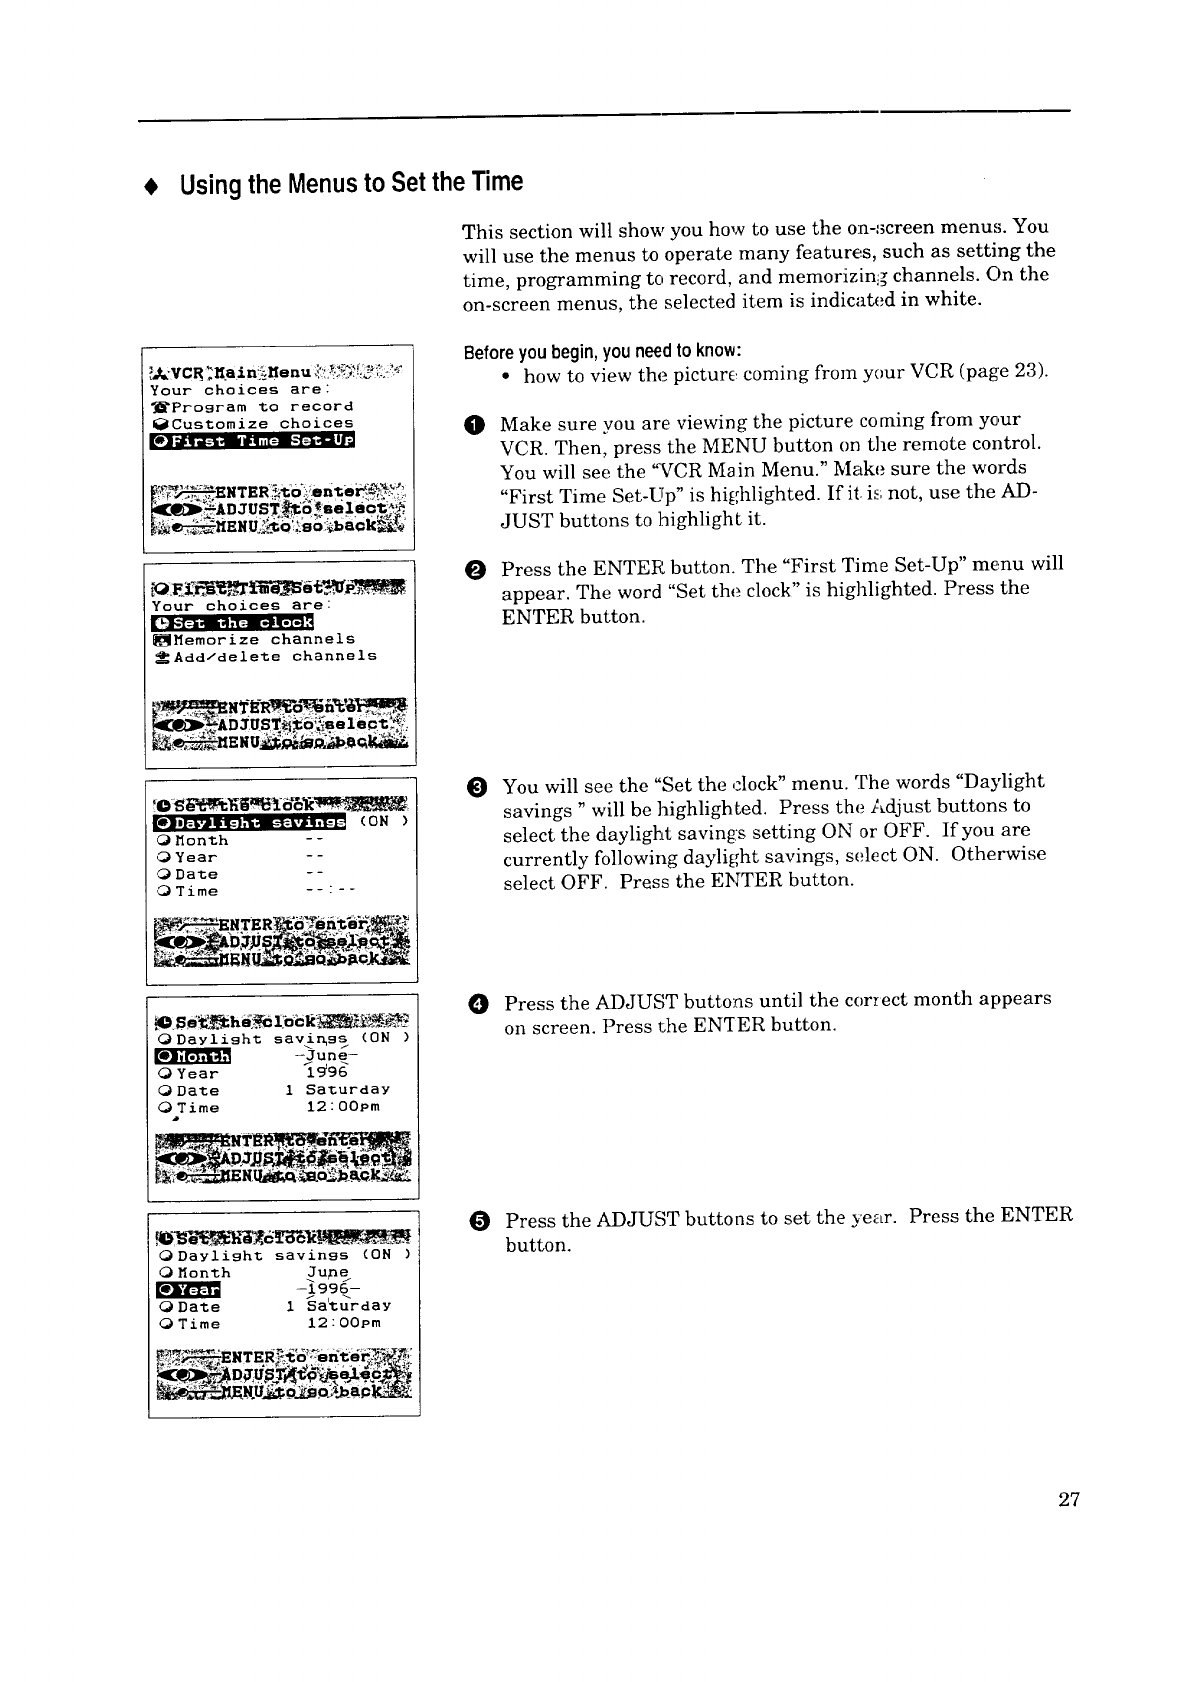
•Usingthe Menusto Setthe Time
This section will show you how to use the on-screen menus. You
will use the menus to operate many features, such as setting the
time, programming to record, and memorizing channels. On the
on-screen menus, the selected item is indicated in white.
Your choices are:
1_Prosram to record
_Customize choices
Before you begin, you need to know:
• how to view the picture coming from your VCR (page 23).
OMake sure you are viewing the picture coming from your
VCR. Then, press the MENU button on the remote control.
You will see the _VCR Main Menu." Make sure the words
"First Time Set-Up" is highlighted. If it. is not, use the AD-
JUST buttons to highlight it.
Your choices are:
.-t-ee
_Hemorize channels
Add/delete channels
OPress the ENTER button. The "First Time Set-Up" menu will
appear. The word "Set the clock" is highlighted. Press the
ENTER button.
[e]m_w=_l_m-_t,_,_ (ON )
Monzh --
Year --
0 Da_e --
0 Time
OYou will see the "Set the ,:lock" menu. The words "Daylight
savings " will be highlighted. Press the Adjust buttons to
select the daylight savings setting ON or' OFF. If you are
currently following dayli_;ht savings, select ON. Otherwise
select OFF. Press the ENTER button.
ODaylisht savir_ss (ON)
-June-
0Year 1_96
Da_e 1 Saturday
Time 12:00pm
O Press the ADJUST buttons until the correct month appears
on screen. Press _:he EN_[ER button.
ODaylish_ savinss (ON)
0Hon_h Jupe
E--1996-
ODa_e 1Sa'_urday
0 Time 12:00pm
Press the ADJUST buttons to set the year. Press the ENTER
button.
27
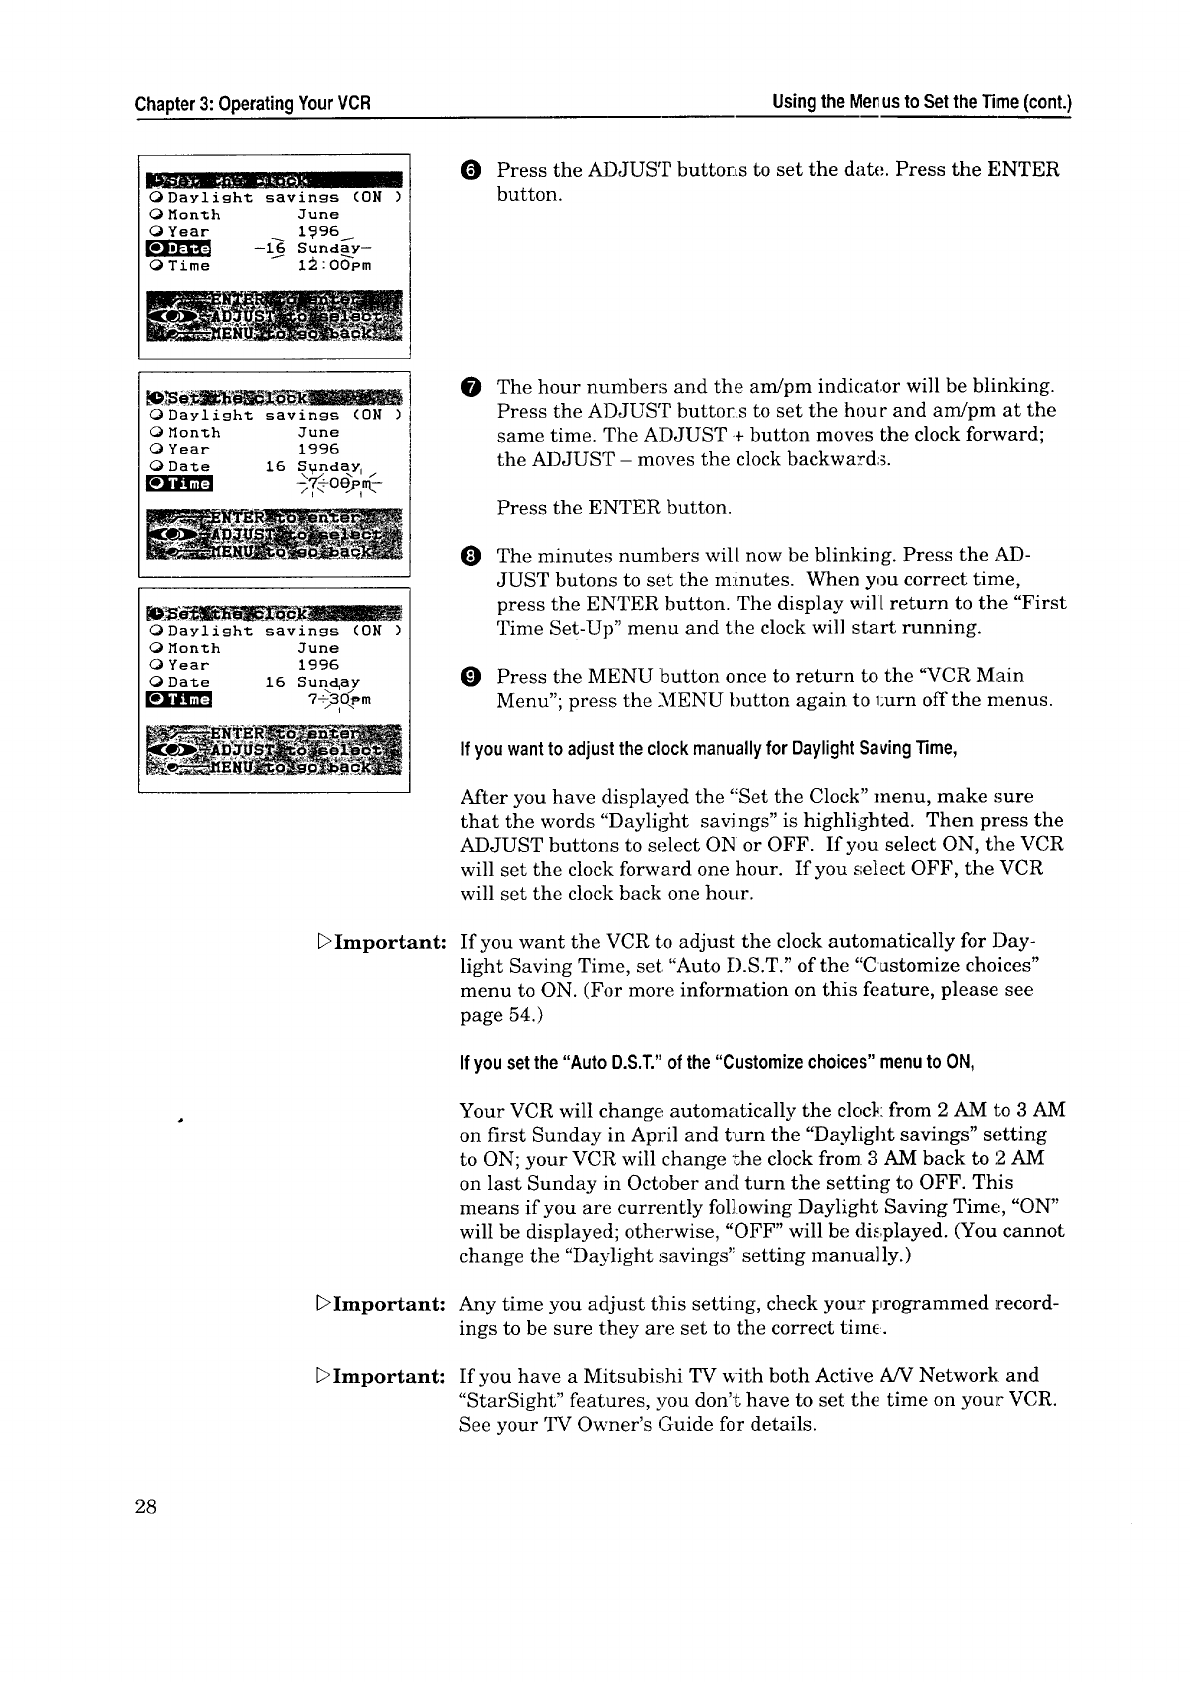
Chapter3: OperatingYourVCR UsingtheMerusto SettheTime(cont.)
ODaylighz savings (ON)
0 Month June
0Year _ I_96 1
--16 Sunday--
OTime I l_:OOem
OPress the ADJUST buttons to set the date. Press the ENTER
button.
ODaylisht savinss (ON)
(_Honth June
<_)Year 1996
_)Date 16 S_nday,
-)_+oepm.-
ODaylisht savinss (ON)
0 Month June
0Year 1996
0Date 16 Sunday
7+3,o_
E>Important:
DImportant:
_>Important:
@The hour numbers and the am/pm indicator will be blinking.
Press the ADJUST buttors to set the hour and am/pm at the
same time. The ADJUST + button mow._s the clock forward;
the ADJUST - moves the clock backwards.
Press the ENTER button.
OThe minutes numbers will now be blinkirlg. Press the _A)-
JUST butons to set the minutes. When you correct time,
press the ENTER button. The display will return to the "First
Time Set-Up" menu and the clock will start running.
0Press the MENU button once to return to the "VCR Main
Menu"; press the MENU lmtton again to 1;urn offthe menus.
If you wantto adjusttheclockmanuallyfor DaylightSavingTime,
After you have displayed the "Set the Clock" menu, make sure
that the words "Daylight savings" is highlighted. Then press the
ADJUST buttons to select ON or OFF. If you select ON, the VCR
will set the clock forward one hour. If you select OFF, the VCR
will set the clock back one hour.
If you want the VCR to adjust the clock automatically for Day-
light Saving Time, set. "Auto D.S.T." of the "Customize choices"
menu to ON. (For more information on this feature, please see
page 54.)
Ifyousetthe "Auto D.S.T."of the"Customizechoices"menuto ON,
Your VCR will change automatically the clock from 2 AM to 3 AM
on first Sunday in April and turn the "Daylight savings" setting
to ON; your VCR will change ;he clock from 3 AM back to 2 AM
on last Sunday in October and turn the setting to OFF. This
means if you are currently following Daylight; Saving Time, "ON"
will be displayed; otherwise, "OFF" will be dL,.played. (You cannot
change the "Daylight savings" setting manually.)
Any time you adjust this setting, check your programmed record-
ings to be sure they are set to the correct timc,.
If you have a Mitsubishi TV with both Active A/V Network and
"StarSight" features, you don't have to set th_ time on your VCR.
See your TV Owner's Guide for details.
28
,ProgrammingtheVCRtoReceiveTVChannels
Before your VCR can receive television channels, you need to
program all of the channels you can receive into your VCR.
Fortunately, our menu system makes this an easy process. This
section will also explain some other channel-related functions.
This section explains:
• Programming channels automatically,
• Using video mute,
•Adding and deleting channels, and
• Selecting a channel.
Programming channelsautomatically
Using this process, your VCR will automatically memorize in all
of the television stations you can receive. You can later get rid of
unwanted or unused stations.
Aspecialnote to
cableboxsubscribers If your local cable box company scrambles some or all stations,
and/or requires you to use a came box, then your abiBty to pro-
gram channels will be limited. The cable box receives all of your
channels and then sends only one to your '.I__(and your VCR),
usually on channel 3 or 4.
If your cable box or came system seems incompatiMe with your
new VCR, call .your came company. They may be able to provide
solutions to your problems.
Your choices are:
_Program Vo record
_Cus_omize choices
Your choices are:
OSet the clock
| _iI[_] i I[o) lID lk+,lP,,lle-] l_[_* |iIiI[ r.]l I
Add/delete channels
Beforeyou begin,youshould:
•have completed all connections between your VCR, TV, and
cable or antenna; (see pages 11-17)
• know how to view the picture coming from your VCR; (page 23)
• know how to use the menus. (See page 26.)
To program channels automatically:
O Set the VCR's input to tuner. To do this, press the INPUT
button on the remote control until a channel number appears
on the screen or on the front panel fluorescent display.
Press the MENU button on the remote control. You will see
the %rCR Main Menu" on the _YVscreen.
Use the ADJUST buttons on the remote to select "First Time
Set-Up." Press the ENTER button.
The "First Time Set-Up" menu appears on your screen. Press
the ADJUST buttons to select "Memorize channels." ]?ress the
ENTER button.
_Important: If you are recording, playing back a tape or receiving a video
signal from an external input, the words "Not available" will flash
and an error message will appear. To correct; this, stop the tape or
switch the VCR's input to tuner.
29
Chapter3:OperatingYourVCR ProgrammingtheVCRto ReceiveTV Channels(cont.)
Nhat type of sources are
connected to the VCR?
Indoor/outdoor ant.
mMomorlzb>_chan'nbls_::_J_q_
Now memorizins all the
stations you can receive
Channel 3
Stand by %his may take
a few minutes
_Important:
Your choices are:
_Prosram to record
I_lJ I_l ,T-] iIl_ 1-4[ :!!-! _,) q -.1=_
OFirst Time Set-UP
[] _pj]_r[:x,] l;Eri;T'_ (ON)
OAuto D.S.T. (OFF)
O Auto power save (OFF)
ORF converter (ON )
0PerfeoTape (AUTO)
OA/V Network (OFF)
_=_ENTER_o;_c_an _ _
0You will see the menu for automatically memorizing chan-
nels. Using the list below as a reference, press the ADJUST
buttons to select the kind of antenna you connected.
• If you are using any other cable combination, including a
cable box with an A/B switch, choose "Cable."
• If you are using an antenna that receives only over-the-air
broadcasts, such as "rabbit ears" or a roof-mounted an-
tenna, choose "Indoor/outdoor ant."
After you have selected, press the ENTER button.
OYou will see an on-screen message and the display on the
front of your VCR will show you that the VCR is memorizing
the stations you can receive. You can cancel the memorization
at any time by pressing CANCEL on the remote control.
After the VCR has programmed all the channels, the screen will
return the VCR's picture.
Automatic programming may include vacant, channels if there are
stray signals or noise on those channels. If this; occurs, you can
manually delete the channels using the procedure in the section
"Adding and deleting c:hannels."
Usingvideo mute
When you turn video mute ON, any blank section of tape, o:cany
station with a weak signal, will be replaced by a blue screen. The
sound will also be turned off. If there is a time when you would
like to try to tune in a weak station, _urn video mute OFF.
Before you begin, you should knowhow:
• to view the picture coming from your VCR; (see page 23)
• to use the menus. (See page 26.)
0Press the MENU button on the remote control. The "VCR
Main Menu" appears on your TV.
Use the ADJUST buttons on the remote to select "CustomiTe
choices." Press the ENTER button.
O The "Customize choices" menu appears 0n your screen. Us_
the ADJUST buttons to select "Video mute."
O Press the ENTER button to set video mute to ON or OFF.
O Press the MENU button once to return to the "VCR Main
Menu;" press the MENU button a second time to turn offthe
menus.
3O
Your choices are:
O Se_ _he clock
_Memorize channels
_Important:
Channel 39
No_ in memory
_Important:
Adding anddeleting channels
If necessary, you can manually add or delete channels after you
have completed the automatic channel programming.
Before youbegin,youshouldknowhow:
•to view the picture coming from your VCK; (see page 23)
• to use the menus. (See page 26.)
O Make sure that video mute is ON. (See page 30.)
O Set the VCR's input to tuner. I'odo this, press the INPUT
button on the remote control until a channel number appears
on the screen or on the front panel fluorescent display.
O Press the MENU button on the remote control. The '_€'CR
Main Menu" appears on your 3_.
O Press the ADJUST buttons on the remote control to select
"First Time Set-Up." Press the ENTER button.
You will see the "First Time Set-Up" menu. Press the AD-
JUST buttons to select "Add/delete channels." Press the
ENTER button.
If you are recording, playing back a tape, or receiving a video
signal from an external input, then the words "Not available" will
flash and you will see an error message. To correct this, stop the
tape or switch the VCR's input to tuner.
OYou will see the screen for adding or deleting channe]ts. Use
the ADJUST buttons to select the channel r_hat you want to
add or delete. Press the ENTER button to add the channel or
press the CANCEL button to delete it.
@When you are finished adding or deleting channels, press the
MENU button once to return to the "First Time Set-Up"
menu; press the MENU button a second tirae to return to the
'_VCR Main Menu"; press the MENU button a third tiime to
turn off the menu.
If you use automatic programming again, you will lose all of the
manual changes you made. All of the channels you deleted will be
added; all of the channels you added will be deleted.
Selectinga channel
Now that you have programmed your channels, and added or
deleted some, you will want to be able to select channels. (If you
have not yet programmed your channels, see page 29, "Program-
ming channels automatically.")
There are two ways to select channels: sequentially or directly.
31
Chapter3:OperatingYourVCR ProgrammingtheVCRto ReceiveTV Channels(cont.)
_Important:
selectingchannelssequentially
Press the CHANNEL buttons on the remote control or on the
VCR front panel. This will cycle through the channels in sequen-
tial numerical order.
selectingchannelsdirectly
Use the number buttons on the remote control. For example,, to
choose channel 23, press the "2" button, then the "3" button
To select a single digit channel, such as channel 5, press the "0"
button, then the number button, "5." You can also press the
number button "5," then press the ENTER button.
If you selected Indoor/Outdoor antenna the VCR can receive
UHF/VHF channels 2-69. If you selected cable antenna the VCR
can receive cable channels 1-125. If you try to select a charmel
number that the VCR cannot receive, the VC,R will not change
channels.
6
UsingtheAudioandVideoFunctions
You can select many of the VCR's audio and video functions and
adjust their settings with function menu. You carl also choose
some advanced features. The VCR will display the functions and
settings on the television's screen.
This section will teach you about:
•Descriptions of audio and video functions, ;and
• Selecting and adjusting the audio and video functions.
The audio and video functions you can se]ecr_ are:
-- audio monitor,
-- normal record,
-- record speed,
-- tape,
-- index search,
--counter zero stop,
--repeat playback, and
-- PerfecTape.
Descriptionsof audioandvideofunctions
Below are descriptions of the audio and video functions, their uses
and their settings. To select these functions and adjust their
settings, refer to the section "Selecting and adjusting the audio
and video functions." (See page 34.)
audiomonitor(Listento:)
The monitor function allows you to listen to tile various audio
32
_Important:
tracks that your VCR is capable of recording. You can choose to
listen to a MONO track, both channels of the STEREO track, or
either of the channels (left (L) and right (R)) of the stereo track.
• Choose "L" to listen to the left channel of a stereo track
• Choose "R" to listen to the right channel of the stereo track.
• Choose "Stereo" to listen to both stereo channels.
• The MONO track is lower in quality than the others, and
the monitor is automatically set to "Mono" if you are
watching a tape that was not recorded in VHS Hi-Fi. Set
the audio monitor to "Mono" to hear an S.A.P. signal
recorded on the mono track of a Hi-Fi tape (see below).
If you have your VCR connected to a surround sound system, set
the audio monitor to "Stereo." Surround sound requires both left
and right channels to create the rear channel effects.
If you are receiving a stereo signal, the word "Stereo" will display
on TV screen for 4 seconds. If you are receiving a S.A.P. broad-
cast, the word "SAP" will display on TV screen tbr 4 seconds.
normalrecording(Record:)
When your VCR is recording, it actually record,,; the audio portion
of a program twice: once on the stereo Hi-Fi tracks, and once on
the mono track. Additionally, your VCR is able to receive Sepa-
rate Audio Program broadcasts, also known as an S.A.P. broad-
cast. An S.A.P. broadcast is an alternative audio soundtrack for a
program; it is often a soundtrack in another language.
You can use the normal recording function to record the S.A.P.
broadcast on the mono track by choosing "Stereo + SAP." Other-
wise, choose "Stereo." In either case, the maiin program is re-
corded on the stereo Hi-Fi track. Also, if there is no S.A.P. broad-
cast, the VCR will record the main program on the mono track.
Be careful if you choose S.A.P. If you play your tapes on a non-
Hi-Fi VCR, you only hear the mono track. You may have to watch
your favorite show in a language you don't _mderstand!
recording speed (RECspeed)
The recording speed has an effect on picture quality. SP produces
the best picture quality and records up to two hours of video on a
T-120 tape. Mitsubishi's EP speed has only slightly poorer qual-
ity, and records up to six hours on a T-120.
tape_Tape)
Adjust this function to ensure the accuracy of the Tape Remain-
ing display. If you are using a tape that is two hours long or less
(labeled T-30 through T-120), set this functi.on to "T-120." If you
are using a tape labeled T-160, select "T-160." If you are using a
tape labeled T-180, select "T-180." If you are using a tape labeled
T-210, select "T-210." You cannot use this function with a tape
that is less than 30 minutes long.
33
Chapter3: OperatingYourVCR Usingthe AudioandVideoFunctions(cont.)
index search (Index search)
Index search is a very useful way to find specific points on a tape.
(For more information on this feature, please see page 53.)
counterzerostop(Counterzerostop)
This function is used to automatically fast fbrward or rewind to
"0H00M00S" and stop the tape. (For more information on this
feature, please see page 52.)
repeatplayback(Repeatplay)
Use this function to repeatedly play a section of tape between l_wo
index marks. (For more information on this feature, please see
page 54.)
PerfecTape
PerfecTape function allows you to test the quality of your video
tapes. After each test_ the VCR will adjust its internal circuitry in
order to make the best possible recording on )'our tape. (For more
information on this feature, please see page 49.)
Selectingandadjustingthe audioandvideofunctions
Below are instructions on how to select and adjust the audio and
video functions.
Before you begin, you need to know:
• how to view the picture coming from your VCR (page 23).
O Press the AUDIO/VIDEO button on the remote control to see
the function menu.
OPress the AUDIO/VIDEO button until the function you want
to a_ust al)pears.
VCR
REC speed SP
_--AD3UST to selec_
[:>Important:
O Press the ADJUST buttons on the remote to adjust the
setting. The functions will disappear if you do not press any
buttons for 5 seconds.
The function menu does not appear when the other VCR menus
are displayed; or during special effects playback. The recording
speed (REC speed) and tape functions do not appear during
playback. The PerfecTape function is displayed only when a tape
with its erasure tab intact is loaded and the VCR is stopped.
34
Recording
Your new VCR offers a wide variety of recording options that take
full advantage of our advanced electronics. This section tells :you
about the following recording procedures:
• Recording a current broadcast,
• Programming your VCR to record,
• Cancelling a recording in progress,
• Using One-Touch Recording (OTR),
• Using One Key Programming,
• Using Quick Program, and
• Notes about programmed recording.
Recordinga current broadcast
Beforeyoubegin,youneedto knowhow:
• to view the picture coming from your VCR. (See page 23.)
To record a TV program that is currently playing:
OLoad a tape with its erasure tab intact into the VCR. If you
have not yet recorded on this tape, the VCR will test the tape
with the PerfecTape feature. For more information on this
feature, please see page 49.
O If you have not already done so, set the speed at whic, h you
would like to record. (See "Selecting and adjusting the audio
and video functions" on page 34.)
Set the VCR's input to tuner. To do this, press the IN'PUT
button on the remote until the channel number shows on-
screen or on the front panel display.
O
O
Select the channel you would like to record by using the
CHANNEL button on the remote control or on the front
panel. (If you are using a cable box, select channel 3 or 4 on
the VCR, and change the channel on the cable box, not on the
VCR. Additionally, if you are using an ,_JB switch, remember
to see the switch to the correct, position.)
Press the record button (REC) on the re:mote control or t:he
record button (I_EC/OTR) on the front panel of the VCR.
Recording will start When you reach the e_.d of the tape, the
VCR will automatically rewind. You can stop recording at any
time by pressing the PLAY/STOP or PAUSE button. To resume
recording from STOP, press the REC or REC/OTR button. To
resume recording from PAUSE, press the PAUSE button. (You
cannot use the REC/OTR button to resume recording from
PAUSE.)
_Important: If you pause the VCR for five minutes, recording will stop auto-
matically to protect the tape. If you record in extended play (EP),
you will only be able to play the tape on a VCR equipped for EP
play, such as this one. 35
Chapter3:OperatingYourVCR Recording(cont.)
'.: ,-
Your choices are:
"_1} _I][l_: I f II1| _[ell I[:J[lle) I
Customize choices
First Time Set-Up
_)Day --
OStart time
0 S1;op time
O RecoFd speed AUTO
Channel _ , /2
-Mgnd?y, ZV--
OStart time
Stop time --:--
ORecord speed AUTO
_Important:
If you attempt to record on a tape that has had its erasure pre-
vention tab removed, the VCR will eject the tape and briefly
display an error message on your TV screen.
Programmingyour VCR to record
You can program your VCR to record with the help of Mitsubishi's
on-screen operating system. You can schedule up to eight record-
ing "events" within a one month period.
Beforeyoubegin,youmust:
• know how to view the picture coming from your VCR; (see
page 23) and
• have set the clock. (See page 27.)
To program your VCR to record:
OLoad a tape with its erasure tab intact into the VCR. If you
have not yet recorded on this tape, the VCR will test the tape
with the PerfecTape feature. For' more infi)rmation on this
feature, please see page 49.
OPress the MENU button on the remote control. The "VCR
Main Menu" appears on your screen. Use Lhe ADJUST
buttons on the remote control to select "Prog_'am to record."
Press the ENTER button.
If there is at least one programmed recording already entered,
you will see the "recap" screen. You can choose an empty
recording slot, or wait four seconds and the VCR will auto-
matically choose the first empty slot.
OYou will see the "Program to record" menu. Press the AD-
JUST buttons to choose the channel you would like to record
(for example, channel 2). Press the ENTER button.
• If you are using a cable box, enter the channel number on
which the cable box sends a signal to your VCR (usually
channel 3 or 4).
• If you wish to record from an external source, press the
INPUT button or press the ADJUST buttons until "Exter-
nal LI" or "External L2" appears. Select "External LI" to
record from an external source connected to the rear panel;
select "External L2" to record from an external source
connected to the front panel.
The "Day" will flash. Press the ADJUST butgons to highli_;ht
the day on which you want to record (for example, Monday
the seventeenth). Press the ENTER button.
When selecting a day, your choices are: a sin_:le day up to one
month away, every day from Monday through Friday, or the same
day every week. To program for every day from Monday through
Friday (to tape a soap opera, for example), press the ADJUST
36

0 C'.hannei 2
ODay Monday 17 ,
0 Stop time
ORecord speed AUTO
0 Channel 2
0 Day Monday 17
0 StoP time
ORecord speed AUTO
buttons until "Monday-Friday" appears. To program the same day
every week (to tape your favorite weekly sitcom, for example),
press the ADJUST buttons until "Every" and. the desired ,:lay of
the week appear.
OThe hour numbers of the starting time, along with the anffpm
indicator, will flash. Press the ADJUST buttons to set the
hour when you wish recording to start. Press the ENTER
button.
O The minute numbers of the start time will flash. Press the
ADJUST buttons to set the minutes when you wish recording
to start. Press the ENTER button.
0 Channel 2
0 Day Monday 17
0 SZart time 15:30_m
.. "t
0 Record speed
0The hour numbers of the stop time, along with the arrffpm
indicator, will flash. Press the ADJUST buttons to set the
hour when you wish recording to stop. Press the ENTER
button.
0 Channel 2
0 Day Monday 17
OStart time ll:_Oam
AUtO
Record speed
[_
0 Channel 2
ODay Monday 17
OSzart time ll:30am
0 Stop time 1 :3,0pm
_) The minute numbers of the stop time will flash. Press the
ADJUST buttons to set the minutes when you wish recording
to stop. Press the ENTER button.
OPress the ADJUST buttons to set the recording speed (SP, EP,
or auto recording speed (AUTO)). (See "auto speed program-
ming" on page 43 for an explanation of' the auto speed record-
ing feature.) Press the ENTER button.
37
Chapter3:OperatingYourVCR Recording(cont.)
CH DAY ON OFF
2 MOI7 ll:30a £:30pSP
: : SP
...... : : SP
--: : SP
@
0
The contents of the programmed memory will appear on the
"recap" screen.
To program additional recording times, ,_elect an empty
program line by pressing the ADJUST buttons. Tben, pres,_
the ENTER button. You will return to tile "Program to record"
screen. Continue the programming procedure from step 0.
_>Important:
_>Important:
Only four of the eight program lines appear on-screen at any one
time. To see additional program lines, press the ADJUST buttons
to scroll the lines on the screen.
OWhen you are finished with all programming, turn the VCR
power OFF and make sure the programmed recording light is
lit. However, if you have a cable box, leave it turned ON and
tuned to the station you wish to record. Additionally, if you
are using an A/B switch, remember to set the switch to the,
correct position.
changingsettingswhileprogramming
If you wish to change one of your settings (such as start time)
while you are programming, press the ENTER and CANCEL
button on the remote r_oselect the setting you wish to change.
ENTER will move you forward through the list, while CANCEL
will move you backwards. Then, use the ADJUST buttons to
change the setting.
If you press the CANCEL button while the channel number is
flashing, you will cancel the entire program.
Cancellinga recording in progress
There are two ways to cancel a recording in progress.
1. Press the PLAY/STOP button. The recording is stopped, but
the program is not cancelled. Therfore, if'you press the REC
or REC/OTR button, the recording will start again.
2. Press the POWER button on the front panel. The recording is
stopped and th program is cancelled.
UsingOne-Touch Recording(OTR)
One-Touch Recording (also called OTR) is a way to begin reco:cd-
ing immediately, but have your VCR stop recording and turn off
automatically after your show is over.
Beforeyoubegin,youneedto knowhow:
• to view the picr_ure coming from your VCR. (See page 23.)
38
TouseOTR:
OLoad a tape with its erasure tab intact into the VCR. If you
have not yet recorded on this tape, the VCR will test the tape
with the PerfecTape feature. For more information on this
feature, please see page 49.
If you have not already done so, set the speed at which you
would like to record. (See "Selecting and adjusting the audio
and video functions" on page 34.)
Set the VCR's input to tuner. To do this, press the INPUT
button on the remote until the channel[ number shows on-
screen or on the front panel display.
O Use the CHANNEL buttons on the remote control or on the
front panel to select the channel you would like to record.
O
If you are using a cable box, select channel 3 or 4 on the VCR,
and change the channel on the cable box. Additionally, if you
are using an A/B switch, remember to set the switch to the
correct position.
Press the REC/OTR button on the front panel twice. The first
time you press the button, recording will begin. The second
time you press the button, 30 minutes is added to the OTR
timer, which is displayed on the front panel.
Press the REC/OTR button for each 30 minutes you want to
add to the OTR timer, up to 4 hours. If you press the button
10 times, you will see the word "End" on the front panel
display. The VCR will record until the end of the tape. If you
press the button an eleventh time, the VCI_: will resume
normal recording.
The OTR timer will begin to count down. When it reaches zero,
the VCR will stop recording and turn off. If you have previously
programmed your VCR to record, the VCR will be ready to record
what you've programmed. If the end of the tape is reached before
OTR is finished, the VCR will stop and the power will turn off.
DImportant: If you attempt to record on a tape that has had its erasure pre-
vention tab removed, the VCR will eject the tape. In addition, the
VCR will briefly display an error message on your TV screen.
if you programtoo much time into the OTRtimer,
continue pressing the REC/OTR button. You will "cycle" around
once you have reached the 4-hour point. You can start over,
adding time in 30 minute intervals.
how OTRaffectsothercontrols
If you press the PAUSE button during OTR, the VCR will pause
recording, but the OTR timer continues to count down.
39
Chapter3: OperatingYourVCR Recording(cont.)
0Day - -
OStart time
Stop time
ORecord speed AUTO
nnel _ , 12
-Mo nd?y 17--
OSzaFZ time
0 Stop time
ORecord speed AUTO
Channel 2
ODay Hond\_y 17 ,_
Stop time
ORecord speed AUTO
If you press PLAY/STOP during OTR, you era,_e the OTR pro-
gramming.
You cannot use the REC/OTR button on the front panel to resume
recording from the record-pause mode.
UsingOne Key Programming
One Key Programming is a programming method that is simple
to use and easy to learn, without using the remote control.
Before you begin,
•you need toknow how to view thepicturecoming from your
VCR; (seepage 23)and
•you must have setthe clock.(Seepage 27.}
To use One-Key Programming:
O Load a tape with its erasure tab intact into the VCR.
If you have not yet recorded on this tape, the VCR will test
the tape with the PerfecTape feature. For more information
on this feature, please see page 49.
OPress the ONE KEY PROGRAM button. (:If you have not set
the time, the "Set the clock" menu will appear. Set the clock,
and then proceed.) If there is already a program in the VCR's
memory, you will see the "recap" screen. You can use the ONE
KEY PROGRAM button to select an empty programming slot,
or you can wait 4 seconds for the VCR to automatically select
an empty slot.
OYou will see the "Program to record" screen. Press the ONE
KEY PROGRAM button until the channel you would like to
record (for example, channel 2) appears. Then, wait for 4
seconds. The word "Day" will be highlighted.
• If you are recording from a cable box, set the channel to 3
or 4, whichever the cable box sends signals on.
• If you wish to record from an external source, press the
ONE KEY PROGRAM button until "External LI" oz'
_External L2" appears.
OPress the ONE KEY PROGRAM button to choose the day you
would like to record (for example, Monday the seventeenth).
Then, wait ibr 4 seconds. The hour number of the starting
time will flash.
Press the ONE KEY PROGRAM button to choose the hour
when you wish recording to start. Then, wait for 4 seconds.
The minute numbers will begin to flash.
4O
0Channel 2
ODay Monday _7
1 l_3,0_m
Q Stop time
Record speed AUTO
@Press the ONE KEY PROGRAM button tx, choose the minute
when you wish recording to start. Then, wait for 4 seconds.
The word "Stop time" is highlighted.
(_ Channel 2
(_ Day Monday 17
0 Start time 1_: 30\a,m
\/. /
ORecord speed
@Press the ONE KEY PROGRAM button to choose the hour
when you wish recording to stop. Then, wait for 4 seconds.
The minute numbers will begin to flash•
Channel 2
Day Monday 17
OSZart time ll_Oam
Xt3_m
AUTO
ORecord speed
0Press the ONE KEY PROGRAM button to choose the minute
when you wish recording to stop. Then, wait for 4 seconds.
The record speed will flash.
(_ Channel 2
0 Day Monday 17
(_Start time ll:30am
0 Stop time i :3,0em
@
@
Press the ONE KEY PROGRAM button t_ set the recording
speed. After 4 seconds, the menus will turn off.
When you are finished with all programming, turn the VC,R
power OFF and make sure the programmed recording light is
lit. However, if you have a cable box, leave it turned ON and
tuned to the channel you wish to record. Additionally, if you
are using an A/B switch, remember to .,;et the switch to the
correct position.
The VCR is ready to record what you've progl'ammed.
changingsettingswhileprogramming
If you make a mistake when using One Key Program:
OPress the FF or REW buttons on the front panel to select l_he
setting you wish to change. Pressing the :FF button will move
you forward, while pressing the REW button will mow_ you
backward. If you wish to use the remote control, you can use
ENTER to move forward or CANCEL to move backward.
Once you have chosen a setting, you can change it by using
the PLAY/STOP button on the front panel or the ADJUST
buttons on the remote control.
Once you have corrected the setting, press the FF button or
press the ENTER button to resume your place.
41
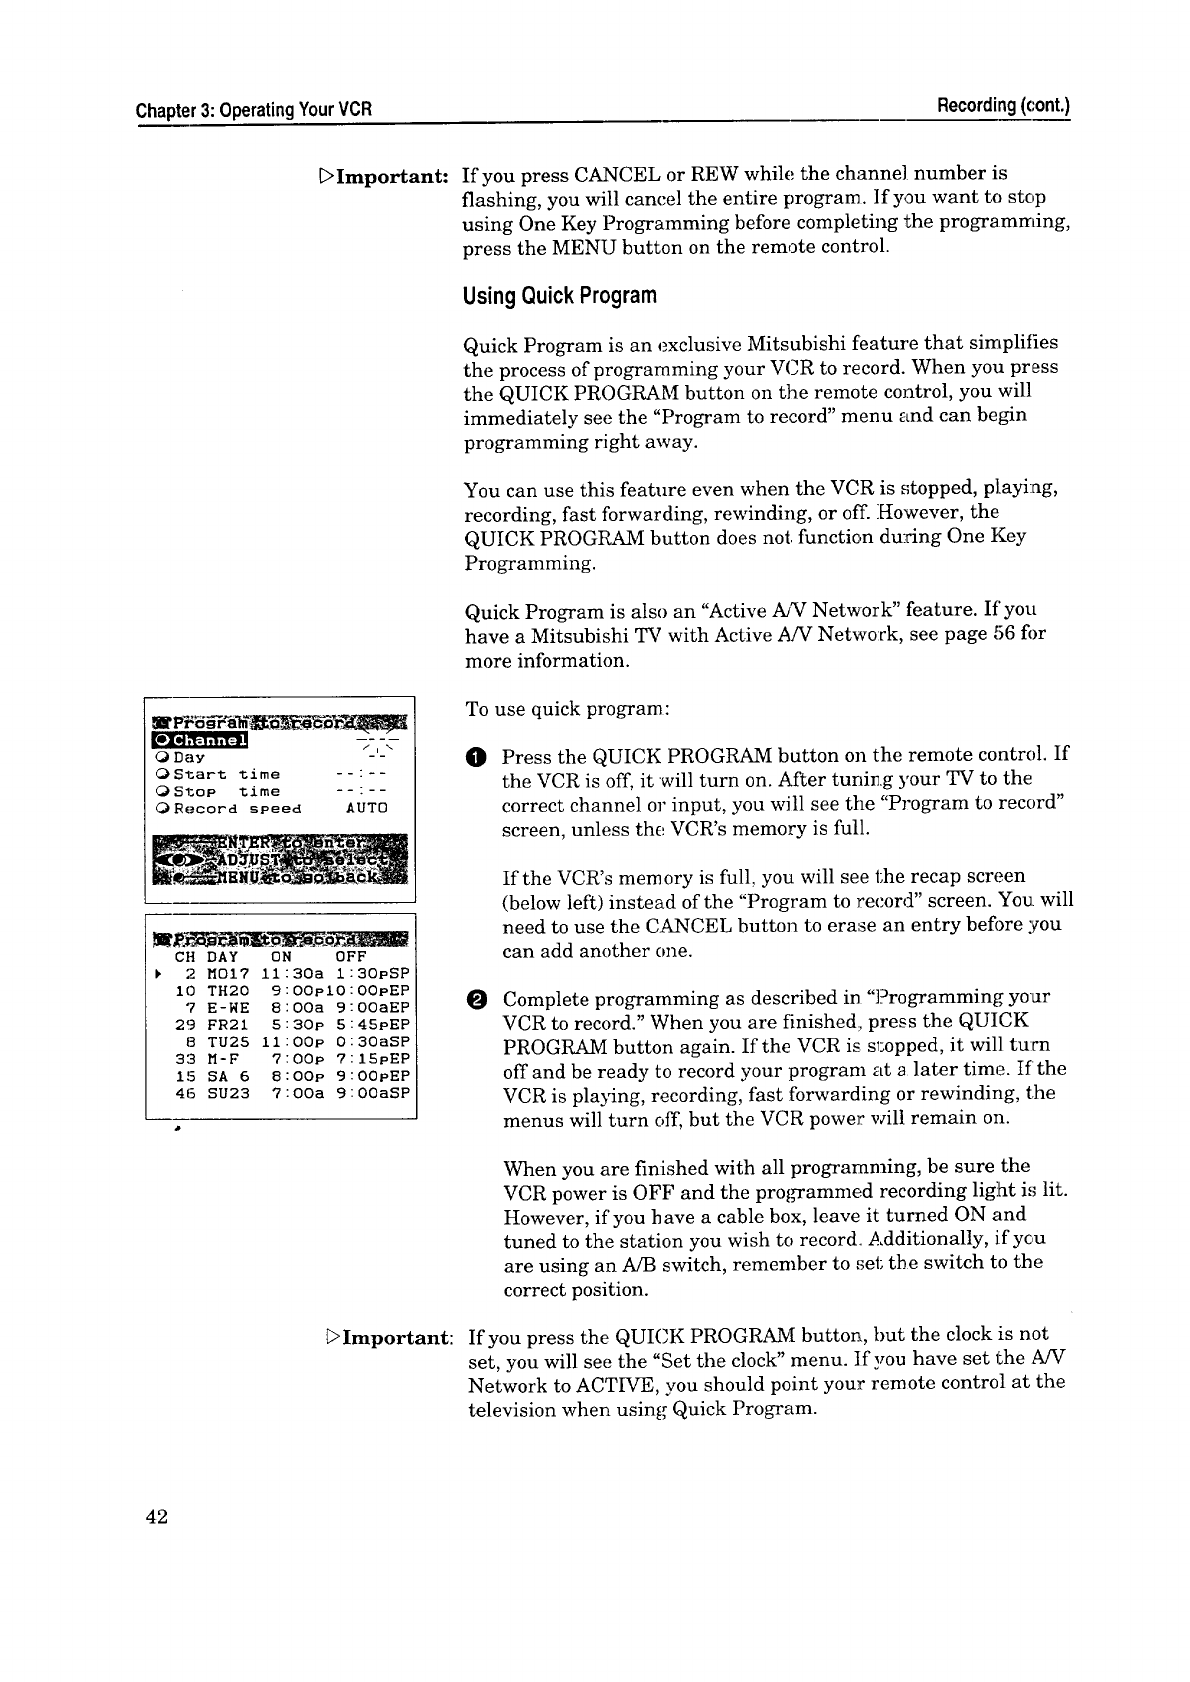
Chapter3:OperatingYourVCR Recording(cont.)
_Important:
/i _-
0 Day - -
0 Sl:art zime
0 S1;op Zime
ORecord speed AUTO
CH DAY
2 MOI7
IO TH20
7 E-HE
29 FR21
8 TU25
3:3 M-F
15 SA 6
46 SU23
ON OFF
ll:30a I:30pSP
9:00pIO:OOPEP
8:00a 9:00aEP
5:30p 5:45PEP
ll:OOP 0:30aSP
7:OOP 7:15pEP
8:00p 9:00pEP
7:00a 9:00aSP
Important:
If you press CANCEL or REW while the channel number is
flashing, you will cancel the entire program. If you want to stop
using One Key Programming before completing the programming,
press the MENU button on the remote control.
UsingQuickProgram
Quick Program is an exclusive Mitsubishi feature that simplifies
the process of programming your VCR to record. When you press
the QUICK PROGRAM button on the remote control, you will
immediately see the "Program to record" menu and can begin
programming right away.
You can use this feature even when the VCR is ,;topped, playing,
recording, fast forwarding, rewinding, or off. However, the:
QUICK PROGRAM button does not. function during One Key
Programming.
Quick Program is also an "Active AJ_ Network" feature. If you
have a Mitsubishi TV with Active A!V Network, see page 56 for
more information.
To use quick program:
OPress the QUICK PROGRAM button on the remote control. If
the VCR is off, it will turn on. After tuning )'our TV to the
correct channel or input, you will see the "Program to record"
screen, unless the VCR's memory is full.
If the VCR's memory is full, you will see the recap screen
(below left) instead of the "Program to record" screen. You. will
need to use the CANCEL button to erase an entry before you
can add another one.
OComplete programming as described in "]?rogramming your
VCR to record." When you are finished:, press the QUICK
PROGRAM button again. If the VCR is sl:opped, it will turn
off and be ready to record your program at a later time. If the
VCR is playing, recording, fast forwarding or rewinding, the
menus will turn off, but the VCR power will remain on.
When you are finished with all programming, be sure the
VCR power is OFF and the programmed recording light i,_ lit.
However, if you have a cable box, leave it turned ON and
tuned to the station you wish to record. Additionally, ifyc,u
are using an A/B switch, remember to ,;et the switch to the
correct position.
If you press the QUICK PROGRAM button, but the clock is not
set, you will see the "Set the clock" menu. If you have set the A/V
Network to ACTIVE, you should point your remote control at the
television when using Quick Program.
42
_Important:
_Important:
Notesabout programmedrecording
You cannot use the VCR when the programmed recording light is
lit. If you want to use the VCR before programmed recording
begins, press the POWER button on the remote once. This turns
the programmed recording light off and the VCR on.
If you use the POWER button on the front panel for this purpose,
you will have to press it twice. Pressing it once turns off the
programmed recording light; pressing it a second time turns t:_e
VCR on.
When you are finished using the VCR, turn the VCR power off
again, either with the POWER button on tile remote or the
POWER button on the front panel. Make sure the programmed
recording light is back on.
After a program has been recorded, the VCR memory is cleared
(unless you have scheduled the VCR to record the program every
day or every week).
If there is already a program in the VCR's memory, you will see
the "recap" screen when you bring up the menus for programrning
to record (unless you are programming with the QUICK PRO-
GRAM button). If the VCR's memory is full, you must era,;e a
program before you can enter a new one.
If a tape runs out during programmed recording, the VCR ejects
the tape and the programmed recording light and the tape status
symbol will flash. Load a new tape and press the REC button. The
VCR will resume recording. Do not overlap the recording times
you program.
Remember that when your VCR is off, it may also be in stand-by
for programmed recording. Also remember that the VCR, wh_,n
programmed, will record over the next section of tape. So, to avoid
recording over tapes you want to save, remember that the VCR
automatically shuts off during OTR recording and auto power
saving. •
Your VCR will not record over a tape that has the erasure preven-
tion tab removed (see "Preventing accidental erasure"). All rental
movies have this tab removed, so they are sa_e fl"om being acci-
dentally erased.
autospeedprogramming
Use auto speed programming if you want to record as much of the
program as possible in standard play (SP) speed, but you vcar_Lt
the VCR to automatically switch to extended play (EP) if there is
not enough tape left.
Auto speed programming is only available in one prograrnming
slot. In the firs_ slot, the recording speed is; automatically set to
43
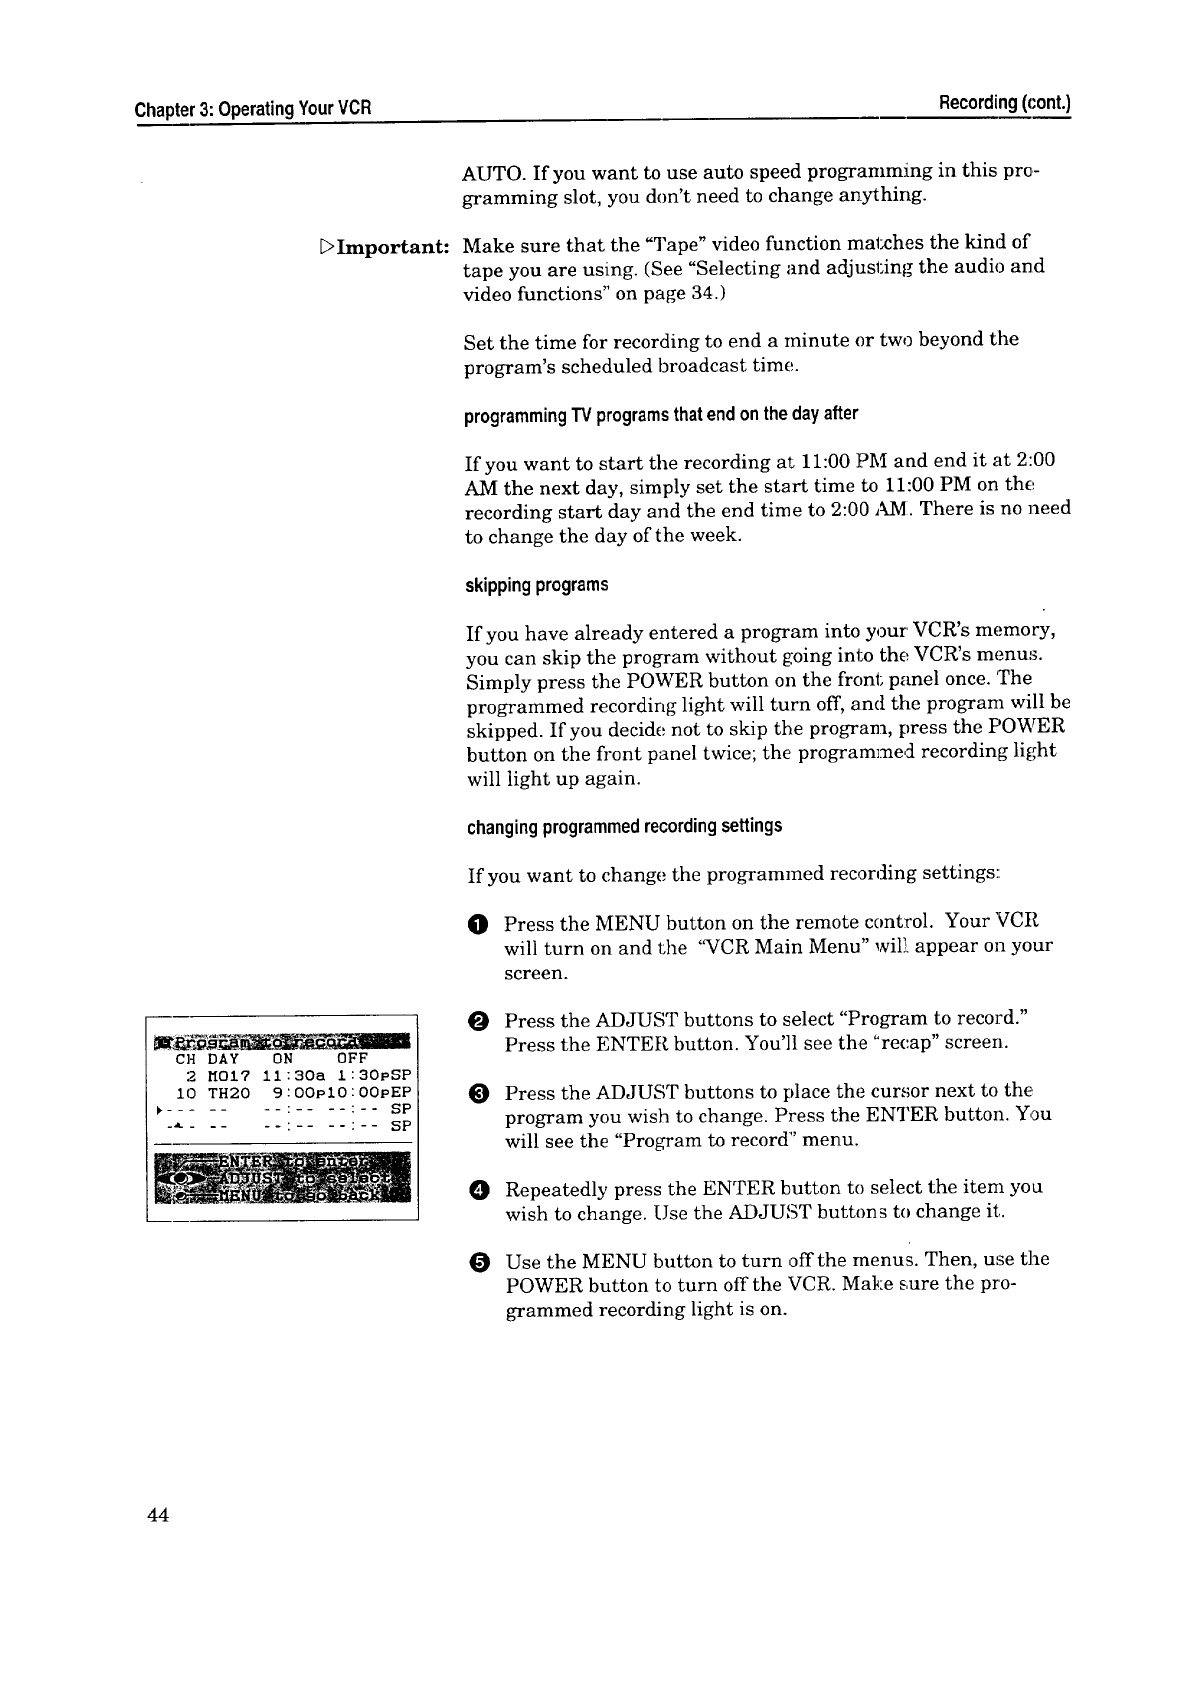
Chapter3: OperatingYourVCR Recording(cont.)
_Important:
CH DAY ON OFF
2 MOI7 11:30a I:30pSP
i0 TH20 9:00pIO:OOPEP
........ :.... :-- SP
-_- -- : : SP
AUTO. If you want to use auto speed programming in this pro-
gramming slot, you don't need to change anything.
Make sure that the "Tape" video function mal_hes the kind of
tape you are using. (See "Selecting and adjusting the audio and
video functions" on page 34.)
Set the time for recording to end a minute or two beyond the
program's scheduled broadcast time.
programmingTVprogramsthatendonthe day after
If you want to start the recording at 11:00 PM and end it at 2:00
AM the next day, simply set the start time to 11:00 PM on the
recording start day and the end time to 2:00 AM. There is no need
to change the day of the week.
skippingprograms
If you have already entered a program into your VCR's memory,
you can skip the program without going into the VCR's menus.
Simply press the POWER button on the front panel once. 'The
programmed recording light will turn off, and the program will be
skipped. If you decide not to skip the program, press the F'OWER
button on the front panel twice; the programmed recording light
will light up again.
changingprogrammedrecordingsettings
If you want to change the programmed recording settings::
O Press the MENU button on the remote control. Your VCR
will turn on and the '_CR Main Menu" wil! appear on your
screen.
O
O
Press the ADJUST buttons to select "Program to record."
Press the ENTER button. You'll see the "recap" screen.
Press the ADJUST buttons to place the cursor next to the,
program you wish to change. Press the ENTER button. You
will see the "Program to record" menu.
O
O
Repeatedly press the ENTER button to select the item you
wish to change. Use the ADJUST buttons to change it.
Use the MENU button to turn offthe menus. Then, use the
POWER button to turn off the VCR. Make s,ure the pro-
grammed recording light is on.
44
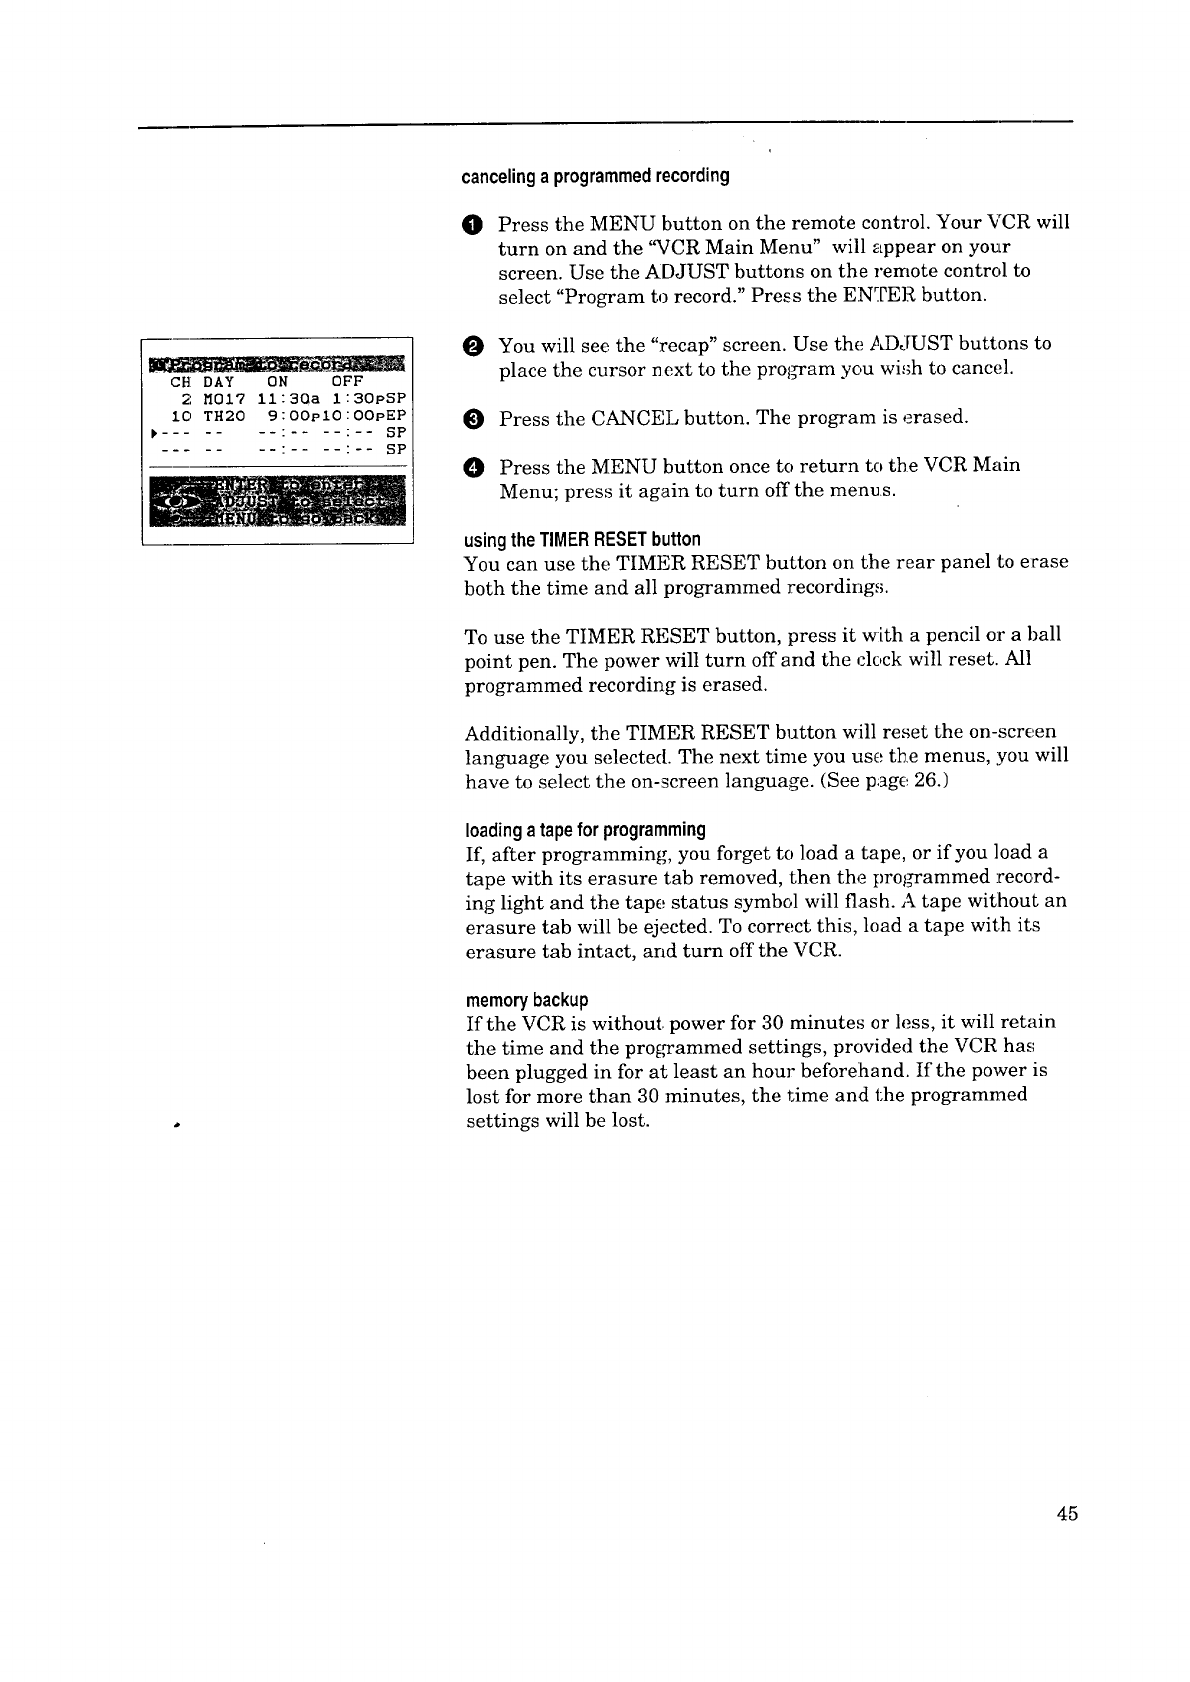
CH DAY ON OFF
2; MOI7 ll:3Oa I:30pSP
IO TH20 9:00pIO:OOpEP
..... : : SP
: : SP
cancelingaprogrammedrecording
0Press the MENU button on the remote control. Your VCR will
turn on and the '_CR Main Menu" will appear on your
screen. Use the ADJUST buttons on the remote control to
select "Program to record." Press the ENTER button.
O You will see the "recap" screen. Use the ADJUST buttons to
place the cursor next to the prot_am you wish to cancel.
O Press the CANCEL button. The program is erased.
Press the MENU button once to return to the VCR Main
Menu; press it again to turn off the menus.
using the TIMERRESETbutton
You can use the TIMER RESET button on the rear panel to erase
both the time and all programmed recordings.
To use the TIMER RESET button, press it with a pencil or a ball
point pen. The power will turn off and the clock will reset. All
programmed recording is erased.
Additionally, the TIMER RESET button will reset the on-screen
language you selectecl. The next time you use the menus, you will
have to select the on-screen language. (See page 26.)
loadingatapeforprogramming
If, after programming, you forget to load a tape, or if you load a
tape with its erasure tab removed, then the prot_ammed record-
ing light and the tape status symbol will flash. A tape witlhout an
erasure tab will be ejected. To correct this, load a tape with its
erasure tab intact, and turn off the VCR.
memorybackup
If the VCR is without, power for 30 minutes or less, it will retain
the time and the programmed settings, provided the VCR has
been plugged in for at least an hour before:hand. If the power is
lost for more than 30 minutes, the time and the programmed
settings will be lost.
45
,_ CHAPTER FOUR
UsingtheAdvancedFeatures
Now that you've learned about the basic operation of your VCR,
you're ready to discover its advanced features. You'll find infor-
mation on:
$Usingthe AdvancedPlaybackControls
Using theAdvancedRecording Controls
SearchingTechniques
Usingthe AdvancedOptions
Usingthe ActiveA/V Network Features
Makinga Copyof a Tape
0UsingChild Lock
Before you use the advanced features, you should be familiar with
all of the VCR's basic operations, including viewing a picture
coming from your VCR (page 23), playing back a tape (page 25),
using the menus (page 26), and recording (palge 35). If you find
any of the information in this section confusing, you may want to
review the previous chapters.
Usingthe AdvancedPlaybackControls
In this section, you'll discover some of the advanced playback
features of your VCR. These include:
• Using special effects,
• Adjusting the tracking, and
• Using the time counter.
Usingspecialeffects
You can use the FF and REW buttons to control the playb.ack
speed of the tape in a step-by-step method.
usingthe FFandREWbuttonsto controlthe playbackspeed
O While the VCR is playing a tape, press the PAUSE buttor_ on
the remote control to freeze the picture on the screen.
OPress the FF or REW button. Each press of r.he FF button
changes the playback speed by one step i3athe forward direc-
tion. Each press of the REW button chan_;es the speed by one
step in the reverse direction. (See the chart on the next page.)
To resume normal playback, press the PLAY/STOP buttc,n.
46
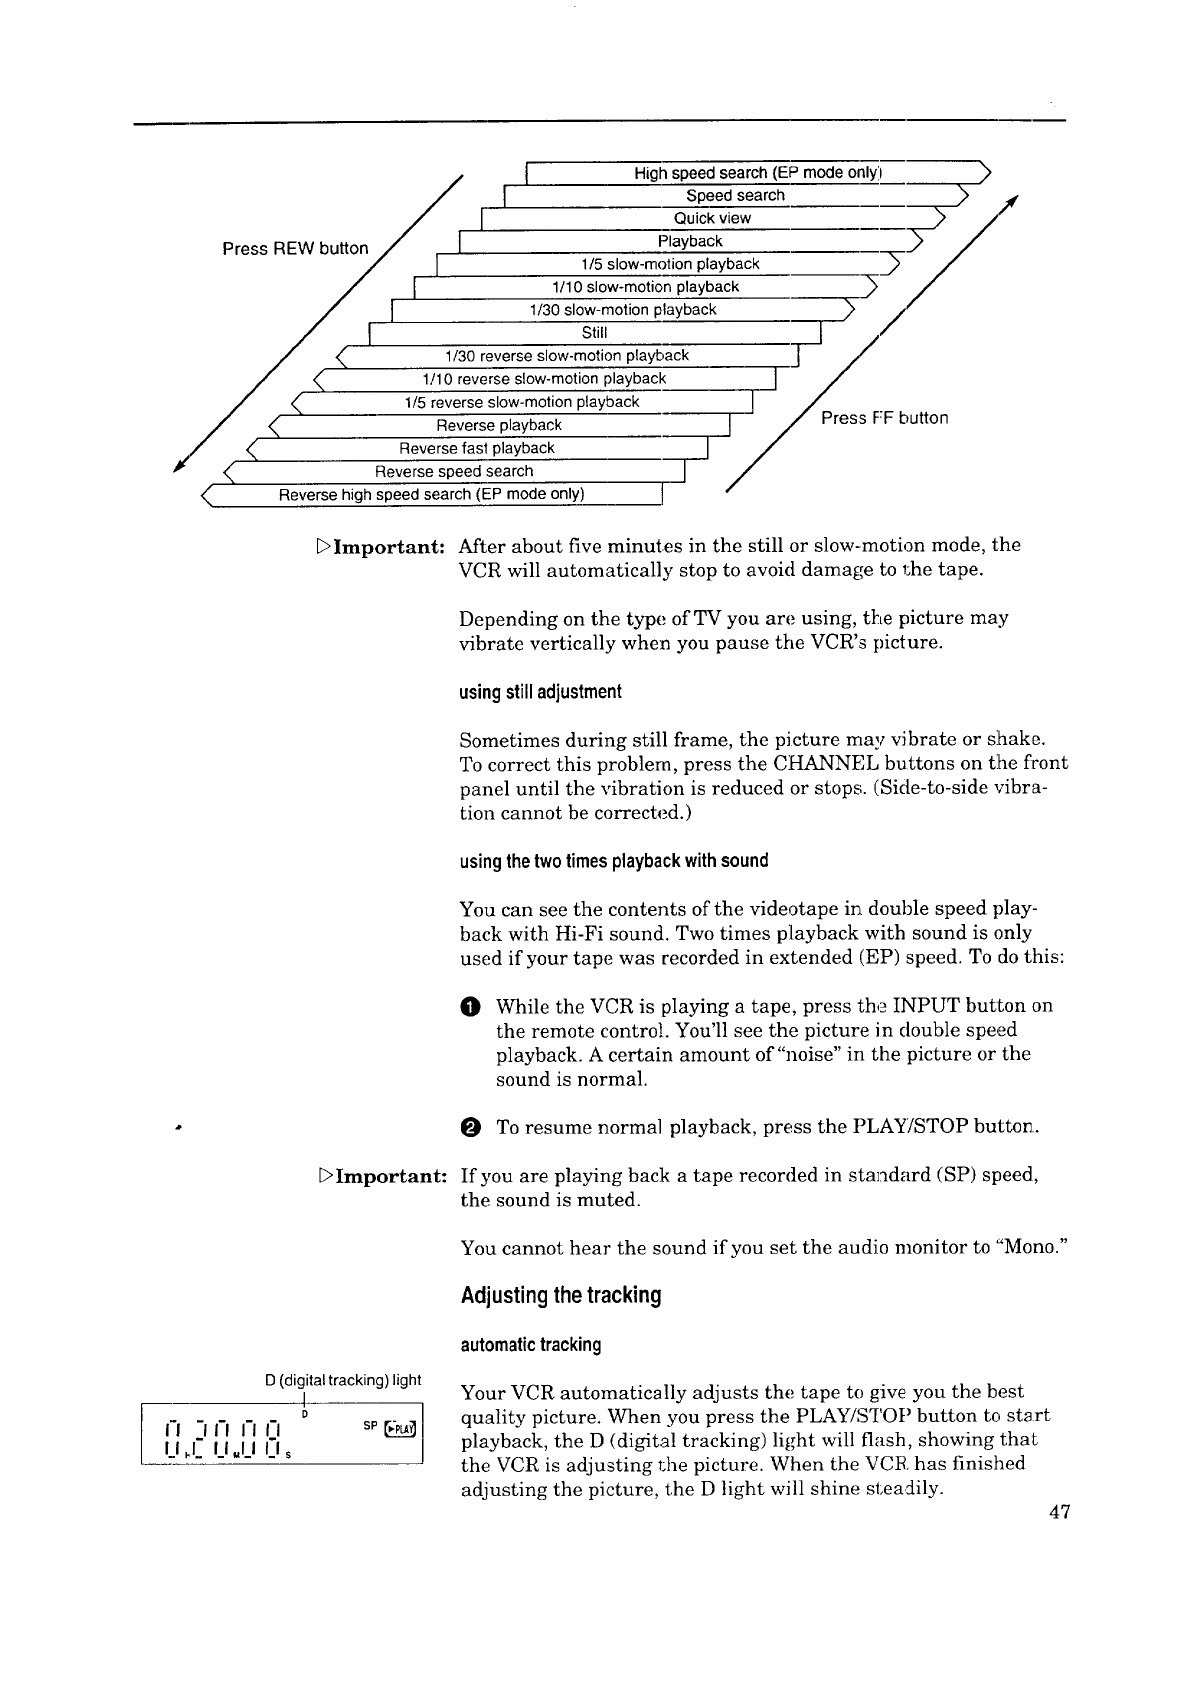
High speed search (EP mode only)
Speed search _._ j
Quick view ./_/___,2t
Press REW button Playback
1/5 slow-motion playback _-
1/10 slow-motion playback _>._ .
1/30 slow-motiOnStillplayback I //
1/30 reverse slow-motion playback J /
1/10 reverse slow-motion playback I/
1/5 reverse slow-motion playback I
Reverse playback I /Press F:F button
Reverse fast playback I
Reverse speed search I
Reverse high speed search (EP mode only) ! /
DImportant: After about five minutes in the still or slow-motion mode, the
VCR will automatically stop to avoid damage to !;he tape.
Depending on the type of TV you are using, the picture may
vibrate vertically when you pause the VCR's picture.
usingstilladjustment
Sometimes during still frame, the picture may vibrate or shake.
To correct this problem, press the CHANNEL buttons on t:he front
panel until the vibration is reduced or stops. (Side-to-side vibra-
tion cannot be corrected.)
using the twotimes playbackwithsound
You can see the contents of the videotape in double speed play-
back with Hi-Fi sound. Two times playback with sound is only
used if your tape was recorded in extended (EP) speed. To do this:
OWhile the VCR is playing a tape, press the INPUT button on
the remote control. You'll see the picture in double speed
playback. A certain amount of"noise" in the picture or the
sound is normal.
O To resume normal playback, press the PLAY/STOP button.
[:>Important: If you are playing back a tape recorded in standard (SP) speed,
the sound is muted.
You cannot hear the sound if you set the audio monitor to ':'Mono."
Adjustingthe tracking
D (digital tracking) light
I
II .111 II II sp -
I_I,I I_1.1_1I.I s
automatictracking
Your VCR automatically adjusts the tape to give you the best
quality picture. When you press the PLAYiSTOt ) button to start
playback, the D (digital tracking) light will flash, showing that
the VCR is adjusting t_he picture. When the VCR has finished
adjusting the picture, the D light will shine stea:Hly. 47
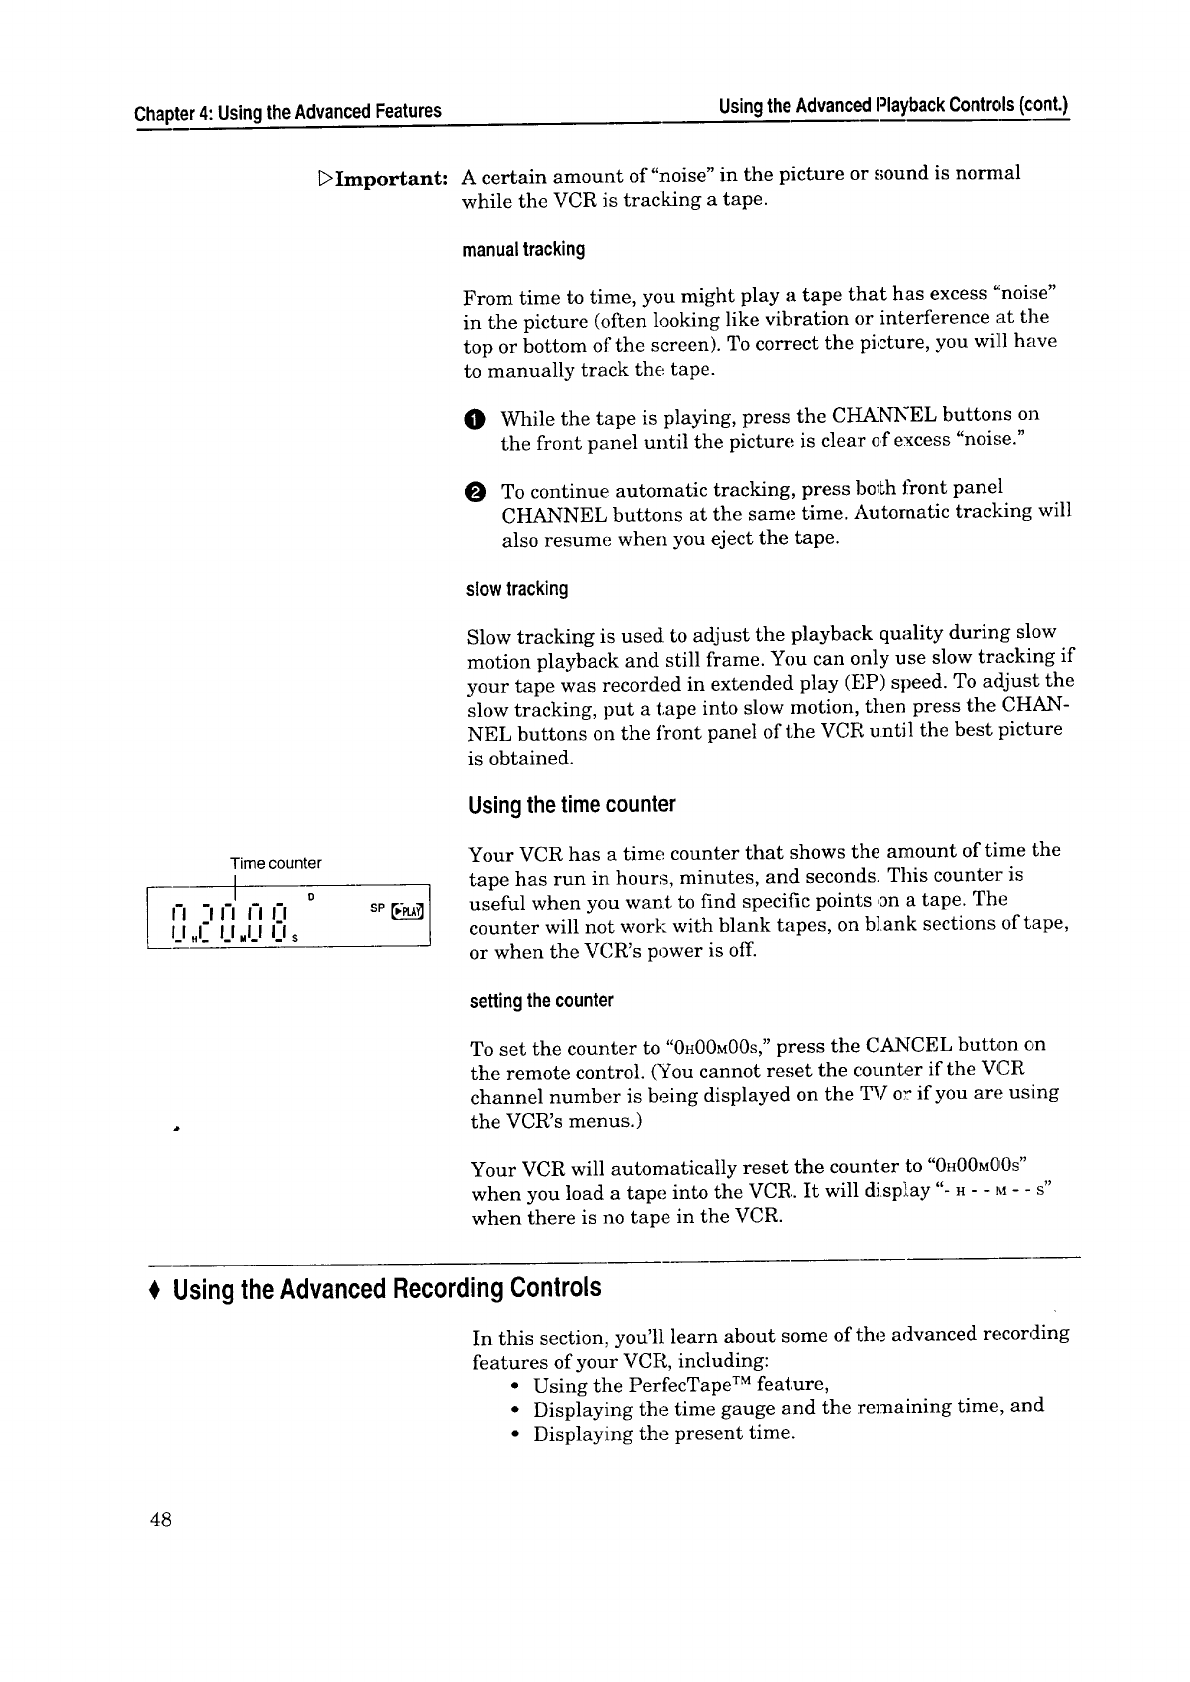
Chapter4:UsingtheAdvancedFeatures UsingtheAdvancedPlaybackControls(cont.)
_Important:
Time counter
[ ' o
II .111 II I.I
I_1.I.I.I .I..I I_1ssPE_
A certain amount of"noise" in the picture or sound is normal
while the VCR is tracking a tape.
manualtracking
From time to time, you might play a tape that has excess °_noise"
in the picture (often looking like vibration or interference at the
top or bottom of the screen). To correct the picture, you will have
to manually track the tape.
O While the tape is playing, press the CHANNEL buttons on
the front panel until the picture is clear of excess "noise."
O To continue automatic tracking, press bo_h front panel
CHANNEL buttons at the same time. Autoraatic tracking will
also resume when you eject the tape.
slowtracking
Slow tracking is used to adjust the playback quality during slow
motion playback and still frame. You can only use slow tracking if
your tape was recorded in extended play (EP) speed. To adjust the
slow tracking, put a tape into slow motion, then press the CHAN-
NEL buttons on the f_ont panel of the VCR until the best picture
is obtained.
Usingthe time counter
Your VCR has a time counter that shows the amount of time the
tape has run in hours, minutes, and seconds. This counter is
useful when you want to find specific points on a tape. The
counter will not work with blank tapes, on blank sections of tape,
or when the VCR's power is off.
settingthecounter
To set the counter to "0H00M00S," press the CANCEL button on
the remote control. (You cannot reset the counter if the VCR
channel number is being displayed on the TV o_: if you are using
the VCR's menus.)
Your VCR will automatically reset the counter to "0H00M00S"
when you load a tape into the VCR. It will display "- n - - M- - S"
when there is no tape in the VCR.
Usingthe AdvancedRecordingControls
In this section, you'll learn about some of the advanced recording
features of your VCR, including:
• Using the PerfecTape TM feature,
• Displaying the time gauge and the remaining time, and
• Displaying the present time.
48
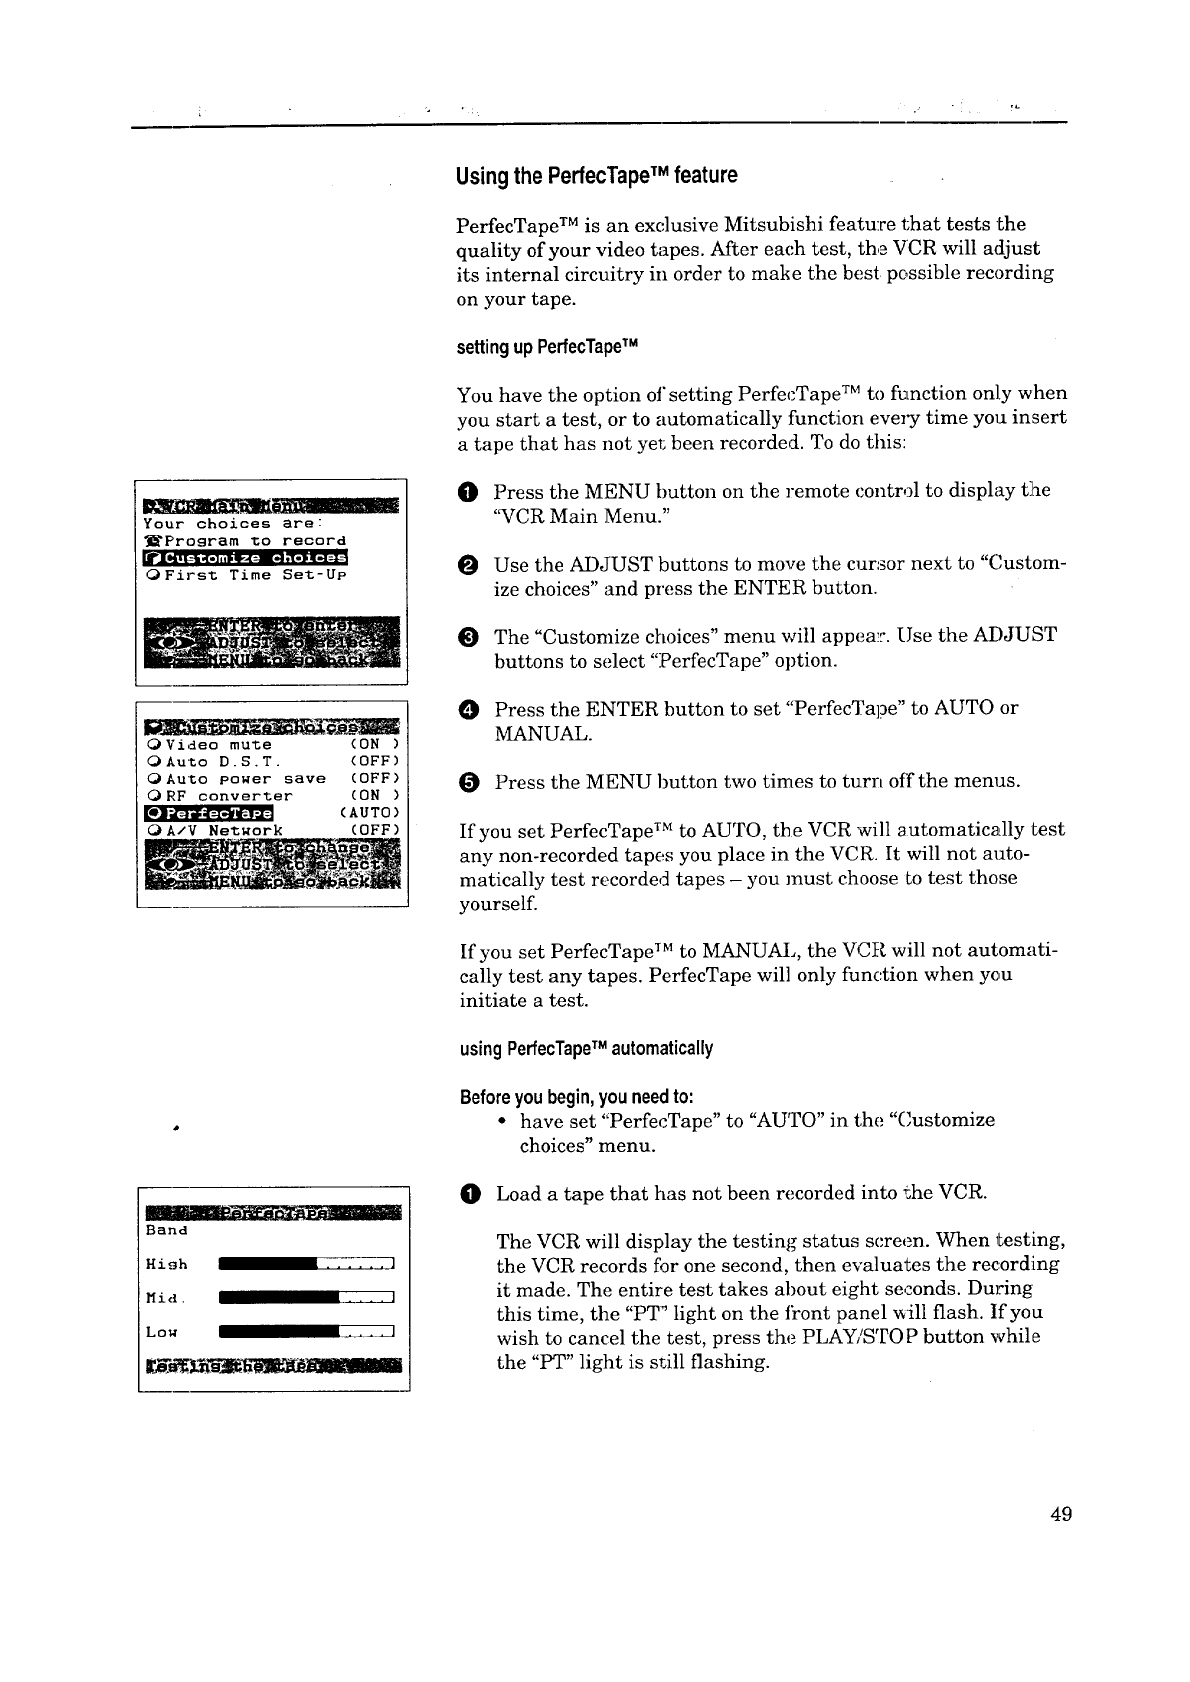
Your choices are:
_Prosram to record
rJ[ • - • =
IlS[---_4_[ ]llliliv-4=-II_t![ Ikq_l
OFi,-st Time Set-Up
OVideo mute (ON )
OAuto D.S.T. (OFF)
OAuto power save (OFF)
ORF converter (ON )
(AUTO)
A/V Network (OFF)
Band
Hish ...... l
Mid ..... 1
Low .... 1
r_ ." --
Usingthe PerfecTapeTM feature
PerfecTape TM is an exclusive Mitsubishi feature that tests the
quality of your video tapes. After each test, the VCR will adjust
its internal circuitry in order to make the best possible recording
on your tape.
settingup PerfecTapeTM
You have the option of setting PerfecTape TM to function only when
you start a test, or to automatically function eveT:_ time you insert
a tape that has not ye_; been recorded. To do this:
O Press the MENU tmtton on the remote control to display tlhe
'_CR Main Menu."
Use the ADJUST buttons to move the cursor next to "Custom-
ize choices" and press the ENTER button.
The "Customize choices" menu will appem". Use the ADJUST
buttons to select "PerfecTape" option.
0 Press the ENTER button to set "PerfecTa]?e" to AUTO or
MANUAL.
Press the MENU button two times to turn off the menus.
If you set PerfecTape TM to AUTO, the VCR will automatically test
any non-recorded tapes you place in the VCR. It will not auto-
matically test recorded tapes - you must choose to test those
yourself.
If you set PerfecTape TM to MANUAL, the VCR will not automati-
cally test any tapes. PerfecTape will only function when you
initiate a test.
usingPerfecTapeTM automatically
Before you begin, you need to:
•have set "PerfecTape" to "AUTO" in the "Customize
choices" menu.
0Load a tape that has not been recorded into the VCR.
The VCR will display the testing status screen. YVhen testing,
the VCR records for one second, then evaluates the recording
it made. The entire test takes about eight seconds. Dinting
this time, the "PT" light on the t_ont panel _ill flash. If you
wish to cancel the test, press the PLAY/STOP button while
the "PT" light is still flashing.
49
Chapter4: UsingtheAdvancedFeatures UsingtheAdvancedRecordingControls(cont.)
You]:" 1;ape is Fated. :
[
Average Excellent
VCR
PerfecTape
_-ADJUST _o select
•Time gauge
VCR
S'toP
REt_ i: 40 --
Oh2OmO8s
Tape remaining display
Tape remaining display
I
I. U I'l -I -I sPEL3
I" I I_1 _'1_1
When the test is finished, the VCR will display the rating of
your tape for eight seconds. On the front panel, the "PT" light
will shine steadily, indicating that the VCR has set it,_ inter-
nal circuitry to make the best possible recording on this tape.
usingPerfecTapeTM manually
OLoad a tape that has its erasure tab intact into the VCR.
OFind a portion of the tape that is OK to record over; this
feature will record over one second of your tape.
O Press the AUDIO/VIDEO button on the remote control. You
will see the function menu.
O Press the AUDIO/VIDEO button until t[_e PerfecTape func-
tion appears.
OPress the ADJUST + button on the remote 1:obegin the test.
The VCR will display the testing status ,;creen. When testing,
the VCR records for one second, then evaluates the recording
it made. The test takes about eight seconds. During this l_ime,
the "PT" light on the front panel will I]ash. To cancel Lhe test,
press the PLAY/STOP button while the "PT" light is still
flashing.
When the test is finished, the VCR will display the rating of
your tape for eight seconds. On the front panel, the "PT" light
will shine steadily, indicating that the VCR has set its inter-
nal circuitry to make the best recording an the tape. You can
quickly turn off the display by pressing the PLAY/STOP
button.
Should you wish to erase the settings, eject the tape. The
settings will also be erased if you pres:s the TIMER RESET
button or if the VCR loses power.
After the test is finished, the PerfecTape function will not
appear unless the tape is ejected.
Displayingthe time gauge and the remaining time
The time gauge is a graphic representation of your position en a
video tape. The left side of the gauge is the start (S) of the tape,
and the right side is the end (E) of the tape. For a T-120 length
tape, played at standard (SP) speed, each mark on the gauge
represents about 15 minutes. The remaining time display shows
the time, in hours and minutes, left until r_he e_]d of a tape.
Thetimegaugeand the remainingtimeautomaticallyappear:
during fast forward and rewind (from a stopped tape), during
counter zero stop, during index searches, ;and when rewinding for
repeat playback.
5O

Important:
VCR
Stop
S_Z_E
Sun 7:30p--
Oh2OmOSs
Present time display
Present time display
i
pM_
N. -na'v "J -I sPr-]
I" .I I.I "1 _1
You can turn off the time gauge and the remaining time by
pressing the DISPLAY button twice.
Tomakethe timegaugeandthe remainingtimeappear:
Press the DISPLAY button once. The time gauge and remaining
time will appear on the TV screen, and the remaining time will
appear on the fluorescent display. They will di sappear after four
seconds when playing a tape. To turn off the display, press the
DISPLAY button twice.
The time gauge and remaining time work by detecting control
signals on recorded tapes. They will therefore not: function with
tapes that have :not yet been recorded. Also, you must have set
the "Tape" video function correctly.
Depending on the length of the tape being used, it may take a
moment for the display to appear.
The tape remaining display may not show the correct remaining
time if the tape function is incorrectly set (see "Using the Audio
and Video Functions" on page 32), if you are using speed search, if
you are using a special length cassette (such as T-10 length), or if
you are using a cassette with an adapter.
Displayingthe present time
The present time display on the fluorescent display panel or on
the TV screen shows the current time. If you have not set the
clock, or if there has been a power failure of longer than 30
minutes, the display will show - : - -. The curr,ant time will be
displayed when the VCR is off. To see the current time when the
VCR is on:
O Press the DISPLAY button on the remote control twice. The
counter will be replaced by the present time.
To turn off the present time, press DISPLAY once.
SearchingTechniques
The VCR lets you search through a tape in a number of ways.
These include:
• Quick searching,
• Speed searching,
• Using counter zero stop, and
• Index search techniques.
Quicksearching
This feature lets you skip over the tape you a_e playing in about
30 second intervals. It is designed so that you can quickly speed
through any commercials you may have recorded.
51
Chapter4:Usingthe AdvancedFeatures Seal:chingTechniques(cont.)
To do this:
O Make sure that you have set the TV/VCR slide switch on the
remote control to the "VCR" position.
O While playing a tape, choose the desired search time by
pressing the number button. (See the following chart.) The
VCR will speed through the selected length of tape, then
resume playback.
Number
button
Search
time
1 2 3 4 5
30 60 90 15(
II se_e.i sec.I sec.,Isec. I sec.I
_>Important:
You can set the search time up to 3 minutes.
Speedsearching
You can use speed search to visually search t!hrough the contents
of a videotape. To do this:
OWhile playing a tape, press the FF or REW button on 1;he
front panel or on the remote control. You wi}l see the picture
as it fast forwards or rewinds. It is normal to see some "noise
bars."
OIf you are playing back a tape recorded i_ extended (EP)
speed, press the FF or REW button and hold it down ibr about
1 second. The search speed will increase. (In case of a tape
recorded in standard (SP), the speed will no_: change.)
To resume normal playback, press FF or REW again quic]dy,
or press PLAY/STOP.
The fastest search speed that allows you to see the picture is
about 15 times normal speed. Using fast forward or rewind
without the picture allows you to search up to 200 times normal
speed. The fastest way to move through the tape is without a
picture. It is normal ibr the number of noise bars on the screen to
increase and roll from top to bottom as the visual search speed
increases.
Usingcounterzero stop
Counter zero stop is useful to quickly access to the beginning of a
recorded or playback section of a tape. The VCR will automati-
cally fast forward or rewind to "OHOOMOOs"and stop the tape.
O Press the CANCEL button on the remote: control at the point
you wish to locate later. The counter will reset to "0H00M00S"
52
VCR
Counter" zero stop
_--ADJUST "co selec_
_Important:
_Important:
VCR
Index search
_L_--AD3UST to selec_
VCR Lookins
for index+ 1
st-3-----]E
REM 1:40
Ch2OmOSs
0When you wish to return to the point specified in step O,
press the AUDIO/VIDEO button on the remote control. The
function menu appears on your screen. Press the AUDIO/
VIDEO button until the counter zero stop function appears.
@) Press the ADJUST +button to start the counter zero stop.
The VCR will automatically search to the counter "0H00M00S"
and then stop.
Index searchtechniques
Index search is a way to find specific points on a tape. Before
using index search, index marks are placed at important places
on a tape. Then, index search is used to find these marks. Index
marks are added automatically whenever your VCR starts a new
recording; you can also add index marks manually during record-
ing at any point.
automaticindexmarks
Whenever recording is begun from the STOP mode, an index
mark is automatically added to the tape. The on--screen message
will indicate that the :mark is being recorded.
Index marks are not added when you press PAUSE to begin
recording from the record-pause mode.
manualindexmarks
To add an index mark yourself, press the REC button on the
remote control while a tape is recording.
Index marks must be added at least one minute apart.
To search for an index mark:
O
O
Press the AUDIO/VIDEO button on the remote control. The
function menu appears on your screen. Press the AUDIO/
VIDEO button until the index search function appears.
Press the ADJUST +button to start a forward search; pre,_s
the ADJUST - button to begin a search in the reverse direc-
tion. The VCR wilt fast forward or rewind and index search
display appears on the TV.
Once the VCR finds an index mark, it will begin playing back
the tape from that point.
OYou can press the plus (+) or minus (-) buttons up to 19 times
to search for that many index marks. For example, to find the
third index mark ahead, press the plus (+) button three times.
The on-screen display will count down the number of marks
to be passed before playback begins.
53
Chapter4: UsingtheAdvancedFeatures SearchingTechniques(cont.)
VCR
Rep_.=a _c play
_'_--ADJUST I=o selec_
t_ To cancel index search, press PLAY/STOP.
usingrepeatplayback
You can play back a section of tape over and over using the
following procedure. The tape will play until the next index mark,
rewind to the previous index mark, and resume playing. If there
is only one index mark on the tape, then the VCR will play or
rewind to that mark and resume playback. If' there is no index
mark, the entire cassette will repeat.
O Press the AUDIO/VIDEO button on the remote control to
display the function menu. Press the AUDIO/VIDEO button
until the repeat playback function appeacs.
O Press the ADJUST + button to start the playback.
When the VCR encounters the next mark (or the end ,ofthe
tape), it will automatically rewind to the previous mark and
begin playback.
The VCR will also search for control sig_lal interruption fi)r more
than four seconds. If the VCR encounters any interruption on a
tape, the repeat playback will begin.
Press the PLAY/STOP button to cancel the repeat.
UsingtheAdvancedOptions
You can make some optional setup choices. This section explains:
• Using the auto daylight saving time,
• Using the auto power saving (auto-off), and
• Setting the RF converter.
Usingthe auto daylightsavingtime
You have the option of setting daylight saving time to automati-
cally adjust or to manually adjust only when you enter the clock
set menu.
_Important: When the auto daylight saving time is set t_ ON, your VCR will
automatically change the clock from 2 AM to 3 AM on first
Sunday in April, and change from 3 AM back to 2 AM on last
Sunday in October. Remember that when you programmed c,n
these days, your recording length may be affected because thee
VCR clock automatically changes.
54
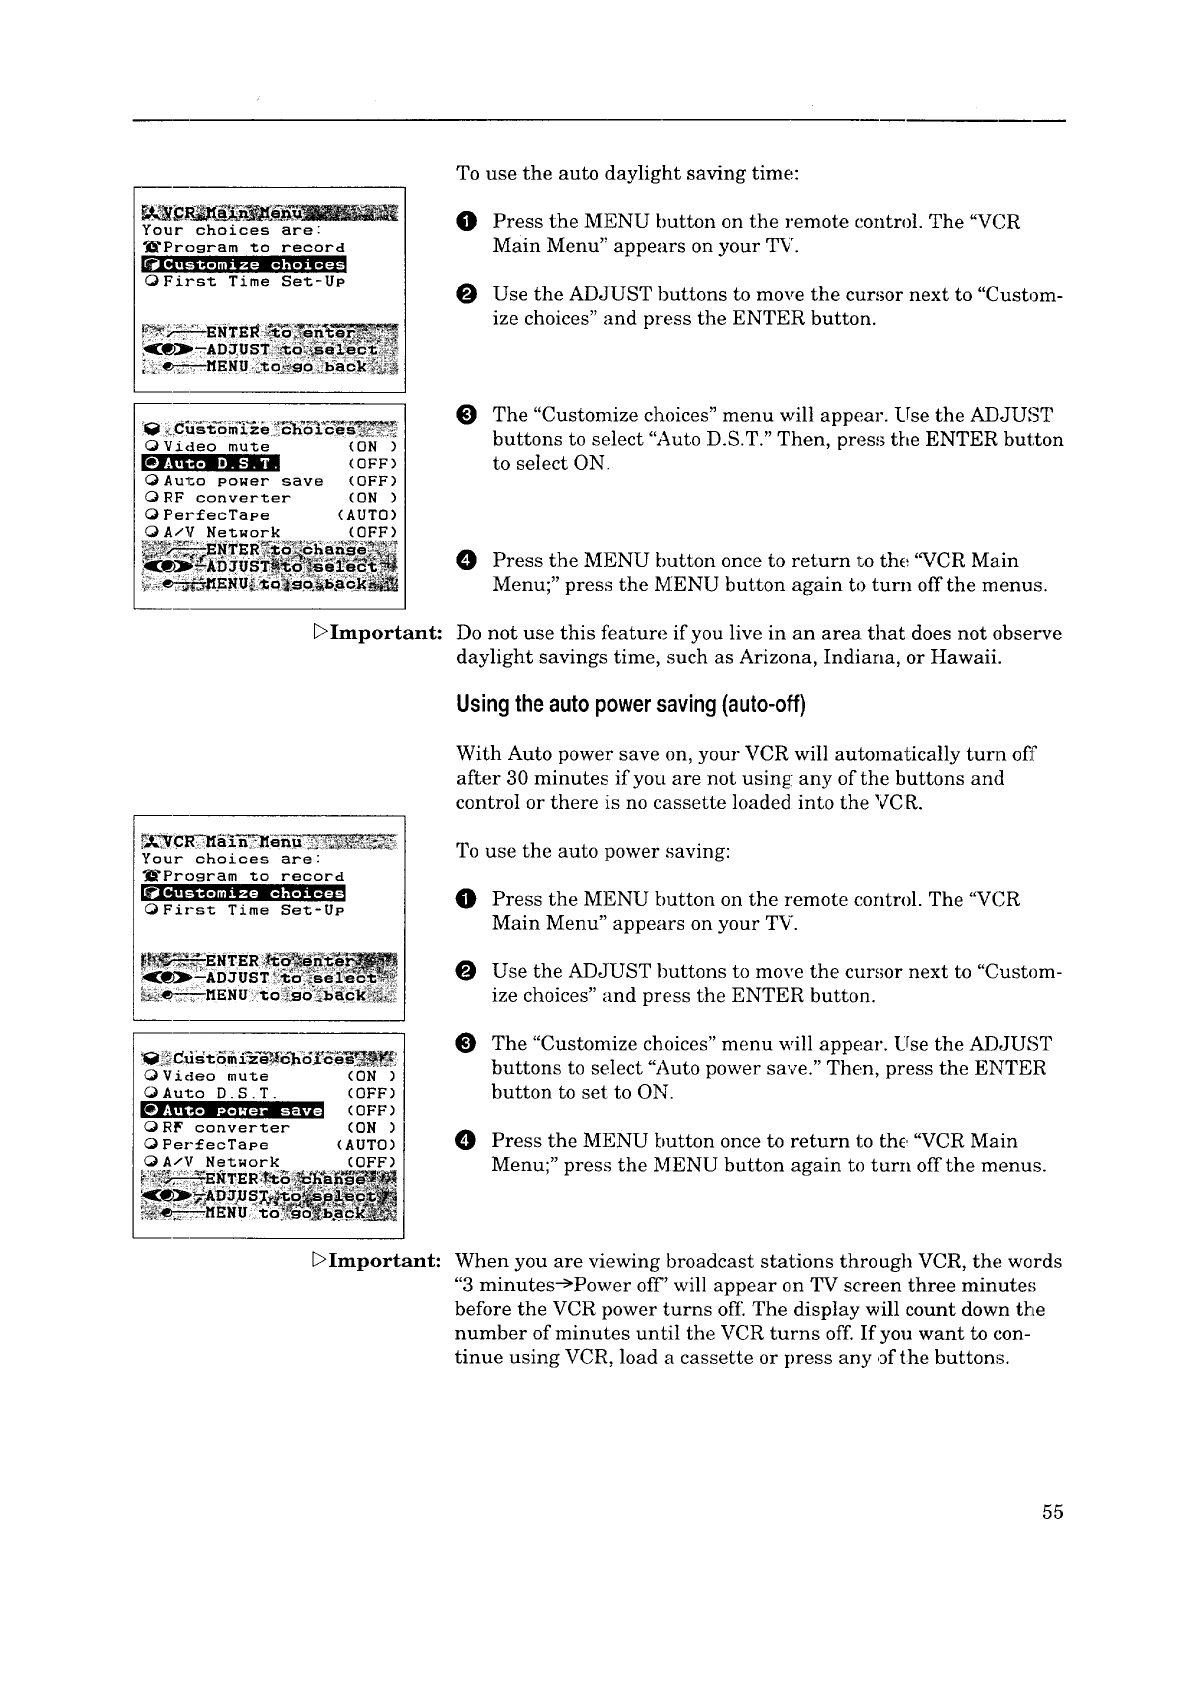
_% _ _ 2 _,_÷. _,
Your choices are:
_Prosram to record
QFirst Time Set-UP
To use the auto daylight saving time:
O
O
Press the MENU button on the remote control. The "VC,R
Main Menu" appears on your TV.
Use the ADJUST buttons to move the cur,_or next to "Custom-
ize choices" and press the ENTER button.
OVideo mu_e (ON )
(OFF)
AuJ:o power save (OFF)
ORF converter (ON )
O PerfecTape (AUTO)
OA/V Network (OFF)
[_Important:
_VCR_al_e
Your choices are:
_"Program to record
First Time Set-Up
<_Video mute (ON )
OAuto D.S.T. (OFF)
(OFF)
O RF conver_er (ON )
O PerfecTape (AUTO)
OA/V Network (OFF)
O The "Customize choices" menu will appear. Use the ADJU,_T
buttons to select "Auto D.S.T." Then, press the ENTER button
to select ON.
Press the MENU button once to return r_othe '%rCR Main
Menu;" press the MENU button again to turn offthe menus.
Do not use this feature if you live in an area that does not observe
daylight savings time, such as Arizona, Indiana, or Hawaii.
Using the auto power saving(auto-off)
With Auto power save on, your VCR will automatically turn off
after 30 minutes if you are not using any of the buttons and
control or there is no cassette loaded into the VCR.
To use the auto power saving:
Press the MENU button on the remote control. The "VCR
Main Menu" appears on your TV.
Use the ADJUST buttons to move the cursor next to "Custom-
ize choices" and press the ENTER button.
O The "Customize choices" menu will appear. Use the ADJUST
buttons to select "Auto power save." Then, press the ENTER
button to set to ON.
0Press the MENU button once to return to the '%'CR Main
Menu;" press the MENU button again to turn off the menus.
[_Important: When you are viewing broadcast stations through VCR, the words
"3 minutes->Power off' will appear on TV screen three minutes
before the VCR power turns off. The display will count down the
number of minutes until the VCR turns off. If you want to (:on-
tinue using VCR, load a cassette or press any of the buttons.
55
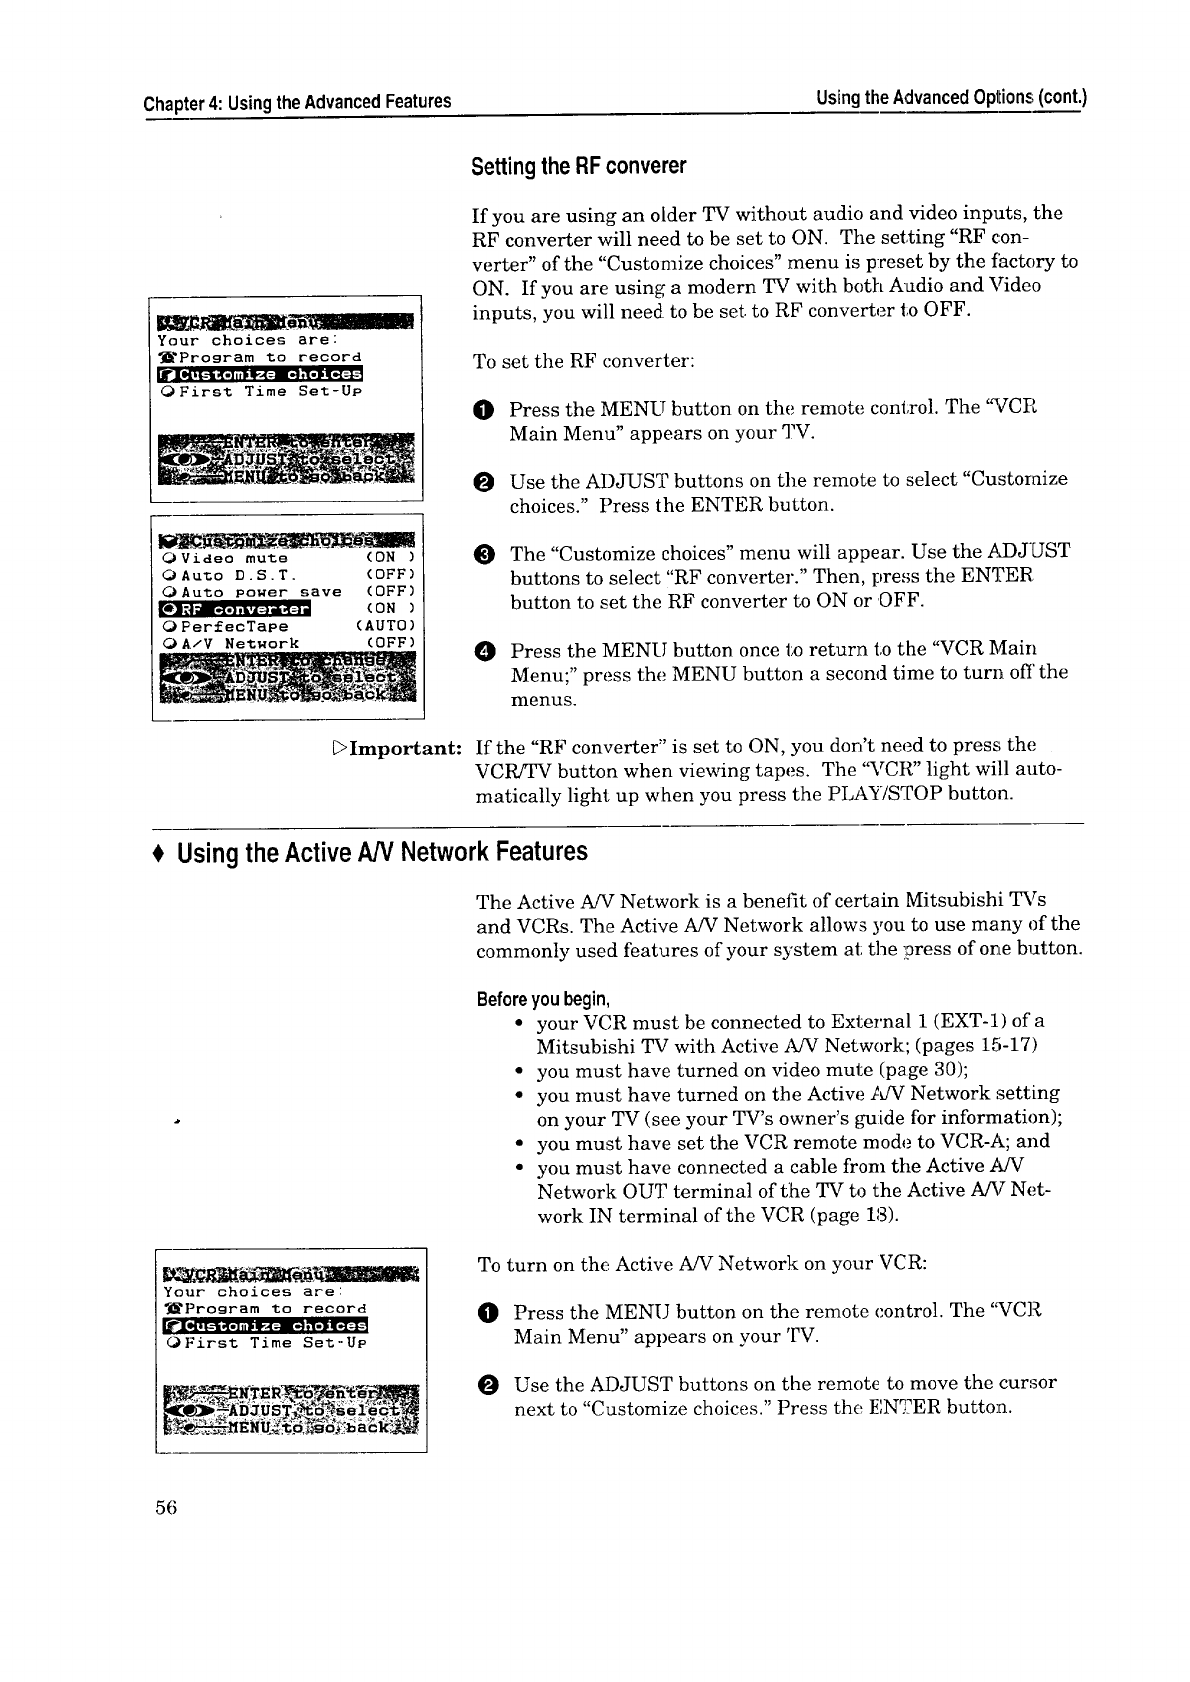
Chapter4: UsingtheAdvancedFeatures UsingtheAdvancedOptions(cont.)
Your choices are:
_'Program 1=o record
rII_ii--I_.l.,1,!--.(=nm-] ,]-_l-_:
OFirst Time Set-Up
I
Video mute (ON)
OAuto D.S.T. (OFF)
O Auto power save (OFF)
(ON )
O PerfecTape (AUTO)
OA/V Network (OFF)
_Important:
Settingthe RFconverer
If you are using an older TV without audio and video inputs, the
RF converter will need to be set to ON. The setting "RF con-
verter" of the "Customize choices" menu is preset by the factory to
ON. If you are using a modern TV with both Audio and Video
inputs, you will need to be set. to RF converter to OFF.
To set the RF converter:
O Press the MENU button on the remote control. The "V'CR
Main Menu" appears on your TV.
Use the ADJUST buttons on the remote to select "Custoraize
choices." Press the ENTER button.
The "Customize choices" menu will appear. Use the .4JMUST
buttons to select "RF converter." Then, press the ENTER
button to set the RF converter to ON or OFF.
O Press the MENU button once to return to the "VCR Main
Menu;" press the MENU button a second time to turn off the
menus.
If the "RF converter" is set to ON, you don't need to press the
VCR/TV button when viewing tapes. The "VCR" light will auto-
matically light up when you press the PLAY/STOP button.
Usingthe ActiveAN NetworkFeatures
The Active A/V Network is a benefit of certain Mitsubishi TVs
and VCRs. The Active A/V Network allows you to use many of the
commonly used features of your system at; the press of one button.
Before you begin,
•your VCR must be connected to External 1 (EXT-1) of a
Mitsubishi TV with Active A/V Network; (pages 15-17)
• you must have turned on video mute (page 30);
• you must have turned on the Actiw_ _CV Network setting
on your TV (see your TV's owner's _,mide for information);
• you must have set the VCR remote mode to VCR-A; and
• you must have connected a cable from the Active ,_ffV
Network OUT terminal of the TV to the Active A/V Net-
work IN terminal of the VCR (page 13).
Your choices are:
_Program to record
OFirst Time Set-Up
To turn on the Active A/V Network on your VCR:
O
O
Press the MENU button on the remote control. The "VCR
Main Menu" appears on your TV.
Use the ADJUST buttons on the remote to move the cursor
next to "Customize choices." Press the ENTER button.
56
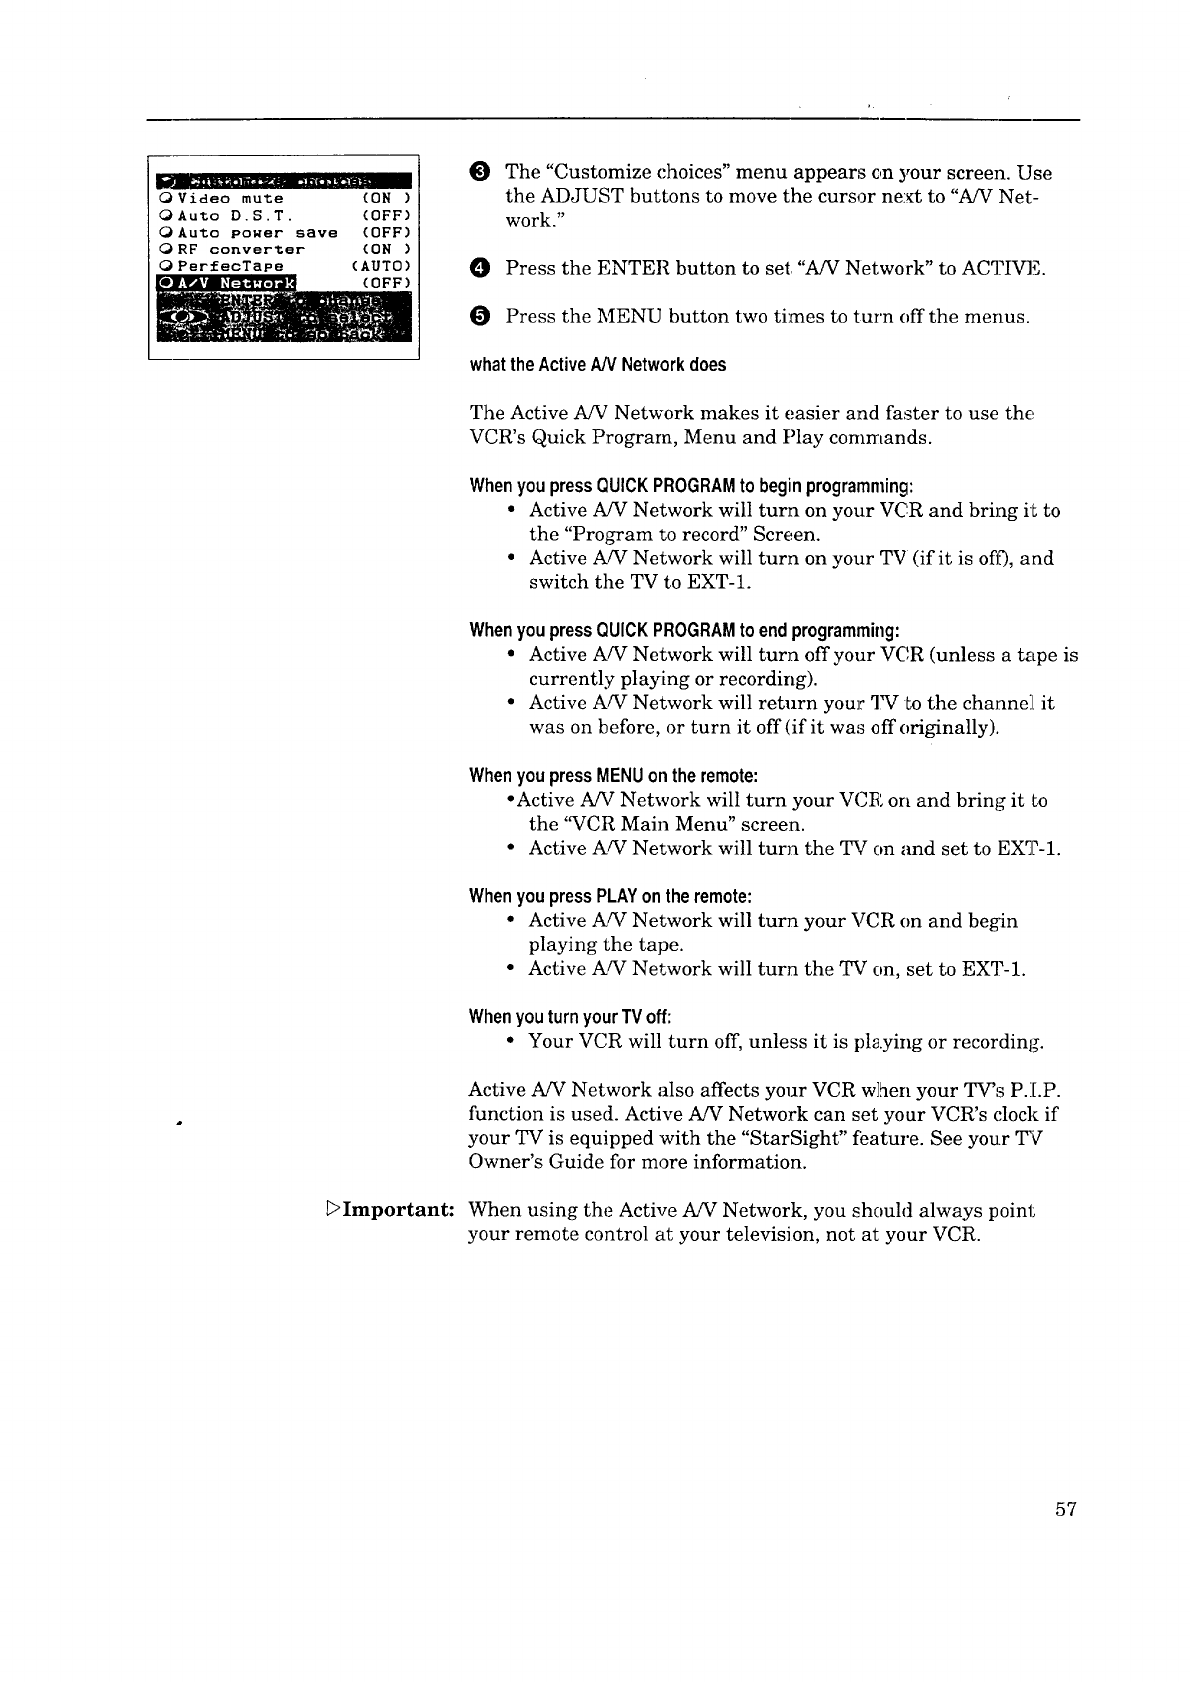
Video mute (ON)
OAuto D.S.T. (OFF)
OAuto power save (OFF)
ORF converter (ON)
OPerfecTape (AUTO)
(OFF)
_Important:
OThe "Customize choices" menu appears on your screen. Use
the ADJUST buttons to move the cursor next to "A/V Net-
work."
O Press the ENTER button to Setr "A/V Network" to ACTIVE.
O Press the MENU button two times to turn off the menus.
whattheActiveA/VNetworkdoes
The Active A/V Network makes it easier and faster to use the
VCR's Quick Program, Menu and Play commands.
WhenyoupressQUICKPROGRAMto beginprogramming:
• Active A/V Network will turn on your VCR and bring it to
the "Program to record" Screen.
• Active A/V Network will turn on your TV (if it is off), and
switch the TV to EXT-1.
WhenyoupressQUICKPROGRAMto endprogramming:
• Active A/V Network will turn offyour VC,R (unless a tape is
currently playing or recording).
• Active A/V Network will return your 2_VLo the channel[ it
was on before, or turn it off (if it wa,_ off originally).
Whenyou press MENUon the remote:
• Active A/V Network wilt turn your VCB', on and bring it to
the '_¢CR Main Menu" screen.
• Active A/V Network will turn the TV on and set to EXT-1.
WhenyoupressPLAYonthe remote:
• Active A/V Network will turn your VCR on and begin
playing the tape.
• Active A/V Network will turn the TV on, set to EXT-1.
Whenyou turnyourTVoff:
• Your VCR will turn off, unless it is pl_.ying or recording.
Active A/V Network also affects your VCR w]hen your TV's P.I.P.
function is used. Active A/V Network can set your VCR's clock if
your TV is equipped with the "StarSight" feature. See your TV
Owner's Guide for more information.
When using the Active A/V Network, you should always point
your remote control at your television, not at your VCR.
57
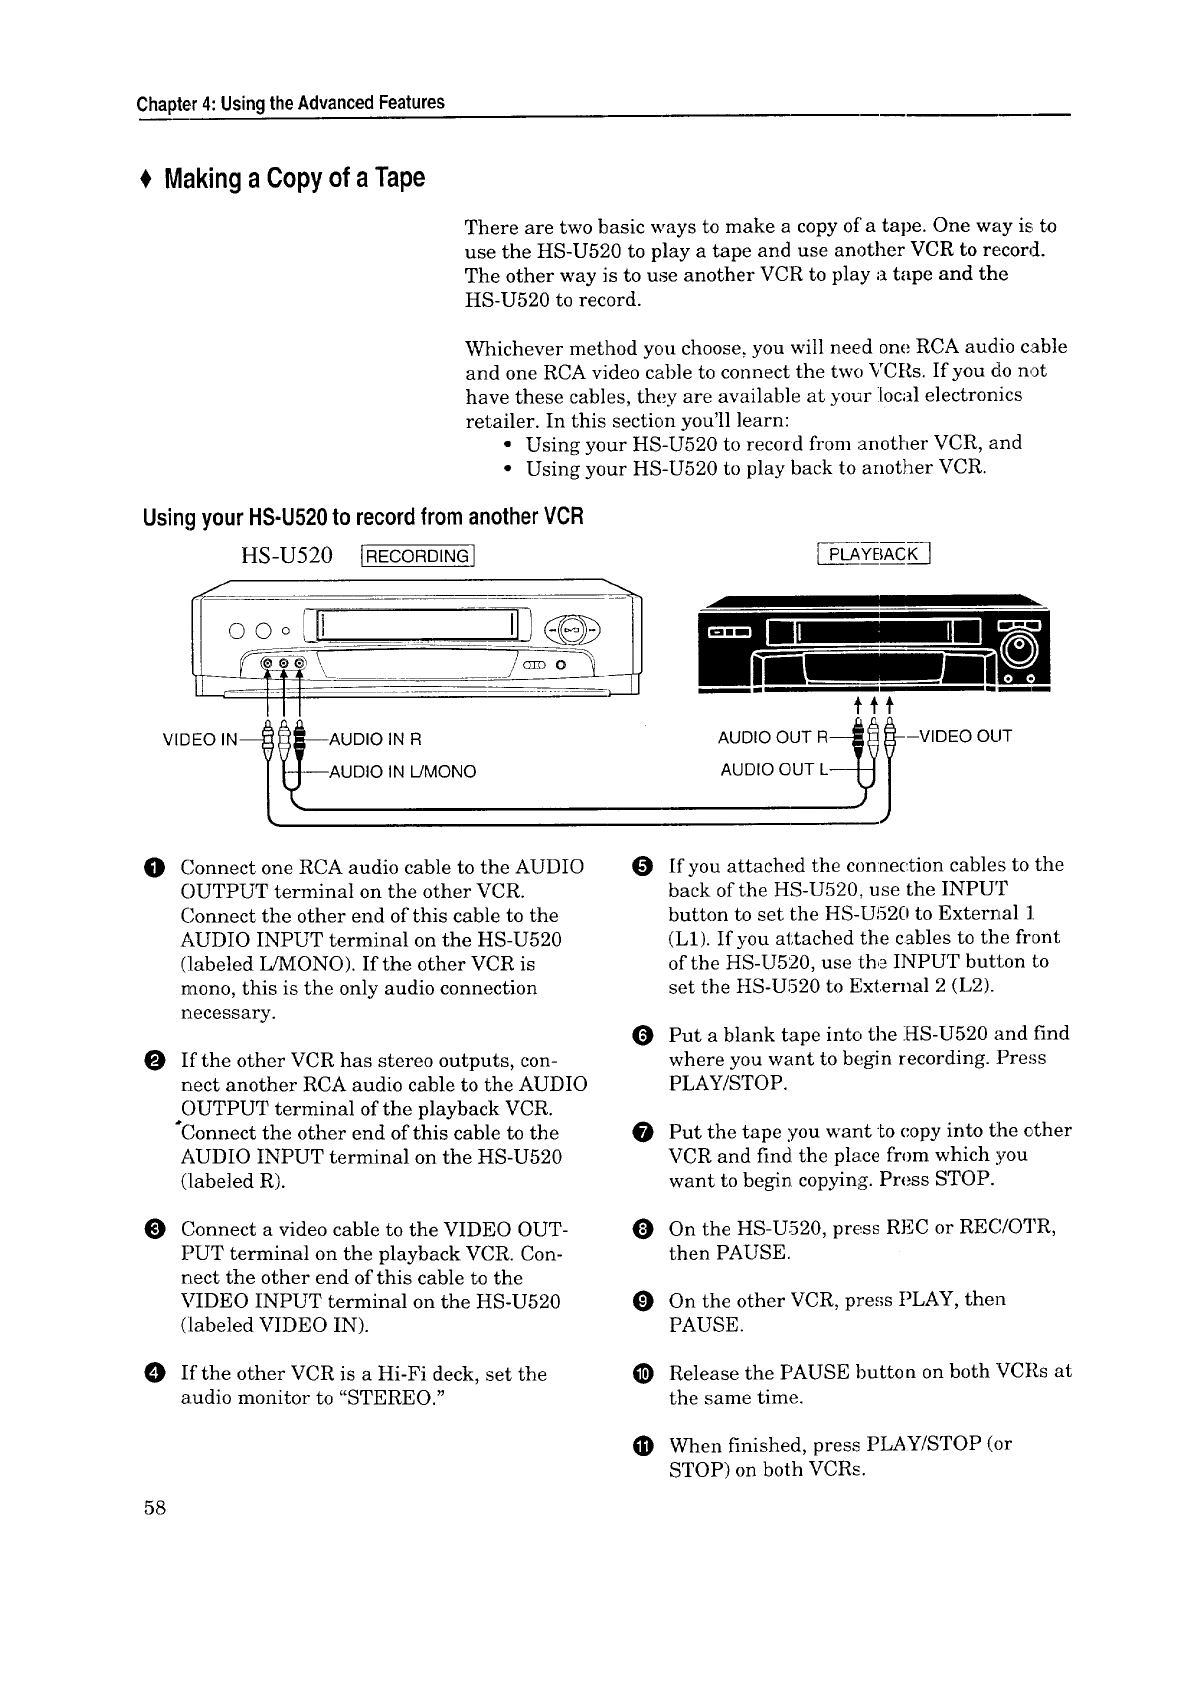
Chapter4:UsingtheAdvancedFeatures
MakingaCopyofaTape
There are two basic ways to make a copy of a tape. One way is to
use the HS-U520 to play a tape and use another VCR to record.
The other way is to use another VCR to play a tape and the
HS-U520 to record.
Whichever method you choose, you will need one RCA audio cable
and one RCA video cable to connect the two VCRs. If you do not
have these cables, they are available at your local electronics
retailer. In this section you'll learn:
• Using your HS-U520 to record from another VCR, and
• Using your HS-U520 to play back to another VCR.
UsingyourHS-U520to recordfrom anotherVCR
HS-U520 IRECORDINGI
ooo
[ PLAYBACK ]
ttt
AUDIO OUT R40 _---VlDEO
AUDIO OUT L--_.J
0
0
Connect one RCA audio cable to the AUDIO
OUTPUT terminal on the other VCR.
Connect the other end of this cable to the
AUDIO INPUT terminal on the HS-U520
(labeled L/MONO). If the other VCR is
mono, this is the only audio connection
necessary.
If the other VCR has stereo outputs, con-
nect another RCA audio cable to the AUDIO
OUTPUT terminal of the playback VCR.
°Connect the other end of this cable to the
AUDIO INPUT terminal on the HS-U520
(labeled R).
O
O
O
If you attached the connection cables to the
back of the HS-U520, use the INPUT
button to set the HS-U520 to External ].
(L1). If you attached the cables to the front
of the HS-U520, use th,; INPUT button to
set the HS-U520 to External 2 (L2).
Put a blank tape into the HS-U520 and find
where you want to begin recording. Press
PLAY/STOP.
Put the tape you want to copy into tlhe other
VCR and find the place from which :you
want to begin copying. Press STOP.
OConnect a video cable to the VIDEO OUT-
PUT terminal on the playback VCR. Con-
nect the other end of this cable to the
VIDEO INPUT terminal on the HS-U520
(labeled VIDEO IN).
On the HS-U520, press REC or REC/OTR,
then PAUSE.
On the other VCR, press PLAY, then
PAUSE.
If the other VCR is a Hi-Fi deck, set the
audio monitor to "STEREO."
_) Release the PAUSE button on both VCRs at
the same time.
O When finished, press PLAY/STOP (or
STOP) on both VCRs.
58
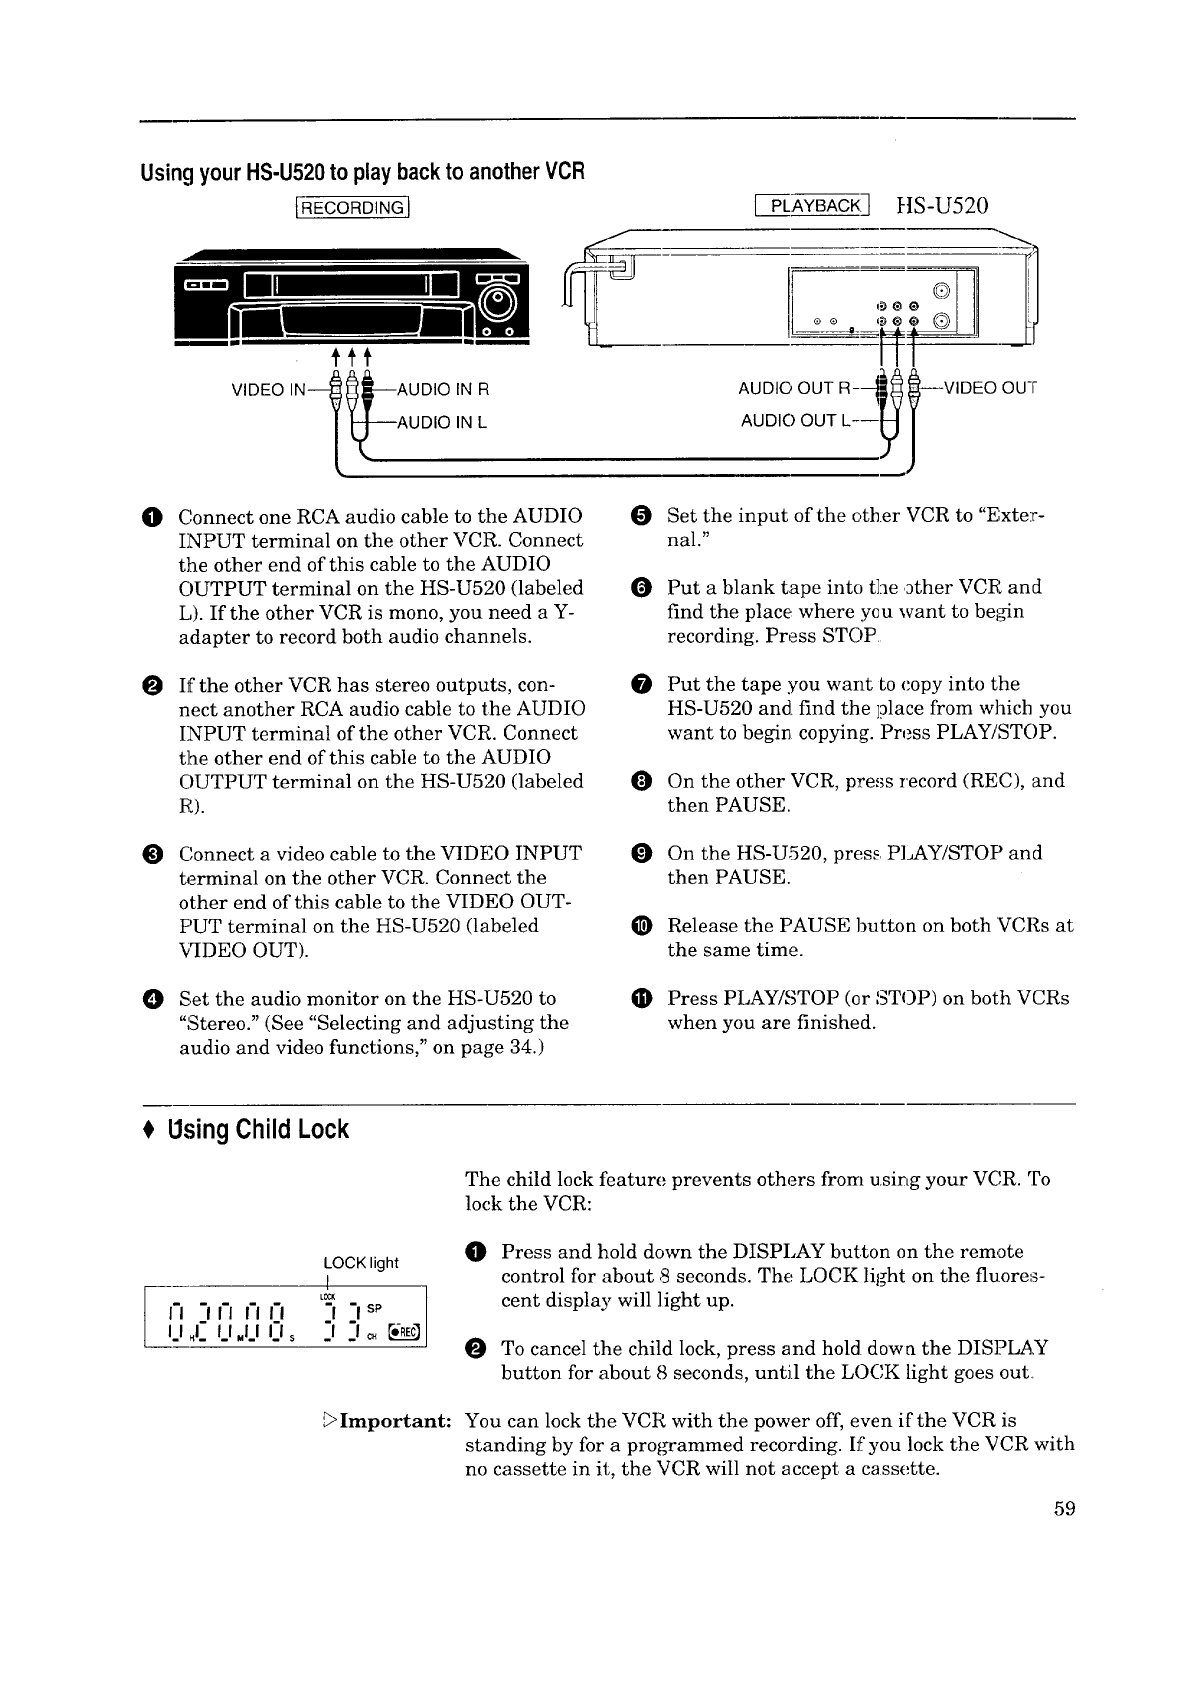
Usingyour HS-U520to play backto anotherVCR
[RECORDINGI
m_ mm
tit
VIDEO IN4OtAUDIO IN R
L_---AUDIO IN L
[ PLAYBACKI HS-U520
0Connect one RCA audio cable to the AUDIO
INPUT terminal on the other VCR. Connect
the other end of this cable to the AUDIO
OUTPUT terminal on the HS-U520 (labeled
L). If the other VCR is mono, you need a Y-
adapter to record both audio channels.
O Set the input of the other VCR to "Exte:r-
nal."
OPut a blank tape into the other VCR and
find the place where you want to bei_n
recording. Press STOP
OIf the other VCR has stereo outputs, con-
nect another RCA audio cable to the AUDIO
INPUT terminal of the other VCR. Connect
the other end of this cable to the AUDIO
OUTPUT terminal on the HS-U520 (labeled
R).
OPut the tape you want Locopy into the
HS-U520 and find the ]place from which you
want to begin copying. Press PLAY/STOP.
On the other VCR, press record (REC), and
then PAUSE.
OC,onnect a video cable to the VIDEO INPUT
terminal on the other VCR. Connect the
other end of this cable to the VIDEO OUT-
F'UT terminal on the HS-U520 (labeled
VIDEO OUT).
On the HS-U520, press PlAY/STOP and
then PAUSE.
Release the PAUSE button on both VCRs at
the same time.
Set the audio monitor on the HS-U520 to
"Stereo." (See "Selecting and adjusting the
audio and video functions," on page 34.)
O Press PLAY/STOP (or STOP) on both VCRs
when you are finished.
Using Child Lock
II _111 II II
I.I _1. I.I .I.I I-I s
LOCK light
I
"1 "1sp
Important:
The child lock feature prevents others from using your VCR. To
lock the VCR:
Press and hold down the DISPLAY button on the remote
control for about 8 seconds. The LOCK light on the fluores-
cent display will light up.
To cancel the child lock, press and hold down the DIS]?LAX
button for about 8 seconds, until the LOCK light goes out.
You can lock the VCR with the power off, even if the VCR is
standing by for a programmed recording. If you lock the VCR with
no cassette in it, the VCR will not accept, a cassette.
59
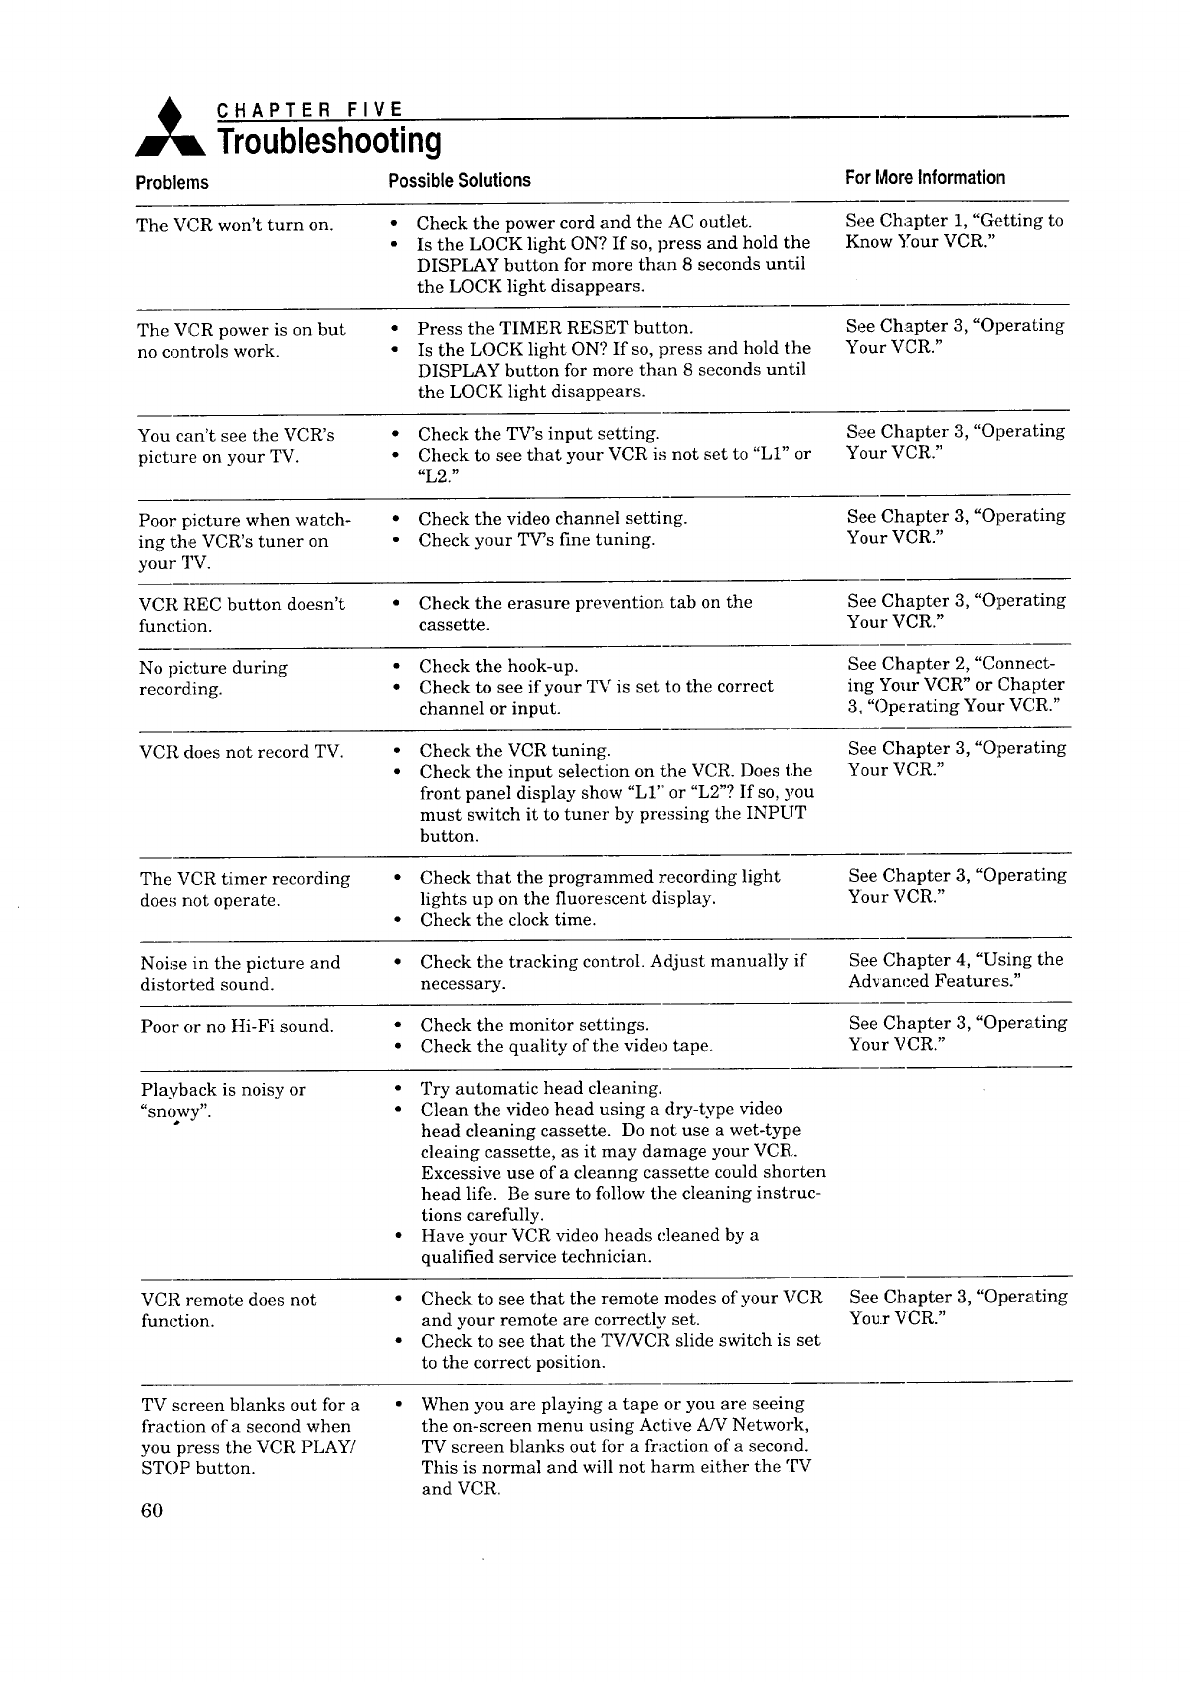
A CHAPTER FIVE
Troubleshooting
Problems PossibleSolutions ForMoreInformation
The VCR won't turn on. • Check the power cord and the AC outlet.
Is the LOCK light ON? If so, press and hold the
DISPLAY button for more than 8 seconds until
the LOCK light disappears.
See Chapter 1, "Getting to
Know Your VCR."
The VCR power is on but •
no controls work. •
Press the TIMER RESET button.
Is the LOCK light ON? If so, press and hold the
DISPLAY button for more than 8 seconds until
the LOCK light disappears.
See Chapter 3, "Operating
Your VCR."
You can't see the VCR's
picture on your TV.
• Check the TV's input setting.
• Check to see that your VCR is not set to "LI" or
"L2."
See Chapter 3, "Operating
Your VCR."
Poor picture when watch-
ing the VCR's tuner on
your TV.
• Check the video channel setting.
• Check your TV's fine tuning.
See Chapter 3, "Operating
Your VCR."
VCR REC button doesn't
function.
• Check the erasure preventiorJ tab on the
cassette.
See Chapter 3, "Operating
Your VCR."
No picture during
recording.
• Check the hook-up.
• Check to see if your TV is set to the correct
channel or input.
See Chapter 2, "Connect-
ing Your VCR" or Chapter
3, "Op_ rating Your VCR."
VCR does not record TV. ° Check the VCR tuning.
Check the input selection on the VCR. Does the
front panel display show "LI" or "L2"? If so, you
must switch it to tuner by pressing the INPUT
button.
See Chapter 3, "Operating
Your VCR."
The VCR timer recording
does not operate.
• Check that the programmed recording light
lights up on the fluorescent display.
• Check the clock time.
See Chapter 3, "Operating
Your VCR."
Noise in the picture and • Check the tracking control. Adjust manually if See Chapter 4, "Using the
distorted sound, necessary. Advanced Features."
Poor or no Hi-Fi sound. • Check the monitor settings. See Chapter 3, "Operating
• Check the quality of the vide,) tape. Your VCR."
Playback is noisy or • Try automatic head cleaning.
"snowy". ° Clean the video head using a dry-type video
head cleaning cassette. Do not use a wet-type
cleaing cassette, as it may damage your VCR.
Excessive use of a cleanng cassette could shorten
head life. Be sure to follow the cleaning instruc-
tions carefully.
• Have your VCR video heads cleaned by a
qualified service technician.
VCR remote does not
function.
• Check to see that the remote modes of your VCR
and your remote are correctly set.
• Check to see that the TV/VCR slide switch is set
to the correct position.
See Chapter 3, "Operating
Your VCR."
TV screen blanks out for a
fraction of a second when
you press the VCR PLAY/
STOP button.
60
When you are playing a tape or you are seeing
the on-screen menu using Active A!V Network,
TV screen blanks out tbr a fraction of a second.
This is normal and will not harm either the TV
and VCR.
Index
A
Actiw. _ A/V Netork,
connecting ........................ 17
terminals .......................... 10
using ................................. 56
adding channels .................. 31
adjust button ......................... 9
adjusting the tracking ........ 47
advanced features, using .... 46
advanced playback
controls ............................. 46
advanced options ................. 54
antenna, connections .......... 11
antenna terminals .............. 10
audio functions .................... 32
audio input terminals ..... 7, 10
audio inputs, connecting
a TV with .......................... 16
audio monitor ...................... 32
audio output terminals ....... 10
audio/video button ................ 9
auto-off ................................ 55
auto speed programming .... 43
automatic tracking .............. 47
B
backup, memory .................. 45
basic playback controls ....... 25
batteries, installing ............. 20
C
cable box, connecting .......... 11
cable, connecting ................. 11
cancel button ......................... 8
canceling a programmed
recording .......................... 45
cassette slot ........................... 6
cassette status symbol .......... 8
changing programmed
recording settings ............ 44
channel buttons ................. 7, 9
channel display ..................... 8
channels,
adding and deleting ......... 31
programming the VCR to
receive ........................... 29
selecting ........................... 31
child lock ............................. 59
cleaning, head ............... 24, 60
clock, setting ........................ 27
Connecting,
Antenna or Cable to the
VCR ................................. 11
A/V network ..................... 17
older TV ............................ 16
Television ......................... 15
TV with audio and video
inputs ............................... 16
UHF/VHF antennas ......... 14
VCR .................................. 11
controlling vibration ........... 26
controls, basic playback ...... 25
copy, making one of a tape. 58
counter/present time/remaing
display ................................ 7
counter, setting ................... 48
counter, time ....................... 48
counter zero stop ........... 34, 52
D
daylight savings time .......... 28
daylight savings time, auto 54
deleting channels ................ 31
digital tracking .................... 47
digital tracking light ............. 7
display button ....................... 9
displaying the time gauge
and present time ........ 50, 51
dubbing ................................ 58
E
eject button ............................ 6
enter button ........................... 9
EP ........................................... 8
erasure, preventing ............. 24
espafiol ................................. 26
F
fast forward and fast forward
serach button ................. 7, 9
fast forwarding a tape ......... 25
flat twin leads, connecting.. 13
fluorescent display ................ 7
frangais ................................. 26
Front Panel Buttons and
Functions ............................ 6
function button ....................... 9
H
head cleaning ................ 24, 60
I
Important Safeguards ........... 2
index
marks ............................... 53
search .......................... 34,53
input button .......................... 9
installing 1:he batteries ....... 20
L
language, selecting on-screen.
.......................................... 26
loading and _nloading
tapes ................................. 24
lock light ................................ 7
locking the VCR .................. 59
M
manual tracking .................. 48
marks, index ........................ 53
raemorize channels ............. 29
memory backup ................... 45
menu button .......................... 9
menus, using the on-screen 26
menus, using to set
the time ............................ 27
modern '1_7........................... 20
modern 'I_7, _iewing the VCR's
picture cn a ...................... 23
monitor (audio monitor) ...... 32
mute button ........................... 8
mute, video .......................... 30
N
normal recording ................. 33
notes about programmed
recording .......................... 43
number buttc,ns ..................... 8
0
One Key Prof_amming ....... 40
one key program button ........ 6
One-Touch Recording .......... 38
Operating Your VCR ........... 19
OTR ..................................... 38
61
Index
P
pause button ......................... 9
pausing a tape ..................... 25
PerfecTape TM ...............................34, 49
PerfecTape TM, light ................ 8
Picture, viewing the one from
your VCR .......................... 23
play/stop button .................... 6
play/stop, enter button .......... 9
play light ............................... 8
playback controls ................ 25
playback speed .................... 46
Playing a Tape .................... 25
power button ..................... 6, 8
present time/remaining
display ................................ 7
Program, Quick ................... 42
Programmed recording,
canceling ........................... 45
changing settings ............. 44
light .................................... 8
notes about ....................... 43
Programming,
auto speed ......................... 43
clhannels automatically .... 29
One Key ............................ 40
g_Vprograms that end on
day after ........................... 44
VCR to Receive TV Channels
.......................................... 29
VCR to record ................... 36
0
Quick Program, using ......... 42
quick program button ........... 9
quick searching ................... 51
R
record button (REC/OTR) ..... 7
record button ......................... 8
record light ............................ 8
record speed ........................ 33
record, programming your
VC.R to .............................. 36
recording,
canceling a programmed.. 45
current broadcast ............. 35
notes about programmed. 43
One Key Programming .... 40
One-Touch Recording ....... 38
Quick Program ................. 42
Remote Control, Using ....... 20
remote control sensor. ........... 7
repaired tapes ..................... 24
rewind and reverse search
buttons ........................... 6, 9
rewinding a tape ................. 25
RF converter, setting .......... 56
S
SAP ...................................... 33
search, index ....................... 53
searching techniques .......... 51
searching, speed .................. 52
selecting channels ............... 31
selecting the on-screen
language ........................... 26
Setting Up Your VCR ......... 19
skipping programs .............. 44
slow motion ......................... 47
SP ........................................... 8
special effects ...................... 46
speed searching ................... 52
splitter ................................. 15
still adjustment ................... 47
stop button ........................ 6, 9
T
tape speed light ..................... 8
tape status symbol ................ 8
tape,
fast forwarding ................. 25
loading .............................. 24
making a copy .................. 58
pausing ............................. 25
playing .............................. 25
repaired ............................ 24
rewinding ......................... 25
television, connecting .......... 15
time counter ........................ 48
time gauge ........................... 50
time, present ....................... 51
time, setting ........................ 27
timer reset ........................... 45
timer reset, button .............. 10
tracking ............................... 47
troubleshooting ................... 60
TV, operating with the
remote .............................. 21
TV/VCR slide switch ............... 9
two times playback ............... 47
U
UHF/VHF antennas ............ 14
Unpacking Your VCR ........... 5
Using,
Advanced Features .......... 46
audio and video functions 32
on-screen menus .............. 26
repeat playback ................ 54
Using tlhe Remote Control .. 20
V
VCR light ............................... 7
VCR, locking ........................ 59
VCR, operating with the
remote .............................. 20
VCR/TV button ...................... 8
vibration, controlling .......... 26
video functions .................... 32
video input terminals ...... 7, 10
video inputs, connecting a
TV with ............................. 16
video mute ........................... 30
video output terminals ........ 10
Viewing the Picture from
Your VCR ......................... 23
volume controls ..................... 8
W
Welcome to Mitsubish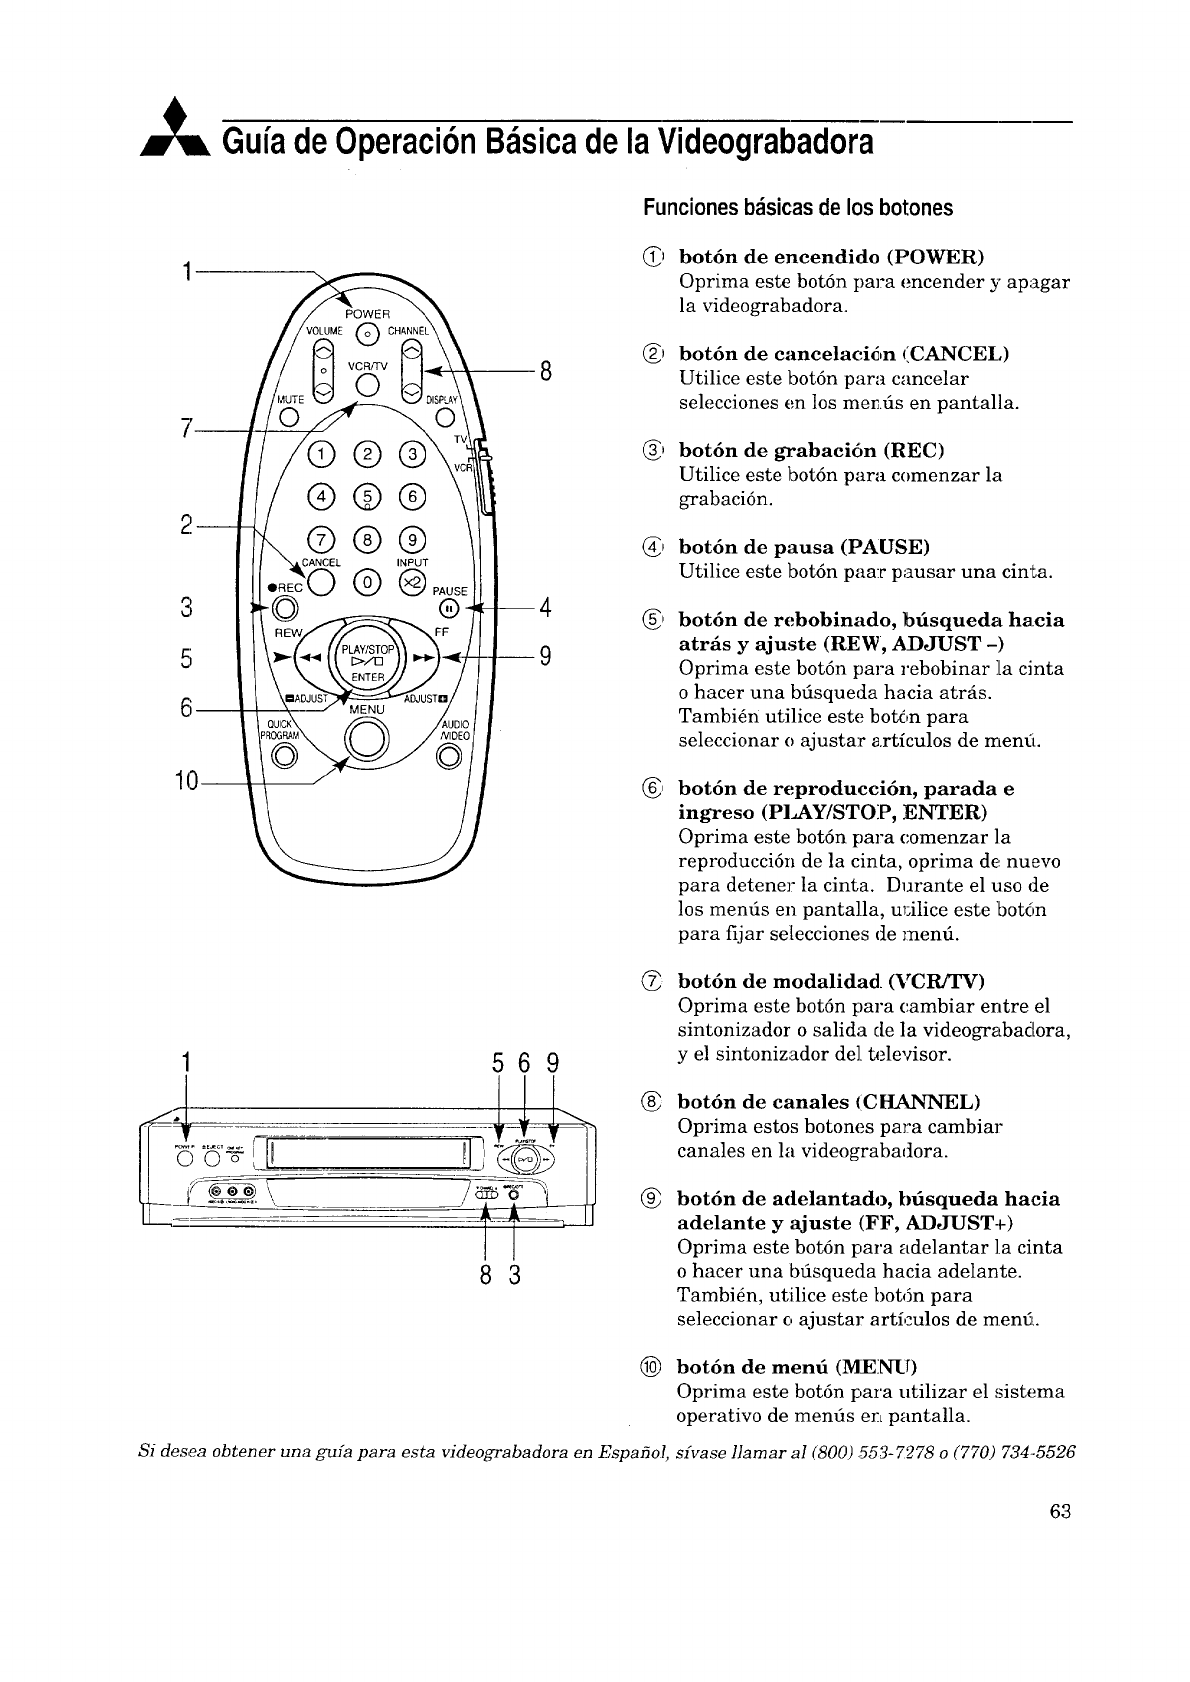
A GufadeOperaci6nB sicadelaVideograbadora
3
5;
61
8
CANCEL INPUT
--9
Funcionesb_sicasde los botones
1569
83
_bot6n de encendido (POWER)
Oprima este botdn para encender y apagar
la videograbadora.
_botdn de cancelaci6n (CANCEL)
Utilice este bot6n para cancelar
selecciones en los mends en pantalla.
_* botSn de grabaci6n (REC)
Utilice este bot6n para comenzar la
grabaciSn.
_, botdn de pausa (PAUSE)
Utilice este bot6n paa:r pausar una cin'La.
®
®
bot6n de rebobinado, btisqueda hacia
atrfs yajuste (REW, ADJUST -)
Optima este bot6n para rebobinar ]a cinta
ohacer una btisqueda hacia atr6s.
Tambi6n utilice este bot_,n para
seleccionar o ajusta:r articulos de menu.
Si desea obtener una g_fa para esta videograbadora en Espafiol,
bot6n de reproducci6n, parada e
ingreso (PLAY/STOP, ENTER)
Oprima este bot6n para comenzar ]a
reproducci6n de la cinta, oprima de nuevo
para detener la cinta. Durante el uso de
los menfis en pantalla, m;ilice este boton
para fijar selecciones de memi.
bot6n de modalidad (VCR/TV)
Oprima este bot6n para cambiar entre el
sintonizador o salida de la videograbadora,
y el sintonizador de] televisor.
bot6n de canales (CHANNEL)
Oprima estos botones para cambiar
canales en la videograbadora.
bot6n de adelantado, bdsqueda ha cia
adelante y ajuste (FF, ADJUST+)
Oprima este bot6n para adelantar la cinta
o hacer una bfisqueda hacia adelante.
Tambi6n, ut:ilice este bot6n para
seleccionar o ajustar articulos de m en_L.
bot6n de menfi (MENU)
Oprima este bot6n l:,ara utilizar el sistema
operativo de menfis en pantalla.
sfvase llamar al (800) ,553-7e.78 o (770) 734-5526
63
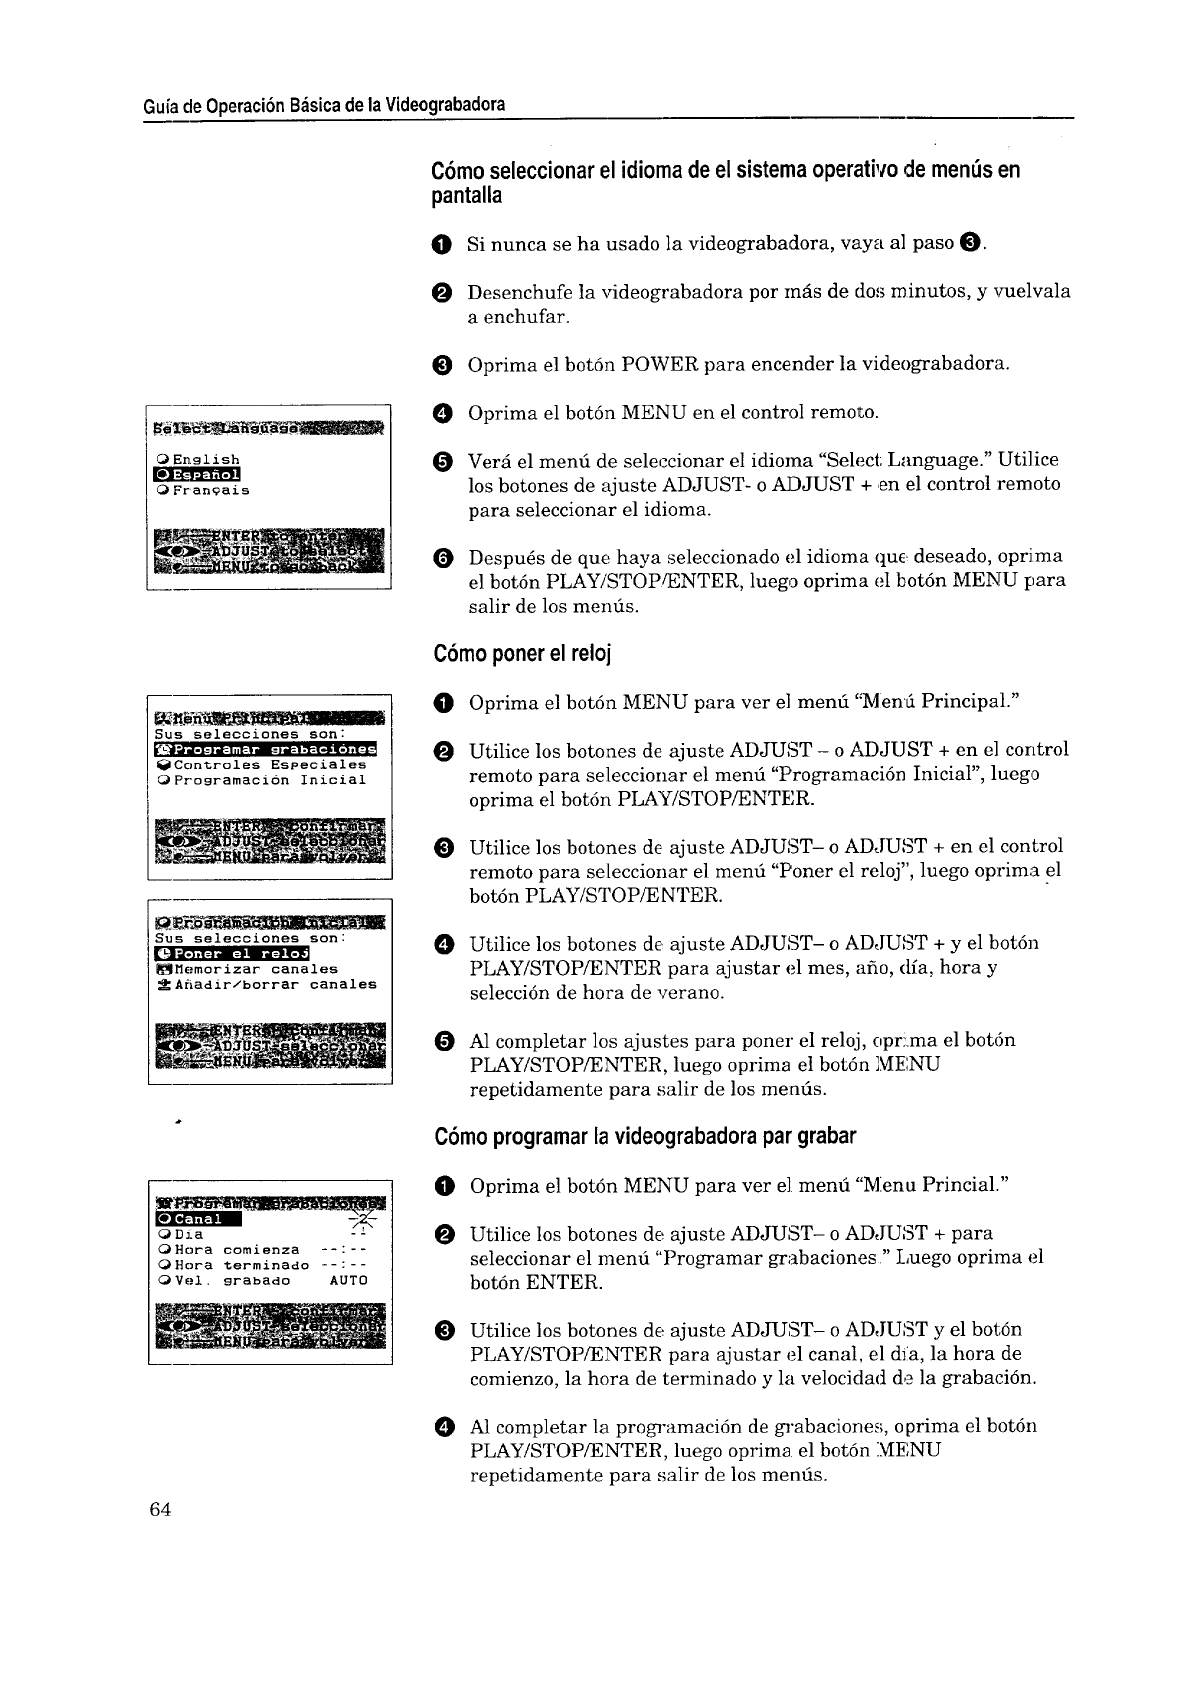
Guiade Operaci6nB_sicade laVideograbadora
0 English
0 Fr an_ais
Sus seleeciones son:
"L'_I _, iiI. I:+ I Ill-'IMP- IiI:. I iii_+| ."_- 1-41, III-) i I:
_Controles Especiales
OPro9ramacion Inicial
Sus selecciones son:
]l;,TJ'h-'
MITSUBISHI
VIDEO CASSETTE RECORDER
LIMITED WARRANTY
MITSUBISHI ELECTRONICS AMERICA, INC. ("MELA") warrants to the original purchaser of this video cassette recorder if purchased
from an authorized MITSUBISHI AudioNideo Dealer that, should it prove defective by reason of improper workmanship and/or materiah
a. Parts. For one year from the date of original purchase at retail, we will repair or replace, at our option, any defective part
including the video head without charge for the part. Parts used for replacement are warranted for the remainder of tPe original warrant!r period.
b. Labor. For six months from the date oforiginal purchase at retail, we will provide the labor for a warranty repair without charge
at an authorized MITSUBISHI service center.
c. Notice. To obtain warranty service, you must notify an authorized MITSUBISHI service center of any defect within the
applicable warranty time period.
1. TC) OBTAIN WARRANTY SERVICE, deliver your VCR to the nearest MITSUBISHI service center.
Shipping expenses are your responsibility. The name and address of the nearest service center can be obtained from your MITSUBISH; Dealer,
or by writing or calling MELA at the address and telephone number below. Proof of purchase date from an authorized MITSUBISHI Dealer is
required when requesting warranty service. Present your sales receipt or other document which establishes proof End date of purchase. THE
RETURN OF THE OWNER REGISTRATION CARD IS NOT A CONDITION OF WARRANTY COVERAGE. However, please detach and return
the Owner Registration Card so that we can contact you should a question of safety arise which could affect ycu.
2. THIS WARRANTY DOES NOT COVER damage caused by: modification, alteration, repair or service of this product by .anyone other
than an authorized MITSUBISHt service center; physical abuse to, or misuse of, the VCR; operation in a manner ccntr_Lrytothe instructions which
accompar, y the VCR; freight damage; or any damage caused by acts of God such as lightning or fluctuation in elec:rical power. This warranty
also excludes all costs arising from installation, adjustment of user controls, external antenna systems, service of F-rod,Jcts purchased or serviced
outside the U.S.A., initial technical adjustments (set-up) and user-required maintenance including head cleaning. Consult the operating
instructions enclosed with the product for information regarding user controls.
3. ANY EXPRESS WARRANTY NOT PROVIDED HEREIN, AND ANY REMEDY WHICH, BUT FOR -rills PROVISION, MIGHT ARISE
BY IMPLIC, ATION OR OPERATION OF LAW, IS HEREBY EXCLUDED AND DISCLAIMED. THE IMPLIED WARRANTIES OF MERCHANT-
ABILITY AND OF FITNESS FOR ANY PARTICULAR PURPOSE ARE EXPRESSLY LIMITED TO A TERM OF ONE YEAR.
4. UNDER NO CIRCUMSTANCES SHALL MELA BE LIABLE TO PURCHASER OR ANY OTHER PERSON FOR ANY INCIDENTAL,
SPECIAL OR CONSEQUENTIAL DAMAGES, WHETHER ARISING OUT OF BREACH OF WARRANTY, BREACH OF CONTRACT, OR
OTHERWISE.
5. Some state do not allow limitations on how long an implied warranty lasts, or the exchJsion or limitation of incidental, special, or
consequential damages, so the above limitations or exclusions may not apply to you.
6. This warranty gives you specific legal rights and you may also have other rights which vary from state to state.
7. BE-FORE REQUESTING SERVICE, please review the instruction booklet to insure proper installation and correct customer control
adjustment. If the problem persists, contact your nearest MITSUBISHI Dealer for name(s) of authorized MITSUBISHI Service Center(s). If you
are unable to obtain the information, please call 1-800-332-2119, or write us at the address below
P.o.MITSUBISH' ELECTRONICS AMERICA,,NC.Box5025 MITSUBISHI
Norcross, GA 30091-5025
RETAIN THIS PORTION FOR YOUR RECORDS SERIAL NO.
CUSTOMER NAME
STREET ADDRESS
CITY
PHONE ( )
STATE ZIP
PURCHASE DATE / /
MO DAY YR
PLACE OF PURCHASE
_,= MITSUBISHI
MITSUBISHI ELECTRONICS AMERICA, INC.
6100 Atlantic Boulevard
Norcross, GA 30071-1305
© 1996 Mitsubishi Electronics America, Inc.
872C151A3 PRINTED IN SINGAPORE
