MOBILE CREATE MCG-W160 Personal Wireless Mobile Camera User Manual
MOBILE CREATE Inc. Personal Wireless Mobile Camera Users Manual
Users Manual

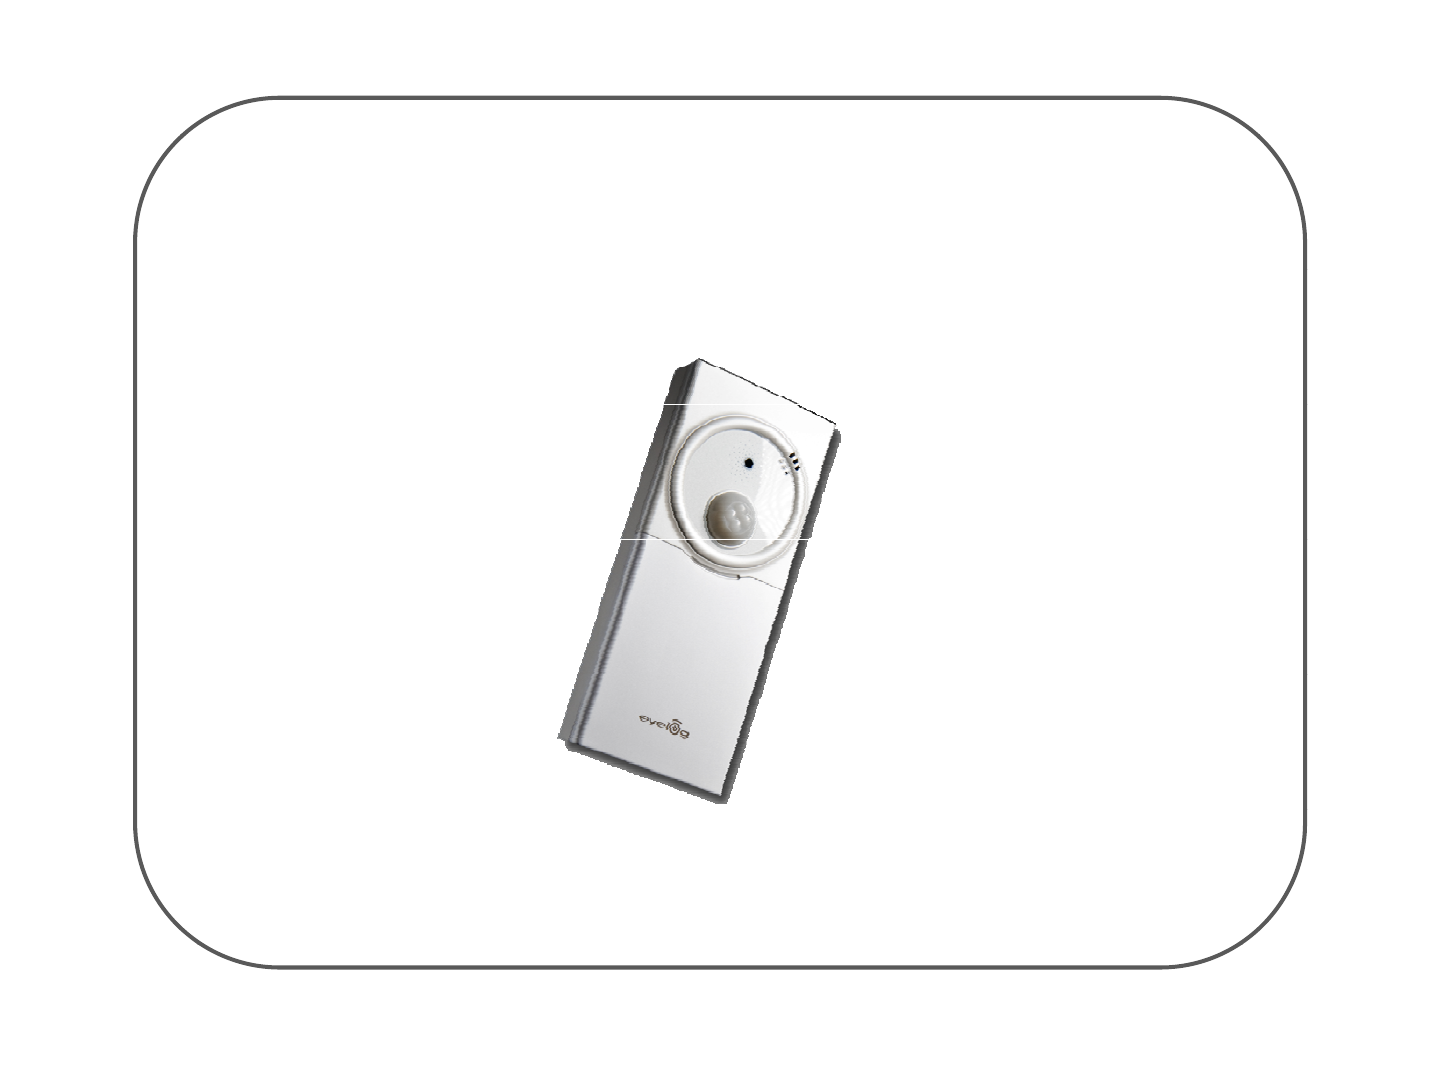
Eyelog User's Manual
-1 -

Getting Started____________________________________________________________________
●Introduction
So many things regarded impossible come true by innovative growth of IT technology. User become able to get
information they want in anytime and anywhere by coming true of Ubiquitous technology. And many new products
having new concept and idea can be developed by dramatic growth of each components technology. IT industrial
world can recognize “New Product” can be from another assembling way of now developed components, and it
t
b
f
bi
td
f
ft
dli
“S it ”
dt
f
th
tt
f
bi
h
b
l
mus
t
b
eoneo
f
bi
g
t
ren
d
so
f
f
u
t
ure
d
eve
l
op
i
ng.
“S
ecur
it
y
”
pro
d
uc
t
s
f
or
th
es
t
a
t
eo
f
b
e
i
ng secure
h
ave
b
een a
l
so
developed a lot according to Ubiquitous technology. But most of users are not satisfied with the security system
with high price, difficulty of setup and handling, limited area, etc. Mobile Create Inc. was founded for creating new
products users want based on users’ recognizing against undesirable trespassing or invaders in real time
anytime and anywhere, and easy changing and setup.
● Applications
With functions for detecting change of environment and movement of people as well as for transmitting requested
information, the device can be installed very conveniently at all places where the user want to check for security.
The device also records every situational development
The device ensures security by detecting intruders when there is no one at home
Th d i it i t b ki i th t l ffi t
Th
e
d
ev
i
ce ensures secur
it
y aga
i
ns
t
b
rea
ki
ng
i
n
th
e s
t
ore, persona
l
o
ffi
ce, e
t
c.
The device can be installed inside a car to prevent vehicle theft or operation of the vehicle by an unwanted person
The device provides security against intruders in the garden or other private places
The device can be installed in front of a safe or an apparatus which can be operated by a specialist
The device can be used in front of a desk or a place where you do not want the presence of person or in which yo
u want to kee
p
a record
p
Only the monitoring function can be used in places where you need to check the situation at designated intervals
including a playroom
The device provides a monitoring function to check the safety of all locations
-2 -

bl f
Ta
bl
e o
f
Contents
Chapter 1. Setup Guide
-------------------------------------------------------------
6
Chapter
1.
Setup
Guide
6
1. Prepare the Parts ---------------------------------------------------- 7
1.1 Functions of Keypads -------------------------------------------8
1.2 LCD Icons --------------------------------------------------------9
2. Insert SIM Card ------------------------------------------------------10
3. Insert Battery ------------------------ ------------------------------- 11
4Sithi thDi O
12
4
.
S
w
it
c
hi
ng
th
e
D
ev
i
ce
O
n --------------------------------------------
12
5. User Registration ----------------------------------------------------13
5.1 Mobile Number -------------------------------------------------14
5.2 E-Mail Address --------------------------------------------------15
5.3 Permit Exception ------------------------------------------------16
6. Settin
g
----------------------------------------------------------------18
g
6.1 Camera -----------------------------------------------------------19
6.2 Video -------------------------------------------------------------20
6.3 Network Setting -------------------------------------------------21
7. The Way to Install ----------------------------------------------------29
8. USB cable connect ---------------------------------------------------30
9 The range & angle of the sensor
------------------------------------
31
9
.
The
range
&
angle
of
the
sensor
------------------------------------
31
Chapter 2. The Rest Functions----------------------------------------------------- 32
1. Album -------------------------------------------------------------------32
1.1 Photo -------------------------------------------------------------- 32
1.2 Video -------------------------------------------------------------- 33
2V i If
34
2
.
V
ers
i
on
I
n
f
o. ------------------------------------------------------------
34
3. Motion function ----------------------------------------------------- ---34
Chapter 3. Remote Control Operation-------------------------------------------- 35
1. How to use remote control by cell-phone ---------------------------36
2. For the Error Reason Code --------------------------------------------37
-3 -

PRECAUTIONS
Warnings
Please carefully read the device instruction and safety precautions booklet included with this product before
using your Eyelog MCG-W150. This booklet contains important device manual and safety information.
Cautions
1. Handle the battery with care.
Do not use excessive force or sharp objects when handling the battery.
Do not heat it or keep it on the heated surfaces.
Do not expose it to moisture
Keep it out of the reach of children or pets to prevent accidental poisoning
Keep
it
out
of
the
reach
of
children
or
pets
to
prevent
accidental
poisoning
.
Ensure that no metal objects come into contact with the + and – terminal of the battery.
2. Do not touch the terminals of the battery or AC adaptor with wet hands.
It may cause electric shock.
3. Do not disassemble or repair the device.
you may not get warranty service if you disassemble or repair the device by yourself.
4. Do not place the device, battery, or the charger in areas near heat such as heaters or microwaves.
This might cause fire, explosion, or injury.
5. Use the supplied battery and accessories from Mobile Create.
Use with any other battery or accessories might cause explosion or injury.
6. Do not connect PC USB port without battery in Eyelog.
Your PC USB port could be damaged
by electric current.
Your
PC
USB
port
could
be
damaged
by
electric
current.
※ Mobile Create is not responsible for items being stolen or accidents by invaders.
Important Notice
Setu
p
is eas
y
with followin
g
direction methodicall
y
. So
g
o throu
g
h it ste
p
b
y
ste
p
with
y
our device connected to
py g yg g pypy
your mobile phone. Referring to several features that this software offers, remember to save your information
often.
The client mobile have to support the following for using Eyelog device
● Client mobile have to support receiving MMS2.0
●
Cli t bil h t t i i i d d li i f ti
ns
●
Cli
en
t
mo
bil
e
h
ave
t
o suppor
t
rece
i
v
i
ng, answer
i
ng an
d
d
e
li
ver
i
ng
f
unc
ti
o
ns
-4 -
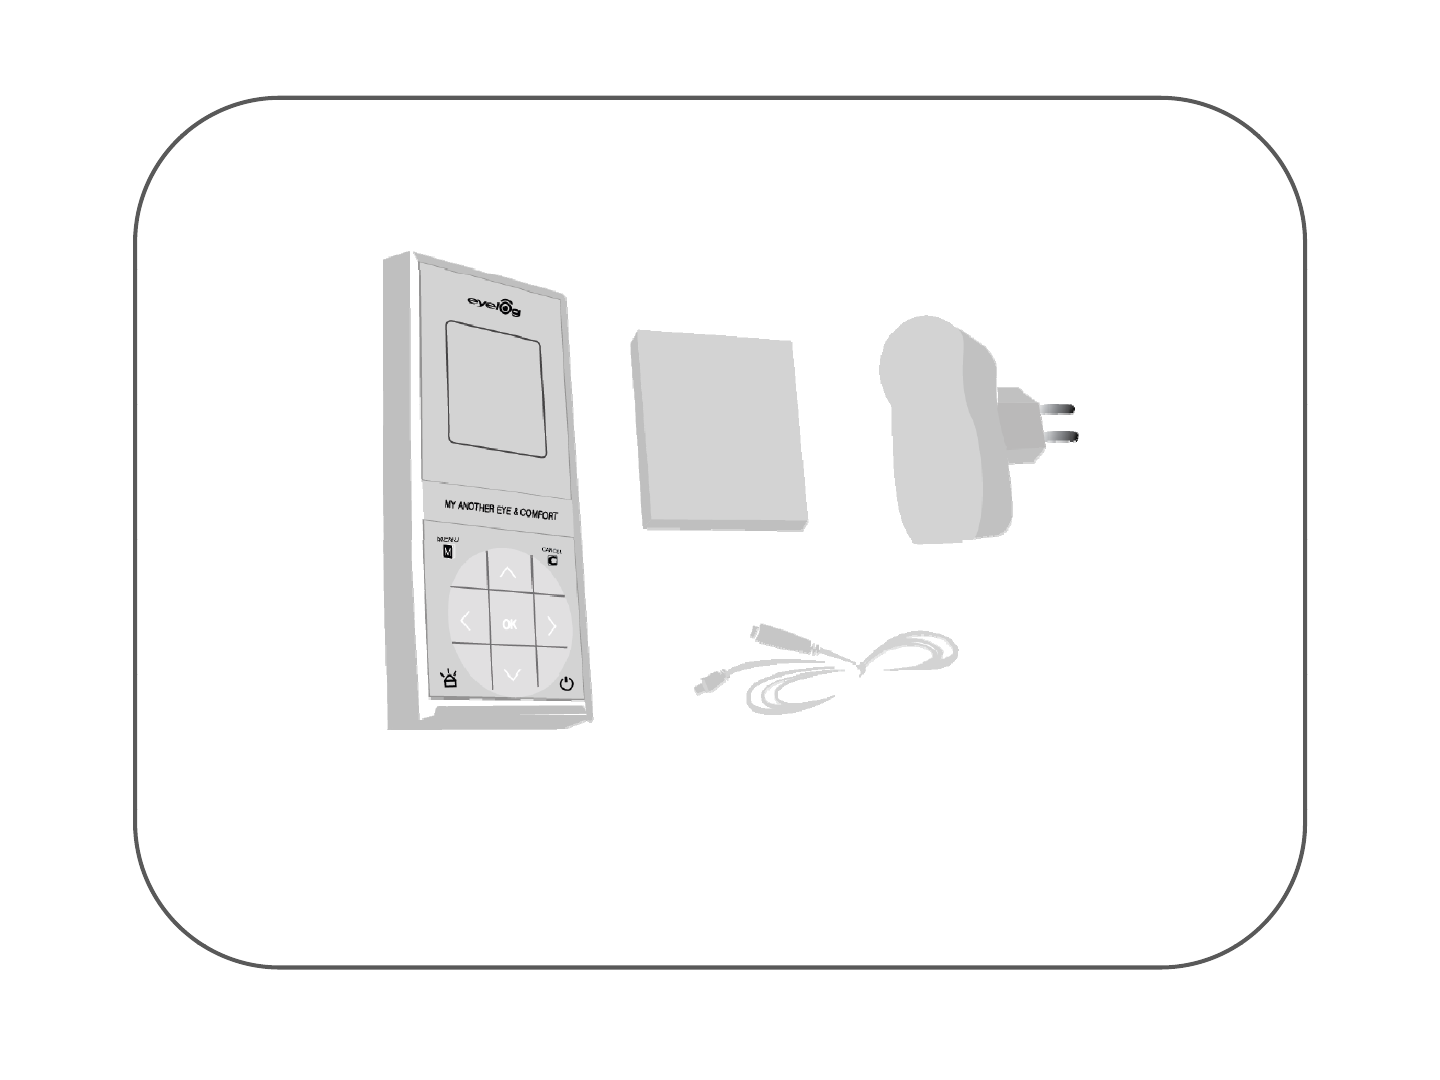
Package contents
② Batter
y
③ TA Adapter
①Eyelog Device ④ Data Cable
•It is separate way to purchase the IR LED Dongle.
It will included in your package if you purchase IR LED Dongle.
-5 -
Chapter 1 Setup Guide
Quick starting to make device
“
Guard on
”
Chapter
1
.
Setup
Guide
Quick
starting
to
make
device
Guard
on
1. Make sure you had inserted the SIM card in device and your cell-phone
2. Put battery on and press power key to turn on the power
3. Press (menu) key and put your cell-phone SIM card number in Mobile Number
option
4. Make sure device and your cell-
p
hone has to be in same communication networ
k
(Network MMS Server Profile select communication network your
using)
5. Input the SMS message by your cell phone right below or in page 31.
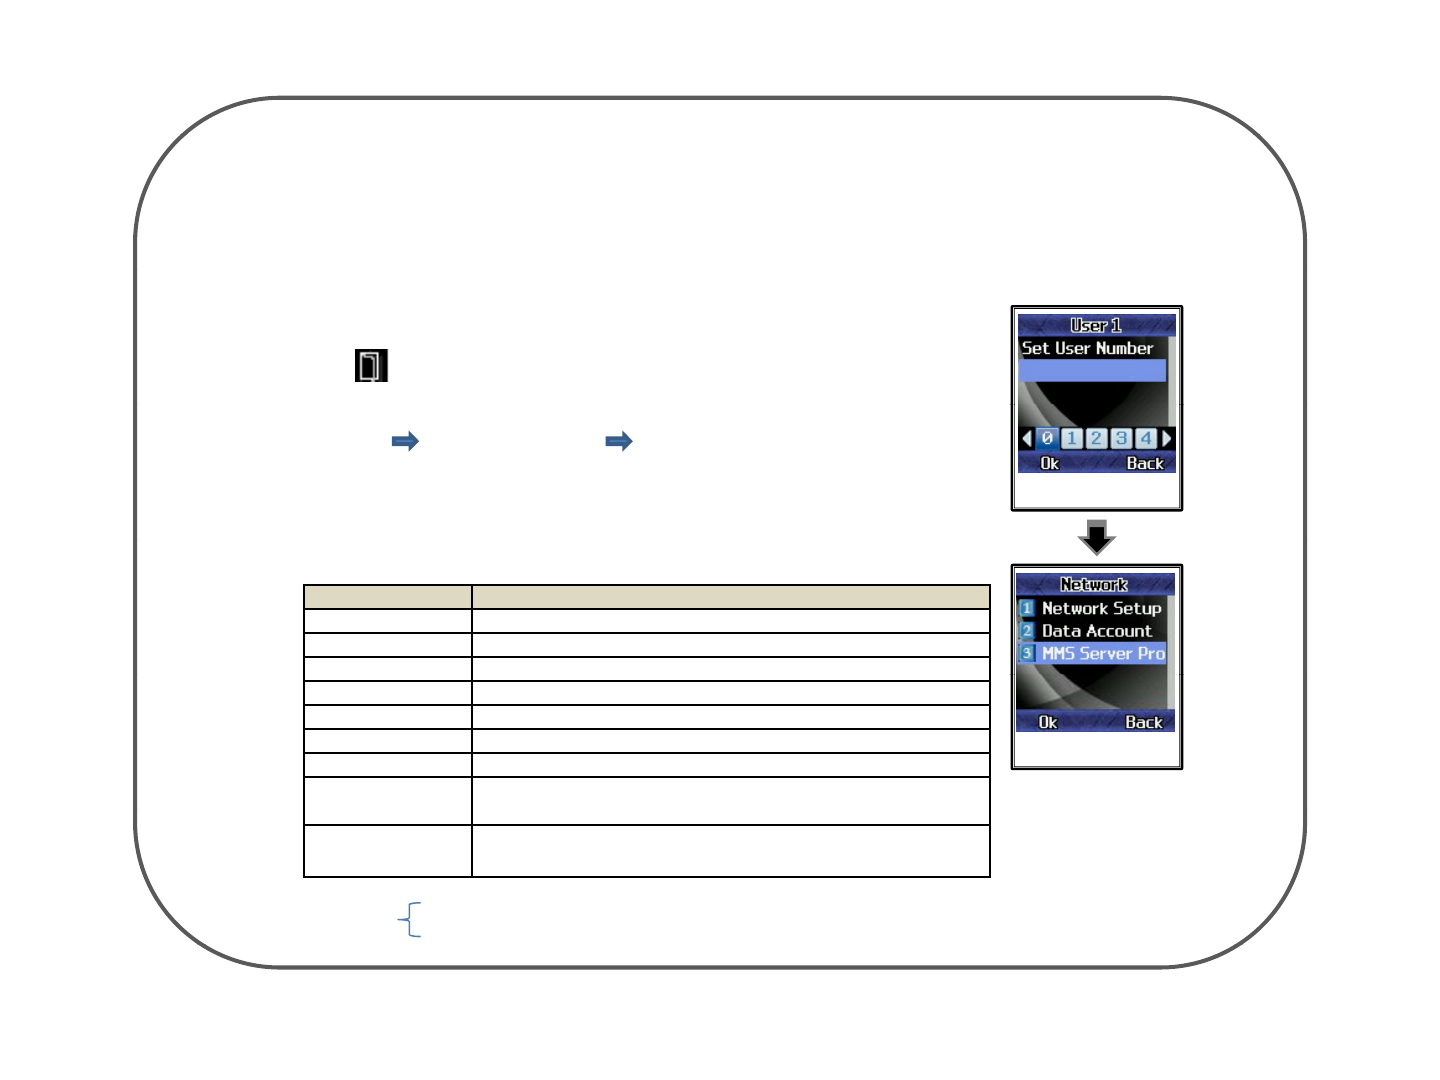
Unable to set “Guard On” if Eyelog connected with USB of your computer. Set User Number
SMS message function of the device
#help Help for user
#goff Guard off
#gon
Guard on
Summary of SMS message
#gon
Guard
on
#pic (Picture) take picture and transmit
#vid (Video) take video and transmit
#son Siren on
#soff Siren off
#picre#ⓝm
(i t)
Input of the time (10≤Ⓝ≤600) automatically enables
t k di MMS t bil
Ⓝ
it
Set MMS server Profile
(
m
i
nu
t
e
)
t
o
k
eep sen
di
ng
MMS
t
o your mo
bil
e every
Ⓝ
m
i
nu
t
e.
#vidur#ⓝs
(second)
Input of the time (1≤Ⓝ≤15) automatically enables to
keep sending MMS to your mobile every Ⓝsecond.
You can input the time you want to.
Put 0 for cancellation of the automatic sending
Ⓝ
-6 -
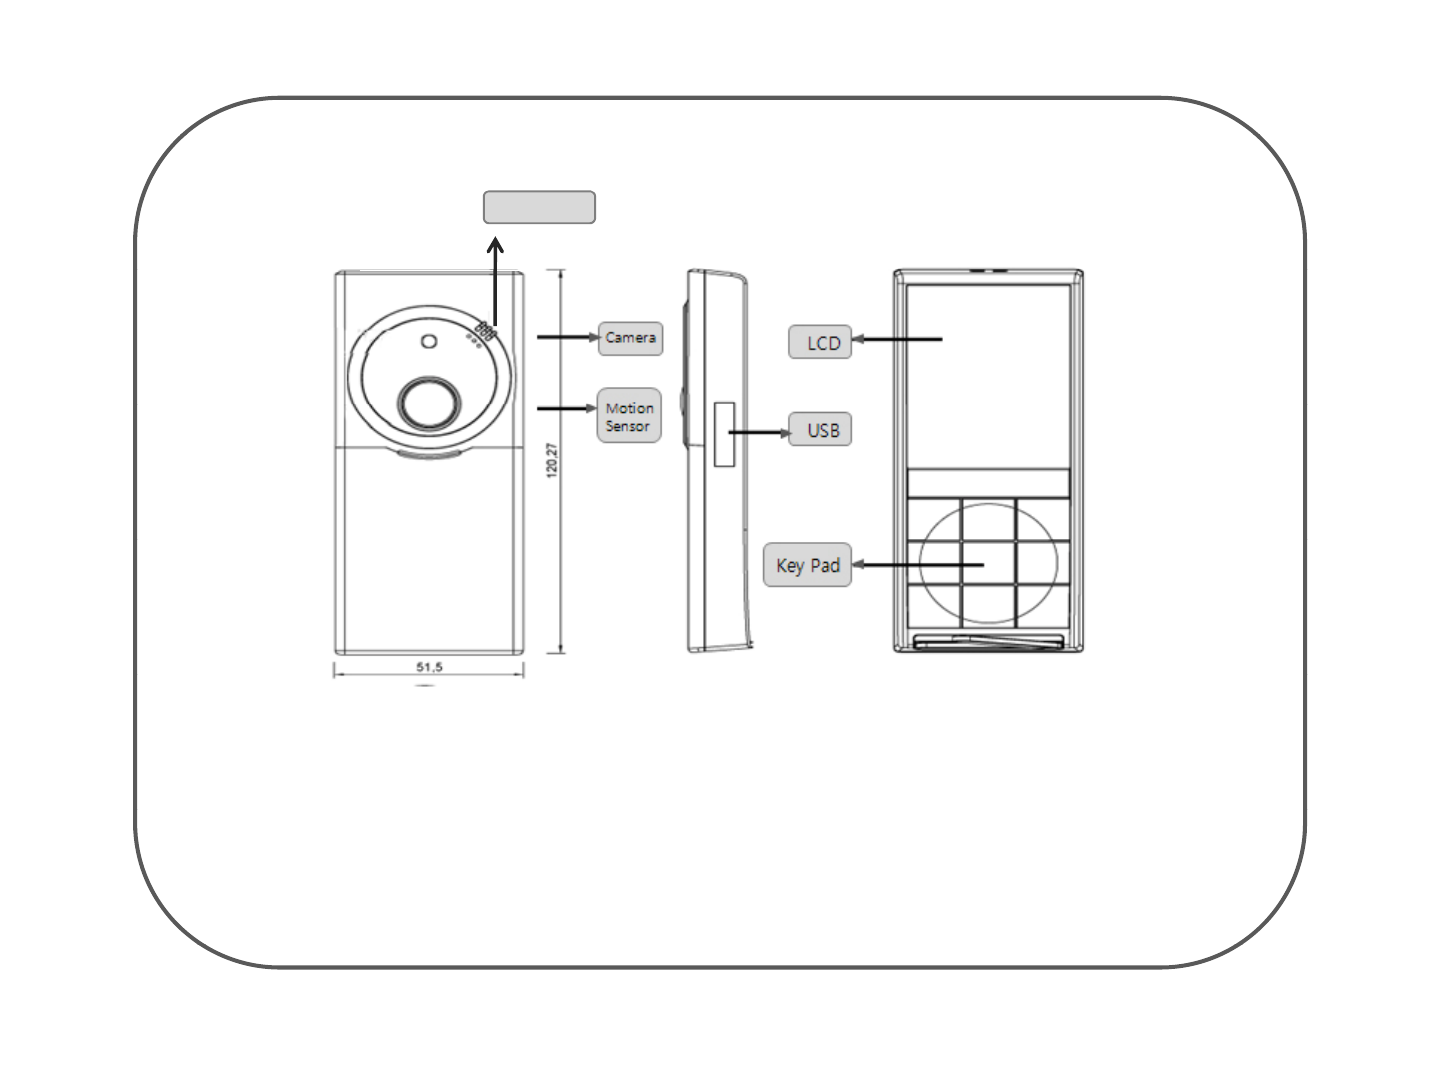
1. Prepare the Parts
Speaker
Camera LCD
Motion
Sensor USB
Key Pad
●Speaker : Melody and alarm
● LCD(Liquid Crystal Display) : Display the screen
●
Mi S
Shiid
●
M
ot
i
on
S
ensor :
S
ense t
h
e mot
i
on or
i
ntru
d
er
●USB: Charge the battery , PC interface
●Key Pad: Control manual
-7 -
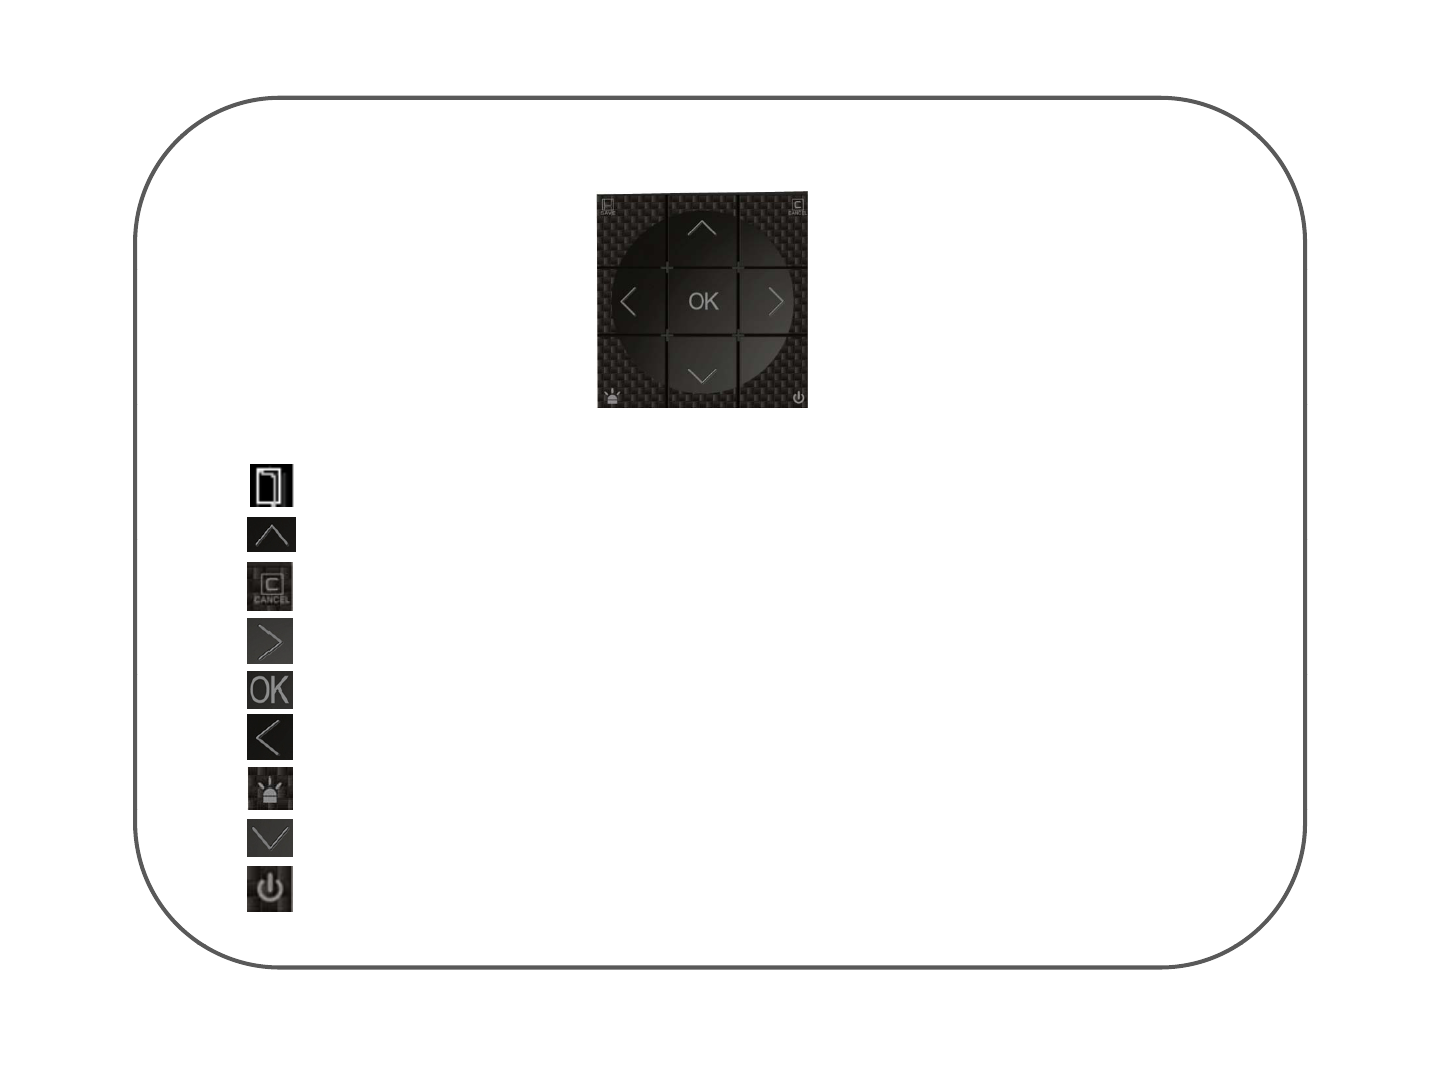
11F ti fk d
1
.
1
F
unc
ti
ons o
f
k
eypa
d
s
; Save the selected menu function(Menu & Save Key)
; Scroll up to select menus numbers or letters
(Up Key)
KEY PAD
;
Scroll
up
to
select
menus
,
numbers
or
letters
(Up
Key)
; Cancel the selected menus, numbers, or letters(Cancel Key)
; Scroll to the right to select menus, numbers or letters(Right Key , Next menu)
; Select a menu function or store user-input information such as names or numbers(OK Key)
; Scroll to the left to select menus, numbers or letters(Left Key , previous menu)
; Switch your guard function (On/Off)
; Scroll down to select menus, numbers or letters(Down Key)
; Switch your device on/off. (POWER KEY)
-8 -
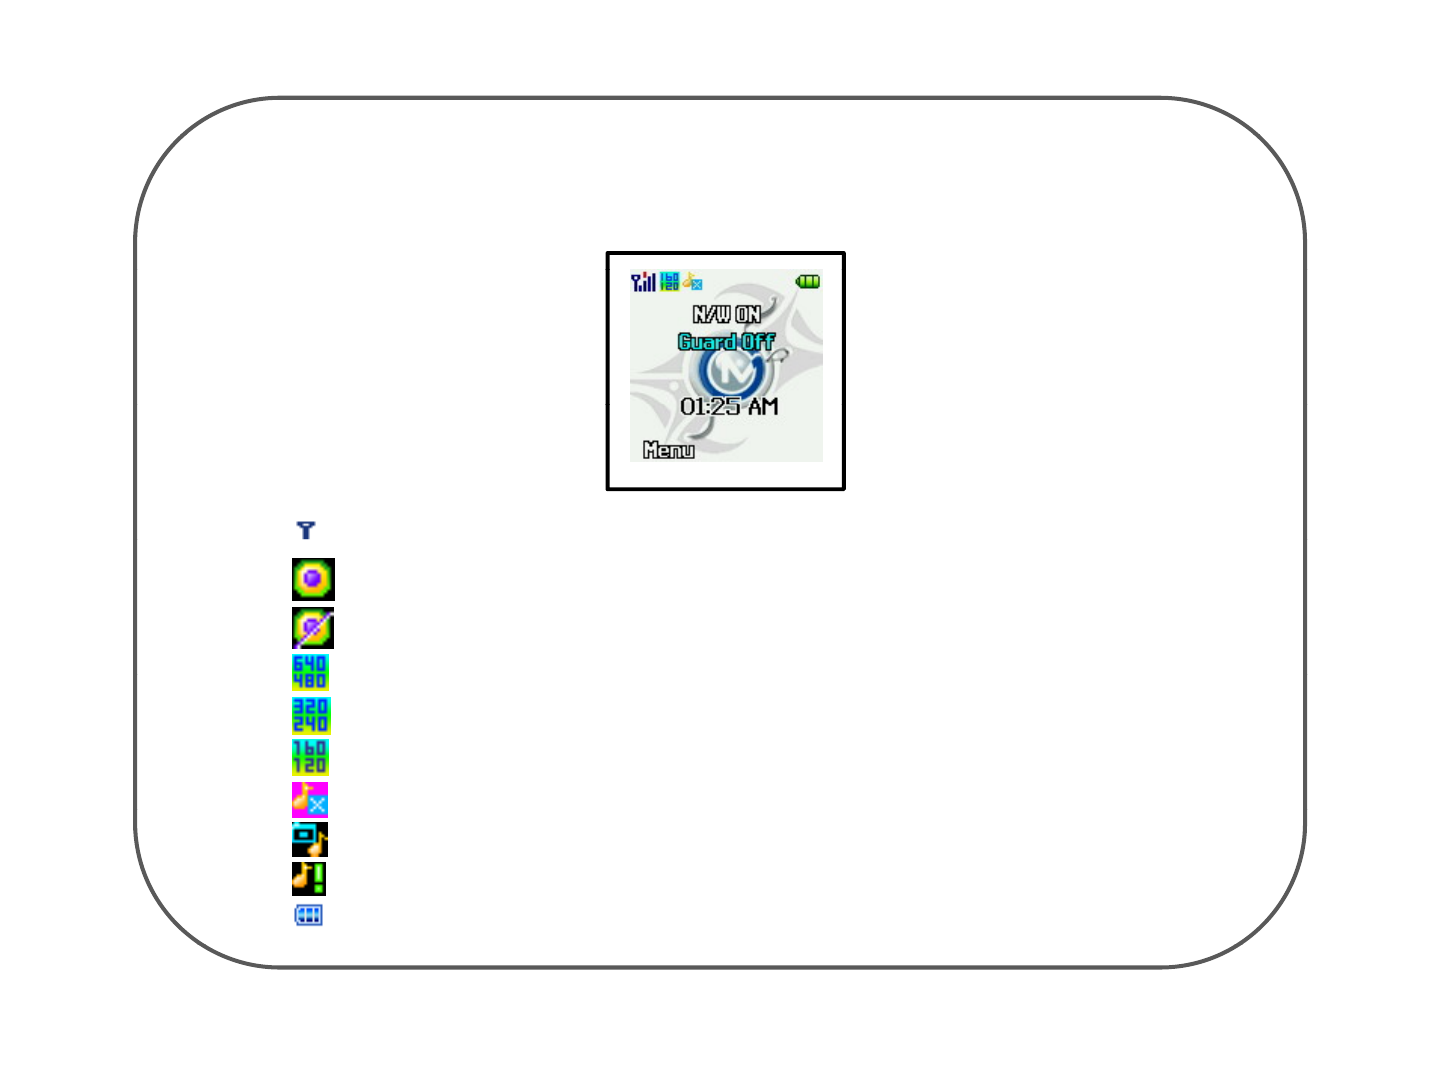
Functions of the icons at the top of the stand-by mode
1.2 LCD Icon
;
Received si
g
nal stren
g
th in the network covera
g
e area.
; Guard function is on.
; Picture resolution is set at high
;
gg g
; Guard function is off.
;
Picture
resolution
is
set
at
high
.
; Picture resolution is set at middle.
;Picture resolution is set at low
;
SILENT is set for sound.
;
; TAKING PICTURE SOUND is set for sound.
; WARNING SOUND is set for sound
; Battery level. The bar indicates the available battery charge
-9 -
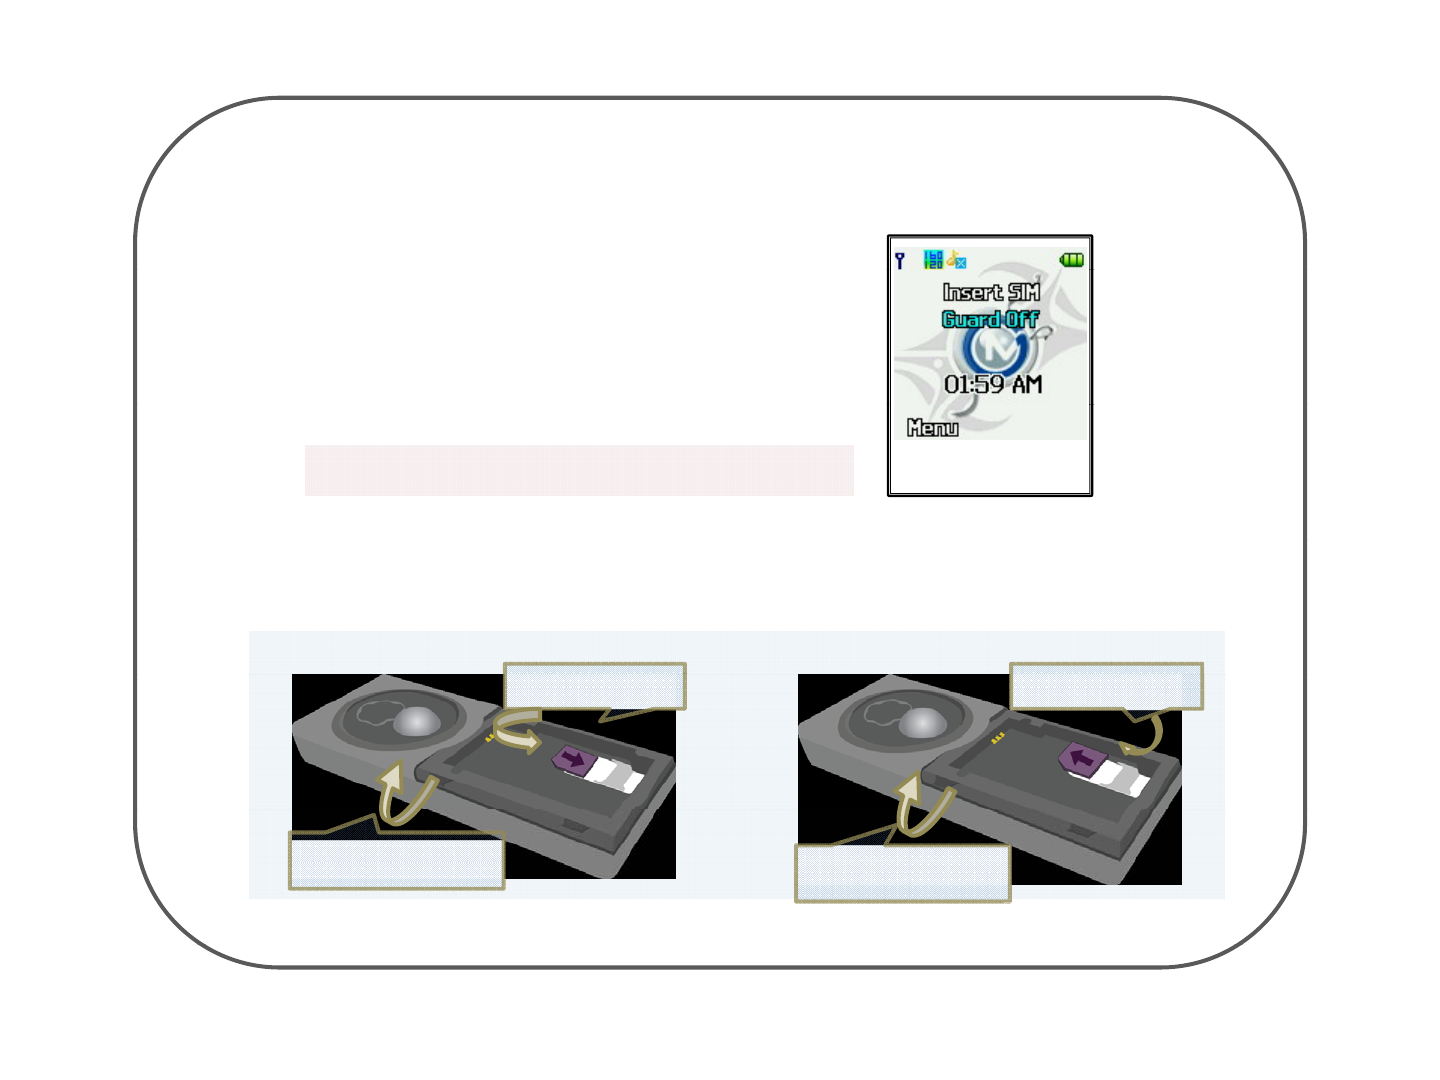
2. Insert SIM Card
SIM Card
SIM
Card
1. Make sure you had inserted the SIM card in your device
properly unless screen displays “Insert SIM Guard Off”.
2. Verify that there is no SIM card enabled (The device must
not ask for a
“
Insert SIM
”
when switched on with SIM
If SIM is not properly
input
Input & Removal of SIM Card
not
ask
for
a
Insert
SIM
when
switched
on
with
SIM
card inside).
Make sure to insert SIM Card available for MMS Service
Input
&
Removal
of
SIM
Card
•This is the way to insert and take out your SIM card in your device.
2
Remove
the SIM Card
2
Insert the SIM Card
Input Removal
2
.
Remove
the
SIM
Card
as it below
2
.
Insert
the
SIM
Card
as it below
1. Remove the battery
cover and battery
1. Remove the battery
cover and battery
- 10 -
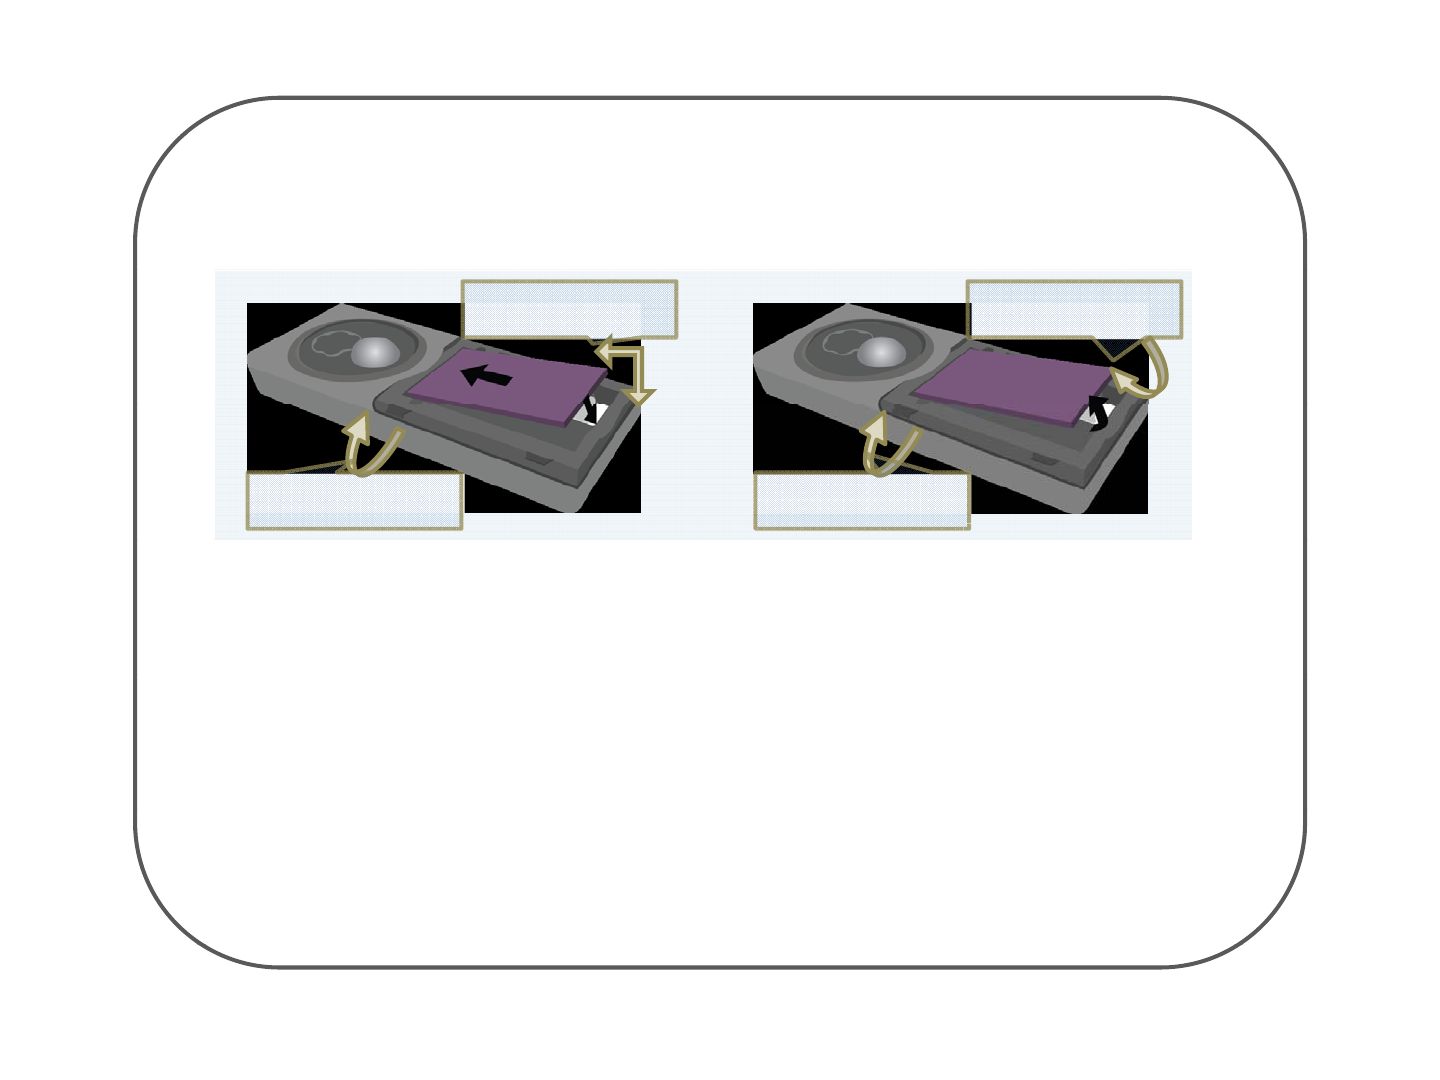
3. Insert Battery
Input & Removal of the Battery
•This is the way to input and take out your battery from your device.
2. Remove the battery as
it below
2. Stick up your battery
first and put it down
Input Removal
1. Remove the battery
cover from the set
1. Remove the battery
cover from the set
Charging the Battery
Uncover the USB jack and connect the cable of the authorized charging device from Eyelog.
●
Recharge the battery time
●
Recharge
the
battery
time
▷ Battery Capacity : 1100 mAh
▷ TA Capacity : 600 mAh (It can recharge 600 mAh for 1 hour)
▷ It takes about 2hours to full charge
●Using time
▷ In sleep system : about 500 hours
▷ In guard system : about 100 hours
It could be less than 100 hours in action,
- 11 -
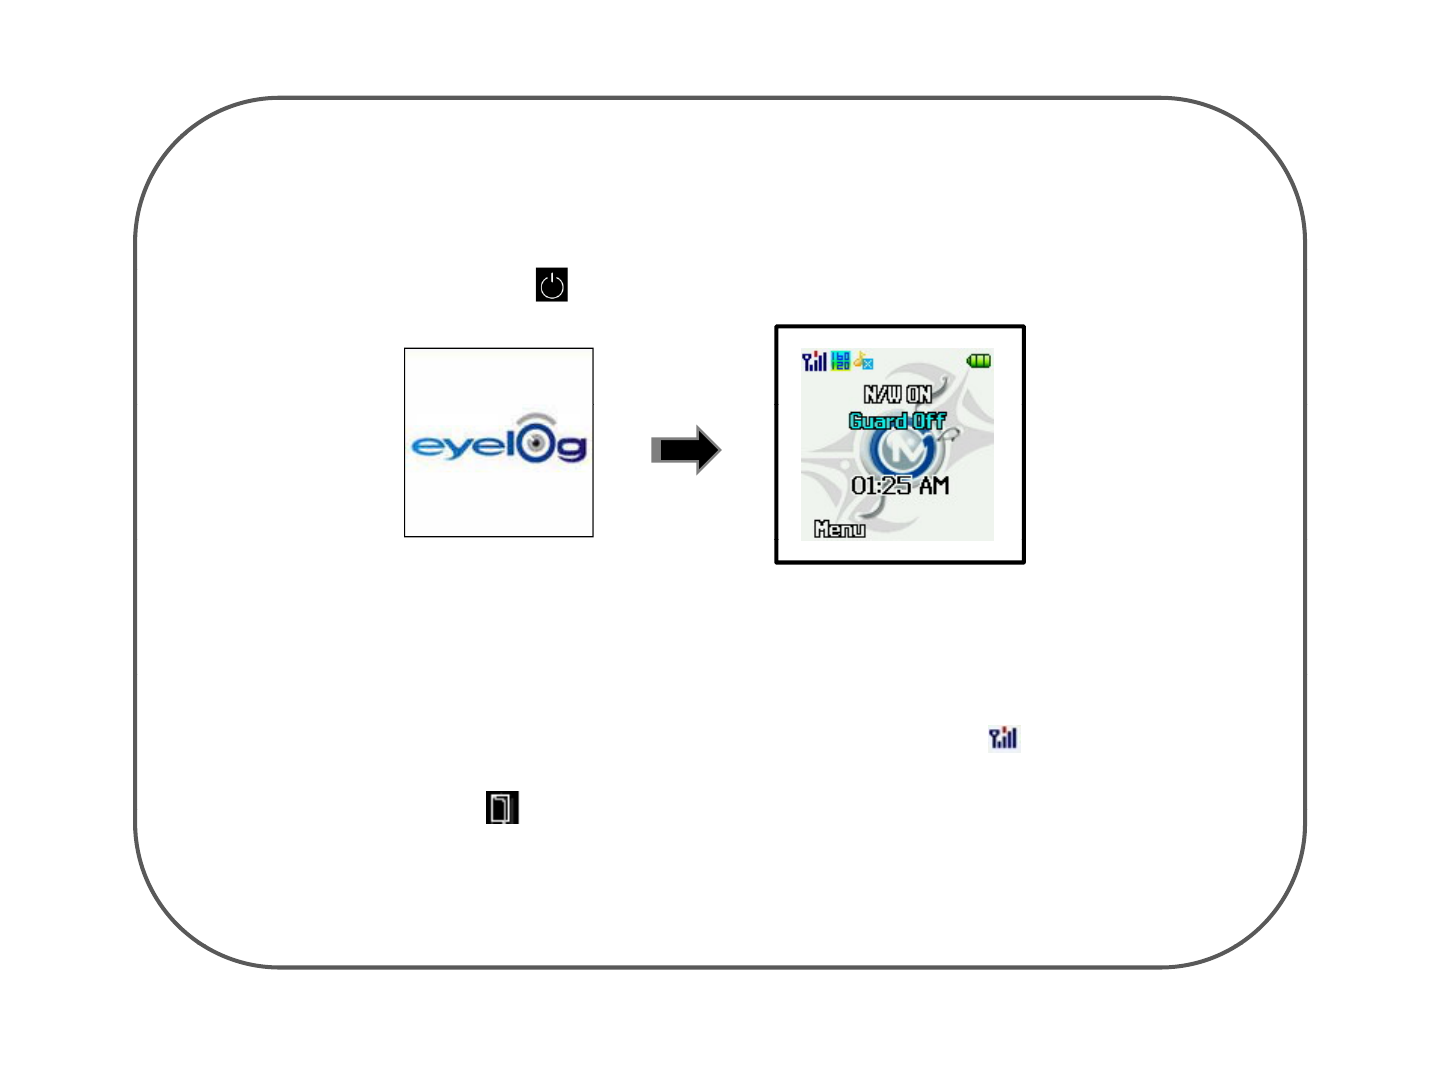
4. Switching the Device On
Press and hold the power on/off Key to switch your device on/off.
Power ON mode
Stand
by
mode
Stand
-
by
-
mode
2Press Keyonstand
-
by mode to enter the menu mode
1.Make sure you have to check the signal strength bar until it displays in your
device LCD
2
.
Press
Key
on
stand
-
by
mode
to
enter
the
menu
mode
- 12 -
5U R it ti
5
.
U
ser
R
eg
i
s
t
ra
ti
on
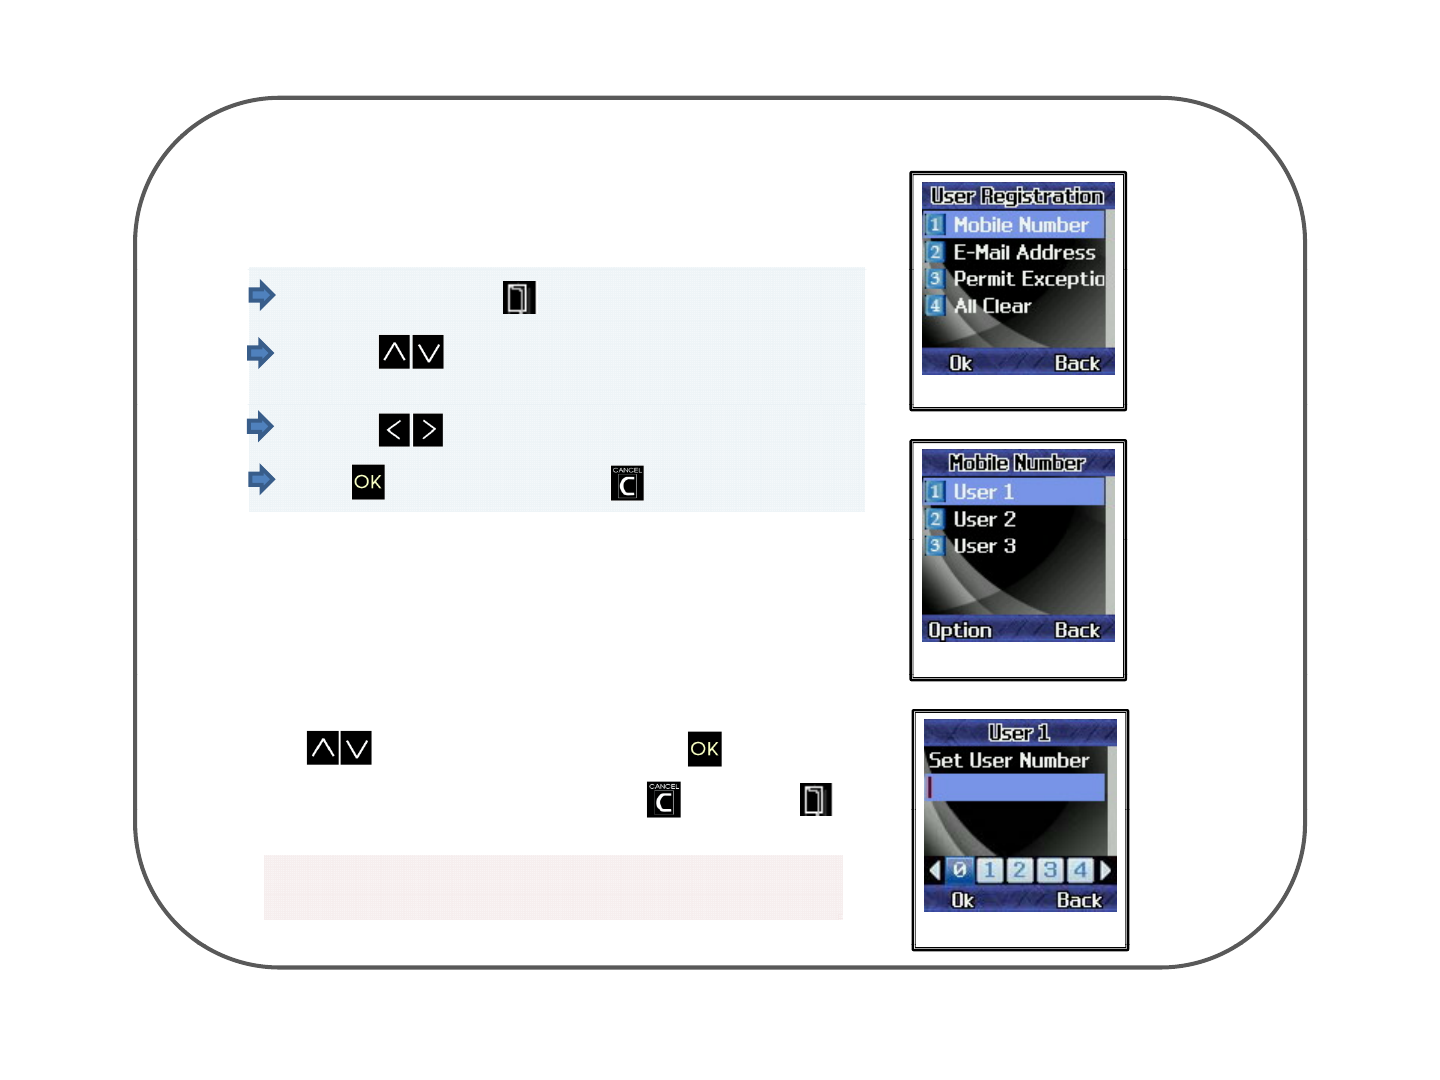
Mobile Number
On main menu press Key and select Client Setting.
By using Key, move the cursor to one Mobile
Number. User Registration page
By using Key, Select the person’s phone number.
press Key to save or press Key to erase.
• This function allows you to register three cell phone
numbers of any selected person whom will get the picture
transformed when the invasion is sensed.
Mobile Number page
• Enter the number of the selected person's cell phone number,
using Key in the keypads and press Key to register
the number. To change the number, move the cursor, to the
number
y
ou want to chan
g
e and
p
ress Ke
y
. Press Ke
y
ygpyy
to store the corrected number.
you have to input Mobile Number correctly
unless SMS and MMS message will not send properly
USER TELNUM page
-13 -
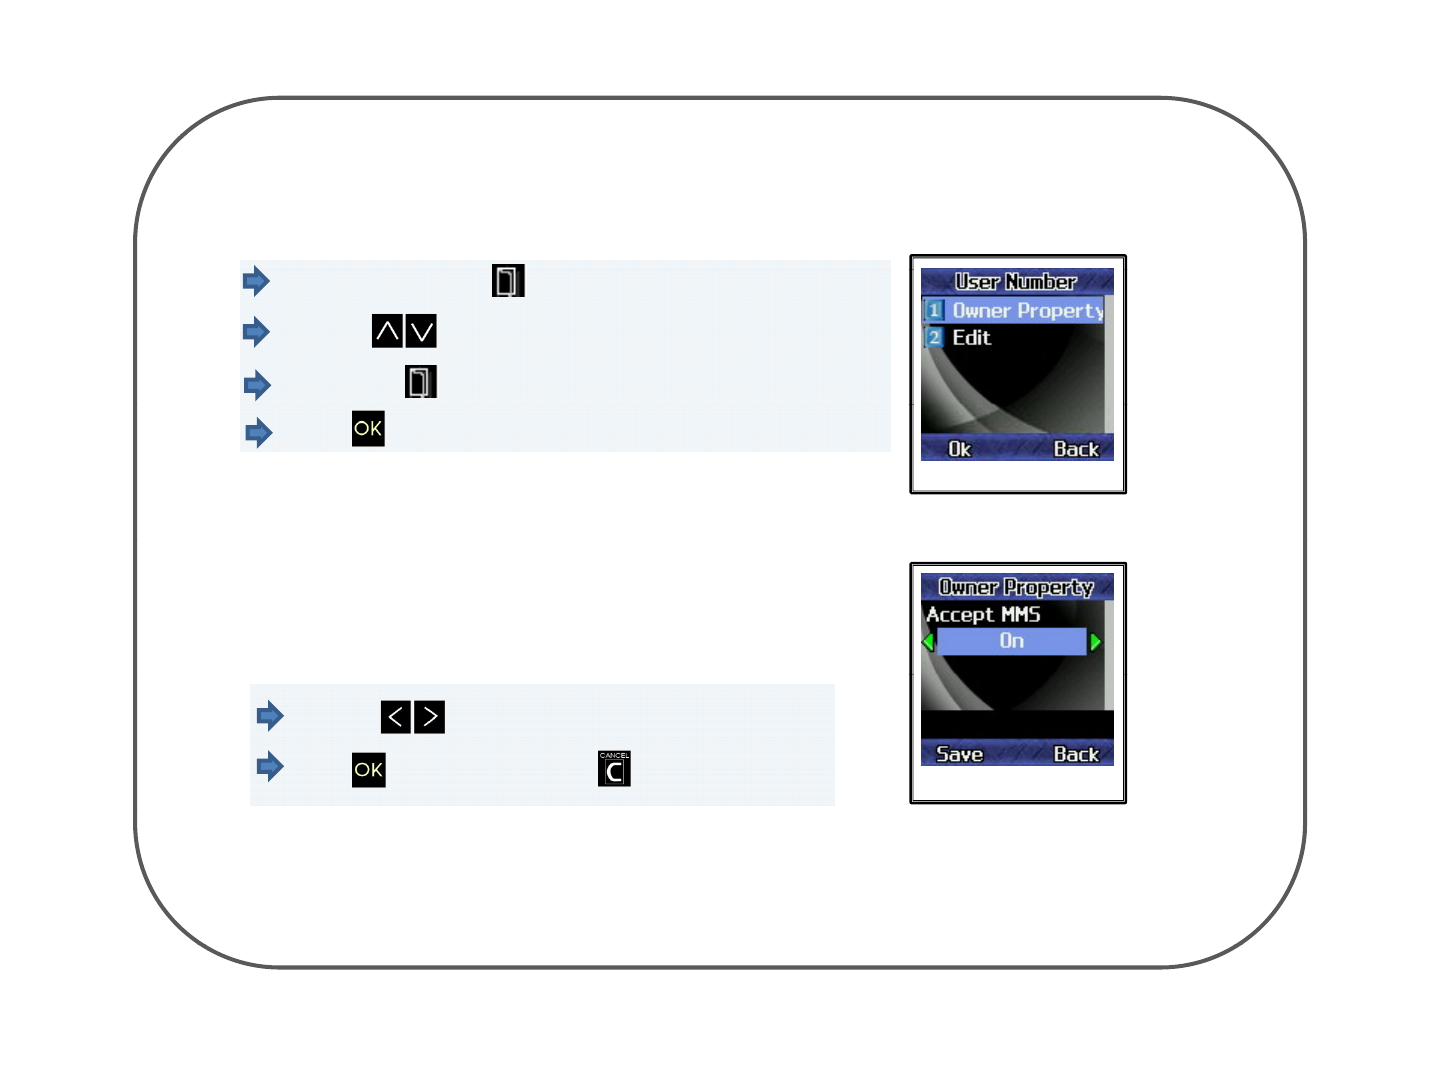
51U R i t ti
User Registration(Option)
5
.
1
U
ser
R
eg
i
s
t
ra
ti
on
On main menu press Key and select Client Setting.
By using Key, move the cursor to one Mobile Number.
Press option Key, to Select the Option.
press Key to change the Owner Property.
Mobile Option page
•
This function allows you to decide whether you transmit
This
function
allows
you
to
decide
whether
you
transmit
the MMS when the invasion is sensed.
•You can choose whether you will receive MMS or not for all
three Mobile Number you’ve already registered.
Owner Property
By using Key to select Accept MMS on or off
Press Key to save or press Key to cancel
- 14 -
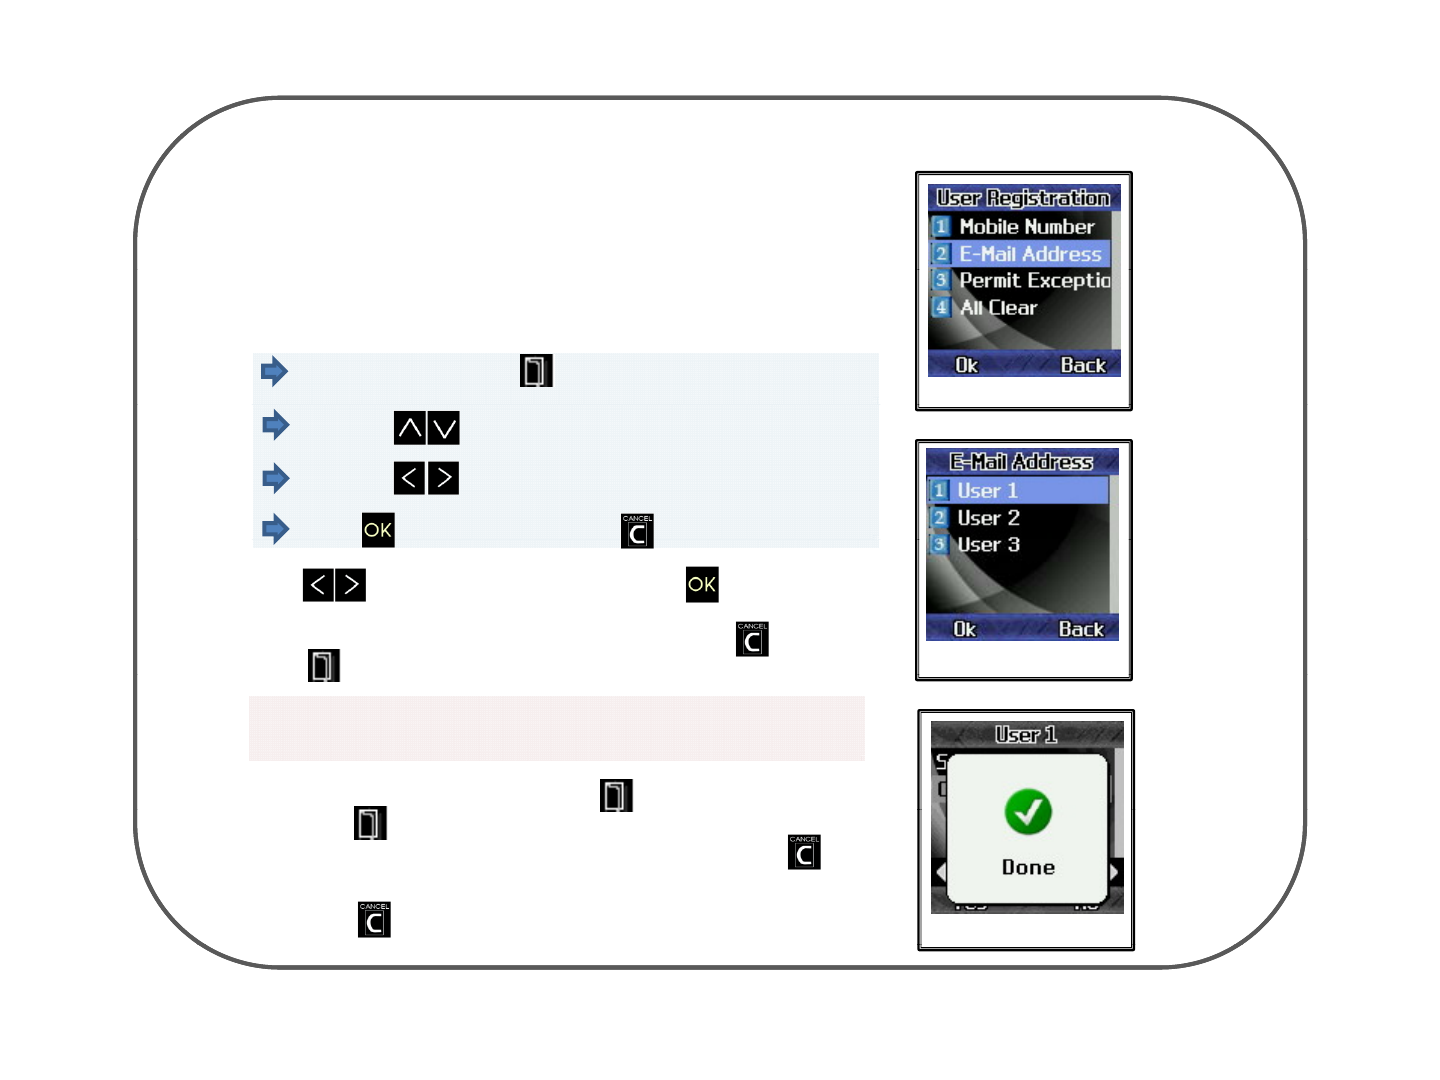
52E
MilAdd
•
This function allows you to register three E
-
Mail address to get
E-Mail Address
5
.
2
E
-
M
a
il
Add
ress
•
This
function
allows
you
to
register
three
E
-
Mail
address
to
get
transformed SMS MSG and photo to your E-Mail when the invasion
is sensed.
On main menu press Key and select Client Setting. E-Mail Address page
By using Key, move the cursor to Email Address.
By using Key, Select the person’s E-Mail Address.
p
ress Ke
y
to save or
p
ress Ke
y
to erase.
pypy
•using Key in the keypads and press Key to register
the address. To change the address, move the cursor, to the
letter or number you want to change and press Key.
Press Ke
y
to store the corrected address. USER E-Mail page
y
You have to input Email address correctly unless SMS
message or picture will not send properly to your Email
•Save
p
a
g
e will come u
p
when the Ke
y
is
p
ressed once.
pg p y p
Press the Key again to store the address. Done mode will
come up when the address is saved. You can press Key
to cancel the address.
•Press the Key to exit menu. Save page
- 15 -
53P itE ti
Permit Exception
5
.
3
P
erm
it
E
xcep
ti
on
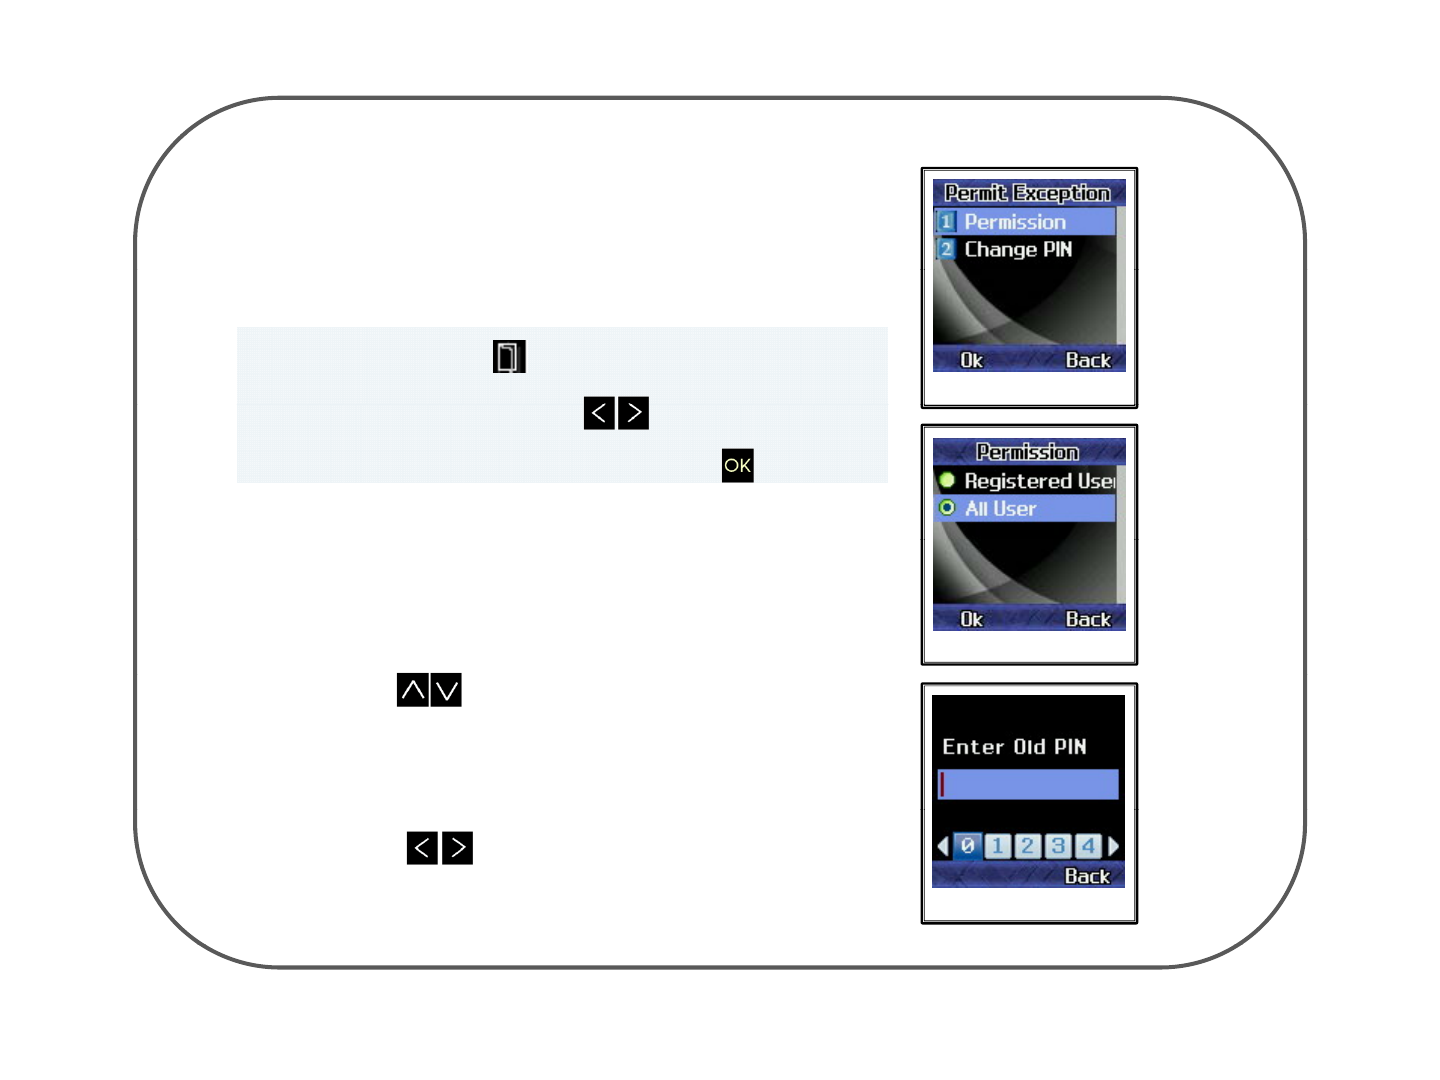
This will allow you to manage the the Eyelog
You can select Permission or Change PIN
On main menu press Key select Pin Code.
dlth dUi K
Permit exception page
an
d
se
l
ec
t
c
h
ange co
d
e
U
s
i
ng
K
ey,
move the cursor select the Option and press Key to save.
Permission
Permission page
•This will allow you to change the user Registered User
or All user.
•Registered User is to use the Eyelog whom Registered,
and All User can use Eyelog for all people
•Press Key to choose the option
Change Code
•This will allow you to change the PIN of the Eyelog
Change Code page
•Press Key to choose the number you wants
to select
- 16 -

54AllCl
5
.
4
All
Cl
ear
All Clear
•It will allow you to reset the User Registration
On main menu press Key select User Registration.
HTTP selected page
and select All Clear menu
- 17 -
6 Settings
6
.
Settings
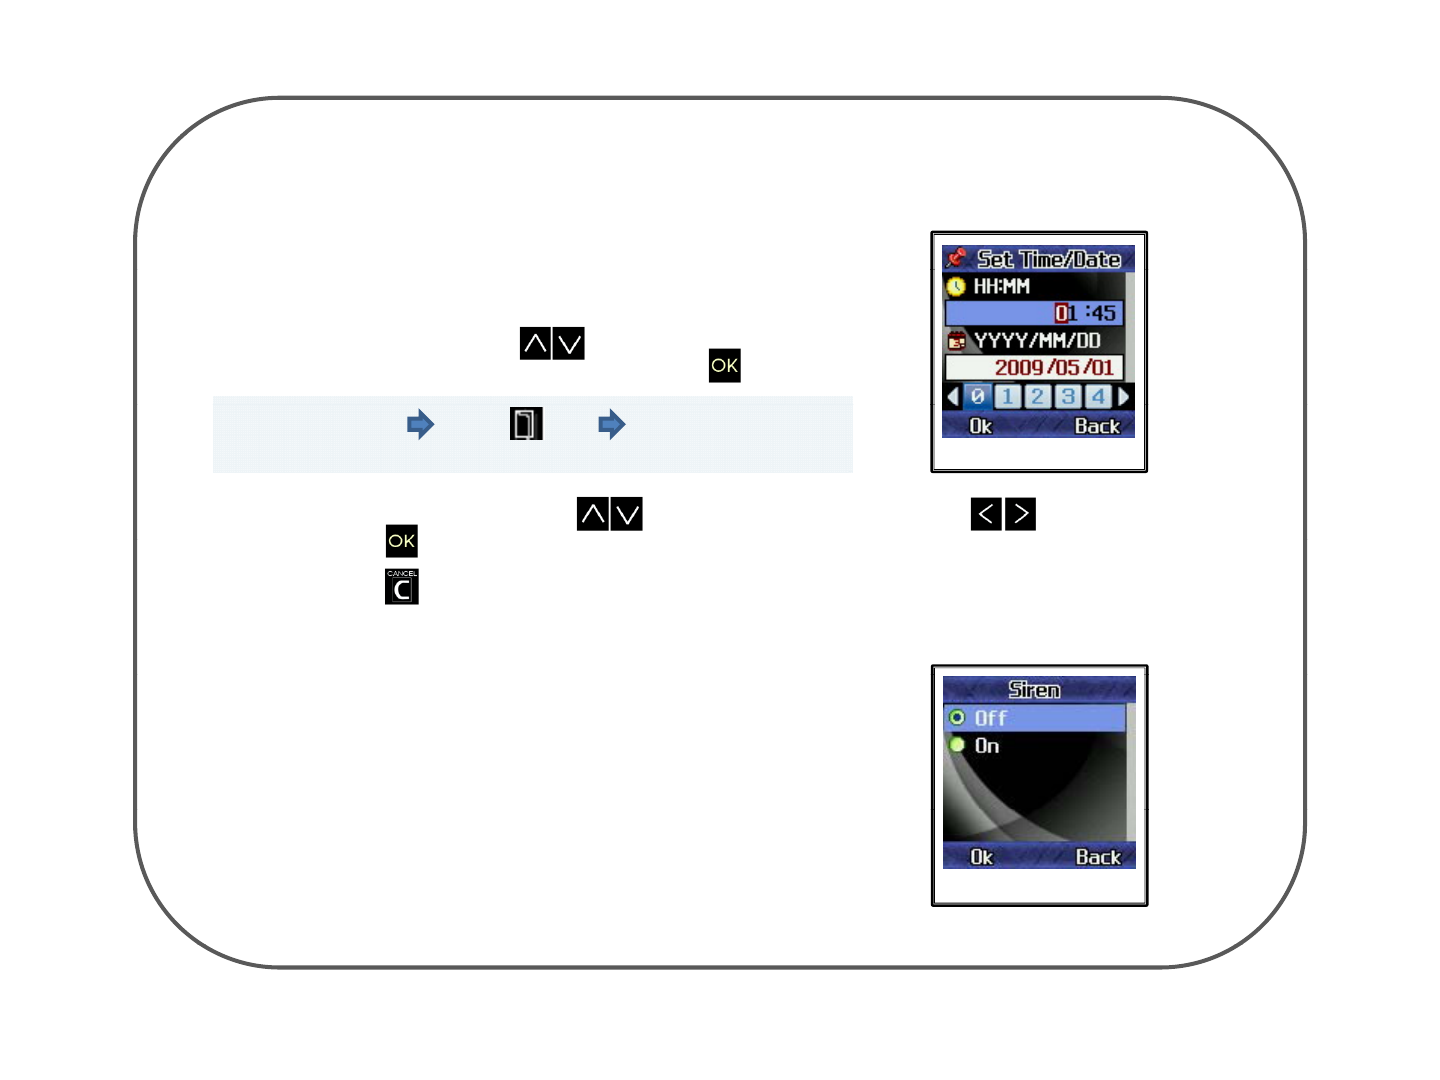
Time/Date
•This will allow you to set the current time and date.
•TIME/DATE : You can set the current time.
On TIMER mode, using Keys,
move the cursor to 1st menu bar and press Key.
In the Main Menu press Key select setting menu
and Set Time/Date TIME/DATE page
Select date or time by using Key. Select the number by using Key
and press Key to set the time or date
and
press
Key
to
set
the
time
or
date
.
Press the Key to exit the menu.
•Siren: You've set the sound alarming when a picture is taken
automatically on any invasions, which will be followed
by siren.
Siren
Siren page
- 18 -
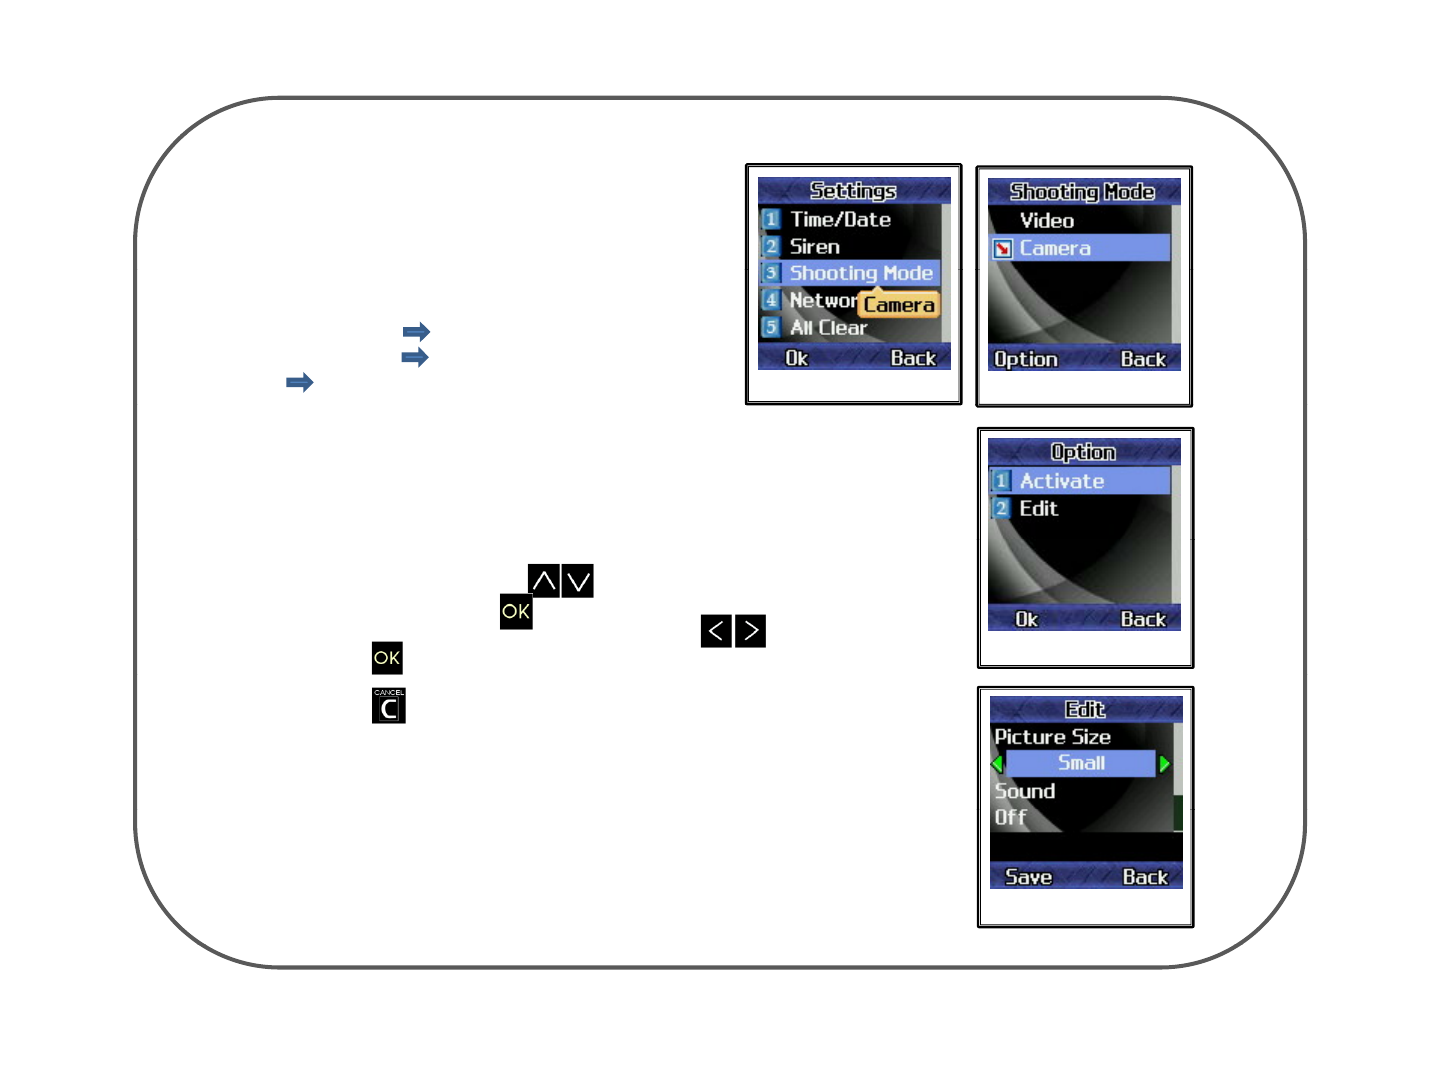
Shooting mode
• It will allow you to choose video or Camera to
send to your cell-phone
• Camera activate Is taking by photo
• Video activate Is played by Video
• Edit Is option to change the Size, Sound and
M lti Shot (Video can change the recording time)
Shooting mode Select Shooting mode
M
u
lti
Shot
(Video
can
change
the
recording
time)
6.1 Camera Edit
Size
•You ma
y
choose small
,
middle
,
or lar
g
e for the resolution
y,,g
of the picture.
•On main menu, using Keys, move the cursor to
Activate and press Key.
•Go to the resolution you want by using Keys and
press Key to register it. Option
•Press Key to exit the menu.
Sound
CSd
Yh tthhtt dh it i
•
C
amera
S
oun
d
:
Y
ou
h
ave se
t
th
e s
h
u
tt
er soun
d
w
h
en a p
i
c
t
ure
i
s
taken.
•Camera Sound off : non-sound
Camera Size & Sound page
- 19 -
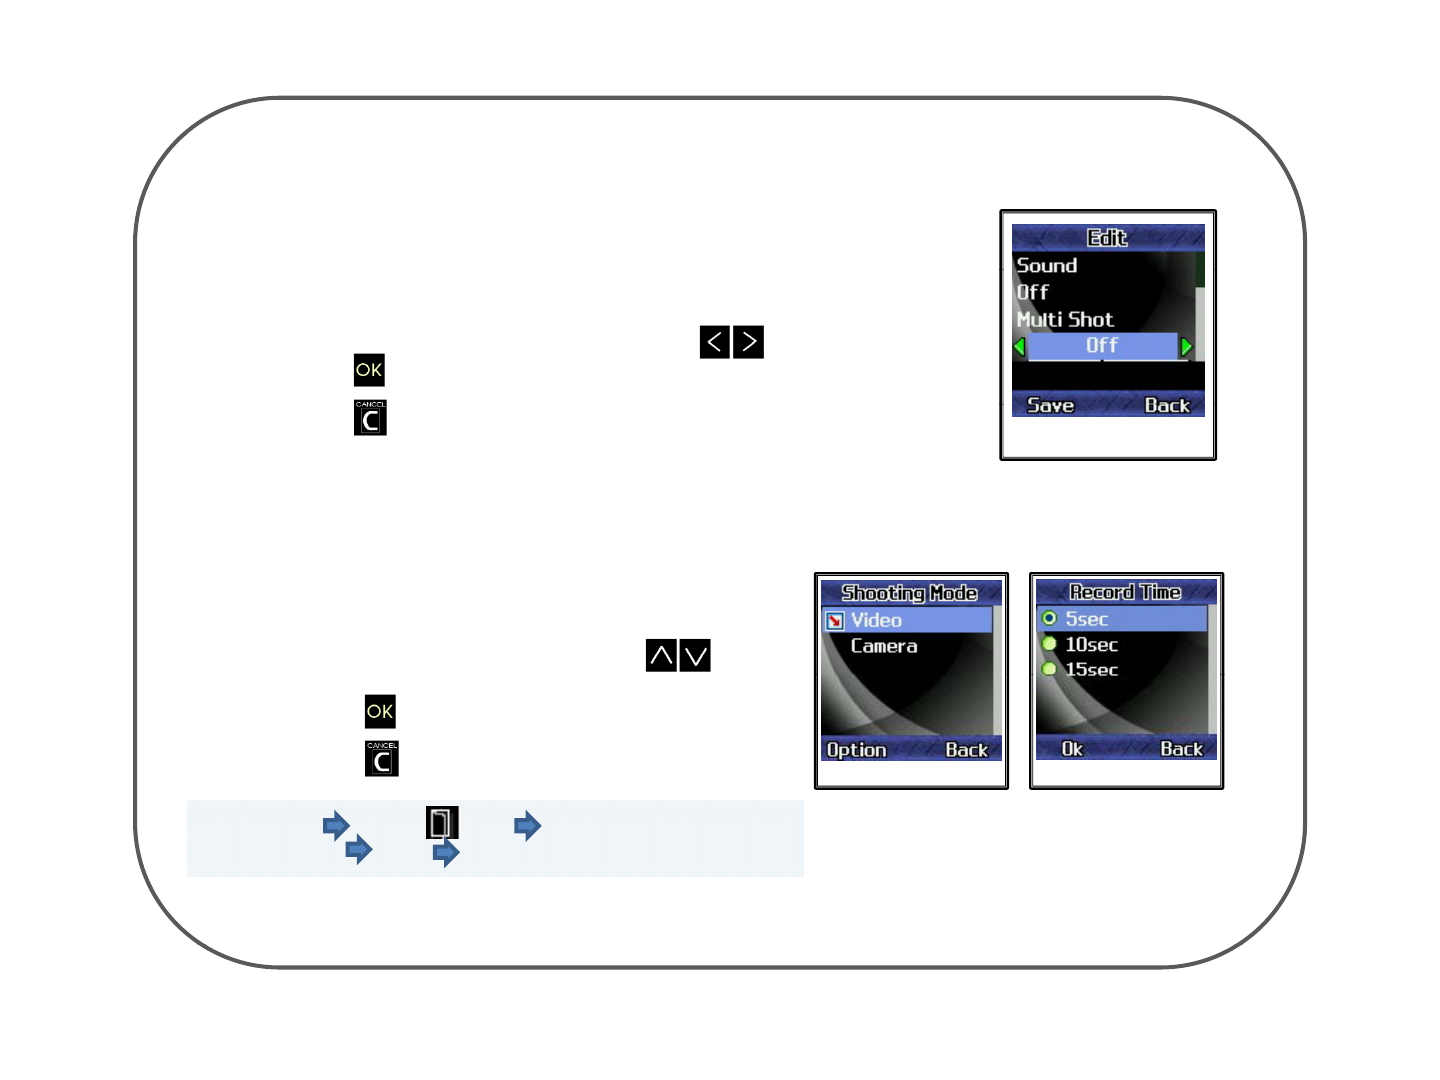
Multi Shot
•
This menu is functions as multi shot capture and transfer
This
menu
is
functions
as
multi
shot
capture
and
transfer
•Capture and transfer consecutive 3 sheets of shot or 5 sheets of
shot
•Go to the resolution you want by using Keys and
press Key to register it.
•Press Key to exit the menu. Multi shot
6.2 Video Edit
recording time
•You may choose the time of recording video
•You can select 5sec , 10sec , 15sec
•Select the time you want by using Keys
d
an
d
press Key to register it.
•Press Key to exit the menu. Select shooting mode Record time menu
Main Menu press Key In setting menu select
Shooting Mode Video Edit
- 20 -
Setup for Network
• This function setup will be allowed to your device connected to your mobile phone
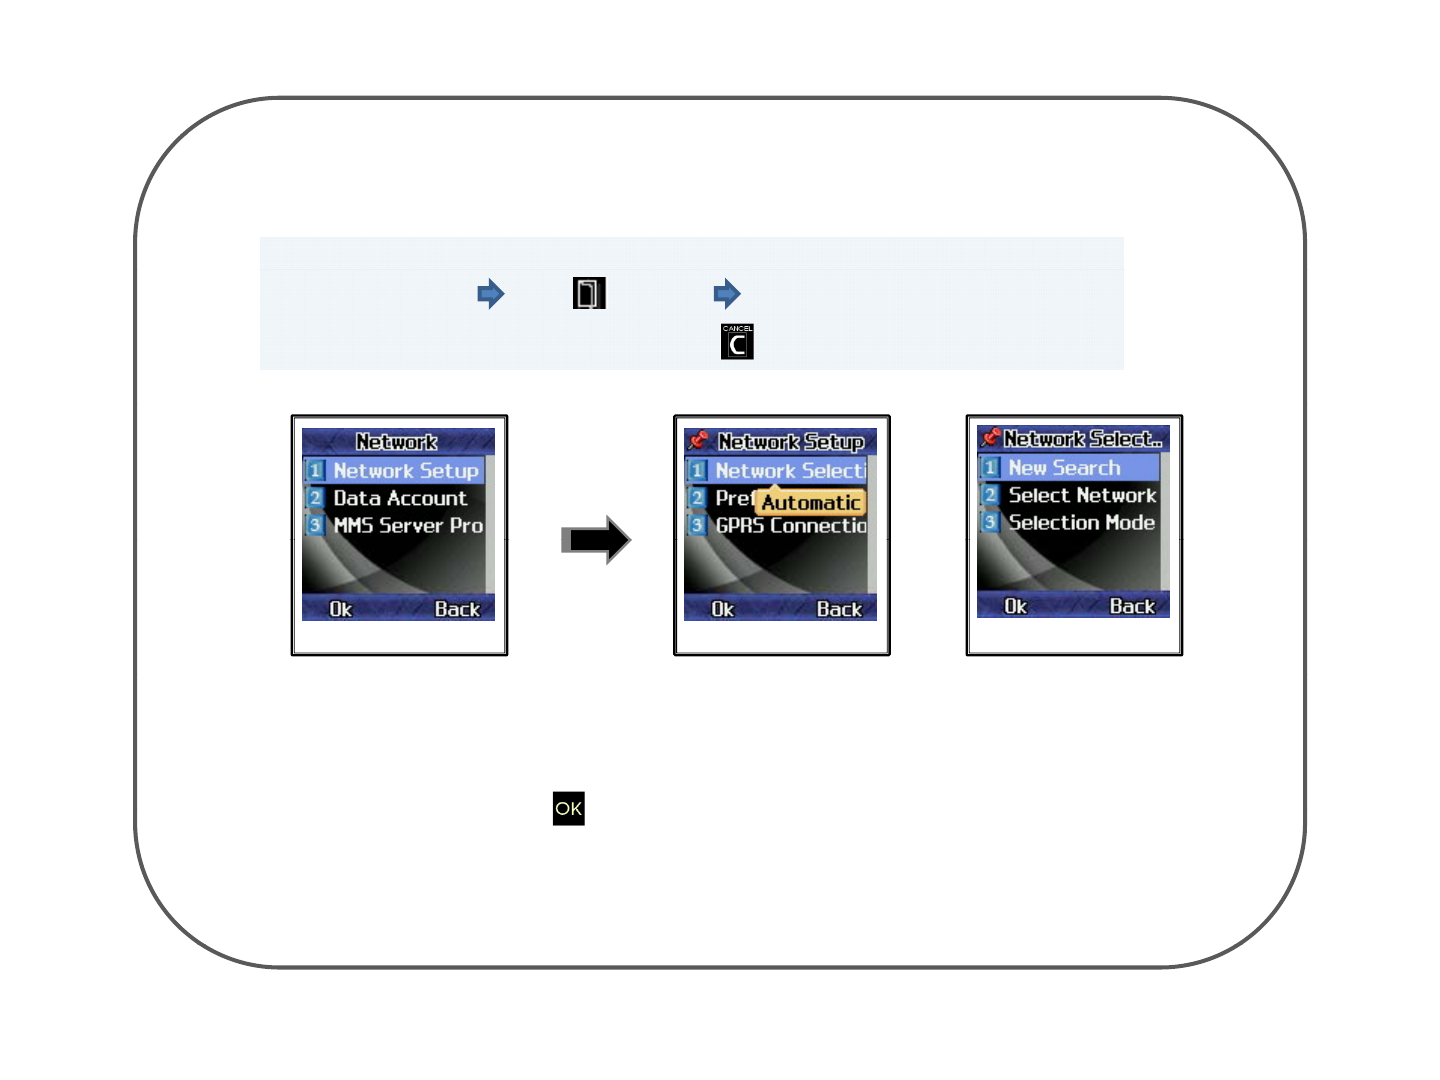
6.3 Network Setting
• In the main display press Key menu select Network option
• NETWORK SETUP : setup the NETWORK. Press Key to exit the menu.
NETWORK page NETWORK SETUP page NETWORK SELECTION page
1) NETWORK SELECTION : Select the network.
NEW SEARCH : It will search the new network.
SELECT NETWORK : It will allow you to select a network.
SELECTION MODE : It will allow you to choose automatic or manual.
Press Key in keypads to select it
Press
Key
in
keypads
to
select
it
.
Done mode will come up when the network is set.
2) PREFERRED NETWORK : It will allow you to select your preferred network.
3) GPRS CONNECTION : It will allow you to choose the connection whether always or necessarily.
Done mode will come up when the GPRS connection is set
Done
mode
will
come
up
when
the
GPRS
connection
is
set
.
- 21 -
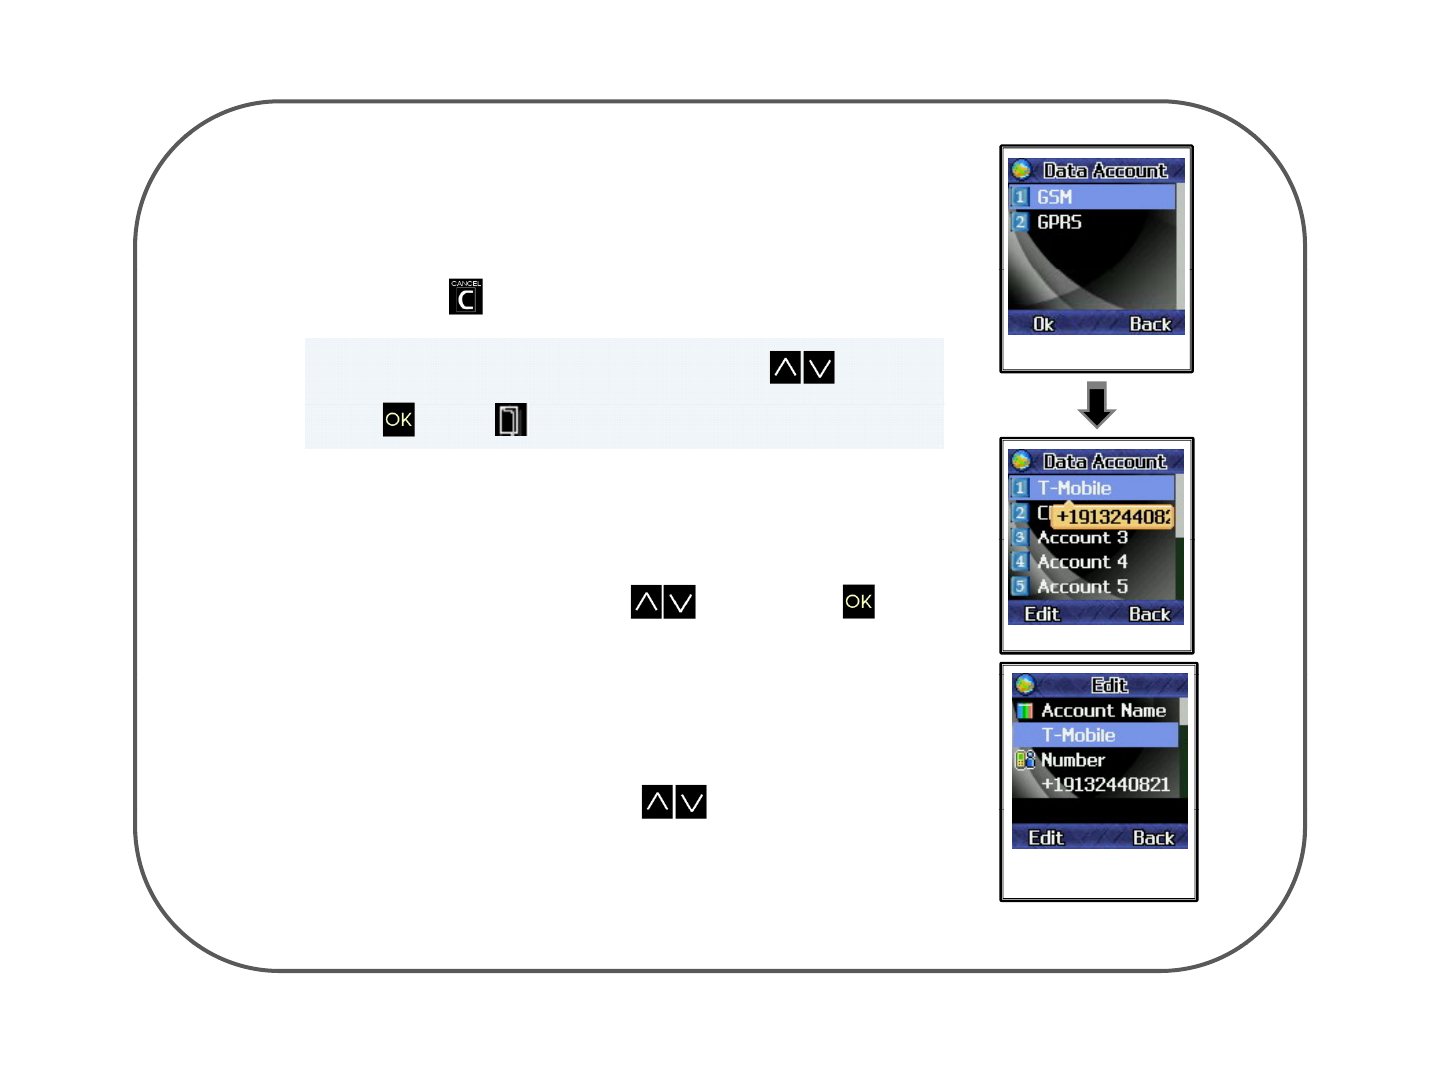
DATA ACCOUNT :
It will allow you to choose GSM DATA or GPRS ACCOUNT
DATA
ACCOUNT
:
It
will
allow
you
to
choose
GSM
DATA
or
GPRS
ACCOUNT
.
Press Key to exit the menu.
Move the cursor to 1 or 2 menu bar by using Key and Data Account page
press Key or Key to enter the next mode.
•GSM DATA :
- It will allow you to set network-related conditions.
- You may set up network in up to 10 different ways on this menu.
- Go to the account by using Key and press Key.
GSM DATA page
You can move the cursor to “Number” or the other menu bar by using
‘Function Ke
y(
Ke
y)
’
GSM DATA ACCOUTN
EDIT page 1
y( y)
- 22 -
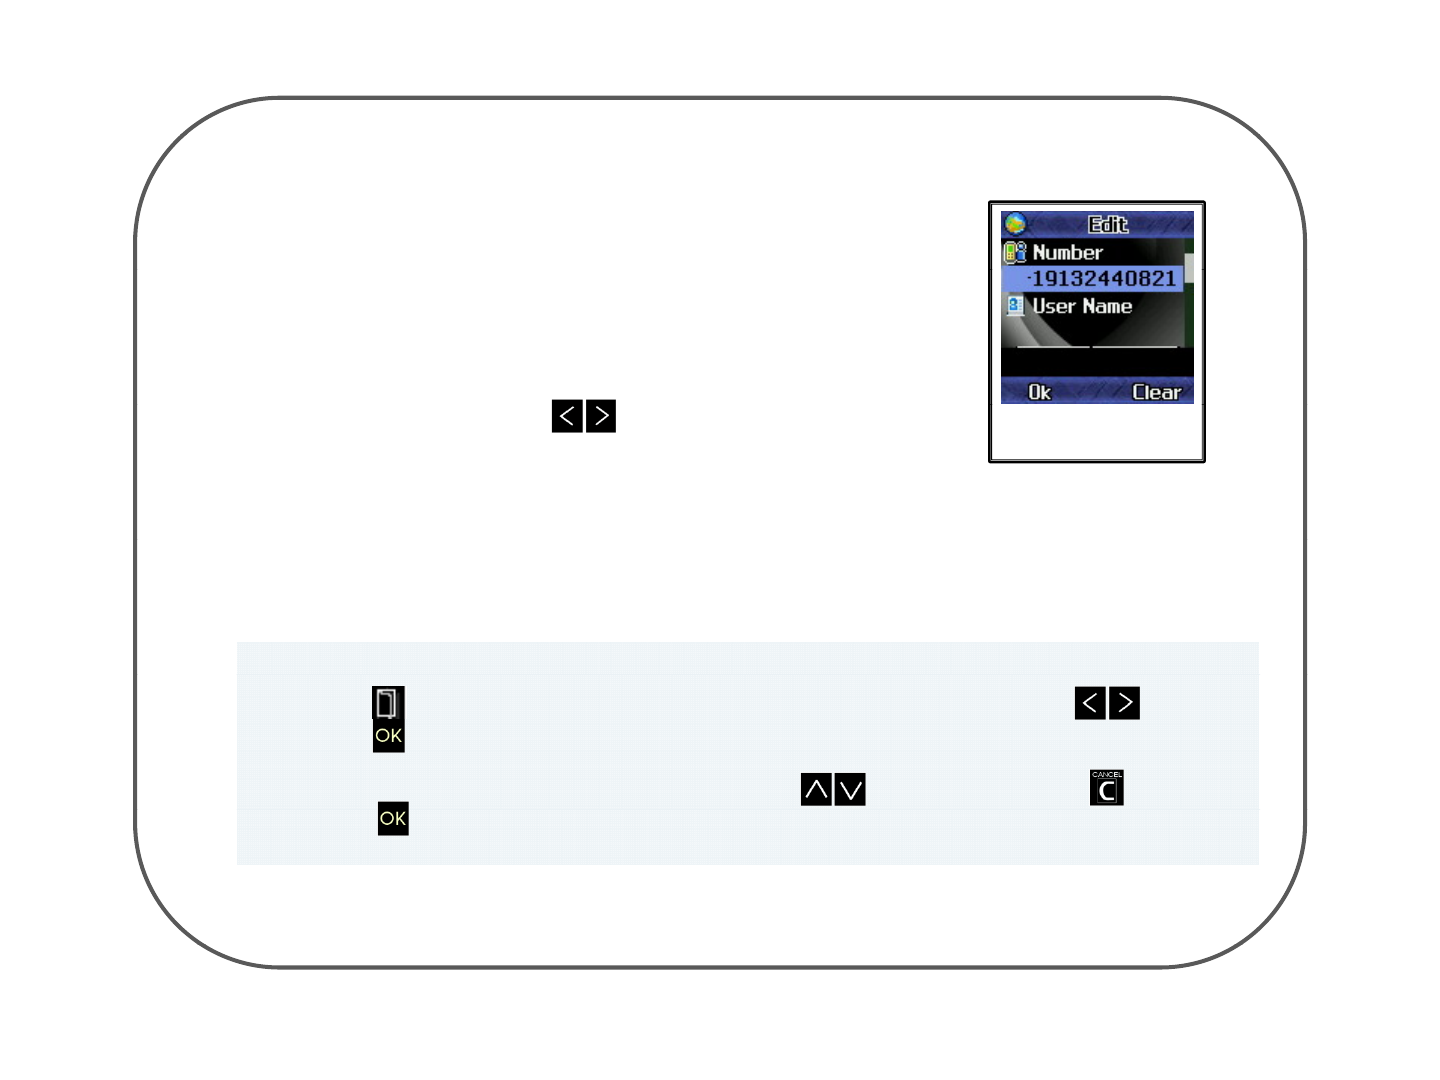
ACCOUNT NAME : It will allow you to name the account.
NUMBER : It will allow you to register the operator number
DNS: It will allow you to register the IP address of DNS SERVER.
GSM DATA ACCOUNT
EDIT page 2
Select numbers by using Key and register it.
USER NAME : It will allow you to register the user name.
PASSWORD: It will allow you to register the password.
<To Registration>
Press Key to enter the registration page select numbers by using key and
press Key to register it.
To correct the name, go to the number with Key and erase with Key.
PK iidiifih
<To
Registration>
P
ress
K
ey to reg
i
ster
i
t an
d
press
i
t aga
i
n to con
fi
rm t
h
e name.
- 23 -
LINE TYPE : It will allow you to set the line type.
Select ISDN or ANALOGUE TYPE by using Key to set the
LINE TYPE.
SPEED
: It will allow you to set the transferring speed
SPEED
:
It
will
allow
you
to
set
the
transferring
speed
.
Select 4.8Kbps, 9.6Kbps, or 14.4Kbps by using Key and register it.
※ When all the information are input, press Cancel key which will be followed by confirmation page.
Press Key to store them or Key to cancel them.
•GPRS : It will allow you to set GPRS related conditions.
You may set up GPRS in up to 10 different ways.
Go to the account by Key and press Key
Go
to
the
account
by
Key
and
press
Key
.
GPRS page
- 24 -
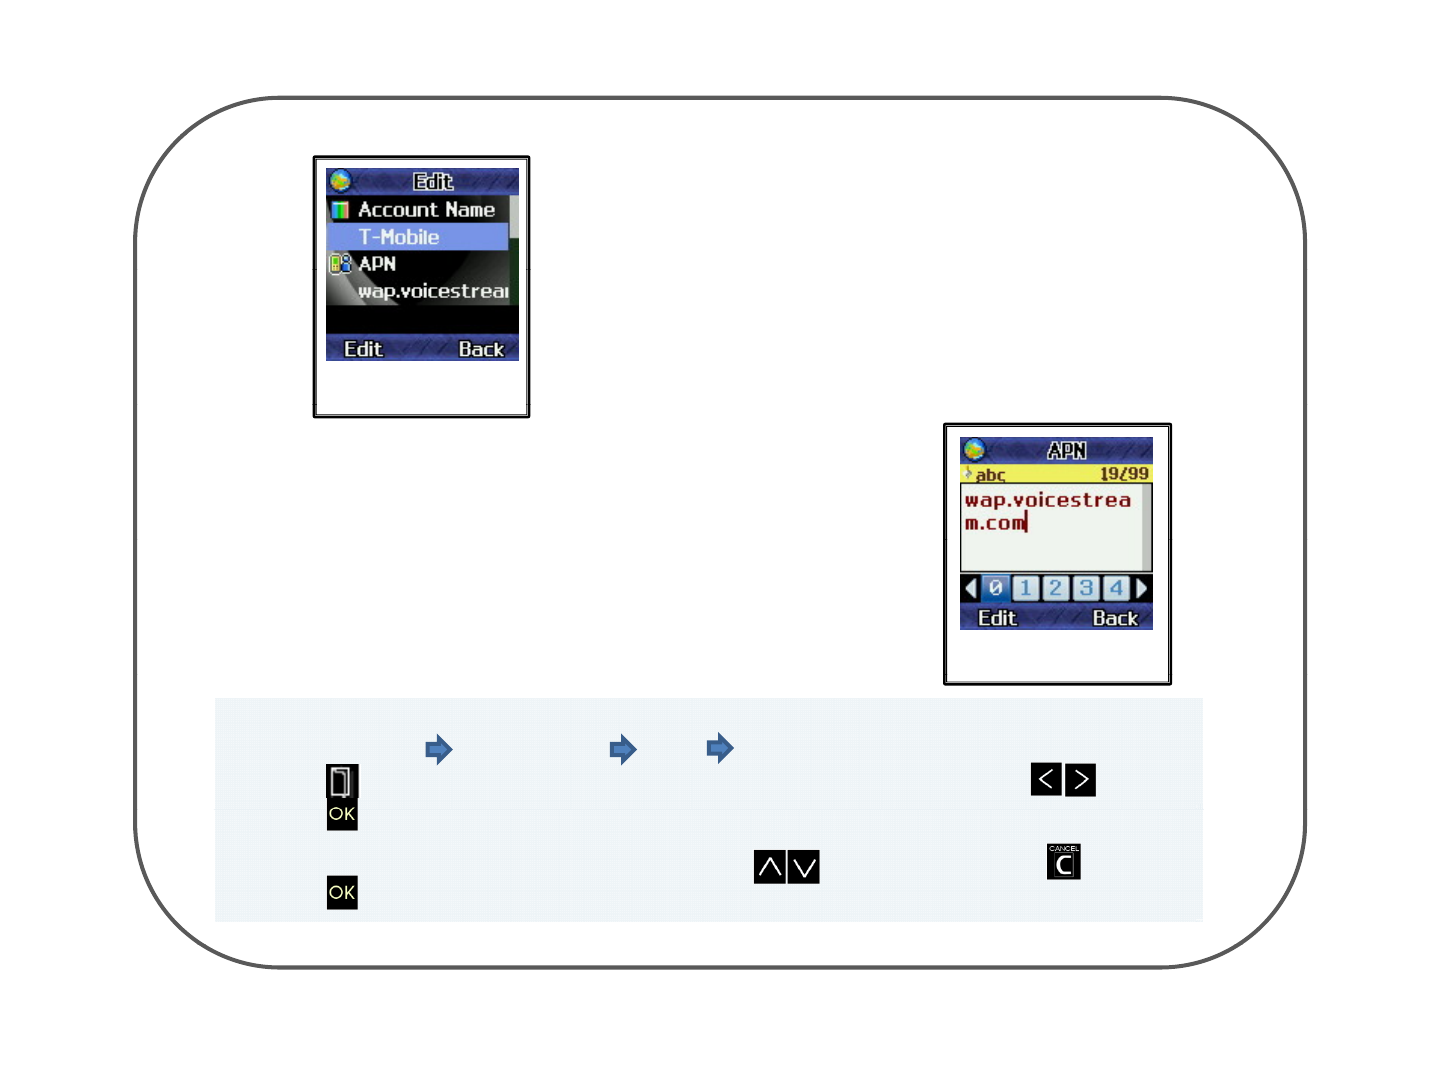
You can move the cursor to “APN” or
the other menu bar by using
GPRS DATA ACCOUNT
EDIT page 1
the
other
menu
bar
by
using
‘Function Key(bottom of the left key)’
EDIT
page
1
ACCOUNT NAME : It will allow you to name the account.
APN : It will allow
y
ou to re
g
ister the APN
GPRS DATA ACCOUNT
EDIT
p
a
g
e 2
USER NAME : It will allow you to register the user name.
PASSWORD : It will allow you to register the password.
pg
<To Registration>
Network option Data Account GPRS select Data Account
Press Key to enter the registration page select numbers by using Key and
press Key to register it
press
Key
to
register
it
.
To correct the name, go to the number with Key and erase with Key.
Press Key to register it and press it again to confirm.
- 25 -
AUTH. TYPE : It will allow you to set the AUTH. TYPE
Select NORMAL or SECURE TYPE by using Key to set the AUTH. TYPE.
When all the information are input, press Key which will be followed by
confirmation page Press Key to store them, or Key to cancel them.
• Press Key to exit the menu.
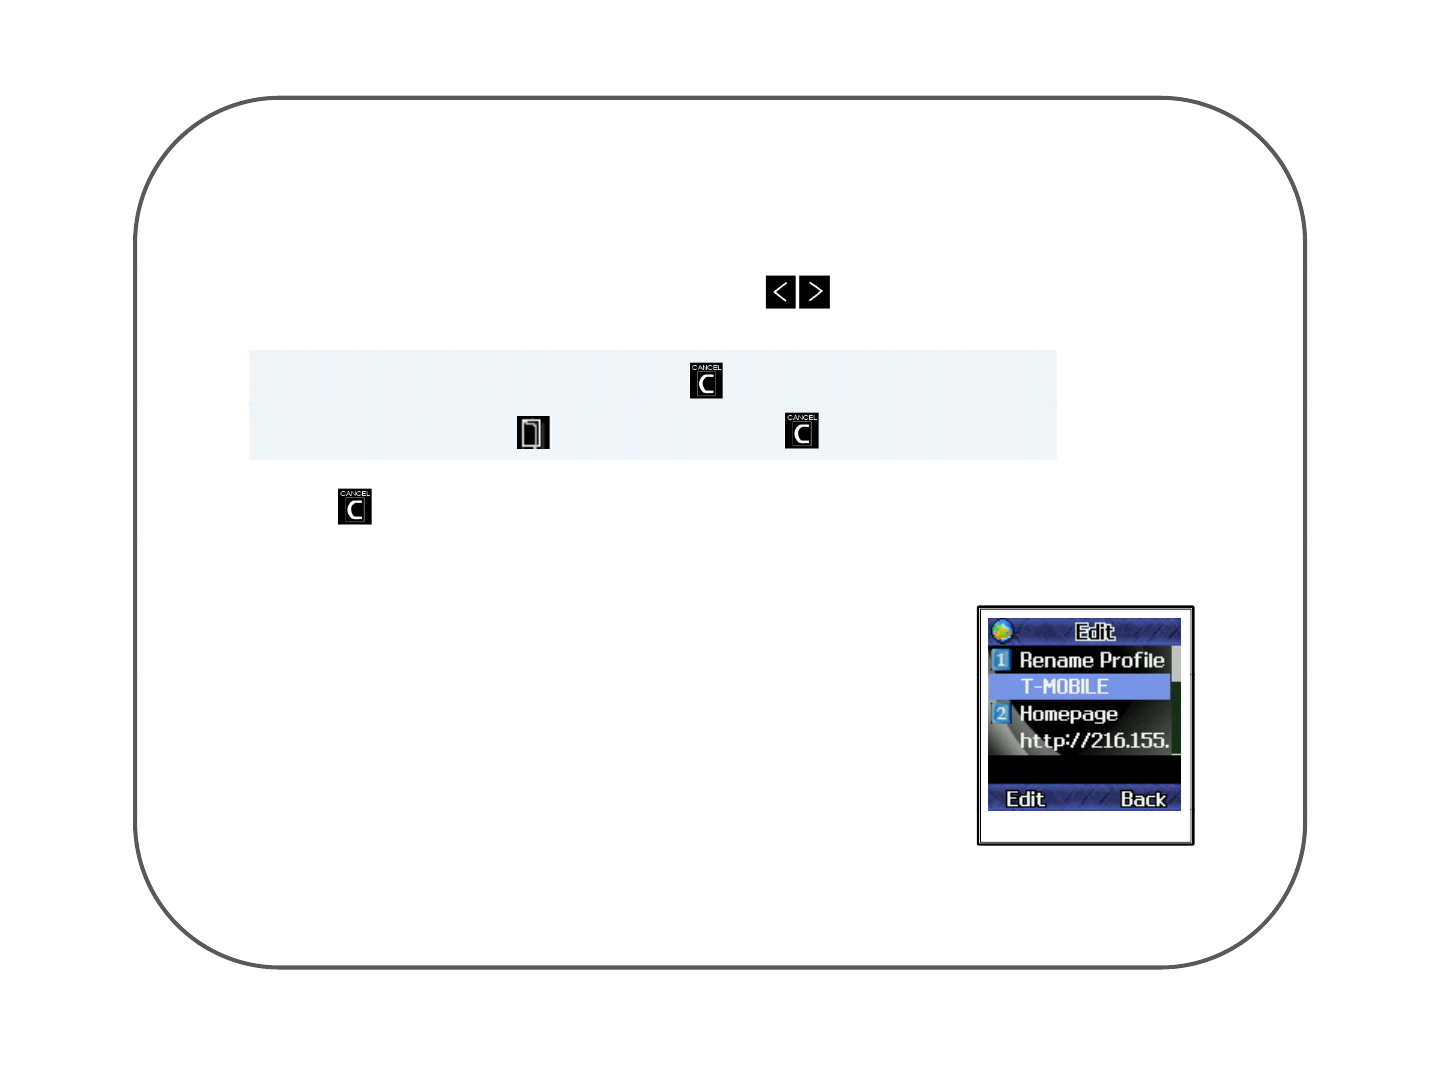
•MMS SERVER PROFILE : It will allow you to set the MMS SERVER PROFILE.
You ma
y
set u
p
the
p
rofile in u
p
to 10 different kinds.
ypp p
You can move the cursor to “Homepage” or the other menu bar by using
EDIT PROFILE page 1
‘Function Key (bottom of the left key)’
- 26 -
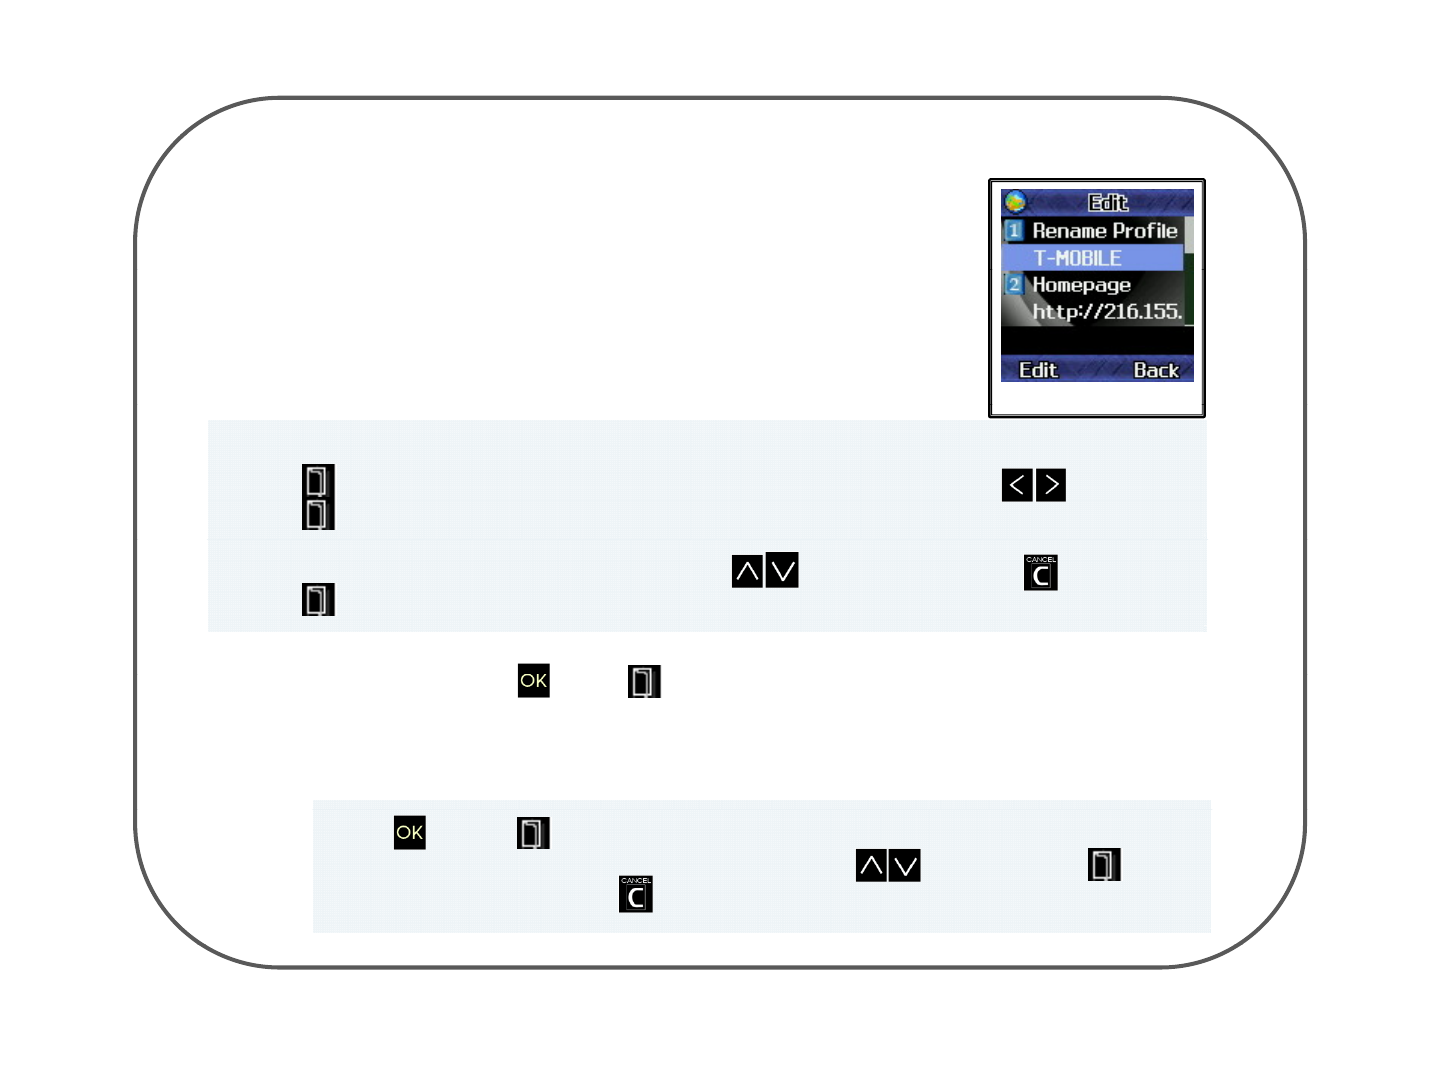
1. RENAME PROFILE : It will allow you to name the profile.
EDIT PROFILE page 2
2. HOMEPAGE : It will allow you to set up the address of the homepage.
EDIT
PROFILE
page
2
<To Registration>
Press Key to enter the registration page select numbers by using Key and
press Key to register it.
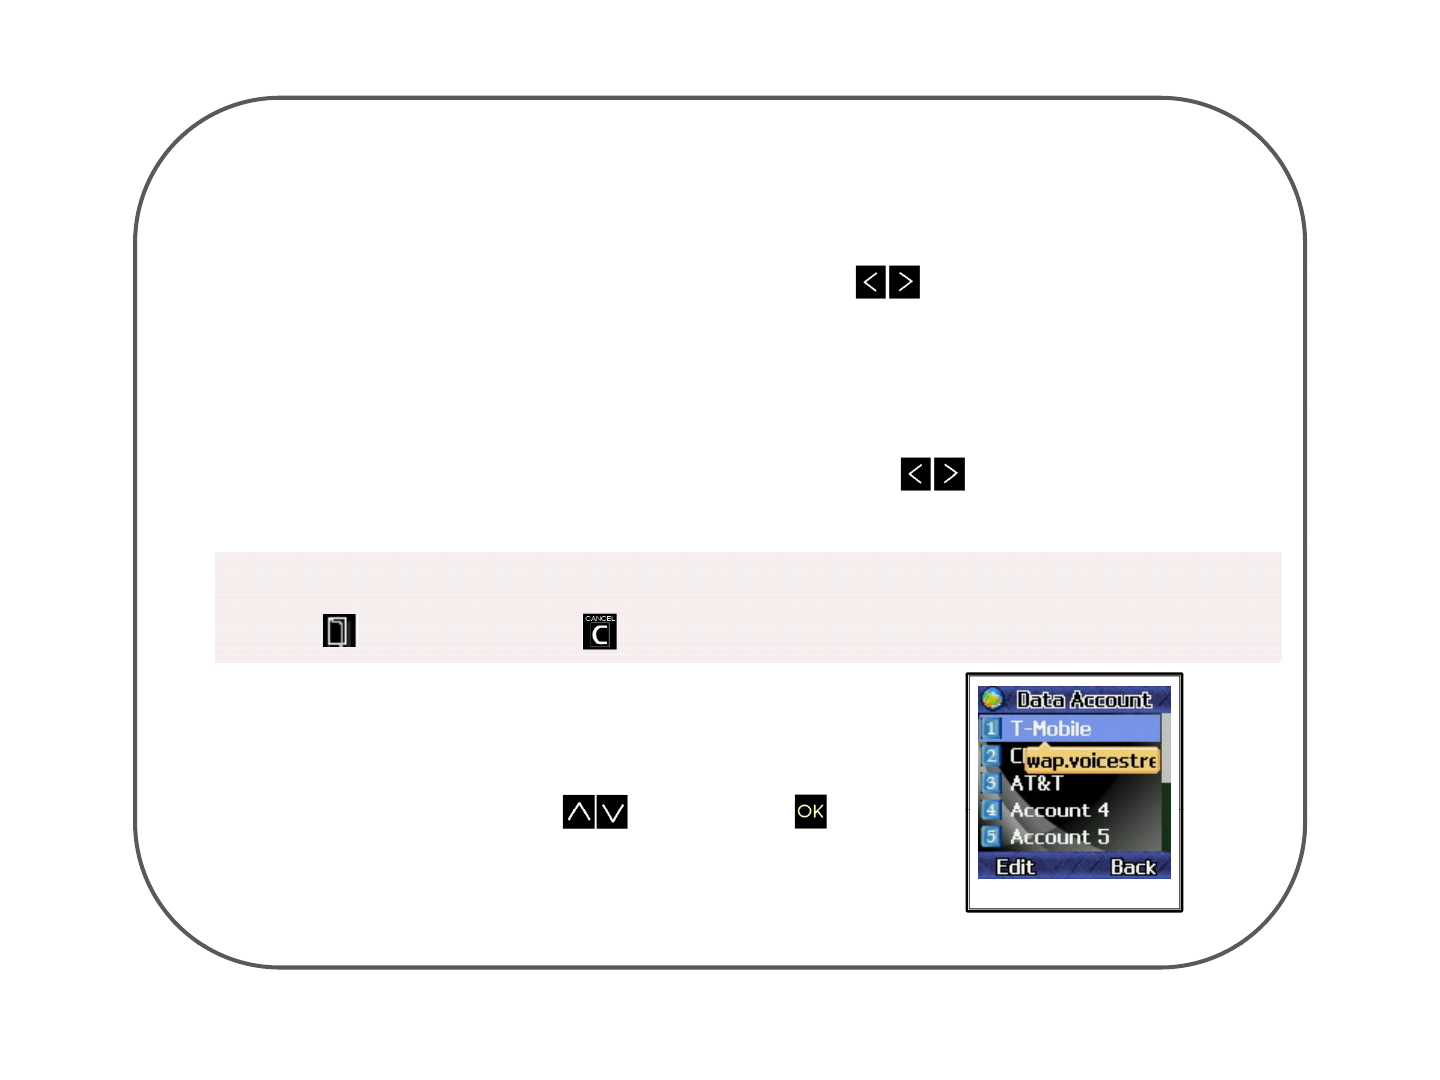
3. DATA ACCOUNT : It will allow you to select the DATA ACCOUNT.
P K K t t th ACCOUNT
To correct the name, go to the number with Key and erase with Key.
Press Key to register it and press it again to confirm.
P
ress
K
ey or
K
ey
t
o en
t
er
th
e
ACCOUNT
page
1) GSM DATA : It will allow you to select GSM DATA ACCOUNT.
2) GPRS : It will allow you to select the GPRS ACCOUNT.
Press Key or Key to enter the GSM DATA or GPRS ACCOUNT page
and move the cursor to any account by using Key and press Key
to select it. You can press Key to exit the page
- 27 -
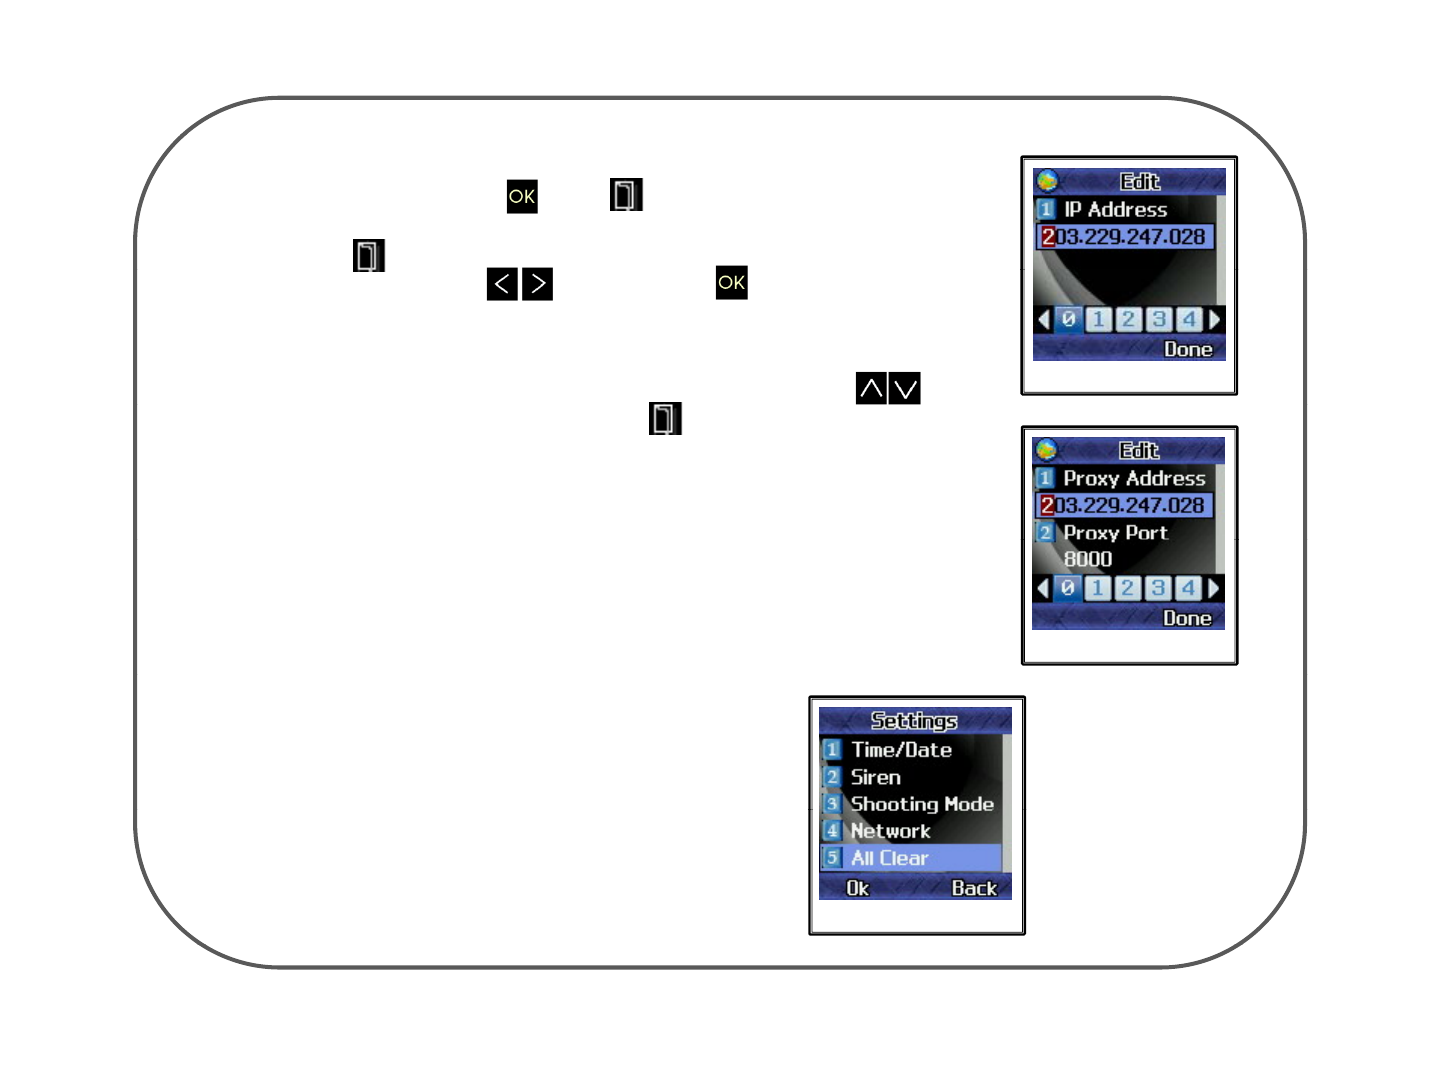
4. CONNECTION TYPE : It will allow you to select the network connection type.
Press Key or Key to enter the registration page.
Press Ke
y
to enter the WAP or HTTP selected
p
a
g
e and select
WAP selected page
To correct the address,
g
o to the letter or number with Ke
y
ypg
numbers by using Key and press Key to register the
IP or Proxy Address.
gy
and select the number again. Press Key to save the IP or Proxy
Address and press it again to confirm it.
HTTP selected page
5. USER NAME : It will allow you to register the name of the network user.
6. PASSWORD : It will allow you to register the password for the network.
All Clear
•It will allow you to reset the Setting
•Because of network setting Eyelog will reboot
HTTP selected page
- 28 -
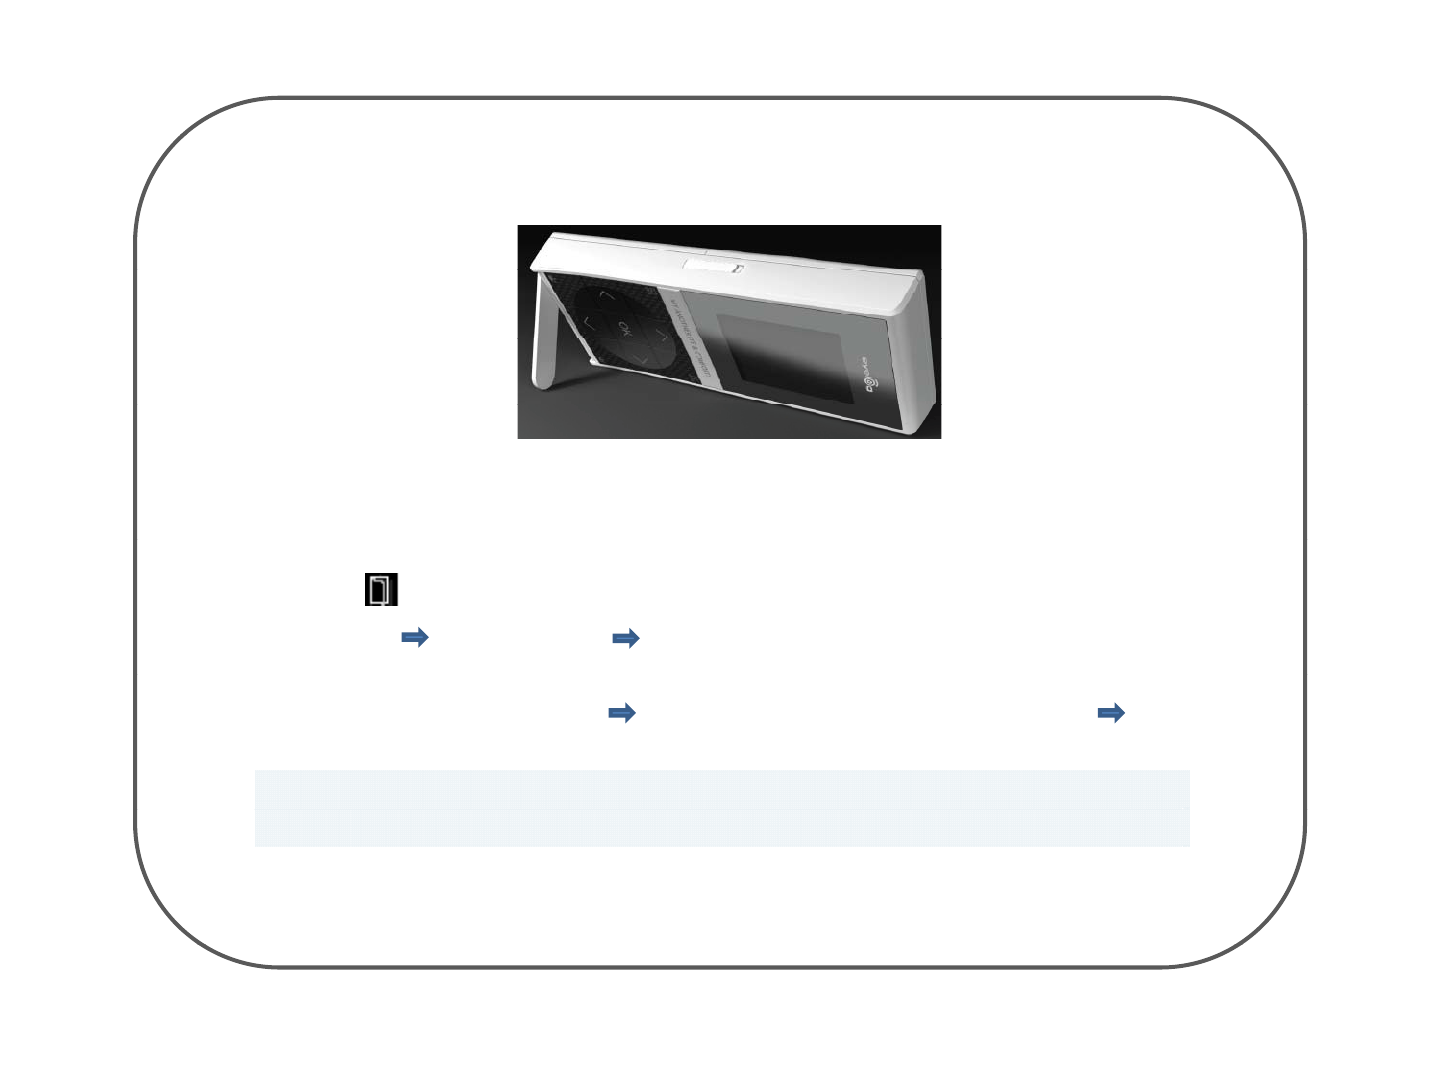
9. The Wa
y
to Install
•You may choose either standing position as below.
Make device “Guard on”
1
Make sure you had inserted the SIM card in
device and your cell
phone
1
.
Make
sure
you
had
inserted
the
SIM
card
in
device
and
your
cell
-
phone
2. Put your battery on and press power key to turn on the power
3. Press (menu) key and put your cell-phone SIM card number in User Mobile Number option
4. Make sure device and your cell-phone has to be in same communication network
(Network MMS Server Profile select communication network you using)
5. Start Remote Control Operation with your cell-phone . (Write “#gon” to start guard.)
6. After you confirm the certificate number The device will be start to guard
7. If invader approach to sensor angle LCD screen will be come up and ready to take a picture
If approach to camera angle the device will take a picture and send to yours cell-phone by MMS
- If there’s no movement in preview mode for 10min. Eyelog will return to “Guard On”.
Eyelog will take a picture for just one sensor except preparing If connected with USB or TA adapter
-
Eyelog
will
take
a
picture
for
just
one
sensor
except
preparing
.
If
connected
with
USB
or
TA
adapter
,
Continuance of camera preview will shown in Eyelog LCD.
- 29 -
Connect USB to user com
p
uterConnect USB to user com
p
uter Connect Eyelog with TA adapter to
il
Connect Eyelog with TA adapter to
il
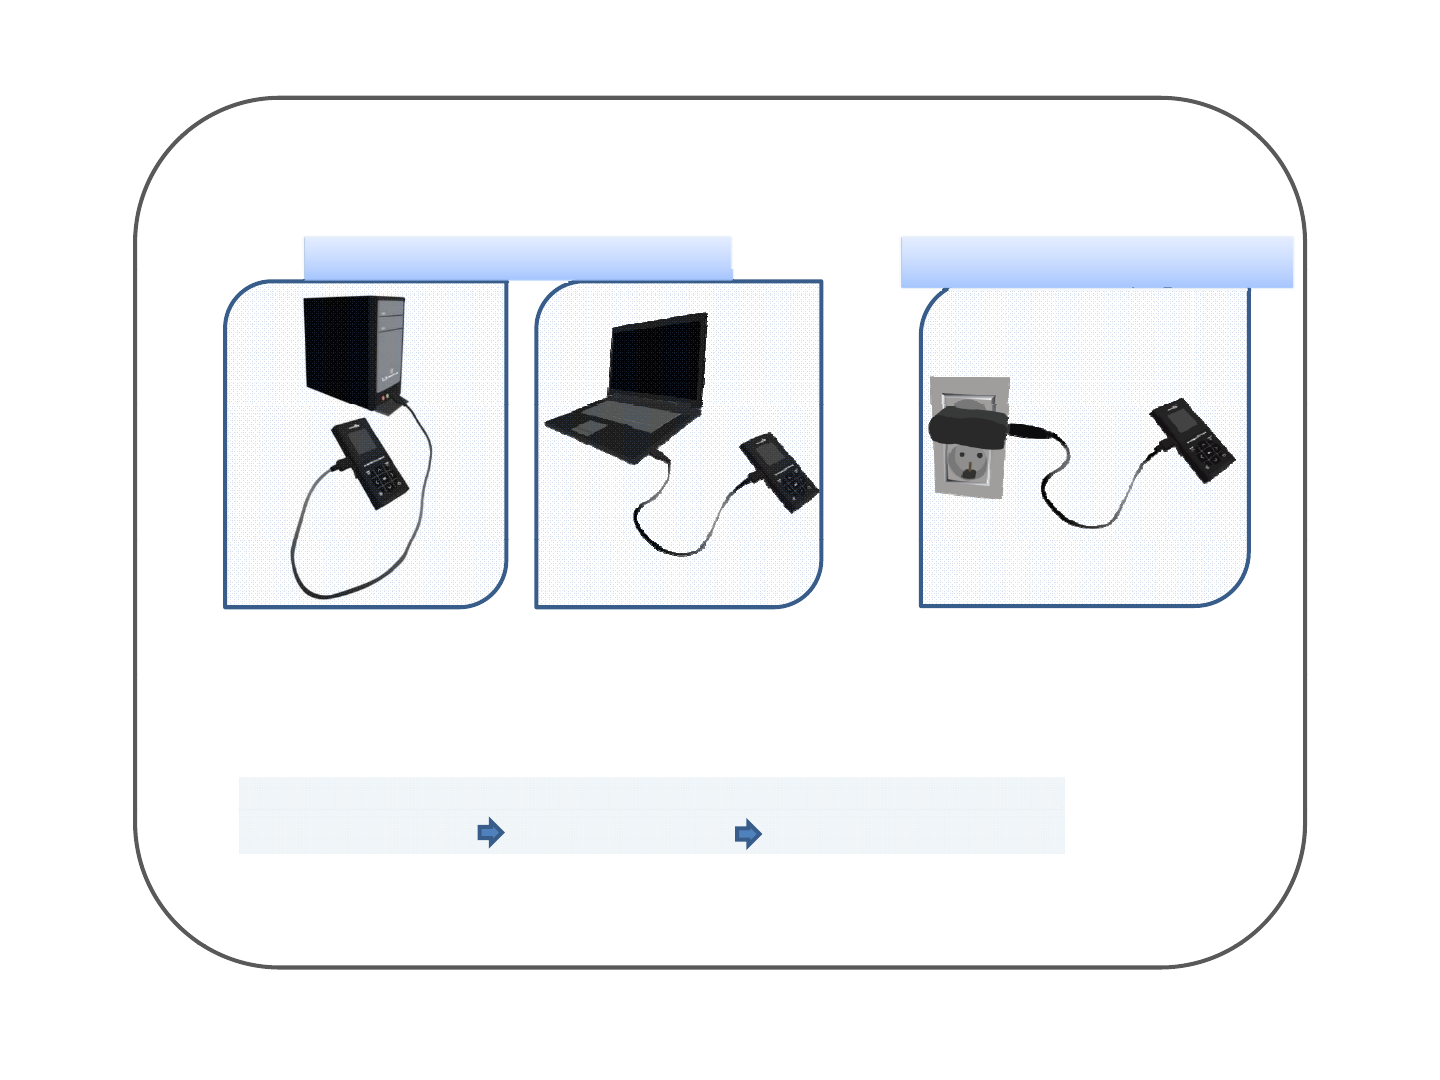
10. USB Cable Connect
pp
concentr
i
c p
l
ugconcentr
i
c p
l
ug
Connect USB to user computer
• It will allow you to see saved video.(MMS) or pictures in your computer.
<Tip>
• You can save the files in your computer and also use for removable disk (PC sync functions)
• Eyelog can charged by USB
• Unable to set “guard on” and see album menu if it’s on mass storage.
• Computer OS should be installed by Window XP or Vista to use
<Tip>
Connect USB cable select mass storage use with your computer
Connect Eyelog with TA adapter to concentric plug
• It will allow you to charge the Eyelog.
• You can still set “guard on” even it’s on charging
- 30 -
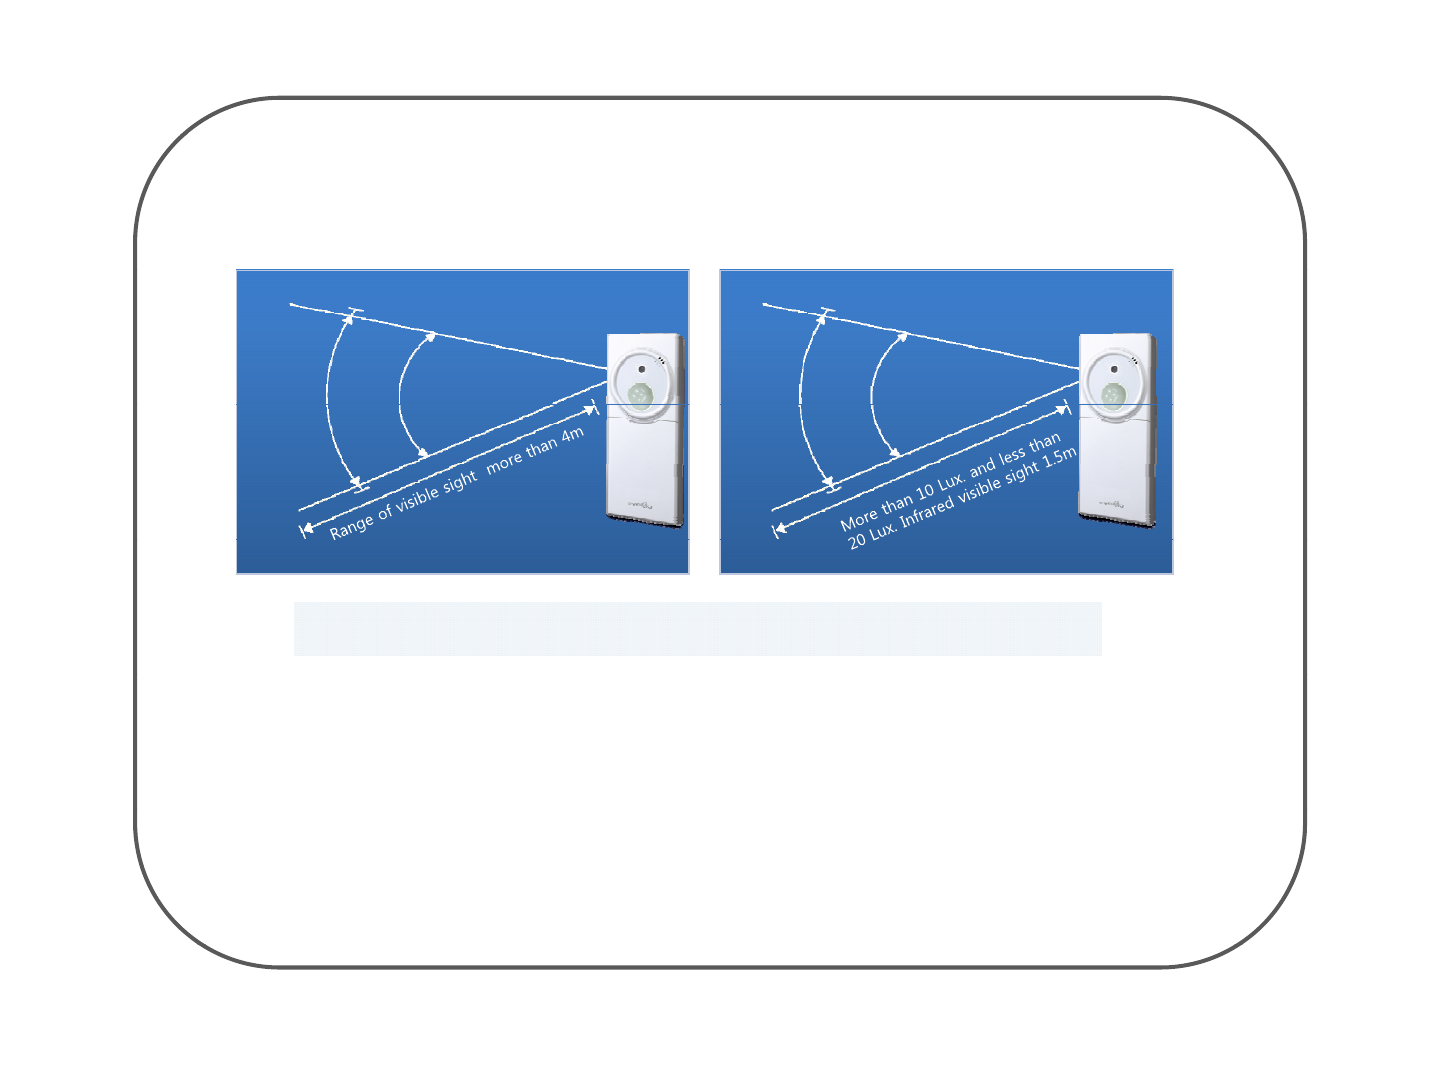
In Night
11. The Ran
g
e & An
g
le Of The Sensor
In Daytime
Camera
an
g
le
Sensor
an
g
le
Camera
an
g
le
Sensor
an
g
le
g
60°
g
95°
g
60°
g
95°
When the light is less than 20 Lux. Infrared sensor will be automatically turn on.
In Daytime
In daytime the range of clear visible sight distance is more than 4m.
In Night
•
It is the
separate way
to purchase the IR LED Dongle
It
is
the
separate
way
to
purchase
the
IR
LED
Dongle
•If you purchase the IR LED Dongle you may see the sight more clearly and more farther at night.
☞ visible sight will be change as proportion with area
☞ It will be able to see more farther if the area is narrow
•In night when the light is more than 10 Lux. and less than 20 Lux. Infrared visible sight distance
is 1.5m.
- 31 -
Ch t 2
Th R t F ti
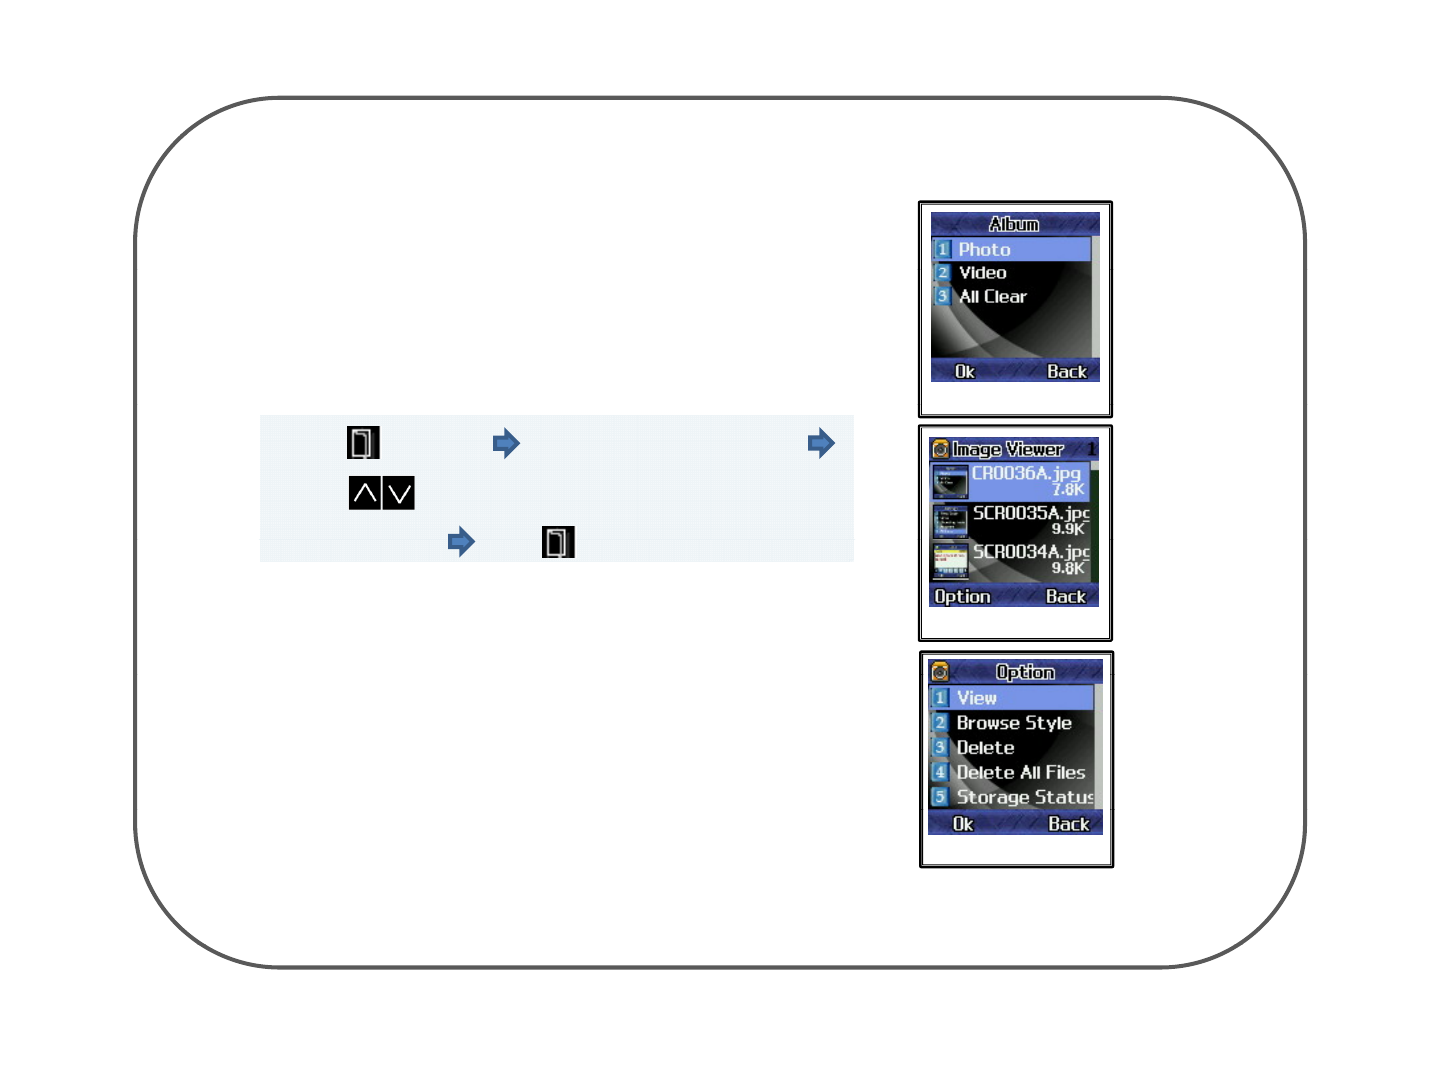
1. Album.
Ch
ap
t
er
2
.
Th
e
R
es
t
F
unc
ti
ons
•It will allow you to see saved pictures in Eyelog.
1. Photo
Album page
Press menu key select Photo Album and you
can see the view
Press Key to select the pictures you want to see
In Image Viewer Press Key to select option
Album
page
Photo Album page
In
Image
Viewer
Press
Key
to
select
option
When Eyelog send picture to phone
the size of 480x640 picture will resized as 240x320
Album file sequence name will be
•Picture view in lar
g
e size
Image Viewer Option
Album
file
sequence
name
will
be
(Year,Month,Date_Hour,Minute_filename)
g
•Change the Browse Style (List style or Matrix style)
•Delete or delete all files
•Can see the storage
Image viewer option
- 32 -
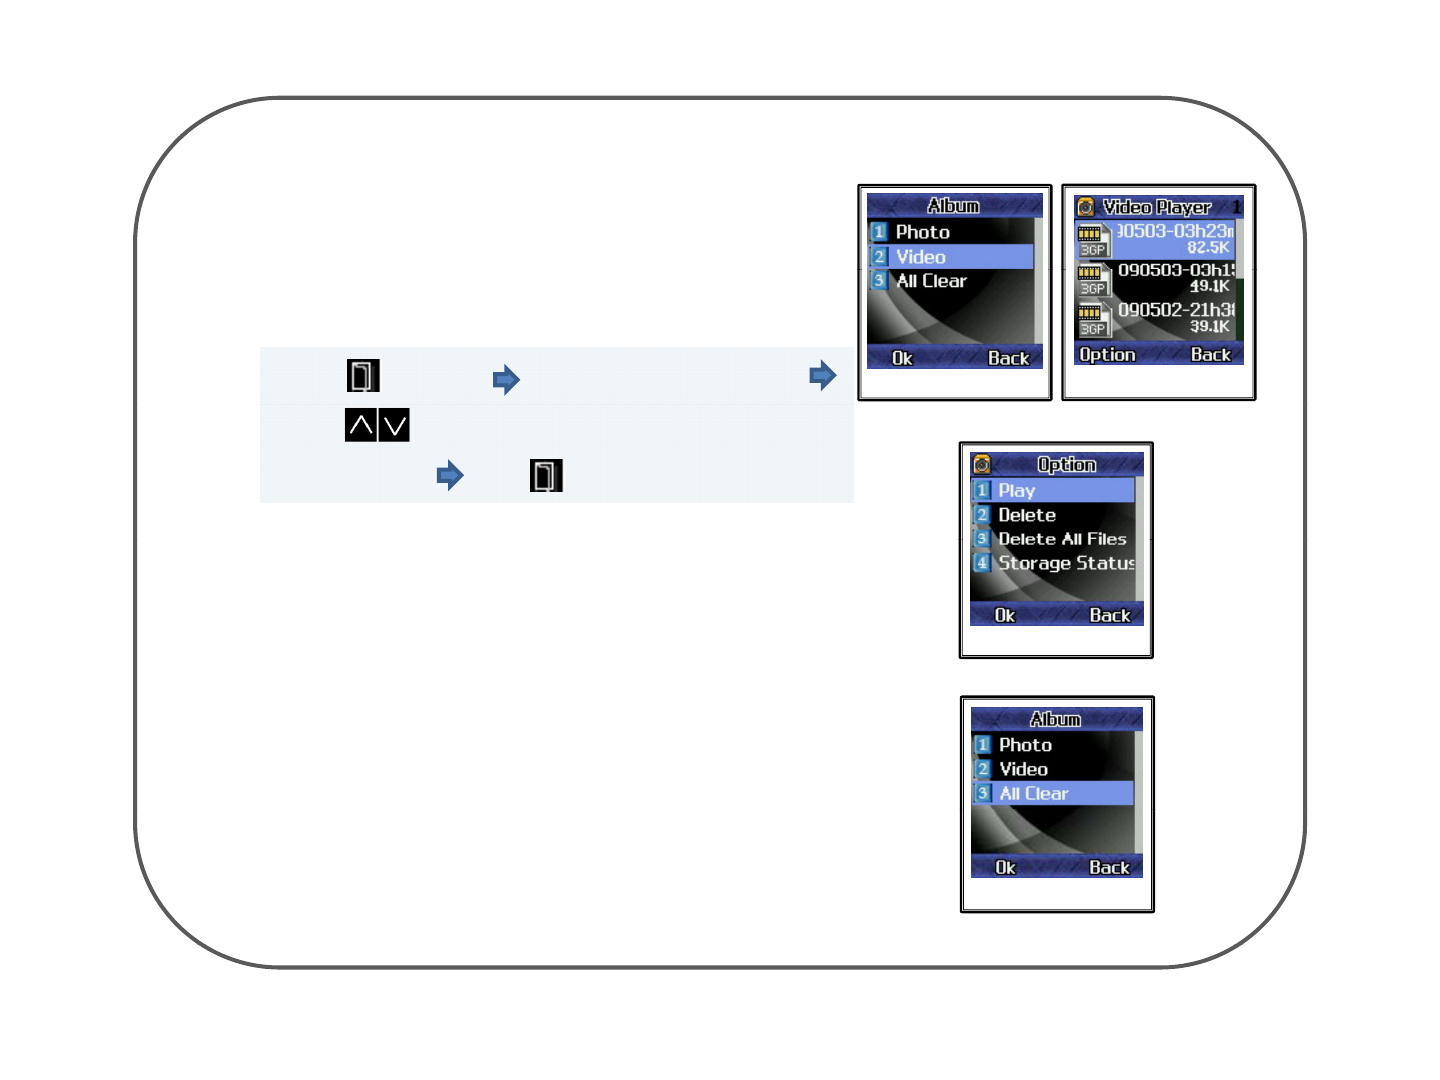
2. Video
• It will allow you to see saved video.(MMS)
Press menu key select Photo Album and you
can see the view
Video Album page
Video Player page
can
see
the
view
Press Key to select the video you want to see
In Video Player Press Key to select option
Vid Pl i
Video Player page
Vid
eo
Pl
ayer opt
i
on
•Play the video file
•Delete or delete all file
Album file sequence name will be
(Year Month Date Hour Minute filename)
(Year
,
Month
,
Date
_
Hour
,
Minute
_
filename)
3. All Clear
Unable to see the Album menu if Eyelog connected
with USB in your computer
• It will allow you to reset the Album
Album all clear
- 33 -
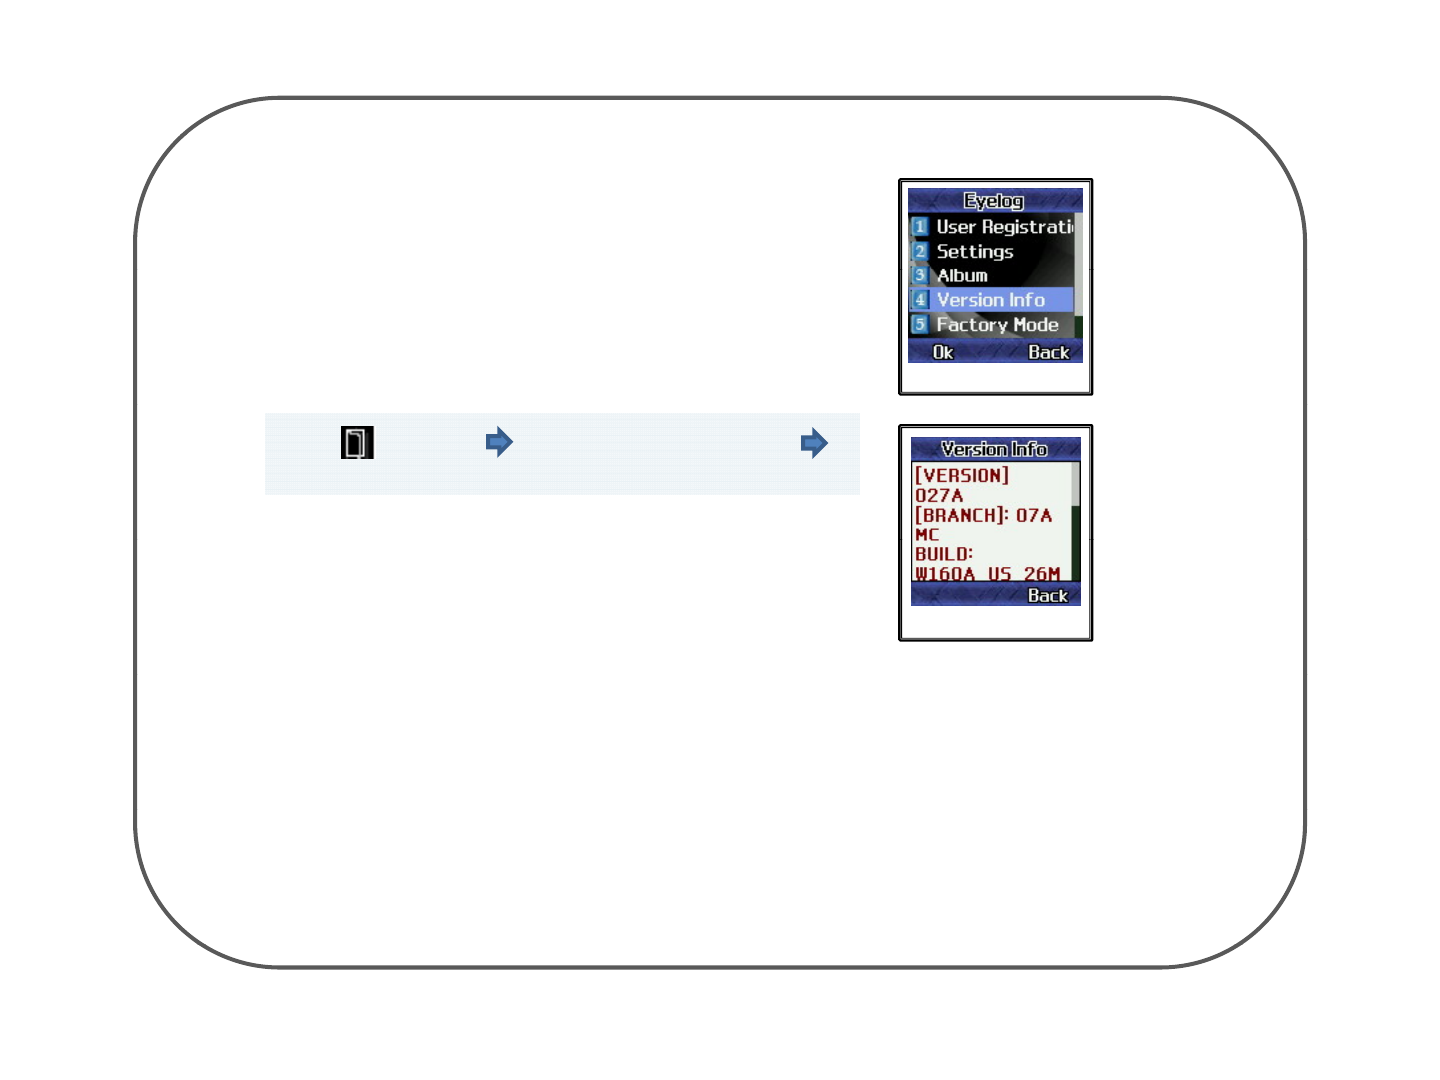
2. Version Info.
•It will allow you to see saved pictures in Eyelog.
1. Version Information
Version Info. page
Press menu key select Version Info. and you
can see the Version of Eyelog
•You could see the Version , Branch, Build Time ,
Build, Serial Number
Version Info.
3. Motion Function.
•Primarily Eyelog will take a picture or record video after
second sensed movement.
•If Eyelog connected with TA or USB port it will take a
picture or record video for just one sensed movement.
- 34 -

Chapter 3. Remote Control Operation
Using your remote control by cell-phone
• You may use the selected person’s cell phone as a remote control by sending SMS message.
• It’s same as when you usually send SMS message.
•Sendin
g
“#hel
p
“#hel
p
” to the device from the remote control b
y
SMS messa
g
e will function as “HELP FOR
g
pp
yg
USER”. Then the device will send the message for all remote control operations to the remote control.
This option is to know all kinds of remote control operation.
•Sending “#“#goffgoff” to the device from the remote control by SMS message will function as “GUARD
OFF”. Then the device will send the messa
g
e “ GUARD OFF
p
erformed” to the remote control.
gp
This option is to make device guard off. It will stop to guard.
•Sending “##gongon” to the device from the remote control by SMS message will function as “GUARD
ON”. Then the device will send the message “ GUARD ON performed” to the remote control.
This option is to make device guard on. It will start to guard.
•Sending “##picpic” to the device from the remote control by SMS message will function as “PHOTO”
Then the device will send the message “ Accept command to send snap-shot” to the remote control.
This option is to take a picture of the place in which the device are placed.
- 35 -
•Sending “##vidvid” to the device from the remote control by SMS message will function as “VIDEO”.
Then the device will send the message “Accept command to send video” to the remote control.
This option is to take a video of the moment where the device are settled
Sdi “
##
”
h d i f h l b SMS ill f i “SIRENON”
•
S
en
di
ng
“
#
son
#
son
”
to t
h
e
d
ev
i
ce
f
rom t
h
e remote contro
l
b
y
SMS
message w
ill
f
unct
i
on as
“SIRENON”
.
Then the device will send the message “Turn on siren” to the remote control.
This option will make device to start function for a siren when picture is taken
•Sending “##soffsoff” to the device from the remote control by SMS message will function as “SIRENOFF”.
Th th d i ill d th “T ff i ” t th t t l
Th
en
th
e
d
ev
i
ce w
ill
sen
d
th
e message
“T
urn o
ff
s
i
ren
”
t
o
th
e remo
t
e con
t
ro
l
.
This option will make device to stop function for a siren when picture is taken
•Sending “#vidur#10s#vidur#10s” to the device from the remote control by SMS message will function as
“photographing of video for 10 seconds”. Then the device will send the message “Accept command
to send 10 seconds video
”
to the remote control
to
send
10
seconds
video
to
the
remote
control
.
This option will make device to photograph video for 10 seconds.
•Sending “#picre#30m#picre#30m” to the device from the remote control by SMS message will function as
“Transfer still shot every 30 minutes”. Then the device will send the message “Accept command to
send snap
-
shot every 30 minutes
”
to the remote control
send
snap
-
shot
every
30
minutes
to
the
remote
control
.
This option will make device to transfer still shot every 30 minutes.
How to use remote control with cell-phone
Confirm your MMS Server Profile Select Message menu Select Write Message
Select Text Message Start Remote Control Operation with your cell-phone remember to
put sharp (#) in front of the Control Operation Message
- 36 -
For the error reason code
Error Index Details Expression in SMS
LOW BATTERY
When can not guarantee surplus battery for confirm MSG
by low battery until receiving Confirm MSG in 10 min
after receiving request MSG
Low battery
For
the
error
reason
code
CERTI TIME OUT When Confirm MSG does not return in 10 min after sent
Certification Number.
Certification timed out
INVALID CERTI NUM When wrong certification number for confirm returns
in waiting 10 min.
Wrong certification num
ber
When receiving other
Request MSG
in need of
#word Command in
PREVIOUS CMD IN PROGRESS
When
receiving
other
Request
MSG
in
need
of
certification while waiting certification number
(Send Error Code for new Req MSG) But if any
certification is not needed it operate without Error
#word
Command
in
progress (#word :
INVALID MSG FORMAT When user sent wrong SMS Wrong message format
INVALID CMD
When execution of undefined
CMD is requested
Wrong command
INVALID
CMD
When
execution
of
undefined
CMD
is
requested
Wrong
command
INVALID PIN CODE When returned Pin code is not same as that defined in
Eyelog
Wrong pin code
INVALID CLIENT
When user is not registered in Eyelog or message is
wrongly sent(To control with unregistered mobile, the
El
htbiPi d d)
Unregistered client
E
ye
l
og
h
as
t
o
b
e
i
n
Pi
n co
d
e mo
d
e
)
ALREADY SET When resetting the value that has been already set Already set
MMS NETWORK ERROR When failing to send after three time of MMS sending
try(But when SMS sending is available)
MMS sending failed
When
can
not
execute
t
he
Req
Command
by
lack
of
Memory problem
MEMORY ERROR
When
can
not
execute
t
he
Req
Command
by
lack
of
memory space or error
Memory
problem
CAMERA ERROR When can not request for taking photo or video by
wrong operation of camera sensor
Camera problem
UNKNOWN ERROR When can not execute given command by other reasons
excluding
reasons listed
above
Occurs unknown error
excluding
reasons
listed
above
- 37 -

Warning
ff
Read this in
f
ormation be
f
ore use
Near-Body Operation
To maintain com
p
liance with FCC RF ex
p
osure re
q
uirements, maintain a 20Cm, se
p
aration distance between
ppq p
the user's body, including the antenna, whether extended or retracted.
Caution
Modifications not expressly approved by the party responsible for compliance could void the user’s authority
to operate the equipment.
FCC Compliance Information
This device complies with Part 15 of FCC Rules. Operation is subject to the following two conditions: (1)
This device may not cause harmful interference, and (2) This device must accept any interference received.
Including interference that may cause undesired operation.
Information to User
This equipment has been tested and found to comply with the limits for a Class B digital device, pursuant to
part 15 of the FCC Rules. These limits are designed to provide reasonable protection against harmful
interference in a residential installation. This equipment generates, uses and can radiate radio frequency
ener
gy
and
,
if not installed and used in accordance with the instructions
,
ma
y
cause harmful interference to
gy , , y
radio communications. However, there is no guarantee that interference will not occur in a particular
installation. If this equipment does cause harmful interference to radio or television reception, which can be
determined by turning the equipment off and on, the user is encouraged to try to correct the interference by
one or more of the following measures:
-Reorient or relocate the receiving antenna.
-Increase the separation between the equipment and receiver.
-Connect the equipment into an outlet on a circuit different from that to which the receiver is connected.
- Consult the dealer or an experienced radio/tv technician for help.
- 37 -