Contents
- 1. User Manual 1
- 2. User Manual 2
User Manual 2
26
Bluetooth Audio
Before playing the Bluetooth
audio
•
•Music saved in the mobile phone can be played
in the car through Bluetooth audio streaming.
•
•Bluetooth audio can be played only when a
Bluetooth phone or Bluetooth audio device
has been connected. To play Bluetooth audio,
connect the Bluetooth phone to the car system.
For more information on connecting Bluetooth,
please refer to the user’s manual [Pairing and
connecting the unit and a Bluetooth phone] on
the page 28.
•
•If Bluetooth is disconnected while playing
Bluetooth audio, the audio stream will be inter-
rupted.
•
•The audio streaming function may not be sup-
ported in some mobile phones. Only one func-
tion can be used at a time, either the Bluetooth
handsfree or the Bluetooth audio function. For
example, if you convert to the Bluetooth hands-
free while playing Bluetooth audio, the music
stream is interrupted.
•
•Playing music from the car is not possible when
there are no music files saved in the mobile
phone.
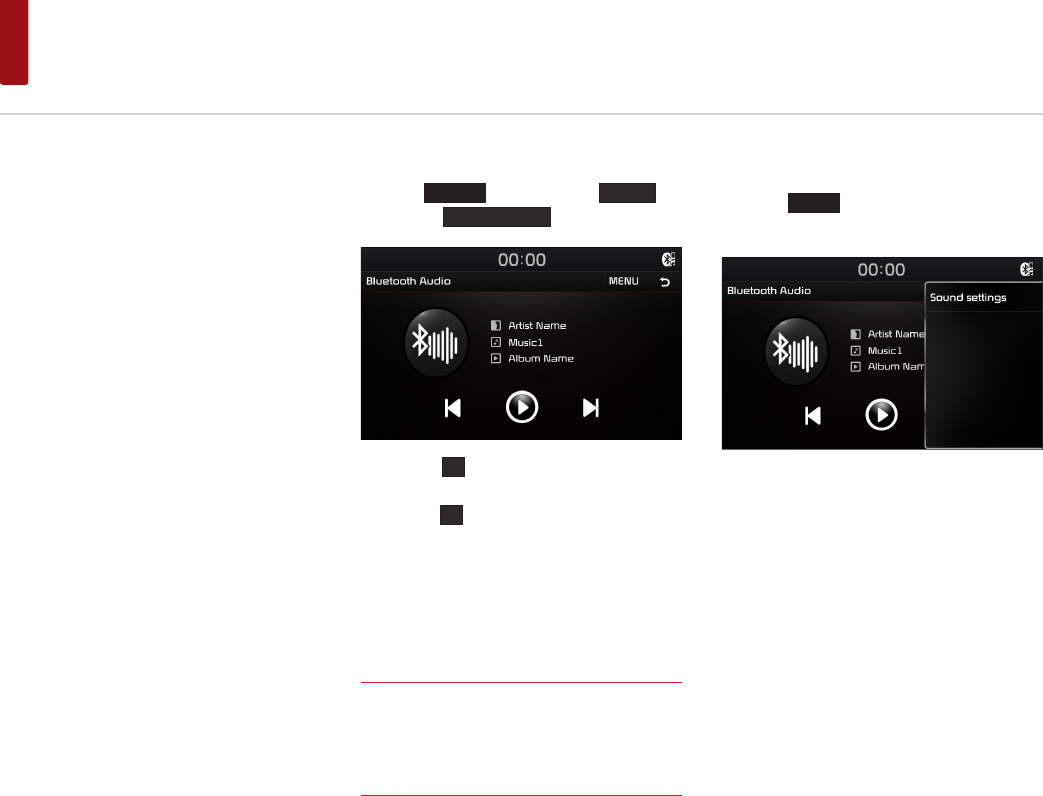
Playing Bluetooth audio
Press the
HOME
key ▶ Press the
Media
key
▶ Press the
Bluetooth Audio
button.
•
•Press the
▶
button to play files saved within
the Bluetooth
®
phone.
•
•Press the
ll
button to pause the file.
Searching Bluetooth audio Files
You can play the previous or next file.
For details, refer on the page 17.
NOTE
• The title/artist info may not be supported in some
mobile phones. When it is not supported, only the
symbol will be displayed.
• The play/pause feature may operate differently
depending on the mobile phone.
Using the Menu Buttons
Press the
MENU
button to set List and Sound
settings menus.
For details, refer to the “Sound” on the page 35.

27
Bluetooth® Wireless Technology
ENGLISH
Before Using the Bluetooth
Handsfree
What is Bluetooth®
Wireless Technology?
•
•Bluetooth ® Wireless Technology refers to a
short-distance wireless networking technol-
ogy which uses a 2.45GHz frequency to con-
nect various devices within a certain distance.
•
•Supported within PCs, external devices,
Bluetooth® phones, PDAs, various electronic
devices, and automotive environments,
Bluetooth ® Wireless Technology to be trans-
mitted at high speeds without having to use a
connector cable.
•
•Bluetooth® Handsfree refers to a device which
allows the user to conveniently make phone
calls with Bluetooth® mobile phones through
the Multimedia system.
•
•The Bluetooth® Handsfree feature may not be
supported in some mobile phones.
Precautions for Safe Driving
•
•Bluetooth® Handsfree is a feature that enables
drivers to practice safe driving. Connecting the
head unit with a Bluetooth® phone allows the
user to conveniently make calls, receive calls,
and manage the phone book. Before using
Bluetooth ® Wireless Technology, carefully read
the contents of this user’s manual.
•
•Excessive use or operations while driving may
lead to negligent driving practices and be the
cause of accidents. Do not operate the device
excessively while driving.
•
•Viewing the screen for prolonged periods of
time is dangerous and may lead to accidents.
When driving, view the screen only for short
periods of time.
Cautions upon Connecting
Bluetooth Phone
•
•Before connecting the head unit with the
mobile phone, check to see that the mobile
phone supports Bluetooth® features.
•
•If you do not want automatic connection with
your Bluetooth® device, turn the Bluetooth®
feature off of the Bluetooth® device.
•
•Park the vehicle when connecting the head
unit with the mobile phone.
•
•Some Bluetooth features may occasionally not
operate properly depending on the firmware
version of your mobile phone. If such features
can be operated after receiving a S/W upgrade
from your mobile phone manufacturer, unpair
all devices and pair again before use.

28
Bluetooth Connection
When no Phones Have Been
Paired
Press the key on the steering wheel or
press the
PHONE
key ▶ Press the
OK
.
Pairing from the Bluetooth® Device
Press the
MENU
button ▶ Press the
Search from device
.
From the Bluetooth® device, search for the car
name and pair the device. When searching
from the Bluetooth® device, the car name is KIA
MOTORS and the default passkey is ‘0000’.
Pairing from the car
Press the
MENU
button ▶ Press the
Search from car
▶ Press the phone name to
pair ▶ Press the
YES
.
29
Bluetooth Connection
ENGLISH
When a Phone is Already Paired
Press the key on the steering wheel or
press the
PHONE
key ▶ Press the
OK
▶
Press the phone name to pair ▶ Press the
YES
.
NOTE
• When a Bluetooth device is connected, a new
device cannot be paired. If you want to pair a new
phone, first disconnect the connected Bluetooth
device.
When your phone is
connected
Press the key on the steering wheel or
press the
PHONE
key on the head unit to dis-
play the following screen.
NOTE
• Once Bluetooth connection is successful, the name
of the connected mobile phone will be displayed
on the phone screen and Bluetooth handsfree
functions will be ready to be operated.
• Some functions may not be supported due to
limited Bluetooth compatibility between the car
system and mobile phone.
30
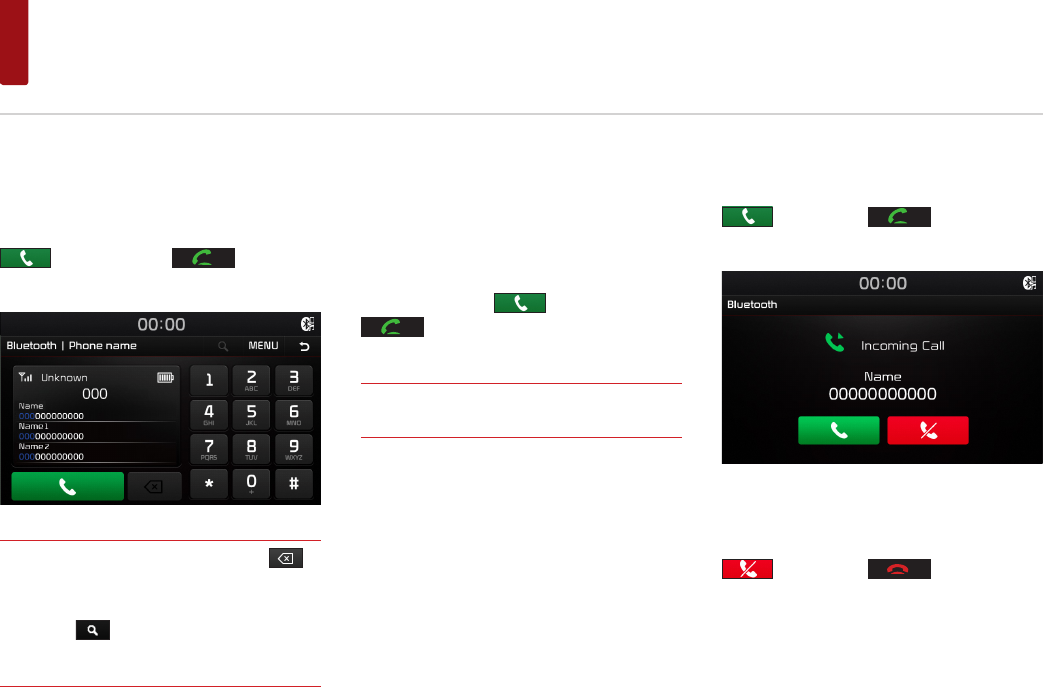
Bluetooth Phone
Making/Answering Calls
Calling by Dialing a Number
Enter number on the Dial Pad ▶ Press the
button or the key on the steer-
ing wheel.
NOTE
• If you press the wrong number, press to
delete one digit of the entered number. Press and
hold the dial pad 0 + to enter a "+".
• Press the button to search phone numbers.
For detail, refer to the “Searching for contacts “ on
the page 32.
Making a Call from Speed Dial
Enter the 1 or 2 digit speed dial number with the
Dial Pad ▶ Press and hold the last number.
Calling through Redial
Press and hold the button or Press the
key on the steering wheel twice.
NOTE
• Redialing is not possible when there is no dialed
calls list.
Answering a Call
Incoming call notice ▶ Press the
button or the key on the
steering wheel.
Rejecting a Call
Incoming call notice ▶ Press the
button or the key on the
steering wheel.
31
Bluetooth Phone
ENGLISH
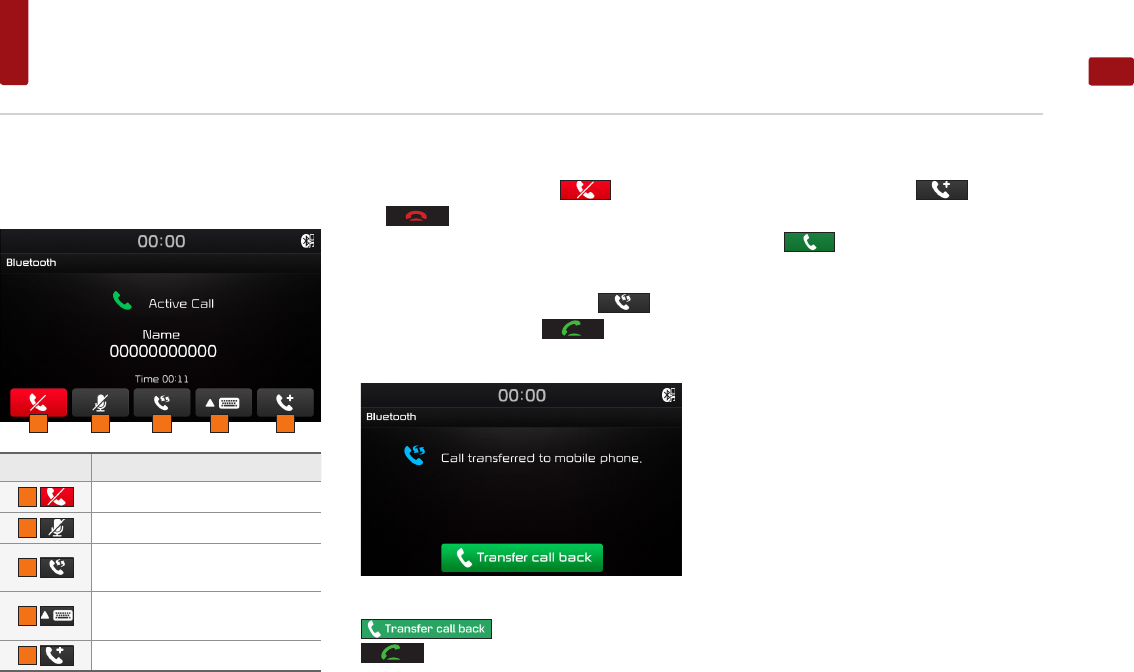
Operating Menus during a
Call
Name Description
1 Ends a call.
2 Turns the Mic On/Off.
3 Switches a voice call from the car
handsfree to the mobile phone.
4 Display dial pad screen for enter-
ing ARS numbers.
5 3 Way call
Ending a Call
While on a call ▶ Press the button or
the key on the steering wheel.
Switching Call to Bluetooth® Phone
During handsfree call ▶ Press the but-
ton or press and hold the key on the
steering wheel.
During call on mobile phone ▶ Press the
button or press and hold the
key on the steering wheel.
Making 3 way call
While on a call ▶ Press the button. ▶
Press phone number you want to make a call ▶
Press the button.
1 2 3 4 5
32
Bluetooth Phone
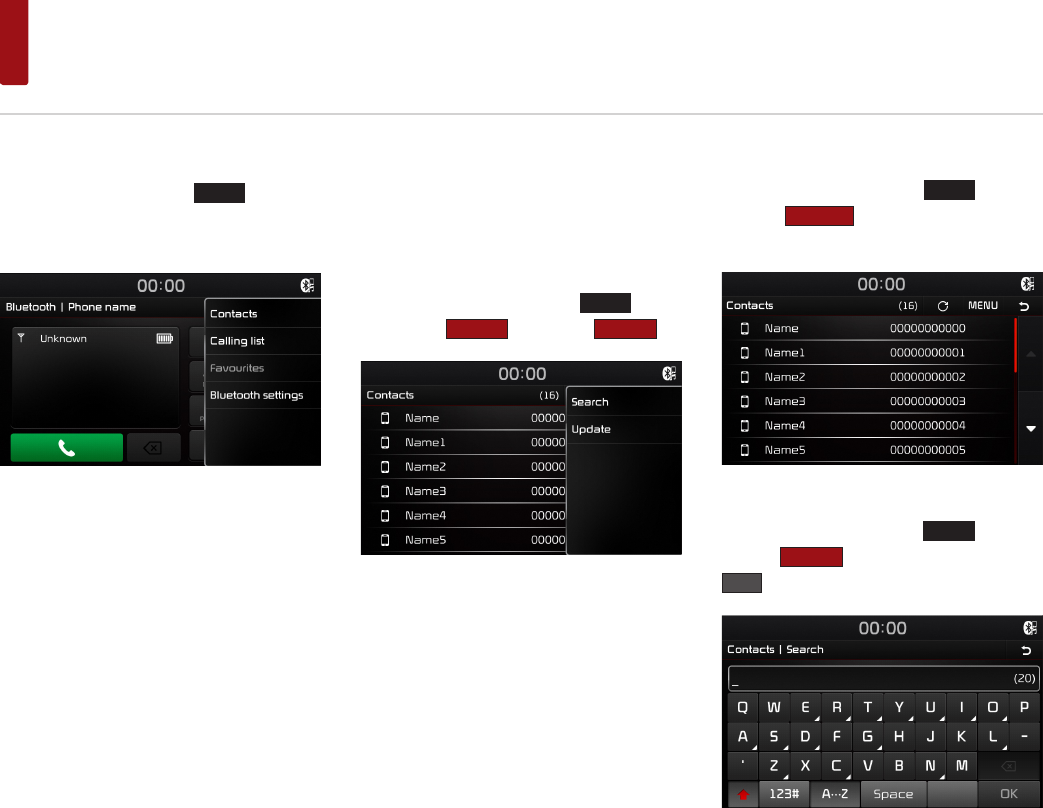
Using the Menu Buttons
In Phone screen ▶ Press the
MENU
button to
use Contacts , Calling list , Favorites , Bluetooth
settings .
Contacts
Updating Mobile Phone Contacts
Up to 5,000 mobile phone contacts can be
updated.
In Contacts screen ▶ Press the
MENU
button
▶ Press the
Contacts
▶ Press the
Update
.
The contacts are deleted and the contacts
of the connected phone is updated.
Making a call from contacts
In Contacts screen ▶ Press the
MENU
button ▶
Press the
Contacts
button ▶ Press the contact
you want to call.
Searching for contacts
In Contacts screen ▶ Press the
MENU
button ▶
Press the
Search
▶ Enter the name ▶ Press the
OK
▶ Press the contact you want to call.
33
Bluetooth Phone
ENGLISH
Calling list
Viewing Calling lists
In Phone screen ▶ Press the
MENU
button ▶
Press the
Calling lists
.
Press the
MENU
button on Calling list screen.
Name Description
1 All Displays all calling list.
2 Missed Displays the missed calling list.
3 Received Displays the incoming calling
list.
4 Dialed Displays the outgoing calling
list.
NOTE
• The calling list may not be saved in some mobile
phones.
Favourites
Calling Favourites
In Phone screen ▶ Press the
MENU
button ▶
Press the
Favourites
▶ Press the Favourite you
want to call.
Saving to Favourite
In Phone screen ▶ Press the
Add to favourites
button.
In Contacts screen or Calling list screen ▶ Press
and hold the contact you want to save ▶ Press
the
Save to Favourites
.
1
2
3
4
34
Bluetooth Phone
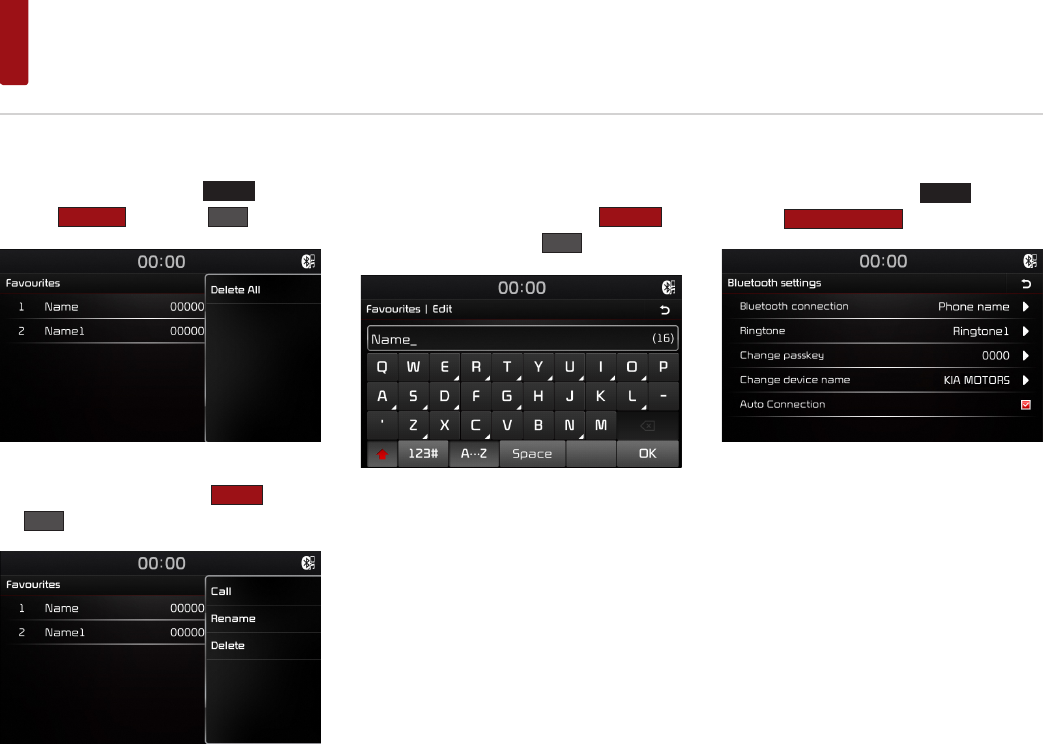
Deleting Favourites
In Favourites screen ▶ Press the
MENU
button ▶
Press the
Delete all
▶ Press the
OK
.
In Favourites screen ▶ Press and hold the favourite
you want to delete ▶Press the
Delete
▶ Press
the
OK
.
Changing the Favourites name
In Favourites screen ▶ Press and hold the favour-
ite you want to change ▶ Press the
Rename
▶
Enter the name ▶ Press the
OK
.
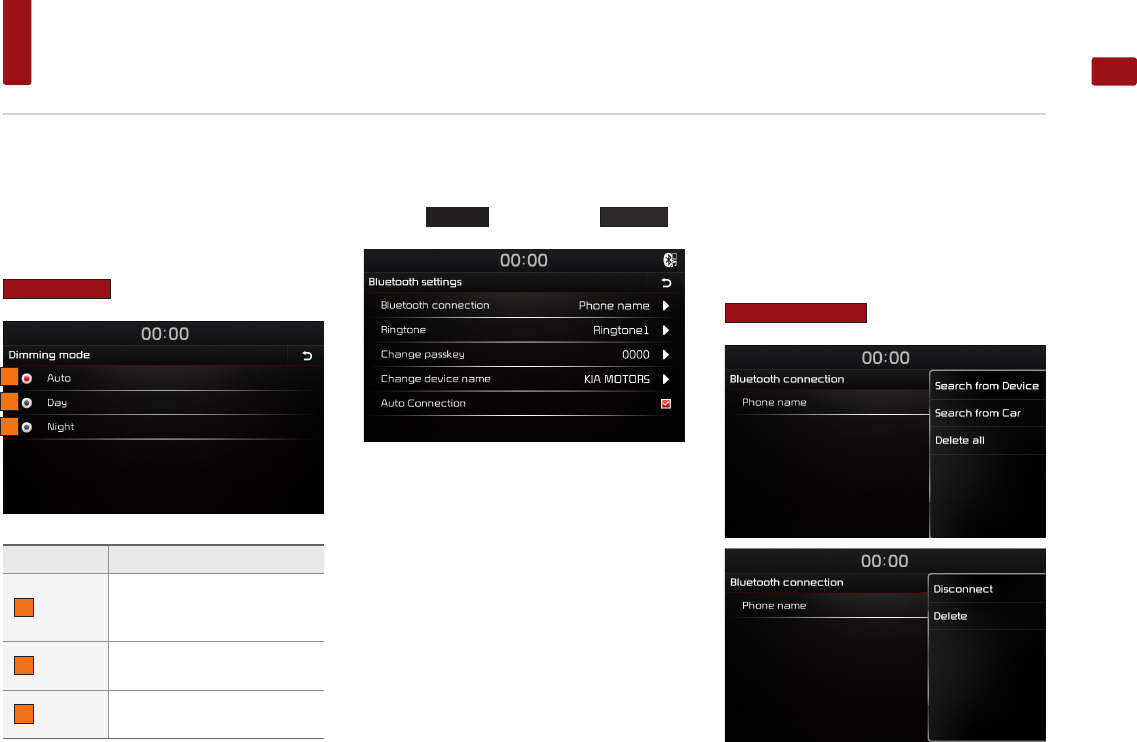
Bluetooth settings
In Phone screen ▶ Press the
MENU
button ▶
Press the
Bluetooth settings
.
For details, refer to the “Bluetooth” on the page
37.
35
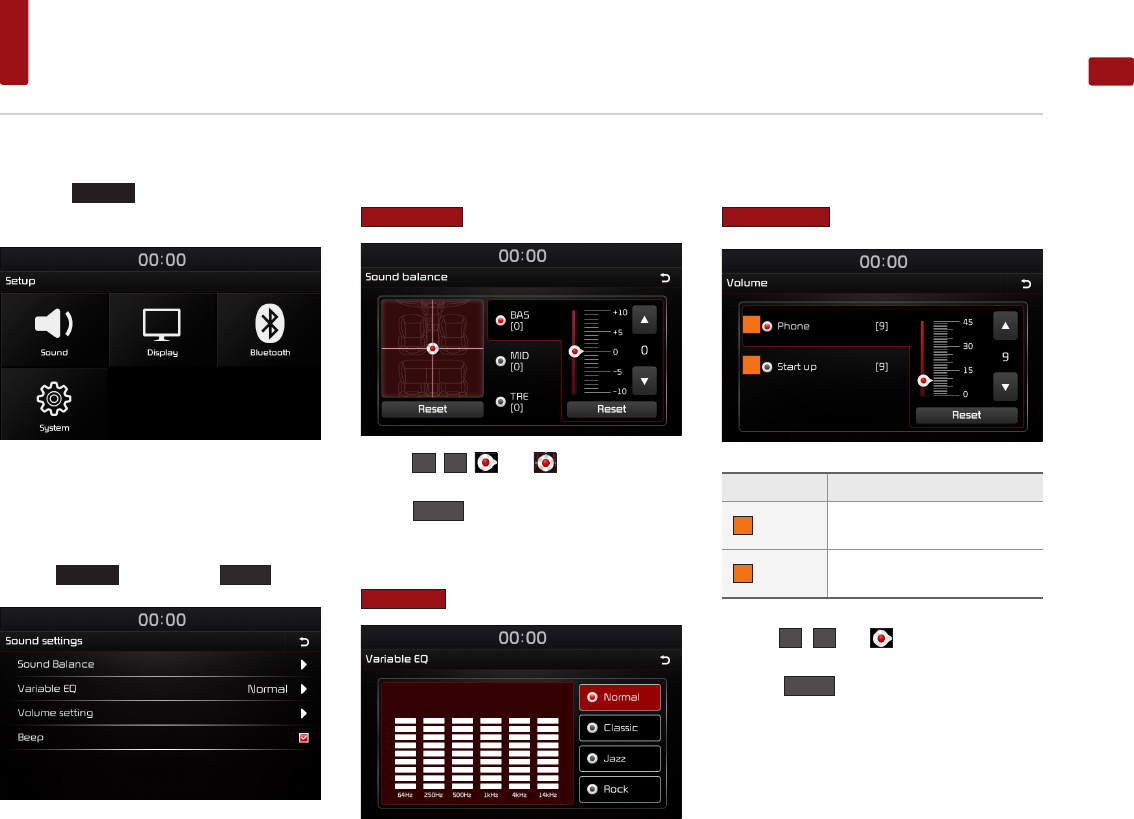
Setup
ENGLISH
Starting mode
Press the
SETUP
key to display the Setup
screen.
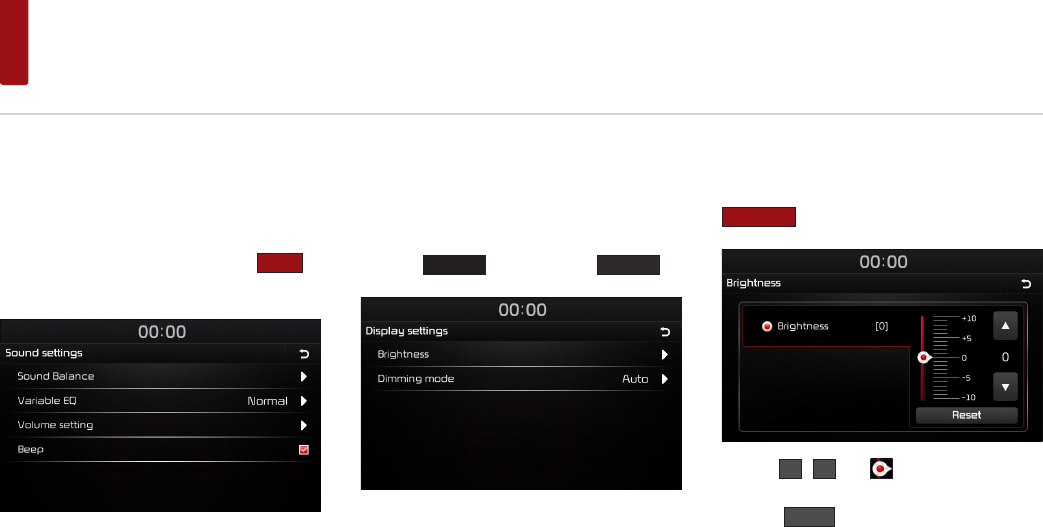
Sound
This menu is used to adjust the sound effects
for the whole system.
Press the
SETUP
key ▶ Press the
Sound
button.
Sound Balance
In Sound settings screen ▶ Press the
Sound Balance
▶ Set the desired sound balance.
Use the
▲
,
▼
, , and buttons to adjust
settings.
Press the
Reset
to restore sound to the center position.
Variable EQ
In Sound settings screen ▶ Press the
Variable EQ
▶ Set the desired mode.
Volume setting
In Sound settings screen ▶ Press the
Volume setting
▶ Set the desired volume.
Name Description
1 Phone Controls the volume related to
phone.
2 Start up Controls the audio volume
when starting the system.
Use the
▲
,
▼
and buttons to adjust set-
tings.
Press the
Reset
to initialize the settings.
1
2
36
Setup
Beep
This menu allows you to play a beep sound
whenever you operate the touch screen.
In Sound settings screen ▶ Press the
Beep
to
turn on/off.
Display
This menu allows you to adjust the brightness
and set the dimming mode for the whole sys-
tem.
Press the
SETUP
key ▶ Press the
Display
.
Brightness
In Display settings screen ▶ Press the
Brightness
▶ Set the desired brightness.
Use the
▲
,
▼
and buttons to adjust set-
tings.
Press the
Reset
to initialize the settings.
37
Setup
ENGLISH
Dimming mode
This menu allows you to set the brightness
according to mode changes.
In Display settings screen ▶ Press the
Dimming mode
▶ Set the desired mode.
Name Description
1 Auto
Adjusts the brightness
automatically according to sur-
rounding brightness.
2 Day Brightness level always set on
high.
3 Night Brightness level always set on
low.
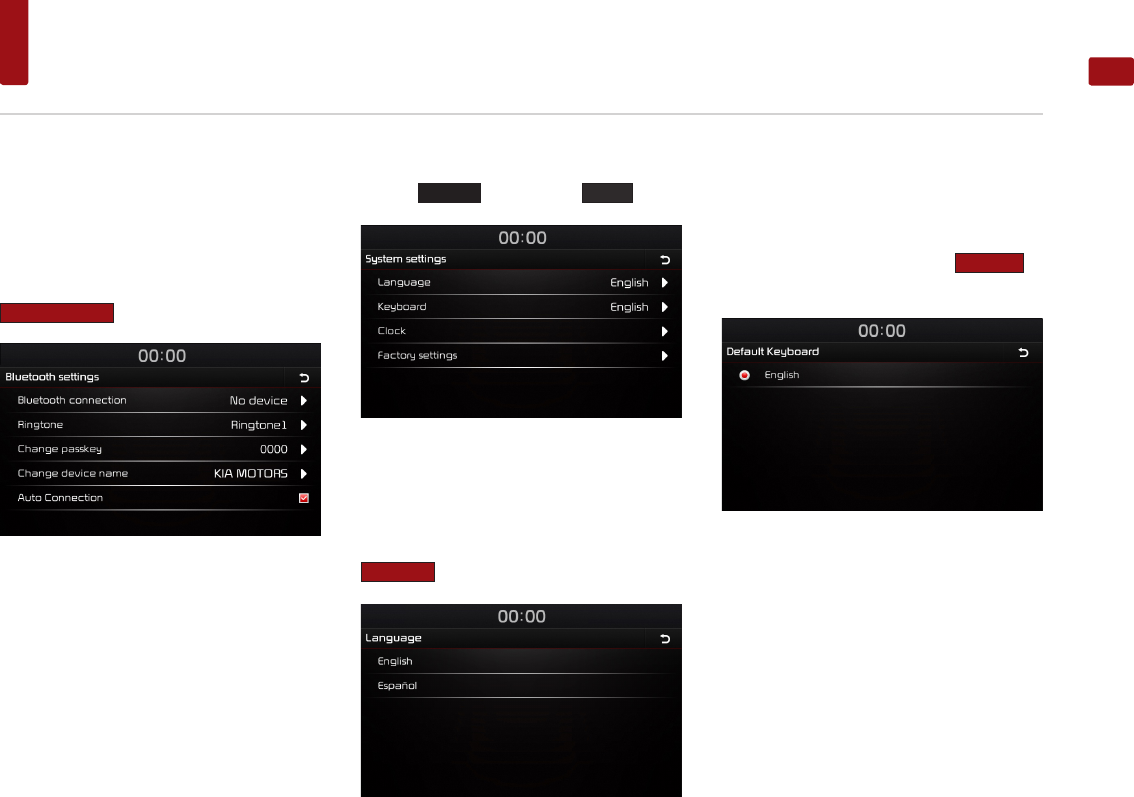
Bluetooth settings
This menu allow you to set Bluetooth settings.
Press the
SETUP
key ▶ Press the
Bluetooth
.
Bluetooth connection
This menu allow you to manage the Bluetooth
device list, such as pairing, connecting or delet-
ing Bluetooth devices.
In Bluetooth settings screen ▶ Press the
Bluetooth connection
▶ Set the desired settings.
Press and hold the phone name to disconnect/
delete the device.
1
2
3
38
Setup
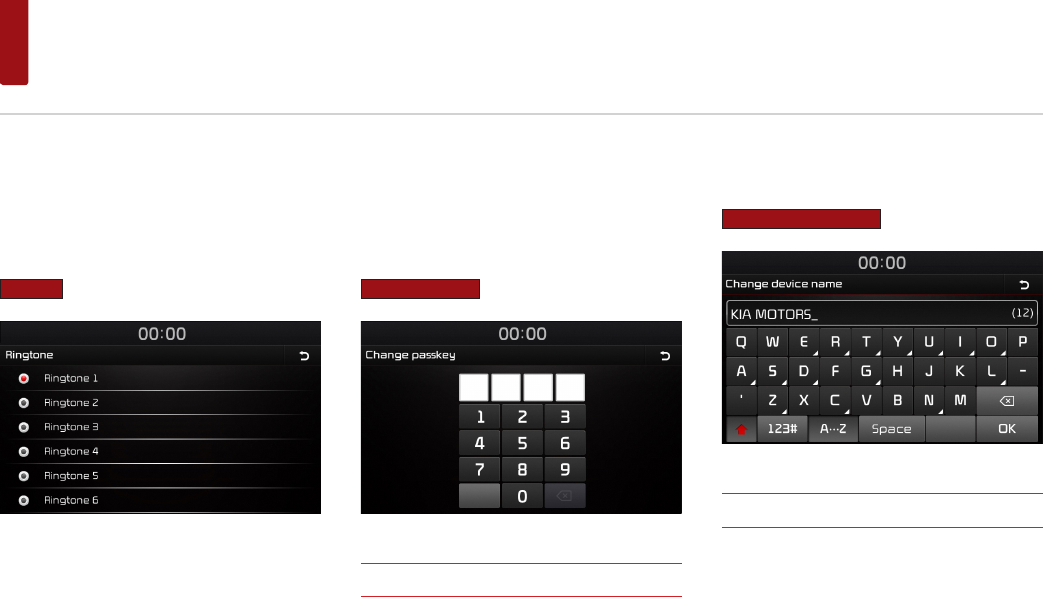
Ringtone
The configured ringtone is played through the
vehicle speakers when you receive a call.
In Bluetooth settings screen ▶ Press the
Ringtone
▶ Set the desired ringtone.
Change passkey
This feature allows you to change the passkey
used for Bluetooth device authentication.
In Bluetooth settings screen ▶ Press the
Change passkey
▶ Enter the passkey.
NOTE
• The default passkey is 0000.
Changing device name
In Bluetooth settings screen ▶ Press the
Change device name
▶ Enter the name.
NOTE
• The default device name is KIA MOTORS.
39
Setup
ENGLISH
Auto Connection
The Bluetooth® device will automatically be con-
nected according to the option set when the car
ignition is turned on.
In Bluetooth settings screen ▶ Press the
Auto Connection
to turn on/off.
System
Press the
SETUP
key ▶ Press the
System
button.
Language
This menu allows you to set the language of the
system.
In System settings screen ▶ Press the
Language
▶ Press the desired language.
Keyboard
This option allows you to change the type
of keyboard used within the system.
In System settings screen ▶ Press the
Keyboard
▶
Press the desired language.
40
Setup
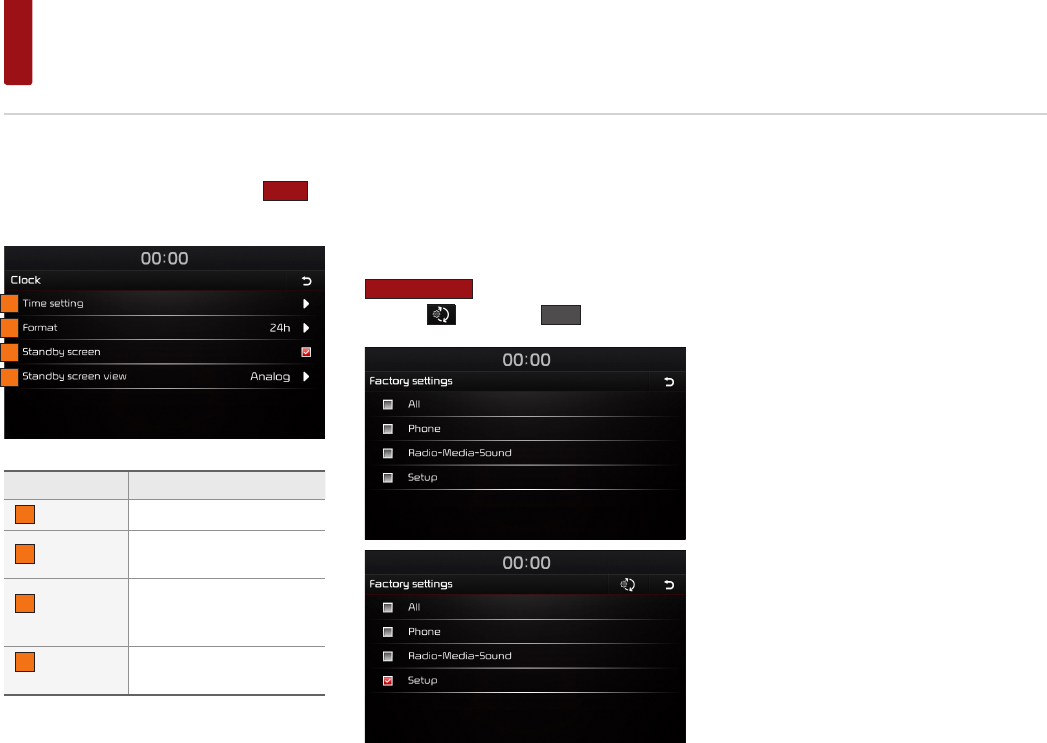
Clock
In System settings screen ▶ Press the
Clock
▶
Set the desired settings.
Button Description
1 Time setting Sets the current time.
2 Format Converts the digital clock
display to 12 or 24 hours.
3 Standby
screen
Turns on/off the screen
displayed when the system
power is turned off.
4 Standby
screen view
Sets the type of Standby
screen.
Factory settings
This menu allows you to reset settings specified
by the user.
In System settings screen ▶ Press the
Factory settings
▶ Press the desired item ▶
Press the ▶ Press the
YES
.
1
2
3
4
41
Specification
ENGLISH
USB MP3 Specification
Category Description
MP3 File Specification Response Specification: MPEG1 AUDIO
LAYER3
Recommended Bitrate and
Sampling Frequency
Response Sampling Frequency : 32, 44.1, 48
(KHz)
Response Bitrate: 32, 40, 48, 56, 64, 80, 96,
112, 128, 160, 192 ,224 ,256 ,320 (Kbps)
ID3 TAG ID3 v1.1 and ID3 v2.x TAG
Detailed Specification
•
•Max Directory Layers: 15 layers
•
•Max length of folder names and file
names: 255Bytes
•
•Characters supported for folder/file
names: English, Español and numbers
•
•Max number of files recognized from
one USB device: 5000
Video and Image Specification
Category Description
File Format AVI(DivX), MPEG
Image Format jpg, gif, bmp, png
Extensions avi, divx, mpg, mpeg, mp4, wmv
Supported Image Resolution Max 4000x3000
Supported Image File Size Max 4 Mbytes
Video Codec MPEG4-ASP, MPEG4-AVC(H.264), AVS, VP8
Video Resolution
1920 x 1080
(WMV 9: Max 8Mbps, 1280x720,
WMV 8: 640x480)
Audio Codec MP3, OGG, WMA …
Subtitles SMI
Unsupported files
•
•Files not compatible with supported
specifications
•
•Modified files (files with modified file
formats)
•
•Transformed files (example: AVI files
encoded with WMV video codec)
•
•Files without indexes

42
Trouble shooting
1. Errors which occur during the operation or installation of the device may be mistaken as a malfunction of the actual device.
2. If you are having problems with the device, try the suggestions listed below.
3. If the problems persist, contact your dealer
Problem Possible Cause
There are small red, blue, or green dots on the
screen
Because the LCD is manufactured with technology requiring high point density, a pixel or lighting deficiency may
occur within 0.01% of total pixels.
The sound or image is not working •
•Has the Switch for the vehicle been turned to [ACC] or [ON]?
•
•Has the SYSTEM been turned OFF?
The screen is being displayed but sound is not
working
•
•Has the volume been set to a low level?
•
•Has the volume been muted?
When the power is turned on, the corners of the
screen are dark
•
•The display appearing somewhat dark after prolonged periods of use is normal with LCD panels. It is not a
malfunction.
•
•If the screen is very dark, contact your nearest dealer for assistance.
Sound is working from only one speaker Are the positions of Fader or Balance sound controls adjusted to only one side?
Sound does not work in AUX mode Are the audio connector jacks fully inserted into the AUX terminal?
The external device is not working Is the external device connected with a standard connector cable?
When turning power on, the most recent mode
screen is not displayed
Within modes that play files by reading external sources, such as USB, iPod, or Bluetooth® streaming mode, the
most recently played mode screen prior to turning off power may not properly load.
•
•If the corresponding device is not connected, the mode operated prior to the most recent mode will operate.
•
•If the previous mode still cannot be properly played, the mode operated prior to that will operate.

43
Trouble shooting
ENGLISH
Problem Possible Cause Countermeasure
The power does not
turn on.
The fuse is disconnected. •
•Replace with a suitable fuse.
•
•If the fuse is disconnected again, please contact your point of purchase or service center.
Device is not properly connected. Check to see that the device has been properly connected.
The system does not
play. The vehicle battery is low. Charge the battery if the problem persists, contact your point of purchase or service center.
The image colour/ tone
quality is low.
The brightness, and contrast levels are
not set properly. Properly adjust the brightness, and contrast levels through Display Setup.
Sound does not work.
The volume level is set to the lowest
level. Adjust the volume level.
The connection is not proper. Check to see that the device has been properly connected.
The device is currently fast-forwarding,
rewinding, scanning, or playing in slow
mode.
The sound will not work when the device is fast-forwarding, rewinding, scanning, or playing
in slow mode.

44
Trouble shooting
Problem Possible Cause Countermeasure
The sound or image
quality is low.
Vibration is occurring from where the
conversion switch has been installed. The sound may be short circuited and the image distorted if the device vibrates.
Image colour/tone quality is low. The device will return to normal once vibrations stop.
The USB does not work
USB memory is damaged. Please use after formatting the USB into FAT 12/16/32 format.
USB memory has been contaminated. Remove any foreign substances on the contact surface of the USB memory and multimedia
terminal.
A separately purchased USB HUB is being
used. Directly connect the USB memory with the multimedia terminal on the vehicle.
A USB extension cable is being used. Directly connect the USB memory with the multimedia terminal on the vehicle.
A USB which is not a Metal Cover Type
USB Memory is being used. Use standard USB Memory.
An HDD type, CF, SD Memory is being
used. Use standard USB Memory.
There are no music files which can be
played.
Only MP3, WMA file formats are supported. Please use only the supported music file for-
mats.
The iPod is not rec-
ognised even though it
has been connected
There are no titles which can be played. Use iTunes to download and save MP3 files into the iPod.
The iPod firmware version has not been
properly updated. Use iTunes to update the firmware version and reconnect the iPod with the device.
The iPod device does not recognise
downloads. Reset the iPod and reconnect with the device.

45
Limited Warranty
ENGLISH
LIMITED WARRANTY
ORIGINAL NAVIGATION HEAD UNIT SUPPLIED BY VEHICLE DEALER
Product :
Product No. :
WHAT THIS WARRANTY COVERS
1. Vehicle Dealer Shop (“Dealer”) warrants to you that the Hardware will be free from defects in workmanship and materials under Normal use (“Defects”)
from the original date of the registration of the motor vehicle (“Warranty Period”). During the Warranty Period the Hardware will be repaired or replaced at
DEALER’s choice (“Limited Warranty”) without charge to you for either parts or labor. This Limited Warranty covers the replacement of the head unit including
of the Hardware only.
Period Warranty Mileage Warranty
3years 60,000 Km
*Whichever Occurs earlier.
*The term of the warranty shall commence from the date of delivery of the new vehicle to the first purchaser.
WHAT THIS WARRANTY DOES NOT COVER
2. The Limited Warranty does not apply to normal wear and tear, does not apply when the Hardware is opened or repaired by someone liquids, proximity or
exposure to heat and accident, abuse, non-compliance with the instructions supplied with the Hardware, neglect or misapplication. The Limited Warranty
does not cover physical damage to the surface of the Hardware. This Limited Warranty does not cover any software that may accompany or be installed on
the Hardware.
The Limited Warranty does not cover the installation, removal or maintenance of the Hardware or any costs related herewith.
HOW TO MAKE A WARRANTY CLAIM
3. In order to make a claim of a Defect, you must contact DEALER. If a defect arises and a valid claim under this Limited Warranty is received by DEALER after the
first 3yrs/60,000 km of the Warranty Period, DEALER is entitled to charge you for any reasonable shipping and handling costs made in connection with the
repair or replacement of the Hardware. You must comply with any other return procedures stipulated by DEALER, if any.

46
Limited Warranty
DEALER LIMITED WARRANTY
YOUR LEGAL RIGHTS
4. Some countries may not allow the exclusion or limitation of damages. If any part of this Limited Warranty is held to be invalid or
unenforceable, the remainder of the Limited Warranty shall nonetheless remain in full force and effect.
5. This Limited Warranty is the only express warranty made to you and is provided in place of any other express warranties or similar obligations (if any) created
by any advertising, documentation, packaging, or other communications.
6. Except for the Limited Warranty and to the maximum extent permitted by applicable law, DEALER and its suppliers provide the Hardware “AS IS AND WITH
ALL FAULTS”, and hereby disclaim all other warranties and conditions, whether express, implied or statutory, including, but not limited to, any (if any) implied
warranties, duties or conditions of satisfactory quality, of fitness for a particular purpose, of reliability or availability, of accuracy or completeness of responses,
of results, of workmanlike effort, of lack of viruses, and of reasonable care and skill, all with regard to the Hardware, and the provision of or failure to provide
support or other services, information, software, and related content through the Hardware or otherwise arising out of the use of the Hardware. Also, there is
no warranty or condition of quiet enjoyment, quiet possession, or non-infringement with regard to the Hardware.
7. This Limited Warranty does not affect any legal rights under applicable national legislation governing the sale of consumer goods.
8. This Limited Warranty cannot be transferred to any other person.
LIMITATION OF LIABILITY
9. Neither DEALER nor its suppliers shall be liable to you or to any third party for any damages either direct, indirect, incidental, consequential or otherwise
(including in each case, but not limited to, damages for the inability to use the equipment or access data, loss of data, loss of business, loss of profits, business
interruption or the like) arising out of the use of or inability to use the Hardware even if DEALER has been advised of the possibility of such damages.
10. Notwithstanding any damages that you might incur for any reason whatsoever, the entire liability of DEALER and any of its suppliers shall be limited to the
amount actually paid by you for the Hardware.
11. DEALER shall not be liable for
(I) any fraud on the part of its employees and/or agents; or
(I) any fraudulent misrepresentation on the part of its employees and/or agents.
12. Notwithstanding the above, neither party’s liability for death or personal injury resulting from its own negligence shall be limited.
FCC Information
This equipment has been tested and found to comply with the limits for a Class В digital device, pursuant to part 15 of the FCC Rules. These limits are
designed to provide reasonable protection against harmful interference in a residential installation.
This equipment generates, uses and can radiate radio frequency energy and, if not installed and used in accordance with the instructions, may cause
harmful interference to radio communications. However, there is no guarantee that interference will not occur in a particular installation. Іf this
equipment does cause harmful interference to radio or television reception, which can be determined by turning the equipment off and on, the user is
encouraged to try to correct the interference by one or more of the following measures:
–Reorient or relocate the receiving antenna.
–Increase the separation between the equipment and receiver.
–Connect the equipment into an outlet on a circuit different from that to which the receiver is connected.
–Consult the dealer or an experienced radio/TV technician for help
This device complies with part 15 of the FCC Rules. Operation is subject to the following two conditions: (1) This device may not cause harmful
interference, and (2) this device must accept any interference received, including interference that may cause undesired operation.
Caution: Any changes or modifications to this device not expressly approved by the party responsible for compliance could void your authority to
operate the equipment.
This equipment complies with FCC radiation exposure limits set forth for an uncontrolled environment.
This equipment should be installed and operated with minimum 20 cm between the radiator and your body. This transmitter must not be collocated or
operating in conjunction with any other antenna or transmitter unless authorized to do so by the FCC.