MOTREX MTXM100UBPE Car Audio Video Navigation User Manual
MOTREX CO., LTD. Car Audio Video Navigation
MOTREX >
User Manual

Car Smart Display
OWNER’S MANUAL
RIO
Please read this manual carefully before operating your set and retain it for future reference. Designs and specifica-
tions are subject to change without prior notice.
The screens shown in this manual may differ from the actual screens of the product.
The design and specification of this product may change without prior notification for product improvement.
When transferring the vehicle to another individual, include this user’s manual so that the next driver can continue its use.
ENGLISH
ESPAÑOL
iPod®
iPod® is a registered trademark of Apple Inc.
Bluetooth®
The Bluetooth Wireless Technology word mark and logos are registered
trademarks owned by Bluetooth Wireless Technology SIG, Inc.
DOLBY
Manufactured under license from Dolby Laboratories “Dolby” and the dou-
ble-D symbol are trademarks of Dolby Laboratories.
Cortex
Cortex is the name of the ARM Processor Architecture used in the AV System.
Windows Embedded Compact 7
Windows Embedded Compact 7 is an operating system used in the AV
System.

Table of Contents
ENGLISH
Precautions for safety
Safety notes
6
Key Product Features
Key Product Features
8
Component Names and Functions
Head Unit
9
Steering Wheel
11
Using the System for the First Time
Turning the System On/Off
12
Turning the System ON
12
Turning the System Off
12
AV ON/OFF
12
Resetting the System
12
Home Screen
12
FM/AM
Basic Screen
13
Listening to FM/AM radio
14
Auto tuning
14
Manual tuning
14
Selecting Presets
14
Selecting Lists
14
Saving Radio Frequency
15
Saving Manually
15
Using Preset Menu
15
Scan
15
Scanning Radio Frequency
15
Scanning Preset frequency
15
Sound settings
15
USB
About USB
16
USB Music
Playing USB Music
17
Searching USB Music Files
17
Repeat
17
Shuffle
17
Scan All
17
Scan Folder
17
Album Cover view
18
List
18
Sound settings
18
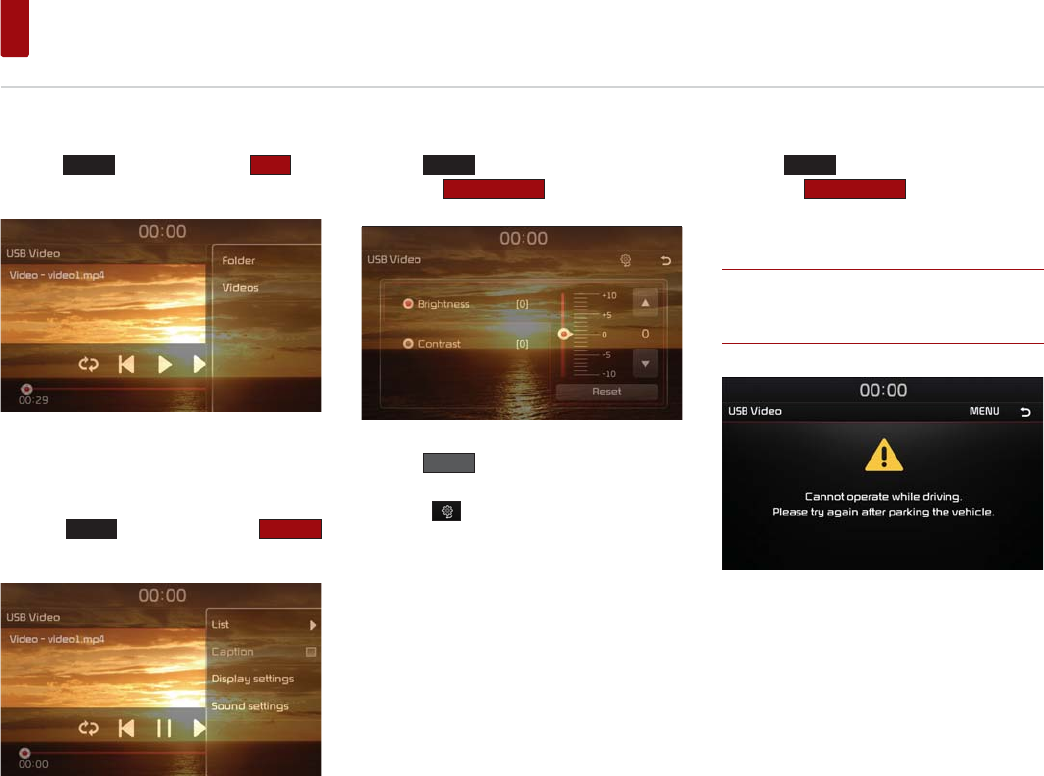
USB Video
Playing USB Video
19
Searching USB Video Files
19
Repeat
19
Shuffle
19
List
20
Caption
20
Display settings
20
Sound settings
20
USB Photo
Viewing USB Photo
21
Switching to menu screen or full screen
21
Searching USB Image Files
21
Rotating / Slide show
21
Using the Menu Buttons
22
Slideshow interval
22
Display settings
22
iPod Music
About iPod
23
Playing iPod Music
24
Searching iPod Music Files
24

Table of Contents
Using the Menu Buttons
24
Setting audiobook playback speed
24
Sound settings
24
AUX
Playing an AUX source
25
Using the Menu Buttons
25
Bluetooth Audio
Before playing the Bluetooth audio
26
Playing Bluetooth audio
26
Searching Bluetooth Audio Files
26
Using the Menu Buttons
26
Bluetooth® Wireless Technology
Before Using the Bluetooth Handsfree
27
What is Bluetooth® Wireless Technology?
27
Precautions for Safe Driving
27
Cautions upon Connecting Bluetooth Phone
27
Bluetooth Connection
When no Phones Have Been Paired
28
Pairing from the Bluetooth® Device
28
Pairing from the car
28
When a Phone is Already Paired
29
When your phone is connected
29
Bluetooth Phone
Making/Answering Calls
30
Calling by Dialing a Number
30
Making a Call from Speed Dial
30
Calling through Redial
30
Answering a Call
30
Rejecting a Call
30
Operating Menus during a Call
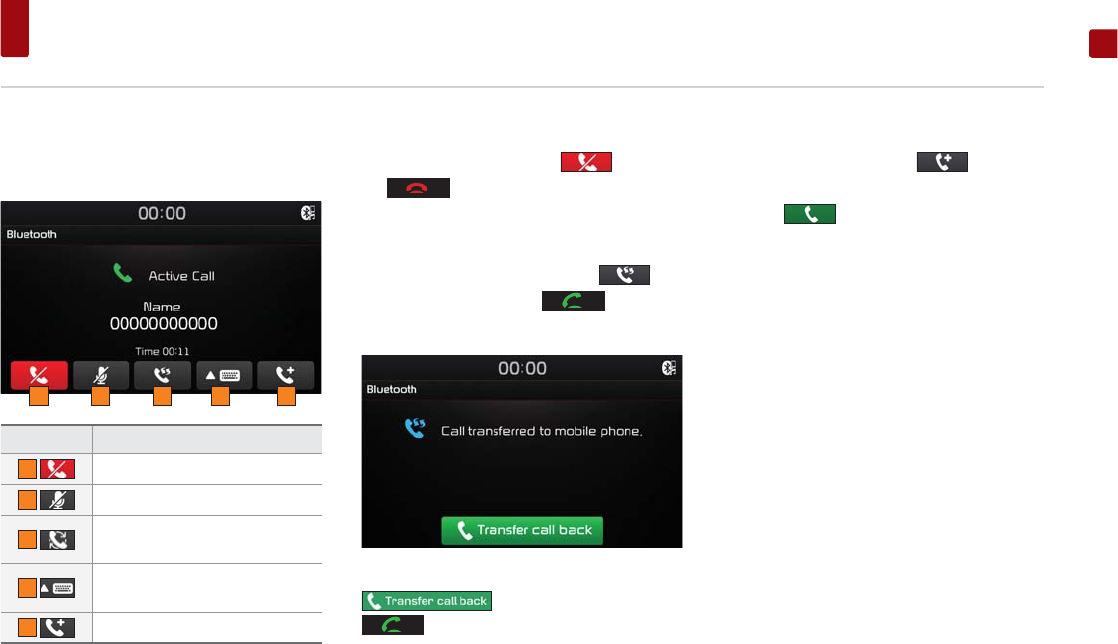
31
Ending a Call
31
Switching Call to Bluetooth® Phone
31
Making 3 way call
31
Using the Menu Buttons
32
Contacts
32
Updating Mobile Phone Contacts
32
Making a call from contacts
32
Searching for contacts
32
Calling list
33
Viewing Calling lists
33
Favourites
33
Calling Favourites
33
Saving to Favourite
33
Deleting Favourites
34
Changing the Favourites name
34
Bluetooth settings
34
Setup
Starting mode
35
Sound
35
Sound Balance
35
Variable EQ
35
Volume setting
35
Beep
36
Display
36
Brightness
36
Dimming mode
37
Bluetooth settings
37
Bluetooth connection
37
Ringtone
38
Change passkey
38
Changing device name
38
Auto Connection
39
System
39

Table of Contents
ENGLISH
Language
39
Keyboard
39
Clock
40
Factory settings
40
Specification
USB MP3 Specification
41
Video and Image Specification
41
Trouble shooting
Trouble shooting
42
Limited Warranty
LIMITED WARRANTY
45
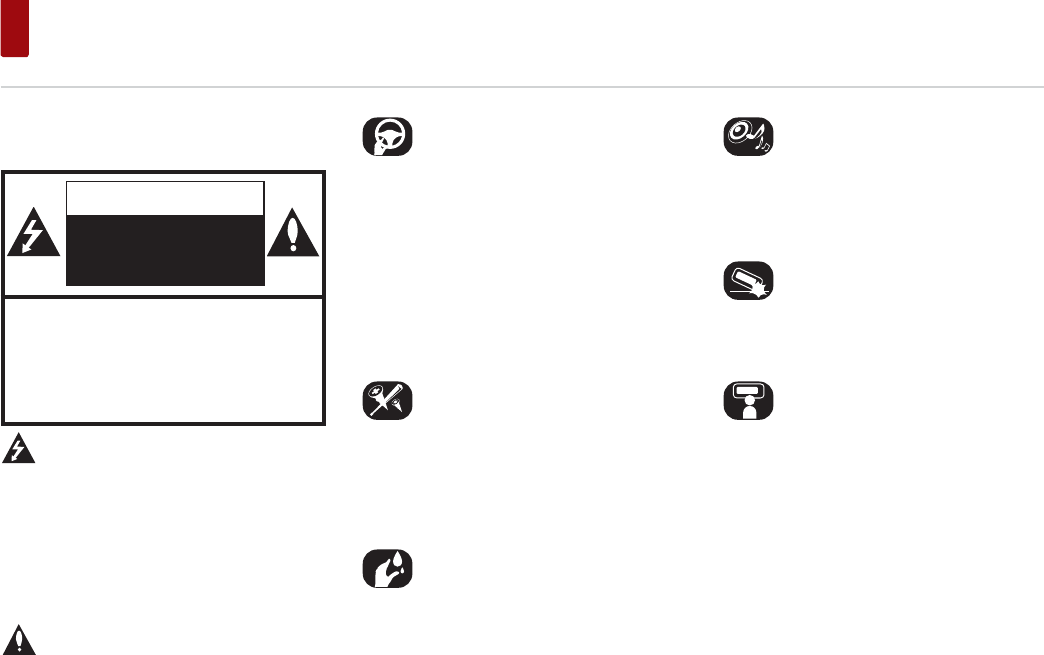
Precautions for safety
Safety notes
CAUTION
RISK OF ELECTRIC
SHOCK
DO NOT OPEN
CAUTION: TO REDUCE THE RISK OF
ELECTRIC SHOCK, DO NOT REMOVE THE
COVER (OR BACK). NO USER SERVICEABLE
PARTS INSIDE. REFER SERVICING TO
QUALIFIED SERVICE PERSONNEL.
The lightning flash with the arrowhead symbol
within an equilateral triangle is intended
to alert the user about the presence of uninsu-
lated dangerous voltage within the product’s
enclosure that may be of sufficient magnitude to
constitute a risk of electric shock.
The exclamation point within an equilateral tri-
angle is intended to alert the user to
the presence of important operating and main-
tenance (servicing) instructions in the literature
accompanying the appliance.
Always operate the vehicle in a safe manner. Do
not become distracted by the vehicle while driv-
ing and always be fully aware of all driving condi-
tions. Do not change settings or any functions.
Pull over in a safe and legal manner before
attempting such operations.
To promote safety, certain functions are disabled
unless the hand brake is on.
To reduce the risk of electric shock, do not
remove the cover or back of this product. There
are no user-serviceable parts inside.
Refer servicing to qualified service personnel.
To reduce the risk of fire or electric shock, do not
expose this product to dripping or splashing
water, rain, or moisture.
When driving your vehicle, be sure to keep the
volume of the unit low enough to allow you to
hear sounds coming from the outside.
Do not drop it and avoid heavy impacts at any-
time.
The driver should not watch the monitor while
driving. If the driver watches the monitor while
driving, it may lead to carelessness and cause an
accident.

Precautions for safety
ENGLISH
WARNING:
У Do not stare at the screen while driving. Staring
at the screen for prolonged periods of time
could lead to traffic accidents.
У Do not disassemble, assemble, or modify the
AV system. Such acts could result in accidents,
fire, or electric shock.
У Using phone features while driving may dis-
tract drivers from paying attention to traffic
conditions and result in traffic accidents.
Use phone features only after the vehicle has
been parked.
У Heed caution not to spill water or introduce
foreign objects into the device. Such acts could
lead to smoke, fire, or product malfunction.
У Please refrain from use if the screen is blank
or no sound can be heard as these signs may
indicate product malfunction. Continued use in
such conditions could lead to accidents (fires,
electric shock) or product malfunctions.
У Do not touch the antenna during thunder or
lightening as such acts may lead to lightning
induced electric shock.
У Do not stop or park in parking-restricted areas
to operate the product. Such acts could lead to
traffic accidents.
УThe video screen will not operate when the
vehicle is in motion. For your safety, first park
the vehicle to watch or view the screen.
У Some Non-video features may also not operate
when the vehicle is in motion. These features
will operate only when the vehicle has been
parked.
CAUTION:
ˍDo not keep the AV system running with the
engine stopped. Doing so may discharge the
vehicle battery. When you use the AV system,
always keep the engine running.
ˍWhen the driver wants to operate AV system,
first park the vehicle in a safe location and set
the parking brake.
Operating the system while driving can dis-
tract the driver and may result in a serious
accident.
ˍDo not disassemble or modify this system. If
you do, it may result in accidents, fire, or elec-
trical shock.
ˍSome states/provinces may have laws limiting
the use of video screens while driving. Use the
system only where it is legal to do so.
ˍDo not use your phone in private mode when
you are driving. You must stop at a safe loca-
tion to use it.

Key Product Features
Key Product Features
Button Description
Display Wide TFT-LCD Display
Provides high quality video through a Wide TFT-LCD Display using an LED Back Light
Radio
Digital Tuner Feature
Digital Tuner using PPL method that supports memory of 20 broadcast stations for each AM and FM modes.
Radio broadcast station name
Displays broadcast station names for key locations.
Multimedia
Player
Support for various Media Formats
Support for various media formats, including Radio, MP3, USB, iPod, AUX and Bluetooth® Audio Streaming modes
Miscellaneous
Bluetooth
®
Wireless Technology
Convenient use of Bluetooth® Handsfree by using buttons within the steering wheel remote controller
Digital Screen Control Features
Easy control of features through touch screen options
Steering Wheel Remote Controller
Control over audio features, voice recognition and Bluetooth® through the steering wheel remote controller for maximum convenience
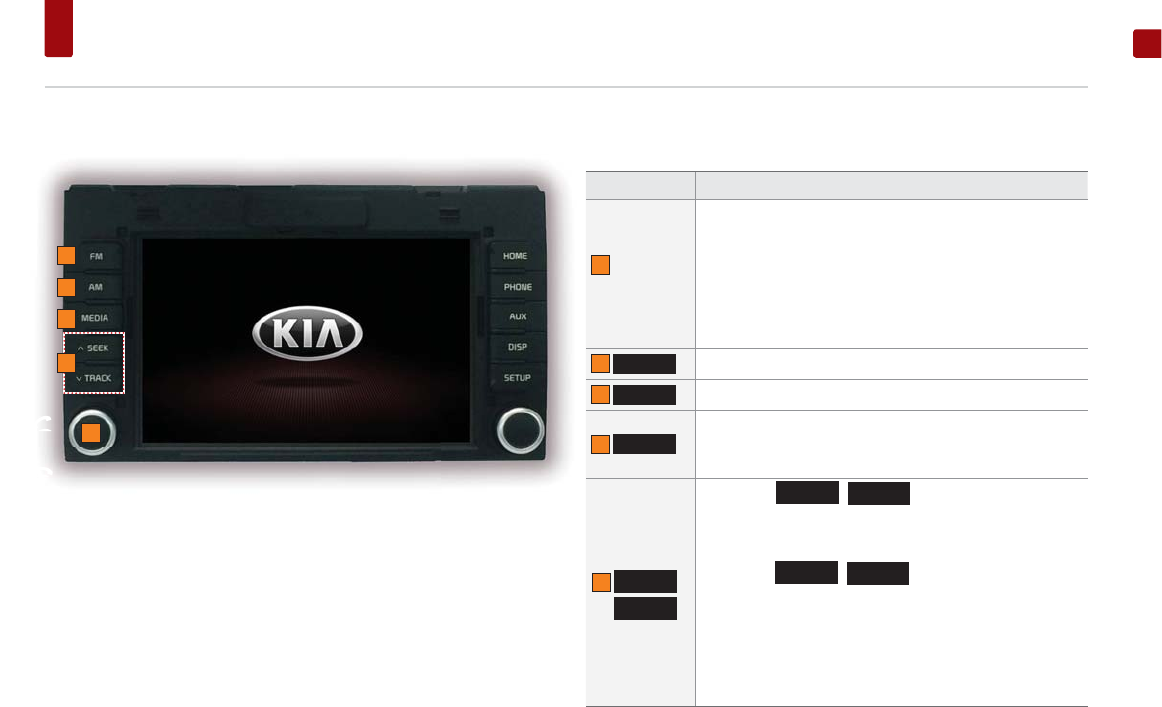
Component Names and Functions
ENGLISH
Head Unit
Name Description
1 POWER /
VOL Knob
УPower on
When power is off, press to turn power on
УPower off
When power is on, press and hold to turn power off
УAudio off
When power is on, press to turn Audio off
УTurn left/right to control volume
2
)0
Operates FM mode
3
$0
Operates AM mode
4
0(',$
УOperates available media (USB, iPod, Bluetooth Audio)
УIf the media is not connected, corresponding modes will
be disabled
5
Ѧ6((.
75$&.ѧ
When the
Ѧ6((.
,
75$&.ѧ
keys are pressed shortly
УIn FM/AM mode, searches broadcast fre-
quencies
УIn Media modes, changes the track, file or chapter
When the
Ѧ6((.
,
75$&.ѧ
keys are pressed and held
УFM/AM mode : automatically searches
broadcast frequencies and channels. Once released,
searches and begins playing the next broadcast fre-
quency
УMedia modes: rewinds or fast forwards the track or file(-
except Bluetooth Audio)
2
3
4
5
1
Component Names and Functions
Name Description
6 TUNE /
ENTER
knob
УFM/AM mode : changes the frequency
УMEDIA (USB/iPod) mode : changes the track, file or title
(Except AUX)
7
+20(
Press to move to the home menu screen
8
3+21(
Takes user to phone screen
9
$8;
Plays external devices that are currently connected
10
',63
Turns off the screen
11
6(783
Displays the Setup mode
12 Reset Resets the system
Head Unit
7
8
9
10
11
6
12
Component Names and Functions
ENGLISH
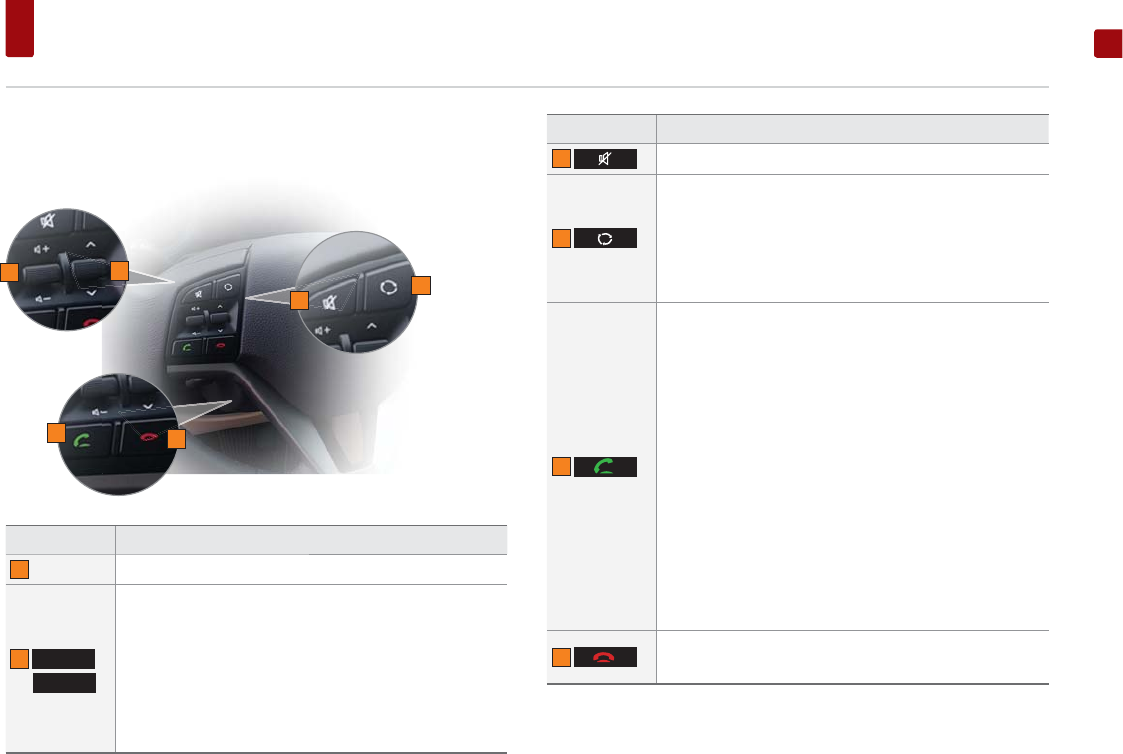
Steering Wheel
Button Description
1 + VOL - Controls the volume
2
Ѧ
ѧ
When keys are pressed shortly.
УFM/AM mode: plays previous/next preset channel if it is
saved.
УMedia mode: changes the track, file or chapter
When keys are pressed and held.
УIn FM/AM mode: changes frequencies while pressed.
Upon release, scans and receives the next frequency
УMedia mode: rewinds or fast forwards the track or file
Button Description
3 Mutes the sound
4
УOperates FM▶ AM ▶ Available Media (USB Music/USB
Video/iPod/Bluetooth Audio/AUX)
УIf the media is not connected, corresponding modes will
be disabled.
УPress and hold the key to turn the Audio system on/off
УWhen power is off, press the key to turn power back on
5
When pressed shortly
УWhen pressed in the phone screen, displays the last call
УWhen pressed in the dial screen, makes a call
УWhen pressed in the incoming call screen, answers the
call
УWhen pressed during single call, switches call back to
mobile phone (Private).
УWhen pressed during 3way call, swap call
УWhen pressed twice, redials the last call
When pressed and held
УWhen pressed during a Bluetooth® Handsfree call,
switches call back to mobile phone (Private)
УWhen pressed while calling on the mobile phone,
switches call back to Bluetooth® Handsfree (Operates
only when Bluetooth® Handsfree is connected)
УWhen pressed, redials the last call
6
ˍWhen pressed during a call, ends the phone call
ˍWhen pressed in the incoming call screen, rejects the call
124
3
56
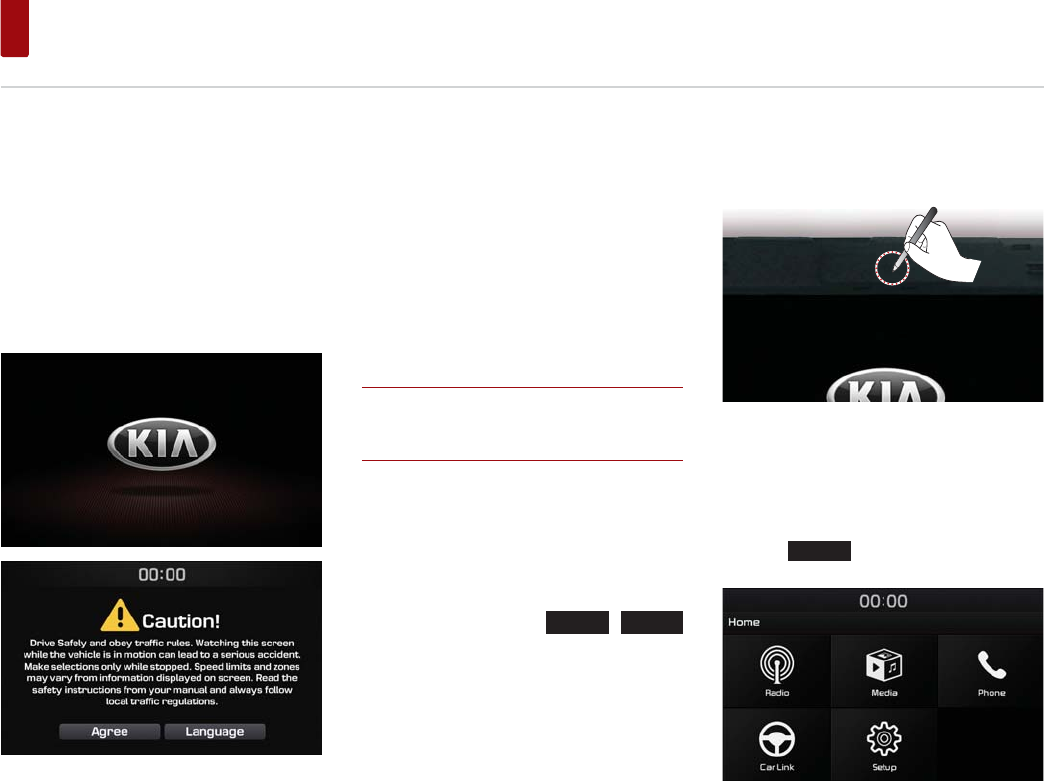
Using the System for the First Time
Turning the System On/Off
Turning the System ON
Press the engine start button. If the brakes are
not pressed, then the ACC and system will turn
on. If the brakes are pressed, then the IGN and
system will turn on and the ignition will start. In
both instances, the following safety warning will
be displayed.
Pressing the PWR key on the head unit will dis-
play the safety warning page.
Press the Agree button to display the most
recent mode.
Turning the System Off
Press the engine start button again or press and
hold the power key on the head unit to turn the
system off.
NOTE
r If the system is turned off while the Handsfree is
being used, then the call will automatically switch
back to the mobile phone.
AV ON/OFF
Press the PWR key on the head unit when the AV
is on. Press the PWR key or press the menu key
to turn on AV.
While AV is turned off, the
Ѧ6((.
,
75$&.ѧ
key and the TUNE / ENTER knob will be disabled.
Resetting the System
This feature is used to reset the system in the
occurrence of an unforeseen error or problem.
Press and hold the RESET key for about 1 second.
(The use of a clip or pin is recommended when
resetting the system.)
Home Screen
Press the
+20(
key ▶ Press the menu icon
you want to use.
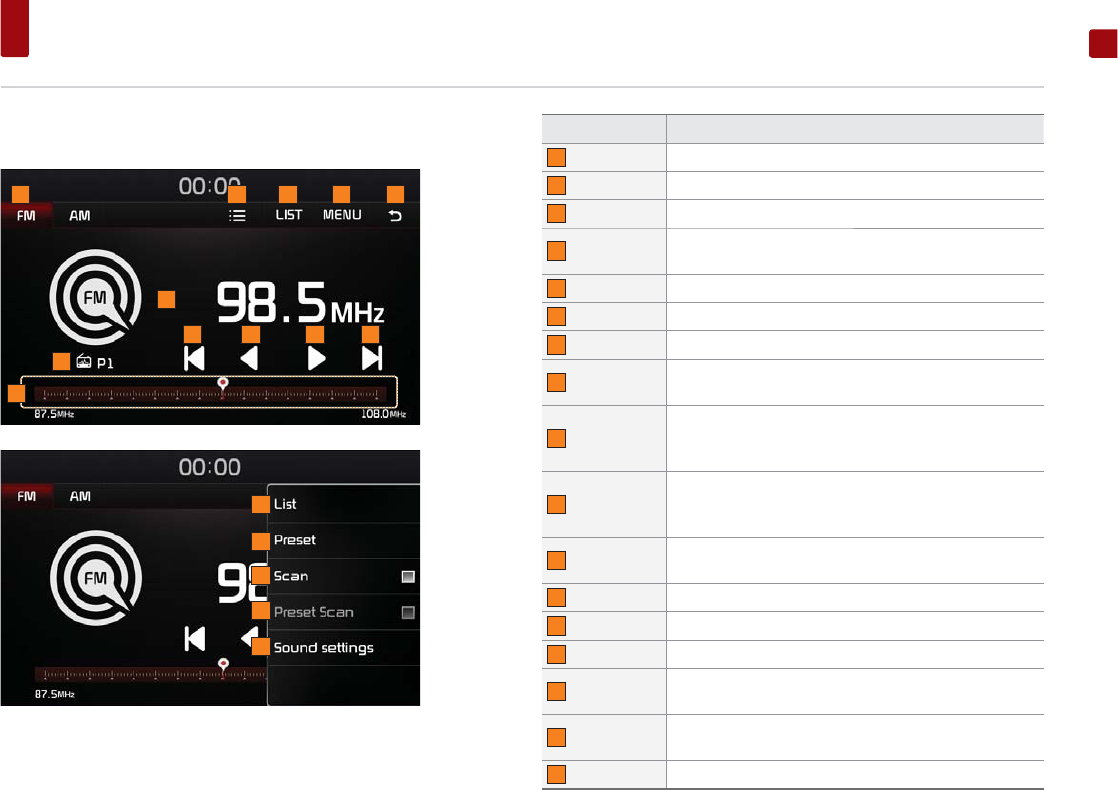
FM/AM
ENGLISH
Basic Screen
Button Description
1 Mode tab Press the tab to change between FM and AM mode
2 Preset button Displays the Preset List
3 LIST button Displays automatically updated lists
4 MENU button Displays List, Preset, Scan, Preset scan and Sound settings
menus
5 Back button Moves to the previous screen
6 Frequency Displays the current frequency
7 Preset No. Displays the current preset number
8 Seek down Single tap: seek down
Long tap: fast seek down
9 Tune down
Single tap : tune down
Long tap: tune down until the button is released and
plays the current frequency
10 Tune up
Single tap : tune up
Long tap: tune up until the button is released and plays
the current frequency
11 Seek up Single tap: seek up
Long tap: fast seek up
12 Frequency bar Use the tap to move to the desired frequency
13 List Displays automatically updated lists
14 Preset Displays saved presets for user selection
15 Scan Plays frequencies with superior reception for 3 seconds
each
16 Preset Scan Plays frequencies saved to presets for 3 seconds and
moves to the next saved frequency
17 Sound settings Sets sound related settings
2 31 4 5
108 9 11
7
6
12
13
14
15
16
17
FM/AM
Listening to FM/AM radio
Press the
)0
or
$0
key to operate the
radio mode.
Or Press the
+20(
key ▶ Press the
5DGLR
button ▶Press FM or AM tab.
Auto tuning
Press the
Ѧ6((.
,
75$&.ѧ
key or press the
button to automatically search for
frequencies.
Manual tuning
Press the TUNE / ENTER knob or press the
button to manually select the frequency.
The stations move up and down step by step.
Press or drag the frequency bar to search for fre-
quencies that you want.
Selecting Presets
Press the
0(18
button ▶ Press the
3UHVHW
button. From the presets, select the frequency
you want to listen to.
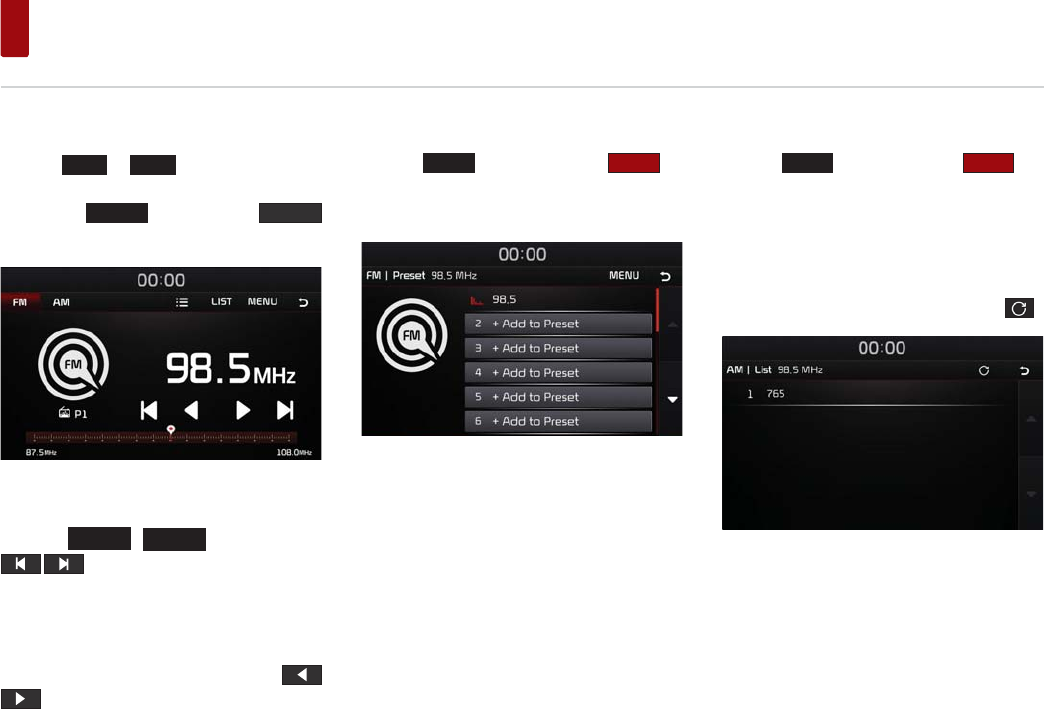
Selecting Lists
Press the
0(18
button
▶
Press the
/LVW
but-
ton.
From the lists, select the frequency you want to
listen to.
FM lists are automatically updated.
AM lists are manually updated by pressing ( ).
FM/AM
ENGLISH
Saving Radio Frequency
Saving Manually
After selecting frequency ▶ Press the but-
ton ▶ Press the
$GGWR3UHVHW
.
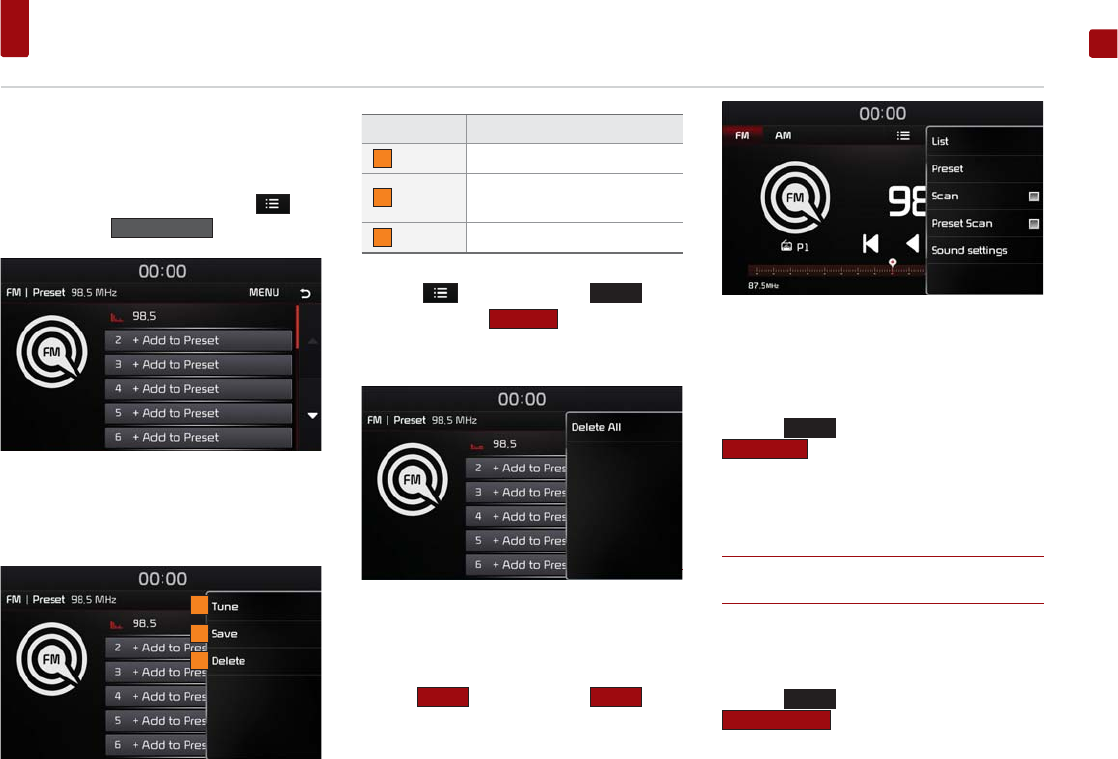
Using Preset Menu
Press and hold the preset list you want to edit.
Button Description
1 Tune listens to frequency selected
2 Save overwrites frequency listening
to currently
3 Delete deletes frequency
Press the
button ▶ Press the
0(18
button▶ Press the
'HOHWHDOO
to delete entire
presets.
Scan
Scanning Radio Frequency
Press the
0(18
button ▶ Press the
6FDQ
.
Starting from the current frequency, frequencies
with superior reception are scanned for 3 sec-
onds and the previous frequency is restored.
Scanning Preset frequency
Press the
0(18
button ▶ Press the
3UHVHW6FDQ
.
Plays frequencies saved to presets for 3 seconds
and moves to the next saved frequency
NOTE
r When the scan is operating, pressing the controller will
stop the function and return to the stopped station.
Sound settings
Press the
0(18
button ▶ Press the
6RXQGVHWWLQJV
.
For details, refer to the “Sound” on the page 35.
1
2
3

USB
About USB
Connect the USB device after turning on the
engine. The USB device may become damaged
if it is already connected when the ignition is
turned on.
ˍFiles that are not standard format files will not
be played.
ˍFor MP3/WMA files, only music files with com-
pression rates between 8 Kbps ~ 320 Kbps
can be played.
ˍHeed caution to static electricity when con-
necting/disconnecting external USB devices.
ˍEncoded MP3 Players will not be recognized
when connected as an external device.
ˍWhen connecting an external USB device, the
device may not properly recognize the USB is
in some states.
ˍOnly USB devices formatted as FAT 12/16/32
are supported, and NTFS file system is not
supported.
ˍSome USB devices may not be supported due
to compatibility issues.
ˍAvoid contact between the USB connector
with bodily parts/foreign objects.
ˍRepeated connecting/disconnecting of USB
devices within short periods of time may
result in product malfunction.
ˍInsert USB device after starting the car. If the
car is started while USB device is inserted, it
may damage USB device.
ˍThe amount of time required to recognize the
external USB device may differ depending
on the type, size, or file formats stored on the
USB. Such differences in required time are not
indications of malfunction.
ˍThe device may not recognize the USB device
if separately purchased USB hubs and exten-
sion cables are being used. Connect the USB
directly with the multimedia terminal of the
vehicle.
ˍWhen application programs are installed to
specific USBs, files may not properly play.
ˍThe device may not operate normally if MP3
Players, cellular phones, digital cameras, or
other electronic devices (USB devices not rec-
ognized as portable disk drives) are connected
with the device.
ˍCharging through the USB may not work for
some mobile devices.
ˍThe device may not support normal opera-
tion when using a USB memory type besides
Metal Cover Type USB Memory.
ˍThe device may not support normal operation
when using formats such as HDD Type, CF, or
SD Memory.
ˍThe device will not support files locked by
DRM (Digital Rights Management).
ˍUSB memory sticks used by connecting an
Adaptor (SD Type or CF Type) may not be
properly recognized.
USB Music
ENGLISH
Playing USB Music
Once a USB is connected, USB Music mode will
operate automatically.
Press the
+20(
key ▶ Press the
0HGLD
button ▶ Press the
86%0XVLF
button▶ Press
the Play button to play USB music.
NOTE
r If the USB is not connected, or there is no media file
in USB then the USB media button will be disabled.
Searching USB Music Files
While playing ▶ Press the
Ѧ6((.
,
75$&.ѧ
key or the button to play the previ-
ous/next file.
ˍPressing and holding the
Ѧ6((.
,
75$&.ѧ
key or the button will rewind or
fast forward the current file.
ˍWhile the
Ѧ6((.
,
75$&.ѧ
key or the
button is being pressed, the track
will rewind or fast-forward at high speeds.
Once the key is released, the USB Music will
begin playing at normal speed.
NOTE
r Press the TUNE / ENTER knob allows you to select
the previous/next file. This key will not rewind or
fast-forward the file.
Repeat
Press the button.
Each time the button is pressed, the option is
changed from Repeat Folder ( ) ▶ Repeat
One( ) ▶Off(Repeat All( )).
Shuffle
Press the button.
Each time the button is pressed, the option is
changed from Shuffle All( ) ▶ Shuffle Folder
( ) ▶ Off( ) .
Scan All
Press the
0(18
button ▶ Press the
2SWLRQV
▶ Press the
6FDQ$OO
to scan files within the
USB in random order.
Scan Folder
Press the
0(18
button ▶ Press the
2SWLRQV
▶
Press the
6FDQ)ROGHU
to search files within the
current folder.
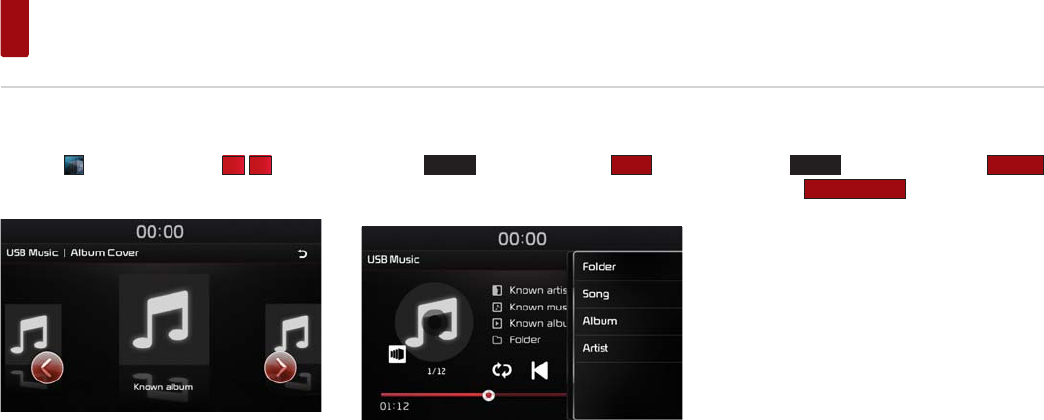
USB Music
Album Cover view
Press the button ▶ Press the
!
button
to search desired album.
List
Press the
0(18
button ▶ Press the
/LVW
but-
ton to display USB Music list screen.
It is possible to search by Folder, Song, Album
and Artist
Sound settings
Press the
0(18
button ▶ Press the
2SWLRQV
▶ Press the
6RXQGVHWWLQJV
.
For details, refer to the “Sound” on the page 35.
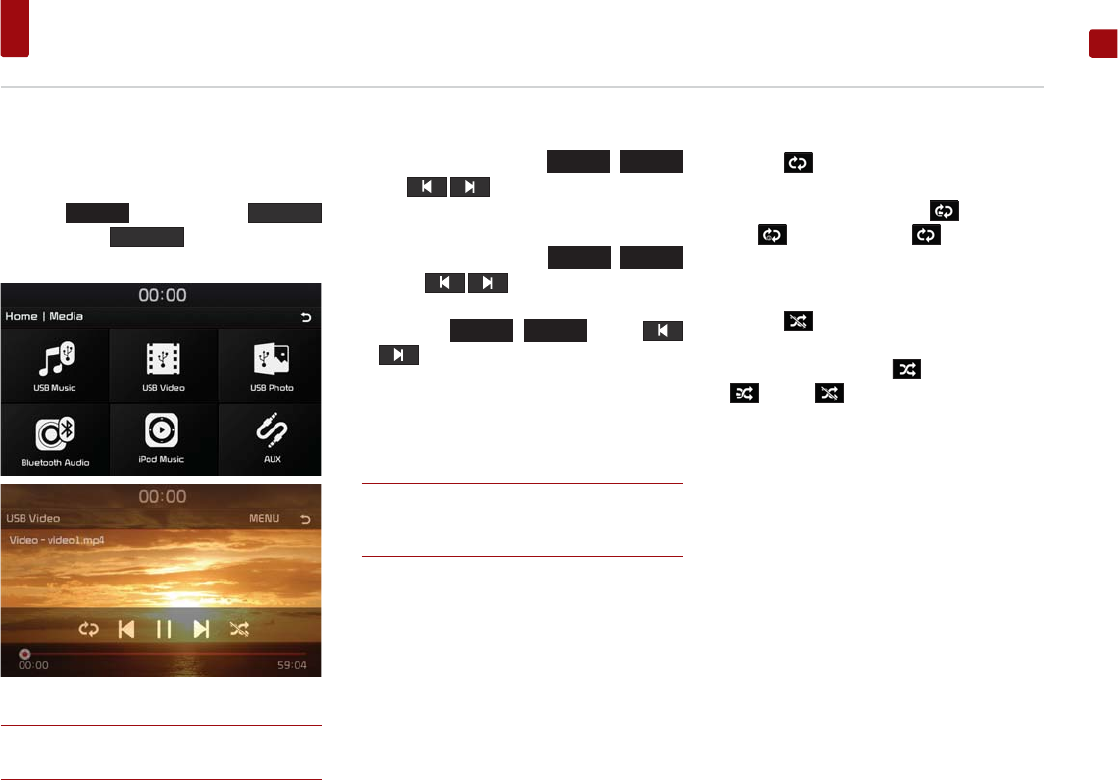
USB Video
ENGLISH
Playing USB Video
Once a USB is connected, USB Video mode will
operate automatically.
Press the
+20(
key ▶ Press the
0HGLD
button ▶ Press
86%9LGHR
button ▶ Press the
Play button to play USB Video.
NOTE
r If the USB is not connected, or there is no media file
in USB then the USB media button will be disabled.
Searching USB Video Files
While playing ▶ Press the
Ѧ6((.
,
75$&.ѧ
key or button to play the previous/
next file.
ˍPressing and holding the
Ѧ6((.
,
75$&.ѧ
key or button will rewind or fast
forward the current file.
ˍWhile the
Ѧ6((.
,
75$&.ѧ
key or
button is being pressed, the track will
rewind or fast-forward at high speeds. Once
the key is released, the USB Video will begin
playing at normal speed.
NOTE
r Press the
TUNE / ENTER knob
allows you to select
the previous/next file. This key will not rewind or fast-
forward the file.
Repeat
Press the button.
Each time the button is pressed, the option is
changed from Repeat Folder( ) ▶ Repeat
One( ) ▶Off(Repeat All( ).
Shuffle
Press the button.
Each time the button is pressed, the option is
changed from Shuffle All( ) ▶ Shuffle Folder
( ) ▶ Off( ) .
USB Video
List
Press the
0(18
button ▶ Press the
/LVW
but-
ton to display USB Video list screen.
It is possible to search by Folder and Videos.
Caption
Press the
0(18
button ▶ Press the
&DSWLRQ
button to display caption on USB Video screen.
Display settings
Press the
0(18
button
▶ Press the
'LVSOD\VHWWLQJV
.
Press the
5HVHW
button to initialize the settings.
Press the button to set “Brightness” and
“Dimming mode”.
For details, refer to the “Display” on the page 36.
Sound settings
Press the
0(18
button
▶ Press the
6RXQGVHWWLQJV
.
For details, refer to the “Sound” on the page 35.
NOTE
r USB Video is not available while driving.
(Because of traffic regulations, videos is only available
when your vehicle is parked.)
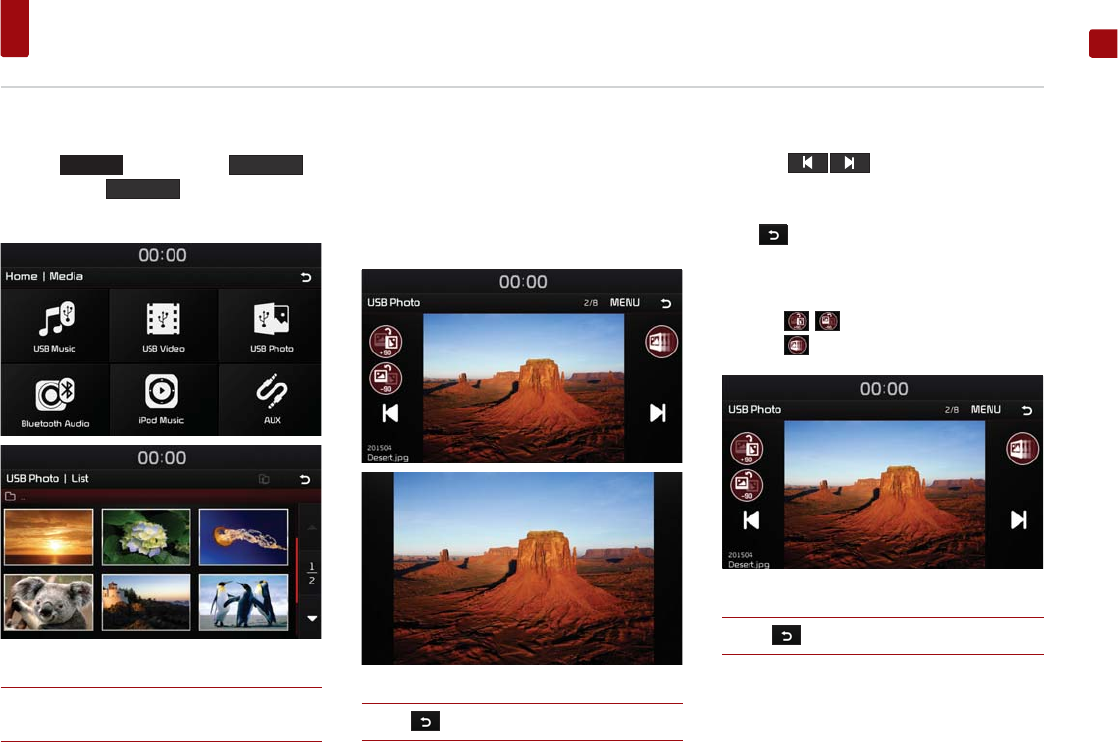
USB Photo
ENGLISH
Viewing USB Photo
Press the
+20(
key ▶ Press the
0HGLD
button ▶ Press
86%3KRWR
button ▶ Press the
desired photo in List screen.
NOTE
r If the USB is not connected, or there is no media file
in USB then the USB media button will be disabled.
Switching to menu screen or full
screen
Press the photo to view with full screen.
Press the photo once more to return to the
menu screen.
NOTE
r Press to move to the List screen.
Searching USB Image Files
Press the button or turn the
TUNE / ENTER knob to view the previous/next
image.
Press to view the list of USB photos.
Rotating / Slide show
Press the buttons to rotate image.
Press the button to view slide show.
NOTE
r Press to move to the previous screen.
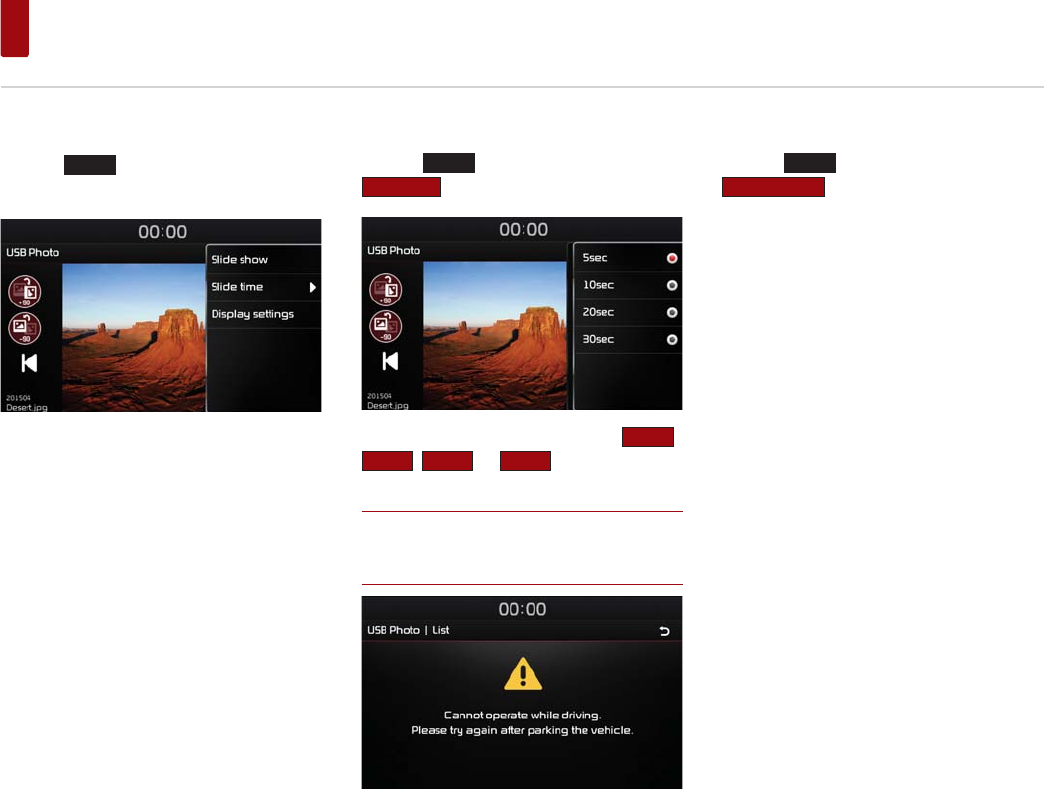
USB Photo
Using the Menu Buttons
Press the
0(18
button to set Slide show, Slide
time and Display settings menus.
Slideshow interval
Press the
0(18
button ▶ Press the
6OLGHWLPH
button.
Slide show intervals can be set at
VHF
,
VHF
,
VHF
, or
VHF
intervals.
NOTE
r Slideshow is not available while driving.
(Because of traffic regulations, image is only
available when your vehicle is parked.)
Display settings
Press the
0(18
button ▶ Press the
'LVSOD\VHWWLQJV
button.
For details, refer to the “Display” on the page 36.

iPod Music
ENGLISH
About iPod
iPod® is a registered trademark of Apple Inc.
ˍSome iPods with unsupported communica-
tion protocols may not properly operate with
the system.
ˍIf the iPod malfunctions due to an iPod device
defect, reset the iPod and try again. (To learn
more, refer to your iPod manual.)
ˍDuring ACC ON state, connecting the iPod
through the iPod cable (The cable that is sup-
plied when purchasing iPod/iPhone product.)
will charge the iPod through the system.
ˍThe use of genuine iPod cables supplied by
Apple is recommended. (The use of other
products may result in noise or abnormal
operation.)
ˍWithin iPhones, streaming audio and iPod
control may occasionally conflict. If problems
persist, remove the iPhone and connect again.
ˍUse iPod with complete synchronization to
iTunes. Unauthorized song addition may
cause abnormal operation.
ˍIf iPod and Bluetooth are connected simul-
taneously with the same iPhone, you cannot
use Bluetooth audio function.
ˍIf iPod touch or iPhone is used, iOS4.2 or a later
version is recommended.
iPod Music
Playing iPod Music
Once a iPod is connected, iPod Music mode will
operate automatically.
Press the
+20(
key ▶ Press the
0HGLD
button ▶ Press
L3RG0XVLF
button.
ˍPress the
ԡ
button to play files saved within
the iPod device.
ˍPress the
OO
button to pause the file.
NOTE
r If the iPod is not connected, or there is no media file
in iPod then the iPod Music button will be disabled.
Searching iPod Music Files
You can play the previous or next file.
For details, refer to the page 17.
Using the Menu Buttons
Press the
0(18
button to set List and options
menus.
For details, refer to the “List” on the page 18.
Setting audiobook playback speed
Setting the playback speed only affects audio
books purchased from the iTunes store or
audible.com.
For details about iPod, refer to the iPod User
Guide.
Press the
0(18
button ▶ Press the
RSWLRQV
▶
Press the
$XGLRERRN
.
Sound settings
Press the
0(18
button ▶ Press the
RSWLRQV
▶
Press the
6RXQGVHWWLQJV
.
For details, refer to the “Sound” on the page 35.
AUX
ENGLISH
Playing an AUX source
If an external device connector is connected
with the AUX terminal, then AUX mode will auto-
matically operate.
Press the
$8;
key to play auxiliary device
while a different source is playing.
NOTE
r Video can be played with video connectors.
r Video is not available while driving. (Because of
traffic regulations, Aux Video is only available when
your vehicle is parked.)
Using the Menu Buttons
Press the
0(18
button to set Sound or Display.
For details, refer to the “Sound” on the page 35
and “Display” on the page 36.
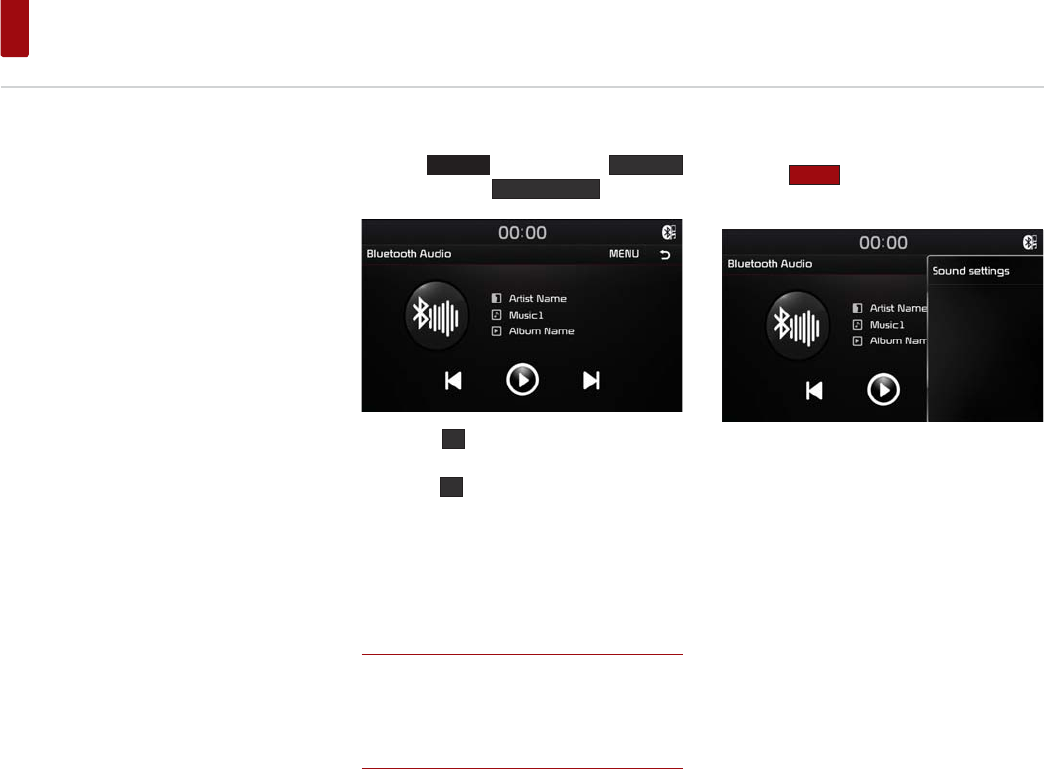
Bluetooth Audio
Before playing the Bluetooth
audio
ˍMusic saved in the mobile phone can be played
in the car through Bluetooth audio streaming.
ˍBluetooth audio can be played only when a
Bluetooth phone or Bluetooth audio device
has been connected. To play Bluetooth audio,
connect the Bluetooth phone to the car system.
For more information on connecting Bluetooth,
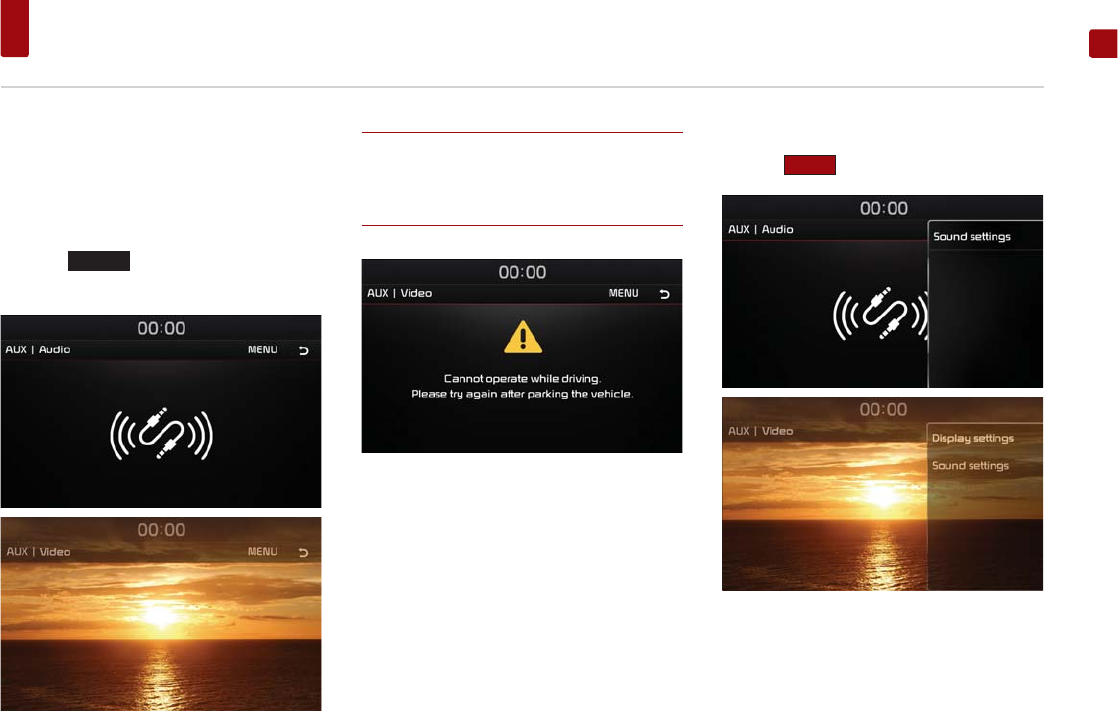
please refer to the user’s manual Bluetooth
Connection on page 28.
ˍIf Bluetooth is disconnected while playing
Bluetooth audio, the audio stream will be inter-
rupted.
ˍThe audio streaming function may not be sup-
ported in some mobile phones. Only one func-
tion can be used at a time, either the Bluetooth
handsfree or the Bluetooth audio function. For
example, if you convert to the Bluetooth hands-
free while playing Bluetooth audio, the music
stream is interrupted.
ˍPlaying music from the car is not possible when
there are no music files saved in the mobile
phone.
Playing Bluetooth audio
Press the
+20(
key ▶ Press the
0HGLD
button ▶ Press the
%OXHWRRWK$XGLR
button.
ˍPress the
ԡ
button to play files saved within
the Bluetooth
®
phone.
ˍPress the
OO
button to pause the file.
Searching Bluetooth audio Files
You can play the previous or next file.
For details, refer to the page 17.
NOTE
r The title/artist info may not be supported in some
mobile phones. When it is not supported, only the
symbol will be displayed.
r The play/pause feature may operate differently
depending on the mobile phone.
Using the Menu Buttons
Press the
0(18
button to set Sound settings
menus.
For details, refer to the “Sound” on the page 35.

Bluetooth® Wireless Technology
ENGLISH
Before Using the Bluetooth
Handsfree
What is Bluetooth®
Wireless Technology?
ˍBluetooth ® Wireless Technology refers to a
short-distance wireless networking technol-
ogy which uses a 2.45GHz frequency to con-
nect various devices within a certain distance.
ˍSupported within PCs, external devices,
Bluetooth® phones, PDAs, various electronic
devices, and automotive environments,
Bluetooth ® Wireless Technology to be trans-
mitted at high speeds without having to use a
connector cable.
ˍBluetooth® Handsfree refers to a device which
allows the user to conveniently make phone
calls with Bluetooth® mobile phones through
the Multimedia system.
ˍThe Bluetooth® Handsfree feature may not be
supported in some mobile phones.
Precautions for Safe Driving
ˍBluetooth® Handsfree is a feature that enables
drivers to practice safe driving. Connecting the
head unit with a Bluetooth® phone allows the
user to conveniently make calls, receive calls,
and manage the phone book. Before using
Bluetooth ® Wireless Technology, carefully read
the contents of this user’s manual.
ˍExcessive use or operations while driving may
lead to negligent driving practices and be the
cause of accidents. Do not operate the device
excessively while driving.
ˍViewing the screen for prolonged periods of
time is dangerous and may lead to accidents.
When driving, view the screen only for short
periods of time.
Cautions upon Connecting
Bluetooth Phone
ˍBefore connecting the head unit with the
mobile phone, check to see that the mobile
phone supports Bluetooth® features.
ˍIf you do not want automatic connection with
your Bluetooth® device, turn the Bluetooth®
feature off of the Bluetooth® device.
ˍPark the vehicle when connecting the head
unit with the mobile phone.
ˍSome Bluetooth features may occasionally not
operate properly depending on the firmware
version of your mobile phone. If such features
can be operated after receiving a S/W upgrade
from your mobile phone manufacturer, unpair
all devices and pair again before use.
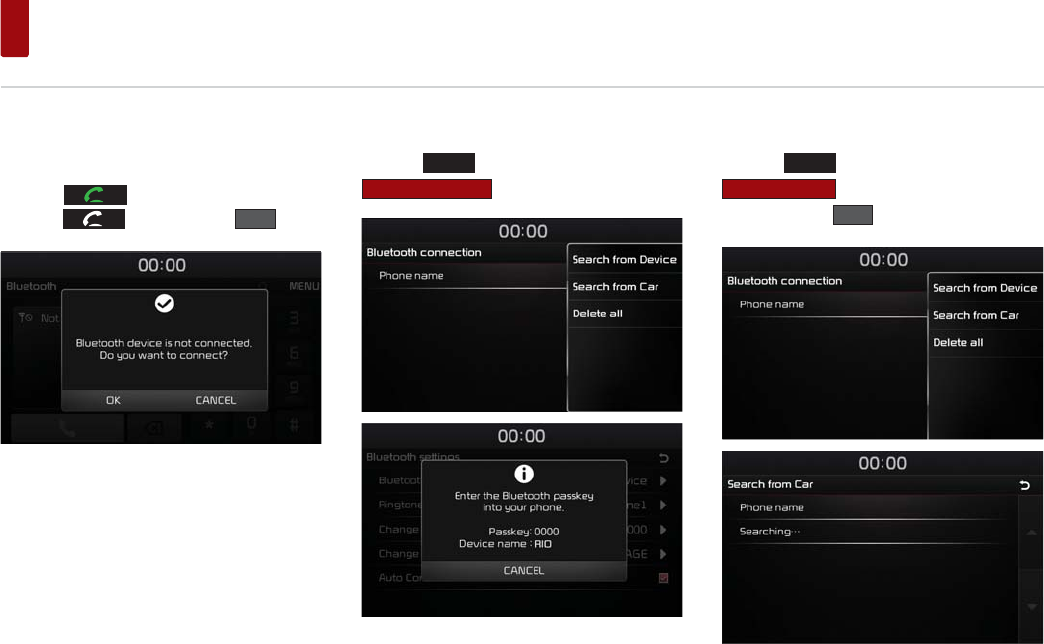
Bluetooth Connection
When no Phones Have Been
Paired
Press the key on the steering wheel or
press the key ▶ Press the
2.
.
Pairing from the Bluetooth® Device
Press the
0(18
button ▶ Press the
6HDUFKIURPGHYLFH
.
From the Bluetooth® device, search for the car
name and pair the device. When searching from
the Bluetooth® device, the car name is RIO and
the default passkey is ‘0000’.
Pairing from the car
Press the
0(18
button ▶ Press the
6HDUFKIURPFDU
▶ Press the phone name to
pair ▶ Press the
<(6
.
Bluetooth Connection
ENGLISH
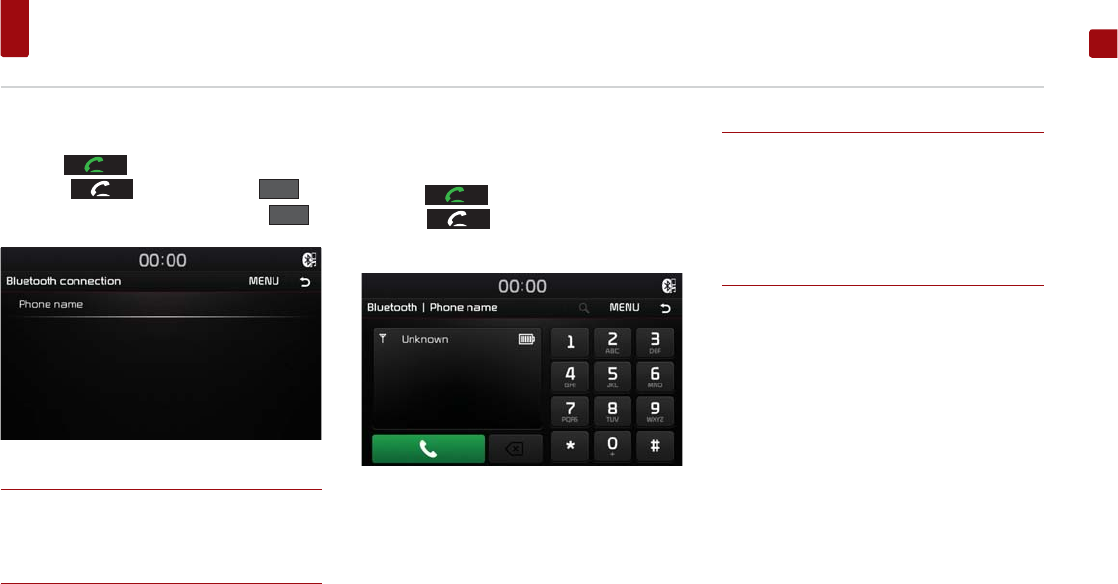
When a Phone is Already Paired
Press the key on the steering wheel or
press the key ▶ Press the
2.
▶
Press the phone name to pair ▶ Press the
<(6
.
NOTE
r When a Bluetooth device is connected, a new
device cannot be paired. If you want to pair a new
phone, first disconnect the connected Bluetooth
device.
When your phone is
connected
Press the key on the steering wheel or
press the key on the head unit to dis-
play the following screen.
NOTE
r Once Bluetooth connection is successful, the name
of the connected mobile phone will be displayed
on the phone screen and Bluetooth handsfree
functions will be ready to be operated.
r Some functions may not be supported due to
limited Bluetooth compatibility between the car
system and mobile phone.

Bluetooth Phone
Making/Answering Calls
Calling by Dialing a Number
Enter number on the Dial Pad ▶ Press the
button or the key on the steer-
ing wheel.
NOTE
r If you press the wrong number, press to
delete one digit of the entered number. Press and
hold the dial pad 0 "+" to enter a "+".
r Press the button to search phone numbers.
For detail, refer to the “Searching for contacts “ on
the page 33.
Making a Call from Speed Dial
Enter the 1 or 2 digit speed dial number with the
Dial Pad ▶ Press and hold the last number.
Calling through Redial
Press and hold the button or Press the
key on the steering wheel twice.
NOTE
r Redialing is not possible when there is no dialed
calls list.
Answering a Call
Incoming call notice ▶ Press the
button or the key on the
steering wheel.
Rejecting a Call
Incoming call notice ▶ Press the
button or the key on the
steering wheel.
Bluetooth Phone
ENGLISH
Operating Menus during a
Call
Button Description
1 Ends a call.
2 Turns the Mic On/Off.
3 Switches a voice call from the car
handsfree to the mobile phone.
4 Display dial pad screen for enter-
ing ARS numbers.
5 3 Way call
Ending a Call
While on a call ▶ Press the button or
the key on the steering wheel.
Switching Call to Bluetooth® Phone
During handsfree call ▶ Press the but-
ton or press and hold the key on the
steering wheel
During call on mobile phone ▶ Press the
button or press and hold the
key on the steering wheel
Making 3 way call
While on a call ▶ Press the button. ▶
Press phone number you want to make a call ▶
Press the button.
1 2 3 4 5
Bluetooth Phone
Using the Menu Buttons
In Phone screen ▶ Press the
0(18
button to
use Contacts , Calling list , Favorites , Bluetooth
settings .
Contacts
Updating Mobile Phone Contacts
Up to 5,000 mobile phone contacts can be
updated.
In Contacts screen ▶ Press the
0(18
button
▶ Press the
8SGDWH
.
The contacts are deleted and the contacts
of the connected phone is updated.
Making a call from contacts
In Contacts screen ▶ Press the
0(18
button ▶
Press the
&RQWDFWV
button ▶ Press the contact
you want to call.
Searching for contacts
In Contacts screen ▶ Press the
0(18
button ▶
Press the
6HDUFK
▶ Enter the name ▶ Press the
2.
▶ Press the contact you want to call.
Bluetooth Phone
ENGLISH
Calling list
Viewing Calling lists
In Phone screen ▶ Press the
0(18
button ▶
Press the
&DOOLQJOLVWV
.
Press the
0(18
button on Calling list screen.
Button Description
1 All Displays all calling list.
2 Missed Displays the missed calling list.
3 Received Displays the incoming calling
list.
4 Dialed Displays the outgoing calling
list.
NOTE
r The calling list may not be saved in some mobile
phones.
Favourites
Calling Favourites
In Phone screen ▶ Press the
0(18
button ▶
Press the
)DYRXULWHV
▶ Press the Favourite you
want to call.
Saving to Favourite
In Phone screen ▶ Press the
$GGWRIDYRXULWHV
button.
In Contacts screen or Calling list screen ▶ Press
and hold the contact you want to save ▶ Press
the
6DYHWR)DYRXULWHV
.
1
2
3
4

Bluetooth Phone
Deleting Favourites
In Favourites screen ▶ Press the
0(18
button ▶
Press the
'HOHWHDOO
▶ Press the
2.
.
In Favourites screen ▶ Press and hold the favourite
you want to delete ▶Press the
'HOHWH
▶ Press
the
2.
.
Changing the Favourites name
In Favourites screen ▶ Press and hold the favour-
ite you want to change ▶ Press the
5HQDPH
▶
Enter the name ▶ Press the
2.
.
Bluetooth settings
In Phone screen ▶ Press the
0(18
button ▶
Press the
%OXHWRRWKVHWWLQJV
.
For details, refer to the “Bluetooth” on the page
39.

Setup
ENGLISH
Starting mode
Press the
6(783
key to display the Setup
screen.
Sound
This menu is used to adjust the sound effects
for the whole system.
Press the
6(783
key ▶ Press the
6RXQG
button.
Sound Balance
In Sound settings screen ▶ Press the
6RXQG%DODQFH
▶ Set the desired sound balance.
Use the
ԟ
,
ԣ
, , and buttons to adjust
settings.
Press the
5HVHW
to restore sound to the center position.
Variable EQ
In Sound settings screen ▶ Press the
9DULDEOH(4
▶ Set the desired mode.
Volume setting
In Sound settings screen ▶ Press the
9ROXPHVHWWLQJ
▶ Set the desired volume.
Button Description
1 Phone Controls the volume related to
phone.
2 Start up Controls the audio volume
when starting the system.
Use the
ԟ
,
ԣ
and buttons to adjust set-
tings.
Press the
5HVHW
to initialize the settings.
1
2
Setup
Beep
This menu allows you to play a beep sound
whenever you operate the touch screen.
In Sound settings screen ▶ Press the
%HHS
to
turn on/off.
Display
This menu allows you to adjust the brightness
and set the dimming mode for the whole sys-
tem.
Press the
6(783
key ▶ Press the
'LVSOD\
.
Brightness
In Display settings screen ▶ Press the
%ULJKWQHVV
▶ Set the desired brightness.
Use the
ԟ
,
ԣ
and buttons to adjust set-
tings.
Press the
5HVHW
to initialize the settings.
Setup
ENGLISH
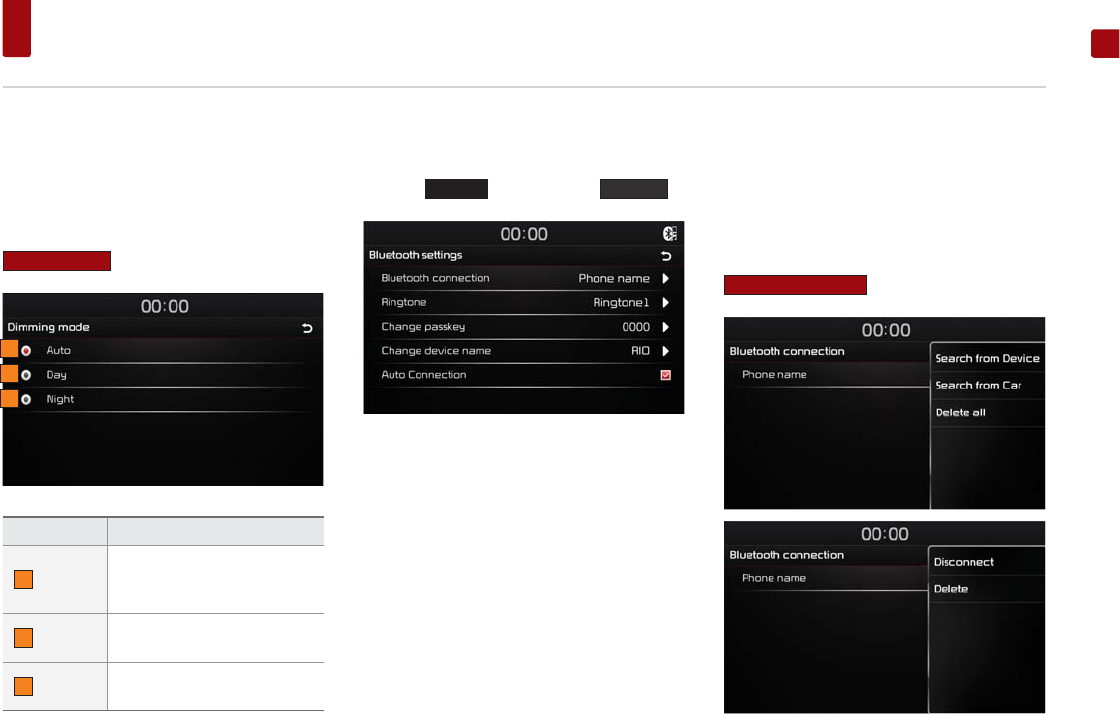
Dimming mode
This menu allows you to set the brightness
according to mode changes.
In Display settings screen ▶ Press the
'LPPLQJPRGH
▶ Set the desired mode.
Button Description
1 Auto
Adjusts the brightness
automatically according to sur-
rounding brightness.
2 Day Brightness level always set on
high.
3 Night Brightness level always set on
low.
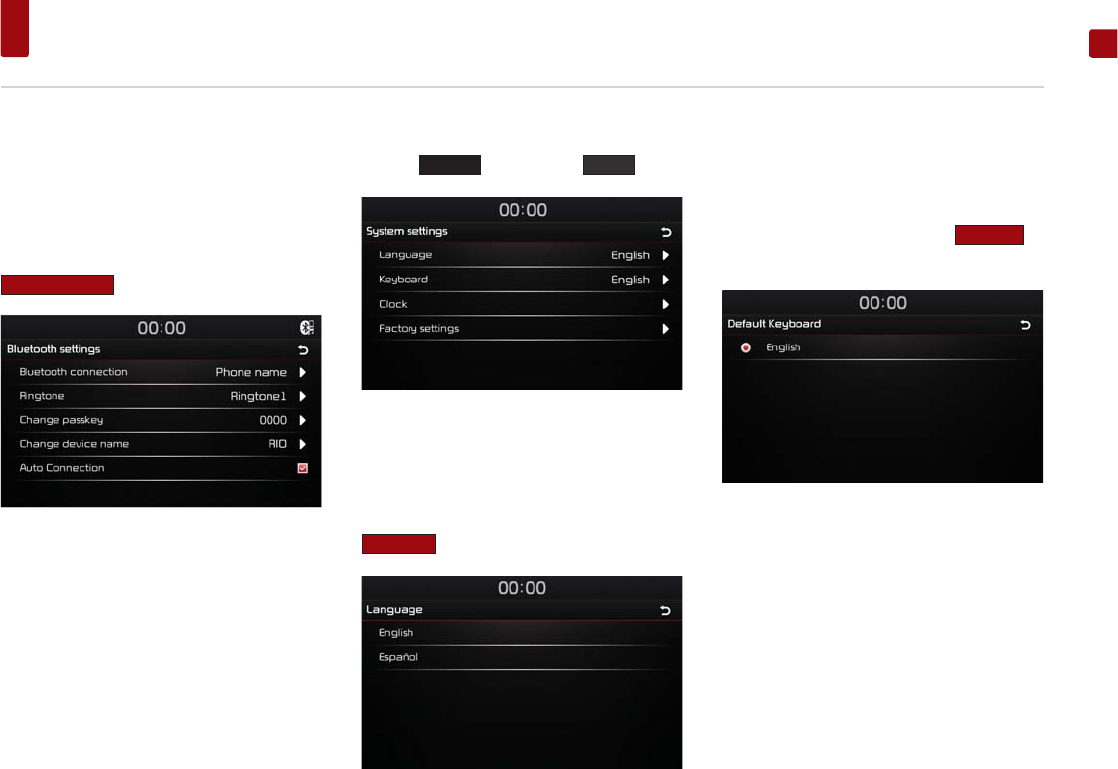
Bluetooth settings
This menu allow you to set Bluetooth settings.
Press the
6(783
key ▶ Press the
%OXHWRRWK
.
Bluetooth connection
This menu allow you to manage the Bluetooth
device list, such as pairing, connecting or delet-
ing Bluetooth devices.
In Bluetooth settings screen ▶ Press the
%OXHWRRWKFRQQHFWLRQ
▶ Set the desired settings.
Press and hold the phone name to disconnect/
delete the device.
1
2
3
Setup
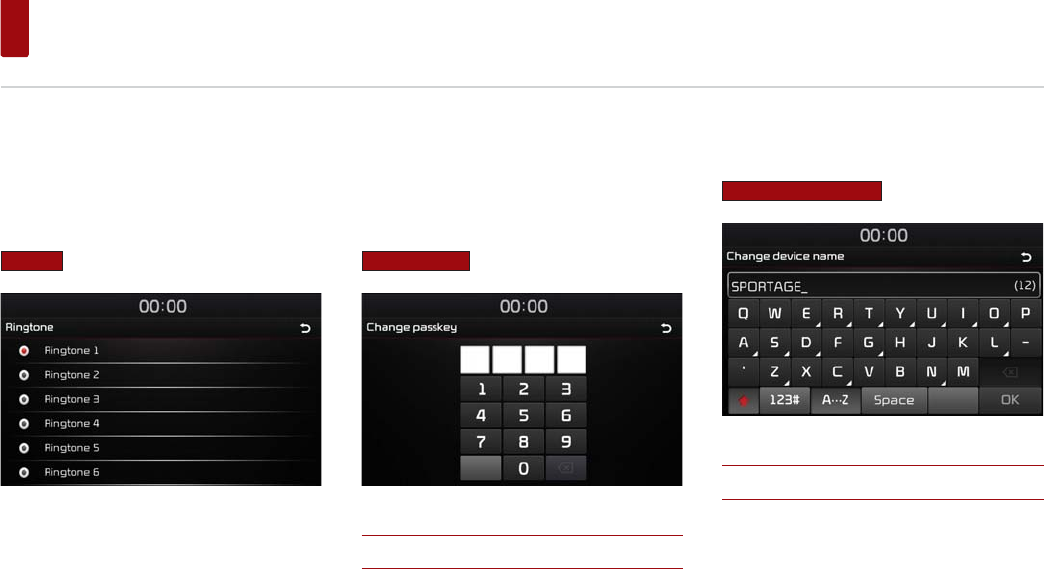
Ringtone
The configured ringtone is played through the
vehicle speakers when you receive a call.
In Bluetooth settings screen ▶ Press the
5LQJWRQH
▶ Set the desired ringtone.
Change passkey
This feature allows you to change the passkey
used for Bluetooth device authentication.
In Bluetooth settings screen ▶ Press the
&KDQJHSDVVNH\
▶ Enter the passkey.
NOTE
r The default passkey is 0000.
Changing device name
In Bluetooth settings screen ▶ Press the
&KDQJHGHYLFHQDPH
▶ Enter the name.
NOTE
r The default device name is RIO.
Setup
ENGLISH
Auto Connection
The Bluetooth® device will automatically be con-
nected according to the option set when the car
ignition is turned on.
In Bluetooth settings screen ▶ Press the
$XWR&RQQHFWLRQ
to turn on/off.
System
Press the
6(783
Key ▶ Press the
6\VWHP
button.
Language
This menu allows you to set the language of the
system.
In System settings screen ▶ Press the
/DQJXDJH
▶ Press the desired language.
Keyboard
This option allows you to change the type
of keyboard used within the system.
In System settings screen ▶ Press the
.H\ERDUG
▶
Press the desired language.
Setup
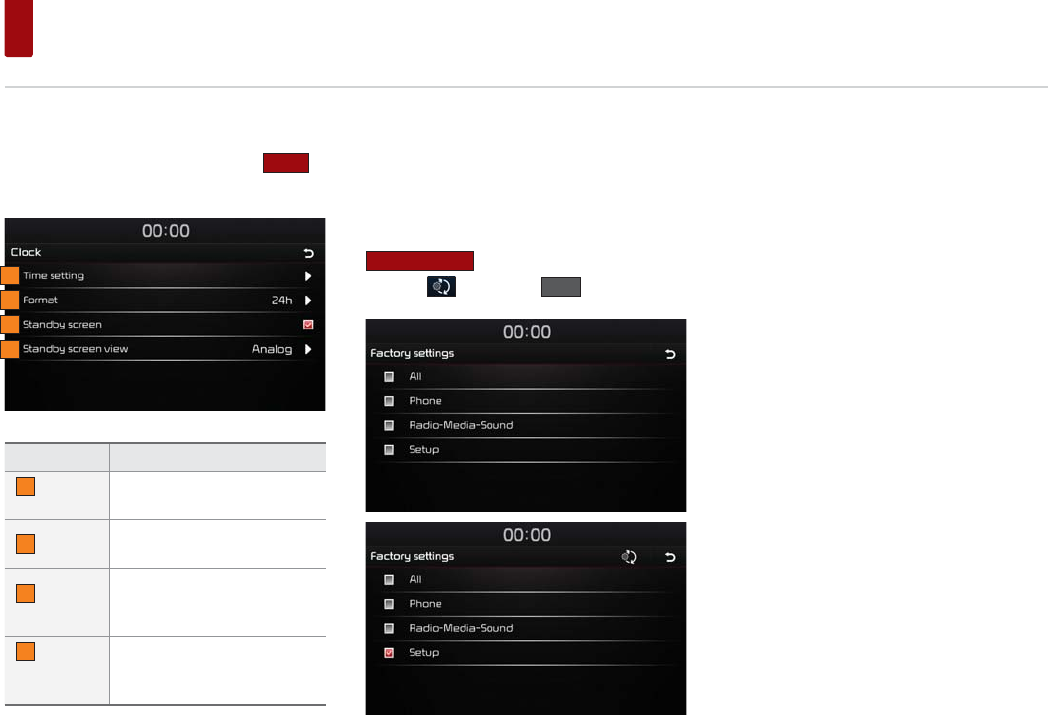
Clock
In System settings screen ▶ Press the
&ORFN
▶
Set the desired settings.
Button Description
1 Time set-
ting Sets the current time.
2 Format Converts the digital clock
display to 12 or 24 hours.
3 Standby
screen
Turns on/off the screen
displayed when the system
power is turned off.
4 Standby
screen
view
Sets the type of Standby
screen.
Factory settings
This menu allows you to reset settings specified
by the user.
In System settings screen ▶ Press the
)DFWRU\VHWWLQJV
▶ Press the desired item ▶
Press the ▶ Press the
<(6
.
1
2
3
4
Specification
ENGLISH
USB MP3 Specification
Category Description
MP3 File Specification Response Specification: MPEG1 AUDIO
LAYER3
Recommended Bitrate and
Sampling Frequency
Response Sampling Frequency : 32, 44.1, 48
(KHz)
Response Bitrate: 32, 40, 48, 56, 64, 80, 96,
112, 128, 160, 192 ,224 ,256 ,320 (Kbps)
ID3 TAG ID3 v1.1 and ID3 v2.x TAG
Detailed Specification
ˍMax Directory Layers: 15 layers
ˍMax length of folder names and file
names: 255Bytes
ˍCharacters supported for folder/file
names: English, Espanol and numbers
ˍMax number of files recognized from
one USB device: 5000
Video and Image Specification
Category Description
File Format AVI(DivX), MPEG
Image Format jpg, gif, bmp, png
Extensions avi, divx, mpg, mpeg, mp4, wmv
Supported Image Resolution Max 4000x3000
Supported Image File Size Max 4 Mbytes
Video Codec H.263, MPEG 1/2, MPEG4-ASP, MPEG4-
AVC(H.264), VC-1, AVS, VP8
Video Resolution
1920 x 1080
(WMV 9: Max 8Mbps, 1280x720,
WMV 8: 640x480)
Audio Codec MP3, OGG, WMA …
Subtitles SMI
Unsupported files
ˍFiles not compatible with supported
specifications
ˍModified files (files with modified file
formats)
ˍTransformed files (example: AVI files
encoded with WMV video codec)
ˍFiles without indexes

Trouble shooting
1. Errors which occur during the operation or installation of the device may be mistaken as a malfunction of the actual device.
2. If you are having problems with the device, try the suggestions listed below.
3. If the problems persist, contact your dealer
Problem Possible Cause
There are small red, blue, or green dots on the
screen
Because the LCD is manufactured with technology requiring high point density, a pixel or lighting deficiency may
occur within 0.01% of total pixels.
The sound or image is not working
ˍHas the Switch for the vehicle been turned to [ACC] or [ON]?
ˍHas the SYSTEM been turned OFF?
The screen is being displayed but sound is not
working
ˍHas the volume been set to a low level?
ˍHas the volume been muted?
When the power is turned on, the corners of the
screen are dark
ˍThe display appearing somewhat dark after prolonged periods of use is normal with LCD panels. It is not a
malfunction.
ˍIf the screen is very dark, contact your nearest dealer for assistance.
Sound is working from only one speaker Are the positions of Fader or Balance sound controls adjusted to only one side?
Sound does not work in AUX mode Are the audio connector jacks fully inserted into the AUX terminal?
The external device is not working Is the external device connected with a standard connector cable?
When turning power on, the most recent mode
screen is not displayed
Within modes that play files by reading external sources, such as USB, iPod, or Bluetooth® streaming mode, the
most recently played mode screen prior to turning off power may not properly load.
ˍIf the corresponding device is not connected, the mode operated prior to the most recent mode will operate.
ˍIf the previous mode still cannot be properly played, the mode operated prior to that will operate.

Trouble shooting
ENGLISH
Problem Possible Cause Countermeasure
The power does not
turn on.
The fuse is disconnected.
ˍReplace with a suitable fuse.
ˍIf the fuse is disconnected again, please contact your point of purchase or service center.
Device is not properly connected. Check to see that the device has been properly connected.
The system does not
play. The vehicle battery is low. Charge the battery if the problem persists, contact your point of purchase or service center.
The image colour/ tone
quality is low.
The brightness, and contrast levels are
not set properly. Properly adjust the brightness, and contrast levels through Display Setup.
Sound does not work.
The volume level is set to the lowest
level. Adjust the volume level.
The connection is not proper. Check to see that the device has been properly connected.
The device is currently fast-forwarding,
rewinding, scanning, or playing in slow
mode.
The sound will not work when the device is fast-forwarding, rewinding, scanning, or playing
in slow mode.

Trouble shooting
Problem Possible Cause Countermeasure
The sound or image
quality is low.
Vibration is occurring from where the
conversion switch has been installed. The sound may be short circuited and the image distorted if the device vibrates.
Image colour/tone quality is low. The device will return to normal once vibrations stop.
The USB does not work
USB memory is damaged. Please use after formatting the USB into FAT 12/16/32 format.
USB memory has been contaminated. Remove any foreign substances on the contact surface of the USB memory and multimedia
terminal.
A separately purchased USB HUB is being
used. Directly connect the USB memory with the multimedia terminal on the vehicle.
A USB extension cable is being used. Directly connect the USB memory with the multimedia terminal on the vehicle.
A USB which is not a Metal Cover Type
USB Memory is being used. Use standard USB Memory.
An HDD type, CF, SD Memory is being
used. Use standard USB Memory.
There are no music files which can be
played.
Only MP3, WMA file formats are supported. Please use only the supported music file for-
mats.
The iPod is not rec-
ognised even though it
has been connected
There are no titles which can be played. Use iTunes to download and save MP3 files into the iPod.
The iPod firmware version has not been
properly updated. Use iTunes to update the firmware version and reconnect the iPod with the device.
The iPod device does not recognise
downloads. Reset the iPod and reconnect with the device.

Limited Warranty
ENGLISH
LIMITED WARRANTY
ORIGINAL NAVIGATION HEAD UNIT SUPPLIED BY VEHICLE DEALER
Product :
Product No. :
WHAT THIS WARRANTY COVERS
1. Vehicle Dealer Shop (“Dealer”) warrants to you that the Hardware will be free from defects in workmanship and materials under Normal use (“Defects”)
from the original date of the registration of the motor vehicle (“Warranty Period”). During the Warranty Period the Hardware will be repaired or replaced at
DEALER’s choice (“Limited Warranty”) without charge to you for either parts or labor. This Limited Warranty covers the replacement of the head unit including
of the Hardware only.
Period Warranty Mileage Warranty
3years 60,000 Km
*Whichever Occurs earlier.
*The term of the warranty shall commence from the date of delivery of the new vehicle to the first purchaser.
WHAT THIS WARRANTY DOES NOT COVER
2. The Limited Warranty does not apply to normal wear and tear, does not apply when the Hardware is opened or repaired by someone liquids, proximity or
exposure to heat and accident, abuse, non-compliance with the instructions supplied with the Hardware, neglect or misapplication. The Limited Warranty
does not cover physical damage to the surface of the Hardware. This Limited Warranty does not cover any software that may accompany or be installed on
the Hardware.
The Limited Warranty does not cover the installation, removal or maintenance of the Hardware or any costs related herewith.
HOW TO MAKE A WARRANTY CLAIM
3. In order to make a claim of a Defect, you must contact DEALER. If a defect arises and a valid claim under this Limited Warranty is received by DEALER after the
first 3yrs/60,000 km of the Warranty Period, DEALER is entitled to charge you for any reasonable shipping and handling costs made in connection with the
repair or replacement of the Hardware. You must comply with any other return procedures stipulated by DEALER, if any.

Limited Warranty
DEALER LIMITED WARRANTY
YOUR LEGAL RIGHTS
4. Some countries may not allow the exclusion or limitation of damages. If any part of this Limited Warranty is held to be invalid or
unenforceable, the remainder of the Limited Warranty shall nonetheless remain in full force and effect.
5. This Limited Warranty is the only express warranty made to you and is provided in place of any other express warranties or similar obligations (if any) created
by any advertising, documentation, packaging, or other communications.
6. Except for the Limited Warranty and to the maximum extent permitted by applicable law, DEALER and its suppliers provide the Hardware “AS IS AND WITH
ALL FAULTS”, and hereby disclaim all other warranties and conditions, whether express, implied or statutory, including, but not limited to, any (if any) implied
warranties, duties or conditions of satisfactory quality, of fitness for a particular purpose, of reliability or availability, of accuracy or completeness of responses,
of results, of workmanlike effort, of lack of viruses, and of reasonable care and skill, all with regard to the Hardware, and the provision of or failure to provide
support or other services, information, software, and related content through the Hardware or otherwise arising out of the use of the Hardware. Also, there is
no warranty or condition of quiet enjoyment, quiet possession, or non-infringement with regard to the Hardware.
7. This Limited Warranty does not affect any legal rights under applicable national legislation governing the sale of consumer goods.
8. This Limited Warranty cannot be transferred to any other person.
LIMITATION OF LIABILITY
9. Neither DEALER nor its suppliers shall be liable to you or to any third party for any damages either direct, indirect, incidental, consequential or otherwise
(including in each case, but not limited to, damages for the inability to use the equipment or access data, loss of data, loss of business, loss of profits, business
interruption or the like) arising out of the use of or inability to use the Hardware even if DEALER has been advised of the possibility of such damages.
10. Notwithstanding any damages that you might incur for any reason whatsoever, the entire liability of DEALER and any of its suppliers shall be limited to the
amount actually paid by you for the Hardware.
11. DEALER shall not be liable for
(I) any fraud on the part of its employees and/or agents; or
(I) any fraudulent misrepresentation on the part of its employees and/or agents.
12. Notwithstanding the above, neither party’s liability for death or personal injury resulting from its own negligence shall be limited.