User Manual

CAR MULTIMEIDA SYSTEM (MTXNC10BA)
USER’S MANUAL
i10
Please read this manual carefully before operating your set and retain it for future reference. Designs and specifica-
tions are subject to change without prior notice.
The screens shown in this manual may differ from the actual screens of the product.
The design and specification of this product may change without prior notification for product improvement.
When transferring the vehicle to another individual, include this user’s manual so that the next driver can continue its use.
Rev.2.0
ENGLISH
ESPAÑOL
iPod®
iPod® is a registered trademark of Apple Inc.
Bluetooth®
The Bluetooth® Wireless Technology word mark and logos are registered
trademarks owned by Bluetooth® Wireless Technology SIG, Inc.
Cortex
Cortex is the name of the ARM Processor Architecture used in the AV System.
Windows Embedded Compact 7
Windows Embedded Compact 7 is an operating system used in the AV
System.
3
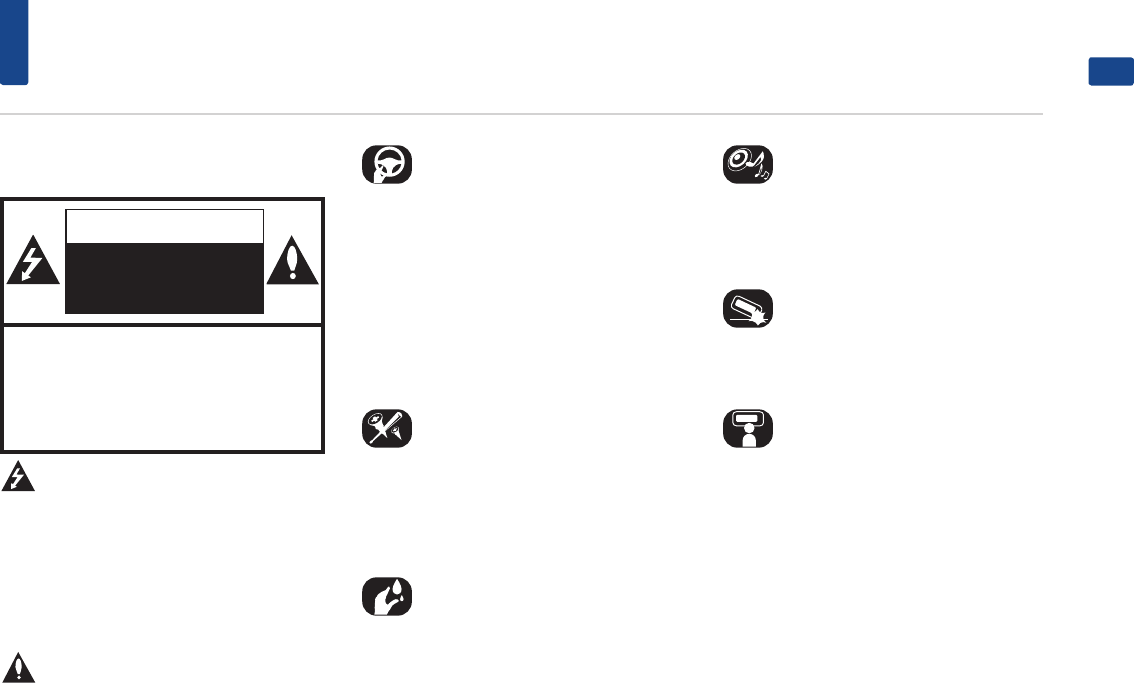
Precautions for safety
ENGLISH
Safety notes
CAUTION
RISK OF ELECTRIC
SHOCK
DO NOT OPEN
CAUTION: TO REDUCE THE RISK OF
ELECTRIC SHOCK, DO NOT REMOVE THE
COVER (OR BACK). NO USER SERVICEABLE
PARTS INSIDE. REFER SERVICING TO
QUALIFIED SERVICE PERSONNEL.
The lightning flash with the arrowhead symbol
within an equilateral triangle is intended
to alert the user about the presence of uninsu-
lated dangerous voltage within the product’s
enclosure that may be of sufficient magnitude to
constitute a risk of electric shock.
The exclamation point within an equilateral tri-
angle is intended to alert the user to
the presence of important operating and main-
tenance (servicing) instructions in the literature
accompanying the appliance.
Always operate the vehicle in a safe manner. Do
not become distracted by the vehicle while driv-
ing and always be fully aware of all driving condi-
tions. Do not change settings or any functions.
Pull over in a safe and legal manner before
attempting such operations.
To promote safety, certain functions are disabled
unless the hand brake is on.
To reduce the risk of electric shock, do not
remove the cover or back of this product. There
are no user-serviceable parts inside.
Refer servicing to qualified service personnel.
To reduce the risk of fire or electric shock, do not
expose this product to dripping or splashing
water, rain, or moisture.
When driving your vehicle, be sure to keep the
volume of the unit low enough to allow you to
hear sounds coming from the outside.
Do not drop it and avoid heavy impacts at any-
time.
The driver should not watch the monitor while
driving. If the driver watches the monitor while
driving, it may lead to carelessness and cause an
accident.

4
Precautions for safety
WARNING:
•• Do not stare at the screen while driving. Staring
at the screen for prolonged periods of time
could lead to traffic accidents.
•• Do not disassemble, assemble, or modify the
AV system. Such acts could result in accidents,
fire, or electric shock.
•• Using phone features while driving may dis-
tract drivers from paying attention to traffic
conditions and result in traffic accidents.
Use phone features only after the vehicle has
been parked.
•• Heed caution not to spill water or introduce
foreign objects into the device. Such acts could
lead to smoke, fire, or product malfunction.
•• Please refrain from use if the screen is blank
or no sound can be heard as these signs may
indicate product malfunction. Continued use in
such conditions could lead to accidents (fires,
electric shock) or product malfunctions.
•• Do not touch the antenna during thunder or
lightening as such acts may lead to lightning
induced electric shock.
•• Do not stop or park in parking-restricted areas
to operate the product. Such acts could lead to
traffic accidents.
••The video screen will not operate when the
vehicle is in motion. For your safety, first park
the vehicle to watch or view the screen.
•• Some Non-video features may also not operate
when the vehicle is in motion. These features
will operate only when the vehicle has been
parked.
CAUTION:
•
•Do not keep the AV system running with the
engine stopped. Doing so may discharge the
vehicle battery. When you use the AV system,
always keep the engine running.
•
•When the driver wants to operate AV system,
first park the vehicle in a safe location and set
the parking brake.
Operating the system while driving can dis-
tract the driver and may result in a serious
accident.
•
•Do not disassemble or modify this system. If
you do, it may result in accidents, fire, or elec-
trical shock.
•
•Some states/provinces may have laws limiting
the use of video screens while driving. Use the
system only where it is legal to do so.
•
•Do not use your phone in private mode when
you are driving. You must stop at a safe loca-
tion to use it.

5
Key Product Features
ENGLISH
Key Product Features
Button Description
Display Wide TFT-LCD Display
Provides high quality video through a Wide TFT-LCD Display using an LED Back Light.
Radio
Digital Tuner Feature
Digital Tuner using PPL method that supports memory of 20 broadcast stations for each AM and FM modes.
Radio broadcast station name
Displays broadcast station names for key locations.
Multimedia
Player
Support for various Media Formats
Support for various media formats, including Radio, MP3, USB, iPod® and Bluetooth® Audio Streaming modes.
Miscellaneous
Bluetooth® Wireless Technology
Convenient use of Bluetooth® Handsfree by using buttons within the steering wheel remote controller.
Digital Screen Control Features
Easy control of features through touch screen options.
Steering Wheel Remote Controller
Control over audio features and Bluetooth® through the steering wheel remote controller for maximum convenience.
Android Auto™
Android Auto™ brings the most useful apps from your phone to your vehicle´s screen, optimized for easy glancing and control while driving.
Apple CarPlay
CarPlay puts key iPhone apps - the ones you want to use while driving - on your car’s built-in display. With CarPlay, you can get turn-by-turn direc-
tions, make phone calls, exchange text messages, listen to music, and more.
6
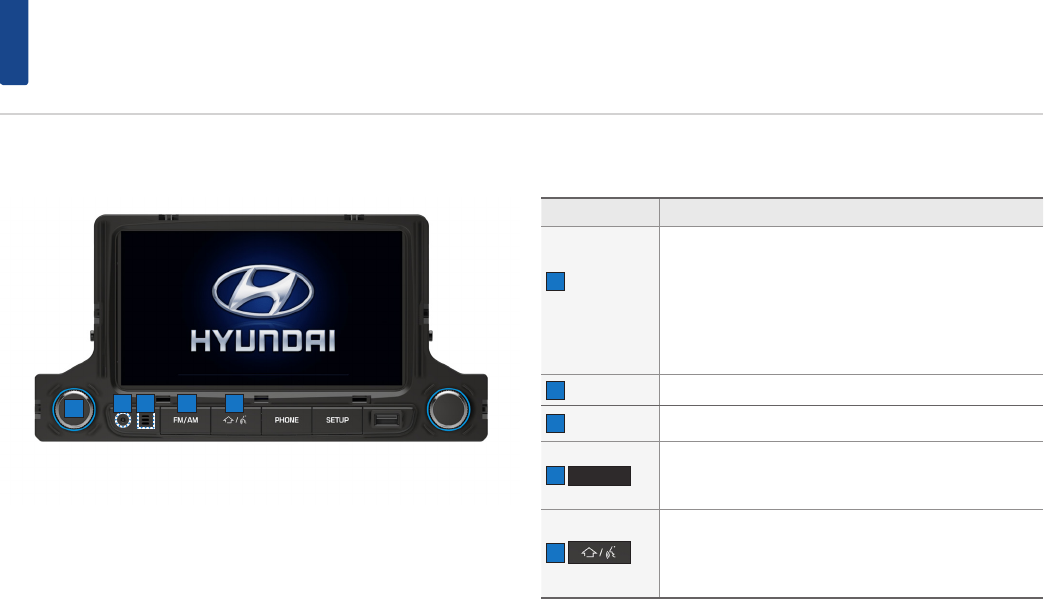
Component Names and Functions
Head Unit
4
1
Name Description
1 Power /
Volume
Knob
••Power on
When power is off, press to turn power on.
••Power off
When power is on, press and hold to turn power off.
••Audio off
When power is on, press to turn Audio off.
••Turn left/right to control volume.
2 Reset Resets the system.
3 Microphone Detects voice during phone conversations.
4
FM/AM
••Operates FM/AM mode.
••Each time the key is pressed, mode is changed in order
of FM1 ▶ FM2 ▶ AM ▶ FM.
5
••Press to display the Home menu screen.
••Press and hold to activate the Google voice or the Siri
function when your Android phone or iPhone is con-
nected to the unit. (optional)
52 3
7
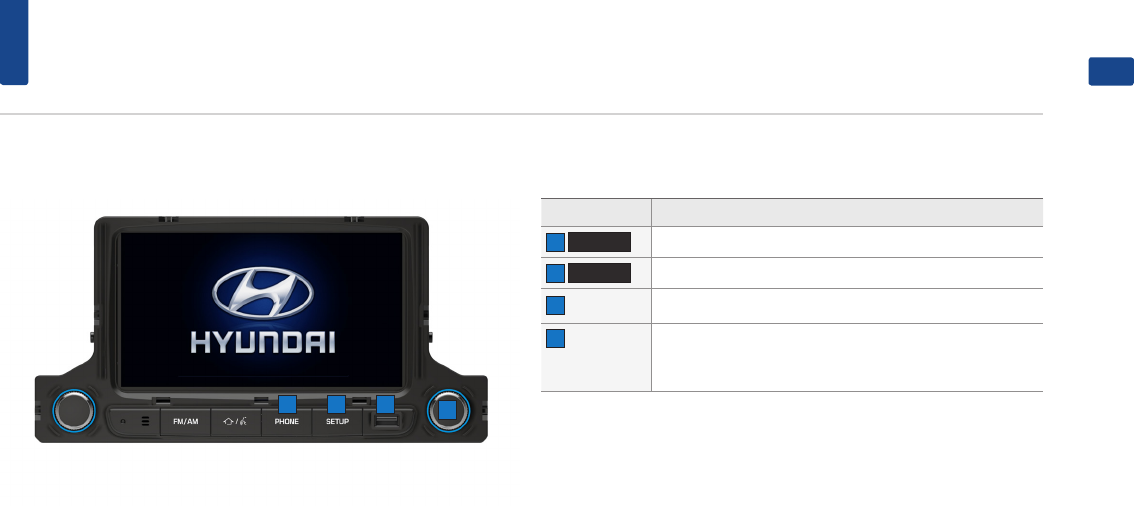
Component Names and Functions
ENGLISH
Head Unit
Name Description
6
PHONE
Takes user to phone screen.
7
SETUP
Displays the Setup mode.
8 USB port Connect USB device or iPod.
9 Tune /
ENTER
Knob
••FM/AM mode : changes the frequency.
••MEDIA (USB/ iPod®) mode : changes the track, file or title
9
6 7 8
8
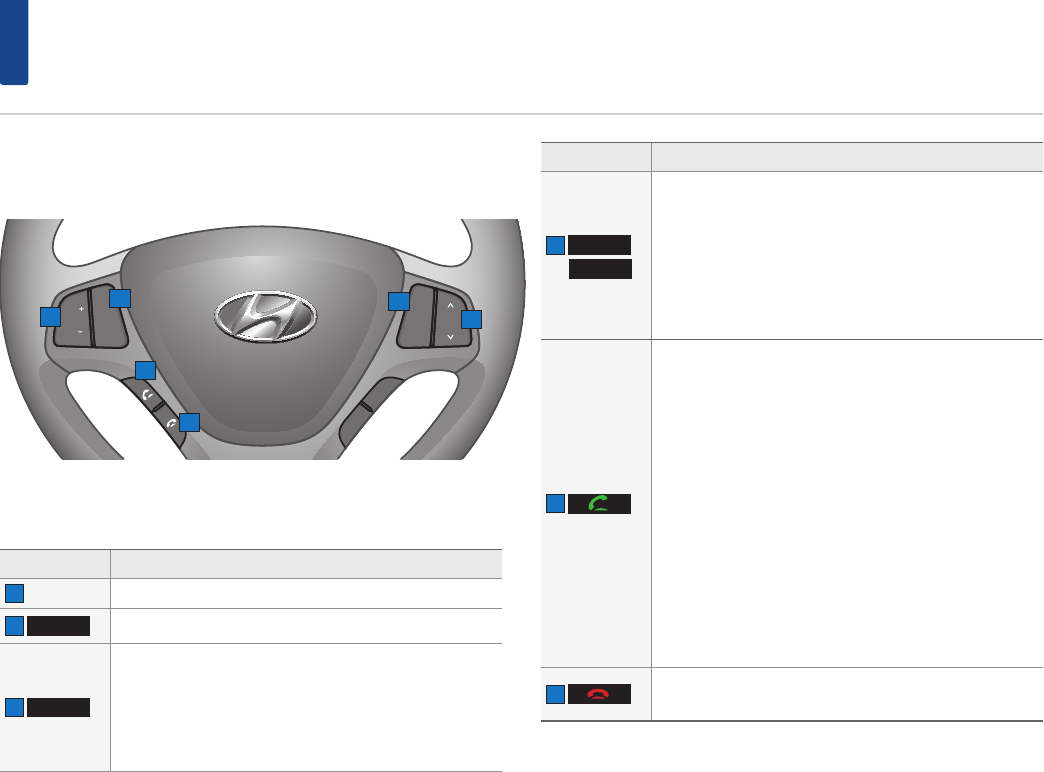
Component Names and Functions
Steering Wheel
Button Description
1 + VOL - Controls the volume.
2
MUTE
Mutes the sound.
3
MODE
••Operates FM1 ▶ FM2 ▶AM ▶ Available Media (USB
Music/USB Video/ iPod®/Bluetooth® Audio).
••If the media is not connected, corresponding modes will
be disabled.
••Press and hold the key to turn the Audio system on/off.
••When power is off, press the key to turn power back on.
Button Description
4
∧
∨
When keys are pressed shortly.
••FM/AM mode: scans and receives the previous/next fre-
quency.
••Media mode: changes the track, file or chapter.
When keys are pressed and held.
••In FM/AM mode: changes frequencies while pressed.
Upon release, scans and receives the next frequency.
••Media mode: rewinds or fast forwards the track or file.
5
When pressed shortly.
••When pressed in the phone screen, displays the last call.
••When pressed in the dial screen, makes a call.
••When pressed in the incoming call screen, answers the
call.
••When pressed during single call, switches call back to
mobile phone (Private).
••When pressed during 3way call, swap call.
••When pressed twice, redials the last call.
When pressed and held.
••When pressed during a Bluetooth® Handsfree call,
switches call back to mobile phone (Private).
••When pressed while calling on the mobile phone,
switches call back to Bluetooth® Handsfree (Operates
only when Bluetooth® Handsfree is connected).
••When pressed, redials the last call.
6 •
•When pressed during a call, ends the phone call.
•
•When pressed in the incoming call screen, rejects the call.
Getting started
MODE
MUTE
VOL
VOL
TRIP
RESET
➊
➋
➎
➏
➌
➍
1
2
4
3
5
6
9
FM/AM
ENGLISH
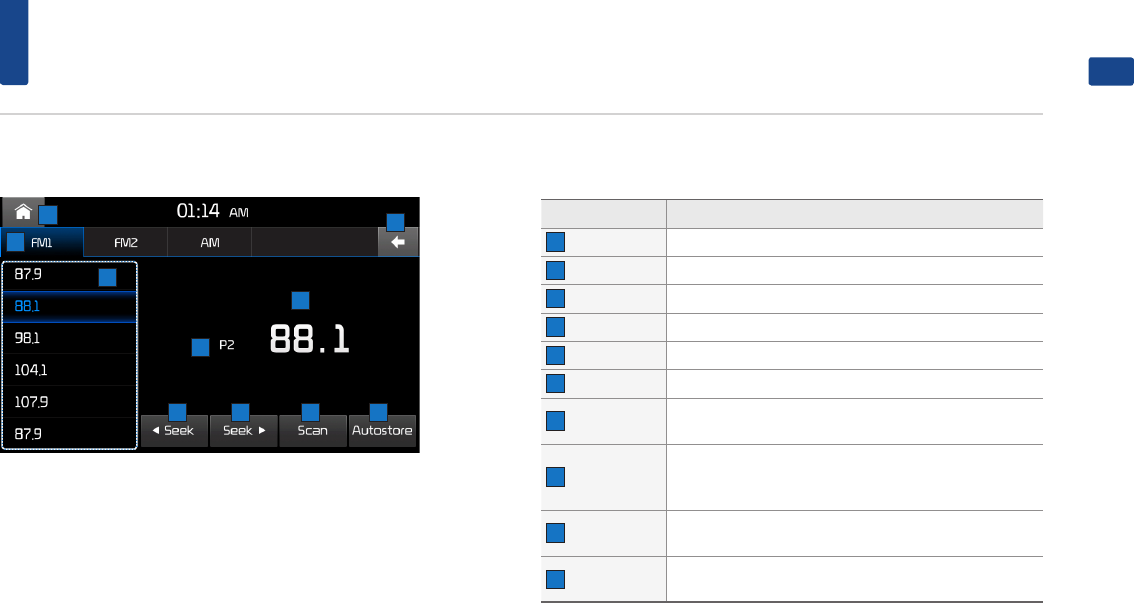
Basic Screen
Button Description
1 Home Moves to the home screen.
2 Mode Tab Press the tab to change mode.
3 Back Moves to the previous screen.
4 Preset Displays saved presets.
5 Frequency Displays the current frequency.
6 Preset No. Displays the current preset number.
7 Seek down Single tap: seek down.
Long tap: fast seek down.
8 Tune down
Single tap : tune down.
Long tap: tune down until the button is released and
plays the current frequency.
9 Scan Plays frequencies with superior reception for 3 seconds
each.
10 Autostore Saves frequencies with superior reception to Preset
list.
3
13
9
7810
6
5
4

10
FM/AM
Listening to FM/AM radio
Press the
FM/AM
key to change the mode in
order of FM1 ▶ FM2 ▶AM ▶ FM1 .
Or Press the key ▶ Press the
Radio
button ▶ Press FM or AM tab.
Auto tuning
Press the
◀
▶
button to automatically
search for frequencies.
Manual tuning
Turn the TUNE / ENTER knob or press the
◀
▶
button to manually select the frequency.
The stations move up and down step by step.
Press or drag the frequency bar to search for fre-
quencies that you want.
Selecting preset lists
From the lists, select the frequency you want to
listen to.
Scan
Press the
Scan
button to save frequencis
Plays frequencies saved to presets for 3 seconds
and moves to the next saved frequency.
Autostore
Press the
Autostore
button to save frequencis
with superior reception.
11
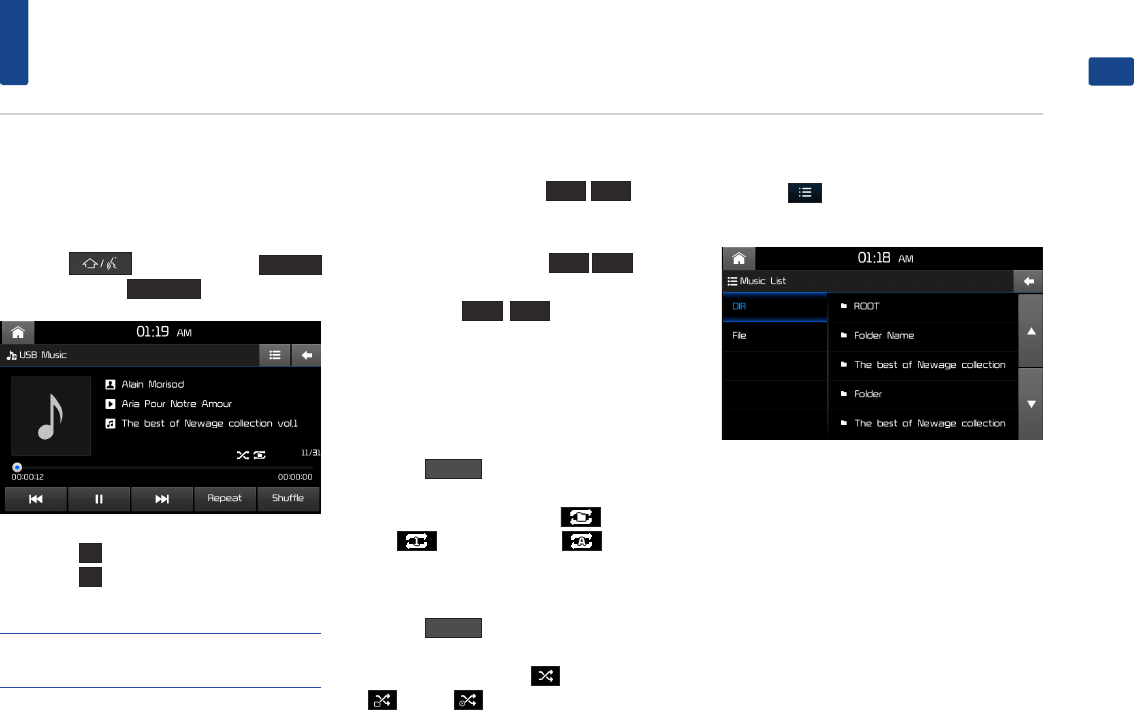
USB Music
ENGLISH
Playing USB Music
Once a USB is connected, USB Music mode will
operate automatically.
Press the key ▶ Press the
Media
button ▶ Press the
USB Music
button.
•
•Press the
▶
button to play files.
•
•Press the
ll
button to pause the file.
NOTE
• If the USB is not connected, or there is no media file
in USB then the USB media button will be disabled.
Searching USB Music Files
While playing ▶ Press the
l◀◀
▶▶l
button
to play the previous/next file.
•
•Pressing and holding the
l◀◀
▶▶l
button
will rewind or fast forward the current file.
•
•While the
l◀◀
▶▶l
button is being
pressed, the track will rewind or fast-forward
at high speeds. Once the key is released, the
USB Music will begin playing at normal speed.
Repeat
Press the
Repeat
button.
Each time the button is pressed, the option is
changed from Repeat Folder( ) ▶ Repeat
One( ) ▶Off(Repeat All( )).
Shuffle
Press the
Shuffle
button.
Each time the button is pressed, the option is
changed from Shuffle All( ) ▶ Shuffle Folder
( ) ▶ Off( ).
List
Press the
button to display USB Music list
screen.
12
USB Video
Playing USB Video
Once a USB is connected, USB Video mode will
operate automatically.
Press the key ▶ Press the
Media
button ▶ Press
USB Video
button.
•
•Press the
▶
button to play files.
•
•Press the
ll
button to pause the file.
NOTE
• If the USB is not connected, or there is no media file
in USB then the USB media button will be disabled.
Searching USB Video Files
While playing ▶ Press the
l◀◀
▶▶l
button
to play the previous/next file.
•
•Pressing and holding the
l◀◀
▶▶l
button
will rewind or fast forward the current file.
•
•While the
l◀◀
▶▶l
button is being
pressed, the track will rewind or fast-forward
at high speeds. Once the key is released, the
USB Video will begin playing at normal speed.
Repeat
Press the
Repeat
button.
Each time the button is pressed, the option is
changed from Repeat Folder( ) ▶ Repeat
One( ) ▶Off(Repeat All( ).
Shuffle
Press the
Shuffle
button.
Each time the button is pressed, the option is
changed from Shuffle All( ) ▶ Shuffle Folder
( ) ▶ Off( ) .
List
Press the
MENU
button ▶ Press the
List
but-
ton to display USB Video list screen.
13
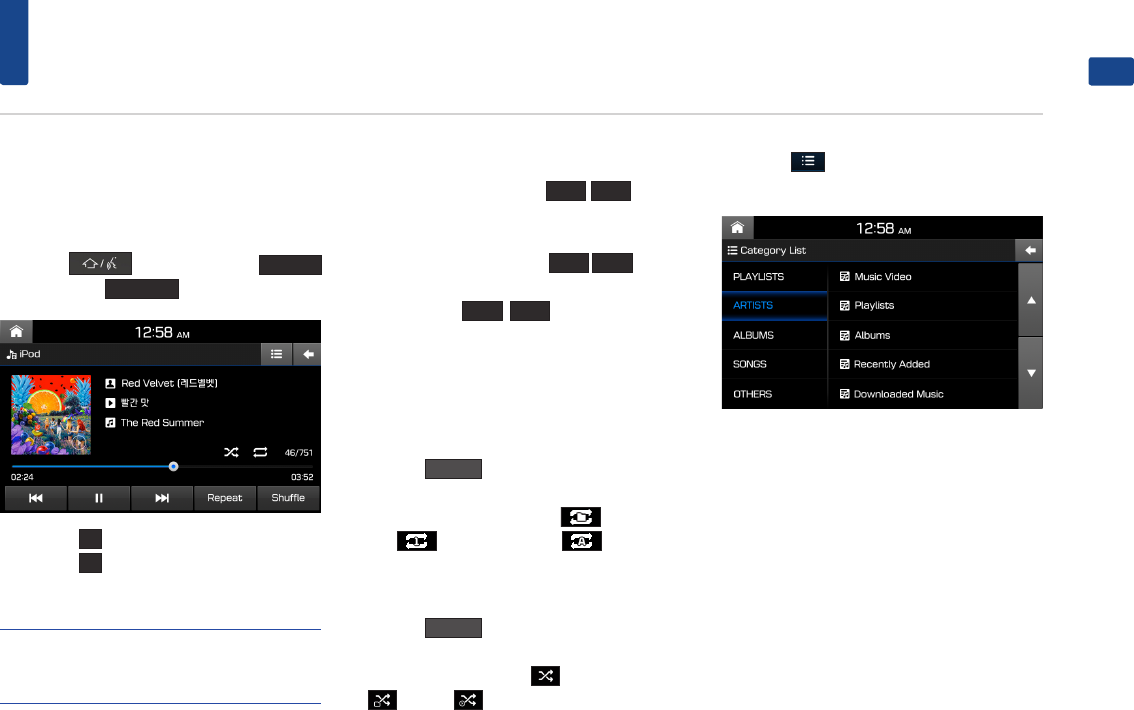
iPod® Music
ENGLISH
Playing iPod® Music
Once a iPod® is connected, iPod® Music mode
will operate automatically.
Press the key ▶ Press the
Media
button ▶ Press
iPod Music
button.
•
•Press the
▶
button to play files.
•
•Press the
ll
button to pause the file.
•
•
NOTE
• If the iPod® is not connected, or there is no media
file in iPod® then the iPod® Music button will be
disabled.
Searching iPod® Music Files
While playing ▶ Press the
l◀◀
▶▶l
button
to play the previous/next file.
•
•Pressing and holding the
l◀◀
▶▶l
button
will rewind or fast forward the current file.
•
•While the
l◀◀
▶▶l
button is being
pressed, the track will rewind or fast-forward
at high speeds. Once the key is released, the
USB Music will begin playing at normal speed.
Repeat
Press the
Repeat
button.
Each time the button is pressed, the option is
changed from Repeat Folder( ) ▶ Repeat
One( ) ▶Off(Repeat All( )).
Shuffle
Press the
Shuffle
button.
Each time the button is pressed, the option is
changed from Shuffle All( ) ▶ Shuffle Folder
( ) ▶ Off( ).
List
Press the
button to set List and options
menus.
14
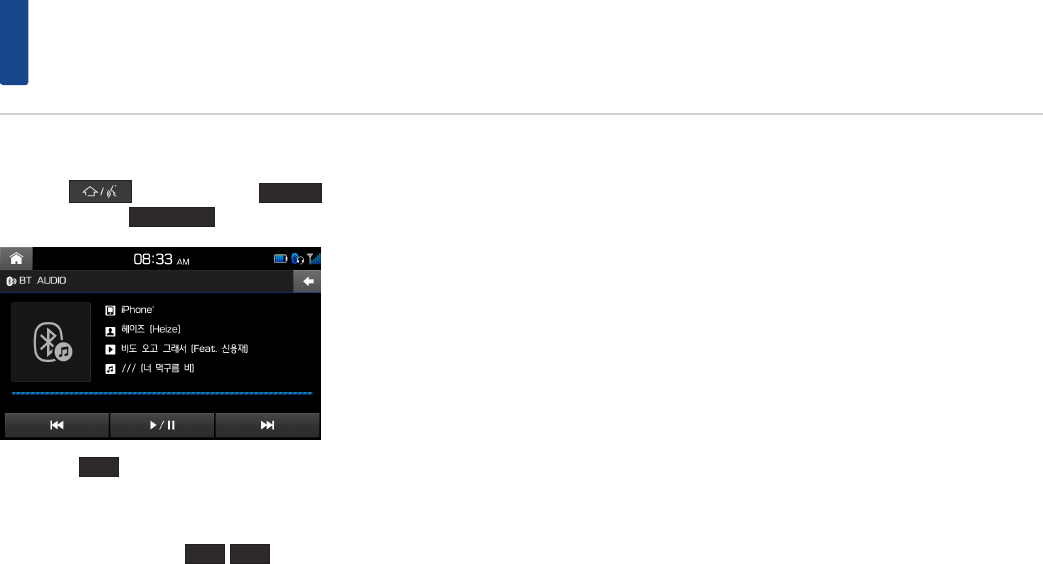
Bluetooth® Audio
Playing Bluetooth® audio
Press the key ▶ Press the
Media
button ▶ Press the
BT Audio
button.
•
•Press the
▶/ ll
button to play/pause files.
Searching Bluetooth® audio Files
While playing ▶ Press the
l◀◀
▶▶l
button
to play the previous/next file.
15
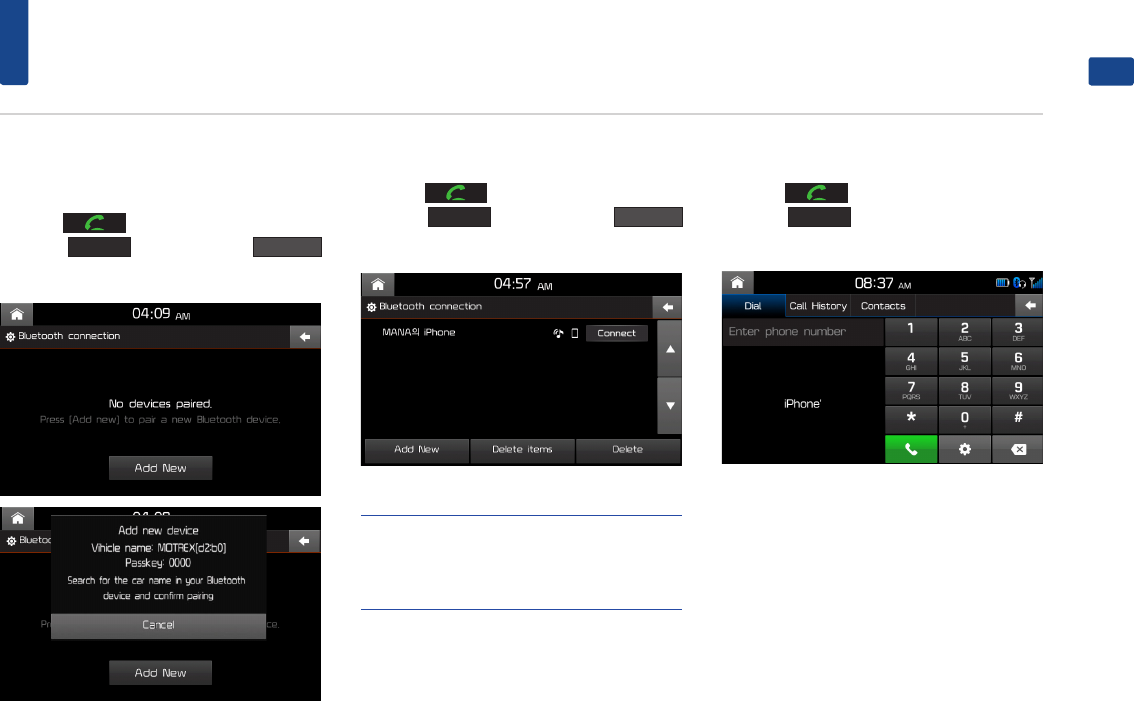
Bluetooth® Connection
ENGLISH
When no Phones Have Been
Paired
Press the key on the steering wheel or
press the
PHONE
key ▶ Press the
Add New
button.
When searching from the Bluetooth® device, the
car name is ‘Hyundai Motors’ and the default
passkey is ‘0000’.
When a Phone is Already Paired
Press the key on the steering wheel or
press the
PHONE
key ▶ Press the
Connect
button.
NOTE
• When a Bluetooth® device is connected, a new
device cannot be paired. If you want to pair a new
phone, first disconnect the connected Bluetooth®
device.
When your phone is connected
Press the key on the steering wheel or
press the
PHONE
key on the head unit to dis-
play the following screen.
16
Bluetooth® Connection
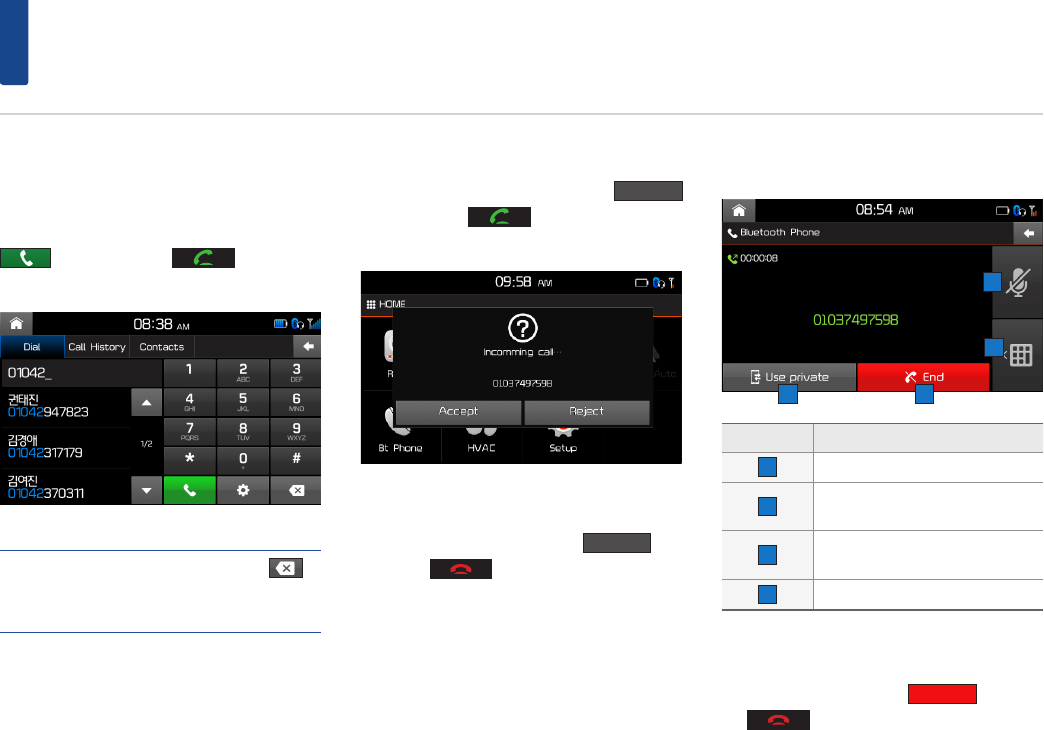
Making/Answering Calls
Calling by Dialing a Number
Enter number on the Dial Pad ▶ Press the
button or the key on the steer-
ing wheel.
NOTE
• If you press the wrong number, press to
delete one digit of the entered number. Press and
hold the dial pad 0 "+" to enter a "+".
Answering a Call
Incoming call notice ▶ Press the
Accept
button or the key on the steering
wheel.
Rejecting a Call
Incoming call notice ▶ Press the
Reject
but-
ton or the key on the steering wheel.
Operating Menus during a Call
Button Description
1 Turns the Mic On/Off.
2 Display dial pad screen for enter-
ing ARS numbers.
3 Switches a voice call from the car
handsfree to the mobile phone.
4 Ends a call.
Ending a Call
While on a call ▶ Press the
End
button or
the key on the steering wheel.
3 4
1
2
17
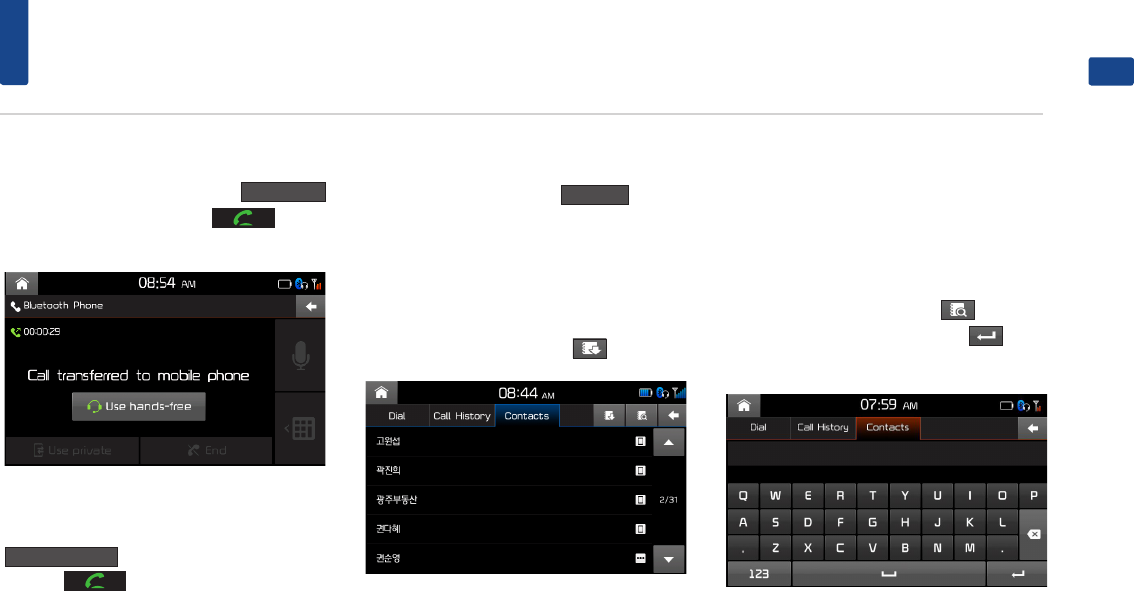
Bluetooth® Phone
ENGLISH
Switching Call to Bluetooth® Phone
During handsfree call ▶ Press the
Use Private
button or press and hold the key on
the steering wheel.
Switching Call to Handsfree
During call on mobile phone ▶ Press the
Use hands-free
button button or press and
hold the key on the steering wheel.
Contacts
In Phone screen ▶ Press the
Contacts
tab.
Updating Mobile Phone Contacts
Up to 5,000 mobile phone contacts can be
updated.
In Contacts screen ▶ Press the
button.
Making a call from contacts
In Contacts screen ▶ Press the contact you want
to call.
Searching for contacts
In Contacts screen ▶ Press the
button ▶
Enter the name or number ▶ Press the
button
▶ Press the contact you want to call.
18
Bluetooth® Phone
Call History
Viewing Call History
In Phone screen ▶ Press the
Call History
tab.
Button Description
1 All Calls Displays all calling list.
2 Dialed Displays the outgoing calling
list.
3 Received Displays the incoming calling
list.
4 Missed Displays the missed calling list.
NOTE
• To download or update the call history, press the
button.
Bluetooth® settings
In Phone screen ▶ Press the
button.
1 2 3 4
19
Android Auto™
ENGLISH
About Android Auto™
Android Auto™ brings the most useful apps from
your phone to your vehicle´s screen, optimized
for easy glancing and control while driving. You
will be able to control things like navigation,
maps, calls, text messages, and music, all from
your vehicle´s screen.
To learn about Android Auto™ and its features,
visit the Android website at http://www.android.
com/auto/
What you need?
1. An Android phone running Android 5.0
(Lollipop) or higher with a data plan.
2. A vehicle that’s compatible with Android
Auto™.
3. A genuine USB cable.
Before starting Android Auto™
Installing the Android Auto™
Application
Install Android Auto™ Application by following
below procedure.
Setting the system
Before connecting your mobile phone, check
whether Android Auto™ is set to be used in
Setup ▶
Phone Projection
▶
Projection Mode
.
Check the
CarPlay / Android Auto
box.
Starting mode
Connect your phone to your car using a USB
cable ▶ Press the key ▶ Press the
Android Auto
button.
Home Screen
No Description
1Microphone
2Navigation suggestions and recent places
3Reminders, messages, calls, and other
alerts
4Maps and navigation
5Calls and messages
6Home screen
7Music and audio
8Exit Android Auto
1
4
2
3
65 7 8
20
Apple CarPlay
About Apple CarPlay
•
•CarPlay puts key iPhone apps - the ones you
want to use while driving - on your vehicle’s
built-in display. With CarPlay, you can get
turn-by-turn directions, make phone calls,
exchange text messages, listen to music, and
more. Apple CarPlay is available on select
automobiles navigation systems, and works
with iPhone 5 or higher with iOS 7.1 or higher.
•
•You can operate CarPlay using your vehicle’s
built-in controls - a touchscreen, a rotary knob
controller, or both. To learn how to operate
your display, refer to the user guide that came
with your vehicle. Or just use Siri voice control
to tell CarPlay what you want. In fact, Siri often
steps in automatically to help you, depending
on the app you’re using.
•
•For more information & troubleshooting, refer to
the iPhone manual or visit the Apple website.
What you need?
1. An iPhone5 or higher.
2. A car that’s compatible with iPhone.
3. A Genuine USB cable from Apple.
Before starting Apple CarPlay
Setting Siri on the iPhone
Siri must be enabled on your iPhone. If Siri is
turned off, a notice will be displayed.
Go to Settings ▶ General ▶ Siri ▶ Turn on Siri.
Setting the system
Before connecting your mobile phone, check
whether Apple CarPlay is set to be used in Setup
▶
Phone Projection
▶
Projection Mode
.
Check the
CarPlay / Android Auto
box.
Starting mode
Connect your phone to your car using a USB
cable. The CarPlay Home screen will be displayed
automatically.
When in a different mode, Press the
key ▶ Press the
Android Auto
button.
Home Screen
No Description
1Return to a call, or to turn-by-turn
directions
2Home button
3View current audio source
4Return to your car’s Home screen
1
2
3 4
21
Setup
ENGLISH
Starting mode
Press the
SETUP
key to display the Setup
screen.
Sound
This menu is used to adjust the sound effects
for the whole system.
Press the
SETUP
key ▶ Press the
Sound
button.
Beep
This menu allows you to play a beep sound
whenever you operate the touch screen.
In Sound settings screen ▶ Press the
Beep
to
turn on/off.
Display
This menu allows you to adjust the brightness
and set the dimming mode for the whole sys-
tem.
Press the
SETUP
key ▶ Press the
Display
.
Display Off
This menu allows you to play a beep sound
whenever you operate the touch screen.
In Sound settings screen ▶ Press the
Display Off
to turn on/off.

22
Setup
Bluetooth®
This menu allow you to set Bluetooth® settings.
Press the
SETUP
key ▶ Press the
Bluetooth
.
Phone Projection
This menu allows you to set the car connectivity
of your system.
Press the
SETUP
key ▶ Press the
Phone Projection
button.
Date and Time
Press the
SETUP
key ▶ Press the
Date/Time
button.
23
Setup
ENGLISH
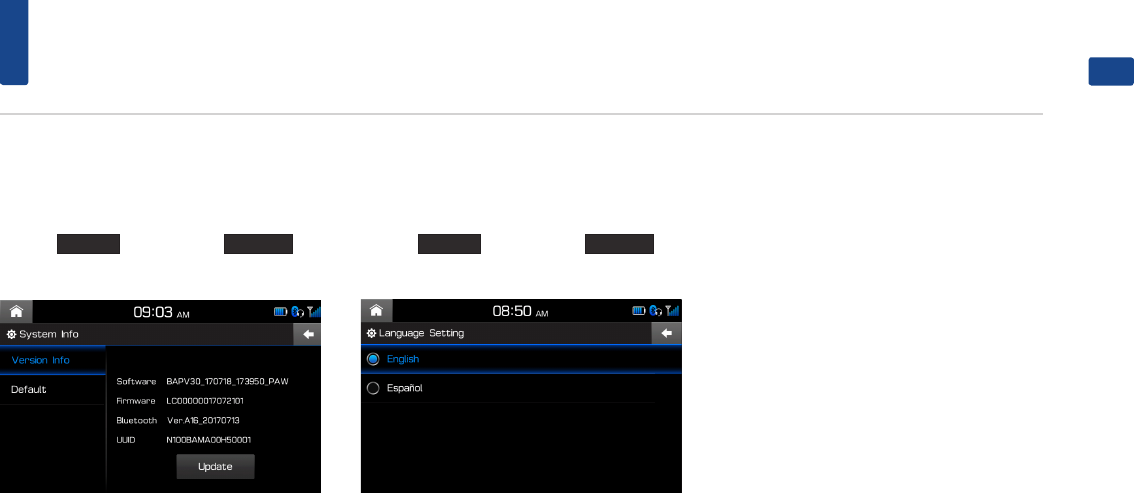
System
This menu allows you to view system informa-
tion and reset settings specified by the user.
Press the
SETUP
key ▶ Press the
System
but-
ton.
Language
This menu allows you to set the language of the
system.
Press the
SETUP
key ▶ Press the
Language
but-
ton.
24
Specification
USB MP3 Specification
Category Description
MP3 File Specification Response Specification: MPEG1 AUDIO
LAYER3
Recommended Bitrate and
Sampling Frequency
Response Sampling Frequency : 32, 44.1, 48
(KHz)
Response Bitrate: 32, 40, 48, 56, 64, 80, 96,
112, 128, 160, 192 ,224 ,256 ,320 (Kbps)
ID3 TAG ID3 v1.1 and ID3 v2.x TAG
Detailed Specification
•
•Max Directory Layers: 15 layers
•
•Max length of folder names and file
names: 255Bytes
•
•Characters supported for folder/file
names: English, Español and numbers
•
•Max number of files recognized from
one USB device: 5000
Video and Image Specification
Category Description
File Format AVI(DivX), MPEG
Image Format jpg, gif, bmp, png
Extensions avi, divx, mpg, mpeg, mp4, wmv
Supported Image Resolution Max 4000x3000
Supported Image File Size Max 4 Mbytes
Supported image zoom in/out Max 300%
Video Codec MPEG4-ASP, MPEG4-AVC(H.264), AVS, VP8
Video Resolution
1920 x 1080
(WMV 9: Max 8Mbps, 1280x720,
WMV 8: 640x480)
Audio Codec MP3, OGG, WMA …
(AC3 not Support)
Subtitles SMI
Unsupported files
•
•Files not compatible with supported
specifications
•
•Modified files (files with modified file
formats)
•
•Transformed files (example: AVI files
encoded with WMV video codec)
•
•Files without indexes

25
Specification
ENGLISH
TFT-LCD
Screen Size 7 inch (154.08 x 85.92 mm)
Resolution 384,000 pixels (Resolution : 800 x 480)
Operating Method TFT (Thin Film Tansistor) Active Matrix
Viewing Angle Left/Right, Top/Bottom: (60°, 60°, 60°, 40°)
Internal Lighting LED
Radio
Channels FM: 87.5MHz ~ 107.9MHz(Step: 100MHz)
AM:530 kHz ~ 1710kHz(Step: 10kHz)
Sensitivity FM : Under 10 dBuV / AM: Under 35dBu
EMF
Distortion Factor Within 2%
Bluetooth Wireless Technology
Frequency Range : 2402 ~ 2480 Mhz
Supported Bluetooth jpg, gif, bmp, png
Specification : 2.1+EDR
Supported Profile : HFP (1.5) , A2DP ( 1.3) , AVRCP (1.4) ,
PBAP(1.0)
Bluetooth Power Class2
Common
Power Supply DC 14.4V Operating Power
Sleep Current 1mA or less (after 96 hours with ACC OFF)
10mA or less (before 96 hours with ACC OFF)
Operating
Temperature
-20 ~ +70 ℃
(-4 ~ +158℉)
Storage
Temperature
-30 ~ +80 ℃
(-22 ~ +176℉)
Dimension 254 x 127 x 199.5 mm
Current
Consumption 10A Weight 2.1 Kg

26
Trouble shooting
1. Errors which occur during the operation or installation of the device may be mistaken as a malfunction of the actual device.
2. If you are having problems with the device, try the suggestions listed below.
3. If the problems persist, contact your dealer
Problem Possible Cause
There are small red, blue, or green dots on the
screen
Because the LCD is manufactured with technology requiring high point density, a pixel or lighting deficiency may
occur within 0.01% of total pixels.
The sound or image is not working •
•Has the Switch for the vehicle been turned to [ACC] or [ON]?
•
•Has the SYSTEM been turned OFF?
The screen is being displayed but sound is not
working
•
•Has the volume been set to a low level?
•
•Has the volume been muted?
When the power is turned on, the corners of the
screen are dark
•
•The display appearing somewhat dark after prolonged periods of use is normal with LCD panels. It is not a
malfunction.
•
•If the screen is very dark, contact your nearest dealer for assistance.
Sound is working from only one speaker Are the positions of Fader or Balance sound controls adjusted to only one side?
The external device is not working Is the external device connected with a standard connector cable?
When turning power on, the most recent mode
screen is not displayed
Within modes that play files by reading external sources, such as USB, iPod®, or Bluetooth® streaming mode, the
most recently played mode screen prior to turning off power may not properly load.
•
•If the corresponding device is not connected, the mode operated prior to the most recent mode will operate.
•
•If the previous mode still cannot be properly played, the mode operated prior to that will operate.

27
Trouble shooting
ENGLISH
Problem Possible Cause Countermeasure
The power does not
turn on.
The fuse is disconnected. •
•Replace with a suitable fuse.
•
•If the fuse is disconnected again, please contact your point of purchase or service center.
Device is not properly connected. Check to see that the device has been properly connected.
The system does not
play. The vehicle battery is low. Charge the battery if the problem persists, contact your point of purchase or service center.
The image colour/ tone
quality is low.
The brightness, and contrast levels are
not set properly. Properly adjust the brightness, and contrast levels through Display Setup.
Sound does not work.
The volume level is set to the lowest
level. Adjust the volume level.
The connection is not proper. Check to see that the device has been properly connected.
The device is currently fast-forwarding,
rewinding, scanning, or playing in slow
mode.
The sound will not work when the device is fast-forwarding, rewinding, scanning, or playing
in slow mode.

28
Trouble shooting
Problem Possible Cause Countermeasure
The sound or image
quality is low.
Vibration is occurring from where the
conversion switch has been installed. The sound may be short circuited and the image distorted if the device vibrates.
Image colour/tone quality is low. The device will return to normal once vibrations stop.
The USB does not work
USB memory is damaged. Please use after formatting the USB into FAT 12/16/32 format.
USB memory has been contaminated. Remove any foreign substances on the contact surface of the USB memory and multimedia
terminal.
A separately purchased USB HUB is being
used. Directly connect the USB memory with the multimedia terminal on the vehicle.
A USB extension cable is being used. Directly connect the USB memory with the multimedia terminal on the vehicle.
A USB which is not a Metal Cover Type
USB Memory is being used. Use standard USB Memory.
An HDD type, CF, SD Memory is being
used. Use standard USB Memory.
There are no music files which can be
played.
Only MP3, WMA file formats are supported. Please use only the supported music file for-
mats.
The iPod® is not rec-
ognised even though it
has been connected
There are no titles which can be played. Use iTunes to download and save MP3 files into the iPod®.
The iPod® firmware version has not been
properly updated. Use iTunes to update the firmware version and reconnect the iPod® with the device.
The iPod® device does not recognise
downloads. Reset the iPod® and reconnect with the device.

29
Limited Warranty
ENGLISH
LIMITED WARRANTY
ORIGINAL HEAD UNIT SUPPLIED BY VEHICLE DEALER
Product :
Product No. :
WHAT THIS WARRANTY COVERS
1. Vehicle Dealer Shop (“Dealer”) warrants to you that the Hardware will be free from defects in workmanship and materials under Normal use (“Defects”)
from the original date of the registration of the motor vehicle (“Warranty Period”). During the Warranty Period the Hardware will be repaired or replaced at
DEALER’s choice (“Limited Warranty”) without charge to you for either parts or labor. This Limited Warranty covers the replacement of the head unit including
of the Hardware only.
Period Warranty Mileage Warranty
3years 60,000 Km
*Whichever Occurs earlier.
*The term of the warranty shall commence from the date of delivery of the new vehicle to the first purchaser.
WHAT THIS WARRANTY DOES NOT COVER
2. The Limited Warranty does not apply to normal wear and tear, does not apply when the Hardware is opened or repaired by someone liquids, proximity or
exposure to heat and accident, abuse, non-compliance with the instructions supplied with the Hardware, neglect or misapplication. The Limited Warranty
does not cover physical damage to the surface of the Hardware. This Limited Warranty does not cover any software that may accompany or be installed on
the Hardware.
The Limited Warranty does not cover the installation, removal or maintenance of the Hardware or any costs related herewith.
HOW TO MAKE A WARRANTY CLAIM
3. In order to make a claim of a Defect, you must contact DEALER. If a defect arises and a valid claim under this Limited Warranty is received by DEALER after the
first 3yrs/60,000 km of the Warranty Period, DEALER is entitled to charge you for any reasonable shipping and handling costs made in connection with the
repair or replacement of the Hardware. You must comply with any other return procedures stipulated by DEALER, if any.

30
Limited Warranty
DEALER LIMITED WARRANTY
YOUR LEGAL RIGHTS
4. Some countries may not allow the exclusion or limitation of damages. If any part of this Limited Warranty is held to be invalid or
unenforceable, the remainder of the Limited Warranty shall nonetheless remain in full force and effect.
5. This Limited Warranty is the only express warranty made to you and is provided in place of any other express warranties or similar obligations (if any) created
by any advertising, documentation, packaging, or other communications.
6. Except for the Limited Warranty and to the maximum extent permitted by applicable law, DEALER and its suppliers provide the Hardware “AS IS AND WITH
ALL FAULTS”, and hereby disclaim all other warranties and conditions, whether express, implied or statutory, including, but not limited to, any (if any) implied
warranties, duties or conditions of satisfactory quality, of fitness for a particular purpose, of reliability or availability, of accuracy or completeness of responses,
of results, of workmanlike effort, of lack of viruses, and of reasonable care and skill, all with regard to the Hardware, and the provision of or failure to provide
support or other services, information, software, and related content through the Hardware or otherwise arising out of the use of the Hardware. Also, there is
no warranty or condition of quiet enjoyment, quiet possession, or non-infringement with regard to the Hardware.
7. This Limited Warranty does not affect any legal rights under applicable national legislation governing the sale of consumer goods.
8. This Limited Warranty cannot be transferred to any other person.
LIMITATION OF LIABILITY
9. Neither DEALER nor its suppliers shall be liable to you or to any third party for any damages either direct, indirect, incidental, consequential or otherwise
(including in each case, but not limited to, damages for the inability to use the equipment or access data, loss of data, loss of business, loss of profits, business
interruption or the like) arising out of the use of or inability to use the Hardware even if DEALER has been advised of the possibility of such damages.
10. Notwithstanding any damages that you might incur for any reason whatsoever, the entire liability of DEALER and any of its suppliers shall be limited to the
amount actually paid by you for the Hardware.
11. DEALER shall not be liable for
(I) any fraud on the part of its employees and/or agents; or
(II) any fraudulent misrepresentation on the part of its employees and/or agents.
12. Notwithstanding the above, neither party’s liability for death or personal injury resulting from its own negligence shall be limited.

31
FCC Warning
ENGLISH
This equipment has been tested and found to comply with the limits for a Class B digital device, pursuant to part 15 of the FCC Rules.
These limits are designed to provide reasonable protection against harmful interference in a residential installation.
This equipment generates, uses and can radiate radio frequency energy and, if not installed and used in accordance with the instructions, may cause harmful
interference to radio communications. However, there is no guarantee that interference will not occur in a particular installation. If this equipment does cause
harmful interference to radio or television reception, which can be determined by turning the equipment off and on, the user is encouraged to try to correct
the interference by one or more of the following measures:
•
•Reorient or relocate the receiving antenna.
•
•Increase the separation between the equipment and receiver.
•
•Connect the equipment into an outlet on a circuit different from that to which the receiver is connected.
•
•Consult the dealer or an experienced radio/TV technician for help
This device complies with part 15 of the FCC Rules. Operation is subject to the following two conditions: (1) This device may not cause harmful interference,
and (2) this device must accept any interference received, including interference that may cause undesired operation.
Caution: Any changes or modifications to this device not expressly approved by the party responsible for compliance could void your authority to operate the
equipment.
This equipment complies with FCC radiation exposure limits set forth for an uncontrolled environment.
This equipment should be installed and operated with minimum 20 cm between the radiator and your body. This transmitter must not be collocated or oper-
ating in conjunction with any other antenna or transmitter unless authorized to do so by the FCC.