MTD 11A 083A800 User Manual LAWN MOWER Manuals And Guides 1108464L
User Manual: MTD 11A-083A800 11A-083A800 MTD LAWN MOWER - Manuals and Guides View the owners manual for your MTD LAWN MOWER #11A083A800. Home:Lawn & Garden Parts:MTD Parts:MTD LAWN MOWER Manual
Open the PDF directly: View PDF ![]() .
.
Page Count: 15

Safety • Setup • Adjustments • Operation • Maintenance • Troubleshooting • Parts Lists • Warranty
AOA AL
22" Rotary Mower- Model Series 080
iMPORTANT
READ SAFETY RULES AND iNSTRUCTiONS CAREFULLY BEFORE OPERATION
Warning: Thisunit is equippedwithaninternalcombustionengineandshouldnot beusedon or nearany unimprovedforest-covered,brush-
coveredor grass-coveredlandunlesstheengine'sexhaustsystemis equippedwitha sparkarrestermeetingapplicablelocalor statelaws(if any).
If a sparkarresteris used,it shouldbemaintainedineffectiveworkingorderby the operator.In theStateof Californiathe aboveis requiredbylaw
(Section4442of the CaliforniaPublicResourcesCode).Otherstatesmayhavesimilarlaws.Federallawsapplyonfederallands.A sparkarrester
for the muffleris availablethroughyour nearestengineauthorizedservicedealeror contactthe servicedepartment,RO.Box361131Cleveland,
Ohio44136-0019.
For USCustomers: MTDLLC,P.O.BOX361131CLEVELAND,OHIO44136-0019 772C0794
PRINTEDIN U.S.A. For CanadianCustomers:MTD Products Ltd.,P.O.Box 1386,KITCHENER,ONTARION2G4J1 10/15/2005

This Operator's Manual is an important part of your new equipment, it will help you assemble,
prepare and maintain the unit for best performance. Please read and understand what it says.
Table of
Slope Gauge ....................................................... 3
Safe Operation Practices ................................... 4
Set-Up & Adjustments ........................................ 6
Operation ............................................................. 8
Contents
Maintenance & Off-Season Storage ................ 10
Trouble Shooting .............................................. 12
Warranty ............................................................ 13
illustrated Parts Lists ....................................... 14
Finding and Recording IVlodel Number
BEFOREYOU STARTASSEMBLING
YOUR NEW EQUIPMENT,
please locatethe model plate on the equipmentand copy the
the model number andthe serial number to the sample model
plate provided to the right. You can locatethe model plate by
standing at the operatingposition and looking down at the rear
of the deck.
Model Number Serial Number
Num6ro de module Num6ro de s_rie
XXXXXXXXXXX XXXXXXXXXXX
__ MTD LLC
CLEVELAND, OH 44136
MTD PRODUCTS LIMITED
KITCHENER, ON N2G 4J1
USA-www.mtdproducts.com 1-800-800-7310
CAN-www.mtdcanada.com 1-800-668-1238
Customer Support
Please do NOTretum the unit to the retailer from which it was purchased,
without first contacting Customer Support.
Ifyou havedifficulty assembling this product or haveany questionsregarding the controls, operationor maintenanceof this unit,
please call a Customer Support Representative.
For US Customers: 1-330-220-4MTD (4683)or 1-800-800-7310
For Canadian Customers: 1-800-668-1238
Pleasehaveyour unit's model number and serial number ready when you call. See previoussection to locate this information.
Youwill be asked to enterthe serial number inorder to processyour call.
The engine manufactureris responsiblefor all enigne-relatedissueswith regardsto performance, power-rating,specifications,
warranty and service. Please referto the engine manufacturer'sOwner's/Operator's Manual,packed separately with your unit,
for more information.
2

O
o
o
C_
>:.
{33
O3
(13
(13
O...
O
C
>.,
C5
E
CD
O
(D
O3
G)
C1.
o
O9
G)
CC
-$
=9
_o9
_ 0
con
_ 0
Sight and hold this level with a vertical tree...
,_------- or a corner of a building...
|
15 °

i il /i¸¸i :/ (:
WARNING
This symbolpoints
out importantsafety
instructionswhich, if
notfollowed,could
endangerthe personal
i safetyand/or property
I ofyourselfand others.
Readandfollowall
instructionsin this
manualbeforeat-
temptingto operate
i this machine.Failure
I to complywith these
instructionsmay result
i in personalinjury.When
you see this symbol.
HEED iTS WARNING!
i Your Responsibility
i Restrictthe use
i of this powermachine
to personswho read,
understand
and follow the warnings
and instructions
, in this manual
I and on the machine.
WARNING:EngineExhaust,someof itsconstituents,andcertainvehiclecomponentscontainor
emitchemicalsknownto Stateof Californiato causecancerand birthdefectsor otherreproduc-
tiveharm.
DANGER:Thismachinewasbuiltto beoperatedaccordingto the rulesfor safeoperationinthismanual.As with
anytypeof powerequipment,carelessnessor erroron the partof the operatorcan resultinseriousinjury.This
machineis capableof amputatinghandsandfeetandthrowingobjects.Failureto observethe followingsafety
instructionscould resultin seriousinjuryor death.
General Operation
1. Readthis operator'smanual carefullyinits entiretybefore
attemptingto assemblethis machine.Read,understand,
andfollowall instructionsonthe machineandin the
manual(s) beforeoperation.Becompletelyfamiliarwith
thecontrols andthe properuseof this machinebefore
operatingit. Keepthis manualin a safeplaceforfuture
and regularreferenceand for orderingreplacementparts.
2. Thismachineis a precisionpieceof powerequipment,
nota plaything.Therefore,exerciseextremecautionat all
times.Yourunithas beendesignedto performonejob: to
mowgrass. Do notuseit for anyotherpurpose.
3. Neverallow childrenunder 14yearsold to operatethis
machine.Children 14yearsold and overshould readand
understandthe instructionsinthis manualandshould
betrainedand supervisedby a parent.Onlyresponsible
individualswho arefamiliar withthese rulesof safe
operationshould beallowedto usethis machine.
4. Thoroughlyinspectthe areawherethe equipmentisto
be used. Removeall stones,sticks,wire, bones,toys and
otherforeignobjectswhichcouldbetripped overor picked
upandthrownby the blade.Thrownobjectscancause
seriouspersonalinjury.Planyourmowingpatternto avoid
dischargeof materialtowardroads,sidewalks,bystanders
andthe like.Also, avoiddischargingmaterialagainsta
wallorobstructionwhich maycausedischargedmaterial
to ricochetbacktoward theoperator.
5. Tohelpavoidbladecontact ora thrownobjectinjury,
stay inthe operatorzonebehindthe handlesand keep
children,bystanders,helpersand petsat least 75feet
fromthe mowerwhileit isin operation.Stop machineif
anyoneentersthe area.
6. Alwayswearsafetyglassesor safetygogglesduring
operationand whileperforminganadjustmentor repair
to protectyour eyes.Thrownobjectswhich ricochetcan
causeseriousinjuryto the eyes.
7. Wearsturdy,rough-soledworkshoesand close-fitting
slacksandshirts. Shirtsand pantsthatcoverthe arms
and legsand steel-toedshoesare recommended.Never
operatethis machinein barefeet, sandals,slipperyor light
weight(e.g.canvas)shoes.
8. Do notputhandsorfeet nearrotatingpartsor underthe
cuttingdeck.Contactwiththe blade can amputatehands
andfeet.
9. A missingor damageddischargecovercancause blade
contactor thrownobject injuries.
10.Manyinjuriesoccuras a resultof the mowerbeing pulled
overthefoot duringa fall causedby slippingor tripping.
Do not holdon to the mowerifyou are falling;releasethe
handleimmediately.
11.Neverpullthe mowerback towardyouwhileyou are
walking.If youmust backthe mowerawayfroma wall or
obstructionfirstlook downand behindto avoidtripping
andthen followthese steps:
a. Stepback fromthe mowerto fullyextend yourarms.
b. Be sureyouare well balancedwithsure footing.
c. Pullthe mowerback slowly,no morethan halfway
towardyou.
d. Repeatthesestepsas needed.
12.Do notoperatethe mowerwhileunderthe influenceof
alcoholordrugs.
13.Do notengagetheself-propelledmechanismon unitsso
equippedwhilestartingengine.
14.The bladecontrolhandleis a safetydevice.Neverattempt
to bypassits operation.Doingso makesthe safetydevice
inoperativeandmayresult in personalinjurythrough
contactwiththe rotatingblade.The bladecontrolhandle
mustoperateeasily in bothdirectionsandautomatically
returnto the disengagedpositionwhen released.
15.Neveroperatethe mowerinwet grass.Alwaysbesure of
yourfooting. A slipand fall cancauseseriouspersonal
injury.If you feelyouare losing yourfooting,releasethe
bladecontrolhandleimmediatelyand the bladewillstop
rotatingwithinthreeseconds.
16.Mowonlyin daylightor in goodartificial light.Walk,never
run.Stopthe bladewhencrossinggraveldrives,walksor
roads.
17.If theequipmentshouldstartto vibrateabnormally,stopthe
engineand checkimmediatelyfor the cause.Vibrationis
generallya warningof trouble.
18.Shutthe engineoff andwait untilthe bladecomesto
a completestopbeforeremovingthe grass catcheror
uncloggingthe chute.Thecutting bladecontinuesto rotate
fora few secondsafterthe engineis shutoff. Neverplace
anypart of the bodyin the bladeareauntilyou aresure the
blade hasstoppedrotating.
19.Neveroperatemowerwithoutpropertrailshield,discharge
cover,grasscatcher,bladecontrolhandleor othersafety
protectivedevicesin placeandworking. Neveroperate
mowerwithdamagedsafetydevices.Failureto do so, can
result inpersonalinjury.
20.Mufflerandenginebecomehotand cancausea burn.Do
nottouch.
21.Only use partsand accessoriesmadefor this machineby
the manufacturer.Failureto do socan resultin personal
injury.
22.If situationsoccurwhich are notcoveredin this manual,use
careand goodjudgment. Call customerassistancefor the
nameof yournearestservicingdealer.
Slope Operation
Slopesare a majorfactor relatedto slip andfall accidentswhich
canresult insevereinjury.Operationon slopesrequiresextra
caution.Ifyoufeel uneasyona slope,do notmow it. For your
safety,usethe slopegaugeincludedas part of this manualto
measureslopesbeforeoperatingthis uniton a slopedor hilly
area.If the slopeis greaterthan 15degrees,donot mowit.
4

Do:
1. Mowacrossthe faceof slopes; neverup anddown.
Exerciseextremecaution whenchangingdirectionon
slopes.
2. Watchfor holes,ruts,rocks, hiddenobjects,or bumpswhich
can causeyouto slipor trip. Tallgrass canhideobstacles.
3. Alwaysbe sure of yourfooting.A slip andfall can cause
serious personalinjury.If you feelyou are losingyour
balance,releasethe bladecontrolhandleimmediately,and
the bladewill stoprotatingwithin 3 seconds.
Do Not:
I. Donot mowneardrop-offs, ditchesorembankments,you
could loseyour footingorbalance.
2. Donot mowslopesgreaterthan 15degreesasshownon
the slopegauge.
3. Donot mowon wetgrass. Unstablefootingcouldcause
slipping.
Children
Tragicaccidentscanoccur ifthe operatorisnot alertto the
presenceof children.Childrenare often attractedto the mower
and the mowingactivity. Theydo notunderstandthe dangers.
Neverassumethat childrenwillremainwhereyou lastsaw
them.
1. Keepchildrenout of the mowingareaand underthewatch-
ful careof a responsibleadult otherthan the operator.
2. Be alert andturnmoweroff if a child entersthe area.
3. Beforeand while movingbackwards,look behindand down
for small children.
4. Useextremecare whenapproachingblindcorners,
doorways,shrubs,trees,or otherobjectsthat mayobscure
your visionof a childwho mayrun into the mower.
5. Keepchildrenawayfrom hotor runningengines.Theycan
suffer burnsfroma hotmuffler.
6. Neverallowchildren under14yearsold to operatea power
mower.Children14years old andover shouldreadand
understandthe operationinstructionsand safetyrules in
this manualandshould betrainedand supervisedby a
parent.
Service
Safe Handling Of Gasoline:
1. To avoidpersonalinjury orpropertydamage useextreme
care inhandlinggasoline.Gasolineis extremelyflammable
and thevaporsare explosive.Seriouspersonalinjurycan
occur whengasolineisspilled onyourselforyour clothes
which canignite.
2. Wash yourskin andchangeclothesimmediately.
3. Useonly an approvedgasolinecontainer.
4. Neverfill containersinsidea vehicleoron a truckor trailer
bedwitha plasticliner.Alwaysplacecontainersonthe
groundawayfromyourvehiclebeforefilling.
5. Removegas-poweredequipmentfromthe truck ortrailer
and refuelit onthe ground.If this is notpossible,then refuel
suchequipmentona trailerwitha portablecontainer,rather
than froma gasoline dispensernozzle.
6. Keepthe nozzlein contactwiththe rimof thefueltank or
container openingat all timesuntil fuelingis complete.Do
notuse a nozzlelock-opendevice.
7. Extinguishallcigarettes,cigars,pipesand othersourcesof
ignition.
8. Neverfuel machineindoorsbecauseflammablevapors
willaccumulateinthe area.
9. Neverremovegascap oradd fuelwhilethe engineis
hotor running. Allowengineto cool at least two minutes
beforerefueling.
10.Neveroverfill fuel tank. Filltankto no morethan Y2inch
below bottomof filler neckto providefor fuel expansion.
11.Replacegasolinecapandtightensecurely.
12.If gasolineis spilled,wipe itoff theengineand equipment.
Moveunit to anotherarea.Wait 5 minutesbeforestarting
theengine.
13.Neverstorethe machineorfuel containernearan open
flame,sparkor pilot light as ona water heater,space
heater,furnace,clothesdryeror othergasappliances.
14.Toreducefire hazard,keepmowerfree of grass, leaves,
orother debrisbuild-up.Clean upoil orfuel spillageand
removeanyfuel soakeddebris.
15.Allowa mowerto cool at least5 minutesbeforestoring.
General Service:
1. Neverrunan engineindoorsor in a poorlyventilatedarea.
Engineexhaustcontainscarbon monoxide,anodorless
anddeadlygas.
2. Beforecleaning,repairing,or inspecting,makecertainthe
bladeand allmoving partshavestopped.Disconnectthe
sparkplugwire and groundagainstthe engineto prevent
unintendedstarting.
3. Checkthe bladeand enginemountingbolts at frequent
intervalsfor propertightness.Also,visuallyinspectblade
for damage(e.g.,bent,cracked,worn)Replacebladewith
theoriginal equipmentmanufacture's(O.E.M.)bladeonly,
listed inthis manual."Use of partswhichdo notmeetthe
originalequipmentspecificationsmayleadto improper
performanceand compromisesafety!"
4. Mowerbladesare sharpandcan cut.Wrapthe bladeor
weargloves,and useextra cautionwhenservicingthem.
5. Keepall nuts,bolts,and screwstightto be surethe
equipmentis insafeworkingcondition.
6. Nevertamper withsafetydevices.Checktheir proper
operationregularly.
7. Afterstrikinga foreignobject,stopthe engine,discon-
nectthe sparkplugwire and groundagainstthe engine.
Thoroughlyinspectthe mowerfor any damage.Repairthe
damagebeforestartingand operatingthe mower.
8. Neverattemptto makea wheel or cuttingheightadjust-
mentwhilethe engineisrunning.
9. Grasscatchercomponents,dischargecover,andtrail
shield aresubjectto wear anddamagewhichcould
exposemovingparts or allowobjectsto be thrown.For
safetyprotection,frequentlycheckcomponentsand re-
placeimmediatelywithoriginalequipmentmanufacturer's
(O.E.M.)partsonly, listedin this manual."Use of parts
whichdo notmeetthe originalequipmentspecifications
mayleadto improperperformanceand compromise
safety!"
10.Do notchangethe enginegovernorsettingor overspeed
theengine.The governorcontrolsthemaximumsafe
operatingspeed of theengine.
11.Maintainor replacesafetylabels,as necessary.
12.Observeproperdisposallawsandregulations.Improper
disposaloffluids and materialscan harmthe environment.
5
Practices
WARNING
Thissymbolpoints
out importantsafety
instructionswhich, if
notfollowed,could
endangerthe personal
safetyand/or property
of yourselfandothers.
Readandfollow all
instructionsinthis
manualbeforeat-
tempting to operate
this machine.Failure
to complywith these
instructionsmayresult
in personalinjury.When
you see this symbol.
HEED ITS WARNING!
Your Responsibility
Restrictthe use
of this power machine
to personswho read,
understand
andfollow the warnings
and instructions
in this manual
andon the machine.

r _ WARNING:Disconnect and
o! j _ groundthe spark plug wire as
!|instructed in the separate engine
(
manual.
1. Thechutedeflectoronyour mowermaybe heldinan
uprightpositionbya blockfor shippingpurposesonly.
ThisshippingNock mustbe removedanddiscarded
beforethe moweris putintooperation.SeeFigure1.
a. Pullthechutedeflectorup towardsengine.
//_./i_ b. Removetheblock andcarefullylowerthe chuteinto
operatingposition,keepingfingersout of the way.
2. Performthe followingsequencefor handlesetup:
a. Pullupand backon theupperhandleto raisethe
handlefrompositionA intothe operatingposition
k,, J B. SeeFigure2.
Your mower is shipped Figure 1
with the handle in the b. Makesurethe carriageboltis seatedproperlyin
higher height position, the handle.Tightenwingnuts(starknobs)securing
upperhandleto the lowerhandle.
NOTE: Each end of _ *
the lowerhandle must NOTE: Onsomemodelswingnutshavebeenreplaced
be placed inthe same withstarknobs.Figuresshowwingnutsonly.
relative position. 3. If satisfiedwith heightof handle,tightenwingnuts(star
knobs)atthe endsof the lowerhandleshownin Figure
3. Forconvenienceof operating,you mayadjustthe
handleheightas follows:
IMPORTANT a. Removethewing nuts(star knobs)shownin Figure
This unit is shipped 3 andremovethe lowerhandle.
WITHOUT GASOLINE b. Positioneach handlebracketstudintothe top hole
or OIL. After assem- in thelowerhandle.SeeFigure3 inset.
bly, service engine c. Tightenthewing nuts(starknobs).
with gasolineand
oil as instructed in 4. Insertpostoncable tiesinto holesprovidedon the
lowerhandle.Pullcabletie tightandtrimexcess.See
the separate engine
manual packedwith ,. Figure4.
your unit. Figure 2
Figure 3 Figure 4
6
.
,
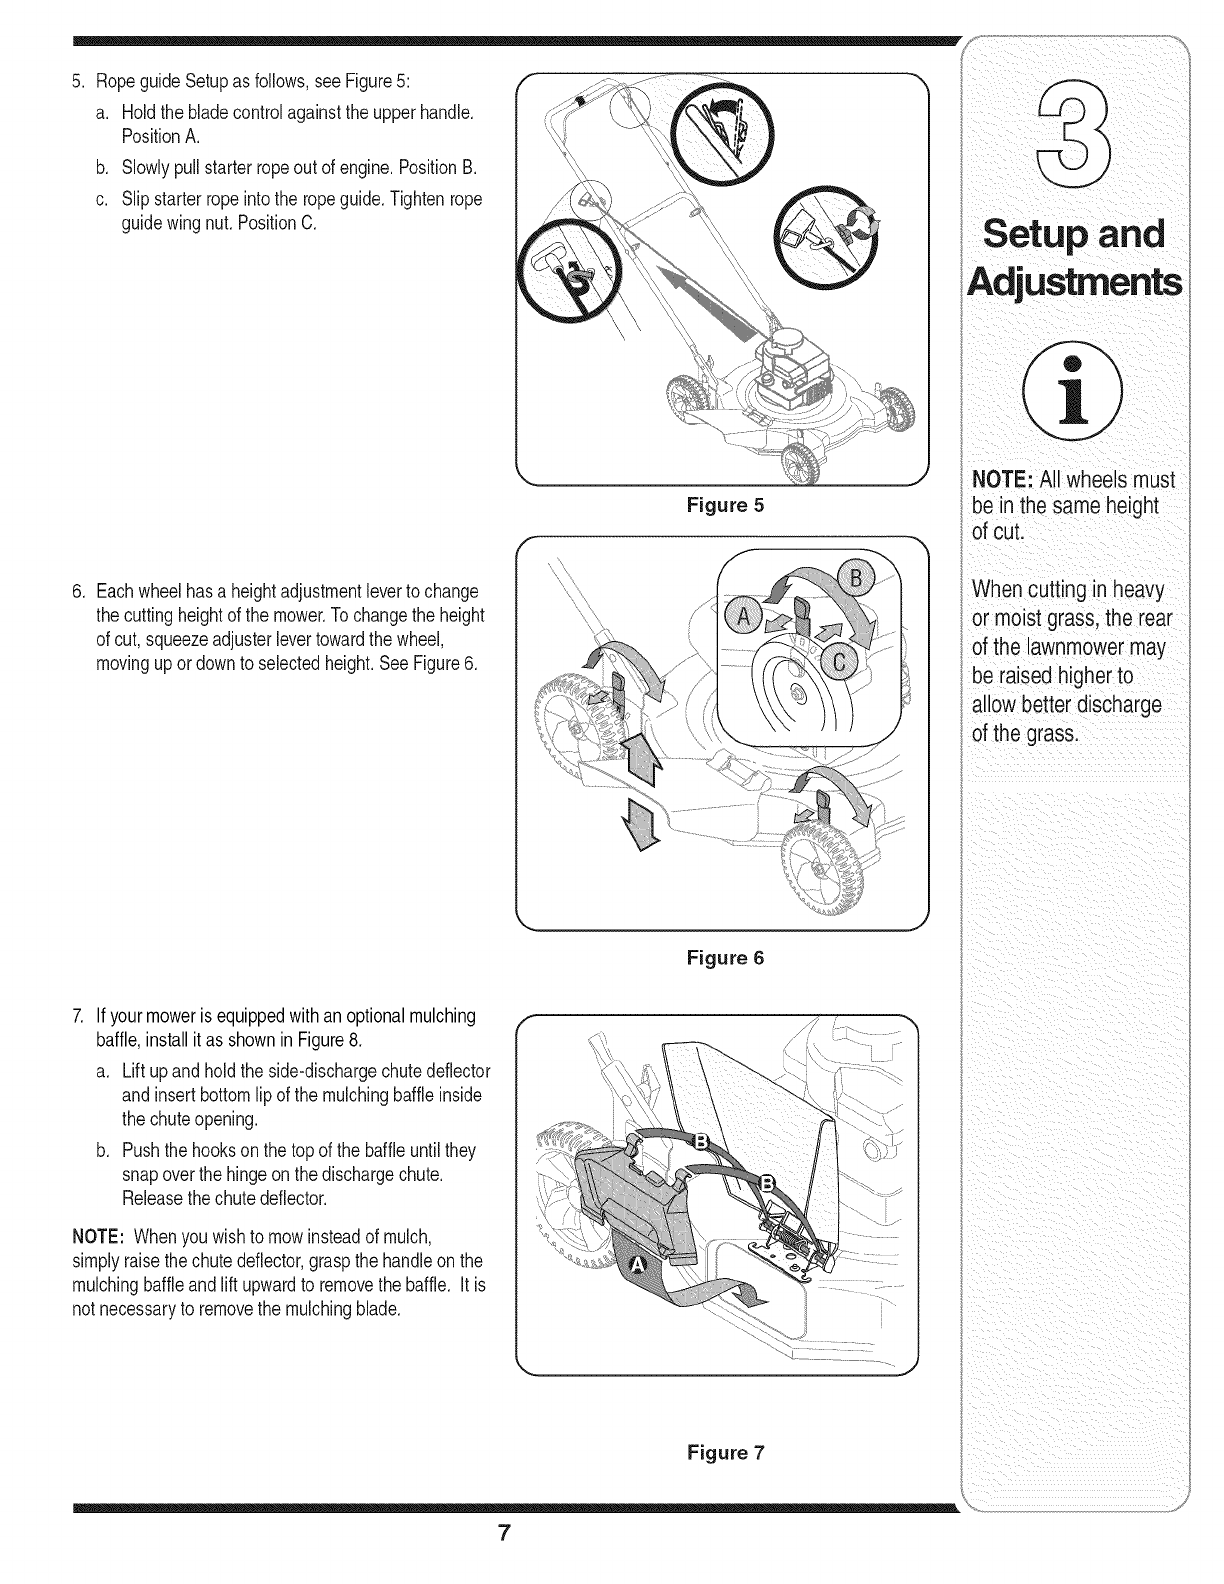
RopeguideSetupas follows,see Figure5:
a. Holdthe bladecontrolagainstthe upperhandle.
PositionA.
b. Slowlypullstarterropeout of engine.PositionB.
c. Slipstarterropeintothe ropeguide.Tightenrope
guidewingnut. PositionC.
Eachwheelhasa heightadjustmentleverto change
the cuttingheightof the mower.Tochangethe height
of cut, squeezeadjusterlevertowardthe wheel,
movingupor downto selectedheight.SeeFigure6.
Figure 5
NOTE: All wheels must
be in the same height
of cut.
When cutting in heavy
or moist grass, the rear
of the lawnmowermay
be raised higher to
allow better discharge
of the grass.
If yourmoweris equippedwithan optionalmulching
baffle,installit as shownin Figure8,
a. Lift upandholdthe side-dischargechutedeflector
andinsertbottomlip of the mulchingbaffleinside
the chuteopening.
b. Pushthe hooksonthe top of the baffleuntilthey
snapoverthe hingeon the dischargechute.
Releasethe chutedeflector.
NOTE: Whenyou wishto mowinsteadof mulch,
simplyraisethe chutedeflector,graspthe handleonthe
mulchingbaffleandlift upwardto removethe baffle. It is
not necessaryto removethe mulchingblade.
Figure 6
........ .......
Figure 7
7
Mower
!! il ¸¸¸¸¸ i
WARNING
Read, understand,
and follow all instruc-
tions and warnings
on the machineand
inthis manual before
operating.
This blade control
mechanism is a
safety device. Never
attempt to bypass its
operations.
Use extreme care
when handling
gasoline.Gasoline is
extrernelyflammable
and the vapors are
explosive. Never fuel
the machine indoors
or while the engine
is hot or running.
Extinguish cigarettes,
cigars, pipes and
other so urcesof
ignition.
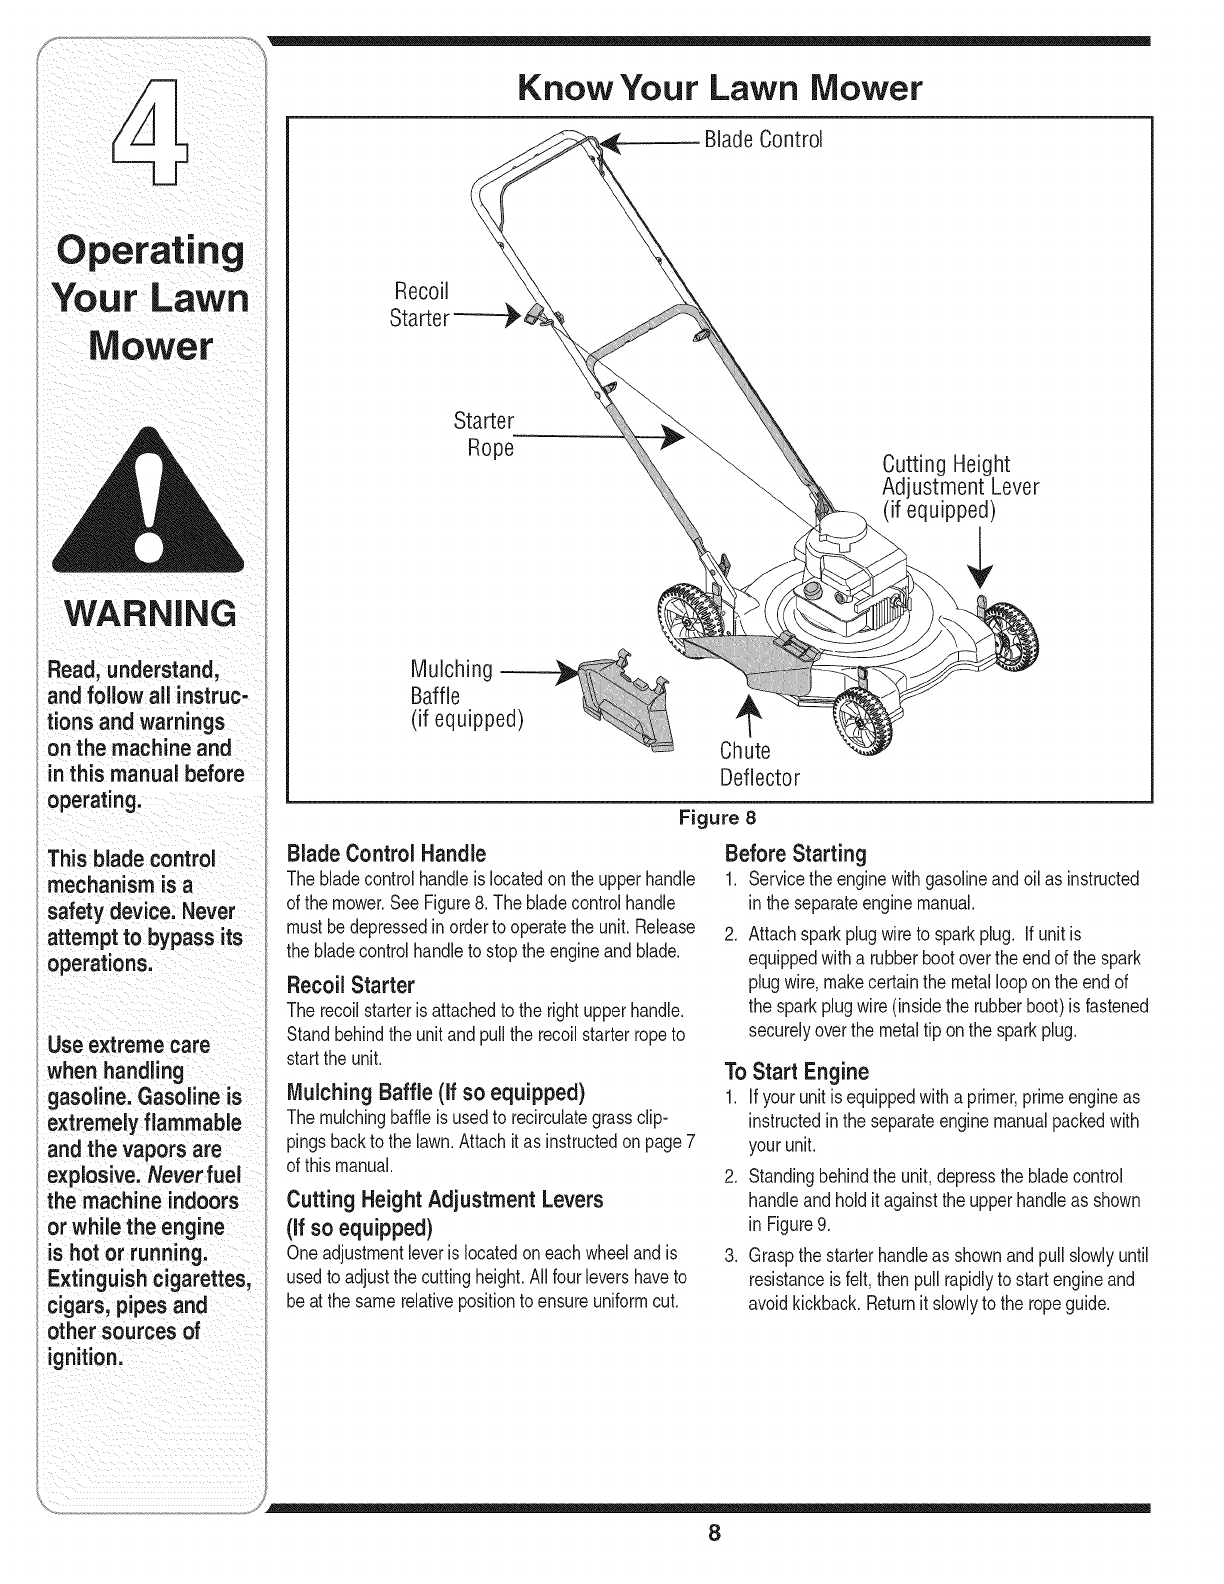
Know Your Lawn Mower
BladeControl
Recoil
Starter
Starter
Rope Cutting Height
Ad ustment Lever
(if equipped)
Chute
Deflector
Figure 8
Blade Control Handle
The bladecontrolhandleis locatedon the upperhandle
of the mower.SeeFigure8. The bladecontrolhandle
mustbedepressedinorderto operatethe unit.Release
the bladecontrolhandleto stopthe engineand blade.
Recoil Starter
The recoilstarteris attachedto the rightupperhandle.
Standbehindthe unitand pullthe recoilstarterropeto
startthe unit.
Mulching Baffle (if so equipped)
The mulchingbaffleis usedto recirculategrassclip-
pingsbackto the lawn.Attachit as instructedonpage7
of thismanual.
Cutting Height Adjustment Levers
(if so equipped)
Oneadjustmentleveris locatedoneachwheelandis
usedto adjustthe cuttingheight.All fourlevershaveto
beat the samerelativepositionto ensureuniformcut.
Before Starting
1. Servicethe enginewithgasolineandoil as instructed
in theseparateenginemanual.
2. Attachsparkplugwireto sparkplug. If unitis
equippedwitha rubberbootovertheend of the spark
plugwire,makecertainthe metalloopon theend of
the sparkplugwire(insidethe rubberboot)is fastened
securelyoverthe metaltip on the sparkplug.
To Start Engine
1. If yourunit isequippedwitha primer,primeengineas
instructedin the separateenginemanualpackedwith
yourunit.
2. Standingbehindthe unit,depressthe bladecontrol
handleandholditagainstthe upperhandleas shown
inFigure9.
3. Graspthe starterhandleas shownandpullslowlyuntil
resistanceisfelt, thenpull rapidlyto start engineand
avoidkickback.Returnit slowlyto the ropeguide.
8
,/+,
"_ UsingYour Lawn Mower
Besurethe lawnisclearof stones,sticks,wire,or other //_
objectswhichcoulddamagethe lawnmoweror the ¢//'1
engine.Suchobjectscould beaccidentlythrownbythe
mowerinanydirectionandcauseseriouspersonalinjury
to the operatorandothers.
Figure 9
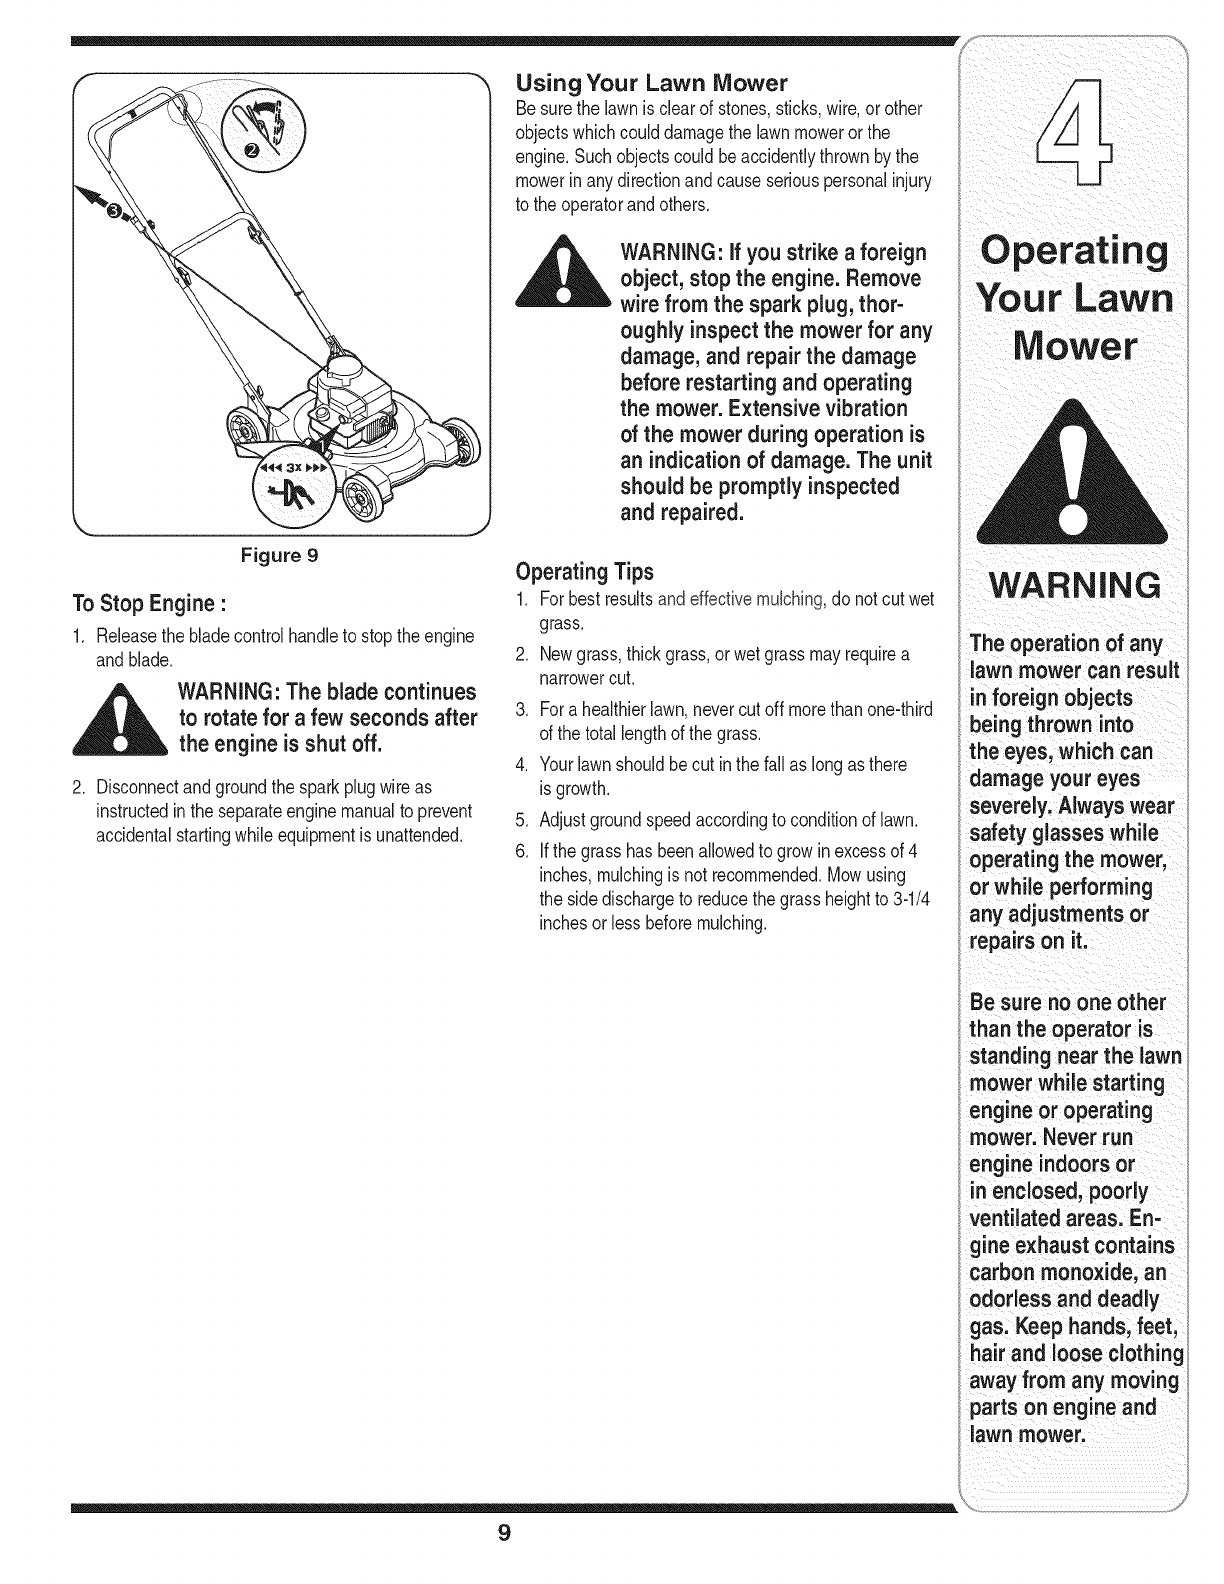
To Stop Engine"
1. Releasethe bladecontrolhandleto stopthe engine
andblade.
_/ WARNING: The blade continues
to rotate for a few seconds after
the engine is shut off.
2. Disconnectandgroundthe sparkplugwireas
instructedin the separateenginemanualto prevent
accidentalstartingwhileequipmentis unattended.
WARNING: If you strike a foreign
object, stop the engine. Remove
wire from the spark plug, thor-
oughly inspectthe mower for any
damage, and repair the damage
before restarting and operating
the mower. Extensive vibration
of the mower during operation is
an indication of damage. The unit
should be promptly inspected
and repaired.
Operating Tips
1. Forbestresultsandeffectivemulching,do notcut wet
grass.
2. Newgrass,thickgrass,orwet grassmayrequirea
narrowercut.
3. Fora healthierlawn,nevercutoff morethan one-third
of the totallengthof the grass.
4. Yourlawnshouldbecut inthe fall as longas there
isgrowth.
5. Adjustgroundspeedaccordingto conditionof lawn.
6. Ifthe grasshasbeenallowedto growin excessof 4
inches,mulchingis not recommended.Mowusing
the sidedischargeto reducethegrassheightto 3-1/4
inchesor lessbeforemulching.
Your LaWn
WARNING
The operation of any
lawn mower can result
in foreign objects
being thrown into
the eyes, which can
damage your eyes
severely. Always wear
safety glasses while
operating the mower,
or while performing
any adjustments or
repairs on it.
Be sure no one other
than the operator is
standing near the lawn
mower while starting
engine or operating
mower. Never run
engine indoorsor
in enclosed, poorly
ventilated areas. En-
gine exhaust contains
carbon monoxide, an
odorless and deadly
gas. Keep hands, feet,
hair and loose clothing
away from any moving
parts on engine and
lawn mower.
9

Engine
1. Referto the separateeng=nemanualfor engine
maintenanceinstructions.
2. Maintainengine oil as instructed inthe separate
Maintenance
i
i_i ii i ii _i i i i i _i
We donot recommend
the useof pressure
hoseto clean your
UniL These mayCause
damage toelectrical
components, spindles,
pulleys, bearings,or
the engine: The use
of water will resuItin
shortened life and
reduce serViceabilityl
Lubricatethese
points before
reassembly.
Figure 10
General Recommendations
.
2.
Alwaysobservesafetyruleswhenperforming
anymaintenance.
Thewarrantyon thislawnmowerdoesnot cover
itemsthathavebeensubjectedto operatorabuse
or negligence.To receivefull valuefromwarranty,
operatormustmaintainthe lawnmoweras
instructedhere.
3. Changingof engine-governedspeedwill void
enginewarranty.
4. Alladjustmentsshouldbecheckedat leastonce
eachseason.
5. Periodicallycheckall fastenersand makesurethese
aretight.
Lubrication
1. Lubricatethe pivotpointsonthe bladecontrolhandle
at leastoncea seasonwithlightoil. The blade
controlmustoperatefreelyin bothdirections.See
Figure10.
2. If yourmoweris equippedwith ballbearingwheels,
lubricateat leastonce a seasonwitha light oil, all
othertypes requireno lubrication.However,if the
wheelsareremovedfor any reason,lubricatethe
surfaceof the axle bolt andthe innersurfaceof the
wheelwithlightautomotiveoil.
3. Lubricatethe torsionspringandpivotpointperiodi-
callywithlightoil to preventrust.SeeFigure10.
4. Followthe accompanyingenginemanualfor lubrica-
tion scheduleandinstruction.
.
.
enginemanualpackedwithyourunit. Readandfollow
instructionscarefully.
Undernormalconditionsserviceaircleaneras
instructedin the separateengine manualpackedwith
yourunit. Cleaneveryfewhoursunderextremely
dustyconditions. Poorengineperformanceand
floodingusuallyindicatesthatthe air cleanershouldbe
serviced•
Thesparkplugshouldbecleanedandthe gapreset
oncea season• Sparkplug replacementis recom-
mendedat the startof each mowingseason;check
enginemanualfor correctplugtypeandgapspecifica-
tions.
NOTE:Thissparkignitionsystemmeetsall require-
mentsof the CanadianInterference-CausingEquipment
Regulations.
5. Cleantheengineregularlywithaclothor brush.
Keepthe coolingsystem(blowerhousingarea)clean
to permitproperair circulationwhichis essentialto
engineperformanceandlife.Becertainto removeall
grass,dirt andcombustibledebrisfrommufflerarea.
Deck
Theundersideof the mowerdeckshouldbecleanedafter
eachuseto preventa buildupof grassclippings,leaves,
dirt orother matter•If thisdebrisis allowedto accumulate,
it will inviterustandcorrosion,and maypreventproper
mulching.
Thedeckmaybecleanedbytiltingthe mowerandscrap-
ingcleanwitha suitabletool (makecertainthe sparkplug
wireis disconnected).
Blade Care
,_ WARNING: When removing the
cutting blade for sharpening or
replacement, protect your hands
with a pair of heavy glovesor use
a heavy rag to hold the blade.
Periodicallyinspectthe bladeadapterforcracks,especial-
ly if you strikea foreignobject•Replacewhennecessary.
Followthe stepsbelowfor bladeservice:
1. Disconnectsparkplugwirefromsparkplug.
2. Tip moweras specifiedinseparateenginemanual,if
it does notspecifyturnmoweron itsside makingsure
thatthe airfilterandthe carburetorareup.
3. Removethebolt andthe bladebellsupportwhich
holdthe bladeandthe bladeadapterto the engine
crankshaft.SeeFigure11.
10
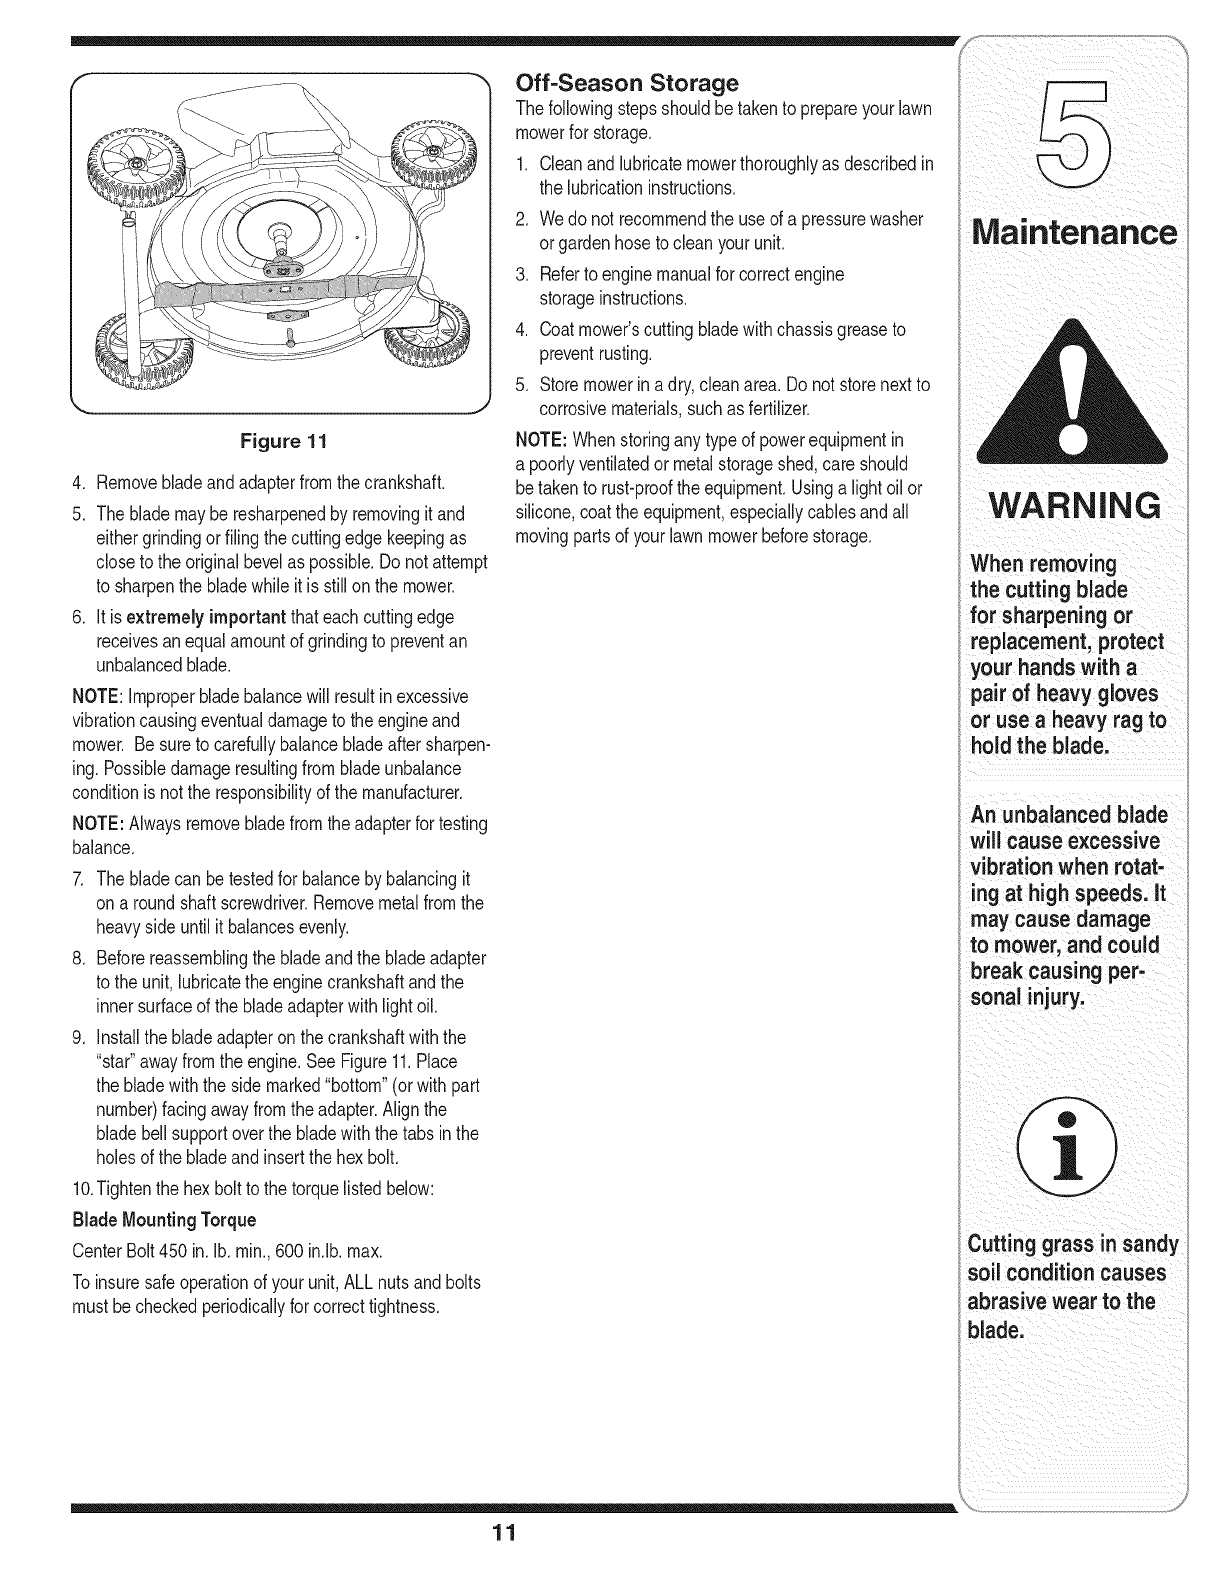
Figure 11
4. Removebladeandadapterfromthe crankshaft.
5, The blademayberesharpenedby removingit and
eithergrindingor filing thecuttingedgekeepingas
closeto the originalbevelas possible.Donot attempt
to sharpenthe bladewhile it is stillon the mower,
6. It is extremely important thateachcuttingedge
receivesanequalamountof grindingto preventan
unbalancedblade.
NOTE:improperbladebalancewill resultinexcessive
vibrationcausingeventualdamageto theengineand
mower. Besureto carefullybalancebladeaftersharpen-
ing.Possibledamageresultingfrom bladeunbalance
conditionisnotthe responsibilityof the manufacturer.
NOTE:Alwaysremovebladefromthe adapterfor testing
balance.
7. The bladecan betestedfor balanceby balancingit
ona roundshaftscrewdriver.Removemetalfromthe
heavyside untilit balancesevenly.
8. Beforereassemblingthe bladeandthe bladeadapter
to the unit,lubricatethe enginecrankshaftandthe
innersurfaceof the bladeadapterwithlightoil.
9. installthe bladeadapteron thecrankshaftwiththe
"star"awayfromthe engine.SeeFigure11.Place
the bladewiththe side marked"bottom"(orwithpart
number)facingawayfromthe adapter.Alignthe
bladebellsupportoverthe bladewiththe tabsinthe
holesof the bladeand insertthe hex bolt.
10.Tightenthe hexbolt to thetorquelistedbelow:
Blade Mounting Torque
CenterBolt450 in.lb. rain.,600 in.lb,max.
Toinsuresafeoperationof your unit,ALLnutsandbolts
mustbecheckedperiodicallyfor correcttightness.
Off-Season Storage
The followingstepsshouldbetakento prepareyour lawn
mowerfor storage.
1. Cleanandlubricatemowerthoroughlyas describedin
the lubricationinstructions.
2. Wedo not recommendthe useof a pressurewasher
or gardenhoseto cleanyour unit.
3. Referto enginemanualfor correctengine
storageinstructions.
4. Coatmower'scutting bladewithchassisgreaseto
preventrusting.
5. Storemowerin adry,cleanarea. Do notstorenextto
corrosivematerials,suchas fertilizer.
NOTE:Whenstoringany typeof powerequipmentin
a poorlyventilatedor metalstorageshed,careshould
betakento rust-proofthe equipment.Usinga light oilor
silicone,coatthe equipment,especiallycablesandall
movingpartsof yourlawn mowerbeforestorage.
11
WARNING
When removing
the cutting blade
for sharpening or
replacement, protect
your hands with a
pair of heavy gloves
or use a heavy rag to
hold the blade, ...........;
unbalanced blade
will cause excessive
vibration whenrotat,
may cause damage
to mower, a
sonal injury;
soil condition causes
abrasive wear tothe
For repairs beyond
the minor adjust-
ments listed here;
contactanautho;ized
service dealer.
ii_i_ii i_iiii_iii _i_i_ii__iiiiii_!_i
iii _iiiiii_iii_i iii _ _i _i_
i_i i ii i i i
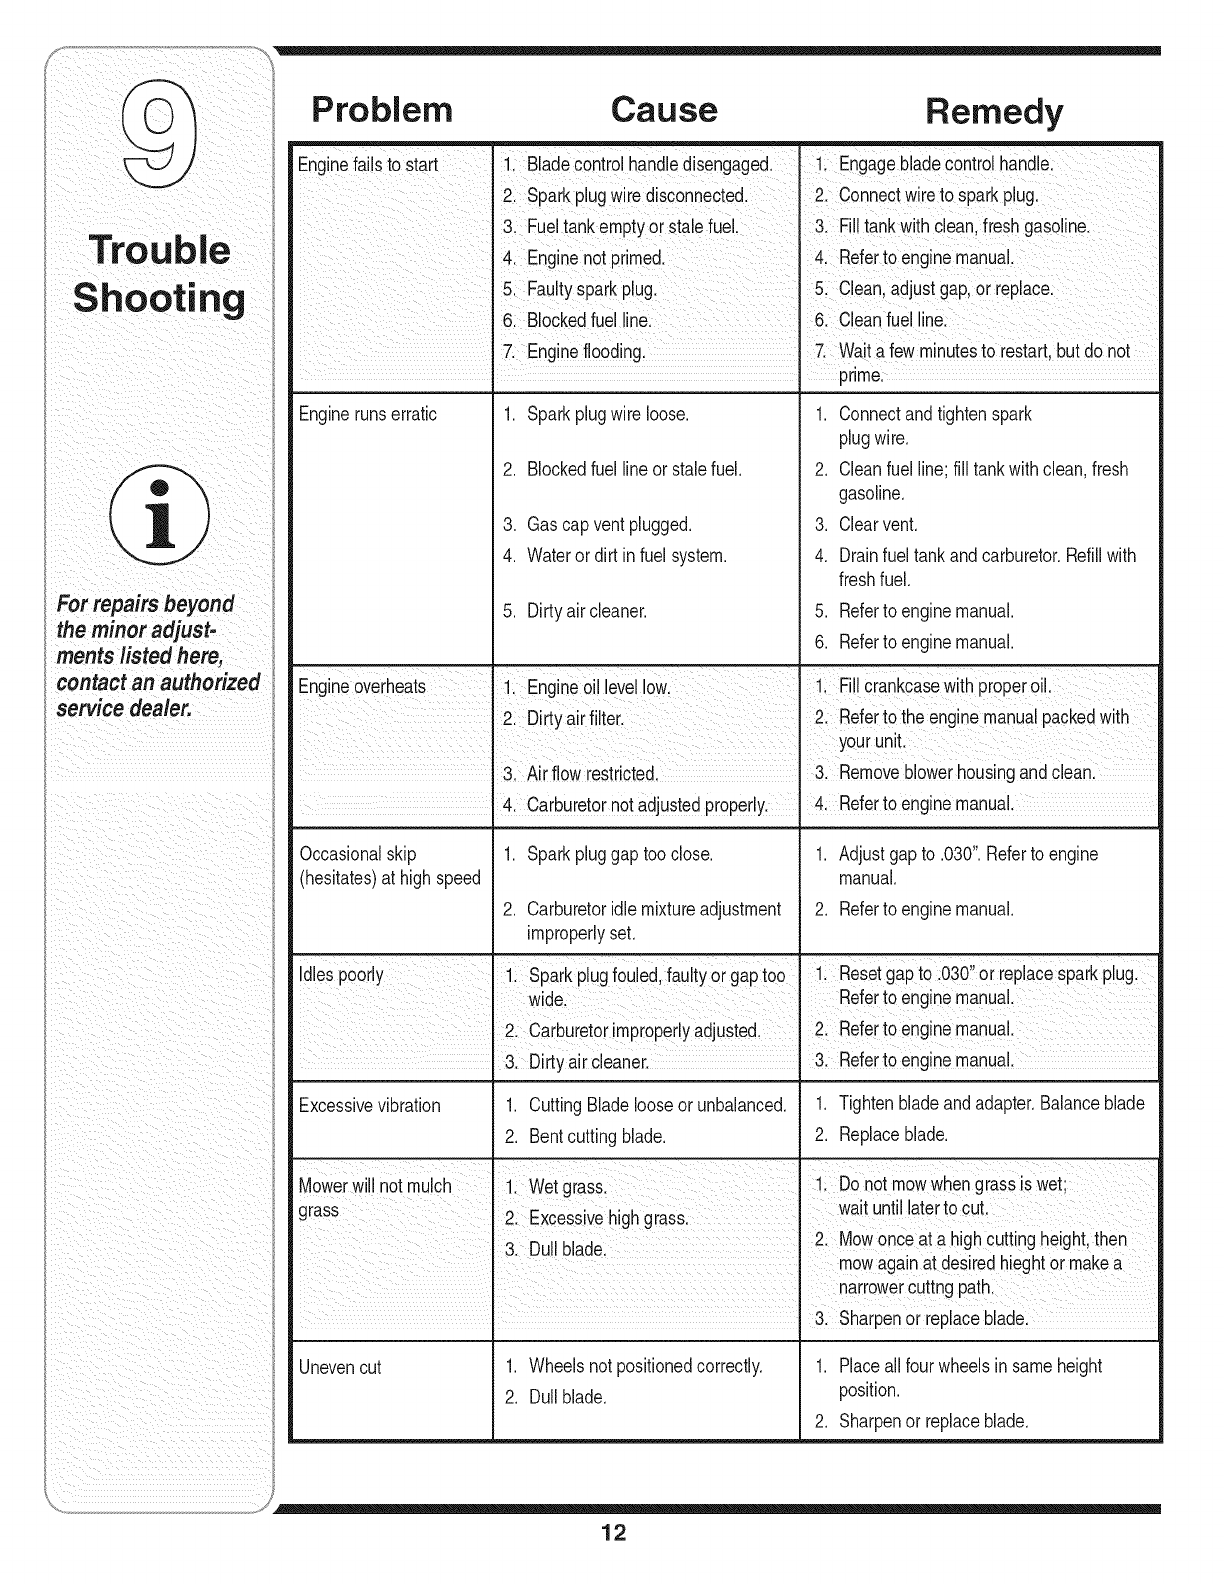
Problem Cause Remedy
Enginefailsto start I 1. Bladecontrolhandledisengaged• 1. Engagebladecontrolhandle•
I2. Sparkplugwiredisconnected• 2. Connectwireto sparkplug,
3. Fueltankemptyor stalefuel. 3, Filltankwith clean,freshgasoline•
4. Enginenot primed• 4. Referto enginemanual•
5. Faultysparkplug. 5. Clean,adjustgap,or replace•
6. Blockedfuel line. 6. Cleanfuel line.
7. Engineflooding• 7. Waita fewminutesto restart,butdo not
Enginerunserratic 1. Sparkplugwire loose. 1. Connectandtightenspark
plugwire.
2. Blockedfuel lineor stalefuel. 2. Cleanfuelline; fill tankwithclean,fresh
gasoline.
3. Gas capventplugged. 3. Clearvent.
4. Wateror dirt infuel system. 4. Drainfueltankandcarburetor.Refillwith
freshfuel.
5. Dirtyaircleaner. 5. Referto enginemanual.
6. Referto enginemanual.
Engineoverheats 1. Engineoil levellow. 1. Fill crankcasewithproperoil.
2. D rty airf lter 2. Referto the enginemanualpackedwith
yourunit.
3. Airflow restricted• 3. Removeblowerhousingandclean•
Occasionalskip
(hesitates)at highspeed
.4. Carburetornotadjustedproperly•
1. Sparkpluggaptoo close.
2. Carburetoridlemixtureadjustment
improperlyset.
4, Referto enginemanual•
1. Adjustgapto .030".Referto engine
manual.
2. Referto enginemanual.
Idlespoorly 1. Sparkplugfouled faultyor gaptoo 1. Resetgapto •030"or replacesparkplug.
wide. Referto enginemanual•
2. Carburetorimproperlyadjusted. 2. Referto enginemanual•
3. Dirty aircleaner• 3. Refertoenginemanual•
Excessivevibration 1. CuttingBladelooseor unbalanced. 1. Tightenbladeandadapter.Balanceblade
2. Bentcutting blade. 2. Replaceblade.
Mowerwill notmuch 1. Wetgrass• 1. Do notmowwhengrassiswet;
grass 2 Excessivehi h rass watunt atertocut
• g g •
I 3. Sharpenor replaceblade•
Unevencut 1. Wheelsnot positionedcorrectly. 1. Placeallfourwheelsinsameheight
2. Dull blade, position.
2. Sharpenor replaceblade.

MANUFACTURER'S LiMiTED WARRANTY FOR
The limitedwarrantysetforthbelowis givenby MTD LLCwith respectto new merchandisepurchasedandusedin the UnitedStatesand/or its territories
and possessions,and by MTDProductsLimitedwithrespectto new merchandisepurchasedandusedin Canadaand/or itsterritoriesandpossessions
(eitherentity respectively,"MTD").
MTDwarrantsthis product(excludingitsnormalwearpartsas describedbelow)againstdefectsinmaterialandworkmanshipfor a periodof two(2)
yearscommencingonthe dateof originalpurchaseandwill,at its option,repairor replace,free of charge,anypart foundto bedefectivein materials
or workmanship.Thislimitedwarrantyshallonly applyif this producthas beenoperatedandmaintainedinaccordancewiththe Operator'sManual
furnishedwiththe product,andhas notbeensubjectto misuse,abuse,commercialuse,neglect,accident,impropermaintenance,alteration,vandalism,
theft,fire,water,or damagebecauseof other perilornaturaldisaster.Damageresultingfromtheinstallationor useof any part,accessoryor attachment
not approvedby MTDfor usewiththe product(s)coveredbythis manualwill voidyourwarrantyas to any resultingdamage.
Normalwearpartsarewarrantedto befree fromdefectsin materialandworkmanshipfor a periodof thirty (30) daysfromthe dateof purchase.Normal
wear partsinclude,but arenot limitedto itemssuchas:batteries,belts,blades,bladeadapters,grassbags,riderdeckwheels,seats,snowthrowerskid
shoes,frictionwheels,shaveplates,augerspiralrubberandtires.
HOWTO OBTAINSERVICE:Warrantyserviceis available,WITHPROOFOF PURCHASE,throughyour localauthorizedservicedealer.To locatethe
dealerinyourarea;
In the U.S.A.: CheckyourYellowPages,orcontactMTDLLCat RO.Box361131,Cleveland,Ohio44136-0019,orcall 1-800-800-7310or
1-330-220-4683or logon to ourWebsiteat www.mtdproducts.com.
In Canada: ContactMTDProductsLimited,Kitchener,ON N2G4J1,orcall 1-800-668-1238or logon to ourWebsiteat www.mtdcanada.com.
Thislimitedwarrantydoes not providecoverageinthe followingcases:
a. The engineorcomponentpartsthereof.Theseitemsmaycarrya separatemanufacturer'swarranty.Referto applicablemanufacturer'swarrantyfor
termsandconditions.
b. Logsplitterpumps,valves,andcylindershavea separateone-yearwarranty.
c. Routinemaintenanceitemssuchas lubricants,filters,bladesharpening,tune-ups,brakeadjustments,clutchadjustments,deckadjustments,and
normaldeteriorationof the exteriorfinishdue to useor exposure.
d. Servicecompletedby someoneotherthan anauthorizedservicedealer.
e. MTDdoes notextendany warrantyfor productssoldor exportedoutsideof the UnitedStatesand/or Canada,andtheir respectivepossessionsand
territories,exceptthosesoldthroughMTD'sauthorizedchannelsof exportdistribution.
f. Replacementpartsthatarenot genuineMTDparts.
g. Transportationchargesand servicecalls.
h. If Productsare usedcommercially.(MTD mayseparatelyoffer LimitedCommercialWarrantiesoncertainselectproducts.Askyourdealeror retailer
for detailsor contactMTDServicefor more information.)
No impliedwarranty, includingany impliedwarrantyof merchantability of fitness for a particular purpose,applies after the applicable period
of expresswritten warranty above as to the partsas identified.No other expresswarranty,whetherwritten or oral, exceptas mentioned
above, givenby any person or entity,includinga dealer or retailer, withrespect to any product, shall bind MTD.Duringthe period of the
warranty, the exclusive remedyis repairor replacementof the productas setforth above.
Theprovisionsas setforth inthis warrantyprovidethe soleand exclusive remedy arising from the sale. MTDshall not be liablefor incidental
or consequential lossor damage including,without limitation,expensesincurredfor substituteor replacementlawn care servicesor for
rentalexpensesto temporarily replacea warranted product.
Somejurisdictionsdo notallowthe exclusionorlimitationof incidentalorconsequentialdamages,or limitationson howlongan impliedwarrantylasts,
so the aboveexclusionsor limitationsmaynot applyto you.
In noeventshall recoveryof any kind begreaterthan theamountof the purchaseprice of the productsold.Alterationof safetyfeatures of the
productshall void this warranty. Youassumethe riskandliabilityfor loss,damage,or injuryto youandyour propertyand/orto othersandtheir
propertyarisingout of the misuseor inabilityto use theproduct.
Thislimitedwarrantyshall notextendto anyoneotherthanthe originalpurchaseror to the personfor whomitwaspurchasedas a gift.
NOWLOCAL LAWSRELATETO THIS WARRANTY:Thislimitedwarrantygivesyou specificlegalrights,andyoumayalso haveother rightsthatvary
in differentjurisdictions.
IMPORTANT:OwnermustpresentOriginalProofof Purchaseto obtainwarrantycoverage.
MTD LLC,P.O.BOX361131CLEVELAND,OHiO44136-0019;Phone: 1-600-600-7310,1-330-220-4683
MTD Products Ltd., P.O. BOX1386,KITCHENER,ON N2G4J1; Phone: 1-800-668-1238
13

14

REF PART
NO. NO.
N° DE N °DE
REF PIECE
1 17032A
2 17098
3 682-3064
4 682-3065
5 687-02048
6 687-02051
7 687-02094
8 710-0216
9 710-0599
10 710-0654A
11 710-1044
12 710-1174
13 710-1205
14 712-04065
15 720-0279
16 720-0284
17 720-0426
18 725-0157
19 731-04019
20 631-04045
21 731-1034B
22 731-1035B
23 732-1014
24 734-1987
25 734-1988
26 736-0270
27 736-0451
28 736-0524B
29 736-0741
30 738-1172
31 738-1173
32 741-0751
32 742-0642A
33 742-0742A
34 746-0946
35 747-0710
36 747-1161A
37 748-04096
38 749-04037
39 749-1092A
40 720-04072
DESCRIPTION
Chute Hinge
Hinge Clip
Handle Bracket Assembly RH
Handle Bracket Assembly LH
Deck Assembly 22"
Lever Ass'y (includes ref. #17)
Pivot Arm
Hex Cap Screw 3/8-16 x .75
Hex Wash S-Tapp Scr 1/4-20 x .50
Hex Wash HD Tap Scr 3/8-16 x .88
Hex Screw 3/8-24 x 1.5" Lg. (Gr. 8)
Carriage Bolt 5/16-18 x 2.0
Rope Guide Bolt
Flanged Lock Nut 3/8-16
Knob -ERS Guide 1/4-20
Wing Nut
Knob
Cable Tie
Trail Shield
Mulching Baffle
Side Dis. Chute Ass'y
Chute Deflector
Torsion Spring
Rear Wheel 8 x 1.8
Front Wheel 7 x 1.8
Cup. Wash..265 ID x .75 OD x .062
Saddle Wash..320 ID x .937 OD
Blade Bell Support
Cupped Washer.760 x 1.25
Shoulder Screw
Shoulder Screw
Height Adjuster Bearing
Blade 22"
Mulching Blade 22"
Blade Control Cable 48.25" Lg.
Hinge Pin
Blade Control Handle
Blade Adapter 25 mm x 1.19
Lower Handle
Upper Handle
Knob -Star 5/16-18
DESCRIPTION
Charniere de deflecteur
Attache
Support de guidon CD
Support de guidon CG
Plateau de coupe de 22 po
Enesmble d'levier (comprend le ref. 17)
Bras de pivot
Visa chapeau a six pans de 3/8-16 x 0,75
Vis autotaraudeuse a rondelle hex. de 1/4-20 x 0,5
Vis autotaraudee 3/8-16 x 0,88
Vis & t6te hex. 3/8-24 x 1,50 po de Ig (Qual. 8)
Boulon ordinaire 5/16-18 x 2,0
Boulon de guidage de cordon
12crou de blocage 3/8-16
Bouton - 1/4-20
12crou & oreilles
Bouton
Attache-c&ble
Abattant de protection arriere
Deflecteur de dechiquetage
Deflecteur lateral complet
Deflecteu r lateral
Ressort de torsion
Roue arriere 8 x 1,8
Roue avant 7 x 1,8
Rondelle creuse 0,265 DI x 0,75 DE x 0,062
Rondelle selle 0,320 DI x 0,937 DE
Support de lame
Rondelle creuse 0,760 x 1,25
Vis a epaulement
Visa epaulement
Roulement
Lame 22 po
Lame dechiqueteuse 22 po
C&ble de la commande 48,25 po de Ig.
Axe fixe
Poignee de commande de la lame
Adaptateur de la lame 22 mmx 1,19
Guidon inferieur
Guidon inferieur
Bouton -etoile 5/16-18
11A-080
10.14.05
For parts and/or
accessories refer to
customersupport on
page 2.
Adressez-vousau
<<Serviceapr_s-vente>>
la page 2 pour ce qui
conceme les pi_ces
et/ou accessoires.
15
