MTD 12AG839E711 User Manual 3rd PARTY LAWN MOWER Manuals And Guides L0502216
TROYBILT Walk Behind Lawnmower, Gas Manual L0502216 TROYBILT Walk Behind Lawnmower, Gas Owner's Manual, TROYBILT Walk Behind Lawnmower, Gas installation guides
User Manual: MTD 12AG839E711 12AG839E711 MTD 3rd PARTY - LAWN MOWER - Manuals and Guides View the owners manual for your MTD 3rd PARTY - LAWN MOWER #12AG839E711. Home:Lawn & Garden Parts:MTD Parts:MTD 3rd PARTY - LAWN MOWER Manual
Open the PDF directly: View PDF ![]() .
.
Page Count: 20

SafetyoAssembly oOperation oTips & Techniques oMaintenance *Troubleshooting oParts Lists oWarranty
®
21" Rotary Mower -- Model Series 830
ModelG839EShown
READ SAFETY RULES AND mNSTRUCTmONS CAREFULLY BEFORE OPERATION
Warning: This unitis equippedwithan internalcombustionengineandshouldnot beusedon or nearany uniiprovedforest=covered,brush=
coveredor grass=coveredlandunlessthe engine'sexhaustsystemis equippedwitha sparkattestermeetingapplicablelocalorstate laws(if any),
if a sparkattesteris used,it shouldbemaintainedineffectiveworkingorderby the operator,inthe Stateof Californiathe aboveis requiredbylaw
(Section4442of the CaliforniaPublicResourcesCode),Otherstatesmayhavesimilarlaws,Federallawsapplyonfederallands,A sparkattester
for the muffleris availablethroughyournearestengineauthorizedservicedealeror contactthe servicedepartment,RO,Box361131Cleveland,
Ohio44136-0019,
FORMNO,769=01541
PRINTEDiN U,S,A MTD LLC, P.O. BOX 361131 CLEVELAND, OHiO 44136-0019 1/4/2005
This Operator's Manua_ is an important part of your new lawn mower, mtwH_ he_p you assemble,
prepare and maintain the unit for best performance. Please read and understand what it says.
Table of Contents
Slope Gauge ....................................................... 3
Safe Operation Practices ................................... 4
Setup and Adjustment ....................................... 6
Operating Your Lawn Mower .............................. 8
Maintaining Your Lawn Mower ......................... 10
Trouble Shooting .............................................. 14
Safety Labels .................................................... 15
Parts List ........................................................... 16
Finding and Recording Model Number
BEFOREYOU STARTASSEMBLING
YOUR NEW EQUIPMENT,
please locatethe model plate on the equipmentand copy the
informationto the sample model plate providedto the righL
Youcan locatethe model plate by standing at the operating
positionand lookingdown at the rearof the deck_ This
informationwill be necessary to use the manufacturer'sweb
site and/or obtain assistance from the Customer Support
Department or an authorizedservice dealer_
Modem Number Serial Number
O TRO_X_--T° TBOY=BRLT LLC
P. O. BOX 361131
www.troybilt.com CLEVELAND, ON 44136
33e=558=7220
1 =800=52e=552e
% J
Customer Support
P{ease do NOTreturn the unit to the retailer from which it was
purchased, without first contacting Customer Support.
Ifyou havedifficulty assemblingthis product or have any
questions regardingthe controls, operationor maintenanceof
this unit, you can seek help from the experts. Choose from the
options below:
Click here to search our knowledge base.
Search by product, keyword, or phrase.
1. Visit troybHt.com for many useful suggestions. Click on
Customer Support button and you will get the four options
reproducedin this sample to the right. Click on the appro-
priatebutton and help is immediatelyavailable.
2. Phonea Customer Support Representative
at 1(800) 520-5520.
3. The engine manufacturer is responsiblefor all engine°
related issues with regardsto performance,power-rating,
Login to check the status of your questions, modify
your inquiries, or update your personal profile.
Need local assistance? Click here to find authorized
service centers in your area.
specifications,warranty and service. Please referto the
eng Need a manual and/or parts list? Download
separatelywith your unit, for more information, literature from recent model years.
2
03 x= S
£
O
_5
o
(D
_5
03
(D
(D
Cz_
O
_5
E
o>.
(D
03
(D
Cz_
o
03
(D
@ CZ.
"7C_ O
o_
"_ o3
Ob
_50
(D O
Ob E
£3-
03
D ;>.
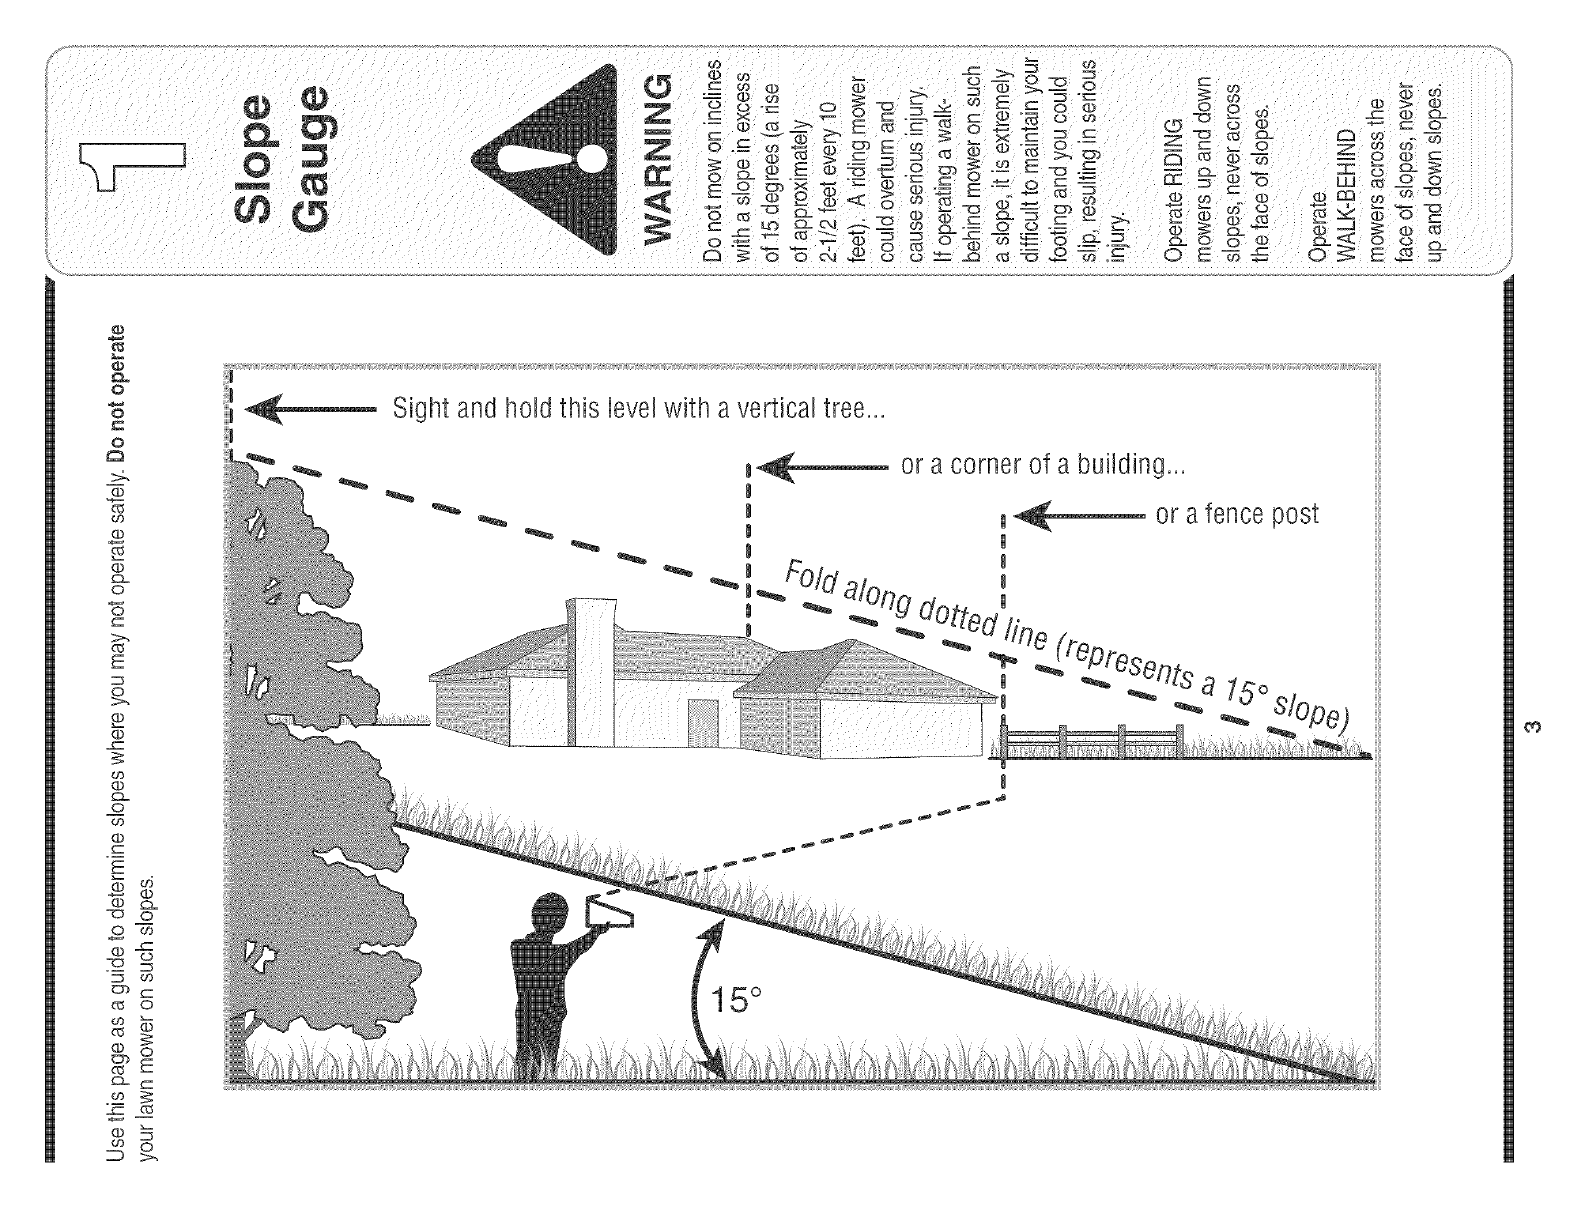
Sight andhold this levelwith a verticaltree...
_,_ or a corner of a building...
I__ or afence post
15°
0_
manual.As with any type of power equipment,carelessness or error on the part of the operator can
result in serious injury.This machineis capable of amputating hands and feet and throwing objects.
! Failureto observethe following safetyinstructionscould result in serious injury or death.
endangerthe personal
safetyand/or property
Children
Tragicaccidentscan occurifoperatoris notalert to presence
of children.Childrenare oftenattractedto mowerandmowing
activity.Theydo not understandthe dangers.Neverassume
thatchildrenwill remainwhereyoulastsawthem.
1. Keepchildrenoutof the mowingarea andunderwatchful
careof a responsibleadultotherthanthe operator.
2. Bealert andturn moweroffifa childentersthearea.
3. Beforeand whilemovingbackwards,look behindanddown
forsmallchildren.
4. Useextremecare whenapproachingblindcorners,
doorways,shrubs,trees,orotherobjectsthat mayobscure
yourvisionof a childwho mayrun into themower.
5. Keepchildrenawayfromhot orrunningengines.Theycan
sufferburnsfroma hotmuffler.
6. Neverallowchildrenunder14yearsoldto operatea power
mower.Children14yearsold andovershouldreadand
understandoperationinstructionsandsafetyrulesinthis
manualandshouldbe trainedandsupervisedbya parent.
General Operation
1. Readthis operator'smanual carefullyin its entiretybefore
attemptingto assemblethis machine.Read,understand,
andfollow allinstructionsonthe machineandin the
manual(s) beforeoperation.Be completelyfamiliarwith
thecontrols andthe properuse of this machinebefore
operatingit.Keepthis manualin a safeplaceforfuture
and regularreferenceandfor orderingreplacementparts.
2. Thismachineis a precisionpieceof powerequipment,
nota plaything.Therefore,exerciseextremecautionat all
times.Yourunit has beendesignedto performonejob: to
mowgrass.Do notuseitfor any otherpurpose.
3. Neverallowchildrenunder 14yearsold to operatethis
machine.Children 14yearsold and overshould readand
understandthe instructionsinthis manualandshould
betrainedand supervisedbya parent.Only responsible
individualswho arefamiliar withthese rulesof safe
operationshould be allowedto usethis machine.
4. Thoroughlyinspectthe areawherethe equipmentisto
be used. Removeall stones,sticks,wire, bones,toys and
otherforeignobjectswhichcould betripped overor picked
upand thrownby the blade.Thrownobjectscancause
seriouspersonalinjury.Planyourmowingpatternto avoid
dischargeof materialtowardroads,sidewalks,bystanders
andthe like.Also, avoiddischargingmaterialagainsta
wallorobstructionwhich maycausedischargedmaterial
to ricochetbacktoward theoperator.
6. Alwayswear safetyglassesor safetygogglesduringopera-
tion andwhile performingan adjustmentor repairto protect
youreyes.Thrownobjectswhich ricochetcancauseserious
injuryto the eyes.
7. Wearsturdy,rough-soledworkshoesand close-fitting
slacksandshirts. Shirtsand pantsthat coverthe arms and
legs andsteel-toedshoesare recommended.Neveroperate
this machinein barefeet,sandals, slipperyor lightweight
(e.g.canvas)shoes.
8. Do notputhands orfeet nearrotatingparts or undercutting
deck.Contactwithblade can amputatehands andfeet.
9. A missingor damageddischargecovercan causeblade
contactor thrownobject injuries.
10.Manyinjuriesoccur asa resultof the mowerbeing pulled
overthefoot duringa fall causedby slippingortripping.
Do notholdon to the mower ifyou are falling;releasethe
handleimmediately.
11.Neverpullthe mowerback towardyouwhileyou are
walking.If youmustback the mowerawayfroma wall or
obstructionfirstlook downandbehindto avoid trippingand
thenfollow thesesteps:
a. Stepback frommowerto fully extendyour arms.
b. Be sureyou arewell balancedwithsure footing.
c. Pullthe mowerbackslowly,no morethan halfway
towardyou.
d. Repeatthese stepsas needed.
12.Do notoperatethe mowerwhileunderthe influenceof
alcoholor drugs.
13.Do notengage theself-propelledmechanismon unitsso
equippedwhilestartingengine.
14.The bladecontrolhandleis a safetydevice.Neverattempt
to bypassits operation.Doingso makesthe safetydevice
inoperativeandmay resultinpersonal injurythrough
contactwiththe rotatingblade.The bladecontrolhandle
mustoperateeasilyin bothdirectionsandautomatically
returnto the disengagedpositionwhen released.
15.Neveroperatethe mowerinwet grass. Alwaysbesure of
yourfooting. A slipand fallcan causeseriouspersonal
injury.If you feelyouare losingyour footing,releasethe
bladecontrolhandleimmediatelyandthe bladewillstop
rotatingwithinthreeseconds.
16.Mow only indaylightor good artificiallight.Walk,neverrun.
17.Stopthe bladewhencrossinggraveldrives,walksor roads.
18.If the equipmentshouldstart to vibrateabnormally,stop the
engineandcheckimmediatelyforthe cause.Vibrationis
and follow the warnings 5. Tohelpavoidbladecontact ora thrownobjectinjury, ._ generallya _arning of !rouble.........
]_ _nut the engne errandwar unl: me Daaecomes-coa
and i..struction2stay inoperatorzone behindhandlesandkeepchildren, "
u _ compete stop beforeremovngthe grasscatcheror uncog
, ,i bystanders,helpersand petsat least75feet frommower .
un_nusmanuau glngthechute
whileit is in operation.Stopmachineifanyoneenters
and on the machine, area.
..... ,J
4
The cutting bladecontinuesto rotatefor a fewseconds after
the engineisshutoff. Neverplaceanypart of the bodyin
the blade area untilyou are surethe blade hasstopped
rotating.
20.Neveroperatemowerwithoutpropertrail shield,discharge
cover,grasscatcher,bladecontrolhandleor othersafety
protectivedevicesin placeandworking.Neveroperate
mowerwithdamagedsafetydevices.Failureto do so,can
resultin personalinjury.
21.Mufflerandenginebecomehotand cancausea burn.Do
nottouch.
22.Onlyuse partsand accessoriesmadefor this machineby
manufacturer.Failureto do so canresult inpersonalinjury.
23.If situationsoccurwhichare not coveredin this manual,
usecareand goodjudgment.Contactyour dealerfor
assistance.Telephone1-800-800-7310forthe name of your
nearestdealer.
SJope Operation
Slopesare a majorfactorrelatedto slipandfallaccidentswhich
canresultinsevereinjury.Operationonslopesrequiresextra
caution.Ifyou feeluneasyon a slope,donotmowit.Foryour
safety,usethe slopegaugeincludedas part ofthis manualto
measureslopesbeforeoperatingthis unit on a slopedor hilly
area.If theslopeis greaterthan 15degrees,do notmowit.
Do:
1. Mowacrossthe faceof slopes;neverup anddown.
Exerciseextremecautionwhenchangingdirectionon
slopes.
2. Watchfor holes,ruts, rocks,hiddenobjects,or bumpswhich
can causeyou to slipor trip.Tallgrasscan hideobstacles.
3. Alwaysbe sure of yourfooting.A slip andfall can cause
seriouspersonalinjury.If youfeel youare losingyour
balance,releasethe blade controlhandle immediately,and
the blade willstop rotatingwithin 3 seconds.
Do Not:
1. Do notmowneardrop-offs, ditchesorembankments,you
could loseyour footing or balance.
2. Do notmowslopesgreaterthan 15degrees as shownon
the slopegauge.
3. Do notmowon wetgrass. Unstablefootingcouldcause
slipping.
Service
Safe HandlingOf Gaso%e:
1. To avoidpersonalinjury or propertydamageuseextreme
care in handlinggasoline.Gasolineis extremelyflammable
andthevaporsare explosive.Seriouspersonalinjurycan
occurwhengasolineis spilledonyourselforyour clothes
which canignite.
2. Washyour skinand changeclothesimmediately.
3. Useonly anapprovedgasolinecontainer.
4. Neverfill containersinsidea vehicle or on a truckor trailer
bedwith a plasticliner.Alwaysplacecontainersonthe
groundawayfromyourvehicle beforefilling.
5. Removegas-poweredequipmentfromthe truck ortrailer
andrefuelit onthe ground.Ifthis is notpossible,then refuel
suchequipmentona trailerwitha portablecontainer,rather
than froma gasoline dispensernozzle.
6. Keepthe nozzlein contactwith therim of thefuel tank or
container openingat all timesuntil fuelingis complete.Do
notuse a nozzlelock-opendevice.
7. Extinguishallcigarettes,cigars, pipesandothersources
of ignition.
8. Neverfuel machineindoorsbecauseflammablevaporswill
accumulatein the area.
9. Neverremovegascap oradd fuelwhileengineishot or
running. Allowengineto cool at leasttwo minutesbefore
refueling.
10.Neverover fill fueltank. Filltankto nomorethan _ inch
belowbottom of filler neckto providefor fuel expansion.
11.Replacegasolinecapandtightensecurely.
12.If gasolineis spilled,wipe it offthe engineand equipment.
Moveunitto anotherarea.Wait5 minutesbeforestarting
engine.
13.Neverstorethe machineorfuel containernearanopen
flame,spark orpilot light as on a water heater,space
heater, furnace ,clothesdryeror othergasappliances.
14.Toreducefire hazard,keepmowerfree of grass, leaves,
or otherdebrisbuild-up.Cleanup oil orfuel spillageand
removeanyfuel soakeddebris.
15.Allow a mowerto cool at least5 minutesbeforestoring.
General Service:
1. Neverrun anengineindoorsor ina poorlyventilatedarea.
Engineexhaustcontainscarbonmonoxide,an odorlessand
deadlygas.
2. Beforecleaning,repairing,or inspecting,makecertainthe
bladeandall movingpartshavestopped.Disconnectthe
sparkplugwire andgroundagainsttheengineto prevent
unintendedstarting.
3. Checkthe bladeandenginemountingboltsatfrequent
intervalsfor propertightness.Also,visuallyinspectbladefor
damage(e.g.,bent,cracked,worn)Replacebladewiththe
originalequipmentmanufacture's(O.EM.) bladeonly,listed
inthis manual."Useof parts whichdo not meettheoriginal
equipmentspecificationsmayleadto improperperformance
andcompromisesafety!"
4. Mowerbladesare sharpandcan cut.Wrapthebladeorwear
gloves,anduse extracautionwhenservicingthem.
5. Keepallnuts,bolts,andscrewstight to be surethe equip-
mentis in safeworkingcondition.
6. Nevertamperwithsafetydevices.Checktheirproperopera-
tionregularly.
7. Afterstrikinga foreignobject,stopthe engine,discon-
nectthe spark plugwire andgroundagainsttheengine.
Thoroughlyinspectthe mowerfor anydamage.Repairthe
damagebeforestartingandoperatingthe mower.
8. Neverattempt to makea wheel orcutting height adjustment
whilethe engineis running.
9. Grasscatchercomponents,dischargecover,and trail
shieldare subjectto wear anddamagewhichcould expose
movingparts orallow objectsto bethrown.Forsafety
protection,frequentlycheckcomponentsand replaceim-
mediatelywithoriginal equipmentmanufacturer's(O.EM.)
partsonly,listed in this manual."Useof partswhich do
not meettheoriginal equipmentspecificationsmayleadto
improperperformanceandcompromisesafety!"
10.Donot changetheenginegovernorsettingor overspeedthe
engine.Thegovernorcontrolsthe maximumsafeoperating
speedof the engine.
11.Maintainor replacesafetylabels,as necessary'.
12.Observeproperdisposallawsand regulations.Improper
disposalof fluidsand materialscan harmtheenvironment.
w o°,°o
This SymbQUpoints
ua! before attempting to
resuUt in personaUinjury_
::When you see th s
_symbol
,EEDMTSWARNmNG
Responsibility
Restd_tthe use
of this powermachine
to persons who read
understand
5
NOTE:Stand behind
Ihe moweras if you
Jveregoing to operate
it,Your right hand cor-
espondsto the right
side of the mower;your
left hand corresponds
to the left side dthe
mower.
NOTE: Forshipping
purposesyour mower
is set with the wheels
in a lowcutting
height position, For
best results raisethe
cutting positionuntil il
is determinedwhich
height is best for your
lawn. See Step 8 for
details.
IMPORTANT
DO NOT crimp the
cables when lifting the
handle up.
IMPORTANT
This unit is shipped
without gasoline or
oil inthe engine. Fill
up gasoline and oil
manual BEFORE
Figure 1
zJ'i .........
Figure 2
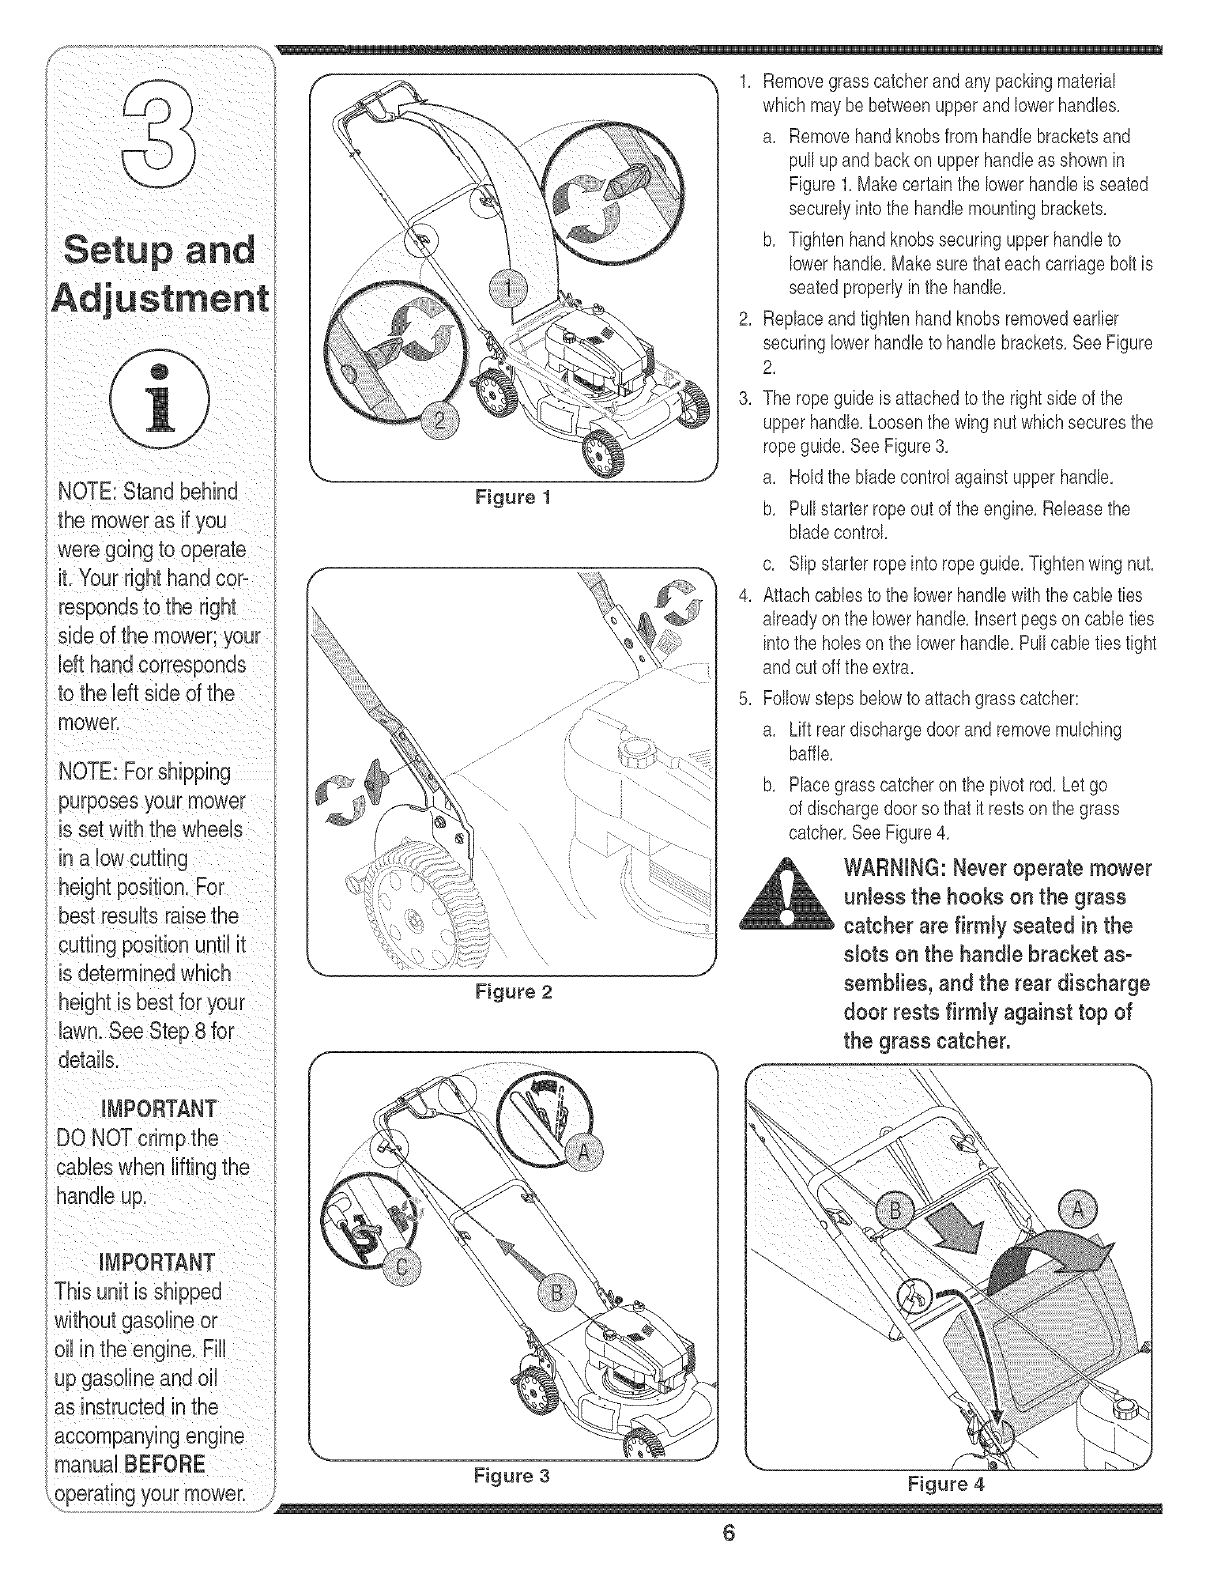
1. Removegrasscatcherand anypackingmaterial
whichmaybe betweenupperandlowerhandles.
a. Removehandknobsfromhandlebracketsand
pullupand backon upperhandleas shownin
Figure1.Makecertainthe lowerhandb is seated
securelyintothe handb mountingbrackets,
b. Tightenhandknobssecuringupperhandb to
lowerhandb. Makesure thateach carriagebolt is
seatedproperlyin the handb.
2. Replaceandtightenhandknobsremovedearlbr
securinglowerhandb to handlebrackets,SeeFigure
2.
3. The ropeguideis attachedto the right sideof the
upperhandb. Loosenthe wingnut whichsecuresthe
ropeguide,SeeFigure3.
a. Holdthe bladecontrolagainstupperhandle.
b. Pullstarterropeoutof the engine,Releasethe
bladecontrol.
c. Slipstarterropeintoropeguide,Tightenwingnut,
4. Attachcanes to the lowerhandb withthe cane ties
alreadyonthe lowerhandle.Insertpegson cane ties
intothe hobs on the lowerhandle.Pullcane tiestight
andcutoff the extra,
5, Followstepsbelowto attachgrasscatcher:
a. Lift reardischargedoorand removemulching
baffle.
b, Placegrasscatcheronthe pivotrod,Let go
of dischargedoorso thatit restsonthe grass
catcher,SeeFigure4.
WARNING: Never operate mower
unless the hooks on the grass
catcher are firmly seated in the
slots on the handle bracket as°
semblies, and the rear discharge
door rests firmly against top of
the grass catcher.
Figure 3 Figure 4
operating your mower.
6
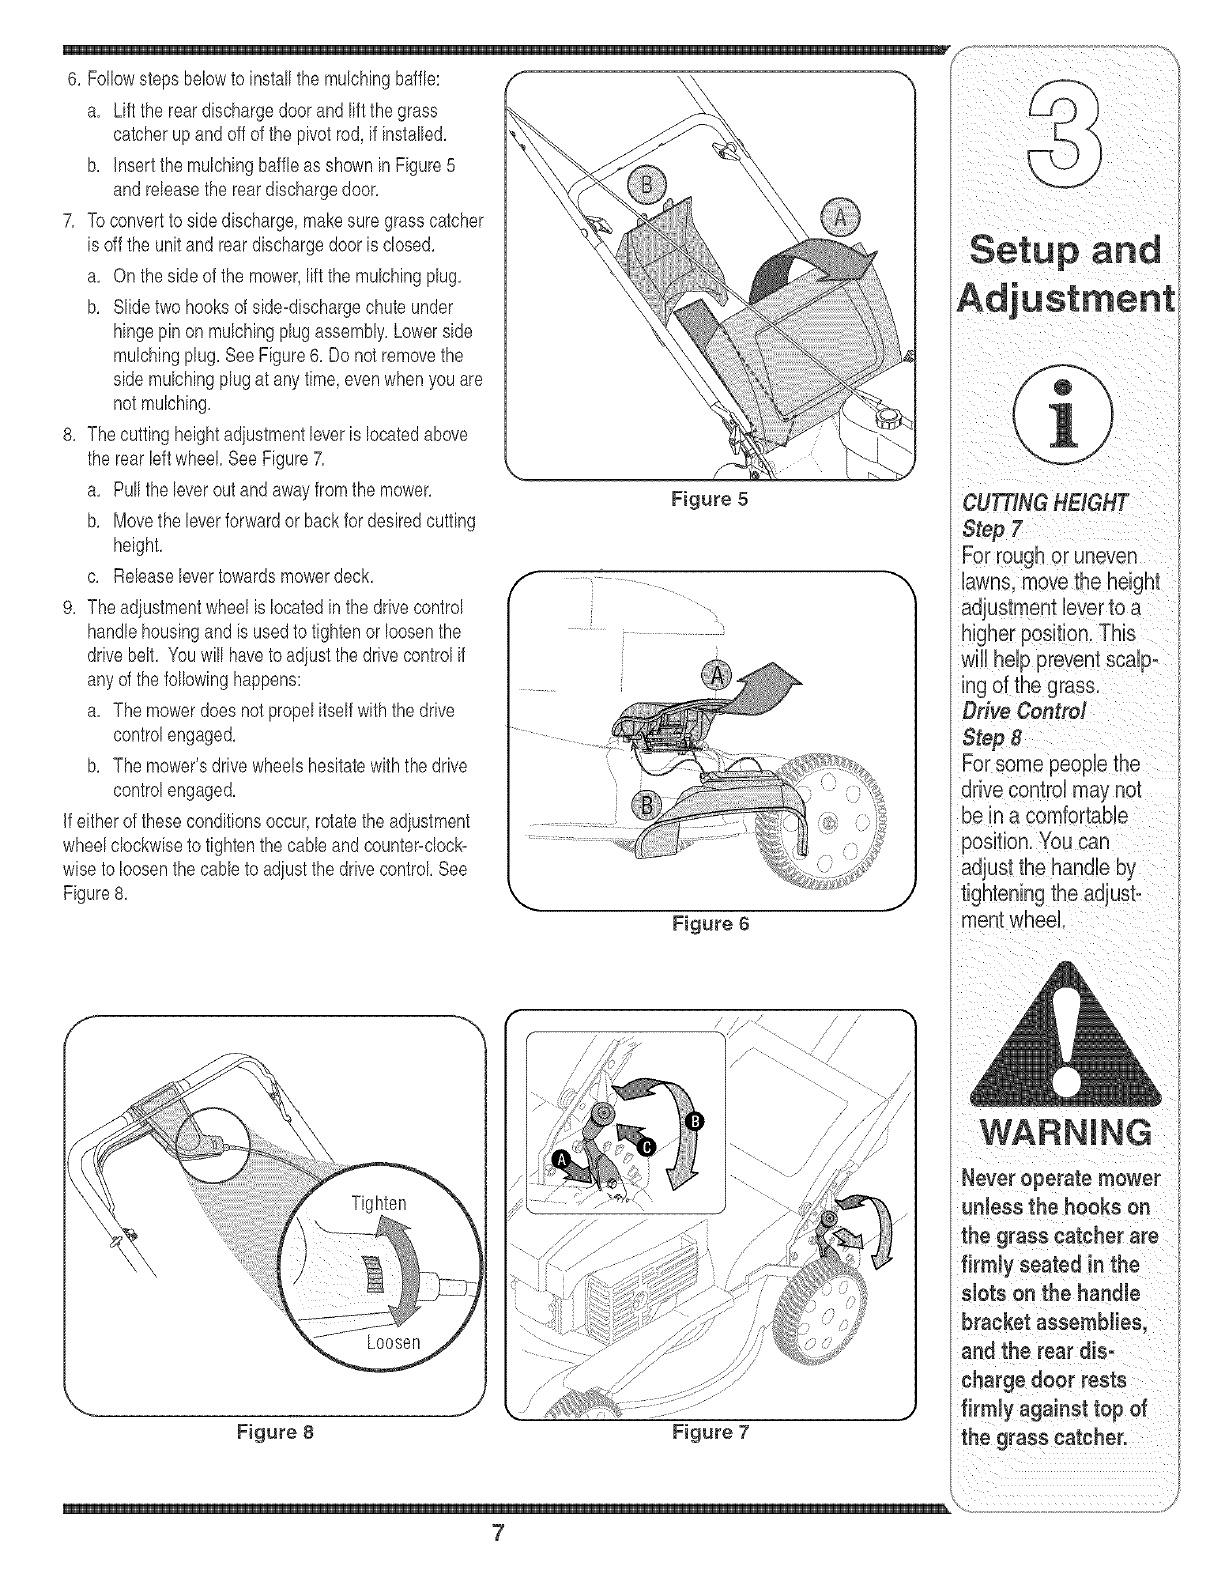
6 Followsteps belowto installthe mulchingbaffle:
a Liftthe reardischargedoorandliftthe grass
catcherupandoff of the pivotrod,if installed
b Insertthemulchingbaffleas showninFigure5
and releasethe reardischargedoor
7 To convertto sidedischarge,makesure grasscatcher
is offthe unit andreardischargedooris closed
a On theside of the mower,liftthe mulchingplug
b Slidetwo hooksof side-dischargechuteunder
hingepinon mulchingplugassemblyLowerside
mulchingplug SeeFigure6 Do notremovethe
side mulchingplugat any time,evenwhenyouare
notmulching
8 The cuttingheightadiustmentleveris locatedabove
the rearbft wheel SeeFigure7
a Pullthe leverout andawayfromthe mower
b Movethe leverforwardor backfor desiredcutting
height
c Rebaselevertowardsmowerdeck
9 The adiustmentwheelis locatedinthe drivecontrol
handlehousingandis usedto tightenor loosenthe
drive belt Youwill haveto adiustthe drivecontrolif
any of the followinghappens:
a The mowerdoesnot propelitselfwiththe drive
controlengaged
b The mower'sdrive wheelshesitatewiththedrive
controlengaged
If eitherof theseconditionsoccur,rotatethe adiustment
wheelclockwiseto tightenthe cabb and counter-clocb
wiseto loosenthe cabb to adjustthe drivecontrol See
Figure8
\
Figure 8
Figure 5
Figure 6
/
/
Figure 7
/1
For rough or uneven
Never operate mower
unless the hooks on
the grass Catcher are
firmly seated in the
f rmly against top of
the grass catcher,
7
WARNING
The blade control
mechanism is a
safety device. Never
attempt to bypassits
operations.
Use extreme care
when handling
gasoline. Gasoline is
extremely flammable
and the vapors are
explosive. Neverfuel
the machine indoors
or while the engine
is hot or running.
Extinguish cigarettes,
cigars, pipes and
other sources of
ignition.
Keep handsand feet
_way from the chute
tea on cutting deck.
Refer to warning
label on the unit.
Recoil Control
__ Electric Start
Ignition Switcht
Height LAedjeustment
Fill
Gasoline FiII
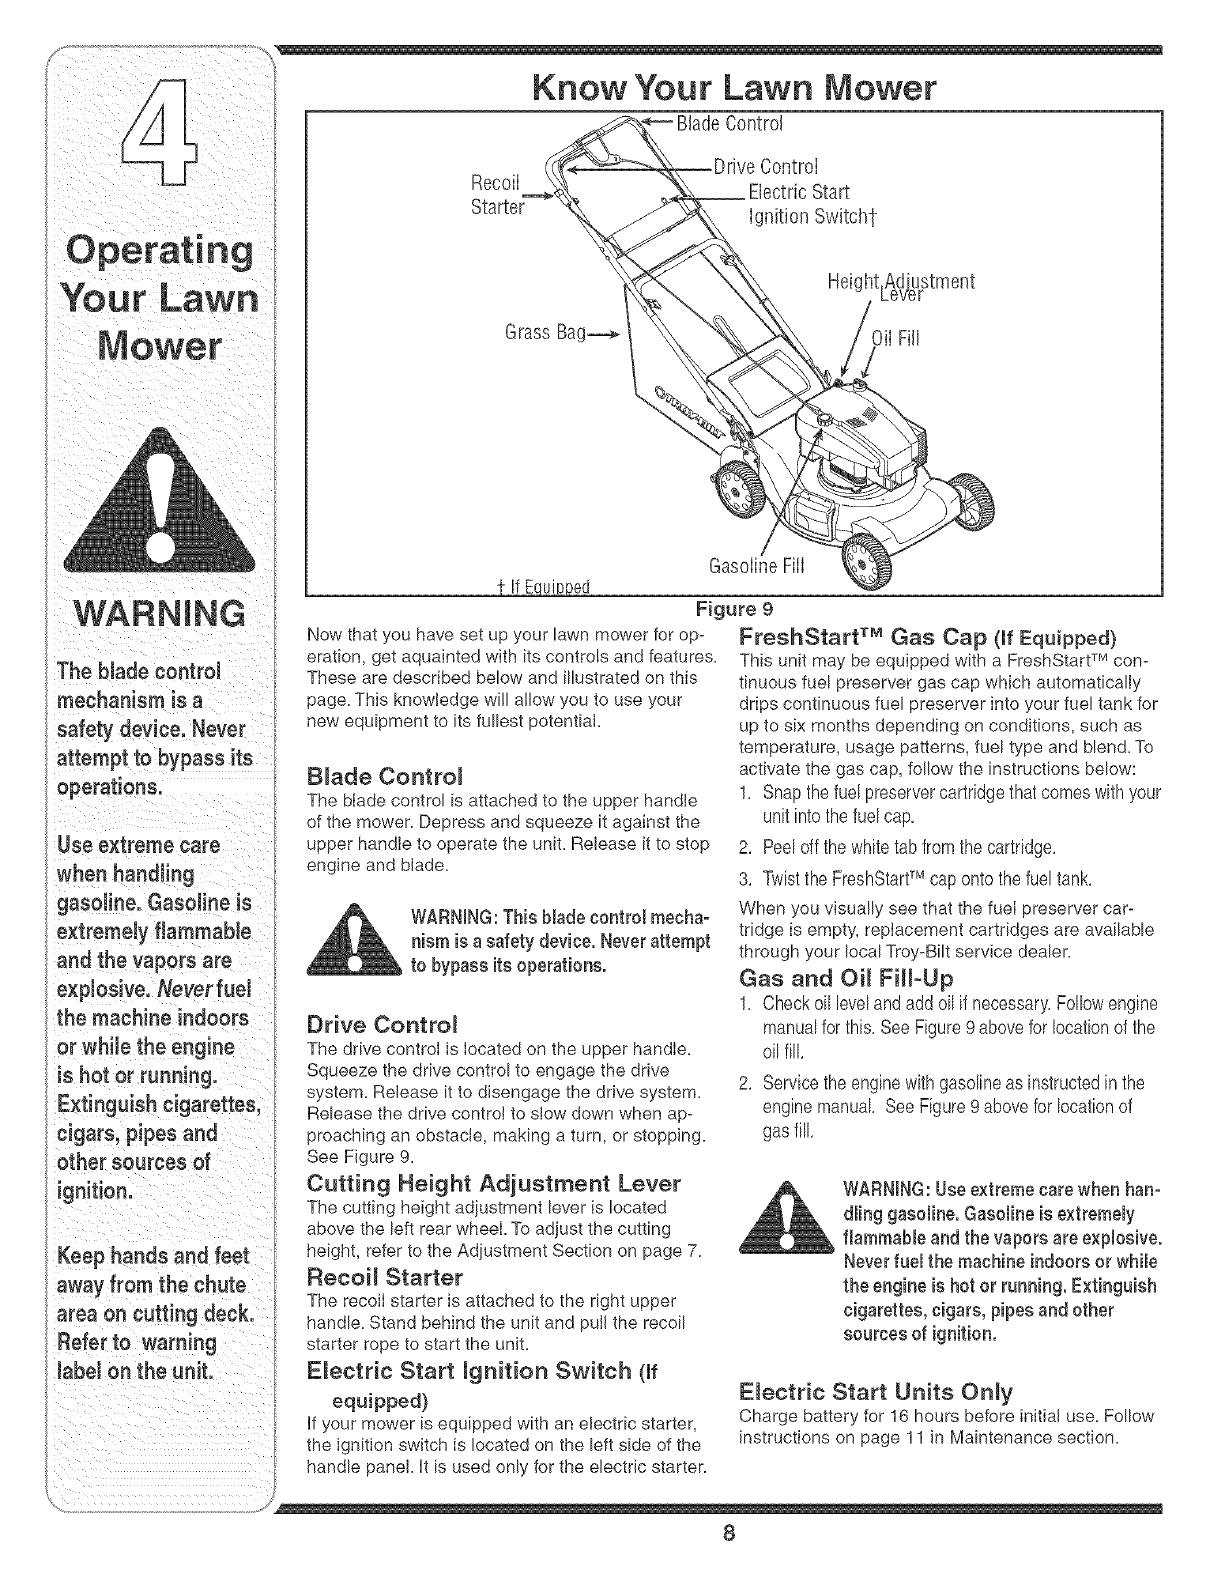
Figure 9
Now that you have set up your lawn mower for op-
eration, get aquainted with its controls and features=
These are described below and illustrated on this
page= This knowledge will allow you to use your
new equipment to its fullest potential=
Blade Control
The blade control is attached to the upper handle
of the mower= Depress and squeeze it against the
upper handle to operate the unit= Release it to stop
engine and blade=
WARNING:This bladecontrol mecha-
nism is a safety device. Neverattempt
to bypass its operations.
Drive Contro_
The drive control is Iocated on the upper handIe=
Squeeze the drive control to engage the drive
system= Release it to disengage the drive system=
Release the drive controI to slow down when ap-
proaching an obstacle, making a turn, or stopping=
See Figure 9=
Cutting Height Adjustment Lever
The cutting height adjustment lever is located
above the left rear wheeI. To adjust the cutting
height, refer to the Adjustment Section on page 7=
Recoi_ Starter
The recoiI starter is attached to the right upper
handle= Stand behind the unit and puII the recoil
starter rope to start the unit=
E_ectric Start Ignition Switch (if
equipped)
If your mower is equipped with an electric starter,
the ignition switch is located on the left side of the
handle panel= It is used only for the electric starter=
FreshStart TM Gas Cap (if Equipped}
This unit may be equipped with a FreshStart TM con-
tinuous fuel preserver gas cap which automatically
drips continuous fuel preserver into your fuel tank for
up to six months depending on conditions, such as
temperature, usage patterns, fuel type and blend= To
activate the gas cap, follow the instructions below:
1, Snap the fuel preserver cartridge that comes with your
unit into the fuel cap,
2, Peel off the white tab from the cartridge,
3, Twist the FreshStartTM cap onto the fuel tank,
When you visually see that the fueI preserver car-
tridge is empty, replacement cartridges are available
through your local Troy-Bilt service dealer=
Gas and Oi_ Fill-Up
1, Check oil level and add oil if necessary, Follow engine
manual for this, See Figure 9 above for location of the
oil fill
2, Service the engine with gasoline as instructed in the
engine manual See Figure 9 above for location of
gas fill
WARNING:Useextreme care when han-
dling gasoline. Gasoline is extremely
flammable andthe vapors areexplosive.
Neverfuel the machine indoors or while
the engine is hotor running. Extinguish
cigarettes, cigars, pipes and other
sources of ignition.
Electric Start Units Only
Charge battery for 16 hours before initial use= Follow
instructions on page 11 in Maintenance section=
8
adjustments or repairs on it.
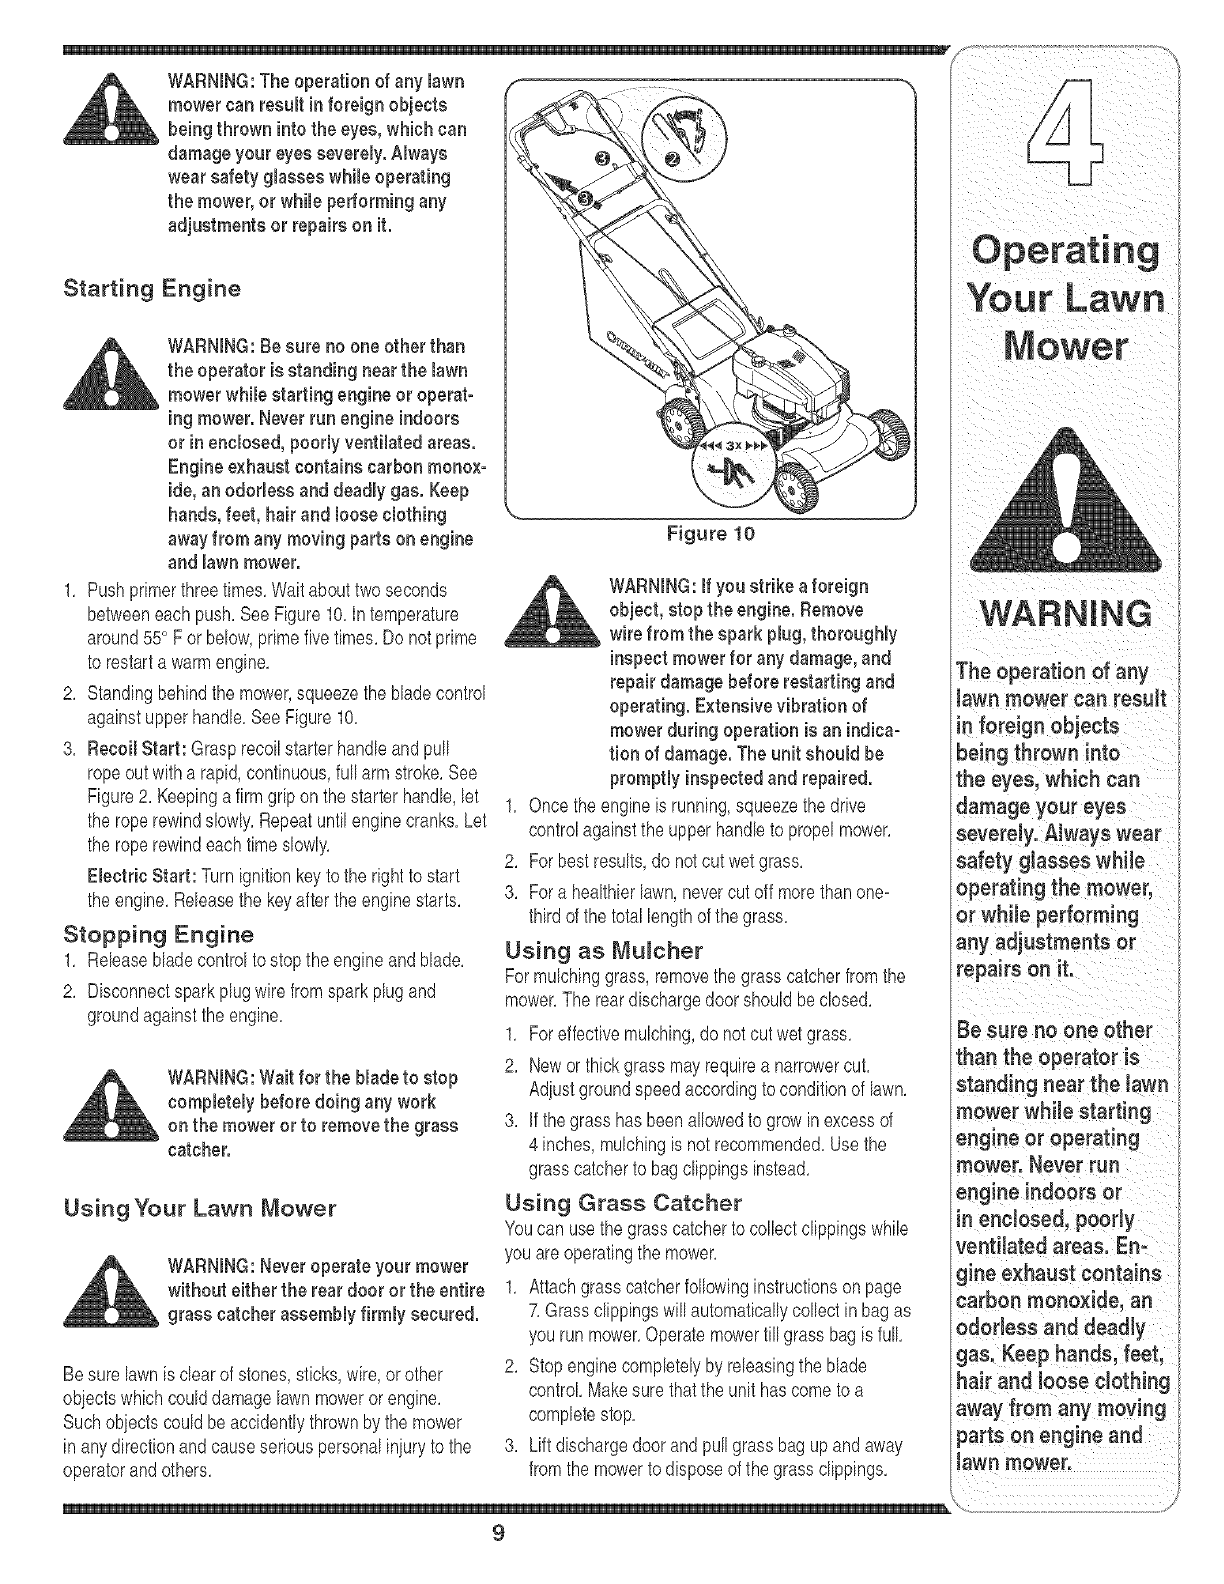
Starting Engine
_k ARNING: Besure no one other than
the operator is standing nearthe lawn
mowerwhile starting engine or operato
ing mower.Neverrun engine indoors
or in enclosed, poorly ventilated areas.
Engine exhaust contains carbon monox-
ide, an odorless and deadly gas. Keep
hands,feet, hair and loose clothing
awayfrom any moving parts onengine
and lawn mower.
1, Pushprimerthreetimes,Waitabouttwoseconds
betweeneachpush,SeeFigure10,Intemperature
around55° F or below,primefivetimes,Do not prime
to restarta warmengine,
2, Standingbehindthe mower,squeezethe bladecontrol
againstupperhandle,SeeFigure10,
3, Recoil Start: Grasprecoilstarterhandleandpull
ropeout witha rapid,continuous,full arm stroke,See
Figure2, Keepingafirmgrip onthe starterhandle,let
the roperewindslowly,Repeatuntilenginecranks,Let
the roperewindeachtimeslowly,
Electric Start: Turnignitionkeytothe rightto start
the engine,Releasethe keyaftertheenginestarts,
Stopping Engine
1, Releasebladecontrolto stopthe engineandblade,
2, Disconnectsparkplugwire fromsparkplugand
groundagainstthe engine,
WARNING:Wait for the blade to stop
completely before doing any work
on the moweror to removethe grass
catcher.
Using Your Lawn Mower
WARNING:Neveroperate your mower
without either the rear door or the entire
grass catcher assembly firmly secured.
Be surelawnis clear of stones,sticks,wire,or other
obiectswhichcoulddamagelawnmowerorengine,
Suchobiectscouldbe accidentlythrownby the mower
in anydirectionandcauseseriouspersonaliniuryto the
operatorandothers,
Figure 10
WARNING:If you strike aforeign
object, stop the engine. Remove
wire from the spark plug, thoroughly
inspect mowerfor any damage,and
repair damage before restarting and
operating. Extensivevibration of
mower during operation isan indica-
tion of damage.The unit should be
promptly inspected and repaired.
1, Oncethe engineis running,squeezethe drive
controlagainstthe upperhandleto propelmower,
2, For bestresults,do notcut wetgrass,
3, Fora healthierlawn,nevercutoff morethanone-
thirdof the totallengthof the grass,
Using as Muncher
Formulchinggrass,removethe grasscatcherfromthe
mower,The reardischargedoorshouldbeclosed,
1, Foreffectivemulching,do notcut wetgrass,
2, Neworthickgrassmayrequirea narrowercut,
Adiustgroundspeedaccordingto conditionof lawn,
3, If thegrasshas beenallowedto growinexcessof
4 inches,mulchingis not recommended,Usethe
grasscatcherto bagclippingsinstead,
Using Grass Catcher
Youcan usethe grasscatcherto collectclippingswhile
youareoperatingthe mower,
1, Attachgrasscatcherfollowinginstructionsonpage
7,Grassclippingswill automaticallycollect inbagas
yourun mower,Operatemowertill grassbagis full,
2, Stopenginecompletelyby releasingthe blade
control Makesure thatthe unit hascometo a
completestop,
3, Liftdischargedoorand pullgrassbagup andaway
fromthe mowerto disposeof the grassclippings,
y
can result
being thrown into
the eyes Which can ;
damage your eyes
severe!y. Nways wear
safety glasses while
iioperating the mower,
-_ngineor operating
_ower. Never tun
engine !ndoors or
in enclosed poorly
ventilated areas' En_
gine exhaust Contains
carbon monoxide, an /
odorless and deadly
_gas, Keep hands, feet,
hair and loose Clothing
away from any mov ng
9
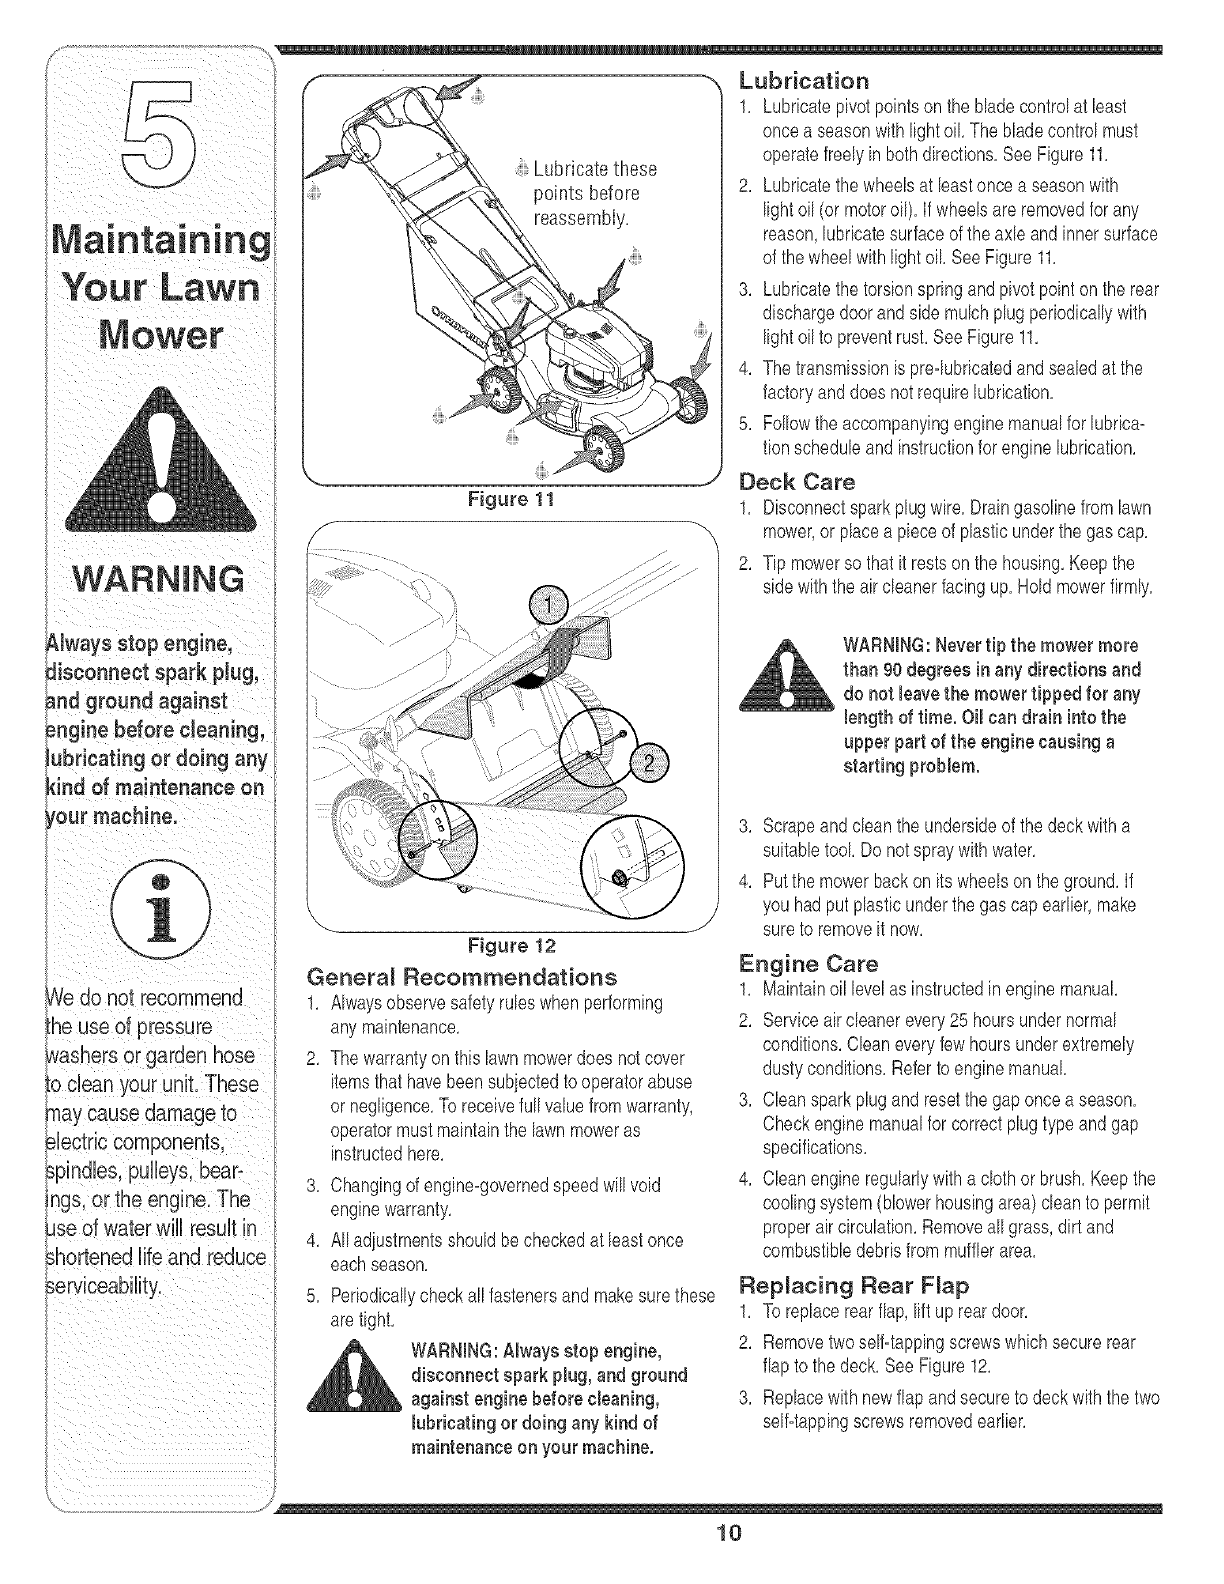
f====== Lubrication
/_-J _ 1, Lubricatepivotpointson the bladecontrolat least
"_ _--'_ oncea seasonwithlightoil The bladecontrolmust
r===_) ) _ ... . operatefreely inboth directions,SeeFigurell,
\ v /_ _. LuDrlca[e-[nose
- _ pc nts before 2, Lubricatethe wheelsat leastoncea seasonwith
-- reassembI' lightoil (or motoroil). Ifwheelsare removedfor any
,, ,, ,, y= ..
M _ | ['1 t_ ! r'_ | r'_ C reason,lubricatesurfaceof the axleand innersurface
_= ='3_ = = ........ of the wheelwith hghtoff,SeeFigure11,
.......... ..............
Figure 12
General Recommendations
1, Alwaysobservesafetyruleswhen performing
any maintenance,
2, Thewarrantyon thislawnmowerdoes notcover
itemsthathavebeensubjectedto operatorabuse
or negfigence,Toreceivefull valuefromwarranty,
operatormustmaintainthe lawnmoweras
instructedhere,
3, Changingofengine=governedspeedwill void
enginewarranty,
4, Alladiustmentsshouldbecheckedat leastonce
eachseason,
5, Periodicallycheckall fastenersand makesurethese
aretight,
_ ARNING:Always stop engine,
disconnect spark plug, and ground
against engine before cleaning,
lubricating or doing any kind of
maintenance on your machine.
Io not reCommend
3, Lubricatethe torsionspringandpivotpointonthe rear
dischargedoorandside mulchplugperiodicallywith
lightoil to preventrust,SeeFigure11,
4, Thetransmissionis pro=lubricatedandsealedat the
factoryanddoes notrequirelubrication,
5, Followthe accompanyingenginemanualfor lubrica-
tionscheduleandinstructionfor enginelubrication,
Deck Care
1, Disconnectsparkplugwire,Draingasolinefromlawn
mower,or placea pieceof plasticunderthegas cap,
2, Tip mowerso that it restson the housing,Keepthe
sidewiththe aircleanerfacingup,Hold mowerfirmly,
WARNING:Nevertip the mowermore
than 90 degrees in any directions and
do not leavethe mowertipped for any
length of time. Oil can drain intothe
upper part of the enginecausing a
starting problem.
3, Scrapeandclean the undersideof the deckwitha
suitabletool Do notspraywithwater,
4, Putthe mowerbackonits wheelsonthe ground,If
you hadput plasticunderthe gas capearlier,make
sureto removeit now,
Engine Care
1, Maintainoil levelas instructedin enginemanual,
2, Serviceaircleanerevery25 hoursundernormal
conditions,Cleaneveryfewhoursunderextremely
dustyconditions,Referto enginemanual
3, Cleansparkplugandresetthegap oncea season,
Checkenginemanualfor correctplugtype andgap
specifications,
4, Cleanengineregularlywitha clothorbrush,Keepthe
coolingsystem(blowerhousingarea)cleanto permit
properaircirculation,Removeallgrass,dirt and
combustibledebrisfrom mufflerarea,
Replacing Rear Flap
1, Toreplacerearflap,lift upreardoor,
2, Removetwoself=tappingscrewswhichsecurerear
flapto thedeck, SeeFigure12,
3, Replacewith newflapandsecureto deckwiththe two
self=tappingscrewsremovedearlier,
10
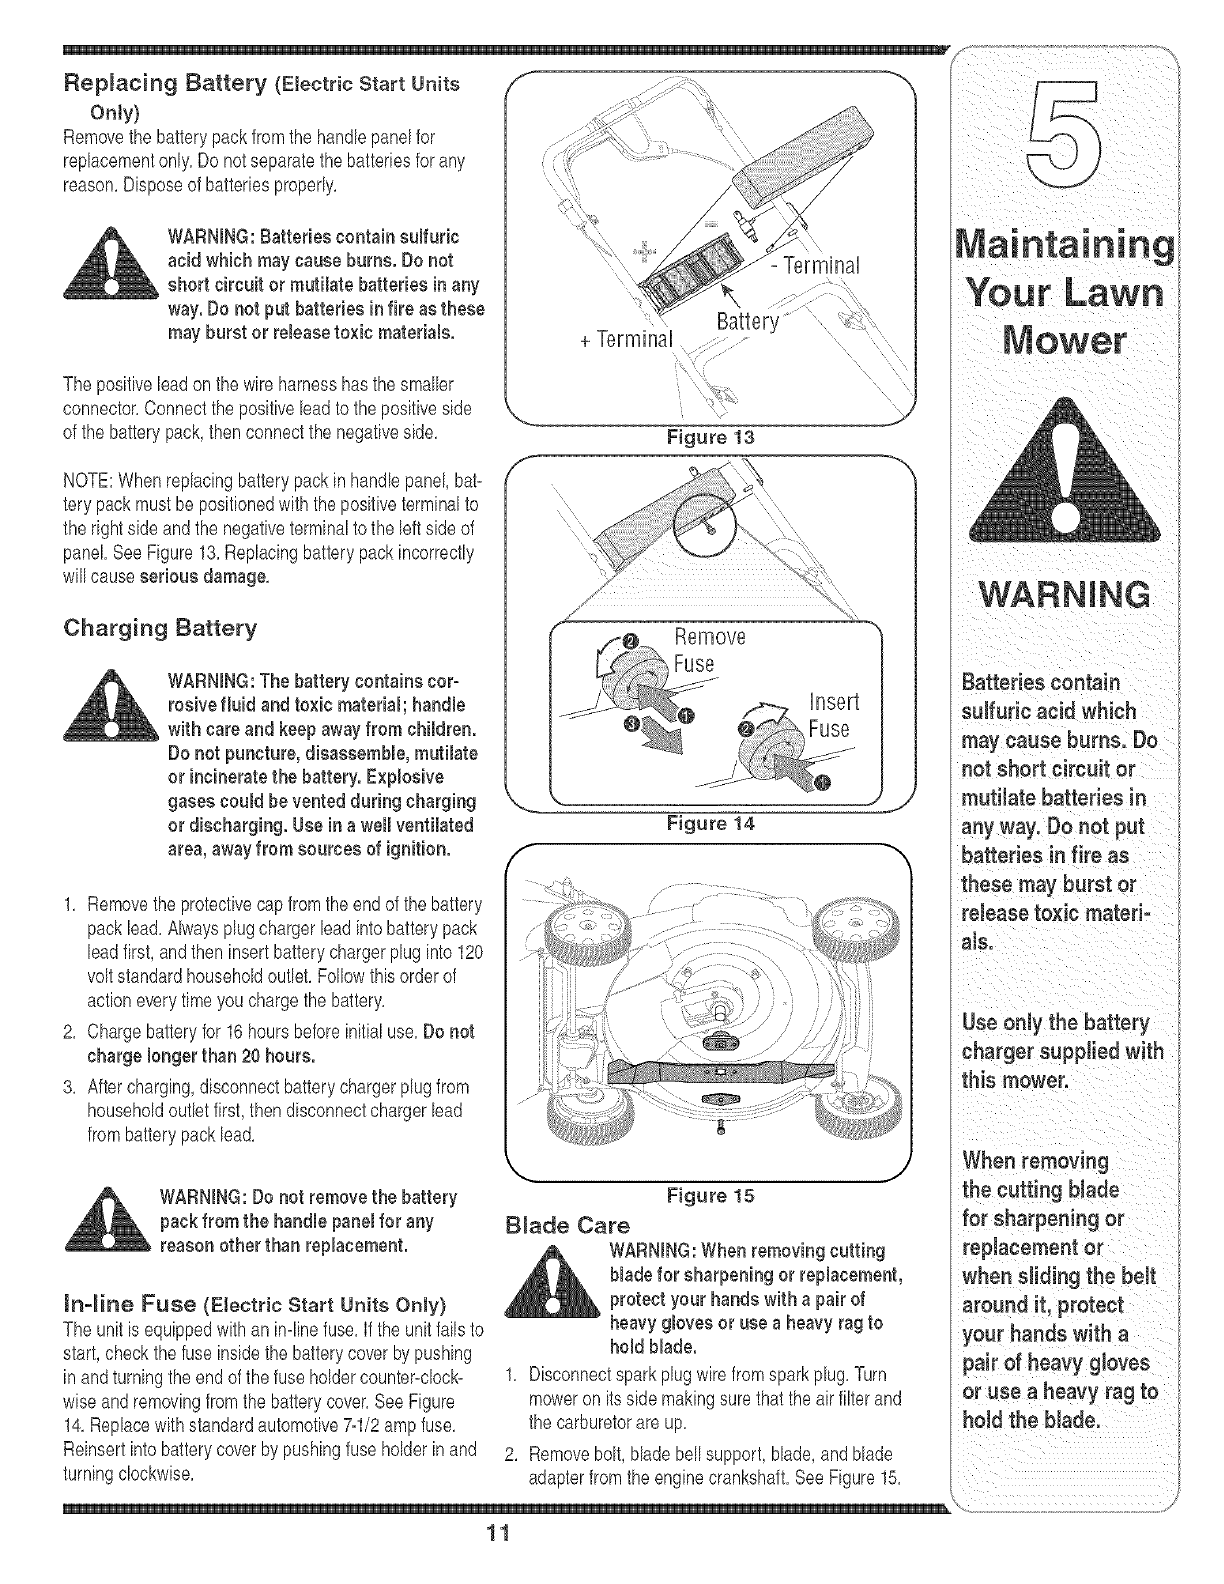
Replacing Battery (Electric Start Units f -- "_
Only)
Removethe batterypackfromthe handlepanelfor ........
replacementonly.Do notseparatethe batteriesfor any
reason.Disposeof batterbs properly. _i
WARNING:Batteries contain sulfuric
acid whichmaycause burns. Do not
short circuit or mutilate batteries inany
way.Do not put batteries infire as these
may buret or release toxic materials.
The positivebad onthe wire harnesshasthe smalbr
connector.Connectthe positivebad to the positiveside
of the batterypack,thenconnectthe negativeside.
NOTE:Whenreplacingbatterypackin handb panel,bat-
tery packmust bepositionedwiththe positiveterminalto
the rightside andthe negativeterminalto the leftside of
panel SeeFigure13.Replacingbatterypackincorrectly
will causeserious damage,
Charging Battery
WARNING:The battery contains cor-
rosive fluid and toxic material; handle
with care and keep awayfrom children.
Do not puncture, disassemble, mutilate
or incineratethe battery. Explosive
gases could be vented during charging
or discharging. Use ina well ventilated
area,awayfrom sources of ignition.
1. Removethe protectivecap fromthe endof the battery
packbad. Alwaysplugchargerbad intobatterypack
bad first,andthen insertbatterychargerpluginto120
voltstandardhouseholdoutlet.Followthisorderof
actioneverytimeyou chargethe battery.
2. Chargebatteryfor 16hoursbeforeinitialuse.Do not
charge longer than 20 hours.
3. Aftercharging,disconnectbatterychargerplugfrom
householdoutbt first,then disconnectchargerbad
frombatterypackbad.
WARNING:Do not removethe battery
pack from the handle panelfor any
reason other than replacement.
mnqine Fuse (EJectric Start Units Only)
The unit is equippedwithan in=linefuse. Ifthe unit failsto
start,checkthe fuseinsidethe batterycoverby pushing
in andturningtheend ofthe fuseholdercounter=clock=
wiseandremovingfromthe batterycover.SeeFigure
14.Replacewithstandardautomotive7=1/2ampfuse.
Reinsertintobatterycoverby pushingfuseholderinand
turningclockwise.
+ Terminal ......:::::.........
a
Figure 13
Figure 14
_Use only the battery
iiiii_ _ i_ i _f_iiiii_ /
ii i . /
When removing
"Jii the cutting blade
Figure 15 _for sharpen ng Or
B_ade Care
_ WARNING:Whenremovingcutting replacement or
blade for sharpening or replacement, when sliding the belt
i /
protect your handswith a pair of around it, protect
heavy gbves or use a heavy ragto your hands with a
hold blade, pair of heavy glOVes
1. Disconnectsparkplug'direfromsparkplug.Turn or use a heavy rag to
moweronits sidemakingsurethatthe air filterand
thecarburetorareup, he d the bade.
2. Removebolt,bladebellsupport,blade,andblade
adapterfrom the enginecrankshaft.SeeFigure15.
11
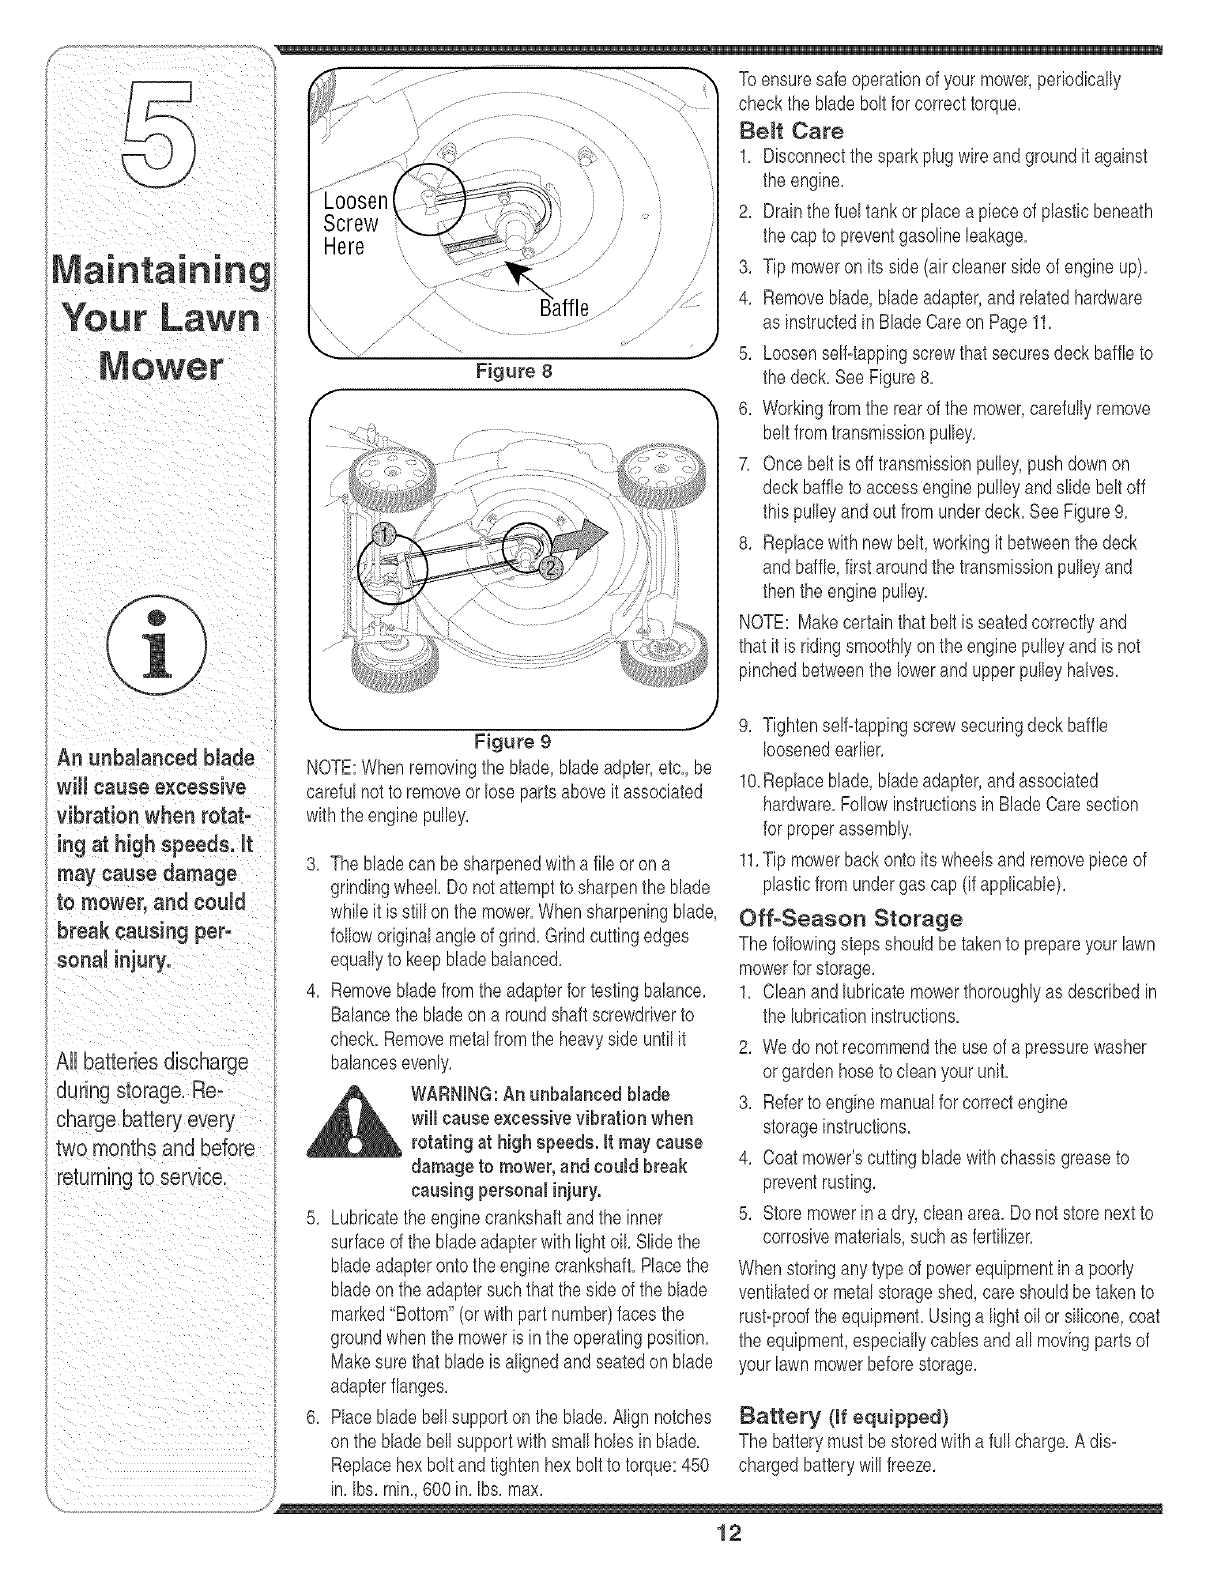
Maintaining
Figure 8
f
To ensuresafeoperationof your mower,periodically
checkthe bladebolt for correcttorque,
Be_t Care
1, Disconnectthe sparkplugwire andgroundit against
the engine,
2, Drainthe fueltankor placea pieceof plasticbeneath
the capto preventgasolineleakage,
3, Tip moweron its side(aircleanersideof engineup),
4, Removeblade,bladeadapter,andrelatedhardware
as instructedin BladeCareon Page11,
5, Loosenself-tappingscrewthatsecuresdeckbaffleto
the deck,SeeFigure8,
6, Workingfromthe rearof the mower,carefullyremove
beltfromtransmissionpulley,
7, Oncebelt is offtransmissionpulley,pushdownon
deckbaffleto accessenginepulleyandslide belt off
thispulleyandout fromunderdeck,SeeFigure9,
8, Replacewith newbelt,workingit betweenthedeck
andbaffle,firstaroundthe transmissionpulleyand
thenthe enginepulley,
NOTE: Makecertainthat beltis seatedcorrectlyand
thatit is ridingsmoothlyonthe enginepulleyandis not
pinchedbetweenthe lowerand upperpulleyhalves,
\
An unbalanced blade
wil! cause excessive
vibration when rotat-
ing at high speeds, it
may cause damage
to mower, and could
break causing per-
sonal injury.
All batteries discharge
during storage, Re-
charge batteryevery
two months and before
returningto service.
Figure 9
NOTE:Whenremovingthe blade,bladeadpter,etc,,be
carefulnot to removeor lose partsaboveit associated
withthe enginepulley,
3, The bladecan besharpenedwitha file or ona
grindingwheel Do notattemptto sharpenthe blade
whileit is stillonthe mower,When sharpeningblade,
followoriginalangleof grind,Grindcuttingedges
equallyto keepbladebalanced,
4, Removebladefromthe adapterfor testingbalance,
Balancethe bladeon a roundshaft screwdriverto
check,Removemetalfromthe heavyside untilit
balancesevenly,
_IL ARNING:An unbalanced blade
will causeexcessive vibration when
rotating at high speeds. It maycause
damage to mower,and could break
causing personalinjury.
5, Lubricatethe enginecrankshaftandthe inner
surfaceof the bladeadapterwithlightoil, Slidethe
bladeadapterontotheenginecrankshaft,Placethe
bladeon the adaptersuchthat theside of the blade
marked"Bottom"(orwith partnumber)facesthe
groundwhenthe moweris inthe operatingposition,
Makesurethat bladeis alignedandseatedon blade
adapterflanges,
6, Placebladebellsupportonthe blade,Alignnotches
onthe bladebellsupportwithsmallholesin blade,
Replacehexboltand tightenhex boltto torque:450
in, Ibs,rain,,600in, Ibs, max,
9, Tightenself-tappingscrewsecuringdeckbaffle
loosenedearlier,
10,Replaceblade,bladeadapter,andassociated
hardware,Followinstructionsin BladeCaresection
for properassembly,
11,Tip mowerbackonto itswheelsandremovepieceof
plasticfromundergas cap(if applicable),
OffoSeason Storage
The followingstepsshouldbetakento prepareyour lawn
mowerfor storage,
1, Cleanandlubricatemowerthoroughlyas describedin
the lubricationinstructions,
2, Wedo not recommendthe use of a pressurewasher
orgardenhoseto cleanyourunit,
3, Referto enginemanualforcorrectengine
storageinstructions,
4, Coatmower'scuttingbladewithchassisgreaseto
preventrusting,
5, Storemowerina dry,cleanarea,Do not storenextto
corrosivematerials,suchas fertilizer,
When storinganytypeof powerequipmentin a poorly
ventilatedor metalstorageshed,careshouldbetakento
rust-proofthe equipment,Usinga lightoil orsilicone,coat
the equipment,especiallycablesandall movingpartsof
yourlawnmowerbeforestorage,
Battery (If equipped)
The batterymust bestoredwitha full charge,A dis_
chargedbatterywill freeze,
12

Notes
Mower
\
13

ble
Shooting
For repairs beyond
the minoradjust-
ments listed here,
eentact an authorized
serviee dealer, I
il_ _ i i i
Problem Cause Remedy
EnginefaiUsto start !_ BladecontroEdisengaged, i !. EngageNadeeontrol,
spa[k Plugwire disconneCte& 2: connect wire to Sparkpiug:
3. Filltankwithclean,freshgasoline.
8. Replacefusefollowinginstructions
on page11.
Engine runs erratic 1. Sparkplugwireloose. 1. Connectandtightenspark
plugwire.
2. Blockedfuel lineor stalefuel 2. Cleanfuel line; fill tankwithclean,
freshgasoline.
3. Ventingas cap plugged. 3. Clearvent.
4. Waterordirt infuel system. 4. Drainfuel tank.Refillwith
freshfuel.
5. Dirty aircleaner. 5. Referto enginemanual.
6. Carburetorout of adjustment. 6. Referto enginemanual
Engne overheats 1. Engineoil levellow. I. Fill crankcasewithproperoil
2. Airflow restricted. 2. Removeblowerhousng
I andclean.
3. Carburetornotadjustedproperly. 3. Referto enginemanual.
Occasional skips 1. Sparkpluggaptooclose. 1. Adjustgapto .030".
(hesitates)at 2. Carburetoridlemixtureadjustment 2. Referto enginemanual
high speed improperlyset.
2. Carburetorimproperlyadjusted.
Excessive 1. Cuttingbladelooseor unbalanced.
Vibration
2. Bentcuttingblade.
Mower will not 1, Wetgrass.
mulchgrass
2. Excessivelyhighgrass.
3. Dullblade.
Uneven cut 1. Dull blade.
Damagedorworn
3. belt.
3. Referto enginemanual
1. Tightenbladeandadapter.
Balanceblade.
2. Seean authorizedservicedealer.
2. Mowonceat a highcuttingheight,
then mowagainat desiredheight
or makea narrowercuttingpath.
3. Sharpenor replaceblade.
1. Sharpenor replaceblade.
wire andcleanout debris.
14
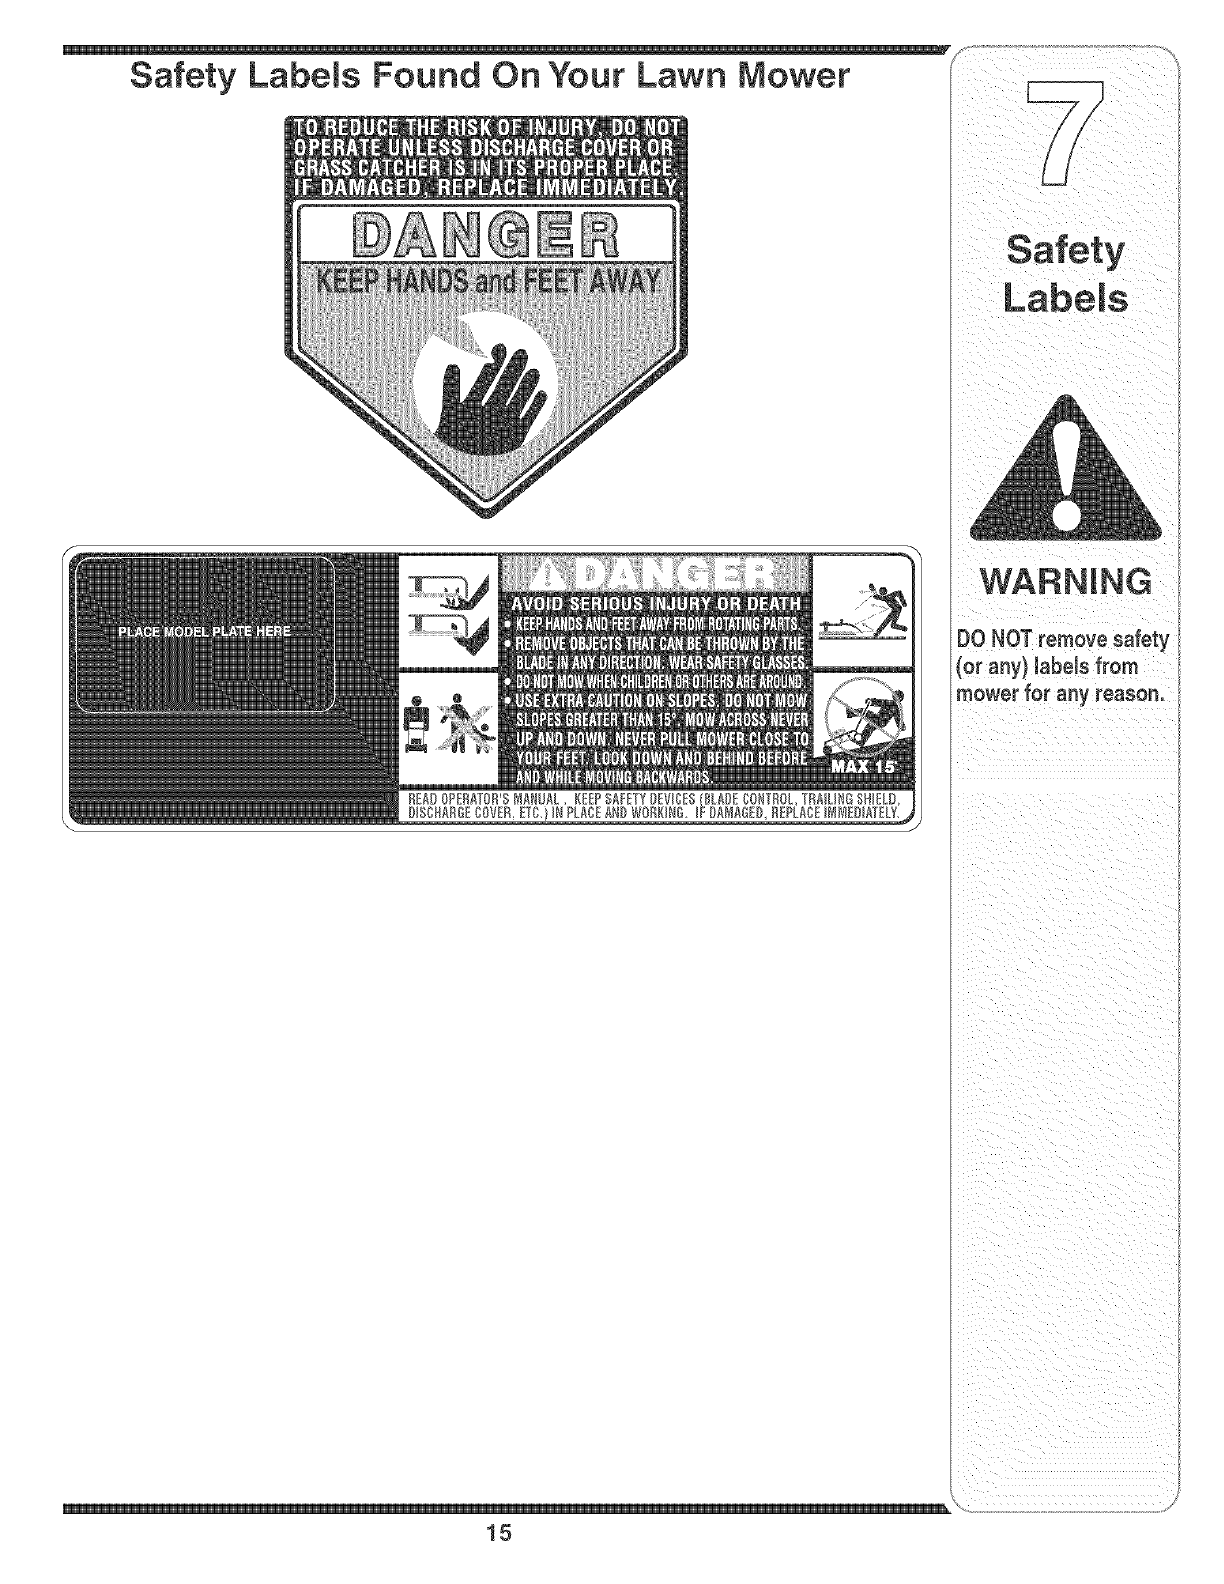
DONOTtemeve safety
(or any) labels frem
mewer fet any reasen,
\
15
Q
Q
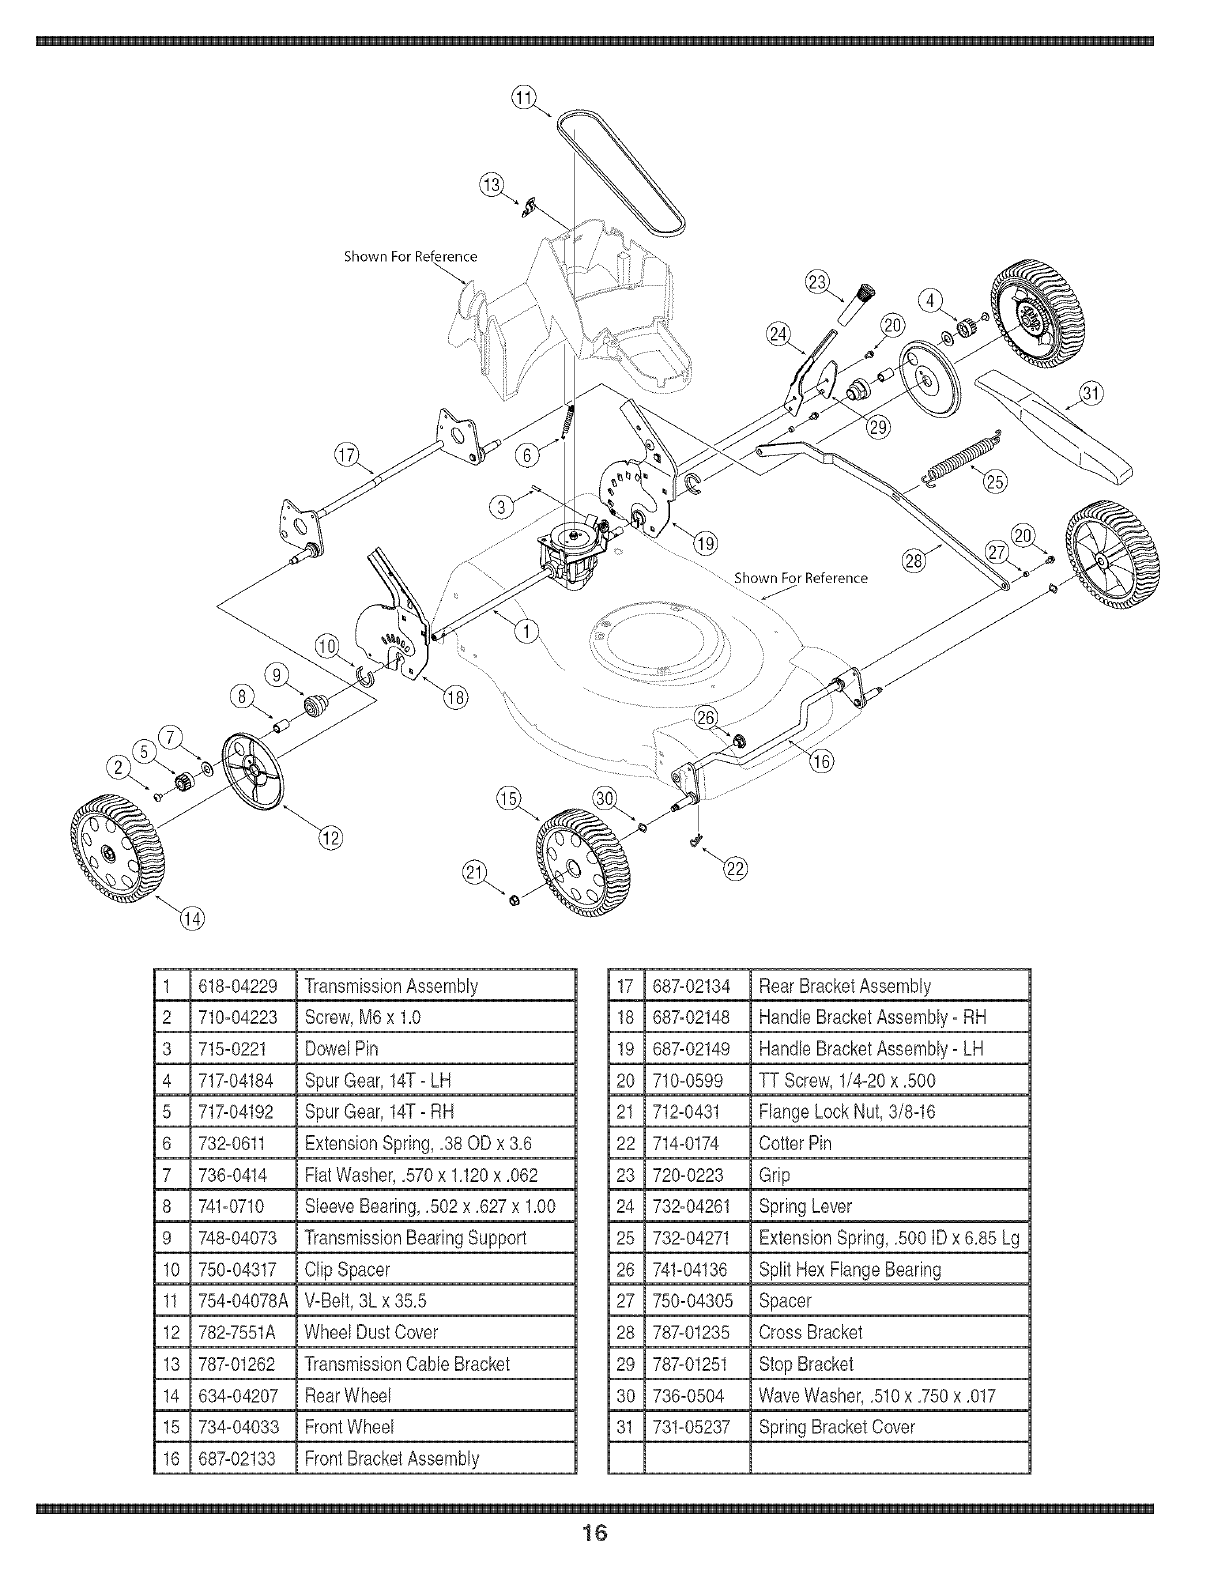
Shown For Reference
/............Shown For Reference
@
1 618-04229 TransmissionAssembly
2 710-04223 Screw,M6 x 1,0
3 715-0221 DowelPin
4 717-04184 SpurGear,14T-LH
5 717-04192 SpurGear,14T-RH
6 732-0611 ExtensionSpring,,38OD x 3,6
7 736-0414 FlatWasher,,570x 1,120x ,062
8 741-0710 SleeveBearing,,502 x ,627x 1,00
9 748-04073 TransmissionBearingSupport
10 750-04317 Clip Spacer
11 754-04078A WBelt,3Lx35,5
12 7867551A WheeIDustCover
13 787-01262 TransmissionCableBracket
14 634-04207 RearWheel
15 734-04033 FrontWheel
16 687-02133 FrontBracketAssembly
17 687-02134 RearBracketAssembly
18 687-02148 HandleBracketAssembly-RH
19 687-02149 HandleBracketAssembly-LH
20 710-0599 TT Screw,1/4-20x ,500
21 71b0431 Range LockNut, 3/8q6
22 714-0174 CotterPin
23 720-0223 Grip
24 732-04261 SpringLever
25 73b04271 ExtensionSpring,,500 IDx 6,85Lg
26 741-04136 Split HexFlangeBearing
27 750-04305 Spacer
28 787-01235 CrossBracket
29 787-01251 StopBracket
30 736-0504 WaveWasher,,510x ,750x ,017
31 731-05237 SpringBracketCover
16

1 721-04107 OilSeal
2 741-04106 PlasticBushing
3 707-04409 ShiftFork
4 707-04540 TransmissionBracket
5 710-04329 Screw,,1590Dx,610
6 710-04374 HexScrew,,159OD x,43
7 711-04386 OutputShaft
8 711-04394 [nputShaft
9 712-0411 HexLockNut,5/16-24
10 715-0129 SpirolPin
11 715-04030 DowelPin
12 717-04194 PlasticGear,28T
13 756-04151 Pulley,3,360D
14 721-04110 O-Ring
15 726-04043 PushNut,3/8 [Dx 3/40D
16 731-04883 LowerHousing
17 731-05099 UpperHousing
18 731-05100 ClutchLever
19 732-04278 CompressionSpring,,5251Dx,588
20 736-0105 BellWasher,,375x ,870x ,063
21 736-04170 FlatWasher,,508[D x 1,00OD
22 736-04178 FeltSIottedWasher
23 736-0572 FlatWasher,,510x 1,00x ,060
24 736-0864 ThrustWasher,,375x ,812x ,060
25 741-04116 BallBearing
1!IIIII iiiiiiii!i IIIIII
Z i i i
i i
Z
i_ ill _ i£i£i ii£i ii ii£i ii£i£i ii£i ii£i_
17
18

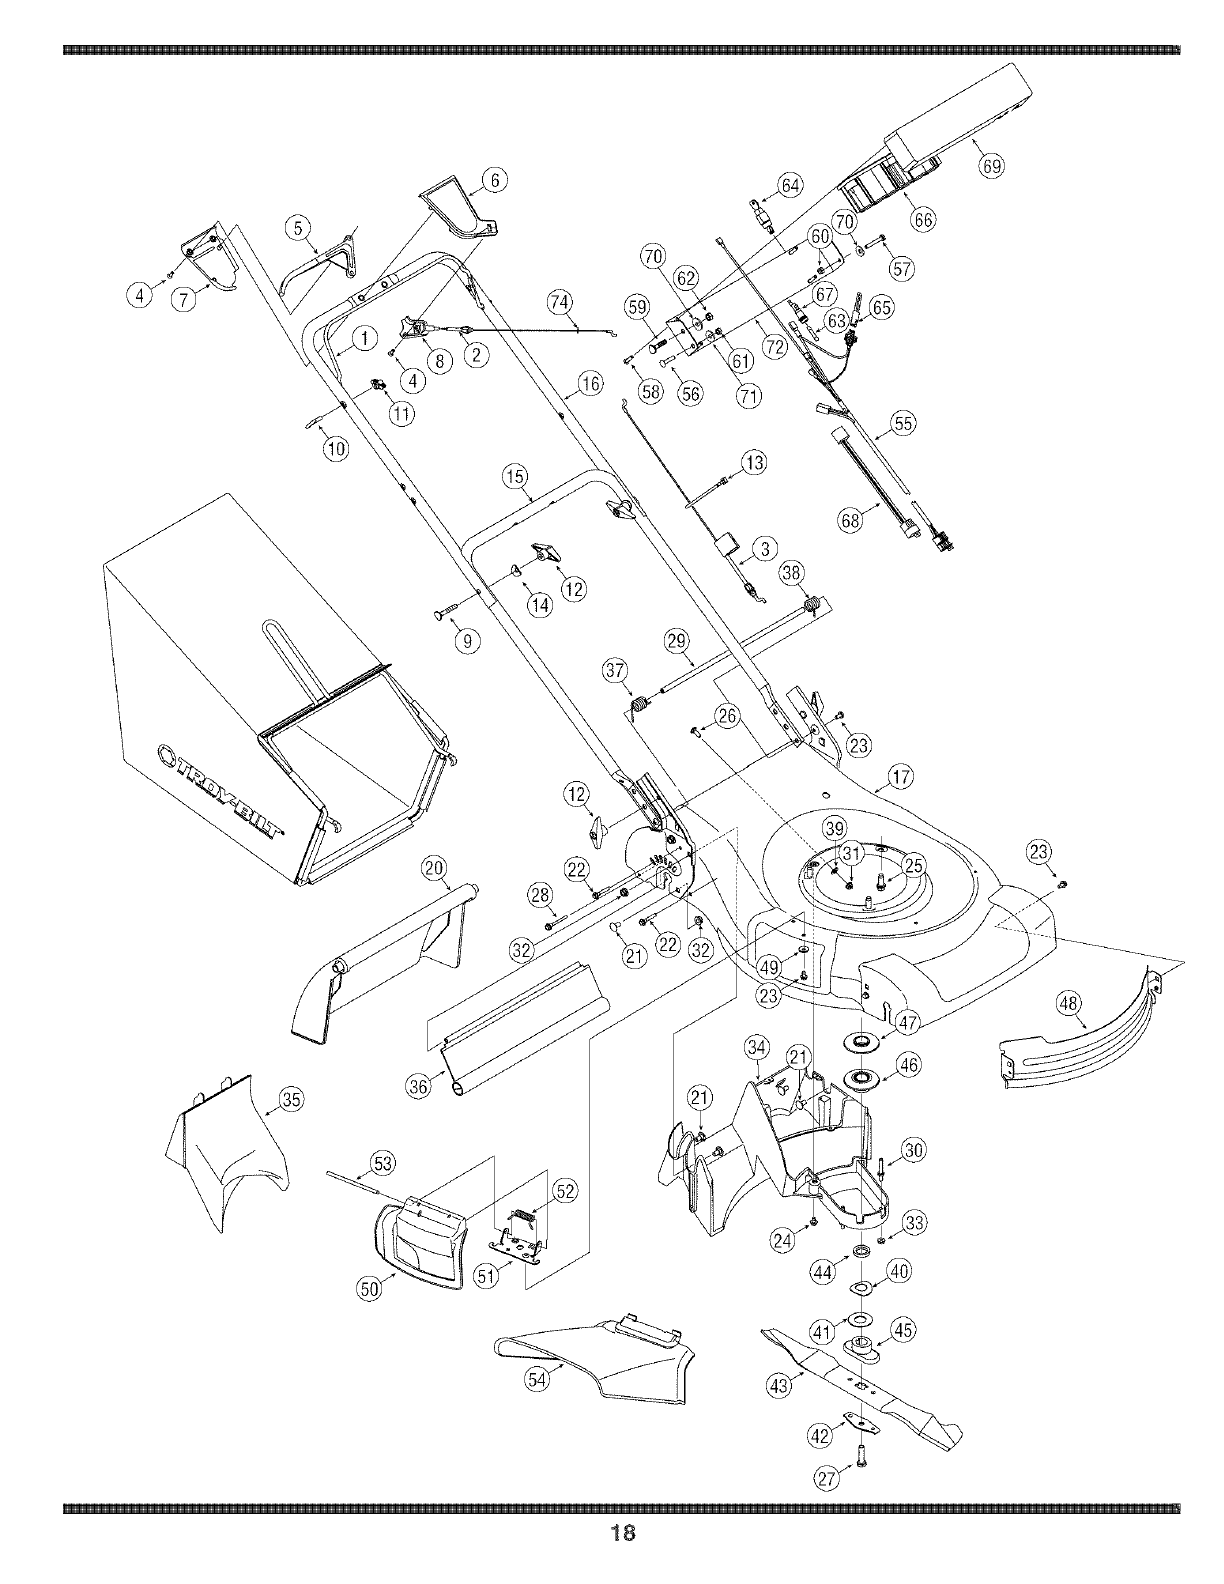
1 747_1161A BladeControl
2 746_04195 DriveCable
3 746_1130 ControlCable
4 710_1667 Screw,#10_16x ,625
5 731-0620 DriveControlLever
6 731q057 UpperControICover
7 731q058 LowerControlCov'er
8 731_1059 MountingCap
9 710q174 CarriageBolt,5/16_18x 2,0
10 710-1205 EyeBolt
11 720-0279 WingNut
12 720_0284 HandleKnob
13 725_0157 CableTie
14 736_0451 SaddleWasher,,320 x ,93 x ,060
15 749_04202 LowerHandle
16 749-04209 UpperHandle
17 787_01213 21"Deck
18 647_04048 GrassCatcherFrame
19 664_04042 GrassCatcher
20 731_05017 RearDoor
21 710_0260A CarriageBolt,5/16_18x,62
22 710q241 Screw,1/4_15x 1,00
23 710_0599 TT Screw,1/4_20x ,500
24 710_0653 TT Screw,1/4_20x ,375
25 710_0654A Screw,3/8_16x1,00
26 710_0703 CarriageScrew,1/4_20x ,75
27 710q044 Screw,3/8_24x1,50
28 710q802 Screw,1/4_20x 2,00
29 711_04374 DoorPivotRod
30 711_0993 BeltGuard Pin
31 712_04064 FlangeLockNut, 1/4_20
32 712_3004A FlangeLockNut, 5/16-18
33 712_3027 FlangeLockNut, 1/4_20
34 731_05154 DeckBaffle
35 731_05157 MulchRug
36 731_05185 Trailshield
37 732_04264 DoorTorsionSpring- RR
39 736_0463 FlatWasher,,25 x ,630x ,0515
40 736_0513 SpringWasher,,890x 1,70x ,048
41 736_0514 FlatWasher,,885 x 1,850x ,060
42 736-0524B BladeBelISupport
43 742_0741 21"MulchingBlade
44 748_0358 EngineSpacer
45 748-0376C BladeAdapter
46 756_04156 LowerEnginePulley
47 756_04157 UpperEnginePulley
48 787-01224 FrontDeckBaffle
49 736_0270 BellWasher,,265 x ,75x ,062
50 687-02055 MulchingBaffle
51 17032A DeflectorChuteAdapter
52 732q014 TorsionSpring
53 747_0710 HingePin
54 731-04177 SideDischargeChute
55 725_1442t ElectricStarterHarnessAssembly
56 710_01111 Screw,1/4_20x 1,25
57 710_01361 Screw,1/4_20x 1,75
58 710_09691 Screw,#12_16x 1,00
59 710_12501 CurvedCarriageBolt,5/16x 1,5
60 712_0324t HexLockNut, 1/4_20
61 712-30061 HexNut, 1/4-20
62 712_30101 HexNut,5/16_18
63 725_02981 7,5AmpFuse
64 725_0873t KeySwitch
65 725_12061 Plug
66 725_12761 12VoltBattery
67 725_1428t FuseHolder
68 725q5381 ExtHarness
69 731_0891A1-UpperBatteryTray
70 736_02421 BellWasher,,340 x ,872x ,060
71 736_02701 BellWasher,,265 x ,75x ,062
72 782_9012t LowerBatteryTray
73 725_0727t BatteryCharger(NotShown)
74 735-0226 RubberGromet
tIf equipped
parts, centact 1,800,
e48L6776or visit www.
machine,use Factory
Approved Parts.
V-BELTS are specially
designed to engage
and disengage safely.
A substitute non OEMI
V-Belt can be danger-
ous by not disengaging
completely.
\
19

MANUFACTURER'S LIMITED WARRANTY FOR
®
The limitedwarrantyset forthbelowis givenbyTroy=BiltLLCwithrespect
to newmerchandisepurchasedandusedin the UnitedStates,itsposses=
sionsandterritories.
"Troy=Bilt"warrantsthis productagainstdefectsinmaterialandworkman=
shipfor a periodof two(2)yearscommencingon thedate of original
purchaseandwill,at its option,repairorreplace,freeof charge,any part
foundto bedefectivein materialsor workmanship.This limitedwarranty
shallonly applyif this producthasbeenoperatedand maintainedin
accordancewiththe Operator'sManualfurnishedwiththe product,and
has notbeensubiectto misuse,abuse,commerdaluse,neglect,accident,
impropermaintenance,alteration,vandalism,theft,fire,water,or damage
becauseof other perilor naturaldisaster.Damageresultingfromthe
installationor use ofany part,accessoryor attachmentnot approvedby
Troy=Biltfor use withtheproduct(s)coveredby this manualwill voidyour
warrantyas to any resultingdamage.
Normalwearpartsarewarrantedto befree fromdefectsinmaterialand
workmanshipfor aperiodof thirty (30)daysfromthedate of purchase.
Normalwearpartsinclude,butare notlimitedto itemssuchas: batteries,
belts,blades,bladeadapters,grassbags,riderdeckwheels,seats,snow
throwerskidshoes,shaveplates,augerspiralrubberandtires.
NOWTO OBTAIN SERVICE: Warranty service is available, WITH
PROOFOF PURCHASE,through your local authorizedservice
dealer, To locate the dealer in your area, check your Yellow Pages,
or contact Troy=BiltLLC at RO, Box 361131,Cleveland, Ohio 44136=
0019, or can 1=800=520=5520or 1=330=558=7220,or log on to our
Web site at www,troybilt,com,
This limitedwarrantydoesnot providecoverageinthe followingcases:
a. The engineor componentpartsthereof.Theseitemsmay
carrya separatemanufacturer'swarranty.Referto applicable
manufacturer'swarrantyfor termsandconditions.
b. Logsplitterpumps,valves,andcylindershaveaseparateone
yearwarranty.
c. Routinemaintenanceitemssuchas lubricants,filters,blade
sharpening,tune=ups,brakeadiustments,clutch adiustments,
deckadiustments,andnormaldeteriorationof the exteriorfinish
dueto use orexposure.
d. Servicecompletedbysomeoneotherthananauthorizedservice
dealer.
e. Troy=Biltdoesnot extendanywarrantyfor productssold or
exportedoutsideof the UnitedStates,its possessionsand
territories,exceptthosesold throughTroy=Bilt'sauthorized
channelsof exportdistribution.
f. Replacementpartsthatare notgenuineTroy=Biltparts.
g. Transportationchargesandservicecalls.
No implied warranty, including any implied warranty of merchant°
ability of fitness for a particular purpose, applies after the applicable
period of express written warranty above as to the parts as identi-
fied. No other express warranty, whether written or oral, except as
mentioned above,given by any person or entity, including a dealer or
retailer,with respect to any product,shall bind Troy-Bilt. During the
period of the warranty,the exclusive remedy is repair or replacement
of the product as set forth above.
The provisions as set forth inthis warranty provide the sole and
exclusive remedyarising from the sale. Troy-Bilt shall not be liable
for incidentalor consequential loss or damage including,without
limitation, expenses incurredfor substitute orreplacement lawn care
services or for rental expenses to temporarily replace a warranted
product.
Somestatesdo not allowtheexclusionor limitationof inddentalor
consequentialdamages,or limitationson howlonganimpliedwarranty
lasts,so the aboveexclusionsor limitationsmaynotapplyto you.
In noeventshall recoveryof any kind begreaterthanthe amountof the
purchasepriceof the productsold.Alteration of safety features of the
product shall void this warranty. Youassumethe riskandliabilityfor
loss,damage,or iniuryto youand yourpropertyand/or to othersandtheir
propertyarisingout of the misuseor inabilityto use the product.
This limitedwarrantyshall notextendto anyoneotherthanthe original
purchaseror to the personfor whomit waspurchasedas a gift.
HOWSTATELAW RELATESTO THiSWARRANTY:This limitedwar-
rantygh,'esyouspecificlegalrights,andyou mayalso haveother rights
whichvaryfromstateto state,
IMPORTANT:OwnermustpresentOriginalProofof Purchaseto obtain
warrantycoverage,
Troy-Bilt LLC, P.O. BOX 361131 CLEVELAND, OHIO 44136-0019; Phone: 1-800-520-5520, 1-330-558-7220
