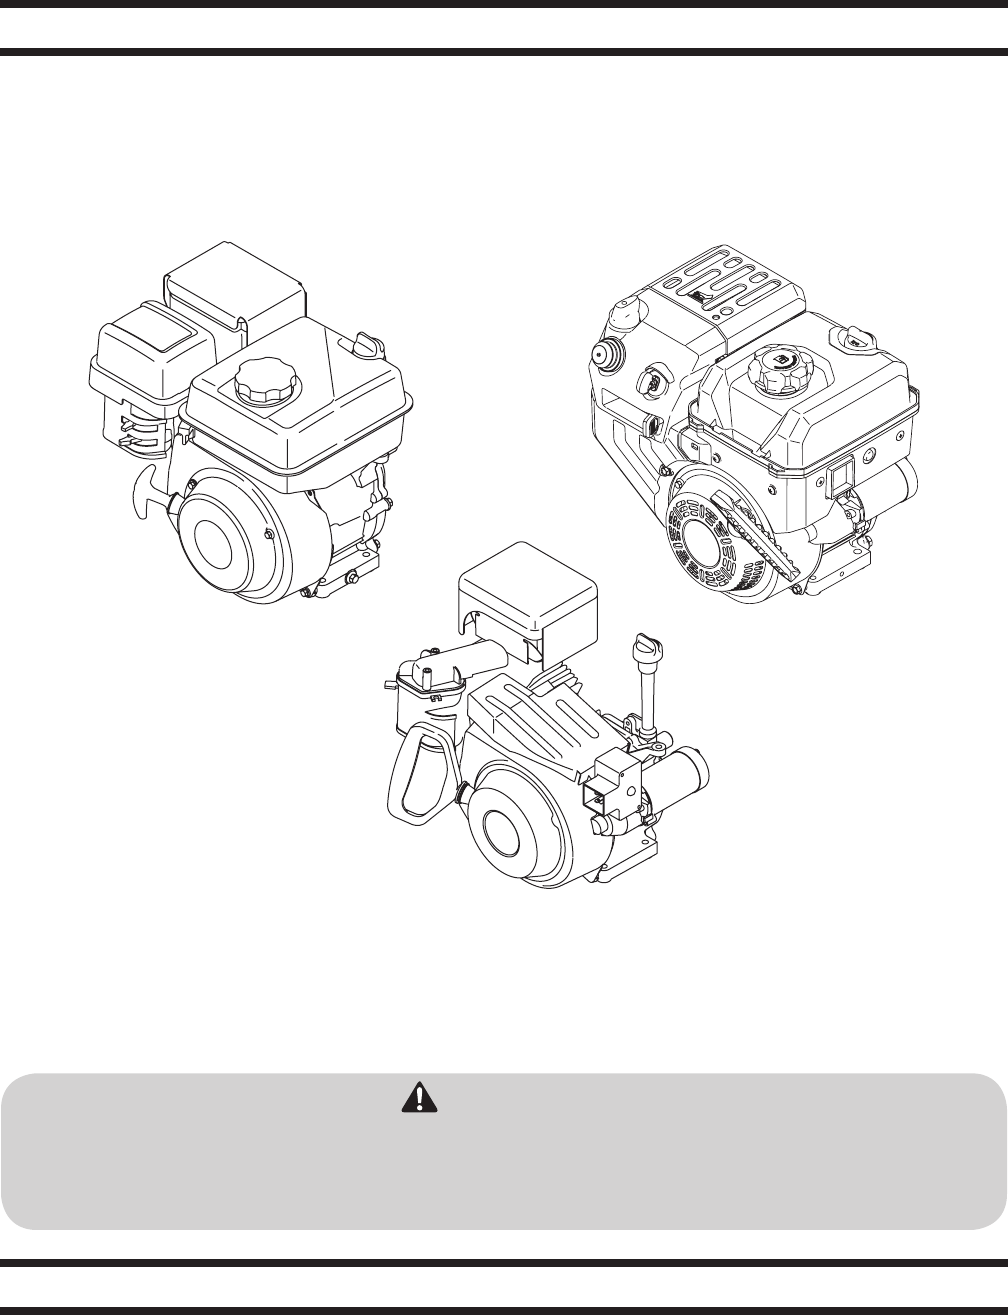
MTD 165 WU User Manual ENGINE Manuals And Guides 1610017L
User Manual: MTD 165-WU 165-WU MTD ENGINE - Manuals and Guides View the owners manual for your MTD ENGINE #165WU. Home:Lawn & Garden Parts:MTD Parts:MTD ENGINE Manual
Open the PDF directly: View PDF ![]() .
.
Page Count: 44
MTD LLC, P.O. BOX 361131 CLEVELAND, OHIO 44136-0019
Safe Operation Practices • Set-Up • Operation • Maintenance • Troubleshooting • Warranty
WARNING
READ AND FOLLOW ALL SAFETY RULES AND INSTRUCTIONS IN THIS MANUAL
BEFORE ATTEMPTING TO OPERATE THIS MACHINE.
FAILURE TO COMPLY WITH THESE INSTRUCTIONS MAY RESULT IN PERSONAL INJURY.
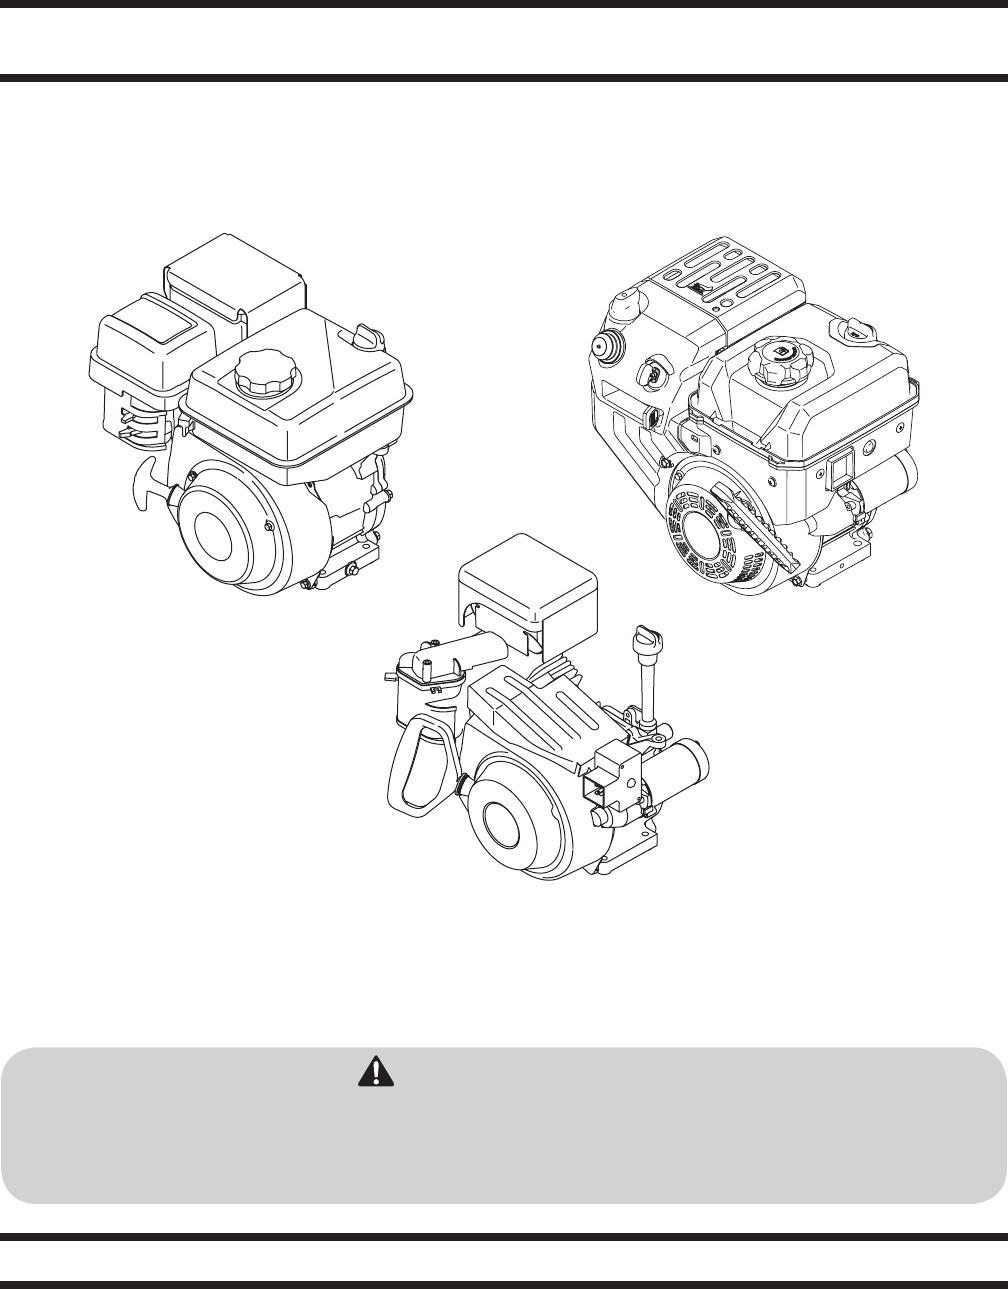
OperatOr’s Manual
179cc, 208cc & 243cc OHV Horizontal Shaft Engine
Form No. 769-11570
(May 10, 2016)
This Operator’s Manual is an important part of your new engine. It will help you prepare and maintain the engine for the best
performance. Please read and understand the contents before operating the engine.
Thank You
Customer Support
Please do NOT return the machine to the retailer or dealer without first contacting our Customer Support Department.
If you have difficulty with this product or have any questions regarding the controls, operation, or maintenance of this
engine, you can seek help from the experts. Choose from the options below:
◊ Visit us on the web at www.mtdproducts.com
See How-to Maintenance and Parts Installation Videos at www.mtdparts.com/KnowledgeCenter
◊ Call a Customer Support Representative at (800) 800-7310 or (330) 220-4683
◊ Write us at MTD LLC • P.O. Box 361131 • Cleveland, OH • 44136-0019
Model NuMber/Serial NuMber
/
Record Product Information
Before operating your new engine, please locate the model plate
on the engine and record the information in the provided area
to the right. This information will be necessary, should you seek
technical support via our web site or with your local dealer.
To The Owner 1
2
Safe Operation Practices ........................................ 3
Safety Symbols ........................................................ 5
Set-Up ....................................................................... 6
Controls & Features ................................................. 9
Operation ................................................................10
Maintenance ...........................................................13
Troubleshooting .....................................................19
Replacement Parts ................................................ 20
Emission Statement/Warranty .............................21
Spanish ................................................................... 23
Table of Contents
Important Safe Operation Practices 2
3
WARNING! This symbol points out important safety instructions which, if not followed,
could endanger the personal safety and/or property of yourself and others. Read and follow
all instructions in this manual before attempting to operate the equipment. Failure to
comply with these instructions may result in personal injury. When you see this symbol.
HEED ITS WARNING!
DANGER! This engine was built to be operated according to the safe operation practices in
this manual. As with any type of power equipment, carelessness or error on the part of the
operator can result in serious injury. Failure to observe the following safety instructions
could result in serious injury or death.
CALIFORNIA PROPOSITION 65
WARNING! Engine Exhaust, some of its constituents, and certain vehicle components
contain or emit chemicals known to State of California to cause cancer and birth defects
or other reproductive harm.
Training
1. Read, understand and follow all instructions on the engine
and in the manual(s) before attempting to assemble and
operate. Keep this manual in a safe place for future and
regular reference and for ordering replacement parts.
2. Be familiar with all controls and their proper operation.
Know how to stop the engine and disengage them quickly.
3. Never allow children under 14 years of age to operate the
engine. Children 14 and over should read and understand
the instructions and safe operation practices in this manual
and be trained and supervised by an adult.
4. Never allow adults to operate the machine without proper
instruction.
5. Keep the area of operation clear of all persons, particularly
small children and pets. Stop machine if anyone enters the
area.
Preparation
1. Wear sturdy, rough-soled work shoes and close fitting
slacks and shirts. Loose fitting clothes or jewelry can be
caught in the moving parts. Never operate the machine in
bare feet or sandals.
2. Disengage clutch levers and shift (if equipped) into neutral
(“N”) before starting the engine.
3. Never leave the engine running while unattended.
4. Never attempt to make any adjustments while the engine
is running, except where specifically recommended in the
operator’s manual.
Safe Handling of Gasoline:
To avoid personal injury or property damage, use extreme care
in handling gasoline. Gasoline is extremely flammable and the
vapors are explosive. Serious personal injury can occur when
gasoline is spilled on yourself and/or your clothes which can
ignite. Wash your skin and change clothes immediately.
1. When adding fuel, turn engine OFF and let engine cool at
least 2 minutes before removing the gas cap.
2. Fill fuel tank outdoors or in well ventilated area.
3. Use only an approved gasoline container.
4. Never fill containers inside a vehicle or on a truck or trailer
bed with a plastic liner. Always place containers on the
ground away from your vehicle before filling.
5. If possible, remove gas-powered equipment from the truck
or trailer and refuel it on the ground. If this is not possible,
then refuel such equipment on a trailer with a portable
container, rather than from a gasoline dispenser nozzle.
6. Keep the nozzle in contact with the rim of the fuel tank or
container opening at all times until fueling is complete. Do
not use a nozzle lock-open device.

4Section 2 — important Safe operation practiceS
7. Do not overfill fuel tank. Fill tank to full as indicated by
the fuel level indicator installed inside of the fuel tank or
marked on the tank. Do not over-fill to allow space for fuel
expansion. On some models, a fuel level indicator may NOT
be present, in this instance, fill the tank no more than 1/2
inch below the bottom of the filler neck to allow space for
fuel expansion.
8. Replace fuel cap and tighten until the cap ratchets.
9. If gasoline is spilled, wipe it off the engine and the
equipment. Move the machine to another area. Wait five
minutes before starting the engine.
10. To reduce fire hazards, keep the machine free of grass ,
leaves or other debris build up. Clean up oil or fuel spillage
and remove any fuel-soaked debris.
11. Keep gasoline away from sparks, open flames, pilot lights,
heat, and other ignition sources.
12. Never fuel equipment indoors because flammable vapors
will accumulate in the area.
13. Extinguish all cigarettes, cigars, pipes, and other sources of
ignition.
14. Check fuel line, tank, cap, and fittings frequently for cracks
or leaks. Replace if necessary.
Operation
1. When starting the engine, make sure spark plug, muffler,
and fuel cap are in place.
2. Do not crank engine with spark plug removed.
3. If fuel spills, wait until it evaporates before starting engine.
4. Allow muffler, engine cylinder, and fins to cool before
touching.
5. Keep children away from hot or running engines. They can
suffer burns from a hot muffler.
6. Remove accumulated combustibles from muffler and
cylinder area.
7. Operate equipment with all guards in place.
8. Keep hands and feet away from rotating parts.
9. Tie up long hair and remove jewelry.
10. Do not wear loose-fitting clothing, dangling drawstrings or
items that could become caught.
11. When starting the engine, pull cord slowly until resistance
is felt, then pull rapidly (if not electric start).
12. Remove all external equipment/engine loads before
starting engine.
13. Direct coupled equipment components such as, but not
limited to blades, impellers, pulleys, sprockets, etc., must
be securely attached.
Maintenance & Storage
1. Keep the engine in safe working order
2. Allow the engine to cool at least five minutes before
storing. Never tamper with safety devices. Check their
proper operation regularly.
3. Check bolts and screws for proper tightness at frequent
intervals to keep the engine in safe working condition.
Visually inspect the engine for any damage.
4. Before cleaning, repairing or inspecting; stop the
engine and make certain all moving parts have stopped.
Disconnect the spark plug wire and ground it against the
engine to prevent unintended starting.
5. Do not change the engine governor settings or over-speed
the engine. The governor controls the maximum safe
operating speed of the engine.
6. Maintain and replace safety and instruction labels as
necessary.
7. Always refer to the operator’s manual for important details
if the machine is to be stored for an extended period of
time.
8. If the fuel tank has to be drained, do this outdoors.
9. Observe proper disposal laws and regulations for gas, oil,
etc. to protect the environment.
Do not modify engine
To avoid serious injury or death, do not modify engine in any
way. Tampering with the governor setting can lead to a runaway
engine and cause it to operate at unsafe speeds. Never tamper
with factory setting of engine governor.
Notice Regarding Emissions
Engines which are certified to comply with California and federal
EPA emission regulations for SORE (Small Off Road Equipment)
are certified to operate on regular unleaded gasoline, and
may include the following emission control systems: Engine
Modification (EM), Oxidizing Catalyst (OC), Secondary Air
Injection (SAI) and Three Way Catalyst (TWC) if so equipped.
Spark Arrestor
WARNING! This machine is equipped with an
internal combustion engine and should not be used
on or near any unimproved forest-covered, brush
covered or grass-covered land unless the engine’s
exhaust system is equipped with a spark arrestor
meeting applicable local or state laws (if any).
If a spark arrestor is used, it should be maintained in effective
working order by the operator. In the State of California the
above is required by law (Section 4442 of the California Public
Resources Code). Other states may have similar laws. Federal laws
apply on federal lands.
A spark arrestor for the muffler is available through your
nearest engine authorized service dealer or contact the service
department, P.O. Box 361131 Cleveland, Ohio 44136-0019.
5Section 2 — important Safe operation practiceS
WARNING! Your Responsibility — Restrict the use of this power machine to persons who read, understand and
follow the warnings and instructions in this manual and on the machine.
SAVE THESE INSTRUCTIONS!
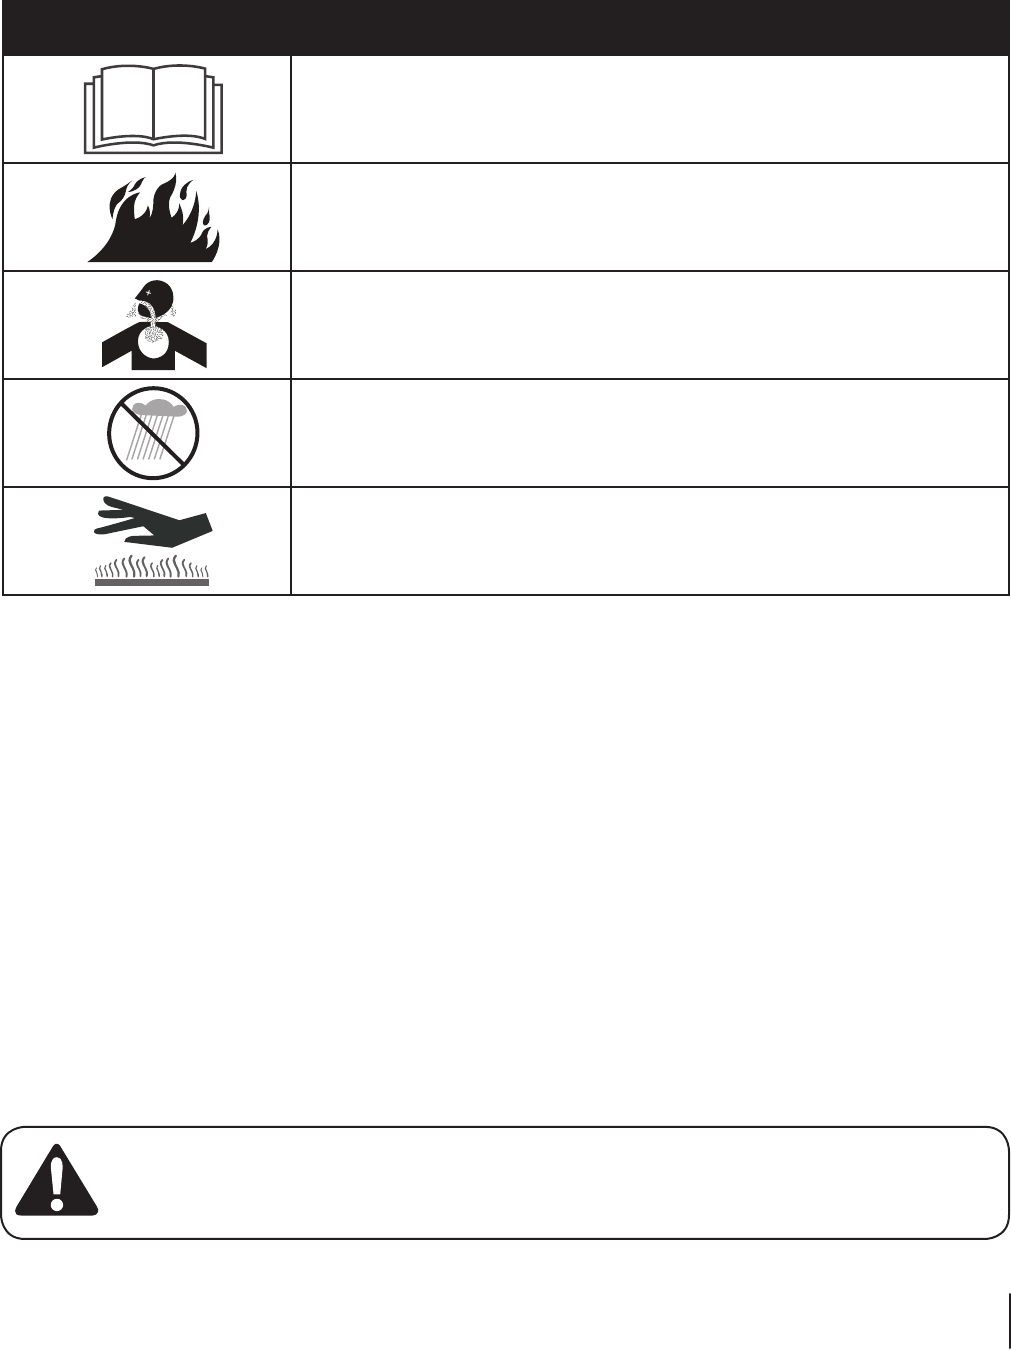
Safety Symbols
This page depicts and describes safety symbols that may appear on this product. Read, understand, and follow all instructions on the
machine before attempting to assemble and operate.
Symbol Description
READ THE OPERATOR’S MANUAL(S)
Read, understand, and follow all instructions in the manual(s) before attempting to
assemble and operate.
WARNING—GASOLINE IS FLAMMABLE
Allow the engine to cool at least two minutes before refueling.
WARNING— CARBON MONOXIDE
Never run an engine indoors or in a poorly ventilated area. Engine exhaust contains carbon
monoxide, an odorless and deadly gas.
WARNING— ELECTRICAL SHOCK
Do not use the engine’s electric starter in the rain.
WARNING— HOT SURFACE
Engine parts, especially the muffler, become extremely hot during operation. Allow engine
and muffler to cool before touching.
Oil & Fuel Specifications
IMPORTANT: The engine is shipped without gasoline in the
engine. See the following instructions for adding gasoline.
IMPORTANT: Some engines are shipped with oil already in
the engine, others without oil already in the engine. It is very
important to check the oil level before operating the engine and
to add oil if necessary. Running the engine with insufficient oil
can cause serious engine damage and void the engine warranty
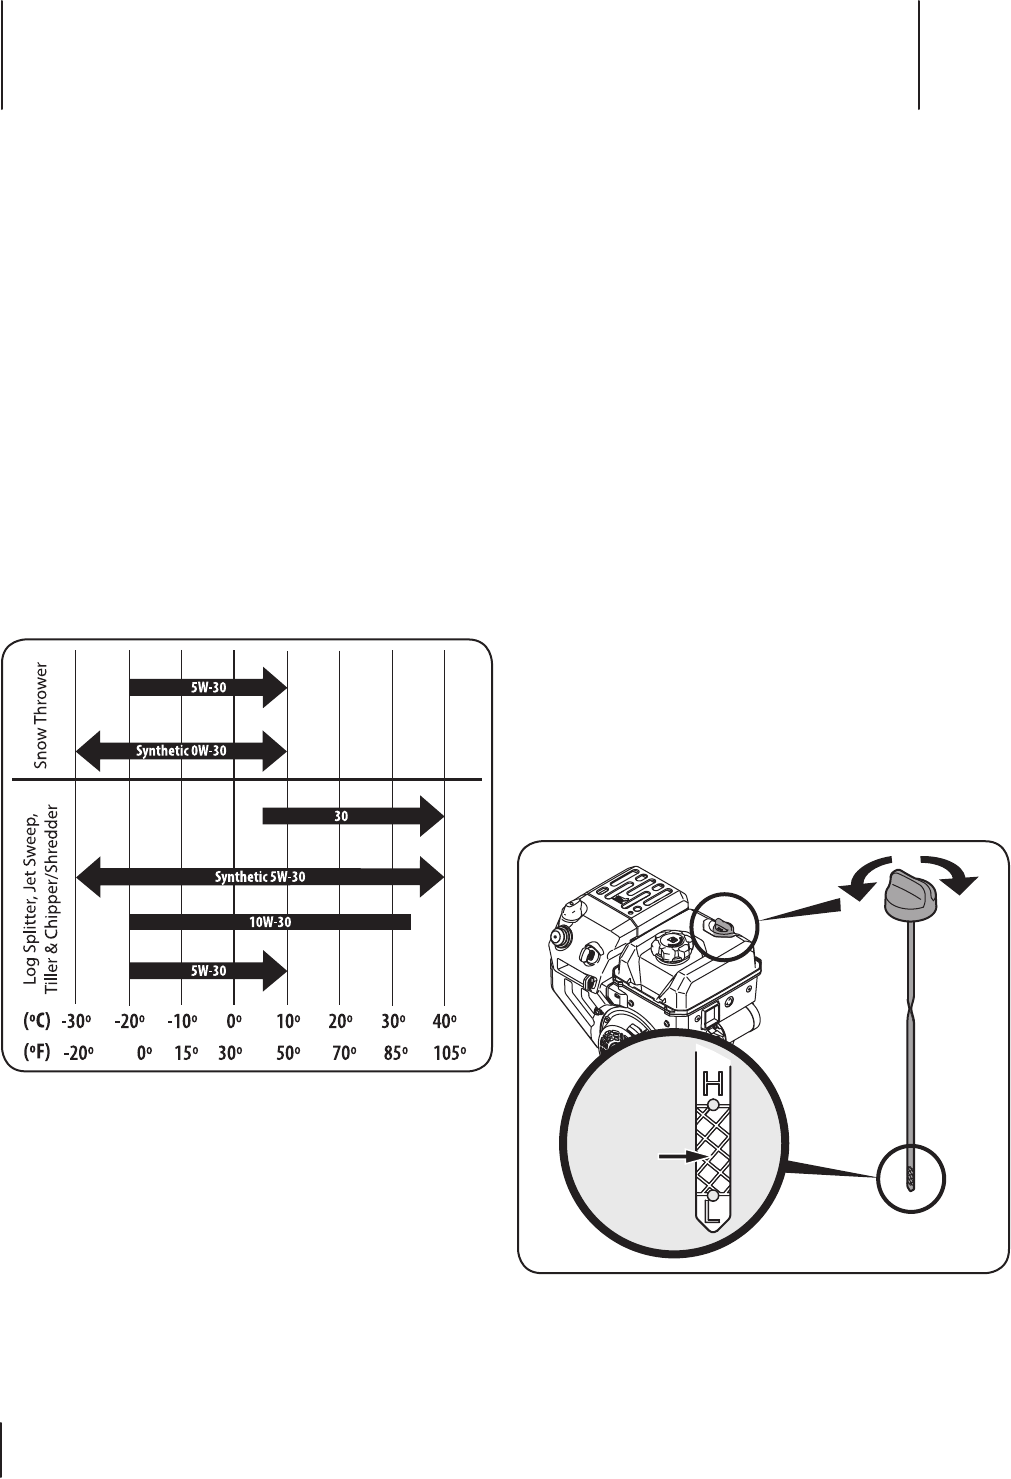
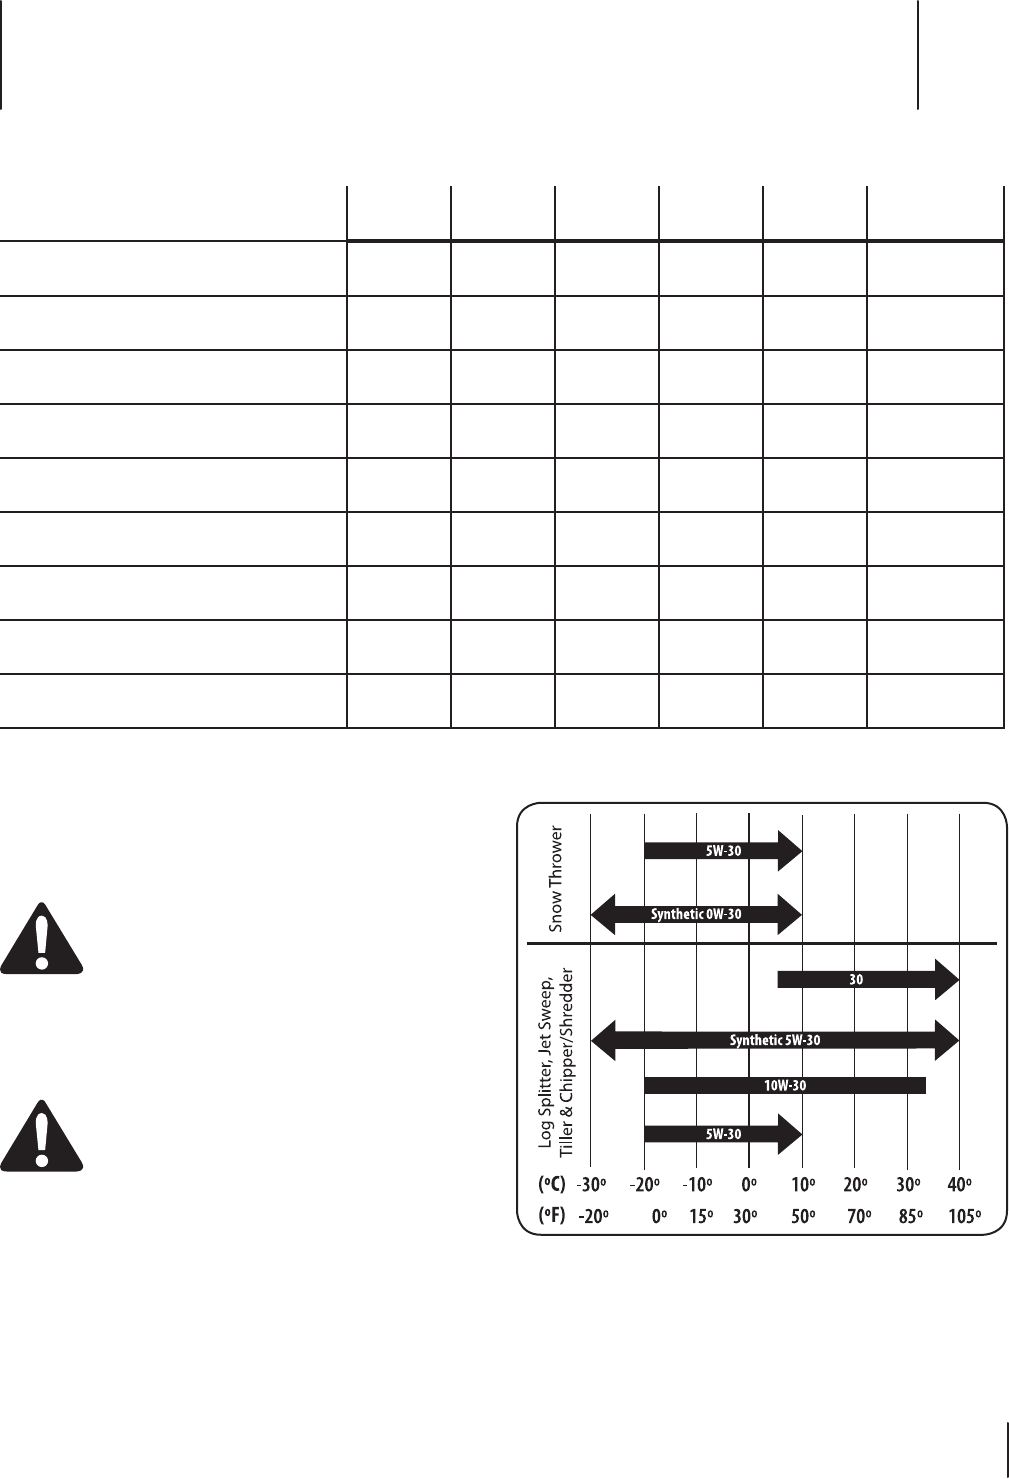
Oil Recommendations
Before starting engine, fill with motor oil, capacity is 600
ml/20 oz. Refer to the viscosity chart (Figure 3-1) for oil
recommendations. Do not over-fill. Use a 4-stroke, or an
equivalent high detergent, premium quality motor oil certified to
meet or exceed U.S. automobile manufacturer’s requirements for
service classification of a minimum level SJ (higher letter ratings
are acceptable such as SL and SM grades).
Motor oil will display this designation on the container.
NOTE: Do not use non-detergent oil or 2-stroke engine oil. It
could shorten the engine’s service life.
Figure 3-1
Checking the Oil Level
Some engines will have a quarter-turn oil fill/dipstick cap, others
may have a threaded oil fill/dipstick cap. Follow the instructions
next that apply to your engine model.
Checking Oil Level on Engines with Quarter-Turn Oil Fill Caps
NOTE: Be sure to check the oil while on a level surface with the
engine stopped.
To avoid engine damage, it is important to:
• Check oil level before each use and every 5 operating
hours when engine is warm. Check oil level more
frequently during engine break-in.
• Keep oil level between “H” and “L” marks on dipstick.
See Figure 3-2.
• Be sure oil fill cap/plug is tightened securely when
checking.
1. Remove the oil filler cap/dipstick and wipe the dipstick
clean. See Figure 3-2.
2. Insert the cap/dipstick into the oil filler neck, and tighten
the cap until seated.
3. Remove the oil filler cap/dipstick. If the level is low, slowly
add oil until oil level registers between high (H) and low (L),
Figure 3-2.
4. Replace and tighten cap/dipstick firmly before starting
engine.
NOTE: Do not overfill. Overfilling with oil may cause smoking,
hard starting, or spark plug fouling.
NOTE: DO NOT allow oil level to fall below the “L” mark on the
dipstick. Doing so may result in equipment malfunctions or
damage.
NOTE: To change the oil on your engine, see the Maintenance
Section of this manual.
Fill
between
high (H)
and low (L)
marks
Figure 3-2
Set-Up 3
6
Filling Oil Sump
1. Be sure the engine is upright and level.
2. Remove the oil fill cap dipstick from oil filler tube by
rotating counter-clockwise and lifting the dipstick out of
the engine. Wipe the dipstick clean with a shop rag.
3. Insert oil fill cap dipstick back into oil filler tube. On
quarter-turn oil fill caps, tighten by rotating the cap
clockwise until firmly seated.
NOTE: Some units may have a threaded dipstick. In this
instance, insert the cap/dipstick into the oil filler neck, but
do not screw it in to check.
4. Loosen and remove the oil fill cap dipstick from the oil
filler tube. Note the oil level, if oil reading on the dipstick
is below the “L” mark, slowly add oil to reach the “H” level.
See Figure 3-2 or Figure 3-3, whichever is applicable.
5. Insert oil fill cap dipstick back into oil filler tube. Tighten by
rotating the cap clockwise until firmly seated.
6. Wipe away any spilled oil.
NOTE: To change the oil, see Checking and Changing Oil
instructions in the Maintenance Section of this manual.
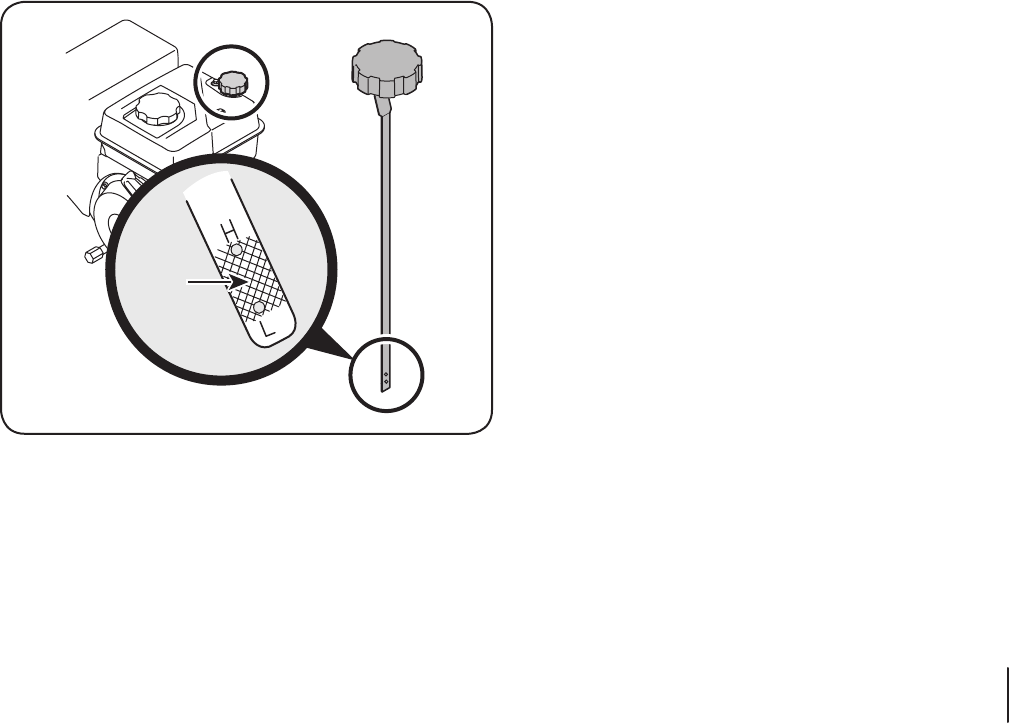
Checking Oil Level on Engines with Threaded Oil Fill Caps
NOTE: Be sure to check the oil while on a level surface with the
engine stopped.
To avoid engine damage, it is important to:
• Check oil level before each use and every 5 operating
hours when engine is warm. Check oil level more
frequently during engine break-in.
• Keep oil level between “H” and “L” marks on dipstick.
See Figure 3-3.
• Be sure to rest oil fill cap on the threads when
checking. Do not tighten down oil fill cap when
checking the oil on threaded oil fill cap engines.
1. Remove the oil filler cap/dipstick and wipe the dipstick
clean. See Figure 3-3.
2. Insert the cap/dipstick into the oil filler neck, but do not
screw it in.
3. Remove the oil filler cap/dipstick. If the level is low, slowly
add oil until oil level registers between high (H) and low (L),
Figure 3-3.
4. Replace and tighten cap/dipstick firmly before starting
engine.
NOTE: Do not overfill. Overfilling with oil may cause smoking,
hard starting, or spark plug fouling.
NOTE: DO NOT allow oil level to fall below the “L” mark on the
dipstick. Doing so may result in equipment malfunctions or
damage.
NOTE: To change the oil on your engine, see the Maintenance
Section of this manual.
Fill
between
high
and low
marks
Figure 3-3
7Section 2 — Set-Up
Fuel Recommendations
CAUTION: Operating the engine with E15 or E85
fuel, an oil/gasoline mixture, dirty gasoline, or
gasoline over 30 days old that has not been
stabilized using a fuel additive, may result in
damage to your engine’s carburetor. Subsequent
damage would not be covered under the
manufacturer’s warranty.
Use automotive gasoline (unleaded or low leaded to minimize
combustion chamber deposits) with a minimum of 87 octane.
Gasoline with up to 10% ethanol or 15% MTBE (Methyl Tertiary
Butyl Ether) can be used. Never use an oil/gasoline mixture or
dirty gasoline. Avoid getting dirt, dust, or water in the fuel tank.
DO NOT use E15 or E85 gasoline.
WARNING! Gasoline is extremely flammable and is
explosive under certain conditions.
• Refuel in a well-ventilated area with the engine stopped.
Do not smoke or allow flames or sparks in the area where
the engine is refueled or where gasoline is stored.
• Do not overfill the fuel tank. After refueling, make sure the
tank cap is closed properly and securely.
• Be careful not to spill fuel when refueling. Spilled fuel or
fuel vapor may ignite. If any fuel is spilled, make sure the
area is dry before starting the engine.
• Avoid repeated or prolonged contact with skin or
breathing of vapor.
Adding Fuel
WARNING! An adult should fuel this engine. NEVER
allow children to refuel this engine. Gasoline (fuel)
vapors are highly flammable and can explode. Fuel
vapors can spread and be ignited by a spark or flame
many feet away from engine. To prevent injury or
death from fuel fires, follow these instructions:
• DO NOT use leaded fuel.
• Fuel must be fresh and clean. NEVER use fuel left over
from last season or stored for long periods.
• NEVER mix oil with fuel.
• DO NOT use fuel containing Methanol (Wood
Alcohol)
1. Before refueling, allow the engine to cool for two minutes.
2. YBe sure engine is outdoors and in a well-ventilated area.
3. Clean area around the fuel fill cap and remove the fuel fill cap.
4. Using an approved red GASOLINE container, add fuel
slowly, being careful to avoid spilling.
5. Replace the fuel cap and tighten securely. Wipe up spilled
fuel before starting engine. If fuel is spilled DO NOT start
engine. Move machine away from area of spillage. Avoid
creating any source of ignition until fuel vapors are gone.
6. Be sure fuel valve, if present, is open.
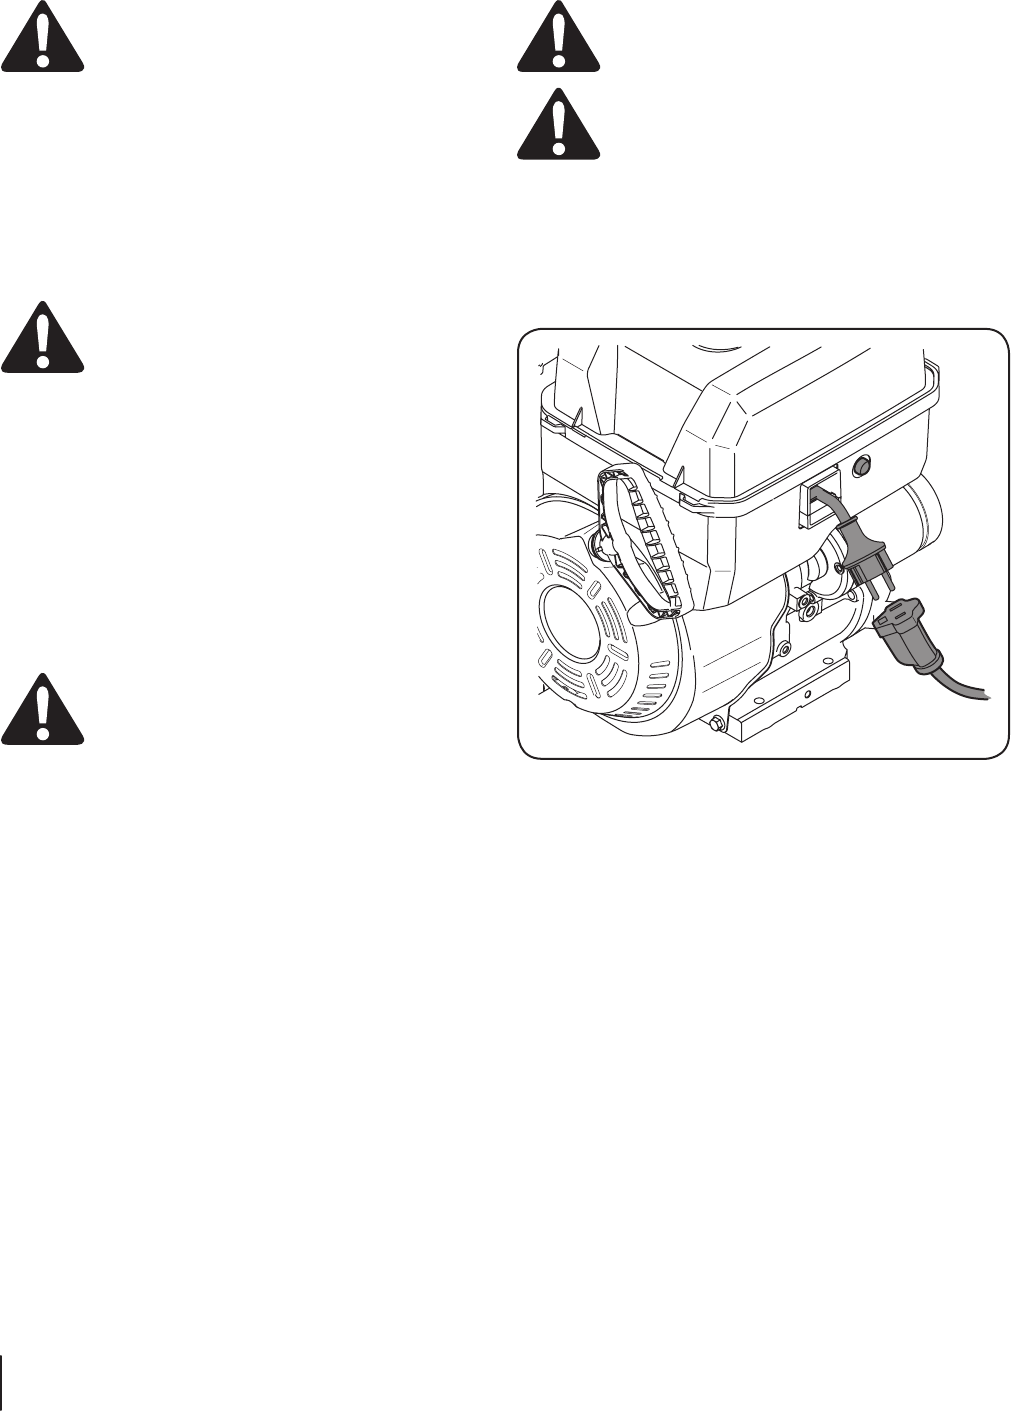
Electrical Power
WARNING! DO NOT pull starter rope with engine
running. Doing so may VOID YOUR WARRANTY.
CAUTION: The extension cord can be any length,
but must be rated for 15 amps at 125 volts, grounded
and rated for outdoor use.
NOTES: When connecting power cord always
connect power cord to switch box on engine first;
then into outlet. See Figure 3-4
Determine what type of power source outlet you will be
connecting the power cord to, before you start your engine.
See Engines with Electric Starters instructions in the Operation
Section of this manual.
Figure 3-4
8Section 2— Set-Up
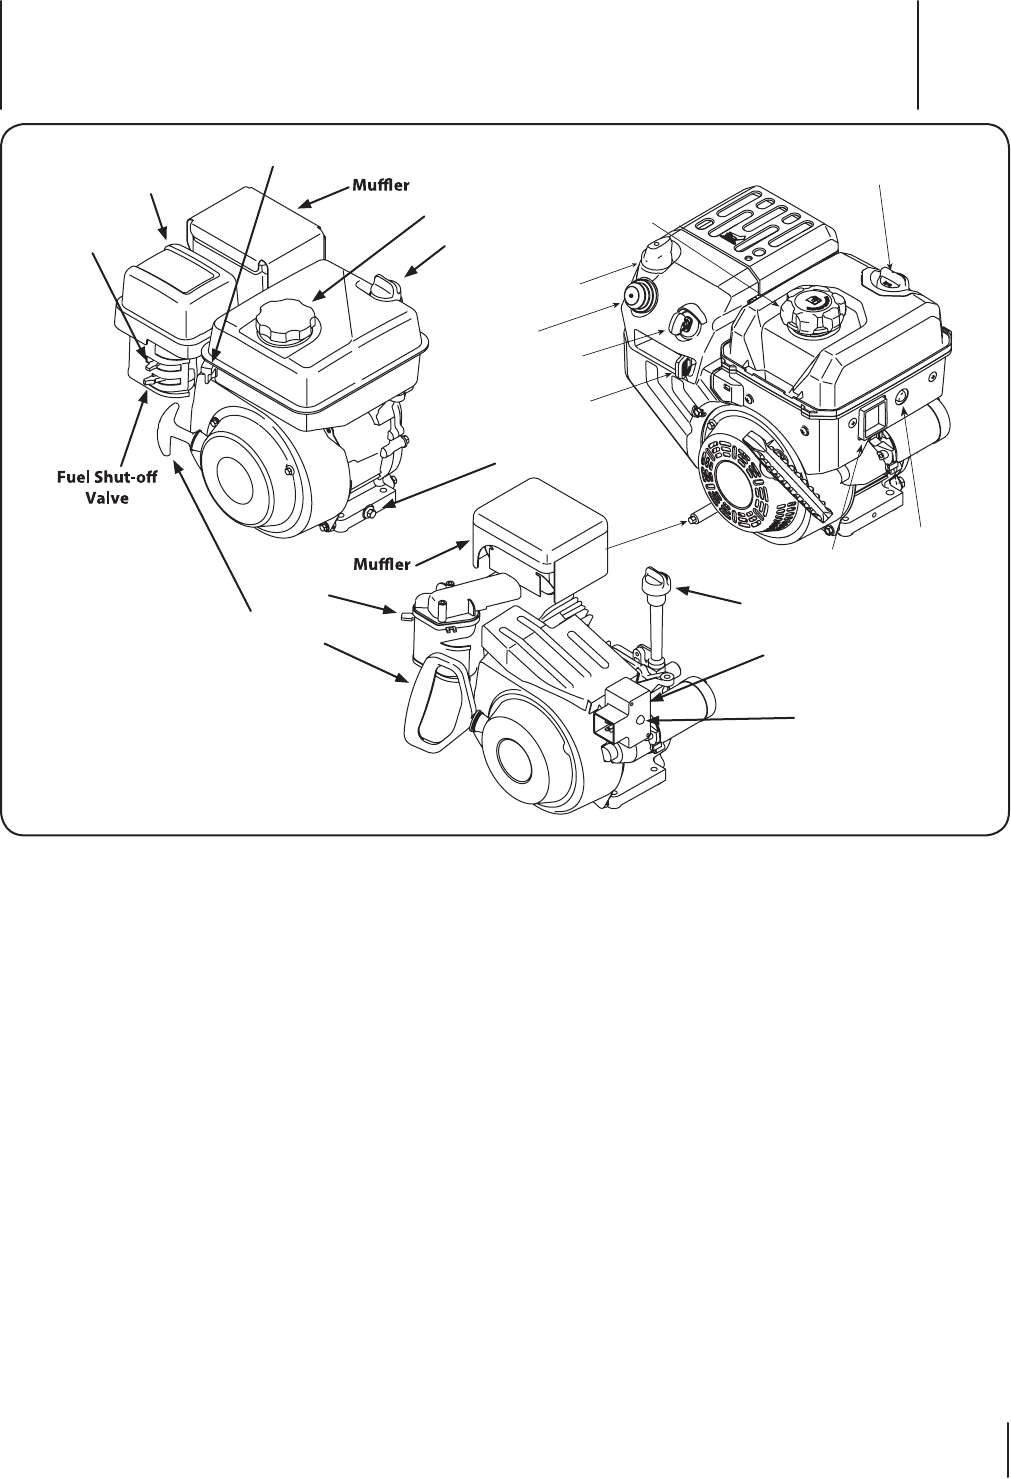
Throttle
The throttle control regulates the speed of the engine and will
shut off the engine when it is moved into the stop position.
Choke
Activating the choke closes the choke plate on the carburetor
and aids in starting the engine.
Oil Drain
Removing the oil drain plug will drain the oil from the engine.
Oil Filler Cap & Dipstick
Remove the oil cap to check the oil level and add oil.
Fuel Fill Cap
Remove the gas cap to add fuel.
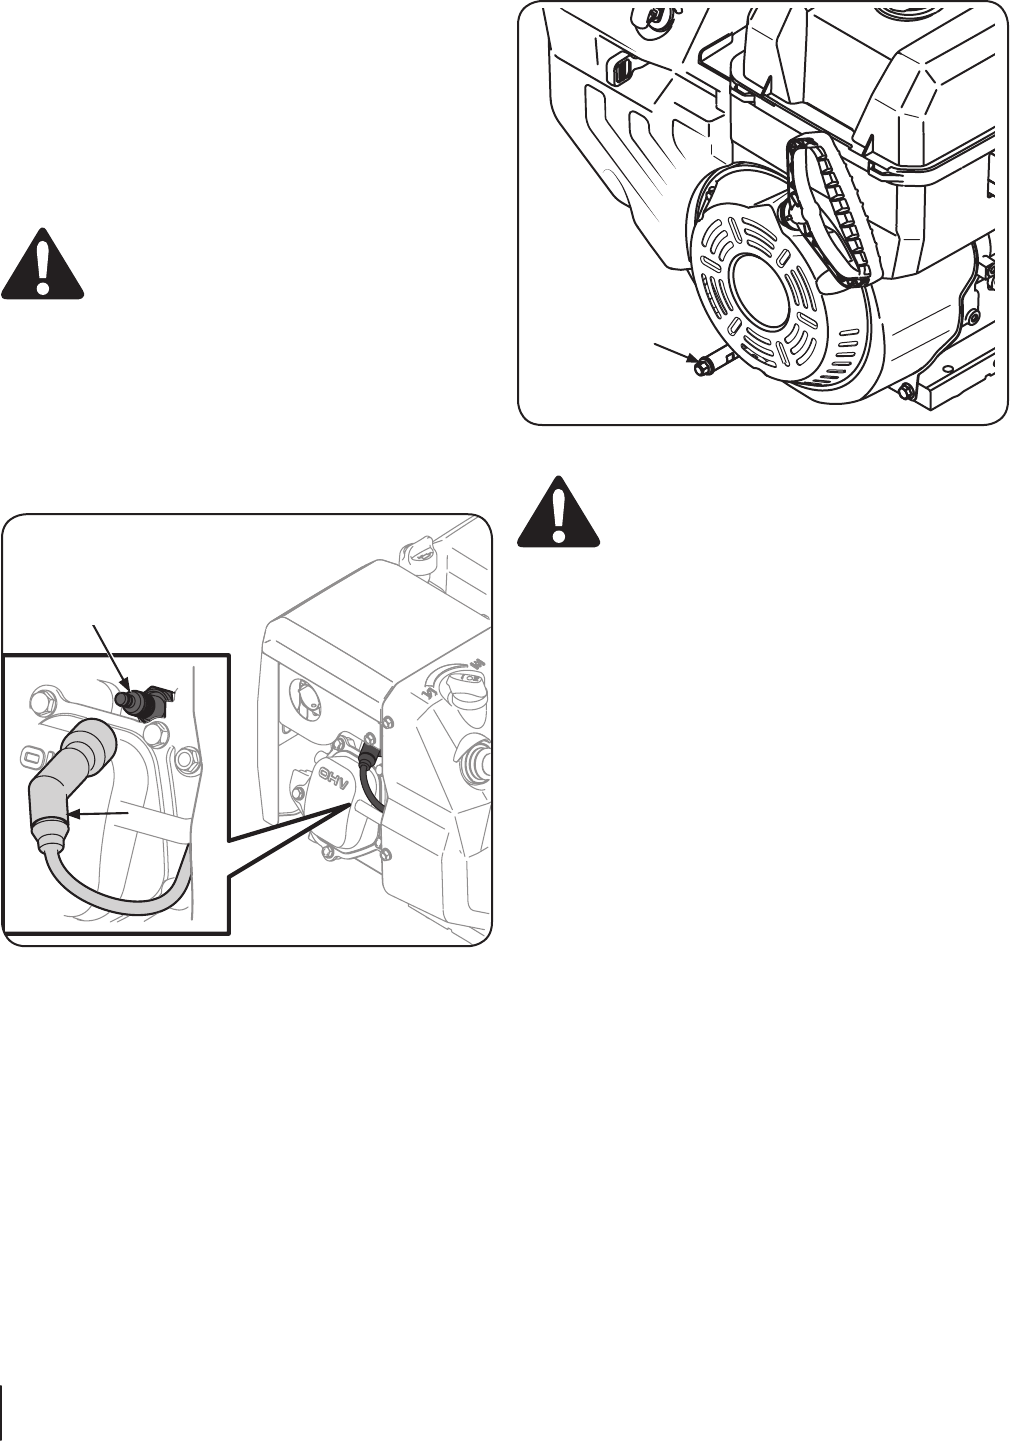
Recoil Starter Handle
Pull the starter handle to start the engine.
Fuel Shut-Off Valve
If equipped, is used for controlling the flow of fuel between
usage and transport/storage.
Electric Starter Outlet
Requires the use of a three-prong outdoor extension cord and a
120V power source/wall outlet.
Electric Start Button
Pressing the button on the top of the electric starter switch engages
the engine’s electric starter when plugged into a 120V power source.
Primer Bulb
Pressing the primer bulb forces fuel directly into the engine’s
carburetor to aid in starting a “Cold” engine.
Key
The key is a safety device. It must be fully inserted in order for the
engine to start. Remove the key when the snow thrower is not in use.
Important: Do not turn the key in an attempt to start the
engine. Doing so may cause it to break.
Oil Filler Cap/
Dipstick
Primer
Fuel Fill
Key
Choke
Starter
Button
Electric
Starter
Outlet
Oil Drain
Throttle
Oil Drain
Starter Button
Oil Fill
Oil Fill
Fuel Fill
Air Filter
Choke
Choke
Throttle
Recoil Starter
Handle Electric Starter
Power Inlet
Controls and Features 4
9
Operation 5
10
Pre-Operation Check
IMPORTANT: The engine is shipped without gasoline in the
engine. See the Set-Up Section of this manual for instructions on
adding gasoline.
IMPORTANT: Some engines are shipped with oil already in
the engine, others without oil already in the engine. It is very
important to check the oil before operating the engine and
to add if necessary. See the Set-Up Section of this manual for
instructions on checking and adding oil.
For your safety, and in order to maximize the service life of this
equipment, it is very important to check its condition before you
operate this engine. Make certain to service, correct or fix any
problem that might be identified before attempting to operate
this engine.
WARNING! Improperly maintaining this engine, or
failure to correct any problem before operation can
cause a malfunction which could result in serious
injury or even death.
Always perform a pre-operation inspection before
each operation, and correct any problem.
Before you start the engine, always check the following items:
1. Fuel Recommendations (See Set Up Section)
2. Checking Oil Level (See Set Up Section)
3. Air filter (if equipped) (See Maintenance Section)
4. General Overall Inspection. Check for any fluid leaks or
discharges, and loose or damaged parts.
5. Check the owner’s manual provided with the equipment
that is powered by this engine. Review the owner’s manual
for any precautions and procedures that should be
followed before starting the engine.
Starting the Engine
WARNING! Always keep hands and feet clear of
moving parts. Do not use a pressurized starting
fluid. Vapors are flammable.
WARNING! An adult should start the engine. Only
allow children to start the engine if an adult has
determined they are experienced and capable of
such operation.
WARNING! If you are unable to start this engine
after following instructions in this manual, contact
you authorized MTD Service Dealer. To avoid serious
burn injuries or damage to your engine, DO NOT
attempt to start or troubleshoot this engine in any
other way. for example:
• DO NOT use starting fluid.
• DO NOT spray flammable vapors into the
carburetor.
• DO NOT put flammable liquids into carburetor.
• DO NOT operate engine or pull on starter rope
with spark plug removed. Fuel can spray from
spark plug hole and ignite.
NOTE: Allow the engine to warm up for a few minutes after
starting. The engine will not develop full power until it reaches
operating temperatures.
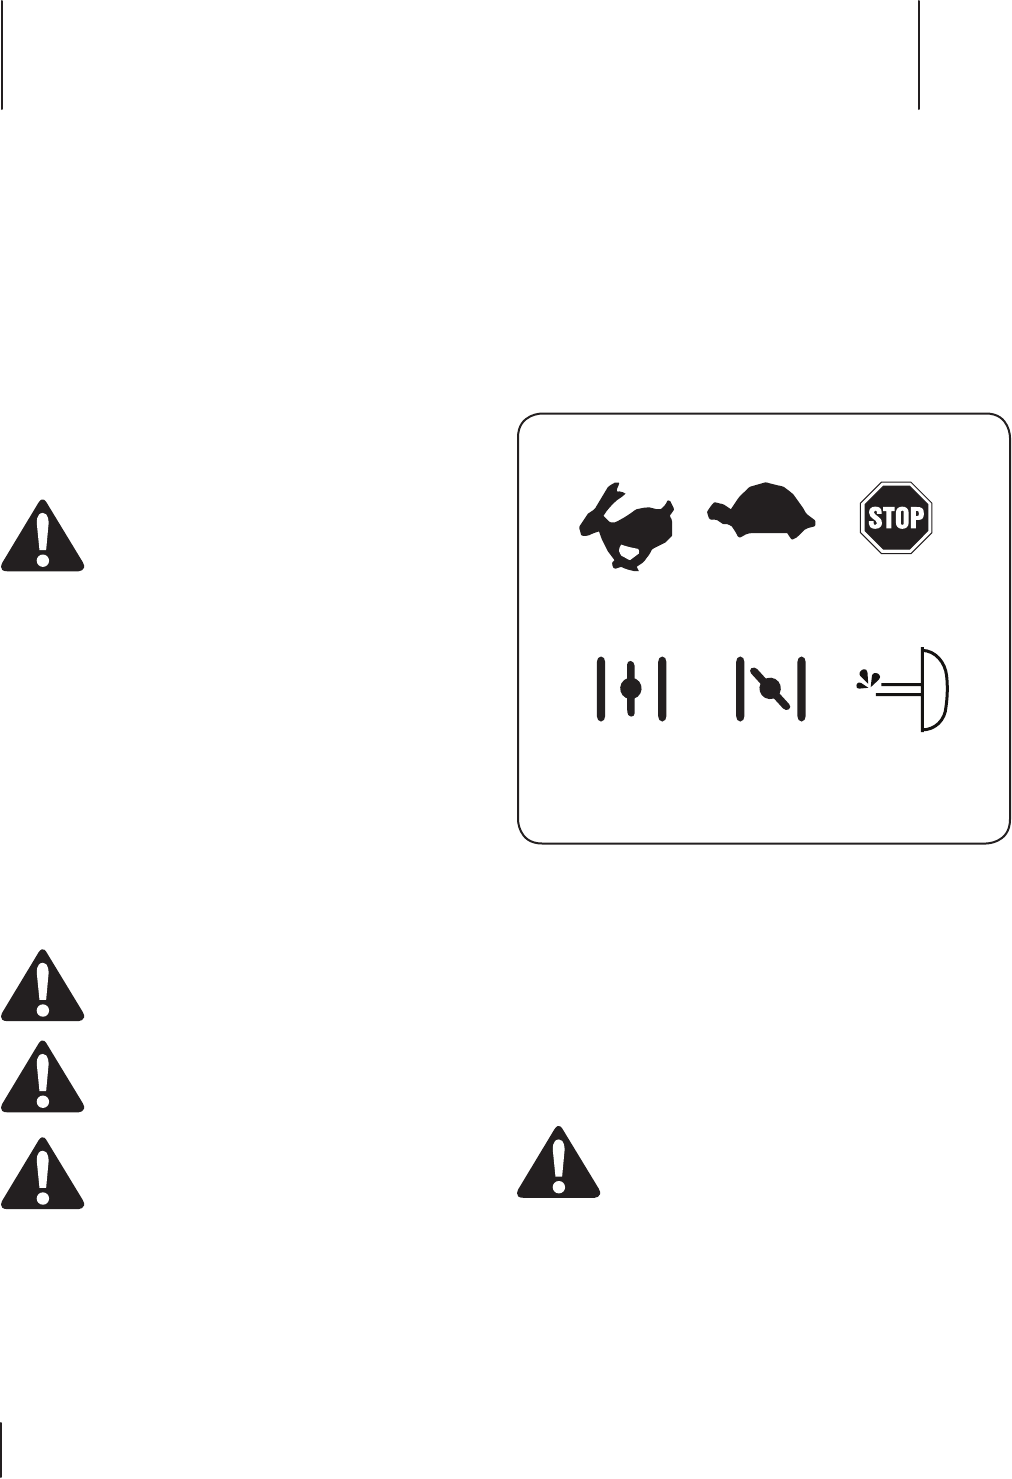
Familiarize yourself with the engine symbols shown in Figure
5-1 before attempting to start this engine. If this engine is
remotely controlled by the equipment it is powering, be sure to
familiarize yourself with the equipment Operator’s Manual as
well.
ChokeRun
Fast Slow/Idle Engine Off
Primer
Figure 5-1
NOTE: The following starting instructions are for several different
types of engines. In order to locate the instructions that apply to
your engine, first determine what type of starter you have. If you
have an electric starter, see Engines With Electric Starters. If you
have a manual recoil starter, see Engines with Recoil Starters later
in this section.
Engines With Electric Starters
If you have a manual recoil starter, see Engines with Recoil
Starters later in this section.
WARNING! DO NOT pull the starter handle while
the engine is running.
WARNING! The electric starter is equipped with
a 120V A.C. Power Plug designed to operated
with a grounded extension cord and on 120V A.C.
household current. It must be properly grounded
at all times to avoid the possibility of injury or death
from electrical shock.
11Section 5 — operation
a. Determine if your house wiring has a Ground Fault
Interrupted (G.F.I.) Three-Wire Grounded System; if
you are not sure, ask a Licensed Electrician.
b. If your house wiring does not have a G.F.I. Three-
Wire Grounded System, DO NOT USE THIS ELECTRIC
STARTER UNDER ANY CONDITION.
c. If your house wiring is grounded and a G.F.I.
three-Prong Wall Receptacle is not available at the
location where your starter will be used, one must
be installed by a Licensed Electrician BEFORE USING
THE ELECTRIC STARTER!
1. To avoid carbon monoxide poisoning, be sure engine is
outdoors in a well-ventilated area.
2. Be sure fuel valve, if present (see equipment Operator’s
Manual instructions) is open and all switches are on.
NOTE: If your engine is equipped with a 12V battery-
operated electric starter, proceed Step 5.
3. Plug an extension cord into the outlet located on the
engine’s surface. Plug the other end of extension cord
into a three-prong 120-volt, grounded, AC outlet in a well-
ventilated area.
CAUTION: The extension cord can be any length,
but must be rated for 15 amps at 125 volts, grounded
and rated for outdoor use.
IMPORTANT: When connecting the power cord, always
connect the power cord to the switch box on the engine
first; then into the outlet.
4. Move engine speed control, if equipped, in the “Fast”
position.
5. If equipped, set the choke control to “FULL CHOKE”
position.
6. Hold the primer bulb in for one full second each time you
press it.
• Make sure you cover the vent hole with your
thumb.
• Prime between 3 and 5 times.
IMPORTANT: DO NOT operate an electric starter for
more than 5 seconds during each attempt.
NOTE: DO NOT use the primer bulb to restart a warm
engine after a short shutdown. Doing so will flood the
engine and may result in equipment malfunction.
NOTE: If restarting a warm engine after a short shutdown,
move the engine speed control (if equipped) the “FAST”
position and move the choke control to the “NO CHOKE”
position.
7. Push the starter button to start the engine.
NOTE: If the engine fails to start after 3 attempts, repeat
steps 1 through 8.
8. When the engine starts:
• Release the starter button.
• Move the choke control to 1/2 “CHOKE” position
until the engine runs smoothly.
• Next, move the choke control to the NO CHOKE
position.
9. Move the engine speed control (if equipped) to the desired
speed in the “RUN” range.
NOTE: If the engine starts but falters when the choke
control is moved to the “NO CHOKE” position:
• Momentarily move choke control back to “FULL
CHOKE” position.
• Next, move the choke control to “!/2 CHOKE”
position until engine runs smoothly.
• Finally, move the choke control to the NO
CHOKE position.
If the engine dies after choke control is moved to “NO CHOKE”
position, repeat steps 5 through 10 to restart engine.
10. If the engine fails to start after 3 attempts in the “NO
CHOKE” position, move the choke control to “FULL CHOKE”
position and start engine.
NOTE: When disconnecting the power cord, always
disconnect the power cord from the outlet first; then
disconnect the power cord from the switch box on the
engine.
11. Disconnect the power cord form the outlet.
12. Disconnect the power cord form the switch box on the
engine.
13. If engine does not start after following steps 1 through
12, contact your Authorized MTD Service Dealer. DO NOT
attempt to troubleshoot this engine in any other way.
Engines with Recoil Starters
If you have an electric starter, see Engines with Electric Starters
earlier in this section.
WARNING! DO NOT pull starter rope with engine
running. Doing so may VOID YOUR WARRANTY.
1. To avoid carbon monoxide poisoning, be sure engine is
outdoors in a well-ventilated area.
2. Be sure fuel valve, if present (see equipment Operator’s
Manual instructions) is open and all switches are on.
3. Move the engine speed control, if equipped, to the “FAST”
position.
4. If equipped, set the choke control to “FULL CHOKE”
position.
5. Hold the primer bulb in for one full second each time you
press it.
• Make sure you cover the vent hole with your
thumb.
• Prime between 3 and 5 times.
NOTE: DO NOT use the primer bulb to restart a warm
engine after a short shutdown. Doing so will flood the
engine and may result in equipment malfunction.
NOTE: If restarting a warm engine after a short shutdown,
move the engine speed control (if equipped) the “FAST”
position and move the choke control to the “NO CHOKE”
position.

12 Section 5— operation
WARNING! When pulling the starter rope, the
rope can unexpectedly jerk back toward the engine
causing serious injury. To avoid this risk, carefully
follow these instructions:
6. Grasp the starter cord handle.
• Pull rope out slowly until you feel drag.
• Without allowing the rope to retract, continue
pulling the rope with one rapid full arm stroke.
• Return the rope slowly to the original position.
NOTE: Following the instructions listed in the steps above
avoids potential damage to the recoil mechanism.
NOTE: If the recoil starter handle is frozen and will not
operate the engine, proceed as follows:
• Pull as much rope out of the starter as possible.
• Release the starer handle and let it snap back
against the starter to break up ice’; these two
steps should only be done when the starter is
frozen.
7. If the engine fails to start after 3 attempts repeat steps 1
through 7 and try again.
8. When the engine starts:
• Move the choke control to 1/2 “CHOKE” position
until the engine runs smoothly.
• Next, move the choke control to the NO CHOKE
position.
9. Move the engine speed control (if equipped) to the desired
speed in the “RUN” range.
NOTE: If the engine starts but falters when the choke
control is moved to the “NO CHOKE” position:
• Momentarily move choke control back to “FULL
CHOKE” position.
• Next, move the choke control to “!/2 CHOKE”
position until engine runs smoothly.
• Finally, move the choke control to the NO
CHOKE position.
If the engine dies after choke control is moved to “NO CHOKE”
position, repeat steps 3 through 10 to restart engine.
10. If the engine fails to start after 3 attempts in the “NO
CHOKE” position, move the choke control to “FULL CHOKE”
position and start engine.
11. If engine does not start after following steps 1 through
11, contact your Authorized MTD Service Dealer. DO NOT
attempt to troubleshoot this engine in any other way.
Stopping the Engine & Short Term Storage
Stop engine in accordance with the equipment Operator’s
Manual.
WARNING! To avoid unsupervised engine
operation, especially by children, NEVER leave the
engine unattended while running. Always turn off
the engine after use and remove the ignition key, if
equipped.
WARNING! NEVER store the engine with fuel in the
fuel tank inside a building with potential sources of
ignition such as hot water tank and space heaters,
clothes drivers, electric motors, etc.
Stopping The Engine
1. If operating the engine in the snow or rain, run the engine
for a few minutes to help dry off any moisture.
2. Move the equipment control, if present (see Equipment
Owner’s Manual), engine control lever or ignition switch to
“STOP” or “OFF” position.
3. Remove ignition key, if provided (see equipment Operator’s
Manual).
NOTE: Removing the key will reduce the possibility of
unauthorized starting of the engine while equipment is not
in use.
WARNING! NEVER store the engine with fuel in the
fuel tank inside a building with potential sources of
ignition such as hot water tank and space heaters,
clothes dryers, electric motors, etc.
After the Engine is Stopped
WARNING! To prevent the possible freeze-up of
engine controls, follow instructions with engine
STOPPED, listed below:
1. Wipe all snow and moisture from the engine control lever
and choke areas.
2. Move the equipment control, if present, (see equipment
Operator’s Manual), engine control lever or ignition switch
back and forth several times and leave the control in the
“STOP” or “OFF” position.
3. Move the engine choke back and forth several times and
leave in the “FULL CHOKE” position.
4. Be sure the Fuel Shut-Off Valve, , if present, is off.
Maintenance 6
13
Periodic inspection and adjustment of the engine is essential if
high level performance is to be maintained. Regular maintenance
will also ensure a long service life. The required service intervals
and the kind of maintenance to be performed are described
in the table above. Follow the hourly or calendar intervals,
whichever occur first. More frequent service is required when
operating in adverse conditions.
WARNING! Shut off the engine before performing
any maintenance. To prevent accidental start-up,
disconnect the spark plug boot.
NOTE: If engine must be tipped to transport equipment or to
inspect or remove grass, keep spark plug side of engine up.
Transporting or tipping engine spark plug down may cause
smoking, hard starting, spark plug fouling, or oil saturation of air
cleaner.
WARNING! If the engine has been running, the
muffler will be very hot. Be careful not to touch the
muffler.
Oil Recommendations
Refer to the viscosity chart (Figure 6-1) for oil recommendations.
Do not over-fill. Use a 4-stroke, or an equivalent high detergent,
premium quality motor oil certified to meet or exceed
U.S. automobile manufacturer’s requirements for service
classification of a minimum level SF or SG (higher letter ratings
are acceptable such as SJ, SL and SM grades). Motor oil will
display this designation on the container.
NOTE: Do not use non-detergent oil or 2-stroke engine oil. It
could shorten the engine’s service life.
Figure 6-1
Maintenance Schedule
First 5 Hours Each Use or
Every 5 Hrs.
Every Season
or 25 Hours
Every Season
or 50 Hours
Every Season
or 100 Hours Service Dates
Check Engine Oil Level P
Change Engine Oil P P
Check Air Cleaner (If so equipped) P
Service Air Cleaner (If so equipped) P
Check Spark Plug P
Replace Spark Plug P
Clean Engine Shroud (If so equipped) P
Clean around muer P
Replace Fuel Filter (If equipped) P
14 Section 6— Maintenance
Checking and Changing the Oil
To avoid engine damage, it is important to:
• Check oil level before each use and every 5 operating hours
when the engine is warm.
• Change the oil after the first 5 operating hours and every
50 operating hours thereafter. Engine should still be warm
but NOT hot from recent use.
Oil Fill Cap and Dipstick
WARNING! Before tipping engine or equipment to
drain oil, drain fuel from tank by running engine
until fuel tank is empty.
1. Carefully disconnect the spark plug wire and keep it away
from the spark plug. Refer to Figure 6-2 for spark plug
location.
• Keep the disconnected spark plug wire securely
away from the metal parts where arcing could
occur.
• Carefully attach the spark plug wire to the
grounding post, if provided.
Spark Plug
Spark Plug
Boot
Figure 6-2
2. Be sure that the fuel fill cap is on and securely tightened.
3. Be sure to find correct oil drain plug location, if present
(see the equipment Operator’s Manual instructions for
additional information).
4. Clean area around the oil drain plug.
5. Place an approved recyclable oil container under the oil
drain plug.
6. Remove the Oil drain plug. See Figure 6-3.
NOTE: Depending on which engine model you have, the oil
plug may be positioned differently. These positions include
on the front and/or rear side of the block, or as an extended
tube. Examples are shown in Figure 6-3.
Oil
Drain
Figure 6-3
WARNING! Used motor oil may cause skin cancer
if repeatedly left in contact with the skin for
prolonged periods. Although this is unlikely unless
you handle used oil on a daily basis, it is still
advisable to thoroughly wash your hands with soap
and water as soon as possible after handling used
oil.
7. Tip engine to position the oil flow, so it will drain from the
lowest point on the engine.
8. Drain the oil into an approved recyclable oil container.
NOTE: Please dispose of used motor oil in a manner that is
compatible with the environment. We suggest you take it in a
sealed container to your local service station for reclamation.
Do not throw it in the trash or pour it on the ground.
9. Install the oil drain plug and tighten securely.
10. Clean area around the oil drain plug.
11. Remove the oil fill cap dipstick.
12. Fill with the recommended Oil. See Figure 6-3.
NOTE: DO NOT overfill oil filler. Doing so may result in oil
carry-over to the equipment and cause malfunction or
damage.
NOTE: DO NOT allow oil level to fall below and “L” mark on
dipstick. Doing so may result in equipment malfunction or
damage.
13. Wipe away any spilled oil.
14. Check the oil level by installing the Oil Fill Cap/Dipstick.
• For threaded Oil Fill Cap/Dipstick models, rest
the cap on the threads, do not tighten down the
cap to check the oil level.
• For quarter-turn Oil Fill Cap/Dipstick models,
tighten down the cap to check the oil level.
NOTE: See the Set-Up section earlier in this manual for
detailed instructions on identifying and checking the oil on
each of these specific engine models.
15Section 6 — Maintenance
15. Remove the oil filler cap/dipstick. If the level is low, slowly
add oil until oil level registers between high (H) and low (L),
Figure 3-2 and Figure 3-3 in the Set-Up section.
16. Repeat Steps 14 & 15 to be sure that the correct oil level has
been achieved.
17. Once the proper oil level has been confirmed, install the Oil
Fill Cap/Dipstick. Tighten securely
18. Carefully disconnect spark plug wire from grounding post,
if present.
19. Carefully reconnect the spark plug wire to the spark plug.
NOTE: It is advisable to recheck the oil level after you have
operated the engine for a short while, and the normal engine
operating temperature has been achieved.
WARNING! If the engine has been running, the
muffler, engine head and spark plug will be very hot.
Be careful not to touch any of these components
until they have cooled.
Spark Plug Service
WARNING! DO NOT check for spark with spark
plug removed. DO NOT crank engine with spark
plug removed.
Check the spark plug yearly or every 100 operating hours. To
ensure proper engine operation, the spark plug must be properly
gapped and free of deposits.
1. Remove the spark plug boot.
2. Clean the area around the spark plug.
3. Use a spark plug wrench to remove the plug.
WARNING! If the engine has been running, the
muffler, engine head and spark plug will be very hot.
Be careful not to touch any of these components
until they have cooled.
4. Visually inspect the spark plug. Discard the spark plug
if there is apparent wear, or if the insulator is cracked or
chipped. Replace the plug if the electrodes are pitted,
burned or fouled with deposits.
5. Clean the spark plug with a wire brush if it is to be reused.
6. Measure the plug gap with a feeler gauge. Correct as
necessary by bending side electrode. See Figure 6-4. The
gap should be set to 0.030 in. (0.76mm).
7. Check that the spark plug washer is in good condition
8. Thread the spark plug in by hand to prevent cross-
threading.
9. After the spark plug is seated, tighten with a spark plug
wrench to compress the washer.
NOTE: When installing a new spark plug, tighten ⁄ turn
after the spark plug seats to compress the washer. When
reinstalling a used spark plug, tighten ⁄-⁄ turn after the
spark plug seats to compress the washer.
NOTE: The spark plug must be securely tightened. An
improperly tightened spark plug can become very hot and
may damage the engine.
0.06-0.03 in.
0.60-0.80 mm
Electrode
Figure 6-4
Air Filter
NOTE: Not all engines have air filters, such as engines used for
snow throwers. Service the air filter if one is present.
Paper filters cannot be cleaned and must be replaced once a year
or every 100 operating hours; more often if used in extremely
dusty conditions.
WARNING! Never use gasoline or low flash point
solvents for cleaning the air cleaner element. A fire
or explosion could result.
NOTE: Never run the engines that have air filters without them.
Rapid engine wear can result.
1. Press the tab on the air filter cover and lift the cover, or
un-thread the thumbscrews, depending on the model of
engine you have. See Figure 6-5.
Figure 6-5

16 Section 6— Maintenance
2. Replace paper element when dirty or damaged. Clean
foam element or replace when damaged.
3. To clean foam element, separate it from the paper element
and wash in liquid detergent and water. Allow to dry
thoroughly before using. Do not oil the foam element.
Adjustments
DO NOT make any engine adjustments. Factory settings are
satisfactory for most conditions. If adjustments are needed,
contact your Authorized MTD Servicing Dealer.
Carburetor
If you think you carburetor needs adjusting, see your nearest
Authorized MTD Servicing Dealer. Engine performance should
NOT be affected at altitudes up to 7,000 feet (2,134 meters). For
operation at higher elevations, contact your Authorized MTD
Servicing Dealer.
Alternator (if equipped)
Contact your Authorized MTD Servicing Dealer for alternator
related electrical problems such as:
• Inoperative Starter
• Discharged Battery
• Fuse Replacement
• Alternator Maintenance/Repairs
Engine Speed
WARNING! To avoid serious injury or death, DO
NOT modify engine in any way. Tampering with the
governor setting can lead to a runaway engine and
cause it to operate at unsafe speeds. NEVER tamper
with the factory setting of the engine governor.
WARNING! Running the engine faster than the
speed set at the factory can be dangerous and will
VOID THE ENGINE WARRANTY.
Removing Snow from the Engine
After each use, remove snow from the following areas:
• Oil Fill Cap Dipstick
• Fuel Fill Cap
• Recoil Starter/Flywheel Screen
• Linkage
• Guards
• Spark Plug Connection (if visible).
• Electric Starter Switch Box, if present (see the
equipment Operator’s Manual instructions).
NOTE: See the equipment Operator’s Manual instructions
for proper location of fuel fill cap and control lever.
1. Removing snow will ease operation of the recoil starter
rope and reduce the risk of water contamination when
opening the fuel fill cap.
NOTE: For more information about recoil starters, see
Engine’s with Recoil Starters in the Operation Section of
this manual.
Transporting Your Engine
WARNING! NEVER transport this engine inside of
another vehicle or in any enclosed space if there is
any gasoline in the tank. Fuel vapor or spilled fuel
may ignite.
WARNING ! If there is fuel in the fuel tank, close
the fuel valve, if equipped, and transport the engine
upright in an open vehicle, such as an open trailer or
open bed of a pickup truck.
If you DO NOT have an open vehicle and have to transport
the engine upright in a closed vehicle, follow these steps for
emptying the fuel tank before transporting:
1. Empty fuel tank by using a commercially available suction
device designed for use with gasoline.
WARNING! DO NOT pour fuel from the engine or
siphon fuel by mouth.
2. Drain fuel into an approved red gasoline container, being
careful to avoid spilling.
3. Run the engine until remaining fuel is consumed.
WARNING! NEVER leave the engine unattended
when it is running and NEVER run the engine in an
enclosed area.
Storing Your Engine
Short-Term/Seasonal Storage
Clean Engine
If the engine has been running, allow it to cool for at least half an
hour before cleaning.
Before servicing the engine, remove the carburetor cover and/or
blower housing. Discard the dirt and debris from the following
areas:
• Cooling Fins
• Air Intake Screen or Recoil Starter/Flywheel
Guard Areas
• Spark Plug Connection
• Levers
• Linkage Area
• Guards
• Carburetor
• Head
Removing debris will insure adequate cooling, correct engine
speed and reduce the risk of fire.
NOTE: Do not spray engine with water to clean because water
could contaminate fuel. Using a garden hose or pressure washing
equipment can also force water into the air cleaner or muffler
opening. Water in the air cleaner will soak the paper element,
and water that passes through the element or muffler can enter
the cylinder, causing damage.
17Section 6 — Maintenance
WARNING! Accumulation of debris around muffler
could cause a fire. Inspect and clean before every
use.
Fuel Storage
WARNING! NEVER store engine with fuel in the
fuel tank inside a building with potential sources of
ignition such as hot water heater, space heater,
clothes dryer, electric motor, etc. Failure to do so
may result in an explosion and result in death or
serious injury.
NOTE: If engine fuel stored in the gas tank and/or an approved
gas container is to be unused without gasoline stabilizer for more
than 15-30 days, prepare it for short-term/seasonal storage. See
Fuel Treatment later in this section.
NOTE: If engine fuel is to be stored for more than one season,
without gasoline stabilizer, it will gradually deteriorate. Also, if
it is stored in the engine’s gas tank without gasoline stabilizer it
is likely that your carburetor will have gum deposits, a clogged
fuel system and will VOID YOUR WARRANTY. Prepare the fuel for
extended storage.
Fuel System
To avoid stale fuel and carburetor problems, treat the fuel system
in the following manner:
NOTE: Always follow mix ratio found on the stabilizer container.
Failure to do so may result in equipment damage.
NOTE: It is NOT necessary to drain stabilized gas from carburetor.
Fuel Treatment
1. Add a gasoline stabilizer according to the manufacturer’s
instructions.
2. Run engine at least 10 minutes after adding the stabilizer to
allow it to reach the carburetor.
WARNING! NEVER store the engine with the fuel in
the fuel tank inside a building with potential sources
of ignition such as a hot water heater, space heater,
clothes dryer, electric motor, etc.
NOTE: Instead of using a fuel preservative/stabilizer, you can
empty the fuel tank as described in Extended Storage —
Draining the Fuel.
Extended Storage
Draining the Fuel
NOTE: Clean debris from the engine before draining fuel from
the carburetor.
NOTE: If you have prepared your fuel for short-term storage it
is NOT necessary to drain fuel that contains stabilizer from your
carburetor.
WARNING! To avoid severe injury or death, DO
NOT pour fuel from engine or siphon fuel by mouth.
1. To prevent serious injury from fuel fires, empty fuel tank
by running engine until it stops from lack of fuel. DO NOT
attempt to pour fuel from engine.
2. Run the engine while waiting until the remaining fuel is
consumed.
WARNING! NEVER leave the engine unattended
when it is running and NEVER run the engine in an
enclosed area.
3. Begin servicing the cylinder bore as per the following
instructions.
Oil Cylinder Bore
WARNING! When lubricating cylinder bore, fuel
may spray from the spark plug hole. To prevent
serious injury from fuel fires, follow these
instructions:
1. Carefully disconnect the spark plug wire and keep it away
from the spark plug.
• Keep the disconnected spark plug wire securely
away from the metal parts where arcing could
occur.
• Carefully attach the spark plug wire to the
grounding post, if provided.
• Disconnect the battery at the negative terminal first, if the
engine is equipped with a D.C. electric starter.
• Turn off all the engine switches.
• Remove the ignition key, if provided.
2. Remove the spark plug.
3. Squirt 1oz. (30ml) of clean engine oil into the spark plug
hole.
4. Cover the spark plug hole with a rag to prevent fuel from
spraying from the spark plug hole when the starter rope is
pulled.
NOTE: for engines equipped with a recoil starter, proceed
to Step 5. For engines equipped with electric starters,
proceed to Step 6.
5. Grasp the starter cord handle:
• Pull the starter cord handle out slowly using a
full arm stroke.
• Repeat once. This will distribute the oil
throughout the cylinder to prevent corrosion
during storage.
• Proceed to Step 7.
6. Push starter button or turn ignition switch key to “START”:
position. Immediately releases the starter button or turn
the ignition switch key to the “OFF” position. This will
distribute the oil throughout the cylinder to prevent
corrosion during storage.
7. Remove the rag from spark plug hole and install the spark
plug.
8. Carefully disconnect the spark plug wire from the
grounding post, if provided.
9. Connect the spark plug wire plug wire to the spark plug.

18 Section 6— Maintenance
Oil
Change the oil if NOT changed within the last 3 months. See
Checking and Changing the Oil earlier in this section.
Off-Season Storage
CAUTION: Failure to use a fuel stabilizing additive
or completely run the engine until it’s out of fuel
before off-season storage may result in damage to
your engine’s carburetor. Subsequent damage
would not be covered under the manufacturer’s
warranty.
Engines stored between 30 and 90 days need to be treated with
a gasoline stabilizer and engines stored over 90 days need to be
drained of fuel to prevent deterioration and gum from forming
in fuel system or on essential carburetor parts. If the gasoline in
your engine deteriorates during storage, you may need to have
the carburetor, and other fuel system components, serviced or
replaced.
1. Remove all fuel from tank by running engine until it stops
from lack of fuel.
WARNING! Never leave engine unattended while
it is running.
2. Change the oil. See Changing the Oil earlier in this section.
3. Remove the spark plug and pour approximately a ⁄-ounce
of engine oil into the cylinder. Replace spark plug and
crank it slowly to distribute oil.
4. Clean debris from around the engine and the muffler.
Touch up any damaged paint, and coat other areas that
may rust with a light film of oil.
5. Store in a clean, dry and well ventilated area away from any
appliance that operates with a flame or pilot light, such
as a furnace, water heater, or clothes dryer. Also avoid any
area with a spark producing electric motor, or where power
tools are operated.
6. If possible, also avoid storage areas with high humidity,
because that promotes rust and corrosion.
7. Keep the engine level in storage. Tilting can cause fuel or
oil leakage.

Problem Cause Remedy
Engine Fails to start 1. Engine flooded
2. Spark plug wire disconnected
3. Fuel tank empty or stale fuel
4. Engine not choked
5. Faulty spark plug
6. Throttle in stop position
1. Wait at least 10 minutes before starting
2. Connect wire to spark plug
3. Fill tank with clean, fresh gasoline
4. Choke engine
5. Clean, adjust gap or replace
6. Move throttle to FAST/Run position
Engine runs erratically 1. Spark plug wire loose
2. Spark plug scorched, defective or electrode
gap is set incorrectly
3. Stale fuel
4. Engine running with choke on
5. Water or dirt in fuel system
1. Connect and tighten spark plug wire
2. Re-adjust electrode gap or change
3. Fill tank with clean, fresh gasoline
4. Move choke to off
5. Drain fuel tank. Refill with fresh fuel
Engine overheats 1. Engine oil level low 1. Fill engine with proper amount of engine oil
Troubleshooting 7
19
Replacement Parts 8
20
Phone (800) 800-7310 or (330) 220-4683 to order replacement parts or a complete Parts Manual (have your full model number and
serial number ready). Parts Manual downloads are also available free of charge at www.mtdproducts.com.
Component Part Number and Description
951-10292 Spark Plug
951-10794 Air Cleaner (Chipper/Shredders
and Log Splitters)
951-14262 Air Cleaner (Tillers)
951-12533 Fuel Cap Assembly
(Two-stage Snow Throwers)
751-14006 Fuel Cap Assembly
(Single-stage Snow Throwers)
951-12535 Fuel Cap Assembly
(Tillers, Chipper/Shredders
and Log Splitters)
731-05632 Key (Two-stage Snow Throwers)

FEDERAL and/or CALIFORNIA EMISSION CONTROL WARRANTY STATEMENT
YOUR WARRANTY RIGHTS AND OBLIGATIONS
MTD Consumer Group Inc, the United States Environmental Protection Agency (EPA), and for those products certified for sale in the state
of California, the California Air Resources Board (CARB) are pleased to explain the emission control system (ECS) warranty on your 2015-
2016 small off-road spark-ignited engine and equipment (outdoor equipment). In California, new outdoor equipment must be designed,
built and equipped to meet the State’s stringent anti-smog standards (in other states, outdoor equipment must be designed, built, and
equipped to meet the U.S. EPA small off-road spark ignition engine regulations). MTD Consumer Group Inc must warrant the ECS on your
outdoor equipment for the period of time listed below, provided there has been no abuse, neglect, or improper maintenance of the outdoor
equipment.
Your ECS may include parts such as the carburetor, fuel-injection system, ignition system, catalytic converter, fuel tanks, fuel lines, fuel caps,
valves, canisters, filters, vapor hoses, clamps, connectors, and other associated emission-related components.
Where a warrantable condition exists, MTD Consumer Group Inc will repair your outdoor equipment at no cost to you including diagnosis,
parts, and labor.
MANUFACTURER’S WARRANTY COVERAGE:
This emission control system is warranted for two years. If any emission-related part on your outdoor equipment is defective, the part will be
repaired or replaced by MTD Consumer Group Inc.
OWNER’S WARRANTY RESPONSIBILITIES:
As the outdoor equipment owner, you are responsible for performance of the required maintenance listed in your owner’s manual. MTD
Consumer Group Inc recommends that you retain all receipts covering maintenance on your outdoor equipment, but MTD Consumer Group Inc
cannot deny warranty solely for the lack of receipts.
As the outdoor equipment owner, you should however be aware that MTD Consumer Group Inc may deny you warranty coverage if your
outdoor equipment or a part has failed due to abuse, neglect, improper maintenance, or unapproved modifications.
You are responsible for presenting your outdoor equipment to MTD Consumer Group Inc’s distribution center or service center as soon as
the problem exists. The warranty repairs should be completed in a reasonable amount of time, not to exceed 30 days. If you have a question
regarding your warranty coverage, you should contact the MTD Consumer Group Inc Service Department at 1-800-800-7310 or at
http://support.mtdproducts.com.
GENERAL EMISSIONS WARRANTY COVERAGE:
MTD Consumer Group Inc warrants to the ultimate purchaser and each subsequent purchaser that the outdoor equipment is: (1) designed,
built, and equipped so as to conform with all applicable regulations; and (2) free from defects in materials and workmanship that cause the
failure of a warranted part for a period of two years.
The warranty period begins on the date the outdoor equipment is delivered to an ultimate purchaser or first placed into service.
Subject to certain conditions and exclusions as stated below, the warranty on emission-related parts is as follows:
1. Any warranted part that is not scheduled for replacement as required maintenance in the written instructions supplied is warranted for
the warranty period stated above. If the part fails during the period of warranty coverage, the part will be repaired or replaced by MTD
Consumer Group Inc according to subsection (4) below. Any such part repaired or replaced under warranty will be warranted for the
remainder of the period.
2. Any warranted part that is scheduled only for regular inspection in the written instructions supplied is warranted for the warranty period
stated above. Any such part repaired or replaced under warranty will be warranted for the remaining warranty period.
3. Any warranted part that is scheduled for replacement as required maintenance in the written instructions supplied is warranted for the
period of time before the first scheduled replacement date for that part. If the part fails before the first scheduled replacement, the part
will be repaired or replaced by MTD Consumer Group Inc according to subsection (4) below. Any such part repaired or replaced under
warranty will be warranted for the remainder of the period prior to the first scheduled replacement point for the part.
4. Repair or replacement of any warranted part under the warranty provisions herein must be performed at a warranty station at no charge
to the owner.
5. Notwithstanding the provisions herein, warranty services or repairs will be provided at all of our distribution centers that are franchised to
service the subject engines or equipment.
6. The outdoor equipment owner will not be charged for diagnostic labor that is directly associated with diagnosis of a defective, emission-
related warranted part, provided that such diagnostic work is performed at a warranty station.
7. MTD Consumer Group Inc is liable for damages to other engine or equipment components proximately caused by a failure under
warranty of any warranted part.
8. Throughout the off-road engine and equipment warranty period stated above, MTD Consumer Group Inc will maintain a supply of
warranted parts sufficient to meet the expected demand for such parts.
9. Any replacement part may be used in the performance of any warranty maintenance or repairs and must be provided without charge to
the owner. Such use will not reduce the warranty obligations of MTD Consumer Group Inc.

050790 Rev. D
10. Add-on or modified parts that are not exempted by the Air Resources Board may not be used. The use of any non-exempted add-on or
modified parts by the ultimate purchaser will be grounds for disallowing a warranty claim. MTD Consumer Group Inc will not be liable to
warrant failures of warranted parts caused by the use of a non-exempted add-on or modified part.
WARRANTED PARTS:
The repair or replacement of any warranted part otherwise eligible for warranty coverage may be excluded from such warranty coverage if MTD
Consumer Group Inc demonstrates that the outdoor equipment has been abused, neglected, or improperly maintained, and that such abuse,
neglect, or improper maintenance was the direct cause of the need for repair or replacement of the part. That notwithstanding, any adjustment
of a component that has a factory installed, and properly operating, adjustment limiting device is still eligible for warranty coverage. Further,
the coverage under this warranty extends only to parts that were present on the off-road equipment purchased.
The following emission warranty parts are covered (if applicable):
1. Fuel Metering System
• Cold start enrichment system (soft choke)
• Carburetor and internal parts (or fuel injection system)
• Fuel pump
• Fuel tank
2. Air Induction System
• Air cleaner
• Intake manifold
3. Ignition System
• Spark plug(s)
• Magneto ignition system
4. Exhaust System
• Catalytic converter
• SAI (Reed valve)
5. Miscellaneous Items Used in Above System
• Vacuum, temperature, position, time sensitive valves and switches
• Connectors and assemblies
6. Evaporative Control
• Fuel hose
• Fuel hose clamps
• Tethered fuel cap
• Carbon canister
• Vapor lines
MTD LLC. APARTADO POSTAL 361131 CLEVELAND, OHIO 44136-0019
Medidas importantes de seguridad • Conguración • Funcionamiento • Mantenimiento
• Solución de problemas • Garantía
ADVERTENCIA
LEA Y RESPETE TODAS LAS NORMAS DE SEGURIDAD E INSTRUCCIONES INCLUIDAS EN ESTE
MANUAL ANTES DE PONER EN FUNCIONAMIENTO ESTA MÁQUINA.
SI NO RESPETA ESTAS INSTRUCCIONES PUEDE PROVOCAR LESIONES PERSONALES.
Manual del OperadOr
Motor de 179cc, 208cc & 243cc Eje Horizontal
Este Manual del Operador es una parte importante de su nuevo motor. Le ayudará a preparar y mantener la unidad para obtener los
mejores resultados. Antes de operar el motor lea cuidadosamente y comprenda todo el manual.
Gracias
Asistencia al Cliente
Por favor, NO devuelva la máquina al minorista o distribuidor sin ponerse en contacto primero con el Departamento de
Asistencia al Cliente.
En caso de tener problemas con este producto o de tener dudas con respecto a los controles, funcionamiento o
mantenimiento de este motor, puede solicitar la ayuda de expertos. Elija entre las opciones que se presentan a continuación:
◊ Visite nuestro sitio web en www.mtdproducts.com
Ver Vídeos demostrativos de instalación de mantenimiento y piezas en www.mtdparts.com/ KnowledgeCenter
◊ Llame a un representante de Asistencia al Cliente al (800) 800-7310 ó (330) 220-4683
◊ Escríbanos a MTD LLC • P.O. Box 361131 • Cleveland, OH • 44136-0019
NúMero de Modelo / NúMero de Serie
/
Registro de información de producto
Antes de operar su motor nuevo, por favor localice su placa de
modelo y registre la información en el área situada a la derecha.
Si tiene que solicitar soporte técnico a través de nuestro sitio
web o de un distribuidor de servicio local, necesitará esta
información.
Al propietario 1
24
Medidas importantes de seguridad .................... 25
Etiquetas de seguridad ......................................... 27
Conguración ........................................................ 28
Controles y Características ....................................31
Funcionamiento .................................................... 32
Mantenimiento ...................................................... 35
Solución de problemas ..........................................41
Piezas De Repuesto ............................................... 42
Declaración de Emisiones/Garantía .................... 43
Índice

Medidas importantes de seguridad 2
25
¡ADVERTENCIA! La presencia de este símbolo indica que se trata de instrucciones de
seguridad importantes que debe respetar para evitar poner en riesgo su seguridad personal
y/o material y la de los demás. Lea y siga todas las instrucciones de este manual antes de
poner en funcionamiento este equipo. Si no respeta estas instrucciones puede provocar
lesiones personales. Cuando vea este símbolo. TENGA EN CUENTA LA ADVERTENCIA.
¡PELIGRO! Esta motor está diseñada para ser utilizada respetando las normas de seguridad
contenidas en este manual. Al igual que con cualquier tipo de equipo motorizado, un descuido o
error por parte del operador puede producir lesiones graves. De no respetar las instrucciones de
seguridad siguientes se pueden producir lesiones graves o la muerte.
PROPOSICIÓN 65 DE CALIFORNIA
¡ADVERTENCIA! El escape del motor de este producto, algunos de sus componentes y
algunos componentes del vehículo contienen o liberan sustancias químicas que el estado
de California considera que pueden producir cáncer, defectos de nacimiento u otros
problemas reproductivos.
Capacitación
1. Lea, entienda y cumpla todas las instrucciones incluidas en
el motor y en los manuales antes de montarlo y utilizarlo.
Guarde este manual en un lugar seguro para consultas
futuras y periódicas, así como para solicitar repuestos.
2. Familiarícese con todos los controles y con el uso adecuado
de los mismos. Sepa cómo detener el motor y desactivar
los controles rápidamente.
3. No permita nunca que los niños menores de 14 años
utilicen este motor. Los niños de 14 años en adelante deben
leer y entender las instrucciones de operación y normas
de seguridad contenidas en este manual y en el motor y
deben ser entrenados y supervisados por un adulto.
4. Nunca permita que los adultos operen la máquina sin
recibir antes la instrucción apropiada.
5. Mantenga el área de operación despejada de personas,
particularmente de niños pequeños y mascotas. Detenga la
máquina si alguien se acerca.
Preparativos
1. Utilice zapatos de trabajo resistentes, de suela fuerte, así
como pantalones y camisas ajustados. Las prendas sueltas
y las alhajas se pueden enganchar en las piezas móviles.
Nunca opere la máquina descalzo o con sandalias.
2. Antes de arrancar el motor, desenganche las palancas del
embrague y desplácelas (en caso de haber) a la posición
neutral (“N”).
3. Nunca deje el motor en marcha sin vigilancia.
4. Nunca intente realizar ajustes mientras el motor está
en marcha, excepto en los casos específicamente
recomendados en el manual del operador.
Manejo seguro de la gasolina:
Para evitar lesiones personales o daños materiales sea
sumamente cuidadoso al manipular la gasolina. La gasolina es
sumamente inflamable y sus vapores pueden causar explosiones.
Si se derrama gasolina encima o sobre la ropa se puede lesionar
gravemente ya que se puede incendiar. Lávese la piel y cámbiese
de ropa de inmediato.
1. Cuando agregue combustible, APAGUE el motor y déjelo
enfriar por lo menos 2 minutos antes de sacar la tapa del
combustible.
2. Llene el tanque de combustible al aire libre o en un área
bien ventilada.
3. Utilice sólo los recipientes para gasolina autorizados.
4. Nunca llene los recipientes en el interior de un vehículo
o camión o caja de remolque con recubrimiento plástico.
Coloque siempre los recipientes en el piso y lejos del
vehículo antes de llenarlos.
5. Si es posible, retire el equipo a gasolina del camión o
remolque y llénelo en el suelo. Si esto no es posible, llene el
equipo en un remolque con un contenedor portátil, en vez
de con una boquilla dispensadora de gasolina.
6. Mantenga la boquilla de llenado en contacto con el
borde del depósito de combustible o con la abertura del
recipiente en todo momento, hasta terminar la carga. No
utilice un dispositivo para abrir/cerrar la boquilla.
26 Sección 2 — MedidaS iMportanteS de Seguridad
7. No llene demasiado el tanque de combustible. Llene
el tanque completo indicado por el indicador de nivel
de combustible instalado en el interior del depósito de
combustible o marcado en el depósito. No más de relleno
para dejar espacio para la expansión del combustible. En
algunos modelos, un indicador de nivel de combustible
no puede estar presente, en este caso, llenar el tanque sin
pulgada más de 1 / 2 por debajo de la parte inferior de la
boca de llenado para dejar espacio para la expansión del
combustible.
8. Reemplace la tapa de combustible y apriete hasta que la
tapa de trinquetes.
9. Limpie el combustible que se haya derramado sobre el
motor y el equipo. Traslade la máquina a otra zona. Espere
cinco minutos antes de encender el motor.
10. Para reducir el riesgo de incendio mantenga la máquina
limpia de pasto, hojas y de la acumulación de otros
desechos. Limpie los derrames de aceite o combustible y
saque todos los residuos embebidos de combustible.
11. Mantenga la gasolina alejada de chispas, llamas expuestas,
llamas piloto, calor, y otras fuentes de ignición.
12. Nunca cargue combustible en el equipo en interiores
porque se acumulan vapores inflamables en el área.
13. Apague todos los cigarrillos, cigarros, pipas y otras fuentes
de ignición.
14. Verifique frecuentemente la línea de combustible, el
depósito, el tapón, y los accesorios buscando rajaduras o
pérdidas. Reemplácelos de ser necesario.
Funcionamiento
1. Al arrancar el motor, asegúrese de que la bujía, el silenciador
y la tapa del combustible están en su lugar.
2. No dé arranque al motor si no está la bujía de encendido.
3. Si se derrama combustible, espere hasta que se evapore
antes de encender el motor.
4. Permita que el silenciador, el cilindro del motor, y las aletas
se enfríen antes de tocarlos.
5. Mantenga a los niños alejados de los motores en marcha o
calientes. Pueden sufrir quemaduras por el contacto con un
silenciador caliente.
6. Extraiga el combustible acumulado en el silenciador y el
cilindro.
7. Haga funcionar el equipo con todos los protectores
colocados.
8. Mantenga las manos y los pies alejados de las piezas
giratorias.
9. Átese el cabello si lo lleva largo y no use alhajas.
10. No use ropa demasiado holgada, con cordones colgantes o
partes que se puedan enganchar.
11. Para encender el motor, jale de la cuerda lentamente hasta
que sienta resistencia, luego jale rápidamente (Si no es de
arranque eléctrico).
12. Antes de arrancar el motor, retire todos los equipos
externos/cargas del motor.
13. Los componentes del equipo acoplados directamente,
tales como por ejemplo, cuchillas, rotores, poleas, ruedas
dentadas, etc, deben estar firmemente conectados.
Mantenimiento y Almacenamiento
1. Mantenga el motor en condiciones seguras de
funcionamiento.
2. Deje que motor se enfríe por lo menos cinco minutos antes
de guardarla. Nunca altere los dispositivos de seguridad.
Controle periódicamente que funcionen correctamente.
3. Controle frecuentemente que todos los pernos y
tornillos estén bien ajustados para mantener el motor
en condiciones seguras de funcionamiento. Inspeccione
visualmente el motor para determinar si está dañado.
4. Antes de limpiar, reparar o revisar el motor, deténgalo y
asegúrese que todas las partes móviles se hayan detenido.
Desconecte el cable de la bujía y póngalo haciendo
masa contra el motor para evitar que se encienda
accidentalmente.
5. No cambie la configuración del regulador del motor ni lo
opere a sobrevelocidad. El regulador del motor controla la
velocidad máxima segura de funcionamiento del motor.
6. Mantenga y reemplace las etiquetas de seguridad e
instrucciones según sea necesario.
7. Consulte siempre el manual del operador para conocer la
información importante relativa al almacenamiento de la
máquina durante un plazo prolongado.
8. Si debe vaciar el tanque de combustible, hágalo al aire libre.
9. Respete las normas referentes a la disposición correcta y las
reglamentaciones sobre gasolina, aceite, etc. para proteger
el medio ambiente.
Aviso referido a emisiones
Los motores que están certificados y cumplen con las regulaciones
de emisiones federales EPA y de California para SORE (Equipos
pequeños todo terreno) están certificados para operar con
gasolina común sin plomo y pueden incluir los siguientes sistemas
de control de emisiones: Modificación de motor (EM) y catalizador
de tres vías (TWC) si están equipados de esa manera.
Amortiguador de chispas
¡ADVERTENCIA! Esta máquina está equipada con
un motor de combustión interna y no debe ser
utilizada en un terreno agreste cubierto por bosque,
malezas o hierba ni en las proximidades del mismo,
excepto si el sistema de escape del motor está
equipado con un amortiguador de chispas que
cumpla con las leyes locales o estatales
correspondientes, en caso de haberlas.
Si se utiliza un amortiguador de chispas el operador lo debe
mantener en condiciones de uso adecuadas. En el Estado de
California las medidas anteriormente mencionadas son exigidas
por ley (Artículo 4442 del Código de Recursos Públicos de
California). Es posible que existan leyes similares en otros estados.
Las leyes federales se aplican en territorios federales.
Puede conseguir el amortiguador de chispas para el silenciador a
través de su distribuidor de mantenimiento de motores autorizado
más cercano o poniéndose en contacto con el departamento de
servicios, Apartado Postal 361131 Cleveland, Ohio 44136-0019.
27Sección 2 — MedidaS iMportanteS de Seguridad
¡ADVERTENCIA! Su responsabilidad:Restrinja el uso de esta máquina motorizada a las personas que lean,
comprendan y respeten las advertencias e instrucciones que figuran en este manual y en la máquina.
GUARDE ESTAS INSTRUCCIONES
Símbolos De Seguridad
Esta página representa y describe la seguridad los símbolos que pueden parecer en este producto. Lea, comprenda, y siga todas
instrucciones en la máquina antes procurar para reunir y operar.
Símbolo Descripción
LEA EL MANUAL(S) DEL OPERADOR
Lea, comprenda, y siga todas instrucciones en el manual (manuales) antes procurar para
reunir y operar.
ADVERTENCIA— GASOLINA ES INFLAMABLE
Allow the engine to cool at least two minutes before refueling.
ADVERTENCIA— MONOXIDO DE CARBONO
Nunca corra un motor dentro ni en un área mal ventilada. El escape del motor contiene
monóxido de carbono, un gas inodoro y mortal.
ADVERTENCIA ELECTROCHOQUE
No use el juez de salida eléctrico del motor en la lluvia.
ADVERTENCIA SUPERFICIE CALIENTE
Las partes del motor, especialmente el silenciador, llega a ser muy caliente durante la
operación. Permita motor y silenciador para ponerse frío antes de tocar.
Especificaciones para el aceite y el combustible
IMPORTANTE: El motor se envía sin gasolina en el motor.
Consulte la Sección Configuración incluida en este manual para
ver las instrucciones para la carga de gasolina.
¡ADVERTENCIA! Siempre mantenga las manos y
los pies alejados de las piezas móviles del equipo.
No utilice fluidos comprimidos para arrancar. Los
vapores son inflamables.
Recomendaciones sobre el aceite
Antes de poner en marcha el motor, cárguelo con aceite para
motor, la capacidad es de 600 ml/20 onzas. Consulte el cuadro
de viscosidad de la Figura 3-1 para las recomendaciones
relacionadas con el aceite. No llene excesivamente. Use un 4
tiempos, o un detergente marca equivalente, el aceite de la
prima de motor de calidad certificada para cumplir o exceder los
requisitos del fabricante EE.UU. automóvil para la clasificación
de servicios de un nivel mínimo de SJ (grados más altos de la
carta son aceptables como SL y grados SM) . El aceite de motor se
mostrará esta denominación en el envase.
NOTA: No utilice aceites sin detergente ni aceite para motor de
tres tiempos. Podría reducirse la vida útil del motor.
Figura 3-1
Verificación del nivel de aceite
Algunos motores tienen un tapón de llenado de aceite /la varilla
de nivel de aceite de un cuarto de giro, otros pueden tener uno
a rosca. Siga las instrucciones que están a continuación que
corresponden a su modelo de motor.
Control del nivel de aceite en los motores que tiene tapones de
llenado de aceite de un cuarto de giro
NOTA: Asegúrese de comprobar el aceite sobre una superficie
nivelada y con el motor apagado.
Para evitar que el motor resulte dañado, es importante que:
• Controle el nivel de aceite antes de cada uso y cada
5 horas de funcionamiento cuando el motor está
tibio. Controle el nivel de aceite con mayor frecuencia
durante el período de funcionamiento inicial del motor.
• Mantenga el nivel de aceite entre las marcas “F
(lleno)” y “L (agregar)” de la varilla de medición del
nivel. Vea la Figura 3-2.
• Cuando realice el control, compruebe que el tapón
de llenado de aceite esté bien ajustado.
1. Retire el tapón de llenado/varilla de medición de aceite y
limpie bien la varilla. Vea la Figura 3-2.
2. Inserte el tapón/la varilla de medición en el cuello de
llenado del aceite y ajuste el tapón hasta que se asiente.
3. Saque el tapón / la varilla de medición de aceite. Si el nivel es
bajo, agregue lentamente aceite hasta que el nivel registrado
esté en un punto intermedio entre alto (H) y bajo (L), Figura 3-2.
4. Vuelva a colocar el tapón / la varilla de medición de aceite
bien ajustados antes de poner en marcha el motor.
NOTA: No lo llene en exceso. Si se carga demasiado aceite se puede
generar humo, problemas de arranque o suciedad en la bujía.
NOTA: NO permita que el nivel de aceite se reduzca por debajo
de la marca “L (agregar)” de la varilla de medición. Si lo hace el
equipo puede funcionar mal o dañarse.
NOTA: Para cambiar el aceite del motor, consulte la sección de
Mantenimiento de este manual.
Se debe
cargar
entre las
marcas de
nivel alto
y bajo
Figura 3-2
Configuración 3
28
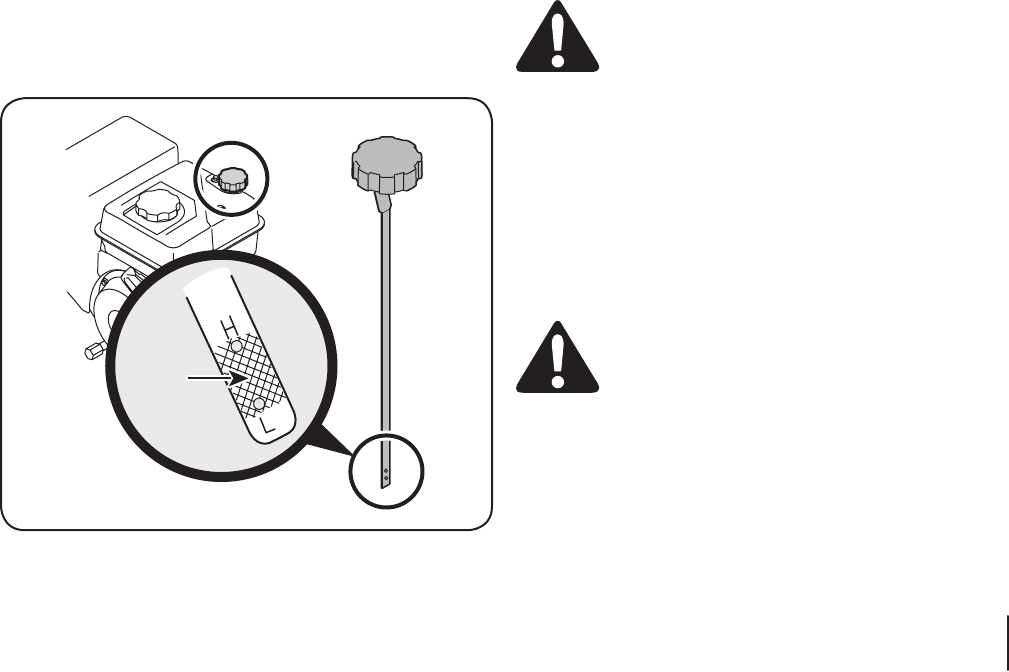
Carga del cárter de aceite
1. Asegúrese de que el motor está vertical y nivelado.
2. Extraiga el tapón de llenado/la varilla de medición del
nivel de aceite del cuello de carga rotándolo en sentido
contrario a las agujas del reloj y levantando la varilla fuera
del motor. Limpie la varilla con un trapo del taller.
3. Inserte el tapón de llenado/la varilla de medición del nivel
de aceite nuevamente en el cuello de llenado. Los tapones
de llenado de aceite de un cuarto de giro, se ajustan
rotando el tapón en el sentido de las agujas del reloj hasta
que se asiente firmemente.
NOTA: Algunas unidades pueden tener una varilla de
medición del nivel a rosca. En ese caso, introduzca el
tapón / la varilla de medición de aceite dentro del cuello
de llenado de aceite pero pero no lo enrosque para
controlarlo.
4. Afloje y retire el tapón de llenado de aceite/la varilla de
nivel de aceite del cuello de llenado de aceite. Anote el
nivel de aceite, si la lectura de aceite en la varilla del nivel
de aceite está por debajo de la marca “L” (agregar), agregue
aceite lentamente hasta alcanzar el nivel “H” (lleno).
Consulte la Fig. 3-2 ó 3-3, según corresponda.
5. Inserte el tapón de llenado/la varilla de medición del nivel
de aceite nuevamente en el cuello de llenado. Ajústelo
rotando el tapón en el sentido de las agujas del reloj hasta
que se asiente firmemente.
6. Limpie todo el aceite que se haya derramado.
NOTA: Para cambiar el aceite, consulte las instrucciones de
Control y cambio de aceite en la sección Mantenimiento de
este manual.
Recomendaciones sobre el combustible
PRECAUCIÓN: Si se opera el motor con
combustible E15 o E85, una mezcla de aceite/
gasolina, gasolina sucia o gasolina con más de 30
días de antigüedad que no se haya estabilizado con
un aditivo de combustible, se puede dañar el carburador del
motor. A los daños subsiguientes no los cubre la garantía del
fabricantes.
Utilice gasolina para automóviles (sin plomo o bajo contenido de
plomo para minimizar los depósitos en la cámara de combustión)
con un mínimo de 87 octanos. Se puede usar gasolina con hasta
un 10% de etanol o un 15% de MTBE (éter metílico terciario-
butílico). Nunca use una mezcla de aceite y gasolina ni gasolina
sucia. Evite que se introduzca suciedad, polvo o agua en el
tanque de combustible. NO utilice gasolina E15 o E85.
¡ADVERTENCIA! La gasolina es sumamente
inflamable y bajo determinadas condiciones es
explosiva.
• Cargue combustible en un área bien ventilada y con el motor
apagado. No fume ni permita llamas o chispas en el lugar
donde se carga combustible o se almacena la gasolina.
• No llene en exceso el depósito de combustible. Después
de cargar combustible, asegúrese de que el tapón del
depósito esté bien cerrado y asegurado.
Control del nivel de aceite en los motores que tiene tapones de
llenado de aceite a rosca
NOTA: Asegúrese de comprobar el aceite sobre una superficie
nivelada y con el motor apagado.
Para evitar que el motor resulte dañado, es importante que:
• Controle el nivel de aceite antes de cada uso y cada
5 horas de funcionamiento cuando el motor está
tibio. Controle el nivel de aceite con mayor frecuencia
durante el período de funcionamiento inicial del motor.
• Mantenga el nivel de aceite entre las marcas “H
(lleno)” y “L (agregar)” de la varilla de medición del
nivel. Vea la Figura 3-3.
• Cuando realice el control, compruebe que el tapón
de llenado de aceite se asiente sobre las rocas. No
ajuste el tapón de llenado del aceite cuando controle
el aceite de los motores que tienen tapones de
llenado de aceite a rosca.
1. Retire el tapón de llenado/varilla de medición de aceite y
limpie bien la varilla. Vea la Figura 3-3.
2. Inserte el tapón/la varilla de medición en el cuello de
llenado del aceite y debe asentarse en las roscas. No lo
apriete cuando controle.
3. Saque el tapón / la varilla de medición de aceite. Si el nivel
es bajo, agregue lentamente aceite hasta que el nivel
registrado esté en un punto intermedio entre alto (H) y
bajo (L), Figura 3-3.
4. Vuelva a colocar el tapón / la varilla de medición de aceite
bien ajustados antes de poner en marcha el motor.
NOTA: No llene en exceso. Si se carga demasiado aceite se puede
generar humo, problemas de arranque o suciedad en la bujía.
NOTA: NO permita que el nivel de aceite se reduzca por debajo
de la marca “L (agregar)” de la varilla de medición. Si lo hace el
equipo puede funcionar mal o dañarse.
NOTA: Para cambiar el aceite del motor, consulte la sección de
Mantenimiento de este manual.
Se debe
cargar
entre las
marcas
de nivel
alto y bajo
Figura 3-3
29Sección 2 — configuración
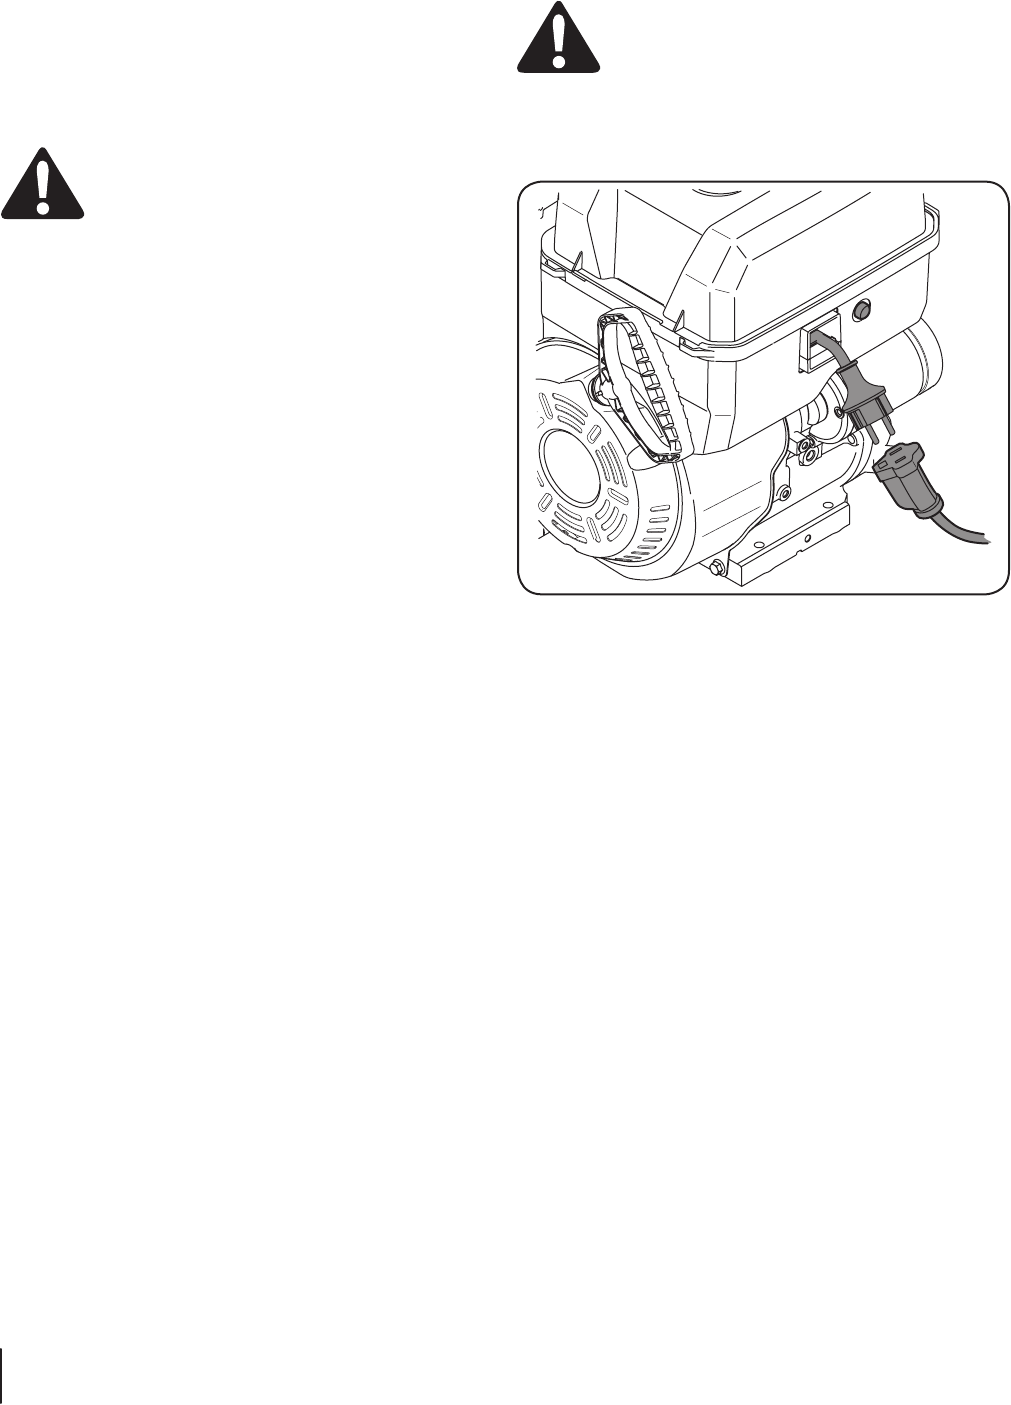
• Tenga cuidado de no derramar combustible al realizar
la recarga. El combustible derramado o sus vapores se
pueden incendiar. Si se derrama combustible, asegúrese de
que el área esté seca antes de arrancar el motor.
• Evite el contacto repetido o prolongado con la piel y la
inhalación de los vapores.
Carga de combustible
¡ADVERTENCIA! El combustible debe cargarlo
un adulto. NUNCA permita que un niño recargue
combustible en el motor. Los vapores de la gasolina
(el combustible) son sumamente inflamables y
pueden explotar. Los vapores del combustible
se pueden esparcir y encenderse por una chispa
o llama que esté a mucha distancia del motor.
Para evitar lesiones o muertes por incendios de
combustible, siga estas instrucciones:
• NO use combustible con plomo.
• El combustible debe ser nuevo y estar limpio.
NUNCA use el combustible que queda desde la
última temporada o que quedó almacenado durante
períodos prolongados.
• NUNCA mezcle aceite con combustible.
• NO use combustible que contenga metanol (alcohol
de madera).
1. Antes de recargar combustible, deje que el motor se enfríe
dos minutos.
2. Compruebe que el motor esté al aire libre en una zona bien
ventilada.
3. Limpie el área que está alrededor del tapón de llenado de
combustible y quite dicho tapón.
4. Use un recipiente rojo para GASOLINA aprobado y agregue
el combustible lentamente, tomando la precaución de
evitar derrames.
5. Vuelva a colocar la tapa del combustible y ajústela
bien. Antes de poner en marcha el motor, debe limpiar
el combustible que se haya derramado. Si se derrama
combustible NO ponga en marcha el motor. Mueva la
máquina para alejarla de la zona del derrame. Evite generar
una fuente de encendido hasta que los vapores del
combustible hayan desaparecido.
6. Compruebe que la válvula de paso del combustible, si está
incluida, esté abierta.
Energía eléctrica
¡ADVERTENCIA! NO tire de la cuerda de arranque
con el motor en funcionamiento. Si lo hace puede
ANULAR LA GARANTÍA.
NOTAS: Siempre debe conectar el cable de alimentación primero
a la caja del interruptor del motor; luego en el tomacorriente. Vea
la Figura 3-4.
Figura 3-4
Determine a qué tipo de tomacorriente de energía conectará
el cable de alimentación, antes de poner en marcha el motor.
Consulte las instrucciones de Motores con arrancadores
eléctricos de la sección Operación de este manual.
30 Sección 2 — configuración
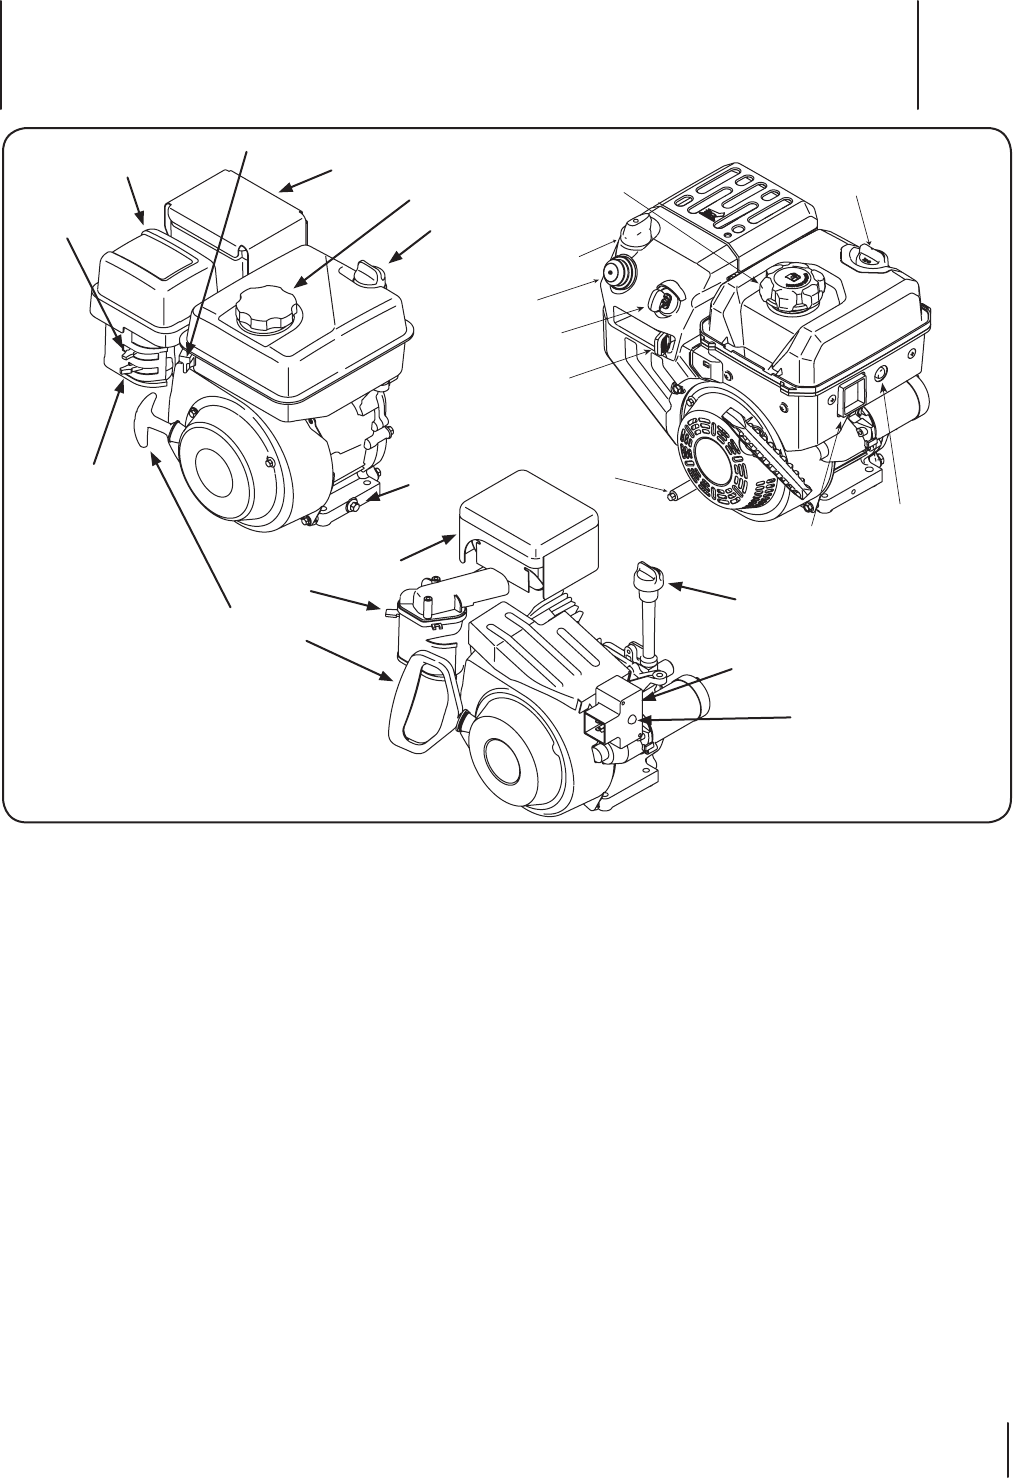
Acelerador
El control del acelerador regula la velocidad del motor y lo apaga
cuando se lo coloca en la posición STOP (detención).
Estrangulador
Al activar el estrangulador se cierra el plato estrangulador del
carburador y esto ayuda a arrancar el motor.
Drenaje del aceite
Al sacar el tapón de drenado, el aceite se drena del motor.
Tapón de llenado de aceite y varilla de medición
del nivel de aceite
Saque el tapón del aceite para verificar el nivel del mismo y
agregar más.
Tapón de llenado de combustible
Saque el tapón del combustible para agregar combustible.
Manija del arrancador de retroceso
Tire de la manija del arrancador para encender el motor.
Control de paso del combustible
Si está equipado, se usa para controlar el flujo de combustible
entre el uso y el transporte/el almacenamiento.
Salida del arrancador eléctrico
Es necesario usar un prolongador para exteriores de tres patas y
una fuente de alimentación / tomacorriente de pared de 120V.
Botón de arranque eléctrico
Al presionar el botón que se encuentra en la parte superior del
arrancador eléctrico se engrana el arrancador eléctrico del motor
cuando está conectado a una fuente de alimentación de 120V.
Cebador
Al presionar el cebador se envía combustible directamente al
carburador del motor para ayudar al encendido el motor.
Llave
La llave es un dispositivo de seguridad. Debe estar completamente
insertada para que el motor arranque. Extraiga la llave cuando no
use la máquina quitanieve.
Importante: No gire la llave para intentar arrancar el motor. Al
hacerlo podría romperla.
Drenaje del
aceite
Botón arrancador
Llenado de aceite
Llenado
de aceite
Recarga de combustible
Silenciador
Silenciador
Filtro de aire
Carburant
robinet
d'arrêt
Estrangulador
Estrangulador
Acelerador
Arrancador de retroceso
Mando Entrada de
potencia
Tapón de llenado
de aceite
Cebador
Tapón de llenado
de combustible
Llave
Estrangulador
Botón de
arranque
eléctrico
Salida del
arrancador
eléctrico
Drenaje del
aceite
Acelerador
Controles y Características 4
31
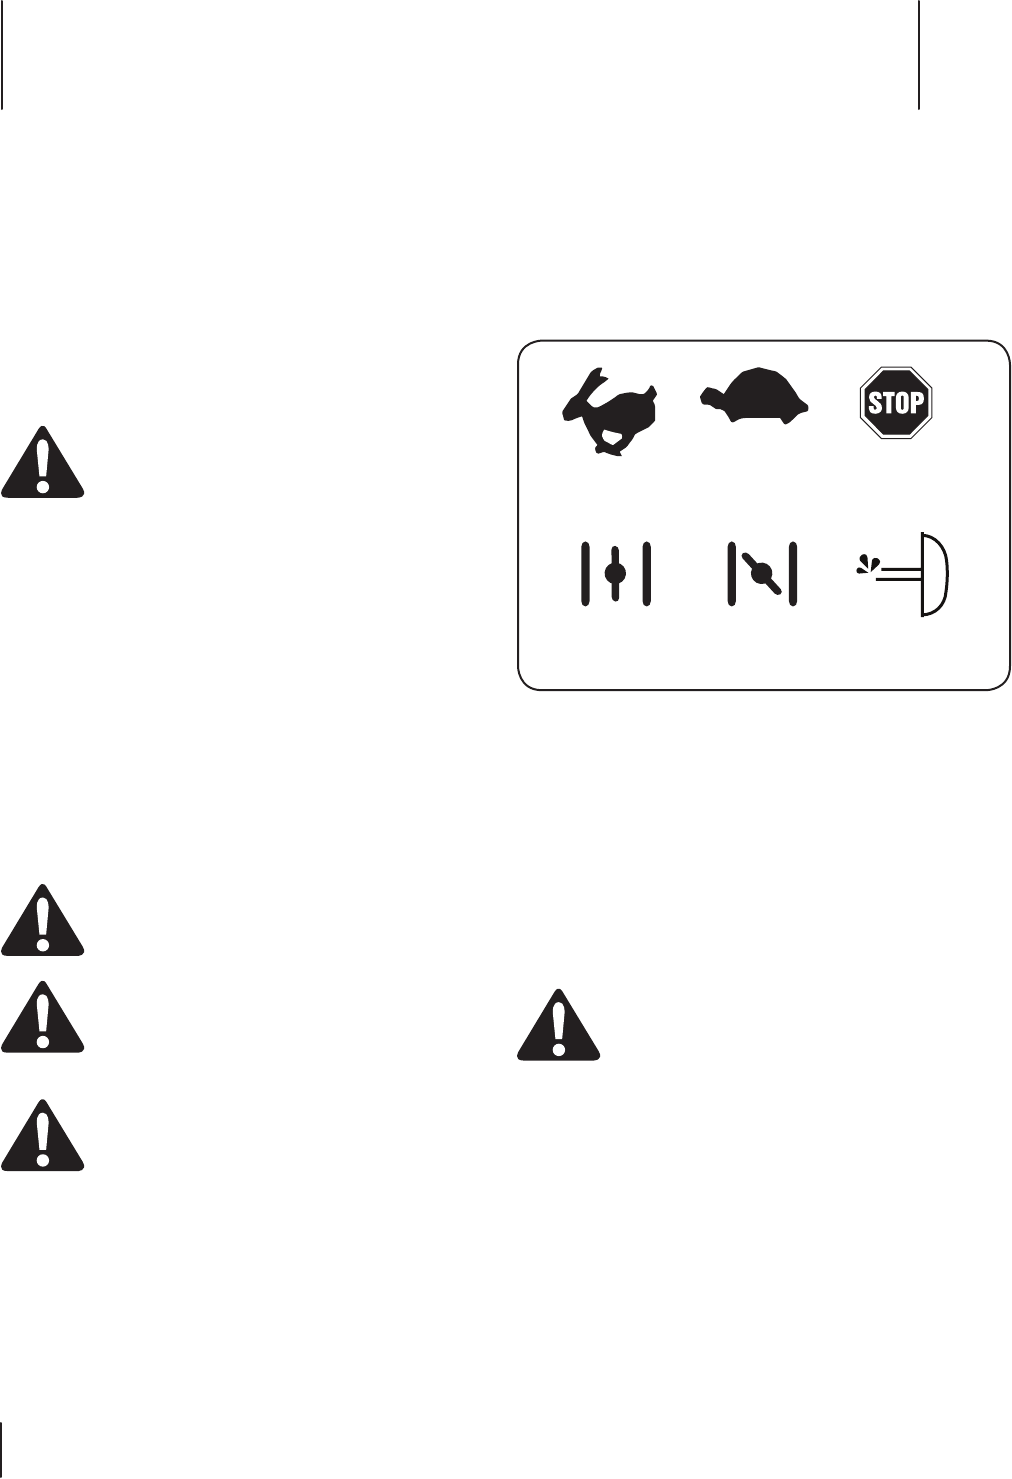
Control previo al funcionamiento
IMPORTANTE: Algunos motores se envían ya con aceite en el
motor, otros sin que el motor tenga ya el aceite. Es muy importante
controlar el aceite antes de operar el motor y agregar más si es
necesario. Consulte la Sección Configuración incluida en este manual
para ver las instrucciones para el control y la carga de aceite.
Para su seguridad y a fin de maximizar la vida útil de este equipo,
es muy importante controlar su estado antes de operar este
motor. Asegúrese de darle servicio, corregir o solucionar cualquier
problema que pudiese identificarse antes de intentar operar este
motor.
¡ADVERTENCIA! Si se realiza un mantenimiento
inadecuado de este motor o si no se corrige algún
problema antes de su operación, se puede producir
un funcionamiento indebido que podría generar
lesiones graves o incluso la muerte.
Realice siempre una inspección previa al funcionamiento antes
de cada operación y corrija todos los problemas.
Antes de arrancar el motor, controle siempre los siguientes puntos:
1. Combustible recomendado (consulte la sección Configuración)
2. Control del nivel de aceite (consulte la sección Configuración)
3. Filtro de aire (consulte la sección Mantenimiento)
4. Inspección general. Controle para detectar la existencia de
pérdidas o descargas de líquidos y de piezas flojas o dañadas.
5. Controle el manual del propietario que se entrega con el
equipo que se acciona con este motor. Analice el manual del
propietario para repasar las precauciones y los procedimientos
que deben seguirse antes de poner en marcha el motor.
Encendido del motor
¡ADVERTENCIA! Siempre mantenga las manos y
los pies alejados de las partes móviles. No utilice
fluidos comprimidos para arrancar. Los vapores son
inflamables.
¡ADVERTENCIA! El motor debe ponerlo en
marcha un adulto. Sólo se puede permitir que un
niño ponga en marcha el motor si un adulto ha
determinado que el niño tiene experiencia y es
capaz para realizar dicha operación.
¡ADVERTENCIA! Si no puede poner en marcha
este motor después de seguir las instrucciones
incluidas en este manual, comuníquese con el
distribuidor de servicio MTD autorizado. Para evitar
lesiones graves por quemadura o daños al motor,
NO intente poner en marcha este motor ni detectar
problemas relacionados con el mismo de ninguna
otra manera, por ejemplo:
• NO use fluidos para arrancar.
• NO rocíe vapores inflamables en el carburador.
• NO cargue líquidos inflamables en el carburador.
• NO opere el motor ni tire de la cuerda de arranque
si se extrajo la bujía. Se puede salpicar combustible
a través del orificio de la bujía y puede encenderse.
NOTA: Deje que el motor se caliente durante unos minutos tras
el arranque. El motor no desarrollará toda su potencia hasta que
alcance temperaturas operativas.
Debe familiarizarse con los símbolos del motor que se indican en
la Figura 5-1, antes de intentar poner en marcha este motor. Si este
motor se controla de forma remota mediante el equipo que acciona,
asegúrese de familiarizarse también con el Manual del operador del
equipo.
Rápido
Funcionamiento
Lento / marcha lenta
Estrangulador
Motor apagado
Cebador
Figura 5-1
NOTA: Las siguientes instrucciones para el arranque son para
muchos tipos diferentes de motores. A fin de ubicar las instrucciones
que corresponden a su motor, debe determinar primero qué tipo
de arrancador tiene. Si tiene un arrancador eléctrico, consulte
Motores con arrancadores eléctricos. Si tiene un arrancador manual
de retroceso, consulte Motores con arrancadores de retroceso que
figura más adelante en esta sección.
Motores con arrancadores eléctricos
Si tiene un arrancador manual de retroceso, consulte Motores con
arrancadores de retroceso que figura más adelante en esta sección.
¡ADVERTENCIA! NO tire de la manija del
arrancador mientras el motor está en marcha.
ADVERTENCIA! El motor de arranque eléctrico
está equipado con un enchufe de energía 120V AC
diseñado para funcionar con un cable de extensión
con conexión a tierra y corriente doméstica de 120 V
AC. Debe estar conectado a tierra correctamente en
todo momento para evitar la posibilidad de lesiones
o muerte por descarga eléctrica.
a. Determine si el cableado de su hogar tiene un sistema
de Interruptor de falla a tierra (G.F.I.) de tres cables
conectados a masa; si no está seguro, pregúnteselo a
un electricista matriculado.
b. Si su hogar no tiene un sistema de interruptor de falla
a tierra (G.F.I.) de tres cables conectados a masa, NO
USE ESTE ARRANCADOR ELÉCTRICO BAJO NINGUNA
CIRCUNSTANCIA.
Funcionamiento 5
32
c. Si el cableado de su hogar está conectado a tierra y no
hay un enchufe de conexión a tierra de tres espigas
con interruptor de falla a tierra en el lugar donde se
usará el arrancador, un electricista matriculado debe
instalar uno ¡ANTES DE QUE SE USE EL ARRANCADOR
ELÉCTRICO!
1. Para evitar el envenenamiento por monóxido de carbono,
asegúrese de que el motor esté al aire libre en un área bien
ventilada.
2. Compruebe que la válvula de paso del combustible, si está
incluida (consulte las instrucciones del Manual del operador
del equipo), esté abierta y que todos los interruptores estén en
la posición de encendido.
NOTA: Si el motor está equipado con un arrancador eléctrico
que funciona con una batería de 12 V, prosiga con el paso 5.
PRECAUCIÓN: El cable de extensión puede ser de
cualquier longitud, pero debe ser clasificado para 15
amperios a 125 voltios, tierra y clasificado para su
uso en exteriores.
IMPORTANTE: Siempre debe conectar el cable de
alimentación
primero a la caja del interruptor del motor; luego en el
tomacorriente.
3. Conecte el cable de alimentación a la caja del interruptor del
motor.
4. Enchufe el extremo del cable de alimentación en el
tomacorriente.
5. Mueva el control de velocidad del motor, si está incluido, hasta
la posición “Fast (rápido)”.
6. If equipped, set the choke control to “FULL CHOKE” position.
7. Hold the primer bulb in for one full second each time you
press it.
• Make sure you cover the vent hole with your
thumb.
• Prime between 3 and 5 times.
IMPORTANTE: NO opere el arrancador eléctrico por más de
5 segundos en cada intento.
NOTA: NO utilice el bulbo del cebador para reiniciar un motor
caliente tras una detención breve. Si lo hace ahogará el motor
y hará que el equipo funcione mal.
NOTA: Si reinicia un motor caliente tras una detención breve,
mueva el control de velocidad del motor (si está incluido)
hasta la posición “FAST (rápido)” y mueva el control del
estrangulador a la posición NO CHOKE (sin estrangulador).
8. Presione el botón del arrancador para arrancar el motor.
NOTA: Si el motor no arranca después de 3 intentos, repita los
pasos 1 a 8.
9. Cuando el motor arranca:
• Suelte el botón del arrancador.
• Mueva el control del estrangulador hasta la
posición 1/2 “CHOKE (1/2 estrangulador)” hasta
que el motor funcione suavemente.
• A continuación, mueva el control del estrangulador
hasta la posición NO CHOKE (sin estrangulador).
10. Mueva el control de velocidad del motor (si está incluido) hasta
la velocidad deseada en el rango “RUN (funcionamiento)”.
NOTA: Si el motor arranca pero falla cuando se mueve el
control del estrangulador hasta la posición NO CHOKE
(sin estrangulador):
• Coloque el control del estrangulador por un
momento nuevamente en la posición FULL
”CHOKE (estrangulador al máximo)”.
• A continuación, mueva el control del estrangulador
hasta la posición 1/2 “CHOKE (1/2 estrangulador)”
hasta que el motor funcione suavemente.
• Por último, mueva el control del estrangulador
hasta la posición NO CHOKE (sin estrangulador).
Si el motor se muere después de que se mueve el control del
estrangulador hasta la posición NO CHOKE (sin estrangulador), repita
los pasos 5 a 10 para reiniciar el motor.
11. Si el motor no arranca después de 3 intentos en la posición
"NO CHOKE (sin estrangulador)", mueva el control del
estrangulador hasta la posición “FULL CHOKE” (estrangulador
al máximo) y arranque el motor.
NOTA: Cuando desconecte el cable de alimentación,
desconéctelo siempre primero del tomacorriente; luego
desconéctelo de la caja del interruptor del motor.
12. Desconecte el cable de alimentación del tomacorriente.
13. Desconecte el cable de alimentación de la caja del interruptor
del motor.
14. Si el motor no arranca después de realizar los pasos
1 a 12, comuníquese con el distribuidor de servicio MTD
autorizado. NO intente detectar los problemas de este motor
de ninguna otra manera.
Motores con arrancadores de retroceso
Si tiene un arrancador eléctrico, consulte Motores con arrancadores
eléctricos que figura previamente en esta sección.
¡ADVERTENCIA! NO tire de la cuerda de arranque
con el motor en funcionamiento. Si lo hace puede
ANULAR LA GARANTÍA.
1. Para evitar el envenenamiento por monóxido de carbono,
asegúrese de que el motor esté al aire libre en un área bien
ventilada.
2. Compruebe que la válvula de paso del combustible, si está
incluida (consulte las instrucciones del Manual del operador
del equipo), esté abierta y que todos los interruptores estén en
la posición de encendido.
3. Mueva el control de velocidad del motor, si está incluido, hasta
la posición “FAST (rápido)”.
4. Coloque el control del estrangulador en la posición “FULL
CHOKE (estrangulador al máximo)”.
5. Mantenga apretado el bulbo del cebador durante un segundo
completo cada vez que lo oprima.
• Compruebe que cubra el orificio de ventilación con
el pulgar.
• Repita esto dos veces para un total de tres cebados.
NOTA: NO utilice el bulbo del cebador para reiniciar un motor
33Sección 5— Funcionamiento
caliente tras una detención breve. Si lo hace ahogará el motor
y hará que el equipo funcione mal.
NOTA: Si reinicia un motor caliente tras una detención breve,
mueva el control de velocidad del motor (si está incluido)
hasta la posición “FAST (rápido)” y mueva el control del
estrangulador a la posición NO CHOKE (sin estrangulador).
6. Opere el control del equipo para soltar el freno o el embrague
del freno, si está incluido (consulte el Manual del operador del
equipo)).
¡ADVERTENCIA! Cuando tire de la cuerda de
arranque, esta puede saltar hacia atrás
inesperadamente hacia el motor causando lesiones
graves. Para evitar este riesgo, siga estas
instrucciones con cuidado:
7. Tome la manija de la cuerda de arranque.
• Tire de la cuerda lentamente hacia afuera hasta
que sienta resistencia.
• Si dejar que la cuerda se vuelva, continúe tirando
de la cuerda con un golpe rápido de todo el brazo.
• Vuelva la cuerda lentamente a su posición original.
NOTA: Si se siguen las instrucciones mencionadas en los pasos
precedentes se evitan los daños potenciales al mecanismo de
retroceso.
Si la manija del arrancador de retroceso está congelada y no
enciende el motor, proceda de la siguiente manera:
• Saque la mayor cantidad de cuerda posible del
arrancador.
• Suelte la manija del arrancador y deje que vuelva
y golpee con fuerza contra el arrancador para
romper el hielo; estos dos pasos sólo deben
hacerse cuando el arrancador está congelado.
8. Si el motor no arranca después de 3 intentos, repita los pasos 1
a 7, e inténtelo nuevamente.
9. Cuando el motor arranca:
• Mueva el control del estrangulador hasta la
posición 1/2 “CHOKE (1/2 estrangulador)” hasta
que el motor funcione suavemente.
• A continuación, mueva el control del estrangulador
hasta la posición NO CHOKE (sin estrangulador).
10. Mueva el control de velocidad del motor (si está incluido) hasta
la velocidad deseada en el rango “RUN (funcionamiento)”.
NOTA: Si el motor arranca pero falla cuando se mueve el
control del estrangulador hasta la posición NO CHOKE (sin
estrangulador).
• Coloque el control del estrangulador por un
momento nuevamente en la posición “FULL
CHOKE (estrangulador al máximo)”.
• A continuación, mueva el control del estrangulador
hasta la posición 1/2 “CHOKE (1/2 estrangulador)”
hasta que el motor funcione suavemente.
• Por último, mueva el control del estrangulador
hasta la posición NO CHOKE (sin estrangulador).
Si el motor se muere después de que se mueve el control del
estrangulador hasta la posición "NO CHOKE (sin estrangulador)",
repita los pasos 3 a 10 para reiniciar el motor.
11. Si el motor no arranca después de 3 intentos en la posición
"NO CHOKE (sin estrangulador)", mueva el control del
estrangulador hasta la posición “FULL CHOKE” (estrangulador
al máximo) y arranque el motor.
12. Si el motor no arranca después de realizar los pasos
1 a 11, comuníquese con el distribuidor de servicio MTD
autorizado. NO intente detectar los problemas de este motor
de ninguna otra manera.
Detención del motor y almacenamiento
de corto plazo
Detenga el motor de acuerdo con el Manual del operador del
equipo.
¡ADVERTENCIA! Para evitar que alguien opere el
motor sin supervisión, especialmente un niño,
NUNCA lo deje sin vigilancia mientras está en
marcha. Apague siempre el motor después de usarlo
y saque la llave de encendido, si está incluida.
¡ADVERTENCIA! NUNCA almacene el motor con el
combustible en el tanque de combustible dentro de
una construcción con probables fuentes de
encendido como calentadores de agua y calefactores,
secadores de ropa, motores eléctricos, etc.
Detención del motor
1. Si opera el motor en la nieve o la lluvia, haga que funcione
durante unos minutos para ayudar a que se seque toda la
humedad.
2. Mueva el control del equipo, si está incluido (consulte el
Manual del propietario del equipo), la palanca de control del
motor o el interruptor de encendido hasta la posición “STOP
(detención) ” u “OFF (apagado)”.
3. Saque la llave de encendido, si está incluida (consulte el
Manual del operador del equipo).
NOTA: Al retirar la llave se reduce la posibilidad de que el
motor sea puesto en marcha sin autorización mientras el
equipo no está en uso.
¡ADVERTENCIA! NUNCA almacene el motor con el
combustible en el tanque de combustible dentro de
una construcción con probables fuentes de
encendido como calentadores de agua y calefactores,
secadores de ropa, motores eléctricos, etc.
Después de que se detiene el motor
¡ADVERTENCIA! Para evitar el congelamiento
posible de los controles del motor, siga las
instrucciones que se indican a continuación con el
motor DETENIDO:
1. Limpie toda la nieve y humedad de la palanca de control del
motor y de las áreas del estrangulador.
2. Mueva el control del equipo, si está incluido (consulte el
Manual del operador del equipo), la palanca de control del
motor o el interruptor de encendido hacia adelante y atrás
varias veces y deje el control en la posición “STOP (detención) ”
u “OFF (apagado)”.
3. Mueva el estrangulador hacia adelante y atrás varias veces y
déjelo en la posición “FULL CHOKE (estrangulador al máximo)”.
4. Compruebe que la válvula de paso del combustible, si está
presente, esté apagada.
34 Sección 5— Funcionamiento
Programa de mantenimiento
Primeras
5 horas
Cada uso o
cada 5 horas.
Cada tempo-
rada o cada
25 horas
Cada tempo-
rada o cada
100 horas
Fechas de Mantenimiento
Inspeccione el nivel de aceite del motor P
Cambie el aceite del motor P P
Verique el depurador de aire (si viene equipado) P
servicio del depurador de aire (si viene equipado) P
Inspeccione las bujías de encendido P
Reemplace la bujía P
Limpie la cubierta del motor (si viene equipado) P
Limpie alrededor del silenciador P
Reemplace el ltro de combustible (si viene equipado) P
La inspección y los ajustes periódicos del motor son esenciales
si se desea mantener un alto nivel de desempeño. El
mantenimiento regular también garantizará una prolongada
vida útil del motor. Los intervalos de mantenimiento requeridos
y el tipo de mantenimiento a ser realizado se describen en la
tabla precedente. Siga los intervalos por hora o calendarios, lo
que ocurra primero. Cuando se opera en condiciones adversas es
necesario llevar a cabo un mantenimiento más frecuente.
¡ADVERTENCIA! Apague el motor antes de
realizar el mantenimiento. Para evitar una puesta en
marcha accidental, desconecte la funda de la bujía.
NOTA: Si el motor debe inclinarse para transportar equipo o
para inspeccionar o extraer pasto, mantenga el lado de la bujía
del motor hacia arriba. Si la bujía del motor se transporta o se
inclina hacia abajo puede causar humo, problemas de arranque,
suciedad en la bujía o saturación con aceite del depurador de aire.
¡ADVERTENCIA! Si el motor ha estado
funcionando, el silenciador estará muy caliente.
Tenga cuidado de no tocar el silenciador.
Recomendaciones sobre el aceite
Consulte el cuadro de viscosidad de la Fig. 6-1 para las
recomendaciones relacionadas con el aceite. No llene
excesivamente. Use un 4 tiempos, o un detergente marca
equivalente, el aceite de la prima de motor de calidad certificada
para cumplir o exceder los requisitos del fabricante EE.UU.
automóvil para la clasificación de servicios de un nivel mínimo de
SF o SG (grados más altos de la carta son aceptables como SJ, SL
y grados SM) . El aceite de motor se mostrará esta denominación
en el envase.
NOTA: No utilice aceites sin detergente ni aceite para motor de
tres tiempos. Podría reducirse la vida útil del motor.
Figura 6-1
Mantenimiento 6
35
Control y cambio del aceite
Para evitar que el motor resulte dañado, es importante que:
• Controle el nivel de aceite antes de cada uso y cada 5 horas
de funcionamiento cuando el motor está tibio.
• Cambie el aceite después de las 5 primeras horas de
operación y cada 50 horas de operación a partir de ese
momento. El motor debe estar tibio aún pero NO caliente
por su uso reciente.
NOTA: Para los motores que tienen una varilla de medición,
consulte las instrucciones de Tapón de llenado del aceite
con varilla de medición que figuran a continuación en
esta sección. Para los motores que no tienen una varilla
de medición, consulte las instrucciones de Tapón de
llenado del aceite sin varilla de medición que figuran
posteriormente en esta misma sección.
Varilla de medición del nivel y tapón de llenado de aceite
¡ADVERTENCIA! Antes de inclinar el motor o
equipo para drenar el aceite, drene el combustible
del depósito haciendo funcionar el motor hasta que
el depósito de combustible esté vacío.
1. Desconecte con cuidado el cable de la bujía y manténgalo
alejado de la misma. Consulte la Fig. 6-2 para determinar
dónde está la bujía.
• Mantenga el cable de la bujía que está desconectado
de forma segura, alejado de las piezas metálicas
donde se podría formar un arco eléctrico.
• Conecte con cuidado el cable de la bujía al borne
de puesta a masa, si está incluido.
Bujía de encendido
Funda de
bujía
Figura 6-2
2. Asegúrese de que el tapón de llenado del combustible esté
puesto y ajustado de forma segura.
3. Asegúrese de encontrar la ubicación correcta del tapón
de drenado del aceite, si está incluida (consulte las
instrucciones del Manual del operador del equipo).
4. Limpie el área alrededor del tapón de drenado del aceite.
5. Coloque un recipiente de aceite reciclable aprobado bajo
el tapón del drenaje del aceite, si está incluido.
6. Retire el tapón de drenado del aceite, si está incluido. Vea
la Fig. 6-3.
NOTA: Dependiendo del modelo de motor que tenga, el
tapón de aceite puede ser colocado de forma diferente.
Estas posiciones incluyen en la parte frontal y / o parte
posterior del bloque, o como un tubo extendido. Los
ejemplos se muestran en la figura. 6-3.
¡ADVERTENCIA! El aceite usado del motor puede
causar cáncer de piel si entra en contacto con la piel
de manera reiterada y por períodos prolongados. Si
bien esto es improbable a menos que manipule
aceite usado todos los días, sin embargo es recomendable
lavarse bien las manos con agua y jabón inmediatamente
después de haber manipulado aceite usado.
Drenaje
del aceite
Figura 6-3
7. Incline el motor para ubicar el flujo de aceite de manera
que se drene desde el punto más bajo del motor (consulte
las instrucciones del Manual del operador del equipo).
8. Drene el aceite en un recipiente de aceite reciclable
aprobado.
NOTA: Elimine el aceite del motor usado de la manera que
sea compatible con el medio ambiente. Sugerimos que lo
coloque en un recipiente sellado y lo lleve a la estación de
servicio local para su recuperación. No lo tire a la basura ni
lo vierta en el suelo.
9. Instale el tapón de drenaje del aceite y ajuste bien.
10. Limpie el área alrededor del tapón de drenado del aceite.
11. Saque la varilla de medición de aceite del tapón.
12. Cargue el aceite recomendado, consulte las especificaciones
para el aceite y el combustible que figuran en la sección
Configuración del presente manual, y la Fig. 6-3.
NOTA: NO cargue en exceso el cuello de llenado. Si lo hace,
se pude producir arrastre al equipo y causar que funcione
mal o se dañe.
36 Sección 6— ManteniMiento
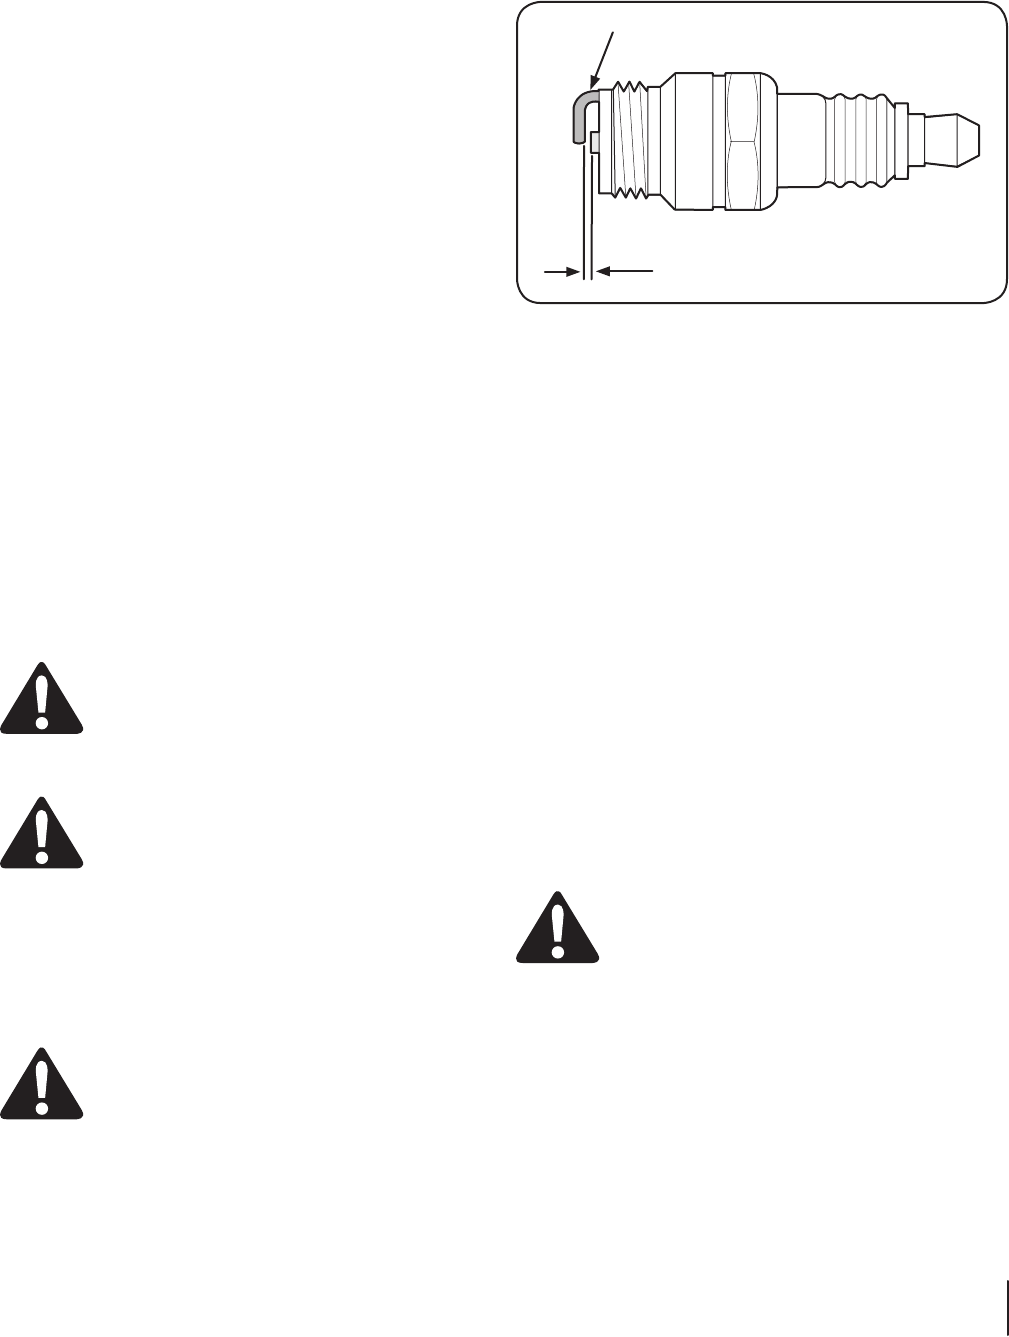
NOTA: NO permita que el nivel de aceite se reduzca por
debajo de la marca "ADD (agregar)" de la varilla de medición.
Si lo hace el equipo puede funcionar mal o dañarse.
13. Limpie todo el aceite que se haya derramado.
14. Coloque la varilla de medición del nivel en el tapón del
aceite. Ajuste bien.
• Pour les modèles filetés pétrole le bouchon de
remplissage / jauge, la PAC reste sur les filets,
ne pas serrer le bouchon pour vérifier le niveau
d’huile.
• Pour un quart de tour le bouchon / la jauge
modèles, serrer le bouchon pour vérifier le
niveau d’huile.
REMARQUE: Voir la section Set-Up, plus tôt dans ce
manuel pour des instructions détaillées sur l’identification
et la vérification de l’huile sur chacun de ces modèles de
moteurs spécifiques.
15. Retirez le bouchon de remplissage d’huile / jauge. Si le
niveau est bas, ajouter lentement l’huile jusqu’à ce que le
niveau d’huile entre les registres de hauteur (H) et bas (L),
Fig. 3-2 et 3-3 dans la section Set-Up.
16. Répétez les étapes 14 et 15 pour être sûr que le niveau
d’huile correct a été atteint.
17. Une fois que le niveau d ‘huile a été confirmée, installer le
bouchon / jauge. Serrez fermement
18. Déconnectez soigneusement le fil de bougie de la terre de
poste, si elle est présente.
19. Reconnectez avec soin le fil de la bougie à la bougie.
NOTE: Il est conseillé de revérifier le niveau d’huile après avoir fait
tourner le moteur pendant une courte période, et la température
du moteur normal d’exploitation a été atteint.
¡ADVERTENCIA! Si le moteur vient de tourner, le
silencieux tête du moteur, et la bougie sera très
chaude. Faites attention à ne pas toucher un de ces
composants jusqu’à ce qu’ils aient refroidi.
Mantenimiento de bujía
¡ADVERTENCIA! NO pruebe la chispa si no está la
bujía de encendido. NO dé arranque al motor si no
está la bujía de encendido.
Controle la bujía anualmente o cada 100 horas de operación.
Para asegurarse de que el motor funcione bien, la bujía debe
tener una separación correcta y debe estar libre de depósitos.
1. Quite la funda de la bujía.
2. Limpie el área alrededor de la bujía.
3. Use una llave para bujías para extraerla.
¡ADVERTENCIA! Si el motor estuvo en marcha, el
silenciador, la culata del motor y la bujía estarán
muy calientes. Tenga cuidado de no tocar ninguno
de estos componentes hasta que se hayan enfriado.
4. Inspeccione visualmente la bujía. Elimine la bujía si
presenta mucho desgaste, o si el aislante está agrietado
o astillado. Reemplace la bujía si los electrodos están
picados, quemados o saturados con depósitos.
5. Limpie la bujía con un cepillo de alambre si se va a reutilizar.
6. Mida la separación de bujía con un calibrador. Corrija de ser
necesario torciendo el electrodo lateral. Vea la Fig. 6-4. La
separación debe establecerse en 0.030 pulg. (0.76mm).
Electrodo
0.06-0,03 pulg.
0.60-0.80 mm
Figura 6-4
7. Controle que la arandela de la bujía esté en buen estado.
8. Enrosque la bujía a mano para evitar que se enrosque
cruzada.
9. Una vez que la bujía está asentada en su lugar, ajuste con
una llave para bujía para comprimir la arandela.
NOTA: Cuando instale una bujía nueva, apriete ⁄ de giro
después de colocar la bujía en su lugar para comprimir la
arandela. Cuando reinstale una bujía usada, ajuste ⁄-⁄ de
giro después que la bujía se encuentra colocada en su lugar
a fin de comprimir la arandela.
NOTA: La bujía debe estar firmemente asegurada. Si la
bujía no está bien asegurada puede calentarse mucho y
dañar el motor.
Filtro de aire
NOTA: No todos los motores tienen filtros de aire, como los
motores que se usan para las máquinas quitanieve. Debe darle
servicio al filtro de aire si uno está incluido.
Los filtros de papel no se pueden limpiar. Se deben reemplazar
una vez al año o cada 100 horas de funcionamiento y con mayor
frecuencia si se utilizan en lugares donde hay gran cantidad de
polvo.
¡ADVERTENCIA! Nunca use gasolina o solventes
de punto de encendido bajo para limpiar el
elemento del depurador de aire. Podría producirse
un incendio o explosión.
NOTA: Nunca haga funcionar los motores que tienen filtros de
aire sin ellos. Se puede producir el desgaste rápido del motor.
1. Oprima la lengüeta de la tapa del filtro de aire y levante
la tapa o desenrosque los tornillos de apriete manual, en
función del modelo de motor que tenga. Vea la Fig. 6-5.
2. Reemplace el elemento de papel si está sucio o dañado.
Limpie el elemento de espuma o reemplácelo si está dañado.
37Sección 6— ManteniMiento

Figura 6-5
3. Para limpiar el elemento de espuma, sepárelo del elemento
de papel y lávelo con detergente líquido y agua. Permita
que se seque bien antes de usarlo. No lubrique el elemento
de espuma.
Ajustes
NO realice ningún ajuste del motor. Los ajustes de fábrica son
satisfactorios para la mayoría de las condiciones. Si los ajustes se
necesitan, comuníquese con el Distribuidor de servicio de MTD
autorizado.
Carburador
Si considera que el carburador necesita ajuste, consulte al
Distribuidor de servicio de MTD autorizado. El desempeño
del motor NO debe verse afectado a altitudes de hasta
7,000 pies (2,134 m). Para el funcionamiento a mayores altitudes,
comuníquese con el Distribuidor de servicio de MTD autorizado.
Alternador (si viene equipado)
Comuníquese con el Distribuidor de servicio de MTD autorizado
por los problemas eléctricos relacionados con el alternador como:
• El arrancador no funciona
• La batería está descargada
• Cambio de fusible
• Mantenimiento/reparaciones del alternador
Velocidad del motor
¡ADVERTENCIA! Para evitar lesiones graves o la
muerte, NO modifique el motor de ninguna manera.
Si altera la configuración del regulador, el motor se
puede desbocar y funcionar a velocidades que no
son seguras. NUNCA cambie la configuración de fábrica del
regulador del motor.
¡ADVERTENCIA! Hacer funcionar el motor más
rápidamente que la velocidad configurada de fábrica
puede ser peligroso y ANULARÁ LA GARANTÍA.
Extracción de la nieve del motor
Después de cada uso, extraiga la nieve de las siguientes áreas:
• Varilla de medición del nivel del tapón de
llenado de aceite
• Tapón de llenado de combustible
• Arrancador de retroceso/Pantalla del volante
• Enlaces
• Protecciones
• Conexión de la bujía (si se ve).
• Caja del interruptor del arrancador eléctrico,
si está incluida (consulte las instrucciones del
Manual del operador del equipo).
NOTA: Consulte las instrucciones del Manual del operador
del equipo para conocer la ubicación adecuada del tapón
de llenado del combustible y de la palanca de control.
4. Si se extrae la nieve se facilita la operación de la cuerda del
arrancador de retroceso y se reduce el riesgo de que se
produzca una contaminación por agua cuando se abre el
tapón de llenado del combustible.
NOTA: Si desea obtener más información acerca de
los arrancadores de retroceso, consulte Motores con
arrancadores de retroceso en la Sección sobre operación
del presente manual.
Transporte del motor
¡ADVERTENCIA! NUNCA transporte este motor
dentro de otro vehículo o en un espacio cerrado si
hay gasolina en el tanque. El vapor del combustible
o el combustible derramado pueden prenderse
fuego.
¡ADVERTENCIA! Si hay combustible en el tanque,
cierre la válvula de paso del combustible, si viene
equipada, y transporte el motor en posición vertical,
en un vehículo abierto, como un remolque abierto o
la caja abierta de una camioneta.
Si NO dispone de un vehículo abierto y tiene que transportar el
motor en posición vertical en un vehículo cerrado, siga estos pasos
para vaciar el tanque de combustible antes de transportar el motor:
Vacíe el tanque de combustible con un dispositivo de succión
disponible comercialmente que esté diseñado para usarse con
gasolina.
¡ADVERTENCIA! NO vierta el combustible del
motor ni haga sifón con la boca para que salga.
Drene el combustible en un recipiente rojo para gasolina
aprobado, tomando precauciones para evitar derrames.
Haga funcionar el motor hasta que el combustible restante se
haya consumido.
¡ADVERTENCIA! NUNCA deje el motor sin
atención cuando está en funcionamiento y NUNCA
haga funcionar el motor en un área cerrada.
38 Sección 6— ManteniMiento
Almacenamiento del motor
Almacenamiento a corto plazo/estacional
Limpie el motor
Si el motor ha estado funcionando, déjelo enfriar durante por lo
menos media hora antes de limpiarlo.
Antes de dar servicio al motor, extraiga la cubierta del carburador
y/o el alojamiento del soplador. Elimine la suciedad y los residuos
de las siguientes áreas:
• Aletas de refrigeración
• Filtro de admisión de aire o Áreas de protección
del volante/arrancador de retroceso
• Conexión de la bujía
• Palancas
• Área de enlace
• Protecciones
• Carburador
• Culata
La extracción de los residuos asegura que el enfriamiento sea
adecuado, la velocidad del motor correcta y el riesgo de incendio
menor.
NOTA: No rocíe el motor con agua para limpiarlo porque el agua
podría contaminar el combustible. Con una manguera de jardín
o equipo de lavado a presión también puede forzar agua dentro
del depurador de aire o la abertura del silenciador. El agua en el
depurador de aire embeberá el elemento de papel, y el agua que
pasa a través del elemento o silenciador puede ingresar en el
cilindro, causando daño.
¡ADVERTENCIA! La acumulación de residuos
alrededor del silenciador podría producir un
incendio. Inspecciónelo y límpielo antes de cada
uso.
Almacenamiento del combustible
¡ADVERTENCIA! NUNCA almacene el motor con
combustible en el tanque dentro de una
construcción con fuentes potenciales de encendido
como calentadores de agua, calefactores, secadores
de ropa, motores eléctricos, etc. Si lo hace se puede producir una
explosión y causar muertes o lesiones graves.
NOTA: Si el combustible del motor almacenado en el tanque
de gasolina y/o en un recipiente para gasolina aprobado, sin
un producto estabilizador para gasolina, no se usará durante
más de 15 a 30 días, debe prepararlo para el almacenamiento a
corto plazo/estacional. Consulte Tratamiento del combustible
posteriormente en esta sección.
NOTA: Si se desea almacenar el combustible del motor durante
más de una temporada, sin un producto estabilizador para
gasolina, se deteriorará gradualmente. Además, si se lo almacena
en el tanque de gasolina del motor sin un producto estabilizador
para gasolina, es probable que en el carburador queden
depósitos de goma, el sistema de combustible se obstruya y
se ANULARÁ LA GARANTÍA. Prepare el combustible para un
almacenamiento prolongado.
Sistema de combustible
Para evitar que el combustible se eche a perder y que haya
problemas con el carburador, debe tratar el sistema de
combustible de la siguiente manera:
NOTA: Respete siempre la proporción de mezclado que figura en el
recipiente del estabilizador. Si no lo hace se puede dañar el equipo.
NOTA: NO es necesario drenar la gasolina estabilizada del
carburador.
Tratamiento del combustible
1. Agregue el estabilizador del combustible de acuerdo con
las instrucciones del Fabricante.
2. Haga funcionar el motor por lo menos 10 minutos después de
agregar el estabilizador para permitirle llegar al carburador.
¡ADVERTENCIA! NUNCA almacene el motor con
el combustible en el tanque de combustible dentro
de una construcción con probables fuentes de
encendido como calentadores de agua, calefactores,
secadores de ropa, motores eléctricos, etc.
NOTA: En lugar de utilizar un producto conservante/estabilizador
del combustible, puede vaciar el tanque de combustible como
se indica a continuación en Almacenamiento prolongado - Cómo
drenar el combustible.
Almacenamiento prolongado
Cómo drenar el combustible
NOTA: Saque los residuos del motor antes de drenar el
combustible del carburador.
NOTA: Si ya preparó el combustible para el almacenamiento
a corto plazo NO es necesario drenar del carburador el
combustible que contiene un estabilizador.
¡ADVERTENCIA! Para evitar lesiones graves o
muertes, NO vierta combustible del motor ni haga
sifón con la boca para que salga.
1. Para evitar lesiones graves por incendios de combustible,
vacíe el tanque de combustible haciendo funcionar el
motor hasta que se pare por falta de combustible. NO
intente verter combustible del motor.
2. Haga funcionar el motor mientras espera hasta que el
combustible restante se haya consumido.
¡ADVERTENCIA! NUNCA deje el motor sin
atención cuando está en funcionamiento y NUNCA
haga funcionar el motor en un área cerrada.
3. Comience el servicio del diámetro interior del cilindro de
acuerdo con las siguientes instrucciones.
Diámetro interior del cilindro de aceite
¡ADVERTENCIA! Cuando lubrique el diámetro
interior del cilindro, es posible que salpique
combustible por el orificio de la bujía. Para evitar
lesiones graves por incendios de combustible, siga
estas instrucciones:
39Sección 6— ManteniMiento

1. Desconecte con cuidado el cable de la bujía y manténgalo
alejado de la misma.
• Mantenga el cable de la bujía que está
desconectado de forma segura, alejado de
las piezas metálicas donde se podría formar
un arco eléctrico.
• Conecte con cuidado el cable de la bujía al
borne de puesta a masa, si está incluido.
• Desconecte la batería en el terminal negativo primero, si el
motor cuenta con un arrancador eléctrico CC.
• Apague todos los interruptores del motor.
• Retire la llave de encendido, si viene equipada.
2. Retire la bujía de encendido.
3. Rocíe 1 onza (30ml) de aceite de motor limpio dentro del
orificio de la bujía de encendido.
4. Cubra el orificio de la bujía con un trapo para evitar que se
salpique combustible desde dicho orificio cuando se tira de
la cuerda de arranque.
NOTA: para los motores que están equipados con un
arrancador de retroceso, prosiga con el Paso 5. Para los
motores que están equipados con arrancadores eléctricos,
proceda prosiga con el Paso 6.
5. Tome la manija de la cuerda de arranque:
• Tire de la manija de la cuerda de arranque hacia
afuera lentamente con un golpe de todo el brazo.
• Repita una vez. Así se distribuirá aceite en todo
el cilindro para evitar la corrosión durante el
almacenamiento.
• Prosiga con el Paso 7.
6. Presione el botón de arranque o ponga la llave del
interruptor de encendido en la posición “START (arrancar)”:
Suelte de inmediato el botón de arranque o ponga la
llave del interruptor de encendido en la posición “OFF
(apagado)”. Así se distribuirá aceite en todo el cilindro para
evitar la corrosión durante el almacenamiento.
7. Saque el trapo del orificio de la bujía.
8. Instale la bujía.
9. Desconecte con cuidado el cable de la bujía del borne de
puesta a masa, si está incluido.
10. Conecte el cable de la bujía a la bujía.
Aceite
Cambie el aceite si NO lo hizo durante los últimos 3 meses.
Consulte el título Control y cambio de aceite ubicado unas
páginas atrás en esta misma sección.
Almacenamiento fuera de temporada
PRECAUCIÓN: Si no se utiliza un aditivo
estabilizador del combustible o si no se hace
funcionar el motor hasta que se agote
completamente el combustible antes del
almacenamiento fuera de temporada, se puede dañar el
carburador del motor. A los daños subsiguientes no los cubre la
garantía del fabricantes.
Para almacenar los motores entre 30 y 90 días es necesario
tratarlos con un estabilizador de gasolina y para almacenamientos
de más de 90 días se necesita drenar el combustible para evitar
deterioros y la formación de depósitos de goma en el sistema
de combustible o en piezas fundamentales del carburador. Si la
gasolina en su motor se deteriora durante el almacenamiento,
puede resultar necesario reparar o reemplazar el carburador y
otros componentes del sistema de combustible.
1. Extraiga todo el combustible del depósito haciendo funcionar
el motor hasta que se detenga por falta de combustible.
¡ADVERTENCIA! Nunca deje el motor sin
vigilancia mientras está en funcionamiento.
2. Cambie el aceite. Consulte el título Cambio de aceite
ubicado unas páginas atrás en esta misma sección.
3. Retire la bujía y vierta alrededor de ⁄ onzas de aceite para
motor en el cilindro. Vuelva a colocar la bujía y dé marcha al
motor lentamente para distribuir el aceite.
4. Limpie la suciedad de las áreas del motor y del silenciador.
Retoque la pintura dañada, y revista con una película
delgada de aceite las demás áreas que puedan oxidarse.
5. Almacene el motor en un sector limpio, seco y bien
ventilado, lejos de cualquier artefacto que funcione con
una llama o luz piloto como hornos, calentadores de agua
o secadores de ropa. También evite cualquier sector con
motores eléctricos que producen chispas o donde se
utilizan herramientas eléctricas.
6. De ser posible, también evita áreas de almacenamiento con
mucha humedad para evitar oxidación y corrosión.
7. Mantenga el motor nivelado cuando lo almacene. La inclinación
del motor puede resultar en fugas de combustible o aceite.
40 Sección 6— ManteniMiento

Problema Causa Solución
El motor no arranca 1. Motor ahogado
2. Se ha desconectado el cable de la bujía
3. El tanque de combustible está vacío o el
combustible es viejo
4. El motor no está cebado
5. La bujía no funciona correctamente
6. El regulador está en posición detención
1. Aguarde al menos diez minutos antes de
encender el motor
2. Conecte el cable a la bujía
3. Llene el tanque con gasolina limpia y fresca
4. Cebe el motor
5. Límpiela, ajuste la distancia disruptiva o
cámbiela
6. Cambie el regulador a la posición FAST
(velocidad rápida) / RUN (funcionamiento)
El motor funciona de
manera errática
1. El cable de la bujía está flojo
2. El cable de la bujía está quemado o
defectuoso o la separación de los electrodos
está mal configurada
3. El combustible es viejo
4. El motor está funcionando con el cebador
encendido
5. Agua o suciedad en el sistema de
combustible
1. Conecte y ajuste el cable de la bujía.
2. Reajuste la separación de los electrodos o
cámbiela
3. Llene el tanque con gasolina limpia y fresca
4. Coloque el cebador en la posición off
(apagado)
5. Vacíe el tanque de combustible. Vuelva a
llenarlo con combustible limpio
El motor recalienta 1. El nivel de aceite del motor está bajo 1. Llene el motor con la cantidad adecuada de
aceite para motor
Solución de Problemas 7
41

Piezas de repuesto 8
42
Teléfono (800) 800-7310 o (330) 220-4683 para solicitar piezas de reemplazo o un manual completo de piezas (tener su número de
modelo y número de serie). Descargar el Manual de piezas también están disponibles de forma gratuita en www.mtdproducts.com.
Componente Número de Pieza y Descripción
951-10292 Bujia
951-10794 Filtro de Aire (Cortadora Trituradora
y Máquina rompe troncos)
951-14262 Filtro de Aire (Cultivadora)
951-12533 Tapa Del Combustible
(Máquina quitanieve de dos etapas)
751-14006 Tapa Del Combustible
(Máquina quitanieve de etapa única)
951-12535 Tapa Del Combustible (Cultivadoras,
Cortadora Trituradora y Máquina
rompe troncos)
731-05632 Llave
(Máquina quitanieve de dos etapas)

DECLARACIÓN FEDERAL y/o DE CALIFORNIA SOBRE GARANTÍAS EN EL CONTROL DE EMISIONES
SUS DERECHOS Y OBLIGACIONES EN CUANTO A LA GARANTÍA
MTD Consumer Group Inc, la Agencia de Protección Medioambiental de los Estados Unidos (EPA), y para aquellos productos certificados
para su venta en el estado de California, el Departamento de los Recursos del Aire de California (CARB) se complacen en explicar la garantía
que cubre al sistema de control (ECS) de emisiones de su equipo y motor (equipos de exteriores) de encendido por chispa para todo terreno,
pequeño, de exteriores del año 2015-2016. En California, los nuevos motores de equipos de exteriores deben estar diseñados, construidos y
equipados para cumplir con las estrictas normas antipolución del Estado (en otros estados, equipos de exteriores deben ser estar diseñados,
construidos y equipados para cumplir con las regulaciones de motores de encendido por chispa para todo terreno pequeños de la Agencia de
Protección Medioambiental de los Estados Unidos, (EPA). MTD Consumer Group Inc. debe garantizar el sistema de control de emisiones (ECS)
de su motor de equipos de exteriores por el período de tiempo indicado más abajo, siempre y cuando no exista uso incorrecto, negligencia o
mantenimiento inadecuado de equipos de exteriores.
Su ECS puede incluir piezas tales como el carburador, el sistema de inyección de combustible, el sistema de encendido, el convertidor catalítico,
los depósitos de combustible, las líneas de combustible, los tapones de combustible, las válvulas, contenedores, filtros, mangueras de vapor,
abrazaderas, conectores y otros componentes afines relacionados con las emisiones.
Donde exista una condición cubierta por la garantía, MTD Consumer Group Inc. reparará de equipos de exteriores sin costo alguno incluyendo
el diagnóstico, las piezas y la mano de obra.
COBERTURA DE LA GARANTÍA DEL FABRICANTE:
Este sistema de control de emisiones se garantiza por el término de dos años. Si alguna pieza relacionada con las emisiones de su motor de
equipos de exteriores es defectuosa, MTD CONSUMER GROUP INC. reparará o sustituirá dicha pieza.
RESPONSABILIDADES DEL PROPIETARIO SEGÚN LA GARANTÍA:
En su carácter de propietario de equipos de exteriores, usted es responsable del mantenimiento requerido que se especifica en el manual del
propietario. MTD Consumer Group Inc le recomienda que conserve todos los recibos que cubren el mantenimiento de equipos de exteriores,
obstante lo cual MTD Consumer Group Inc no podrá denegar el cumplimiento de la garantía únicamente por la falta de los recibos.
Como propietario de equipos de exteriores, usted debe saber que MTD Consumer Group Inc. puede denegar la cobertura de la garantía si
su equipos de exteriores o una pieza del mismo fallan debido a uso incorrecto, negligencia, mantenimiento indebido o a modificaciones no
aprobadas.
Usted es responsable de presentar su equipos de exteriores al centro de distribución o servicio técnico de MTD Consumer Group Inc. tan pronto
como aparezca el problema. Las reparaciones cubiertas por la garantía se deben llevar a cabo en un lapso razonable que no exceda de 30
días. Si tiene alguna pregunta respecto de la cobertura de la garantía, póngase en contacto con el Departamento del Servicio Técnico de MTD
Consumer Group Inc. al teléfono 1-800-800-7310 o por correo electrónico en http://support.mtdproducts.com.
COBERTURA DE LA GARANTÍA DE EMISIONES GENERALES:
MTD Consumer Group Inc garantiza al comprador final y a cada comprador subsiguiente que el equipos de exteriores: está diseñado,
construido y equipado de modo de cumplir con todas las regulaciones aplicables y que se encuentra libre de defectos de materiales y de
fabricación que pudieren causar la falla de una pieza garantizada idéntica, en todos los aspectos materiales a la pieza descripta en la solicitud
de certificación de MTD Consumer Group Inc.
El período de garantía comienza en la fecha de entrega del equipos de exteriores al comprador final o en la fecha en que la máquina se pone en
funcionamiento por primera vez. El período de garantía es de dos años.
Sujeto a ciertas condiciones y exclusiones que se indican a continuación, la garantía de las piezas relacionadas con las emisiones es la siguiente:
1. Cualquier pieza garantizada que no esté programada para ser reemplazada como parte del mantenimiento requerido en las instrucciones
escritas suministradas se garantiza por el período de garantía arriba mencionado. Si la pieza falla durante el período de cobertura de la
garantía, la misma será reparada o reemplazada por MTD Consumer Group Inc. de acuerdo con el párrafo (4) a continuación. Cualquier
pieza reparada o reemplazada según la garantía se garantizará por el resto del período de garantía.
2. Cualquier pieza garantizada que esté programada solamente para inspección regular en las instrucciones escritas suministradas se
garantiza por el período de garantía arriba mencionado. Cualquier pieza reparada o reemplazada según la garantía se garantizará por el
resto del período.
3. Cualquier pieza garantizada que esté programada para reemplazo según el mantenimiento requerido de conformidad con las
instrucciones escritas suministradas, se garantiza por el período de tiempo anterior a la primera fecha de reemplazo programada para esa
pieza. Si la pieza falla antes del primer reemplazo programado, la misma será reparada o reemplazada por MTD Consumer Group Inc. de
acuerdo con el párrafo (4) a continuación. Cualquier pieza reparada o reemplazada bajo garantía se garantizará por el resto del período
anterior al primer reemplazo programado puntual para esa pieza.
4. La reparación o el reemplazo de cualquier pieza garantizada de conformidad con las disposiciones de la garantía que aquí se estipula se
deben realizar en un centro de garantía sin costo alguno para el propietario.
5. No obstante las disposiciones que aquí se estipulan, los servicios o reparaciones bajo garantía se suministrarán en todos nuestros centros
de distribución bajo franquicia de mantenimiento para los motores o equipos en cuestión.
6. El propietario de equipos de exteriores no deberá pagar el trabajo de diagnóstico directamente asociado con una pieza garantizada
defectuosa en relación con las emisiones, siempre y cuando dicho trabajo de diagnóstico se realice en un centro cubierto por la garantía.

050790 Rev. D
7. MTD Consumer Group Inc es responsable por daños causados a otros componentes de motores o equipos derivados de la falla bajo
garantía de cualquier pieza garantizada.
8. Durante la totalidad del período de garantía del motor y equipo para todo terreno arriba mencionado, MTD Consumer Group Inc
mantendrá un suministro
de piezas bajo garantía suficiente para satisfacer la demanda esperada de tales piezas.
9. Cualquier pieza de reemplazo se podrá usar para el cumplimiento del mantenimiento o las reparaciones bajo garantía y se suministrarán
sin cargo para
el propietario. Dicho uso no reducirá las obligaciones de garantía de MTD Consumer Group Inc.
10. No se podrán usar piezas adicionales ni modificadas que no estén exentas de acuerdo con el Departamento de los Recursos del Aire
(Air Resources Board). El uso de cualquier pieza adicional o modificada no exenta por el comprador final será causal de invalidez de los
reclamos bajo garantía. MTD Consumer Group Inc no tendrá responsabilidad por la garantía de fallas de piezas garantizadas que fueren
causadas por el uso de una pieza adicional no exenta
o modificada.
PIEZAS GARANTIZADAS:
La reparación o el reemplazo de cualquier pieza garantizada que de otro modo pudiese estar cubierta por la garantía podrá ser excluida de
tal cobertura de garantía si MTD Consumer Group Inc demuestra que el equipos de exteriores es objeto de uso incorrecto, negligencia o
mantenimiento inadecuado, y que tal uso incorrecto, negligencia o mantenimiento inadecuado fue causa directa de la necesidad de reparación
o reemplazo de dicha pieza. No obstante lo antedicho, cualquier ajuste de un componente con un dispositivo de limitación de ajuste instalado
en fábrica y que funcione adecuadamente, podrá ser cubierto por la garantía. Además, la cobertura bajo esta garantía se extiende solo a piezas
que estuvieron presentes en y equipo todo terreno adquiridos.
Están cubiertas las siguientes piezas con garantía para emisiones (de corresponder):
1. Sistema de medición de combustible
• Sistema de mejora para inicio en frío (cebado suave)
• Carburador y piezas internas (o sistema de inyección por combustible)
• Bomba de combustible
• Depósito de combustible
2. Sistema de inducción de aire
• Purificador de aire
• Colector de admisión
3. Sistema de encendido
• Bujía(s) de encendido
• Sistema de encendido por magneto
4. Sistema de encendido
• Convertidor catalítico
• SAI (válvula Reed)
5. Componentes varios utilizados en el sistema anterior
• Válvulas e interruptores de vacío, temperatura, posición sensibles al tiempo
• Conectores y montajes
6. Control evaporativo
• Manguera de combustible
• Abrazaderas de la manguera de combustible
• Tapón del combustible atado por correa
• Caja de carbono
• Líneas de vapor
