MTD 21A 241E052 User Manual FRONT TINE TILLER Manuals And Guides 1109054L
User Manual: MTD 21A-241E052 21A-241E052 MTD FRONT TINE TILLER - Manuals and Guides View the owners manual for your MTD FRONT TINE TILLER #21A241E052. Home:Lawn & Garden Parts:MTD Parts:MTD FRONT TINE TILLER Manual
Open the PDF directly: View PDF ![]() .
.
Page Count: 20
Safety • Assembly • Operation • Tips & Techniques • Maintenance • Troubleshooting • Parts Lists • Warranty
AOA AL
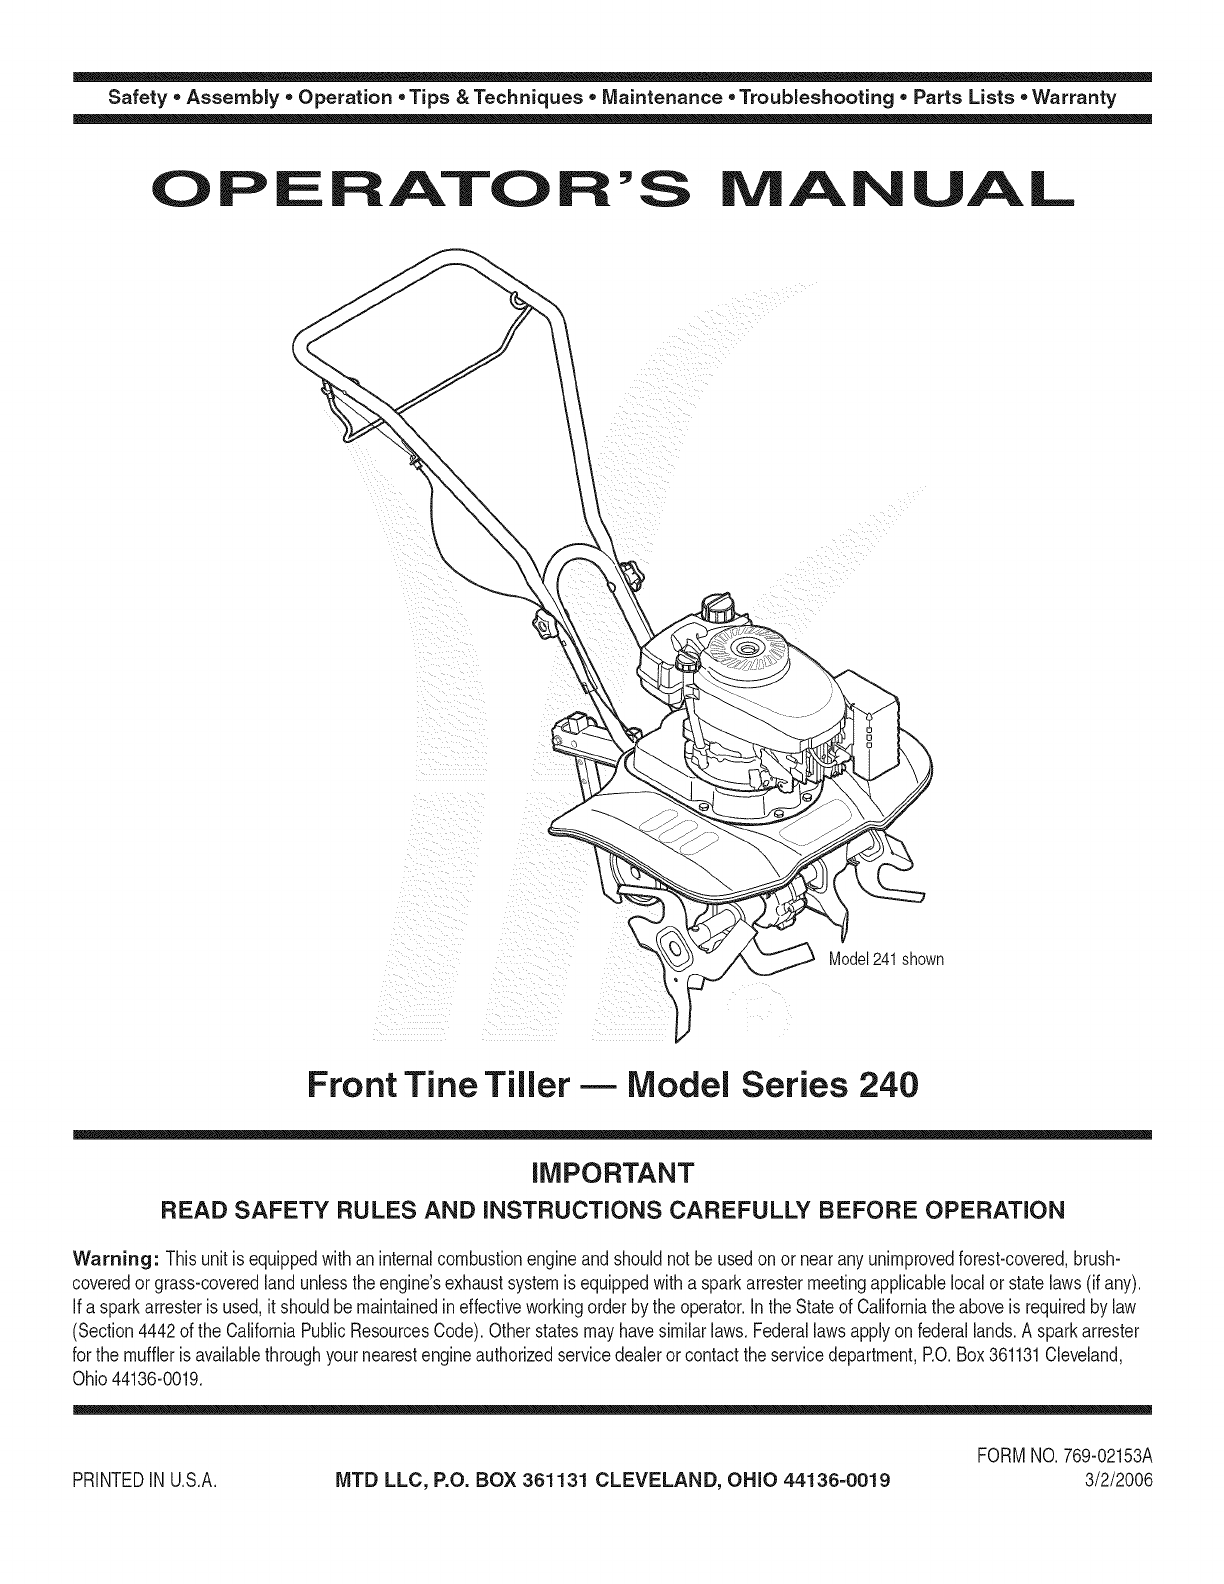
Model241shown
Front Tine Tiller -- Model Series 240
IMPORTANT
READ SAFETY RULES AND INSTRUCTIONS CAREFULLY BEFORE OPERATION
Warning: Thisunit isequippedwithaninternalcombustionengineandshouldnot beusedon or nearany unimprovedforest-covered,brush-
coveredor grass-coveredlandunlesstheengine'sexhaustsystemis equippedwitha sparkarrestermeetingapplicablelocalor statelaws(if any).
If a sparkarresterisused,it shouldbemaintainedineffectiveworkingorderby the operator.In theStateof Californiathe aboveisrequiredbylaw
(Section4442of the CaliforniaPublicResourcesCode).Otherstatesmayhavesimilarlaws.Federallawsapplyonfederallands.A sparkarrester
for the muffleris availablethroughyour nearestengineauthorizedservicedealeror contactthe servicedepartment,RO.Box361131Cleveland,
Ohio44136-0019.
PRINTEDIN U.S.A. MTD LLC, P.O. BOX 361131 CLEVELAND, OHIO 44136-0019
FORMNO.769-02153A
3/2/2006

This Operator's Manual is an important part of your new tiller, it will help you assemble,
prepare, and maintain the unit for best performance. Please read and understand what it says.
Table of Contents
Safety Labels ...................................................... 3
Safety ................................................................... 4
Assembly ............................................................. 6
Operation ............................................................. 8
Adjustments ...................................................... 12
Maintenance ...................................................... 13
Troubleshooting ................................................ 14
Off-Season Storage .......................................... 15
Parts List ........................................................... 16
Warranty ............................................ Back Cover
ThisOperatorsManualcoversa rangeof productspecificationsfor variousmodels.Characteristicsandfeaturesdiscussedand/orillustratedinthis manualmaynotbe
applicableto all models.MTDLLC reservesthe rightto changeproductspecifications,designsand equipmentwithoutnoticeand withoutincurringobligation.
Finding and Recording Model Number
BEFOREASSEMBLINGYOUR NEW EQUIPMENT,
pleaselocatethe modelplateon the equipmentand
copythe informationto the samplemodel plate pro-
vided to the right.Youcan locatethe modelplate by
lookingat the rearof the tineshield.This information
is importantfor usewhenvisiting the manufacturer's
web site, obtainingassistancefrom the Customer
Support Department,or whencontactingan autho-
rizedservice dealer.
r
Model Number
www.mtdproducts.corn
Serial Number
MTD LLC
P.O= BOX 361131
CLEVELAND, ON 44136
330-220-4683
800-800-7310
Customer Support
Please do IVOTreturn the unit to the retailer from which it was
purchased, without first contacting Customer Support.
if you havedifficulty assembling this product or haveany questionsregarding the controls, operation,or maintenanceof this
unit, you can seek helpfrom the experts. Choose from the options below:
• Visit www.mtdproducts.com.
• Call a Customer Support Representative at 1-800-800-7310.
• The engine manufacturer is responsiblefor all engine-relatedissues with regardsto performance,power-rating,specifica-
tions, warranty and service. Please referto the engine manufacturer'sOwner's/Operator's Manual,packed separatelywith
your unit, for moreinformation.
2

Safety Labels Found On Your Tiller
TO AVOID SERIOUS iNJURY
1. READTHEOPERATOR'SMANUAL.
2. KNOWLOCATIONAND FUNCTIONSOF ALL
CONTROLS.
3. KEEPALLSAFETYDEVICESANDSHIELDS
iNPLACEANDWORKING.
4. NEVERALLOWCHILDRENOR
UNINSTRUCTEDADULTSTO OPERATE
TILLER.
5. SHUT OFF ENGINE BEFOREUNCLOGGING
TINES OR MAKING REPAIRS.
6. KEEPBYSTANDERSAWAYFROMMACHINE.
7,KEEP AWAY FROM ROTATING PARTS.
8.USE EXTREME CAUTION WHEN
REVERSING OR PULLING THE MACHINE
TOWARDS YOU.
S32147
i_ii__i ii_iI i__ii_
Labels
WARNING
DO NOT remove safety
(or any) labels from
tiller for any reason.
3

Operat on
WARNING
This symbol points
out important safety
instructionswhich, if
notfollowed, could
endangerthe personal
safetyand/or property
of yourself and others.
Readand follow all
instructionsinthis man-
ual before attempting to
operatethis machine.
Failureto complywith
these instructions
may result in personal
injury.When you see
i this symbol, HEED ITS
WARNING!
WARNING: Engine Exhaust,some of its constituents, andcertain vehicle compo-
nentscontain or emit chemicals knownto State of Californiato cause cancer and
birth defects or other reproductiveharm.
DANGER: This machinewas built to be operatedaccordingto the rules for safe operationin this
manual.As with any type of power equipment,carelessness or error on the part of the operator can
result in serious injury.This machine is capable of amputating hands andfeet andthrowing objects.
Failureto observethe followingsafety instructionscould result in serious injury or death.
Training
1. Read,understand,andfollow all instructionsonthemachine
and in the manual(s)beforeattemptingto assembleand
operate.Keepthis manualina safeplaceforfuture and
regularreferenceand for orderingreplacementparts.
2. Befamiliar withall controlsand their properoperation.Know
howto stopthe machine.
3. Neverallowchildrenunder14 yearsold to operatethis
machine.Children14 yearsold and overshouldread and
understandthe operationinstructionsand safetyrules in
this manualandshould be trainedand supervisedby a
parent.
4. Neverallowadultsto operatethis machinewithoutproper
instruction.
5. Keepbystanders,helpers,petsandchildren at least75 feet
fromthe machinewhile it is in operation.Stop machineif
anyoneentersthe area.
Preparation
1. Thoroughlyinspectthe areawhere theequipmentis to be
used.Removeallstones,sticks,wire,and otherforeign
objects whichcouldbe trippedover andcausepersonal
injury.
2 Wearsturdy,rough-soledworkshoesand closefitting
slacksand shirt. Loosefittingclothesor jewelrycan be
caughtin movableparts.Neveroperatethis machinein bare
feet or sandals.
3. Disengageclutchleversand shift (if provided)into neutral
("N")beforestartingthe engine.
4. Neverleavethis machineunattendedwiththe engine
running.
5. Neverattemptto makeany adjustmentswhile engineis
running,exceptwherespecificallyrecommendedinthe
operator'smanual.
6. Toavoid personalinjury orpropertydamageuseextreme
care in handlinggasoline.Gasolineis extremelyflammable
and thevapors are explosive.Seriouspersonalinjurycan
occur whengasolineis spilled onyourselforyour clothes
which canignite.Washyourskin andchangeclothes
immediately.
7. Useonly an approvedgasolinecontainer.
8. Extinguishallcigarettes,cigars,pipesand othersourcesof
ignition.
9. Neverfuel machineindoors.
10.Neverremovegascapor addfuel whiletheengineishot or
running.
11.Allowengine to cool at leasttwo minutesbefore refueling
12.Neveroverfill fuel tank. Filltankto no morethan Y2inch
belowbottomof filler neck to providespacefor fuel
expansion.
13. Replacegasolinecap andtightensecurely.
14. Ifgasolineisspilled,wipeit offthe engineand
equipment.Movemachineto anotherarea.Wait 5
minutesbeforestartingthe engine.
15. Neverstorethe machineorfuel containerinside nearan
open flame,spark or pilotlight (e.g. furnace,wateror
space heater,clothesdryer,etc.).
16. Allow machineto cool 5 minutesbeforestoring.
Operation
1. Do notput handsor feetnear rotatingparts.Contactwith
the rotatingparts canamputatehands andfeet.
2. Do notoperatemachinewhileunderthe influenceof alcohol
or drugs.
3. Neveroperatethis machinewithoutgood visibility or light.
Alwaysbesureof yourfootingand keepafirm hold onthe
handles.
4. Keep bystanders,helpers,pets,and childrenat least 75feet
fromthe machinewhile itis inoperation.Stopthe machineif
anyoneentersthe area.
5. Becarefulwhentillingin hardground.Thetines maycatch
in the groundand propelthe tiller forward.Ifthis occurs,let
goof the handlebars anddo notrestrainthe machine.
6. Exerciseextremecaution whenoperatingonor crossing
gravelsurfaces.Stayalert for hiddenhazardsor traffic.
7. Neveroperatethe machineat hightransport speedsonhard
or slipperysurfaces.
8. Exercisecautionto avoidslippingorfalling.
9. Lookdownand behindand use care whenin reverseor
pullingmachinetowardsyou.
10.Startthe engineaccordingto the instructionsfoundin this
manualandkeepfeet well awayfromthetines at alltimes.
11.Afterstrikinga foreignobject, stoptheengine,disconnect
the sparkplugwire and groundagainstthe engine
Thoroughlyinspectthe machinefor anydamage.Repairthe
damagebeforestarting andoperating.
12.Disengageall clutch levers(if fitted) and stopengine before
youleavetheoperatingposition(behindthe handles).Wait
until thetines come to a completestopbefore unclogging
thetines, makingany adjustments,orinspections.
13.Neverrun anengineindoorsor ina poorly ventilatedarea.
Engineexhaustcontainscarbonmonoxide,an odorlessand
deadlygas.
14.Mufflerand enginebecomehotandcan causea burn.Do
nottouch.
15.Use cautionwhentilling nearfences,buildingsand
undergroundutilities. Rotatingtines cancause property
damageor personalinjury.
4

16.Do notoverloadmachinecapacityby attemptingto till soil to
deep at toofast of a rate.
17.Ifthe machineshould start makingan unusualnoiseor
vibration,stopthe engine,disconnectthe spark plugwire
and groundit againstthe engine.Inspectthoroughlyfor
damage.Repairany damagebeforestartingandoperating.
18.Keep allshields,guards,andsafetydevicesin placeand
operatingproperly.
19.Neverpick upor carry machinewhiletheengineis running.
20.Use onlyattachmentsand accessoriesapprovedbythe
manufacturer.Failureto do so can resultin personalinjury.
21. Ifsituationsoccur whichare notcoveredinthis manual,use
care andgood judgment.Contactyour dealerortelephone
1-800-800-7310for assistanceandthe nameof your
nearestservicingdealer.
Maintenance & Storage
1. Nevertamperwith safetydevices.Checktheir proper
operationregularly.
2. Check boltsand screwsfor propertightnessat frequent
intervalsto keepthe machineinsafe workingcondition.
Also,visuallyinspectmachinefor anydamage.
3. Beforecleaning,repairing,or inspecting,stopthe engine
and makecertainthe tinesand all movingparts have
stopped.Disconnectthe spark plugwire andground it
againstthe engineto preventunintendedstarting.
4. Do notchangethe enginegovernorsettings orover-speed
the engine.Thegovernorcontrolsthe maximumsafe
operatingspeedof the engine.
5. Maintainor replacesafetyand instructionlabels,as
necessary.
6. Followthis manualfor safeloading,unloading,transporting,
and storageof this machine.
7. Neverstore themachineor fuelcontainer insidewhere
there isan open flame,spark orpilot light such as a water
heater,furnace,clothesdryer,etc.
8. Alwaysreferto the operator'smanualfor properinstructions
on off-seasonstorage.
9. Ifthe fuel tank hasto bedrained,do this outdoors.
10.Observeproperdisposallawsand regulationsfor gas,oil,
etc.to protectthe environment.
Your Responsibility
1. Restrictthe useof this power machineto personswho read,
understand,andfollowthe warningsand instructionsinthis
manualand onthe machine.
2. Thesafetylabels onthe tiller are showninthe "Safety
Labels"section.Toensuresafeoperationof the tiller,follow
theinstructionsonall labelsclosely.
5
ces
WARNING
This symbol points
out importantsafety
instructionswhich, if
not followed,could
endangerthe personal
safety and/or property
of yourself and others.
Readand follow all
instructions inthis man-
ual before attempting to
operate this machine.
Failureto complywith
these instructions
may result in personal
njury. When you see
this symbol, HEED ITS
WARNING!

Assembly
Standbehindthe tiller
asif youweregoingto
operate it. Yourright hand
correspondsto the right
side of the tiller; your left
hand correspondsto the
left side of the tiller.
This operator'smanual
maycovervariousmodels
of tillers. The units il-
lustratedmay varyslightly
from your unit.
II[VIPORTANT:This unitis
shippedwithoutgasoline
ioroil inthe engine.Fill
up gasolinean¢loUas
i nstr.ucted n the accom-
panyingenginemanual
BEFOREoperatingyour
machine.
Assembly
1. Removethe star handle knobs andcarriage
boltsfrom the lowerhandle, Figure 3-1.
Figure3-1: Removehardwarefrom lowerhandle.
J
2. Position the upper handle onto the lower
handle,Step A Figure 3-2. Align the holes
on lower handle with the holes on the upper
handle (choosethe upper or lower holes
dependingon the desired handle height).
3. Insertcarriage bolts through the holes and se-
cure with star knobs, Step B Figure 3-2. Make
certain carriage bolts are seated securely into
one of the two positions provided.
f
4. Insert left end of tine clutch control into the
hole on the leftside of the upper handle,
Figure 3-3.
f
\
Figure3-3: Installleft side ofthe tine clutchcontrol.
J
5. Insert the Z-fittingon the clutch cable into
the hole on the tine clutch control. Hook the
"Z" end into the opening from the inside to
the outside as shown in Figure3-4.
\
....... J
Figure3-4: Hookcableintotineclutchcontrol.
Figure3-2:Attachandsecureupperhandle.
6

6. Squeezethetineclutchcontrolinward.
Insertrightendintotheholeontherightside
oftheupperhandle,Figure3-5.
f
Figure3-5: Installrightend of tine clutchcontrol.
7
Stand behind the tiller
as if youwere goingto
operate it. Yourrighthand
correspondsto the right
sideof the tiller; your left
handcorrespondsto the
left sideof the tiller.
Thisoperator's manual
maycovervariousmodels
oftillers. The units il-
lustratedmayvary slightly
from your unit.
WARNING
Thetit _:
is asafety device'Never
attempt to bypass its
operation,
Use extremecarewhen
handling gaso ne
Gasoline is extremely
f ammabloandtheVapors
are explosive,Neverfuel
the machineindoorsor
while the engineis hot
or running. Ext nguish
cigarettes, cigars,pipes,
and othersources of
ignition:
I
Keephandsandfeet away
from the tines, Referto
war" ng ontheunit:
I
I _
This operator!smanual
may cover variousmodels
of tUlers,Theunits il_
lustrated may Varyslightly
from your unit.
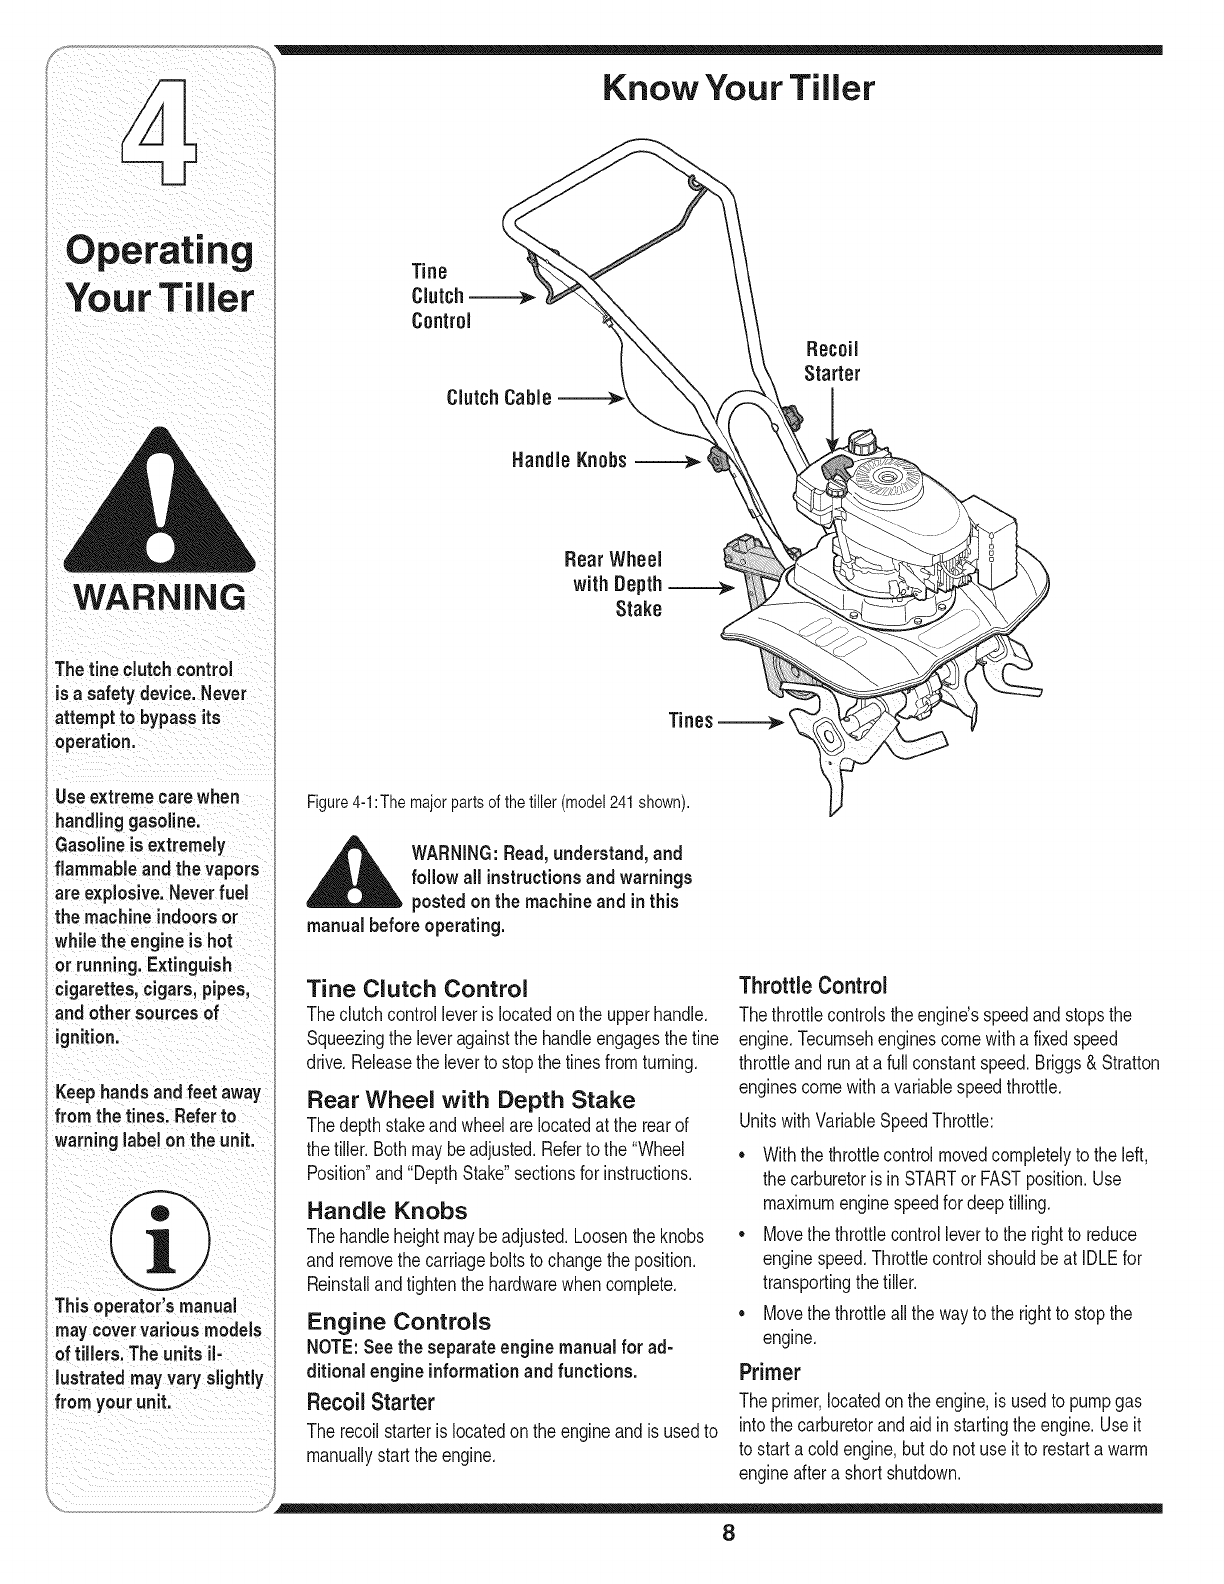
Know Your Tiller
ClutchCable
Rear Wheel
with Depth
Stake
Figure4-1:The majorparts of thetiller (model241 shown).
__k ARNING:Read,understand, and
follow all instructionsand warnings
postedon the machine and inthis
manual before operating.
Tine Clutch Control
Theclutchcontrolleveris locatedonthe upperhandle.
Squeezingthe leveragainstthe handleengagesthefine
drive.Releasethe leverto stopthe tinesfromturning.
Rear Wheel with Depth Stake
Thedepthstakeandwheelare locatedat the rearof
the tiller.Bothmaybeadjusted.Referto the "Wheel
Position"and"DepthStake"sectionsfor instructions.
Handle Knobs
Thehandleheightmaybeadjusted.Loosenthe knobs
andremovethe carriageboltsto changethe position.
Reinstallandtightenthe hardwarewhencomplete.
Engine Controls
NOTE:Seethe separate engine manual for ad-
ditional engineinformationand functions.
Recoil Starter
The recoilstarteris locatedon the engineandis usedto
manuallystart the engine.
Throttle Control
Thethrottlecontrolsthe engine'sspeedandstopsthe
engine.Tecumsehenginescomewitha fixedspeed
throttleand runat a full constantspeed.Briggs& Stratton
enginescomewithavariablespeedthrottle.
UnitswithVariableSpeedThrottle:
• Withthe throttlecontrolmovedcompletelyto the left,
the carburetorisin STARTor FASTposition.Use
maximumenginespeedfor deeptilling.
Movethe throttlecontrolleverto the rightto reduce
enginespeed.Throttlecontrolshouldbeat IDLEfor
transportingthe tiller.
Movethe throttleallthe wayto the rightto stopthe
engine.
Primer
Theprimer,locatedonthe engine,is usedto pumpgas
intothe carburetorandaid instartingthe engine.Useit
to starta cold engine,but do notuse it to restarta warm
engineaftera shortshutdown.
8

_ARNING: Read,understand, and follow
all instructionsand warningspostedon the
machineand inthismanual beforeoperating.
Before Starting
Gas And Oil Fill-Up
Servicethe enginewithgasolineandoil as instructedin
theenginemanualpackedwithyourtiller.Readinstruc-
tionscarefully.
,_ WARNING:Useextremecarewhen handling
gasoline. Gasolineis extremelyflammable
and the vaporsare explosive.Neverfuel machine
indoorsor while the engineis hot or running.
manyotherusefullaborsavingtasksinthe garden.After
engineis runningandappropriatespeedseton throttle
(if equipped),squeezefine clutchcontrol(see Figure4-1)
againstupperhandleto engagethe fine drive.Release
the leverto stopthe tinesfromturning.
Wheel Position
Thetiller isshippedwiththe wheeladjustedsuchthat the
unit sitslevel.Beforetilling,thewheelmust beraised.To
dothis, removethe clevisandcotterpins,raisethe wheel
to the desiredposition,then reattachpinsto secure,
Figure4-2. Fortransportingthe tiller, reversethe stepsto
lowerthewheel.
Starting the Engine
_L ARNING: Besureno one is standingin
front of the tiller while the engineis running
or being started.
Referto the enginemanual shippedwith your unit for
engine-specificinstructions.
1. Attachsparkplugwireto sparkplug. Makesurethe
metalcap onthe endof the sparkplugis fastened
securelyoverthe metaltip on the sparkplug.
2. Makesurethatthe fine clutchcontrolisdisengaged.
3. Forunitswith Briggs& Strattonengine,placethe
throttlecontrolinthe FASTposition.
ForunitswithTecumsehengine,moveleveronengine
to RUNposition.
4. Forfirst timestart-up,firmly pressengineprimerfive
(5)times.Forall futurestarts, pressthree(3) times.
Waitabouttwo secondsbetweeneach press.
5. Placelefthandongas tank.Grasprecoilstarterand
pullropeout slowlyuntil enginereachesthe beginning
of itscompressioncycle(ropewillpull slightlyharder
at thispoint).
6. Pullropewith a rapid,continuous,full armstroke.
Keepa firmgripon handle.Let roperewindslowly.Do
not let recoilstartersnapbackagainstengine.Repeat
untilenginestarts.
Stopping the Engine
1. Movethe controlleveronthe engineto the STOPor
OFFposition.
2. Disconnectsparkplugwire fromsparkplugand
groundagainsttheengine.
Using Your Tiller
Yourtiller(also knownas acultivator)is a precisionbuilt
machinedesignedfor seedbed preparation,cultivating,
furrowing,andmulching.It isengineeredto minimize
the hardestworkinthe vegetableorflowergarden,to
till the soilfor plantingandcultivating,andto perform
Figure4-2:WheelAdjustment
Depth Stake
Thedepth stakeacts as a brakefor the tillerand controls
the depthand speedat whichthe machinewill operate,
Figure4-3. Removethe clevisandcotterpins,raiseor
lowerthedepthstake,then reattachpinsto secure.
f
Figure4-3:The DepthStake
Your Tiller
WARNING
Be sure nooneother than
the operator is standing
near the tiller while start,
ing engine or operating
the unit. Neverrun engine
indoors or in enclosed,
poorlyventilated areas,
Eng noexhaustcontains
carbonmonoxide, an
odorlessand deadlygas,
Keep hands feet hair
andloose€ oth ngaway
from any moving partson
engine andtiller.
See yourengine manual
packagedwith your unit
for detailedinstructions
pertainingto startingthe
engine.
_ii_i__i/_I_I:_I_I_I_I_I_I_I_I_I_I_I_I!!il
9

i ¸
WARNING
i i i i ii iiiiiill i i _
Besurenooneother
thantheoperator
standing near the tiller
while startingengine
or operatingthe unit,
Never run engine
indoors or in enclosed
poorly ventilated
areas: Engine exhaust
contains carbon
monoxide, an odorless
anddeadlygas:Keep
hands; feet; hair and
,loose clothing away
from any moving parts
on engine and
I
See your engl e
manual packaged with
your unit for detailed
instructions pertainin
to engine controls.
Fortilling,thedepth stakemustbeloweredandthe
wheelmustbe raised,Figure4-4.
By increasingthedepthof thedepth stake,theforward
speedof the machineis reducedandthe workingdepth
is increased.Whenthe depthstakeis raised,the working
depthof the machineis reducedandthe forwardspeed
is increased.The workingdepthof the machinemay
bepredeterminedby settingthedepthstakeso thatthe
wheelsareaboutfourinchesfromthe groundwhenthe
tinesanddepthstakearerestingonthe ground.This
settingwill permitaworkingdepthof about fourinches.
Whenpresettingthe workingdepth,the handlesshould
beadjustedso the handgrips area littleabovewaist.
Thetiller will belowerwhenthe tinesand depthstake
penetratethe ground.
Figure4-4:Lowerthedepthstakeand raisethe wheelwhen
tilling.
Controlling Speed and Tilling Depth
Whentilling,leaveapproximatelyeight inchesof
untilledsoilbetweenthefirst andsecondtilling paths,
thenmakethe third pathbetweenthe first andsecond,
Figure4-5. Insomesoils,the desireddepthis obtained
the firsttimeoverthe garden.Inother soils,thedesired
depthis obtainedby goingoverthegardentwoorthree
times.Passesshouldbe madeacrossthe lengthand
widthof thegardenalternately.Rockswhichareturned
upshouldbe removedfromthe gardenarea.
Thetypeof soilandworkingconditionswill determinethe
actualsettingof the depthstakeandthe handlepressure
required.
Cultivating
Forcultivating,a twoto threeinchdepth isdesirable.
Thethrottle(if equipped)shouldbesetto controlforward
movementto a slowwalkingspeed.Withthe outertines
installed,the workingwidthof the machineis22or 24
inches.
Forcultivation,thismaybereducedto 13inchesby
removingthe outertines,referto the AdjustmentSection.
Whenlayingout plant rows,be sureto allowenough
widthto permitcultivationbetweenthe rows.Ingrowing
cornor similarcrops,check-rowplantingwill permitcross
cultivationandpracticallyeliminatehandhoeing,Figure
4-6.
Figure4-5:Recommendedtillerpaths.
J
Handle Pressure
Furthercontrolof tillingdepthandtravelspeedcan be
obtainedby variationof pressureonthe handles.
A downwardpressureon the handleswill reducethe
workingdepthandincreasethe forwardspeed.An
upwardpressureon the handleswill increasethe
workingdepthandreducethe forwardspeed.
Figure4-6:Allowenougharea betweenrows.
Thetiller has manyusesotherthan tillingandcultivating
a garden.Oneof theseis the preparationof lawnarea
for seeding.The tillerwill prepareadeepseed bedwhich
10

will befree of harduntilledspots,allowinga betterstandof grassto grow.The tiller is veryusefulfor looseninghard
soil for excavationwitha shovel;Notedioushandworkwill benecessary.Yourtiller maybe usedfor mixingcompost
in the pileorfor mixingit withthe soil inyourgarden.Thisshouldbe doneafterthe soil has beenbrokento thefull
workingdepth.The compostshouldbe workedin to a depthof six to seveninches.Thismaybedoneby workingthe
lengthof the gardenandthen by makingseparatepassesacrossits width.Theadditionof decayedorganicmatterwill
substantiallyincreasethefertilityof yourgarden.For properdecayingaction,fertilizershouldbeappliedandworkedin
withthe mulchmaterials.Breakingupleavesandstrawandmixingit with severalinchesof soilallowsproperaeration
of the plant rootsystemand retardsthe growthof weeds.
Transporting and Storing the Tiller
Totransportthetiller,lowerthewheeland movethedepth staketo the highestposition,Figure4-7.
To storethe tiller,lowerthe wheelandorientthe depthstakeso botharetouchingthe ground,Figure4-8.
f "_, f
Figure4-7:Fortransport,lowerwheelandraisedepthstake. Figure4-8:Forstorage,lowerwheelanddepthstake.
Your Tiller
Besurenooneother
than the operator is
standing near the tiller
while starting engine
or operating the unit;
Never engine
indoorsor in enclosed,
poorlyventilated
areas. Engineexhaust
contains carbon
monoxide; an odorless
hands; feet, hair and
loose clothing away
fromanymovingparts
on engine and tiller.
Seeyour engine
manua!packagedw_th
your unit for detailed
instructions Pertaining
to engine controls,
11

manualmaycover
Variousmodelsof tillers.
Theunits, ust otedmaY
varyslightlyfrom your
Standbehindthetiller as
ifyouweregoingto operi
ate it.Yourrighthand
correspondsto theright
sideof the tiller; yourleft
hand correspondsto the
leftsideof thetil let.
Making Adjustments
Warning: Disconnectthe spark
plug wire and ground it against
the engine before performing
any adjustments.
Engine Adjustment
Refer to the separateengine manual for engine
adjustmentinstructions.
Tine Width Adjustment
The tilling width of the unit is22 inches.Tilling
width can increaseto 24 inches by removing
the clevis and cotter pins, sliding each outer
tine out one inch, and securing in this position
with the pins. Forcultivation, reduce the tine
width to 13inches by removingthe outer tines
completely, Figure 5-1.
f
,€ 24-inch
2-inch •
J
Figure5-1:Tinewidthadjustment.
12

_LIl_lLik, l=WARNING:Alwaysstopengine,discon-
nectsparkplug, and groundagainst
enginebeforecleaning,lubricatingor
performingany maintenance on your
machine.
Engine
Referto the separateenginemanualfor enginemainte-
nanceinstructions.
• Maintainengineoilas instructedintheseparate
enginemanualpackedwithyourunit.Readandfollow
instructionscarefully.
• Serviceair cleanereveryten hoursundernormal
conditions.Cleaneveryhourunderextremelydusty
conditions.Poorengineperformanceandflooding
usuallyindicatesthatthe air cleanershouldbe
serviced.Toservicethe aircleaner,referto the
separateenginemanualpackedwithyourunit.
(_ MPORTANT:Neverrunyour enginewithout
air cleanercompletely assembled.
• The sparkplugshouldbecleanedandthegap reset
every25hoursof engineoperation.Sparkplug
replacementis recommendedat the startof eachtiller
season;checkenginemanualfor correctplugtype
andgap specification.
• Cleanthe engineregularlywitha clothor brush.
Keepthecoolingsystem(blowerhousingarea)clean
to permitproperaircirculationwhichisessentialto
engineperformanceand life.Becertainto removeall
dirt andcombustibledebrisfrommufflerarea.
Lubrication
Transmission
The transmissionis pre-lubricatedandsealedat the fac-
tory. It requiresnochecking.Seean authorizedservice
dealerforany serviceissues.
Tine Shafts
Removetine assembliesand lubricatethe tine shaftsat
leastoncea season.
Wheel Shaft
Removewheelassemblyandlubricatethe axleshaft at
leastoncea season.
Cleaning Tine Area
Cleanthe undersideof the fineshieldaftereach use.
The dirt washesoff thetineseasierif rinsedoff im-
mediatelyinsteadof afteritdries.Alwaystoweldry the
tiller afterwardsandapplya lightcoatof oil or siliconeto
preventrustingorwaterdamage.
(_ IMPORTANT:Neveruse a "pressure washer"
to cleanyour tiller. Water canpenetratetight
areas of the tiller causingseriousdamage.
Replacing the Belt
Yourtillerhas beenengineeredwitha belt madeof
specialmaterialfor longerlifeand betterperformance.
It shouldnotbe replacedwithanoff-the-shelfbelt.See
the retailerfromwhichyou purchasedyourtiller,an
authorizedMTDServiceDealer,or call 1-800-800-7310
for informationregardingpriceandavailability.
1. Removethe frameandengineby removingthe six
screwsandlocknutsholdingtheengineandframeto
the shield,Figure6-1.
Figure6-1:Removeengineandframeto gainaccessto thebelt.
(Model241shown)
2. Loosenthe locknut showninStepA Figure6-2.
3. Unloopthe belt fromthepulleys,StepB Figure6-2.
4. Reassemblethe newbelt andtightenthe locknut.
5. Reattachframeandengineusingthe hardware
removedearlier.
J
Figure6-2:Loosenthenutto removethebelt.
IMPORTANT:Never use a
pressurewasherto clean
yourtiller. Watercan
penetratetight areas of
the tiller causingserious
damageto the unit.
IMPORTANT:Neverrun
yourengine withoutthe
air cleanercompletely
assembled.
13

For repairs beyond
the minor adjust.
merits listed here,
contact an authorized
service dealer.
Problem Cause Remedy
Engine fa! s tO start wi!ed ! connect wire to spa[k
I 2 Fue tankemptyorstaefue 2 F tankwthcean freshgaso ne
3. Throttle control!evernot incorrect 3, Movethrottlelevertostart position.
sta_ingPosition(i! equipped)position I
4, Chokenot n ON post on. 5: clean fuel line.
&Blocked fue! 6 C!ean:adjustgaR Or[epiace:
Fau!tysPa[k wait afew rninutes to restartlbut do
7, Engnefood ng. . not prme (f equpped)
Engineruns erratic 1. Sparkplugwire loose.
2. Unitrunningon CHOKE.
3. Blockedfuel lineor stalefuel.
4. Ventplugged.
5. Wateror dirt in fuel system.
6. Dirtyair cleaner.
7. Carburetorout of adjustment.
1. Connectandtightenspark
plugwire.
2. Movechokeleverto OFE
3. Cleanfuel line;fill tankwithclean,
freshgasoline.
4. Clearvent.
5. Drainfuel tank. Refillwith
freshfuel.
6. Cleanfollowingenginemanual.
7. Referto enginemanual.
I
Engine overheats !; Engineoi! !eve!low: 1; E!!crankcasew th ProPeroi!:
2 Di!tYa[fi!ter: 2 c!eanai[C!eaiei:
Ai[f!ow iest[ cte& Removeblowerhousingandc!eanr
4. Carburetornot adjustedproperly. 4. Referto enginemanual.
1. Foreignobjectlodgedintines.
2. Tineclevispin(s) missing.
3. Beltwornand/or stretched.
4. Pulleyandidlernot incorrectadjust-
ment.
1. Stop tillercompletely,checkand
discardforeignobject.
2. Replacefineclevis pin(s).
3. Replacebelt.
4. Takeunit to authorizedservice
Tines do no engage
14

Off-Season Storage
if the tillerwill not be usedfor a periodlongerthan30
days,the followingstepsshouldbetakento preparethe
tiller for storage.
Cleanthe exteriorof engineandthe entiretiller
thoroughly.Lubricatethetiller as describedin the
lubricationinstructions.
We donot recommendthe useof pressurewashersto
cleanyour unit.Theymaycausedamageto spindles,
pulleys,bearings,orthe engine.The use of pressure
washerswill resultin shortenedlifeand reduce
serviceability.
Referto the enginemanualfor correctenginestorage
instructions.
Wipetineswithoiled ragto preventrust.
Storetiller in aclean,dry area.Do not storenextto
corrosivematerials,suchas fertilizer.
When storingany typeof powerequipmentinan
unventilatedor metalstorageshed,care shouldbe
takento rustproofthe equipment.Usinga light oil
or silicone,coatthe equipmentandespeciallyany
springs,bearings,andcables.
NOTE: When storing
anytype of power
equipment inan unven-
tilated or metal storage
shed.care should be
takento rustproofthe
equipment.Usinga
Ight oil or silicone, coat
the equipmentand
especiallyany springs,
bearings, and cables.
15

16

1 749-04282 UpperHandle
2 720-04072 StarHandle Knob
3 749-04281 LowerHandle
4 710-04398 FlangeScrew5/16-18x 7.5
5 754-04123 Belt
6 756-04163 idlerPulley
7 748-04125 ShoulderSpacer
8 686-04080 IdlerBracket
9 712-04065 FlangeLockNut:3/8-16
10 710-0654A TT Screw3/8-16x 1.00
11 786-04303 Frame
12 710-0514 HHCapScrew3/8-16x 1.00
13 732-0418 ExtensionSpring
14 738-04139 Stud 33x 1.5x 3/8-16
15 756-04217 FlywheelPulley
16 710-0591 HHCapScrew3/8-24x 1.00
17 710-0520 HHCapScrew3/8-16x 1.50
18 786-04256 Tine Shield61cm
19 711-0415 ClevisPin
20 642-0005 OuterTineAssemblyLH
21 642-0003 InnerTineAssemblyLH
22 714-0149B internalCotterPin
23 710-0809 TT Screw1/4-20x 1.25
24 GW-9727 PipePlug3/8 NPT
25 642-0002 InnerTineAssemblyRH
26 642-0004 OuterTineAssemblyRH
27 618-04276A CaseAssembly
28 721-04157 Gasket
29 726-0299 PushCap
30 734-0973 Wheel5 x 1.38
31 749-04265 DepthStakeTube
32 711-04520 Axle Shaft
33 710-1007 TT Screw3/8-16x 1.50
34 786-04296 WheelBracket
35 749-04266 RearWheelTube
36 714-3020 internalCotterPin
37 712-04063 FlangeLockNut:5/16-18
38 710-0487 CarriageBolt
39 731-05385 ClutchCableFitting
40 746-04247 ClutchCable
41 710-0599 TT Screw1/4-20x.50
42 786-04307 Cable MountBracket
43 747-04508 Clutch Bail
44 736-0300 FiatWasher.406x.875x.059
Parts List
_FACTORY PARTS
To order
replacement parts, call
1-800-800-7310
or visit
www.mtdproducts.com
Fora proper working
machine,use Fac-
tory Approved Parts.
V-BELTSare specially
designed to engage and
disengage safely. A
substitute (nomOEM)
V-Belt can be danger-
ous by not disengaging
completely.
Tiller features/compo-
nentsvary by model.
Some parts listed may
not be available on your
unit.
17

Notes
_ ii_ _ i_ill i_ii i_iii_ _ I_
Use this page to take notes.

Use this page to take notes.
19
Notes

MANUFACTURER'S LiMiTED WARRANTY FOR
The limitedwarrantysetforthbelowisgivenby MTDLLCwithrespect
to newmerchandisepurchasedandusedin the UnitedStates,its
possessionsandterritories.
"MTD"warrantsthisproductagainstdefectsinmaterialandworkman-
shipfor a periodof two (2)yearscommencingonthe date of original
purchaseandwill,at itsoption,repairor replace,freeof charge,any
part foundto bedefectiveinmaterialsorworkmanship.Thislimitedwar-
rantyshallonlyapply if thisproducthasbeenoperatedand maintained
inaccordancewiththe Operator'sManualfurnishedwiththe product,
andhas notbeensubjectto misuse,abuse,commercialuse,neglect,
accident,impropermaintenance,alteration,vandalism,theft,fire,water,
ordamagebecauseof otherperilor naturaldisaster.Damageresulting
fromthe installationor useof any part,accessoryor attachmentnot
approvedby MTDfor use withthe product(s)coveredbythis manual
willvoid yourwarrantyas to any resultingdamage.
Normalwearpartsarewarrantedto befree fromdefectsinmaterialand
workmanshipfor a periodof thirty (30)daysfromthe dateof purchase.
Normalwearpartsinclude,butare notlimitedto itemssuchas: batter-
ies,belts,blades,bladeadapters,grassbags,riderdeckwheels,seats,
snowthrowerskidshoes,shaveplates,augerspiralrubberandtires.
NOW TO OBTAIN SERVICE: Warranty service is available,WITH
PROOFOF PURCHASE, through your local authorized service
dealer. To locate the dealer in your area, check your Yellow Pages,
or contact MTD LLC at RO. Box 361131,Cleveland, Ohio 44136-
0019, or call 1-800-800-7310or 1-330-220-4683 or log on to our
Web site at www.mtdproducts.com.
Thislimitedwarrantydoesnotprovidecoverageinthe followingcases:
a. Theengineor componentpartsthereof.Theseitemsmaycarrya
separatemanufacturer'swarranty.Referto applicablemanufacturer's
warrantyfor termsandconditions.
b. Logsplitterpumps,valves,andcylindershavea separateoneyear
warranty.
c. Routinemaintenanceitemssuchas lubricants,filters,blade
sharpening,tune-ups,brakeadjustments,clutchadjustments,deck
adjustments,andnormaldeteriorationof the exteriorfinishdueto
useor exposure.
d. Servicecompletedby someoneotherthananauthorizedservice
dealer.
e. MTDdoesnot extendanywarrantyfor productssoldor exported
outsideof the UnitedStates,its possessionsandterritories,except
thosesoldthroughMTD'sauthorizedchannelsof exportdistribution.
f. ReplacementpartsthatarenotgenuineMTDparts.
g. Transportationchargesandservicecalls.
No impliedwarranty,includingany impliedwarrantyof mer-
chantabilityof fitness for a particular purpose,applies after the
applicable periodof express written warranty above as to the
partsas identified.No otherexpresswarranty, whetherwritten or
oral, except as mentioned above,givenby any personor entity,
includingadealeror retailer, withrespect to any product,shall
bindMTD.Duringthe periodof the warranty,the exclusiveremedy
is repairor replacementof the productas setforth above.
Theprovisionsas set forth inthis warrantyprovidethe soleand
exclusiveremedy arising from the sale.MTDshallnot be liable
for incidentalor consequentiallossor damage including,without
limitation, expensesincurredfor substituteor replacementlawn
careservicesor for rentalexpensesto temporarily replacea
warranted product.
Somestatesdo notallowthe exclusionor limitationof incidentalor
consequentialdamages,or limitationsonhowlongan impliedwarranty
lasts,sothe aboveexclusionsor limitationsmaynot applyto you.
Innoeventshallrecoveryof any kindbegreaterthanthe amountof the
purchasepriceof the productsold.Alterationof safetyfeatures of
the product shallvoid this warranty. Youassumethe riskand liability
for loss,damage,or injuryto you andyourpropertyand/orto othersand
theirpropertyarisingout of the misuseor inabilityto usethe product.
Thislimitedwarrantyshallnot extendto anyoneotherthan theoriginal
purchaserorto the personfor whomitwas purchasedas a gift.
HOWSTATELAWRELATESTOTHIS WARRANTY:This limited
warrantygivesyou specificlegalrights,and youmayalsohaveother
rightswhichvaryfrom stateto state.
IMPORTANT:OwnermustpresentOriginalProofof Purchaseto obtain
warrantycoverage.
MTD LLC, P.O. BOX 361131 CLEVELAND, OHIO 44136=0019; Phone: 1=800=800=7310, 1=330=220=4683
