MTD 247462B000 User Manual CHIPPER/SHREDDER Manuals And Guides WL000209
MTD Chipper Shredder/Vacuum, Gas Manual WL000209 MTD Chipper Shredder/Vacuum, Gas Owner's Manual, MTD Chipper Shredder/Vacuum, Gas installation guides
User Manual: MTD 247462B000 247462B000 MTD MTD CHIPPER/SHREDDER - Manuals and Guides View the owners manual for your MTD MTD CHIPPER/SHREDDER #247462B000. Home:Lawn & Garden Parts:MTD Parts:MTD MTD CHIPPER/SHREDDER Manual
Open the PDF directly: View PDF ![]() .
.
Page Count: 8
MACHINES
OWNER'S GUIDE
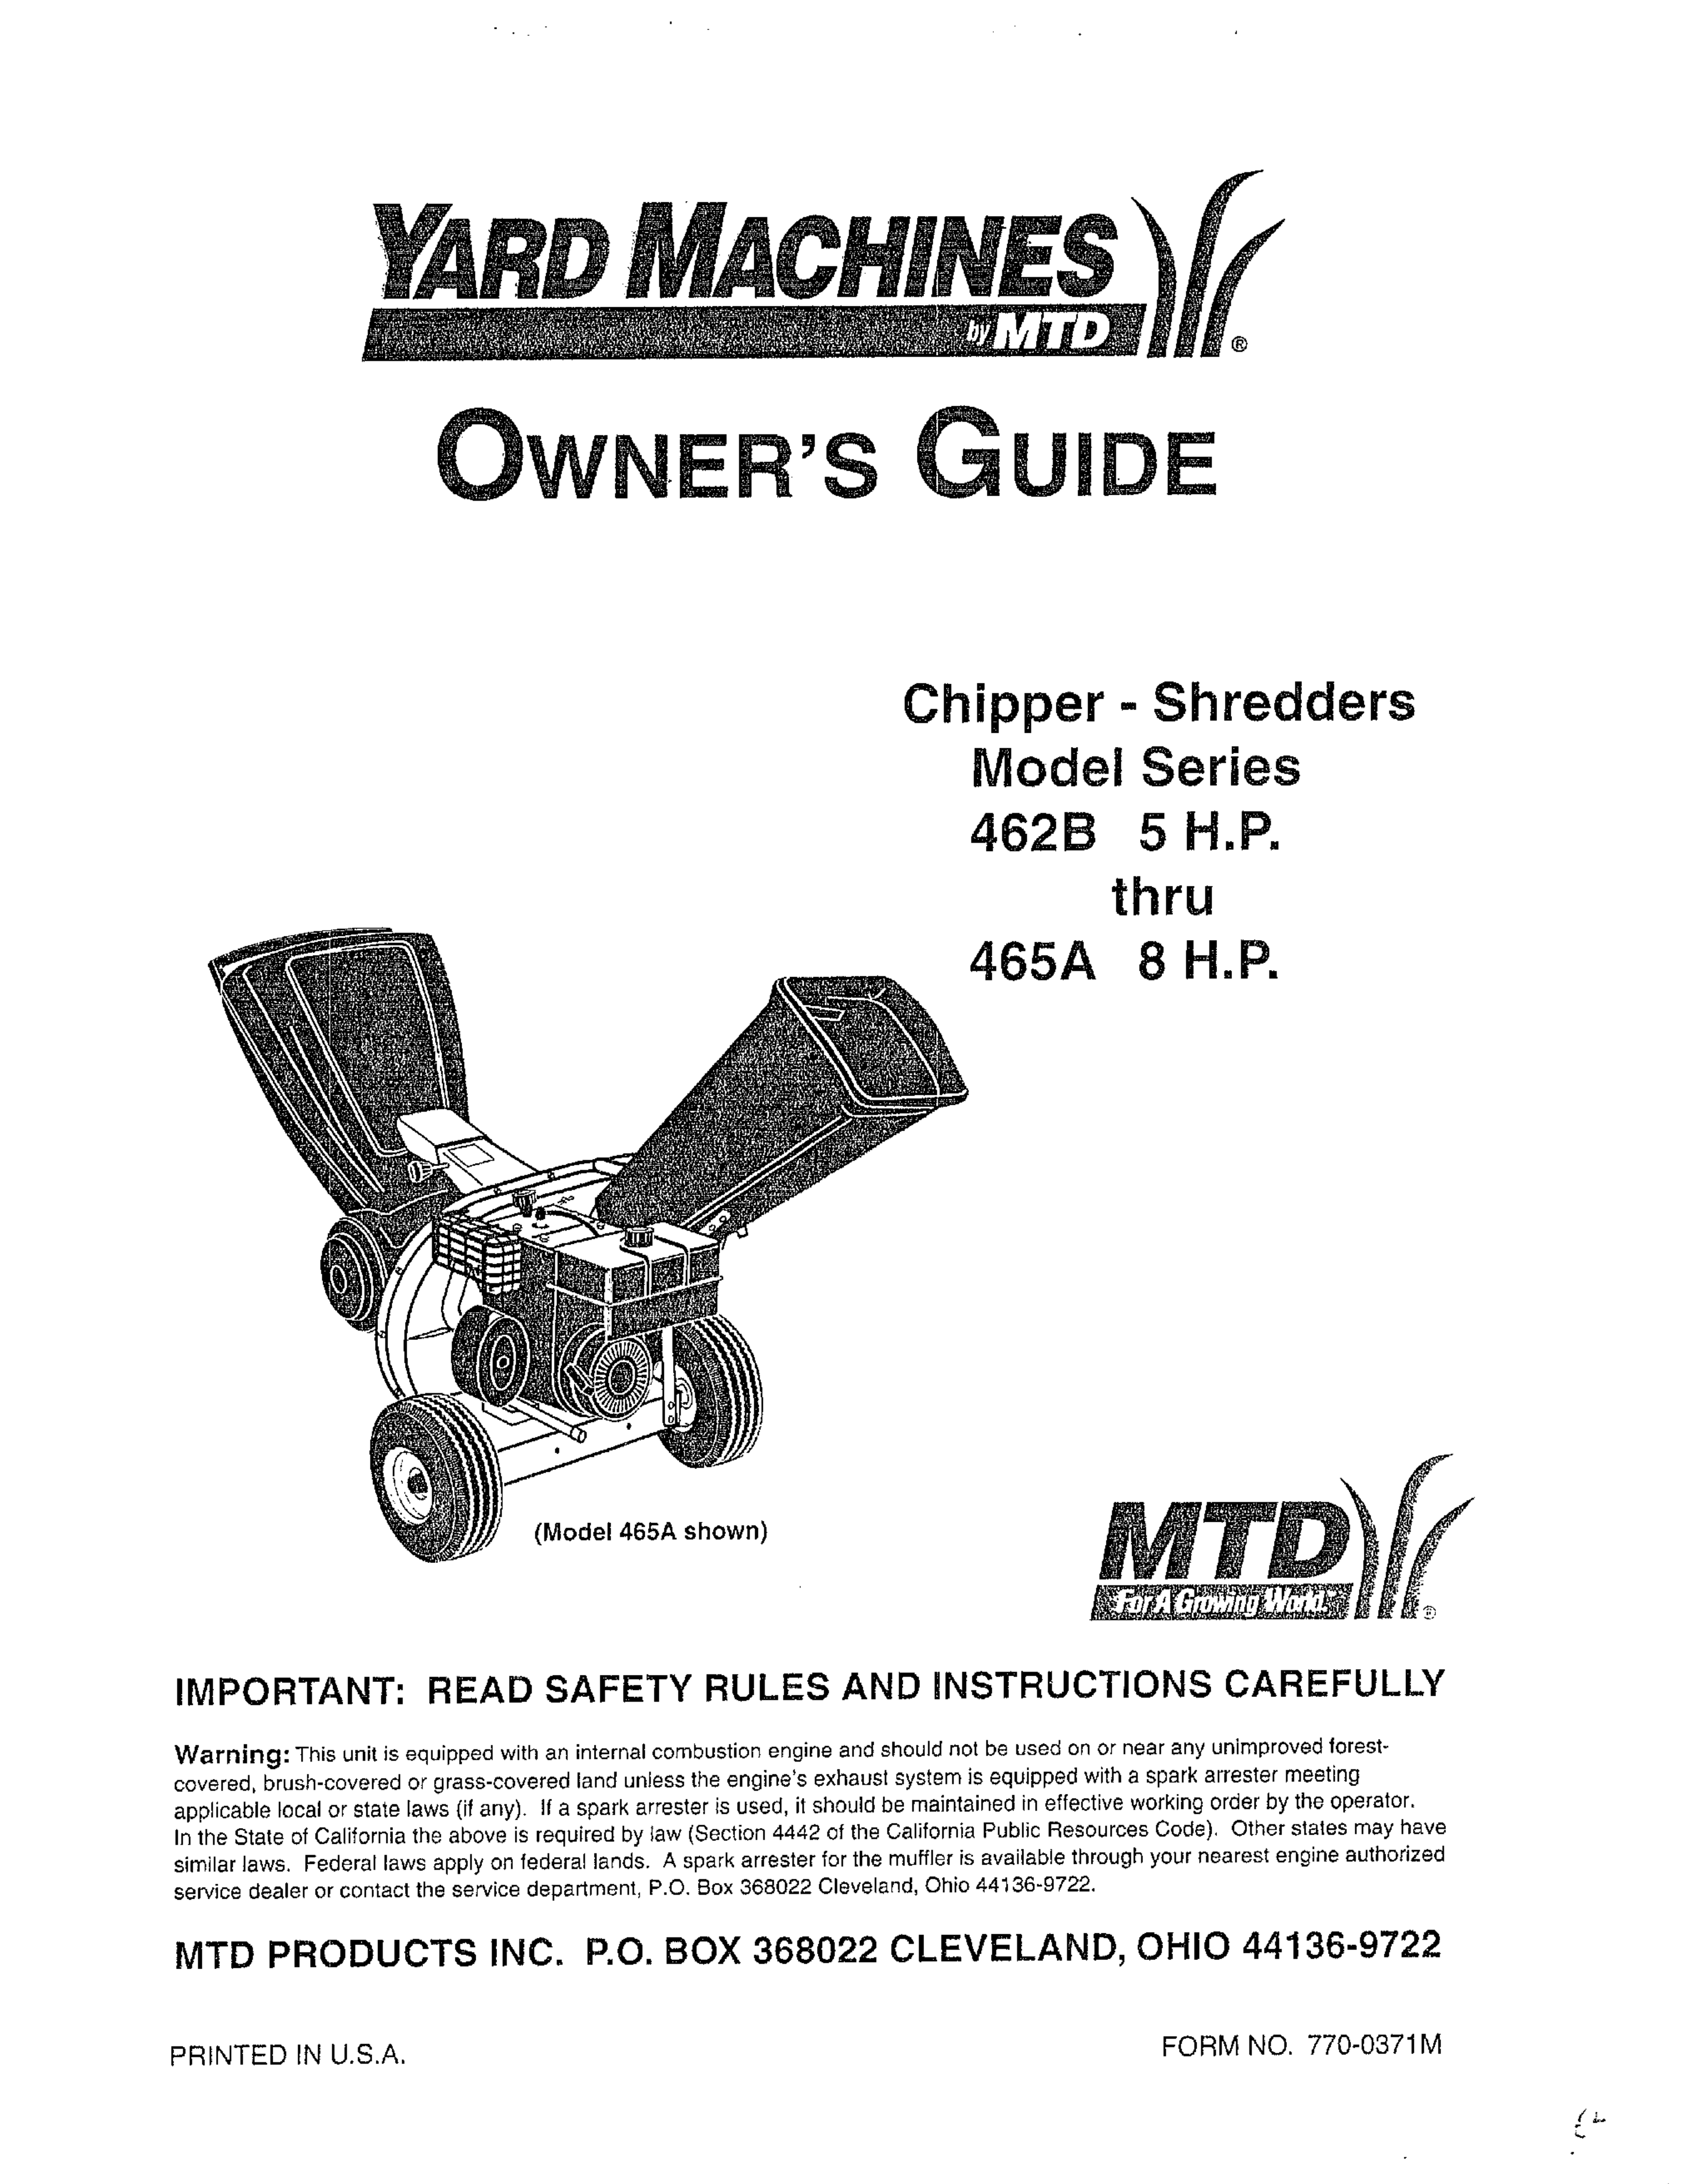
Chipper -Shredders
Model Series
462B 5H.P.
thru
465A 8 H.P.
(Model 465A shown)
IMPORTANT: READ SAFETY RULES AND INSTRUCTIONS CAREFULLY
Warning: This unit is equ=pped with an internal combustion engine and should not be used on or near any unimproved forest-
covered, brush-covered or grass-covered land unless the engine's exhaust system is equipped with a spark arrester meeting
applicable local or state laws (if any). If a spark arrester is used, it should be maintained in effective working order by the operator.
In the State of California the above is required by law (Section 4442 of the California Public Resources Code), Other states may have
similar laws. Federal laws apply on federal lands. A spark arrester for the muffler is available through your nearest engine authorized
service dealer or contact the service department, P.O. Box 368022 Cleveland, Ohio 44136-9722.
MTD PRODUCTS INC. P.O. BOX 368022 CLEVELAND, OHIO 44136-9722
PRINTED IN U.S.A. FORM NO. 770-0371M
i ii nil
SECTION 1" IMPORTANT SAFETY PRACTICES
WARNING: THIS SYMBOL POINTS OUT IMPORTANT SAFETY INSTRUCTIONS WHICH, IF NOT (
FOLLOWED, COULD ENDANGER THE PERSONAL SAFETY AND/OR PROPERTY OF YOURSELF
AND OTHERS. READ AND FOLLOW ALL INSTRUCTIONS IN THIS MANUAL BEFORE
ATTEMPTING TO OPERATE YOUR CHIPPER-SHREDDER. FAILURE TO COMPLY WITH THESE
INSTRUCTIONS MAY RESULT IN PERSONAL INJURY. WHEN YOU SEE THIS SYMBOL: HEED ITS
WARNING.
DANGER: Your chipper-shredder was built to be operated according to the rules for safe operation in
this manual. As with any type of power equipment, carelessness or error on the part of the operator can
result in serious injury, This chipper-shredder is capable of amputating fingers and hands and throwing
objects. Failure to observe the following safety instructions could result in serious injury or death.
1. GENERAL OPERATION
* Read this owner's guide carefully in its entirety
before attempting to assemble this machine. Read,
understand, and follow all instructions on the
machine and in the manual(s) before operation. Be
completely familiar with the controls and the proper
use of the machine before operating it. Keep this -
manual in a safe place for future and regular
reference and for ordering replacement parts.
. Your chipper-shredder is a powerful tool, not a
plaything. Therefore, exercise extreme caution at all
times, Your unit has been designed to perform two
jobs; to chip and shred vegetation found in a normal
yard. Do not use it for any other purpose.
Never allow children under age 16 to operate the
unit. Children 16 years and older should only operate
the unit under close parental supervision. Only
responsible individuals who are familiar with these
rules of safe operation should be allowed to use your
unit.
Keep the area of operation clear of all persons,
particularly small children and pets, Stop the engine
when they are in the vicinity of the unit. Keep work
area clean and clear of branches or obstacles which
could cause you to stumble or fall.
When feeding material into this equipment, be
extremely careful that pieces of metal, rocks, bottles,
cans or other foreign objects are not included.
Personal injury or damage to the machine could
result.
Always wear safety glasses or safety goggles, during
operation and while performing an adjustment or
repair, to protect eyes from foreign objects that may
be thrown from the machine.
Wear sturdy, rough-soled work shoes and close
fitting slacks and shirt. Shirt and slacks that cover the
arms and legs and steel-toed shoes are
recommended. Do not wear loose fitting clothes or
jewelry and secure hair so it is above shoulder
length. They can be caught in moving parts. Never
operate a unit in bare feet, sandals or sneakers.
Wear gloves when feeding material in the chipper
chute or shredder hopper.
Q
Never place your hands, feet, or any part of your
body into the shredder hopper, chipper chute,
discharge opening, or near any moving part while the
engine is running. Keep clear of the discharge
opening at all times, If it becomes necessary to push
material into the chipper chute or shredder hopper,
use a small diameter stick, NOT YOUR HANDS.
If it is necessary for any reason to unclog the feed
intake or discharge openings or to inspect or repair
any part of the machine where a moving part can
come in contact with your body or clothing, stop the
machine, allow it to cool, disconnect the spark plug
wire from the spark plug and move it away from the
spark plug before attempting to unclog, inspect or
repair.
•Do not operate unit while under the influence of
alcohol or drugs.
The machine should only be operated on a level
surface. Never operate your unit on a slippery, wet,
muddy or icy surface. Keep your work area clean
and clear of branches or obstacles which could
cause you to stumble and fall. Do not overreach,
Maintaining proper footing and balance is essential
to preventing accidents.
Do not allow an accumulation of processed material
to build-up in the discharge area as this will prevent
proper discharge and can result in kick-back from the
chipper chute.
Keep your face and body back from chipper chute to
avoid accidental bounce back of any material.
Do not transport machine while engine is running.
If the cutting mechanism strikes a foreign object or if
your machine should start making an unusual noise
or vibration, immediately stop the engine and allow
the machine to come to a complete stop. Disconnect
the spark plug wire and move it away from the spark
plug. Take the following steps.
Inspect for damage.
Repair or replace any damaged parts.
for any loose parts and tighten to assure (
#
Check
continued safe operation.
2
'l
Never attempt to attach or remove catcher bag when
engine is running. Shut the engine off and wait for
the impeller to come to a complete stop. The impeller
continues to rotate for a few seconds after the engine
is shut oft. Never place any part of the body in the
impeller area until you are sure the impeller has
stopped rotating.
Muffler and engine become hot and can cause a
burn. Do not touch.
• Do not allow leaves or other debris to build-up on
engine's muffler. The debris could ignite and cause a
fire.
• Do not attempt to shred or chip material larger than
specified in this manual. Personal injury or damage
to the machine could result.
Do not operate engine if air cleaner or cover over
air-intake is removed, except for
Removal of such pads could create a
carburetor
adjustment.
tire hazard.
Only use accessories approved for this machine by
the manufacturer. Read, understand, and follow all
instructions provided with the approved accessory.
if situations occur which are not covered by this
manual, use care and good judgment. Contact your
dealer for assistance.
Keep discharge chute deflector, chipper chute door,
and all other guards and safety devices in place and
operating properly.
Only operate unit in good daylight. Do not operate
unit at night or in dark areas where your vision may
be impaired.
2. CHILDREN
Tragic accidents can occur if the operator is not alert to the
presence of small children. Children are often attracted to
the chipper-shredder and the chipping and shredding
activity. Never assume that children will remain where you
last saw them.
Keep children out of the work area and under the
watchful eye of a responsible adult other than the
operator.
Be alert and turn the unit off if a child enters the area.
• Never allow children under the age of 16 to operate
the chipper-shredder.
3. SERVICE
° Use extreme care in handling gasoline and other
fuels. They are extremely flammable and the vapors
are explosive.
Store fuel and oil in approved containers, away from
heat and open flame, and out of the reach of
children. Check and add fuel before starting the
engine. Never remove gas cap or add fuel while the
engine is running. Allow engine to cool at least two
minutes before refueling.
• Replace gasoline cap securely and wipe off any
spilled gasoline before starting the engine as it may
cause a fire or explosion.
• Extinguish all cigarettes, cigars, pipes and other
sources of ignition.
• Never refuel unit indoors because flammable vapors
will accumulate in the area.
Never store the machine or fuel container inside
where there is an open flame or spark such as a gas
hot water heater, space heater, clothes dryer or
furnace.
Never run your machine in an enclosed area as the
exhaust from the engine contains carbon monoxide,
which is an odorless, tasteless and deadly poisonous
gas.
To reduce fire hazard, keep engine and muffler free
of leaves, grass, and other debris build-up. Clean up
fuel and oil spillage. Allow unit to cool at least 5
minutes before storing.
Before cleaning, repairing, or inspecting, make
certain the impeller and all moving parts have
stopped. Disconnect the spark plug wire and keep
wire away from spark plug to prevent accidental
starting. Do not use flammable solutions to clean air
filter.
O
Check the blade and engine mounting screws at
frequent intervals for proper tightness. Also visually
inspect blades for wear and/or damage (e.g, bent,
cracked). Replace with blades which meet original
equipment specifications.
Keep all nuts, bolts, and screws tight to be sure the
equipment is in safe working condition.
Never tamper with safety devices. Check their proper
operation regularly.
After striking a foreign object, immediately stop the
engine, disconnect the spark plug wire from the
spark plug, and thoroughly inspect the unit for any
damage. Repair damage before starting and
operating unit.
Do not alter or tamper with the engine's governor
setting. The governor controls the maximum safe
operating speed of the engine. Over-speeding the
engine is dangerous and will cause damage to the
engine and to other moving parts of the machine.
WARNING - YOUR RESPONSIBILITY: Restrict the use of this power machine to persons who read,
understand and follow the wa.n_ngs and nstruct_ons n this manual and on the machine.
3
ii i
SECTION 2: FINDING YOUR MODEL NUMBER
This Owner's Guide is an important part of your new chipper shredder. It will help you assemble, prepare and
maintain your chipper shredder. Please read and understand what it says.
Before you start to prepare your chipper shredder for its first use, please locate the model plate and copy the
information from it in this Owner's Guide. The information on the model plate is very important If you need help
from your dealer or the MTD customer support department.
•Every chipper shredder has a model plate. You can locate it by standing behind the unit in the operating
position and looking down at the frame next to the engine.
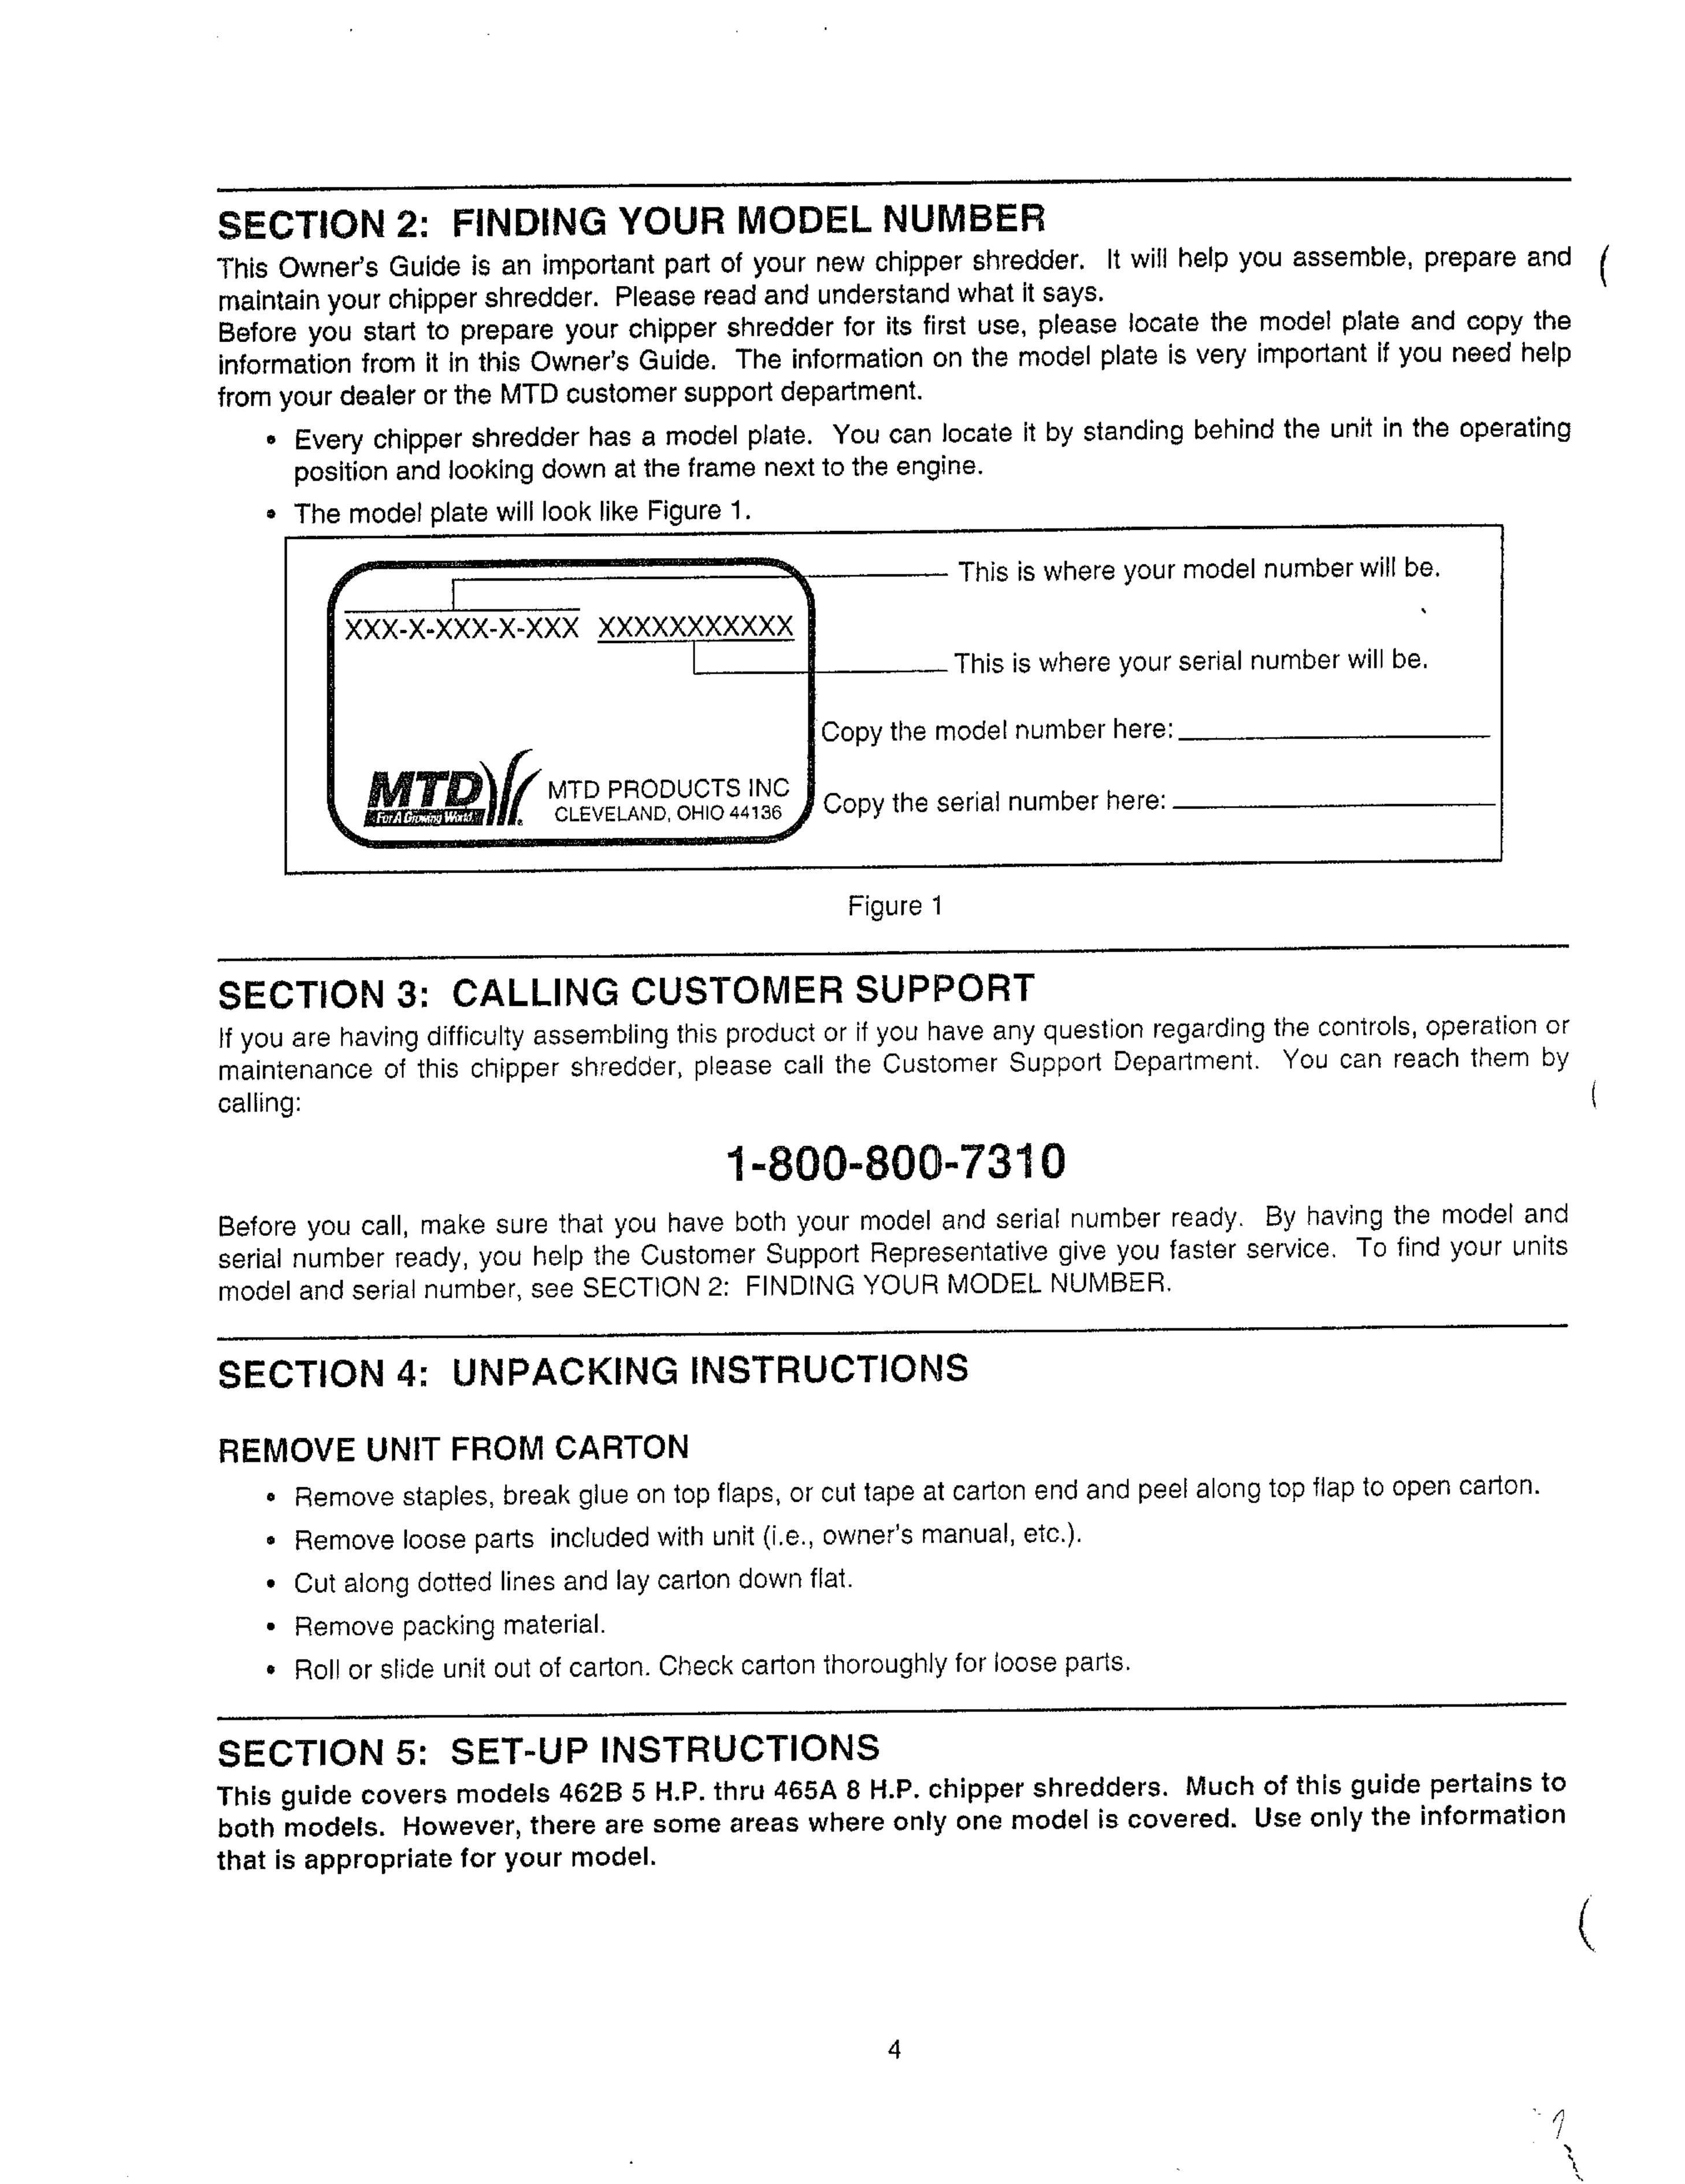
° The model plate will look like Figure 1.
I 1
XXX-X-XXX-X-XXX I
Mro /2MTOPROOOCTS,.O
_l_"Jil_lt_l'. CLEVELAND, OHIO 441_
This is where your model number will be.
This is where your serial number will be.
Copy the model number here:
Copy the serial number here:
Figure 1
SECTION 3: CALLING CUSTOMER SUPPORT
If you are having difficulty assembling this product or if you have any question regarding the controls, operation or
maintenance of this chipper shredder, please call the Customer Support Department. You can reach them by
calling:
1-800-800-7310
Before you call, make sure that you have both your model and serial number ready. By having the model and
serial number ready, you help the Customer Support Representative give you faster service. To find your units
model and serial number, see SECTION 2: FINDING YOUR MODEL NUMBER.
SECTION 4: UNPACKING INSTRUCTIONS
REMOVE UNIT FROM CARTON
• Remove staples, break glue on top flaps, or cut tape at carton end and peel along top flap to open carton.
•Remove loose parts included with unit (i.e., owner's manual, etc.).
• Cut along dotted lines and lay carton down fiat.
• Remove packing material.
° Rol! or slide unit out of carton. Check carton thoroughly for loose pads.
• ,i i i
SECTION 5: SET-UP INSTRUCTIONS
This guide covers models 462B 5 H.P. thru 465A 8 H.P. chipper shredders. Much of this guide pertains to
both models. However, there are some areas where only one model is covered. Use only the information
that is appropriate for your model.
4
f
Start with Step 1 to set-up you new chipper shredder.
All models.
n
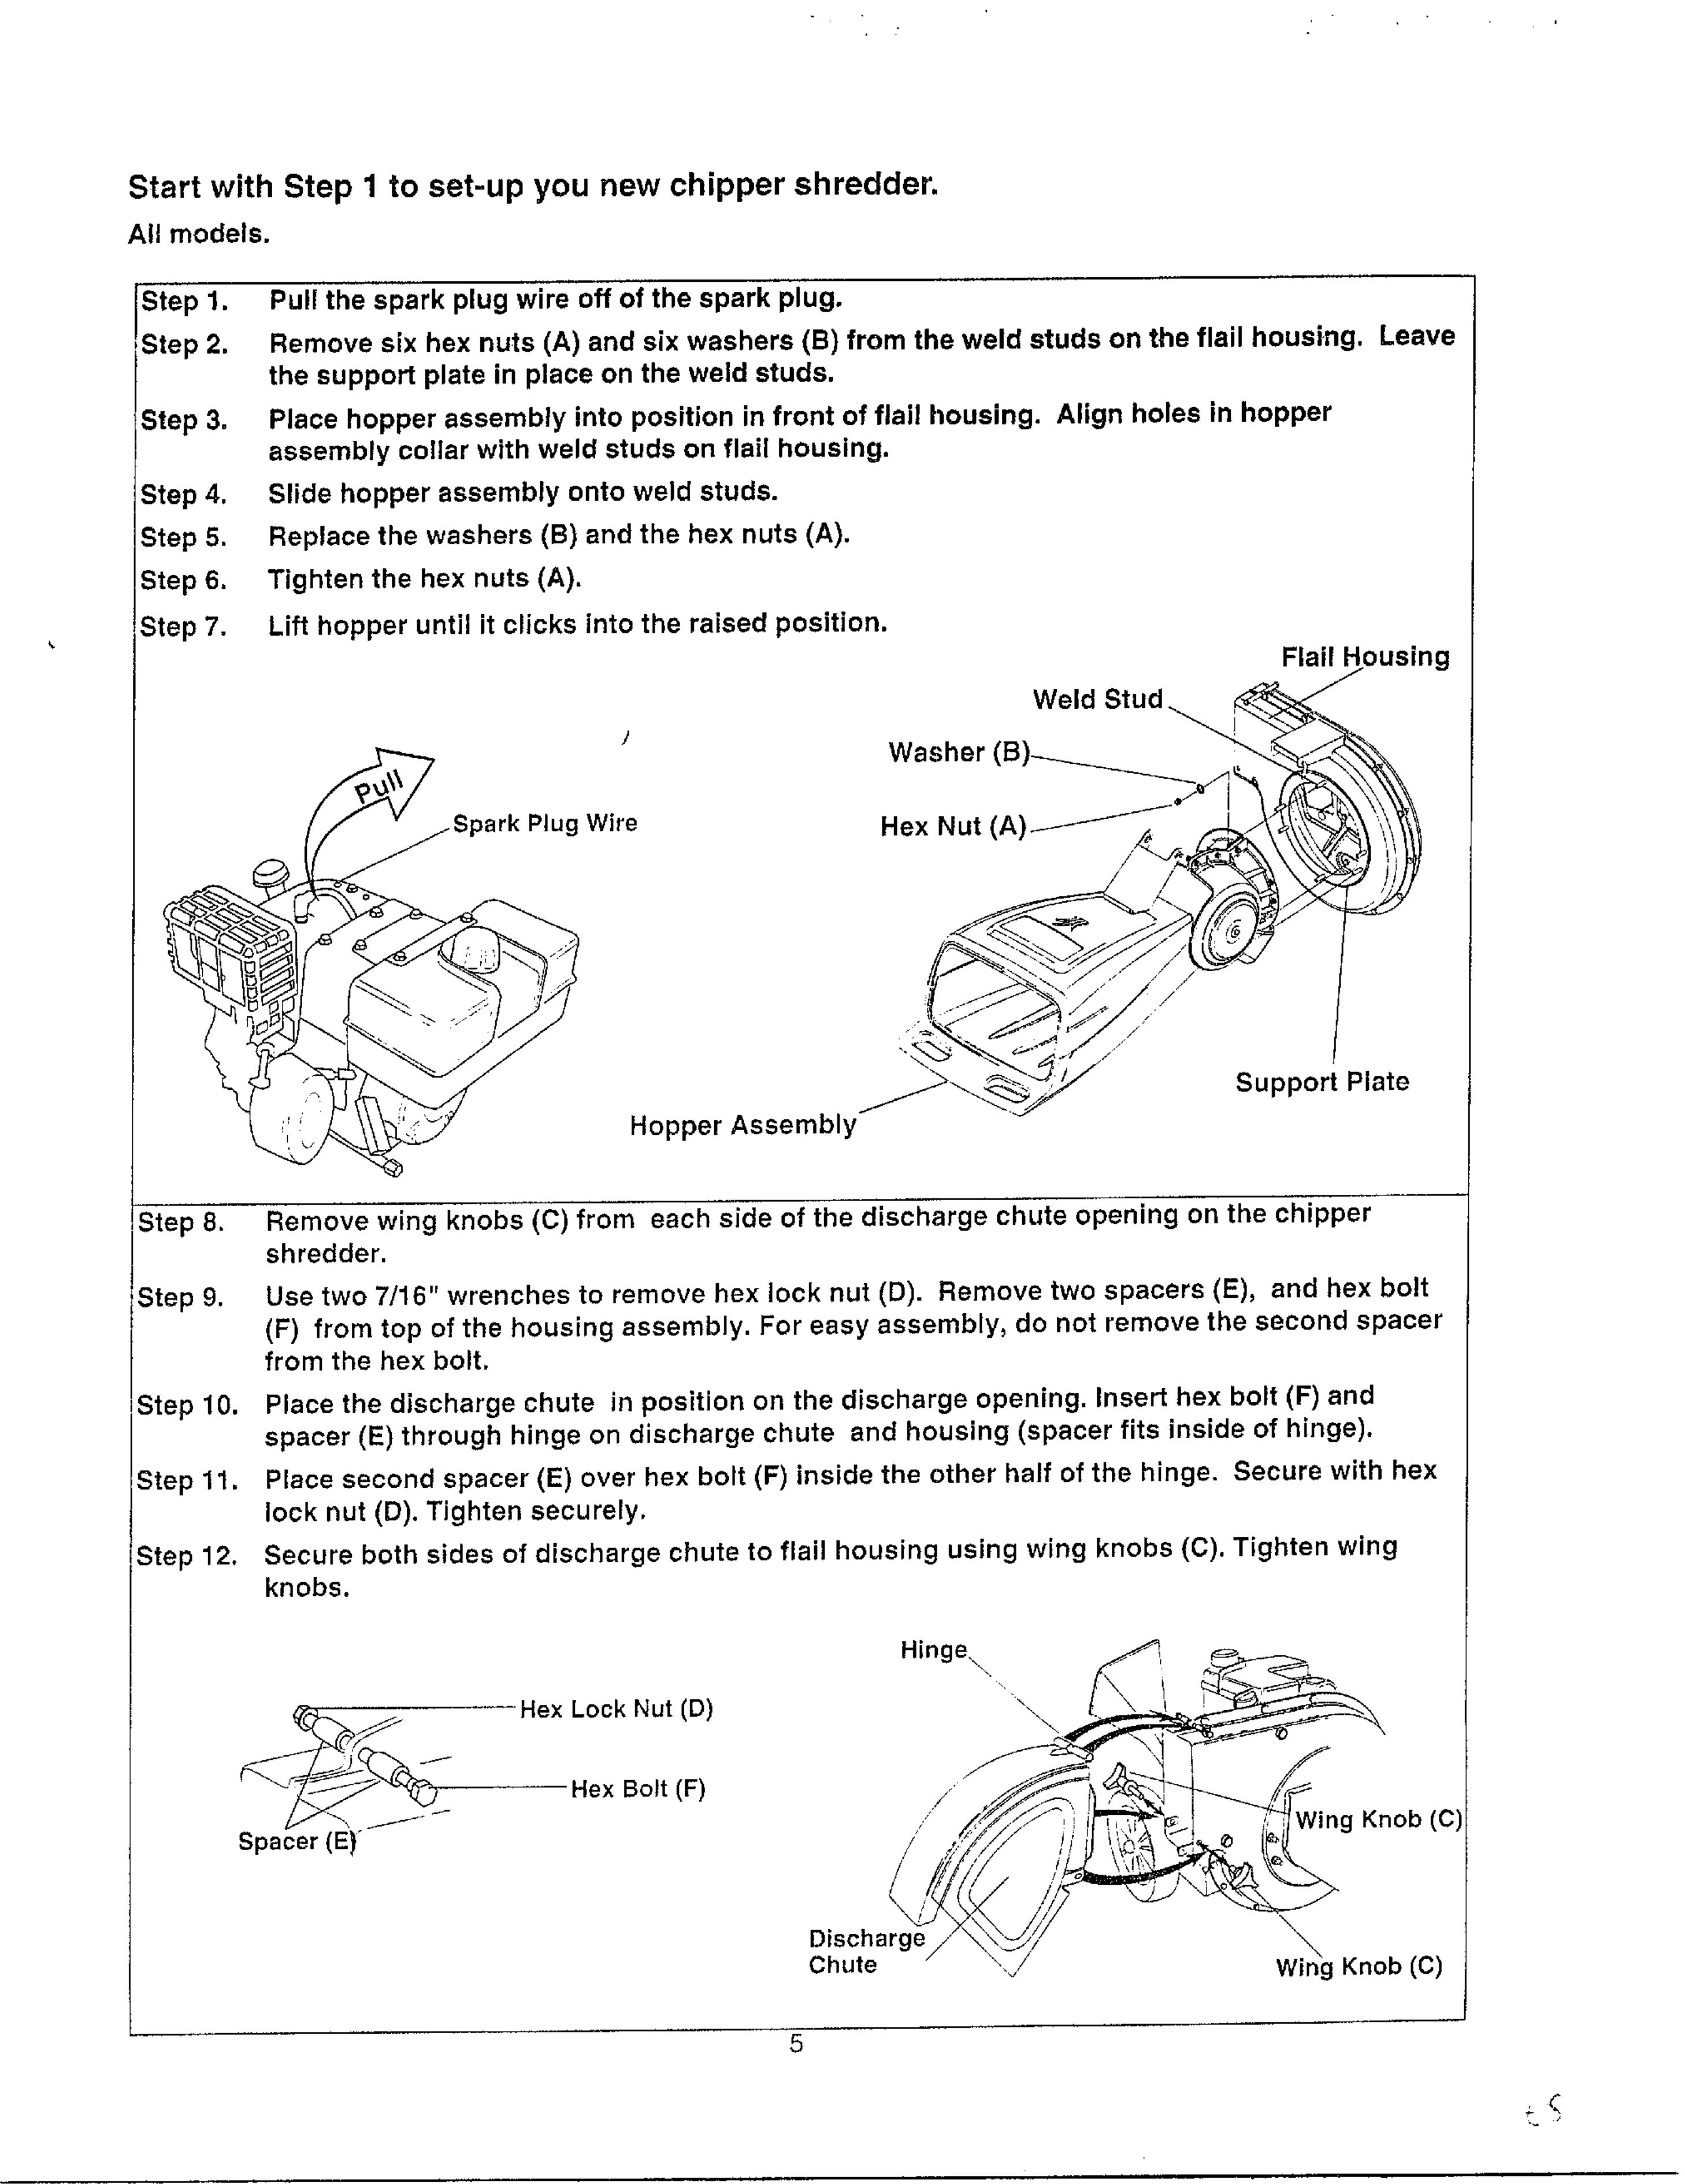
IStep 1. Pull the spark plug wire off of the spark plug.
EStep 2. Remove six hex nuts (A) and six washers (B) from the weld studs on the flail housing. Leave
the support plate in place on the weld studs.
Step 3, Place hopper assembly into position in front of flail housing. Align holes in hopper
assembly collar with weld studs on flail housing.
Step 4. Slide hopper assembly onto weld studs.
Step 5. Replace the washers (B) and the hex nuts (A).
Step 6. Tighten the hex nuts (A).
Step 7. Lift hopper until it clicks into the raised position.
Flail Housing
)
_ark Plug Wire
Washer
Hex Nut
Weld Stud
Support Plate
Hopper Assembly
)8, Remove wing knobs (C) from each side of the discharge chute opening on the chipper
shredder.
pg. Use two 7/16" wrenches to remove hex lock nut (D). Remove two spacers (E), and hex bolt
(F) from top of the housing assembly. For easy assembly, do not remove the second spacer
from the hex bolt.
10. Place the discharge chute in position on the discharge opening. Insert hex bolt (F) and
spacer (E) through hinge on discharge chute and housing (spacer fits inside of hinge).
Step 11 Place second spacer (E) over hex bolt (F) inside the other half of the hinge. Secure with hex
lock nut (D). Tighten securely,
Step 12. Secure both sides of discharge chute to flail housing using wing knobs (C). Tighten wnng
knobs.
Hinge\
Spacer (E)"
Hex Lock Nut (D)
Hex Bolt (F)
\
\\
Wing Knob(C)
Dischargej
Chute
\
Wi_ng Knob (C)
5
</
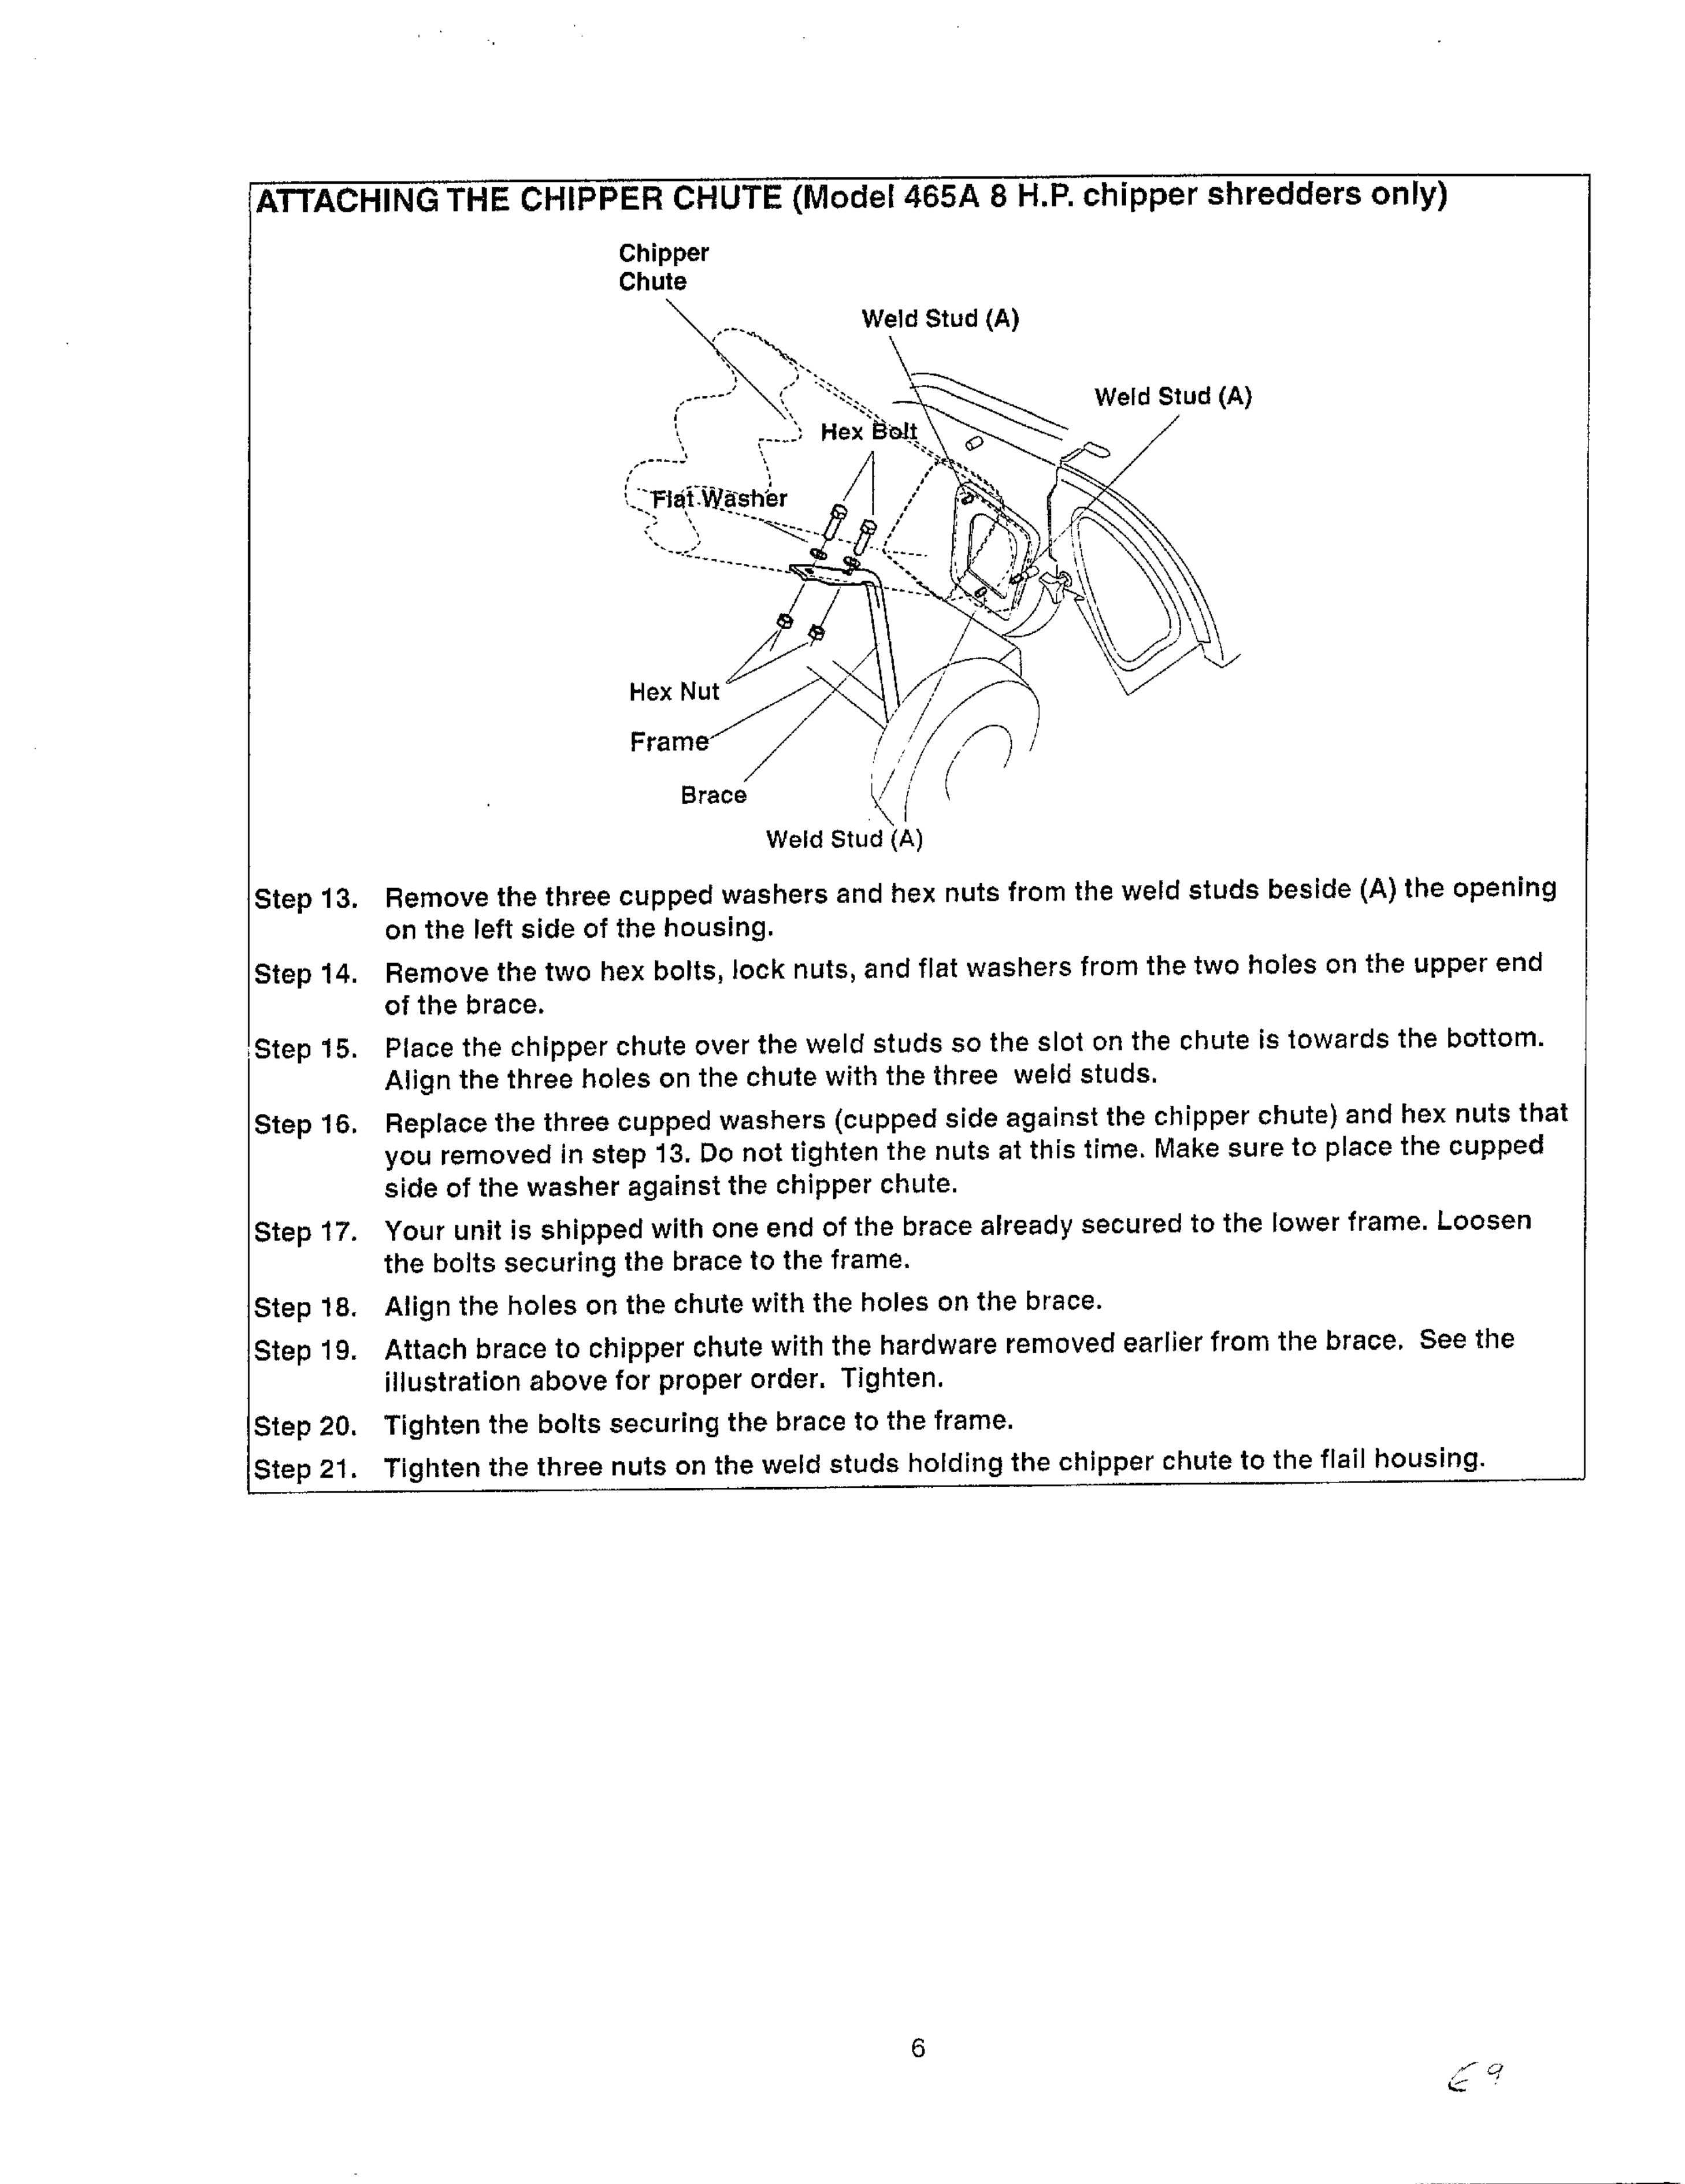
ATTACHING THE CHIPPER CHUTE (Model 465A 8 H.P. chipper shredders only)
Chipper
Chute
Weld Stud (A)
Weld Stud (A)
Hex Nut
Weld Stud (A)
_tep 13. Remove the three cupped washers and hex nuts from the weld studs beside (A) the opening
on the left side of the housing.
Step 14. Remove the two hex bolts, lock nuts, and flat washers from the two holes on the upper end
of the brace.
15. Place the chipper chute over the weld studs so the slot on the chute is towards the bottom,
Align the three holes on the chute with the three weld studs,
p 16, Replace the three cupped washers (cupped side against the chipper chute) and hex nuts that
you removed in step 13. Do not tighten the nuts at this time. Make sure to place the cupped
side of the washer against the chipper chute.
Step 17. Your unit is shipped with one end of the brace already secured to the lower frame. Loosen
the bolts securing the brace to the frame.
Step 18. Align the holes on the chute with the holes on the brace.
Step 19. Attach brace to chipper chute with the hardware removed earlier from the brace. See the
illustration above for proper order. Tighten.
Step 20. Tighten the bolts securing the brace to the frame.
Step 21, Tighten the three nuts on the weld studs holding the chipper chute to the flail housing.
6
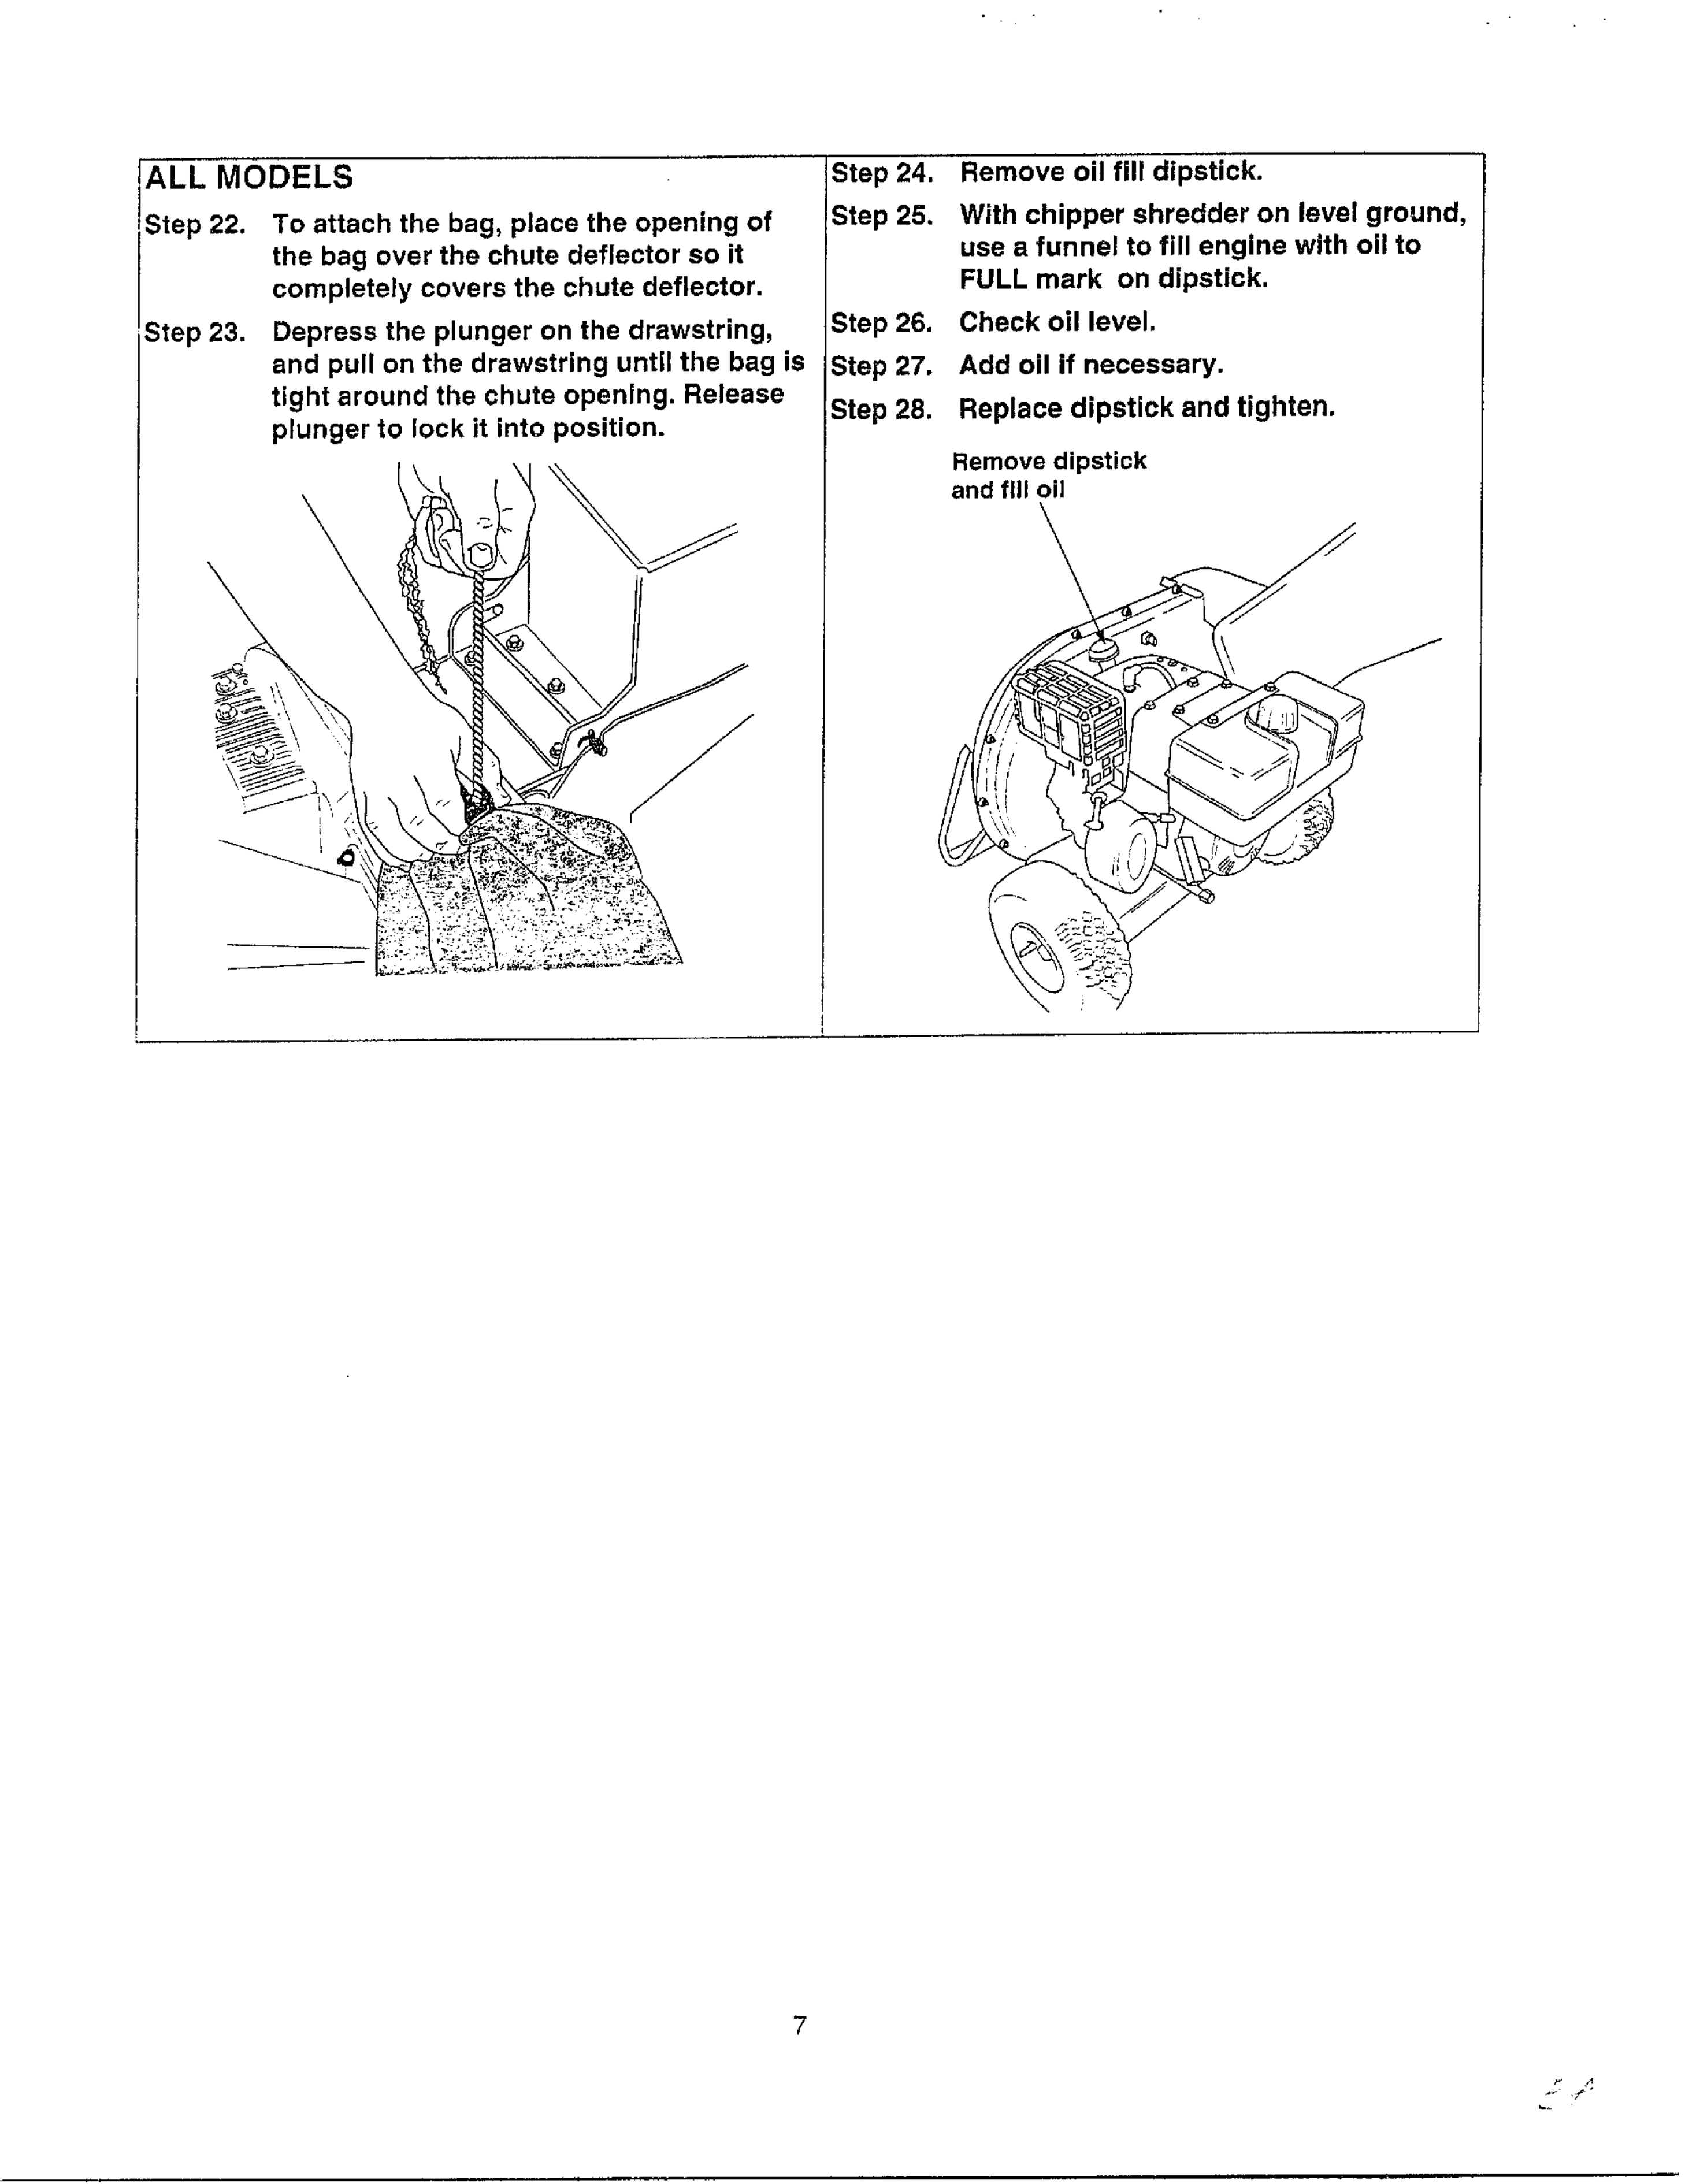
ALL MODELS
Step 22. To attach the bag, place the opening of
the bag over the chute deflector so it
completely covers the chute deflector.
23. Depress the plunger on the drawstring,
and pull on the drawstring until the bag is
tight around the chute opening. Release
plunger to lock it into position.
K
Step 24. Remove oil fill dipstick.
Step 25. With chipper shredder on level ground,
use a funnel to fill engine with oil to
FULL mark on dipstick.
Step 26. Check oil level.
Step 27. Add oil if necessary.
Step 28. Replace dipstick and tighten.
Remove dipstick
and fill oil
7
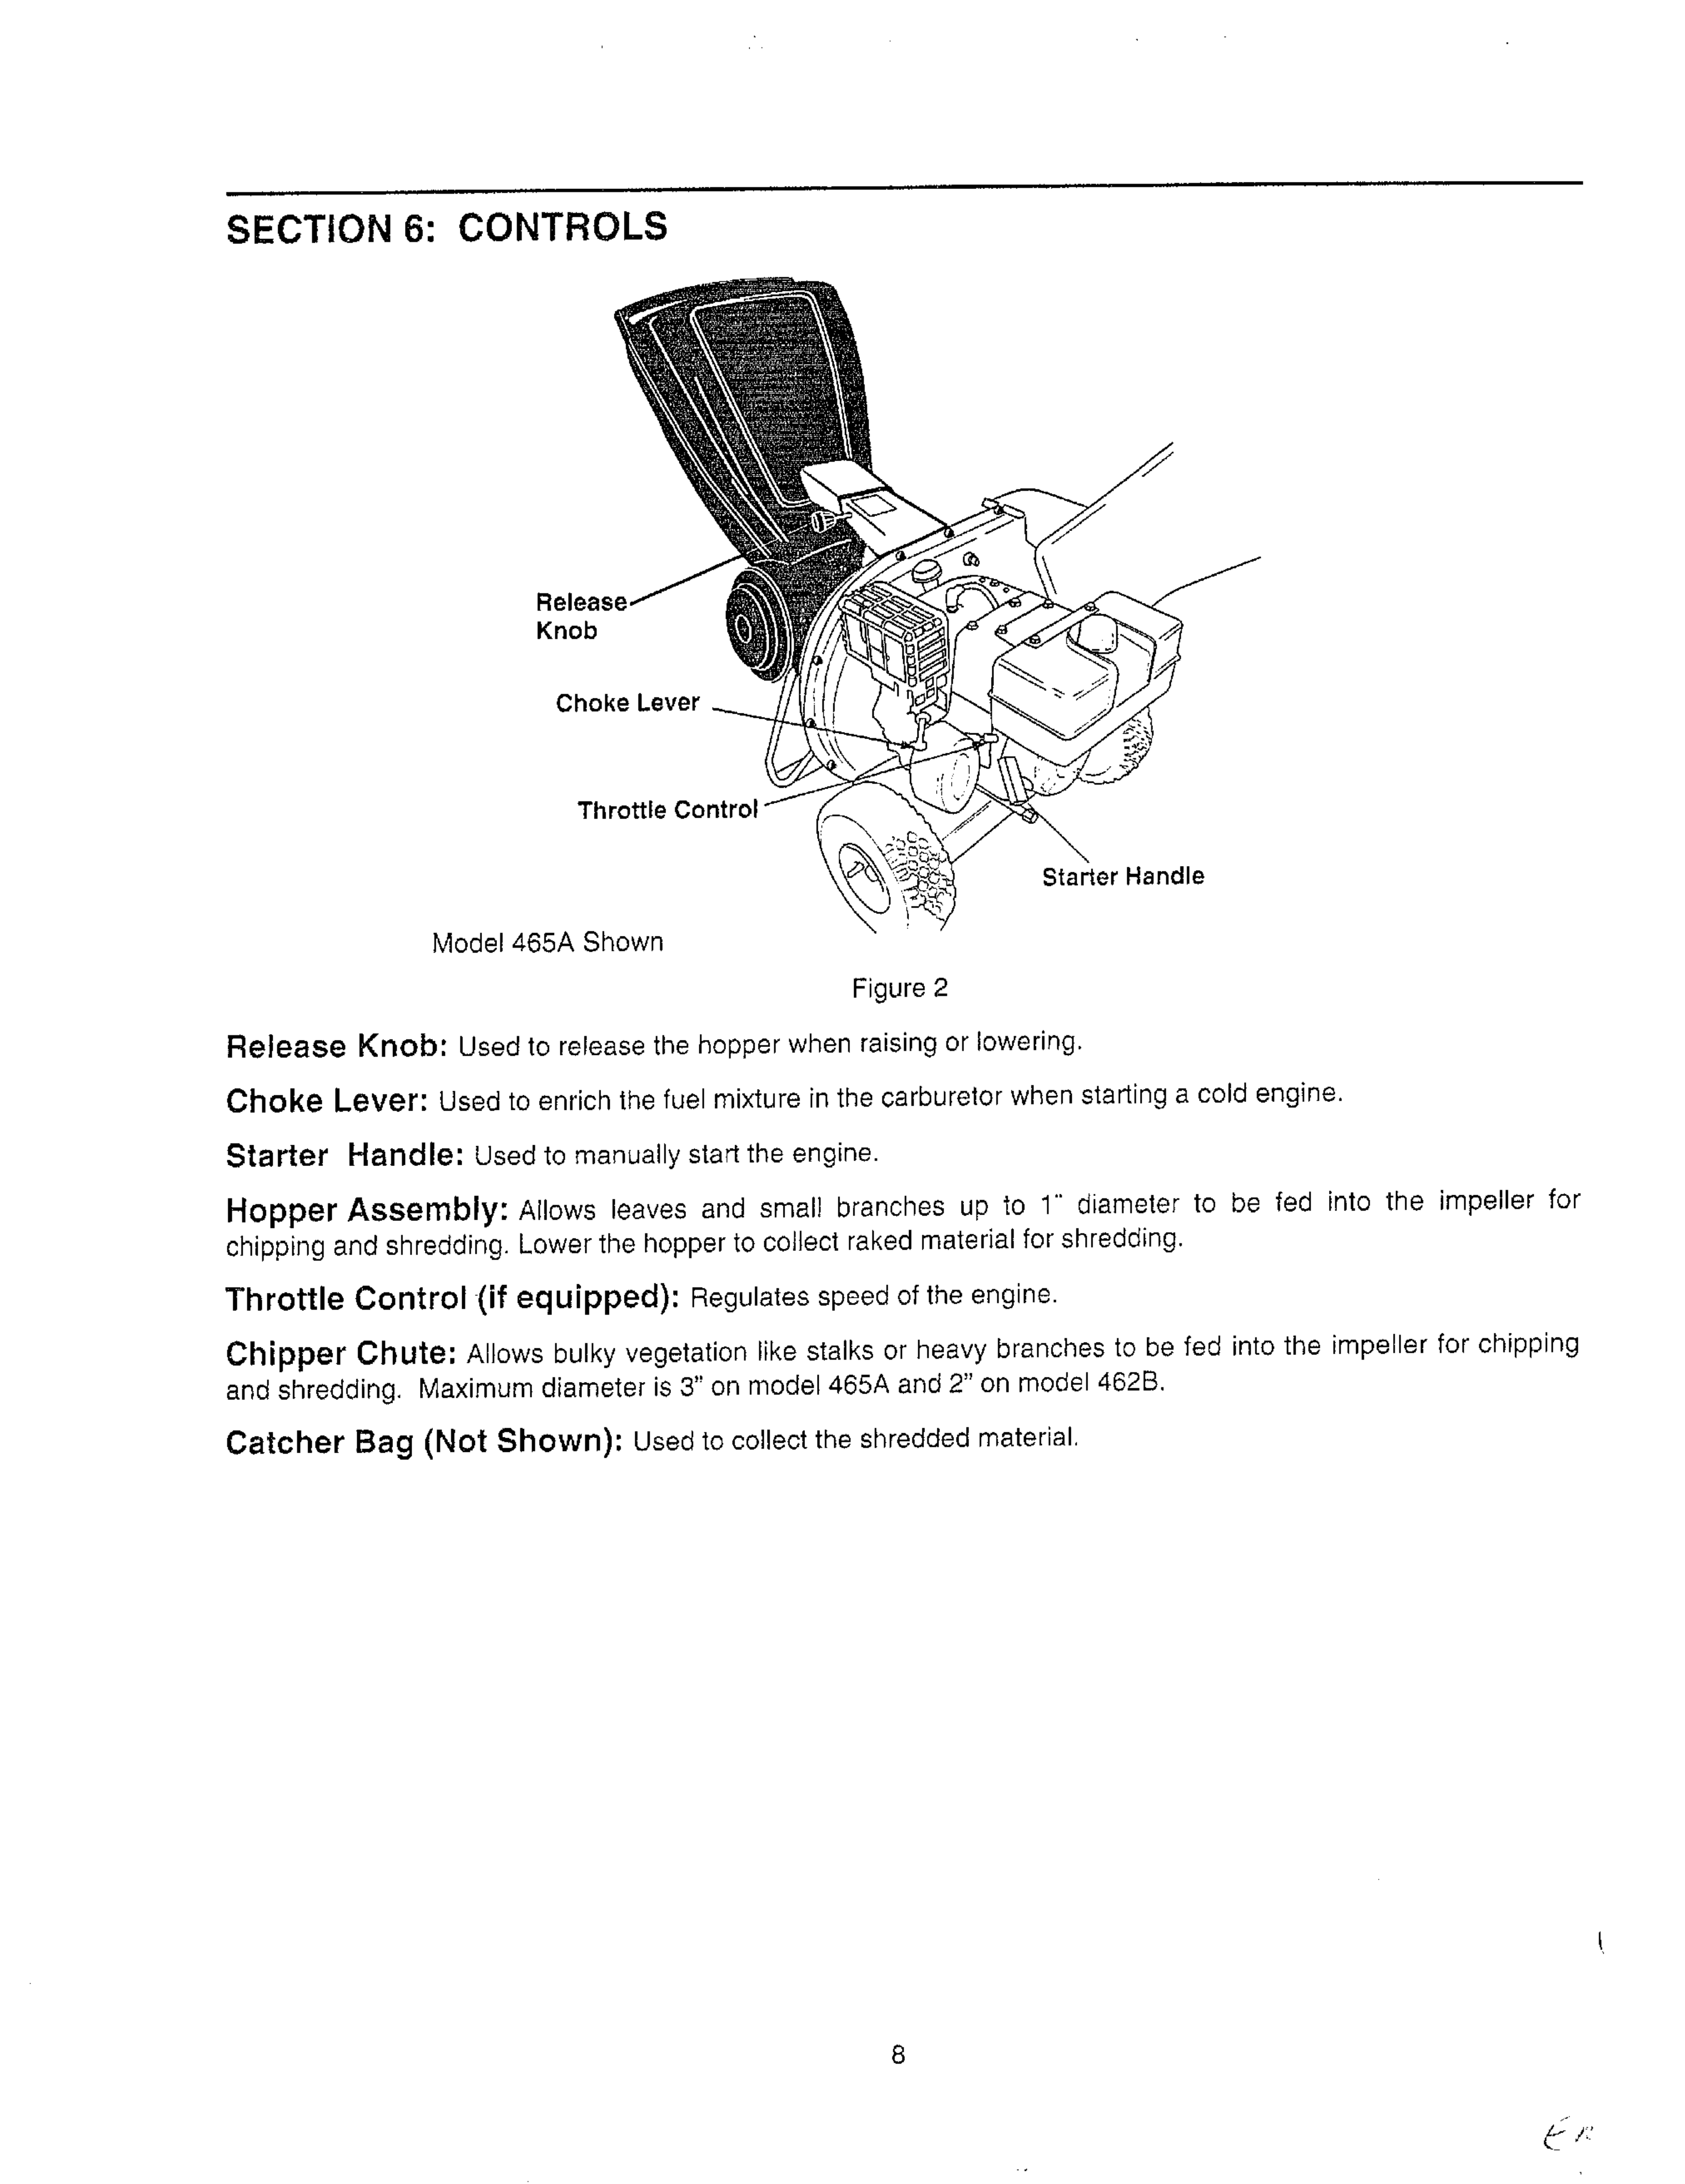
SECTION 6: CONTROLS
Release
Knob
Choke Lever
Throttle Control
Starter Handle
Model 465A Shown
Figure 2
Release Knob: Used to release the hopper when raising or lowering.
Choke Lever: Used to enrich the fuel mixture in the carburetor when starting a cold engine.
Starter Handle: Used to manually start the engine•
Hopper Assembly: Atlows leaves and smart branches up to 1" diameter to be fed
chipping and shredding• Lower the hopper to collect raked material for shredding.
Throttle Control (if equipped): Regulates speed of the engine.
Chipper Chute: Allows bulky vegetation like stalks or heavy branches to be fed into the
and shredding. Maximum diameter is 3" on model 465A and 2" on model 462B.
Catcher Bag (Not Shown): Usedto collect the shredded material,
into the impeller for
impeller for chipping
8
