MTD 31A 261 718 User Manual SNOW THROWER Manuals And Guides 1107430L
User Manual: MTD 31A-261-718 31A-261-718 MTD SNOW THROWER - Manuals and Guides View the owners manual for your MTD SNOW THROWER #31A261718. Home:Lawn & Garden Parts:MTD Parts:MTD SNOW THROWER Manual
Open the PDF directly: View PDF ![]() .
.
Page Count: 20
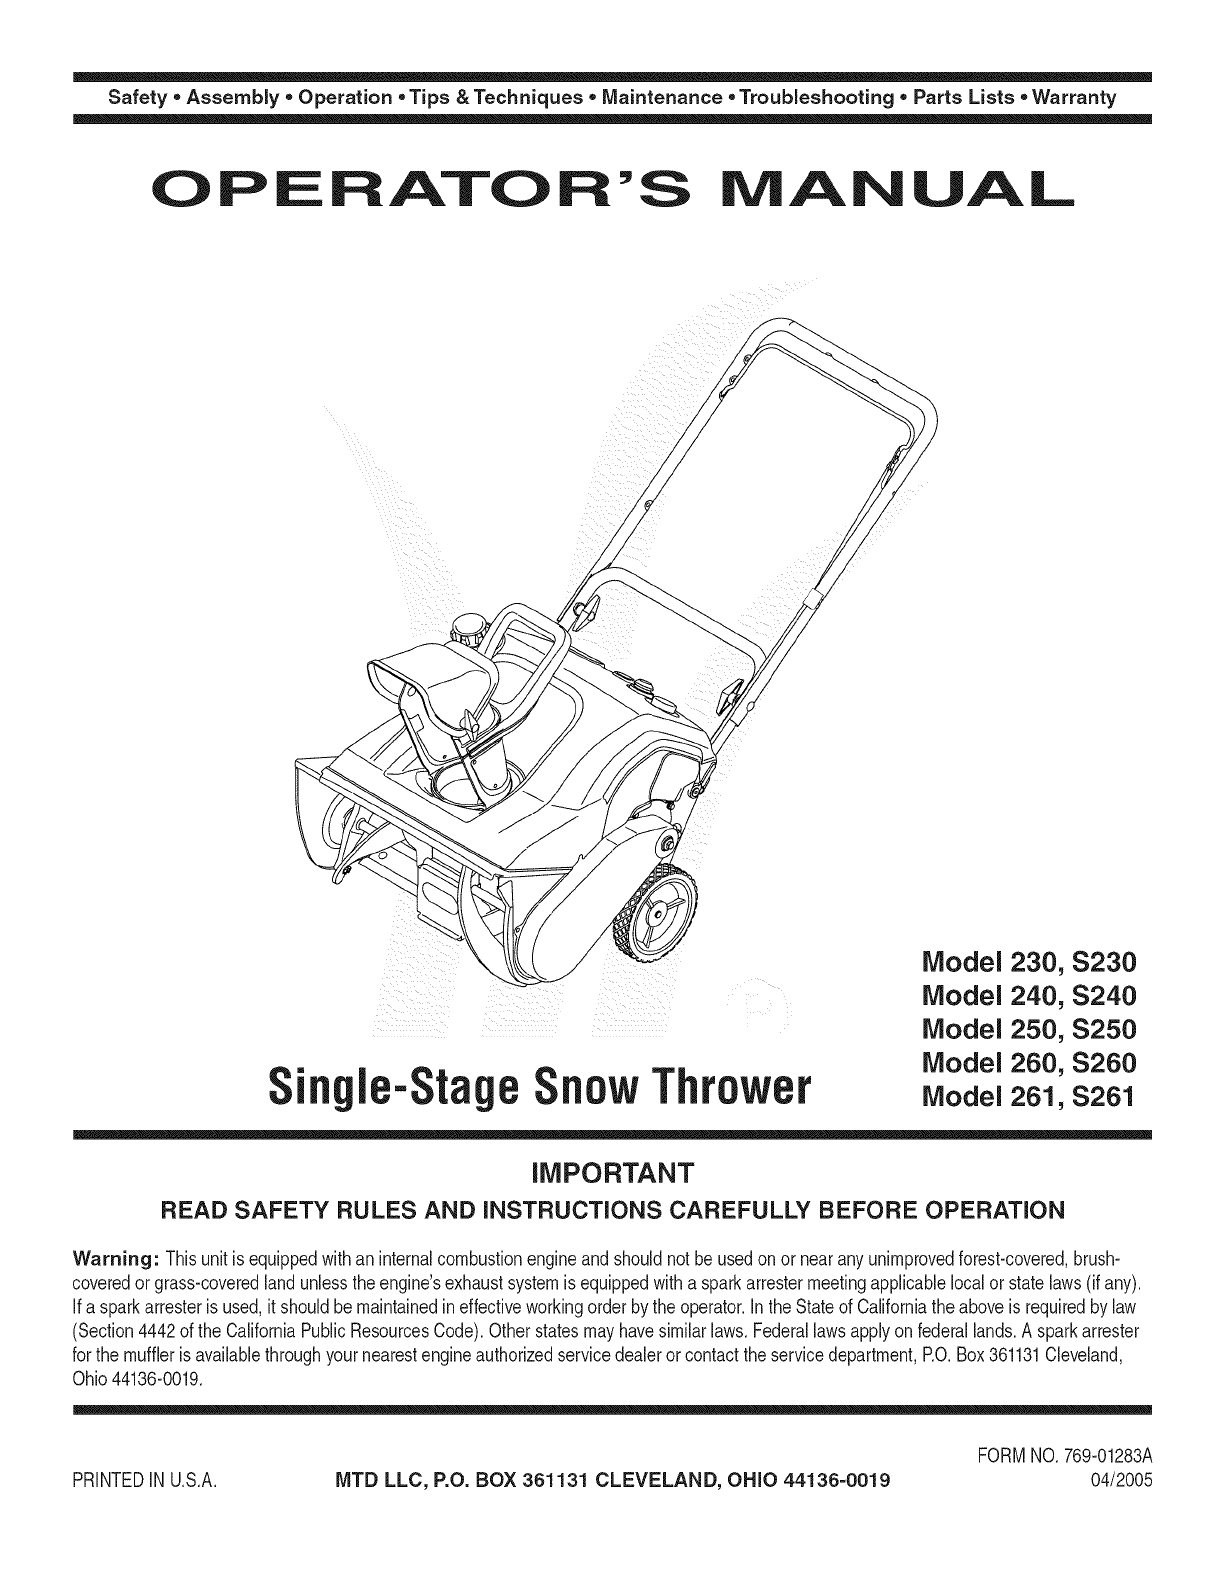
Safety ,, Assembly ,, Operation ,,Tips & Techniques ,, Maintenance ,,Troubleshooting ,, Parts Lists ,,Warranty
OF AOA AL
ingle-Stage nowThrower
Model 230, $230
Model 240, S240
Model 250, S250
Model 260, S260
Model 261, S261
iMPORTANT
READ SAFETY RULES AND iNSTRUCTiONS CAREFULLY BEFORE OPERATION
Warning: Thisunit is equippedwithan internalcombustionengineandshouldnot beusedon or nearany unimprovedforest-covered,brush-
coveredor grass-coveredlandunlesstheengine'sexhaustsystemis equippedwitha sparkarrestermeetingapplicablelocalor statelaws(if any).
If a sparkarresteris used,it shouldbemaintainedineffectiveworkingorderby the operator.In theStateof Californiathe aboveis requiredbylaw
(Section4442of the CaliforniaPublicResourcesCode).Otherstatesmayhavesimilarlaws.Federallawsapplyonfederallands.A sparkarrester
for the muffleris availablethroughyour nearestengineauthorizedservicedealeror contactthe servicedepartment,RO.Box361131Cleveland,
Ohio44136-0019.
PRINTEDIN U.S.A. IVITDLLC, P.O. BOX 361131 CLEVELAND, OHiO 44136-0019
FORMNO.769-01283A
04/2005
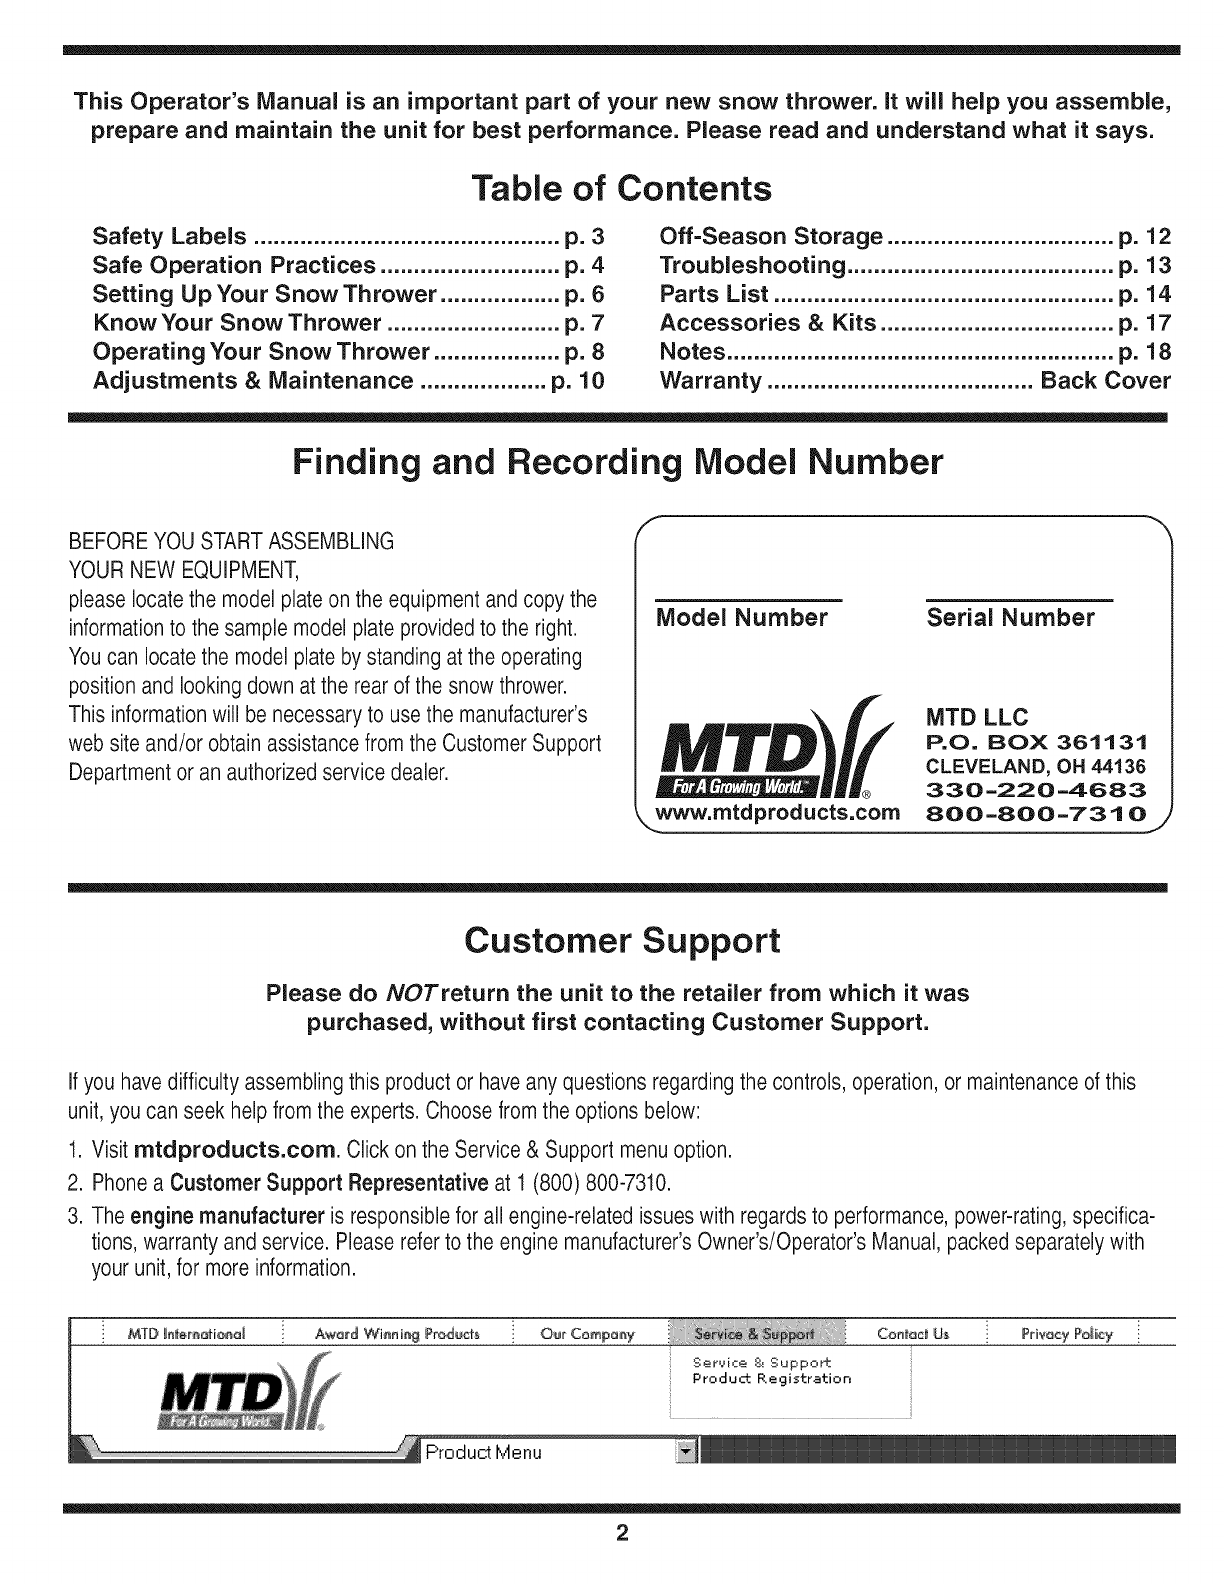
This Operator's Manual is an important part of your new snow thrower, it will help you assemble,
prepare and maintain the unit for best performance. Please read and understand what it says.
Table of Contents
Safety Labels .............................................. p. 3
Safe Operation Practices ........................... p. 4
Setting Up Your Snow Thrower .................. p. 6
Know Your Snow Thrower .......................... p. 7
Operating Your Snow Thrower ................... p. 8
Adjustments & Maintenance ................... p. 10
Off-Season Storage .................................. p. 12
Troubleshooting ........................................ p. 13
Parts List ................................................... p. 14
Accessories & Kits ................................... p. 17
Notes .......................................................... p. 18
Warranty ........................................ Back Cover
Finding and Recording IVlodel Number
BEFOREYOU STARTASSEMBLING
YOUR NEW EQUIPMENT,
please locatethe model plate on the equipmentand copy the
informationto the sample model plate provided to the right.
Youcan locatethe model plateby standing at the operating
position and lookingdown at the rear of the snow thrower.
This information will be necessaryto use the manufacturer's
web site and/or obtain assistance from the Customer Support
Department or an authorizedservice dealer.
Model Number
_D
www. rntdprod ucts.corn
Serial Number
MTD LLC
P.O. BOX 361131
CLEVELAND, OH 44136
330-220-4683
800-800-7310j
Customer Support
Please do NOTreturn the unit to the retailer from which it was
purchased, without first contacting Customer Support.
If you have difficulty assemblingthis product or have any questions regardingthe controls, operation, or maintenanceof this
unit,you can seek help from the experts. Choose from the options below:
1. Visit mtdproducts.com. Click on the Service & Support menuoption.
2. Phonea Customer Support Representative at 1 (800) 800-7310.
3. The engine manufacturer is responsiblefor all engine-relatedissues with regardsto performance,power-rating,specifica-
tions, warranty and service. Please refer to the engine manufacturer'sOwner's/Operator's Manual, packed separatelywith
your unit, for more information.
MTD _rtt_r,t_fi_a_ O_r C_mp_y
Ser,_ice 8_Suppo_±
Product. Registration
Priwcy P_y
2
1.KEEPAWAYFROMROTATINGAUGER
CONTACTWiTHAUGERCAHAMPUTATE
HAHOSAND FEET.
2. DISEHGAGECLUTCHLEVERS,STOPEHGIHE,
ANDREMAINDEHIHDHAHBLESUNTILALL
MOVIHGPARTSHAVESTOPPEDBEFORE
UHCLOGGiHGORSERViCIHGMACHiHE.
3.TO AVOIDTHROWNOBJECTSIHJURIES,
NEVERDIRECTDISCHARGEATBYSTANDERS.
USEEXTRACAUTIONWHEHOPERATINGOH
GRAVELSURFACES.
4. BEADOPERATOR'SMAHUAL
3
WARNING
This symbolpoints
out importantsafety
instructionswhich, if
not followed,could
endangerthe personal
safetyand/or property
of yourself andothers.
Readandfollowall
instructionsinthis
manualbefore
attemptingto operate
this machine.Failure
to complywiththese
instructionsmay result
in personalinjury.When
you see this symbol.
HEED ITS WARNING!
Your Responsibility
Restrictthe use of
this power machineto
personswho read,
understand and
followthe warnings
and instructionsin this
manualand on the
machine.

WARNING
This symbolpoints
out importantsafety
instructionswhich, if
notfollowed,could
endangerthe personal
i safetyand/or property
I ofyourselfand others.
Readandfollowall
instructionsinthis
manualbeforeat-
temptingto operate
i this machine.Failure
I to complywiththese
instructionsmay result
i in personalinjury.When
you see this symbol.
i HEED ITS WARNING!
Your Responsibility
Restrictthe use
of this power machine
to personswho read,
_understand
ano followthe warnings
and instructions
inthis manual
and on the machine.
WARNING: Engine Exhaust,some of its constituents, andcertain vehicle compo-
nentscontain or emit chemicals knownto State of Californiato cause cancer and
birth defects or other reproductiveharm.
DANGER: This machine was built to be operated according to the rules for safe operation in this
manual.As with any type of power equipment, carelessnessor error on the part of the operator can
result in serious injury.This machine is capable of amputating hands andfeet andthrowing objects.
Failureto observethe followingsafety instructionscould result in serious injury or death.
Training
1. Read,understand,andfollowall instructionsonthe 1.
machineandin themanual(s)beforeattemptingto
assembleand operate.Keepthis manualina safe placefor
futureandregularreferenceandfor orderingreplacement
parts. 2.
2. Befamiliarwithall controlsandtheir properoperation.
Knowhowto stopthe machineanddisengagethem quickly.
3. Neverallowchildrenunder14yearsoldto operatethis
machine.Children14yearsold andovershouldreadand
understandtheoperationinstructionsand safetyrulesin 3.
this manualand shouldbe trainedand supervisedbya
parent.
4. Neverallowadultsto operatethis machinewithoutproper
instruction.
5. Thrownobjectscancauseseriouspersonalinjury.Plan 4.
yoursnow-throwingpatternto avoiddischargeof material
towardroads,bystandersandthe like.
6. Keepbystanders,helpers,petsandchildrenat least 75feet 5.
fromthe machinewhileit is in operation.Stopmachineif
anyoneentersthe area. 6.
7. Exercisecautionto avoidslippingor falling,especially 7.
whenoperatingin reverse.
8,
9.
Preparation
Thoroughlyinspectthe areawherethe equipmentisto be
used. Removeall doormats,newspapers,sleds,boards,
wiresand otherforeignobjects,whichcouldbetripped over
orthrownbythe auger/impeller.
Alwayswearsafetyglassesor eyeshieldsduringoperation
andwhile performinganadjustmentorrepairto protectyour
eyes.Thrownobjectswhich ricochetcan cause serious
injuryto the eyes.
Do notoperatewithoutwearingadequatewinterouter
garments.Do notwearjewelry,longscarvesorother
looseclothing,whichcould becomeentangledin moving
parts.Wearfootwearwhich willimprovefootingonslippery
surfaces.
Usea groundedthree-wireextensioncordand receptacle
forall units withelectric startengines.
Adjustcollectorhousingheightto cleargravel orcrushed
rocksurfaces.
Disengageallcontrolleversbeforestartingthe engine.
Neverattemptto makeanyadjustmentswhileengineis
running,exceptwherespecificallyrecommendedinthe
operator'smanual.
Letengine andmachineadjustto outdoortemperature
beforestartingto clearsnow.
Toavoidpersonalinjuryor propertydamageuseextreme
care inhandlinggasoline.Gasolineis extremelyflammable
andthe vaporsare explosive.Seriouspersonalinjurycan
occurwhengasolineis spilledonyourselforyour clothes,
whichcan ignite.Washyour skinand changeclothes
immediately.
a. Useonly an approvedgasolinecontainer.
b. Extinguishallcigarettes,cigars, pipesandothersources
of ignition.
c. Neverfuel machineindoors.
d. Neverremovegascap oradd fuelwhilethe engineis hot
or running.
e. Allowengineto coolat leasttwo minutesbeforerefuel-
ing.
f. Neveroverfill fueltank. Filltankto nomorethan Y2inch
belowbottomoffiller neckto providespacefor fuel
expansion.
g. Replacegasolinecap andtightensecurely.
h. If gasolineis spilled,wipe itoff theengineand equip-
ment.Movemachineto anotherarea.Wait5 minutes
beforestartingtheengine.
i. Neverstorethe machineorfuel containerinsidewhere
there isan openflame, sparkor pilot light (e.g.furnace,
waterheater,spaceheater,clothesdryeretc.).
j. Allow machineto cool at least5 minutesbeforestoring.
4
Operation
1. Donot puthands orfeet nearrotatingparts,inthe
auger/impellerhousingor chuteassembly.Contactwiththe
rotatingpartscanamputatehandsandfeet.
2. The auger/impellercontrolleveris a safetydevice.Never
bypassitsoperation.Doingso makesthe machineunsafe
and maycausepersonalinjury.
3. The controlleversmustoperateeasilyin bothdirections
and automaticallyreturnto the disengagedpositionwhen
released.
4. Neveroperatewitha missingor damagedchuteassembly.
Keepall safetydevicesin placeandworking.
5. Neverrunan engineindoorsor in a poorlyventilatedarea.
Engineexhaustcontainscarbonmonoxide,anodorlessand
deadly gas.
6. Donotoperatemachinewhile underthe influenceof alcohol
or drugs.
7. Mufflerandenginebecomehotandcan causea burn.Do
nottouch.
8. Exerciseextremecautionwhenoperatingonor crossing
gravel surfaces.Stayalert for hidden hazardsortraffic.
9. Exercisecaution whenchangingdirectionandwhileoperat-
ing on slopes.
10.Planyoursnow-throwingpatternto avoiddischargetowards
windows,walls,carsetc.Thus,avoidingpossibleproperty
damageor personalinjury causedby a ricochet.
11.Neverdirect dischargeat children,bystandersand pets or
allow anyonein frontof the machine.
12.Donotoverloadmachinecapacity byattemptingto clear
snow at toofast of a rate.
13.Neveroperatethis machinewithoutgoodvisibility or light.
Alwaysbe sure of yourfootingand keepa firm holdon the
handles.Walk,neverrun.
14.Disengagepowerto the auger/impellerwhentransportingor
notin use.
15.Neveroperatemachineat hightransport speedson slippery
surfaces. Lookdownand behindand usecare when
backingup.
16.Ifthe machineshouldstartto vibrateabnormally,stopthe
engine,disconnectthe sparkplugwire and groundit against
the engine.Inspectthoroughlyfor damage.Repairany
damagebeforestartingandoperating.
17.Disengageallcontrolleversandstopenginebeforeyou
leavethe operatingposition (behindthe handles).Wait
untilthe auger/impellercomesto a completestop before
uncloggingthe chuteassembly,makinganyadjustments,or
inspections.
18.Neverputyourhand in thedischargeor collectoropenings.
Alwaysuse the clean-outtoolprovidedtounclogthe dis-
charge opening.Donot unclogchuteassemblywhileengine
isrunning.Shut offengineand remainbehindhandlesuntil
all movingparts havestoppedbefore unclogging.
19.Useonly attachmentsandaccessoriesapprovedbythe
manufacturer(e.g.wheelweights,tire chains,cabsetc.).
20. If situationsoccurwhich are notcoveredin this manual,
usecareand goodjudgment.Contactyourdealeror call
(800) 800-7310for assistanceand the nameof your nearest
servicing dealer..
Maintenance & Storage
1. Nevertamper withsafetydevices.Checktheir proper
operationregularly.Referto the maintenanceandadjust-
mentsectionsof this manual.
2. Beforecleaning,repairing,or inspectingmachinedisen-
gageall controlleversandstopthe engine.Wait untilthe
auger/impellercometo a completestop. Disconnectthe
sparkplugwire and groundagainstthe engineto prevent
unintendedstarting.
3. Checkbolts and screwsfor propertightnessat frequent
intervalsto keepthe machinein safeworkingcondition.
Also,visuallyinspectmachinefor anydamage.
4. Do notchangethe enginegovernorsettingor over-speed
theengine.The governorcontrolsthemaximumsafe
operatingspeed of theengine.
5. Snowthrowershaveplatesand skidshoesare subjectto
wearanddamage.Foryoursafetyprotection,frequently
checkallcomponentsand replacewith originalequipment
manufacturer's(OEM) partsonly."Useof partswhich do
notmeetthe originalequipmentspecificationsmayleadto
improperperformanceandcompromisesafety!"
6. Checkcontrols periodicallyto verify they engageand
disengageproperlyandadjust, if necessary.Referto the
adjustmentsection inthis operator'smanualfor instructions.
7. Maintainor replacesafetyandinstructionlabels,as neces-
sary.
8. Observeproperdisposallawsandregulationsfor gas,oil,
etc. to protectthe environment.
9. Priorto storing,run machinea few minutesto clearsnow
frommachineand preventfreezeup of auger/impeller.
10.Neverstorethe machineorfuel containerinsidewhere
thereis an openflame,sparkor pilot lightsuchas a water
heater,furnace,clothesdryeretc.
11.Alwaysreferto theoperator'smanualfor properinstructions
onoff-seasonstorage.
Do not modify engine
Toavoidseriousinjuryordeath,donot modifyengineinany
way.Tamperingwiththegovernorsettingcan leadto a runaway
engineandcauseit to operateat unsafespeeds.Nevertamper
withfactorysettingof enginegovernor.
Notice regarding Emissions
Engineswhichare certifiedto complywithCaliforniaandfederal
EPAemissionregulationsfor SORE(SmallOff RoadEquipment)
arecertifiedto operateon regularunleadedgasoline,and may
includethefollowingemissioncontrolsystems:EngineModifica-
tion(EM)andThreeWayCatalyst(TWO)ifso equipped.
Your Responsibility
Restrictthe useof this powermachineto personswho read,un-
derstandand followthe warningsand instructionsin this manual
andon the machine.
5
Operation
WARNING
This symbol points
out importantsafety
instructions, which if
not followed,could
endangerthe personal
safety and/or property
of yourselfand others.
Readand followall
instructions inthis man-
ual before attempting to
operate this machine.
Failureto comply with
these instructionsmay
result in personal injury.
When you see this
symbol.
HEED IT'S WARNING!
YourResponsibility
Restrictthe use
of this power machine
to personswho read.
understand
and followthe warnings
and instructions
in this manua
and on the machine.
} ThisOperator'sManual
i coversseveralmodels.
i Snowthrowerfeatures
varybymodel.Not
allfeaturesdiscussed
} inthismanualare
applicabletoal snow
i ihrowermodels.
NOTE:
Allreferencesto left
orrightsideofthe
snowthroweris
fromtheoperating
positiononly.
iMPORTANT:
Do not use the
chute handle to lift
the snow thrower.
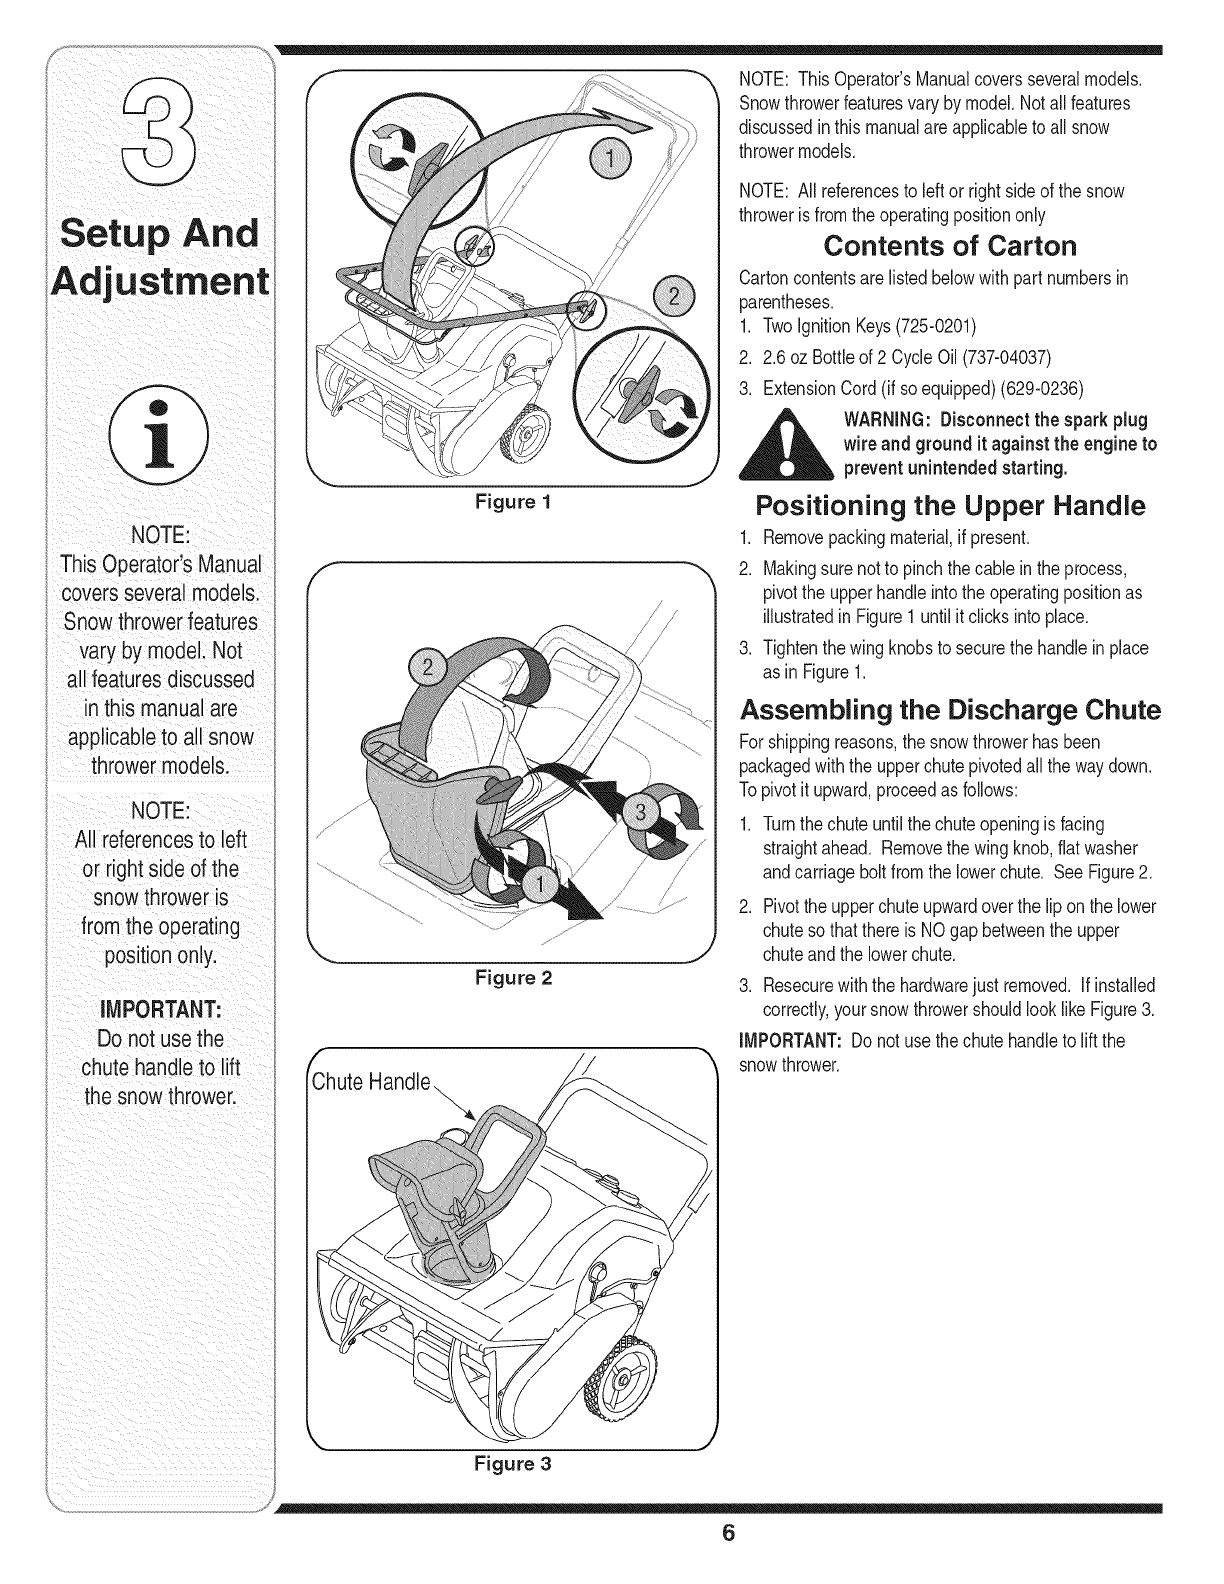
NOTE: This Operator'sManualcoversseveralmodels.
Snowthrowerfeaturesvaryby model.Notall features
discussedin thismanualareapplicableto all snow
throwermodels.
Figure 1
Figure 2
NOTE: All referencesto leftor rightsideof the snow
throweris fromthe operatingpositiononly
Contents of Carton
Cartoncontentsare listedbelowwithpart numbersin
parentheses.
1. TwoIgnitionKeys(725-0201)
2. 2.6 oz Bottleof 2 CycleOil (737-04037)
3. ExtensionCord(if soequipped)(629-0236)
__, ARNING: Disconnectthe sparkplug
wire and ground it against the engineto
preventunintended starting.
Positioning the Upper Handle
1. Removepackingmaterial,if present.
2. Makingsurenot to pinchthe cablein the process,
pivotthe upperhandleintothe operatingpositionas
illustratedin Figure1 untilit clicksinto place.
3. Tightenthewing knobsto securethe handleinplace
as in Figure1.
Assembling the Discharge Chute
For shippingreasons,the snowthrowerhasbeen
packagedwiththe upperchutepivotedall the waydown.
Topivotit upward,proceedas follows:
1. Turnthe chuteuntilthe chuteopeningis facing
straightahead. Removethewing knob,flatwasher
andcarriagebolt fromthe lowerchute. See Figure2.
2. Pivotthe upperchuteupwardoverthe lip onthe lower
chuteso thatthere is NOgap betweenthe upper
chuteandthe lowerchute.
3. Resecurewiththe hardwarejust removed. If installed
correctly,your snowthrowershouldlook like Figure3.
IMPORTANT:Do not usethe chutehandleto liftthe
snowthrower.
Figure 3
6
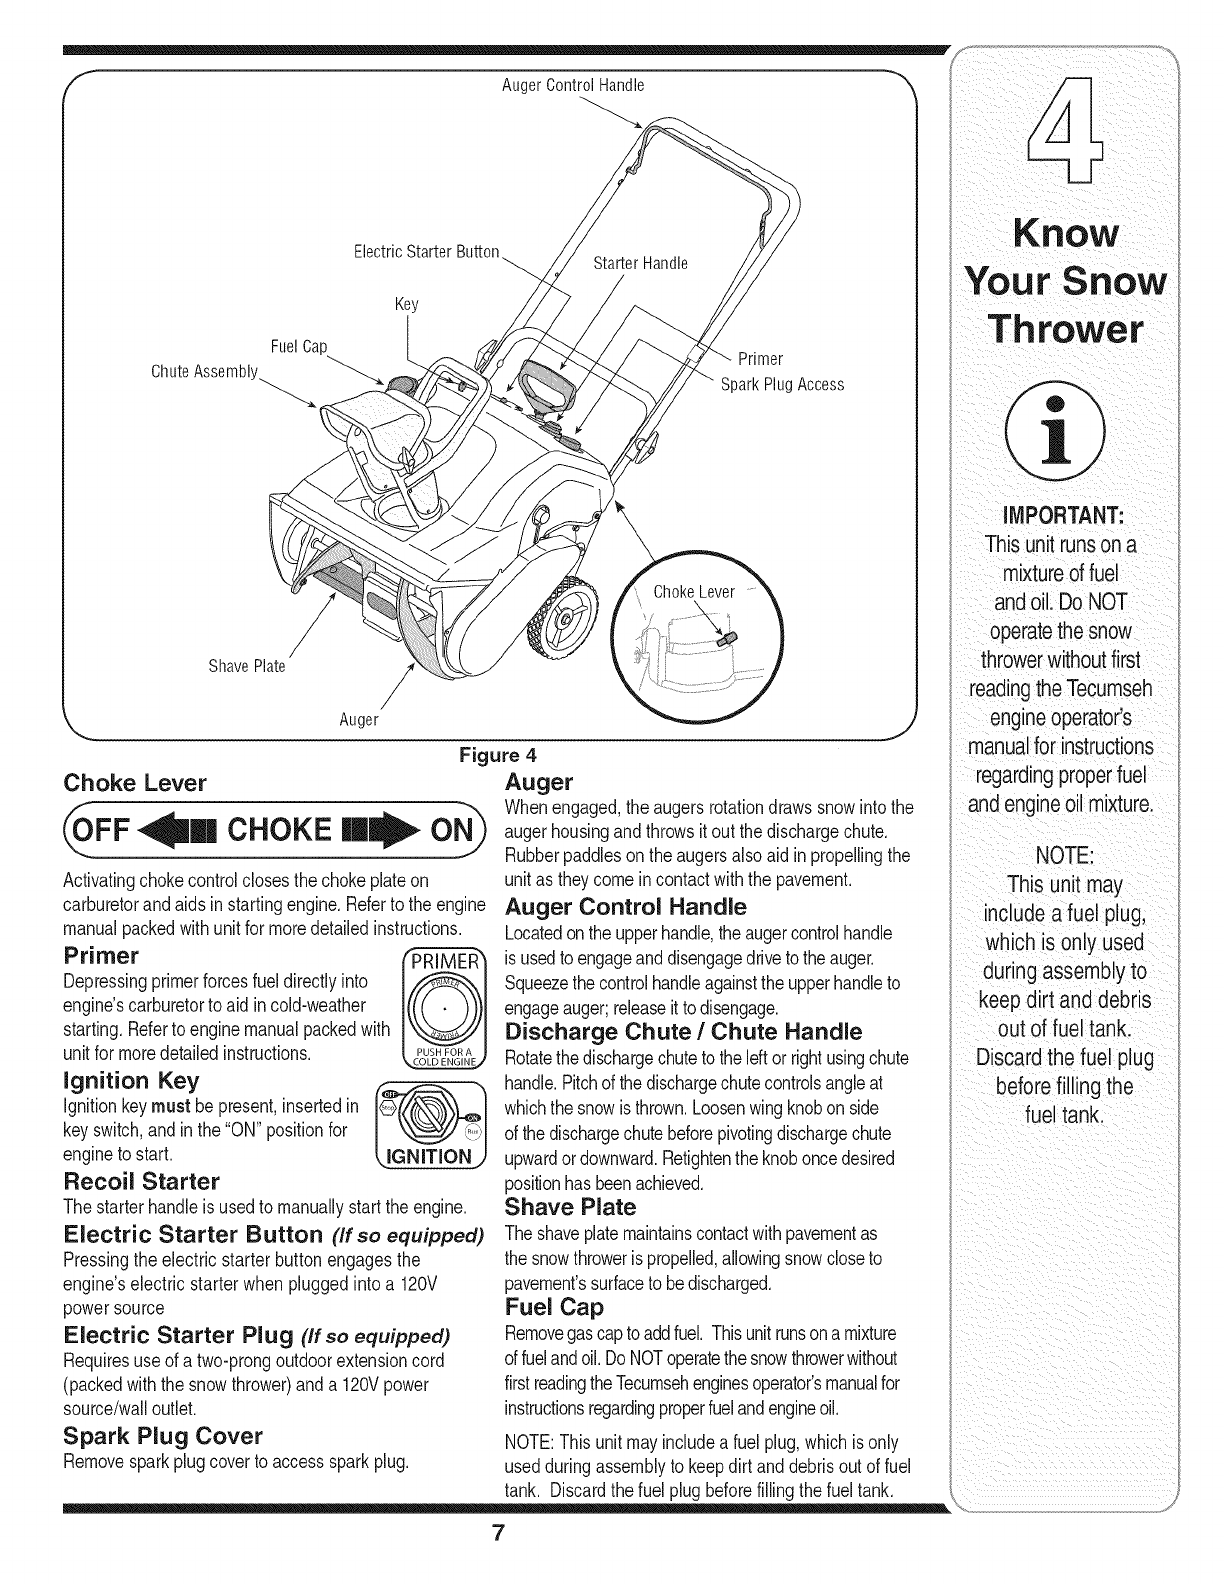
"f AugerControlHandle "_
Chute
FuelCap
ElectricStarterButton
Key
StarterHandle
Primer
SparkPlugAccess
ChokeLever......
ShavePlate /
/
Auger
Figure 4
Choke Lever Auger
4m,c.oKE
Activatingchokecontrolclosesthechokeplateon
carburetorandaids in startingengine.Referto the engine
manualpackedwithunitfor moredetailedinstructions.
Primer
Depressingprimerforcesfueldirectlyinto
engine'scarburetorto aidin cold-weather
starting.Referto enginemanualpackedwith
unit for moredetailedinstructions.
Ignition Key
Ignitionkeymust be present,insertedin
keyswitch,andinthe "ON"positionfor
engineto start. IGNITION
Recoil Starter
The starterhandleis usedto manuallystartthe engine.
Electric Starter Button (If so equipped)
Pressingthe electric starterbuttonengagesthe
engine'selectric starterwhen pluggedinto a 120V
power source
Electric Starter Plug (If so equipped)
Requiresuseof a two-prongoutdoorextensioncord
(packedwiththe snowthrower)anda 120Vpower
source/walloutlet.
Spark Plug Cover
Removesparkplugcoverto accesssparkplug.
Whenengaged,the augersrotationdrawssnowinto the
augerhousingandthrowsit out the dischargechute.
Rubberpaddleson the augersalso aidin propellingthe
unitas theycomeincontactwiththe pavement.
Auger Control Handle
Locatedontheupperhandle,theaugercontrolhandle
is usedto engageanddisengagedriveto theauger.
Squeezethecontrolhandleagainstthe upperhandleto
engageauger;releaseit todisengage.
Discharge Chute /Chute Handle
Rotatethe dischargechuteto theleftor rightusingchute
handle.Pitchof the dischargechutecontrolsangleat
whichthesnowis thrown.Loosenwingknobonside
of thedischargechutebeforepivotingdischargechute
upwardordownward.Retightenthe knoboncedesired
positionhasbeenachieved.
Shave Plate
Theshaveplatemaintainscontactwithpavementas
thesnowthroweris propelled,allowingsnowcloseto
pavement'ssurfaceto bedischarged.
Fuel Cap
Removegascaptoaddfuel. Thisunitrunsona mixture
offuelandoil.Do NOToperatethe snowthrowerwithout
firstreadingtheTecumsehenginesoperator'smanualfor
instructionsregardingproperfuelandengineoil.
NOTE:This unit mayincludea fuel plug,whichisonly
usedduringassemblyto keepdirt anddebrisoutof fuel
tank. Discardthefuel plugbeforefillingthe fueltank.
7
IMPORTANT:
This unitrunson a
mixtureoffuel
andoil.Do NOT
operatethesnow
throwerwithoutfirst
readingthe Tecumseh
engineoperator's
manualfor instructions
regardingproperfuel
and engineoil mixture.
NOTE:
This unit may
includeafuel plug,
which is only used
duringassembly to
keepdirt and debris
out of fuel tank.
Discardthe fuel plug
beforefilling the
fuel tank.
WARNING
Read, understand,
and follow all
instructions and
warnings on the
machineand in
this manual before
operating.
Use extreme care
when handling
gasoline. Gasoline is
iextremely flammable
iand theVapors are
i explosive. Neverfuel
the machine indoors
or while the engine
is hot or running.
iExtinguishcigarettes,
Icigars, pipesand
iother sources of
ignition.
The electric starter
must be used with a
iproperlygrounded
i three-prong
receptacle at all
i times to avoid the
Ipossibility ofelectric
shock. Follow all
instructionscarefully
priorto operating the
electric starter.
Electric
Starter
Button
(if equipped)
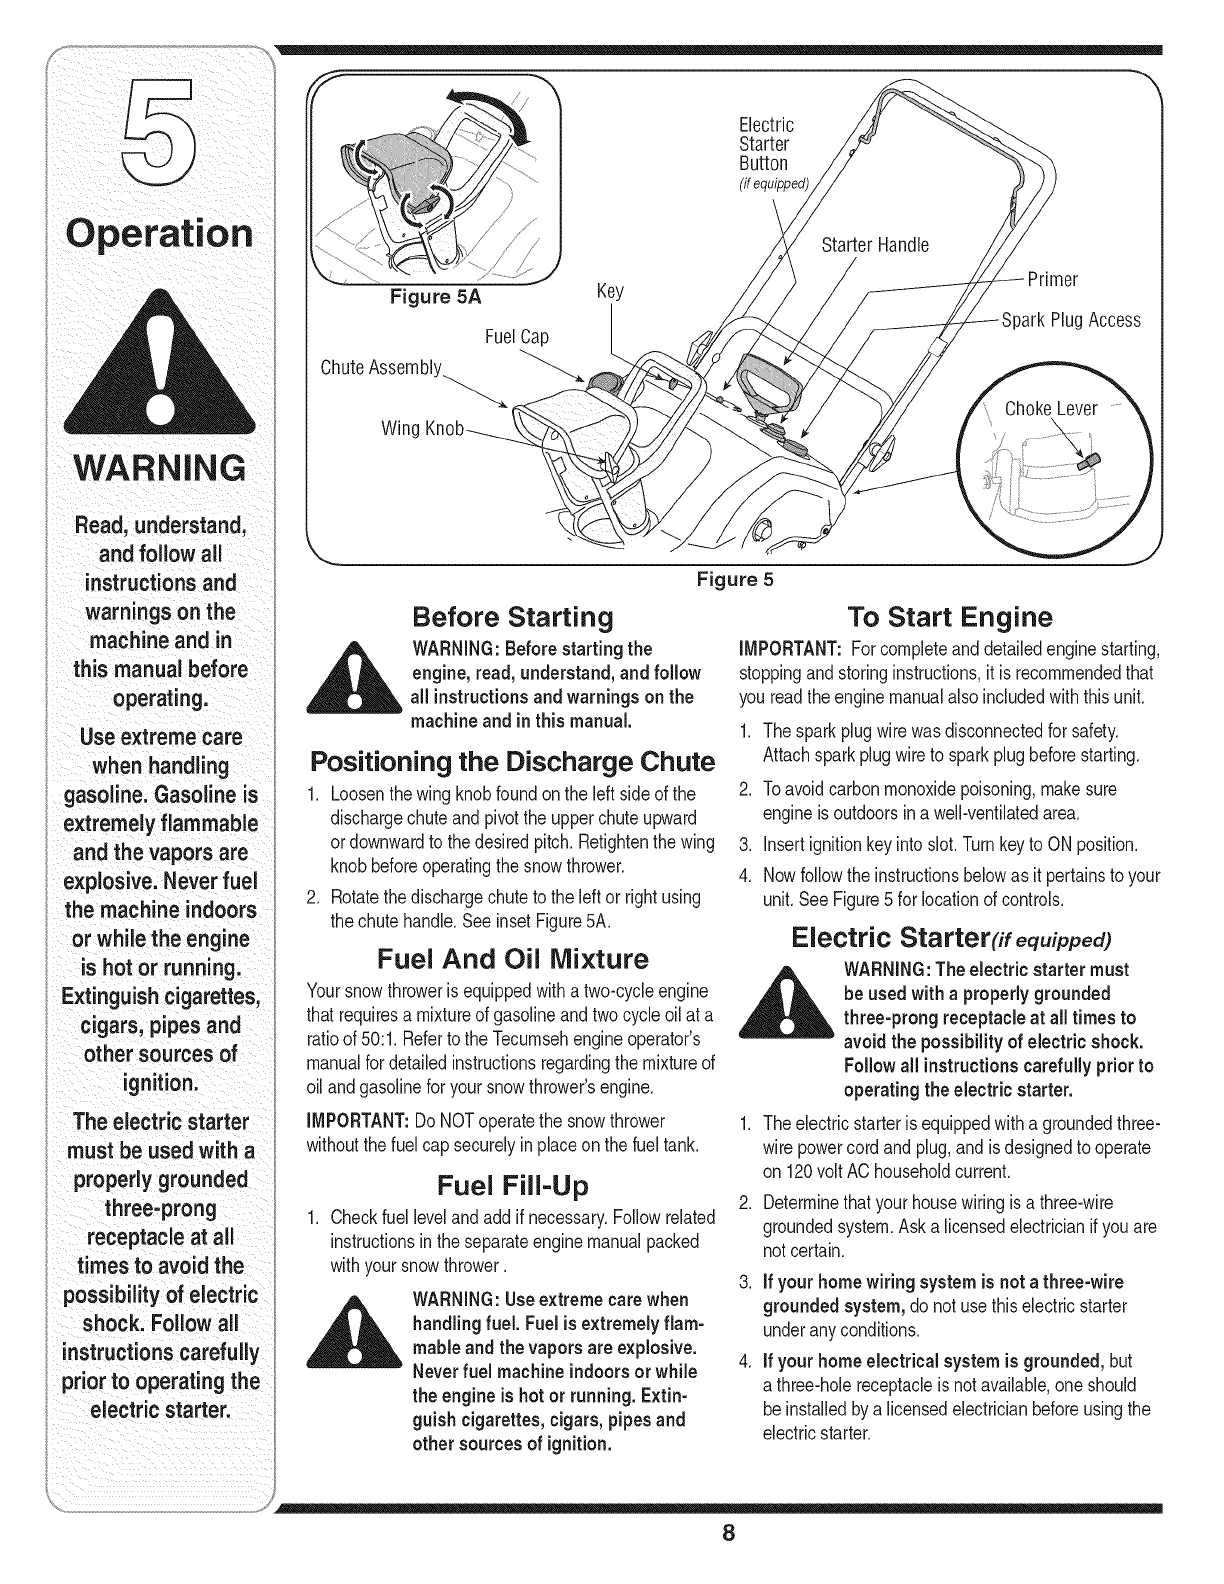
Figure 5A
FuelCap
ChuteAssembl
Wing
Key
StarterHandle
PlugAccess
ChokeLever
\
Figure 5
Before Starting
_ ARNING: Before starting the
engine,read, understand, and follow
all instructionsand warnings on the
machine and inthis manual.
Positioning the Discharge Chute
1. Loosenthe wing knobfoundon the leftside of the
dischargechuteandpivotthe upperchuteupward
ordownwardto the desiredpitch.Retightenthe wing
knobbeforeoperatingthe snowthrower.
2. Rotatethe dischargechuteto the leftor rightusing
the chutehandle.SeeinsetFigure5A.
Fuel And Oil Mixture
Yoursnowthrowerisequippedwithatwo-cycleengine
thatrequiresa mixtureof gasolineandtwocycleoilat a
ratioof 50:1.Referto the Tecumsehengineoperator's
manualfor detailedinstructionsregardingthe mixtureof
oilandgasolineforyour snowthrower'sengine.
IMPORTANT:Do NOToperatethe snowthrower
withoutthe fuel cap securelyinplaceon the fueltank.
Fuel Fill-Up
Checkfuellevelandadd if necessary.Followrelated
instructionsinthe separateenginemanualpacked
withyoursnowthrower.
_ WARNING:Useextremecare when
handling fuel. Fuel is extremelyflam-
mable and the vapors are explosive.
Neverfuel machine indoorsor while
the engine is hot or running.Extin-
guish cigarettes, cigars, pipesand
other sources of ignition.
To Start Engine
IMPORTANT:Forcompleteanddetailedenginestarting,
stoppingand storinginstructions,it is recommendedthat
you readthe enginemanualalso includedwiththisunit.
1. Thesparkplugwirewasdisconnectedfor safety.
Attachsparkplugwireto sparkplugbeforestarting.
2. Toavoidcarbonmonoxidepoisoning,makesure
engineis outdoorsina well-ventilatedarea.
3. Insertignitionkeyintoslot.Turnkeyto ON position.
4. Nowfollowthe instructionsbelowas it pertainsto your
unit.SeeFigure5 for locationof controls.
Electric Starter(if equipped)
_ ARNING:The electric starter must
be used with a properly grounded
three-prong receptacle at all times to
avoid the possibility of electric shock.
Follow all instructionscarefullypriorto
operating the electric starter.
1. Theelectricstarteris equippedwitha groundedthree-
wirepowercordandplug,and is designedto operate
on 120voltAC householdcurrent.
2. Determinethatyour housewiringis a three-wire
groundedsystem.Aska licensedelectricianif you are
not certain.
3. If your home wiring system is not a three-wire
grounded system, do not usethiselectricstarter
underany conditions.
4. If your home electricalsystemis grounded, but
a three-holereceptacleis not available,oneshould
beinstalledby a licensedelectricianbeforeusingthe
electricstarter.
8
5. If you haveagroundedthree-prongreceptacle,
proceedasfollows.
6. MoveChokeControlto the"Full"position.
7. PushPrimerthree(3) times,makingsureto cover
ventholewhenpushing.
8. Connectpowercord to switchboxon dashpanel.
Plugthe otherendof powercordintoa three-prong
120-volt,grounded,AC receptacle.
9. Pushstarterbuttonto crankengine.
10.Whenenginestarts,releasestarterbutton,and move
chokegraduallyto 1/2 Chokeuntilthe engineruns
smoothly. NextmoveChoketo OFE Ifenginefalters,
movechokeimmediatelyto FULLandthengradually
to 1/2then to OFF.
11.Disconnectthe powercord.Always unplug from the
outlet first, and then from the snow thrower.
Recoil Starter
1. Movechokeleverto FULLchokeposition(coldengine
start).
2. ifengineiswarm,placechokeinOFFpositioninstead
of FULL.
3. PushPrimerthree(3) times,makingsureto cover
ventholewhenpushing.
4. Ifengineiswarm,push primerbuttononly once.
NOTE:Alwayscoverventholein primerbuttonwhen
pushing.Additionalprimingmaybenecessaryfor first
start iftemperatureisbelow 15degreesFahrenheit.
5. Graspstarterhandleand pullropeout slowly,untilit
pulls slightlyharder.Letroperewindslowly.
6. Pullstarterhandlerapidly.Do notallow handleto snap
back.Allow itto rewindslowlywhilekeepinga firm
holdon the starterhandle.
7. As enginewarmsupand beginsto operateevenly,
rotatechokeleverslowlyto the 1/2 Chokeposition.
Whenthe enginebeginsto runsmoothly,movethe
choketo the OFFposition.Ifenginefalters,return
to FULLchoke,then slowlymoveto 1/2 thenOFF
position.
To Stop Engine
1. To stopengine,turnignitionkeycounter-clockwise.
Disconnectthe sparkplugwirefromthe sparkplug
to preventaccidentalstartingwhile equipmentis
unattended.
To help preventpossiblefreeze-upof starter,
proceedas follows:
1. Runenginefor afew minutesbeforestoppingto help
dry off anymoistureon the engine.
2. ElectricStarter:Connectpowercord to switchbox
on engine,thento 120voltAC receptacle.Withthe
enginerunning,pushstarterbuttonandspin the
starterfor severalseconds.The unusualsoundmade
by spinningthe starterwill not harmengineorstarter.
.
Disconnectthe powercordfromreceptaclefirst,and
thenfromswitchbox.
RecoilStarter:Withenginerunning,pullstarterrope
witha rapid,continuousfull arm strokethreeor four
times.Pullingthe starterropewill producea loud
clatteringsound,whichisnotharmfulto the engine
or starter.
4. Wipeall snowandmoisturefromthecarburetor
coverintheareaof the controllevers.Also,move
controlleversbackandforthseveraltimes.Leave
chokecontrolinthe FULLchokeposition.
5. Removeignitionkeyanddisconnectsparkplugwire
to preventaccidentalstarting.
Operating the Snow Thrower
The pitchof the chuteassemblycontrolsthe angleat
whichthe snowis thrown.
1. Loosenthe wingknob foundon the leftside of the
chuteassemblyandpivotthe upperchuteupwardor
downwardto the desiredpitch.Retightenthe wing
knobbeforeoperatingthe snowthrower.
2. Positionthe chuteassemblyopeningby usingthe
ChuteHandleto throwthe snowinthe desired
direction.SeeinsetFigure5Aon page8.
Clearing Snow
__L ARNING:Neveroperate the snow
thrower with bystanders in front of or
near the discharge chute opening.
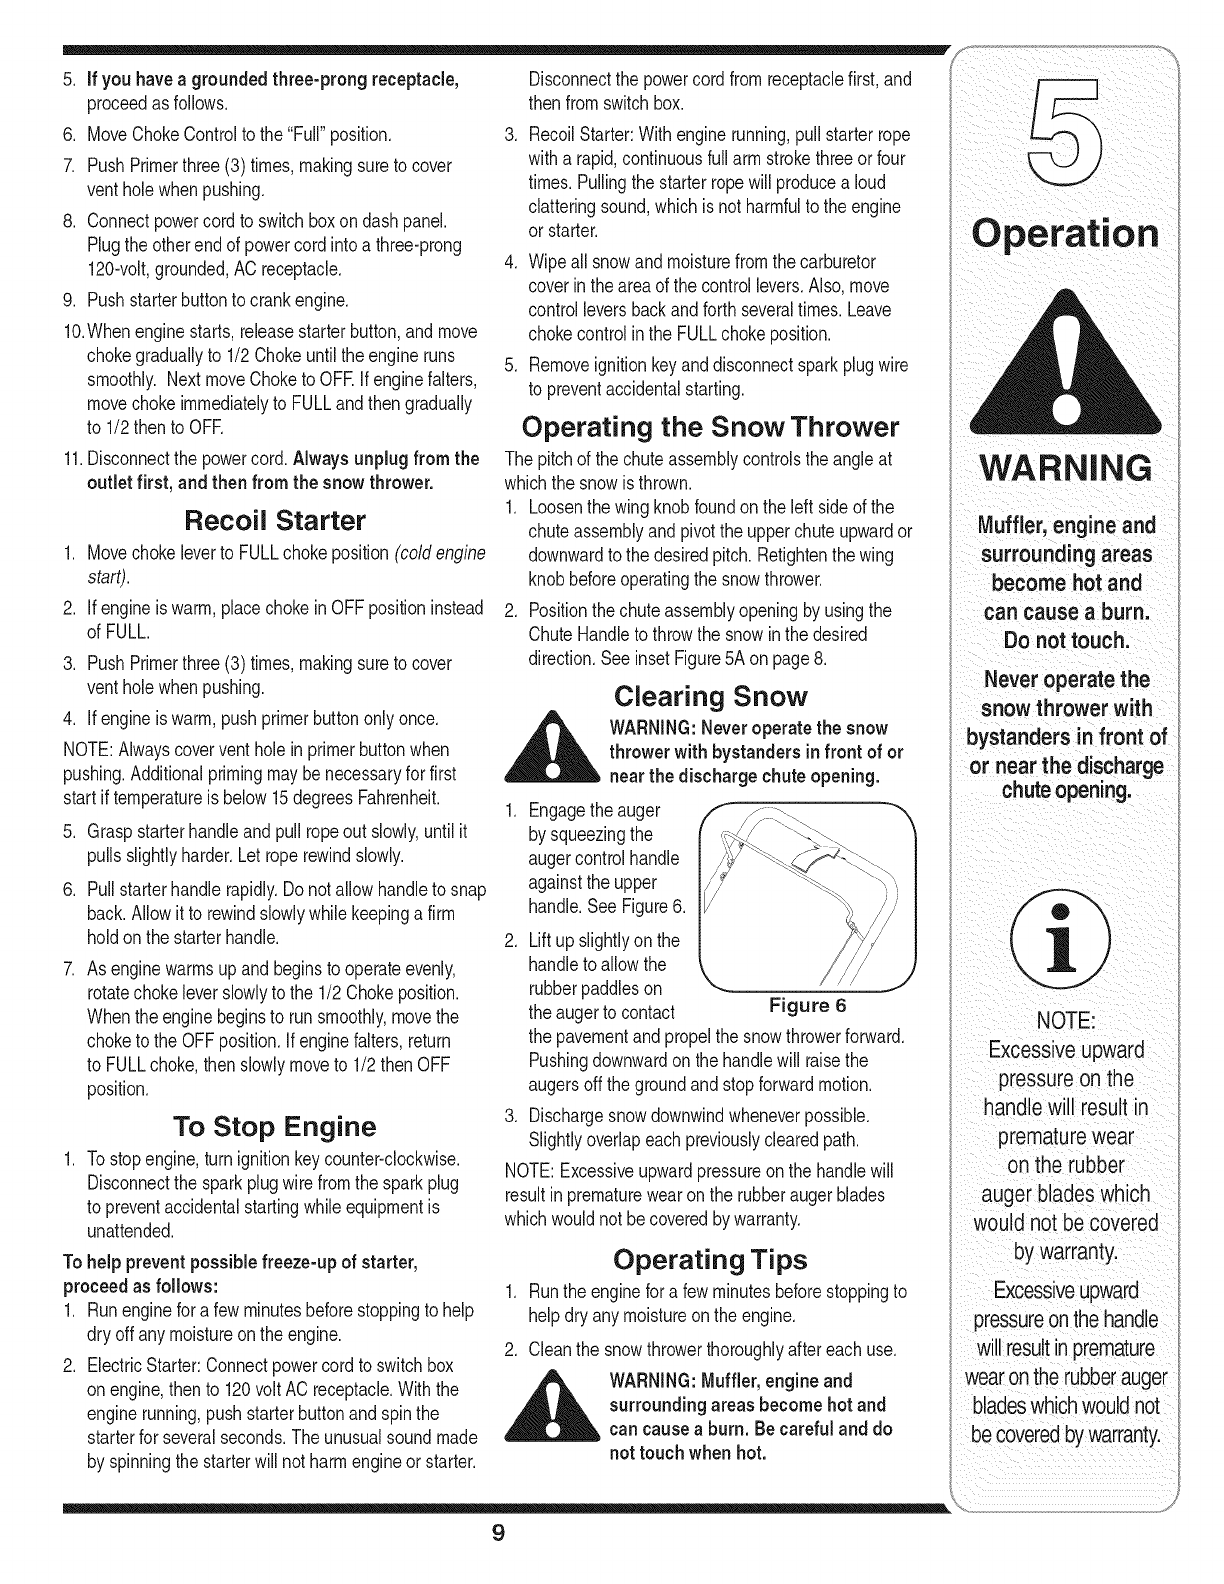
1. Engagethe auger
by squeezingthe
augercontrolhandle
againstthe upper
handle.See Figure6.
2. Liftup slightlyon the
handleto allowthe
rubberpaddleson
theaugerto contact Figure 6
the pavementandpropelthe snowthrowerforward.
Pushingdownwardonthe handlewill raisethe
augersoff the groundandstopforwardmotion.
3. Dischargesnowdownwindwheneverpossible.
Slightlyoverlapeachpreviouslyclearedpath.
NOTE:Excessiveupwardpressureon the handlewill
resultinprematurewearonthe rubberaugerblades
whichwouldnot becoveredbywarranty.
Operating Tips
1. Runthe enginefor a fewminutesbeforestoppingto
helpdry anymoistureonthe engine.
2. Cleanthe snowthrowerthoroughlyaftereach use.
__k ARNING:Muffler,engineand
surroundingareas become hot and
can causeaburn.Becareful and do
not touch when hot.
WARNING
Muffler, engine and
surrounding areas
become hot and
can cause a burn,
Donottouch:
Never operate the
snow thrower with
bystanders in front of
Ornearthed scharge
chuteopening,
NOTE:
ExCesSiveupward
pressure on the
handlewill result in
prematurewear
onthe rubber
auger blades which
WouldnOt be covered
by warranty.
ExcessiVeUpward
pressureon thehandle
resultinpremature
wear onthe rubberauger
bladeswhichWouldnot
becoveredbywarranty.
9
WARNING
Disconnectthe
sparkplugwire
andgrounditagainst
the engineto prevent
unintendedstarting.
NEVERattempt
to make any
adjustmentswhile
I the engine is
running, except
where specified in
the operator's
manual.
Before servicing,
repairing,or
inspecting,
disengagethe
control bail and
istop engine. Wait
until all moving
parts have come to a
complete stop.
Figure 7
Figure 8
_ARNING:Disconnectthe spark plug
wireand groundit against the engine
to preventunintended starting.
__lk ARNING:NEVERattempt to make
any adjustments while the engineis
running,except where specified inthe
operator'smanual.
Shave Plate
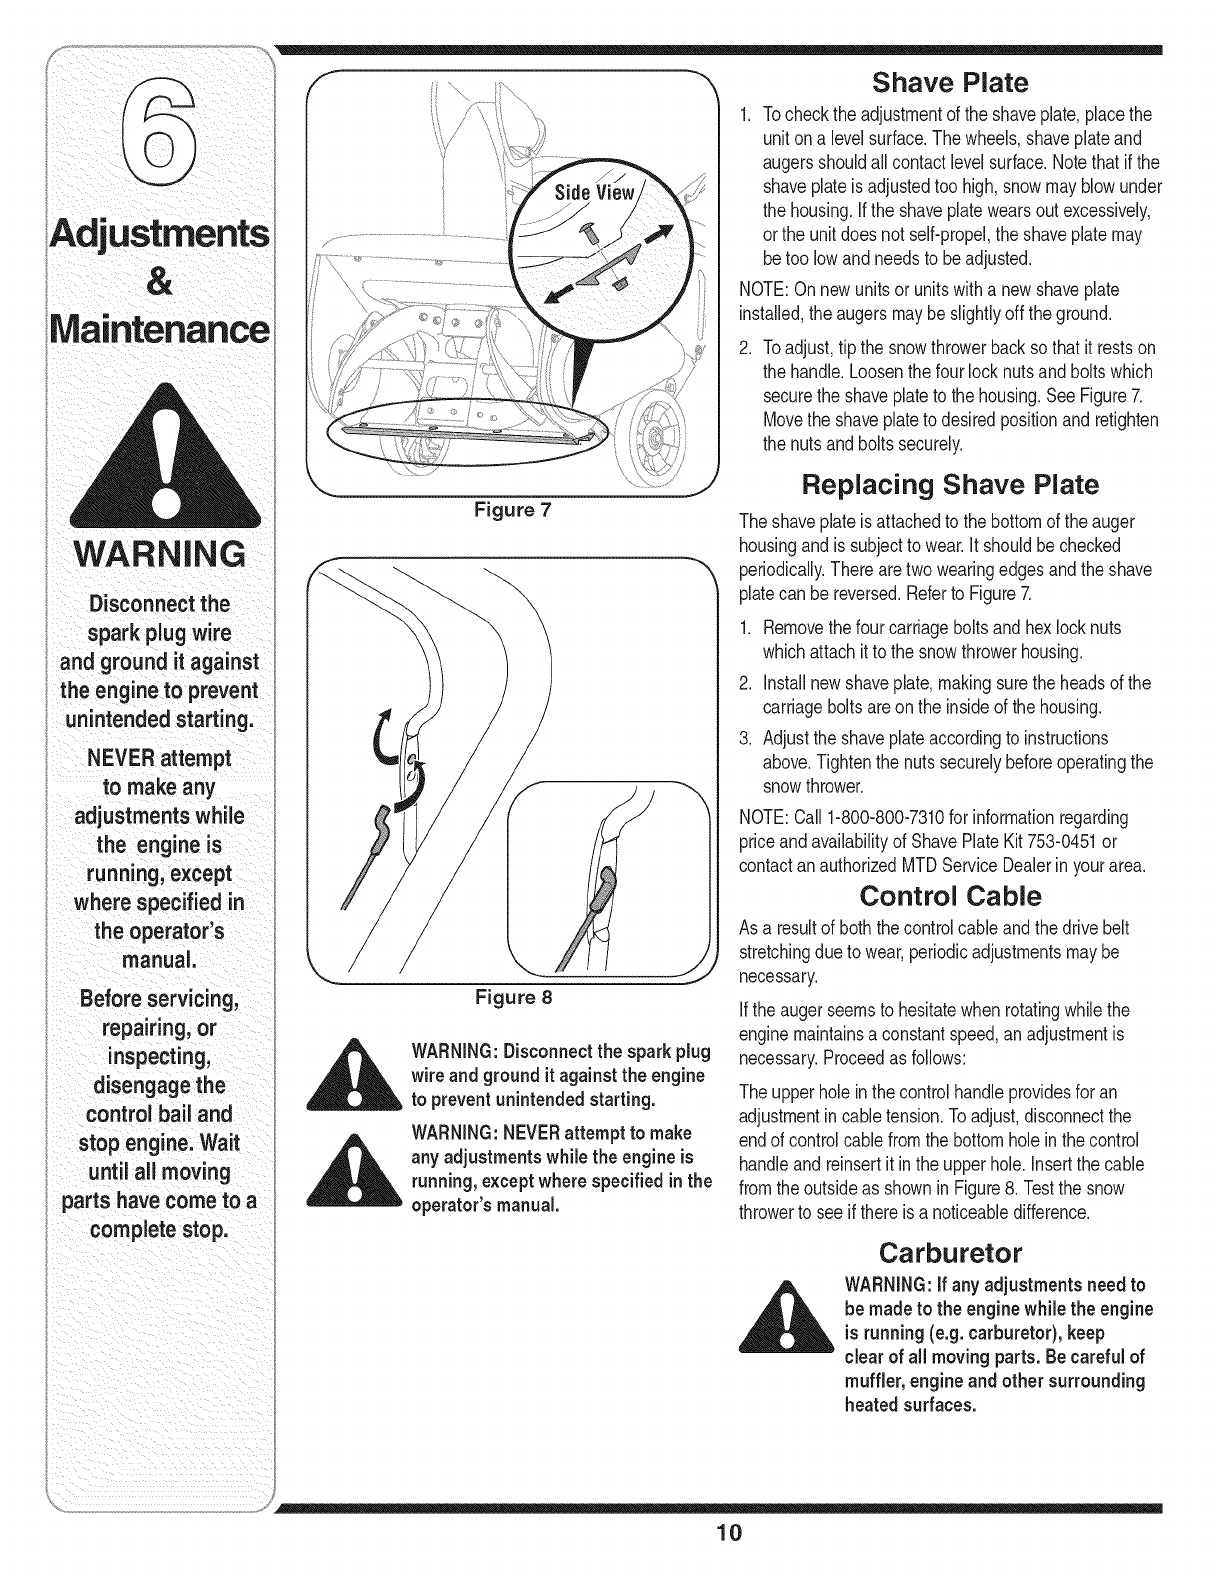
1. Tocheckthe adjustmentof the shaveplate,placethe
uniton a levelsurface.The wheels,shaveplateand
augersshouldallcontactlevelsurface.Notethatif the
shaveplateis adjustedtoo high,snowmayblowunder
the housing.Ifthe shaveplatewearsout excessively,
orthe unit doesnot self-propel,the shaveplatemay
betoo lowand needsto beadjusted.
NOTE:On newunitsorunitswitha newshaveplate
installed,the augersmaybeslightlyoff theground.
2. Toadjust,tip the snowthrowerbacksothat it restson
the handle.Loosenthe four locknutsand boltswhich
securethe shaveplateto the housing.See Figure7.
Movethe shaveplateto desiredpositionand retighten
the nutsandboltssecurely.
Replacing Shave Plate
Theshaveplate is attachedto the bottomof theauger
housingandis subjectto wear.It shouldbechecked
periodically.Therearetwo wearingedgesandthe shave
platecan bereversed.Referto Figure7.
1. Removethefour carriageboltsandhex locknuts
whichattach it to the snowthrowerhousing.
2. Installnewshaveplate,makingsuretheheadsof the
carriageboltsareonthe insideof the housing.
3. Adjustthe shaveplateaccordingto instructions
above.Tightenthe nutssecurelybeforeoperatingthe
snowthrower.
NOTE:Call 1-800-800-7310for informationregarding
priceandavailabilityof ShavePlateKit 753-0451or
contactanauthorizedMTDServiceDealerin yourarea.
Control Cable
As a resultof both thecontrolcable andthedrive belt
stretchingdueto wear,periodicadjustmentsmaybe
necessary.
If the augerseemsto hesitatewhenrotatingwhilethe
enginemaintainsa constantspeed,an adjustmentis
necessary.Proceedas follows:
Theupperholeinthe controlhandleprovidesfor an
adjustmentincabletension.Toadjust,disconnectthe
endof controlcablefromthe bottomholeinthe control
handleand reinsertit inthe upperhole.Insertthe cable
fromtheoutsideas shownin Figure8. Testthe snow
throwerto seeif thereis a noticeabledifference.
Carburetor
__ ARNING:If any adjustments needto
be made to the enginewhile the engine
is running(e.g. carburetor), keep
clear of all moving parts.Becareful of
muffler, engine and other surrounding
heated surfaces.
10
1. Referto the separateenginemanual,packedwith
your unit,for carburetoradjustmentinformation
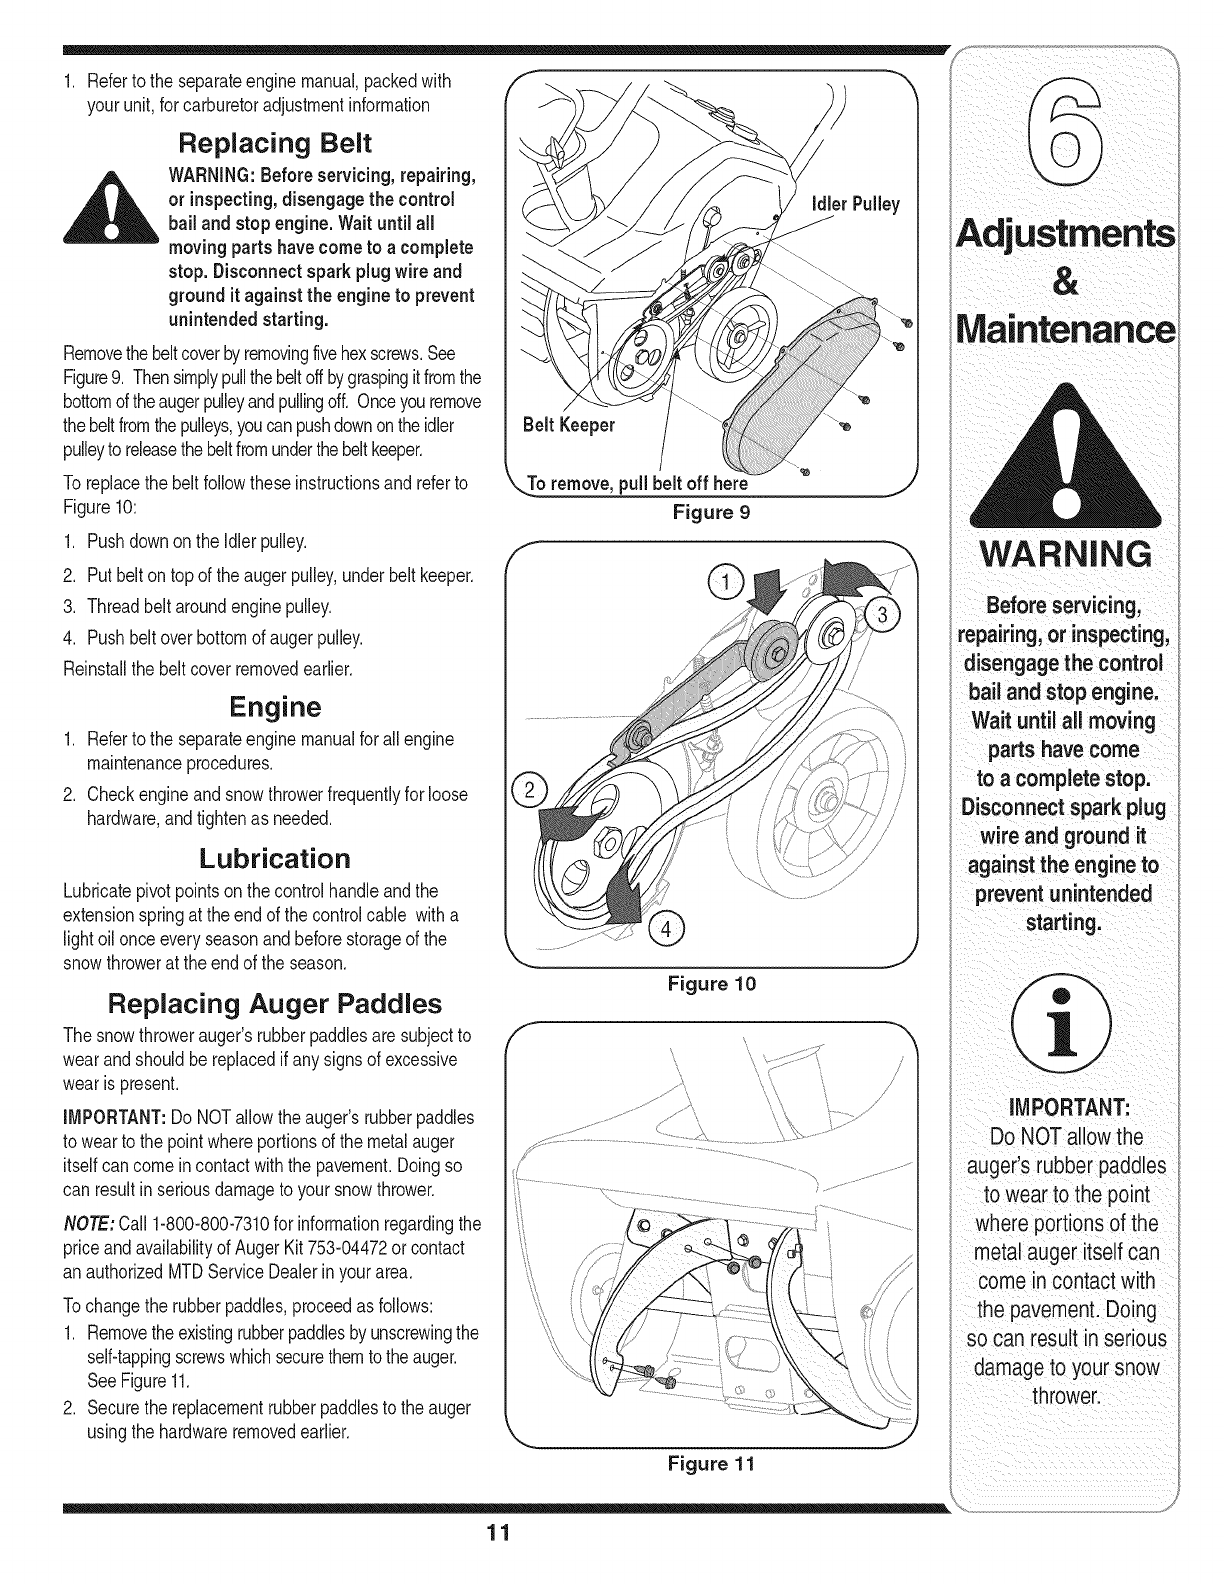
Replacing Belt
__i ARNING:Before servicing,repairing,
or inspecting,disengage the control
bail and stop engine. Wait until all
moving partshave come to a complete
stop. Disconnect spark plugwire and
ground it against the engine to prevent
unintended starting.
Removethebeltcoverbyremovingfivehexscrews.See
Figure9. Thensimplypullthebeltoffbygraspingitfromthe
bottomoftheaugerpulleyandpullingoff. Onceyou remove
thebeltfromthepulleys,youcanpushdownonthe idler
pulleyto releasethebeltfromunderthebeltkeeper.
To replacethe beltfollowtheseinstructionsandreferto
Figure10:
1. Pushdownon the Idlerpulley.
2. Putbelton top of the augerpulley,underbelt keeper.
3. Threadbeltaroundenginepulley.
4. Pushbeltoverbottomof augerpulley.
Reinstallthe belt coverremovedearlier.
Engine
1. Referto the separateenginemanualfor all engine
maintenanceprocedures.
2. Checkengineandsnowthrowerfrequentlyfor loose
hardware,andtightenas needed.
Lubrication
Lubricatepivotpointsonthe controlhandleandthe
extensionspringat the endof the controlcable witha
light oilonce everyseasonandbeforestorageof the
snowthrowerat the endof the season.
Replacing Auger Paddles
The snowthrowerauger'srubberpaddlesaresubjectto
wearandshouldbe replacedif any signsof excessive
wear is present.
IMPORTANT:Do NOTallowthe auger'srubberpaddles
to wearto the pointwhereportionsof the metalauger
itself cancomeincontactwiththe pavement.Doingso
can resultinseriousdamageto your snowthrower.
NOTE:Call 1-800-800-7310for informationregardingthe
price andavailabilityof AugerKit 753-04472or contact
an authorizedMTDServiceDealerinyourarea.
Tochangethe rubberpaddles,proceedas follows:
1. Removethe existingrubberpaddlesby unscrewingthe
self-tappingscrewswhichsecurethemtothe auger.
SeeFigure11.
2. Securethe replacementrubberpaddlesto the auger
usingthe hardwareremovedearlier.
f
Figure 10
Figure 11
11
Maintenance
WARNIN
Before servicing,
repairing, orinspecting,
disengage the control
bail and stop engine:
Wa t moving
parts have come
to a complete stop:
Disconnect spark plug
wire and ground
engineto
preventunintended
IMPORTANT:
Do NOT alloWthe
auger s rubber paddles
to WeartOthe point
whereportions of the
metal augeritself can
come _ncontact with
the pavement.Doing
socan result in serious
damageto yaur snow
throwerl
WARNING
Never store snow
thrower with fuel
intank indoors or
in poorlyventilated
areas, where fuel
fumes may reach an
open flame, spark
or pilot light as on a
furnace, water heater,
clothes dryer or gas
appliance.
Drain fuel intoan
approved container
outdoors, away from
any open flame. Be
certain engine is
cool. Do not smoke.
Fuelleft in engine
i during warm weather
deteriorates and
will cause serious
starting problems.
Do not drain
carburetor if using
fuel stabilizer.
i Never use engine or
carburetor cleaning
products inthe fuel
tank or permanent
damage may occur.
If the snowthrowerwill notbe usedfor30 daysor
longer,or ifit istheendof the snowseasonwhenthe
lastpossibilityof snowis gone,the equipmentneedsto
bestoredproperly.Followstorageinstructionsbelowto
ensuretop performancefromthe snowthrowerfor many
moreyears.
Preparing Engine
_ARNING:Neverstore snowthrower
with fuel intank indoorsor in poorly
ventilated areas,where fuel fumes
may reach an open flame, spark or
pilotlight as on a furnace, water
heater,clothes dryer or gas appliance.
NOTE:Itis importantto preventgumdepositsfrom
forminginessentialfuel systempartsof the enginesuch
as the carburetor,fuel filter,fuelhoseor tankduring
storage.
CAUTION:Alcohol blended fuels(called gasohol
or using ethanol or methanol) can attract moisture
which leads to separation and formation of acids
during storage. Acidic gas can damage the fuel
system of an engine while in storage.
Toavoidengineproblems,thefuel systemshouldbe
emptiedbeforestoragefor 30daysor longer.Follow
theseinstructionsto prepareyour snowthrowerfor
storage:
_ARNING:Drainfuel intoan approved
container outdoors, awayfrom any
openflame. Becertain engineis cool.
Do not smoke. Fuel left in engine
during warmweather deteriorates and
will cause serious starting problems.
1. Removeallgasolinefromthe carburetorandthefuel
tankto preventgum depositsfromformingon these
partsandharmingthe engine.
2. Runthe engineuntilthe fuel tankis emptyandit
stopsdueto lackof fuel.
3. Draincarburetorby pressingupwardon bowldrain,
locatedbelowthecarburetorcover. Thethe engine
owner'smanualfor completeinstructions.
__lh WARNING:Donot drain carburetor if
using fuel stabilizer. Neveruse engine
or carburetor cleaning productsinthe
fuel tank or permanentdamage may
OCCUr,
4. Removethesparkplugandpourone(1)ounce
of engineoil throughthe sparkplugholeinto the
cylinder.Coversparkplugholewitha ragandcrank
the engineseveraltimesto distributethe oil. Replace
sparkplug.
NOTE:Referto theenginemanualfor moreinformation
onpreparingthe snowthrowerenginefor storage.
Preparing Snow Thrower
1. Whenstoringthe snowthrowerinan unventilatedor
metalstorageshed,careshouldbetakento rustproof
the equipment.Usinga light oilor silicone,coatthe
equipment,especiallyanychains,springs,bearings
andcables.
2. Removealldirt fromexteriorof engineandequipment.
3. Followlubricationrecommendationson page11.
4. Storeequipmentina clean,dry area.
NOTE:Fuelstabilizer(suchas STA-BIL)is anaccept-
ablealternativeinminimizingthe formationof fuelgum
depositsduringstorage.Addstabilizerto gasoline
infueltankor storagecontainer.Alwaysfollowmix
ratiofoundon stabilizercontainer.Runengineat least
10minutesafteraddingstabilizerto allowitto reach
the carburetor.Donot draincarburetorifusingfuel
stabilizer.
12
Problem Possible Cause(s) Solution
Engine fails to start i iFue! tankernptyloi StalefueI li Filltankwith cleanfreshgaSoline
2. Improperfue!mixture 21Mixnewfuel ata ratioof 50:l
3. Bockedfuel line 31 clean fuel line
41 Keynotin ON position 4i insertkeyandtuin to ONposition
5; spark plugwire disconnected &Connect wireto sparkplug,
Faultysparkplug 6: C!eanspark plugl readjustgap;oi
replace.
7. Enginenot primed 7, Piime enginefour timesl
81 Enginefloodedfromexcessive .......8: wait at leasttenminutesbefore
priming starting
Engine runs erratic 1. Unitrunningonchoke
2. Fuellineblocked,or stalefuel
3. Waterordirt infuel system
4. Carburetorout of adjustment
I Engineoverheats 1. Carburetorout of adjustment
Loss of power 1. Sparkplugwire loose
2. Ventingas cap plugged
1. Movechokeleverto OFFposition.
2. Cleanfuellineandfill tankwith
fresh,cleangasoline.
3. Referto enginemanualfor remedy.
4. Referto enginemanualfor remedy.
1. Referto enginemanualfor instruction./
1. Firmlyconnectsparkplugwire.
2. Clearvent.
Excessivevibration 1. Loosepartsor damagedauger 1, Stopengineimmediatelyand
disconnectsparkplugwire.Check
for possibledamage.Tightenall
boltsand quts.Repairas needed.If
the problempersists,takeunitto an
authorizedservicedealer.
Unitfails to self-propel
rontinueto rotate 1. Cableoutof adjustment.
1Unit fails to discharge
snow
1. Drivecableout of adjustment
2. Drivebelt looseordamaged
Chuteassemblyclogged.
2. Shearpinsheared.
3. Foreignobjectlodgedinauger
4 Augercontrolcableout of
adjustment.
5. Augerbelt looseor damaged.
1. Adjustcontrolcablefollowinginstruc-
tionson page9 of thismanual
2. Replacedrive belt.
!
1. Adjustaugercontrolcableas |
shownin "MakingAdjustments"on !
page10.
1. Stopengineanddisconnectspark
plugwire.Cleanchuteandinside
of augerhousingwithclean-out
toolor stick.
2. Replaceshearpin.
3. Stopengineimmediatelyand
disconnectthe sparkplugwire.
Removeobjectfromauger.
4. Adjustaugercontrolcable
5. Replaceaugerbelt.
_IOTE:Forrepairsbeyondtheminoradjustmentslistedabove,contactyournearestauthorizedservicerepresentativeor
call 1-866-800-7310forthe CustomerSupportCenter.Referto the enginemanualfor moreenginerelatedinformation.
13
pleasedoNOr
return the unit tothe
retailerfrom which it was
purchased,without first
contactingCustomer
SuPport:
Logonto
www, mtdproducts;com
or call a customer
service representative
at 1(800) 800.7310 or
(330) 220.,4683,
Note:
Youwili need the
modelnumberand
serial number ifand
when calling Customer
SupPort,logging
onto ourwebsite and
contaCtinga ServiCe
dealer: Pleaserefer
to page 2 of this
manual for information
regarding locating and
recordingyour-odel
and serial nUmber&
\i_.:............................................)
i
i
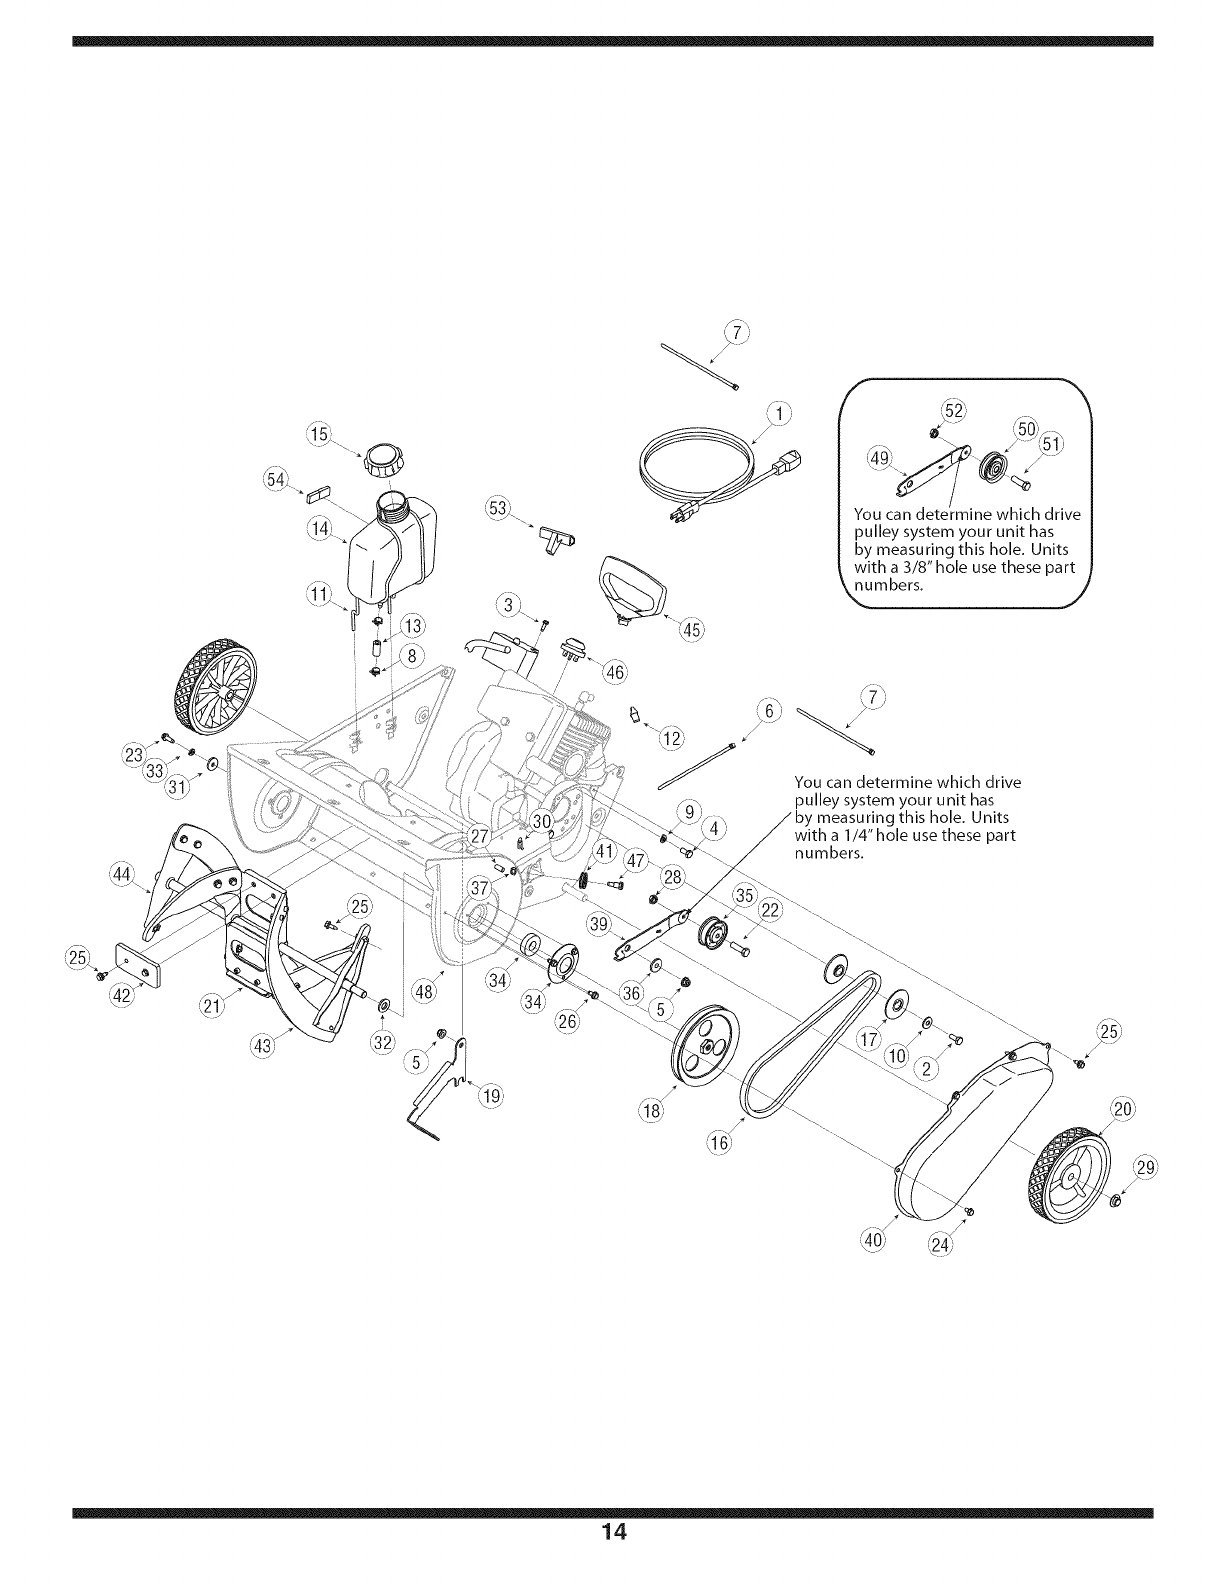
You can determine which drive
pulley system your unit has
by measuring this hole. Units
with a 3/8" hole use these part
numbers.
,. j
You can determine which drive
pulley system your unit has
by measuring this hole. Units
a 1/4" hole use these part
numbers.
14
1 629-0236 ExtensionCord 1 28 712-04064 Hex FlangeLock Nut, 1/4-20 1
2 710-0627 HexScrew,5/16-24x .75 1 29 726-0299 PushCap,1/2" 2
6 710-1003 Screw,#10-16x.625 2 30 732-0357A ExtensionSpring 1
4 710-3025 HexScrew,5/16-18x .625 4 31 736-0176 FiatWasher.265 x .938x .120 4
5 712-04063 Hex FlangeLockNut, 5/16-18 2 32 736-0326 FiatWasher.510x 1.0x .125 1
6 725-0157 PushMountCableTie 1 33 736-0329 LockWasher,1/4 1
7 726-0154 PushMountCable Tie 1 34 741-0600 Ball Bearing17x 40x 12 2
8 726-0205 Clamp,Hose 2 35 684-04168 Idler Pulley(Pulleyhole1/4") 1
9 736-0119 Washer,Lock5/16 4 36 748-0234 ShoulderSpacer.25 1
10 736-0159 Fiat Washer.349 x .879x .063 1 37 712-0896 HexLockNut 1/4-28 1
11 747-04150 Gas TankSupportWire 1 38 784-5174 BearingCup 2
12 7511825510 ChokeLeverKnob 1 39 790-00238A Idler Brkt.w/Brake (Pulleyholel/4") 1
13 751-0535 Hose,FuelLine 18 40 790-00045 BeltCover 1
14 751-10023 Tank,Fuel 1 41 756-0625 Cable Roller 1
15 751-10278 Cap,Fuel 1 42 735-04033 RubberPaddle 2
16 754-0101A V-Belt,1/2 1 43 735-04032 CrescentSpiral 4
17 756-0416B Pulley Half,.625 IDx 2.25 OD 2 44 684-04025A AugerAxle 1
18 756-0475 Pulley,1/2 V 1/2-20LH x6.0 1 45 7510009636 RecoilHandle,Mitten (Optional) 1
19 790-00225 2-CycleMountingBracket 1 46 7512B1476 Primer 1
20 734-04070 Wheel,7 x 1.61Dia. Tread 2 47 738-0924 CarriageScrew1/4-28 1
21 684-04027A AugerAssemblyComplete 1 48 684-04167 AugerAssemblyHousing21" 1
22 710-0106 HexScrew,1/4-20x 1.00Gr.5 1 49 790-00238 Idler Brkt.w/Brake (Pulleyhole3/8") 1
23 710-0642 HexScrew 1/4-20x .75Gr.5 1 50 756-0313 Idler Pulley(3/8"hole) 1
24 710-0653 Self-tappingScrew1/4-20 x .375 1 51 710-0191 HexScrew3/8-24 x 1.25 1
25 710-0896 HexScrew,1/4-14x0.625" 24 52 712-0116 JamLock Nut 3/8--24 1
26 710-1005 Self-tappingScrew,1/4-14x .50" 6 53 7519630 RecoilHandle(Optional) 1
27 710-3008 HexScrew5/16-18x .75 1 54 722-3022 FoamTape.625X.25 2
OTES:Fora properworkingmachine,
se FactoryApprovedParts. V-beltsare/
signedto engageanddisengagesafely. I
substitute(nonOEM)V-beltcan be /
ngerousbynot disengagingcompletelyJ
NOTE: Snow thrower features/components vary by model. NOT all parts listed above and pictured on the previous
page are standard equipment.
15
For parts and/or
accessories
please call
1-800-800-7310,or
1-330-220-4683.
www.mtdproducts.com
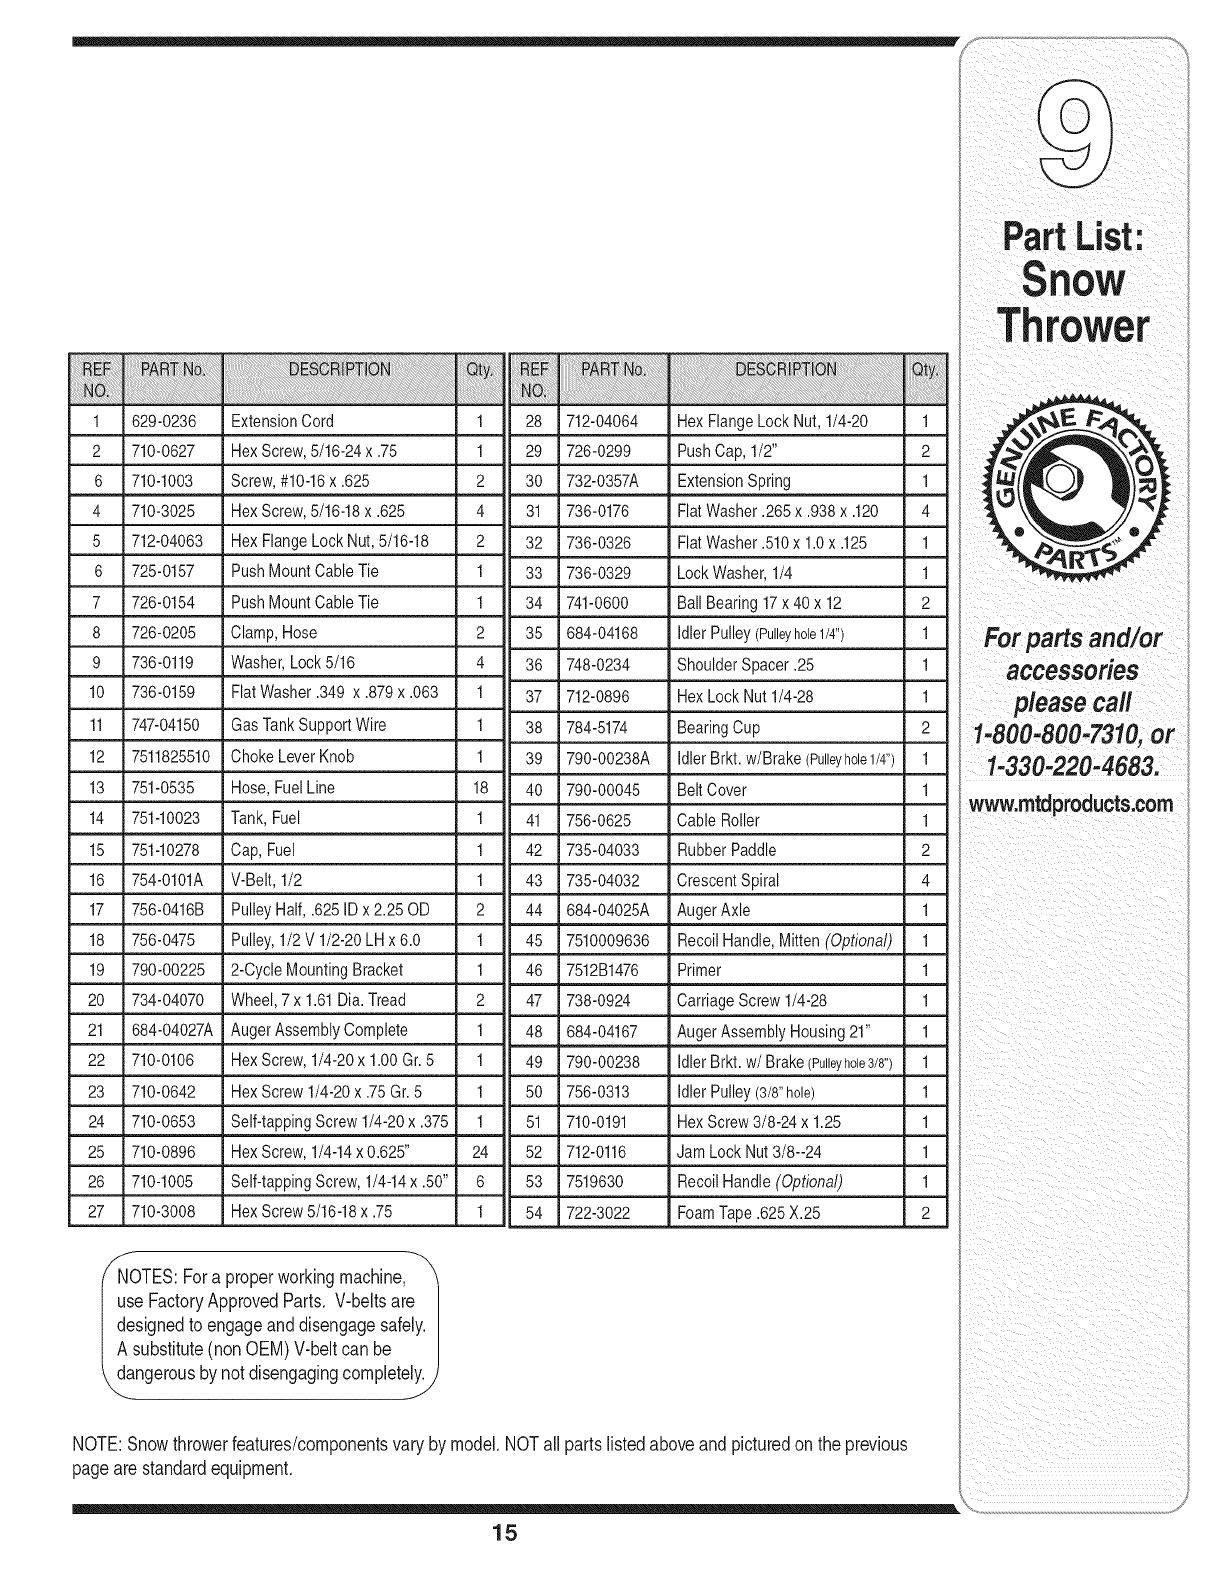
PartL=st,
For parts and/or
accessories
please call
1-800-800-7310,or
1-330-220-4683.
www.mtdproducts.com
16
_-?:_i!?iq!ii!iI
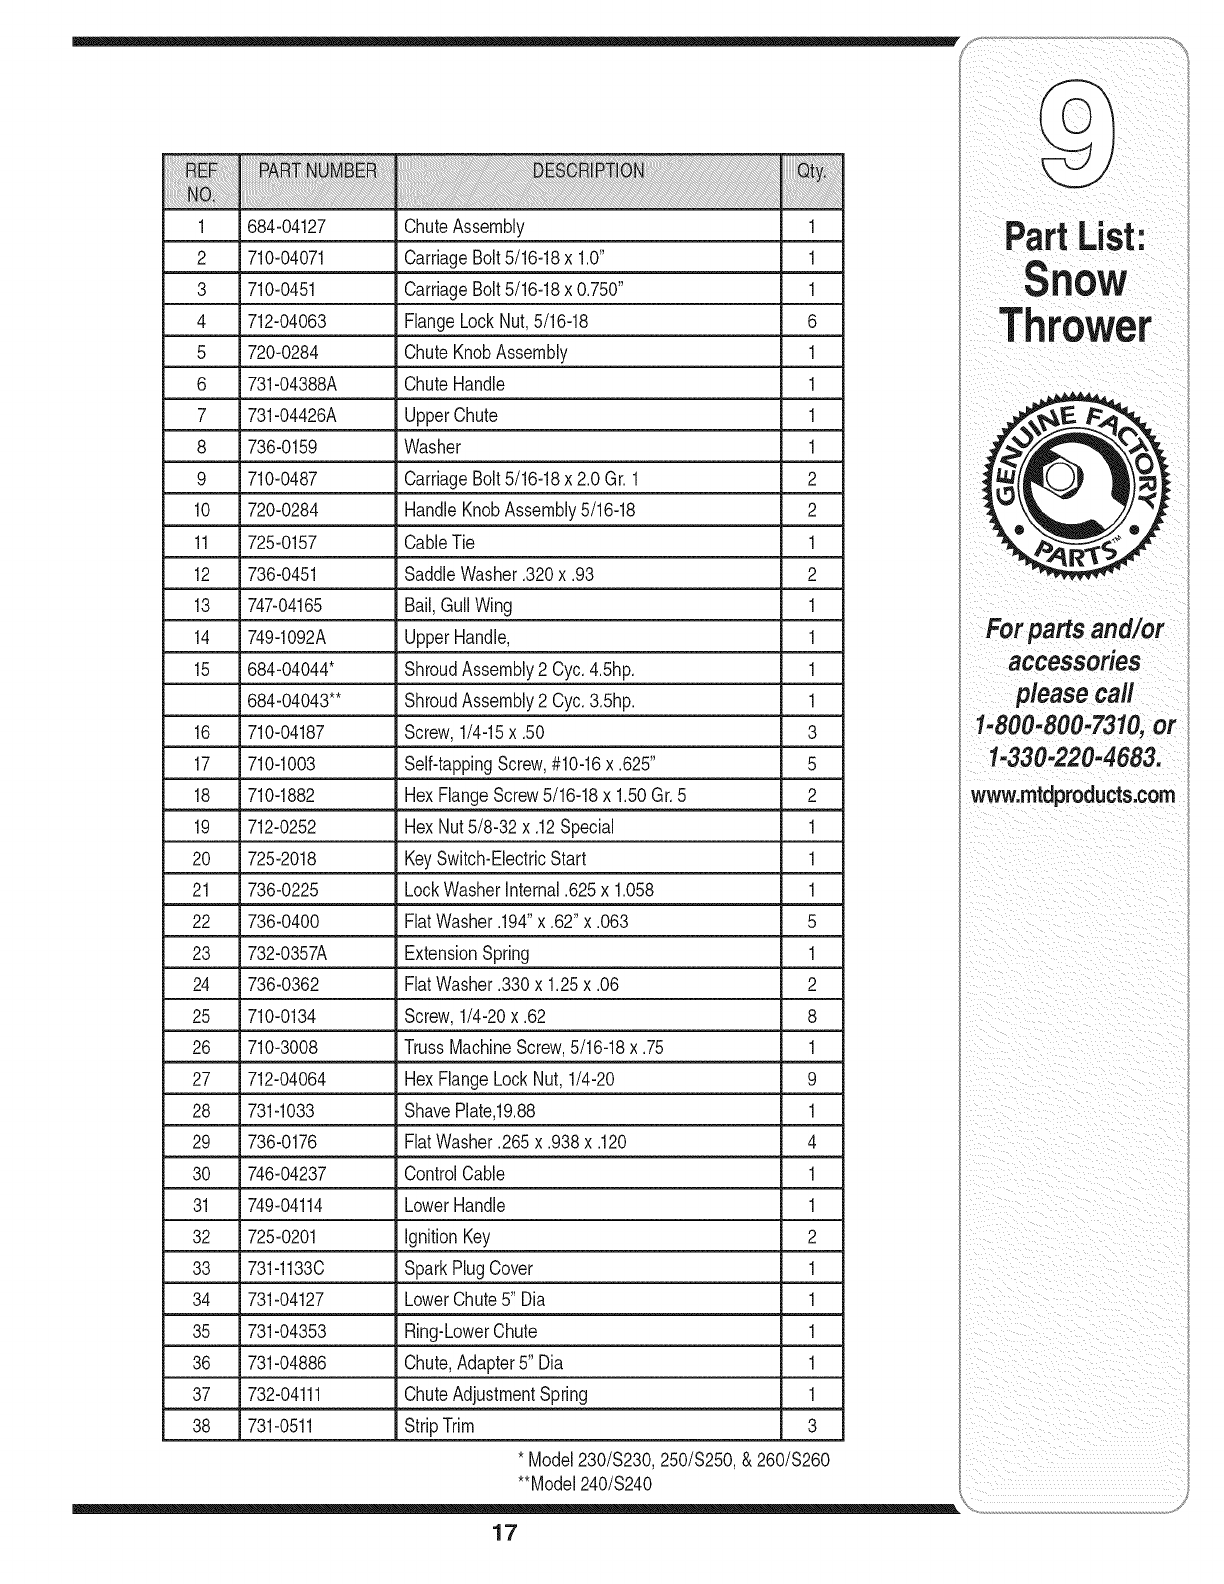
1 684-04127 ChuteAssembly 1
2 710-04071 CarriageBolt5/16-18x 1.0" 1
3 710-0451 CarriageBolt5/16-18x 0.750" 1
4 712-04063 FlangeLockNut,5/16-18 6
5 720-0284 ChuteKnobAssembly 1
6 731-04388A ChuteHandle 1
7 731-04426A UpperChute 1
8 736-0159 Washer 1
9 710-0487 CarriageBolt5/16-18x 2.0 Gr. 1 2
10 720-0284 HandleKnobAssembly5/16-18 2
11 725-0157
12 736-0451
13 747-04165
14 749-1092A
15 684-04044*
684-04043**
16 710-04187
17 710-1003
18 710-1882
CableTie
SaddleWasher.320x.93
Bail,GullWing
UpperHandle,
ShroudAssembly2 Cyc.4.5hp.
ShroudAssembly2 Cyc.3.5hp.
Screw,1/4-15x .50
Self-tappingScrew,#10-16x .625"
HexFlangeScrew5/16-18x 1.50Gr.5
1
2
1
1
1
1
3
5
2
19 712-0252 HexNut5/8-32x .12Special 1
20 725-2018 KeySwitch-ElectricStart 1
21 736-0225 LockWasherInternal.625x 1.058 1
22 736-0400 FiatWasher.194"x.62"x.063 5
23 732-0357A ExtensionSpring 1
24 736-0362 FiatWasher.330 x 1.25x .06 2
25 710-0134 Screw,1/4-20x .62 8
26 710-3008 TrussMachineScrew,5/16-18x .75 1
27 712-04064 HexFlangeLockNut, 1/4-20 9
28 731-1033 ShavePlate,19.88 1
29 736-0176 FiatWasher.265 x.938x.120 4
30 746-04237 ControlCable 1
31 749-04114 LowerHandle 1
32 725-0201 IgnitionKey 2
33 731-1133C SparkPlugCover 1
34 731-04127 LowerChute5" Dia 1
35 731-04353 Ring-LowerChute 1
36 731-04886 Chute,Adapter5" Dia 1
37 732-04111 ChuteAdjustmentSpring 1
38 731-0511 StripTrim 3
* Model230/S230,250/$250,& 260/$260
**Model240/$240
17
For parts and/or
accessories
please call
1-800-800-7310,or
1-330-220-4683.
www.mtdproducts.com
For parts and/or
accessories
please call
1-800-800.7310,or
1-330-220-4683.
www.mtdproducts.com
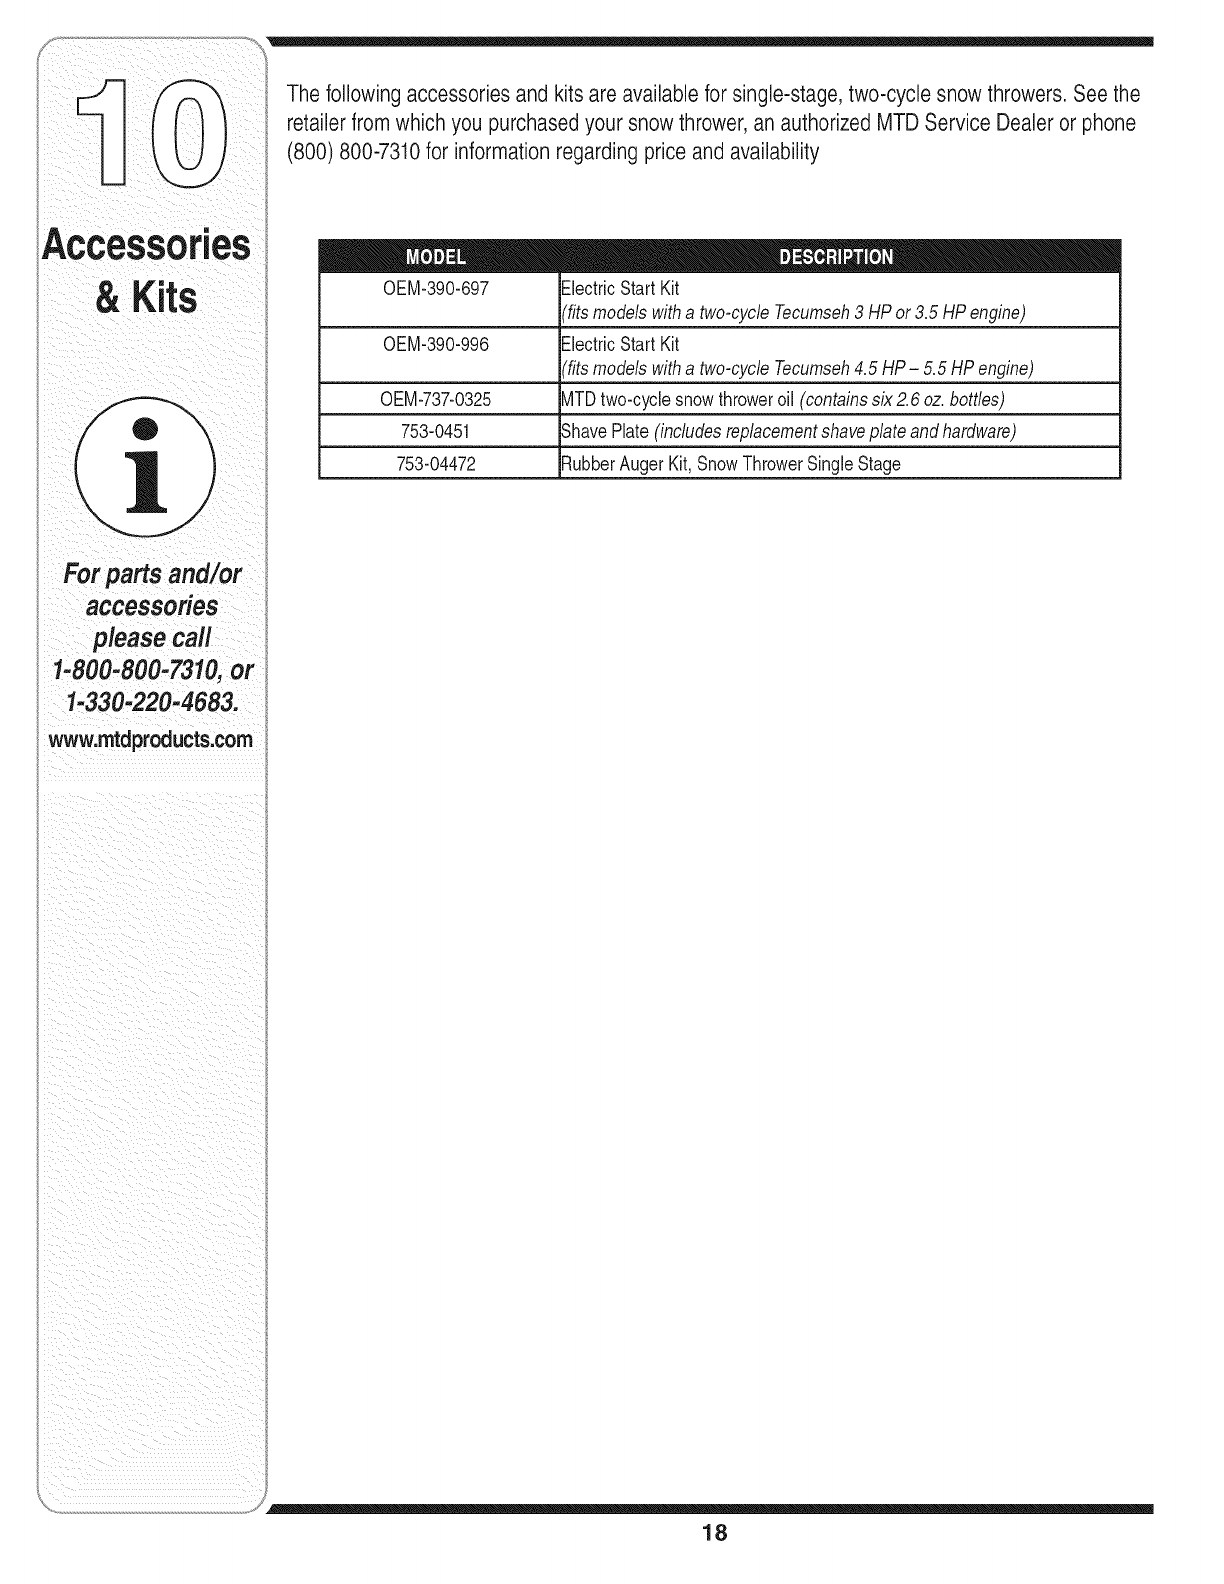
The following accessories and kits are available for single-stage,two-cycle snow throwers. See the
retailer from which you purchased your snow thrower,an authorized MTD Service Dealer or phone
(800) 800-7310for information regarding price and availability
0EM-390-697
0EM-390-996
0EM-737-0325
753-0451
753-04472
ElectricStartKit
'fitsmodelswitha two-cycleTecumseh3 HP or 3.5 HPengine)
ElectricStartKit
'fitsmodelswitha two-cycleTecumseh4.5 HP -5.5 HPengine)
MTDtwo-cyclesnowthroweroil (containssix2.6 oz.bottles)
ShavePlate(includesreplacementshaveplateand hardware)
RubberAugerKit,SnowThrowerSingleStage
18

For parts and/or
accessories
please call
1-800-800-7310,or
1-330-220-4683.
www.mtdproducts.com
19
MANUFACTURER'S LiMiTED WARRANTY FOR
The limitedwarrantysetforthbelowisgivenby MTDLLCwithrespectto
newmerchandisepurchasedandusedin the UnitedStates,itsposses-
sionsandterritories.
"MTD"warrantsthisproductagainstdefectsin materialandworkmanship
for a periodof two(2) yearscommencingonthe dateof originalpurchase
andwill,at its option,repairor replace,free of charge,anypart foundto
bedefectiveinmaterialsor workmanship.Thislimitedwarrantyshallonly
applyif this producthas beenoperatedandmaintainedinaccordance
withthe Operator'sManualfurnishedwiththe product,andhas not been
subjectto misuse,abuse,commercialuse,neglect,accident,improper
maintenance,alteration,vandalism,theft,fire,water,ordamagebecause
of otherperilor naturaldisaster.Damageresultingfromthe installationor
useof any part,accessoryorattachmentnotapprovedby MTDfor use
withthe product(s)coveredbythis manualwill voidyourwarrantyas to
any resultingdamage.
Normalwearpartsarewarrantedto befree fromdefectsinmaterialand
workmanshipfor a periodof thirty (30)daysfromthe dateof purchase.
Normalwearpartsinclude,butare notlimitedto itemssuchas: batteries,
belts,blades,bladeadapters,grassbags,riderdeckwheels,seats,snow
throwerskidshoes,shaveplates,augerspiralrubberandtires.
HOW TO OBTAIN SERVICE: Warranty service is available,WITH
PROOFOF PURCHASE, through your local authorized service
dealer. To locate the dealer in your area, check your Yellow Pages, or
contact MTD LLC at RO. Box 361131,Cleveland, Ohio 44136-0019,or
call 1-800-800-7310or 1-330-220-4683or log on to our Web site at
www.mtdproducts.com.
Thislimitedwarrantydoesnot providecoverageinthe followingcases:
a. Theengineor componentpartsthereof.Theseitemsmaycarrya
separatemanufacturer'swarranty.Referto applicablemanufacturer's
warrantyfor termsandconditions.
b. Logsplitterpumps,valves,andcylindershavea separateoneyear
warranty.
c. Routinemaintenanceitemssuchas lubricants,filters,blade
sharpening,tune-ups,brakeadjustments,clutchadjustments,deck
adjustments,andnormaldeteriorationof the exteriorfinishdueto use
orexposure.
d. Servicecompletedby someoneotherthananauthorizedservice
dealer.
e. MTDdoes notextendany warrantyfor productssoldor exported
outsideof the UnitedStates,itspossessionsandterritories,except
thosesoldthroughMTD'sauthorizedchannelsof exportdistribution.
f. Replacementpartsthatarenot genuineMTDparts.
g. Transportationchargesand servicecalls.
No impliedwarranty,includingany impliedwarranty of merchant-
ability of fitness for a particularpurpose,applies after the applicable
periodof express written warranty above as to the partsas identi-
fied. No other express warranty, whether written or oral, except as
mentionedabove,givenby any personor entity,includingadealer
or retailer,with respect to any product,shallbind MTD.Duringthe
periodof the warranty, the exclusive remedyis repairor replacement
of the productas set forth above.
The provisionsas set forth inthis warranty providethe sole and
exclusive remedyarising from the sale. MTDshall not be liable
for incidentalor consequential loss or damage including,without
limitation, expenses incurredfor substitute or replacementlawn care
services or for rentalexpenses to temporarily replacea warranted
product.
Somestatesdo not allowtheexclusionor limitationof incidentalor
consequentialdamages,or limitationson howlonganimpliedwarranty
lasts,so the aboveexclusionsor limitationsmaynotapplyto you.
In noeventshall recoveryof any kind begreaterthan theamountof the
purchasepriceof the productsold.Alterationof safetyfeatures of the
productshall void this warranty. Youassumethe riskandliabilityfor
loss, damage,or injuryto youandyour propertyand/orto othersandtheir
propertyarisingout of the misuseor inabilityto use theproduct.
Thislimitedwarrantyshall notextendto anyoneotherthanthe original
purchaseror to the personfor whomitwaspurchasedas a gift.
HOWSTATELAW RELATESTO THISWARRANTY: Thislimitedwar-
rantygivesyouspecificlegalrights,andyou mayalso haveother rights
whichvaryfromstateto state.
IMPORTANT: OwnermustpresentOriginalProofof Purchaseto obtain
warrantycoverage.
MTD LLC, P.O. BOX 361131 CLEVELAND, OHIO 44136-0019; Phone: 1-800-800-7310, 1-330-220-4683
