MUL T LOCK TECHNOLOGIES 81130 Electromechanical door cylinder User Manual Users manual
MUL-T-LOCK TECHNOLOGIES LTD Electromechanical door cylinder Users manual
Users manual

ii ENTR™ Dead Bolt User Manual
Table of Content
1. Cylinder Installaon 5
1.1 Package content 5
1.2 Tools required 5
1.3 Prior to installaon 6
1.4 Cylinder & unit Installaon 6
1.5 Magnet ng 7
1.6 Cylinder to unit assembly (oponal) 7
2. ENTR™ descripon 9
2.1 ENTR™ descripon 9
2.2 Indicaons 9
2.3 ON/OFF switch 10
2.3.1 Switching the ENTR™ ON 10
2.3.2 Switching the ENTR™ OFF 10
2.3.3 Low baery indicaon 10
2.4 Iniang the lock 11
2.5 Default PIN code 11
3. Operaon 12
3.1 Changing PIN code 12
3.2 Door conguraon 13
3.3 Pairing remote control 14
3.4 Deleng remote control 15
3.5 Seng the sound signal 16
3.6 Seng locking mode 17
3.7 Operated by knob 18
3.8 Operated by slide buons 18

iii
ENTR™ Dead Bolt User Manual
4. Touchpad Reader 19
4.1 Changing PIN code 19
4.2 Baery replacement 19
4.2.1 Low baery indicaon 19
5. Touchpad Reader operaon 20
5.1 Operaon 20
5.2 Pairing Touchpad Reader 20
5.3 Touchpad Reader master PIN code 22
5.4 Menu mode 22
5.5 Adding personal user code 22
5.6 Open door 23
5.7 Lock door 23
5.8 Delete personal user code 23
5.9 Delete all personal user codes 23
5.10 Factory reset 24
6. Fingerprint Reader 25
6.1 Mounng the Fingerprint Reader 25
6.2 Baery replacement 25
6.3 Inial conguraon 25
6.3.1 Adjust Date & Time 25
6.4 Pairing ngerprint reader 26
6.4.1 Add master 27
6.4.2 Set nger 27
6.4.3 Set PIN code 27
6.5 Unlock the door 28

4ENTR™ Dead Bolt User Manual
iv
6.6 Lock Door 31
6.7 Low-baery Indicaon 31
6.8 Seng Menu 31
6.9 Add User 32
6.10 Delete User 33
6.11 Enable/Disable User 33
6.12 Delete all Users 34
6.13 Add Time Schedule 34
6.14 Edit Time Schedule 35
6.15 Volume Control 35
6.16 Double Security 36
6.17 Factory Reset 36
7. Smartphone App 37
7.1 App Installaon 37
7.2 Pairing Smartphone 38
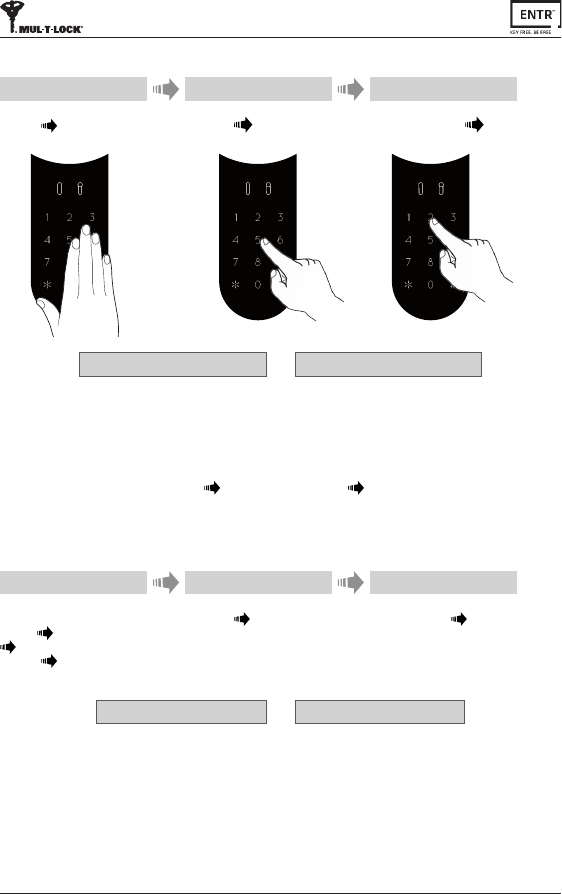
8. Remote Control Baery Change 39
8.1 Baery Removal 39
8.2 Baery Inseron 40
9. Sabbath Mode 41
10. Troubleshoong 42
10.1 Limitaons and External Inuences 42
10.2 Cases 42
Limited warranty 45
Federal Communicaons Commission (FCC) Statement 48

5
ENTR™ Dead Bolt User Manual
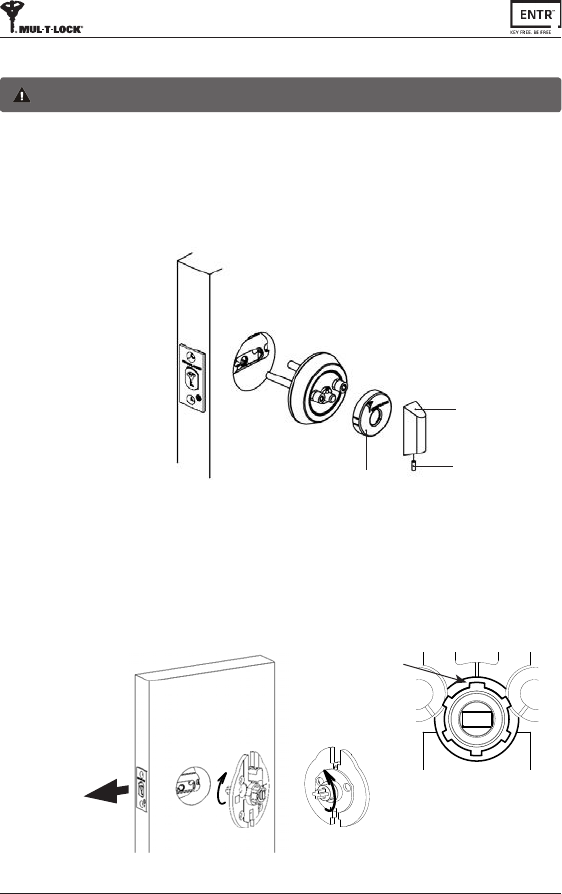
1.1 Package content
1.2 Tools required
• 2mm Allen key
• 3mm Allen key
• 5/32" Allen key
• Smallatscrewdriver
Note:DonotusepowertoolsoranyexcessiveforcetoassembleENTR™parts.
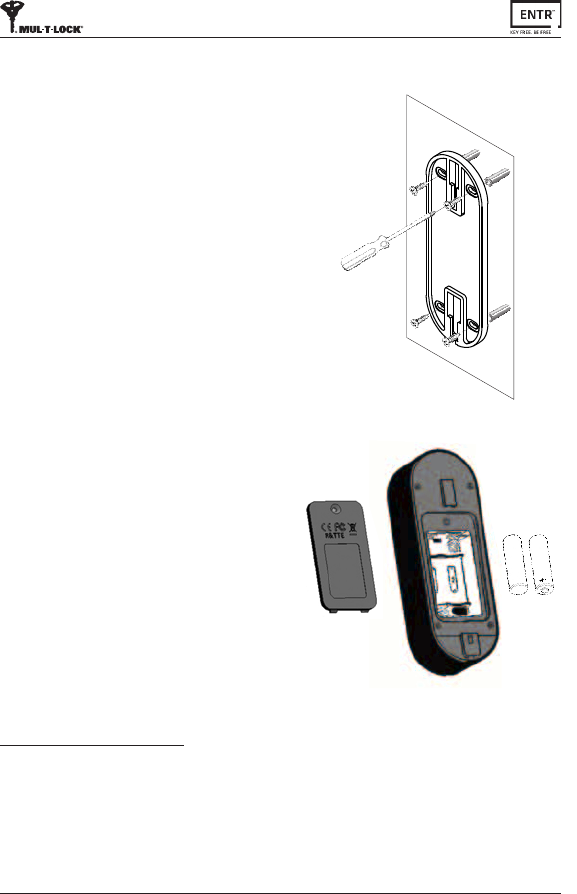
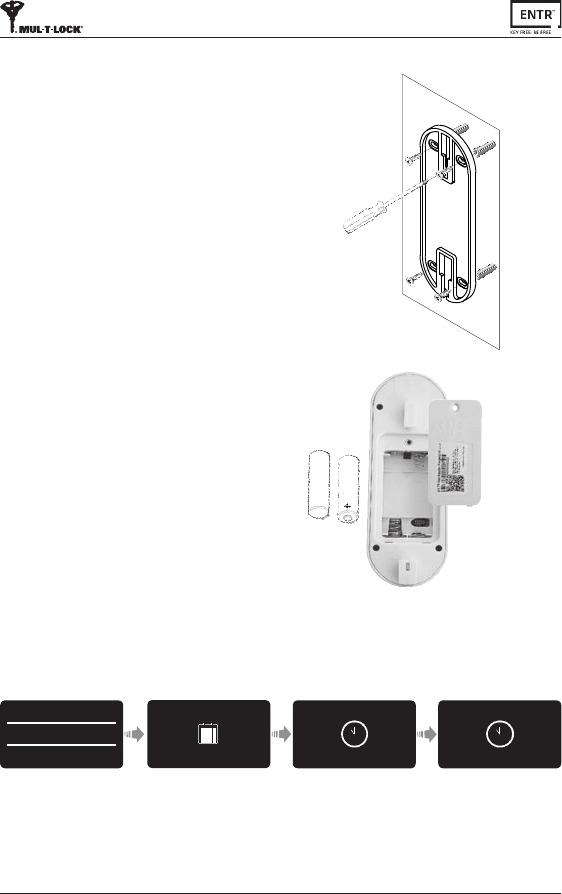
1. Cylinder Installaon
Baerycharger5
Magnet6
Inside drive adaptor7
Mounngscrews8
Baseplate&Knob1
Electricalunit2
Mounngscrew
3
Panelscrew
4
Decoravespacer9
6ENTR™ Dead Bolt User Manual
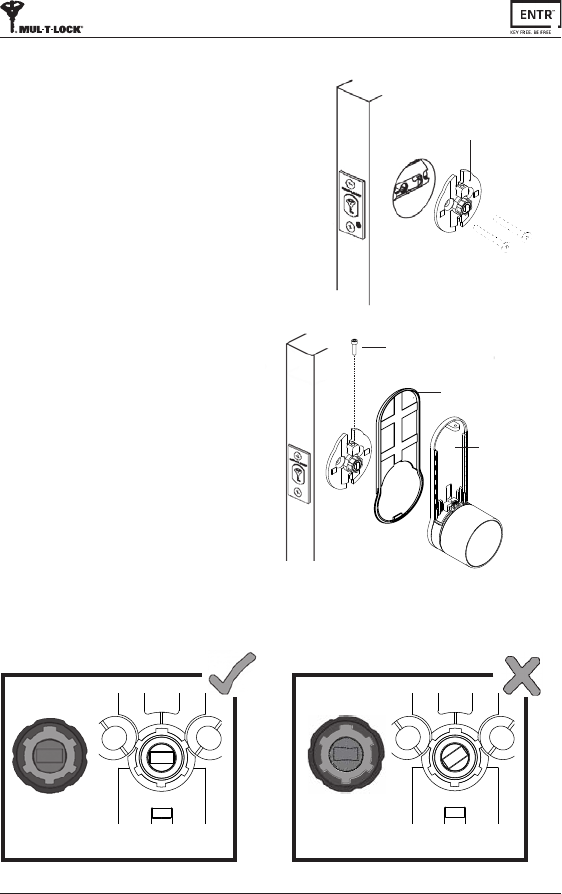
1.3 Prior to installaon
• Priortoinstallaoncheckboltlockingdirecon.
• Verifythattheboltisinopenposion(boltinsidethedoor,unlocked).
• Rotateadaptortailpieceoppositetotheboltlockingdireconunlstopped.
• Verifythatthewideteethispoinngup.Ifnotrotatetheexternalringunlthe
wideteethwillpointup.
1.4 Unit installaon
Warning:Donotaempttooperatetheunitunlassembledintothedoor
• Removeknobscrewusing1/16"Allenkeyandtaketheknobout.
• Useaatscrewdrivertoremovethecover.
• RemovebothAllenscrewsenrelyandremoveinternalmechanism.
Note:Whileremovingtheinternalmechanismsecuretheoutsidecylinderfrom
falling.Considerusingmaskingtapeorsimilar.
Knob
Knobscrew
Cover
Boltlockingdirecon
Rotateadaptortailpieceopposite
totheboltlockingdirecon
Wideteeth
7
ENTR™ Dead Bolt User Manual
Adaptor
• PlacetheInside drive adaptorandghtenthe
screws.Donotoverghtenthescreworuse
powertools.
• Placedecoravespaceroverthe
Inside drive adaptor
• Assemblebaseplate(top
housing&knob).
• Tightencylindermounngscrew.
Note: Incasethegearandtheprojecngrectanglearenotalignedtheunitwillnotbe
engagedtotheknob.
Knobbackview
Adaptor
Knobbackview
Adaptor
Mounngscrew
Base plate
Decoravespacer
8ENTR™ Dead Bolt User Manual
1.5 Magnet ng
• Carefullyconnectdatacableplug.
• Assembleelectricalunitpanel(baeryhousing).aachetobase
plate(1)andpushdown(2).
• Tightenelectricalunitpanelscrew.
Electricalunit
Datacableplug
1
Panelscrew
2
MagnetFing:
• Posionthemagnetontheframe.
moldings,ascloseaspossibletothe
lock.
• Thetoppointofthemagnetshouldbe
Alignwiththelowerpointoftheslider
(seeillustraon).
Note:Themagnetareaonframemolding
shouldbecleanandfreefromdust,
peelingpaintetc.Usealcoholifrequired.
Waitunlcompletelydrypriortoscking.
Frame
molding
Magnet
Slider
9
ENTR™ Dead Bolt User Manual
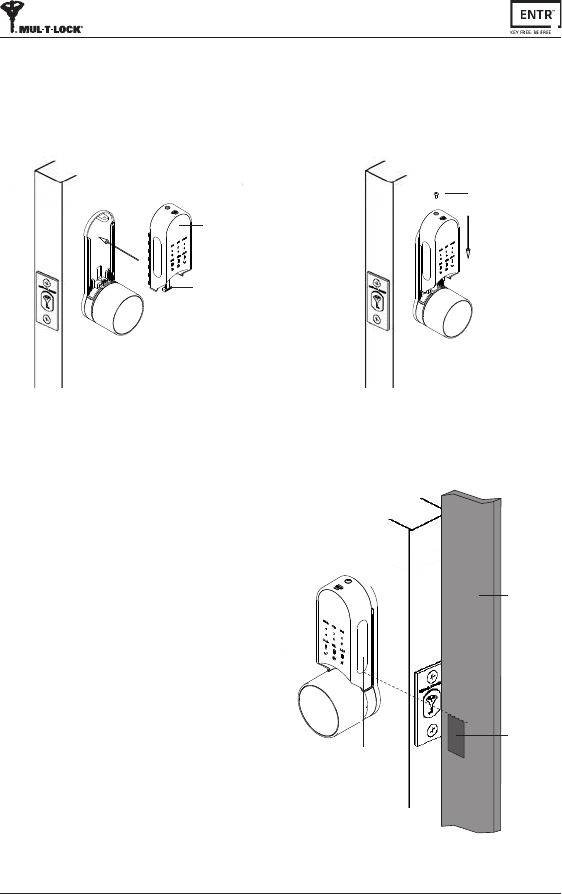
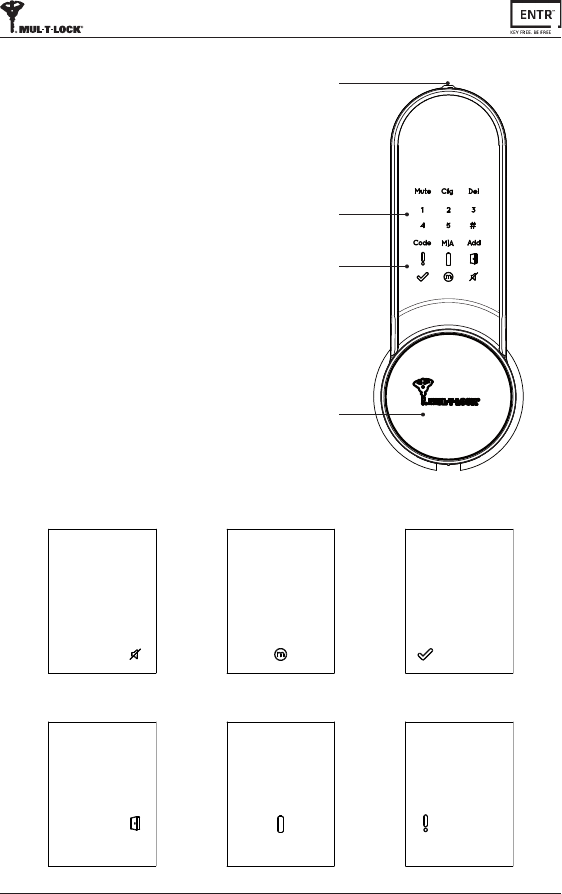
2.2 Indicaons
Error (Red)Baery status (Green/Red)Door not closed (Red)
OK (Green)Manual Mode (Green)Mute (Green)
Knob
ON/OFFswitch
Indicaons
Touchpad
2.1 ENTR™ descripon
2. ENTR™ descripon

10 ENTR™ Dead Bolt User Manual
• TurningtheENTR™lockON or OFF.
2.3.1 Switching the ENTR™ ON
BeforeturningENTR™ ON, verifythatthe
doorisshut.
• MovetheswitchtotheONposion.Make
surethattheknobisinthezeroposion
(seeillustraon).
• Funconandnumericbuonswillallblink
once.
• Hazardbeepsoundwillbeemiedand
errorindicaonwillblinkonce.
• ENTR™isnowinoperang mode.
Note:
• AerturningENTR™ON,avoidtouching
thefrontpanelunlbeepsoundends.
• AerturningENTR™ON,thedoorwillbe
shutbutnotlocked.
2.3 ON/OFF switch
2.3.2 Switching the ENTR™ OFF
• MovetheswitchtoOFFposion.
2.3.3 Low baery indicaon
Baeryredsignalrapidlyblinkingand2longbeepswillbeemiedduringevery
lock/unlockacon,indicangthatthebaeryislowandneedstobecharged.
OFF ON
•
Zeroposion
11
ENTR™ Dead Bolt User Manual
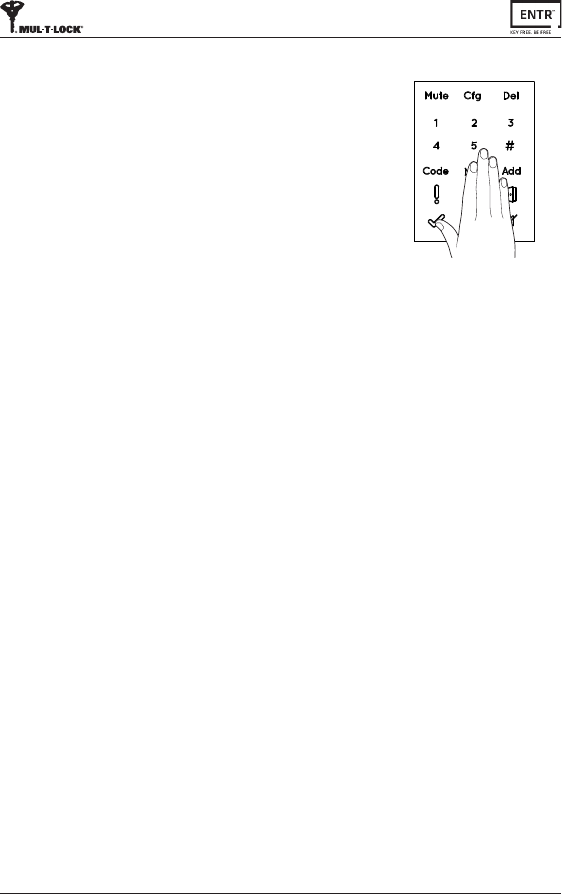
2.4 Inializaon of the Lock
Iniatethelockbytouchingthescreenwiththepalmof
yourhandorngersfor3seconds.
• Programingbuonsandbaerystatusindicaonlight
willilluminatefor15seconds,waingforuser'sacon.
• Aer15secondsofinacvity,ENTR™willidle.
2.5 Default PIN Code
The lock's default factory PIN code is: 1 2 3 4 5 #
Please note:
• DefaultPINcodemustbechangedbeforestarngtheconguraonprocess.
• ThePINcodemustconsistof4-10digitsusingnumbers1through5inanysequence.
• OnlytheCode and MutefunconswilloperateunlthedefaultPINcodeischanged

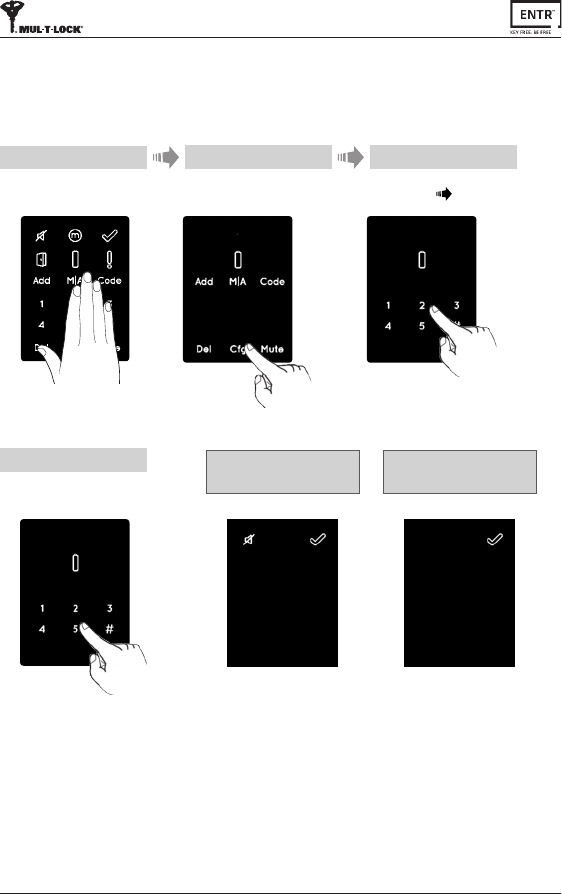
12 ENTR™ Dead Bolt User Manual
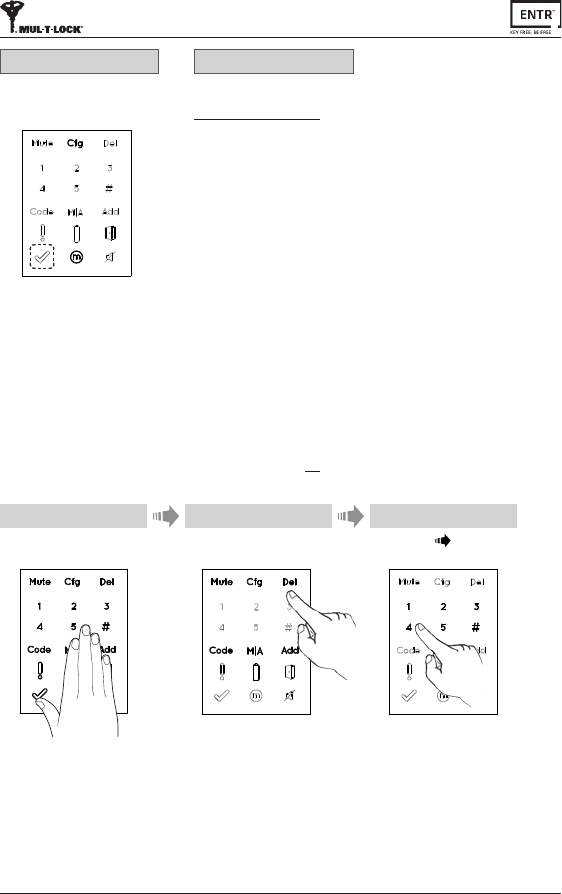
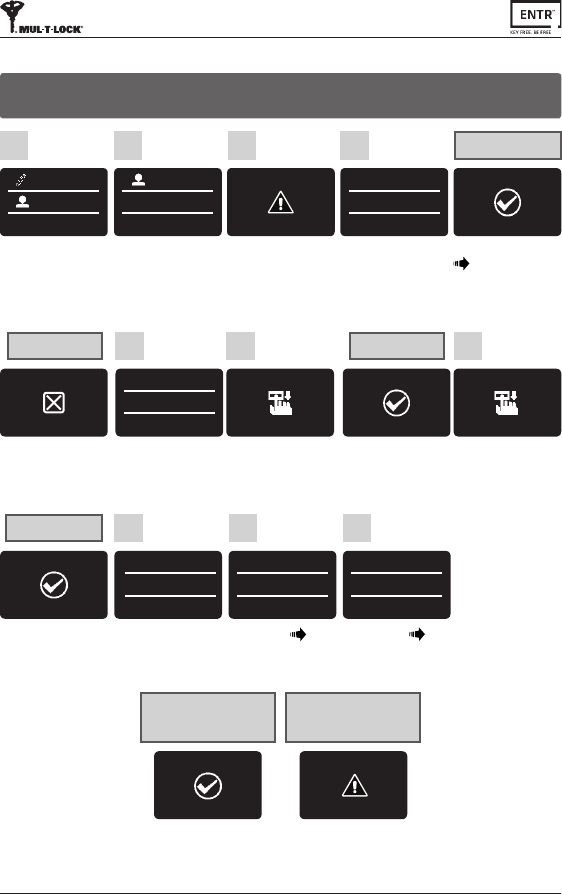
3.1 Changing PIN code
[OK]indicaonilluminated.
2shortbeepemied.
New PIN code is set.
[Error]indicaonilluminated.
2longBeepsemiedfor1second.
ENTR™goestomenumode.
Start the process from stage 1.
NumericbuonsilluminatedReenter
[New PIN code] [#]
Forexample:1231234#
PIN codes match PIN Code doesn't match
7
3. Operaon
Touchscreenwithpalmorngersfor
3secondstoacve.
Press [Code]
Numericbuonsilluminated.
Type [Default PIN code]
(12345) [#]
1 2 3
Warning:Donotaempttooperatetheunitunlassembledonthedoor.
NumericbuonsilluminatedEnter
[New PIN code](4-10digits) [#]
Forexample:1231234#
[OK]indicaonblinksonce.
1longbeepemied.
Illuminatedbuonsturnso.
[OK]indicaonblinksonce,
1longbeepemied.
Illuminatedbuonsturno.
5 6
4

13
ENTR™ Dead Bolt User Manual
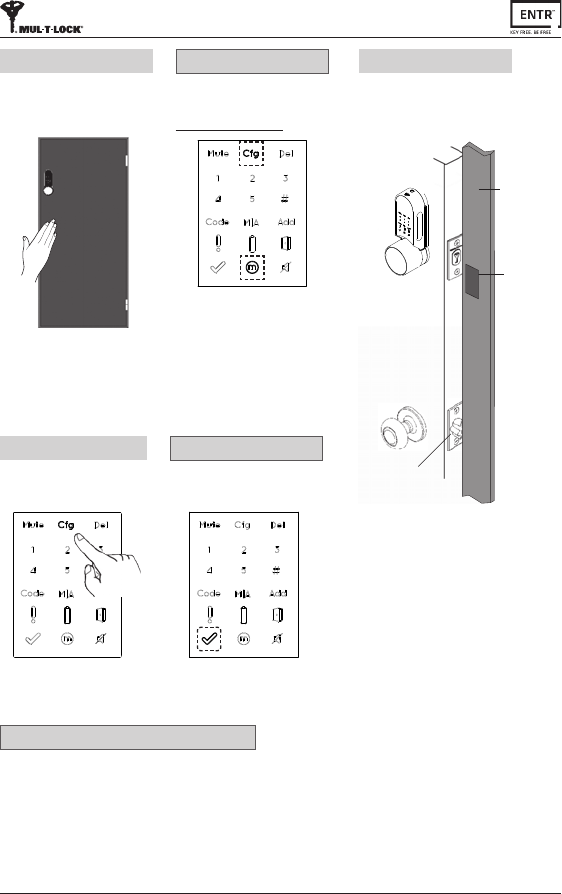
3.2 Door Conguraon
Thedoorconguraonprocesssetsyourlockanddoorpreferences.
Thisprocessshouldbedoneaersuccessfulinstallaonofthelock.Itwilltake15-20
secondstocomplete.
Press [Cfg]
Numericbuonsilluminated,
Type [PIN code] [#]
1longbeepemied.
Touchscreenwithpalmorngers
for3secondstoacve.
3
4
2
Press [1] or [3]tocongureENTR™
side(seeillustraon).
Press [1]forENTR™onleside.
Press [3]forENTR™onrightside.
5
ENTR™ on le
side of the door
Press [1]
ENTR™ on right
side of the door
Press [3]
1
Important: Verifythatthedooris
shutandnokeyisinsertedintothe
cylinderduringconguraonsteps.
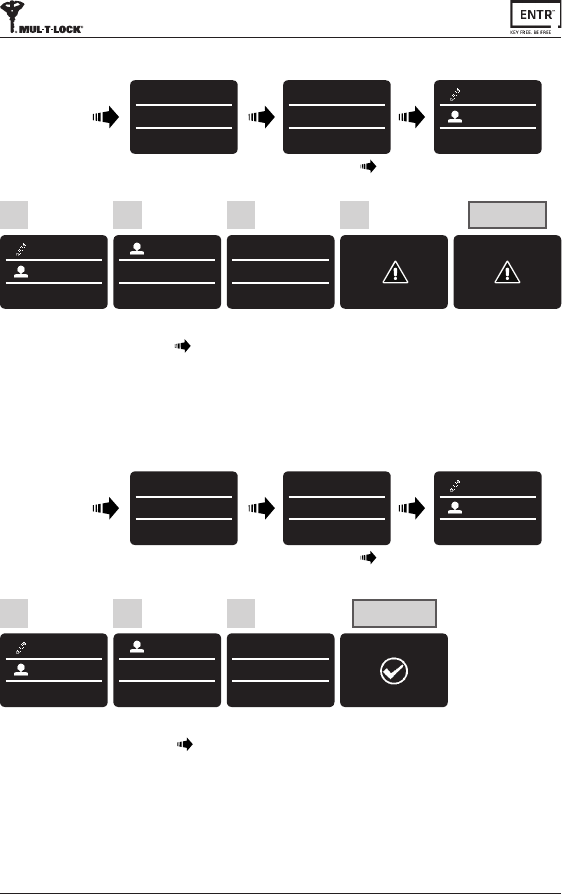
14 ENTR™ Dead Bolt User Manual
Lock conguraon failed
1. Removethemechanicalkeyfromthelock.
2. Checkthatthedoorwasclosedproperlyorif
lockoperaonwasinterfered.
Troubleshoong #1
Press [Cfg]
Thelockwillcarryoutthe
conguraonprocess.
8
[OK] Indicaonblinksonce.
2shortbeepsemied,
Illuminatedbuonsturno.
Conguraon OK
[Manual] indicaonilluminated.
[Cfg] indicaonblinks.
Note:Iftheconguraonfails
refertotroubleshoong#1
Conguraon OK
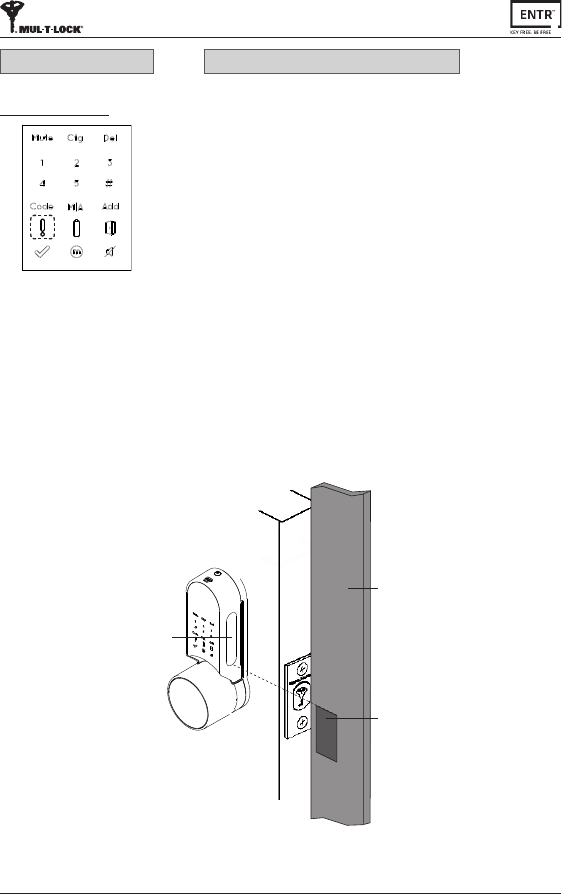
Hold the door shut to avoid opening.
Thelockwillcarryoutthe
conguraonprocess.
Ittake's15-20secondstocomplete.
6
Openthedoorusingthehandle.
Bringthelatchascloseaspossibleto
thedoorframe.
Note:Donotshutthedoor.
7
Door
moldings
Latch
Magnet
15
ENTR™ Dead Bolt User Manual
[Error]indicaonilluminated,
2longbeepsemied.
Refertotroubleshoong#2
Conguraon failed
Magnet conguraon failed
1. YoucanslloperateENTR™inManualmode(w/oautomaclocking).
2. Removeanyothermagnetsfromthedoor.
3. Placethemagnetaccordingtoinstrucons.
4. ConsultyourinstallerorcontactENTR™TechnicalSupport.
Troubleshoong #2
MagnetFing:
• Posionthemagnetonthedoormoldings,ascloseaspossibletothelock.
• Thetoppointofthemagnetshouldalignwiththelowerpointofthe
slider(seeillustraon).
Doorframe
Magnet
Slider
16 ENTR™ Dead Bolt User Manual
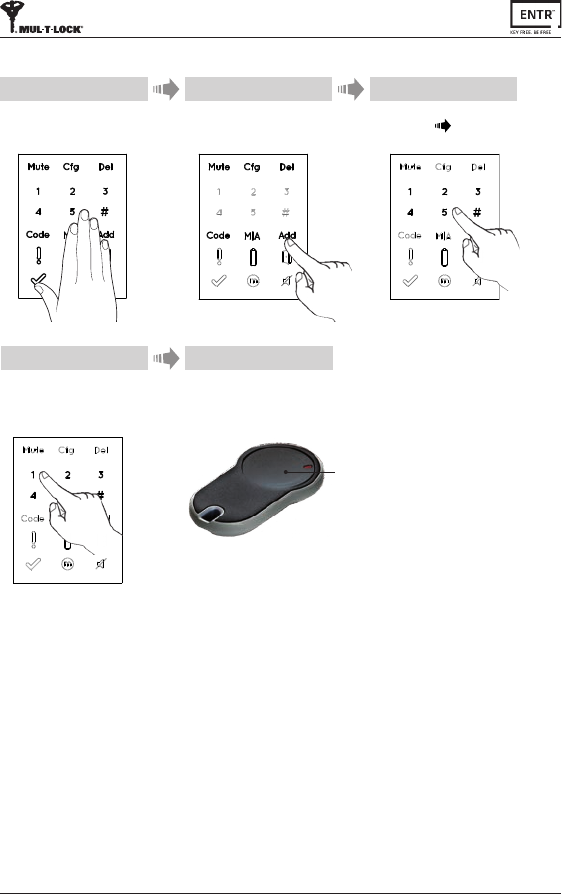
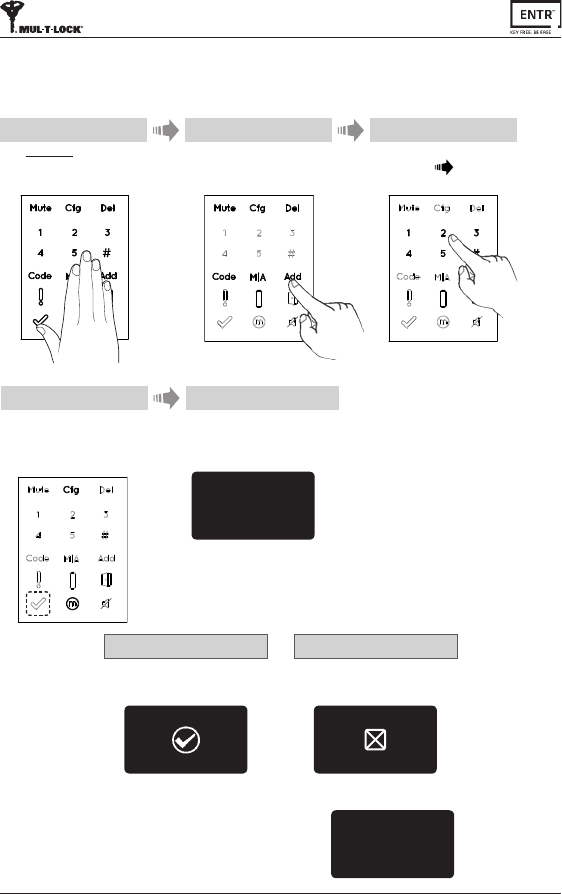
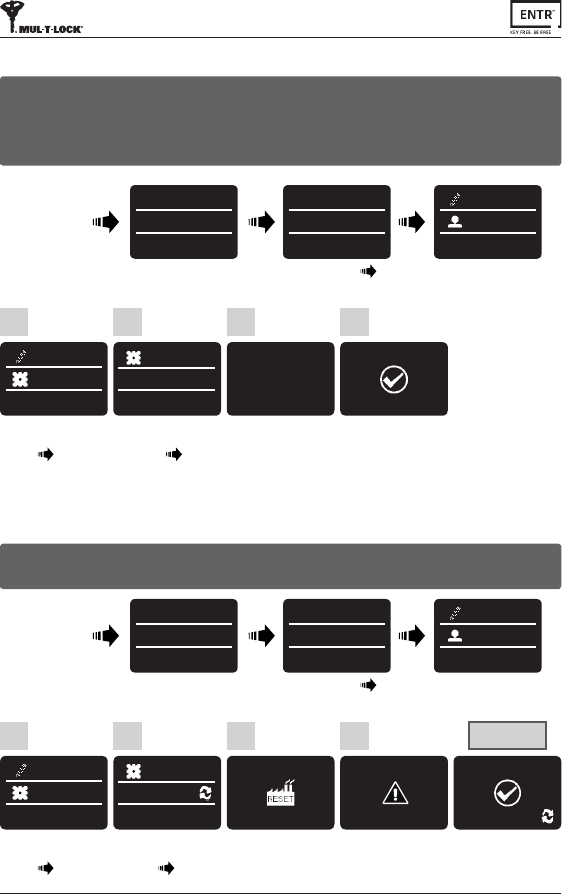
3.3 Pairing Remote Control
Press [Add] Touchscreenwithpalmorngersfor
3secondstoacve.
Numericbuonsilluminated.
Type [PIN code] [#]
Numericbuonsblinking.
21 3
Remote
control
buon
Presstheremotecontrolbuon.
5
Press [1]toaddremotecontrol.
Illuminatedbuonsturno.
[OK]indicaonblinksfor15Seconds,
waingforremotecontrolunit
4
17
ENTR™ Dead Bolt User Manual
Notes:
• Toaddmoreremotecontrolunitsrepeatthisprocedure.
• Aremotecontrolunitcanbepairedwithonlyonesingledoorunit.
• Itispossibletoaddupto20remotecontrolunits.
• Onlyauthorizeddealercanresetapairedremote.
[OK]indicaonblinksonce,
2shortbeepsemied.
Remote control unit added.
[OK]indicaonblinksfor15seconds,
Nobeepsemied.
Start the process from stage 1.
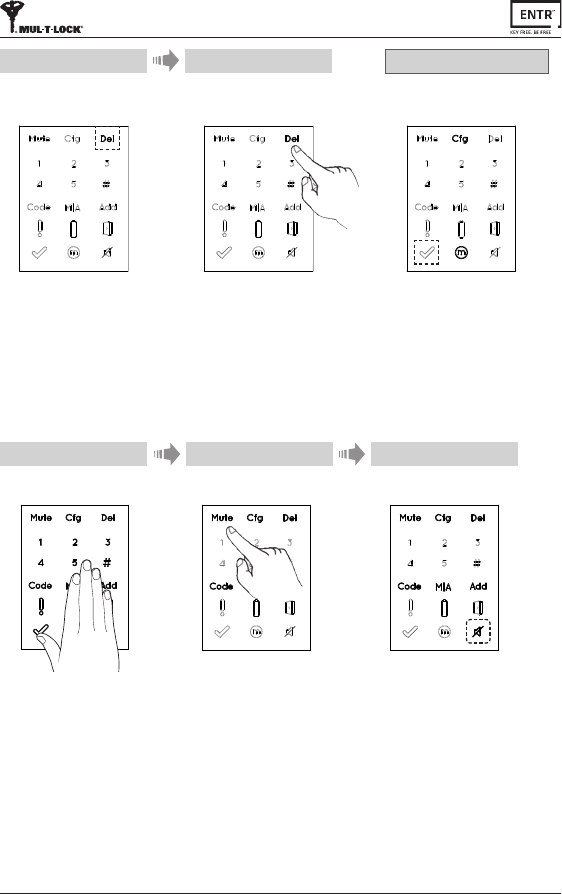
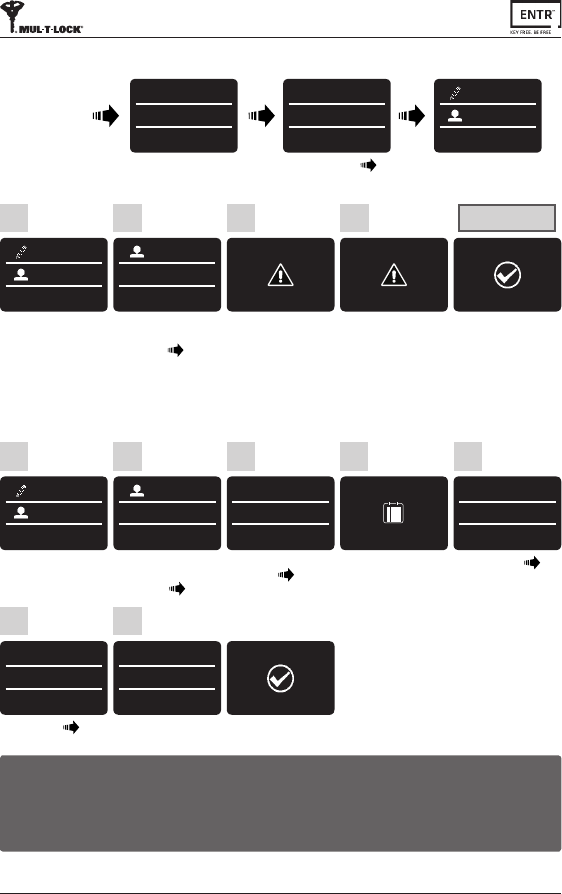
3.4 Deleng Remote Control
Thedelengremotecontrolprocess'willdeleteallremotecontrolunitsincluding
TouchpadandFingerprintreadersdenedwithinthesystem.
1 2
Touchscreenwithpalmorngersfor
3secondstoacve.
Press [Del]
Numericbuonsilluminated.
Type [PIN code] [#]
1longbeepemied.
3
Pairing OK Pairing failed
18 ENTR™ Dead Bolt User Manual
5Deleon accomplished
Press [Del]toconrm. [OK]indicaonblinksonce.
2shortbeepsemied,
Illuminatedbuonsturn o.
[Del]blinksfor30seconds.
4
Note: WallreaderandsmartphoneconnectedtotheENTR™lockwillnotbedeleted.
Notes:
• SengtheENTR™locksoundtoOFFwillmutethelockandunlocksounds,and
theopendoorhazardsignal.Itwillnotmutethetouchpad,mechanicaloverride
andlow-baerysounds.
• Followthesameproceduretoturnthesoundbackto[ON].
3.5 Seng Sound Signal
TurnthesoundsignaltoOFF or ON
21
Press [Mute] Touchscreenwithpalmorngersfor
3secondstoacve.
[Mute]indicaonilluminated.
Soundsignaliso.
3
19
ENTR™ Dead Bolt User Manual
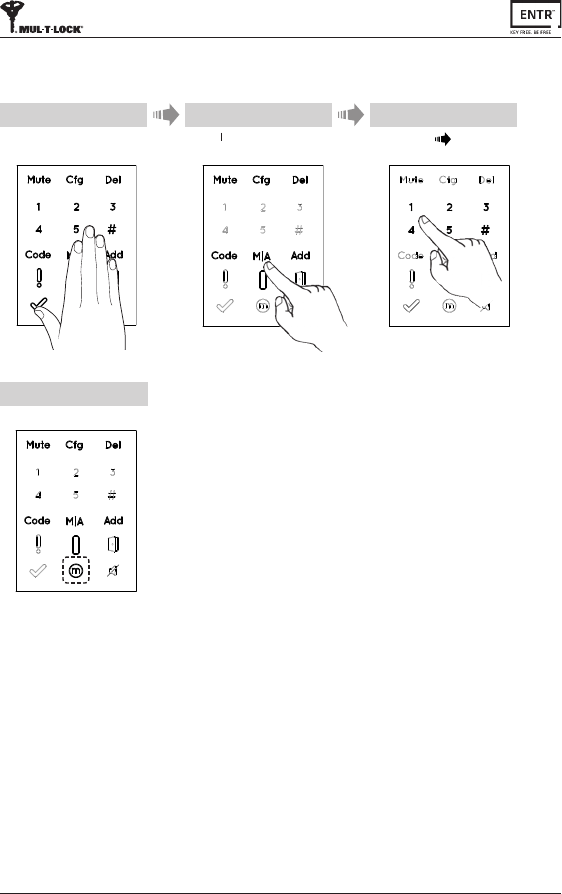
3.6 Seng Locking Mode
TogglebetweenAutomac to Manuallockingmode
Notes:
• SengtheENTR™locktoManualwilldisableautomaclocking.
• FollowthesameproceduretosettheENTR™locktoAutomac locking.
1 2
[Manual]indicaonilluminated.
4
Touchscreenwithpalmorngersfor
3secondstoacve.
Press [M A] Type [PIN code] [#]
3
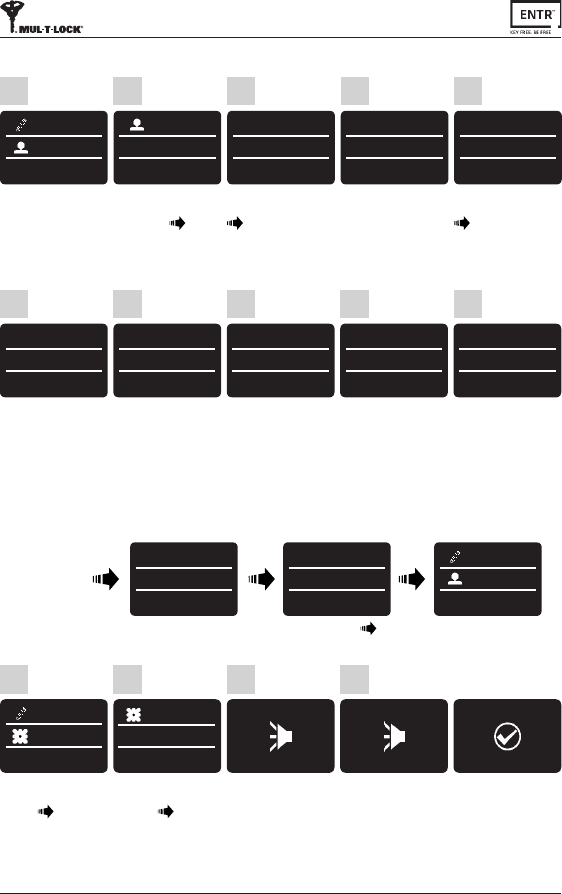
20 ENTR™ Dead Bolt User Manual
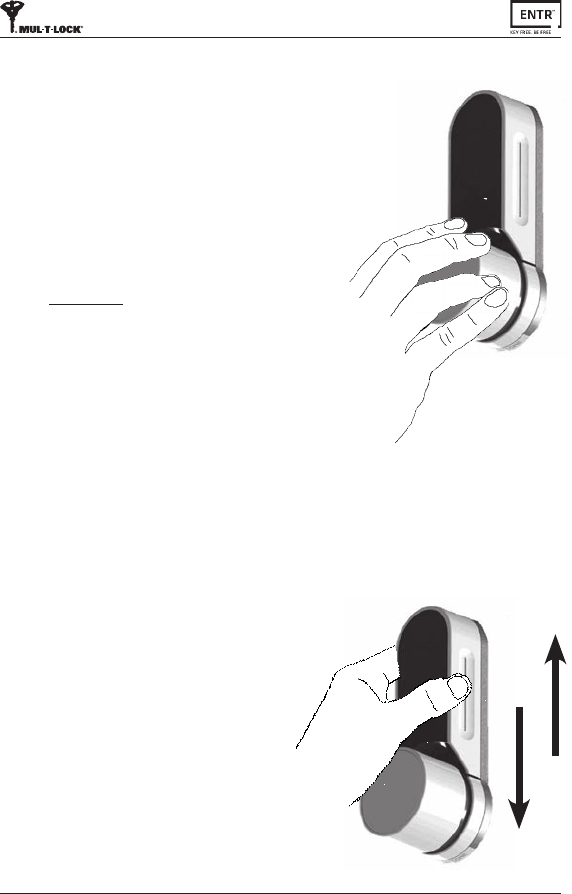
3.7 Doorknob operaon
Turnclockwiseorcounterclockwisetounlock.
Beepsoundemiedduringdoorknoboperaon.
3.8 Slide Buons Operaon
Slideyourngersontherecessedgroovesonboth
sidesoftheENTR™frontpanel:
• Toopen,slidengersdownwardsontherecessed
groovesonbothsides.
• Tolock,slidengersupwardsontherecessed
groovesonbothsides.
Open
Lock
Important!Whenanacvelockisopenedby
turningoftheknobyoumustre-operateitby
oneofitsautomacmodes(i.eremote,phone,
slidingyourngers,touchpadetc.)orelseitwill
remain UNLOCKED.
Knoboperaonismeantsolelyformechanical
overrideintherareeventitwillnototherwise
unlock.
21
ENTR™ Dead Bolt User Manual
4.1 Mounng the Touchpad Reader
SelectthelocaonwheretheTouchpadReaderwillbe
mounted.
• AachtheTouchpadReaderbaseplatetothewall.
• Use4screwsandscrewanchors,ordoublesided
adhesivestrip.
4.2 Baery Replacement
1.Releaselidscrewandopenthelid.
2.Putinthebaeries(2xAA)according
tothe"+""-"signs.
3.Closethelidandghtenthescrew.
Notes:
• AerinserngthebaeriestheTouchpad
Readerwillturnonautomacally.
• AshortbeepsoundemiedandGreen
[OK]indicaonilluminatedfor2seconds.
Important:DonottouchtheTouchpadduring
theselftestprocedureandunlthelights
areo.
4.2.1 Low baery indicaon
Whenbaeriesneedreplacement,ared
warningsignalwillblinkrapidlyandlongbeep
willsoundduringeverylock/unlockacon.
4. Touchpad Reader

22 ENTR™ Dead Bolt User Manual
5.2 Pairing Touchpad Reader
ThisprocedureisdoneviatheENTR™lock.Seealso:PairingRemoteControl.
TouchtheTouchpad Readerscreen
withpalmorngers.
Press [77] [#]
BlueLEDblinkingrapidly.
5
Press [Add]
2
TouchENTR™ lockscreenwithpalm
orngersfor3secondstoacve.
1
Numericbuonsilluminated.
Type [PIN code] [#]
Numericbuonsblinking.
3
4
Press [1]toaddTouchpad.
Illuminatedbuonsturno.
[OK]indicaonblinksfor15seconds
waingfortheTouchpad.
5. Touchpad Reader Operaon
5.1 Operaon
ToturntheTouchpadReaderON press [#]for5seconds.Thereaderwillperforma
selftestfollowedbyseriesofbeeps.LEDblinksGreen,Red,Blue.

23
ENTR™ Dead Bolt User Manual
[OK]indicaonblinksonce,
2shortbeepsemied.
Touchpad Reader added.
Pairing OK
[OK]indicaonblinksfor15seconds,
Nobeepsemied.
In wall reader:GreenLEDilluminated
and2beepsemied.
Start the process from stage 1.
Pairing failed
• HangtheTouchpadReaderonthebaseplate.
• Tightenxingscrew.
Fixingscrew
24 ENTR™ Dead Bolt User Manual
5.3 Touchpad Reader Master PIN Code
Touchscreenwithpalmorngers.
Press [11] [#]
1
Enter [New master PIN code]
(4-10digits) [#]
Forexample:1231234#
2
Reenter:
[New master PIN code] [#]
3
5.4 Menu Mode
Enteringmenumode:Press [*] [Master PIN code] [#]
5.5 Adding PIN Code (up to 20 dierent codes)
TouchReaderscreenwithpalm
orngers.
Press [*] [Master PIN code]
[#]
Press [11] [#]
1
Enter [Personal PIN code]
(4-10digits) [#]
Forexample:1231234#
2
Retype:
[Personal PIN code] [#]
3
Green [OK]illuminatedfor1second,
2shortbeepsemied
PIN code added
Red [Error]illuminatedfor1second,
1longbeepemied.
PIN code not added
Green [OK]illuminatedfor1second.
2shortbeepsemied.
Master PIN code added
Red [Error]illuminatedfor1second.
1longbeepemied.
Master PIN code not added
25
ENTR™ Dead Bolt User Manual
5.6 Open Door
5.7 Lock Door
TouchReaderscreenwithpalmorngers.
1
Press [Personal PIN code] [#]
2
Red [Error]illuminatedfor1second,
1longbeepemied.
Not opening
TouchReaderscreenwithpalmorngers.
1
Press [1] [#]
2
Red [Error]illuminatedfor1second,
1longbeepemied.
Not locking
5.9 Delete all PIN Codes
TouchReaderscreenwithpalmorngers.
Press [*] [Master PIN code] [#]
Press [22] [#]
1
Enter [Master PIN code] [#]
Reenter: [Master PIN code] [#]
2
5.8 Delete PIN Code
TouchReaderscreenwithpalmorngers.
Press [*] [Master PIN code] [#]
Press [33] [#]
1
Fordeleonenter:
[Personal PIN code] [#]
2
Green [OK]illuminatedfor1second,
2shortbeepsemied.
Personal code deleted Personal code not deleted
Red [Error]illuminatedfor1second,
1longbeepemied.
Green [OK]illuminatedfor1second,
2shortbeepsemied.
Note:MasterPINcodecannotbedeleted.
Personal PIN codes deleted Personal PIN codes not deleted
Red [Error]illuminatedfor1second,
1longbeepemied.
26 ENTR™ Dead Bolt User Manual
TouchReaderscreenwithpalmorngers.
Press [*] [Master PIN code] [#]
Press [99] [#]
1
Enter [Master PIN code] [#]
2
5.11 Factory reset
TheresetaconwilldeleteallPINcodes(masterandpersonal)andwillcutothe
TouchpadReaderfromtheENTR™lock.
Green [OK]illuminatedfor1second.
2shortbeepsemied.
Deviceperformingselftest&isfactoryreset.
Personal and master PIN
codes deleted
Personal and master PIN
codes not deleted
Red [Error]illuminatedfor1second.
1longbeepemied.
5.10 Volume Control
TouchReaderscreenwithpalmorngers.
Press [*] [Master PIN Code] [#]
Press [55] [#]
1
Press [2]toincreasethevolume,or[8] to
decreasethevolume.
Press [#] toconrmvolumelevel.
2
27
ENTR™ Dead Bolt User Manual
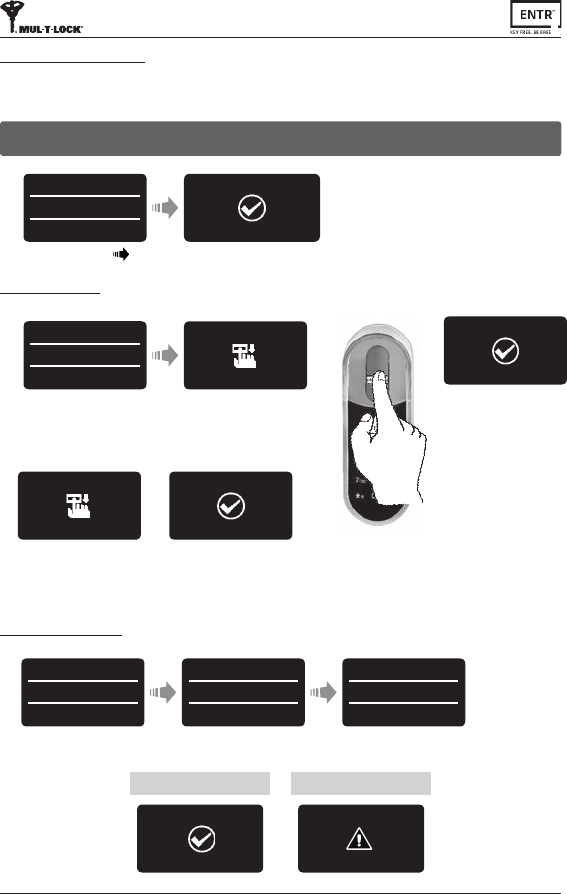
6.1 Mounng the Fingerprint Reader
Priortostarng,selectthelocaonwhere
theFingerprintReaderistobemounted.
Avoiddirectsunlighttothefrontpanel.
• AachtheFingerprintReaderbaseplate
tothewall.
• Use4screwsandscrewanchorsor
doublesidedgluedtape.
6.2 Baery Replacement
1.Usinga2mmAllenkeyreleasethelid
screwandopenthelid.
2.Insertbaeries(2xAA)accordingtothe
"+""-"signs.GreenLEDwillilluminate
for2seconds.
3.Closethelidandghtenthescrew.
4.Pressonnumber#5for5seconds.
6. Fingerprint Reader
Thereaderwillselfcalibrate,whichwillbefollowed
byaseriesofbeepsandblinkingLEDs.
DEVICE
DATE/TIME
--/--
hh:mm
39
6
12
1
2
4
57
8
10
11
Enter Time
Press [OK]
Enter Date
Press [OK]
--/--/--
DD/MM/YY
15/03/15
11:00
39
6
12
1
2
4
57
8
10
11
Press [OK]
6.3 Adjust Date & Time
28 ENTR™ Dead Bolt User Manual
TouchFingerprintReaderscreen.
2shortbeepsemied.
Press [OK]forYESor[*]tocancel.
5
6.4 Pairing Fingerprint Reader
ThisprocedureisdoneviatheENTR™lock.
Seealso:PairingTouchpadReader.
Press [Add]
2
TouchENTR™ lockscreenwithpalm
orngersfor3secondstoacve.
1
Numericbuonsilluminated.
Type [PIN code] [#]
Numericbuonsblinking.
3
4
Press [1]toaddthereader.
Illuminatedbuonsturno.
[OK]indicaonblinksfor15seconds
waingforthereader.
PAIR LOCK?
*-NO OK-YES
Pairing OK Pairing failed
[OK]indicaonblinksonce.
2shortbeepsemied.
Fingerprint Reader added.
FAILED
PAIR
LOCK
PAIR
1longbeepemied.
RedLEDilluminatedfor2seconds.
NO USERS
Note:Attheendoftheinialpairingprocess,
ashortnocewillbedisplayed.
29
ENTR™ Dead Bolt User Manual
GreenLEDblinking.
Swipe2ndngerseveral
mesoverngerprintscanner
unltwoconrmaonbeeps
emied.
BlueLEDilluminates.
Press [OK]
Type in [Master name] [OK]
SengaMasterUserrequiresbothngerprintandPINcode.Itispossibletohaveupto
twoMasterUsers.
MASTERNAME
JOHN
MASTER #01
JOHN
ADD USER
SET FINGER
GreenLEDblinking.
Swipe1stngerseveralmes
overngerprintscanner
unltwoconrmaonbeeps
emied.
SWIPE
1 FINGER
SUCCESS
1 FINGER
SWIPE
2nd FINGER
SUCCESS
2nd FINGER
Note:Atanystageyoucanpressandholdthe[*]keytomovetostandbymode.
Retype [PIN Code]
Press [OK] Press [OK]
ADD USER
SET CODE
RETYPE CODE
******
4-10 digits
ENTER CODE
******
4-10 digits
ENTER CODE
Type in [PIN Code],(4to10digits)
Press [OK]
6.4.2 Set Finger
6.4.3 Set PIN Code
SET CODE
SUCCESS
Matched Codes Mismatched Codes
FAILED
INVALID
6.4.1 Add Master User
30 ENTR™ Dead Bolt User Manual
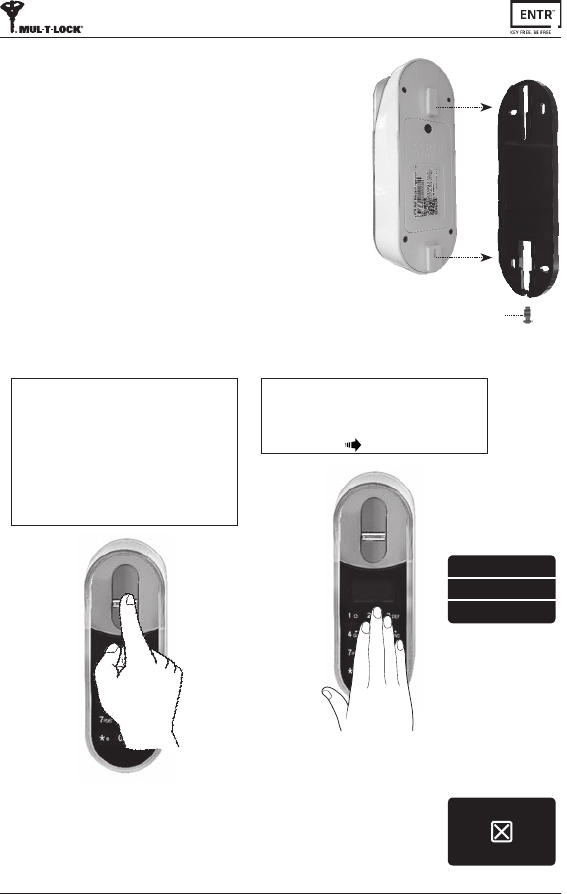
• Hangthereaderonthebaseplate.
• Tightenxingscrew.
Fixingscrew
OPTION 1:
Placengeronngerprintscanner.
Shortbeepemied&whiteLEDison.
Swipengeroverngerprintscanner
Fingerprint authorized:BlueLEDblinking
andunlockcommandissent.
Fingerprint not authorized: Red LED is ON.
Thedevicegoestostandby.
FAILED
UNLOCK
OPTION 2:
TouchtheFingerprintTouchpad.
Screenshowsusercode.
Enteryourcode [OK].
Note:IncaseENTR™lockhasn’tsucceedtounlockthedoor,
unlockfailedmessageappearonthescreen.
USER CODE
23:49 03/01
6.5 Unlock the Door

31
ENTR™ Dead Bolt User Manual
6.7 Low baery indicaon
Warningsignalblinking.
TouchtheFingerprintTouchpad
Press [1] [#]
6.6 Lock the Door
FingerprintReaderlowbaeryindicaon
RedLEDilluminatefor1saerwake-up,
2longbeepsemied.
DoorUnitlowbaeryindicaon
Low baery:RedLEDilluminatefor1saer
wake-up.
Extremely low baery:
RedLEDilluminatefor1saerwake-up,
2longbeepsemied.
BATTERY LOW BATTERY LOW
6.8 Seng Menu
Touchscreen
Press [*]
USER CODE
23:49 03/01
MASTER CODE
******
23:49 03/01
SETTING
USERS
Enter [Master PIN code] [OK] or
swipengeroverngerprintscanner
32 ENTR™ Dead Bolt User Manual
6.9 Add User
SUCCESS
2nd FINGER
2nd nger added
Press [OK] forYES or [*]
forNO.
ADD USER
SET CODE
*-NO OK-YES
8
Type [CODE] [OK]
ENTER CODE
******
4-10 digits
ENTER CODE
9
Retype [CODE] [OK]
RETYPE CODE
******
4-10 digits
10
Press [OK]
5
ADD USER
SET FINGER
Swipe1stngerseveral
mesoverngerprint
scannerunltwo
conrmaonbeepsemied.
6
SWIPE
1 FINGER
Swipe2ndngerseveral
mesoverngerprint
scannerunltwo
conrmaonbeepsemied.
7
SWIPE
2nd FINGER
1st nger added
SUCCESS
1 FINGER
Sameusername.
Choosedierentusername.
User name exist
USERNAME
EXIST
SET CODE
SUCCESS FAILED
INVALID
Matched codes Mismatched
codes
Processdidnotcomplete.
Alldatatypedinwillbe
erasedfrommemory.
USER #08
JENNIFER
Type [USER NAME]
[OK]
User name added
SETTING
USERS
Press [OK]
1
USERS
ADD USER
Press [OK]
2
USERNAME
JENNIFER
Usernameadded.
4
2nd MASTER?
*-NO OK-YES
Choose[OK] to add 2nd
Master User or [*] to
addauser.
Note:Thisscreenwillnot
appeariftwoMasterUsers
aredened.
3
Theunitallowsaddingupto20users.Foreachusertwodierentngerprintsand
onePINcode.Usedierentusernameforeachuser.
33
ENTR™ Dead Bolt User Manual
6.10 Delete User
SETTING
USERS
Press [OK]
1
USERS
DELETE USER
Use [8▼] or [2▲] to
selectuserfordeletion:
[DELETE USER] [OK]
2
DELETE USER
JENNIFER
*-NO OK-YES
Press [OK]
3
SURE?
*-NO OK-YES
Conrmdeleon.
4
DELETED
JENNIFER
Twobeepsemied,
GreenLEDilluminates.
User deleted
Touchscreen
USER CODE
23:49 03/01
MASTER CODE
******
23:49 03/01
SETTING
USERS
Press [*]Enter [Master PIN Code] [OK] or
swipengeroverngerprintscanner
Note:TherstMasterUsercan'tbedeletedwithoutdoingafactoryreset.
6.11 Enable/Disable User
SETTING
USERS
Press [OK]
1
USERS
ENABLE USER
Use [8▼] or [2▲] to
selectuser:
[ENABLE USER] [OK]
2
ENABLE USER
JENNIFER
Disabled
Use [8▼] or [2▲] to
togglebetweenusers.
Press [OK]
3
USER
ENABLED
Twobeepsemied.
GreenLEDilluminates.
User enabled
Touchscreen
USER CODE
23:49 03/01
MASTER CODE
******
23:49 03/01
SETTING
USERS
Press [*]Enter [Master PIN Code] [OK] or
swipengeroverngerprintscanner.
Note:Repeatthisproceduretodisableauser
34 ENTR™ Dead Bolt User Manual
6.13 Add Time Schedule
Enter STARTme [OK]
SUNDAY
FROM
12:00
5
Press [OK]
SETTING
USERS
1
Use [8▼] or [2▲] to
select:
[ADD SCHED] [OK]
USERS
ADD SCHED
2
Press1-7tochooseaday.
Example:1forSunday.
CHOOSE DAY
Sun-Sat(1-7)
4
Use [8▼] or [2▲] to
selectauser [OK]
ADD SCHED
SARAH
3
SUNDAY
TO
13:00
SUNDAY
12:00-13:00
*-No OK-Yes
Schedule
Saved
6 7
Enter ENDme [OK] Press [OK] forYES or [*]
forNO
Notes:
1. Dene up to 7 dierent me schedules for the same user.
2. Press [*] to go back on every menu.
3. Press [*] for 3 seconds to exit seng menu.
6.12 Delete All Users
Press [OK]
1
SETTING
USERS
Use [8▼] or [2▲] to
select:
[DELETE ALL] [OK]
2
USERS
DELETE ALL
Press [OK]
3
DELETE ALL?
*-NO OK-YES
Press [OK]
4
SURE?
*-NO OK-YES
Twobeepsemied.
GreenLEDilluminates.
All users deleted
SUCCESS
DELETED ALL
Touchscreen
USER CODE
23:49 03/01
MASTER CODE
******
23:49 03/01
SETTING
USERS
Press [*]Enter [Master PIN Code] [OK] or
swipengeroverngerprintscanner.
35
ENTR™ Dead Bolt User Manual
6.14 Edit Time Schedule
1
SETTING
USERS
Press [OK]
2
USERS
EDIT SCHED
Use [8▼] or [2▲] to
select:
[EDIT SCHED] [OK]
5
FRIDAY
▼ DAY ▲
12:00-13:00
Use [8▼] or [2▲] to
changescheduleday
[OK]
3
EDIT SCHED
SARAH
Use [8▼] or [2▲] to
togglebetweenusers
[OK]
FRIDAY
--:mm-HH:MM
11:00-13:00
Use [8▼] or [2▲] to
changetheSTARThour
setting.Use[6 ►] to move
to STARTminutes.
6
FRIDAY
HH:---HH:mm
12:15-13:00
Use [8▼] or [2▲] to
changeSTART minutes
setting.Use[6 ►] to move
totheENDhour.
7
FRIDAY
HH:mm---:mm
12:15-17:00
Use [8▼] or [2▲] to
changeENDhoursetting.
Use [6 ►] tomovetothe
ENDminutes.
8
FRIDAY
HH:mm-HH:--
12:15-17:45
Use [8▼] or [2▲] to
changeEND minutes
setting.
9
FRIDAY
12:15-17:45
*-NO OK-Yes
Press [OK] forYES or [*]
forNO.
10
4
SUNDAY
12:00-13:00
*-Back OK-Yes
Use [8▼] or [2▲] to
choosethedesired
scheduletobeedited.
Pressingon[4◄] for3
secondsshalldeletethe
specicschedule.
6.15 Volume Control
Press [OK]
4
Use [8▼] or [2▲] to
select:
[DEVICE] [OK]
1
SETTING
DEVICE
Use [8▼] or [2▲] to
select:
[VOLUME] [OK]
2
DEVICE
VOLUME
3
VOLUME
HIGH
Twobeepsemied.
GreenLEDilluminates.
SUCCESS
SET VOLUME
Touchscreen
USER CODE
23:49 03/01
MASTER CODE
******
23:49 03/01
SETTING
USERS
Press [*]Enter [Master PIN Code] [OK] or
swipengeroverngerprintscanner.
Use [8▼] or [2▲] to
togglebetweenHIGH,
MEDIUMorLOW.
VOLUME
LOW
36 ENTR™ Dead Bolt User Manual
6.17 Factory Reset
Press [OK]
4
SURE?
*-NO OK-YES
Use [8▼] or [2▲] to
select:
[DEVICE] [OK]
1
SETTING
DEVICE
Use [8▼] or [2▲] to
select:
[FACTORY] [OK]
2
DEVICE
FACTORY
Press [OK]
3
RESET?
*-NO OK-YES
Twobeepsemied.
GreenLEDilluminates.
Factory reset
SUCCESS
FACTORY
Warning: A factory reset acon will delete all informaon stored in the memory,
including users and paired locks.
Touchscreen
USER CODE
23:49 03/01
MASTER CODE
******
23:49 03/01
SETTING
USERS
Press [*]Enter [Master PIN Code] [OK] or
swipengeroverngerprintscanner.
6.16 Double Security
4
Use [8▼] or [2▲] to
select:
[DEVICE] [OK]
1
SETTING
DEVICE
Use [8▼] or [2▲] to
select:
[2x Security] [OK]
2
DEVICE
2x Security
Press [OK]
3
ENABLE?
*-NO OK-YES
Twobeepsemied.
GreenLEDilluminates.
2x Security
ON
Aeracvangthedoublesecurityoponusebothmethods-swipingangerprint
andinserngaPINcodetounlockthedoor.
Note:Usersetupwithonlyoneofthesengs(ngerprintorPINcode)willnotbe
abletounlockthedoor.
Touchscreen
USER CODE
23:49 03/01
MASTER CODE
******
23:49 03/01
SETTING
USERS
Press [*]Enter [Master PIN Code] [OK] or
swipengeroverngerprintscanner.

37
ENTR™ Dead Bolt User Manual
• Androidsmartphoneusers:gotoGooglePlaytodownloadtheENTR™applicaon.
Systemrequirements:Android4.4
• iOS(iPhone/iPad)users:gototheappstoretodownloadtheENTR™applicaon.
Systemrequirements:iOS7.0orhigher.
• Bluetoothlow-energycompliant.
7.1 App Installaon
7. Smartphone App
Thebelowmessagewillbedisplayedwhenopeningthe
ENTR™apppriortopairingitwithyourlock:
"There are no available locks or keys within range".
38 ENTR™ Dead Bolt User Manual
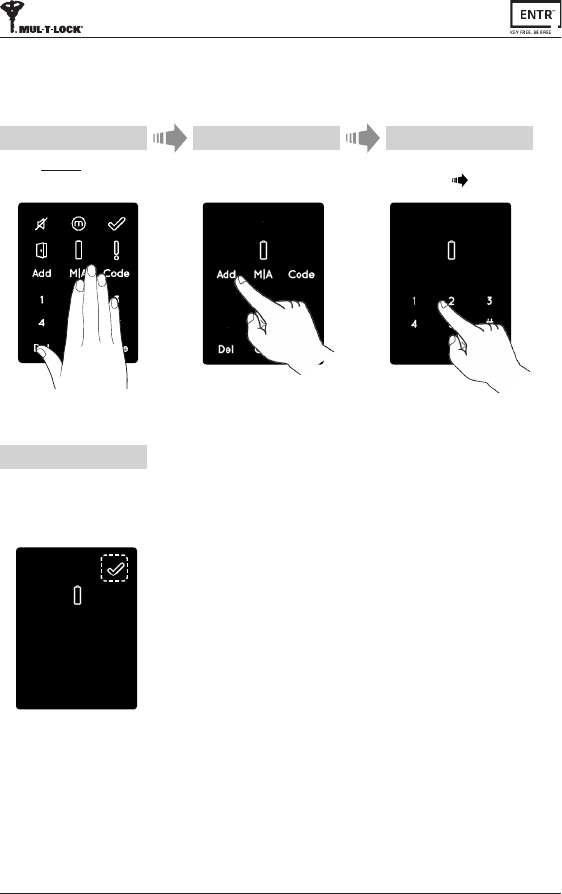
7.2 Pairing a Smartphone
Press [Add].
2
TouchtheDoor Unitscreenwith
yourpalmorngersfor3seconds
toacvate.
1
Numericbuonsilluminate.
Type [PIN Code] [#]
Numericbuonsblink.
3
Press [2]toaddasmartphone.
[OK]indicaonblinksfor3seconds.
Illuminatedbuonsturno,
ENTR™willbevisiblefor5min.
4
ThisprocedureisdoneviatheENTR™lockdoorunit.
OpentheENTR™appandfollowthestepsdescribedinordertopairthesmartphone
withtheENTR™lock.
ENTR™AppUserManualisavailablefordownloadat:www.entrlock.com
39
ENTR™ Dead Bolt User Manual
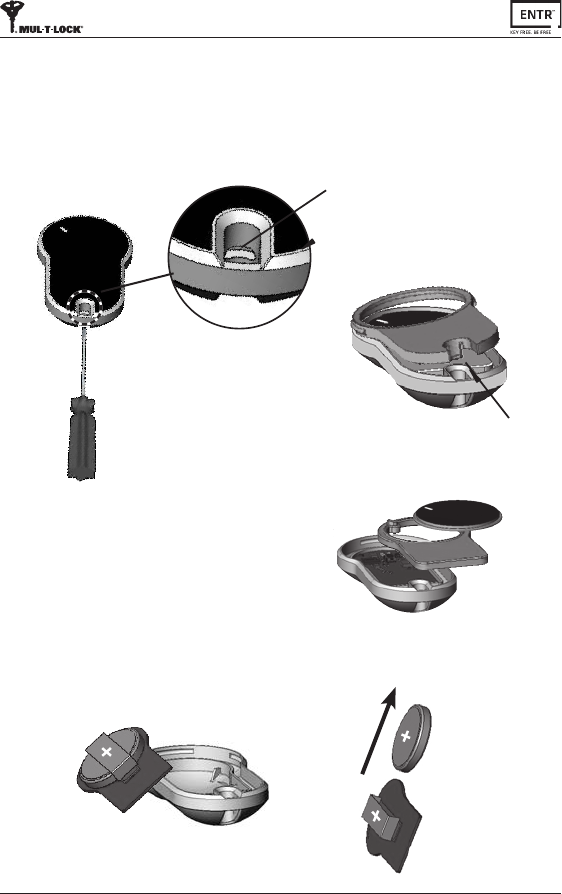
8.1 Baery Removal
a. Releasethelidbysafelyinserngasmalltoolintothenotch(1),
andpressthelidclasp(2).
b.Takeoutthepushbuon
andintermediatepart.
c. Takeouttheelectronicboardwiththebaeryandremovebaery.
8. Remote Control Baery Change
Notch
1
Clasp
2
40 ENTR™ Dead Bolt User Manual
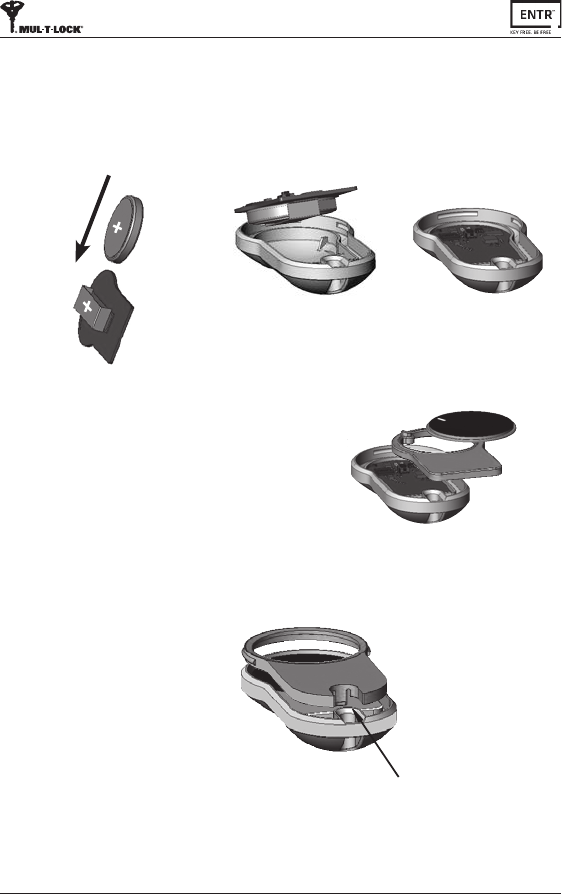
c. Reassembletheintermediatepartandthe
pushbuonandplaceovertheelectronic
board.
a.Insertnewbaery(CR2032)intotheelectronicboardaccording
tothe"+""-"signs(1).
b.Inserttheelectronicboardintotheremotecontrol’shousing(2).
8.2 Baery Inseron
d.Placethelidandpressunltheclaspclicksintoplace.
Clasp
1
2
41
ENTR™ Dead Bolt User Manual
1 2
Touchscreenwithpalmorngersfor
3secondstoacve.
Press [Cfg] Numericbuonsilluminated.
Type [PIN Code] [#],
Numericbuonsblinking.
3
Auto-lockingandhazardbeepsaerknoboperaonaredisabled.BaeryindicaonLED
blinksevery20seconds.
Press [5]totogglebetween
acvaonanddeacvaonofthe
Sabbathmode.
4Sabbath mode
acvated
Sabbath mode
deacvated
9. Sabbath Mode

42 ENTR™ Dead Bolt User Manual
New Unit Installaon and Conguraon
Symptom Correcve acon Page
Theunitisn'taccepngmyadministrave
code.
Makesurethecodeyouareusingcontainsbetween4-10
digitsandisdierentfromthe"12345"factorycode.
12
WhenItrytostarttheconguraon
(Cfg)process,I'mgenganerrorsound
andlight.
Thiscouldmeanthatthefactorycodehasn'tbeen
replacedwithyouradministravecode.Gobackandset
youradministravecode.
12
AttheendofStep1oftheconguraon
process,I'mgenganerrorsound
1.Verifythatyouareabletolockandunlockthedoor
usingthekeywithoutissue.
2.Pleasecontactyourlocksmith
13
AttheendofStep2oftheconguraon
process,I'mgenganerrorsound.
1.Verifythatthemagnethasbeencorrectlyposioned
2.Contacttoyourlocksmithtoreplacethemagnetwith
astrongerone.
13
Iturntheknob,butthelockisn't
unlocking.
1.Makesurethatthemechanicalkeycanoperatethelock
2.Checkthattheelectronicunitisproperlyaachedto
thecylinder.
3.Pleaseconsultwithyourlocksmith/installertoensure
properinstallaonwascompleted.
6
I'veconguredENTR™,butwhenIslidemy
ngersdown,thedoorlocks;andwhenI
slidemyngersup,itunlocks--opposite
aconsofwhatshouldhappen.
1.Redotheconguraonprocess.
2.Payaenontothedoor'sorientaon,(Le=1and
Right=2).
13
10.1 Limitaons and External Inuences
1.Doorposionsensormightbeinuencedbyexternalelectromagnecinterference.
2.Aermechanicalkeyoperaon,theusershouldunlockandlocktheunit
electronically.
10.2 Cases
10. Troubleshoong
Remote Control
Symptom Correcve acon Page
I'mhavingtroublepairingtheremote
control.
1.PleaseconrmthattheLEDontheremotecontrolis
ONwhenyoupressthebuon.
2.Repeatthepairingprocessagainwhilestanding
closertothedoorunit.
3.Ifaerthesestepsaretakenandpairingsllisn't
working,pleasecontactyourlocksmith/installer.
16
Somemestheremotecontroldoesn't
openontherstaempt.
TheremotecontroloperatesonRFsignal,soyouneed
tobewithinacertainproximitytothelock.Getcloser
andtryagain.
16

43
ENTR™ Dead Bolt User Manual
Constant Usage
Symptom Correcve acon Page
ENTR™hasstarteddoublebeeping
wheneverIlockorunlockthedoor.
Thisisanindicaonyourbaeryislow;it'smeto
chargethedoorunit.
31
Theunithasstartedtobeepconstantly. 1.Placetheknobinthezeroposion.
2.Pleaseconsultyourlocksmithorinstaller.
20
Slidersaren'trespondingasexpected. Turntheunito,waitfor3seconds,andthenturnit
backontoresetit.
20
Thetouchpanelisn'trespondingas
expected.
Turnthedoorunitoandwaitfor3seconds.When
turningthepowerbackon,avoidtouchingthefront
panelunltheunitbeeps.
12-19
Thelatchisn'tmovingfullyintoposion. 1.Pull/pushthedoortowardtheframeandobserveif
theproblemissolved.Ifso,consultyourlocksmiths
toadjustthedoororlockcase.
2.Verifythatthelockisoperangsmoothlywhen
manuallyusingthekey.
6
WhenIlockorunlocktheunit,anerror
soundoccurs.
Pleaseconsultwithyourlocksmith/installertoadjust
thedoororlockcase.
6
Thepoweradaptorisnotchargingthe
doorunit.
MakesureyouareusingthededicatedENTR™power
adaptorthatwassuppliedwithyourlock.Standard5V
poweradaptorsWILL NOTchargetheunit.
31
Whenifullyopenthedoortheknobis
touchingthewall.
Placeadoorstopatcorrectposiontopreventthedoor
fromopeningtoowidelyanddamagingtheknobor
nearbywall.
Fingerprint/Touchpad Reader
Symptom Correcve acon Page
I'mhavingtroublepairingwiththewall
reader.
1.Repeatthepairingprocessunlyouheardoublebeep
fromboththedoorunitandthewallreader.
2.Insomecases,ifthereareelectro-magnec
interferences,theremaybeaneedtorepeatthepairing
processseveralmesunlpairingiscompleted.
22
I'mhavingtroublepairingthewallreader
withthedoorunit.
Setthedoorunittopairmode,bypressingAdd+Code
+1,thenimmediatelysetthewallreadertopairmode.
You'llhavea30secondwindowunlthedoorunitreverts
backtostandbymode.
22
Thewallreader'sblueLEDisblinking,but
thedoorunitisn'tresponding.
Verifythatthewallreaderispairedtothedoorunitby
redoingthepairingprocess--youwillheardoublebeeps
frombothdeviceswhencompleted.
25
Thetouchpadisn'taccepngthePINcode
I'mentering.
1.Thisspeciccodealreadyexistswithinthedevice's
memory.
2.MakesurethatthePINcodeis4-10digits.
25

44 ENTR™ Dead Bolt User Manual
Mobile App
Symptom Correcve acon Page
TheENTR™mobileappisdisconnected
fromthedoorunitand/orIcan'tndmy
lockontheapp.
1.Makesureyourphoneiscompablewithbluetooth
4.0,andthatyourphonemodelandOSversionare
approvedforENTR™.
2.Refreshtheapp.
3.OnlyonephonecanconnecttoENTR™atthesame
me.It'spossiblethatanotheruser'sphoneisalready
connectedtoENTR™.Ifso,closetheapponanyother
user'sphone.
4.Closetheapp,turnoyourphone'sBluetooth.Then
turnBluetoothbackon,andopentheapp.
5.Turnthedoorunito,andthenturnitonagain.
38
I'veupdatedtheOSonmymobilephone,
buttheENTR™appsllisn'tworking
properly.
Ifyouarealockowner,uninstallandthenre-installthe
app.ThengotoMyLocksintheappandchooselock
recovery.Useyourownerpasswordtorecoverthelock.
Ifyouareauser,pleaseaskthelockownertoissueyou
anewkey.
38
I'munabletocompletethe'SetOwner'
processbecauseIcan'tscantheQRonthe
ENTR™package.
1.Verifythatyouhaveaworkinginternetconnecon.
2.Trytoentertheunit'sserialnumbermanually
(IFEU000xxxx…).
3.Openacketonwww.entrlock.com.
38
Ihavecreatedakeyforanewuser,butthe
userdoesn'tseethatthekeyisavailable
eventhoughtheuseriswithinthelock's
Bluetoothrange.
1.Asonlyonephonecanconnecttothelockatthesame
me,pleasemakesureyouhaveclosedyourapp.
2.Verifythatyoucompletedthekeycreaonprocessby
selecngthe"acve"buon.
3.Verifythatthenewuserdidnotexceedtheexpiraon
meyouhavesetforthiskey.
38
I'munabletoopenthedoorfroma
distanceof10meters/yards.
1.TheappworksviaaBluetoothconnecon,whichcan
beimpactedbytheenvironment.
2.Forbothsecurityandfunconalityreasons,theideal
operangdistanceshouldnotexceed5mfromthedoor
3.Trymovingascloseaspossibletothelock.
38
I'mgengstrangeerrormessagesand/or
theappcrashedduringoperaon.
1.Verifythatyouareusingasupportedmobiledeviceand
OSforENTR™app.
37
Symptom Correcve acon Page
Ihavereplacedthebaeries,butwhenI
presson"5",nothinghappens.
Youneedtorstpower-upthewallreaderbypressing
andholdingthe"#"buonfor5seconds.
27
My5-yearoldsonandhisgrandmother's
ngerprintsarenolongerworkingwiththe
ngerprintreader.
Bothchildrenandtheelderlyhavengerprints
thatchange.Ifthisoccurs,you'llhavetorepeatthe
ngerprintlearningprocessforthem.
Alternavely,theycanuseaPINcode.
30
ThengerprintTouchpadkeysaren't
funconingproperly.
PleasegotoSengmode-->Device-->Device,inorder
togettheproductversion.Contactyourlocksmith/
installerforfurtherinformaonandnextsteps.
6

45
ENTR™ Dead Bolt User Manual
LIMITED WARRANTY
Mul-T-Lock® hereby warrants, to the end user ("Purchaser") who purchased the
genuine Mul-T-Lock® product (“Product"), from an authorized Mul-T-Lock® dealer
(“Dealer”),thatthe Product will befreefromdefectsinmaterialsandworkmanship
("Defects"),foraperiodofoneyearfromthedatetheProductwaspurchasedfrom
Mul-T-Lock®’sauthorizeddealer.Subjecttothetermsandcondionsindicatedbelow,
Mul-T-Lock®willrepairorreplacesuchProductorpartthereofwhich,uponinspeconby
Mul-T-Lock®’s authorized dealer, is found to be defecve, despite the Product not
havingbeensubjectedtoImproperAcvity(asdenedbelow).
ImproperAcvityshallrenderthiswarrantyvoid.“ImproperAcvity”includesanyand
allofthefollowing:installaonbyanyoneotherthanaDealer:improperinstallaon;
use/operaon/maintenanceotherthaninaccordancewithMul-T-Lock®’sinstrucons
and requirements (as directed below); tampering by Purchaser; neglect; damage
by the applicaon of force; bending; breaks; cracks; scratches; any other act of
vandalism;repairoralteraonbyanyoneotherthanaDealer:useofkeys,keyblanks,
cylinders, locks, approved baeries, accessories and/or other components that are
not suitable and genuine Mul-T-Lock® products; all the foregoing as determined by
Mul-T-Lock®,initssolejudgment.
Some basic instrucons and recommendaons for correct use of the Product are
shown overleaf.
Mul-T-Lock®’s sole obligaon under this limited warranty is to repair or replace, at
Mul-T-Lock®’s sole discreon, at the venue of a Dealer, any Product and/or Product
component found by Mul-T-Lock® to have Defects. This limited warranty does not
grantanyotherrightsorgiverisetoanyotherobligaon,orabsolvePurchaserofthe
responsibilitytoemploy any other suitablemeasures,by whatevermeans, including
insurance, against the risk of personal injury or damage to property. This limited
warrantyrelatetoproduct’sdefectsonly.Mul-T-Lock®shallbeliable,inanyevent,for
anylabourcostsassociatedwiththeproductanditsinstallaonprocess.
In order to facilitate the warranty service and enable Mul-T-Lock® to determine
entlementunderthiswarranty, PurchasermustrstreturntheProduct,withproof
ofpurchasefromaDealer,toMul-T-Lock®,eitherdirectly,orthroughtheDealerfrom
whomPurchaserpurchasedtheProduct.Allshipping,handling,travel,servicecalland/
orotherincidentaland/orrelatedchargesarefullypayablebyPurchaseronlyandare
notincludedinthislimitedwarranty.
46 ENTR™ Dead Bolt User Manual
THE USE OF OTHER THAN SUITABLE, GENUINE MUL-T-LOCK® COMPONENTS MAY
CAUSESEVEREDAMAGETOTHEPRODUCT,ANDWILLVOIDTHISLIMITEDWARRANTY.
THIS LIMITED WARRANTY MAY NOT BE ASSIGNED OR OTHERWISE TRANSFERRED IN
ANYWAYANDMAYNOTBEEXTENDED,ALTEREDORVARIED.
TOTHEFULLESTEXTENTALLOWABLEBYTHELAWSAPPLYINGHERETO,THISLIMITED
WARRANTY IS IN LIEU OF ANY OTHER WARRANTIES, EITHER EXPRESS OR IMPLIED,
INCLUDING BUT NOT LIMITED TO ANY WARRANTIES OF MERCHANTABILITY OR
FITNESSFORAPARTICULARPURPOSE,ALLOFWHICHAREEXPRESSLYEXCLUDEDAND
DISCLAIMED.MUL-T-LOCK®WILLNOTBELIABLEFORLOSSOFPROFITS,ANYSPECIAL,
INCIDENTAL, OR CONSEQUENTIAL DAMAGES, WHICH PURCHASER MAY SUSTAIN, OR
PUNITIVE DAMAGES, EVEN IN THE EVENT OF NOTICE OF THE POSSIBILITY OF SUCH
DAMAGES.
Some Basic Instrucons and Requirements for Correct Use of ENTR™ Products
Protecon of Keys:
• Keysshouldbeusedonlyfortheiroriginalpurpose,ofoperangthecorresponding
cylinder.
• Yourkeycarriesacode.Makesureyoukeepitconcealed.
• OnlygenuineMul-T-Lock®keyblanksshouldbeused.
• Duplicate keys must be performed by an authorized Mul-T-Lock® locksmith on
Mul-T-Lock®’skeycungmachine.
• Keysmustbeinspectedperiodicallyandmustbereplacedwhenshowphysicalwear.
Cylinders:
• InstallaonmustbeperformedbyanauthorizedMul-T-Lock®dealeronly.
• Cylindersmustnotbesubmergedinwater,orexposedtoanychemicalwash,orbe
painted.
• Protectthecylinderfromdirt&dust.
• Protect your cylinder from exposure to extreme temperatures. (External -20 C to
+80C,Internal-10Cto+50C)
• Thecylinder’skeywayshouldbelubricatedatleastonceperyear(preferablyusing
lubricants authorized by Mul-T-Lock®, or light machinery oil). In any heavy use
environments, extreme weather condions, lubricaon must be conducted every
threemonths.

47
ENTR™ Dead Bolt User Manual
LEGAL NOTICES
Mobile phones
ENTR™warrantyshouldnotcoveranyproblemrelatedwithendusermobilephone/
smartphoneoritsoperaonsystem,byconnecngtoENTR™lockorinstallingENTR™
applicaon.ForanyotherlimitaonpleaserefertoEndUserlicenceagreement.
Items excluded / limited from this warranty
• Screws
• Normalwearandtear
• Cleaningwithcleaningdetergents
• WarrantyforENTR™’sMainbaeryislimitedfor1year
Trademarks
Mul-T-Lock®andENTR™aretrademarks/tradenamesbelongingtoMul-T-Lock®Ltd.No
unauthorisedusemaybemadeofthesetrademarks.
NoInsurance
No security product can ever guarantee the safety of assets. The ENTR™ product is
by no means a substute for suitable insurance coverage protecng against loss or
damage of your property. Mul-T-Lock® is not an insurance company and does not
provideinsuranceservicesofanykind.
External Inuences
• Services are subject to various external inuences, outside our control, such as
satellitesandcellularorothercommunicaonsnetworks,andmayalsobeinuenced
by weather condions, frequency jamming/interference, improper use or acvity,
interference,vandalism,destruconetc.
• Servicesmayalsobeadverselyaected,orrenderedimpossiblewhenthe ENTR™
product is located in places where a signal may not be available - for example,
agarage,parkinglot,tunnelorothersuchlocaon.
• The ngerprint sensor may not work for certain members of the populaon, for
physiologicalreasons
Limitaons of Services and Liability
TheServiceswillnotalwaysprovideanaccuratepictureofwhetherornotassetshave
beensubjecttounauthorizedaccess-forexample,iftheENTR™productisaccessed
usingtheoriginalkeyoraduplicatekey.
• ProperfunconingoftheENTR™productmaybeimpairediftheENTR™productis
notinstalledandmaintainedproperly,inaccordancewiththeinstruconsprovided
withtheENTR™product.Installaonand/ordisassemblymustbecarriedoutonlyby
authorisedENTR™installaonpersonnel.

48 ENTR™ Dead Bolt User Manual
Forradioenclosure
Federal Communicaons Commission (FCC) Statement
Labelling requirement for small device statement (FCC15.19(3))
Thisdevicecomplieswithpart15oftheFCCRules.Operaonissubjecttothe
followingtwocondions:(1)Thisdevicemaynotcauseharmfulinterference,and(2)
thisdevicemustacceptanyinterferencereceived,includinginterferencethatmay
causeundesiredoperaon.
Radio Frequency Interference (RFI) (FCC 15.105)
ThisequipmenthasbeentestedandfoundtocomplywiththelimitsforClassBdigital
devicespursuanttoPart15oftheFCCRules.Theselimitsaredesignedtoprovide
reasonableproteconagainstharmfulinterferenceinaresidenalenvironment.
Thisequipmentgenerates,uses,andcanradiateradiofrequencyenergy,and
ifnotinstalledandusedinaccordancewiththeinstruconmanual,maycause
harmfulinterferencetoradiocommunicaons.However,thereisnoguaranteethat
interferencewillnotoccurinaparcularinstallaon.Ifthisequipmentdoescause
harmfulinterferencetoradioortelevisionrecepon,whichcanbedeterminedby
turningtheequipmentoandon,theuserisencouragedtotryandcorrectthe
interferencebyoneormoreofthefollowingmeasures:
• Reorientorrelocatethereceivingantenna.
• Increasetheseparaonbetweentheequipmentandthereceiver.
• Connecttheequipmentintoanoutletonacircuitdierentfromthattowhichthe
receiverisconnected.
• Consultthedealeroranexperiencedradio/TVtechnicianforhelp.
Labeling Requirements (FCC 15.19)
ThisdevicecomplieswithPart15ofFCCrules.Operaonissubjecttothefollowing
twocondions:(1)thisdevicemaynotcauseharmfulinterference,and(2)this
devicemustacceptanyinterferencereceived,includinginterferencethatmaycause
undesiredoperaon.
Modicaons (FCC 15.21)
ChangesormodicaonstothisequipmentnotexpresslyapprovedbyMul-T-Lock®
mayvoidtheuser’sauthoritytooperatethisequipment.
RF Exposure info ( FCC 2.1093)-for module radio
Thisequipmenthasbeenapprovedformobileapplicaonswheretheequipment
shouldbeusedatdistancesgreaterthan20cmfromthehumanbody(withthe
exceponofhands,wrists,feetandankles).Operaonatdistanceslessthan20cmis
strictlyprohibited.