MUL T LOCK TECHNOLOGIES 81136 Household User Manual
MUL-T-LOCK TECHNOLOGIES LTD Household Users Manual
Users Manual
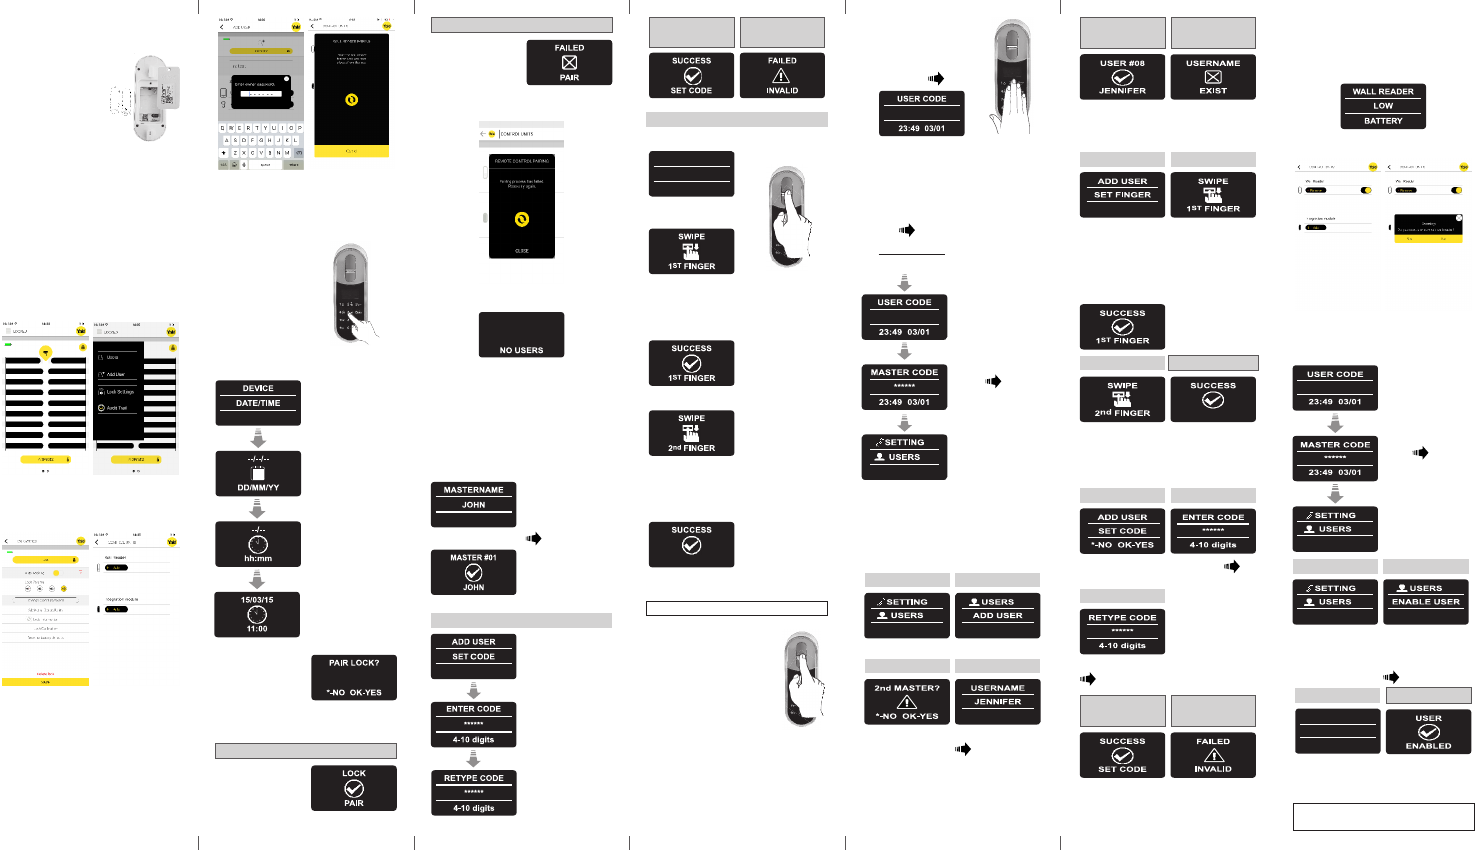
• Releasethelidscrewandopenthelid.
• Insertbaeries
(2xAA)accordingto
the"+""-"signs.
GreenLEDwill
illuminatefor2
seconds.
• Closethelidand
ghtenthescrew.
• Touch[#]for5seconds.
Thereaderwillselfcalibrate,whichwill
befollowedbyaseriesofbeepsand
blinkingLEDs.
1. Baery Replacement
EnterDate
Press[OK]
EnterTime
Press[OK]
Press[OK]
3. Adjust Date & Time
2. Pairing Fingerprint Reader
Thisprocedureisdoneviathe
smartphoneapplicaon.
Seealso:PairingTouchpadReader.
Openthesmartphoneapplicaon.
Pressonthelockicon
ontherightsideat
thetop.
Pressonlocksengs
fromthelist.
Presson“Addional
ControlUnits”.
Presson“+Add”
buonlocatedunder
“WallReader”.
Typeinowner
password.
2LED’sblinkinginthe
doorunit.
Thelockiswaing
forthengerprint
tocreatethe
connecon.
Press#5towake-upthe
FingerprintTouchpad.
2shortbeepsemied.
Press[OK]
Note: during the pairing process 2 green lock
signs blinking in the door unit.
Pairing OK
[OK]indicaonblinks
once.
2shortbeepsemied.
Fingerprint Reader
added.
Pairing failed
1longbeepemied.
RedLEDilluminatedfor
2seconds.
Intheappscreen:
“Pairingprocesshadfailed.Pleasetryagain”.
Note:Attheendoftheinialpairingprocess,
ashortnocewillbedisplayed.
SengaMasterUserrequiresboth
ngerprintandPINcode.Itispossibleto
haveuptotwoMasterUsers.
Note: Atanystageyoucanpressandhold
the[*]keytomovetostandbymode.
4. Add Master User
Typein[Master name] [OK]
Set PIN code
Press[OK]
Typein[PIN Code],
(4to10digits).
Press[OK]
Retype[PIN Code]
Press[OK]
Matched Codes Mismatched
Codes
GreenLEDblinking
ADD USER
SET FINGER
Set Finger
BlueLEDilluminates
Press[OK]
Placengeronscanner,waitforbeep,
thenswipengerdownseveralmesover
ngerprintscannerunltwoconrmaon
beepsemied
GreenLEDblinking
Placengeronscanner,waitforbeep,
thenswipengerdownseveralmesover
ngerprintscannerunltwoconrmaon
beepsemied.
5. Unlock the Door
Opon 1:
Placengeronngerprint
scanner.
Shortbeepemied&white
LEDilluminates.
Swipengeroverngerprint
scanner.
Fingerprint authorized:Blue
LEDblinksandunlockcommandissent.
Fingerprint not authorized:RedLED
illuminates.Thedevicegoestostandby.
Opon 2:
TouchtheFingerprint
Touchpad.
Screenpromptsforusercode.
Enteryourcode [OK]
Note:Intheevent,theunlockingaempt
fails,1longbeepemied.
RedLEDilluminatedfor2seconds.
6. Lock the Door
TouchtheFingerprintTouchpad.
Press[1] [#]
7. Seng Menu
8. Add User
Theunitsupportupto20users.
Foreachuser,twodierentngerprints
andonePINcode.Usedierentusername
foreachuser.
1 2
Press [OK] Press [OK]
3 4
Choose[OK]toadd
2ndMasterUseror
[*]toaddauser.
Note:Thisscreen
willnotappeariftwo
MasterUsersare
dened.
Type[USER NAME]
[OK]
Press[*]
Touchscreen
Enter [Master PIN
Code] [OK] or
swipengerover
ngerprintscanner
User name
added
User name
exists
Sameusername.
Choosedierent
username.
56
Press [OK] toseta
ngeroruse[8▼]
or[2▲]inorderto
setacodeonly.
Swipe1stnger
severalmes
overngerprint
scannerunltwo
conrmaonbeeps
sound.
Swipe2ndngerseveral
mesoverngerprint
scannerunltwo
conrmaonbeepssound.
72nd nger added
8 9
Press [OK] forYES or
[*] forNO
Type[CODE]
[OK]
10
Retype[CODE]
[OK]
Matched Codes Mismatched
Codes
Note: verify the app is closed.
11. Enable/Disable User
Press[*]
Enter [Master PIN
Code] [OK] or
swipengerover
ngerprintscanner
1 2
Press [OK] Use[8▼] or[2▲]
toselect:
[ENABLE USER]
[OK]
9. Low-baery Indicaon
FingerprintReaderLow-baeryIndicaon:
RedLEDilluminatesfor1secondaer2long
wake-upbeepsareemied.
10. Delete Fingerprint Reader
Pressontheremove
switch.
PressYes.
ENABLE USER
JENNIFER
Disabled
3User enabled
Use[8▼] or[2▲]
totogglebetween
users.Press [OK]
Note:Repeatthisproceduretodisable
auser.
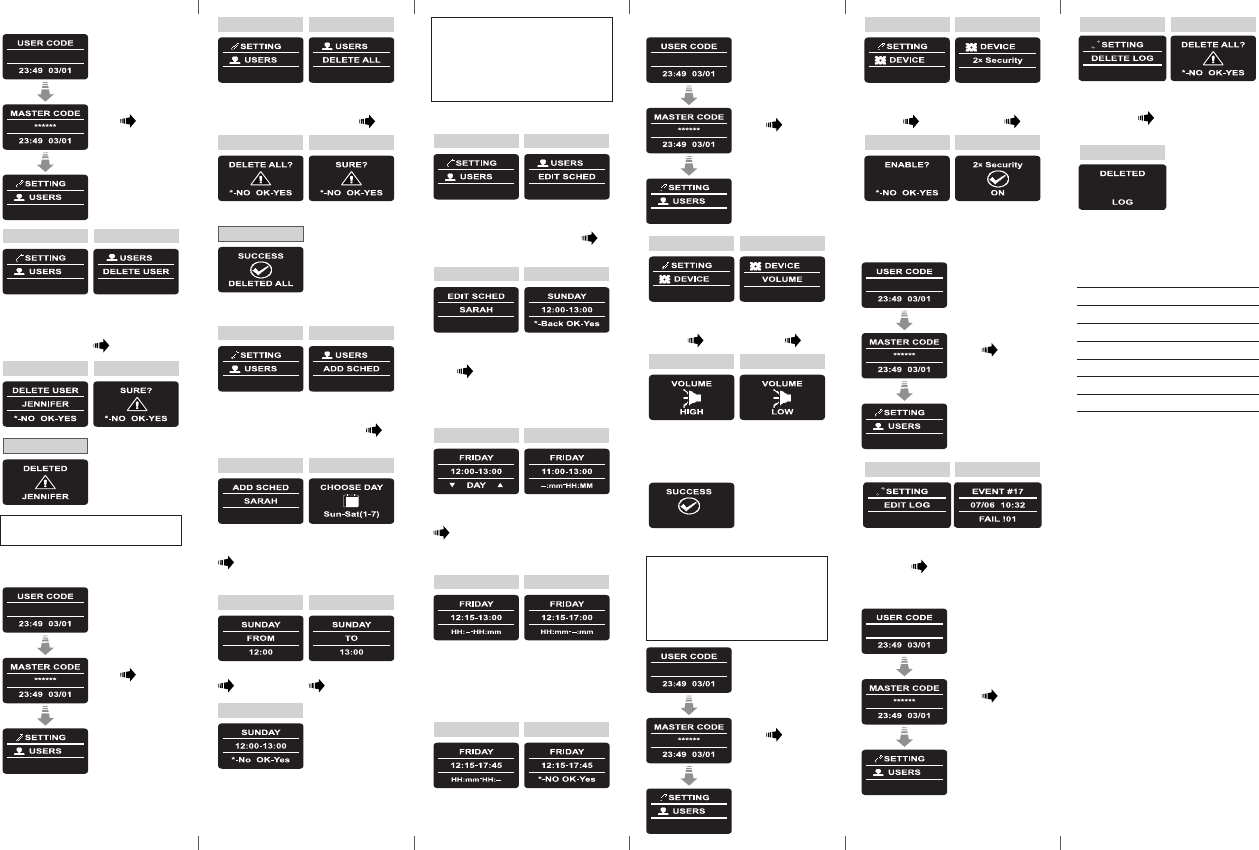
12. Delete all Users
Press[*]
Enter [Master PIN
Code] [OK] or
swipengerover
ngerprintscanner
13. Add Time Schedule
1 2
Press [OK] Use[8▼]or[2▲]
toselect:
[ADD SCHED]
[OK]
3 4
Press1-7tochoose
aday.
Example:1for
Sunday
Use[8▼]or[2▲]
toselectauser
[OK]
56
EnterSTARTme
[OK]
EnterENDme
[OK]
7
Press [OK] forYES or
[*] forNO
Twoconrmaonbeepsemied.
GreenLEDilluminates.
Use[8▼]or[2▲]to
changescheduleday
[OK]
Use[8▼]or[2▲]
tochangetheSTART
hoursetting.
Use[6 ►] tomove
toSTARTminutes.
56
Use[8▼]or[2▲]
tochangeSTART
minutessetting.
Use[6 ►] tomove
totheENDhour.
Use[8▼]or[2▲]
tochangeENDhour
setting.
Use[6 ►] tomove
totheENDminutes.
7 8
Use[8▼]or[2▲]to
changeENDminutes
setting.
Press [OK] forYES or
[*] forNO.
910
Use[8▼] or[2▲]
toselect:
[DEVICE] [OK]
1 2
Use[8▼] or[2▲]
toselect:
[VOLUME] [OK]
3 4
Press [OK]Use[8▼] or[2▲]
totogglebetween
HIGH,MEDIUM
orLOW.
Twobeepsemied.
GreenLED
illuminates.
16. Double Security
Aeracvangthedoublesecurityopon
usebothmethods-swipingangerprint
andinserngaPINcodetounlockthedoor.
Note:Usersetupwithonlyoneofthe
sengs(ngerprintorPINcode)willnotbe
abletounlockthedoor.
1 2
Use[8▼] or[2▲]
toselect:
[DEVICE] [OK]
Use[8▼] or[2▲]
toselect:
[2xSecurity] [OK]
3 4
Press [OK] Twobeepsemied.
GreenLEDilluminates.
Press[*]
Enter [Master PIN
Code] [OK] or
swipengerover
ngerprintscanner
1 2
Press [OK] Use[8▼]or[2▲]
toselect:
[DELETE ALL] [OK]
3 4
Press [OK] Press [OK]
Twobeepsemied.
GreenLED
illuminates.
All users deleted
Notes:
1. Deneupto7dierentmeschedules
forthesameuser.
2. Press[*]togobackoneverymenu.
3. Press[*]for3secondstoexitseng
menu.
14. Edit Time Schedule
Press [OK] Use[8▼]or[2▲]
toselect:
[EDIT SCHED]
[OK]
1 2
Use[8▼]or[2▲]
totogglebetween
users [OK]
Use[8▼]or[2▲]to
choosethedesired
scheduletobeedited.
Pressingon[4◄] for
3secondsshalldelete
thespecicschedule.
3 4
15. Volume Control
Press[*]
Enter [Master PIN
Code] [OK] or
swipengerover
ngerprintscanner
19. Error Codes
Error
Failedtounlock
Failedtolock
Unauthorizedngerprint
UnauthorizedCode
2xSecuritymismatch
Devicefailureduringoperaon
Absentcorrectme/dateinRTC
Useroutofschedules
Code#
01
02
03
04
05
06
07
08
Press[*]
Enter [Master PIN
Code] [OK] or
swipengerover
ngerprintscanner
17. Edit Log
Use[8▼] or[2▲]
toselect:
[EDIT LOG] [OK]
1 2
Use[6 ►] or[4 ◄]
totogglebetween
events.
18. Delete Log
Press[*]
Enter [Master PIN
Code] [OK] or
swipengerover
ngerprintscanner
Use[8▼] or[2▲]
toselect:
[DELETE LOG]
[OK]
1 2
11. Delete User
Press[*]
Enter [Master PIN
Code] [OK] or
swipengerover
ngerprintscanner
1 2
Press [OK] Use[8▼] or[2▲]
toselect:
[DELETE USER]
[OK]
3 4
User deleted
Note: The rst Master User can't be
deleted without doing a factory reset.
Press [OK]
3
However,thereisnoguaranteethat
interferencewillnotoccurinaparcular
installaon.Ifthisequipmentdoescause
harmfulinterferencetoradioortelevision
recepon,whichcanbedeterminedby
turningtheequipmentoandon,theuseris
encouragedtotryandcorrecttheinterference
byoneormoreofthefollowingmeasures:
•Reorientorrelocatethereceivingantenna.
•Increasetheseparaonbetweenthe
equipmentandthereceiver.
•Connecttheequipmentintoanoutleton
acircuitdierentfromthattowhichthe
receiverisconnected.
•Consultthedealeroranexperiencedradio/
TVtechnicianforhelp.
Labeling Requirements (FCC 15.19)
ThisdevicecomplieswithPart15ofFCC
rules.Operaonissubjecttothefollowing
twocondions:(1)thisdevicemaynotcause
harmfulinterference,and(2)thisdevicemust
acceptanyinterferencereceived,including
interferencethatmaycauseundesired
operaon.
Modicaons (FCC 15.21)
Changesormodicaonstothisequipment
notexpresslyapprovedbyMul-T-Lock®may
voidtheuser’sauthoritytooperatethis
equipment.
RF Exposure info (FCC 2.1093)-for module
radio
Thisequipmenthasbeenapprovedformobile
applicaonswheretheequipmentshouldbe
usedatdistancesgreaterthan20cmfromthe
humanbody(withtheexceponofhands,
wrists,feetandankles).Operaonatdistances
lessthan20cmisstrictlyprohibited.
FOR MOBILE DEVICE USAGE (>20cm/low
power) Radiaon Exposure Statement:
ThisequipmentcomplieswithISEDradiaon
exposurelimitssetforthforanuncontrolled
environment.Thisequipmentshouldbe
installedandoperatedwithminimumdistance
20cmbetweentheradiator&yourbody.
For radio enclosure
Federal Communicaons Commission (FCC)
Statement labelling requirement for small
device statement (FCC15.19 (3))
Thisdevicecomplieswithpart15oftheFCC
Rules.Operaonissubjecttothefollowing
twocondions:(1)Thisdevicemaynotcause
harmfulinterference,and(2)thisdevicemust
acceptanyinterferencereceived,including
interferencethatmaycauseundesired
operaon.
Radio Frequency Interference (RFI) (FCC
15.105).
Thisequipmenthasbeentestedandfound
tocomplywiththelimitsforClassBdigital
devicespursuanttoPart15oftheFCCRules.
Theselimitsaredesignedtoprovide
reasonableproteconagainstharmful
interferenceinaresidenalenvironment.
Thisequipmentgenerates,uses,andcan
radiateradiofrequencyenergy,andifnot
installedandusedinaccordancewiththe
instruconmanual,maycauseharmful
interferencetoradiocommunicaons