Magnadyne AT449150 Car Audio User Manual AT JD manual
Magnadyne Corporation Car Audio AT JD manual
User Manual
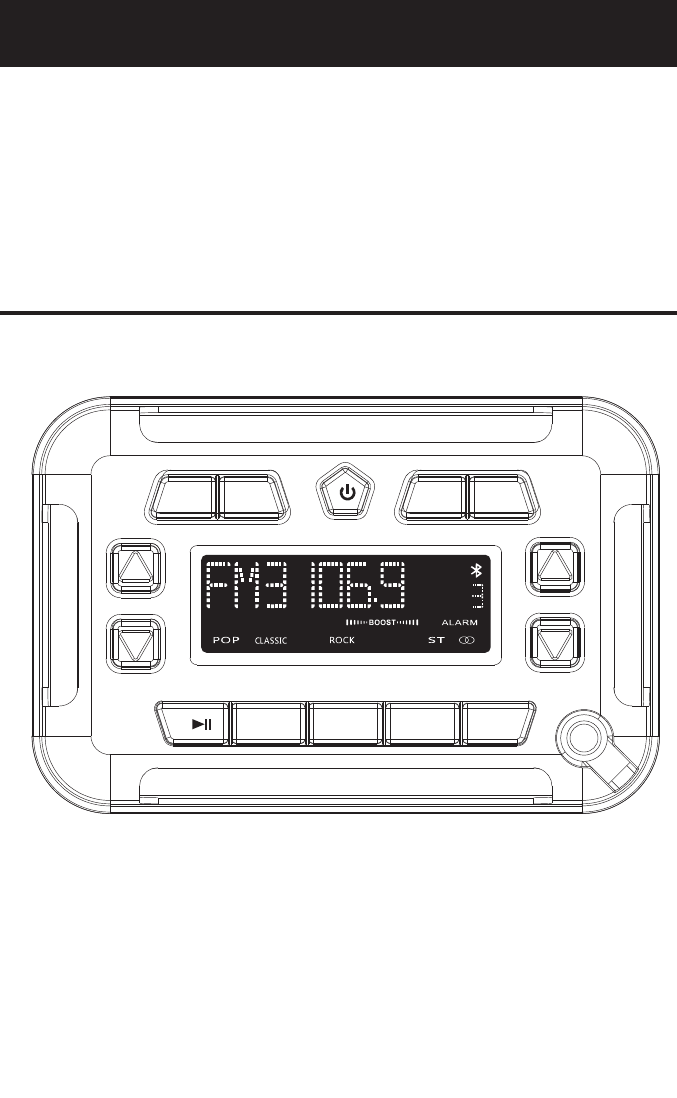
Operation
and Installation
Manual
AT449150
VOL TUNER
MUTE
1
MENU
2
3
4
+
-
AM/FM
AUX/BT
ALARM
CLOCK
+
-

Please take the time to read all of the information in this manual. Familiarity with operation and
Introduction
Index
Button Locations and Functions . . . . . . . . . . . . . . . . . . . . . . . . . . . . . . . . . . . . . . . . . . . . . . . . . . . . .
General Operation . . . . . . . . . . . . . . . . . . . . . . . . . . . . . . . . . . . . . . . . . . . . . . . . . . . . . . . . . . . . . . . .
Sound Controls . . . . . . . . . . . . . . . . . . . . . . . . . . . . . . . . . . . . . . . . . . . . . . . . . . . . . . . . . . . . . . . . . .
Using a Device with 3.5mm Output
. . . . . . . . . . . . . . . . . . . . . . . . . . . . . . . . . . . . . . . . . . . . . . .
Bluetooth Operation . . . . . . . . . . . . . . . . . . . . . . . . . . . . . . . . . . . . . . . . . . . . . . . . . . . . . . . . . . . . .
Radio Operations . . . . . . . . . . . . . . . . . . . . . . . . . . . . . . . . . . . . . . . . . . . . . . . . . . . . . . . . . . . . . . .
. . . . . . . . . . . . . . . . . . . . . . . . . . . . . . . . . . . . . . . . . . . . . . . . . . . . . .
WIRE Connections . . . . . . . . . . . . . . . . . . . . . . . . . . . . . . . . . . . . . . . . . . . . . . . . . . . . . . . . . . . . .
ALARM/CLOCK Operations
installation procedures will help you obtain the best possible performance from your new
Entertainment Center.
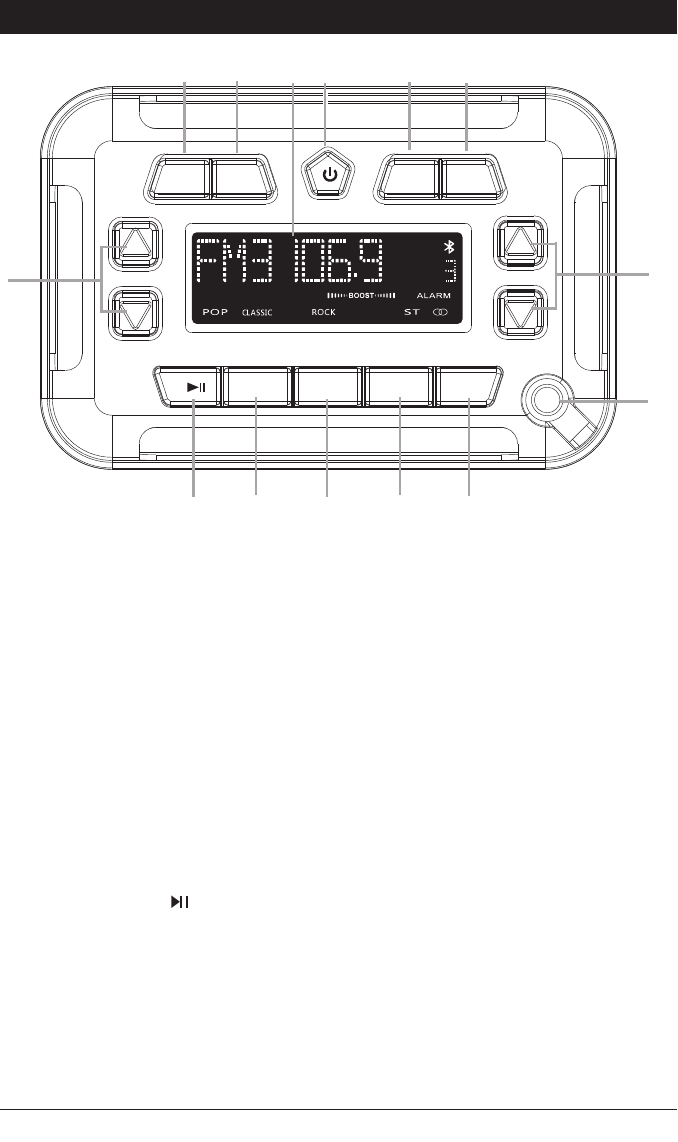
Button Locations and Functions
1.
4. Play/Pause Button (
):
Bluetooth Mode: Press to pause playback.
5.
MENU Button: Press to toggle between: bass,
treble, balance, fader, equalizer, area, boost
local/distance ,MO/ST ,DISP on/off ,alarm
6.Track Buttons:
Radio Mode: Press for automatic seek up or
seek down of radio stations. Press and hold
to activate manual tuning.
7.
V
olume: Press to increase or decrease the
volume level
.
9.
Display Area: This area displays mode infor-
mation, in the radio mode the radio frequency
and in IPOD and supported Bluetooth modes
song information is displayed.
10.
3.5mm Jack: Plug a cable into the 3.5mm jack
then into a device (MP3 player or phone) with
a 3.5mm socket. The unit will not control the
device, it simply allows the audio to be played
through the system.
VOL TUNER
MUTE
1
MENU
2
3
4
+
-
AM/FM
AUX/BT
ALARM
CLOCK
+
-
1
4
76
23
5
9
10
8
11
12 13 14
Power/Mute Button ( MUTE):
Mute:When the unit is on press and
release this button to mute the audio,
press again to restore the audio.
2. CLOCK Button:
Press to switch between infor mation
display and clock.
hold the button clock adjust setup
3. ALARM Button:
Press to switch between infor mation
display and alarm clock.
hold the button alarm clock adjust setup
Power: Press to turn the unit on when
the unit is off, press and hold the button
to turn the unit off.
Radio: Recalls a memorized radio
station, and programs a radio station
into memory
Bluetooth Mode: Press to select the next or
previous tracks.
8. BT/AUX :
Press to select between input sources
BT and AUX
settings.
11. AM/FM:
Press to select between input band
FM and AM
12. 12~14 Button:
Radio: Recalls a memorized radio
station, and programs a radio station
into memory
Sound Controls
Volume:
Increase the volume by pressing the VOL
button. Decrease the volume by pressing the
VOL button.
Display
Increase
Decrease
General Operations
VOL TUNER
MUTE
1
MENU
2
3
4
+
-
AM/FM
AUX/BT
ALARM
CLOCK
+
-
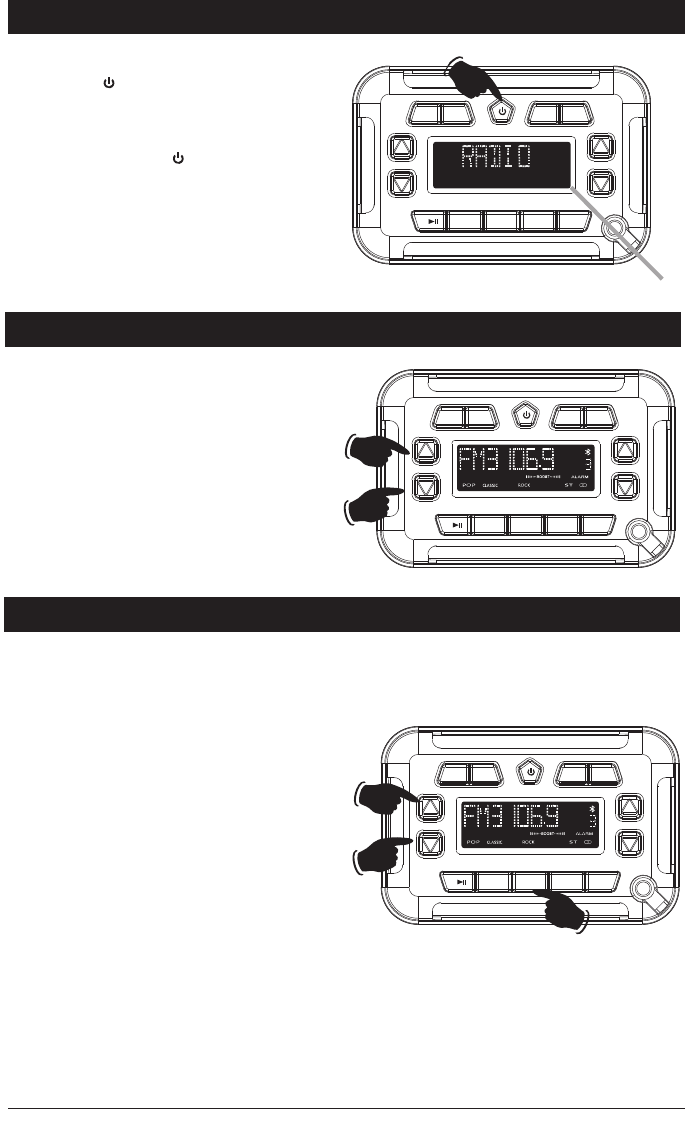
Power On:
Press the / button to turn the
entertainment center on.
mute
Power Off:
Press and hold the / Mute button for 2
sec onds to turn the unit off.
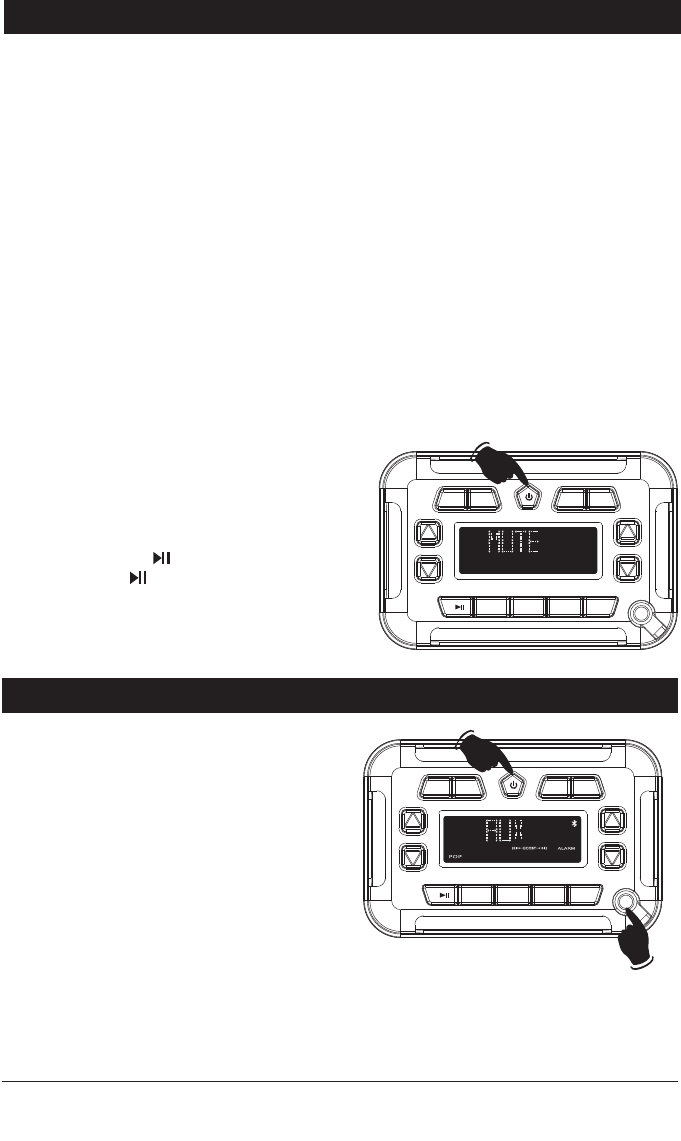
Mute:
When the unit is on press and
release this button to mute the audio,
press again to restore the audio.
VOL TUNER
MUTE
1
MENU
2
3
4
+
-
AM/FM
AUX/BT
ALARM
CLOCK
+
-
-
+
Sound Controls (Continued)
VOL TUNER
MUTE
1
MENU
2
3
4
+
-
AM/FM
AUX/BT
ALARM
CLOCK
+
-
Bass, Treble, Balance, Fader and Equalizer Control
Select the desired sound mode by pressing the MENU button. The modes will be displayed in the following
order: Bass, Treble, Balance, Fader, Equalizer, Area Setting, Loudness, Distance/Local and Volume. After
5 seconds of inactivity control reverts back to volume control.
Bass:
Select the Bass mode by pressing the MENU
button
and “BAS 0” will appear in the display. Increase the
Bass by pressing the VOL
button. Decrease
the Bass by pressing the VOL
button.
+-
Treble:
Select the Treble mode by pressing the MENU
until “TRE 0” appears in the display. Increase the
Treble by pressing the
VOL
button. Decrease
the Treble by pressing the
VOL
button.
+-
Balance:
Select the Balance mode by pressing the MENU button until “BAL L-R” appears in the display.
Adjust the Balance to the right speakers by pressing the
button. Adjust the Balance to the
left speakers by pressing the button.
VOL+
VOL-
R -L = Equal sound Right and Left.
R 10R = Right speakers only.
L 10L = Left speakers only.
Adjustment
Buttons
Charge Only
Sound Controls (Continued)
Fader:
Select the Fader mode by pressing the MENU
button until “FAD F_R” appears in the display.
Adjust the Fader to the front speakers by pressing the VOL+
button. Adjust the Fader to the
Rear speakers by pressing the VOL-
button.
F
-R = Equal sound Front and Rear.
F 10F = Front speakers only.
R 10R = Rear speakers only.
Equalizer (EQ):
Select the Equalizer mode by pressing the MENU
button until “DSP OFF” appears in the display.
button. Select between: Pop, Jazz, Rock, Classic
and Equalizer Off (DSP OFF).
Note: When an Equalizer setting is selected ( Classic) both the Bass and) Treble mode will become
To change the equalizer setting press the VOL+
inactive and can not be selected. To change the bass and treble settings set the Equalizer to .
“DSP OFF”
Boost will boost high and low tones at low volume levels. To turn on boost press the MENU
BOOST:
button until “boost off ” appears in the display. Press the VOL+ button and “boost” will
appear in the display. boost off mode is now activated.
Mute:
Press the MUTE
button to mute the volume level.
Press the MUTE button again to restore the
Note: If the unit is in either the Bluetooth
mode pressing the
button will pause play
back. Press the
button again will resume
playback.
volume.
VOL TUNER
MUTE
1
MENU
2
3
4
+
-
AM/FM
AUX/BT
ALARM
CLOCK
+
-
Using a Device with 3.5mm Audio Output
Inserting a Device with 3.5mm Audio Output
Jack into Docking Station:
Selecting the Input Mode:
1.Press the BT/AUX button until “AUX IN”
appears in the display.
2.Use the controls on the entertainment center
to adjust the volume.
Note 1: The unit will not automatically switch
to “AUX IN ” mode when the device is initially
connected to the 3.5mm cable. Select “AUX IN ”
using the BT/AUX
button.
Note 2: The entertainment center will not control
the device it just allows for the audio from the
device to play through the entertainment center.
Note 3: For optimum sound quality make sure the
media volume on the device is set at 75% or greater.
3.5mm CD_J Cable
VOL TUNER
MUTE
1
MENU
2
3
4
+
-
AM/FM
AUX/BT
ALARM
CLOCK
+
-
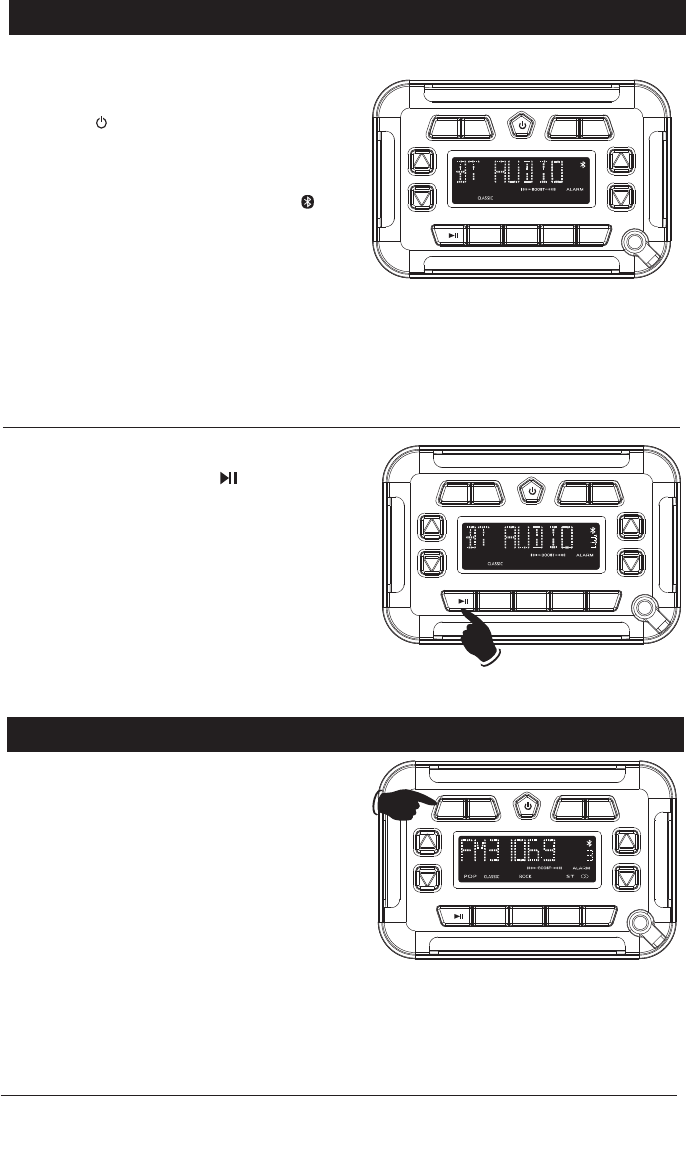
Bluetooth Operation
Pairing Bluetooth Devices:
1. Open the Bluetooth setup program on the
device and activate the Bluetooth feature. mobile
2.
Press the
button to turn on the entertainment
3. From you mobile device scan for available devices.
Select ”AT JD ” to connect to the unit.
4.
When the mobile device has been paired “ ”
will
appear in the entertainment center’s display
.
5.
Press the
BT/AUX
button until “BT AUDIO” appears in
the display. Bluetooth audio from your mobile device
can now be played through the entertainment center.
Note 1: A previously paired Bluetooth mobile device
will automatically connect to the entertainment center when “BT AUDIO” is selected using the
(if it is within range).
Note 2: If the Bluetooth mobile device is already paired with the entertainment center, select
“AT JD ” on your phone and touch “Connect”.
Bluetooth Operation:
Play/Pause Button:
Press the
button to pause the
Bluetooth playback. Press again to resume playback.
Note: The Entertainment Center display will not
show the playback is pause. The mobile device will
show that the playback is paused.
Changing the Track:
Press the TUNER+
button to select a higher track.
Press the TUNER -
button to select a lower track.
Sound Controls: Use the sound controls on the main
unit to adjust the volume and sound quality.
Note: For optimum sound quality make sure the
media volume on the device is set at 75% or greater.
VOL TUNER
MUTE
1
MENU
2
3
4
+
-
AM/FM
AUX/BT
ALARM
CLOCK
+
-
center.
BT/AUX button
VOL TUNER
MUTE
1
MENU
2
3
4
+
-
AM/FM
AUX/BT
ALARM
CLOCK
+
-
Radio Operations
Selecting the AM/FM Radio Mode:
Press the AM/FM
button until “RADIO” appears
in the display along with the radio will appear
VOL TUNER
MUTE
1
MENU
2
3
4
+
-
AM/FM
AUX/BT
ALARM
CLOCK
+
-
in the display. After a brief moment “FM or AM”
frequency.
Radio Operations
Manually Tuning in a Radio Station:
Press and hold the TUNER+ button until
“MANUAL” appears in the display.
Then press
the TUNER+ button to manually tune to a
higher radio station or press the TUNER-
button to manually tune to a lower radio
Note: After 5 seconds of inactivity control
reverts back to scan tuning. “AUTO” will be
displayed in the LCD.
Hold
Tuning in a Radio Station Using Seek:
Press the TUNER+ button and the tuner will
seek up to the next strong station and stop
seeking, then start playing.
Press the TUNER- button and the tuner will
seek down to the next strong station and
stop seeking, then start playing.
VOL TUNER
MUTE
1
MENU
2
3
4
+
-
AM/FM
AUX/BT
ALARM
CLOCK
+
-
Higher
Lower
VOL TUNER
MUTE
1
MENU
2
3
4
+
-
AM/FM
AUX/BT
ALARM
CLOCK
+
-
station.
Stereo/Mono Operation:
Note: “ST” will appear in the display when a FM
stereo station is being received.
For weaker FM stereo stations selecting mono
reception usually improves reception.
1.
To switch from stereo to mono reception hold
press the MENU button until “STEREO”
appears in the display.
2. Press the VOL+ button and
“MONO” will
appear in the display.
Note: The unit will leave feature programing after
5 seconds of no button activity.
Stereo Reception Indicator
VOL TUNER
MUTE
1
MENU
2
3
4
+
-
AM/FM
AUX/BT
ALARM
CLOCK
+
-
When scanning for station to eliminate weaker
fringe stations change the radio reception from
Distance (DX) to Local (LOCAL).
1.
To switch from distance to local reception press
the SEL button until “DX” appears in the display.
2. Press the VOL+ button and
“LOCAL” will
appear in the display.
Note: The unit will leave feature programing after
5 seconds of no button activity.
VOL TUNER
MUTE
1
MENU
2
3
4
+
-
AM/FM
AUX/BT
ALARM
CLOCK
+
-
Switching from US to Europe Radio Tuning
Note: Do not change if using in North America.
1. Press the MENU button until “AREA USA” appears in the display.
2.
Press the VOL+ button and
“AREA EUR” will appear in the display.
Note: The unit will leave feature programing after 5 seconds of no button activity.
Distance/Local Reception Operation:
ALARM Reception Operation:
CLOCK Reception Operation:
VOL TUNER
MUTE
1
MENU
2
3
4
+
-
AM/FM
AUX/BT
ALARM
CLOCK
+
-
VOL TUNER
MUTE
1
MENU
2
3
4
+
-
AM/FM
AUX/BT
ALARM
CLOCK
+
-
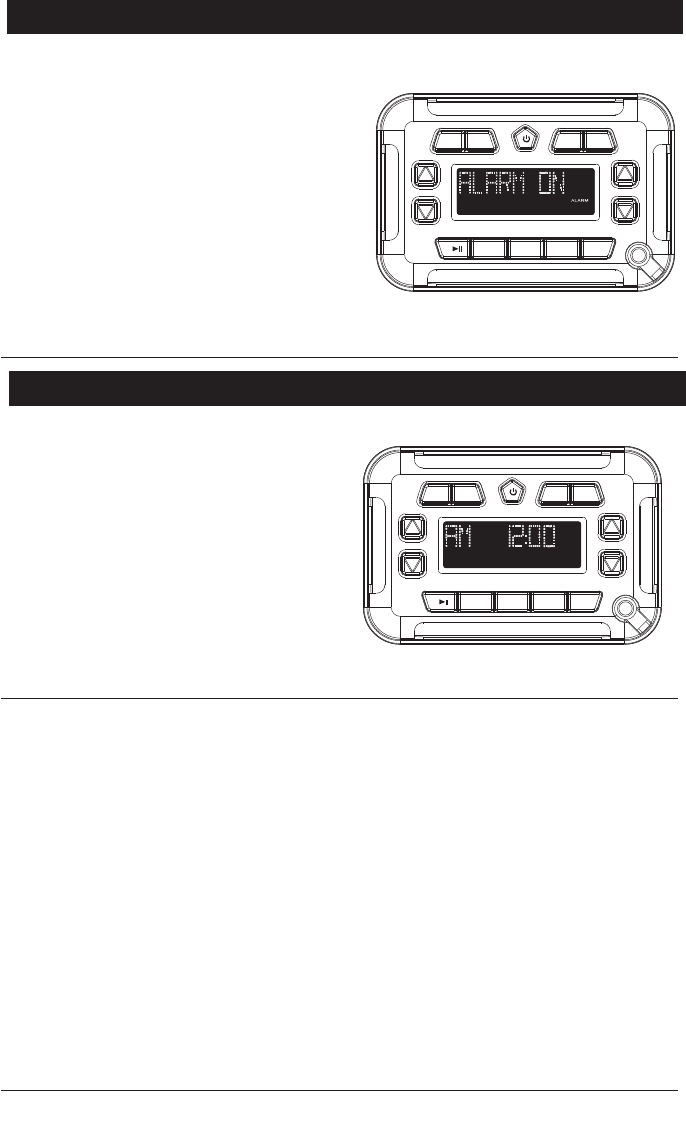
Setting the Clock:
1:
2: When hold press CLOCK button
again until Time adjudt ,
3:press VOL (+)
4:
or press any
button to finish time setting.
Press and hold the CLOCK button until
the time starts flashing.
to adjust the hours.
to adjust the minutes.
After waiting a few seconds the unit will
exit clock programming.
press VOL (-)
1:Hold press MENU button until display
ALARM OFF, than press VOL (+/-) to open
ALARM ON. LCD on display“ ALARM”
2: press ALARM button to display time,
3: hold press ALARM button again, when
ARLAM blink, adjustment hour VOL (+) and
minute VOL (-) to setting correct time. After
complete the adjustment, wait for 8 sec to
automatically set the time or press any
button to finish time setting.
Setting the ALARM :
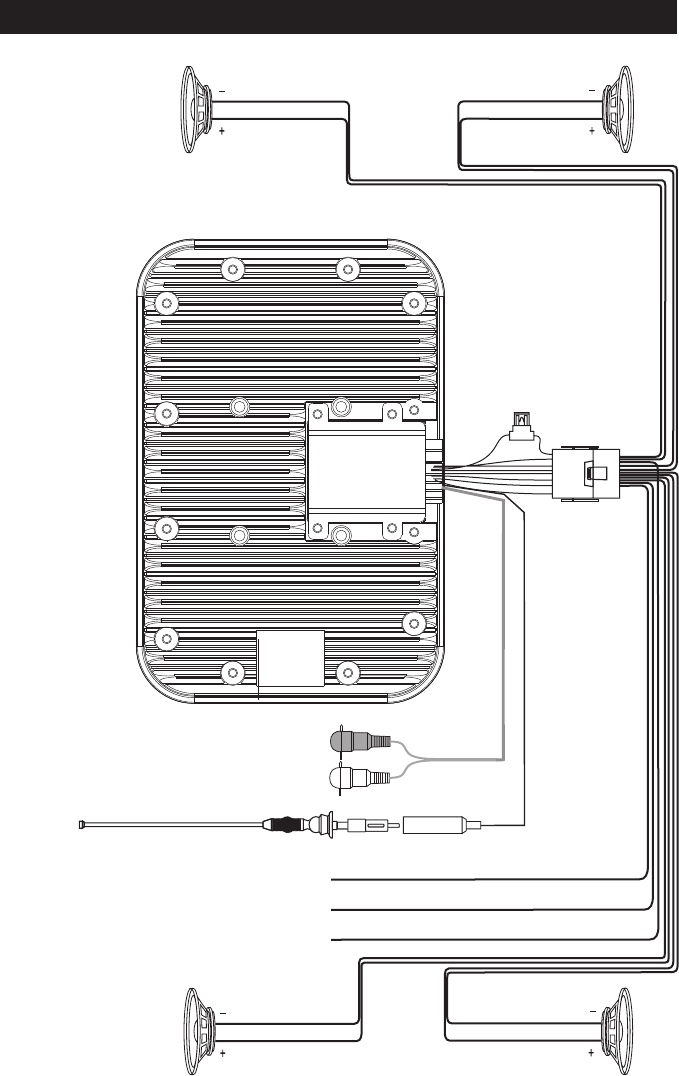
Speaker Connections
External Automotive
Type Antenna
(Optional)
White/Black Wire
Left
Front
Speaker White Wire
Gray/Black Wire
Gray Wire
Right
Front
Speaker
Right
Rear
Speaker
Violet/Black Wire
Violet Wire
Green/Black Wire
Green Wire
Left
Rear
Speaker
Blue WireTrigger for Amp (+12VDC)
Black Wire Ground
Red Wire (+) to 12 Volt Ignition
10 Amp
Fuse
Gray Wires Audio Out
Right
Left
Wiring Harness
Model: SPA-HAR
(Sold Separately)
Speaker Connections
FCC Statement:
This device complies with part 15 of the FCC Rules. Operation is subject to the following
two conditions: (1) This device may not cause harmful interference, and (2) this device
must accept any interference received, including interference that may cause undesired
operation.
This equipment has been tested and found to comply with the limits for a Class B digital
device, pursuant to part 15 of the FCC Rules. These limits are designed to provide
reasonable protection against harmful interference in a residential installation. This
equipment generates, uses and can radiate radio frequency energy and, if not installed
and used in accordance with the instructions, may cause harmful interference to radio
communications. However, there is no guarantee that interference will not occur in a
particular installation. If this equipment does cause harmful interference to radio or
television reception, which can be determined by turning the equipment off and on, the
user is encouraged to try to correct the interference by one or more of the following
measures:
—Reorient or relocate the receiving antenna.
—Increase the separation between the equipment and receiver.
—Connect the equipment into an outlet on a circuit different from that to which the
receiver is connected.
—Consult the dealer or an experienced radio/TV technician for help.
Caution: Any changes or modifications not expressly approved by the party responsible
for compliance could void the user's authority to operate the equipment.
This equipment complies with FCC radiation exposure limits set forth for an uncontrolled environment.
This transmitter must not be co-located or operating in conjunction with any other antenna or
transmitter.