Magnavox 15MF605T/17 User Manual LCD TELEVISION Manuals And Guides L0504190
MAGNAVOX LCD Television Manual L0504190 MAGNAVOX LCD Television Owner's Manual, MAGNAVOX LCD Television installation guides
User Manual: Magnavox 15MF605T/17 15MF605T/17 MAGNAVOX LCD TELEVISION - Manuals and Guides View the owners manual for your MAGNAVOX LCD TELEVISION #15MF605T17. Home:Electronics Parts:Magnavox Parts:Magnavox LCD TELEVISION Manual
Open the PDF directly: View PDF ![]() .
.
Page Count: 20

NEED HELP?CALL us!
MAGNAVOX REPRESENTATIVES ARE READY TO HELP YOU WITH
ANY QUESTIONS ABOUT YOUR NEW PRODUCT, WE CAN GUIDE
YOU THROUGH CONNECTIONS, FIRST-T{ME SETUP, AND ANY OF
THE FEATURES, WE WANT YOU TO START ENJOYING YOUR NEW
PRODUCT RIGHT AWAY,
CALL US BEFORE YOU CONSIDER RETURNING THE PRODUCT.
t-800-70S-2000
OR VISIT US ON THE WEB AT WWW, MAGNAVOX, COM
3!38 155 23432
Registering your model with MAGNAVOX makes you eligible for all of the valuable benefits listed
below, so don't miss out, Complete and return your Product Registration Card at once to ensure:
Cengretuletlens on your purchnse,
end welcome to the "fernilyt"
Dear MAGNAVOX product owner:
Thank you for your confidence in
MAGNAVOXJou've selected one of the
best-built, best-backed products available today.
\_/e'll do everything in our power to keep you
happy with your purchase for many years to
come,
As a member of the PfAGNAVOX '%miJy."
you're entided to protection by one of the most
comprehensive warranties and
outstanding service networks in the industry.
\_'/haEs more, your purchase guarantees you'll
receive all the information and special offers for
which you qualify, plus easy access to
accessories from our convenient home
shopping network.
Most importantly, you can count on our
uncompromising commkcment to your total
satisfaction.
All of this is our way of saying welcome - and
thanks for investing in a !'4AGNAVOX product.
P.S.To get the mo_t from your MAGNAVOX
purchase, you must return your
Warranty Registration Card within J0
days. So please mail it to us right now!
Know these safety symbols
_l his "bolt of lightning" indicates
uninsulated material within your unit may
cause an electrical shock. For the safety of
everyone in your household, please do not
remove product covering.
,_The "exclamation point" calls attention to
features for which you should read the
enclosed literature closely to prevent
operating and maintenance problems.
WARNING: To reduce the risk of fire or
electric shock, this apparatus should not be
exposed to rain or moisture and objects filled with
liquids, such as vases, should not be placed on this
apparatus.
CAUTION: To prevent electric shock, match wide
blade of plug to wide slot, fully insert.
ATTENTION: Pour &viter tes choc
&lectriques, introduire la lame ta plus large de la fiche
dans la borne correspondante de ta prise et pousser
iusqu'au fond.
For Customer Use
Enter below the Serial No. which is located
on the rear of the cabinet. Retain this
information for future reference.
Model No.
Serial No.
IMPORTANT SAFETY INSTRUCTmONS
READ BEFORE erECTiNG EQUIPMENT
I.
2.
3.
4.
5.
6.
7,
II.
12
13.
14.
Read these instructions.
Keep these instructions,
Heed all warnings.
Foiler€ all instructions.
Do not use this apparatus near water
C_ean only with a dry cloth.
Do not block any of the vendhdon openings.
Install in accordance with the manufacturers instructions.
Do not install near any heat sources such as radiators,
heat registers, stoves, or other apparatus (including
amplifiers) that produce heat,
Do not defeat the safety purpose of the polarized or
grounding-type plug. A polarized plug has two blades with
one wider than the other. A grounding type plug has two
blades and third grounding prong. The wide blade or third
prong are provided for your safety. When the provided
plug does not fit into your outlet, consult an electrician
for replacement of the obsolete outlet,
Protect the power cord from being walked on or pinched
particularly at plugs, convenience receptacles, and the
point where they exit from the apparatus.
Only use attachments/accessories specified by the
manufacturer
Use only with a cart, stand, tripod, bracket, or
table specified by the manufacturer, or sold with
the apparatus. When a cart is used, use caution
when moving the cart/apparatus combination to avoid
injury frorn tip-over.
Unplug this apparatus during lightning storms or when
unused for long periods of time.
Refer BI servicing to qualified service personnel Servicing
is required when the apparatus has been damaged in any
way, such as power-supply cord or plug is damaged, liquid
has been spilled or objects have fallen into apparatus, the
apparatus has been exposed to rain or moisture, does not
operate normally, or has been dropped.
This product may contain lead and mercury, Disposal of
these materials may be regulated due to envh*onmentB
considerations. For disposal or recycling information,
please contact your local authorities or the Electronic
h_dustries Alfiance: www.eiae.org
Damage Requiring Service - The appliance should be
serviced by qualified service personnel when:
A. The power supply cord or the plug has been damaged;
B. Objects have fallen, or liquid has been spilled into the
appliance;
C. The appliance has been exposed to rain
D, The appliance does not appear to operate normally or
exhibits a marked change in performance;
E. The apphance has been dropped, or the enclosure
damaged.
17. TUtfgtabiUty -AI[ televisions must comply with
recommended international global safToy standards for tilt
and stability properties of its cabinet design.
• Do not compromise these design standards by applying
excessive pull force to the front, or top, of the cabinet
which could ultimately overturn the product.
• Also, do not endanger yourseff, or children, by placing
electronic equipment/toys on the top of the cabinet. Such
items could unsuspecdngly fall from the top of the set and
cause product damage and/or personal iniury,
18. Wall or CeUing Mounting -The appliance should be
mounted to a wall or ceiling on_y as recommended by the
manufacturer
19. Power Lines - An outdoor antenna should be located
away from power {inns.
20. Outdoor Antenna Grounding - If an outside antenna is
connected to the receiver, be sure the antenna systePf] is
grounded so as to provide some protection against voltage
surges and built up static charges.
Section 810 of the National Electric Code, ANSI/NFPA
No, 70-1984, provides information with respect to proper
grounding of the mast and supporting structure, grounding
of the lead-in wire to an antenna discharge unit, size of
grounding connectors, location of antenna discharge unit,
connection to grounding electrodes, and requirements for
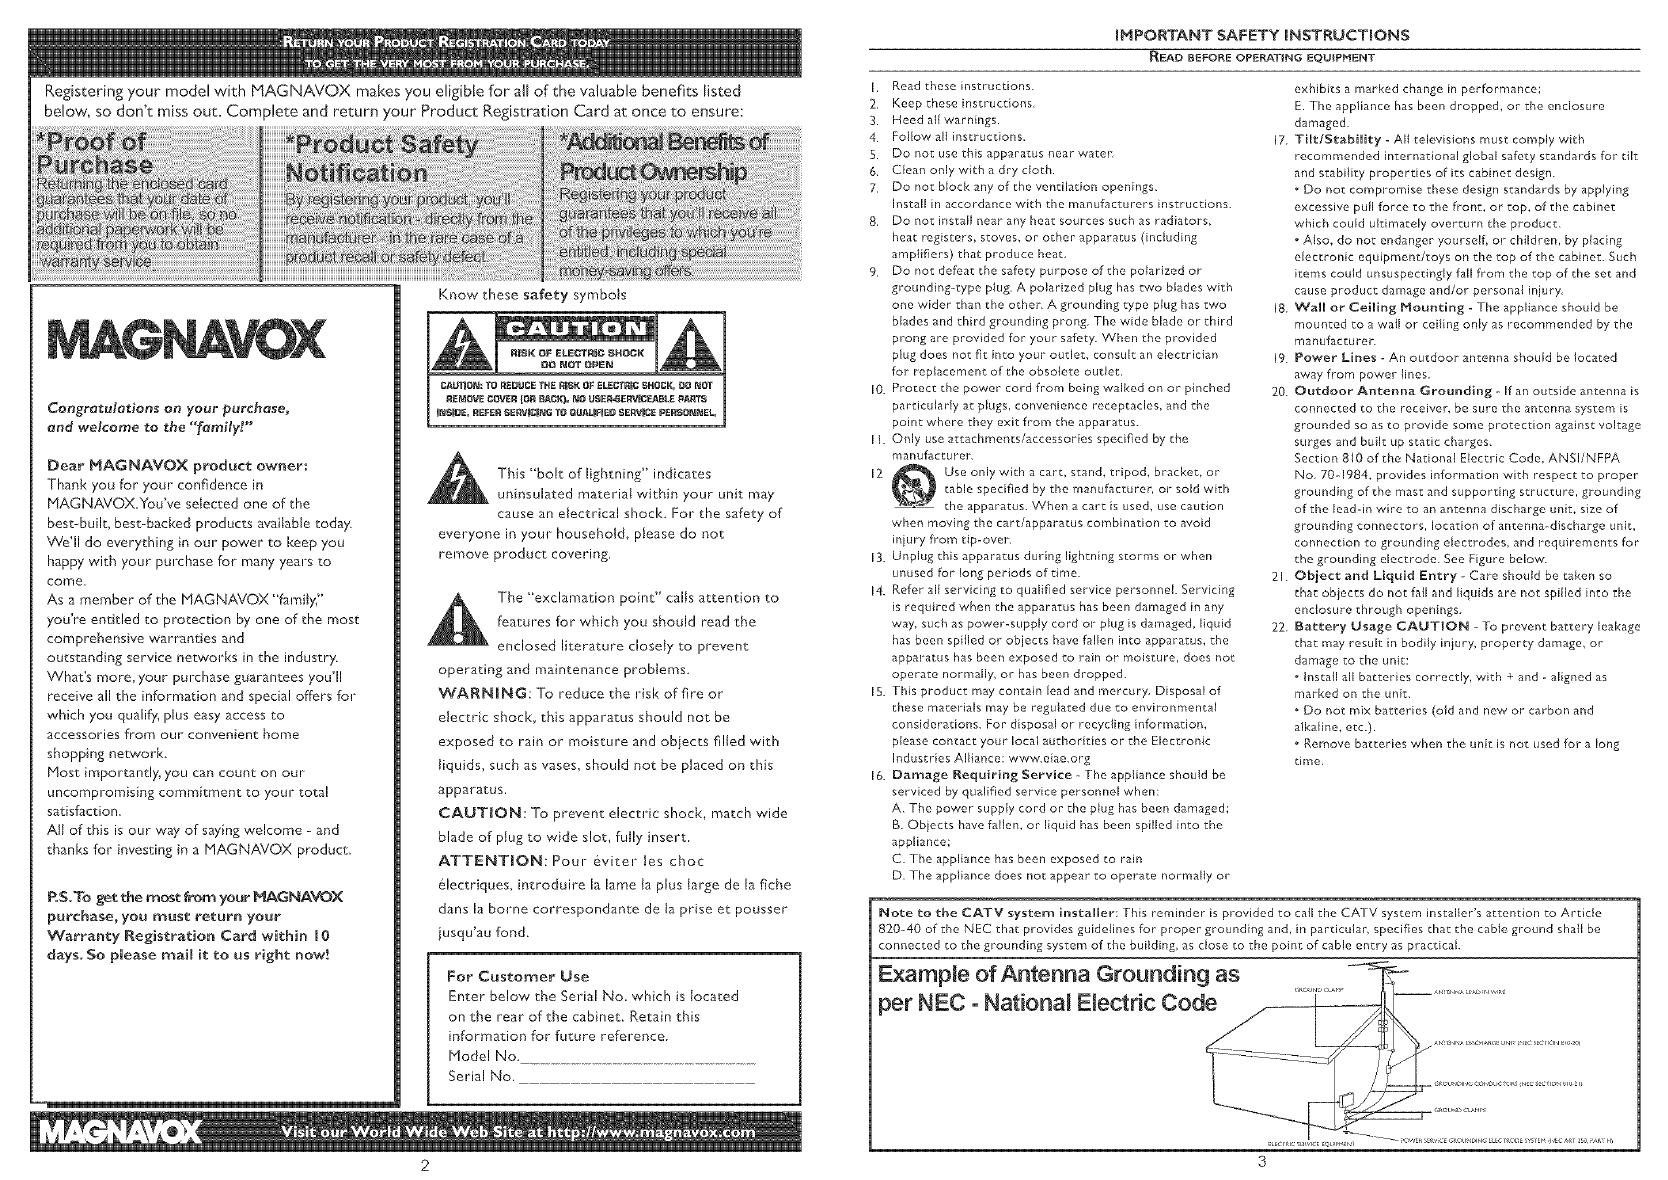
the grounding electrode. See Figure below.
21. Object and Liquld Entry _ Care should be taken so
that obiects do not fB[ _nd liquids _re not spilled into the
enclosure through openings.
22. Battery Osage CAUTION - To prevent battery leakage
that may result in bodily in}ury, property damage, or
damage to the unit:
• Install all batteries correctly, with + and - aligned as
marked on the unit.
• Do not mix batteries (old and new, or carbon and
alkaline, etc.).
• Remove batteries when the unit is not used for a long
time,
Note to the CATV system installer: This reminder is provided to call the CAI V system installer's attention to Article
820-40 of the NEC that provides guideEines for proper grounding and, in particular, specifies that the cable ground shall be
connected to the grounding system of the building, as Bose to the point of cable entry as practicak
Example of Antenna Grounding as -_ _-
)er NEC -National Electric Cod ......... *_.......
3
Introduction
VVelcome/Registration of Your TV ............ 2
IMPORTANT SAFETY INSTRUCTIONS ...... 3
Table of Content 4
[] Getting Started
Before h]stallation .......................... 5
Installing LCD TV on the wall ................... 5
Basic TV and Remote Control Operations ...... 6
Remote Control ................................... 7
Antenna Connection 8
Basic Cable TV Connection 8
Cable Box Connections 9
Audio/Video Input Connections ............. 10
S-Video Connections .......................... ! !
Component (YPbPr) Connections .......... 12
PC (Monitor) Connection !3
trista[[ Neriu
Language Settings 14
Tuner Mode Control ..................... IS
Auto Program (Setting Up Channels) ............. 16
Channel Edit Control (To Add or Delete channels) 17
Factory Reset 18
Smart Picture arid Smart Sourid
Smar t Picture Control .............. 19
Srnart Sound Control !9
Picture Neriu
TV Picture Menu Controls 2.0
Sourid Neriu
TV Sound Menu Controls 21
Features Heriu
Auto Lock ........................ 22
Auto Lock Access Code 23
Auto Lock Program 24
Auto Lock - Movie Ratings 25
Auto Lock - TV Ratings 26
Using The Picture Format 27
Closed Captions 28
PC Node
PC Picture Controls ................. 29
PC Audio Controls ...................... 30
Using PC PIP (Picture In Picture) Feature ....... 31
Setting Up The PC Mode 32
Gerieral Iriformatiori
Trouble Shooting Tips ...................... 33
Care And Cleaning 34
Index 35
Regulatory ........................... 36
Factory Service Locations 37
Factory Service Locations 38
Limited Warranty 39
Here are a few of the special features of your new LCD
TV
Audio/Video Iri Jacks: Use to quickly connect other
equipment to your LCD TV.
Automatic Chaririel Programmirig (Auto Program):
Quick and easy setup of available channels.
Closed Captioriing: Allows the viewer to read TV
program dialog or voice conversations as on-screen text.
Ori-screeri Merius: Helpful messages (in English, Spanish,
or French) for setting TV controls.
Remote Control Works your LCD TV features.
Sleep Timer: Turns off the LCD TV within an arnount
of time you specify (15-240 minutes frorn the current
time).
AutoLock: Lets you block viewing of certain TV
channels if you do not want your children viewing
inappropriate material
Staridard broadcast (VHF/UHF) or Cable TV
chaririel
capability
Stereo capability: Includes a built-in amplifier and
twin-speaker system, allowing reception of TV programs
broadcast in stereo
Treble, [Bass, arid Ba[arice: Enhance the LCD TV's
sound.
"Your new LCD TV and its packaging contain materials
that can be recycled and reused Specialized companies
can recycle your product to increase the amount of
reusable materials and minimize the amounts that need
to be properly disposed.
Your product also uses batteries that should not be
thrown away when depleted, but should be handed in
and disposed of as small chemical waste.
When you replace your existing equipment, please find
out about the local reguJa'dons regarding disposal of your
old television,
batteries, and pacldng materials
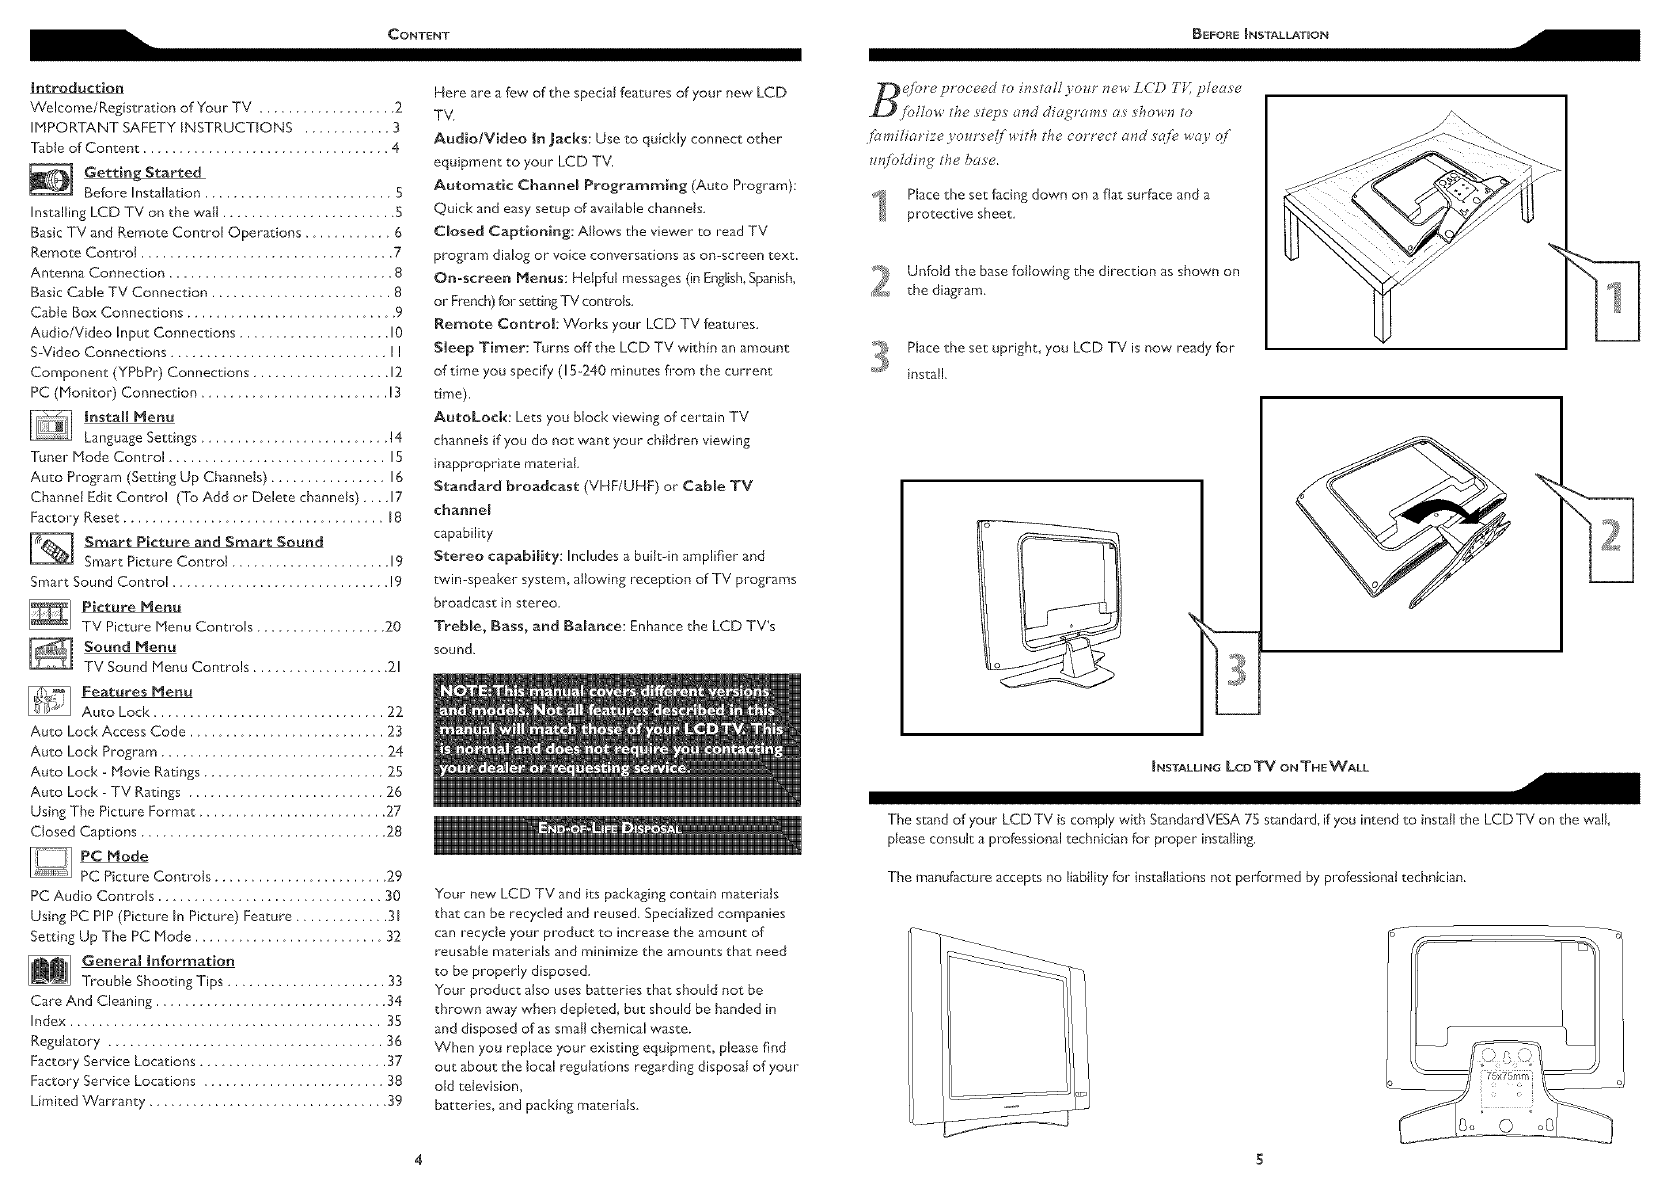
e/ore proceed to inrtall yo_u" new LCD TI [please
/ollow the s'tepr and diagrums <a_ s'howt7 to
_alriUiat ize youl:YeU ri,ith the correct and _q[e wa) q_
w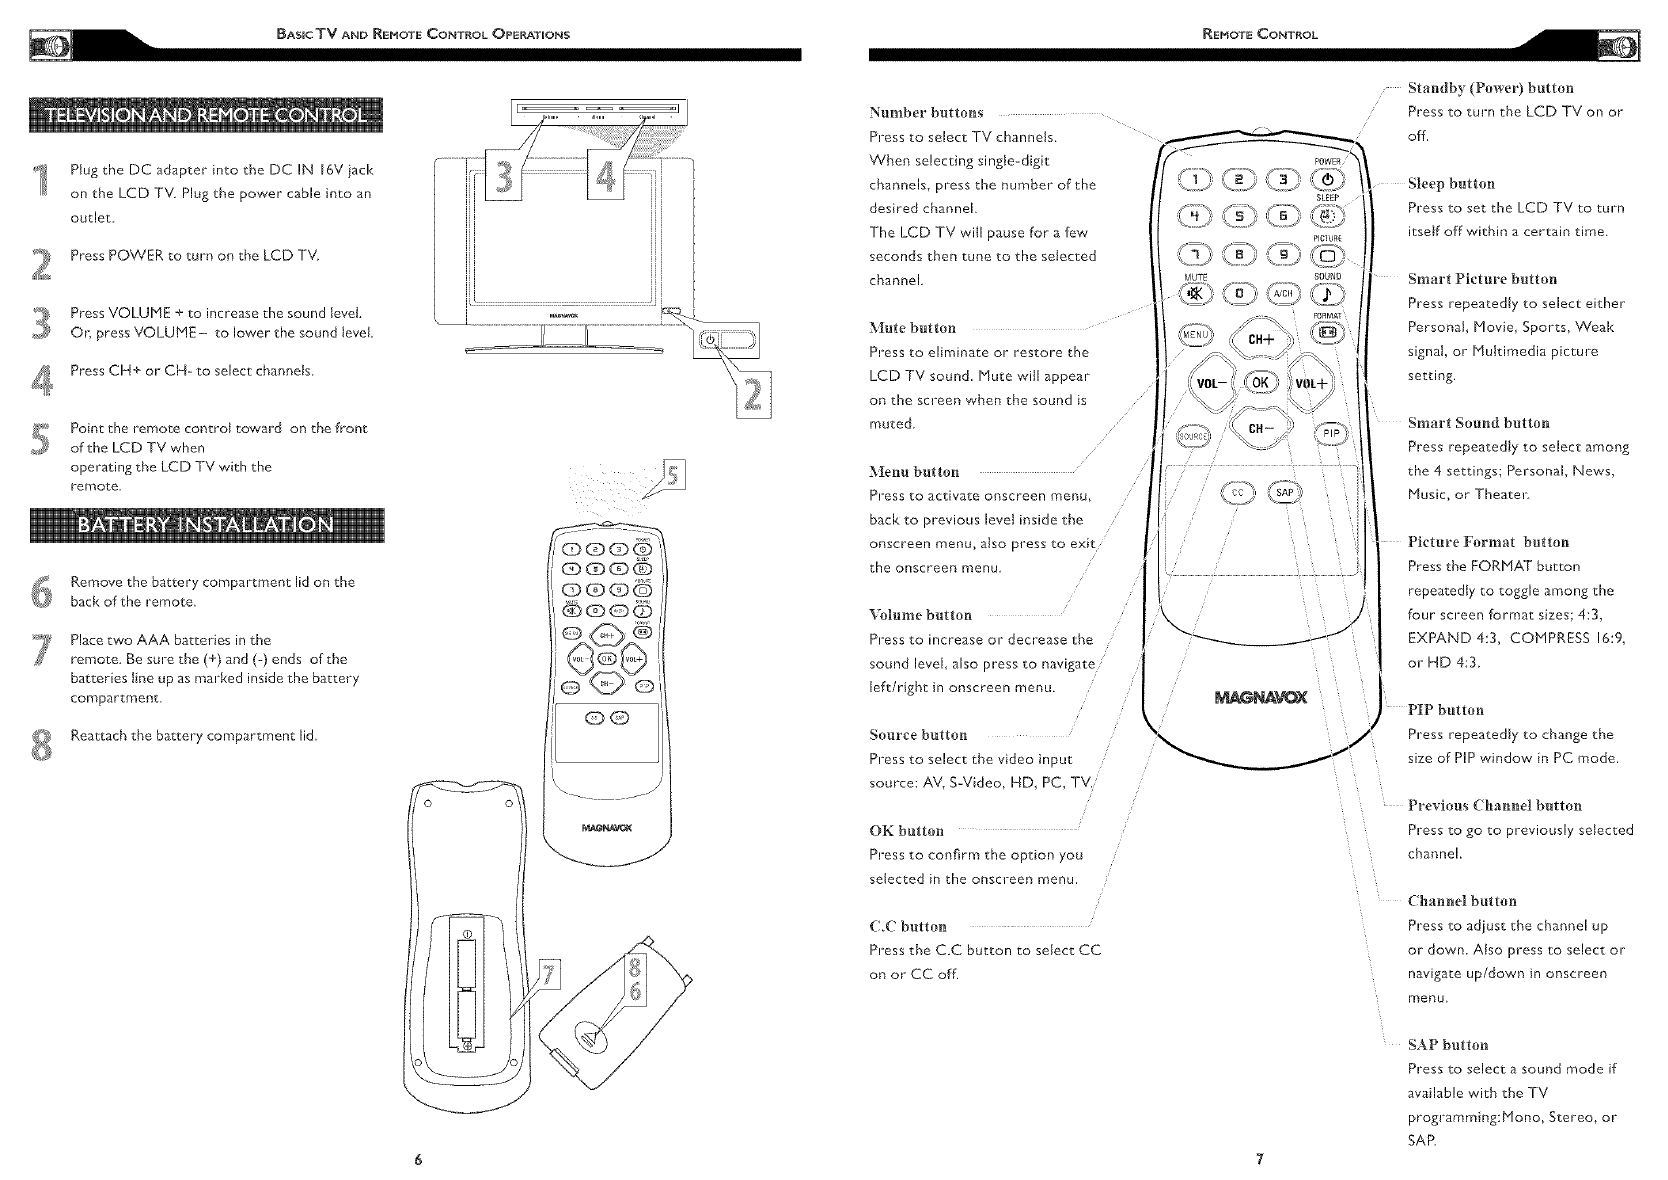
4
6
7
8
Plug the DC adapter into the DC IN 16Viack
on the LCD TV Plug the power cable into an
outlet
Press POWER to turn on the LCD TV
Press VOLUME + to increase the sound level.
On press VOLUME- to lower the sound level
Press CH+ or CH- to select channels
Pointthe remote controltoward on the front
of the LCD TV when
operating the LCD TV with the
rernote
Remove the battery compartment lid on the
back of the remote.
Place two AAA batteries in the
remote. Be sure the (+) and (-) ends of the
batteries line up as marked inside the battery
compartment,
Reattach the battery compartment lid.
.......... ,,_ ZZZZZ Z::: ............
@(3::)@@
QQ
0 0
L_J
• j
Nuulber buttous
Press to select TV channeis.
"When selecting single-digit
channels, press the number of the
desired channel.
The LCD iV will pause for a few
seconds "then tune to the selected
channel
_ute buttou
Press to eliFninate or restore the
LCD TV sound. Mute will appear
on the screen when the sound is
muted
_euu button
Press to activate onscreen menu,
back to previous level inside the
onscreen menu, also press to exit
the onscreen menu
%_lu_Je buttou
Press to increase or decrease the
sound level also press to navigate
left/right in onscreen menu.
Source butteu
Press to select the video input
source: AV, S-Video, HD, PC, TV.
/
OK buttou
Press to confirm the option you
selected in the onscreen menu.
C.C button
Press the C.C button to select CC
on or CC off.
Standby (Pov_er) button
Press to turn the LCD TV on or
off.
Sleep buttou
Press to set the LCD TV to turn
itself off within a certain time
Smart Picture butteu
Press repeatedly to select either
Personal, Movie, Sports, Weal<
signaI, or Multimedia picture
setting.
Smart Souud buttou
Press repeatedJy to select among
the 4settings; Personal News,
Music, or Theatel:
Picture Forruat buttou
Press the FORMAT button
repeatedly to toggle among the
four screen format sizes; 4:3,
EXPAND 4:3, COMPRESS 16:9,
or HD 4:3
buttnu
Press repeatedJy to change the
size of PIP window in PC mode.
Previous Chauuel butteu
Press to go to previously seJected
channel.
Chauuel button
Press to adjust the channel up
or down. Rise press to select or
navigate up/down in onscreen
menu
SAP buttnu
Press to select a sound mode if
available with the TV
programming:Mono, Stereo, or
SAR
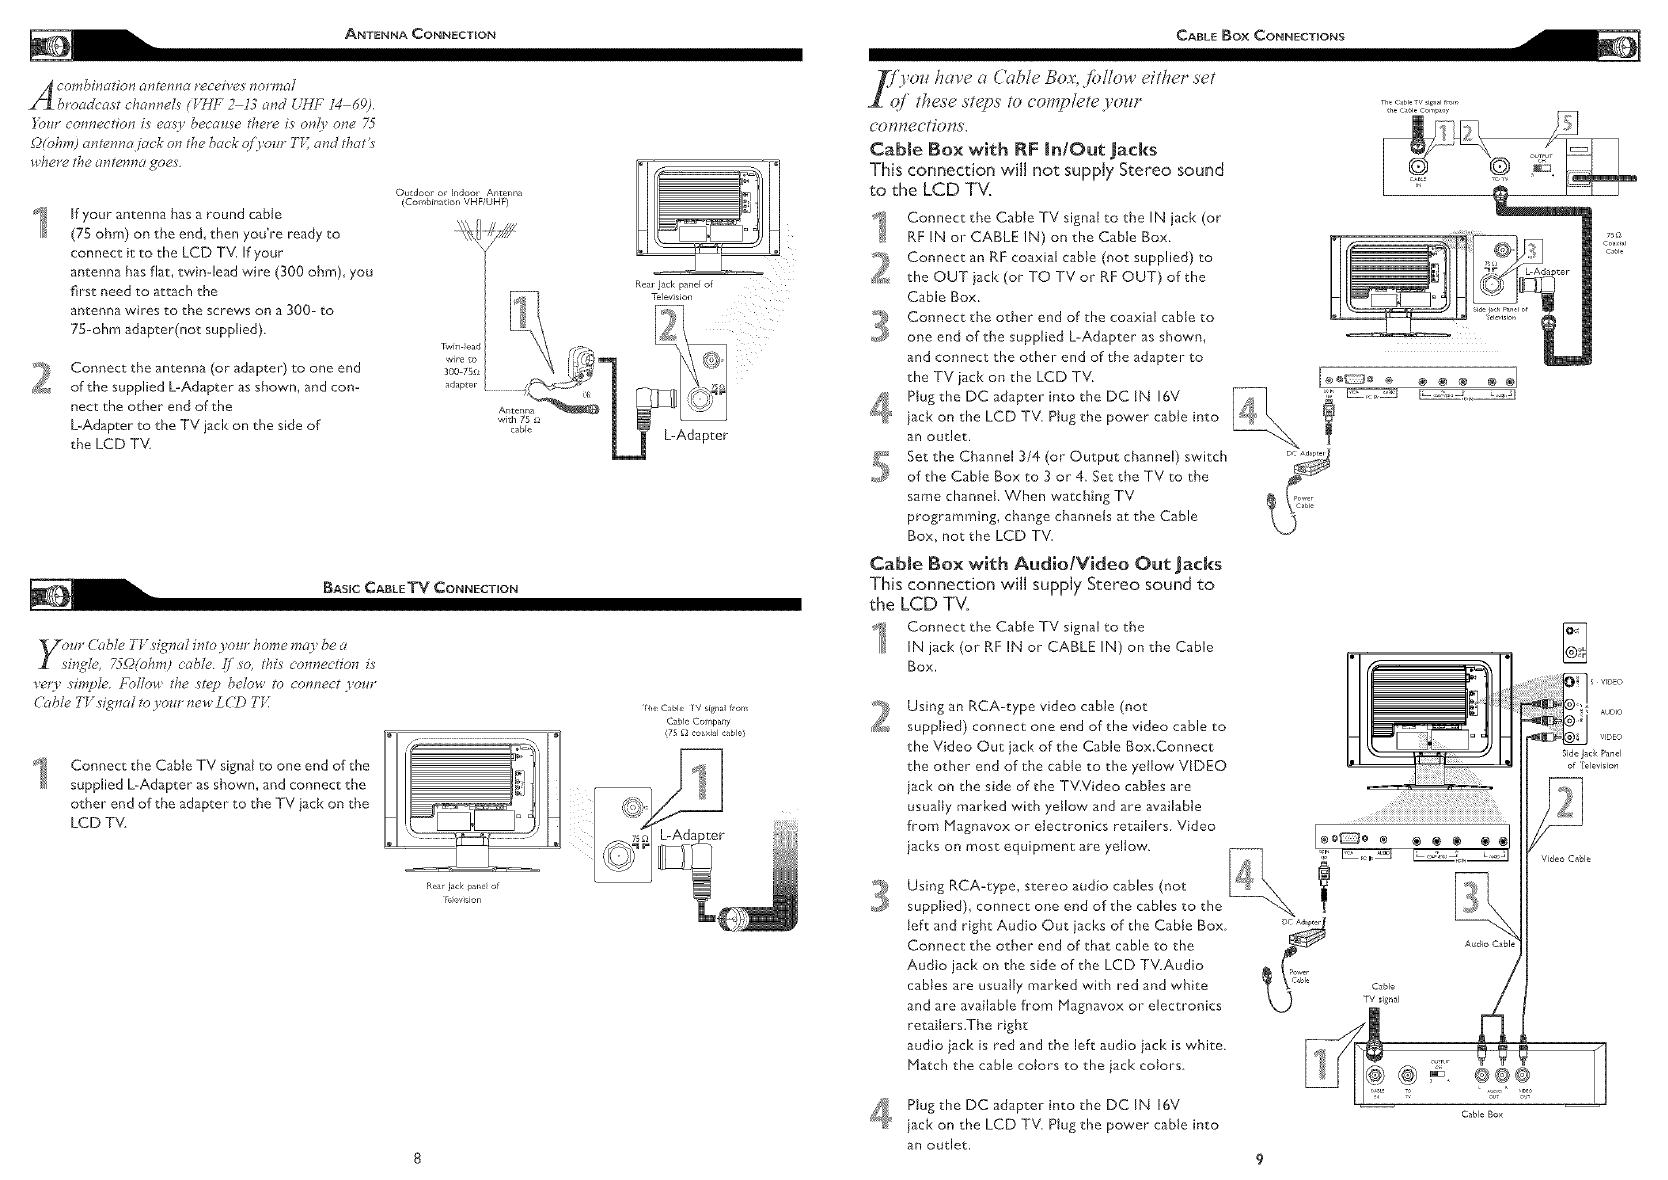
}b_n" con_eetion is eas) becalts'e there i_ only o_e 75
(2(obrn) ante_m_ jack on the back qf l'our T_[ and tbat'_
_d_ere the antenna goe_
If your antenna has a round cabte
(75 ohm) on the en& then you're ready to
connect it to the LCD TV. If your
antenna has flat, twin-lead wire (300 ohm)_ you
first need to attach the
antenna wires to the screws on a 300- to
7S-ohm adapter(not supplied)
Connect the antenna (or adapter) to one end
of the supplied L-Adapter as shown, and con-
nect the other end of the
L-Adapter to the TV jack on the side of
the LCD TV
mr dk_ble TU dgnal into yoln" home may be a
_ingle', 75_(ohm) cable _S[_o, thi_ connection is
very s'imple b_lloH the s'tep below _o compeer yore"
( 2_ble TU _'igm_l to 3our new L CD Tl f
Connect the Cable TV signal to one end of the
supplied L-Adapter as shown, and connect the
other end of the adapter to the TV iack on the
LCD TV
Outdoor or [ndool Antenn_
(Combination VHFIUHF)
Rear jack p_ne[ of
_bl_ L_ L-Adapter
the C,_ble ]V sfgnal flora
Czble Company
(75 _) coaxial came)
Rear lad< pane of
7evi,,ion
') _ have _ ('able Box, <ibllow either set
•these steps to conLnlete),our
col_tTecHol_s,
Cable Box with RF InlOut jacks
This connection will not supply Stereo sound
to the LCD TV.
Connect the Cable TV signal to the IN jack (or
BF IN or CABLE IN) on the Cable Box.
Connect an RE coaxial cable (not supplied) to
the OUT iack (or TO TV or RE OUT) of the
Cable Box.
Connect the other end of the coaxial cabJe to
one end of the supplied L-Adapter as shown,
and connect the other end dthe adapter to
the TV jack on the LCD TV.
1' Ptug the DC adapter into the DC IN 16V
iack on the LCD TV. Plug the power cable into
an outlet.
Set the Channel 3/4 (or Output channel) switch
of the Cable Box to 3 or 4. Set the TV to the
same channel When watching TV
programming, change channels at the Cable
Box, not the LCD TV
Cable Box with AudiolVideo Out jacks
This connection will supply Stereo sound to
the LCD TV.
Connect the CabJe TV signal to the
IN jack (or RF IN or CABLE IN) on the Cable
Box.
2Using an BCA-type video cable (not
supplied) connect one end of the video cable to
the Video Out jack of the Cable Box.Connect
the other end of the cabte to the yellow VIDEO
iack on the side of the TV.Video cables are
usually marked with yetlow and are available
from P1agnavox or electronics retailers Video
jacks on most equipment are yellow.
Using RCA-type, stereo audio cables (not
supplied), connect one end of the cables to the
left and right Audio Out jacks of the Cable Box
Connect the other end of that cable to the
Audio jack on the side of the LCD TV.Audio
cables are usually marked with red and white
and are available from Magnavox or electronics
retailers.The right
audio iack is red and the left audio iack is white
Match the cable colors to the iack colors
1' Plug the DC adapter into the DC IN 16V
iack on the LCD TV. Plug the power cable into
an outlet.
....
SideJackPanel
of/elevision
TV signal
@ @ ®®®
C_ble Box
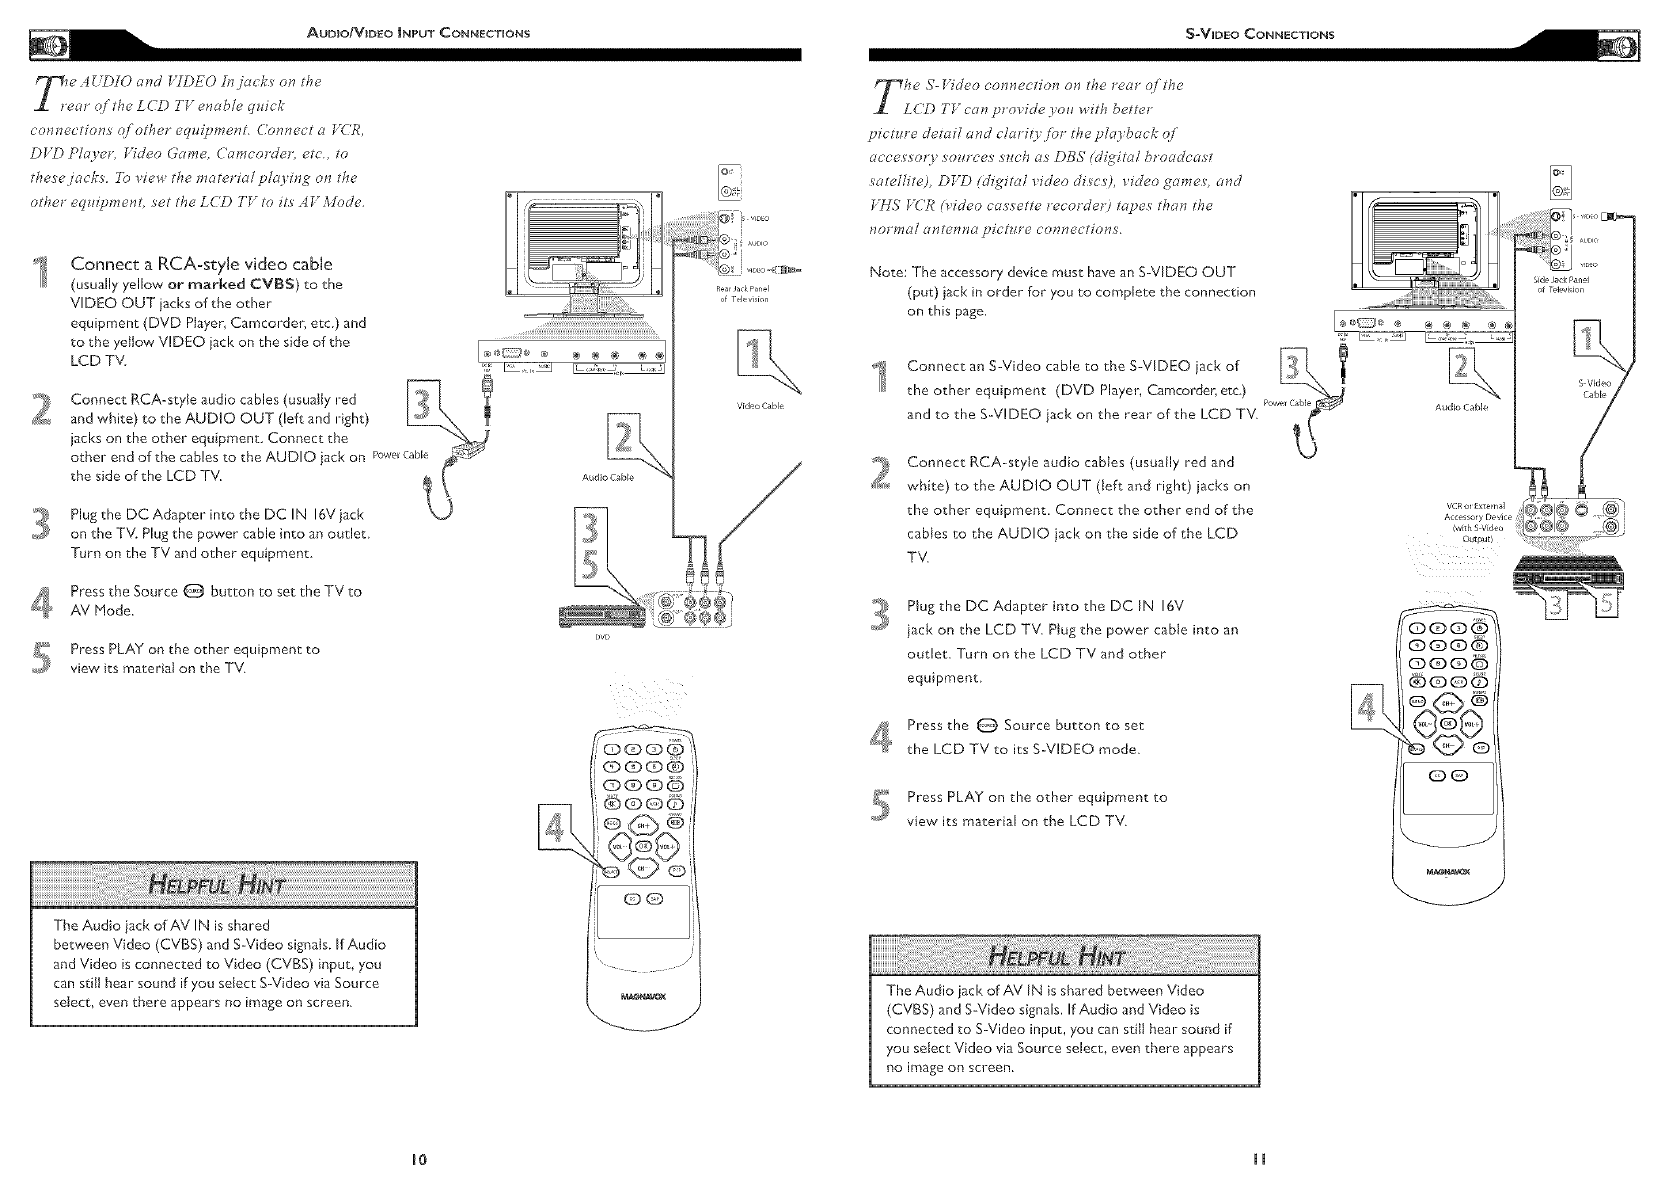
_e 4 <,20]0 and _7[)EO In jack_ on the
ear qf the LCD TV enable quick
connections of oghe_ equipmeng. Connect aN('R,
DIkO Pla) et; _Ydeo Game, Camcotdet; etc., to
these jack_ To _iew the material pla3 ing on the
other equipment, _eg the LCkO TV go its AV Mode,
Connect a RCA-style video cable
(usually yellow or marked CVB$) to the
VIDEO OUT jacks of the other
equipment (DVD Player, Camcorder, etc) and
to the yellow VIDEO jack on the side of the
LCD TV '7 _, ,,_
Connect RCA-style audio cables (usualiy red J_l _
and white) to the AUDIO OUT (left and right)
jacks on the other equipment. Connect the _\_.._]
other end of the cables to the AUDIO jack on powerCaM
the side of the LCD iV.
Plug the DC Adapter into the DC IN 16V jack
on the TV. Plug the power cable into an outlet
Turn on the TV and other equipment
Audio Cable
_ Press the Source _ button to set the TV to
AV Mode.
Press PLAY on the other equipment to
view its material on the TV
The Audio jack of AV IN is shared
between Video (CVBS) and S-Video signats. If Audio
and Video is connected to Video (CVBS) input, you
can still hear sound if you select S-Video via Source
select, even there appears no irnage on screen.
QQOQ
@®®@
OQ
RearJackPanel
,)f Tele v_sion
Video Cable
picgure derail and clarib for ghe pla3 back qf
acces so<l _ource_ n¢ch a_ DBS (di_ita[ broadcast
satellite), DVD <digital video discs), $ideo games, and
NHS FUR {_ideo cassette recorder) tapes than the
lToFma[ _rltcnrla ])icf_ye eonncetions
Note: The accessory device must havean S-VIDEO OUT
(put) jack in order for you to complete the connection
on this page.
!
2
3
4
5
Connect an S-Video cable to the S-VIDEO jack of
the other equipment (DVD Player, Camcorder, etc)
and to the S-VIDEO iack on the rear of the LCD TV.
Connect RCA-style audio cabies (usuaily red and
white) to the AUDIO OUT (Jeff and right) jacks on
the other equipment. Connect the other end of the
cables to the AUDIO iacl< on the side of the LCD
TV.
Plug the DC Adapter into the DC IN 16V
iack on the LCD TV. Plug the power cabte into an
outlet. Turn on the LCD TV and other
equipment
Press the _ Source button to set
the LCD TV to its S-VIDEO mode.
Press PLAY on the other equipment to
view its material on the LCD TV.
The Audio jack of AV IN is shared between Video
(CVBS) and S-Video signals. If Audio and Video is
connected to S-Video input, you can s'diJ hear sound if
you select Video via Source select, even there appears
no image on screen.
(DCD(D_
C_CD(D®
o®o@
@0®6
o<F>2®
(DO
_i_i_ifil;_"_!i;_i_iiiiiliiiiii_',_ .......,_,,,_o,
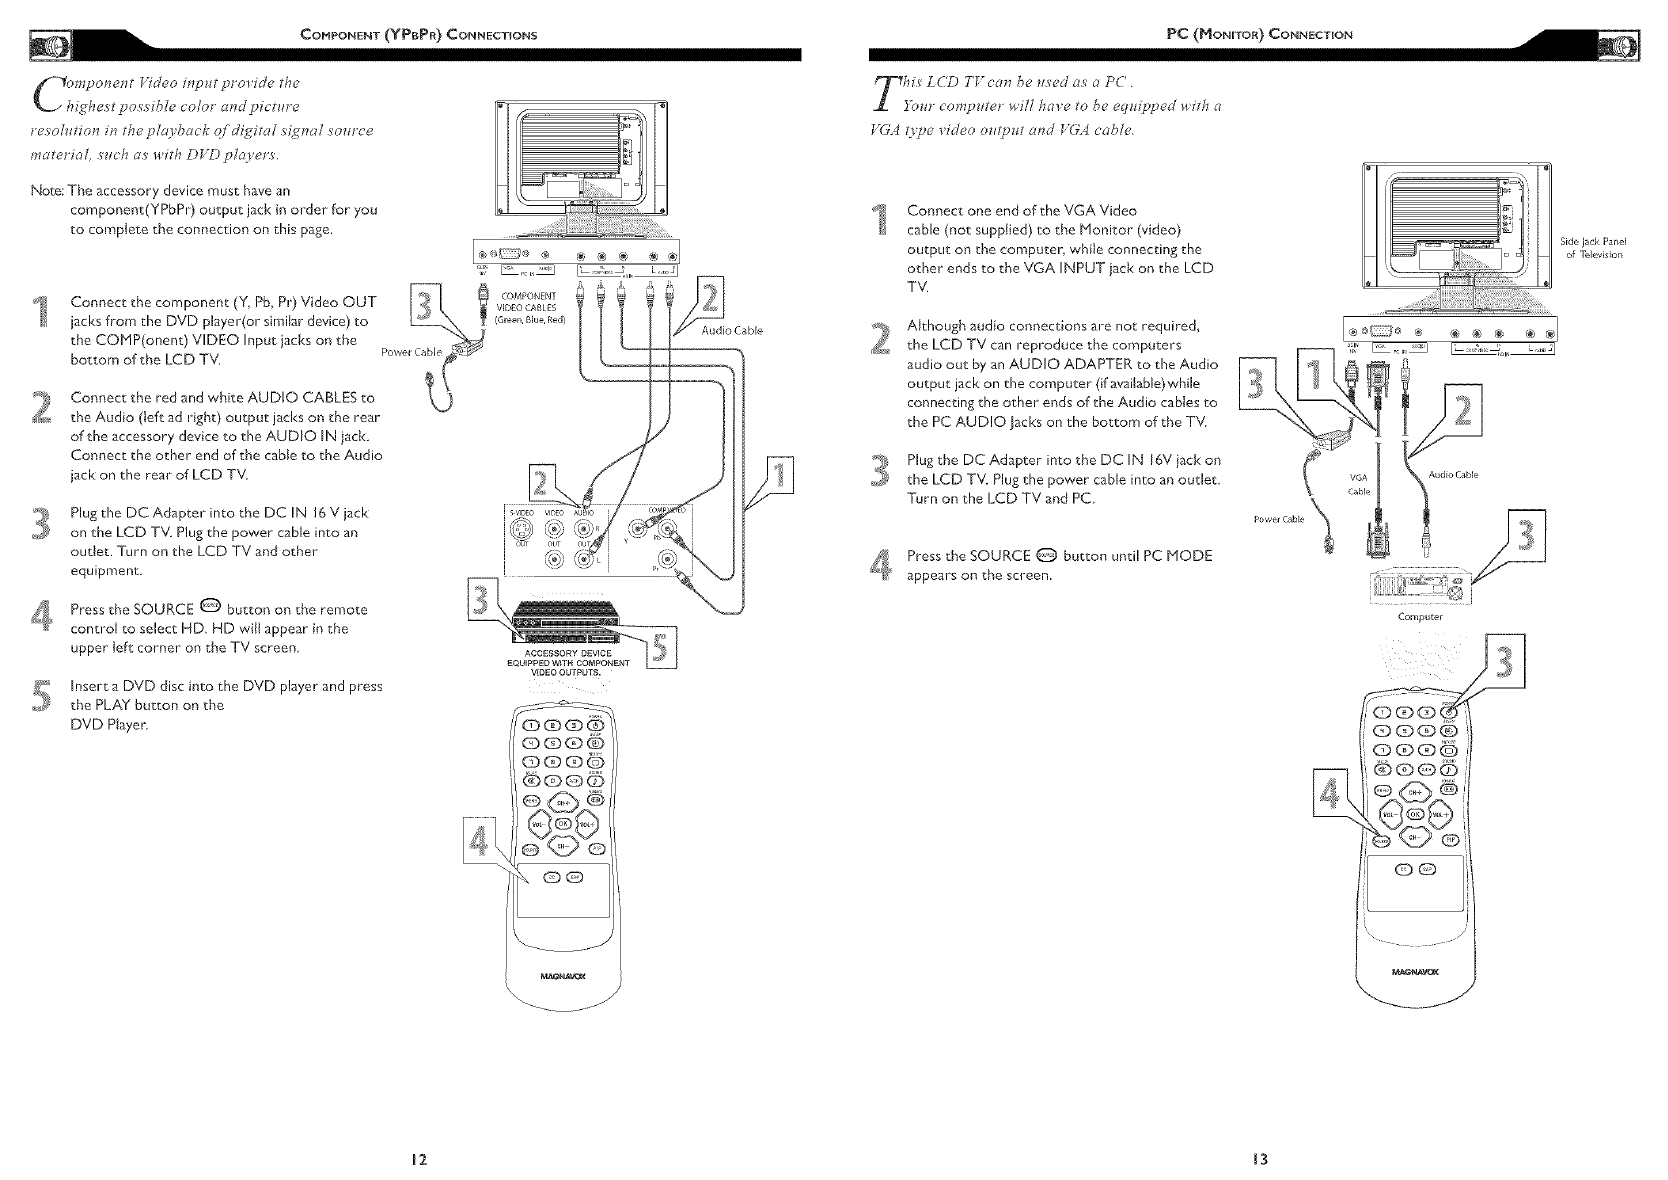
_znpone_tVideo i_pttg provide the
ighe_t pos'_ible color cnTd picmre
re_ol_tio_7 in theplatback qf digit_l _ig_d _ource
materi_L _uch a_ _ith DVD pla) ers,
Note: The accessory device must have an
component(YPbPr) output jack in order for you
to cornptete the connection on this page.
Connect the component (Y, Pb, Pr) Video OUT
jacks from the DVD player(or similar device) to
the COMP(onent) VIDEO Input iacks on the Powel CaNe
bottom of the LCD TV.
Connect the red and white AUDIO CABLES to
the Audio (teft ad right) output jacks on the rear
of the accessory device to "the AUDIO IN jack.
Connect the other end of the cable to the Audio
jack on "the rear of LCD TV
Plug the DC Adapter into the DC IN 16 V jack
on the LCD TV. Plug the power cable into an
outtet. Turn on the LCD TV and other
equipment
, Press the SOURCE _ button on the remote
control to select HD. HD wiJJ appear in the
upper left corner on the TV screen
Insert a DVD disc into the DVD player and press
the PLAY button on the
DVD Player
_ COMPONENT
VIDEO CABLB
(Greon, Blue, Red)
V(DEO OUTPUTS.
OGOQ
G®®6
QO
AudioCable
his' LCD TF carl be _ls'ed as a PC.
]Y_m" computer will have to be equipped _¢ith a
V(iA O_e video o_ttput and VGA cable.
Connect one end of the VGA Video
cable (not supplied) to the blonitor (video)
output on the computer, while connecting the
other ends to the VGA INPUT iack on the LCD
TV.
Although audio connections are not required,
the LCD TV can reproduce the computers
audio out by an AUDIO ADAPTER to the Audio
output jack on the cornputer (if available)while
connecting the other ends of the Audio cables to
the PC AUDIO Jacks on the bottom of the TV
_ Plug the DC Adapter into the DC IN I6V iack on
the LCD TV. Plug the power cable into an outlet
Turn on the LCD TV and PC
, Press the SOURCE _ button until PC MODE
appears on the screen.
Computer
Side jack Panel
of Tfdevlsioll
12 13
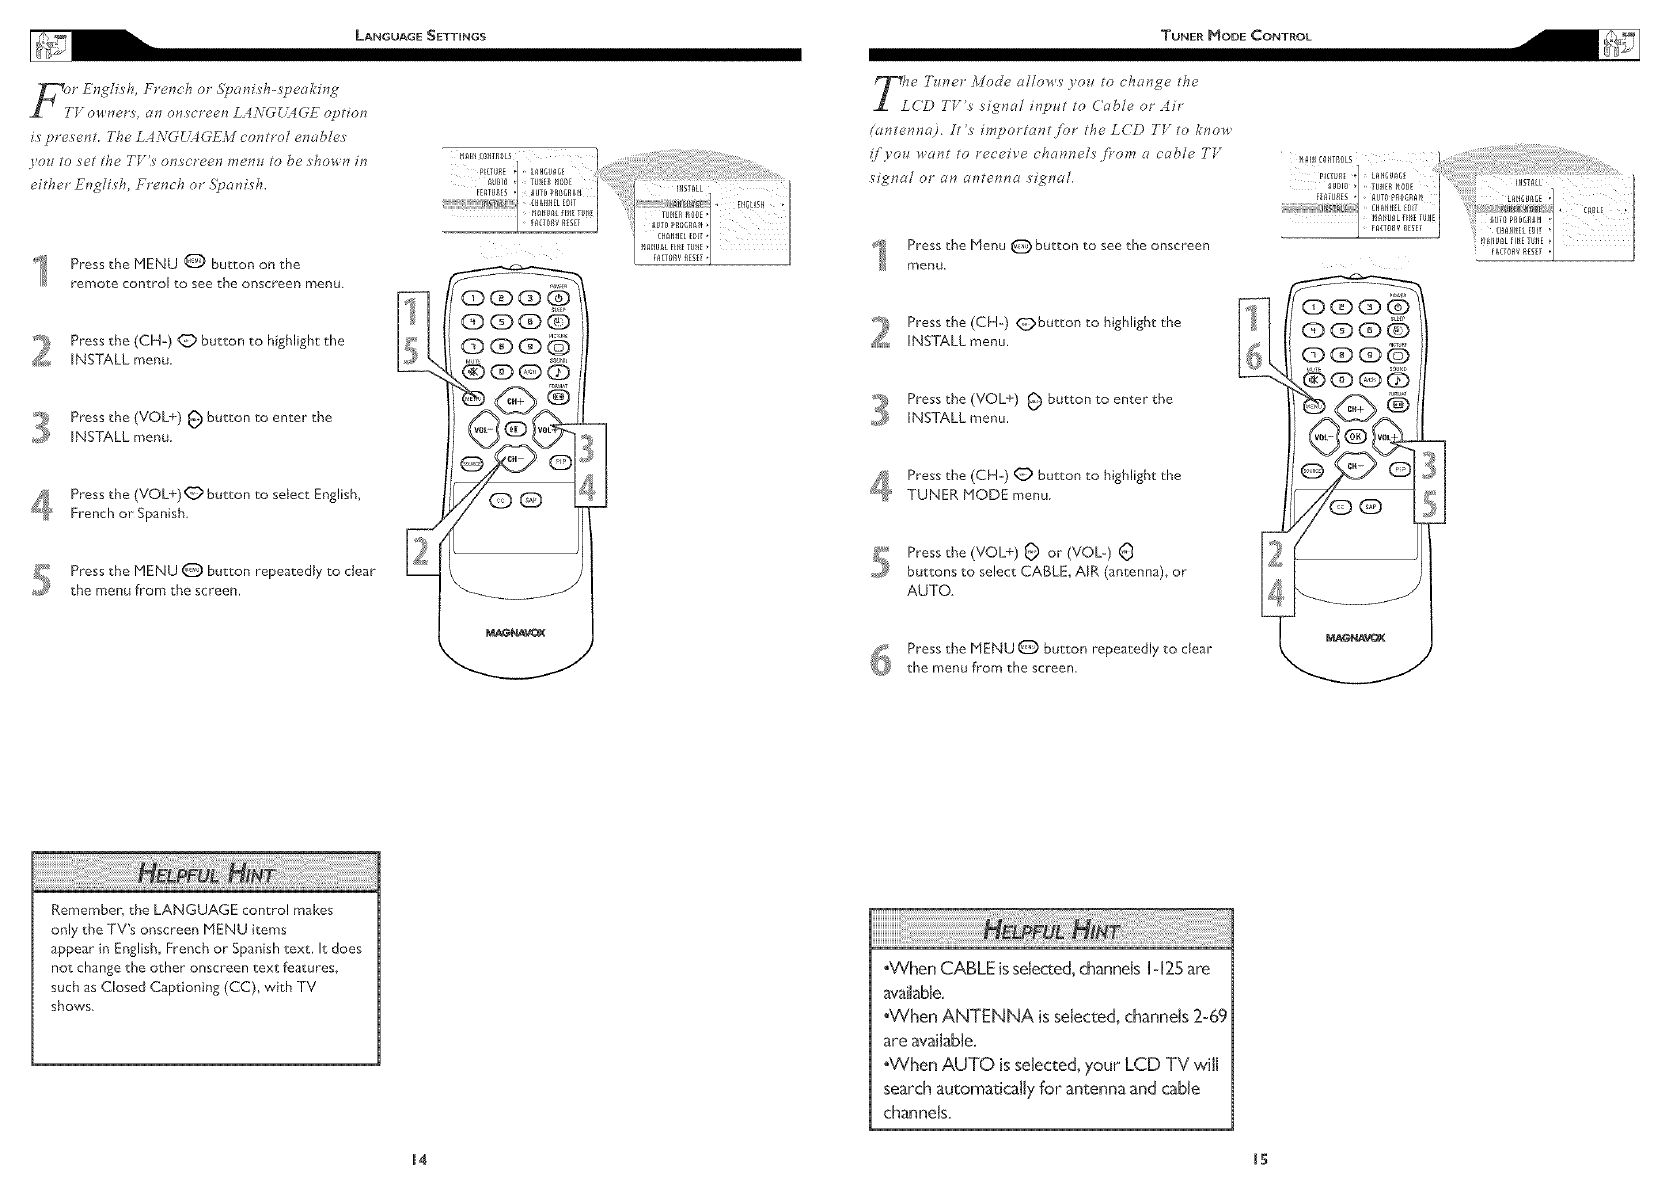
_"Englfs'h, F_'ench or Syani_h-_geal:m %
V OH_eF_, a_ on_cteen L4;\rG_L4GE oration
is' gfes'ent. The L 4:\rGC]4GEM co_t_'ol enables'
you to _et the TV'_ on_c_een menu to be _how'_ in
either" Englis'h, F_'e_ch ol" 5parlls'h.
(a_temTa). It _imgos'tant fm" the LCD TV to kno_*
i_)>ou _arlt to seceive channel_ _'om a cable TV
s'ignal os an ante_na s'ignaL
Press the MENU @ button on the
remote control to see the onscreen menu
Press the (CH-) @ button to highlight the
INSTALL menu
Press the (VOL+) _ button to enter the
INSTALL menu
, Press the (VOL+)_ button to select English,
French or Spanish
Press the MENU @ button repeatedly to clear
the menu from the screen.
7
Press the Menu _ button to see the onscreen
menu.
Press the (CH-) _button to highlight the
INSTALL menu.
Press the (VOL+) _ button to enter the
INSTALL menu.
41 _ Press the (CH-) _ button to highlight the
TUNER MODE menu
Press the (VOL+) _ or (VOL-) @
buttons to select CABLE, AIR (antenna), or
AUTO
Press the MENU @ button repeatedly to clear
the menu from the screen.
Rememben the LANGUAGE contro! makes
only the TV's onscreen MENU items
appear in English, French or Spanish text. It does
not change the other onscreen text features,
such as Closed Captioning (CC), with TV
shows.
,When CABLE isselected,channels 1-125are
available,
°when ANTENNA is selected, channels 2-69
are available,
°When AUTO is selected, your LCD TV will
search automatically for antenna and cable
channels,
14 IS
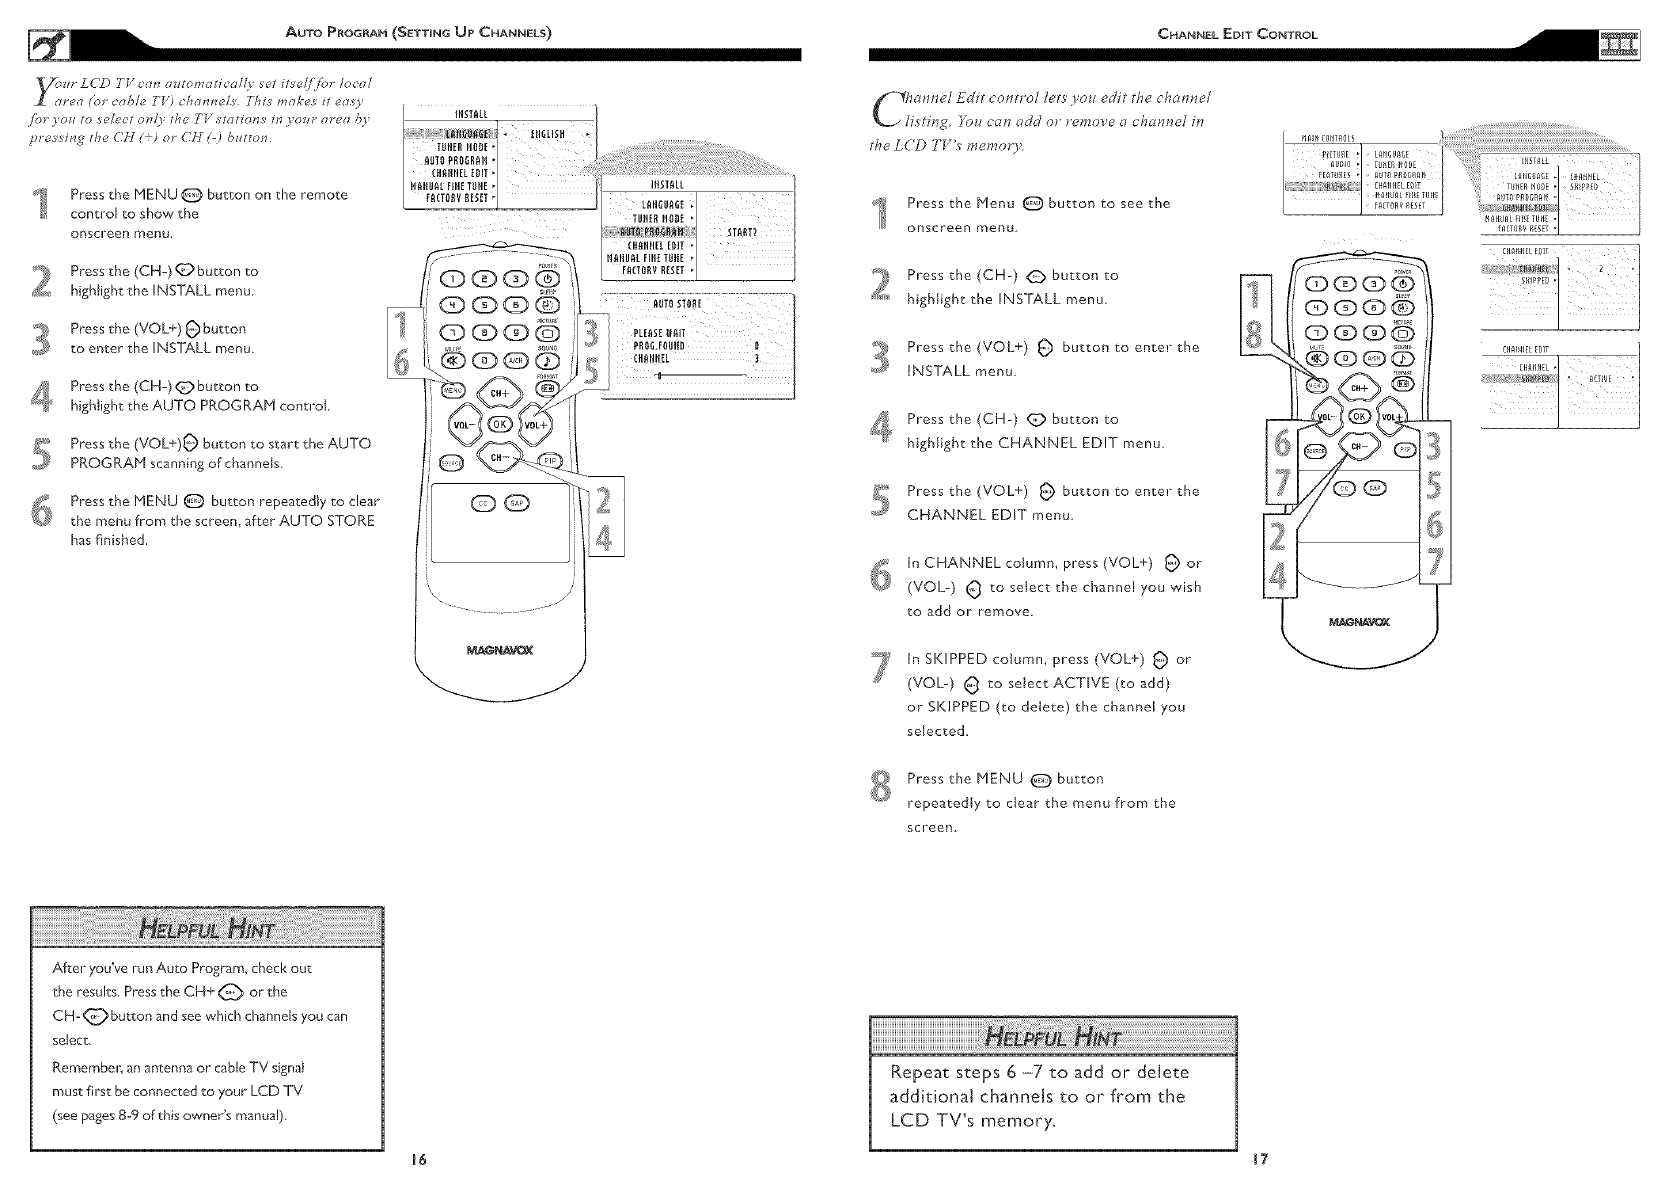
Jbr yol: to select on:J the T_Z stotfons in >oz:r areo B>
pre_ing t/Te CH 11 or CH E-) b_:tton
4
Press the MENU O button on the remote
control to show the
orlscreer! menu,
Press the (CH-)_:_ button to
highlight the INSTALL menu
Press the (VOL+) _ button
to enter the INSTALL menu
Press the (CH-)_ button to
highlight the AUTO PROGRAM control
Press the (VOL+)_ button to start the AUTO
PROGRAM scanning of channels
_ Press the MENU O button repeatedly to clear
the menu frorn the screen, after AUTO STORE
has finished.
_annel Edit co_trol lets'yozl edit the channel
is'tirlg }gz_can _Md or Yernos'eachannel in
the LCD 17%' me_noo'.
2
4
Press the Menu _ button to see the
onscreen menu
Press the (CH-) <_ button to
highlight the INSTALL menu.
Press the (VOL+) _ button to enter the
INSTALL menu
Press the (CH-) _ button to
highlight the CHANNEL EDIT menu.
Press the (VOL+) _ button to enter the
CHANNEL EDIT menu
_ In CHANNEL column+ press (VOL+) _ or
(VOL-) 0 to select the channel you wish
to add or remove
7In SKIPPED column+ press (VOL+) _ or
(VOU) _ to select ACTIVE (to add)
or SKIPPED (to delete) the channel you
selected.
Press the MENU @ button
repeatedly to clear the menu frorn the
screen
!
After you've run Auto Program+ check out
the results+ Press the CH+ _ or the
CH- _ button and see which channels you can
se[ect.
Remember, an antenna or cable TV signal
must first be connected to your LCD TV
(see pages 8-9 o[this owner's manual)
Repeat steps 6 -7 to add or delete
additional channels to or from the
LCD TV's memory,
_6 _7
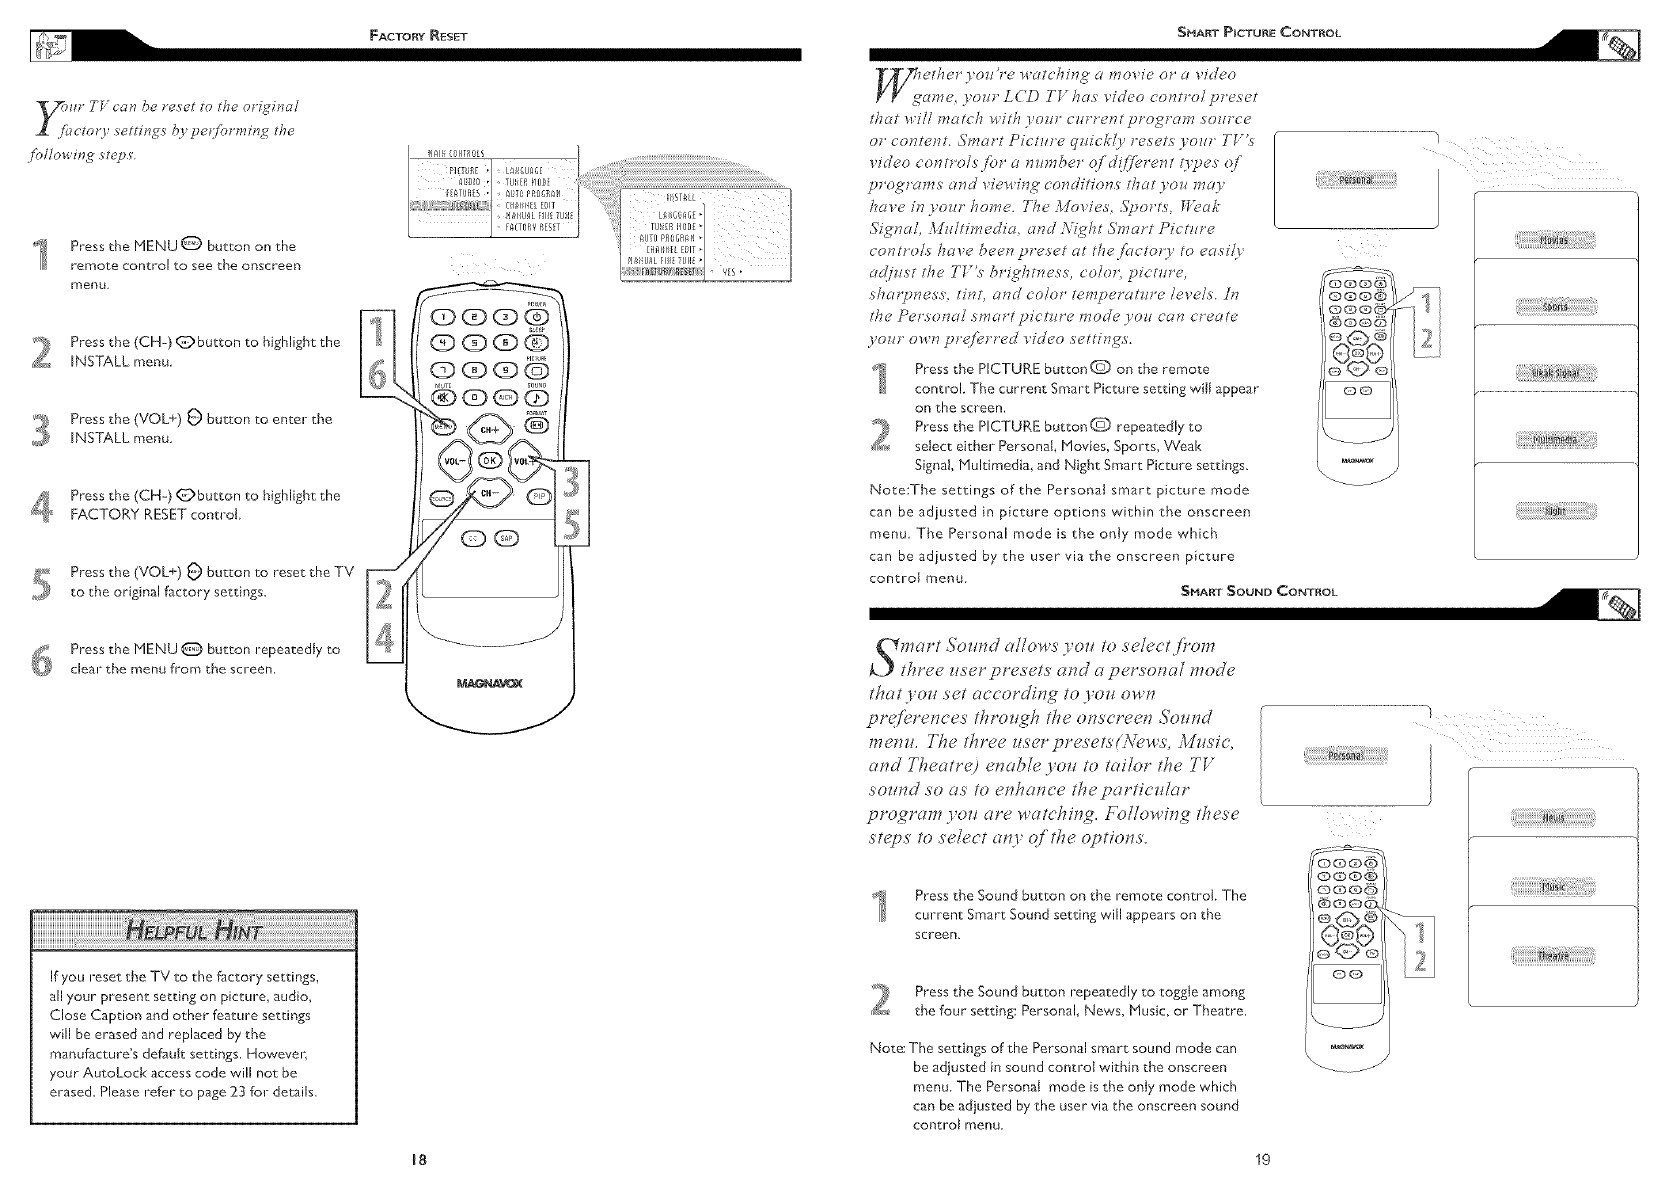
ur TV can be re_'et to the origi_Ta!
_cto O' _etting_ b) pe_[ormin_ the
Press the PIENU _ button on the
remote control to see the onscreen
menu
Press the (CH-) @button to highlight the
iNSTALL menu
Press the (VOL+) O button to enter the
INSTALL menu
4Press the (CH-) _button to highlight the
FACTORY RESET control
Press the (VOL+) _ button to reset the TV
to the ol iginal factory settings.
Press the MENU _ button repeatedly to
clear the menu from the screen.
111111111111111111117 !i !i ! ! ! i ii ii ii ii ii ii ii ii ii ii ii ii ii ii ii ii ii ii ii ii ii ii ii ii ii ii ii ii ii ii ii ii ii ii ii ii ii ii ii ii ii ii ii ii ii ii ii ii ii ii! i!i!i
If you reset the TV to the factory settings,
all your present setting on picture, audio,
Close Caption and other feature settings
will be erased and replaced by the
manufacture's default settings. Howevel;
your AutoLock access code will not be
erased. Please refer to page 23 for details.
ether S,ou're watchin_ _,_movie or avideo
ame, yo_r LdL© TF has "_ideo controT greset
that _ii7 match with yo_r cz_m'ent pro_ram so_rce
Ot contes_t Sma_'t _ict_ls'e q_iickl)' re._ets )o_r TTt_
video co_tro/sfur a mH_ber ql" d!_fL're_t O'pes qf
t_rograms a_d _iew#_£ co_dition.s tiTat +10_ may
,%_e i_ )o_r home. 7%eMovies, .S})orts, [Veak
Si_I1a}, MzUtimedi_, as'_U.\'i£ht Smart Piety/re
cos_tro/s have bee_ yre.set at tDeJ'_tctor) to e_tsi/y
a_!/_lst the TU's brioITt_ess, coTo& pict_Tre,
sh_mZ*_ess, ti_t, as_c/ color temz:er_ff_lre leveL_. _&/
the Persos_dZ sm_mt gict_lre mode )'o_1 c_n create
yo_n" ow_ proWL, fred video .setti_£s.
Press the PICTURE button f_) on the remote
control. The current Smart Picture setting wilt appear
on the screen.
Press the PICTURE button _ repeatedly to
select either Personal, Movies, Sports, Weal<
Signal, Multimedia, and Night Smart Picture settings.
Note:The settings of the Personal smart picture mode
can be adjusted in picture options within the onscreen
menu The Personal mode is the onIy mode which
can be adjusted by the user via the onscreen picture
control menu
_.,J i_ i771
Smart ,_'_d _dlowsmo_ to select jt_om
three _serpresets a_d a persxmal mode
that 3ou set aeeordi_g to lou ow_
prefere_ees through the o_seree_ Sou_d
memo. !i_e three us'er presefs/News, M;,_sie,
m_d Theatre) e_ab/e you to tailor the TV
sound so as to e_@anee thepartie_Uar
program you are watehi_g. Followi_g these ................
steps to select a_y q/'the optRms.
Press the Sound button on the remote control The
current Smart Sound setting win appears on the
screen.
Press the Sound button repeatedly to toggle among
the four setting: Personal News, Music, or Theatre.
Note: The settings of the Personal smart sound mode can
be adjusted in sound control within the onscreen
menu. The Personal mode is the onty mode which
can be adjusted by the user via the onscreen sound
control menu
000®
I®0 I
18 19
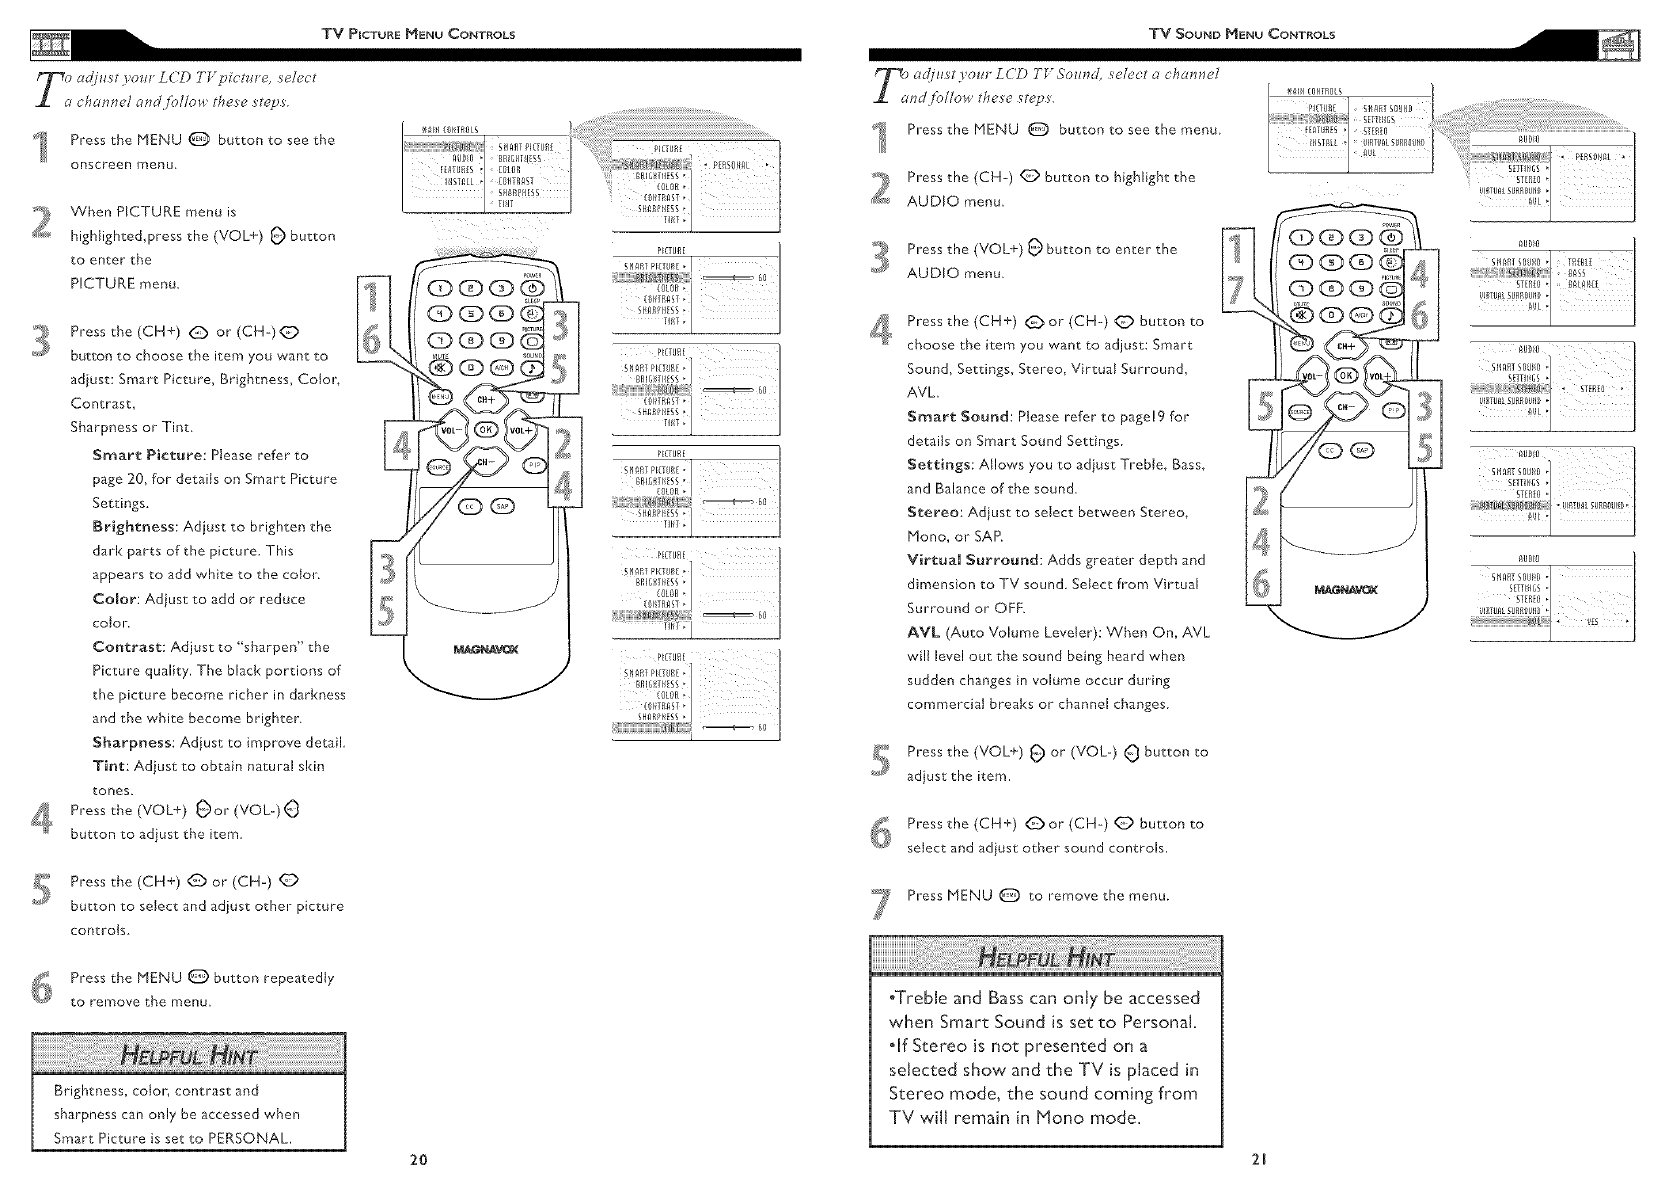
4
Press the MENU Q button to see the
onscreen rnenu
When PICTURE menu is
highlighte&press the (VOL+) _ button
to enter the
PICTURE menu.
Press the (CH+) _ or (CH-)C)
button to choose the item you want to
adiust: Smart Picture, Brightness, Cotor,
Contrast,
Sharpness or Tint
Smart Picture: Please refer to
page 20, for details on Smart Picture
Settings.
Brightness: Adjust to brighten the
dark parts of the picture. This
appears to add white to the rotor.
Color: Adiust to add or reduce
color,
Contrast: Adjust to "sharpen" the
Picture quality. The black portions of
the picture become richer in darkness
and the white become brighter
Sharpness: Adjust to improve detail
Tint: Adiust to obtain natural skin
tones_
Press the (VOL+) _)or (VOL-)_
button to adiust the item
Press the (CH+) (_ or (CH-)
button to select and adjust other picture
controls
Press the MENU @ button repeatedly
to rernove the menu.
Brightness, colon contrast and
sharpness can only be accessed when
Smart Picture is set to PERSONAL.
II_IH £01 T_OLS
[(]HTR_ST BBI_ THESS'
IHST_LL, ''! S_R?IiS:,
SH_P,PH[_S 0 _
2O
T_ c(iust ) oz_r L (TD TF Sound, s'elect a charmel
nd follow thes'e s'tep_.
Press the MENU Q button to see the menu
Press the (CH-) _ button to highlight the
AUDIO menu.
3
4
5
6
7
Press the (VOL+) _ button to enter the
AUDIO menu.
Press the (CH+) _or (CH-) _ button to
choose the itern you want to adjust: Smart
Sound, Settings, Stereo, Virtual Surround,
AVL
Smart Sound: Please refer to page!9 for
details on Smart Sound Settings.
Settings: Allows you to adjust Treble, Bass,
and Balance of the sound.
Stereo: Adiust to select between Stereo,
Mono, or SAR
Virtual Surround: Adds greater depth and
dimension to TV sound Select frorn Virtual
Surround or OFF.
AML (Auto Volume Leveler): When On, AVL
will level out the sound being heard when
sudden changes in volume occur during
cornrnerciat breaks or channel changes
Press the (VOL+) _ or (VOL-) _ button to
adiust the item.
Press the (CH+) _)or (CH-) (_ button to
select and adiust other sound controls.
Press MENU @ to remove the menu.
oTreb[e and Bass can only be accessed
when Smart Sound is set to Persona[,
o[f Stereo is not presented on a
selected show and the TV is placed in
Stereo mode, the sound coming from
TV will remain in Plono mode.
2_
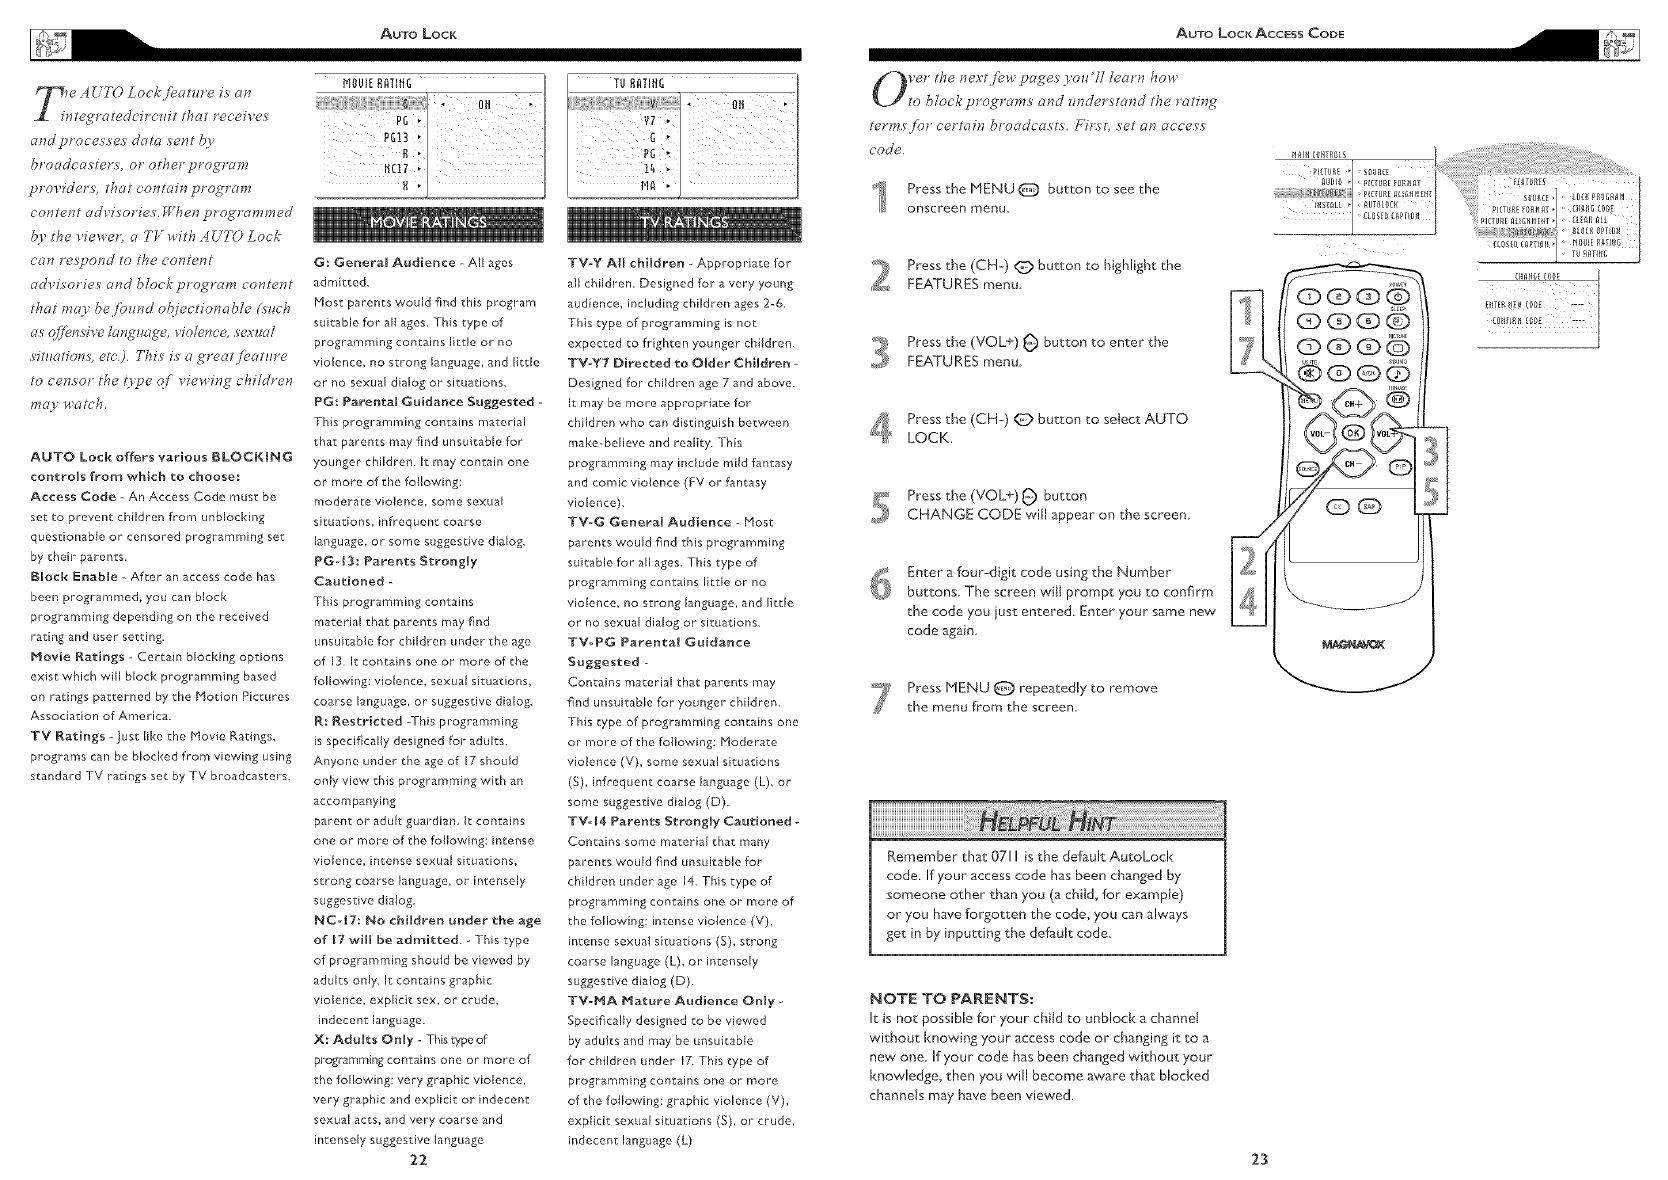
and groce_fe_ data sent h)
broadcaster% or other grogram
gros, ider_, that contain grogram
content advi_orieL ff_hen programmed
by the _iewet, a TV with AUTO Lock
can re&ond to the content
advisorie_ and block yrogram content
that ma 3be found ol!/ectionable (sttch
at qffend_ lung_age, Ho/ence, _ex_lal
_ituationk etc'.). This is agreat feature
to censor the 07_e of _im_ing children
l_aj 1_atch.
AUTO Lock offers various [BLOCKING
controUs from whlch to choose:
Access Code - An Access Code must be
set to prevent children from unblocking
questionable or censored programming set
by their parents,
BUock Enable - After an access code has
been programmed, you can block
programming depending on the received
rating and user setting.
Movie Ratings -Certain blocking options
exist which will block programming based
on ratings patterned by the Hotion Pictures
Association of America.
TV Ratlngs - just like the Hovie Ratings,
programs can be blocked from viewing using
standard TV ratings set by TV broadcasters.
TU RATIH_
14 _
G: GeneraU Audlence - All ages
admitted.
Host parents would find this program
suitable for all ages. This type of
programming contains little or no
violence, no strong language, and litde
or no sexual dialog or situations.
P($: ParentaU Guidar_ce Suggested -
This programming contains material
that parents may find unsuitable for
younger children. It may contain one
or more of the following:
moderate violence, some sexual
situations, infrequent coarse
language, or some suggestive dialog.
PG43: Parents StrongUy
Cautloned -
Th{s programming cof_zains
material that parents may find
unsuitable for children under the age
of [3. [t cor_cafns one or more of the
following: violeI_ce, sexual SitUations,
coarse language, or suggestive dialog.
_: _estricted -This programming
is specifically designed for adults.
Anyone under the age of 17 should
only view this programming with an
accompanying
parent or adult guardian, tt contains
one or more of the following: intense
violence, intense sexual situations,
strong coarse language, or intensely
suggestive dialog
NC-[7: No chiidren under the age
of 17 will be admltted. - This type
of programming should be viewed by
adults only. It contains graphic
violence, explicit sex, or crude,
indecent language.
X: Adults OnUy - This type of
programming contains one or more of
the following: very graphic violence,
very graphic and explicit or indecent
sexual acts, and very coarse and
intensely suggestive language
22
TV-Y All children Appropriate for
all children. Designed for a very young
audience, including children ages 2-6,
]-his type of programming is not
expected to frighten younger children.
TV=Y7 Directed to Older ChiUdren -
Designed for children age 7 and above.
It rnay be more appropriate for
children who can distinguish between
make-believe and reality. This
programming may include mild fantasy
and comic violence (FV or fantasy
violence).
TV=G GeneraU Audience - Host
parents would find this programming
suitable for all ages. This type of
programming contains little or no
violence, no strong language, and little
or no sexual dialog or situations.
TV-PG Parental Guldance
Suggested -
Contains material that parents may
find unsuitable for younger children.
]-his type of programming contains one
or more of the following: Moderate
violence (V), some sexual situations
(S), infrequent coarse language (L), or
some suggestive dialog (D).
TV= 14 Parents Strongly Cautloned -
Contains some material that many
parents would find unsuitable for
chddren under age 14. This type of
programming contains one or more of
the following: ff_tense violence (V),
intense sexual situations (5), strong
coarse language (L), or intensely
suggestive dialog (D).
TV-MA Mature Audience Only
Spedfcally desiT_ed to be viewed
by adults and may be unsuitable
for children under 17. This type of
programming contains one or more
of the following: graphic violence (V),
explicit sexual situations (S), or crude,
indecent language (L)
terms for certain broadcas't_, First, s'et an acces's'
code.
Press the MENU @ button to see the
orlscreen menu.
_ Press the (CH-) _) button to highlight the
FEATURES menu
Press the (VOL+) _ button to enter the
FEATURES menu
, Pressthe (CH-) _ button to select AUTO
LOCK.
Press the (VOL+) _ button
CHANGE CODE will appear on the screen
,_,,_ Enter a four-digit code using the Number
_ buttons The screen will prompt you to confirm
the code you just entered. Enter your same new
code again
_;_ Press MENU _ repeatedly to remove
the menu from the screen.
Remember that 0711 is the default AutoLock
code. If your access code has been changed by
someone other than you (a child, for example)
or you have forgotten the code, you can always
get in by inputting the default code.
NOTE TO PARENTS:
It is not possible for your child to unblock a channel
without knowing your access code or changing it to a
new one If your code has been changed without your
knowledge, then you will become aware that blocked
channels may have been viewed,
23
(D CDCD O
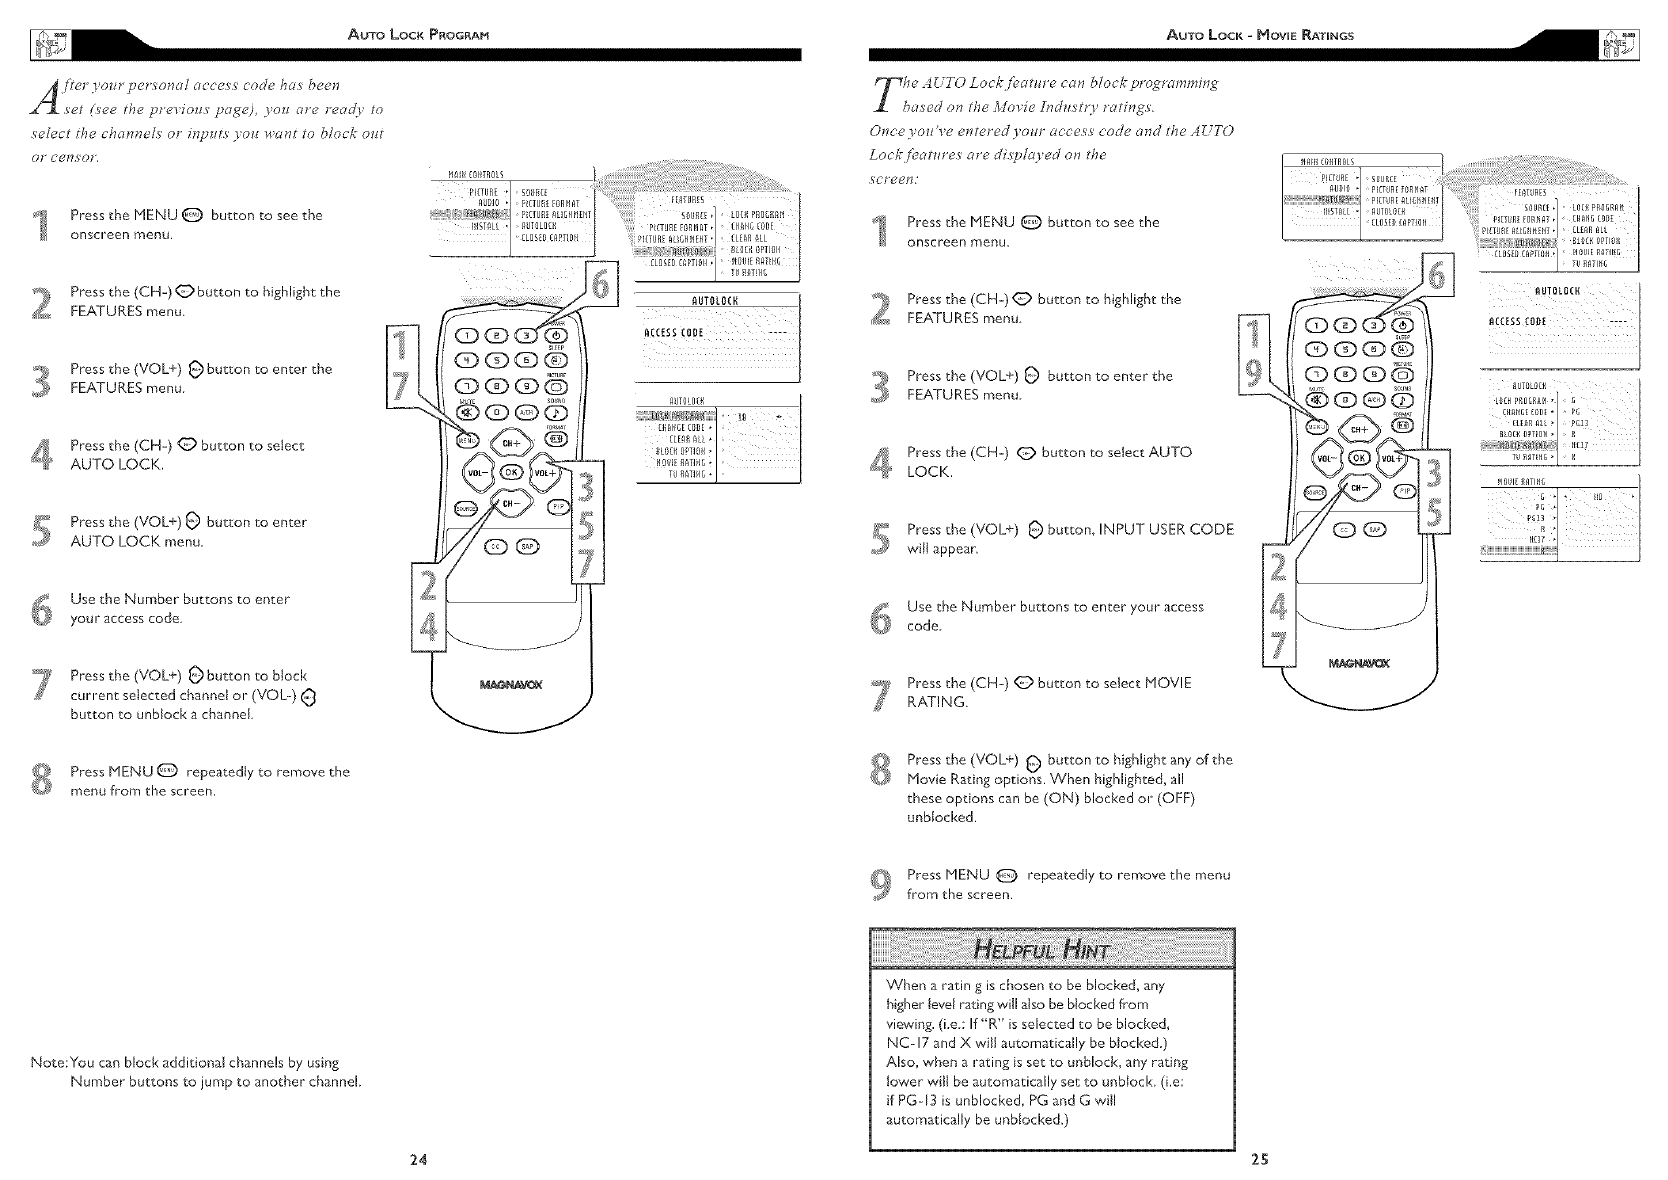
.Z4 _tel yo_lrpe_ s'on_l a_ ce_s' code ha_ been
s'et fs'ee the p_evious' p_ge) you ure read_ to
s'elect the cham_els' oi inputs' )'ou _¢ant to block out
01" cen_oF,
Press the MENU 0 button to see the
onscreen menu,
Once yo_l ve entered your acces's' code and the AUTO
iock _e_ture_ _re dl_pla) ed on the
_'ctweKl:
Press the MENU O button to see the
or!screen menu.
Press the (CH-)_ button to highlight the
FEATURES menu
Press the (VOLe) _ button "coenter the
FEATURES menu
,Press the (CN-) _ button to select
AUTO LOC!<.
Press the (VOLe) _ button to enter
AUTO LOC!< menu
Use the Number buttons to enter
your access code
_ ress the (VOLe) _ button to block
current selected channel or (VOL-)
button to unblock a channel
Press MENU _ repeatedly to remove the
menu from the screen.
_ ress the (CH-) _ button to highlight the
FEATURES menu
Press the (VOLe) _ button to enter the
FEATURES menu
41 _ Press the (CH-) _ button to setect AUTO
LOCK.
_ Press the (VOLe) _ button, INPUT USER CODE
_,J will appear.
_; Use the Number buttons to enter your access
code
_ ress the (CH-) _ button to select MOVIE
RATING
Press the (VOLe) _ button to highlight any of the
Movie Rating options. When highlighted, all
these options can be (ON) blocked or (OFF)
unbtocked.
QQQ
?_13
Press MENU @ repeatedly to remove the menu
from the screen.
Note:You can block additional channels by using
Nurnber buttons to jurnp to another channel
When a ratin g is chosen to be blocked, any
higher level rating will also be biocked from
viewing, (i.e: If"R" is selected to be blocked,
NC-17 and X wiiJ automatically be blocked.)
Also, when a rating is set to unblock, any rating
lower will be automatically set to unbJock (i.e:
if PG-13 is unblocked, PG and G will
automatically be unblocked.)
24 2_
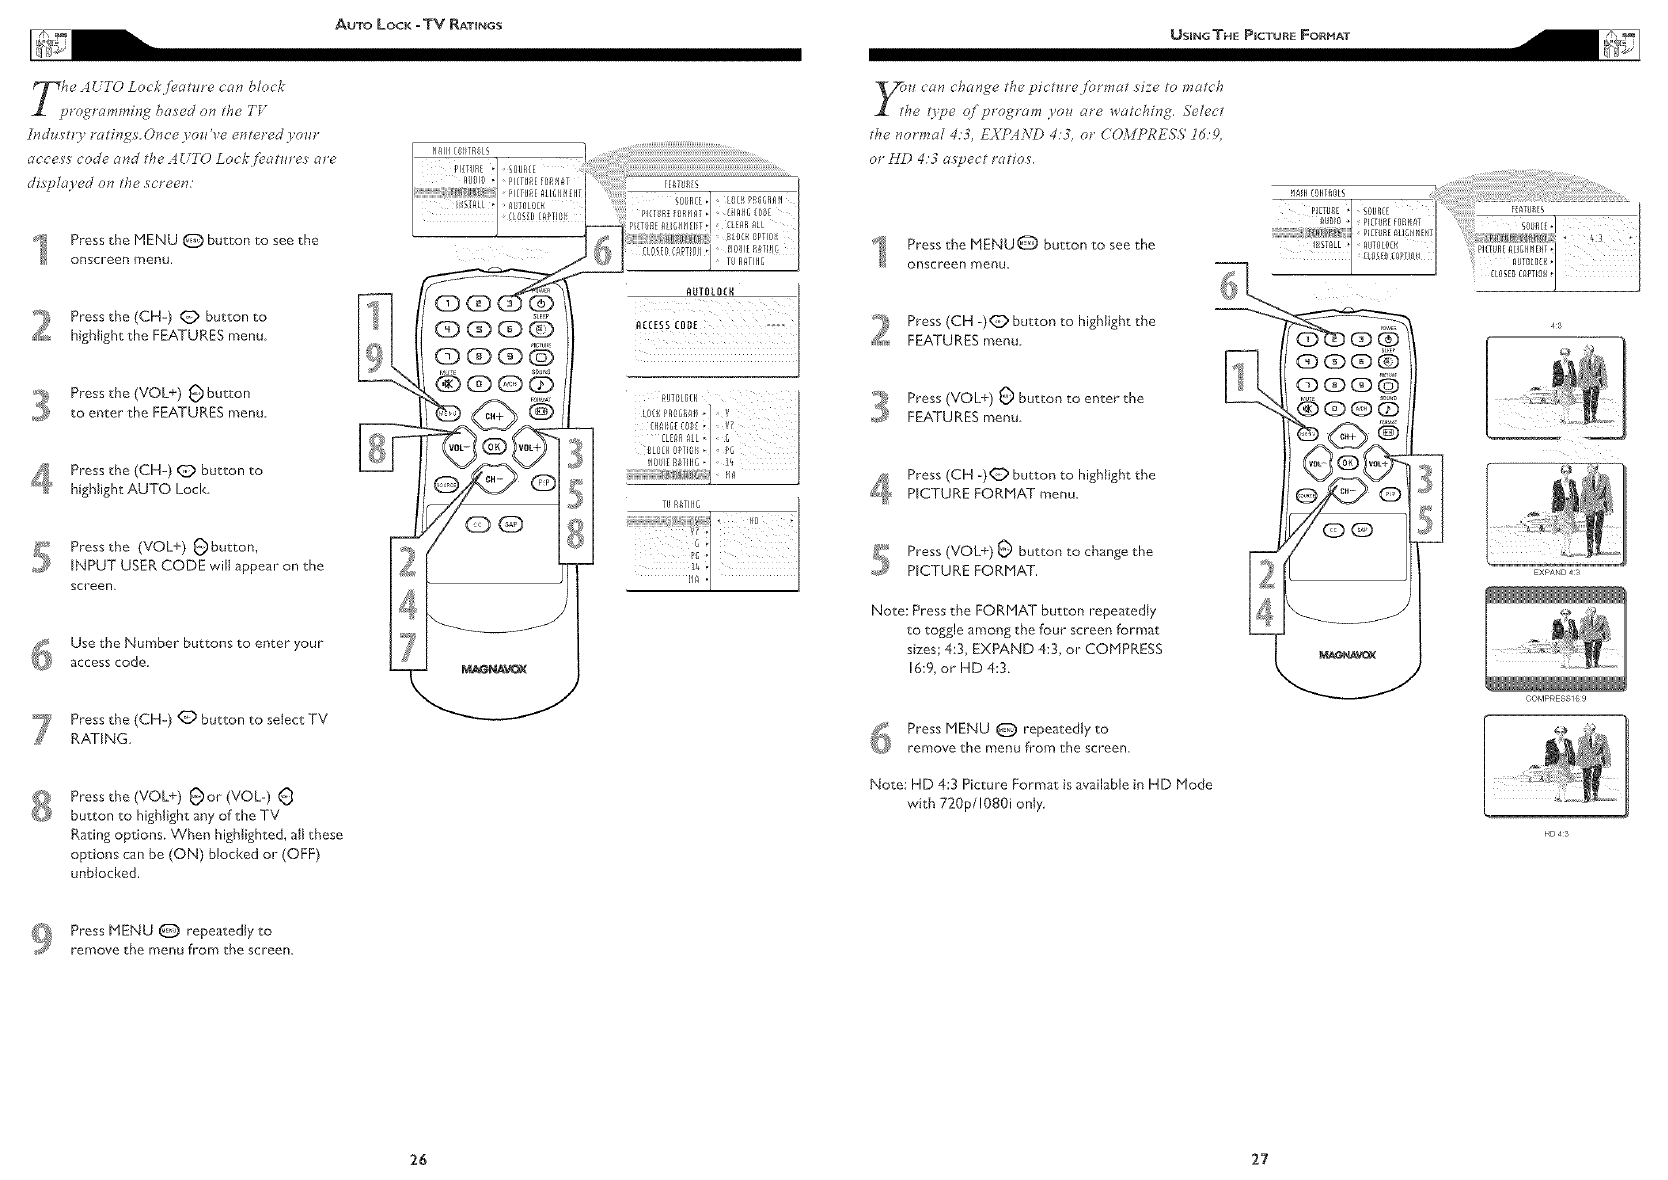
AUTO Lock -TV _ATINGS
]ndz_'tt_ rdtDTg,_ O_ce youhe e_tered]om"
ac'ce_' code cmd the 4UTO Loc]{fv*2tln'e_ c,re
di_pl¢o'ed on the s'creen:
Press the MENU Q button to see the
onscreen menu,
Press the (CH-) _ button to
highlight the FEATURES menu,
Press the (VOL+) _ button
to enter the FEATURES menu
, Press the (CH-) @ button to
highlight AUTO Loci<
Press the (VOL+) _button,
INPUT USER CODE will @pear on the
screen.
_i Use the Number buttons to enter your
_ access code
_7_ Press the (CH-) @ button to setect TV
RATING
8Press the (VOL+) _or (VOL-)
button to highlight any of the TV
Rating options. When highlighted, aJt these
options can be (ON) blocked or (OFF)
unblocked.
the normal 4:3, EXIR4zVD 4:3, or CO_JPRESS ]6.'9,
or HD 4:3 asT_ect st_tios'.
Press the MENU_ button to see the
onscreen menu.
Press (CH -)_ button to highlight the
FEATURES menu
Press (VOL+) _ button to enter the
FEATURES menu
Press (CH -)_ button to highlight the
, PICTURE FORMAT menu.
Press (VOL+) _ button to change the
PICTURE FORMAT.
Note: Press the FORMAT button repeatedly
to toggle among the four screen format
sizes; 4:3, EXPAND 4:3, or COMPRESS
16:9, or HD 4:3.
_; Press MENU Q repeatedly to
remove the menu from the screen.
Note: HD 4:3 Picture Format is available in HD Mode
with 720p/!080i only
;_ Press MENU @ repeatedly to
remove the menu frorn the screen.
26 27
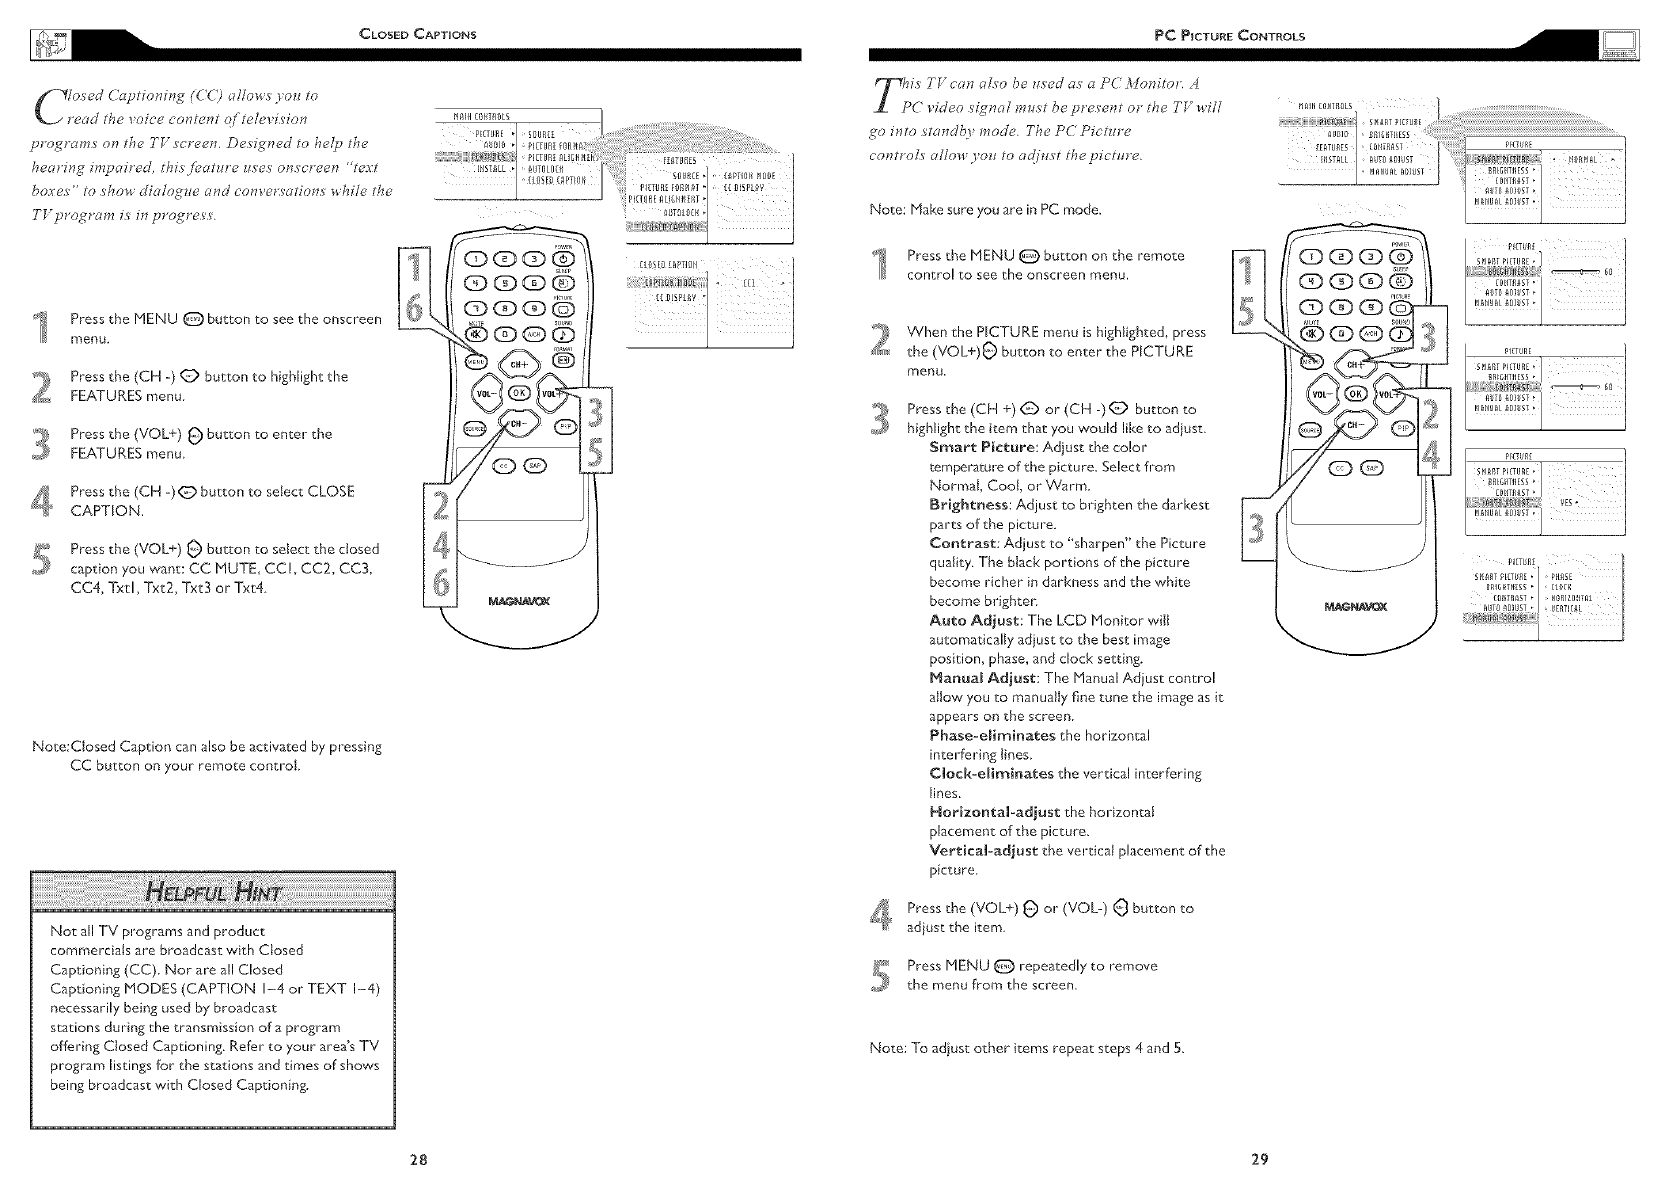
lo_cd ( aptionirl_ r (d @ allows' rozt to
"e_zdthe _*oiee cow,tent of teie_*i_ion
pro_ra_n_ on the ]-Fs'creen. De_izCned to hcl Uthe
hearing irnyaired, thi_ fe'amrc _s'es' otis'croon "text
boxe_" to s'ho_' cliaio_r_le and com'c_:_atiom while the
TFprozcta_n i_' in pro_me_'_'.
4
Press the MENU @ button to see the onscreen
mertu.
Press the (CH -) _) button to highlight the
FEATURES menu
Press the (VOL+) _ button to enter the
FEATURES menu
Press the (CH -) _ button to select CLOSE
CAPTION.
Press the (VOL+) _ button to select the closed
caption you want: CC MUTE, CC!, CC2, CC3,
CC4, Txt[, Txt2, Txt3 or Txt4
Note:Closed Caption can also be activated by pressing
CC button on your remote control
Not all TV programs and product
commerdaJs are broadcast with Closed
Captioning (CC). Nor are all Closed
Captioning MODES (CAPTION I-4 or TEXT I-4)
necessarily being used by broadcast
stations during the transmission of a program
offering Closed Captioning. Refer to your area's TV
program listings for the stations and times of shows
being broadcast with Closed Captioning.
go into _mndb) snode. The PC Picms'e
controls affo_* ;¢ozzto ad/t_s't thepicntre.
Note: Make sure you are in PC mode.
Press the MENU @ button on the remote
control to see the onscreen menu.
When the PICTURE menu is highlighted, press
the (VOL+)_ button to enter the PICTURE
menu,
Press the (CH +) _) or (CH -)(_ bu[ton to
highlight the item that you would like to adiust.
Smart Picture: Adiust the co!or
temperature of the picture. Select from
Normal, Cool, or Warm.
Brightness: Adjust to bHgh[en the darkest
parts of the picture.
Contrast: Adjust to "sharpen" the Picture
quality. The black portions of the picture
become richer in darkness and the white
become brighten
Auto Adjust: The LCD Monitor will
automatically adjust to the best image
position, phase, and clock setting.
Manual Adjust: The Manual Adjust control
allow you to manually fine tune the image as it
appears on the screen.
Phase-e[im#_ates the horizontal
interfering lines
Clock-eliminates the vertical interfering
lines.
Horizontal-adiust the horizontal
placement of the picture.
Vertical-adjust the vertical placemen_ of the
picture
, Press the (VOL+) _ or (VOL-) (_ button to
adjus_ the itern
i Press MENU _ repeatedly to remove
the menu from the screen.
Note: To adiust o[her items repeat steps 4 and 5.
PICTURE
............!_ { :
1
fl{_£17{{11J£{, pt{l_ E
81_1__lblES S • CL0C_
28 29
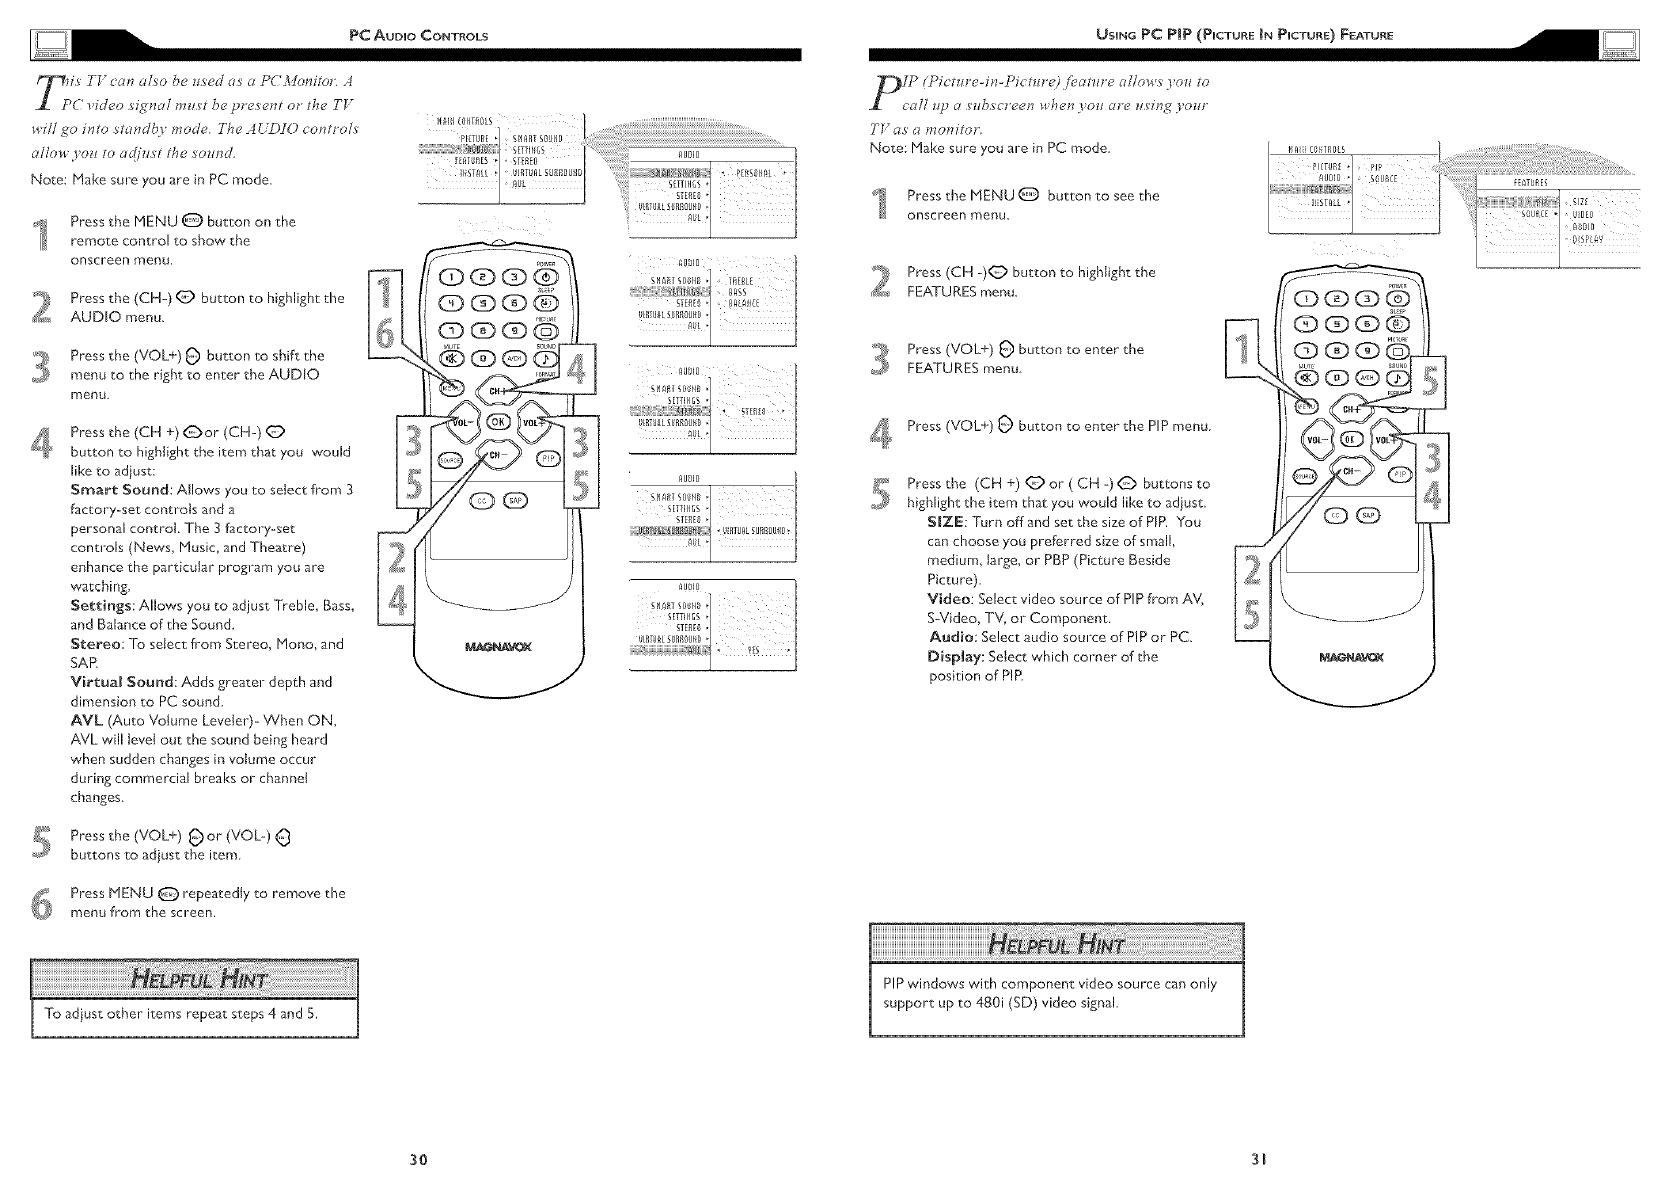
_*illgo into _t_db), mode. The 4C_910 controls'
allow you m c_c(/ust the _ound
Note: Make sure you are in PC mode.
Press the MENU Q button on the
remote control to show the
onscreen menu,
Press the (CH-) _ button to highlight the
AUDIO menu.
Press the (VOL+) _ button to shift the
menu to the right to enter the AUDIO
menu
4Press the (CH +) _or (CH-)
button to high{ight the item that you would
like to adjust:
Smart Sound: Atlows you to select frorn 3
factory-set controls and a
personal control. The 3 factory-set
controls (News, Music, and Theatre)
enhance the particular program you are
watching.
Settings: Allows you to adjust Treble, Bass,
and Balance of the Sound.
Stereo: To select from Stereo, Mono, and
SAn
Virtual Sound: Adds greater depth and
dimension to PC sound.
AVL (Auto Votume Leveler)- When ON,
AVL will Jevet out the sound being heard
when sudden changes in votume occur
during commercial breaks or channel
changes
Press the (VOL+) _or (VOL-) (_
buttons to adiust the item
_ Press MENU Q repeatedly to remove the
menu from the screen.
iiiiiiiiiiiiiiiiiiiiiiiiiiiiiiiiiiiiiiiiiiiiiiiiiiiiiiiiiiiiiiiiiiiiiiiiiiiiiiiiiiiiiiiiiiiiiiiiiiiiiiiiiiiiiii ii
To adiust other iterns repeat steps 4 and 5.
f_'_ls' _ monitor,
Note: Make sure you are in PC mode.
Press the MENU @button to see the
onscreen menu,
4
Press (CH -)_ button to highlight the
FEATURES menu.
Press (VOL+) _ button to enter the
FEATURES menu
Press (VOL+) _ button to enter the PIP menu
Press the (CH +) _ or ( CH -) _ buttons to
highlight the item that you would like to adiust.
SIZE: Turn off and set the size of PIP. You
can choose you preferred size of small,
medium, large, or PBP (Picture Beside
Picture)
Video: Select video source of PIP from AV,
S-Video, TV, or Component.
Audio: Select audio source of PIP or PC.
Display: Select which corner of the
position of P!E
iii !ii!ii!ii!ii!ii!ii!i!iiiiii!ii!i1
PIP windows with component video source can only
support up to 480i (SD) video signal J
CD®CD@
(D (:D (D O
b;q
30 31
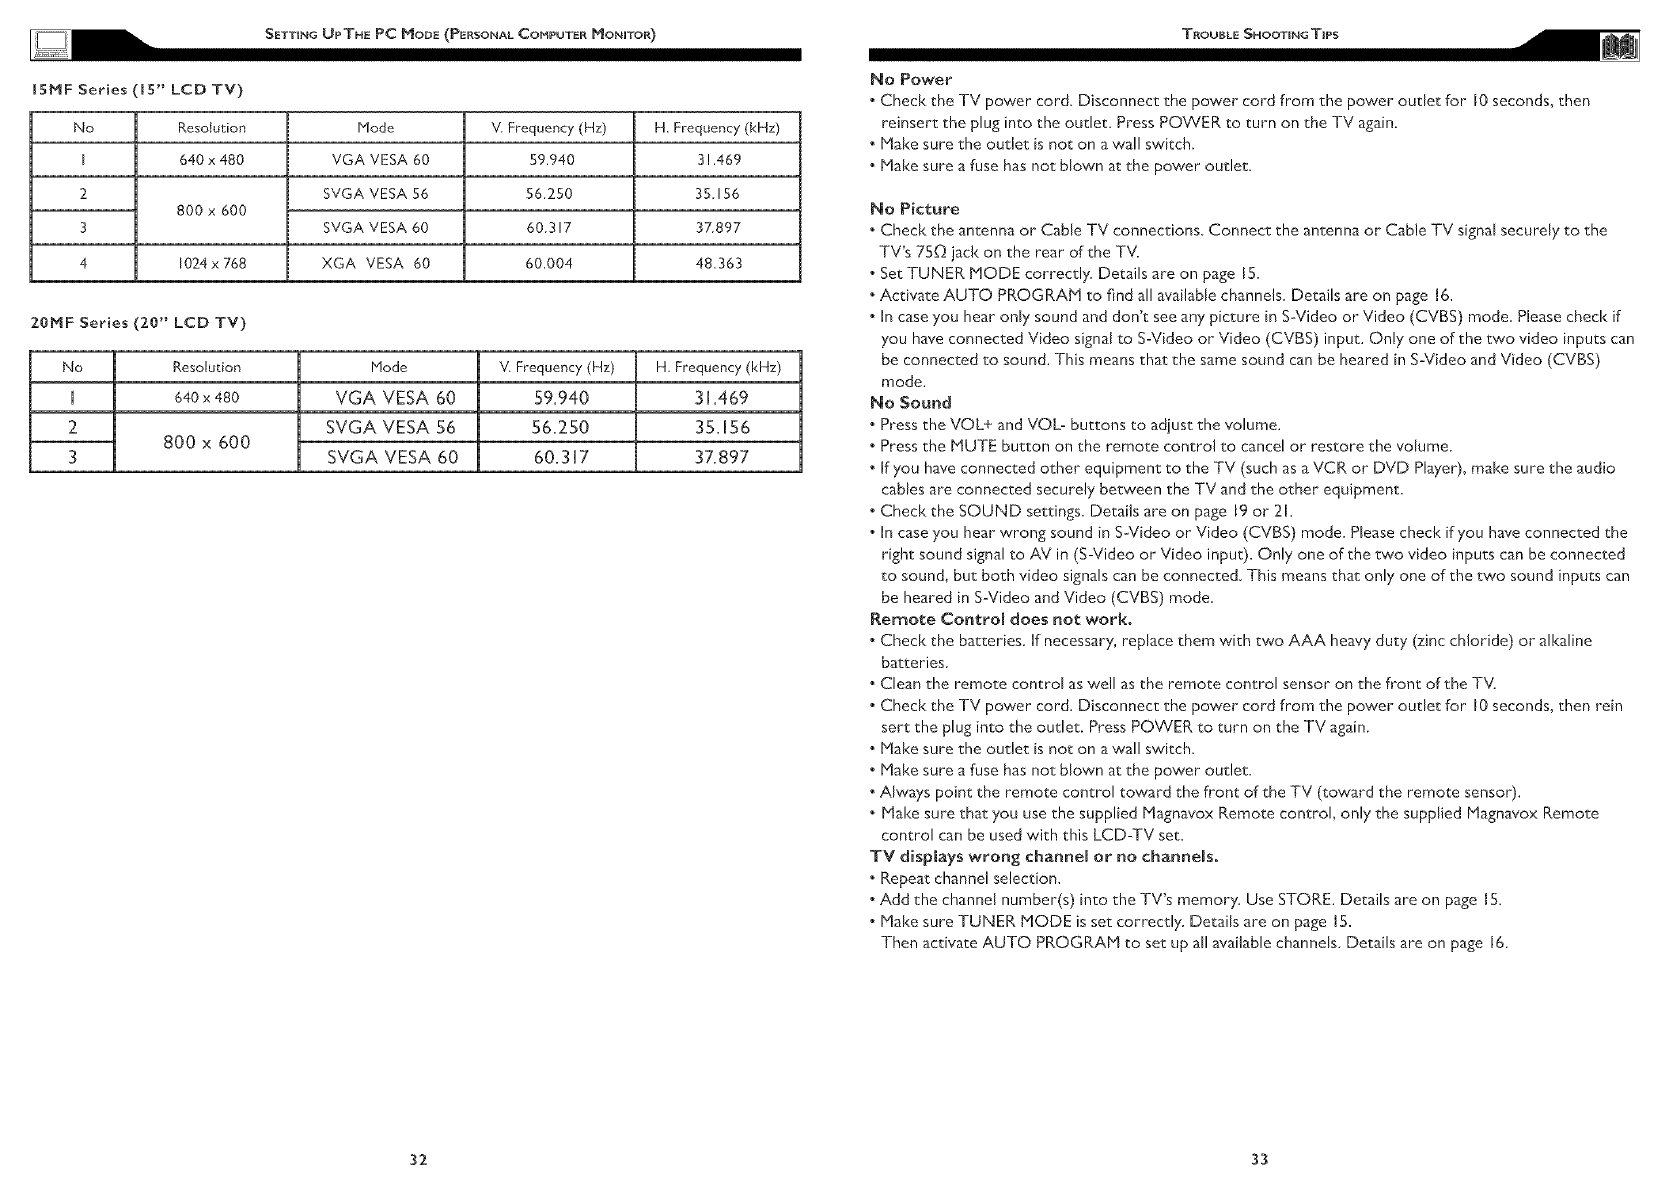
[SMF Series
No
2
3
4
[5" LCD TV)
Resolution
640 x 480
800 x 600
1024 x 768
Mode
VGA VESA 60
SVGA VESA 56
SVGA VESA 60
XGA VESA 60
Frequency(Hz)
59.940
5&250
60_317
60.004
H. Frequency(kHz)
3!.469
35A56
3Z897
48.363
20MF Series (20" LCD TV)
No
U
2
3
Resolution
640 x 480
800 x 600
Mode
VGA VEgA 60
SVGA VESA 56
SVGA VEgA 60
Frequency(Hz)
59.940
56.250
60.3U7
H_Frequency(kHz)
3U,469
35.U56
37.897
No Power
Check the TV power cord. Disconnect the power cord from the power outlet for I0 seconds, then
reinsert the plug into the outlet. Press POWER to turn on the TV again.
• Hake sure the outlet is not on a wail switch.
•Hake sure a fuse has not blown at the power outlet.
No Picture
• Check the antenna or Cable TV connections. Connect the antenna or Cable TV signal securely to the
TV's 75_ jack on the rear of the TV.
• Set TUNER MODE correctly. Details are on page 15.
• Activate AUTO PROGRAM to find all available channels. Details are on page 16.
In ease you hear only sound and don't see any picture in S-Video or Video (CVBS) mode. Please check if
you have connected Video signal to S-Video or Video (CVBS) input. Only one of the two video inputs can
be connected to sound. This means that the same sound can be heated in S-Video and Video (CVBS)
mode.
No Sound
• Press the VOL+ and VOL- buttons to adjust the volume.
• Press the MUTE button on the remote control to cancel or restore the volume.
• If you have connected other equipment to the TV (such as a VCR or DVD Player), make sure the audio
cables are connected securely between the TV and the other equipment.
• Check the SOUND settings. Details are on page t9 or 21.
• In case you hear wrong sound in S-Video or Video (CVBS) mode. Please check if you have connected the
right sound signal to AV in (S-Video or Video input). Only one of the two video inputs can be connected
to soun& but both video signals can be connected. This means that only one of the two sound inputs can
be heated in S-Video and Video (CVBS) mode.
Remote Control does not work.
Check the batteries. If necessary, replace them with two AAA heavy duty (zinc chloride) or al!<aline
batteries.
Clean the remote control as well as the remote control sensor on the front of the TV.
Check the TV power cord. Disconnect the power cord from the power outlet for I0 seconds, then rein
sert the plug into the outlet. Press POWER to turn on the TV again.
Hake sure the outlet is not on a wall switch.
Make sure afuse has not blown at the power outlet.
Always point the remote control toward the fl°ont of the TV (toward the remote sensor).
Make sure that you use the supplied Hagnavox Remote control only the supplied Magnavox Remote
control can be used with this LCD-TV set.
TV displays wrong channel or no channels.
• Repeat channel selection.
• Add the channel number(s) into the TV's memory. Use STORE. Details are on page 15.
• Make sure TUNER MODE is set correctly. Details are on page 15.
Then activate AUTO PROGRAM to set up all available channels Details are on page 16.
32 33
WARN[N6concerningstationaryimagesontheTV
Screen:Donotleavefixedimagesonthescreenforextendedperiodsof'time.ThiscancauseunevenagingoftheLCD
panel.NormaluseoftheTVshouldinvolveviewingofprograms"that have constantly moving or changing images. Do not
leave onmoving images on screen for extended periods of time. Do not dispiay the same images too frequently; if you
do, subtle "ghost" images can be left on the LCD screen. Sources of stationary images may be Laser discs, video games,
Compact Discs Interactive (CDd), or paused Digital Video Discs (DVDs) or video tapes
Here are some common examples of stationary images:
. DVD menus tist DVD content.
. Letterbox black bars appear at the top and bottom of the TV screen when a wide screen (16:9) movie is viewed on a
TV with standard (4:3) aspect ratio This is available with some DVDs.
. Video game images and scoreboards
. Television station Iogos cause a problem if'they are bright and stationary. Moving or low-contrast graphics are
less likely to damage the picture "tube
. Stock market tickers may appear at the bottom of the TV screen if the TV programming covers this news.
. Shopping channel Iogos, pricing displays may be bright and may appear constantly during "the show
These are usually in the same location on the TV screen.
TV Location
. To avoid cabinet warping, cabinet color changes, and an increased chance of TV failure, do not place the TV
where temperatures can become excessively hot (for example, in direct sunlight or near a heating appliance)
. Allow a free flow of air around the TV
Cleaning
. To avoid possible shock hazard, remove the TV's power cord from "the electrical outlet before cleaning.
. Regularly dust the TV with a dry, non-scratching duster.
, When denning the TV, take care not to scratch or damage the screen surface. Avoid wearing jewelry or using
anything abrasive. Do not use household cleaners. Wipe "the screen with a clean cloth dampened with waten
Use even, easy, vertical strokes when cleaning.
. Occasionally vacuum "the vents on the rear of the TV.
. Never use thinners, insecticide sprays, or other chemicals on or near the cabinet They may blemish the cabinet
permanently
A
Antenna Connection 4, 8
Audio In jack l0
Auto Program 4, 16, 24
B
Balance ........................... 4, 21, 30
Bass 4, 2!, 30
Batteries 6
Blocking 25
Brightness 20, 29
C
Cable Box Connections 4, 9
Cable TV Connection ....................... 4, 8
Care and Cleaning 34
Channel Edit 4, !7
Closed Captions 4, 28
Color 20
F
Factory Service .................. 4, 36, 37
Factory Service Information .......... 36, 37
Factory reset 18
Index 4, 35
L
Language 4, 14
Limited "Warranty 4, 38
M
Mono 7, 21,30
P
PC (Monitor) Connection ........... 4, 13
R
Regulatory 36
S
S-Video Connection ..................... I I
Sound 4, 7, 19, 21, 30, 33
Sound Mode 19
Stereo 4, 7, 9, 21, 30
T
Table of Contents ................................ 4
Tint ....................... 20
Treble 4, 2!, 30
Troubleshooting 33
TV Operation (Basic) 6
W
Warranty I, 2, 4, 36, 38
Wetcome 4
34 35
FEDERAL COMMUNICATIONS COMMiSSiON (FCC) NOTICE (U,S. ONLY)
This equipment has been tested and found to comply with the limits for a Class B digital
device, pursuant to Part IS of the FCC Rules. These limits are designed to provide iAeasonable
protection against harmful interference in a residential instal{ation. This equipment generates,
uses and can radiate radio flAequency energy and, if not installed and used in accordance with
the instructions, may cause harmful interference to radio communications. However, there
is no guarantee that interference will not occur in a particular installation. If this equipment
does cause harmful interference to radio or television reception, which can be determined by
turning the equipment off and on, the user is encouraged to try to correct the interference by
one or more of the following measures:
Reorient or relocate the receiving antenna.
Increase the separation between the equipment and receiver.
Connect the equipment into an outlet on a circuit different fl_om that to which the receiver is connected,
Consult the dealer or an experienced radio/TV technician for help
Changes or modifications not express{y approved by the party responsible for compliance
could void the useCs authority to operate the equipment
Use only RF shielded cabte with ferrite core when connecting this monitor to a computer device
To prevent damage which may result in fire or shock hazard, do not expose this appliance to rain or excessive moisture
THIS CLASS B DIGITAL APPARATUS MEETS ALL REQUIREMENTS OF THE CANADIAN
INTERFERENCE-CAUSING EQUIPMENT REGULATIONS.
COMMISSION EEDEFIALE OE LA CONMUNICATION (FCC DECLARATION)
Cet equipement a 6t6 test6 et d&clar6 conforme auxlimites des appareils num&riques de
class B,aux termes de J'articte 15 Des r&g{es de la FCC. Ces timites sont con_ues de fa_on
fourir une protection raisonnabte contre les interf6rences nuisibles dans le cadre d'une
installation r&sidentie{le. CET appareit produit, utilise et peut _mettre des hyperfrequences
qui, si t'appareil n'est pas install6 et udlis6 seton les consignes donnees, peuvent causer des
interf6rences nuisibtes aux communications radio. Cependant, rien ne peut garantir t'absence
d'interf6rences dans le cadre d'une installation particuti&re. Si cet appareil est la cause
d'interf&rences nuisibles pour la r&ception des signaux de radio ou de t61&vision, ce qui peut
&u-e d6cel& en fermant r6quipement, puis en le remettant en fonction, t'utilisateur pourrait
essayer de corriger la situation en prenant les mesures suivantes:
R_orienter ou d6placer rantenne de r6ception.
Augmenter la distance entre I'_quipement et Je r_cepteun
Brancher I'&quipement sur un autre circuit que celui utilis6 par le r_cepteur.
Demander t'aide du marchand ou d'un technicien chevronn& en radio/t&t6vision.
m
_ Toutes modifications n'ayant pas re_u I'approbation des services competents en mad&re de
conformit_ est
susceptible d'interdire _ t'utilisateur I'usage du present &quipement.
N'utiliser que des c_.bles RF btind&s avec ame en ferrite pour les connections avec des ordinateurs ou p&riph&riques.
CET APPAREIL NUMERIQUE DE LA CLASSE B RESPECTE TOUTES LES EXlGENCES DU REGLEMENT SUR LE
MATERIEL BROUILLEUR DU CANADA.
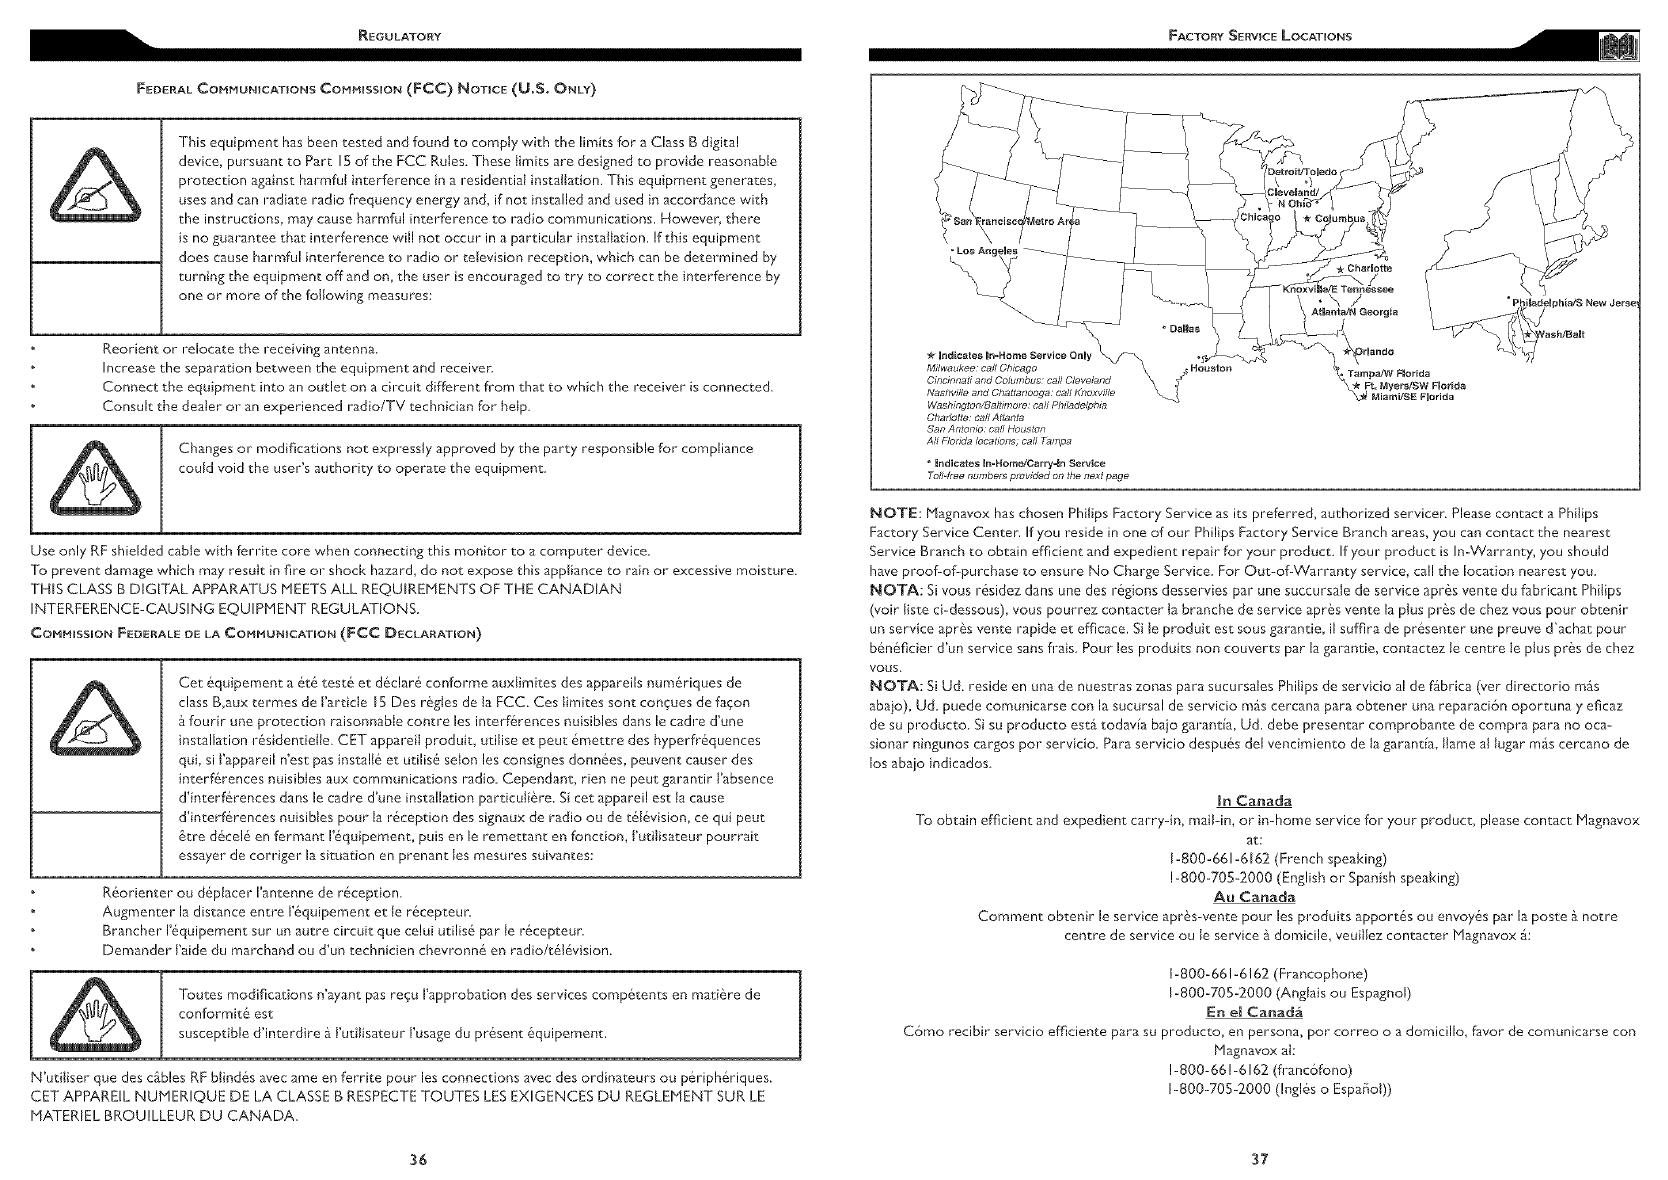
Cincinnati and Cotumbus: carl Clevdand
Nashviffo and Ctlattanooga: call Knoxville
Washington/B,]J#lnole: carl Philadelphia
Odadotte: carl Atlanta
San At?rondo: ca# I _ouston
All FIodda locations; carl Tattlpa
" Indicates I_Home/Carry4n Service
Toll#tee numbers provided on lhe nex[ page
Tampa/W Florida
Ft. Myers/SW Florida
_ MiamFSE Fmorida
NOTE: Magnavox has chosen Phiiips Factory Service as its preferred, authorized servicer. Please contact a PhiJips
Factory Service Center. If you reside in one of our Philips Factory Service Branch areas, you can contact the nearest
Service Branch to obtain efficient and expedient repair for your product. If your product is In-Warranty, you should
have proof-of-purchase to ensure No Charge Service. For Out-of-Warranty service, call the location nearest you.
NOTA: Si vous r6sidez dans une des r6gions desservies par une succursaJe de service apr6s vente du fabricant Philips
(voir liste ci-dessous), vous pourrez contacter Jabranche de service apr&s vente la plus pr&s de chez vous pour obtenir
un service apr&s vente rapide et efficace. Site produit est sous garantie, il suffira de pr&senter une preuve d'achat pour
b&n6ficier d'un service sans frais Pour les produits non couverts par la garantie, contactez le centre te plus pr&s de chez
VOUS
NOTA: Si Ud. reside en una de nuestras zonas para sucursales Phitips de servicio al de f_.brica (ver directorio m_.s
abajo), Ud. puede comunic_rse con la sucursal de servicio m_s cercana para obtener una reparaci6n oportuna yeficaz
de su producto. Si su producto est'. todavia bajo garantia, Ud. debe presentar comprobante de compra pars no oca-
sionar ningunos cargos por servicio Para servicio despu6s del vencimiento de ta garantia, tJame aJtugar m_s cercano de
los abajo indicados
In Canada
To obtain efficient and expedient carry-in, mail-in_ or in-home service for your product, please contact Magnavox
at:
1-800-661-6162 (French speaking)
1-800-705-2000 (English or Spanish speaking)
Au Canada
Comment obtenir le service apr_s-vente pour les produits apport6s ou envoy&s par la poste & nou_e
centre de service ou le service _ domicile_ veuiltez contacter Magnavox _:
1-800-661-6162 (Francophone)
1-800-705-2000 (Angiais ou Espagnol)
En e_ Canadg_
C6mo recibir servicio efficiente pars su producto, en persona, pot correo o a domicillo, favor de cornunicarse con
Magnavox aI:
1-800-66!-6162 (fl_anc6fono)
1-800-705-2000 (Ingl6s o Espa_ol))
QUALITY SERVICE ISAS CLOSE AS YOUR TELEPHONE! SIMPLY LOOK OVER THE LiST BELOW FOR THE NUMBER OF A
FACTORY SERVICE CENTER NEAR YOU. HAGNAVOX HAS CHOSEN PNILIPS FACTORY SERVICE AS ITS
PREFERRED, AUTHORIZED SERVICER.
YOUR PRODUCT WILL RECEIVE EFFICIENT AND EXPEDIENT CARRYdN, HAtL4N, OR IN-HOME SERVICE, AND
YOU WILL RECEIVE PEACE OF HIND, KNOWING YOUR PRODUCT IS BEING GIVEN THE EXPERT ATTENTION OF
PHILIPS' FACTORY SERVICE.
COMMENT OBTENIR NOTRE SERVICE APRES VENTE RAPmDE ET EFFICACE SUIT PAR COURRIER, A DOMICILE,
OU EN SE PRESENTANT A UN CENTRE DE SERVICE PHtLIPS. PLUS DE 600 CENTRES DE RECEPTION DE
PRODUSTS A REPARER A TRAVERS LE PAYS: CONTACTER LE CENTRE DE SERVICE AUX CONSOMNATEURS LE
PLUS PROCNE POUR SAVOIR L'EHPLACEMENT DE CES DIEPETS DANE UN RAYON DE 50 A 75 MILES (80 KM A 120
KH) DU CENTRE DE SERVICE LOCAL,
COHO OBTENER UN SERVICIO OPORTUNOY 5FICIENTE POR CORREO, EN CASA O EN PERSONA PARA SU
PRODUCTO A TRAV'S DE UN CENTRO PNIUPS DE SERViCIO, MAS DE 600 SITmOS POR TODO EL PAIS PARA LA
RECEPCION DE PRODUCTOS NECESmTADOS DE REPARAaONES: COHUNICARSE CON EL CENTRO DE SERVIClO
DE FABRICA HAS CERCANO PARA ESTOS LUGARES DENTRO DE UN RADIO DE 80 A 120 KH (50 A 75 H_LLAS) DEL
CENTRO DE SERVICIO LOCAL.
ATLANTA
Philips Factory Service
550 Franklin Road. Suite F
Marietta, GA 30067
800-273-150 I
TAMPA
Philips Factory Service
1911 US Highway 30! North, Suite 100
Tampa, FL 33619
800-442-2027
SAN FRANCISCO
Philips Factory Service
681 East Brol<aw Pal.
San Jose, CA 95! !2
800-300-9013
HOUSTON
Philips Factory Service
Ill0 N Post Oak Rd,Suite 100
Houston, TX 7705S
800-952-3254
CHICAGO
Philips Factory Service
1279 W. Hamiiton Pkwy
Itasca, IL 60 !43
800-53!-1922
KNOXVILLE
Phi@s Factory Service
One Philips Drive
Buiiding 2
Knoxville, TN 37914
800-821-1767
PHILADELPHIA
Philips Factory Service
354 Dunks Ferry Rd.
8ensaiem, PA 19020
800-847-9320
CLEVELAND
Philips Factory Service
950 KeyNote Circle
Brooklyn Heights, OH 44! 3I
800-331-7037
DETROIT
Philips Factory Service
25173 Dequindre
Madison Heights, HI 48071
800-438-!398
DALLAS
PhiJips Factory Service
4!5 N. Main Street, #J07
Euiess, TX 76040
800-952-3254
LOS ANGELES
PhiJips Factory Service
20930 Bonita, Ste. V
Carson, CA 90746
800-300-90!3
LCD TV
90 Days Free Labor
One Year Parts Exchange
This product must be carried in for service
WHO IS COVERED?
You must have proof of purchase to receive warran{y service.
A sales receipt or other document showing that you pur-
chased the product is considered proof of purchase.
WHAT IS COVERED?
Warranty coverage begins the day you buy your product.
For 90 days thereaRer, all parts will be repaired or replaced
free_ and labor is free. From 90 days to one year from the day
of purchase, all parts will be repaired or replaced free, but
you pay for all k_bor charges. After one year fiom the day of
purchase, you pay for the replacement or repair" of all parts,
and for all labor charges.
All p_rts, including repaired and repbced p_rts, are covered
only for the origh'lal warranty period. When the warranty on
the product expires_ the win-runty on _]l replaced _nd repaired
parts also expires.
WHAT _S EXCLUDED?
You_" warranty does not Cover
* labor charges for instai]atlon or setup of the produc_, adiust-
meat of customer controls on the product, _nd hlst_llation or
repair of antenna systems outside of the product.
*product repalr and/or part replacement because of misuse,
_ccJdent, unauthorized repair Of other cause not within the
control of Magnavox.
*reception problems caused by signal conditions or cable or
antenna systems outside the unit.
z product that requires modification or adaptation to enable
it to operate in any country other than the country for which
it was designed, manufactured approved and/or authorized,
or repair of products damaged by d'lese modifications.
* incidental or consequential damages resulting E-ore the
product.(Some states do not allow the exclusion of incidental
ol- consequential damages, so the above exc]uslon may not
apply to you. This incJudes, but is not limited to, pFe_ecorded
materi_l, whether copyrighted or not copyrighted.)
, _ product used for commercial or inst]tutiomd purposes.
MAKE SURE YOU KEEP..,
Please keep your sales receipt or other document showing proof
o4 purchase. Attach it to this owner's manual _nd keep both
nearby. Also keep [he original box and packing material in case you
need to return your product.
BEFORE REQUESTING SERViCE.-
Please check your owner's m_nual before req/lesting service.
Adjustments of the controls discussed there may save you a
service call,
TO GET WARRANTY SERVICE }N U.S.A.,
PUERTO RICO, OR U.S. VmRGIN ISLANDS...
Contact a Plagn&vox &ctory service center (see enclosed list) or
authorized service cent:oF to arrange repair.
(hi U.S.A., Puerto Rico, and US. Virgin {slands, all implied
warranties, including implied w_rr_nties of merchantability and
fitness for a particular pro"pose are limited in duration to the
duration of this express warranty. But, bee&use some states do riot
allow limitations on how long an impiled warranty may last, this
Ihnit_tion may not apply to you)
TO GET WARRANTY SERVICE iN CANADA,,,
Please contact Magnavox at:
1-800-705-2000
(M Canada, this warranty is given in heu of all other warranties.
No other walranties are explessed ol implied including any implied
warranties of merchantability o) fitness for a particular purpose,
Magnavox is not liable under any circumstances for any direct_
indirect, special, incidental or consequential damages, howsoever
incurred, even if notified of the possibility of such damages)
REMEHBEB._
Please record below the model and serial numbers found on the
product. Also, please fill out and mail your warranty registration card
promptly. It will be easier for us to notify you if necessary.
b1ODEL #
SERIAL #
WHERE tS SERVICE AVAILABLE?
Warranty servlce is available in all countries where the
product is omcialiy distributed by blagnavox. Jn countries
where Hagnavox does not distribute the product, the local
_agnavox service organization will attempt 1:o provide service
(although there may be a delay if the appropriate spare parts
and technical manual(s) are not readily available),
Fhi_ _'arrantp giw_ poz_ _ific/_gal rights¸ Yoz_ lnRp ha_ oth_r rights which _al2p _'om stat_ro_inc_ to stat_ro_inc_
38 39
