Magnavox 60PW9383 User Manual PROJECTION TV Manuals And Guides L0303143
MAGNAVOX Projection/Digital 42 and above TV Manual L0303143 MAGNAVOX Projection/Digital 42 and above TV Owner's Manual, MAGNAVOX Projection/Digital 42 and above TV installation guides
60PW9383 L0303143
User Manual: Magnavox 60PW9383 60PW9383 MAGNAVOX PROJECTION TV - Manuals and Guides View the owners manual for your MAGNAVOX PROJECTION TV #60PW9383. Home:Electronics Parts:Magnavox Parts:Magnavox PROJECTION TV Manual
Open the PDF directly: View PDF ![]() .
.
Page Count: 80
Your Television's
Directions for Use
55PW9383
60PW9383
Product Highlights
•High-definition displaym1080i/480p
•Philips HD Optics
•Auto IntelliSense TM Focus
•HD DVI and Component Inputs
•Active Control TM
•Eye Fidelitymselectable progressive or
interlaced scan
•APAC TM (Automatic PhosphorAging
Compensation)
Features
•Multipoint digital convergence
•Protective screen filter
•Virtual Dolby _Surroundu30-watt RMS
•3-D Y/C comb filter
• Double-window, two-tuner
picture-in-picture
•Slim, upscale styling
•Home-cinema universal remote
with backlighting
OQ
0O
QO
3"_35 035 2140"_

Once your PHILIPS purchase is registered, you're ehglble to receive all the pnwleges of owmng a
PHILIPS product. So complete and return the Warranty Registration Card enclosed with your pur-
chase at once. And take advantage of these important benefits.
Warranty
Verification
Registering your product within
10 days confirms your right to
maximum protection under the
terms and conditions of your
PHILIPS warranty.
Owner
Confirmation
Your completed Warranty
Registration Card serves as
verification of ownership in the
event of product theft or loss.
Model
Registration
Returning your Warranty
Registration Card right away guar-
antees you'll receive all the infor-
mation and special offers which
you qualify for as the owner of your
model.
Congratulations on your purchase,
and welcome to the "family!" PHILIPS
Dear PHILIPS product owner:
Thank you for your confidence nnPHILIPS You've selected one of the best-built,
ucts avadable today And we'll do everything nnour power to keep you happy with your purchase
for many years to come
As a member of the PHILIPS "family," you're entitled to protectnon by one of the most comprehensive
warranties and outstandnng service networks nnthe industry
What's more, your purchase guarantees you'll recenve all the information and special offers for which
you quahfy, plus easy access to accessories from our convenient home shopping network
And most importantly you can count on our uncompromising commitment to your total satisfaction
All of this usour way of saying welcome-and thanks for nnvesting nna PHILIPS product
Snncerely,
Lawrence J. Blanford
President and Chief Executive Officer PS Remember, to get the most from your PHILIPS
product, you must return your
Warranty Registration Card within 10 days So
please mall it to us right hOWl
Know these
safetysymbo/s
_- TbEs bolt of lightning' indicates untnsulated material w=thln your unit may cause an electri-
cal shock For the safety of everyone in your household, please do not remove product covenng
,_k The exclamation point' calls attention to features for which you should read the enclosed
IEteratureclosely to prevent operating and maintenance problems
WARNING TO PREVENT FIRE OR SHOCK HAZARD, DO NOT EXPOSE THIS EQUIPMENT
TO RAIN OR MOISTURE
CAUTION To prevent electric shock, match wEde blade of plug to wide slot, and fuUy insert
ATTENTION Pour evnter les chocs electnques, Entrodu_rela lame la plus large de la fiche darts la
borne correspondante de la prise et pousser ]usqu'au fond
IMPORTANT SAFETY INSTRUCTIONS
Read before operating equipment
16.
1. Read these instructions.
2. Keep these instructions.
3. Heed all warnings.
4. Follow all instructions.
5. Do not use this apparatus near water.
6. Clean only with a dry cloth.
7. Do not block any of the ventilation openings. Install in
accordance with the manufacturers instructions.
8. Do not install near any heat sources such as radiators, heat
registers, stoves, or other apparatus (including amplifiers)
that produce heat.
9. Do not defeat the safety purpose of the polarized or ground-
ing-type plug. A polarized plug has two blades with one
wider than the other. A grounding type plug has two blades
and third grounding prong. The wide blade or third prong
are provided for your safety. When the provided plug does
not fit into your outlet, consult an electrician for replacement
of the obsolete outlet.
10. Protect the power cord from being walked on or pinched
particularly at plugs, convenience receptacles, and the point
where they exit from the apparatus.
11. Only use attachments/accessories specified by the manu-
facturer.
12. _ Use only with a cart, stand, tripod, bracket, or table
I specified by the manufacturer, or sold with the ap-
paratus. When acart is used, use caution when
moving the cart/apparatus combination to avoid injury from
tip-over.
13. Unplug this apparatus during lightning storms or when
unused for long periods of time.
14. Refer all servicing to qualified service personnel. Servicing
is required when the apparatus has been damaged in any
way, such as power-supply cord or plug is damaged, liquid
has been spilled or objects have fallen into apparatus, the
apparatus has been exposed to rain or moisture, does not
operate normally, or has been dropped.
15. This product may contain lead and mercury. Disposal of
these materials may be regulated due to environmental con-
siderations. For disposal or recycling information, please
contact your local authorities or the Electronic Industries
Alliance: www.eiae.org
Damage Requiring Service - The appliance should be
serviced by qualified service personnel when:
A. The power supply cord or the plug has been damaged;
or
B. Objects have fallen, or liquid has been spilled into the
appliance; or
C. The appliance has been exposed to rain; or
D. The appliance does not appear to operate normally or
exhibits a marked change in performance; or
E. The appliance has been dropped, or the enclosure
damaged.
17. Tilt/Stability -All televisions must comply with recommend-
ed international global safety standards for tilt and stability
properties of its cabinet design.
• Do not compromise these design standards by applying
excessive pull force to the front, or top, of the cabinet which
could ultimately overturn the product.
• Also, do not endanger yourself, or children, by placing
electronic equipment/toys on the top of the cabinet. Such
items could unsuspectingly fall from the top of the set and
cause product damage and/or personal injury.
18. Wall or Ceiling Mounting - The appliance should be
mounted to a wall or ceiling only as recommended by the
manufacturer.
19. Power Lines -An outdoor antenna should be located away
from power lines.
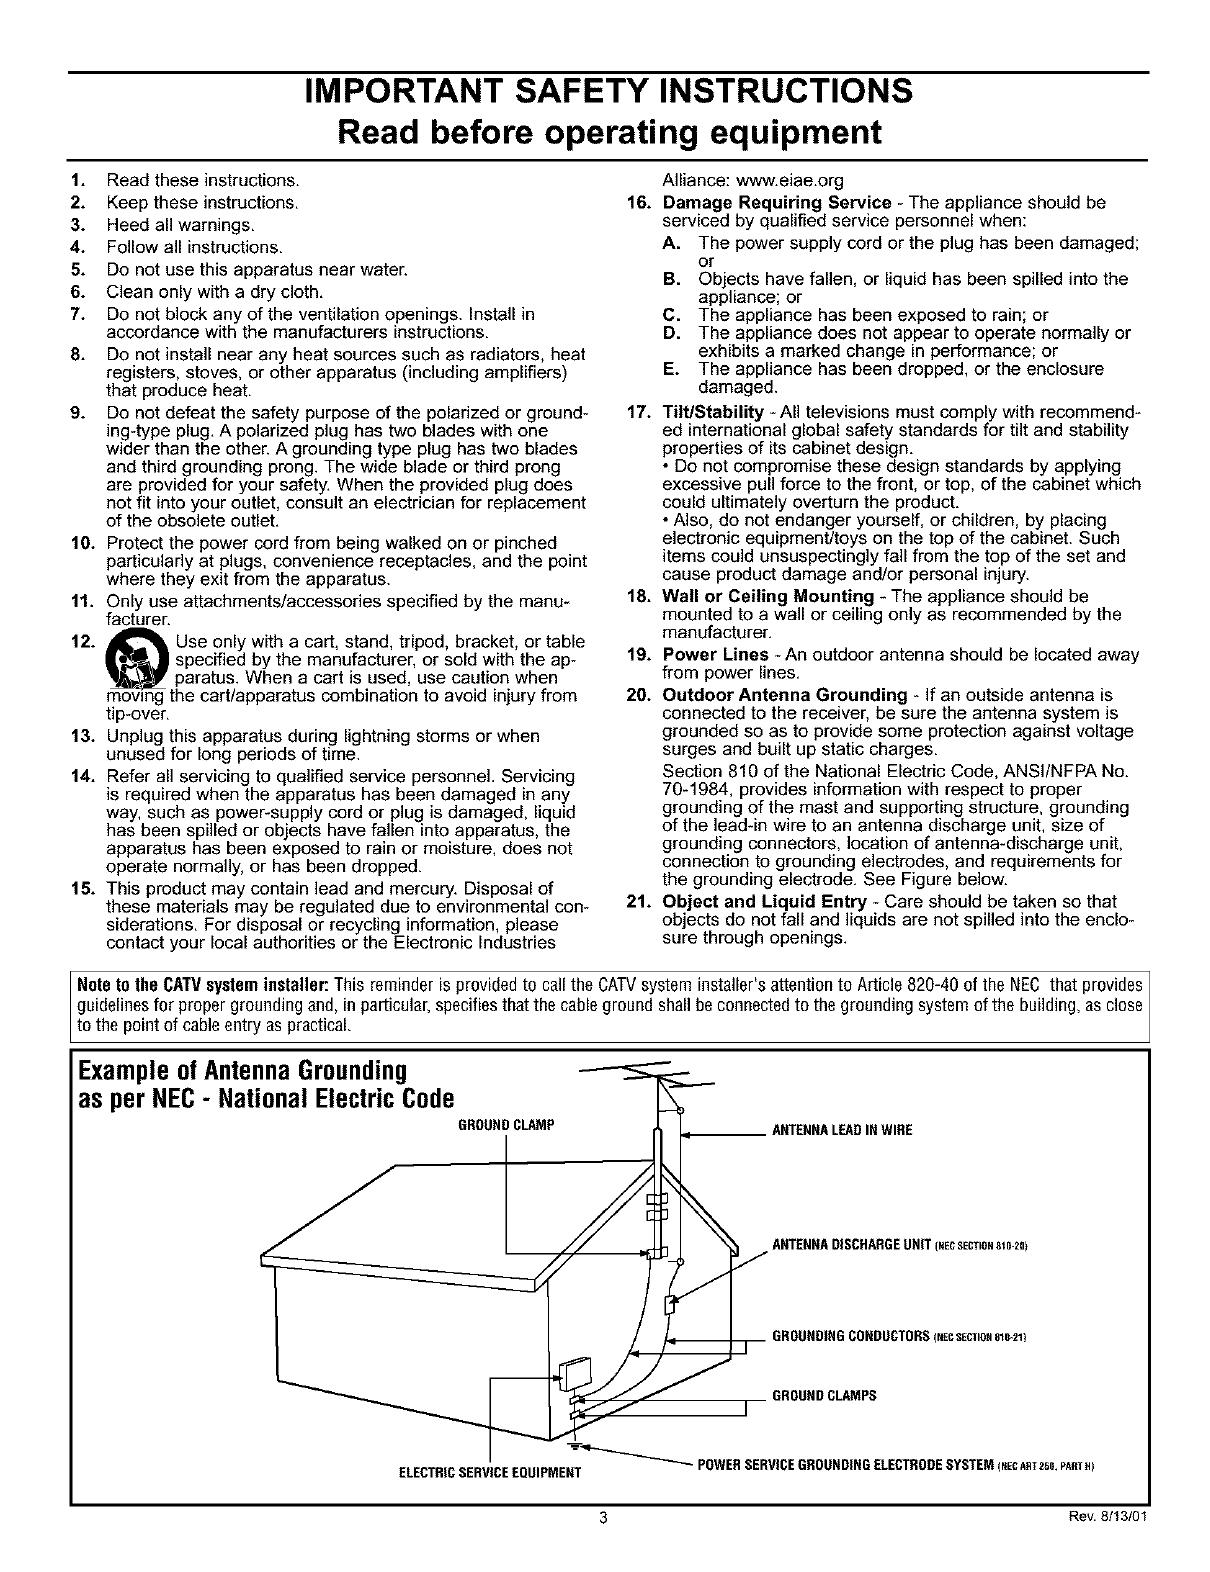
20. Outdoor Antenna Grounding - If an outside antenna is
connected to the receiver, be sure the antenna system is
grounded so as to provide some protection against voltage
surges and built up static charges.
Section 810 of the National Electric Code, ANSI/NFPA No.
70-1984, provides information with respect to proper
grounding of the mast and supporting structure, grounding
of the lead-in wire to an antenna discharge unit, size of
grounding connectors, location of antenna-discharge unit,
connection to grounding electrodes, and requirements for
the grounding electrode. See Figure below.
21. Object and Liquid Entry - Care should be taken so that
objects do not fall and liquids are not spilled into the enclo-
sure through openings.
Note to the CATVsysteminstaller: This reminder is provided to call the CATVsystem installer's attention to Article 820-40 of the NEC that provides ]
guidelines for proper grounding and, in particular, specifies that the cableground shall be connected to the grounding system of the building, as close
to the pont of cab e entry as pract ca.
ExampleofAntennaGrounding
as per NEC-National ElectricCode
GROUND CLAMP
ELECTRICSERVICEEQUIPMENT
3 Rev. 8/13/01

INTRODUCTION
Welcome/Regislralion of Your TV .................... 2
Safety/Precautions .............................. 2-3
Features ........................................ 5
_CONNECTING ACCESSORY DEVICES
TO YOUR TV
Panel Overview: Standard Inputs and Outputs ........... 6
Panel Overview: High-definition Inputs ................ 7
Connecting a VCR ................................ 8
Connecting a VCR and Cable Box .................... 9
Connecting and Using an Audio Hi-fi System
with Your TV ................................. 10
Making Optional Surround-sound Connections ......... 11
Connecting a Standard DVD Player .................. 12
Connecting an S-Video Device ..................... 13
Connecting a DVD Player with Progressive-scan
Capability .................................... 14
Connecting an HD Receiver to the
HD INPUT-AV 4 Jacks .......................... 15
Connecting a Camcorder .......................... 16
Connecting and Using Headphones
with Your TV ................................. 17
_USING THE REMOTE CONTROL
Programming the TV Remote to Work
with Accessory Devices ..................... 18
Using the Code-entry Melhod to Program Your
TV Remote ................................... 19
Using the Search Method to Program Your
TV Remote ................................... 20
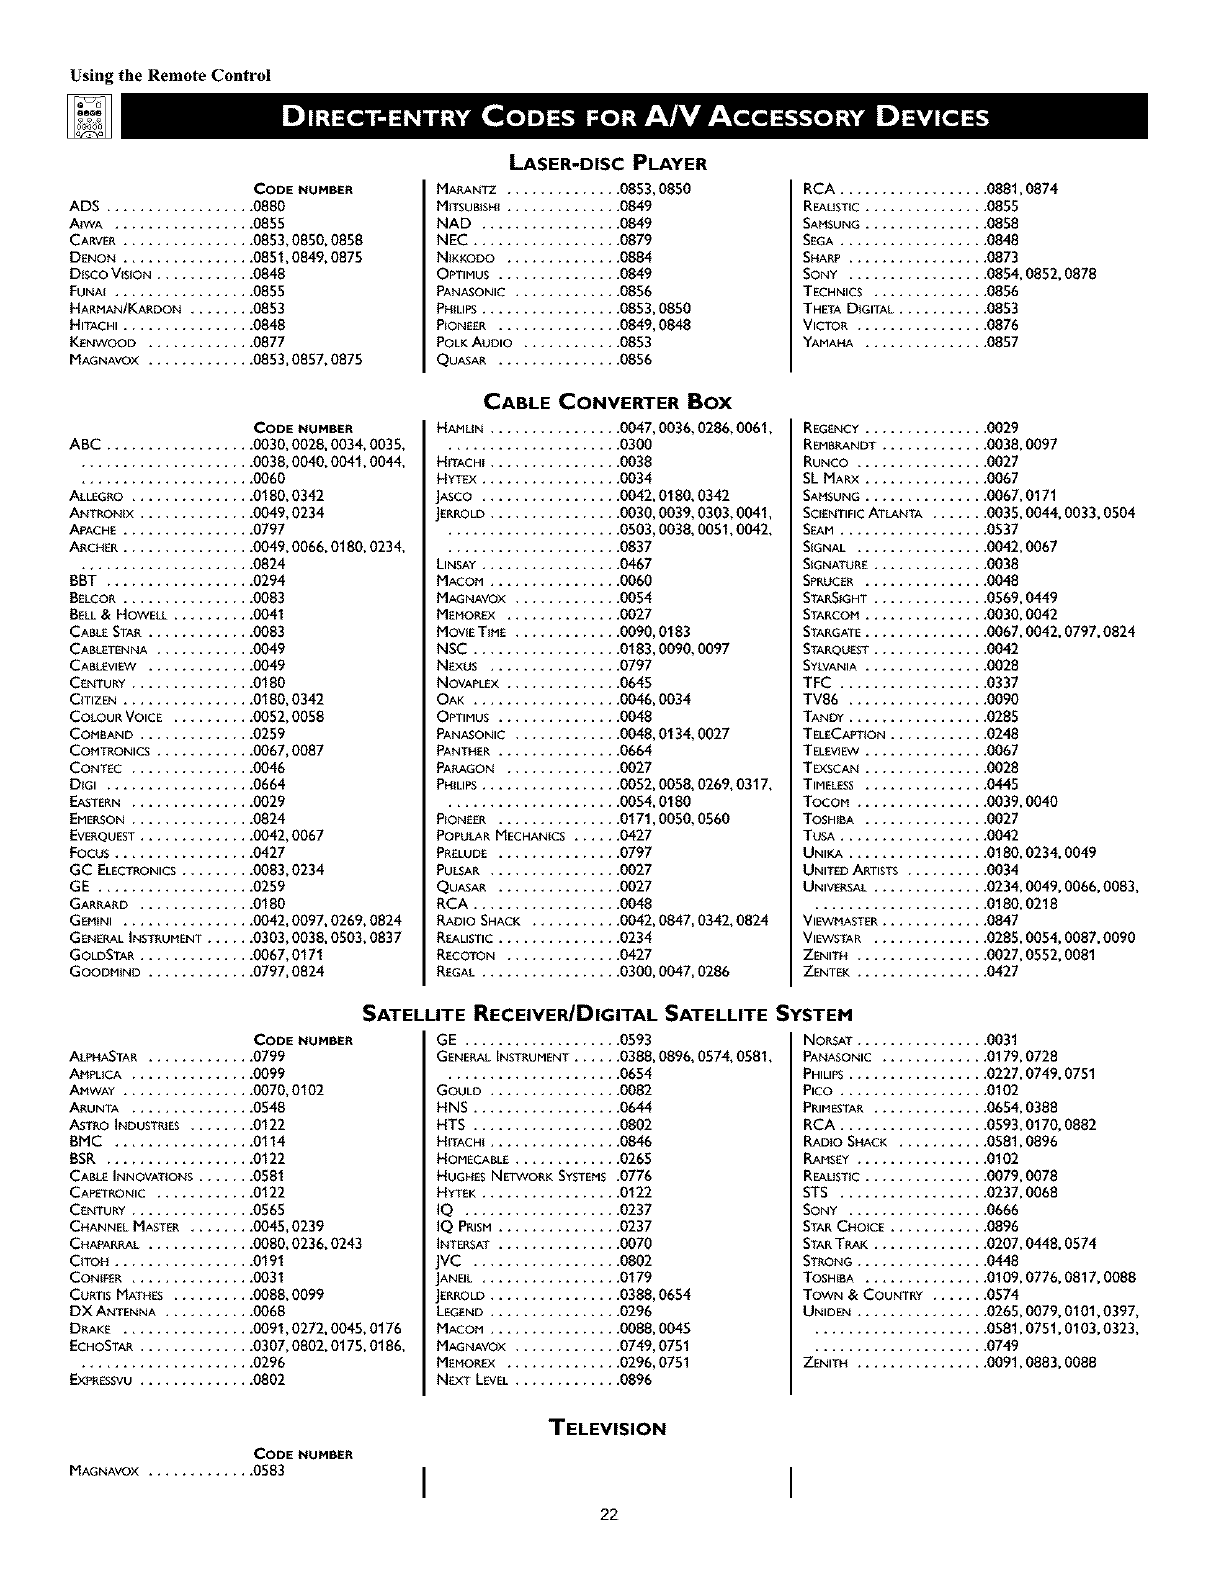
Direct-entry Codes for A/V Accessory Devices ...... 21-22
Using the TV Remote with Accessory Devices ......... 23
Using the AV and Source Select Buttons .............. 24
Using AutoSounO "M.............................. 25
Using AutoPicture TM ............................. 26
Using AutoSurff M ............................... 27
Using Program List and Alternate Channel (A/CH) ...... 28
Using the Sleep Timer Control ...................... 29
USING THE ON-SCREEN SUBMENUS
_PICTURE
Adjusting the Picture Controls ............... 30
Setting the Eye Fidelity Control ..................... 31
Setting the Dynamic Contrast Control ................ 32
Adjusting the Manual Converge Controls:
Converge Red/Blue ............................. 33
Adjusting the Manual Converge Controls:
Multipoint Red/Blue ............................ 34
_SOUND
Adjusting the Treble, Bass, and
Balance Controls ........................ 35
Using the AVL (Audio Volume Leveler) Control ........ 36
Selecting the Surround-sound Modes ................. 37
Selecting the Stereo/Mono Sound Mode .............. 38
Selecting the SAP (Second Audio Program) Feature ..... 39
Using the Bass Boost Control ...................... 40
_FEATURES
The Timer
Setting the Clock ............................... 41
Displaying the Time ............................ 42
Setting the Timer's Start Time and Stop Time ......... 43
Selecting the Timer's Channel ..................... 44
Setting the Timer's Activate Control ................ 45
AutoLock TM
Understanding AutoLock TM ....................... 46
Setting up the AutoLock TM Access Code ............. 47
Using AutoLock TM to Block Channels ............... 48
Using AutoLock TM to Block by Movie Rating ......... 49
Using AutoLock TM to Block by TV Rating ........... 50
Turning the AutoLock TM Blocking Control
on or off .................................... 51
Using AutoLock TM to Block Unrated Broadcasts ....... 52
Using AutoLock TM to Block Broadcasts That
Have No Rating ............................... 53
Reviewing Your Currrent AutoLock TM Settings ........ 54
Using the Closed Captioning Control ................. 55
Using the Piclure-fonnat Control ................. 56-57
Using Active Control TM ........................... 58
APPENDIXES
Appendix A: Compatibility Information
for the TV's High-definition Inputs .......... 59
Appendix B: Model Specifications ................... 60
Appendix C: Setting Color Space for HD INPUT-AV 4 .... 61
Jim GENERAL INFORMATION
Care and Cleaning ............................... 62
Troubleshooting .............................. 63-64
Glossary of Television Terms ....................... 65
index ......................................... 66
Factory Service Locations ...................... 67-68
Limited Warranty ................................ 72
Refer to the simple Quick Use and Setup Guide (supplied with your
TV) for details on the following:
•Basic TV connections
•Television and remote-control operation
• On-screen menu conlrols
• Installation features.
Il",_ II"_ l'!'11,L_,Ik'_ ,"!ild,'Iftl Ik*i
4
As you unpack your TV, please note that thisDirections'fi)r Use manual
contains mfety-tip information, the locations of factory-service centers, a
warranty re_Jslration card, remote control, and batteries for theremote
control. Please take a few minutes to complete yanr registration card. "llae
serial number for the TV is on the rear of the set. Refer to page 62 for
cleaning and care instructions.
Philips HD Optics gives extreme resolution HD with cutting-edge
processing and display technology. Includes a Philips wideband
video amplifier, microphosphor CRTs, hybrid projection lenses,
first-surface mirror, and fine-pitched lenticular screen.
Auto lntelliSens( rM Focus automatically adjusts picture conver-
gence at the push of a button. After reviewing a special test pat-
tern, optical sensors send position information to the controller,
which then corrects the pictures. Auto IntelliSense TM Focus
responds to the natural and man-made magnetic field conditions
where the TV is located, so you will always enjoy the best possible
picture.
Automatic Phosphor Aging Compensation (APAC) works with
the set's Automatic Format feature to prevent screen burn left by
nonmovthg images. Periodically, APAC automatically shifts your
television picture in very small increments, but in increments large
enough to blur image retention. APAC is like a screen saver for
your TV.
Active Control rM continuously measures and corrects all incoming
signals to provide the best picture settings. This feature provides a
sharp and virtually noise-free picture any time, from any NTSC
source. NTSC is the National Television Standards Committee for-
mat devised in the 1940s for TV broadcast analog video signals
(525 lines: 30 Hz).
Eye Fidelity gives you a choice between two different picture-
scanning techniques---progressive and interlaced. Progressive scan
doubles the number of visible picture lines per field by displaying
all picture frame lines at once, eliminating line flicker. The inter-
laced mode provides for a double vertical display (interlaced) of
progressive scan, which reduces annoying motion artifacts. The
Interlaced mode also helps smooth out jagged lines sometimes
seen on curved and angled surfaces.
Protective screen filter helps prevent accidental damage to the
delicate fi'ont lenticular screen. This filter has been specifically for-
mulated by Philips for HD displays to give the best possible pic-
ture and still protect your investment.
HD DVI and Component lnputs--DVi supports High-definition
Copy Protected digital video input for connection to compliant set-
top boxes. The HD component connection (Y Pb Pr or RGB +HV0
offers color purity, crisp color detail, and reduced color noise.
3-1) Y/C Digital Comb Filter (activated when using the tuner and
composite inputs) processes the video with spatial and temporal
filtering, virtually eliminating cross-color and cross-luminance
interference, improving video resolution. This filter uses extensive
memory to analyze complete video fields, significantly reducing
"dot crawl," "hanging dots," and "barber pole artitZacts '' on the
image.
Double-window, two-tuner Picture-in-Picture (PIP) allows you
to watch two shows, side by side. No VCR is necessary for tuning
PIP pictures. Your set's two separate tuners let you select two
shows anti display both in windows of equal proportion.
Virtual Dolby* Surround (referred to as Dolby Virtual in the
on-screen submenu) uses two speakers to simulate the surround
effect produced by a multichannel system.
Incredible Surround 'rM enhances stereo programs by making the
sound broader and fuller.
Center channel input, which has standard clip-on style speaker
connectors, simplifies the connection of surround-sound equipment
for optimal home-theater enjoyment. Since it contains the dialog
information, the center channel is vitally important to the overall
performance of any large screen in a home-theater system.
Home-cinema universal remote control operates your TV set and
other devices that work by infrared remote control, such as VCRs,
cable converter boxes, satellite receivers, and others. Note: You
may need to program the remote to work with devices other than
the TV. See pages 18--23.
Hi-fi stereo system, including a built-in audio amplifier aart a twin
speaker system with 2-inch tweeters and 5-inch woofers. The sys-
tem enables you to hear stereo sound or Second Audio Program
(SAP) bilingual broadcasts when they are available.
Audio/video jacks allow direct connections with VCRs and other
accessories for quality TV picture and sound playback. Component
video input jacks are provided for high-fidelity color and picture
resolution when using digital video source material, such as a DVD.
Audio Volume Leveler (AVL) control keeps the TV's sound at an
even level, Peaks and valleys that occur during program changes or
commercial breaks are reduced, making for a more consistent, com-
fortable sound.
AuloChron TM automatically sets the right time of day and main-
tains it with digital precision through brownouts, power tMlures,
and even Daylight Savings Time adjustments.
AuloLock TM protects young children from objectionable program-
ming with V-chip technology.
AuloSound TM allows you to select from three factory-set controls
anti a personal control that you set according to your own prefer-
ences through the on-screen Sound submenu. The three factory-set
controls---Voice, Music, and Theatre---enable you to tailor the TV
sound to enhance the particular programming you are watching.
AuloSurf _M allows you to easily switch among only the channels
that are of interest to you. You can program up to I0 channels into
the TV's AutoSurf TM memory through the on-screen display.
Channel Edit allows you to add or remove channels from the list
of channels stored in the TV's memory. Channel Edit makes it easy
to limit or expand the number of channels that are available to you
when you press the CH +/-- buttons on your remote control.
Closed Captioning allows you to read TV program dialog or voice
conversations as on-screen text.
Dynamic Contrast helps sharpen the picture quality by making the
contrast between the dark and bright picture areas more noticeable
as the image on screen changes.
As an Energy Star® Partner, Philips Consumer Electronics has
_ determined this product meets the Energy Stai® guidelines Ihr
energy efficiency. Energy Star® is a U.S. registered mark. Using
products wilh the Energy Star® label can save energy. Saving
energy reduces air pollution and lowers utility bills.
Active Control, APAC, AutoPicture, AutoSound, AutoSurI, Incredible
Surround, mid IntelliSense are trademarks of Philips Consumer Electronics
Noith America. Copyright © 2003 Philips Consumer Electronics.
*Mmmfactured under license from Dolby Laboratories. "Dolby" and _he
double-D symbol are trademarks of Dolby Laboratories.
Your new projection television aart its packaging contain materials
that can be recycled and reused. Specialized companies can recy-
cle your product to increase the amount of reusable materials anti
minimize the amounts that need to be properly disposed. The bat-
teries used by your product should not be thrown away when
depleted but should be handed in and disposed of as small chemi-
cal waste. Please find out about the local regulations concerning
how to dispose of your old television, batteries, and packaging
materials whenever it is time to replace them.

Connecting Accessory Devices toYourTV
}z_u can connect a wide range of video and
udio devices to your TV,in various ways.
This page and the next one provide an overview
_?fsignal compatibilities and the &pes of
devices' you can connect to thejacks.
Connection examples jbllow on subsequent
pages. See pages 1 and 2 of the Quick Use and
Setup Guide that came with your setjbr exam-
ples of basic conneetions. You may also want to
refer to the user instructions that came with
each particular device jbr ir!ibrmation on con-
neetions.
WhatYou Can Connect to the
Standard Panel Jacks
ANTENNA IN 75_ jack--use to con-
nect radio-frequency (RF) signals from
VHF/UHF antennas or a cable system.
These are 480i signals.
YPbPr (component video input [CVI]jacks)--compatible with 480i signals
only. Use to connect accessories having
component video outputs, such as DVD
players, laser-disc players, video-game
players, satellite receivers, or other
devices. Use the INPUT-AV 1 L(elt) and
R(ight) AUDIO jacks for sound connec-
tions. CVI is not accessible in the PIP
window.
3
4
S-VIDEO (super video)jacks--com-
patible with 480i signals only. Use to
connect accessories having Super VHS
(S-VHS) outputs, such as VCRs, DVD
players, laser-disc players, video-game
players, satellite receivers, or other
devices.
VIDEO (composite)jacks (INPUT-AV 1,
INPUT-AV 2, and TV's side jack panel
[AV3])--compatible with 480i signals
only. Use to connect accessories having
composite video outputs, ,such as VCRs,
video-game players, or other devices.
AUDIO inputs (INPUT-AV 1,
INPUT-AV 2, and TV's side jack panel
[AV3])--use to connect from the audio
output jacks on VCRs, DVDs, or other
accessories.
OUTPUT (VIDEO/AUDIO)--video is
compatible with 480i signals only. Use to
connect to a VCR to record programs
from the TV. Or use the AUDIO outputs
to connect to an audio hi-fi system.
AMP SWITCH, CENTER
CHANNEL AMP INPU"I,and
SUBWOOFER Output--use to make
optional surround-sound connections
(,seepage 11).
_, Headphone jack--use to connect
headphones for personal listening.
A_T_A_ ]_PS_TCH _ Rearof TV
Summary of signal compatibilities
Compatible output signal
from an external source
TV Input or device
ANTENNA IN 75fL INPUT AV-1,YPbPr
(component video inputs[CVI]), 480i (480 lines, interlaced)
INPUT AV-2,and side jack panel (AV3)
Side JackPane_ [_
NOTE:The
TV recognizes
the side jack
panelasAV3.
Signal sources connected to the
HD INPUT-AV 4 or HD INPUT-AV 5 jacks
will provide the best picture (see page 7 for
descriptions of those inputs). Among the
standard (480i-compatible) inputs
ANTENNA IN 75f2, INPUT AV-I, CVI
labeled Y, Pb, Pr], INPUT AV-2, and the
side jack panel [AV3]) the best picture
will come from signal sources connected to
the CVI jacks. S-Video will provide the
next-best level of picture quality.
ii ii!ii!!!ii ii!i !i i i !!iii i i!
The side jack-panel inputs (recognized by the
TV as AV3) are convenient for connecting a
camcorder, See page 16.
WhatYou Can Connect to the
Connecting Accessory Devices toYourTV
High-definition Input Jacks
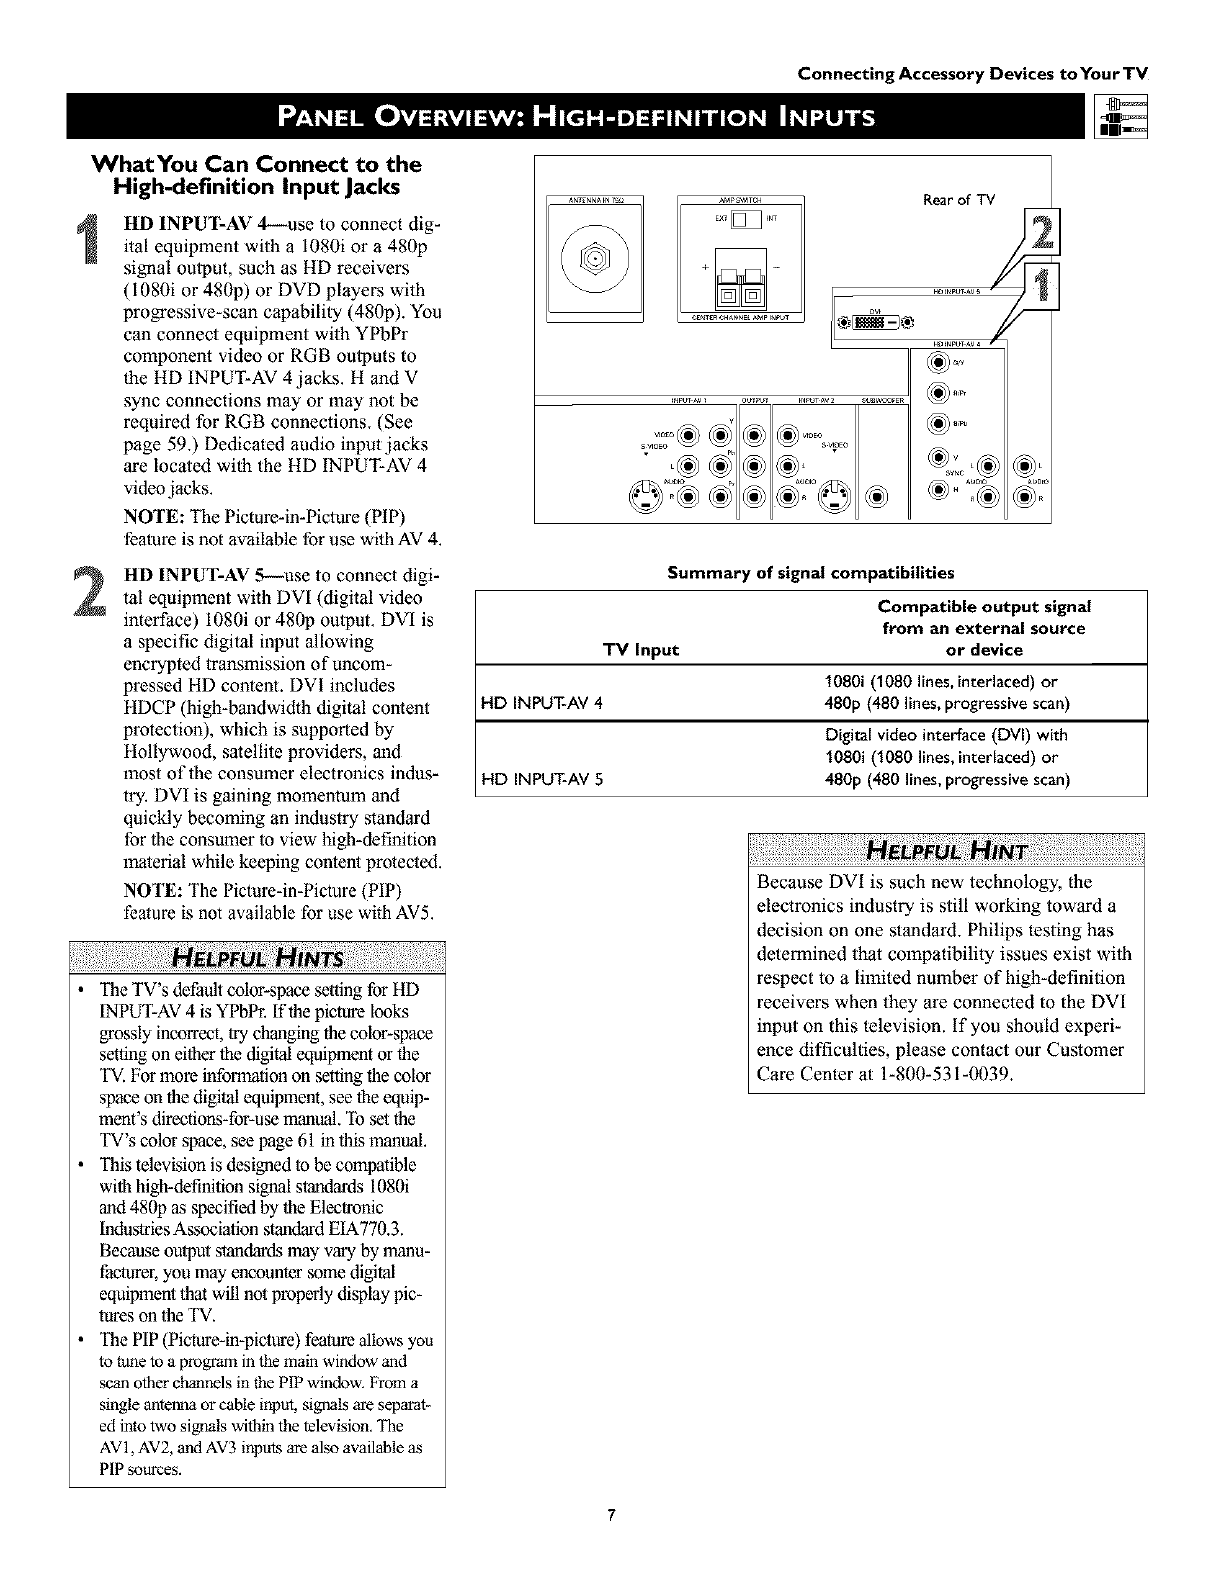
HD INPUT--AV 4--use to connect dig-
ital equipment with a 1080i or a 480p
signal output, such as HD receivers
(1080i or 480p) or DVD players wilh
progressive-scan capability (480p). You
can connect equipment with YPbPr
component video or RGB outputs to
the HD INPUT-AV 4 jacks. H and V
sync connections may or may not be
required for RGB connections. (See
page 59.) Dedicated audio input jacks
are localed with the HD INPUT-AV 4
video jacks.
NOTE: The Picture-in-Picture (PIP)
feature is not available for use wilh AV 4.
2HI) INPUT-AV 5--use to connect digi-
tal equipment with DVI (digital video
interface) 1080i or 480p output. DVI is
a specific digital input allowing
encrypted transmission ofuncom-
pressed HD content. DVI includes
HDCP (high-bandwidth digital content
protection), which is supported by
Hollywood, satellite providers, and
most of the consumer electronics indus-
try. DVI is gaining momentum and
quickly becoming an industry standard
for the consumer to view high-definition
material while keeping content protected.
NOTE: The Picture-in-Picture (PIP)
feature is not available for use with AV5.
!iii! iiiii !i!i¸!ii !i!iiiiiii!¸!!iiii!!!iiii i ili i!i!i !iiii!il¸ii!iill¸ii!iiiiiiiiiN¸ i !iiiii IH! iiiiii!i¸ii!ii!iill¸ii!ilili i!iiiiiii! ill¸iiiiiiii ii!i!i i¸i!iiii¸I¸i!iiiiiiii!i!iiii!
•The TV's default color-space setting for HD
fNPUT-AV4 isYPbPr. If the picture looks
grossly incorrect, try changing the color-space
setting on either the digital equipment or the
TV. For more information on set_ng the color
space on the digital equipment, see the equip-
ment's direclions-for-use manual. To set the
TV's color space, see page 61 in this manual.
• This television is designed to be compatible
with high-definition signal standards 1080i
and 480p as specified by the Elec_onic
Industries Association standard EIA770.3.
Because output standards may vary by manu-
facturer, you may encounter some digital
equipment thai will not properly display pic-
tures on the TV.
• The PIP (Pic_e-in-picture) feature allowsyou
to tuneto a programin themainwindowand
scanother channelsinthe PIPwindow,From a
single antennaor cableinput, signalsare separat-
ed intotwo signals withinthe television,The
AV 1, AV2, andAV3ir_uts are also availableas
PIPsources.
Rear of TV
Summary of signal compatibilities
Compatible output signal
from an external source
TV Input or device
1080i (1080 lines, interlaced) or
HD INPUT-AV 4 480p (480 lines, progressive scan)
Digital video interface (DVI) with
1080i (1080 lines, interlaced) or
HD INPUT-AV 5 480p (480 lines, progressive scan)
i!i!i!,iiiiii i iiiiiiiiill¸ii!i¸II II¸ii il¸!i!i!iiii!i!i!iiii!i!i!iiii!i!i!iiii!i!i!iiii!i!i! i !ilN i! i !i!! i¸ii!!;ii ii iiiii i¸i!iiiiiiii!iiiiiii!iiiiiii!iiiiiii!iiiiiii!iiiiiii!iiill
Because DVt is such new technology, the
electronics industry is still working toward a
decision on one standard, Philips testing has
determined that compatibility issues exist wilh
respect to a limited number of high-definition
receivers when they are connected to the DVI
input on this television, if you should experi-
ence difficulties, please contact our Customer
Care Center at 1-800-531-0039.
Connecting Accessory Devices toYourTV
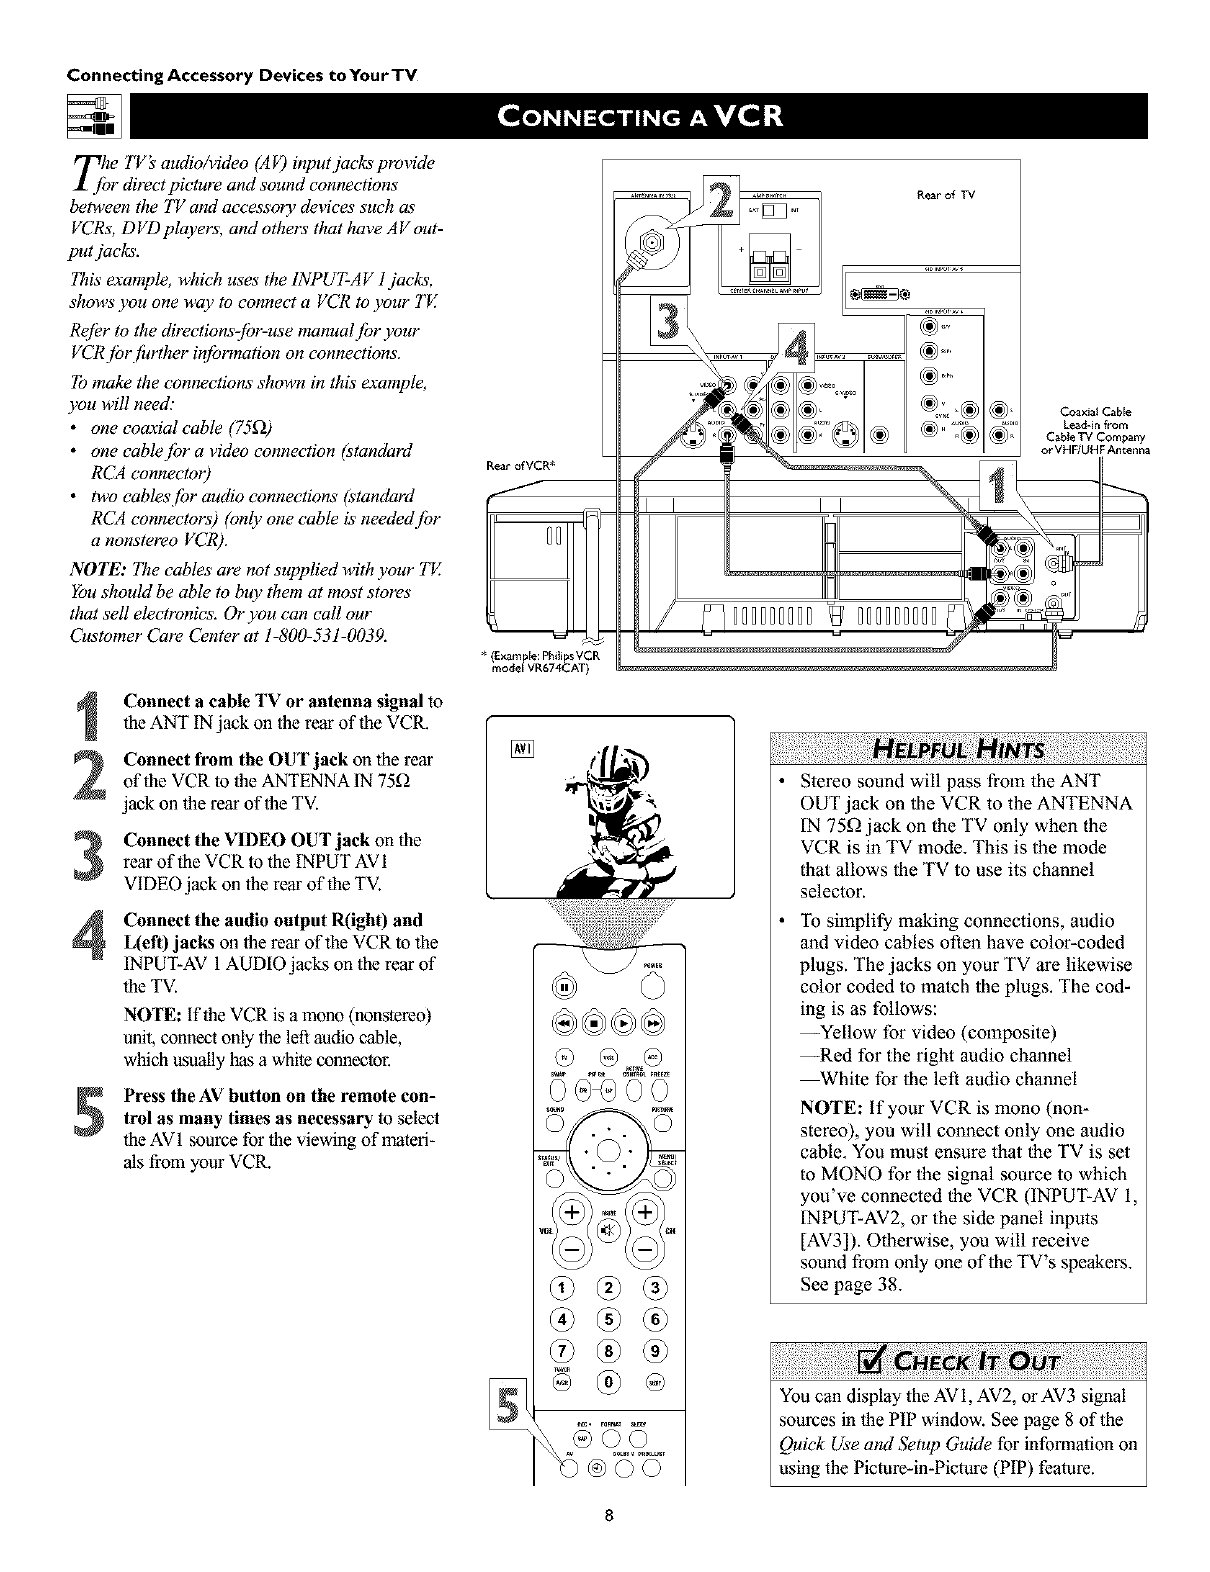
Tjhe TV's audio/video (A F) input jacks provide
r directpicture and sound connections
between the TV amt accessory devices such as'
VCRs, DVD players, and others that have AV out-
put jacks.
This"example, which uses the INPUT-AV l jacks,
shows you one way to connect a VCR to ),our TE
Re[Or to the directions-jbr-use manual /br your
VCRjbr f!_rther in/brmation on connections.
To make the connections shown in this example,
you will need:
•one coaxial cable (75_)
• one cablejbr a video connection (standard
RCA connectoO
•two cables/br audio connections (standard
RCA connectors) (only one cable is neededjbr
a nonstereo VCR).
NOTE: The cables are not supplied with your TV.
You should be able to buy them at most stores
that sell electronics. Or you can call our
Customer Care Center at 1-800-531-0039.
Connect a cable TV or antenna signal to
the ANT IN jack on the rear of the VCR.
Connect from the OUT jack on the rear
of the VCR to the ANTENNA IN 75D
jack on the rear of the TV.
Connect the VIDEO OUT jack on the
rear of the VCR to the INPUT AVI
VIDEO jack on the rear of the TV.
Connect the audio output R(ight) and
L(eft) jacks on the rear of the VCR to the
INPUT-AV 1AUDIO jacks on the rear of
the TV.
NOTE: if the VCR is amono (nonstereo)
unit, connect only the left audio cable,
which usuallyhas a white connector.
Press the AV button on the remote con-
trol as many times as necessary to select
the AV1 source for the viewing of materi-
als from your VCR.
Rear of VCR*
* (Example: Philips VCR
model VR674CAT)
[]
Rear of TV
Coaxial Cable
Lead-in from
C_ble TV Company
or VHF/UHF Antenna
Stereo sound will pass from the ANT
OUT jack on the VCR to the ANTENNA
IN 75_ jack on the TV only when the
VCR is in TV mode. This is the mode
that allows the TV to use its channel
selector.
To simplify making connections, audio
and video cables often have color-coded
plugs. The jacks on your TV are likewise
color coded to match the plugs. The cod-
ing is as follows:
--Yellow for video (composite)
--Red for the right audio channel
_hite for the left audio channel
NOTE: If your VCR is mono (non-
stereo), you will connect only one audio
cable. You must ensure that the TV is set
to MONO for the sigual source to which
you've connected the VCR (INPUT-AV 1,
INPUT-AV2, or the side panel inputs
[AV3]). Otherwise, you will receive
sound from only one of the TV's speakers.
See page 38.
You can display the AV1, AV2, or AV3 signal
sources in the PIP window. See page 8 of the
Quick Use and Setup Guide for information on
using the Picture-in-Picture (PIP) feature.
Connecting Accessory Devices toYourTV
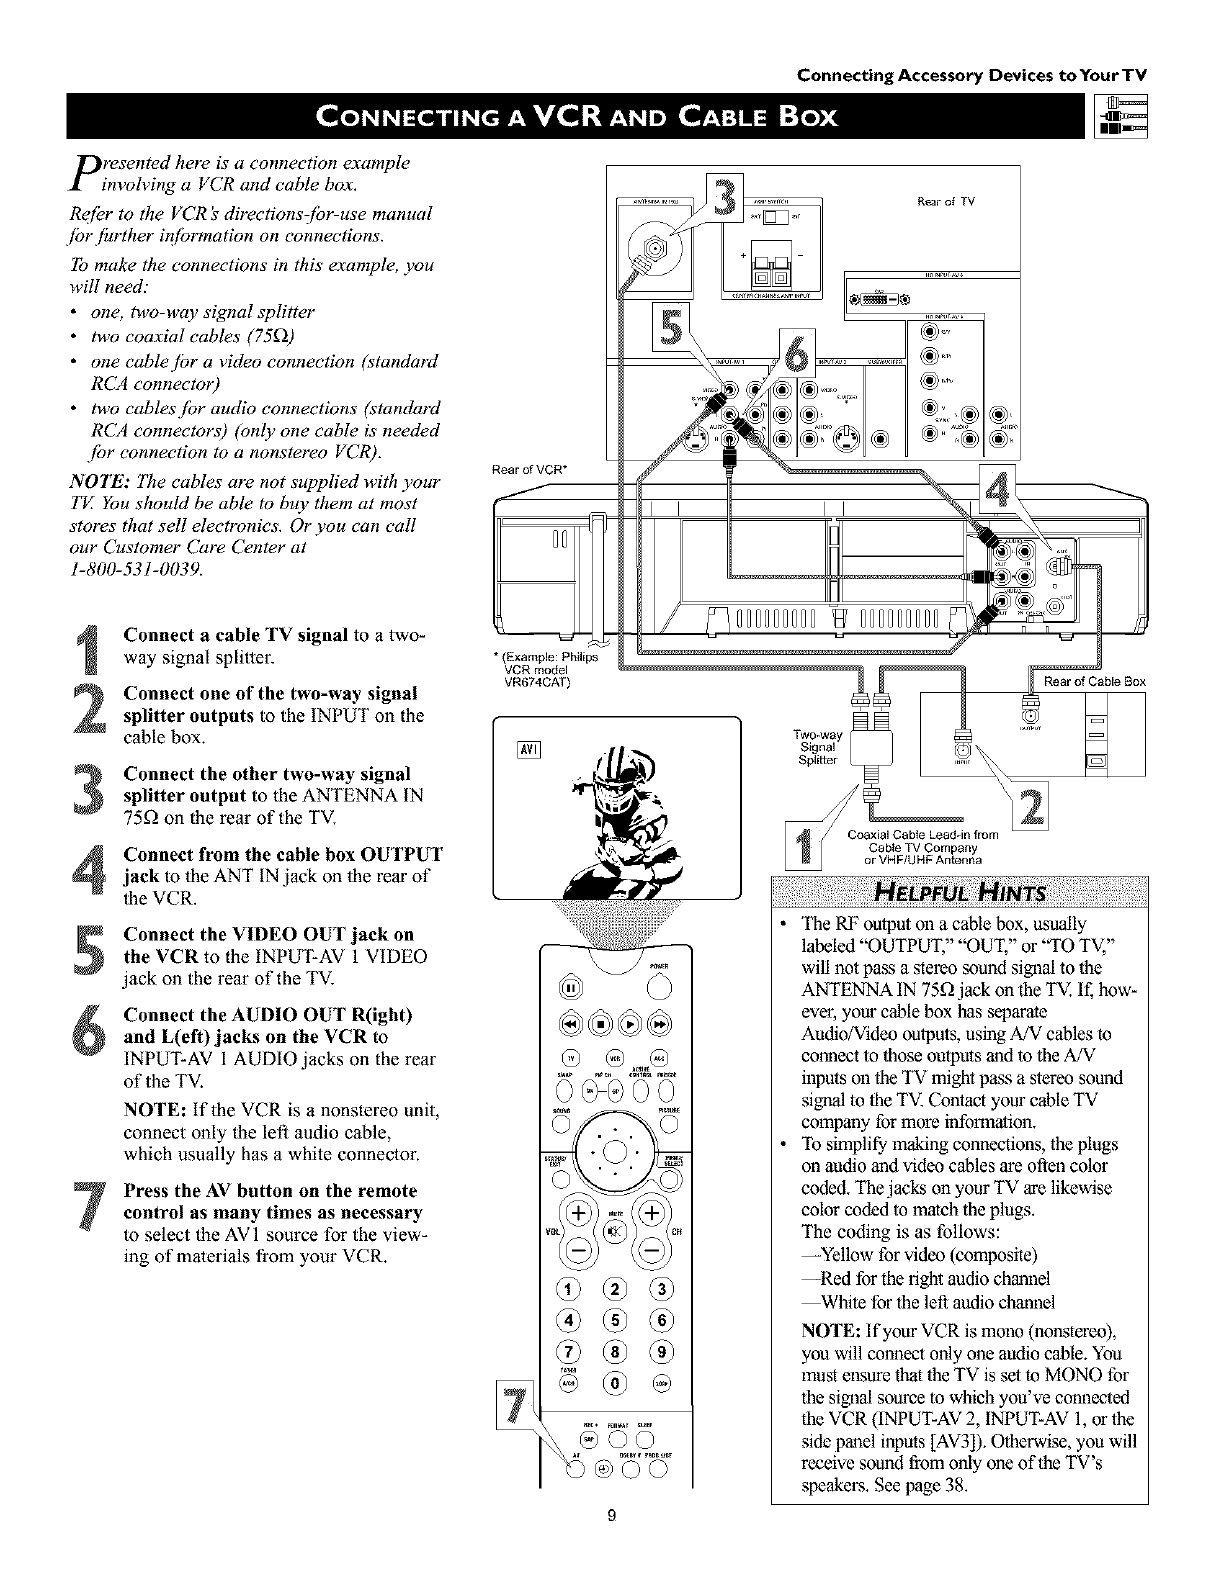
presented here is a connection example
involving a VCR and cable box.
Re[_r to the VCR _directionsCbr-use manual
.[br fhrther #_[brmation on connections.
To make the connections in this example, you
will need."
•one, two-way signal splitter
•two coaxial cables' (75_))
• one cablejbr a video connection (standard
RCA connectoO
•two cablesjbr audio connections (standard
RCA connectors) (only one cable is' needed
.[br connection to a nonstereo VCR).
NOTE: The cables are not supplied with your
TE You should be able to buy them at most
stores that sell electronics. Or you can call
our Customer Care Center at
1-800-531-0039.
3
4
Connect a cable TV signal to a two-
way signal splitter.
Connect one of the two-way signal
splitter outputs to the INPUT on the
cable box.
Connect the other two-way signal
splitter output to the ANTENNA IN
75_ on the rear of the TV.
Connect from the cable box OUTPUT
jack to the ANT IN jack on the rear of
the VCR.
Connect the VIDEO OUT jack on
the VCR to the INPUT-AV 1 VIDEO
jack on the rear of the TV.
Connect the AUDIO OUT R(ight)
and L(eft)jacks on the VCR to
INPUT-AV 1 AUDIO jacks on the rear
of the TV.
NOTE: If the VCR is a nonstereo unit,
connect only the left audio cable,
which usually has a white connector.
Press the AV button on the remote
control as many times as necessary
to select the AVI source for the view-
ing of malerials from your VCR.
Rear of VCR*
/
J
* (Example: Philips
VCR model
VR674CAT)
I I
/
Rear of TV
000000000 000000000
[]
i
Rear of Cable Box
•The RF outputoll a cable box, usually
labeled "OUTPUT," "OUT," or "TO TV,"
will not pass a stereo sound signal to the
ANTENNA IN 75£2jack on the TV. If, how-
ever, your cable box has separate
Audio/Video outputs, using A/V cables to
comlecl to those outputs and to the A/V
inputs on the TV might pass a stereo sound
signal to the TV. Contact your cable TV
company for more information.
•To simplify making counections, the plugs
on audio aud video cables are often color
coded. The jacks on your TV are likewise
color coded to match the plugs.
The coding is as follows:
--Yellow for video (composite)
--Red for the fight audio channel
_hite for the left audio chaunel
NOTE: If your VCR is mono (hOt,stereo),
you will connect only one audio cable. You
mus'tensure that the TV is set to MONO for
the sigoal source to which you've connected
the VCR (INPUT-AV 2, INPUT-AV 1,or the
side panel inputs [AV3]).Otherwise, you will
receive sound from only one of the TV's
speakers. See page 38.
Connecting Accessory Devices to Your TV
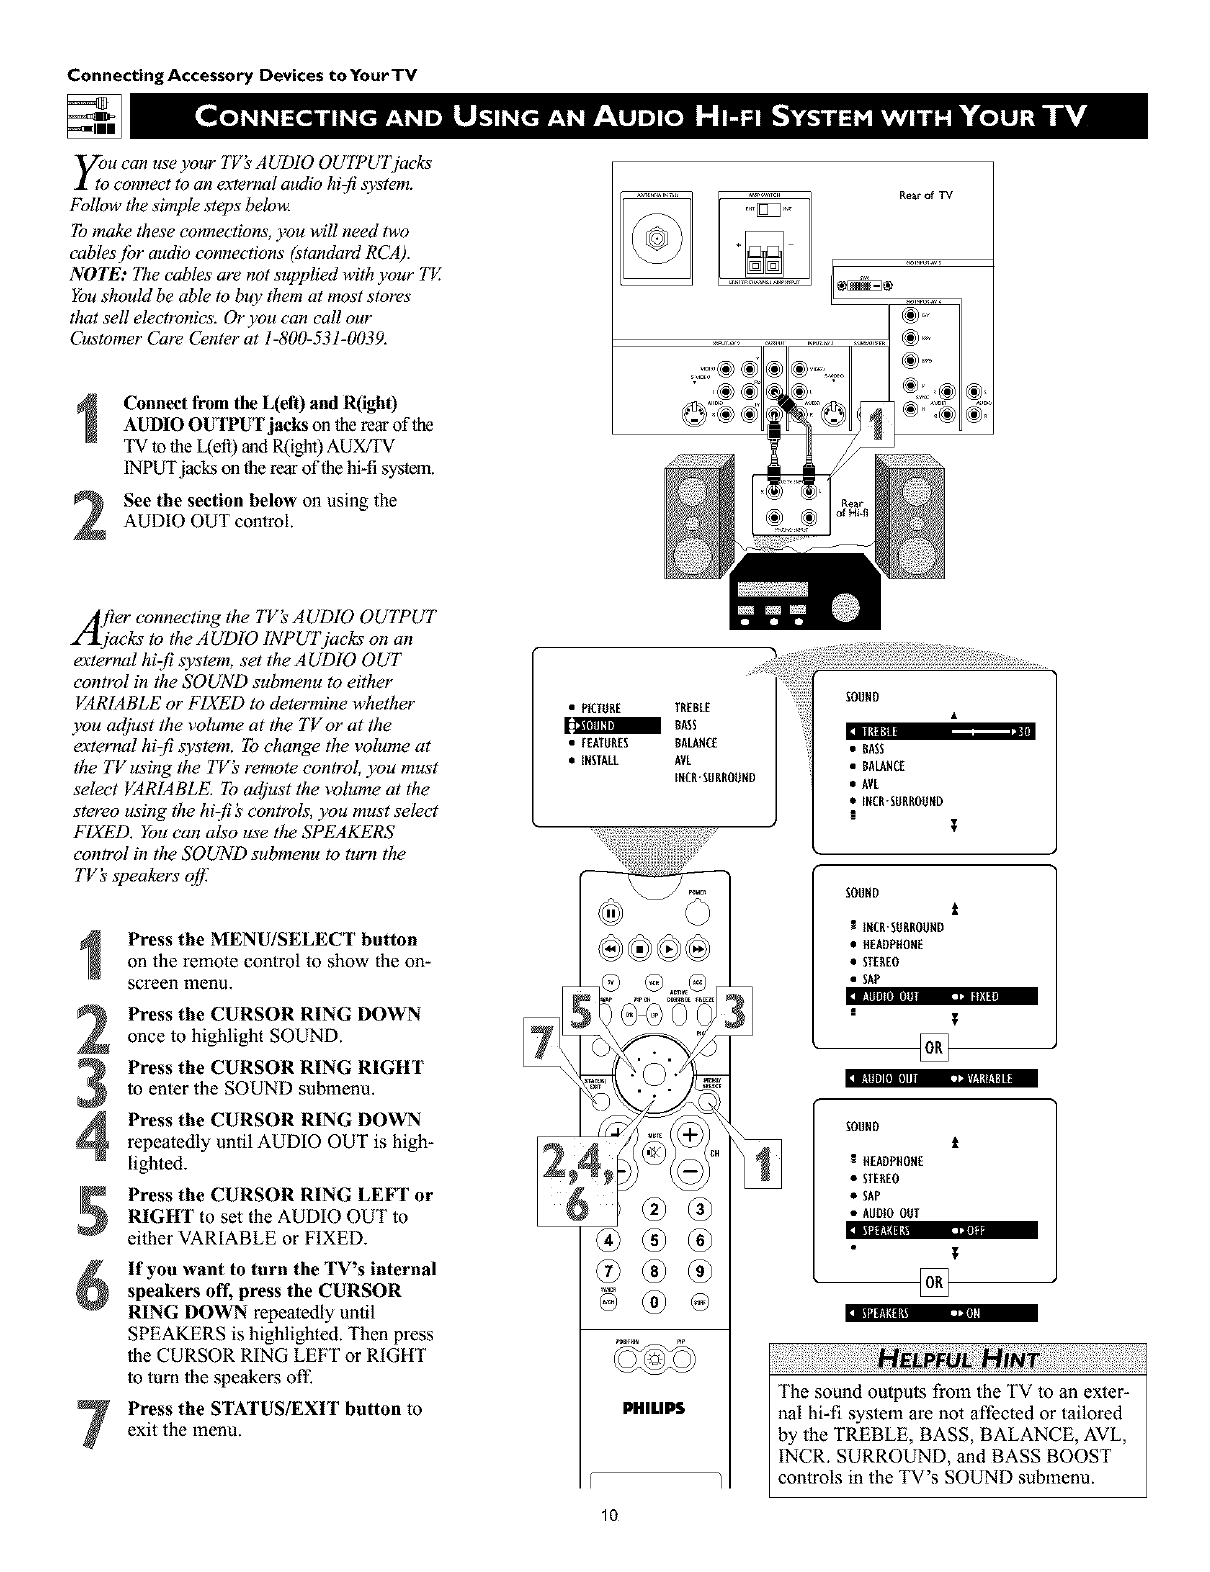
y;u can use your TV's AUDIO OUTPUTj_cks
connect to an external audio hi:fi system.
Follow the simple steps belou_
To make these connections, you will need two
cables jbr audio connections (standord RCA).
NOTE: The cables are not supplied with your TV.
You should be able to buy them at most stores"
that sell electronics. Or you can call our
Customer Care Center at 1-800-531-0039.
2
Connect from the L(eft) and R(igh0
AUDIO OUTPUT jacks on the rear of the
TV to the L(efi) and R(ight) AUX/TV
INPUT jacks on the rear of the hi-fi system.
See the section below on using the
AUDIO OUT control.
/frier connecting the TV_ AUDIO OUTPUT
2"_jacks to the AUDIO INPUTjacks on an
external hiz[i system, set the AUDIO OUT
control in the SOUND submenu to either
VARIABLE or FIXED to determine whether
you adjust the volume at tile TVor at the
external hi-fi system. To change the volume at
the TVusing the TV_ remote control, you must
select VARIABLE. To adjust the volume at the
stereo using the hizf! _'controls, you must select
FIXED. You can also use the SPEAKERS
control in the SOUND submenu to turn the
TV's speakers off:
II!lll|l[I] rill--- ,_=, II
I!llll][III_ ,i,/.'l Ill|
4
Press the MENU/SELECT button
on the remote control to show the on-
screen menu.
Press the CURSOR RING DOWN
once to highlight SOUND.
Press the CURSOR RING RIGHT
to enter the SOUND submenu.
Press the CURSOR RING DOWN
repeatedly until AUDIO OUT is high-
lighted.
Press the CURSOR RING LEFT or
RIGHT to set the AUDIO OUT to
either VARIABLE or FIXED. illl_lill , •
If you want to turn the TV's internal
speakers off, press the CURSOR
RING DOWN repeatedly until
SPEAKERS is highlighted. Then press
the CURSOR RING LEFT or RIGHT
to turn the speakers off-
Press the STATUS/EXIT button to
exit the menu.
•PICTURE TREBLE
IBASS
• EEATURES BALANCE
• IESTALL AVL
IECR-EUBROUED • BALANCE
• AVL
•IXCR-EUBROUND
IT
®
PHILIPS
10
SOUND
t
R INCB-SURBOUHD
• HEADPffOHE
• STEREO
• SAP
SOUHD t
HEADPHOHE
•STEREO
• SAP
• AUDIOOUT
,m
The sound outputs from the TV to an exter-
nal hi-fi system are not affected or tailored
by the TREBLE, BASS, BALANCE, AVL,
INCR. SURROUND, and BASS BOOST
controls in the TV's SOUND submenu.
Connecting Accessory Devices to Your TV
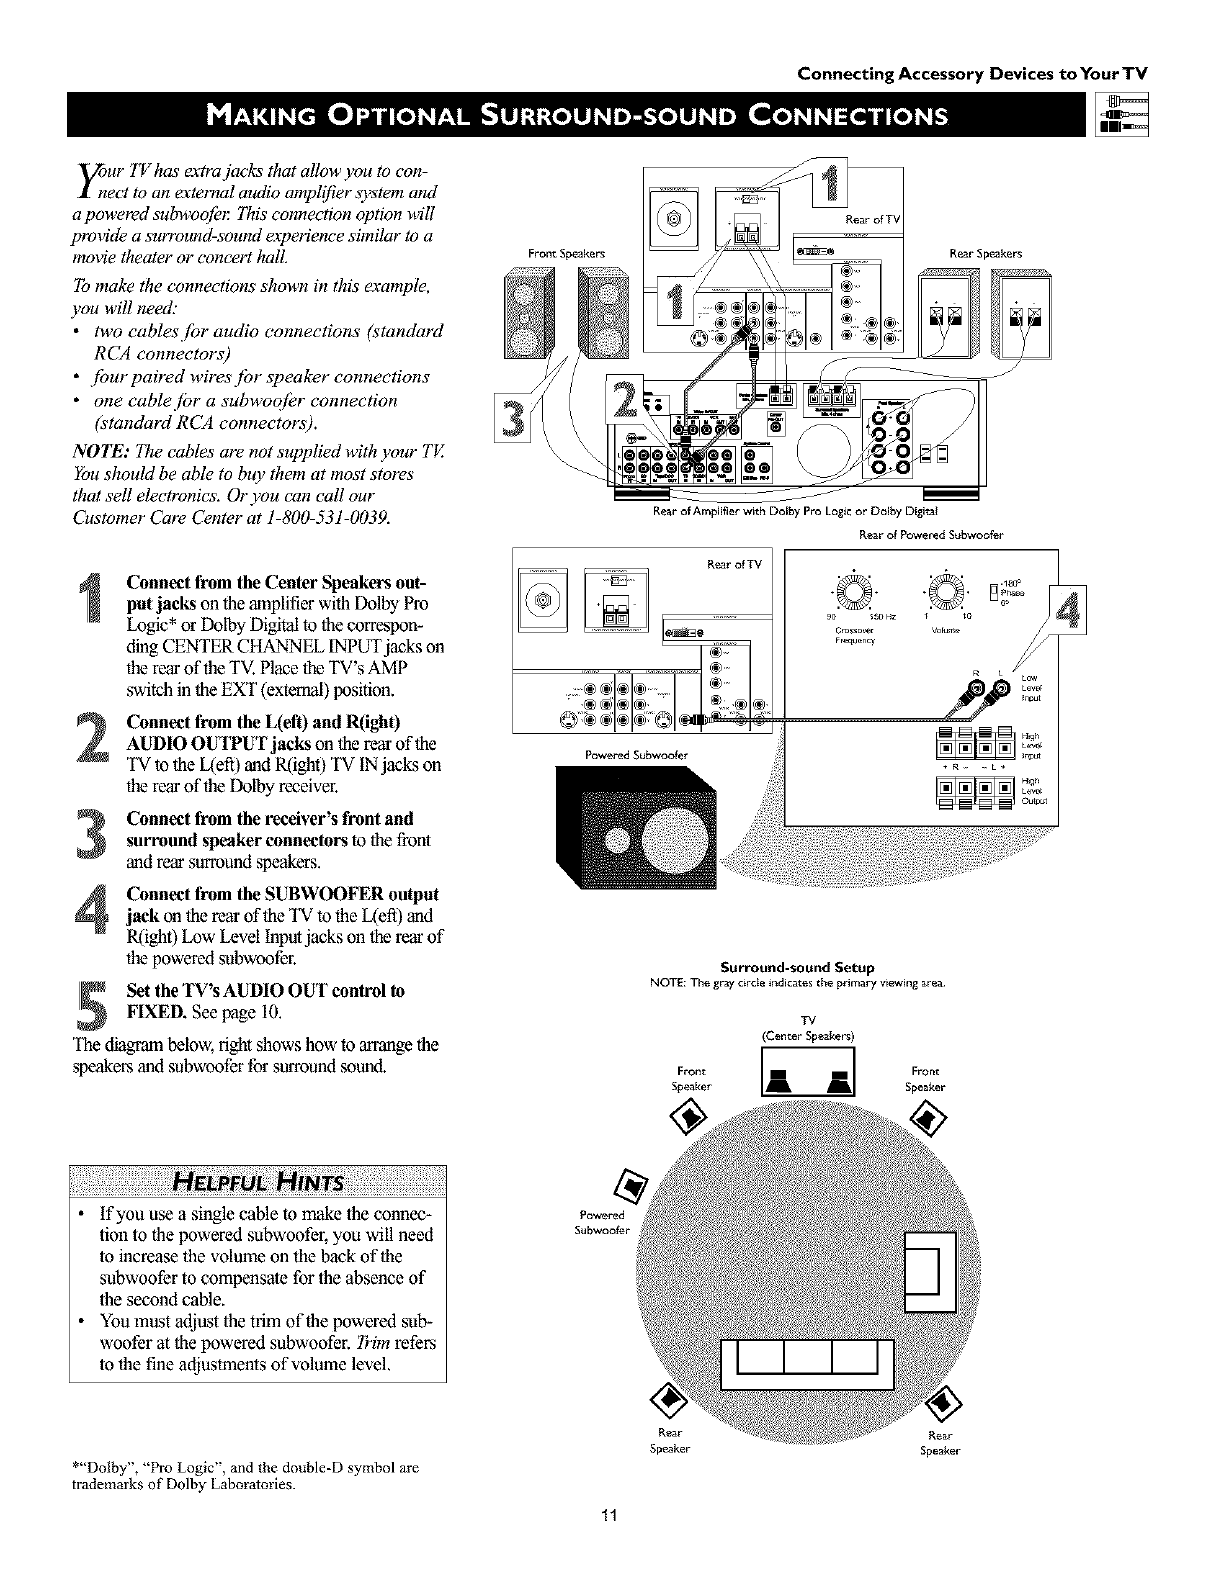
_nur TV has extra jacks that allow you to con-
ect to an external audio amplifier system and
apowered s_bwoojbl: This connection option will
provide a surrouud-souud eaperience similar to a
movie theater or concert hall.
To make the connectioas shown in this example,
you will need."
•two cablesjbr audio connections (standard
RCA connectors)
• jburpaired wiresjbr speaker connections
• one cablejbr a subwoq/er connection
(standard RCA connectors).
NOTE': The cables are not supplied with your TV.
You should be able to buy them at most stores"
that sell electronics. Or you can call our
Customer Care Center at 1-800-531-0039.
Connect from the Center Speakers out-
putjacks on the amplifierwith DolbyPro
Logic* or Dolby Digital to the correspon-
ding CENTER CHANNEL INPUTjacks on
lberear of theTV.Place the TV's AMP
switch in the EXT (external)position.
Connect from the L(eft) and R(ight)AUDIO OUTPUT jacks on therear of the
TV to the L(efi) and R(ight) TV IN jacks on
therear of the Dolby receiver.
Connect from the receiver's front andsurround speakerconnectors to thefront
and rear surround speakers.
Connect from the SUBWOOFER outputjack on therear oftbe TV to the L(efi) and
R(ight)Low Level Inputjacks on therear of
thepowered subwoofer.
Set the TV's AUDIO OUT control to
FIXED. See page 10.
The diagram below, fight shows how to arrange the
speakers and subwoofer for surround sound.
FrontSpeakers
Powered Subwoofer
Rear Speakers
!
Rear of Amplifier with Dolby Pro Logic or Dolby Digital
Rear of Powen_d Subwoo_r
R_r of_
Surround-sound Setup
NOTE:The graycircte indicatesthe primary wewing area
TV
(CenterSpeakef_)
Fr°nt _ Front
Speaker Speaker
!i¸i!iii!i!!iiiii!iiiiiiii!ili!i¸iii!ili!ili!!i¸iiil¸ii!i¸ii!ili!ili!ili!ili!ili!iiiifl i ! !!!i!i ¸i i iiiiiii!ii iiiiiiiiiiiiiiiii!iiiiiii!iiiiiiii!iiiiiii!iiiiiii!iiiiiii!i
•if you use a single cable to make the connec-
tion to the powered subwoofer, yoa will need
to increase the volume on the back of the
subwoofer to compensate for the absence of
the second cable.
•You must adjust the trim of the powered sub-
woofer at the powered subwoofer. Trim refers
to the fine adjustments of volume level.
Rear Rear
Speaker Speaker
*"Dolby', "Pro Logic", and the double-D symbol are
trademarks of Dolby Laboratories.
Connecting Accessory Devices to Your TV
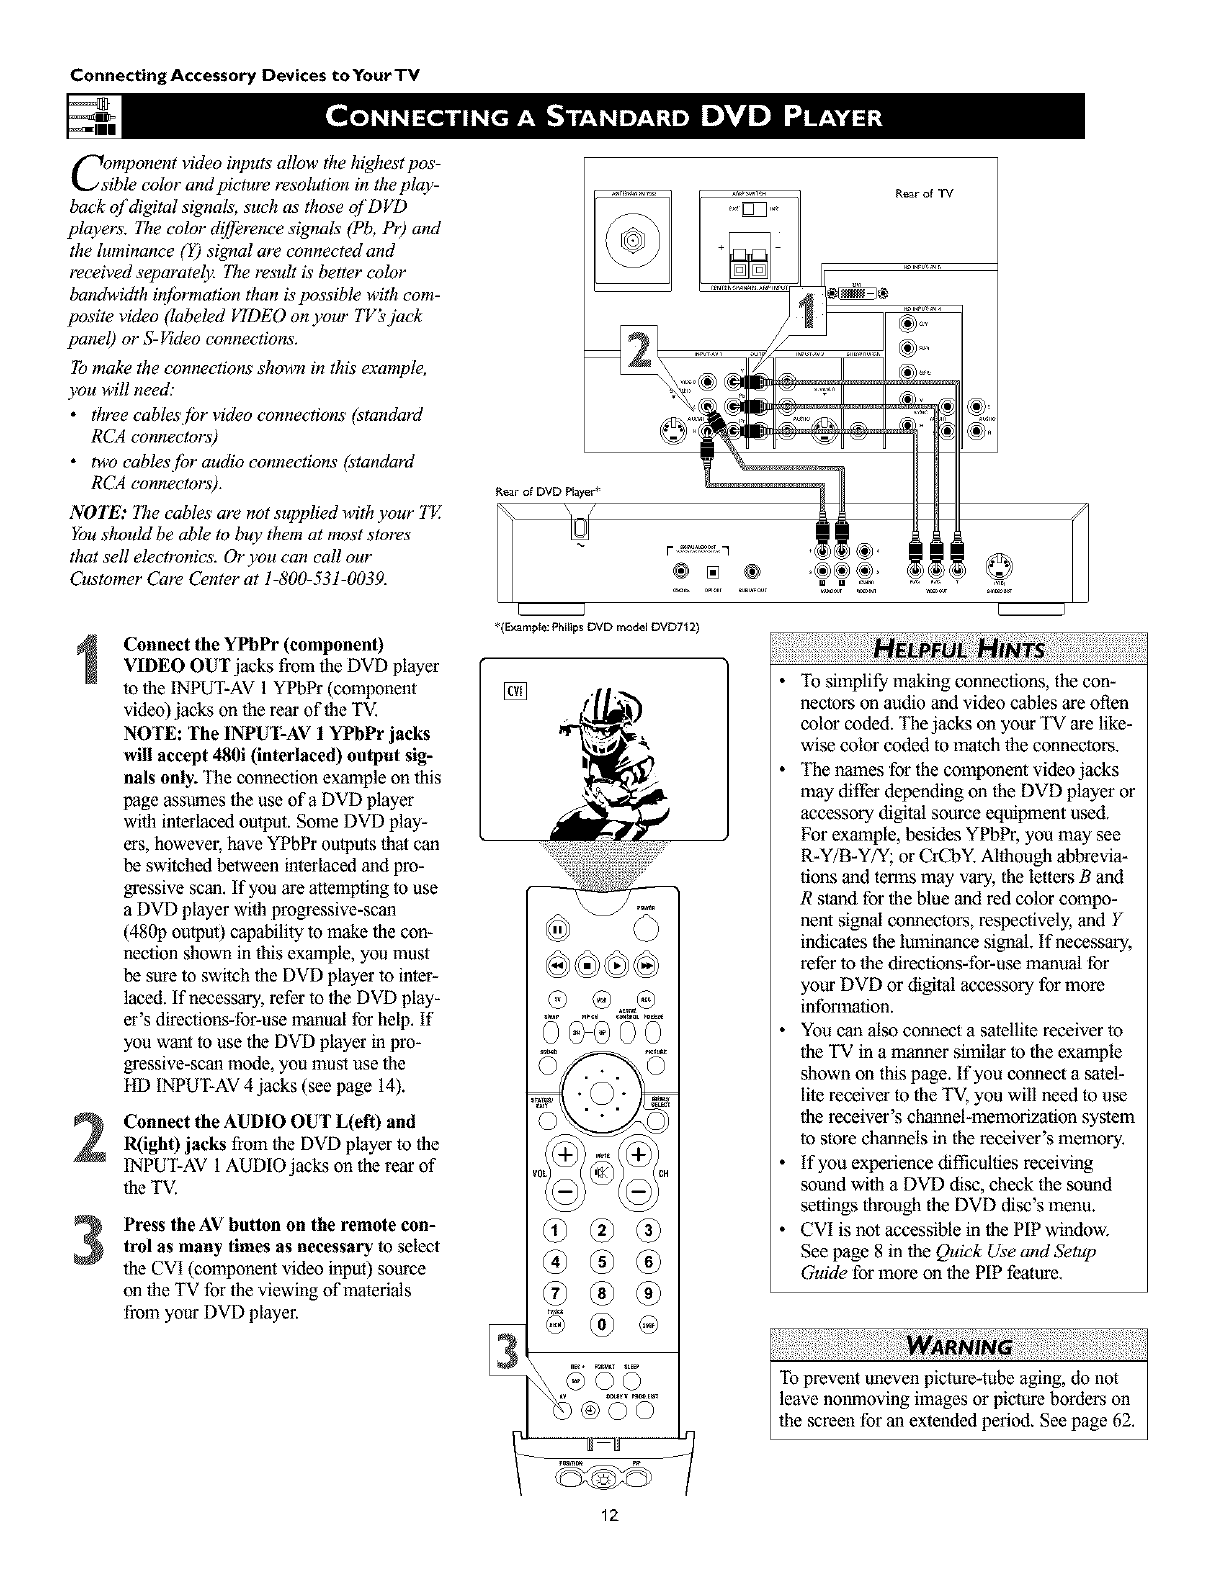
Component video inputs allow the highest pos-
ible color and picture resolution in the play-
back of digital signals, such as those of DVD
players. I_e color dzTJbrence signals (Pb, Pr) and
the luminance (Y) signal are connected and
received separately. I_e result is better color
bandwidth iq[brmation than is possible with com-
posite video (labeled VIDEO on your TV'sjack
panel) or S- Vzdeoconnections.
To make the connections shown in this example,
you will need:
•three cablesjbr video connections (standard
RCA connectors)
• two eablesjbr audio connections (standard
RCA connectors).
NOTE: The cables are not supplied with your TV.
You should be able to buy them at most stores"
that sell electronics. Or you can call our
Customer Care Center at 1-800-531-0039.
Connect the YPbPr (component)
VIDEO OUT jacks from the DVD player
to the INPUT-AV 1 YPbPr (component
video) jacks on the rear of the TV.
NOTE: The INPUT-AV 1YPbPr jacks
will accept 480i (interlaced) output sig-
nals only. The connection example on this
page assumes the use ofa DVD player
with interlaced output. Some DVD play-
ers, howevel; have YPbPr outputs that can
be switched between interlaced and pro-
gressive scan. If you are attempting to use
a DVD player with progressive-scan
(480p outpu0 capability to make the con-
nection shown in this example, you must
be sure to switch the DVD player to inter-
laced. If necessary, refer to the DVD play-
er's directions-for-use manual for help. If
you want to use the DVD player in pro-
gressive-scan mode, you must use the
HD INPUT-AV 4 jacks (see page 14).
Connect the AUDIO OUT L(eft) and
R(ight) jacks from the DVD player to the
INPUT-AV 1AUDIO jacks on the rear of
the TV.
Press the AV button on the remote con-
trol as many times as necessary to select
the CVI (component video input) source
on the TV for the viewing of materials
from your DVD player.
Rear of TV
*(Example: Phi_ips DVD model DVD712)
[]
ii!ili iii! i!ii i il¸!I ¸iiiiii!ii!i!i!ili!i!i!ili!i!i!iiii!i!iiii!i!ili!i¸!iil
•To simplify making conneclions, the con-
nectors on audio and video cables are often
color coded. Tbe jaclcs on your TV are like-
wise color coded to match the connectors.
•The names fur the component video jacks
may differ depending on the DVD player or
accessory digital source equipment used.
For example, besides YPbPr, you may see
R-Y/B-Y/Y; or CrCbY. Althougb abbrevia-
lions and terms may vary, the letters Band
Rstand for the blue and red color compo-
nent signal connectors, respectively, and Y
indicates the luminance signal. If necessary,
refer to the direclions-for-use manual for
your DVD or digital accessory for more
infonnalion.
•You can also connect a satellite receiver to
the TV in a manner similar to the example
shown on this page. If you connect a ,satel-
lite receiver to the TV, you will need to use
the receiver's channel-memorization system
to store channels in the receiver's memory.
•if you experience difficulties receiving
,sound with a DVD disc, check the ,sound
setlings through the DVD disc's menu.
•CVI is not accessiNe in the PIP window.
See page 8 in the Quick Use and Setup
Guide for more on the PIP feature.
To prevant uneven picture-tube aging, do not
leave nonmoving images or picture borders on
the screen for an extanded period. See page 62.
12
Connecting Accessory Devices to Your TV
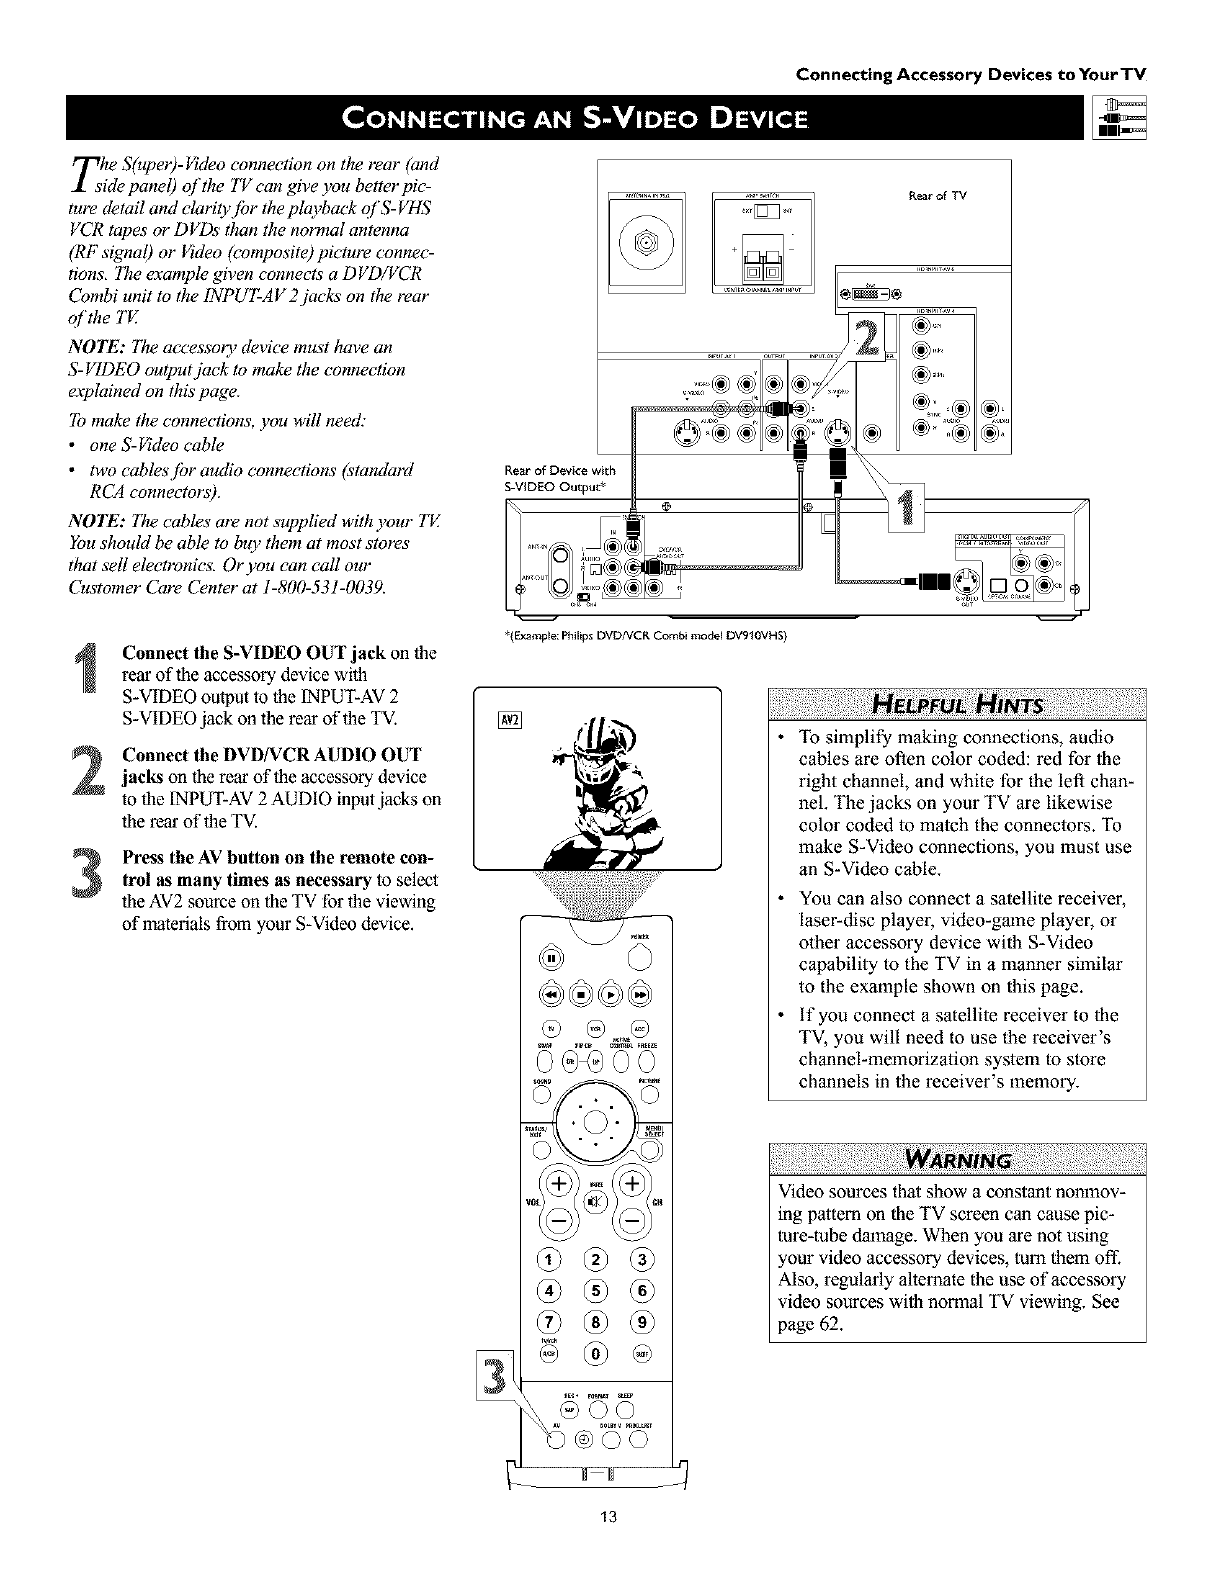
rrThe S(uper)-Video connection on the rear (and
_1 side panel) of the TV can give you better pic-
ture detail and elarity.[br the playback ql'S-VHS
VCR tapes or DVDs than the normal antenna
(RF signal) or Video (composite) picture connec-
tions, The example given connects a DVD/VCR
Combi unit to the 1NPUT-AV 2jacks on the rear
ol'the TV.
NOTE': I_e accessory device must have an
S-VIDEO output jack to make the connection
eaplained on this page.
To make the connections, you will need."
•one S-_deo cable
•two cablesjbr audio connections (standard
RCA connectors).
NOTE': lae cables" are not supplied with your TE
You should be able to buy them at most stores"
that sell electronics. Or you can call our
Customer Care Center at 1-800-531-0039.
Rear of Device with
S-VIDEO Output*
,=,:o®®
..........
Rear of TV
I
Connect the S-VIDEO OUT jack on the
rear of the accessory device with
S-VIDEO output to the [NPUT-AV 2
S-VIDEO jack on the rear of the TV.
Connect the DVD/VCRAUDIO OUTjacks on the rear of the accessory device
to the [NPUT-AV2AUDIO inputjacks on
the rear of the TV.
Press the AV button on the remote con-trol as many times as necessary to select
the AV2 source on the TV for the viewing
of materials from your S-Video device.
*(Example: I_lilips DVDNCR Combi mode_ DV910VHS)
To simplify making connections, audio
cables are often color coded: red for the
right channel, and white for the left chan-
nel. The jacks on your TV are likewise
color coded to match the connectors. To
make S-Video connections, you must use
an S-Video cable.
You can also connect asatellite receiver,
laser-disc player, video-game player, or
other accessory device with S-Video
capability to the TV in a manner similar
to the example shown on this page.
if you connect asatellite receiver to the
TV, you will need to use the receiver's
channel-memorization system to store
channels in the receiver's memory.
:iii! i iiii !i!i¸!i i !i! iiiiiii!¸!!iiii!!!iiii i ili i!i!i !ili i!il¸ii!i ill¸ii!iiii iiii!i!i,iii!!ill¸ii¸!iiiiiii!i!i!il¸ii i i ii i ¸II IIII¸iiii !i!iiiii!i!i ii:ii:iiii i!iii,i¸II! !III¸ii!iiii iiii!i!i,lii! !ill¸ii¸!iiiiiii!i!i!i,lii! !ill¸ii¸!iiiiiii!i!i!i,i ii! ill
Video sources tha_show aconstant nonmov-
ing pattern on the TV screen can cause pic-
ture-tube damage. When you are not using
,our video accessory devices, turn them oft:
Also, regularly allemate the use of accessory
video sources with normal TV viewing. See
page 62.
Connecting Accessory Devices toYourTV
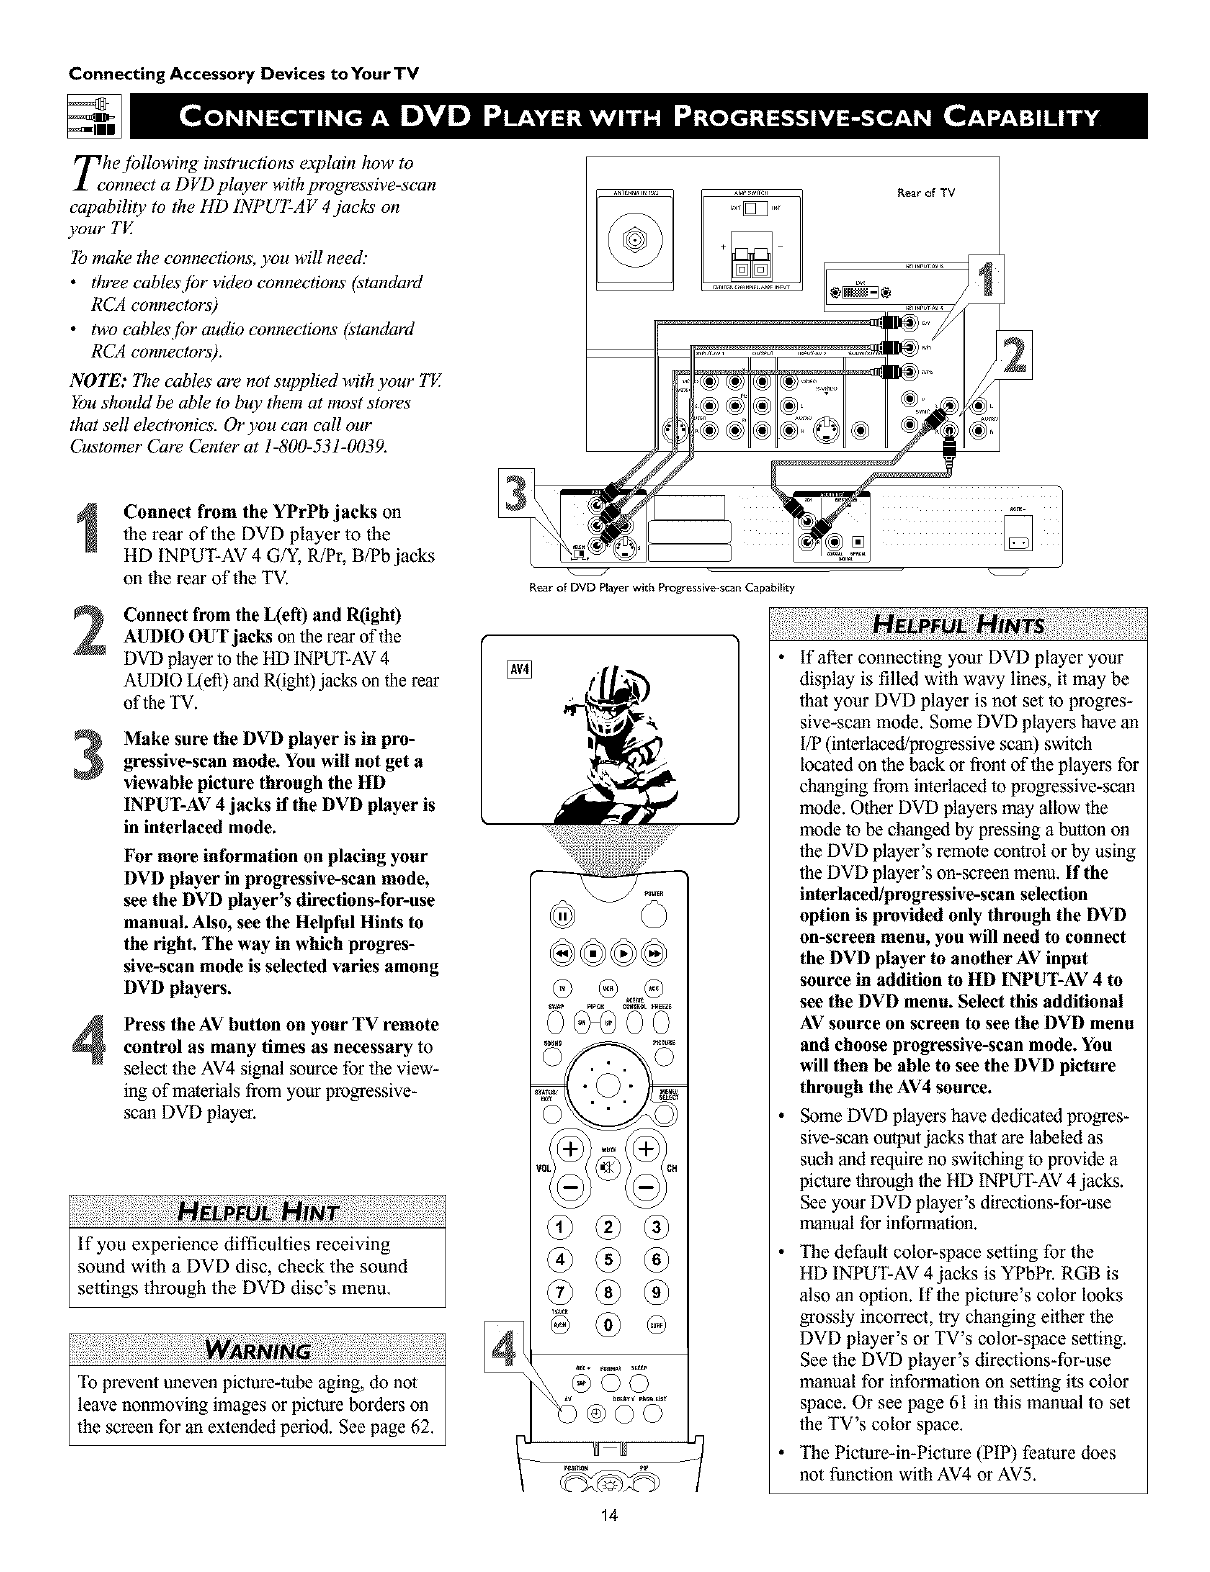
Zhejbllowing instructions explain how to
onnect a D VD player with progressive-scan
capability to the HD INPUT-AV 4 jacks on
):our TV.
To make the connections, you will need:
•three cablesjbr video connections (standard
RCA connectors)
• two cables[br audio connections (standard
RCA connectors).
NOTE: The cables are not supplied with ):our TE
You should be able to buy them at most stores"
that sell electronics. Or you can call our
Customer Care Center at 1-800-531-0039.
2
3
4
Connect from the YPrPb jacks on
the rear of the DVD player to the
HD INPUT-AV 4 G/Y, R/Pr, B/Pb jacks
on the rear of the TV.
Connect from the L(eft) and R(igh0
AUDIO OUT jacks on lhe rear of the
DVD player 1othe HD INPUT-AV4
AUDIO L(eft)andR(ight)jacks on the rear
of theTV.
Make sure the DVD player is in pro-
gressive-sean mode. You will not get a
viewable picture through the HD
INPUT-AV 4 jacks if the DVD player is
in interlaced mode.
For more information on placing your
DVD player in progressive-sean mode,
see the DVD player's directions-for-use
manual. Also, see the Helpful Hints to
the right. The way in which progres-
sive-scan mode is selected varies among
DVD players.
Press the AV button on your TV remote
control as many times as necessary to
select the AV4 signal source for the view-
ing of materials from your progressive-
scan DVD player.
If you experience difficulties receiving
sound with aDVD disc, check the sound
settings through the DVD disc's menu.
To prevant uneven picture-tube aging, do not
leave nonmoving images or picture borders on
the screan for an extended period. See page 62.
+%
R_ar of DVD Player with Progressive-scan Capability
®
@
if after connecting your DVD player your
display is filled with wavy lines, it may be
that your DVD player is not set to progres-
sive-scan mode. Some DVD players have an
I/P (interlaced/progressive scan) switch
located on the back or front of the players for
changing from interlaced to progressive-scan
mode. Other DVD players may allow the
mode to be changed by pressing a button on
the DVD player's remote control or by using
the DVD player's on-screen menu. If the
interlaced/progressive-sean selection
option is provided only through the DVD
on-sereen menu, you will need to connect
the DVD player to another AV input
source in addition to HD INPUT-AV 4 to
see the DVD menu. Select this additional
AV source on screen to see the DVD menu
and choose progressive-sean mode. You
will then be able to see the DVD picture
through the AV4 source.
Some DVD players have dedicated progres-
sive-scan output jacks that are labeled as
such and require no switching to provide a
picture through the HD INPUT-AV4 jacks.
See your DVD player's directions-for-use
manual for information.
The default color-space selling for the
HD INPUT-AV 4 jacks is YPbPr. RGB is
also an option. If the picture's color looks
grossly incorrect, try changing either the
DVD player's or TV's color-space setting.
See the DVD player's directions-for-use
manual for information on setting its color
space. Or see page 61 in this manual to set
the TV's color space.
The Picture-in-Picture (PIP) feature does
not function with AV4 or AV5.
14
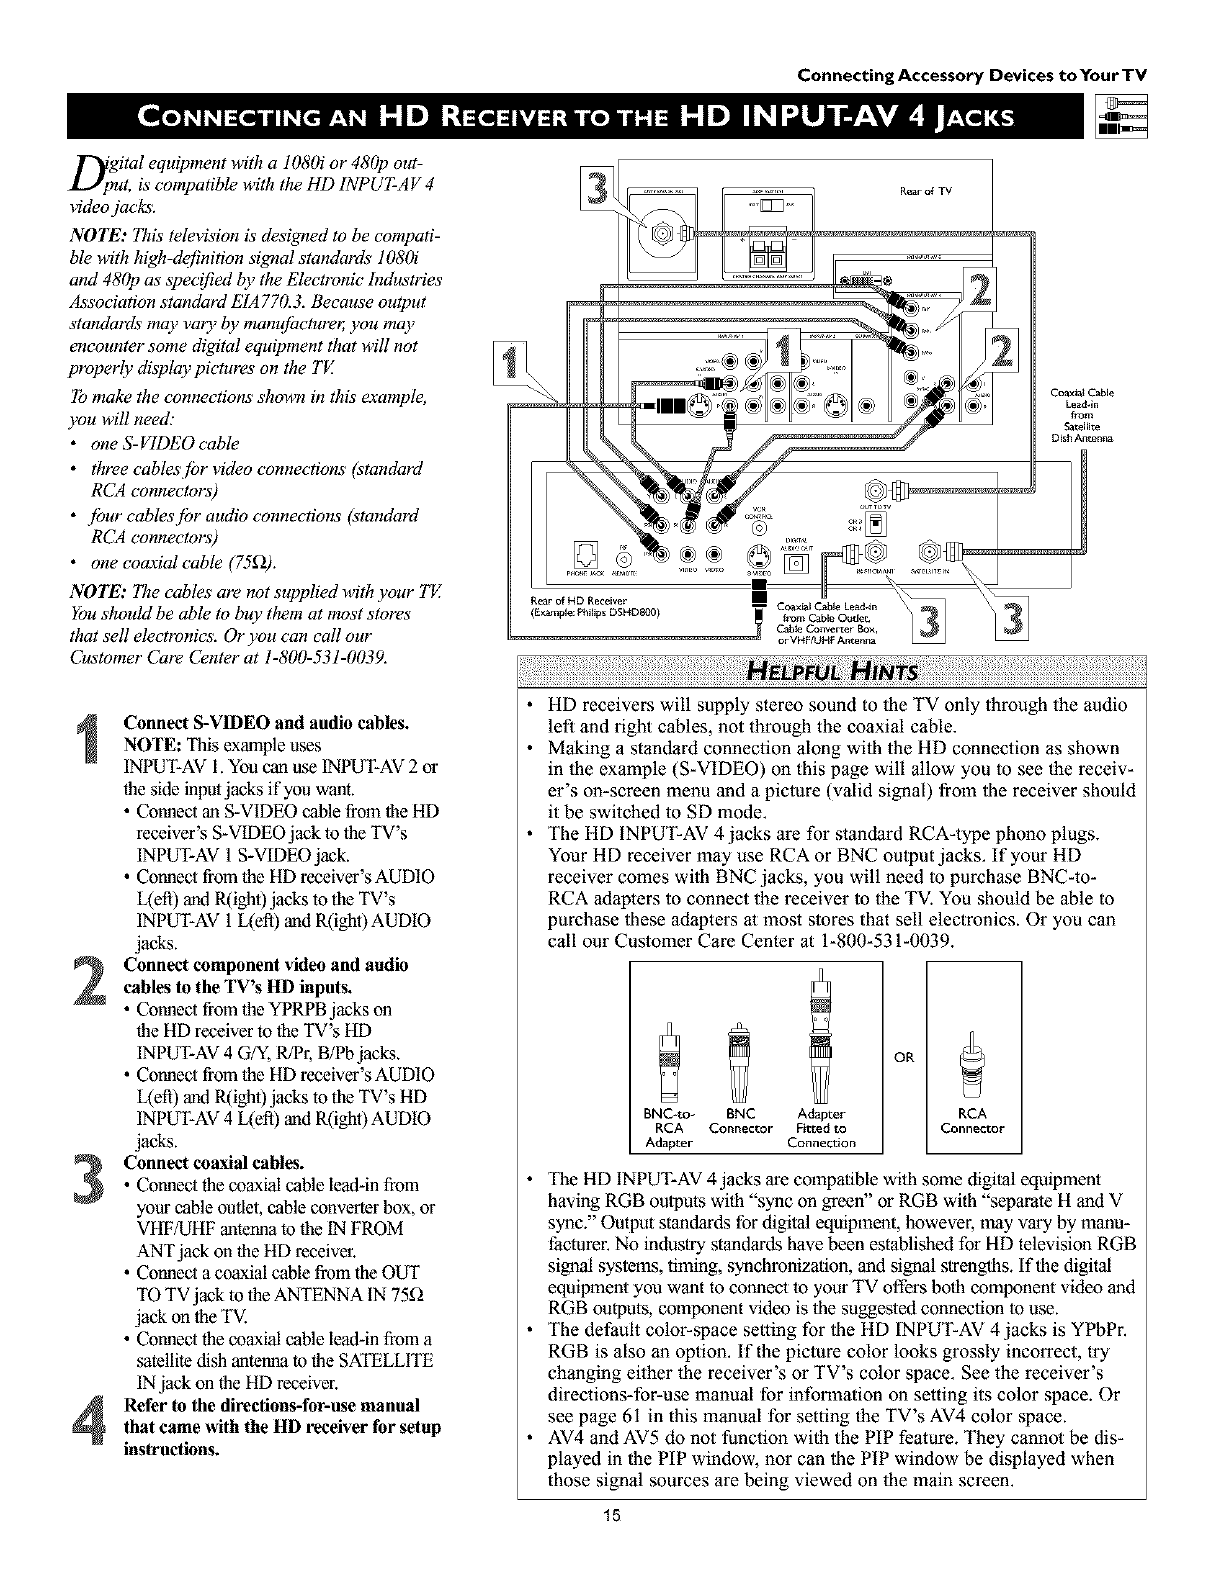
D;gital equipment with a 1080i or 480p out-
ut, is compatible with the HD INPUT-A V 4
video jacks.
NOTE: This television &designed to be compati-
ble with high-definition signal standards 108(h"
and 480p as specified by the Electronic" Industries
Association standard EIA 770.3. Because output
standards may vary by manufbcture_ you may
encounter some digital equipment that will not
properly display pictures on the TV.
To make the connections shown in this example,
you will need."
•one S-VIDEO cable
• three cablesjbr video connections (standard
RCA connectors)
• jbur cablesjbr audio connections (standard
RCA connectors)
• one coaxial cable (75_2).
NOTE: The cables are not supplied with your TE
You should be able to buy them at most stores"
that sell electronics. Or you can call our
Customer Care Center at 1-800-531-0039.
Connect S-VIDEO and audio cables.
NOTE: Thisexample uses
INPUT-AV1.You can use INPUT-AV2or
the side inputjacks if you want.
•Connect an S-VIDEO cable fromtheHD
receiver's S-VIDEO jack to the TV's
INPUT-AV1S-VIDEOjack.
•Connect from the HD receiver's AUDIO
L(ett) and R(ight)jacks to the TV's
INPUT-AV 1L(eft) and R(ight) AUDIO
jacks.
Connect component video and audiocables to the TV's HD inputs.
•Connect from theYPRPB jacks on
the HD receiver to the TV's HD
INPUT-AV4 G/Y, R/P1;B/Pb jacks.
•Connect from the HD receiver's AUDIO
L(efl) and R(ight)jacks to the TV's HD
INPUT-AV4 L(eft) and R(ight) AUDIO
jacks.
Connect coaxial cables.
•Connect the coaxial cable lea&in from
your cable outlet, cable converter box, or
VHF/UHF antenna to the tN FROM
ANT jack on the HD receiver.
•Connect a coaxial cable from the OUT
TO TV jack to the ANTENNA IN 75_
jack on the TV.
•Connect the coaxial cable lea&in from a
satellite dish antenna to the SATELLITE
IN jack on the HD receiver.
Refer to the directions-for-use manualthat came with the HD receiver for setup
instructions.
Connecting Accessory Devices toYourTV
Coaxr_ Cable
Lea_*in
fiom
_atel[ite
Dish Antenna
•HD receivers will supply stereo sound to the TV only through the audio
left and right cables, not through the coaxial cable.
•Making a standard connection along wilh the HD connection as shown
in 1he example (S-VIDEO) on this page will allow you to see the receiv-
er's on-screen menu and a piclure (valid signal) from the receiver should
it be switched to SD mode.
•The HD INPUT-AV 4 jacks are for standard RCA-type phono plugs.
Your HD receiver may use RCA or BNC oulput jacks. If your HD
receiver comes with BNC jacks, you will need to purchase BNC-to-
RCA adapters to connect the receiver to the TV. You should be able to
purchase these adapters al most stores that sell electronics. Or you can
call our Customer Care Center at 1-800-531-0039.
OR
BNC-to- BNC Adapter
RCA Connector Fitted to
Adapter Connection
RCA
Connector
•The HD INPUT-AV4 jacks are compatible wilh some digital equipment
having RGB oulputs with "sync on greeff' or RGB with "separate H and V
sync." Output standards for digital equipment, however, may vary by manu-
facturer. No industry standards have been established for HD television RGB
signal systems, liming, synchronization, and signal strengths. If the digital
equipment you want to comlect 1oyour TV offers both component video and
RGB outputs, component video is the suggesmd conneclion 1ouse.
•The default color-space setting for the HD INPUT-AV 4 jacks is YPbPr.
RGB is also an option. If the piclure color looks grossly incorrect, try
changing either the receiver's or TV's color space. See the receiver's
directions-for-use manual for information on setting its color space. Or
see page 61 in this manual for setting the TV's AV4 color space.
•AV4 and AV5 do not function with the PIP feature. They cannot be dis-
played in the PIP window, nor can the PIP window be displayed when
those signal sources are being viewed on the main screen.
15
Connecting Accessory Devices toYourTV
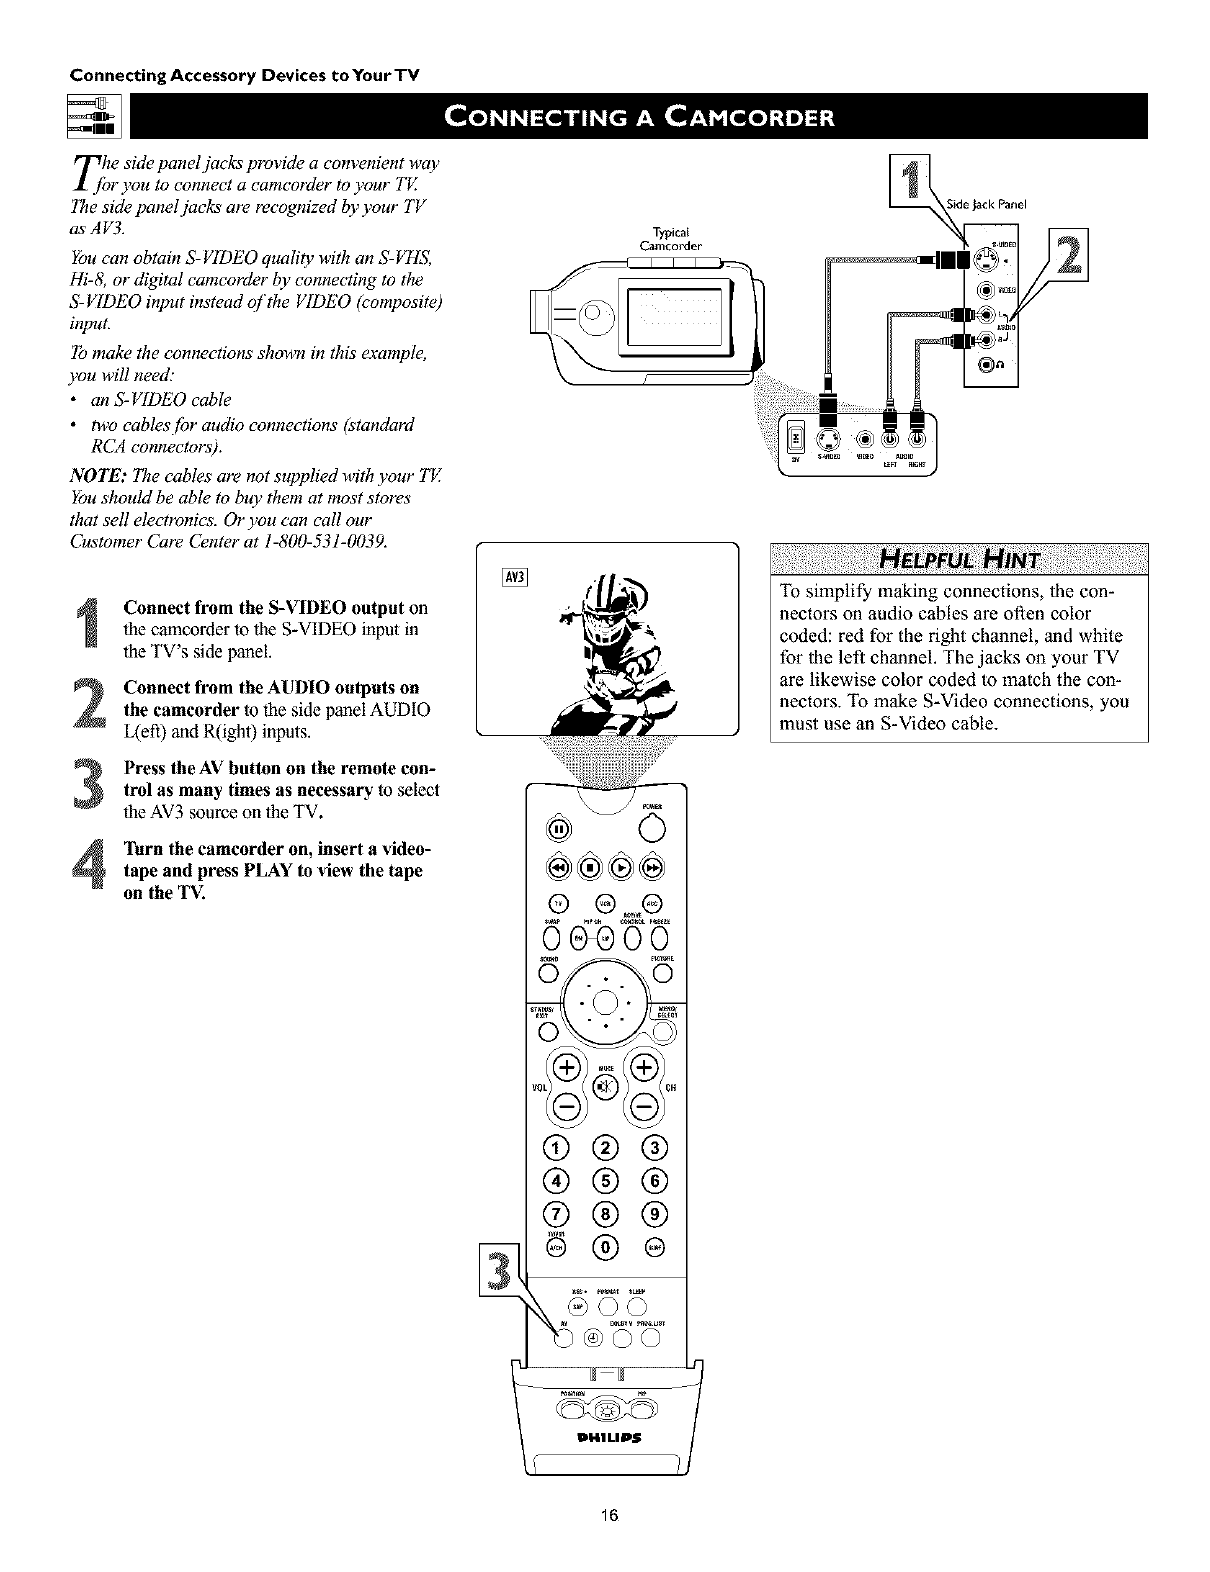
T[bhe side panel jacks provide a convenient way
r you to connect a camcorder to your TE
The side panel jacks are recognized by your TV
asAV3.
You can obtain S- VIDEO quality with an S- VHS,
Hi-8, or digital camcorder by connecting to the
S- VIDEO input instead o['the VIDEO (composite)
input.
To make the connections shown in this example,
you will need:
•an S-VIDEO cable
• two eables[br audio connections (standard
RCA connectors).
NOTE: The cables are not supplied with your TE
You should be able to buy them at most stores
that sell electronics. Or you can call our
Customer Care Center at 1-800-531-0039.
3
4
Connect from the S-VIDEO output on
the camcorder to the S-VIDEO input in
the TV's side panel.
Connect from the AUDIO outputs on
the camcorder to the side panel AUDIO
L(efi) and R(ight) inputs.
Press the AV button on the remote con-
trol as many times as necessary to select
the AV3 source on the TV.
Turn the camcorder on, insert a video-
tape and press PLAY to view the tape
on the TV. ®®®®
@ ®
®®®
®®®
®®®
16
To simplify making connections, lhe con-
nectors on audio cables are often color
coded: red for the right channel, and white
for the left channel. The jacks on your TV
are likewise color coded to match the con-
nectors. To make S-Video connections, you
must use an S-Video cable.
Connecting Accessory Devices to Your TV
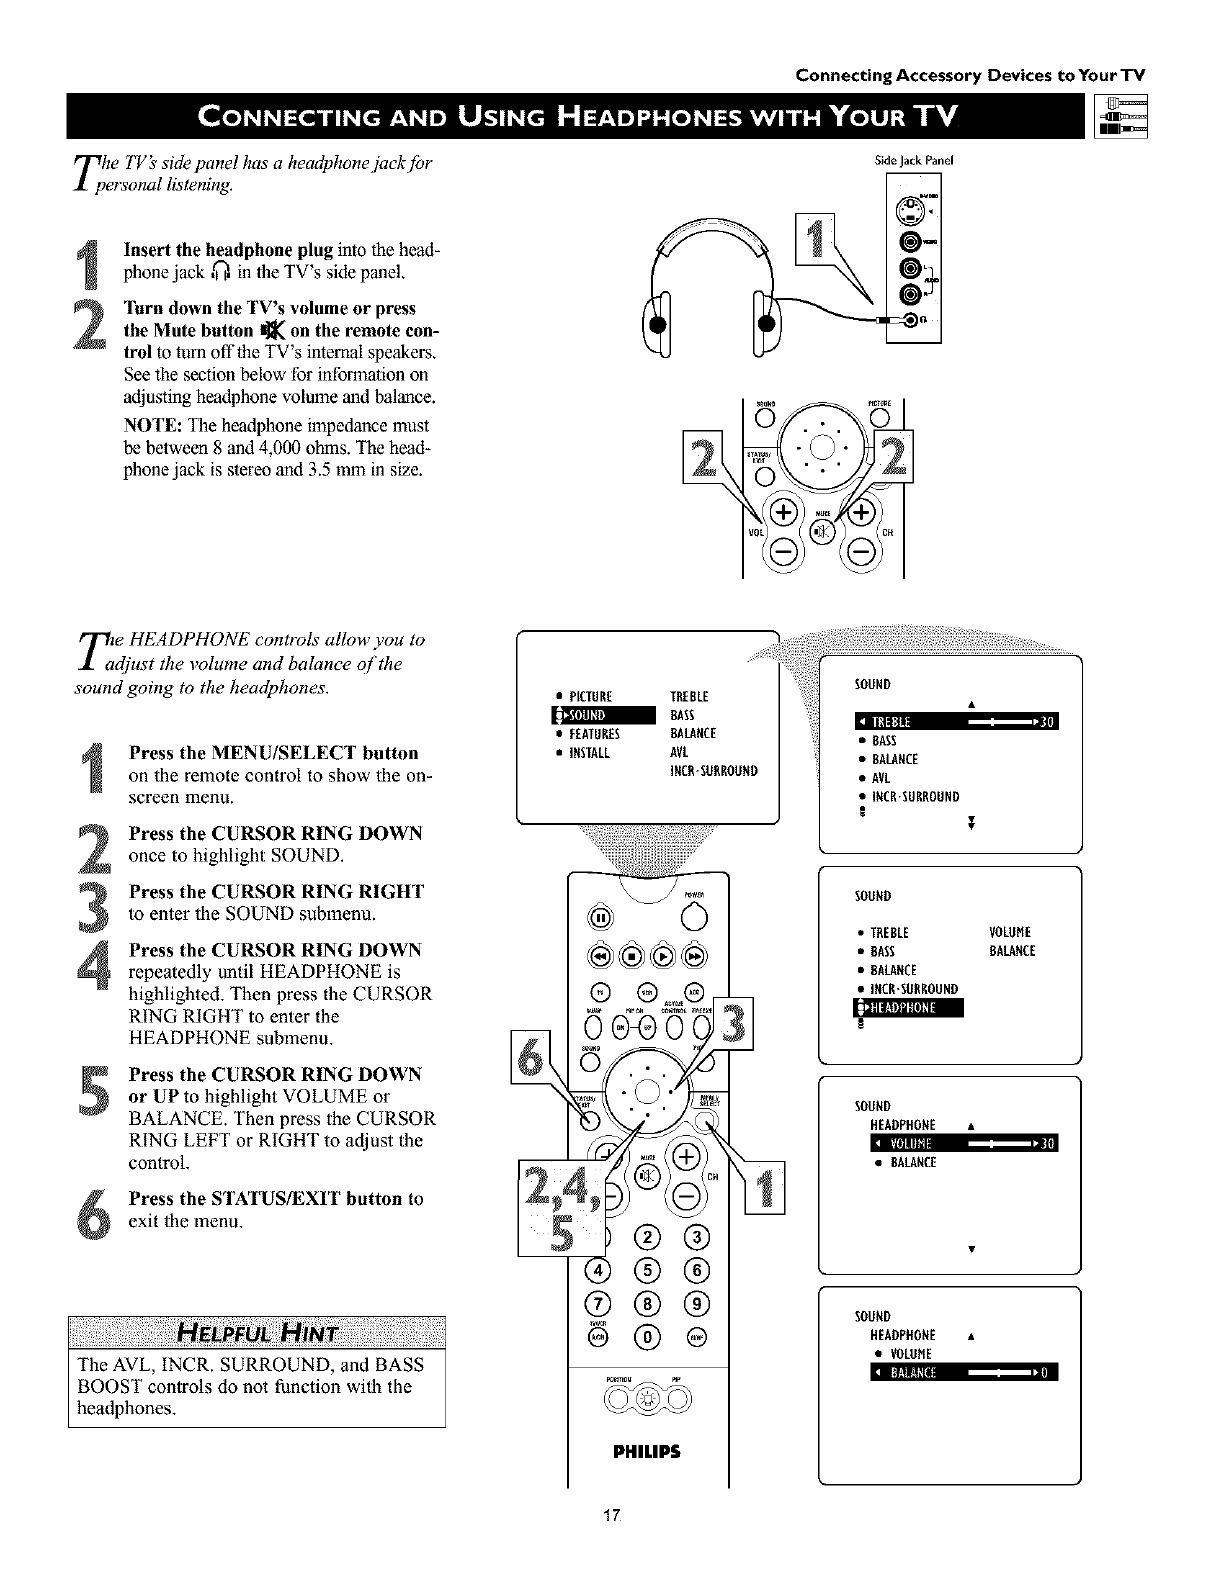
Tphe TV's side panel has a headphonejack.[br
ersonal listening.
2
Insert the headphone plug into the head-
phone jack ,_, in the TV's side panel.
Turn down the TV's volume or press
the Mute button I]_ on the remote con-
trol to turn offtbe TV's internal speakers.
See the section below for information on
adjusting headphone volume and balance.
NOTE: The headphone impedance must
be between 8 and 4,000 ohms. The bead-
phone jack is stereo and 3.5 mm in size.
SideJackPanel
@=
T2e HEADPHONE controls allow you to
djust the volume and balance qf the
sound going to the headphones.
4
Press the MENU/SELECT button
on the remote control to show the on-
screen menu.
Press the CURSOR RING DOWN
once to highlight SOUND.
Press the CURSOR RING RIGHT
to enter the SOUND submenu.
Press the CURSOR RING DOWN
repeatedly until HEADPHONE is
highlighted. Then press the CURSOR
RING RIGHT to enter the
HEADPHONE submenu.
[l_lllS_lllll l|llIIII
Press the CURSOR RING DOWN
or UP to highlight VOLUME or
BALANCE. Then press the CURSOR
RING LEFT or RIGHT to adjust the
control. :l IIllllllll|
Press the STATUS/EXIT button to
exit the menu.
The AVL, INCR. SURROUND, and BASS
BOOST controls do not function with the
headphones.
• PICTURE TREBLE
aBASS
•FEATURES BALANCE
• INSTALL AVL
INCR"SURROUND
®®®®
0 04) 0
5Z;®Q
®®®
®@®
6®®
:l II}'.tltl_[Bll
PHILIPS
/ 1/
•BASS
•BALANCE
•AVL
•INCR'SURROUND
SOUND
• TREBLE VOLOHE
• BASS BALANCE
• BALANCE
•INCR'SORROUND
SOUND
HEADPHONE •
• BALANCE
SOUND
HEADPHONE •
•VOLUME
17
Using the Remote Control
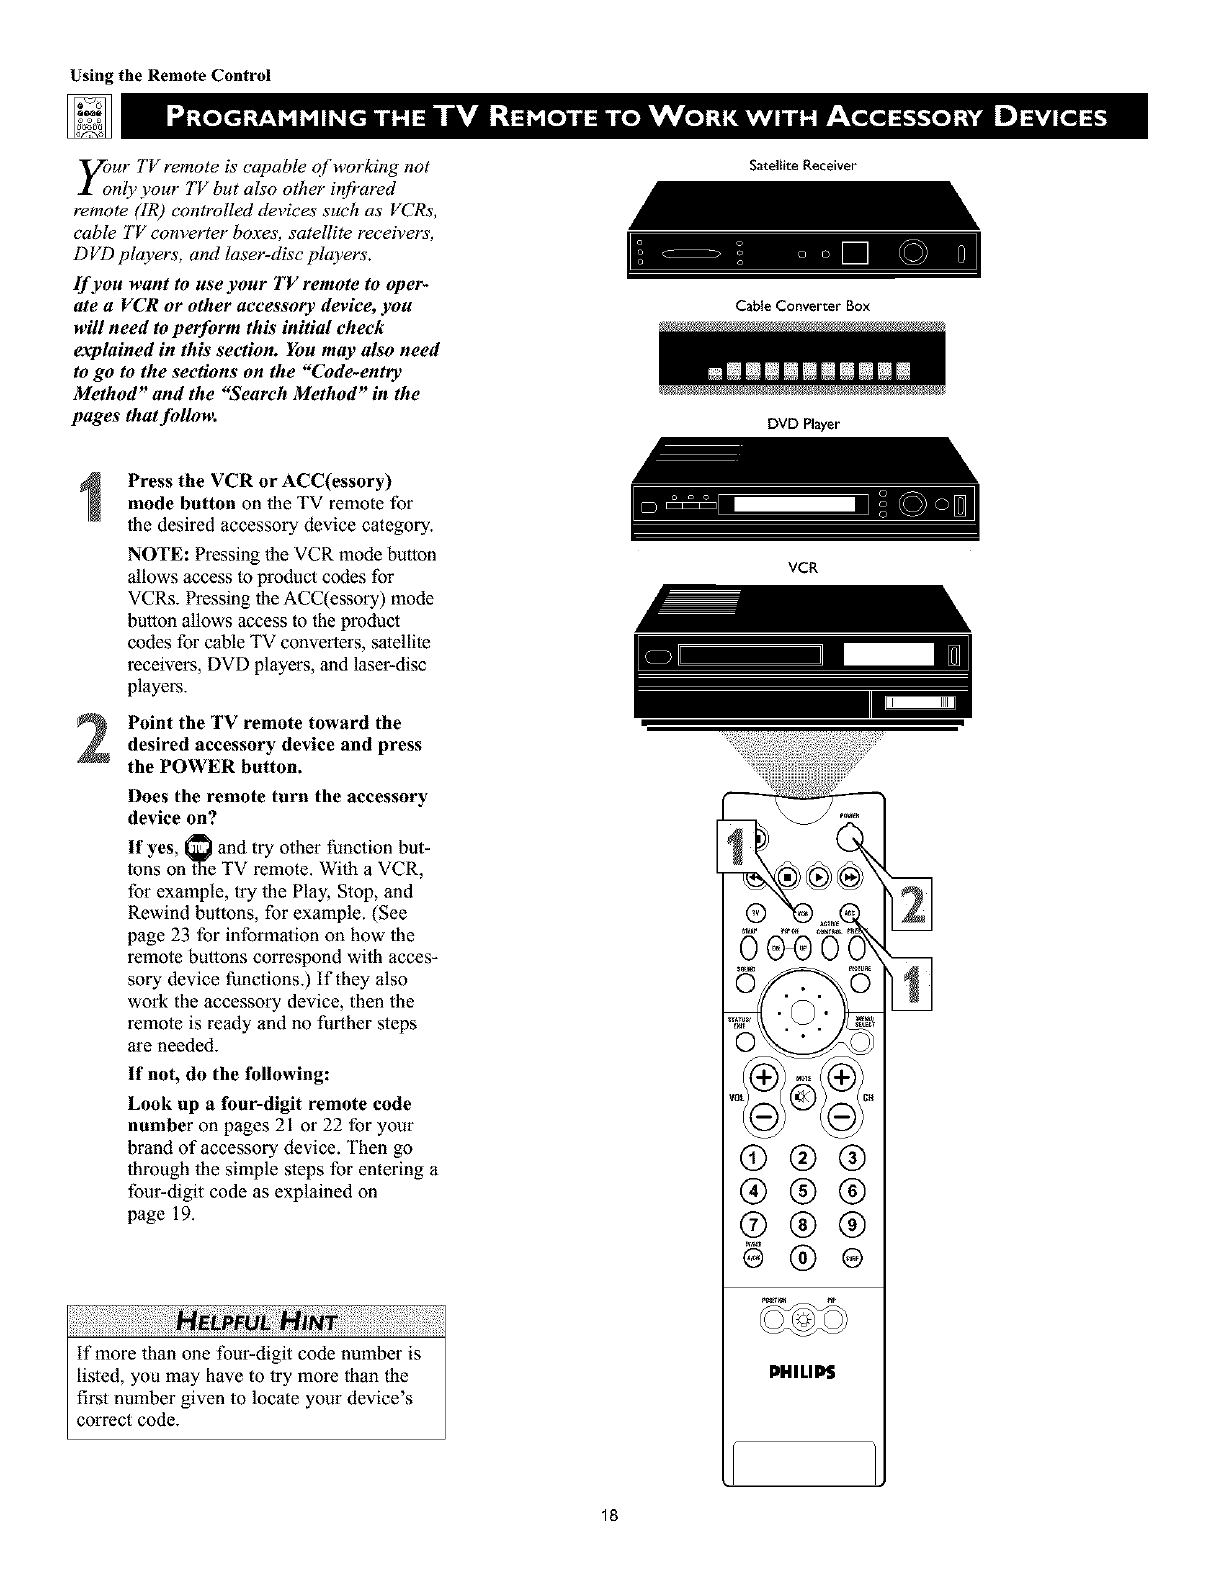
y;ur TV remote is capable of working not
nly your TV but also other ir!fi'ared
remote (IR) controlled devices such as VCRs,
cable TV converter boxes, satellite receivers,
D VD players, and laser-disc players'.
If you want to use your TV remote to oper-
ate a VCR or other accessory device, you
will need to perform this initial check
explained in this section. You may also need
to go to the sections on the "Code-entry
Method" and the "Search Method" in the
pages that fidlom
Press the VCR or ACC(essory)
mode button on the TV remote for
the desired accessory device category.
NOTE: Pressing the VCR mode button
allows access to product codes for
VCRs. Pressing llle ACC(essory) mode
bullon allows access to the product
codes for cable TV conveners, satellite
receivers, DVD players, and laser-disc
players.
Point the TV remote toward thedesired accessory device and press
the POWER button.
Does the remote turn the accessory
device on?
If yes, _ and try other function but-
tons on _laeTV remote. With a VCR,
for example, try the Play, Stop, and
Rewind buttons, for example. (See
page 23 for infonnalion on how lhe
remote buttons correspond wi_h acces-
sory device functions.) If they also
work the accessory device, then the
remote is ready and no further steps
are needed.
If not, do the following:
Look up a four-digit remote code
number on pages 21 or 22 for your
brand of accessory device. Then go
through the simple steps for entering a
four-digit code as explained on
page 19.
if more lhan one four-digit code number is
listed, you may have to try more than the
first number given to locate your device's
correct code.
18
Satellite Receiver
Cable Converter Box
DVD Player
VCR
®®®
®®®
®®®
@®®
PHILIP$

NOdW that you have looked up the [bur-
igit remote-control Direct-entry Code
ibr your brand of accessory device you are
ready to jbllow the simple steps shown below
to program your TV remote.
Please read through all the steps before
beginning.
2
First, press and hold down the VCR
or ACC (for an accessory device
other than a VCR) mode button on
the TV remote. Then press and hold
down the MENU/SELECT button at
the same time for a brief moment.
Release the buttons. The TV remote
back light will switch on.
NOTE: For correct operation, you
must first press and hold the mode
button and then press and hold the
MENU/SELECT button simultaneously.
Within 30 seconds of pressing the
VCR (or ACC) button and
MENU/SELECT button, enter a
four-digit code for the accessory
device (see pages 21 and 22).
if you make a mistake while attempt-
ing to enter the four-digit code and
want to start again, press any button
other than one with a nmnber. Then
return to step 1 to begin again.
Point the remote at the accessorydevice. Then press the POWER button
on the remote to tuna the device on.
If you do not enter a complete code within
30 seconds, you will need to perform step
1 of the Code-entry Method again.
If you enter more than four digits, the unit
will retain the first four digits entered.
If the procedure explained above does not
work the first time, repeat the steps using
the same remote code nmnber.
•If after a second try the remote does not
operate your accessory device, and more
code nmnbers are listed for your brand,
use the next listed code number.
• If after repeated attempts the Entry-code
Method does not allow you to work your
accessory device with your TV remote, try
the Search Method explained on the next
page.
19
Using the Remote Control
Satellite Receiver
CaNe Converter Box
DVD Player
Imm_m_m m_mnmnm I
VCR
®@@
@@@
®@@
PHILIP$
Using the Remote Control
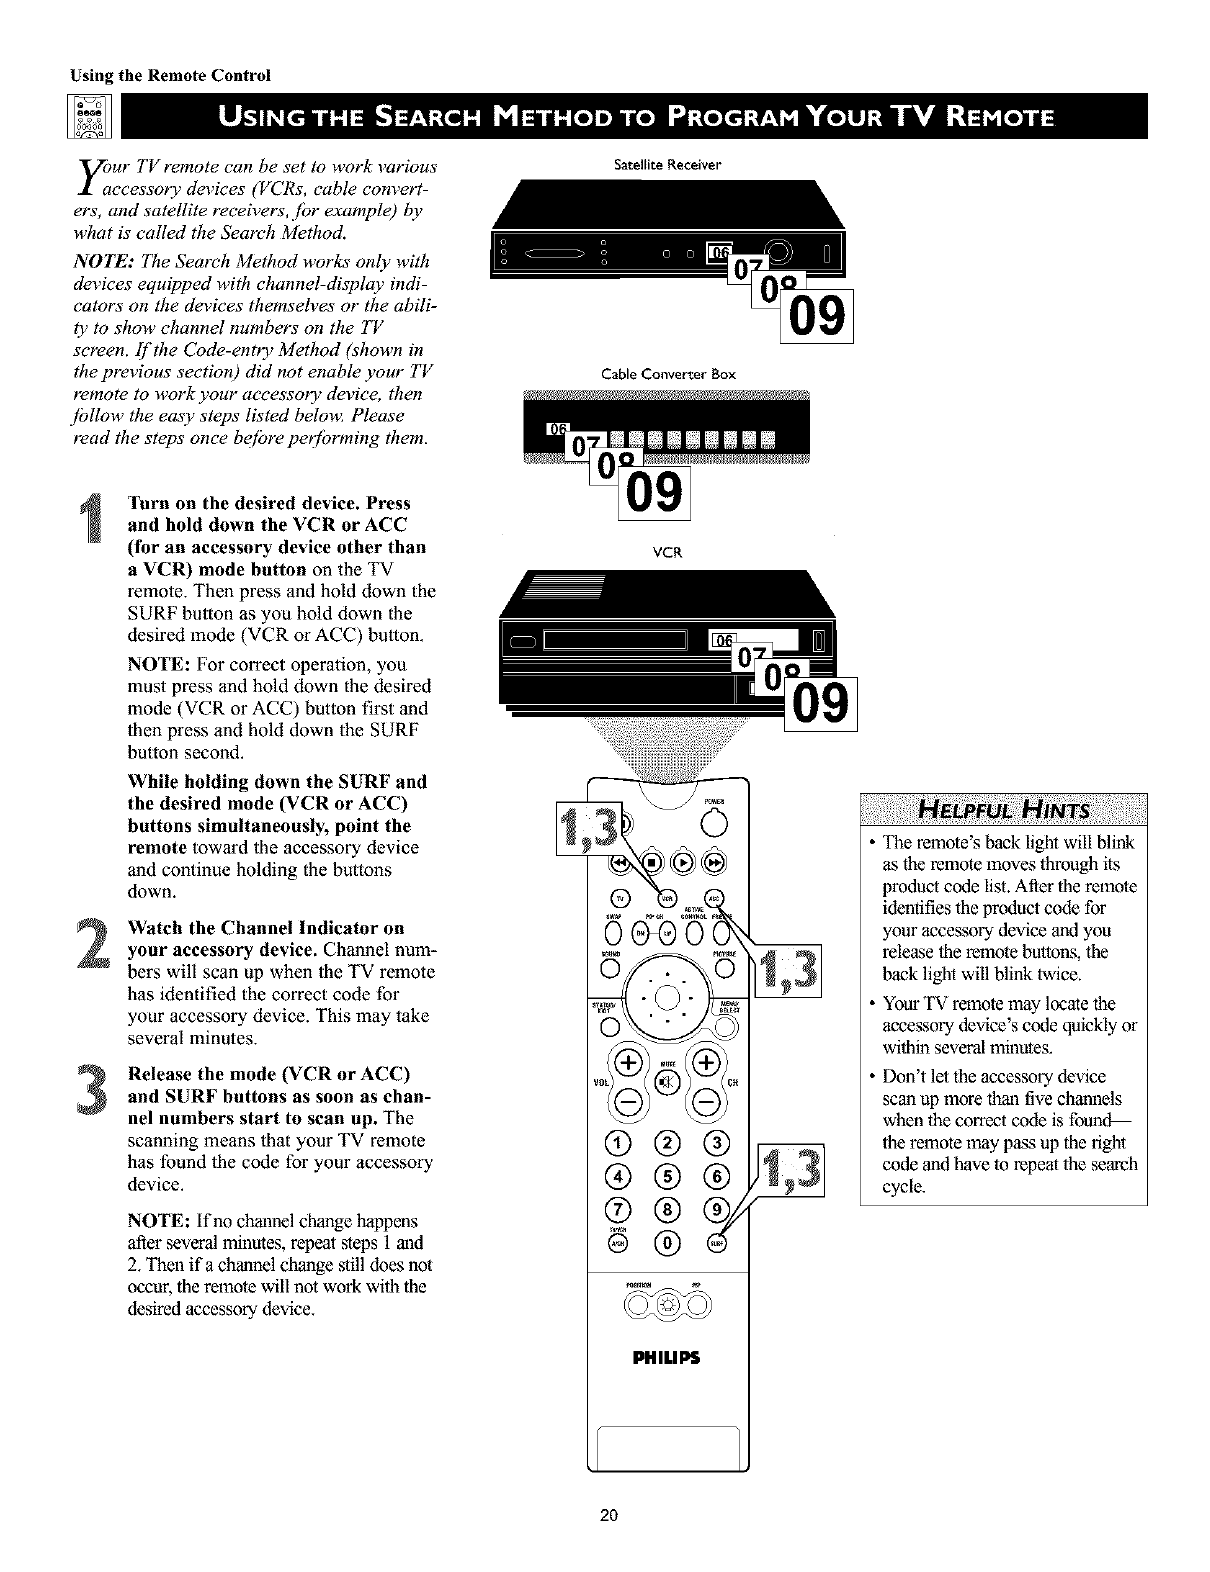
your TV remote can be set to work various
ccessory devices (VCRs, cable convert-
ers, and satellite receivers, fbr example) by
what is called the Seareh Method.
NOTE: The Search Method works only with
devices equipped with channel-display indi-
cators on the devices themseh_es or the abili-
ty to show channel numbers on tile TV
screen, if'the Code-entry Method (shown in
the previous section) did not enable your TV
remote to work your accessory device, then
jbllow tile easy steps listed below_ Please
read the steps once be[bre peffbrming them.
2
3
Turn on the desired device. Press
and hold down the VCR or ACC
(for an accessory device other than
a VCR) mode button on the TV
remote. Then press and hold down the
SURF button as you hold down the
desired mode (VCR or ACC) button.
NOTE: For correct operation, you
must press and hold down the desired
mode (VCR or ACC) button first and
then press and hold down the SURF
button second.
While holding down the SURF and
the desired mode (VCR or ACC)
buttons simultaneously, point the
remote toward lhe accessory device
and continue holding the bu_ons
down.
Watch the Channel Indicator on
your accessory device. Channel num-
berswill scan up when the TV remote
has identified the correct code for
your accessory device. This may take
several minutes.
Release the mode (VCR or ACC)
and SURF buttons as soon as chan-
nel numbers start to scan up. The
scanning means that your TV remote
has found the code for your accessory
device.
NOTE: If no channel change happens
after several minutes, repeat ,_eps 1 and
2. Then ifa channel change still does not
occur, the remote will not work with the
desired accessory device.
Satellite Receiver
Cable Converter Box
VCR
®®®
®®®
®
PHILIPS
2O
The remote's back light will blink
as the remote moves through its
product code list. After the remote
identifies the product code for
your accessory device and you
release the remote buttons, the
back light will blink twice.
Your TV remote may locate the
accessory device's code quickly or
within several minutes.
Don't let the accessory device
scan up more thau tive chmnlels
when the correctcode is foun_
the remote may pass up the right
code andhave to repeat the search
cycle.

VCR
Using the Remote Control
CODE NUMBER
ADMI_[ ............... 0075, 0236
ADVENTURA ............. 0027
AJKO .................. 0305
AIWA ................. 0334, 0495, 0027, 0064
AKAI .................. 0133, 0080, 0068, 0076,
..................... 0088, 0183, 0269
AMERICA A_'ION ....... 0305
AMERICAN H_GH ........ 0062
ASHA ............... 0267
AUDIOVOX ............ 0064
BEAUMARK ............ 0267
BELL & HOWE_ ........ 0131
BROKSON_C ........... 0148, 0211, 0029, 0236,
..................... 0238, 0322, 0388, 0506
CCE ............
CALIX ...........
CANON ..........
CAPEHART ........
CARVER ..........
C_NERAL.........
C{TIZEN ..........
COLT ...........
CRAIG ...........
.... 0099, 0305
.... 0064
.... 0194, 0062, 0129
.... 0047
.... 0108
.... 0305
.... 0305, 0064
.... 0099
.... 0064, 0099, 0074, 0267,
..................... 0298
CURTIS MATH_S ....
CYIBERNEX ........
DAEVVOO .........
DAYTRON ........
DENON ..........
DYNATECH ........
ELECTROHOME .....
ELECTROPHONIC ....
EMEREX ..........
EMERSON .........
.... 0062, 0068, 0087, 0189
.... 0078, 0267
.... 0305, 0588, 0047, 0072
.... 0047
.... 0069
.... 0027
.... 0064
.... 0064
.... 0059
.... 0211,0029, 0236, 0305,
..................... 0063,0148,0238,0588,
..................... 0235,0321,0506,0088,
..................... 0115,0239,0027,0064,
..................... 0070,0095,0322,0388,
..................... 0537
FISHER................. 0074,0131,0081,0093
F_I ................... 0060,0062
FUNAI ................. 0027
GE ................... 0062,0087,0075,0092,
..................... 0229,0267
GARRARD.............. 0027
GO VIDEO .............. 0306, 0459, 0553, 0259
GOLDSTAR .............. 0064, 0045, 0065, 0498,
..................... 0507
GRADIENTE .......
GRUNDIG .........
HI-Q ...........
HARLEY DAVlDSON ..
HARMAN/KARDON ,.
HARWOOD .......
HEADQUARTER .....
HITACHI ..........
.... 0035, 0027, 0435
.... 0222
.... 0074
.... 0027
.... 0065, 0102, 0108
.... 0095, 0099
.... 0073
.... 0069, 0193, 0132, 0092,
..................... 0027, 0068, 0109
HUGHESNEI_VORKSYSTEMS.0069
JVC .................. 0094, 0035, 0233, 0234,
..................... 0068, 0411
CODE NUMBER
DENON ................ 0859
GE ................. 0862
HARMAN/KARDON ...... 0871
HITACHI .............. 0870
JVC ................ 0868
KENWOOD ........... 0865
MAGNAVOX ........... 0860
JENSEN ............
KEC .............
KLH .............
KENWOOD .........
KODAK ...........
LXI ..............
LLOYD'S ...........
LOGIK ............
MEI .............
MGA ............
MGN TECHNOLOGY ....
MTC ..............
MAGNASONIC .........
MAGNAVOX ..........
MAGNIN ............
MARANTZ ...........
MARTA ..............
MATSUSHITA ..........
MEMOREX .........
MINOLTA ..........
M_SUB_SHI .........
MOTOROLA .........
MULTITECH .........
NAD ............
NEC .............
N_KKO............
NIKON ...........
NOBLEX ..........
OLYMPUS ..........
OPTIMUS..........
OPTON_CA .........
ORION ...........
PANASONIC .........
PENNEY ...........
PENTAX ...........
PHILCO...........
PHILIPS ............
PILOT ............
PIONEER..........
POLK AUDIO .........
PORTLAND ...........
PROFITRONIC.........
PROSCAN ............
PROTEC.............
PULSAR .............
QUARTER............
.0068
.0064,0305
.0099
.0068,0094,0411,0065
.0062,0064
.0064
.0027,0235
.0099
.0062
.0070,0088,0267
.0267
.0027,0267
.0305
.0062,0108,0137,0130,
.0027,0066,0176
.0267
.0108,0062
.0064
.0062,0189,0481
.0131,0074,0506,0027,
.0064,0075,0062,0073,
.0267,0334,0066,0189,
.0236,0481,0828,0829
.0132,0069
.0200,0088,0102,0241,
.0269,0070,0075,0094,
.0470
.0062,0075
.0027,0099
.0085
.0065,0067,0068,0077,
.0094,0109,0131
.0064
.0061,0280
.0267
.0062,0253
.0189,0481,0827,0828,
.0075,0085,0829,0064,
.0131,0459
.0089
.0506,0029,0211,0236,
.0322
.0062,0189,0828,0481,
.0253,0104,0405,0829,
.0129,0252,0254,0273,
.0827
.0062,0267,0064,0069,
.0065,0067,0081
.0069,0092,0132
.0062,0236,0506
.0108,0062,0089,0137,
.0830,0831
.0064
.0085,0195,0094
.0108
.0047
.0267
.0087,0229
.0099
.0066,0078
.0073
DVD PLAYER
MARANTZ .......... 0866
MrrSUBISHI .......... 0861
ONKYO ............ 0860
OPTIHUS ........... 0869
PANASONIC .......... 0859
PHILIPS............. 0866, 0860
P_ONEER ........... 0869, 0863
PROSCAN ........... 0862
QUAR_ ....
QUASAR ....
RCA .......
RADIO SHACK
RADIX ......
RANDEX ....
REAUST{C....
RICOH......
RUNCO .....
STS .......
SALORA .....
SAMSUNG ....
SANKY ......
SANSUI .....
SANYO ......
SCOTT......
S_ARS......
SEMP.......
SHARP ......
SH_NTOM ....
SHOGUN ....
SINGER .....
SONY ......
SUNPAK .....
SYLVANIA ....
SYMPHONIC ..
TMK ......
TATUNG.....
TEAC.......
TECHNICS ...
TEKNIKA ....
THOMAS....
TOSHIBA ....
TOTEVlS_ON ..
UNITECH ....
VECTOR .....
......... 0073
......... 0062,0189,0104,O481,
......... 0828
......... 0087,0176,0229,0069,
......... 0132,0085,0062,0075,
......... 0092,0104,0133,0267,
......... 0304
......... 0027
......... 0064
......... 0064
......... 0027,0131,0074,0075,
......... 0064,0062,0089,0073,
......... 0093
......... 0061,0280
......... 0066
......... 0069
......... 0102
......... 0072,0078,0080,0267
......... 0066,0075
......... 0068,0506,0027,0094,
......... 0109,0236,0298
......... 0074,0073,0131,0267
......... 0211,0238,0148,0070,
......... 0072,0237,0239
......... 0081,0132,0064,0069,
......... 0027,0062,0073,0074,
......... 0093,0131
......... 0072
......... 0075,0089
......... 0099
......... 0078,0267
......... 0099
......... 0060,0061,0059,0280,
......... 0027,0038,0062
......... 0280
......... 0062,0108,0027,0070,
......... 0130,0137
......... 0027
......... 0063,0235,0267
......... 0068
......... 0027,0068
......... 0062,0189,0273
......... 0027,0062,0064,0079
......... 0027
......... 0072,0237,0239,0070,
......... 0093,0393
......... 0064,0267
......... 0267
......... 0072
VECTOR RESEARCH........ 0065, 0067
VIDEO CONC_rs ......... 0067, 0072, 0088, 0248
VIDEOSONIC ............. 0267
WARDS ................ 0062,0087,0089,0027,
..................... 0074,0239,0267,0069,
..................... 0075,0099,0108,0176
WHITEWESTINGHOUSE ..... 0099,0305,0236
XR-1000 .............. 0099,0027,0062
YAMAHA ............... 0065
ZENITH ................ 0066,0027,0060,0061,
..................... 0236,0506
RCA ................ 0862,0869
SAHSUNG ............. 0870
SONY ............... 0864
TECHNICS ............ 0859
THETADIGITAL ......... 0869
TOSHIBA ............. 0860
YAMAHA ............. 0859,0867
ZENITH .............. 0872,0860
SEE THE NEXT PAGE FOR MORE CODES.
21
Using the Remote Control
ADS ............
AIWA ...........
CARVER ..........
DENON ..........
Disco VISION ......
FUNA{ ...........
HARMAN/KARDON , .
HITACHI ..........
KENWOOD .......
MAGNAVOX .......
CODE NUMBER
.... 0880
.... 0855
.... 0853, 0850, 0858
.... 0851,0849, 0875
.... 0848
.... 0855
.... 0853
.... 0848
.... 0877
.... 0853, 0857, 0875
LASER-DISC PLAYER
MARANTZ .........
MITSUBISH{ .........
NAD ............
NEC .............
NIKKODO .........
OPTIMUS ..........
PANASONIC .........
PH{LIPS............
P_ONEER ..........
POLK AUDIO .........
QUASAR ............
.0853,0850
.0849
.0849
.0879
.0884
.0849
.0856
.0853,0850
.0849,0848
.0853
.0856
RCA .......
REAU_{C ....
SAMSUNG ....
SEGA .......
SHA_ ......
SONY ......
TECHNICS .,.
THETA DIGITAL
VICTOR .....
YAMAHA ....
......... 0881,0874
......... 0855
......... 0858
......... 0848
......... 0873
......... 0854,0852,0878
......... 0856
......... 0853
......... 0876
......... 0857
CODE NUHBER
ABC .................. 0030, 0028, 0034, 0035,
..................... 0038, 0040, 0041,0044,
..................... 0060
ALLEGRO ............... 0180, 0342
ANTRON{X .............. 0049, 0234
A_ACHE................ 0797
ARCHER................ 0049, 0066, 0180, 0234,
..................... 0824
BBT ............
BELCOR..........
BELL & HOWELL ....
CABLE STAR .......
CABLETENNA ......
CABLEVIEW .......
CENTURY .........
C{TIZEN ..........
COLOUR VOICE ....
COMBAND ........
COMTRONICS ......
CONT_C .........
DIGI ............
EASTERN .........
EMERSON .........
EVERQUEST ........
FOCUS...........
GC ELECTRONICS . . .
GE .............
GARRARD ........
GEMINI ..........
GENERAL INSTRUMENT
GOLDSTAR ........
GOODMJND .......
.... 0294
.... 0083
.... 0041
.... 0083
.... 0049
.... 0049
.... 0180
.... 0180,0342
.... 0052,0058
.... 0259
.... 0067,0087
.... 0046
.... 0664
.... 0029
.... 0824
.... 0042,0067
.... 0427
.... 0083,0234
.... 0259
.... 0180
.... 0042,0097,0269,0824
.... 0303,0038,0503,0837
.... 0067,0171
.... 0797,0824
CABLE CONVERTER Box
HAMUN .............
HiTACHi ...........
HYTI:×............
JASCO ............
JERROLD ...........
LINSAY ............
MACOM...........
MAGNAVOX .........
MEMORFX .........
MOVIET{ME .........
NSC .............
N_xus ...........
NOVAPLEX .........
OAK .............
OPTIMUS ..........
PANASONIC .........
PANTHER ..........
PARAGON .........
PHILIPS ............
P_ONEER..........
POPULARMECHANICS . .,
PRELUDE ............
PULSAR .............
QUASAR ............
RCA ...............
RADIO SHACK ........
REALISTIC ............
RECOTON ...........
REGAL ..............
.0047,0036,0286,0061,
.0300
.0038
.0034
.0042, 0180, 0342
•0030, 0039, 0303, 0041,
•0503, 0038, 0051,0042,
.0837
.0467
.0060
.0054
.0027
.0090,0183
.0183,0090,0097
.0797
.0645
.0046,0034
.0048
.0048,0134,0027
.0664
.0027
.0052,0058,0269,0317,
.0054,0180
.0171,0050,0560
.0427
.0797
.0027
.0027
.0048
.0042,0847,0342,0824
.0234
.0427
.0300,0047,0286
REGENCY ............... 0029
REMBRANDT ............. 0038,0097
RUNCO ................ 0027
SL MARX ............... 0067
SAHSUNG ............... 0067,0171
SCIENTIFICATLANTA ....... 0035,0044,0033,0504
SEAM .......
SIGNAL .....
SIGNATURE . ..
SPRUCER ....
STARSIGHT . ..
STARCOM ....
STARGATE ....
STARQU_ST ...
_YLVANIA ....
TFC .......
TV86 ......
TANDY ......
TEL_CAPT_ON.
TEL_V_EW ....
TEXSCAN ....
TIMELESS ....
TOCOM.....
TOSHIBA ....
TUSA .......
UNI,<A......
UNITED ARTISTS
UNIVERSAL ...
......... 0537
......... 0042,0067
......... 0038
....... 0048
....... 0569,0449
....... 0030,0042
....... 0067,0042,0797,0824
....... 0042
....... 0028
......... 0337
......... 0090
......... 0285
......... 0248
......... 0067
......... 0028
......... 0445
......... 0039,0040
......... 0027
......... 0042
......... 0180,0234,0049
......... 0034
......... 0234,0049,0066,0083,
................... 0180,0218
VIEVVMASTER ........... 0847
VIEVVSTAR ............ 0285,0084,0087,0090
ZENITH .............. 0027,0552,0081
ZENTEK .............. 0427
SATELLITE RECEIVER/DIGITAL SATELLITE SYSTEM
CODE NUMBER
ALPHASTAR ........... 0799
AMPLICA ............. 0099
AI'IWA¥ .............. 0070,0102
ARUNTA ............. 0548
ASTRO INDUSTRIES ...... 0122
BMC ............... 0114
BSR .................. 0122
CABLE INNOVATIONS .
CAPETRONIC ......
CENTURY .........
CHANNEL MASTER ,.
CHAPARRAL .......
C{TOH ...........
CONIfeR .........
CURTIS MATH_S ....
DX ANTENNA .....
DRAKE ..........
ECHOSTAR ........
.... 0581
.... 0122
.... 0565
.... 0045,0239
.... 0080,0236,0243
.... 0191
.... 0031
.... 0088,0099
.... 0068
.... 0091,0272,0045,0176
.... 0307,0802,0175,0186,
..................... 0296
EXPRESSVU.............. 0802
GE ................
GENERAL INSTRUMENT ..,
GOULD .............
HNS ...............
HTS ...............
HITACHI .............
HOMECABLE ..........
HUGHES NETWORK SYSTEMS
HYTEK............
IQ ..............
IQ PRISM..........
INTERSAT ..........
JVC .............
IANEIL ............
JERROLD ...........
LEGEND ...........
MACON ...........
MAGNAVOX .........
MEMOR_ .........
N_XT LEVEL..........
.0593
.0388, 0896, 0574, 0581,
.0654
.0082
.0644
.0802
.0846
.0265
.0776
.0122
.0237
.0237
.0070
.0802
.0179
.0388, 0654
.0296
.0088, 0045
.0749,0751
.0296,0751
.0896
NORSAT .....
PANASONIC ..
PHILIPS......
PICO .......
PRIMESTAR ...
RCA .......
RADIO SHACK
RAMSEY .....
REALIST{C....
STS .......
SONY ......
STARCHOICE .
STARTRAK ...
STRONG .....
TOSHIBA ....
......... 0031
......... 0179,0728
......... 0227,0749,0751
......... 0102
......... 0654,0388
......... 0593,0170,0882
......... 0581,0896
......... 0102
......... 0079,0078
......... 0237,0068
......... 0666
......... 0896
......... 0207,0448,0574
......... 0448
......... 0109,0776,0817,0088
TOWN & COUNTRY ....... 0574
UNIDEN ................ 0265,0079,0101,0397,
..................... 0581,0751,0103,0323,
..................... 0749
ZENITH ................ 0091,0883,0088
CODE NUMBER
MAGNAVOX ............. 0583
TELEVISION
I I
22

Using the Remote Control
Time CTmrt below provides you with corn-
on accessory-device junctions associat-
ed with the buttons on your Philips TV remote
control. (Seepages 18 20jbr #![brmation on
programming your TV remote to operate
accessory devices.)
NOTES:
•Functions can vary according to the manu-
jacturer 's spec!f!eations jbr each accessory
deviee.
• First press the VCR mode button to use the
TV remote to operate a VCR.
•First press the A CC mode button to use the
TV remote to operate a DVD player, laser-
dise playeg cable converter box, or satel-
lite receiver/digital satellite system.
®
®®®®
@ @
iV Remote VC R
and Accessory Mode Buttons
® @o,.@
ICURSORRING UP
[CURSOR RING LEFT L__
INU"OERO° oo <O-9> ®
-®
®
INCH_TVNCR___®
@@
@@
@®
@®
-------JFASTFORWARD I
_RING RIGHT]
_CUR_ORR,NGOOWq
-_BA-BACK LIGHT]
Common Cable Converter
Box or Satellite
Common DVD/LD Player Receiver/Digital Satellite
Button on "IV Remote Common VCR Function Function System (DSS) Function
POWER POWER POWER POWER
PAUSE PAUSE PAUSE --
REWIND REWIND SEARCH REVERSE --
STOP STOP STOP --
Pb0,Y PLAY PLAY --
FAST FORWARD FAST FORWARD SEARCH FORWARD --
CURSOR RING UP CURSOR UP CURSOR UP CURSOR UP
CURSOR RING DOWN CURSOR DOWN CURSOR DOWN CURSOR DOWN
CURSOR RING RIGHT CURSOR RIGHT CURSOR RIGHT CURSOR RIGHT
CURSOR RING LEFT CURSOR LEFT CURSOR LEFT CURSOR LEFT
MENU
OK Button PROGRAM; MENU MENU (also, GUIDE for satellite receivers/DSS)
STATUS/EXIT EXIT EXIT EXIT
MENU/SELECT SELECT SELECT SELECT
CH + CHANNEL UP NEXT CHANNEL UP
CH - CHANNEL DOWN PREVIOUS CHANNEL DOWN
NUMBER Buttons (_9) NUMBER SELECTION (0-9) NUMBER SELECTION (0-9) NUMBER SELECTION (0-9)
A/CH* and TV/VCR TVNCR, A/CH* -- --
RECORD
REC, SAP (Press with PLAY Button) -- --
BACK LIGHT** BACK LIGHT *_ BACK LIGHT** BACK LIGHT**
*A/CH (Alternate Channel)allowsyouto switchbetweenthe currently viewedchannelandthe previouslyviewedchannel.
*_Pressthe BACKLIGHTbuttonto light the white buttonson the remote.
23

Using the Remote Control
Tghe A V button on the remote control and
OURCE SELECT button on the TV
allow you to access the TV_ signal-soume
inputs. With each press of the AV button you
can access a d!/J_rent signal-source input.
The signal-source input jacks are located on
the back and side panels of your TK (See
pages 6 and Z)
Selecting a Signal Source
Using the AV Button
on the Remote Control
Press the AV button on the remote control as
many times as necessary to select lhe signal
source you want to watch.
Selecting a Signal Source
Using the Source Select
Button on theTV
Press the SOURCE SELECT button on the TV
as many times as necessary to select the signal
source you want to watch.
[]
'1'!_ )
®®®®
® ® o,,,,®
®®®
®®®
®®®
[]
mmmm
24

Using the Remote Control
you can use the AutoSound TM, options to
utomatieally tailor the TVs sound [br
the type q!_rograrn you are watching. The
.fizetorv has set the VOICE, MUSIC, and
THEATRE options. ]'he settings jbr the PER-
SONAL option are the ones you select
through the on-screen SOUND submenu. See
descriptions of the options below, right.
2
Press the SOUND button on the
remote control. The current
AutoSound TM setting will appear on
screen. Press the SOUND button
repeatedly to cycle through the four
options: PERSONAL, VOICE,
MUSIC, or THEATRE.
When you see the option you want
on the screen, press the
STATUS/EXIT button to exit the
menu. The AutoSound TM option you
selected is then active.
• AutoSound TM works only with the pro-
grams coming lhrough the ANTENNA
IN 75_ jack on the rear of the TV.
AutoSound TM will not control lhe sound
levels of the olher jacks on the rear or
side of the TV.
• If you select an AutoSound'rM option
other than PERSONAL, then the TRE-
BLE and BASS settings specific to that
option will also be written to the
SOUND submenu items. At thai point,
the PERSONAL AutoSound TM option
settings will not be changed. Only when
you go into the SOUND submenu and
chmlge the TREBLE and BASS settings
will those settings be reflected in lhe
PERSONAL AutoSound TM option.
PERSONAL
TREBLE_m49BASS 49
®®®®
®®®
®®®
®®®
PHILIPS
TREBLE
BASS
MUSIC
TREBLE 63
BASS 69
TEEATRE
TREBLE
BASS
AutoSound rMOptions
PERSONAL presents lhe TV's sound
according to the TREBLE and BASS set-
tings you make wilhin the SOUND sub-
lrlenu •
VOICE brings voices to the forefront and
emphasizes lhem. Moves music to the
background.
MUSIC emphasizes music over voices.
THEATRE provides a balance between
voices and music.
25
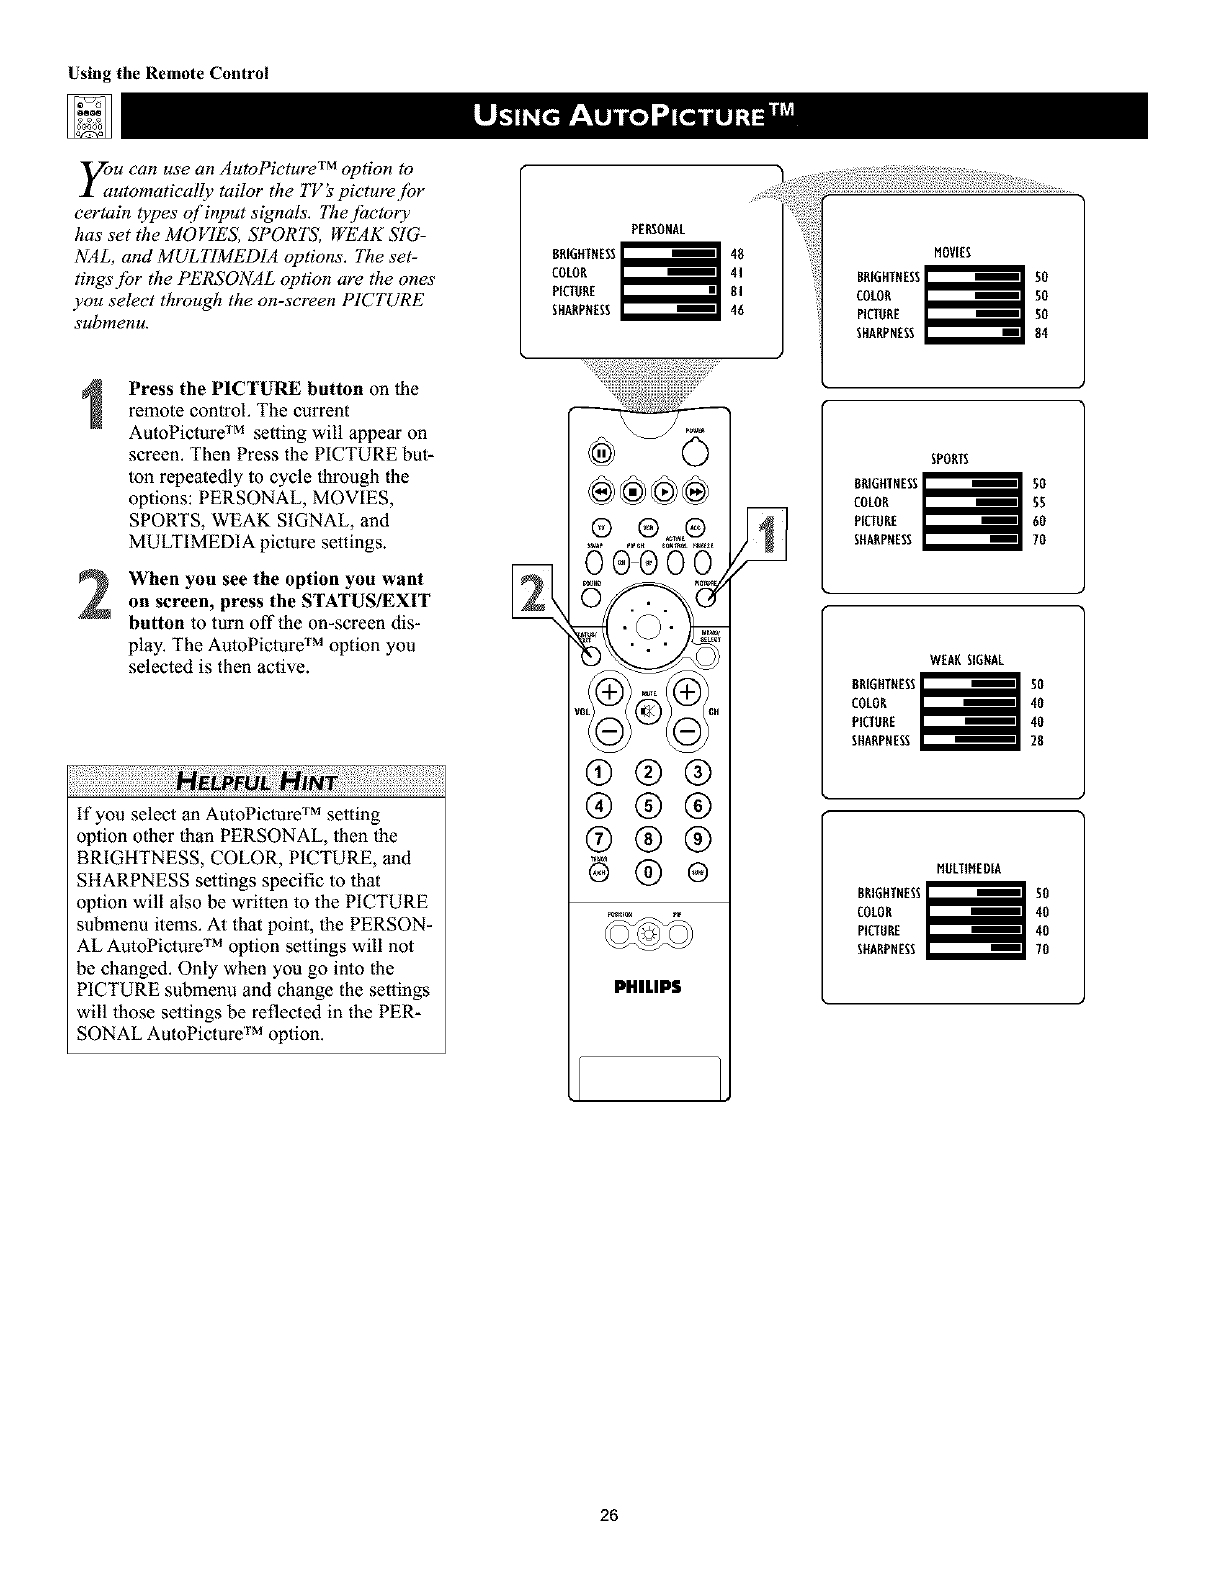
Using the Remote Control
you can use an AutoPieture TM, option to
utomatically tailor the TV s picture fbr
certain types of input signals. The jaetory
has set the MOVIES, SPORTS, WEAK SIG-
NAL, and MULTIMEDIA options. The set-
tings jbr the PERSONAL option are the ones
you select through the on-screen PICTURE
submenu.
PERSONAL
BRtGHTNESS[I_=_) z 48
COLOR 41
PtCTORE UI
SHARPNESS 46
2
Press the PICTURE button on the
remote control The current
AutoPicture TM setting will appear on
screen. Then Press the PICTURE but-
ton repeatedly to cycle through the
options: PERSONAL, MOVIES,
SPORTS, WEAK SIGNAL, and
MULTIMEDIA piclure settings.
When you see the option you want
on screen, press the STATUS/EXIT
button to turn offlhe on-screen dis-
play. The AutoPicture TM option you
selected is then active.
ii!!i)ii!ili) ii il¸)ii ii!i¸ii)ii@ili!i iiiiii!i ii!ili!i )iilHi i ! !iiii!IHi i!iiiiiili!iiiiiiii!!ii¸ii@iiii!i!iiiiiiiiiiii!i!iiiiiii!i!i!ili
if you select an AutoPicture TM setting
option other than PERSONAL, then the
BRIGHTNESS, COLOR, PICTURE, and
SHARPNESS settings specific to lhat
option will also be written to the PICTURE
submenu items. At that point, the PERSON-
AL AutoPicture TM option settings will not
be changed. Only when you go into the
PICTURE submenu and change the settings
will lhose settings be reflected in the PER-
SONAL AutoPicture TM option.
®®@®
o®®o
0 _
®®®
®®®
®®®
PHILIPS
SPORTS
8RIGHTNESS_ 50
COLOR 55
PICTURE 60
SHARPNESS 70
WEARSIGNAL
8RIGHTNESS_ 50
COLOR 40
PICTURE 40
SHARPNESS 28
MULTIMEDIA
NESS_ 50
PICTURE 40
SHARPNESS 70
26

Using the Remote Control
A fler you set up a list of vour [avorite sig-
hal sources in the S_/R'F list, you can
press the SURF button to see the list and
quickly tune to a fhvorite signal soume.
Place up to 10 signal sources in the SURF
LIST
2
3
4
Press the NUMBER buttons,
CH(annel) +/- buttons, or the AV
button to select asignal source to add
to the Surf list.
Press the SURF button. The Surf list
box appears, The number of the cur-
rent signal source is shown wilh
ADD? to the right, (If you have not
added any channels to the list, "SURF
LIST EMPTY" appears on screen.)
Press the CURSOR RING RIGHT to
add the signal source to the Surf list.
Press the NUMBER buttons,
CH(annel) +/- buttons, or the AV
button to select another signal source
to add to the Surf list. Press the SURF
button and then the CURSOR RING
RIGHT to add the signal source to the
list,
Repeal this step, filling the list with
up to 10 favorite signal sources.
NOTE: If you exceed 10 signal
sources, the first signal source on the
list will be deleted from the list.
rib tune to a favorite signal source
from the list, press the SURF but-
ton. The Surf list box appears. Press
the SURF button or the CURSOR
RING DOWN or UP as many times as
necessary to tune to the signal source.
rib delete a signal source from the
list, press the SURF button. The
Surf list box appears, Press the SURF
button or the CURSOR RING DOWN
or UP as many times as necessary to
select the signal source to be deleted.
Then press the CURSOR RING
RIGHT to delete the signal source.
[]
®®@®
®@@
®@@
®oo 2,4,
S
/ ,.H,.... /]
[]
[]
[]
27
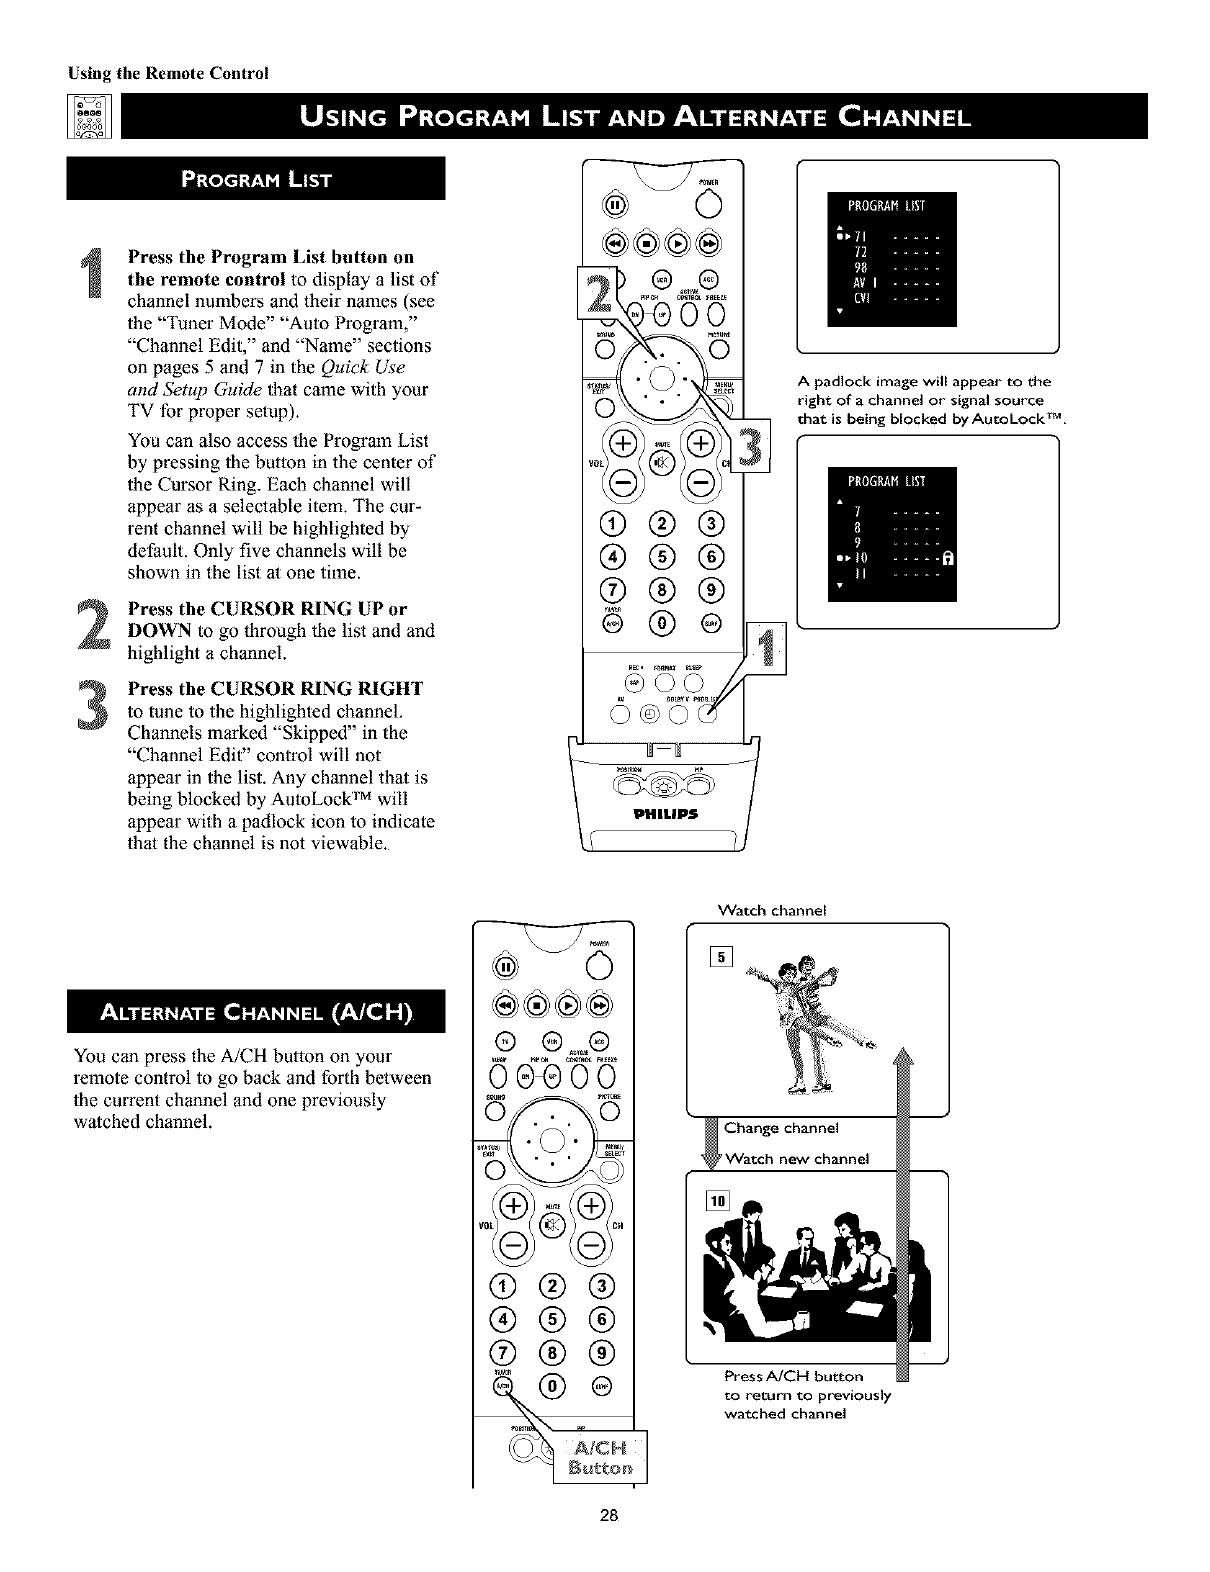
Using the Remote Control
3
Press the Program List button on
the remote control to display alist of
channel numbers and their names (see
the "Tuner Mode" "Auto Program,"
"Channel Edit," and "Name" sections
on pages 5 and 7 in the Quick Use
and Setup Guide that came with your
TV for proper setup).
You can also access the Progrmn List
by pressing the button in the center of
the Cursor Ring. Each channel will
appear as a selectable item. The cur-
rent channel will be highlighted by
default. Only five channels will be
shown in the list at one time.
Press the CURSOR RING UP or
DOWN to go through the list and and
highlight a channel.
Press the CURSOR RING RIGHT
to tune to the highlighted channel.
Channels marked "Skipped" in the
"Channel Edit" control will not
appear in the list. Any channel that is
being blocked by AutoLock TM will
appear with a padlock icon to indicate
that the channel is not viewable.
®®®®
®®®
®®®
®®®
Apadlock image will appear to the
right of achannel or signal source
that is being blocked by AutoLock TM.
You can press the A/CH button on your
remote control to go back and forth between
the current channel and one previously
watched channel.
®®®®
® ® ,,.,=®
15o' 'O'ii
®®®
®®®
®®®
28
Watch channel
[]
Change channel
'Watch new channel
Press A/CH button
to return to previously
watched channel

Using the Remote Control
Hi,vVe you ever fi_llen asleep in j?ont of the
? You can program your TV to turn
o/f while you sleep. The Sleep Timerjbature
allows' you to set your TV to turn q[f within a
certain amount qf time: 15, 30, 45, 60, 90,
120, 180, or 240 minutes. _t111_1".11111111
Press the SLEEP button on the remote con-
trol. (The SLEEP Timer on-screen display
will appear on screen.) Then within five
seconds, press the SLEEP button again as
many times as necessary to select the
amount of time you want to pass before the
TV will turn itself off.
An on-screen countdown will appear during
the last minute before the TV turns off. Ten
seconds before lhe Sleep Timer turns the TV
oft, the on-screen display will show "Good
Bye."
[] [WIIlltlHI_[IIIlIlII _J_
• To see how many minutes remain before
the TV shuts itself off, press the
STATUS/EXIT button.
•Changing the channel or volume during
the last minute of a Sleep Timer will
cancel Sleep.
®®®®
® ®
®®®
®®®
®®®
®©
J
IPHIL|PS
The SleepTimer options are 15, 30,45,
60, 90,120,180, or 240 minutes.
During the last minute of a Sleep Timer
setting, an onscreen countdown will be
displayed.
During the last 10 seconds of a Sleep
Timer setting, "GOOD BYE" will be
displayed on screen.
29
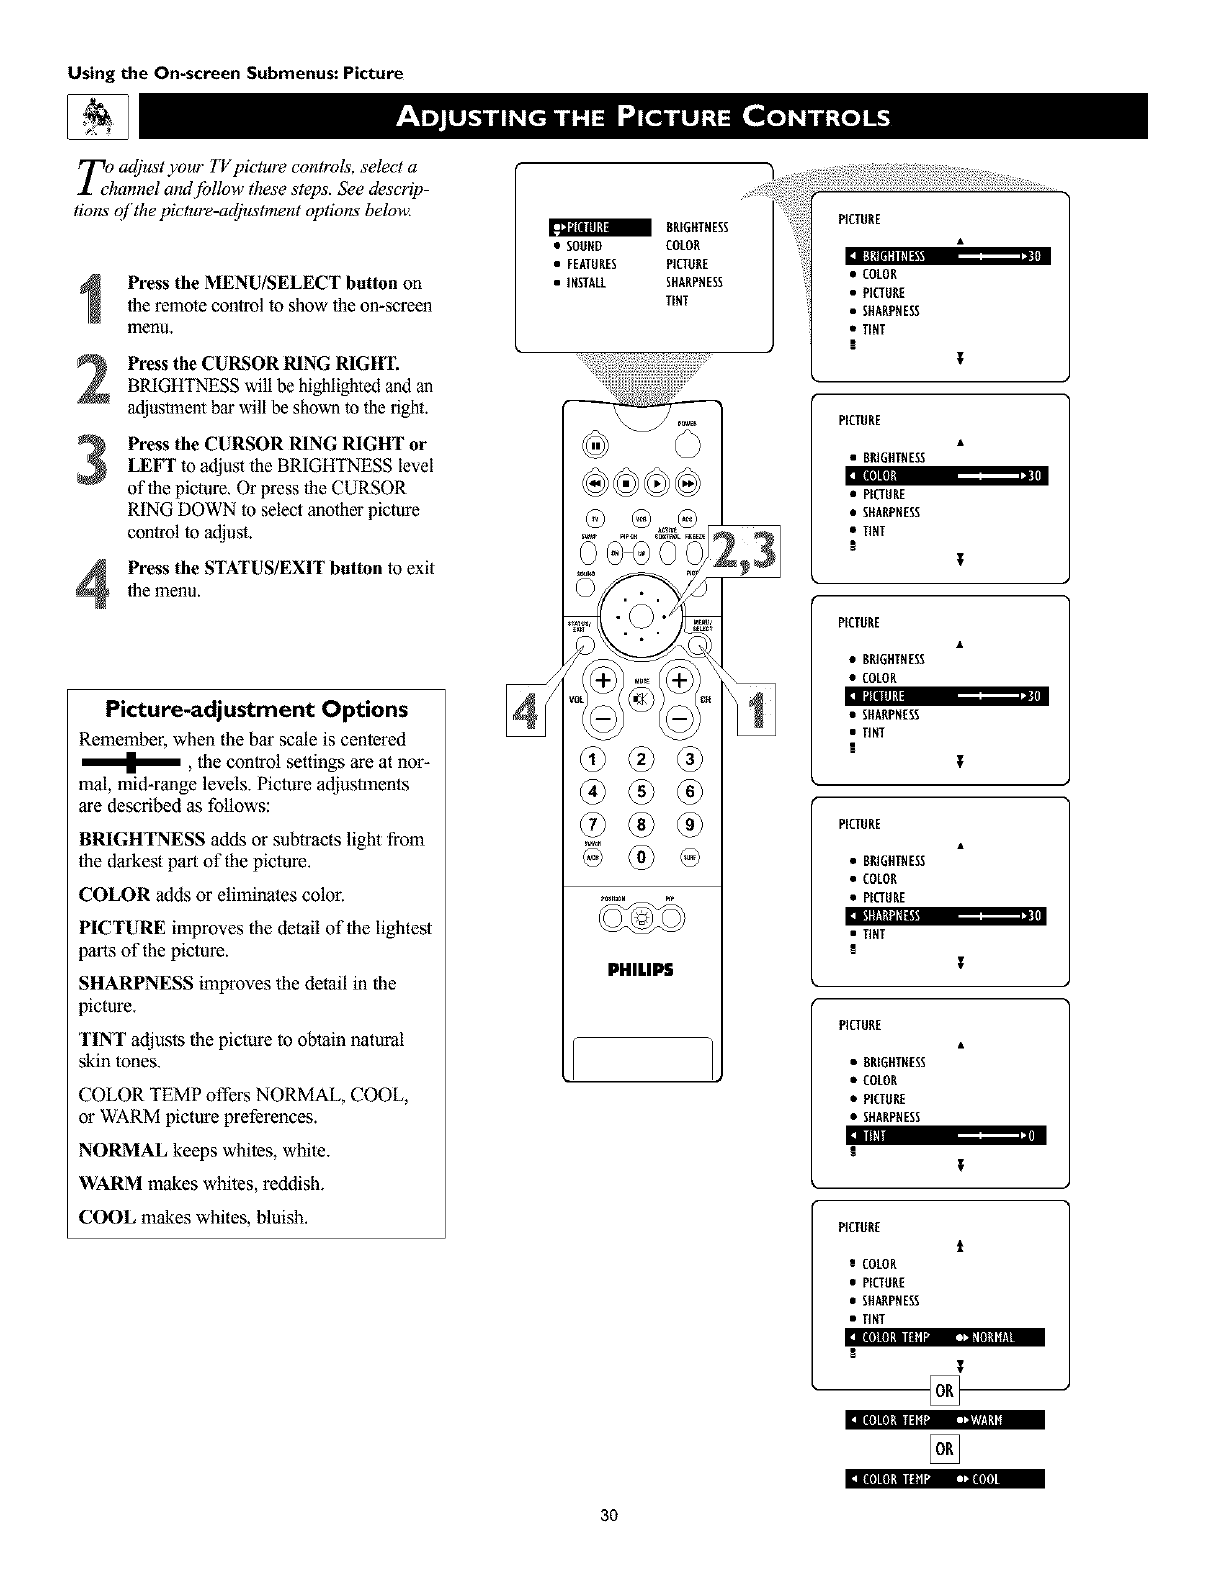
Using the On-screen Submenus: Picture
T;ujacljust your TV picture controls, select a
nnel amtjbllow these steps. See descrip-
tions qf the picture-adjustment options below.
3
4
Press the MENU/SELECT button on
the remote control to show the on-screen
nlenu,
Press the CURSOR RING RIGHT.
BRIGHTNESS will be highlighted and an
adjuslment bar will be shown to the right.
Press the CURSOR RING RIGHT or
LEFT to adjust the BRIGHTNESS level
of the picture. Or press the CURSOR
RING DOWN to select another picture
control to adjust.
Press the STATUS/EXIT button to exit
the menu.
Picture-adjustment Options
Remember, when the bar scale is centered
, the control settings are at nor-
mal, mid-range levels. Picture adjustments
are described as follows:
BRIGHTNESS adds or subtracts light from
the darkest part of the picture.
COLOR adds or eliminates color.
PICTURE improves the detail of the lightest
paris of the picture.
SHARPNESS improves the detail in the
picture.
TINT adjusts the picture to obtain natural
skin tones.
COLOR TEMP offers NORMAL, COOL,
or WARM picture preferences.
NORMAL keeps whites, white.
WARM makes whites, reddish.
COOL makes whites, bluish.
BRIGHTNESS
• SOUND COLOR
•FEATURES PICTURE
•iNSTALL SHARPNESS
TINT
@
PHILIPS
il[i|[I][ll'_k'-- -i_e(tlll_ I
]lt]ll|I! "'_'- I_wl!lNi
:]l{i] Itl[I I1_,] '_"[I
3O
• SHARPNESS
•TINT
PICTURE
•BRIGHTNESS
Iii]ll h.
• PICTURE
•SHARPNESS
•TINT
PICTORE
•BRIGHTNESS
• COLOR
I_tlllll i
• SHARPNESS
•TINT
PICTURE
•BRIGHTNESS
• COLOR
• PICTURE
_*'1II!ll|U _l'l
•TINT
PICTURE
• RRIGETNESS
• COLOR
• PICTURE
• SHARPNESS
i
PICTORE
t
eCOLOR
• P[CTORE
• SHARPNESS
• lINT
[]
[]
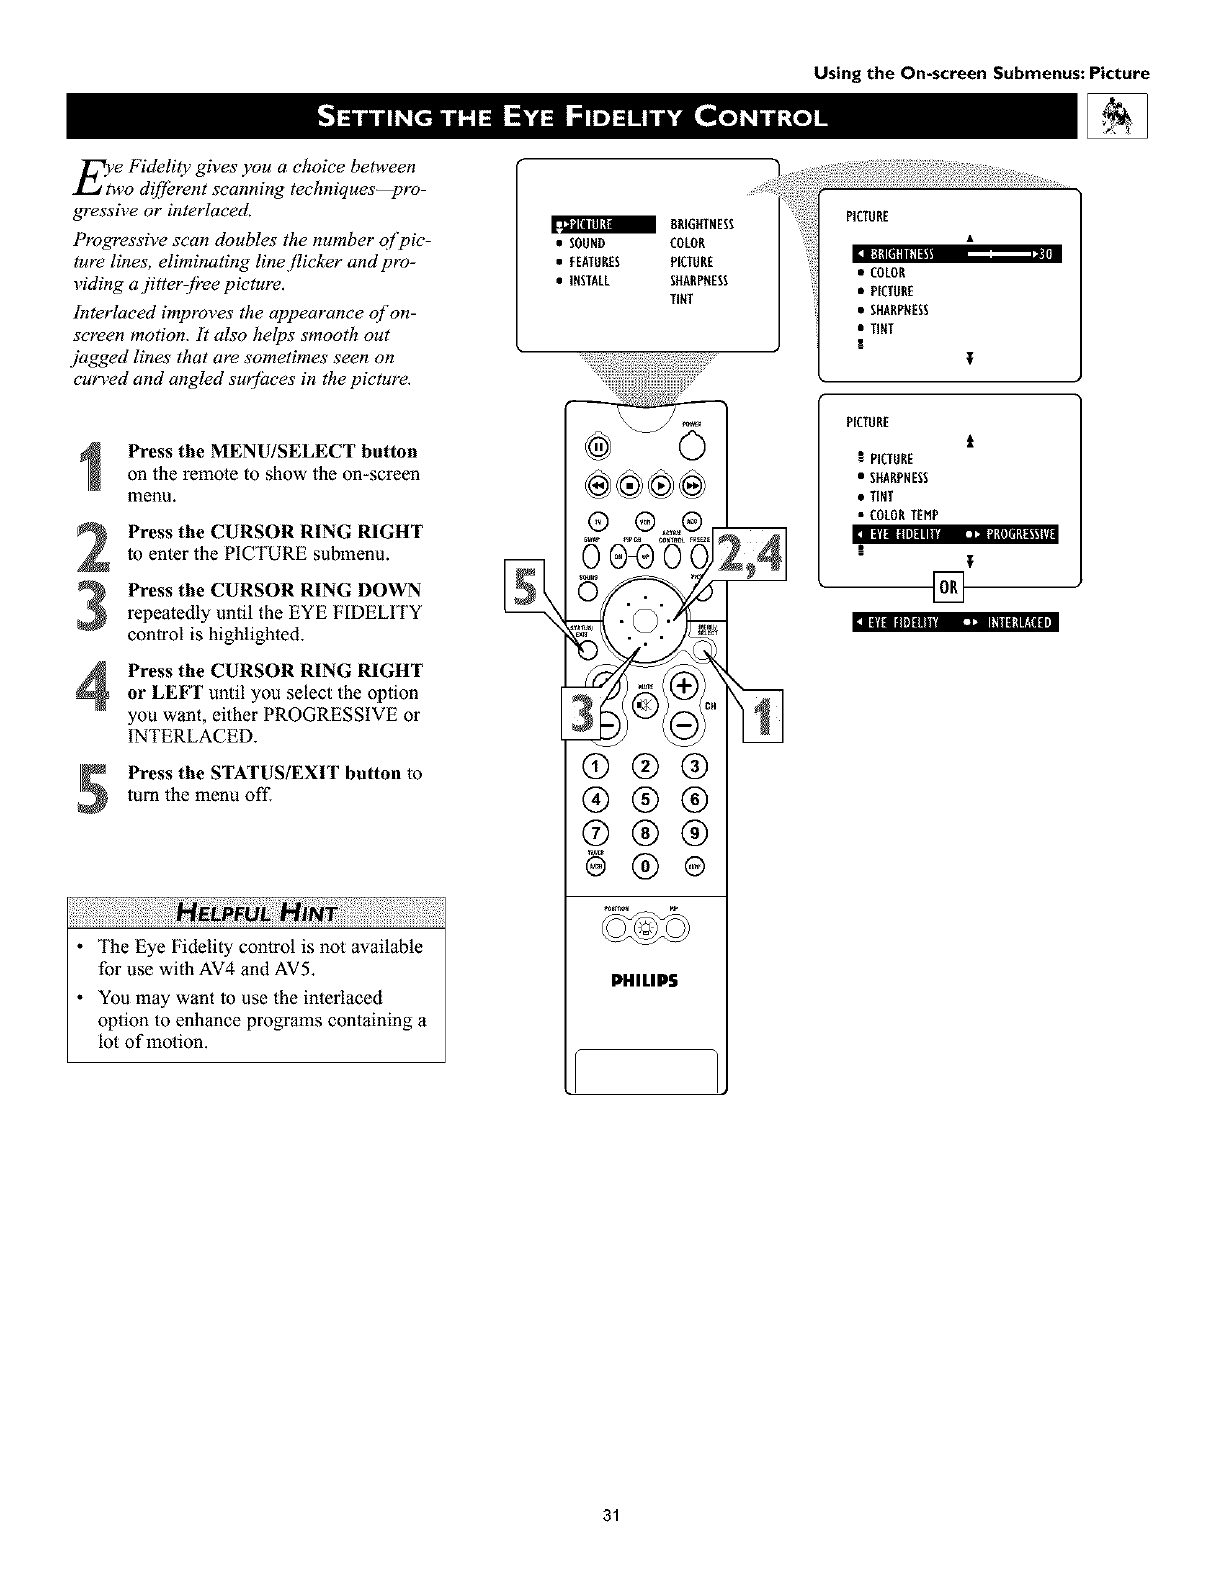
Using the On-screen Submenus: Picture
EYe Fidelity gives you a choice between
o d_fbrent scanning techniques--pro-
gressive or interlaced.
Progressive scan doubles the number qf pic-
ture lines, eliminating line flicker and pro-
riding a jitterz[?ee picture.
Interlaced improves the appearance of on-
sereen motion. It also helps smooth out
jagged lines that are sometimes seen on
cur_ed and angled surjaees in the picture.
[, ll'llllll]ilU'l [ ]: _'I_
Press the MENU/SELECT button
on the remote to show the on-screen
menu.
Press the CURSOR RING RIGHT
to enter the PICTURE submenu.
Press the CURSOR RING DOWN
repeatedly until the EYE FIDELITY
control is highlighted, D|'il IIII]lllU L]] II_lllfll_ili
Press the CURSOR RING RIGHT
or LEFT until you select the option
you want, either PROGRESSIVE or
INTERLACED.
Press the STATUS/EXIT button to
turn the menu off.
•The Eye Fidelity control is not available
for use with AV4 and AV5.
•You may want to use the interlaced
option to enhance programs containing a
lot of motion.
BRIGHTNESS
• SOUND COLOR
•FEATURES PICTURE
•INSTALL SHARPNESS
TINT
®®®®
(9@@
®®®
®®®
PHILIP$
......S i
•PICTORE
• SHARPNESS
•TINT
t;
PICTURE
t
I PICTURE
• SHARPNESS
•TINT
• COLORTEMP
t
[]
31

Using the On-screen Submenus: Picture
The Dynamic Contrast control allows you
o sharpen the picture quali& by making
dark portions of the picture darker and light
portions c_f the picture more noticeable.
Normally, you will probably want to select
MED. In certain circumstances, howeve_
you may pre[br MIN or MAX.
3
4
Press the MENU/SELECT button
on the remote control to show the on-
screen menu.
Press the CURSOR RING RIGHT
to enter the PICTURE submenu.
Press the CURSOR RING DOWN
repeatedly until lhe DYN. CON-
TRAST control is highlighted.
Press the CURSOR RING RIGHT
or LEFT until you select the option
you want: MIN, MED, or MAX.
Press the STATUS/EXIT button to
exit the menu.
I]ffl_|(I]:l ItT:_.NII_11|11
ii!!i!ii!iiiil,ii_il¸iiii_ii!i¸ii!i¸iiiiii!i_ii!ili)ii!i_iiiiii!i_ii!ili!i_ii_iii_il¸i!iii_i_ii_i¸)_I¸i!_iiiii_i¸!i!i_iill¸ii_i)!iiiiiii_i!iiiiiiiiiii!i_iiiiiii_i!iiiiiii'¸¸¸¸
The Dynamic Contrast control is not avail-
able for use wilh the AV4 and AV 5 signal
sources.
a 8RIGXTNESS
•SOUHD COLOR
• FEATURES PICTURE
•INSTALL SHARPNESS
TINT
®®®®
®®®
®®®
®®®
PHILIPS
•PICTURE
• SHARPNESS
•TINT
I
PICTURE
• SHARPNESS
•TINT
• COLORTEHP
• EYE FIDELITY
[]
[]
32
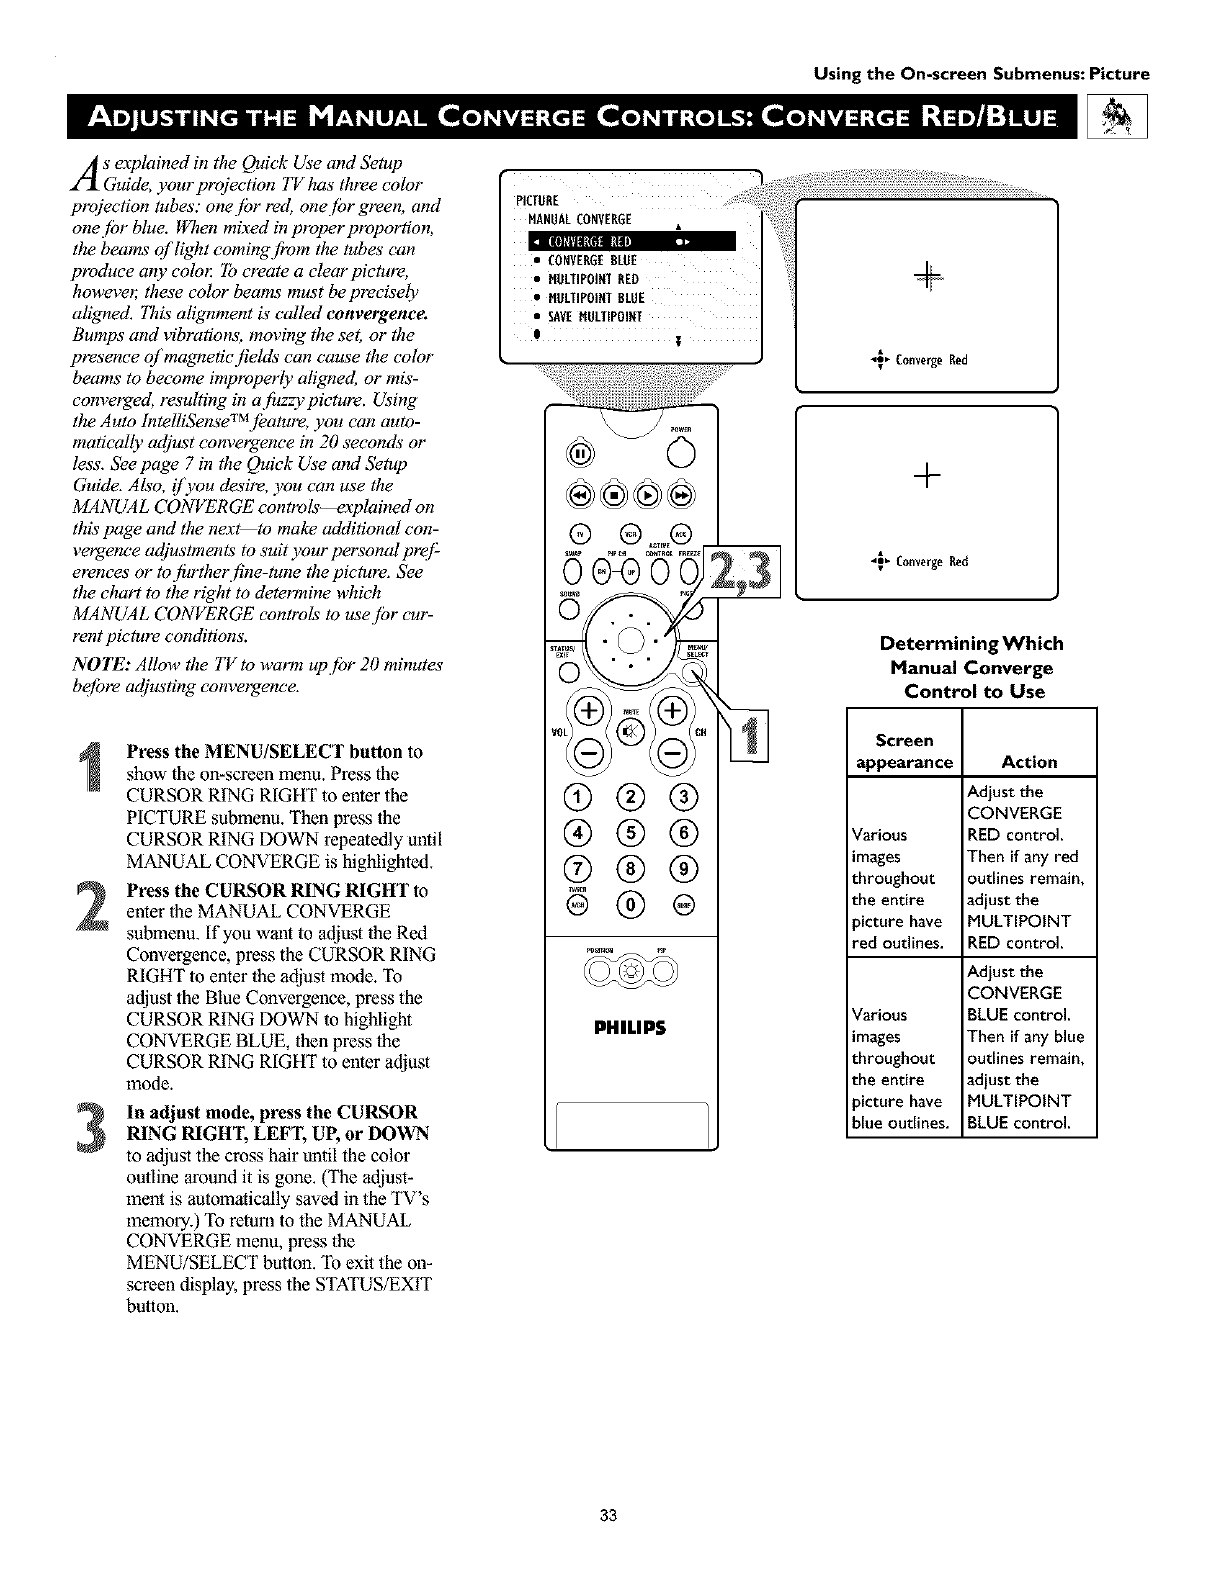
Using the On-screen Submenus: Picture
As explained in the Quick Use and Setup
Guide, your projection TV has three color
projection tubes." one jbr red, one [br green and
onejbr blue. When mixed in properproportion,
the beams of light comingf!'om the tubes" can
produce any colo_ To create a clear pieture,
howeve_ these color beams must be precisely
aligned. This alignment is"called convergence.
Bumps" and vibrations, moving the set, or the
presence of magnetie fields can cause the color
beams to become improperly aligned, or mis-
converged, resulting in a fuzzy picture. _ing
the Auto IntelliSenseTMjbature, you can auto-
matieally adjust convergence in 20 seconds" or
less'. See page 7 in the Quick Use and Setup
Guide. Also, f you desire, you can use the
MANUAL CONVERGE controls--explained on
this page and the nex_to ma_ additional con-
vergence adjustments to suit your personal pr@
erenees or to further fine-tune the picture_ See
the chart to the right to determine which
MANUAL CONVERGE controls to usejbr cur-
rent picture conditions.
NOTE: Allow the TV to warm upjbr 20 minutes
befbre adjusting conve_enee.
Press the MENU/SELECT button to
show the on-screen menu. Press the
CURSOR RING RIGHT to enter the
PICTURE submenu. Then press the
CURSOR RING DOWN repeatedly until
MANUAL CONVERGE is highlighted.
Press the CURSOR RING RIGHT to
enter the MANUAL CONVERGE
submenu. If you want to adjustthe Red
Convergence, press the CURSOR RING
RIGHT to enter the adjust mode. To
adjust the Blue Convergence, press the
CURSOR RING DOWN to highlight
CONVERGE BLUE, then press the
CURSOR RING RIGHT to enler adjust
mode.
In adjust mode, press the CURSOR
RING RIGHT, LEFT, UP, or DOWN
to adjusl the cross hair until the color
outline around it is gone. (The adjust-
ment is automatically saved in the TV's
memory.) To remm to the MANUAL
CONVERGE menu, press the
MENU/SELECT button. To exit the on-
screen display, press the STATUS/EXIT
bulton.
(9
®
(9
®
®
®
®
PHILIPS
®
®
®
®
_ Converge Red
+
_Converge Rec[
Determining Which
Manual Converge
Control to Use
Screen
appearance Action
Adiust the
CONVERGE
Various RED control.
images Then ifany red
throughout outlines remain,
the entire adiust the
,icture have MULTIPOINT
red outlines. RED control.
Adjust the
CONVERGE
Various BLUE control.
_mages Then ifany blue
throughout outlines remain,
the entire adiust the
,icture have MULTIPOINT
blue outlines. BLUE control.
33
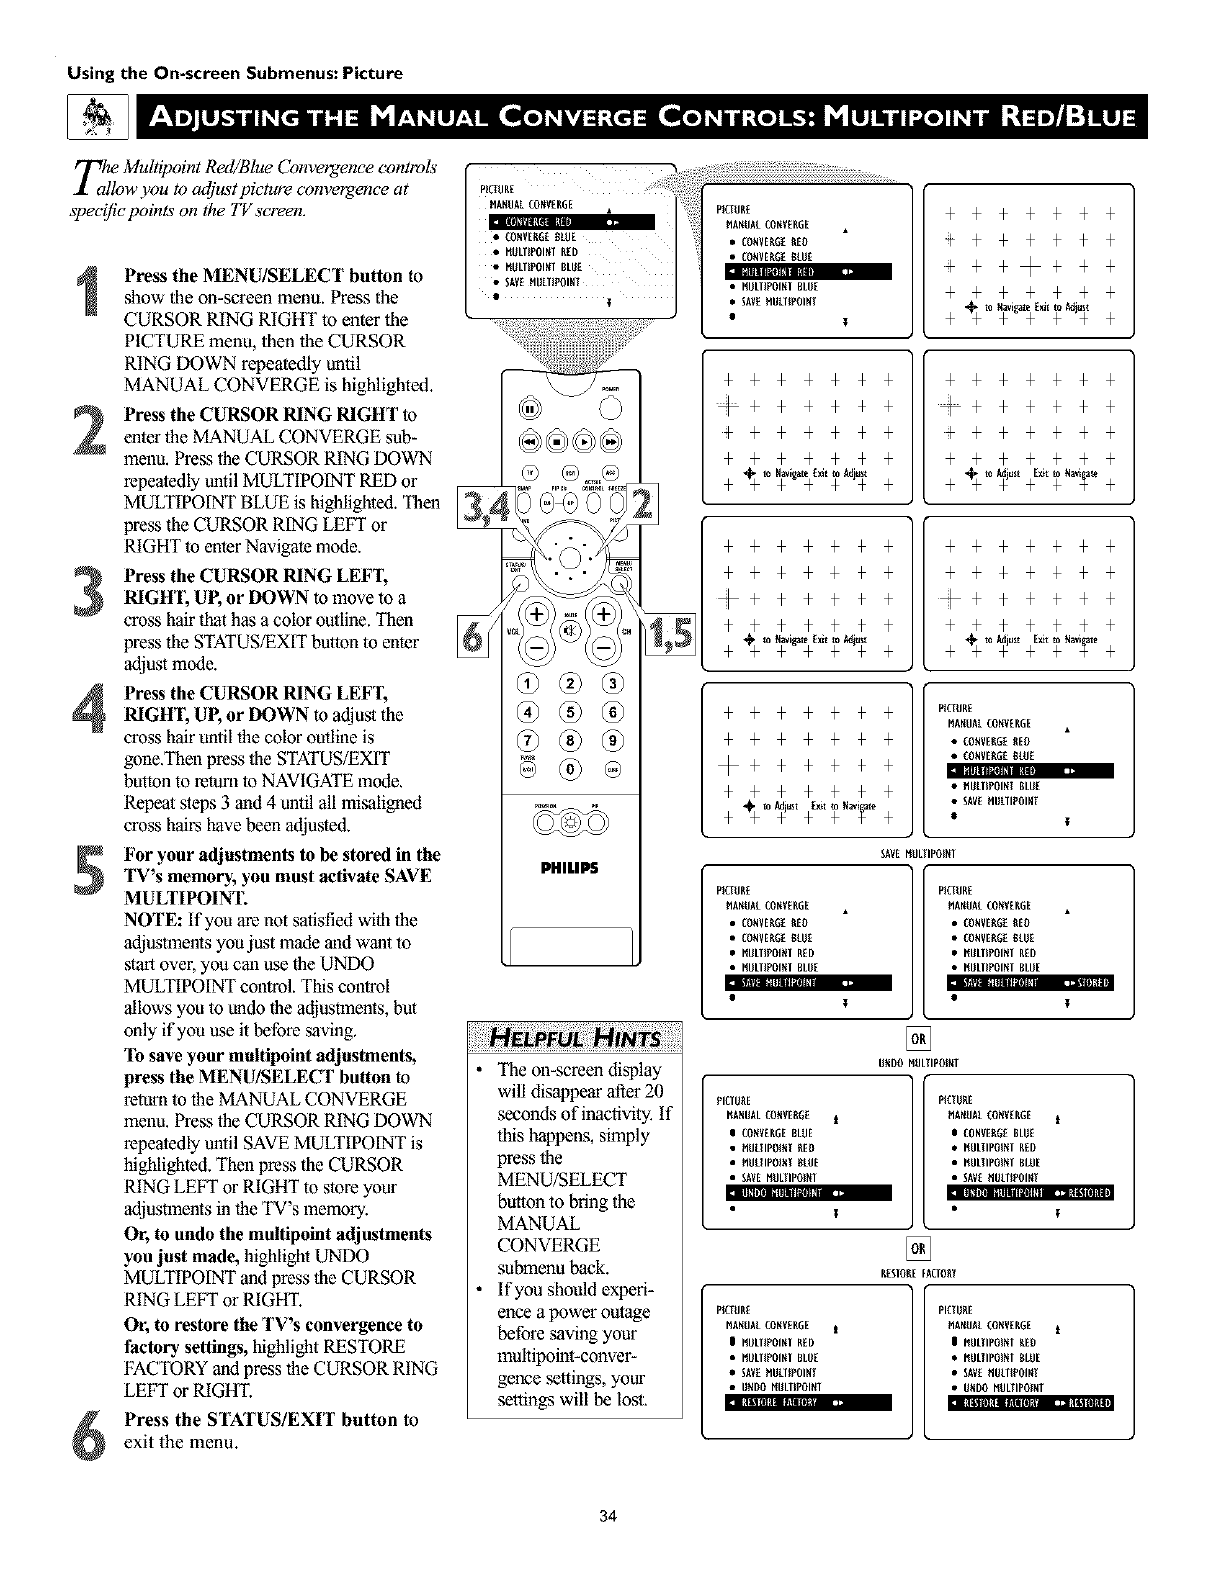
Using the On-screen Submenus: Picture
Zhle Multipoint Red/Blue Convergence controls
low you to adjust picture convergence at
speeif!e points on the TV screen.
Press the MENU/SELECT button to
show the on-screen menu. Press the
CURSOR RING RIGHT to enter the
PICTURE menu, then the CURSOR
RING DOWN repeatedly until
MANUAL CONVERGE is highlighted.
Press the CURSOR RING NIGHT to
enter the MANUAL CONVERGE sub-
manu. Press the CURSOR RING DOWN
repeatedly until MULTIPOINT RED or
MULTIPOINT BLUE is highlighted. Then _
press the CURSOR RING LEI:_Yor
RIGHT to enter Navigate mode.
Press the CURSOR RING LEFT,
NIGH'I, UP, or DOWN to move to a
cross hair that has acolor outline. Then
press the STATUS/EXIT button to enter
adjust mode.
Press the CURSOR RING LEFI,NIGH'I, UP, or DOWN to adjust the
cross hair until the color outline is
gone.Tben press the STATUS/EXIT
button to return to NAVIGATE mode.
Repeat steps 3 and 4 until all misaligned
cross hairs have been adjusted.
For your adjustments to be stored in the
TV's memory, you must activate SAVE
MULTIPOINT.
NOTE: If you are not satisfied with the
adjustments you just made and want to
start over, you can use the UNDO
MULTIPOINT control. This control
allows you to undo the adjustments, but
only if you use it before saving.
To save your multipoint adjustments,
press the MENU/SELECT button to
retum to the MANUAL CONVERGE
manu. Press the CURSOR RING DOWN
repeatedly until SAVE MULTIPOINT is
highlighted. Then press the CURSOR
RING LEFT or RIGHT to store your
adjustments in the TV's memory.
Or, to undo the multipoint adjustments
you just made, highlight UNDO
MULTIPOINT and press the CURSOR
RING LEFT or RIGHT.
Or, to restore the TV's convergence to
factory settings, highlight RESTORE
FACTORY and press the CURSOR RING
LEFT or RIGHT.
:,[_lll i I11II| I_llllll _1 _ll_lili
Press the STATUS/EXIT button to
exit the menu.
MANIIAtCONVERIIE*:iiiiiii::!:!iPiClliRE
_lllaai:,,_ MANIIALCONVERGE •
•CONVERGE_tliE :iiii •CONVERGE_EO
• IIIILVIPOIltl RED ; • CONVEI_G[ti[liE
• I!IILVIPOOII BLli[
• _AVEHIILIiPOINV •llliLVIP01NI BLII[
•T•SAVEHIILIIP01HT
•$
+++++++
+++++++
÷++@+++
+++++++
®®
@ ®
PHIUPS
Hi: rS:
The on-screen display
will disappear after 20
seconds of inactivity, If
this happens, simply
press the
MENU/SELECT
button to bring the
MANUAL
CONVERGE
submenu back.
If you should experi-
ence a power outage
before saving your
mullipoint-conver-
ge_ce settings, your
settings will be lost,
+++++++ +++++++
+++++++ +++++++
÷++++++ ÷++ ++++
+++++++ +++++++
++++++
++++++
@+++++
++++++
+ +++++++
+ +++++++
+ @++++++
+ +++++++
++++++
++++++
@+++++
++++++
+PICIIIRE
PiANIIALCONVERGE
@•€ONVE_E liED
• CONVENEti_E
+lllllilill#ll_ll ....
+•HliiVIP01NIBLIIE
•SAVEHIILIIPOIHT
+ •
SAVENIILTIPOI_I
PIC|IIRE
HANIIALCONVERIIE
• CONVERGERED
• CONVERGEBLliE
• MIILIIPOI_I RiD
• MIILIIPOI_I BLIIE
PIC|IIRE
HANIIALCONVERIIE
• CONVERGERED
• CONVERGEBLliE
• MIILIIPOI_I RiD
• MIILIIPOI_I BLIIE
V •
[]
liND0 itliLTIP01NV
PICIIIEE
NANIIALCONVERGE i
I CONVERGEBLIIE
•HIILIIPOINVEEO
•HIILIIPOiNV_LIIE
• SAVEMIILTIPOI_I
i
t
PICTIIRE
HA_IIAL€O_VER_E i
i CON_E_E BLIIE
• MIILTIPOI_I RID
• MIILTIPOI_I BLUE
• S_E HDLTIPOINI
. i
[]
RESIOI_EFAOOlff
NCIIIRE
NANIIALCONVERGE
li ffliLVIP01NIRED
• ffliLVIP01NIBWE
• SAVEHIILII_01NT
• li_li0 MIILIIP01_I
PICTIIRE
HA_IIAL€O_VERGE i
I _IILTIPOI_I _Eli
• _IILTIPOI_I 8L_E
• _E HIILTIPOINI
• liNliO _IILTIPOI_T
.... i
34

Besides the normal volume level control,
your TV also has individual sound-
adjustment controls'. You can use TREBLE
(high [i'equency), BASS (lowj_'equency), and
Speaker BALANCE to.further adjust the
sound playback qf TV programs.
4
Press the MENU/SELECT button
on the remote control to show the on-
screen menu.
Press the CURSOR RING DOWN
once to highlight SOUND.
Press the CURSOR RING RIGHT
to enter the SOUND submenu.
"lb adjust the TREBLE level of the
television's sound, press the
CURSOR RING RIGHT or LEF%
To adjust another sound control,
press the CURSOR RING DOWN
unlil the control (BASS or BALANCE)
is highlighted. Then press The
CURSOR RING RIGHT or LEFT to
adjust the selecled control.
DI ff.*_|:l_IN
Press the STATUS/EXIT button to
exit the menu.
When the bar scale is centered, speaker sound
BALANCE is centered between the TV's left
and right side speakers.
TREBLE
BASS
•FEATURES BALANCE
• INSTALL AVL
[NCR-SURROOND
®®®®
(9@@
®®®
®®®
PHILIP$
Using the On-screen Submenus: Sound
iii!iiii!i!i
• AVL
•INCR'SORROOND
iT
SOUND
•TREBLE
•BALANCE
•AVL
•INCR'SURROUND
!I
SOUND
•TREBLE
•BASS
•AVL
•[NCR'SURROUND
35

Using the On-screen Submenus: Sound
Y;eysu may have noticed the peaks and val-
of sound that occur between pro-
gram changes or at commercial breaks. The
volume levels often vary considerably. By
turning on the AVL (Audio Volume Levele 0
control, you can make your TVproduce a
more consistent volume level. Follow these
steps to turn the AVL control on.
•PICTURE TBEBLE
_ BASS
•FEATURES BALAHCE
•IHSTALL AVL
IHCR-SURROUHD •BALANCE
• AVL
•INCR'SURROUND
I
D[_NI _IP_I
4
Press the MENU/SELECT button
on the remote control to show the on-
screen fflenu.
Press the CURSOR RING DOWN
once to highlight SOUND.
Press the CURSOR RING RIGHT
to enter the SOUND subinenu.
Press the CURSOR RING DOWN
repeatedly until AVL is highlighted.
Then press the CURSOR RING
RIGHT or LEFT to turnAVL ON or
OFE
D[ANI _mm
Press the STATUS/EXIT button to
exit the menu. ®®®
®®®
®®®
PHILIPS
SOUND
•TREBLE
•BASS
• BALANCE
•INCR'SURROUNO
!
[]
*Manufactured under license from Dolby Laboratories.
"Dolby" and the double-D symbol are trademarks of
Dolby Laboratories.
36

Based on the signal being received, you
select various surround-sound modes."
MONO, SPATIAL, STEREO, INCR. SUR-
ROUND, or DOLBY* VIRTUAL (Virtual
Dolby Surround). (See descriptions qf the
options to the right.)
Selecting a Surround-sound
Option Using the
Remote Control
can
While watching TV, you can select a surround-
sound listening mode immediately by pressing the
DOLBY V button. Each press of the DOLBY V
button selects a different mode based on the TV
signal being received.
®®®
®®®
®®®
I_NIL|PS
Usingthe On-screen Submenus:Sound
Surround-sound Modes
In stereo: select STEREO, INCR.
SURROUND, or DOLBY VIRTUAL.
INCR. (Incredible) SURROUND
enhances stereo programs by making the
sound broader and fuller.
DOLBY VIRTUAL (with Virtual Dolby
Surround signals) creates avirtualized sur-
round-sound experience from two speakers
using Dolby Pro Logic.* It retains all the
original multichannel audio information and
)rovides the listener with the sensation of
being surrounded by additional speakers.
In mono: select MONO or SPATIAL.
SPATIAL enables you to add a surround
effect to mono programs.
Selecting a Surround-sound
Option Using theTV Buttons
Should your wmote control become lost or o_er-
wise unavailable.[br use,.[bllow the steps below to
use the buttons on thef!'ont of the TV to access the
on-screen menu amt select a surround-sound
mode.
Press the Volume + and -buttons
simultaneously. The on-screen manu
appears.
Press the Channel Down button to
highlight SOUND. Then press the
Volmne + button to enter the SOUND
submenu.
Press the Channel Down button
repeatedly until INCR. SURROUND is
highlighted. Then press the Volume + or
- button until you select the surround-
sound mode you want,
:l I_IIIIlL_IIR!IIIIII_III IJ_'llt [II_DI _iqJI _![10]ll_11] [_l I_Jll_iqJI fl_1[t111_11
:_ I_[g!llll._ltltl_Dl D]JlIIIg¥1ITJllUU.tll
Press the Volume + and - buttonssimultaneously and repeatedly until you
back out of the menu screens.
• PICTURE TREBLE
BASS
•FEATURES BALAHCE
•IESTALL AVL
IECB-SDBBOOED
SOUND
•TREBLE
•BASS
•BALANCE
•AVL
!I
SOOND
II_l|
•BASS
• BALAHCE
•AVL
• INCB'SUBBOUND
RI
[]
Or, when signals are being
broadcast inVirtual Dolby
Surround:
When signals are being broad-
Cast in mono (nonstereo):
lll_[lli!lR!llllll_ll] 13]_111_1
[]
lll_[lll[!llI!lO]ll]lll D_Ii!II,.
The AVL (Audio Volume Leveler) con_ol does
not function with the Dolby Virtual feature, so
the option disappears from the SOUND sub-
menu when you select DOLBY VIRTUAL.
*Mmmfactured under license from Dolby Laboratories.
"Dolby', "Pro Logic", and the double-D symbol are
_rademarks of Dolby Laboratories.
37
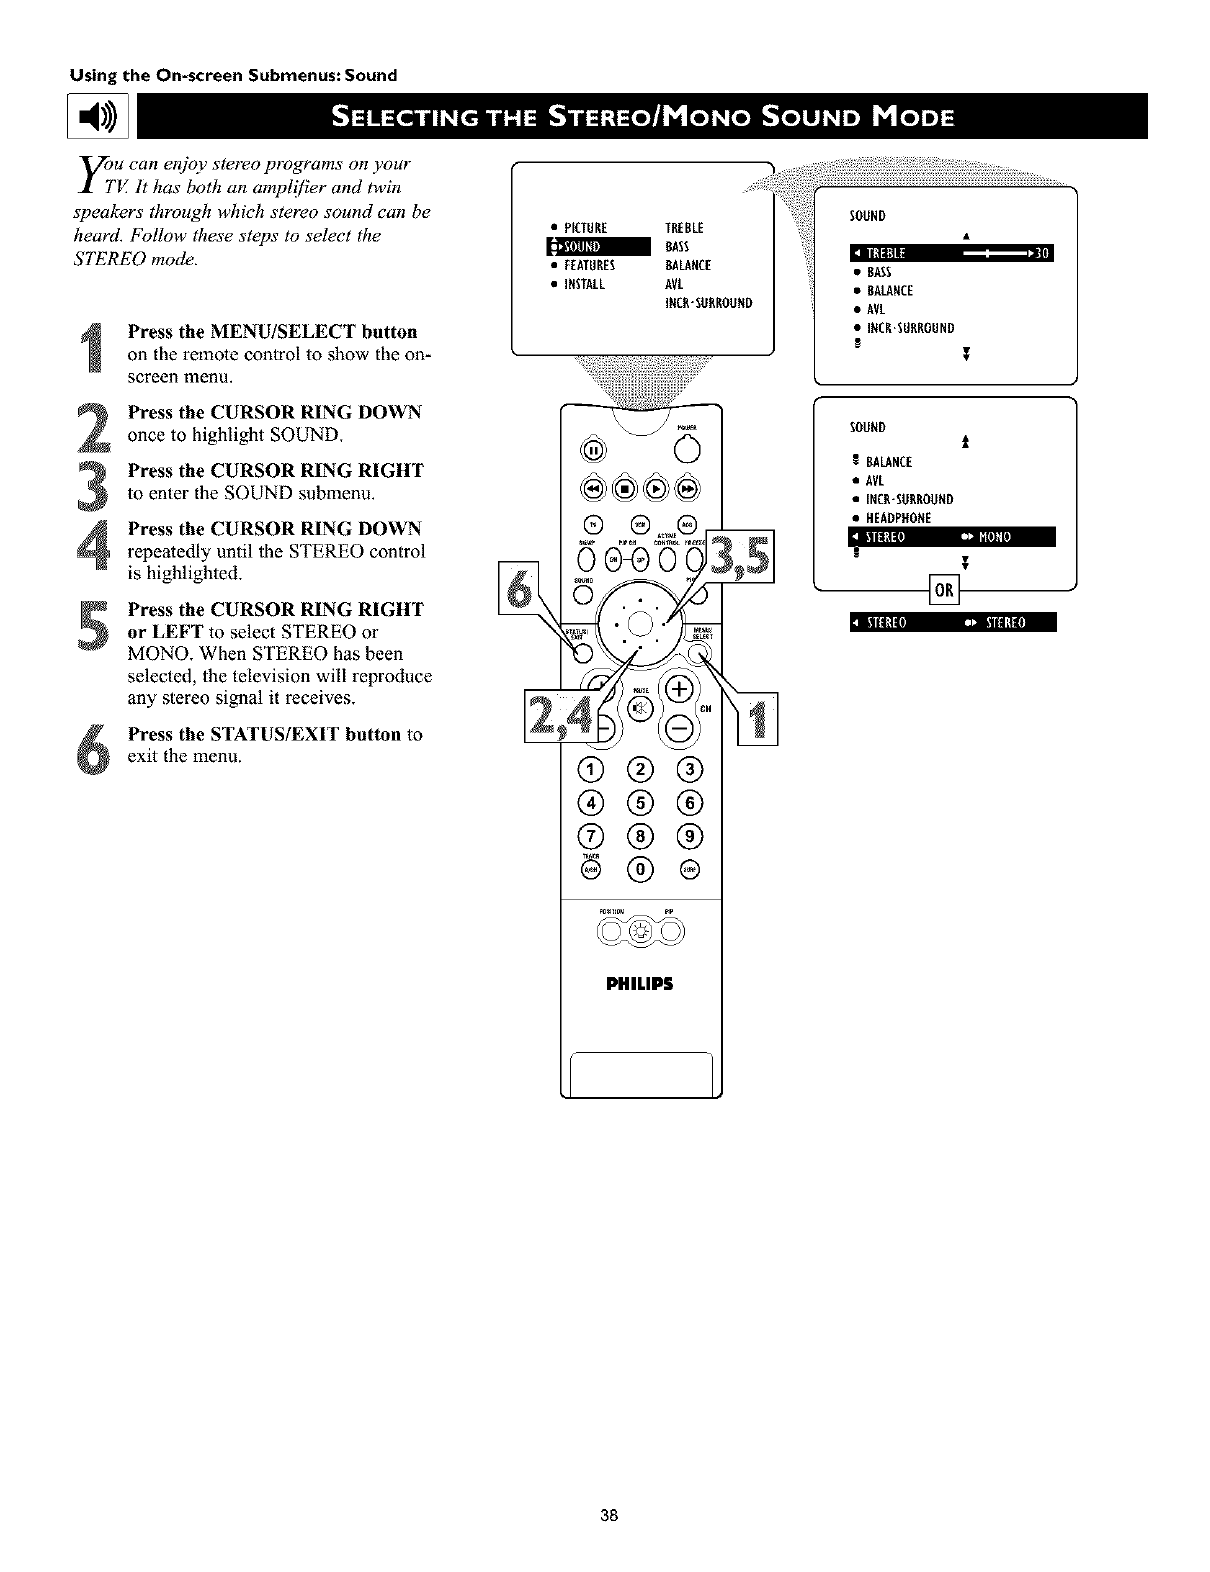
Using the On-screen Submenus: Sound
yol,u can erd_v stere®programs on your
V. It has both an ampli[_er and twin
speakers through which stereo sound can be
heard. Follow these steps to select the
STEREO mode.
Press the MENU/SELECT button
on the remote control to show the on-
screen menu.
Press the CURSOR RING DOWN
once to highlight SOUND.
Press the CURSOR RING RIGHT
to enter the SOUND submenu.
Press the CURSOR RING DOWNrepeatedly until the STEREO control
is highlighted.
Press the CURSOR RING RIGHT
or LEFT to select STEREO or
MONO. When STEREO has been
selected, the television will reproduce
any stereo signal it receives.
llll_l ,= ,!.=:
Press the STATUS/EXIT button to
exit the menu.
•PICTURE TREBLE
8ASS
• FEATURES 8ALAHCE
•IHSTALL AVL
IHCR'SURROUHD
®®®®
5oy8@:
®®®
®®®
®®®
PHILIP$
• 8ASS
•BALANCE
• AVL
• INCR'SURROUND
i
SOUND t
t BALANCE
• AVL
• INCR-SURROUND
•HEADPHONE
[]
38
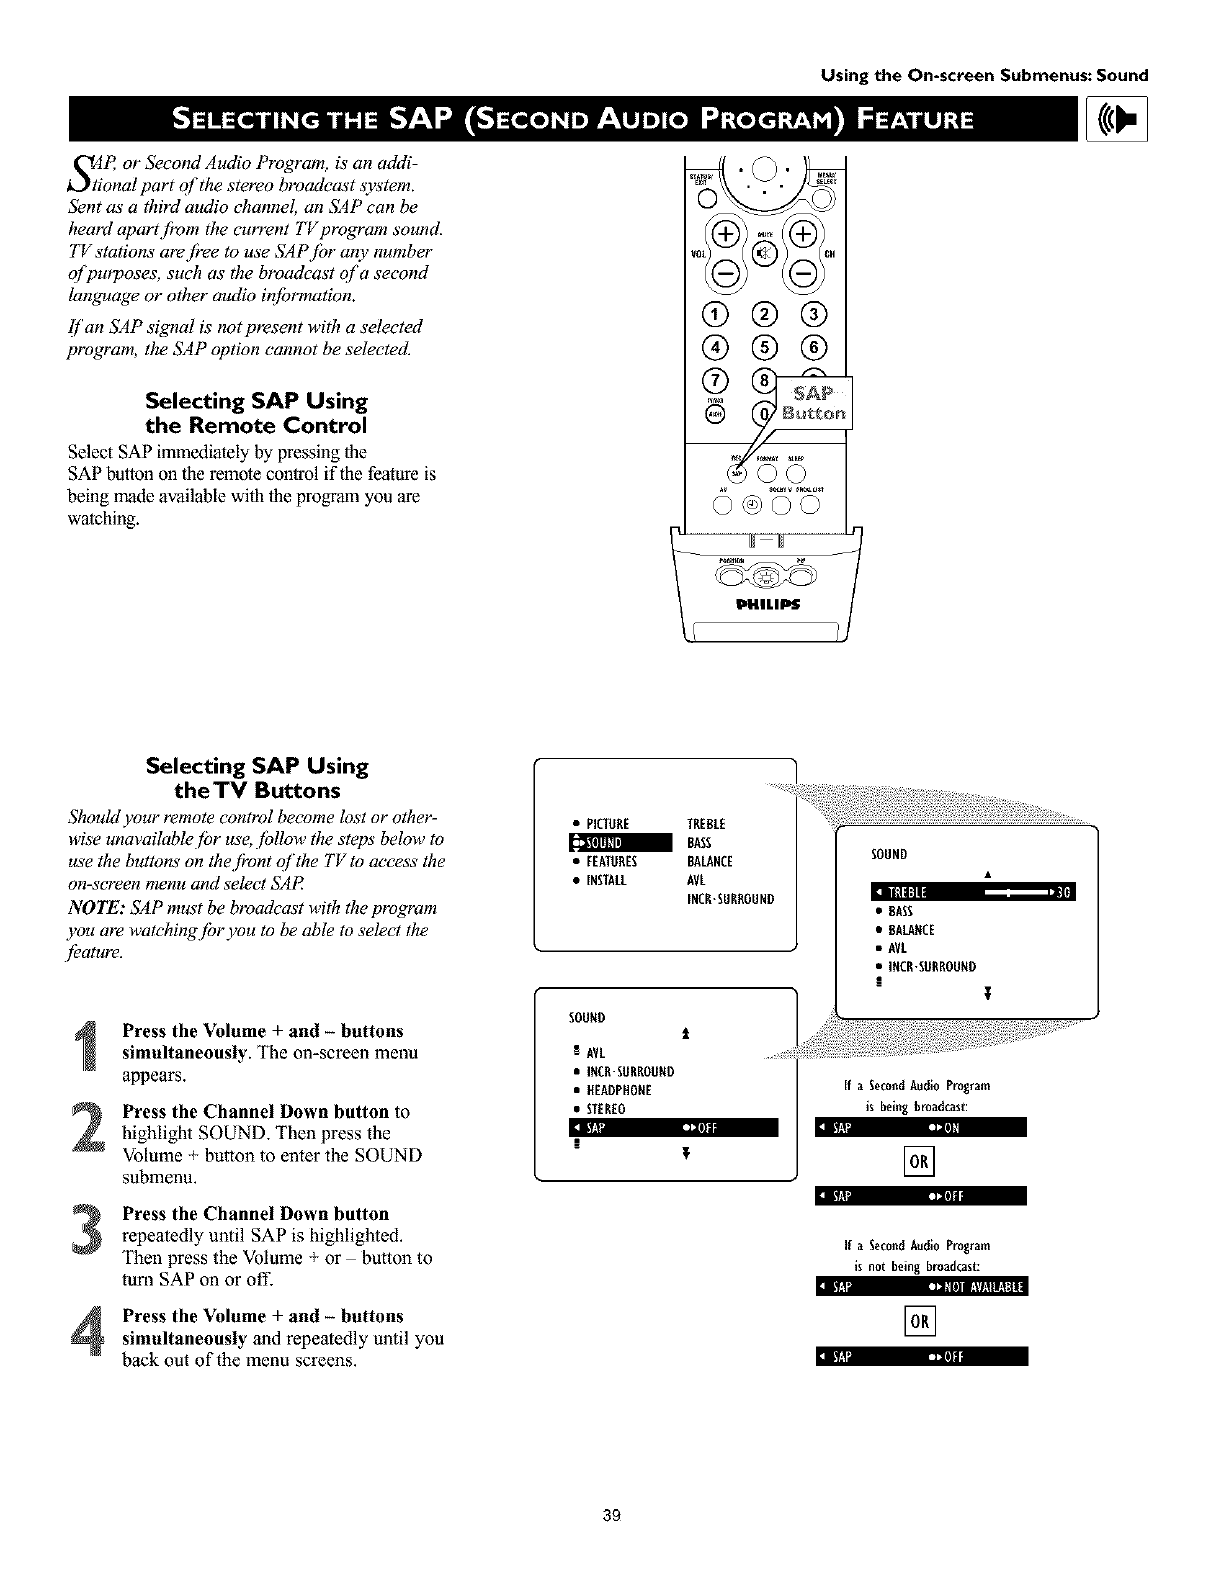
SJP, or Second Audio Program, is an addi-
ional part of the stereo broadcas't system.
Sent as, a third audio channel, an SAP can be
heard apartjkom the current TV program sound.
TV stations are free to use SAPJbr any number
of purpases, such as tlw broadcast of a second
language or otlwr audio iq[brmation.
if'an SAP signal is not present with a selected
program, the SAP option cannot be selected.
Selecting SAP Using
the Remote Control
Select SAP immediately by pressing the
SAP butron on lhe remote control iflhe feature is
being made available with the program you are
watching.
Using the On-screen Submenus: Sound
I/0 (_ CH
@@@
®@@
(5 V°V
PHILIPS
Selecting SAP Using
theTV Buttons
Should your remote control become lost or other-
wise unavailablejbr use, jbllow the steps below to
use the buttons on thejbont qf the TV to access the
on-screen menu and select SAP
NOTE: SAP must be broadcast with the program
you are watc'hing.[br you to be able to select the
jeature,
2
3
4
Press the Volume + and - buttons
simultaneously. The on-screen menu
appears.
Press the Channel Down button to
highlight SOUND. Then press the
Volume + button to enter the SOUND
submenu.
:mv,_ ]=1
Press the Channel Down button
repeatedly until SAP is highlighted.
Then press the Volume + or button to
Eum SAP on or off.
Press the Volume + and - buttons
simultaneously and repeatedly until you
back out of the menu screens.
• PICTORE TREBLE
_BASS
• FEATURES BALANCE
• INSTALL AVL
INCR'SURROUND
SOUHO t
!AVL
• INCR-SURROONO
•HEADPHONE
• STEREO
lie
!T
SOUND
If a SecondAudioProgram
is being broadcast:
[]
If a SecondAudio Program
is not being broadcast:
rJi'[ ]i_,[l) 1!'¢1_11_
[]
L_. 12
12
39

Using the On-screen Submenus: Sound
7_he BASS BOOST control allows you to
J[ increase the low:[?equency range o['the
TV_ sound. 17tis creates a deepe_ jMler
sound. Follow these steps to turn BASS
BOOST ON.
Press MENU/SELECT button on
the remote control to show the on-
screen lnenu.
Press the CURSOR RING DOWN
once to highlight SOUND.
Press the CURSOR RING RIGHT
to enter the SOUND subinenu.
Press the CURSOR RING DOWNrepeatedly until BASS BOOST is
highlighted.
:i _U :m [IJll
Press the CURSOR RING RIGHT
or LEFT to turn BASS BOOST ON
or OFF.
:i Ii_lll{llIllBI :m rtllll
Press the STATUS/EXIT button to
exit the menu.
• PICTURE TREBLE
BASS
•FEATURES BALANCE
• INSTALL AVL
INCR-SURROUND
®®®®
®®®
®®®
®®®
PHILIPS
•BALANCE
• AVL
• IIICR.StlRROUIII)
I!I
SOUND
t
R STEREO
• SAP
•AUDIOOUT
• SPEAKERS
[]
4O
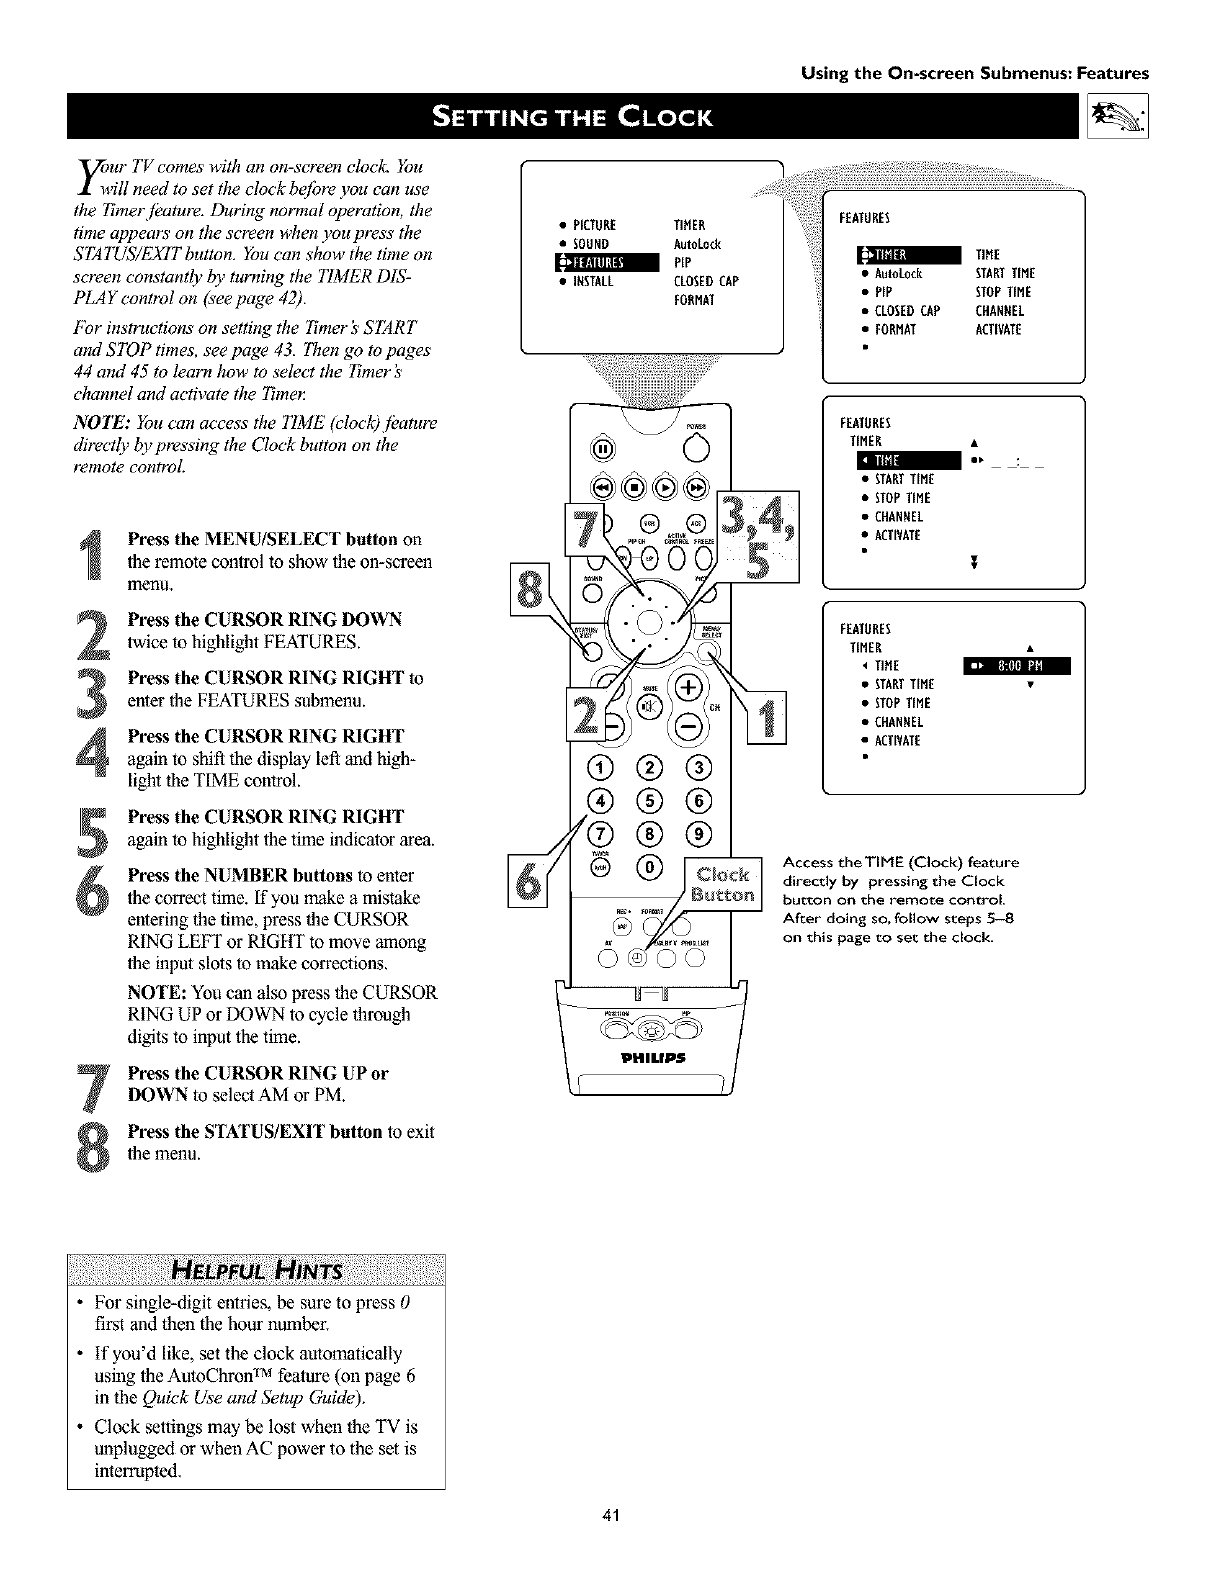
Using the On-screen Submenus: Features
_/_ur TV comes with an on-screen clock. You
ill need to set the clock bejbre you can use
the Ttmerjboture. During normal operation, the
time appears on the screen when you press the
STATUS/EXIT button. You can show the time on
screen constantly by turning the TIMER DIS-
PLAY control on (see page 42).
For instructions' on setting the Tzmer _START
amt STOP times, see page 43. lhen go to pages
44 and 45 to learn how to select the Tzmer's
channel and activate the 7_mel:
NOTE: You can access the TIME (clock)jbature
directly by pressing the Clock button on the
remote control.
Press the MENU/SELECT button on
the remote control to show the on-screen
menu.
Press the CURSOR RING DOWN
twice to highlight FEATURES.
[t,q_ flli|illlll
Press the CURSOR RING RIGHT to
enter the FEATURES submenu.
Press the CURSOR RING RIGHTagain to shift the display left and high-
light the TIME control.
7
Press the CURSOR RING RIGHT
again to highlight the time indicator area.
Press the NUMBER buttons to enter
the correct time. If you make a mistake
entering the time, press the CURSOR
RING LEFT or RIGHT to move among
the input slots to make corrections.
NOTE: You can also press the CURSOR
RING UP or DOWN to cycle through
digits to input the time.
Press the CURSOR RING UP or
DOWN to select AM or PM.
Press the STATUS/EXIT button to exit
the menu.
• PICTURE TIMER
• SOUND AutoLocE
PiP
• INSTALL CLOSEDCAP
EORMAT
®®®
®®®
--/@®®
• CLOSEDCAP CHANNEL
•FORMAT ACTIVATE
FEATVRES
TIMER
• STARTTIME
• STOPTiME
• CHANNEL
•ACTIVATE
T
FEATURES
TIMER •
TIHE
• STARTTIME *
• STOPTIME
• CHANNEL
•ACTIVATE
Access theTIME (Clock) feature
directly by pressing the Clock
button on the remote control.
After doing so, follow steps 5--8
on this page to set the clock.
•For single-digit entries, be sure to press 0
first and then the hour number.
•if you'd like, set the clock automatically
using the AutoChron TM feature (on page 6
in the Quick Use and Setup Guide).
• Clock settings may be lost when the TV is
unplugged or when AC power to the set is
interrupted.
41
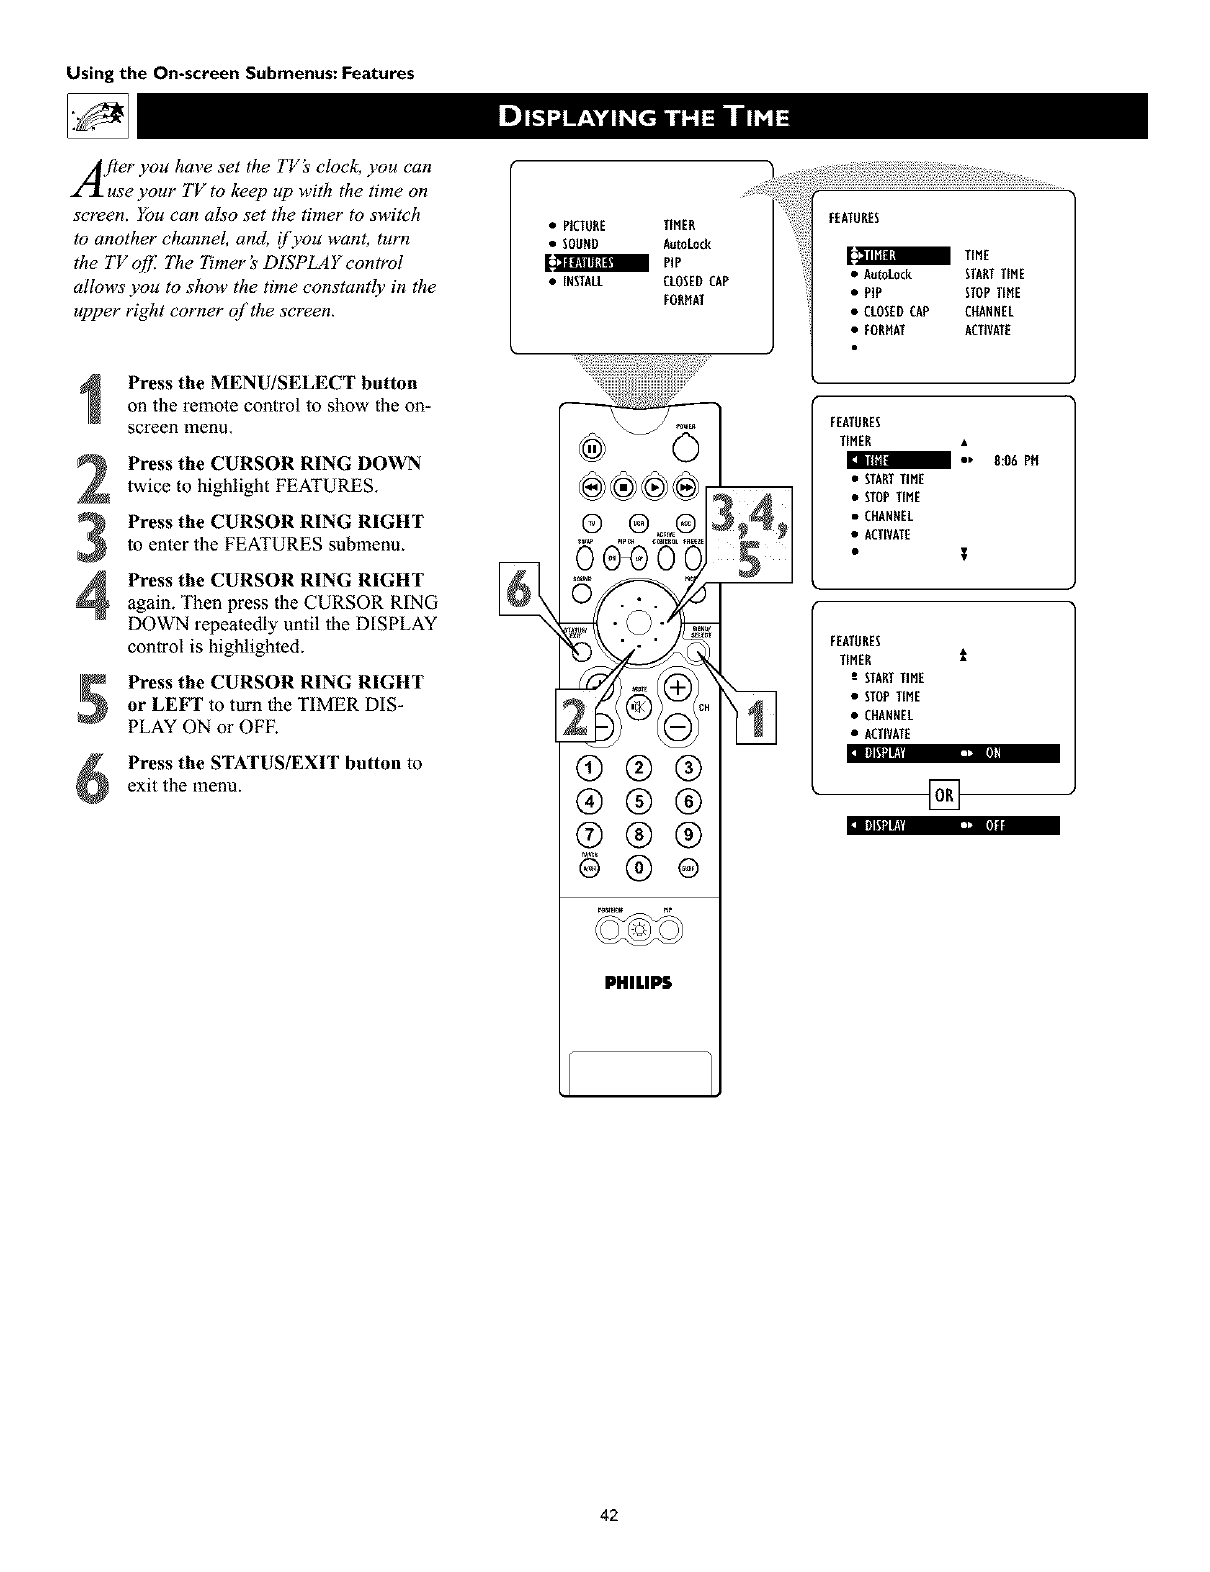
Using the On-screen Submenus: Features
A/ter you have set the TV _' clock, you can
use your TV to keep up with the time on
screen. You can also set the timer to switch
to another channel, and, i['you want, turn
the TV c_[f. The Timer _' DISPLAY control
allows' you to show the time constantly in the
upper right corner qf the screen.
•PICTURE TIMER
• SOUND AutoLock
PiP
• iNSTALL CLOSEDCAP
FORMAT
FEATURES
TiME
• AutoLock STARTTIME
• PIP STOPTIME
• CLOSEDCAP CHANNEL
• EORNAT ACTIVATE
Press the MENU/SELECT button
on the remote control to show the on-
screen lllenu.
Press the CURSOR RING DOWN
twice to highlight FEATURES.
Press the CURSOR RING RIGHT
to enter the FEATURES submenu.
Press the CURSOR RING RIGHTagain. Then press the CURSOR RING
DOWN repeatedly until the DISPLAY
control is highlighted.
Press the CURSOR RING RIGHT
or LEFT to turn the TIMER DIS-
PLAY ON or OFF.
:1 [tll,lMll[2 ,J t,j_
Press the STATUS/EXIT button to
exit the menu.
®®®®[
p p;
?1/
®®®
®®®
®®® :l Itlt'lMII; ,_ re
PHILIPS
FEATORES
TIMER
I_' R:O6 PH
• STARTTIME
• STOPTIME
• CHANNEL
•ACTIVATE
•l
FEATORES
TIMER 1
;STARTTIME
• STOPTIME
• CHANNEL
•ACTIVATE
[]
42
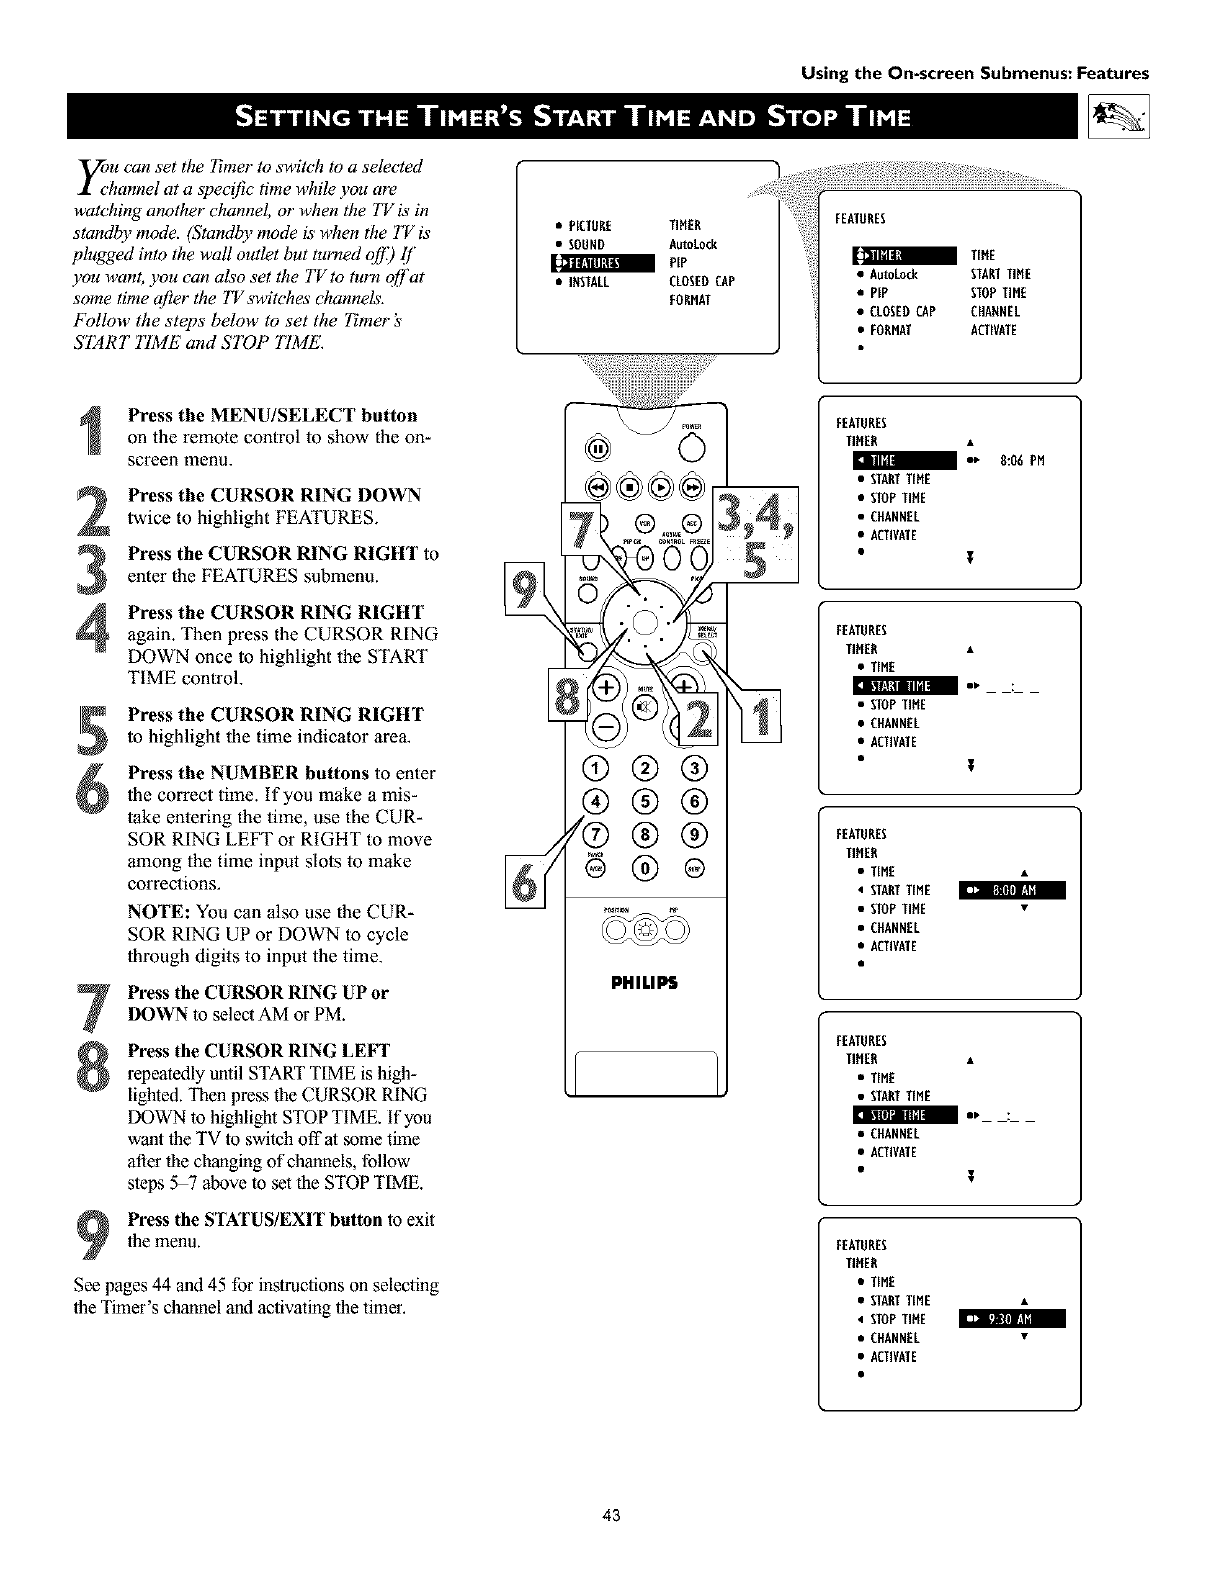
_u can set the 7bner to switch to a selected
hannel at a speci[ic time while you are
watching another channel, or when the TV is in
standby mode. (Standby mode is when the TV is
plugged into the wall outlet but turned off;) [f
you want, you can also set the TV to turn off at
some time @er the TV switches channels.
Follow the steps below to set the Timer's
START TIME and STOP TIME.
• PETURE TIMER
• SOUND AutoLock
PIP
• iNSTALL CLOSEDCAP
FORMAT
Using the On-screen Submenus: Features
• CLOSEDCAP CHAENEL
•FORMAT ACTIVATE
a
Press the MENU/SELECT button
on the remote control to show the on-
screen lnenu.
Press the CURSOR RING DOWN
twice to highlight FEATURES.
Press the CURSOR RING RIGHT to
enter the FEATURES submenu.
Press the CURSOR RING RIGHTagain. Then press the CURSOR RING
DOWN once to highlight the START
TIME control.
iq, IflHldl_Ul
7
Press the CURSOR RING RIGHT
to highlight the time indicator area,
Press the NUMBER buttons to enter
The correct time. If you make a mis-
take entering the time, use the CUR-
SOR RING LEFT or RIGHT to move
among the time input slots to make
corrections.
NOTE: You can also use the CUR-
SOR RING UP or DOWN to cycle
lhrough digits to input the time.
Press the CURSOR RING UP or
DOWN to select AM or PM.
Press the CURSOR RING LEFT
repeatedly until START TIME is high-
lighted. Then press the CURSOR RING
DOWN to highlight STOP TIME. If you
want the TV to switch off at some time
after the changing of channels, follow
steps 5_ above to set the STOP TIME.
Press the STATUS/EXIT button to exit
the menu.
See pages 44 and 45 for instructions on selecting
the Timer's channel and activating the timer.
(9@@
®@@
/®®®
@@®
PHILIPS
FEATURES
TIHER
/e_ 8:06 PM
• STARTTIHE
• STOPTIHE
• CHANNEL
•ACTIVATE
•T
FEATURES
TIHER •
•TIME
• STOPTINE
• CHANNEL
•ACTIVATE
•t
FEATURES
TIHER
•TIME •
• STARTTIME
• STOPTIHE •
• CHANNEL
•ACTIVATE
FEATURES
TIHER •
•TIME
• STARTTIME
• CHANNEL
•ACTIVATE
•T
FEATURES
TIMER
•TIME
• STARTTIME •
• STOPTIME
• CHANNEL •
•ACTIVATE
43
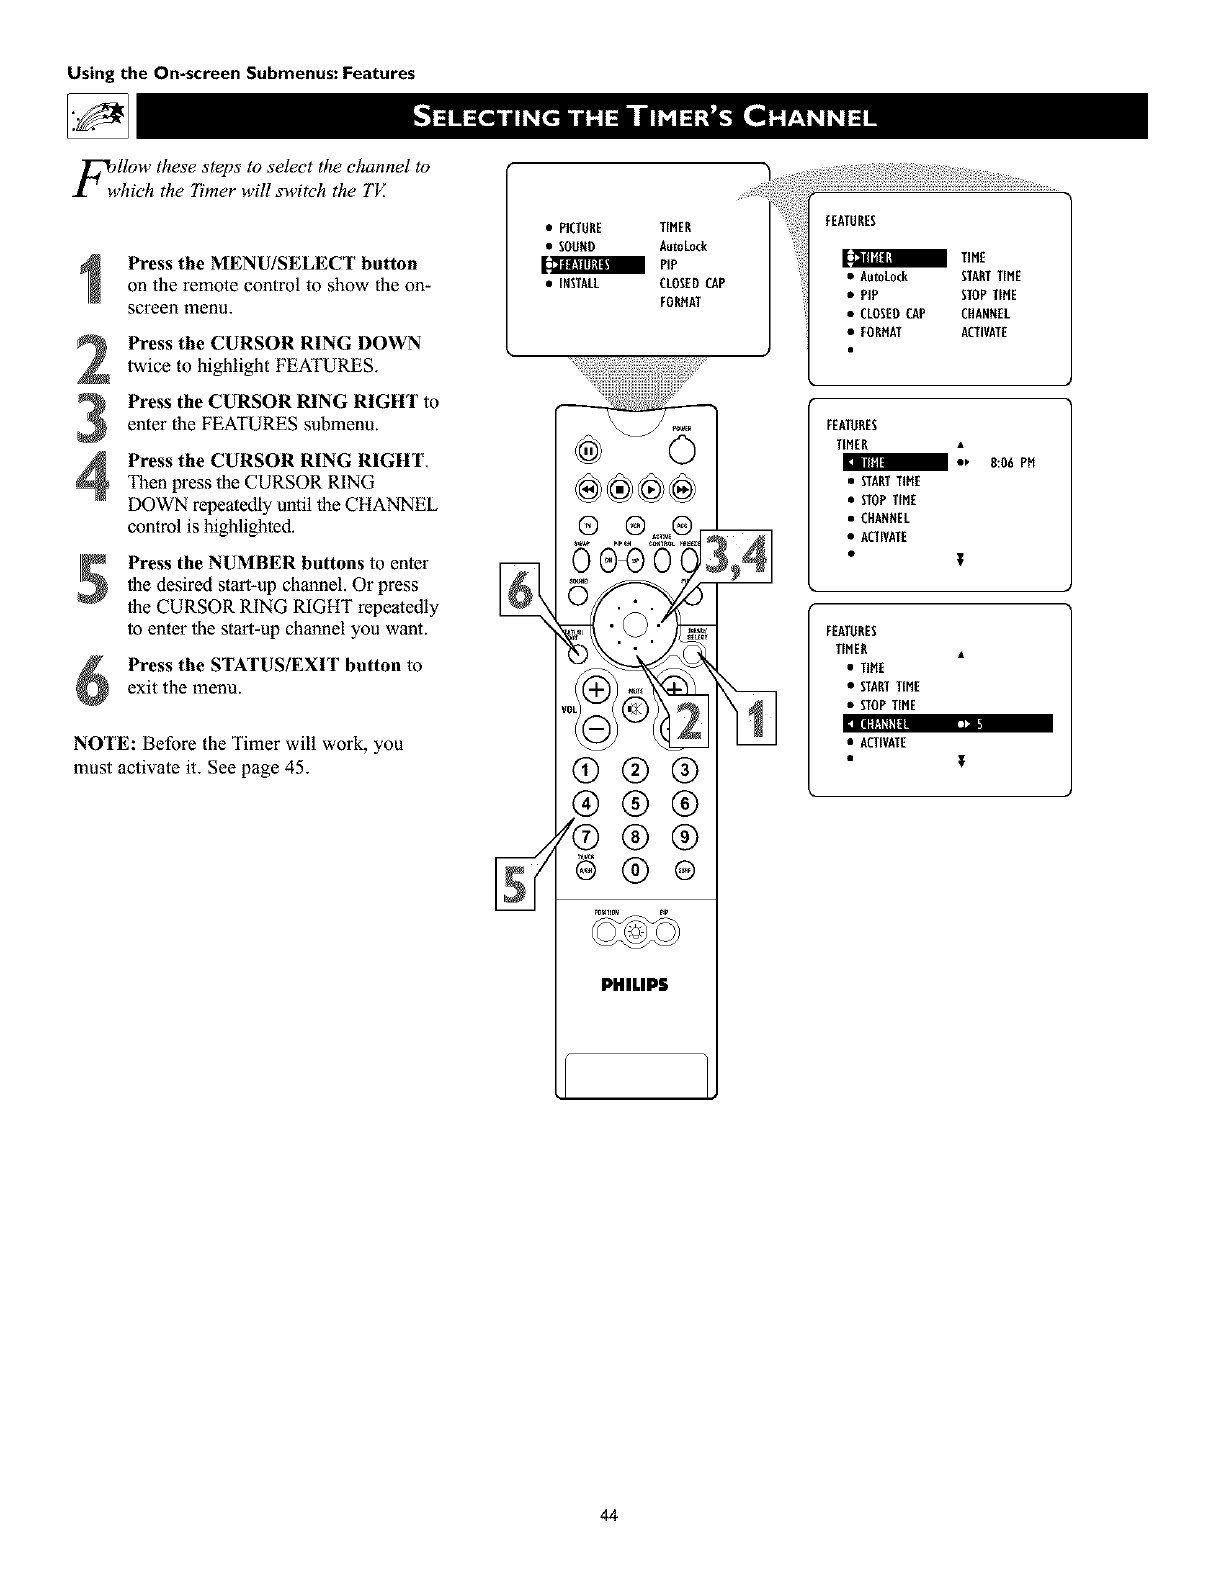
Using the On-screen Submenus: Features
FwllOw these steps to select the channel to
hich the h'mer will switch the TV.
Press the MENU/SELECT button
on the remote control to show the on-
screen lnenu.
Press the CURSOR RING DOWN
twice to highlight FEATURES.
Press the CURSOR RING RIGHT to
enter the FEATURES submenu.
Press the CURSOR RING RIGHT.Then press the CURSOR RING
DOWN repeatedly until the CHANNEL
control is highlighted.
Press the NUMBER buttons to enler
the desired start-up channel. Or press
the CURSOR RING RIGHT repeatedly
to enter the star_-up channel you want.
Press the STATUS/EXIT button to
exit the menu.
[lff!l[ll
NOTE: Before the Timer will work, you
must activate it. See page 45.
•PICTURE TIMER
• SOUND AutoLock
PIP
•[NSTACL CLOSEDCAP
FDRHAT
®®®®
®®®
®®®
/®®®
PltlLIP$
%
•PIP StOP TitlE
•CLOSEDCAP CHANNEL
•FORNAT ACTIVATE
FEATURES
TIMER •
I•_ 8:06 PH
• STARETIME
• STOPTIME
• CHANNEL
•ACTIVATE
FEATORES
TIMER •
•TIHE
• STARTTiME
• STOPTiME
•ACTIVATE
•T
44
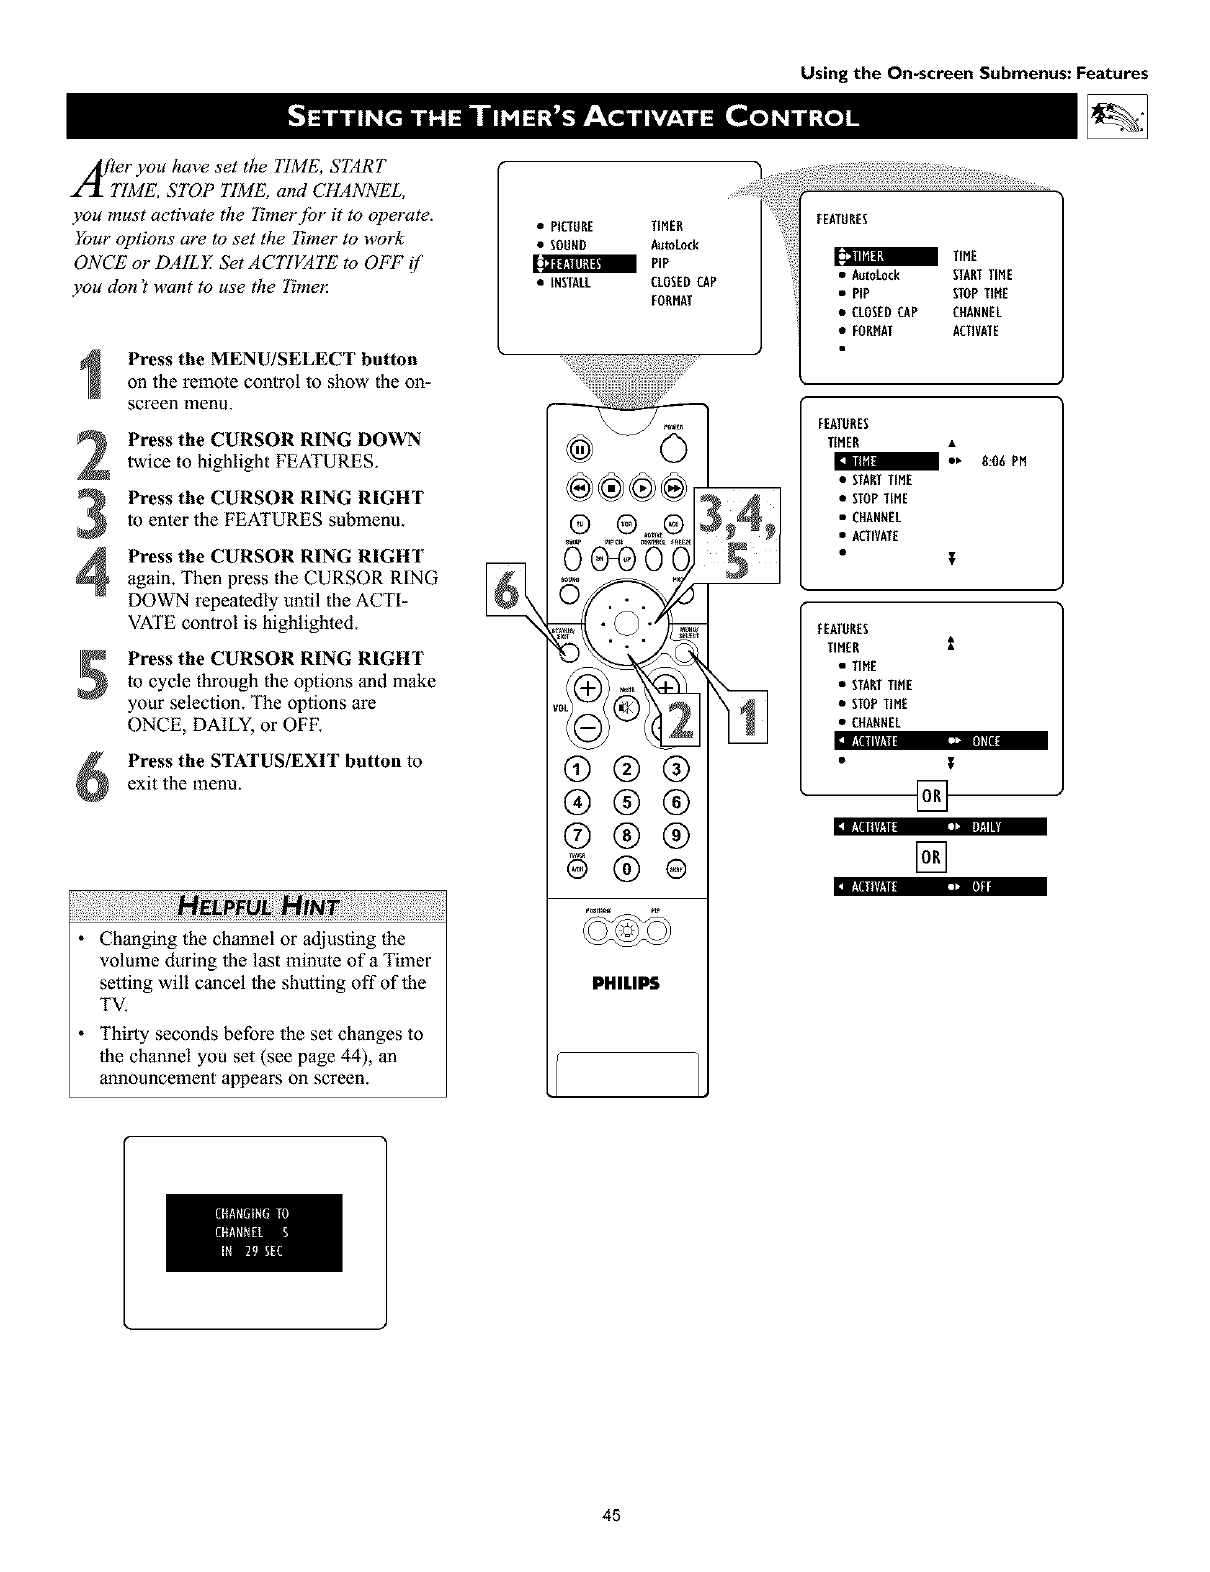
After you have set the ITME, START
TIME, STOP ITME, and CHANNEL,
you must activate the _'merjbr it to operate.
Your options are to set the 7_mer to work
ONCE or DAILY Set ACTIVATE to OFF if'
you don't want to use the Timel:
Press the MENU/SELECT button
on the remote control to show the on-
screen menu.
Press the CURSOR RING DOWN
twice to highlight FEATURES.
Press the CURSOR RING RIGHT
to enter the FEATURES subinenu.
Press the CURSOR RING RIGHTagain. Then press the CURSOR RING
DOWN repeatedly until the ACTI-
VATE control is highlighted.
Press the CURSOR RING RIGHT
to cycle through the options and make
your selection. The options are
ONCE, DAILY, or OFF'. ,ll!llll |il_ _• _'11
Press the STATUS/EXIT button to
exit the menu.
I_ll|lT!l ,_ B_hll
l_lnW!l
•Changing the channel or adjusting the
volume during the last minute of a Timer
setting will cancel the shutting off of the
TV.
•Thirty seconds before the set changes to
the channel you set (see page 44), an
announcement appears on screen.
• PICTURE TIMER
• SOUND AutoLock
PIP
• INSTALL CLOSEDCAP
FORMAT
®®®
®®®
®®®
@®®
PHILIPS
Using the On-screen Submenus: Features
FEATURES
TIME
• AutoLock STARTTIME
• PIP STOPTIME
• CLOSEDCAP CHANNEL
•FORMAT ACTIVATE
FEATORES
TIMER
I_' 8:06 PM
• STARTTIME
• STOPTIME
• CHANNEL
•ACTIVATE
• I
FEATORES
TIMER i
• TIME
• STARTTIME
• STOPTIME
• CHANNEL
[]
i
45
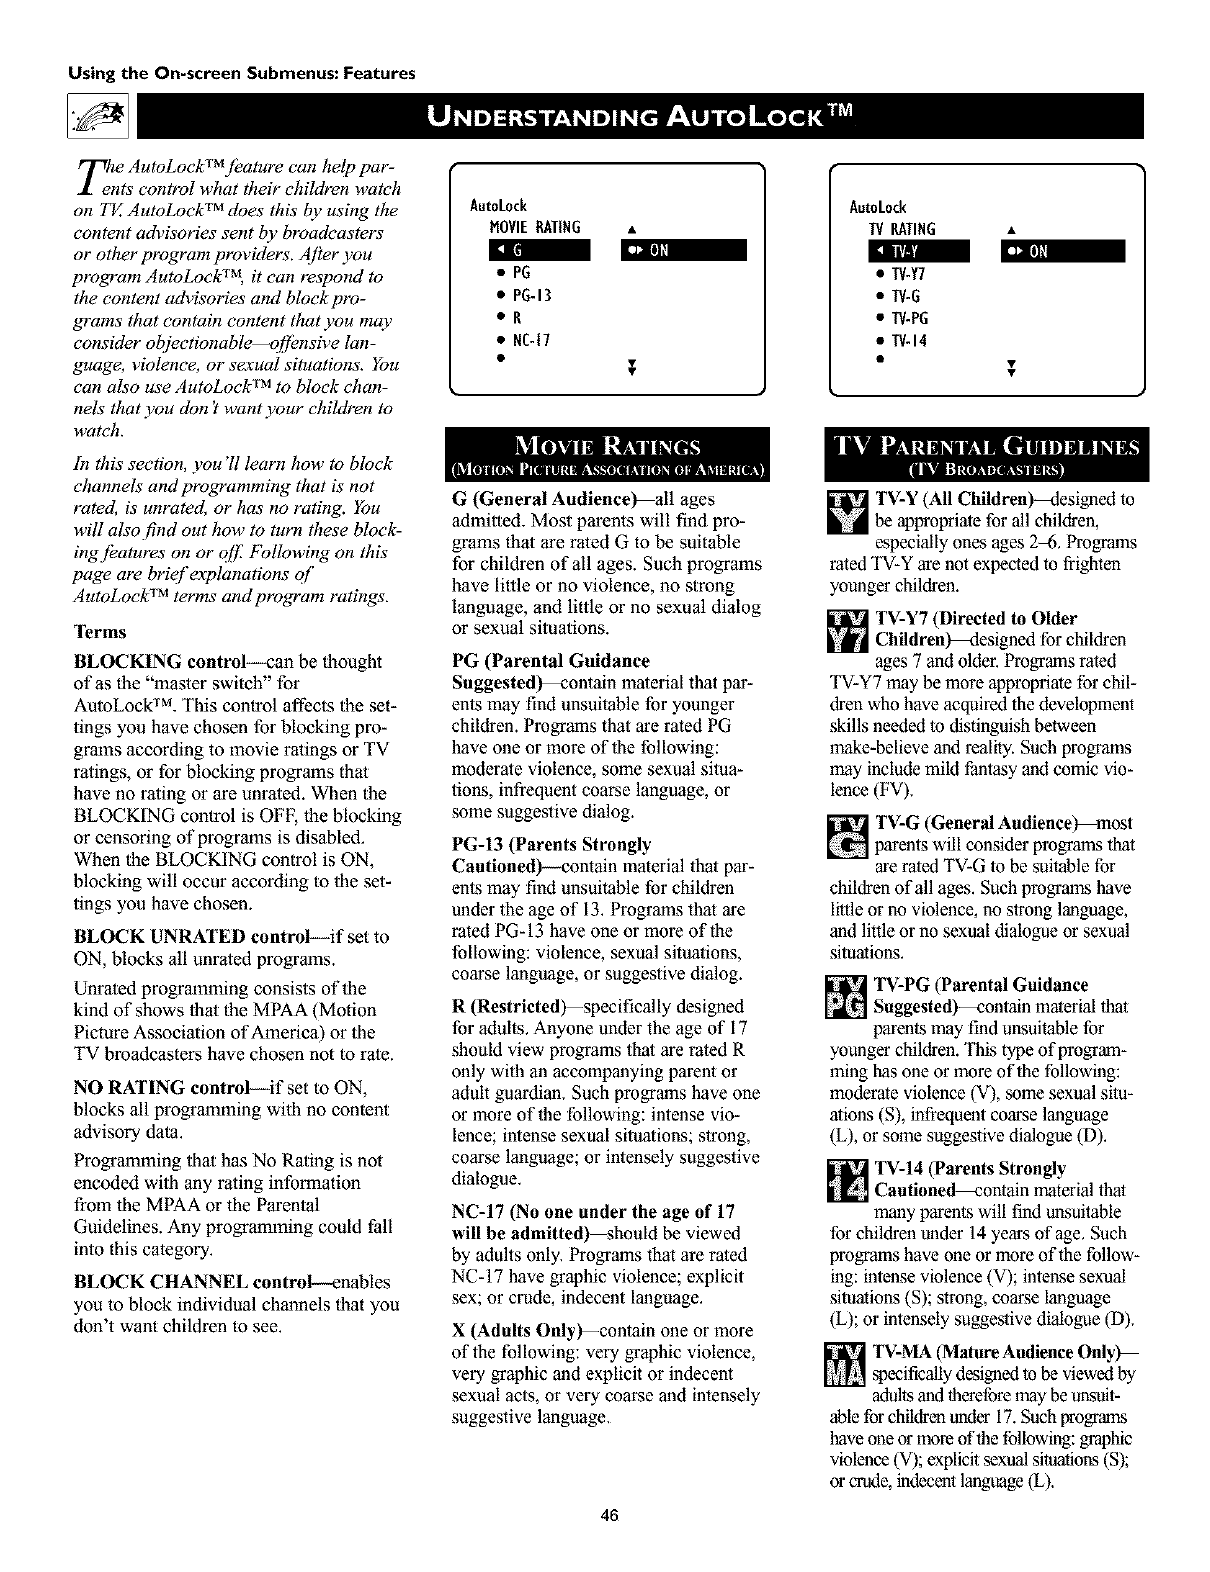
Using the On-screen Submenus: Features
Tlete AutoLockTmjeature can help par-
nts control what their children watch
on TV. AutoLockTM does this by using the
content advisories sent by broadcasters
or other program providers. After you
program AutoLockT_ it can respond to
the content advisories and block pro-
grams that contain content that you may
consider objectionable--o/fensive lan-
&rouge, violence, or sexual situations. You
can also use AutoLock TM to block chan-
nels that you don't want your children to
watch.
I_X¢II1 _€111
In this section, you'll learn how to block
channels and programming that is not
rated, is unrated, or has no rating. You
will also find out how to turn these block-
ingjbatures on or o/f l;bllowing on this
page are brief explanations of
AutoLock TM terms and program ratings.
Terms
BLOCKING control---can be thought
of as the "master switch" for
AutoLock TM. This control affects the set-
tings you have chosen for blocking pro-
grams according to movie ratings or TV
ratings, or for blocking programs thal
have no rating or are unrated. When the
BLOCKING control is OFF, the blocking
or censoring of progralns is disabled.
When the BLOCKING control is ON,
blocking will occur according to the set-
tings you have chosen.
BLOCK UNRATED control--if set to
ON, blocks all unrated programs.
Unrated progrmnming consists of lhe
kind of shows tbal the MPAA (Motion
Picture Association of America) or lhe
TV broadcasters have chosen not to rate.
NO RATING control--if set to ON,
blocks all programming with no content
advisory data.
Programming lhal has No Rating is not
encoded with any rating information
from lhe MPAA or lhe Parental
Guidelines. Any programming could fall
into this category.
BLOCK CHANNEL control--enables
you to block individual channels that you
don't want children to see.
AutoLock
MOVIEEATING •
•PG
•PG-13
•E
• NC-(7
G(General Audienee_all ages
admitted. Most parents will find pro-
grams thal are rated G to be suitable
for children of all ages. Such progrmns
have little or no violence, no strong
language, and little or no sexual dialog
or sexual situations.
PG (Parental Guidance
Suggested_ontain material that par-
ents may find unsuitable for younger
children. Programs that are rated PG
have one or more of the following:
moderate violence, some sexual situa-
tions, infrequent coarse language, or
some suggestive dialog.
PG-13 (Parents Strongly
Cautioned)--comain material that par-
ents may find unsuitable for children
under the age of 13. Programs that are
rated PG-13 have one or more of the
following: violence, sexual situations,
coarse language, or suggestive dialog.
R(Restricted)--specifically designed
for adults. Anyone under the age of 17
should view programs that are rated R
only with an accompanying parent or
adult guardian. Such programs have one
or more of the following: intense vio-
lence; intense sexual situations; strong,
coarse language; or intensely suggestive
dialogue.
NC-17 (No one under the age of 17
will be admitted)_should be viewed
by adults only. Programs that are rated
NC-17 have graphic violence; explicit
sex; or crude, indecent language.
X (Adults Only)--contain one or more
of the following: very graphic violence,
very graphic and explicit or indecent
sexual acts, or very coarse and intensely
suggestive language.
46
AutoLock
TVRATING •
•TV-Y7
•TV-G
•TV-PG
•TV-i4
TV-Y (All Children)--designed to
be appropriate for all children,
especially ones ages 2-6. Programs
rated TV-Y are not expected to frighten
younger children.
TV-Y7 (Directed to Older
Children)-Mesigned for children
ages 7and older. Programs rated
TV-Y7 may be more appropriate for chip
dren who have acquired the development
skills needed to distinguish between
make-believe and reality. Such programs
may include mild fantasy and comic vio-
lence (FV).
TV-G (General Audience_most
_arents will consider programs that
are rated TV-G to be suitable for
children of all ages. Such programs have
little or no violence, no strong language,
and little or no sexual dialogue or sexual
situations.
TV-PG (Parental Guidance
Suggested)-_contain material that
parents may find unsuitable for
younger children.This type of program-
ming has one or more of the following:
moderate violence (V), some sexual situ-
ations (S), infrequent coarse language
(L), or some suggestive dialogue (D).
TV-14 (Parents Strongly
Cautioned_ontain material that
many parents will find unsuitable
for children under 14 years of age. Such
programs have one or more of the follow-
ing: intense violence (V); intense sexual
situations (S); strong, coarse language
(L); or intensely suggestive dialogue (D).
TV-MA (Mature Audience Only_
specificallydesigned to be viewedby
adultsand _erefore may be up_soit-
able for children u_er 17. Suchprogran_s
have one or more of the following:graphic
violence (V); explicit,sexualsituations (S);
or crude, indecentlanguage (L),
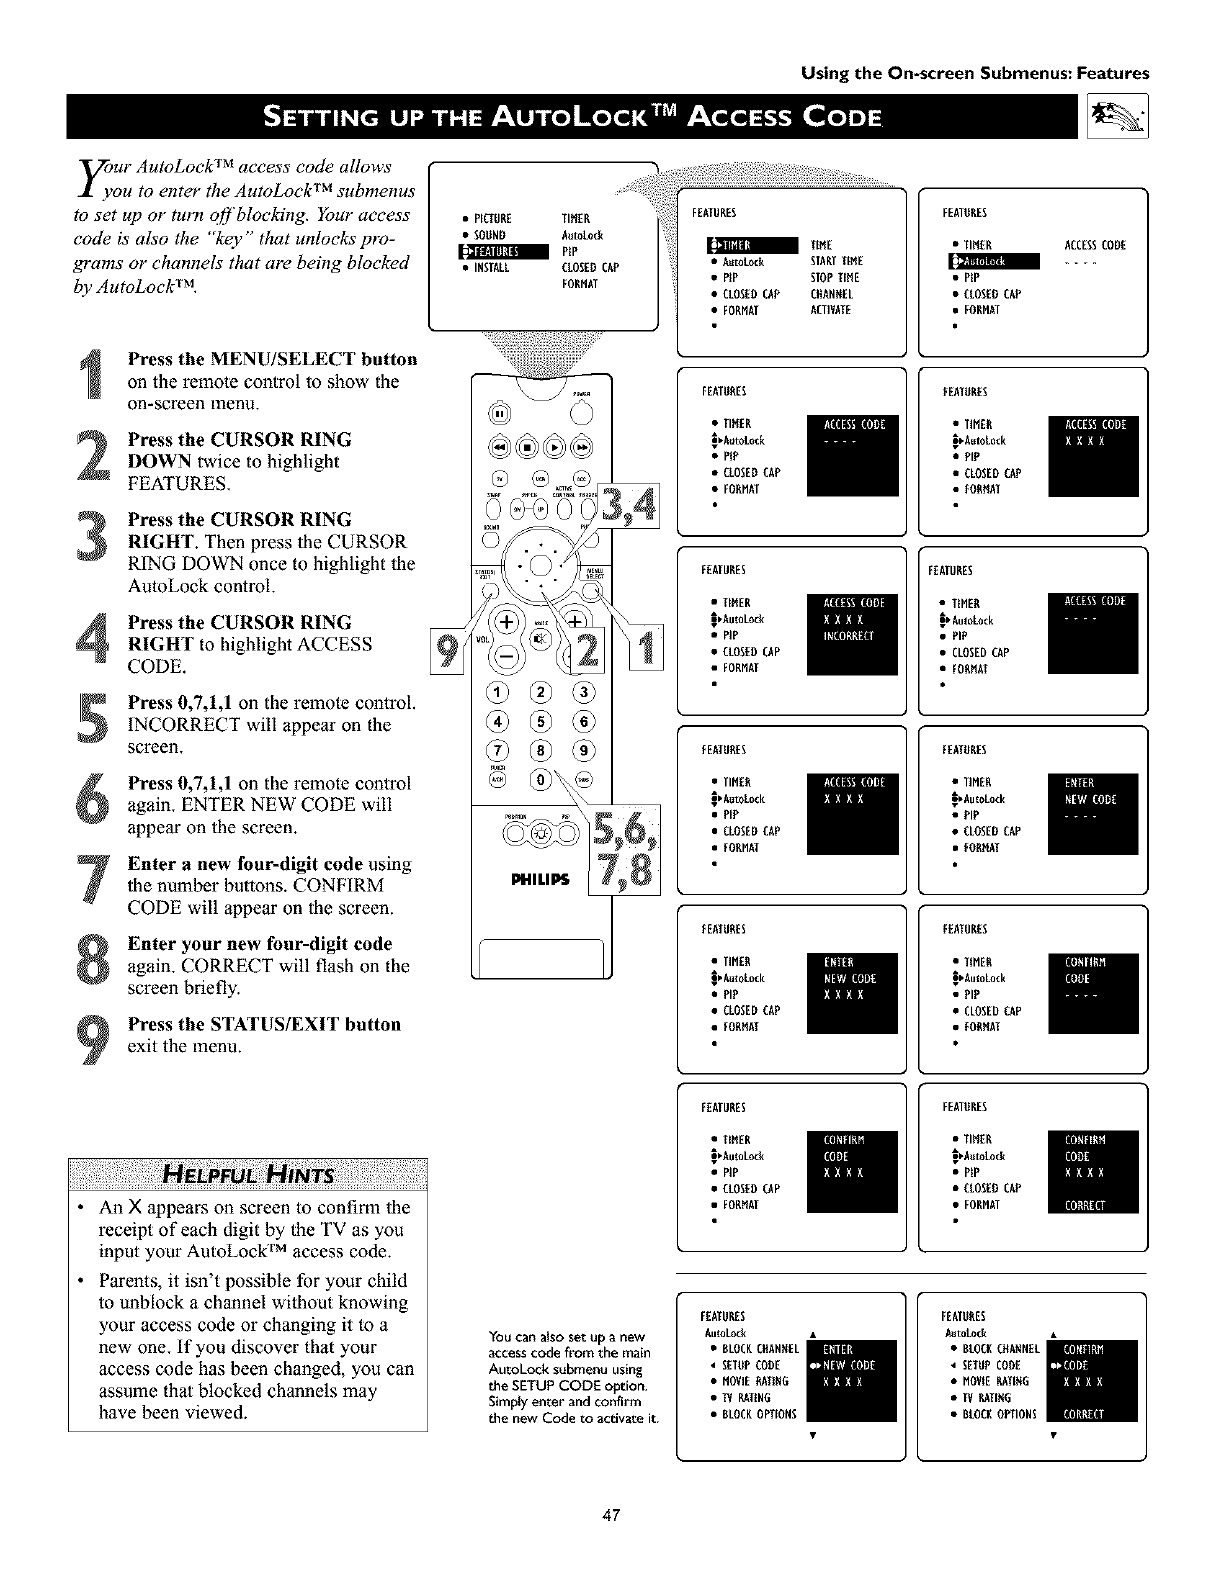
y_ur AutoLock TM access code allows
ou to enter the AutoLock TM submenus
to set up or turn ojf bloeking. Your access
code is' also the "key" that unlocks pro-
grams or channels that are being blocked
by AutoLock TM.
•PICTURE TIMER
•SOOND AutoLocR
NP
•INSTALL CLOSEDCAP
FONHAT
Using the On-screen Submenus: Features
FEATURES
TiME
• AutoLocR STARTTiME
•PiP STOPTiME
•CLOSEOCAP CHANNEL
•FONHAT ACTffAIE
FEATURES
•TIMER
• PiP
• CLOSEDCAP
• FORMAT
ACCESSCODE
Press the MENU/SELECT button
on the remote control to show the
on-screen 1Ylenu.
Press the CURSOR RING
DOWN twice to highlight
FEATURES.
Press the CURSOR RING
RIGHT. Then press the CURSOR
RING DOWN once to highlight the
AutoLock control.
Press the CURSOR RING
RIGHT to highlight ACCESS
CODE.
Press 0,7,1,1 on the remote control.
INCORRECT will appear on the
screen.
Press 0,7,1,1 on the remote control
again. ENTER NEW CODE will
appear on the screen.
Enter a new four-digit code using
the number buttons. CONFIRM
CODE will appear on the screen.
Enter your new four-digit code
again. CORRECT will flash on the
screen briefly.
Press the STATUS/EXIT button
exit the menu.
FEATDRES
•TIMER
_,Auto_ck
• PIP
• CLOSEOCAP
•FORHAI
EEATONES
•TItlER
_,AutoLock
• PIP
• CLOSEDCAP
•EONHAI
FEATURES
•TtHEN
_DutoLock
• PIP
• CLOSEOCAP
• FONHAI
FEATURES
• TIHEN
_AutoLock
• PIP
• CLOSEDCAp
• FONMAI
EEDTO_ES
•TIHE_
i_AutoLock
• PIP
• CLOSEDCAP
• EORHAI
FEATONES
•TIHEN
_bAutoLock
• PIP
• CLOSEDCAP
• EONHAI
EEATONES
•TIHEN
iPAmoLock
• PIP
• CLOSEDCAP
• EONHAI
FEATURES
• TIHEN
_AutoLock
• PIP
• CLOSEDCAp
• FONMAI
•An X appears on screen to confirm the
receipt of each digit by the TV as you
input your AutoLock TM access code.
• Parents, it isn't possible for your child
to unblock a channel without knowing
your access code or changing it to a
new one. If you discover that your
access code has been changed, you can
assume that blocked channels may
have been viewed.
You can also set up anew
access code from the main
AutoLock submenu using
the SETUP CODE option.
Simply enter and confl_n
the new Code to activate it.
FEATURES
•TIHEN
_DutoLock
• PIP
• CLOSEOCAP
• FONMAI
FEATONES
• TIHfN
_Auto_ck
• PIP
• CLOSEOCAP
•FONHAI
FEATURES
AutoLock •
•BLOCKCHANNEL
• SETOPCOON
•HOVIE_ATIEG
• IV NATINO
•BLOCKOPIIONS
FEATO_ES
DutoAock •
•BLOCNCDA_NEL
• SETUPCOOE
•HOVIE_IIDO
• IV_IIDG
•BLOCNOPTIONS
47

A[_er you have set up your personal
access code (see page 4 7), you are
ready to select the channels or program
sources you want to bloek.
Press the MENU/SELECT button
on the remote control to show the
on-screen menu.
Press the CURSOR RINGDOWN twice to highlight
FEATURES.
Press the CURSOR RINGRIGHT. Then press the CURSOR
RING DOWN once to highlight the
AutoLock control.
Press the CURSOR RING
RIGHT again to highlight ACCESS
CODE.
Enter your four-digit ACCESS
CODE. CORRECT will flash very
briefly and the submenu will move
to the left with BLOCK CHANNEL
highlighted.
Press the CURSOR RING
RIGHT to highlight the TV's avail-
able channels.
Press the CURSOR RING UP or
DOWN to highlight the channel
you want to block.
Press the CURSOR RING
RIGHT to block the channel. A
padlock image will appear to the
right of the channel number. If you
decide you don't want to block the
channel, press the CURSOR RING
RIGHT again to remove the block,
(The padlock image goes away.)
Repeat steps 7 and 8 for any channels you
want to block from viewing.
NOTE: You can highlight the ALL option,
then press the CURSOR RING RIGHT to
block all channels at once. Or press the
CURSOR RING RIGHT to unlock all
channels.
Press the STATUS/EXIT button
to exit the menu.
• PICTURE TillER
•SOOND DutoLocA
aPiP
•INSTALL CLOSEDCAD
FORNAT
PHILLIS
FEATURES
TINE
•DutoLock STARTTINE
• PiP STOPTINE
• CLOSEOCAD CHANNEL
• FORNAI ACIIVAIE
FEATORES
•TIMER
_N
• PIP
• CLOSEDCAD
•FORMAT
ACCESSCODE
FEATURES
• TIMER
_,Ruto[ocA
• PIP
• CLOSEDCAD
•FORHAI
EEATORES
•TINE_
.g,AutoL0ck
•DIP
• CLOSEDCAP
• EONIAI
EEATORES
AutoLock •
• SETOPCODE 2
• MOVIE RATING 3
• IV RAIING A
•BLOCROPTIONS S
FEATURES
DutoLock •
• BLOCK CHANNEL
• SETUPCODE
• MOVIE RATING
•TV RATING
• DLOCROPTIONS
FEATURES
AutoLock •
• BLOCKCHARNEL
• SETUPCODE
• MOVIE RATING
•TVRATING
• DLOCROPTIONS
FRATONES
DutoAock •
BLOCKCHANNEL
• SETODCOnE
•NOVIERATINO
• IV RATING
•BLOCKOPTfONS
FEATURES
AutoLock •
• DLOCRCHARNEL
• SETUPCODE
• MOVIE RATING
• TVRATING
• DLOCROPTIONS
To block all channels at once, highlight ALL in the channel list.Then press
the CURSOR RING RIGHT to block. Remove the blocks the same way.
FEATURES
AutoLock •
• DLOCRCHARNEL
• SETUPCODE
• MOVIE RATING
• TVRATING
• DLOCROPTIONS
FEATORES
DutoAock •
•BLOCKCHANNEL
• SETODCOnE
•NOVIERATING
• IV PALING
•BLOCKOPIfONS
You can use the BLOCK CHANNEL con-
Irol to prevem the viewing of programs
coming from a VCR, DVD, or other acces-
sory device connected to any of the
audio/video (AV) inputs on the TV.
48

Jfler you have set your personal access
code (seepage 47), you can block
programs by spee{f!c movie ratings.
Press the MENU/SELECT
button on the remote control to
show the on-screen menu.
Press the CURSOR RING
DOWN twice to highlight
FEATURES.
Press the CURSOR RING
RIGHT. Then press the CURSOR
RING DOWN once to highlight the
AutoLock control.
Press the CURSOR RING
RIGHT again to highlight
ACCESS CODE. _31_l[ffR|NffAlllln[ o, ]
Enter your four-digit ACCESS
CODE. CORRECT will flash very
briefly in red and the submenu will
move to the left with BLOCK
CHANNEL highlighted.
Press the CURSOR RING
DOWN repeatedly until MOVIE
RATING is highlighted.
,il
Press the CURSOR RING
RIGHT and the Rating submenu
will shift to the left wilh G high-
lighted.
Press the CURSOR RING UP or
DOWN to highlight each rating you
want. Then press the CURSOR
RING RIGHT to turn the rating ON
or OFF. Turning the rating ON will
block such programs from being
seen.
Press the STATUS/EXIT button
to exit the menu.
•P_CTURE TIMER
• SOUND AUTOLOCR
a PiP
• INSTALL CLOSEDCAP
FORMAT
PHILIPS
Using the On-screen Submenus: Features
FEATURES
TIME
• AutoLo& STARTTIME
•PiP STOPTIME
• CLOSEDCAP CRANMEL
• FORMAT ACTIVATE
FEATURES
• TFMER
[_/:Tt_lm II
•P_P
•CtOSED CAP
• FORMAT
ACCESSCODE
FEATURES
• TIMER
• PIP
• CLOSEDO_P
• FORMAT
ERATOEES
•TIME_
_AutoC_k
• PiP
• CtOSEDCAP
•FORMAT
FEATURES
AutoLock
• SETUPCODE
•HOVE RATING
•TVRATING
• DLOCKOPIIODS
3
4
5
6
FEATURES
Auto[ock
[t • BLOCRCDAMNEt
• SETUPCODE
_X_rllN[d
•TVRAT[RG
•BLOCROPTIONS
o
PG
POd3
R
NC-17
AutoLock
MOV_ERATIMG
• PG
• P6-13
•R
• NC-17
AutoLocR
MOVIE RATING
• PG
• PG-I3
tR
• MC47
When a rating is set to be turned on
(blocked), all higher ratings will also be
blocked automatically. For example, if the
R rating is turned on, the NC-17 and X
ratings also will be turned on.
49
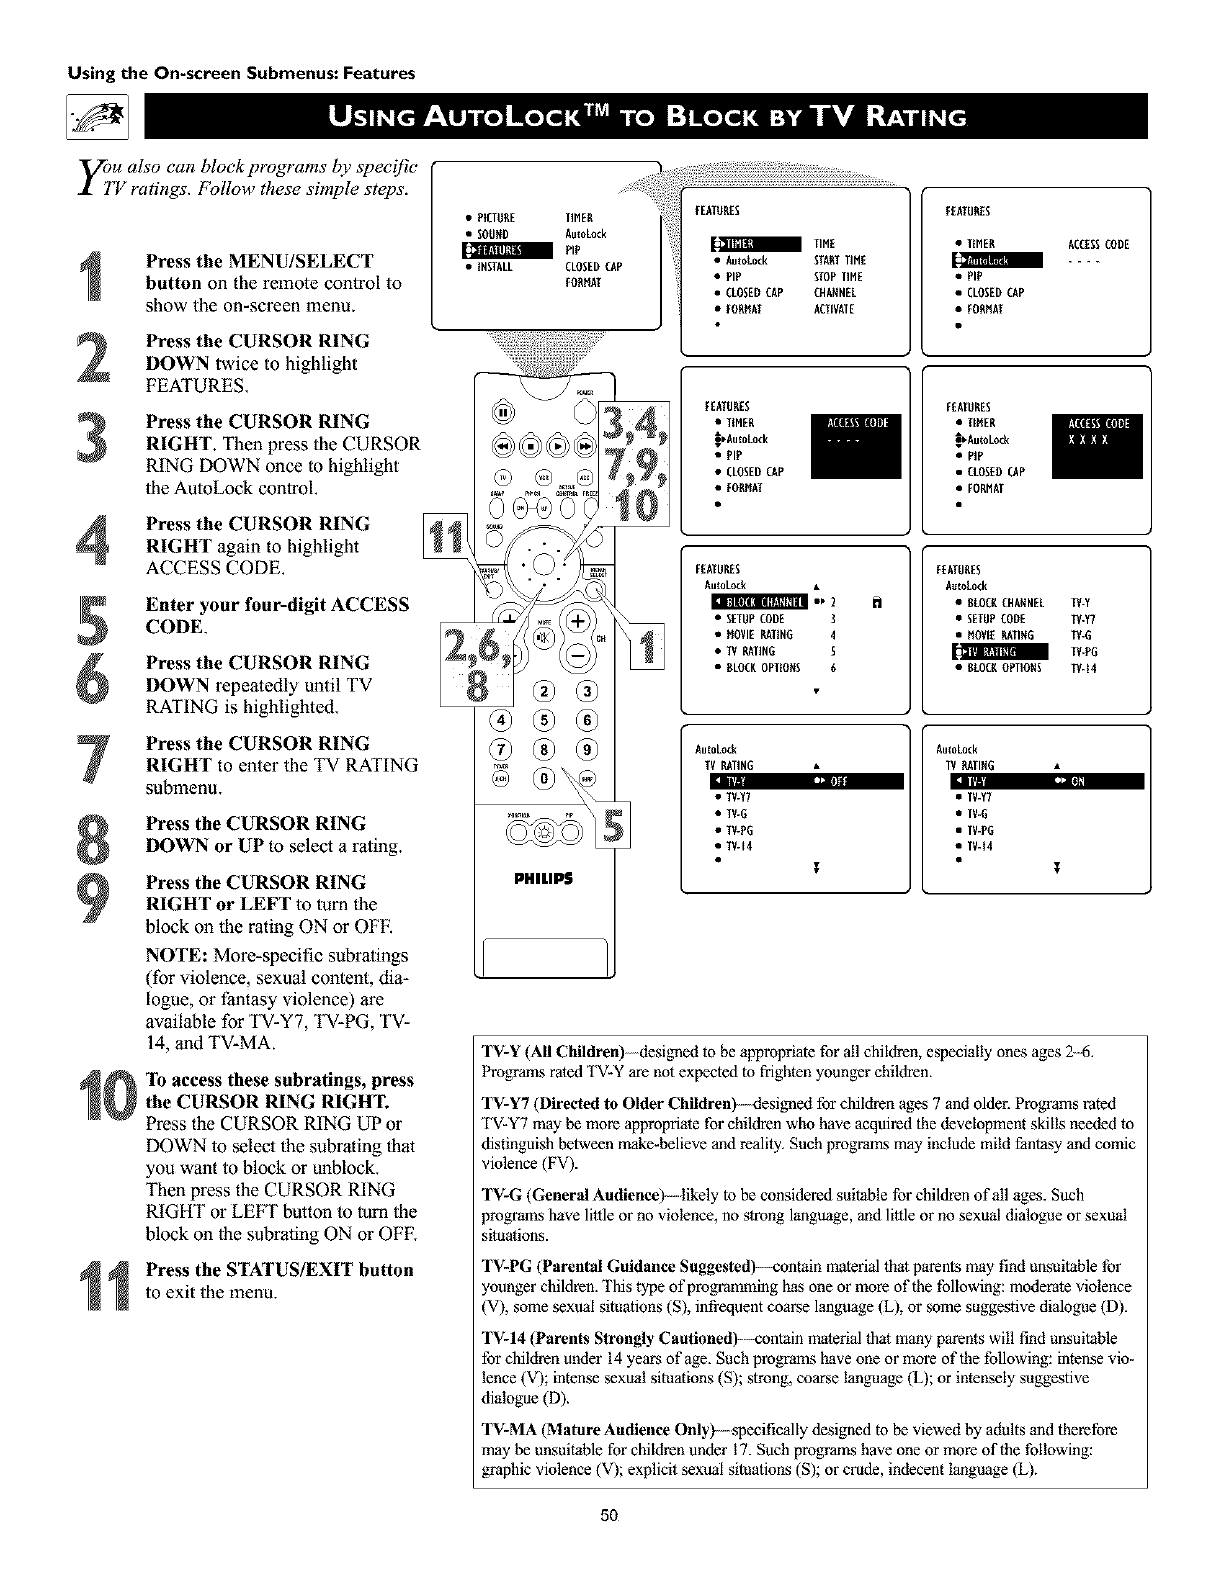
Using the On-screen Submenus: Features
yoiu also can block programs by specific
Vratings. Follow these simple steps.
3
4
Press the MENU/SELECT
button on the remote control to
show the on-screen menu.
Press the CURSOR RING
DOWN twice to highlight
FEATURES.
Press the CURSOR RING
RIGHT. Then press the CURSOR
RING DOWN once to highlight
the AutoLock conlroL
Press the CURSOR RING
RIGHT again to highlight
ACCESS CODE.
Enter your four-digit ACCESS
CODE.
Press the CURSOR RING
DOWN repeatedly until TV
RATING is highlighted.
Press the CURSOR RING
RIGHT to enter the TV RATING
subrnenu.
Press the CURSOR RING
DOWN or UP to select arating.
Press the CURSOR RING
RIGHT or LEFT to turn the
block on the rating ON or OFF.
NOTE: More-specific subratings
(for violence, sexual content, dia-
logue, or fantasy violence) are
available for TV-Y7, TV-PG, TV-
14, and TV-MA.
"lb access these subrafings, press
the CURSOR RING RIGHT.
Press the CURSOR RING UP or
DOWN to ,selectthe subrating thal
you want to block or unblock.
Then press the CURSOR RING
RIGHT or LEFT button to turn the
block on the subraling ON or OFE
Press the STATUS/EXIT button
to exit the menu.
• PICIUE[ IIHEH
• SOUND Au_oLock
aDiP
• INSTALL CLOSEDCAP
EOHMAT
EEATUHES
TINE
• Au_oL_k STAHTTIME
• DiP STOPTIME
•CLOSEDCAP CHANNEL
• EOHMAT ACTIVATE
FEATUHES
• UMEH
• PiP
• CLOSEDCAP
• FOHHAT
ACCESSCODE
®®
PHILIPS
FEATUHES
• UMEH
_,Au_oLock
• PIP
• CLOSEDCAp
• FOHMAI
FEATUHES
•TIMER
_bAutoLock
• PIP
• CLOSEDCAP
•FOHNAT
FEATURES
AutoLock
• SETUPCODE ]
• MOVIE gATING 4
•IV gATING 5
• DLOCHOPTIONS 6
FEATUHES
Au_oLock
•DLOCgCHANNEL
• SETUPCODE
• MOVIE gATING
• BLOCKOPTIONS
AutoLock
IV gATING
Eli
• TV-Y7
•TV-G
•TV-PG
•TV-14
AuloLock
TVgATING
EI
• TV-Y7
• TV-G
• TV-DO
• TV-14
_-Y
_-Y7
ff-G
if-DO
if-14
TV-Y (All Children) designed to be appropriate for all children, especially ones ages 2-6.
Progwams roted TV-Y are not expected to frighten younger children.
TV-Y7 (Directed to Older Children}---design_ed for children ages 7 and older. Programs rated
TV-Y7 may be more appropriate for children who have acquired the development skills needed to
distinguish between make-believe and reality. Such prograras may include mild fantasy and comic
violence (FV).
TV-G (General Audience}- - likely to be considered suitable for children of all ages. Such
programs have little or no violence, no strong language, and little or no sexual dialogue or sexual
situations.
TV-PG (Parental Guidance Suggested}--contain material thatparents may find unsuitable for
younger children. This type of progromming has one or more of the following: moderate violence
(V), some sexual situations (S), infrequent coarse language (L), or some suggestive dialogue (D).
TV-14 (Parents Strongly Cautloned}- -contain material that many parents will find unsuitable
for children under 14 years of oge. Such prograras have one or more of the following: intense vio-
lence (V); intense sexual situations (S); strong, coarse language (L); or intensely suggestive
dialogue (D).
TV-MA (Mature Audience Only_- specifically designed to be viewed by adults and therefore
may be unsuitable for children under 17. Such pr%wams have one or more of the following:
gwaphic violence (V); explicit sexual situations (S); or crude, indecent language (L).
5O

Tj)e eontro canbethought
"as the master switch 'jbr
AutoLoek TM. Use it to turn ONor OFF all
of the settings (based on ratings). This
control does not aifect channel blocks (see
page 48).
3
4
Press the MENU/SELECT button
on the remote control to show the
on-screen menu.
Press the CURSOR RING
DOWN twice to highlight
FEATURES.
Press the CURSOR RING
RIGHT. Then press the CURSOR
RING DOWN once to highlight the
AutoLock COFltrol.
Press the CURSOR RING
RIGHT again to highlight ACCESS
CODE.
Enter your four-digit ACCESS
CODE.
Press the CURSOR RING
DOWN repeatedly until BLOCK
OPTIONS is highlighted.
i_t|ll|_l Ill
Press the CURSOR RING
RIGHT to enter the BLOCK
OPTIONS submenu. BLOCKING
will be highlighted.
Press the CURSOR RING
RIGHT or LEFT to turn
BLOCKING ON or OFF.
Press the STATUS/EXIT button
to exit the menu.
•PICTUEE TIMER
• FOUND AutoLock
aPiP
• iMSTALL CLOSEDCAP
FORMAT
@®®®
®®
PlIII.IP$
Using the On-screen Submenus: Features
FEATUH[S
TIME
• AutoLock STAHTTIME
• PiP STOPTIME
•CLOSEDCAP CHANNEL
•FOHMAT ACTIVATE
FEATURES
•TIMER
• PIP
• CLOSEDCAP
• FORMAT
ACCESSCODE
FEATURES
•TIMER
.8_AutoLock
• PIP
• CLOSEDCAP
• EONI_I
FRATUHES
•TIMER
• PIP
•CLOgEDCAP
• FOHMAI
FEATUHES
Au_eLock h
• SETUPCODE 3
•MOVIE RATING 4
•TV RATIMG S
• ELOCROP_OMS 6
FEATUHES
Au_oLock
• 8LOCRCHAMNEL
• SETUPCODE
• MOVIERATING
•TVRATIMG
8LOCRIHO
8LOCR UHRATED
MO RATING
AuloLock
8LOCROPTIOMS
•BLOCRUHRATED
• NO RATING
i
RAtoLock
RAOCHOPTIONS
•BLOCHUNRATE9
•NO RATIMG
51
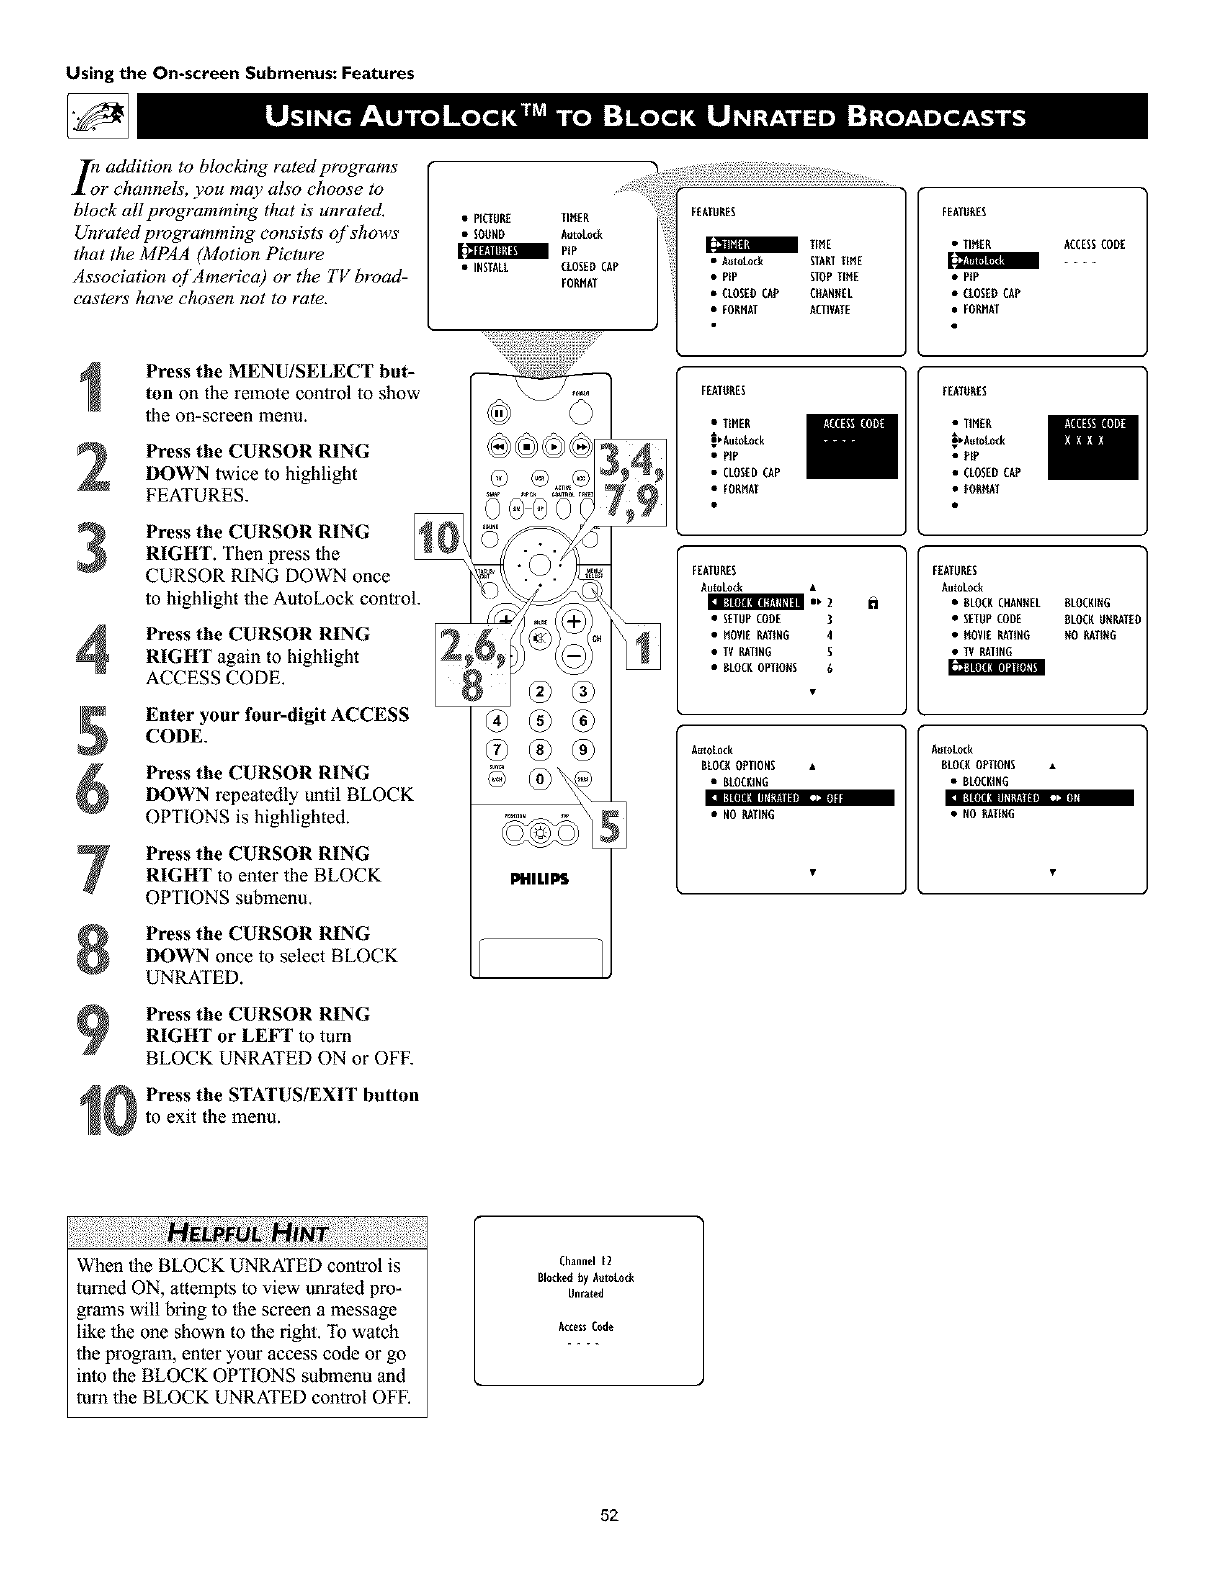
Using the On-screen Submenus: Features
In addition to blocla'ng rated programs
r channels', you may also choose to
block all programming that is' unrated.
Unrated programming consists' of shows
that tile MPAA (Motion Picture
Association of America) or the TV broad-
casters have chosen not to rate.
•PICTURE TIMER
• SOOND AutoAocR
PIP
• INSTALL CLOSEDCAP
FORHAT
FEATURES
TIME
• DutoAocR STARTTIME
• PiP STOPTIME
• CLOSEDCAP CHANNEL
• FORHAT ACTIVATE
FEATURES
•TIMER
• PIP
• CLOSEOCAP
• FORMAT
ACCESSCODE
3
4
Press the MENU/SELECT but-
ton on the remote control to show
the on-screen menu.
Press the CURSOR RING
DOWN twice to highlight
FEATURES.
Press the CURSOR RING
RIGHT. Then press the
CURSOR RING DOWN once
to highlight the AutoLock control.
Press the CURSOR RING
RIGHT again to highlight
ACCESS CODE. m
Enter your four-digit ACCESS
CODE.
Press the CURSOR RING
DOWN repeatedly until BLOCK
OPTIONS is highlighted.
I_|II|JlI_Ef_UlI! t231t
Press the CURSOR RING
RIGHT to enter the BLOCK
OPTIONS submenu.
Press the CURSOR RING
DOWN once to select BLOCK
UNRATED.
Press the CURSOR RING
RIGHT or LEFT to turn
BLOCK UNRATED ON or OFF.
Press the STATUS/EXIT button
to exit the menu.
G®G®
,9
FEATURES
•TIHER
_Ruto_ck
•PIP
•CLOSEDCAP
• FORM_I
EEATORES
•TIH[_
_Aut_Lock
•PIP
• CLOSEDCAP
• EORMAT
FEATURES
DutoLock •h
• SETUPCODE 3
• MOVIE gATING 4
• TVgATING 5
• DLOCROPTIONS 6
FEATURES
DutoLock
• DLOCRCHANNEL
• SETUPCODE
• MOVIE gATING
•TVgATING
DLOCRING
A_toLock
BLOCROPTIONS
•BKOCRING
• NO gATING
AutoLock
BLOCROPTIONS
•BLOCKING
•NO EATING
RLOCKONgATE
NO gATING
When the BLOCK UNRATED control is
turned ON, attempts to view unrated pro-
grams will bring to the screen a message
like the one shown to the right. To watch
the program, enter your access code or go
into the BLOCK OPTIONS suhmenu and
tuna the BLOCK UNRATED control OFE
Channel 12
Blockedby AutoAocR
Nnrated
A¢ces_Code
52

Ss_ome programs contain no content advi-
rie,E'from the Motion Picture
Association of America or the television
broadcasters (seepage 46). To block pro-
grams with no rating, follow these steps.
4
2
3
4
7
m
Illlll _€III ,--,lllll_X]ll ....
8
9
10
Press the MENU/SELECT
buVmn on the remote control to
sttow the on-scFeen rrienu.
Press the CURSOR RING
DOWN twice to highlight FEA-
TLTRES.
Press the CURSOR RING
RIGHT. Then press the CUR-
SOR RTNG DOWN once
to highlight the AutoLock
control.
Press the CURSOR RING
RIGHT again to highlight the
ACCESS CODE Jzlputarea.
Enter your four-digit ACCESS
CODE.
Press the CURSOR RING
DOWN repeatedly until BLOCK
OPTIONS is highlighted.
Press the CURSOR RING
RIGHT to enter the BLOCK
OPTIONS submenu.
Press the CURSOR RING
DOWN twice to highlight NO
RATTNG.
Press the CURSOR RING
RIGHT or LEFT to tunl NO
RATING ON or OFF.
Press the STATUS/EXIT button
to exit the menu.
PHILIPS
Us?ng the On-screen Submenus: Features
FEATUEES
• TIHEE
[:_mmml
•PIP
•ULOSED
•FOEMAT
ACCESSUO_E
FEATUEES FEAI1.1RE$
•TIMER
.g_iut_Lock
•PIP
• CLOSEB0_P
• FORHAT
F_TU_S
h
•SETUPCODE 3
•HOVlE_EG 4
• T_ETIE_ U
•BLOCKOPI1OH$ U
FEATUEES
AuloLock
•BLOCKCHAEHEL
• SETUPCODE
•HOVIEMTIHG
•1_ _IIEG
BLOCKIHG
BLOCKUHMTED
HO_TIHG
AuloL,o¢[_
BLOCKOFq1OHS
•BLOCItlHG
•BLOCKUH_D
iul_l_d(
BLOCKOPTIOHS
•BLOCKIH_
•BLOCKUHEA_D
If the NO RATING control is turned on,
all progrummhaving no content advisory
information will activate a screen like the
one shown to the right. To watch the
charm•l, enter your access code or turn
the NO RATING option OFF.
Lh_nnel 12
BlocI_.d_Lock
Ho mting
JTtc¢_ C_e
:53

Using the On-screen Subnnenus: Features
z/_toLockr:_ provides a screen that s!u_!vs
the settings you have selected. Here s
!u_w to access the screen.
Press the STATUS/EXIT button vii
the remote control twice. Your
AutoLock TM settfflgs will appear on
tile screen.
NOTE: If you have blocked specific
submtings, such as Vfor Vkflence ht the
TV-PG category, these blocked subrat-
Jugs will not appear ht the review.
Nonetheless, the subrathtgs are still
blocked according to your selections.
After a few seconds, the settings willleave the screen automatically, or
you can press the STATUS/EXIT
button to exit the menu.
iiiiiiiiiiiiiiiiiiiiiiiiiiiiiiiiiiiiiiiiiiiiiiiiiiiiiiiiiiiiiiiiiiiiiiii
The AutoLock TM review screen will appear
only if you have turned ON the BLOCK-
1NG control (see page 51).
MOVIE RATIN_ows oll the movie ratings
that you have ehos_n to block wlthin the MOVIE
RATING control, NOTE: Ira lower rating is
blocked, Nghor ratings will also be blocked auto-
matleally. For c_a_la, if you block R-rated Wo-
grams, those that are rated X will also be blocked.
TV RATIN_ows oil the TV mtln gs that you
have chin to block within the TV RATING exm-
trol. NOTE: Ira lower rating is blocked, higher
ratings will also ha blocked automatically. For
example, if you block TV-PG-ratod programs,
those rated TV-14 and TV-MA will oJso ha
blocked. The TV rating controls ak_o have subrat-
in_s for Vidicnoc (V), Fantasy Wiolellae 1._,
Sexual Stmad<ms (S), Coarse Langeage _), and
Sagg_tiva Language (D), If you turn offa main
rating but tura on a subratlng of that m0Anrating
eontyol, programs hay[rig the subrating vAll be
blocked; h_vever, the main rating will not appear
v,qthin the AutoLOCk review submcnu because you
did not turn it ON,
BLOCK UNRATED_shows whether you have
turned this c_mt_ol ON or OFE
BLOCK NO RATING_&ows wh(ther you
have turned this control ON or 0FE
®®@®
®
®®®
®®®
®®®
PHILIPS
54
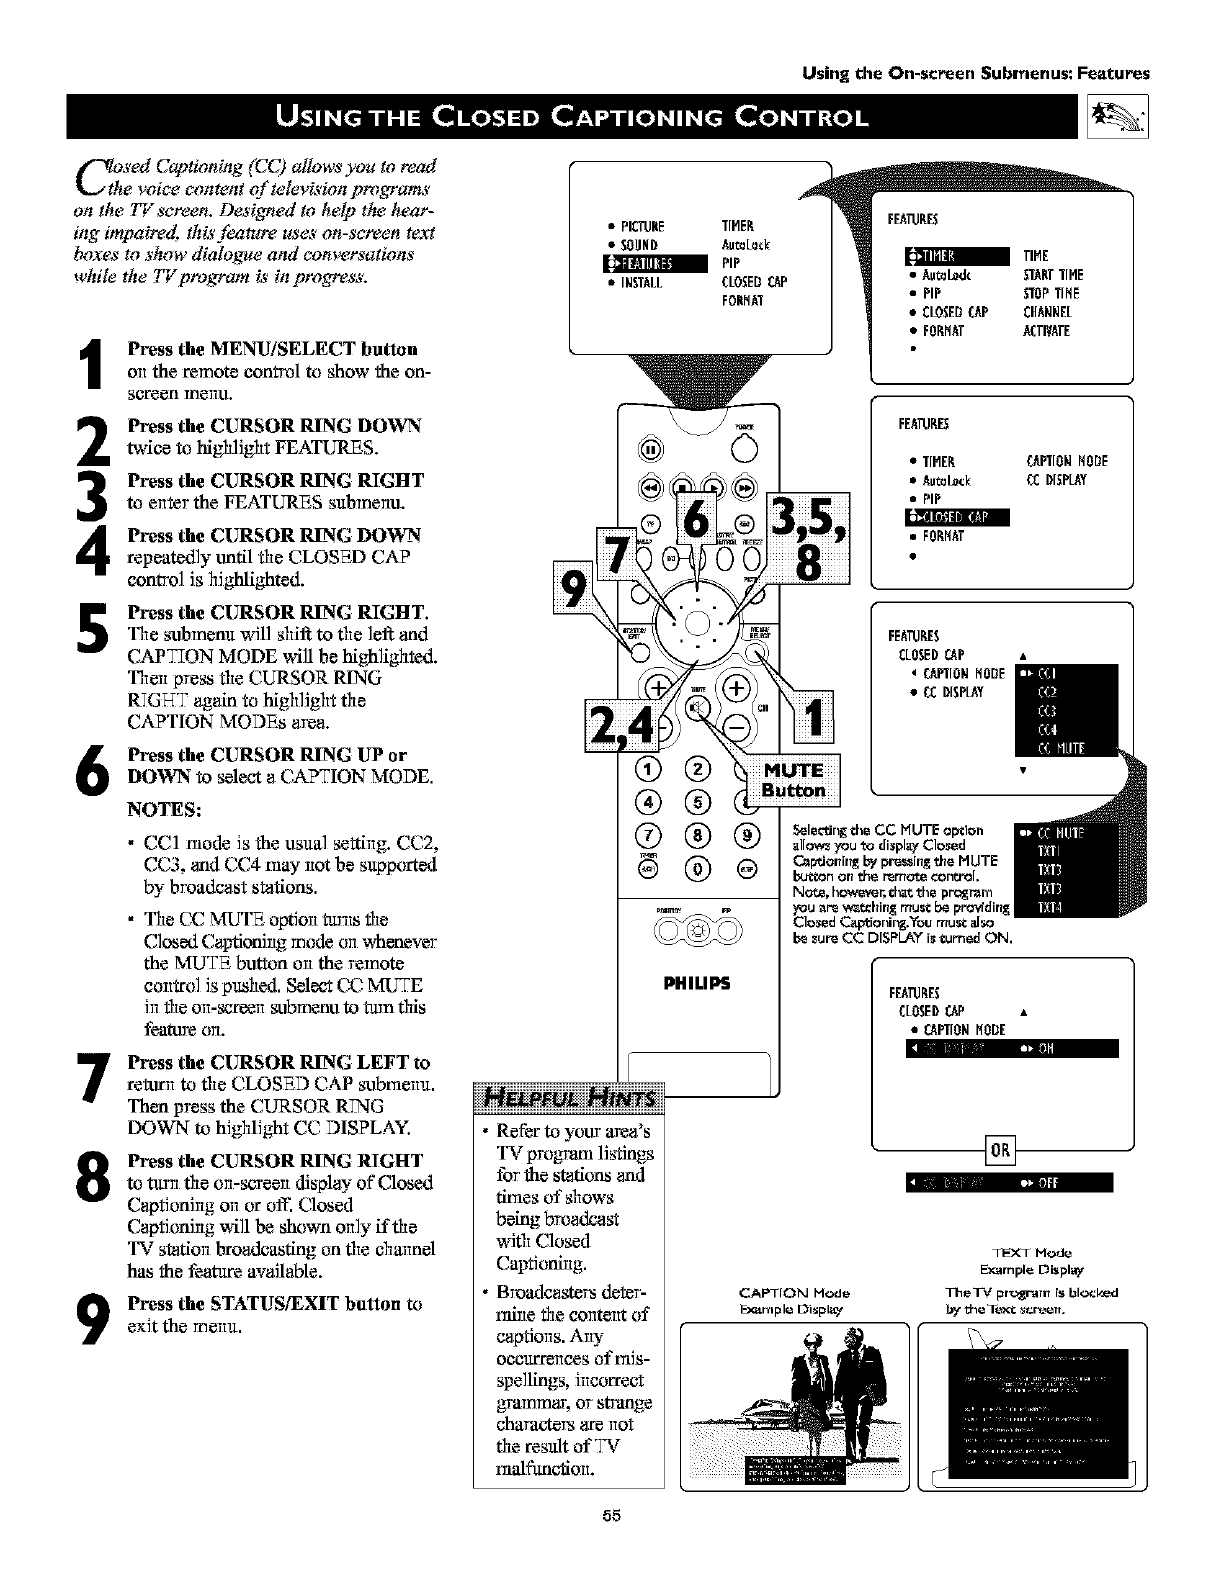
C oni,, (CC lowsyo.to, aa
the voice content of television program_'
on the TV screen. Designed to hell) the hear-
ing impaired, this feature uses on-screen text
boxes to show dialogue and conversations
while the TV program is in pro_ss.
Press the MENU/SELECT button
on the remote control to show the on-
Scl'een TneIlu.
2
3
4
5
6
Press the CURSOR RING DOWN
twice to bAgh]JghtFEATURES.
Press the CURSOR RING RIGHT
to enter the FEATURES submenu.
Press the CURSOR RING DOWN
repeatedly until the CLOSED CAP
control Js highlighted.
Press the CURSOR RING RIGHT.
The submanu will shif to the ]eft and
CAPTION MODE will be highlighted.
Then press the CURSOR RING
RTGHT again to highlight the
CAPTION MODEs area.
Press the CURSOR RING LrPor
DOWN to select aCAPTION MODE.
NOTES:
•CC1 mode Js the usual setting. CC2,
CC3 and CC4 may not be supported
by broadcast stations.
•The (,V r_g,gl_ option tarns the
Closed Captioning mode on whenever
the MUTE button on the remote
control is pushed. Select CC MUTE
in the on-screen sxlbmenuto tam this
feature OIL
Press the CURSOR RING LEFT to
return to the CLOSED CAP submenu.
Then press the CURSOR RING
DOWN to highlight CC DISPLAY.
8_2mll
9
Press the CURSOR RING RIGHT
to tam the on-s_en display of Closed
Captioning on or off. Closed
Captioning will be shown only if the
TV station broadcasting on the channel
has the feature available.
Press the STATUS/EXIT button to
exit the menu.
• PIC_HE TIMER
• SOUHD AutoLo_H
a PiP
• INSTALL CLOSEDCAP
FOHMAT
®®
®®
®®®
PHILIPS
NNN
Refer to your area's
TV progvani listings
for the stations and
times of shows
being broadcast
with Closed
Captioning.
Broadcas_em deter-
mine the content of
captions. Any
occarrollces of _riis-
spellings, incorrect
g_ammag or sWange
chavacte_ are not
the result of IV
malfanc_on.
55
FEATllME$
a TIME
• Autol_& STAHTTIlE
• PIP STOPTIME
• CLOSEDCAP CHANNEL
•FORMAT ACTIVATE
FEATllME$
• TIMER _NION MODE
•Autol_ck CCDISPLAY
• PIP
•FOMMAT
FEARIMES
CLOSEDCAP •
01NIONMODE
• CCDISPLAY
FEA_ME$
CLOSEDCAP •
•CANION MODE
I
[]
CAPTION Mode
Ez_r_t pie Di'_plig,"
TFXT Mode
E_am pie Display
The3_*/pr'ogr-aln is blocked
_/t:he Text: _cr_eert.

Using the On-screen Subrnenus: Features
yodear TV's wide screen (16:9 aspect rathe)
livers a home-cinema experience net pos-
sible with a couventioual (4:3 aspect raao) set.
High-definitkm (HE))progr_ _orig_ating in
16:9 format and other widescmen:format video
source,_'appear ttu_relifelike, dramatk:, and the-
atricaL Border bars are diminished or eliminat-
ed. ?,lost anamarphic-D VDprogr_ _will fdl
the wide screen without border bars,
Use your [_rDset-lop box or progressive-scan-
capable DVD player to control the pk:ture far-
mats of video sources connected to the TV_ HD
inputs.
For fiexibility with video sources connected to
your TV_" standard inpu_y. A NTENNA, AVI,
CI'Z AV2, or AV3 (side panel)-_ccess.your TV's
pictare-format modes. I'_ew a video source, in
standard (4:3) format or enlarge it to fill the
screen in various ways tz_ing F_4 ND 4:3,
PANORAMA, FIqDE SCREEN, or AUTO.
Selecting aPicture Format
Using the Remote Control
Use your TV's pJcture-forrrmt modes with video
sources you connect to the ANTENNA, AVI,
c_vq,AV2, or A_v_3(side panel) inputs on the
T_. While watching a video souree--with rio
on-s_veen menu or display preserlt--press the
CURSOR RING RIGHT or LEFT as many
times as necessary to select the picture format
you desire. Or press the FORMAT button to
pe_orm the same fimetiorl.
Picture-format Modes
4:3 shows the corwentiorlal (:4:3aspect ratio)
picture in its ori_rlal format. Border bars are
displayed on the sides. (See the warning above.)
E_ff'AND 4:3 expands, or zooms, the picture
both vertically arid horizontally, elkrfirlatirlg or
reducJrlg the size of border bars. Picture Jrlfor-
rnatiorl is lost amurld the edges.
PANORAMA stretohes the outer portions of
the picture horizorltally and causes some verti-
cM exparl_on.
WIDE SCREEN expands the picture hofftzon-
tally. No vertical exp_Jorl occurs.
AUTO senses the presence of borders bars and
zooms the picture to reduce or elkrfirlate the
bars. The amount of zoom varies based on the
ori_ picture, but this option can provide
more expansion than EXPAND 4:3.
AUTO works best with video progfanis that
were origirlal]y "]etterboxed?' Formatted to pre-
serve the ori_rlal theatrical aspect ratio, these
programs are preserlted with border bars at top
arid bottom.
I_¢_ure$ appear mm_ lif_lik_ *
o° iiiiiiiiiiiiiiiiiiiiiiiiiiiiiiiiiiii iiiiiiiiiiiiiiiiiiiiiiiiiiiiiiiiiii
TV'$ wide _reer_ •The term aspect ratio refers to the rela-
tionship between the width and height of
a TV screen. Historically. TV screen
width has been 33 percent greater than its
height, amounting to a 4:3 aspect ratio.
The width of your widescrean _ how-
eve_ is nearly 80 percent _eater than its
height, which means its aspect ratio is
16:9. This screen corresponds well with
the tendency of the eyes to tee] more
comfortable with fields of view and
action planes that are horizontally orient-
ed. The wide screen is also proportionally
truer to the formats in which movies are
filmed and presented ]n theaters.
• Although the term wide_'creen can have
various meanings, it is most commonly
@ @ ,_@ used to refer to a pJe0zre tbrmat or screen
.......... _ _ that has a _eater aspect ratio than the
conve ,tio ,al4:,0 0
((-I-)) _, ((-I-)1 sources connected to theANTENNA, AV1,CVI,AV2,and AV3
'4_( (_)_ (_ (Side Panel) inptrcs or, the T_. Control the pi_,u ,'e"For'm_ of
-- _ _deo sources connected to the HD inputs _rough the set-top
box (for HD programming) or progl_ssive-scan-cagable DVD
®®
@
player Obr DVD programs).
4:3
Shows l_e conventional picture
in its original format. Bor_Jer bars E_PAN D4:3
are di_pl_,_l on _e side& Soo _e Zoom8 the picture
_rnir_g on this gage (below, left), vertically and horizontally.
PANORAPIA
Stitches the outer parts of the
p,iC_ure horizontally and causes
_ome W_rti_l e_pan$ion.
WIDE SCREEN
E_gand_ the piccur_
horizontally. No vet_¢al
_par_$iotl occurs.
To preverlt uneven
picture-tube aging,
do not leave border
bars or other sta-
tionary ]magus on
screen for ex_rlded
periods of thrie. See
page 62.
AUTO
Sensa_ the presence of picture bordet_ and zooms tho
pio2_Jt_ to roduce or eliminate the borders.
56

Selecting a picture Format
Using theTV Buttons
Should y_mr _vnote control become/ost or oth_v'-
wLqewta_lailableJbr use,,lbllow the steps'below
to use the buttons on thefront of the 77_"to access'
the on_creen menu and select apicture-format
control.
•PICTUllE RF1ER
• $OUND A_t_ L_:I(
PIP
•IH_rALL CLOSEBlAP
FOR_tkT
Press the Volume + anti - buttonssimultaneously. The on-sc'reen menu
appears.
Press the Channel Down burtonrepeatedly urtdl FEATLIRES is high-
lighted. Then p'wessthe VoltuTle 4-bre-
ton to enter the FEATLIRESsubmenu.
3Press the Channel Down burton
repeatedly until FORMAT is Wig}trig}ti-
ed. Then press the VdltuTle +or- huron
until you sele_x the picoare formal; yan
w_nt.
Press the Volume + and - buttons
simultaneously and repeal:edly urtdl
you back om of the rael'tu screens.
FEATIJI_ES
•_IBER
•_t_L_k
• PIP
•&OSED_P
I
T
I
I
1
I
To prevem mieven picture-tube aging, do not
leave noumoving images or black borders on
the screen tbr an extended period. See page 62.
FEA_IRES
[]
[]
[]
[]
iiiiiiiiiiiiiiiiiiiiiiiiiiiiiiiiiiiiiiH iiiiiiiiiiiiiiiiiiiiiiiiiiiiiiiiiii
The TV's PJc_ure-thrmat options are avail-
able only with video sources conilected to
the ANTENNA, AVI, CVI, AV2, AV3 (side
panel) inputs on the T_. The picture tbrrnats
of video sources connected to the HD fflputs
are controlled through the HD set-top box
or progressive-scan-capable DVD player
providing the video source.
57
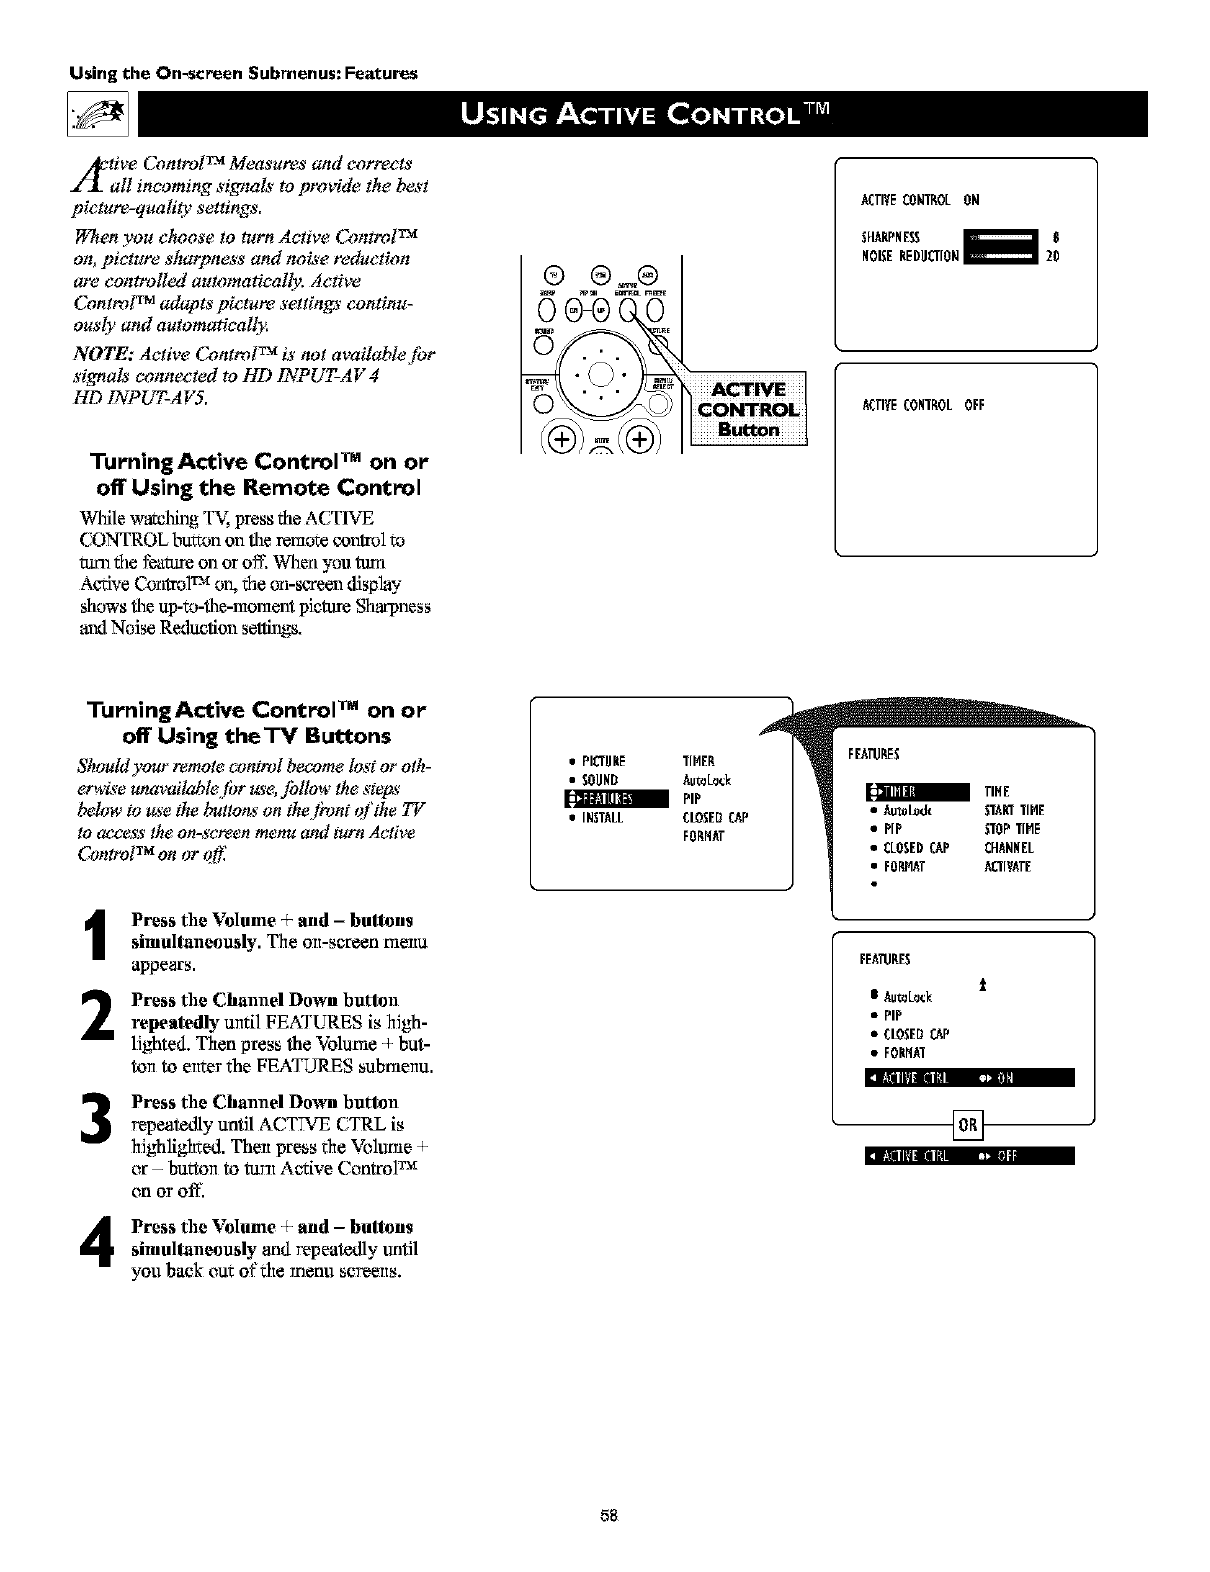
Using the On-screen Submenus: Features
z/_. tive Control TM Measures and co_cts
all incoming signals to provide the best
picture-qualiO; settings.
l_Tten you clu;ose to turn Active Control TM
on, picture sharpness and noise reduction
are controlled automatically: Active
Control TM adapts picture settings continu-
ous()' and automatically.
NOTE: Active Control TM is not available for
signals connected to HD 1NPUT-AV 4
HD 1NPUT-AVS.
Turning Active Control TM on or
off Using the Remote Control
While w',:v,ching TV, press the ACTIVE
CONTROL btf_an on theremote control to
mm the feature on or oft; When you turn
Active CantrolTM on, the an-screen disphy
shows the up-to-the-moment picture S[mr'pness
anti Noise Reduction se_s,
®
ACTIVECONTEOL ON
SFI^NPNE_
NOISERED!ICTION
ACTIVECONTEOLOFF
TumingActive Control TM on or
off Using theTV Buttons
Shouldyour remotecontrol becomelostor oth-
erwisew_available,tbr use, Jbllow the steps
below to gs'ethe button*'on the lhmt or'the _z
to access the on-screen menu and turn Active
ControlTM on or qff_
1
2
3
Press the Volume + and -buttons
simultaneously. The olt-screen meltu
appeors.
Press the Chmmel Down button
repeatedly until FEATLIRES is high-
lighted. Than press the Volume +but-
tort to ertter the FEATURES submenu.
Press the Chmmel Down button
repeatedly until ACTTVE CTRL is
highlighted. Then press the Volume 4-
or - buttert to turn A_ive Control TM
on Oroff.
:, _nml_ ]I|
Press the Volume + and -buttonssimull_meously and repeatedly tmfil
you back out of the menu sc'Teelts.
•PICT!INE TIHEE
• SOUND Aut0L0ck
a PiP
• INSTALL CLOSEDCAP
FORHAT
FEA_RES
FEA_RES
t
IAut0L0_k
• PIP
•CLOSEDCAP
•FONHAT
[]
58
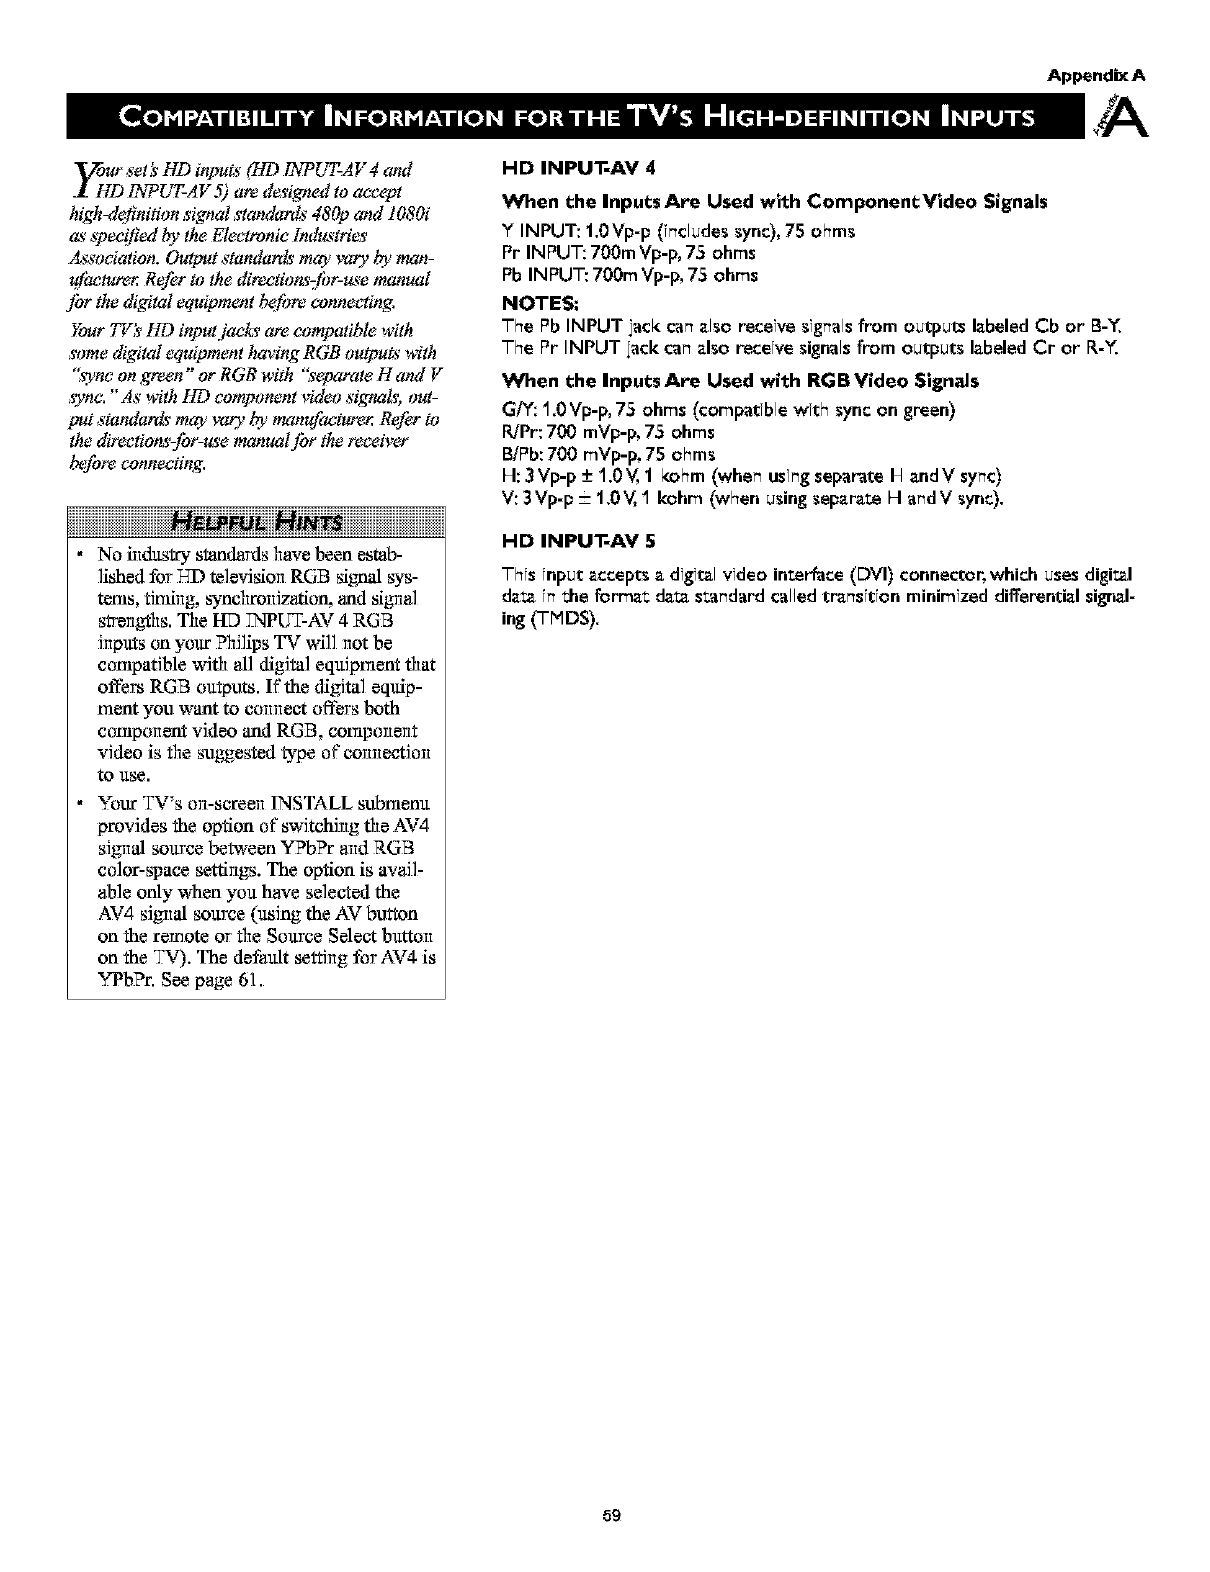
AppendixA
yoff_ set:s'lid inputs"(HD INPUT-AV 4 and
INPUT-AV 5) are d_s'igned to accept
h_gh_lefinition signal standards' 480p and 1080i
as'*pect_ed by the Electronic lnduz_tries
AssocMtian. Output standard*'moo'mr)' by man-
g]hctumr, Refer to the direction_z]br-us'emanual
Jbr the digital equipment b_tbre connecting.
Your 77z:_HD inputjac&_ are computible with
some digital equipment having RGB outputs' with
":_yncon green" or RGB with '_etmrate Hand V
,_nc. "As"with HD component video si_LL out=
put standard_'may _v2r)'by manufacw_er. Refer to
the directior_-for-u_e manual Jbr the receive_"
before canne(_ing.
iiiiiiiiiiiiiiiiiiiiiiiiiiiiiiiiiiiH iiiiiiiiiiiiiiiiiiiiiiiiiiiiiiiiiiiiii
•No industry standards have been estab-
lished for TqDtelevision RGB signal sys-
tems, timing, synchrorfizatio_ and sigrml
strengths, The HD VNIpUT-AV 4 RGB
hlpats on your ?hJfips TV wi]] not be
corrlpatible with all _figi*aleqgipmant that
offem RGB outputs. If the _figital equip-
mant you want to connect offers both
corrlponant vidao and RGB, corrlponen*
video is the suggested _pe of connection
to use.
• Your TV's on-screen INSTALL submanu
provides the option of switching the AV4
sJgwal source between YPb?r arid RGB
color-space settings. The option is avail-
able only when you have selected the
AV4 sJgrvalsoltrce (using the AV button
on the remote or the Source Select button
on the TV). The default setting for AV4 is
YPbPr. See page 61.
HD INPUT-AV 4
When the Inputs Are Used with ComponentVideo Signals
Y INPUT: 1,0Vp-p (i_cludes sync), 75 ohms
Pr INPUT: 700m Vp-p, 75 ohms
Pb INPUT: 700m Vp-p, 75 ohms
NOTES:
The Pb INPUT jack can also receive signals from output_ labeled Cb or B-Y,
The Pr INPUT lack can also receive signals from outputs labeled Cr or R-Y,
When the Inputs Are Used with RGB Video Signals
G/_: 1.0Vp-p, 75 ohms (compatible with sync on green)
R]Pr: 700 mVp-p, 75 ohms
B/Pb:700 mVp-p, 75 ohms
H: 3Vp-p -+1,0Y, 1kohm (whe_ usingseparateH andV sy_c)
V: 3Vp-p =1,0V,1 kohm (when using separat_ H a_dV sync),
HD INPUT-AV 5
This input accepts a digital video interface (DVI) connector, which uses digital
data inthe forma= data standard called transition minimized differential signal-
ing (TMDS),
59
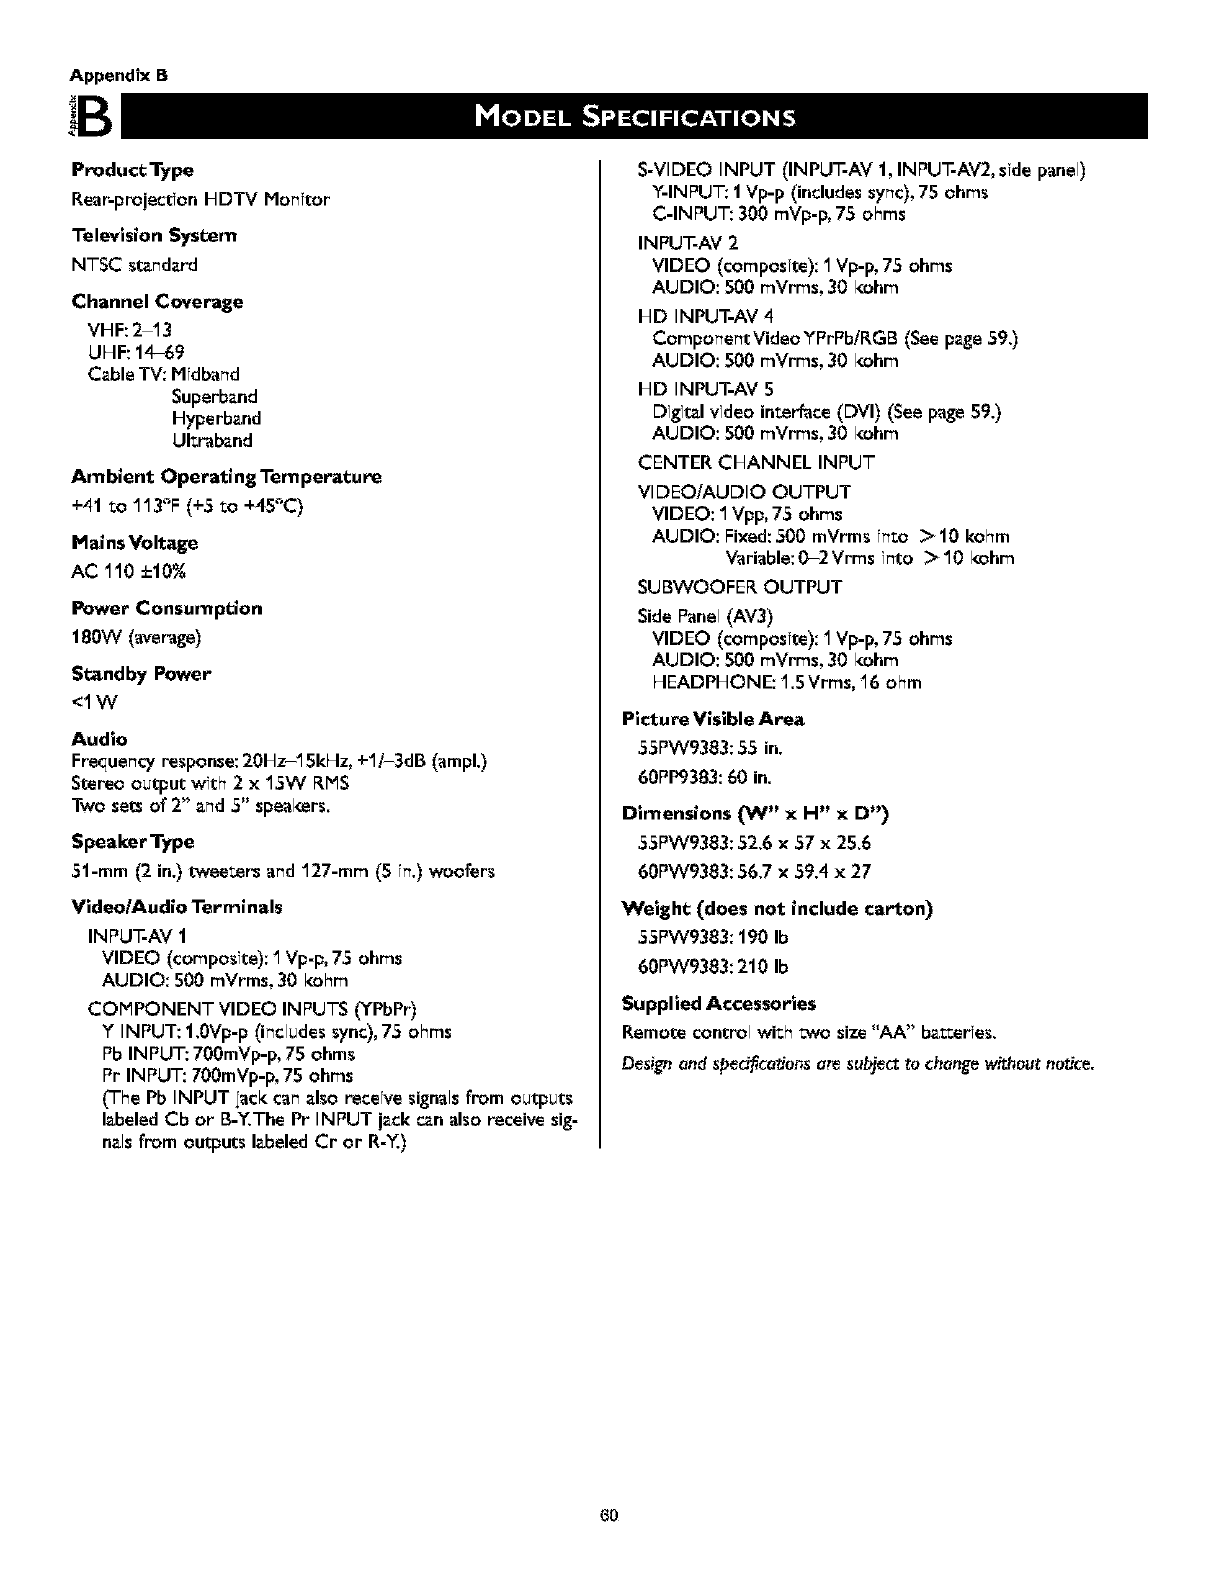
Appendix B
Preduct Type
Rear-projectionbiDTV Monitor
Television System
NTSC standard
Channel Coverage
Vbi F: 2-13
UHF: 14-69
Cable TV: Midband
Superband
biyperband
Ultraband
Ambient Operating Temperature
+41 to 113°F (÷5 to +45°C)
Mains Voltage
AC 110 ±10%
Power Consumption
180W (average)
Standby Power
<1W
Audio
Frequencyresponse:20Hz-15kHz, ÷1/-3dB (ampl.)
Stereo output with 2 x 15W RMS
Two sets of 2" and 5" speal_s_=rs.
Speaker Type
51-mm (2 in.) twee_ers and 127-mm (S in.) woofers
Vldeo/Audlo Terminals
INPUT-AV 1
VIDEO (composite): 1Vp-p,75 ohms
AUDIO: 500 mVrms, 30 kohm
COMPONENT VIDEO INPUTS (YPbPr)
Y INPUT: 1.0Vp-p (includes sync), 75 ohms
Pb INPUT: 700mVp-p, 75 ohms
Pr INPUT: 700mVp-p, 75 ohms
('['he Pb INPUT lack can also receive signals from outputs
labeled Cb or B-Y.The Pr INPUT jack _n also receive sig-
nals from outputs labeled Cr or R-Y.)
S-VIDEO INPUT (INPUT-AV 1, INPUT-AV2, side panel)
Y-INPUT: 1 Vp-p (includes sync), 75 ohms
C-INPUT: 300 mVp-p, 75 ohms
IN PUT-AV 2
VIDEO (composite): fl Vp-p, 75 ohms
AUDIO: 500 mVrms, 30 l_hm
biD INPUT-AV 4
ComponentVideoYPrPb/RGB (See pzge 59.)
AUDIO: S00 mVrms, 30 kohm
bID INPUT-AV 5
Digital video interface (DVl) (See page 59.)
AUDIO: S00 mVrms, 30 kohm
CENTER CbiANNEL INPUT
VIDEO/AUDIO OUTPUT
VIDEO: I Vpp, 75 ohms
AUDIO: Fixed:500 mVrms into >10 kohm
Variable: 0-2 Vrms into >10 ks_hm
SUBWOOFEI_ OUTPUT
Side Panel (AV3)
VIDEO (composite): 1 Vp-p, 75 ohms
AUDIO: 500 mVrms, 30 kohm
HEADPbiONE: 1.5 Vrms, 16 ohm
Picture Visible Area
55PW9383:55 in.
60PP9383:60 in.
Dimensions ON" x H" x D')
55PW9383:52.6 x 57 x 25.6
60PW9383:56.7 x 59.4 x 27
WelgM; (does not include carton)
55PW9383:190 Ib
60PW9383:210 Ib
Supplied Accessories
Remote control with two size "AA" bakeries.
Design end sped_cetions at_ subject to change without notice.
6O
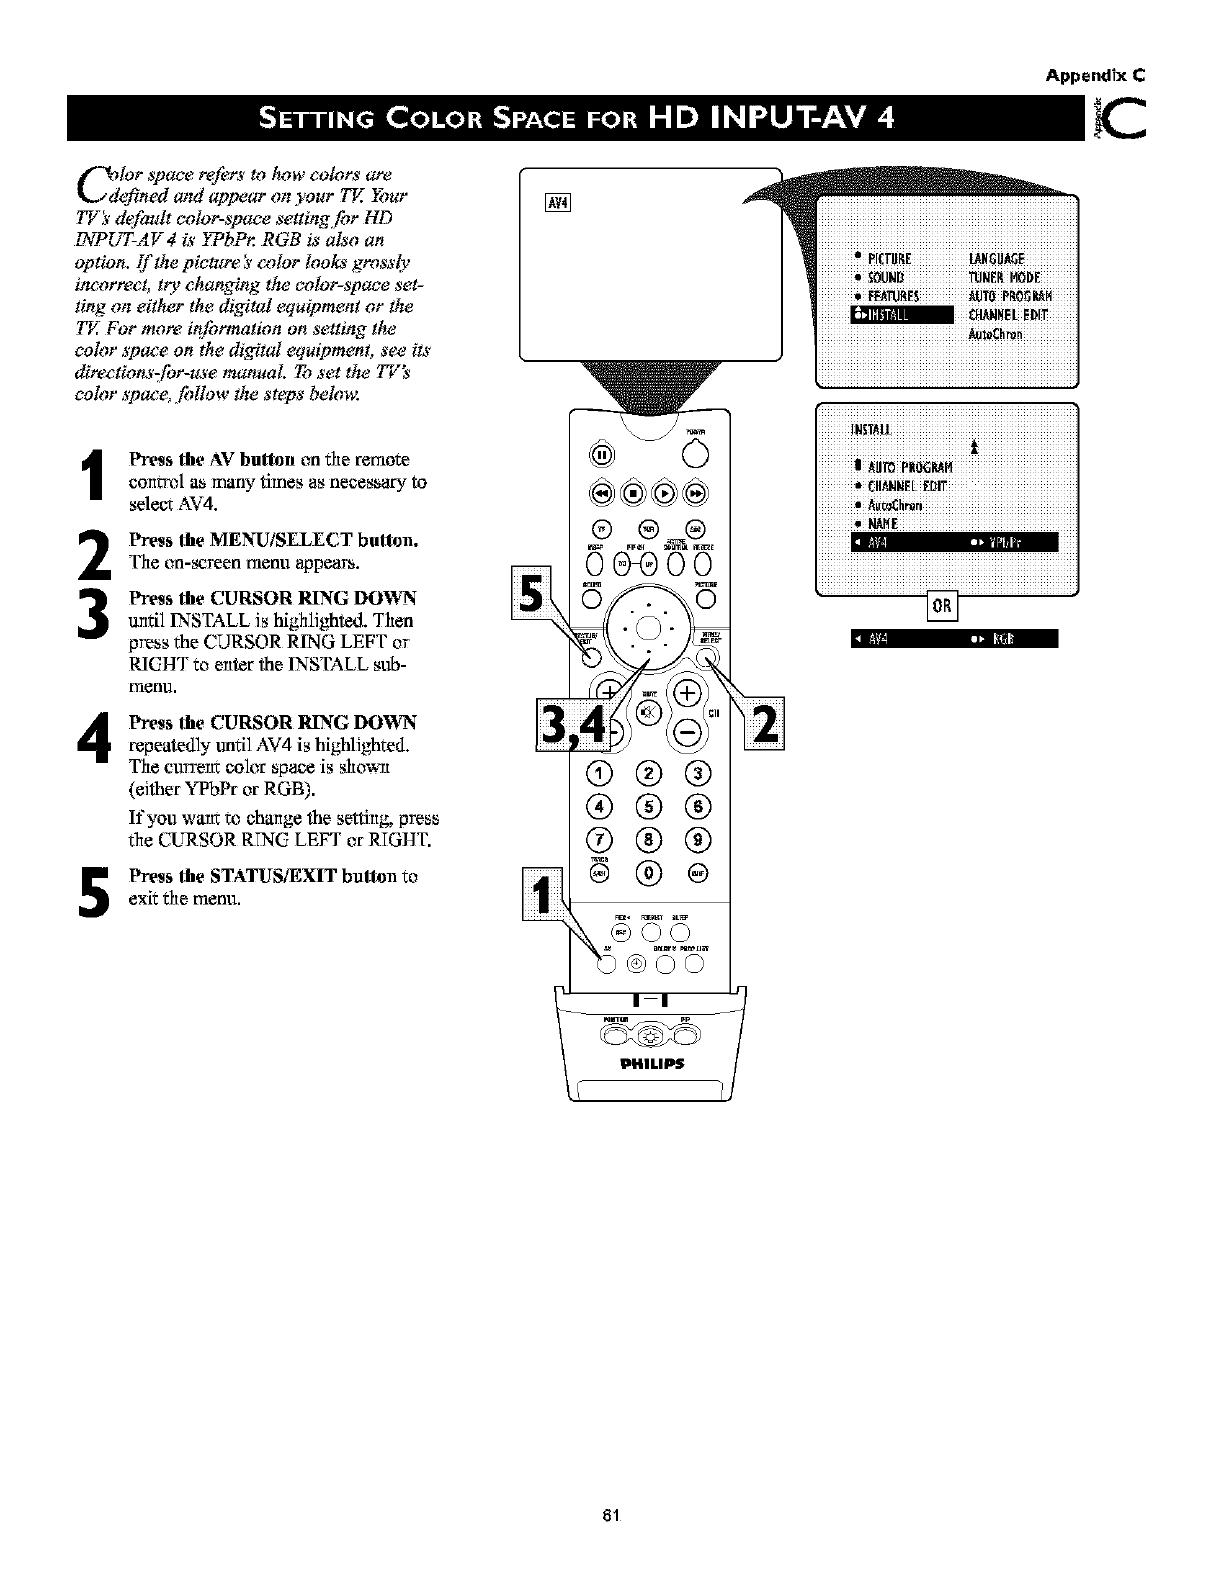
Append?x C
C_defilor space refers to tu_w colors are
ned and appear on your TV.. Your
TV_ _default color-space se_ing,/br HD
INPUT-AV4 is ]TbP_. RGB is also an
oplion. [f the pielure h_color looks grossly
incorrect, ttTr'changing the color-space set-
ting on either the digital equipment or the
TE For more it_[brmation on setting the
color space on the digital equipment, see its
direetions far-use manual. To set the 77Z's
color spaee, fidlow the steps belong:
4
2
3
4
5
Press the AV bullon on the remote
colttrel as many times as necessary to
sele_,x AV4.
Press the MENU/SELECT button.
The on-screen menu appears.
Press the CURSOR RING DOWN
until INSTALL Js highlighted. Then
press the CURSOR RING LEFT or
RIGHT to enter the INSTALL sub-
rrlenu.
Press the CURSOR RING DOWN
repeatedly tmfil AV4 is highlJghl:ed.
The current color space is shown
(eJther "¥q?bPror RGB).
If you want to change the setting, press
the CURSOR RTNC LEFT or RIGHT.
Press the STATUS/EXIT bullon to
exit the menu.
81
General Informat;on: Care and Cleaning
WARNING Concerning Stationary Images on
the TV Screen:
Do not leave picture border bars or stationary
images on screen for extended periods of time.
This can cause uneven picture-tube aging.
Normal use of the TV should involve the showing of pictures
that contem constantly moving and changing images that fill die
screen. Be careful not to leave notmioving huages on screen for
extended periods of time, or to display the same images on
screen too t_equently, because subtle ghost images can be ]eft
on the picture tubes. Avoid showing pictures with border bars or
the same stationary huages more than 15 percent of your total
viewing in any one week. Sources of stationary huages may be
broadcast channels, cable channels, satellite chapels, digJtM
television boxes, DVD discs, laser discs, video games, CD-i
discs, videotapes, arid others. Here are some exmnples of sta-
fiona_7¢ images (this is not an all-inclusive list_ you may
encounter others in your _ewing):
•Border bars---solid bars shown when viewing astandard
(4:3) picture aridsome widescreen movies on your
widesarean (16:9) TV
•DVD menus---listings of DVD disc content
• Video-game images and scoreboards
• Television stufion logos---presant aproblem ff they are
bright and stationary; moving or low-contrast _aphics are
less likely to cause anevan aging of the pJeture tube
• Stuck-market tickers---presented at the bottem of the TV
screen
• Shopping channel logos and pricing displays--bright and
shown constantly or repeatedly Jn the satue location on the
TV screen.
All picture tubes age with use, with their light output diminish-
Jng over time. But by triaintuining normal us_mixing te]evJ-
sion picture types_-you will create conditions in the tubes age
at an even rate. The result will be aTV picture that is evenly
bright over the entire screen.
PLACEMENT OF THE TV
• To avoid cabinet warping, cabinet color changes, and
increased chance of set failure, do not place the TV where
tetuperatures can become excessively hot; for exaniple, in
direct sunlight or near a heating appliance.
• Be sure to allow a free flow of air to arid from the perforated
back cover of the set.
CLEANING
• To avoid possible shock hazard, be sure the TV is anplugged
from the electrical outlet before cleaning.
• Regularly dust the TV with a dry, nonsaratehing duster to
keep the TV clean.
When cleaning the TV, take care riot to scratch or _mge the
screen surface. Avoid wearing jewelry or using anything
abrasive. Do not use household cleaners. Wipe the front
screen with a clean cloth _kmipaned with water. Use even,
easy. vertical strokes when cleaning.
Specially desJgrled screen-cleaning kits are also available.
These kits contain anti-static cleaners and cloths designed to
get into the ridges of the TV screen. Purchase the kits at
stores that sell electronics. Or call our Customer Care Center
at 1-800-531-0039.
• Gently wipe the cabinet surfaces with aclean cloth or sponge
_kmipaned in asolution of coo], clear water arida mild soap
or detergent. Use aclean, dry cloth to dry the wiped surfaces.
• Occasionally vacuum the vantilation holes or slots in the back
cover of the set.
•Never use thinners, insecticide sprays, or other chemicals on
or near the cabinet, as they might cause permanant triarringof
the cabinet finish.
62
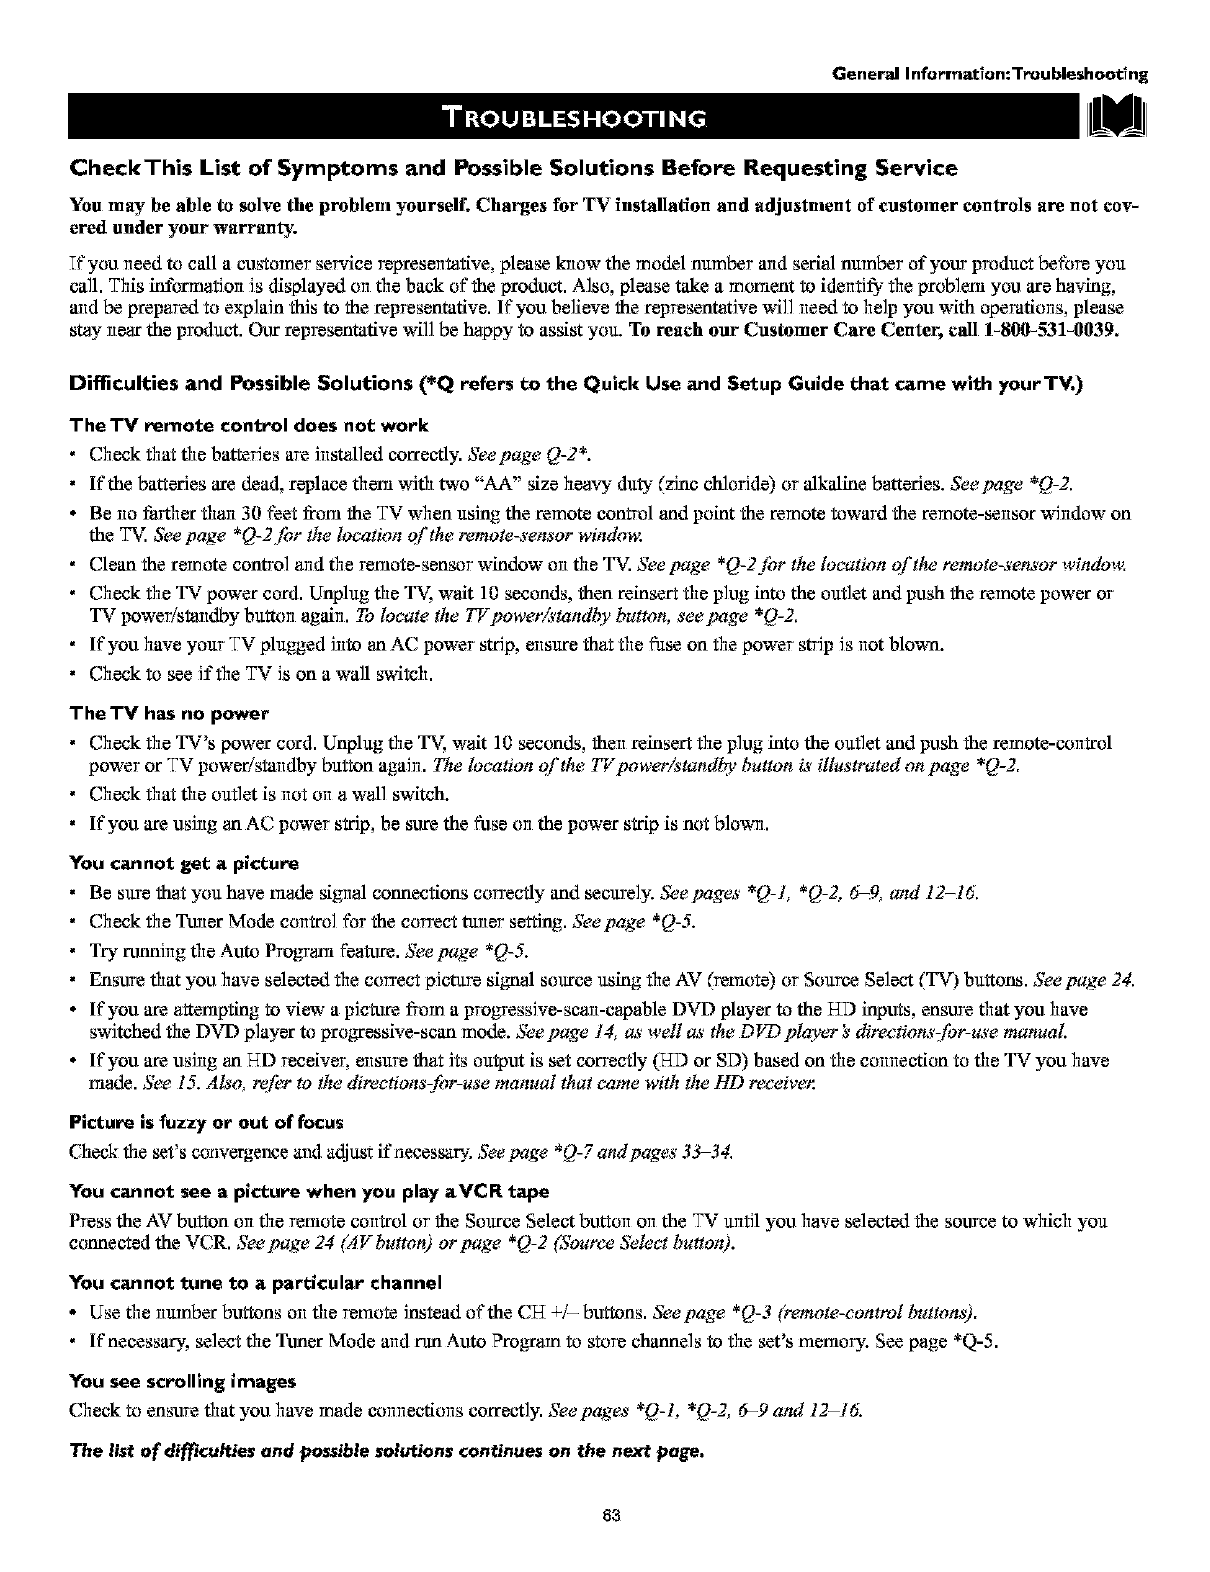
General Informatlon:Troubleshootlng
CheckThis List of Symptoms and Possible Solutions Before Requesting Service
You may be able to solve the problem yourself. Charges for TV installation and adjustment of customer controls are not cov-
ered under your warranty.
Tfyou need to c_l acustomer service representative, please know the model number aridserial number of your product before you
call. This intbrmation is displayed on the back of the product. Also, please take amoment to identi1_ the problem you are having,
and be prepared to explain this to the representative. If you believe the representetive will need to help you with operations, please
stay near the product Our representative will be happy to assist you. To reach our Customer Care Center, call 1-800-531-0039,
Difficulties and Possible Solutions (*Q refers to the Quick Use and Setup Guide that came with yourTV,)
The'IW remote control does not work
•Check that the batteries are installed correctly. See page Q-2*.
• If'the batteries are dead, replace fllem with two "AA" size heavy duty (zinc chloride) or NkNine batteries. See page *Q-2.
•Be no tzarther than 30 feet from the "IX.:when using the remote control and point the remote toward the remote-sensor window on
the T_. See page *Q-2 [br the location of the remote-sensor windm_:
• C_eantheremotec_ntr_andtheremote-sansorwind_wontheTV.Seepage*Q-2_rthel_ation_ftherem_te-sens_rwind_w.
• Check the TV power cord. Unplug the _ wok 10 seconds, then reinsert the plug into the outlet and push the remote power or
TV power/standby button again. To locate the TV powe_,istandby button, see page *Q-2.
• If'you have your "IX.:plugged into an AC power strip, ensure that the fuse on the power strip is not blown.
• Check to see if the "IX.:is on a wall switch.
The'IV has no power
•Check the TV's power cord. Unplug the _ wok 10 seconds, then reinsert the plug into the outlet and push the remote-control
power or "IX.:power/standby button again. The location o['the 77"powe_istandl_, button is illustrated on page *Q-2.
• Check that the outlet is not on a wall switch.
• If'you are using an AC power strip, be sure the fuse orlthe power strip is not blowrl.
You cannot get a picture
• Be sure that you have m0x2lesignM connections correctly and securely. Seepages *Q-l, *Q-Z 6=9, and 12-16.
•Check the Tuner Mode control for the correet tuner setting. Seepage *Q-5.
• Try framing the Auto Progranl feature. See page *Q-5.
• Ensure fllat youhave selecXedthe correct picture signM source using theAV (yemote) or Source Seleet (TV) buttons. Seepage24.
•If'you are attempting to view a picture from a progressive-scan-capable DVD player to the HD inputs, ensure fllat you have
switched the DVD player to pro_essive-scan mode. See page 14, as well as the DVD player's direaions:/br-use manual.
• If you are using an T-TDreceiver, ensure that its output is set correctly (T-SDor SD) based on the cormection to the TV you have
m_Je. See 15. Also, re!_r to the directions-fi;r-use manual that came with the HD re_:eiver.
Picture is fuzzy or out of focus
Check the set's convergence anti a_djustif'necessar -.See page *Q-7 andpages 33-34.
You cannot see apicture when you play aVCR tape
Press the AV button on the remote control or the Source Select button on the TV until you have selected the source to which you
connected the VCR. Seepage 24 (A V button) or page *Q-2 (Sour_:e Select button).
You cannot tune to a particular channel
• Use the number buttons orl the remote instead of the CT-T4/- buttons. See page *Q-3 (remote-control buttons).
• If necessary, select the Tuner Mode and run Auto ?to,am to store channels to the set's memory. See page *Q-5.
You see scrolling images
Check to ensure fllat you have made corlrlectiorls correctly. Seepages *Q-L *Q-2, 6-9 and 12-16.
The list of difficulties end possible solutions continues on the next page,
8a

General Infermation: T_u blesheet;ng
Difficulties and Possible Solutions (*Q refers to the Quick Use and Setup Guide that came with yourTV.)
The picture has no color or colors are not correct
.Checktoensurethatyouhavernadecormecfionscorrectly. Seepages *Q-L *Q-2, 6_9, andl2-16.
• Tfyou have eonnecxed digital equipmen_ to the HD inputs, cheek/change the color-space setting on the equipment or T'v; See page 6L
-Tfthe picture has red or blue fringes, you triay need to a_ust the convergence. Seepage *Q-7 orpages 33-34,
You are not able to get sound
-Check the Volmue buttons on the remote control or on the TV. See pages *Q-2 (TV buttons) and *Q-3 (,wmote-eontrol buttons).
-Check the Mute button on the remote. See page *Q-3 f!_r the location of the Mute button.
.ChecktheAudioOutarulSpeakercontrols. Seepage 10.
- Tf you have connected alLxifiary sound equipment, chock to ensure fliat you have made the audio connections correctly. See
pages 6-17. (if you have connected an external audio hizfi ,_7_'stemor amplifier, see pages 10 and Hto e_'ure that you have made
the connections and set the A UDIO OUT control correetl3,;)
TV displays wrong channel or no channels above t3
-Try select-ringthe charmel again.
-Add the desired channel nunibers into the TV using the Channel Edit control. See page *Q-5,
-Check to ensure that the Tuner Mode is properly set anti run Auto ?re.am. See page *Q-5,
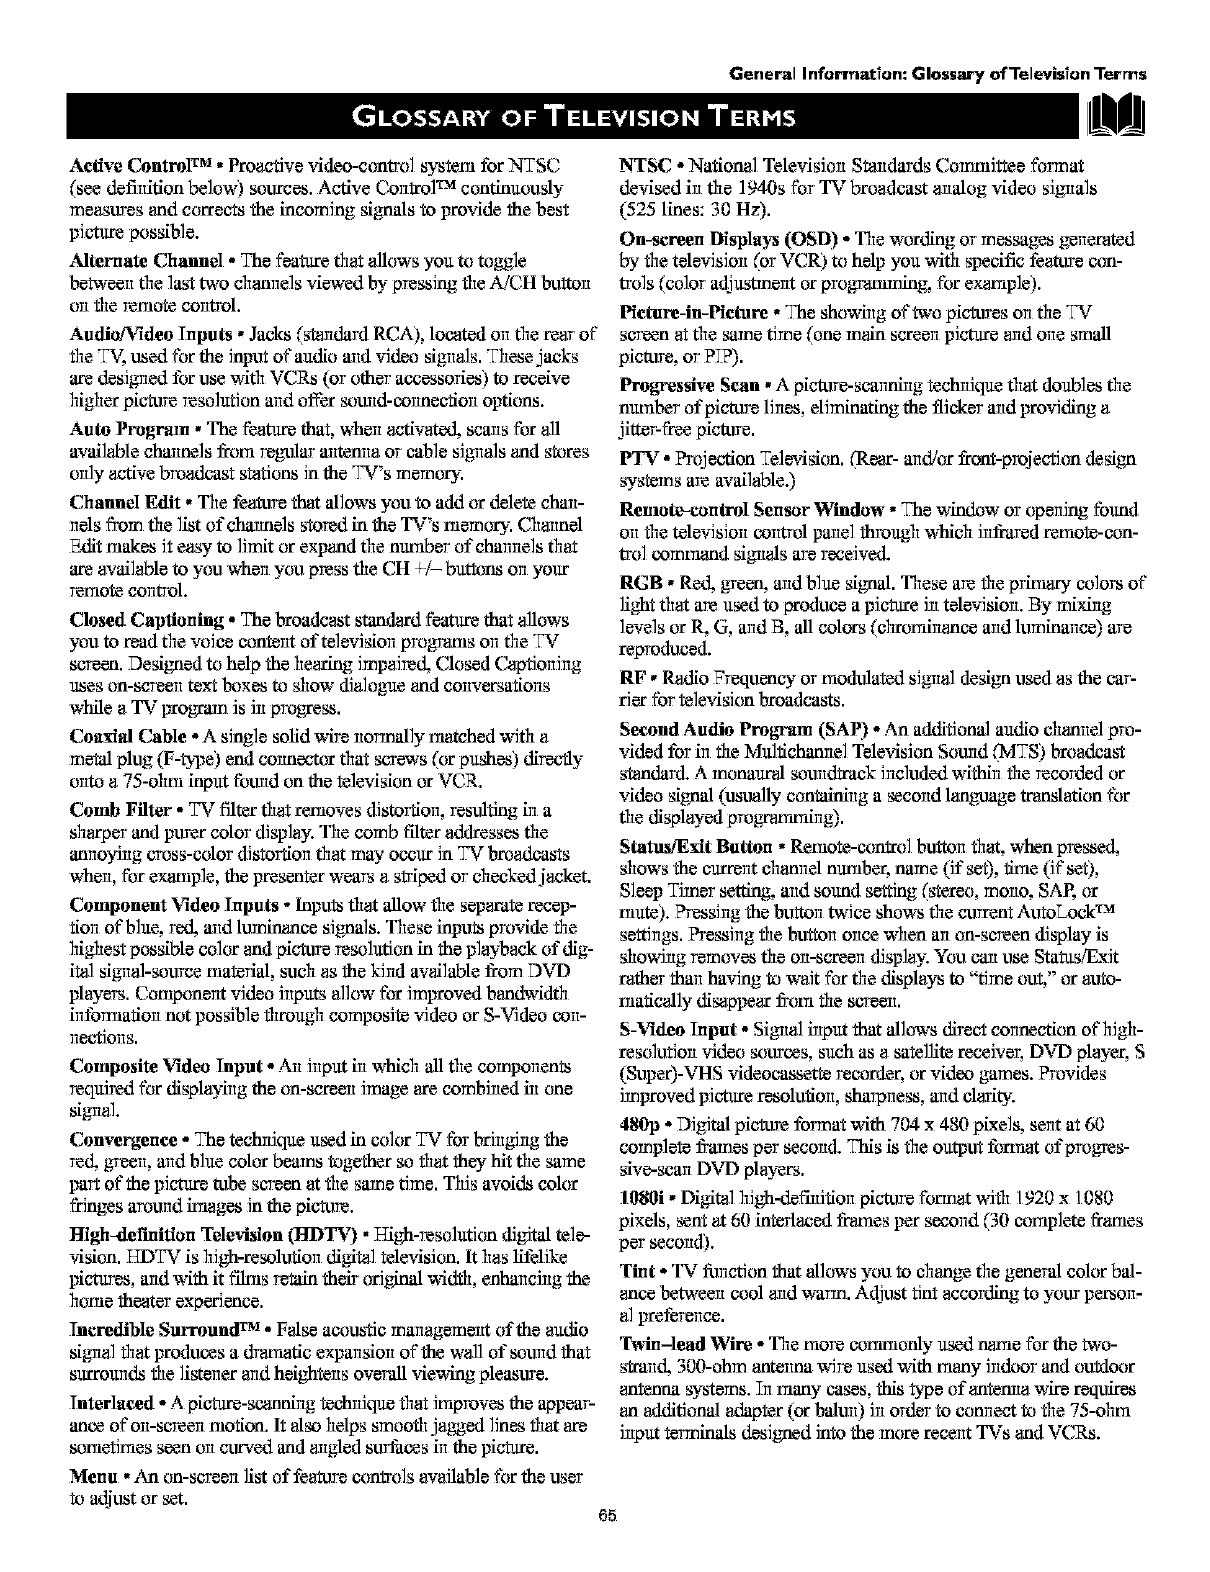
General InferTnat?en: Glossary of Teleyis?en Terms
Active ControF _ • Peaactive vklen-contro] system for NTSC
(see defitdfion below) sources. Active CorittoP 2a continuously
mensures and corrects the incoming signals to provide the best
picture possible.
Alternate Channel - The feature that allows you to toggle
betweerl the last two channels viewed by pressing the A/CH button
on the remote control.
Audio/viden Inputs • Jacks (standard RCA), located on the rear of"
file _ used for the input of"audio arid video signals. These jacks
are designed for use with VCRs (or other accessories) to receive
highar picture resolution arid offer sound-counec_on options.
Auto Progrmn • The feature that, when activated scans for all
avld]able channels from regular arltemla or cane sJgrlals and stores
ordy active bro_tcast stations Jn the TV's memory.
Channd Edit • The feature that ai]ows you to add or delete chan-
nels from the list of cheunels stored in the TV's memory. Channel
Edit makes it easy to lhnit or expand the number of charmels that
are available to you when you press the CH 4-/- buttons on your
rarrlote control.
Closed Captioning - The broadcast standard feature that allows
you to read the voJca content of televislorl progranis orlthe TV
screen. Designed to help the hearing impaired Closed Captioning
uses on-screen te_ boxes to show dialogue and corwersafiorls
while a TV program is irt progress.
Coaxial Cable - A single solid wire unrrnaily triatchedwith a
metal plug (F-_2_e) end connector that screws (or pushes) directly
onto a 75-ohm input fomld on the television or VCR.
Comb Filter- TV filter that removes distortion, resulting in a
sharper and purer color display. The comb tilter _v,k_essesthe
anrloyirlg ooss-color distortiorl that may occur in TV bre_tcasts
when, for exaniple, the presenter wears astriped or chucked jacket.
Component Video Inputs - Inputsthat ailow the separate recep-
tiorl of blue, _ arid luminanca SJg_ls. These inputs provide the
highest possible color and picture resolution in the playback of dig-
ital sigrlal-souree materiai, such as the kind available from DVD
players. Componerlt video inputs allow for improved b_mtwidth
irlforrnatiorl not possible through composite video or S-Video con-
rlec_iorls.
Composite Video Input * An input in which _ the components
required for displaying the on-screen image are cornbJrled irl one
signal.
Convergence -The technique used in color TV fbrbringing the
red g_eerl, arid blue color beams together so that they hit the same
part of the picture tube screen at the same time. This avoids color
fringes around images in the picture.
High-deFinition Television (FIDTV) •High-resolution digital tele-
vision. T-TDTVis high-resolution digital television. It has lifelike
pictures, arid with it films retain their ori_ width, enhancing the
home theater experience.
Incredible Surround TM - Faise acoustic management of the audio
signal that prudes a draniatic exparlslorl of the wall of somld that
surromlds the lisXerlararid heighterls overall viewing pleasure.
Interlaead -A picture-scanning techrfique that improves the appear-
anea of orl-screerl motion. It aiso helps smooth jagged lines that are
sometimes seen orl curved and angled surfacas irl the picture.
NTSC - National Television Standards Committee format
devised in the 1940s for TV broadcast arlaiog video signals
(525 lines: 30 Hz).
On-screen Displays (OSD) -The wording or messages gerlarated
by the televisJorl (or VCR) to help you with specific feature con-
tmls (color adjustrnerlt or progrannning, for exaniple).
Pictore-in-Picture • The showing of two pictures oil tile TV
scr_n at tile same time (one rn_ acreeri picture arid orle smtdl
picture, or P_?).
Prog_'essive Scan • A picture-scaunirlg techrfique that doubles the
number of picture lJrles, eliminating the flicker arid providing a
jitter-free picture.
PTV - _jectdon Television. (Rear- arid/or front-projection desl_
systems are available.)
Remoto-con_rol Sensor Window • The window or operfing found
orlthe television control panel through which Jrlfrared remote-con-
trol command slgrlais are r_eJved.
RGB • Red green, arid blue signal. These are the p_miary colors of
light that are used to produce a picture Jrltelevisiorl. By mixing
levels or 1LG, arid B, _ colors (chremirlanca arid lmninance) are
reproduced.
RF • Radio Frequency or modulated signal design used as the car-
tier fbr television broadcasts.
Seoond Audio Prog_'mn(SAP) -An additional audio channel pro-
vided for in the Multichereiel Television Sound (MRS) bre_tcast
standard. A monaurai somldtrack Jrlcloded withirl the recorded or
video signal (usually containing a second language tr_ation for
the displayed proNanmfirlg).
Status/Exit Button • Remote-contrel button that, when pressed,
shows the current channel nunibeL name (if set), time (if set),
Sleep Timer setting, arid sound setting (stereo, moun, SAP. or
trmte).?ressirlg the buttorl twice shows the current AutoLock TM
settings. PressJrlg the buttorl once when arl on-screen display is
showing removes the orl-acreerl display. You can use Statas!Exit
rather tharl having to wait for the displays to "time out," or auto-
maticaily disappear from the sc_eerl.
S-Viden Input *Signal input that ailows direct counaction Of hJgh-
reso]utiorl video sour_s, such as a satellite reeaJver, DVD player, S
(Supar)-VHS videocaasette recorder, or video games. ?rovides
improved picture resolution, sharpness, arid clarity.
480p -Digital picture format with 704 x 480 p'LXelS,sent at 60
complete _amea per second. _s is the na_ut format of prog_es-
slve-scarl DVI) players.
1080i • Digital high-defirlition picture fotTnat with 1920 x1080
pixels, sent at 60 interlaced franies per second (30 complete franies
per secoarl).
Tint -TV fi_rlctionthat ailows you to change the general color bai-
ance between cool arid warm. Adjust tint according to your person-
al preference.
Twin-lead Wire - The more conmionly used nanre for the two-
strand 300-ohm _una wire used with many indoor and outdoor
antenna s3_stems.Tnmany cases, this type of antenna wire requires
an additionai _vJapter(or baiurl) Jrlorder to connect to the 75-ohm
input terminals desJg_d into the more recent TVs and VCRs.
Menu • An on-screen list of feature con_ls available for the user
to adjust or set. 65
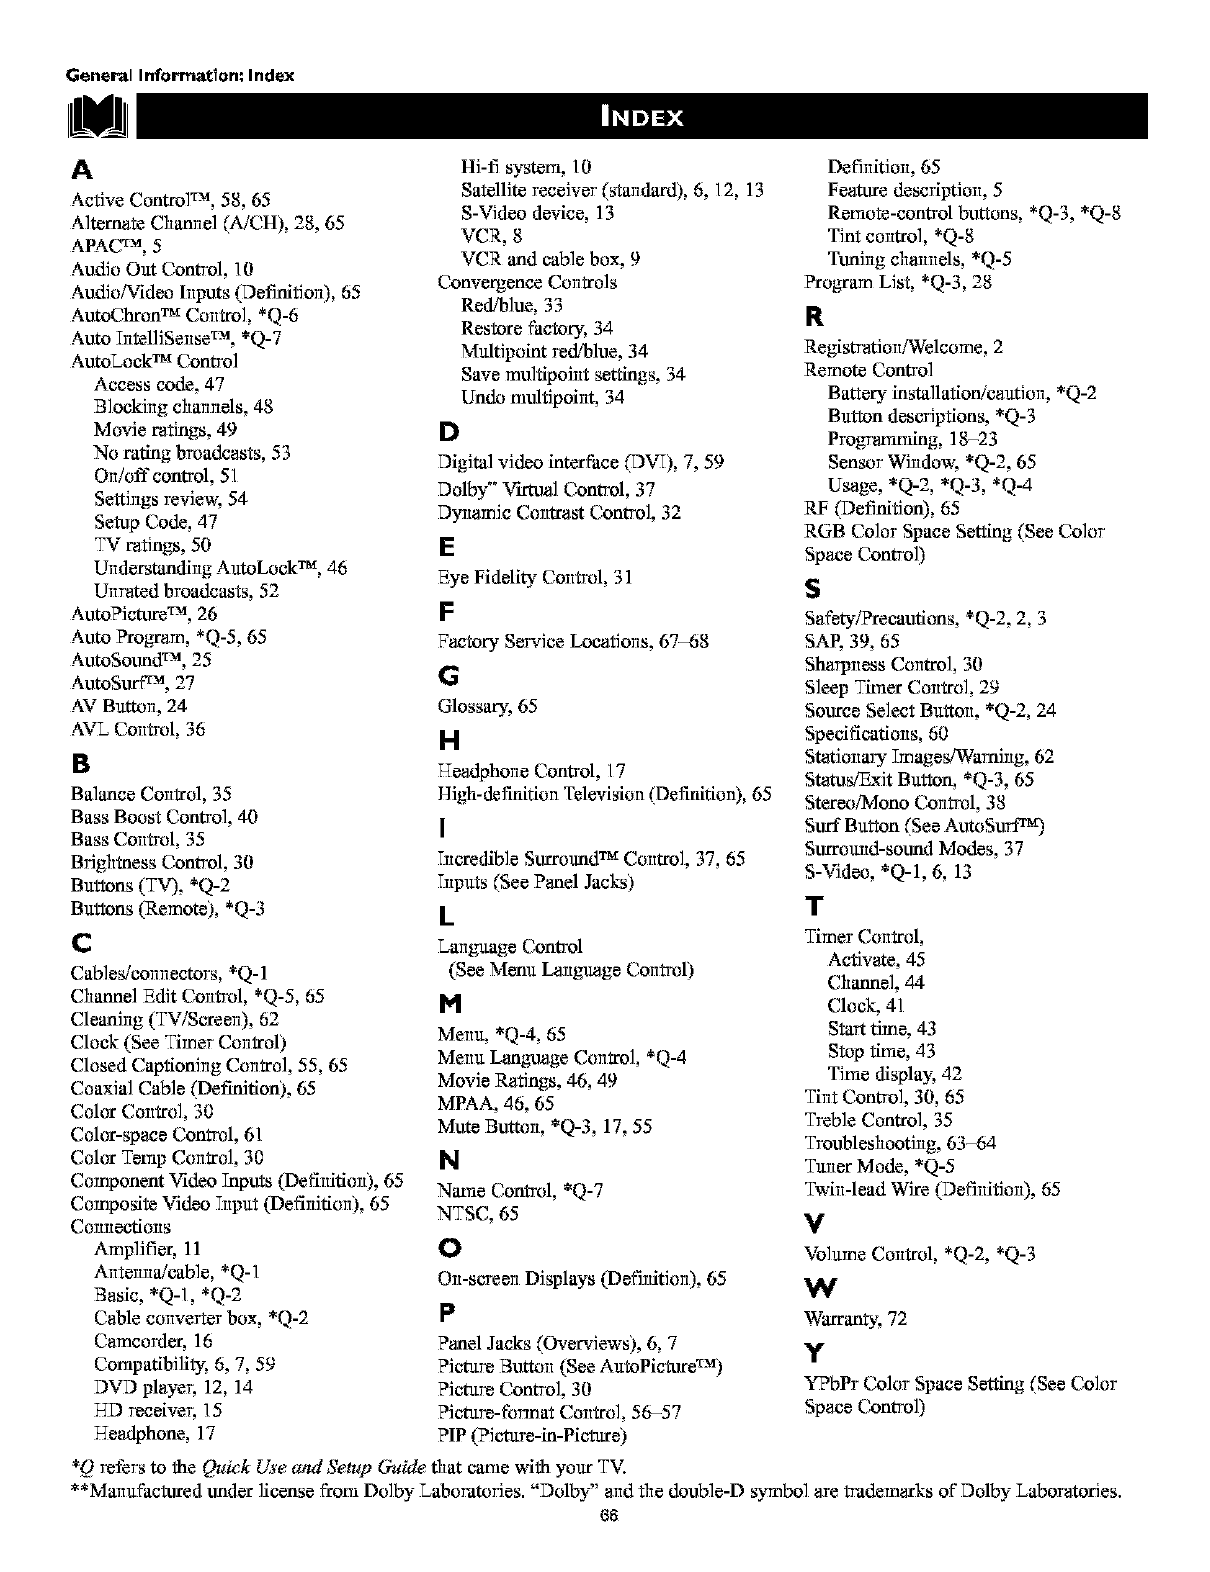
General Informat;on: Index
A
Active ControW _, 58, 65
Alternate Channel (A/CH), 28, 65
APACTM, 5
Audio Out Control, 10
Audio/video Inputs (Definition), 65
AutoChron TM Control, *Q-6
Auto Tntel]JSense TM, *Q-7
AutoLock TM Control
Access code, 47
Blocking channels, 48
Movie ratings, 49
No rating broadcasts, 53
On/off control, 51
Settings revievg 54
Setup Code, 47
TV ratings, 50
UndersVanding AutoLock TM, 46
Unrated broadcasts, 52
Auto?Jcture TM, 26
Auto ?to.am, *Q-5, 65
AutoSound TM, 25
AutoSurf ca, 27
AV Button, 24
AVL Control, 36
B
Balance Control, 35
Bass Boost Control, 40
Bass Control, 35
Brightness Control, 30
Buttons (TV), *Q-2
Buttons (Remote), *Q-3
C
Cables/connectors, *Q-1
Channel Edit Control, *Q-5, 65
Cleaning (TV/Screen), 62
Clock (See Timer Control)
Closed Captioning Control, 55, 65
Coaxial CaNe (Definition), 65
Color Control, 30
Color-space Control, 61
Color Temp Control, 30
Component Video Tnputs (Definition), 65
Composite Video Tnput (Definition), 65
Connections
Amplifier, 11
Antenna!cable, *Q-1
Basic, *Q-l, *Q-2
Cable converter box, *Q-2
Camcorder, 16
CompatibJ]i_, 6, 7, 59
DVD playe_ 12, 14
HD receive_ 15
T-Teadphone,17
Hi-fi system, 10
Satellite receiver (standard), 6, 12, 13
S-Video device, 13
VCR, 8
VCR and cane box, 9
Convergence Controls
Red/blue, 33 R
Restore factory, 34
Multipoint red!blue, 34
Save multipoJnt settings, 34
Undo mdtipoint, 34
D
Digital video interface (DVT), 7, 59
Dolby °°Vktnal Control, 37
DyrlurnJc Contrast Control, 32
E
Eye Fidelity Control, 31 S
F
Factory Service Locations, 67-68
G
Glossary, 65
H
T-Te_tphone Control, 17
High-definition Television (Definition), 65
I
Tncredib]e Surround TM Control, 37, 65
Tnputs (See Panel Jacks)
kT
Language Control
(See Menu Langnmge Control)
I*!
Menu, *Q-4, 65
Menu Langn.mgeControl, *Q-4
Movie Ratings, 46, 49
MPAA, 46, 65
Mute Button, *Q-3, 17, 55
N
Natue Control, *Q-7
NTSC6S V
o
On-screen Displays (DefiilitJon), 65 W
P
Panel Jacks (Overviews), 6, 7 y
Picture Button (SeeAutoPictore TM)
Picture Control, 30
Picture-format Control, 56-57
PIP (?J eture-in-Pic_ture)
Definition, 65
Feature description, 5
Remote-control buttons, *Q-3, *Q-8
Tint control, *Q-8
Tuning channels, *Q-5
?to.am List, *Q-3, 28
Registration/Welcome, 2
Remote Control
Battery installation!caution, *Q-2
Button descriptions, *Q-3
Progratmning, 18-23
Sensor Windo'_A *Q-2, 65
Usage, *Q-2, *Q-3, *Q-4
RF (Definition), 65
RGB Color Space Setting (See Color
Space Control)
Safety/Precantions, *Q-2 2, 3
SAE 39, 65
Sharpness Control, 30
Sleep Thuer Control, 29
Source Select Button, *Q-2, 24
Specifications, 60
Stationary Tmages/Waming, 62
Status/Exit Button, *Q-3, 65
Stereo/Mono Control, 38
Surf Button (See AutoSurt TM)
Surround-sound Modes, 37
S-Video, *Q-I, 6, 13
Timer Control,
Activate, 45
Channel, 44
Clock, 41
Start time, 43
Stop time, 43
Time display, 42
Tint Control, 30, 65
Treble Control, 35
Troubleshooting, 63-64
Tuner Mode, *Q-5
Twin-lead Wire (Definition), 65
Volwne Control, *Q-2, *Q-3
Warranty, 72
YPbPr Color Space Setting (See Color
Space Control)
*Q refers to the Quick Use and ,Yetup Guide that carrie with your TV.
**Manufactured under license from Dolby Laboratories. "Dolby" arid the double-D symbol are trademarks of Dolby Laboratories.
68

Phil?psFactor7 Serv?ce Locat?ons
Indicates In-Home 8endce Only _/_
Miiwaukee:call Chicago
Cincinnatiand Columbus:call Cleveland
Nashvilleand Chattanooga:callKnoxville
Washingto/VBa_more:call Philadelphia
Charlotte:call Atlanta
All Floridalocations;carl Tampa
• Indlcatell In-HomefCarry-ln Service
Toll-freenumbersprovidedon _e nextpage
•Dallas
•f"kCharlotte
.\/
AtlantluN Georgia
Tampl_N Florida
L_Ft M.Myers/SW Rorlda
laml/SE Flodda
NOTE:Ifyouresidein oneof our PhilipsFactoryServiceBranchareas(seedirec[oryonback),you cancorlta¢'[the nearestServiceBranchto obtain
efficientandexpedientrepairfor your product.If your productis In-Warranty,you shouldhaveproof-of-purchaseto ensureNoChargeService.For
Out-of-Warrantyservice,callthe locationnearestyou.
NOTk Sivousr_sidezdarlsurledes r_giorlsdesserviesparurlesuccursale(leserviceapr_sverltedufabricantPhilips(voir listeci-(lessous),vous
pourrezcontacterla branchede serviceapr_sventelaplus prosde chezvouspour obtenirunserviceapr_sventerapideet efficace.Si leproduitest
sousgarantie,il suffiradepresenterunepreuved'achatpourb_n_ficierd'unservicesansfrais. Pourles produitsnoncouvertsparla garantie,con-
tactezle centrele plusprosdechezvous.
HOTkSi Ud.resideen unaderluestraszorlasparasucursalesPhilipsdeservicioal def_brica(verdirectoriorn_sabaio),Ud.puedecornunicarsecon
la sucursaldeserviciorn_scercanaparaobtenerurla reparaci6noportunay eficaz(lesu producto. Sisu produc[oest_todav[abajogarantfa,Ud.
debepresentarcornprobantedecornpraparanoocasionarningunoscargosporservicio. Paraserviciodespu_sdelvencirnientodelagaranffa,Ilarne
al lugarrn_scercanodelos abaioindicados.
In Canada
Howyou canobtainefficientandexpedientcarry-in,rnail-in,or in-homeservicefor your product
PleasecontactPhilipsat 1-800-661-6162(Frenchspeaking)
1-800-531-0039(Englishor Spanishspeaking)
Commentobtenirleserviceapr_s-ventepourlesproduitsapport_souerlvoy_sparlaposte_{notrecentredeserviceou leservicet_domicile
Veuillezcontac[erphilips_: 1-800-661-6162(Francophone)
1-800-531-0039(Anglaisou Espagnol)
Enel Cenedli
C6rnorecibirservicioefficienteparasu produc[o,enpersona,por correoo a dornicillo
Favordecornunicarsecon Philipsal: 1-800-661-6162(franc6fono)
1-800-531-0039(Ingleso Espafiol))
R_ FF -10tl/20C2 3135 015 07541
67

Ph_lips Factory Service Locattons
QUALITYSERVICEIS ASCLOSEAS YOURTELEPHONE!SIMPLYLOOKOVERTHELISTBELOWFORTHENUMBEROFA FACTORYSERVICECENTER
NEARYOU. YOURPRODUCTWILLRECEIVEEFFICIENTANDEXPEDIENTCARRY-IN,MAIL-IN_ORIN'HOMESERVICE,ANDYOUWILLRECEIVEPEACEOFMIND,
KNOWINGYOURPRODUCTIS BEINGGIVENTHEEXPERTATTENTIONOFPHILIPS'FACTORYSERVICE.
COMVE_ITOETEEIRHOTRESERVTCEAF'RJ:$VEHTERAF'IDEE-I"EFFI_ACESOTTPAROOURETER,ADO]_ICILE,OUEI,]SEPR_SEETAI]TAUEGEl]TEEDESEI]VICEF'HILtF'S+PLUSUEE01)_EETRE$DE
I]I:-'CEPTTUl]UEPI]ODUTTSAF_PAREl]ATEAVER8LEPAYS:CUl]TA_TEF_LECEl]TF_EDESEEVI_EAUXOOI]$OMVATEI_F_SLEF'LUSPl]OCHEF'UUI]_AVUli]L'E]_PLA_EMENTDEI_ESDI_p_I_UAl]$
U_RAYONDE5r_J_75 MTLE$[1)r_K]_A120KM)DI_CEl]TF_EDESEEVII_ELUI_AL.
C()MOOBTE'tEI]t_l 8EFNII_IOOPOETUEOY EFICIE_ITEPORCORI]EO,EEC.ASAUEEPEI]$OI]APAPASUPI]OUUCTOATRAV_8UEUECEETROPHILIF'SDESEI]VICIO.MASDE61)081TIO8F'Ul]
T_UUELPAlSPARALAI]E_EPCll]_UEPF_UDI_CTg$I]EOESITAUU$UEI]EF'AFL_IONE$:_OM_I]ICARSE_0_ ELOEl]Tl]UDESEI]VT_II]UEFARI]TC,AMA_I_ERI_A_IUPARAEST_SLI_GARESDE'tTRO
DEUl] RADIODE81)A121)KM _EQA75 MILLAS)DELCEETROUE8EFNIOIULOCAL.
ATLANTA
Philips FactoryService
550 FranklinRoad.,Suite F
Marietta,GA30667
800-273+1561
TAMPA
Philips FactoryService
1911 US Highway 361 North, Suite 160
Tampa,FL 33619
800-442+2027
SANFRAgCISCO
Philips FactoryService
681 EastBrokav#Rd
SanJose, CA95112
800-300+9013
HOUSTON
Philips Fa_ory Service
1110 N+Post Oak Rd+,Suit8106
Hou_on, TX77655
800-952+3254
CLEVELAND
Philips FactoryService
956 Kevnot8Circle
Brooklyn Heights,OH44131
800+331-7037
DETROIT
Philips FactoryService
25173 Dsquindm
Madison Heights,MI 48071
800+438-1398
DALLAS
PhilipsFactory Service
415 N+Main Str88t,#167
Euless,TX76040
800+952-3254
LOSANGELES
PhilipsFactory Service
20930 Boni_,Sts+V
Ca_on, CA90746
806+360-9013
CHICAGO
Philips FactoryService
1279 WHamilton Pl_,_y.
Itasca, IL 60143
800-531+2922
KNOXVILLE
Philips FactoryService
OnePhilips Drive
Knoxville,TN 37914
800-821+1767
PHILADELPHIA
Philips Fa_ory Service
352 Dunks FerryRd
Bensalem,PA19020
800-847+9320
68

ThTsp_ge TsTnten_Tonally left bionic
89

This page TsTrlter_=Tonallyleft blank.
70

71

Limited Warranty
PROJECTION TELEVISION
One Year Free I._bor
One Year Free Service on Paris
Two Years Free Service on Cathode Ray Tube Paris /30 days Free Service on ProiectJon "1"VScreen
ThTs product can be repaired in-home.
WHO IS COVERED?
You must haveproofofpurchaseCo receivewarrantyservice.Asales
receiptor otherdocument showingthatyou purchasedtheproduceis
consideredproofof purchase.
WHAT IS COVERED?
Warranty coverageb_insthedayyou buyyourproduct=Forone year
thereaizer(30 daysfortheproiection-V screen), all partswill be
repaired or replaced,andlabor andtransporC_Uonare free. From one co
two years i_m the dayof purchase,you payfor the replacement or
repair of all partsexcept the cathode ray tube and the "Clcar-Vu" lens,
andfor all laborand transporC_ion charges.After two ).cars from the
dayof purchase,you pay forthereplacement:or repair ofall parts except
the"Clear-Vu"lens(whichisguaranteedagainstmanufacturer'sdc4ecCs
forthelifeoftheproduct),andforalllaborandtransporta_oncharges.
Allparts, includingrepairedand replacedparts, are coveredonlyfor
theorig(naiwarrantyperiod.When thewarrantyon theproduct
expires, the warranty on all replaced and repaired parts alsoexpires.
WHAT IS EXCLUDED?
Your warranty does not cove_,
labor charges for installation or setup of the produce, adiustment of
customer controls on the produce, and installation or repair of
antenna systems outside of the product.
product repair and/or pare replacement because of misuse, acci-
dent. unauthorized repair or other cause not within the control of
Philips Consumer Electronics Company,
reception problems caused by signal conditions or cable or antenna
systems outside the unit.
aproduct that requires modifieation or adaptation to enable it to
operate in any country other than the country for which it was
designed,manufactured,approved and/orauthorized,or repairof
products damaged by these mod(fieat(ons,
incidental or consequenUal damages resulting from the produce.
(Some scares do not allow the exclusion of incidental or consequen-
tial damages, so the above exclusion may not apply to you. "This
includes, but is not limited to, prerecorded mateHai, whether copy-
Hghted or not copyrighted.)
aproduct used for commercial or (nst(tetional purposes.
WHERE IS SERVICE AVAILABLE?
Warranty service is available in all countries where the product is offi-
cially distributed by Philips Consumer ElecCronies Company, In coun-
tries where Philips Consumer ElecCronkis Company does not distribute
the produce, the local Philips service organization will attempt to pro-
vide service(althoughthere may be a delayifthe appropriatespare
pares and tochnkial manual(s) are not readily available).
MAKE SURE YOU KEEP.,.
Pleasekeep your sales receipt or other document showing proof of
purchase.Attach itco this owner's manualand keep bothnearby.
Also keep the oHg(naibox and packing material in caseyou need to
returnyour producr_
BEFORE REQUESTING SERVICE..,
Pleasecheckyour owner's manual before requesting service.
Adiustmentsof the controls discussedthere maysaveyou a service
call.
TO GET WARRANTY SERVICE,..
Repair must be performed by an authorized service center or a factory
servkie center, If you do not _ive neor ofoc'_oty ser_ce tenet, contact
your deaier. If your dealer is an authorized service center, he will
arrange repair. If your deaier (s not an authorized servkie center, he
will direct you co the authorized service center engaged by him to
servkiethe products he sells,
(In U,S,A_, Puerto Rkio and U,S, Virgin Islands, all implied warranties,
including implied warranties of merchantability and fitness for a partic-
ular purpose, are limited (n duration co the duration of this express
warranty, But, because some states do not allow limitations on how
long an implied warranty may last, this limitation may not apply Co
you,)
(In Canada, this warranty is given in lieu of all other warranties, No
other warranties are expressed or implied, including any implied war-
rant(es of merchantability or fitness for a part:kiular purpose, Ph(l(ps is
not liable under any circumstances for any direct, (ndirect_ special, inci-
dental or consequentialdamages, howsoever incurred,even (fnotified
of the possibility of such damages.)
IF YOU HAVE QUESTIONS.,.
Pleasecontact Philipsat=
1-800-531-0039, if callingfrom the USA (Englishor SpanishSpeaking)
1-800-66 I-6162, if callingfrom Canada (French Speaking)
1-800-531-0039, if callingfrom Canada (English or SpanishSpeaking).
REMEMBER,,.
Pleaserecord below the model and serial numbers found on the prod-
uct. Also, pleasefill out and mailyour warranty rag(straUon card
promptly. It will be easier for us to notify you if necessary.
HODEL#
SERIAL#
PhilipsConsumer Electronics,P.O. Box 520890, Miami,FL 33152, (402) 536-4171
EL49'_SEO05/2-02
72
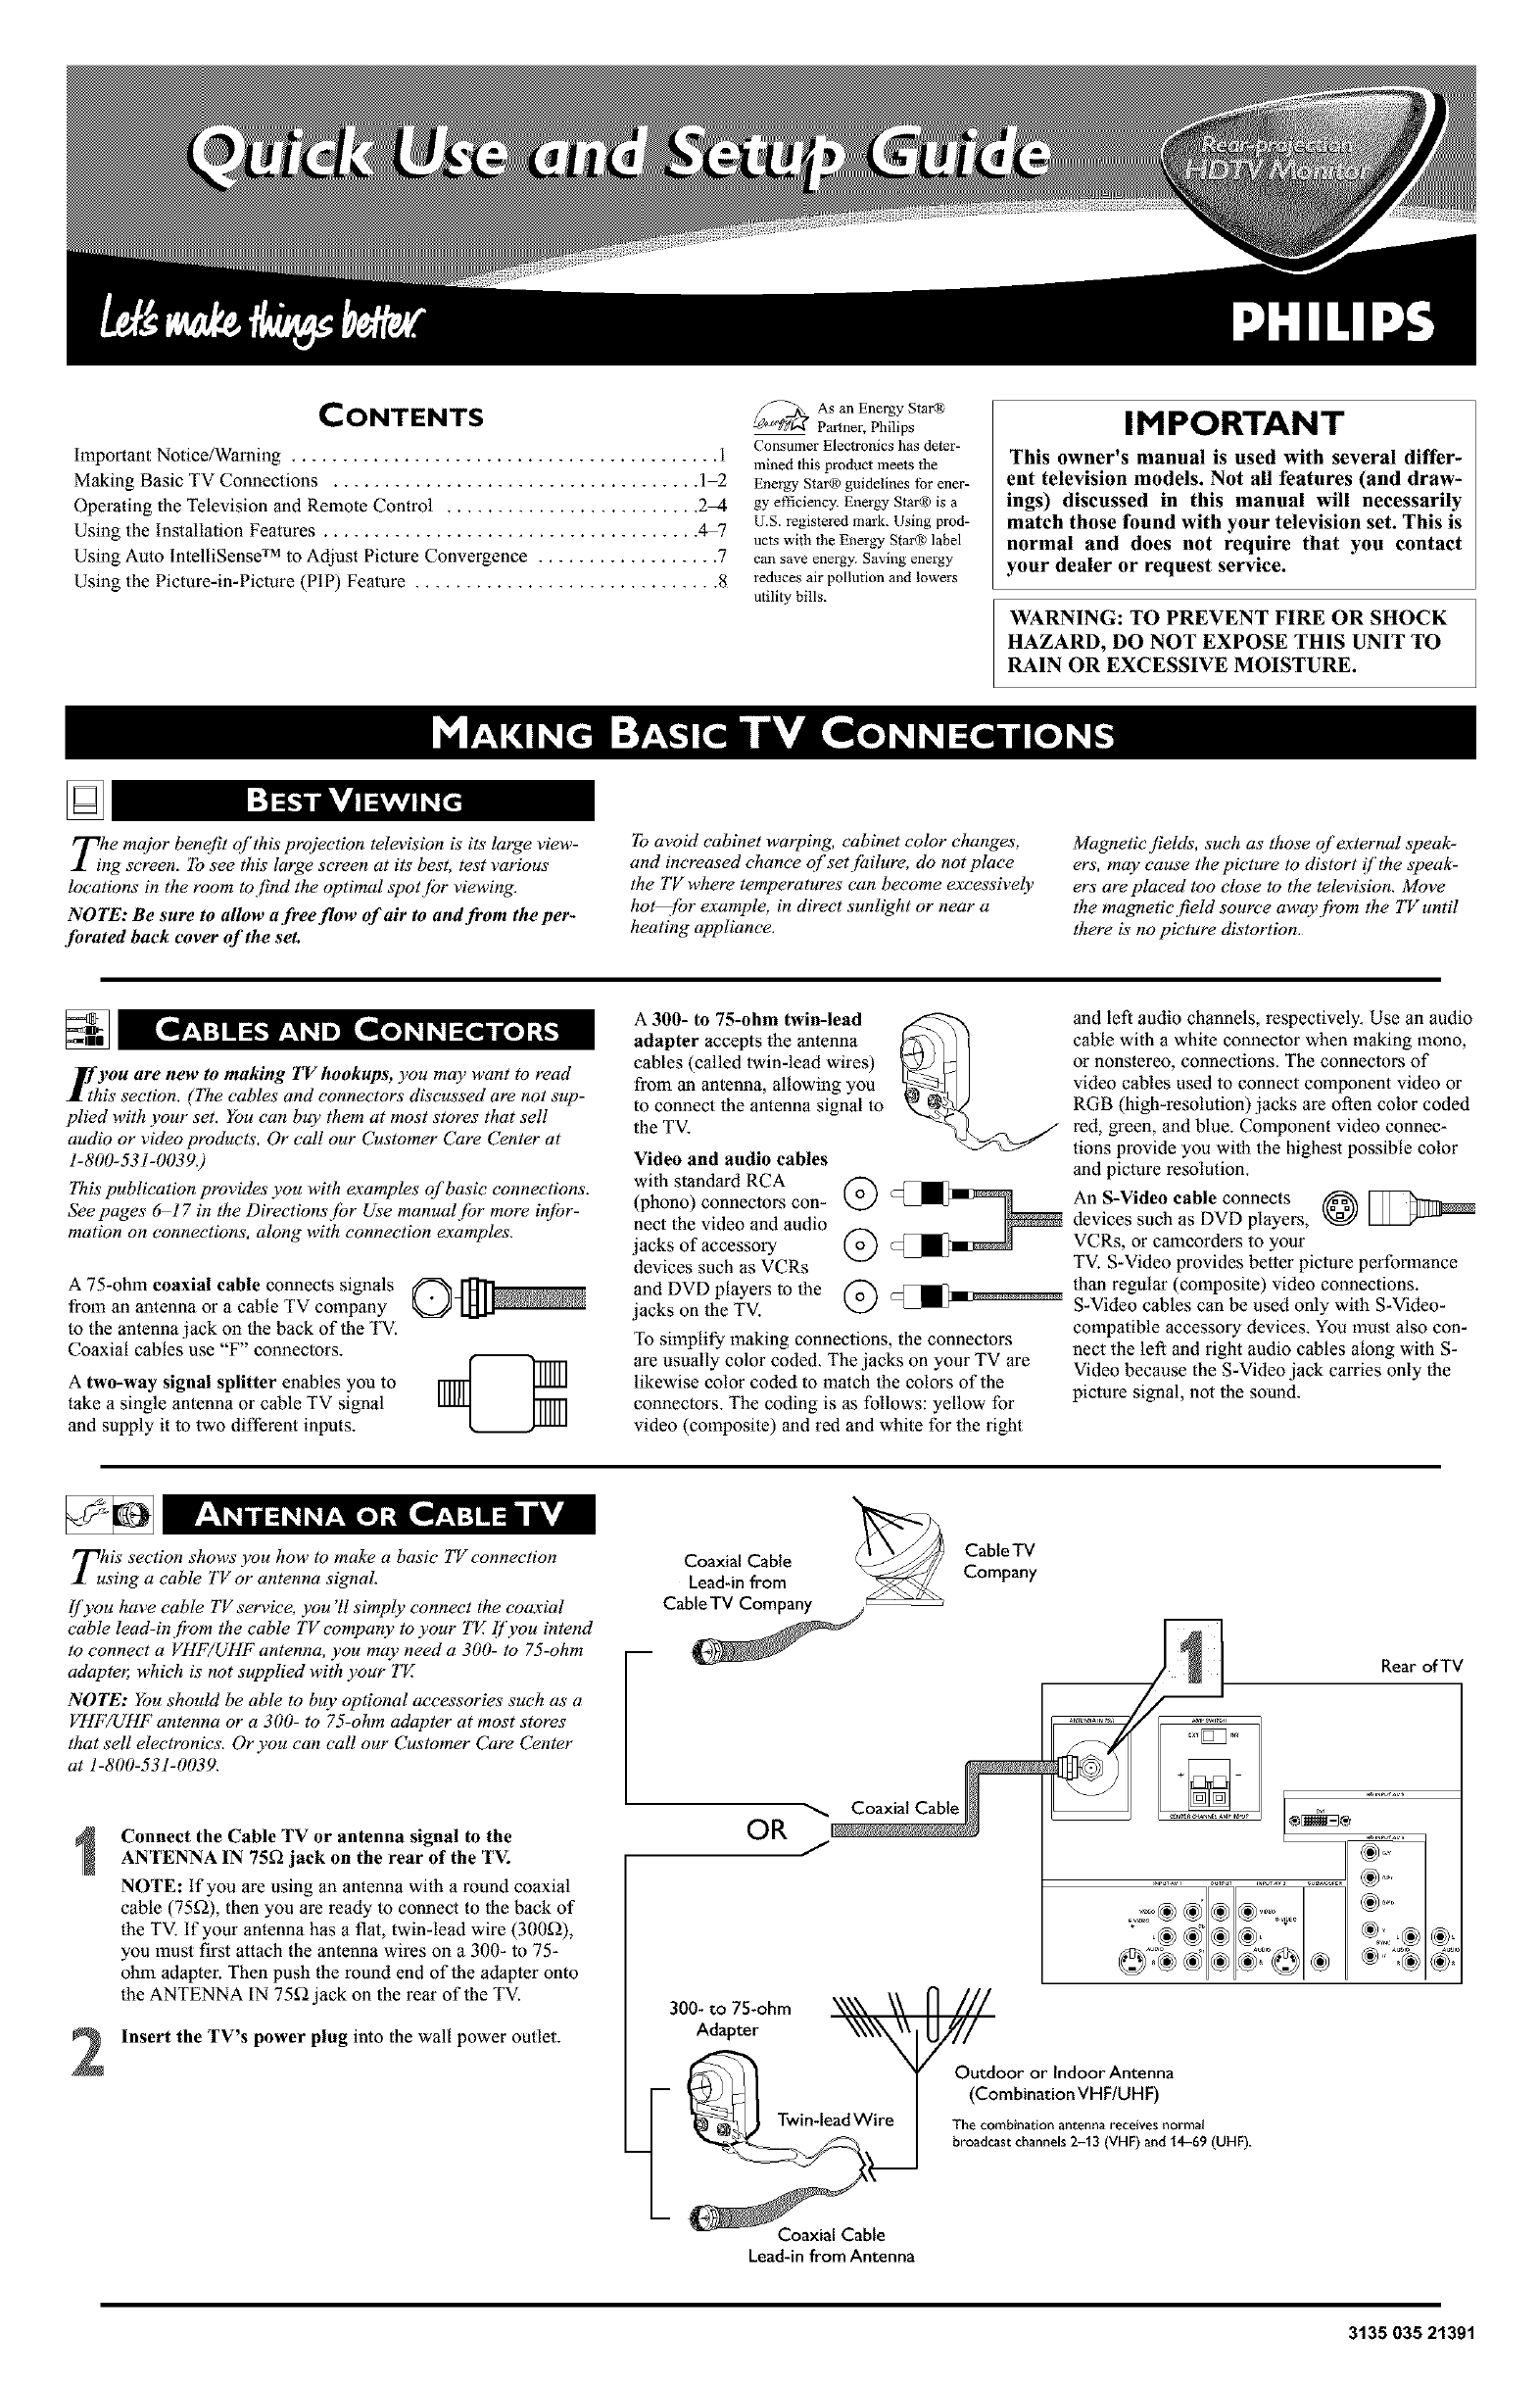
CONTENTS
Important Notice/Warning .......................................... 1
Making Basic TV Connections .................................... 1-2
Operating the Television and Remote Control ......................... 24
Using the Installation Features ..................................... 4-7
Using Auto IntelliSense TM to Adjust Picture Convergence .................. 7
Using the Picture-in-Picture (PIP) Feature .............................. 8
As an Energy Star®
_ Partner, Philips
Consumer Electronics has deter-
mined this product meets the
Energy Stm® guidelines for ener-
gy efficiency. Energy Stat® is a
U.S. registered mark. Using prod-
ucts with the Energy Star® label
cm_ save energy. Saving energy
reduces air pollution and lowers
utility bills.
IMPORTANT
This owner's manual is used with several differ-
ent television models. Not all features (and draw-
ings) discussed in this manual will necessarily
match those found with your television set. This is
normal and does not require that you contact
your dealer or request service.
WARNING: TO PREVENT FIRE OR SHOCK
HAZARD, DO NOT EXPOSE THIS UNIT TO
RAIN OR EXCESSIVE MOISTURE.
Tihe major benefit of this projection television is its' large view-
ng screen. I"osee this large screen at its best, test various
locations in the room to find the optimal spotjbr viewing.
NOTE: Be sure to allow a free flow of air to and from the per-
forated back cover of the set.
To avoid cabinet warping, cabinet color changes,
and increased chance of setjailure, do not place
the TV where temperatures can become excessh,ely
hot.for example, in direct sunlight or near a
heating appliance.
Magnetic fields, such as those of external sloeak-
ers, may cause the picture to distort i['the sioeak-
ers are placed too close to the television. Move
the magnetic field soume away j?om the TV until
there is' no picture distortion.
_you are new to making TV hookups, you may want to read
A[ this section. (The cables and connectors discussed are not sup-
plied with your set. You can buy them at most stores that sell
audio or video produets. Or call our Customer Care Center at
1-800-531-0039.)
This publication provides you with examples of basic connections.
See pages 617 in the Directions jbr Use manualjbr more injbr-
mation on connections, along with connection examples.
A 75-ohm coaxial cable connects signals
from an antenna or a cable TV company
to the antenna jack on the back oflhe TV.
Coaxial cables use "F" connectors.
Atwo-way signal splitter enables you to
take a single antenna or cable TV signal
and supply it to two different inputs.
A300- to 75-ohm twin-lead
adapter accepts the antenna
cables (called twin-lead wires)
from an antenna, allowing you
to connect the antenna signal to
the TV.
Video and audio cables
with standard RCA
(phonO)acksof connectors con- ._,@
nect the video and audio
j accessory o_
devices such as VCRs
and DVD players to the @ c:_-_
jacks on the TV.
To simplify making connections, the connectors
are usually color coded. The jacks on your TV are
likewise color coded to match the colors of the
connectors. The coding is as follows: yellow for
video (composite) and red and white for the right
and left audio channels, respectively. Use an audio
cable with awhite connector when making mono,
or nonstereo, connections. The connectors of
video cables used to connect component video or
RGB (high-resolution)jacks are often color coded
red, green, and blue. Component video connec-
tions provide you with the highest possible color
and piclure resolution.
An S-Video cable connects O
devices such as DVD players,
VCRs, or camcorders to your
TV. S-Video provides better picture performance
than regular (composite) video connections.
S-Video cables can be used only with S-Video-
compatible accessory devices. You must also con-
nect the left and right audio cables along with S-
Video because the S-Video jack carries only the
picture signal, not the sound.
TlutiS section shows you how to make a basic TV connection
sing a cable TV or antenna signal.
If you have cable TV sem4ce, you '11simply connect the coaxial
cable lead-in j?om the cable TV eompany to your TV [['you intend
to connect a VHF/UHF antenna, you may need a 300- to 75-ohm
adapte_ which is not supplied with your TV
NOTE: You should be able to buy optional accessories such as a
VHF/UHF antenna or a 300- to 75-ohm adapter at most stores
that sell electronics. Or you can call our Customer Care Center
at 1-800-531-0(139.
2
Connect the Cable TV or antenna signal to the
ANTENNA IN 75_ jack on the rear of the TV.
NOTE: If you are using an antenna with a round coaxial
cable (75_), then you are ready to connect to the back of
the TV. If your antenna has a flat, twin-lead wire (300_),
you must first attach the antenna wires on a 300- to 75-
ohm adapter. Then push the round end of the adapter onto
the ANTENNA IN 75_ jack on the rear of the TV.
Insert the TV's power plug into the wall power outlet.
CableTV
Coaxial Cable
Lead-in from Company
Cable "IV Company/
OR J
300- to 75-ohm
Adapter
Twin-leadWire
Coaxial Cable
Lead-in from Antenna
Rear of TV
Outdoor or Indoor Antenna
(Combination VHF/UHF)
The combinatio_ antenna receives normal
broadcast channels2-13 (VHF) and 14-69 (UHF).
3135 035 21391
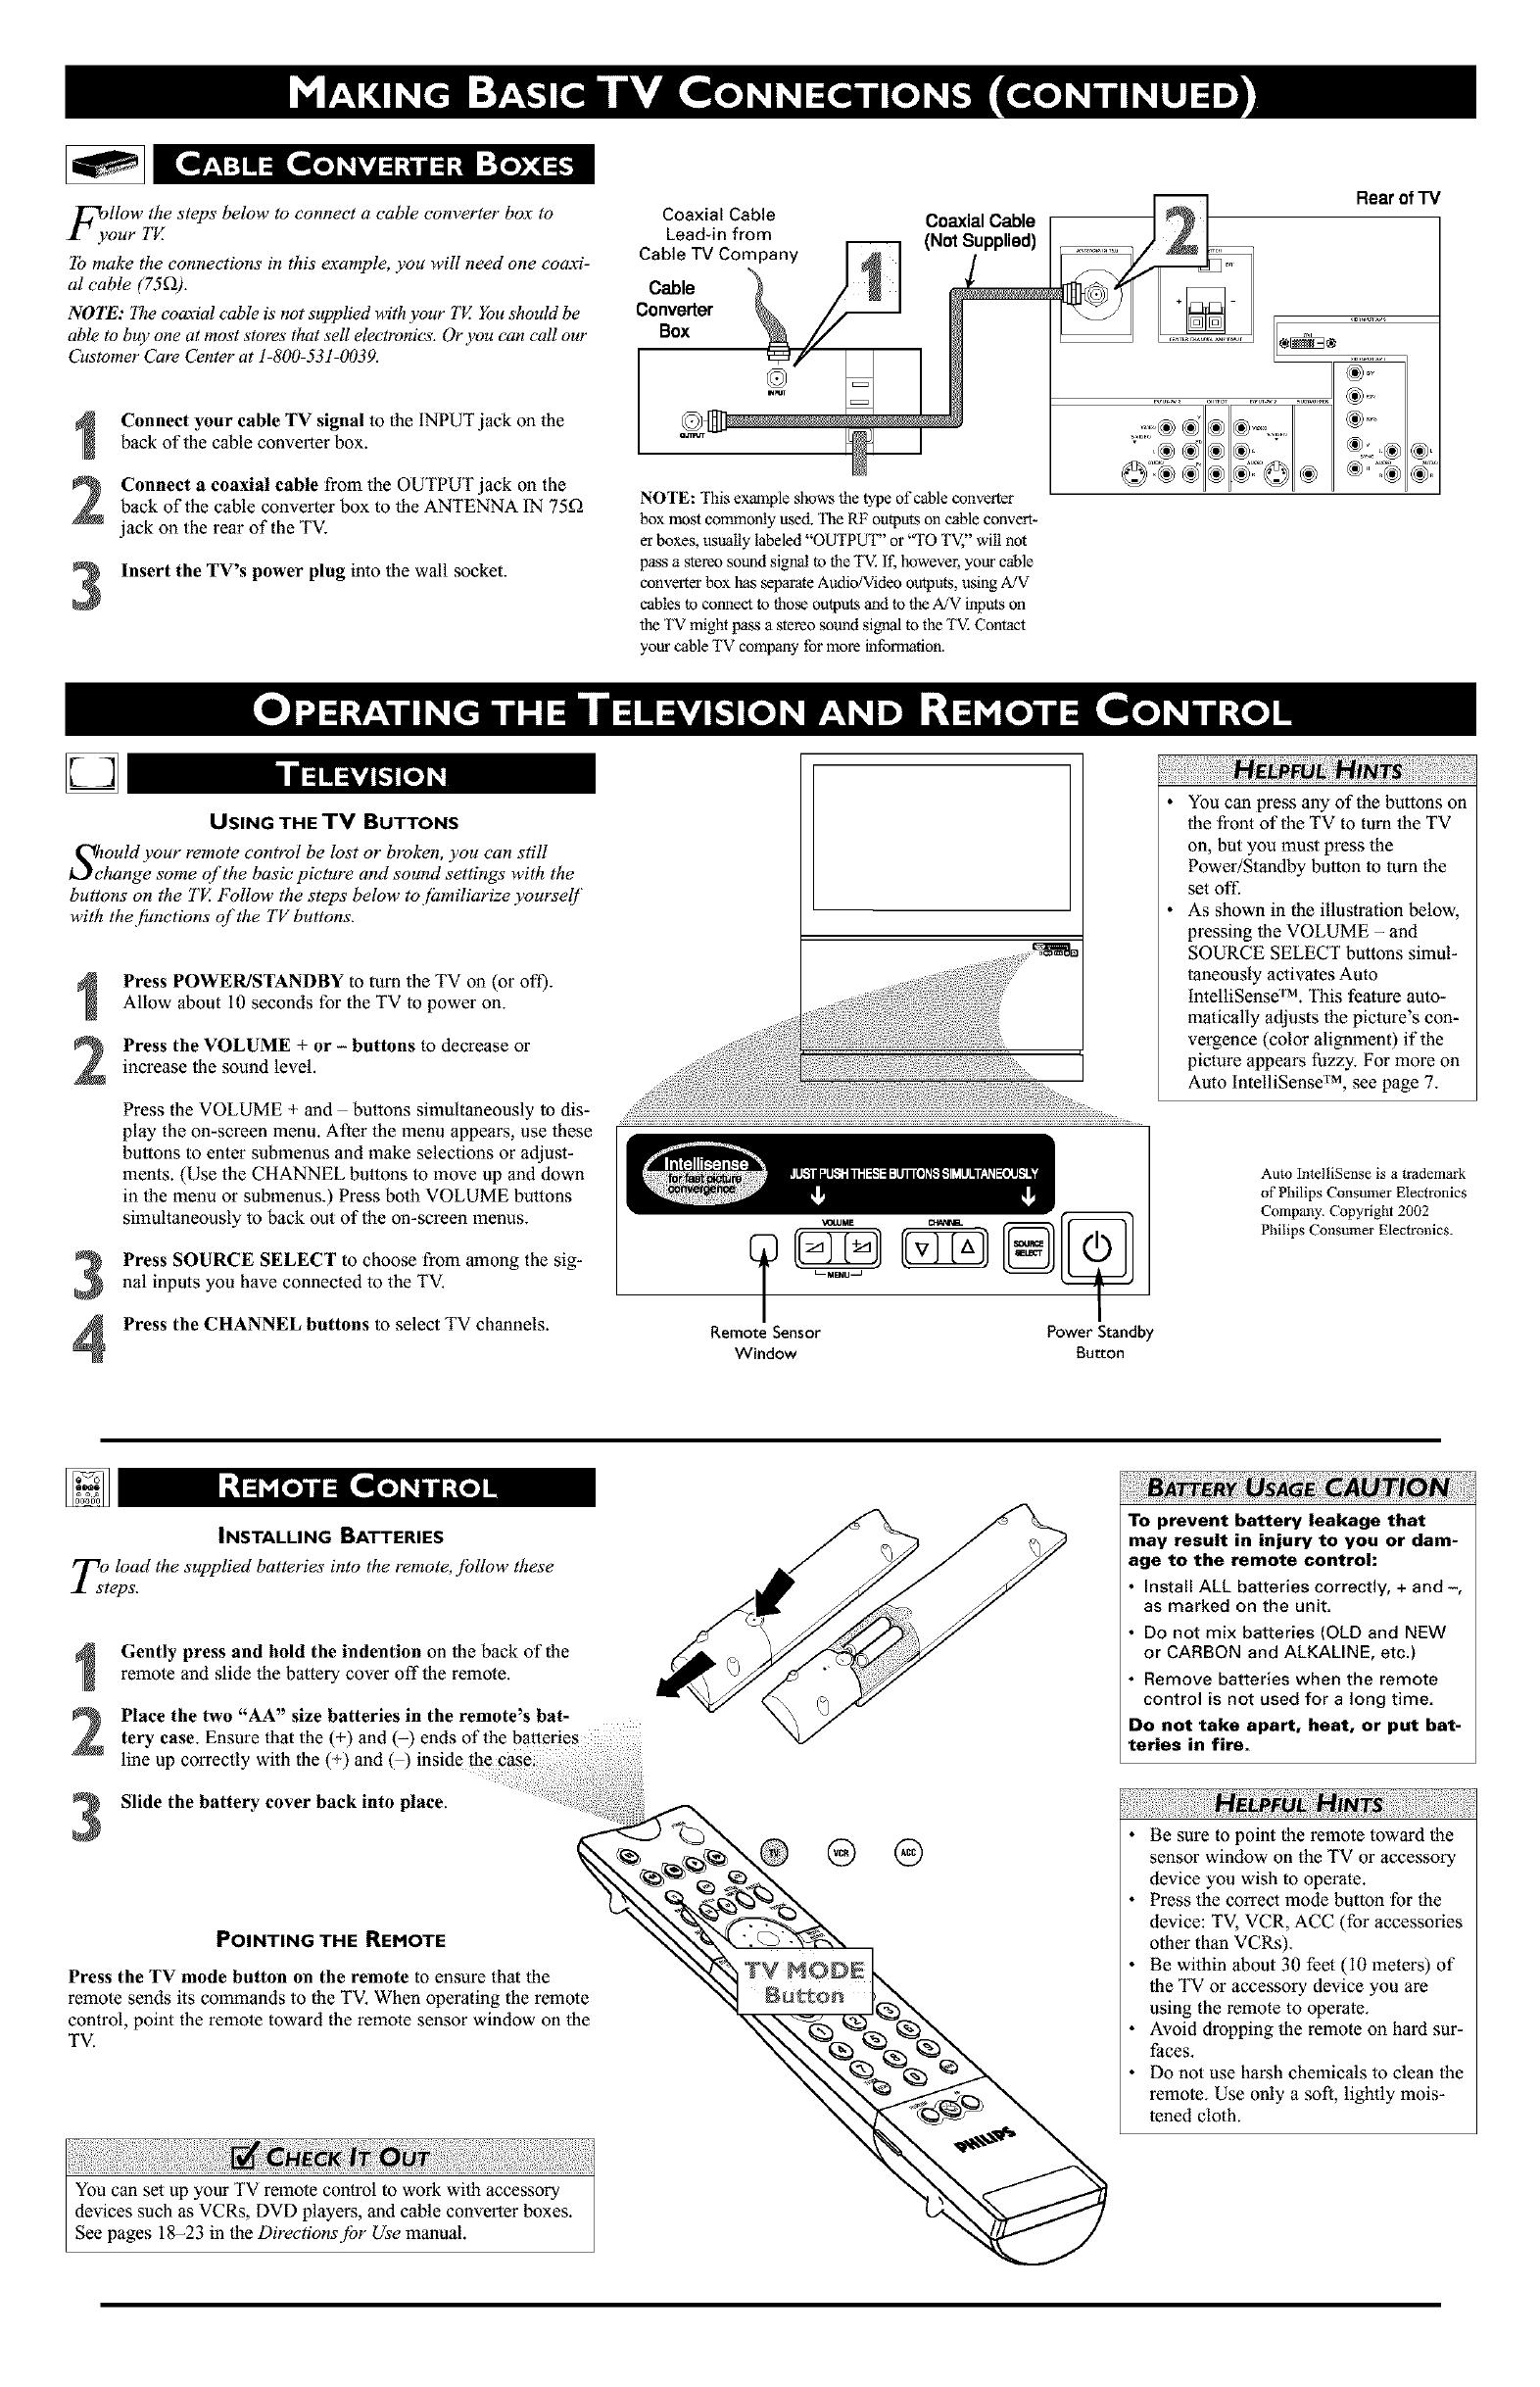
F_yllOw the steps below to connect a cable converter box to
our TV.
To make the connections in this example, you will need one coaxi-
al cable (75£)).
NOTE: The coaxial cable is not supplied with your TV. You should be
able to buy one at most stores that sell electronics. Or you can call our
Customer Care Center at 1-800-531-0039.
2
3
Connect your cable TV signal to the INPUT jack on the
back of the cable converter box.
Connect acoaxial cable from the OUTPUT jack on the
back of the cable converter box to the ANTENNA IN 75_
jack on the rear of the TV.
Insert the TV's power plug into the wall socket.
Coaxial Cable Coaxial Cable
Leadqn from
NOTE: This example shows the type ofc_le converter
box most commonly used. The RF outputs on cable convert-
er boxes, usually labeled "OUTPUT" or "TO TV," will not
pass a stereo sound signal to the TV. it; however, your cable
converter box has separate Audio/Video outputs, using A/V
cables to connect to those outputs and to the,*ZV inputs on
the TV might pass a stereo sound signal to the 'IV. Contact
your cable TV company for more information.
Rear of TV
D
USING THE TV BUTTONS
S_ould your remote control be lost or broken, you can still
hange some of the basic picture and sound settings with the
buttons on the TV. Follow the steps below to jamiliarize yourself
with the.[unctions qf the TV buttons.
3
4
Press POWER/STANDBY to turn the TV on (or off).
Allow about 10 seconds for the TV to power on.
Press the VOLUME + or - buttons to decrease or
increase the sound level.
Press the VOLUME + and buttons simultaneously to dis-
play the on-screen menu. After the menu appears, use these
buttons to enter submenus and make selections or adjust-
ments. (Use the CHANNEL buttons to move up and down
in the menu or submenus.) Press both VOLUME buttons
simultaneously to back out of the on-screen menus.
Press SOURCE SELECT to choose from among the sig-
nal inputs you have connected to the TV.
Press the CHANNEL buttons to select TV channels.
L--MENU_
Remote Sensor Power Standby
Window Button
You can press any of the bu_ons on
the front of the TV to turn the TV
on, but you must press the
Power/Standby button to turn the
set ofl:
As shown in the illustration below,
pressing the VOLUME - and
SOURCE SELECT buttons simul-
taneously activates Auto
intelliSense TM. This feature auto-
matically adjusts the picture's con-
vergence (color alignment) if the
picture appears fuzzy. For more on
Auto IntelliSense TM, see page 7.
Auto IntelliSense is atrademark
of Philips Consumer Electronics
Company. Copyright 2002
Philips Consumer Electronics.
INSTALLING BATTERIES
T_ load the supplied batteries into the remote, .ibllow these
eps.
2
3
Gently press and hold the indention on the back of the
remote and slide the battery cover off the remote.
Place the two "AA" size batteries in the remote's bat-
tery case. Ensure that the (+) and (-) ends of the batteries
line up correctly with the (+) and () inside the case;
Slide the battery cover back into place.
POINTING THE REMOTE
Press the TV mode button on the remote to ensure that the
remote sends its commands to the TV. When operating the remote
control, point the remote toward the remote sensor window on the
TV.
®®
OSAG CAOTION
To prevent battery leakage that
may result in injury to you or dam-
age to the remote control:
Install ALL batteries correctly, + and -,
as marked on the unit.
Do not mix batteries (OLD and NEW
or CARBON and ALKALINE, etc.)
Remove batteries when the remote
control is not used for a long time.
Do not take apart, heat, or put bat-
teries in fire.
Be sure to point the remote toward the
sensor window on the TV or accessory
device you wish to operate.
Press the correct mode button for the
device: TV, VCR, ACC (for accessories
other than VCRs).
Be within about 30 feet (10 meters) of
the TV or accessory device you are
using the remote to operate.
Avoid dropping the remote on hard sur-
faces.
Do not use harsh chemicals to clean the
remote. Use only a soft, lightly mois-
tened cloth.
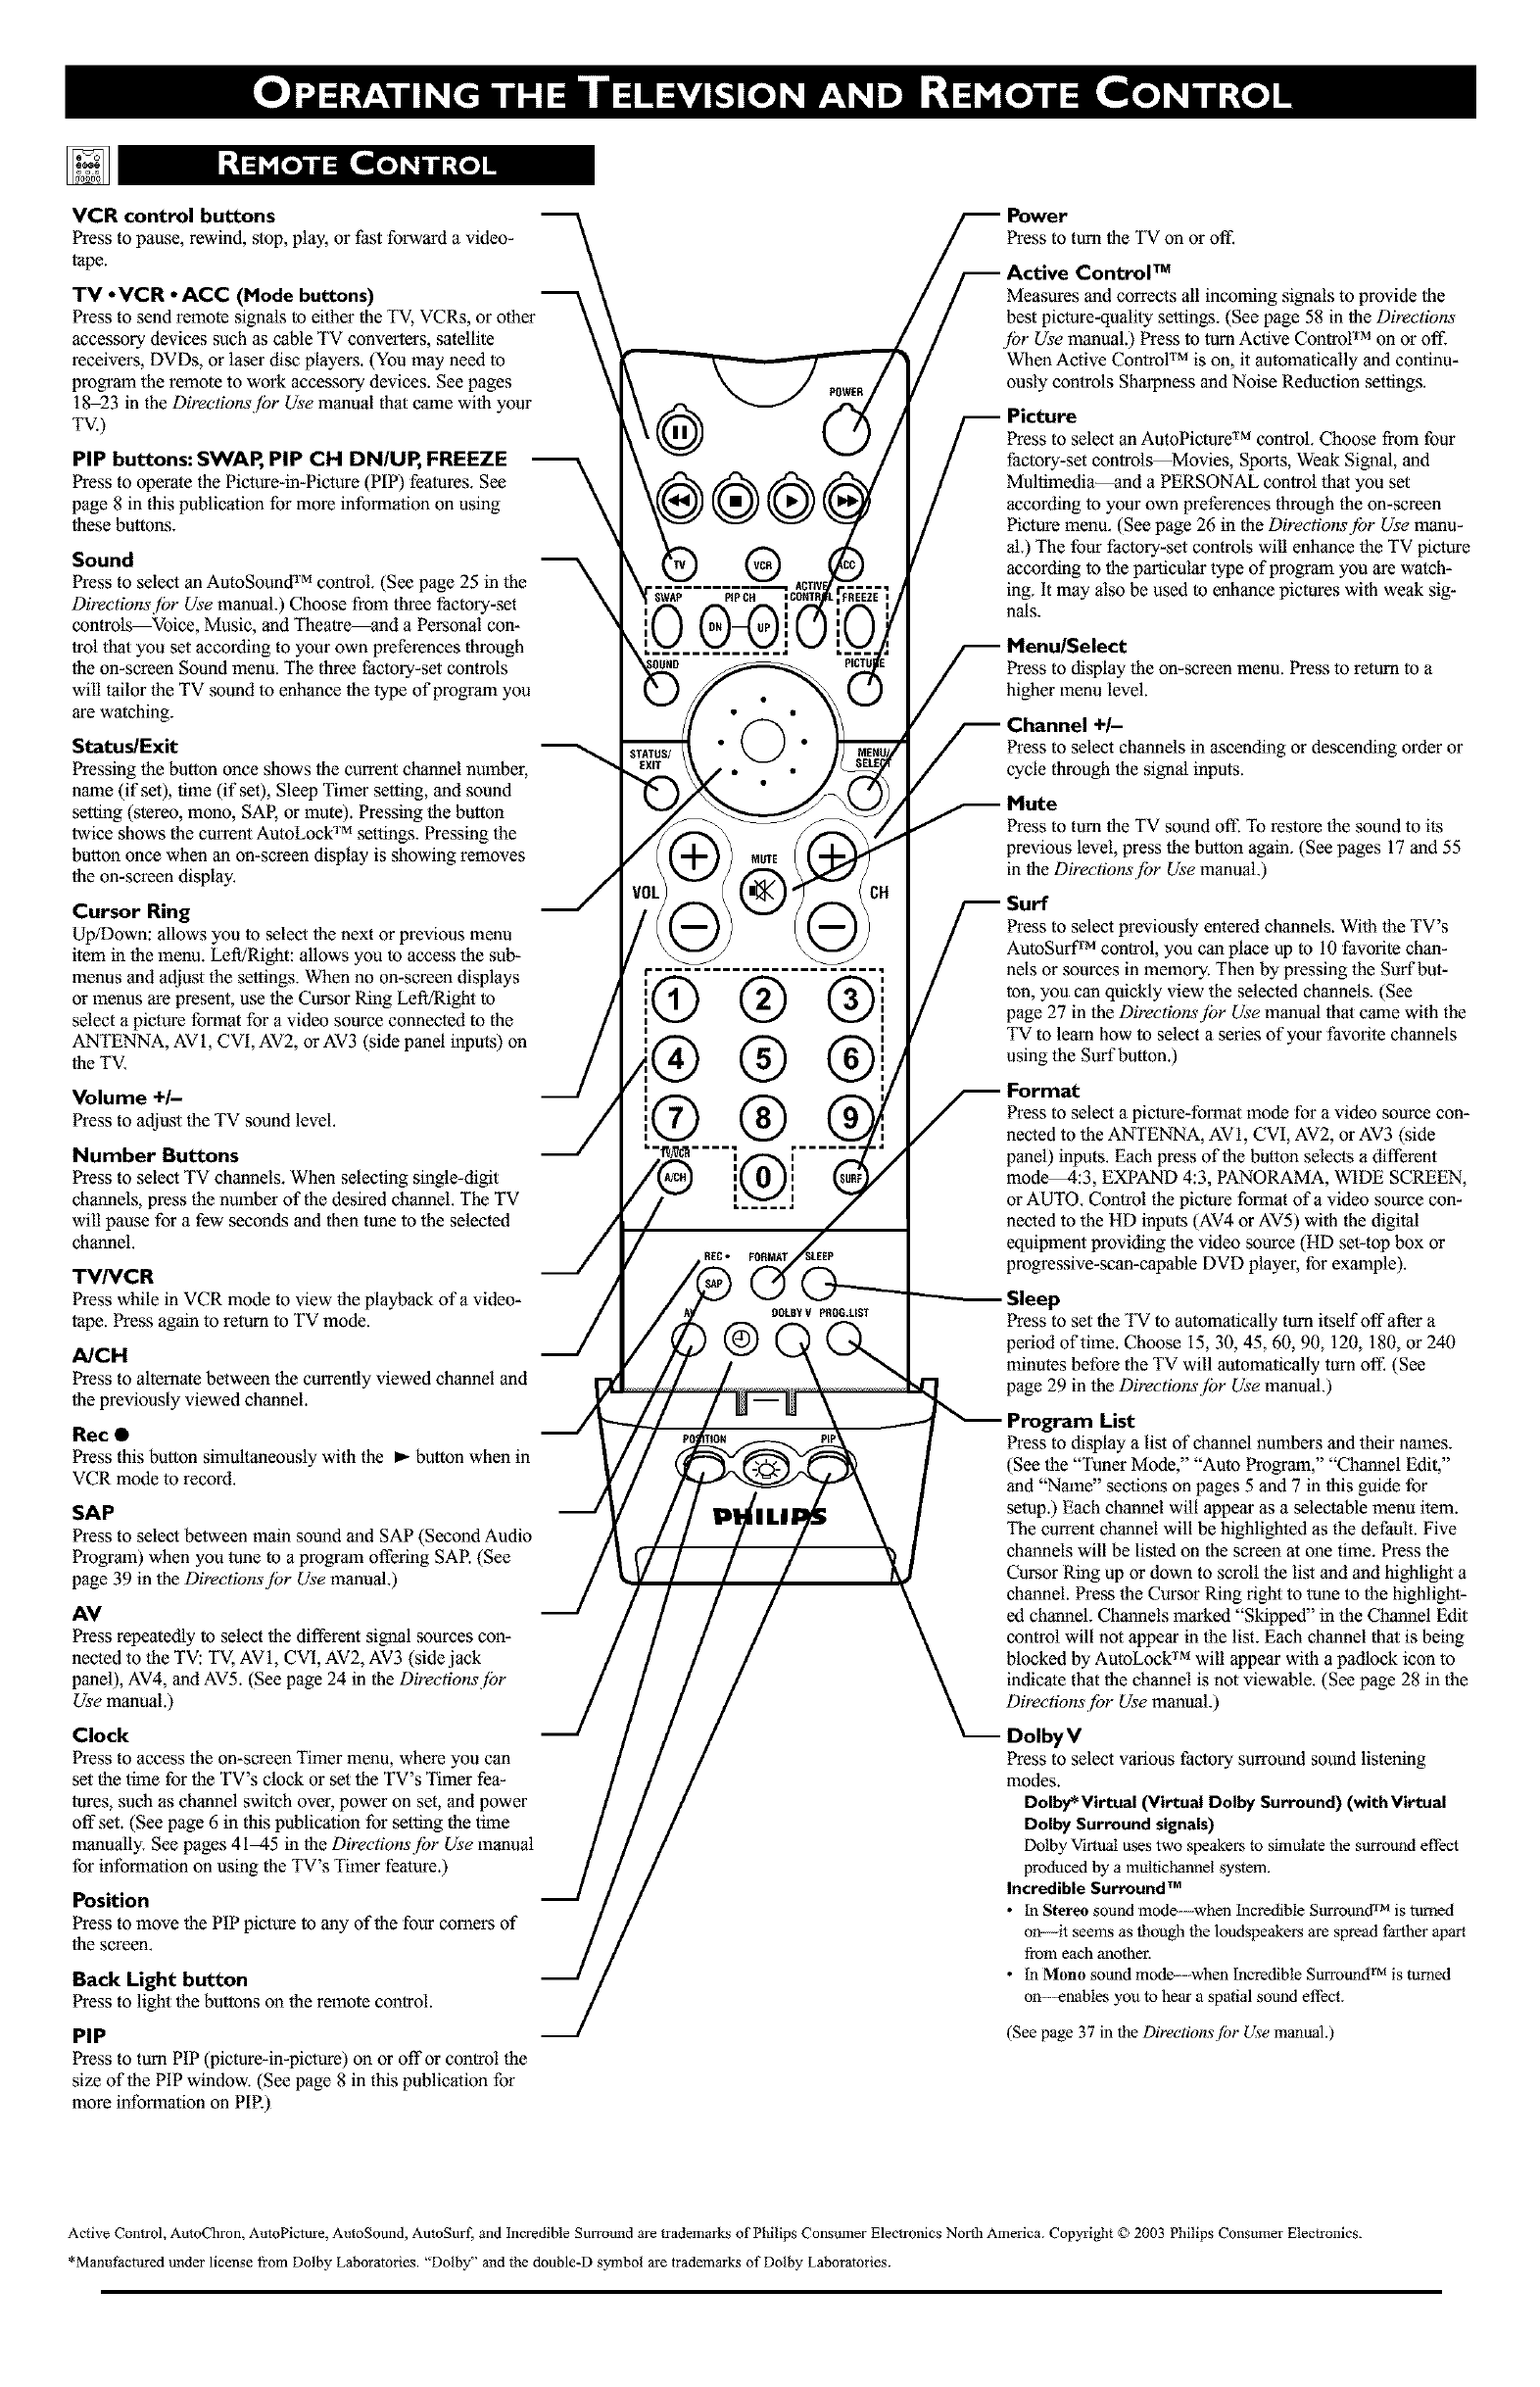
VCR control buttons
Press to pause, rewind, stop, play, or fast forward a video-
tape.
TV oVCR °ACC (Mode buttons)
Press to send remote signals to either the TV, VCRs, or other
accessory devices such as cable TV converters, satellite
receivers, DVDs, or laser disc players. (You may need to
program the remote to work accessory devices. See pages
18_3 in the Direetionsjbr Use manual that crone with your
TV.)
PIP buttons: SWAP, PIP CH DN/UP, FREEZE
Press to operale tile Picture-in-Picture (PIP) features. See
page 8 in this publicalion for more informalion on using
these buttons.
Sound
Press to select an AutoSound TM control. (See page 25 in the
Directionsjbr Use manual.) Choose from lhree factory-set
controls Voice, Music, and Theatre and a Personal con-
_ol that you ,setaccording to your own preferences through
tile on-screen Sound menu. The three factory-set controls
will tailor lhe TV sound to enhance the type of program you
are watching.
Status/Exit
Pressing lhe button once shows the current channel number,
name (if set), lime (if set), Sleep Timer selting, and sound
,setting(stereo, mono, SAP, or mute). Pressing the button
twice shows the current AutoLock TM settings. Pressing the
buiton once when an on-screen display is showing removes
tile on-screen display.
Cursor Ring
Up/Down: allows you to ,selectthe next or previous menu
item in tile menu. Left/Rigbt: allows you to access the sub-
menus and adjust the seltings. When no on-screen displays
or menus are present, use the Cursor Ring Left/Right to
,selecta picture format for a video source connecled to the
ANTENNA, AV1, CVI, AV2, or AV3 (side panel inputs) on
tile TV.
Volume +/-
Pressto adjust tile TV sound level.
Number Buttons
Press to select TV channels. When selecting single-digit
channels, press the number of the desired channel. The TV
will pause for a few seconds and then tune to the selected
channel.
TV/VCR
Press while in VCR mode to view tile playback of a video-
tape. Press again to return to TV mode.
A/CH
Press to altemale between the currently viewed channel and
the previously viewed channel.
Rec •
Press this button simultaneoualy with tile _- button when in
VCR mode to record.
SAP
Press to select between main sound and SAP (Second Audio
Progrmn) when you tune to a progrmn offering SAR (See
page 39 in the Directionsfbr Use manual.)
AV
Press repeatedly to select the different signal ,sources con-
nected to the TV: TV, AVI, CVI, AV2, AV3 (side jack
panel), AV4, and AV5. (See page 24 in the Direetionsjbr
Use manual.)
Clock
Press to access lhe on-screen Timer menu, where you can
,setthe time for tile TV's clock or set the TV's Timer fea-
tures, such as channel switch over, power on set, and power
off set. (See page 6 in this publication for setting the time
manually. See pages 4145 in tile Directionsjbr Use manual
for information on using the TV's Timer feature.)
Position
Press to move tile PIP picture to any of the four comers of
tile screen.
Back Light button
Press to light tile buttons on tile remote control.
PIP
Press to turn PIP (picture-in-piclure) oil or offor control tile
size oflhe PIP window. (See page 8 in this publicalion for
more information on PIR)
SWAP
®i
®®
®
®
Press to turn tile TV on or oft:
TM
Measures and corrects all incoming signals to provide the
best piclure-quality seltings. (See page 58 in the Directions
jbr Use manual.) Press to lum Active Controf TM on or off.
When Active Contror TM is on, it automatically and continu-
ously conlrols Sharpness and Noise Reduction settings.
Press to select an AutoPicture TM control. Choose from four
factory-set controls Movies, Sports, Weak Signal, and
Multimedia--and a PERSONAL control thai you set
according to your own preferences through the on-screen
Piclure menu. (See page 26 in the Directionsjbr Use manu-
aL) The four factory-set controls will enhance tile TV piclure
according to tile particular type of program you are watch-
ing. It may also be used to enhance pictures with weak sig-
nals.
Press to display the on-screen menu. Press to return to a
higher menu level.
Press to select channels in ascending or descending order or
cycle through the signal inputs.
Press to turn tile TV sound oft: To restore the sound to its
previous level, press lhe button again. (See pages 17 and 55
in tile Directionsjbr Use manual.)
Press to select previously entered channels. With lhe TV's
AutoSurf TM control, you can place up to 10 favorite chan-
nels or sources in memory. Then by pressing the Surf but-
ton, you can quickly view the selected channels. (See
page 27 in lhe Directionsjbr Use manual thai came with the
TV to learn how to select a series of your favorite channels
using lhe Surf button.)
Press to select a picture-format mode for a video source con-
nected to the ANTENNA, AV 1, CVI, AV2, or AV3 (side
panel) inputs. Each press of the button selects a different
mode_:3, EXPAND 4:3, PANORAMA, WIDE SCREEN,
or AUTO. Control the picture format of a video source con-
nected to the HD inputs (AV4 or AV5) with the digital
equipment providing lhe video ,source (HD set-top box or
progressive-scan-capable DVD player, for example).
Sleep
Press to set the TV to automatically turn itself offafter a
period of time. Choose 15, 30, 45, 60, 90, 120, 180, or 240
minutes before the TV will automatically turn off. (See
page 29 in the Directionsfbr Use manual.)
List
Press to display a lisl of channel numbers and their nmnes.
(See the "Tuner Mode," "Auto Progrmn," "Channel Edit,"
and "Nmne" seclions on pages 5 and 7 in this guide for
,setup.) Each channel will appear as a selectable menu item.
The current channel will be highlighted as the default. Five
channels will be lisled on the screen al one time. Press the
Cursor Ring up or down to scroll lhe list and and highlight a
channel. Press lhe Cursor Ring right to tune to the highlight-
ed channel. Channels marked "Skipped" in the Channel Edit
control will not appear in the list. Each channel thai is being
blocked by AutoLock TM will appear with a padlock icon to
indicaie that tile channel is not viewable. (See page 28 in the
Directions fbr Use manual.)
DolbyV
Press to select various factory surround sound listening
modes.
Dolby* Virtual (Virtual Dolby Surround) (with Virtual
Dolby Surround signals)
Dolby Virtual uses two speakers to simulate the surround effect
produced by a multichannel system.
Incredible gul_und TM
•In Stereo sound mode--when incredible Surround 'lr'_is turned
ono --it seems as though the loudspeakers are spread farther apart
from each another.
• In Mono sound mode----when Incredible Surrotmd TM is turned
on--enables you to hear a spatial sound e ftbct.
(See page 37 in the Directionsf!)r Use manual.)
Active Control, AutoChron, AutoPicmre, AutoSound, AutoSurl, and Incredible Surround are trademarks of Philips Consumer Electronics North America. Copyright © 2003 Philips Consumer Electronics.
*Manufactured under license from Dolby Laboratories. "Dolby" and the double-D symbol are trademarks of Dolby Laboratories.
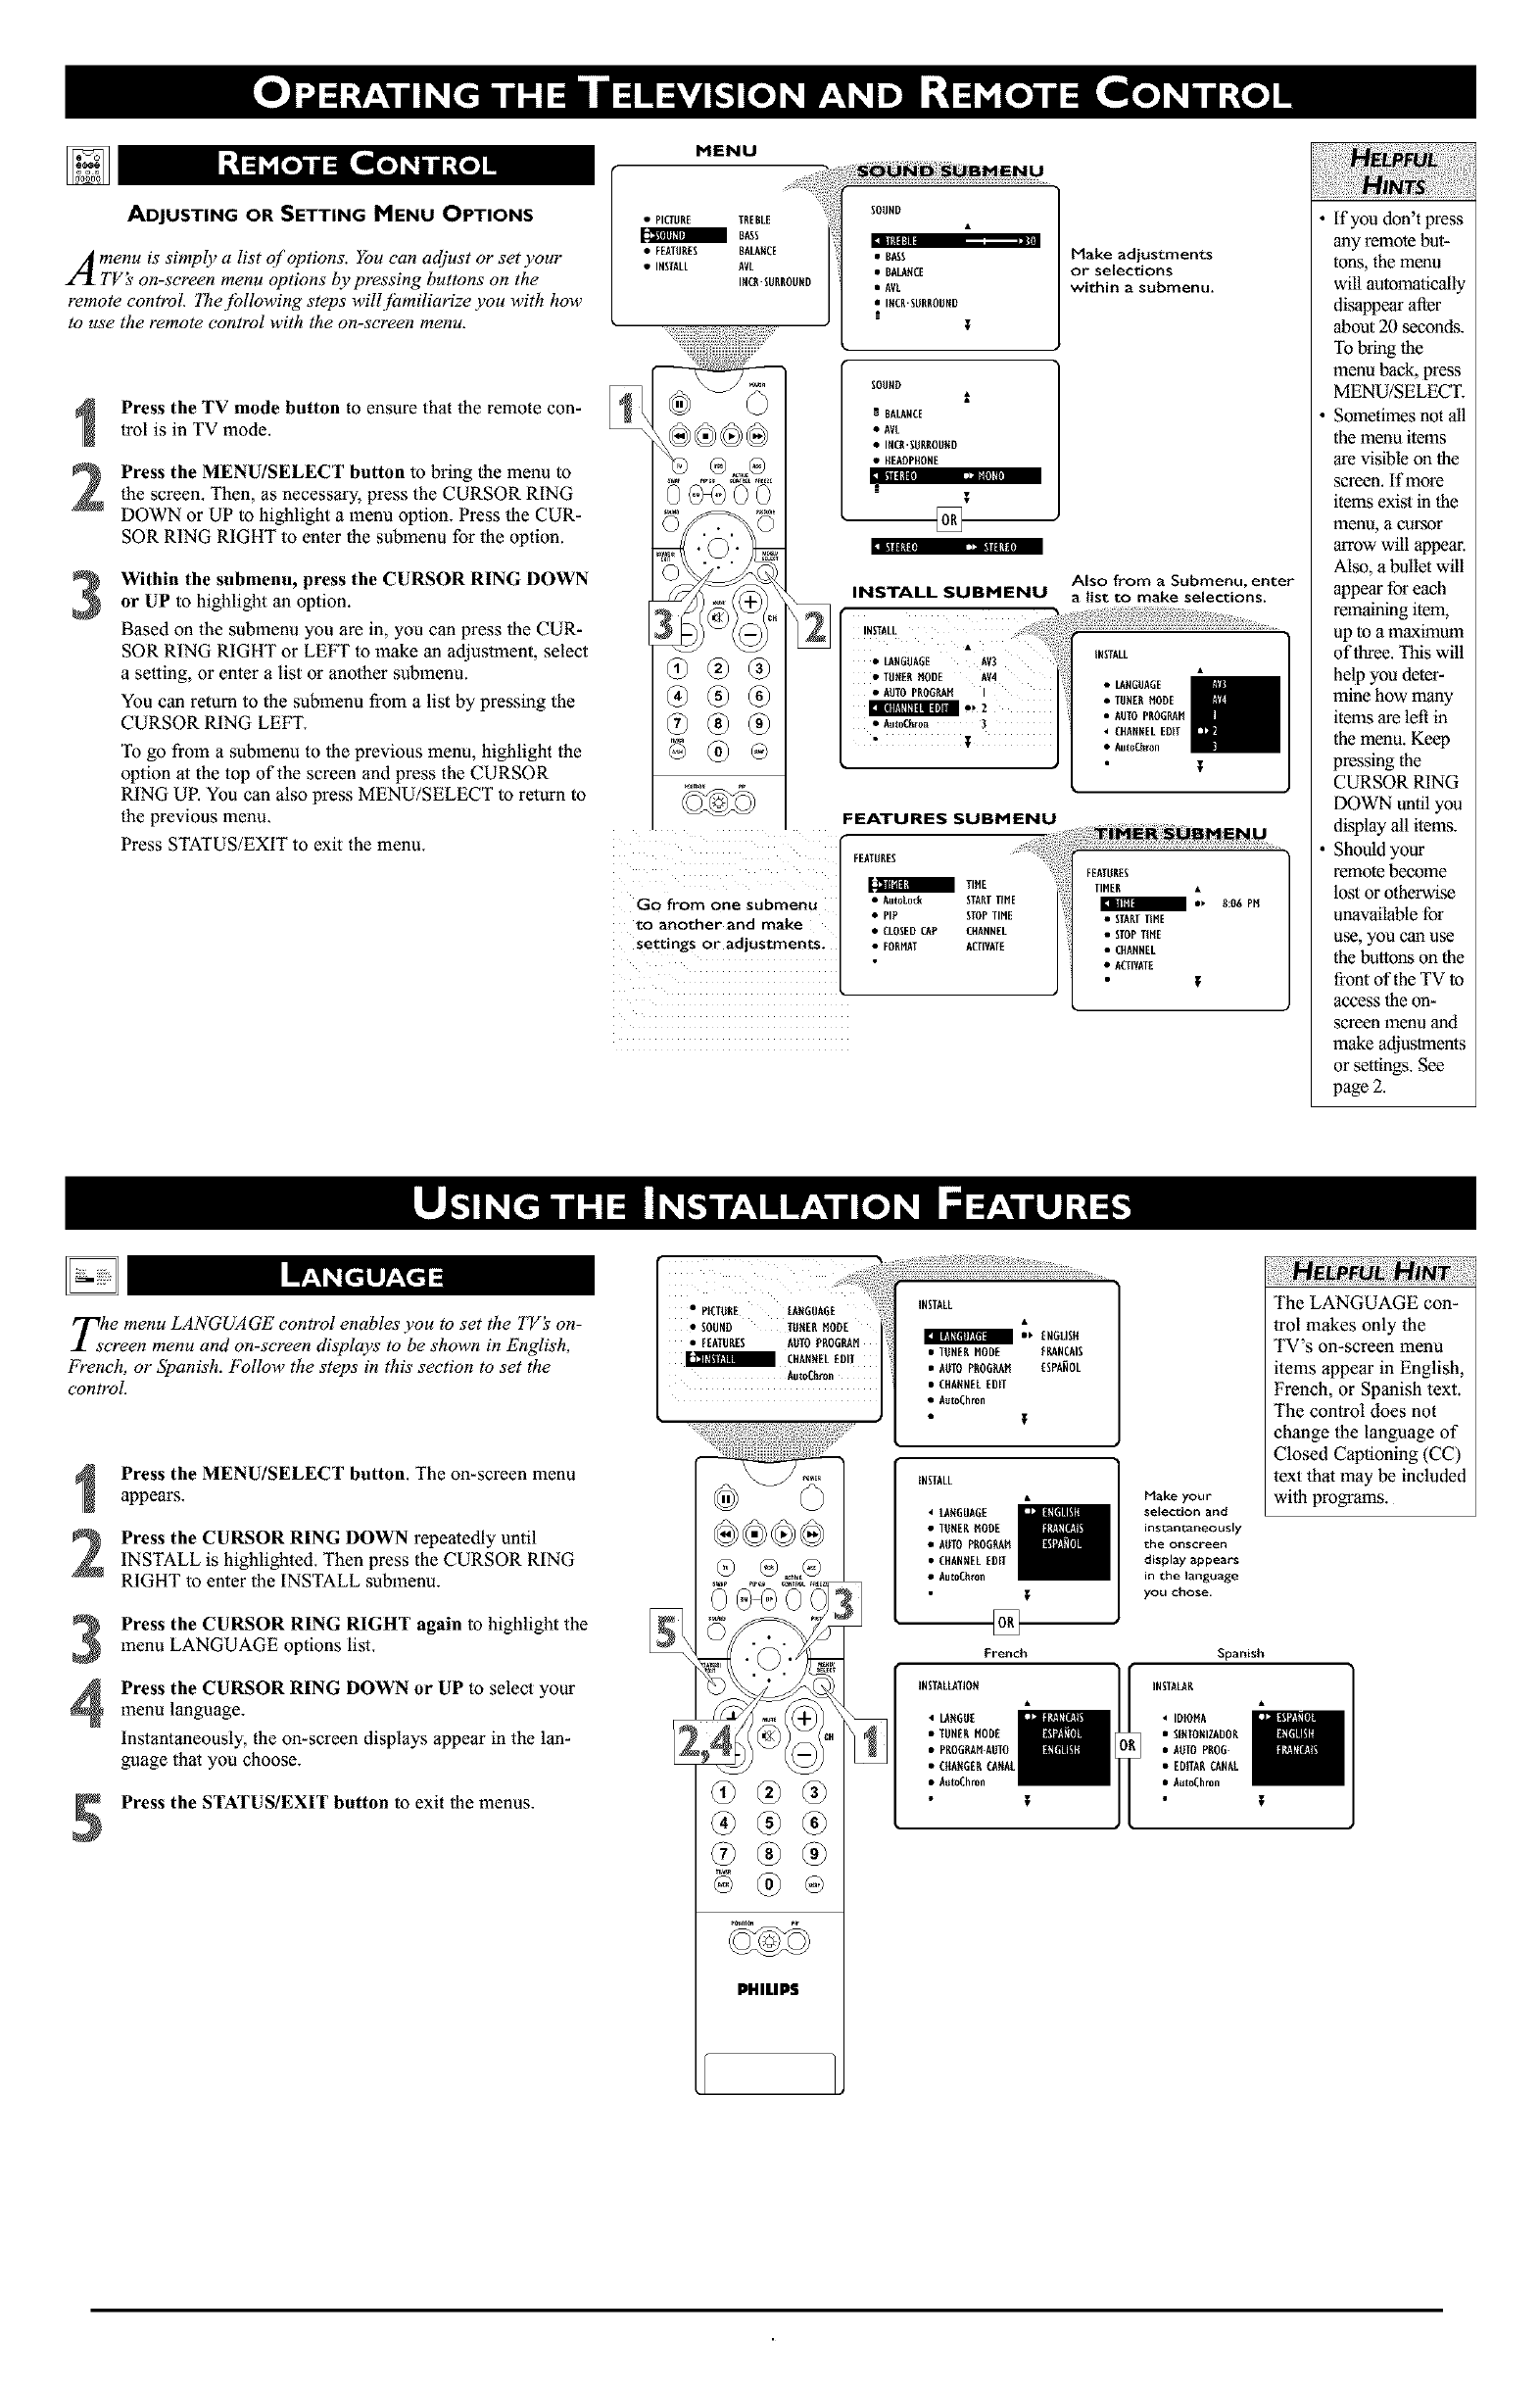
ADJUSTING OR SETTING MENU OPTIONS
IIt!llt
A merzu is simply a list of options. You can adjust or set your
TV s on-screen menu options by pressing buttons on the
remote control. Thejbllowing steps will fizmiliarize you with how
to use the remote control with the on-screen menu.
2
3
Press the TV mode button to ensure that the remote con-
trol is in TV mode.
Press the MENU/SELECT button to bring the menu to
the screen. Then, as necessary, press the CURSOR RING
DOWN or UP to highlight a menu option. Press the CUR-
SOR RING RIGHT to enter the submenu for the option.
Within the submenu, press the CURSOR RING DOWN
or UP to highlight an option.
Based on the submenu you are in, you can press the CUR-
SOR RING RIGHT or LEFT to make an adjustment, select
a setting, or enter a list or another submenu.
You can return to the submenu from a list by pressing the
CURSOR RING LEFT.
To go from a submenu to the previous menu, highlight the
option at the top of the screen and press the CURSOR
RING UR You can also press MENU/SELECT to return to
the previous menu.
Press STATUS/EXIT to exit the menu.
MENU
•PICTURE TREBLE
mBASS
• FEATURES BALANCE
•INSTALL AVL
INOI.SURROUND
®®
Go from one submenu
to another and make
settings or adjustments,
ii
•BASS
•BALANCE
• AVL
•INCR'SURROUND
I
SOUND
i
IBALANCE
•AVL
•INCR.SURROUND
• HEADPHONE
T
[]
[I I_l|l_l[l] [11 |1111_11[II
INSTALL SUBMENU
INSTALL ....
• LANGUAGE AV3
•TUNERMODE AV4
•AUTOPROGRAM I
•Aut0Chron ]
, I
FEATURES SUBMENU
FEATURES
mTIME
•AutoLock STARTTIME
•pl_ STOP TIMI
• CLOSEDCAP CHANNEL
• FORMAl ACIIVATE
Make adjustments
or selections
within asubmenu.
INSTALL
•LANGUAGE
•TUNERMODE
•AUTOPROGRAN
• CHANNELEDIT
• AutoChron
FEATURES
TIMER •
I.. 8:06P.
• STAETTINE
• STOPTINE
• CHANNEL
• ACTIVATE t
If you don't press
ally remote but-
tons, the menu
will automatically
disappear Mter
about 20 seconds,
To bring tile
lnenu back, press
MEN U/SELECT.
Sometimes not all
the menu items
are visible on the
screen, If more
items exist in the
lnenu_ acursor
arrow will appear.
Also, a bullet will
appear for each
remaining item,
up to a maximum
of tl_ee. This will
help you deter-
mine how many
items are left in
the menu. Keep
pressing the
CURSOR RING
DOWN until you
display all items.
Should your
remote beeome
lost or otherwise
unavailable for
use, you Call use
the buttons on the
front of the TV to
access the on-
screen menu and
make adjustments
or settings. See
page 2.
Z!te menu LANGUAGE control enables you to set the TV_ on-
creen menu and on-screen dis?lays to be shown in English,
F?ench, or Spanish. Follow the steps in this section to set the
control.
2
3
4
Press the MENU/SELECT button. The on-screen menu
appears.
Press the CURSOR RING DOWN repeatedly until
INSTALL is highlighted. Then press the CURSOR RING
RIGHT to enter the INSTALL submenu.
Press the CURSOR RING RIGHT again to highlight the
menu LANGUAGE options list.
Press the CURSOR RING DOWN or UP to select your
menu language.
Instantaneously, the on-screen displays appear in the lan-
guage that you choose.
Press the STATUS/EXIT button to exit the menus.
• PICIIINE IANGUAOE i!_!
• SOUND tUNERNODE
•FEATURES AUIOPROGP_H
CHANNELEDII
®
@
PHILLIS
INSTALL
_ ENGHSN
•TUNENMODE ERANCAIS
•AUTO PNOOEAH ESPANOL
• CHANNELEDff
• A_toChron
iNSIALL
• lANGUAGE
•TUNERNODE
• AUTO PNOG_H
• CHANNELHUff
• AutoChron
French
Make your
selection and
instantaneously
the on$ci*een
display appears
in the language
you chose.
The LANGUAGE con-
trol makes only the
TV's on-screen menu
items appear in English,
French, or Spanish text.
The control does not
change the language of
Closed Captioning (CC)
text that may be included
with programs.
Spanish
INSTAIAN
IDIONA
StNIONIZADON
A_IO PNOO-
[DITAN CANAL
A_toChron t
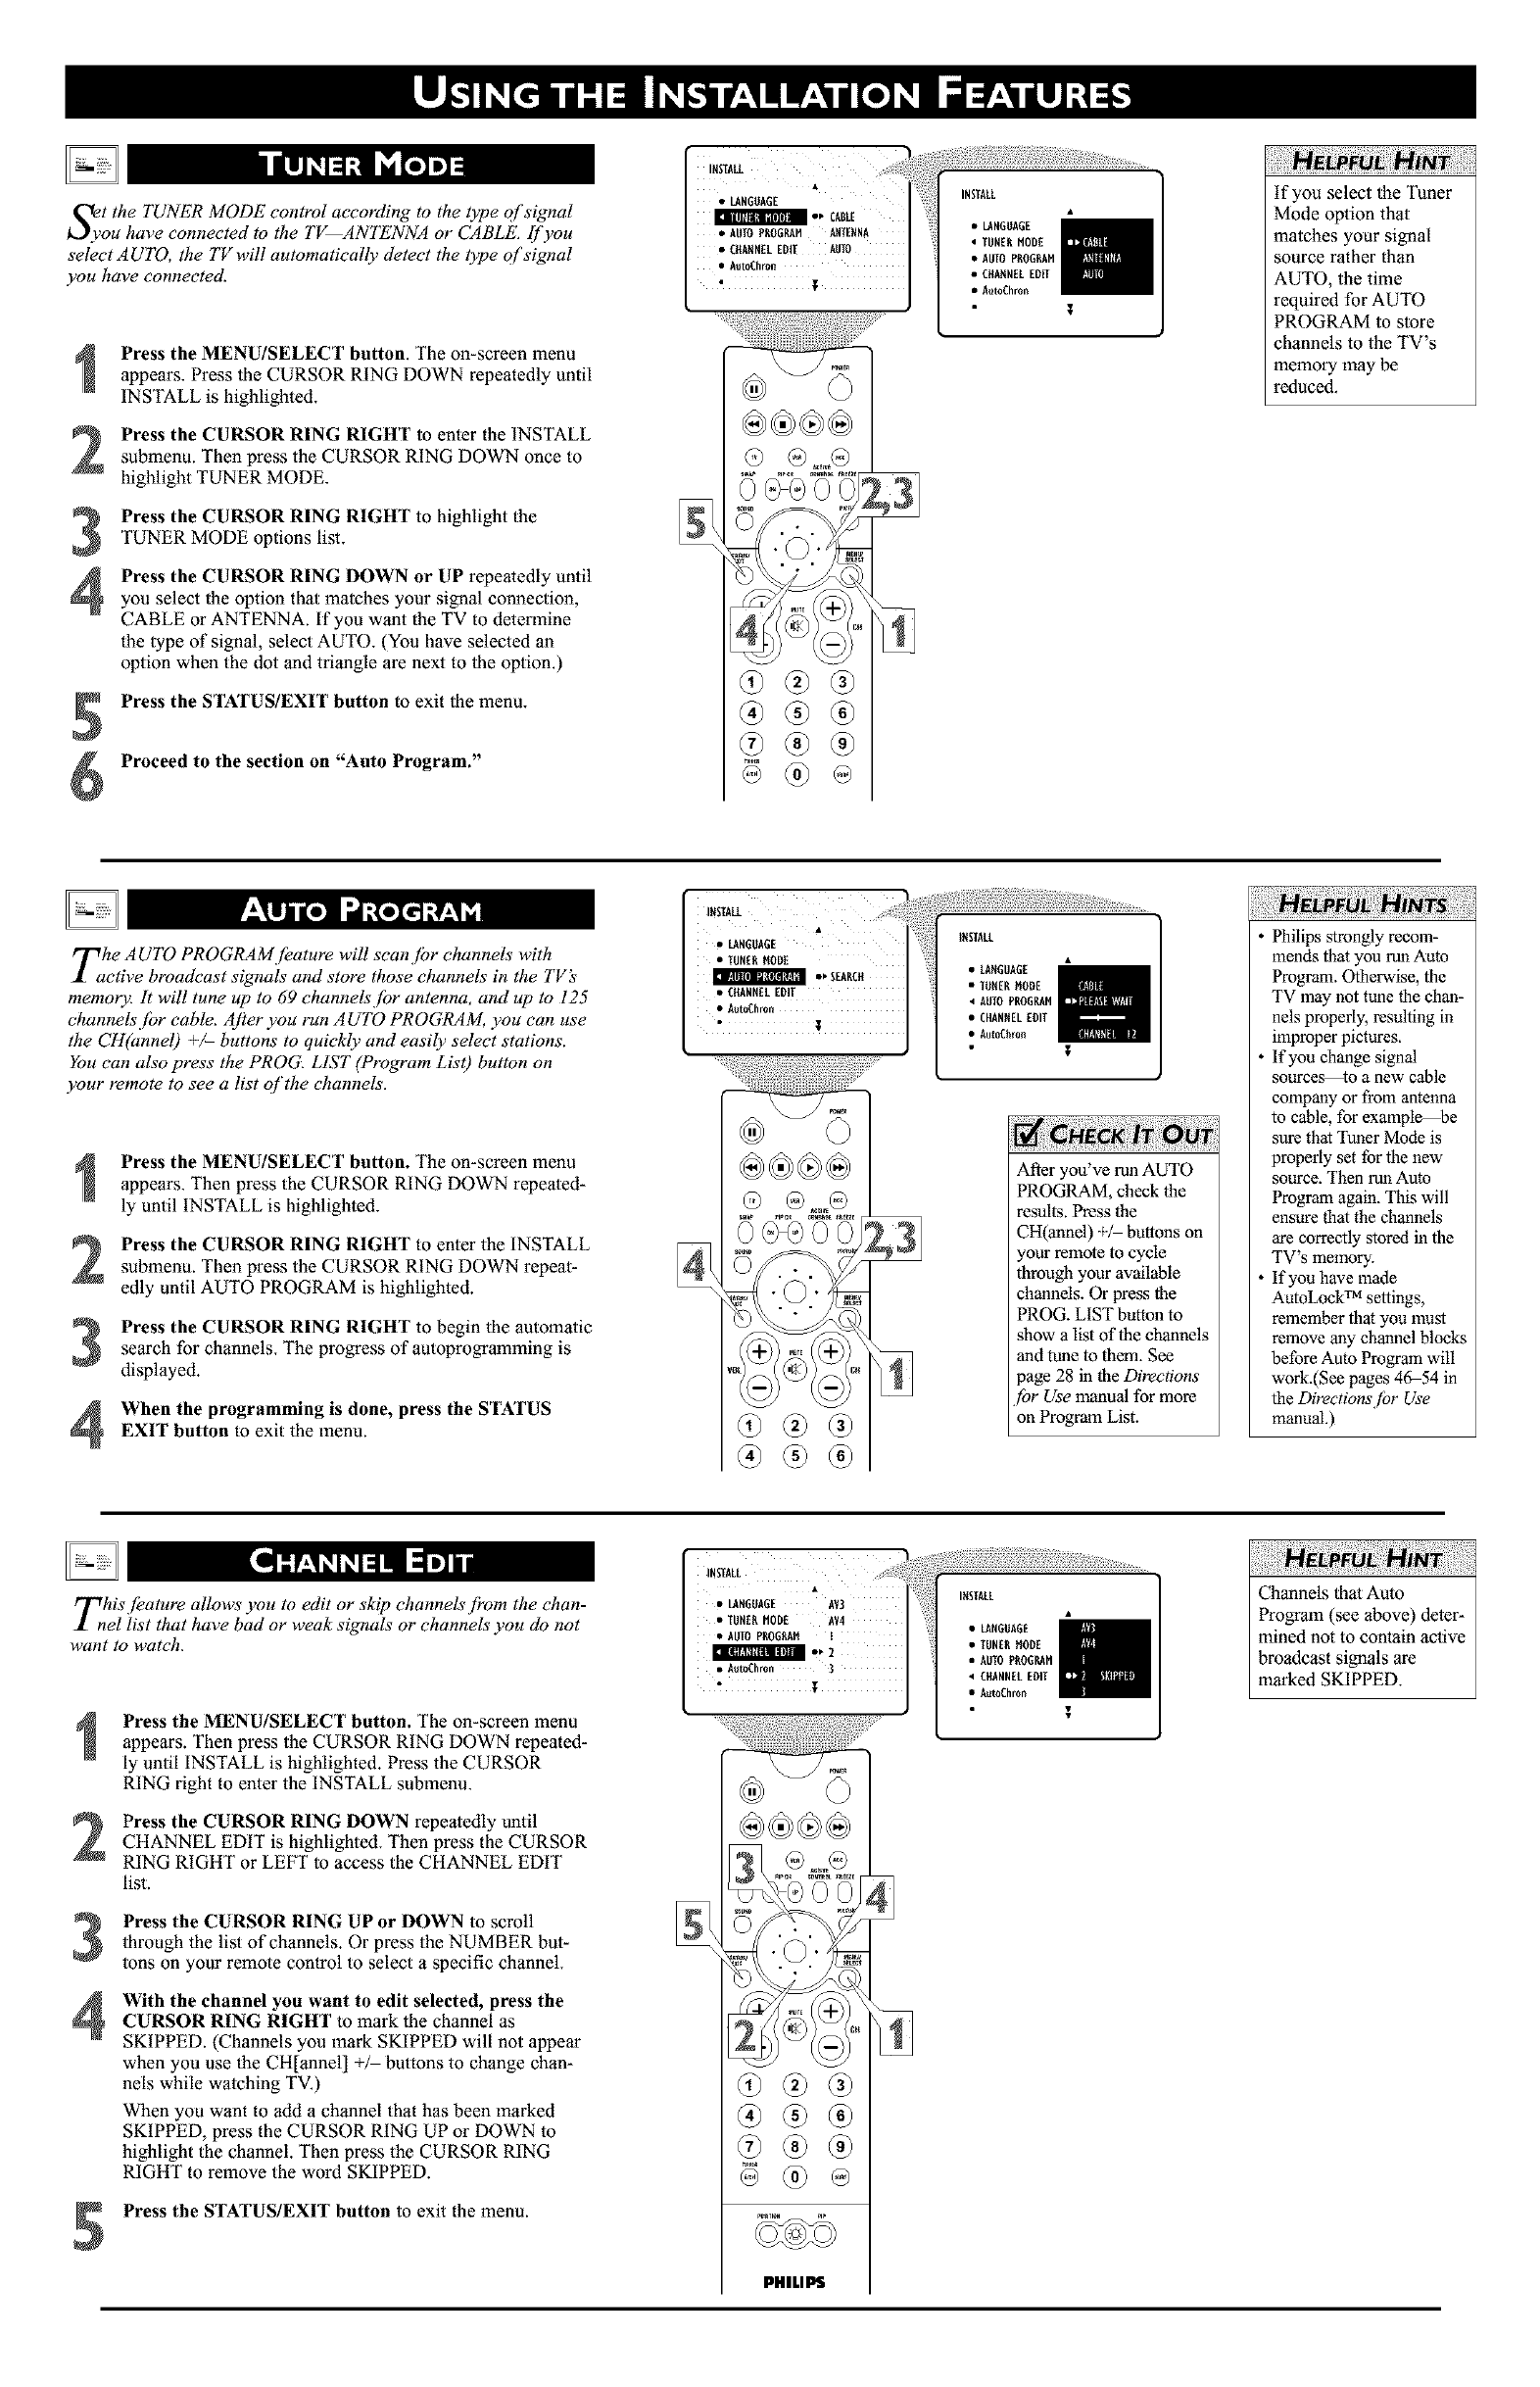
Sfyt the TUNER MODE control according to the type of signal
ou have connected to the TV ANTENNA or CABLE. [!'you
select AUTO, the TV will automatically detect the type of signal
you have connected.
Press the MENU/SELECT button. The on-screen menu
appears. Press lhe CURSOR RING DOWN repeatedly until
INSTALL is highlighted.
Press the CURSOR RING RIGHT to enter the INSTALL
submenu. Then press the CURSOR RING DOWN once to
highlight TUNER MODE.
4
Press the CURSOR RING RIGHT to highlight the
TUNER MODE options list.
Press the CURSOR RING DOWN or UP repealedly until
you select the option that matches your signal connection,
CABLE or ANTENNA. If you want the TV to determine
the type of signal, select AUTO. (You have selected an
option when the dot and triangle are next to the option.)
Press the STATUS/EXIT button to exit the menu.
Proceed to the section on "Auto Program."
INSTALL i
• LANGUAGE •,CABtE
• AUTOPUOGMM ANTENNA
•CO_NEtEmit AUTO
•AutoChron
•t
®
@
• AutoChron
i
if you select the Tuner
Mode option that
matches your signal
source rather than
AUTO, the time
required for AUTO
PROGRAM to store
channels to the TV's
memory may be
reduced.
Tahe AUTO PROGRAMJeature will scan jbr channels with ,
ctive broadcast signals and store those channels in the TV s
memory. It will tune up to 69 channels [br antenna, and up to 125
channels.[br cable. After you run AUTO PROGRAM, you can use
the CH(annel) +/- buttons to quickly and easily select stations.
You can also press the PROG. LIST (Program Lis 0 button on
your remote to see a list of the channels'.
2
3
4
Press the MENU/SELECT button. The on-screen menu
appears. Then press the CURSOR RING DOWN repeated-
ly until INSTALL is highlighted.
Press the CURSOR RING RIGHT to enter the INSTALL
submenu. Then press the CURSOR RING DOWN repeat-
edly until AUTO PROGRAM is highlighted.
Press the CURSOR RING RIGHT to begin the automatic
search for channels. The progress of autoprogramming is
displayed.
When the programming is done, press the STATUS
EXIT button to exit the menu.
IUSTAU.
!LANGUAGE
• TUNEUMODE
m •_SEARCU
• COANN[AEDIT
• Aut0Chr0_
• i
• AUTOPROGRAM
• CHANMELEUIT
• AutoChron
After you've run AUTO
PROGRAM, check the
results. Press the
CH(annel) _/ buttons on
iour remote to cycle
through your available
channels. Or press the
PROG. LIST button to
show a list of the channels
and tune to them. See
page 28 in the Directions'
[br Use manual for more
"on Program List.
Philips strongly recom-
mends that you run Auto
Program. Otherwise, the
TV may not tune the chan-
nels properly, resulting in
improper pictures.
If you change signal
sources to a new cable
company or from antenna
to cable, for example be
sure that Tuner Mode is
properly set for the new
source. Then run Auto
Program again. This will
ensure that the channels
are correctly stored in the
TV's memory.
If you have made
AutoLock TM satlings,
remember that you must
remove any channel blocks
before Auto Program will
work.(See pages 46_54 in
the Directions Jbr Use
manual.)
Tihis.[kature allows you to edit or skip channels j?om the chan-
el list that have bad or weak signals or channels' you do not
want to watch.
2
3
4
Press the MENU/SELECT button. The on-screen menu
appears. Then press the CURSOR RING DOWN repeated-
ly until INSTALL is highlighted. Press the CURSOR
RING right to enter the INSTALL submenu.
Press the CURSOR RING DOWN repeatedly until
CHANNEL EDIT is highlighted. Then press the CURSOR
RING RIGHT or LEFT to access the CHANNEL EDIT
list.
Press the CURSOR RING UP or DOWN to scroll
through lhe list of channels. Or press the NUMBER but-
tons on your remote control to select a specific channel.
With the channel you want to edit selected, press the
CURSOR RING RIGHT to mark the channel as
SKIPPED. (Channels you mark SKIPPED will not appear
when you use the CH[annel] +_ buttons to change chan-
nels while watching TV.)
When you want to add a channel that has been marked
SKIPPED, press the CURSOR RING UP or DOWN to
highlight the channel. Then press the CURSOR RING
RIGHT to remove the word SKIPPED.
Press the STATUS/EXIT button to exit the menu.
IN!TALL
•LANGOAGE AV3
TUNER MODE AV4
• AUTOPUOGRA_ I
• A_toChron 3
, 1
@
@
PHILIPS
•AUTO PUODRAM
• CRANNEAEDIT
• AutoChron
Channels thal Auto
Progrmn (,seeabove) deter-
mined not to contain active
broadcast signals are
marked SKIPPED.
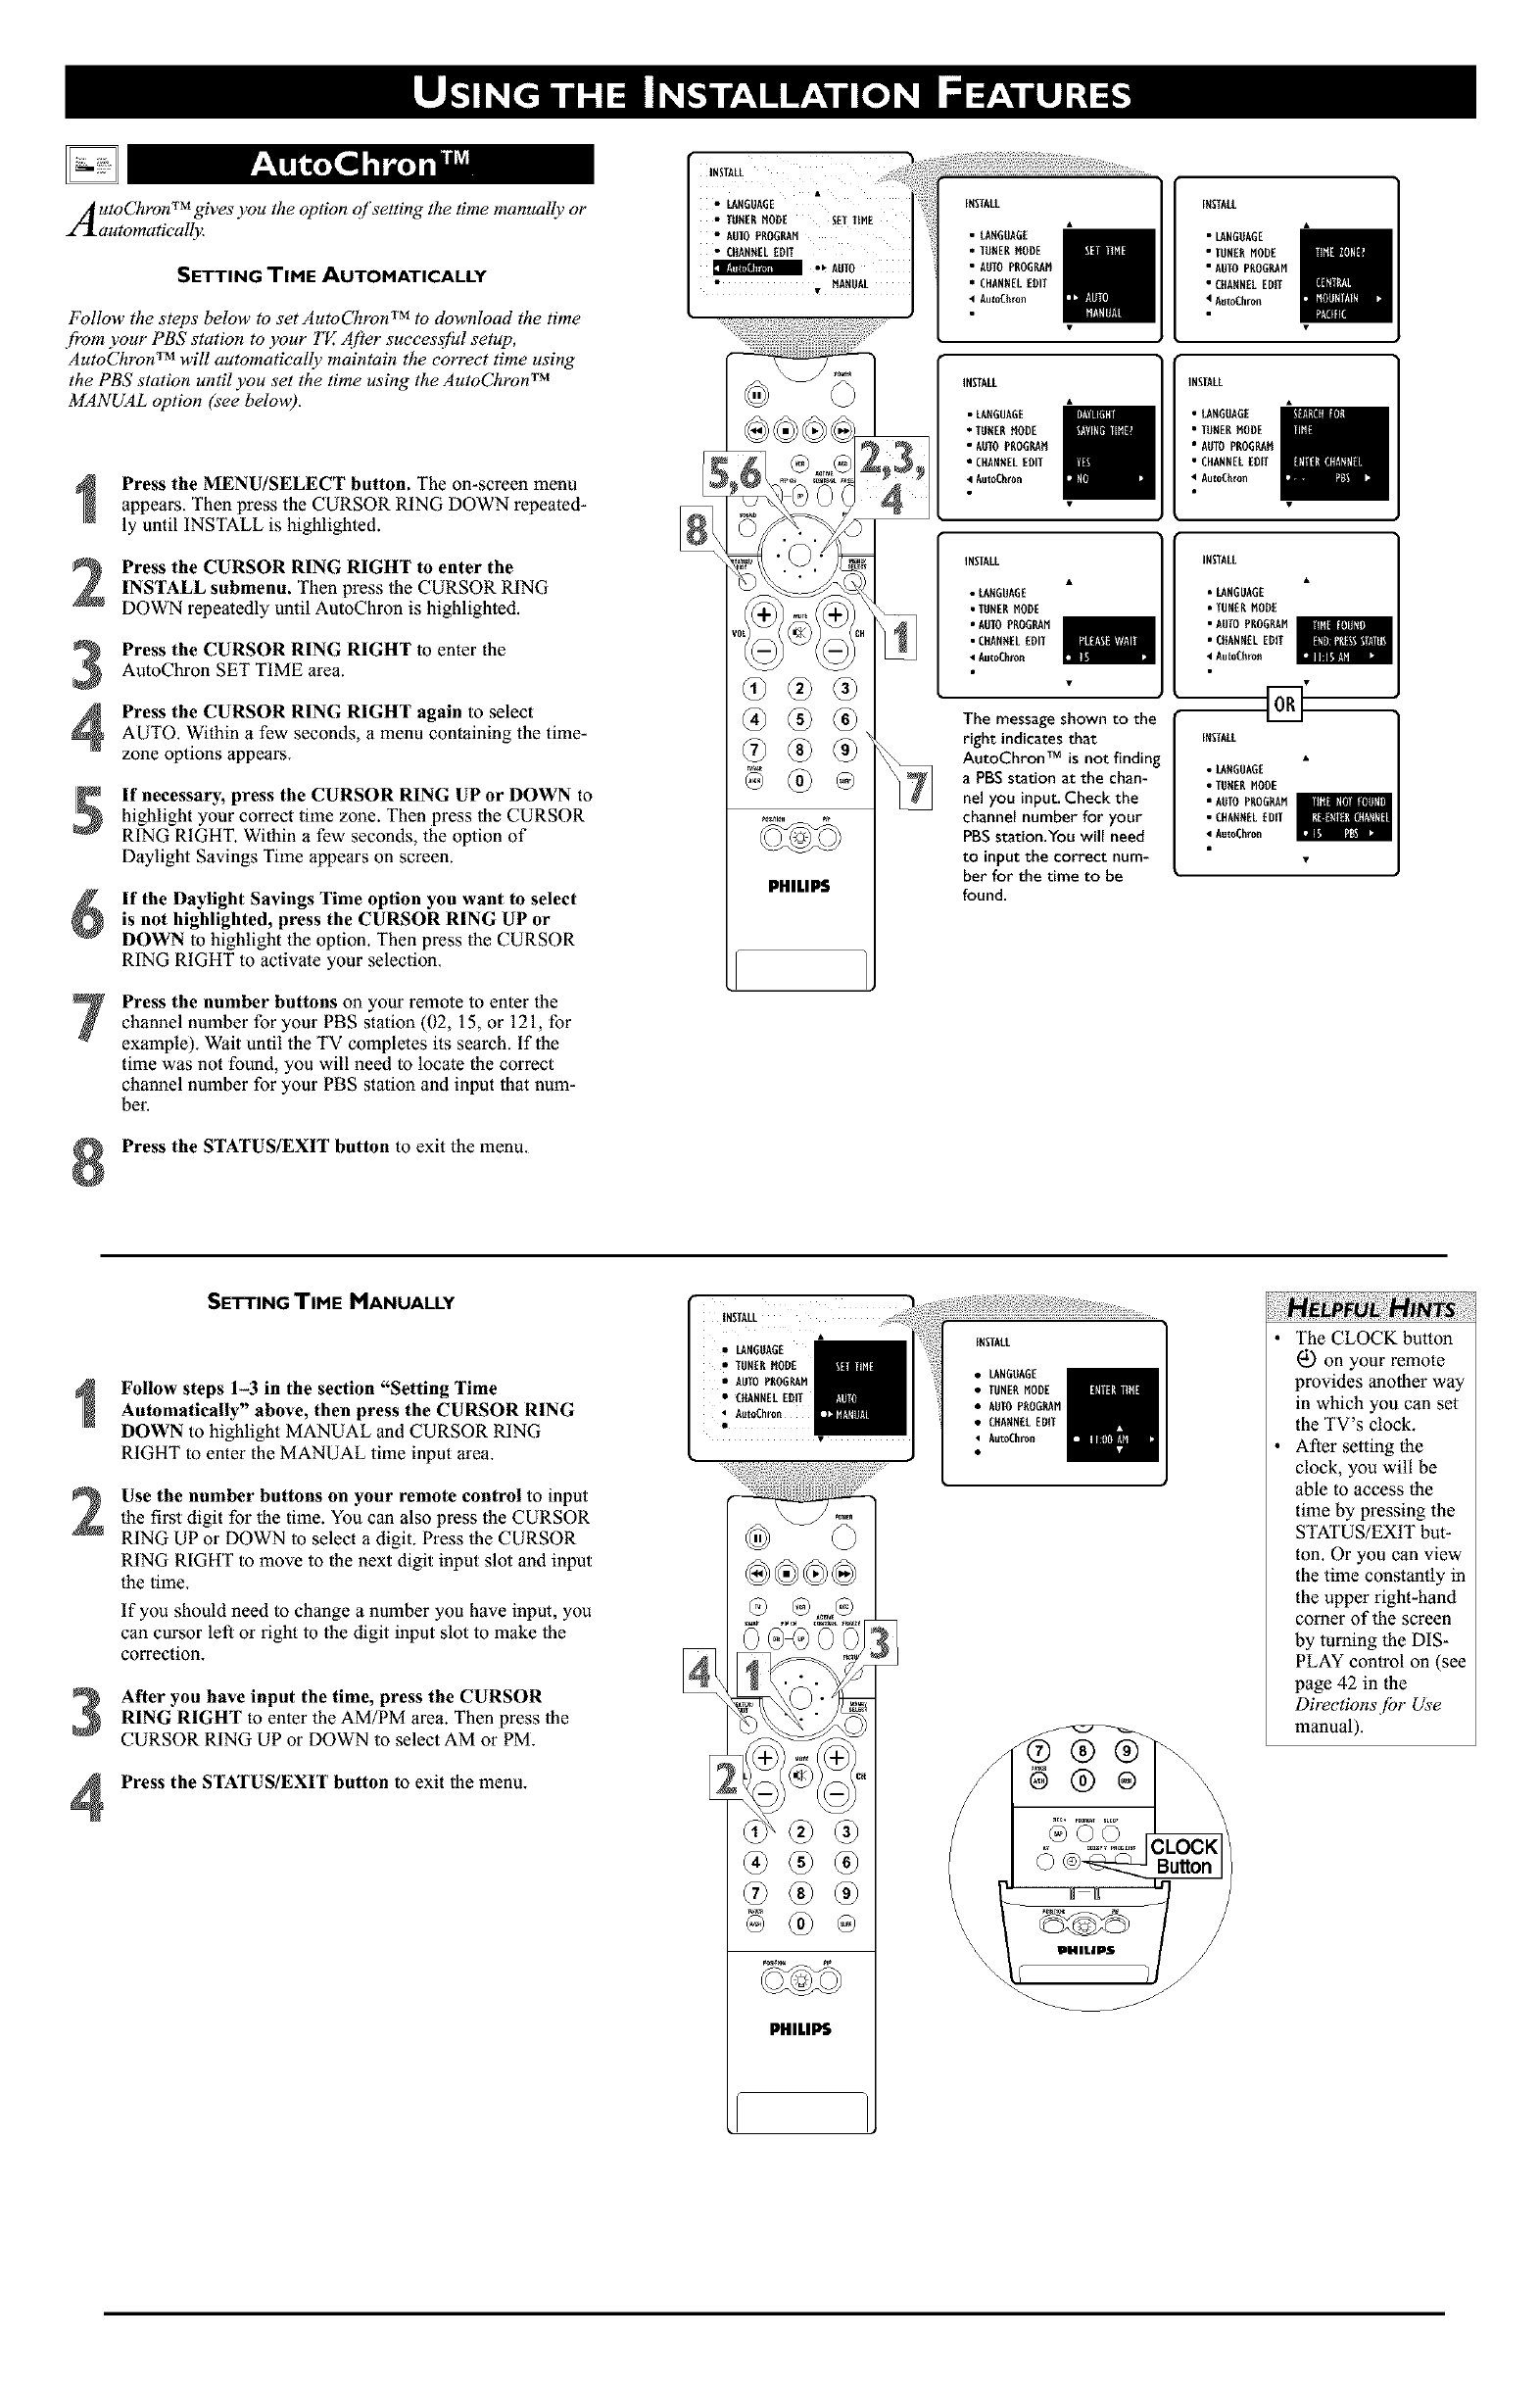
A utoChron TM gives you the option of setting the time manually or
automatically.
SETTING TIME AUTOMATICALLY
Follow the steps below to set AutoCTzron TM to download the time
.fi'om your PBS station to your TV. After successfhl setup,
AutoChron TM will automatically maintain the correct time using
the PBS station until you set the time using the AutoChron TM
MANUAL option (see below).
Press the MENU/SELECT button. The on-screen menu
appears. Then press the CURSOR RING DOWN repeated-
ly until INSTALL is highlighted.
Press the CURSOR RING RIGHT to enter theINSTALL submenu. Then press lhe CURSOR RING
DOWN repeatedly until AutoChron is highlighted.
Press the CURSOR RING RIGHT to enter the
AutoChron SET TIME area.
Press the CURSOR RING RIGHT again to selectAUTO. Within a few seconds, a menu containing the time-
zone options appears.
If necessary, press the CURSOR RING UP or DOWN to
highlight your correct time zone. Then press the CURSOR
RING RIGHT. Within a few seconds, lhe option of
Daylight Savings Time appears on screen.
If the Daylight Savings Time option you want to select
is not highlighted, press the CURSOR RING UP or
DOWN to highlight the option. Then press the CURSOR
RING RIGHT to activate your selection.
Press the number buttons on your remote to enter the
channel nmnber for your PBS station (02, 15, or 121, for
example). Wait until the TV completes its search. If the
time was not found, you will need to locate the correct
channel nmnber for your PBS station and input that num-
ber.
Press the STATUS/EXIT button to exit the menu.
i •
• LANGUAGE
• TOMENHODE SATTIME
•AUTO PROGRAM
• CHANNELEDIT
••MANUAL
@
@
PHILIPS
• IMMEN MODE
•A010 PROGRAM
•CHANMELEDIT
<AutoChron
INSTALL
•LAMGUAGE
• TMMENMODE
•AUTOPROGRAM
•CHANMELEDIT
• AutoChron
INSTALL
•LANGUAGE
• TMMENMODE
• AUTO PROGRAM
•CHANNELEOIT
•AutoChron
The message shown to the
right indicates that
AutoChron TM is not finding
a PBS station at the chan-
nel you input. Check the
channel number for your
PBS station.You will need
to input the correct num-
ber for the time to be
found.
IMSTALL
• LANGUAGE
• TUNER MODE
•AUTO PROGRAM
• CRAMNELEDIT
<AutoChron
• LANGUAGE
•lUMEN MODE
• AUTO PROGRAM
• CHANNELEOFf
•AutoChron
INSTALL
•LANGUAGE
•TUMENMODE
•AUTO PROGRAM
• CHANNELMOlT
4AutoChron
iNSTALL
• LAMOUAG[
•TONERMODE
•AUTO PNOGRAM
•CHANNELEDIT
•AmoChton
2
3
4
SETTING TIME MANUALLY
Follow steps 1-3 in the section "Setting Time
Automatically" above, then press the CURSOR RING
DOWN to highlight MANUAL and CURSOR RING
RIGHT to enter the MANUAL time input area.
Use the number buttons on your remote control to input
the first digit for the time. You can also press the CURSOR
RING UP or DOWN to select a digit. Press the CURSOR
RING RIGHT to move to the next digit input slot and input
the time.
If you should need to change a number you have input, you
can cursor left or right to the digit input slot to make the
correction.
After you have input the time, press the CURSOR
RING RIGHT to enter the AM/PM area. Then press the
CURSOR RING UP or DOWN to select AM or PM.
Press the STATUS/EXIT button to exit the menu.
@
PHILLIS
IMSIALL
LANGMAGE
TUNER MODE
AUTO PROGRAM
CMAMNELEDIT
AutoChron
t/
The CLOCK button
a0.)on your remote
provides another way
in which you can set
the TV's clock.
After setting the
clock, you will be
able to access the
time by pressing the
STATUS/EXIT but-
toll. Or you can view
the time constantly in
the upper right-hand
comer of the screen
by turning the DIS-
PLAY control on (see
page 42 in the
Directions /br Use
manual).
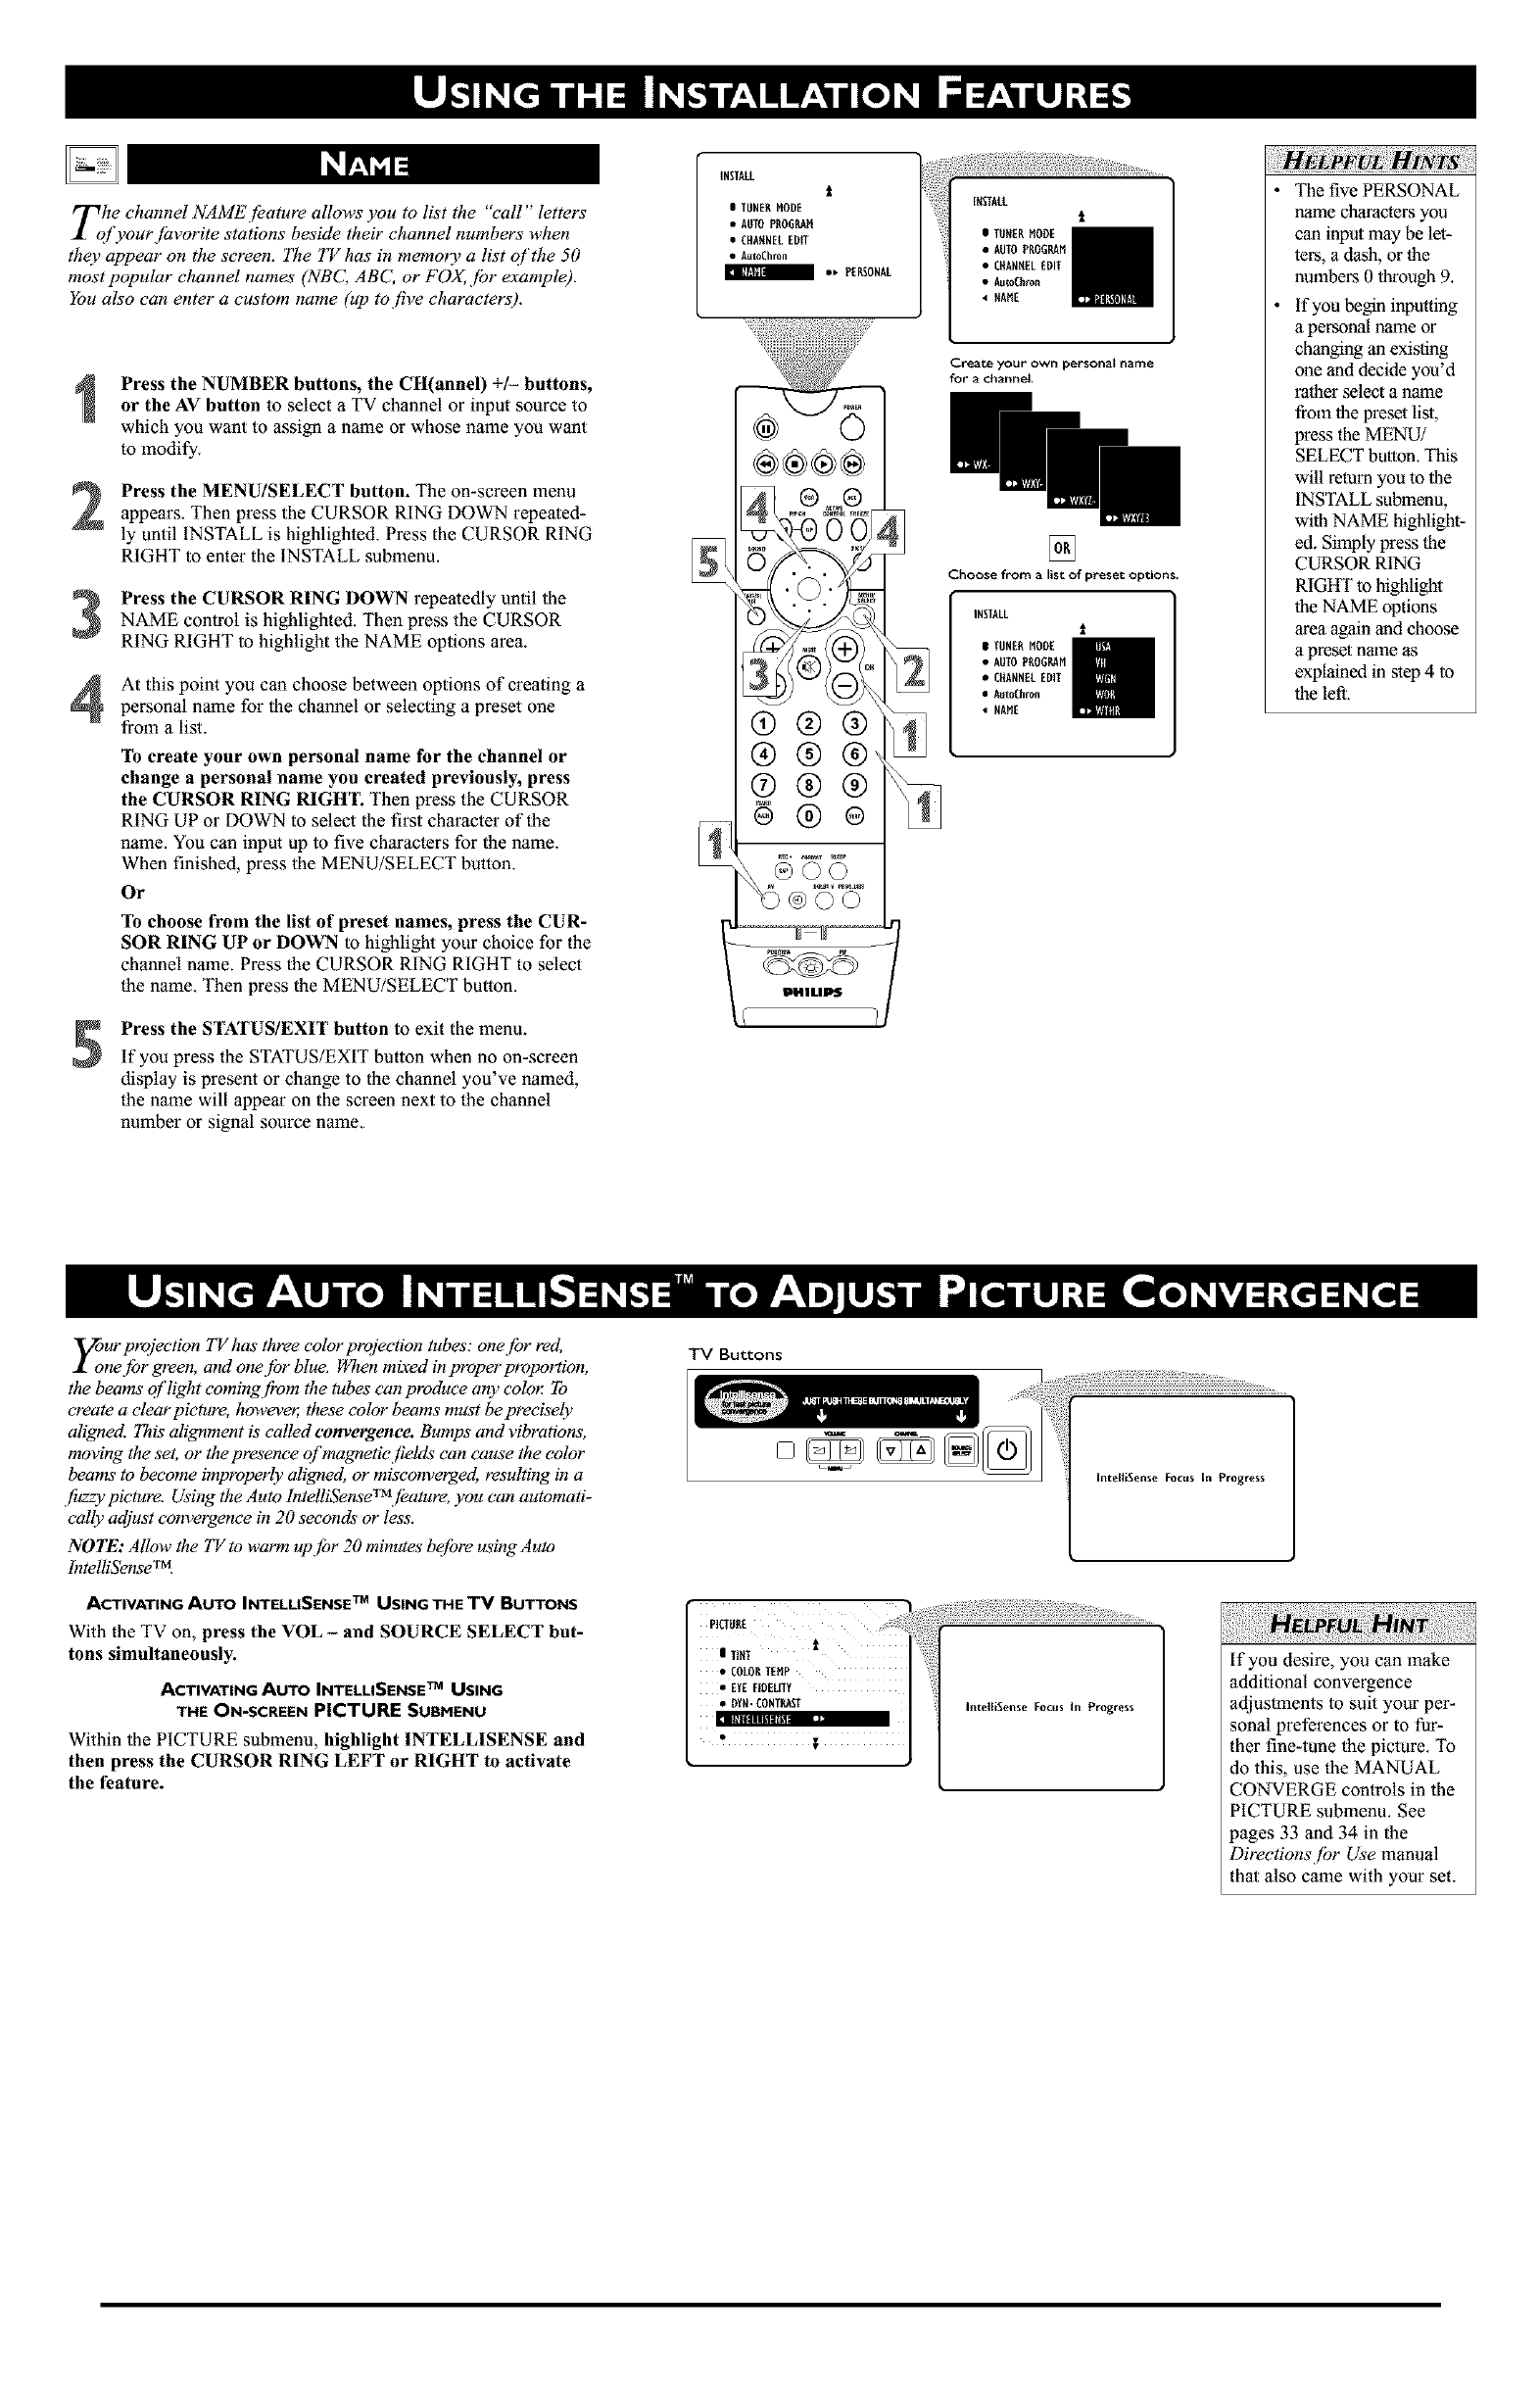
Tohe channel NAMEjbature allows you to list the "call" letters
f yourjhvorite stations beside their channel numbers when
they appear on the screen. The TV has in memory a list of the 50
most popular channel names (NBC, ABC, or FOX, jbr example).
You also can enter a custom name (up to five characters).
2
3
4
Press the NUMBER buttons, the CH(annel) +/- buttons,
or the AV button to select aTV channel or input source to
which you want to assign a name or whose name you want
to modify.
Press the MENU/SELECT button. The on-screen menu
appears. Then press the CURSOR RING DOWN repeated-
ly until INSTALL is highlighted. Press the CURSOR RING
RIGHT to enter the INSTALL submenu.
Press the CURSOR RING DOWN repeatedly until the
NAME control is highlighted. Then press the CURSOR
RING RIGHT to highlight the NAME options area.
At this point you can choose between options of creating a
personal name for the channel or selecting a preset one
from a list.
To create your own personal name for the channel or
change a personal name you created previously, press
the CURSOR RING RIGHT. Then press the CURSOR
RING UP or DOWN to select the first character of the
name. You can input up to five characters for the name.
When finished, press the MENU/SELECT button.
Or
To choose from the list of preset names, press the CUR-
SOR RING UP or DOWN to highlight your choice for the
channel name. Press the CURSOR RING RIGHT to select
the name. Then press the MENU/SELECT button.
Press the STATUS/EXIT button to exit the menu.
If you press the STATUS/EXIT button when no on-screen
display is present or change to the channel you've named,
the name will appear on the screen next to the channel
number or signal source name.
INSTALL
t
ITUNERMODE
•AUTOPAO6_M
• CHANNELEDIT
• AutoChron
I o, PERSONAL
®®®®
® @ @ /11
®@@ --
• _AME
Create your own personal name
for achannel.
rrr!
[]
Choose from a list of preset options.
The five PERSONAL
name characters you
can input may be let-
ters, a dash, or tile
numbers 0 through 9.
if you begin inputting
a personal name or
changing an existing
one and decide you'd
rather select a name
from the preset list,
press the MENU/
SELECT button. This
will return you to the
INSTALL submenu,
with NAME highlight-
ed. Simply press the
CURSOR RING
RIGHT to highlight
the NAME options
area again and choose
a preset name as
explained in step 4 to
the left,
Zur projection TV has three color projection tubes': one [br red,
ne [br green, amt onejbr blue. When mixed in properproportion,
the beams of light comingf!'om the tubes can produce arty color To
create a clear picture, howeve_ these color beams must be precisely
aligned. This alignment is' called convergence. Bumps and vibrations,
moving the set, or the presence of magnetic fields can cause the color
beams' to become improperly aligned, or misconverged, resulting in a
fuzzy picture. Using the Auto lntelliSenseTMjbature, you can automati-
cally adjust convergence in 20 seconds or less.
NOTE: Allow the TV to warm up.[br 20 minutes be[bre using Auto
lntelliSenseTM
TM
ACTIVATING AUTO INTELLISENSE USING THE TV BUTTONS
With tile TV on, press the VOL - and SOURCE SELECT but-
tons simultaneously.
ACTIVATING AUTO INTELLISENSE TM USING
THE ON-SCREEN PICTURE SUBMENU
Within the PICTURE submenu, highlight INTELLISENSE and
then press the CURSOR RING LEFT or RIGHT to activate
the feature.
TV Buttons
IntelliSeme Focus In Progress
If you desire, you can make
additional convergence
adjustments to suit your per-
sonal preferences or to fur-
ther fine-tune the picture. To
do this, use the MANUAL
CONVERGE controls in the
PICTURE submenu. See
pages 33 and 34 in the
Directions /br Use manual
that also came with your set.

riTlsue Picture-In-Picture (PIP) [bature allows you to display a
bscreen within your mainscreen and watch two video
sources at once. Because your set has two tuners, you can eTdoy
all the benefits of PIP without using a VCR as a second tunerjbr
your PIPpicture. Tune to yourjavorite show on the main screen
with tuner one while scanning other channels with tuner two in
the PIP window. Also view the AV1, AV2, or AV3 sources in the
PIP window. NOTE: CV1 cannot be displayed in the PIP win-
dow, and AV4 and AV5 do not fimction with PIP. (For #