Magnavox CVT325AV01 User Manual VHS CAMCORDER Manuals And Guides 97090062
MAGNAVOX Compact VHS C Camcorder Manual 97090062 MAGNAVOX Compact VHS C Camcorder Owner's Manual, MAGNAVOX Compact VHS C Camcorder installation guides
User Manual: Magnavox CVT325AV01 CVT325AV01 MAGNAVOX VHS CAMCORDER - Manuals and Guides View the owners manual for your MAGNAVOX VHS CAMCORDER #CVT325AV01. Home:Electronics Parts:Magnavox Parts:Magnavox VHS CAMCORDER Manual
Open the PDF directly: View PDF ![]() .
.
Page Count: 40

VHSCAMCOROER
OWHER'SMAHUAL

MAGNAVOX
Smart.Very smart:
Return you
ensure yoU
your MAGNAVOX purchase is registered_ you're ehglble 1;o
)duct. So complete and return the .Warranty Registration card
e of these important benefits.
Warranty II ,.
Verification
%gistering your product within 1i3'"" _''!
lays confirms your right to maximum _
under the terms and ownership, in the
lditions of your MAGNAVOX • "_._ _.theft or loss.
receive
own,
;away g,
MAGNAVOX
Smart.Verysmart:
Congratulations on your purchas
and welcome to the "family!"
Dear MAGNAVOX product owner:
Thank you for your confidence in MAGNAVOX. You've selected one of the
best-built, best-backed products available today. And we'll do everything in
our power to keep you happy with your purchase for many years to come.
As a member of the MAGNAVOX "family," you're entitled to protection by
one of the most comprehensive warranties and outstanding service
networks in the industry.
What's more, your purchase guarantees you'll receive all the information
and special offers for which you qualify, plus easy access to accessories
from our convenient home shopping network.
And most importantly you can count on our uncompromising commitment
to your total satisfaction.
All of this is our way of saying welcome-and thanks for investing in a
MAGNAVOX product.
Sincerely,
Robert Minkhorst
President and Chief Executive Officer
P.S. Remember, to get the mast from your MAGNAVOX product,
you must return your Warranty Registration Card within 10
days, So please mail it to us right naw!
Features
• High Speed Shutter
• Power Zoom Function
• Automatic Tracking
• Automatic White Balance
• Automatic Macro
• Video Playback
• Automatic/Manual Focusing
• CCD Image Sensor
• HQ (High Quality) System
• Two Ways to Supply Power
Comments
• This camcorder is designed to record and play back in Stanc[ard
Play (SP) only. It will not play normally programs recorded in
Long Play (LP) or Super Long Play (SLP).
• This camcorder is equipped with a HQ (high quality) system to
provide excellent Video pictures. It is compatible with standard
VHS equipment.
• Only use those tapes with the _ mark. We recommend that
you use only cassette tapes that have been tested and inspected for
use in two, four, six, and eight hour VCRs.
Safety Precautions
Caution: To prevent fire or shock hazard as well as interference, use
only the recommended accessories.
Copyright ©1995,
PHIL1PS CONSUMER ELECTRONICS COMPANY.
All rights reserved.
3
Introduction
:Welcome to your camcorder owner's
! manual. This manual was designed for
i you. When looking through it, it will
i help you to keep several things in mind.
i One, this manual is divided into four
sections. The Getting Started section
! guides you through the initial setup and
i simple operations of the camcorder.
i The Description of Controls section
:describes all of the camcorder controls
:EVF indications. The Doing More sec-
i lion guides you through the features of
the camcorder. Finally, the Information
:You May Need section provides infor-
mation you may or may not need - alter-
nate power supply sources, for example,
and trouble checks.
Two, the instructions follow a simple
format. Detailed steps explaining oper-
ations are on the outside edges of pages.
Illustrations accompanied by brief steps
explaining operations are on the inside
edges of pages. Additional information
can be found in boxes labeled NOTES
along the lower edges of pages.
Finally, never be afraid to try a feature!
You cannot hurt the carncorder by
trying any of the features in this man-
ual!
So read on - and relax.
•,eeo ieee• ooe ee oe ee Je • • ee • • ee g oe o • eo e • o• e *
Before doing anything else, record the
:camcorder s model and serial numbers ]
• [in the spaces provided on page two. [
IThese numbers will help us assist you ifl
lyou ever call for help. I

4
Table of Contents
Getting Started
Introduction ................................................................................................................................ 3
Table of Contents ....................................................................................................................... 4
Quick Use Guide ........................................................................................................................ 5
Before Using the Camcorder .................................................................................................. 6-7
Description of Controls
Front View of Camcorder ....................................................................................................... 8-9
Rear View of Camcorder ......................................................................................................... 10
Underside View of Camcorder ................................................................................................. 11
AC Adapter/Charger ................................................................................................................ 12
EVF Display ....................................................................................................................... 13-14
Doing More
Setting the Clock ................................................................................................................. 15-16
Recording ................................................................................................................................. 17
Fading In and Out .................................................................................................................... 18
Focusing ................................................................................................................................... 19
Zooming In and Out ................................................................................................................. 20
Using the Tape Counter ........................................................................................................... 21
Shutter Speeds ...................................................................... .................................................... 22
EVF Playback ........................................................................................................................... 23
Playing (or Monitoring a Recording) on a TV ................................................................... 24-25
Rerecording .............................................................................................................................. 26
Alternate Power Supply ........................................................................................................... 27
Color Enhancement Light ........................................................................................................ 28
Shoulder Strap .......................................................................................................................... 29
Information You May Need
Notes On Operations ................................................................................................................ 30
Before Requesting Service ....................................................................................................... 31
Specifications ........................................................................................................................... 32
Warranty .................................................................................................................................. 33
Notes ......................................................................................................................................... 34
Index ......................................................................................................................................... 35
Accessories ............................................................................................................................... 36
5
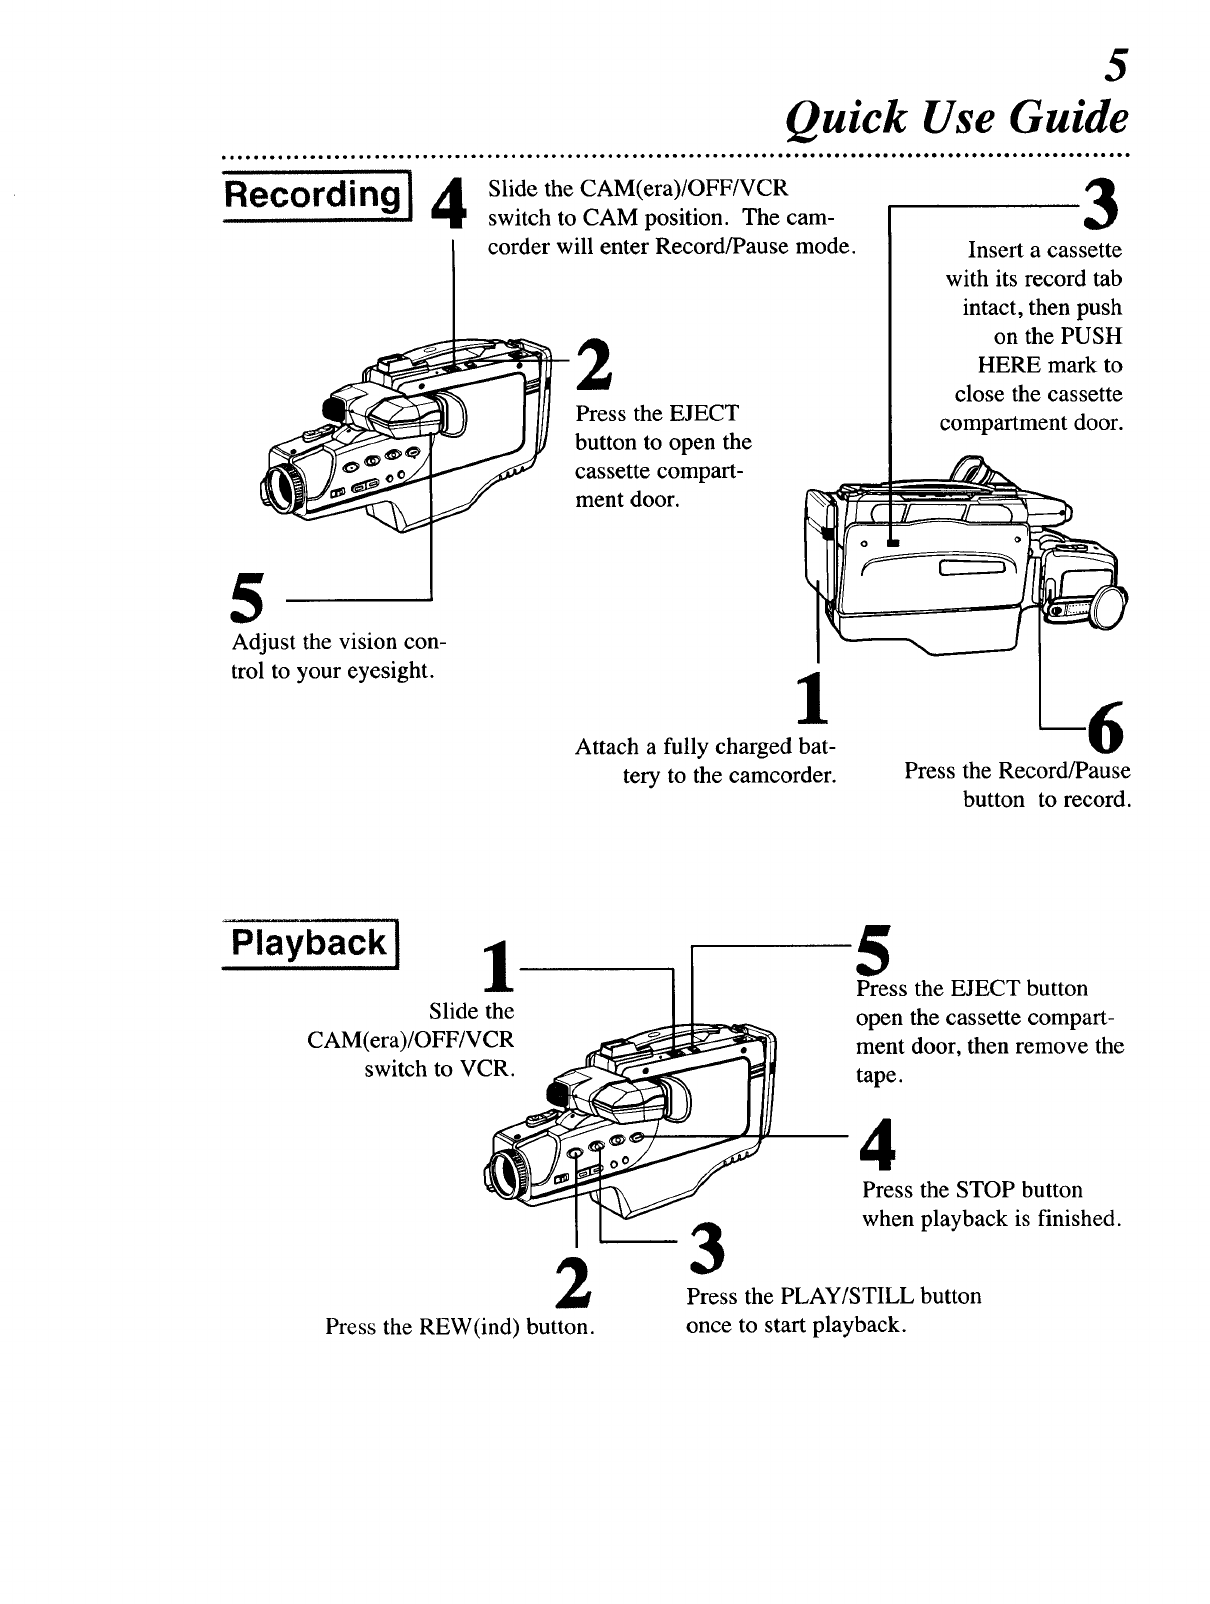
Quick Use Guide
Rec°rding ] 4Slide the CAM(era)/OFF/VCR
switch to CAM position. The cam-
corder will enter Record/Pause mode.
2
Press the EJECT
button to open the
cassette compart-
ment door.
3
Insert a cassette
with its record tab
intact, then push
on the PUSH
HERE mark to
close the cassette
compartment door.
5
Adjust the vision con-
trol to your eyesight. 1
Attach a fully charged bat-
tery to the camcorder. Press the Record/Pause
button to record.
Playback I1
Slide the
CAM(era)/OFF/VCR
switch to VCR.
2
Press the REW(ind) button.
5
Press the EJECT button
open the cassette compart-
ment door, then remove the
tape.
4
Press the STOP button
when playback is finished.
3
Press the PLAY/STILL button
once to start playback.
6
Before Using the Camcorder...
...charge the battery.
1
Plug the AC adapter/charger power
plug into an AC outlet. The POWER
light will come on.
2
Place the three grooves on the side of
the battery into the slots on the AC
adapter/charger so the battery rests flat
on the AC adapter/charger, as shown at
right. The arrows on the each side of
the battery should be aligned with the
arrows on the AC adapter/charger.
Then slide the battery toward the
POWER light until it clicks in place.
The CHARGE light will appear.
3
Wait for approximately one hour while
the battery charges. When the battery
is finished charging, the CHARGE light
will disappear.
4
Remove the battery from the AC
adapter/charger.
2
Insert the battery.
tt Plug the AC
adapter/charger
into an AC outlet.
3
Wait until the CHARGE
light disappears.
4
Remove the battery.
•To preserve the life of the battery, remove the battery from the
camcorder and the AC adapter/charger when it's not in use.
• It takes approximately one hour to charge a one-hour (part
number V80146BKO1) battery and two hours to charge a two-
hour (part number 483513817046) battery. The part number
can be found on the back of the battery.
• Charging these batteries on a charger other than the one pro-
vided may result in over-charging, which reduces battery life.
•The battery must be charged until the CHARGE light disap-
pears to ensure normal battery life of one hour of playing or
recording time.
•If the CHARGE light goes out shortly after charging begins,
remove the battery and use it. If the battery soon runs low on
power, you may need to purchase a new battery.
•Use the battery until it is completely empty (discharged).
•Always charge the battery after soon after using it. A battery
that remains uncharged for a long time may never take a charge
again.
•Do not use a charger other than that specified.
• Do not try to use an insufficiently charged or worn out battery.
determine the best method
7
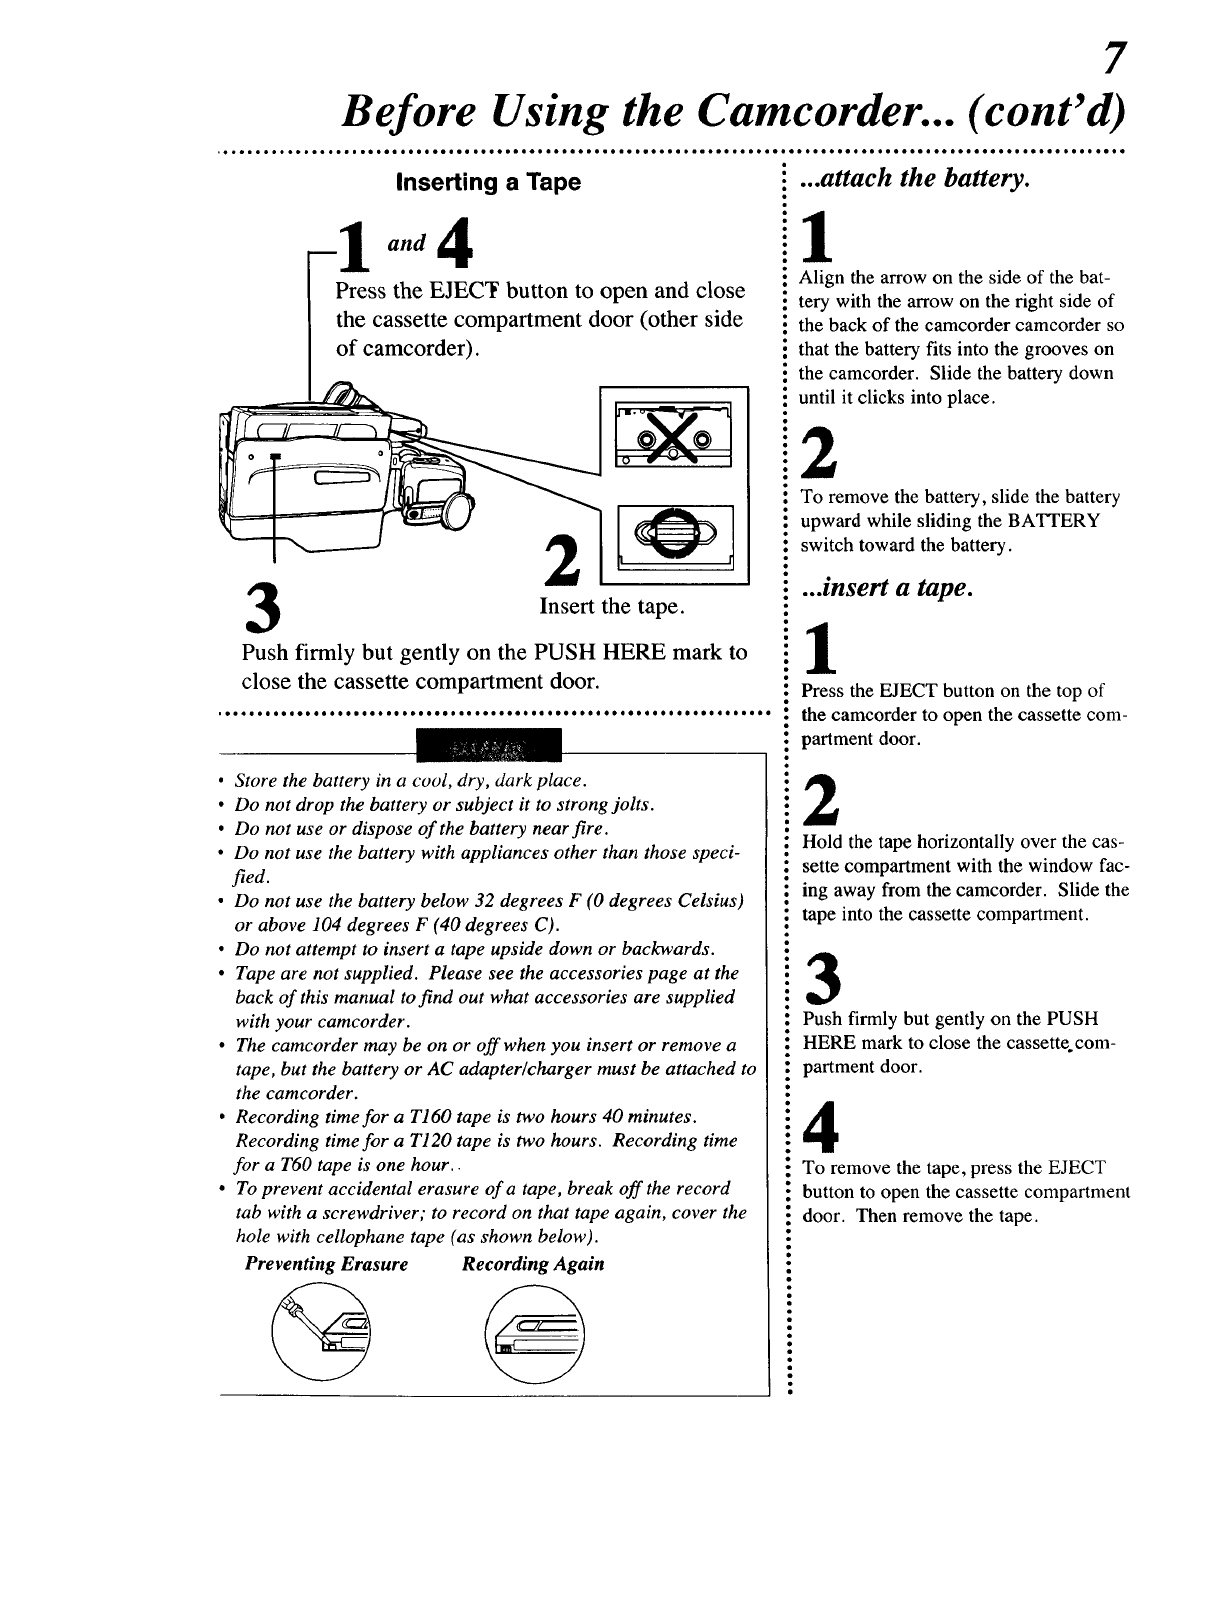
Before Using the Camcorder... (cont'd)
Inserting a Tape
Press the EJECT button to open and close
the cassette compartment door (other side
of camcorder).
2
Insert the tape.
Push firmly but gently on the PUSH HERE mark to
close the cassette compartment door.
•Store the battery in a coot, dry, dark place.
•Do not drop the battery or subject it to strong jolts.
• Do not use or dispose of the battery nearfire.
• Do not use the battery with appliances other than those speci-
fied.
•Do not use the battery below 32 degrees F (0 degrees Celsius)
or above 104 degrees F (40 degrees C).
• Do not attempt to insert a tape upside down or backwards.
•Tape are not supplied. Please see the accessories page at the
back of this manual to find out what accessories are supplied
with your camcorder.
• The camcorder may be on or off when you insert or remove a
tape, but the battery or AC adapter/charger must be attached to
the camcorder.
• Recording time for a T160 tape is two hours 40 minutes.
Recording time for a T120 tape is two hours. Recording time
for a T60 tape is one hour..
• To prevent accidental erasure of a tape, break off the record
tab with a screwdriver; to record on that tape again, cover the
hole with cellophane tape (as shown below).
Preventing Erasure Recording Again
•..attach the battery.
1
Align the arrow on the side of the bat-
tery with the arrow on the right side of
the back of the camcorder camcorder so
that the battery fits into the grooves on
the camcorder. Slide the battery down
until it clicks into place.
2
To remove the battery, slide the battery
upward while sliding the BATTERY
switch toward the battery.
••..insert a tape.
il
Press the EJECT button on the top of
the camcorder to open the cassette com-
. partment door.
l2
Hold the tape horizontally over the cas-
sette compartment with the window fac-
eing away from the camcorder. Slide the
tape into the cassette compartment.
3
Push firmly but gently on the PUSH
HERE mark to close the cassette com-
partment door.
4
To remove the tape, press the EJECT
button to open the cassette compartment
door. Then remove the tape.
8
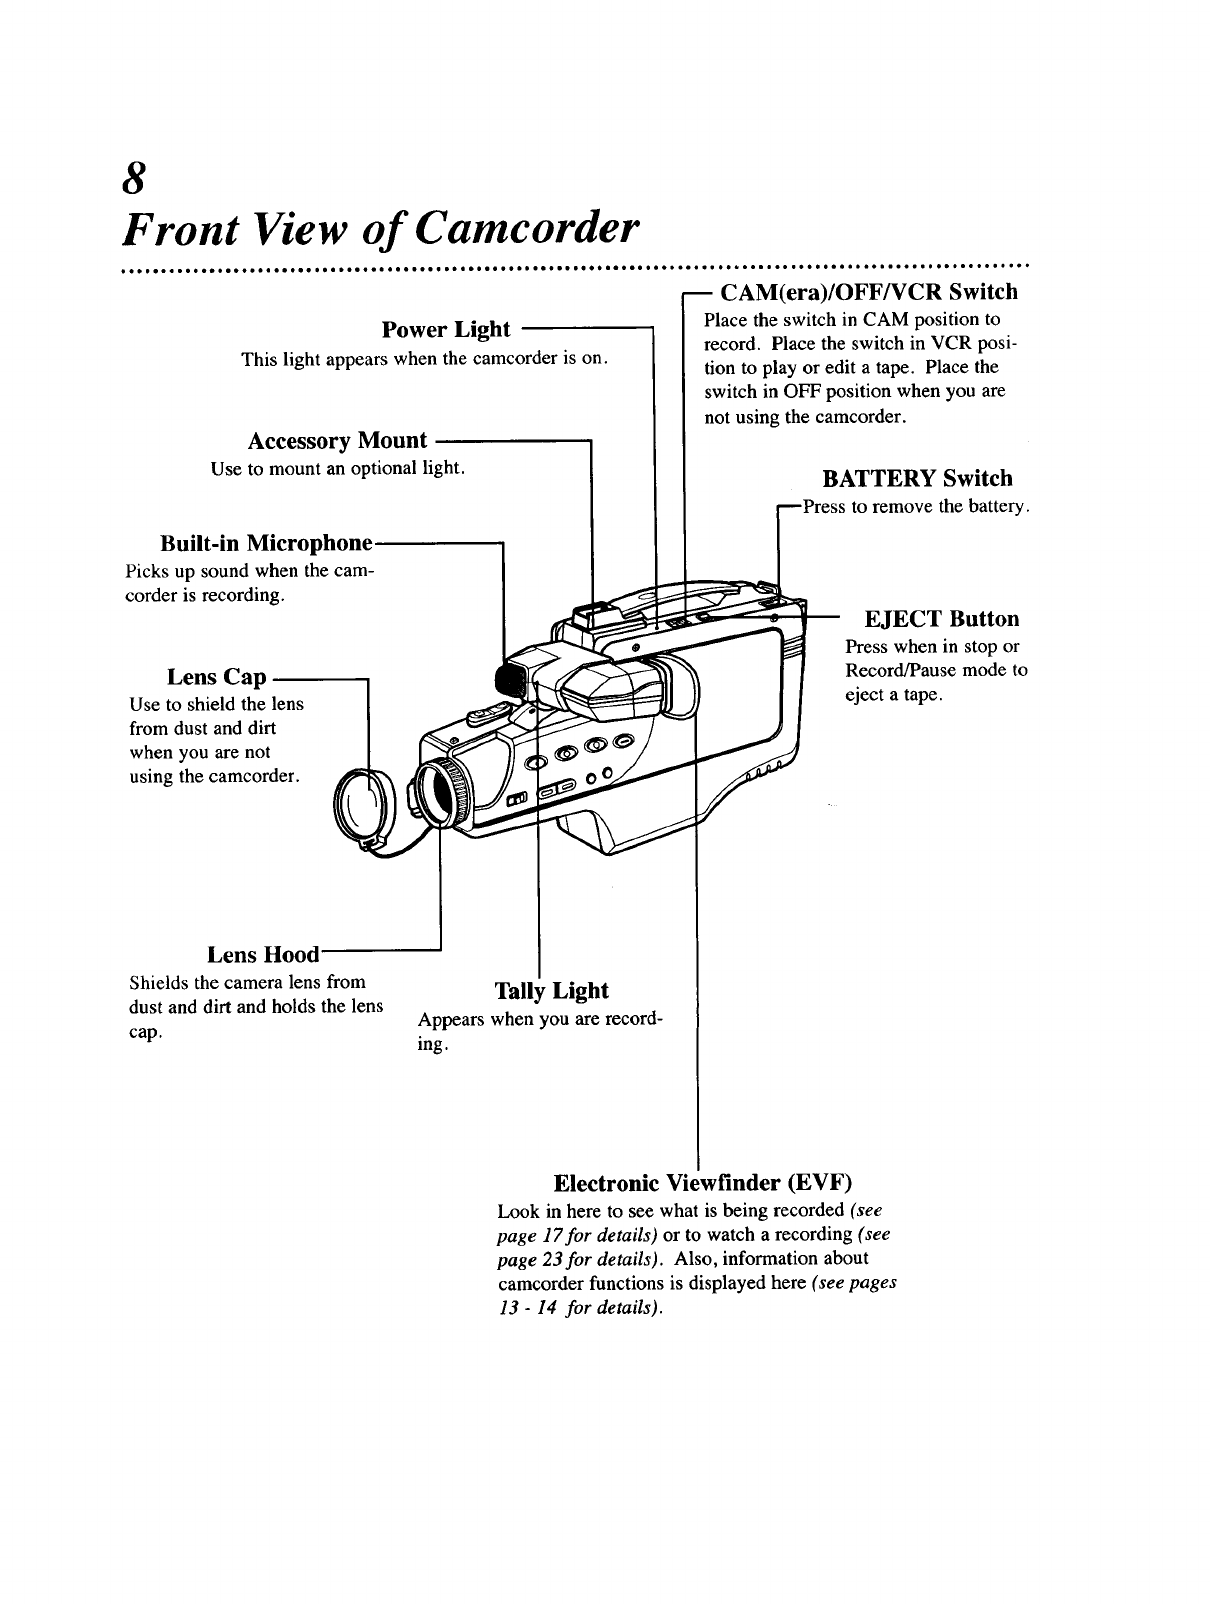
Front View of Camcorder
Power Light
This light appears when the camcorder is on.
Accessory Mount
Use to mount an optional light.
Built-in Microphone
Picks up sound when the cam-
corder is recording.
CAM(era)/OFF/VCR Switch
Place the switch in CAM position to
record. Place the switch in VCR posi-
tion to play or edit a tape. Place the
switch in OFF position when you are
not using the camcorder.
Lens Cap
Use to shield the lens
from dust and dirt
when you are not
using the camcorder.
Lens Hood
Shields the camera lens from
dust and dirt and holds the lens
cap.
Tally Light
Appears when you are record-
ing.
BATTERY Switch
to remove the battery.
EJECT Button
Press when in stop or
Record/Pause mode to
eject a tape.
Electronic Viewfinder (EVF)
Look in here to see what is being recorded (see
page 17for details) or to watch a recording (see
page 23for details). Also, information about
camcorder functions is displayed here (see pages
13 -14 for details).
9
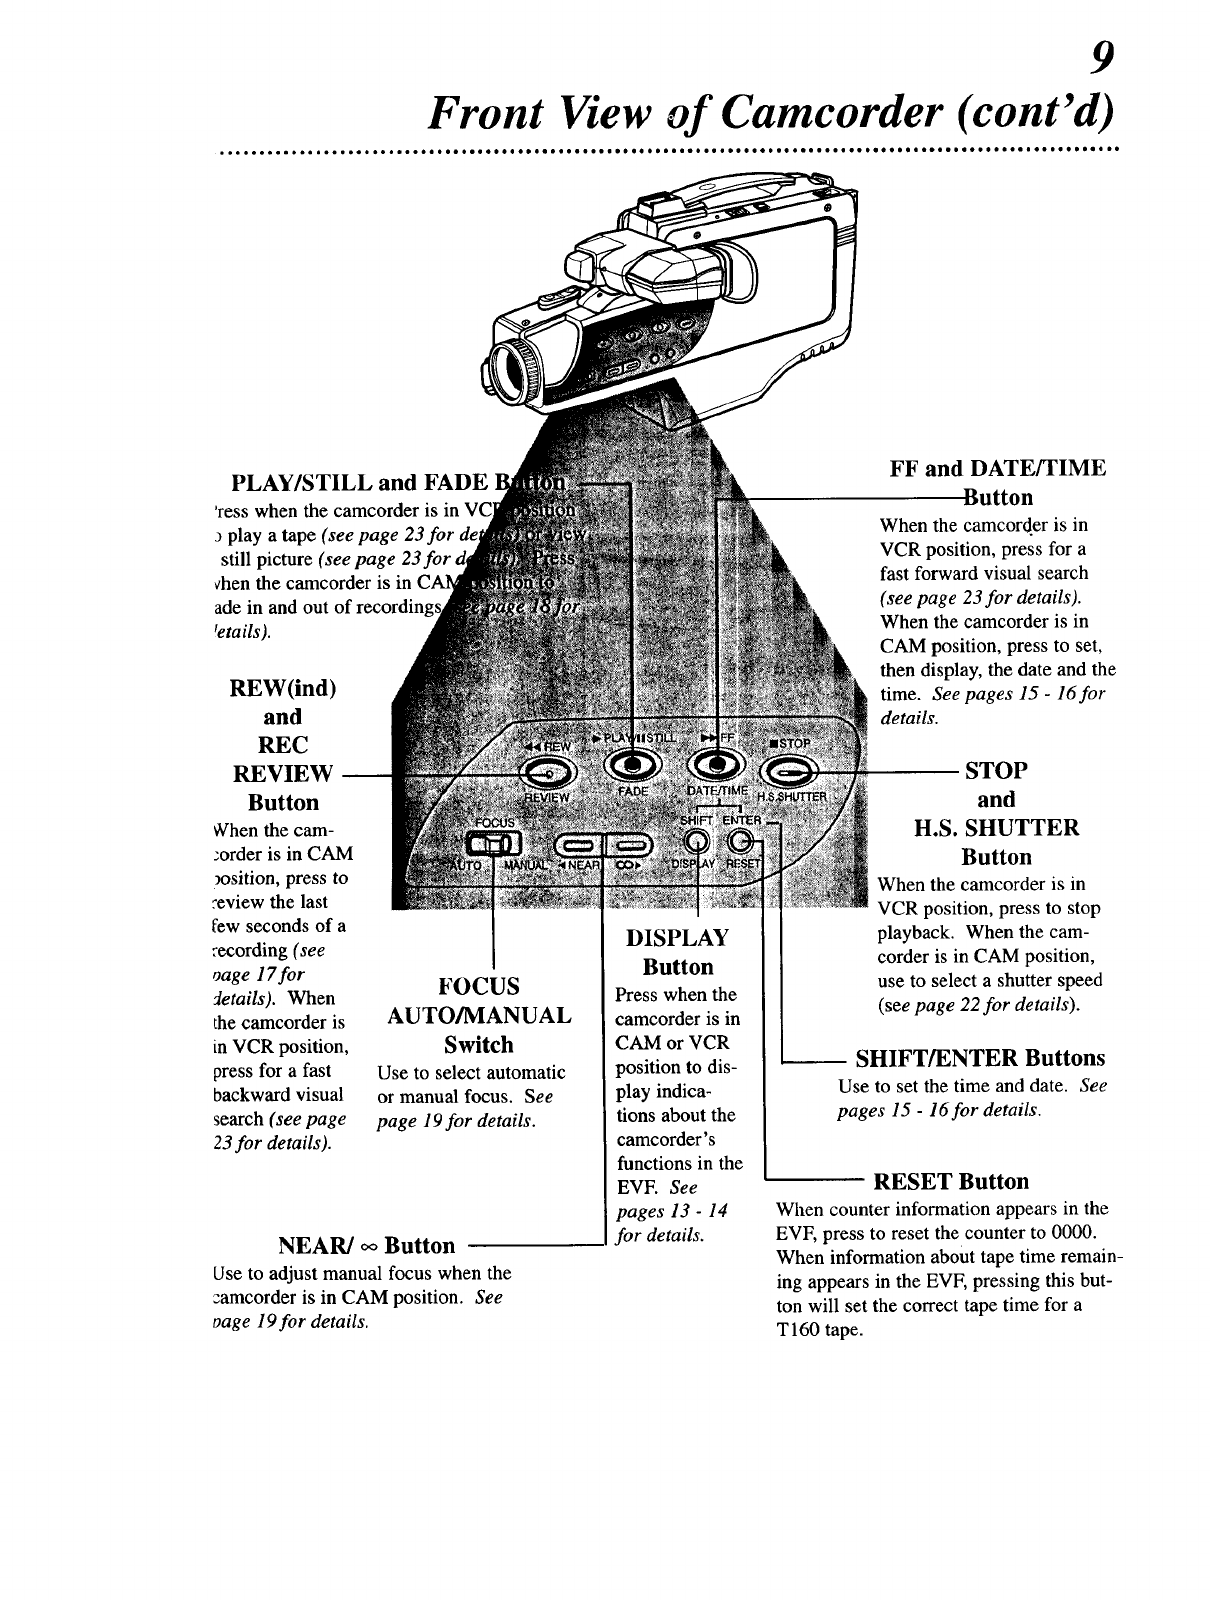
Front View of Camcorder (cont'd)
PLAY/STILL and FADE
'ress when the camcorder is
play a tape (see page
still picture (see page
vhen the camcorder is in
ade in and out of recordin
letails).
REW(ind)
and
REC
REVIEW
Button
_Vhenthe cam-
:order is in CAM
_osition, press to
.'eview the last
few seconds of a
recording (see
oage 17for
details). When
the camcorder is
in VCR position,
press for a fast
backward visual
search (see page
23 for details).
FOCUS
AUTO/MANUAL
Switch
Use to select automatic
or manual focus. See
page 19for details.
NEAR/oo Button
Use to adjust manual focus when the
:amcorder is in CAM position. See
oage 19for details.
DISPLAY
Button
Press when the
camcorder is in
CAM or VCR
position to dis-
play indica-
tions about the
camcorder's
functions in the
EVE See
pages 13 -14
for details.
FF and DATE/TIME
Button
When the camcord.eris in
VCR position, press for a
fast forward visual search
(see page 23for details).
When the camcorder is in
CAM position, press to set,
then display, the date and the
time. See pages 15 -16for
details.
STOP
and
H.S. SHUTTER
Button
When the camcorder is in
VCR position, press to stop
playback. When the cam-
corder is in CAM position,
use to select a shutter speed
(see page 22for details).
SHIFT/ENTER Buttons
Use to set the time and date. See
pages 15 -16for details.
RESET Button
When counter information appears in the
EVE press to reset the counter to 0000.
When information about tape time remain-
ing appears in the EVF, pressing this but-
ton will set the correct tape time for a
TI60 tape.

10
Rear View of Camcorder
Strap Attachment Rings
Attach the shoulder strap to these
rings. See page 29for details.
Battery
Compartment
insert a battery pack
here to use it as the
power supply. See
page 7for details.
Cassette Compartment
Insert tape here. See page 7for details.
Color Enhancement Light Jack
Attach the cord of an optional color enhancement
light here. See page 28for details.
DC IN(put) Jack
When you want to use electricity to power
the camcorder, connect this jack to the DC
OUTPUT jack on the AC adapter/charger
with the DC cord. See page 27for details.
AUDIO OUT(put) Jack
Use an audio cable to connect this jack to the
Audio Input jack on audio/video equipment,
such as a TV. See page 26for details.
Power Zoom
Button
Use to zoom in or out
when recording. See
page 20for details.
Hand Strap
This adjustable hand
strap helps you han-
dle the camcorder.
You also can attach
the lens cap to the
clip on the hand strap
when the camcorder
is in use.
Record/Pause Button
Press to start or pause a camera
recording. See page 17for details.
RF DC OUT(put)
Jack
Use a RF converter
unit (not supplied) to
connect this jack to the
Antenna Input jack on
the back of a TV (see
page 25for details).
VIDEO OUT(put) Jack
Use a video cable to connect this jack to the
Video Input jack on audio/video equipment, such
as a TV. See page 26for details.
11
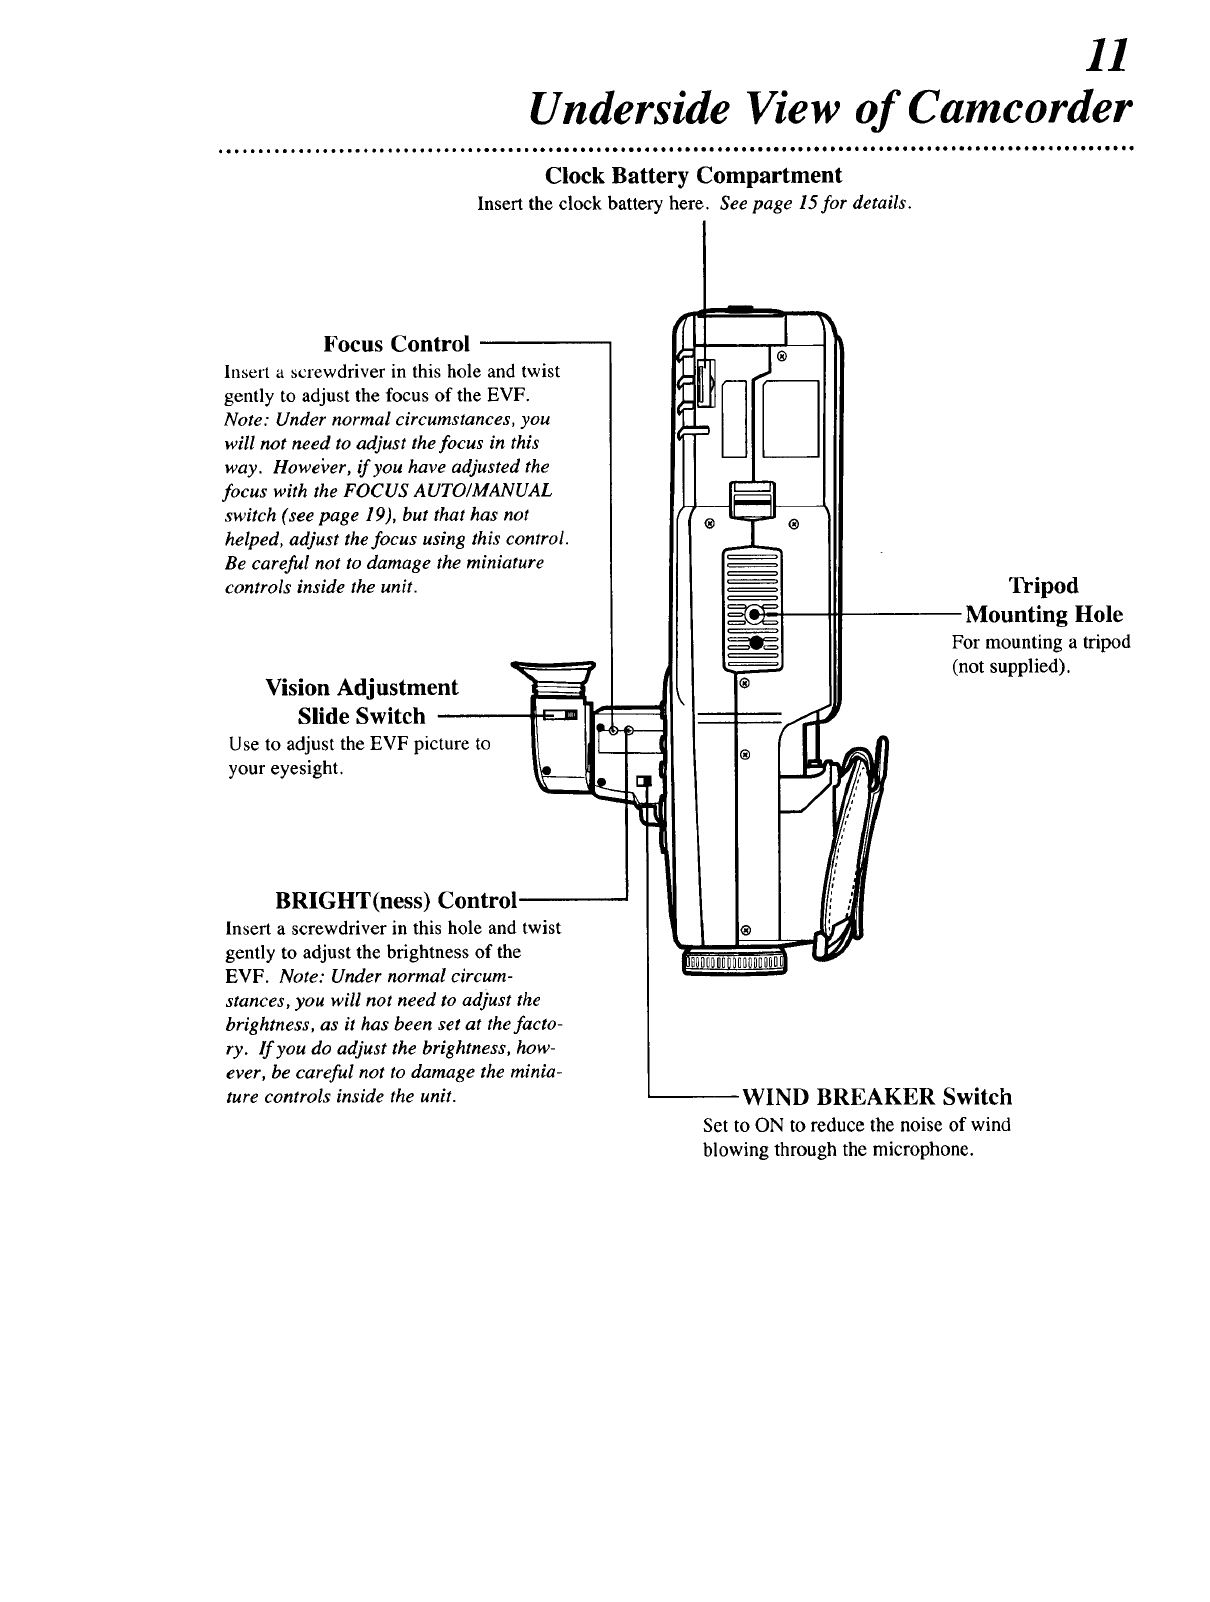
Underside View of Camcorder
eoeelo •e•e ••o•ooe•,e *o
_o_i_oo_ooooo_oooIooeoeo_o'i•eeeiiIoo•eeo•••eo•e•oo_ieI•oeeoe•oQ•e•oIo_ee•e•e••o•o•e •e•t
Clock Battery Compartment
Inse_ the clock battery here. See page 15for details.
Focus Control
Insert a screwdriver in this hole and twist
gently to adjust the focus of the EVF.
Note: Under normal circumstances, you
will not need to adjust the focus in this
way. Howei_er, if you have adjusted the
focus with the FOCUS AUTO/MANUAL
switch (see page 19), but that has not
helped, adjust the focus using this control.
Be careful not to damage the miniature
controls inside the unit.
Vision Adjustment
Slide Switch
Use to adjust the EVF picture to
your eyesight.
Tripod
Mounting Hole
For mounting a tripod
(not supplied).
BRIGHT(ness) Control
Insert a screwdriver in this hole and twist
gently to adjust the brightness of the
EVF. Note: Under normal circum-
stances, you will not need to adjust the
brightness, as it has been set at the facto-
ry. lf you do adjust the brightness, how-
ever, be careful not to damage the minia-
ture controls inside the unit. WIND BREAKER Switch
Set to ON to reduce the noise of wind
blowing through the microphone.
12
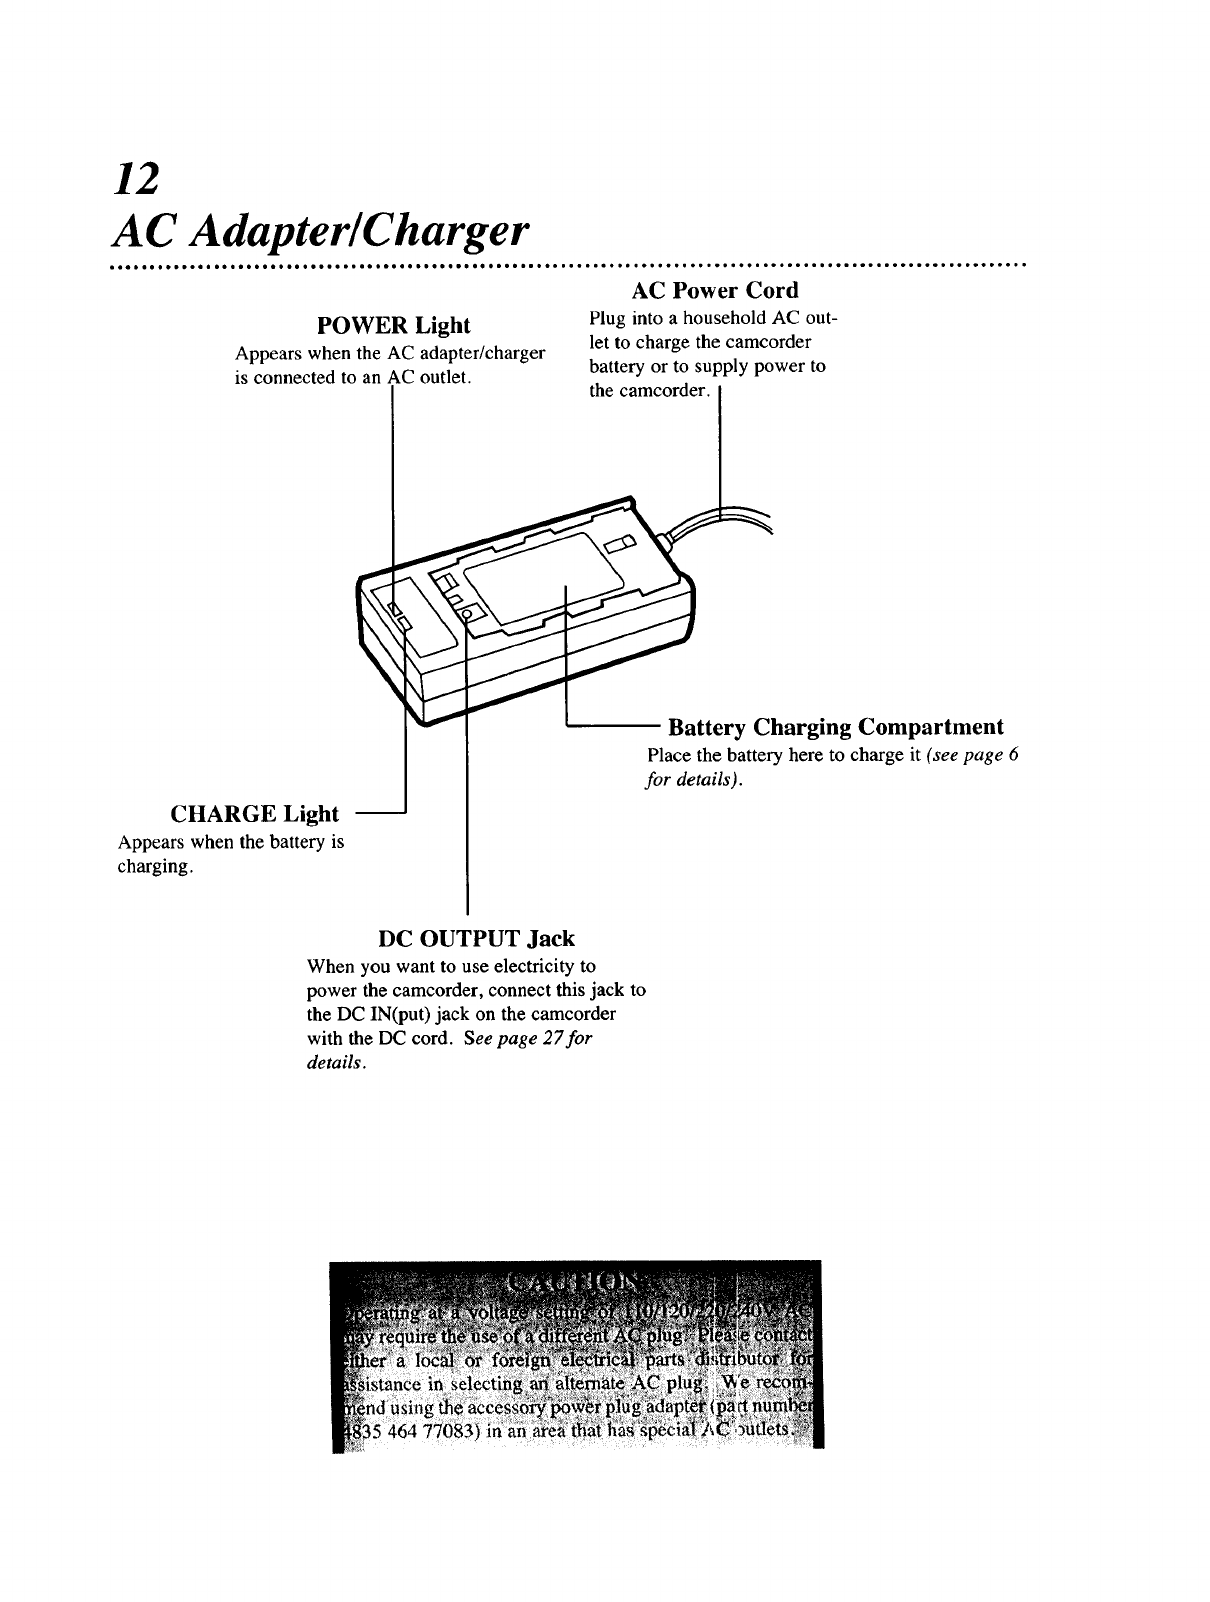
A C Adapter/Charger
AC Power Cord
POWER Light
Appears when the AC adapter/charger
is connected to an AC outlet.
Plug into a household AC out-
let to charge the camcorder
battery or to supply power to
the camcorder.
CHARGE Light
Appears when the battery is
charging.
Battery Charging Compartment
Place the battery here to charge it (see page 6
for details).
DC OUTPUT Jack
When you want to use electricity to
power the camcorder, connect this jack to
the DC IN(put) jack on the camcorder
with the DC cord. See page 27for
details.
13
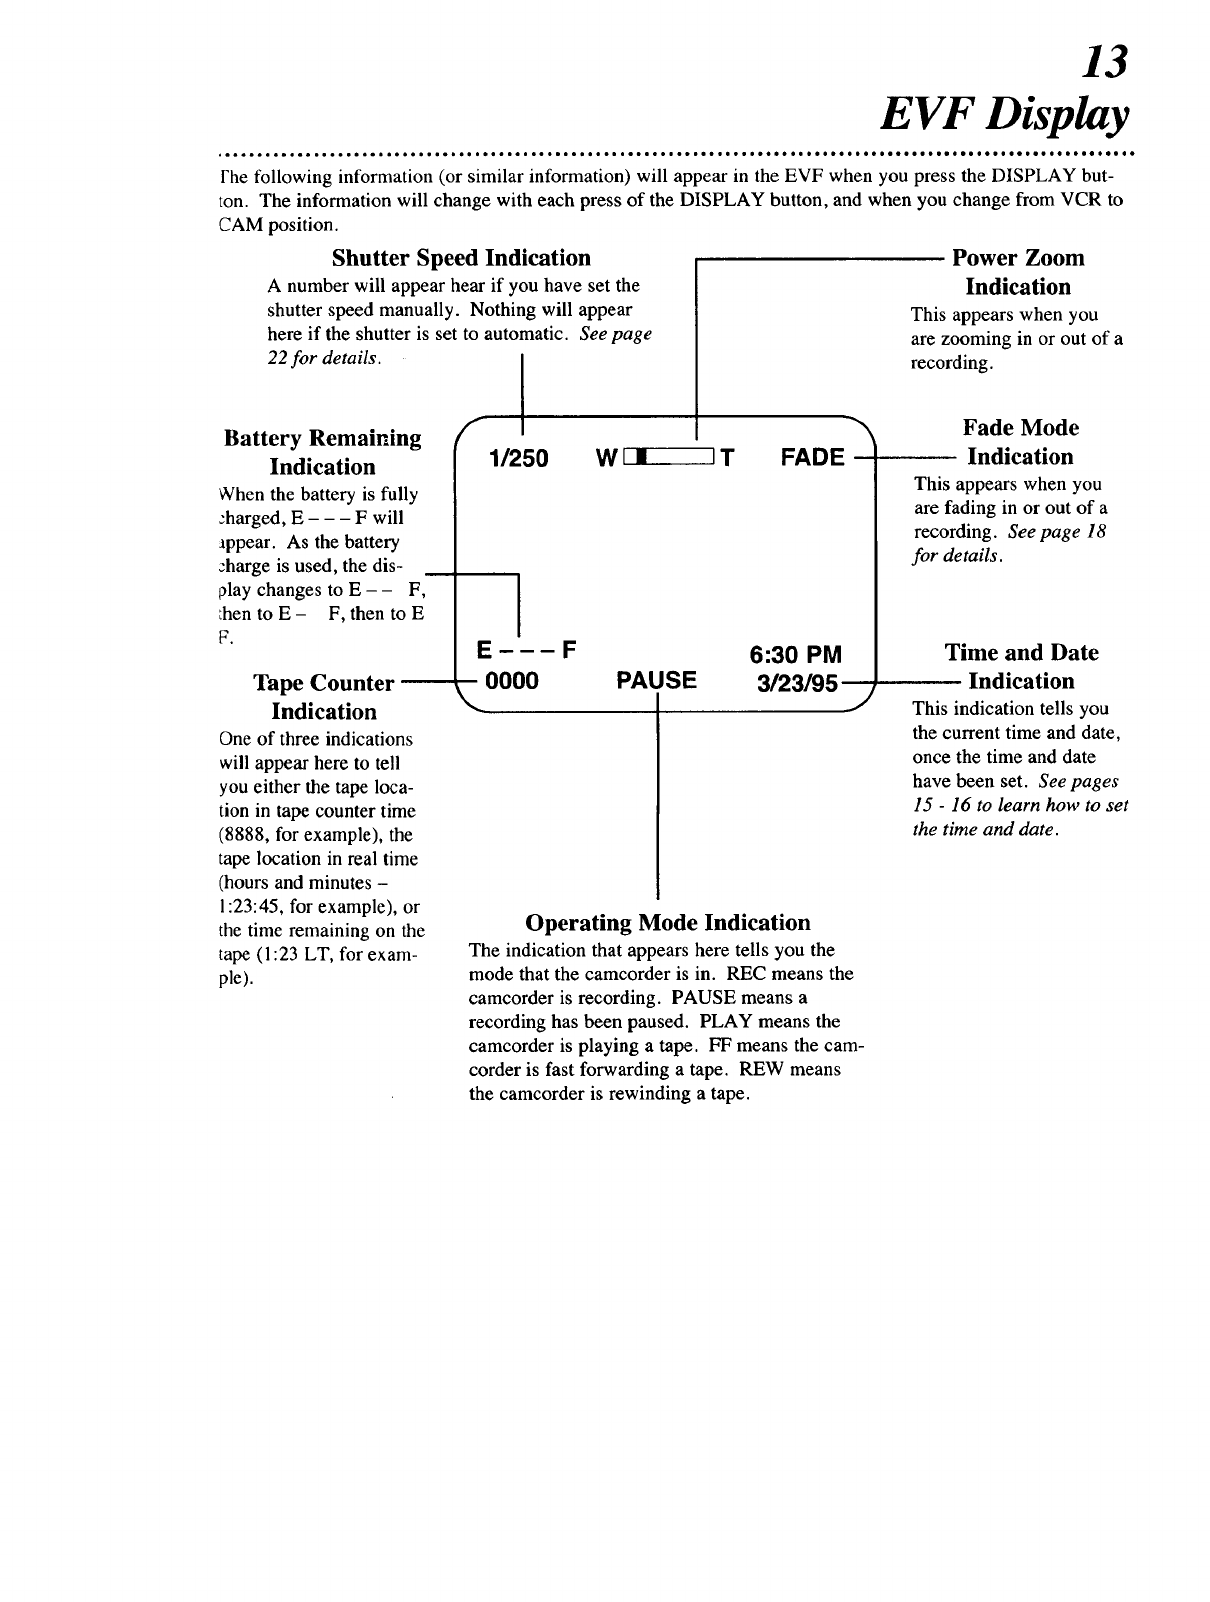
EVF Display
• • iiJ
°teOoo_ooeooo_o'eoooo_ooojIoo**o*IaQoIo_oIoteoooioeeIooItoIIooIooooo*ooIoeoeooooeeeoeeeoIweo oe ooe oe***ee**oe
Fhe following information (or similar information) will appear in the EVF when you press the DISPLAY but-
ton. The information will change with each press of the DISPLAY button, and when you change from VCR to
CAM position.
Shutter Speed Indication Power Zoom
A number will appear hear if you have set the Indication
shutter speed manually. Nothing will appear This appears when you
here if the shutter is set to automatic. See page are zooming in or out of a
22 for details, recording.
Battery Remaining
Indication
When the battery is fully
:harged, E - - - F will
appear. As the battery
charge is used, the dis-
play changes to E - - F,
:hen to E - F, then to E
F.
Tape Counter
Indication
One of three indications
will appear here to tell
you either the tape loca-
tion in tape counter time
(8888, for example), the
tape location in real time
(hours and minutes -
1:23:45, for example), or
the time remaining on the
tape (1:23 LT, for exam-
pie).
f
1/250 W _ T FADE
I
E--- F 6:30 PM
_, 0000 PAUSE 3/23/95 J
Operating Mode Indication
The indication that appears here tells you the
mode that the camcorder is in. REC means the
camcorder is recording. PAUSE means a
recording has been paused. PLAY means the
camcorder is playing a tape. FF means the cam-
corder is fast forwarding a tape. REW means
the camcorder is rewinding a tape.
Fade Mode
Indication
This appears when you
are fading in or out of a
recording. See page 18
for details.
Time and Date
Indication
This indication tells you
the current time and date,
once the time and date
have been set. See pages
15 -16 to learn how to set
the time and date.
14
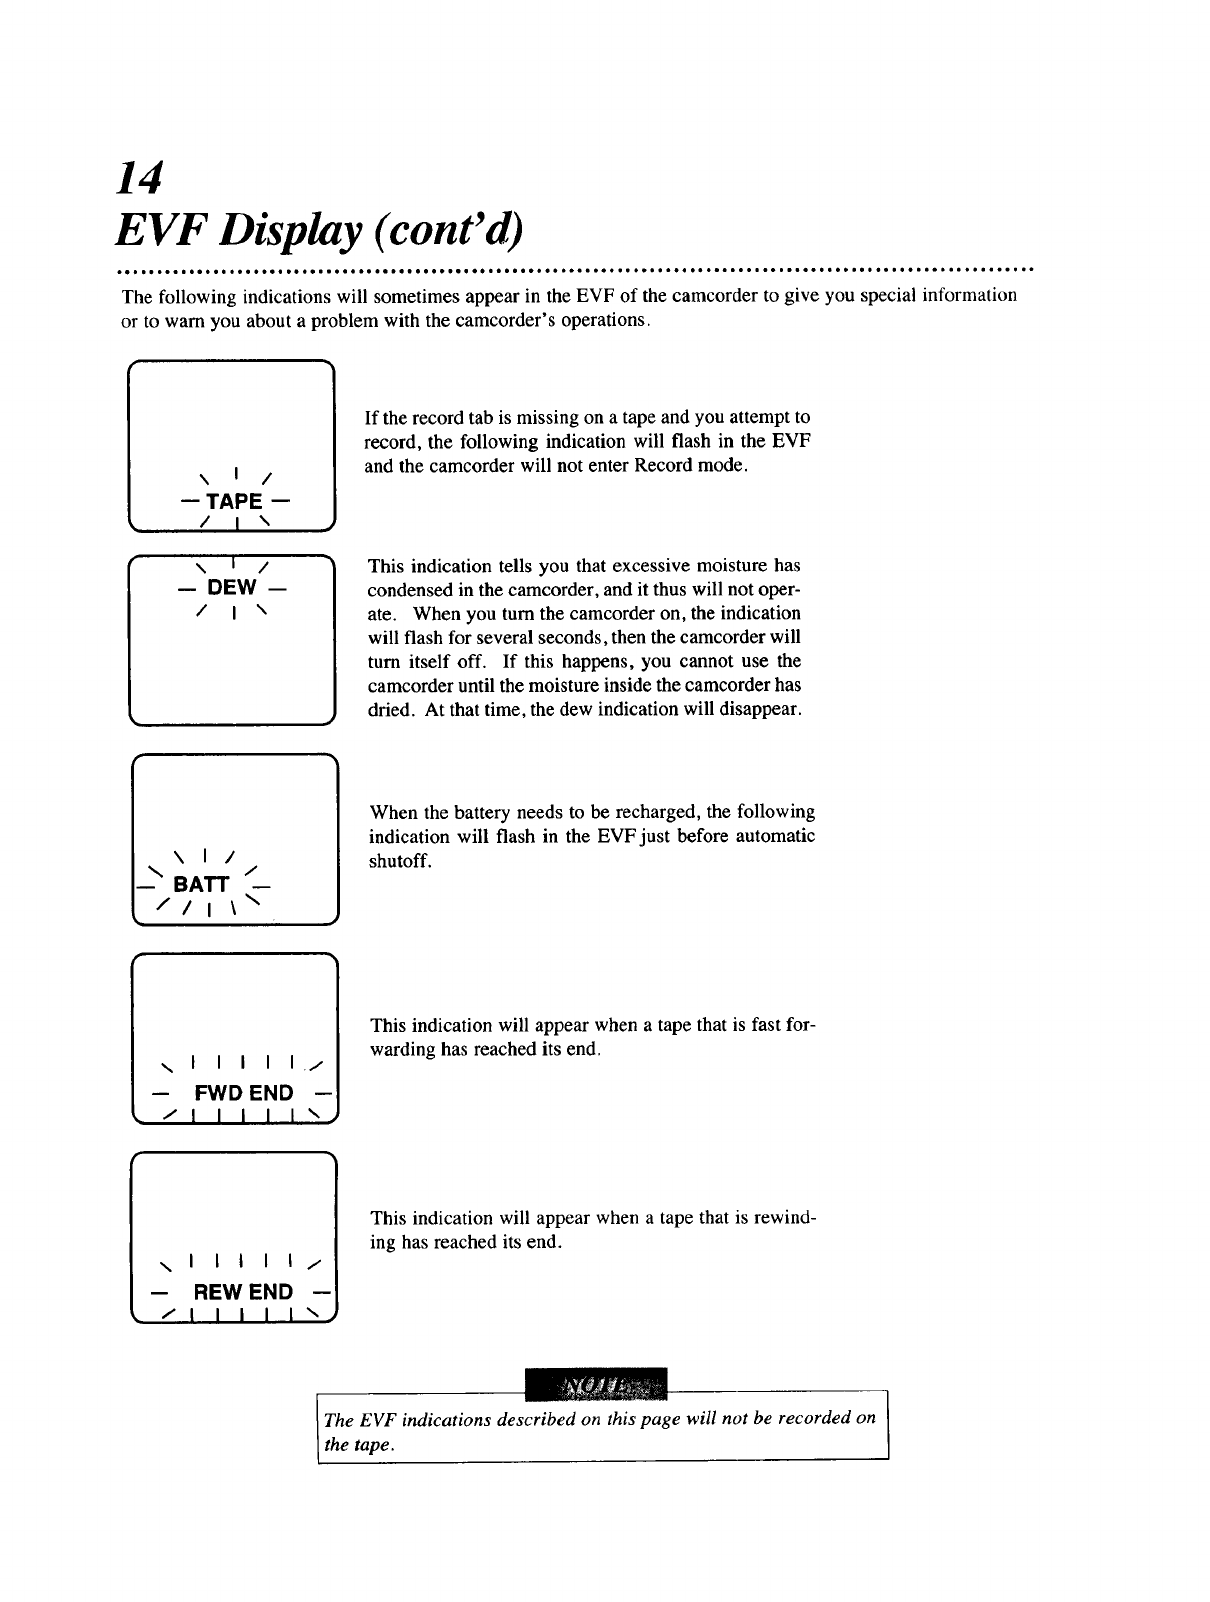
EVF Display (cont'd)
oeo • • oo • • Qoo •• eo • oooo oo oo •oo ee Qo ee oel oe oolio ** eo oee oo • • ooet *oo • • oo * • *oo oo oao ao • • Io • •eol • • o* * •• oo * • • • *• • **••*••••••
The following indications will sometimes appear in the EVF of the camcorder to give you special information
or to warn you about a problem with the camcorder's operations.
\I/
-- TAPE --
/I\
\I/
-- DEW --
/I\
If the record tab is missing on a tape and you attempt to
record, the following indication will flash in the EVF
and the camcorder will not enter Record mode.
This indication tells you that excessive moisture has
condensed in the camcorder, and it thus will not oper-
ate. When you turn the camcorder on, the indication
will flash for several seconds, then the camcorder will
turn itself off. If this happens, you cannot use the
camcorder until the moisture inside the camcorder has
dried. At that time, the dew indication will disappear.
\ I /
\BATT /
// i \ \
I I I I I /
-- FWD END -
•/I I I I I \_
When the battery needs to be recharged, the following
indication will flash in the EVF just before automatic
shutoff.
This indication will appear when a tape that is fast for-
warding has reached its end.
\ I I I I I /
-- REW END --
/IIIII\.,
This indication will appear when a tape that is rewind-
ing has reached its end.
I
The EVF indications described on this page will not be recorded on I
the tape. I

15
Setting the Clock
2
Slide the clock battery
tray out of the cam-
corder.
1
Turn the camcorder
off, then turn it
upside down.
4
Replace the battery tray.
Insert the clock bat-
tery into the clock
battery tray.
•The clock battery should be replaced once a year. Replace the .
clock battery only with Philips Consumer Electronics part num- °
ber 4835 138 17043.
• Keep the clock battery away from children. Swallowing it may °
be harmful.
• The clock battery used in this camcorder may present a fire or •
chemical hazard if mistreated. Do not recharge it, disassemble :
it, incinerate it, or heat it above 212 degrees F (100 degrees C). •
The camcorder has a clock that keeps
track of the date and time (including
leap year) even when the camcorder is
off. Before the clock will work, you
must install the clock battery and set the
date and time. Just follow the steps
below to do this.
First, insert
the clock battery.
1
Turn the camcorder off and turn it
upside down.
2
Slide the clock battery tray out of the
camcorder by placing your fingernail
under the edge of the compartment
labeled CLOCK BATTERY, then
pulling up.
3
Insert the clock battery into the clock
battery tray with the + side facing the
three prongs on the battery tray.
4
Gently insert the clock battery tray into
the camcorder with the + side of the
clock battery facing the caution stick-
ers on the camcorder.
16
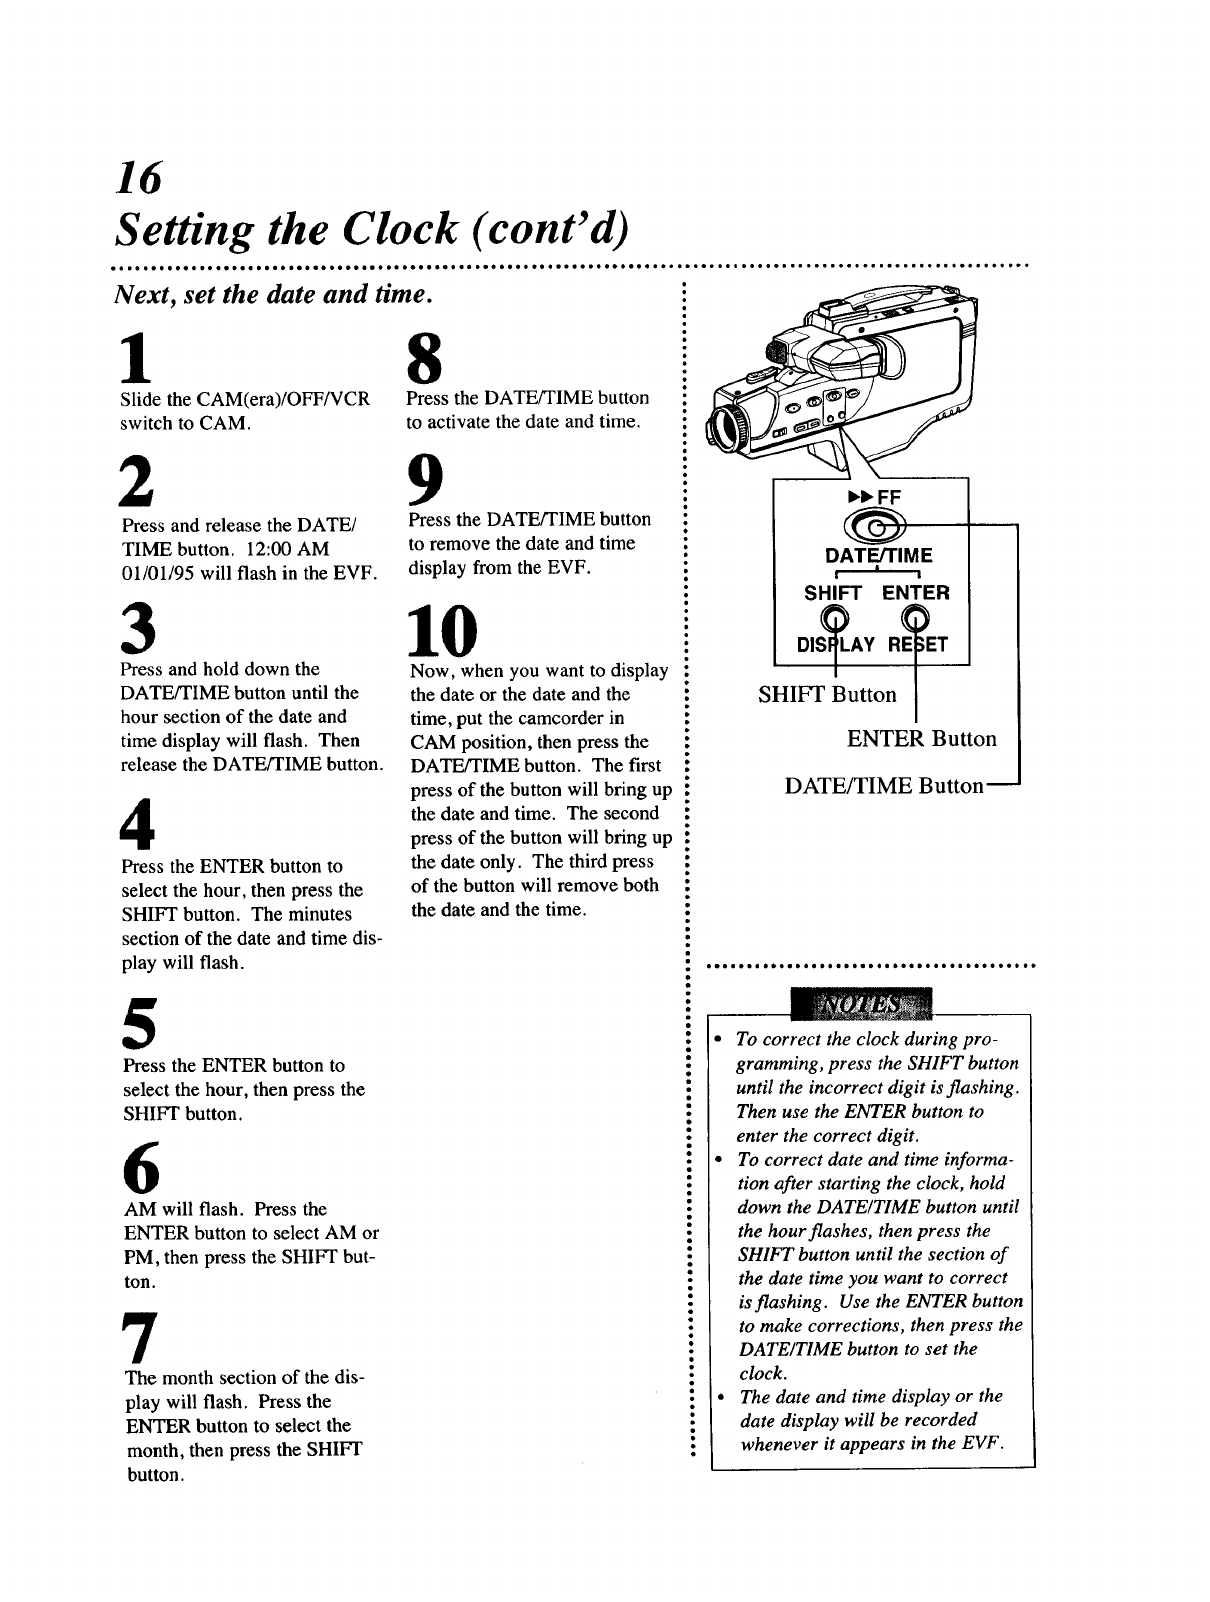
Setting the Clock (cont'd)
Next, set the date and time.
18
Slide the CAM(era)/OFF/VCR
switch to CAM.
Press the DATE/TIME button
to activate the date and time.
2 9
Press and release the DATE/
TIME button. 12:00 AM
01/01/95 will flash in the EVF.
3
Press and hold down the
DATE/TIME button until the
hour section of the date and
time display will flash. Then
release the DATE/TIME button.
4
Press the ENTER button to
select the hour, then press the
SHIFT button. The minutes
section of the date and time dis-
play will flash.
Press the DATE/TIME button
to remove the date and time
display from the EVF.
10
Now, when you want to display
the date or the date and the
time, put the camcorder in
CAM position, then press the
DATE/TIME button. The first
press of the button will bring up
the date and time. The second
press of the button will bring up
the date only. The third press
of the button will remove both
the date and the time.
5
Press the ENTER button to
select the hour, then press the
SHIFT button.
6
AM will flash. Press the
ENTER button to select AM or
PM, then press the SHIFI" but-
ton.
7
The month section of the dis-
play will flash. Press the
ENTER button to select the
month, then press the SHIPT
button.
_FF
DATFJTIME
! I I
SHIFT ENTER
DISMAY R_ET
SHIFT Button /
ENTER Button
DATE/TIME Button m
•To correct the clock during pro-
gramming, press the SHIFT button
until the incorrect digit is flashing.
Then use the ENTER button to
enter the correct digit.
• To correct date and time informa-
tion after starting the clock, hold
down the DATE/TIME button until
the hour flashes, then press the
SHIFT button until the section of
the date time you want to correct
is flashing. Use the ENTER button
to make corrections, then press the
DATE/TIME button to set the
clock.
•The date and time display or the
date display will be recorded
whenever it appears in the EVF.

17
Recording
Place the CAM(era)/OFF/VCR
switch in CAM position.
1
Slide the
CAM(era)/OFFNCR
switch to CAM posi-
tion.
Insert atape
(other side of
camcorder).
5 6
Press the Set the
Record/Pause FOCUS
button to start AUTO/MAN-
recording, to UAL switch to
pause recording. AUTO.
4
Adjust the
EVF position.
•The date and time display will be recorded whenever they
appear in the EVF at the time of recording. No other EVF dis-
plays (such as REC or PAUSE) will be recorded.
• The camcorder will go into Standby mode when it has been in
Record/Pause mode for five minutes. To start recording again,
press the Record/Pause button.
• You can review a recording while the camcorder is in
Record/Pause mode. To do so, press the REC REVIEW button.
The camcorder will rewind several seconds on a tape, then play
up to the position at which you stopped recording.
• The underside of the back of the camcorder is specially
designed to rest on your shoulder while you record.
•When your camcorder is aimed at a scene that contains a very
bright light (such as the sun), a vertical bar may appear across
the picture. This is normal. It shows that the camcorder's
charge coupling device is working. If this happens, you should
try not to aim the camcorder directly at a bright light.
Follow the steps below to record with the
camcorder.
1
Slide the CAM(era)/OFF/VCR switch to
CAM position.
•Place a tape in the camcorder, if necessary.
:See page 7for details.
• Set the FOCUS AUTO/MANUAL
switch to AUTO. Or, if you prefer,
• follow the steps on page 19 to adjust
the focus manually.
• Slide the black box that attached the
EVF to the camcorder away from the
camcorder, toward the EVF. Then
swivel the EVF until you are comfort-
• able with its position.
• Press the Record/Pause button.
• Recording will start. The Tally light
• will appear on the front of the cam-
ecorder. REC will appear in the EVF.
6
Press the Record/Pause button again.
Recording will pause. The Tally light
will disappear. REC will change to
PAUSE in the EVF. Press the
Record!Pause button once more to
return to recording.
7
To stop recording, press the
Record/Pause button, then set the
CAM(era)/VCR/OFF switch to OFF
position.
18
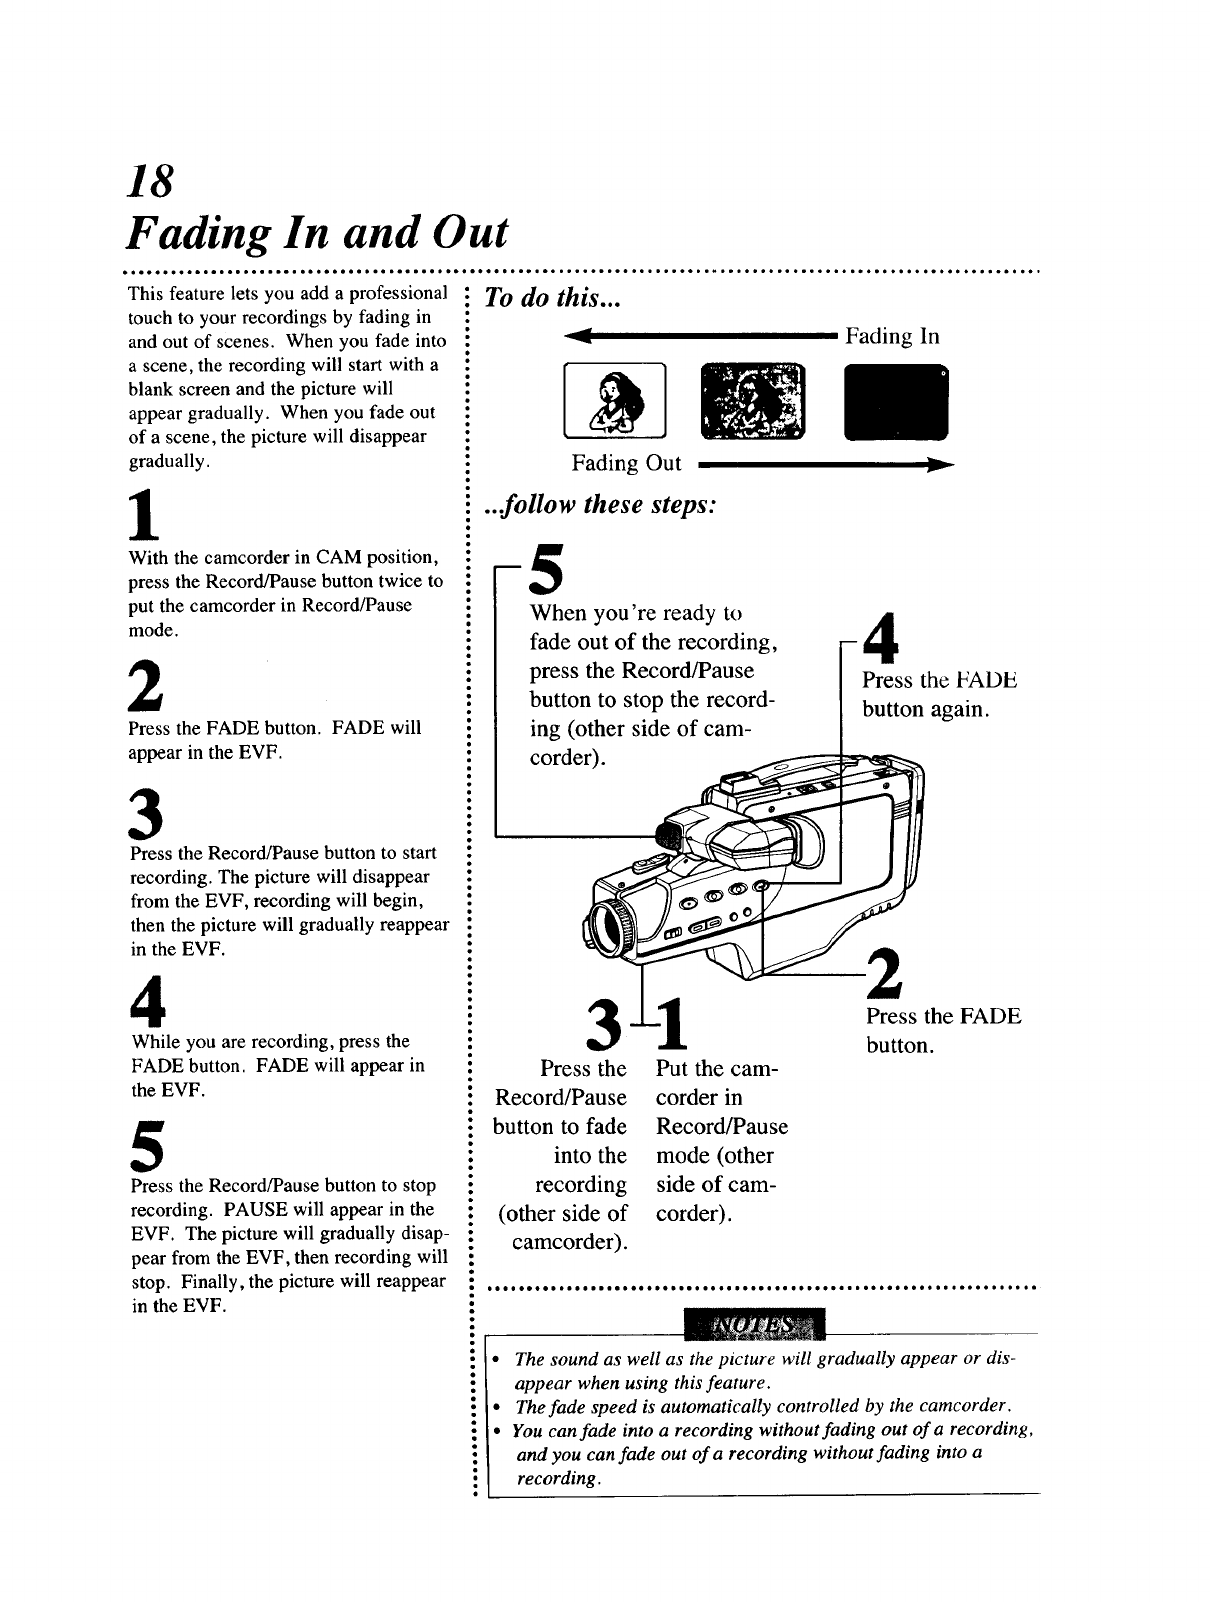
Fading In and Out
This feature lets you add a professional
touch to your recordings by fading in
and out of scenes. When you fade into
a scene, the recording will start with a
blank screen and the picture will
appear gradually. When you fade out
of a scene, the picture will disappear
gradually.
1
With the camcorder in CAM position,
press the Record/Pause button twice to
put the camcorder in Record/Pause
mode.
2
Press the FADE button. FADE will
appear in the EVF.
3
Press the Record/Pause button to start
recording. The picture will disappear
from the EVF, recording will begin,
then the picture will gradually reappear
in the EVF.
4
While you are recording, press the
FADE button. FADE will appear in
the EVF.
5
Press the Record/Pause button to stop
recording. PAUSE will appear in the
EVF. The picture will gradually disap-
pear from the EVF, then recording will
stop. Finally, the picture will reappear
in the EVF.
To do this..•
el Fading In
[ lB1
Fading Out
...follow these steps:
5When you're ready to
fade out of the recording,
press the Record/Pause
button to stop the record-
ing (other side of cam-
corder).
4
Press the FADE
button again.
3
Press the Put the cam-
e
• Record/Pause corder in
• button to fade Record/Pause
• into the mode (other
recording side of cam-
. (other side of corder).
: camcorder).
Press the FADE
button.
•ee ee ••••e .. ee i• • •• •eeoc• e•• •• •• 100•• •• •..•.01 e • .. •0• •• •• e e e eooe ••••••
o
The sound as well as the picture will gradually appear or dis-
appear when using this feature.
The fade speed is automatically controlled by the camcorder.
You can fade into a recording without fading out of a recording,
and you can fade out of a recording without fading into a
recording.
19
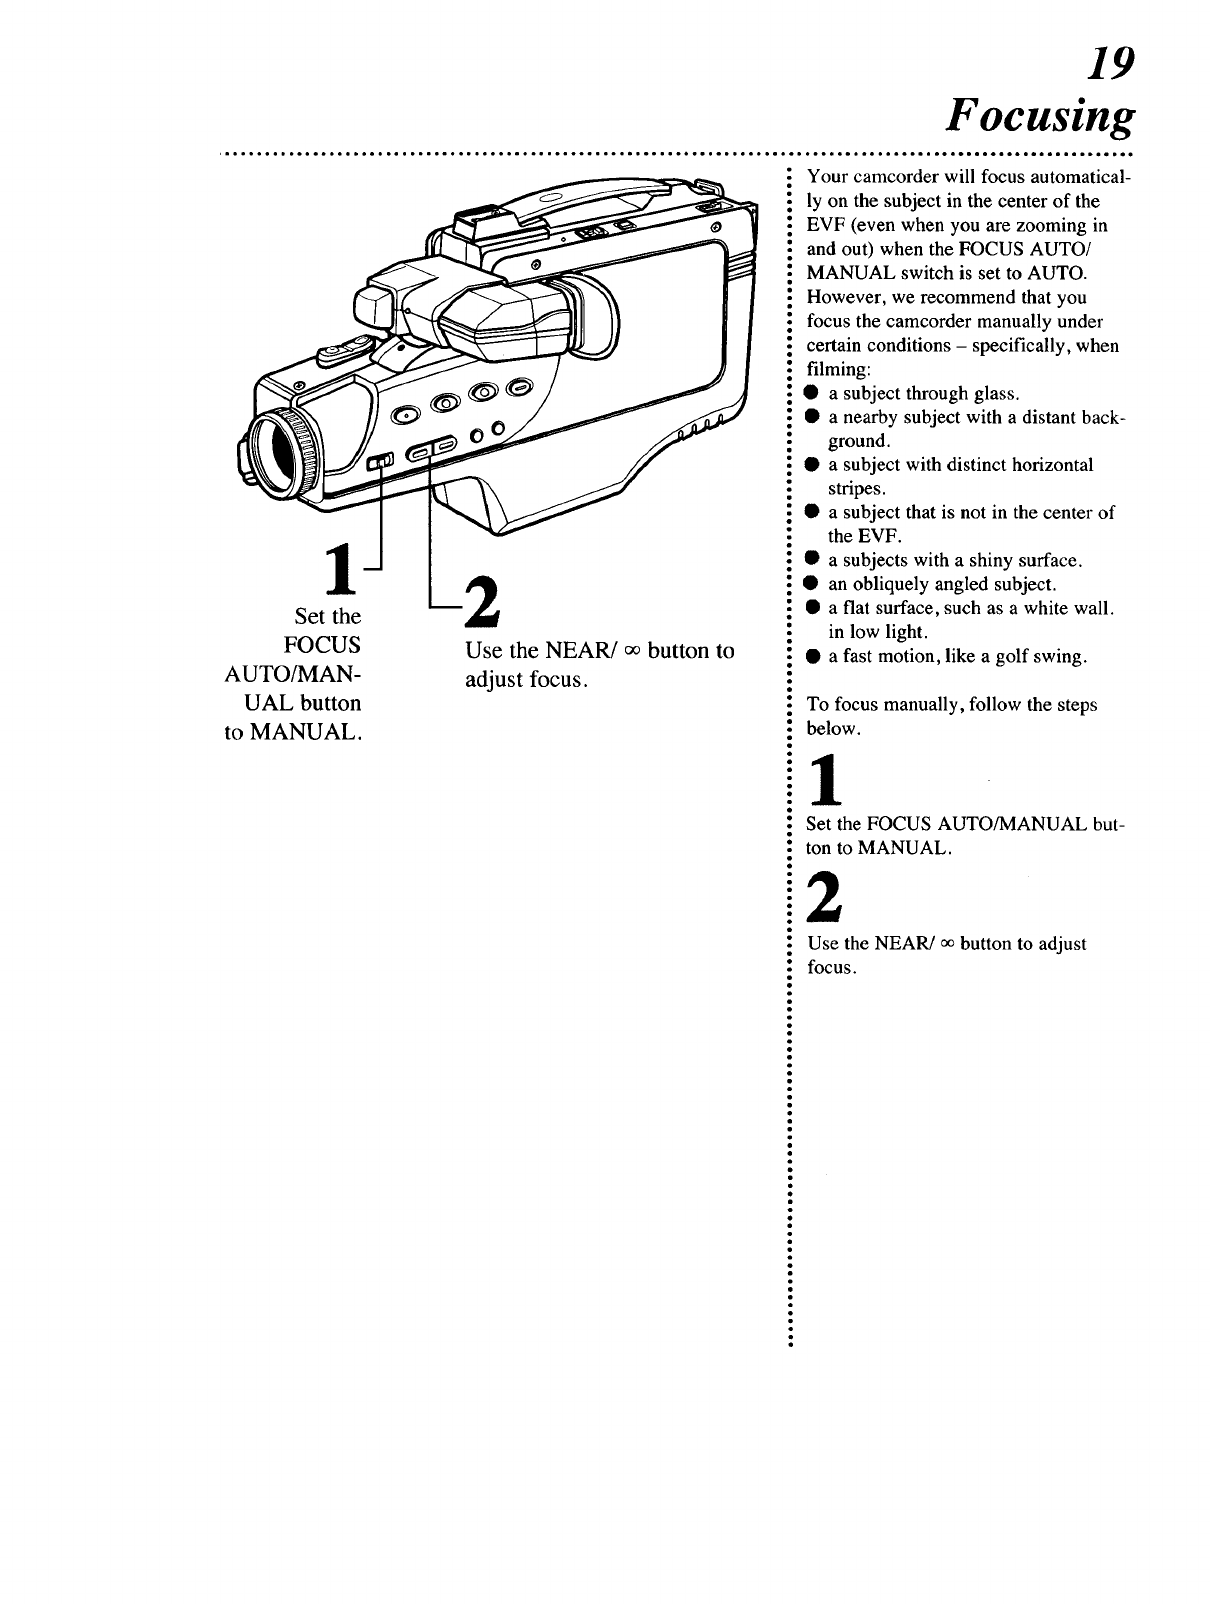
1
Set the
FOCUS
AUTO/MAN-
UAL button
to MANUAL.
Use the NEAR/_ button to
adjust focus.
Focusing
:Your camcorder will focus automatical-
i ly on the subject in the center of the
: EVF (even when you are zooming in
• and out) when the FOCUS AUTO/
• MANUAL switch is set to AUTO.
:However, we recommend that you
:focus the camcorder manually under
i certain conditions - specifically, when
! filming:
asubject through glass.
anearby subject with a distant back-
ground.
a subject with distinct horizontal
stripes.
a subject that is not in the center of
the EVF.
a subjects with a shiny surface.
an obliquely angled subject.
a flat surface, such as a white wall.
in low light.
a fast motion, like a golf swing.
To focus manually, follow the steps
below.
:O
:O
:O
!o
:O
:O
:O
:O
: Set the FOCUS AUTO/MANUAL but-
:ton to MANUAL.
:Use the NEAR/oo button to adjust
:focus.
20
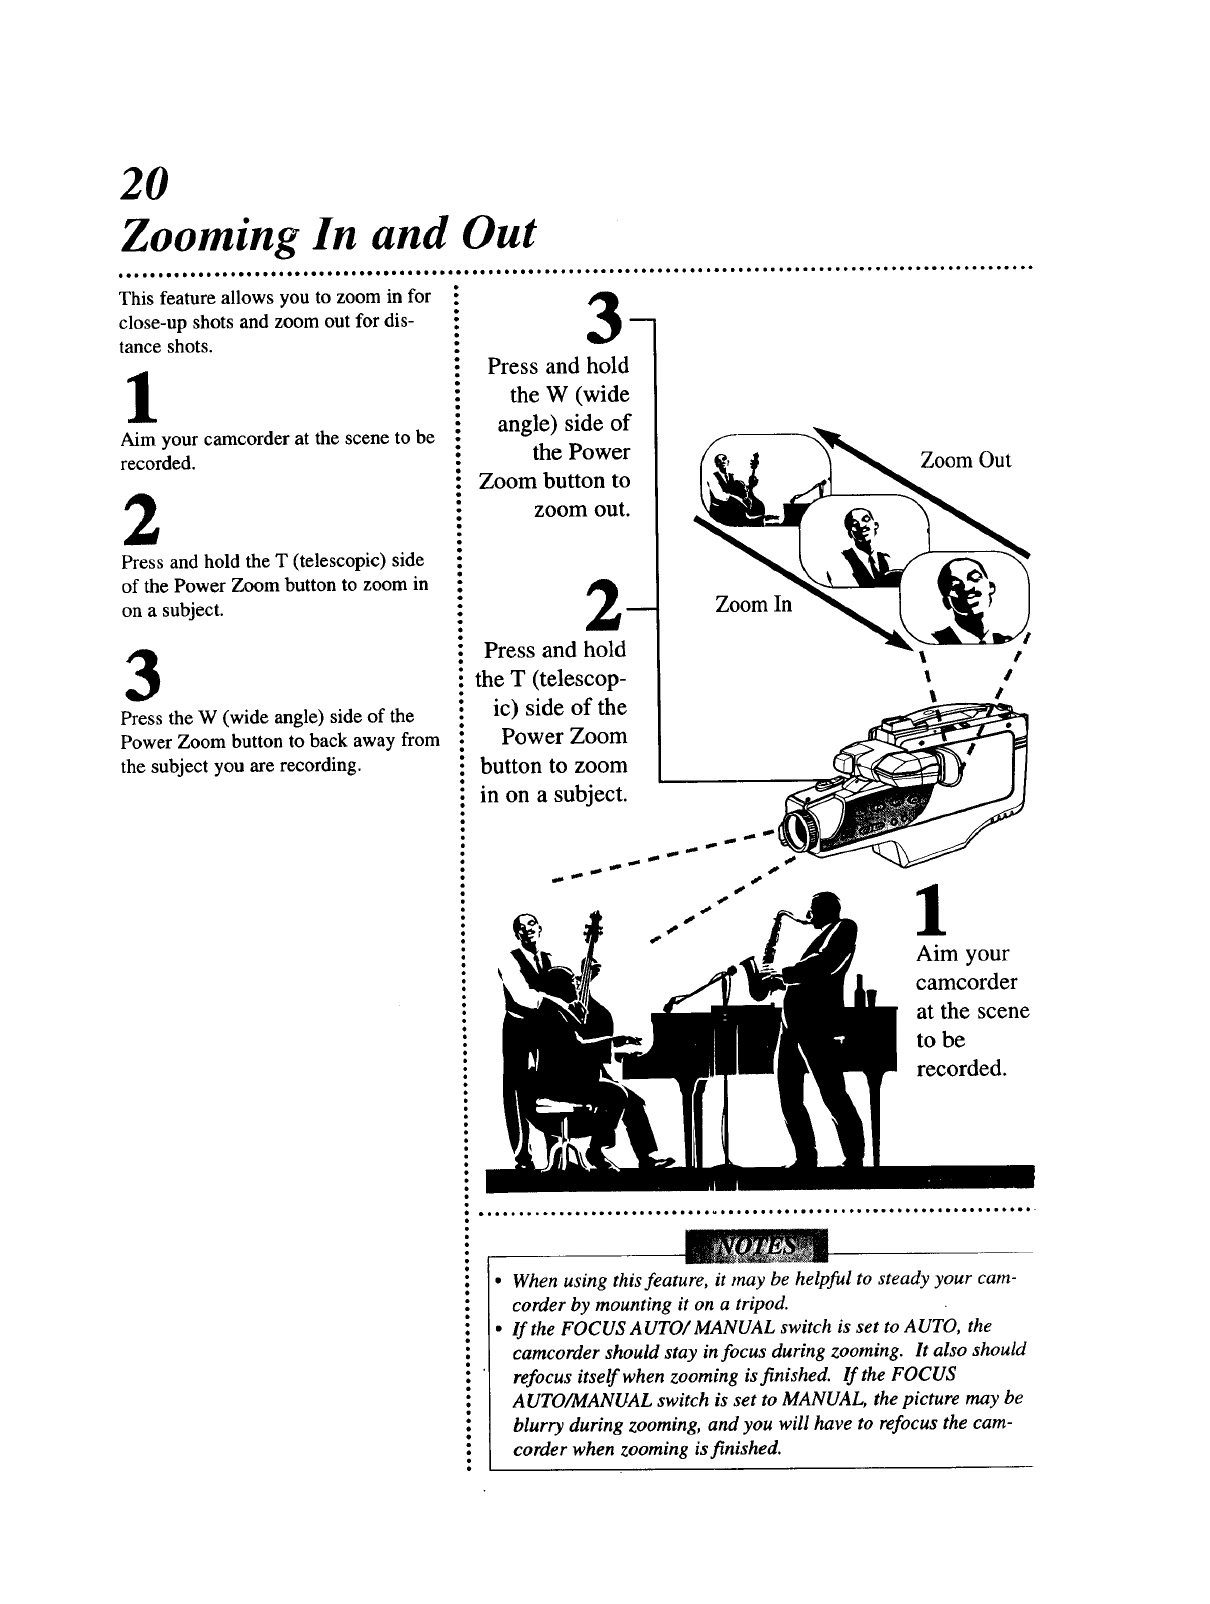
Zooming In and Out
This feature allows you to zoom in for
close-up shots and zoom out for dis-
tance shots.
1
Aim your camcorder at the scene to be
recorded.
2
Press and hold the T (telescopic) side
of the Power Zoom button to zoom in
on a subject.
3
Press the W (wide angle) side of the
Power Zoom button to back away from
the subject you are recording.
o
__
Press and hold
the W (wide
angle) side of
the Power
Zoom button to
zoom out.
Press and hold
the T (telescop-
ic) side of the
Power Zoom
button to zoom
in on a subject.
Zoom Out
Zoom In
lI
lI
1I
1
Aim your
camcorder
at the scene
to be
recorded.
When using this feature, it may be helpful to steady your cam-
corder by mounting it on a tripod.
lf the FOCUS AUTO/ MANUAL switch is set to AUTO, the
camcorder should stay in focus during zooming. It also should
refocus itself when zooming is finished. If the FOCUS
AUTO/TffANUAL switch is set to MANUAL, the picture may be
blurry during zooming, and you will have to refocus the cam-
corder when zooming is finished.
• •,lto,_°.o.°_ooo°.oo.6ooooooo_oooool,•oDio•e,,_loo°o,o**olooooo,°o4o•.
21
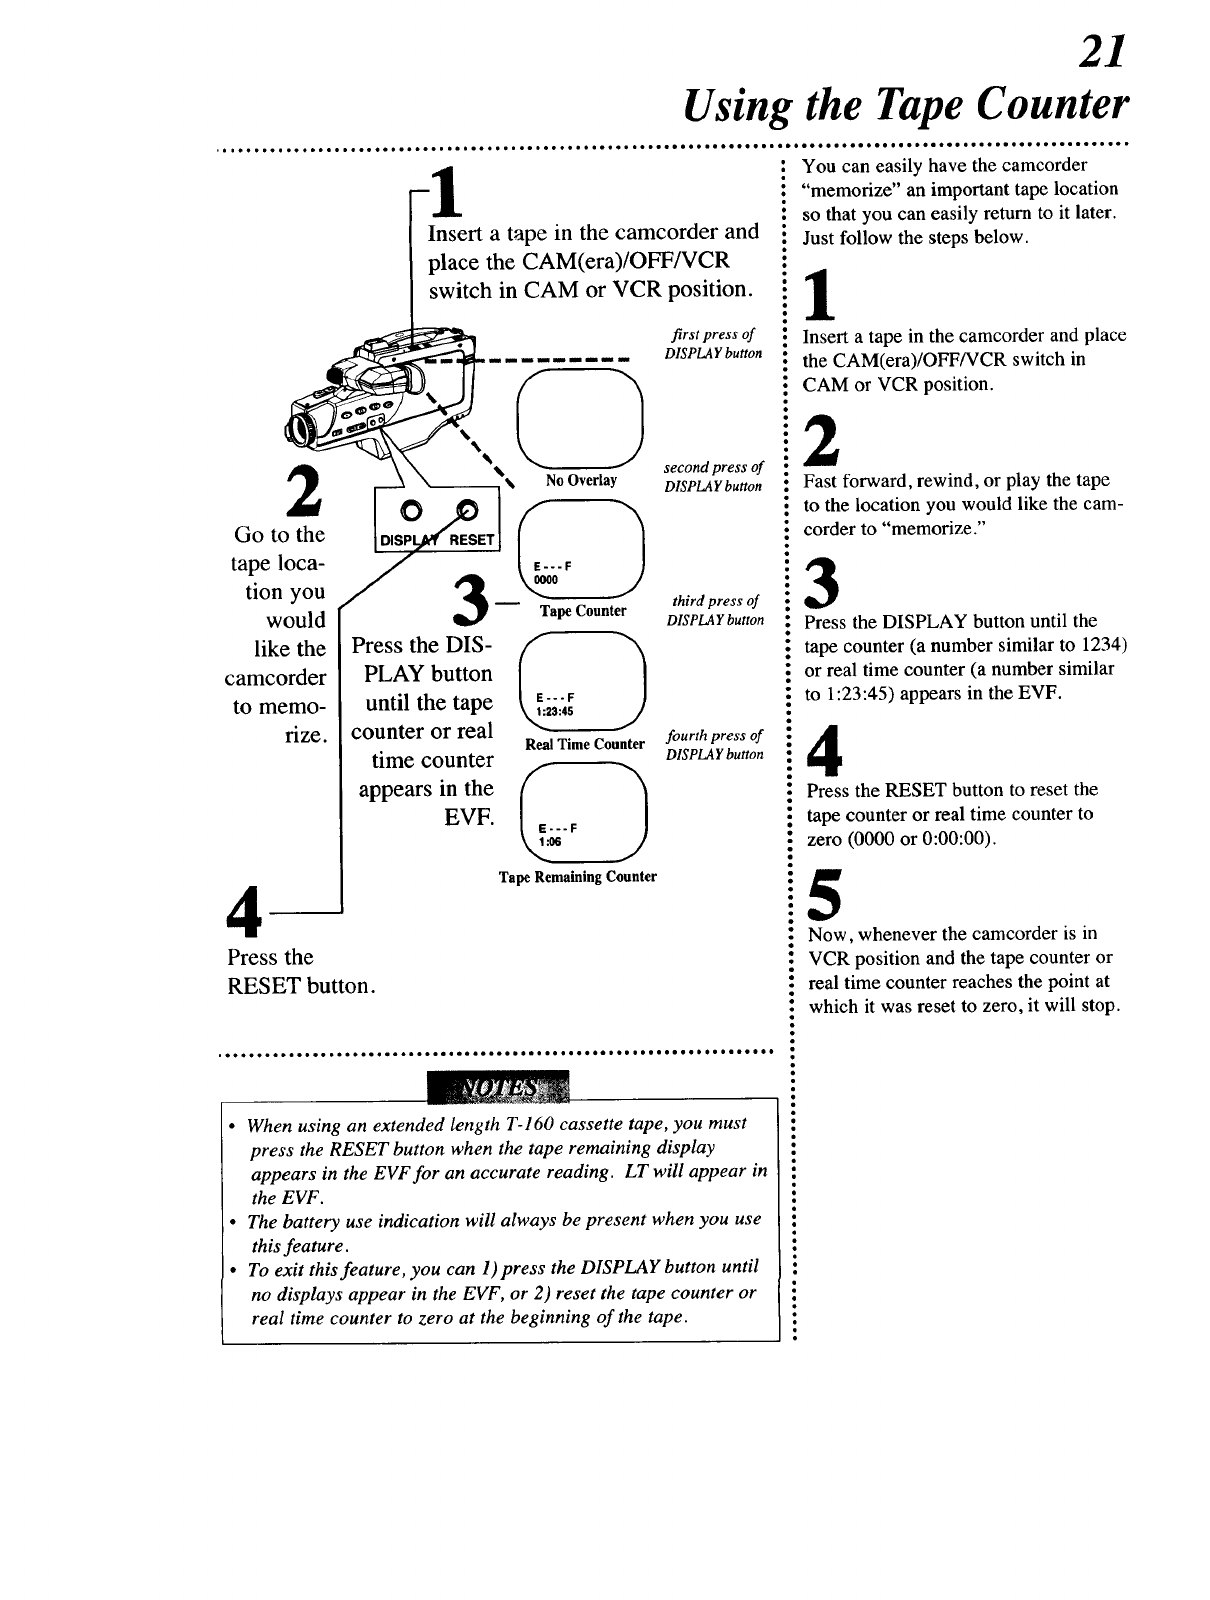
Using the Tape Counter
• eoeeeeee*eeooeeeo*eeeeee*eeo
.ole,e**e,**ooeooeee,eoeooeo*laoeoo*e,oeoee**loeee*Jloeeee**eleQoeoe*eeoeeee*e eooeeee
: You can easily have the camcorder
FI : so that you can easily return to it later.
Insert a tape in the camcorder and
place the CAM(era)/OFF/VCR
switch in CAM or VCR position.
first press of
DISPLAY button
"'()eoreo,
t_pleil_ " _" N° Overlay_ DISPLAYbuttOn__'g l (OffO.O.F
thirdpress of
TapeCounter DISPLAYbutton
like the
camcorder
to memo-
rize. resst eOI )
PLAY button
until the tape _... F
3:45
counter or real Real Time Counter
time counter _,
appears inEVF.the_IE.._.F )
J
Tape RemainingCounter
fourth press of
DISPLAY button
Press the
RESET button.
e, •o, ee• eoeee oeoe• eeeoeo*e
0*eee*eeeeeeeeoeeeeeeeeoeeee eeeeeo eeee o• ** **
•When using an extended length T-160 cassette tape, you must
press the RESET button when the tape remaining display
appears in the EVF for an accurate reading. LT will appear in
the EVF.
• The battery use indication will always be present when you use
this feature.
• To exit this feature, you can 1)press the DISPLAY button until
no displays appear in the EVF, or 2) reset the tape counter or
real time counter to zero at the beginning of the tape.
•"memorize" an important tape location
• Just follow the steps below.
: Insert a tape in the camcorder and place
i the CAM(era)/OFF/VCR switch in
: CAM or VCR position.
"Fast forward, rewind, or play the tape
i t°t3e l°cati°n YOn would like the cam-
corder to "memorize."
:Press the DISPLAY button until the
i tape counter (a number similar to 1234)
: or real time counter (a number similar
:to 1:23:45) appears in the EVF.
: Press the RESET button to reset the
:tape counter or real time counter to
•" zero (0000 or 0:00:00).
: Now, whenever the camcorder is in
: VCR position and the tape counter or
"- real time counter reaches the point at
• which it was reset to zero, it will stop.
22
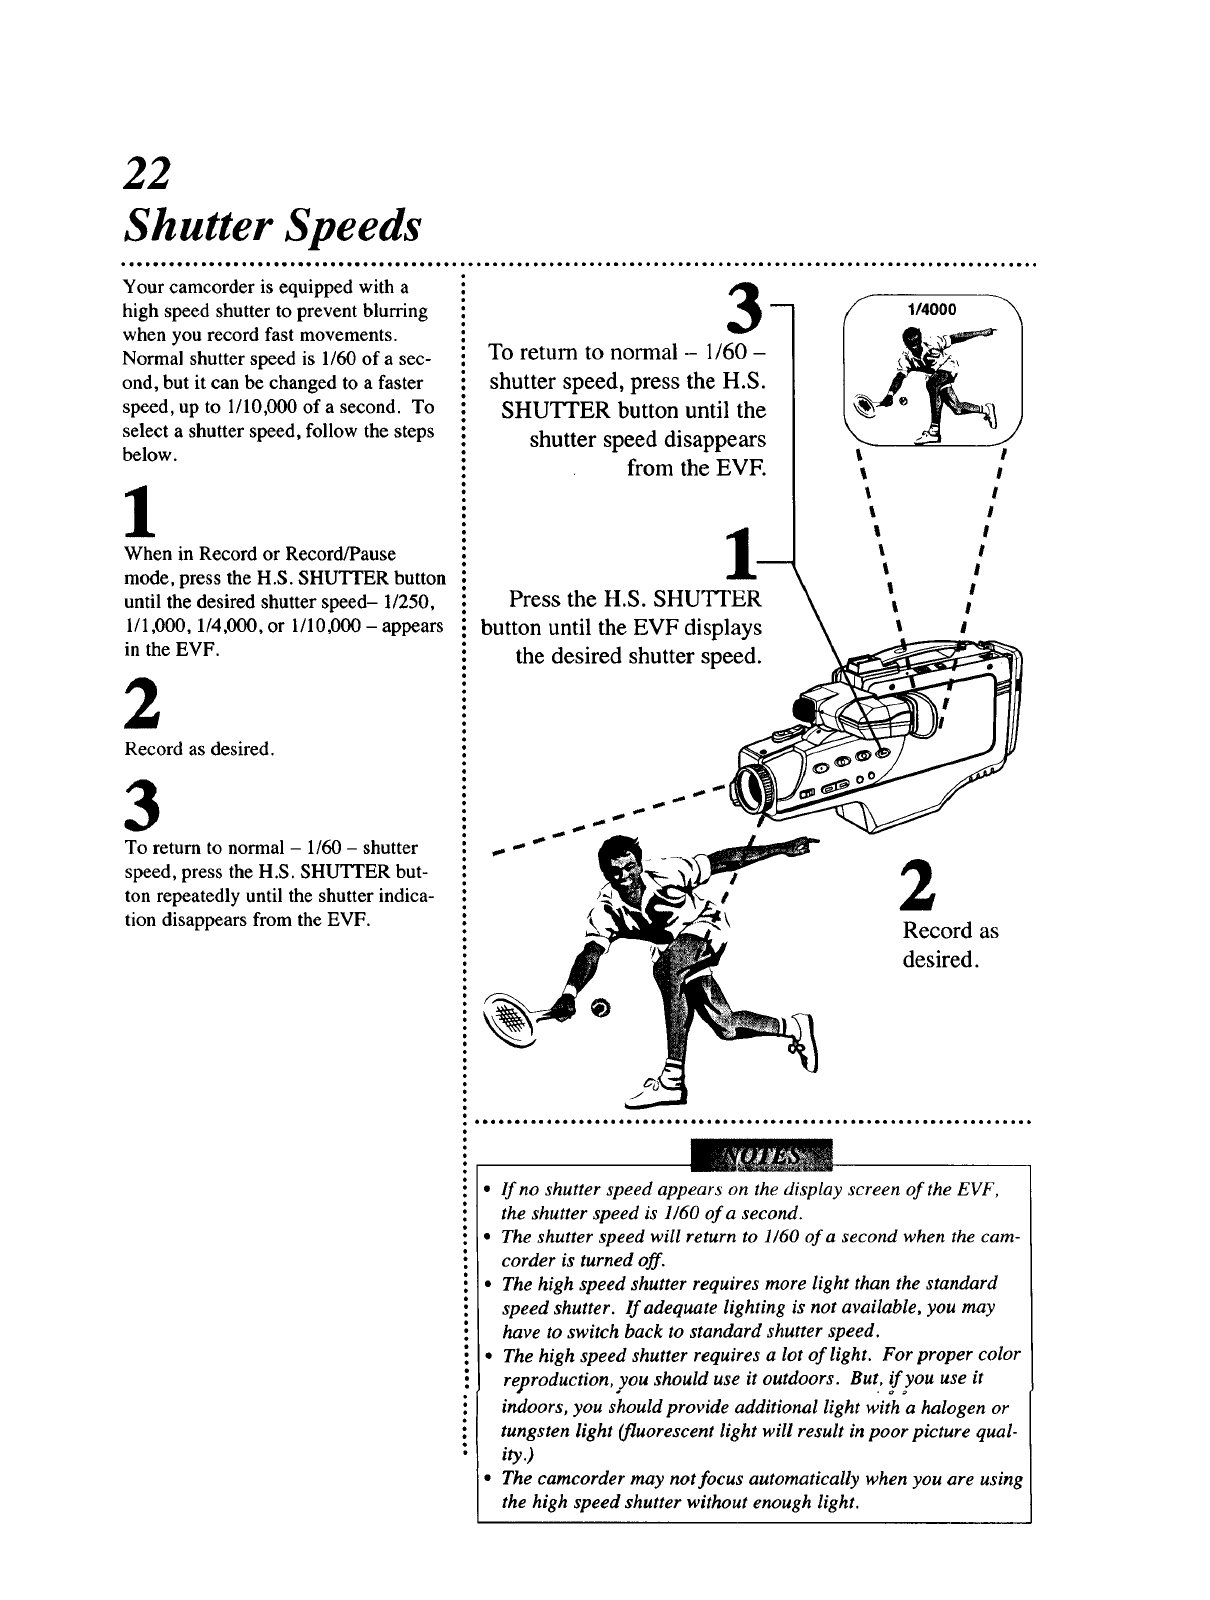
Shutter Speeds
Your camcorder is equipped with a
high speed shutter to prevent blurring
when you record fast movements.
Normal shutter speed is 1/60 of a sec-
ond, but it can be changed to a faster
speed, up to 1/10,000 of a second. To
select a shutter speed, follow the steps
below.
1
When in Record or Record/Pause
mode, press the H.S. SHUTTER button
until the desired shutter speed- 1/250,
1/1,000, 1/4,000, or 1/10,000 - appears
in the EVF.
2
Record as desired.
3
_
To return to normal - 1/60 -
shutter speed, press the H.S.
SHUTTER button until the
shutter speed disappears
from the EVE
To return to normal - 1/60 - shutter
speed, press the H.S. SHUTTER but-
ton repeatedly until the shutter indica-
tion disappears from the EVF.
Press the H.S. SHUTTER
button until the EVF displays
the desired shutter speed.
®
1
!2
Record as
desired.
••lfno shutter speed appears on the display screen of the EVF,
• the shutter speed is 1/60 of a second.
•• The shutter speed will return to 1/60 of a second when the cam-
"corder is turned off.
• The high speed shutter requires more light than the standard
• speed shutter. If adequate lighting is not available, you may
have to switch back to standard shutter speed.
• • The high speed shutter requires a lot of light. Forproper color
reflroduction, you should use it outdoors. But, !f you use it
•indoors, you should provide additional light with a halogen or
•tungsten light (fluorescent light will result in poor picture qual-
ity .)
•The camcorder may not focus automatically when you are using
the high speed shutter without enough light.
23
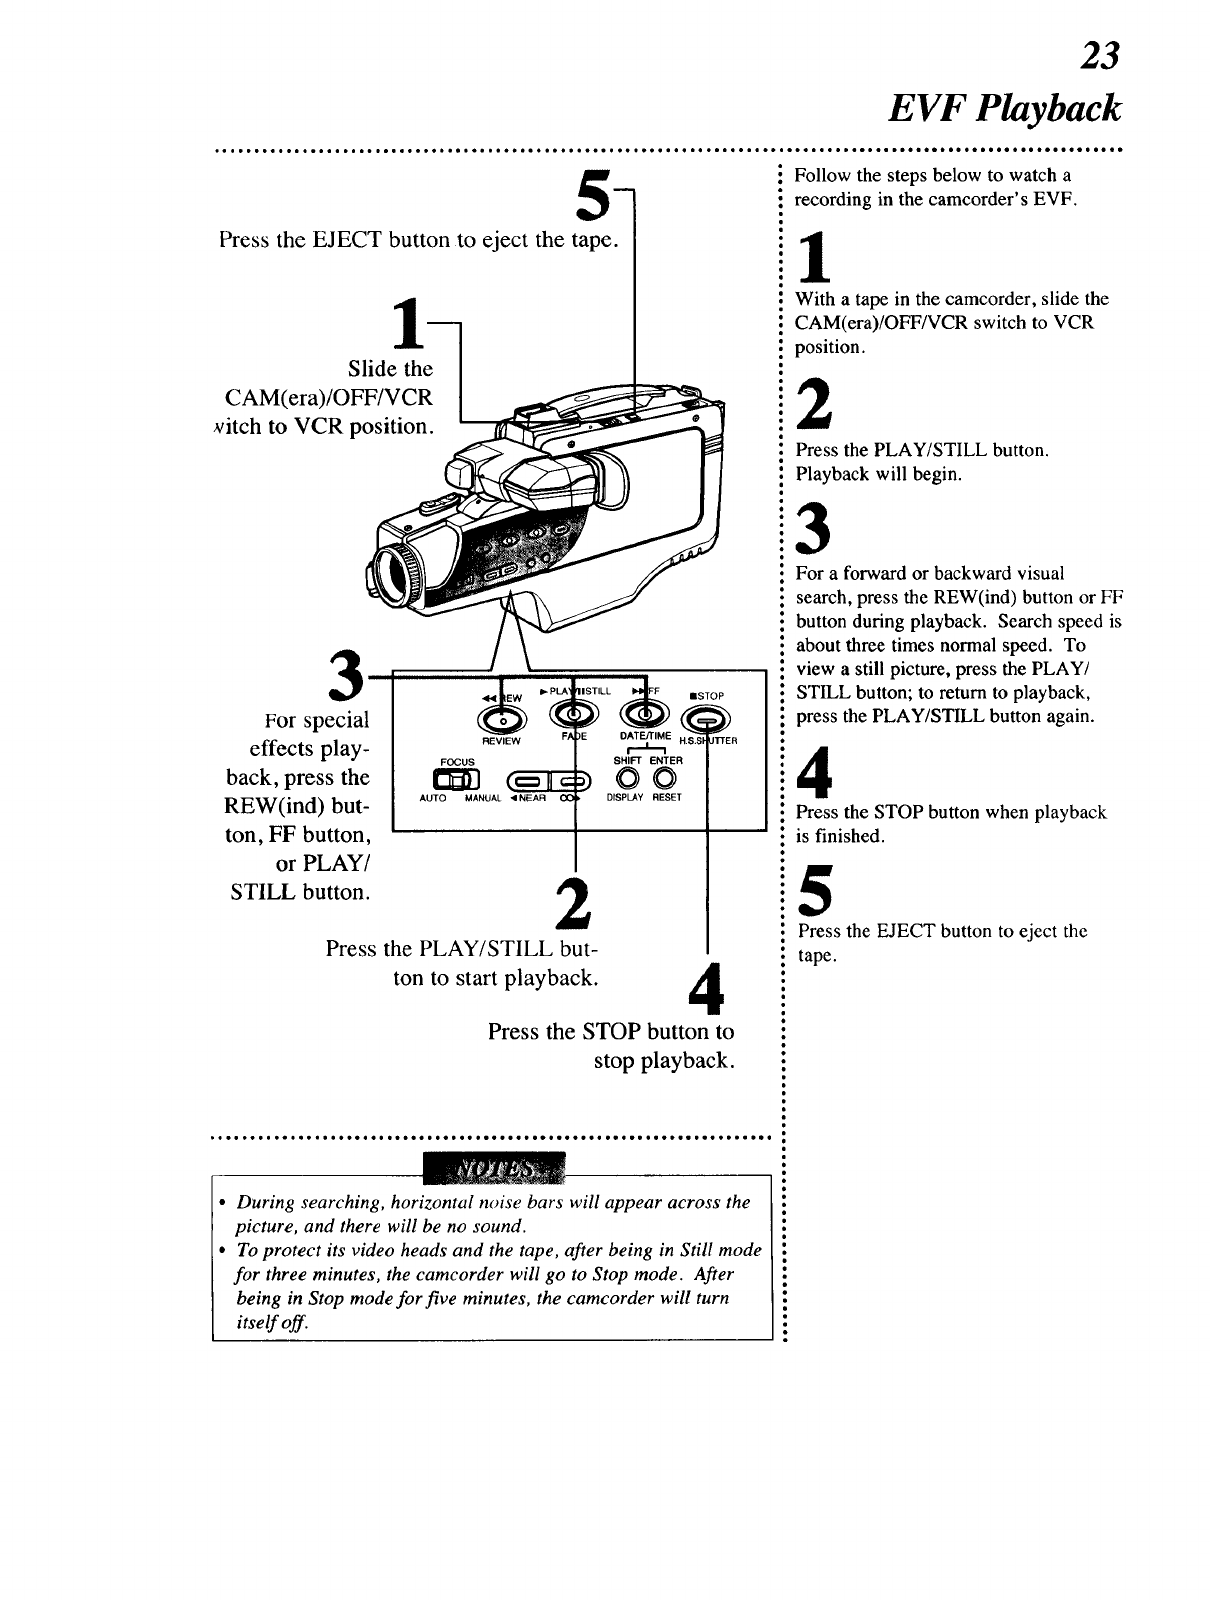
EVF Playback
Press the EJECT button to eject the tape.
1
Slide the
CAM(era)/OFF/VCR
_,itch to VCR position.
3
REVIEW F,_
For special
effects play- s.,_ E,TE,
back, press the 1_ _ O
REW(ind) but- AoTO_A.OAL..EA. _. o,sP_ .E_E_
ton, FF button,
or PLAY/
STILL button. 2
Press the PLAY/STILL but-
ton to start playback. 4
n
Press the STOP button to
IISTILL (_ (_ _IISTOP
_E DATE/TIME H.S.SI JTTER
stop playback.
•During searching, horizontal noise bars will appear across the
picture, and there will be no sound.
• To protect its video heads and the tape, after being in Still mode
for three minutes, the camcorder will go to Stop mode. After
being in Stop mode for five minutes, the camcorder will turn
itself off.
Follow the steps below to watch a
recording in the camcorder's EVF.
1
With a tape in the camcorder, slide the
CAM(era)/OFF/VCR switch to VCR
position.
2
Press the PLAY/STILL button.
• Playback will begin.
"3
• For a forward or backward visual
i search, press the REW(ind) button or FF
• button during playback. Search speed is
about three times normal speed. To
view a still picture, press the PLAY/
i STILL button; to return to playback,
i press the PLAY/STILL button again.
! Press the STOP button when playback
: is finished.
iPress the EJECT button to eject the
i tape.
24
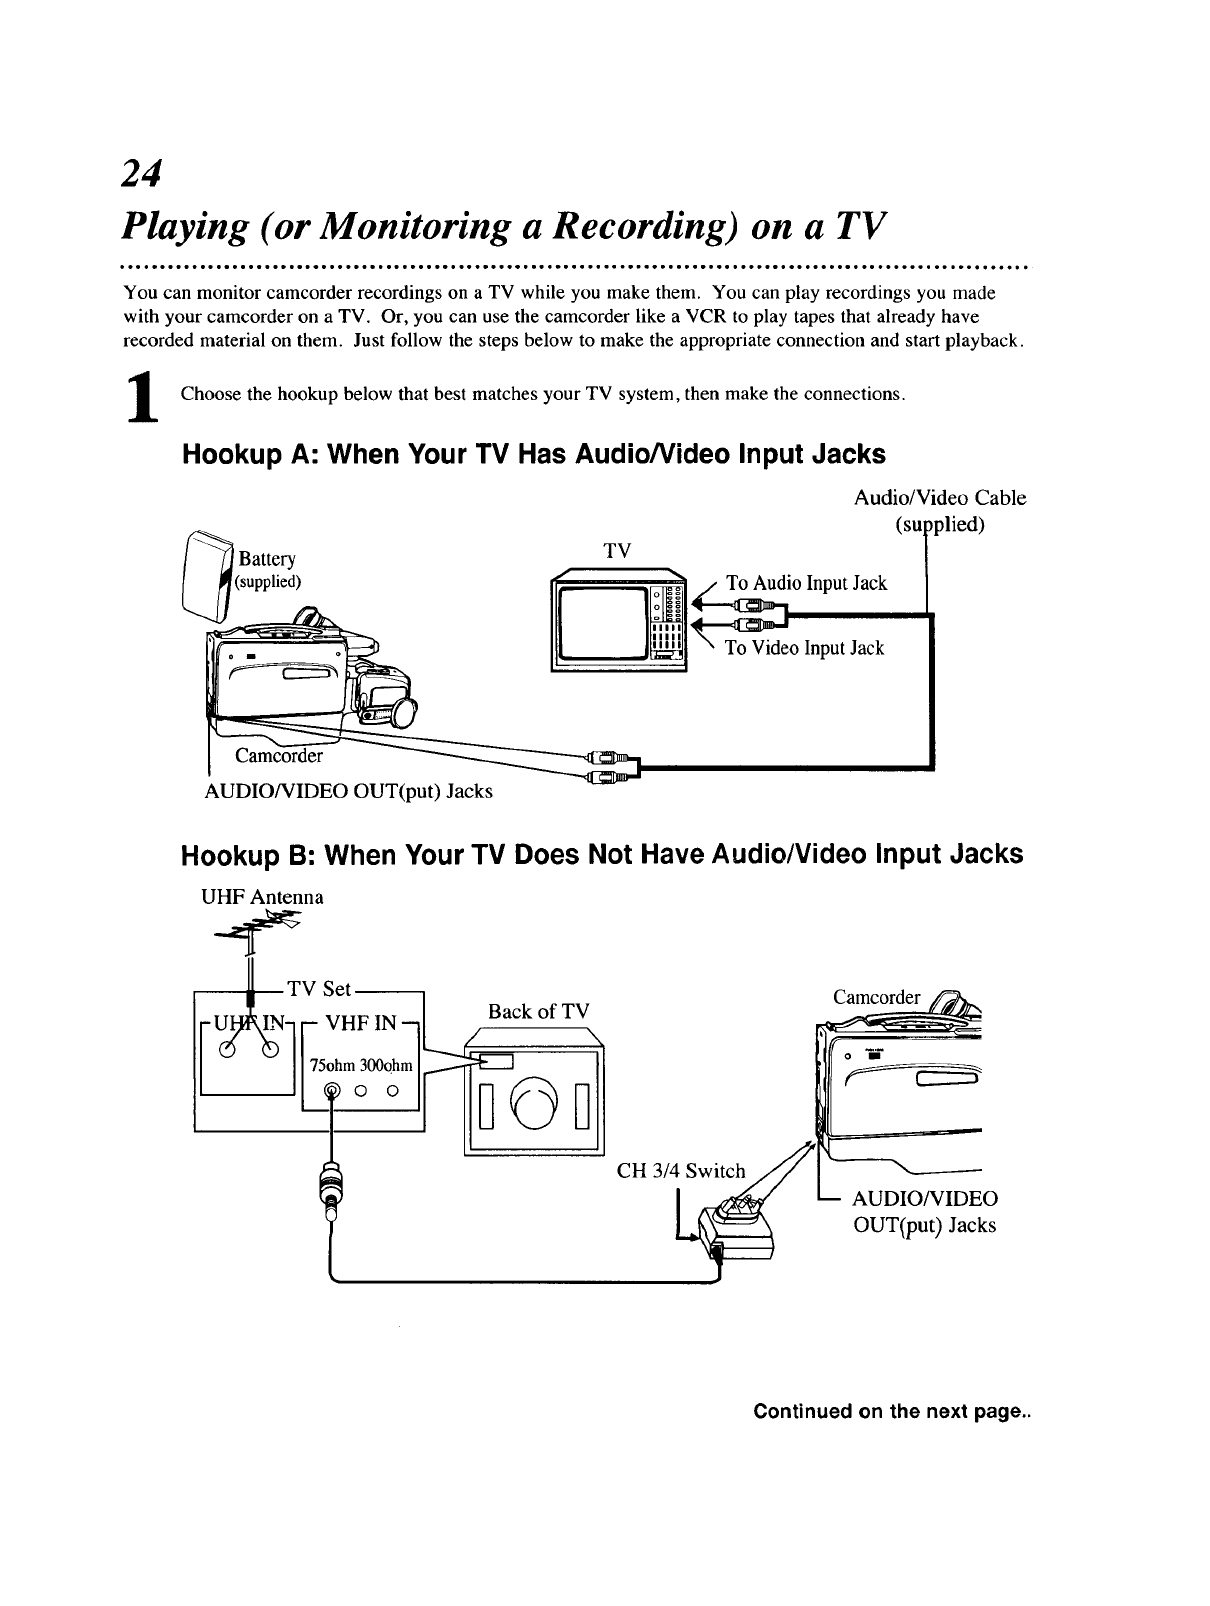
Playing (or Monitoring a Recording) on a TV
• ** • eeee e• ee ee *ee e• eeieee• •e *eeoe ee eleeeoe eeeoeeeo• *e eoiee *e ee ooeee •* *ee •co*, • *eeee ee ee oeeee *e o• •ee •, ••, oee • e• • * •
You can monitor camcorder recordings on a TV while you make them. You can play recordings you made
with your camcorder on a TV. Or, you can use the camcorder like a VCR to play tapes that already have
recorded material on them. Just follow the steps below to make the appropriate connection and start playback.
Choose the hookup below that best matches TV then make the connections.
your system,
Hookup A: When Your TV Has Audio/Video Input Jacks
Audio/Video Cable
,lied)
Battery TV
(supplied) To Audio Input Jack
AUDIO/VIDEO OUT(put) Jacks
Hookup B: When Your TV Does Not Have Audio/Video Input Jacks
UHF Antenna
TV Set
CH 3/4 Switch
AUDIO/VIDEO
OUT(put) Jacks
Continued on the next page..
25
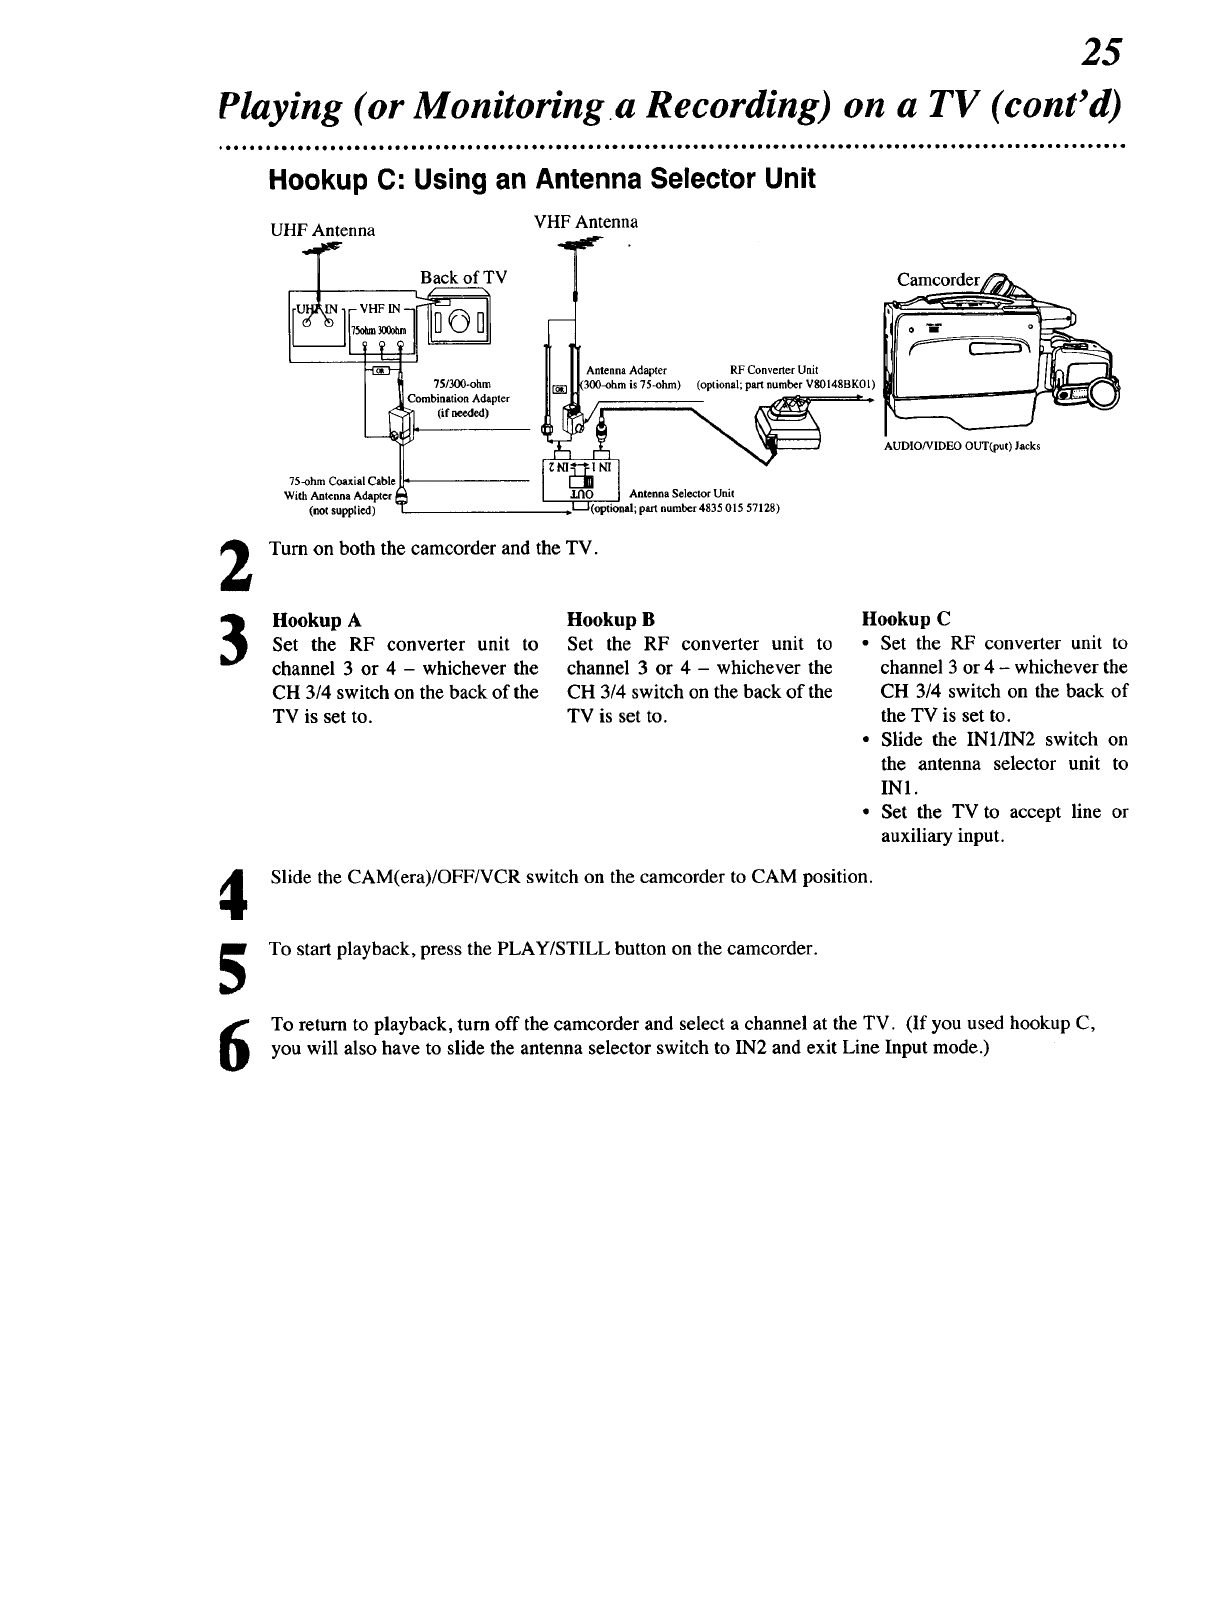
Playing (or Monitoring.a Recording) on a TV (cont'd)
Hookup C: Using an Antenna Selector Unit
UHF Antenna
75-ohm Coaxial Cabl
With Antenna Adapter
(not supplied)
Back of TV
75/300-ohm
Combination Adapter
(if needed)
Antenna Adapter RF Converter Unit
300-ohm is 75-ohm) (optional; part number vg0148BK01)
I1_ I Antenna Selector Unit
Coptiooal; part number 4835 015 57128)
Camcorder
AUDIO/VIDEO OUT(put) Jacks
Turn on both the camcorder and the TV.
Hookup A
Set the RF converter unit to
channel 3 or 4 - whichever the
CH 3/4 switch on the back of the
TV is set to.
Hookup B
Set the RF converter unit to
channel 3 or 4 - whichever the
CH 3/4 switch on the back of the
TV is set to.
Hookup C
•Set the RF converter unit to
channel 3 or 4 - whichever the
CH 3/4 switch on the back of
the TV is set to.
•Slide the IN1/IN2 switch on
the antenna selector unit to
IN1.
•Set the TV to accept line or
auxiliary input.
Slide the CAM(era)/OFF/VCR switch on the camcorder to CAM position.
To start playback, press the PLAY/STILL button on the camcorder.
To return to playback, turn off the camcorder and select a channel at the TV. (If you used hookup C,
you will also have to slide the antenna selector switch to IN2 and exit Line Input mode.)
26
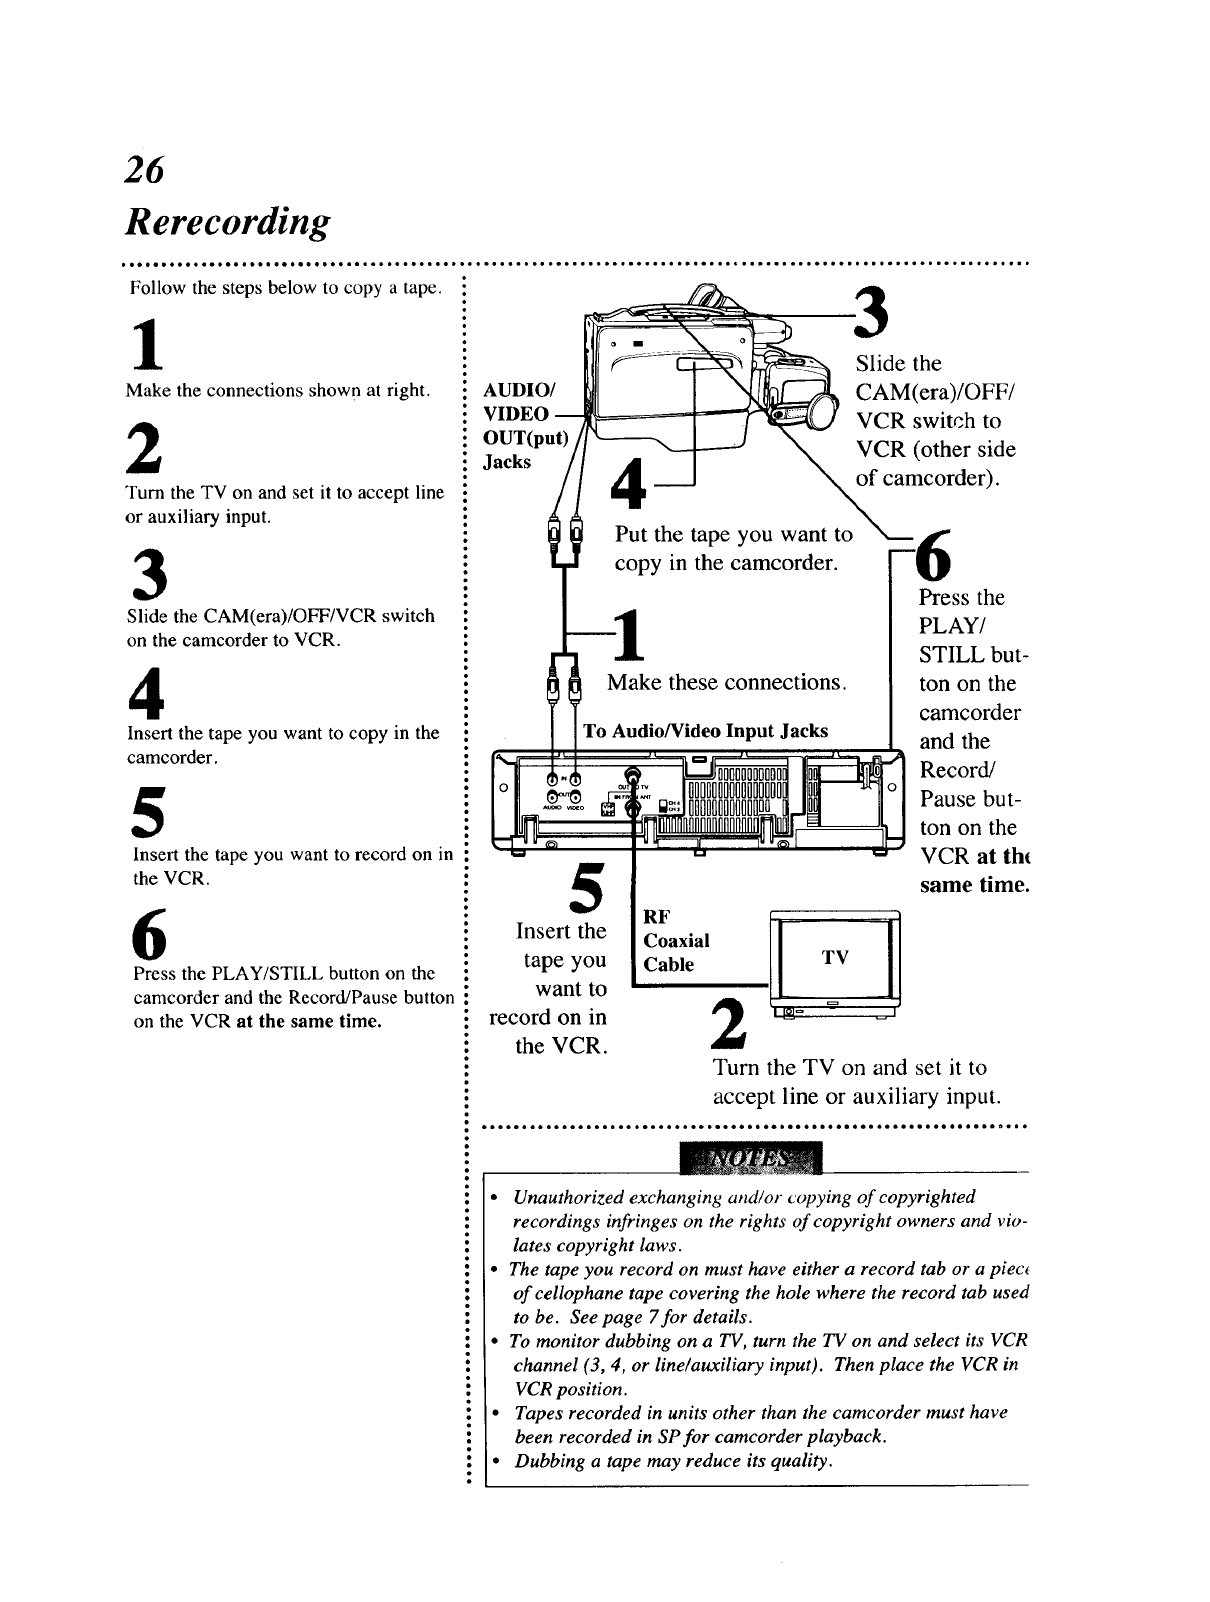
Rerecording
,e*ee coo*•,ode* • Q***e*** e***e t.*o .* do*** do .. * °.** o... *o.°.. °• • ° t* o..* .do*..0 •. ,oo.° °° .o.o* .* ,..*.e, o..do°....*.. °
Follow the steps below to copy atape. _ _ 3Slide___the
Make the connections shown at right. AUDIO/ ill I"__ CAM(era)/OFF/
VIDEO _ _ VCR switch to
OUT(put)/1_----_ __J _- VCR (other side
Jacks /I•I
or auxiliary input. Put the tape you want to _
3
Slide the CAM(era)/OFF/VCR switch
on the camcorder to VCR.
4
Insert the tape you want to copy in the
camcorder.
5
Insert the tape you want to record on in
the VCR.
6
Press the PLAY/STILL button on the
camcorder and the Record!Pause button
on the VCR at the same time.
copy in the camcorder. 1!]_
Press the
1PLAY/
STILL but-
I Make these connections, ton on the
camcorder
/ To Audio/Video Input Jacks and the
_b-_b _ -JLooooooooooottl Record/
o oooooooooooooooot
_o Vow: Pause but-
3nn,,nnnnnnnnn , -l I ---I ton on the
VCR at th(
same time.
"_ILll
Insert the Coaxial
tape you Cable TV
want to =
record on in r_ - _,
the VCR.
• Turn the TV on and set it to
accept line or auxiliary input.
• eoeee *• e* eeoc* ee ee eeee* e* e• eoee• ee e,eoeee eeeoeoe •• •eeoc • e ee *co o_el •
•Unauthorized exchanging attd/or copying of copyrighted
recordings infringes on the rights of copyright owners and vio-
lates copyright laws.
• • The tape you record on must have either a record tab or a piect
•of cellophane tape covering the hole where the record tab used
•to be. See page 7for details.
• ° To monitor dubbing on a TV, turn the TV on and select its VCR
• channel (3, 4, or line/auxiliary input). Then place the VCR in
• VCR position.
•• Tapes recorded in units other than the camcorder must have
• been recorded in SPfor camcorder playback.
•°Dubbing a tape may reduce its quality.
27
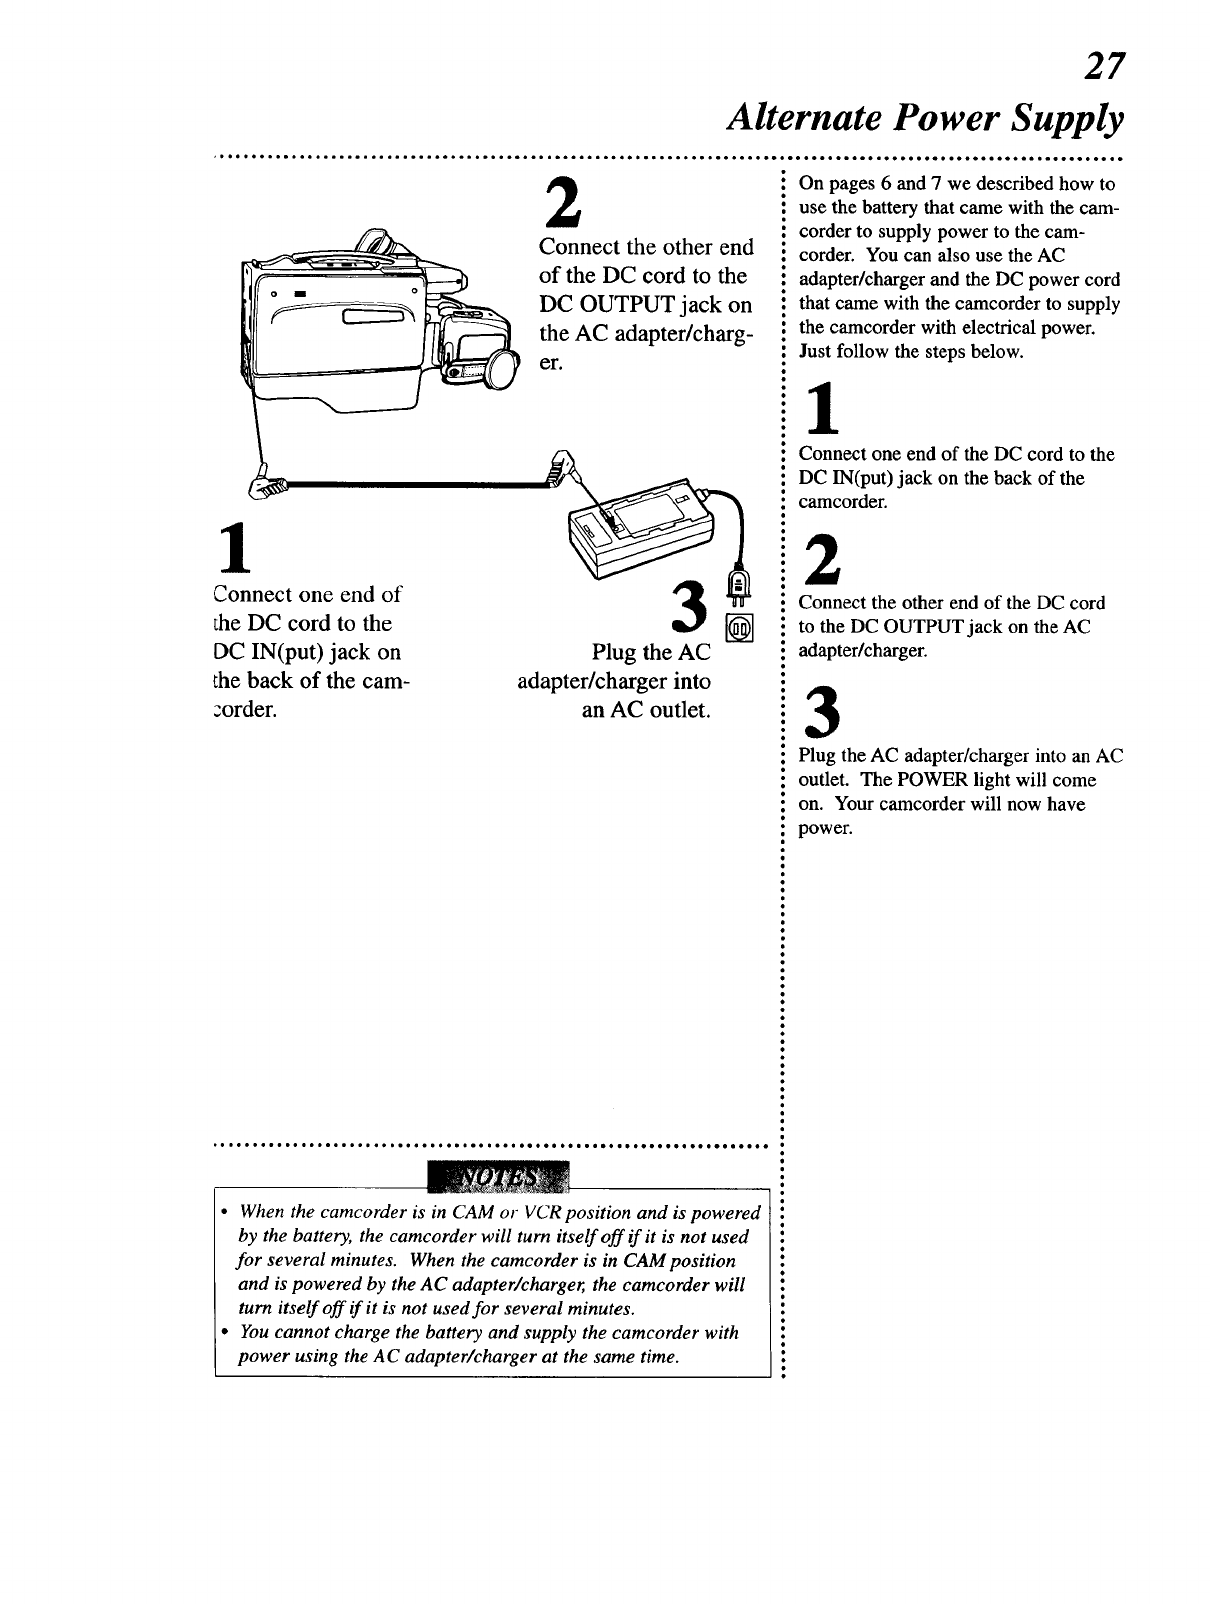
Alternate Power Supply
2
Connect the other end
of the DC cord to the
DC OUTPUT jack on
the AC adapter/charg-
er.
1
Connect one end of
lhe DC cord to the
DC IN(put)jack on
the back of the cam-
zorder.
Plug the AC
adapter/charger into
an AC outlet.
•When the camcorder is in CAM or VCR position and is powered
by the battery, the camcorder will turn itself off if it is not used .
for several minutes. When the camcorder is in CAM position •
and is powered by the AC adapter/charger, the camcorder will •
turn itself off if it is not used for several minutes.
•You cannot charge the battery and supply the camcorder with .
power using the A C adapter/charger at the same time. •
On pages 6 and 7 we described how to
use the battery that came with the cam-
corder to supply power to the cam-
corder. You can also use the AC
adapter/charger and the DC power cord
that came with the camcorder to supply
the camcorder with electrical power.
Just follow the steps below.
1
Connect one end of the DC cord to the
DC IN(put) jack on the back of the
camcorder.
2
Connect the other end of the DC cord
to the DC OUTPUT jack on the AC
adapter/charger.
3
Plug the AC adapter/charger into an AC
outlet. The POWER light will come
on. Your camcorder will now have
power.
28
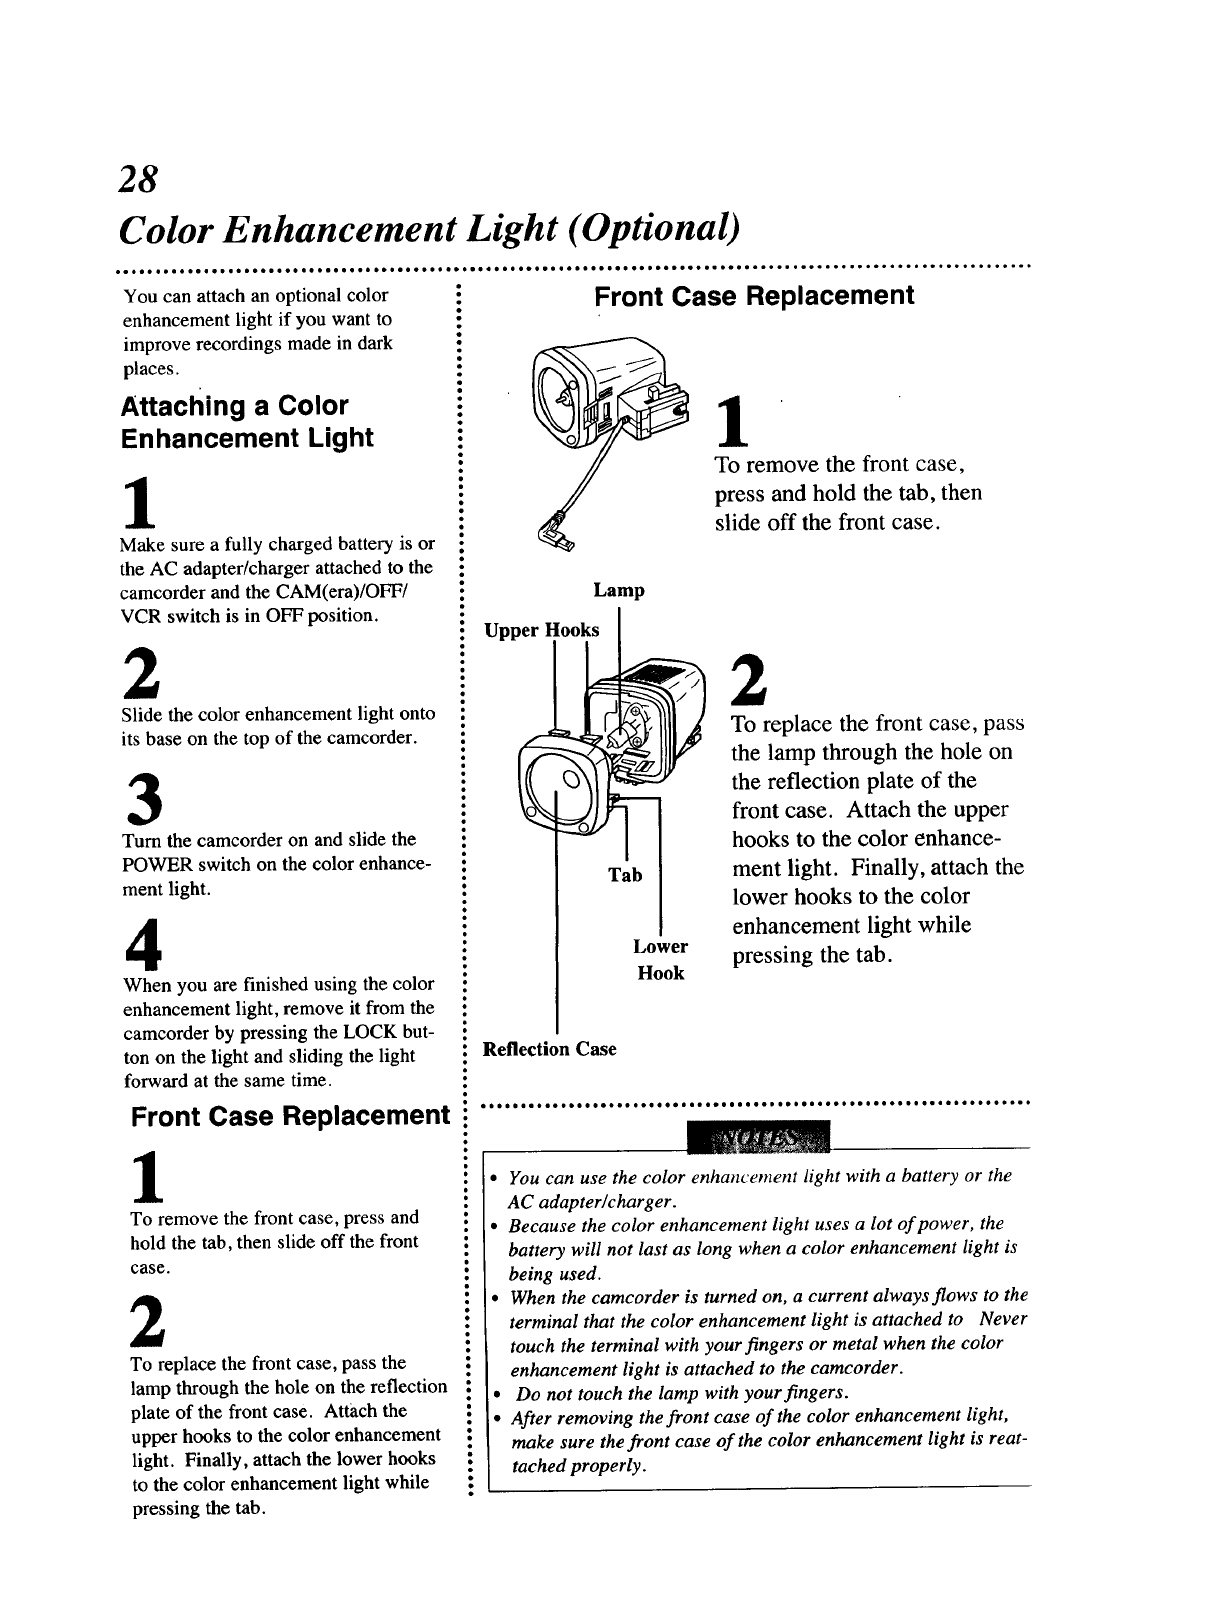
Color Enhancement Light (Optional)
You can attach an optional color
enhancement light if you want to
improve recordings made in dark
places.
Attaching a Color
Enhancement Light
1
Make sure a fully charged battery is or
the AC adapter/charger attached to the
camcorder and the CAM(era)/OFF/
VCR switch is in OFF position.
2
Slide the color enhancement light onto
its base on the top of the camcorder.
3
Turn the camcorder on and slide the
POWER switch on the color enhance-
ment light.
4
When you are finished using the color
enhancement light, remove it from the
camcorder by pressing the LOCK but-
ton on the light and sliding the light
forward at the same time.
Front Case Replacement
1
To remove the front case, press and
hold the tab, then slide off the front
case.
2
To replace the front case, pass the
lamp through the hole on the reflection
plate of the front case. Attach the
upper hooks to the color enhancement
light. Finally, attach the lower hooks
to the color enhancement light while
pressing the tab.
Front Case Replacement
1
To remove the front case,
press and hold the tab, then
slide off the front case.
Lamp
Upper Hooks
Tab
Lower
Hook
2
To replace the front case, pass
the lamp through the hole on
the reflection plate of the
front case. Attach the upper
hooks to the color enhance-
ment light. Finally, attach the
lower hooks to the color
enhancement light while
pressing the tab.
Reflection Case
• ••co •coo o• •l 1••• •coo••j•••••••••••••
•You can use the color enhancement light with a battery or the
AC adapter/charger.
•Because the color enhancement light uses a lot of power, the
battery will not last as long when a color enhancement light is
being used.
• When the camcorder is turned on, a current always flows to the
terminal that the color enhancement light is attached to Never
touch the terminal with your fingers or metal when the color
enhancement light is attached to the camcorder.
• Do not touch the lamp with yourfingers.
• After removing the front case of the color enhancement light,
make sure the front case of the color enhancement light is reat-
tached properly.
29
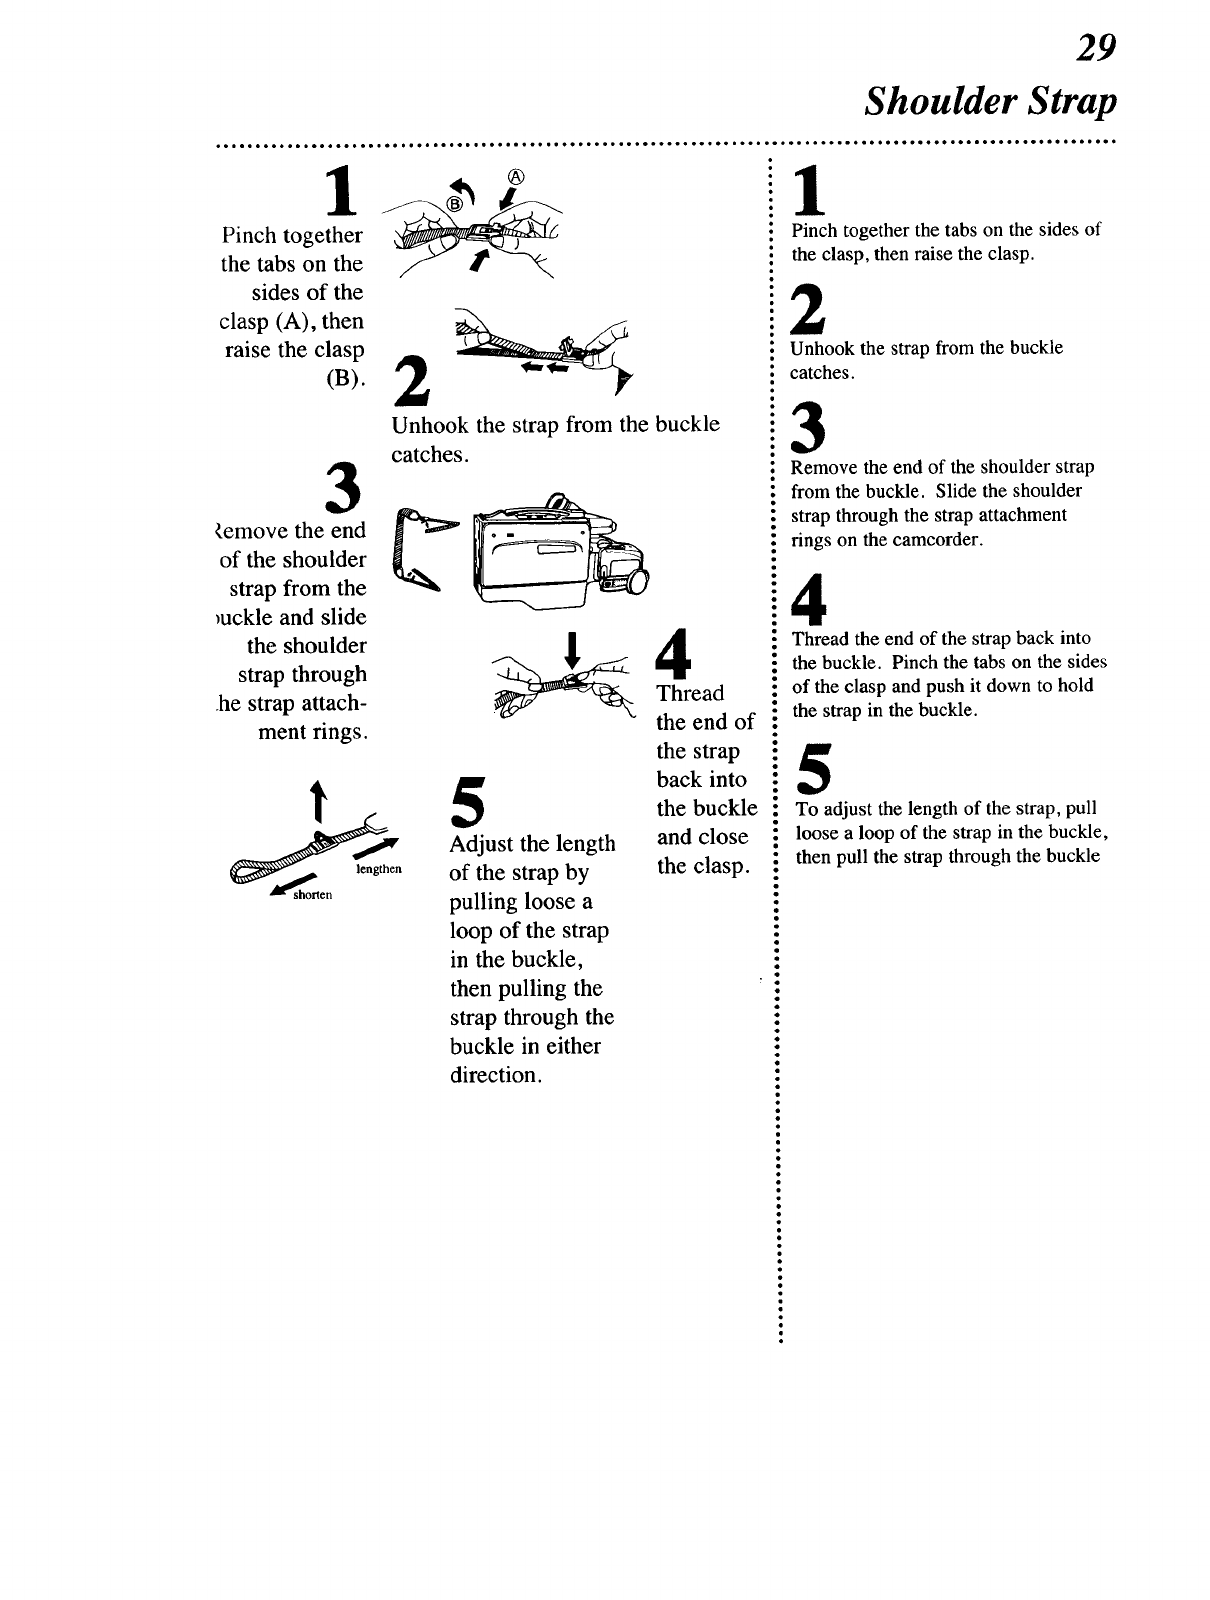
Pinch together
the tabs on the
sides of the
clasp (A), then _ ,._,
raise the clasp
(B). 2
Unhook the strap from the buckle
catches.
3
_emove the end
of the shoulder
strap from the
_uckle and slide
the shoulder
strap through
.he strap attach-
ment rings.
Thread
the end of
the strap
back into
the buckle
and close
the clasp.
5
Adjust the length
of the strap by
pulling loose a
loop of the strap
in the buckle,
then pulling the
strap through the
buckle in either
direction.
Shoulder Strap
Pinch together the tabs on the sides of
the clasp, then raise the clasp.
2
Unhook the strap from the buckle
catches.
• Remove the end of the shoulder strap
• from the buckle. Slide the shoulder
• strap through the strap attachment
rings on the camcorder.
4
• Thread the end of the strap back into
• the buckle. Pinch the tabs on the sides
: of the clasp and push it down to hold
: the strap in the buckle.
:To adjust the length of the strap, pull
! loose a loop of the strap in the buckle,
:then pull the strap through the buckle
.
.
30
Notes On Operations (cont'd)
ee ee *eoee ee ee ioeoo oo oooolee eoeeoooee ee oeeoeoo ee oleol eeoe Jlaee oi ol • • * o•. • •••••*••• • *•••• ••• •o••••••••••*•••••••° •.
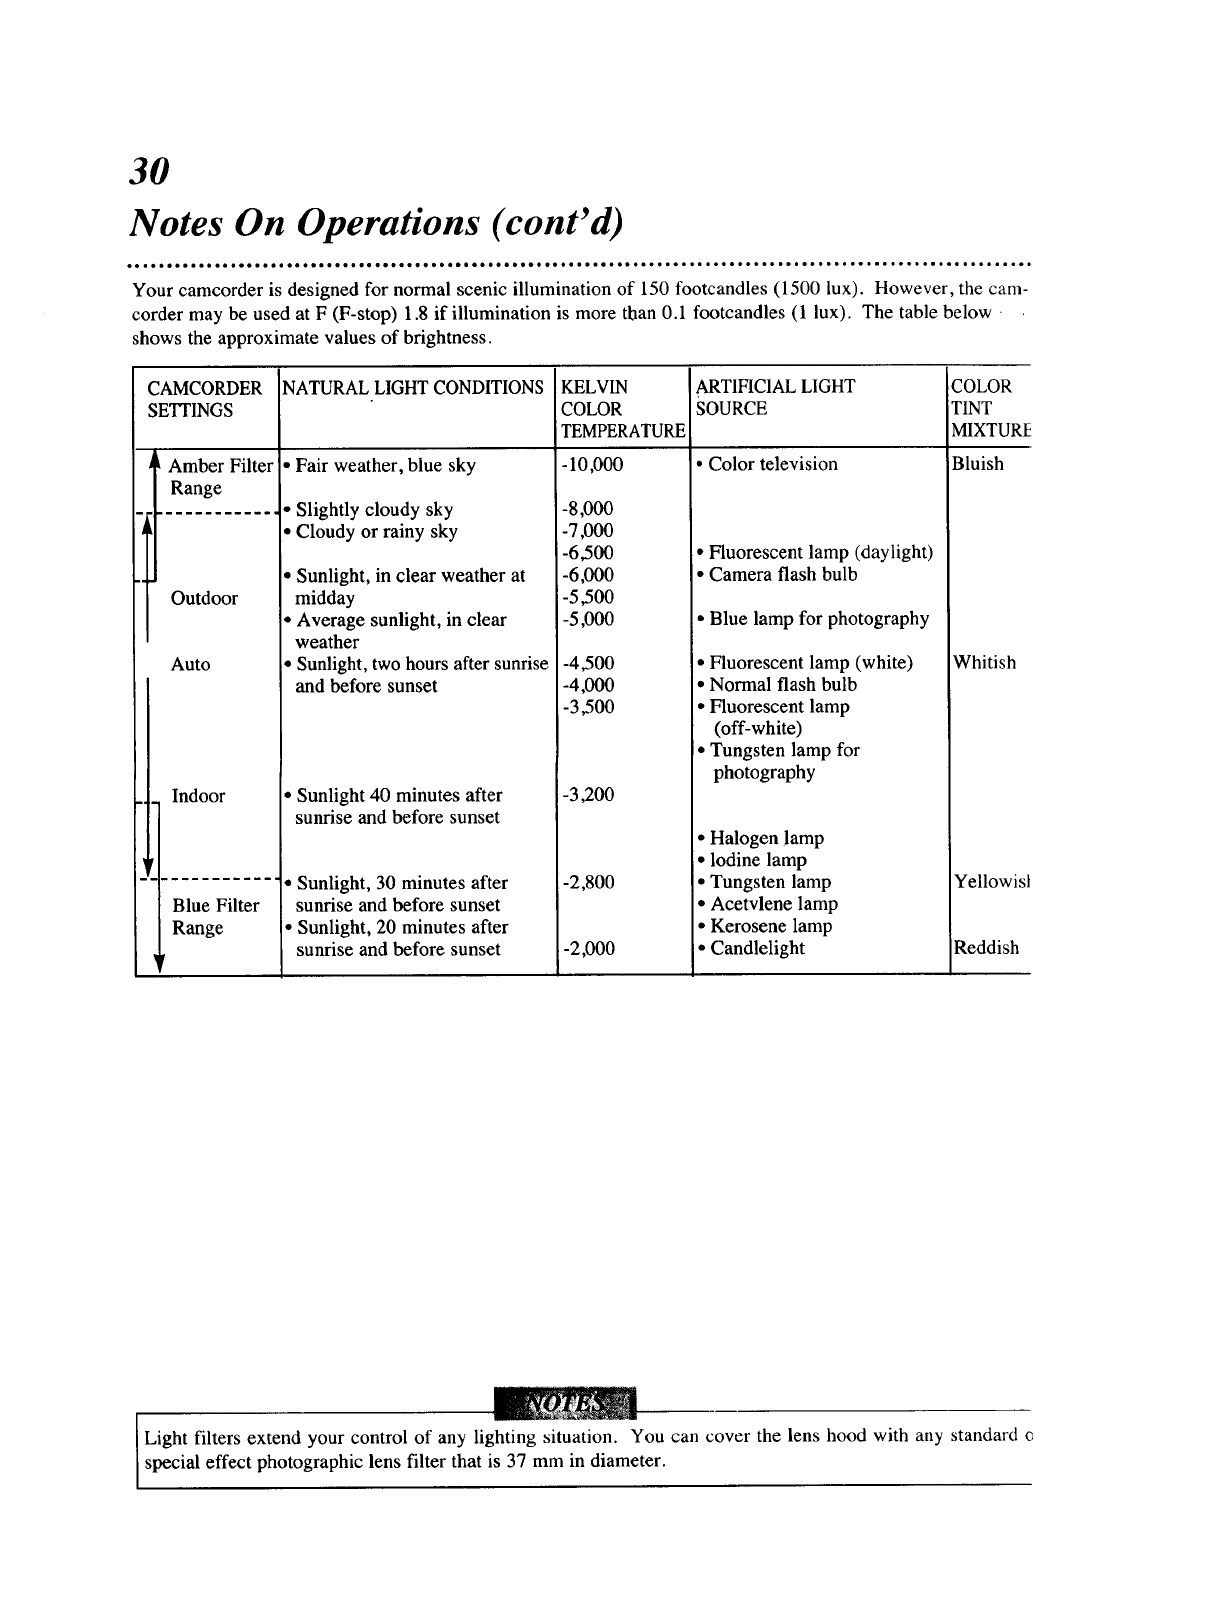
Your camcorder is designed for normal scenic illumination of 150 footcandles (1500 lux). However, the cam-
corder may be used at F (F-stop) 1.8 if illumination is more than0.1 footcandles (1 lux). The table below
shows the approximate values of brightness.
CAMCORDER
;EITINGS
Amber Filter
Range
Outdoor
Auto
.Indoor
Blue Filter
Range
NATURAL LIGHTCONDITIONS
• Fair weather, blue sky
•Slightly cloudy sky
• Cloudy or rainy sky
• Sunlight, in clear weather at
midday
•Average sunlight, in clear
weather
• Sunlight, two hours after sunrise
and before sunset
KELVIN
COLOR
TEMPERATURE
-10,000
-8,000
-7,000
-6.500
-6,000
-5.500
-5,000
• Sunlight 40 minutes after
sunrise and before sunset
• Sunlight, 30 minutes after
sunrise and before sunset
• Sunlight, 20 minutes after
sunrise and before sunset
-4,500
-4,000
-3,500
[-3,200
-2,800
-2,000
ARTIFICIAL LIGHT
SOURCE
• Color television
• Fluorescent lamp (daylight)
• Camera flash bulb
• Blue lamp for photography
• Fluorescent lamp (white)
• Normal flash bulb
• Fluorescent lamp
(off-white)
• Tungsten lamp for
photography
• Halogen !amp
•lodine lamp
• Tungsten lamp
•Acetvlene lamp
• Kerosene lamp
• Candlelight
COLOR
TINT
MIXTUR[
Bluish
Whitish
Yellowisl
Reddish
Light filters extend your control of any lighting situation. You can cover the lens hood with any standard c
special effect photographic lens filter that is 37 mm in diameter.
31
Before Requesting Service
•ee IlleeQleeeoetoo eeooo•
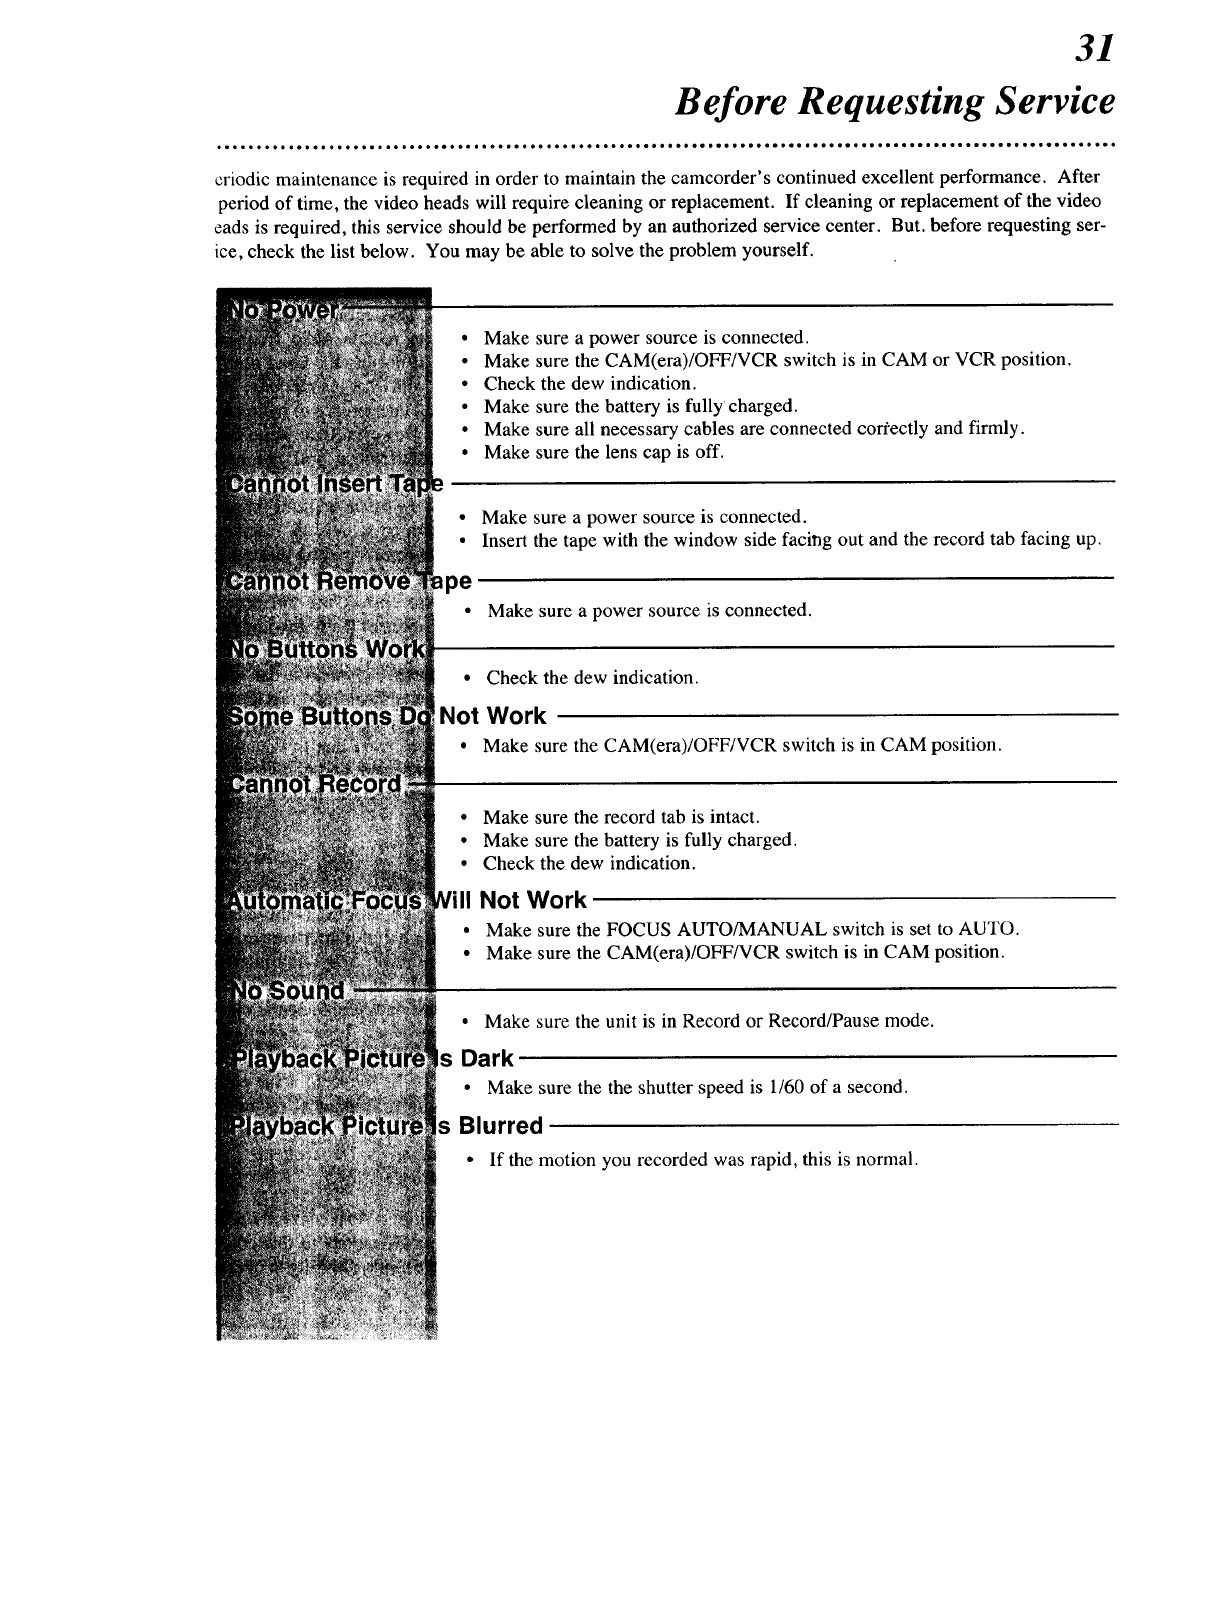
o.°°°,° o**oooo o• oo,l= aoooo.o**oo o• ooo=ooooo* Jo*= ••o.o•••• oooeol• Jo•oeooo• •col•e•••* • • e•Q
criodic maintenance is required in order to maintain the camcorder's continued excellent performance. After
period of time, the video heads will require cleaning or replacement. If cleaning or replacement of the video
eads is required, this service should be performed by an authorized service center. But. before requesting ser-
ice, check the list below. You may be able to solve the problem yourself.
Make sure a power source is connected.
Make sure the CAM(era)/OFF/VCR switch is in CAM or VCR position.
Check the dew indication.
Make sure the battery is fully charged.
Make sure all necessary cables are connected correctly and firmly.
Make sure the lens cap is off.
Make sure a power source is connected.
Insert the tape with the window side facing out and the record tab facing up.
Make sure a power source is connected.
• Check the dew indication.
Not Work
•Make sure the CAM(era)/OFF/VCR switch is in CAM position.
• Make sure the record tab is intact.
• Make sure the battery is fully charged.
• Check the dew indication.
Make sure the unit is in Record or Record/Pause mode.
s Dark
• Make sure the the shutter speed is 1/60 of a second.
s Blurred
• If the motion you recorded was rapid, this is normal.
Not Work
Make sure the FOCUS AUTO/MANUAL switch is set to AUTO.
Make sure the CAM(era)/OFF/VCR switch is in CAM position.
32
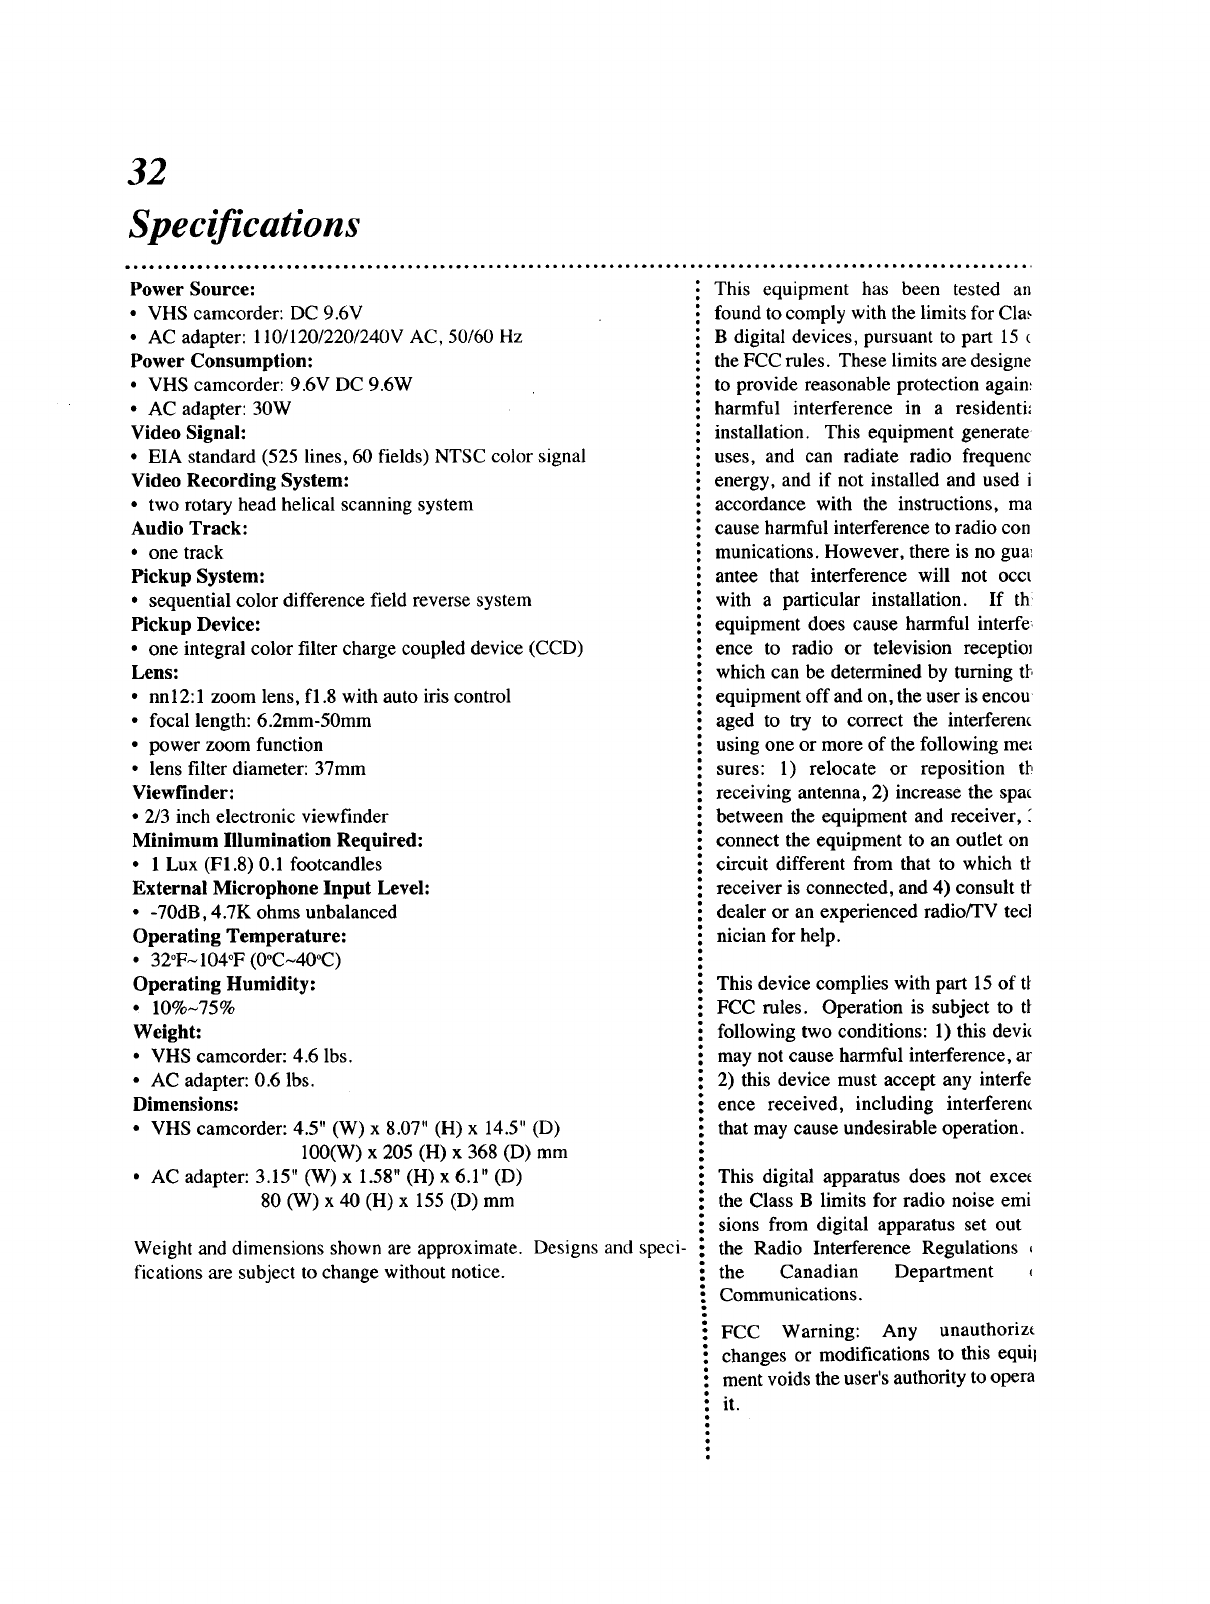
Specifications
Power Source:
• VHS camcorder: DC 9.6V
• AC adapter: 110/120/220/240V AC, 50/60 Hz
Power Consumption:
•VHS camcorder: 9.6V DC 9.6W
•AC adapter: 30W
Video Signal:
• EIA standard (525 lines, 60 fields) NTSC color signal
Video Recording System:
• two rotary head helical scanning system
Audio Track:
• one track
Pickup System:
•sequential color difference field reverse system
Pickup Device:
•one integral color filter charge coupled device (CCD)
Lens:
•nnl2:l zoom lens, fl.8 with auto iris control
•focal length: 6.2mm-50mm
•power zoom function
•lens filter diameter: 37mm
Viewfinder:
• 2/3 inch electronic viewfinder
Minimum Illumination Required:
• 1 Lux (F1.8) 0.1 footcandles
External Microphone Input Level:
• -70dB, 4.7K ohms unbalanced
Operating Temperature:
• 32oF~I04oF (0oC~40oC)
Operating Humidity:
• 10%~75%
Weight:
• VHS camcorder: 4.6 lbs.
• AC adapter: 0.6 lbs.
Dimensions:
• VHS camcorder: 4.5" (W) x 8.07" (H) x 14.5" (D)
100(W) x 205 (H) x 368 (D) mm
• AC adapter: 3.15" (W) x 1.58" (H) x 6.1" (D)
80 (W) x 40 (H) x 155 (D) mm
Weight and dimensions shown are approximate. Designs and speci-
fications are subject to change without notice. 1
This equipment has been tested an
found to comply with the limits for Cla_
B digital devices, pursuant to part 15
the FCC rules. These limits are designe
to provide reasonable protection again:
harmful interference in a residentfi
installation. This equipment generate
uses, and can radiate radio frequenc
energy, and if not installed and used i
accordance with the instructions, ma
cause harmful interference to radio con
munications. However, there is no gua_
antee that interference will not occt
with a particular installation. If th
equipment does cause harmful interfe:
ence to radio or television receptioJ
which can be determined by turning tt.
equipment off and on, the user is encou
aged to try to correct the interferem
using one or more of the following me_
sures: 1) relocate or reposition tl_
receiving antenna, 2) increase the spat
between the equipment and receiver,
connect the equipment to an outlet on
circuit different from that to which tt
receiver is connected, and 4) consult tt
dealer or an experienced radio/TV tecl
nician for help.
This device complies with part 15 of tt
FCC rules. Operation is subject to tt
following two conditions: 1) this devk
may not cause harmful interference, ar
2) this device must accept any interfe
ence received, including interferen_
that may cause undesirable operation.
This digital apparatus does not exce_
the Class B limits for radio noise emi
sions from digital apparatus set out
the Radio Interference Regulations ,
the Canadian Department ,
Communications.
FCC Warning: Any unauthorizt
changes or modifications to this equil
ment voids the user's authority to opera
it.
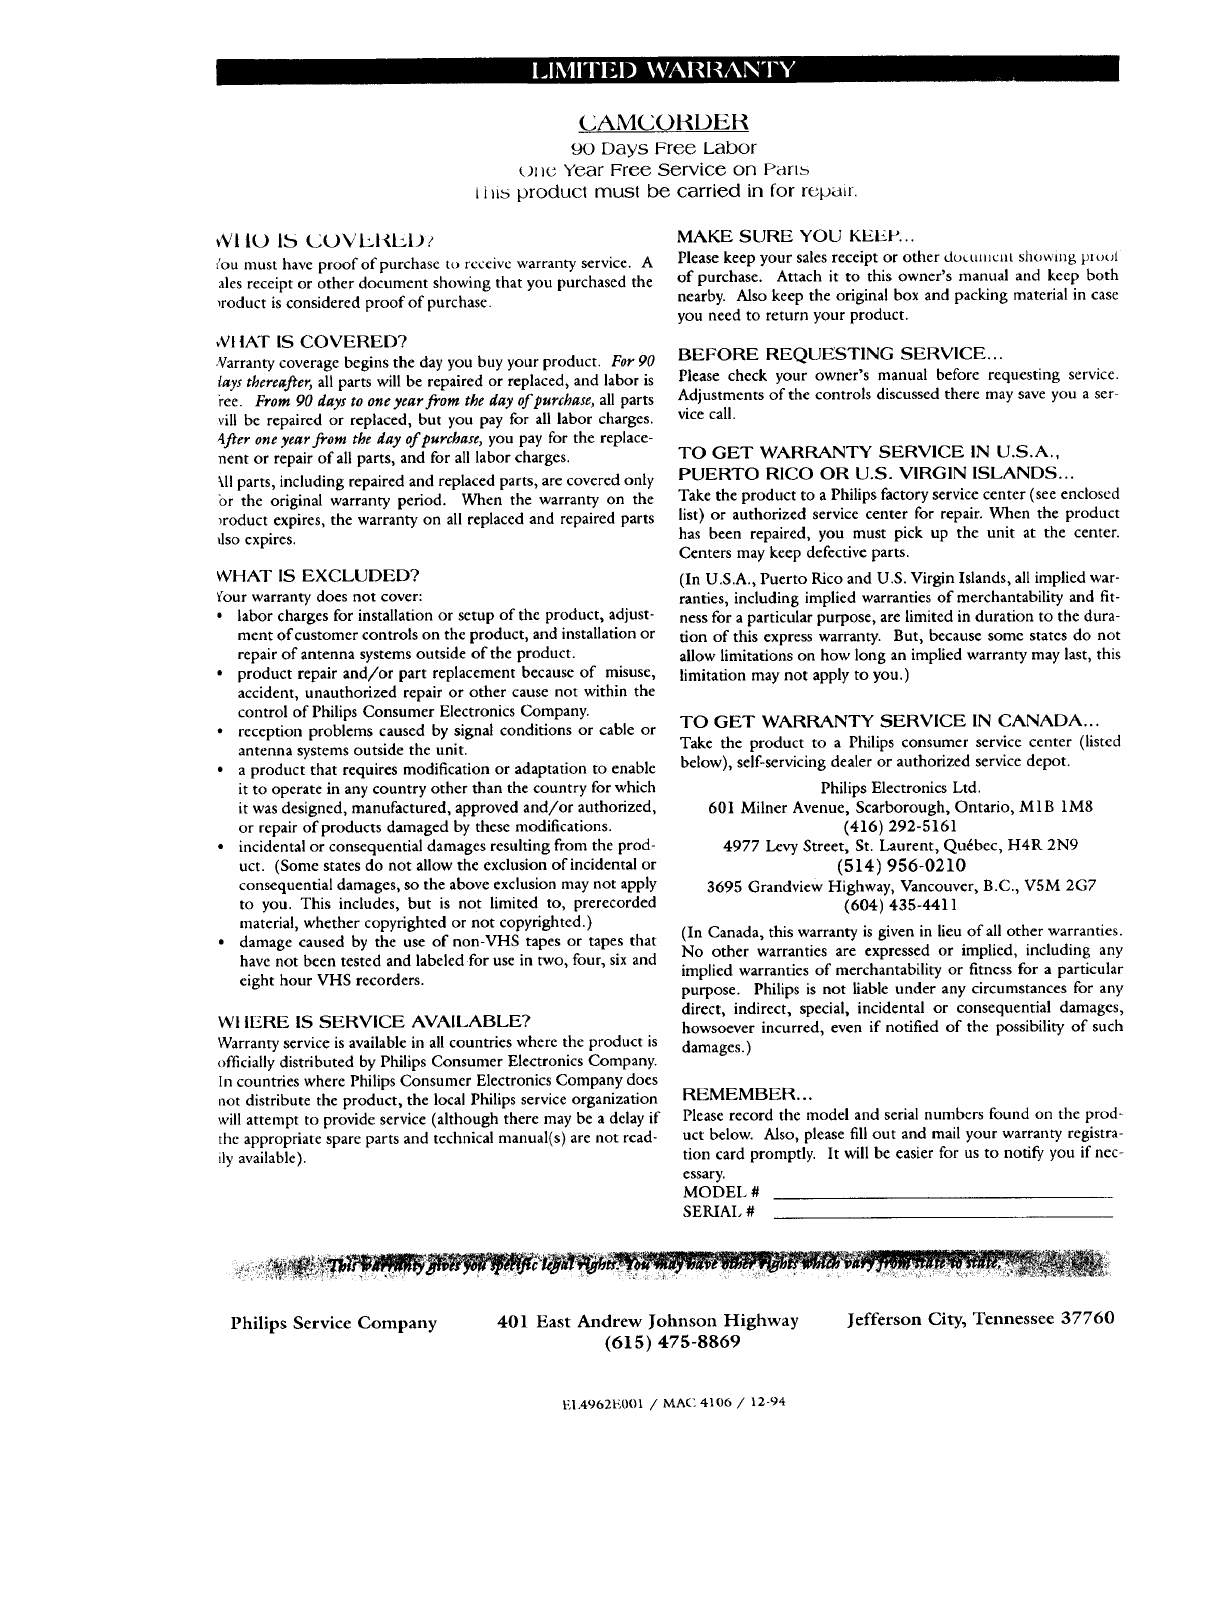
(ZAMCOItDER
90 Days Free Labor
t)x_e Year Free Service on Partb
i i lib product must be carried in for rel,)air.
_V110 lb COVEIC, LI)z
/OU must have proof of purchase to receive warranty service. A
ales receipt or other document showing that you purchased the
,roduct is considered proof of purchase.
vV!IAT IS COVERED?
•Varrantycoverage begins the day you buy your product. For 90
lays thereafter, all parts will be repaired or replaced, and labor is
_ee. From 90 days to one year from the day oflpurchase, all parts
viii be repaired or replaced, but you pay for all labor charges.
4fter one year from the day of purchase, you pay for the replace-
nent or repair of all parts, and for all labor charges.
\ll parts, including repaired and replaced parts, are covered only
or the original warranty period. When the warranty on the
_roduct expires, the warranty on all replaced and repaired parts
dso expires.
WHAT IS EXCLUDED?
Your warranty does not cover:
•labor charges for installation or setup of the product, adjust-
ment of customer controls on the product, and installation or
repair of antenna systems outside of the product.
• product repair and/or part replacement because of misuse,
accident, unauthorized repair or other cause not within the
control of Philips Consumer Electronics Company.
•reception problems caused by signal conditions or cable or
antenna systems outside the unit.
• a product that requires modification or adaptation to enable
it to operate in any country other than the country for which
it was designed, manufactured, approved and/or authorized,
or repair of products damaged by these modifications.
• incidental or consequential damages resulting from the prod-
uct. (Some states do not allow the exclusion of incidental or
consequential damages, so the above exclusion may not apply
to you. This includes, but is not limited to, prerecorded
material, whether copyrighted or not copyrighted.)
•damage caused by the use of non-VHS tapes or tapes that
have not been tested and labeled for use in two, four, six and
eight hour VHS recorders.
Wl IERE IS SERVICE AVAILABLE?
Warranty service is available in all countries where the product is
officially distributed by Philips Consumer Electronics Company.
In countries where Philips Consumer Electronics Company does
not distribute the product, the local Philips service organization
will attempt to provide service (although there may be a delay if
the appropriate spare parts and technical manual(s) are not read-
ily available).
MAKE SURE YOU KEI_,P...
Please keep your sales receipt or other do_,ttmcnt showing ptot,l
of purchase. Attach it to this owner's manual and keep both
nearby. Also keep the original box and packing material in case
you need to return your product.
BEFORE REQUESTING SERVICE...
Please check your owner's manual before requesting service.
Adjustments of the controls discussed there may save you a ser-
vice call.
TO GET WARRANTY SERVICE IN U.S.A.,
PUERTO RICO OR U.S. VIRGIN ISLANDS...
Take the product to a Philips factory service center (see enclosed
list) or authorized service center for repair. When the product
has been repaired, you must pick up the unit at the center.
Centers may keep defective parts.
(In U.S.A., Puerto Rico and U.S. Virgin Islands, all implied war-
ranties, including implied warranties of merchantability and fit-
ness for a particular purpose, are limited in duration to the dura-
tion of this express warranty. But, because some states do not
allow limitations on how long an implied warranty may last, this
limitation may not apply to you.)
TO GET WARRANTY SERVICE IN CANADA...
Take the product to a Philips consumer service center (listed
below), self-servicing dealer or authorized service depot.
Philips Electronics Ltd.
601 Milner Avenue, Scarborough, Ontario, M1B 1M8
(416) 292-5161
4977 Levy Street, St. Laurent, Quebec, H4R 2N9
(514) 956-0210
3695 Grandview Highway, Vancouver, B.C., V5M 2G7
(604) 435-4411
(In Canada, this warranty is given in lieu of all other warranties.
No other warranties are expressed or implied, including any
implied warranties of merchantability or fitness for a particular
purpose. Philips is not liable under any circumstances for any
direct, indirect, special, incidental or consequential damages,
howsoever incurred, even if notified of the possibility of such
damages.)
REMEMBER...
Please record the model and serial numbers found on the prod-
uct below. Also, please fill out and mail your warranty registra-
tion card promptly. It will be easier for us to notify you if nec-
essary.
MODEL #
SERIAL #
Philips Service Company 401 East Andrew Johnson Highway
(615) 475-8869
Jefferson City, Tennessee 37760
EI.4962E001 /MAC 4106 /12-94

35
Index
c adapter/charger
diagram ................................... 12
using ......................................... 6
c power cord ................................ 6
ccessories ................................... 36
ccessory mount ............................ 8
udio output jack ................... 10, 26
udio/video cable ......................... 26
.uto focus ..................................... 19
,attery, clock
installing ................................ 15
replacement ............................ 36
_attery, camcorder
charging .................................... 6
charging compartment ............ 12
ejecting ..................................... 8
remaining indication .............. 13
using ......................................... 7
_rightness control ........................ 11
:able, audio/video ........................ 26
:amera
position ..................................... 8
recording .......................... 17, 26
:amera/off/vcr switch .................... 8
:assette
compartment ........................... 12
inserting .................................... 7
removing .................................. 7
types ......................................... 7
-harge light .............................. 6, 12
-harging, battery ............................ 6
:lock
battery ..................................... 15
battery compartment .............. 15
-olor enhancement light
replacement ............................ 36
using ....................................... 28
:late, setting ................................. 16
late/time
button ...................................... 9
displaying ............................... 16
setting ..................................... 16
dc input jack ......................... 10, 27
dc output jack ........................ 12, 27
dew indication .............................. 14
display button .......................... 9, 13
eject button .................................... 8
electronic viewfinder
indications ........................ 13-14
location ..................................... 8
playback ................................. 23
erase protection .............................. 7
EVF
indications ......................... 13- 14
operation ............................. 8, 17
overlays ............................. 13-14
playback ................................. 23
fast forward button ........................ 9
fast forwarding ............................. 17
fade
button ........................................ 9
in/out ..................................... 18
ff button ......................................... 9
focus
auto ......................................... 19
control .................................... 11
manual .................................... 19
switch ....................................... 9
hand strap .................................... 10
h.s. shutter
button ........................................ 9
indication ................................ 13
operation ................................. 22
jacks
audio output ............................ 10
de input ................................... 10
dc output ................................. 12
rf dc output ............................. 10
video output ............................ 10
lens
cap ............................................ 8
hood .......................................... 8
light
mount ........................................ 8
tally ........................................... 8
manual focus ................................ 19
microphone .................................... 8
monitoring recordings ............ 24-25
overlays .................................. 13-14
playback
EVF ........................................ 23
when rerecording .............. 24-25
tv ....................................... 24-25
play/still button .............................. 9
power
light, adapter/charger ............. 12
light, camcorder ....................... 8
supply .............................. 6-7, 27
switch ....................................... 8
zoom button .......................... 10
record
/pause button
button ...................................... 10
tab ............................................. 7
recording ..................................... 18
rerecording ................................... 26
reset button .................................... 9
rewind button ................................ 9
rf dc output jack .......................... 10
search
buttons ...................................... 9
speed ....................................... 23
shoulder strap ............................... 29
shutter speeds ............................... 22
special effects playback ............... 23
specifications ............................... 32
still picture ................................... 23
stop button ..................................... 9
strap
attachment rings ..................... 10
shoulder .................................. 29
hand ........................................ 10
tally light ........................................ 8
tape
counter .................................... 21
counter indication ................... 13
inserting .................................... 7
remaining indication .............. 13
removing .................................. 7
time remaining indication ......21
types ......................................... 7
warnings ................................. 14
time
displaying ............................... 16
setting ................................ 15- 16
tripod mounting hole ................... 11
vcr
rerecording with ..................... 26
video adjustment slide ................. 11
video output jack ......................... 10
vision adjustment ................... 11, 17
warranty ....................................... 33
wind breaker switch .................... 11
zooming ....................................... 20
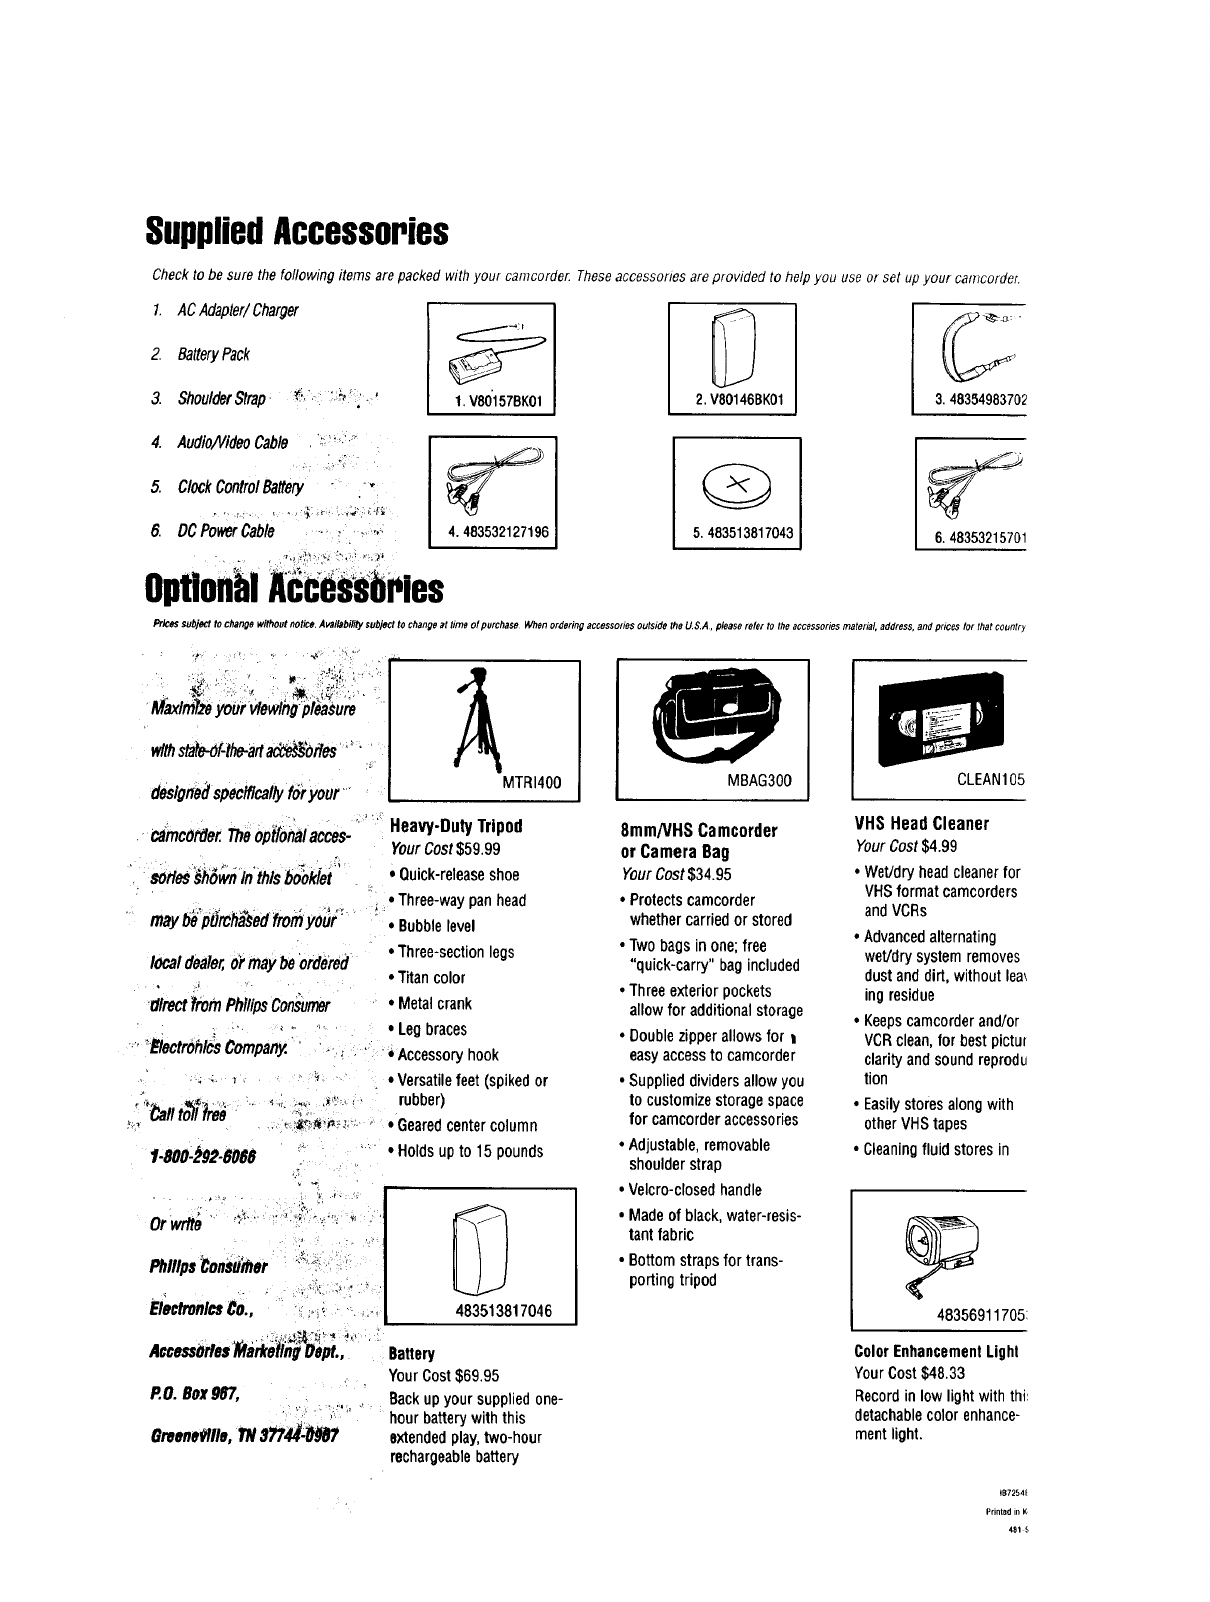
SuppliedAccessories
Check to be sure the following items are packed with your camcorde_ These accessories are provided to help you use or set up your camcordef.
1. ACAdapter/Charger
2, BatteryPack _ _,
3. ShouldefStrap: _' ,: ,__ '-' 1.V80'157BKO1 2.V80146BK01 3.48354983702
4. Audio/VideoCable ,",__i_,,
...... : o;
5. ClockControIBattery "'
6. OCPowerCable .. _ ,_,..: 4.483532127196
Q
5. 483513817043 6.48353215701
Prices subject to change without notice. Availability subject to change a time of purchase When ordering accessories outside the US.A. #lease rote[ to the accessories material, address, and prices for that co,ntr_.
MaxlmTzeyoUrv/ew/hg"pteasure
withs_te-of-the-anad#_'Oites''_"
deslgtledspeclflcaltyforyour "
camcONer.Theoptionalacces-
sOrfes9howninthisbook/et
maybe"pt_rcha_edfromyoui :'"
localdealer,ormaybeordered
•directfromPhl/ipsConsumer
=" ?tlectrohlcs Company.
':' Heavy-Duty Tripod
YourCost $59.99
• Quick-releaseshoe
•Three-way pan head
• Bubblelevel
•Three-sectionlegs
•Titan color
•Metalcrank
• Leg braces
f-OOO-L)92-6066
Orwrtte _ ....... "_; ""'"' " "
' _ ,"-* Accessoryhook
•Versatilefeet(spikedor
rubber)
•Gearedcentercolumn
•Holdsupto 15pounds
electronl_Co., :_,_ ..o 483513817046
8mm/VHSCamcorder
or CameraBag
YourCost$34.95
•Protectscamcorder
whethercarriedorstored
•Twobagsinone;free
"quick-carry"bagincluded
•Threeexteriorpockets
allowfor additionalstorage
•Doublezipperallowsfor
easyaccessto camcorder
• Supplieddividersallowyou
to customizestoragespace
forcamcorderaccessories
• Adjustable,removable
shoulderstrap
•Velcro-closedhandle
•Madeofblack,water-resis-
tantfabric
•Bottomstrapsfor trans-
portingtripod
Accessories_arke_i_ept.,
P.O.Box_67,
_reene_lle, TN3774_-0tj_7
Battery
YourCost$69.95
Backupyour suppliedone-
hourbatterywiththis
extendedplay.two-hour
rechargeablebattery
CLEAN105
VHS Head Cleaner
YourCost$4.99
•Wet/dryheadcleanerfor
VHSformat camcorders
andVCRs
• Advancedalternating
wet/drysystemremoves
dustanddirt,withoutleax
ing residue
• Keepscamcorderand/or
VCRclean,for bestpictu_
clarityandsoundreprodu
tion
• Easilystoresalongwith
otherVHStapes
• Cleaningfluid storesin
48356911705:
ColorEnhancementLight
YourCost$48.33
Recordinlowlightwiththi:
detachablecolorenhance-
mentlight.
_B7254[
Printed in K
491 5

QUALITY SERVICEIS AS CLOSEAS YOUR TELEPHONE!SIMPLY LOOKOVERTHELIST BELOW FOR THE NUMBER OF A FACTORYSERVICE CENTER
NEAR YOU. WHEN YOU CALL, ASERVICEREPRESENTATIVEWILL GLADLYDIRECTYOU TO ONE OF OVER 1100 DROP-OFF SITES LOCATEDNATIONWIDE.
YOURPRODUCTWILL RECEIVEEFFICIENTAND EXPEDIENTCARRY-IN, MAIL-IN, OR IN-HOME SERVICE, AND YOU WILL RECEIVEPEACEOF MIND,
KNOWING YOUR PRODUCTIS BEINGGIVENTHEEXPERTA'rIENTION OF PHILIPS' FACTORY SERVICE. AND, IF THE PHONENUMBER LISTEDFOR YOURAREA
IS LONG DISTANCE,CALL1-800-242-9225 FOR FACTORYSERVICE.
COMMENTOBTENIRNOTRESERVICEAPR_SVENTERAPIDEEl"EFFICACESOITPARCOURRIER,J_DOMICILE,OUENSEPR_SENTANTAUNCENTREDESERVICEPHILIPS.PLUSDE600CENTRESDE
R_CEPTIONDEPnODUITSAR_:PARERATRAVERSLEPAYS:CONTACTERLECENTREDESERVICEAOXCONSOMMATEORSLEPLUSPROCHEPOURSAVOIRL'EMPLACEMENTDECESDr:POTSDANS
UNRAYONDE50A75MILES(80KMA120KM)DUCENTREDESERVICELOCAL.
C_MOOBTENERUNSERVICIOOPORTUNOY EFICIENTEPORCORREO,ENCASA0 ENPERSONAPARASUPRODUCTOATRAVI_SDEUNCENTROPHILIPSDESERVICIO.MASDE600SITIOSPOR
TODOELPAlSPARALARECEPCIONDEPRODUCTOSNECESlTADOSDEREPARACIONES:COMUNICARSECONELCENTRODESERVICIODEFABRICAMASCERCANOPARAESTOSLUGARESDENTRO
DEONRADIODE80A120KM(50A75 MILLAS)DELCENTRODESERVICIOLOCAL.
Atlanta-Athens-
Macon-Chattanooga,TN-
NorthGeorgiaArea
1898 LelandDrive
Marietta, GA 30067
(404) 952-3279
Over 100drop-off locations.
Boston-SouthernMaine-
SouthernNew HampshireArea
1 NorthAvenue
Burlington, MA 01803
(617) 272-4825
Over 60 drop-off locations.
Charlotte-WinstonSalem-
Greensboro-ChapelHill-
Raleigh-Spartanburg,SCArea
520-G Clanton Road
Charlotte,NC 28217
(704) 529-6330
Over25 drop-off locations.
Chicago-Milwaukee-
GaryArea
1360 W. Hamilton Parkway
Itasca, IL 60143
(708) 775-0990
Over80 drop-off locations.
Cleveland-Akron-
YoungstownArea
24090 Detroit Road
Westlake, OH 44145
(216) 899-2040
Over65 drop-off/ocations.
Columbus-Dayton-
CincinnatiArea
5164 BlazerParkway
Dublin, Ohio 43017
(614) 792-1495
Over 19drop-off locations.
Connecticut-RhodeIsland-
Springfield,MA Area
1294 Blue Hills Avenue
Bloomfield, CT06002
(203) 726-9612
Over45 drop-off locations.
Dallas-Ft. WorthArea
1901 N. Glenville Drive
Richardson,TX 75081
(214) 690-8440
Over25 drop-off locations.
Detroit/ToledoArea
25173 Dequindre
Madison Heights, MI 48071
(810) 544-2110
Over30 drop-off locations.
Knoxville-Greeneville-
Tri Cities-EastTennesseeArea
6700 D. Papermill Road
Papermill Plaza
Knoxville, TN37919
(615) 584-6614
Over 7drop-off locations.
Ft. Myers-Naples-
SouthwestFloridaArea
11601 ClevelandAve., Suite 15
Ft. Myers, FL 33907
(813) 278-4242
Over 30 drop-off locations.
Houston-Galveston-
Beaumont-Austin-
San AntonioArea
1110NorthPostOakRoad
Suite100
Houston,TX 77055
(713)682-3990
Over 40 drop-off locations.
LosAngeles-San DiegoArea
2910 E. LaPalma,Suite E
Anaheim,CA 92806
(714) 238-7250
Over70 drop-off locations.
Miami-SoutheastFloridaArea
2099W. Atlantic Blvd.
Pompano Beach,FL 33069
(305) 978-0467
Over45 drop-off locations.
NorthNJ-Staten Island-
RocklandCounty,NY Area
140JCornmerce Way
Totowa, NJ 07512
(201) 890-7200
Over50 drop-off locations.
NewYorkMetro Area
116 Charlotte Avenue
Hicksville, NY 11801
(516) 933-1780 NassauCounty
Over40 drop-off locations.
Orlando-Jacksonville--North
Florida-SoutheastGeorgiaArea
2452Sand Lake Road
Orlando,FL 32809
(407) 857-8998
Over 30 drop-off locations.
Philadelphia/Lancaster/
S. NewJerseyArea
352 Dunks FerryRoad
Bensalem,PA 19020
(215) 638-7500
Over35 drop-off locations.
Phoenix-Scottsdale-
Mesa-TempeArea
5032 S. Ash Avenue,Ste.101
Tempe,AZ 85282
(602) 897-7358
Over20 drop-off locations.
Pittsburgh,PA-Steubenville,OH-
Wheeling/Morgantown,WV Area
2891 BanksvilleRoad
Pittsburgh, PA15216
(412) 563-8020
Over 11 drop-off locations.
Rockford-Kenosha-
Beloit-MadisonArea
5602 N. Second
Loves Park,IL 61111
(815) 654-7343
Over5 drop-off locations.
San Francisco-Oakland-
San JoseArea
3370 Montgomery Drive
Santa Clara,CA95054
(408) 492-9013
Over 30 drop-off locations.
Seattle-Tacoma/OlympiaArea
1055 Andover Park East
Tukwila,WA 98188
(206) 575-6288
Over20 drop-off locations.
Tampa-St.Petersburg-
SarasotaArea
CenterPoint BusinessPark,
Building B-l, Suite 100
1911 U.S. Hwy.301 North
Tampa,FL 33619
(813) 621-8181
Over 75drop-off locations.
Washington,DC-BalUmore-
Richmond,VA Area
6671-J Santa BarbaraRoad
Elkridge,MD 21227
(410) 796-0105
Over 55 drop-off locations.
HOW YOU CAN OBTAIN EFFICIENTAND EXPEDIENT CARRY-IN, MAIL-IN, OR IN-HOME SERVICEIN CANADA FOR YOUR PRODUCTTHROUGH A PHILIPS CONSUMER SERVICECENTER
COMMENT OBTENIR NOTRESERVICEAPRIESVENTE RAPIDE ETEFFICACESOIT PAR COURRIER, ADOMICILE, OU ENSE PRI_SENTANTAUN CENTREDESERVICEPHILIPS
;OMO OBTENERUN SERVICIO OPORTUNOY EFICIENTEPORCORREO,EN CASA0 ENPERSONA ENEL CANADAPARA SU PRODUCTOA TRAV(:SDE UN CENTRO PHILIPSDE SERVICIOAL CONSUMIDOR
TORONTO
601 Milner Avenue
Scarborough, Ontario
M1B 1M8
(416) 754-6064 (Tel.)
(416) 292-5161 (Tel.)
(416) 754-6290 (Fax)
MONTREAL
4977 Levy Street
St. Laurent, Quebec
H4R 2N9
(514) 956-0120 (Tel.)
(514) 956-0828 (Fax)
VANCOUVER
1741 BoundaryRoad
Vancouver,B.C.
V5M 3Y7
(604) 294-3441 (Tel.)
(604) 294-3574 (Fax)
MAC2929 2/95

Philips Consumer Electronics Company
Factory Service Center Locations
See Reverse Side for More Details.
San Franclsco/Metro Area
Diego
/
• Phoenix/Metro Area
Detroit/Toledo
Rockford • Cleveland/N Ohlo
f•
Milwaukee Columbus/D_on/Cincinnati
Charlotte
.\/
Atlanta/N Georgia
Dallas/Ft. Worth •Orlando/N Florlda/SE Georgia
Beaumont/Austin Tampa/W Florida
tFt. Myers/SW Florida
San Antonio -"_Miaml/SE Florida
Over 1100 Drop-Off Sites Nationwide
•Boston/S Maine/
i.J
=rtford/Rhode Island
York/Metro
New Jersey
• p_hlladelphla/S New Jersey
]h/W_t _rp_.
ngton/Baltimore/Richmond
NOTE:If you reside inone of our Philips Factory Service Branch areas (see directory onback), you can contact the nearest Service Branch to obtain
efficient and expedient repair for your product. If your product is In-Warranty, you should have proof-of-purchase to ensure No Charge Service.
For Out-of-Warranty service, call the location nearest you.
NOTA:Si vousr_sidezdansunedesrdgionsdesserviesparunesuccursaledeserviceapr_sventedufabricantPhilips(voir listeci-dessous),vous
pourrezcontacterlabranchedeserviceapr_sventela pluspr_,sdechezvouspourobtenirunserviceapr_sventerapideetefficace.Si leproduitest
sousgarantie,ilsuffirade presenterunepreuved'achatpourb_n_ficierd'unservicesansfrais. Pourlesproduitsnoncouvertsparla garantie,
contactezlecentrele plusprosdechezvous.
NOTA:Si Ud.resideen unadenuestraszonasparasucursalesPhilipsdeservicioaldefdbrica(verdirectoriorodsabajo),Ud.puedecomunicarsecon
lasucursaldeserviciomdscercanaparaobtenerunareparaci6noportunay eficazdesu producto. Si su productoestdtodav[abajogarant[a,Ud.debe
presentarcomprobantedecompraparanoocasionarningunoscargospot servioio. Paraserviciodespu_sdelvencimientodela garantia,Ilameal
lugarrodscercanodelos abajoindicados.
Vanco
MAC2929 2/95
EL4482-3 Rev. K
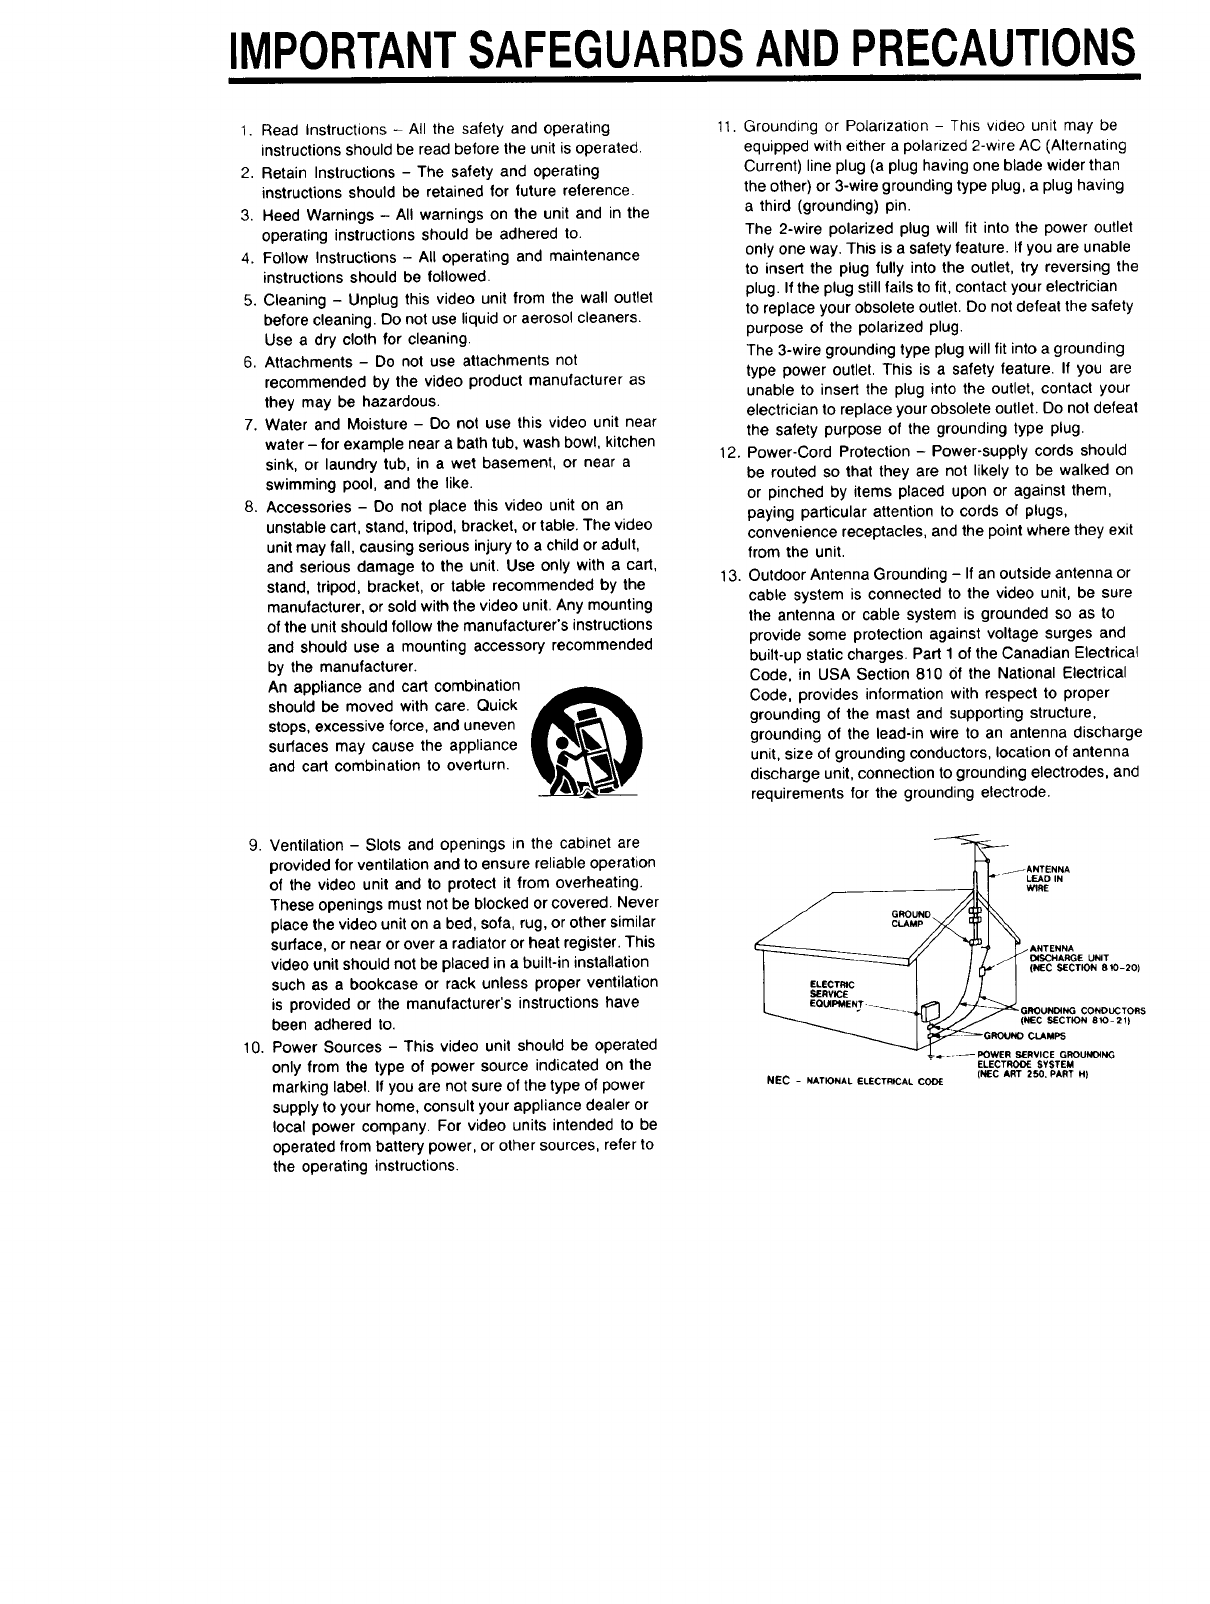
IMPORTANTSAFEGUARDSANDPRECAUTIONS
1. Read Instructions - All the safety and operating
instructions should be read before the unit is operated.
2. Retain Instructions - The safety and operating
instructions should be retained for future reference.
3. Heed Warnings - All warnings on the unit and in the
operating instructions should be adhered to.
4. Follow Instructions - All operating and maintenance
instructions should be followed.
5. Cleaning - Unplug this video unit from the wall outlet
before cleaning. Do not use liquid or aerosol cleaners.
Use a dry cloth for cleaning.
6. Attachments - Do not use attachments not
recommended by the video product manufacturer as
they may be hazardous.
7. Water and Moisture - Do not use this video unit near
water - for example near a bath tub, wash bowl, kitchen
sink, or laundry tub, in a wet basement, or near a
swimming pool, and the like.
8. Accessories - Do not place this video unit on an
unstable cart, stand, tripod, bracket, or table. The video
unit may fall, causing serious injury to a child or adult,
and serious damage to the unit. Use only with a cart,
stand, tripod, bracket, or table recommended by the
manufacturer, or sold with the video unit. Any mounting
of the unit should follow the manufacturer's instructions
and should use a mounting accessory recommended
by the manufacturer.
An appliance and cart combination
should be moved with care. Quick
stops, excessive force, and uneven
surfaces may cause the appliance
and cart combination to overturn.
11. Grounding or Polarization -This video unit may be
equipped with either a polarized 2-wire AC (Alternating
Current) line plug (a plug having one blade wider than
the other) or 3-wire grounding type plug, a plug having
a third (grounding) pin.
The 2-wire polarized plug will fit into the power outlet
only one way. This is a safety feature. If you are unable
to insert the plug fully into the outlet, try reversing the
plug. If the plug still fails to fit, contact your electrician
to replace your obsolete outlet. Do not defeat the safety
purpose of the polarized plug.
The 3-wire grounding type plug will fit into a grounding
type power outlet. This is a safety feature. If you are
unable to insert the plug into the outlet, contact your
electrician to replace your obsolete outlet. Do not defeat
the safety purpose of the grounding type plug.
12. Power-Cord Protection - Power-supply cords should
be routed so that they are not likely to be walked on
or pinched by items placed upon or against them,
paying particular attention to cords of plugs,
convenience receptacles, and the point where they exit
from the unit.
13. Outdoor Antenna Grounding - If an outside antenna or
cable system is connected to the video unit, be sure
the antenna or cable system is grounded so as to
provide some protection against voltage surges and
built-up static charges. Part 1 of the Canadian Electrical
Code, in USA Section 810 Of the National Electrical
Code, provides information with respect to proper
grounding of the mast and supporting structure,
grounding of the lead-in wire to an antenna discharge
unit, size of grounding conductors, location of antenna
discharge unit, connection to grounding electrodes, and
requirements for the grounding electrode.
9. Ventilation - Slots and openings in the cabinet are
provided for ventilation and to ensure reliable operation
of the video unit and to protect it from overheating.
These openings must not be blocked or covered. Never
place the video unit on a bed, sofa, rug, or other similar
surface, or near or over a radiator or heat register. This
video unit should not be placed in a built-in installation
such as a bookcase or rack unless proper ventilation
is provided or the manufacturer's instructions have
been adhered to.
10. Power Sources - This video unit should be operated
only from the type of power source indicated on the
marking label. If you are not sure of the type of power
supply to your home, consult your appliance dealer or
local power company. For video units intended to be
operated from battery power, or other sources, refer to
the operating instructions.
_A__ NTENNAIN
GROUND
ANTENNA
DISCHARGE UNIT
(NEC SECTION 8!0-20)
C SECTION 810-21)
_=--GROUNO CLAMPS
-- --POWER SERVICE GROUNO#NG
ELECTROOE SYSTEM
NEC -NATIONAL ELECTRICAL CODE (NEC ART 250. PART H)

IMPORTANTSAFEGUARDSANDPRECAUTIONS
I
14. Lightning For added, protection ol this video unit
receiver during a lightning storm, or when it is left
unattended and unused for long periods of time, unplug
it from the wall outlet and disconnect the antenna or
cable system. This will prevent damage to the video
unit due to lightning and power-line surges.
15. Power Lines - An oufside antenna system should not
be located in the vicinity of overhead power lines or
other electric light or power circuits, or where it can fall
into such power lines or circuits. When installing an
outside antenna system, extreme care should be taken
to keep from touching such power lines or circuits as
contact with them might be fatal.
16. Overloading - Do not overload wall outlets and
extension cords as this can result in a risk of fire or
electric shock,
17. Objects and Liquids - Never push objects of any kind
into this video unit through openings as they may touch
dangerous voltage points or short out. parts that could
result in a fire or electric shock. Never spill liquid of any
kind onto the video unit.
18. Servicing - Do not attempt to service this video unit
yourself as opening or removing covers may expose
you to dangerous voltage or other hazards. Refer all
servicing to qualified service personnel.
19.
20.
21.
Damage Requiring Service - Unplug this video unit
from the wall outlet and refer servicing to qualified
service personnel under the following conditions:
a. When the power-supply cord or plug is damaged.
b. If any liquid has been spilled onto, or objects have
fallen into the video unit.
c. If the video unit has been exposed to rain or water.
d If the video unit does not operate normally by
following the operating instructions. Adjust only
those controls that are covered by the operating
instructions as an improper adjustment of other
controls may result in damage and will often require
extensive work by a qualified technician to restore
the video unit to its normal operation.
e. If the video unit has been dropped or the cabinet
has been damaged.
f. When the video unit exhibits a distinct change in
performance - this indicates a need for service.
Replacement Parts - When replacement parts are
required, be sure the service technician has used
replacement parts specified by the manufacturer or
have the same characteristics as the original part.
Unauthorized substitutions may result in fire, electric
shock or other hazards.
Safety Check - Upon completion of any service or
repairs to this video unit, ask the service technician to
perform safety checks to determine that the video unit
is in safe operating order.
PRECAUTIONS
USE & LOCATION
•TO AVOID SHOCK HAZARD Your Camcorder and power supply should not be exposed to rain or moisture. Do not
connect the power supply or operate your Camcorder if it gets wet. Your Camcorder has been designed for outdoor use in
all kinds of weather, however it will probably not survive any type of direct exposure to water, rain, sleet, snow, or a direct
splashing from a pool or even a cup of coffee. Do not attempt to disassemble this unit. There are no user serviceable parts
reside. Unplug your Camcorder from the power supply before cleaning.
•DO NOT AIM YOUR CAMCORDER AT THE SUN OR OTHER BRIGHT OBJECTS
•DO NOT EXPOSE YOUR CAMCORDER TO EXTENDED HIGH TEMPERATURE ... Such as, in direct sunlight, inside a
closed car, next to heater, etc.. This action could permanently damage the internal parts of your Camcorder.
•AVOID SUDDEN CHANGES IN TEMPERATURE .. If the unit is suddenly moved from a cold place to a warm place, moisture
may form on the tape and reside the unit.
• DO NOT LEAVE YOUR CAMCORDER OR THE POWER SUPPLY TURNED ON WHEN NOT IN USE
• STORAGE OF YOUR CAMCORDER Store and handle your Camcorder in a manner that will not subject it to unnecessary
movement (avoid shaking and striking). Your Camcorder contains a sensitive pick-up device which could be damaged by
_mproper handling or storage
CARE
• TO CLEAN YOUR CAMCORDER Do not use strong or abrasive detergents when cleaning your Camcorder body.
•TO PROTECT THE LEN_.. O0 nor {ouch f_le surf'ace of'(Re (ens wl(_ your Rand. Use a commerc_a(camcorofer (ens so/u{ion
and paper when cleaning the lens Improper cleaning can scratch the lens coating
• TO PROTECT THE FINISH OF YOUR CAMCORDER .. Before handling your Camcorder. make sure your hands and face
are free from any chemical products such as suntan lotion as it may damage the finish
