Magnavox 27Tp83 C101 Users Manual
MAGNAVOX Direct View Digital 27 to 40 TV Manual 97110024 MAGNAVOX Direct View Digital 27 to 40 TV Owner's Manual, MAGNAVOX Direct View Digital 27 to 40 TV installation guides
27TP83 C101 to the manual 54682811-885a-4bc5-a518-c7e237b33cc4
2015-01-05
: Magnavox Magnavox-27Tp83-C101-Users-Manual-166546 magnavox-27tp83-c101-users-manual-166546 magnavox pdf
Open the PDF directly: View PDF ![]() .
.
Page Count: 40
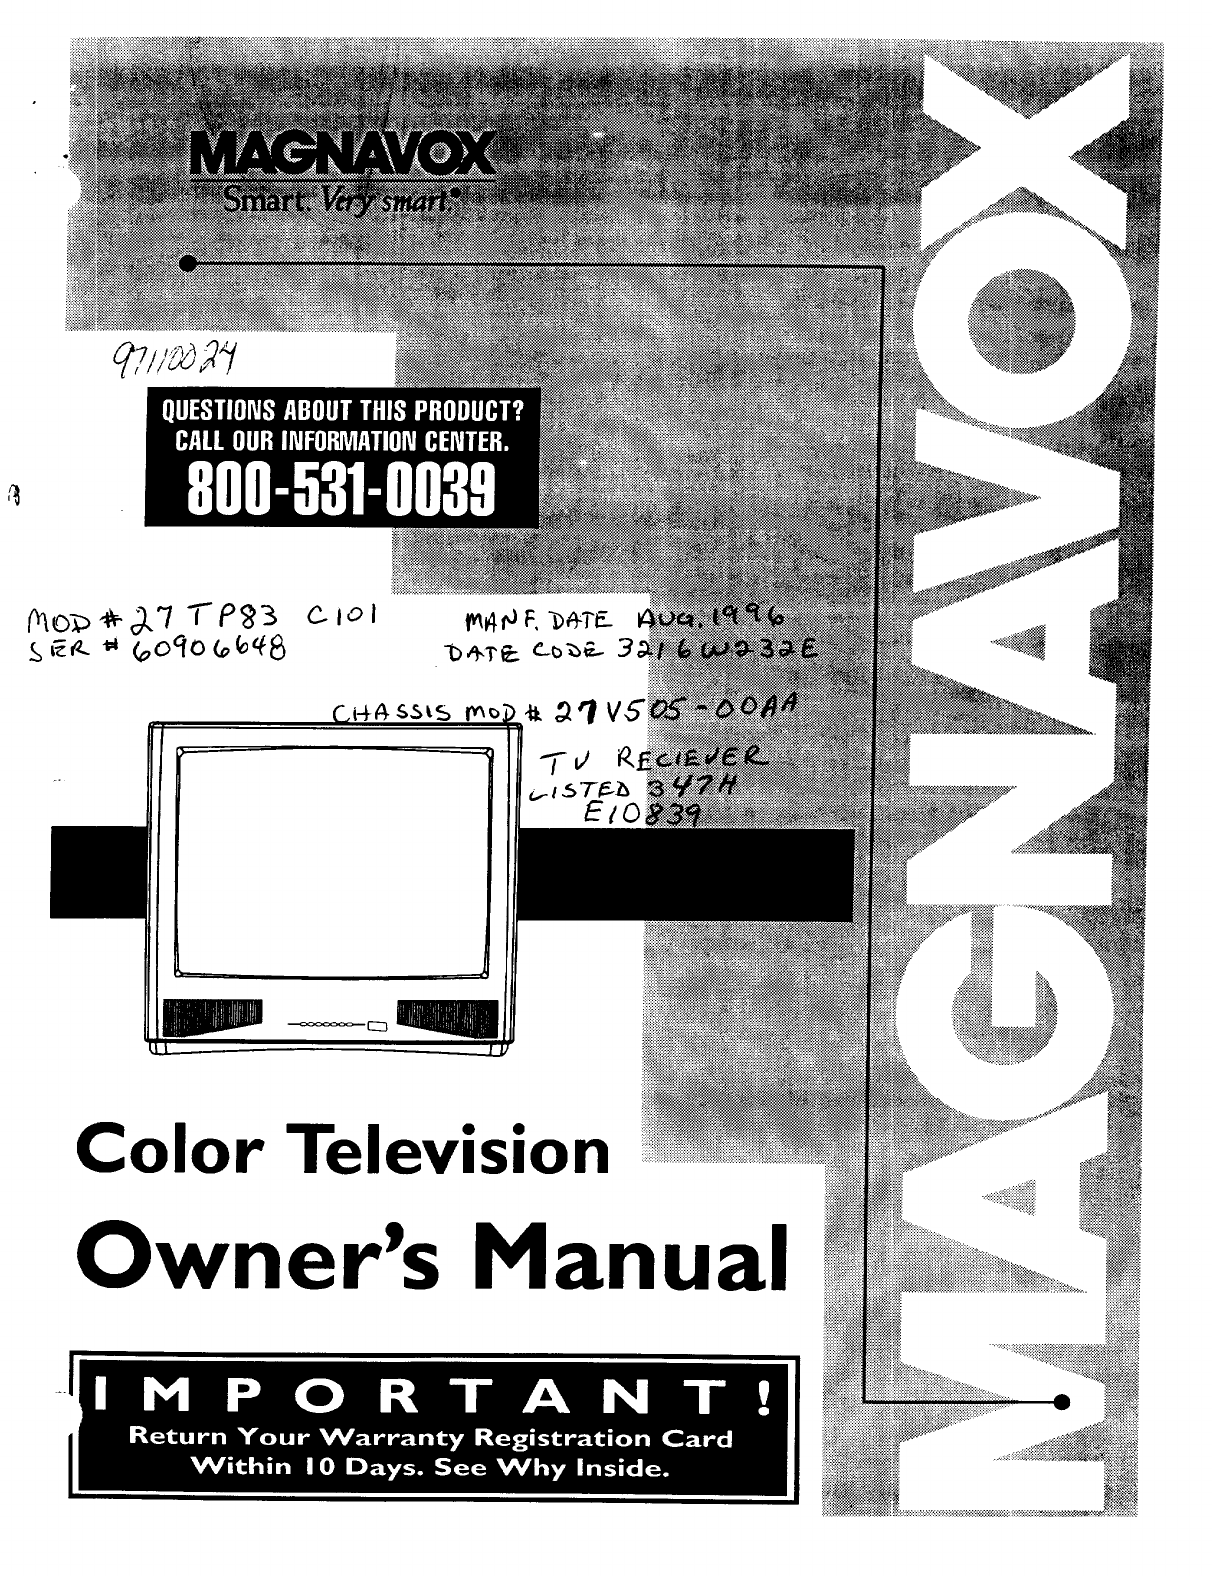
Color Television
Owner's Manual
Once your MAGNA VOX purchase is registered, you're eligible to receive all the privileges of owning a MAGNA VOX
product. So complete and return the Warranty Registration Card enclosed with your purchase at once. And take
advantage of these important benefits.
,_Warranty!
Verification
Registering your product within
I 0 days confirms your right to
maximum protection under the
terms and conditions of your
MAGNAVOX warranty.
.Ownerl
Confirmation
Your completed Warranty
Registration Card serves as
verification of ownership in the
event of product theft or loss.
.Model!
Registration
Returning your Warranty Registration
Card right away guarantees you'll
receive all the information and special
offers which you qualifyfor asthe
owner of your model.
Cong tu,ationson purch--, MAGNAVOX
welcome to the "family!"
Dear MAGNAVOX product owner: Smart. Very smart®
Thank you for your confidencein MAGNAVOX. You've selected one of the best-built,best-backed products
availabletoday. And we'll do everythingin our power to keep you happywith your purchase for many years to come.
As a member of the MAGNAVOX "family," you're entitled to protection by one of the most comprehensive warrantiesand outstanding
servicenetworks inthe industry.
'What's more, your purchaseguaranteesyou'll receive allthe informationand special offers for which you qualify,pluseasyaccessto
;accessoriesfrom our convenient home shopping network.
,And most importandy you cancount on our uncompromisingcommitment to your total satisfaction.
All of this isour way of sayingwelcome-and thanks for investing in a MAGNAVOX product_
Sincerely,
__ P.S. Remember, to get the most from your
MAGNAVOX product, you must return your
Robert Minkhorst Warranty Registration Card within 10 days.
President and Chief Executive Officer So please mail it to us right now!
For Customer Use
Enter below the Serial No. which is located on the rear of the cabinet. Retain this information for future reference.
Model No. Serial No.
Know these
safetysymbols
A This "bolt of lightning" indicates uninsulated material within your unit may cause an electrical shock.
For the safety of everyone in your household, please do not remove product covering.
_k, The "exclamation point" calls attention to features for which you should read the enclosed literatur_
closely to prevent operating and maintenance problems.
WARNING: TO PREVENT FIRE 01_ SIdOCK HAZARD, DO NOT EXPOSE THIS EQUIPMENT TO RAIN
OR MOISTURE.
CAUTION: To prevent electric shock, match wide blade of plug to wide slot, and fully insert.
ATTENTION: Pour eviter les chocs electriques, introduire la lame la plus large de la fiche dans la borne
correspondante de la prise et pousser iusqu'au fond.
SAFETYINSTRUCTIONS- Read before operating equipment
Thisproductwasdesignedandmanufacturedto meetstrictqualityand
_fetystandards.Thereare,however,someinstallationandoperation
ecautionswhichyoushouldbeparticularlyawareof.
1. Read Instructions- All the safetyand operatinginstructionsshould
be readbeforetheapplianceis operated.
2. Retain Instructions- The safetyand operatinginstructionsshould
be retainedfor future reference.
3. HeedWarnings - All warningsontheapplianceand inthe operating
instructionsshouldbeadheredto.
4. Follow Instructions- All operatingand use instructionsshould be
followed.
5. 'Water and Moisture - Theapplianceshouldnot be used nearwater
- for example,neara bathtub,washbowl,kitchensink,laundrytub,
in a wet basementor neara swimmingpool,etc.
6. Cartsand Stands- The applianceshouldbe usedonly witha cart or
stand that is recommendedbythe manufacturer.
6A. ,_ An appliance and cart combination should be moved
with care. Quick stops, excessive force, and uneven
surfacesmay causetheapplianceand cart combination
to overturn.
7. Wall or Ceiling Mounting- The applianceshouldbe mountedto a
wallor ceilingonlyas recommendedbythe manufacturer.
8. Ventilation- The applianceshouldbe situatedso thatits locationor
position does not interferewith its properventilation.For example,
the applianceshouldnot be situatedon a bed, sofa,rug, or similar
surface that may block the ventilationopenings; or, placed in a
built-in installation,such as a bookcaseor cabinetthat may impede
theflow of air throughthe ventilationopenings.
9. Heal - The applianceshould be situatedaway from hear sources
such as radiators, heat registers, stoves, or other appliances
(includingamplifiers)that produce heat.
10. Power Sources - The applianceshould be connectedto a power
.... supply onlyof thetype describedinthe operatinginstructionsor as
marked onthe appliance.
•,. Power-Cord Protection - Powersupplycordsshouldbe routed so
that they are not likelyto be walkedonor pinchedby items placed
upon or against them, paying particular attention to cords and
plugs, conveniencereceptacles,andthe pointwhere they exitfrom
the appliance.
12. Cleaning- The applianceshould be cleanedonly as recommended
bythe manufacturer.
13. Power Lines - An outdoor antenna should be locatedaway from
powerlines.
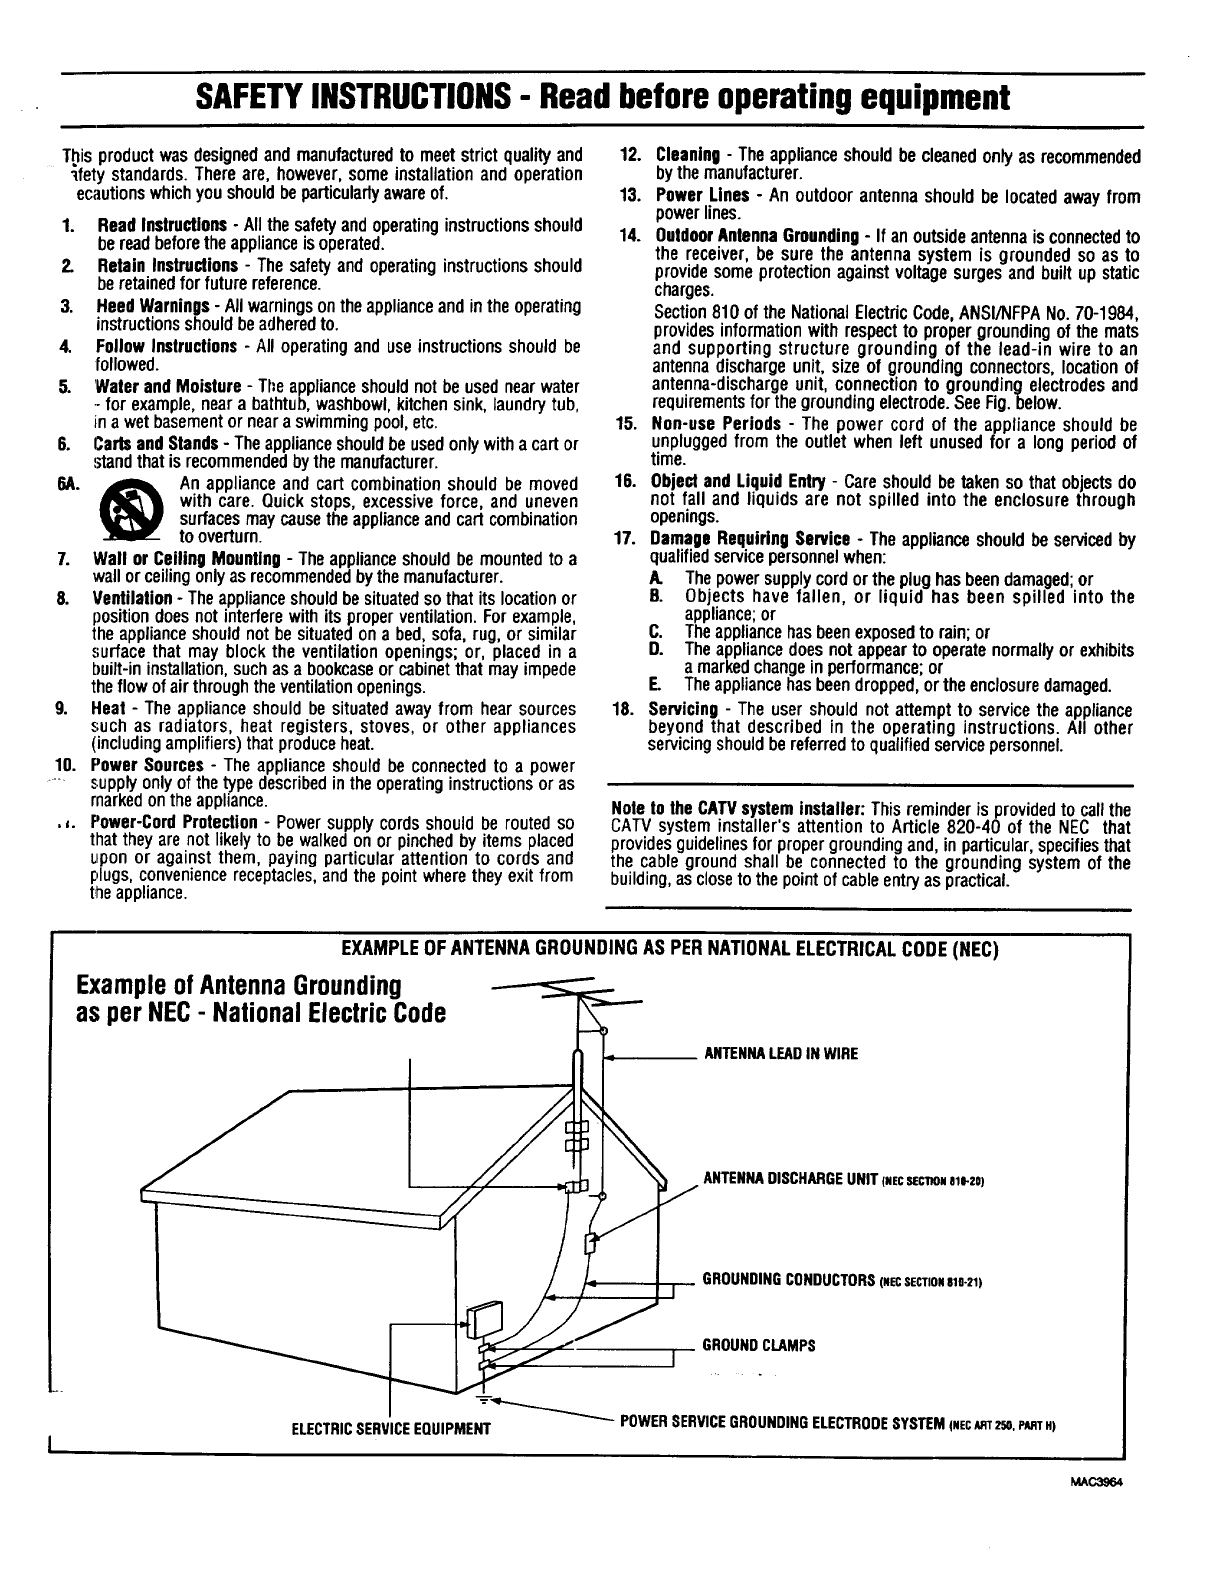
14. OutdoorAntennaGrounding- If an outsideantennais connectedto
the receiver, be sure the antenna system is grounded so as to
providesomeprotectionagainstvoltagesurgesand built up static
charges.
Section 810 of the National ElectricCode,ANSI/NFPANo. 70-1984,
providesinformationwith respectto proper groundingof the mats
and supporting structure grounding of the lead-in wire to an
antenna dischargeunit, size of grounding connectors,locationof
antenna-dischargeunit, connection to grounding electrodesand
requirementsfor the groundingelectrode.See Fig.below.
15. Non-use Periods - The power cord of the appliance should be
unpluggedfrom the outlet when left unused for a longperiod of
time.
16. Object and Liquid Entry - Care should be taken so that objectsdo
not fall and liquids are not spilled into the enclosure through
openings.
17. Damage RequiringService - The applianceshould be servicedby
qualifiedservicepersonnelwhen:
A. The power supplycordor the plughasbeendamaged;or
B. Objects have fallen, or liquid has been spilled into the
appliance;or
C. Theappliancehasbeenexposedto rain;or
D. The appliancedoes not appearto operatenormallyor exhibits
a markedchangein performance;or
F_ Theappliancehas beendropped,orthe enclosuredamaged.
18. Servicing - The user should not attempt to service the appliance
beyond that described in the operating instructions. All other
servicingshouldbe referredto qualifiedservicepersonnel.
Noteto the CATVsystem installer: This reminderis providedto callthe
CATV system installer's attention to Article 820-40 of the NEC that
providesguidelinesfor propergroundingand, in particular,specifiesthat
the cable ground shall be connectedto the grounding system of the
building, as closeto thepoint of cableentryas practical.
EXAMPLEOFANTENNAGROUNDINGAS PERNATIONALELECTRICALCODE(NEC)
ExampleofAntennaGrounding
asper NEC- NationalElectricCode
ANTENNALEADINWIRE
ANTENNADISCHARGEUNIT(NECSEC_ONale-20)
GROUNDINGCONDUCTORS(NECSECTIONS10-21)
J GROUNDCLAMPS
.-'-_-_r-.__.__ POWERSERVICEGROUNDINGELECTRODESYSTEMINECART250,PARTH)
ELECTRICSERVICEEQUIPMENT
MAC3964
Welcome/Registration of Your TV ............................ 2
fety/Precautions ..................................................... 3
l'able of Contents ....................................................... 4
Features ...................................................................... 4
On-Screen (MENU) Features
_,Setting the TV for Cable TV Operation .............. 5
_,Adding Channels in Memory (Automatically)...6
_,Adding Channels in Memory (Manually) ........... 7
<_How to Set the TV for Closed Captioning ......... 8
,ffSetting the TV for Stereo Programs .................... 9
ffUsing the Sound Image Control ........................ 10
<_Using the TV Volume Bar Control ................... 10
_Setting the Surf/Smart Surf Control .................. 11
_,Adjusting the TV Picture .................................. 12
<_Adjusting the Set Clock Control ....................... 13
Adjusting the Set Timer/Timer ON/OFF .......... 14
ffSetting the TV Sleep Timer Control ................. 15
C-Using the TV Channel Reminder ...................... 16
_,Using the On-Screen Language Option ..............
ffUsing the Audio Out Jacks (with TV Speaker
On/Off Control) ................................................ 17
*Using the TV's Audio/Video Input Jacks .... 18-19
Remote Control Oneration
Using the Remote l.x_catorFeature ....... 20-21
Using: the Smart Picture Control .............................. 22
Using: the Smart Sound Control ............................... 23
Setting the TV Remote to Work VCRs .............. 24-25
Setting the TV Remote to Work
Cable TV Converters .......................................... 26-27
Setting the TV Remote to Work VCRs or Cable
Conwmers - Search Method .................................... 28
Using the Remote's VCR Buttons ............................ 29
Picture-in-Pictore (PIP)
Using:the PIP Feature (Connections) ................. 30-31
Using:PIP with the TV Remote ............................... 32
Selecting the PIP Picture Source ............................. 33
More PIP Connections (Cable Converter) ............... 34
MGeneral Information
Tips if Something Isn't Working ............................. 35
Glossary of TV Terms ............................................. 36
ex ........................................................................ 36
- ,_ctory Service Locations .................................. 37-38
Warranty .................................................................. 39
Accessories .............................................................. 40
Use the simple Set-Up Guide (supplied with
your TV information packet) for details on:
•Antenna Hook-ups
•First Time Set-Up
(Automatic Settings)
•Basic TV and Remote
Control Operation
___ _ _.-_-_
° On-Screen Menu Use
Infrared Remote Control works your TV set and a
variety of wireless remote control VCRs and Cable
Converters. A special "Locator" feature can also help
you find the remote when it has been stuck out of
sight or misplaced.
Standard broadcast (VHF/UHF) or Cable TV
(CATV) channel capability.
Stereo Ready TV with built-in audio amplifier and
twin speaker system for receiving TV programs
broadcast in stereo sound.
Picture-In-Picture feature can show a TV program
and the direct video output from an accessory (VCR,
etc.) on the TV screen at the same time.
Closed Captioning allows the viewer to read TV
program dialogue or voice conversations as on-screen
text.
Automatic Programming of Channels for quick
and easy selection of faw_rite stations available in
your area.
On-Screen Features (in either English, French, or
Spanish) show helpful messages for setting of TV
controls.
Audio/Video Jackpanel for direct connections with
VCRs (or other video accessories) providing quality
TV picture and sound playback.
Smart Button for the control of TV Sound and
Picture levels. Use the Smart Button on the remote to
quickly adjust Smart Sound (to keep volume levels
consistent during program changes or commercial
breaks); Smart Picture (for automatic picture
adjustments on a variety of program sources); and
Smart Surf (for quick one button channel selection of
up to 10 of your favorite channels).
Sleep-Timer automatically turns the TV OFF at
preset times.
Clock Timer feature can turn ON the TV at any
preset time - just like an alarm clock.
Coovri_ht © 1996 Philinx Con,_.mer l_lectronie_: ("omn_nv All rlahtc r_:,_.-.,._d
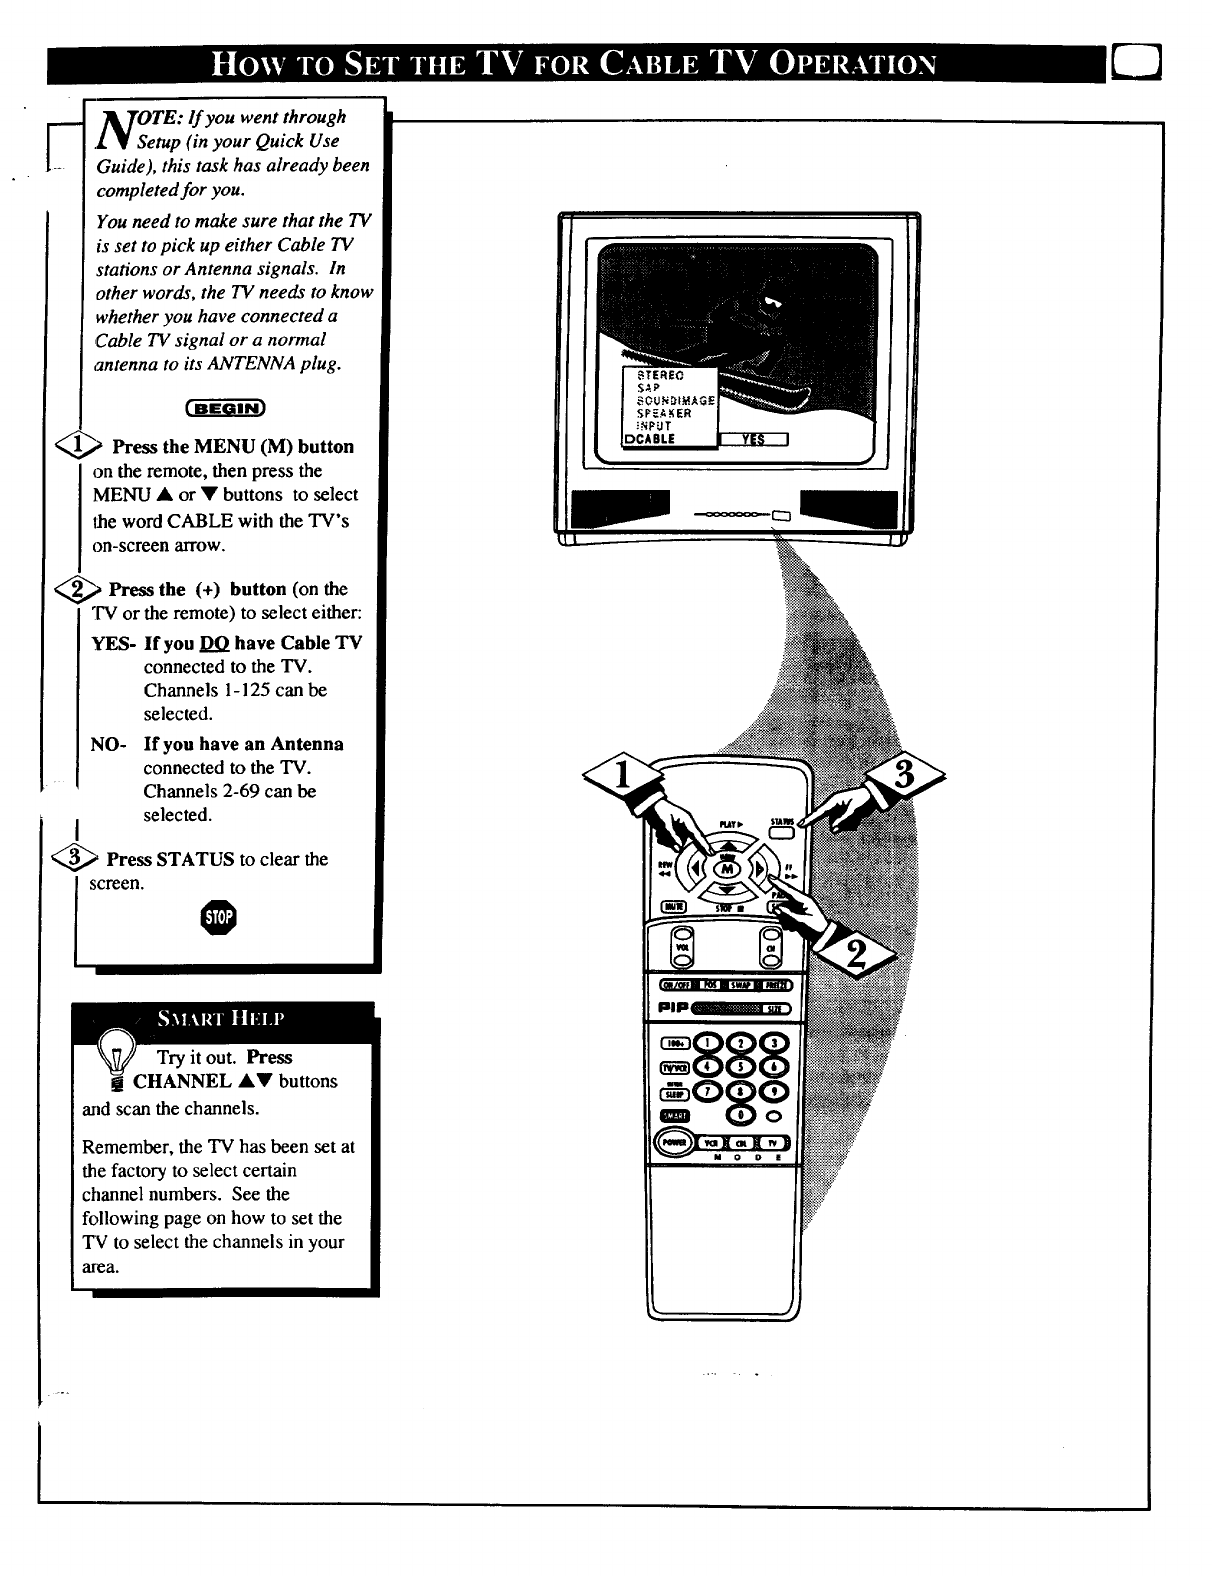
]_k]rOTE: lf you went through
.L • Setup (in your Quick Use
Guide), this task has already been
completed for you.
You need to make sure that the TV
is set to pick up either Cable TV
stations or Antenna signals. In
other words, the TV needs to know
whether you have connected a
Cable TV signal or a normal
antenna to its ANTENNA plug.
Press the MENU (M) button
on the remote, then press the
MENU • or • buttons to select
the word CABLE with the TV's
on-screen arrow.
_,_ Press the button the
(+) (on
"IV or the remote) to select either:
YES- If you DO have Cable TV
connected to the TV.
Channels 1-125 can be
selected.
NO- If you have an Antenna
connected to the TV.
Channels 2-69 can be
selected.
I
_ Press STATUS to clear the
screen. @
SW •
Try it out. Press
CHANNEL •V buttons
and scan the channels.
Remember, the TV has been set at
the factory to select certain
channel numbers. See the
following page on how to set the
TV to select the channels in your
area.
l
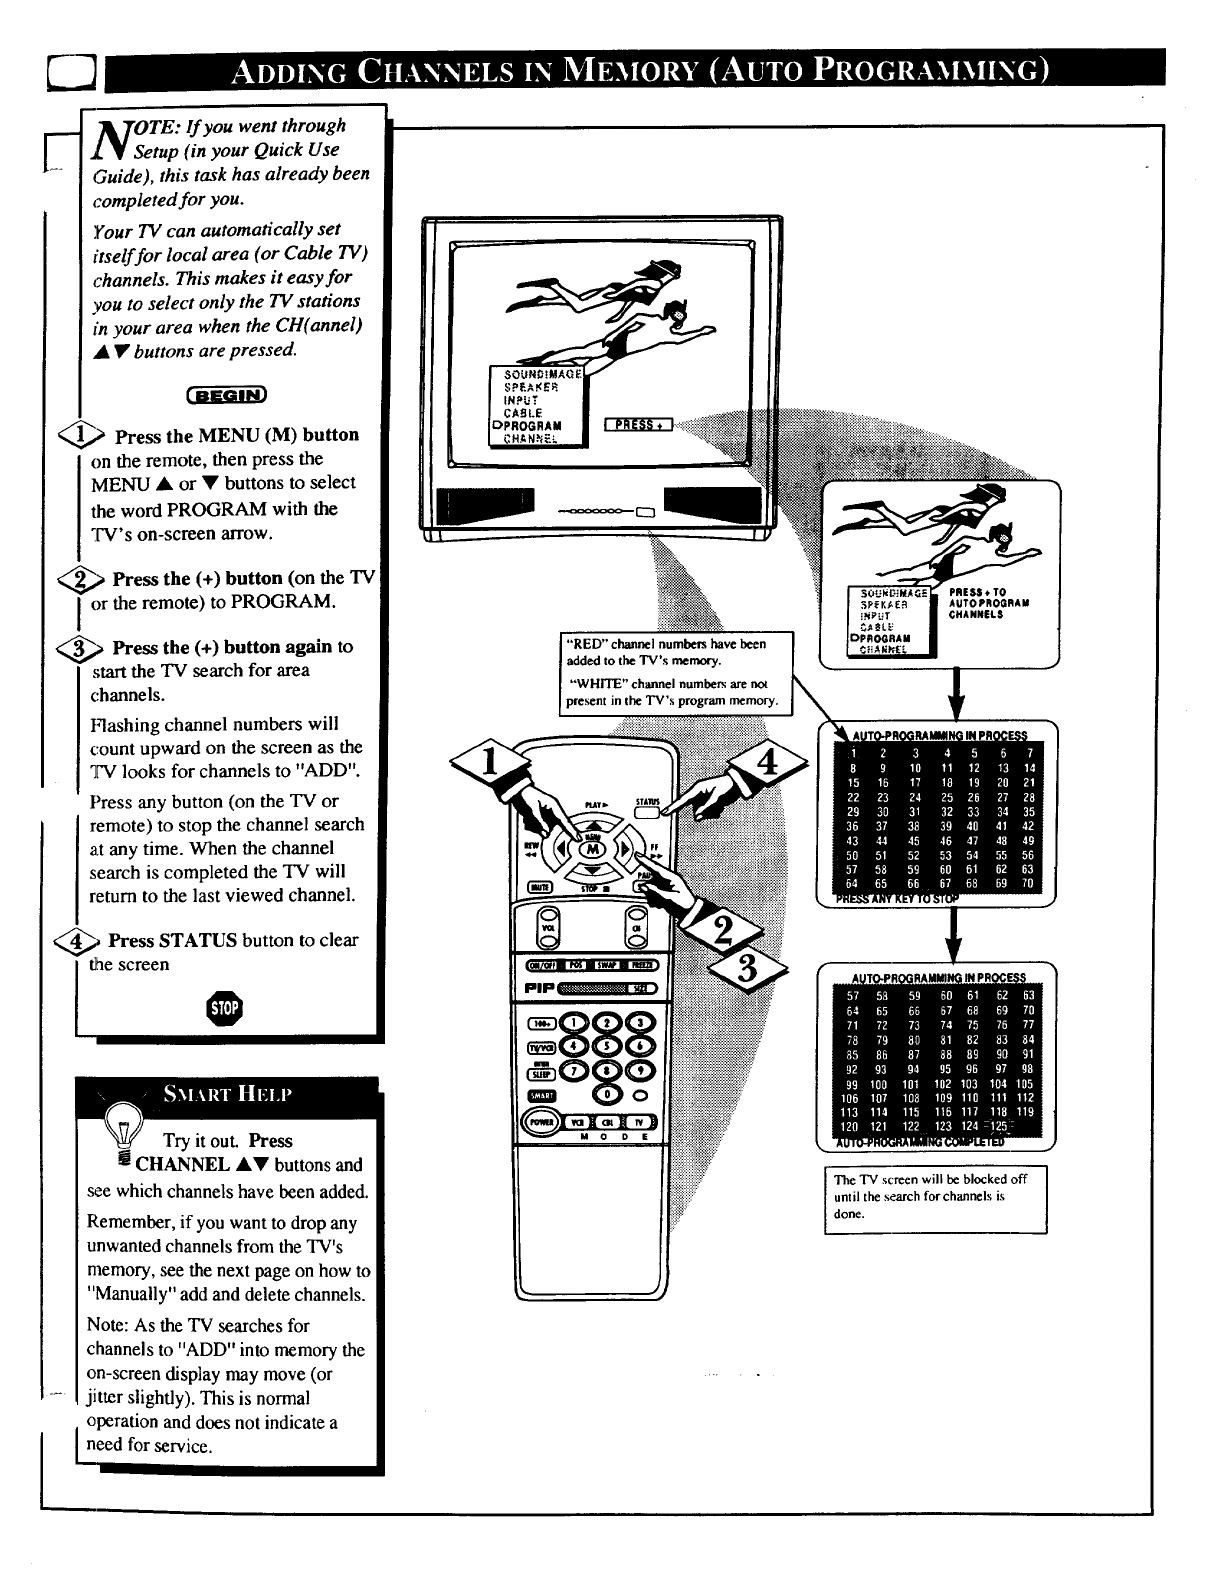
OTE: If you went through
tup (in your Quick Use
Guide), this task has already been
completed for you.
Your TV can automatically set
itself for local area (or Cable TV)
channels. This makes it easy for
you to select only the TV stations
in your area when the CH(annel)
• • buttons are pressed.
_) Press the MENU (M) button
on the remote, then press the
MENU •or •buttons to select
the word PROGRAM with the
TV's on-screen arrow.
_,_ Press the button the TVI
(+) (on
or the remote) to PROGRAM.
_.,_ Press (+) again to
the button
start the TV search for area
channels.
Flashing channel numbers will
count upward on the screen as the
TV looks for channels to "ADD".
Press any button (on the TV or
remote) to stop the channel search
at any time. When the channel
search is completed the TV will
return to the last viewed channel.
Press STATUS button to clear
rthescreen
Try it out. Press
CHANNEL AT buttons and
see which channels have been added.
Remember, if you want to drop any
unwanted channels from the TV's
memory, see the next page on how to
"Manually" add and delete channels.
Note: As the TV searches for
channels to "ADD" into memory the
on-screen display may move (or
jitter slightly). This is normal
[_peration and does not indicate a
eed for service.
"RED" channel numbe_ have been
added to the 'IV's memory.
"WHITE" channel numbers are not
present in the TV's program memory.
PRESS ÷ TO
AUTO PROGRAI_I
CHANNELS
888
I he TV screen will be blocked off
until the search for channels is
done.
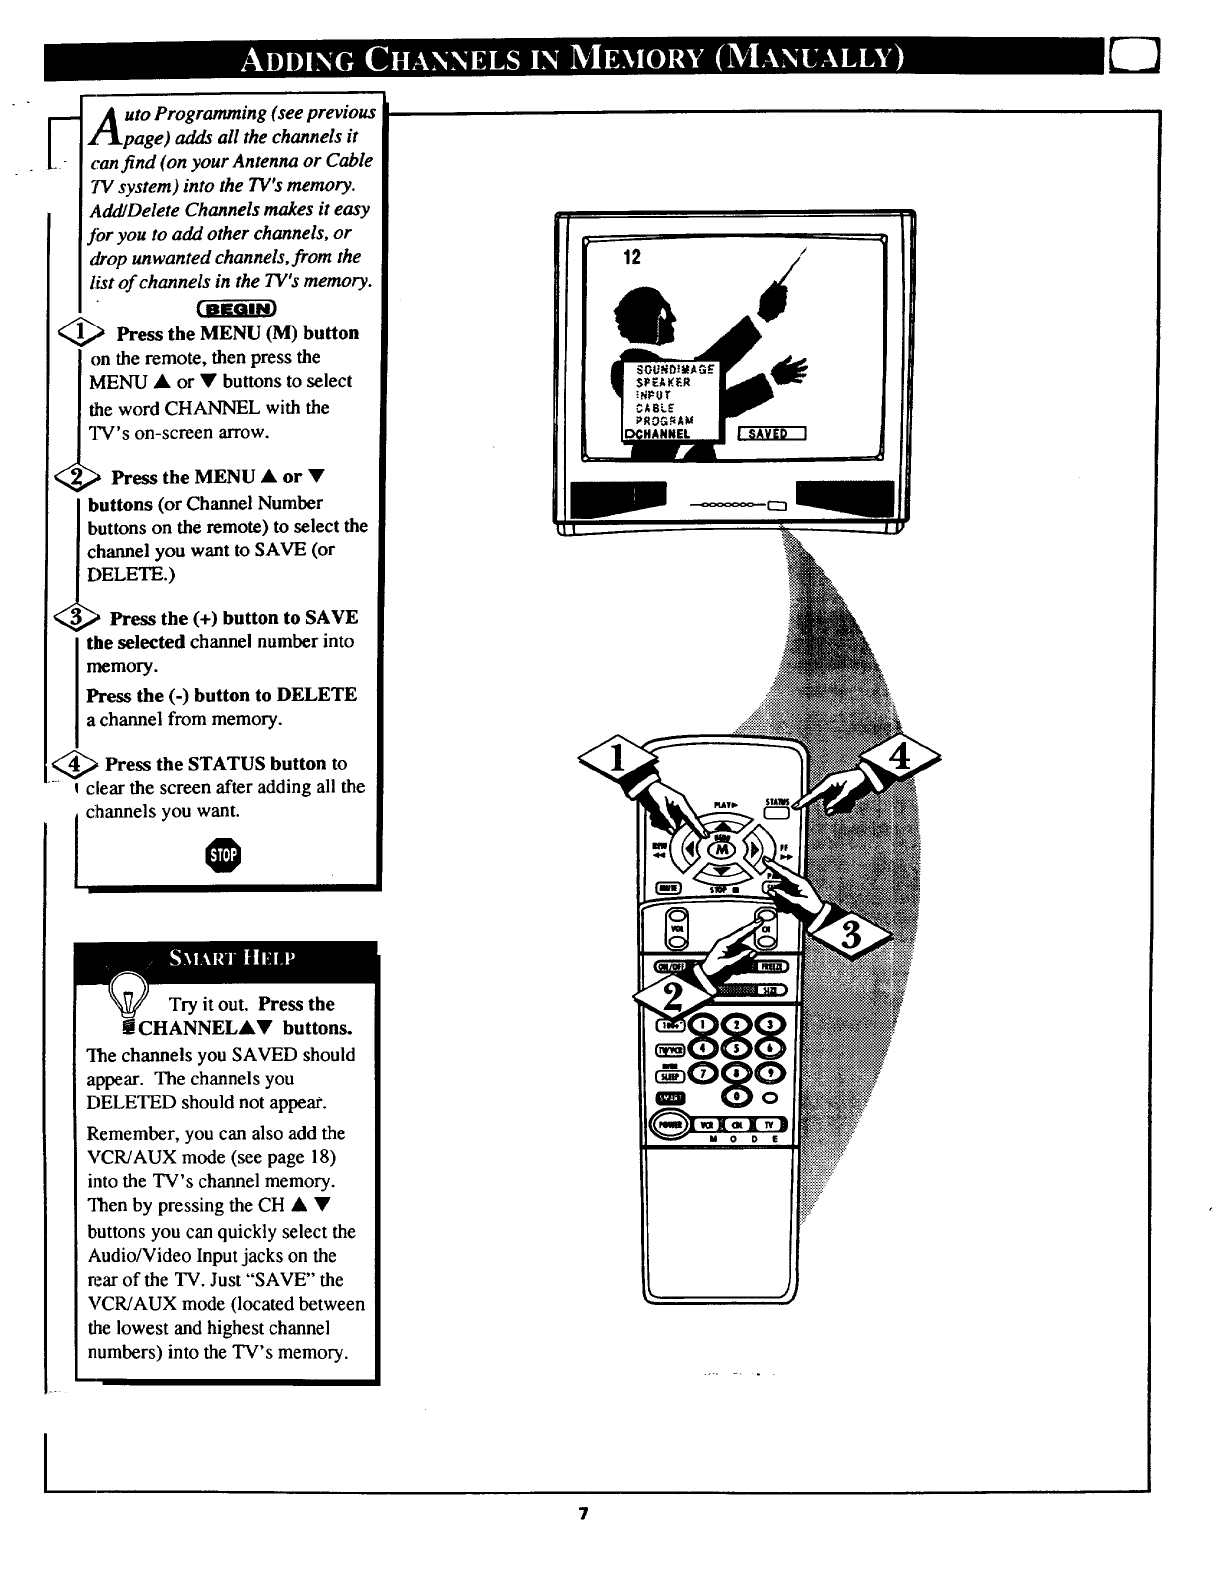
-- Auto Programming (see previous
1-_-_1page)adds all the channels it
tranfind (on your Antenna or Cable
TV system) into the TV's memory.
AddlDelete Channels makes it easy
for you to add other channels, or
drop unwanted channels, from the
list of channels in the TV's memory.
_Press the MENU (M) button
on the remote, then press the
MENU • or •buttons to select
the word CHANNEL with the
?V's on-screen arrow.
Press the MENU •or •
buttons (or Channel Number
buttons on the remote) to select the
channel you want to SAVE (or
ELETE.)
Press the (+) button to SAVE
the selected channel number into
memory.
Press the (-) button to DELETE
a channel from memory.
_Press the STATUS button to
q clear the screen after adding all the
jchannels you want
Try it out. Press the
CHANNEL•• buttons.
Ihe channels you SAVED should
appear. The channels you
DELETED should not appear.
Remember, you can also add the
VCR/AUX mode (see page 18)
into the TV's channel memory.
Then by pressing the CH • •
buttons you can quickly select the
Audio/Video Input jacks on the
rear of the TV. Just "SAVE" the
VCR/AUX mode (located between
the lowest and highest channel
numbers) into the TV's memory.
I
7
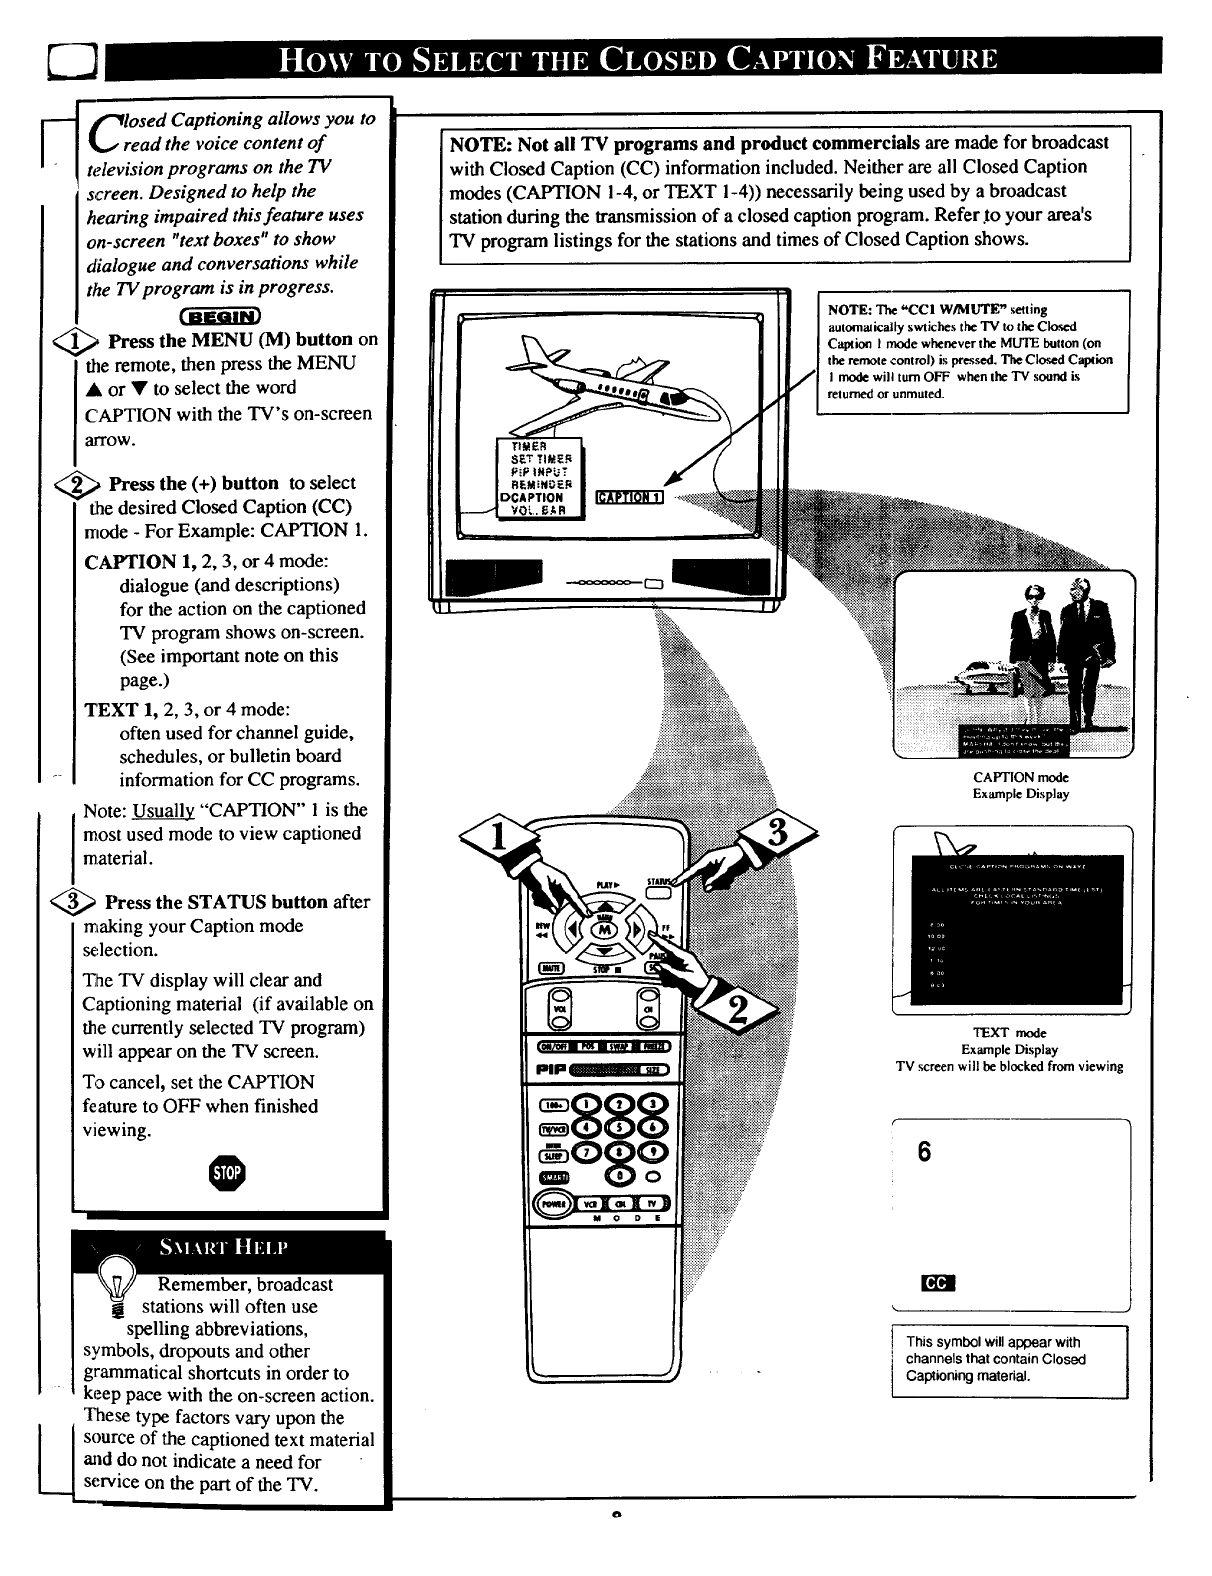
_ _losed Captioning allows you to
read the voice content of
television programs on the TV
screen. Designed to help the
hearing impaired this feature uses
on-screen "text boxes" to show
dialogue and conversations while
the TV program is in progress.
_, Press the MENU (M) button on
tile remote, then press the MENU
A or • to select the word
CAPTION with the TV's on-screen
alTOW.
_,_ Press the (+) button to select
the desired Closed Caption (CC)
mode - For Example: CAPTION I.
CAPTION 1, 2, 3, or 4 mode:
dialogue (and descriptions)
for the action on the captioned
TV program shows on-screen.
(See important note on this
page.)
TEXT 1, 2, 3, or 4 mode:
often used for channel guide,
schedules, or bulletin board
-information for CC programs.
Note: Usu_.U__o_il"CAPTION" 1 is the
I most used mode to view captioned
material.
@>Press STATUS button after
the
making your Caption mode
se,lection.
The TV display will clear and
Captioning material (if available on
the currently selected TV program)
will appear on the TV screen.
To cancel, set the CAPTION
feature to OFF when finished
viewing.
O
Remember, broadcast
stations will often use
spelling abbreviations,
symbols, dropouts and other
grammatical shortcuts in order to
keep pace with the on-screen action.
These type factors vary upon the
source of the captioned text material
*,id do not indicate a need for
service on the part of the TV.
NOTE: Not all TV programs and product commercials are made for broadcast
with Closed Caption (CC) information included. Neither are all Closed Caption
modes (CAPTION !-4, or TEXT !-4)) necessarily being used by a broadcast
station during the transmission of a closed caption program. Refer.to your area's
"IV program listings for the stations and times of Closed Caption shows.
NOTE: The "COl W/MUTE" setting
autommically swtiches the TV to the Closed
Caption I mode whenever the MUTE button (on
the remote control) is pressed. The Closed Caption
I mode will turn OFF when the TV sound is
returned or unmuted.
CAPTION mode
Example Display
TEXT mode
Example Display
TV screen will be blocked from viewing
This symbol will appear with
channels that contain Closed
Captioning material.
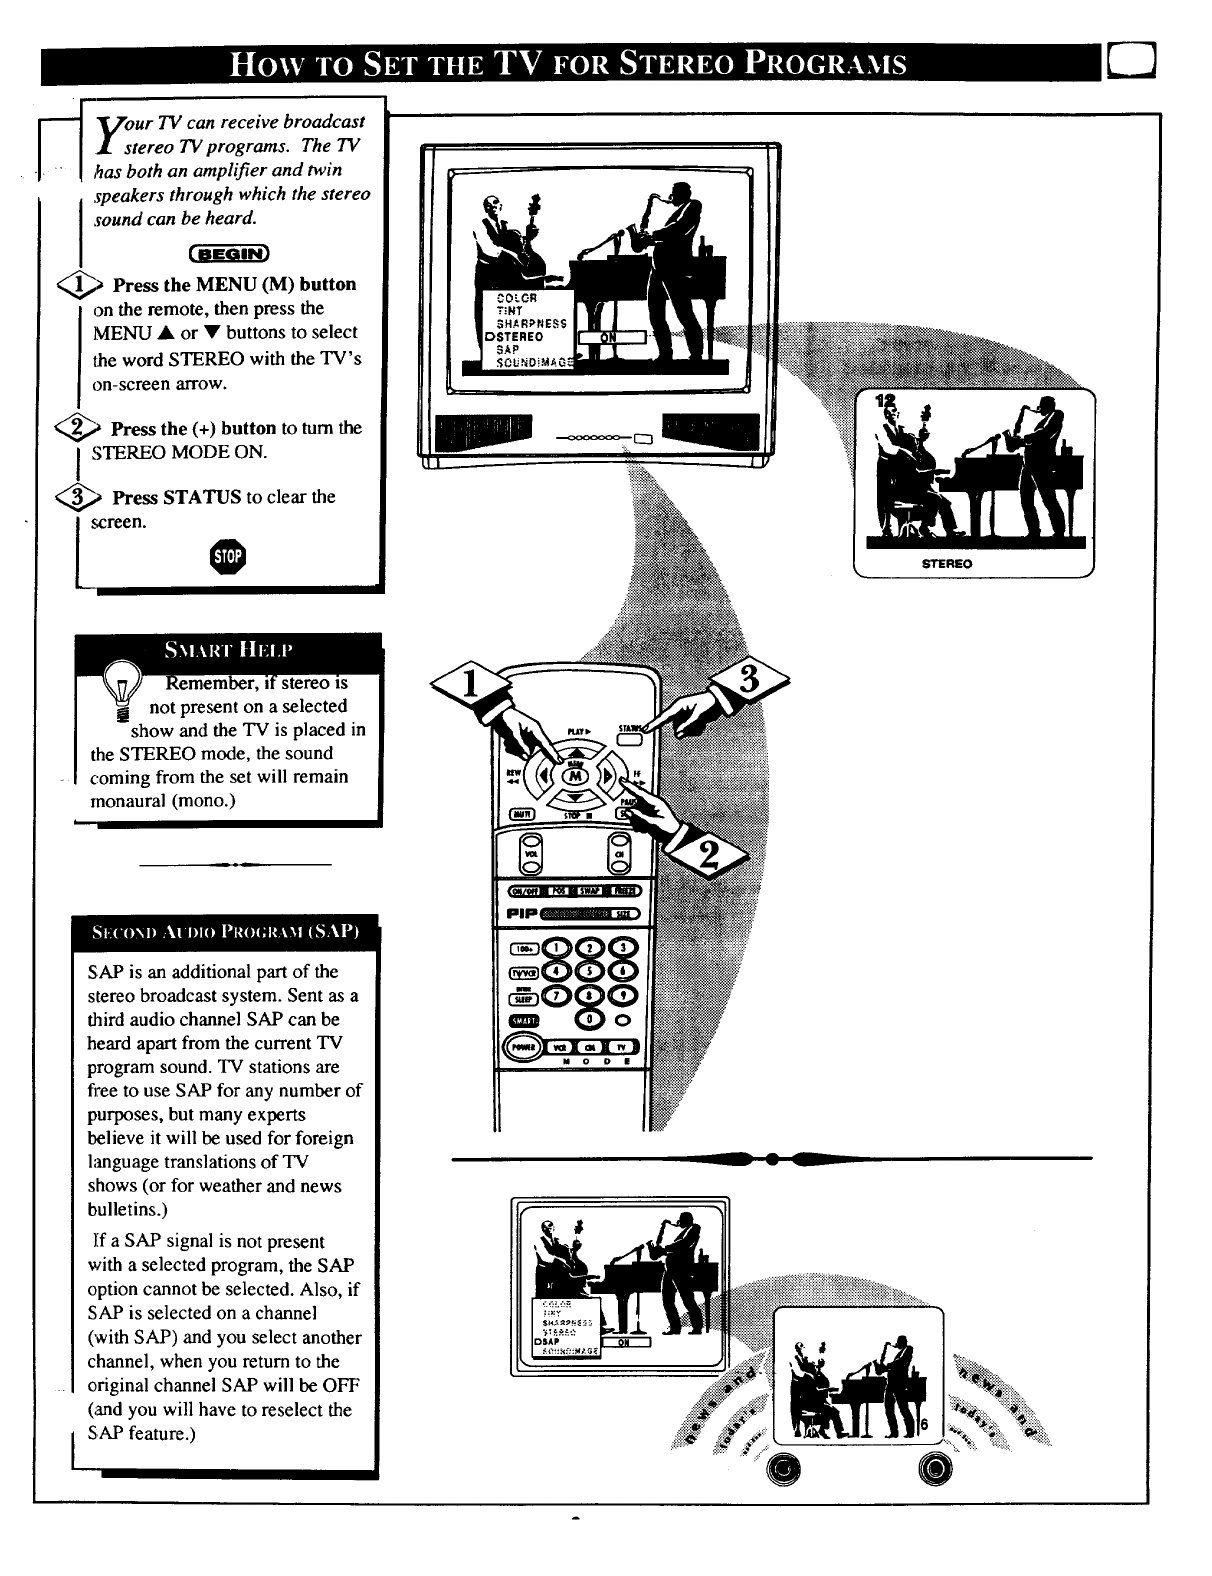
_-_ Vour TV can receive broadcast
I I • stereo TV programs. The TV
• "t - I ,_as both an amplifier and twin
speakers through which the stereo
I sound can be heard.
_.) Press the MENU button
(M)
on the remote, then press the
MENU • or • buttons to select
the word STEREO with the TV's
on-screen arrow.
_,_ Press the (+) button to turn the
STEREO MODE ON.
_Press STATUS to clear the
on. O
monaural (mono.)
I
SAP is an additional part of the
stereo broadcast system. Sent as a
third audio channel SAP can be
heard apart from the current TV
program sound. TV stations are
free to use SAP for any number of
purposes, but many experts
believe it will be used for foreign
hmguage translations of TV
shows (or for weather and news
bulletins.)
If a SAP signal is not present
with a selected program, the SAP
option cannot be selected. Also, if
SAP is selected on a channel
(with SAP) and you select another
channel, when you return to the
original channel SAP will be OFF
(and you will have to reselect the
SAP feature.)
STEREO
-- L
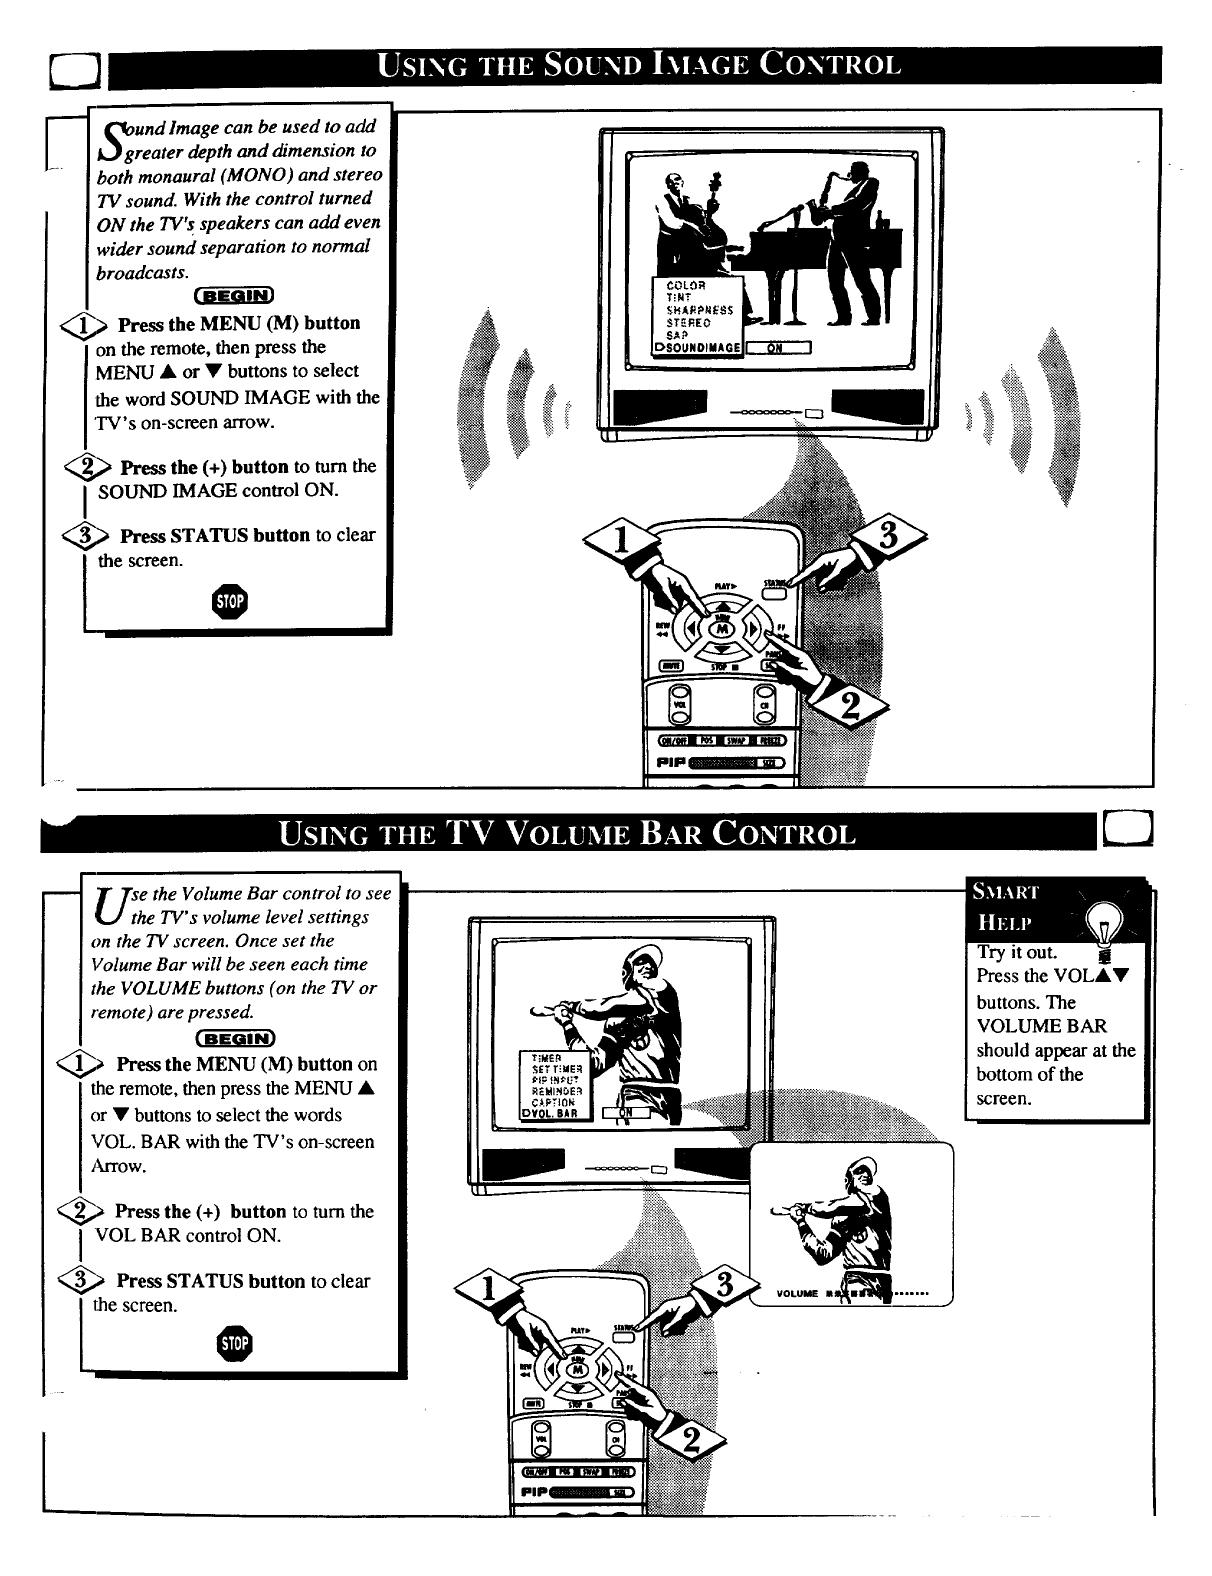
Und Image can be used to add
reater depth and dimension to
both monaural (MONO) and stereo
TV sound. With the control turned
ON the TV's speakers can add even
wider sound separation to normal
broadcasts.
_,> Press the MENU (M) button
I on the remote, then press the
MENU • or • buttons to select
Ithe word SOUND IMAGE with the
I'I_¢'s on-screen arrow.
_,_ Pl-ess the (+) button to turn the
ISOLIND IMAGE control ON.
_,_ Press STATUS button to clear
I thescreen.0
.?'.':
.:i_'!:,.
U_h e the Volume Bar control to see
e TV's volume level settings
on the TV screen. Once set the
Volume Bar will be seen each time
the VOLUME buttons (on the TV or
remote) are pressed.
_,_ Press the MENU button
(M) on
the remote, then press the MENU •
or • buttons to select the words
VOL. BAR with the TV's on-screen
Arrow.
_._ Press the (+) button to turn the
VOL BAR control ON.
_.) Press STATUS button to clear
thescreen.
VOLUME M_ .......
Try it out.
Press the VOL••
buttons. The
VOLUME BAR
should appear at the
bottom of the
screen.

"list" or series of previously
viewed channels can be selected
with the SURF button on your remote
control. With this feature you can
easily switch between different TV
programs that currently interest you.
7he Smart Surf control allows you to
set up to 10 channels in its quick
viewing "list".
,Press the MENU (M) button on
the remote, then press the MENU •
or • buttons to select the word
SURF with the TV's on-screen arrow
(or press the SMART button on the
remote).
<:
Press the (+) button to select
either 2-Channel Surf or Smart Surf.
See explanation of Surf options with
the illustration on this page.
Press STATUS button to clear
the screen.
With the Smart Surf control
ON (see above), select a desired
channel for viewing. You can use the
number buttons on the remote (or the
/_hannel • or • buttons).
Press the SURF button on the
remote. (Some channel numbers may
already appear within the Surf
channel list.)
_ Press the Menu button to
",M)D" the selected channel to the
Surf list.
Select the next desired channel and
repeat steps 2 and 3. Continue until
all desired channels are on the Surf
list.
<_ Press the SURF button the
on
remote to quickly review current
action on channels contained within
the Surf list.
I®
2CHANNEL SURF -
Current and one prev_
channel.
SMART SURF - Current
and upto nineadditional
channels available. Note."
the Channel Surf can he
used with fewer than ten
channels. In this way the
number of Surf channels
can match or fit you
present viewing interests.
To Use 2- I
Channel Surf:
With the 2-Channel
Surf control ON,
select the two
desired channels for
viewing with the
number buttons on
the remote control.
Press the SURF
button on the
remote to "toggle"
between the two
selected channels.
When using Smart
Surf:
A "SURF MENU
TABLE FULL"
message will appear
on-screen when the
maximum of i 0
channels has been
added to the Smart
Surf list.
22
11
3
25
PRESSMENUTOADD
11
3
PRESS MENU TO DELETE
Note: To Delete a channel from the Surf
list just press the SURF button to select
the desired channel. Then press the
MENU button and the channel will be
immediately dropped from the on
screen Surf list.
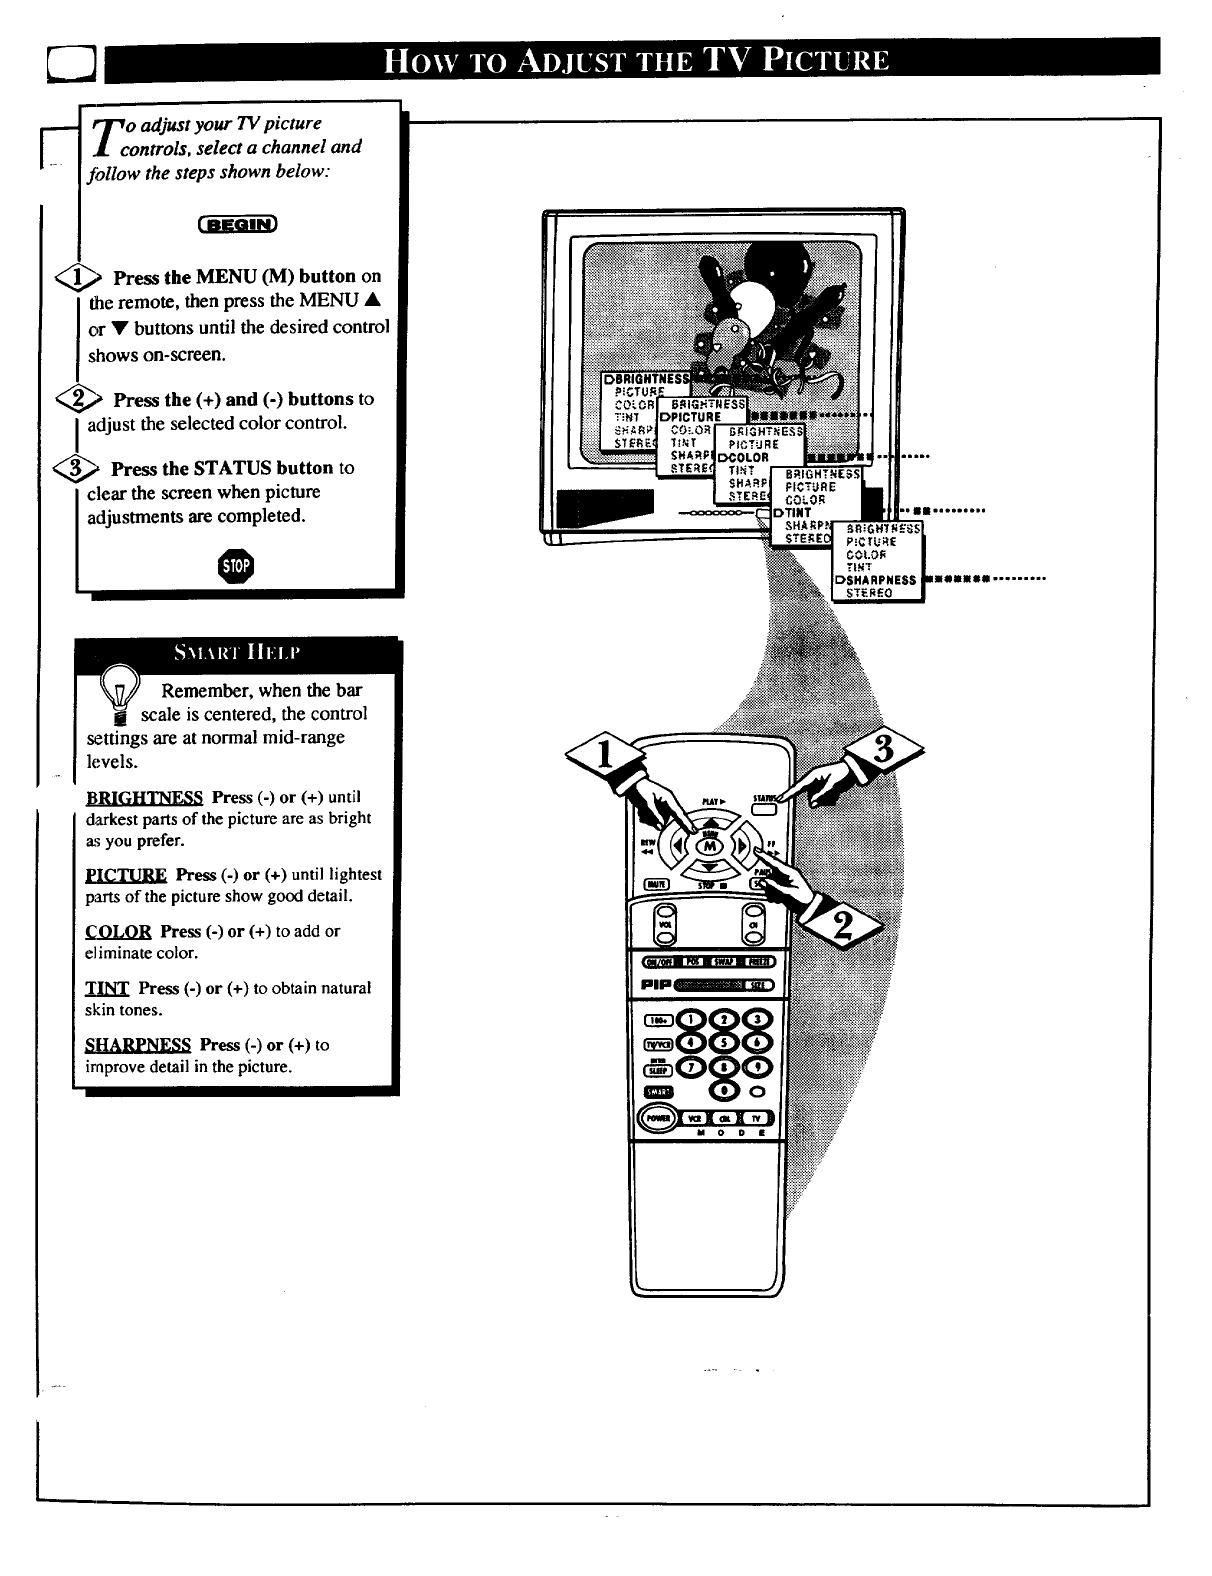
Tco o adjust your 13/picture
ntrols, select a channel and
_'ollow the steps shown below:
_,_ Press the MENU (M) button on
the remote, then press the MENU •
or • buttons until the desired control
shows on-screen.
_,_ Press the (+) and (-) buttons to
Iadjust the selected color control.
_ Press the STATUS button to
clear the screen when picture
adjustments are completed.
O
Remember, when the bar
j scale is centered, the control
settings are at normal mid-range
levels.
Press (-) or (+) until
darkest parts of the picture are as bright
as you prefer.
PICTURE Press (-) or (+) until lightest
parts of the picture show good detail.
Press (-) or (+) to add or
eliminate color.
TINT Press (-) or (+) to obtain natural
skin tones.
SHARPNESS Press (-) or (+) to
irnprove detail in the picture.
DBRIGHTNESI
:888
°8o°
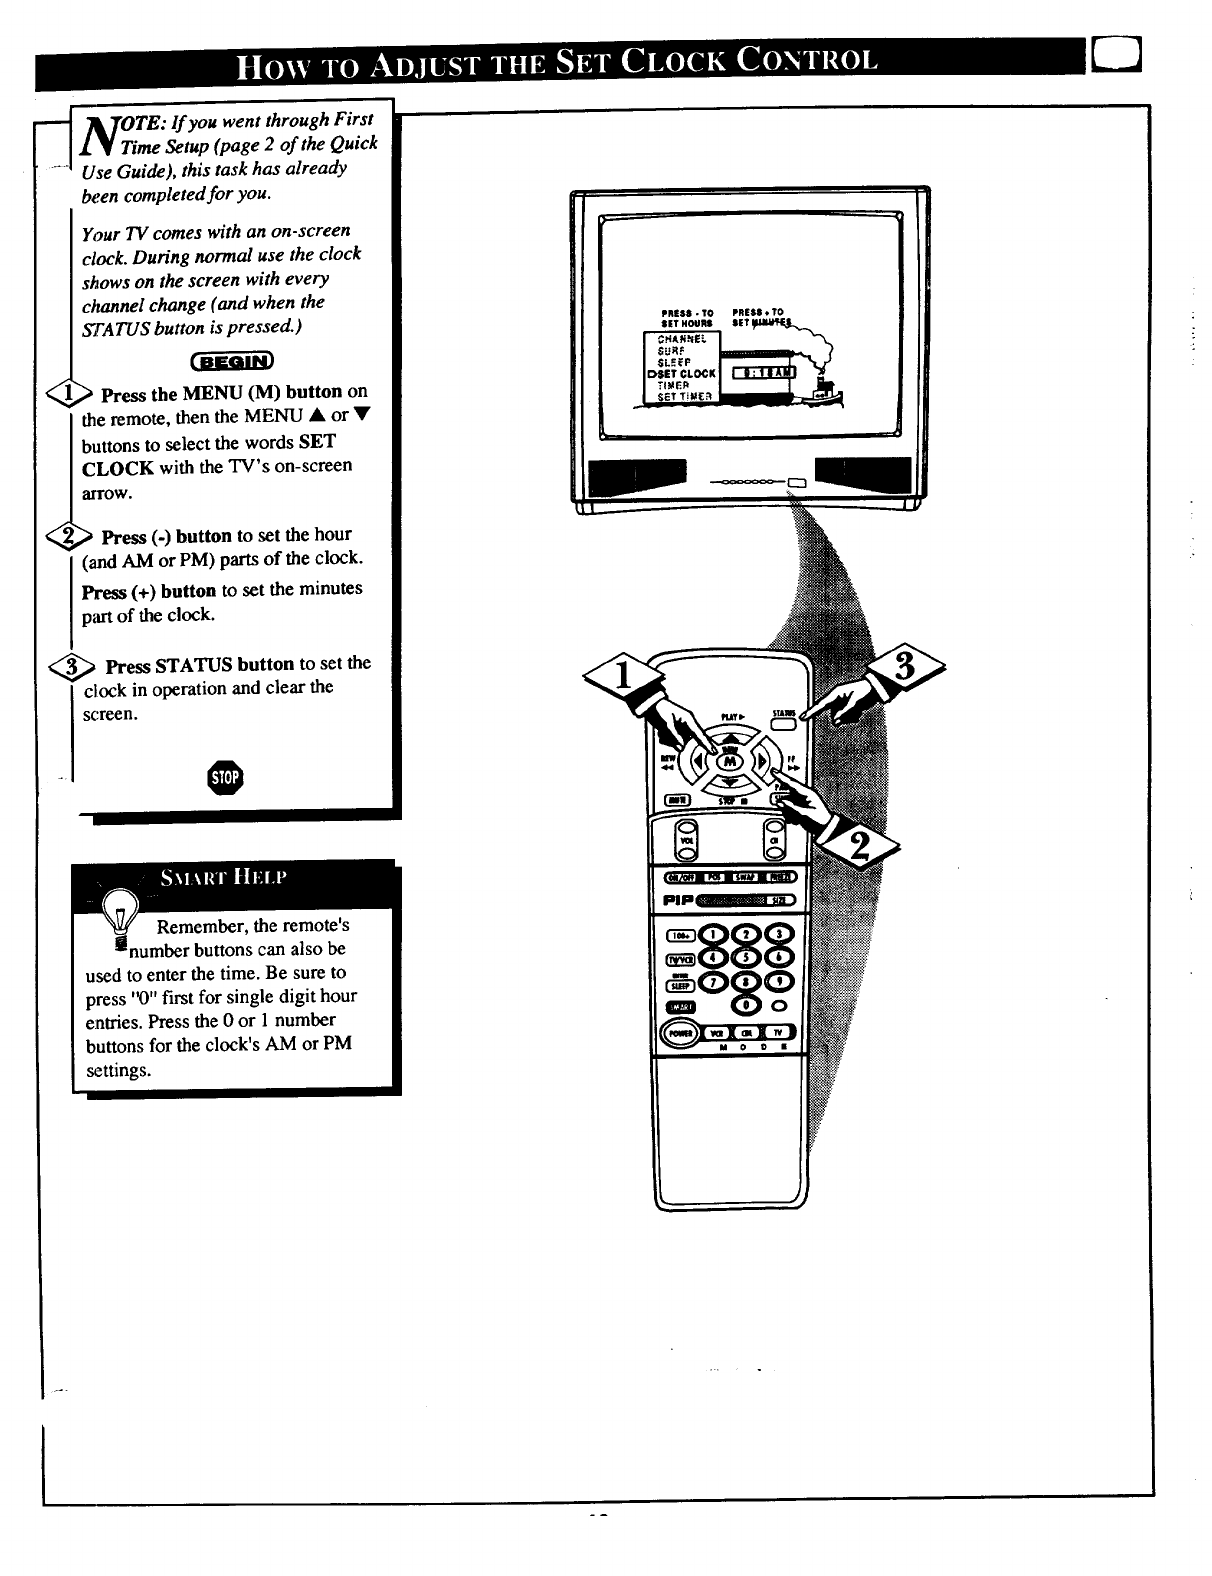
------[ 7_TOTE: If you went through First
ll•Time Setup (page 2 of the Quick
...... Use Guide), this task has already
been completed for you.
Your TV comes with an on-screen
clock. During normal use the clock
shows on the screen with every
channel change (and when the
STATUS button is pressed.)
Press the MENU (M) button on
the remote, then the MENU • or •
buttons to select the words SET
CLOCK with the TV's on-screen
W.
ess (-) button to set the hour
(and AM or PM) parts of the clock.
Press (+) button to set the minutes
p_trtof the clock.
<_ Press STATUS button to set the
clock in operation and clear the
screen.
J O
can also be
used to enter the time. Be sure to
press "0" first for single digit hour
entries. Press the 0 or 1 number
buttons for the clock's AM or PM
settings.
PRESS • TO PRESS *TO
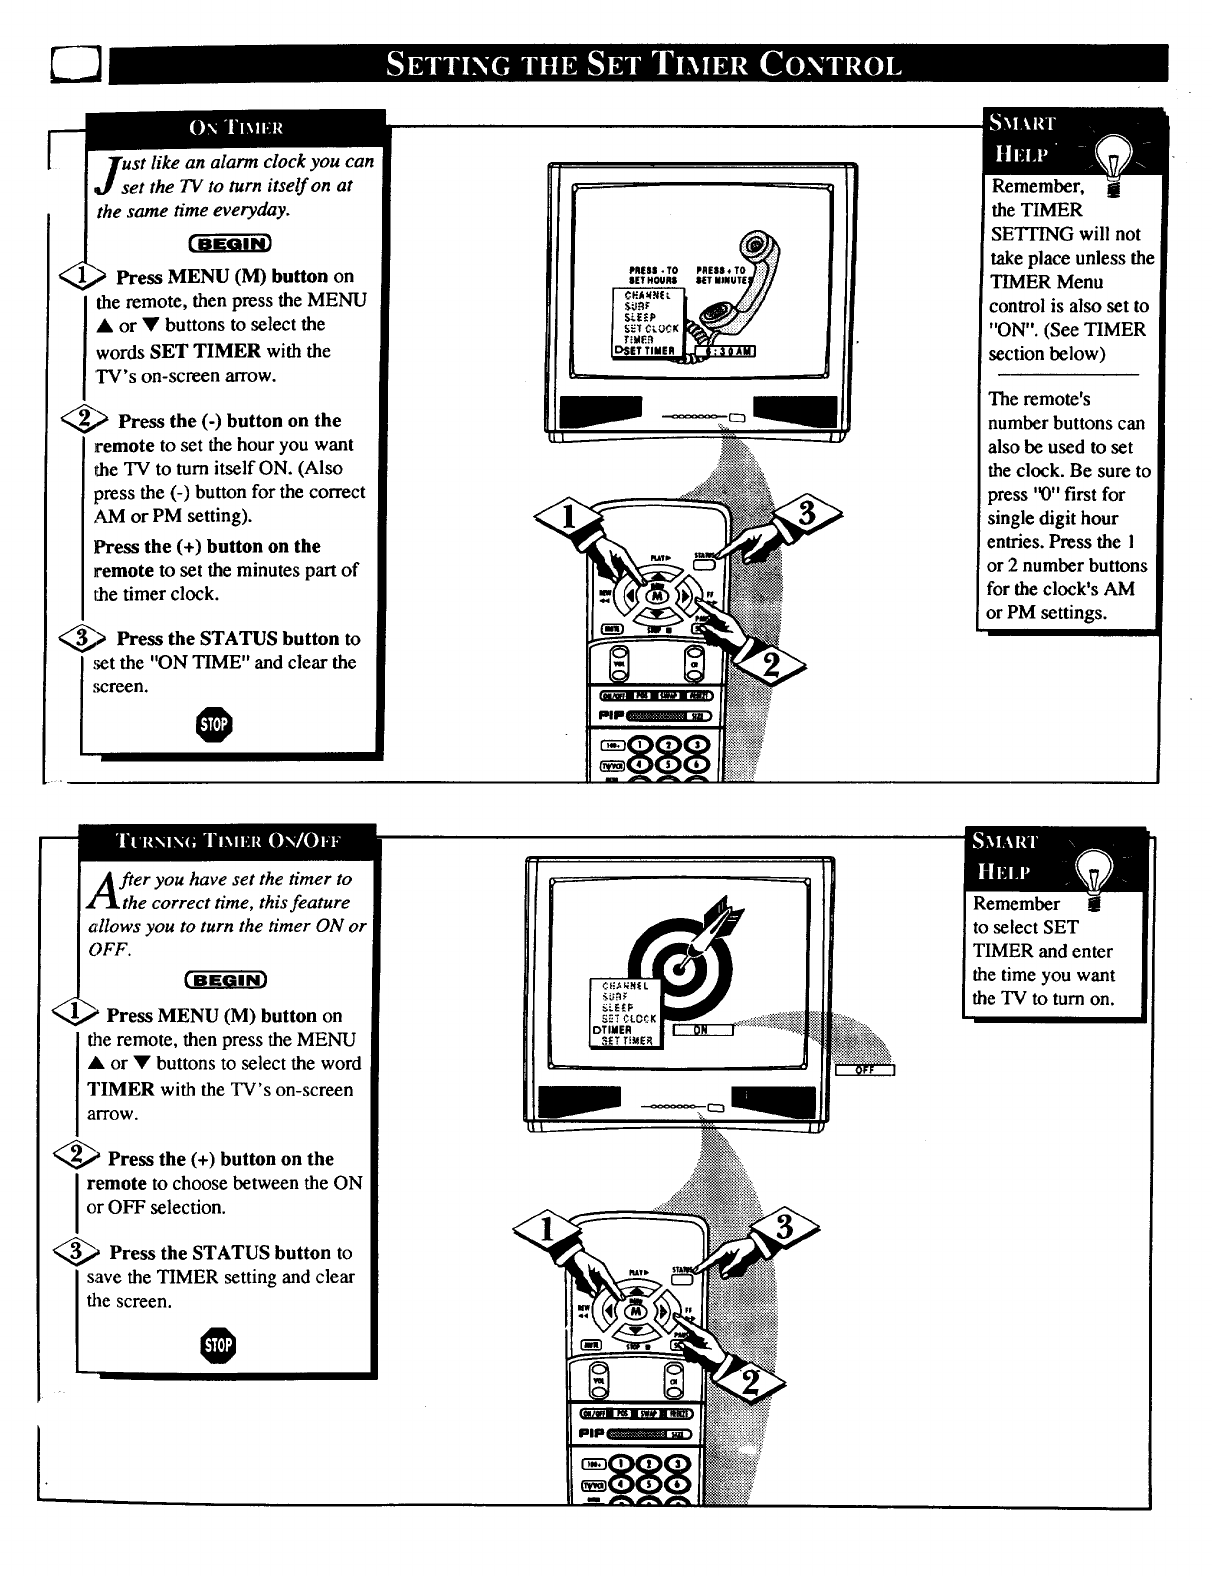
Tust like an alarm clock you can
Jset the TV to turn itself on at
the same ti_y.
Press MENU (M) button on
the remote, then press the MENU
• or • buttons to select the
words SET TIMER with the
"l'V's on-screen arrow.
_,_ Press the (-) button on the
remote to set the hour you want
the TV to turn itself ON. (Also
press the (-) button for the correct
,AMor PM setting).
Press the (+) button on the
remote to set the minutes part of
1abetimer clock.
_',,> Press the STATUS button to
set the "ON TIME" and clear the
screen. 0
f!er you have set the timer to
the correct time, this feature
allows you to turn the timer ON or
OFF.
Press MENU (M) button on
the remote, then press the MENU
• or • buttons to select the word
TIMER with the TV's on-screen
arrow.
_,_ Press the (+) button on the
I remote to choose between the ON
or OFF selection.
_Press the STATUS button to
save the TIMER setting and clear
le screen. O
I.
PRESS-TO
8ETHOUR$
Remember,
the TIMER
SETI'ING will not
take place unless the
TIMER Menu
control is also set to
"ON". (See TIMER
section below)
The remote's
number buttons can
also be used to set
the clock. Be sure to
press '_)" first for
single digit hour
entries. Press the 1
or 2 number buttons
for the clock's AM
or PM settings.
Remember
to select SET
TIMER and enter
the time you want
the TV to turn on.
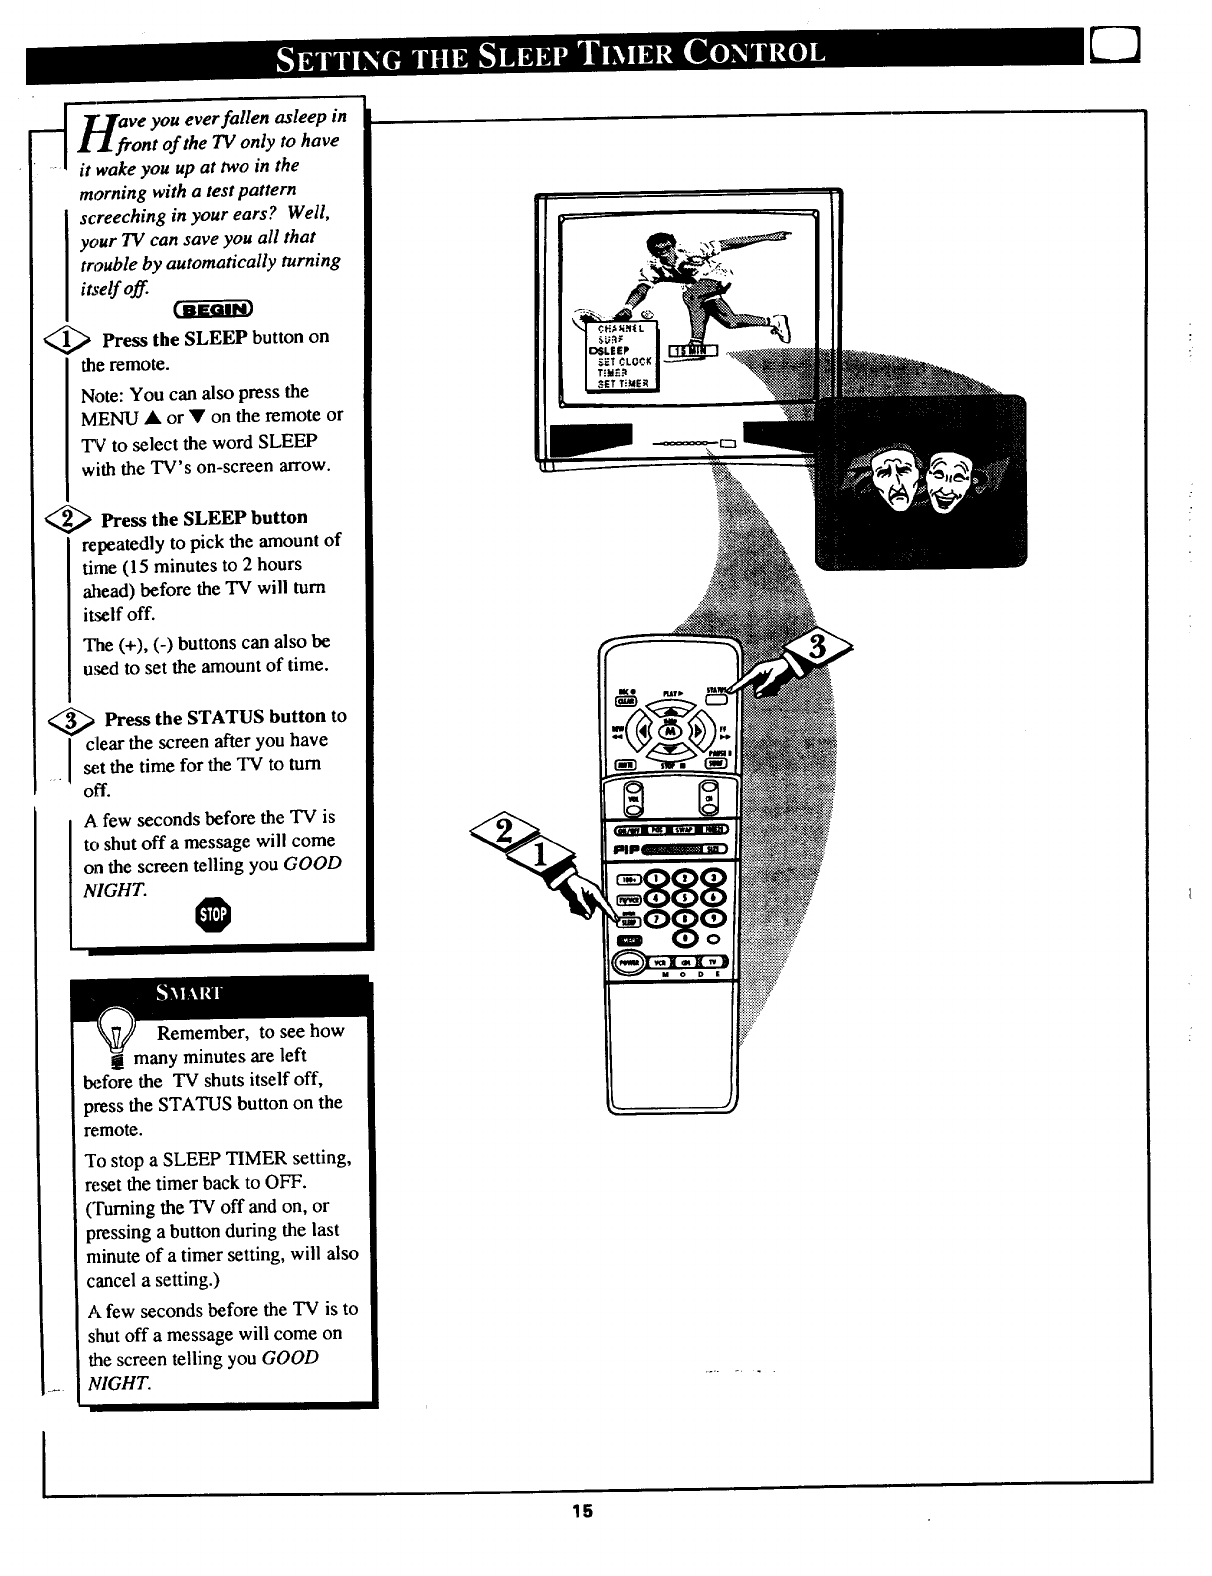
Ve you ever fallen asleep in
nt of the TV only to have
it wake you up at two in the
morning with a test pattern
screeching in your ears? Well,
your TV can save you all that
mguble by automatically turning
itself off.
Press the SLEEP button on
the remote.
Note: You can also press the
MENU • or • on the remote or
TV to select the word SLEEP
with the TV's on-screen arrow.
<_ Press the SLEEP button
repeatedly to pick the amount of
time (15 minutes to 2 hours
ahead) before the TV will turn
itself off.
The (+), (-) buttons can also be
used to set the amount of time.
_Press the STATUS button to
clear the screen after you have
• set the time for the TV to turn
off.
A few seconds before the TV is
to shut off a message will come
on the screen telling you GOOD
NIGHT. 0
Remember, to see how
a many minutes are left
before the TV shuts itself off,
press the STATUS button on the
remote.
To stop a SLEEP TIMER setting,
reset the timer back to OFF.
('Fuming the TV off and on, or
pressing a button during the last
minute of a timer setting, will also
cancel a setting.)
A few seconds before the TV is to
shut off a message will come on
the screen telling you GOOD
NIGHT.
15
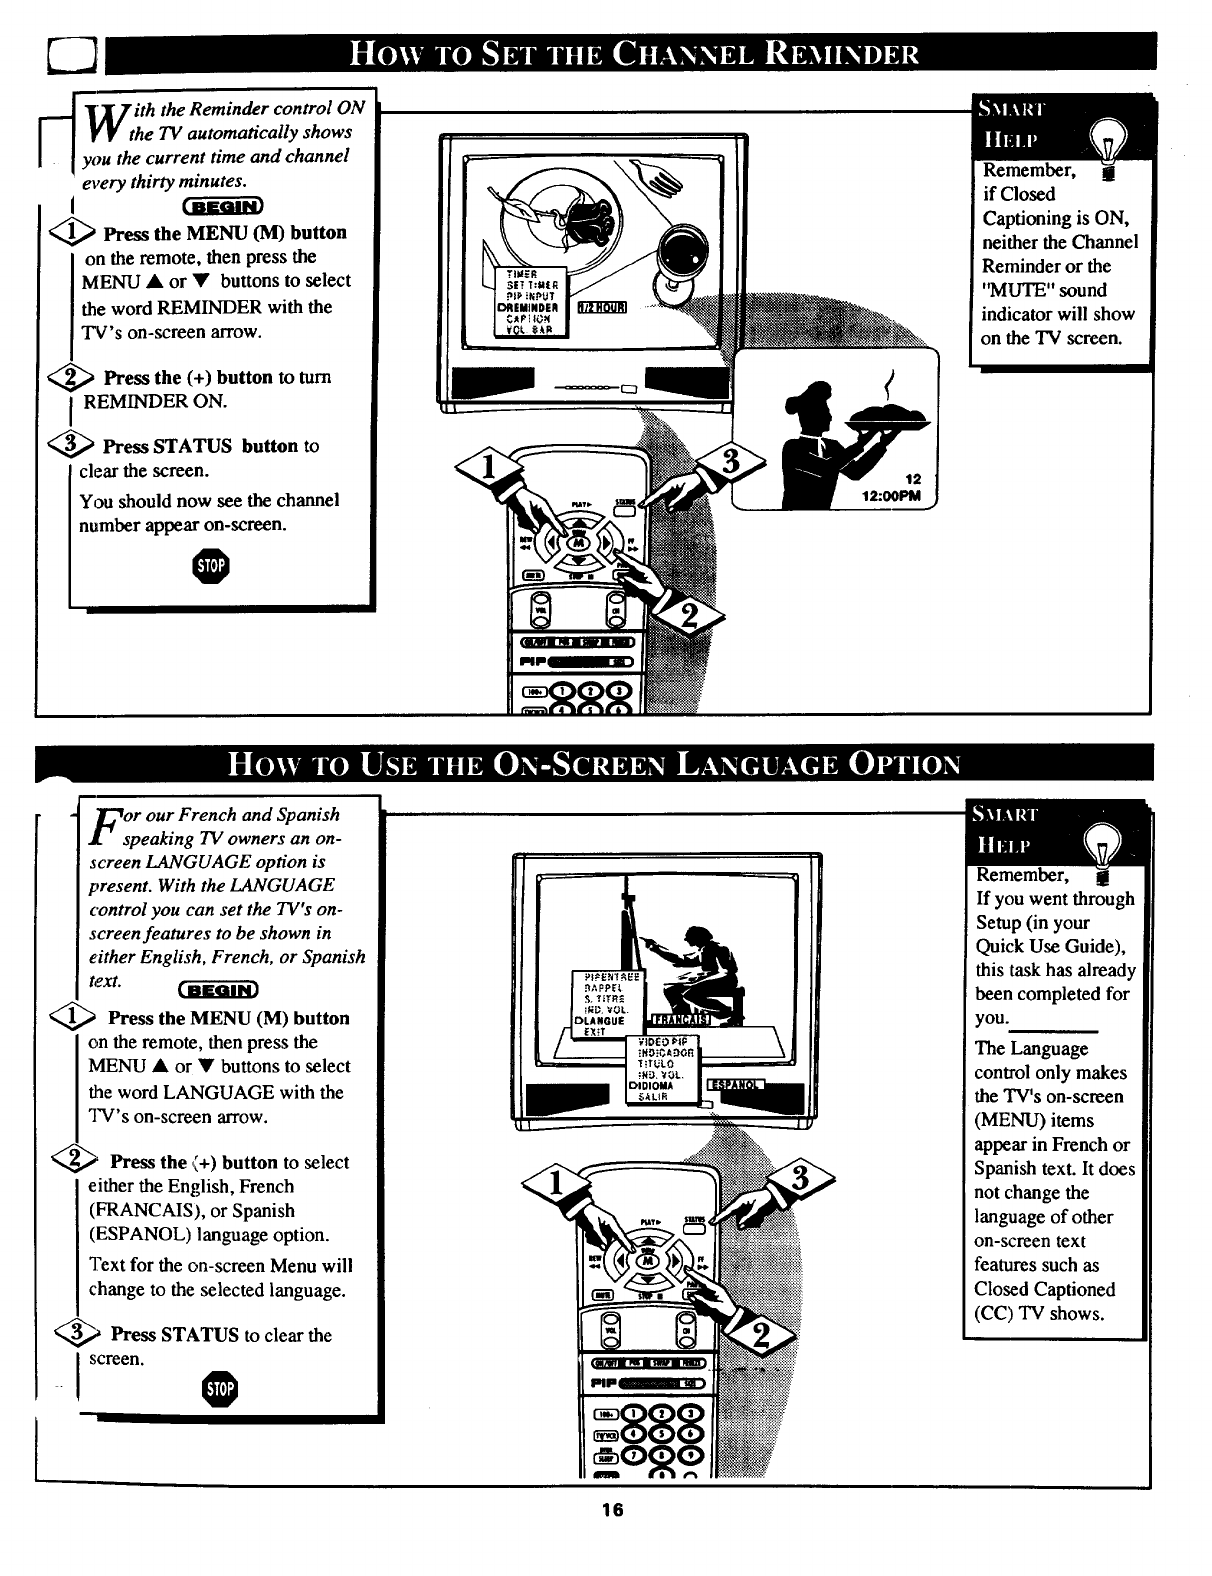
_ l_T ith Reminder control ON
the
ItVthe TV automatically shows
you the current time and channel
every thirty minutes.
<_ Press the MENU (M) button
on the remote, then press the
MENU • or • buttons to select
the word REMINDER with the
TV's on-screen arrow.
<_ Press the (+) button to turn
REMINDER ON.
<_ Press STATUS button to
clear the screen.
You should now see the channel
number appear on-screen.
O
Remember, !!
if Closed
Captioning is ON,
neither the Channel
Reminder or the
"MUTE" sound
indicator will show
on the TV screen.
In
Oprour French and Spanish
eaking TV owners an on-
screen LANGUAGE option is
present. With the LANGUAGE
control you can set the TV's on-
screen features to be shown in
either English, French, or Spanish
text.
<_ Press the MENU (M) button
on the remote, then press the
MENU • or • buttons to select
the word LANGUAGE with the
TV's on-screen arrow.
_ Press the (+) button to select
either the English, French
(FRANCAIS), or Spanish
(ESPANOL) language option.
Text for the on-screen Menu will
change to the selected language.
_,_ Press STATUS to clear the
!screen. @
Remember,
If you went through
Setup (in your
Quick Use Guide),
this task has already
been completed for
you.
The Language
control only makes
the TV's on-screen
(MENU) items
appear in French or
Spanish text. It does
not change the
language of other
on-screen text
features such as
Closed Captioned
(CC) TV shows.
16
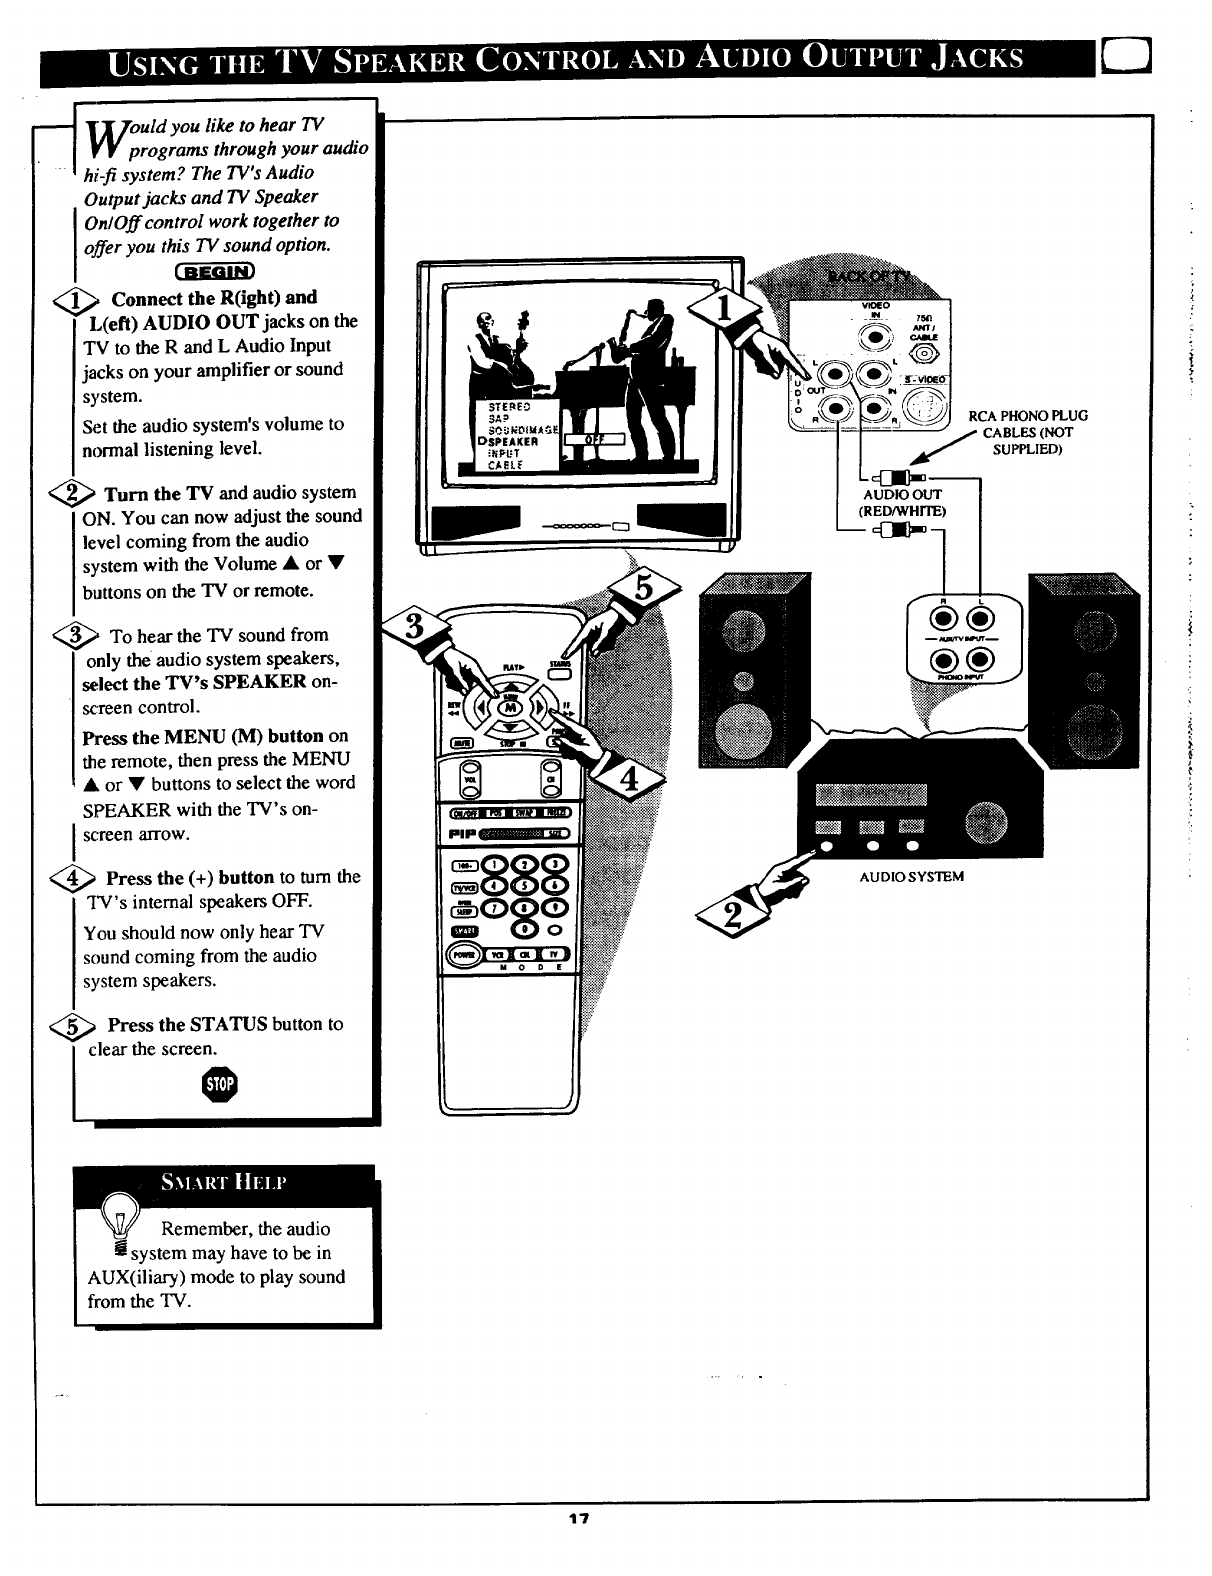
_ould you like to hear TV
•• programs through your audio
hi-fi system? The TV's Audio
Output jacks and TV Speaker
On/Off control work together to
offer you this TV sound option.
< _,, Connect the R(ight) and
L(eft) AUDIO OUT jacks on the
TV to the Rand L Audio Input
jacks on your amplifier or sound
system.
Set the audio system's volume to
normal listening level.
<_ Turn the "IV and audio system
ON. You can now adjust the sound
level coming from the audio
system with the Volume • or •
buttons on the "IV or remote.
_ To hear the TV sound from
only the audio system speakers,
select the TV's SPEAKER on-
screen control.
Press the MENU (M) button on
the remote, then press the MENU
Aor • buttons to select the word
SPEAKER with the TV's on-
screen arrow.
_ Press the (+) button to turn the
TV's internal speakers OFF.
You should now only hear TV
sound coming from the audio
system speakers.
<_ Press the STATUS button
iclear the scree_
tO
RCA PHONO PLUG
CABLES (NOT
SUPPLIED)
®®
AUDIO SYSTEM
17
yV u can view the playback of
CR tapes (Video Disc
Players, camcorders, etc). by
using the AUDIO and VIDEO
INPUT jacks (on the rear of the
TV).
For example: to view the
playback of a VCR tape:
_,,_ Connect the VIDEO and
AUDIO IN(put) jacks on the
TV to the AUDIO and VIDEO
OUT(put) jacks on the VCR.
_Press the MENU (M) button
,on the remote, then press the
MENU • or • buttons to select
the word INPUT with the TV's
on-screen arrow.
Note: You can press the
CHANNEL •• buttons to
.select "VCR/AUX" (if it has
been added to the TV's channel
memory.) See page 7 for details.
_._ Press the (+) button to select
the VCR/AUX(iliary) INPUTS
-_ on the rear of the TV.
4_ Turn the VCR ON and
PLAY the VCR tape to be
viewed on the TV.
O
gh using the A/V INPUT
jacks, return the INPUT display
screen on the TV to ANTENNA.
If you leave the TV in the
VCR/AUX INPUT mode and
there is no signal source connected
to the jacks, you will be seeing
only a blank screen on the TV.
NOTE: If you have a mono (single
audio OUTPUT) VCR, "Y"
Connectors are available (from
your dealer or Parts Information
Center 1 800 292-6066) to connect
to the audio inputs on the TV.
PICTURE AND SOUND FROM
PLAYBACK OF VCR TAPE
VIDEO IN
(YELLOW)
RCA PHONO PLUG
j CABLF_ (NOT
SUPPLIED)
(RED_HrrE)[
_OF VCR
pup
=888 VCR
(EQUIPPED WITH VIDEO AND
AUDIO OUTPUT JACKS)
NOTE: THE "TV/VCR" B_N
CAN ALSO BE USED TO PLACE
THE TV IN EITHER VCR/AUX OR
S-VIDEO MODES (AS WELL AS
SELF_,C_ CHANNELS 3 OR 4.)
_ rrThe S(uper)-Video connection
.l on the rear of the TV is used
for the playback of S-VHS VCR
tapes, Video Discs, or Compact
Disc Interactive (cd-i) discs.
Better picture detail and clarity
is possible with the S-Video
playback as compared to the
picture from a normal antenna
(RF) connection.
C-a-gdg
<_ Connect the S-VIDEO IN
Jack on the TV to the S-VHS
Out(put) jack on a S-VHS VCR.
The S-VHS connecting cable
will be supplied with the S-VHS
VCR (or Video Disc player.)
Also connect the AUDIO
IN(put) jacks from the TV to the
AUDIO OUT jacks on the VCR.
<_ Press the MENU (M) button
on the remote, then press the
MENU • or • buttons to select
the word INPUT with the TV's
on-screen arrow.
_<_ Press button select the
(+) to
S-VHS INPUT on the rear of the
TV.
I
<_ Turn the and place
VCR ON
it in the S-VIDEO or S-VHS
mode. Insert aS-VHS cassette
tape and PLAY the VCR in a
normal manner.
O
Remember, when you're
a through using the S-VIDEO
IN(put) jack return the INPUT
control on the TV to ANTENNA. If
you leave the TV in the S-VIDEO
mode and there is no signal source
connected to the jack, you will be
seeing only a blank screen on the
TV.
PICTURE AND SOUND FROM
PLAYBACK OF S-VHS VCR TAPE
RCA PHONO
PLUG CABLES
(NOT SUPPLIED)
VCR
S-VHS VCR
(EQUIPPED WITH S-VIDEO
OUTPUT JACK)
NOTE: THE "I'V/VCR" BUTTON
CAN ALSO BE USED TO PLACE
THE TV IN EITHER S-VIDEO OR
VCR/AUX MODES (AS WELL AS
SELECT CHANNELS 3OR 4.)
.€
qo
W
H ___rave you ever played hide and
••seek with your remote
:ontrol? Are you tired of tearing
the' house apart trying tofind if
someone has stuffed the remote
under the couch, put it on the
shelves, or hid it in the desk? Well,
your TV remote can save you all
that looking by automatically
signaling its location to you.
Here's how it works:
I_ Press the POWER button on
<the set to turn the TV ON.
Note: Normally you can press any
button on the front of the TV to
tuna the set ON. But for the remote
locator to work you need to be sure
to use the Power button at the TV.
"LOCATING REMOTE" shows on
the TV screen.
<_ Within a few seconds a
chirping or beeping sound will
begin to come from the remote
control hand unit.
•The remote will continue to signal
slocation for around 30 seconds.
i Normal TV program sound wilt not
be heard while the remote locator is
working.
_Once you remote just
find the
press any button on the remote and
the beeping sound will stop.
The remote is now ready for
normal TV feature use.
O
Remember., the remote
locator may not properly
receive its '%oming"signal from
the TV if it has been placed on a
metal shelf or counter material.
Also, since there's a special type
of radio frequency '%oming"
signal receiver inside the remote
we are required to notify you that
any changes or modifications not
xpressly approved by Philips
Consumer Electronics Company
could void the user's authority to
operate the remote equipment.
Your "IV is attempting [
to locate a lost remote I
Remote Locator
range is around 30 Feet.
<
I
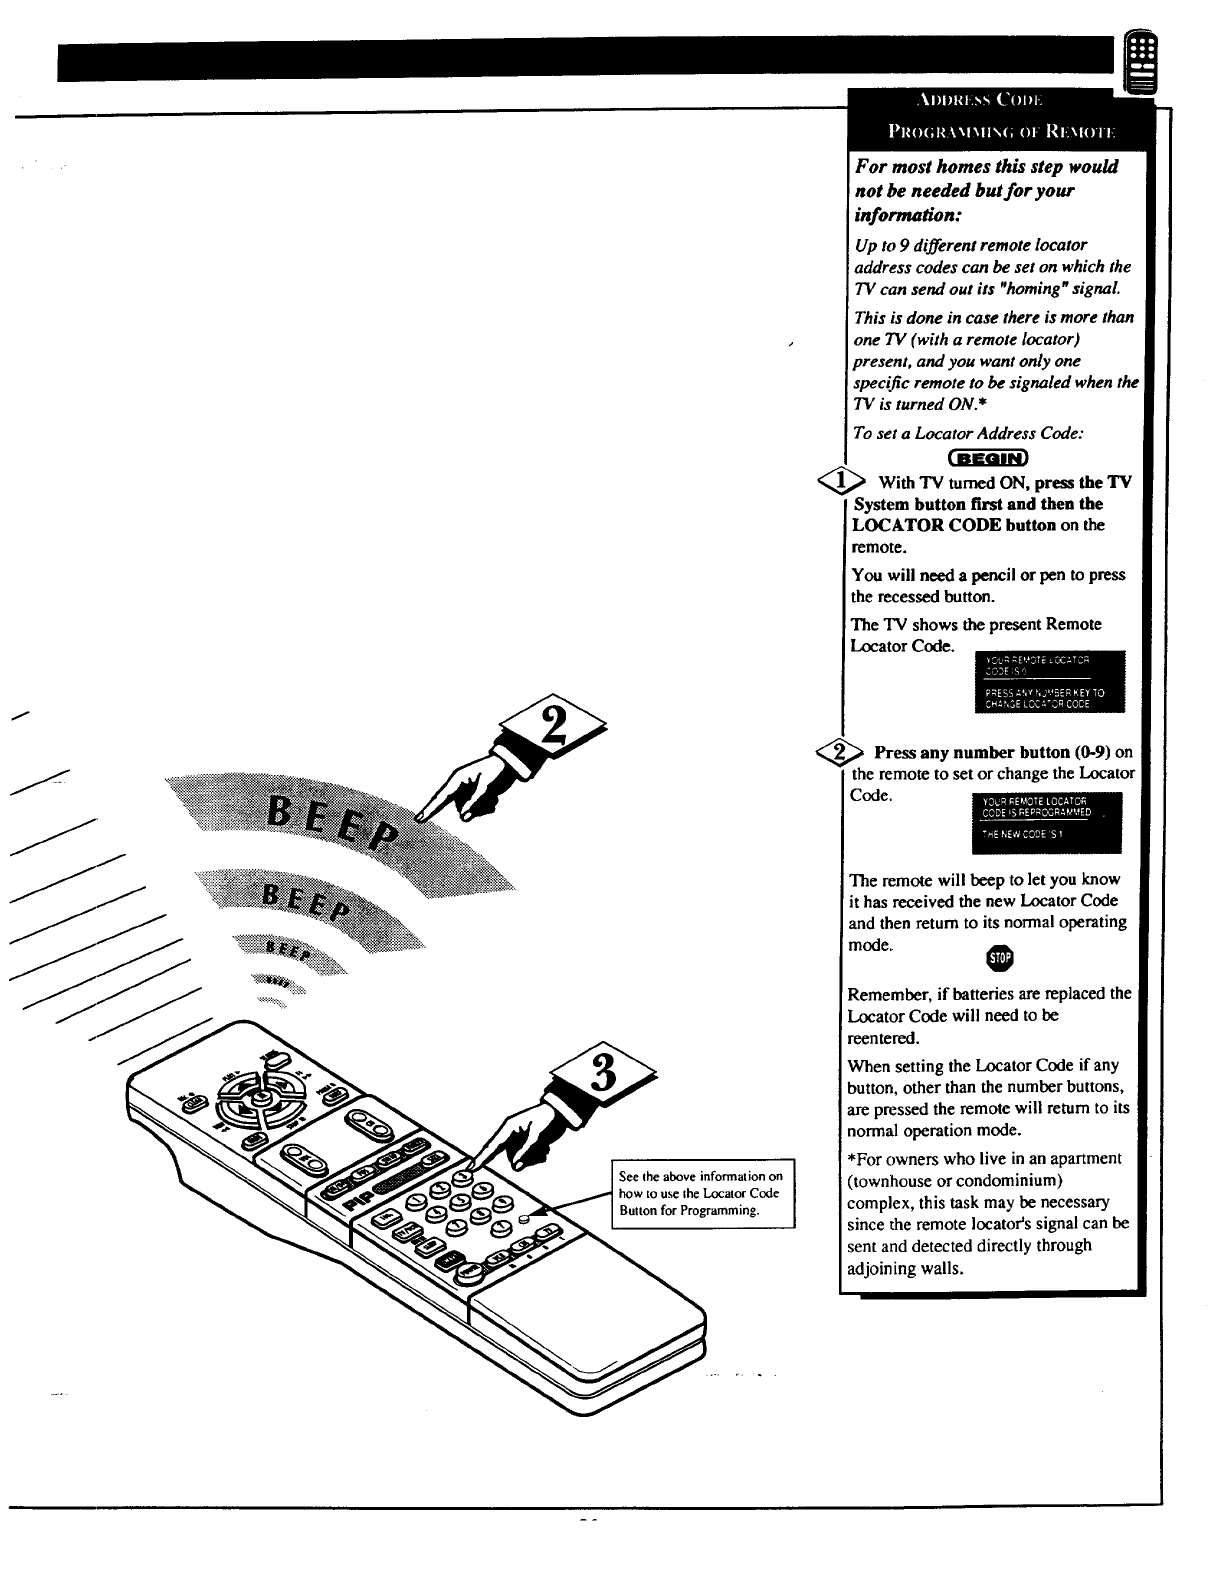
For most homes this step would
not be needed but for your
information:
Up to 9 different remote locator
address codes can be set on which the
TV can send out its "homing" signal.
This is done in case there is more than
one TV (with a remote Iocator)
oresent, and you want only one
specific remote to be signaled when the
TV is turned ON.*
To set a Locator Address Code:
With "IVturned ON, press the TV
System button first and then the
LOCATOR CODE button on the
remote.
You will need a pencil or pen to press
the recessed button.
The TV shows the present Remote
Locator Code.
>Press any number button (0-9) on
the remote to set or change the Locator
Code.
The remote will beep to let you know
it has received the new Locator Code
and then return to its normal operating
mode.1 0
Remember, if batteries are replaced the
Locator Code will need to be
reentered.
When setting the Locator Code if any
button, other than the number buttons,
are pressed the remote will return to its
normal operation mode.
*For owners who live in an apartment
(townhouse or condominium)
complex, this task may be necessary
since the remote Iocator's signal can be
sent and detected directly through
adjoining walls.
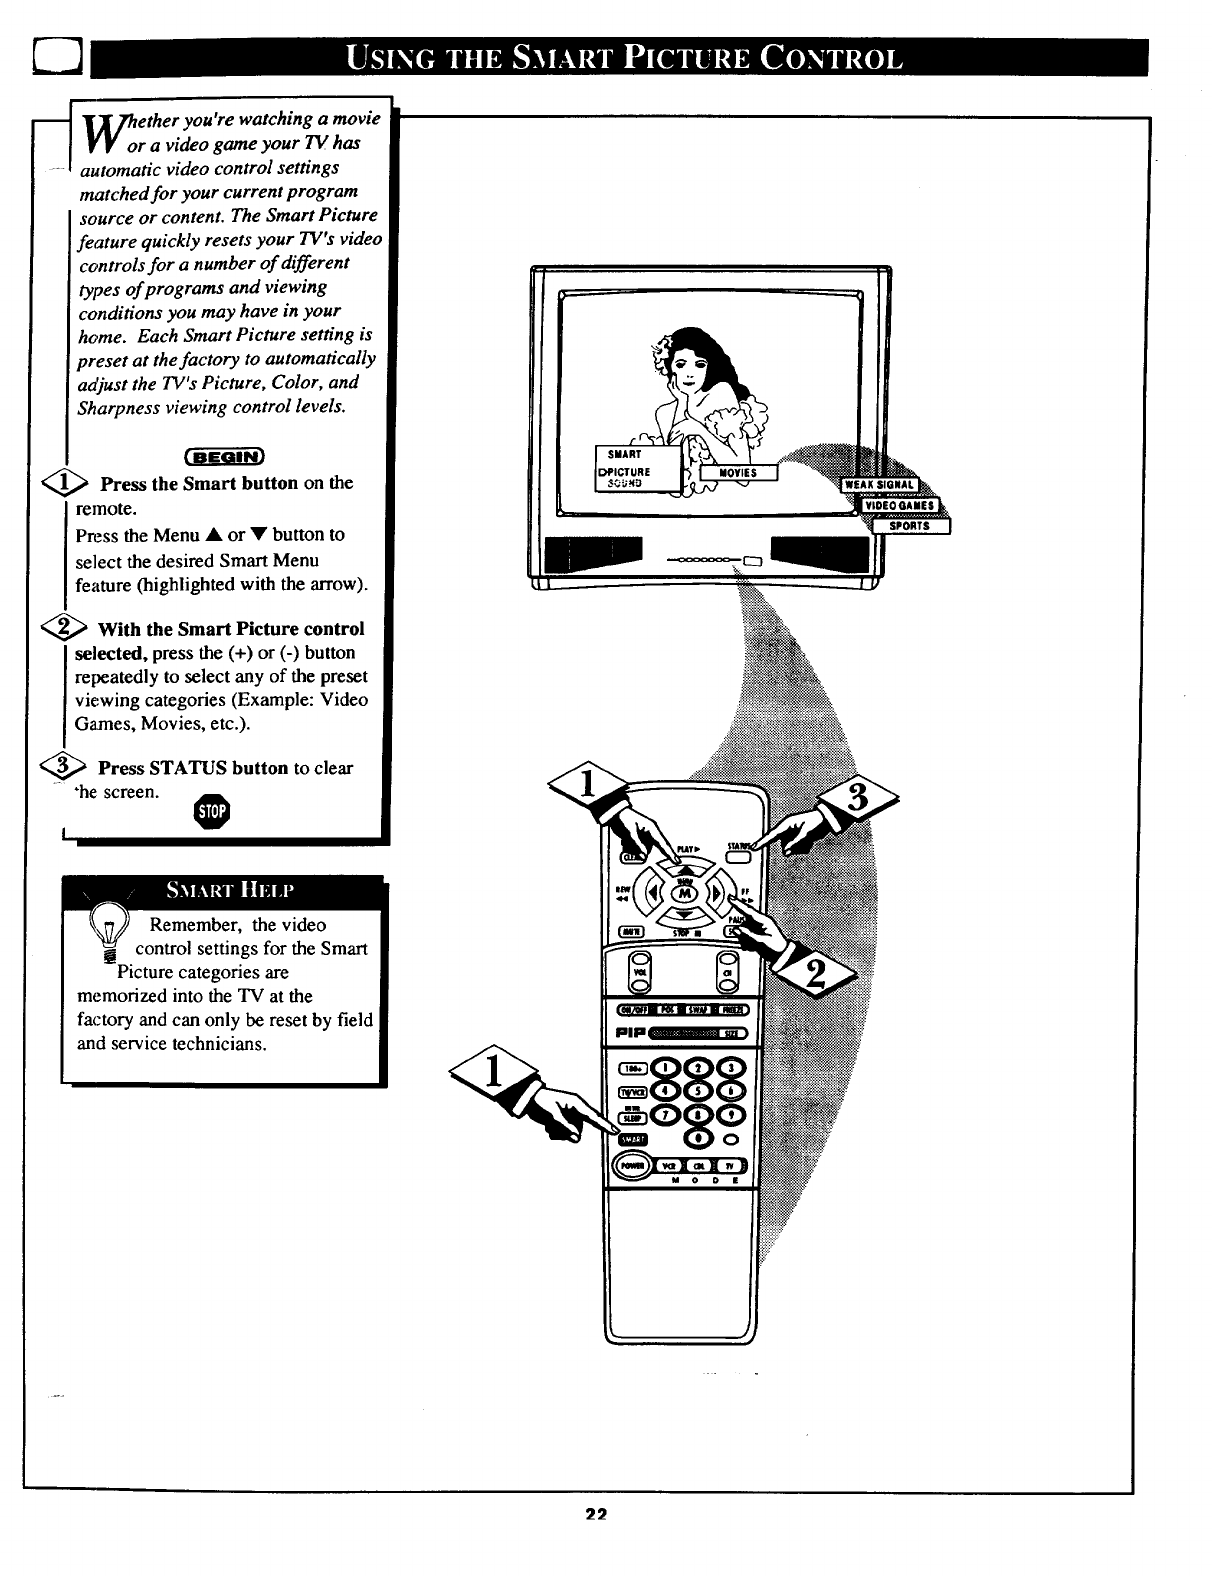
_ ]_hether you're watching a movie
VV or a video game your TV has
automatic video control settings
matched for your current program
source or content. The Smart Picture
feature quickly resets your TV's video
controls for anumber of different
types of programs and viewing
conditions you may have in your
home. Each Smart Picture setting is
preset at the factory to automatically
adjust the TV's Picture, Color, and
Sharpness viewing control levels.
<_ Press the Smart button on the
remote.
Press the Menu • or • button to
select the desired Smart Menu
feature (highlighted with the arrow).
<_ With the Smart Picture control
selected, press the (+) or (-) button
repeatedly to select any of the preset
viewing categories (Example: Video
Games, Movies, etc.).
<_ Press STATUS button to clear
"he: screen. @
I
Remember, the video
control settings for the Smart
Picture categories are
memorized into the TV at the
factory and can only be reset by field
and service technicians.
SMART
DPICTURE
22
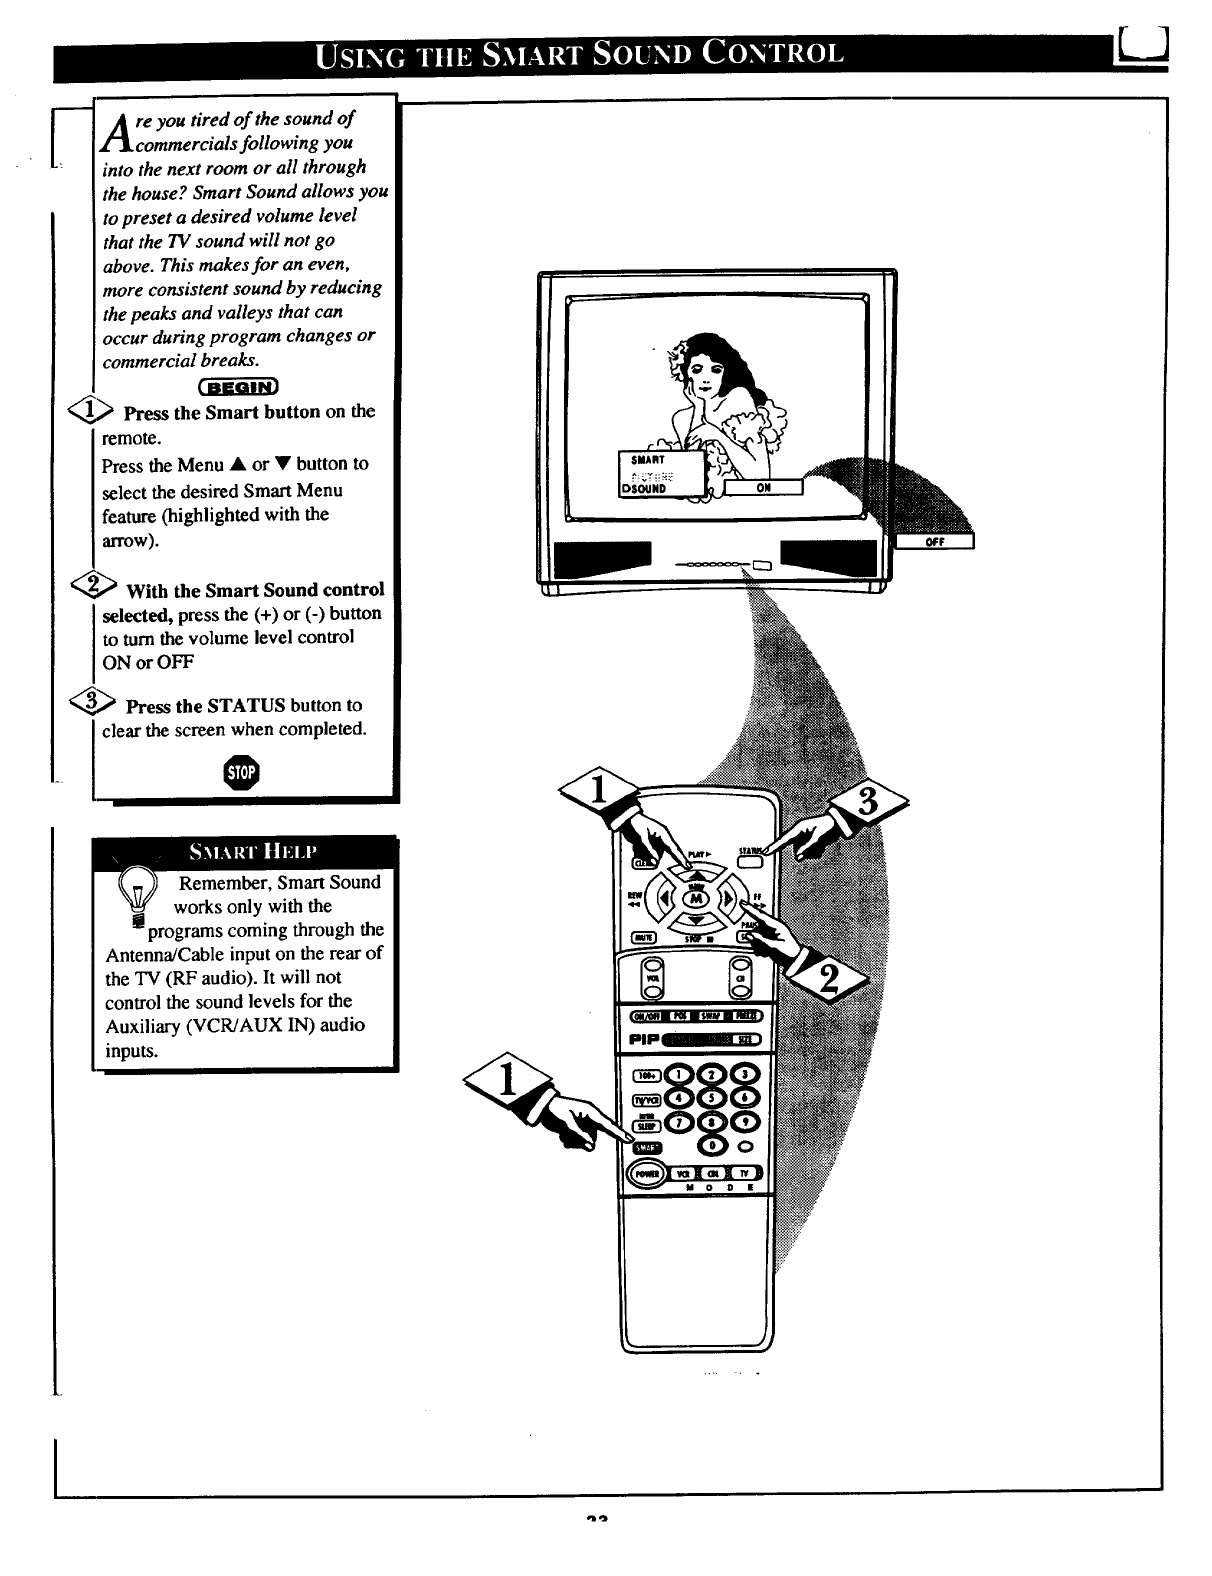
_A re you fired of the sound of
1-1 commercials following you
into the next room or all through
the house? Smart Sound allows you
to preset a desired volume level
that the TV sound will not go
above. This makes for an even,
more consistent sound by reducing
the peaks and valleys that can
occur during program changes or
commercial breaks.
@ Press the Smart button on the
remote.
Press the Menu • or • button to
select the desired Smart Menu
feature (highlighted with the
alTOW).
<'_ With the Smart Sound control
selected, press the (+) or (-) button
to turn the volume level control
ON or OFF
3_ Press the STATUS button to
clear the screen when completed.
0
L]
Remember, Smart Sound
works only with the
programs coming through the
Antenna/Cable input on the rear of
the TV (RF audio). It will not
control the sound levels for the
Auxiliary (VCR/AUX IN) audio
inputs.
I
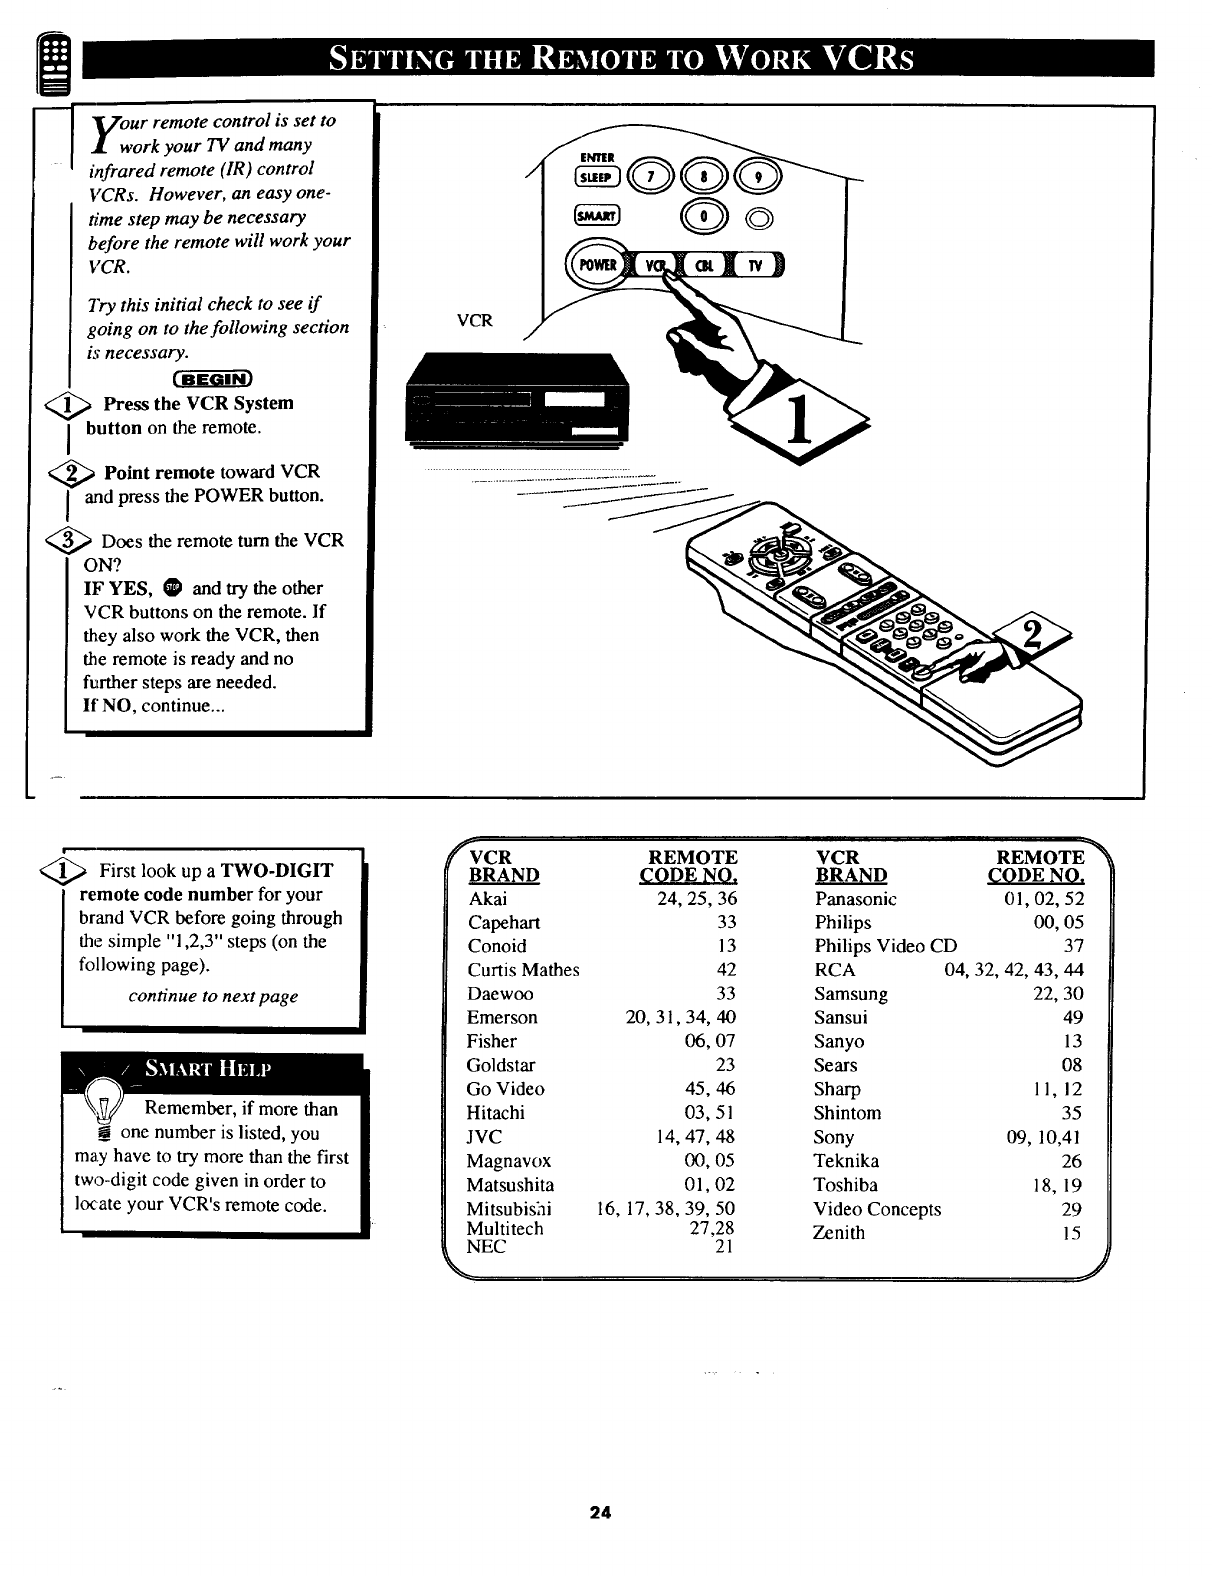
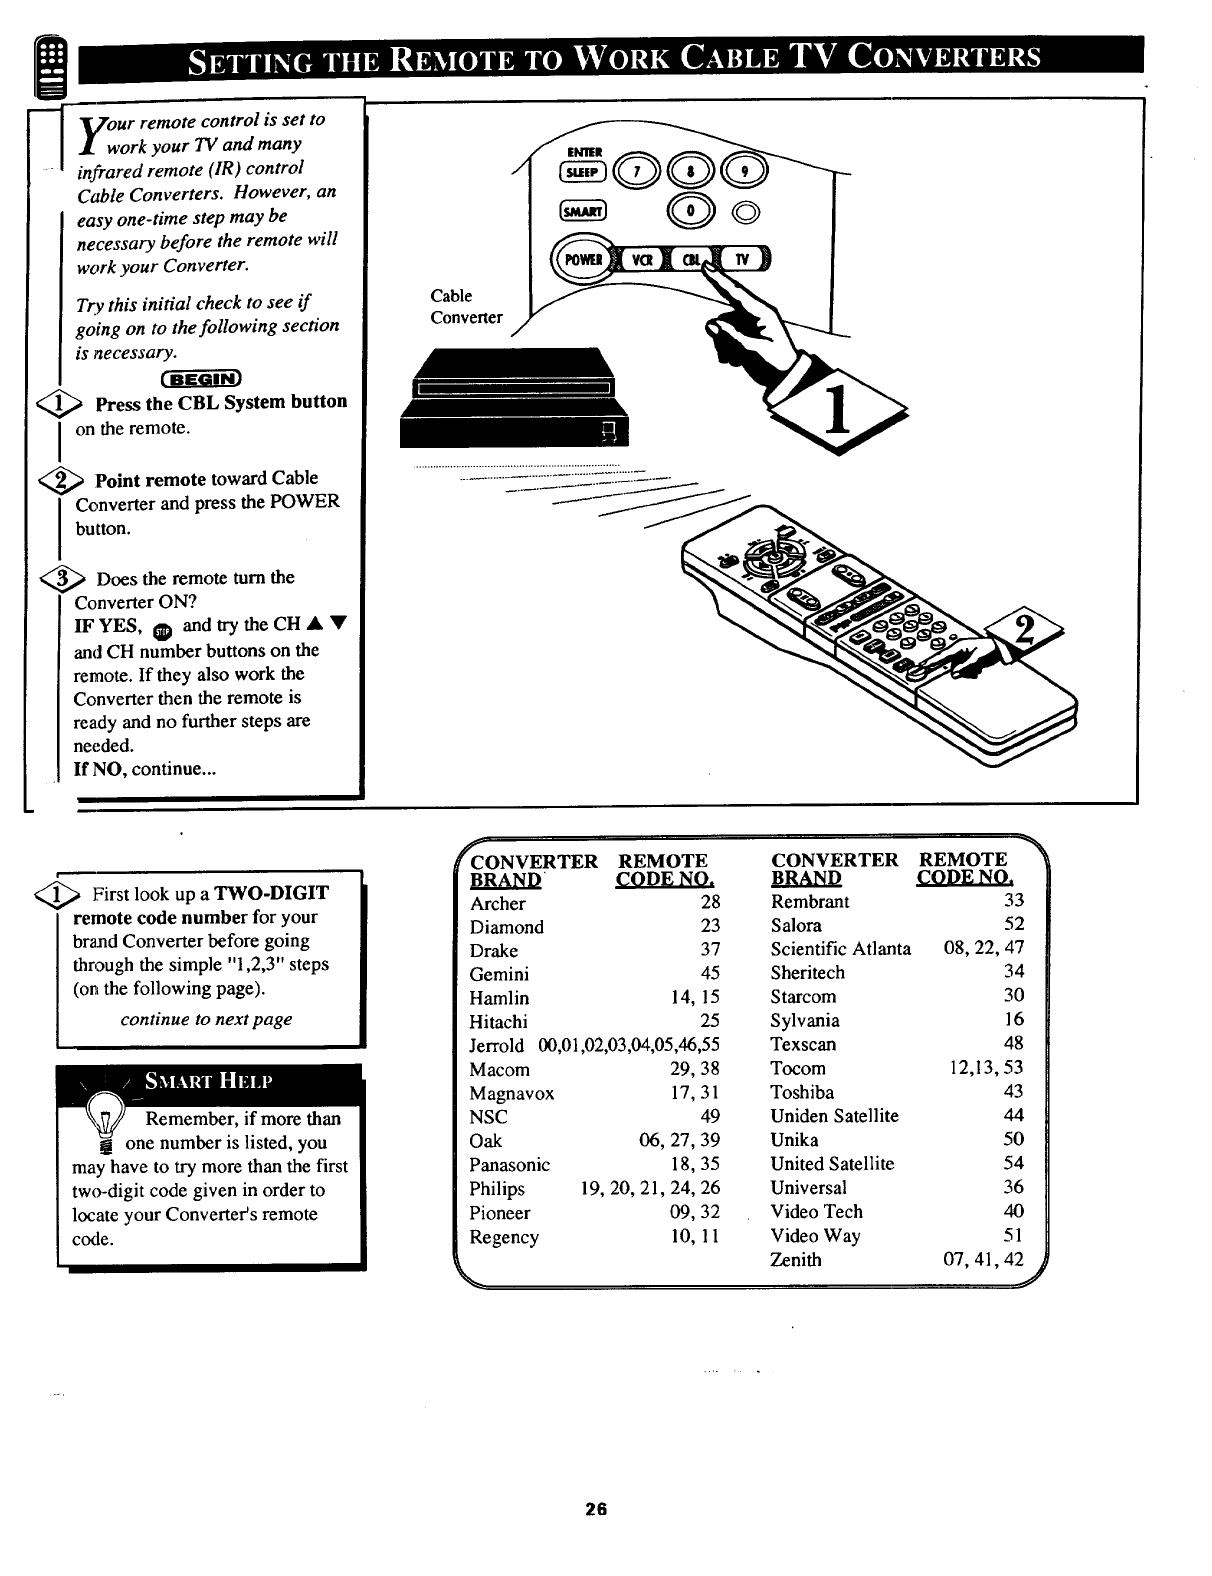
our remote control is set to
ork your TV and many
infrared remote (IR) control
VCRs. However, an easy one-
time step may be necessary
before the remote will work your
VCR.
VCR
Try this initial check to see if
going on to the following section
is necessary.
<_ Press the VCR System
button on the remote.
<_ Point remote toward VCR
I and press the POWER button.
,_ Does the remote turnthe VCR
ON?
IF YES, _l and try the other
VCR buttons on the remote. If
they also work the VCR, then
the remote is ready and no
further steps are needed.
If'NO, continue...
©
<_ First look up a TWO-DIGIT
I emote code number for your
brand VCR before going through
the simple "1,2,3" steps (on the
following page).
continue to next page
_'VCR REMOTE VCR REMOTE "_
BRAND CODE NO. BRAND CODE NO.
Akai 24, 25, 36 Panasonic 01,02, 52
Capehart 33 Philips 00, 05
Conoid 13 Philips Video CD 37
Curtis Mathes 42 RCA 04, 32, 42, 43, 44
Daewoo 33 Samsung 22, 30
Emerson 20, 31,34, 40 Sansui 49
Fisher 06, 07 Sanyo 13
Goldstar 23 Sears 08
Go Video 45, 46 Sharp 11, 12
Hitachi 03, 51 Shintom 35
JVC 14, 47, 48 Sony 09, 10,41
Magnavox 00, 05 Teknika 26
Matsushita 01,02 Toshiba 18, 19
Mitsubishi 16, 17, 38, 39, 50 Video Concepts 29
Multitech 27,28 Zenith 15
NEC 21
24
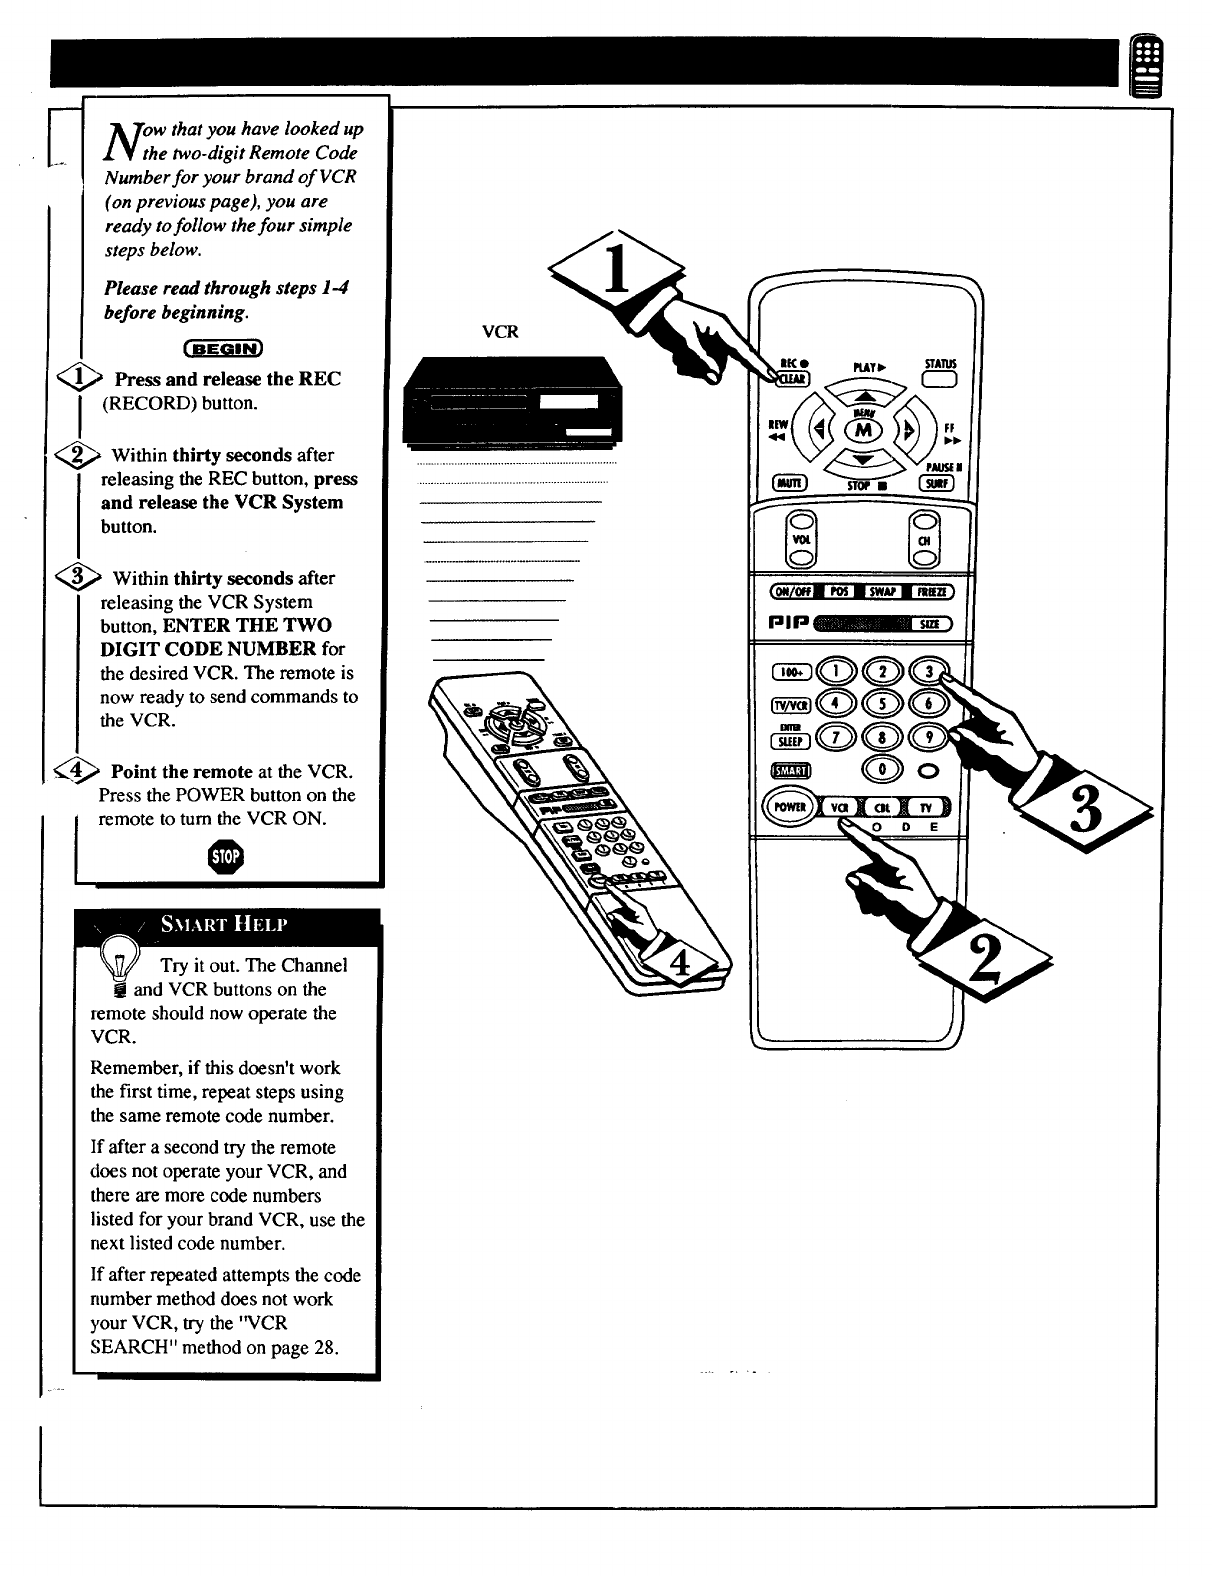
Nth wthat you have looked up
e two-digit Remote Code
Number for your brand of VCR
(on previous page), you are
ready to follow the four simple
steps below.
Please read through steps 1-4
before beginning.
_,_ Press and release the REC
(RECORD) button.
_,_ Within seconds after
thirty
releasing the REC button, press
and release the VCR System
button.
_",_ Within thirty seconds after
releasing the VCR System
button, ENTER THE TWO
DIGIT CODE NUMBER for
the desired VCR. The remote is
now ready to send commands to
the VCR.
._4j Point the remote at the VCR.
Press the POWER button on the
remote to turn the VCR ON.0
Try it out. The Channel
! and VCR buttons on the
remote should now operate the
VCR.
Remember, if this doesn't work
the first time, repeat steps using
the same remote code number.
If after asecond try the remote
does not operate your VCR, and
there are more code numbers
listed for your brand VCR, use the
next listed code number.
If after repeated attempts the code
rmmber method does not work
),our VCR, try the "VCR
SEARCH" method on page 28.
VCR
{o.io.[]m • sw_•
pmp
!
_our remote control is set to
Iwork your TV and many
infrared remote (IR ) control
Cable Converters. However, an
easy one-time step may be
necessary before the remote will
work your Converter.
Try this initial check to see if
going on to the following section
is necessary.
<_ Press the CBL System button
I on the remote.
<_ Point toward Cable
remote
Converter and press the POWER
button.
<_ Does the remote turn the
Converter ON?
IF YES, Oand try the CH • •
and CH number buttons on the
remote. If they also work the
Converter then the remote is
ready and no further steps are
needed.
If NO, continue...
/
Cable
Converter /
©
<_ First look up a TWO-DIGIT
remote code number for your
brand Converter before going
through the simple "1,2,3" steps
(on the following page).
continue to next page
Remember, if more than
! one number is listed, you
may have to try more than the first
two-digit code given in order to
locate your Converter's remote
code.
_CONVERTER REMOTE
BRAND CODE NO.
Archer 28
Diamond 23
Drake 37
Gemini 45
Hamlin 14, 15
Hitachi 25
Jerrold 00,01,02,03,04,05,46,55
Macom 29, 38
Magnavox 17, 31
NSC 49
Oak 06, 27, 39
Panasonic 18, 35
Philips 19, 20, 21, 24, 26
Pioneer 09, 32
Regency 10, 11
CONVERTER REMOTE
BRAND CODE NO.
Rembrant 33
Salora 52
Scientific Atlanta 08, 22, 47
Sheritech 34
Starcom 30
Sylvania ]6
Texscan 48
Tocom 12,13, 53
Toshiba 43
Uniden Satellite 44
Unika 50
United Satellite 54
Universal 36
Video Tech 40
Video Way 51
Zenith 07, 41,42
211
To ,thatyouhaw lookedup
IYth etwo-digit Remote Code
Number for your brand of Cable
Converter (on previous page),
you are ready tofollow the four
simple steps below.
Please read through steps 1.4
before beginning.
1_ Press and release the REC
(RECORD) button.
2_ Within thirty seconds after
releasing the REC button, press
and release the CBL System
button.
3_,,'_ Within thirty seconds after
releasing the CBL System
button, ENTER THE TWO
DIGIT CODE NUMBER for
the desired Converter. The
remote is now ready to send
commands to the Converter.
.,_ Point remote at the
the
Converter. Press the POWER
button on the remote to turnthe
Converter ON.
O
Try it out. The Channel
and POWER buttons on the
remote should now operate the
Converter.
Remember, if this doesn't work
the first time, repeat steps using
the same remote code number.
If after a second try the remote
does not operate your Converter,
and there are more code numbers
listed for your brand Converter,
use the next listed code number.
If after repeated attempts the code
number method does not work
your Converter, try the
"CONVERTER SEARCH"
method on page 28.
Cable Convener
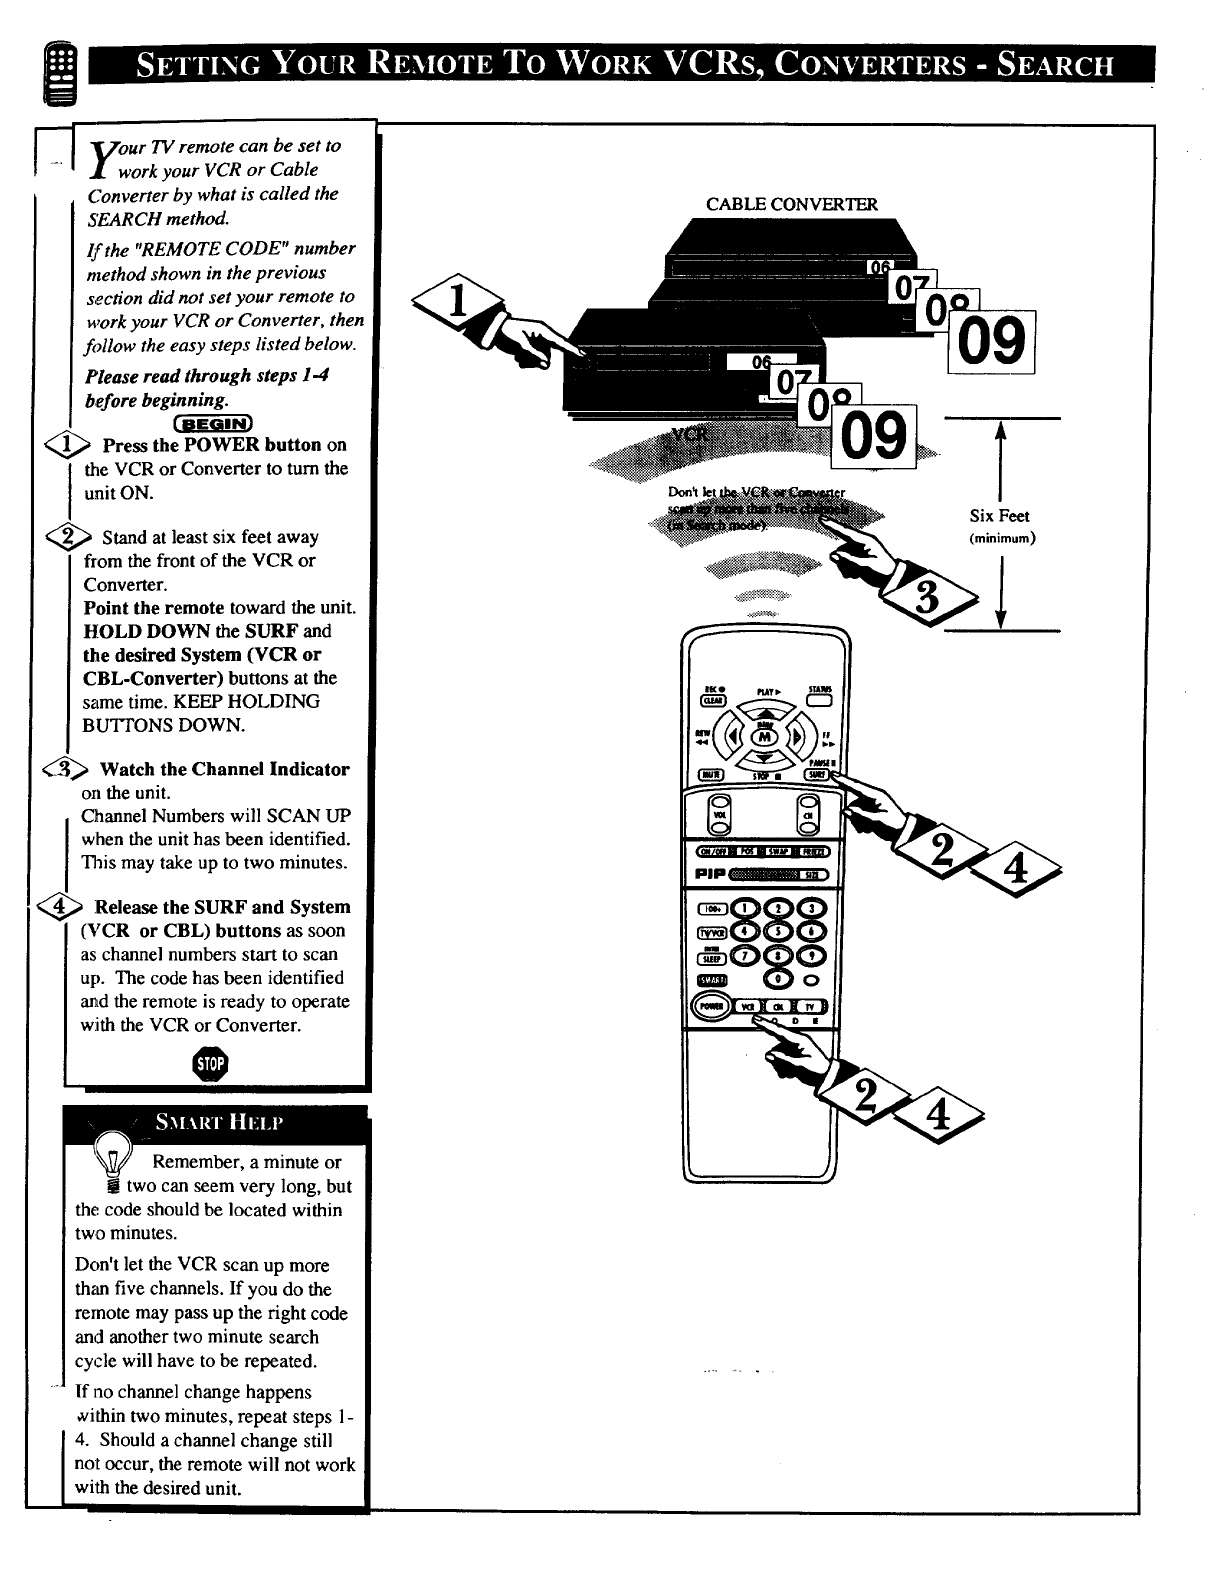
!ITV remote can be set to
Vour
- • work your VCR or Cable
Converter by what is called the
SEARCH method.
lf the "REMOTE CODE" number
method shown in the previous
section did not set your remote to
work your VCR or Converter, then
fi_llow the easy steps listed below.
Please read through steps 1-4
before beginning.
<_ Press the on
POWER button
the VCR or Converter to turn the
unit ON.
<_ Stand at least away
six feet
from the front of the VCR or
Converter.
Point the remote toward the unit.
HOLD DOWN the SURF and
the desired System (VCR or
CBL-Converter) buttons at the
same time. KEEP HOLDING
BU'I_ONS DOWN.
Watch the Channel Indicator
on the unit.
Channel Numbers will SCAN UP
when the unit has been identified.
This may take up to two minutes.
Release the SURF and System
(VCR or CBL) buttons as soon
as channel numbers start to scan
up. The code has been identified
and the remote is ready to operate
with the VCR or Converter.
O
Remember, a minute or
two can seem very long, but
the code should be located within
two minutes.
Don't let the VCR scan up more
than five channels. If you do the
remote may pass up the right code
and another two minute search
cycle will have to be repeated.
" If no channel change happens
¢¢ithintwo minutes, repeat steps 1-
4. Should a channel change still
not occur, the remote will not work
with the desired unit.
CABLE CONVERTER
=888
09 .
o91
f
Six Feet
(minimum)
1
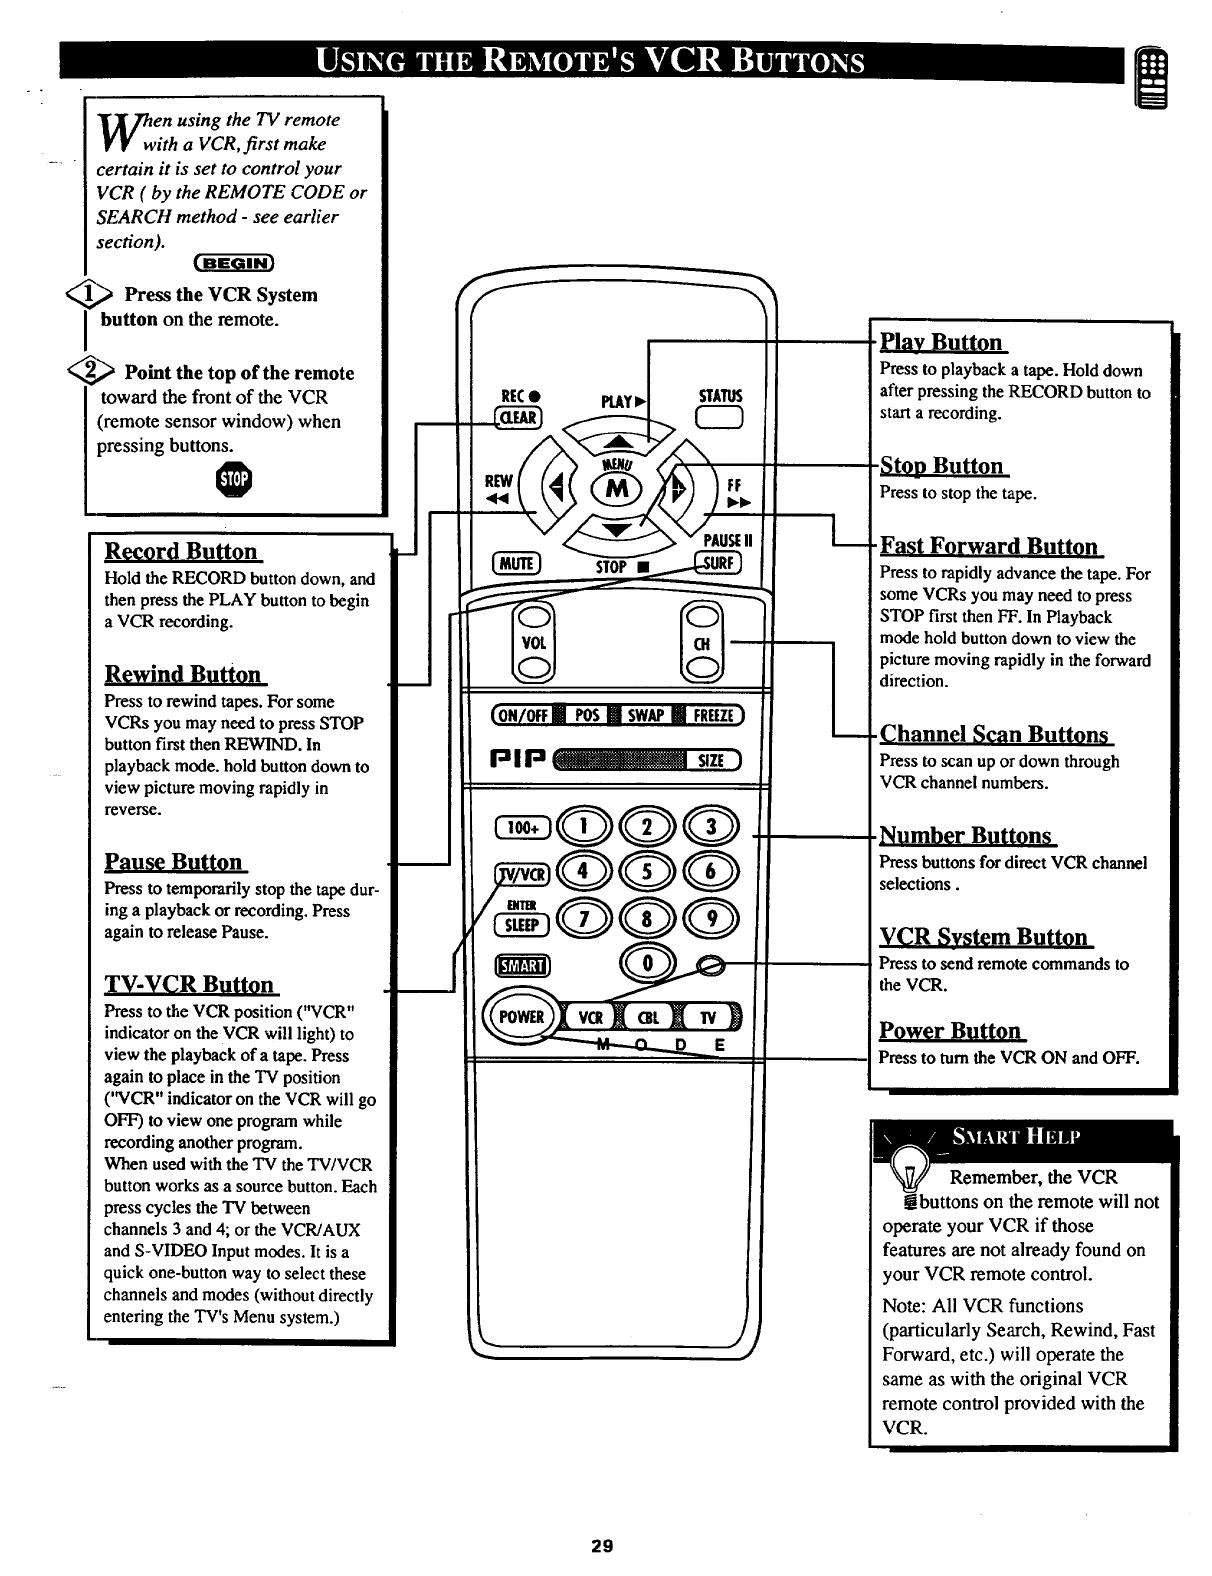
_wenusing the TV remote
ith a VCR, first make
certain it is set to control your
VCR ( by the REMOTE CODE or
SEARCH method -see earlier
section).
Press the VCR System
button on the remote.
Point the top of the remote
toward the front of the VCR
(remote sensor window) when
pressing buttons.
O
Record Button
Hold the RECORD button down, and
then press the PLAY button to begin
aVCR recording.
Rewind Button
Press to rewind tapes. For some
VCRs you may need to press STOP
button first then REWIND. In
playback mode. hold button down to
view picture moving rapidly in
reverse.
Pause Buttpn
Press to temporarily stop the tape dur-
ing a playback or recording. Press
again to release Pause.
TV-VCR Button
Press to the VCR position ('NCR"
indicator on the VCR will light) to
view the playback of a tape. Press
again to place in the "IVposition
('WCR" indicator on the VCR will go
OFF) to view one program while
recording another program.
When used with the "IV the TV/VCR
button works as a source button. Each
press cycles the TV between
channels 3 and 4; or the VCR/AUX
and S-VIDEO Input modes. It is a
quick one-button way to select these
channels and modes (without directly
entering the TV's Menu system.)
(ON/OFF[] POSIm SWAPill FREEZE)
PIP _-_--_.Z size)
k__
L
Press to playback a tape. Hold down
after pressing the RECORD button to
start a recording.
-Stop Button
Press to stop the tape.
Fast Forward Button
Press to rapidly advance the tape. For
some VCRs you may need to press
STOP first then FF. In Playback
mode hold button down to view the
picture moving rapidly in the forward
direction.
.Channel Scan Button_
Press to scan up or down through
VCR channel numbers.
Number Buttons
Press buttons for direct VCR channel
selections.
VCR System Button
Press to send remote commands to
the VCR.
Power BoRon
Press to turn the VCR ON and OFF.
Remember, the VCR
abuttons on the remote will not
operate your VCR if those
features are not already found on
your VCR remote control.
Note: All VCR functions
(particularly Search, Rewind, Fast
Forward, etc.) will operate the
same as with the original VCR
remote control provided with the
VCR.
29
__ Dicture in Picture (PIP) is the
J[ showing of two pictures on the
TV screen at the same time. (One
nain screen picture and one small
inset picture -or PIP).
NOTE: The PIP picture must be
supplied by a VCR (or other
accessory equipped with a VIDEO
OUTPUT jack). See the following
exwnple on how a VCR can be
used to supply a PIP picture.
<_ Connect the VIDEO OUT
jack on the VCR to the VIDEO
IN jack on the TV.
Also connect the AUDIO OUT
jack (Right/Left) from the VCR to
the AUDIO IN jack on the TV.
(See Reminder note below.)
Also ensure the normal antenna
connection between the VCR and
"IV is in place.
<_ Move to the next page after
te VCR to TV PIP connections
are completed.
.continue to nextpage
MAIN
SCREEN PIP
AUDIO IN
(RED/
WHITE)
CABLE "IV
SIGNAL
VCR
(EQUIPPED WITH VIDEO AND
AUDIO OUTPUT JACKS)
For other possible PIP
connections see page 34 for
the "More PIP Connections"
section.
If you have a single (monaural)
Audio Output VCR, '%'"
connectors are available to
complete your connection to the
TV. Contact your dealer, or our
Parts Information Center (1-800-
292-6066), for details.
3O
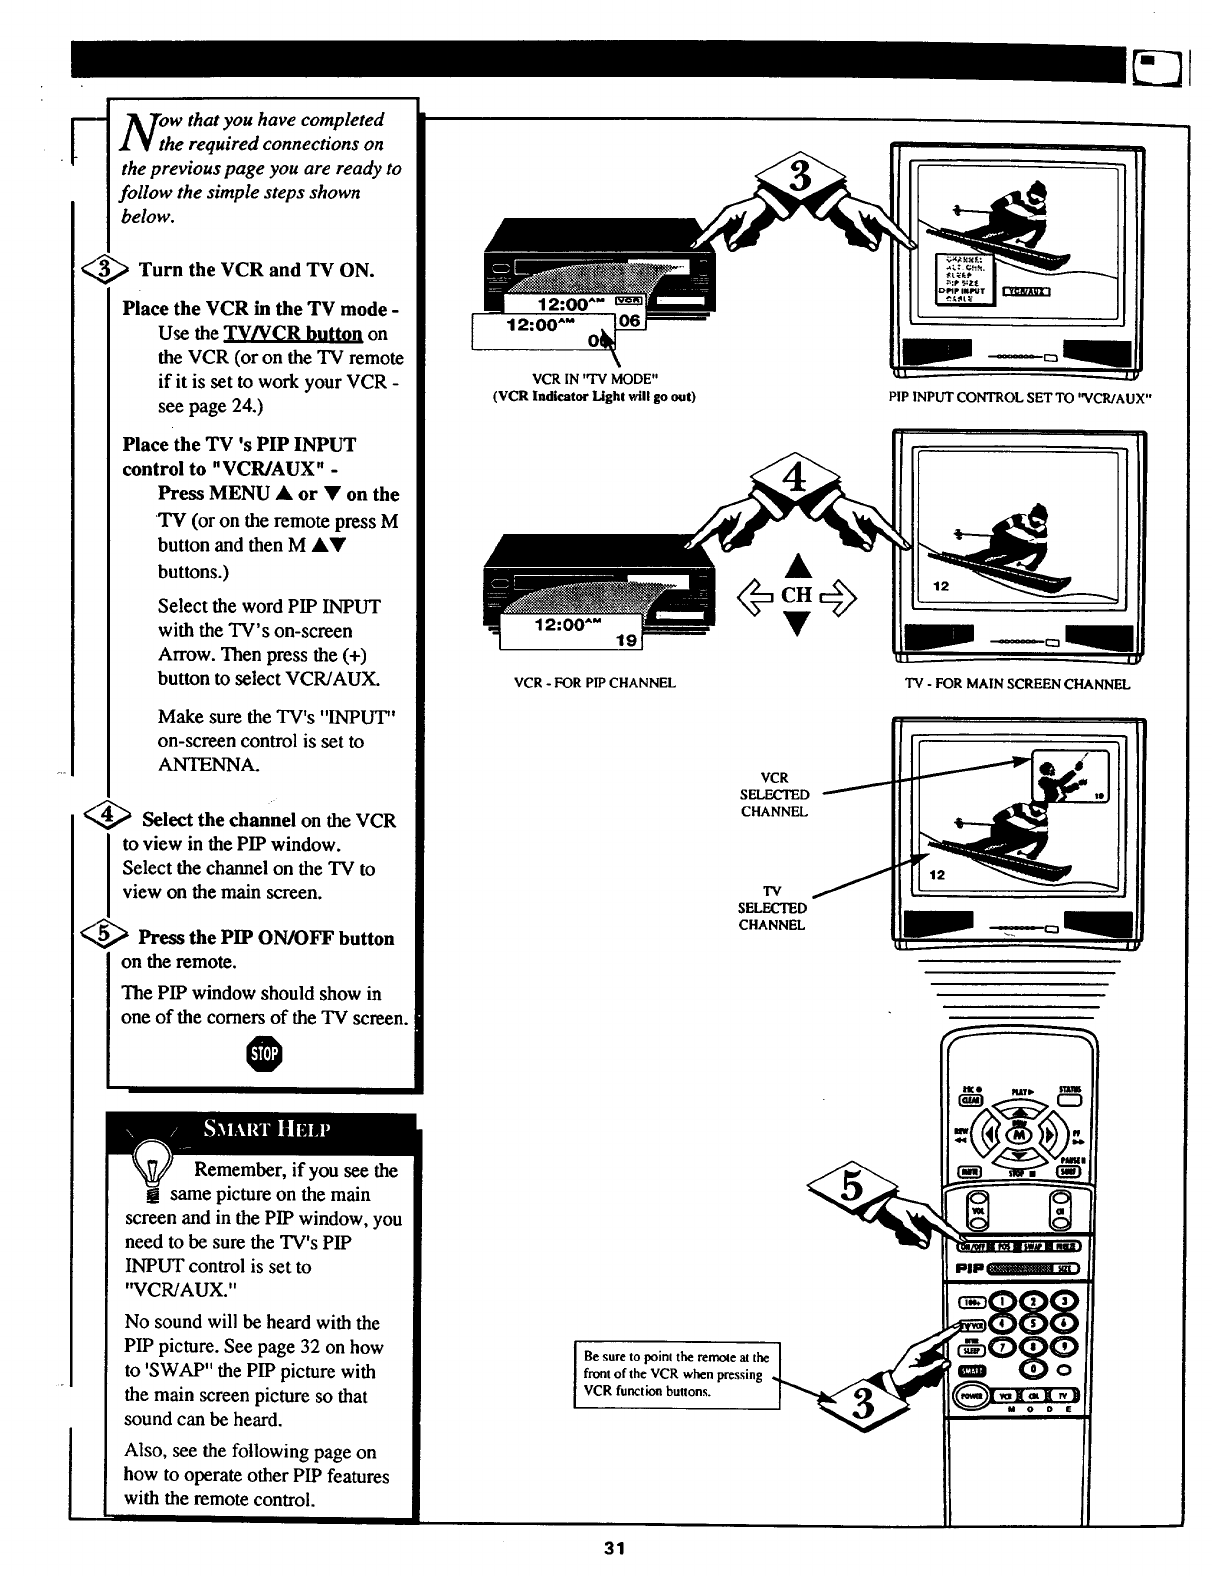
F_Tow that you have completed
• ¥ the required connections on
the previous page you are ready to
follow the simple steps shown
below.
_Turn the VCR and TV ON.
Place the VCR in the TV mode -
Use the TV/VCR button on
the VCR (or on the TV remote
if it is set to work your VCR -
see page 24.)
Place the TV's PIP INPUT
control to "VCR/AUX" -
Press MENU •or •on the
TV (or on the remote press M
button and then M •g
buttons.)
Select the word PIP INPUT
with the TV's on-screen
Arrow. Then press the (+)
button to select VCR/AUX.
Make sure the TV's "INPUT"
on-screen control is set to
ANTENNA.
<,_ Select the channel on the VCR
to view in the PIP window.
Select the channel on the TV to
view on the main screen.
_Press the PIP ON/OFF button
on the remote.
The PIP window should show in
one of the comers of the TV screen.
O
Remember, if you see the
same picture on the main
screen and in the PIP window, you
need to be sure the TV's PIP
INPUT control is set to
"VCR/AUX."
No sound will be heard with the
PIP picture. See page 32 on how
to 'SWAP" the PIP picture with
the main screen picture so that
sound can be heard.
Also, see the following page on
how to operate other PIP features
[12:00""
VCR IN "IV MODE"
(VCR Indicator Light will go out) PIP INPUT CONTROL SET TO "VCR/AUX"
VCR - FOR PIP CHANNEL TV - FOR MAIN SCREEN CHANNEL
VCR
SELECTED
CHANNEL
"IV
SE_D
CHANNEL P
Be sure to point the remoqe at tl_
front of the VCR when pressing
VCR function buttons.
31
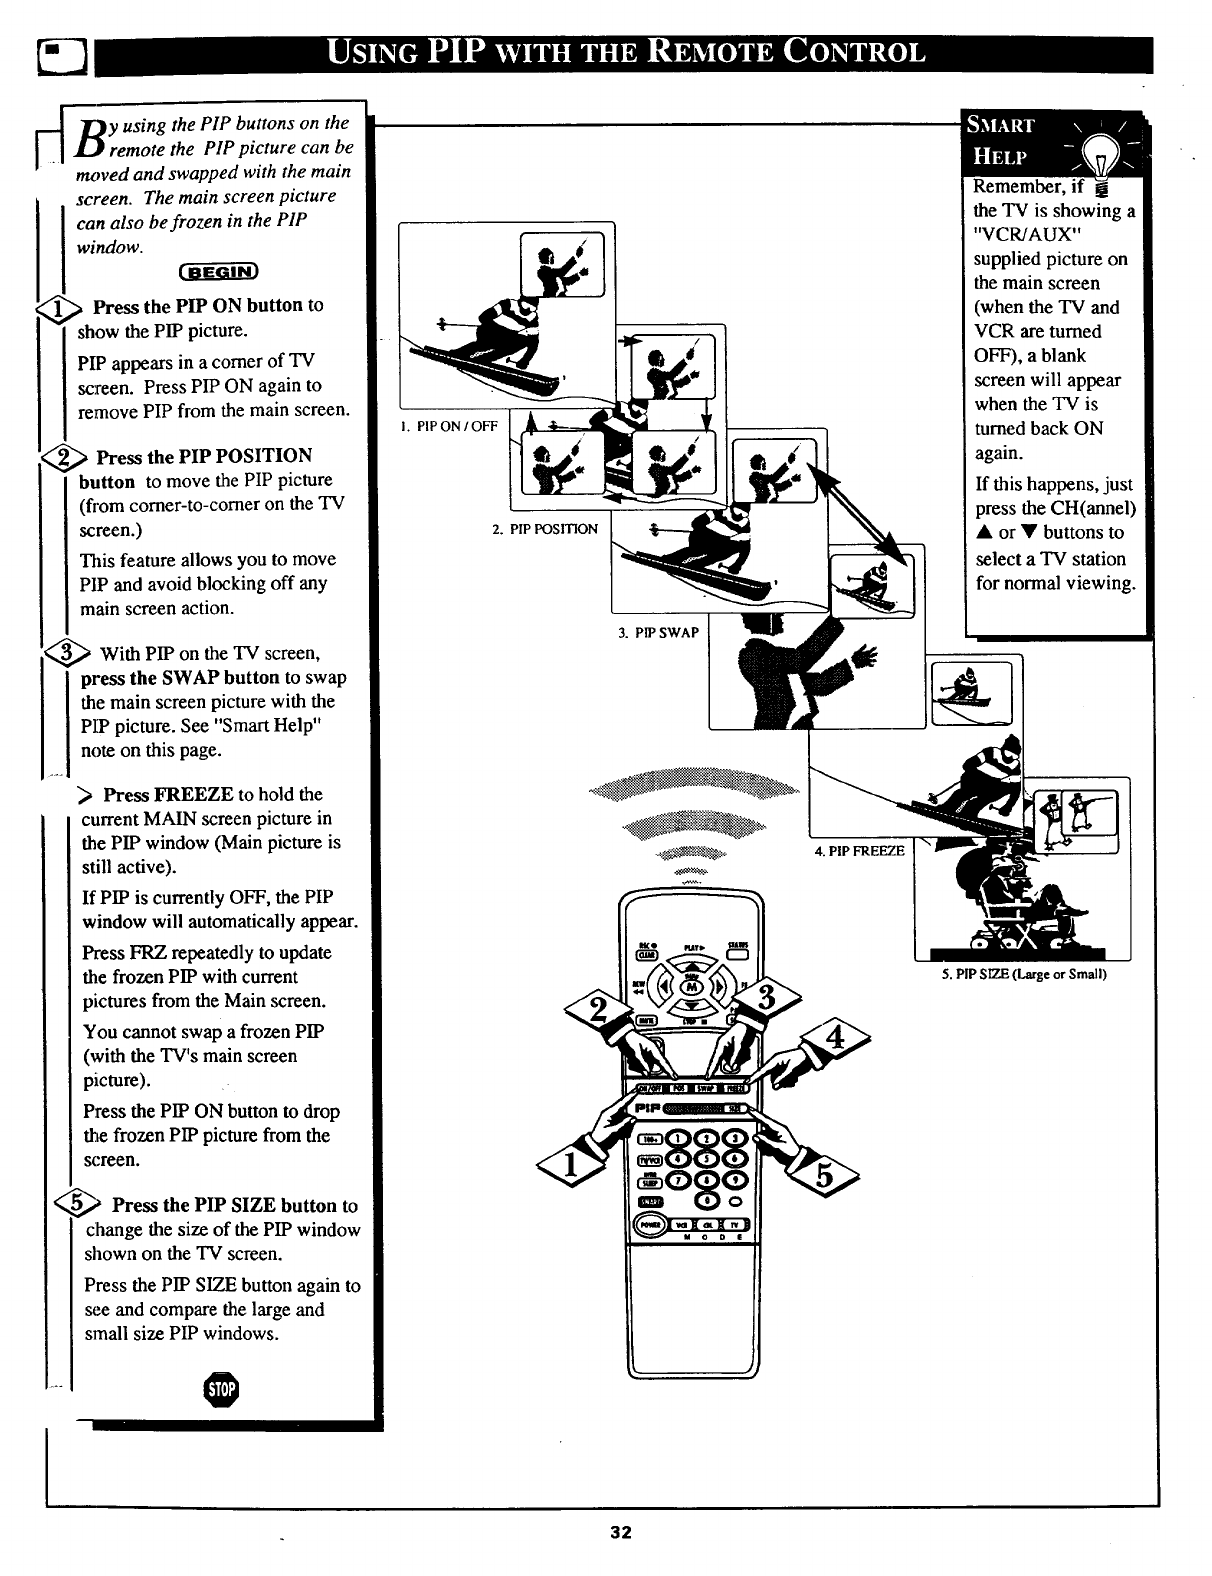
_y using the PIP buttons on the
LJ remote the PIP picture can be
moved and swapped with the main
screen. The main screen picture
can also be frozen in the PIP
window.
,,_ Press the PIP ON button to
show the PIP picture.
PIP appears in a corner of TV
screen. Press PIP ON again to
remove PIP from the main screen.
_;_ Press the PIP POSITION
button to move the PIP picture
(fi'om corner-to-corner on the TV
screen.)
This feature allows you to move
PIP and avoid blocking off any
main screen action.
_With PIP on the screen,
TV
press the SWAP button to swap
the main screen picture with the
PIP picture. See "Smart Help"
note on this page.
<
Press FREEZE to hold the
current MAIN screen picture in
the PIP window (Main picture is
still active).
If PIP is currently OFF, the PIP
window will automatically appear.
Press FRZ repeatedly to update
the frozen PIP with current
pictures from the Main screen.
You cannot swap a frozen PIP
(with the TV's main screen
picture).
Press the PIP ON button to drop
the frozen PIP picture from the
screen.
_,_ Press the PIP SIZE button to
change the size of the PIP window
shown on the TV screen.
Press the PIP SIZE button again to
see and compare the large and
small size PIP windows.
I. PIP ON IOFF
2. PIP POSITION
3. PIP SWAP
._._,_,_-..-__*_,
.._- 4. PIP FREEZE
Remember, if
the TV is showing a
"VCR/AUX"
supplied picture on
the main screen
(when the TV and
VCR are turned
OFF), a blank
screen will appear
when the TV is
turned back ON
again.
If this happens, just
press the CH(annel)
• or • buttons to
select a TV station
for normal viewing.
5. PIP SIZE (Large or Small)
32
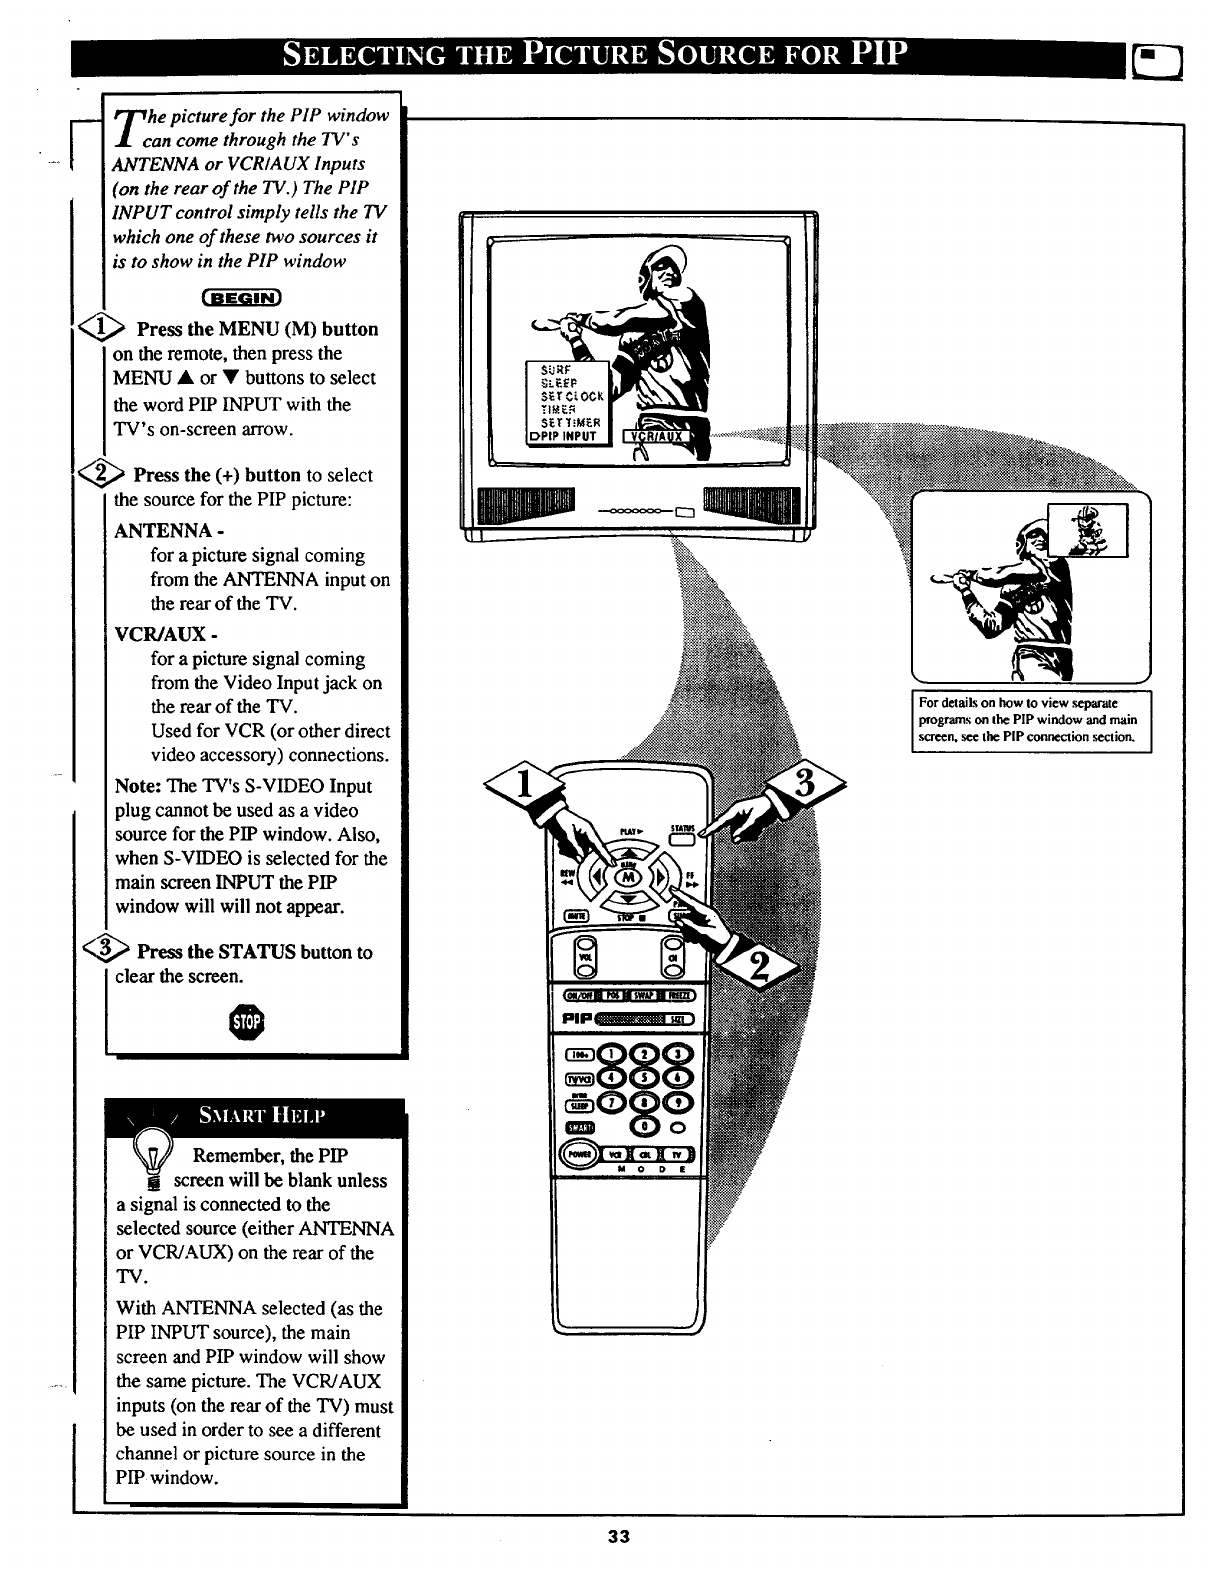
he picture for the PIP window
an come through the TV's
ANTENNA or VCRIAUX Inputs
(on the rear of the TV.) The PIP
INPUT control simply tells the TV
which one of these two sources it
is to show in the PIP window
m-ffdrm
_._ Press the MENU (M) button
on the remote, then press the
MENU •or • buttons to select
the word PIP INPUT with the
TV's on-screen arrow.
_.,_ Press the (+) button to select
the source for the PIP picture:
ANTENNA -
for a picture signal coming
from the ANTENNA input on
the rear of the TV.
VCR/AUX -
for a picture signal coming
from the Video Input jack on
the rear of the TV.
Used for VCR (or other direct
video accessory) connections.
Note: The TV's S-VIDEO Input
plug cannot be used as a video
source for the PIP window. Also,
when S-VIDEO is selected for the
main screen INPUT the PIP
window will will not appear.
(_ Press the STATUS button to
clear the screen.
@
Remember, the PIP
screen will be blank unless
a signal is connected to the
selected source (either ANTENNA
or VCR/AUX) on the rear of the
TV.
With ANTENNA selected (as the
PIP INPUT source), the main
screen and PIP window will show
the same picture. The VCR/AUX
inputs (on the rear of the TV) must
be used in order to see a different
channel or picture source in the
PIP window.
For details on how to view separate I
programs on the PIP window and main I
._r_n. see the PIP connection .section.
33
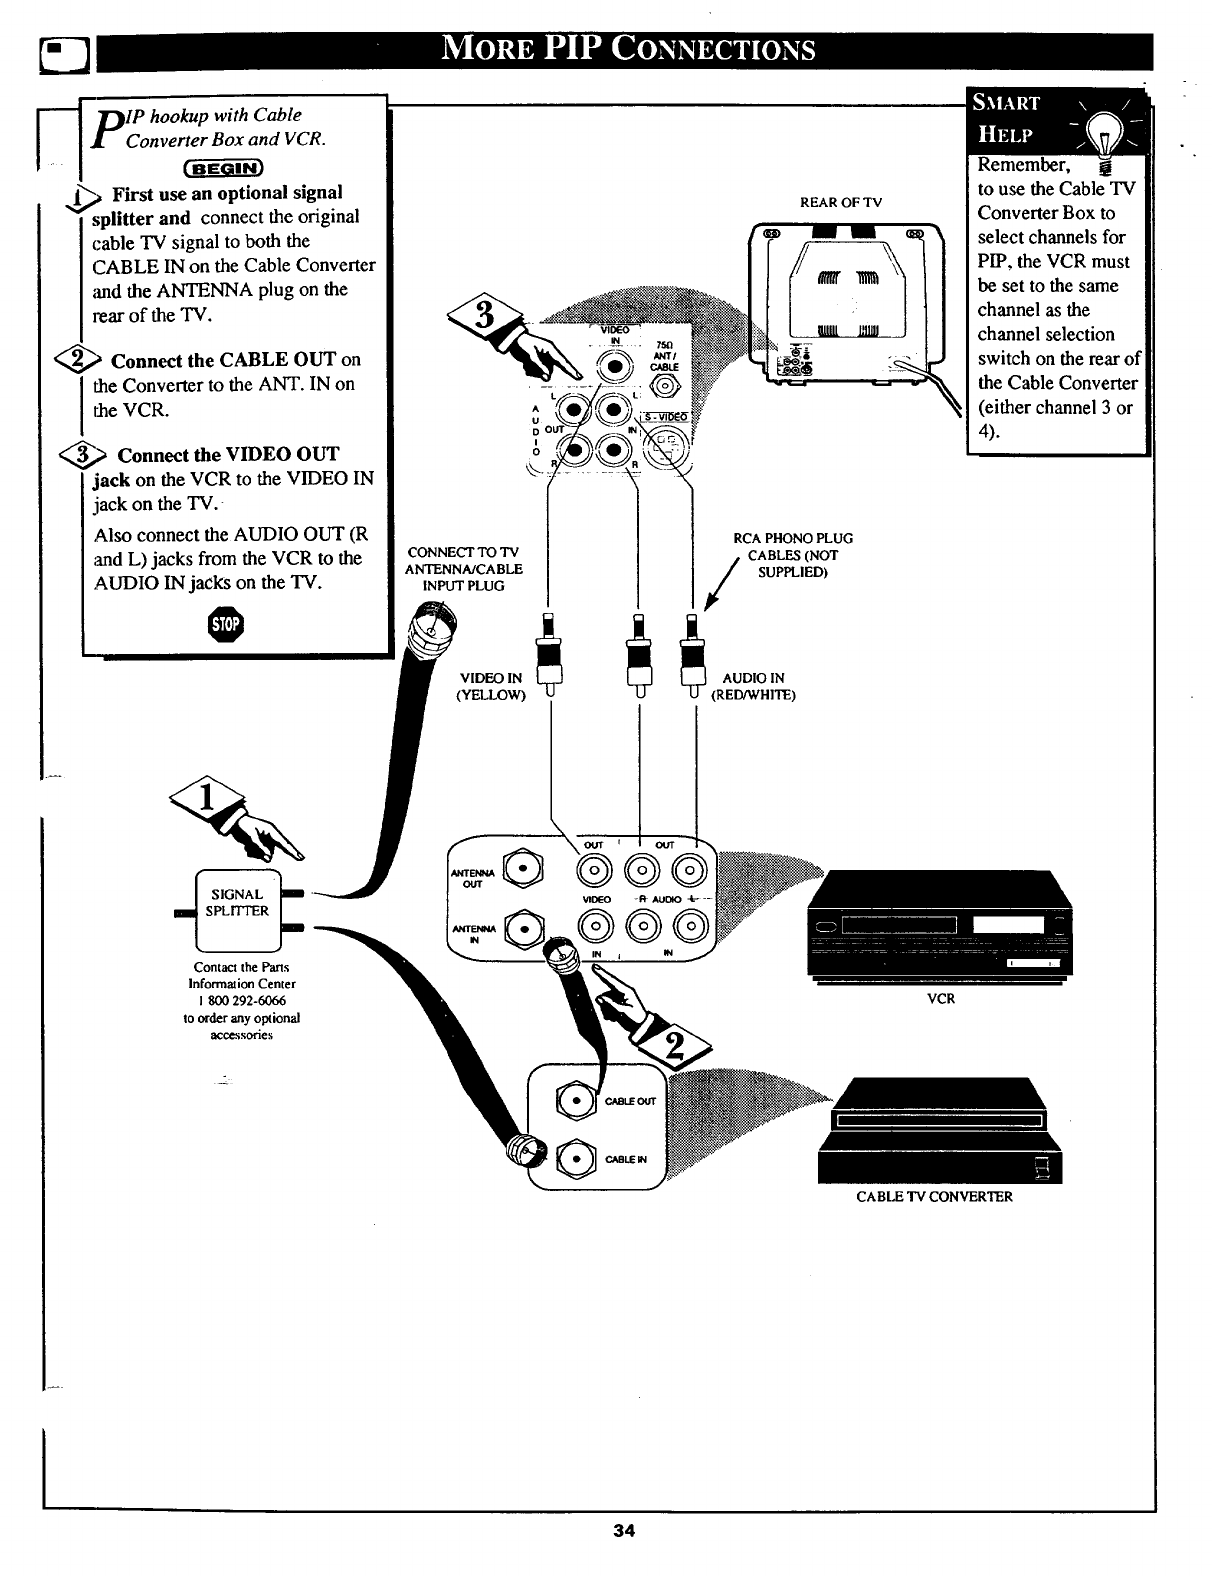
_DIP hookup with Cable
IConverter Box and VCR.
_,_ First use an optional signal
splitter and connect the original
cable TV signal to both the
CABLE IN on the Cable Converter
and the ANTENNA plug on the
rear of the "IV.
_._ Connect the CABLE OUT on
the Converter to the ANT. IN on
the VCR.
_._ Connect the VIDEO OUT
jack on the VCR to the VIDEO IN
jack on the TV.
Also connect the AUDIO OUT (R
and L) jacks from the VCR to the
,AUDIO IN jacks on the TV.
Contact the Parts
Information Center
I 800 292-6066
to order any optional
acc..cssories
..L
REAR OF TV
CONNECT TO TV
ANTENNA/CABLE
INPUT PLUG
VIDEO IN
(YELLOW)
A
IJ
RCA PHONO PLUG
CABLES (NOT
SUPPLIED)
®
IN
@
@@
VCR
Remember, !
to use the Cable TV
Converter Box to
select channels for
PIP, the VCR must
be set to the same
channel as the
channel selection
switch on the rear of
the Cable Converter
(either channel 3 or
4).
CABLE TV CONVERTER
34
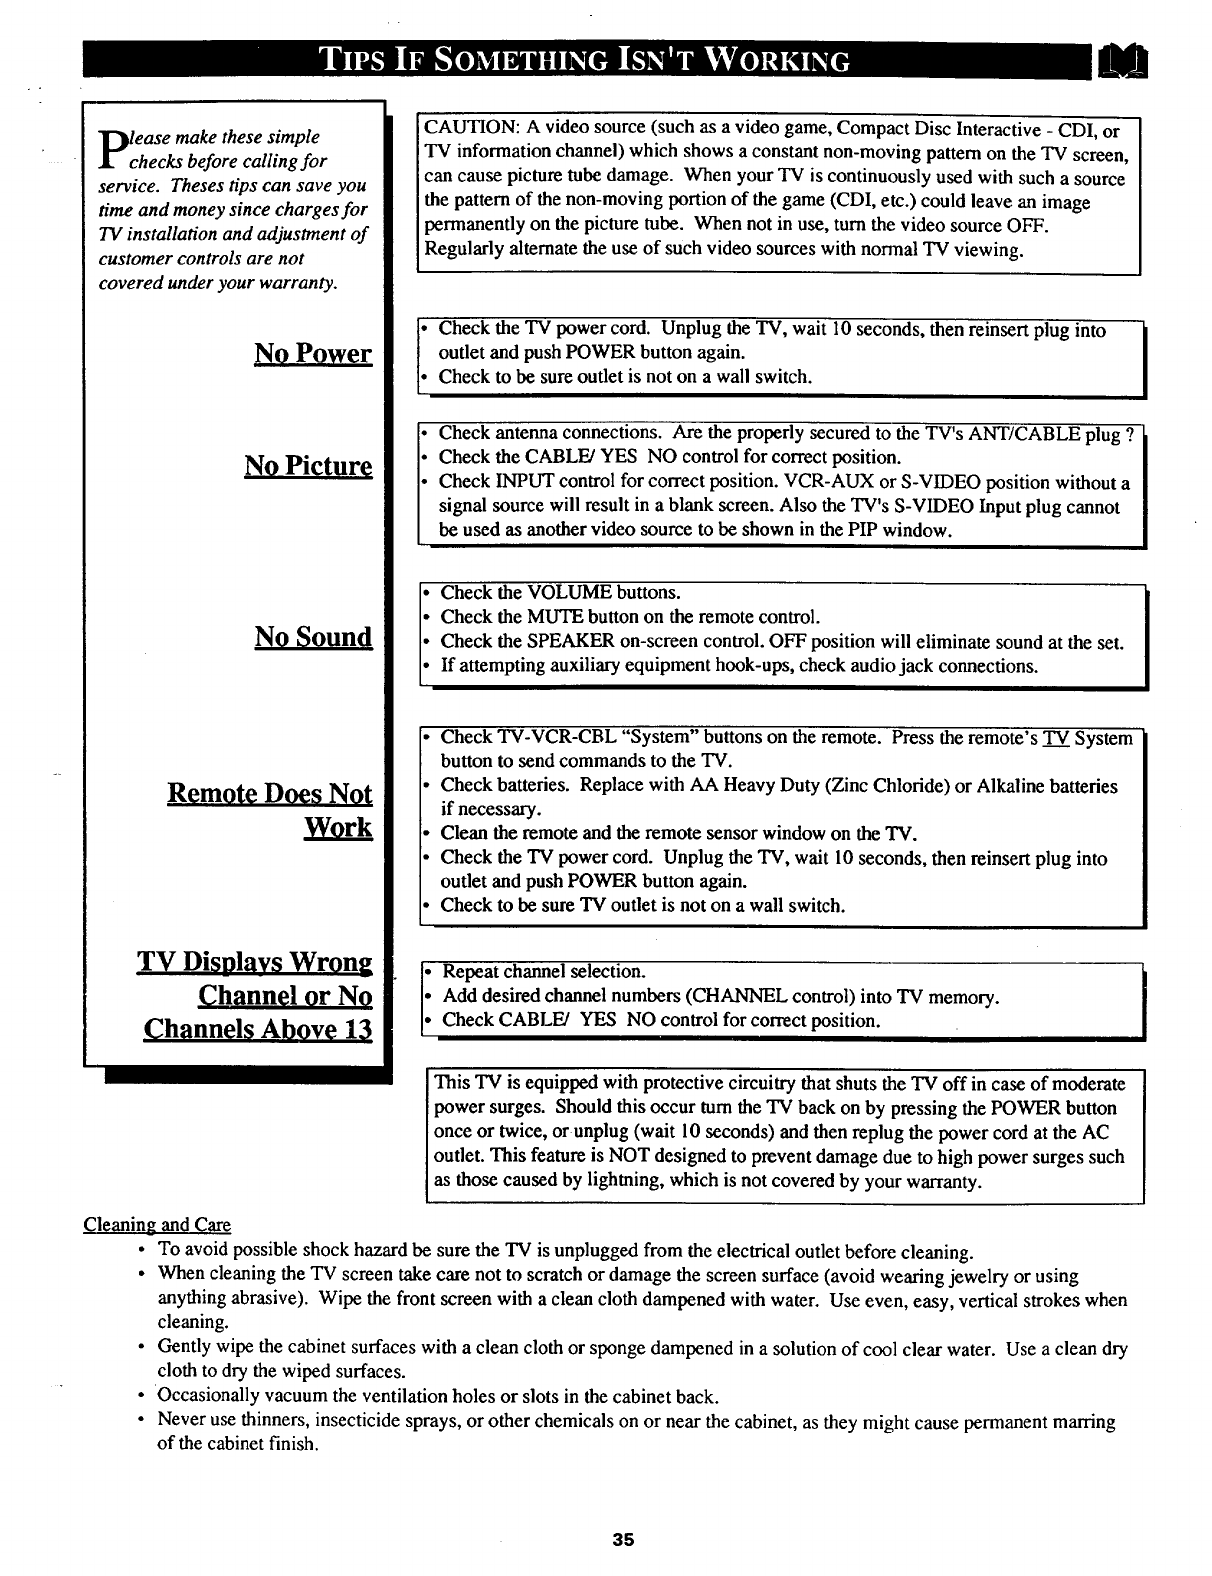
lease make these simple
checks before calling for
service. Theses tips can save you
time and money since charges for
TV installation and adjustment of
customer controls are not
covered under your warranty.
NO Power
No Picture
No Sound
Remote Does Not
Work
TV Displays Wrong
Channel or NO
Channels Above 13
iCAUTION: A video source (such as a video game, Compact Disc Interactive - CDI, or
iTV information channel) which shows a constant non-moving pattern on the TV screen,
can cause picture tube damage. When your TV is continuously used with such a source
the pattern of the non-moving portion of the game (CDI, etc.) could leave an image
permanently on the picture tube. When not in use, turn the video source OFF.
Regularly alternate the use of such video sources with normal TV viewing.
Check the TV power cord. Unplug the TV, wait 10 seconds, then reinsert plug into
outlet and push POWER button again.
Check to be sure outlet is not on a wall switch.
Check antenna connections. Are the properly secured to the TV's ANT/CABLE plug ?
Check the CABLE/YES NO control for correct position.
Check INPUT control for correct position. VCR-AUX or S-VIDEO position without a
signal source will result in a blank screen. Also the TV's S-VIDEO Input plug cannot
be used as another video source to be shown in the PIP window.
Check the VOLUME buttons.
Check the MUTE button on the remote control.
Check the SPEAKER on-screen control. OFF position will eliminate sound at the set.
If attempting auxiliary equipment hook-ups, check audio jack connections.
Check TV-VCR-CBL "System" buttons on the remote. Press the remote's "IV System
button to send commands to the TV.
Check batteries. Replace with AA Heavy Duty (Zinc Chloride) or Alkaline batteries
if necessary.
Clean the remote and the remote sensor window on the TV.
Check the 'IV power cord. Unplug the TV, wait 10 seconds, then reinsert plug into
outlet and push POWER button again.
Check to be sure TV outlet is not on a wall switch.
i Repeat channel selection.
Add desired channel numbers (CHANNEL control) into TV memory.
Check CABLE/ YES NO control for correct position.
This TV is equipped with protective circuitry that shuts the "IV off in case of moderate
power surges. Should this occur tum the TV back on by pressing the POWER button
once or twice, or unplug (wait l0 seconds) and then replug the power cord at the AC
outlet. This feature is NOT designed to prevent damage due to high power surges such
as those caused by lightning, which is not covered by your warranty.
Cleaning and Care
•To avoid possible shock hazard be sure the TV is unplugged from the electrical outlet before cleaning.
• When cleaning the TV screen take care not to scratch or damage the screen surface (avoid wearing jewelry or using
anything abrasive). Wipe the front screen with a clean cloth dampened with water. Use even, easy, vertical strokes when
cleaning.
• Gently wipe the cabinet surfaces with a clean cloth or sponge dampened in a solution of cool clear water. Use a clean dry
cloth to dry the wiped surfaces.
• Occasionally vacuum the ventilation holes or slots in the cabinet back.
• Never use thinners, insecticide sprays, or other chemicals on or near the cabinet, as they might cause permanent marring
of the cabinet finish.
35
Coaxial Cable *A single solid antenna wire normally matched with a
metalplug (F-type)end connector that screws (or pushes) directly onto
a75 Ohm inputfound on the Television orVCR.
;edCaption *Broadcast standard which allows you to readthe
voice content of television programs on the TV screen. Designed to
help the hearing impaired this feature uses on-screen"text boxes" to
show dialogue and conversations while the TV program is in progress.
Direct Audio/Video Inputs * Located on therearof theTV these
connectors (RCA phono type plug) are used for the input of audio and
videosignals. Designed for use with VCRs(orother accessories) in
order to receivehigher picture resolutionand offer sound connection
options.
Identify* Method by which a remote control searches and finds an
operat!ng code for another product (such as a VCR or Cable Converter).
Once the code has been "identified" then the TV remote can operate
and send commands to the other product.
Multichannel Television Sound (MTS) *The broadcast standard that
allows for stereo sound to be transmittedwith the TV picture.
On Screen Displays (OSD) * Refers to the wording or messages
generated by the television (or VCR) to help the user with specific
feature controls (color adjustment, programming, etc.).
Menu * An on-screen listing of featurecontrols shown on the
Televisionscreen that are made available for user adjustments.
Picture -In-Picture (PIP) * Term used when two pictures are shown
on theTV screen at thesame time.The smaller PIPpicture is supplied
bya VCR(or othertuner/video playback source). The PIPpicture can
also be moved and swapped withthe TV's main screen picture.
Programming * The procedure of adding or deleting channel
numbers into the Television's memory circuits. In this way the
Television "remembers" only the locally available or desired
channel numbers and skips over any unwanted channel numbers.
Remote Sensor Window * A window or opening found on the
Television control panel through which infrared remote control
command signals are received.
Setup Mode * Automatic feature control settings made by the TV.
Designed for first time set-up and use. Settings for signal connections
(antenna or cable TV), plus channel program memory are held in the
TV's memory (even if the set is unplugged and moved to a new
location.)
Second Audio Program (SAP) *Another or additional audio
channel provided for in the Multichannel Television Sound (MTS)
broadcast standard. The most frequently proposed use for SAP is the
simultaneous bilingual broadcast of TV program material.
Status * Allows the user to quickly confirm what channel number is
currently being viewed. Status can also be used to clear the
Television of on screen displays or information (rather than waiting
for the displays to "time out" or automatically:disappeax" from the
screen).
Twin Lead Wire * The more commonly used name for the two
strand 300 Ohm antenna wire used with many indoor and outdoor
antenna systems. In many cases this type of antenna wire requires an
additional adapter (or balun) in order to connect to the 75 Ohm Input
terminals designed into the more recent Televisions and VCRs.
Accessories/Optional ............................... 17-19, 30, 34, *Q/U- 1
Adapter Connector ........................................ 18, 30, 34, *Q/U-1
Add0)elete Channels .......................................... i...6, 7, *Q/U-2
Audi(_/ideo Input Jacks ............................................. 18-19, 34
Battery Installation ......................................................... *Q/U-3
Cable TV Connections/Settings .................. 5, 30, 34, *Q/U-1,2
Channel Display ...................................................... 16, *Q/U-3
Channel Memory..._.... ..... _...................................... 6, 7, *Q/U-2
Channel Reminder .................................................................. 16
Clock ....................................................................................... 13
Closed Captioning .................................................................... 8
Controls/TV .................................................................... *Q/U-3
Controls/Remote ........................................... 20-29, 32, *Q/U-3
Features ..................................................................................... 4
Glossary "IV Terms ................................................................. 36
Identify VCRs with TV Remote .................................. 24-25, 28
Identify Cable Converters with TV Remote ...................... 26-28
Input Control ........................................................................... 18
Inputs/Audio and Video ........................................ 18-19, 30, 34
aguage Option .................................................................... 16
,vlemory/Program Channels .................................... 6, 7, *Q/U-2
Menu Button ................................................................... *Q/U-4
Minus(-)/Plus (+) Buttons ............................................... *Q/U-4
Picture-in-Picture .............................................................. 30-34
PIP Input Control .............................................................. 30, 33
Precautions/Safety ................................................ 3, 35, *Q/U- 1
Programming Channels .......................................... 6, 7, *Q/U-2
Remote Control ............................................. 20-29, 32, *Q/U-3
Requesting Service ...................................................... 35, 37-39
RF Coaxial Cable ............................................... 30, 34, *Q/U-1
Remote Locator ................................................................. 20-21
Safety/Precautions ................................................ 3, 35, *Q/LI-1
Second Audio Program ............................................................. 9
Sensor Remote ................................................................ *Q/U-3
Set Timer ................................................................................ 14
Set Up/First Time Use ........................................ Q/U-1, 2, 3, 4
Sleep Timer ............................................................................. 15
Smart Picture .......................................................................... 22
Smart Sound ............................................................................ 23
Status Button .................................................................. *Q/U-4
Stereo ........................................................................................ 9
Timer ....................................................................................... 14
Tips for Service ........................................................... 35, 37-39
VCR Buttons ........................................................................... 29
VCR/TV Connections .............................. 16-17, 26, 30, *Q/U- !
Volume Bar Control ............................................................... 10
Warranty ................................................................................. 39
* Information contained in Quick-Use (Q/U) Guide-page listed.
36
Philips Consumer Electronics Company
Factory Service Center Locations
See Reverse Side for More Details.
San Francisco/Metro Area
Detroit/Toledo,
Rockford
Chlcago
•Cleveland/N Ohio
•Columbus/Dayton/Cincinnati •Boston/S Mains/
Diego
/
• Phoenix/Metro Area
DailasiFL Worth
_Beau_t/AusUn
San Antonio
Charlotte
New Jersey
• _, /' \"Ph/Triladelphia/S New Jersey
Atlanta/N Georgia _1_._ _r__," Washi
•Orlando/N Florida/SE Georgia _-_-_\_"l,_-_Jngt°n/Baltim°re/Rlchm°nd
F,o.=
t. My_SW Flodda
Mlami/SE Flodc_
NOTE:If youresideinoneofourPhilipsFactoryServiceBranchareas(seedirectoryonback),youcancontactthenearestServiceBranchtoobtain
efficientandexpedientrepairforyourproduct.IfyourproductisIn-Warranty,youshouldhaveproof-of-purchaseto ensureNoChargeService.
ForOut-of-Warrantyservice,callthelocationnearestyou.
NOTA:Sivousr6sidezdansunedesr6gionsdesserviesparunesuccursaledeserviceaprbsventedufabricantPhilips(voirlisteci-dessous),vous
pourrezcontacterla branchedeserviceaprbsventela plusprosdechezvouspourobtenirunserviceaprbsventerapideetefficace.Si leproduitest
sousgarantie,ilsuffiradeprdsenterunepreuved'achatpourb_ndficierd'unservicesansfrais. Pourlesproduitsnoncouvertsparla garantie,
contactezlecentrele pluspr_.sdechezvous.
NOTA:SiUd.resideenunadenuestraszonasparasucursalesPhilipsdeservicioal def_brica(verdirectoriom:tsabajo),Ud.puedecomunicareecon
lasucursaldeserviciorodscercanaparaobtenerunareparaci_noportunayeficazdesuproducto.Sisuproductoestdtodaviabajogarantfa,Ud.debe
presentarcomprobantedecompraparanoocasionarningunoscargosporservicio.Paraserviciodespudsdelvencimientode lagarantfa,Ilameal
Ilugarm_tscercanode losabajoindicados.
MAC2_298/95 EL4482-3 Rev.0
37
QUALITYSERVICEIS AS CLOSEAS YOURTELEPHONEI. SIMPLY LOOKOVERTHE UST BELOWFOR THE NUMBER OF A FACTORYSERVICE CENTER
NEARYOU. YOURPRODUCTWILL'RECEIVEEFFICIENTAND EXPEDIENTCARRY-IN, MAIL'IN, OR IN-HOME SERVICE, AND YOUWILL RECEIVEPEACEOF MIND,
KNOWINGYOUR PRODUCTIS BEINGGIVEN THE EXPERTAI"rENTIONOF PHlUPS'FACTORYSERVICE.AND,IF THE PRONENUMBER LISTEDFOR YOUR AREA
IS LONGDISTANCE,CALL1-800-242-9225 FORFACTORYSERVICE.
-OMMENTODTENIRNOTRESERVICEAPRJ:SVENTEPAPIDEETEFFICACESOITPARCOURRIER,ADOMICILE,OUENSEPRI_SENTANTAUNCENTREDESERVICEPHILIPS.PLUSDE600CENTRESDE
!CEPTIONDEPRODUITSARI_PARER/_TRAVERSLEPAYS:CONTACTERLECENTREDESERVICEAUXCONSOMMATEURSLIEPLUSPROCHEPOURSAVOIRL'EMPLACEMENTDECESOI_POTSDANS
UNRAYONDE50A75MILES(80KMA120KM)DUCENTREDESERVICELOCAL.
C(_MOOBTENERUNSERVICIOOPORTUNOYEFICIENTEPDRCORREO,ENCASA0 ENPERSONAPARASUPRODUCTOATRAVI_SDEUNCENTROPHILIPSDESERVICIO.MASDE600SITIOSPOR
TODOELPAlSPAPALARECEPCIONDEPRODUCTOSNECESITADOSDEREPAPACIONES:COMUNICARSECONELCENTRODESERVICIODEFABRICAMASCERCANOPARAESTOSLUGARESOENTRD
DEUNRADIODE80 A120KM(50A75 MILl.AS)DELCENTRODESERVICIOLOCAL.
Atlanta-Athens-
Macon-Chattanooga,TN-
NorthGeorgiaArea
1898 LelandDrive
Marietta,GA 30067
(4041)952-3279
Boston-SouthernMaine-
SouthernNew HampshireArea
1 NorthAvenue
Burlington,MA 01803
(617) 272-4825
Charlotte-WinstonSalem-
Greensboro-ChapelHill-
Raleigh-Spartanburg,SCArea
520-GClantonRoad
Charlotte,NC 28217
(704) 529-6330
Chicago-GaryArea
1360W. HamiltonParkway
...._sca,IL 60143
_)8)775-0990
Cleveland-Akron-
YoungstownArea
24090 DetroitRoad
Westlake,OH 44145
(216) 899-2040
Columbus-Dayton-
CincinnatiArea
6333 BuschBlvd.
Columbus,Ohio43229
(614) 781-2605
Connecticut-RhodeIsland-
Springfield,MAArea
1294 BlueHillsAvenue
Bloomfield, CT06002
(880) 726-9612
Dallas-Ft. WorthArea
13375 StemmonsFreeway,
Suite 200
Dallas,Texas 75234
(214) 243-4775
Detroit/ToledoArea
25173 Dequindre
Madison Heights,MI 48071
(810) 544-2110
Knoxville-Greeneville-
Tri Cities-EastTennesseeArea
6700 D. PapermillRoad
Papermill Plaza
Knoxville,TN37919
(423) 584-6614
Ft. Myers-Naples-
SouthwestFloridaArea
11601 ClevelandAve., Suite15
Ft.Myers,FL 33907
(813) 278-4242
Houston-Galveston-
Beaumont-AusUn-
SanAntonioArea
1110NorthPostOakRoad
Suite100
Houston,1)( 77055
(713)682-3990
LosAngeles-SanDiegoArea
2910 E. LaPalma,Suite E
Anaheim,CA 92806
(714) 238-7250
Miami-SoutheastFloridaArea
2099 W. Atlantic Blvd.
PompanoBeach,FL 33069
(305) 978-0467
NorthNJ-Staten Island-
RocklandCounty,NYArea
140JCommerceWay
Totowa,NJ 07512
(201) 890-7200
New YorkMetroArea
116 CharlotteAvenue
Hicksville,NY 11801
(516) 933-1780 NassauCounty
Orlando-Jacksonville-North
Florida-SoutheastGeorgiaArea
2452 SandLakeRoad
Orlando,FL32809
(407) 857-8998
Philadelphia/S.NewJerseyArea
352 DunksFerryRoad
Bensalem,PA 19020
(215) 638-7500
Phoenix-Scottsdale-
Mesa-TempeArea
5032 S. Ash Avenue,Ste.101
Tempe,AZ 85282
(602) 897-7358
Pittsburgh,PA-Steubenville,01.1-
Wheeling/Morgantown,WV Area
2891 BanksvilleRoad
Pittsburgh,PA 15216
(412) 563-8020
Rockford-Kenosha-
Beloit-MadisonArea
5602 N. Second
LovesPark,IL 61111
(815) 654-7343
SanFrancisco-Oakland-
SanJoseArea
3370 MontgomeryDrive
SantaClara,CA95054
(408) 492-9013
Seattle-Tacoma/OlympiaArea
1055AndoverParkEast
Tukwila,WA98188
(206) 575-6288
Tampa--St.Petersburg-
SarasotaArea
CenterPoint BusinessPark,
BuildingB-l, Suite100
1911U.S. Hwy.301 North
Tampa,FL 33619
(813) 621-8181
Washington,DC-Baltimore-
Richmond,VA Area
6671-JSantaBarbaraRoad
Elkridge,MD 21227
(410) 796-0105
HOW YOU CAN OBTAINEFRCIENT AND EXPEDIENTCARRY-IN, MAIL-IN, OR IN-HOME SERVICEIN CANADAFOR YOUR PRODUCTTHROUGHA PHILIPSCONSUMER SERVICECENTER
COMMENT OBTENIRNOTRESERVICEAPRf:SVENTE RAPIDEET EFFICACESOIT PAR COURRIER,J_DOMICILE, OU EN SE PR¢SENTANTJ_UN CENTREDESERVICEPHILIPS
COMO OBTENERUN SERVICIOOPORTUNOY EFICIENTEPORCORREO,EN CASA0 EN PERSONAENEL CANADAPAPASU PRODUCTOATPAV#S DE UN CENTROPHILIPSDE SERVICIOAL CONSUMIDOR
TORONTO
601MilnerAvenue
Scarborough,Ontario
M1B1M8
(416)754-6064(Tel.)
(416)292-5161(Tel.)
(416)754-6290(Fax)
MONTR_L
4977LevyStreet
St.Laurent,Quebec
H4R2N9
(514)956-0120(Tel.)
(514)956-0828(Fax)
VANCOUVER
1741BoundaryRoad
Vancouver,D.C.
V5M3Y7
(604)294-3441(Tel.)
(604)294-3574(Fax)
IVlAC29298/95
38
COLOR TELEVISION
90 Days Free Labor
One Year Free Replacement of Parts (Two Years Free Replacement on Color Picture Tube)
This product can be repaired in-home.
WHO IS COVERED?
You must have proof of purchase to receive warranty service. A
sales receipt or other document showing that you purchased the
product is considered proof of purchase.
WHAT IS COVERED?
Warranty coverage begins the day you buy your product. For 90
days thereafter, all parts will be repaired or replaced free, and labor
is free. From 90 days to one year from the day of purchase, all
parts will be repaired or replaced free, but you pay for all labor
charges. From one to two years from the day of purchase, you pay
for the replacement or repair of all parts except the picture tube, and
for all labor charges. After two years from the day of purchase, you
pay for the replacement or repair of all parts, and for all labor
charges.
All parts, including repaired and replaced parts, are covered only for
the original warranty period. When the warranty on the product
expires, the warranty on all replaced and repaired parts also
expires.
WHAT IS EXCLUDED?
Your warranty does not cover:
• labor charges for installation or setup of the product, adjustment
of customer controls on the product, and installation or repair of
antenna systems outside of the product.
•product repair and/or part replacement because of misuse,
accident, unauthorized repair or other cause not within the
control of Philips Consumer Electronics Company.
• reception problems caused by signal conditions or cable or
antenna systems outside the unit.
•a product that requires modification or adaptation to enable it to
operate in any country other than the country for which it was
designed, manufactured, approved and/or authorized, or repair
of products damaged by these modifications.
• incidental or consequential damages resulting from the product.
(Some states do not allow the exclusion of incidental or
consequential damages, so the above exclusion may not apply
to you. This includes, but is not limited to, prerecorded material,
whether copyrighted or not copyrighted.)
•aproduct used for commercial or institutional purposes.
WHERE IS SERVICE AVAILABLE?
Warranty service is available in all countries where the product is
officially distributed by Philips Consumer Electronics Company. In
countries where Philips Consumer Electronics Company does not
distribute the product, the local Philips service organization will
attempt to provide service (although there may be a delay if the
appropriate spare parts and technical manual(s) are not readily
available).
MAKE SURE YOU KEEP...
Please keep your sales receipt or other document showing proof of
purchase. Attach it to this owner's manual and keep both nearby.
Also keep the original box and packing material in case you need to
return your product.
BEFORE REQUESTING SERVICE...
Please checkyourowner'smanualbeforerequestingservice.
Adjustments of the controlsdiscussedtheremay saveyoua service
call.
TO GET WARRANTY SERVICE IN U.S.A.,
PUERTO RICO OR U.S. VIRGIN ISLANDS...
Contact a Philips factory service center (see enclosed list) or
authorized service center to arrange repair.
(In U.S.A., Puerto Rico and U.S. Virgin Islands, all implied
warranties, including implied warranties of merchantability and
fitness for a particular purpose, are limited in duration to the
duration of this express warranty. BUt, because some states do not
allow limitations on how long an implied warranty may last, this
limitation may not apply to you.)
TO GET WARRANTY SERVICE IN CANADA...
Contact a Philips consumer service center (listed below), self-
servicing dealer or authorized service depot to arrange repair.
Philips Electronics Ltd.
601 Milner Avenue, Scarborough, Ontario, M1B 1M8
(416) 292-5161
4977 Levy Street, St. Laurent, Quebec, H4R 2N9
(514) 956-0210
1741 Boundary Road, Vancouver, B.C., V5M 3Y7
(604) 294-3441
(In Canada, this warranty is given in lieu of all other warranties. No
other warranties are expressed or implied, including any implied
warranties of merchantability or fitness for a particular purpose.
Philips is not liable under any circumstances for any direct, indirect,
special, incidental or consequential damages, howsoever incurred,
even if notified of the possibility of such damages.)
REMEMBER...
Please record the model and serial numbers found on the product
below. Also, please fill out and mail your warranty registration card
promptly. It will be easier for us to notify you if necessary.
MODEL #
SERIAL #
Philips Service Company, P.O. Box 555, Jefferson City, Tennessee 37760
(423) 475-8869
39
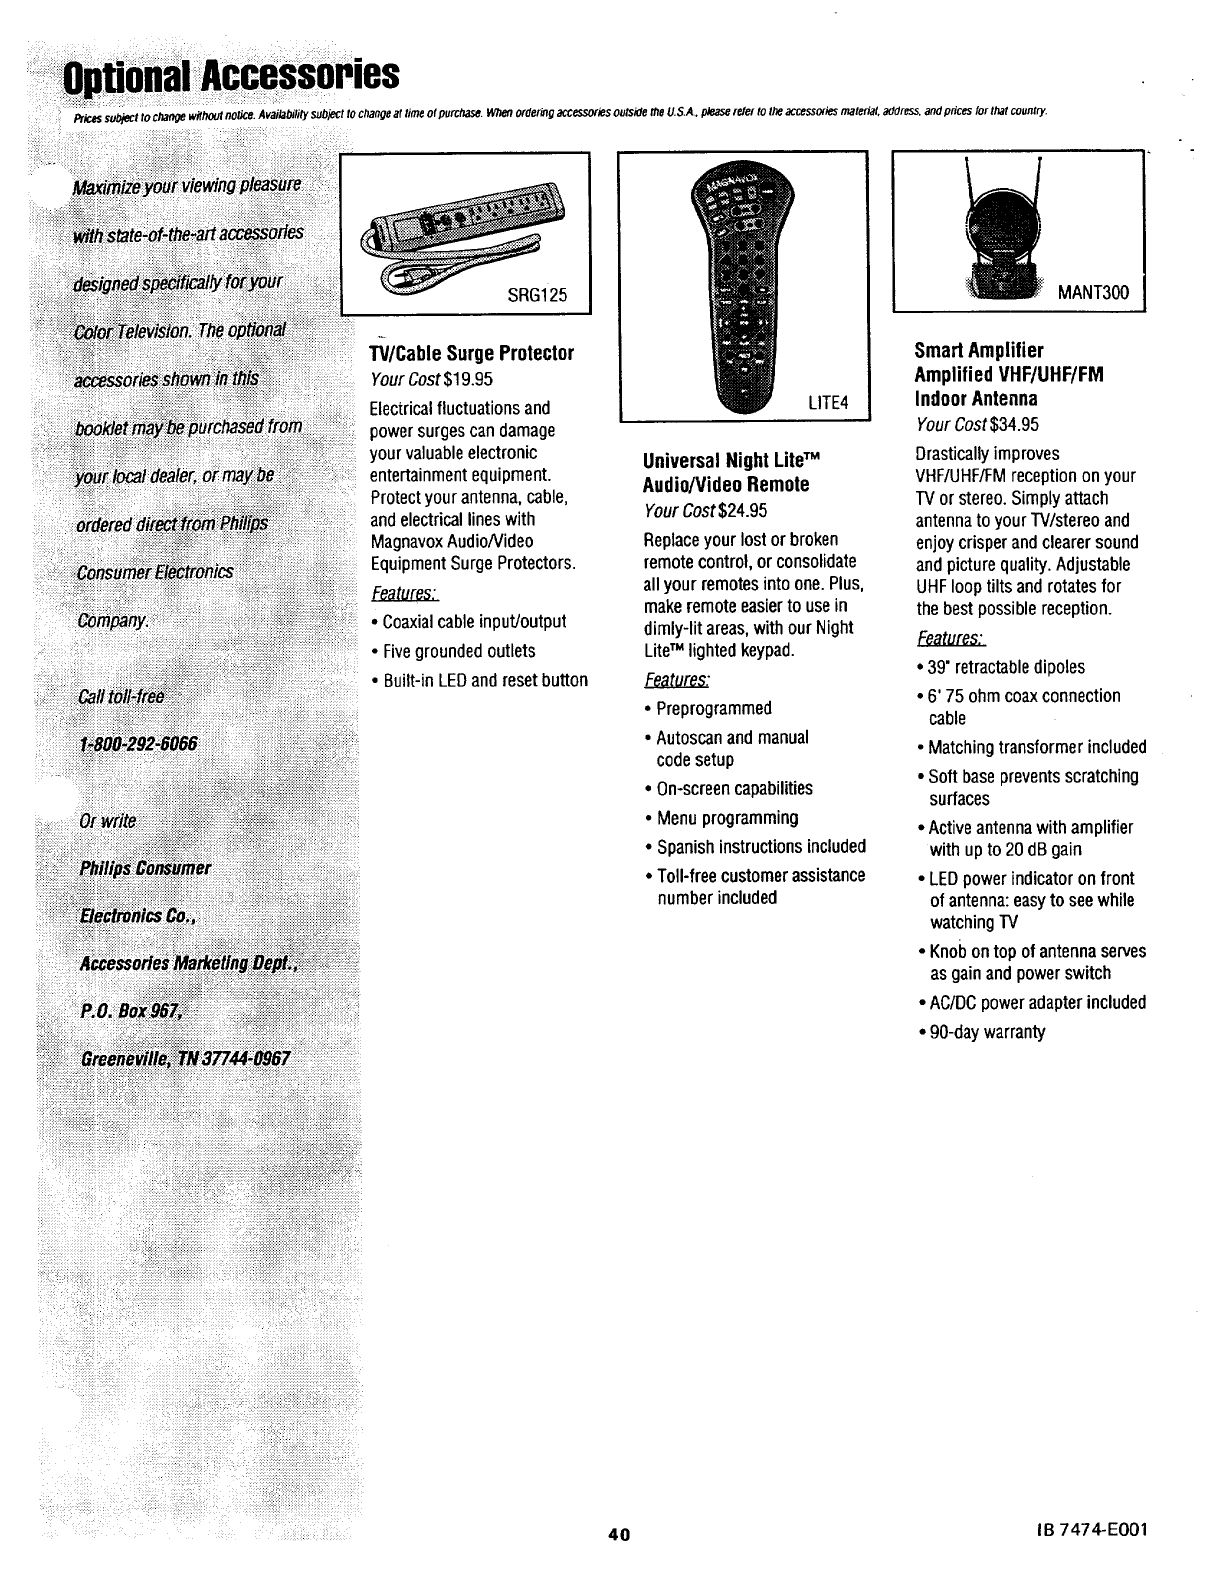
Availat_litysubjectto changeat time ot purchase.When orderingaccessoriesoutside the U,S.A., please[eler to the accessoriesmaten;_l,address, and pncesfor that country.
I_k_es
sutl_ct to cl_noe
WithOut notice.
SRG125
W/Cable Surge Protector
YourCost$19.95
Electricalfluctuationsand
power surgescan damage
your valuableelectronic
entertainment equipment.
Protect your antenna, cable,
and electrical lines with
MagnavoxAudio/Video
EquipmentSurge Protectors.
•Coaxial cableinput/output
•Fivegrounded outlets
• Built-in LEDand reset button
LITE4
Universal Night LiteTM
Audio/VideoRemote
YourCost $24.95
Replaceyourlostor broken
remotecontrol,or consolidate
all your remotes intoone. Plus,
make remote easierto usein
dimly-litareas,withour Night
LiteTM lightedkeypad.
•Preprogrammed
•Autoscan and manual
code setup
•On-screencapabilities
•Menu programming
• Spanishinstructionsincluded
• Toll-freecustomerassistance
number included
I: MANT300
Smart Amplifier
AmplifiedVHF/UHF/FM
Indoor Antenna
YourCost $34.95
Drastically improves
VHF/UHF/FMreception on your
TV or stereo. Simply attach
antennato your W/stereo and
enjoy crisper and clearer sound
and picture quality. Adjustable
UHF loop tilts and rotates for
the best possible reception.
•39" retractabledipoles
•6' 75 ohm coax connection
cable
• Matching transformer included
• Soft base prevents scratching
surfaces
• Active antennawith amplifier
with upto 20 dB gain
• LEDpower indicator on front
of antenna: easyto see while
watching TV
• Knob on top of antenna serves
as gain and power switch
• AC/DCpoweradapterincluded
• 90-daywarranty
40 IB 7474-E001
