Magnavox Dvd611 Owners Manual
Return your Warranty Registration Card today to ensure you ... dvd611at_dfu_aen
DVD611AT dvd611at_dfu_aen Philips DVD611AT user manual - US English, Pdf file (34 Kb) - Owner's / User's manual
DVD611AT98 dvd611at98_dfu_aen Philips DVD611AT98 user manual - US English, Pdf file (34 Kb) - Owner's / User's manual
DVD611AT99 dvd611at99_dfu_aen Philips DVD611AT99 user manual - US English, Pdf file (34 Kb) - Owner's / User's manual
DVD611 to the manual f3662338-9307-1cc4-497f-b9acdf856fa6
2015-01-05
: Magnavox Magnavox-Dvd611-Owners-Manual-166337 magnavox-dvd611-owners-manual-166337 magnavox pdf
Open the PDF directly: View PDF ![]() .
.
Page Count: 56
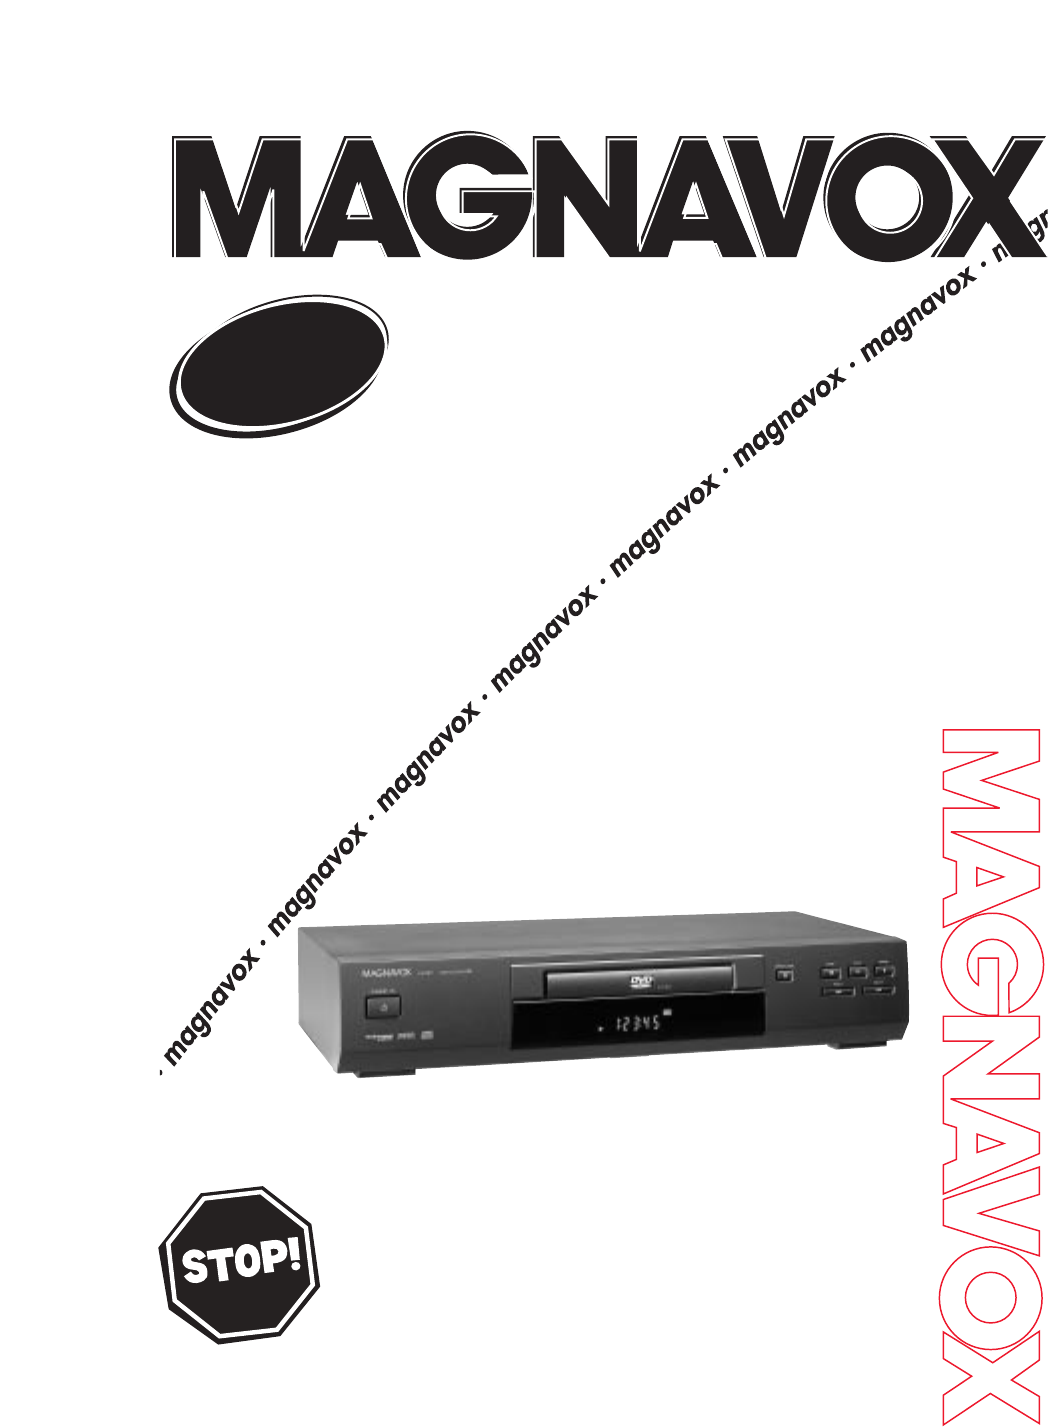
DVD611
Digital V
Digital Video Disc Player
ideo Disc Player
Owner’
Owner’s Manual
s Manual
Read this manual first!
Congratulations on purchasing this product. We’ve included everything you
need to get started. If you have any problems, our Representatives can help
you get the most from your new product by explaining:
• Hookups,
• First Time Setup, and
• Feature Operation.
Do not attempt to return this product to the store.
For fast help, call us first!
1-800-531-0039
Thank you for making us a part of your home!
Once your purchase is registered, you’re eligible to receive all the privileges of owning this prod-
uct. So complete and return the Warranty Registration Card enclosed with your purchase at
once. And take advantage of these important benefits.
MAC5097
Return your Warranty Registration Card today to
ensure you receive all the benefits you’re entitled to.
Warranty
Verification
Registering your product within
10 days confirms your right to
maximum protection under the
terms and conditions of your
warranty.
Owner
Confirmation
Your completed Warranty
Registration Card serves as
verification of ownership in the
event of product theft or loss.
Model
Registration
Returning your Warranty
Registration Card right away
guarantees you’ll receive all
the information and special
offers which you qualify for
as the owner of your model.
Congratulations on your purchase, and
welcome to the “family!”
Dear Magnavox product owner:
Thank you for your confidence in this product. You’ve selected one
of the best-built, best-backed products available today. And we’ll do
everything in our power to keep you happy with your purchase for
many years to come.
As a member of the Magnavox “family,” you’re entitled to protection
by one of the most comprehensive warranties and outstanding ser-
vice networks in the industry.
What’s more, your purchase guarantees you’ll receive all the infor-
mation and special offers for which you qualify, plus easy access to
accessories from our convenient home shopping network.
And most importantly, you can count on our uncompromising com-
mitment to your total satisfaction.
All of this is our way of saying welcome - and thanks for investing in
a Magnavox product.
P.S. Remember, to get the most from your product,
you must return your Warranty Registration
Card within 10 days. So please mail it to us
right now!
R
E
G
I
S
T
R
A
T
I
O
N
N
E
E
D
E
D
W
I
T
H
I
N
1
0
D
A
Y
S
Hurry!
Know these
safetysymbols
This “bolt of lightning”
indicates uninsulated
material within your unit may
cause an electrical shock. For
the safety of everyone in your
household, please do not
remove product covering.
The “exclamation point”
calls attention to features
for which you should read
the enclosed literature closely
to prevent operating and
maintenance problems.
WARNING: TO PREVENT
FIRE OR SHOCK HAZARD,
DO NOT EXPOSE THIS
EQUIPMENT TO RAIN OR
MOISTURE.
CAUTION: To prevent elec-
tric shock, match wide blade of
plug to wide slot, fully insert.
ATTENTION: Pour éviter
les choc électriques, intro-
duire la lame la plus large de la
fiche dans la borne correspon-
dante de la prise et pousser
jusqu’au fond.
CAUTION
RISK OF ELECTRIC SHOCK
DO NOT OPEN
CAUTION: TO REDUCE THE RISK OF ELECTRIC SHOCK, DO NOT
REMOVE COVER (OR BACK). NO USER-SERVICEABLE PARTS
INSIDE. REFER SERVICING TO QUALIFIED SERVICE PERSONNEL.
t
s
For Customer Use
Below, enter your product’s model number and serial number, which are located on the rear of the cabinet.
Keep this information for future reference.
Model No. ______________________________________ Serial No. ____________________________

Safety Precautions
Warning: To prevent fire or shock hazard, do not expose this equipment to rain or
moisture.
Federal Communications Commission (FCC) Warning: Any unauthorized changes
or modifications to this equipment void the user’s authority to operate it.
Laser Safety
This unit employs a laser. Only a qualified service person should remove the cover or
attempt to service this device, due to possible eye injury.
CAUTION: USE OF CONTROLS OR ADJUSTMENTS OR PERFORMANCE OF
PROCEDURES OTHER THAN THOSE SPECIFIED HEREIN MAY RESULT IN
HAZARDOUS RADIATION EXPOSURE.
CAUTION: VISIBLE AND INVISIBLE LASER RADIATION WHEN OPEN AND
INTERLOCK DEFEATED. DO NOT STARE INTO BEAM. THE BEAM IS LOCATED
INSIDE, NEAR THE DECK MECHANISM.
Special Information for Canadian Users
This Class B digital apparatus complies with Canadian ICES-003.
Cet appareil numérique de la classe B est conforme à la norme NMB-003 du Canada.
Radio/TV Interference
This equipment has been tested and found to comply with the limits for a Class B digital
device, pursuant to Part 15 of the FCC Rules. These limits are designed to provide
reasonable protection against harmful interference in a residential installation. This equip-
ment generates, uses, and can radiate radio frequency energy and, if not installed and used
in accordance with the instructions, may cause harmful interference to radio communica-
tions. However, there is no guarantee that interference will not occur in a particular
installation. If this equipment does cause harmful interference to radio or television recep-
tion, which can be determined by turning the equipment off and on, the user is encour-
aged to try to correct the interference by one or more of the following measures:
1) Reorient or relocate the receiving antenna.
2) Increase the separation between the equipment and the receiver.
3) Connect the equipment into an outlet on a circuit different from that to which the
receiver is connected.
4) Consult the dealer or an experienced radio/TV technician for help.
Copyright Protection
Unauthorized copying, broadcasting, public performance and lending of Discs are
prohibited.
This product incorporates copyright protection technology that is protected by method
claims of certain U.S. patents and other intellectual property rights owned by Macrovision
Corporation and other rights owners.
Use of this copyright protection technology must be authorized by Macrovision
Corporation and is intended for home and other limited viewing uses only unless other-
wise authorized by Macrovision Corporation. Reverse engineering or disassembly is pro-
hibited.
Declaration of Conformity
Model Number: DVD611
Trade Name: Magnavox
Responsible Party: Philips Consumer Electronics
P.O. Box 14810
Knoxville, TN 37914-1810
(865) 521-4316
Safety Information 3
Manufactured under license from Dolby Laboratories. "Dolby" and the double-D symbol are trademarks of
Dolby Laboratories. Confidential Unpublished Works. (© 1992-1997 Dolby Laboratories, Inc. All rights
reserved.)
“DTS” and “DTS Digital Out” are trademarks of Digital Theater Systems Inc. in the United States of America.
Copyright 2001 Philips Consumer Electronics. All rights reserved.

4 Table of Contents
General Information
Safety Information . . . . . . . . . . . . . . . . . . . . . . . . . . . . . . . . . . . . . . . . . . . . . . . . . . . . . .3
Table of Contents . . . . . . . . . . . . . . . . . . . . . . . . . . . . . . . . . . . . . . . . . . . . . . . . . . . . . .4
Introduction . . . . . . . . . . . . . . . . . . . . . . . . . . . . . . . . . . . . . . . . . . . . . . . . . . . . . . . . . . .5
Playable Discs . . . . . . . . . . . . . . . . . . . . . . . . . . . . . . . . . . . . . . . . . . . . . . . . . . . . . . . . .6
Getting Started
Remote Control Setup . . . . . . . . . . . . . . . . . . . . . . . . . . . . . . . . . . . . . . . . . . . . . . . . . . .7
Hookups . . . . . . . . . . . . . . . . . . . . . . . . . . . . . . . . . . . . . . . . . . . . . . . . . . . . . . . . . . .8-12
DVD Player Display . . . . . . . . . . . . . . . . . . . . . . . . . . . . . . . . . . . . . . . . . . . . . . . . . . . .13
Front Panel . . . . . . . . . . . . . . . . . . . . . . . . . . . . . . . . . . . . . . . . . . . . . . . . . . . . . . . . . .14
Rear Panel . . . . . . . . . . . . . . . . . . . . . . . . . . . . . . . . . . . . . . . . . . . . . . . . . . . . . . . . . . .15
Remote Control Buttons . . . . . . . . . . . . . . . . . . . . . . . . . . . . . . . . . . . . . . . . . . . . .16-17
Disc Playback and Features
Playing a Disc . . . . . . . . . . . . . . . . . . . . . . . . . . . . . . . . . . . . . . . . . . . . . . . . . . . . . . . . .18
Disc Menus . . . . . . . . . . . . . . . . . . . . . . . . . . . . . . . . . . . . . . . . . . . . . . . . . . . . . . . . . .19
Pausing Playback . . . . . . . . . . . . . . . . . . . . . . . . . . . . . . . . . . . . . . . . . . . . . . . . . . . . . . .20
Step by Step Playback . . . . . . . . . . . . . . . . . . . . . . . . . . . . . . . . . . . . . . . . . . . . . . . . . . .21
Fast Forward/Reverse Search . . . . . . . . . . . . . . . . . . . . . . . . . . . . . . . . . . . . . . . . . . . . .22
Slow Motion . . . . . . . . . . . . . . . . . . . . . . . . . . . . . . . . . . . . . . . . . . . . . . . . . . . . . . . . .23
Zoom Playback . . . . . . . . . . . . . . . . . . . . . . . . . . . . . . . . . . . . . . . . . . . . . . . . . . . . . . .24
Track Playback . . . . . . . . . . . . . . . . . . . . . . . . . . . . . . . . . . . . . . . . . . . . . . . . . . . . . . . .25
Title/Chapter Playback . . . . . . . . . . . . . . . . . . . . . . . . . . . . . . . . . . . . . . . . . . . . . . . . . .26
Specific Time Playback . . . . . . . . . . . . . . . . . . . . . . . . . . . . . . . . . . . . . . . . . . . . . . . . . .27
Repeat Playback . . . . . . . . . . . . . . . . . . . . . . . . . . . . . . . . . . . . . . . . . . . . . . . . . . . . . . .28
A-B Repeat Playback . . . . . . . . . . . . . . . . . . . . . . . . . . . . . . . . . . . . . . . . . . . . . . . . . . .29
Programmed Playback . . . . . . . . . . . . . . . . . . . . . . . . . . . . . . . . . . . . . . . . . . . . . . . . . .30
Random Playback . . . . . . . . . . . . . . . . . . . . . . . . . . . . . . . . . . . . . . . . . . . . . . . . . . . . . .31
Audio Language . . . . . . . . . . . . . . . . . . . . . . . . . . . . . . . . . . . . . . . . . . . . . . . . . . . . . . .32
Subtitle Language . . . . . . . . . . . . . . . . . . . . . . . . . . . . . . . . . . . . . . . . . . . . . . . . . . . . . .33
Camera Angles . . . . . . . . . . . . . . . . . . . . . . . . . . . . . . . . . . . . . . . . . . . . . . . . . . . . . . . .34
Parental Lock Password . . . . . . . . . . . . . . . . . . . . . . . . . . . . . . . . . . . . . . . . . . . . . . . . .35
Parental Lock Levels . . . . . . . . . . . . . . . . . . . . . . . . . . . . . . . . . . . . . . . . . . . . . . . . . . .36
DVD Player Setup and Features
Display Screen (DVD) . . . . . . . . . . . . . . . . . . . . . . . . . . . . . . . . . . . . . . . . . . . . . . . . . .37
Display Screen (Audio CD) . . . . . . . . . . . . . . . . . . . . . . . . . . . . . . . . . . . . . . . . . . . . . .38
Marker Setup Screen . . . . . . . . . . . . . . . . . . . . . . . . . . . . . . . . . . . . . . . . . . . . . . . . . . .39
Audio Settings . . . . . . . . . . . . . . . . . . . . . . . . . . . . . . . . . . . . . . . . . . . . . . . . . . . . . .40-41
Display Settings . . . . . . . . . . . . . . . . . . . . . . . . . . . . . . . . . . . . . . . . . . . . . . . . . . . . .42-43
Language Settings . . . . . . . . . . . . . . . . . . . . . . . . . . . . . . . . . . . . . . . . . . . . . . . . . . .44-46
Information You May Need
Care and Maintenance . . . . . . . . . . . . . . . . . . . . . . . . . . . . . . . . . . . . . . . . . . . . . . . . . .47
Helpful Hints . . . . . . . . . . . . . . . . . . . . . . . . . . . . . . . . . . . . . . . . . . . . . . . . . . . . . . .48-49
Specifications . . . . . . . . . . . . . . . . . . . . . . . . . . . . . . . . . . . . . . . . . . . . . . . . . . . . . . . . .50
Glossary . . . . . . . . . . . . . . . . . . . . . . . . . . . . . . . . . . . . . . . . . . . . . . . . . . . . . . . . . . . . .51
Limited Warranty . . . . . . . . . . . . . . . . . . . . . . . . . . . . . . . . . . . . . . . . . . . . . . . . . . .52-53
Index . . . . . . . . . . . . . . . . . . . . . . . . . . . . . . . . . . . . . . . . . . . . . . . . . . . . . . . . . . . . . . .54
Supplied Accessories . . . . . . . . . . . . . . . . . . . . . . . . . . . . . . . . . . . . . . . . . . . . . . . . . . .56

Introduction 5
Welcome!
This Digital Video Disc Player will allow you to enjoy better picture quality, clearer
sound, and endless playback features available on Digital Video Discs (DVDs). Expanding
technology allows you to add options to your viewing - watch a director’s cut of a
movie, listen to the producer’s comments, or play your favorite scene over and over
again. Hear a movie in different languages, or listen only to the soundtrack. The possibil-
ities are limited only by your choices and the materials available on the DVD.
Of course, you can listen to your favorite Audio Compact Discs on this DVD Player as
well. Determine the order in which you want to hear the songs, or play the Disc
repeatedly - all while seeing the status of the CD on your television.
We hope you enjoy this DVD Player and learn to use all of its features. To get the most
out of the DVD Player, read this owner’s manual carefully. It will describe how you can
access all the features listed below.
Features
When referring to this manual, remember...
Indicates that the feature described is available on some Digital Video Discs.
Indicates that the feature described is available on some Audio Compact
Discs.
Disc Menus...
Some explanations in this manual describe the Disc Menus. These menus are set by
the movie producers or by the music industry; the menus will vary among Discs.
Furthermore, not all Discs have menus. However, if the Disc has a menu, you can
access the Disc Menu by pressing the DISC MENU button on the remote control.
Details are on page 19.
DVD Player Menus...
Some instructions explain how to use the DVD Player’s menu to set up features of
the DVD Player or the Disc. You get to the DVD Player Menu by pressing the SETUP
button on the remote control when Disc playback is stopped. Even if a feature is set
up in the DVD Player’s menu, it may not be available if the current Disc does not
include that feature.
Available Disc Features...
Not all of the features described in this manual may be available on every
DVD or Audio CD. If the feature is not available on the Disc, you cannot
use the DVD Player to make these features available. An “X” will appear
in the top right corner of the TV screen if you try to access a feature that is not avail-
able on the current Disc or not available at the current time. The “X” may not be vis-
ible if the DVD you are playing is in Widescreen format (with black bars at the top
and bottom of the picture).
DVD
AUDIO CD
• A-B Repeat
• Audio Language choices*
• Automatic Detection of Disc type
(Audio CD or DVD)
• Bit Rate display
• Display Panel with Dimmer
• Dolby Digital Sound
• DTS (Digital Theater System)
• DVD Menus in a desired language *
• Dynamic Range Control
• Markers
• On-Screen Display for DVD Player
• Parental Lock*
• Paused/Fast/Slow/Step-by-Step Playback
• Program Playback (Audio CD only)
• Random Playback (Audio CD only)
• Repeat (Chapter, Title, Track, Disc)
• Screen Saver
• Selecting a Camera Angle *
• SRS TruSurround
• Subtitles in a Desired Language *
• Time Search
• Title/Chapter Search
• Track Search
• Zoom Playback
* If available on the Disc
Playable Discs
This DVD Player will play Digital Video Discs (DVDs) and Audio CDs. In order to play a
DVD or Audio CD on this DVDPlayer, make sure the Disc meets the requirements for
Region Codes and Color Systems as described on this page. Also, the Discs should have
the following logos and should meet these standards.
•CD-ROM
•Compact Disc-Interactive
(CD-I)
•Compact Disc-Recordable
(CD-R)
•Digital Video Disc-Video
Recordable (DVD-VR)
•DVD-RAM
•DVD-ROM
•Super Audio CD (SACD)
•Photo CD
•Video CD
•Video Single Disc (VSD)
Digital
Video
Disc
12 cm
12 cm
Approx. 4 hours
(single-sided)
Approx. 8 hours
(double-sided)
Approx. 80 minutes
(single-sided)
Approx. 160 minutes
(double-sided)
20 minutes
8 cm
8 cm
(singles)
Logo Maximum
Playback Time
ContentsDisc Type
Sound
and
Pictures
Audio
CD
Disc Size
Sound 74 minutes
Disc
Segments
DVDs are
divided into Titles,
which are divided
into Chapters.
Titles and Chapters
are numbered.
Audio CDs are divided
into numbered Tracks, i.e.,
a track may be one song.
6 Playable Discs
Region Codes
DVDs also must be labeled for ALL regions or for Region 1 in order to play on this DVD
Player. You can not play Discs that are labeled for other regions.
Look for the symbols below on your DVDs. If these region symbols do not appear on
your DVD, you cannot play the DVD in this DVD Player.
The number inside the globe refers to a region of the world. Region 1 represents the
United States, Canada, upper regions of North America, Bermuda, the U.S. Virgin Islands,
and small regions near Australia.
A Disc encoded in a specific region format can only be played on DVD Players with the
same region code. For example, if a Disc is labeled for Region 2, you can not play the
DVD on this DVD Player.
Color Systems
Different color systems are available throughout the world. The most common color sys-
tems are NTSC, which is used primarily in the United States and North America, PAL,
and SECAM.
This DVD Player uses the NTSC color system. Therefore, the Discs that you play must be
recorded in the NTSC system. You cannot play Discs recorded in other formats. The
color system of the DVD may be listed on the DVD or on the Disc case.
Unacceptable Discs
If you insert an unacceptable type of disc, “Please insert a playable disc” will appear on
the TV screen. Also, “- - - - - “ will appear on the DVD Player display panel. Insert a
DVD or Audio CD. The following Discs will not play on this DVD Player.
•Compact Disc-Graphic
(CD-G) •Compact Disc-Video
(CD-V)
The following discs might play, but only the audio will be available. There will be no picture.
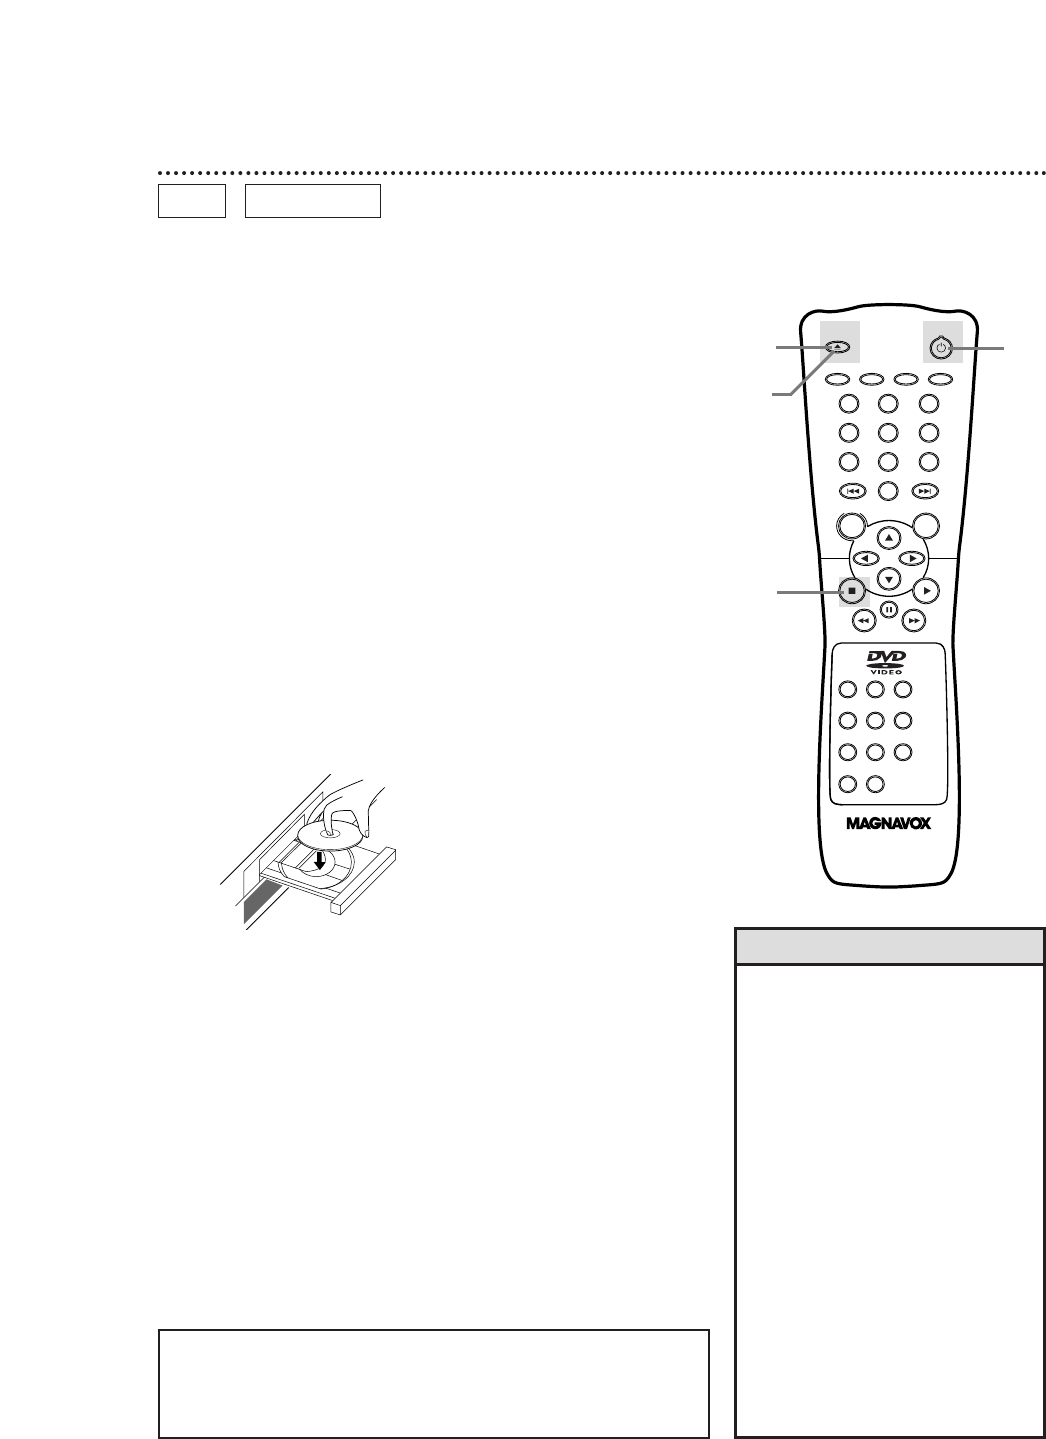
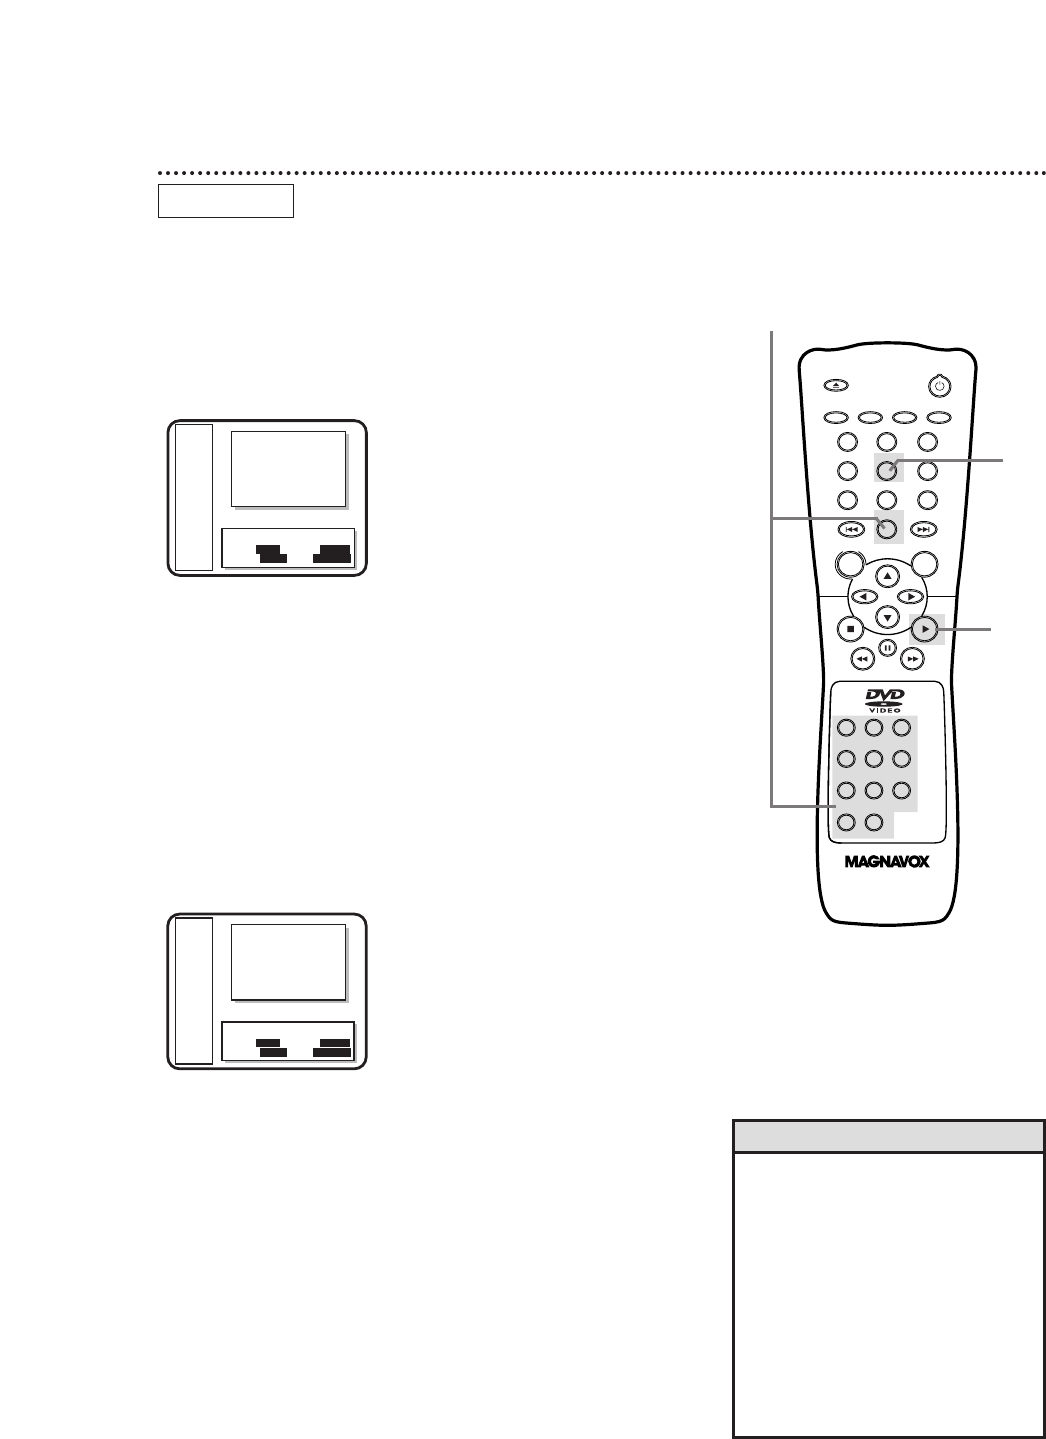
Remote Control Setup 7
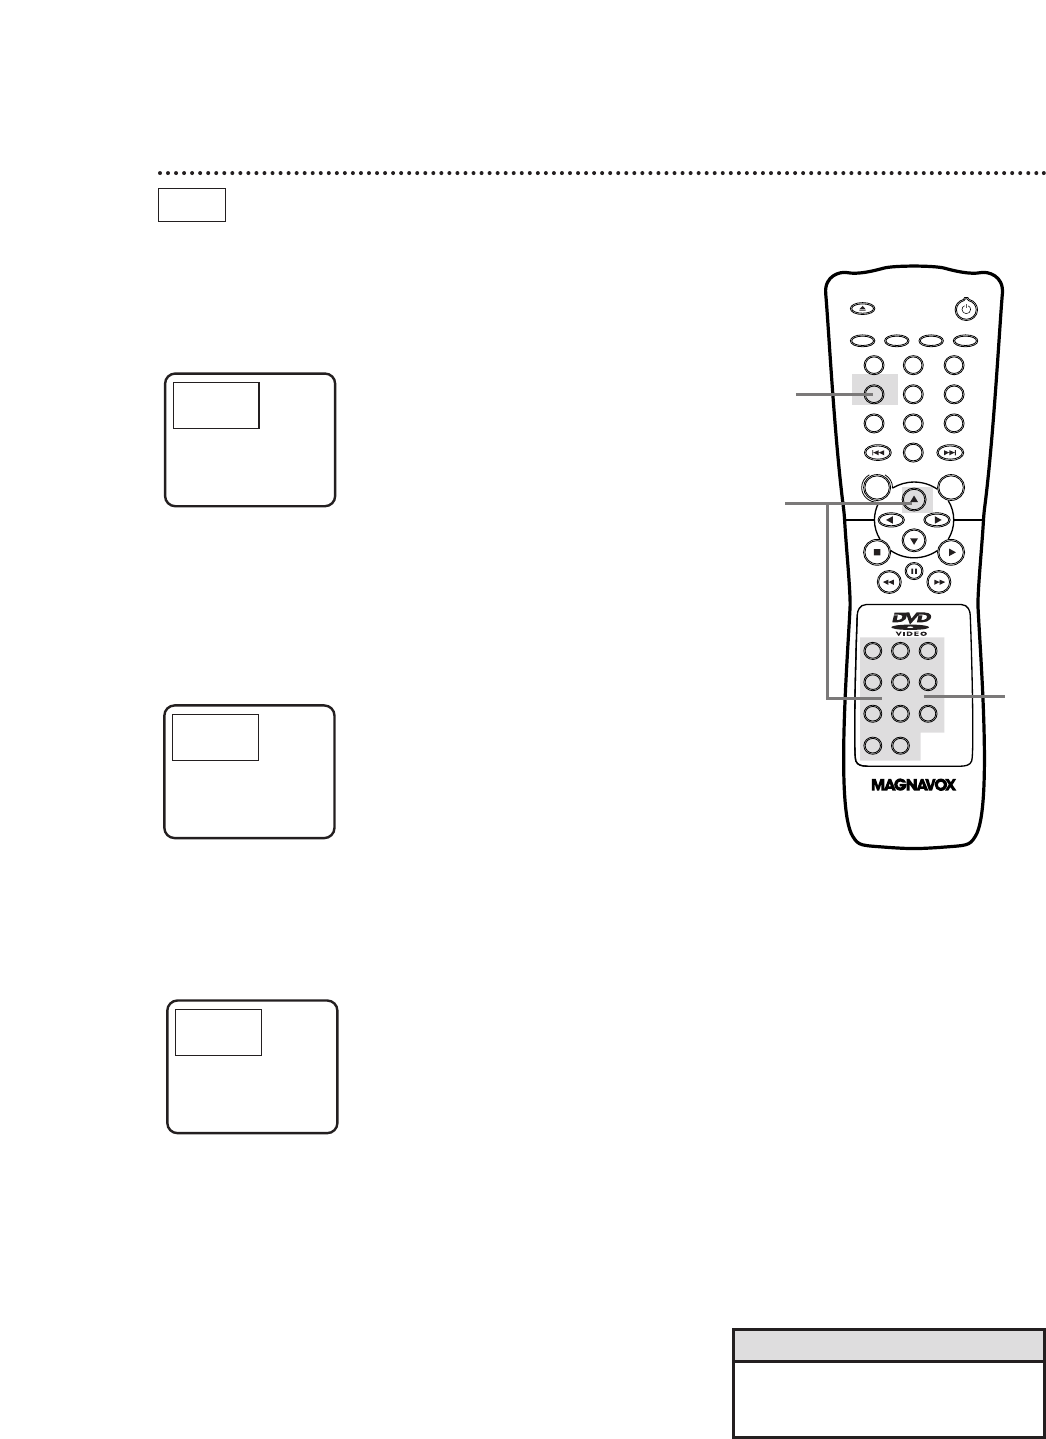
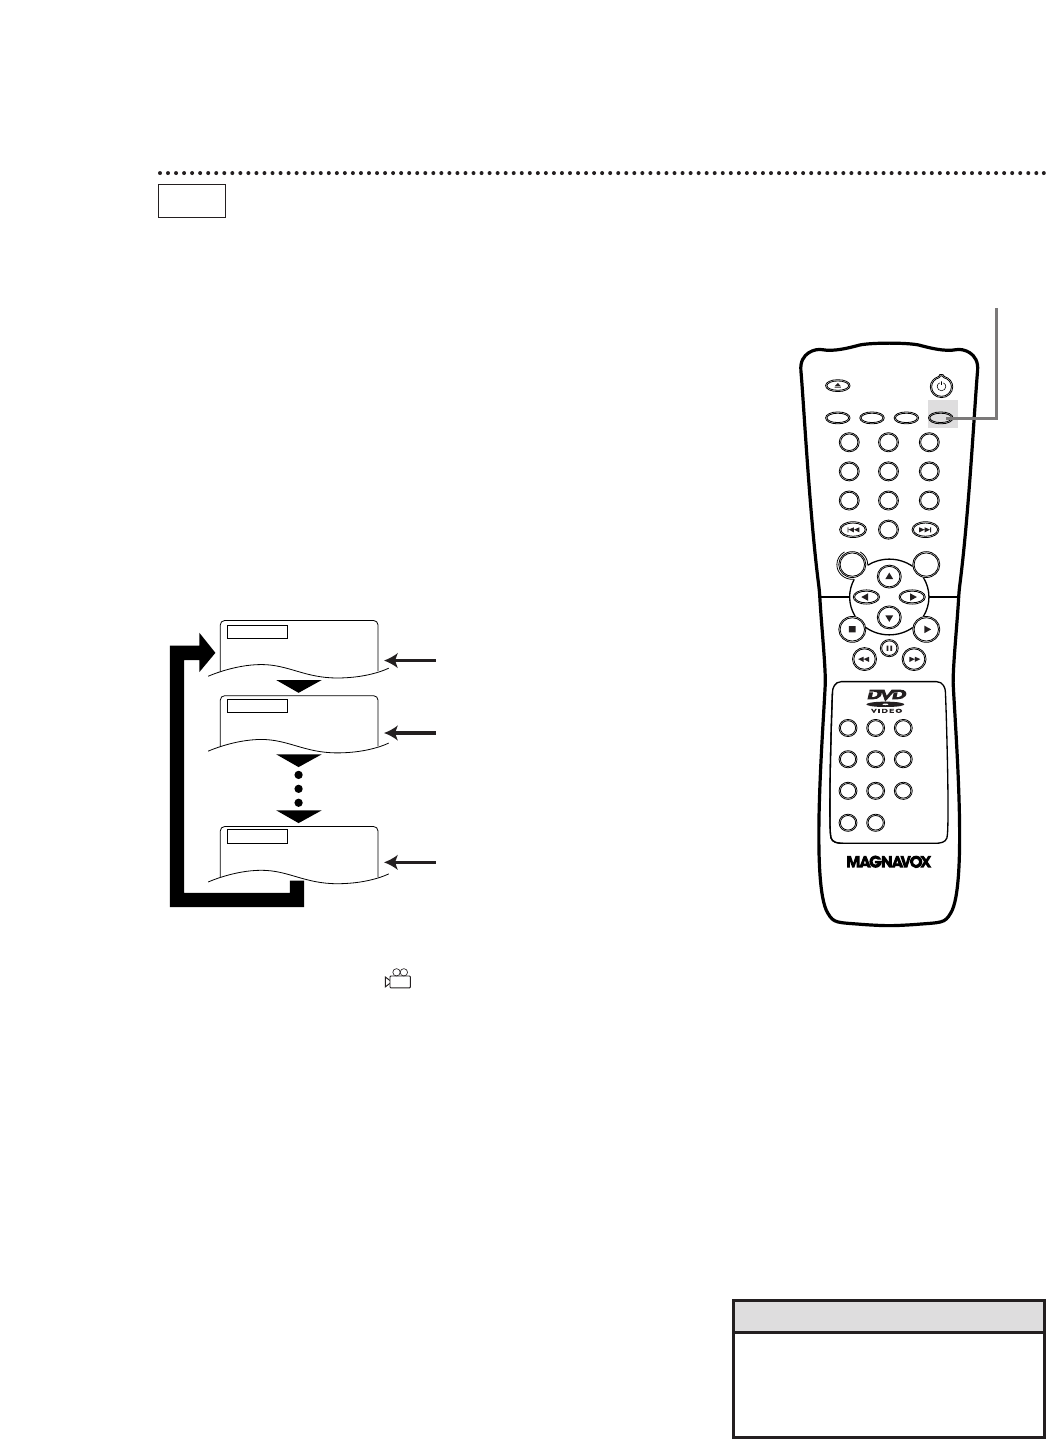
Using the Remote Control
●Point the remote control at the DVD Player’s remote sensor
(see page 14) when using the remote control to operate the
DVD Player.
●Do not put objects between the remote control and the DVD
Player.
Putting Batteries in the Remote Control
1
Remove the battery compartment lid on the bottom of the
remote control by pressing the tab, then lifting the lid.
2
Place two AA batteries inside the battery compartment
with their +and –ends aligned as indicated.
3
Replace the battery compartment lid.
1
2
3
Recycling Guidelines/Battery Safety
●Your new product and its packaging contain materials that can be
recycled and reused. Specialized companies can recycle your prod-
uct to increase the amount that needs to be properly disposed.
Your product uses batteries that should not be thrown away when
depleted but should be disposed of as small chemical waste. Please
find out about the local regulations on disposal of your old prod-
uct, batteries, and packaging whenever you replace existing equip-
ment.
●Battery Usage CAUTION - To prevent battery leakage that may
result in bodily injury or damage to the unit:
Install ALL batteries correctly, with the + and - markings on the
battery aligned as indicated on the unit;
Do not mix batteries, for example, old with new or carbon with
alkaline; and
Remove batteries when the unit will not be used for a long time.
8 Hookups
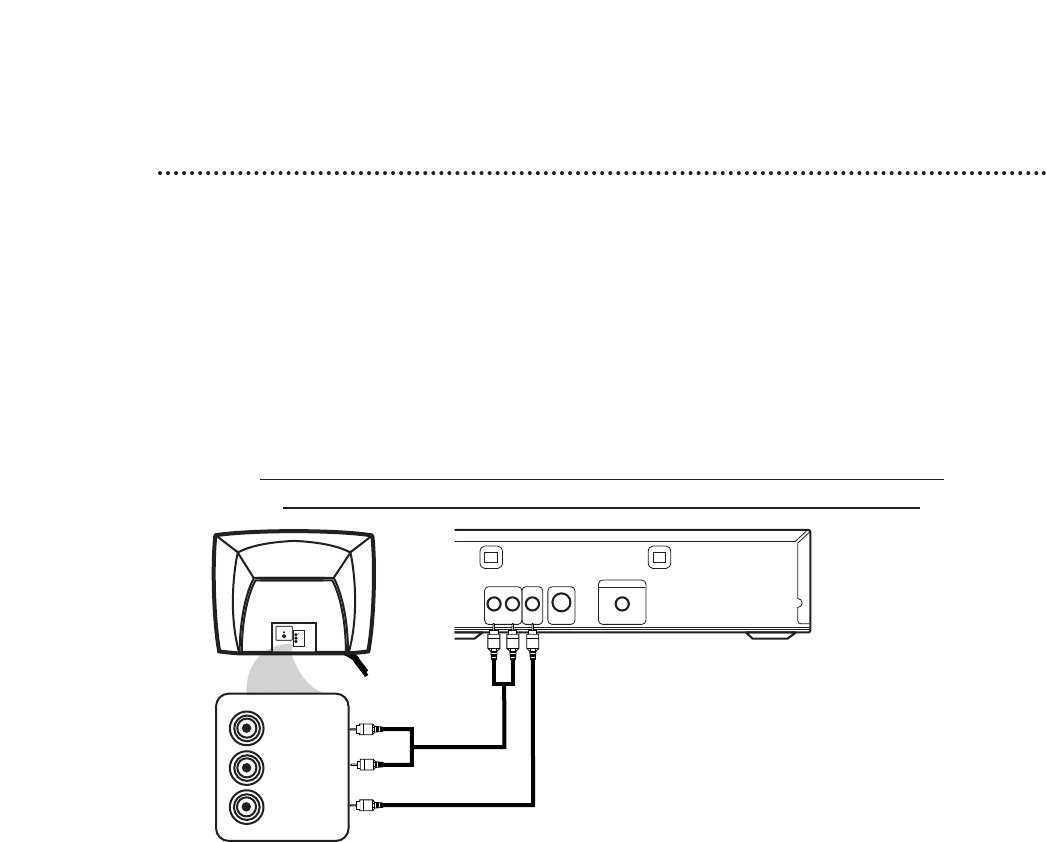
Connecting the DVD Player to a TV only (no stereo or amplifier)
TV has AUDIO (red and white) and VIDEO (yellow) IN jacks
You may connect the DVD Player several different ways, depending on your existing equipment and your pref-
erences for sound and picture quality. To determine which hookup is best for you, examine the options on the
following pages, then see which best matches your situation. Before you hook up the DVD Player, remember:
●Connect the DVD Player directly to a TV. If you connect the DVD Player to a VCR, then connect the VCR
to the TV, the picture may be distorted by the copyright protection system.
●Turn off the power of all equipment before making any connections.
●Refer to the owner’s manuals of your other equipment for additional information.
●Depending on your connection, you may need to purchase additional cables.
●If you do not connect the DVD Player to a Dolby Digital or DTS Decoder, set Dolby Digital and DTS to Off
on the DVD Player. Details are on pages 11 and 40-41. Playing a DVD when the settings are wrong will dis-
tort the sound or damage the speakers.
1
Connect the supplied red and white audio cables to the red and white
AUDIO OUT jacks on the DVD Player and to the red and white AUDIO IN
jacks on the TV, matching the cable colors to the jack colors.
2
Connect the supplied yellow video cable to the VIDEO OUT jack on the DVD
Player and to the VIDEO IN jack on the TV.
3
Connect the TV’s power cord to a power outlet.
Turn on the TV and set it to the Audio/Video In channel, which also may be
referred to as A/V In or Auxiliary In. This channel usually is located in the vicinity of
channel 00. See your TV owner’s manual for details.
4
Connect the DVD Player’s power cord to a power outlet.
Press the POWER button to turn on the DVD Player. “P-ON” will appear briefly
on the DVD Player’s display panel. You should see the DVD logo on the TV screen. If
you do not, check your connections and make sure the TV is set to the correct
Audio/Video In channel.
VIDEO
L/MONO
AUDIO
R
in
1
VIDEO IN
LEFT AUDIO IN
RIGHT AUDIO IN
AUDIO OUT COAXIAL
S-VIDEO
OUT
VIDEO
OUT
R L
DIGITAL AUDIO OUT
PCM / BITSTREAM
1 2
Back of TV
(example only)
DVD Player
Hookups (cont’d) 9
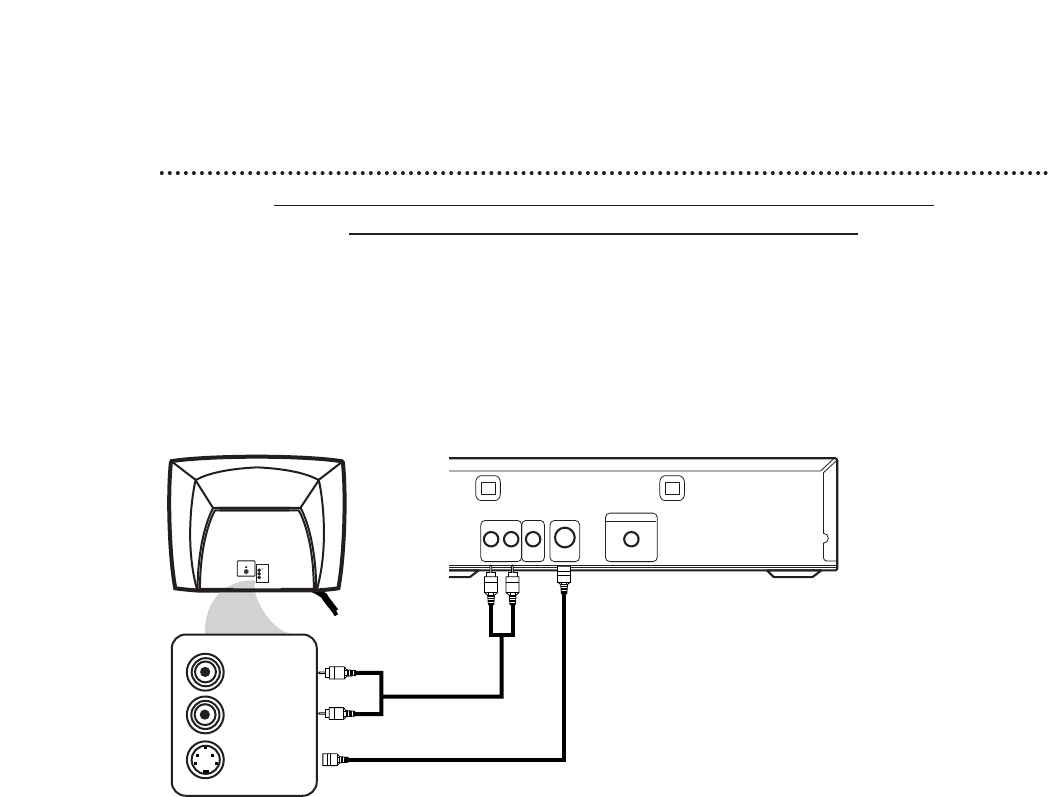
Connecting the DVD Player to a TV only (no stereo or amplifier)
TV has audio (red and white) and S-Video In jacks
●For better picture quality, use an optional S-Video cable to connect the S-VIDEO OUT jack on the DVD
Player to the S-VIDEO IN jack on your TV. You will not use the VIDEO OUT jack on the DVD Player, and
you will not need the supplied yellow video cable.
●Set Dolby Digital and DTS to Off on the DVD Player. Details are on pages 40-41. Playing a DVD when the
settings are wrong will distort the sound or damage the speakers.
1
Connect the supplied red and white audio cables to the red and white
AUDIO OUT jacks on the DVD Player and to the red and white AUDIO
IN jacks on the TV, matching the cable colors to the jack colors.
2
Connect an S-Video cable (not supplied) to the S-VIDEO OUT jack on
the DVD Player and to the S-VIDEO IN jack on the TV.
3
Connect the TV’s power cord to a power outlet.
Turn on the TV and set it to the S-VIDEO IN channel. This channel usually
is located near channel 00. See your TV owner’s manual for details.
4
Connect the DVD Player’s power cord to a power outlet.
Press the POWER button to turn on the DVD Player. “P-ON” will appear
briefly on the DVD Player’s display panel. You should see the DVD logo on the TV
screen. If you do not, check your connections and make sure the TV is on the cor-
rect S-Video In channel.
DVD Player
AUDIO OUT COAXIAL
S-VIDEO
OUT
VIDEO
OUT
R L
DIGITAL AUDIO OUT
PCM / BITSTREAM
S-VIDEO IN
LEFT AUDIO IN
RIGHT AUDIO IN
VIDEO
L/MONO
AUDIO
R
in
1
1 2
Back of TV
(example only)
10 Hookups (cont’d)
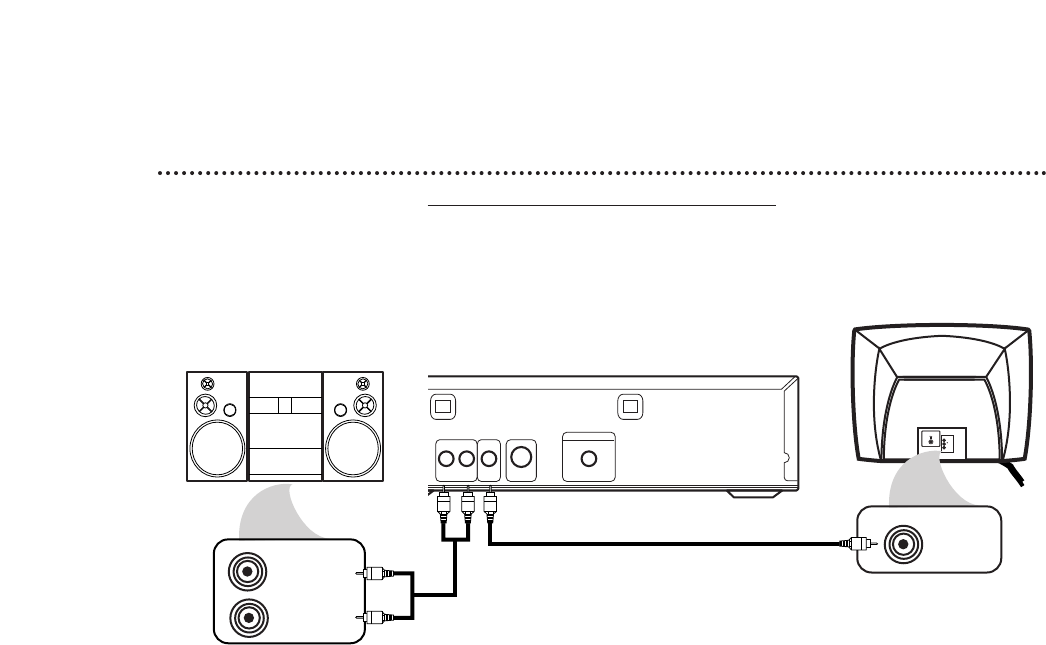
Connecting to a TV and a Stereo
●Set Dolby Digital and DTS to Off on the DVD Player. Details are on pages 40-41. Playing a DVD when the
settings are wrong will distort the sound or damage the speakers.
1
Connect the supplied red and white audio cables to the red and white
AUDIO OUT jacks on the DVD Player and to the red and white AUDIO IN
jacks on the Stereo, matching the cable colors to the jack colors.
2
Connect the supplied yellow video cable to the yellow VIDEO OUT jack on
the DVD Player and to the VIDEO IN jack on the TV. (Or, you may connect an
optional S-Video cable to the S-VIDEO OUT jack on the DVD Player and to the S-
VIDEO IN jack on the TV. Only one video connection is needed.)
3
Plug in the Stereo’s power cord. Turn on the Stereo and select the Stereo’s
Auxiliary IN station. During Disc playback, you will adjust the volume at your
Stereo. See your Stereo owner’s manual for details.
4
Plug in the TV’s power cord. Turn on the TV and set it to the Video In
channel (or S-Video In channel), which usually is located near channel 00.
During Audio CD playback, you may check the status of Audio CDs on your TV
screen. During DVD playback, you will watch the program on the TV. See your TV
owner’s manual for details.
5
Connect the DVD Player’s power cord to a power outlet.
Press the POWER button to turn on the DVD Player. “P-ON” will appear
briefly on the DVD Player’s display panel. You should see the DVD logo on the TV
screen. If you do not, check your connections and make sure the TV is on the correct
Video In channel.
AUDIO OUT COAXIAL
S-VIDEO
OUT
VIDEO
OUT
R L
DIGITAL AUDIO OUT
PCM / BITSTREAM
VIDEO
L/MONO
AUDIO
R
in
1
VIDEO IN
AUDIO (RIGHT) IN
AUDIO (LEFT) IN
Back of TV
(example only)
DVD Player
Back of Stereo
(example only)
2
1
Hookups (cont’d) 11
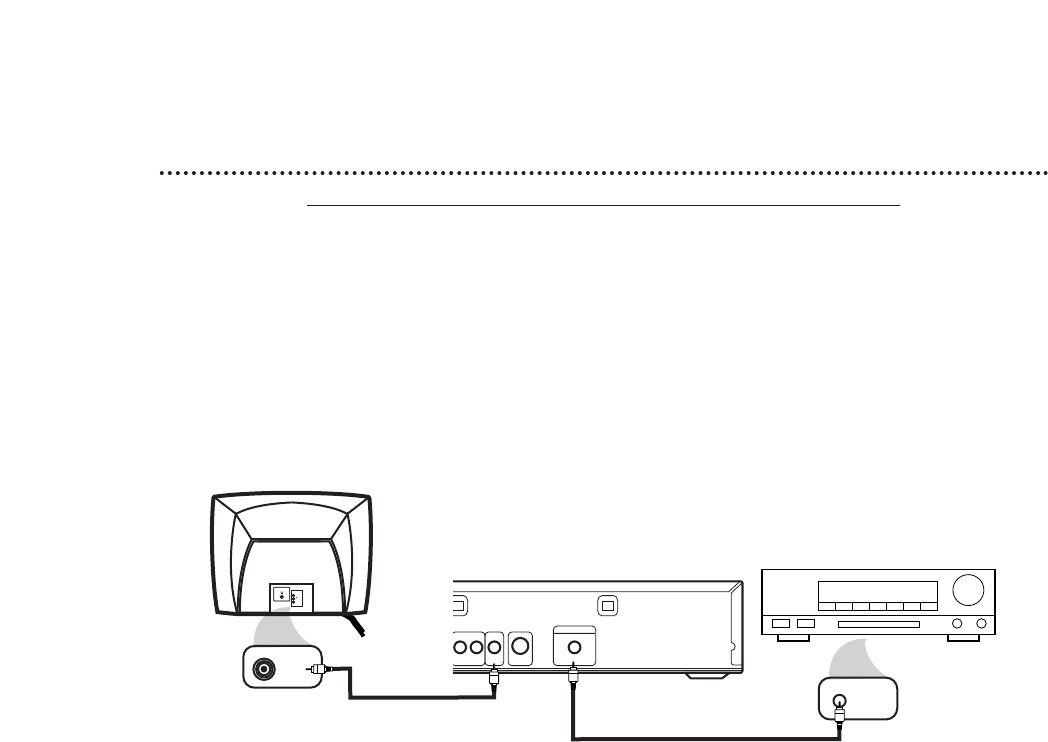
Connecting to a Dolby Digital Decoder or DTS Decoder
Some Discs are recorded in a 5.1 channel Dolby Digital Surround or Digital Theater System (DTS)
Surround format. These Discs will sound best if you connect the DVDPlayer to a Dolby Digital or DTS
Decoder.
●You will need a coaxial digital audio cable (not supplied).
●If you connect the DVD Player to a Dolby Digital Decoder, set Dolby Digital to On. Details are on pages
40-41.
●If you connect the DVD Player to a DTS Decoder, set DTS to On. Details are on pages 40-41.
If you do not connect the DVD Player to a Dolby Digital or DTS decoder, set Dolby Digital and DTS to
Off. Incorrect settings may cause noise distortion and damage the speakers.
●Select 5.1 channel Dolby Digital Surround sound in the Disc menu.
●Connect a subwoofer and the center, front, and surround speakers to the Decoder as described in the
Decoder’s owner’s manual.
1
Connect a coaxial digital audio cable to the COAXIAL jack on the DVD Player
and to the COAXIAL DIGITAL AUDIO IN jack on the Decoder.
2
Connect the supplied yellow video cable to the yellow VIDEO OUT jack on
the DVD Player and to the VIDEO IN jack on the TV. (Or, you may connect an
optional S-Video cable to the S-VIDEO OUT jack on the DVD Player and to the S-VIDEO
IN jack on the TV. Only one video connection is needed.)
3
Plug in the Decoder’s power cord. Turn on the Decoder and select the
Auxiliary IN station. During Disc playback, you will adjust the volume at the Decoder.
See your Decoder owner’s manual for details.
4
Plug in the TV’s power cord. Turn on the TV and set it to the correct Video In
channel. During Audio CD playback, you may check the Disc status on your TV screen.
During DVD playback, you will watch the program on the TV. See your TV owner’s man-
ual for details.
5
Connect the DVD Player’s power cord to a power outlet. Press the POWER
button to turn on the DVD Player. “P-ON” will appear briefly on the DVD Player’s
display panel. You should see the DVD logo on the TV. If you do not, check your connec-
tions and make sure the TV is on the correct Video In channel.
AUDIO OUT COAXIAL
S-VIDEO
OUT
VIDEO
OUT
R L
DIGITAL AUDIO OUT
PCM / BITSTREAM
VIDEO
L/MONO
AUDIO
R
in
1
VIDEO IN
COAXIAL DIGITAL
AUDIO IN
Back of Decoder
(example only)
DVD Player
Back of TV
(example only)
1
2

Connecting to a TV and an Amplifier with Digital Input jacks, Mini-Disc Deck or
Digital Audio Tape Deck
●Use a coaxial digital audio cable (not supplied) for this connection.
●If the Disc is recorded in 5.1 channel Dolby Digital Surround, you cannot dub the Disc in digital sound using
a Mini-Disc or Digital Audio Tape Deck.
●Set Dolby Digital and DTS to Off on the DVD Player. Details are on pages 40-41. Playing a DVD when the
settings are wrong will distort the sound or damage the speakers.
12 Hookups (cont’d)
1
Connect a coaxial digital audio cable to the COAXIAL jack
on the DVD Player and to the COAXIAL DIGITAL AUDIO
IN jack on the Amplifier.
2
Connect the supplied yellow video cable to the yellow
VIDEO OUT jack on the DVD Player and to the VIDEO IN
jack on the TV. (Or, you may connect an optional S-Video cable
to the S-VIDEO OUT jack on the DVD Player and to the S-VIDEO
IN jack on the TV. Only one video connection is needed.)
3
Plug in the Amplifier’s power cord. Turn on the Amplifier
and select the Auxiliary IN station. During Disc playback, you
will adjust the volume at the Amplifier. See your Amplifier owner’s
manual for details.
4
Plug in the TV’s power cord. Turn on the TV and set it to
the correct Video In channel. During Audio CD playback, you
may check the status of the Disc on your TV screen. During DVD
playback, you will watch the program on the TV. See your TV
owner’s manual for details.
5
Plug in the DVD Player’s power cord. Press the POWER
button to turn on the DVD Player. “P-ON” will appear briefly
on the DVD Player’s display panel. You should see the DVD logo
on the TV. If you do not, check your connections and make sure
the TV is on the correct Video In channel.
• Insert cable plugs firmly into the jacks
when making connections.
• If a plug has minor scratches or is
dirty, clean it with a soft cloth before
inserting it into a jack.
Helpful Hints
AUDIO OUT COAXIAL
S-VIDEO
OUT
VIDEO
OUT
R L
DIGITAL AUDIO OUT
PCM / BITSTREAM
VIDEO
L/MONO
AUDIO
R
in
1
VIDEO IN
COAXIAL DIGITAL
AUDIO IN
Back of TV
(example only)
Back of Amplifier
(example only)
DVD Player
1
2
TITLE CHP. TRK.
REPEAT
A – B
OPEN/CLOSE
STANDBY-ON
STOP
PREV NEXT
PLAY PAUSE
DVD611 DVD/CD PLAYER
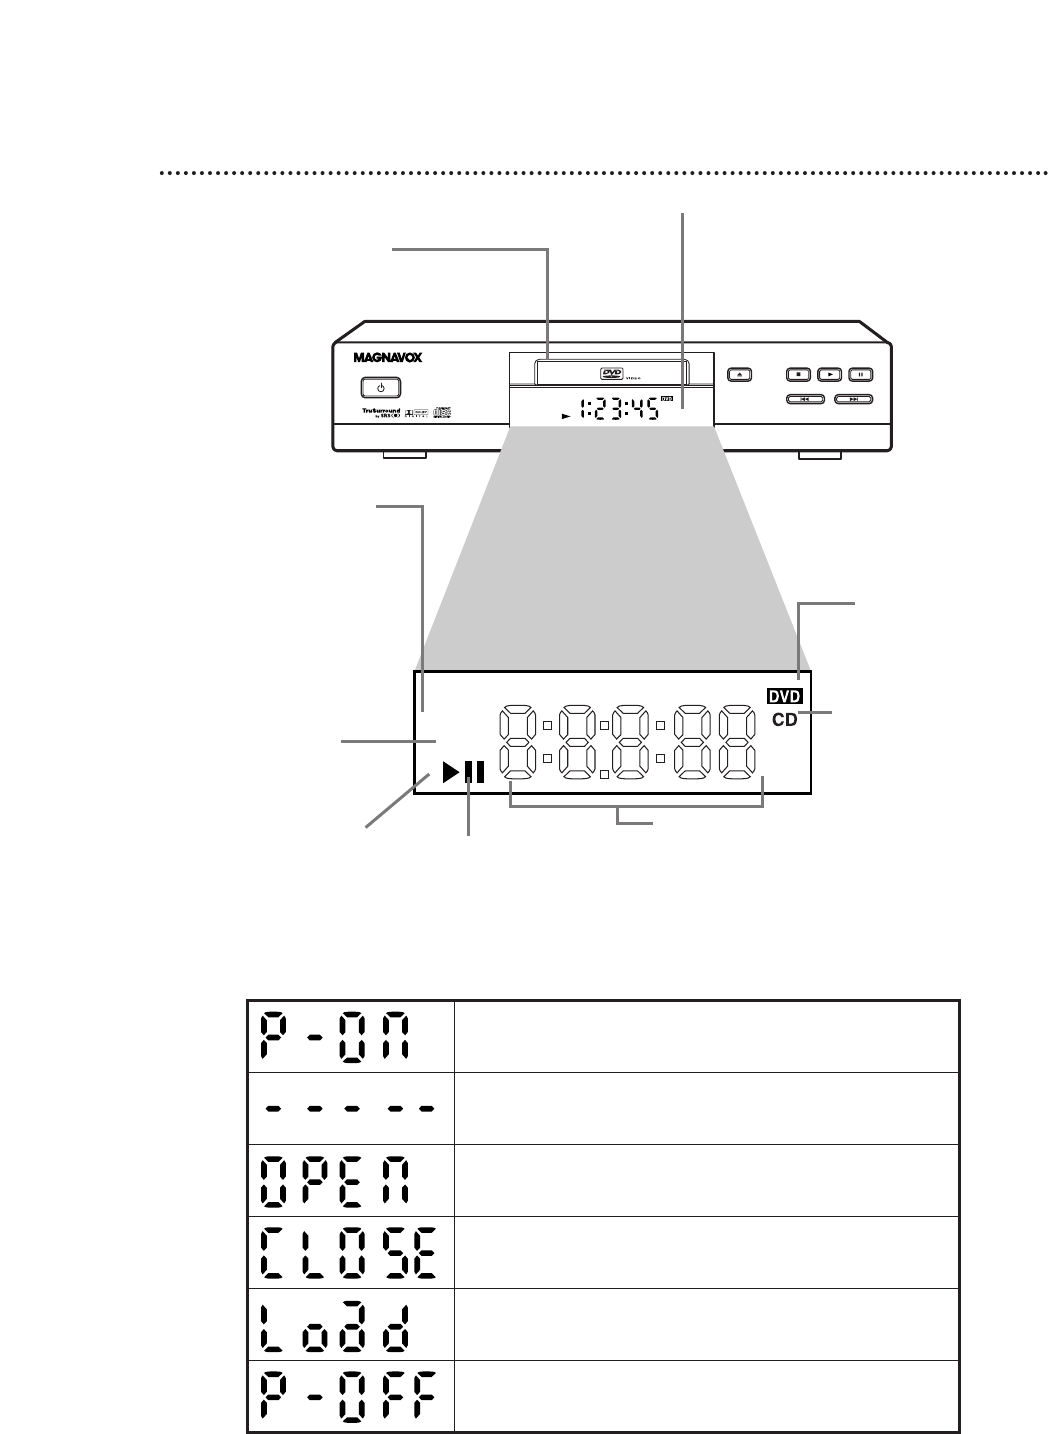
DVD Player Display 13
Display with Dimmer
Messages about current DVD Player oper-
ations appear here. See Display Messages
below. You can adjust the brightness of
the display. Details are on pages 42-43.
Disc tray
Insert a Disc here.
REPEAT: Appears during
Repeat Playback, along with
A-B, TITLE, CHP, or TRK.,
depending on the type of
Repeat Playback you have
selected. Details are on
pages 28-29.
A-B: Appears during
A-B Repeat Playback.
Details are on page 29.
B: Appears during Disc
playback. F: Appears
when play is
paused.
DVD: Lights when a
DVD is in the tray and
ready for playback.
CD: Lights when an
Audio CD is in the tray
and ready for playback.
Displays the elapsed playing time of the
current Title or Track. Briefly displays
Title, Chapter, or Track numbers.
Power is turning on.
Appears after the disc tray closes if the tray is empty, if
there is an error reading the disc, or if an unacceptable
disc is installed.
Tray is opening or is open.
Tray is closing. This also may appear as the Player tries
to load a Disc.
Disc is loading.
Power is turning off.
Display Messages
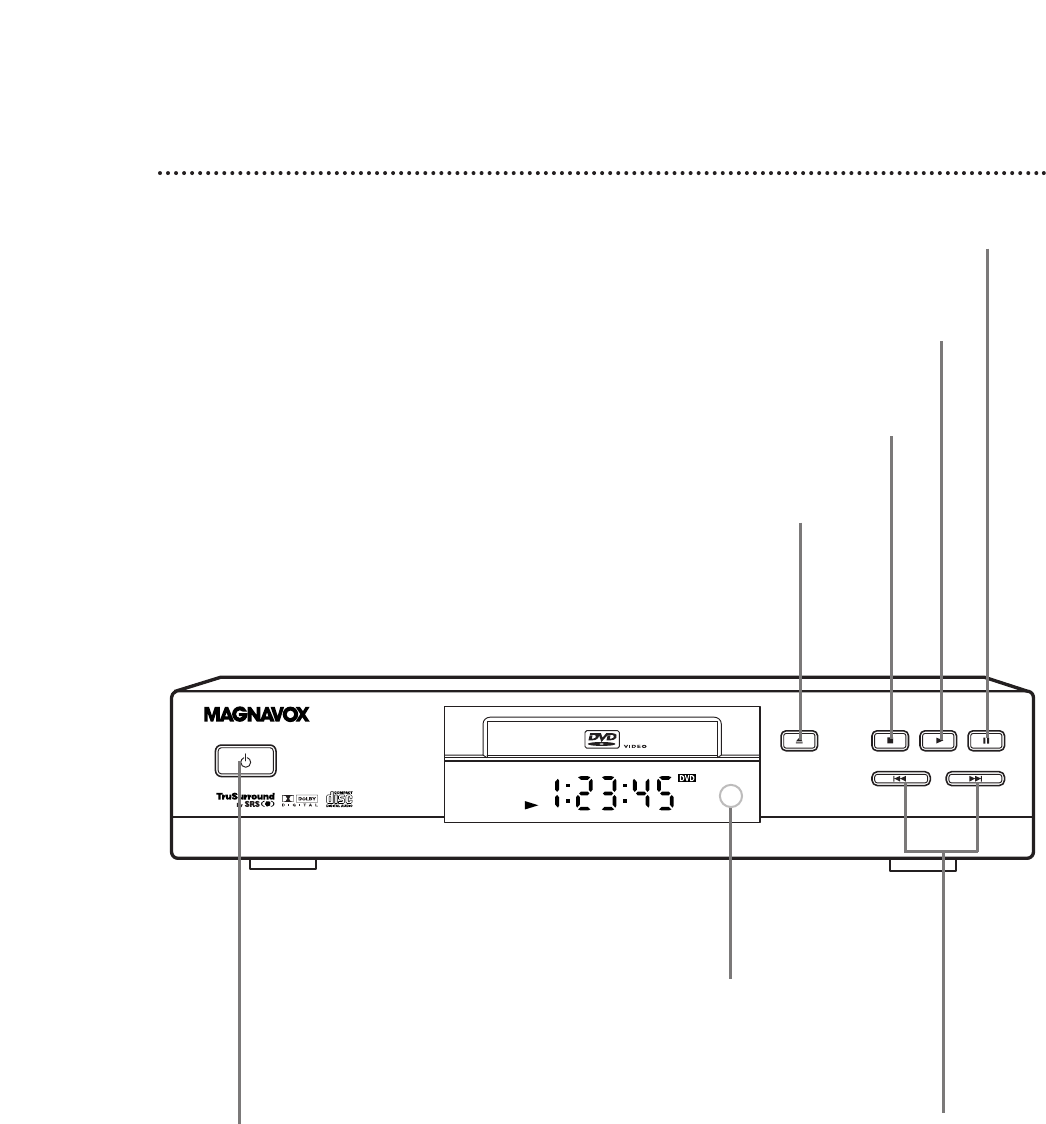
14 Front Panel
OPEN/CLOSE
STANDBY-ON
STOP
PREV NEXT
PLAY PAUSE
DVD611 DVD/CD PLAYER
OPEN/CLOSE Button
Press to open or close the Disc tray.
Details are on page 18.
PLAY Button
Press to start or resume Disc playback.
Details are on page 18.
STOP Button
Press to stop Disc playback.
Details are on page 18.
PAUSE Button
Press to pause Disc playback.
Details are on page 20.
STANDBY-ON Button
Press to turn the power on and off.
Details are on page 18.
Remote Sensor
Receives a signal from your remote control so you
can operate your DVD Player from a distance.
PREV(ious)/NEXT
Press to go to previous or subsequent Tracks
or Chapters. Press and hold for about three
seconds for a fast forward or reverse search.
Details are on page 22.
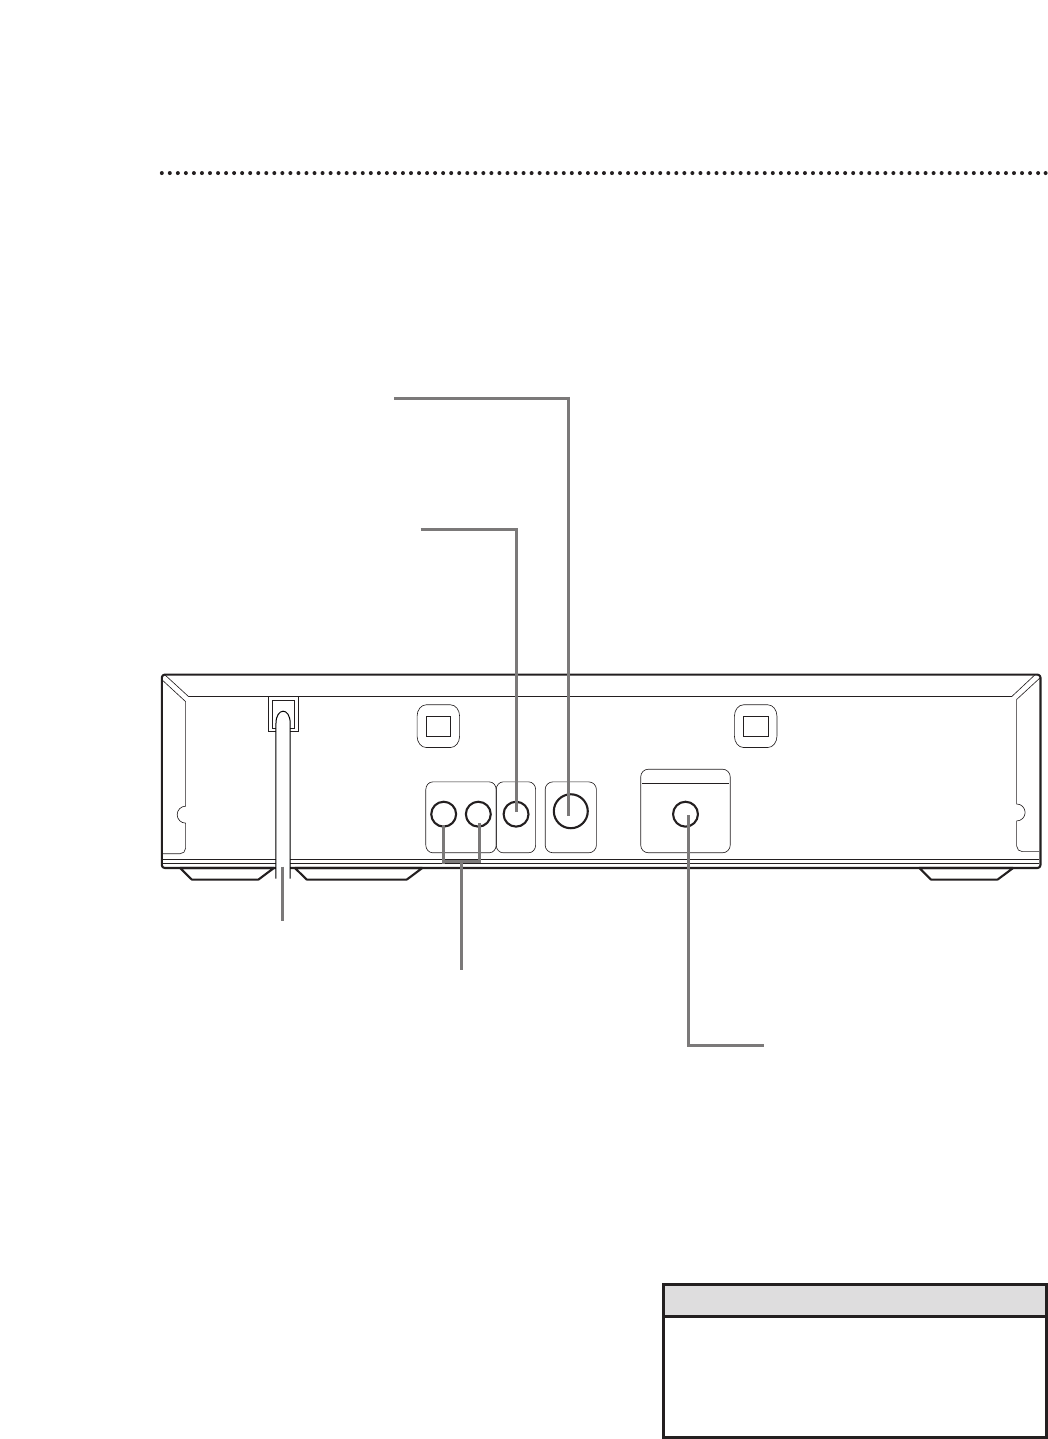
Rear Panel 15
AUDIO OUT COAXIAL
S-VIDEO
OUT
VIDEO
OUT
R L
DIGITAL AUDIO OUT
PCM / BITSTREAM
AC Power Cord
Connect to a standard AC
outlet to supply power to
the DVD Player.
COAXIAL Jack
Connect an optional audio
coaxial digital cable here
and to the coaxial digital
Audio In jack of a decoder
or amplifier. Details are on
pages 11-12.
S-VIDEO OUT Jack
Connect an optional S-Video cable here
and to the S-Video In jack of a televi-
sion. Details are on pages 9-12.
VIDEO OUT Jack
Connect the yellow video cable
(supplied) here and to the TV’s
Video In jack. Details are on
pages 8 and 10-12.
AUDIO OUT Jacks
Connect the supplied red
and white audio cables here
and to the Audio In jacks of
a television or stereo. Details
are on pages 8-10.
• You only need one audio connection and one
video connection, so you will not have a cable
connected to every jack. For example, if you
are using the S-VIDEO OUT jack, you will not
use the VIDEO OUT jack.
Helpful Hint
Stop CButton
Press to stop Disc play.
Play BButton
Press to begin Disc play.
RETURN Button
Press to return to the previous DVD Player Setup menu
or to remove the Setup menu from the TV screen.
Skip Gand HButtons
Press to skip Chapters or Tracks. Details are on page 25.
16 Remote Control Buttons
OPEN/
CLOSE
OK
CLEAR
A-B
RETURN DISPLAY TITLE
SEARCH MODE MODE ZOOM
REPEAT REPEAT MARKER
SETUP AUDIO
SUBTITLE ANGLE
POWER
DISC
3
2
1
65
4
987
0
+
10
MENU
AUDIO Button
Press to choose one of the audio languages or sound
modes available on the Disc. Details are on page 32.
POWER Button
Press to turn the power on and off. “P-ON” appears
briefly on the display panel as the DVD Player turns on.
“P-OFF” appears briefly as the DVD Player turns off.
DISC MENU Button
Press to display the menu of the Disc. Details are on pages 5 and 19.
OPEN/CLOSE Button
Press to open or close the Disc tray.
SETUP Button
When Disc playback is stopped, press to access or remove the
DVD Player’s Setup menu. Details are on pages 35-36 and 40-46.
REPEAT Button
Press to repeat playback of the current Disc or Track (Audio
CD) or a Title or Chapter (DVD). Details are on page 28.
OK Button
Press to confirm a setting in the Player menu
or to select a feature in the Disc menu.
SEARCH MODE Button
Press to access or remove the Search display, which allows you to go
directly to a specific Title/Chapter/Track/Time. Details are on pages 25-27.
Arrow Buttons
Press to select an item in the DVD Player
menu or in the Disc menu.
Reverse h Button
Press to view the picture in fast reverse motion (DVD) or to
reverse playback of an Audio CD. Details are on page 22.
Number Buttons
Press to directly select a Track (Audio CD) for playback.
Details are on page 25. For single-digit Tracks, press a single
Number button. For example, to play Track three, press the
Number 3 button.
For Tracks 10 and above, press the +10 button so that the
Search display appears. Then, press the Number button for the
first digit, then a Number button for the second digit. For
example, to play Track 12, press the +10 button, then the
Number 1 button, then the Number 2 button. For Track 22,
press the +10 button, then press the Number 2 button twice.
Also, you can use the Number buttons to program Tracks
(Audio CD) for playback. Details are on page 30.

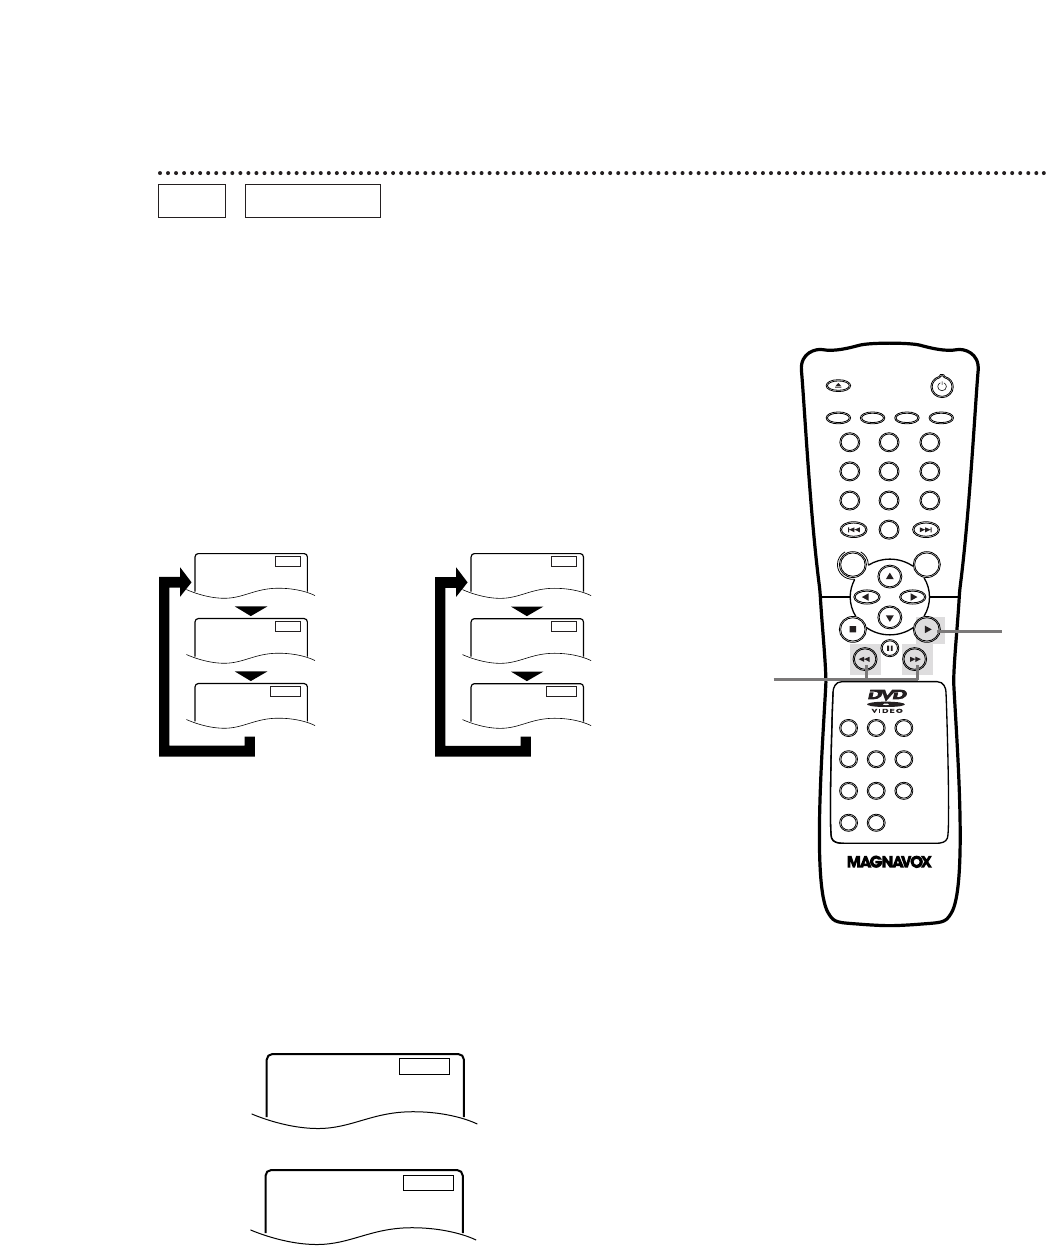
Remote Control Buttons (cont’d) 17
OPEN/
CLOSE
OK
CLEAR
A-B
RETURN DISPLAY TITLE
SEARCH MODE MODE ZOOM
REPEAT REPEAT MARKER
SETUP AUDIO
SUBTITLE ANGLE
POWER
DISC
3
2
1
65
4
987
0
+
10
MENU
A-B REPEAT Button
Press to set up A-B Repeat Play, which repeatedly plays a specific
segment of a Disc. Details are on page 29.
SUBTITLE Button
Press to select a language for the subtitles (among those available)
or to turn off the subtitles. Details are on page 33.
ANGLE Button
Press to view the picture from a different angle (if available). Press
to choose one of the available angles. Details are on page 34.
MODE Button
Press to set up programmed or random playback for an Audio CD.
Details are on page 30-31.
DISPLAY Button
Displays the current status of the Disc during playback. Press again
to remove the status display. Details are on pages 37-38.
CLEAR Button
Press to erase incorrect information when setting up features.
MARKER Button
Press to set a Marker, which will give you quick access to points
on a Disc that you select. Details are on page 39.
Pause FButton
Press to pause Disc playback. Details are on page 20. Press repeat-
edly to advance the DVD picture step by step (or one frame at a
time). Details are on page 21.
Fast Forward g Button
Press to fast forward the Disc. Details are on page 22.
Press the Pause Fbutton, then press the Fast Forward gbut-
ton to begin slow motion playback. Press the Fast Forward g
button repeatedly to change the forward speed of slow motion.
Details are on page 23.
TITLE Button
Press to display the Title menu of the Disc, if available.
Details are on page 19.
ZOOM Button
Enlarges the DVD picture during playback. Details are on page 24.
OPEN/
CLOSE
OK
CLEAR
A-B
RETURN DISPLAY TITLE
SEARCH MODE MODE ZOOM
REPEAT REPEAT MARKER
SETUP AUDIO
SUBTITLE ANGLE
POWER
DISC
3
2
1
65
4
987
0
+
10
MENU
18 Playing a Disc
Playing a DVD or an Audio CD
Before you begin...
Turn on the power of the TV, amplifier and any other equipment
connected to the DVD Player. Make sure the TV and the stereo
or amplifier (if applicable) are set to the correct channel. Details
are on pages 8-12.
2
Press the OPEN/CLOSE button to open the Disc tray.
1
Press the POWER button to turn on the DVD Player.
“P-ON” will appear briefly on the display panel.
3
Place a Disc into the tray. Make sure the Disc is sitting prop-
erly in the recessed groove of the tray.
Some DVDs are recorded on both sides. Make sure the side you
want to play is facing up. Or, if the DVD is recorded on only one
side, place the Disc in the tray with the label facing up.
4
Press the OPEN/CLOSE button to close the tray. Disc
playback may start automatically. Or, if the DVD has a menu, the
menu may appear on the screen instead. Details are on page 19.
With some Audio CDs, playback will not begin until you press the
Play Bbutton.
To search forward or backward during playback, see page 22.
5
Press the Stop Cbutton to stop playback.
2
41
5
DVD AUDIO CD Insert a Disc.
3
Remember, this DVD Player
will play only certain Discs.
See page six for details.
• An “X” may appear at the top right
corner of the TV screen when you try
a feature. This means either the fea-
ture you tried is not available on the
Disc, or the DVD Player can not
access the feature at this time. This
does not indicate a problem with the
DVDPlayer.
• If a Disc is dirty or has scratches, the
pictures may appear distorted and
playback may stop. In such cases,
remove the Disc and turn off the
DVD Player. Unplug the power cord,
then reconnect it to the power outlet.
Clean the Disc, then turn on the DVD
Player again and reinsert the Disc for
playback.
• When the DVD or CD light appears
on the display panel, the Disc is
loaded completely and is ready for
playback.
Helpful Hints
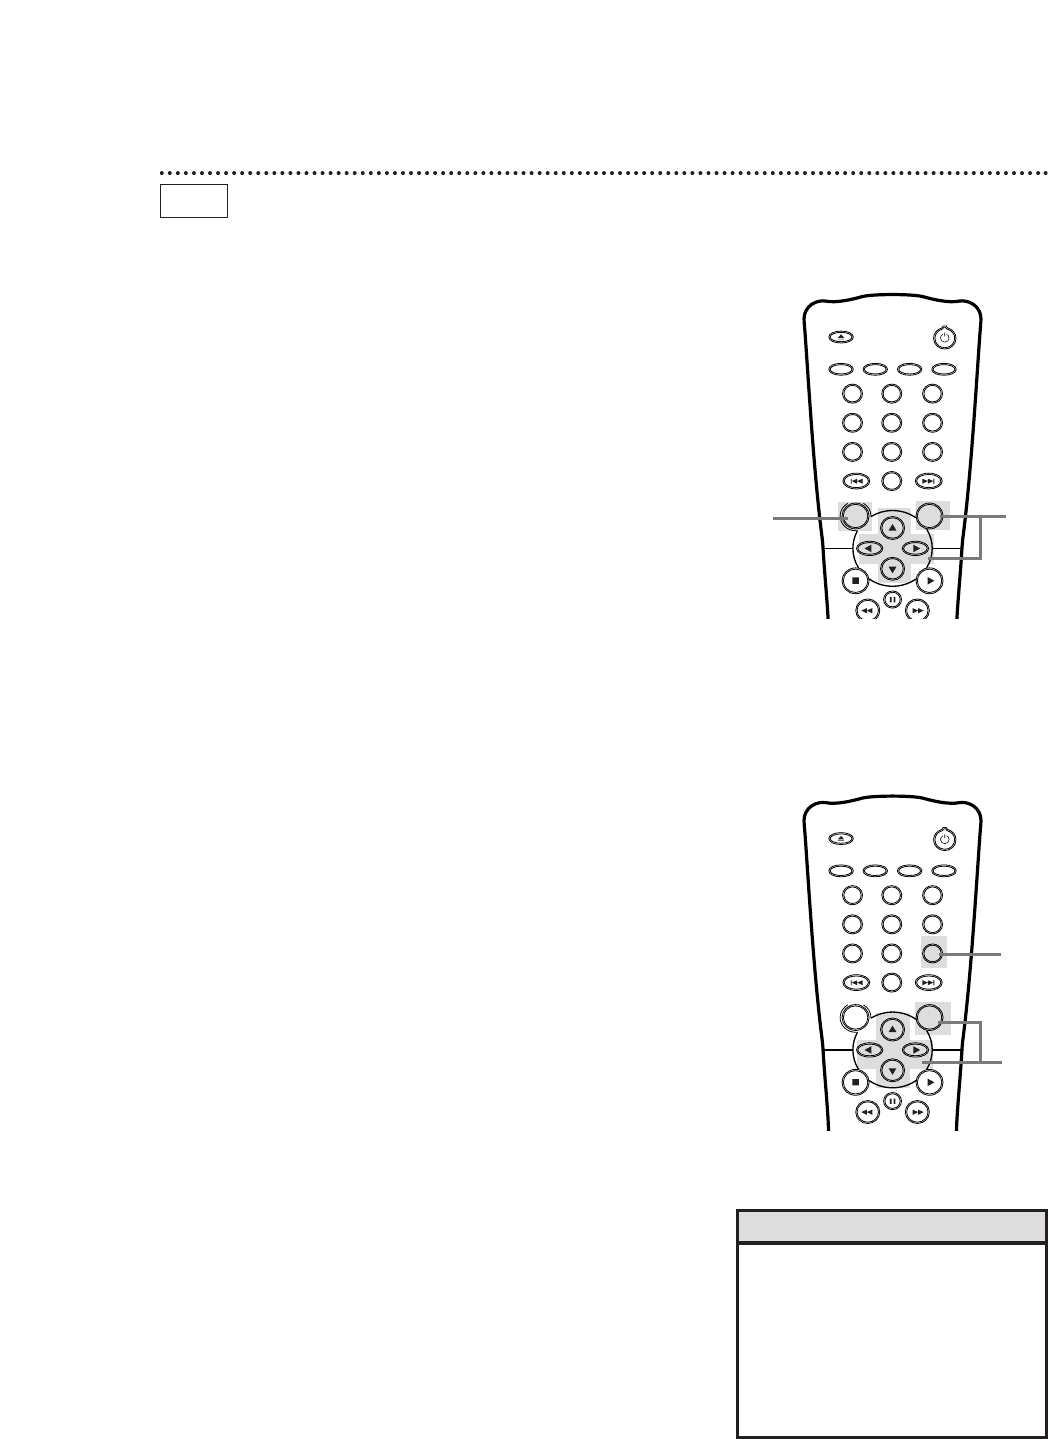
Using the Title Menu
Some DVDs have a Title Menu, which lists the Titles available on
the Disc. Use the Title Menu to start playback at a specific Title.
Some DVDs may allow you to choose Chapters from the Title
menu.
For example, if a DVD has 10 Titles and you want to go directly
to Title 5, follow these steps.
2
Press the Arrow buttons o p s B to select the desired
Title, then press the OK button.
Playback will begin at the Title you selected.
• Menus may vary among Discs. Refer
to the literature accompanying the
Disc for details.
• Not all DVDs have Title menus.
• Some DVDs may refer to Chapters
as “scenes.” Some DVDs may refer
to the Title Menu as the “scene
index.”
Helpful Hints
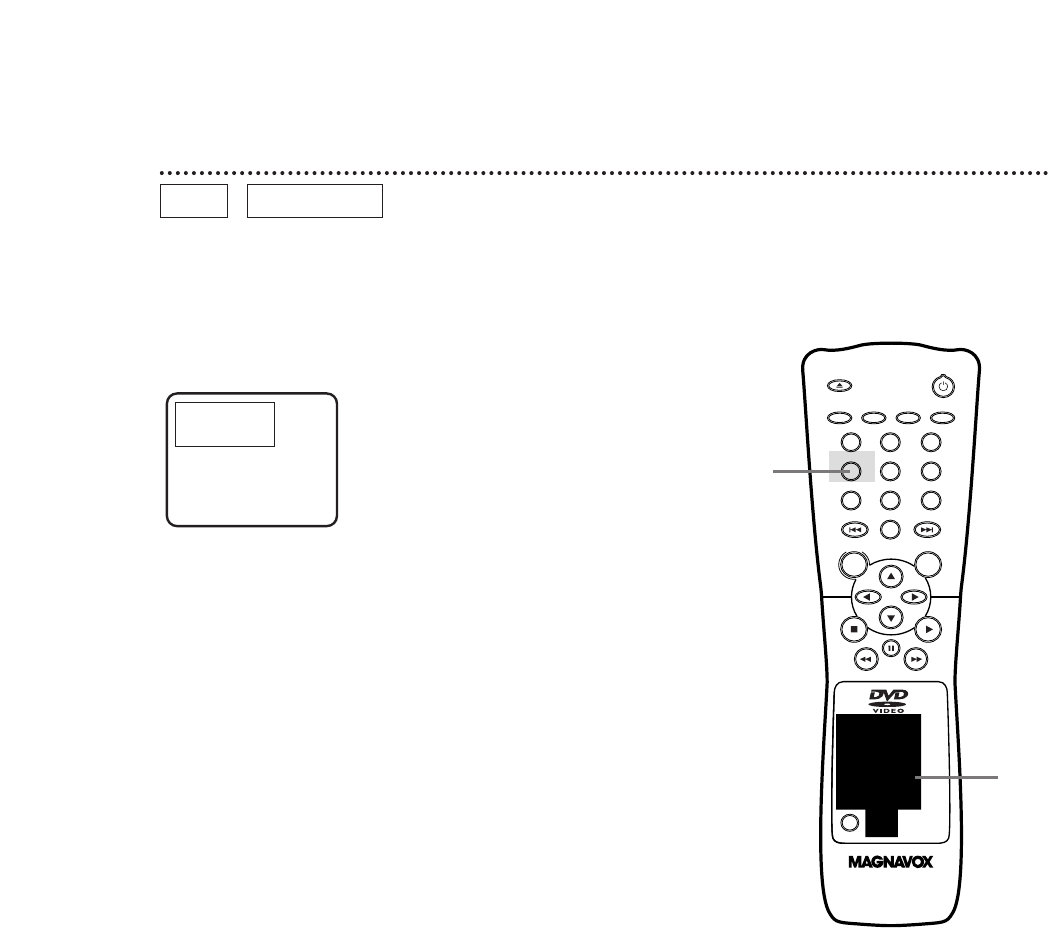
Disc Menus 19
1
Press the DISC MENU button. The DVD’s main menu will
appear.
2
Press the Arrow buttons o p s B to select an item, then
press the OK button. Continue this process to set up all the
features you wish to see on the Disc.
Using the DVD Menus
Some DVDs contain menus that describe the contents of the Disc
or allow you to customize Disc playback. For example, the menu
may offer choices for subtitle languages, director’s commentary,
or soundtrack playback.
To use the DVD menu and select playback features, follow these
steps.
DVD
To access the DVD’s Main Menu...
2
1
To access the DVD’s Title Menu...
1
2
1
Press the TITLE button. The Title Menu will appear.
If a Title menu is not available, the “X” may appear on the TV
screen. If the DVD only has a main menu, the main menu may
appear when you press the TITLE button.
OPEN/
CLOSE
OK
CLEAR
A-B
RETURN DISPLAY TITLE
SEARCH MODE MODE ZOOM
REPEAT REPEAT MARKER
SETUP AUDIO
SUBTITLE ANGLE
POWER
DISC
MENU
OPEN/
CLOSE
OK
CLEAR
A-B
RETURN DISPLAY TITLE
SEARCH MODE MODE ZOOM
REPEAT REPEAT MARKER
SETUP AUDIO
SUBTITLE ANGLE
POWER
DISC
MENU
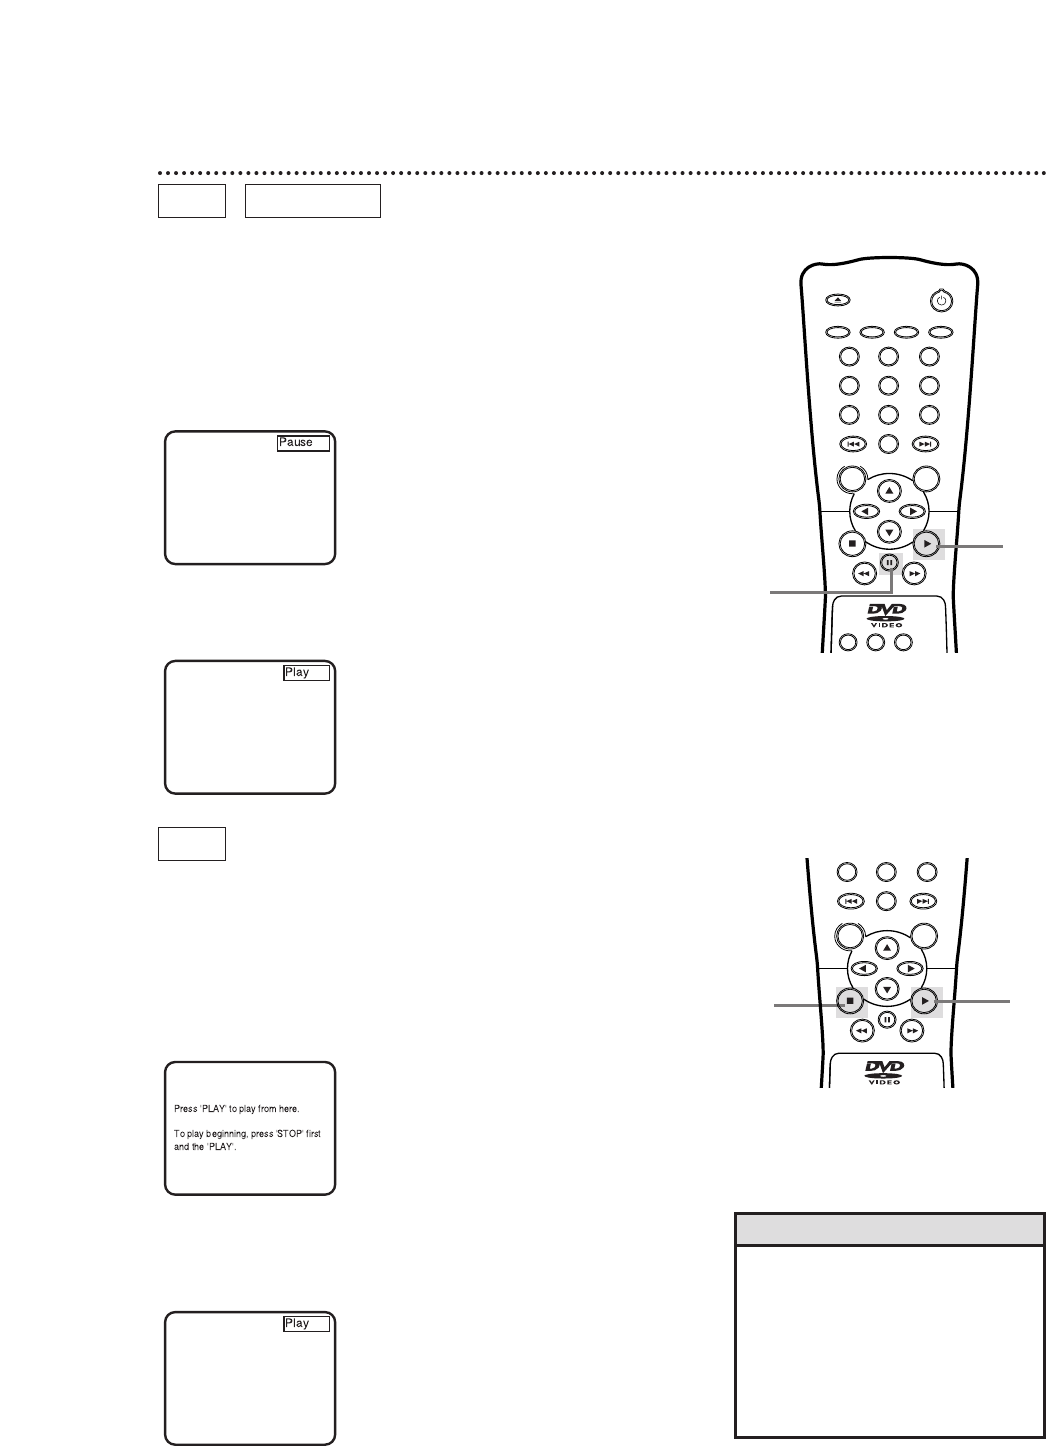
20 Pausing Playback
Pausing Playback
1
During playback, press the Pause Fbutton on the remote
control (or press the PAUSE button on the DVD Player).
Playback will pause and the sound will be muted.
If you press the Pause Fbutton repeatedly, the picture will advance
one frame at a time with each button press.
2
Press the Play Bbutton to resume playback.
• To cancel resume playback and start
playing the DVD from the beginning,
press the Stop Cbutton a second
time while playback is stopped.
Resume Off will appear briefly at the
top right corner of the TV screen.
Press the Play Bbutton to start play-
ing the DVD.
Helpful Hint
k
B
Resume On:
Resuming playback from the point
at which playback stopped
1
Press the Stop Cbutton during playback. In a few seconds,
the following Resume message will appear on the TV screen.
2
Press the Play Bbutton. In a few seconds, playback will
resume from the point at which playback stopped last.
B
DVD AUDIO CD
DVD
Pausing Playback...
2
Resuming Playback...
2
1
OPEN/
CLOSE
OK
CLEAR
A-B
RETURN DISPLAY TITLE
SEARCH MODE MODE ZOOM
REPEAT REPEAT MARKER
SETUP AUDIO
SUBTITLE ANGLE
POWER
DISC
3
2
1
MENU
1
OK
CLEAR
RETURN DISPLAY TITLE
DISC
MENU
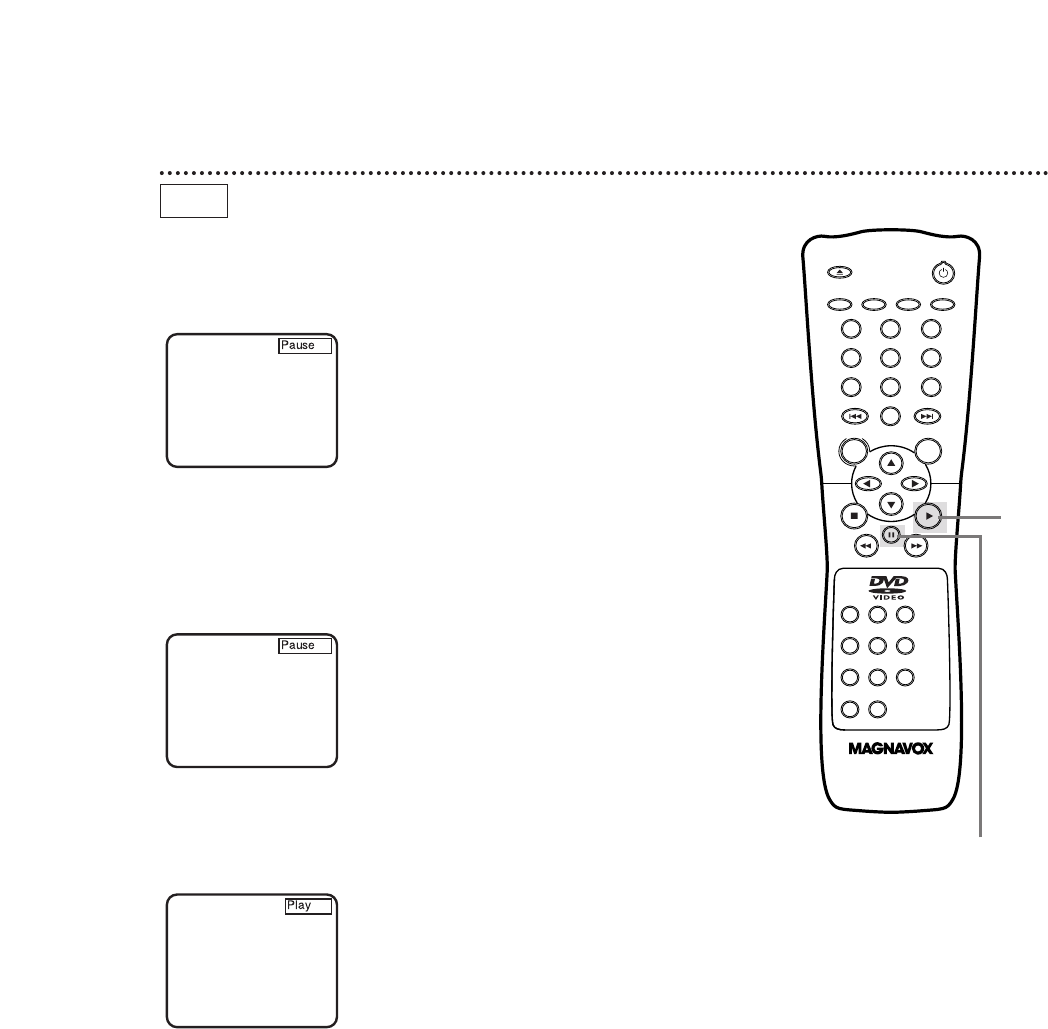
Step by Step Playback 21
1
During playback, press the Pause Fbutton to pause play-
back. The sound will be muted.
3
Press the Play Bbutton to resume playback.
Play Bwill appear briefly on the TV screen.
2
Press the Pause Fbutton repeatedly to see the picture
advance one frame (or step) at a time.
The sound will remain muted. Pause Fwill appear briefly on the
screen each time you press the Pause Fbutton.
k
k
B
DVD
3
1-2
OPEN/
CLOSE
OK
CLEAR
A-B
RETURN DISPLAY TITLE
SEARCH MODE MODE ZOOM
REPEAT REPEAT MARKER
SETUP AUDIO
SUBTITLE ANGLE
POWER
DISC
3
2
1
65
4
987
0
+
10
MENU
OPEN/
CLOSE
OK
CLEAR
A-B
RETURN DISPLAY TITLE
SEARCH MODE MODE ZOOM
REPEAT REPEAT MARKER
SETUP AUDIO
SUBTITLE ANGLE
POWER
DISC
3
2
1
65
4
987
0
+
10
MENU
22 Fast Forward/Reverse Search
2
Press the Play Bbutton to return to normal playback.
1
During playback, press the Fast Forward gbutton or the
Reverse hbutton on the remote control (or press and hold
the NEXT button or the PREV(ious) button on the DVD Player).
●On a DVD, pressing the Fast Forward gor Reverse hbut-
ton repeatedly will forward or reverse the picture at twice, eight
times, or 32 times the normal playback speed. Sound will be
muted during searching.
●Use the Fast Forward gbutton for a forward search. Press the
Reverse hbutton for a reverse search.
D
Press the Fast Forward button.
D
Press the Fast Forward button again.
D
Press the Fast Forward button again.
D
Press the Fast Forward button again.
E
X2
E
Press the Reverse button.
E
Press the Reverse button again.
E
Press the Reverse button again.
E
Press the Reverse button again.
E
X8
E
X32
D
X2
D
X8
D
X32
DX16
D
Press the Fast Forward button during Audio CD playback.
EX16
E
Press the Reverse button during Audio CD playback.
DVD AUDIO CD
12
●On an Audio CD, you may search forward or backward at 16
times the normal playback speed (hX16 or gX16). Pressing
the Fast Forward gor Reverse hbutton repeatedly will not
affect the speed of the search. Sound will be intermittent during
searching on an Audio CD.
●Use the Fast Forward gbutton for a forward search. Press the
Reverse hbutton for a reverse search.
3
Press the Play Bbutton to return to normal playback.
2
Press the Fast Forward Dbutton. Slow motion playback will
begin.
Press the Fast Forward Dbutton repeatedly during slow motion
playback to vary the speed of slow motion playback.
You may play the DVD at 1/16, 1/8, or 1/2 the normal playback
speed.
1
Press the PAUSE Fbutton during playback.
• The sound will be muted when play-
back is paused and during slow
motion playback.
• You can not play the DVD in
reverse slow motion.
Helpful Hints
DVD
Slow Motion 23
12
3
OPEN/
CLOSE
OK
CLEAR
A-B
RETURN DISPLAY TITLE
SEARCH MODE MODE ZOOM
REPEAT REPEAT MARKER
SETUP AUDIO
SUBTITLE ANGLE
POWER
DISC
3
2
1
65
4
987
0
+
10
MENU
k
B
D
Press the Fast Forward button.
D
Press the Fast Forward button again.
D
Press the Fast Forward button again.
D
Press the Fast Forward button again.
X1/16
X1/8
X1/2
• Zooming is not possible when you
access the DVD Player’s display
screen. Details are on page 37.
Helpful Hint
DVD
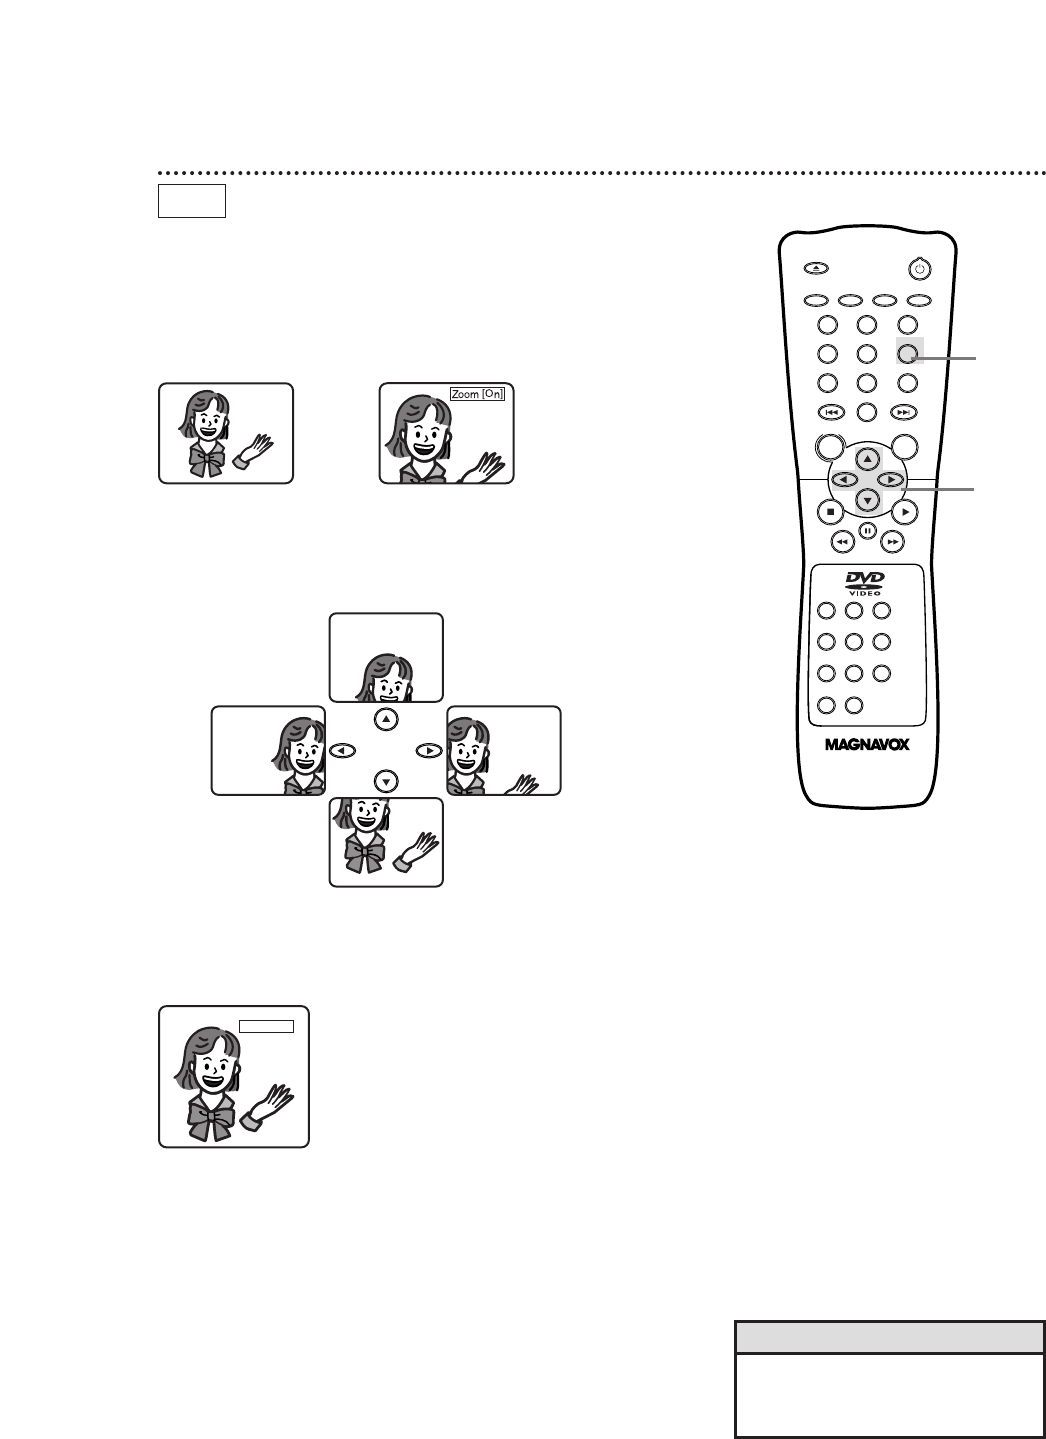
You can enlarge the DVD picture during playback. The picture will
be four times larger than normal.
1
Press the ZOOM button during playback. The enlarged pic-
ture will continue to play.
2
Press the Arrow buttons o p s B to move the zoomed
image left, right, up, and down.
3
To return the picture to its normal size, press the ZOOM
button again.
➜
24 Zoom Playback
Zoom [Off]
OPEN/
CLOSE
OK
CLEAR
A-B
RETURN DISPLAY TITLE
SEARCH MODE MODE ZOOM
REPEAT REPEAT MARKER
SETUP AUDIO
SUBTITLE ANGLE
POWER
DISC
3
2
1
65
4
987
0
+
10
MENU
2
1,3
OPEN/
CLOSE
OK
CLEAR
A-B
RETURN DISPLAY TITLE
SEARCH MODE MODE ZOOM
REPEAT REPEAT MARKER
SETUP AUDIO
SUBTITLE ANGLE
POWER
DISC
3
2
1
65
4
987
0
+
10
MENU
Track Playback 25
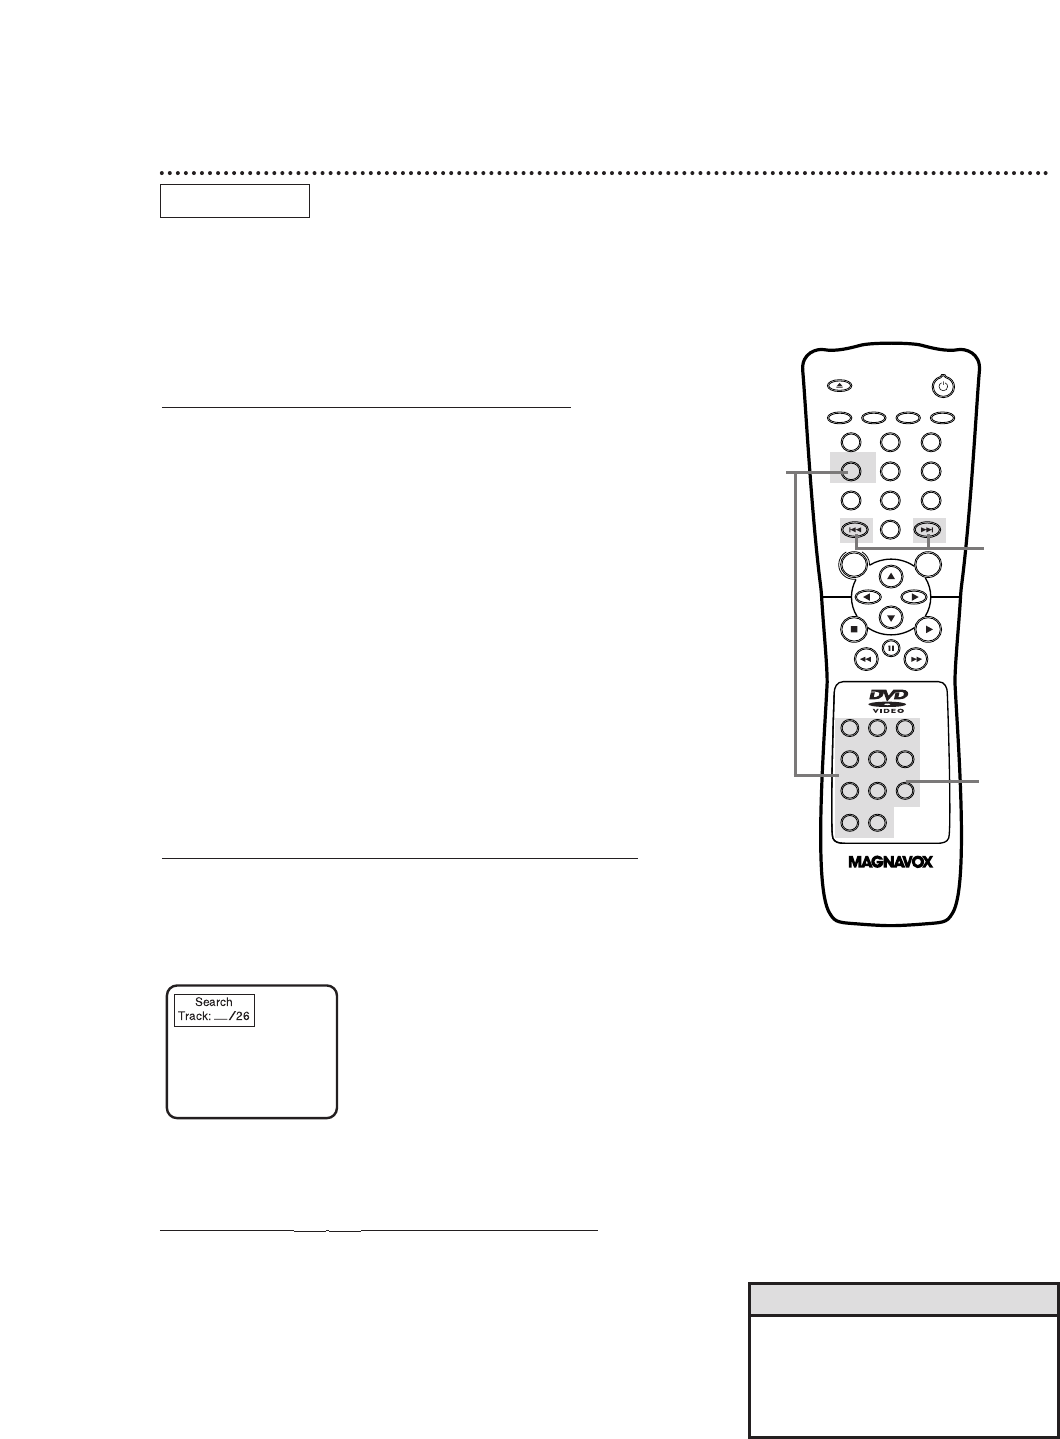
Starting Playback at a Specific Track
There are three ways to begin playback on an Audio CD at a specific
Track. You may use the Number buttons, the SEARCH MODE but-
ton, or the Skip H G buttons. For details, read this information.
B
Using the SEARCH MODE Button to Select a Track
Press the SEARCH MODE button once so that the Track
Search display appears. Within 30 seconds, press the Number
buttons to select the Track number you desire. Playback will
begin at the selected Track. For a single-digit Track (1-9), enter a
zero first. For example, to play Track 5, press 0, 5.
A
Using the Number Buttons to Select a Track
Press the Number buttons to enter the desired Track num-
ber. Playback will start at the selected Track. You may select a Track
with the Number buttons during playback or when playback is
stopped.
For single-digit Tracks (1-9), press a single Number button. For exam-
ple, to play Track three, press the Number 3 button.
For Tracks 10 and above, press the +10 button so that the Search dis-
play appears on the TV screen. Then press the Number button of the
first digit, then press the Number button of the second digit.
For example, to play Track 26, press the +10 button, then press the
Number 2 button, then press the Number 6 button.
If you enter a Track number that is not available on the Disc, playback
will not begin (or the current Track will continue to play). An “X” will
appear in the top right corner of the TV screen.
C
Using the SkipHGButtons to Select a Track
Press the Skip GGbutton during playback to skip the current
Track and move to the next Track. Press the Skip GGbutton
repeatedly to skip subsequent Tracks. The Track number will
appear briefly on the DVD Player display panel.
Press the SkipHHbutton during playback to return to the
beginning of the current Track. Press the SkipHHbutton
repeatedly to go to previous Tracks. The Track number will
appear briefly on the DVD Player display panel.
AUDIO CD
A
C
B
•The Skip buttons are not active when
playback is stopped.
• You can not use the Skip GGbutton
to go from the last Track on the disc
to the first Track.
Helpful Hints
26 Title/Chapter Playback
Search
Title :1 /
4
Chapter :
–
/17
Search
Title :4 /
4
Chapter :
–
/17
Search
Title :4 /
4
Chapter :12/17
DVD
1
Press the SEARCH MODE button so that the Title/Chapter
Search display appears on the TV screen.
2
To select the Title, press the Arrow oobutton to select
the Title space, then press the Number buttons to enter
the Title number. The bar will move to Chapter automatically.
●For a single digit, 1-9, press 0 first. For example, to select Title
4, press 0, 4.
Starting Playback at a Specific Title/Chapter
3
To select the Chapter, press the Number buttons to enter
the Chapter number. The DVD Player will begin playback at the
selected Chapter.
• Title/Chapter playback is not avail-
able with some DVDs.
Helpful Hint
OPEN/
CLOSE
OK
CLEAR
A-B
RETURN DISPLAY TITLE
SEARCH MODE MODE ZOOM
REPEAT REPEAT MARKER
SETUP AUDIO
SUBTITLE ANGLE
POWER
DISC
3
2
1
65
4
987
0
+
10
MENU
2
3
1
OPEN/
CLOSE
OK
CLEAR
A-B
RETURN DISPLAY TITLE
SEARCH MODE MODE ZOOM
REPEAT REPEAT MARKER
SETUP AUDIO
SUBTITLE ANGLE
POWER
DISC
3
2
1
65
4
987
0
+
10
MENU
1
During playback, press the SEARCH MODE button
repeatedly so that the Time Search display appears on the TV
screen.
2
Within 30 seconds, use the Number buttons to enter the
Disc time at which you want playback to begin. Within a
few seconds, playback will start at the specified time.
●Example: 1 hour, 23 minutes and 30 seconds
1 →2 →3 →3 →0
●Make sure the time you enter is within the total time of the
Title or Track. If it is not, “X” will appear on the screen.
Playback will continue at its current point.
●If you make a mistake, press the CLEAR button. Then, enter the
correct information.
Starting Playback at a Specific Disc Time
Search
Time
–:
–
:
–
Total Time 1
:
29
:
00
Specific Time Playback 27
DVD AUDIO CD
2
1
OPEN/
CLOSE
OK
CLEAR
A-B
RETURN DISPLAY TITLE
SEARCH MODE MODE ZOOM
REPEAT REPEAT MARKER
SETUP AUDIO
SUBTITLE ANGLE
POWER
DISC
3
2
1
65
4
987
0
+
10
MENU
1
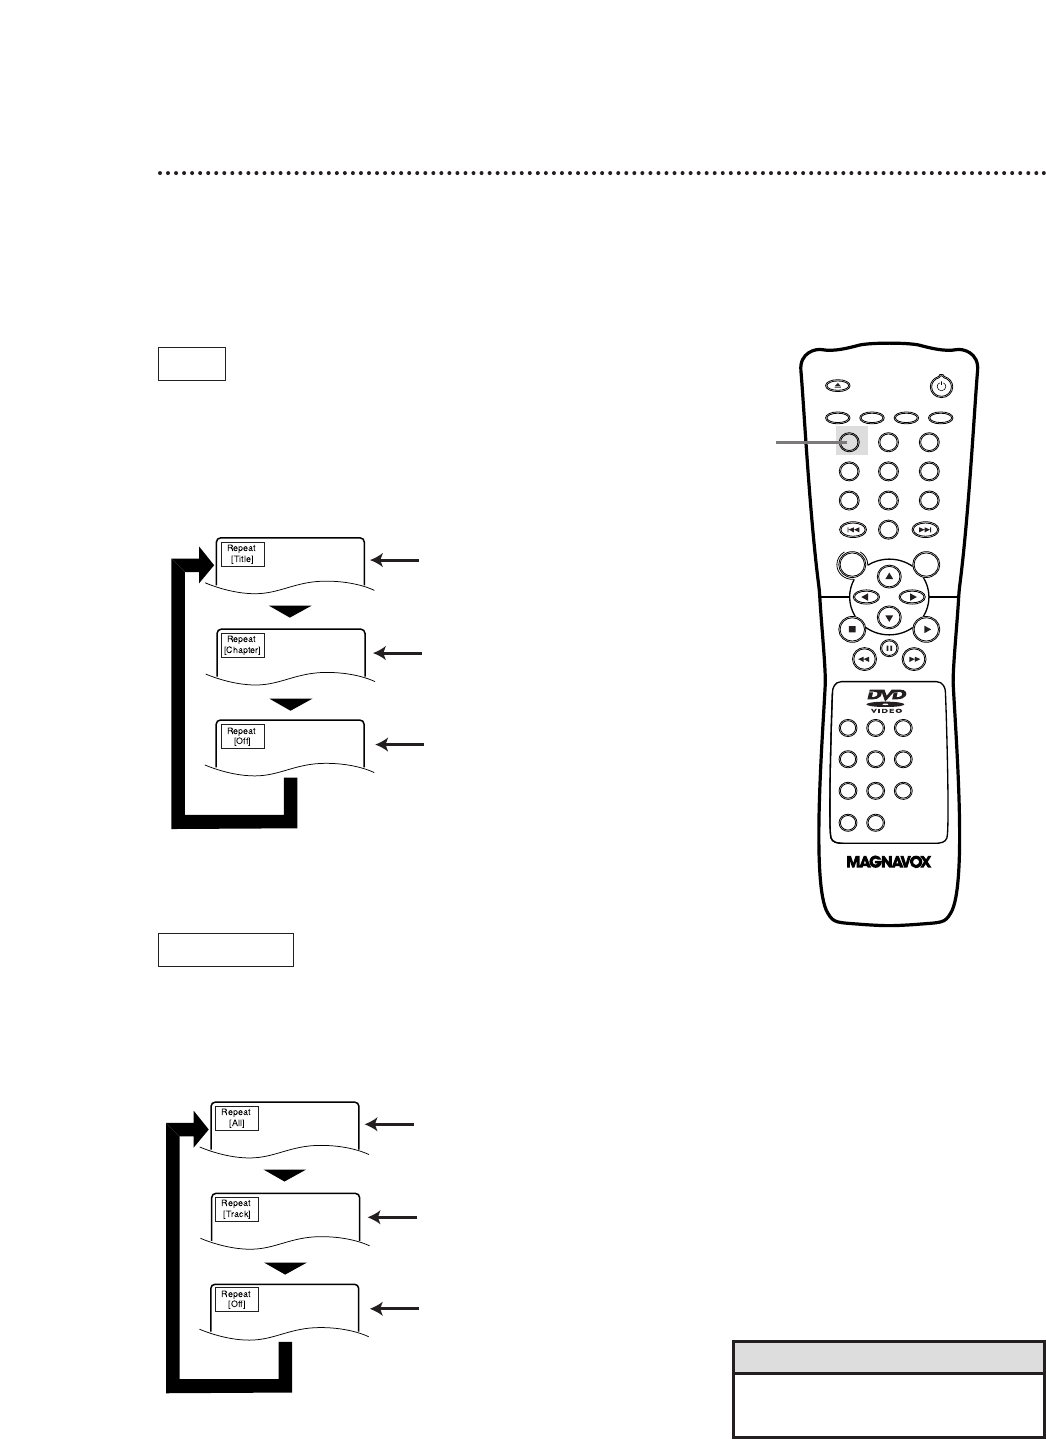
28 Repeat Playback
●Repeatedly pressing the REPEAT button during playback lets
you choose Repeat Title, Repeat Chapter, or Repeat Off.
●Selecting a new Chapter or Title will cancel repeat playback.
1
Press the REPEAT button repeatedly until the repeat
mode you want appears in the top left corner of the TV
screen.
●Repeatedly pressing the REPEAT button during playback lets
you choose Repeat All, Repeat Track, or Repeat Off.
●Selecting a new Track will cancel repeat playback.
DVD
Press the REPEAT button to select
Repeat All. The entire Audio CD plays
over and over. REPEAT will appear on
the DVD Player Display.
Press the REPEAT button to select
Repeat Title. The entire current Title
plays over and over. REPEAT and TITLE
will appear on the DVD Player Display.
Press the REPEAT button again to
select Repeat Track. The current Track
plays over and over. REPEAT and TRK.
will appear on the DVD Player Display.
Press the REPEAT button again to select
Repeat Chapter. The current Chapter
plays over and over. REPEAT and CHP.
will appear on the DVD Player Display.
Press the REPEAT button again to
select Repeat Off. Regular playback
will resume.
Press the REPEAT button again to select
Repeat Off. Regular playback will resume.
AUDIO CD
• Repeat playback is not available
with some discs.
Helpful Hint
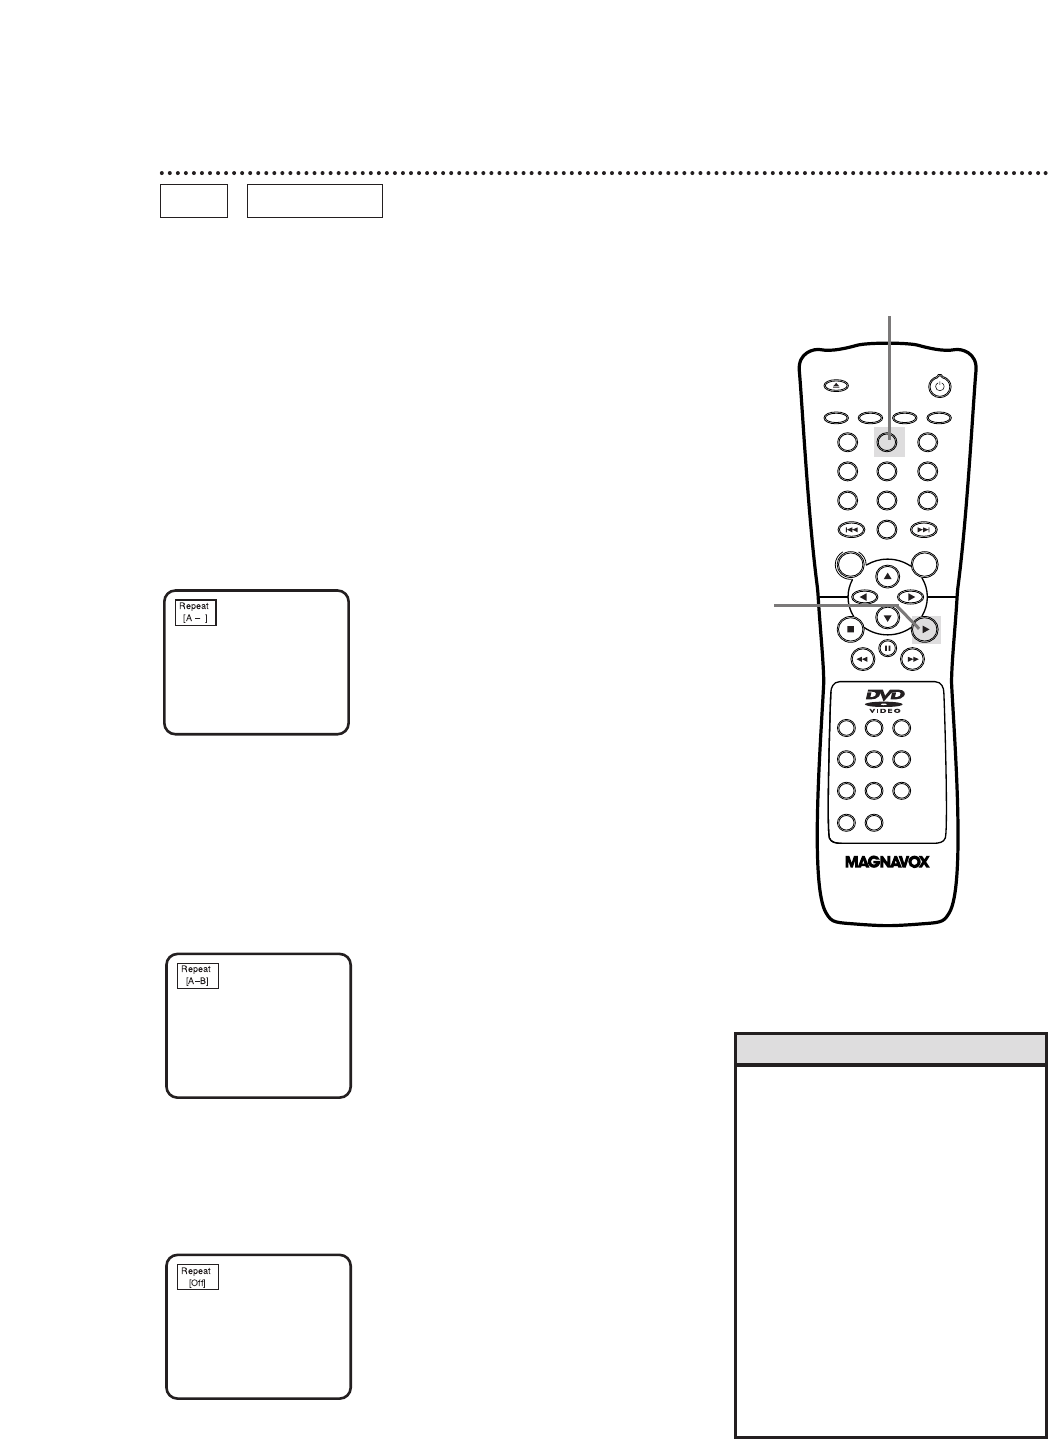
A-B Repeat Playback 29
• A-B Repeat playback is not available
with some DVDs.
• With DVDs, the entire A-B repeat
section must be within a single Title.
The DVD Player will automatically
set the end point (B) at the end of
the Title.
• With Audio CDs, the A-B repeat
section must be within a single
Track. The DVD Player will auto-
matically set the end point (B) at
the end of the Track.
• Point B must be later on the Disc
than Point A.
• Pressing the Stop Cbutton will can-
cel A-B Repeat Playback.
Helpful Hints
You can play a section of an Audio CD or DVDrepeatedly.
Follow these steps to set up the section that you want to play
over and over.
1
Play the Disc to the point at which you want repeated
playback to begin.
2
Press the A-B REPEAT button to set the starting point
(A). Repeat A will appear on the DVD Player’s display panel.
3
Play the Disc to the point at which you want repeated
playback to end, then press the A-B REPEAT button
again.
Within a few seconds, the section will begin to play. The segment
will play over and over until you cancel the A-B Repeat feature.
REPEAT A-B will appear on the DVD Player’s display panel.
4
To cancel A-B Repeat Playback, press the A-B REPEAT
button so that Repeat [Off] appears on the TV screen.
Regular Disc playback will resume.
DVD AUDIO CD
OPEN/
CLOSE
OK
CLEAR
A-B
RETURN DISPLAY TITLE
SEARCH MODE MODE ZOOM
REPEAT REPEAT MARKER
SETUP AUDIO
SUBTITLE ANGLE
POWER
DISC
3
2
1
65
4
987
0
+
10
MENU
2-4
1
OPEN/
CLOSE
OK
CLEAR
A-B
RETURN DISPLAY TITLE
SEARCH MODE MODE ZOOM
REPEAT REPEAT MARKER
SETUP AUDIO
SUBTITLE ANGLE
POWER
DISC
3
2
1
65
4
987
0
+
10
MENU
30 Programmed Playback
You may determine the order in which Tracks will play. The order
that you set is called the Program. To set up programmed play-
back, follow these steps.
1
While playback is stopped, press the MODE button. The
program screen will appear.
AudioCD
Program
Total
[Track]
- -
[Time]
0:00:00
Track
00 / 15
Start : PLAY Delete : CLEAR
Random: MODE Exit : RETURN
2
Press the Number buttons to enter the number of the
first Track that you want to play.
●If you enter a wrong Track number, press the CLEAR button.
The last Track in the Program will be removed.
●Enter single-digit Tracks with a single Number button. For
example, for Track three, press the Number 3 button.
●For Tracks 10 and above, press the +10 button, then the
Number button for the first digit, then the Number button for
the second digit. For example, to play Track 26, press the +10
button, then press the Number 2 button, then press the Number
6 button.
3
Repeat step 2 until you have selected all the Tracks you
wish to play in the Program.
●Make sure the Track numbers you enter are available on the
Audio CD.
AudioCD
Program
Total
[Track]
12
[Time]
0:47:29
Track 0
3 / 15
Start : PLAY Delete : CLEAR
Random: MODE Exit : RETURN
02 05 07 14 01 09 13 10 03 11
08 03
4
Press the Play Bbutton. The Tracks will play in the order in
which you programmed them. The Program will play once. When
programmed playback ends, the Program will be erased. Turning
off the Player or opening the disc tray also will erase the Program.
• You can not combine specific track
and random playback with pro-
grammed playback.
• You may play a Program repeatedly.
During programmed playback, press
the REPEAT button so that Repeat
[All] or Repeat [Track] appears. The
entire program or the current Track
will play over and over.
• To see which Tracks you stored in the
Program, press the DISPLAY button
during playback.
Helpful Hints
1
4
2-3
AUDIO CD
OPEN/
CLOSE
OK
CLEAR
A-B
RETURN DISPLAY TITLE
SEARCH MODE MODE ZOOM
REPEAT REPEAT MARKER
SETUP AUDIO
SUBTITLE ANGLE
POWER
DISC
3
2
1
65
4
987
0
+
10
MENU
Random Playback 31
You may play the Tracks of an Audio CD in Random order
instead of the order in which they are recorded (1,2,3...). To set
up Random Playback, follow these steps.
1
While playback is stopped, press the MODE button twice
so that the RANDOM screen appears.
AudioCD
Random
Start : PLAY Exit : MODE
2
While the RANDOM screen appears, press the Play B
button. The Tracks will play in random order. After each Track
plays once, playback will stop.
1
2
AUDIO CD
32 Audio Language
• If a desired language is not available
after pressing the AUDIO button sev-
eral times, the DVD does not have
that language.
• The display will disappear after about
5 seconds.
• Some DVDs only allow you to change
the language in the Disc menu.
Helpful Hints
The DVD Player allows you to select a language for DVDs during
playback. You can change the language only if multiple languages
are available on the DVD.
1
Press the AUDIO button during playback so that the
audio display appears in the top left corner of the TV
screen. Press the AUDIO button repeatedly until you select your
desired language.
Audio 1. English / 8
Audio 2. French / 8
Audio 3.
Japanese
/ 8
➜•••
AUDIO 1 AUDIO 2
DVD
Press the AUDIO button.
Press the AUDIO button again.
Press the AUDIO button repeatedly to see
and hear all the available languages. The num-
ber of available languages appears at the right
of the audio display. In this example, eight
languages are available ( /8).
OPEN/
CLOSE
OK
CLEAR
A-B
RETURN DISPLAY TITLE
SEARCH MODE MODE ZOOM
REPEAT REPEAT MARKER
SETUP AUDIO
SUBTITLE ANGLE
POWER
DISC
3
2
1
65
4
987
0
+
10
MENU
1
OPEN/
CLOSE
OK
CLEAR
A-B
RETURN DISPLAY TITLE
SEARCH MODE MODE ZOOM
REPEAT REPEAT MARKER
SETUP AUDIO
SUBTITLE ANGLE
POWER
DISC
3
2
1
65
4
987
0
+
10
MENU
Subtitle Language 33
• With some DVDs, you may select a
subtitle language only in the Disc
menu.
• If the desired language does not
appear after pressing the SUBTITLE
button several times, the Disc does
not have subtitles in that language.
• The subtitles may be delayed for a
few seconds.
• Opening the disc tray or turning off
the Player’s power will cancel your
subtitle setting. The default setting of
the DVD will be active again.
• When “Subtitle Not Available”
appears on the TV screen, no subtitle
is available for the current scene.
Helpful Hints
The DVD Player allows you to select a language for subtitles dur-
ing playback. You may select only the languages that are available
on the Disc.
1
Press the SUBTITLE button during playback so that the
subtitle display appears on the TV screen.
2
Within 5 seconds, press the SUBTITLE button repeatedly
to select a subtitle language. The number of available lan-
guages appears at the right of the audio display. In this example,
eight languages are available ( /8).
3
The subtitle display will disappear after about 5 seconds.
Press the SUBTITLE button.
Press the SUBTITLE button to
select another language.
Subtitle 2
To turn off subtitles, press the
SUBTITLE button repeatedly until
OFF appears in the subtitle display.
No subtitles
Subtitle 1. English / 8
Subtitle 2. French / 8
Subtitle Off
➜•••
SUBTITLE 1 SUBTITLE 2
DVD
1-2
OPEN/
CLOSE
OK
CLEAR
A-B
RETURN DISPLAY TITLE
SEARCH MODE MODE ZOOM
REPEAT REPEAT MARKER
SETUP AUDIO
SUBTITLE ANGLE
POWER
DISC
3
2
1
65
4
987
0
+
10
MENU
34 Camera Angles
Some DVDs contain scenes that were recorded from different
angles. You may select a camera angle with the DVD Player during
playback.
1
Press the ANGLE button during playback so that the
Angle display appears in the top left corner of the TV
screen.
Angle 1 / 8
Angle 2 / 8
Angle 8 / 8
Angle 1 (default) of eight
available angles
Press the ANGLE button
repeatedly to select
another angle.
Angle 2
Press the ANGLE button again.
Angle 8
2
Within 5 seconds, press the ANGLE button repeatedly to
select a different angle. The number of available angles appears
at the right of the Angle display. In this example, eight angles are
available ( /8).
1-2
DVD
●If the Disc contains sequences recorded from different camera
angles, the angle symbol will appear at the top right corner
of the screen. You can change the camera angle when the sym-
bol appears on the screen.
●The camera angle will not change if the Disc does not contain
sequences recorded from different camera angles.
• Angle Icon must be On in order for
the angle symbol to appear as
described in step 2. To set Angle
Icon to On, see pages 42-43.
Helpful Hint
OPEN/
CLOSE
OK
CLEAR
A-B
RETURN DISPLAY TITLE
SEARCH MODE MODE ZOOM
REPEAT REPEAT MARKER
SETUP AUDIO
SUBTITLE ANGLE
POWER
DISC
3
2
1
65
4
987
0
+
10
MENU
• Write down the password in case
you forget it.
• If you forget the password, you can
reset all of the Player’s settings to
the factory presets. Remove the Disc
from the Player. Press the Number
buttons 1,2,3,4, then press the DIS-
PLAY button. Then, press the OK
button. The original settings of the
Player will be restored. You need to
set the DVD player to your desired
setting again.
Helpful Hints
Parental Lock Password 35
1
While playback is stopped, press the SETUP button. The
setup screen will appear.
2
Press the Arrow ooppbuttons to select Parental. Then, press
the OK button. The Setup/Parental Password menu will appear.
3
Press the Number buttons to enter the 4-digit password.
The Parental Controls screen will appear. When doing this for the
first time, enter any 4 digits. That number will be the password until
you change it.
Language
Display
Audio
Parental Select : / Set : OK
Cancel :
Exit : SETUP
Password
Enter current password.
– – – –
Language
Display
Audio
Parental Select : / / Set : ENTER
Cancel :
Exit : SETUP
Parental Controls
• Parental Level 7 [NC-17]
Change
Select : / Set : OK
Cancel :
Exit : SETUP
Language
Display
Audio
Parental Select : / / Set : ENTER
Cancel :
Exit : SETUP
Parental Controls
Parental Level 7 [NC-17]
• Change
Select : / Set : OK
Cancel :
Exit : SETUP
Password
Enter current password.
– – – –
1,7 2,4
3,5,6
4
Press the Arrow ooppbuttons to select CHANGE. Then,
press the OK button.
5
Press the Number buttons to enter your old password.
6
Press the Number buttons to enter a new 4-digit pass-
word as prompted on the screen. The Parental Controls screen
will reappear, with Parental Level selected.
7
Press the SETUP button to remove the menu.
Follow these steps to change your Parental Controls password.
OPEN/
CLOSE
OK
CLEAR
A-B
RETURN DISPLAY TITLE
SEARCH MODE MODE ZOOM
REPEAT REPEAT MARKER
SETUP AUDIO
SUBTITLE ANGLE
POWER
DISC
3
2
1
65
4
987
0
+
10
MENU
36 Parental Lock Levels
• Some DVDs are not compatible with
Parental Lock. Make sure the DVD
plays according to the Parental Lock
settings you have made.
• The DVD Player will not allow you to
change Parental Level settings until
you enter the correct password.
• When you try to play a Disc that has
a rating that exceeds the level you
set, a message will appear on the
screen, indicating the Disc cannot
play. If this happens, eject the Disc,
then select a level that allows play-
back. Or, select All to turn off
Parental Lock. Load the Disc again
and begin playback as usual. Some
Discs may allow you to simply enter
your 4-digit password, then begin
playback automatically. Follow the
instructions of the Disc.
Helpful Hints
RATING EXPLANATIONS
•NC-17 - Under 17 not admitted
• R - Restricted; under 17 requires
accompanying parent or adult guardian
• PG13 - Unsuitable for children under 13
• PG - Parental Guidance suggested
• G - General Audience
1
While playback is stopped, press the SETUP button. The
setup screen will appear.
Follow these steps to set the rating level for your DVD Player.
Discs whose ratings exceed the level you set will not play. See
Helpful Hints below.
2
Press the Arrow ooppbuttons to select Parental. Then, press
the OK button. The Setup/Parental Password screen will appear.
3
Press the Number buttons to enter your 4-digit password.
Language
Display
Audio
Parental
Select : / Set : OK
Cancel :
Exit : SETUP
Language
Display
Audio
Parental Select : / Set : OK
Cancel :
Exit : SETUP
Password
Enter current password.
– – – –
Language
Display
Audio
Parental Select : / / Set : ENTER
Cancel :
Exit : SETUP
Parental Controls
• Parental Level 7 [NC-17]
Change
Select : / Set : OK
Cancel :
Exit : SETUP
3
1,6
2,4,5
4
Press the Arrow ooppbuttons to select Parental Level.
Then, press the OK button.
5
Press the Arrow op buttons to select the level you desire,
then press the OK button. For example, if you want to play
Discs rated PG13, you must select Level 4 or higher. The level you
select will appear on the screen beside Parental Level, beneath
Parental Controls at the top of the screen.
6
Press the SETUP button to remove the menu.
Language
Display
Audio
Parental
Parental Controls
• Parental Level 7 [NC-17]
Change
Parental Level
• 5
4 [PG13]
3 [PG]
2
Select : / / Set : ENTER
Cancel :
Exit : SETUP
Select : / Set : OK
Cancel :
Exit : SETUP
OPEN/
CLOSE
OK
CLEAR
A-B
RETURN DISPLAY TITLE
SEARCH MODE MODE ZOOM
REPEAT REPEAT MARKER
SETUP AUDIO
SUBTITLE ANGLE
POWER
DISC
3
2
1
65
4
987
0
+
10
MENU
Display Screen (DVD) 37
You can check information about the current Disc by pressing the
DISPLAY button on the remote control. You can select or change
Disc features using the Display Screen.
1
Press the DISPLAY button repeatedly during playback to
access or remove the Display Screen.
2
To select a new Chapter or Title, use the Arrow oopp but-
tons to select Chapter or Title, then press the OK button.
Use the Number buttons to select the Chapter or Title you
want. Playback will begin at the Chapter or Title you selected.
5
Press the DISPLAY button to remove the Display Screen.
4
Use the Arrow ooppbuttons to select a setting, then
press the OK button.
3
To change a setting of Audio, Subtitle, Angle, Marker, or
SRS TruSurround, use the Arrow ooppbuttons to select
an item, then press the OK button.
DVD
Play
Repeat
[Chapter]
Title
1
Chapter
18
Time
0:17:52
-1:38:46
Bit Rate Chapter
18 / 30
Title
1 / 5
Time
1:56:38
Audio 1.English /
4
1,5
2-4
This unit employs TruSurround system
of SRS Labs, Inc. as virtual technology.
TruSurround and the symbol are trademarks of SRS Labs, Inc.
TruSurround technology is incorporated under license from SRS Labs, Inc.
• Current type of disc
• Playback status
• Repeat status
• Current Title number
• Current Chapter number
• Elapsed playing time of
current Title
• Remaining playing time of
current Title
• Bit Rate display
• Current Chapter / Total Chapters in current Title
• Current Title / Total Titles on current Disc
• Total playing time of current Title
• Current settings of Audio, Subtitle, Angle, Marker,
and SRS TruSurround
Indicates additional items are available if you press
the Arrow button
Example
• If you do not want to change the
setting at step 4, press the RETURN
button.
• If there are no optional settings for
the feature, nothing will happen
when you press the OK button to
select an item (Angle, Audio, etc.).
• Additional information about the set-
tings is on pages 32-34 and 39-46.
Helpful Hints
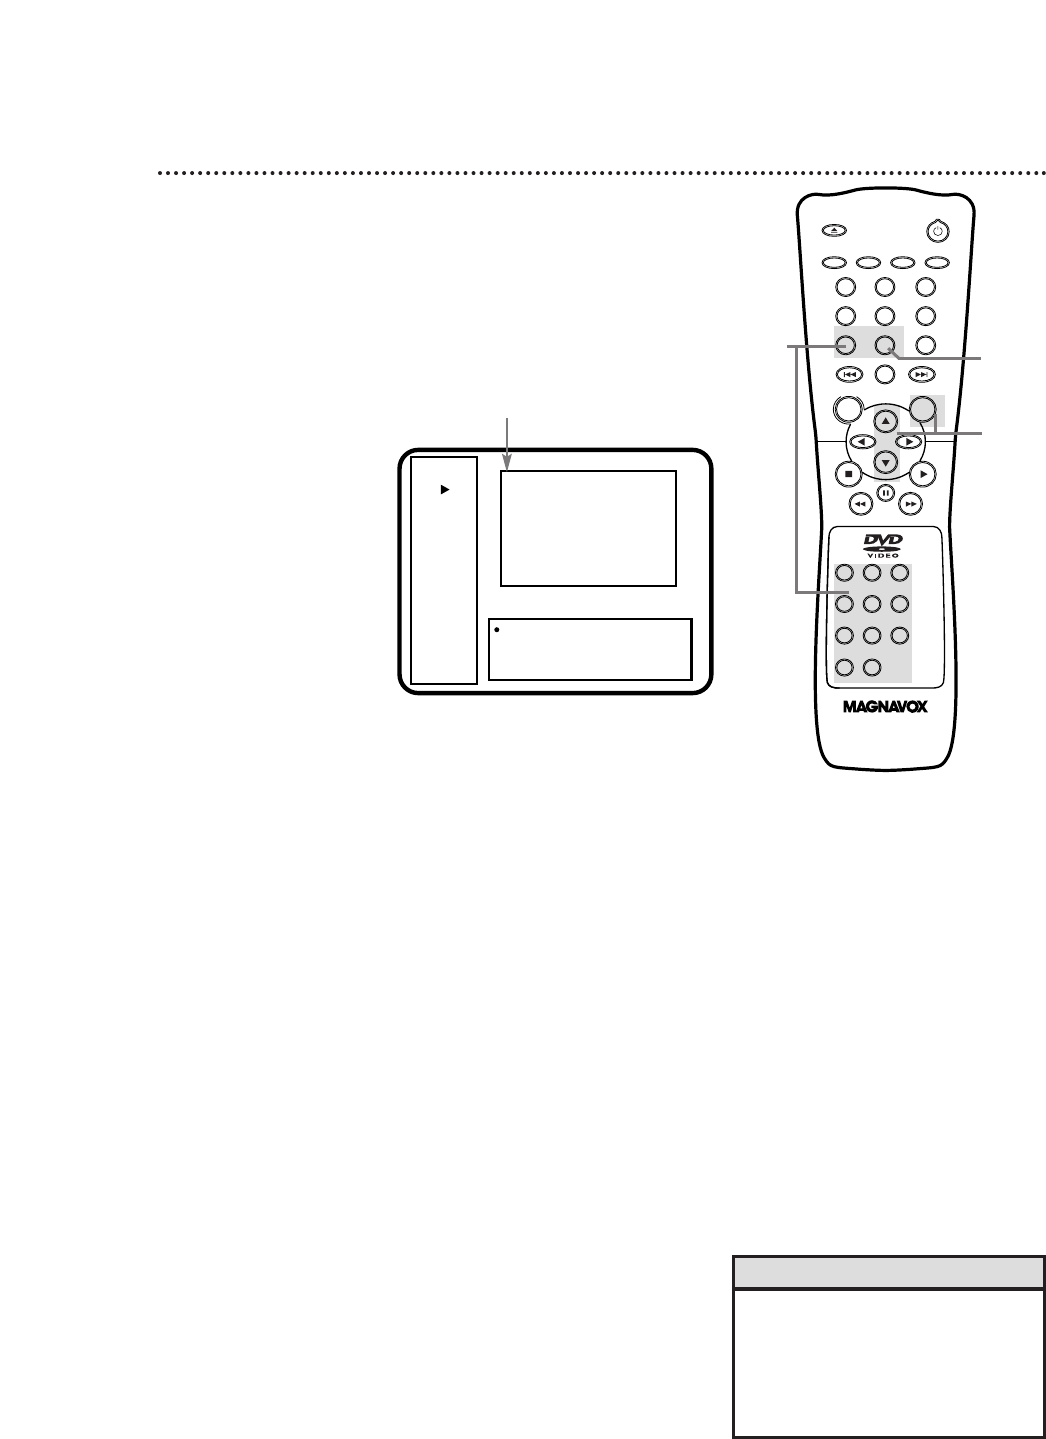
OPEN/
CLOSE
OK
CLEAR
A-B
RETURN DISPLAY TITLE
SEARCH MODE MODE ZOOM
REPEAT REPEAT MARKER
SETUP AUDIO
SUBTITLE ANGLE
POWER
DISC
3
2
1
65
4
987
0
+
10
MENU
38 Display Screen (Audio CD)
You can check the information about the current Disc by pressing
the DISPLAY button on the remote control. You can select or
change some Disc features using the Display screen.
1
Press the DISPLAY button repeatedly during playback to
access or remove the Display Screen.
2
To change a setting, press the Arrow op buttons to select
an item, then press the OK button.
3
Track: Press the Number buttons of the Track you want to
play. Playback will begin at the track you selected.
Time: Press the Number buttons to enter a time within the
current Track at which you want playback to begin. For
example, if the current Track is three minutes long and you want to
begin play one minute and 30 seconds into the song, press 0,0,1,3,0.
Marker: Press the Arrow op buttons to select Marker 1,
Marker 2, Marker 3, Marker 4, or Marker 5, then press the
OK button. Then, press the RETURN button to return to
the Display Screen. Marker details are on page 39.
Time Display: Press the OK button repeatedly to choose All
or Track. This determines whether the times shown in the left box
of the Display Screen are for the current Track [Track] or the entire
Disc [All].
Audio CD
Play
Repeat
[Off]
Track
5
Play Mode
Normal
Time
[All]
0:27:56
-0:38:46 Track 0
5 / 20
Time
0:04:19
Marker . . .
Time Display All
01 02 03 04 05 06 07 08 09 10
11 12 13 14 15 16 17 18 19 20
1,4
2-3
3
Available Track numbers,
with current Track in yellow
• Current type of Disc
• Playback status
• Repeat status
• Current Track number
• Play Mode: Normal,
Random, or Program
• [Track] Elapsed playing time
of the current Track and
Remaining playing time of the
current Track
• [All] Elapsed playing time of
the current Disc or Program
and Remaining playing time of
the current Disc or Program • Current Track / Total Tracks on current Disc
• Total playing time of current Track
• Marker
• Time Display
4
When you are finished, press the DISPLAY button to
remove the Display Screen.
• If you select a Track or Time that is
not available, playback will continue
at its current position.
• During programmed playback, you
can not select a Track that is not part
of the Program.
Helpful Hints
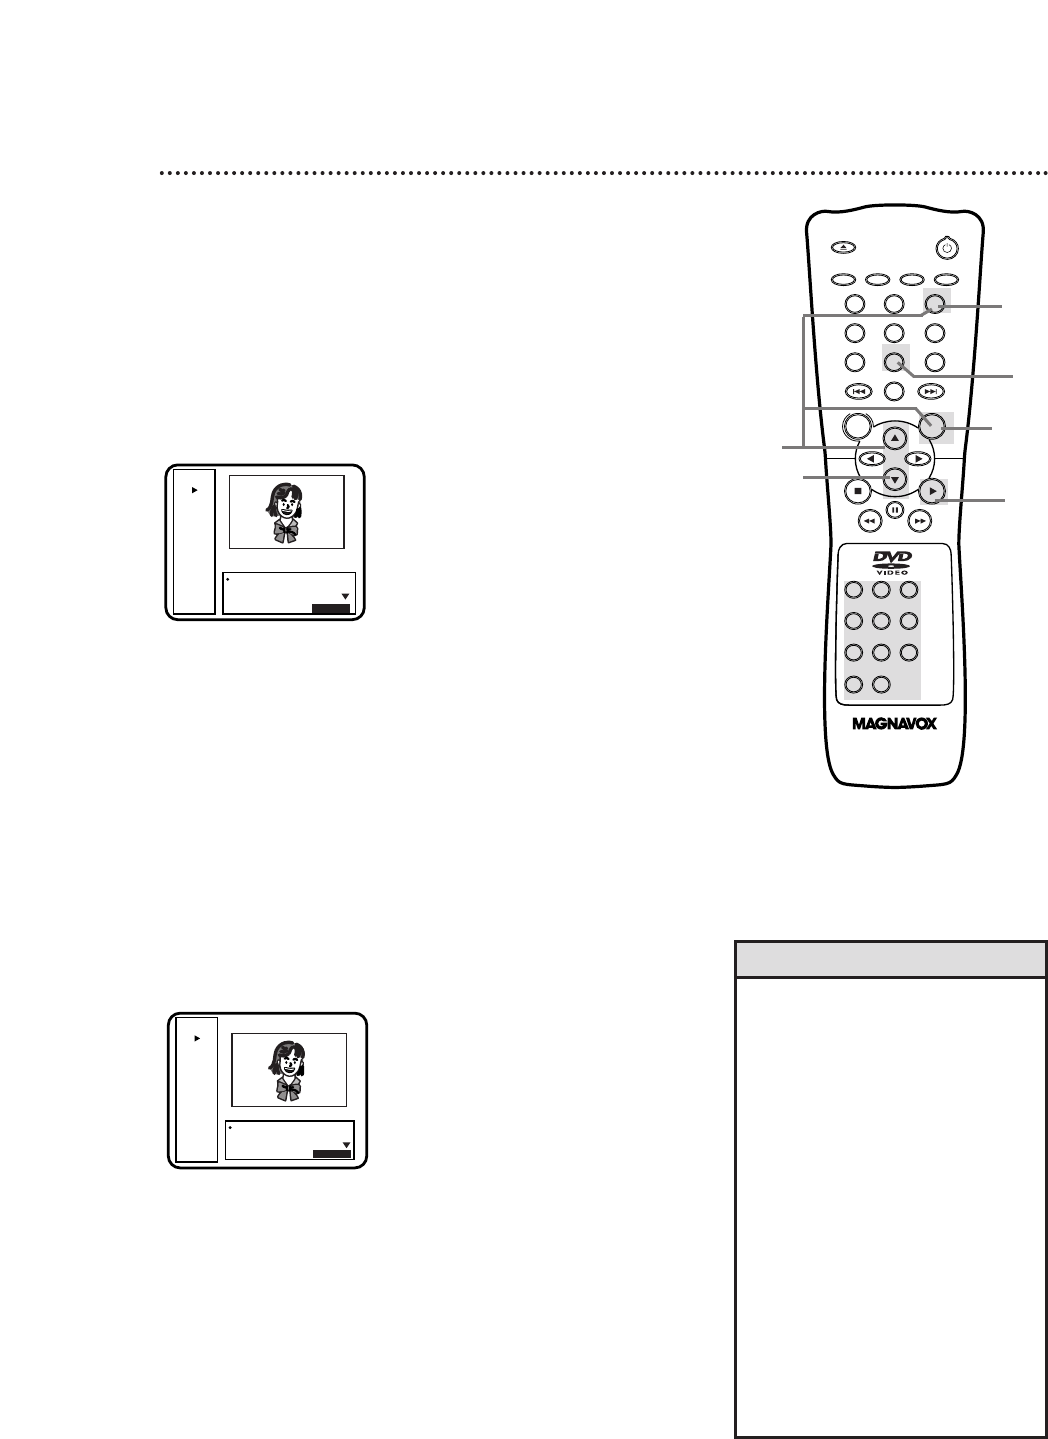
DVD
Play
Repeat
[Off]
Title
1
Chapter
3
Time
0:10:20
-1:30:36
Bit Rate
IIIIIIIIIII
Marker 1 Not Set
Marker 2 Not Set
Marker 3 Not Set
Return : RETURN
DVD
Play
Repeat
[Off]
Title
1
Chapter
3
Time
0:20:20
-1:20:36
Bit Rate
IIIIIIIIIII
Marker 1 Title 01, 0:20:20
Marker 2 Not Set
Marker 3 Not Set
Return : RETURN
Marker Setup Screen 39
Use Markers to remember your favorite places on a disc. You can
set Markers on either DVDs or Audio CDs. To set the Markers,
follow these steps.
1
During playback, press the MARKER button. The Display
Screen will appear. (Details are on pages 37-38.) The Markers will
appear at the bottom of the screen.
2
Press the Arrow op buttons to select Marker 1, Marker 2,
Marker 3, Marker 4, or Marker 5. Make sure the Marker you
select is “Not Set.”
3
Play the Disc to the point at which you want to set the
Marker.
4
When the Disc reaches the point that you want to remem-
ber, press the OK button. The Disc time at the specified point
will appear beside the Marker you selected.
5
Press the DISPLAY button to remove the Display Screen.
6
To later return to the point at which you set the Marker,
press the MARKER button during playback. Press the
Arrow op buttons to select the Marker you want, then
press the OK button. Playback will resume at the point you set.
OPEN/
CLOSE
OK
CLEAR
A-B
RETURN DISPLAY TITLE
SEARCH MODE MODE ZOOM
REPEAT REPEAT MARKER
SETUP AUDIO
SUBTITLE ANGLE
POWER
DISC
3
2
1
65
4
987
0
+
10
MENU
1
5
2
63
4
DVD example
• Opening the disc tray or turning off
the DVD Player will erase all the
Markers.
• To erase a single Marker, press the
MARKER button, then press the
Arrow op buttons to select your
desired Marker. Press the CLEAR
button. “Not Set” will appear beside
the Marker you cleared. Press the
DISPLAY button to remove the
Display Screen.
• To erase all the Markers, press the
MARKER button, then press the
Arrow op buttons to select “Clear
All Markers.” Press the OK button.
“Clear All Markers” will appear in
the top right corner of the screen.
(If no Markers were set, nothing will
happen.) Press the DISPLAY button
to remove the Display Screen.
Helpful Hints
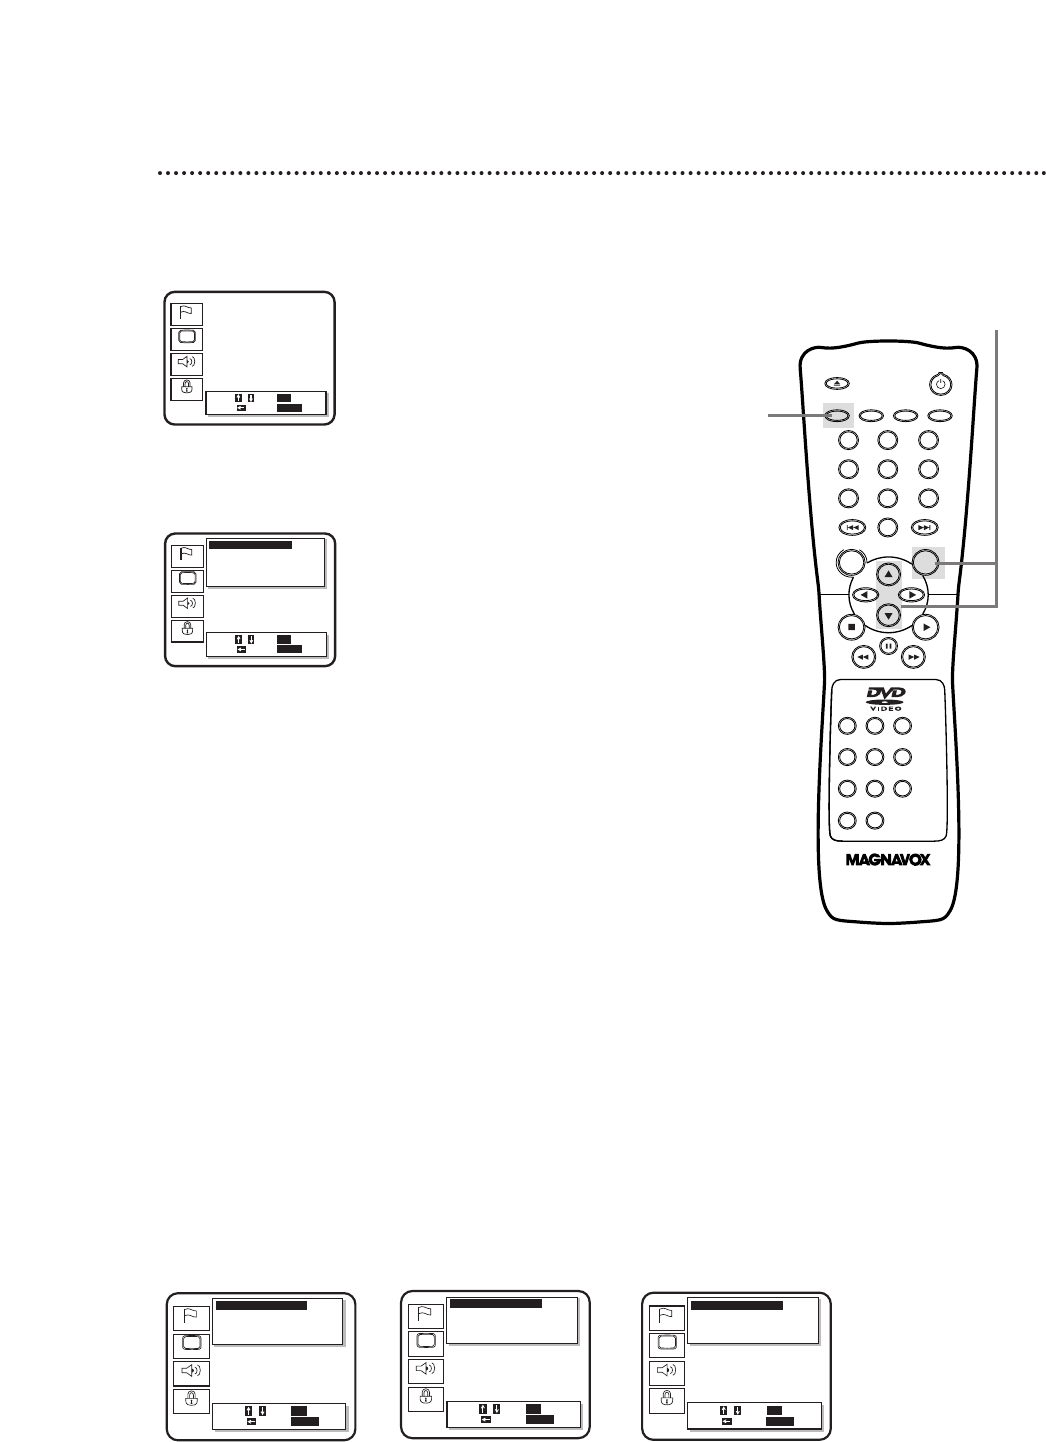
OPEN/
CLOSE
OK
CLEAR
A-B
RETURN DISPLAY TITLE
SEARCH MODE MODE ZOOM
REPEAT REPEAT MARKER
SETUP AUDIO
SUBTITLE ANGLE
POWER
DISC
3
2
1
65
4
987
0
+
10
MENU
40 Audio Settings
1
While playback is stopped, press the SETUP button. The
setup screen will appear.
2
Press the Arrow ooppbuttons to select Audio. Then, press
the OK button.
3
Press the Arrow ooppbuttons to select an item: Digital Audio
Out, Dynamic Range, Downmix Mode or Down Sampling.
4
If you selected Dynamic Range, Downmix Mode, or Down
Sampling, press the OK button repeatedly to adjust the set-
ting of these items. When you are finished, go to step 6.
If you selected Digital Audio Out, press the OK button,
then go to step 5.
●Dynamic Range: Press the OK button repeatedly to turn Dynamic
Range On or Off. This compresses the range of sound volume by
suppressing loud sound and raising the volume of low sound.
However, Dolby Digital 5.1 Channel sound is compressed auto-
matically, even if “Dynamic Range” is “Off.”
●Downmix Mode: Press the OK button repeatedly to select Stereo
or Dolby Surround. Choose Dolby Surround if the DVD Player is
connected to audio equipment that is Dolby Surround (Pro Logic)
compatible. Choose Stereo if the Player is connected to normal
audio equipment.
●Down Sampling: Press the OK button repeatedly to select 48 kHz
or 96 kHz. Select 96 kHz if the Disc was recorded in PCM 96
kHz. Otherwise, select 48 kHz.
Language
Display
Audio
Parental
Select : / Set : OK
Cancel :
Exit : SETUP
Language
Display
Audio
Parental
Audio Controls
• Digital Audio Out . . .
Dynamic Range On
Downmix Mode Dolby Surround
Down sampling 48kHz
Select : / / Set : ENTER
Cancel :
Exit : SETUP
Select : / Set : OK
Cancel :
Exit : SETUP
Language
Display
Audio
Parental
Audio Controls
Digital Audio Out . . .
Dynamic Range On
• Downmix Mode Dolby Surround
Down Sampling 48kHz
Select : / / Set : ENTER
Cancel :
Exit : SETUP
Select : / Set : OK
Cancel :
Exit : SETUP
Language
Display
Audio
Parental
Audio Controls
Digital Audio Out . . .
Dynamic Range On
Downmix Mode Dolby Surround
• Down Sampling 48kHz
Select : / / Set : ENTER
Cancel :
Exit : SETUP
Select : / Set : OK
Cancel :
Exit : SETUP
1
2-4
Downmix Mode
Language
Display
Audio
Parental
Audio Controls
Digital Audio Out . . .
• Dynamic Range On
Downmix Mode Dolby Surround
Down Sampling 48kHz
Select : / / Set : ENTER
Cancel :
Exit : SETUP
Select : / Set : OK
Cancel :
Exit : SETUP
Dynamic Range Down Sampling

OPEN/
CLOSE
OK
CLEAR
A-B
RETURN DISPLAY TITLE
SEARCH MODE MODE ZOOM
REPEAT REPEAT MARKER
SETUP AUDIO
SUBTITLE ANGLE
POWER
DISC
3
2
1
65
4
987
0
+
10
MENU
Audio Settings (cont’d) 41
5
When you select Digital Audio Out at steps 3-4, the Dolby Digital, DTS,
and MPEG settings will be available at the bottom of the Display Screen.
To change the Dolby Digital, DTS, or MPEG settings, press the
Arrow ooppbuttons to select the desired item, then press the
OK button repeatedly to set the item to On or Off.
Language
Display
Audio
Parental
Audio Controls
• Digital Audio Out . . .
Dynamic Range On
Downmix Mode Dolby Surround
Down sampling 48kHz
Digital Audio Out
• Dolby Digital
Off
DTS On
MPEG Off
Select : / / Set : ENTER
Cancel :
Exit : SETUP
Select : / Set : OK
Cancel :
Exit : SETUP
6
5
Language
Display
Audio
Parental
Audio Controls
• Digital Audio Out . . .
Dynamic Range On
Downmix Mode Dolby Surround
Down sampling 48kHz
Digital Audio Out
Dolby Digital
Off
• DTS On
MPEG Off
Select : / / Set : ENTER
Cancel :
Exit : SETUP
Select : / Set : OK
Cancel :
Exit : SETUP
Language
Display
Audio
Parental
Audio Controls
• Digital Audio Out . . .
Dynamic Range On
Downmix Mode Dolby Surround
Down sampling 48kHz
Digital Audio Out
Dolby Digital
Off
DTS On
• MPEG Off
Select : / / Set : ENTER
Cancel :
Exit : SETUP
Select : / Set : OK
Cancel :
Exit : SETUP
6
Press the SETUP button to remove the menu.
• To enjoy Dolby Digital Surround or
DTS Surround sound, you must con-
nect the DVD Player to a Dolby
Digital or DTS decoder. Details are
on page 11.
• MPEG sound is not available if the
DVD player is connected to audio
equipment that is not MPEG sound
compatible.
Helpful Hints
Dolby Digital DTS
MPEG
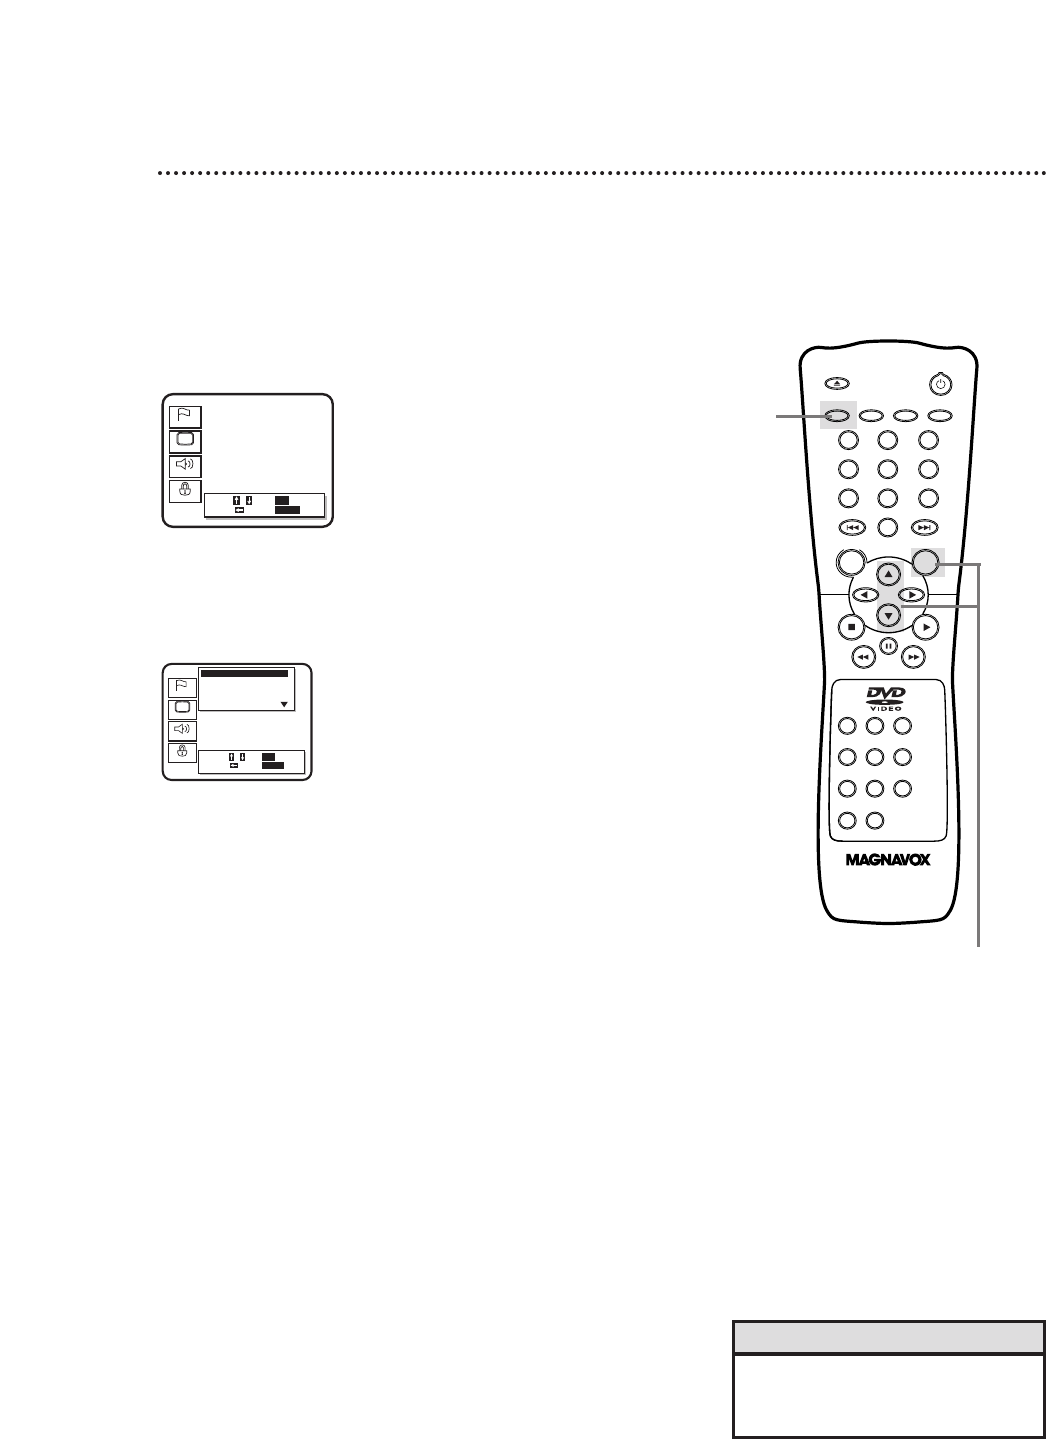
OPEN/
CLOSE
OK
CLEAR
A-B
RETURN DISPLAY TITLE
SEARCH MODE MODE ZOOM
REPEAT REPEAT MARKER
SETUP AUDIO
SUBTITLE ANGLE
POWER
DISC
3
2
1
65
4
987
0
+
10
MENU
42 Display Settings
1
When playback is stopped, press the SETUP button. The
setup screen will appear.
You can change certain aspects of the DVD Player’s Display
Screens, on-screen messages, and the display panel on the front of
the DVD Player. You also can change the TV’s Aspect Ratio in the
Display menu. To change such settings, follow these steps.
2
Press the Arrow ooppbuttons to select Display.
Then, press the OK button.
Language
Display
Audio
Parental
Select : / Set : OK
Cancel :
Exit : SETUP
Language
Display
Audio
Parental
Select : / / Set : OK
Cancel :
Exit : SETUP
Display Controls
• TV Aspect 4:3 Pan & Scan
On Screen Info On
Panel Display Bright
Angle Icon On
1
• Selecting a different TV Aspect set-
ting will only be effective if it is avail-
able on the Disc.
Helpful Hint
2-3
3
Press the Arrow ooppbuttons to select an item: TV
Aspect, On Screen Info, Panel Display, Angle Icon,
Background Color, or Auto Power Off.
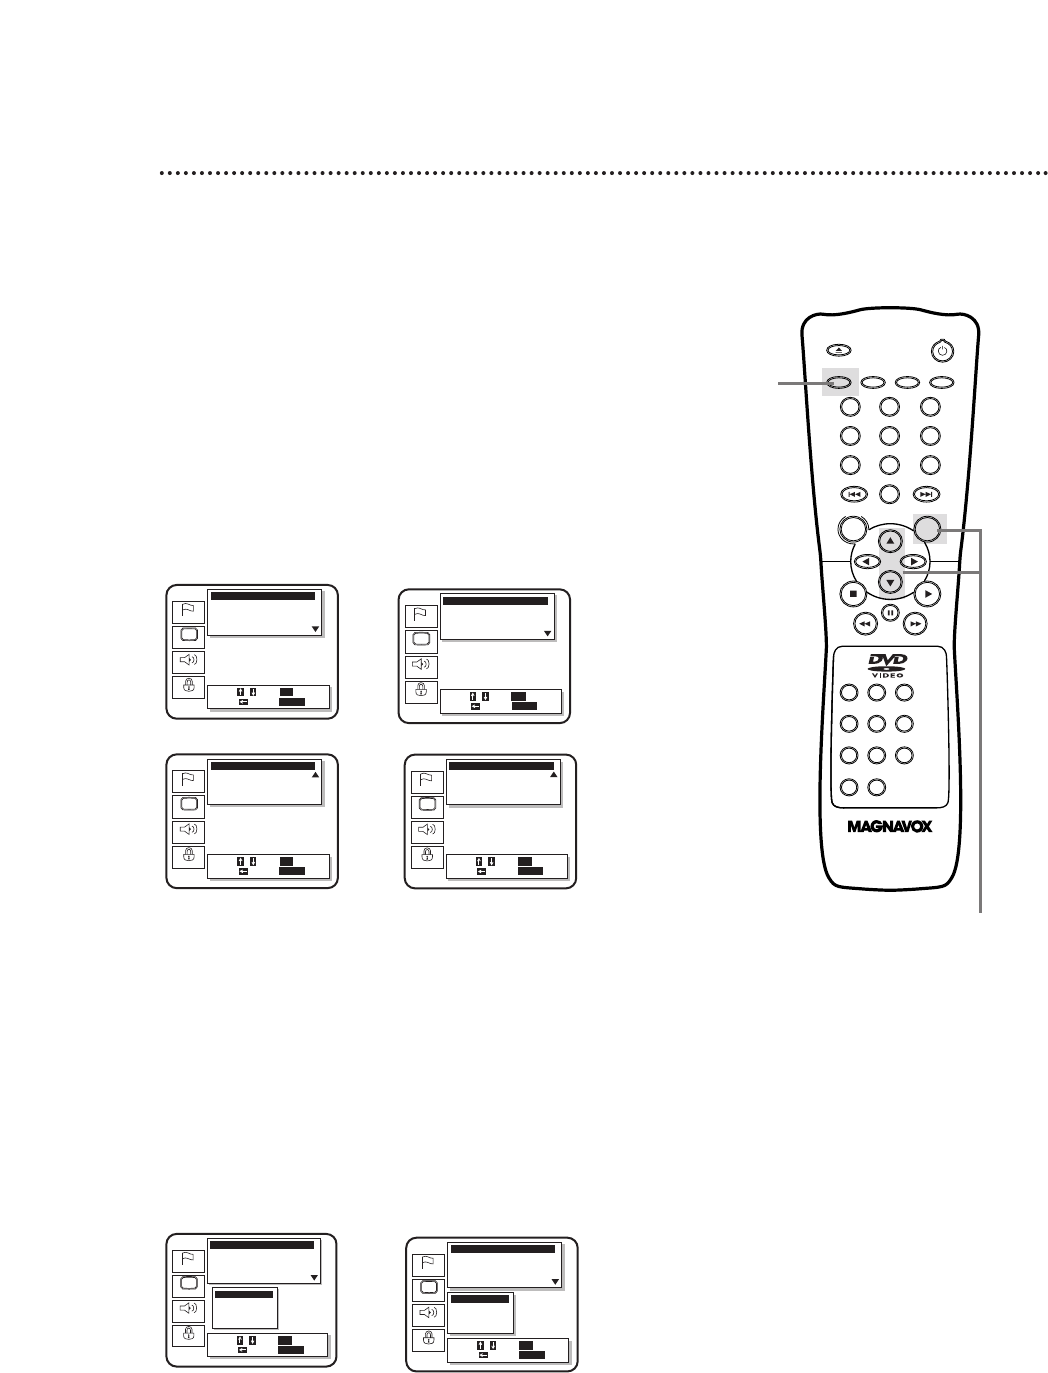
Display Settings (cont’d) 43
5
Press the OK button to select TV Aspect or Panel
Display. Press the Arrow oopp buttons to select a setting,
then press the OK button.
●Select 4:3 Pan & Scan to see the picture in full-height, with one or
both sides trimmed.
●Select 4:3 Letterbox for wide-screen, full-width pictures, with
black bars at the top and bottom of the picture.
●Select 16:9 Wide if you have connected a wide-screen TV to the
DVD Player.
●Select Bright, Dim, or Auto to adjust the brightness of the display
panel. If you select Auto, the display is dim only during playback.
6
Press the SETUP button to remove the menu.
OPEN/
CLOSE
OK
CLEAR
A-B
RETURN DISPLAY TITLE
SEARCH MODE MODE ZOOM
REPEAT REPEAT MARKER
SETUP AUDIO
SUBTITLE ANGLE
POWER
DISC
3
2
1
65
4
987
0
+
10
MENU
6
4-5
Language
Display
Audio
Parental
Display Controls
• TV Aspect 4:3 Pan & Scan
On Screen Info On
Panel Display Bright
Angle Icon On
TV Aspect
4:3 Pan & Scan
4:3 Letterbox
• 16:9 Wide
Select : / / Set : ENTER
Cancel :
Exit : SETUP
Select : / Set : OK
Cancel :
Exit : SETUP
Language
Display
Audio
Parental
Display Controls
TV Aspect 4:3 Pan & Scan
• On Screen Info On
Panel Display Bright
Angle Icon On
Select : / / Set : ENTER
Cancel :
Exit : SETUP
Select : / Set : OK
Cancel :
Exit : SETUP
Language
Display
Audio
Parental
Display Controls
TV Aspect 4:3 Pan & Scan
On Screen Info On
Panel Display Bright
• Angle Icon On
Select : / / Set : ENTER
Cancel :
Exit : SETUP
Select : / Set : OK
Cancel :
Exit : SETUP
Language
Display
Audio
Parental
Display Controls
Panel Display Bright
Angle Icon On
Background Color Blue
• Auto Power Off On
Select : / / Set : ENTER
Cancel :
Exit : SETUP
Select : / Set : OK
Cancel :
Exit : SETUP
4
If you selected On Screen Info, Angle Icon, Background
Color, or Auto Power Off, press the OK button repeated-
ly to change the settings of each item.
If you selected TV Aspect or Panel Display, go to step 5.
●Set On Screen Info to On if you want to see messages on the TV
screen. For example, Play Bwill appear in the top right corner of
the screen when you press the Play Bbutton.
●Set Angle Icon to On if you want to see the Angle symbol on the
screen. Details are on page 34.
●Set Background Color to Blue or Gray. Choose the color you
prefer for the background when the menus or messages are on
the TV screen.
●Set Auto Power Off to On if you want the DVD Player to auto-
matically turn off when it is inactive for 35 minutes.
Language
Display
Audio
Parental
Display Controls
TV Aspect 4:3 Pan & Scan
On Screen Info On
• Panel Display Bright
Angle Icon On
Select : / / Set : ENTER
Cancel :
Exit : SETUP
Select : / Set : OK
Cancel :
Exit : SETUP
Panel Display
• Bright
Dim
Auto
Language
Display
Audio
Parental
Display Controls
Panel Display Bright
Angle Icon On
• Background Color Blue
Auto Power Off On
Select : / / Set : ENTER
Cancel :
Exit : SETUP
Select : / Set : OK
Cancel :
Exit : SETUP
On Screen Info
Background Color
TV Aspect Panel Display
Auto Power Off
Angle Icon
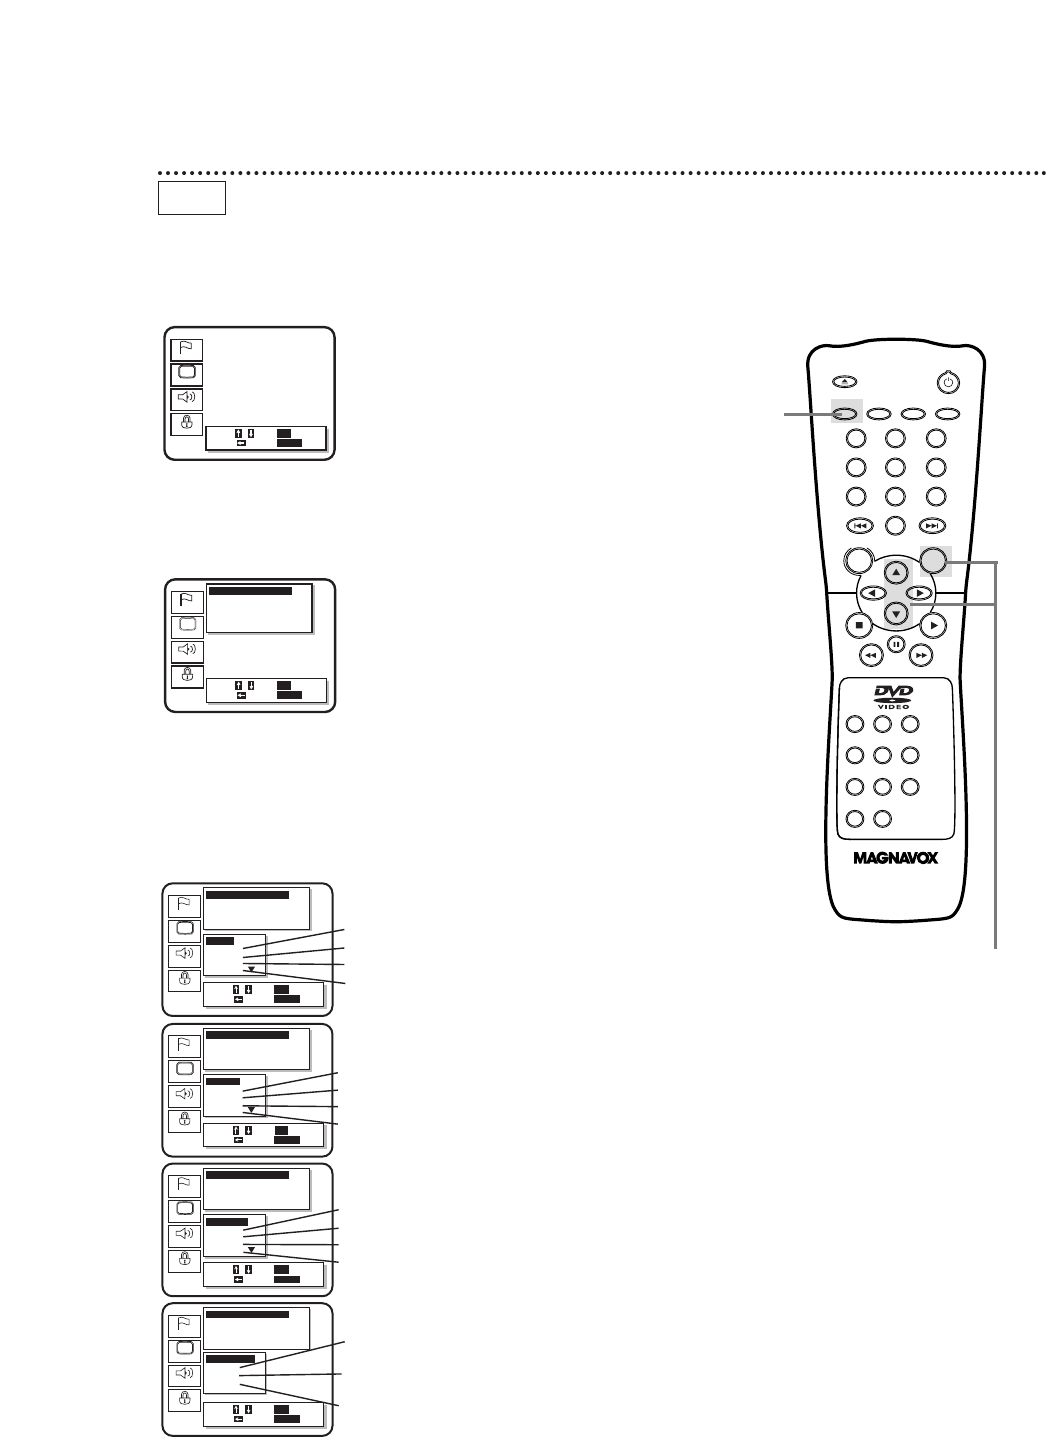
OPEN/
CLOSE
OK
CLEAR
A-B
RETURN DISPLAY TITLE
SEARCH MODE MODE ZOOM
REPEAT REPEAT MARKER
SETUP AUDIO
SUBTITLE ANGLE
POWER
DISC
3
2
1
65
4
987
0
+
10
MENU
1
While playback is stopped, press the SETUP button. The
setup screen appears.
2
Press the Arrow ooppbuttons to select LANGUAGE.
Then, press the OK button.
44 Language Settings
3
Press the Arrow ooppbuttons to select an item: Audio,
Subtitle, Disc Menu, or Player Menu. Then, press the OK
button.
Language
Display
Audio
Parental
Select : / Set : OK
Cancel :
Exit : SETUP
Language
Display
Audio
Parental
Language Controls
• Audio English
Subtitle English
Disc Menu
English
Player Menu
English
Select : / / Set : ENTER
Cancel :
Exit : SETUP
Select : / Set : OK
Cancel :
Exit : SETUP
• The voice is in the original language of the disc.
• Voice is in English.
• Voice is in French.
• Voice is in Spanish.
Language
Display
Audio
Parental
Language Controls
• Audio English
Subtitle
English
Disc Menu
English
Player Menu
English
Audio
• Original
English
French
Spanish
Select : / / Set : ENTER
Cancel :
Exit : SETUP
Select : / Set : OK
Cancel :
Exit : SETUP
Language
Display
Audio
Parental
Language Controls
Audio English
• Subtitle
English
Disc Menu
English
Player Menu
English
Subtitle
Off
• English
French
Spanish
Select : / / Set : ENTER
Cancel :
Exit : SETUP
Select : / Set : OK
Cancel :
Exit : SETUP
• Subtitles are not shown.
• Subtitles are in English.
• Subtitles are in Spanish.
• Subtitles are in French.
• The disc menu is in the original language of the disc.
• The disc menu appears in English.
• The disc menu appears in French.
• The disc menu appears in Spanish.
Language
Display
Audio
Parental
Language Controls
Audio English
Subtitle
English
• Disc Menu
English
Player Menu
English
Disc Menu
Original
• English
French
Spanish
Select : / / Set : ENTER
Cancel :
Exit : SETUP
Select : / Set : OK
Cancel :
Exit : SETUP
• The displays and DVD Player menus
appear in English.
• The displays and DVD Player menus
appear in French.
• The displays and DVD Player menus
appear in Spanish.
Language
Display
Audio
Parental
Language Controls
Audio English
Subtitle
English
Disc Menu
English
• Player Menu
English
Player Menu
• English
Français
Español
Select : / / Set : ENTER
Cancel :
Exit : SETUP
Select : / Set : OK
Cancel :
Exit : SETUP
DVD
1
2-3
Use these buttons
if you select OTHER.
OPEN/
CLOSE
OK
CLEAR
A-B
RETURN DISPLAY TITLE
SEARCH MODE MODE ZOOM
REPEAT REPEAT MARKER
SETUP AUDIO
SUBTITLE ANGLE
POWER
DISC
3
2
1
65
4
987
0
+
10
MENU
Language Settings (cont’d) 45
4
Press the Arrow ooppbuttons to select a setting, then
press the OK button.
●If you select Other at the Audio, Subtitle, or Disc Menu screen,
press four Number buttons to enter the country code you
desire. Refer to the list on page 46.
●You can only select other languages for Audio, Subtitle, and
Disc Menu if the language is available on the Disc.
5
Press the SETUP button to remove the menu.
Language
Display
Audio
Parental
Language Controls
• Audio English
Subtitle English
Disc Menu
English
Player Menu
English
Audio
Irish
Portuguese
Dutch
• Other _
...
Select : / / Set : ENTER
Cancel :
Exit : SETUP
Select : / Set : OK
Cancel :
Exit : SETUP
4
5
• If the automatic settings for Audio
and Subtitle are the same language,
the subtitles will not be shown.
• Language settings for Audio and
Subtitle are not available with some
discs. Use the Audio and Subtitle but-
tons instead to select different lan-
guages for the audio and subtitles.
Details are on pages 32 and 33.
Helpful Hints

46 Language Settings (cont’d)
A-B
Abkhazian 4748
Afar 4747
Afrikaans 4752
Albanian 6563
Amharic 4759
Arabic 4764
Armenian 5471
Assamese 4765
Aymara 4771
Azerbaijani 4772
Bangla 4860
Bashkir 4847
Basque 5167
Bengali 4860
Bhutani 5072
Bihari 4854
Bislama 4855
Breton 4864
Bulgarian 4853
Burmese 5971
Byelorussian 4851
C-E
Cambodian 5759
Catalan 4947
Chinese 7254
Corsican 4961
Croatian 5464
Czech 4965
Danish 5047
Dutch 6058
English 5160
Esperanto 5161
Estonian 5166
F-H
Faroese 5261
Fiji 5256
Finnish 5255
French 5264
Frisian 5271
Gaelic (Scots) 5350
Galician 5358
Georgian 5747
German 5051
Greek 5158
Greenlandic 5758
Guarani 5360
Gujarati 5367
Hausa 5447
Hebrew 5569
Hindi 5455
Hungarian 5467
I-K
Icelandic 5565
Indonesian 5560
Interlingua 5547
Interlingue 5551
Inupiak 5557
Irish 5347
Italian 5566
Japanese 5647
Javanese 5669
Kannada 5760
Kashmiri 5765
Kazakh 5757
Kinyarwanda 6469
Kirghiz 5771
Kirundi 6460
Korean 5761
Kurdish 5767
L-N
Laothian 5861
Latin 5847
Latvian 5868
Lettish 5868
Lingala 5860
Lithuanian 5866
Macedonian 5957
Malagasy 5953
Malay 5965
Malayalam 5958
Maltese 5966
Maori 5955
Marathi 5964
Moldavian 5961
Mongolian 5960
Nauru 6047
Nepali 6051
Norwegian 6061
O-R
Occitan 6149
Oriya 6164
Oromo (Afan) 6159
Panjabi 6247
Pashto 6265
Persian 5247
Polish 6258
Portugese 6266
Pushto 6265
Quechua 6367
Rhaeto-Romance 6459
Romanian 6461
Russian 6467
S
Samoan 6559
Sangho 6553
Sanskrit 6457
Serbian 6564
Serbo-Croatian 6554
Sesotho 6566
Setswana 6660
Shona 6560
Sindhi 6550
Singhalese 6555
Siswat 6565
Slovak 6557
Slovenian 6558
Somali 6561
Spanish 5165
Sundanese 6567
Swahili 6569
Swedish 6568
T
Tagalog 6658
Tajik 6653
Tamil 6647
Tatar 6666
Telugu 6652
Thai 6654
Tibetan 4861
Tigrinya 6655
Tonga 6661
Tsonga 6665
Turkish 6664
Turkmen 6657
Twi 6669
U-Z
Ukrainian 6757
Urdu 6764
Uzbek 6772
Vietnamese 6855
Volapuk 6961
Welsh 4971
Wolof 6961
Xhosa 7054
Yiddish 5655
Yoruba 7161
Zulu 7267
Language Country Code Language Country Code Language Country Code
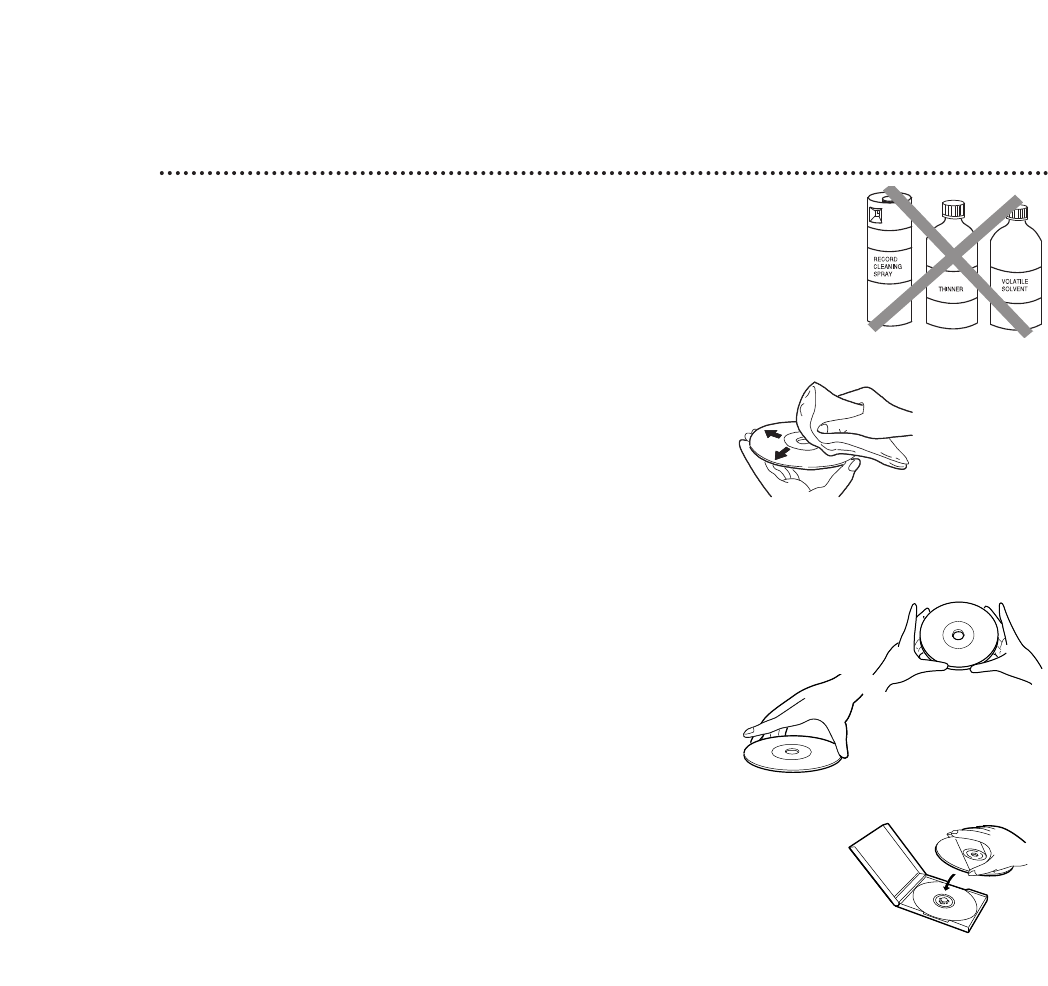
Care and Maintenance 47
Cleaning the DVD Player
• Wipe the front panel and other exterior surfaces of the DVD
Player with a soft, slightly damp cloth.
• Never use a solvent, thinner, benzene or alcohol to clean the
DVD Player. Do not spray insecticide liquid near the DVD
Player. Such chemicals may discolor the surface or damage the
DVD Player.
Cleaning a Disc
• Use a soft, dry cloth to wipe the Disc.
• Wipe the Disc in a straight line from the center to the edge.
Never wipe the Disc in a circular motion.
• Do not use detergent or abrasive cleaning agents.
• Handle the Discs so that fingerprints and dust do not adhere to
the surfaces of the Discs.
• Always store the Disc in its protective case when it is not in use.
Checking the Laser
• If the DVD Player does not operate as described in this owner’s
manual, the laser may be dirty. Consult an Authorized Service
Center for inspection and cleaning of the laser.
Don’t use cleaners.
Wipe Discs from the
center to the edge.
Handle Discs
by the edges.
Keep the Disc in its case.

48 Helpful Hints
If you are having problems with your product, check this list of problems and possi-
ble solutions before requesting service. You may be able to solve the problem
yourself.
If you need to call a customer service representative, please know the model num-
ber and serial number of your product before you call. This information is on the
back of the product. Also, please take a moment to identify the problem you are
having, and be prepared to explain this to the representative. If you believe the
representative will need to help you with operations, please stay near the product.
Our representatives will be happy to assist you.
The DVD Player has no power.
• Make sure the power cord is connected completely to an AC (alternating cur-
rent) outlet.
• Press the POWER button to turn on the DVD Player. “P-ON” will appear briefly
on the display panel as the power is turning on.
The remote control will not operate the DVD Player.
• Aim the remote control directly at the DVD Player’s remote sensor. Details are
on page 14.
• Remove all obstacles between the remote control and the DVD Player.
• Inspect and/or replace the batteries in the remote control. Details are on page
seven.
• Use the remote control within 23 feet of the DVD Player.
No picture
• Make sure the video cable is connected correctly. You may connect either the
yellow video cable (supplied) or an optional S-Video cable. Details are on pages 8-
12.
• Make sure the TV is set to the correct Video or S-Video In channel (usually the
AUX IN, A/V IN, Auxiliary In, or S-Video In channel). Check your TV owner’s
manual for details.
• Insert a Disc that is playable on this DVD Player. Details are on page six.
Disc cannot play.
• Insert a playable Disc. Details are on page six.
• Place the Disc correctly in the recesses in the Disc tray. If the Disc is one-sided,
place the Disc in the tray with the label facing up. If the Disc is two-sided, make
sure the side you want to play is facing up.
• Clean the Disc.
• Cancel the parental lock, enter the password, or change the control level. Details
are on pages 35-36.
• Make sure the Disc is labeled for use in Region 1 or ALL regions. Details are on
page six.
No sound
• Connect the audio cables firmly. Make sure the cables are connected to the
AUDIO IN jacks on the TV or audio equipment. Details are on pages 8-12.
• Check the audio settings of the DVD Player. Details are on pages 40-41.
• Turn on the power of the audio equipment and make sure it is set to the correct
channel, usually Auxiliary IN. Refer to the owner’s manual of the audio equipment
for details.
• Check the audio settings of the Disc. For example, you may have selected
“soundtrack” playback on a DVD. Only the music of the movie will play, not the
characters’ dialog; music might not be recorded throughout the entire DVD.
Details are on page 32.

Helpful Hints (cont’d) 49
Distorted picture
• Connect the DVD Player directly to the TV. Details are on page eight.
• There are some cases where the picture may be distorted slightly; this is not a
malfunction of the DVD Player.
You can not change the camera angle.
• The DVD might not contain segments recorded from different camera angles. See
if multiple angles are available. Details are on page 34.
You can not change the audio or subtitle language.
• The DVD does not contain audio or subtitles in the desired language. Not all
DVDs contain audio or subtitles in multiple languages. See if other languages are
available. Details are on pages 32-33.
An “X” appears on the TV screen, prohibiting an operation.
• The DVD Player prohibits the current operation or it is not available on the Disc.
Details are on page five.
The DVD Player turns off after 35 minutes.
• The DVD Player turns off automatically if playback stops for more than 35 min-
utes and you press no buttons on the remote control or the DVD Player. Details
are on pages 42-43.
A screen saver appears on the TV screen.
• The DVD logo will appear on the TV screen if you stop Disc playback for more
than five minutes (and you do not press any buttons on the remote control or
the DVD Player). The DVD logo prevents damage to your TV’s picture tube. A
prolonged still image, including TV station identification logos or video games,
may damage the picture tube.

50 Specifications
Product Type
Digital Video Disc Player
Playable Discs
DVD-Video
Audio CD
Color System
NTSC
Frequency Response
DVD (linear sound): 20 Hz to 22 kHz (sample rate: 48 kHz)
20 Hz to 44 kHz (sample rate: 96 kHz)
Audio CD: 20 Hz to 20 kHz
Signal-to-Noise Ratio (S/N Ratio)
Audio CD: 110 dB EIAJ (Electronic Industries Association of Japan)
Dynamic Range
DVD (linear sound): 95 dB
Audio CD: 94 dB (EIAJ)
Total Distortion Factor
Audio CD: 0.007% (EIAJ)
Wow and Flutter
Below the measurement limitation (±0.001% W PEAK) (EIAJ)
Power Requirement
120V AC ± 10%, 60 Hz ± 0.5%
Connections
S-Video output Mini DIN 4-pin jack (75 Ω)
Video output One pin jack, 1 Vpp (75 Ω)
Coaxial digital output One pin jack, 500m Vpp (75Ω)
Analog audio output Two pin jacks
(one left channel, one right channel)
2 Vrms (47 kΩ)
Power Consumption
Power on: 17 W
Standby (power off): 5 W
Operating Temperature
41°F (5°C) to 104°F (40°C)
Relative Humidity
30% to 80%
Dimensions
17-1/8” (W) x 3-3/8” (H) x 8-5/16” (D)
(435mm x 85mm x 211mm)
Weight
5.07 lbs. (2.3 kg.)
NOTE: Designs and specifications are subject to change without notice.

AUDIO OUT Jacks: Jacks on the back of the DVD Player that send audio to
another system (TV, decoder, or amplifier).
CD: Compact Disc (audio)
Coaxial jack: Sends digital audio to a decoder or amplifier, allowing you to adjust
the volume at the decoder or amplifier. The decoder or amplifier must have a
coaxial in jack. This connection provides the 5.1 channel surround sound as heard
in movie theaters.
Dolby Digital: A surround sound system that provides 5.1 channel sound as used
in movie theaters.
DTS: Digital Theater Systems. This is a surround sound system, but it is different
from Dolby Digital. The formats were developed by different companies.
DVD: Digital Video Disc.
Letterbox: A TV aspect ratio setting (4:3). Displays the video in full-width, with
black bars at the top and bottom of the TV screen. This format is used often when
you see a movie in a theater. If the Disc does not include a letterbox format ,
selecting Letterbox may have no effect. (For example, some DVD discs are two-
sided, with one side playing in Letterbox and the other side playing in a normal for-
mat.)
Pan & Scan: A TV aspect ratio setting (4:3). Displays the video with full-height
picture, with one or both sides of the picture trimmed.
Remote Control: The small electronic unit that came with your DVD Player;
allows you to operate your DVD Player from a distance.
S-Video: Produces a clearer picture by sending separate signals for the luminance
and the color. If you connect an optional S-Video cable, you will not need to use
the supplied yellow video cable. You can use S-Video only if your TV has an S-
Video In jack.
VIDEO OUT Jack: Jack on the back of the DVD Player that sends video to a TV.
Wide: A TV aspect ratio setting (16:9). Displays the video appropriately when you
connect the DVD Player to a widescreen TV.
Glossary 51

52 Limited Warranty
Digital Video Disc Player
90 days Free Exchange / 91 days–One Year Reduced-Cost Exchange
WHO IS COVERED?
You must have proof of the date of purchase to
exchange your product. A sales receipt or other docu-
ment showing the date that you purchased the product
is considered such proof.
WHAT IS COVERED?
Warranty coverage begins the day you buy your prod-
uct. For 90 days thereafter, you may exchange the defec-
tive product for a new or renewed product at the store
from which it was purchased or through Philips. Either
exchange is made at no cost to you.
From 91 days to one year from the date of purchase, you
will pay a preset exchange fee to obtain a new or
renewed product. Follow the exchange procedures on
the next page. This exchange opportunity ends one year
after the date of purchase. The replacement product is
covered only for the warranty period of the original
product. When the warranty on the original product
expires, the warranty on all replaced products also
expires.
WHAT IS EXCLUDED?
Your warranty does not cover:
• shipping charges to return defective product.
• labor charges for installation or setup of the prod-
uct, adjustment of customer controls on the prod-
uct, and installation or repair of antenna systems
outside of the product.
• product repair and/or part replacement because of
improper installation, abuse, neglect, misuse, acci-
dent, unauthorized repair or other cause not within
the control of Philips Consumer Electronics.
• a product that requires modification or adaptation
to enable it to operate in any country other than
the country for which it was designed, manufac-
tured, approved and/or authorized, or repair of
products damaged by these modifications.
• incidental or consequential damages resulting from
the product. (Some states do not allow the exclu-
sion of incidental or consequential damages, so the
above exclusion may not apply to you. This includes,
but is not limited to, prerecorded material, whether
copyrighted or not copyrighted.)
• a product that is used for commercial or institution-
al purposes (including but not limited to rental pur-
poses).
WHERE IS EXCHANGE AVAILABLE?
Warranty exchange is available in all countries where
the product is officially distributed by Philips Consumer
Electronics. In countries where Philips Consumer
Electronics does not distribute the product, the local
Philips service organization will attempt to exchange the
product, although there may be a delay if the appropri-
ate product is not readily available.
MAKE SURE YOU KEEP...
Please keep your sales receipt or other document
showing proof of date of purchase. Attach it to the
owner’s manual and keep both nearby. Also keep the
original box and packing material in case you need to
return your product.
BEFORE EXCHANGING THE PRODUCT...
Please check your owner’s manual before exchanging
the product. Adjustments of the controls discussed
there may save you time and money.
LIMITATION OF LIABILITY AND REMEDY...
Philips is not liable under any circumstances for any
direct, indirect, special, incidental, or consequential dam-
ages, howsoever incurred, even if notified of the possi-
bility of such damages.
To the extent permitted by local law, the remedies pro-
vided in this warranty statement are your sole and
exclusive remedy.
This limited warranty gives you specific legal rights, and
you may also have other rights which vary from
state/province to state/province.
TO EXCHANGE YOUR PRODUCT IN THE U.S.A.,
PUERTO RICO, OR U.S. VIRGIN ISLANDS...
Follow the instructions stated previously in the “What
is Covered” section, or refer to the exchange instruc-
tions on the next page.
In the U.S.A., Puerto Rico, and U.S. Virgin Islands, all
implied warranties, including the implied warranties of
non-infringement, merchantability and fitness for a par-
ticular purpose, are specifically disclaimed, and to the
extent inconsistent with law of the locality of the user,
limited in duration to the duration of this express war-
ranty. Because some states do not allow limitations on
how long an implied warranty may last, this limitation
may not apply to you.
TO EXCHANGE A PRODUCT IN CANADA...
Please contact Philips at:
1-800-661-6162 (French Speaking)
1-800-363-7278 (English Speaking)
In Canada, this warranty is given in lieu of all other war-
ranties. There are no other warranties, express or
implied, including any implied warranties of mer-
chantability or fitness for a particular purpose.
TO GET OUT-OF-WARRANTY EXCHANGE...
In the U.S.A., Puerto Rico, or U.S. Virgin Islands, contact
Philips Service Solutions Group at 1-800-531-0039 to
obtain the cost of out-of-warranty exchange.
REMEMBER...
Please record below the model and serial numbers
found on the product. Also, please fill out and mail your
warranty registration card promptly. It will be easier for
us to notify you if necessary.
MODEL#__________________________________
SERIAL#__________________________________
Philips Service Solutions Group, P.O. Box 2976, Longview, Texas 75606, (903) 242-4800
EL6478E001 /2-01

Limited Warranty (cont’d) 53
If your product is defective, you may be able to exchange it at the store from which it was purchased.
Most stores display a Return Policy. If not, ask the manager or sales associate how many days you have to
exchange a product with them. After the store’s return period has expired, or if the store does not have an
exchange program, you may exchange the product with Philips if you have your original sales receipt.
To exchange your product with Philips (per the warranty conditions stated previously), remember:
• If you exchange the product within 90 days of the original purchase, there is no cost to you.
• If you exchange the product more than 90 days after but less than one year after the day of original purchase,
contact Philips Service Solutions Group (PSSG) at 1-800-531-0039 to determine the preset cost for exchange.
• After 12 months from the day of original purchase, contact PSSG at 1-800-531-0039 for information regard-
ing out-of-warranty exchange.
• If you do not have your original sales receipt, or if you have any questions, call PSSG at 1-800-531-0039.
To obtain a replacement product from Philips:
1. Contact PSSG at 1-800-531-0039 to determine the cost for exchange.
2. Complete the Exchange Form below.
3. Pack the product and its accessories in the original box or a suitable alternative. You will receive replacement
accessories with your replacement product. For packing details, call 1-800-531-0039.
4. Put the completed Exchange Form, a copy of the original sales receipt, and the proper payment amount into
an envelope. DO NOT SEND CASH. Do not staple or clip these items together. Label the envelope “Return
Documents Enclosed.” Place this envelope in the box with the product.
5. Seal the box with packing tape and return the product via United Parcel Service (UPS), insured and freight
prepaid, to: Philips Recovery Center
Rojas 6
12420 Mercantile Avenue
El Paso, TX 79928
ATTENTION: DVD PLAYER EXCHANGE
A replacement will be sent to you via UPS within 48 business hours of Philips’ receipt of the product.
EXCHANGE INSTRUCTIONS
EXCHANGE FORM
Your Address (street address to which replacement should be delivered, no P.O. boxes allowed):
Name:
Street Address: Apt. #:
City: State/Province: Zip Code/Postal Code:
Phone (day): Phone (night):
Exchange Fee: + Sales Tax: = Total:
Method of Payment: (Check one. Please, no cash or CODs.)
_____ Check/Money order Check/Money order No.
Account number Expiration date
_____ American Express ___________________________ __________
_____ Visa ___________________________ __________
_____ Novus/Discover ___________________________ __________
_____ Mastercard ___________________________ __________
Signature: _____________________________________________________________
Detailed reason for return, use additional paper if necessary: _____________________________________________
_______________________________________________________________________________________________
Model Number Serial Number
Remember, the return box should include the following:
•The product,
• Completed Exchange Form and sales receipt, • Accessories supplied with the product, and
• Payment, if applicable.

ac power cord..........................................................15
accessories.................................................................56
angle button.......................................................17, 34
arrow buttons...........................................................16
audio button.......................................................16, 32
audio cd.................................................................6, 18
audio out jacks...............................................8-10, 15
audio setting........................................................40-41
a-b repeat...................................................................29
a-b repeat button..............................................17, 29
batteries........................................................................7
bit rate........................................................................37
camera angle.............................................................34
chapters.................................................................6, 26
clear button...............................................................17
coaxial jack...................................................11-12, 15
connections...........................................................8-12
contents, table of.......................................................4
controls, remote................................................16-17
disc menu button.....................................................16
display button..............................................17, 37-38
display panel..............................................................13
display screens....................................................37-38
dvd video......................................................................6
fast forward button..........................................17, 22
front panel.................................................................14
glossary.......................................................................51
helpful hints.........................................................48-49
hookups
amplifier with digital in jacks/
md deck/dat deck ...............................................12
dolby digital decoder/
dts decoder...........................................................11
dolby surround
compatible amplifier
.............................................11
s-video......................................................................9
stereo.....................................................................10
tv..........................................................................8-12
language................................................................32-33
marker button...................................................17, 39
markers......................................................................39
menus.....................................................................5, 19
mode button................................................17, 30-31
next button.........................................................14, 22
number buttons........................................................16
ok button...................................................................16
open/close button......................................14, 16, 18
parental lock.......................................................35-36
password....................................................................35
pause button.................................14, 17, 20, 21, 23
play button...................................................14, 16, 18
playing.........................................................................18
power
button.....................................................................16
cord.........................................................................15
prev(ious) button..............................................14, 22
program......................................................................30
random.......................................................................31
rear panel...................................................................15
remote control
buttons.............................................................16-17
sensor.....................................................................14
using..........................................................................7
repeat button.....................................................16, 28
repeat playback.........................................................28
resuming play............................................................20
return button............................................................16
reverse button...................................................16, 22
safety precautions......................................................3
setup button...........................................35-36, 40-46
search mode button...................................16, 25-27
setting
audio.................................................................40-41
language...............................................32-33, 44-46
skip buttons........................................................16, 25
slow motion..............................................................23
sound mode..............................................................32
standby-on button...................................................14
still picture.................................................................20
stop button.........................................................14, 16
subtitle button...................................................17, 33
s-video out jack...................................................9, 15
table of contents........................................................4
titles.................................................................6, 19, 26
title button..........................................................17, 19
tracks......................................................................6, 25
video out jack..........................................8, 11-12, 15
warranty...............................................................52-53
zoom button......................................................17, 24
54 Index

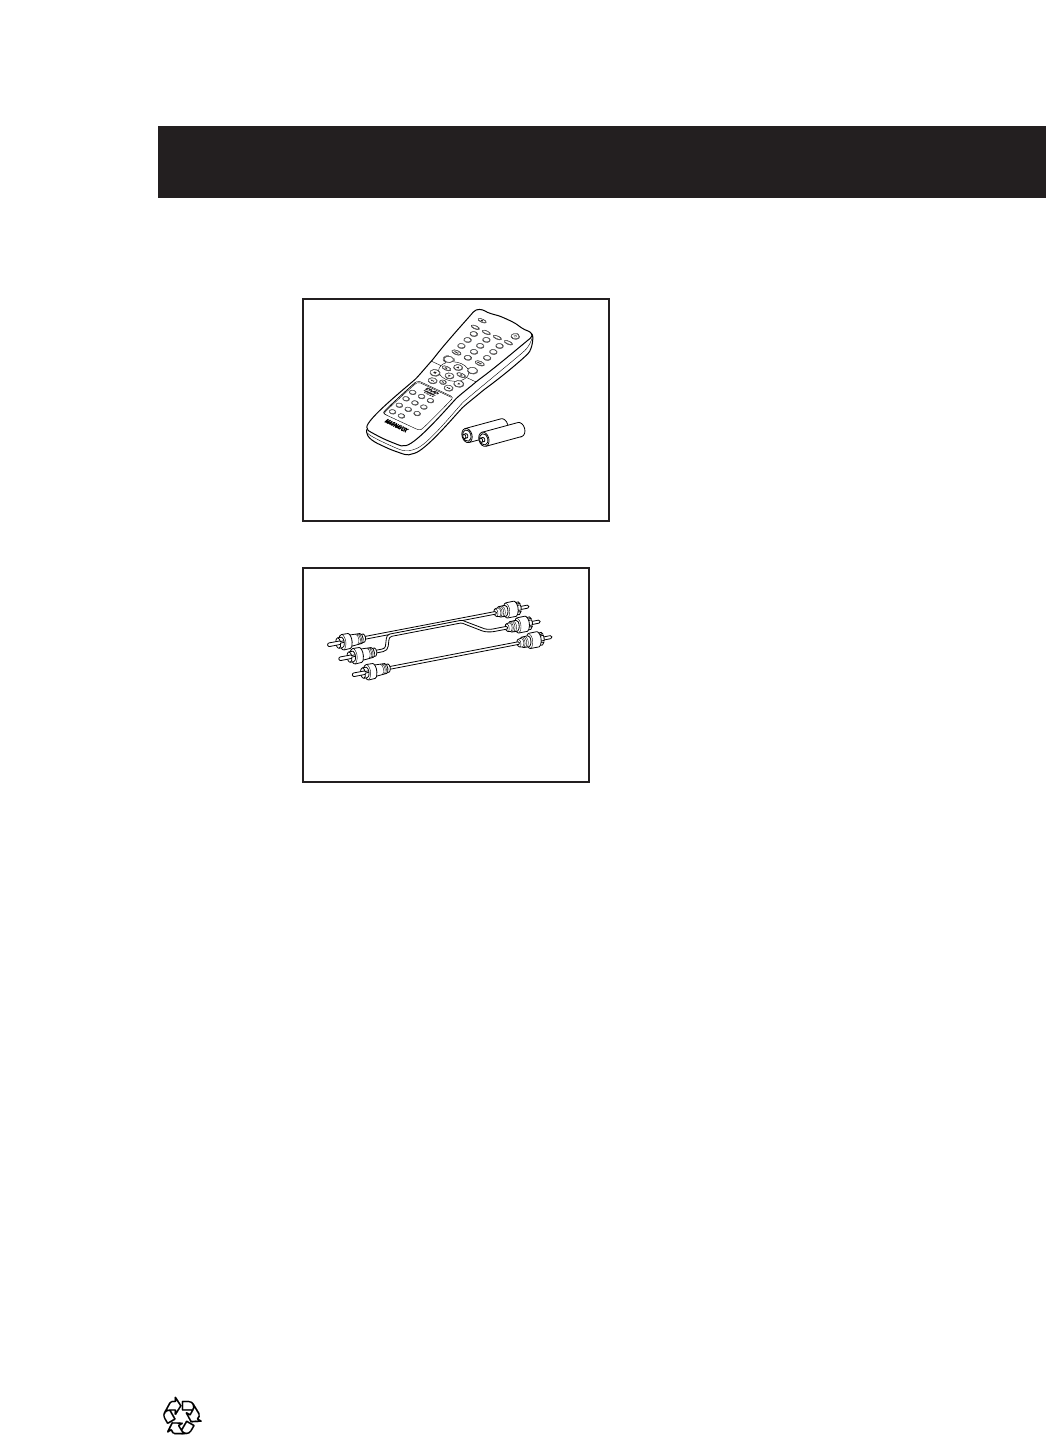
IB8299E001
Printed In China
0VMN02667 / E5520UD * * * * *
SUPPLIED ACCESSORIES
The following items are supplied with your DVD Player;
they are provided to help you use or set up your DVD Player.
OPEN/
CLOSE
OK
CLEAR
A-B
RETURN DISPLAY TITLE
SEARCH MODE MODE ZOOM
REPEAT REPEAT MARKER
SETUP AUDIO
SUBTITLE ANGLE
POWER
DISC
3
2
1
65
4
987
0
+
10
MENU
9
Remote Control 4835 218 37325
Two AA Batteries 4835 138 17012
This owner’s manual is made of recyclable materials.
Remember to recycle!
Audio and Video Cables
4835 321 17148
