Maniway Electronics MW1480 Bluetooth Speaker User Manual MW 1480 R1
Shenzhen Maniway Electronics Limited. Bluetooth Speaker MW 1480 R1
user manual
BRAND
2
2.
.0
0C
CH
H
W
Wi
ir
re
el
le
es
ss
s
S
So
ou
un
nd
db
ba
ar
r
PLEASE READ BEFORE OPERATING THIS EQUIPMENT.
Model No.:MW-1480
1
WARNING: TO PREVENT FIRE OR ELECTRICAL SHOCK HAZARD. DO NOT
EXPOSE THIS PRODUCT TO RAIN OR MOISTURE.
WARNING: REMOVE THE BATTERY FROM REMOTE CONTROL IF WILL NOT
BE IN USE FOR A LONG PERIOD. DO NOT PLACE BATTERY IN TRASH.
PLEASE RECYCLE OR MANAGE AS HAZARDOUS WASTE.
Some of the following information may not apply to your particular product;
however, as with any electronic product, precautions should be observed during
handling and use.
z Read these instructions.
z Keep these instructions.
z Heed all warnings.
z Follow all instructions.
z Do not use this apparatus near water.
z Clean only with dry cloth.
z Do not block any ventilation openings. Install in accordance with the
manufacturer’s instructions.
z Do not install near any heat sources such as radiators, heat registers, stoves,
or others apparatus (including amplifiers) that produce heat.

2
z Do not defeat the safety purpose of the polarized or grounding plug. A polarize
d plug has two blades with one wider than the other. A grounding plug has two
blades and a third grounding prong. The wide blade or the third prong is provi
ded for your safety. If the provided plug does not fit into your outlet, consult an
electrician for replacement of the obsolete outlet.
z Protect the power cord from being walked on or pinched particularly at plugs,
convenience receptacles, and point where they exit from the apparatus.
z Only use attachments/accessories specified by the manufactured by the
manufacturer.
z Use only with the cart, stand, tripod, bracket, or table specified by the
manufacturer, or sold with the apparatus. When a cart is used, use caution
when moving the cart/apparatus combination to avoid injury from tip-over.
z Unplug this apparatus during lightning storms or when unused for long periods
of time.
z Refer all servicing to qualified service personnel. Servicing is required when the
apparatus has been damaged in any way, such as power-supply cord or plug
is damaged, liquid has been spilled or objects have fallen into the apparatus,
the apparatus has been exposed to rain or moisture has been exposed to rain
or moisture, does not operate normally, or has been dropped.
z WARNING: Please refer the information on exterior bottom (enclosure) for
electrical and safety information before installing or operating the apparatus.
z WARNING:
To reduce the risk of fire or electric shock, do not expose this apparatus to rain
3
or moisture. The apparatus shall not be exposed to dripping or splashing and t
hat objects filledwith liquids, such as vases, shall not be placed on apparatus.
z WARNING: The battery (battery or batteries or battery pack) shall not be expo
sed to excessive
heat such as sunshine, fire or the like.
z WARNING: The main plug is used as disconnect device, the disconnect devic
e shall remain readily operable.
ADDITIONAL SAFETY INFORMATION
z Apparatus shall not be exposed to dripping or splashing and no objects filled
with liquids, such as vases. Should be placed on the apparatus.
z Always leave sufficient space around the product for ventilation. Do not place
product in or on a bed, rug, or in a bookcase or cabinet that may prevent air
flow through vent openings.
z Do not place lighted candles, cigarettes, cigars, etc. on the product.
z Care should be taken so that objects do not fall into the product.
z Do not attempt to disassemble the cabinet. This product does not contain
customer serviceable components.
z The marking information is located at the rear panel of apparatus.
z The ventilation should not be impeded by covering the ventilation openings
with items such as newspaper, table-cloths ,curtains etc.
z No naked flame sources such as lighted candles should be placed on the
apparatus.
z Only use this in moderate climates.
IMPORTANT BATTERY INFORMATION
Warning: Your product contains a battery and charging system which is designed to
work in temperatures that do not exceed 50℃(122℉).Leaving this product in a
closed automobile or the trunk of an automobile where temperatures may result in
4
permanent battery damage, fire, or explosion. Please remove your product from the
automobile when you exit, do not place your product in the trunk of your automobile,
and do not leave your product in any location where temperatures may exceed
50℃.
ECOLOGY
Your product must be disposed of properly according to local laws and regulations.
Because this product contains a battery, the product must be disposed of separately
from the household waste.
PRECAUTIONS FOR THE UNIT
z Do not use the unit immediately after transportation from a cold place to a
warm place; condensation problems may result.
z Do not store the unit near fire, places with high temperature or in direct sunlight.
Exposure to direct sunlight or extreme heat (such as inside a parked car) may
cause damage or malfunction.
z Clean the unit with a soft cloth or a damp chamois leather. Never use solvents.
z The unit must only be opened by qualified personnel.
FCC STATEMENT
This device complies with Part 15 of the FCC Rules. Operation is subject to
the following two conditions:
(1) this device may not cause harmful interference.
(2) this device must accept any interference received, including
interference that may cause undesired operation.
NOTE : This equipment has been tested and found to comply with the limits
for a Class B digital device, pursuant to Part 15 of the FCC Rules. These
limits are designed to provide reasonable protection against harmful
interference in a residential installation. This equipment generates, uses
and can radiate radio frequency energy and, if not installed and used in
accordance with the instructions, may cause harmful interference to radio
5
communications. However, there is no guarantee that interference will not
occur in a particular installation. If this equipment does cause harmful
interference to radio or television reception, which can be determined by
turning the equipment off and on, the user is encouraged to try to correct
the interference by one or more of the following measures:
-Reorient or relocate the receiving antenna.
-Increase the separation between the equipment and receiver.
-Connect the equipment into an outlet on a circuit different from that to
which the receiver is connected.
-Consult the dealer or an experienced radio/TV technician for help.
CAUTION: Any changes or modifications not expressly approved by
the party responsible for compliance could void the user’s authority
to operate the equipment.
INDUSTRY CANADA REGULATORY INFORMATION
This device complies with Industry Canada license-exampt RSS
standard(s). Operation is subject to the following two conditions: (1) this
device may not cause interference, and (2) this device must accept any
interference, including interference that may cause undesired operation of
the device.
Changes or modifications to your device not expressly approved by the
party responsible for compliance can void the user’s authority to operate
the equipment.
Le présent appareil est conforme aux CNR d'Industrie Canada applicables
aux appareils radio exempts de licence. L'exploitation est autorisée aux
deux conditions suivantes : (1) l'appareil ne doit pas produire de brouillage,
et (2) l'utilisateur de l'appareil doit accepter tout brouillage radioélectrique
subi, même si le brouillage est susceptible d'en compromettre le
fonctionnement.
Les modifications apportées à votre appareil et non expressément
approuvés par la partie responsable de la conformité peuvent annuler le
droit de l'utilisateur à utiliser l'équipement.
6
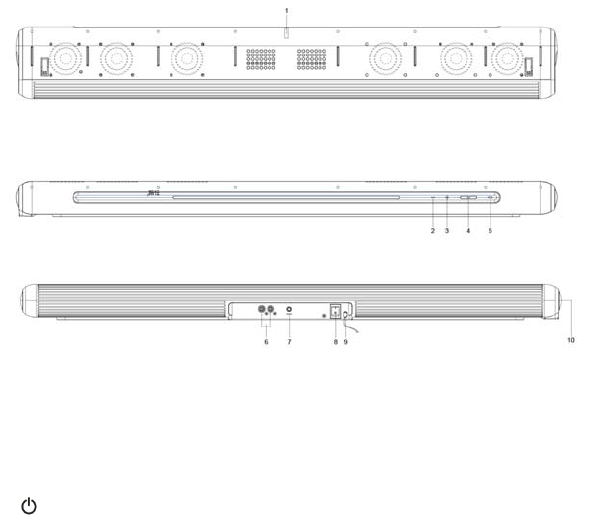
Controls
1. Remote Control Sensor
2. - Button
Press to decrease the volume level.
3. +Button
Press to increase the volume level.
4. /SOURCE Button
Press this button to turn ON or press and hold to Standby mode.
Short press this button to select different play mode during power on
5. LED Status Indicator
Red=Standby mode
Blue=Bluetooth mode
Green=AUX/RCA input mode
Yellow=USB mode
6. RCA (L, R) Socket
7. 3.5mm Aux-in Socket
8. Main Power ON/OFF Switch
9. Power Cord
10. USB Port
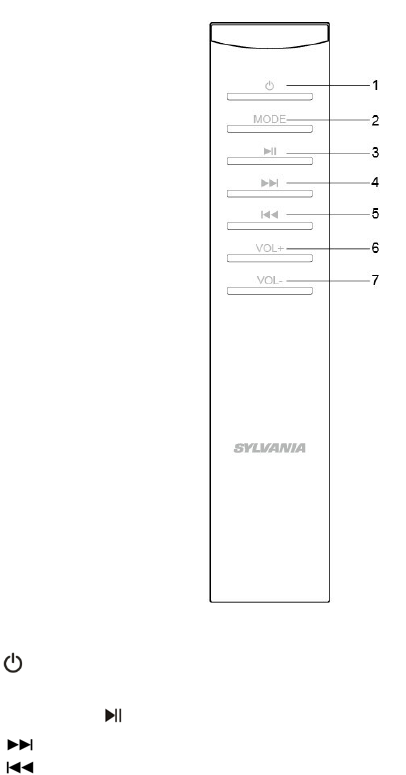
REMOTE CONTROL
7
1. Power Button (On/Standby)
2. MODE button (Bluetooth/AUX)
3. Play/Pause button
4. Next track
5. Previous track
6. Volume – Button
7. Volume + Button:
8
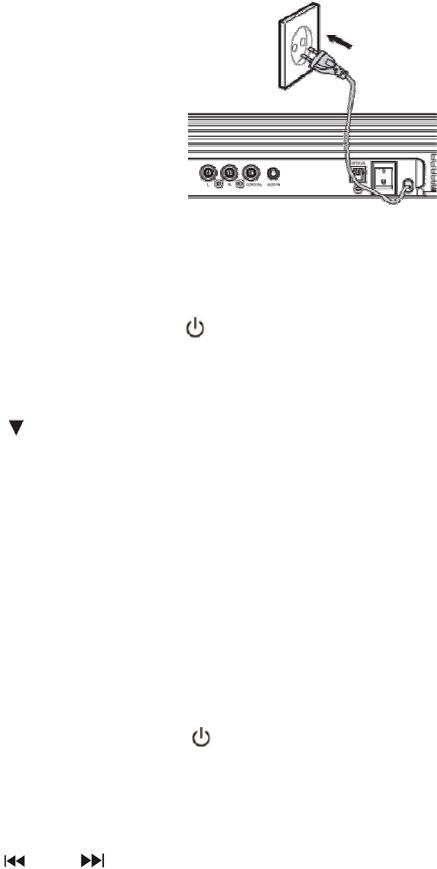
Before using the speaker
Plug the power cord to a wall outlet
(120V~60Hz).
3.5mm AUX/RCA inputs operation
1. Ensure that the unit is well connected to the TV or other audio device
via the accompanied 3.5mm-RCA cable.
2. While in Power On mode, press the /SOURCE button on the main
unit repeatedly or press the AUX/RCA button on remote control to select
the AUX/RCA input mode.
3. Operate your audio device directly for playback features.
4. Press “▲” / “ ” button on remote control or tap the“+”/ “-” button on
the main unit to raise/lower the volume level.
Note: If you want to play it via RCA input, make sure the 3.5mm Aux in
socket is not plugged in
USB port
This Sound bar has also been developed in line with the latest technical
advances in the USB filed. The wide range of different USB storage
devices of all types which are currently on the market, unfortunately do not
allow us to guarantee full compatibility with all USB storage devices. For
this reason, in rare cases there may be problems in playing back files from
USB storage devices. This is not a malfunction of the device.
1. While in Power On mode, press the /SOURCE button on the main
unit repeatedly until the status indicator changed to yellow or press the
MODE button on remote control to select the USB mode.
2. Connect a USB storage device directly into the port, after a few
seconds, it will start music playback automatically.
3. Press the “ ” or “ ” button on remote control to skip to the
9
previous or next track
4. Press “VOL+” / “VOL-” button on remote control or tap the“+”/ “-” button
on the main unit to raise/lower the volume level.
NOTE:
• The USB port is also designed for charging external devices during any
mode other than USB mode.
Connect and use the speaker (Bluetooth mode)
1. Power on the speaker.
2. Change to Bluetooth mode. Status indicator will blink blue.
3. On your Bluetooth device, turn on Bluetooth and scan for device in its
Bluetooth menu. When “MW-1480” appears on the device list of your
Bluetooth device, select and connect (enter 0000 if pass code is
required).
4. The status indicator will change to solid blue after Bluetooth pairing
established.
Specification
Speaker
Input voltage: 120V~60Hz
USB output: DC 5V 1A
Power Consumption: 48W
Standby power Consumption: ≤0.5W
Transmission distance: up to 30ft (10m)
Working temperature: 0℃-35℃
Bluetooth version: V2.1+EDR
Supported protocol: A2DP, AVRCP
Frequency response: 60Hz-18KHz@-10dB
Signal noise ratio: 50dB
Dimension: 33.10x4.37x2.17in (840x111x55mm)
Weight: 95 oz (2.7Kg)
Remote control
Use battery: 2pcsxAAA
Working current: 8mA
Sleep mode current:
8μA

10
Operation distance:up to 10ft (3m)
Operation angel:
±30º
Trouble shooting
Problem Cause Solution
No audio signal
via the
Bluetooth
connection
Speaker is not
paired to the audio
source.
Check whether a connection exists.
If necessary, pair the speaker
again to the audio source.
Volume is setting
too low
Increase the volume on the
speaker
Increase the volume on the the
audio source.
Speaker cannot
be connected
Pairing does not
work
Check whether the audio source
supports the A2DP protocol
Audio source is
switched off Switch on the audio source
Bluetooth is
switched off at the
audio source.
Switch on the Bluetooth function in
the audio source.
Existing Bluetooth
connection is not
unpaired normally
Unpaired current Bluetooth
connection and pair again.
Poor sound
quality from a
Bluetooth®
device
Bluetooth device
is almost out of
range of the
speaker
Move your Bluetooth device
closer to this unit
Remote control
is not
functioning
properly.
Low battery. Replace the battery with correct
type AAA
Remote Control
is not pointed
toward the IR
window
Point the Remote Control toward
the unit IR window, use within 10
feet of the unit.