AT01 MTAG351 L2 Repair V1.0 Alcatel Service Manual
User Manual: Manual Alcatel - Schematics & Service Manuals PDF
Open the PDF directly: View PDF ![]() .
.
Page Count: 22
By NCK Team
L2 Repair Document TCT Mobile Limited
Rev. MTAG351 Level 2 Repair Document Page
1.0 1/26
All rights reserved. Transfer, copy, use or communication of this file is prohibited without authorization.
AT01
MTAG351
Note: this manual is non-contractual and TCT Mobile Limited can modify it without prior notice the
characteristics of described equipments.
By NCK Team
L2 Repair Document TCT Mobile Limited
Rev. MTAG351 Level 2 Repair Document Page
1.0 2/26
All rights reserved. Transfer, copy, use or communication of this file is prohibited without authorization.
1.0 2012-06-19 First Launch Shichuan
Rev. Date Modification description Prepared By Checked By Approved By

By NCK Team
L2 Repair Document TCT Mobile Limited
Rev. MTAG351 Level 2 Repair Document Page
1.0 3/26
All rights reserved. Transfer, copy, use or communication of this file is prohibited without authorization.
Content
1.Level 2 repair process .............................................................................................. 4
2.Warranty Check and Visual Inspection ................................................................... 5
2.1.Warranty confirmation of L1: ................................................................................... 5
2.2.Visual mechanical check: ......................................................................................... 5
3.Pretest ........................................................................................................................ 6
4.software update ......................................................................................................... 9
5.Disassembly and assembly .................................................................................... 13
5.1.Disassembly tool ..................................................................................................... 13
5.2.Disassembly process.............................................................................................. 14
5.3.Assembly Process .................................................................................................. 20
6.Disassembly process evaluation ........................................................................... 20
7.Level 2 repair ........................................................................................................... 21
8.PCBA Exchange ...................................................................................................... 22
9.Other component exchange ................................................................................... 22
10.Commercial label marking (MEID sticker) ............................................................. 22
10.1.Blank label size .................................................................................................... 22
10.2.Samples for commercial label ............................................................................ 23
11.Tools ......................................................................................................................... 23
12.Package Requirement ............................................................................................. 24
By NCK Team
L2 Repair Document TCT Mobile Limited
Rev. MTAG351 Level 2 Repair Document Page
1.0 4/26
All rights reserved. Transfer, copy, use or communication of this file is prohibited without authorization.
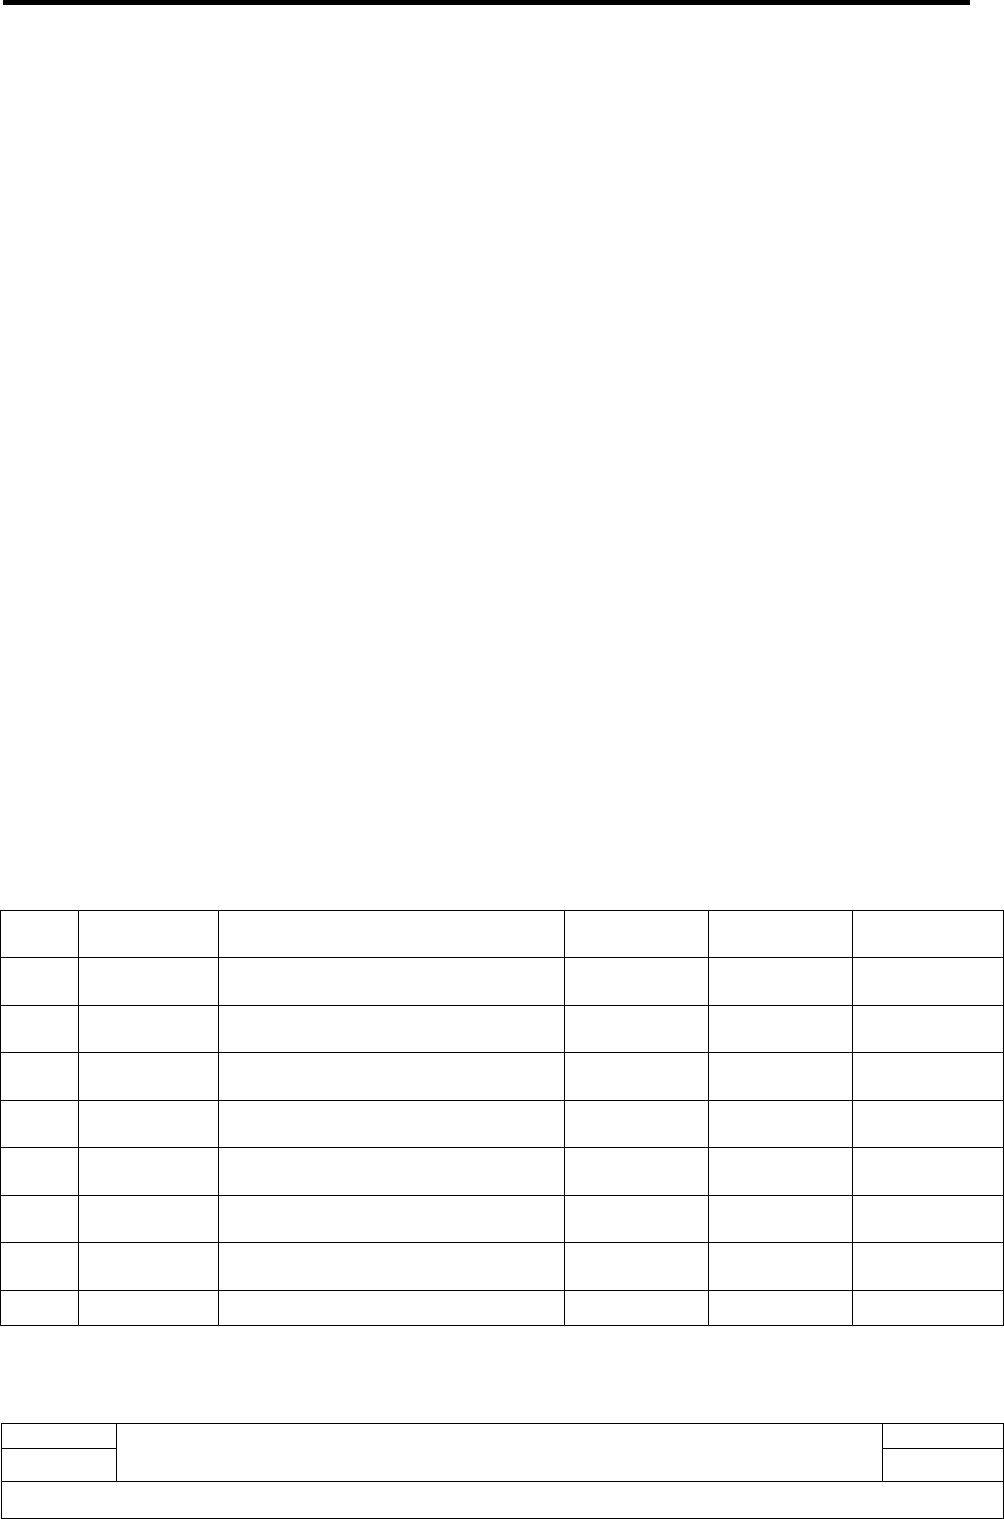
1. Level 2 repair process
By NCK Team
L2 Repair Document TCT Mobile Limited
Rev. MTAG351 Level 2 Repair Document Page
1.0 5/26
All rights reserved. Transfer, copy, use or communication of this file is prohibited without authorization.
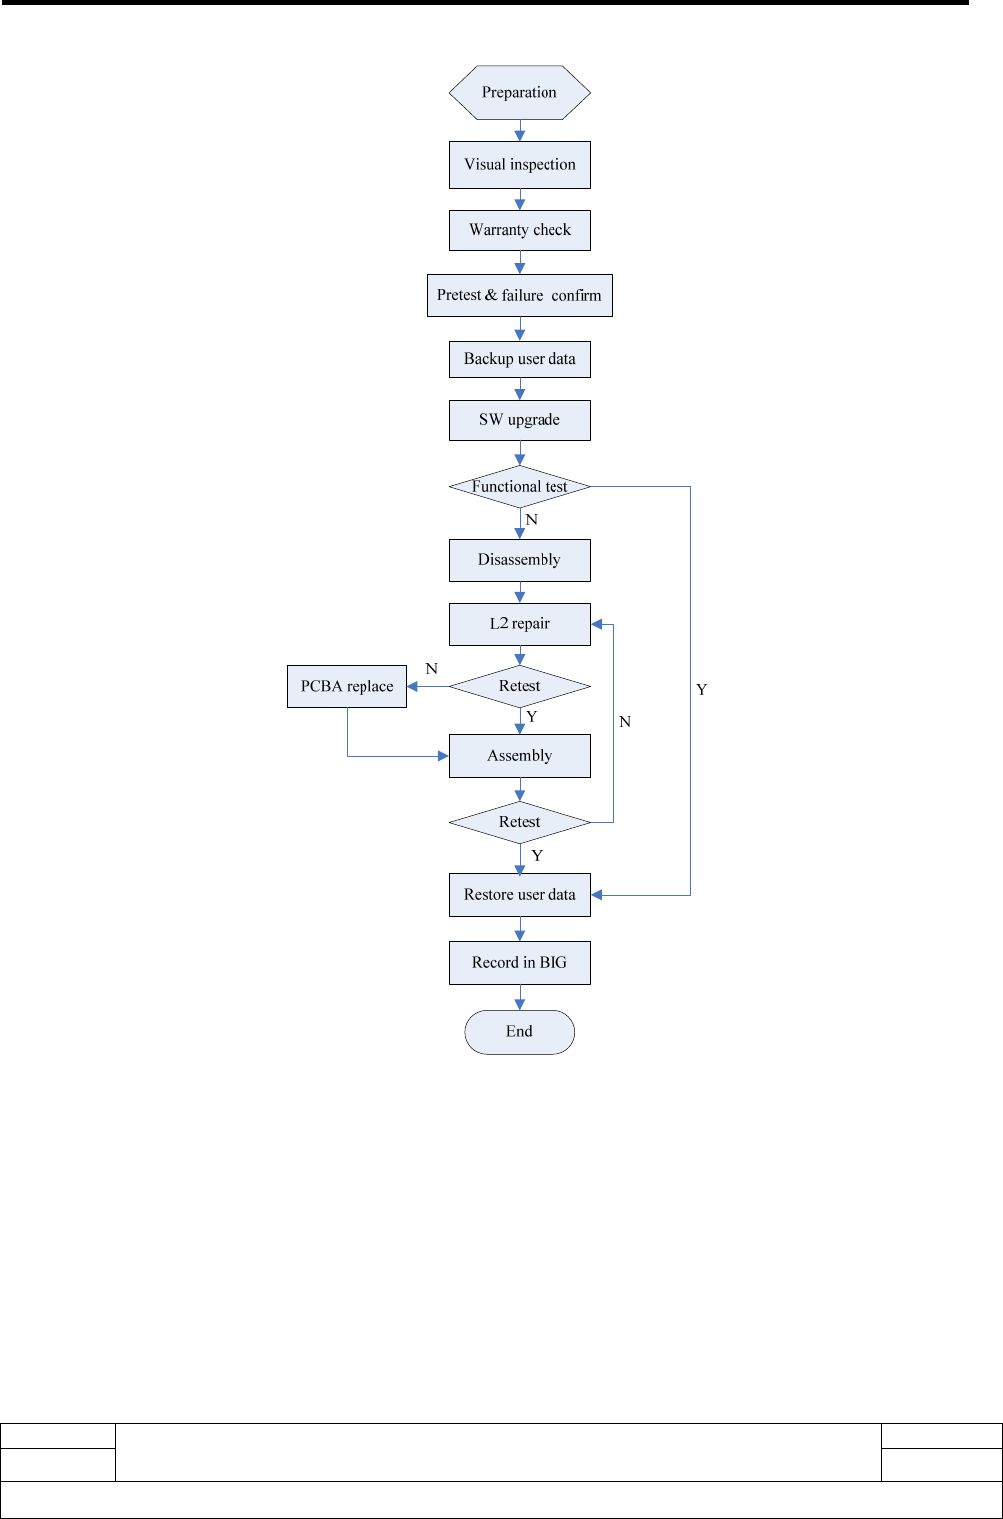
2. Warranty Check and Visual Inspection
2.1. Warranty confirmation of L1:
1) MEID label check:
a) The MEID number must be the same with the one on the MEID label. If not, it’s out of warranty
policy
b) MEID label should not be
Removed
Scratched
Unreadable
Un-approved or un-provided by Alcatel.
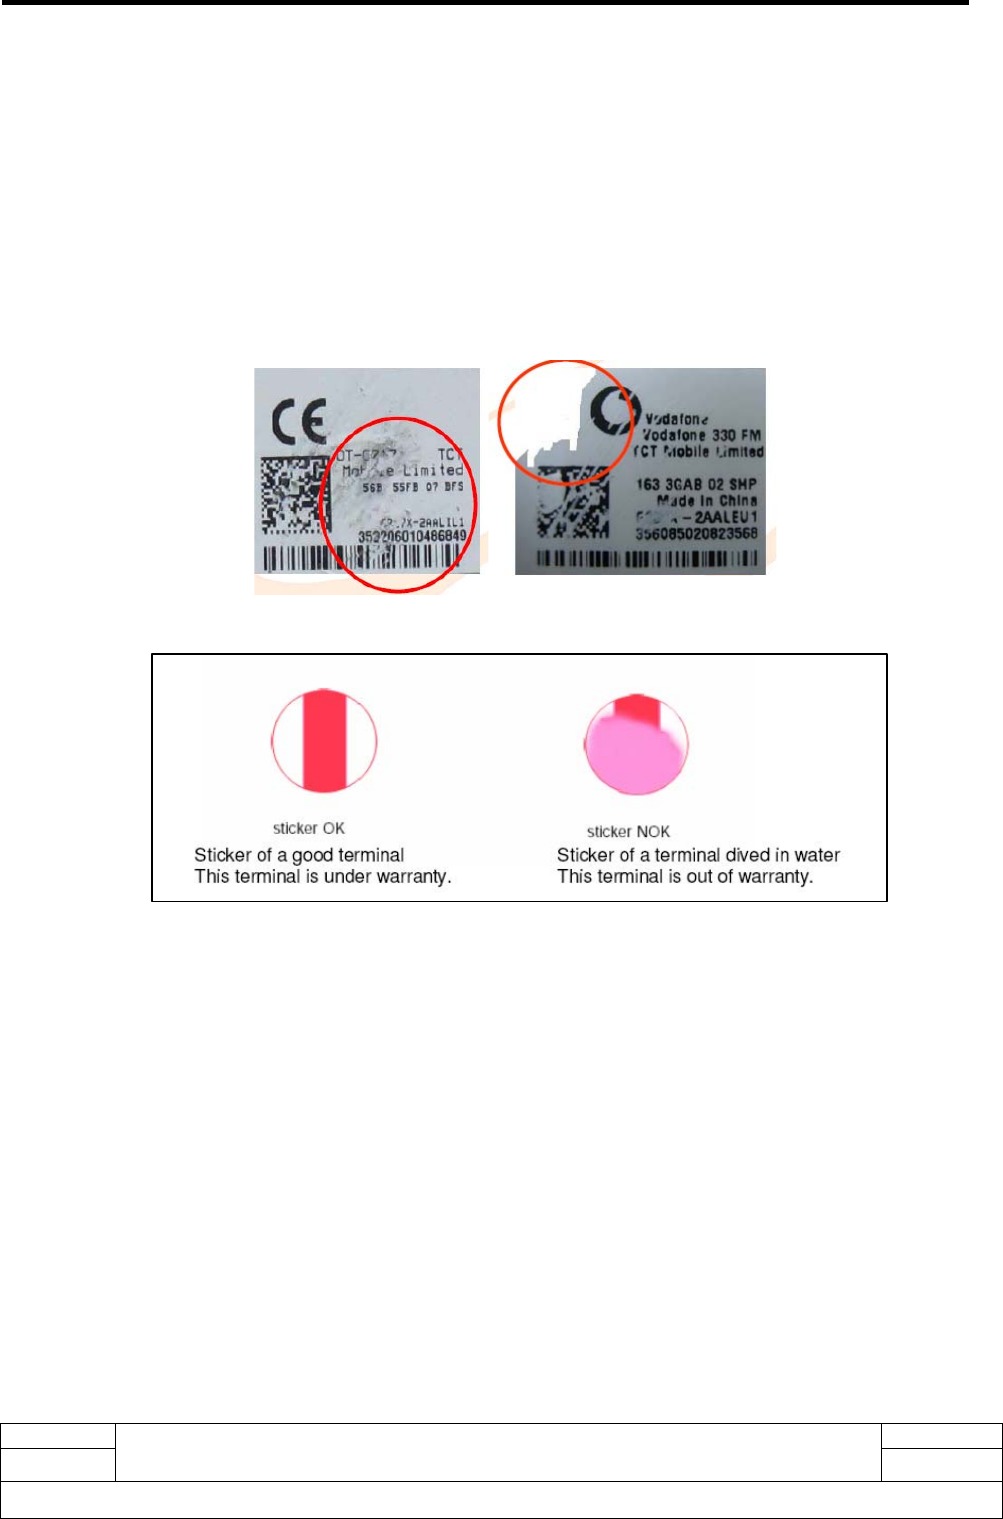
2) Humidity sticker: Liquid detection on humidity sticker.
2.2. Visual mechanical check:
1) Corrosion
Corrosion on the USB connector, SIM connector, and other metal surface
2) Hole (diameter > 1mm)
Holes on any surface, including the front casing, furnished frame, battery cover, touch Lens,
keypad…
3) Bump
Bumps (diameter > 1mm) on any surface, including front casing, decorate frame, battery
cover, touch Lens, keypad, etc.
4) Scratch
Scratches (length > 3mm) on any surface, including the front casing, decorate frame, battery
cover, touch Lens, keypad, etc.
5) Distortion
Bend, twisted or crushed on the h/s, cover/casing or connectors, etc.

By NCK Team
L2 Repair Document TCT Mobile Limited
Rev. MTAG351 Level 2 Repair Document Page
1.0 6/26
All rights reserved. Transfer, copy, use or communication of this file is prohibited without authorization.
6) Broken
Touch broken, casing/cover broken, etc.
7) Dropped
Keypad torn, touch lens, connectors dropped, etc.
8) Gap
External physical damage relating to abnormal use, like front case and frame opened
9) Others
Damage caused by disassembly ,wrong part assembly, lost of components
Use in abnormal environment like high temperature cause plastic melts
3. Pretest
1) Check that the SIM card is set correctly.
2) Insert the battery.
3) Power on the cell phone.
4) If the cell phone can not power on, visually check the condition of the battery connector. Replace it if
necessary..
5) If the cell phone asks to input NCK code, which means it is SIM locked, and can only be worked with
dedicated SIM card. Use the correct SIM card.
6) Enter the phone code if necessary.
7) If power on, test step by step with the auto test code:
8) Press *01763*366# in dial screen and select “AUTO” or “MANU” to start testing
LCD test.
i. Screen will display Red/Green/Blue three color bars.
ii. Select “Pass” to continue.
iii. Screen will turn black.
iv. Select “Pass” to continue.
v. Screen will display with gray bars ,the back light become week from bottom to top.
vi. Select “Pass” to continue.
vii. Screen will display white backlight.
viii. Select “Pass” to continue.
Battery temperature test.
i. Screen display OK and the temperature.
ii. Select “Pass” to continue.
Keypad test.
i. Press hard key(Vol up & Vol down Home) or touch icon (Menu &Search&Back), the icon on

By NCK Team
L2 Repair Document TCT Mobile Limited
Rev. MTAG351 Level 2 Repair Document Page
1.0 7/26
All rights reserved. Transfer, copy, use or communication of this file is prohibited without authorization.
the screen will disappear.
ii. Select “Pass” to continue.
Camera LED test.
i. The LED beside the main camera will turn on.
ii. Select “Pass” to continue.
LCD backlight test.
i. LCD backlight will flash with three times.
ii. Select “Pass” to continue.
Key backlight test.
i. Touch key backlight will flash with three times.
ii. Select “Pass” to continue
Front camera test.
i. Scenery capture by front camera will display on the screen.
ii. Select “Pass” to continue
Vibrator test.
i. Vibrator with vibrating.
ii. Select “Pass” to continue after vibrating stopped.
Main camera test
i. Scenery capture by main camera will display on the screen.
ii. Select “Pass” to continue
Receiver test.
i. Screen will display “Receiver discrete test” and handset will sound di-di-di-di.
ii. Select “Pass” to continue
Speaker test.
i. Melody can be heard.
ii. Select “Pass” to continue.
Mic-Receiver loop test.
i. Talk to the handset and your sound should be heard
ii. Select “Pass” to continue.

By NCK Team
L2 Repair Document TCT Mobile Limited
Rev. MTAG351 Level 2 Repair Document Page
1.0 8/26
All rights reserved. Transfer, copy, use or communication of this file is prohibited without authorization.
UIM card test.
i. Insert UIM card, it can be detected by handset.
ii. Select “Pass” to continue.
Memory card test
i. When test pass, screen will display SD test OK.
ii. Select “Pass” to continue.
USB test
i. Plug and remove the USB cable according to prompt. Handset will display OK.
ii. Select “Pass” to continue.
Headset test
i. Plug headset when handset prompts and screen will display “OK”.
ii. Melody can be heard on left earphone when screen displays “Headset left discrete test”
iii. Select “Pass” to continue.
iv. Melody can be heard on right earphone when screen displays “Headset right discrete test”
v. Select “Pass” to continue.
vi. Screen will display “Headset Mic loop”.
vii. After heard the loop sound, select “Pass” to continue.
viii. Screen will prompt remove the headset. When headset removed screen will display “OK”.
Bluetooth test.
i. Handset will detect the access point and display “OK” and MAC address.
ii. Select “Pass” to continue
WIFI test.
i. Handset will detect the WIFI network and display “OK” and WIFI information.
ii. Select “Pass” to continue.
G-sensor test.
i. Screen will display “put the handset face up and towards up”, follow this prompt screen will
display left arrow, right arrow and down arrow.
ii. Select “Pass” to continue.
Compass test.
i. Screen will display compass and arrow always point north.
By NCK Team
L2 Repair Document TCT Mobile Limited
Rev. MTAG351 Level 2 Repair Document Page
1.0 9/26
All rights reserved. Transfer, copy, use or communication of this file is prohibited without authorization.
ii. Select “Pass” to continue.
Light-sensor test.
i. Handset will detect the ambient light. The lightness data will change when put something
close to the sensor on the left top corner.
ii. Select “Pass” to continue.
Proximity-sensor test.
i. Follow handset prompt to shadow the sensor on the left top corner from far to near and from
near to far, the relevant data will change that displayed on the screen.
ii. Select “Pass” to continue.
GPS test.
i. Satellite will be detected if subscribe the service.
ii. Select “Pass” to continue.
Bt/Wifi Address.
i. The MAC address of Bt&Wifi should be displayed
ii. Select “Pass” to continue
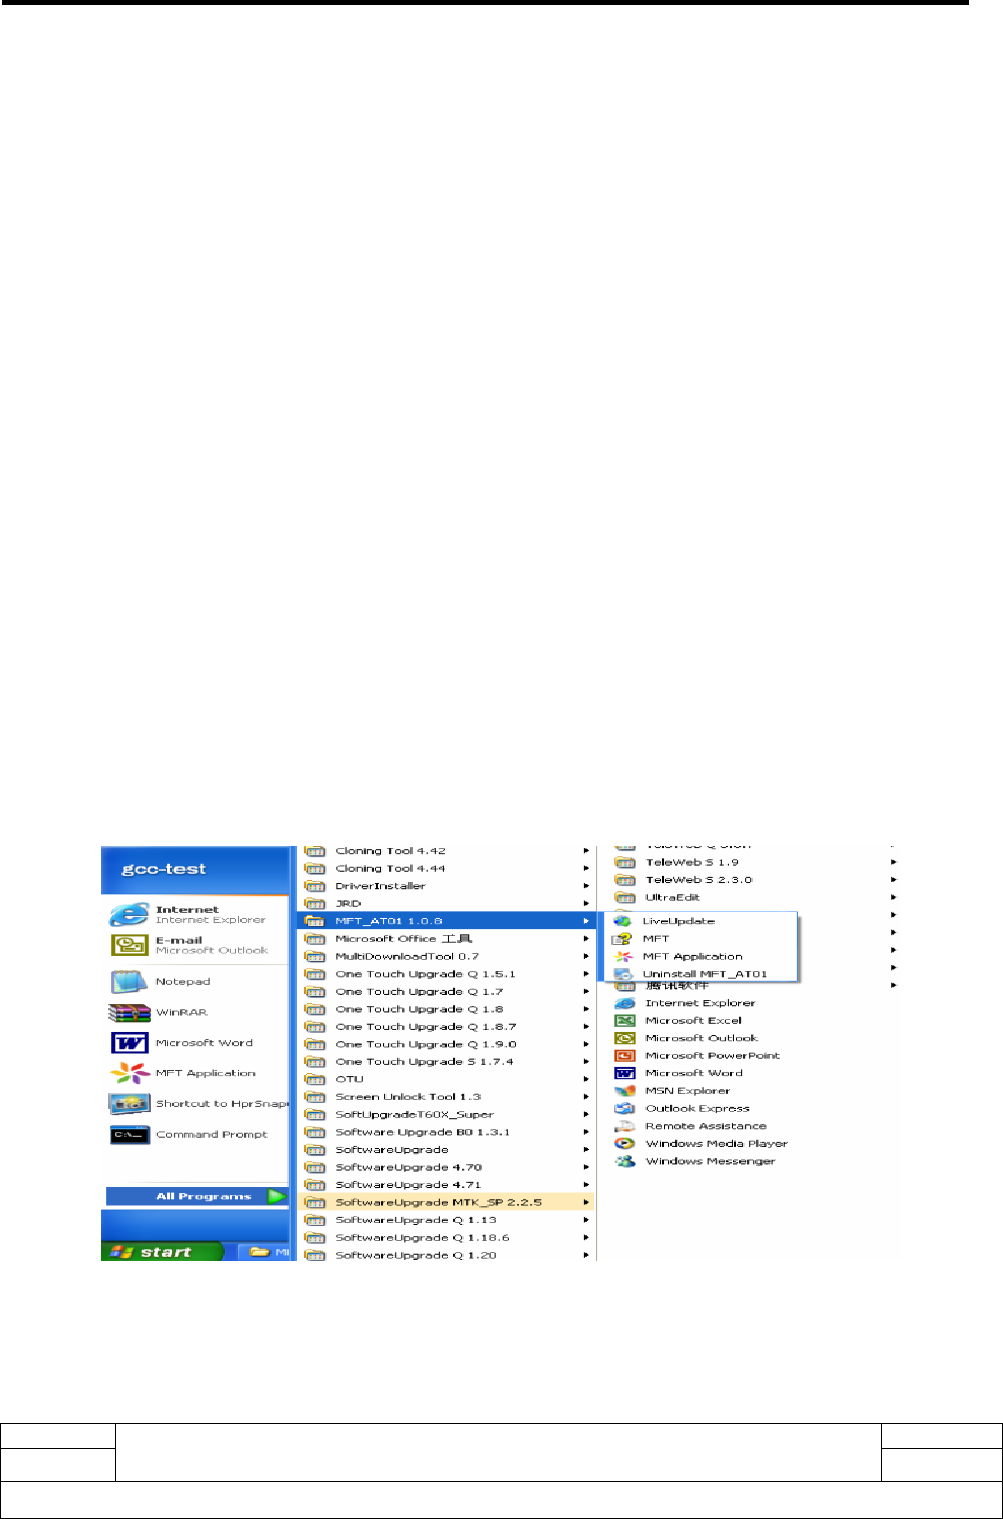
4. software update
We use MFT tool to do software upgrading in this case. Firstly, you have to install the tool in your computer;
after installation of this MFT, you can find it in your computer`s program list as below.
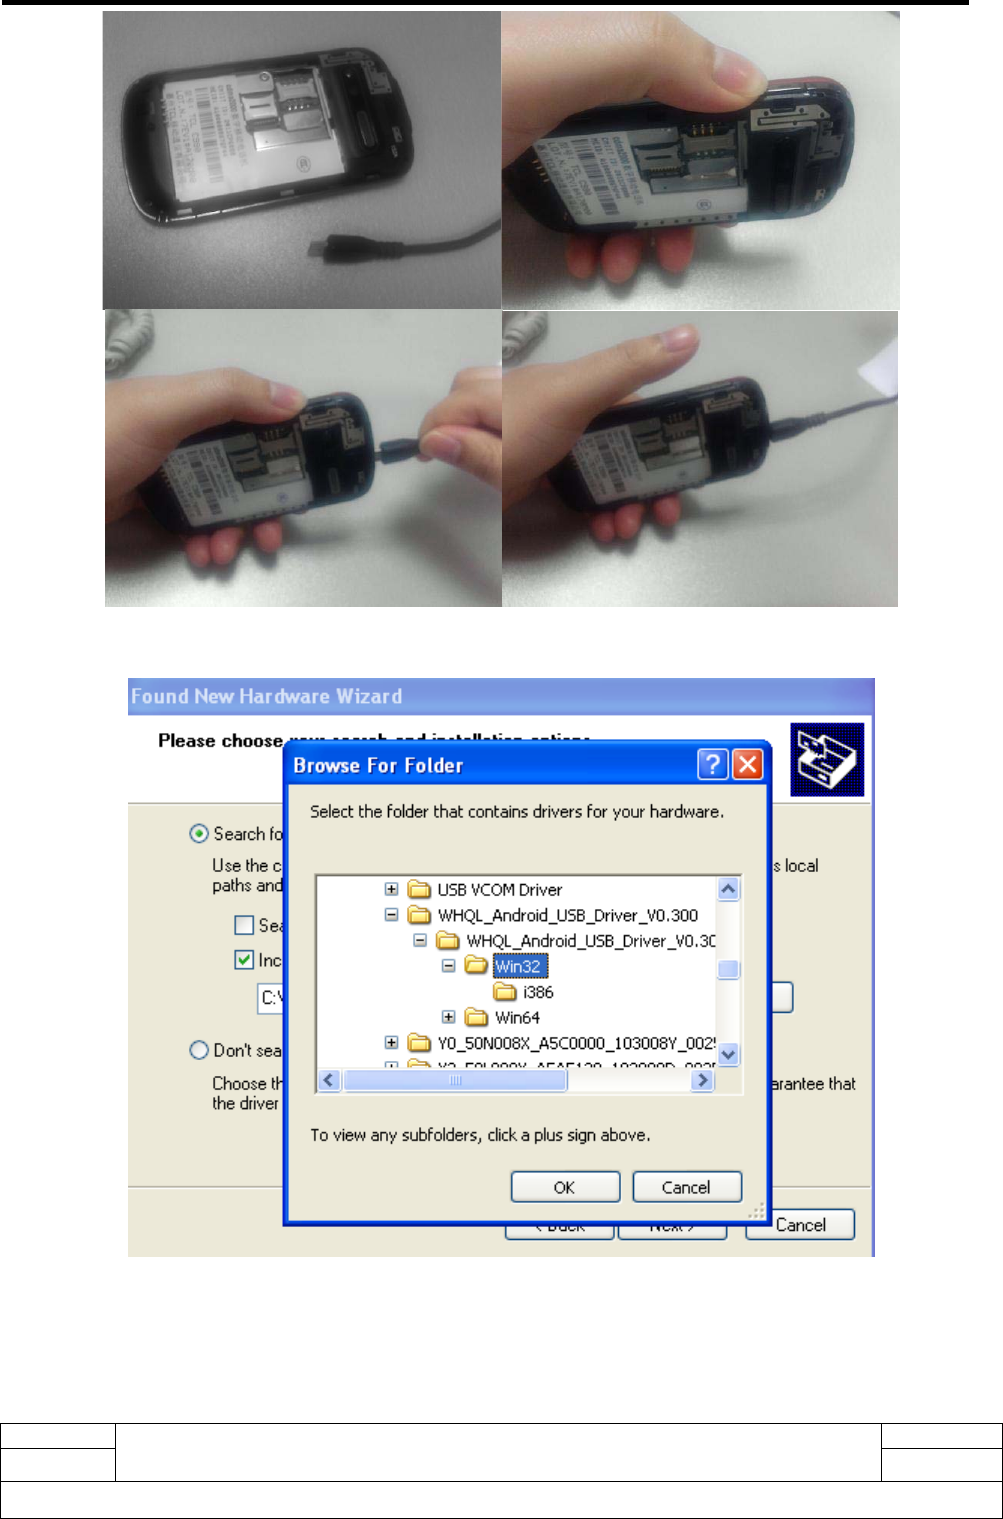
i. Take out the battery of the handset, press the volume down key and do not release it, at the same time
connect to computer the handset via USB cable; you can release the volume down key about 5
seconds after the USB cable is connected.
By NCK Team
L2 Repair Document TCT Mobile Limited
Rev. MTAG351 Level 2 Repair Document Page
1.0 10/26
All rights reserved. Transfer, copy, use or communication of this file is prohibited without authorization.
ii. After all this above is done, the computer may prompt a dialog box for installing driver for new
hardware; choose the corresponding driver to install.
By NCK Team
L2 Repair Document TCT Mobile Limited
Rev. MTAG351 Level 2 Repair Document Page
1.0 14/26
All rights reserved. Transfer, copy, use or communication of this file is prohibited without authorization.
Screw driver
Tweezers
Soldering iron
Hot air gun
Hook
Knife
Please refer to APPENDIX 1 and find out the picture of the tool.
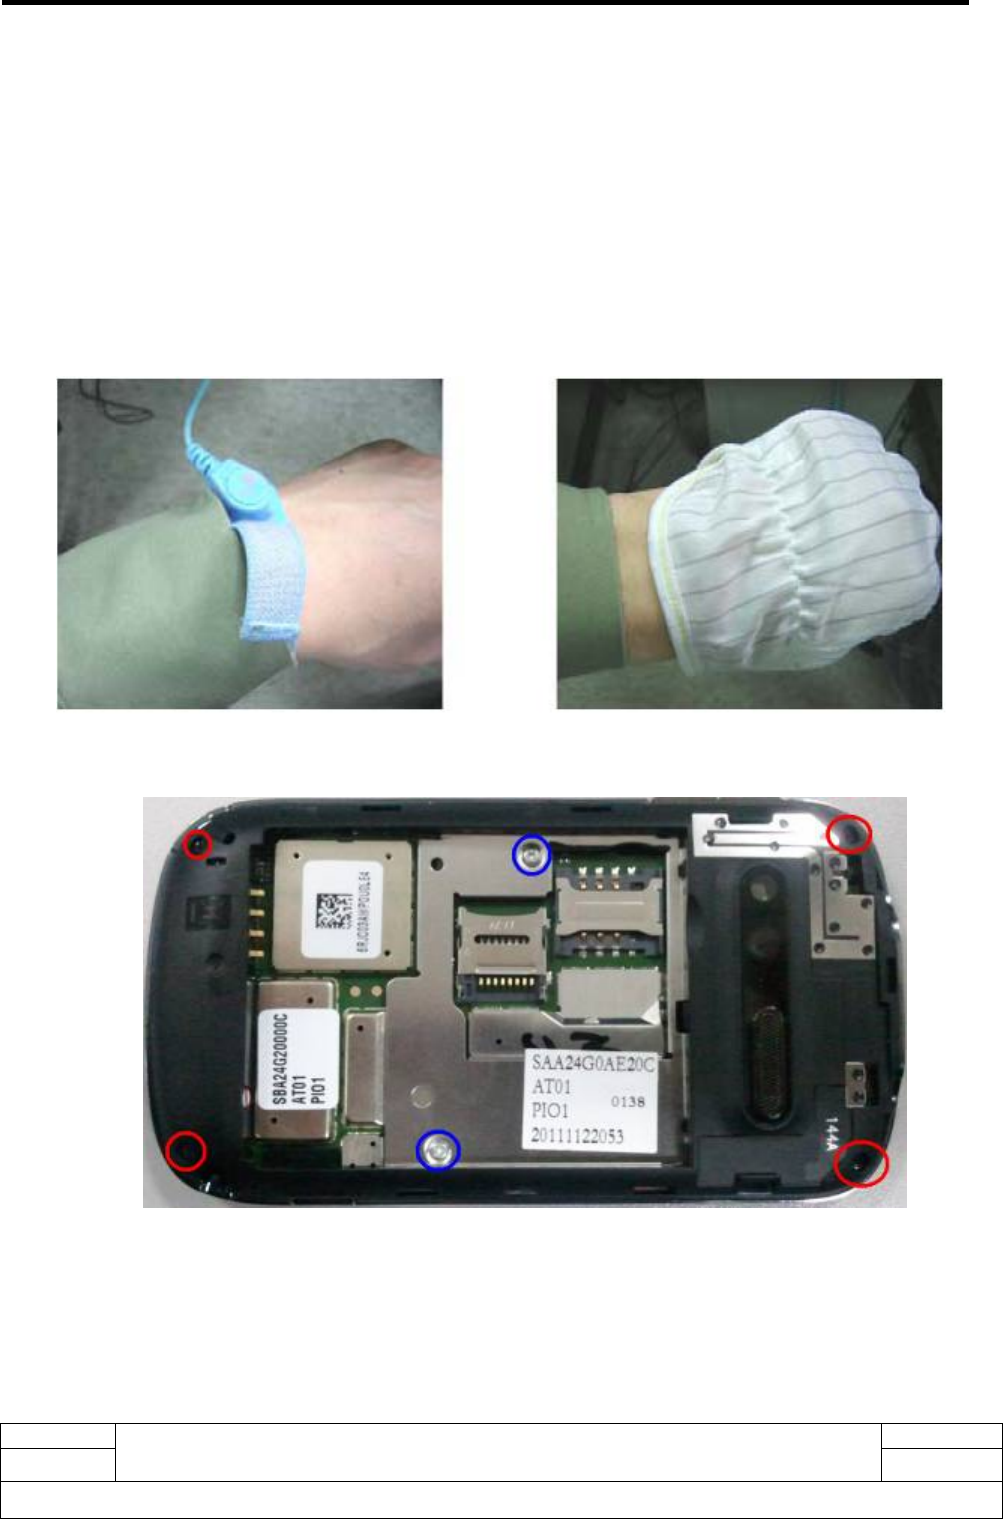
5.2. Disassembly process
Step 1: Before disassembling process begins, make sure you have worn static loop, and the static loop has
good connection with GND, which can help to avoid ESD damage on the PCBA during disassembling.
Step 2: Remove the screws from the cover first.
Step 3: Separate the decorate frame.
By NCK Team
L2 Repair Document TCT Mobile Limited
Rev. MTAG351 Level 2 Repair Document Page
1.0 15/26
All rights reserved. Transfer, copy, use or communication of this file is prohibited without authorization.
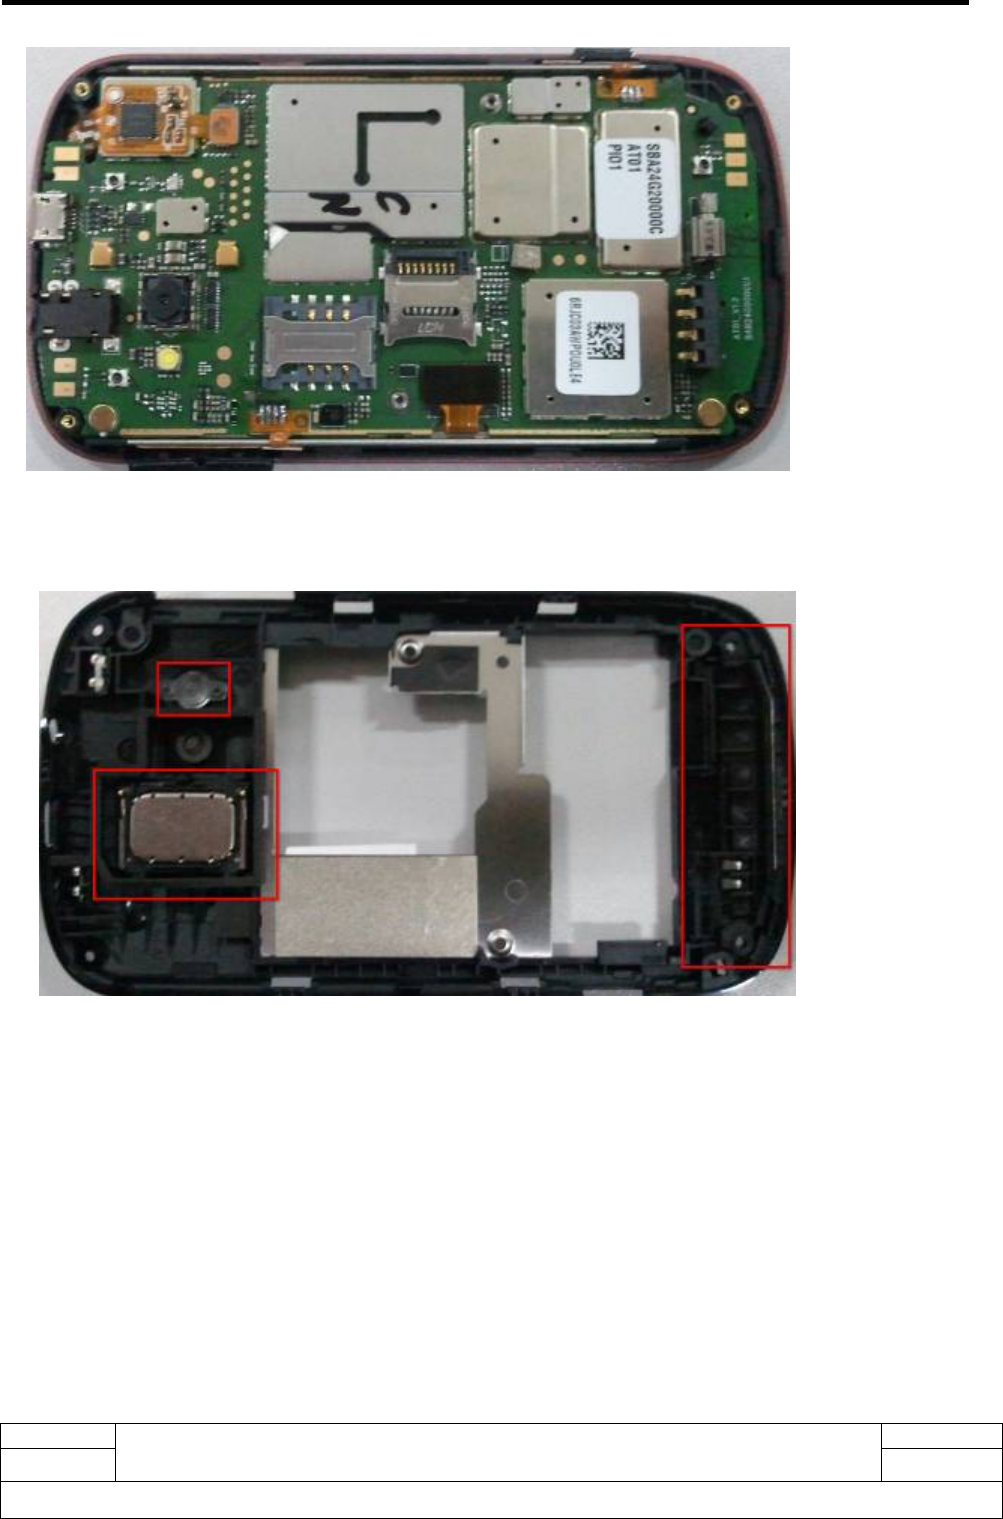
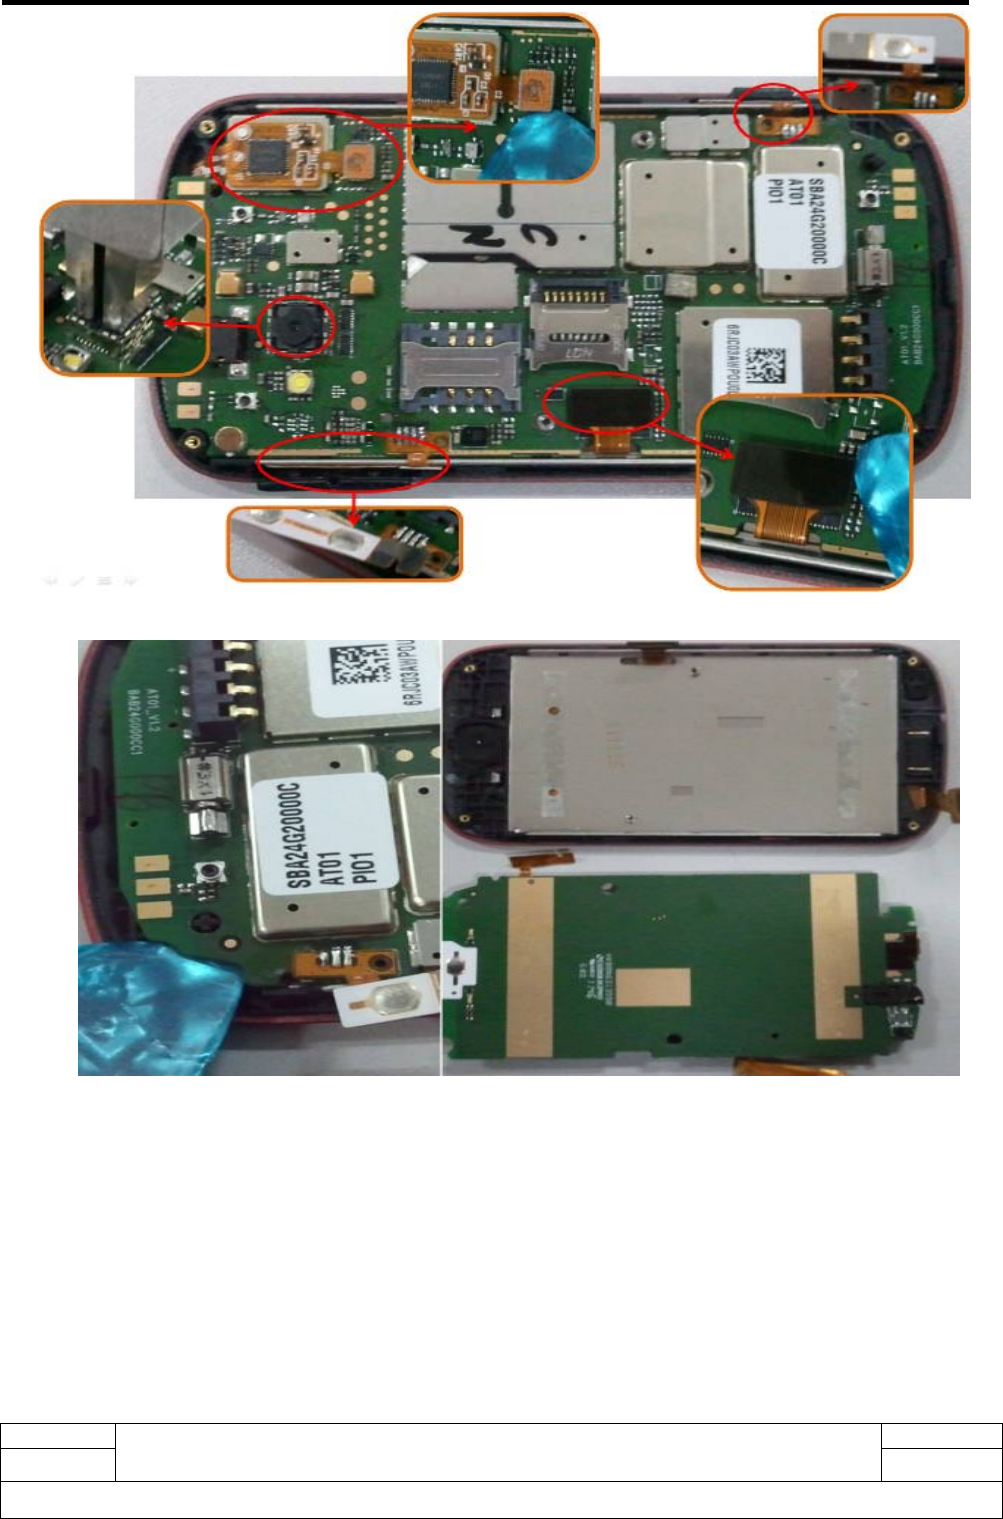
Step 4: Remove the Speaker, antenna, and the shield for Camera LED
Step 5:Seperate the FPC connector and Camera
By NCK Team
L2 Repair Document TCT Mobile Limited
Rev. MTAG351 Level 2 Repair Document Page
1.0 16/26
All rights reserved. Transfer, copy, use or communication of this file is prohibited without authorization.
Step 6: Remove PCBA from the front casing
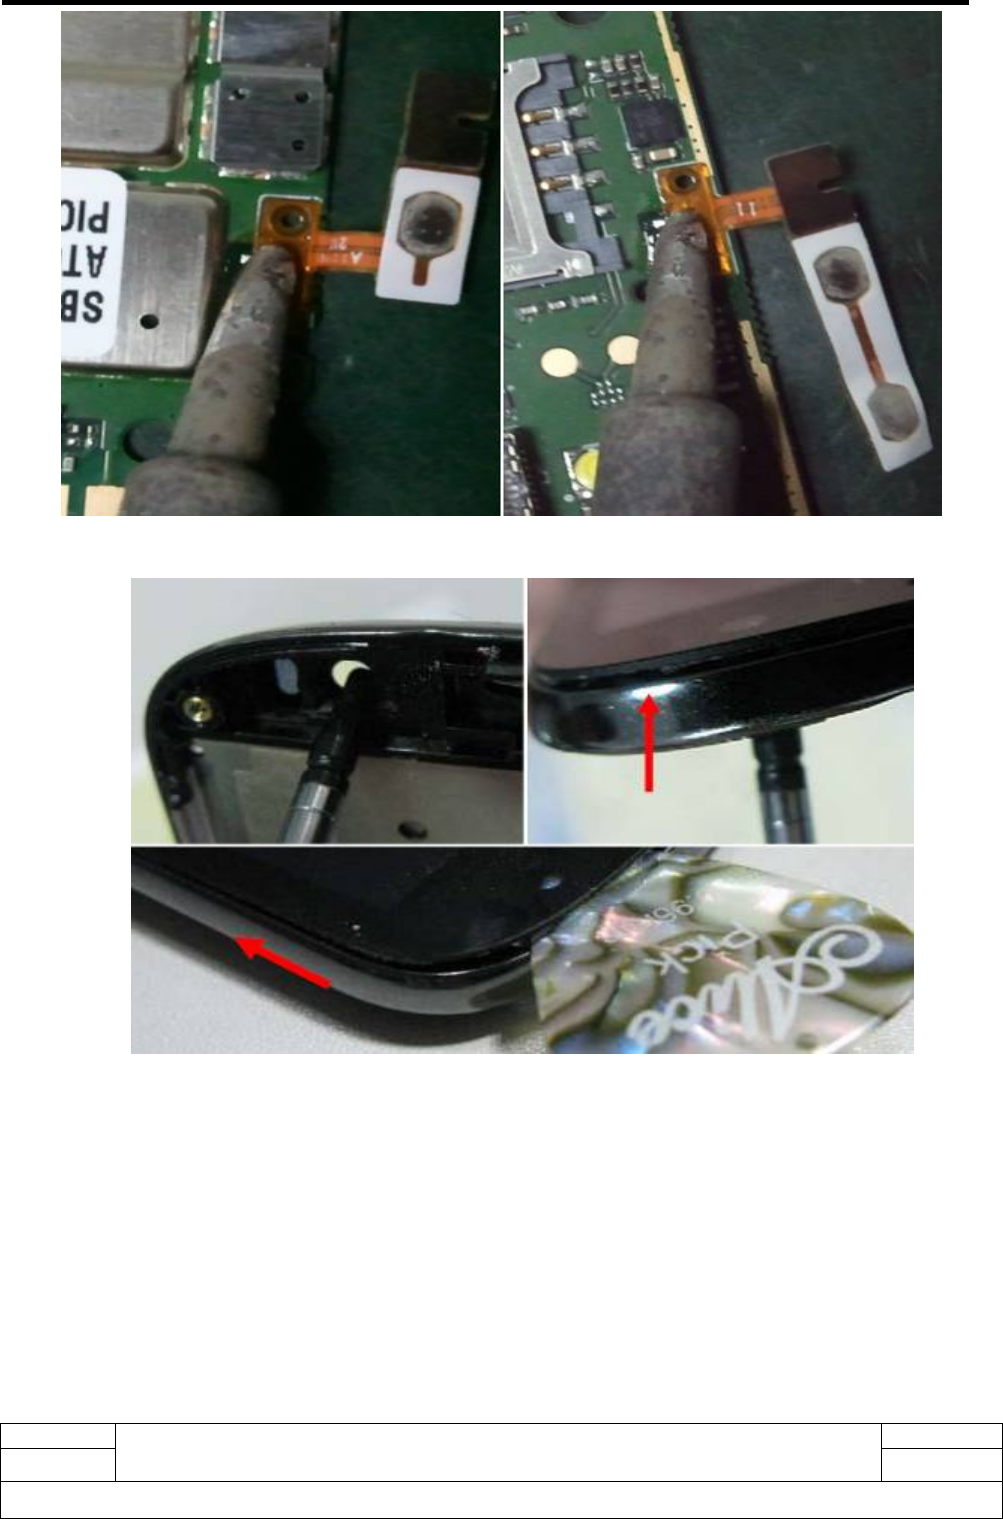
Step 7:Separate FPC from the PCBA(Temperature: 350±10℃))
By NCK Team
L2 Repair Document TCT Mobile Limited
Rev. MTAG351 Level 2 Repair Document Page
1.0 17/26
All rights reserved. Transfer, copy, use or communication of this file is prohibited without authorization.
Step 8: Firstly, Please use hot wind gun heating around the touch lens, then separate the touch lens from
furnished front casing. (Temperature: 100±10℃, Air Level:3, Height:5-10mm, Time:30s)
Step 9: Disassembly completed!
By NCK Team
L2 Repair Document TCT Mobile Limited
Rev. MTAG351 Level 2 Repair Document Page
1.0 18/26
All rights reserved. Transfer, copy, use or communication of this file is prohibited without authorization.
NO Spare part
By NCK Team
L2 Repair Document TCT Mobile Limited
Rev. MTAG351 Level 2 Repair Document Page
1.0 19/26
All rights reserved. Transfer, copy, use or communication of this file is prohibited without authorization.
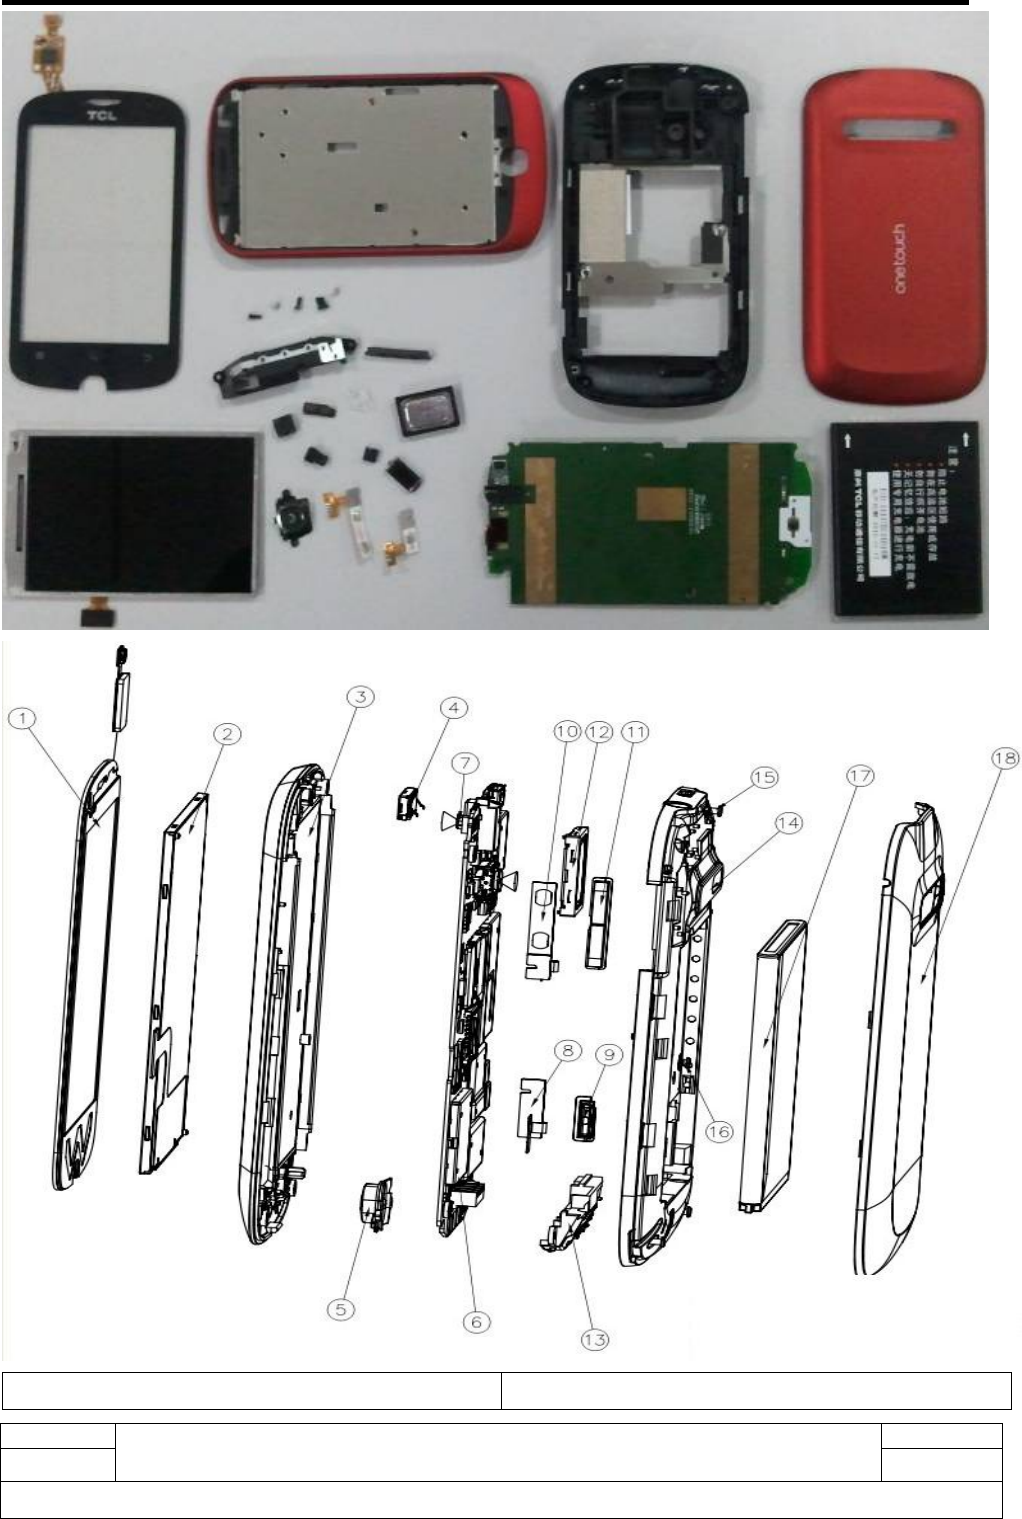
1 LCD
2 Touch Panel
3 Furnished Front casing
4 Receiver
5 Home Key
6 PCBA
7 Sub Camera
8 Side key FPC-1
9 Side Key-1
10 Side key FPC-2
11 Side Key-2
12 Speaker
13 Antenna Stand
14 Furnished Frame
15 Screw-1
16 Screw-2
17 Battery
18 Back Cover
AT01 MTAG351 L2 spare part list
Item Description Part number Remark
1 Furnished front casing BCA31P0A20C0 Bluish black soft touch
2 Furnished front casing BCA31P0E20C0 Spicy red soft touch
3 Furnished Touch panel
Module BED24G0A17C3 IC:Focal5206,,Black printing on the backside,,no
logo
4 LCD Module AUA350T207C1
262K colors,3.5",320×480,TFT,Driver
IC:ILI9481B(COG)
5 Furnished frame BCC24G0V10C0 Dark chrome
6 Home key BFC31P0A20C0 Black painting,Home key deco:Dark chrome
7 Volume side key BFC31P0A11C0 Dark chrome
8 Power side key BFC31P0A12C0 Dark chrome
9 volume key FPC SBF31P00011C 2Layer,26.3*10.2mm
10 power key FPC SBF31P00021C 2Layer,12.5*10.95mm
11 rubber gasket BNG31P0006C0
12 receiver plug BNG31P0007C0
13 Camera module ASA3001017C1 3M,6.5×6.5×4.1mm,with CONN
14 wafer camera ASA0300001C2
0.3M,3.24×2.8×2.74mm,20pin,SMT,with metal
can,for India version
15 FRAME CONDUCTIVE
FOAM BLF31P0000C0 4*3.5*1.6mm,work thickness
16 Receiver insulated label BLE31P0000C0 TKAPTON 0.15mm,12*7*0.15mm
By NCK Team
L2 Repair Document TCT Mobile Limited
Rev. MTAG351 Level 2 Repair Document Page
1.0 20/26
All rights reserved. Transfer, copy, use or communication of this file is prohibited without authorization.
17 Screw TA54-
T3000952AAAA PM1.4×4.0mm,HD=Ф2.5×T0.5mm,BZN(3+),十 type
18 Screw BMA1421250C0
PM1.4×(0.3P)×L2.1mm,HD=Ф2.5×T0.5mm,silvery,
十 type
19 Main Antenna BBC24G0000C2
20 Receiver AWB0612S06C1 6×12×2mm,,32 Ohms,Spring contact
21 Speaker AWA2014S04C1
20×14×3.0mm,91dB±3dB,,spring contact, second
source
22 Speaker AWA1420S00C1 14×20×3.0mm,,,Spring contact
23 Audio Jack ARG0050004C1 5pin,Diameter=3.5mm, H=4.3
24 USB connector ARH0050018C1 5pin,0.65pitch,H=2.4mm
25 T-Flash card connector ARJ0080046C1 8pin,1.1pitch,H=1.6mm
26 SIM card connector ARD0060051C1 6pin,2.54pitch,13.6×16.4×H1.8mm
27 Battery connector ARE0040021C1 4pin,3.1pitch,H=5.4mm
28 Camera socket ARK0240004C1 24pin,,8×8×H3.5mm
29 Microphone AWC4013M02C1 Φ4.0×T1.3mm,-44±3dB,SMT
30 Keypad film BJA31P0000C1 1 dome,17×10.5mm
31 Vibrator motor AVA0410M01C1 11*4.4*3.6mm,DC2.7V,SMT type
32 TP adhesive Tape 1 BPA31P0001C1
33 TP adhesive Tape 2 BPA31P0002C1
34 TP film BPA24G0004C0 Φ4.5mmX0.15mm
35 conductive adhesive tape BLG31P0000C0
36 Commercial Label CPE0000026C0 64×49mm,L type, blank
37 SWAP PCBA F-B24G0MSIN1 SWAP PCBA,AT01,800,MT351-2A\BMSIN1
The MTAG351 L2 Spare Part List will be updated in future. And, you can download the latest version
form TS web: https://css.tclmobile.cn/
5.3. Assembly Process
Please refer to the disassembly process for assembly in reverse order.
6. Disassembly process evaluation
The MTAG351 parts disassembly time is listed here. Technique level and disassembly method listed below.
For technique levels:
1) Class 1 stands for easy to disassemble.
2) Class 2 stands for normally to disassemble.
3) Class 3 stands for difficulty to disassemble.
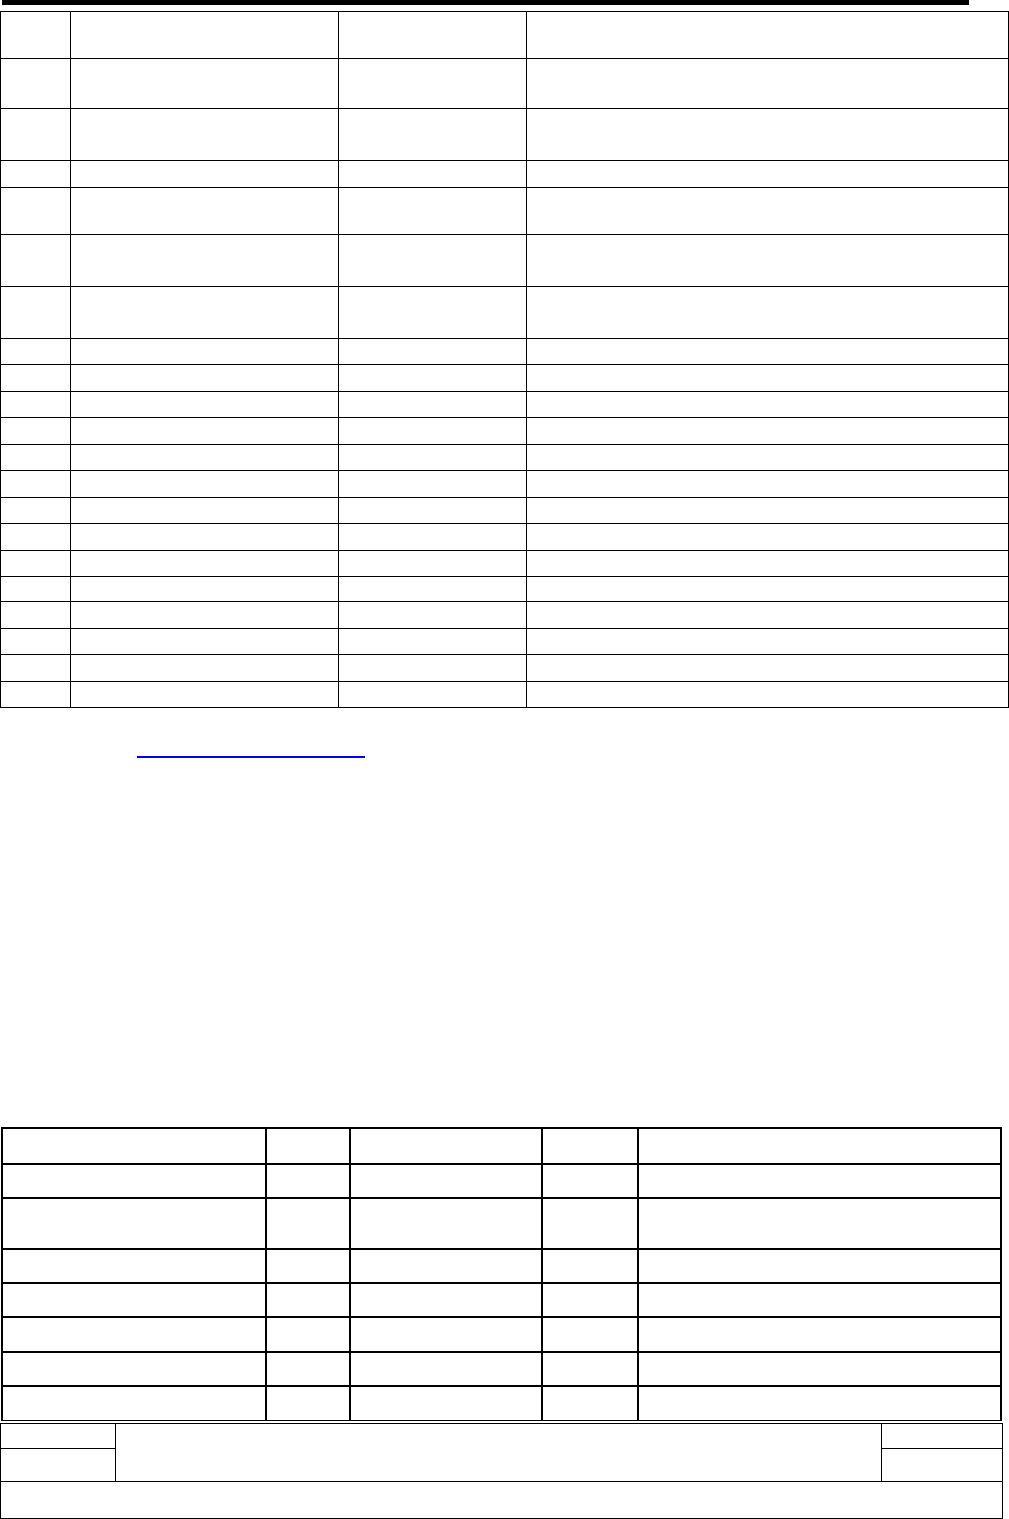
Spare part Time Jig Class Remark
Battery cover 3s Plastic Wedge Class 1
Remove screws on
decorate casing
20 screwdriver Class 1
Volume key 5S Tweezers Class 1
Power key 5S Tweezers Class 1
Touch screen connector 5s Tweezers Class 1
Camera connector 5S Tweezers Class 1
LCD connector 5S Tweezers Class 1
By NCK Team
L2 Repair Document TCT Mobile Limited
Rev. MTAG351 Level 2 Repair Document Page
1.0 21/26
All rights reserved. Transfer, copy, use or communication of this file is prohibited without authorization.
Remove PCBA 20s Plastic Wedge
Tweezers
Class 2
Remove speaker1 5s Tweezers Class 1
Remove speaker1 mask 5s Tweezers Class 1
Separate LCD 20s Plastic Wedge
Tweezers
Class 2
Remove main camera 5s Tweezers Class 1
Remove touch screen 20s Plastic Wedge
Tweezers
Class 2
Remove SIM connector 120s Hot air gun
Tweezers
Class 3 The connector is easy to damage
Remove audio jack 5s Tweezers Class1
Remove speaker2 5s Tweezers Class1
Remove T flash
connector
120s Hot air gun
Tweezers
Class 3 The connector is easy to damage
Battery connector 40s Hot air gun
Tweezers
Class3 The connector is easy to damage
Remove Microphone 40 Hot air gun
Tweezers
Class3 Easy to damage the FPC
Remove Vibrator 40 Hot air gun
Tweezers
Class3 Easy to damage the FPC, action
must take ambient components into
consideration
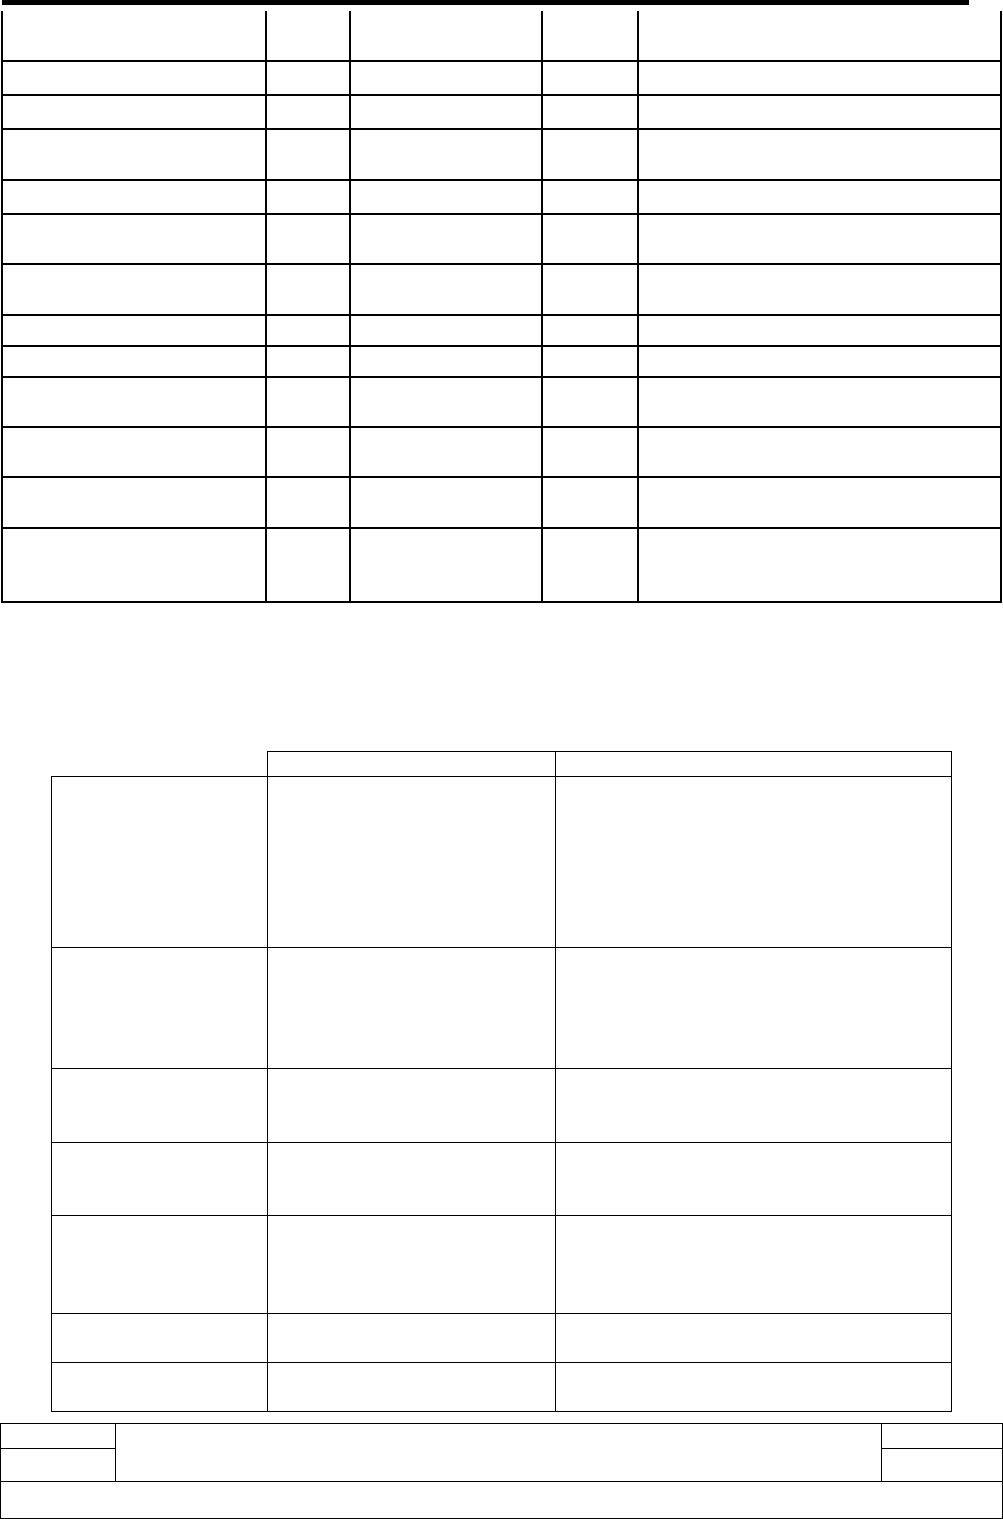
7. Level 2 repair
This chapter describes the LEVEL 2 repair that can be done without any diagnostic equipment.
Problem description Action And Solution
Charging Bad
or
No Charge
1.Check voltage of the battery: if 0V,
charge some minutes and check the
charge indicator;
2.Check the battery contact, change the
battery connector if broken;
3.Check the charge plug on B cover,
change it if necessary;
Switch on with
battery power
Can ‘t Switch on 1.Check voltage of the battery;
2.Check the battery contact, change the
battery connector if broken;
3.Check the keypad
4.Check BTB connector socket pin
Main display Missing line or column; no
display; bad or no LCD
backlight
Check Connection flex (FPC
cable),change it if necessary;
Replace display module if necessary;
Vibrator The vibrator does not work Check the contact on the PCBA (dirty or
oxidized), replace the vibrator if
necessary;
Network Problem No emission or No reception Check the antenna contactor on the B
cover;
Check the contact on the PCBA (dirty or
oxidized);
TF card No communication between
the phone and the TF card
Check the TF connector on the PCBA;
Camera Camera doesn't work Check camera module
Check also camera FPC broken or not

By NCK Team
L2 Repair Document TCT Mobile Limited
Rev. MTAG351 Level 2 Repair Document Page
1.0 22/26
All rights reserved. Transfer, copy, use or communication of this file is prohibited without authorization.
Audio Bad or no emission (TX
audio from mobile);
Bad or no reception (RX
audio on mobile);
Hands-free problem;
Key beep and melody
problem
Check microphone, replace it if
necessary;
Check the contact on the PCBA (dirty or
oxidized)
Check loud speaker, replace it if
necessary;
Check the contact on the PCBA (dirty or
oxidized)
In case the LEVEL 2 repair can’t solve the problem, or if the board is damaged, exchange the board.
8. PCBA Exchange
If Level 2 repair does not solve the failure, it is mandatory to change the PCBA and follow the process
herein.
1) Collect the PCBA (without accessories, LCD and camera), with microphone and vibrator.
2) Get a new PCBA from the swap stock. Reuse those accessories to assemble the mobile.
3) Fill in the record sticker with IMEI number, fault code, short code, Hardware Technical Level and
software version.
4) Send the NG PCBA with record sticker back to L3 repair center with the recommended packaging
method,
Note: packaging method please refer item “12. Package requirement”.
9. Other component exchange
The other components exchange such as
1) LCD module
2) Vibrator
3) Receiver
4) Speaker
5) Microphone
6) Camera module
7) Audio connector
8) Other related mechanical components.
We need to be very careful to handle the components with related special tool or jig (especially replacing
new components)
It is better to handle it with plastic tools (plastic tweezers and wedge etc.).
Besides operator must wear anti-static gloves, fingertips or wear static loop during the whole process of
components exchange.
10. Commercial label marking (MEID sticker)
10.1. Blank label size
Label Dimension Reference : 64×49mm
By NCK Team
L2 Repair Document TCT Mobile Limited
Rev. MTAG351 Level 2 Repair Document Page
1.0 23/26
All rights reserved. Transfer, copy, use or communication of this file is prohibited without authorization.
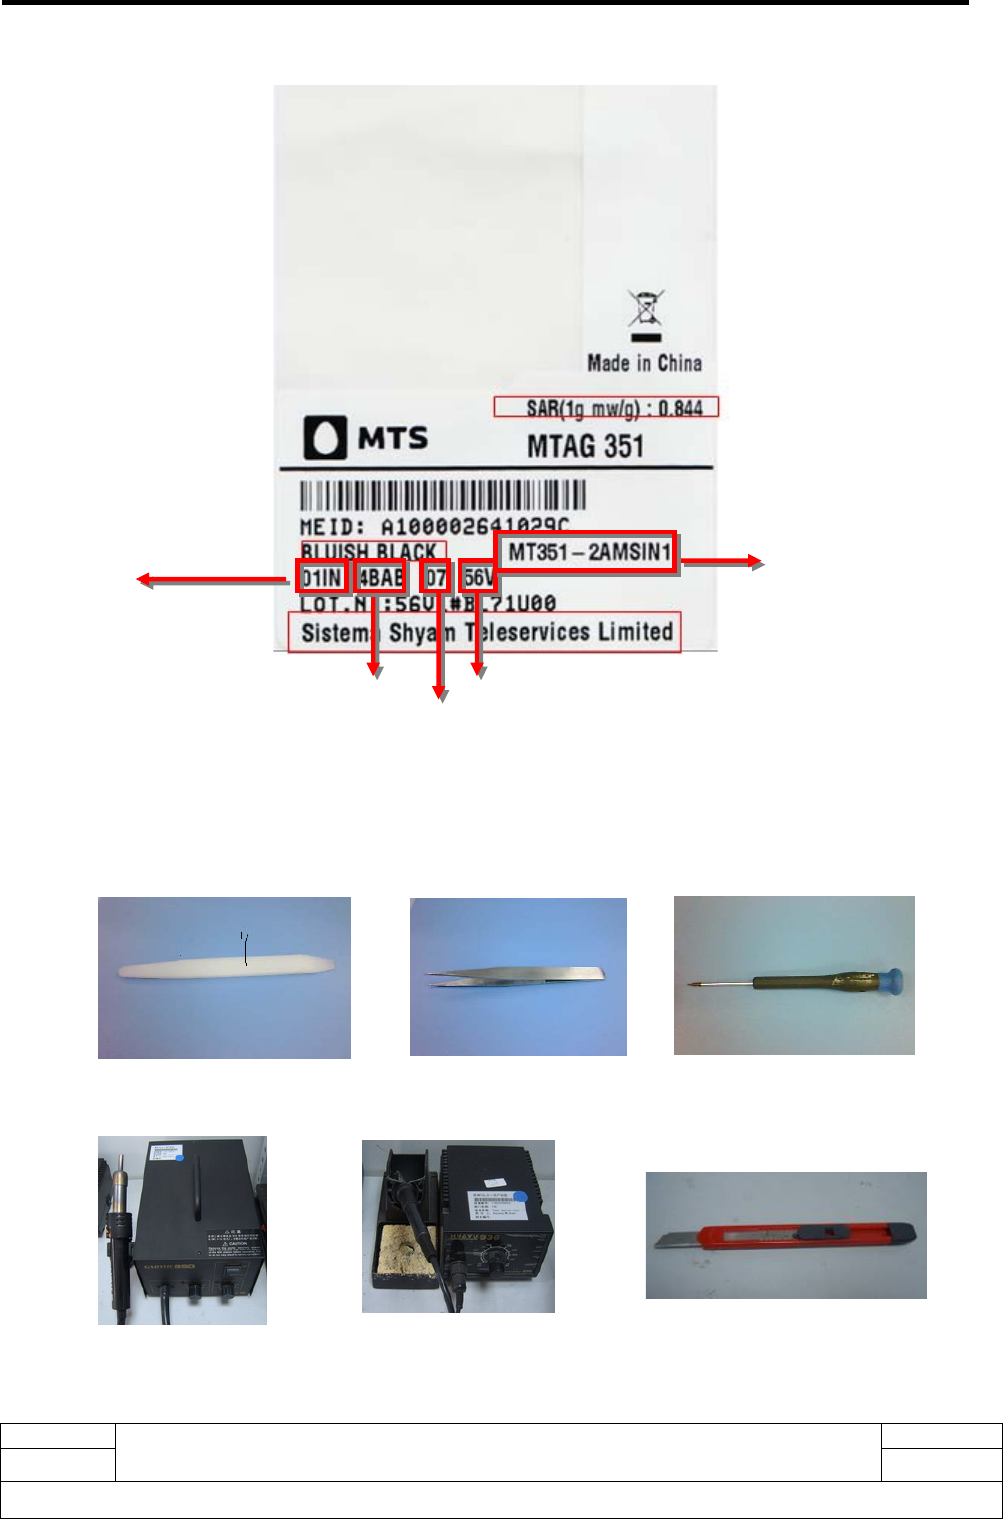
10.2. Samples for commercial label
Figure 1.1 Commercial Label
11. Tools
Hot air gun
Plastic Stick Tweezers
Knife
Soldering iron
Screwdriver (TORX6)
S/W version and
leading exporter
Short code
CU reference
Short
code Hardware version
Date code
By NCK Team
L2 Repair Document TCT Mobile Limited
Rev. MTAG351 Level 2 Repair Document Page
1.0 24/26
All rights reserved. Transfer, copy, use or communication of this file is prohibited without authorization.
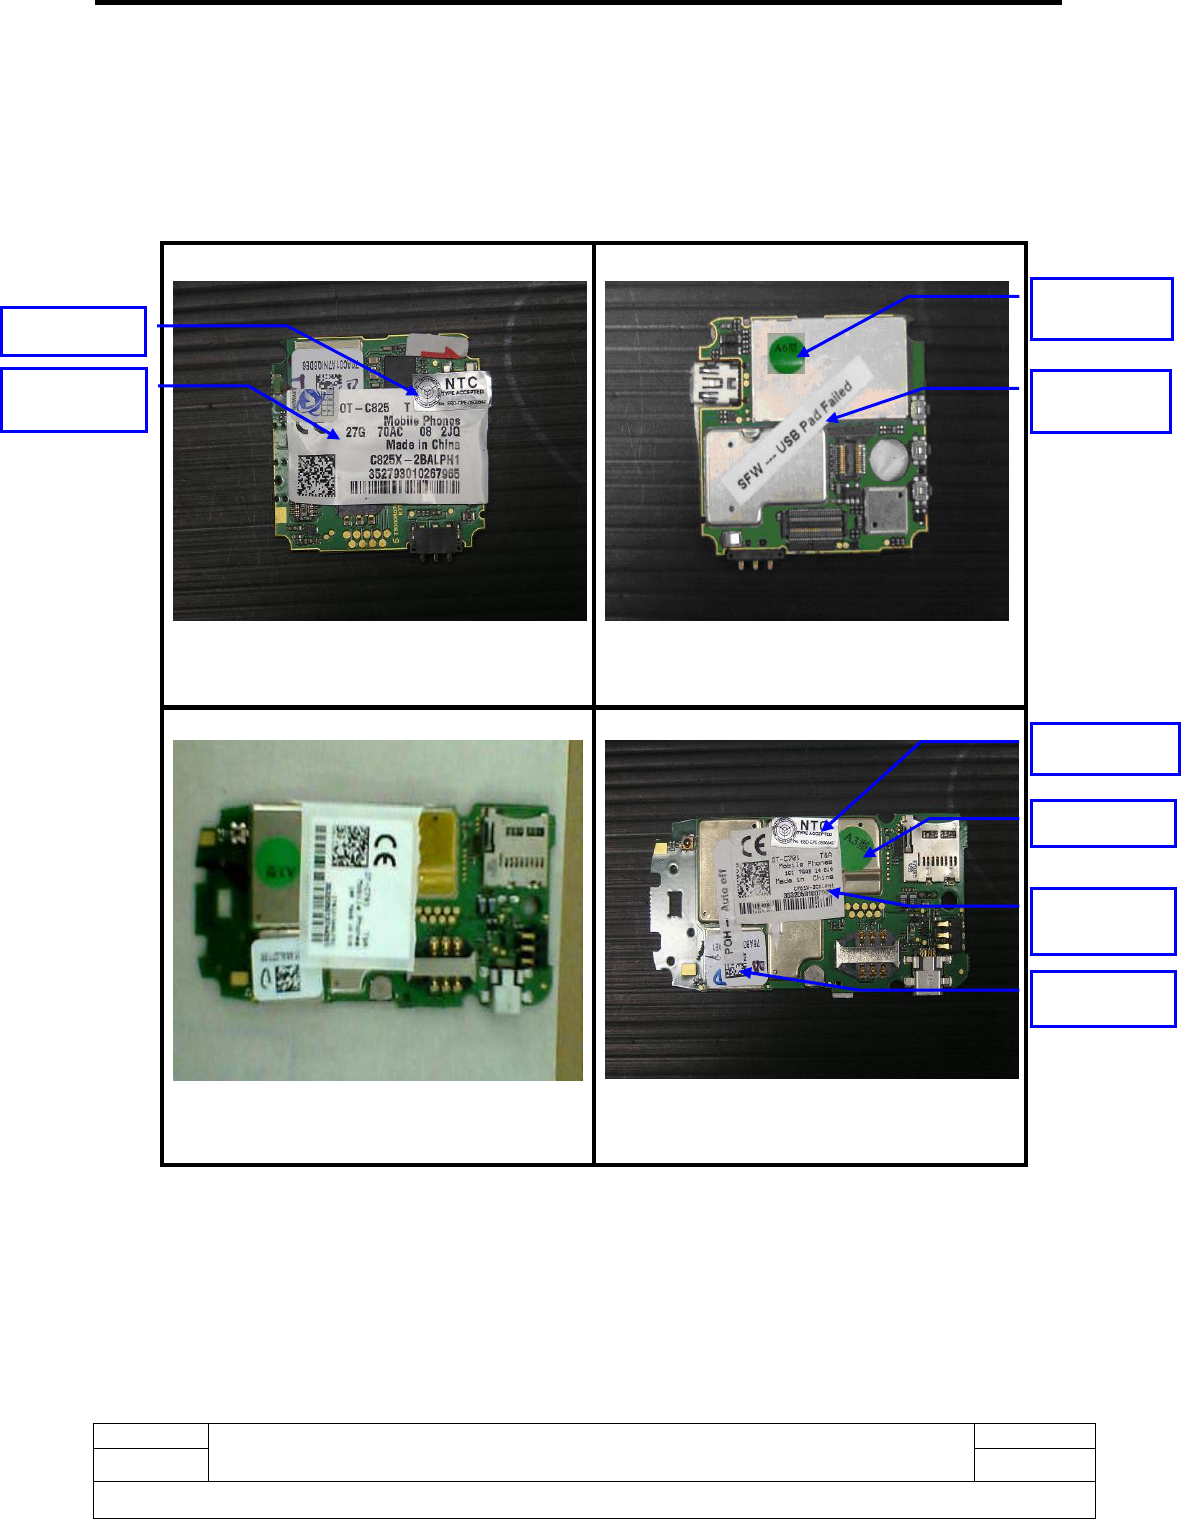
12. Package Requirement
1) Appearance Requirements of PCBA
i. The failure code label, commercial label, custom label and network code should be stuck onto
PCBA
ii. The repair PCBA and custom label should be matched (see appendix one for the detailed
information)
PCBA of Flip Phone
put commercial label and network code on
one side
Put failure code label and custom label on
other side
PCBA of Bar Phone
Put commercial label and custom label on
PCBA
At the same time put network code
label and failure code label
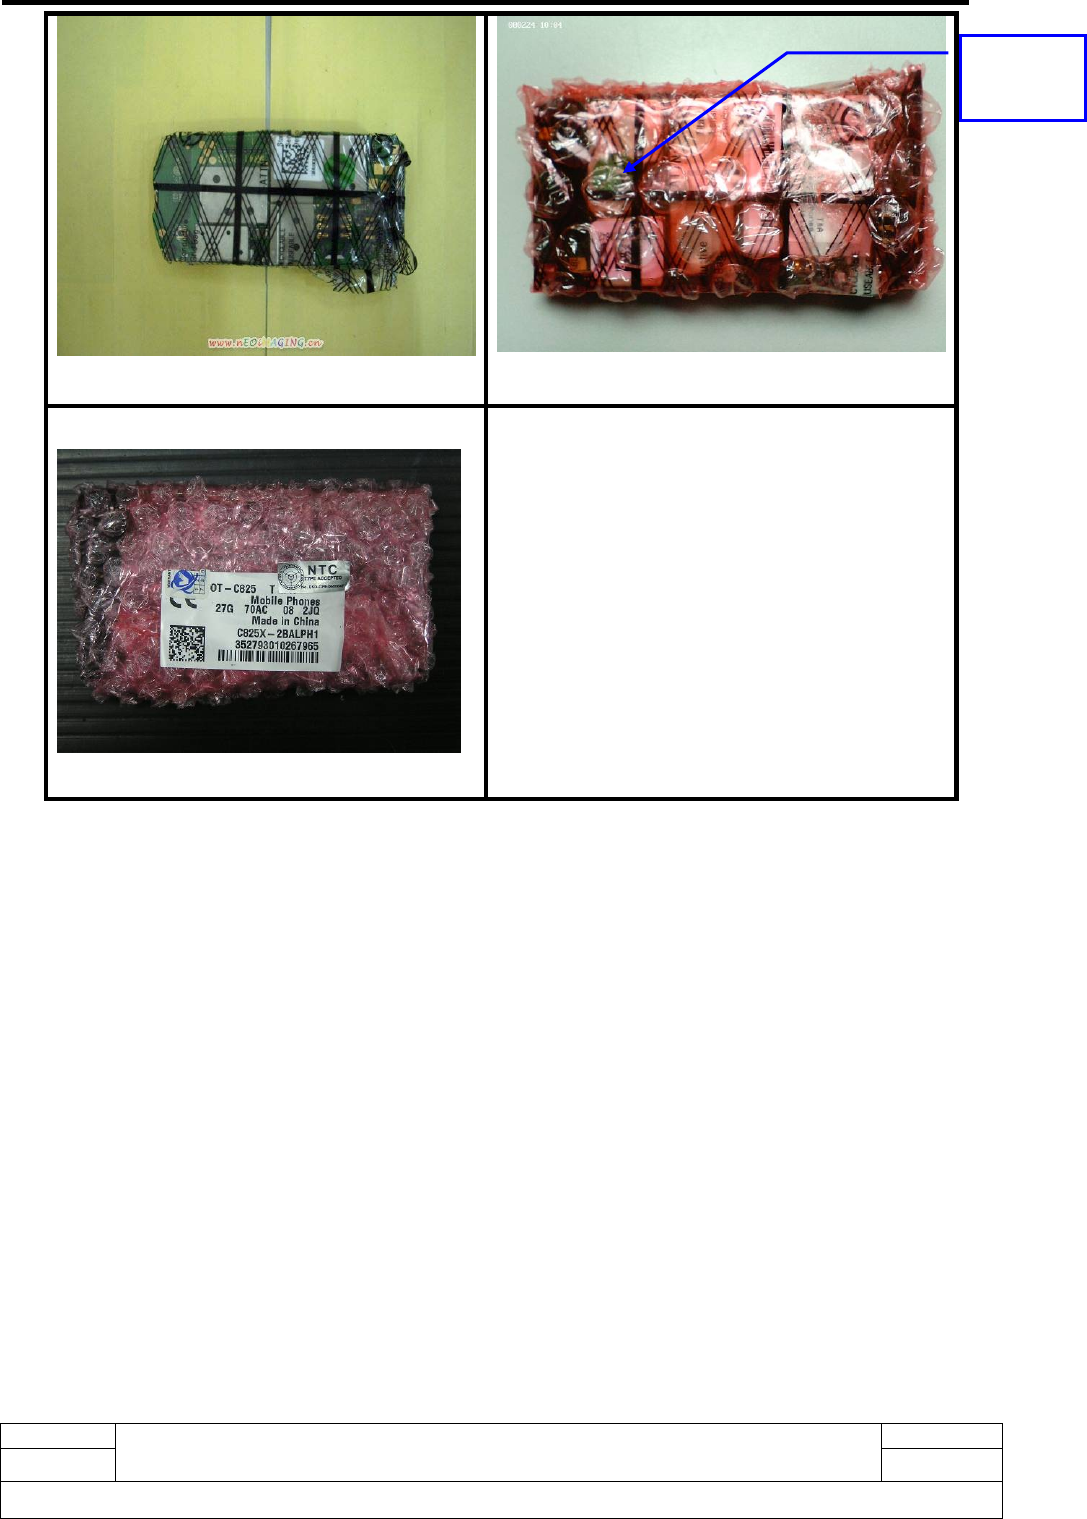
2) PCBA Packing Requirements
i. After packing with anti-vibration bag, the commercial label on PCBA should be easy to
identify.
Network code
Commercial
label
Custom label
Network code
Failure code
label
Custom label
Commercial
code
Failure code
label
By NCK Team
L2 Repair Document TCT Mobile Limited
Rev. MTAG351 Level 2 Repair Document Page
1.0 25/26
All rights reserved. Transfer, copy, use or communication of this file is prohibited without authorization.
Inner packing is anti-static bag Outer packing is anti-vibration bag
Put commercial label on anti-vibration bag
3) Packing Requirement
Note: Please pay attention to the following points when different models put into one box. Stick up
the same models with tapes.
i. Mark the model, quantity and specification of custom label on tape.
ii. The packing box for PCBA should have marking sticker and well sealed by the tape with TCL
logo
iii. Finally put all the packing boxes into packing cases strong enough and post to HK.
Custom
label is
easy to see
