Pdf Ghr200 Quick Install Guide HR200_QR_Guide_9901357_RevA_0703_PRINT User Manual G HR200
2017-06-28
User Manual: Manual Pdf Ghr200 Quick-Install-Guide pdf_gHR200_quick-install-guide gHR200 products
Open the PDF directly: View PDF ![]() .
.
Page Count: 3

HR200
Quick Reference Guide
Job: Universal Quick Reference Guide
Size: 15” wide x 10” high - INCHES
07/03/2014 -> PRINT PDF
Universal - Quick Reference ‘Guide’ (ELAN, Niles & SpeakerCraft)
HR200 Handheld Remote
2 pages - 1/1 - black - Format: 15” wide x 10” high
Final print pdf
English only
07/03/2014 - TH
Questions?
Juergen 707 - 778 - 5826
P/N 9901357 REV. A 06/2014
PRINTER’S INSTRUCTIONS:
INK: only 1-color black
NO. of PAGES: 2
MATERIAL: 90G paper - or simliar specified
FINISHED SIZE: 15.0 x 10.0 inches
SCALE: 1:1
Must be RoHS Compliant
ARTWORK ON PAGE 2 of PDF
Folding-Method:
Folded size:
5” x 10”
Open:
15” x 10”
No bleed
5 5 5
10
Guide
on top on bottom
Card
+
HR200 Handheld Remote Control
Touchscreen
Simply touch an icon to
navigate menus, control
source components and
more. Lets you see
real-time status of
Now Playing and your
lighting, climate and
security systems.
Soft Buttons
These buttons cor-
respond to labels shown
at the bottom of the
touchscreen. Functions
vary depending on device
or menu selected.
Rooms
When placed on the
charging cradle the HR200
is switched to control the
primary room. To change
rooms press this button
and select a new room.
Media
Press to choose a source
or return to the currently
playing source.
Press to go to Main Menu
EVERYTHING ELSE IS JUST A REMOTE.
Congratulations! You are now the proud owner of the HR200
handheld remote control. The most convenient way
to control your home and media systems.
Zone Power
Tap to turn current
room off, press and hold
to turn all rooms off.
Navigation
Use these buttons for
navigating your TV, DVD,
cable or satellite box, etc.
Transport Buttons
For use with DVD, CD, MP3,
SAT, DVR, Cable, etc.
Numeric Buttons
P/N 990000 REV A
© 2014 Core Brands, LLC, a Nortek company.
CoreBrands.com
PLEASE NOTE:
Use of the HR200 remote
will vary depending
on the configuration
of your system.
HR200
Quick Reference Guide
HR200_QR_Guide_9901357_RevA_0703_PRINT.indd 1 7/3/14 2:09 PM
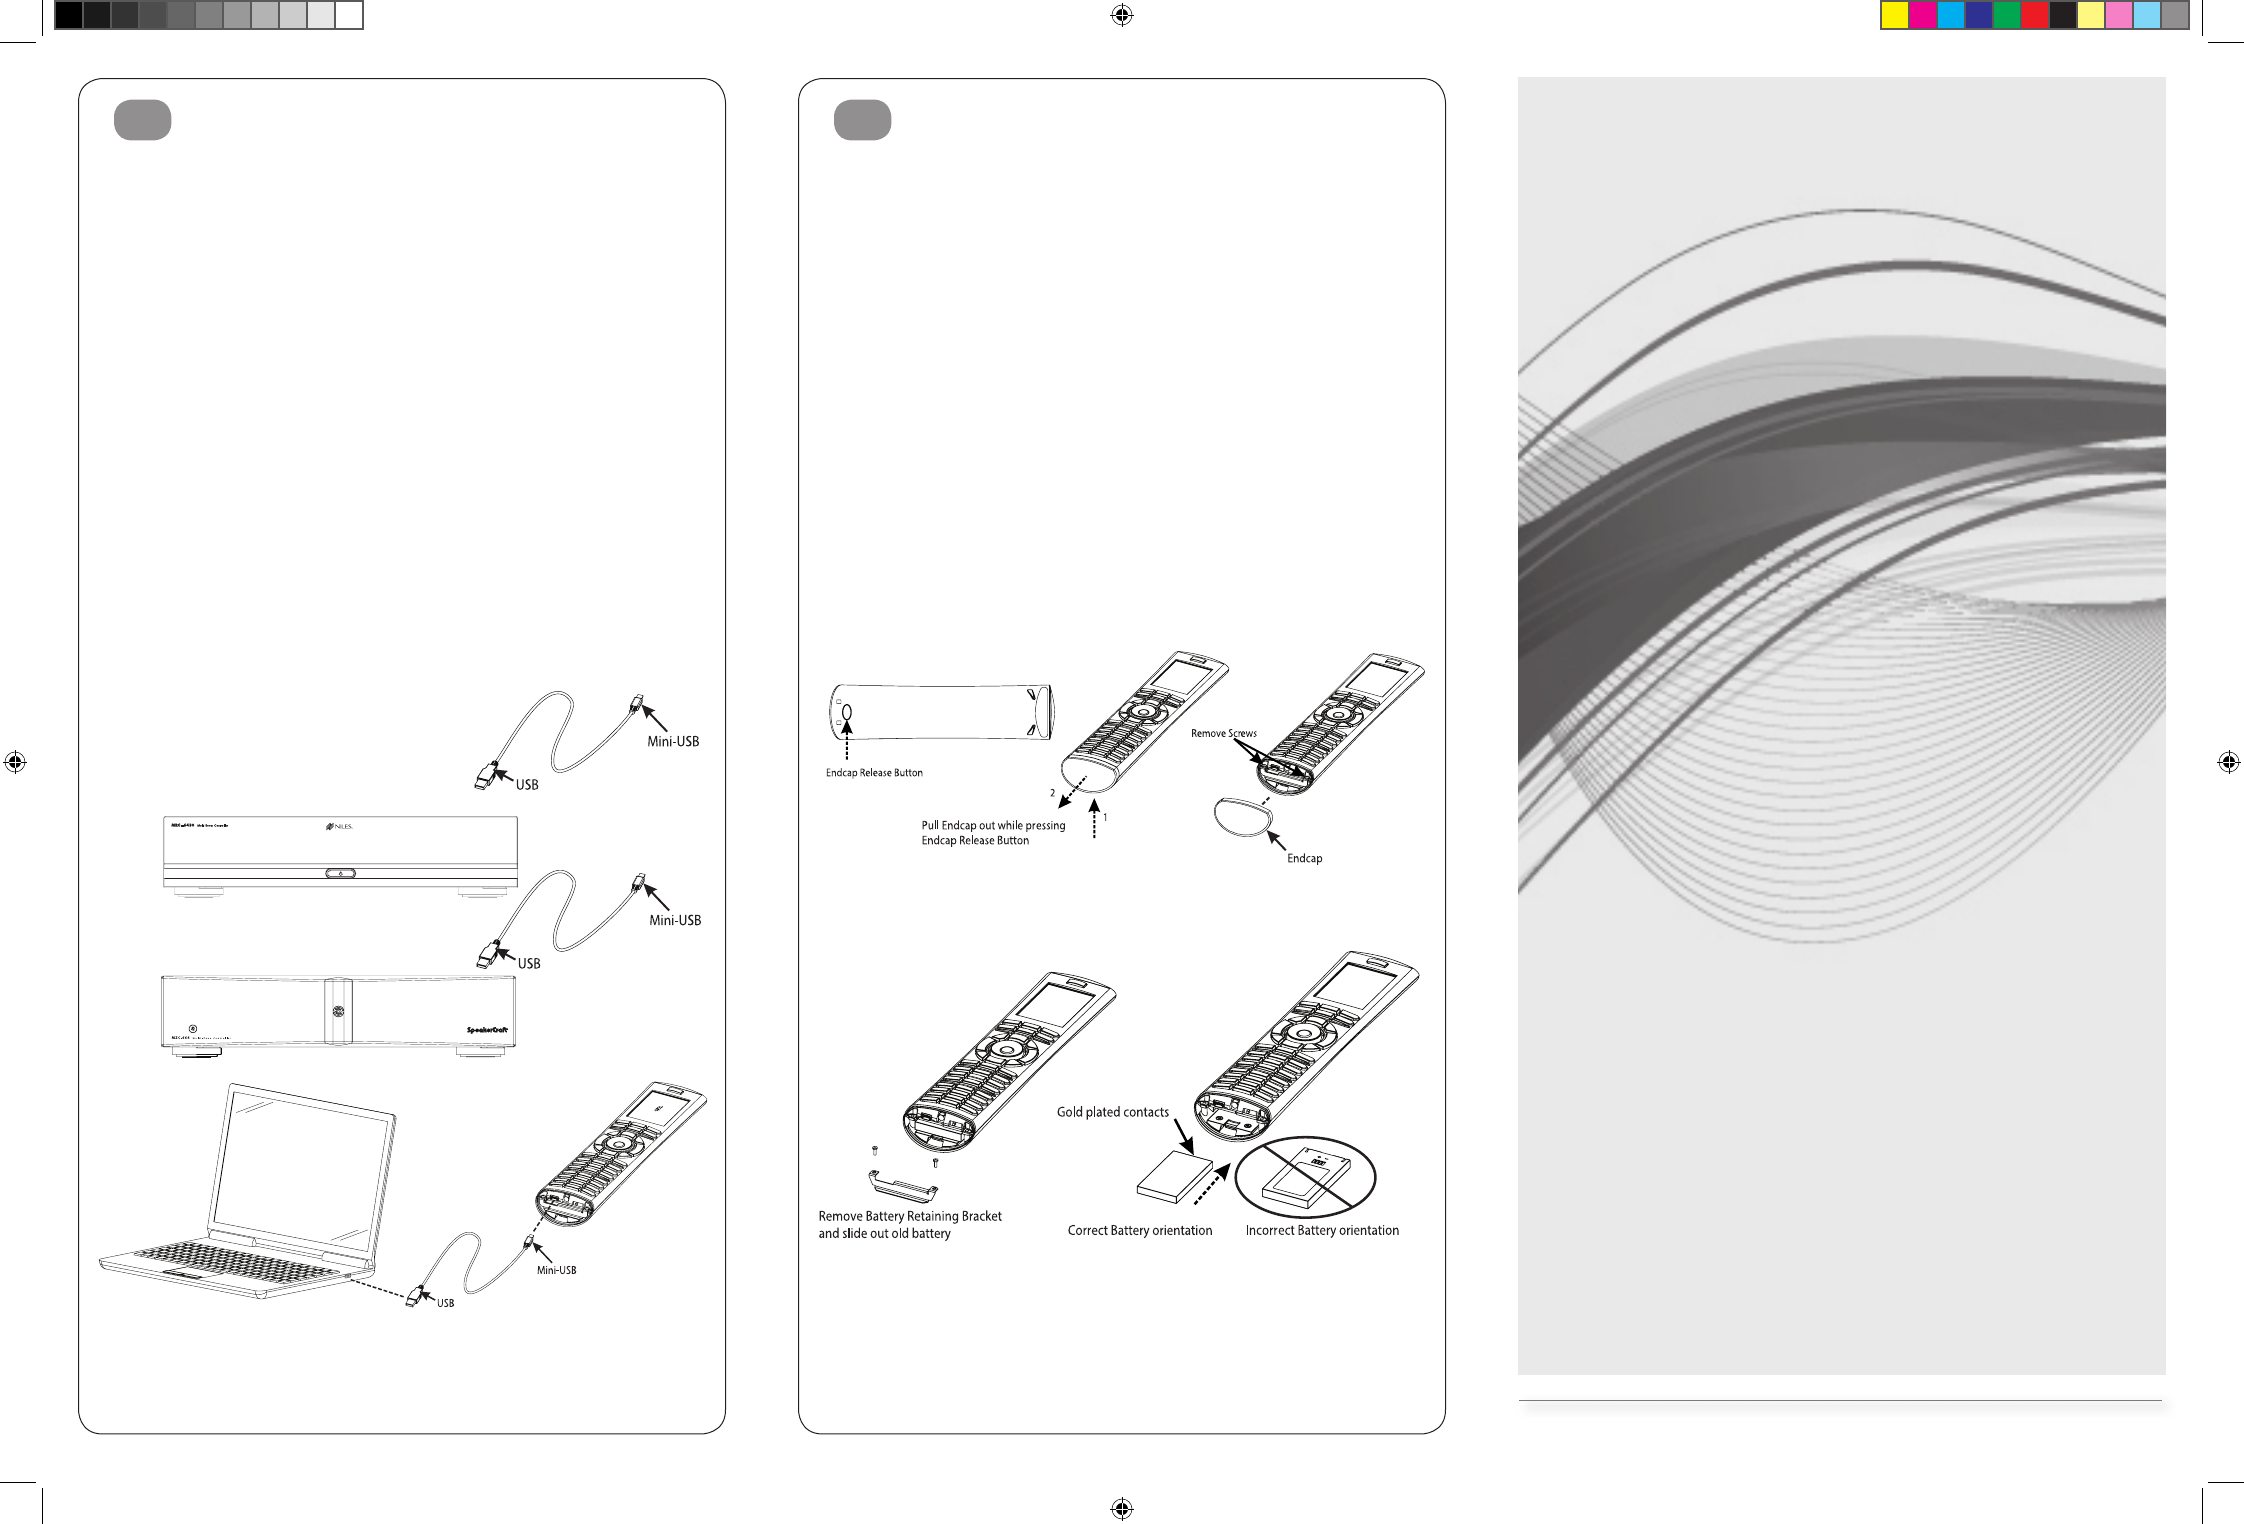
Remote Confi guring
After charging the remote fully, proceed with the setup
by following these steps:
1) Remove endcap and slide the power switch right to the “off” position.
2) Plug in the provided mini-USB cable to the remote USB port located on
the left side behind the endcap (see figure one for location).
3) Plug the other end of the USB cable into a computer or chassis
with compatible software already installed and running.
4) Slide the power switch left to the “on” position.
5) Enter the password requested on the HR200 screen using
the following numeric buttons in this sequence: 3526 enter.
6) You are now ready to proceed with configuration.
Please refer to the HR200 integration note or your System Training Guide
for more details.
Removal and Replacement of the battery
1) To access the battery locate the Endcap Release Button on the bottom of
the remote. While depressing the Endcap release button pull the Endcap away
from the body of the remote as illustrated.
2) Remove the two screws holding the Battery Retaining Bracket in place
using a #1 Phillips Screwdriver. Slide out the old battery.
3) CAUTION: Danger of explosion if battery is incorrectly replaced.
Replace battery with only Core Brands approved battery part number 2900008.
(Contact your local dealer for replacement battery.)
4) Assure proper orientation while inserting replacement battery.
Battery label should be faced down and gold plated charging contacts
should enter the unit first. Refer to the illustration above. Improper installation
of the battery will result in permanent damage to the remote.
HR200
Quick Reference Guide
English
© 2014 Core Brands, LLC, aNortek company. P/N 9901357 Rev. A 07/2014
3 4
on rear
on rear
HR200_QR_Guide_9901357_RevA_0703_PRINT.indd 2 7/3/14 2:09 PM
HR200 Quick Reference Guide
The HR200 allows users to enjoy wireless control of their system from
any zone in the house. A few simple steps are required prior to using
your new HR200 remote control.
You will need the following items which are included in the HR200 kit:
A. Remote
B. Charging Station
C. USB to Mini-USB Cable
D. 16VDC @ 1.5A Power Supply (2.1mm tip Positive)
Required items not included in HR200 kit:
System Controller with compatible software.
Optional items purchased separately:
2900008 – Additional Battery
HR2CS – Additional Charging Station
Please note:
The HR200 requires a controller running with compatible software.
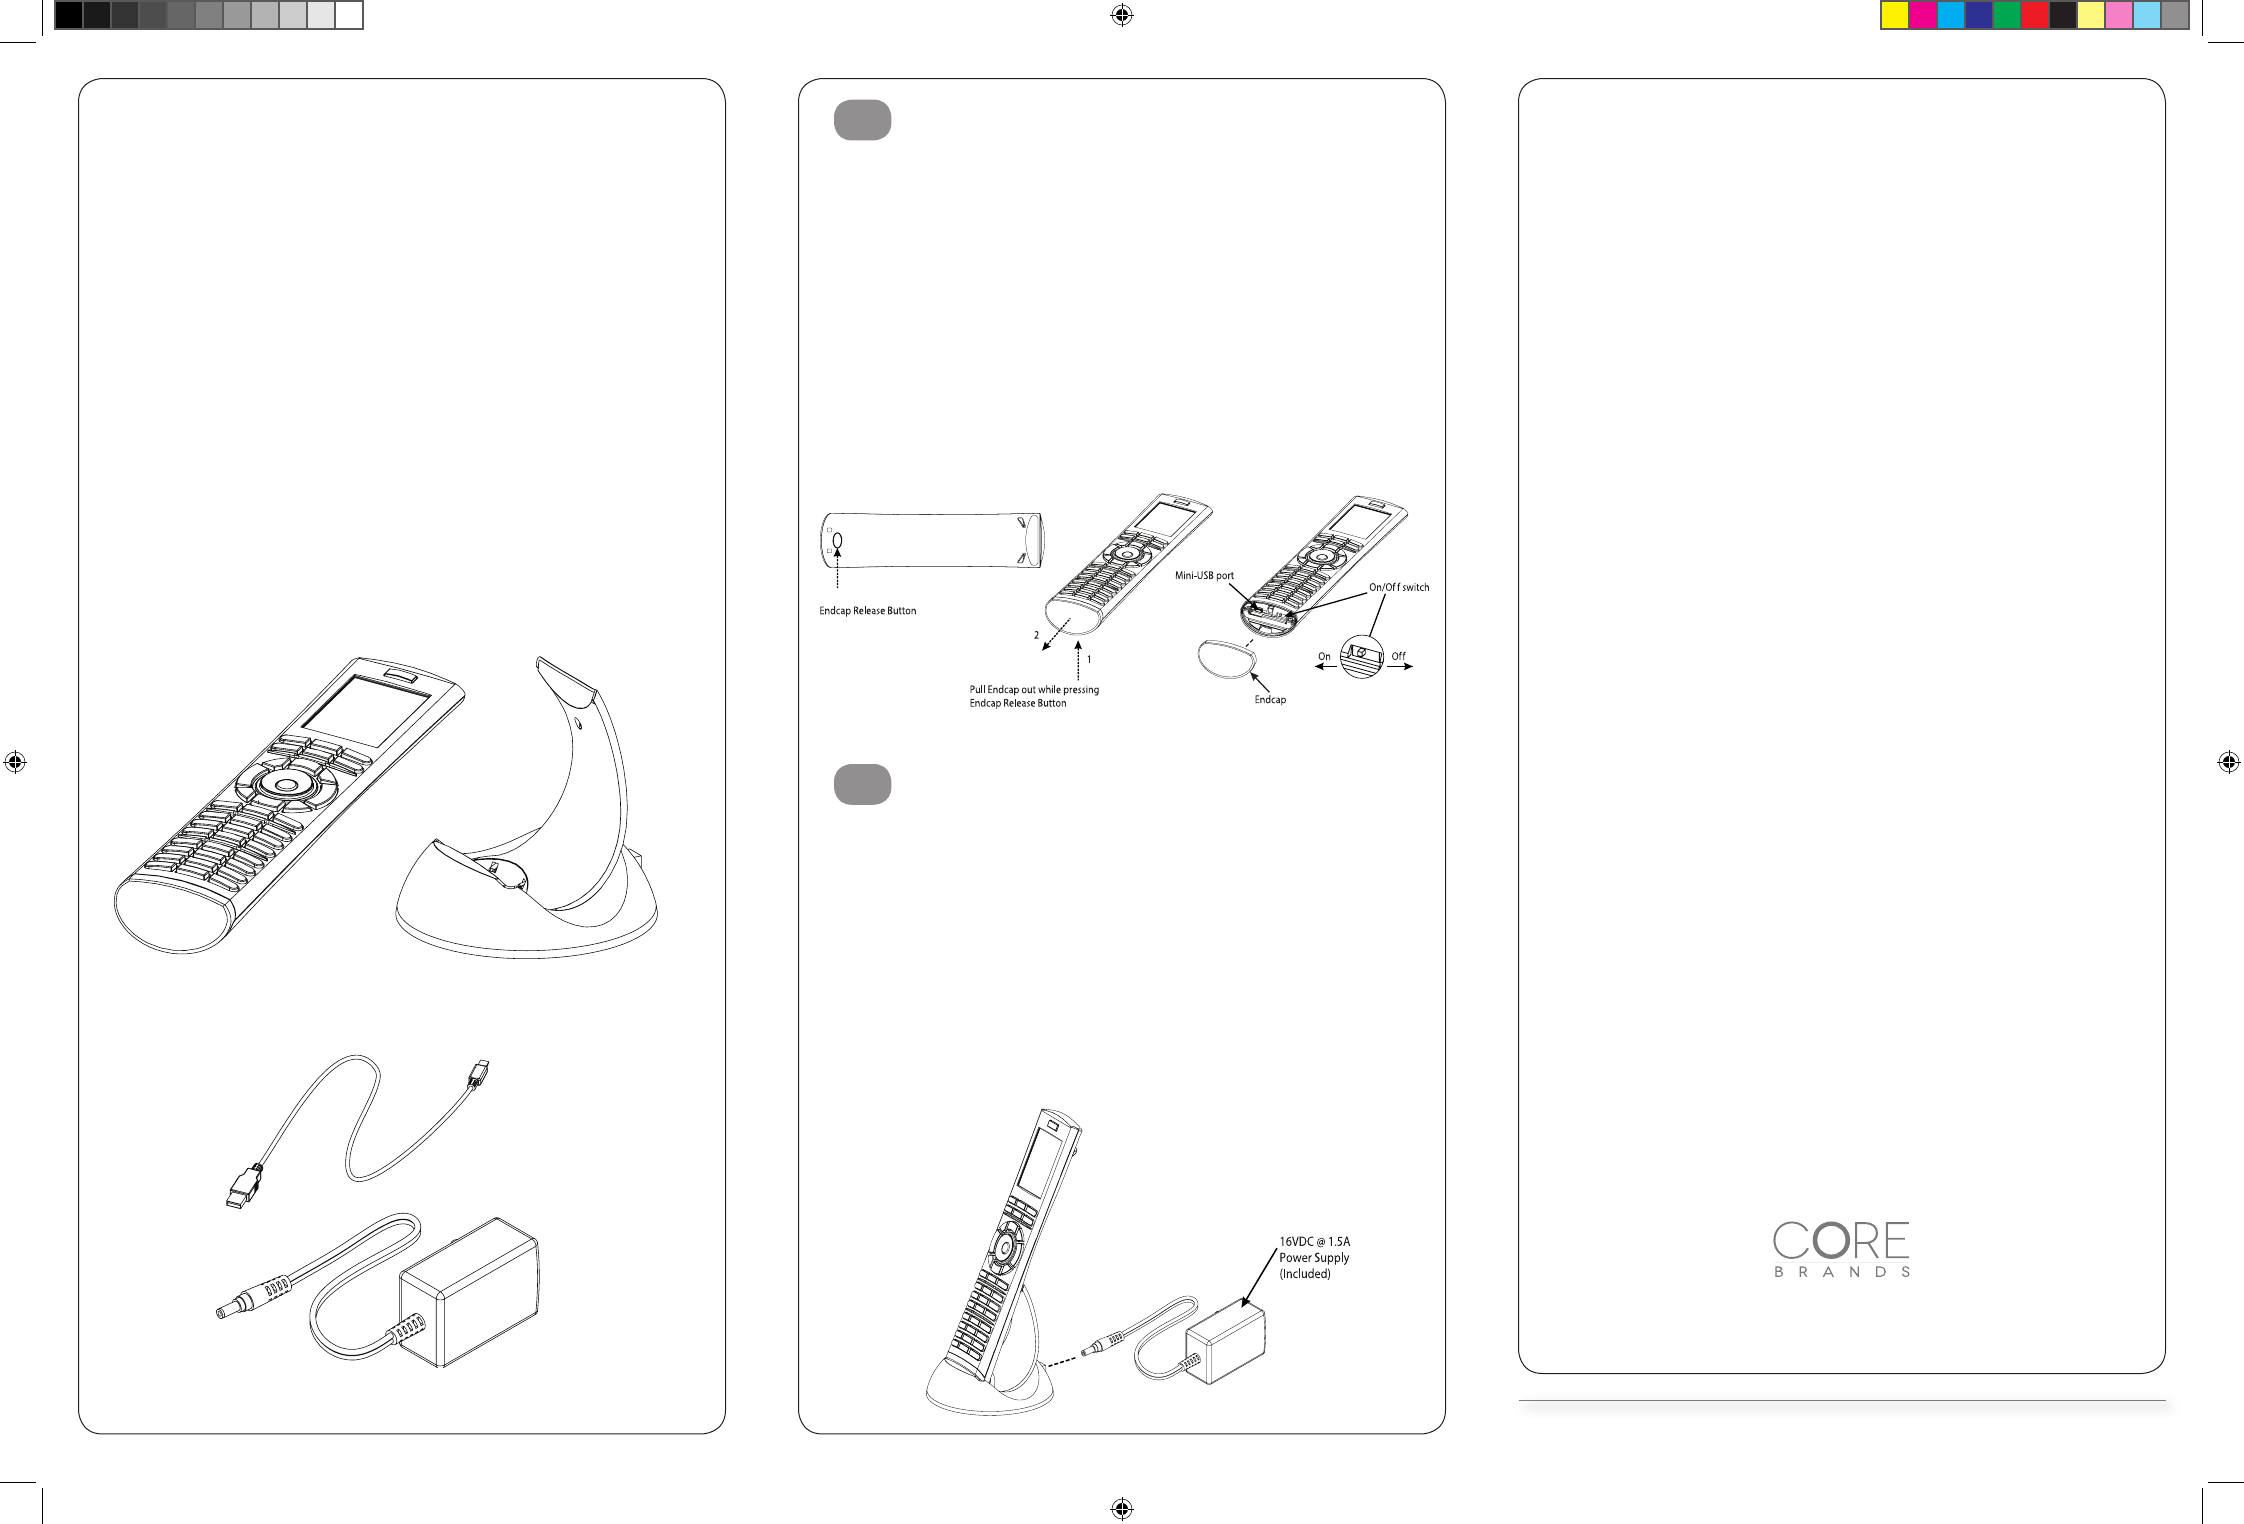
Accessing the Mini-USB Programming Port, IR Receiver, and On/Off Switch
The HR200 is shipped with the power switch in the “off” position to conserve
battery life. Prior to setup the endcap must be removed and the power switch
must be changed to the “on” position. To access the power switch locate the
Endcap Release Button on the bottom of the remote.
While depressing the endcap release button pull the endcap away from the body
of the remote as illustrated. Move the On/Off power switch located on the
right side to the “on” position. (For extended periods of non-use it is
recommended to turn the remote off with this switch to conserve the battery life.)
Note the location of the Mini-USB port and IR Receiver. Replace endcap and
follow the charging instructions below.
Limited Warranty
Core Brands, LLC ( ‘CB’ ) warrants the HR200 to be free from defects in
materials and workmanship for the period of two years (2 years) from the
date of purchase. If within the applicable warranty period above purchaser
discovers that such item was not as warranted above and promptly notifies
‘CB’ in writing, ‘CB’ shall repair or replace the item at the company’s option.
This warranty shall not apply (a) to equipment not manufactured by ‘CB’,
(b) to equipment which shall have been installed by other than an ‘CB’ authorized
installer, (c) to installed equipment which is not installed to ‘CB’s’ specifications,
(d) to equipment which shall have been repaired or altered by others than ‘CB’,
(e) to equipment which shall have been subjected to negligence, accident,
or damage by circumstances beyond ‘CB’s’ control, including, but not limited to,
lightning, flood, electrical surge, tornado, earthquake, or other catastrophic
events beyond ‘CB’s’ control, or to improper operation, maintenance or storage,
or to other than normal use of service. With respect to equipment sold by,
but not manufactured by ‘CB’, the warranty obligations of ‘CB’ shall in all
respects conform to the warranty actually extended to ‘CB’ by its supplier.
The foregoing warranties do not cover reimbursement for labor, transportation,
removal, installation or other expenses which may be incurred in connection
with repair or replacement.
Except as may be expressly provided and authorized in writing by ‘CB’,
‘CB’ shall not be subject to any other obligations or liabilities whatsoever with
respect to equipment manufactured by ‘CB’ or services rendered by ‘CB’.
THE FOREGOING WARRANTIES ARE EXCLUSIVE AND IN LIEU OF ALL OTHER
EXPRESSED AND IMPLIED WARRANTIES EXCEPT WARRANTIES OF TITLE,
INCLUDING BUT NOT LIMITED TO IMPLIED WARRANTIES OF MERCHANTABILITY
AND FITNESS FOR A PARTICULAR PURPOSE.
ATTENTION: TO OUR VALUED CUSTOMERS
To ensure that customers obtain quality pre-sale and after-sale support and
service, Core Brands products are sold exclusively through authorized dealers.
Core Brands products are not sold online. The warranties on Core Brands
products are NOT VALID if the products have been purchased from an
unauthorized dealer or an online E-tailer.
To determine if your Core Brands reseller is authorized,
please call Core Brands, LLC at (707) 283-5900.
Charging the Remote
Before configuring, the HR200 must be fully charged.
Charge the remote in the included charging cradle
for at least 2 hours prior to setup.
To charge, place the remote in the charging cradle and connect the included
power supply to the back of the charging cradle and wall outlet. The remote display
may light up briefly while beginning to charge. It is recommended to place
the remote in the charging cradle when not in use.
A B
C
D
© 2014 Core Brands, LLC, aNortek company. All rights reserved.
CoreBrands.com
1
2
HR200_QR_Guide_9901357_RevA_0703_PRINT.indd 3 7/3/14 2:09 PM
