Marelli Europe S p A FWSHU11 CAR Radio with Bluetooth Transceiver User Manual
Magneti Marelli S.p.A. CAR Radio with Bluetooth Transceiver
User Manual


Page 1 – February 5, 2009 Edition
www.fordworksolutions.com / 1.800.624.2726 / fordtechhelp@hunt-radio.com
© 2009 Ford Motor Company and Magneti Marelli.
All rights reserved.
The information in this manual is subject to change without notice and
does not represent a commitment on the part of Magneti Marelli or
Ford Motor Company.
FORD MOTOR COMPANY, MAGNETI MARELLI AND THEIR
AFFILIATES SPECIFICALLY DISCLAIM LIABILITY FOR ANY AND
ALL DIRECT, INDIRECT, SPECIAL, GENERAL, INCIDENTAL,
CONSEQUENTIAL, PUNITIVE OR EXEMPLARY DAMAGES
INCLUDING, BUT NOT LIMITED TO, LOSS OF PROFITS OR
REVENUE, OR ANTICIPATED LOSS OF PROFITS OR REVENUE,
ARISING OUT OF THE USE OR INABILITY TO USE ANY MAGNETI
MARELLI PRODUCT, EVEN IF MAGNETI MARELLI AND/OR ITS
AFFILIATES HAVE BEEN ADVISED OF THE POSSIBILITY OF
SUCH DAMAGES OR THEY ARE FORESEEABLE FOR CLAIMS BY
ANY THIRD PARTY.
Notwithstanding the foregoing, in no event shall Magneti Marelli
and/or its affiliates aggregate liability arising under, or in connection
with, the Magneti Marelli product, regardless of the number of events,
occurrences or claims giving rise to liability, in excess of the price paid
by the purchaser for the Magneti Marelli product.

Page 2 – February 5, 2009 Edition
www.fordworksolutions.com / 1.800.624.2726 / fordtechhelp@hunt-radio.com
Table of Contents
Copyright . . . . . . . . . . . . . . . . . 1
Limitation of Liability . . . . . . . . 1
Preface
Manual Conventions and
Definitions . . . . . . . . . . . . . . 4
Warranty and Service . . . . . 5
Warnings and Notices . . . . . 7
General . . . . . . . . . . . . . . 7
Safety . . . . . . . . . . . . . . . 7
Caring for Your In-Dash
Computer . . . . . . . . . . . . 8
Usage Limitations . . . . . . 9
Laser Safety . . . . . . . . . . 9
FCC Notice . . . . . . . . . . 10
Getting Started
Overview . . . . . . . . . . . . . . 11
Getting to Know Your
Computer . . . . . . . . . . . . . . 12
Buttons – Hard and Soft
Buttons . . . . . . . . . . . . . . 12
Basic Operation . . . . . . . 13
Voice Commands . . . . . . 15
Operation Prerequisites . 15
Avoiding Distraction . . . . 16
Peripherals & Accessories . 17
Bluetooth
®
Keyboard . . . 17
On-Screen Keyboard . . . 17
Bluetooth
®
Printer . . . . . 18
Tutorials and How-To Guides
Phone Mode . . . . . . . . . . . . 19
Making and Receiving
Phone Calls . . . . . . . . . . 20
Phone Mode (Cont’d)
Phone Book . . . . . . . . . . 21
Call History . . . . . . . . . . 22
Text Messaging . . . . . . . 23
Voice Commands . . . . . 26
Media Mode . . . . . . . . . . . . 29
Radio . . . . . . . . . . . . . . . 29
CD Player . . . . . . . . . . . 31
Line In . . . . . . . . . . . . . . 32
Voice Commands . . . . . 33
Navigation Mode . . . . . . . . 34
Voice Commands . . . . . 35
Application Mode . . . . . . . . 36
Internet Browser . . . . . . 37
Setting and Accessing
Internet Favorites . . . 37
Picture Viewer . . . . . . 38
Word Processor . . . . . . 39
Spreadsheet Program . . 39
E-mail . . . . . . . . . . . . . . 40
Presentation Viewer . . . 40
PDF Reader . . . . . . . . . 41
File Manager . . . . . . . . . 41
Backing Up Files to
External USB Drive . . 42
Calculator . . . . . . . . . . . 43
Calendar . . . . . . . . . . . . 43
Tool Link . . . . . . . . . . . . 43
LogMeIn
®
. . . . . . . . . . . . 43
Voice Commands . . . . . 44

Page 3 – February 5, 2009 Edition
www.fordworksolutions.com / 1.800.624.2726 / fordtechhelp@hunt-radio.com
Settings
Audio Settings . . . . . . . . . . 45
Display Settings . . . . . . . . . 46
Home Screen Image . . . 46
Bluetooth
®
Settings . . . . . . 48
Pairing a Phone/Device . 48
Bluetooth
®
Properties . . 49
Reconnecting a Phone
or Device . . . . . . . . . . . . 50
Deleting Phone/Device . 51
Setting a Favorite . . . . . 51
Downloading Your
Phone Book . . . . . . . . . . 51
System Settings . . . . . . . . . 52
Voice/Nav Volume . . . . . 52
Navigation Prompts . . . . 52
Voice Recognition
Confirmation . . . . . . . . . 52
Units . . . . . . . . . . . . . . . 53
Calibrate Touch Panel . . 53
Sprint
®
Connection
Manager . . . . . . . . . . . . 54
Restore Factory
Settings . . . . . . . . . . . . . 54
Delete Stored Items . . . . 54
About Your Computer . . 54
Clock . . . . . . . . . . . . . . . 54
Voice Commands . . . . . 55
Troubleshooting
Resetting Your Computer . 56
Frequently Asked
Questions . . . . . . . . . . . . . 56
Contacting Magneti Marelli 58
Index

Page 4 – February 5, 2009 Edition
www.fordworksolutions.com / 1.800.624.2726 / fordtechhelp@hunt-radio.com
Preface
Manual Conventions
The following icons will be used throughout this manual to call out key
points:
NOTE: Indicates important information that will help you
make better use of your in-dash computer.
NOTICE: Indicates ways to avoid potential damage to
hardware or loss of data.
CAUTION: Indicates actions that may cause personal injury
or fatality.
The following terminology will be referenced throughout this manual:
FWS Ford Work Solutions
PTT Push-to-Talk (referenced as “Voice” throughout)
SD Memory Secure Digital Memory Card
USB Universal Serial Bus
BT Bluetooth
®
RFID Radio Frequency Identification
RDS Radio Data System
MP3 MPEG Audio Layer 3 compressed audio file
WMA Windows Media Application compressed file
WAV Waveform Audio Format uncompressed audio file

Page 5 – February 5, 2009 Edition
www.fordworksolutions.com / 1.800.624.2726 / fordtechhelp@hunt-radio.com
Warranty and Service
Warranty
MAGNETI MARELLI is dedicated to quality craftsmanship and is pleased to
offer this Warranty. We suggest that you read it thoroughly. Should you have
any questions, please contact your Ford Dealer.
Products Covered
This Warranty covers the Ford Work Solutions Computer (“the product”).
Products purchased in Canada are covered only in Canada. Products
purchased in the U.S.A. are covered only in the U.S.A.
Length of Warranty
The warranty on the product coincides with the vehicle manufacturer's
warranty. If the product is installed in the vehicle at the time of delivery, this
Warranty is in effect for a period of 3 years/36,000 miles from the date of the
purchase of the vehicle. If the product is purchased and installed at the
dealer on a 2008 or prior model year vehicle, the warranty period is 12
months/12,000 miles from the date of purchase of the product.
Who is Covered
This Warranty only covers the product in the vehicle in which it was
originally installed, as long as the vehicle resides in the United States,
Puerto Rico or Canada. The unit must have been installed in the vehicle
when delivered or installed by a Ford, Lincoln or Mercury dealer.
What is Covered
This Warranty covers defects in materials or workmanship (parts and labor)
in the product, software applications loaded on the product from date of
purchase.
What is Not Covered
This Warranty does not cover the following:
Damage occurring during shipment of the product to Magneti Marelli for
repair (claims must be presented to the carrier).
Damage caused by accident or abuse, including burned voice coils
caused by over-driving the speaker (amplifier level is turned up and driven
into distortion or clipping). Speaker mechanical failure (e.g. punctures,
tears or rips). Cracked or damaged LCD panels. Dropped or damaged
drives.
Damage caused by negligence, misuse, improper operation or failure to
follow instructions contained in the Owner’s manual.
Damage caused by act of God, including without limitation, earthquake,
fire, flood, storms or other acts of nature. Any cost or expense related to
the removal or reinstallation of the product.
Service performed by an unauthorized person, company or association.

Page 6 – February 5, 2009 Edition
www.fordworksolutions.com / 1.800.624.2726 / fordtechhelp@hunt-radio.com
Any product which has the serial number defaced, altered or removed.
Any product which has been adjusted, altered or modified without Magneti
Marelli’s written consent.
Any product not distributed by Magneti Marelli within the United States,
Puerto Rico or Canada.
Any product not purchased from a Ford Dealer.
Any product with added software applications not approved by Ford or
Magneti Marelli.
Any product that has had aftermarket amplifiers or audio/video equipment
added to the system.
How to Obtain Warranty Service
You are responsible for delivery of the product in its original condition to
an Authorized Ford Service Center. Magneti Marelli will, at its option,
repair or replace the product with a new or reconditioned product without
charge, if the repairs are covered by the warranty
You should provide a detailed description of the problem(s) for which
service is required.
How We Limit Implied Warranties
Any implied warranties including fitness for use and merchantability are
limited in duration to the period of the express warranty set forth above and
no person is authorized to assume for Magneti Marelli any other liability in
connection with the sale of the product.
How We Exclude Certain Damages
Magneti Marelli expressly disclaims liability for incidental and consequential
damages caused by the product. The term “incidental damages” refers to
expenses of transporting the product to the Ford Service Center, loss of the
original purchaser’s time, loss of the use of the product, bus fares, car
rentals or other costs relating to the care and custody of the product. The
term “consequential damages” refers to the cost of repairing or replacing
other property which is damaged when this product does not work properly.
The remedies provided under this warranty are exclusive and in lieu of all
others.
How State/Provincial Law Relates to the Warranty
This Warranty gives you specific legal rights, and you may also have other
rights which vary from state to state and province to province. Please check
with your state or province for any specific laws related to warranty, specific
or implied.
How to Contact Customer Service
Should the product require service, please contact a Ford, Lincoln or
Mercury Dealer. To locate a dealer in your area, visit www.fordvehicles.com.
For questions about system operation call 1-800-624-2726.
Page 7 – February 5, 2009 Edition
www.fordworksolutions.com / 1.800.624.2726 / fordtechhelp@hunt-radio.com
Service
If your in-dash computer is not working properly, please reference the
Troubleshooting section of this manual. If the problem persists, visit your
nearest Ford, Lincoln or Mercury dealer to obtain service.
In the event your vehicle requires service, be sure to back up
any files on your system to an external USB drive. For more
information on how to back up your files, see the File
Manager section of this manual (page 41).
Warnings and Notices
General Notices
Due to the nature of wireless communications, the
transmission and reception of data cannot be guaranteed.
Data may be delayed, corrupted or totally lost.
In the event of damage to the in-dash computer, data may be
lost. It is the user’s responsibility to backup data to an
external memory source via USB drive.
The only programs certified by Ford to work on your in-dash
computer are those programs installed at the factory.
Installing new programs on your computer may void the
warranty and/or cause reduced performance or data loss.
In the case of extreme temperature conditions, the Liquid
Crystal Display (LCD) may require longer response times
upon startup. Response time will vary based on how quickly
the vehicle warms up or cools down.
Safety Warnings
Reference the following safety guidelines to help protect yourself, your
device, and your working environment from harm.
Use care when operating this device while the vehicle is in
motion. Certain computer modes may function while the
vehicle is moving, but you are responsible for your own safety
and that of pedestrians, passengers and other drivers.
Always obey traffic regulations.

Page 8 – February 5, 2009 Edition
www.fordworksolutions.com / 1.800.624.2726 / fordtechhelp@hunt-radio.com
Map data and/or route guidance may be incomplete or
inaccurate under certain environmental conditions or in
certain geographical areas. Use common sense and obey
posted traffic signs when following navigational instructions.
If the LCD screen on your in-dash computer should become
cracked or damaged, do not touch it. The liquid contained in
the screen can be harmful or fatal. If you come in contact with
the liquid, go to the nearest emergency room for treatment.
Caring for Your In-Dash Computer
To ensure the lasting performance of your in-dash computer, abide by the
care and usage guidelines outlined below.
Do not use solvents, abrasive cleaners, detergents or
household cleaning agents to clean the computer, as they
may damage the LCD screen and other computer surfaces.
To clean the unit, use a clean, soft cloth that has been slightly
moistened with water.
Keep fluids of all kinds away from the device. Liquids may
cause corrosion or damage to computer components.
Do not insert fingers, writing utensils or any other foreign
objects into the CD, USB or SD slots. These openings
contain sensitive electrical connections that can be easily be
damaged by foreign objects. Use care when inserting CD,
USB or SD media.
Use only your fingertip or the included stylus to touch the
LCD screen. Touching the screen with excessive force and/or
foreign objects may damage the screen or reduce its
effectiveness.
Do not attempt to service the system yourself. Only a trained
service technician should do so.

Page 9 – February 5, 2009 Edition
www.fordworksolutions.com / 1.800.624.2726 / fordtechhelp@hunt-radio.com
Usage Limitations
Signal strength, data transfer speed and navigation
performance may be compromised if the system’s view of the
sky is obscured.
An active Sprint® Mobile Broadband contract and connection
is required in order to access the Internet, use text messaging
via the in-dash computer’s dedicated phone number, and
access your remote PC using the LogMeIn® system.
An active LogMeIn® contract is required in order to access
your office PC using the LogMeIn® application.
An active Crew Chief™ contract is required in order to utilize
the Crew Chief™ system.
A Bluetooth® compatible phone must be connected to the
system in order to activate and use the handsfree phone
feature.
Not all Bluetooth® phones are compatible with the FWS in-
dash computer system. See www.FordWorkSolutions.com for
a list of compatible phones.
Laser Safety Notice
This system complies with all appropriate safety standards, including IEC 60825-1. The
laser device in this system is classified as a “Class 1 Laser Product” under the US
Department of Health and Human Services (DHHS) Radiation Performance Standard.
The unit should only be serviced by a trained service technician at a Ford dealership.
Controls, adjustments or procedures other than those
specified in this manual may result in hazardous radiation
exposure. To prevent exposure to laser beams, do not
attempt to open the CD enclosure or service the unit yourself.
Class 1M laser radiation when operating part is open. Do not
view directly with optical instruments.
Class 3B invisible laser radiation when open. Avoid exposure
to the beam.

Page 10 – February 5, 2009 Edition
www.fordworksolutions.com / 1.800.624.2726 / fordtechhelp@hunt-radio.com
FCC Notice
THIS DEVICE COMPLIES WITH PART 15 OF THE FCC REGULATIONS.
OPERATION IS SUBJECT TO THE FOLLOWING TWO CONDITIONS: (1) THIS
DEVICE MAY NOT CAUSE HARMFUL INTERFERENCE, AND (2) THIS DEVICE
MUST ACCEPT ANY INTERFERENCE RECEIVED, INCLUDING INTERFERENCE
THAT MAY CAUSE UNDESIRED OPERATION.
The design on the modem that comes with the computer system complies with U.S.
Federal Communications Commission (FCC) and Industry Canada (IC) guidelines with
respect to safety levels or radio frequency (RF) exposure for portable devices, which in
turn are consistent with the following safety standards previously set by Canadian, U.S.
and international standard bodies:
ANSI/IEEE C95.1-1999, IEEE Standards for Safety Levels with Respect to Human
Exposure to Radio Frequency Electromagnetic Fields, 3kHz to 200GHz
National Council on Radiation Protection and Measurements (NCRP) Report 86,
1986, Biological Effects and Exposure Criteria for Radio Frequency Electromagnetic
Fields
Health Canada, Safety Code 6, 1999, Limits of Human Exposure to Radio
Frequency Electromagnetic Fields in the Frequency Range from 3kHz to 200GHz
International Commission on Non-Ionizing Radiation Protection (ICNIRP) 1998,
Guidelines for Limiting Exposure to Time-Varying Electric, Magnetic, and
Electromagnetic Fields (up to 300GHz)
FCC ID: RX2FWSHU11 IC: 4983A-FWSHU11
WARNING (EMI) – United States FCC Information – This equipment has been tested
and found to comply with the limits for a Class B computing device peripheral, pursuant
to Part 15, 22 and 24 of the FCC rules. These limits are designed to provide
reasonable protection against harmful interference in a residential installation.
This equipment generates, uses and can radiate radio frequency energy and, if not
installed and used in accordance with the instructions, may cause interference to radio
communications. However, there is no guarantee that interference will not occur in a
particular installation.
If this equipment does cause harmful interference to radio or television reception, which
can be determined by turning the equipment off and on, the user is encouraged to try to
correct the interference by contacting or consulting with his/her dealer.
The device complies with Part 15 of the FCC rules. Operation is subject to the condition
that this device does not cause harmful interference.
CAUTION: Any changes or modifications to the wireless transmitter not expressly
approved by Sierra Wireless could void the user’s authority to operate the equipment.
WARNING (EMI) – Canada – This digital apparatus does not exceed the Class B limits
for radio noise emissions from digital apparatus as set out in the interference causing
equipment standard entitled, “Digital Apparatus,” ICES-003 edictee par le Minister des
Communications.
If you have purchased this product under a United States Government contract, it shall
be subject to restrictions as set forth in subparagraph (c)(1)(ii) of Defense Contracts,
and as set forth in Federal Acquisitions Regulations (FARs) Section 52.227-19 for
civilian agency contracts or any successor regulations. If further government
regulations apply, it is the user’s responsibility to ensure compliance with such
regulations.

Page 11 – February 5, 2009 Edition
www.fordworksolutions.com / 1.800.624.2726 / fordtechhelp@hunt-radio.com
Getting Started
Overview
To ensure a positive Ford Work Solutions experience, please read
through this manual and the other manuals provided with your owner
kit in their entirety. Doing so will enable you to use the system to its
fullest capacity.
The Ford Work Solutions computer is designed to provide an easy-to-
use, Windows CE 6.1 based interface with your Bluetooth
®
phone,
integrated Garmin
®
navigation system, and other desktop productivity
applications. You can direct basic menu and phone actions handsfree
using simple voice commands.
What truly sets the Ford Work Solutions computer apart is its ability to
access the Internet via Sprint
®
Wireless Broadband (contract required),
connect to your office PC using LogMeIn
®
(contract required), manage
your fleet online using the Crew Chief™ system (optional and contract
required), and track your tools using the Tool Link™ RFID System
(optional). This manual – combined with the other manuals provided
with your owner kit – will enable you to use these components to
enhance your productivity.
In addition, you can easily connect the included Bluetooth
®
keyboard
with integrated mouse, as well as the available Bluetooth
®
printer by
HP
®
. As with many desktop PCs, outside files and information can be
transferred to the system via the USB port.
Magneti Marelli is committed to a policy of continuous improvement. It
is therefore possible that the features and appearance of the
equipment in your vehicle may vary slightly from illustrations and
descriptions provided in this manual.
Please visit www.FordWorkSolutions.com for additional information on
Ford Work Solutions including system updates, partner information,
and news relating to Ford Work Solutions.
Page 12 – February 5, 2009 Edition
www.fordworksolutions.com / 1.800.624.2726 / fordtechhelp@hunt-radio.com
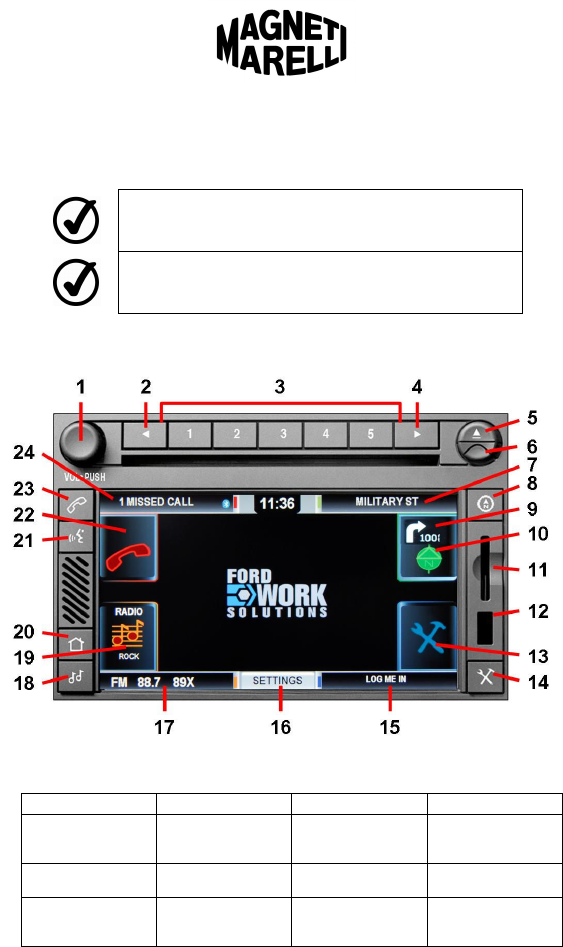
Getting to Know Your Computer
Buttons – Hard and Soft Buttons
Throughout this manual, “hard buttons” are the buttons on the
bezel surrounding the screen. These are always accessible.
Throughout this manual, “soft buttons” are on-screen buttons.
These buttons can be accessed from the main system menu.
The figure and chart below list the buttons, features and status notifications
available on your in-dash computer.
Buttons & Features: Note that when the home screen is visible as shown
above, certain buttons are available as both hard and soft buttons.
1 Volume / Power 2 Prior Track / Seek 3 Radio Presets 4 Next Track / Seek
5 CD Eject 6 Pullout Stylus 7 Current Navigation
Status Information
and Next Turn
8 Navigation (Hard)
9 Next Navigation
Turn (Inset Box)
10 Navigation (Soft) 11 SD Card Slot 12 USB Port
13 Applications (Soft) 14 Applications (Hard)
and Keyboard
Re-Connect
15 Open Application
and Device Status
16 Settings (Soft)
Page 13 – February 5, 2009 Edition
www.fordworksolutions.com / 1.800.624.2726 / fordtechhelp@hunt-radio.com
Buttons & Features (Continued):
17 Media Status
Information
18 Media (Hard) 19 Media (Soft) 20 Home/Main
21 Voice Activation 22 Phone (Soft) 23 Phone (Hard) 24 Phone Status and
Messaging
Information
Basic Operation
Returning to the Home Screen
You can return to the computer’s home screen at any time by pressing
the “Home” button on the computer bezel.
Accessing Phone, Media, Navigation or Application Modes
To access the Phone, Media, Navigation or Applications menus from the
home screen, simply press the hard or soft button that corresponds to
your desired selection.
You may also access these sub-menus using voice commands by
pressing the “Voice” button.
Once the Bluetooth® keyboard has been paired with the
system, its connection can be re-established when necessary
by pressing the “Applications” button.
Switching Between Computer Modes
It is not necessary to return to the main menu to access the Phone, Media,
Navigation or Application modes. You can easily jump from one mode to
another by pressing the desired program’s hard button on the computer
bezel.
For example, if you are in Navigation mode and you wish to place a call,
simply press the “Phone” button on the computer bezel. When finished
with the call, you can return to Navigation mode by pressing the
“Navigation” button on the computer bezel.
Accessing the Ford Work Solutions Productivity Applications
You may access the productivity applications by pressing the
“Applications” button. From the Applications submenu, simply press the
application you would like to open. As long as the vehicle is standing still,
the selected application will remain open until you close it.

Page 14 – February 5, 2009 Edition
www.fordworksolutions.com / 1.800.624.2726 / fordtechhelp@hunt-radio.com
Closing an Application
You may exit many of the applications available on your in-dash computer
by pressing the “X” or “Exit” buttons shown within each application. In
some cases, you may need to select “File” > “Exit.” Please note that you
may need to wait for the application to close before another application
can be opened. Certain programs, like navigation, media and phone, are
always open and cannot be closed.
Running an Application in the Background
If you are using one of the programs available in Applications mode, you
can jump to another system mode (Phone, Navigation, Media) without
closing the program you are using. Simply press the hard button
associated with the desired mode. The current program will continue
running in the background, and a notification will show in the lower right
section of your screen. The next time you press the “Applications” button,
you will be returned to the open program.
For example, if you are using the Internet browser and wish to access
your radio, simply press the “Media” hard button on the computer bezel.
The Internet browser will continue running in the background. When you
are ready to return to the Internet browser, simply press the “Applications”
button on the computer bezel.
Accessing the On-Screen Keyboard
An on-screen keyboard will usually appear when a text field is selected
on-screen. This keyboard may not appear automatically if the Bluetooth
®
keyboard is already connected.
To toggle the on-screen keyboard on and off, simply press the small
keyboard icon located on-screen.
Changing System Settings
System settings – such as screen brightness, language, audio settings,
and so on – can be accessed by pressing the “Settings” button located in
the bottom center of the computer screen. See the Settings section of this
manual (page 45) for additional information.
Pairing Your Bluetooth
®
Phone or Devices
You can pair your Bluetooth
®
phone or other devices in the Settings
section of the computer. See the Settings section of this manual (page
48) for additional information.

Page 15 – February 5, 2009 Edition
www.fordworksolutions.com / 1.800.624.2726 / fordtechhelp@hunt-radio.com
Using Voice Commands
Accessing the Voice Command Function
To control the in-dash computer using your voice, simply press the
“Voice” button. The system will then prompt you to say a command. Say
“Help” at any time to hear available voice commands.
Whenever the system is ready for your command, you will
hear a beep. After the beep, say your command clearly.
You may press the "Voice" button again while the system is
talking to skip the audible prompts. The system will skip
directly to the beep, prompting you for a command.
Available Voice Commands
Your system’s basic functions are accessible via voice command. Use the
voice commands listed below to access the associated function.
Phone: To access the Phone menu via voice command, say “Phone.”
See the Phone section (page 26) for more Phone voice commands.
Media: To access the Media menu, say “Media.”
Navigation: To access the Navigation menu, say “Navigation.”
Applications: To access the Applications menu, say “Applications.”
Settings: To access the Settings menu, say “Settings.”
Help: You can say “Help” at any time to hear the available commands.
Cancel: Say “Cancel” to cancel the current voice command.
Operation Prerequisites
Phone Connections
In order to place and receive calls via the in-dash computer, you must
connect your Bluetooth
®
compatible phone to the system. See the
Settings section of this manual for detailed instructions (page 48).
Garmin
®
Navigation
In order to use the Garmin
®
navigation system, insert the SD memory
card containing map data into the computer’s SD card slot before turning
the system on. If the SD card is inserted while the system is on, there
may be a delay of up to one minute navigation can be used.
To prevent accidental deletion of files and maps stored on the
SD card, be sure to slide the lever on the SD card to the
“lock” position before inserting it into the computer.

Page 16 – February 5, 2009 Edition
www.fordworksolutions.com / 1.800.624.2726 / fordtechhelp@hunt-radio.com
See the Garmin
®
manual included in your owner kit for additional
instructions.
Sprint
®
Broadband Network Connection
Before using the system’s Internet browser, internal text messaging, or
LogMeIn
®
feature, you must activate your Sprint
®
Broadband Network
contract. See the Sprint
®
manual included in your owner kit for activation
instructions.
LogMeIn
®
Contract
In order to access your office computer using the system’s LogMeIn
®
feature, you will need to activate a LogMeIn
®
contract. See the LogMeIn
®
manual included in your owner kit for activation and usage instructions.
Crew Chief™ (Optional) Contract
In order to access fleet information using the Crew Chief™ website, you
will need to activate a contract with Microlise
®
. See the Microlise
®
manual
included in your owner kit for activation and usage instructions.
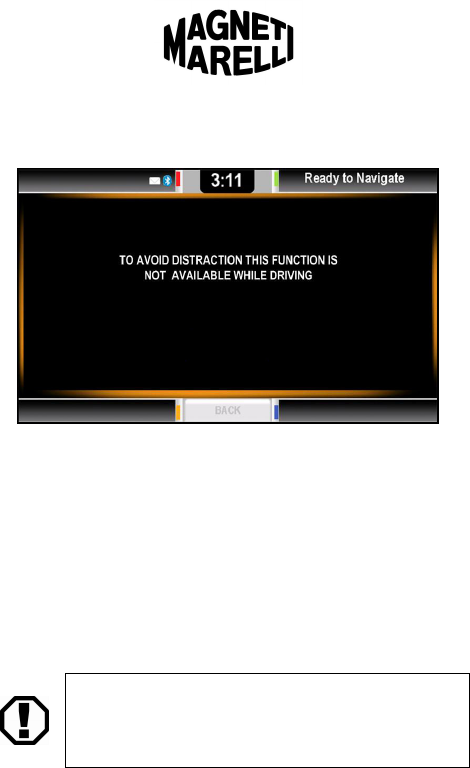
Avoiding Driver Distraction
Every time the in-dash computer is turned on, the screen shown below will
appear. Always use caution when operating your vehicle, and avoid using the
in-dash computer when the vehicle is in motion.
To continue on to the main menu, simply press “OK.” By doing so, you are
accepting responsibility for driving safely.
Some menus described in this manual will be disabled when
the vehicle is in motion.
Page 17 – February 5, 2009 Edition
www.fordworksolutions.com / 1.800.624.2726 / fordtechhelp@hunt-radio.com
If you attempt to access a disabled application while the vehicle is in motion,
the message shown in the following image will appear.
This message will close automatically after five seconds, and the system will
return to the prior menu.
Peripherals and Accessories
Bluetooth
®
Keyboard
The system comes standard with a Bluetooth
®
keyboard and integrated
mouse. When using certain applications, the mouse will enable you to
control the in-dash computer without touching the screen. The keyboard
is small enough to be stored in the armrest console or door map pocket of
most vehicles.
To pair your Bluetooth
®
keyboard with the in-dash computer system, see
the Settings section of this manual (page 48).
Only the included Bluetooth® keyboard with integrated mouse
is certified by Ford to be compatible with your in-dash
computer system. Other Bluetooth® and USB keyboards and
mice may or may not be compatible with your system.
On-Screen Keyboard
If the external keyboard is not attached to the system, an on-screen
keyboard will generally appear when a text field is selected on-screen.
To toggle the on-screen keyboard on and off, press the small keyboard
icon located on-screen.

Page 18 – February 5, 2009 Edition
www.fordworksolutions.com / 1.800.624.2726 / fordtechhelp@hunt-radio.com
Bluetooth
®
Printer
An optional Bluetooth
®
compatible printer from HP
®
is available for
purchase through www.FordWorkSolutions.com. This printer will enable
you to print documents while on the road and can offer substantial
productivity improvements for your business. For example, the printer
would allow you to print estimates and invoices on-site instead of
returning to the office and mailing them to the customer.
If you have purchased the HP
®
Bluetooth
®
printer, see the printer manual
for further information and installation instructions.
Only the HP® Bluetooth® printer available from
www.FordWorkSolutions.com is certified by Ford to be
compatible with your in-dash computer system. Other printers
may or may not be compatible with your system.
Page 19 – February 5, 2009 Edition
www.fordworksolutions.com / 1.800.624.2726 / fordtechhelp@hunt-radio.com
Tutorials and How-To Guides
Phone Mode
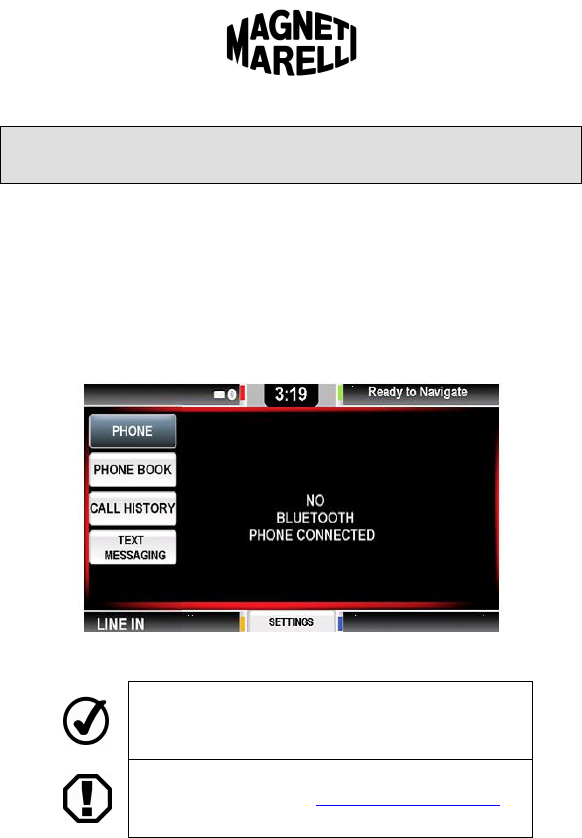
Pressing the “Phone” button (either hard or soft) opens the Phone menu. The
in-dash computer uses your personal cell phone to make and receive phone
calls, so a Bluetooth
®
compatible phone must be connected in order for Phone
mode to work.
See the Settings section of this manual (page 48) for instructions on pairing a
phone. If no Bluetooth
®
phone is connected, the information shown below will
appear on-screen.
If this screen appears, refer to the Settings section of this manual (page 48) to
connect a Bluetooth
®
phone.
If a Bluetooth® phone is connected to the system, the
Bluetooth® symbol will highlight in the upper left section of the
computer screen.
Not all Bluetooth® phones are compatible with the FWS in-
dash computer system. See www.FordWorkSolutions.com for
a list of compatible phones.
Page 20 – February 5, 2009 Edition
www.fordworksolutions.com / 1.800.624.2726 / fordtechhelp@hunt-radio.com
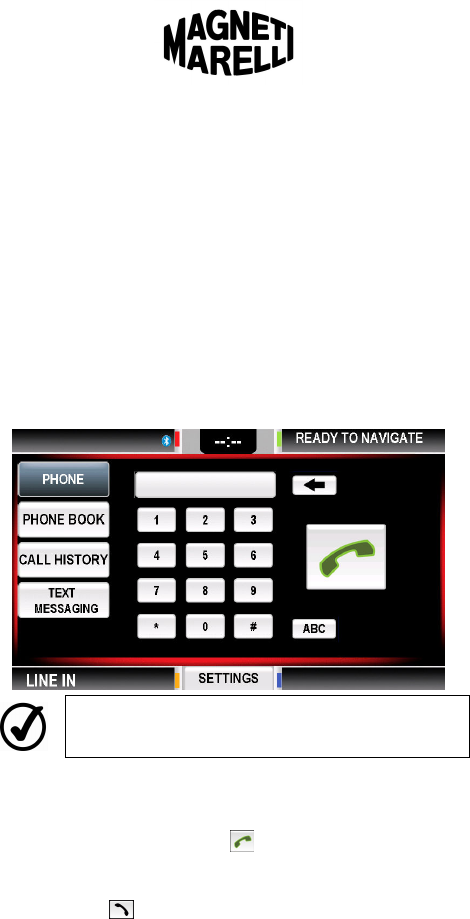
Once your phone is connected to the system, the buttons available on the left
side of the main Phone screen will open the following functions:
Phone (Dial)
Phone Book
Call History
Text Messaging
This feature is also available when a phone is not connected to the
system, thanks to the embedded Sprint
®
wireless modem (Sprint
®
contract required).
Further information on each of these functions is provided below.
Phone
The “Phone” button opens an on-screen keypad that allows you to dial the
desired phone number.
Press the “ABC” button next to the keypad to toggle between
characters and numbers.
Dialing a Phone Number
STEP 1 Dial the phone number using the on-screen keypad.
STEP 2 Press the phone icon on the screen to initiate your
call.
STEP 3 When you are finished with your call, press the phone
icon again to hang up.
Page 21 – February 5, 2009 Edition
www.fordworksolutions.com / 1.800.624.2726 / fordtechhelp@hunt-radio.com
Receiving a Phone Call
STEP 1 When an incoming call occurs, your phone will ring
and any available Caller ID information will appear on
your screen.
STEP 2 Press the phone icon on-screen to answer the
call.
STEP 3 When your call is finished, press the phone icon
again to hang up.
Phone Book
The phone book information on your Bluetooth
®
compatible phone can be
downloaded onto your in-dash computer system. See the Settings section of
this manual (page 51) for instructions on downloading your address book.
Once your address book is downloaded onto your system, pressing the
“Phone Book” button will bring up the following screen.
Not all Bluetooth® phones are compatible with the FWS in-
dash computer system. See www.FordWorkSolutions.com for
a list of compatible phones.
Using the Phone Book
Follow these steps to place a call using your address book:
STEP 1 Press the “Phone Book” button.
STEP 2 Locate the alphabetical category containing your
contact’s last name, then press the category. You
may need to press the button multiple times to access
Page 22 – February 5, 2009 Edition
www.fordworksolutions.com / 1.800.624.2726 / fordtechhelp@hunt-radio.com
the desired letter.
STEP 3 Scroll up or down to locate the name of the contact
you wish to call. Press the contact’s name on-screen.
STEP 4 The contact’s name and phone numbers will appear
on-screen. To initiate the call, press the phone
number you wish to dial.
STEP 5 When your call is complete, press the phone icon
on-screen to hang up.
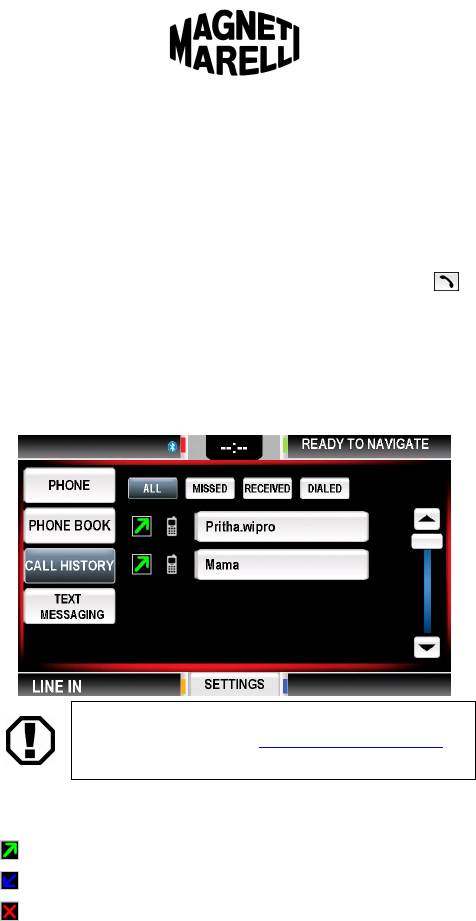
Call History
The call history information from your Bluetooth
®
phone can be viewed on
your in-dash computer. This feature enables you to track recent calls and
return calls easily to contacts that may not be in your address book. An
example Call History screen is provided below.
Not all Bluetooth® phones are compatible with the FWS in-
dash computer system. See www.FordWorkSolutions.com for
a list of compatible phones.
Using Call History
On-screen icons indicate the following information:
Outgoing call placed
Incoming call received
Incoming call missed

Page 23 – February 5, 2009 Edition
www.fordworksolutions.com / 1.800.624.2726 / fordtechhelp@hunt-radio.com
Follow these steps to place a call using your call history:
STEP 1 Press the “Call History” button.
STEP 2 Scroll up or down to locate the desired contact or
phone number.
STEP 3 Press the number or contact name you wish to dial.
STEP 4 Press the phone icon and your call will be
initiated.
STEP 5 When your call is complete, press the phone icon
on-screen to hang up.
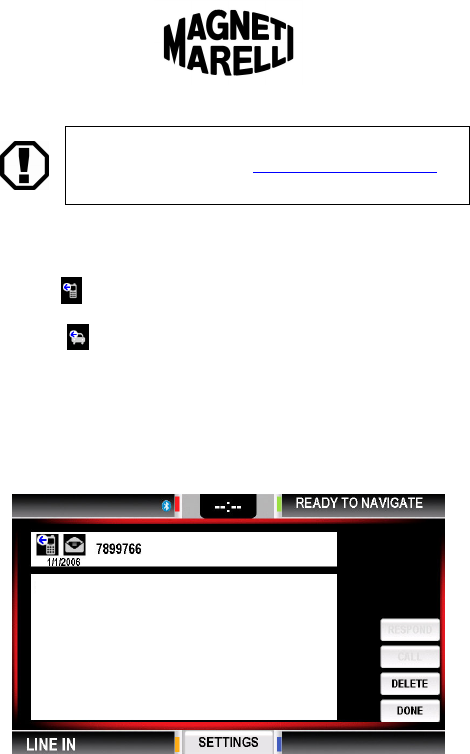
Text Messaging
Text messaging is available via two potential methods:
In-Dash Modem: A Sierra Wireless Modem from Sprint
®
is located inside
the in-dash computer. When activated, it can be used to send and receive
text messages from the in-dash computer (connectivity contract required).
Bluetooth
®
Phone: Text messages can be sent and received via certain
Bluetooth
®
phones paired with the FWS system. See
www.FordWorkSolutions.com for a list of compatible phones.
A sample text messaging screen is provided below. An envelope will appear
in the upper left status bar when a new text message has been received.
Never read or send text messages while driving. You are
responsible for your own safety and that of pedestrians,
passengers and other drivers.
How are you?
Meet at the office.
Page 24 – February 5, 2009 Edition
www.fordworksolutions.com / 1.800.624.2726 / fordtechhelp@hunt-radio.com
Not all Bluetooth® phones are compatible with the FWS in-
dash computer system. See www.FordWorkSolutions.com for
a list of compatible phones.
Sorting Text Messages
In the main Text Messaging screen, you can select which text messages
you wish to view on-screen by pressing one of the following buttons:
Phone ( Icon): This button will display only messages sent or
received on a compatible Bluetooth
®
phone.
Vehicle ( Icon): This button will display only messages sent or
received via the embedded Sprint
®
modem.
To locate the phone number for your vehicle’s embedded modem,
see the Settings section of this manual (page 54).
All: This button will show all messages on-screen, regardless of source.
Sending a New Text Message
The screen used to create a new text message is shown below.
Follow these instructions to create a new text message:
STEP 1 Press the “Text Messaging” button.
STEP 2 Press the “New” button.
STEP 3 Press the empty recipient section at the top of the
page.
STEP 4 Press the “Keyboard” button to open the on-screen
keyboard. Then press the “123” button in the lower
Will meet you there.

Page 25 – February 5, 2009 Edition
www.fordworksolutions.com / 1.800.624.2726 / fordtechhelp@hunt-radio.com
right to bring up the numeric keyboard.
STEP 5 Enter the recipient’s phone number using the on-
screen keyboard. Close the keyboard with the red X.
STEP 6 Press the empty text message box on-screen to begin
typing your message.
STEP 7 If necessary, reopen the keyboard by pressing the
“Keyboard” button, and type your message. When
your message is complete, close the keyboard with
the “X.”
STEP 8 Press the “Send” button. The system will provide a
visual confirmation once the message is sent.
Reviewing Text Messages
Follow these instructions to open a text message.
STEP 1 Press the “Text Messaging” button.
STEP 2 Press the message you wish to review.
Responding to Text Messages
Follow these instructions to respond to a text message.
STEP 1 Open the text message you wish to respond to.
STEP 2 Select one of the following options:
Respond: This will open a new screen with a blank
window for typing your response (go to Step 3).
Call: If a Bluetooth
®
phone is connected, this
button will initiate a call to the contact that sent the
message.
Delete: This button will delete the message being
reviewed.
Back: This button will return you to the main list of
text messages.
STEP 3 If you selected the “Respond” button, a blank window
will open for you to type your response.
STEP 4 Select the blank text box to begin typing, or press the
“Quick Respond” button (see Quick Responses on the
following page).
Page 26 – February 5, 2009 Edition
www.fordworksolutions.com / 1.800.624.2726 / fordtechhelp@hunt-radio.com
STEP 5 When you are finished typing your text message,
press the “Send” button.
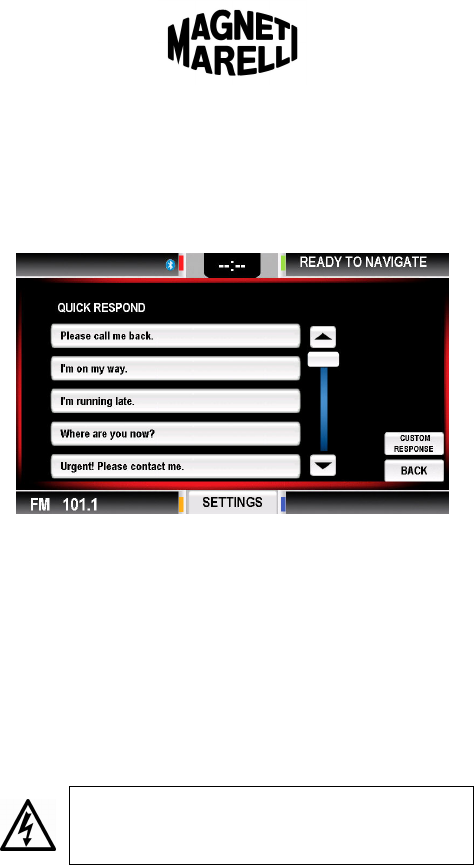
Quick Responses
The Quick Respond feature is available when responding to an existing
text message. An example Quick Respond screen is shown below.
Follow these instructions to use the Quick Respond feature:
STEP 1 Create a new text message or open an existing text
message.
STEP 2 Press the “Quick Respond” button.
STEP 3 Select your desired response.
STEP 4 Press the “Send” button.
Voice Commands – Phone
Voice commands enable handsfree dialing while you’re driving. The voice
commands identified below may be used to make calls without taking your
eyes off the road.
Use caution when making or answering calls while driving.
You are responsible for your own safety and that of
pedestrians, passengers and other drivers.

Page 27 – February 5, 2009 Edition
www.fordworksolutions.com / 1.800.624.2726 / fordtechhelp@hunt-radio.com
Using Voice Commands to Call an Address Book Contact
STEP 1 Press the "Voice" button on the computer or your
steering wheel (if equipped) and wait for the system to
prompt you with, “Say a command.”
STEP 2 Clearly say “Phone” or “Telephone” after the beep.
STEP 3 The system will recognize your guidance by
responding, “Phone. Say a command.”
STEP 4 Say “Call” followed by the name of the address
book contact you wish to call. For example, say “Call
Jane Doe.”
STEP 5 If the contact only has one phone number assigned in
the address book, the system will immediately begin
dialing the number.
If the contact has multiple phone numbers assigned in
the address book, the system will ask you which
number you wish to call (“Call Jane Doe at home, at
work, or on cell?”).
STEP 6 Say the type of number you want the system to dial.
Say “Cell” (or “Mobile”), “Home,” or “Work.”
STEP 7 The system will acknowledge your command by
asking. For example the system will say,
“Call Jane Doe on cell. Is that correct?”
STEP 8 Say “Yes” or “No.” If you say “Yes,” the system will
proceed with the call.
STEP 9 To end your call, press the phone icon on the in-dash
computer, or press and hold the phone icon (if
equipped) on your steering wheel.
To cancel a voice command and return to the prior screen,
either press the button on-screen or say “Cancel.”

Page 28 – February 5, 2009 Edition
www.fordworksolutions.com / 1.800.624.2726 / fordtechhelp@hunt-radio.com
Additional Voice Commands – Phone
Additional voice commands are available when making handsfree calls.
After stating the “Phone” command, you may proceed with any of the
following commands:
“Dial”
After the system acknowledges your instruction, continue with:
Phone numbers in single digits “0” through “9”
“Pound”
“Star”
“Plus”
“Help”
“Cancel” or “Exit”
After the final number has been stated, wait for the prompt and say
“Call” to make the call.
“Call <insert contact name>”
After the system acknowledges your instruction, continue with:
“Home”
“Work”
“Mobile”
“Call <contact name> at home”
“Call <contact name> at work”
“Call <contact name> on mobile”
“Help”
“Cancel” or “Exit”
“Help” may be stated in any menu. The system will explain
any available commands and request your instruction.
To cancel a voice command and return to the prior screen,
either press the button on-screen or say “Cancel.”
Page 29 – February 5, 2009 Edition
www.fordworksolutions.com / 1.800.624.2726 / fordtechhelp@hunt-radio.com
Media Mode
Pressing the “Media” button (either hard or soft) opens the Media menu. The
buttons available on the left side of the screen will open the following functions:
Radio
CD Player
Line In
Further information on each of these functions is provided below.
The USB port on the in-dash computer cannot be used to
play audio files stored on a USB drive or MP3 player.
The radio may not function immediately when the vehicle is
turned on. There may be a brief delay while the computer
boots up. This delay is normal.
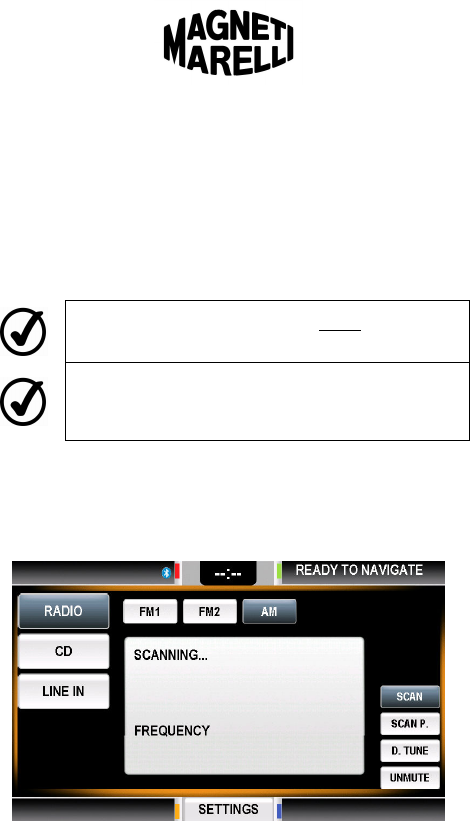
Radio
The Radio function enables you to select from one (1) AM and two (2) FM
station bands. The system is also capable of storing 15 station presets – five
on each frequency band using the numbered hard buttons at the top of the
computer bezel.
Available Radio Functions
Band: Select the “AM,” “FM1” or “FM2” buttons to tune the radio to your
desired radio band.
Scan: This button causes the radio to scan continually through all
available channels. To stop the scan, press this button again.

Page 30 – February 5, 2009 Edition
www.fordworksolutions.com / 1.800.624.2726 / fordtechhelp@hunt-radio.com
Scan P.: This button causes the radio to scan continually through all
preset radio channels on the band currently selected. Press this button
again to stop the scan.
D. Tune: This button allows you to access the desired station directly by
entering the station’s frequency using an on-screen keypad.
Seek: The < and > arrows at the top of the computer bezel enable you to
tune the radio to the previous or next available radio station.
Steering Wheel Controls (if Equipped)
Volume Control: Use the + or - controls provided on the steering wheel
to increase or decrease volume.
Seek: Use the < or > controls on the steering wheel to go to the previous
or next available radio station for the band currently selected.
Setting a Preset
The following instructions explain how to set the preset station buttons
(1-5) provided at the top of the computer bezel.
STEP 1 Tune the radio to your desired radio station.
STEP 2 Press and hold the desired preset button (1-5) for
approximately two seconds. Station playback will be
muted momentarily while the preset is recorded. Once
the preset has been recorded, its number will show in
the upper right corner of that station’s RDS
information box.
Since the radio has two FM bands, a total of 10 FM preset
locations are available. You can program up to five presets
on FM1 and five on FM2.
To overwrite a preset location with another radio station,
simply repeat the steps shown above.
On-Screen RDS Information
Radio Data System (RDS) information will appear on-screen when
available. Information may include station name, artist name, song title,
etc. If you return to the FWS home screen while the radio is playing, RDS
information will show in the Media section on the lower left portion of the
screen.
Page 31 – February 5, 2009 Edition
www.fordworksolutions.com / 1.800.624.2726 / fordtechhelp@hunt-radio.com
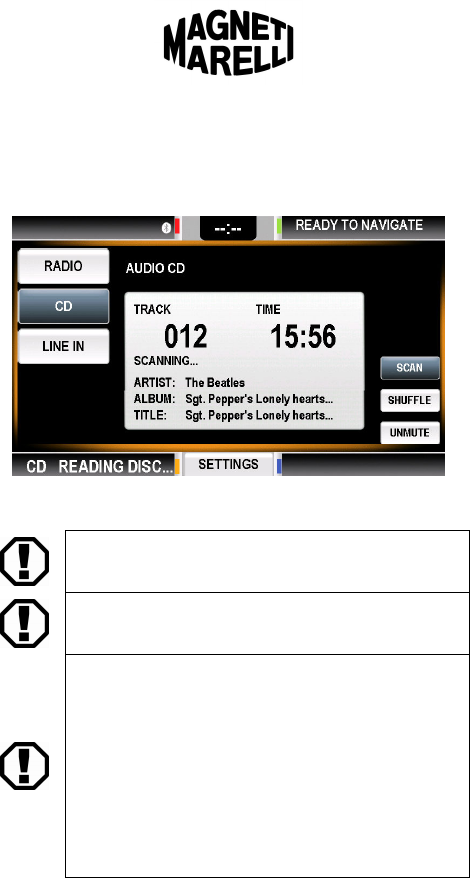
CD Player
The CD Player function enables you to play normal audio CDs as well as
audio CDs you have recorded on your desktop PC. Compatible file types
include MP3 and WMA.
Available CD Player Functions
Start Playback: To begin CD playback, insert a CD into the CD slot.
Before inserting a CD into the CD slot, ensure there is not a
CD already in the CD player.
Insert your CD into the CD slot gently. Never force a disc into
the CD player.
CD units are designed to play commercially pressed 4.75 in
(12CM) audio compact discs in the ISO 9660 format only.
(UDF format is not supported.) Due to technical
incompatibility, certain recordable and re-recordable compact
discs may not function correctly when used in CD players.
Irregular shaped CDs, CDs with a scratch protection film
attached, and CDs with homemade paper (adhesive) labels
should not be inserted into the CD player. The label may peel
and cause the CD to become jammed. It is recommended
that homemade CDs be identified with permanent felt tip
marker rather than adhesive labels. Ballpoint pens may
damage CDs.
Continue Playback: To continue playback of a CD already in the CD
player, press the “CD” button on the Media menu. The disc will continue
playing from where it previously stopped.

Page 32 – February 5, 2009 Edition
www.fordworksolutions.com / 1.800.624.2726 / fordtechhelp@hunt-radio.com
Stop Playback: To stop CD playback, either (1) eject the CD by pressing
the “Eject” button at the top right of the computer bezel or (2) select
another Media function.
Skip Track: Pressing the “< “or “>” buttons at the top of the radio bezel
will skip to the prior or next track on the CD.
Scan Track: To scan forward or backward in the current track, press and
hold the “<” or “>” buttons at the top of the radio bezel.
Steering Wheel Controls (if Equipped)
Volume Control: Use the + or - controls provided on the steering wheel
to increase or decrease volume.
Skip Track: Use the < or > controls on the steering wheel to go to the
previous or next CD track.
On-Screen Information
On-screen information varies based upon the data provided on the CD
being played. Basic information includes track number and time. Some
CDs may display album information.
Line In
The Line In function plays audio directly from an external MP3 player and
other electronic devices. Simply plug a 3.5mm stereo cable from the
headphone jack on your device to the Line In jack on your vehicle’s center
console.
Available Line In Functions
Volume: Volume can be controlled from your external device and/or from
the volume knob on the in-dash computer.
The Line In feature only plays the audio being transmitted
from your external electronic device. As a result, you will
need to use the controls on your external device to select
songs, titles, etc.
For best results – and to avoid damage to your vehicle’s
speaker system – turn up the volume on your external
electronic device (MP3 player) before turning up the volume
on your in-dash computer system.
Steering Wheel Controls (if Equipped)
Volume Control: Use the + or - controls provided on the steering wheel
to increase or decrease volume.

Page 33 – February 5, 2009 Edition
www.fordworksolutions.com / 1.800.624.2726 / fordtechhelp@hunt-radio.com
On-Screen Information
The Line In feature simply states “Line In” on the computer screen. Song
information will only be visible on your external device.
Voice Commands – Media
The steps outlined below will enable you to access basic Media functions
with voice commands.
STEP 1 Press the "Voice" button and wait for the system to
prompt you with, “Say a command.”
STEP 2 Clearly say “Media.”
STEP 3 The system will recognize your guidance by
responding, “Media. Say a command.”
STEP 4 Say “Radio,” “CD,” or “Line In” to access the desired
feature.
STEP 5 The system will confirm your command and then
transition to the appropriate mode.
Once you have entered the desired Media mode, all
remaining functions must be accessed using the buttons
available on-screen, on the system bezel, or on your steering
wheel.
Say “Help” at any time to be reminded of available voice
commands.
To cancel a voice command and return to the prior screen,
either press the button on-screen or say “Cancel.”
Page 34 – February 5, 2009 Edition
www.fordworksolutions.com / 1.800.624.2726 / fordtechhelp@hunt-radio.com
Navigation Mode
The Garmin
®
navigation system included with your in-dash computer provides
voice-guided navigation to millions of points-of-interest as well as your custom
favorites. With an active Sprint
®
Wireless Broadband contract, you can also
access weather, traffic and fuel price data at the touch of a button.
For more information and detailed instructions, see the Garmin
®
owner’s
manual provided in your owner kit.
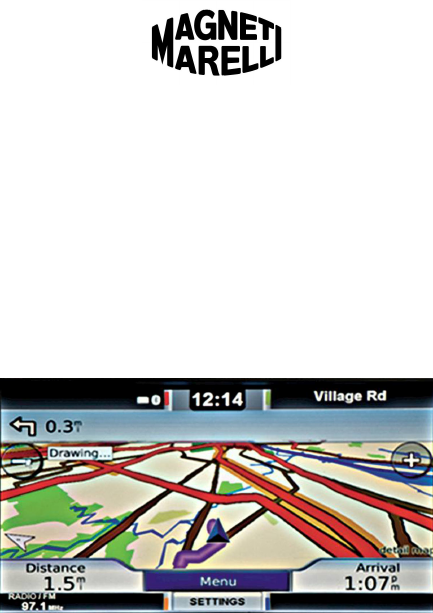
Full-Screen View
The image below shows the navigation screen in its normal view. When you
are navigating to a destination, this is the screen that you will most likely
wish to view on the in-dash computer.
Whenever you switch to another computer function while navigating to a
route, however, the system will continue to provide on-screen directions in
addition to audible route instructions. This alternate view is called Icon View
and is explained below.
Icon View
If you switch to the in-dash computer’s home screen while navigating to a
destination, Icon View provides route guidance in the upper right hand
corner of the screen. Information provided includes:
Current location (upper right status bar)
Distance to, and direction of, your next turn (inset in the Navigation soft
button in the upper right corner)
A sample image of Icon View is shown on the following page.
Page 35 – February 5, 2009 Edition
www.fordworksolutions.com / 1.800.624.2726 / fordtechhelp@hunt-radio.com
Note the navigation information provided in the upper right corner of the
screen.
Voice Commands – Navigation
You can access your Garmin
®
navigation system with voice commands. To
do so, follow the instructions below:
STEP 1 Press the "Voice" button and wait for the system to
prompt you with, “Say a command.”
STEP 2 Clearly say “Navigation.”
STEP 3 The system will recognize your guidance by
responding, “Navigation. Say a waypoint.”
STEP 4 To continue, say “Home.”
STEP 5 The system will confirm your command and then
transition to Navigation Mode.
Once you have entered the desired Navigation mode, all
remaining functions must be accessed using the buttons
available on-screen.
Page 36 – February 5, 2009 Edition
www.fordworksolutions.com / 1.800.624.2726 / fordtechhelp@hunt-radio.com
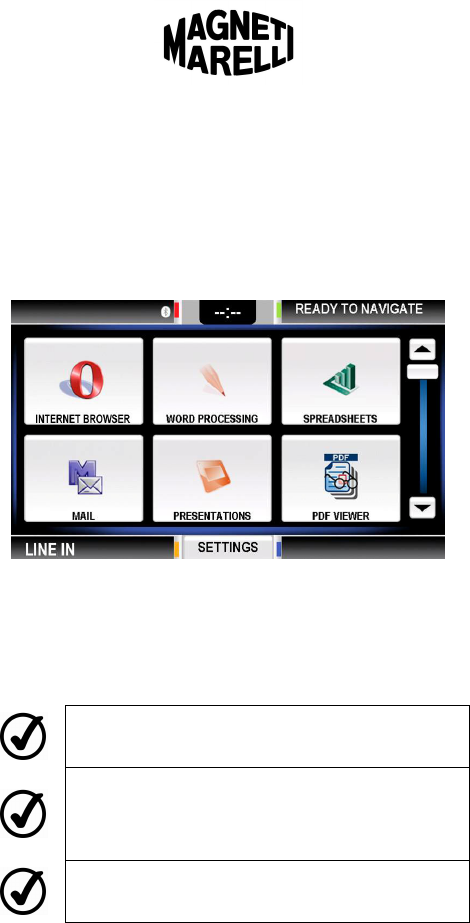
Application Mode
Application Mode is the heart of the Ford Work Solutions in-dash computer.
Here you can access key software programs that turn your truck into a mobile
office. From browsing the Internet, to accessing your office PC, to tracking the
tools in your cargo area, you’ll be able to use this industry-leading system to
improve your productivity.
Once in Application Mode, scroll up and down to select your desired program.
The image below shows some of the programs available in Application Mode.
To open any of these programs, follow the instructions below:
STEP 1 Enter Application Mode by pressing the hard or soft
“Applications” button.
STEP 2 Press the icon or button associated with the program
you wish to open.
To close a program, simply press the “X” or “Exit” on the
program’s screen. In some cases, you will need to select
“File” > “Exit.”
If you change to another FWS menu (Home, Navigation, or
Phone), without closing an active program, it will continue
running in the background. You will see its status in the
Applications status bar in the lower right corner of the screen.
To reopen the program, press the “Applications” button.
If an application is already open when you press the
“Applications” button, that program will appear on-screen. To
return to the Applications menu, close the open program.

Page 37 – February 5, 2009 Edition
www.fordworksolutions.com / 1.800.624.2726 / fordtechhelp@hunt-radio.com
Opera Internet Browser
The Opera Internet browser provided with your FWS system provides a
superb platform for accessing and viewing websites. Opera works much like
the Internet browser on your desktop computer, but it provides improved
compatibility in a mobile setting like Ford Work Solutions.
Your Sprint® Wireless Broadband contract must be active in
order to access the Internet.
Download and upload speeds are dependent upon the signal
strength of your in-dash modem. For best performance,
ensure that your vehicle has a clear view of the sky.
As with other wireless mobile Web browsers, Opera Internet
Browser is not capable of viewing Flash® animation or video.
Accessing a Website
Follow these steps to access a website on your in-dash computer:
STEP 1 In the Applications menu, press the “Opera Internet
Browser” button.
STEP 2 Once the Internet browser is open, press the website
address bar at the top of the screen to enter a new
address.
STEP 3 Use the on-screen keyboard or your external
keyboard to type in the website address for your
desired website then press the “Enter” key.
STEP 4 The desired website should appear on-screen.
Setting and Accessing Internet Favorites
You can tag your favorite websites for easy access anytime. To do so,
follow the instructions below:
STEP 1 Once you have opened Opera, access the website
you wish to save as a favorite.
STEP 2 Once the desired website appears, press the
“Add to Favorites” button in the toolbar at the top
of the browser screen.
STEP 3 Rename the website for easy recognition in the
Favorites list (e.g., “Hardware Store Website” or

Page 38 – February 5, 2009 Edition
www.fordworksolutions.com / 1.800.624.2726 / fordtechhelp@hunt-radio.com
“Crew Chief™ Home Page”).
STEP 4 Press “OK.” Your website will be saved to the
Favorites list for quick access.
To access your saved Favorites, follow the instructions below:
STEP 1 Open Opera Internet Browser.
STEP 2 Press the “Favorites” button to access your saved
favorites.
STEP 3 Press the name of the website you wish to access.
STEP 4 The desired website should appear on-screen.
Setting a New Homepage
The first website that appears when you open Opera is known as your
“homepage.” Follow these instructions to set a different homepage:
STEP 1 Once you have opened Opera, select the
“Preferences” button at the top of the screen.
STEP 2 In the Preferences window, select the “General” tab.
STEP 3 Enter the Web address of your preferred homepage
on the appropriate line.
STEP 4 Press “OK” to save your changes and return to your
previous website.
Picture Viewer
Your in-dash computer can also be used to view pictures stored on its
internal memory, an SD card or a USB drive. Follow the instructions
below to view your pictures.
STEP 1 Access the Opera internet browser.
STEP 2 Press the “Favorites” button .
STEP 3 Select one of the following favorites:
“SD Card” – View photos stored on an SD card.
“USB Drive” – View photos stored on a USB drive.
“Internal Memory” – View photos stored on your
in-dash computer’s internal memory.

Page 39 – February 5, 2009 Edition
www.fordworksolutions.com / 1.800.624.2726 / fordtechhelp@hunt-radio.com
Additional Browser Tools
The following options are also available in Opera:
Dial Phone Number: If you select a hot-linked phone number when using
the Opera browser, the Phone feature of your computer will be launched
and begin dialing the number (requires a Bluetooth® phone connection).
Full-Screen Mode: To open the browser in full-screen mode, press the
“Full-Screen” button in the toolbar.
Exiting Full-Screen Mode: To exit full-screen mode press the
“Full-Screen” button again.
Accessing the On-Screen Keyboard: Press the “Keyboard” button
to open the on-screen keyboard.
Touch to Scroll Feature: There are no scroll bars present in Opera for
scroll up and down on a website. Instead, Opera provides an easier
alternative. To scroll up and down when viewing a website, just hold your
finger on the screen and slide your finger up and down. The website will
move up and down on-screen as your finger moves.
Word Processor
This word processing program is similar to word processing programs used
on typical desktop computers. Files you create and save on your FWS
system will open on most standard desktop word processing programs.
Working with Word Processor
The commands and functions available on Word Processor are similar to
those available on typical desktop PC word processing programs. Use the
intuitive menu options at the top of the page to create, format, print and
save your documents.
To bring up the on-screen keyboard at any time, press the
small keyboard icon floating at the top of the screen.
Spreadsheet Program
This spreadsheet program is similar to spreadsheet programs used on
typical desktop computers. Files you create and save on your FWS system
will open on most standard desktop spreadsheet programs.
Working with Spreadsheets
The commands and functions available on Spreadsheets are similar to
those available on typical desktop PC spreadsheet programs. Use the
intuitive menu options at the top of the page to create, format, print and
save your spreadsheets.

Page 40 – February 5, 2009 Edition
www.fordworksolutions.com / 1.800.624.2726 / fordtechhelp@hunt-radio.com
To bring up the on-screen keyboard at any time, press the
small keyboard icon floating at the top of the screen.
E-mail
This e-mail software is similar to e-mail programs used on typical desktop
computers, but instead of downloading your messages, it simply views and
sends messages through your web-based e-mail server.
Follow the intuitive menu options on-screen to create, send, save and delete
e-mails.
Every web-based e-mail server is different. E-mails sent,
deleted or moved using the in-dash computer may or may not
appear on your Web-based e-mail server. Consult your
system administrator to determine proper settings.
To bring up the on-screen keyboard at any time, press the
small keyboard icon floating at the top of the screen.
Setting Up E-mail
Follow the instructions below to set up your in-dash e-mail software and
begin downloading messages:
STEP 1 Check to be sure your external keyboard is connected
to the FWS system.
STEP 2 Open the e-mail software by pressing the “E-mail”
button in the Applications menu.
STEP 3 The first time you use e-mail, a setup wizard will
appear. Follow the on-screen instructions to enter the
information from the web-based e-mail account you
wish to access.
If you need to access the setup wizard again later,
press “Tools” > “New Account” in the toolbar at the
top of the screen.
Presentations
This presentation software is similar to presentation software used on typical
desktop computers. Files you create and save on your FWS system will
open on most standard desktop presentation programs.

Page 41 – February 5, 2009 Edition
www.fordworksolutions.com / 1.800.624.2726 / fordtechhelp@hunt-radio.com
Working with Presentations
The commands and functions available on Presentations are similar to
those available on typical desktop PC presentation programs. Use the
intuitive menu options at the top of the page to create, format, print and
save your presentations.
To bring up the on-screen keyboard at any time, press the
small keyboard icon floating at the top of the screen.
PDF Reader
Many manufacturers post user manuals, installation guides and wiring
diagrams to their websites in PDF format. PDF Reader enables you to open
these files when you need them.
Working with PDF Reader
Saving PDF Files
Once you’ve opened a PDF file, you can save a copy of it to your in-dash
computer by pressing “File” > “Save a Copy.” Then just name the file and
save it where you’d like to access it later.
Opening Saved PDF Files
To open your file later, locate it using File Manager (below) and press or
click the file name to open it. As an alternative, you can open PDF Reader
first, then select “File” > “Open.” File Manager will be opened
automatically, and you will be able to select from the PDF files stored on
your system.
File Manager
File Manager works just like the file management system on a typical
desktop PC. Use it to delete or move files in your in-dash computer system
or an attached USB Drive.
Be sure to back up your files to an external USB drive on a
regular basis. Before servicing your vehicle, back up any
important files to prevent possible data loss (see page 42).
The following terminology is used in File Manager:
“User” The system’s internal storage memory
“Hard Disk” A USB drive inserted into the computer’s
USB port
“SD Storage Card”
An SD card inserted into the computer’s
SD card slot

Page 42 – February 5, 2009 Edition
www.fordworksolutions.com / 1.800.624.2726 / fordtechhelp@hunt-radio.com
Accessing Files on a USB Drive
Follow these instructions to access or copy files from your USB drive to
the in-dash computer.
STEP 1 Insert your USB drive into the USB slot on your in-
dash computer.
STEP 2 Open File Manager from the Applications menu.
STEP 3 To access your USB drive, press or click “Hard Disk”
in the on-screen menu.
STEP 4 To move a file to your in-dash computer, use the
control buttons at the top of the screen. (Buttons
include Copy, Cut, Paste, Delete and Rename.)
STEP 5 Select the “Copy” or “Cut” option. The “Copy”
command will only copy the file from your USB drive,
while the “Cut” command will permanently remove the
file from your USB drive.
STEP 6 Locate the folder on your in-dash computer (called
“User” drive) where you wish to save the file.
STEP 7 Select the “Paste” command from the control buttons
at the top of the screen. Your file will be saved in the
folder currently selected.
Backing Up Files to an External USB Drive
You should back up important files from your in-dash computer to an
external USB drive on a regular basis and/or before having your vehicle
serviced. Follow the instructions below to back up your files.
STEP 1 Insert your USB drive into the USB slot on your in-
dash computer.
STEP 2 Open File Manager.
STEP 3 Locate the folder(s) or file(s) you wish to back up onto
an external drive.
STEP 4 Select the “Copy” button from the control buttons at
the top of the screen.
STEP 6 Access the USB drive (“Hard Disk”) in File Manager.
STEP 7 Select the “Paste” command from the control buttons
at the top of the screen. Your file will be saved on
Page 43 – February 5, 2009 Edition
www.fordworksolutions.com / 1.800.624.2726 / fordtechhelp@hunt-radio.com
your USB drive.
STEP 8 Repeat the process above for any remaining files you
wish to back up.
The SD card slot in your in-dash computer is intended for the
Garmin® SD card containing map data. If you remove the
Garmin® SD card from your computer, the navigation system
will not function properly. Reinsert the Garmin® SD card
before attempting to use the navigation system.
Calculator
Open the Calculator function to make basic calculations using your in-dash
computer. Simply press the keypad on-screen or use your wireless
keyboard to perform calculations.
Calendar
Open the Calendar function to reference upcoming dates. The Calendar
function does not allow you to save or schedule appointments and events.
Tool Link™
Tool Link™ (optional) is a superb tool designed specifically for contractors
and craftsmen who need to ensure they have the right tools for the job
loaded in their vehicle. This feature will help you keep track of your tools,
avoid wasting time and improve your productivity.
See the Tool Link™ owner’s manual included in your kit for usage
instructions and further information.
LogMeIn®
LogMeIn
®
is a Web-based application that enables you to access your office
computer from the cab of your vehicle. Once you activate your subscription,
you will be able to take control of your office computer to access key
programs and update documents. With the optional Bluetooth
®
printer, you
can also print documents from your office computer without ever leaving the
cab of your vehicle.
See the LogMeIn
®
owner’s manual included in your kit for activation
information and usage instructions.
An active Sprint® Mobile Broadband contract and connection
is required in order to access the Internet, use text messaging
via the in-dash computer’s dedicated phone number, and
access your office PC using the LogMeIn® system.
Page 44 – February 5, 2009 Edition
www.fordworksolutions.com / 1.800.624.2726 / fordtechhelp@hunt-radio.com
An active LogMeIn® contract is required in order to access
your office PC using the LogMeIn® application.
Voice Commands – Applications
You can access Applications Mode with voice commands. To do so, follow
the instructions below:
STEP 1 Press the "Voice" button and wait for the system to
prompt you with, “Say a command.”
STEP 2 Clearly say “Applications.”
STEP 3 The system will confirm your command by
responding, “Applications” and will go to Applications
Mode or the current open application.
Once you have entered Applications Mode using voice
commands, all remaining functions must be accessed using
the buttons available on-screen.
Say “Help” at any time to be reminded of available voice
commands.
To cancel a voice command and return to the prior screen,
either press the button on-screen or say “Cancel.”
Page 45 – February 5, 2009 Edition
www.fordworksolutions.com / 1.800.624.2726 / fordtechhelp@hunt-radio.com
Settings
Select the “Settings” soft button on the FWS home screen to open the Settings
menu. This menu allows you to configure certain features of your in-dash
computer, pair Bluetooth
®
phones and devices, and obtain information on the
Sprint
®
phone number and ID associated with your in-dash modem.
Continue reading for more information on each of the available settings.
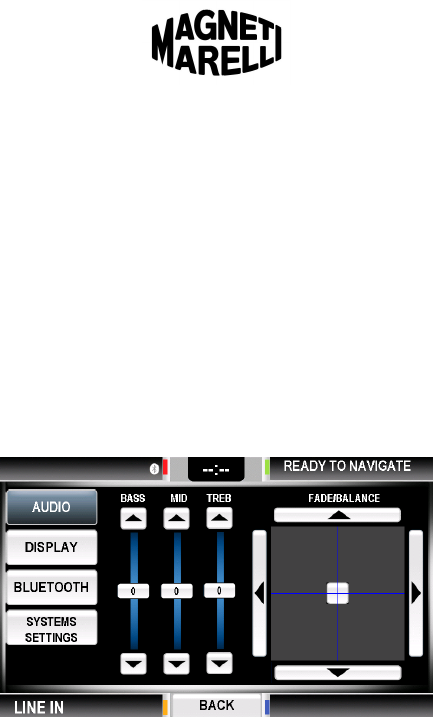
Audio Settings
Pressing the “Audio” button on the Settings menu will bring up a screen
where you can adjust the following settings:
Tone settings
Bass, Mid, Treble
Speaker settings
Balance (left-right)
Fade (front-back)
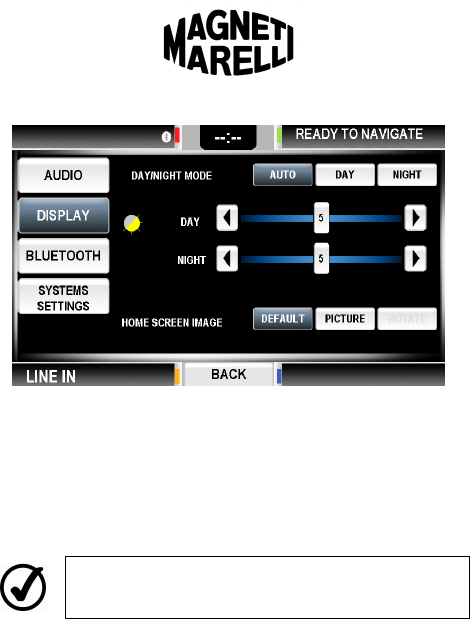
Display Settings
Pressing the “Display” button on the Settings menu will bring up the screen
shown on the following page. Here you can adjust the brightness and day /
night settings of your in-dash computer. You can also set a custom image as
the background on your computer’s home screen.
Page 46 – February 5, 2009 Edition
www.fordworksolutions.com / 1.800.624.2726 / fordtechhelp@hunt-radio.com
Setting Day / Night Mode
Day and night settings allow your in-dash computer screen to be adjusted
for better visibility and easier viewing in bright or dark conditions. The
settings available for Day / Night Mode are explained below:
Auto: Select the “Auto” button to allow the system to adjust automatically
between day or night mode. When your vehicle’s headlamps are off, the
system will remain in Day Mode. When your vehicle’s headlamps are
turned on, the system will automatically switch to Night Mode.
If your vehicle is equipped with automatic headlamps, the
day/night mode may not change unless the light sensor
determines that the interior lamps should be dimmed.
Day: Select the “Day” button to keep the system on daylight settings
regardless of the ambient light conditions.
Night: Select the “Night” button to keep the system on nighttime settings
regardless of the ambient light conditions.
Setting Screen Brightness for Day / Night Modes
Two sliders are available on the Display Settings screen – one for Day
Mode and one for Night Mode. Press “<” to decrease the brightness for
the selected setting, or press “>” to increase brightness.
Home Screen (Wallpaper) Image
You can use the Home Screen Image section to change the background
image on your in-dash computer’s home screen. To do so, follow the
instructions below:
STEP 1 Open Applications Mode.
STEP 2 Open File Manager.

Page 47 – February 5, 2009 Edition
www.fordworksolutions.com / 1.800.624.2726 / fordtechhelp@hunt-radio.com
STEP 3 Locate the image you would like to use as your
background image.
STEP 4 Copy the image using the control buttons at the top of
the screen.
STEP 5 Locate the folder called “User” and open it.
STEP 6 Once in the “User” folder, open the folder called
“Pictures,” then open the folder called “Favorite.”
STEP 7 Once in the “Favorite” folder, paste the image using
the control buttons at the top of the screen.
STEP 8 To avoid any confusion, delete any other images
currently located in the “Favorite” folder.
STEP 9 Close File Manager.
STEP 10
Return to Settings > Display Settings.
STEP 11
In the Home Screen Image section, press the
“Picture” button.
When the “Picture” button is selected, only the image located
in User\Pictures\Favorite will be used as the home screen
background image.
Selecting the “Cycle” button will cause the home screen
image to change every time the vehicle is turned on.
When in Cycle mode, images located in the
User\Pictures_and_User\Pictures\Favorite folder will be used.
For best results, pre-size your home screen image to 544 x
390 pixels before saving it to the in-dash computer.
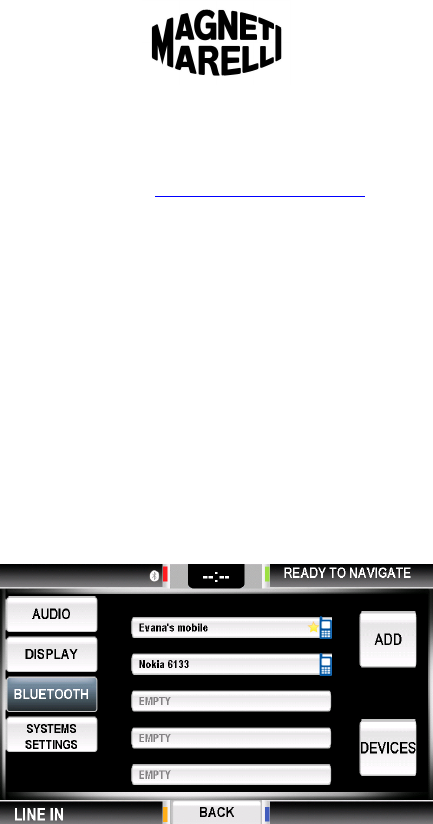
Page 48 – February 5, 2009 Edition
www.fordworksolutions.com / 1.800.624.2726 / fordtechhelp@hunt-radio.com
Bluetooth® Settings
Your Ford Work Solutions computer is compatible with many Bluetooth
®
phones and devices. Check www.FordWorkSolutions.com for a complete list
of compatible phones.
The Ford Work Solutions computer allows you to pair up to four Bluetooth
®
phones and four Bluetooth
®
devices. See below for instructions on pairing
phones.
Pairing a Phone
Follow these instructions to pair your Bluetooth
®
compatible phone with
your Ford Work Solutions system.
STEP 1 Enable the Bluetooth
®
feature on your phone (see
your phone’s owner’s manual).
STEP 2 From your computer home screen, press “Settings” >
“Bluetooth.”
STEP 3 Once in the Bluetooth Settings screen, you will see a
list of the phones paired with your system (shown
below). To see the list of paired devices, press the
“Devices” button.
To add a phone, touch the “Add” button.
STEP 4 The system will generate a unique PIN on-screen
(as shown on the following page).
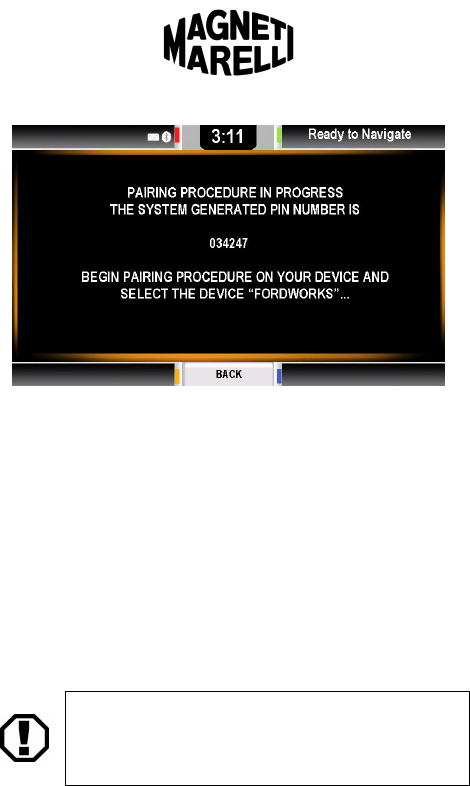
Page 49 – February 5, 2009 Edition
www.fordworksolutions.com / 1.800.624.2726 / fordtechhelp@hunt-radio.com
STEP 5 Begin the pairing procedure on your Bluetooth
®
phone
(see the phone owner’s manual for instructions).
STEP 6 On the pairing screen on your phone, select “Ford
Work Solutions” to proceed.
STEP 7 Enter the system-generated PIN on your phone. The
system will attempt to create a secure connection.
This may take a few minutes.
STEP 8 Once the connection is created, the FWS screen will
say “Pairing Successful.”
STEP 9 The confirmation screen will time out after five
seconds, and you will see your phone on the list of
paired phones.
If you receive a message stating “Pairing Failed,” begin the
pairing process again. Ensure that your phone’s Bluetooth®
feature is turned on and that your phone is compatible with
the in-dash computer.
Phone / Device Properties
Once your phone or device is paired with the system, the Properties
screen allows you to adjust connection settings. An example Properties
screen is shown on the following page.
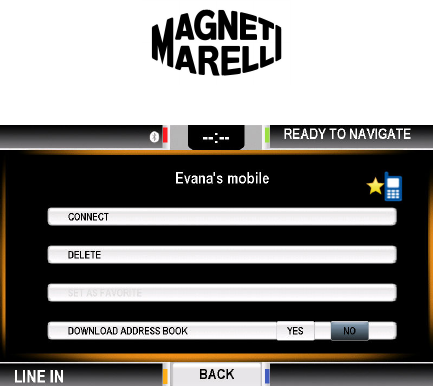
Page 50 – February 5, 2009 Edition
www.fordworksolutions.com / 1.800.624.2726 / fordtechhelp@hunt-radio.com
Follow the instructions below to connect and delete, set favorite, and
download your address book.
Accessing the Properties Screen
Follow these steps to access the Properties screen.
STEP 1 Press “Settings” > “Bluetooth
®
” > “Phones” (or
“Devices”).
STEP 2 Press the button containing your phone / device name.
STEP 3 The Properties screen will appear.
Reconnecting a Phone or Device that is Already Paired
If multiple phones or devices are paired with your system, you may
need to tell the in-dash computer to reconnect to your desired phone or
device.
STEP 1 Access the Properties screen for the phone / device
(see Accessing the Properties Screen above).
STEP 2 Ensure that the Bluetooth
®
feature is turned on in your
phone / device.
STEP 3 Press the “Connect” button to reconnect to your phone
/ device.
STEP 4 If the connection is successful, “Connection
Successful” will appear on-screen.
If the connection fails, “Connection Failed” will appear
on-screen (return to Step 1).
Page 51 – February 5, 2009 Edition
www.fordworksolutions.com / 1.800.624.2726 / fordtechhelp@hunt-radio.com
STEP 4 Once the connection is complete, the main Settings
screen will appear.
Up to four phones and four devices may be paired with the
system at once, but only one phone may have an active
Bluetooth® connection to the system at any particular time.
Several devices may have an active connection at once.
Devices generally remain connected with the system until
deleted. Simply begin using the device to reconnect.
Once the Bluetooth® keyboard has been paired with the
system, its connection can be re-established when
necessary by pressing the “Applications” button.
Deleting a Phone / Device
Follow the instructions below to delete a paired phone / device.
STEP 1 Access the Properties screen for the desired phone or
device (see Accessing the Properties Screen above).
STEP 2 Press the “Delete” button to delete the selected phone /
device.
Setting a Phone as Favorite
If you want the system to try connecting to your phone automatically
whenever the in-dash computer is turned on, you need to set your
phone as a favorite. Follow the instructions below to do so.
STEP 1 Access the Properties screen for your phone (see
Accessing the Properties Screen above).
STEP 2 Press the “Set as Favorite” button.
Only one phone may be set as a favorite. To apply this
setting to a different phone, connect the alternate phone to
the system and then repeat the procedure outlined above
for the alternate phone.
Downloading Your Phone Book
In order to take full advantage of the FWS system’s voice command
feature and to see caller ID information on-screen, you will need to
copy your phone’s address book onto the FWS in-dash computer. To
do so, connect your phone to the system and then follow the
instructions on the following page.
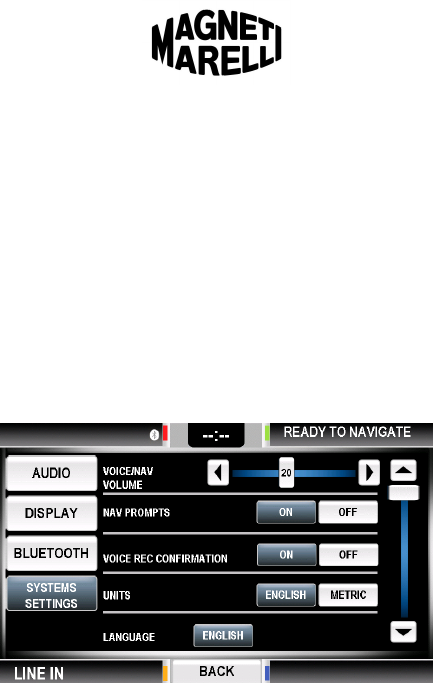
Page 52 – February 5, 2009 Edition
www.fordworksolutions.com / 1.800.624.2726 / fordtechhelp@hunt-radio.com
STEP 1 Access the Phone Properties screen for your phone.
STEP 2 On the Download Phone Book bar, press the “Yes”
button.
STEP 3 Wait while your address book is downloaded to the
system. This may take a few minutes.
STEP 4 To confirm that your address book has been
downloaded, access the Phone menu and press the
“Phone Book” button. You should see alphabetical
choices listed on-screen.
System Settings
If you press the “System Settings” button, the screen shown below will
appear.
On this screen, you can select from the following features:
Voice / Nav Volume
This setting adjusts the volume of the audible instructions and
navigation instructions provided by the FWS system. To increase
volume, press the “>” button. To decrease volume, press the “<” button.
Nav Prompts
This setting turns the navigation system’s voice guidance off and on.
Voice Recognition Confirmation
The voice command system repeats your commands to ensure it has
properly understood your command (e.g., you say “Phone” and the
system responds, “Phone”). The Voice Recognition Confirmation
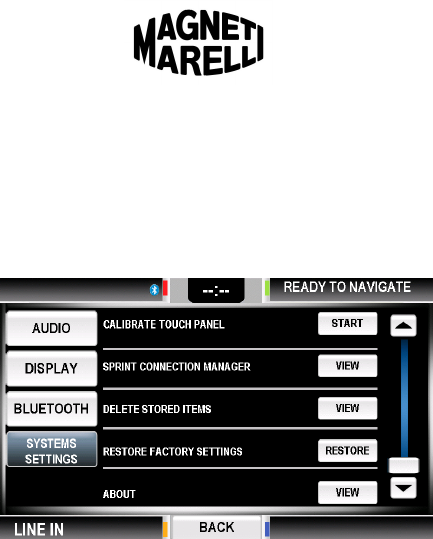
Page 53 – February 5, 2009 Edition
www.fordworksolutions.com / 1.800.624.2726 / fordtechhelp@hunt-radio.com
setting allows you to turn the system’s confirmation response off and
on.
Units
Distance units will be set to English (miles) at the factory. If you wish to
change distance units to Metric (kilometers), you can do so here.
If you scroll down to the second page of System Settings, you will see the
remaining options shown below.
On the System Settings screen shown above, you can select from the
following features:
Calibrate Touch Panel
In the event that your system does not properly recognize your touch
commands, you may wish to recalibrate the touch panel. Follow the
instructions below to do so.
STEP 1 On the Calibrate Touch Panel row, press the “Start”
button.
STEP 2 Follow the on-screen instructions to recalibrate the
touch panel.

Page 54 – February 5, 2009 Edition
www.fordworksolutions.com / 1.800.624.2726 / fordtechhelp@hunt-radio.com
Sprint
®
Connection Manager
This feature provides the following Sprint® information and options:
Information – This information will be helpful when contacting Sprint
®
.
Signal strength
Roaming status
Phone number (assigned to the in-dash computer)
ESN number
Connect / disconnect options
Activation Wizard – The options available in Activation Wizard will
help you set up your Sprint
®
Wireless Broadband connection.
First time activation
Installation of new modem
Reinstallation of modem
Other (for diagnostics only)
For more information on your Sprint
®
connection, reference the Sprint
®
manual provided in your owner kit.
Restore Factory Settings
This feature allows you to restore your settings to the factory default.
Restoring factory settings will not delete programs, files or
radio presets stored on your in-dash computer.
Delete Stored Items
This feature will delete all of your stored data and return the system to
its original state. All personal files / programs, navigation data and
paired phones / devices will be removed from the system.
In the event that you sell your vehicle, you may wish to use
this feature to clear the computer of all personal data.
About Your Computer
This feature allows you to view which version of FWS software you are
running on your in-dash computer.
Clock Settings
To adjust your computer’s clock, simply press the time in the upper
status bar on-screen. The screen shown on the following page appears.
Since the time is obtained from the GPS module, this
feature may be delayed in areas with poor GPS visibility.
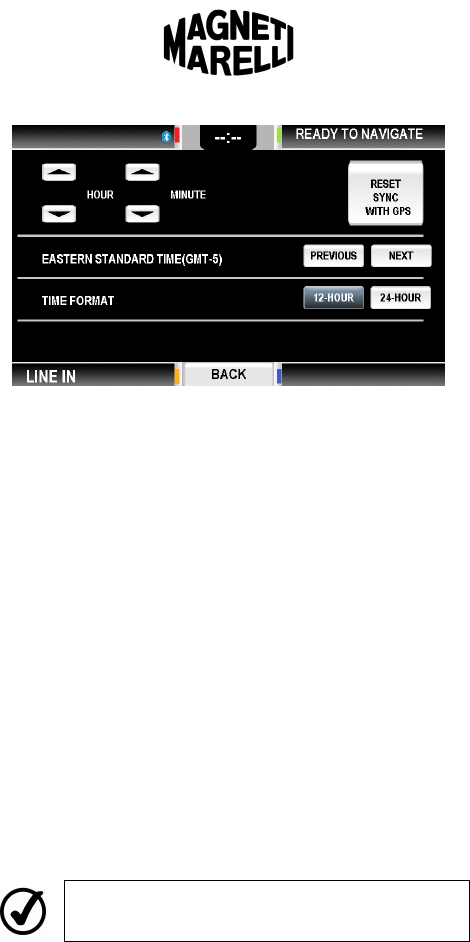
Page 55 – February 5, 2009 Edition
www.fordworksolutions.com / 1.800.624.2726 / fordtechhelp@hunt-radio.com
You will not be able to adjust the time until it has been received from
the GPS module. Once the time appears, the following settings are
available:
Time Selection: In the upper left portion of the screen, you may scroll
up and down to adjust the hour and minute. You will be able to adjust
the time once it has been recognized by the GPS system.
Reset Sync with GPS: In the upper right portion of the screen, you
may direct the system to re-synchronize the time with GPS data.
Time Zone: Select the “Previous” or “Next” buttons to change from one
time zone to another. The default time zone is Eastern Standard Time.
Time Format: You may select whether to show the time in 12-hour or
24-hour format by pressing the appropriate button. The default format
is 12-hour.
Voice Commands – Settings
You can access Settings Mode with voice commands. To do so, follow
the instructions below:
STEP 1 Press the “Voice” button and wait for the system to
prompt you with, “Say a command.”
STEP 2 Clearly say “Settings.”
STEP 3 The system will confirm your command by
responding, “Settings” and will go to Settings Mode.
Once you have entered the Settings Mode, all remaining
functions must be accessed using the buttons available on-
screen.
Page 56 – February 5, 2009 Edition
www.fordworksolutions.com / 1.800.624.2726 / fordtechhelp@hunt-radio.com
Troubleshooting
Resetting Your Computer
You may reset your computer by pressing and holding the “Power” button for
approximately 10 seconds.
Note that a loud speaker pop may occur when the in-dash
computer is reset or subsequently reboots. This pop will not
damage your in-dash computer or vehicle speakers.
Frequently Asked Questions
Q: Why won’t my system turn on?
A: Make sure that your key is in the ignition and turned to the Accessory
or On position.
Q: Why won’t my Tool Link™ application work?
A: Make sure your vehicle is equipped with the optional Tool Link™
equipment. If the necessary equipment is installed, refer to the Tool Link™
manual included with your owner kit.
Q: Can I watch TV or play DVDs with this system?
A: The current version does not support TV, DVDs or Flash animations /
videos.
Q: Can I plug in a video-audio RCA cable?
A: The current version does not support A/V RCA connections.
Q: Why can’t I access the Internet?
A: Contact Sprint
®
to ensure that you have an active and current Sprint
®
Mobile Broadband account.
Q: Why can’t I pair my phone to the system?
A: Make sure that your phone is Bluetooth
®
capable and that the Bluetooth
®
feature is turned on. Refer to your phone’s manual for pairing instructions.
Check www.FordWorkSolutions.com to make sure your phone is
compatible with Ford Work Solutions.
Q: Why doesn’t my song title display on the screen?
A: The current software version does not display song data for CDs if not
contained in the audio file.
Q: Why isn’t my navigation system routing properly?
A: Be sure your vehicle has a clear view of the sky and the GPS signal is
strong. The system may not work properly in a city environment, as tall
buildings may block the GPS signal. Check to confirm that the Garmin SD

Page 57 – February 5, 2009 Edition
www.fordworksolutions.com / 1.800.624.2726 / fordtechhelp@hunt-radio.com
card is properly inserted into the SD card slot. Also, check to be sure you
have the most recent Garmin
®
maps. New maps are published on a
regular basis to support newly completed roadways. Refer to your Garmin
®
owner’s manual for more information.
Q: Why won’t my printer work with the system?
A: Only the HP
®
Bluetooth
®
printer available from Ford is certified to work with
the FWS system.
Q: Why won’t the computer read my USB drive?
A: Remove your USB drive and reinsert it. If your USB drive still does not
work, it may not be compatible with the in-dash computer. Try an alternate
USB drive. If no USB drives work, visit www.FordWorkSolutions.com or
call 1-800-624-2726 to obtain service.
Q: How can I find out what Bluetooth
®
phones and devices work with my
system?
A: Visit www.FordWorkSolutions.com for a list of compatible Bluetooth
®
phones and devices.
Q: How do I get a LogMeIn
®
account?
A: See the LogMeIn
®
owner’s manual provided in your owner kit, or check
www.LogMeIn.com/Ford for more information.
Q: Where can I obtain service if my system is malfunctioning?
A: Visit www.FordWorkSolutions.com or call 1-800-624-2726 for instructions
on how to obtain service.
Q: Can I add aftermarket stereo equipment to my system?
A: Changes to your vehicle’s stereo system are at your own discretion and
will most likely void your warranty. Review the warranty information
provided in your vehicle owner’s manual for warranty details.
Q: Can I install software to my FWS system?
A: No. External software cannot currently be installed on the system. Updates
may be available in the future to allow installation of software that has
been approved by Ford or a third party partner.
Q: Why won’t my computer screen respond?
A: Wait for the system to respond or perform a hard reset by holding down
the “Power” button for 10 seconds. This will close any open files and clear
the system’s memory. Note: You will lose any information that has not
been saved.

Page 58 – February 5, 2009 Edition
www.fordworksolutions.com / 1.800.624.2726 / fordtechhelp@hunt-radio.com
Contacting Magneti Marelli
If you wish to contact Magneti Marelli regarding your Ford Work Solutions
in-dash computer, please use the contact information provided below:
Phone: 1-800-624-2726
E-mail: fordtechhelp@hunt-radio.com
Hours: 9:00 a.m. to 5:00 p.m. EST

Page 59 – February 5, 2009 Edition
www.fordworksolutions.com / 1.800.624.2726 / fordtechhelp@hunt-radio.com
Index
A
Application Mode 13-15, 36
Calculator 43
Calendar 43
E-mail 40
File Manager 41
Accessing Files on a USB Dive 42
Backing Up Files to a USB Drive 42
LogMeIn® 9, 11, 16, 43, 57
Opera Internet Browser 37-39
Accessing a Website 37
Accessing the On-Screen Keyboard 37
Favorites 37
Full-Screen Mode – Accessing 39
Full-Screen Mode – Exiting 39
Home Page Setup 38
Picture Viewer 38
Scrolling 39
PDF Reader 41
Opening Saved PDF Files 41
Saving PDF Files 41
Presentations 40-41
Spreadsheet Program 39
Tool Link™ 43, 56
Voice Commands (Applications) 44
Word Processor 39
B
Backing Up Files
See Application Mode: File Manager
Basic Operation 13-14
Accessing Applications 13
Accessing Computer Modes 13
Accessing On-Screen Keyboard 14
Bluetooth® Pairing Overview 14
See also – Settings: Bluetooth® Settings
Closing an Application 14
Home Screen 13
See also – Settings: Display Settings:
Home Screen Image
Running Applications in the Background 14
Settings Overview 14
See also – Settings
Switching Between Computer Modes 13
Bluetooth®
See Settings: Bluetooth® Settings
Button Definitions 12
Hard Buttons 12
Soft Buttons 12
C
CD Player
See Media Mode: CD Player
Computer Modes
See Application Mode
See Media Mode
See Navigation Mode
See Phone Mode
Calculator 43
Calendar 43
Crew Chief 16
D
Display Settings
See Settings: Display Settings
Driver Distraction Warning 16
See also – Warnings and Notices:
Safety Warnings
E
E-mail 40
F
FAQs 56-57
FCC Notice 10
File Manager 41-42
G
Garmin® Navigation
See Navigation Mode
H
I
Internet Browser
See Application Mode: Opera Internet Browser
J
K
Keyboard
See Peripherals and Accessories

Page 60 – February 5, 2009 Edition
www.fordworksolutions.com / 1.800.624.2726 / fordtechhelp@hunt-radio.com
L
Line In
See Media Mode: Line In
Liquid Crystal Display (LCD) 7-8
Care Instructions 8
Settings – See Settings: Display Settings
Warnings 7-8
LogMeIn® 9, 11, 16, 43, 57
M
Media Mode 13-15, 29-33
CD Player 31-32
Available CD Player Functions 31-32
Continue Playback 31
Scan Track 32
Skip Track 32
Start Playback 31
Stop Playback 32
On-Screen Information 32
Steering Wheel Controls 32
Skip Track 32
Volume Control 32
Line In 32-33
Available Line In Functions 32-33
Volume 32
On-Screen Information 33
Steering Wheel Controls 32
Volume 32
Radio 29-30
Available Radio Functions 29-30
Band 29
D. Tune 30
Scan 29
Scan P. 30
Seek 30
On-Screen RDS Information 30
Steering Wheel Controls 30
Seek 30
Volume Control 30
Presets 29, 30
Voice Commands (Media) 33
N
Navigation Mode 13-15, 34-35
Full-Screen View 34
Icon View 34
Voice Commands (Navigation) 35
O
Operating System 11
Opera Internet Browser 37-39
See also – Application Mode: Opera
Internet Browser
P
PDF Reader 41
Peripherals and Accessories 17-18
Bluetooth® Keyboard 17
Bluetooth® Printer 18
On-Screen Keyboard 17
Phone Mode 13-15, 19-28
Call History 22
Phone Book 21
Placing a call 20
Receiving a call 21
Text Messaging 23-26
Voice Commands (Phone) 26-28
Picture Viewer 38
Presentations 40-41
Printer
See Peripherals and Accessories
Push-to-Talk (PTT)
See Voice Commands
Q
R
Radio
See Media Mode: Radio
Resetting the Computer 56
S
SD Memory Card 15, 41, 56-57
Service 6, 7, 8, 9, 41, 42, 58, 58
Care and Cleaning 8
Contacting Magneti Marelli 58
Customer Service 6, 58
Repairs / Service 6, 7, 8, 9, 41, 42, 57
Settings 45-55
Audio Settings 45
Bluetooth® Settings 48-52
Deleting a Phone / Device 51
Downloading a Phone Book 51-52
Favorite Phone Setting 51
Pairing a Phone 48-49
Properties – Phone / Device 49-50
Reconnecting a Phone / Device 50-51
Display Settings 45-47
Day / Night Mode 46
Home Screen Image 46-47
Screen Brightness 46
System Settings 52-55
About the Computer 54
Calibrate Touch Panel 53
Clock Settings 54-55
Reset Sync with GPS 55

Page 61 – February 5, 2009 Edition
www.fordworksolutions.com / 1.800.624.2726 / fordtechhelp@hunt-radio.com
Clock Settings (Cont’d)
Time Selection 55
Time Zone 55
Time Format 55
Delete Stored Items 54
Navigation Prompts 52
Restore Factory Settings 54
Sprint® Connection Manager 54
Units 53
Voice / Navigation Volume 52
Voice Recognition Confirmation 52-53
Voice Commands (Settings) 55
Spreadsheet Program 39
Sprint® 9, 11, 16, 20, 23, 34, 37, 43, 45, 54, 56
Broadband Network 16
Connection Manager 54
Modem 10, 20, 23, 37, 54
Phone Number (On-Board) 54
T
Text Messaging 23-26
Tool Link™ 43, 56
U
Usage Limitations 9, 54
USB Port 41-43
See also – Application Mode: File Manager
V
Voice Commands 15, 26-28, 33, 35, 44, 55
Applications 44
Media 33
Navigation 35
Phone 26-28
Settings 55
W
Wallpaper / Home Screen Image 46-47
See Also – Settings: Display Settings
Warnings and Notices 7-10
Caring for the Computer 8
Driver Distraction 16-17
FCC Notice 10
General Notices 7
Laser Safety 9
Safety Warnings 7-8
Usage Limitations 9, 54
Warranty 5-6
Word Processor 39
X
Y
Z