Marelli Europe S p A N145BT N145BT Multi Media Vehicle Radio System User Manual
Magneti Marelli S.p.A. N145BT Multi Media Vehicle Radio System
Users Manual

Multi Media System

2
The vehicle is equipped with the IT Maserati Multi Media System which includes
the vehicle radio system with AUDIO CD player/CD ROM drive/MP3 CD player,
GSM Dual Band mobile telephone (also available in USA version), navigator, on-
board computer and MP3 jukebox.
The system is installed in an ergonomic position for both the driver and the
passenger, and the user-friendly graphics on the front panel allows quickly
identifying the controls.
In the following pages you will fi nd the instructions for its use. We advise you
to read them carefully and thoroughly and to keep them within reach at all
times (e.g. in the glove compartment).
Warning: Only use the the maps provided, which are stored on the hard disk of
the system for the Maserati Multi Media System
USA and Canada versions
Contains transmitter FCC ID: 09EQ24AU001
Contains transmitter IC ID: 3651C-Q24AU001

1
2
3
4
5
6
7
8
9
10
3
Contents
Controls and general information
Audio functions
Mobile phone
Navigator
Traffi c information
On-board computer (TRIP)
System confi guration
Voice controls
Appendix Japanese version
Table of contents

4

1
5
Controls and general information
Control description 7
Advice 13
General information 16
Switching-on / off 17
Adjusting the volume 17
22
1 2 3 4 6 7 8
9
10
11
5
21 20 16 15 14 12131819 17
Fig. 1
1
6

1
7
Control description
Some controls have multiple functions, depending on the system current operating conditions. In some cases, the
activation of the function selected is controlled by the pressure on the button (short or prolonged press) as listed in the
table below.
Pos. Symbol Button pressed briefl y Button pressed at length Ref. page
1CD eject 28
2 SOURCE Mode selection: radio, CD or Jukebox.
3 BAND Radio mode: Frequency band selection: FM1 – FM2
– FMAST – AM
Radio mode: Automatic storage
of radio stations in FMAST
(Autostore).
23
4Telephone mode activation.
Send call.
Accept incoming call.
42
5 RPT Activates the navigation message repetition.
6 ESC Exits a selection list or goes to the previous menu level.
7Radio mode: radio frequency shift to the next station
in preset steps, starting from the station currently
tuned.
MP3 CD and Jukebox mode: previous album selection.
Menu: scrolls through the menus.
23
30
8With Basic Hi-Fi system:
Radio, CD and Jukebox mode: audio adjustment (music
ambience, bass, treble,Fr-rr balance, L-R balance,
loudness, automatic volume adjustment).
With Bose Hi-Fi system (optional):
Radio, CD and Jukebox mode: audio adjustment (bass,
treble, Fr-rr balance, L-R balance, Center Point ).
20
20

1
8
Pos. Symbol Button pressed briefl y Button pressed at length Ref. page
9SIM card adapter eject button. 40
10 SIM card adapter 40
11 Radio mode: auto store of the next radio station.
CD and Jukebox mode: go to next track.
Menu: scrolls through the menus.
CD audio mode: track fast
forward
23
28
12 LIST Radio mode: displays the list of stations receivable in
alphabetical order.
AUDIO CD mode: displays the list of tracks.
MP3 CD and Jukebox mode displays the list of albums
and tracks.
Radio mode: updates the list of
stations
27
30
32
13 Telephone mode, Navigation, Audio (Radio, audio
CD and MP3, Jukebox) and Trip: opens the function-
related menu.
Menu: turn to select the function, the item and the
value, which are then confi rmed by pressing the knob
itself.
14 Radio mode: radio frequency shift to the previous
station in fi xed steps, starting from the station
currently tuned.
MP3 CD and Jukebox mode: next album selection.
Menu: scrolls through the menus.
23
30
15 MENU Access to main menu Access to Help menu.

1
9
Pos. Symbol Button pressed briefl y Button pressed at length Ref. page
16 Radio mode: auto store of the previous radio station.
CD and Jukebox mode: goes to previous track if
selected within the fi rst 3 seconds of track playing,
otherwise the track is played again from the
beginning.
Menu: scrolls through the menus.
CD audio mode: track fast
rewind
23
28
17 Radio mode: recalls the stations stored (1– 6)
Telephone mode: dial phone number: (1 – 12) or input
text. Quick selection of a name in the directory and on
the SIM card that starts with the selected letter.
Storage of current station (1 – 6). 23
40
18 Telephone mode: Reject incoming call.
Drop call.
43
19 TA/PTY TA (Traffi c Announcements): Activation of
automatic reception of traffi c information.
Functions availableonly in the countries where RDS is
available.
PTY (Type Program): Activation
of the search fi lter in relation
to the broadcasting station
category.
24-25
20 With the key in position MAR or the engine on: Audio
OFF/ON
With the key in position STOP or the gearshift lever in
PARK: system activation / deactivation
Rotation: to adjust the volumes. 17
21 DARK 1st pulse: partial display darkening.
2nd pulse: total display darkening.
3rd pulse: back to normal display brightness.
System reinitialisation.
22 MODE Changes current display on the right-hand side of
the screen (Radio, Map, Onboard Computer (TRIP),
Telephone).
23 + Increases the sound system volume. 17

2423
32 33 28 27
25 26
29
30
31
29
30
31
Fig. 2
1
10

1
11
Pos. Symbol Button pressed briefl y Button pressed at length Ref. page
24 - Decreases the sound system volume. 17
25 Radio mode: Search for the fi rst
tuneable station with
higher frequency;
CD and Jukebox mode: next track selection.
CD audio mode: track fast
forward.
23
28
26 Radio mode: Search for the fi rst
tuneable station with
lower frequency;
CD and Jukebox mode: goes to previous track if
selected within the fi rst 3 seconds of track playing,
otherwise the track is played again from the
beginning.
CD audio mode: track fast
rewind
23
28
27 SRC Mode selection: radio, CD or Jukebox.
28 Mute function on/off.
29 Radio mode: radio frequency shift to the next station
in preset steps, starting from the station currently
tuned.
MP3 CD and Jukebox mode: selects next folder.
Menu: scrolls through the menus.
23
30
30 Radio mode: radio frequency shift to the previous
station in fi xed steps, starting from the station
currently tuned.
MP3 CD and Jukebox mode: selects the previous folder.
Menu: scrolls through the menus.
23
30
31 Confi rms the function, item or value selected.

1
12
Pos. Symbol Button pressed briefl y Button pressed at length Ref. page
32 Voice control function activation/deactivation.
Navigator Mode: Enables the guiding voice during the
trip guidance and also displays information pertaining
to the guidance session.
33 Telephone mode activation.
Send telephone call.
Accept incoming call.
End telephone call
in progress.
Reject incoming telephone call. 42

1
13
Advice
Road safety
It is advisable to learn to use the
various functions of the Multi Media
System before setting off, especially
the radio (e.g. storing the stations).
Setting a too high volume
may endanger the life of the
driver and other persons.
Therefore, always adjust the volume
to such a level that you can still hear
the surrounding ambient noises (e.g.
horns, ambulance and police sirens,
etc.).
Reception conditions
The reception conditions change
continuously while driving. The
reception may be disturbed in the
vicinity of mountains, buildings or
bridges, especially when you are far
from the transmitter of the station
you are listening to.
WARNING: Traffi c information is
normally broadcast at a higher than
normal volume.
Care and maintenance
The Maserati Multi Media System has
been constructed to assure long-
lasting operation without requiring
any particular maintenance. In the
event of system failure contact the
Maserati Service Network.
Nevertheless, some care must be
taken to ensure full functional
effi ciency of the Maserati Multi Media
System:
- The display is sensitive to scratches,
cleaning liquids and UV rays
- Should liquids penetrate the
system, it may be irreparably
damaged.
Clean the front panel and the
display using only a soft, clean, dry
and antistatic cloth. Cleaning and
polishing products might damage the
surface.
WARNING: Be careful not to knock
against the display with sharp or
rigid objects and avoid touching it
with your hands. When cleaning the
display, do not exercise any pressure.
WARNING: In the event of a
malfunction, the Maserati Multi
Media System may only be checked
and repaired by the Maserati Service
Network.
WARNING: If the ambient
temperature is very low, the display
will reach its optimal brightness only
after a certain period of operation.
This equipment meets the requirements
of FCC Part 15 Rules subject to the
following two conditions:
1)This equipment must not cause harmful
interference and,
2)This equipment must accept all
interference, including interference that
may cause undesired operation of the
device.
Warning: Changes or modifications not
expressly approved by the party
responsible for compliance could void the
user's authority to operate the equipment.
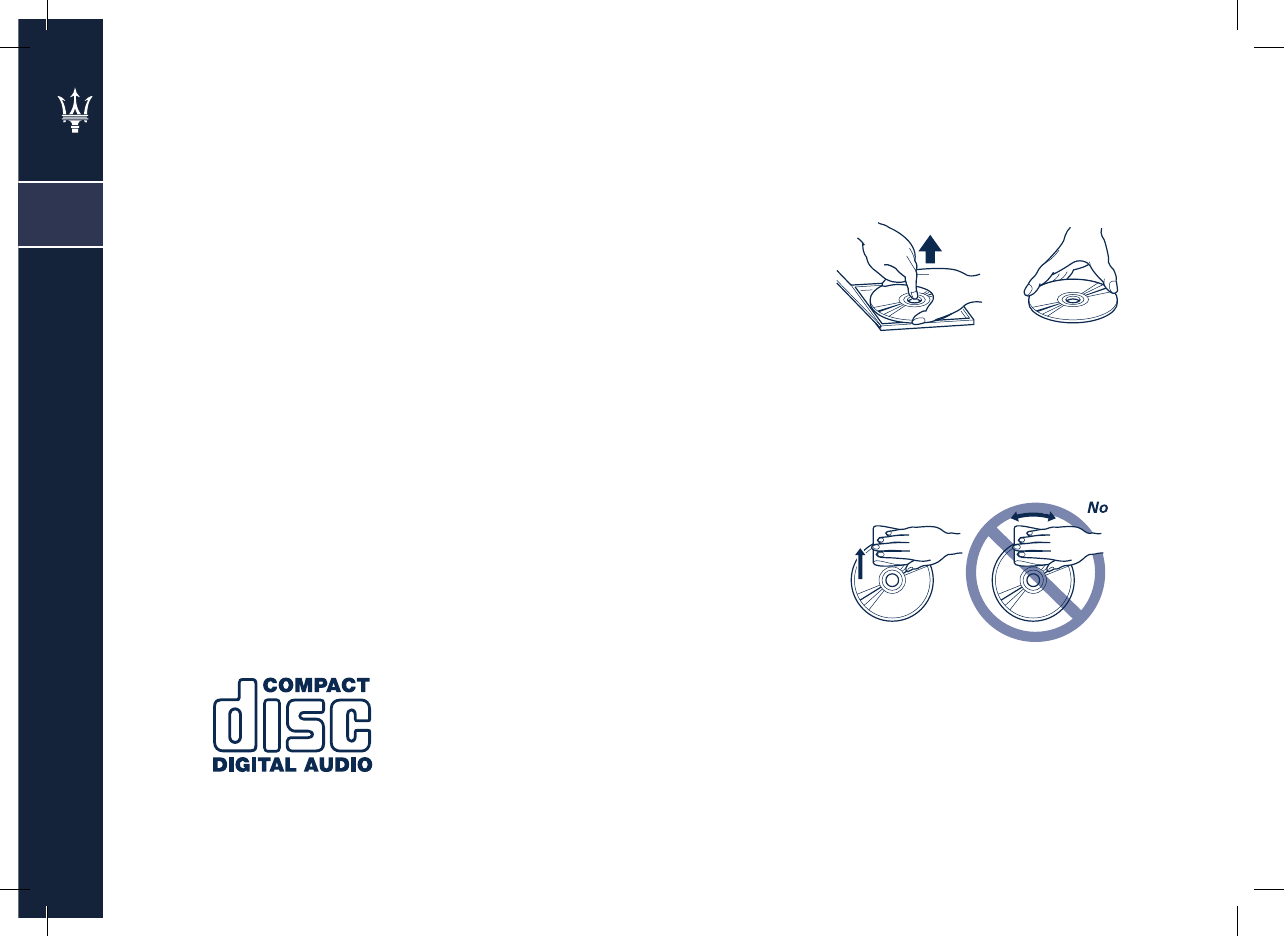
Proper way to hold the
Compact Disc
Removing the disc
1
14
System software update
When new software versions for the
navigation module of the Maserati
Multi Media System become available,
the system can be upgraded to
enable you to benefi t from the
function management improvements
introduced.
The software upgrade is performed
by specialists of the Maserati Service
Network.
Compact Disc
If using the Audio Compact Disc
player, remember that traces of
dirt or marks on the CD may cause
jumping and poor sound quality. The
same occurs when compact discs are
unintentionally bent.
For optimal playing conditions, you
are advised to:
- Use only compact discs that carry
the trademark:
- Thoroughly clean the compact
discs with a soft cloth to remove
fi ngermarks and dust. Hold the CD
by the edge and clean it starting
at the centre working towards the
edge.
- Never use chemical products to
clean CDs (e.g. spray cleaners,
antistatic spray or thinners) as they
may damage the surface.
- After listening to a CD, put it back
in its sleeve to protect it against
marks or scratches, which may
cause jumping when playing the
CD.
- Do not expose compact discs to
direct sunlight, high temperatures
or humidity to prevent them from
deforming.
- Do not stick labels or write on the
recording surface of compact discs.
To take the CD out of its sleeve, press
in the centre of the sleeve and lift out
the CD holding it by the edge.
Always hold compact discs by the
edge. Never touch the surface.
To remove fi ngerprints and dust use a
soft cloth starting at the centre of the
CD working towards the edge.
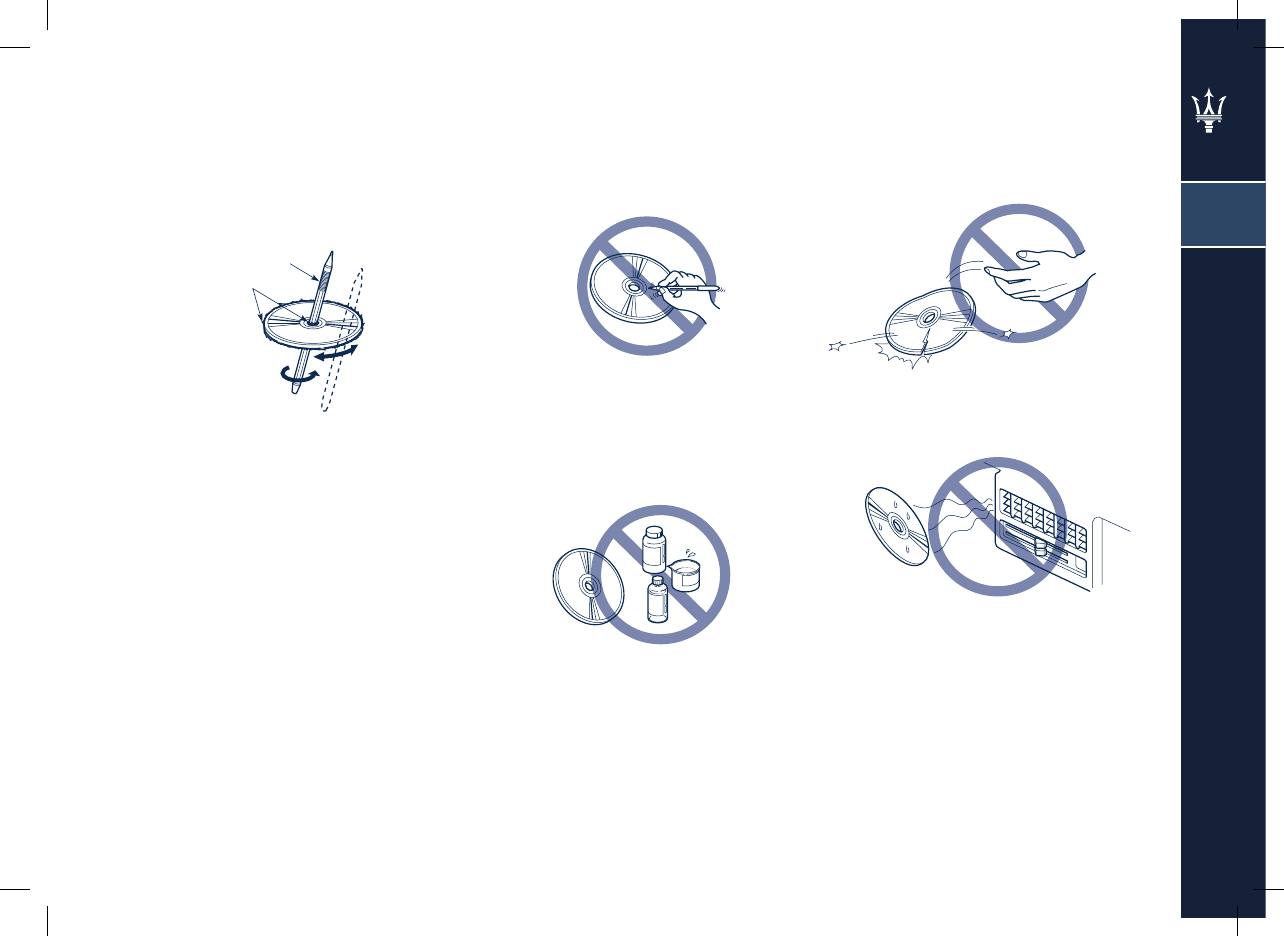
Ball-point pen
Roughness
No
No
No
No
1
15
New discs may be rough around the
edges. When playing these discs,
the CD player may not work or the
sound may jump. To smooth the edge
roughness use a ballpoint pen or
similar.
WARNING: Do not use the protective
fi lm of commercial CDs or discs with
stabilizers, etc. since they might get
jammed in the internal mechanism
and damage the disc.
Notes on compact discs
Do not stick labels or write with
pencils and pens on the surface of
compact discs.
Do not use solvents, such as stain
removers, antistatic sprays or thinners
available on the market to clean
compact discs.
Do not use badly scratched, cracked,
deformed etc. compact discs. Using
such discs will lead to malfunctioning
or damage to the CD player.
Do not expose compact discs to direct
sunlight or any source of heat.

1
16
General information
Important warnings for use and
safety during road circulation
The Maserati Multi Media System
with Radio/Telephone/Navigator/
On-board computer permits user-
friendly control of the vehicle’s main
functions.
To avoid creating conditions that pose
a risk to you and other peole please
follow the below mentioned advice:
- The Maserati Multi Media System
must be used keeping full control
over the vehicle. If you have
any doubts about the use of the
functions, stop to perform the
various operations.
- It is prohibited to use the mobile
phone in the vicinity of explosive
substances.
The navigation system helps you reach
your destination, indicating every
change in the route on the maps
stored on the hard disk.
In fact, when working out the
route, the system takes account of
all the road information stored and
advises you on the best route to
take. Nonetheless, it cannot consider
the traffi c conditions, sudden
interruptions or any other problems.
The navigation system
assists the driver while
driving, providing advice
and suggestions, by means of voice
guidance and graphic information,
for the best route to take for reaching
the set destination The suggestions
provided by the navigation system
do not relieve the driver from full
responsibility for the manoeuvres
made through traffi c while driving,
or from compliance with road
regulations and other provisions
regarding road traffi c. The person
driving the vehicle is always and in
any case responsible for safe driving
on the road.
In any manoeuvre you perform,
always comply with the road
regulations whatever the advice
the navigation system provides.
Should you decide to go off the
recommended route, the navigation
system will work out a new route and
suggest it to you.
1
17
Switching-on / off
With the key in position MAR you can
turn the audio section on and off by
pressing the knob (20). The navigation
messages will nonetheless remain
active.
Adjusting the volume
For safety reasons, if the
volume of any audio source
is higher than 20 when
turning off the system, the volume
will automatically be set to 20 when
turning on again.
The volume of all the sources in the
system can be set using the volume
adjustment knob. Turn the volume
adjustment knob (20) clockwise to
increase the volume and anticlockwise
to decrease it.
The volume control is specifi c for each
sound source and remains stored until
the next adjustment.
It is also possible to preset the
minimum volumes for the telephone
operation, the traffi c news and the
navigation guide’s voice. For more
information, please refer to the
paragraph “Adjusting the volume“ in
the “Confi guration“ chapter.
The warning tone (beep) volume can
be modifi ed only for some warnings.

18

2
19
Audio functions
Audio adjustments 20
Radio mode 23
CD / Jukebox mode 28
Jukebox Mode 30
Audio mode menu 33
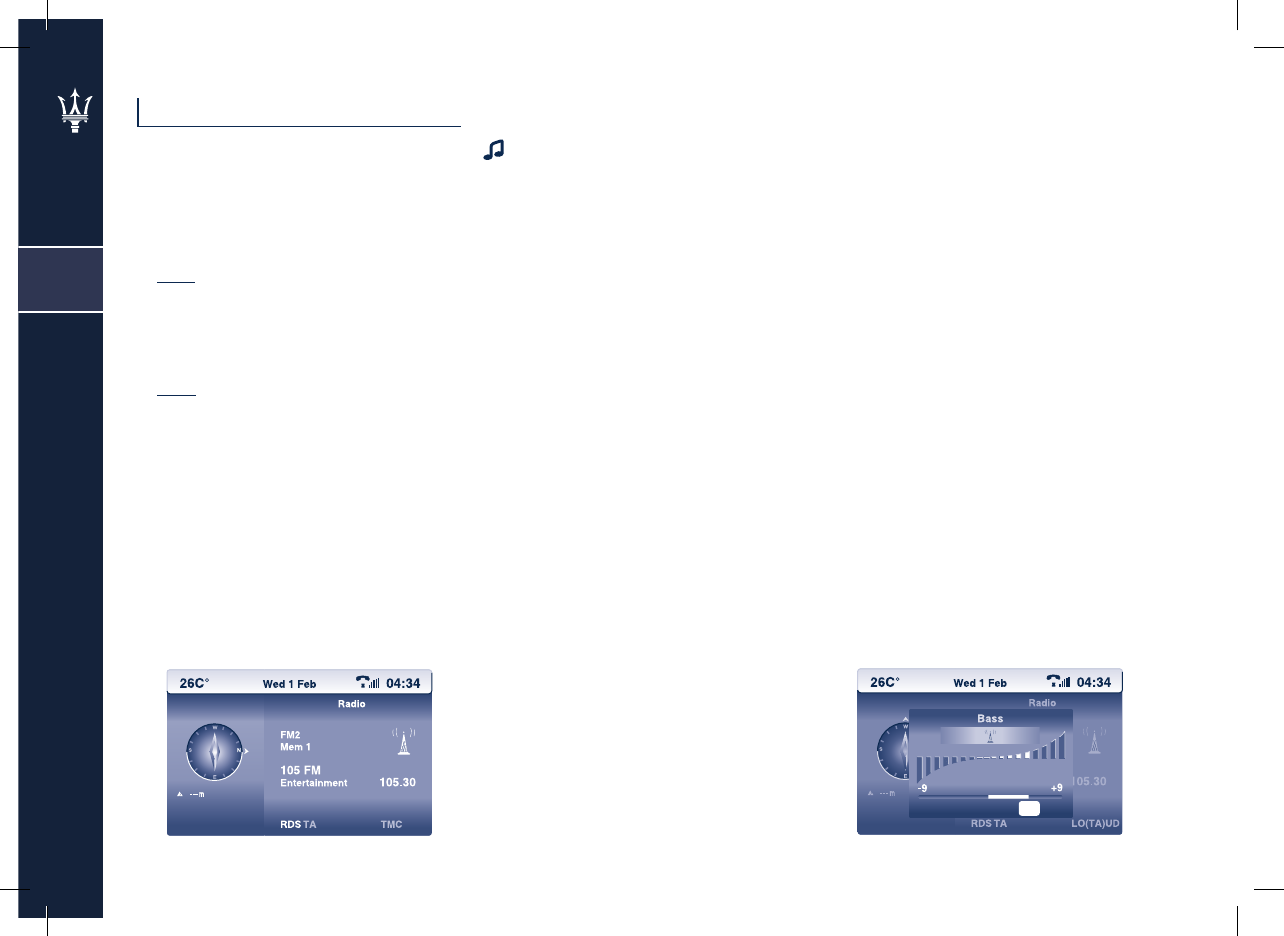
Fig. 3 Fig. 4
2
20
Audio adjustments
With the key in position MAR you can
turn the audio section on and off by
pressing the knob (20), (see Fig. 3).
Depending on the system installed,
the audio adjustments may be:
- Base: Radio, CD and Jukebox mode:
audio adjustment (music ambience,
bass, treble, Fr-Rr balance, L-R
Balance, loudness, automatic
volume adjustment).
- Bose: Radio, CD and Jukebox mode:
audio adjustment (bass, treble,
FR-Rr balance, L-R balance, Center
Point ).
To perform an audio adjustment,
repeatedly press the AUDIO button
(8) to access adjustment of the
bass tones (BASS), treble tones (TREB),
loudness (LOUD), fader (FAD), balance
(BAL), automatic volume and sound
type (musical ambience). The system
stores the data and deactivates audio
adjustment when the button ESC (6)
is pressed or after a few seconds if no
adjustment is made.
WARNING: Bass and treble tone
adjustment is specifi c to each source,
and they can therefore be adjusted
differently in the RADIO, CD or
JUKEBOX modes.
Bass adjustment (BASS)
When “BASS” is shown on the display
(see Fig. 4), turn the knob (13) to
adjust within the following audio
levels:
- “BASS -9” to adjust the bass to the
minimum value
- “BASS 0” to adjust the bass to the
medium value
- “BASS +9” to adjust the bass to the
maximum value.
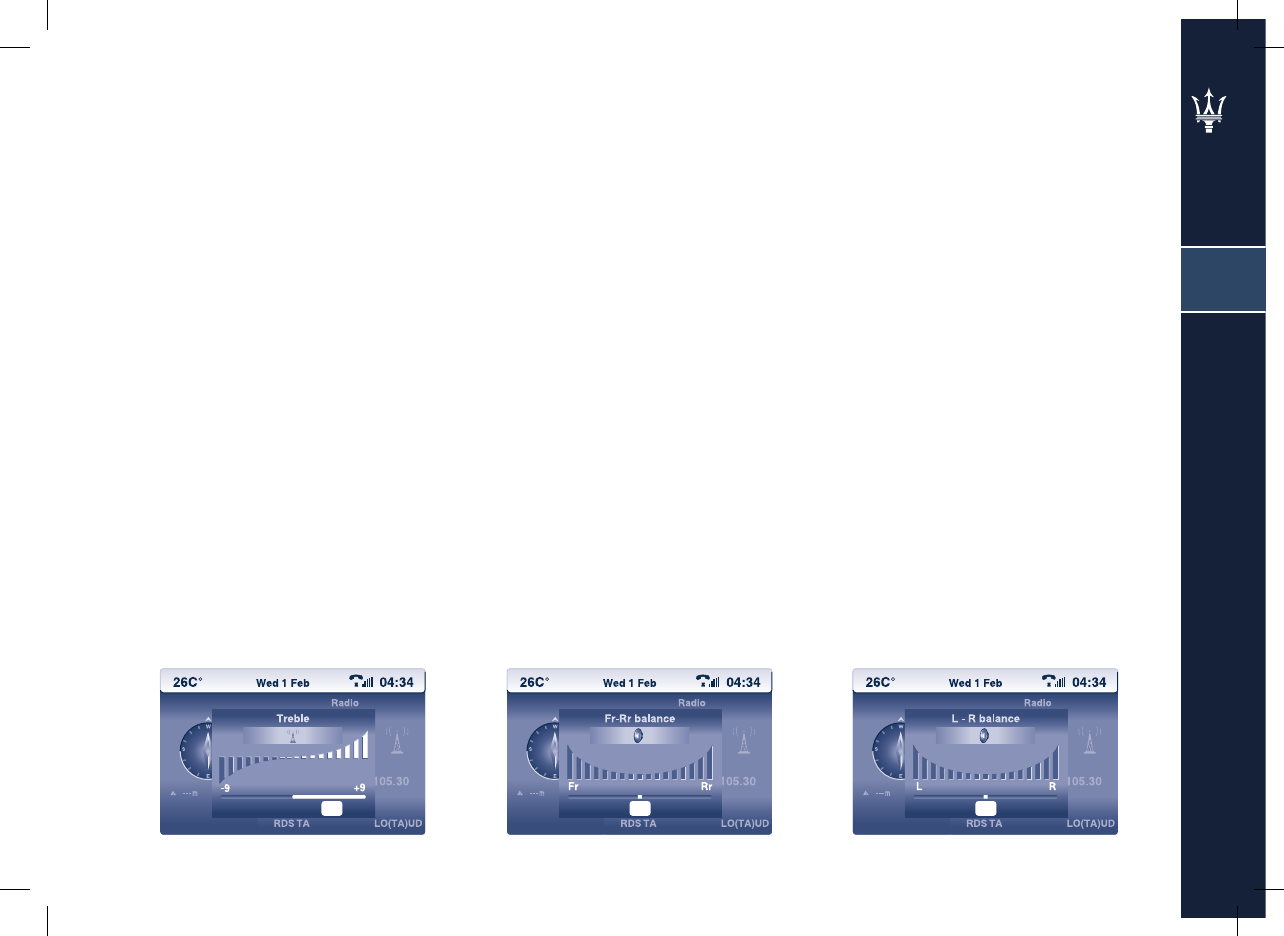
Fig. 5 Fig. 6 Fig. 7
2
21
Treble adjustment (TREB)
When “TREB” is shown on the display
(see Fig. 5), turn the knob (13) to
adjust within the following audio
levels:
- “TREB -9” to adjust the treble to
the minimum value
- “TREB 0” to adjust the treble to the
medium value
- “TREB +9” to adjust the treble to
the maximum value.
Front/rear balance (Fader)
When “Fr-Rr balance” is shown on the
display (see Fig. 6):
- turn the knob (13) clockwise to
amplify the sound emitted by the
rear speakers
- turn the knob (13) anticlockwise to
amplify the sound emitted by the
front speakers.
Right/left balance (Balance)
When “L– R balance” is shown on the
display (see Fig. 7):
- turn the knob (13) clockwise to
ampligy the sound emitted by the
right-hand speakers
- turn the knob (13) anticlockwise to
amplify the sound emitted by the
left-hand speakers.

2
22
Loudness function (LOUD)
This function is not available with
the Bose ® Surround Sound System
(on request), since it is automatically
controlled by the system.
This function allows automatically
amplifying the bass and treble tones
when the volume is low. To activate
or deactivate the function, turn the
knob (13).
Automatic volume correction
This function is not available with
the Bose ® Surround Sound System
(on request), since it is automatically
controlled by the system.
This function allows automatically
adjusting the volume in relation
to the vehicle speed. To activate or
deactivate the function, turn the knob
(13).
Musical ambience
This function is not available with
the Bose ® Surround Sound System
(on request), since it is automatically
controlled by the system.
This function allows setting the
desired sound and the options
available are:
- None
- Classic
- Jazz
- Pop/Rock
- Techno
- Voice
Select the desired sound by turning
the knob (13).
After setting the desired sound,
select and confi rm “OK” by pressing
the knob and the system will
automatically return to the previous
menu.
Center point
This function is available only with
the Bose® Surround Sound System (on
request) and when the CD source is
active.
Equalizing system that converts the
stereo recordings into 8 separate
channels, thus assuring absolute
precision with any volume level.
The automatic output frequency
balancing makes manual adjustments
through switches or knobs
unnecessary.
To activate or deactivate the function,
select and confi rm the corresponding
options by turning and pressing the
knob (13).
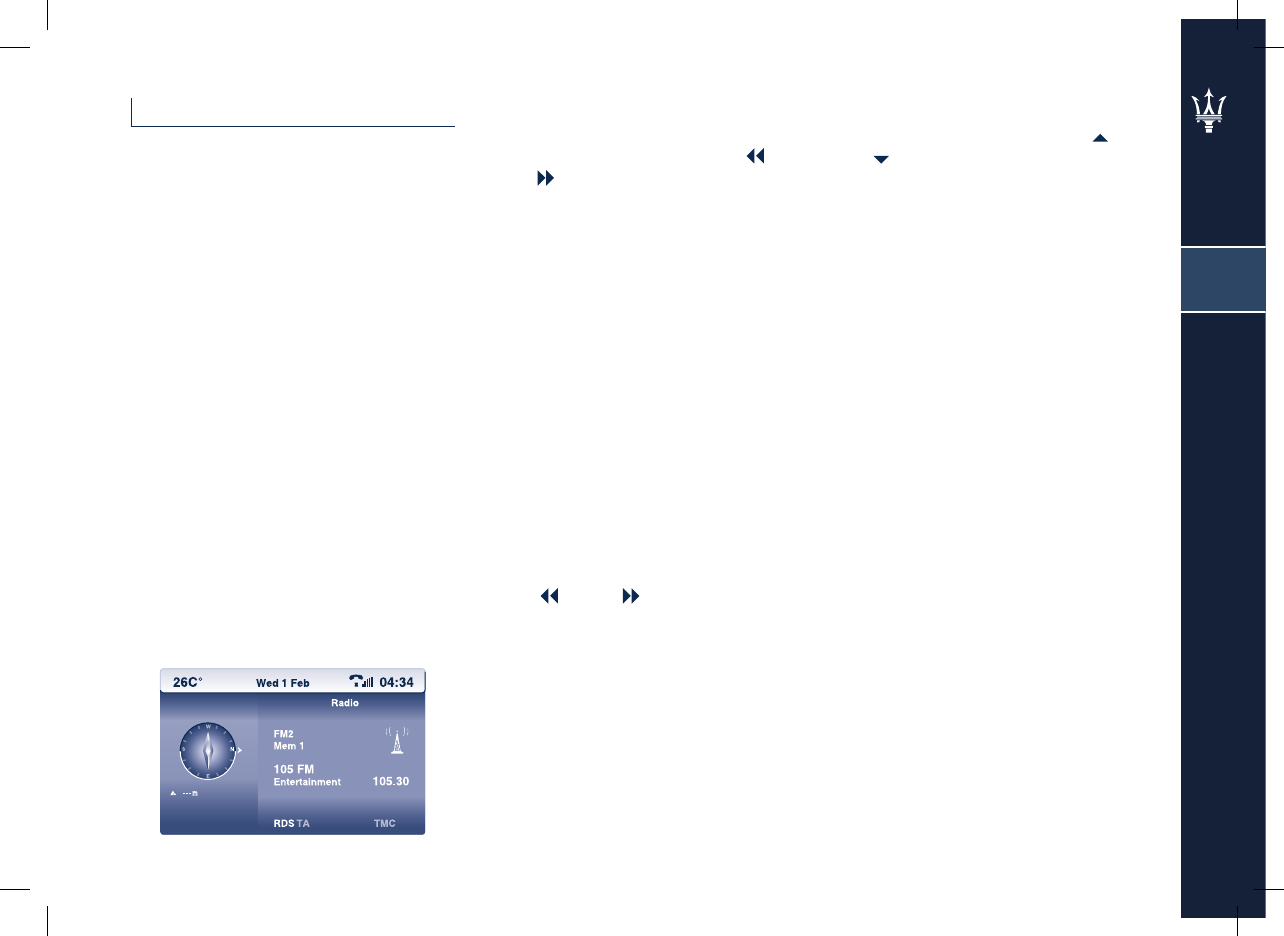
Fig. 8
2
23
Radio mode
Listening to the radio
To select the Radio mode repeatedly
press the button SOURCE (2) or
SRC (27) until the “Radio” mode is
displayed (see Fig. 8).
Frequency band selection
Press the button BAND (3) to
respectively select the FM1, FM2,
FMAST or AM frequency bands.
Automatic station search
To activate automatic station search
briefl y press one of the buttons
(16) or (11) to select the previous or
next station, respectively.
Holding the chosen direction
button down, the frequency bands
are continuously scrolled. When
the button is released, scrolling is
interrupted on
the fi rst receivable station. If the TA
function is active, only the stations
that transmit traffi c information are
selected.
The search for a station is initially
performed with “LO” sensitivity
(selection of the most powerful
stations) and then with “DX”
sensitivity (selection of the weaker
stations).
To directly perform a search with
“DX” sensitivity, twice press the
button (16) or (11).
Manual station search
Briefl y press one of the buttons
(7) or (14). Holding the chosen
direction button down, the frequency
bands are continuously scrolled.
Scrolling is interrupted as soon as the
button is released.
Manual station storage
To manually store the stations,
proceed as follows:
- Select the desired station;
press one of the keys from 1 to 6 on
the keypad (17) and hold it down
until hearing a brief mute which
confi rms that the station has been
stored.

Fig. 9
2
24
Automatic FM station storage
(Autostore)
To activate the “Autostore” function,
press and hold down the button
BAND (3).
When this function is activated, the
radio automatically stores the 6
stations with the strongest signal in
the FMAST band.
During automatic storage, the
message “AUTOSTORE” is shown
on the display. The stations will
automatically be stored under the
keys 1 to 6 of the keypad (17).
When the stations have been stored,
the radio automatically tunes in to
the fi rst station in the FMAST band
corresponding to the frequency
stored under key 1 of the keypad (17).
Each station is stored once only,
except for the regional programmes
that can be stored twice.
When the Autostore function is
active, the system operates as follows:
- At the beginning of the Autostore
function, all the other functions are
disabled
- If changing the listening source
(radio, CD, Jukebox) during the
automatic storage process, the
Autostore function is interrupted.
WARNING: It may occur that the
Autostore function is unable to fi nd
6 stations with a strong signal; in this
case, only those found will be stored.
WARNING: When activating the
Autostore function, the stations
previously stored in the FMAST band
are automatically deleted.
TA (traffi c information) function
(where available)
To activate/deactivate the function,
press the button TA/PTY (19) with the
Radio mode active (see Fig. 9).
When the TA function is active, you
can receive traffi c information.
When traffi c information is
transmitted, the radio automatically
switches to the programme that is
transmitting it. When the information
has been transmitted, the radio
automatically returns to the audio
source you were listening to.
When the TA function is active,
the letters “TA” are shown on the
display; when the letters “TA” are
shown in grey, the function is active
but unavailable for the frequency to
which the radio is tuned.

Fig. 10
2
25
All traffi c information will have
priority over any audio source you are
listening to (RADIO, CD or JUKEBOX).
WARNING:The traffi c information
volume is independent of the normal
radio volume. It can be adjusted with
the volume knob while listening
to the traffi c information. This
adjustment will be stored and used
for the next traffi c information
broadcast. When pressing the button
TA/PTY (19) while listening to the
traffi c information, the broadcast will
be interrupted and the TA function
deactivated.
PTY (Program Type) function
(where available)
The PTY function, where available,
allows giving priority to stations
that transmit specifi c programmes
classifi ed according to the PTY.
The PTY programmes may regard
emergency messages or various other
topics (music, news, etc.).
WARNING: The PTY function is only
available on FM band.
To access the list of PTY programmes,
proceed as follows:
- Hold down the button TA/PTY (19)
to view the list of PTY programmes
on the display (see Fig. 10);
- To scroll down the list turn the
knob (13);
- To select a highlighted programme
type, press the knob (13).
When the PTY function is active,
the letters “PTY” are shown on the
display on the “Radio” page.
List of PTY programmes:
- News
- Current affairs
- Information
- Sport
- Education
- Theatre
- Culture
- Science
- Entertainment
- Pop Music
- Rock Music
- Light music
- Classics
- Classical Music
- Other music
- Weather
- Finance
- Children
- Social affairs
- Religion
- Direct line
- Travel & Touring
- Leisure & Hobby
- Jazz Music
- Country Music
- National music
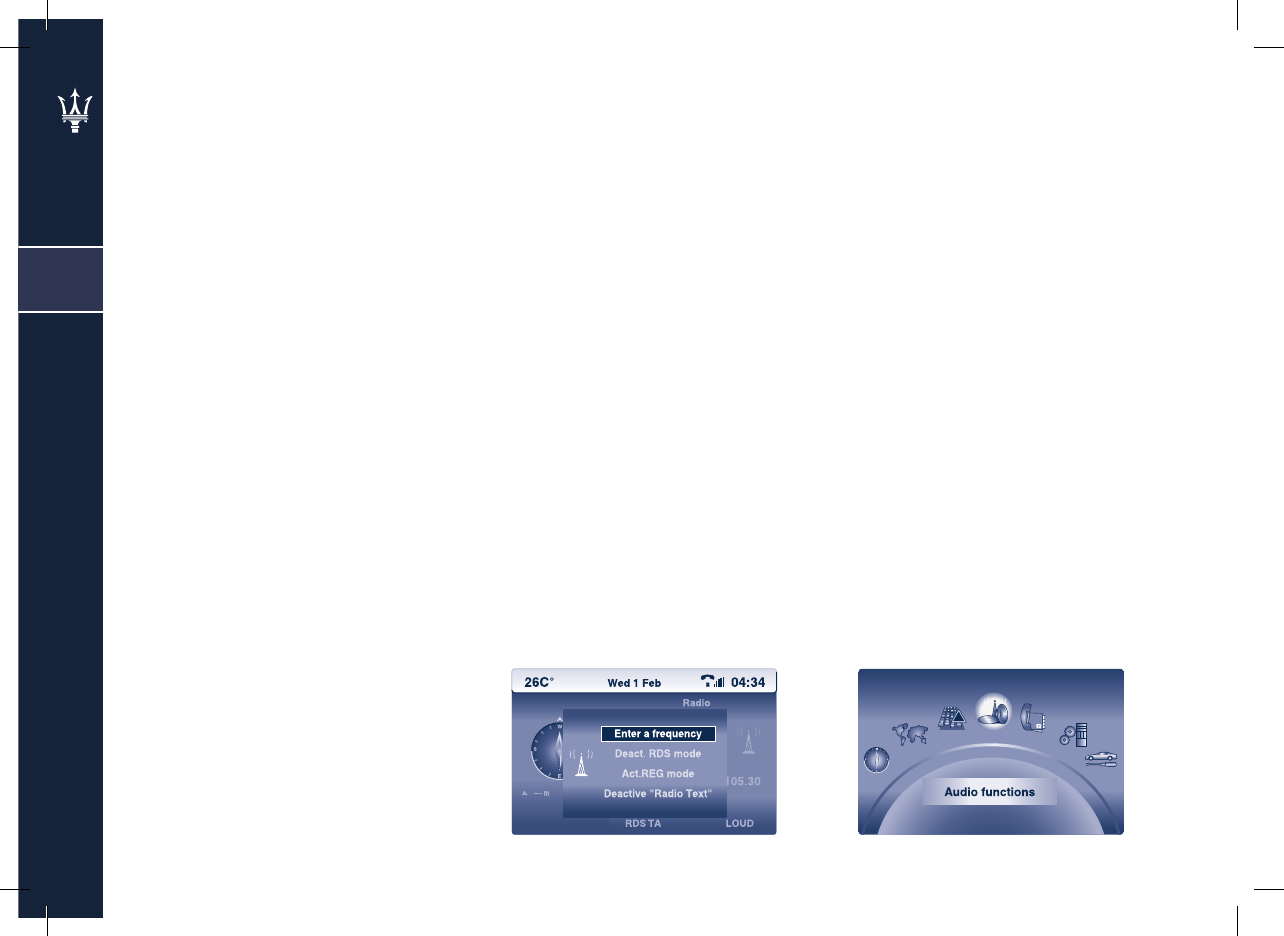
Fig. 11 Fig. 12
2
26
- Oldies music
- Folk Music
- Documentaries
Should some stations be unavailable
with this type of programme, the
system automatically tunes into the
previously selected station. To exit
the list of PTY programmes, select a
programme type or press the button
ESC (6).
EON (Enhanced Other Networks)
function
This function connects stations
forming part of the same network
to each other. The function allows
receiving news on the traffi c situation
or a PTY programme transmitted by
a station forming part of the same
network as the station you are tuned
into. This service is automatically
activated when selecting the TA or
PTY function.
Radio mode menu
Repeatedly press the MODE button
(22) until the RADIO mode is
displayed.
Pressing the knob (13) the display will
show the following menu (see Fig.
11):
- Enter a frequency
- Deactivate RDS frequency search
mode (where available)
- Activate regional mode
- Deactivate “Radio Text” (where the
system is available).
The same menu can also be accessed
by pressing the MENU button (15)
(see Fig. 12) and on the next page
selecting and confi rming the “Radio
favourites” function with the knob
13.
Enter a frequency
You can directly enter the frequency
value using the numerical keypad (17)
or by turning the knob (13).
To set the frequency entered, select
and confi rm OK with the knob (13).
Deactivate RDS frequency search
mode (where available)
Allows activating or deactivating
the RDS function which allows you
to receive the same station on any
frequency used by the station in the
region you cross.
To activate/deactivate the function,
press the knob (13) after selecting the
function.
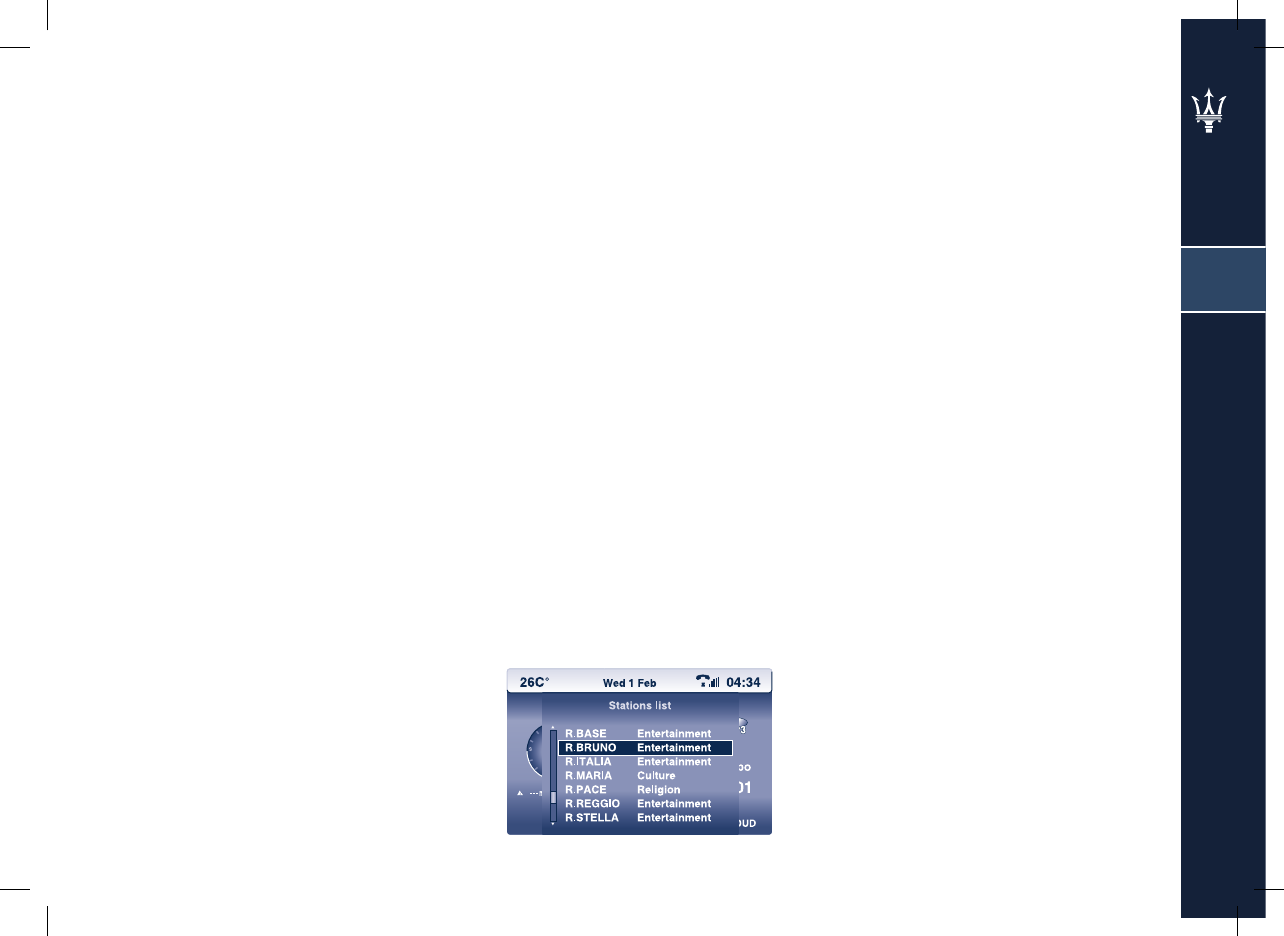
Fig. 13
2
27
Activate regional mode
Allows giving preference to reception
of the same programme even if
you change the reception zone. To
activate/deactivate the function,
press the knob (13) after selecting the
function.
Deactivate “Radio Text”
(where available)
Allows activating or deactivating
display of RDS information relating to
the frequency selected.
LIST function
Allows displaying a list in alphabetical
order containing the local radio
stations with the strongest signal
receivable. To activate the function,
press the LIST button (12), (see Fig.
13). Select the desired station by
turning the knob (13) and confi rm by
pressing the same knob.
To update the list when the Radio
mode is active, press and hold down
the LIST button (12).

Fig. 14 Fig. 15
2
28
CD / Jukebox mode
To ensure optimal sound reproduction
you are advised to use original CDs. If
you use CD-R or CD-RW compact discs
we advise you to use good quality
mediums masterized at the lowest
possible speed.
WARNING: Do not use AUDIO CD or
MP3 CD mediums in 8 cm format, not
even with a specifi c adapter; using
this format will damage the system.
After inserting a CD with the printed
side facing up, it will automatically
start playing. If you are listening to
another audio source and there is
already a CD in the player, press the
SOURCE button (2) or SCR (27), (see
Fig. 14): the CD will automatically
start playing.
Ejecting the CD
To eject the CD, press the button
(1).
Track selection
To select a track, proceed as follows:
- press the button briefl y (11) to
select the next track;
- press the button briefl y (16)
to go back to the beginning of the
track you are listening to ; press it
again to select the previous track.
Fast forward/backward
Press and hold down the button
(11) or (16) to fast forward or
backward to a track on the AUDIO
CD; release them to go back to the
normal playing speed.
WARNING: This function is not
available for MP3 CD and Jukebox.
CD / Jukebox mode menu
Repeatedly press the MODE button
(22) until the AUDIO mode is
displayed.
Pressing the knob (13) (see Fig. 15) the
display will show the following menu:
- Copy CD to Jukebox
- Activate Introscan
- Activate random mode
- Activate repeat.
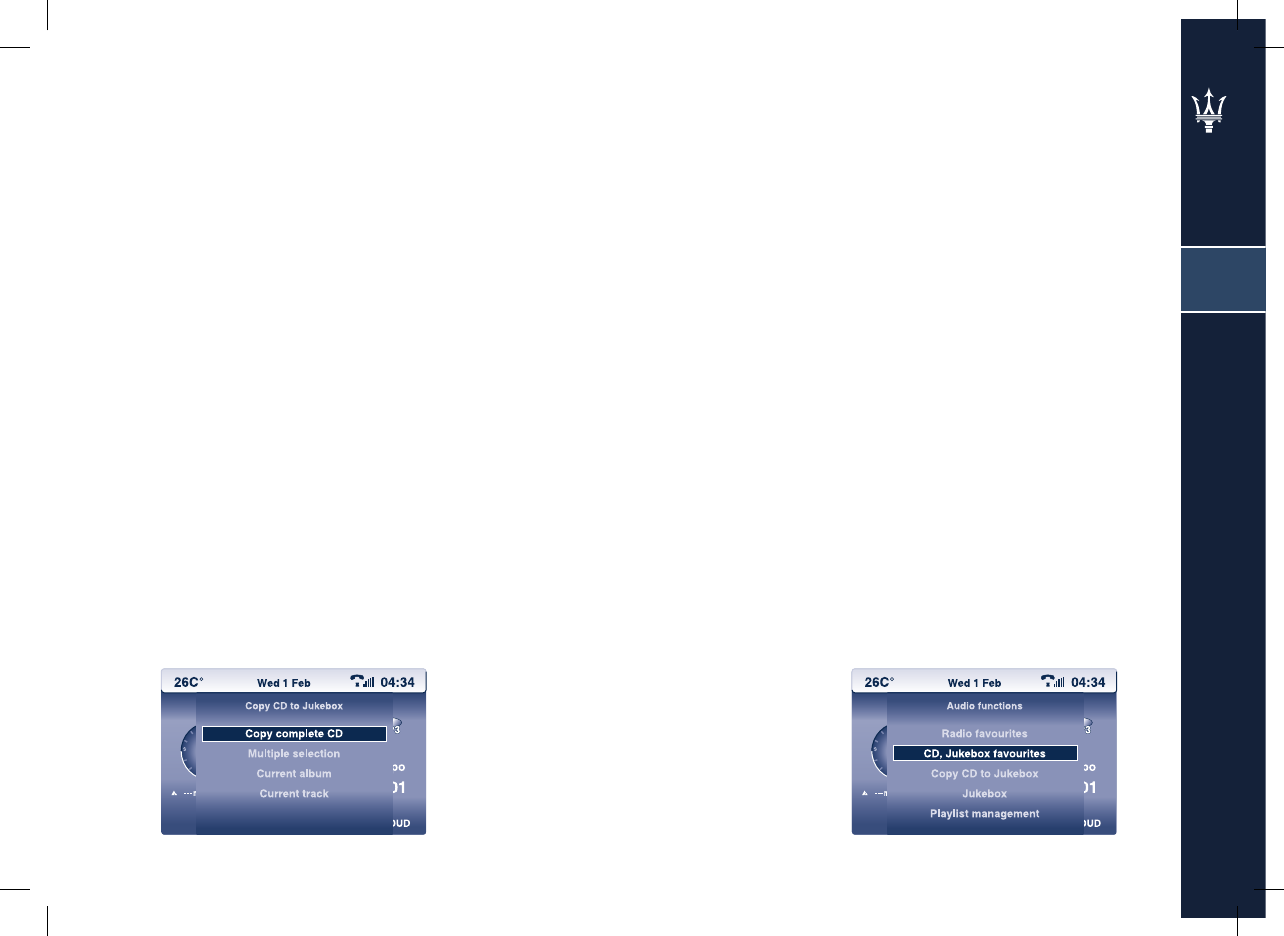
Fig. 16 Fig. 17
2
29
Copy CD to Jukebox
Confi rming this function with the
knob (13) you access a submenu
containing the following options (see
Fig. 16):
• Copy complete CD
• Multiple selection (allows copying a
series of tracks selected by the user)
• Complete album (only with MP3
CD)
• Current track.
During copying in Audio mode only
the Radio function is active.
Activate Introscan
Once selected and confi rmed, this
function allows you to listen to the
beginning of all the tracks on the CD
or in the Jukebox in actual order. To
deactivate this function, press the
knob (13) then select “Deactivate
Introscan” and confi rm.
Activate random mode
Once selected and confi rmed, this
function allows you to listen to the
tracks on the CD or in the Jukebox
in random order. When this function
is active the letters RDM are shown
on the display. To deactivate this
function, press the knob (13) then
select “Deactivate random mode” and
confi rm.
Activate repeat
(only with MP3 CD and Jukebox)
Selecting this function with the
knob (13) you can repeatedly play
the folder/album. To deactivate
this function, press the knob (13)
then select “Deactivate repeat” and
confi rm.
You can also access a CD/Jukebox
mode control menu by pressing the
MENU button (15), select and confi rm
the “Audio Functions” mode (see Fig.
17) and select and confi rm the “CD,
Jukebox favourites” function with the
knob (13); the available options are:
• Activate Introscan
• Activate random mode
• Activate repeat
• Activate display of CD info
Activate display of CD info
Selecting this function with the knob
(13) you can view some information
on the track being played (name of
the singer or title of the song). To
deactivate this function, press the
knob (13) then select “Deactivate
display of CD info” and confi rm.
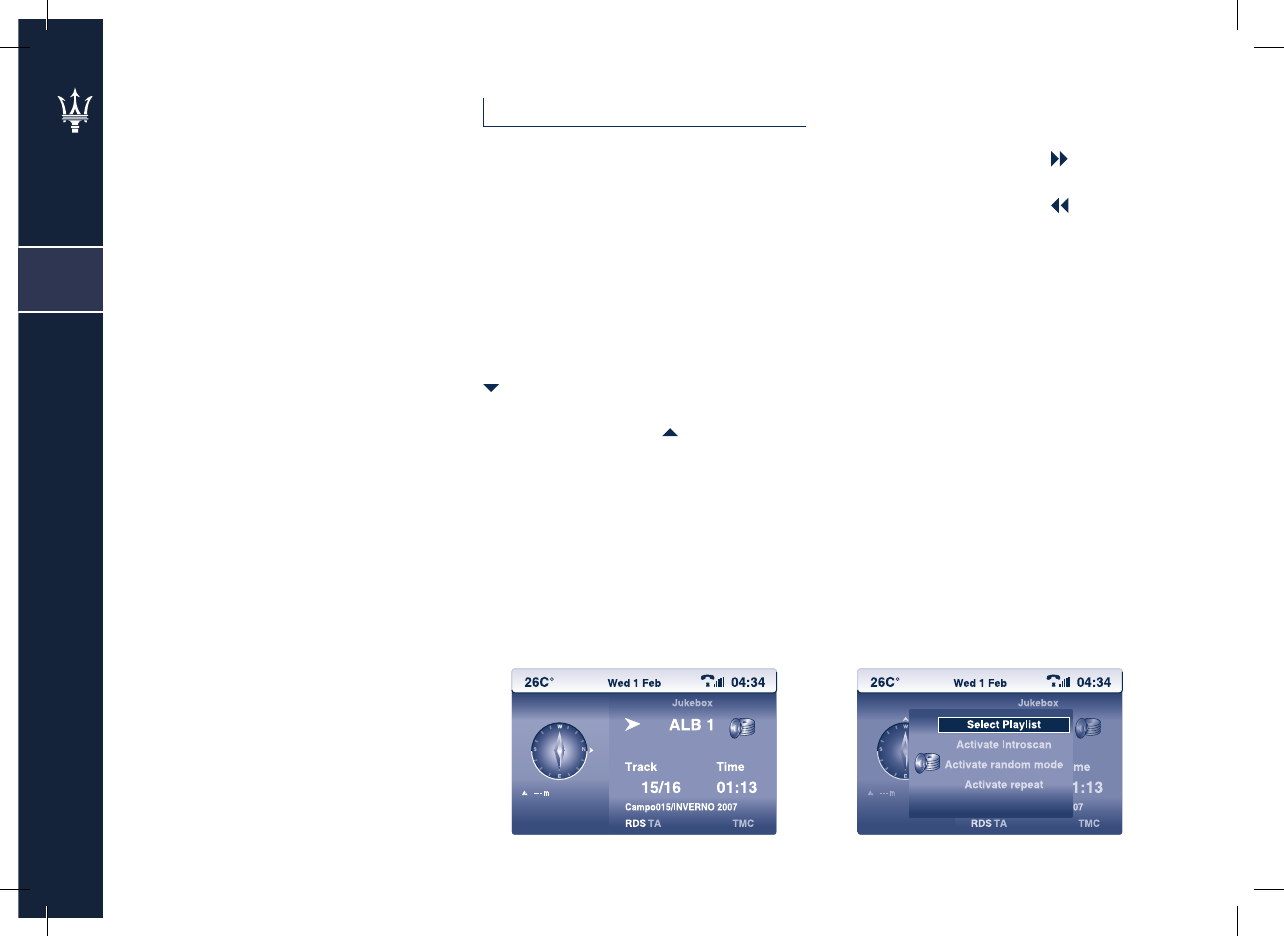
Fig. 18 Fig. 19
2
30
List Function
Allows displaying a list of the tracks
on the AUDIO CD or the MP3 CD.
Activate the function by pressing the
LIST button (12); while listening to an
AUDIO CD a list of tracks is displayed;
using the knob (13) you can select
and confi rm the desired track to start
playing it. While listening to an MP3
CD a list of folders, which are stored
on the CD, is displayed; select the
desired folder with the knob (13) and
confi rm by pressing the knob to access
the list of tracks contained in the
folder. Select the desired track with
the knob (13) and confi rm by pressing
the knob to start playing it.
Jukebox Mode
Allows playing the music albums
stored on the hard disk of the system.
To select the Jukebox mode,
repeatedly press the SOURCE button
(2) or SRC (27) until the “Jukebox”
mode is displayed (see Fig. 18).
Album selection
When the Jukebox mode is active, to
select the next album press the button
(14). Each time you press the button
you go forward by one album. When
you press the button (7) you go to
the previous album.
Track selection
To select a track, proceed as follows:
- press the button briefl y (11) to
select the next track;
- press the button briefl y (16) to
go back to the beginning of the
track you are listening to; press it
again to select the previous track.
Jukebox mode menu
Repeatedly press the MODE button
(22) until the Jukebox mode is
displayed.
Pressing the knob (13) (see Fig. 19) the
display will show the following menu:
- Select Playlist
- Activate Introscan
- Activate random mode
- Activate repeat.

Fig. 20
2
31
Select Playlist
Selecting and confi rming this function
with the knob (13) you can select a
series of tracks to play in sequence.
You can also access a control menu of
this function by pressing the MENU
button (15), select and confi rm the
“Audio functions” mode with the
knob (13), (see Fig. 20) and select the
“Jukebox” function; the available
options are:
- Jukebox Management
- Jukebox Confi guration
- Delete Jukebox data.
Jukebox Management
Selecting and confi rming this function
with the knob (13), you can access the
MP3 albums stored on the hard disk
of the system; the options available
on this page are:
• Open (opens the folder)
• Delete
• Rename.
• Open
Allows you to access the list of
tracks contained in the album
selected. To listen to one of the
tracks in the list, select it with the
knob (13) and then confi rm OK.
• Delete
Allows you to delete an album from
the Jukebox memory. Select the
album you want to delete with the
knob (13) and on the confi rmation
page select “Yes”.
• Rename
Allows you to rename an album
stored in the Jukebox memory.
Select and confi rm the album you
want to rename with the knob (13)
and then select and confi rm the
“Change” option; briefl y pressing
the button deletes one character,
holding the button pressed down
deletes the entire name. To enter
the new name, select and confi rm
the letters using the knob (13).
To save the new name select and
confi rm OK.
Jukebox Confi guration
Selecting and confi rming this function
with the knob (13) you can set the
sound defi nition of the albums stored
in the Jukebox. The available options
are:
• Hi-Fi (320 kbps)
• High (192 kbps)
• Normal (128 kbps)
Select and confi rm the desired option
by turning and pressing the knob
(13), and to set the data, select and
confi rm OK.

2
32
Delete Jukebox data
Selecting and confi rming this function
with the knob (13) you can delete all
the albums stored in the Jukebox.
To proceed with deletion select “Yes”
on the confi rmation page.
LIST Function
Allows displaying the list of the
albums stored in the Jukebox. To
activate the function, press the LIST
button (12) while listening in Jukebox
mode. Select the desired album with
the knob (13) and confi rm by pressing
the knob to access the list of tracks.
Select the desired track with the knob
(13) and confi rm by pressing the knob
to start playing it.
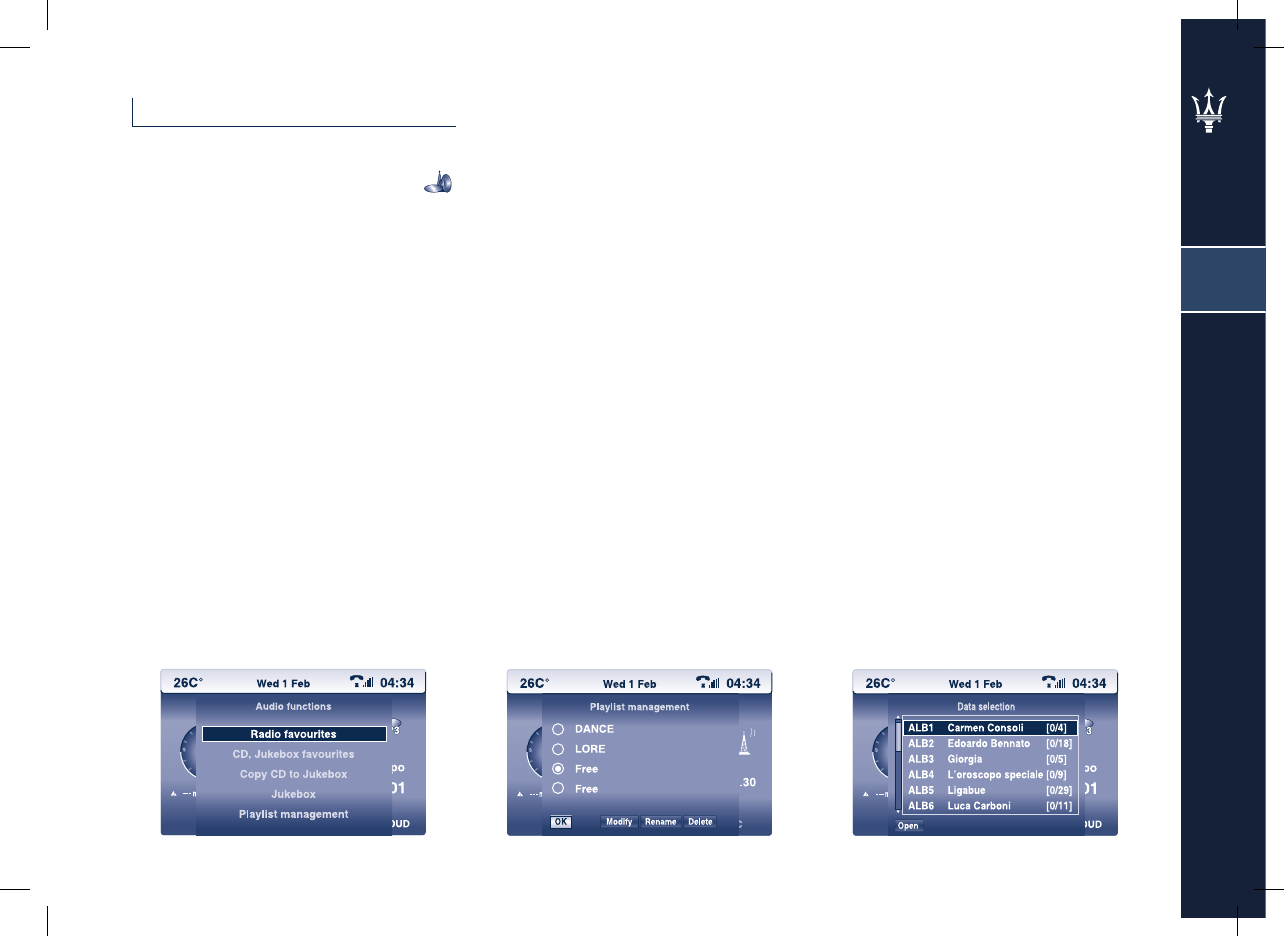
Fig. 21 Fig. 22 Fig. 23
2
33
Audio mode menu
Press the MENU button (15) to access
the main menu. Selecting the icon
by turning and pressing the knob (13),
(see Fig. 21) you access the following
menu:
- Radio favourites
- CD, Jukebox favourites
- Copy CD to Jukebox
- Jukebox
- Playlist Management.
Playlist Management
Selecting and confi rming this
function with the knob (13), you can
create and manage 4 lists of tracks
retrievable from the albums stored in
the Jukebox (see Fig. 22).
Creating a new list
To access the list, select and confi rm
the “Empty” option with the knob
(13), and confi rm the “Modify” option
(see Fig. 23).
Then with the knob (13) select the
individual albums from which you
want to extract the tracks that will
make up the new list.
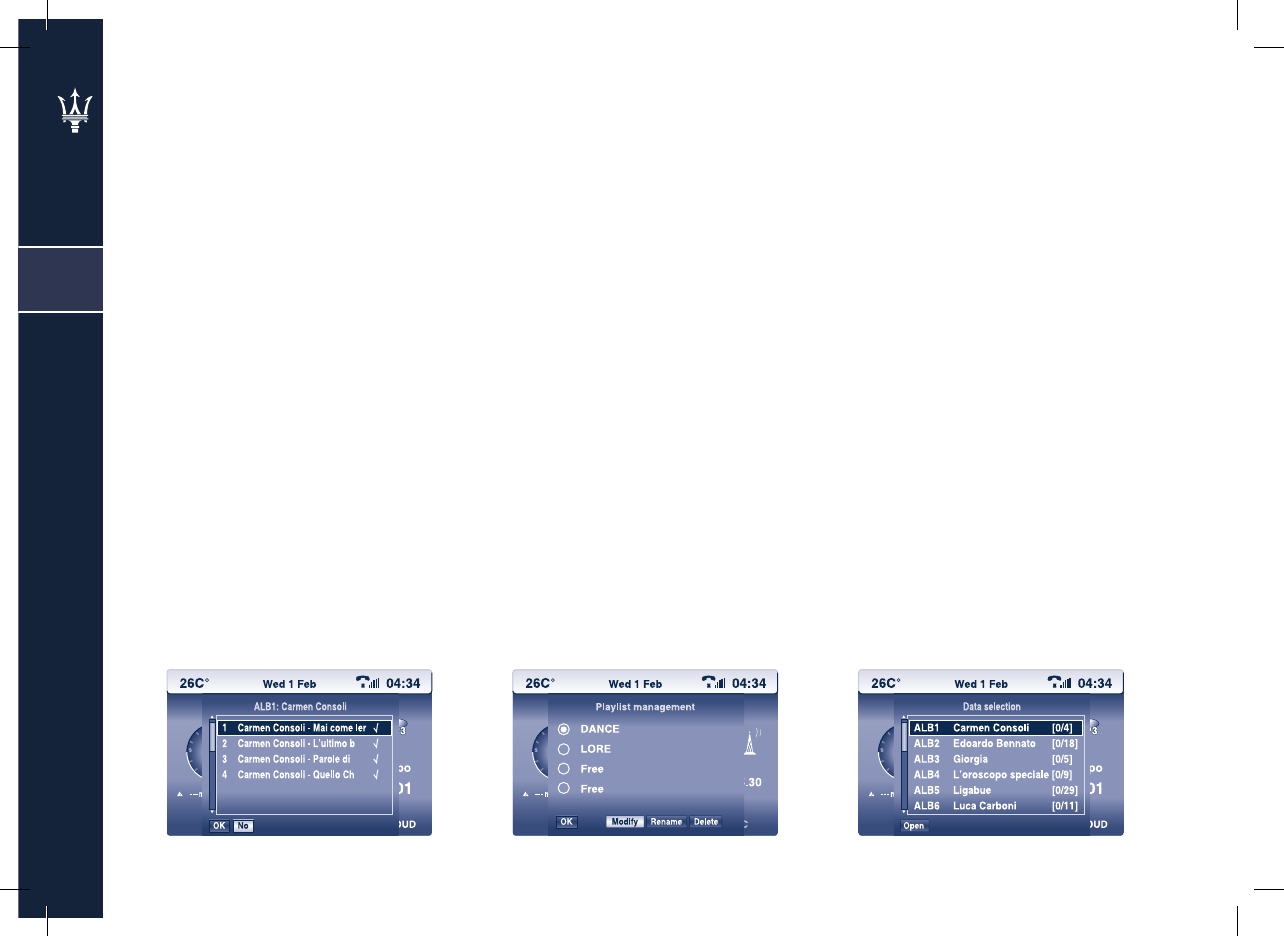
Fig. 24 Fig. 25 Fig. 26
2
34
From the list of tracks that make up
the album, select and confi rm with
the knob (13); a symbol will appear
next to the track selected. To delete
a track from the list, select it with the
knob (13) and confi rm by pressing the
same knob (see Fig. 24).
WARNING: Should there not be any
free lists, an existing one needs to be
deleted so that you can create a new
one.
Modifying a list
Select and confi rm the list you want
to modify with the knob (13), and
then select and confi rm the “Modify”
option (see Fig. 25).
Then with the knob (13), select the
individual albums from which you
want to extract the tracks and confi rm
the “Open” option (see Fig. 26).
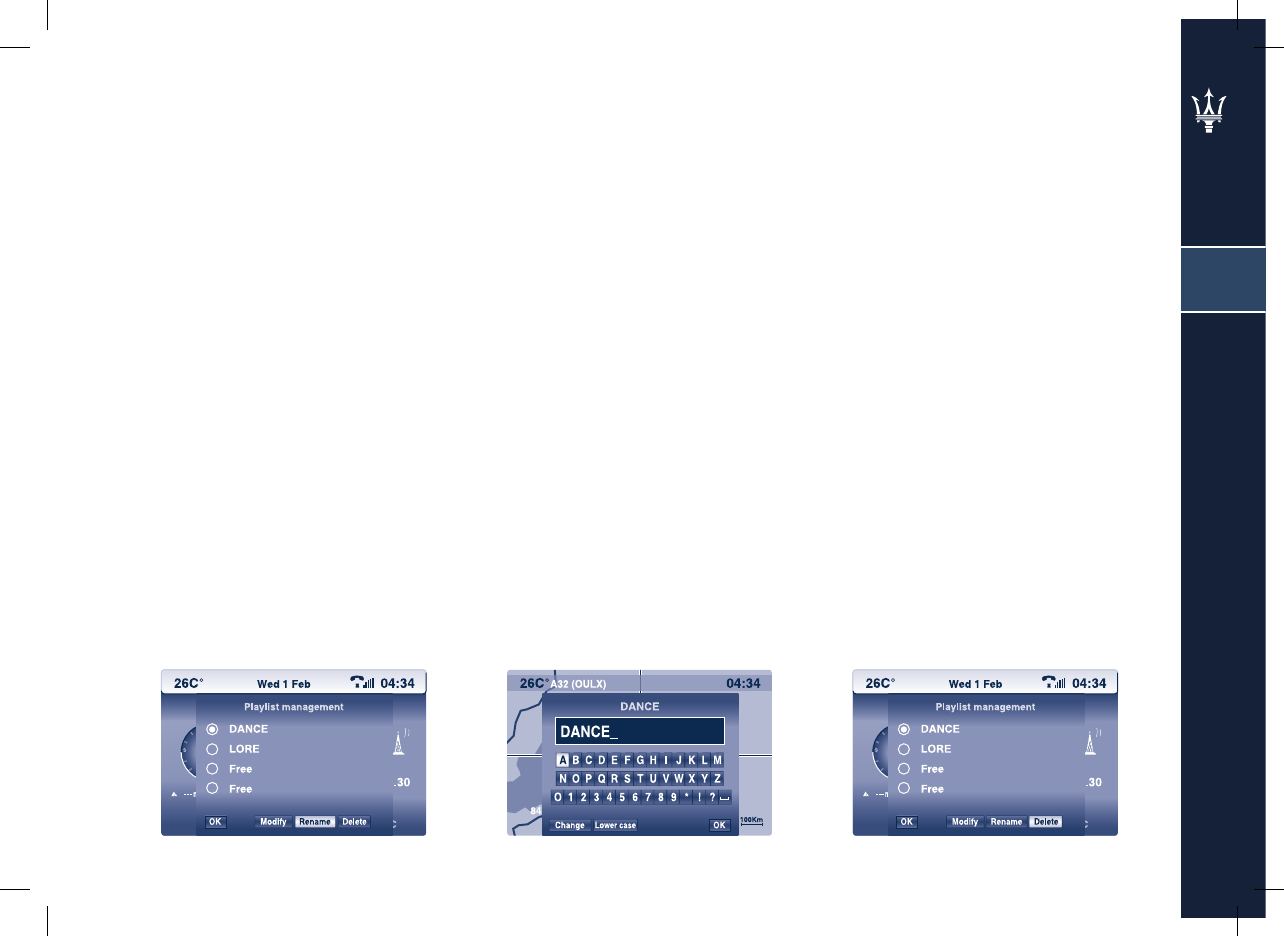
Fig. 27 Fig. 29Fig. 28
2
35
Renaming a list
Select and confi rm the list you want
to modify with the knob (13) (see
Fig. 27), then select and confi rm the
“Rename” option (see Fig. 28).
Then select and confi rm the “Change”
option; briefl y pressing the button
deletes one character, holding the
button pressed down deletes the
entire name. To enter the new name,
select and confi rm the letters using
the knob (13).
To save the new name select and
confi rm OK.
Deleting a list
Select and confi rm the list you want
to modify with the knob (13 and
then select and confi rm the “Delete”
option (see Fig. 29).
To proceed with deletion select “Yes”
on the confi rmation page.

2
36
Compatible MP3 formats:
Sample rate: 22 kHz and 44 kHz
Bit rate: 16 kHz - 320 kHz

3
37
Mobile phone
(not supplied for U.S. and Japanese versions)
Alphanumerical codes 40
SIM card insertion 40
Entering the PIN code 41
Making a call 42
Calling a service number 43
Answering a call 43
Rejecting a call 43
Directory 44
Messages (SMS - Short Message Service) 48

Fig. 30
3
38
The Multi Media System Nav+ is
equipped with a GSM Dual Band
mobile phone with a hands-free
microphone.
The GSM standard (Global System
for Mobile Communication) is widely
used in many countries and enjoys
excellent coverage. For information
on the areas currently covered by the
GSM networks and those that will be
available in the future, please contact
your local network access provider.
The system is composed of a hands-
free microphone (positioned in
proximity of the front ceiling light)
and a set of speakers. The remote
controls on the steering wheel allow
accessing most of the functions.
General
The mobile phone is equipped with
the following user-friendly functions:
- PIN code (Personal Identifi cation
Number) for protection against
unauthorised use of the phone
- Modify PIN
- Activate/deactivate the access PIN
code
- Accept or reject incoming calls
- Make a phone call
- Emergency call (also without SIM
card and without entering the PIN
code)
- Read the telephone numbers stored
on the SIM card
- Store a new telephone number on
the SIM card
- Delete a telephone number from
the SIM card
- Access the list of the last numbers
dialled to facilitate making
recurring calls
- Access the list of the last calls
received
- SMS (Short Message Service)
management, which allows
receiving and sending short text
messages
- Manual dialling
- Adjust the volume of incoming
calls.
Telematics mode menu
To access the telephone menu,
proceed as follows:
- Press the MENU button (15)
(see Fig. 30);
- Select the icon and confi rm by
pressing the knob (13),
The display will appear as shown in
Fig. 31;

Fig. 31 Fig. 32
3
39
- Select “Telephone functions” by
turning the knob (13), then press
the same knob to confi rm and
access the following functions (see
Fig. 32):
• Network
• Length of calls
• Manage PIN Code
• Call options
Network
Allows selecting the network search
mode and viewing the networks
available.
Length of calls
The display will show a page with
the total call time and the length of
the calls from the last reset; you can
reset the counter by selecting and
confi rming the “Reset” option.
Manage PIN code
The display will show a page where
you can activate, deactivate or modify
the PIN code.
Call options
The display will show the following
Setup menu:
• Confi gure calls
• Ring options
• Voice call diversion to number
• Delete call log
• Configure calls
Allows setting sending of your own
number and automatic answering
of incoming calls.
• Ring options
Allows setting the type of ring
for an incoming call and the
notifi cation of receipt of an SMS.
• Voice call diversion to number
Allows setting the telephone
number to which you want to
transfer a call
• Delete call log
Allows deleting the list of stored
incoming and outgoing calls.

10
9
Fig. 33
3
40
Alphanumerical codes
Buttons Associated characters
1 1 / space
2 2/ABC2/abc2
3 3/DEF3/def3
4 4/GHI4/ghi4
5 5/JKL5/jkl5
6 6/MNO6/mno6
7 7/PQRS7/pqrs7
8 8/TUV8/tuv8
9 9/WXYZ9/wxyz9
0 0 / + (holding down the
button)
##
* * / deletion of previous
character (holding down
the button)
SIM card insertion
When inserting a valid SIM card, the
phone is activated and you can access
all its functions.
Press and release the button (9) on
the adapter (10) and then pull out the
adapter. Insert the SIM card following
the instructions screen-printed on
it (see Fig. 33); then reinsert the
adapter.
If you have correctly inserted the SIM
card, you will be asked to enter the
PIN code.
To remove the SIM card, press and
release the button (9); and then
remove the SIM card.
WARNING: If the SIM card is removed
when the telephone is active, it may
cause temporary malfunctioning. In
this case, restore normal telephone
functioning by turning the engine off
and on again.
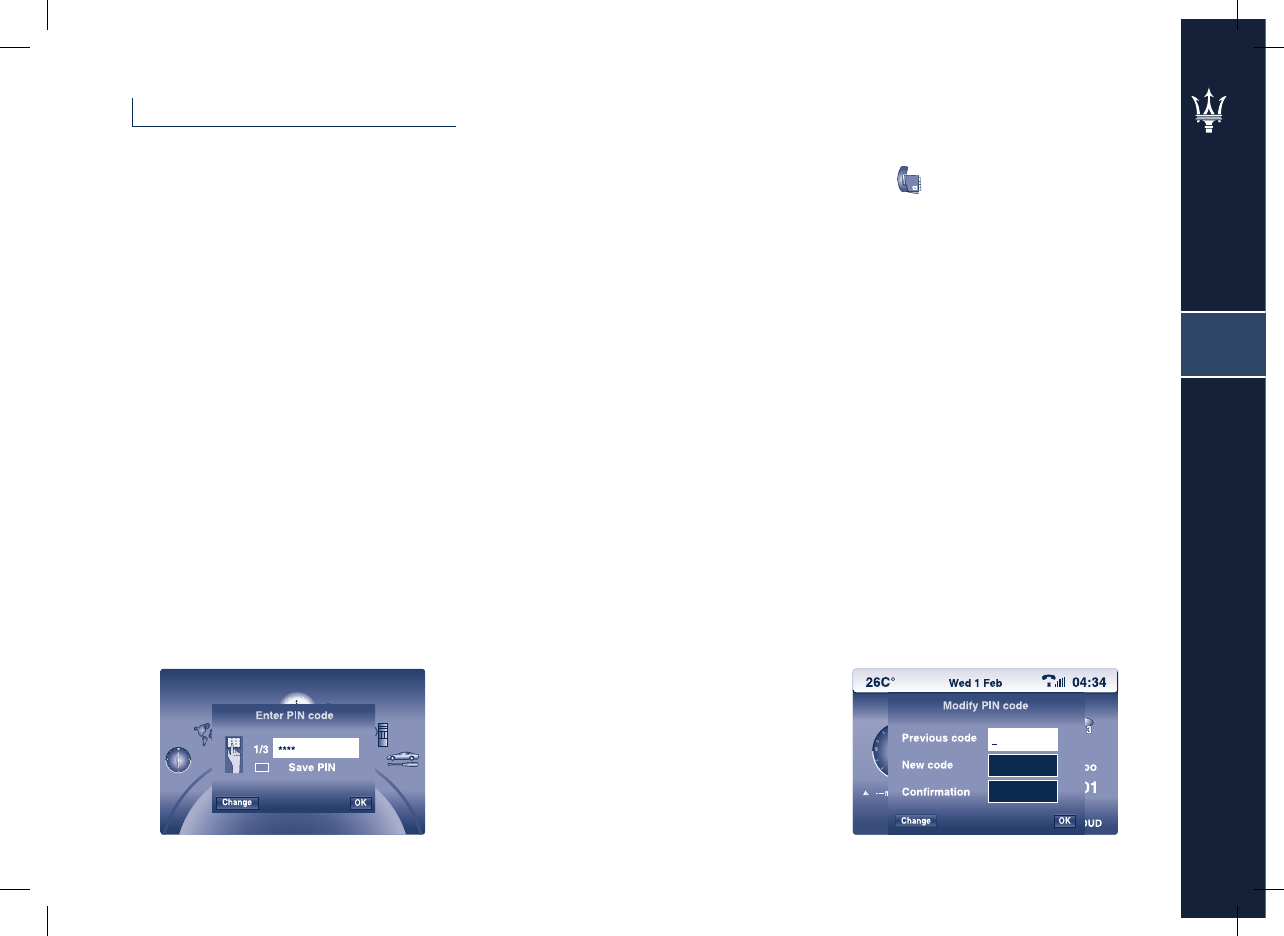
Fig. 34 Fig. 35
3
41
Entering the PIN code
WARNING: The PIN code (Personal
Identifi cation Number) prevents
unauthorised use of the SIM card
services.
The PIN code, made up of a variable
number of digits between four
and eight, must be entered using
the keypad on the front panel and
confi rmed by pressing the knob (13).
The digits entered are shown on the
display in the form of asterisks (*),
(see Fig. 34).
If you make a mistake when entering
the PIN code, you can correct it by
selecting “Change” with the knob
(13); press to delete the last character
entered.
WARNING: If an incorrect PIN code is
entered and confi rmed three times,
the SIM card is blocked. It can be
unblocked by entering both the PUK
code (Pin Unblocking Key) and the
new PIN code.
The search for the network signal
begins once the PIN code has been
entered, and the page with the main
telephone functions will be shown on
the display. When the connection is
successful, the name of the network
access provider appears on the display.
You can also access the Telematics
mode without entering the PIN code,
however, you will be asked to enter it
when you want to make a call.
Modifying the PIN code
Press the MENU button (15) then use
the knob (13) to select and confi rm
the icon .
Continuing to use the knob (13),
select “Telephone Functions”, then
“PIN code management”, and fi nally
“Modify PIN code” (see Fig. 35); The
system will then ask you to enter the
new code, and after doing so, select
OK to confi rm it.
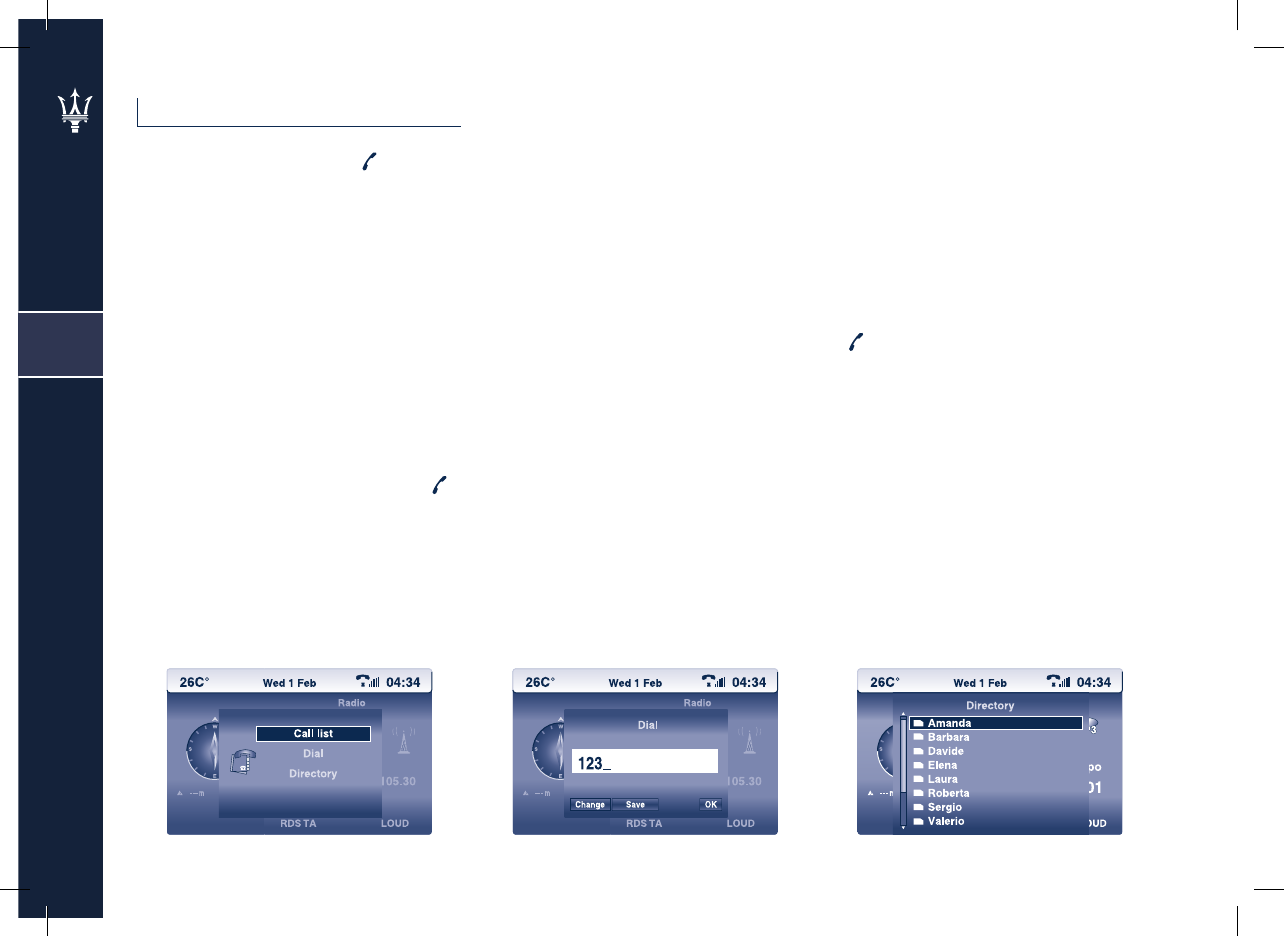
Fig. 36 Fig. 37 Fig. 38
3
42
Making a call
When pressing the button (4) the
display will show the following menu
(see Fig. 36):
- Call list
- Dial
- Directory.
Selecting a number from the last
calls list
Select and confi rm the “Call list”
function by turning and pressing the
knob (13) to access the list of the last
calls made or received.
Turn the knob (13) to select the
number and then press the button
(4) to make the call.
The call can also be made by selecting
“OK” and pressing the knob (13).
Dialling a phone number
To dial a phone number, proceed as
follows:
- Select and confi rm the “Dial”
function by turning and pressing
the knob (13) and dial the number
using the alphanumerical keypad
(see Fig. 37);
- Press the button (4) to make the
call.
The call can also be made by selecting
“OK” and pressing the knob (13).
Calling a number from the
directory
Proceed as follows:
- Select and confi rm the “Directory”
function by turning and pressing
the knob (13) to access the list of
numbers stored in the directory (see
Fig. 38);
- turn the knob (13) to select the
number, and then press the button
(4) to make the call.
The call can also be made by selecting
“OK” and pressing the knob (13).

3
43
Calling a service number
Although you can dial service
numbers (e.g.*123*5#) following
the instructions in the previous
paragraph, these are not managed by
the system.
Answering a call
To answer a call, press the button
(4) or the knob (13) or the button
(33); To end the call, press the
button (18) or the button (33).
Rejecting a call
To reject a call, press the button
(18) or select and confi rm “NO” by
turning and pressing the knob (13)
when “Reply?” appears on the display
or press and hold down the button
(33).
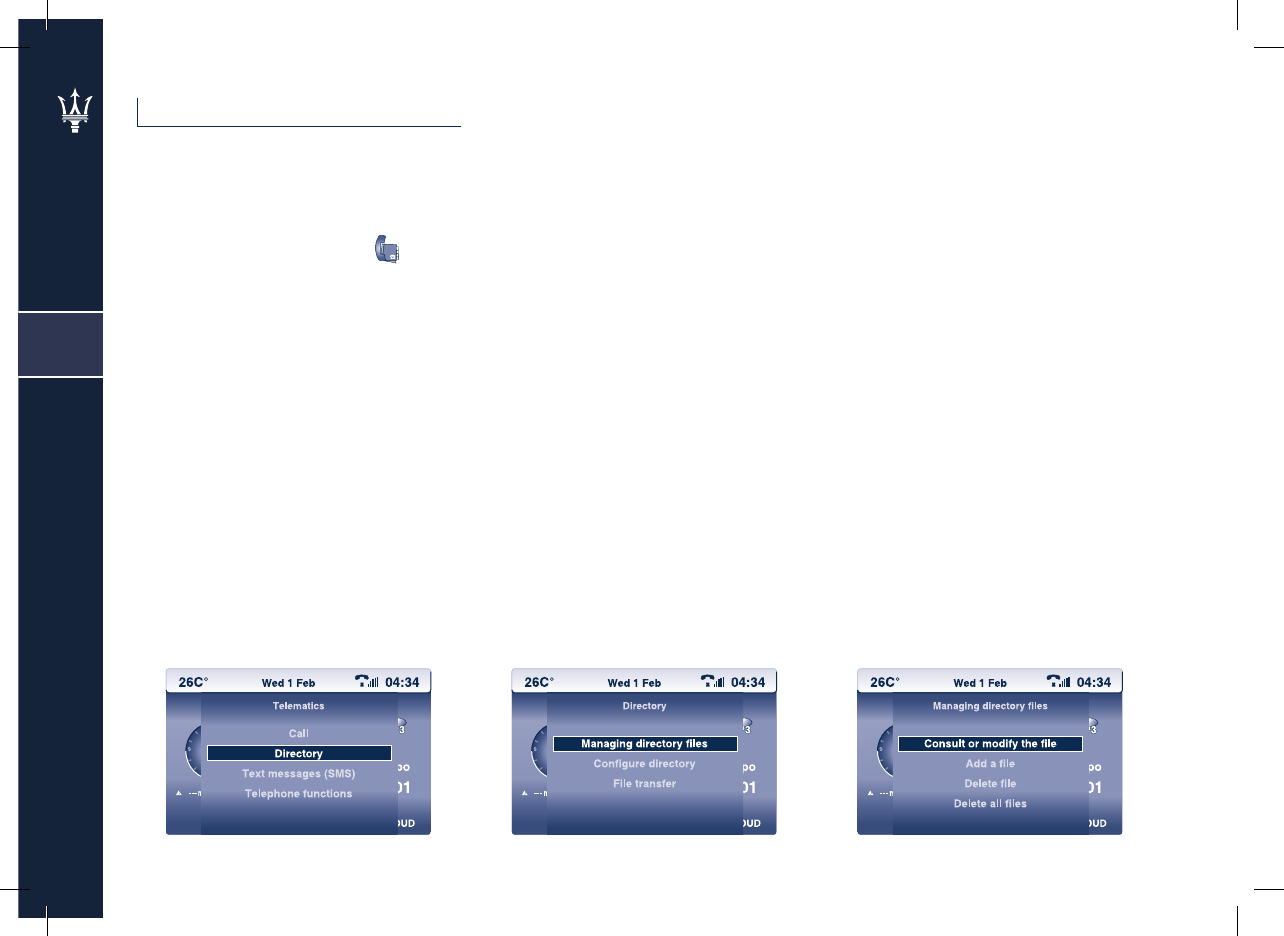
Fig. 39 Fig. 40 Fig. 41
3
44
Directory
Allows storing 400 items splitting
them into 4 different directories: User
1, User 2, User 3 and User 4.
Press the MENU button (15) then
select the “Telematics” icon by
turning and pressing the knob (13)
(see Fig. 39),
then select the “Directory” function
(see Fig. 40), the display will show the
following menu:
- Managing directory fi les
- Confi gure number directory
- File transfer.
Managing directory fi les
The system allows inserting,
modifying and deleting a record
(name) from the directory.
Using the knob (13) to select
“Managing directory fi les”, the
display will show the following menu
(see Fig. 41):
• Consult or modify a fi le
• Add a fi le
• Delete a fi le
• Delete all fi les.
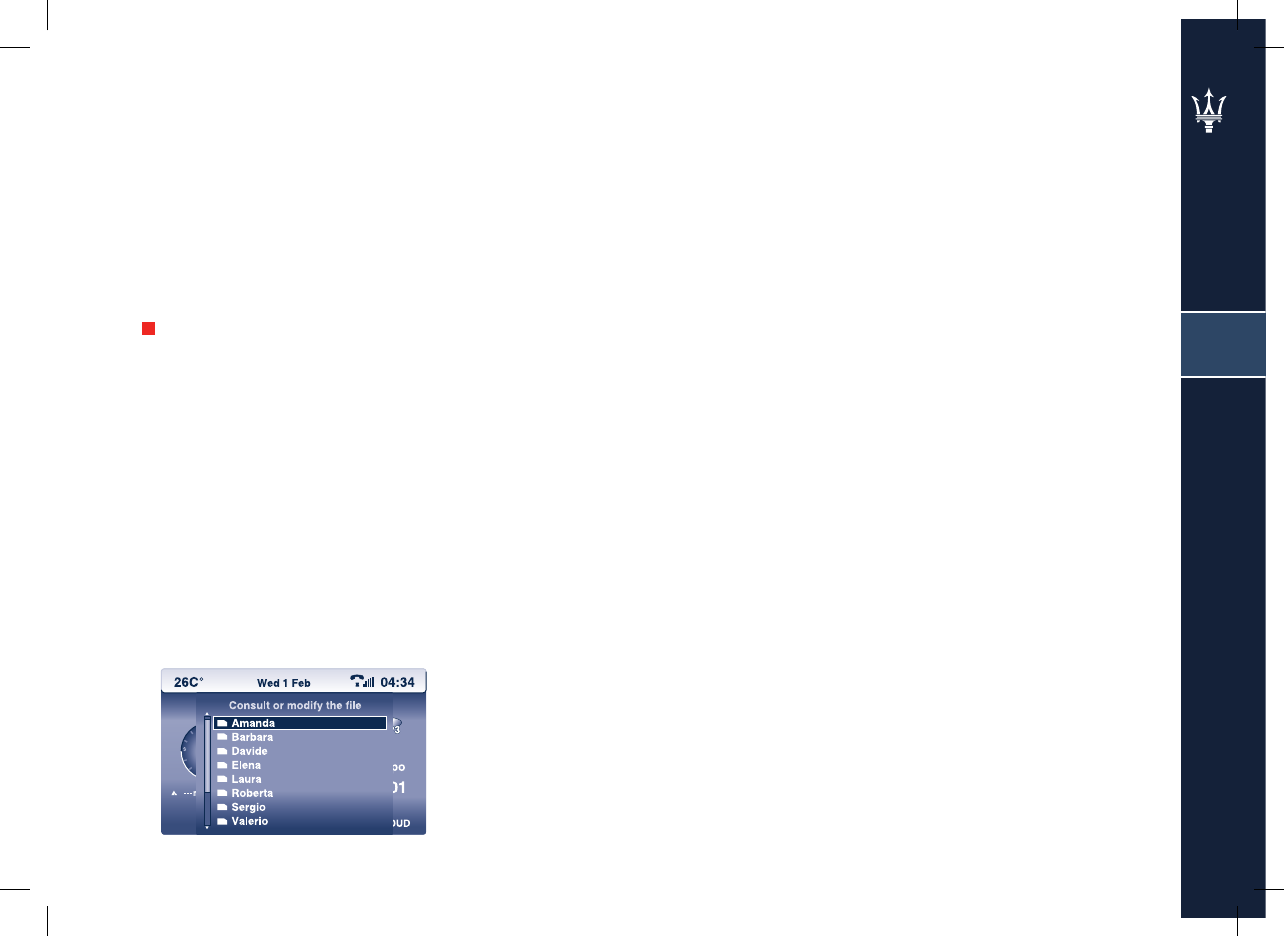
Fig. 42
3
45
Consult or modify a fi le
Using the knob (13) to select this
option, the display will show the
list of the fi les stored (see Fig. 42);
Selecting a fi le (name) from the
list, you can customise each fi le by
inserting a voice recognition string, a
text note, address, telephone number,
e-mail.
Selecting the central button icon
“” you can insert a voice recognition
string.
Selecting “Note” the display will
show the window containing the
text for the fi le selected. Selecting
the “Modify” option, you access an
“Editor” which allows you to modify
the note.
Selecting “Address” you can enter the
city, street and street number for the
fi le selected.
Selecting “Number” you can insert or
modify the telephone number for the
fi le selected.
Selecting “e-mail” you access an
“Editor” which allows you to store the
e-mail address for the fi le selected.
Add a fi le
Using the knob (13) to select this
option, the display will show a
window which allows you to add a
new fi le to the directory or modify an
existing fi le. Proceed as follows:
- To create a new fi le use the knob
(13) to select and confi rm the
“Add” option
- To modify an existing fi le use the
knob (13) to select and confi rm the
“Consult” option.
Delete a fi le
Using the knob (13) to select this
option, you can delete a fi le stored in
the directory.
Delete all fi les
The system allows you to delete all
the fi les contained in a directory.
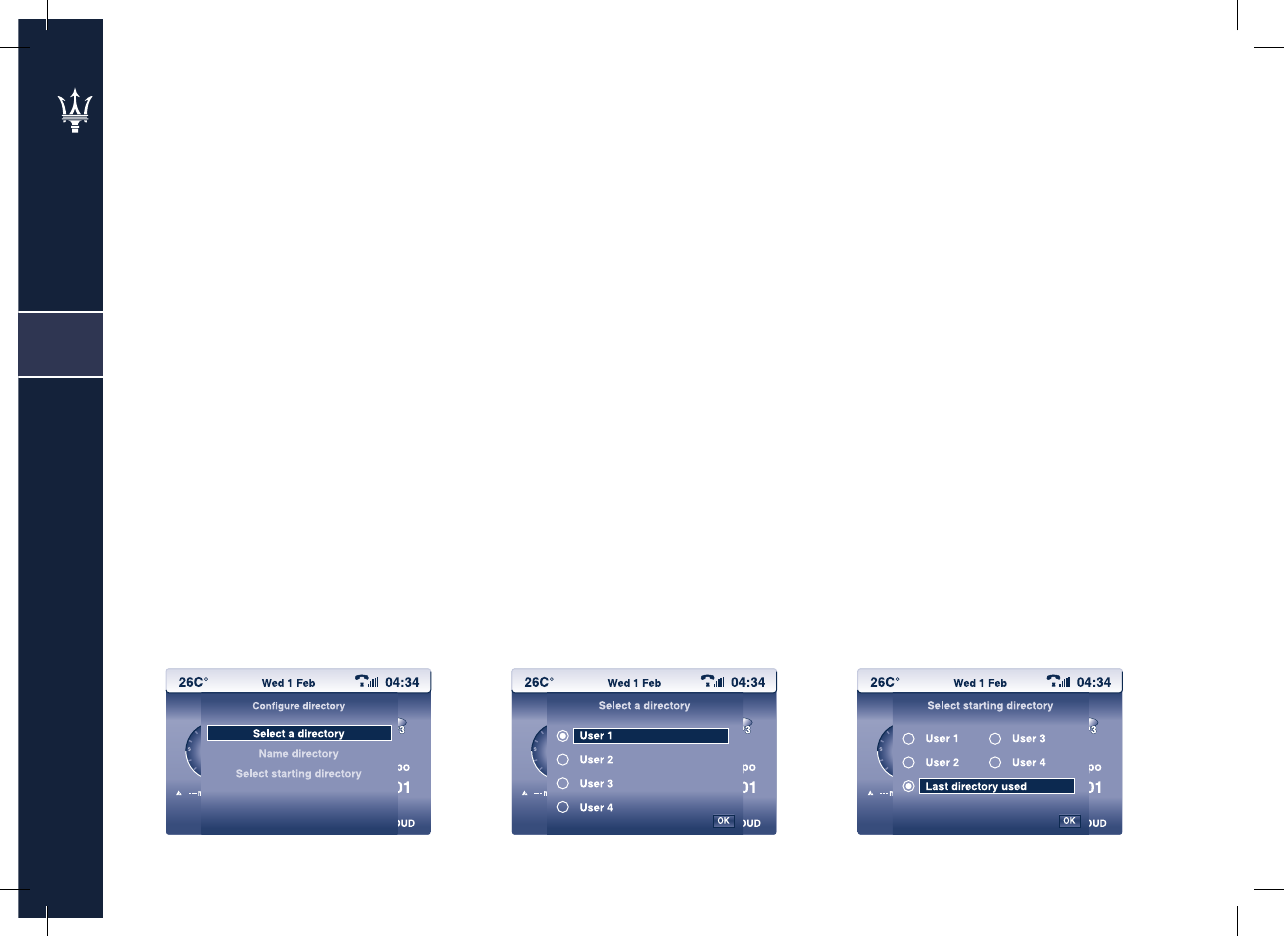
Fig. 43 Fig. 44 Fig. 45
3
46
Confi gure directory
The system is capable of managing 4
different directories within the Multi
Media System.
Through this function you can select
which of the 4 directories to view,
name them and select which one to
display when the system is started.
Using the knob (13) to select
“Confi gure directory “, the display
will show the following menu (see
Fig. 43):
• Select a directory
• Name directory
• Select starting directory.
Select a directory
Using the knob (13) select and
confi rm this option (see Fig. 44)
then select and confi rm the desired
directory: User 1, User 2, User 3 or
User 4. This selection will be valid
until next system starting.
Name directory
Using the knob (13) to select and
confi rm this option, you can rename
the directory giving it a personalised
name.
Select starting directory
You can select which directory to
display when the system is started.
Using the knob (13) to select and
confi rm this option, the display will
show the 4 directories available (see
Fig. 45), select the one desired and
then confi rm the selection with OK.
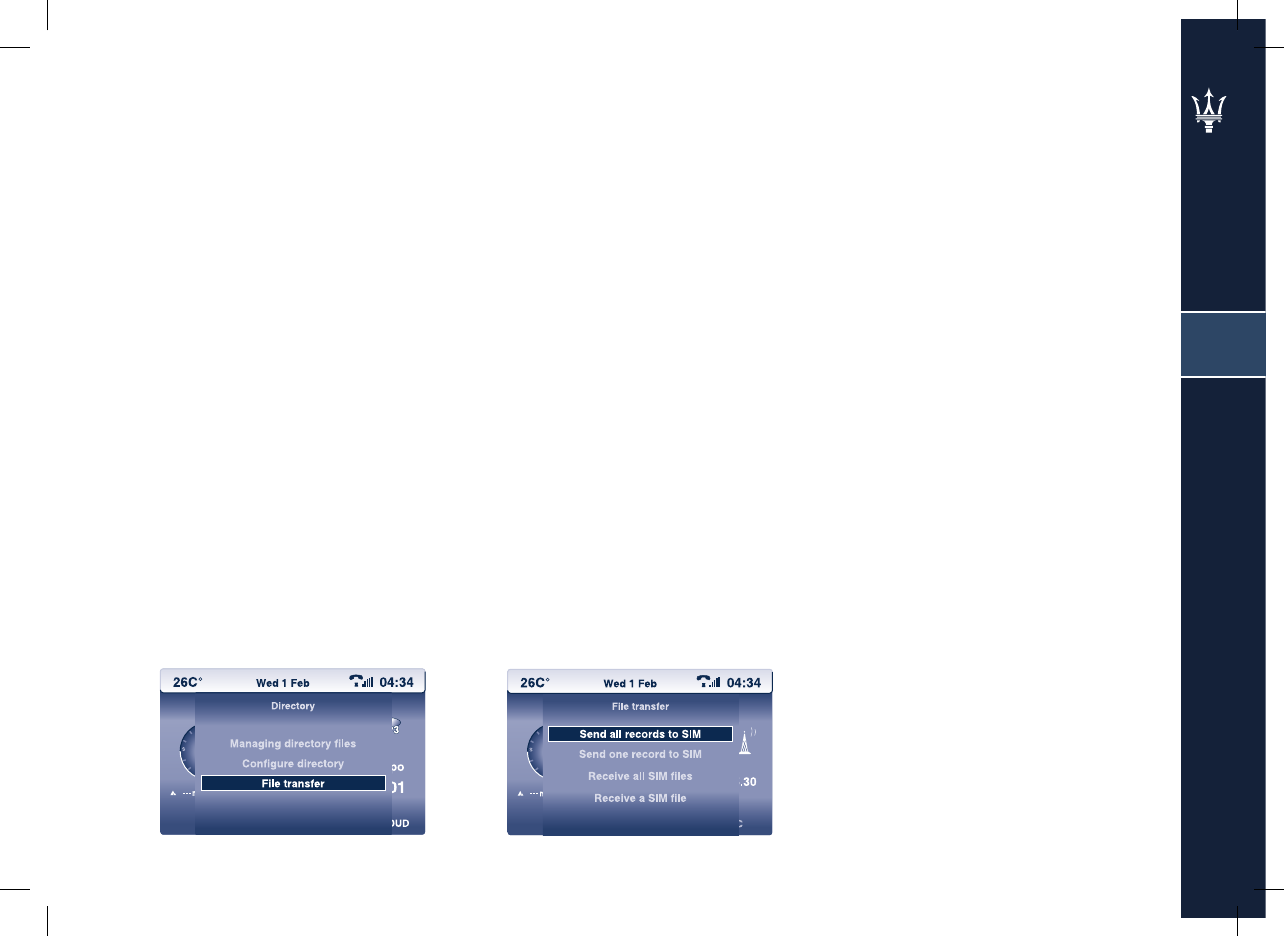
Fig. 46 Fig. 47
3
47
File transfer
The system allows transferring one
fi le or all the fi les from the SIM
directory to that of the system and
vice versa.
Using the knob (13) to select “File
transfer “ (see Fig. 46), the display will
show the following menu (see Fig.
47):
• Send all fi les to SIM
• Send one fi le to SIM
• Receive all SIM fi les
• Receive a SIM fi le.
Fig. 48
3
48
Messages (SMS - Short
Message Service)
Receipt of an SMS is accompanied
by an acoustic signal (if the SMS
ringer tone option is active) and
an announcement on the display
“Do you wish to read the new text
message?”. To immediately read the
message, select and confi rm “YES” by
turning and pressing the knob (13),
otherwise select “NO” or press the
button ESC (6).
Using the knob (13) to select “Text
messages (SMS)”, the display will
show the following menu (see Fig.
48):
• Received SMS Reading (No.)*
• SMS archive
• SMS writing
• Delete list of text messages
* The number of stored messages is
shown in brackets
WARNING: The text messages are
stored on the hard disk or on the SIM
card according to their intrinsic type.
For the text messages on hard disk,
the reading status is not displayed.
Received SMS reading
Using the knob (13) to select and
confi rm this option, you access the
list of messages stored. Continuing to
use the same knob you can select the
desired one and read it.
Each message can also be deleted by
selecting the “Delete” option.
SMS archive
Using the knob (13) to select and
confi rm this option, you can consult,
modify and send a message stored or
unsent.
Select the desired message, then
select “Send” and enter the number
of the recipient, or if you have stored
the number, select it from the number
directory.
SMS writing
Using the knob (13) to select and
confi rm this option, the display will
show the alphanumerical keyboard.
Select and confi rm each individual
character to write the text; when you
have fi nished writing the message,
select and confi rm with OK.
Delete list of text messages
Using the knob (13) to select and
confi rm this option, the display will
show a page through which you can
delete the text messages stored.

4
49
Navigator
(not supplied for Japanese version)
Main menu 51
Map 57

4
50
The navigator integrated in the
Multi Media System Nav+ helps
you reach the selected destination
by means of visual and acoustic
instructions. The navigation system is
fast, easy, safe to use and, above all,
very fl exible, as it allows you to call
already programmed destinations
or reference points, such as hotels,
monuments, public buildings, petrol
stations.
The position of the vehicle is
determined by means of the GPS
(Global Positioning System) installed
in the vehicle. The GPS is equipped
with an antenna and a reception
module integrated in the IT system.
The navigation system
assists the driver while
driving, providing advice
and suggestions, by means of voice
guidance and graphic information,
for the best route to take for reaching
the set destination The suggestions
provided by the navigation system
do not relieve the driver from full
responsibility for the manoeuvres
made through traffi c while driving,
or from compliance with road
regulations and other provisions
regarding road traffi c. The person
driving the vehicle is always and in
any case responsible for safe driving
on the road.
WARNING:
- GPS receptionis diffi cult under
trees, between tall buildings, in
multi-storey car parks, tunnels and
any other place where the satellite
antenna cannot receive the signals.
- The GPS takes a few minutes to
activate if the vehicle battery is
disconnected.
- The GPS takes a few minutes to
determine the new vehicle position
if the engine is switched off and the
vehicle is moved while the system is
off (e.g. with a breakdown truck).
If no satellite information is
received, the onboard system uses
the information sent by the vehicle
sensors to allow navigation to
continue.
- The GPS satellite antenna must
not be covered with metal or wet
objects .
The instantaneous position of the
vehicle is identifi ed within the
navigation system and shown on the
display together with the topographic
characteristics of the area stored on
the navigation hard disk.
It may take a few seconds to access
the data stored on the hard disk and
for the maps to be displayed.
- The navigation system requires
about 50 km of driving when used
for the fi rst time and when the
tyres have been replaced in order
to accurately self-adjust.
- In conditions where the wheels
have no grip (for example, when
slipping on ice), the system might
temporarily read an inexact
position.
- During self-adjustment, the
position may not be read with
maximum accuracy.
Navigation is fully controlled by the
Multi Media System Nav+.
Fig. 49
Navigation
Select destination
Journey leg and route
Guidance options
Stop guidance
Fig. 50
4
51
Repeat last Navigator Voice
Information
Press the button (5) once to repeat
the last voice information provided by
the system.
Main menu
Press the MENU button (15) to access
the main menu (see Fig. 49).
Selecting the “Navigation” icon by
turning and pressing the knob (13)
you access the navigation menu (see
Fig. 50):
- Select destination
- Journey legs and route
- Guidance options
- Stop guidance (*)
(*) Only when navigation is active.
Using the knob (13) select and
confi rm “Select destination”.
Fig. 51 Fig. 52 Fig. 53
4
52
Select destination
Using the knob (13) to select and
confi rm “Set destination”, the display
will show the following menu (see
Fig. 51):
- Enter an address
- GPS coordinates
- Directory
- Last destinations
Enter an address
This function allows you to select an
address and use it as destination.
The data displayed refer to the last
destination set (see Fig. 52).
Use the knob (13) to select and
confi rm the option you want to
modify and once in the fi eld (see Fig.
53), use the alphanumerical keypad to
enter the desired city, the street and
the street number.
To select the characters, turn the knob
(13) and enter them by pressing the
knob.
If you make a mistake, select the
“Change” function by turning and
pressing the knob (13) to delete the
last letter selected.
Fig. 55Fig. 54
4
53
Selecting the “List” function by
turning and pressing the knob (13)
you can access a list of places whose
name starts with the letters selected
up to that moment.
Activating this function you can select
a place from the list by turning and
pressing the knob (13).
As there are stretches of road that
join at roundabouts without a name,
it might not be possible to set this
junction as address. In this case, you
can set the address by selecting the
“Junctions” option (see Fig. 54).
After setting the city name, the street
and the street number, select “OK” by
turning and pressing the knob (13).
WARNING:You can also activate
navigation by entering only the city
without entering the street and
the street number. In this case, the
navigator will guide you to the centre
of the city selected.
After entering the city, the street and
the street number, select (see Fig. 55):
- “OK”: to confi rm the address and
access the “Navigation” function
which allows you to activate
navigation.
- “Curr. loc.”: to view the address
where you currently are
- “Save”: to save the address and
make it available later.
- “POI”: to fi nd and select the type of
location you desire and then defi ne
it as fi nal destination or store it.
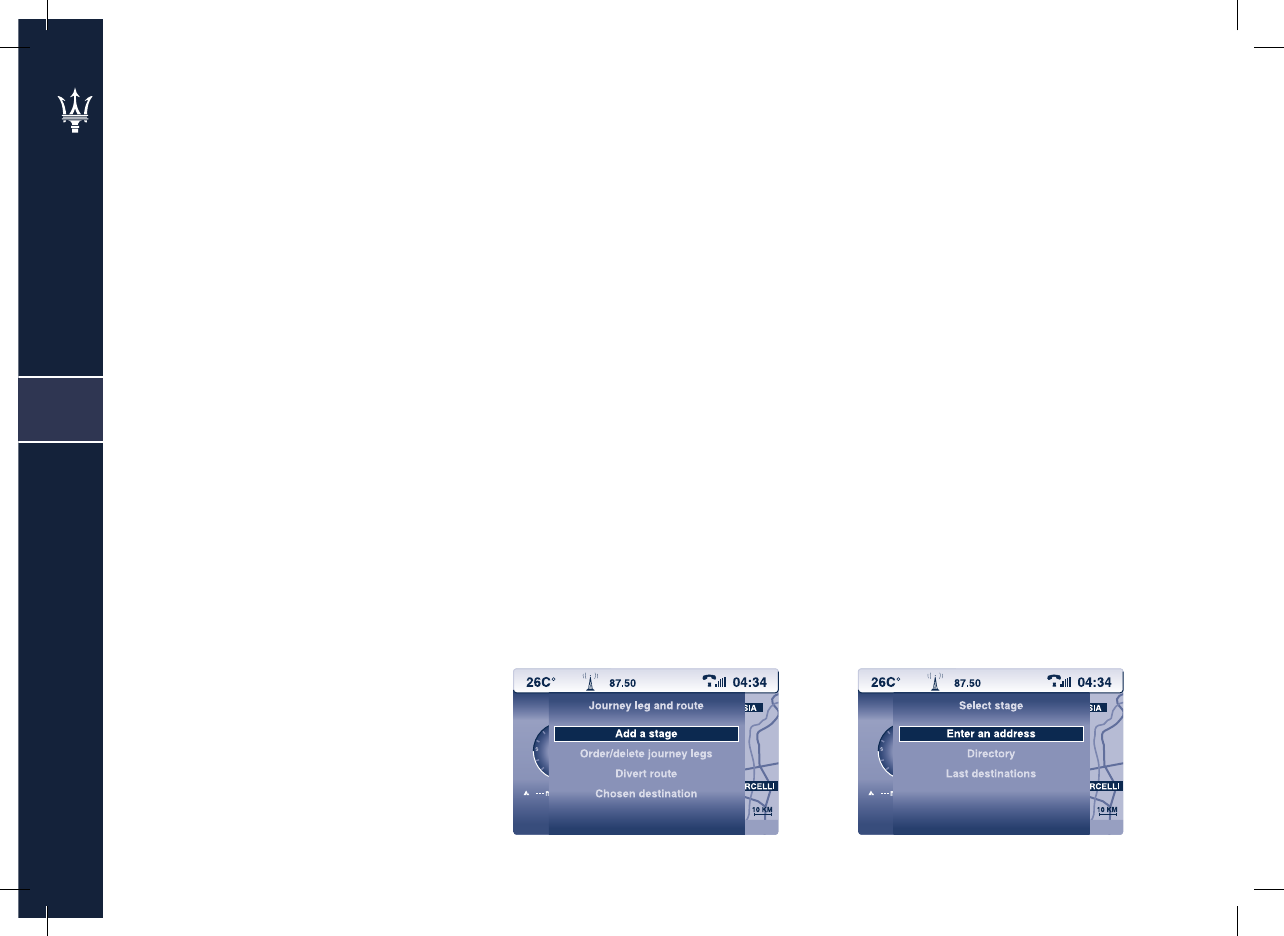
Fig. 56 Fig. 57
4
54
Journey leg and route
Selecting “Journey leg and route” by
turning and pressing the knob (13)
the display will show the following
menu (see Fig. 56):
- Add a stage
- Order/delete journey legs
- Divert route
- Chosen destination.
Add a stage
After setting off you can add a
stage to the route by selecting and
confi rming the “Add a stage” option
with the knob (13). The display will
show a menu with an option to enter
an address (see Fig. 57). To do this,
proceed as described in the paragraph
“Enter an address”.
Please note that if a journey leg has
been programmed, the navigation
system will always try to include it
until it has been passed or is deleted.
Order/delete journey legs
Selecting this function with the knob
(13) you can order the sequence of
routes or delete them.
Directory – Last destinations
You can store the addresses selected
for the navigation in the menus of the
“Directory” and “Last destinations”
functions.
To use one of these addresses as
destination, proceed as follows:
- Select and confi rm the “Directory”
or “Last destination” function by
turning and pressing the knob 13
- Select and confi rm an address by
turning and pressing the knob (13);
- Select and confi rm the “OK”
function by turning and pressing
the knob (13) to activate navigation
to the address selected.
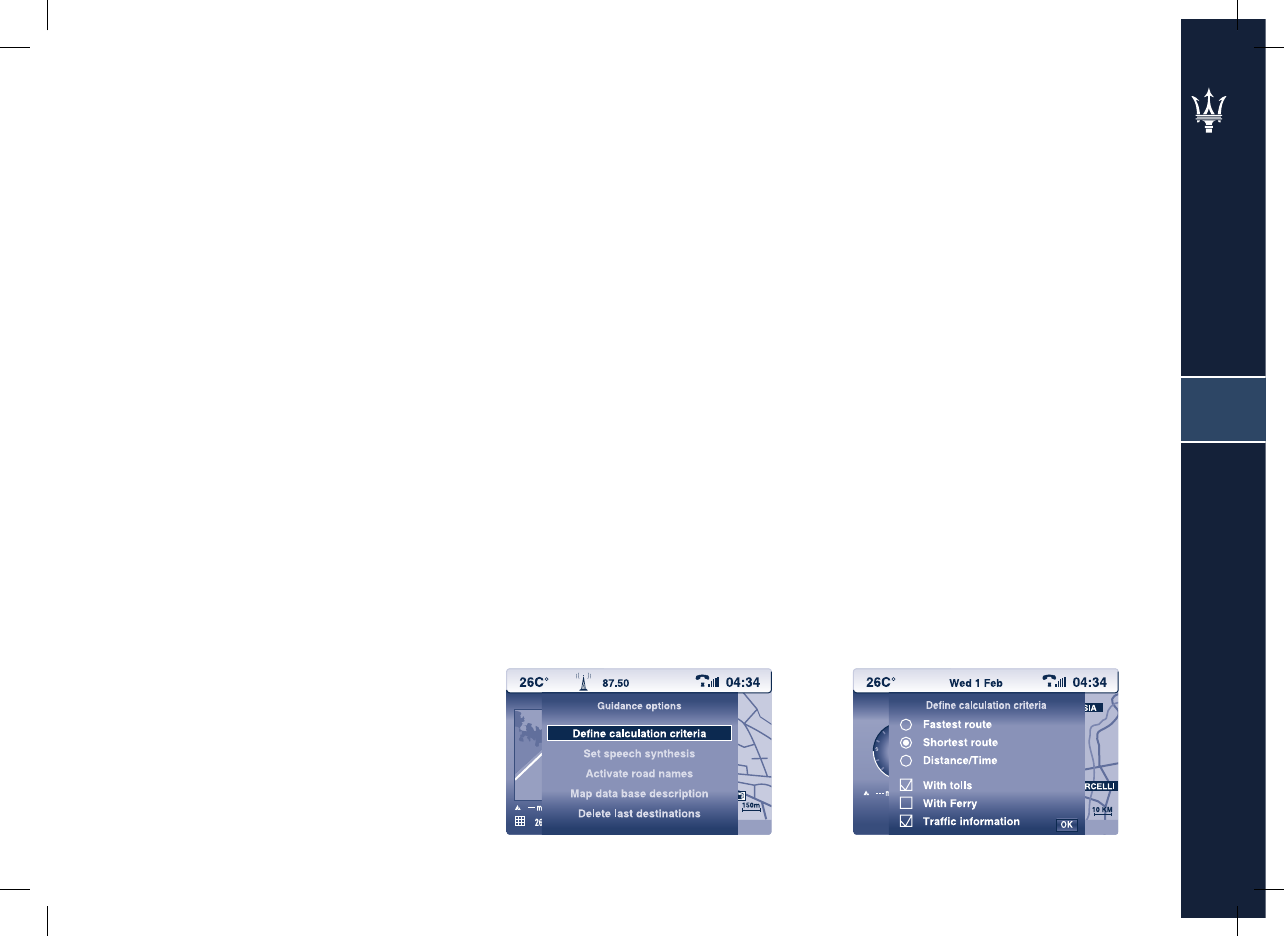
Fig. 58 Fig. 59
4
55
Divert route
The “Divert route” function,
selectable by turning and pressing the
knob (13), allows the system to work
out a diversion from the set route,
selectable between 1 and 50 km after
the current position.
Chosen destination
Selecting and confi rming the “Chosen
destination” function with the knob
(13) you can change the destination
initially set.
Guidance options
Selecting “Guidance options” by
turning and pressing the knob (13)
the display will show the following
menu (see Fig. 58):
- Defi ne calculation criteria
- Set speech synthesis
- Activate road names
- Map database description
- Delete last destinations.
Defi ne calculation criteria
Using the knob (13) to select and
confi rm this option, the display will
show a window where you can set the
route calculation criteria (see Fig. 59):
- Fastest route
- Shortest route
- Distance / Time
You can also select whether or not
toll roads and/or ferries should be
included in the calculated route
and whether you want the traffi c
information available on TMC channel
to be included too.

4
56
Map database description
Displays the map information stored
on the hard disk.
Delete last destinations
This function allows deleting the list
of the last destinations stored.
Set speech synthesis
You can activate, deactivate and
change the volume of the voice
indications provided by the system
during navigation. Using the knob
(13) to select and confi rm this option,
the display will show a graphic scale
that identifi es the voice indication
volume. This value can be changed
using the knob (13).
The display also shows the “Activate”
or “Deactivate” option, which when
selected and confi rmed with the knob
(13) activates or deactivates the voice
indications.
Activate road names
This function allows activating or
deactivating pronouncement of the
street name during voice synthesis of
the route.
Fig. 60 Fig. 61 Fig. 62
4
57
Map
To access the Map menu, proceed
as follows: Press the MENU button
(15), select the icon (see Fig. 60), and
confi rm by pressing the knob (13);
the display will show the following
menu (see Fig. 61):
- Map orientation
- Map details
- Display map
- Move the map.
Map orientation
Using the knob (13) to select and
confi rm this option, the system
allows you to orient the map in three
different ways (see Fig. 62):
• Vehicle direction
• North direction
• 3D view.
• Vehicle direction
The map is displayed following the
vehicle direction in zoom scales
from 50 m to 5 km. From 10 km to
200 km the map is always oriented
towards the north.
• North direction
The map is always displayed
oriented towards the north.
• 3D view
The map is displayed in 3D view
with zoom from 50 m to 200 m.
With a zoom of over 200 m, the
map will be displayed as described
under “Vehicle direction”.
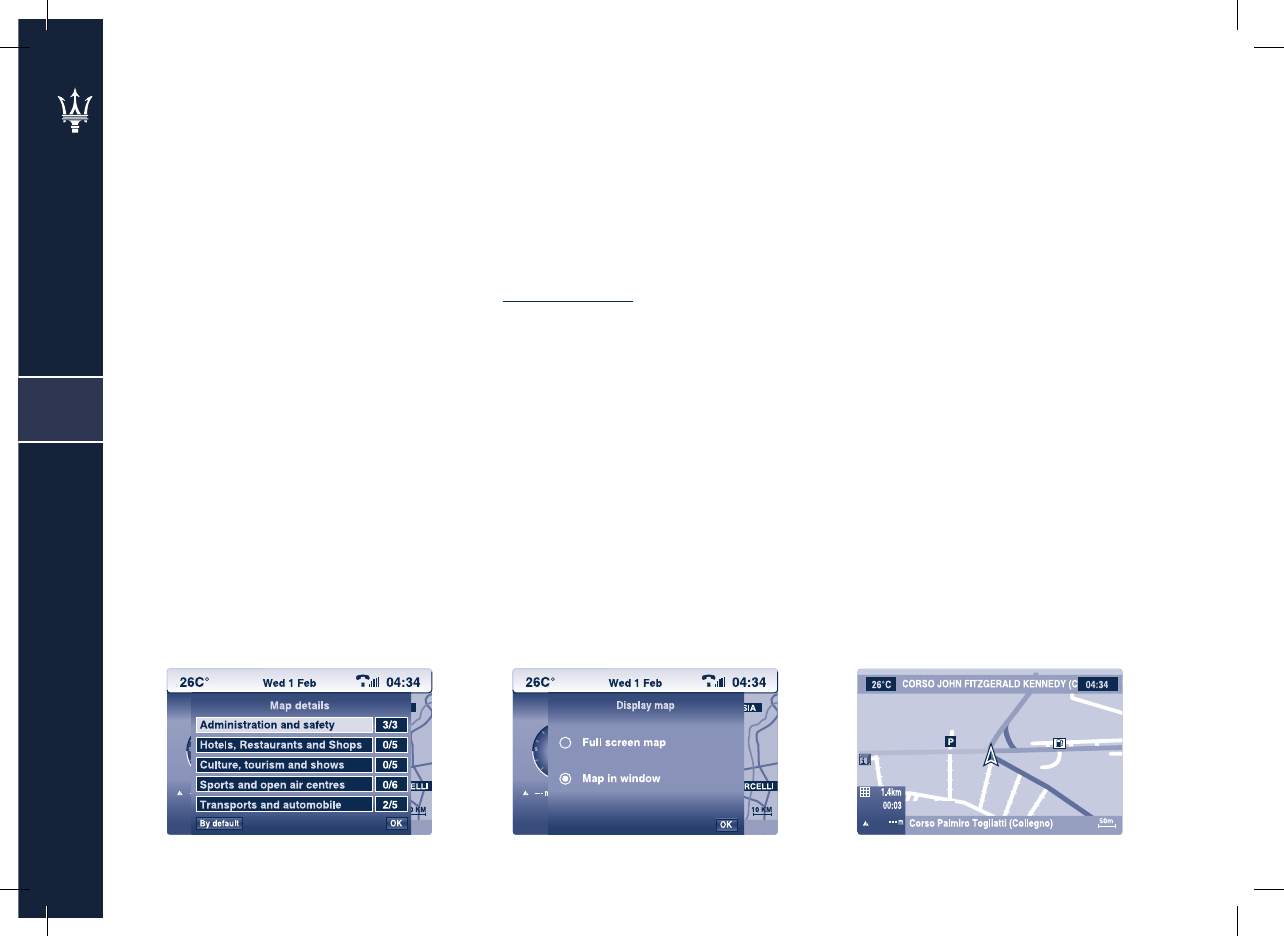
Fig. 65Fig. 63 Fig. 64
4
58
• At the top centre, the name of
the next street you need to take.
The map is displayed following the
vehicle direction in zoom scales from
50 m to 5 km. From 10 km to 200 km
the map is always oriented towards
the north. Up to 5 km, the map is
displayed following the direction of
the vehicle and from 10 km it displays
the northerly direction.
When coming close to a manoeuvre
(less than 300 m) the enlarged area
of the route to follow appears on the
left-hand side of the screen.
Details
Using the knob (13) to select and
confi rm this option, you can set the
details, broken down into categories,
to be shown on the map relating to
the points of interest (POI) (see Fig.
63).
The options:
- “By default”: sets the selection of
the options to the basic version for
each category.
- “OK”: opens the page containing
the list of options included in the
category selected.
Display map
Using the knob (13) to select and
confi rm this option, you can choose
between two map display modes (see
Fig. 64):
• Full screen map
• Map in window
• Full screen map
Shows the map in full screen with
the following indications (see Fig.
65):
• At the bottom left, the distance
to travel, the remaining time to
arrival at your destination and
the altitude
• At the bottom right, the zoom
value set
• At the bottom centre, the name
of the street you are in
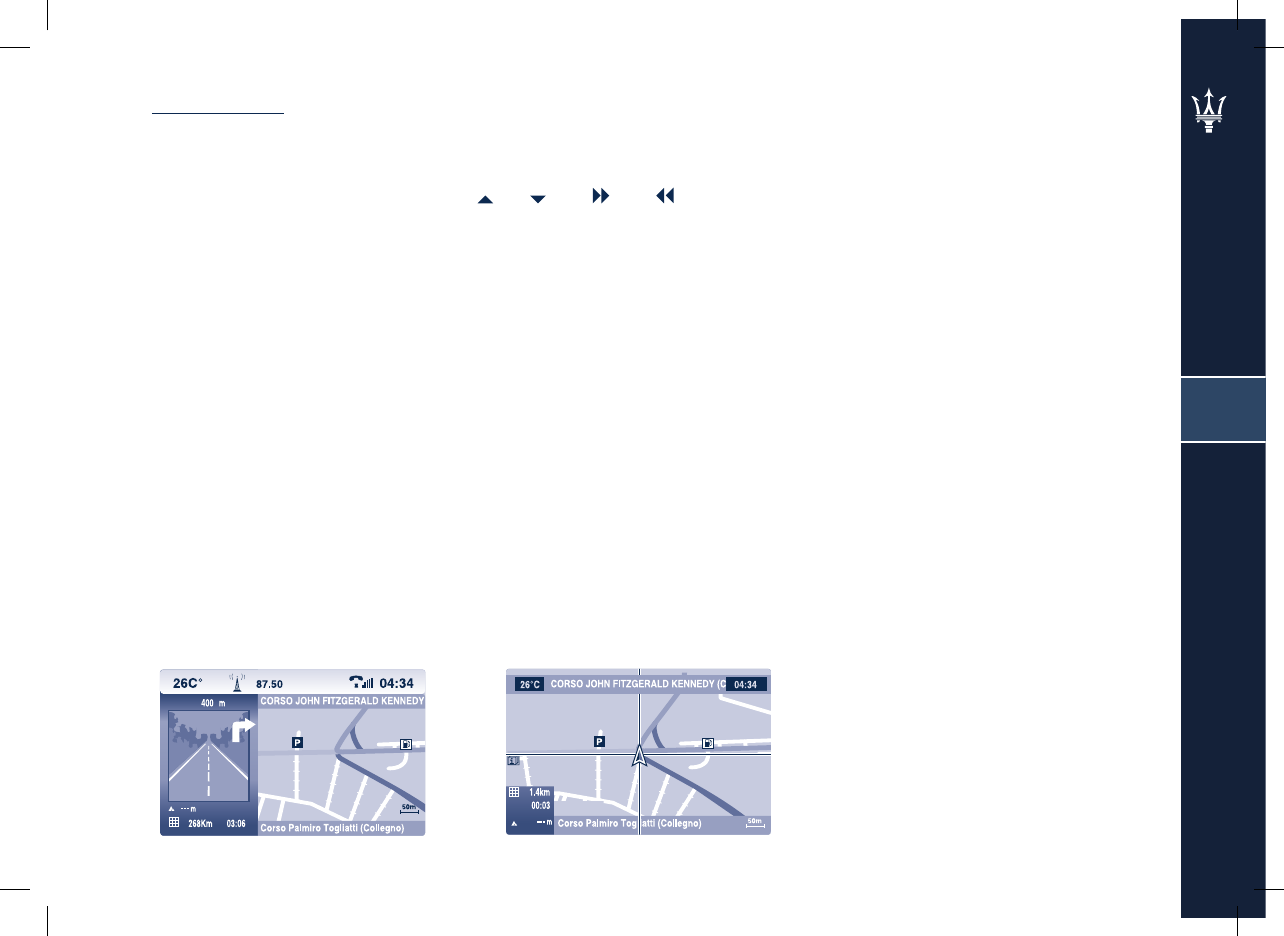
Fig. 66 Fig. 67
4
59
• Map in window
Shows the map on the right-hand
side of the display and on the left
the panel indicating the route (see
Fig. 66).
Move the map
Using the knob (13) to select and
confi rm this option you can move the
map in 4 directions using the buttons
(7), (14), (11), (16); You can
also change the zoom scale (zoom in
or out) using the knob (13), (see Fig.
67).

6060

5
61
Traffi c information
Traffi c information 62
Zoom function 64

Fig. 68 Fig. 69 Fig. 70
5
62
Traffi c information
From the main menu (see Fig. 68),
selecting and confi rming this function
by turning and pressing the knob (13)
you access the following menu:
- Read traffi c messages
- Filter traffi c information
- Confi gure message announcement
- Select TMC station.
Read traffi c messages
Selecting and confi rming this function
by turning and pressing the knob
(13) you can view the list of traffi c
information messages received.
Filter traffi c information
Selecting and confi rming this function
by turning and pressing the knob (13)
you access the following menu (see
Fig. 69), which allows you to select
the type of information you wish to
receive:
- Geographic fi lter
- Road information
- Urban/city information
Geographic fi lter
Selecting and confi rming this function
by turning and pressing the knob (13)
you can access the following menu
(see Fig. 70):
Selecting and confi rming:
• Around the vehicle
• Around location
• On the route.
• Around the vehicle
Turning and pressing the knob (13)
you can obtain information on
the areas surrounding the current
position of the vehicle.
• Around location
Turning and pressing the knob
(13) you can obtain information
on the areas surrounding a certain
geographical position.
• On the route
Turning and pressing the knob (13)
you can obtain information on the
current route.
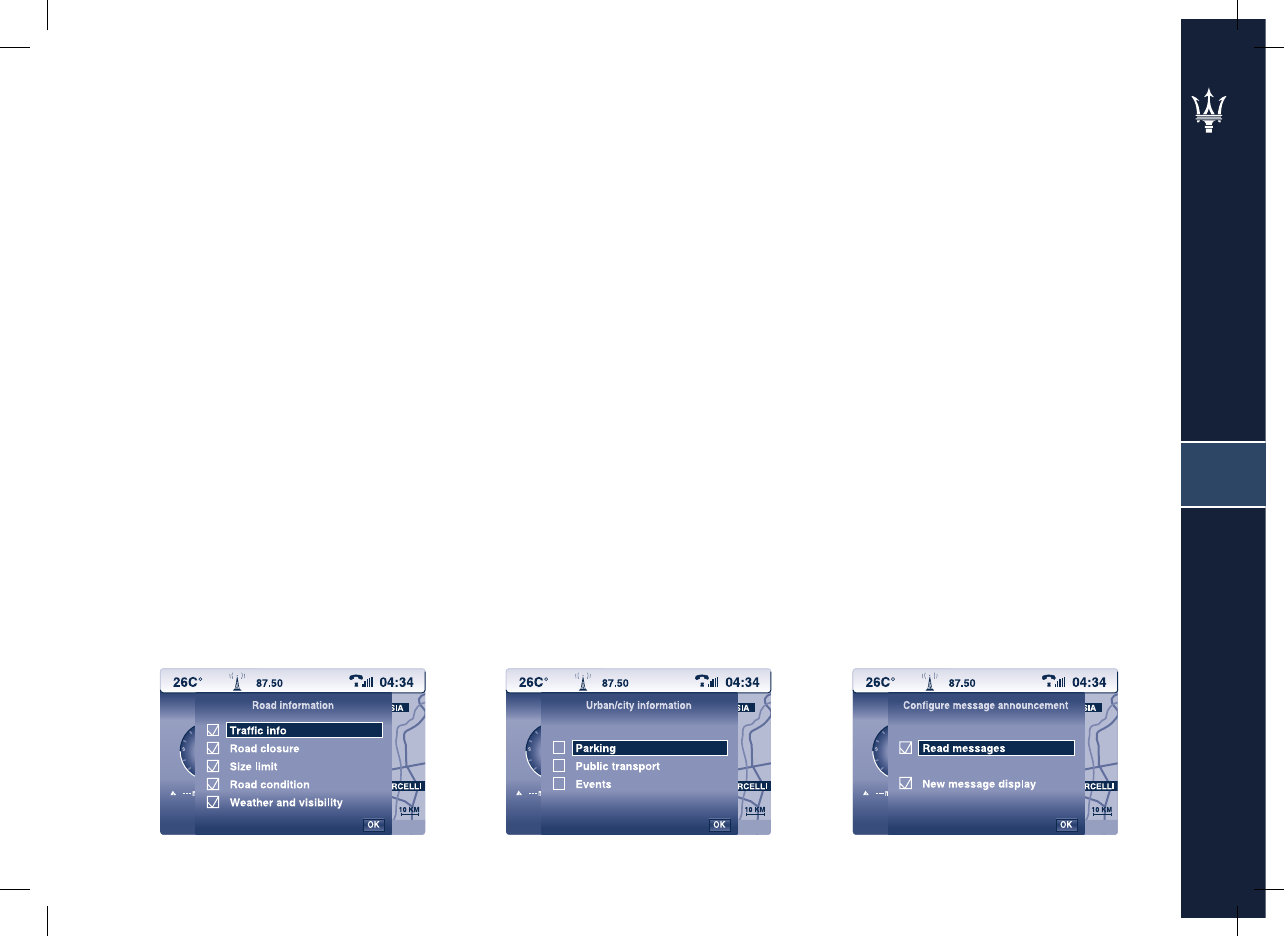
Fig. 71 Fig. 72 Fig. 73
5
63
Road information
Selecting and confi rming “Road
information” by turning and pressing
the knob (13) you access the selection
of the information you wish to
receive (see Fig. 71): “Traffi c Info”,
“Road closure”, “Size limits”, “Road
conditions”, “Weather and visibility”.
Selecting and confi rming this
information by turning and pressing
the knob (13) you can activate/
deactivate receipt of the information.
Urban/city information
Selecting and confi rming “Urban/city
information” by turning and pressing
the knob (13) you access the selection
of the information you wish to receive
(see Fig. 72): “Parking”, “Public
transport”, “Events”.
Selecting and confi rming this
information by turning and pressing
the knob (13) you can activate/
deactivate receipt of the information.
Confi gure message
announcement
Selecting and confi rming this function
with the knob (13), (see Fig. 73) you
can select to have the system display
or read the messages transmitted.
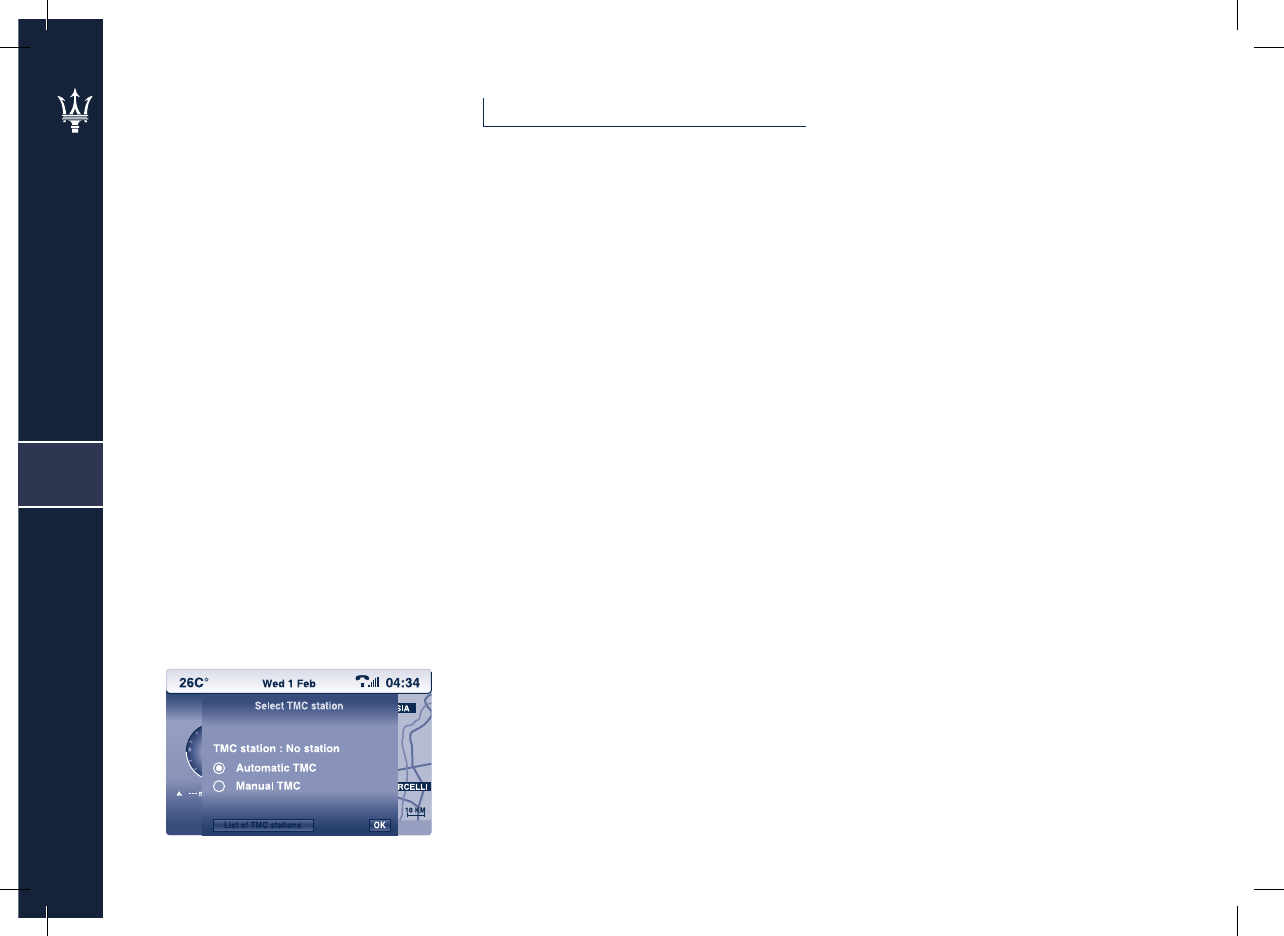
Fig. 74
5
64
Select TMC station
Selecting and confi rming this function
by turning and pressing the knob (13)
you can choose between automatic or
manual management of TMC station
selection (see Fig. 74).
Zoom function
Turning the knob (13) clockwise or
anticlockwise you can zoom in or out
on the current vehicle position on the
map.

6
65
On-board computer (TRIP)
Trip computer mode menu 66
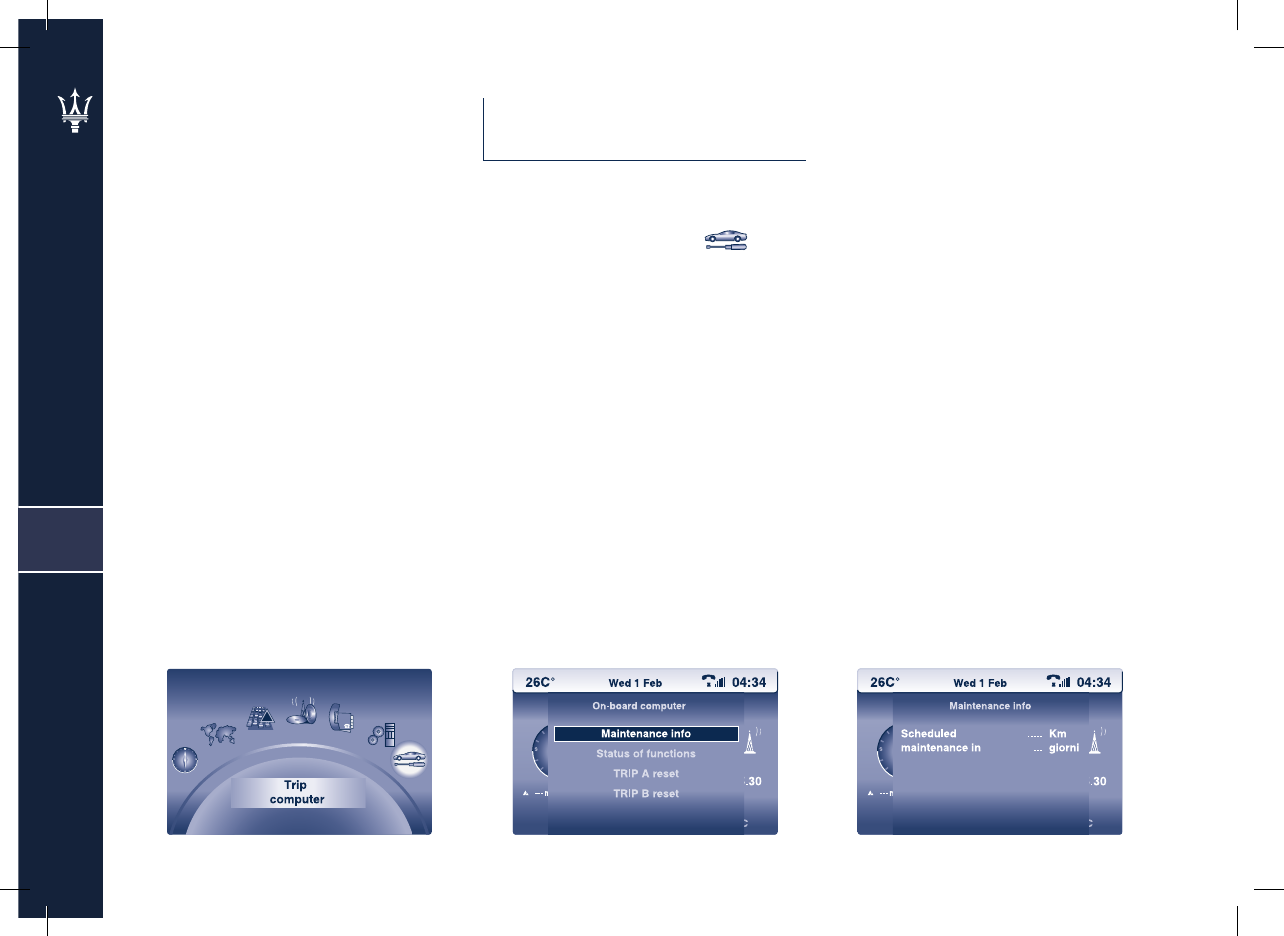
Fig. 75 Fig. 76 Fig. 77
6
66
As well as indicating the next service
due, the trip computer summarises
the setting status of the various
functions and resets the partial trip
parameters (TRIP) A and B.
Trip computer mode
menu
To access the “Trip computer (TRIP)”
menu, proceed as follows:
- press the MENU button (15),
(see Fig. 75);
- Select the icon and confi rm by
pressing the knob (13), the display
will show the following menu (see
Fig. 76):
- Maintenance info
- Status of functions
- Reset TRIP A
- Reset TRIP B
Maintenance info
Selecting and confi rming this function
with the knob (13) you can view when
the next service is due. The remaining
kilometres the vehicle can travel will
be shown along with the expiry date.
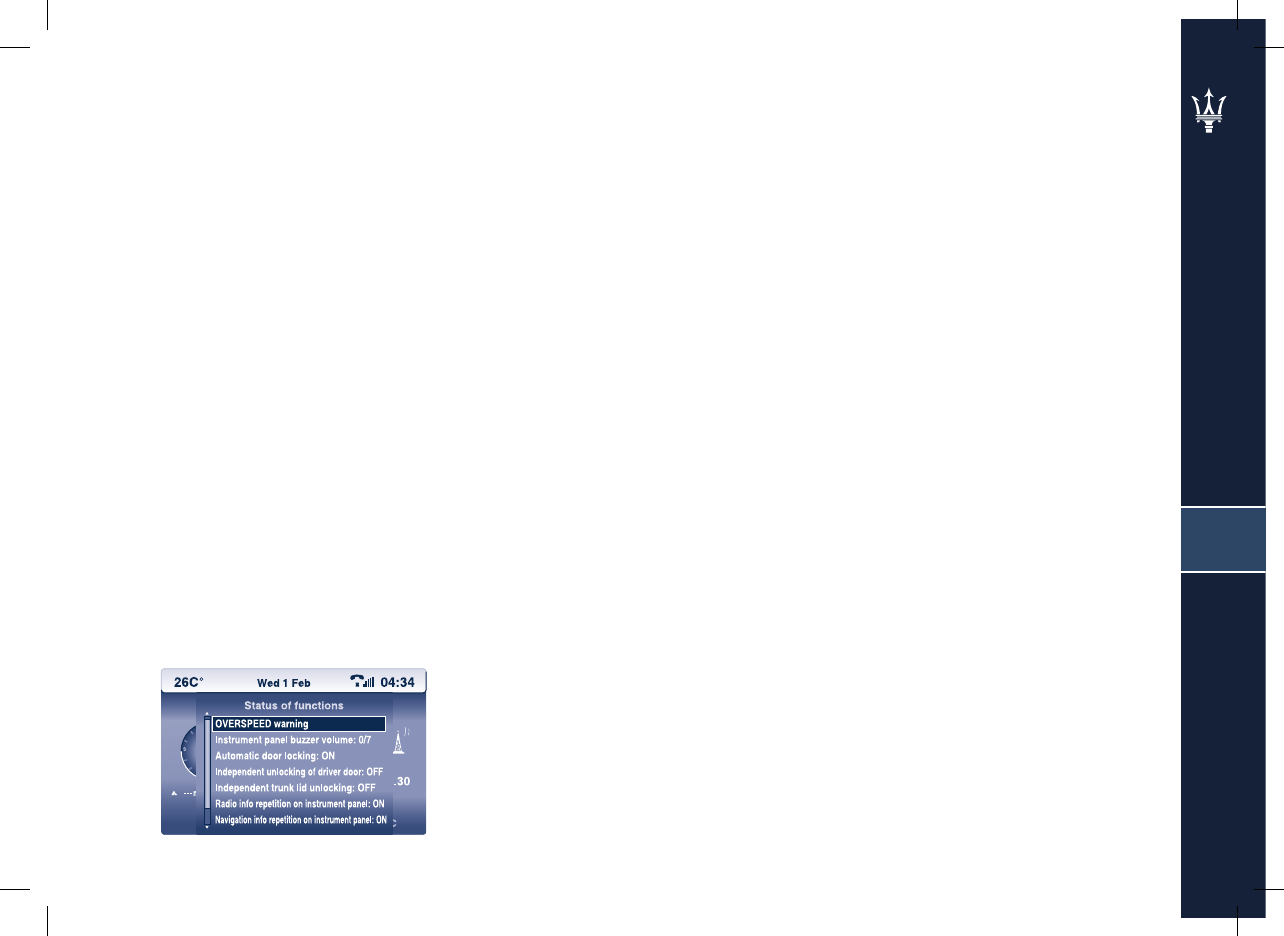
Fig. 78
6
67
Status of functions
Selecting and confi rming this function
with the knob (13), you can view the
setting of the system functions (see
Fig. 78).
Reset TRIP
Selecting and confi rming this function
with the knob (13), one of two
functions allows you to reset the
information relating to the relative
route.
After resetting, the message “Route
initialised” will appear on the screen.

6868

7
69
System confi guration
Confi guration mode menu 70
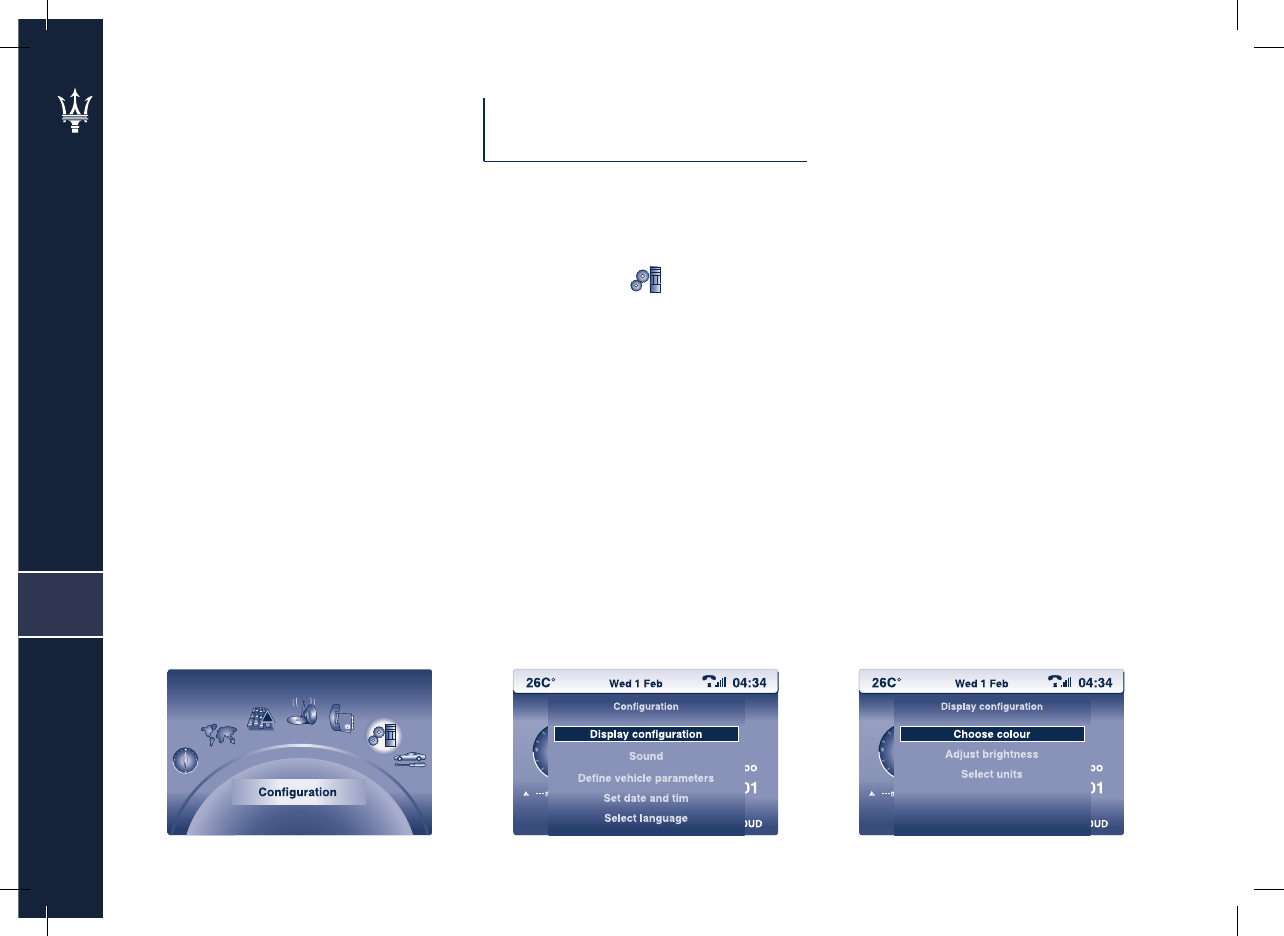
Fig. 79 Fig. 80 Fig. 81
7
70
With system confi guration some
system settings can be adjusted to the
requirements of the user, for example,
the volume with which the system
communicates the information,
the display language, colour and
brightness and some vehicle settings.
Confi guration mode
menu
To access the “Confi guration” menu,
proceed as follows:
- press the MENU button (15), (see
Fig. 79);
- Select the icon and confi rm by
pressing the knob (13),
the display will show the following
menu (see Fig. 80):
- Display confi guration
- Sound
- Defi ne vehicle parameters
- Set date and time
- Select language
Display confi guration
Selecting and confi rming this function
with the knob (13) you can set the
following parameters (see Fig. 81):
• Choose colour
• Adjust brightness
• Select units.
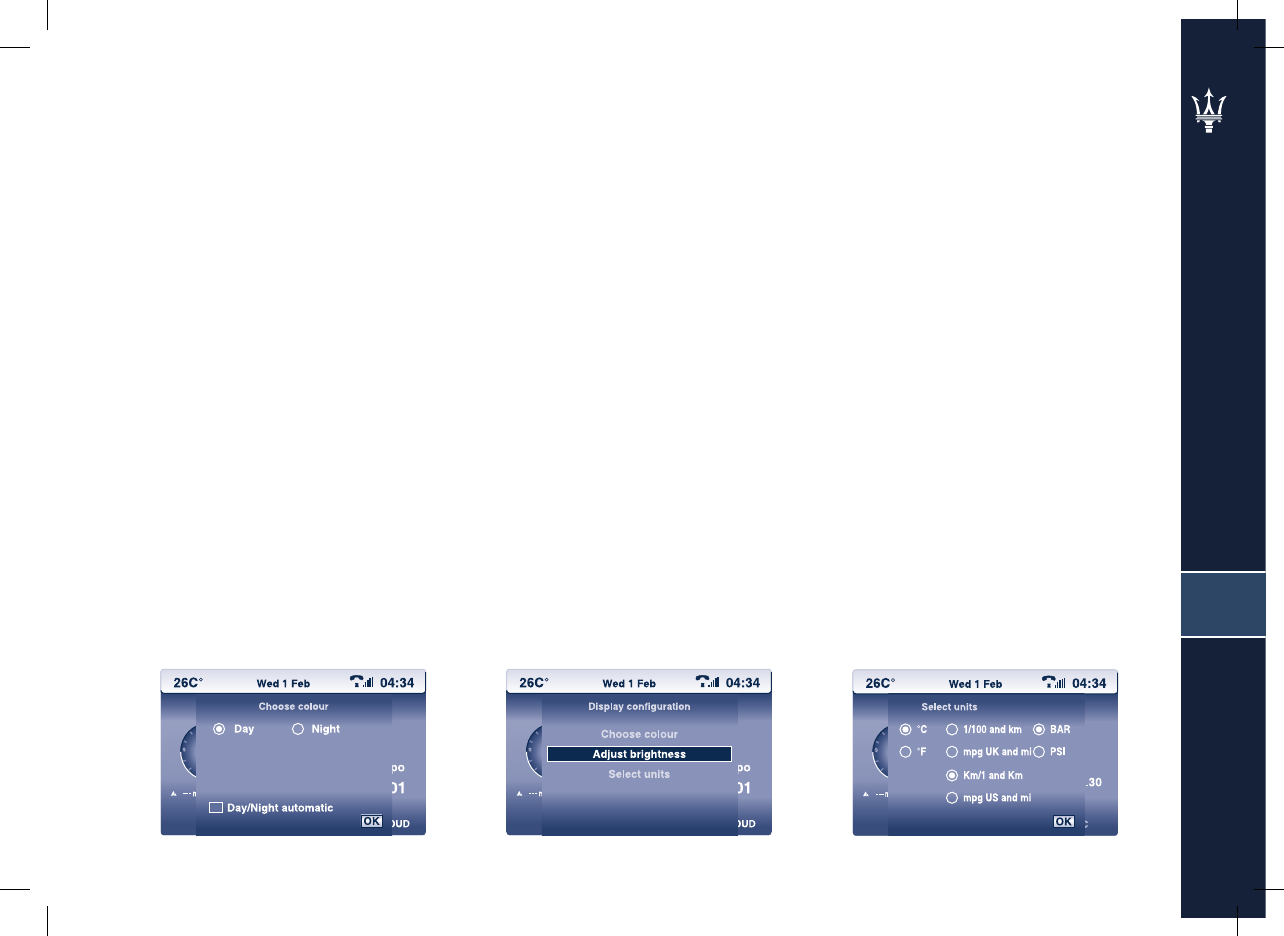
Fig. 82 Fig. 83 Fig. 84
7
71
Choose colour (see Fig. 82)
Allows selecting Day or Night or
automatic management of the two
settings.
Adjust brightness (see Fig. 83)
Allows adjusting the screen
brightness.
Set units (see Fig. 84)
You can choose between metric and
Anglo-Saxon units of measure.
The system acquires the new
parameter setting only after
confi rming OK on each single
adjustment page with the knob (13).

Fig. 85 Fig. 86 Fig. 87
7
72
Speech synthesis setting
(see Fig. 86)
This function allows adjusting the
individual volumes of the messages
linked to the driving indications and
other types of messages. Finally, you
can also decide whether you want the
message to be spoken in a male or
female voice.
Sound
Selecting and confi rming this function
with the knob (13) you can set the
type and volume of the messages
transmitted by the system.
The menu on the specifi c page has the
following functions:
• Voice command settings
• Speech synthesis setting
• Instrument panel buzzer volume
Voice command settings
(see Fig. 85)
Allows adjusting the volume with
which the system interacts with
the user during voice command
acquisition.
Instrument panel buzzer volume
(see Fig. 87)
Allows adjusting the volume of the
acoustic signal that accompanies
some instrument panel warnings
(EPB overheating, seat and rear-view
mirror position storage, parking
sensors).
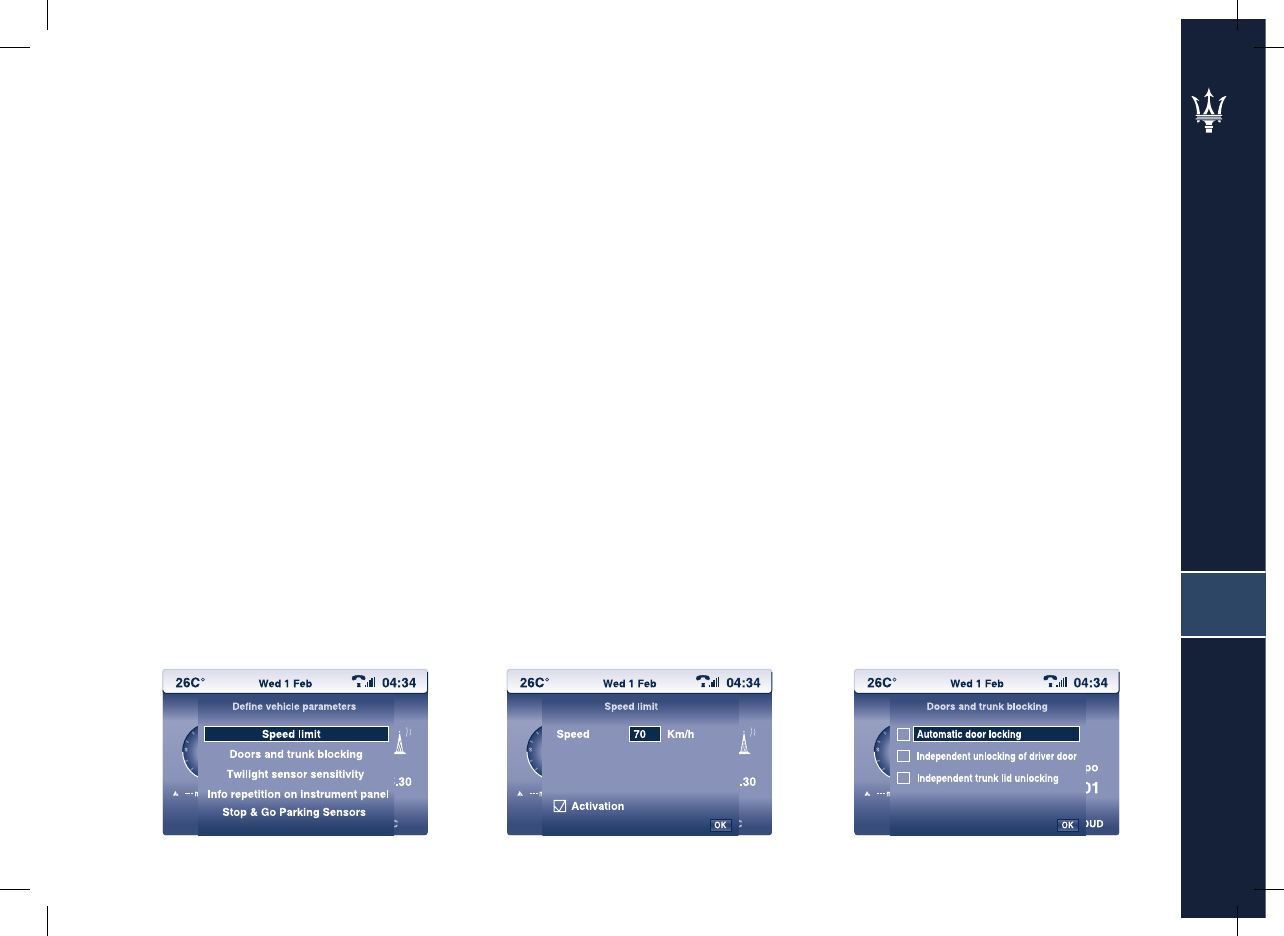
Fig. 88 Fig. 90Fig. 89
7
73
Defi ne vehicle parameters
Selecting and confi rming this function
with the knob (13) you can set the
following parameters (see Fig. 88):
• Speed limit
• Doors and trunk blocking
• Twilight sensor sensitivity
• Info repetition on instrument panel
• Stop & Go parking sensors
Speed limit (see Fig. 89)
You can set a speed limit and activate
an alarm signal which will sound
when the maximum speed limit set is
exceeded.
Doors and trunk blocking
(see Fig. 90)
When setting off, after reaching
a given speed, you can select the
following settings: Automatic locking
of all the doors driver’s door opening
independently of the vehicle’s
other doors; luggage compartment
lid opening independently of the
vehicle’s other doors.
Fig. 92Fig. 91 Fig. 93
7
74
Info repetition on instrument panel
(see Fig. 92)
You can view information relating
to the audio sources, telephone and
navigation on the instrument panel
display.
Twilight sensor sensitivity
(see Fig. 91)
You can adjust the sensitivity of the
sensor for turning on the lights.
Stop & Go parking sensors
(see Fig. 93)
You can activate/deactivate the
parking sensor function.
Fig. 95
Fig. 94
7
75
Select language
Selecting and confi rming this function
with the knob (13) you can set the
voice synthesis and display language
(see Fig. 95).
Set date and time
This function allows setting the date
and time, and the time can also be
linked to GPS minute adjustment (see
Fig. 94).

7676

8
77
Voice controls
Voice command list 78

8
78
The voice commands allow you to
control the main system functions
by voice. To activate the system to
receive voice commands, press the
button (32).
WARNING: If the system does not
understand the voice command, it
will speak the word “please” and
the scroll bar, which indicates the
time available to give a command,
will start timing from scratch. If the
time runs out without you giving a
command, the system will interrupt
the voice recognition session in
course.
At the third failed attempt, the voice
recognition session will be ended.
To activate a new voice recognition
session, again press the button (32).
Pronouncing “Help” or “What can
I say?” the display shows the list of
voice commands available, which the
system is able to “obey”.
Voice command list
VOICE COMMAND LIST
1st level command 2nd level command 3rd level command
Call
Guide to
Display
Help
What can I say?
Cancel
Audio
Navigator
Trip computer
Telephone
Radio
Help
What can I say?
Cancel
Auto store
List
Memory
1 - 6
Help
What can I say?
Cancel

8
79
1st level command 2nd level command 3rd level command
Previous
Next
CD player
Help
What can I say?
Cancel
Random
List
Track number
1 - 20
Help
What can I say?
Cancel
Previous track
Next track
Scan
Directory
Next
Previous
Repeat
Help
What can I say?
Cancel

8
80
1st level command 2nd level command 3rd level command
Jukebox
Help
What can I say?
Cancel
Random
List
Track number
1 - 20
Help
What can I say?
Cancel
Previous track
Next track
Scan
Directory
Next
Previous
Repeat
Help
What can I say?
Cancel

8
81
1st level command 2nd level command 3rd level command
Navigator
Help
What can I say?
Cancel
Stop
Directory
Restart
Zoom out
Zoom in
Show
Destination
Vehicle
Help
Cancel
What can I say?
Telephone
Help
What can I say?
Cancel
Directory
Answer phone
Dial last number

8
82
1st level command 2nd level command 3rd level command
Messages
Display
Read
Help
Cancel
What can I say?
Stop
Delete
No
Yes
Traffi c info
Display
Read
Help
Cancel
What can I say?
Help
What can I say?
Cancel
Stop
Previous
Next
Example of voice command:
To call the radio station stored under
button 3, 3proceed as follows:
- Pronounce the voice command
“Radio”, the system will emit an
acoustic confi rmation signal
- Pronounce the voice command
“Memory,” the system will emit an
acoustic confi rmation signal
- Pronounce the voice command “3”,
the system will emit an acoustic
confi rmation signal and then tune
in to the desired radio station.

8
83
Storing a voice in the directory
with voice identifi cation
Storing a voice in the directory with
voice identifi cation
The system allows recording a voice
command associated with a name
in the directory. This function, for
example, makes it easy to make a
telephone call to a number listed
in the directory with which a voice
command is associated (e.g.
“Call” / “Name with which the voice
command is associated”).
When inserting or modifying a record
(see the paragraph “Directory” on
page 45) select and confi rm the
recording button “ “ shown in
Fig. 1 with the knob (13), then follow
the on-screen instructions given case
by case.

8484

9
85
Appendix Japanese version
9
86
Il sistema Multi Media System che
equipaggia le vetture destinate al
mercato giapponese presenta alcune
differenze rispetto alla versione
installata sulle vetture destinate agli
altri mercati.
Non essendo supportate le modalità
Telefono e Navigatore (quest’ ultima
gestita solo come visualizzazione,
interfacciando al MMS un navigatore
esterno), il sistema presenta un menu
di gestione “ridotto”.
Le modalità gestibili rimangono:
- Audio
- Computer di bordo
- Confi gurazione sistema.
Nota: Le funzionalità delle tre
modalità rimaste rimangono
pressochè inalterate. Le differenze
sono descritte nella presente
appendice.
Navigatore
È possibile collegare al Multi Media
System un sistema di navigazione
esterno, in questa condizione il
display del MMS riproduce le videate
trasmesse dal navigatore.
Tutti i comandi operativi di
navigazione (impostazione
destinazione, avvio/interruzione
navigazione, scala, ecc.) sono
impostabili solo dai tasti dello
strumento di navigazione, l’unico
parametro comandato dai tasti MMS
è il volume in uscita delle istruzioni di
guida.
Audio
Modalità Radio
Non essendo supportata la
funzionalità RDS, le funzioni ad essa
correlate, LIST e TA/PTY non sono
operative.
Pertanto con Radio funzionante,
la pressione del tasto LIST (12),
sia su banda AM che FM, oppure
del tasto TA/PTY (19), comporta
la visualizzazione del messaggio
“Funzione non disponibile”.
Fig. 1
26C°
Radio
FM2
Mem 1
105 FM
Divertimento 105.30
RDS TA LOUD
04:34
W
E
SN
m
Wed 1 Feb
Fig. 2
9
87
Menu modalità radio
Con funzionante la sorgente Radio,
premendo la manopola (13) il display
visualizza la sola funzione:
- Introdurre frequenza
È possibile accedere al medesimo
menu anche premendo il pulsante
MENU (15), e nella videata successiva
selezionando e confermando,
con la manopola (13), la funzione
“Preferenze radio”.
Computer di bordo (TRIP)
Accedendo al menu “Computer di
bordo (TRIP)”, procedendo come di
seguito descritto:
· premere il tasto MENU (15);
· selezionare l’icona “ “ e
confermare premendo la manopola
(13);
il display visualizza il seguente menu:
- Info manutenzione
- Stato delle funzioni
- Reset TRIP A
- Reset TRIP B
Fig. 3 Fig. 4 Fig. 5
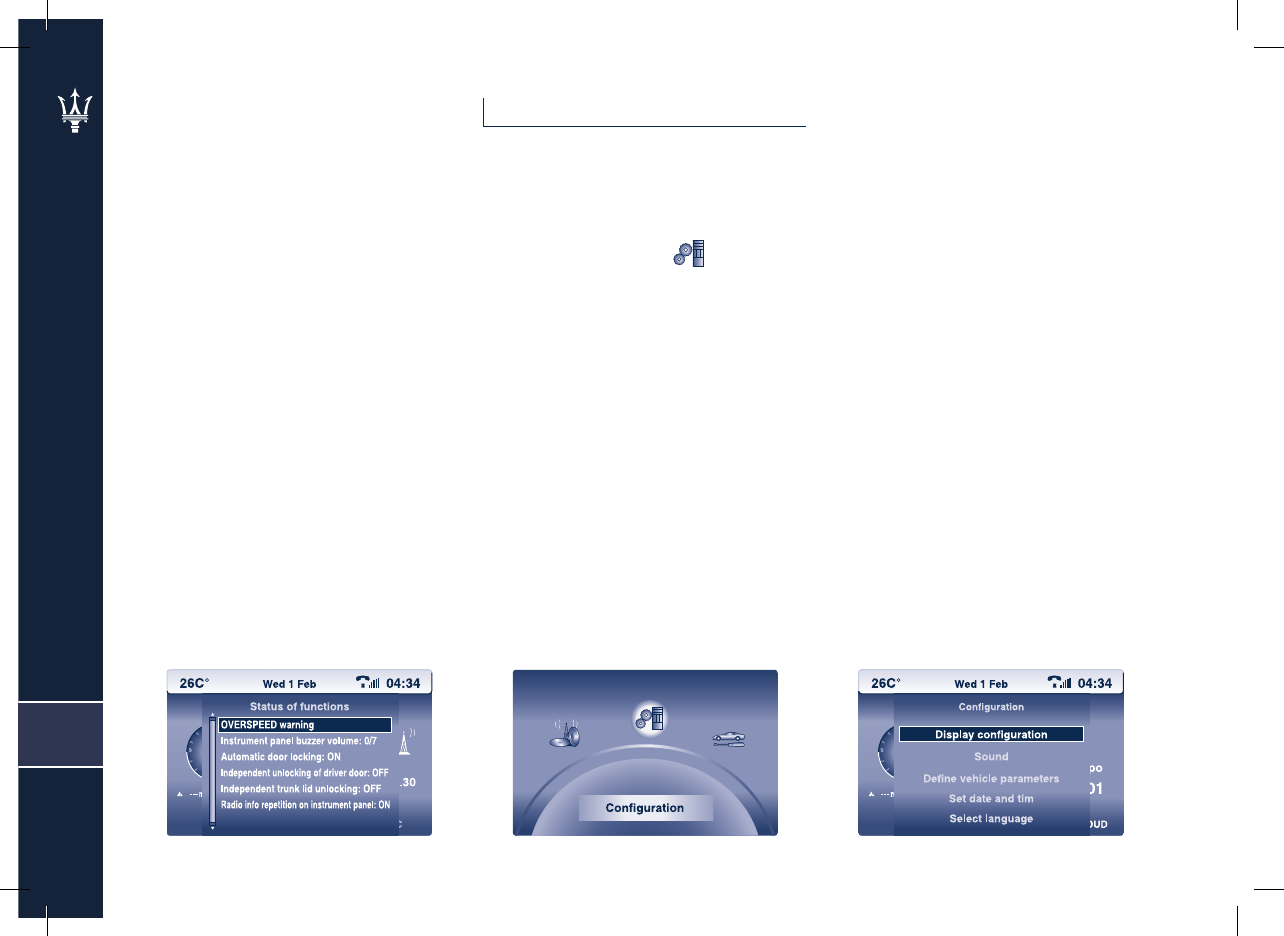
9
88
Selezionando e confermando ,
mediante la manopola (13) la voce
“Stato delle funzioni” il sistema
propone come unca opzione la voce
“Radio”, ne consegue che le uniche
informazioni ripetibili su quadro
strumenti siano quelle ad essa
relative.
Confi gurazione sistema
Accedendo al menu
“Confi gurazione”, procedendo come
descritto di seguito:
· premere il tasto MENU (15);
· selezionare l’icona “ “ e
confermare premendo la manopola
(13);
Fig. 6
il display visualizza il seguente menu:
- Confi gurazione display
- Volume buzzer quadro strumenti
- Defi nire i parametri veicolo
- Impostare data e ora
- Scelta della lingua.
Fig. 7 Fig. 8
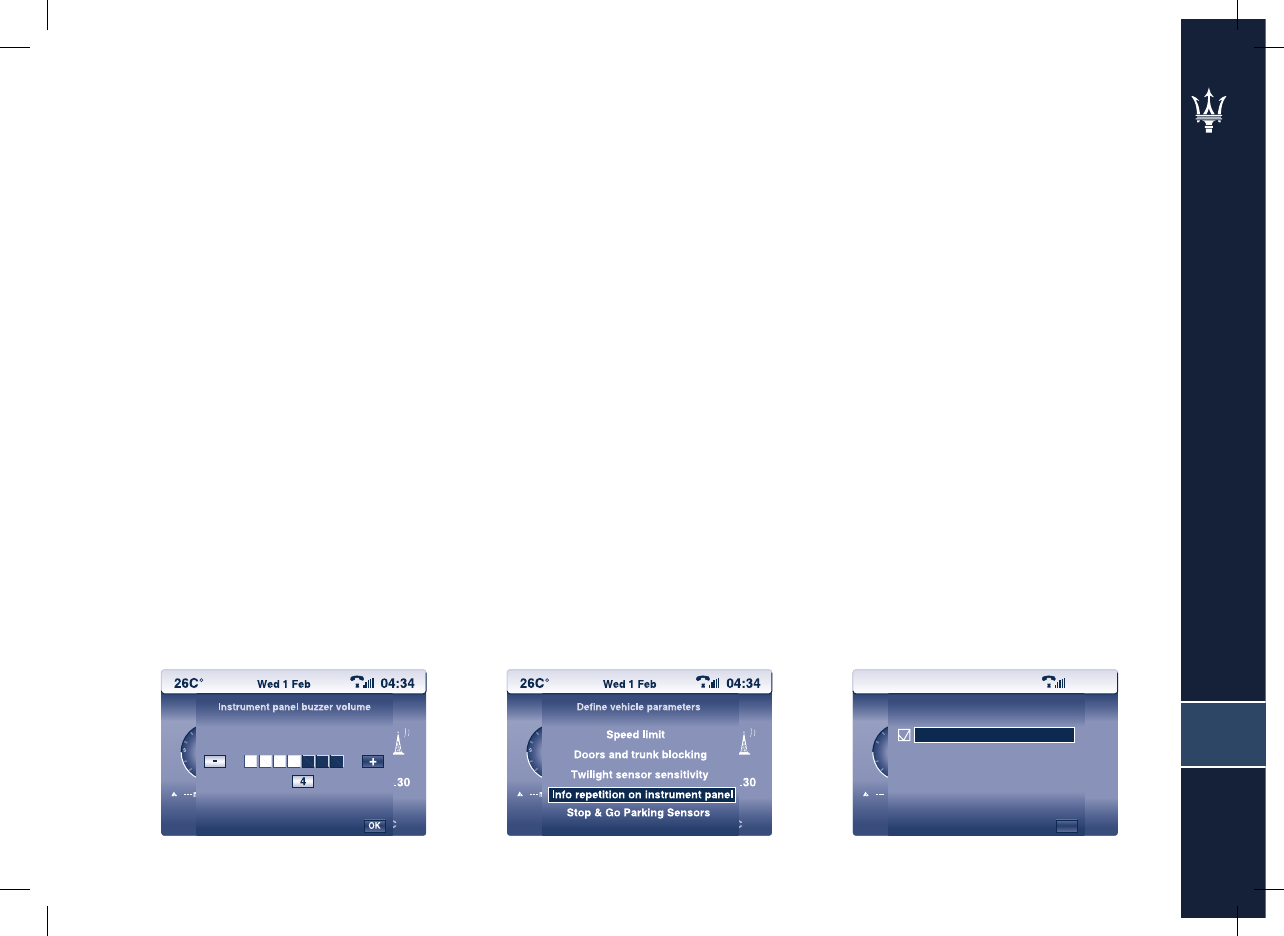
9
89
Non essendo previste la modalità
“Comandi vocali” e “Navigazione”
i parametri sonori ad esse abbinati
non sono più gestibili, per cui la
precedente funzioni “Suoni” è
sostituita dall’unico parametro sonoro
rimasto gestibile “Volume buzzer
quadro strumenti”.
Ripetizione info su quadro
strumenti
Come è già stato detto nel paragrafo
“Computer di bordo (TRIP)” le
informazioni relative alle funzioni del
MMS ripetibili su display sono quelle
relative alla fonte Radio, per cui
accedendo alla funzione “Ripetizione
info su quadro strumenti “ (funzione
presente nel menu “Defi nire i
parametri veicolo),
Fig. 9 Fig. 10
26C°
Lettore MP3 (CD)
INTRO
ALB 3
Brano
6/17
Together/Elisa
Tempo
00:01
RDS TA LOUD
04:34
W
E
SN
m
Wed 1 Feb
Info repetition on instrument panel
Radio
OK
Fig. 11
tramite la manopola (13), (vedi
pag.73), l’unica opzione proposta dal
sistema è la voce “Radio”.


10
91
Table of contents
Table of contents 86

10
92
Table of contents
Controls and general
information 5
Control description 7
Advice 13
Road safety 13
Reception conditions 13
Care and maintenance 13
System software update 14
Compact Disc 14
General information 16
Important warnings for use and
safety during road circulation 16
Switching-on / off 17
Adjusting the volume 17
Audio functions 19
Audio adjustments 20
Bass adjustment (BASS) 20
Treble adjustment (TREB) 21
Front/rear balance (Fader) 21
Right/left balance (Balance) 21
Loudness function (LOUD) 22
Automatic volume correction 22
Musical ambience 22
Center point 22
Radio mode 23
Listening to the radio 23
Frequency band selection 23
Automatic station search 23
Manual station search 23
Modifying the PIN code 41
Making a call 42
Selecting a number from
the last calls list 42
Dialling a phone number 42
Calling a number from
the directory 42
Calling a service number 43
Answering a call 43
Rejecting a call 43
Directory 44
Managing directory fi les 44
Confi gure directory 46
File transfer 47
Messages (SMS - Short Message
Service) 48
Navigator
(not supplied for Japanese
version) 49
Repeat last Navigator Voice
Information 51
Main menu 51
Select destination 52
Journey leg and route 54
Guidance options 55
Map 57
Traffi c information 61
Traffi c information 62
Read traffi c messages 62
Filter traffi c information 62
Confi gure message
Manual station storage 23
Automatic FM station storage
(Autostore) 24
TA (traffi c information)
function (where available) 24
PTY (Program Type) function
(where available) 25
EON (Enhanced Other Networks)
function 26
Radio mode menu 26
LIST function 27
CD / Jukebox mode 28
Ejecting the CD 28
Track selection 28
Fast forward/backward 28
CD / Jukebox mode menu 28
List Function 30
Jukebox Mode 30
Album selection 30
Track selection 30
Jukebox mode menu 30
LIST Function 32
Audio mode menu 33
Compatible MP3 formats: 36
Mobile phone
(not supplied for U.S. and
Japanese versions) 37
General 38
Telematics mode menu 38
Alphanumerical codes 40
SIM card insertion 40
Entering the PIN code 41

10
93
announcement 63
Select TMC station 64
Zoom function 64
On-board computer (TRIP) 65
Trip computer mode menu 66
Maintenance info 66
Status of functions 67
Reset TRIP 67
System confi guration 69
Confi guration mode menu 70
Display confi guration 70
Sound 72
Defi ne vehicle parameters 73
Set date and time 75
Select language 75
Voice controls 77
Voice command list 78
Example of voice command: 82
Storing a voice in the directory
with voice identifi cation 83
Appendix Japanese version 85
Navigatore 86
Audio 86
Modalità Radio 86
Computer di bordo (TRIP) 87
Confi gurazione sistema 88
Ripetizione info su quadro
strumenti 89
Table of contents 91
Table of contents 92

All the information contained in this manual is purely indicative, since
MASERATI vehicle models may vary either for legal or market reasons.
MASERATI does therefore reserve the right to make any modifi cation to the
vehicle described in this manual, at any time, for either technical or commercial
reasons.
Ask your MASERATI Dealer for any further information you may require.
For safety and performance reasons, as well as to preserve the vehicle original
value, we recommend that you do not modify the vehicle equipment unless
you use parts of the approved type, which meet the requirements for the
equipment intended use.
Publication no. 80687400 - 1nd Edition - 10/2007
All rights reserved. This document must not be reproduced, even partially,
without the written consent of Maserati S.p.A.