Marquardt FBSB802 Transmitter User Manual Users manual
Marquardt GmbH Transmitter Users manual
Users manual
Annex No.5
Page 1 of 20
Functional Description
User Manual
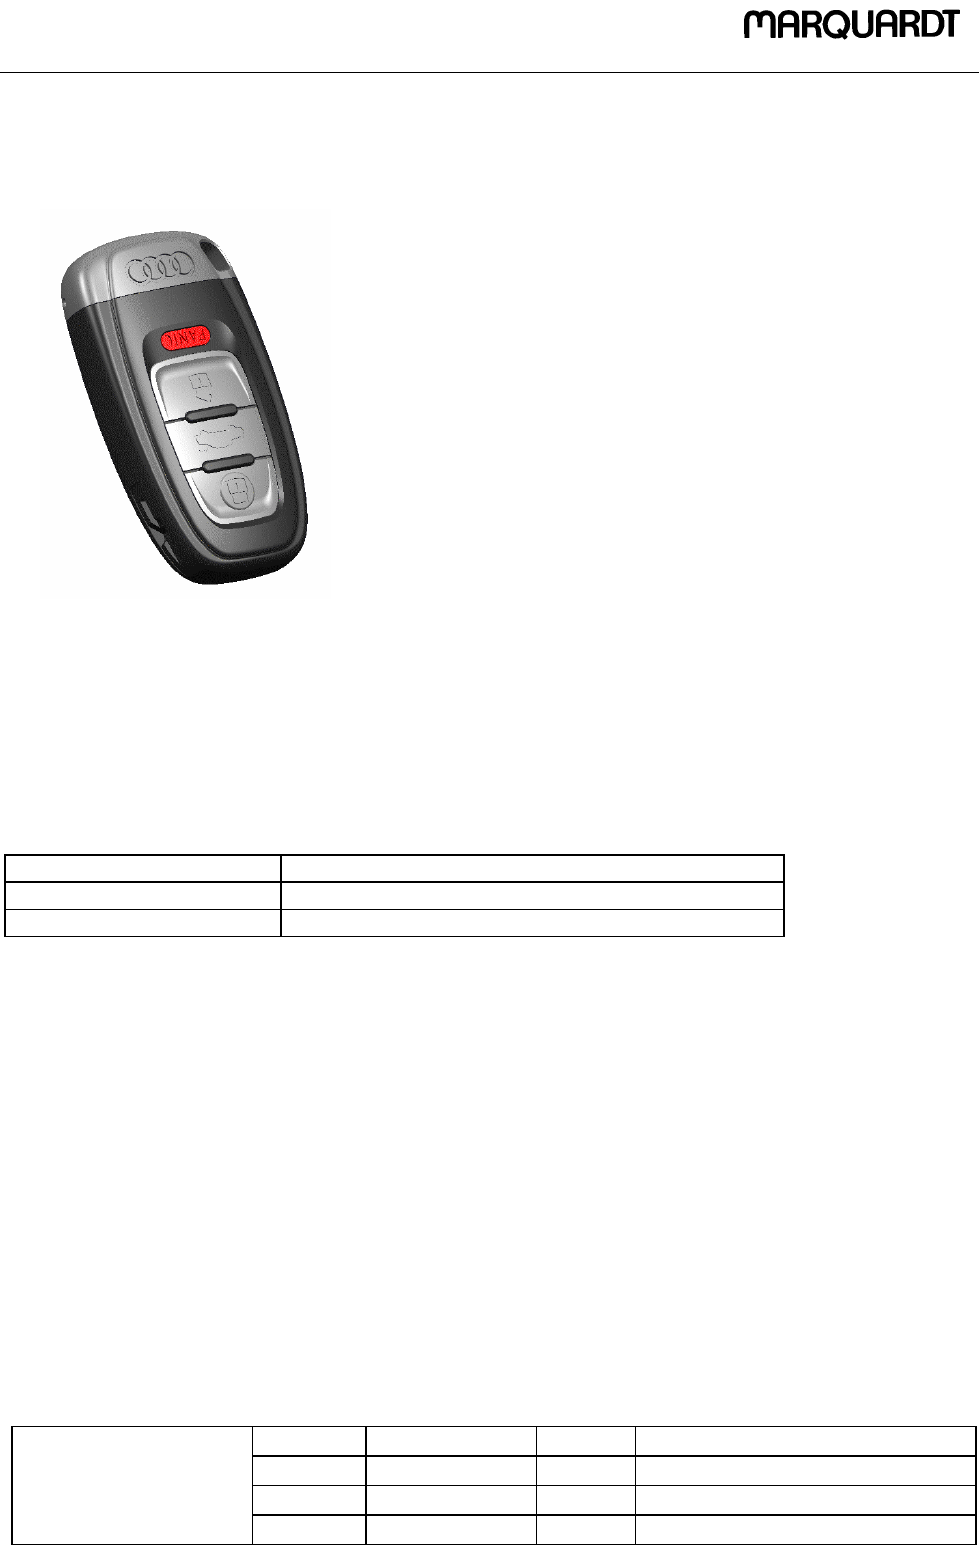
Key: FBSB802 ID-Geber Keyless Go

!"
#$" #%&
' ())*&&)
+, ())*-&
% !". /$
%$" &-&0
1$" &-&0
&

%$" &-&0 &
#$" #%& 2
!" 2$*3
4# 56# 2'7
88&0
290 *:
2$ &-&0
'2 +*;<#$9
.
Proprietary da ta, comp any confidential. All r ights reserve d.
Confié à titre de se c re t d'entrepr is e. T ous dr oits réservés .
Comunicado c omo segr ed o empr esarial. R eservados todos os direitos.
Confidado com o s ecreto industrial. N os reserv amos todos los d erechos.
.
.
W eitergabe sow ie Ver vie lfältig un g dieser U nterlage, Ve r
-
w ertung und M itte ilung ihres Inhalts nicht gestattet, so w eit
nicht ausdrücklich zugestanden. Zuw iderhandlungen ver
-
pflichte n zu Schad enersatz. Alle R echte vorbeh alten , insbe-
sondere für den Fall de r Patenterteilun g od er G M -Eintragung
.
.
+$=
'<="$"$
" +*"=;%$
7'2
: "=$ *>0-?
2 +*;
< $=,
+/$ &-@4A
@)4A
909@4A
+/$ >(*9==
B=$@""@=$C
'=B%D ;C , *. &-@4AB6#C
, *. &-@4ABE=C
*&. @)4A
*&-. 909@4A
4$ *+<B/$"C
+/$ >(*&0A. &-4AB>(*-F C
>(*&0A. @)4AB>(*-F C
>(*-A. 909@4AB>(*-F C
4$ "
2 &@(G&(
?" 4
2 $B&@<(C
&H*=>)0
%$" &-&0 &
#$" #%& 2
!" 2$*3
4# 56# 2'7
88&0
290 *:
2$ &-&0
'2 +*;<#$9
.
Proprietary data, comp an y confidential. A ll r ights re serve d.
Confié à titre de se c ret d'e ntrepr is e. T ous dr oits réservés .
Comunicado c omo segr ed o empr esarial. R eservados to dos os d ireitos.
Confidado com o secreto industrial. N os reserv amos todos lo s derechos.
.
.
W eitergabe sow ie Ver vie lfältig un g dieser U nterlage, Ve r
-
w ertung und M itte ilung ihres Inhalts nicht gestattet, so w eit
nicht ausdrücklich zugestanden. Zuw iderhandlungen ver
-
pflichte n zu Schad enersatz. Alle R echte vorbeh alten , insbe-
sondere für den Fall de r Patenterteilun g od er G M -Eintragung
.
.
# +"
4
!
;="$"'
$$-
!= '
? '@&@A"$
'$ '@&A"$
Opening and closing 1
Opening and closing
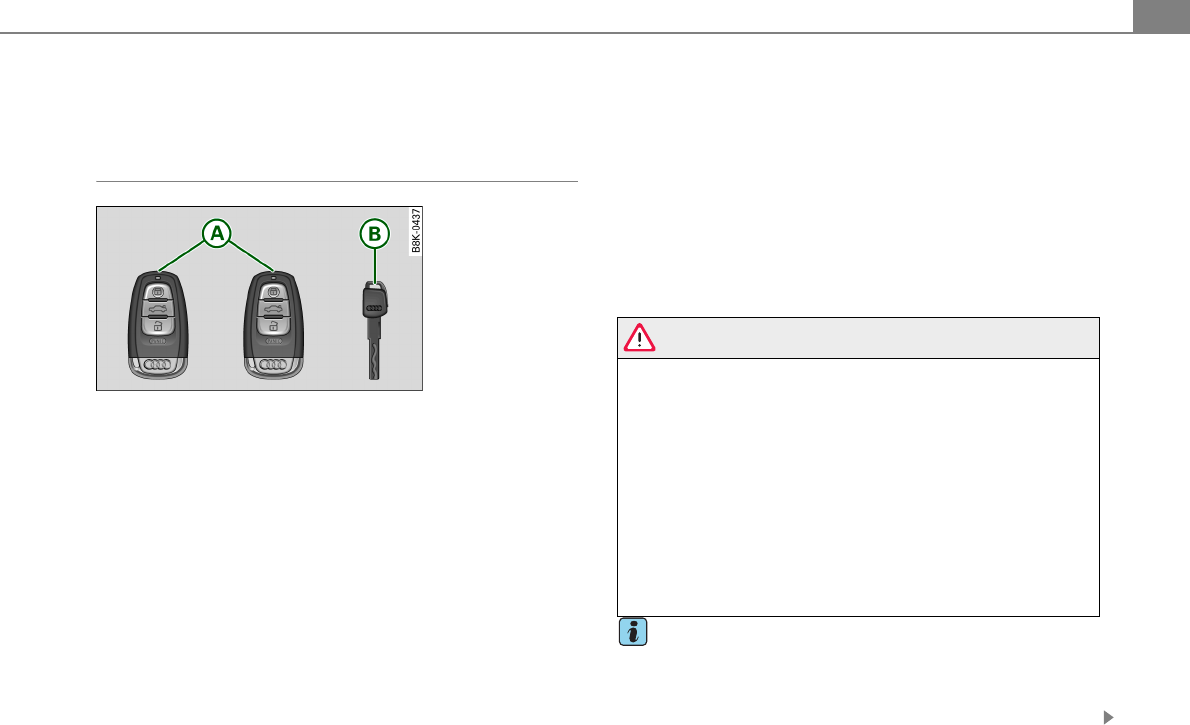
Keys
Key set
Master key with remote control
You can centrally lock and unlock your vehicle and start the engine
with the master key with remote control.
Emergency key
The emergency key is not intended for constant use. It should only
be used in an emergency. Keep it in a safe place and do not carry it
on your key ring.
Key replacement
If you lose a key, contact your authorized Audi dealer immediately
to have the lost key disabled. Be sure to bring all your keys with you.
Personal comfort settings
If two people use one vehicle, it is recommended that each person
always uses “their own” master key. When the ignition is turned off
or when the vehicle is locked, personal convenience settings for the
following systems are stored and assigned to the remote master
key.
•Climate control
•Central locking system
•Ambient lighting
•Windows
•Audi parking system*
•Seat memory*
The stored settings are automatically recalled when you unlock the
vehicle, when you open the doors or when you turn on the ignition.
WARNING
•Do not leave your vehicle unattended with the key in the igni-
tion lock. Entry by unauthorized persons could endanger you or
result in theft or damage the vehicle. Always lock all doors and
take the key.
•Do not leave children unattended in the vehicle, especially with
access to vehicle keys. Unguarded access to the keys provides
children the opportunity to start the engine and/or activate vehicle
systems such as the power windows etc. Unsupervised operation
of any vehicle system by children can result in serious injury.
•Do not remove the key from the ignition lock until the vehicle
has come to a complete stop. Otherwise the steering column lock
could suddenly engage - causing the risk of an accident.
Tips
•The operation of the remote control key can be temporarily
disrupted by interference from transmitters in the vicinity of the
vehicle working in the same frequency range (e.g. a cell phone,
radio equipment).
Fig. 1 Key set
A
A
A
B
Opening and closing2
•If you open the driver’s door with the key left in the ignition lock,
a chime will sound. This is your reminder to remove the key and lock
the door.
•For security reasons, replacement keys are only available from
Audi dealers.
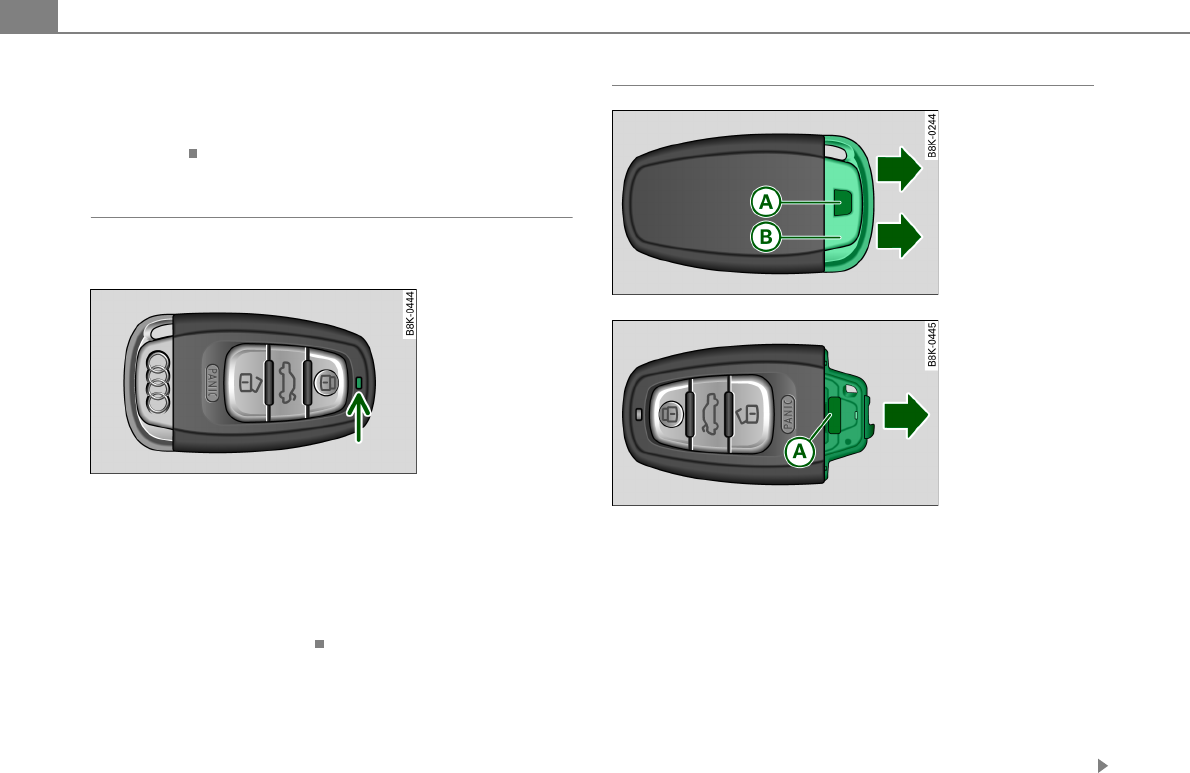
Check light in the master key
The check light in the master key provides information
about different conditions.
The check light comes on briefly once when a button is pressed, and
during an “inquiry” by the advanced key system.
If the check light does not come on, the battery is dead and has to
be replaced. In addition, when the battery is dead the § symbol
appears in the instrument cluster display as well as the message:
Please change key battery
Battery replacement ⇒page 2.
Master key battery replacement
We recommend having the battery changed by an autho-
rized Audi dealer. However, if you wish to replace the dead
battery yourself, proceed as follows:
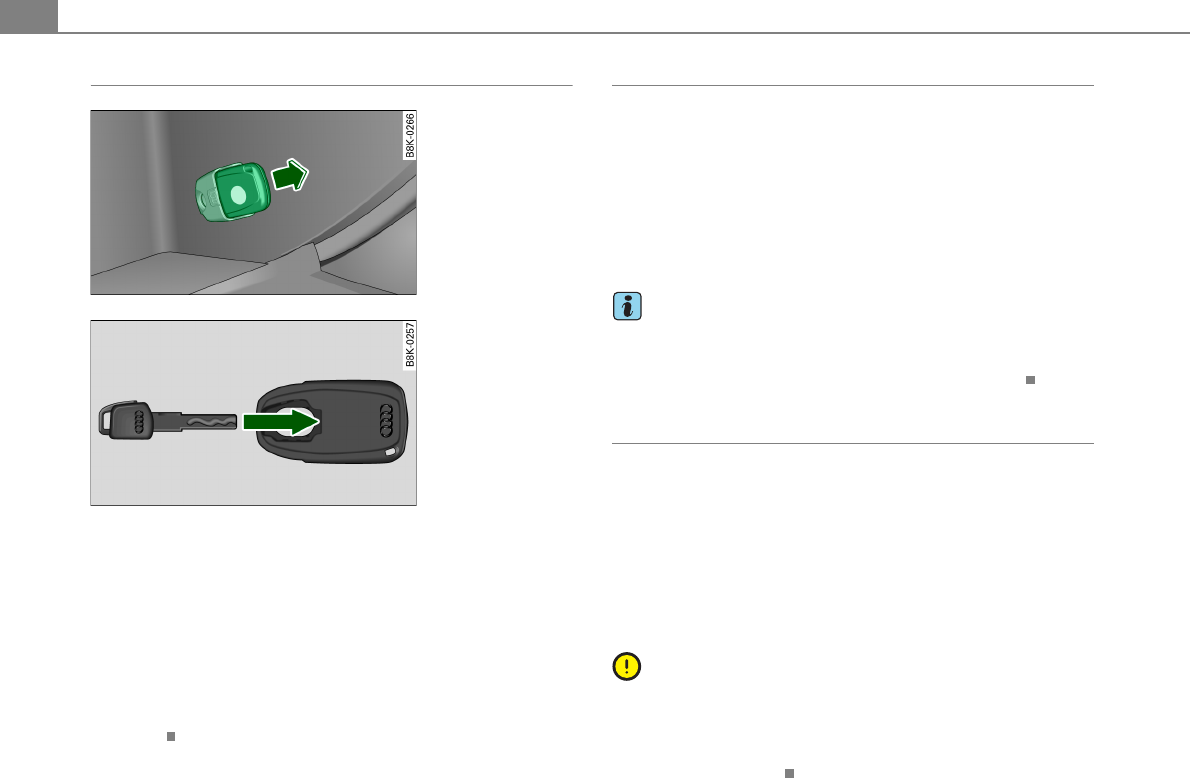
– Press the release button ⇒fig. 3.
– Pull the mechanical key out of the master key.
– Press the release button ⇒fig. 4 on the battery holder
and at the same time pull the battery holder out of the
master key in the direction of the arrow.
– Install the new battery CR 2032 with the “+” sign facing
down.
Fig. 2 Check light in
the master key
Fig. 3 Remote master
key: Removing the
mechanical key
Fig. 4 Remote master
key: Removing the
battery holder
A
A
A
B
A
A
Opening and closing 3
– Push the battery holder carefully into the master key.
– Install the mechanical key.
For the sake of the environment
Dispose of dead batteries properly so as not to pollute the environ-
ment.
Tips
The replacement battery must be the same specification as the
original.
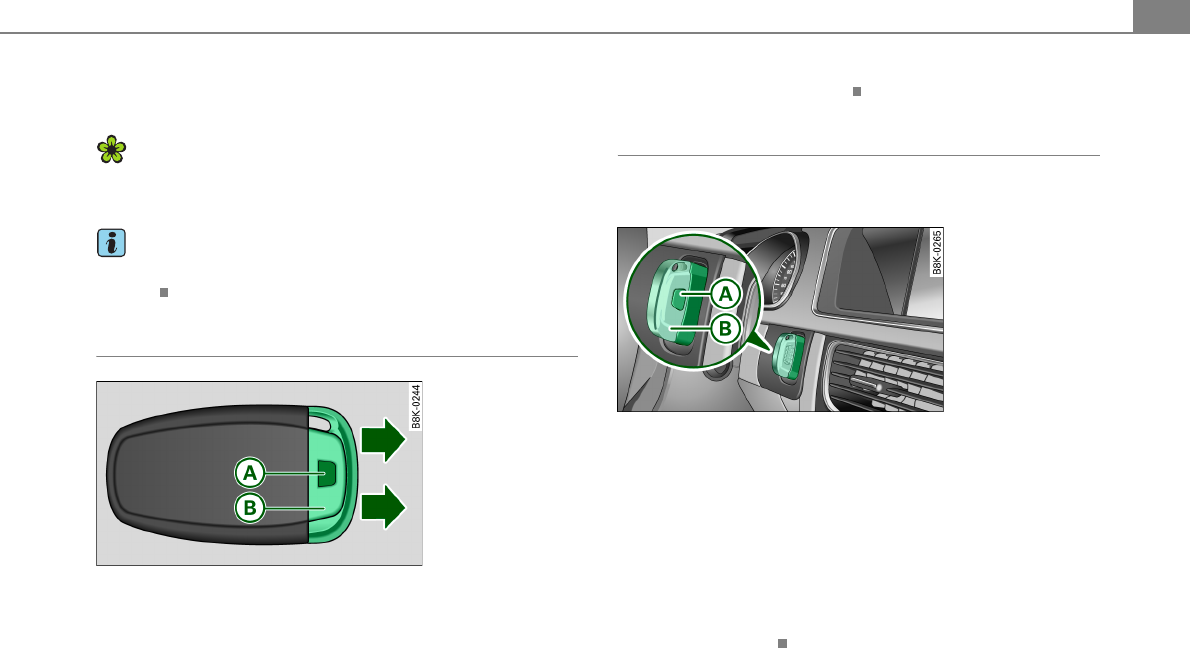
Removing the mechanical key
– Press the release button ⇒fig. 5.
– Pull the mechanical key out of the master key.
Using the mechanical key, you can
•Lock and unlock* the storage compartment on the passenger's
side [Cross reference error: reference link ID='Handschuhfach' not
found].
•Lock and unlock the lockable rear seat [Cross reference error:
reference link ID='Rueckenlehne-abschliessen' not found].
•Lock and unlock the vehicle manually ⇒page 9 if this should not
be possible with the master key.
Emergency unlocking of the ignition key
In the event of malfunctions in the electrical system, it
may happen that you cannot remove the ignition key.
If you are unable to remove the ignition key, for example
because the vehicle battery is discharged, proceed as
follows:
– Press the release button ⇒fig. 6 for example with a
ball point pen and pull the mechanical key out of the
master key.
– Lock the vehicle using the mechanical key ⇒page 9.
– Have the electrical system inspected by an authorized
Audi dealership.
Fig. 5 Remote master
key: Removing the
mechanical key
A
A
A
B
Fig. 6 Ignition switch
with ignition key
A
A
A
B
Opening and closing4
Starting the vehicle with the emergency key
– Take the adapter for the emergency key out of the glove
box ⇒fig. 7.
– Push the emergency key ⇒fig. 8 fully into the adapter.
Make sure that the Audi rings are facing up.
– Press the emergency key in the adapter down until it
latches audibly.
– Insert the adapter with the emergency key forward into
the ignition switch. The engine can now be started as
usual.
Electronic immobilizer
The immobilizer prevents your vehicle from being started
by unauthorized persons.
Inside the key there is a computer chip. This chip automatically
deactivates the electronic immobilizer when you insert the key in
the ignition lock. When you remove the key from the ignition lock,
the electronic immobilizer is automatically activated once again.
If an unauthorized key was used, SAFE is displayed continuously in
the odometer display field.
Tips
•Your engine can only be started using the factory-equipped key.
•You may not be able to start your vehicle if an ignition key of a
different vehicle make is also located on your set of keys.
Certification
The remote control device complies with
•USA models: Part 15 of the FCC Rules.
•Canada models: RSS-210 of Industry Canada.
Operation is subject to the following conditions:
•this device may not cause harmful interference, and
•this device must accept any interference received, including
interference that may cause undesired operation.
Note
The manufacturer is not responsible for ANY RADIO OR TV interfer-
ence caused by unauthorized modifications to this equipment.
Changes or modifications to this unit not expressly approved by the
party responsible for compliance could void the user's authority to
operate the equipment.
Fig. 7 Glove compart-
ment: Adapter for
emergency key
Fig. 8 Insert emer-
gency keyinto the
adapter
Opening and closing 5
Power locking system
General description
The power locking system locks or unlocks all doors and
the rear lid simultaneously.
You can lock and unlock the vehicle centrally. You have the following
choices:
•Remote master key ⇒page 6
•Door handles with advanced key* ⇒page 7,
•Lock cylinder at the driver's door ⇒page 9, or
•Power window switch inside ⇒page 9.
Selective unlocking
When they are closed, the door and rear lid are locked. When
unlocking, you can set in the radio or in the MMI* whether only the
driver's door or the entire vehicle should be unlocked ⇒page 6.
Automatic locking
The automatic locking feature locks all the vehicle doors and the
rear lid when you drive faster than 9 mph (15 km/h).
The car is unlocked again once the ignition key is removed. In addi-
tion, the vehicle can be unlocked if the opening function in the
power locking system switch or at one of the door levers is actuated.
The Auto Lock function can be turned on and off in the radio or in
the MMI* ⇒page 6.
Additionally, in the event of a crash with airbag deployment the
doors are automatically unlocked to allow access to the vehicle.
Anti-theft alarm warning system
If the anti-theft alarm warning system detects a break-in into the
vehicle, acoustic and visual warning signals are triggered.
The anti-theft warning system is activated automatically when you
lock the vehicle. It is deactivated when unlocking using the remote
key, with the mechanical key, and when you switch on the ignition.
The alarm also turns off when the alarm cycle has expired.
Turn signals
When you unlock the vehicle, the turn signals flash twice, when you
lock it once. If they do not flash, one of the doors, the rear lid or the
hood is not locked.
Unintentionally locking yourself out
In the following cases there safeguards to prevent you locking your
remote master key in the vehicle:
•If a door is open, the vehicle cannot be locked using the central
locking system switch ⇒page 9.
•On vehicles with advanced key*, if the most recently used master
key is in the luggage compartment, the rear lid is automatically
unlocked again after it is closed ⇒page 11.
Do not lock your vehicle with the remote master key until all doors
and the rear lid are closed. In this way you avoid locking yourself out
accidentally.
WARNING
•When you leave the vehicle, always remove the ignition key and
take it with you. This will prevent passengers (children, for
example) from accidentally being locked in the vehicle should they
accidentally press the power locking switch in the front doors.
•Do not leave children inside the vehicle unsupervised. In an
emergency it would be impossible to open the doors from the
outside without the key.
Opening and closing6
Tips
•In the event of a crash with airbag deployment all locked doors
will be automatically unlocked to give access to the vehicle occu-
pants from the outside.
•If the power locking system should malfunction, you can lock the
driver's door using the mechanical key ⇒page 10.
•If the power locking system should fail, you can still open the
fuel tank flap in an emergency [Cross reference error: reference link
ID='Tankklappe-not' not found].
•You are well advised not to keep valuables inside an unattended
vehicle, visible or not. Even a properly locked vehicle cannot provide
the security of a safe.
•If the LED in the upper edge of the driver's door panel comes on
for about 30 seconds after the vehicle is locked, there is a malfunc-
tion in the power locking or the anti-theft warning system. Have the
malfunction corrected by an authorized Audi dealership or qualified
repair facility.
Setting power locking
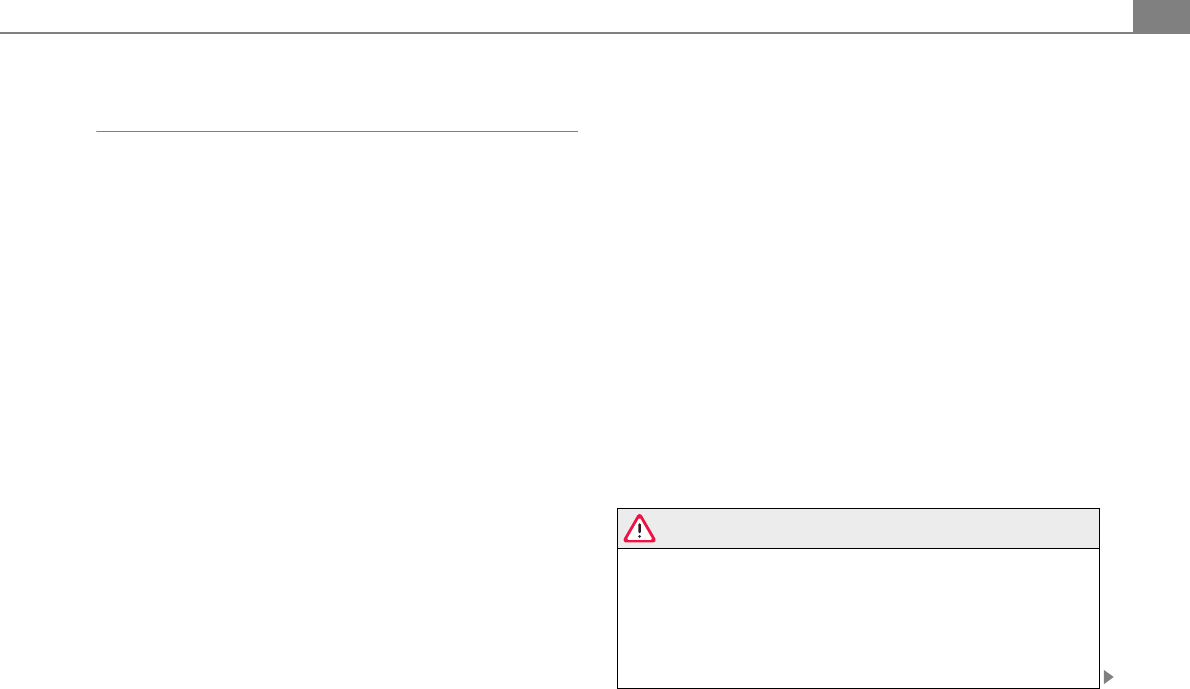
The driver can determine the functions for power locking
in the radio or in the MMI*.
In the Central locking menu you can decide which doors
should be unlocked with the remote key, and/or the
advanced key* when opening the vehicle.
– Press the function button.
– Select Central locking. The Central locking menu appears
⇒fig. 9.
For example, if you switch the item “Single door unlocking” on, the
passenger's door is no longer included in the power locking system,
and will not be unlocked by pressing the unlock button on the
master key remote control.
You can continue to unlock all the doors and the rear lid as before.
Press the opening button on the master key twice.
When locking the vehicle, all doors and the trunk lid are locked auto-
matically.
If you switch “Trunk lid” off, opening the rear lid at the handle
⇒page 11, fig. 17 is blocked. In this case the rear lid can be opened
with the button on the master key ⇒fig. 10 or with the unlocking
button in the driver's door ⇒page 11, fig. 16.
Unlocking and locking the vehicle with the
remote control
Fig. 9 MMI display:
Central locking menu
CAR
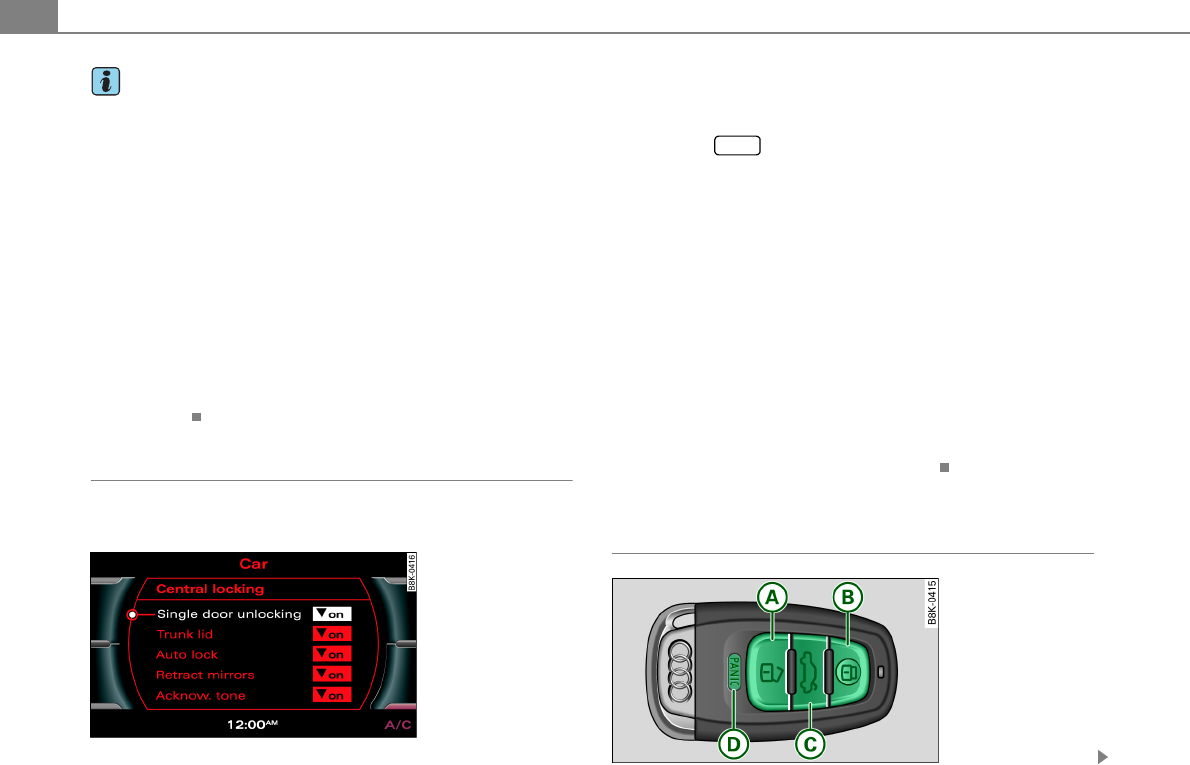
Fig. 10 Remote
control: function
buttons
Opening and closing 7
Either the driver's door only or the entire vehicle will unlock
when the unlock button is pressed once, depending on
the settings in the MMI Central locking menu ⇒page 6.
– Press button Q ( ) to unlock the vehicle ⇒page 6,
fig. 10.
– Press button R ( ) to lock the vehicle ⇒ in “General
description” on page 5.
– Press button ( ) briefly to unlock the rear lid.
– Press the button for at least one second to open the
rear lid.
– Push the red button ( ) to activate the panic
function. The horn sounds and the turn signals flash.
Push the red button again to deactivate the
panic function.
If the vehicle is unlocked and no door, the rear lid or the hood is
opened within 60 seconds, the vehicle locks itself again automati-
cally. This feature prevents the vehicle from being accidentally left
unlocked over a long period of time.
It depends on the settings in the radio or in the MMI* whether the
entire vehicle is unlocked or only certain doors ⇒page 6.
On vehicles with advanced key*, the selector lever must be in the P
position, otherwise the vehicle cannot be locked.
WARNING
Read and follow all WARNINGS ⇒ in “General description” on
page 5.
Tips
•In order to make sure the locking function is working, you should
always keep your eye on the vehicle to make sure it is properly
locked.
•Do not use the remote control if you are inside the car, otherwise
you may unintentionally lock the vehicle, and then you would set off
the anti-theft alarm when you try to start the engine or open a door.
In case this happens anyhow, push the unlock button 0.
•Use the panic function only if you are in an emergency
situation.
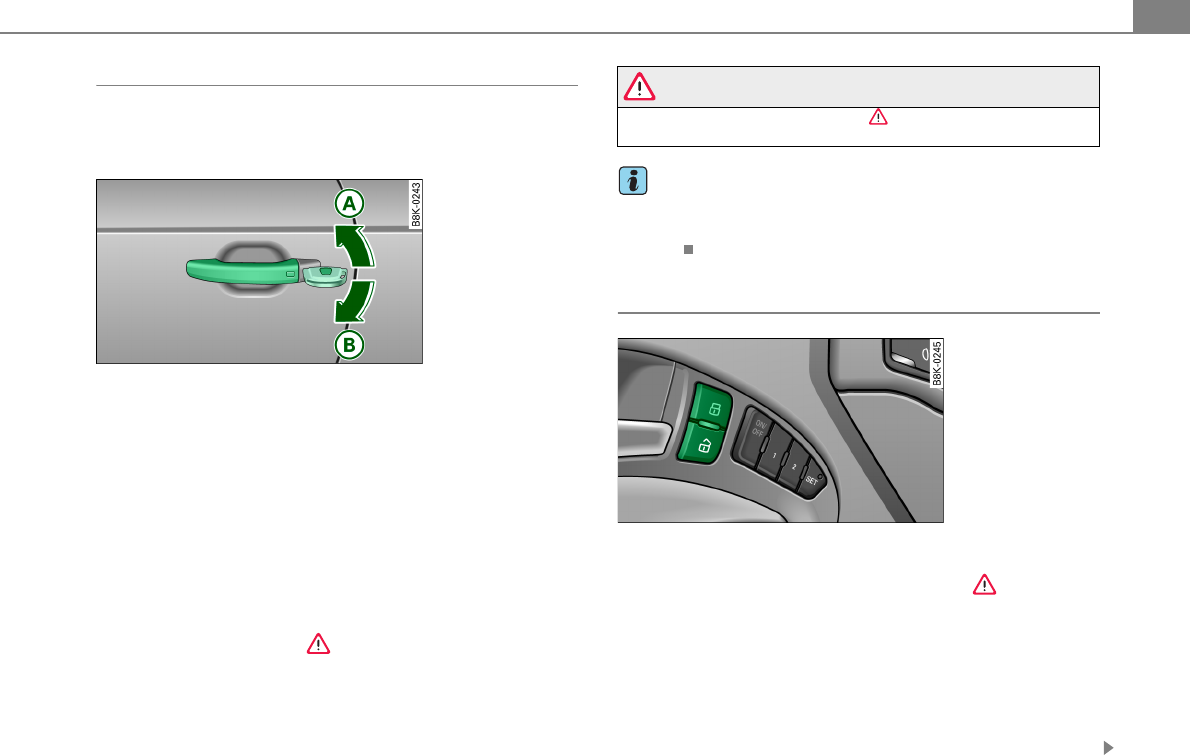
Applies to vehicles: with advanced key
Locking and unlocking with advanced key
The doors and the rear lid can be unlocked and locked
without operating the master key.
A
A
A
A
A
B
A
C
PANIC
A
D
PANIC
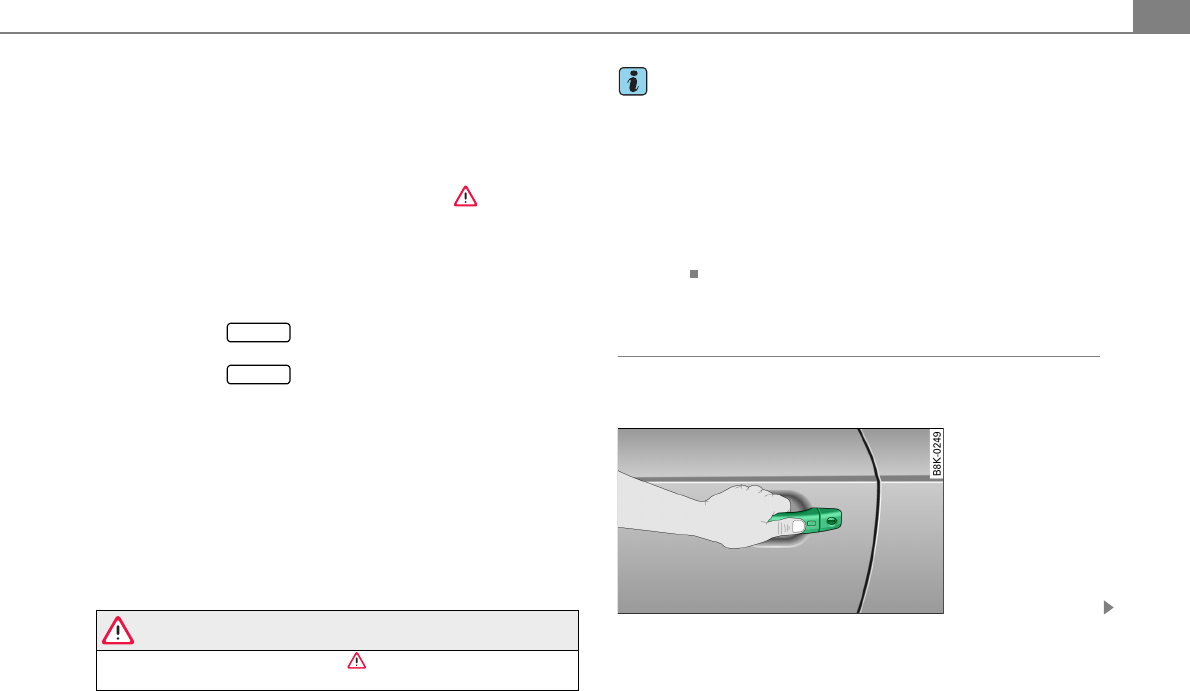
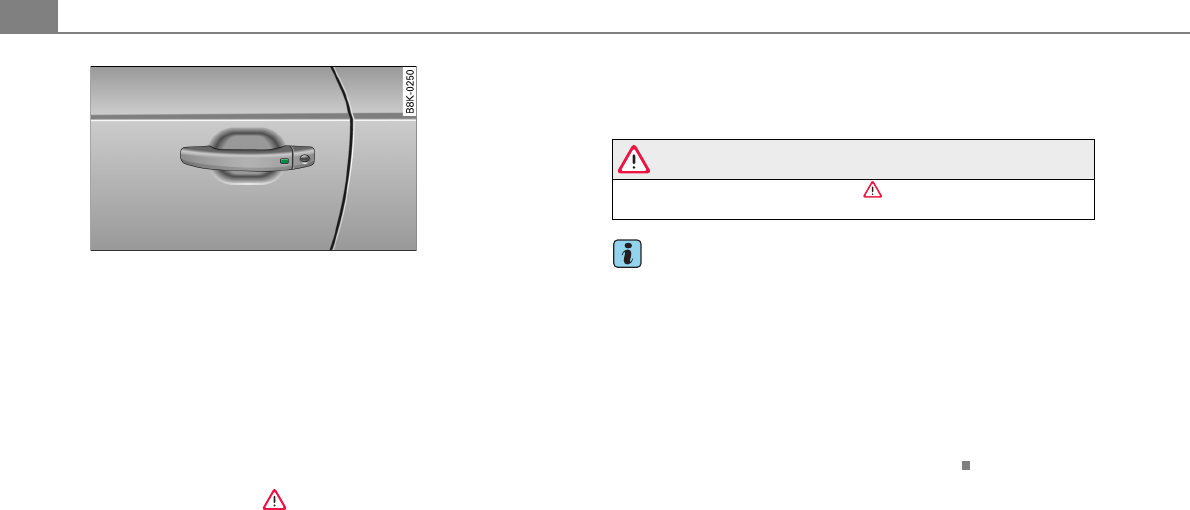
Fig. 11 Advanced key:
Unlocking vehicle door
Opening and closing8
Unlocking vehicle
– Take hold of the door handle. The door is unlocked auto-
matically.
– Pull the handle to open the door.
Locking vehicle
– Move the selector lever to the P position (automatic
transmission), otherwise the vehicle cannot be locked.
– Touch the sensor at the door handle once ⇒fig. 12 to
lock the vehicle ⇒ in “General description” on page 5.
The vehicle can be locked and unlocked at any door. It depends on
the settings in the radio or in the MMI* whether the entire vehicle is
unlocked or one of the doors ⇒page 6. The master key must be
within a range of about 1.5 m from the appropriate door or the rear
lid. It makes no difference whether the master key is in your jacket
pocket or in your brief case.
If the area of the sensor in the door handle is touched while
unlocking ⇒fig. 12, this may adversely affect the opening function.
If you grip the door handle while locking, this can adversely affect
the locking function.
It is not possible to re-open the door for a brief period directly after
closing it. This allows you to ensure that the doors are properly
locked.
WARNING
Read and follow all WARNINGS ⇒ in “General description” on
page 5.
Tips
If your vehicle has been standing for an extended period, please
note the following:
•The proximity sensors are deactivated after a few days to save
power. You then have to pull on the door handle once to unlock the
vehicle and a second time to open the vehicle.
•To prevent the battery from being discharged and to preserve
your vehicle's ability to start for as long as possible, the energy
management system gradually switches off unnecessary conve-
nience functions. It is possible that you will not be able to unlock
your vehicle using these convenience functions.
Fig. 12 Advanced key:
Locking the vehicle
Opening and closing 9
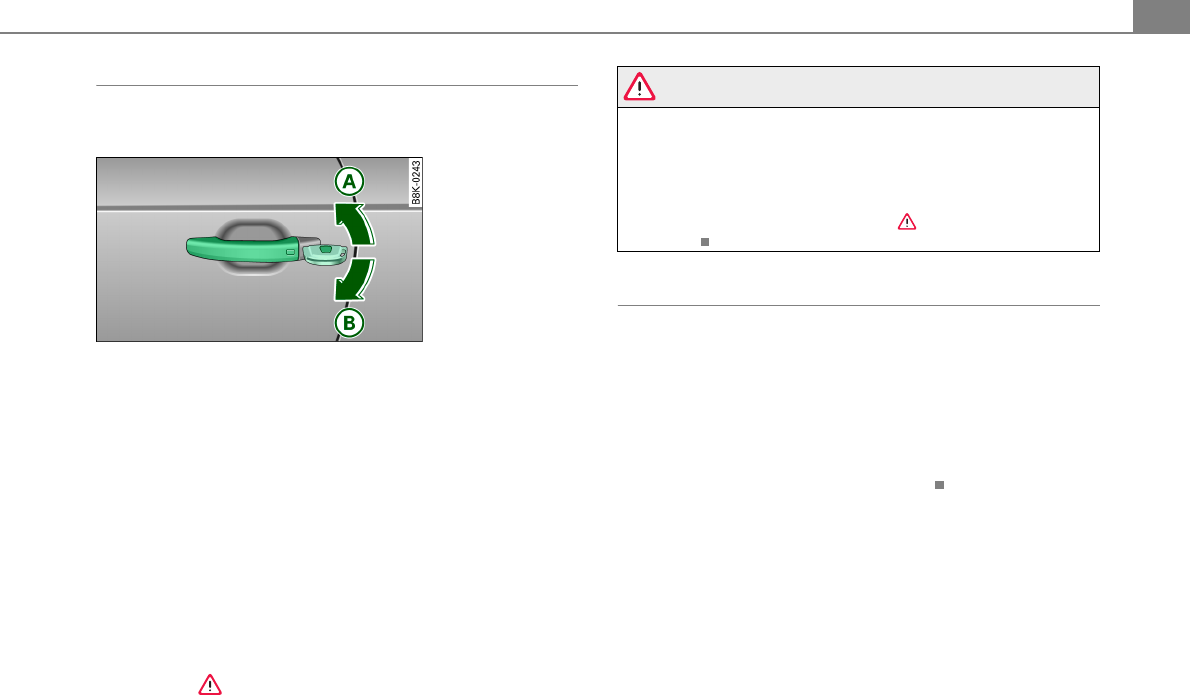
Operating locks with the mechanical key
In the event of a failure of the power locking system, the
driver's door can locked and unlocked with the mechan-
ical keyat the lock cylinder.
To unlock the vehicle
– Insert the mechanical key into the lock of the driver’s
door.
– Turn the mechanical key to position ⇒fig. 13.
To lock the vehicle
– Move the selector lever to the P position (automatic
transmission).
– Close all windows and doors properly.
– Turn the mechanical key in the lock of the driver’s door to
the lock position ⇒ in “General description” on
page 5.
If the power locking system fails, there is emergency locking for the
passenger's door ⇒page 10.
WARNING
Read and follow all WARNINGS ⇒ in “General description” on
page 5.
Tips
•After the ignition is switched on, the power locking system
switch and the unlocking button for the rear lid in the door are
enabled.
Locking and unlocking the vehicle from inside
– Press the button to unlock the vehicle ⇒fig. 14.
– Press the button to lock the vehicle ⇒.
If you lock the vehicle using the power locking switch, please note
the following:
•If a door is open, the vehicle cannot be locked using the power
locking system switch.
•You cannot open the doors or the rear lid from the outside
(increased security, for example when you are stopped at a red
light).
Fig. 13 Key turns for
opening and closing
A
A
A
B
Fig. 14 Driveàs door:
power locking switch
Opening and closing10
•The diodes in the power locking switch illuminate when all the
doors are closed and locked.
•You can unlock and open the doors from the inside by pulling on
the door handle.
•If you have a crash and the airbag is activated, the doors auto-
matically unlock.
WARNING
•The power locking switch works with the ignition off and auto-
matically locks the entire vehicle when it is actuated.
•On a vehicle locked from the outside the power locking system
switch is inoperative.
•Locking doors from the inside can help prevent inadvertent
door opening during an accident and can also prevent unwanted
entry from the outside. Locked doors can, however, delay assis-
tance to vehicle occupants and hold up rescue efforts from the
outside in an accident or other emergency.
Tips
Your vehicle is locked automatically at a speed of 9 mph (15 km/h)
(Auto Lock) ⇒page 5. You can unlock the vehicle again using the
opening function in the power locking system switch.
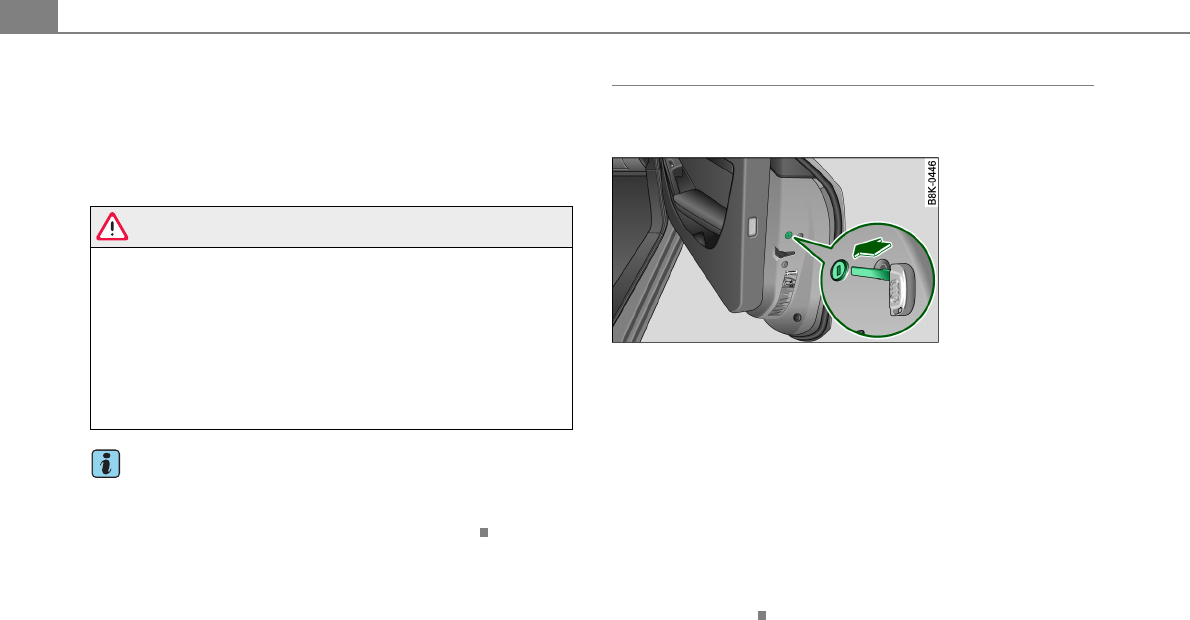
Emergency locking of the passenger's door
If the power locking system fails (power failure), you will
need to lock the passenger door separately.
An emergency locking mechanism is integrated in the edge
of the passenger's door (only visible when the door is open).
– Take the mechanical key out of the master key ⇒page 3.
– Open the door.
– Pull the protective cover out of the hole ⇒fig. 15.
– Insert the mechanical key into the inner slot and turn it
to the right as far as it can go.
After you close the door, you will no longer be able to open it from
the outside. The door can be opened from the inside by pulling once
on the door handle.
Fig. 15 Emergency
locking of the
passenger's door
Opening and closing 11
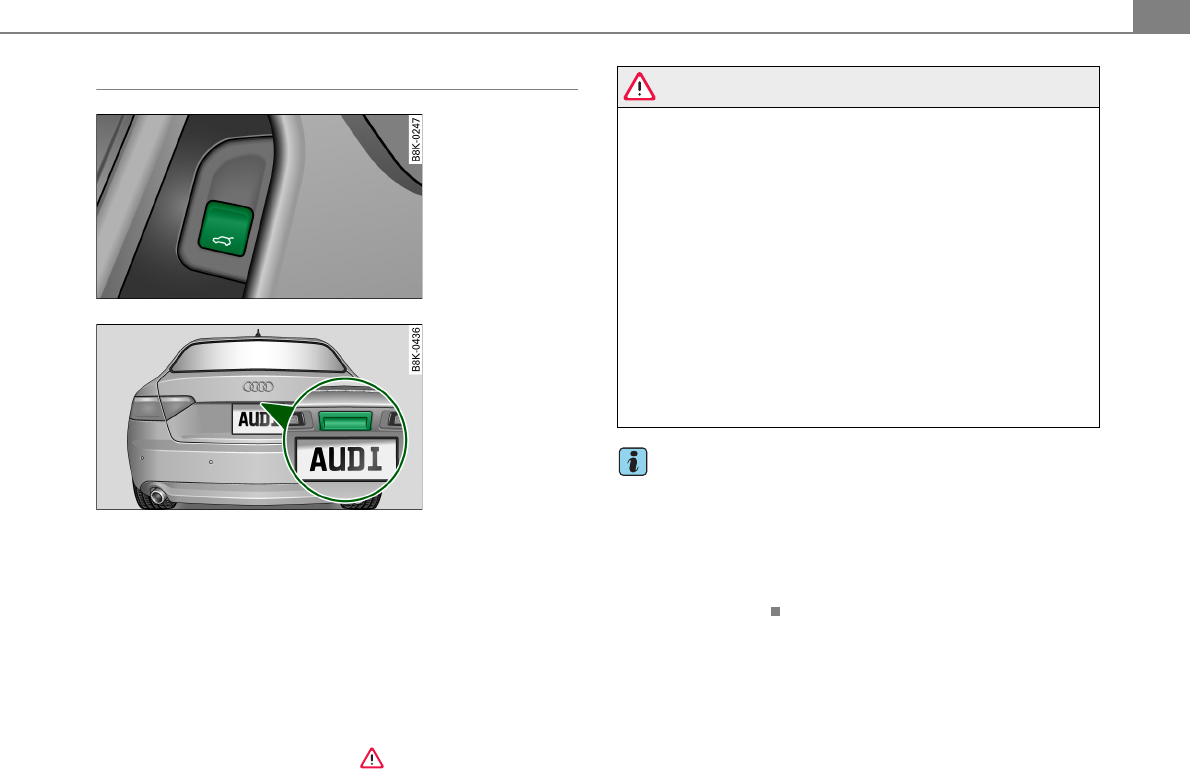
Opening and closing rear lid/trunk lid
Opening the rear lid
– Press the middle button on the remote control master
key for at least one second, or
– Pull the release button in the driver's door ⇒fig. 16.
The rear lid unlocks and opens, or
– Press the handle on the rear lid ⇒fig. 17.
Closing the rear lid
– Pull the rear lid down at the grip on the inside and allow
it to drop gently to close it ⇒.
WARNING
•After closing the rear lid, always pull up on it to make sure that
it is properly closed. Otherwise it could open suddenly when the
vehicle is moving.
•To help prevent poisonous exhaust gas from being drawn into
the vehicle, always keep the rear lid closed while driving. Never
transport objects larger than those which fit completely into the
luggage area, because then the rear lid cannot be fully closed.
•Never leave your vehicle unattended especially with the rear lid
left open. A child could crawl into the car through the luggage
compartment and pull the lid shut, becoming trapped and unable
to get out. To reduce the risk of personal injury, never let children
play in or around your vehicle. Always keep the rear lid as well as
the vehicle doors closed when not in use.
•Always ensure that no one is within range of the rear lid when
it is moving, in particular close to the hinges - fingers or hands can
be pinched.
Tips
•When the vehicle is locked, the rear lid can be opened separately
by pressing the button on the master key. When you close the
rear lid again, it locks automatically.
•If the rear lid is open or not properly closed when the ignition is
turned on, the door and rear lid warning [Cross reference error:
reference link ID='Tuerwarnung' not found] appears in the instru-
ment cluster display.
Fig. 16 Driver's door:
remote rear lid release
Fig. 17 Position of
handle in the rear lid
Opening and closing12
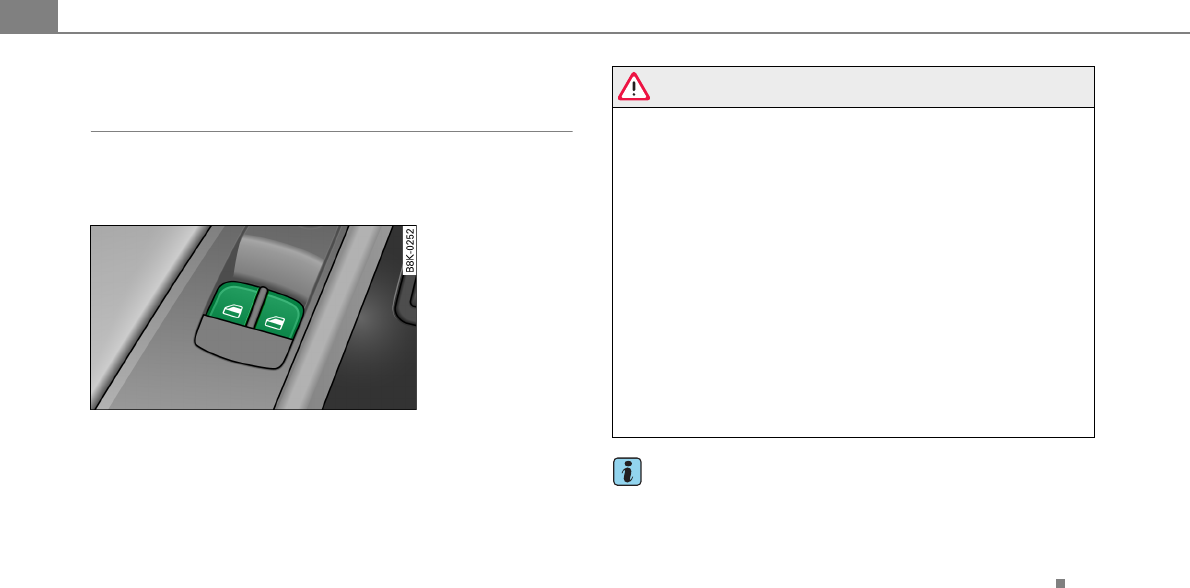
Power windows
Controls
The driver can operate the window regulator for the
driver's door with the left switch and the window regu-
lator for the passenger's door with the right switch.
If the respective switch is pushed or pulled the window will
open or close. The power window switches have a two-posi-
tion function:
Opening the windows
– Push the switch to the first stop and hold it there until the
window has lowered to the desired position.
– Push the switch briefly to the second stop: the window
will automatically open all the way.
Closing the windows
– Pull the switch up to the first stop and hold it there until
the window has risen to the desired position.
– Pull the switch quickly to the second position: the
window will automatically close all the way.
WARNING
•Do not leave children unattended in the vehicle, especially with
access to vehicle keys. Unsupervised use of the keys can result in
starting of the engine and use of vehicle systems such as power
windows, etc. which could result in serious injury.
•Remember – you can still open or close the power windows for
about ten minutes after the ignition is switched off. Only when
either of the doors are opened are the power windows switched
off.
•Be careful when closing the windows. Check to see that no one
is in the way, or serious injury could result!
•Always remove the ignition key whenever you leave your
vehicle.
•If you lock your vehicle from the outside, no one, especially chil-
dren, should remain in the vehicle.
•Do not stick anything on the windows or the windshield that
may interfere with the driver’s field of vision.
Tips
•When you open the doors, the windows automatically lower
about 10 mm.
•After the ignition has been switched off, the windows can still be
opened or closed for about 10 minutes. The window regulators are
not switched until the driver's or passenger's door is opened.
Fig. 18 Driver's door:
power window
switches
Opening and closing 13
Convenience opening/closing
The windows and the panorama roof can be opened and
closed with the mechanical key or the emergency key.
Convenience opening feature
– Use the emergency key or pull the mechanical key out of
the master key ⇒page 3.
– Insert the key into the lock of the driver’s door.
– Turn the key to position ⇒fig. 19 until all the
windows have reached the desired position and the
panorama roof is tilted.
Convenience closing feature
– Use the emergency key or pull the mechanical key out of
the master key ⇒page 3.
– Turn the key in the lock of the driver’s door to the lock
position until the windows and the panorama roof are
closed ⇒.
When the panorama roof is tilted/closed, the electric sun shade* is
also opened/closed.
WARNING
•Never close the windows and the panorama roof inattentively
and without checking - there is risk of injury.
•You must always watch when the windows are being raised so
that no one can be trapped. If you release the key, the closing
action is immediately canceled.
•Always read and heed WARNING ⇒ in “General description”
on page 5.
Correcting window regulator malfunction
After disconnecting the vehicle battery, the one-touch up
and down feature must be activated again.
– Pull and hold the power window switch until the window
is completely closed.
– Release the switch.
– Pull the switch again for one second. The automatic
closing/opening is now reactivated.
Fig. 19 Key turns for
opening and closing
A
A
A
B
Opening and closing14
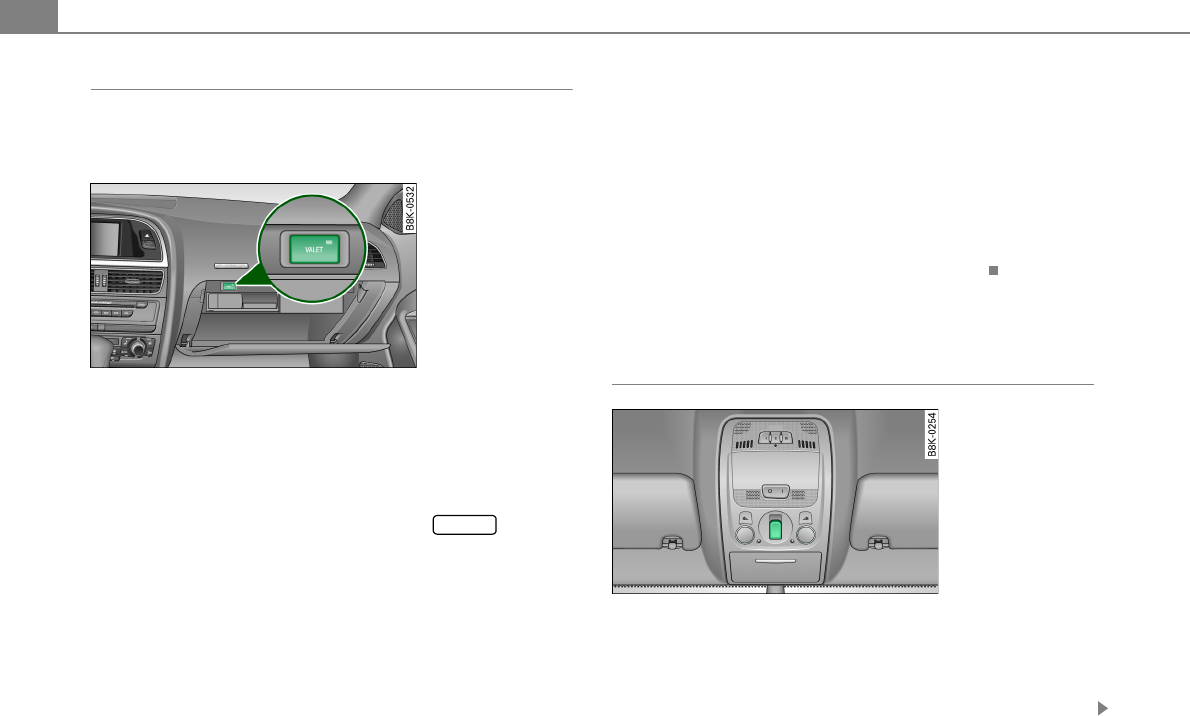
Valet parking
Through the “valet parking” feature the luggage compart-
ment of your vehicle is secured from unauthorized access
during the valet parking service.
With “valet parking” activated, the rear lid cannot be
opened.
– Take the mechanical key out of the master key ⇒page 3.
– Open the glove box [Cross reference error: reference link
ID='Handschuhfach' not found] and activate ⇒fig. 20 the
“valet parking” feature by pressing the button.
The indicator light in the switch illuminates.
– Close the glove box and lock it with the mechanical key.
– Lock both rear seat backs with the mechanical key [Cross
reference error: reference link ID='Rueckenlehne-
abschliessen' not found].
– Lock the luggage compartment pass-through with the
mechanical key [Cross reference error: reference link
ID='Durchladeeinrichtung' not found].
– Leave the master key with the service personnel for
parking and keep the mechanical key with you.
When the “valet parking” feature is activated:
•the unlocking button for the rear lid in the driver's door is
inactive
•the button on the master key is inactive
•the opening handle in the rear lid is inactive.
The vehicle can be driven and locked and unlocked with the master
key. Access to the luggage compartment is blocked.
Panorama roof
Tilting and closing
– To tilt the panorama roof, press the switch briefly.
– To close the panorama roof, pull the switch briefly.
– To set an intermediate position, press/pull the switch
until the roof reaches the desired position.
Fig. 20 Valet parking
button
VALET
Fig. 21 Section from
headliner: Switch for
panorama roof
Opening and closing 15
After the ignition is switched off, you can still operate the Panorama
for about 10 minutes. As soon as the driver's or passenger's door is
opened, the switch is inoperative.
Sun blind
The sun blind can be opened and closed manually in any position.
WARNING
Pay careful attention when closing the panorama roof - otherwise
serious injury could result! For this reason, always remove the
ignition key when leaving the vehicle.
•Never leave children or persons requiring assistance alone in
the vehicle, especially when they could access the vehicle keys.
Unsupervised use of the keys can result in the engine being
started or use of vehicle systems such as the power windows, etc.
which could result in serious injury. The doors could be locked
with the remote key, delaying help in an emergency.
•The panorama roof will continue to operate until the ignition
key has been removed and one of the front doors has been opened.
Note
Always close your panorama roof when leaving your vehicle.
Sudden rain can cause damage to the interior equipment of your
vehicle, particularly the electronic equipment.
Tips
•If the tilted roof cannot be closed, pull the switch within 5
seconds after the automatic opening until the roof is closed.
•Information on convenience opening/closing ⇒page 13.
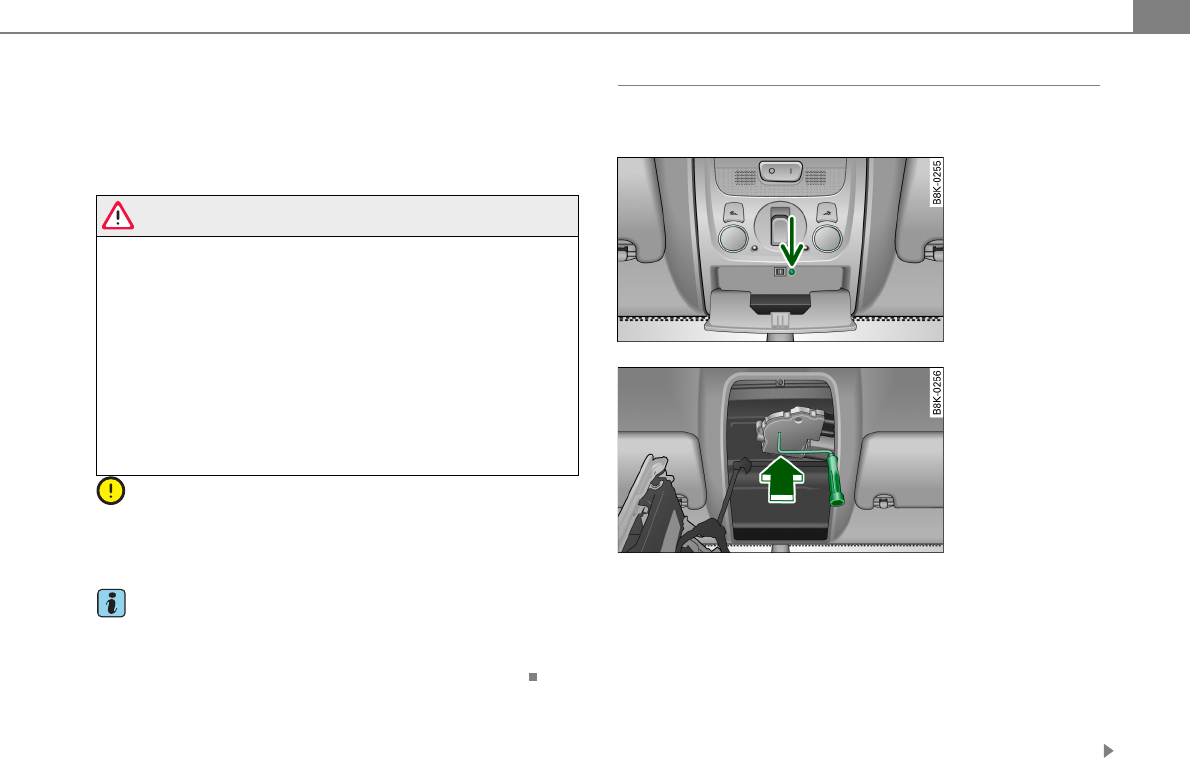
Emergency closing of the panorama roof
The panorama roof can be closed manually in an emer-
gency.
You will find the screwdriver in the vehicle tool kit [Cross
reference error: reference link ID='Bordwerkzeug' not found]
and the crank in the fuse cover [Cross reference error: refer-
ence link ID='B4b-114' not found].
– Remove the screw ⇒fig. 22 -Arrow- from the lighting
unit and pull the lighting unit out carefully.
– Push the crank into the hexagonal hole as far as it will go
⇒fig. 23 and turn it. The roof will close.
Fig. 22 Section from
headliner: Unscrewing
lighting unit
Fig. 23 Section from
headliner: Crank for
emergency operation

Opening and closing16
Tips
The crank is easier to turn if you use the screwdriver handle (vehicle
too kit) as an aid.