Masterbuilt MPRFB-R Digital Meat Probe with RF monitor Receiver User Manual MPRFB Instructions indd
Masterbuilt Manufacturing, Inc. Digital Meat Probe with RF monitor Receiver MPRFB Instructions indd
user manual
1. Locate the battery compartments and load 2AAA
batteries (not included) into both Handheld Unit
(Receiver) and Base Unit (Transmitter).
2. Place Handheld unit in Base Unit cradle (units should
be in close proximity for establishing data link).
3. Place meat on grill or in oven.
4. Insert stainless-steel meat probe into thickest part of
the meat.
5. Carefully, replace/close grill lid or oven door on
heat-resistant braided steel wire.
6. Plug probe wire into Base unite.
7. Turn ON the Handheld Unit and Base Unit by locating both
small “ON/OFF” switches.
8. Handheld Unit and Base Unit will establish data link
automatically. Registration is complete when the Handheld
Unit beeps and the probe temperature appears where the
“__” was fl ashing.
9. Once link is established, enter type of meat (Beef, Veal,
Lamb, Pork, Chicken, Turkey) by pressing meat button on
Handheld Unit until desired meat is selected.
10. Once meat type is selected, set desired taste level (Rare,
Medium-Rare, Medium, Well-Done) by pressing taste
button on Handheld Unit until desired taste/doneness
level is selected.
11. To set the desired internal meat temperature manually.
Press HR or MIN button to raise or lower the temperature
value after meat selection is made.
12. Grill or Cook until alarm sounds indicating that the desired
taste/doneness level is reached. For the best results set
count down/count up timer and check meat periodically
(see timer instructions).
13. Remove meat from grill or oven and allow to cool and
serve.
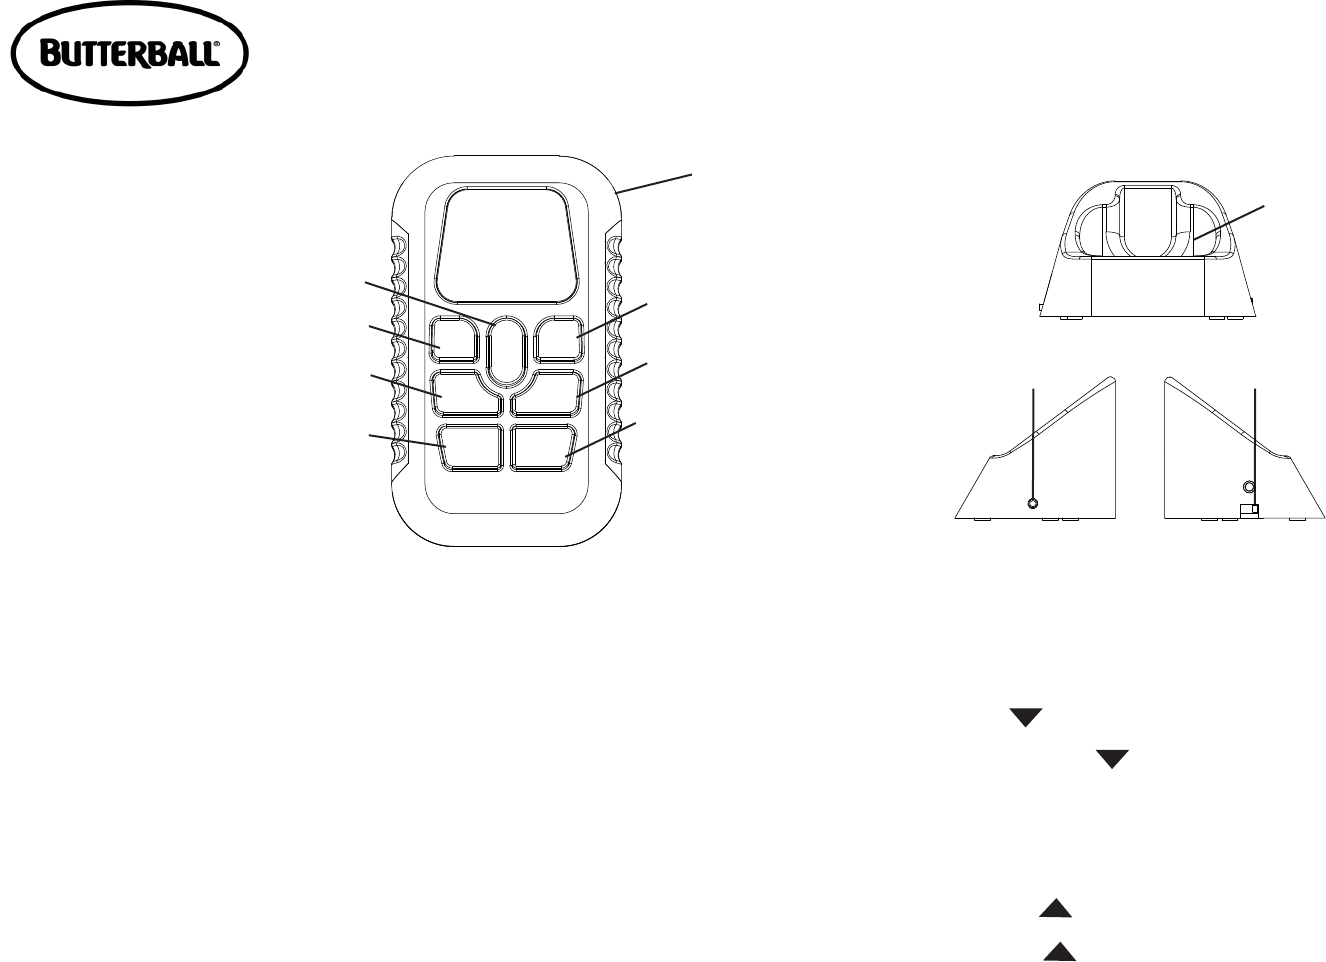
HR MIN
MEAT TASTE
MODE START
STOP
°F/°C
C
L
E
A
R
In timer mode, press to set hour.
In thermometer mode, press to
increase temperature.
In timer mode, when timer count down/
count up process is stopped, press to
clear timer.
In thermometer mode, press to select
temperature readings in Celsius or
Fahrenheit. In timer mode, press to set minutes.
In thermometer mode, press to
decrease temperature value.
On/Off Switch
on back of unit,
above belt clip.
In thermometer mode, press to select
taste-doneness level.
Press to start or stop timer count
down/count up.
Press to select
thermometer or timer
mode.
In thermometer mode,
press to select meat type.
Handheld Unit
(Receiver)
GENERAL USE INSTRUCTIONS
Receiver
Cradle
On/Off Switch
Probe Wire
Plug Connector
Base Unit
(Transmitter)
OFF
ON
Count Down Timer:
1. Press MODE to select timer mode. The upper display will
show a small TIMER and 0:00.
2. Press HR and MIN button to set the timer.
Press START/STOP button to start count down timer.
“ ” will blink for every second.
3. To stop countdown timer, press START/STOP button
again. The “ ” becomes solid.
4. Press CLEAR button to clear the setting back to 0:00.
Count Up Timer:
1. Press MODE to select timer mode. The upper display will
show a small TIMER and 0:00.
2. Press START/STOP button to start count up.
The “ ” will blink for every second.
3. To stop count timer, press START/STOP button again.
The “ ” becomes solid.
4. Press CLEAR button to clear the setting back to 0:00.
TIMER INSTRUCTIONS
FOR BEST RESULTS
1. Make sure probe tip is inserted into the meat at least 1 inch.
2. Do not allow the probe or probe wire to come in direct
contact with fl ames. If cooking with grill cover closed, only
use medium and low heat.
3. Make sure that probe tip is inserted into the center of meat
(not poking through meat).
Digital Meat Probe
Model No. 23100111
100610JM
Problem: Cannot make meat selection.
Solution: May be in timer mode. Check to make sure that the Handheld
Unit (Receiver) is in the thermometer mode by pressing MODE button.
Problem: No data link between Handheld Unit (Receiver) and Base Unit
(Transmitter).
Solutions: Check to make sure that both units are turned ON while in
close proximity to one another.
Check batteries for replacement.
1. Hand wash probe with soap and water.
2. Do not immerse probe in water while cleaning.
3. Dry immediately.
4. Do not wash Handheld Unit (Receiver) or Base Unit (Transmitter).
5. Unit is not Dishwasher Safe.
TROUBLE SHOOTING
CLEANING INSTRUCTIONS
1. Meat probe and wire are very hot while in use.
2. Always use a heat-resistant glove when handling meat probe or probe
wire while in use. Do not touch with bare hands.
3. Do not expose Handheld Unit (Receiver) or Base Unit (Transmitter) to
direct heat or hot surfaces.
4. Not for use in microwave ovens.
5. Do not expose Base Unit (Transmitter) or meat probe plug connector to
water.
6. Do not use Handheld Unit (Receiver) or Base Unit (Transmitter) in the
rain.
7. Base Unit (Transmitter) registers temperatures as low as 14
CAUTION!
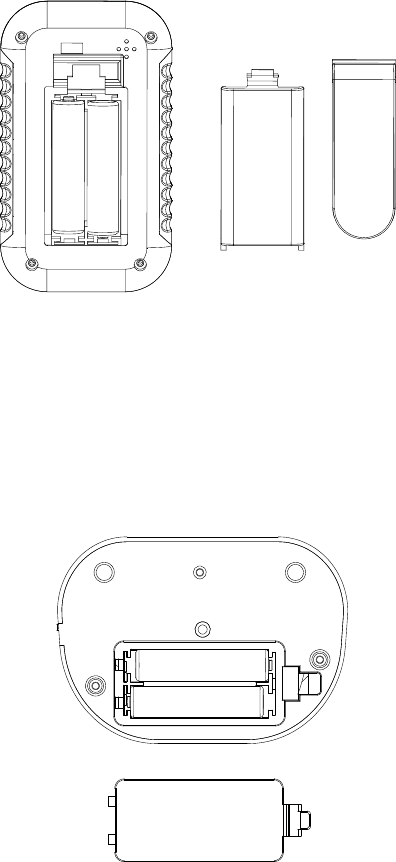
1. Locate the battery compartment on bottom of unit.
2. Carefully, remove battery cover.
3. Load 2AAA batteries (not included).
5. Replace battery cover.
BASE UNIT
BATTERY REPLACEMENT
1. Locate the battery compartment under belt clip
on the backside of the unit.
2. Slide belt clip off to access battery compartment.
3. Carefully, remove battery cover.
4. Load 2AAA batteries (not included).
5. Replace battery cover and belt clip.
HANDHELD UNIT
BATTERY REPLACEMENT
FCC NOTE:
THE MANUFACTURER IS NOT RESPONSIBLE FOR ANY RADIO OR TV INTERFERENCE
CAUSED BY UNAUTHORIZED MODIFICATIONS TO THIS EQUIPMENT. SUCH MODIFICATIONS
COULD VOID THE USER’S AUTHORITY TO OPERATE THE EQUIPMENT.
This device complies with Part 15 of the FCC Rules. Operation is subject to the following two
conditions:
1. This device may not cause harmful interference, and
2. This device must accept any interference received, including interference that may cause
undesired operation. Note: This equipment has been tested and found to comply with the limits
for a Class B digital device, pursuant to part 15 of the FCC Rules.