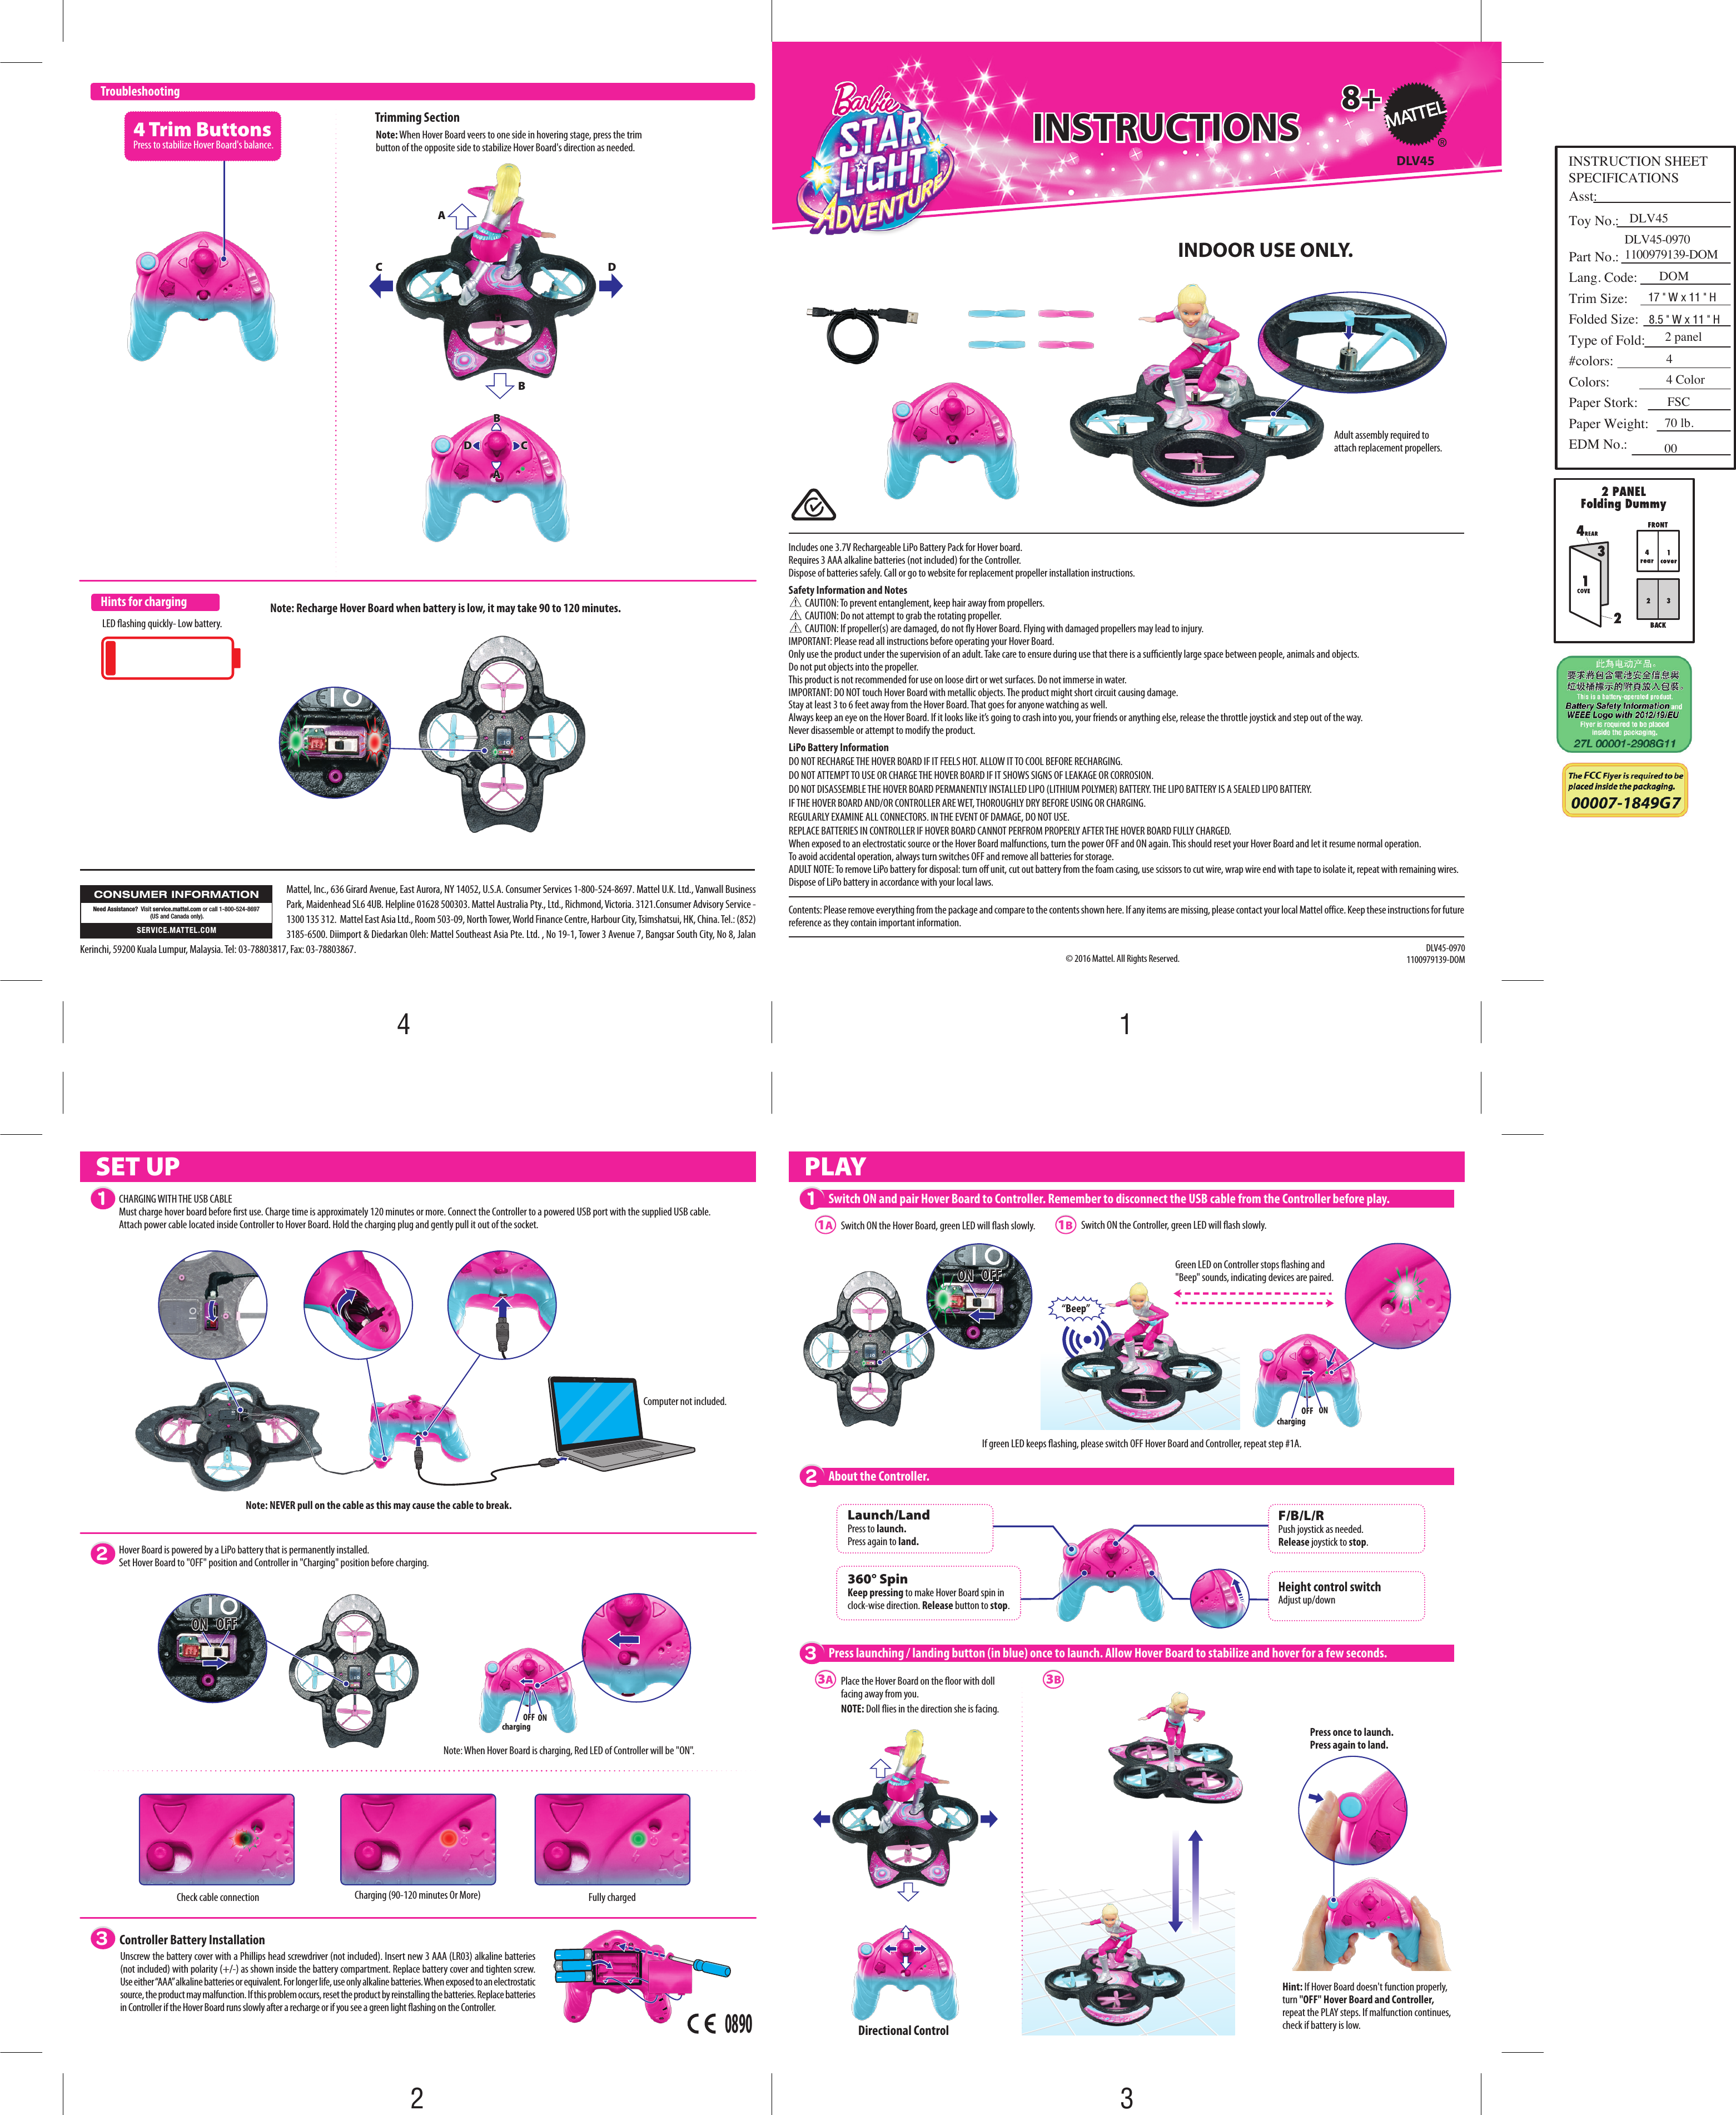
Mattel Asia Pacific Sourcing DLV45-16A5T BARBIE HOVERBOARD - CONTROLLER (2.4GHz TRANSCEIVER) User Manual usb manual 4390C DLV4516A5T 4390C DLV4516A5R PIYDLV45 16A5T PIYDLV45 16A5R

Mattel Asia Pacific Sourcing Ltd. BARBIE HOVERBOARD - CONTROLLER (2.4GHz TRANSCEIVER) usb manual 4390C DLV4516A5T 4390C DLV4516A5R PIYDLV45 16A5T PIYDLV45 16A5R

usb manual_4390C-DLV4516A5T_4390C-DLV4516A5R_PIYDLV45-16A5T_PIYDLV45-16A5R

ONONOFFOFFchargingAABBCCDDAABBCCDDAdult assembly required to attach replacement propellers.ONON OFFOFF DLV45© 2016 Mattel. All Rights Reserved.8+8+INSTRUCTIONSINSTRUCTIONSDLV45-09701100979139-DOM360° SpinKeep pressing to make Hover Board spin in clock-wise direction. Release button to stop.Launch/LandPress to launch. Press again to land.F/B/L/RPush joystick as needed.Release joystick to stop.4 Trim ButtonsPress to stabilize Hover Board's balance.1A3A3BNote: Recharge Hover Board when battery is low, it may take 90 to 120 minutes. 1BSwitch ON the Controller, green LED will ash slowly. Computer not included.LED ashing quickly- Low battery.Switch ON the Hover Board, green LED will ash slowly. If green LED keeps ashing, please switch OFF Hover Board and Controller, repeat step #1A.CHARGING WITH THE USB CABLEMust charge hover board before rst use. Charge time is approximately 120 minutes or more. Connect the Controller to a powered USB port with the supplied USB cable.  Attach power cable located inside Controller to Hover Board. Hold the charging plug and gently pull it out of the socket. Contents: Please remove everything from the package and compare to the contents shown here. If any items are missing, please contact your local Mattel office. Keep these instructions for future reference as they contain important information.  PLAYController Battery InstallationPress launching / landing button (in blue) once to launch. Allow Hover Board to stabilize and hover for a few seconds. 3Switch ON and pair Hover Board to Controller. Remember to disconnect the USB cable from the Controller before play.1About the Controller.2TroubleshootingDirectional ControlTrimming Section123SET UPHints for chargingCheck cable connection Fully chargedCharging (90-120 minutes Or More)Height control switchAdjust up/downONON OFFOFFNote: When Hover Board is charging, Red LED of Controller will be "ON".ONONOFFOFFchargingHover Board is powered by a LiPo battery that is permanently installed.Set Hover Board to "OFF" position and Controller in "Charging" position before charging.Hint: If Hover Board doesn't function properly, turn "OFF" Hover Board and Controller, repeat the PLAY steps. If malfunction continues, check if battery is low.“Beep”Note: When Hover Board veers to one side in hovering stage, press the trim button of the opposite side to stabilize Hover Board's direction as needed.Place the Hover Board on the oor with doll facing away from you.NOTE: Doll ies in the direction she is facing.LiPo Battery InformationDO NOT RECHARGE THE HOVER BOARD IF IT FEELS HOT. ALLOW IT TO COOL BEFORE RECHARGING.DO NOT ATTEMPT TO USE OR CHARGE THE HOVER BOARD IF IT SHOWS SIGNS OF LEAKAGE OR CORROSION.DO NOT DISASSEMBLE THE HOVER BOARD PERMANENTLY INSTALLED LIPO (LITHIUM POLYMER) BATTERY. THE LIPO BATTERY IS A SEALED LIPO BATTERY.IF THE HOVER BOARD AND/OR CONTROLLER ARE WET, THOROUGHLY DRY BEFORE USING OR CHARGING.REGULARLY EXAMINE ALL CONNECTORS. IN THE EVENT OF DAMAGE, DO NOT USE.REPLACE BATTERIES IN CONTROLLER IF HOVER BOARD CANNOT PERFROM PROPERLY AFTER THE HOVER BOARD FULLY CHARGED.When exposed to an electrostatic source or the Hover Board malfunctions, turn the power OFF and ON again. This should reset your Hover Board and let it resume normal operation.To avoid accidental operation, always turn switches OFF and remove all batteries for storage.ADULT NOTE: To remove LiPo battery for disposal: turn o unit, cut out battery from the foam casing, use scissors to cut wire, wrap wire end with tape to isolate it, repeat with remaining wires.  Dispose of LiPo battery in accordance with your local laws.Includes one 3.7V Rechargeable LiPo Battery Pack for Hover board. Requires 3 AAA alkaline batteries (not included) for the Controller.Dispose of batteries safely. Call or go to website for replacement propeller installation instructions. Safety Information and Notes         CAUTION: To prevent entanglement, keep hair away from propellers.         CAUTION: Do not attempt to grab the rotating propeller.         CAUTION: If propeller(s) are damaged, do not y Hover Board. Flying with damaged propellers may lead to injury.IMPORTANT: Please read all instructions before operating your Hover Board.Only use the product under the supervision of an adult. Take care to ensure during use that there is a suciently large space between people, animals and objects.Do not put objects into the propeller.         This product is not recommended for use on loose dirt or wet surfaces. Do not immerse in water. IMPORTANT: DO NOT touch Hover Board with metallic objects. The product might short circuit causing damage.Stay at least 3 to 6 feet away from the Hover Board. That goes for anyone watching as well.Always keep an eye on the Hover Board. If it looks like it’s going to crash into you, your friends or anything else, release the throttle joystick and step out of the way.Never disassemble or attempt to modify the product.Note: NEVER pull on the cable as this may cause the cable to break.Green LED on Controller stops ashing and "Beep" sounds, indicating devices are paired.Press once to launch.Press again to land.INDOOR USE ONLY. Unscrew the battery cover with a Phillips head screwdriver (not included). Insert new 3 AAA (LR03) alkaline batteries (not included) with polarity (+/-) as shown inside the battery compartment. Replace battery cover and tighten screw. Use either “AAA” alkaline batteries or equivalent. For longer life, use only alkaline batteries. When exposed to an electrostatic source, the product may malfunction. If this problem occurs, reset the product by reinstalling the batteries. Replace batteries in Controller if the Hover Board runs slowly after a recharge or if you see a green light ashing on the Controller.0890Mattel, Inc., 636 Girard Avenue, East Aurora, NY 14052, U.S.A. Consumer Services 1-800-524-8697. Mattel U.K. Ltd., Vanwall Business Park, Maidenhead SL6 4UB. Helpline 01628 500303. Mattel Australia Pty., Ltd., Richmond, Victoria. 3121.Consumer Advisory Service - 1300 135 312.  Mattel East Asia Ltd., Room 503-09, North Tower, World Finance Centre, Harbour City, Tsimshatsui, HK, China. Tel.: (852) 3185-6500. Diimport & Diedarkan Oleh: Mattel Southeast Asia Pte. Ltd. , No 19-1, Tower 3 Avenue 7, Bangsar South City, No 8, Jalan Kerinchi, 59200 Kuala Lumpur, Malaysia. Tel: 03-78803817, Fax: 03-78803867.CONSUMER INFORMATIONSERVICE.MATTEL.COMNeed Assistance?  Visit service.mattel.com or call 1-800-524-8697 (US and Canada only).4312INSTRUCTION SHEET SPECIFICATIONSAsst:Toy No.:Part No.:Lang. Code:Trim Size:Folded Size:Type of Fold:#colors:Colors:Paper Stork:Paper Weight:EDM No.:17 " W x 11 " H8.5 " W x 11 " H2 panel4 Color4FSC70 lb.00DLV45DOMDLV45-09701100979139-DOM
NOTE: Changes or modifications not expressly approved by the manufacturer responsible for compliance could void the user’s authority to operate the equipment.This device complies with Part 15 of the FCC Rules.Operation is subject to the following two conditions: (1)  This device may not cause harmful interference, and  (2)  this device must accept any interference  received, including interference that may cause undesired operation.• This equipment has been tested and found to comply with the limits for a Class B digital device, pursuant to part 15 of the FCC  rules.  These  limits  are  designed  to  provide  reasonable  protection  against  harmful  interference  in  a  residential installation.  This equipment generates, uses and can  radiate  radio  frequency energy and, if not installed and used in accordance with the instructions, may cause harmful interference to radio communications. However, there is no guarantee that interference  will not occur  in a particular  installation. If this equipment does cause harmful interference to  radio  or television reception, which can be determined by turning the equipment off and on, the user is encouraged to try to correct the interference by one or more of the following measures:• Reorient or relocate the receiving antenna.• Increase the separation between the equipment and receiver.• Connect the equipment into an outlet on a circuit different from that to which the receiver is connected.• Consult the dealer or an experienced radio/TV technician for help.size: 138 x 175 (mm)Cet appareil est conforme à l'article 15 de la réglementation de la FCC.L'utilisation de ce dispositif est autorisée seulement aux deux conditions suivantes :(1)  il ne doit pas  produire  de  brouillage nuisible, et  (2)  l'utilisateur  du dispositif doit être  prêt à accepter  tout  brouillage radioélectrique reçu, même si ce brouillage est susceptible de compromettre le fonctionnement du dispositif.• Cet appareil a été testé et jugé conforme aux limites de la classe B pour un appareil numérique en vertu de l'article 15 de la réglementation de la FCC. Ces limites ont été instaurées pour fournir une protection raisonnable contre toute interférence nuisible dans une installation résidentielle. Cet appareil génère, utilise et peut émettre de l'énergie radiofréquence. S'il n' est pas installé et utilisé conformément aux instructions, il peut  provoquer  des interférences sur  les communications  radio. Cependant, il n'est pas garanti que des interférences ne se  produiront pas dans certaines installations.  Si  cet appareil cause des interférences à la réception radio ou télévisée (ce qui peut être vérifié en éteignant l'appareil puis en le remettan t sous tension), l'utilisateur peut tenter de les résoudre en suivant une ou plusieurs des mesures ci-après :• Réorienter ou déplacer l'antenne réceptrice.• Augmenter l'espace entre l'appareil et le récepteur.• Brancher l'appareil sur une prise de courant différente de celle sur laquelle le récepteur est branché.• Pour obtenir de l'aide, contacter le vendeur ou un technicien radio/télévision expérimenté.REMARQUE : Tout changement ou modification de cet appareil n'ayant pas été expressément approuvé par les partiesresponsables de sa conformité peut entraîner l'annulation du droit d'exploitation de l'équipement par l'utilisateur.FOR PRODUCT SOLD IN USA • POUR LES PRODUITS VENDUS AUX ÉTATS-UNIS This equipment complies with FCC  & Canada radiation exposure limits set forth for uncontrolled environments.This transmitter must not be co-located or operating in conjunction with any other antenna or transmitter.Cet équipement est conforme aux limites d’exposition aux radiations définies par le Canada pour des environnements non contrôlés.Cet émetteur ne doit pas être installé au même endroit ni utilisé avec une autre antenne ou un autre émetteur.THIS DEVICE COMPLIES WITH INDUSTRY CANADA LICENCE-EXEMPT RSSs.CET APPAREIL EXEMPT DE LICENCE EST CONFORME AU RSSs D'INDUSTRIE CANADA. Operation is subject to the following two conditions:(1) this device may not cause interference, and (2) this device must accept any interference, including interference that may cause undesired operation of the device.L’utilisation de ce dispositif est autorisée seulement aux conditions suivantes : (1)  il ne doit pas  produire  de  brouillage et  (2)  il doit pouvoir  tolérer  tout  brouillage  radioélectrique  reçu, même si ce brouillage est susceptible de compromettre son fonctionnement.FOR PRODUCT SOLD IN CANADA • POUR LES PRODUITS VENDUS AU CANADA00007-1850 FCC flyer for 2.4 GHz RC item only00007-1850

Navigation menu