Maui Innovative Peripherals 1122 3-D Mouse, CyMouse User Manual manual CM0311
Maui Innovative Peripherals, Inc. 3-D Mouse, CyMouse manual CM0311
Users Manual
User’s Manual

Cymouse User’s Manual
Maui Innovative Peripherals, Inc.This device complies with Part 15 of the FCC Rules. Operation is subject to
the following two conditions: (1) this device may not cause harmful interference, and (2) this device must accept
any interference received, including interference that may cause undesired operation.
(Refer to Appendix C for further detail.)
© 2002 Maui Innovative Peripherals, Inc. All rights reserved, including those to reproduce this book or parts
thereof in any form without first obtaining written permission from Maui Innovative Peripherals, Inc.
Every effort has been made to keep this information current; however, periodically, changes are made to the
information herein, and these changes will be incorporated into new editions of this publication.
MIP, Cymouse, and the “Eye” logo are trademarks of Maui Innovative Peripherals, Inc. Windows is a registered
trademark of Microsoft Corporation. All other trademarks and registered trademarks are the property of their
respective owners.
Contents
1Introduction
How It Works ................................................................................pg #
2Installing Cymouse
Requirements................................................................................pg #
Installation ....................................................................................pg #
Calibration ....................................................................................pg #
3Quickstart
4Cyprofiler Overview
Launching Cyprofiler ....................................................................pg #
5Creating Game Profiles
Creating a New Profile ..................................................................pg #
Loading an Existing Profile ..........................................................pg #
Saving a Profile ............................................................................pg #
6Setting Up Game Profiles
Assigning a Game to a Profile ......................................................pg #
Setting the Pause Key ..................................................................pg #
Setting Commands for Direction Icons ........................................pg #
7Advanced Settings
Power Commands ........................................................................pg #
Submaps ......................................................................................pg #
8Troubleshooting
Cymouse ......................................................................................pg #
Cyprofiler ......................................................................................pg #
Appendix A:
Mode and Command Type Reference ..........................................pg #
Appendix B:
Adjusting the Headset ..................................................................pg #
Appendix C:
About Us ......................................................................................pg #
Cymouse Underground ................................................................pg #
30-Day Money-Back Guarantee ....................................................pg #
Glossary
Index
Do we need to add the
License agreement?

Cymouse User’s Manual
4
Introduction
5
Cymouse is a revolutionary 3-D game controller designed to provide
you with a new level of game control. Cymouse is a head-worn game
controller, so it uses the motion of your head to control games.
Because you can use Cymouse as a second set of hands, you don’t
give up any of your existing game controllers.
You can use Cymouse with any Windows-based game that supports a
mouse, keyboard or joystick. Cyprofiler—the software utility that
comes with Cymouse—works in conjunction with Cymouse to let you
make amazing moves you could have only imagined until now. With
Cyprofiler, you can perform one command or a combination of
commands—up to 50—with a single head movement!
How It Works
Cymouse tracks the motion and rotation of your head in a 3-D space
by sending and receiving an infrared signal to and from a Cymouse
sensor attached to your PC. By exchanging information with the
sensor, Cymouse knows the exact location of your head in a 3-D
space. In the Cymouse world, we call this the “direction”. The
direction of Cymouse changes when you move or tilt your head in
any direction.
Using Cyprofiler, you can set up commands that are generated when
your head moves in each of ten directions. These commands are the
same commands that you have set up in your game. For example, if
you press the W key to walk during a game, you can set up Cyprofiler
to press the W key when you look right. Therefore, when you look
right, you will walk during the game.
You can use Cymouse without setting up any commands. In this
case, the mouse cursor will simply move in the direction in which
you look.
Chapter
1
Introduction

Cymouse User’s Manual
6
Installing Cymouse
7
Requirements
Cymouse must be used with a PC that meets the following minimum
requirements:
Hardware
•Pentium II class CPU running at 400 MHz or faster
•32 MB of RAM
•CD ROM drive
•Available USB port
Software
•Windows 98 Second Edition, or later
•DirectX version 8.0 or later (included on Cymouse Installation CD)
Chapter
2
Installing Cymouse
Cymouse User’s Manual
8
Installation
1. Remove the contents from the Cymouse box and verify that you
have one each of the following:
• Cymouse Installation CD
• Cymouse headset
• Cyhub
• Monitor sensor with extra Velcro pad
• USB cable
Cymouse contents (manual and CD not shown)
2. Insert the Cymouse CD into the CD ROM drive of your PC.
3. If the Installation program appears, proceed to step 4. If it does
not appear, select Run from the Start menu. In the Run box, enter
d:\setup.exe and click OK (where d: is the designation for
CD-ROM drive).
4. Follow the on-screen instructions in the Installation program.
5. Connect the Cymouse headset cable to the headset port on the
Cyhub as shown in figure 2-1.
Installing Cymouse
9
Figure 2-1. Connecting the Cymouse Headset Cable
6. Connect the monitor sensor cable to the monitor port on the
Cyhub as shown in figure 2-2.
Figure 2-2. Connecting the Monitor Sensor Cable
7. Remove the protective plastic and attach the extra Velcro pad to
the center top of your computer monitor in the location shown in
figure 2-3.
Installing Cymouse
11
Figure 2-5. Cyhub USB Port
Calibration
As with any new game controller, you should calibrate Cymouse at
least once. This will tell Cymouse approximately how far you are able
to comfortably move and turn your head.
1. From the Start menu, select Settings >> Control Panel. The
Control Panel dialog box will appear.
2. Double-click the Game Controllers icon (also called Gaming
Options on some systems). The Game Controllers dialog box will
appear.
3. Click on Cymouse in the list of available game controllers, and
click Properties. The Properties dialog box will appear.
4. Click the Settings tab.
5. Click the Calibrate button.
6. Follow the on-screen instructions.
Congratulations! Your Cymouse is now calibrated and ready for use.
Cymouse User’s Manual
10
Figure 2-3. Velcro Pad Attached to a Monitor
8. Attach the monitor sensor to the Velcro pad on your computer
monitor as shown in figure 2-4.
Figure 2-3. Monitor Sensor Attached to the Velcro Pad
9. Plug the square shaped end of the USB cable into the USB port on
the front of the Cyhub, as shown in figure 2-5, and the rectangular-
shaped end of the USB cable into a free USB port on your computer.
If you have properly connected the components, the red lamp on
Cyhub will be on to indicate that the hub is powered on and the green
lamp will be off to indicate that Cymouse is inactive. When Cymouse
is active, the green lamp will light.
Quickstart
13
Cyprofiler by default is set to control the mouse cursor based on the
direction in which you look. For example, looking to your left will
cause the cursor to move to the left on the screen. The farther you
look in one direction, the faster the cursor will move.
1. With Cymouse placed on your head, open Cyprofiler from your
PC desktop. The main screen (shown in figure 3-1) will appear.
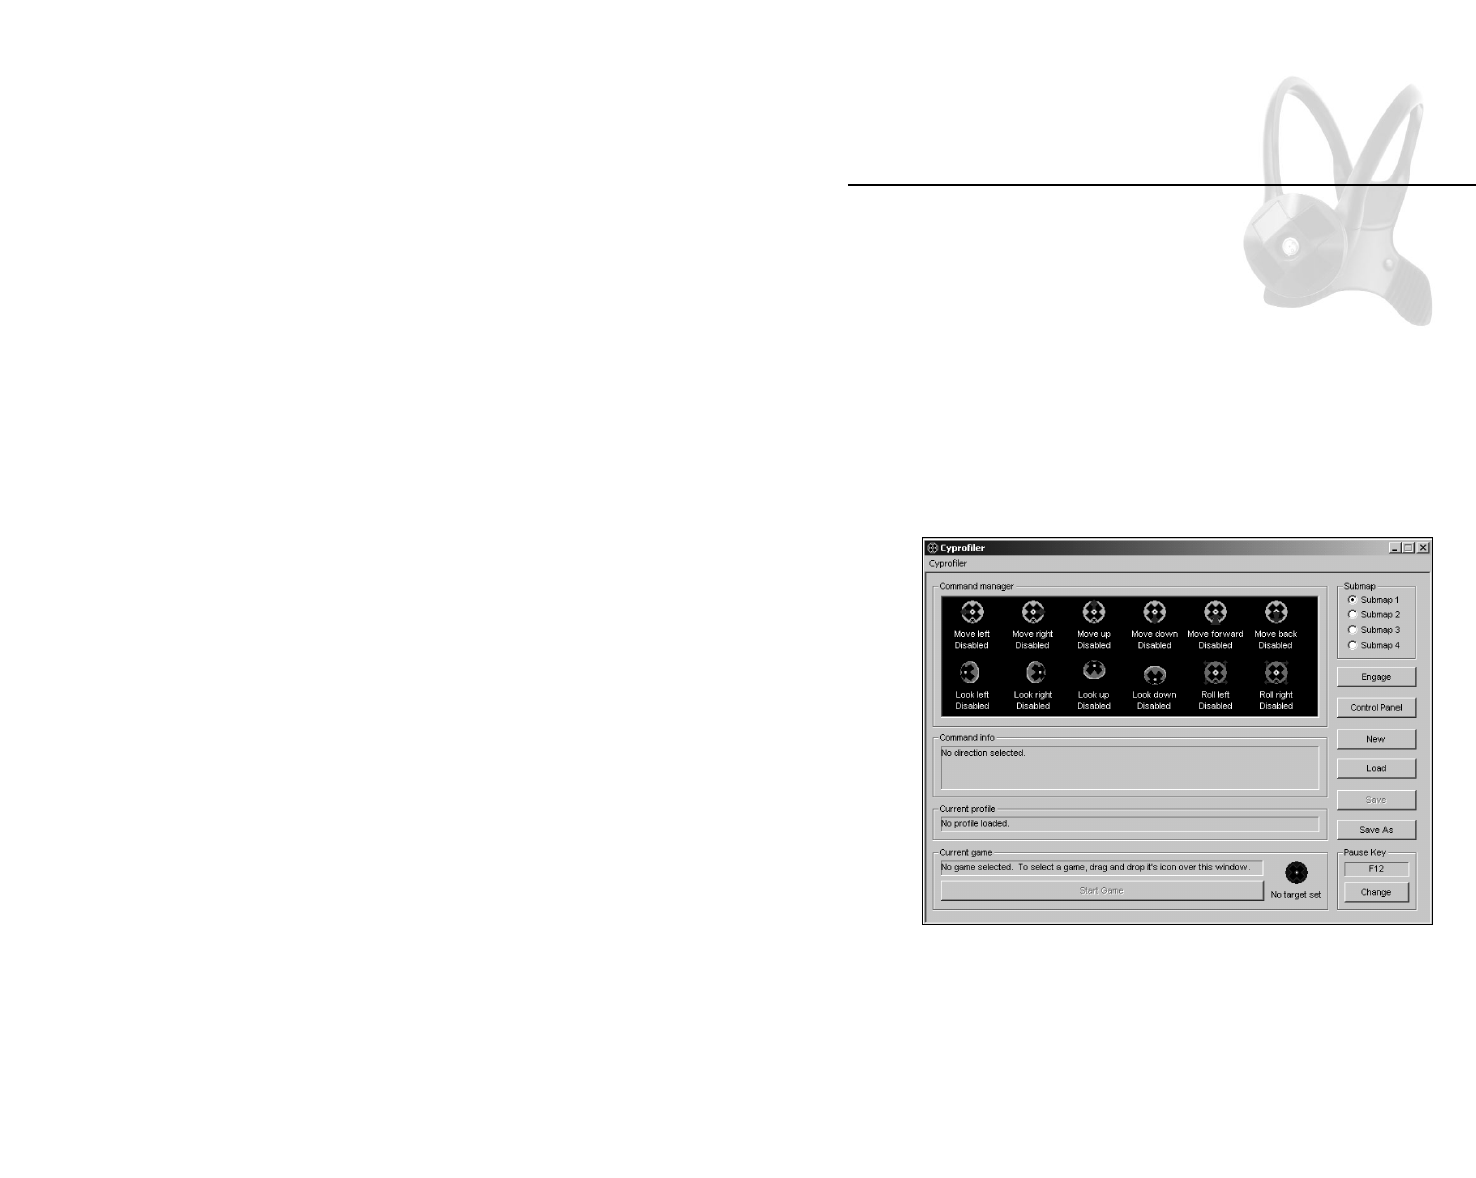
Figure 3-1. Cyprofiler Main Screen
2. Drag and drop the desired game icon from your desktop or from
your Start menu anywhere over the Cyprofiler window. (This is a
game icon you use to start the game.)
3. Click the Change button in the Pause Key frame to set a pause
key. See ‘Note’ below for more pause key information.
Chapter
3
Quickstart
Cymouse User’s Manual
12

Cyprofiler Overview
15
Cyprofiler is a software utility that enables you to fully customize the
behavior of Cymouse. Cyprofiler can perform commands that any
game can understand:
Mouse buttons clicks. Cyprofiler can generate five unique mouse
button clicks: left, middle, right, 4, and 5. (The side buttons on
Microsoft's Intellimouse, buttons 4 and 5 are available only when
Cymouse is used with Windows 2000 and later.) Although you do not
need to use a five-button mouse to be able to generate these
commands, you may need to set the commands in the game.
Mouse wheel scrolls. Cyprofiler can scroll the mouse wheel in either
direction up or down.
Keystrokes. Cyprofiler can generate any key on the keyboard, with
the exception of the Pause key.
For Cyprofiler to generate these commands within a game, you must
assign the command to a direction icon in the Cyprofiler command
menu screen and set the same command within the game. Once you
have set up a profile for a game, Cyprofiler lets you launch that game
and the corresponding Cymouse profile—with the single click of the
mouse.
Chapter
4
Cyprofiler Overview
Cymouse User’s Manual
14
4. When the on-screen keyboard appears, click the key you will use
to pause Cymouse, and click OK.
5. Click Start Game to launch the game and activate Cymouse.
During the game, you can use Cymouse for the look left, look right,
look up and look down directions. These are the default settings for
your Cymouse. To change and customize these settings, refer to
Chapter 6, Setting Up Game Profiles.
Note: If you have difficulty controlling the cursor at any time while
using Cyprofiler or while setting up your game, use the Pause key to
pause Cymouse until you play the game. See page 23 for details
about the Pause key.
Cyprofiler Overview
17
(2) Command Info Displays information about the command
set to the selected direction icon.
(3) Command Profile Displays the name of the active (most
recently saved or loaded) profile. Profiles
are described in Chapter 5, Creating Game
Profiles.
(4) Current Game Displays the active game target. You set
the game target by dragging and dropping
the icon used to start the game over the
Cyprofiler main screen. This action simply
provides information to Cyprofiler about
the game; it does not move the icon from
its original location.
(5) Start Game Activates Cymouse and starts the game
that is set as the game target. This
becomes active only after you have set the
game target.
(6) Submap Enables the use of up to four different
(Map 1 through Map 4) control schemes to be changed “on the
fly” while playing the game. (For details,
see “Submaps” in Chapter 7, Advanced
Settings.)
(7)Engage/Disengage Engage turns on Cymouse, while
Disengage turns off Cymouse.
(8) Control Panel Opens the Windows Game Controllers
(also called Gaming Options) applet so
that you can calibrate Cymouse.
(Calibration is described in Chapter 2,
Installing Cymouse.)
(9) New Creates a blank profile.
(10) Load Opens a saved game profile.
(11) Save Saves the current game profile.
(12) Save As Saves the current game profile as a new
profile.
(13) Pause Key Sets the Pause key that enables you to
pause Cyprofiler during a game. The Change
button lets you change the selected key.
Cymouse User’s Manual
Launching Cyprofiler
From the Start menu, select Programs >> Cymouse >> Cyprofiler.
The Cyprofiler program will execute and the main screen (shown in
figure 4-1) will appear.
Figure 4-1. Cyprofiler Main Screen
Following is a description of each of the numbered items shown in
Figure 4-1.
(1) Command Manager Contains twelve direction icons, each of
which represents a distinct motion or
rotation in which you can move Cymouse in
3D space. The name of the direction (which
describes the direction you must move in
order for Cymouse to perform the
command(s)) is indicated just below the
icon along with either “Active” or “Disabled”
to identify if a command is set for that
direction. (Refer to “Setting Commands for
Direction Icons” in Chapter 7.)
Note: Roll features have been disabled in
Cymouse for ergonomic reasons. The Roll
Left and Roll Right icons in Command
Manager are disabled. An ergonomic
study is available at our website.
16
7
8
9
10
11
12
13
2
3
4
5
16

Cymouse User’s Manual
18
Creating Game Profiles
19
A game profile contains all the commands for each available
direction, as well as information about the game associated with the
profile. Profiles are stored on your hard drive using the .cpf
extension.
Several pre-defined profiles for popular PC games are provided on
the Cymouse CD ROM. You can use these profiles as provided,
customize the profiles for your own game play, or set up new
profiles. In fact, there is no limit to the number of profiles you can
create and store.
After you have created a new game profile, or to modify an existing
game profile, you will assign commands to the Cymouse direction
icons identified in the Cyprofiler main screen. Steps for assigning
commands are described in the next chapter.
Creating a New Profile
1. Click New to create a blank profile in which the Mode setting in
every command is set to No Output. (If you have not saved the
current profile, you will be prompted to do so before the settings
are reset for a new profile.)
Loading an Existing Profile
1. Click Load. (If you have not saved the current profile, you will be
prompted to do so before your load the profile.) The Open dialog box
will appear.
2. Click the profile (*.cpf) you wish to load from the list provided and
click Open. The name of the current profile will appear in the Current
Profile field.
Chapter
5
Creating Game Profiles
Setting Up Game Profiles
In this chapter, you’ll learn how to set up a game profile, including
assigning a game to a profile, setting the pause key and setting
commands for a direction icon.
Assigning a Game to a Profile
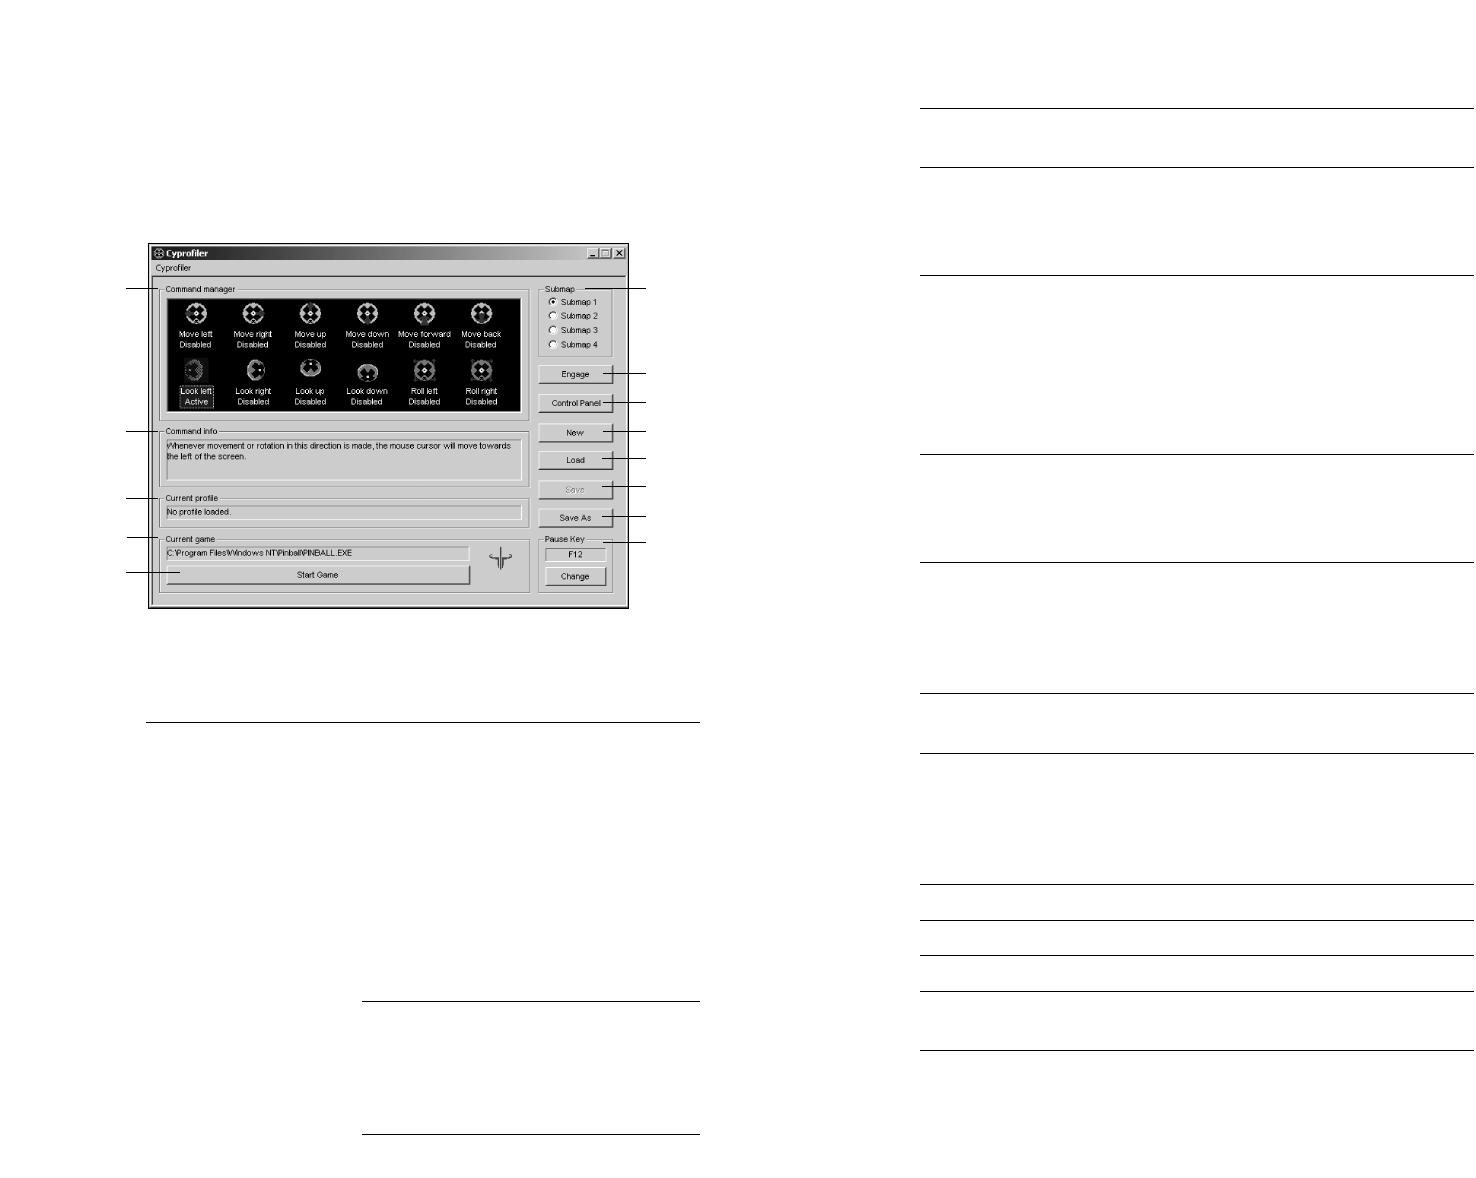
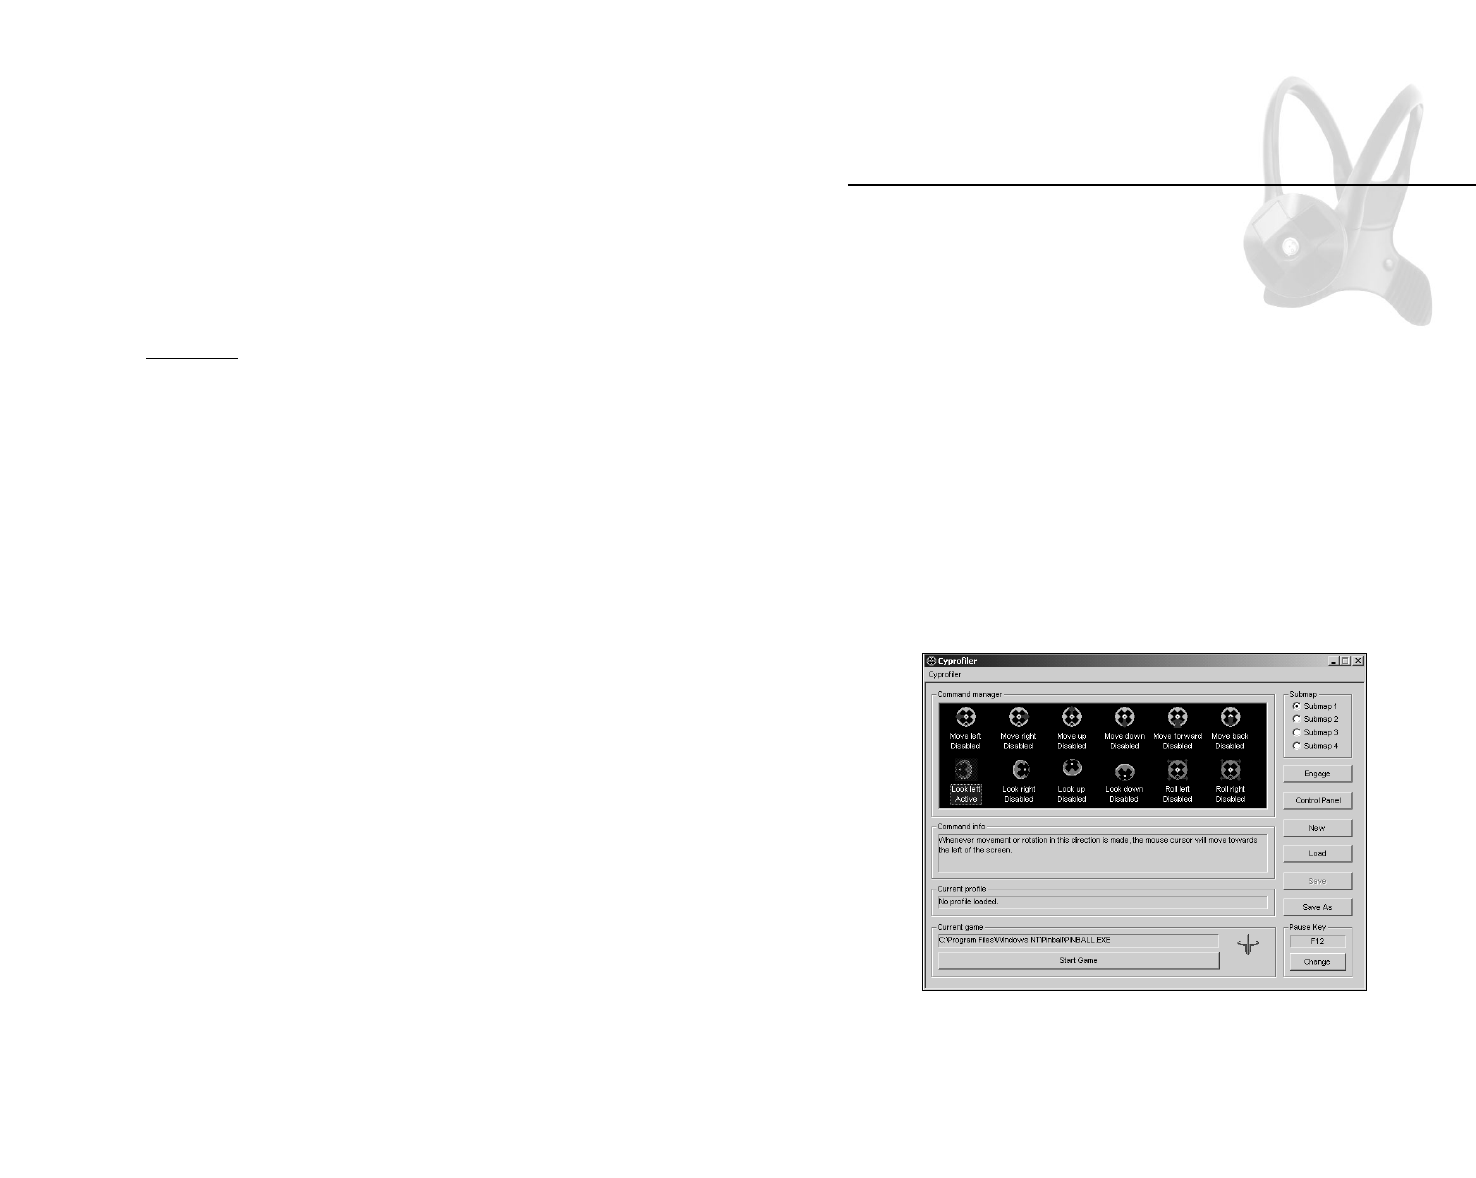
1. Drag and drop over the Cyprofiler window the icon of the game
for which you wish to create a profile. As shown in figure 6-1, the
directory location of the game appears in the Current Game field,
the game icon appears to the right of this field, and the Start
Game button becomes active.
Figure 6-1. Game Information Displayed in Cyprofiler
2. At this point, you can start the game and use Cymouse for the
look left, look right, look up and look down directions. Simply
click Start Game to launch the game.
Chapter
6
Setting Up
Game Profiles
Cymouse User’s Manual
20
Saving a Profile
1. Click Save to save your current profile and its settings.
or
1. Click Save As to save your current settings as a new profile name.
2. When the Save As dialog box appears, enter the new name for this
profile and click Save. The name of the current profile will appear in
the Current Profile field.
SPEED TIP: You can open Cyprofiler by double-clicking the icon of a
saved profile in Windows Explorer. Doing so will make Cyprofiler load
that profile during its startup process. That means you’ll be able to
press the Start Game button as soon as the main interface appears.
21
Setting Up Game Profiles
23
Look Down – Look down without moving your head away from the
center point.
Roll Right – Tilt and move your head right to the right of the center
point. (This function is disabled for head-mounted devices.)
Roll Left – Tilt and move your head to the left of the center point.
(This function is disabled for head-mounted devices.)
To assign commands to a Cymouse direction follow these steps:
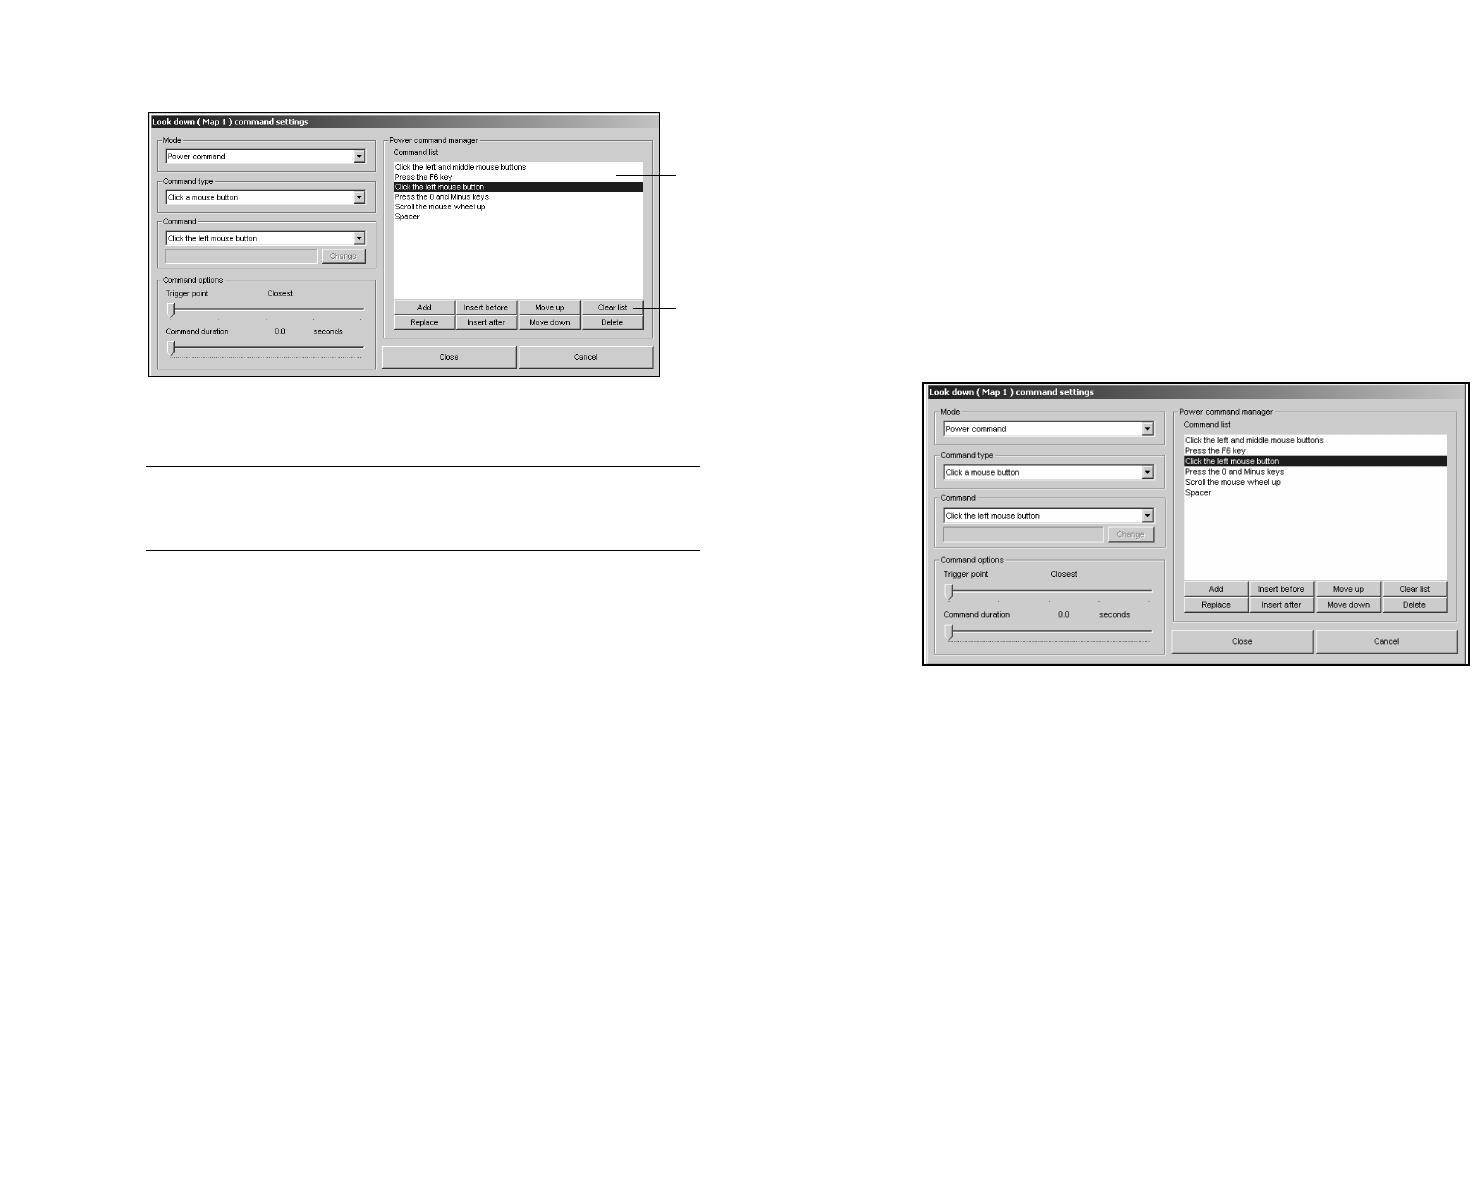
1. Open the Command Settings Dialog Box
Double-click on one of the Cymouse direction icons (shown in figure
6-1) to open the Command Settings dialog box for that direction as
shown in figure 6-2. With the exception of the Direction indication in
the title bar, this screen is identical for each direction.
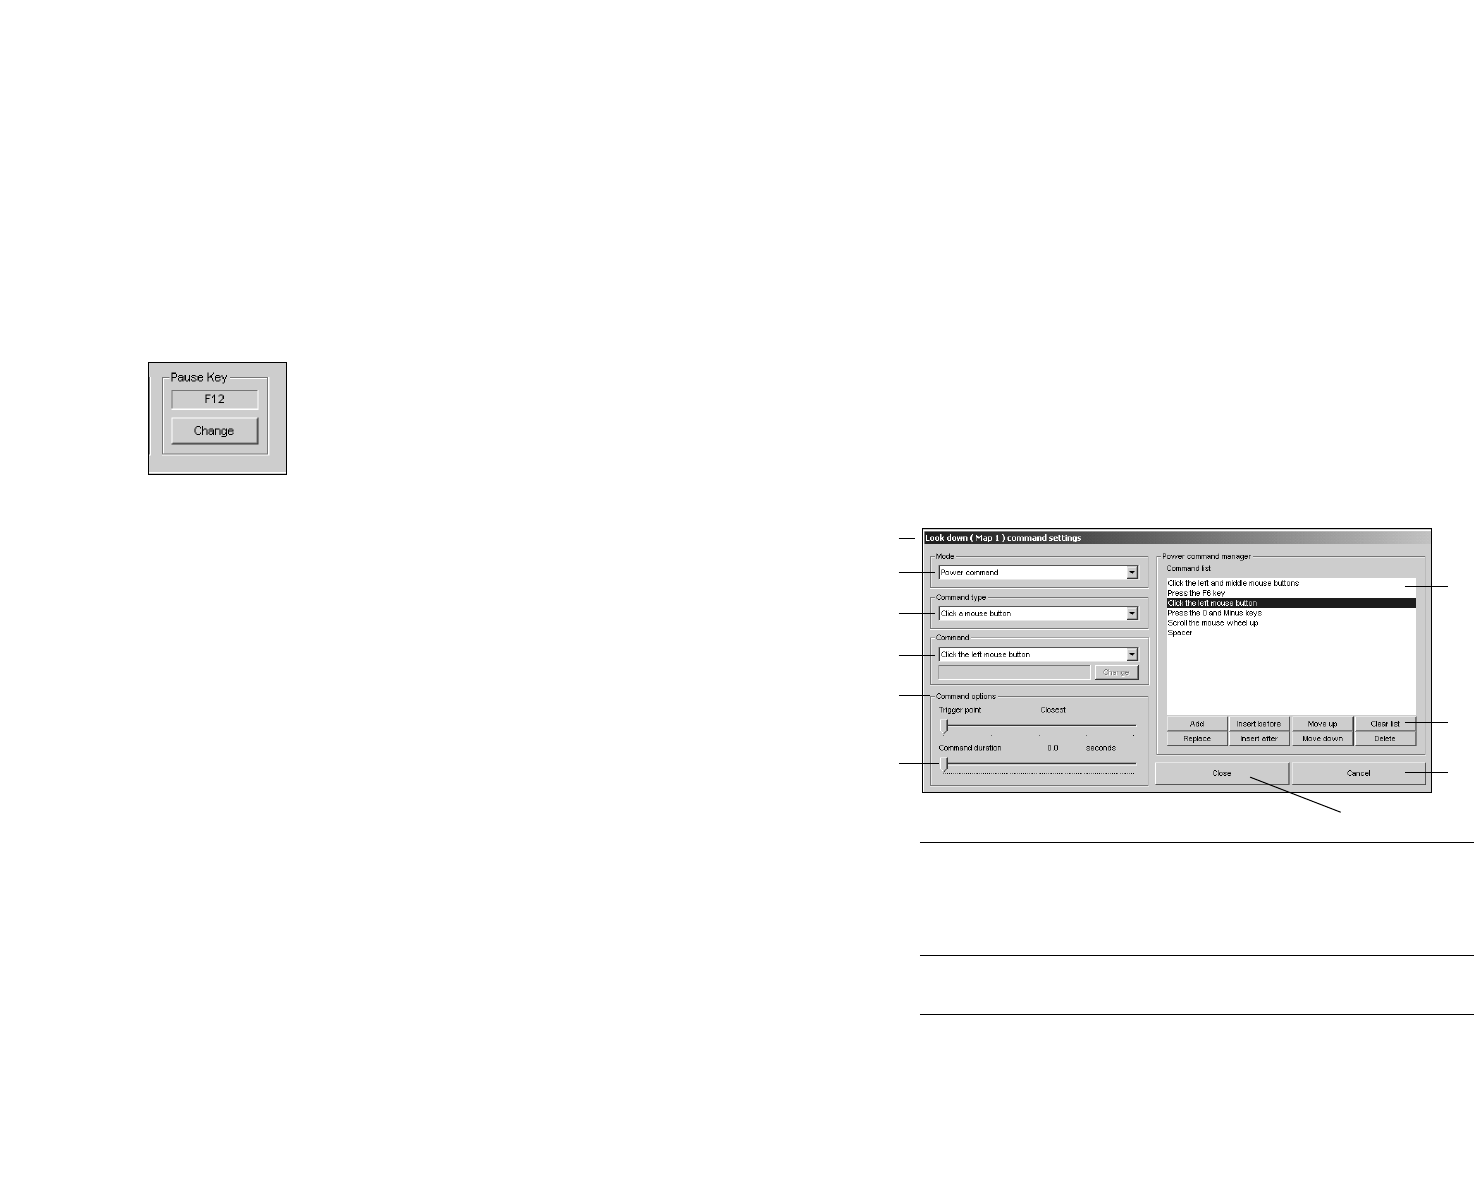
Figure 6-2. Cyprofiler Command Settings Dialog Box
(1) Title Bar Indicates the direction and map to which
you are currently making changes. In the
example, changes are being made to the
Look Down direction, Map 1.
(2) Mode Determines the method Cyprofiler will use
to generate commands for the direction.
(3) Command Type Determines the type of command to be
performed.
Cymouse User’s Manual
22
Setting the Pause Key
You can set up a pause key that will let you pause Cymouse while
playing a game. You still have full control over all of your other
peripheral devices while Cymouse is paused.
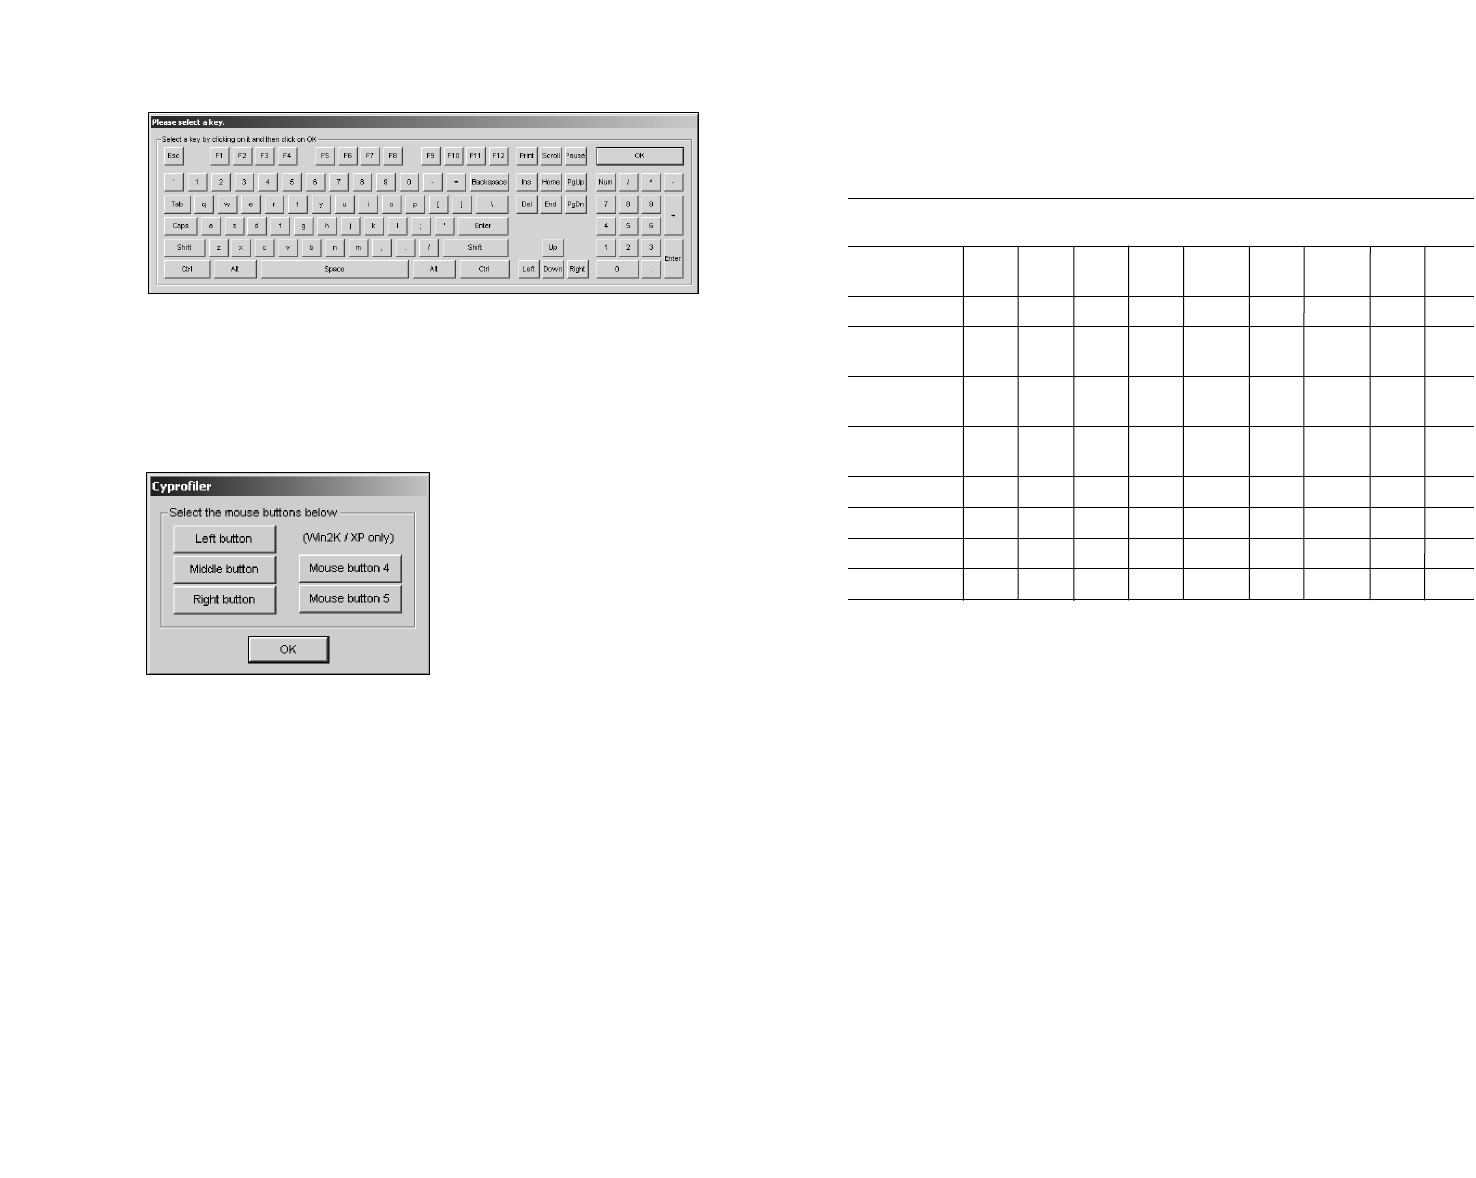
1. From the Cyprofiler main screen, click Change. The on-screen
keyboard will appear to enable you to select a key.
2. Select a key and click OK. The name of the selected key will
appear in the Pause Key field in the Cyprofiler main screen.
Figure 6-1. Example of the Pause Key Set for the F12 Key
Setting Commands for Direction Icons
Within a game profile you can set a command or series of commands
that can be performed when Cymouse passes a trigger point. Ten
(10) different direction icons can be used as follows:
Move Left – Move your entire head to the left of the center point.
Move Right – Move your entire head to the right of the center point.
Move Down – Move your entire head downward from the center
point.
Move Up – Move your entire head upward from the center point.
Move Forward – Move your entire head straight toward the monitor.
Move Backward – Move your entire head straight back from the
monitor.
Look Left – Turn your head to the left without moving your head
away from the center point.
Look Right – Turn your head to the right without moving your head
away from the center point.
Look Up – Look up without moving your head away from the center
point.
7
8
10
9
1
2
3
4
6
5
Setting Up Game Profiles
25
2. Select a Mode
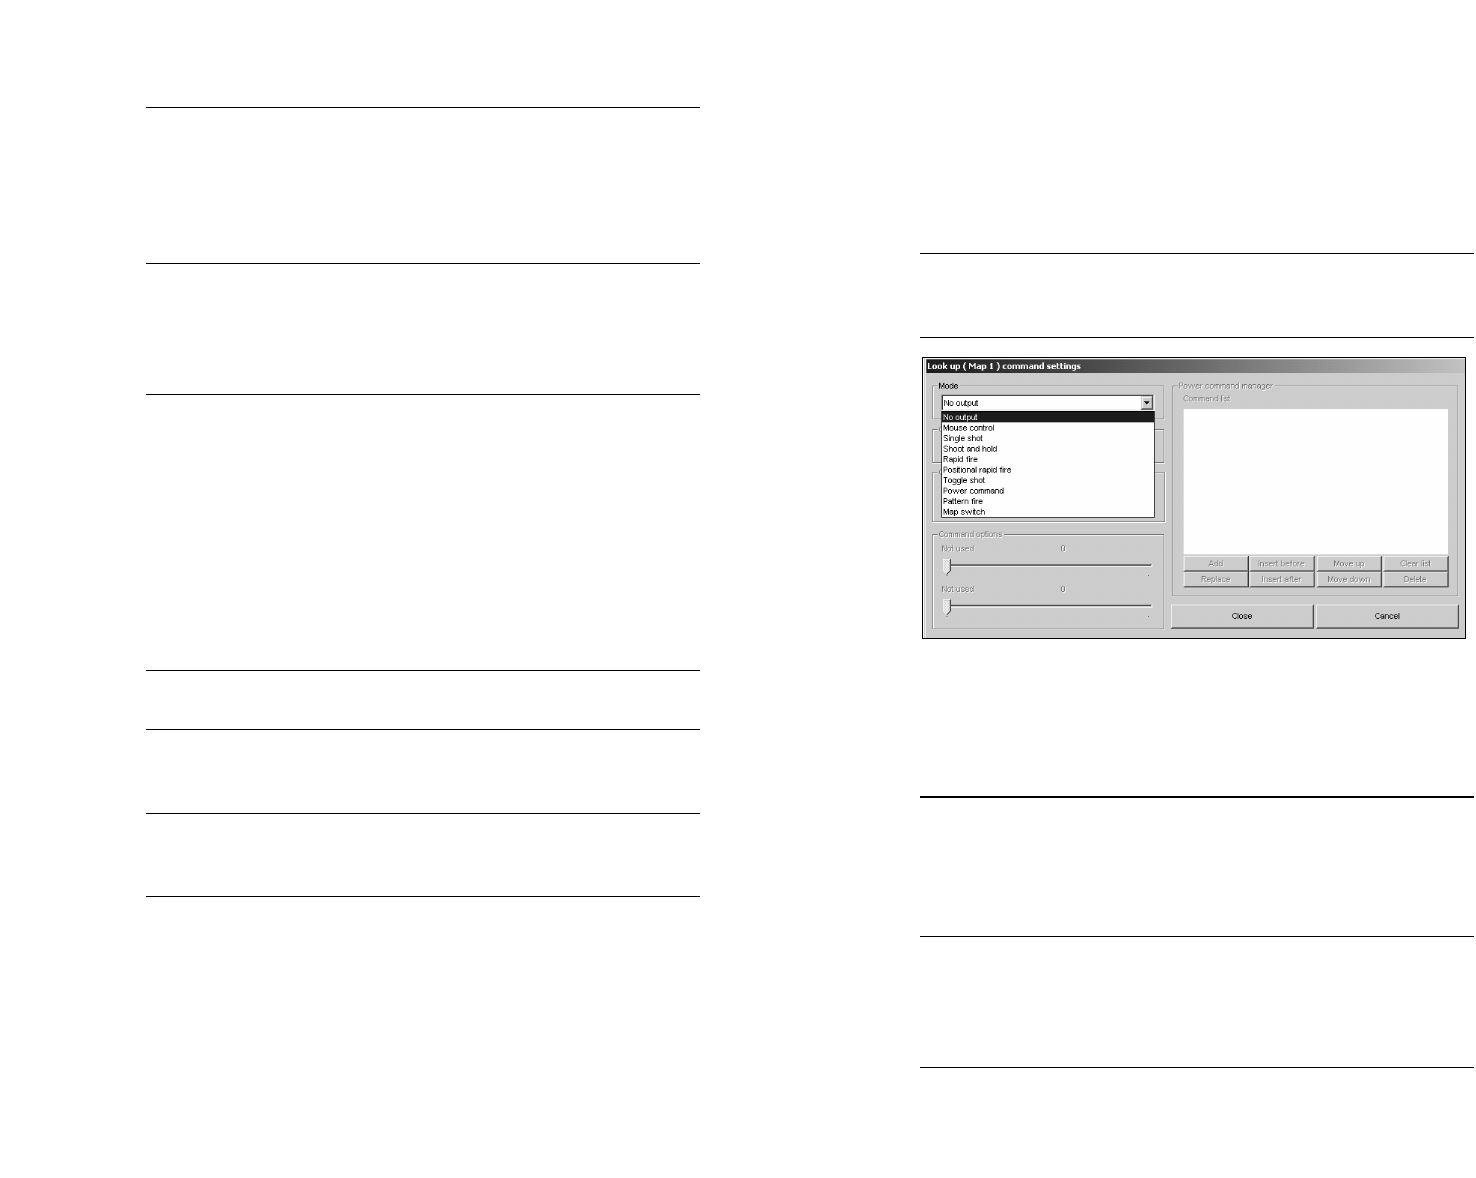
From the pull-down Mode menu (shown in figure 6-3), select the
method Cyprofiler will use to generate commands for the direction.
Each menu option is described in the table 6-1. After you select a
mode, the options for the selected mode will become active.
Note: The Power Command Manager box on the right side of the
screen becomes active only if Power Command or Pattern Fire is
selected. These modes are described in detail the next chapter.
Figure 6-3. Mode Pull-Down Menu
Table 6-1. Descriptions of Modes
Mode Description
No output (Default) Tells Cymouse to ignore everything pertaining
to this direction. This mode should be used to
eliminate directions that you don’t want to use,
as nothing will happen when this direction
passes the trigger point.
Mouse control This mode allows you to set any directional
output to any of four directions of cursor
motion (look up, look down, look left, or look
right). Your existing mouse will continue to
function while in this mode.
(continued on following page)
Cymouse User’s Manual
24
(4) Command Determines the actual command to be
performed. A description of the command
will appear in the field just below the
Command pull-down menu. The Change
button enables you to change the
command after it has been set.
(5) Command Options Contains slider controls used to set
options for the selected command. The
available sliders change dynamically
depending on the mode you have
selected.
(6) Command The bottom slider in the Command
Duration Slider Options frame is used to adjust two
settings. The settings depend on the Mode
selected: a) When in Rapid-Fire mode,
the setting of the lower slider will
determine the interval between firing. The
slider will have a caption that reads
"slowdown"; b) When in Pattern Fire or
Power Command mode, the setting of the
lower slider is used to set the duration of
each individual command in the list.
(7) Power Command Displays the individual commands set for
Manager a Power Command or Pattern Fire mode.
(8) Power Command Enable you to set up and modify the list of
Edit Buttons commands for Power Command or
Pattern Fire commands.
(9) Close Saves changes made in the Command
Settings window and returns you to the
main screen.
(10) Cancel Erases any changes made to the
command since it was saved.

Setting Up Game Profiles
27
Mode Description
Pattern fire When Cymouse makes an outward pass of the
trigger point, repeatedly sends up to 50
individual commands in sequence until
Cymouse makes an inward pass of the trigger
point. Each command in the Pattern Fire list
has its own timing setting, allowing you to
adjust the timing. (This mode is similar to
Power Command, except that it repeats while
your direction is past the trigger point. This
mode is described in detail in Chapter 7,
Advanced Settings .)
Map switch Switches to the next map for the profile in the
order indicated for that direction. (This mode
is described in detail in the Chapter 7,
Advanced Settings.)
After you have selected a mode all related menus, sliders, and
buttons will become active. All unrelated items remain disabled.
Note: Changing the mode will erase all other settings made for this
direction. For instance, if you change the mode from Power
Command mode to Rapid Fire mode, the list of commands that you
have set up for the Power Command mode will be erased and cannot
be retrieved. (See Appendix A for more Mode and Command Type
details.)
3. Select a Command Type
From the pull-down Command Type menu select the type of output.
The options available will be determined by the mode you have
selected. The complete list of options for the Command Type include:
Click a mouse button – Clicks the selected mouse button. After
choosing this Command Type you must select the mouse button
from the Command pull-down menu.
Press a key – Presses the selected key. As soon as you select this
Command Type option, the on-screen keyboard shown in figure 6-4
will appear to enable you to select the key. Click a key, then click OK
to close the keyboard.
Cymouse User’s Manual
26
Mode Description
Single shot Presses and immediately releases the specified
mouse button or key each time Cymouse
passes the trigger point. In the case of mouse
wheel output, Cyprofiler will tick the wheel in
the specified direction for mouse wheel output.
Shoot and hold Presses and holds the specified mouse button
or key when Cymouse makes an outward pass
of the trigger point. When Cymouse makes an
inward pass of the trigger point, Cyprofiler
releases the mouse button or key.
Rapid fire Repeatedly sends the specified command at a
rate determined by the Slowdown slider when
Cymouse makes an outward pass of the
trigger point. When Cymouse makes an inward
pass of the trigger point, the command stops.
Positional rapid fire When Cymouse makes an outward pass of the
trigger point, repeatedly sends the specified
command at a rate determined by the distance
between Cymouse and the center point. The
farther away Cymouse is from the center point,
the faster Cyprofiler will repeat the command.
The command stops when Cymouse makes an
inward pass of the trigger point.
Toggle shot Presses and holds the specified mouse button
or key when Cymouse makes an outward pass
of the trigger point. Cyprofiler releases the
mouse button or key when Cymouse makes
another outward pass of the trigger point.
Power command Sends up to 50 individual commands in
sequence when Cymouse makes an outward
pass of the trigger point. Each command in the
Power Command list has its own timing
setting. (This mode is described in detail in
Chapter 7, Advanced Settings.)
Setting Up Game Profiles
29
The Command Types available for each mode are shown in the table
6-2 and described in detail in Appendix A.
Table 6-2. Command Types for Each Mode
Mouse Single Shoot Rapid Positional Toggle Power Pattern Map
Control Shot & Hold Fire Rapid Fire Shot Command Fire Switch
Click a XXX X X X X
mouse button
Press a key XXX X X X X
Click multiple XXX X X X X
buttons
Press multiple XXX X X X X
keys
Scroll mouse XXX XX
wheel
Use 2 maps X
Use 3 maps X
Use 4 maps X
Spacer XX
4. Select a Command
If you selected Click a Mouse Button or Scroll Mouse Wheel in the
Command Type menu, select the command for the direction from the
pull-down Command menu. For all other Command Types, the
command is automatically entered for you during the Command Type
selection or is not available as an option. In these cases, the
Command field will be gray.
5. Set the Command Options
The Command Options sliders change dynamically depending on the
mode you have selected. Following is a description of each Command
Option slider:
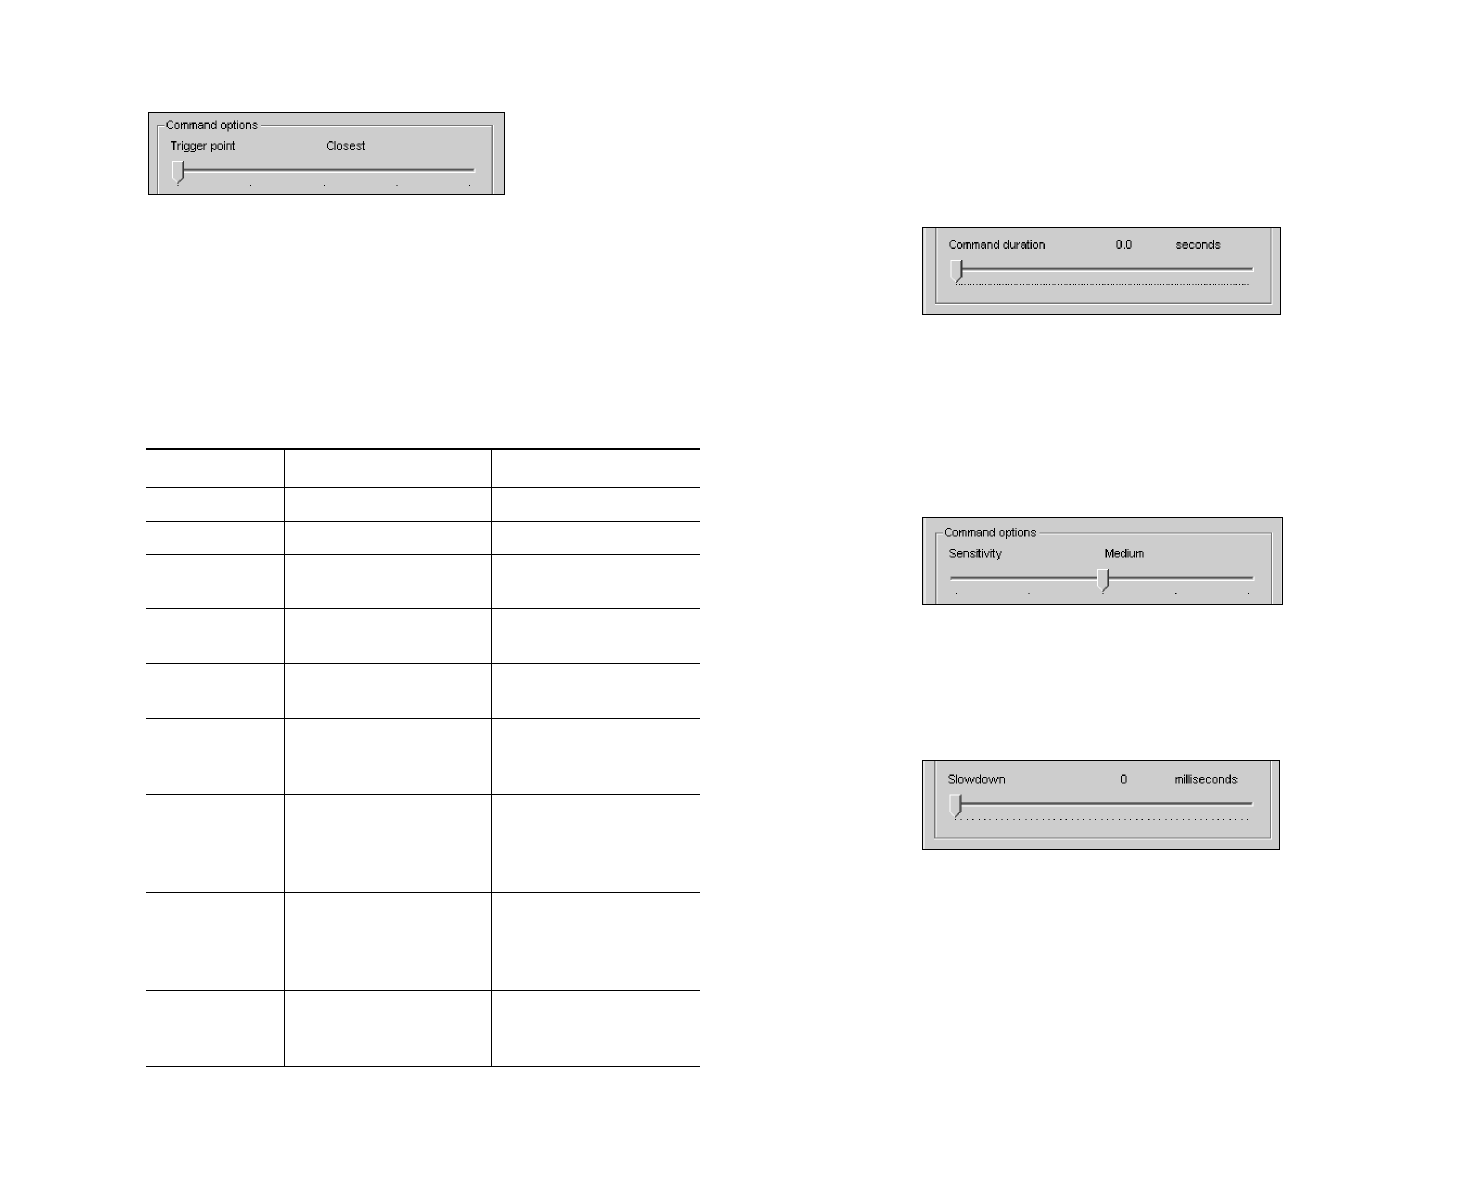
Trigger Point – If you selected any mode but Mouse Control, move the
Trigger Point slider to adjust the trigger point for that direction (from
Closest to Farthest). The Trigger Point is the point along the axis that
determines the distance in which you must move your head to trigger a
command. This slider (shown in figure 6-6) determines how far you
must move your head in a certain direction to perform a command.
You should always adjust the Trigger Point so that it is comfortable
and natural to perform the gestures needed to use Cymouse.
Cymouse User’s Manual
28
Figure 6-4. On-Screen Keyboard
Click multiple mouse buttons – Simultaneously clicks the selected
mouse button. When you select this Command Type option, the
Select Mouse Buttons dialog box (shown in figure 6-5) will appear.
Select the buttons that are to be clicked and click OK.
Figure 6-5. Select Mouse Buttons Dialog Box
Press multiple keys – Simultaneously presses the selected keys. As
soon as you select this Command Type option, the on-screen
keyboard will appear to enable you to select the keys to be pressed. A
dialog box will appear to ask if you would like to set another key after
you have selected two keys. If so, click Yes. When you are finished,
click No.
Scroll the mouse wheel – Scrolls the mouse wheel. After choosing
this Command Type you must select a direction (up or down) from
the Command pull-down menu.
Spacer – Inserts a delay between Power Commands. (This Command
Type is available only for Power Command and Pattern Fire modes,
which are described in Chapter 7, Advanced Settings.)
Use 2 maps, Use 3 maps, Use 4 maps – Switches to the next map.
(Maps are described in the Chapter 7, Advanced Settings.)
Setting Up Game Profiles
31
Command Duration – If you selected Power Command or Pattern
Fire mode (described in Chapter 7, Advanced Settings), move the
Command Duration slider (shown in figure 6-7) to set the duration of
each individual command in the list.
Figure 6-7. Command Duration Slider
Sensitivity – If you selected Mouse Control mode, move the
Sensitivity slider (shown in figure 6-8) to adjust the response speed
(or sensitivity of the mouse), from slowest to fastest. The sensitivity
of Cymouse works in the same way as the sensitivity of a desktop
mouse.
Figure 6-8. Sensitivity Slider
Slowdown – If you selected Rapid Fire mode, move the Slowdown
slider (shown in figure 6-9) to determine the interval (in milliseconds)
between each command.
Figure 6-9. Slowdown Slider
6. Save Your Settings
Click Close to exit the Command Settings dialog box, then click Save
from the main screen to save the settings in the current game profile.
If you do not click Save the command settings will not be saved in
the current profile.
Cymouse User’s Manual
30
Figure 6-6. Trigger Point Slider
Each command available has a Trigger Point setting. The way in
which each available Mode uses a Trigger Point is described in table
6-3. An outward pass occurs when you move away from the center
point and pass a Trigger Point. An inward pass occurs when you
move toward the center point and pass a Trigger Point.
Table 6-3. Command Types for Each Mode
Mode Passing outward… Passing inward…
No output Not used in this mode. Not used in this mode.
Mouse control Not used in this mode. Not used in this mode.
Single shot Triggers a command. Does nothing.
Shoot and hold Toggles the command to Toggles the command to
its down or pressed state. its up or released state.
Rapid fire Triggers repeating Stops repeating
commands. commands.
Positional Triggers repeating Stops repeating
rapid fire commands. commands.
Toggle shot Toggles the command Does nothing.
to either down or up
alternatively.
Power command Triggers the commands Does nothing.
in the Power Command
list from top to bottom
once for each pass.
Pattern fire Triggers and repeats Stops the commands
the commands in the after the last command
Power Command list in the list has been
from top to bottom. performed.
Map switch Triggers Cyprofiler to Does nothing.
switch to the next
available Submap.

Advanced Settings
33
Cyprofiler lets you make advanced settings to provide even more
control over Cymouse. These settings include:
Power Commands – Send up to 50 commands that will be executed
in sequence, once or in rapid fire mode, when Cymouse moves in the
assigned direction.
Submaps – Assign up to four maps for each game profile that you
can switch to, on the fly, during a game.
Power Commands
A Power Command or pattern fire command is a user-defined
sequence of commands that you can perform with a single head
movement. In Power Command mode Cyprofiler generates the
commands ONCE for each outward pass of the trigger point. In
Pattern Fire mode, the sequence of commands set up for that
direction will REPEAT continuously as long as Cymouse remains to
the outside of the trigger point. Returning to center discontinues
Pattern Fire.
To set up Power Commands, you will use the Power Command
Manager on the right of the Command Settings dialog box (shown in
figure 7-1).
Chapter
7
Advanced Settings
Cymouse User’s Manual
32
Advanced Settings
35
8. Click Add to insert the command to the bottom of the Power
Command list.
9. Repeat steps 4 through 8 until you have added all the desired
commands to the Power Command list.
10.When you have finished adding commands to the list click Close
to save your changes and exit to the main screen. Figure 7-2
provides an example of a completed Power Command list.
11.Click Save to save the Power Command settings in the current
profile.
Figure 7-2. Sample Power Command List
To perform the Power Command, simply move your head in the
direction you have set for the Power Command, far enough to pass
the trigger point. Note that the Pause key will have no effect on
Cyprofiler while it is performing a Power Command or Pattern Fire
command.
Editing the Power Command List
Left-click on a command in the list to edit the Power Command list.
The available buttons at the bottom of the list will become active.
Following is a description of each button in the Power Command
Manager area:
Cymouse User’s Manual
34
Figure 7-1. Power Command Manager
The Power Command Manager consists of:
(1) Command List Contains the list of commands set for the
Power Command or Pattern Fire
commands.
(2) Edit Buttons Consists of eight buttons that enable you
to set up and modify the list of commands
for Power Command or Pattern Fire
commands.
Setting Up Power Commands or Pattern Fire
1. Double-click the direction icon to open the Command Settings
screen.
2. From the Mode pull-down menu, select Power Command (to
perform the sequence of commands once) or Pattern Fire (to
repeat the sequence of commands).
3. From the Mode pull-down menu, select Power Command (to
perform the sequence of commands once) or Pattern Fire (to
repeat the sequence of commands).
4. Move the Trigger Point slider to set the trigger point for the command.
5. Select a Command Type from the Command Type pull-down
menu. If you select Spacer, proceed to step 7.
6. Select a command if required.
7. Move the Command Duration slider to set the duration of the
command.
1
2
Advanced Settings
37
Setting Up Submaps
When using the Submap feature, you need to set one of the
directions to perform the switch. When you pass the trigger point to
perform a map switch, the commands mapped to each direction
(except the one you switch with) are changed immediately to the
commands in the next Submap.
To set up Submaps in your profile:
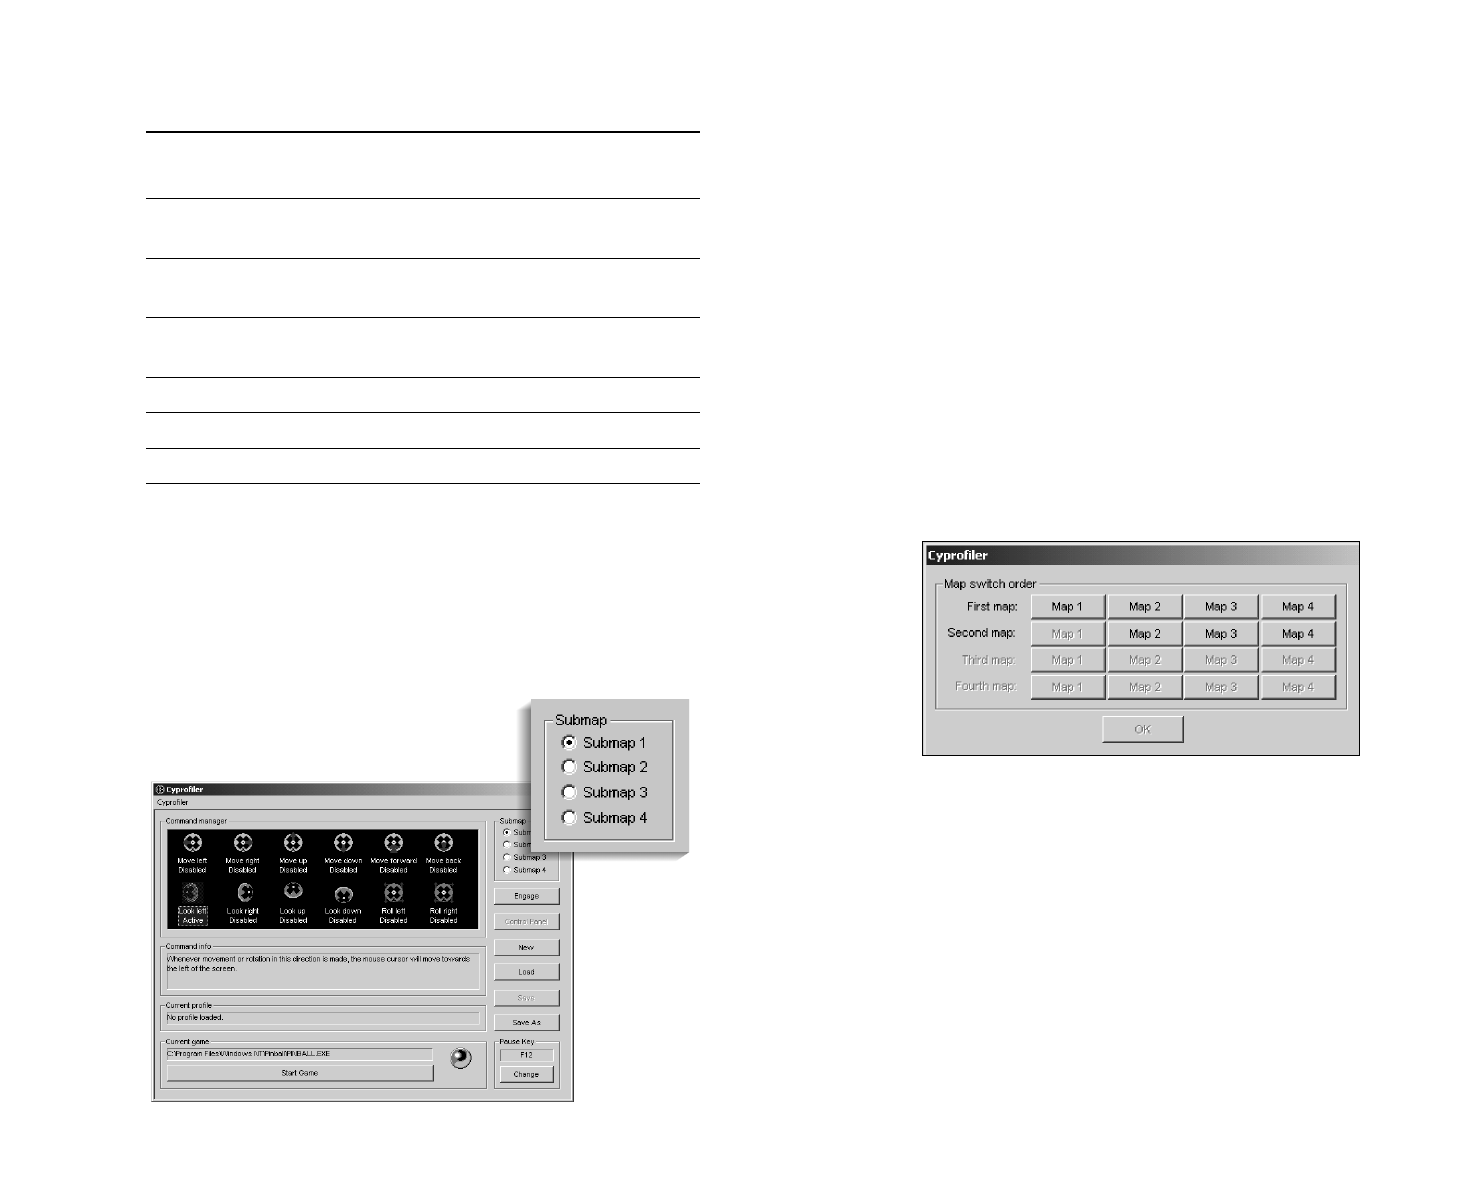
1. From the main screen, select a submap (as shown in figure 7-3).
2. Double-click the direction icon you want to use for switching
submaps.
3. From the Mode pull-down menu, select Map Switch.
4. From the Command Type pull-down menu, select the number of
maps (two, three or four) you wish to use. The Map Ordering dialog
box shown in figure 7-4 will appear.
Figure 7-4. Map Ordering Dialog Box
5. Select the submaps you wish to cycle through in order from top to
bottom. The selection in the “First Map” row will be the map you
start on after engaging Cymouse.
6. Click OK.
7. Adjust the Trigger Point setting as desired.
8. Click Close to save your changes.
Cymouse User’s Manual
Button Click to…
Add Add the current command to the end of the
list.
Replace Replace the selected command with the
current command.
Insert Before Insert the current command before the
selected command.
Insert After Insert the current command after the selected
command.
Move Up Move the selected command up one line.
Move Down Move the selected command down one line.
Clear List Clear the entire list of commands.
Delete Remove the selected command from the list
and shifts up all commands below.
Submaps
A Submap contains one set of commands for each available direction.
The active Submap can be switched during use (or cycled through in
cases where more than two Submaps are used). The active submap is
determined by the selection in the Submap
field (indicated in figure 7-3) on the
Cyprofiler main screen.
Figure 7-3. Submap Buttons
36
Troubleshooting
39
This section will attempt to help you resolve issues with Cymouse
and Cyprofiler. If you are unable to resolve the problem after reading
through this section, please do not hesitate to call our Customer
Support department at 1-808-875-0555.
Cymouse
Cause(s) Solution(s)
The most likely cause is Use Cyprofiler.
that the game may not
natively support Cymouse.
Your game may not be set Go through the control options
to use Cymouse. for your game and use Cymouse
to set the commands you want it
to perform by moving or turning
your head in the desired direction.
The game’s settings for In the control options for your
Cymouse may be set game, adjust basic settings such
improperly. as sensitivity and dead zone to
accommodate Cymouse.
These settings usually are
available in most games that
support game controllers.
If you are not using Use Cyprofiler, as it will not let
Cyprofiler, the game may games use Cymouse as the
be trying to use Cymouse primary joystick when running.
as the game controller that
provides input.
Cymouse may be set to Open the Control Panel through
Controller ID 1. Cyprofiler and re-arrange the
Controller IDs so that Cymouse
is not set to ID-1.
Chapter
8
Troubleshooting
Cymouse User’s Manual
38
Changing the Submap Order
At any time, you may change the order in which the Submaps are
switched or cycled through by doing the following:
1. Select the submap you wish to change in the upper right corner of
the main interface.
2. Double-click on the direction icon currently set to Map Switch
mode.
3. To change the number of submaps you are using, open the
Command Type pull-down menu and select the choice that reflects
the number of submaps you want to use.
or
To change the order in which the submaps are switched or cycled
through, click Change.
4. From the Map Ordering dialog box, select the submaps you wish
to switch or cycle through in order from top to bottom. As you select
a map, the buttons directly below each selection will become
unavailable.
5. Click OK.
6. Click Close to save your changes.
Problem
You’ve successfully
installed the software
and plugged in the
hardware. When you
try to play a game,
Cymouse does
nothing.
You’ve successfully
installed Cymouse;
however, it is difficult
to control.
While trying to play a
game using Cymouse,
neither it nor your
regular joystick
works.
Troubleshooting
41
Cause(s) Solution(s)
You can go to the Cymouse
Underground website for help.
There are help forums available
at the site. For additional
information, see Appendix C.
Simply restart Cyprofiler. The
default startup settings set
Cyprofiler to move the mouse
cursor. Press Engage to see
exactly how it moves.
The headset may need to be Stretch the headset to fit. Refer
stretched to accommodate to the instructions in Appendix B.
the size of your head.
Your computer has no Install an add-in card that
USB port. provides additional USB ports.
All of the USB ports on Install a USB hub that provides
your computer are in use. additional USB ports.
Press Disengage in the main
interface of Cyprofiler.
No. You can save and retrieve
profiles to and from your hard
drive.
Cymouse User’s Manual
40
Cyprofiler
Cause(s) Solution(s)
DirectX 8 may not be Reinstall DirectX 8.0 or later,
installed properly. either from the Cymouse
Installation CD or from the
Microsoft website.
Cymouse might be out of Use the Pause key (if set) to
the dead zone when you temporarily pause Cymouse.
press Start Game.Adjust the headset on your head
until it doesn’t move when you
un-pause Cymouse.
Your sensitivity settings Double-click on each of the
may be set too high. direction icons set to Mouse
Control mode and slide the
sensitivity slider slightly to the
left. Repeat until you find the
desired sensitivity setting.
Cymouse may not be Calibrate Cymouse. Refer to the
calibrated.instructions in Chapter 2,
Installing Cymouse.
The commands you’ve set Check that the commands set in
are not consistent with Cyprofiler match those set in the
those set in the game. game. If they don’t match,
change one of them so that they
do match.
The Trigger Point setting Adjust the Trigger Point settings
could be either too far or for each command that
too close. encounters this problem. Start
by setting the trigger point in the
middle of the slider control and
work your way inward from there.
Cyprofiler is in the middle Wait until the Power Command
of performing a Power or Pattern Fire command has
Command or Pattern finished and try again.
Fire command.
If the game can be safely
minimized, you can change the
commands for a direction.
Simply minimize the game and
double-click on the direction
icon that you wish to change.
Problem
You receive a DirectX
error when you start
Cyprofiler.
You’ve opened
Cyprofiler and dragged
your game icon over
the interface. When
you press Start Game,
the mouse cursor
becomes difficult to
control.
You’ve set up some
commands in
Cyprofiler, but none
of them work in a
game.
When you press the
assigned Pause Key,
it seems to have no
effect.
You want to change
the commands for a
direction after you’ve
started the game.
Problem
You’ve never used
anything like
Cymouse before.
Where can you go for
help?
You can’t make your
cursor move.
Your Cymouse
headset does not fit
comfortably.
You don’t have a free
USB port on your PC.
How do you turn off
Cymouse?
Do you have to make
a new profile every
time I use Cymouse?

Mode and Command Type Reference
43
Following is a detailed reference that provides the list of Command
Types available for each mode in the Command Settings screen.
Mouse Control Mode
There are no Command Types associated with this mode. After
selecting Mouse Control mode, you choose the direction in which
Cyprofiler should move the mouse cursor from the Command
pull-down menu. The four directions available are: left, right, up and
down.
Single Shot Mode
The following Command Types are available with Single Shot mode:
•Click a mouse button – simulates a single click of a mouse
button.
•Press a key – simulates a single press of a key.
•Click multiple mouse buttons – simulates clicks of up to five
different mouse buttons simultaneously.
•Press multiple keys – simulates up to four keys being pressed
simultaneously.
•Scroll the mouse wheel – simulates a single tick of the mouse
wheel, either up or down.
Whenever Cyprofiler simulates keystrokes or mouse button clicks in
Single Shot mode, the key or button is pressed and then released
immediately. In the case of mouse wheel scrolling, the wheel is
simply ticked once, as it is a stateless feature of the mouse.
Cyprofiler simulates a Single Shot command only when your position
passes the Trigger Point set in the command.
Appendix
A
Mode and Command
Type Reference
Cymouse User’s Manual
42

Mode and Command Type Reference
45
Positional Rapid Fire Mode
Positional Rapid Fire mode differs in only one way from Rapid Fire
mode: in this mode the interval between repetitions is derived from
the distance between your position and the Trigger Point. Your
position must be beyond the Trigger Point for Cyprofiler to begin
commands.
Toggle Shot Mode
The following Command Types are available with Toggle Shot Mode:
•Click a mouse button – toggles the state of a single mouse
button.
•Press a key – toggles the state of a single key.
•Click multiple mouse buttons – toggles the states of up to five
mouse buttons simultaneously.
•Press multiple keys – toggles the states of up to four keys.
In Toggle Shot mode, the state(s) of the key(s) or mouse button(s)
are toggled whenever your position passes the Trigger Point setting
in the command.
Power Command Mode
The following Command Types are available with Power Command
mode:
•Click a mouse button – simulates a single click of a mouse
button.
•Press a key – simulates a single press of a key.
•Click multiple mouse buttons – simulates the clicks of up to five
different mouse buttons simultaneously.
•Press multiple keys – simulates the presses of up to four
different keys simultaneously.
•Scroll the mouse wheel – simulates scrolling of the mouse in
either direction. When used, the mouse wheel is ticked once.
•Spacer – creates a delay in the playback of the Power Command.
The length of the delay is adjustable via the Duration slider (which
becomes available in this mode). There are no Command Types
associated with the Spacer Command Type.
Cymouse User’s Manual
44
Shoot and Hold Mode
The following Command Types are available with Shoot and Hold
mode:
•Click a mouse button – simulates a single click of a mouse
button.
•Press a key – simulates a single press of a key.
•Click multiple mouse buttons – simulates clicks of up to five
different mouse buttons simultaneously.
•Press multiple keys – simulates up to four keys being pressed
simultaneously.
Whenever Cyprofiler sets the state of a mouse button or key in Shoot
and Hold mode, it does so in the following manner:
•If your position is beyond the direction’s Trigger Point, the state is
set to resemble the key or button being held down.
•If your position is not beyond the Trigger Point, the state is set to
resemble the key or button being up in its un-pressed state.
Rapid Fire Mode
The following Command Types are available with Rapid Fire mode:
•Click a mouse button – simulates a repeated clicks of a mouse
button.
•Press a key – simulates repeated presses of a key.
•Click multiple mouse buttons – simulates repeated clicks of up
to five different mouse buttons simultaneously.
•Press multiple keys – simulates repeated presses of up to four
different keys.
•Scroll the mouse wheel – simulates constant scrolling of the
mouse wheel in either direction.
In Rapid Fire mode, Cyprofiler repeats a Single Shot mode command
over and over. The rate at which it repeats the command is adjustable
using the Slowdown slider (which becomes available when this mode
is selected). The Slowdown setting determines the interval of time in
milliseconds between each repetition.
Adjusting the Headset
47
The Cymouse headset can be adjusted for a more comfortable fit. To
increase the size of the headset, simply stretch the headset comb
over the Cymouse retail box (front side forward as shown in figure
4-1), or other apparatus of similar size and shape, but not larger than
9” in width, length or height. First stretch the headset overnight to a
maximum of 9” and try for comfort. Repeat this process as needed,
without exceeding the 9” maximum increase in size.
Figure 4-1. Stretching the Cymouse Headset
Appendix
B
Adjusting the
Headset
Cymouse User’s Manual
46
Pattern Fire Mode
Pattern Fire mode has the same Command Types as Power
Command mode. The only difference between the two modes is in
how the commands are performed. A Power Command is performed
once while a Pattern Fire command is repeated as long as your
position is beyond the Trigger Point.
Map Switch Mode
The following Command Types are available with Map Switch mode:
•Use 2 Submaps – switches between two of the four Submaps.
•Use 3 Submaps – cycles through three of the four Submaps.
•Use 4 Submaps – cycles through all four Submaps.
Map Switch mode is different from all other modes. When used, it
changes the active Submap whenever your position passes the
Trigger Point set in the command. Each Submap can hold a set of
commands (one for each direction). The active Submap determines
the set of commands that are currently being performed by Cyprofiler
at any point in time. Changing this causes Cyprofiler to start using
the commands stored in the new active Submap.
Note that whenever you use Map Switch mode, the direction you
choose will not be available to perform commands and can only be
accessed when Submap 1 is selected on the main interface.

Additional Product Information
49
About Us
Maui Innovative Peripherals develops and markets revolutionary 3D
navigational controllers used for precision movement in PC computer
gaming, assistive technologies, CAD, and other innovative
applications.
Based on the Hawaiian island of Maui, Maui Innovative Peripherals
has taken advantage of the island’s thriving high tech community to
put together a talented group of professionals to design and perfect
navigational products that will change the way people use computers.
Founded in 1999, Maui Innovative Peripherals is a privately-held
company.
Cymouse Underground
www.cymouse.com/CymouseUnderground.htm
Cymouse Underground, home of Team Cymouse, is a premiere on-line
community for gamers of all ages. Whether you are casual player
searching for a good tip, or an enthusiastic cyber athlete looking for a
useful move to perfect, Cymouse Underground is for you.
On Cymouse Underground, you can post in the forums, review the
Power Command archives, download new game profiles, and find
command cheat sheets for many popular games. In the Cymouse
Underground chat room, you’ll have the chance to meet and bond
with people who have similar interests. We encourage everyone to
showcase their cool new Power Commands and get the latest
information about how they work.
Appendix
C
Additional
Product Information
Cymouse User’s Manual
48

Additional Product Information
51
FCC Statement
15.21 Information to user.
Modifications not expressly approved by the party responsible for
compliance could void the user’s authority to operate the equipment.
This equipment has been tested and found to comply with the limits
for a Class B digital device, pursuant to Part 15 of the FCC Rules.
These limits are designed to provide reasonable protection against
harmful interference in a residential installation. This equipment
generates, uses and can radiate radio frequency energy and, if not
installed and used in accordance with the instructions, may cause
harmful interference to radio communications. However, there is no
guarantee that interference will not occur in a particular installation. If
this equipment does cause harmful interference to radio or television
reception, which can be determined by turning the equipment off and
on, the user is encouraged to try to correct the interference by one or
more of the following measures:
–Reorient or relocate the receiving antenna.
–Increase the separation between the equipment and receiver.
–Connect the equipment into an outlet on a circuit different from
that to which the receiver is connected.
–Consult the dealer or an experienced radio/TV technician for help.
This device was tested and found to be fully compliant with BS EN55024 (1998), EN61000-3-2
(1995 w/A1 & A2 1998), EN61000-3-3 (1995 wA1 1998),BS EN55022 (1998) Class B, VCCI (April
2000) Class B, FCC Part 15 Subpart B Class B, CISPR 22 (1997) Class B, ICES-003 Class B (ANSI
C63.4 1992) & AS/NZS 3548 (w/A1 &A2 1997) Class B.
Cymouse User’s Manual
50
With a chat room and news group related specifically to Cymouse,
the Cymouse Underground lets you:
•Meet other Cymouse users and compare profiles
•Share gaming secrets and strategies
•View new profiles as they become available
•Engage in live chat
•Download the latest drivers
•And much, much more
30-Day Money-Back Guarantee
Cymouse includes a thirty-day (30) money back guarantee. If your
Cymouse does not perform as advertised or expressed by Maui
Innovative Peripherals, Inc., contact Maui Innovative Peripherals
within thirty-days for a full refund of the purchase price.
In order to return or exchange Cymouse, you must contact us toll
free at 1-808-875-0555 or send email to return@maui-innovative.com
within 30-days of your original purchase to obtain a Return
Merchandise Authorization (RMA) number from Maui Innovative
Peripherals, Inc.
Cymouse must be returned in the original packaging with all of the
original parts, including the user guide. Proof of purchase is required.
A copy of the original dated receipt must be included with the unit.
The RMA number must be printed clearly on the outside of the
package. Please note: Any shipping and/or handling charges on the
original order cannot be refunded.
Maui Innovative, Inc. is not responsible for shipping costs or damage
on returned items. Units to be returned should be packed carefully.
Maui Innovative cannot provide credit for a return if receipt cannot be
confirmed. We recommend that you use a delivery service that can
be tracked and or insured.
Customer Support will provide you with all necessary shipping
information for return of the product.

Glossary
53
Axis The plane, in 3-D space, that defines position.
In 3-D space there are three planes: X, Y, and
Z. Each of these forms an axis.
Binding The action of specifying the key you want to
use to perform a function or command within
a game.
Center Point See Dead Zone.
Command A signal, movement or gesture that sends a
control function to the computer.
Cymouse Power A sequence of keystrokes, mouse clicks and
Command mouse wheel scrolls used to perform a "move"
or specific event with a single head gesture.
Dead Zone The point in 3-D space where each of the axes
intercepts each other. This is also called the
Center Point.
Direction The term used in Cyprofiler to describe either
side of each axis in relation to the Center
Point.
Infrared A narrow frequency band of light that is
invisible to the human eye. Commonly used in
remote control wands.
Mouse Look A method of controlling your in-game
perspective using your mouse.
Pitch The rotation along the RY-axis, accomplished
by looking up or down.
Roll The rotation along the RZ-axis, accomplished
by tilting your head towards your shoulders.
Glossary
Cymouse User’s Manual
52

Index
55
A
Axis
B
Binding
C
Calibration
CD-ROM
Center Point
Command
Command Duration
Command Info
Command Manager
Command Options
Sensitivity
Trigger point
Rapid fire speed
Command duration
Command Profile
Command Settings
Command Type
Click a mouse button
Press a key
Click multiple mouse buttons
Press multiple keys
Scroll the mouse wheel
Use 2 maps
Use 3 maps
Use 4 maps
Spacer
Commands
Assigning commands to Cymouse
Directions
Control panel
Cyhub
Cymouse headset
Adjusting the headset
Cymouse Underground
Cyprofiler
D
Dead Zone
Disengage
Index
Cymouse User’s Manual
54
Sensitivity The amount of time it takes for Cymouse to
respond to your head motions.
Submap An object that holds the commands settings
for each direction. Cyprofiler provides four of
these with every profile and even allows you to
switch through them in-game.
Trigger Point A Cyprofiler setting which controls the location
of the point in space that you must pass to
trigger a command. Each axis has two of
these.
Yaw The rotation along the RX-axis, accomplished
by turning your head left or right.

Index
57
Rapid fire
Rapid fire speed
Roll
S
Save, Save as
Sensitivity
Shoot and hold
Single shot
Spacer
Start game
Submap
Setting up submaps
Changing the submap order
T
Title bar
Toggle shot
Trigger point
Troubleshooting
U
USB cable
W
X, Y, Z
Yaw
Cymouse User’s Manual
56
Direction
E
Engage
F
FCC statement
G
H
Headset
I
Infrared
J
K
L
Launch
Launching Cyprofiler
Load
M
Map switch
Maps
Mode
Monitor sensor
Mouse control
Mouse Look
N
New
No output
O
Options
P
Pattern fire
Pause
Setting the pause key
Pitch
Positional rapid fire
Power command
Power command manager
Edit buttons
Profiles
Setting up game profiles
Create a new profile
Load an existing profile
Saving a profile
Sample Profiles…………..
Q
R

Notes
Notes

Notes
Notes

Notes

www. cymouse.com
Maui Innovative Peripherals, Inc.
300 Ohukai Road, C-325
Kihei, HI 96753
1-866-875-5556
© 2002 Maui Innovative Peripherals, Inc.
All rights reserved. 03/02