Maycom Co MAYCOMMP50 MP3 Player User Manual Manual UMP50M
Maycom Co Ltd MP3 Player Manual UMP50M
users manual
maycom MP-50
User's Guide

3
Information to user : PART 15, PARAGRAPH 15.21 AND
15.105(b)
Changes or modifications not expressly approved by the party
responsible for compliance could void the user’s authority to
operate the equipment
FCC Notice
NOTE : This equipment has been tested and found to comply
with the limits for a Class B digital device, pursuant to Part 15 of
the FCC Rules. These limits are designed to provide reasonable
protection against harmful interference in a residential installation.
This equipment generates, uses and can radiate radio frequency
energy and, if not installed and used in accordance with the
instructions, may cause harmful interference to radio
communications. However, there is no guarantee that interference
will not occur in a particular installation. If this equipment does
cause harmful interference to radio or television reception, which
can be determined by turning the equipment off and on, the user is
encouraged to try to correct the interfe rence by one or more of the
following measures:
- Reorient or relocate the receiving antenna.
- Increase the separation between the equipment and receiver
- Connect the equipment into an outlet on a circuit different
from that to which the receiver is connected.
Consult the dealer or an experienced radio/TV technician for help.

4
About your maycom MP-50 Player .............................................................4
Unpacking your maycom MP-50 Player .....................................................5
At a glance...................................................................................................6
Specifications ..............................................................................................7
Installing Batteries.......................................................................................8
Exchanging Covers......................................................................................9
Installing the USB driver in Windows ......................................................10
Copying files to the MP -50 Player in Windows ........................................17
Macintosh Operation .................................................................................19
Operating the MP -50 Player ......................................................................21
Keylock .....................................................................................................22
The Menu Key...........................................................................................22
The Menu / Menu Tree / Equalizer ...........................................................23
Play Modes................................................................................................24
Using the MMC Expansion Slot ............................................................... 25
Inserting a MultiMediaCard......................................................................25
Selecting the source for playback..............................................................26
Removing a MultiMediaCard.................................................................... 27
Installing Music Match Jukebox (Windows) ............................................28
Encoding MP3 files from Audio CDs (Windows) .................................... 32
Static discharge.......................................................................................... 33
Storing & Handling ...................................................................................34
Troubleshooting.........................................................................................34
Contents
5
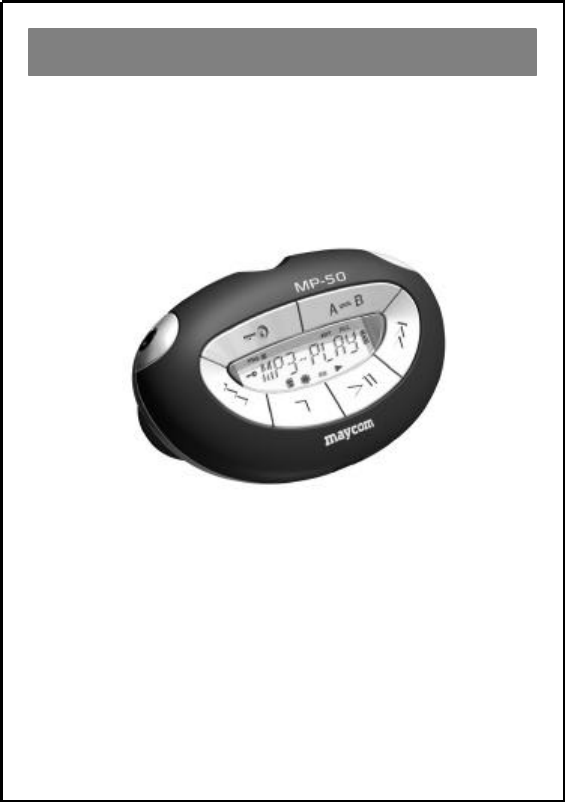
The maycom MP-50 Player is the most convenient and easy-to-use
way to enjoy music whereever you are.
In order to make the most of your MP-50 Player read this user´s
guide thoroughly.
About your maycom MP-50 Player
6
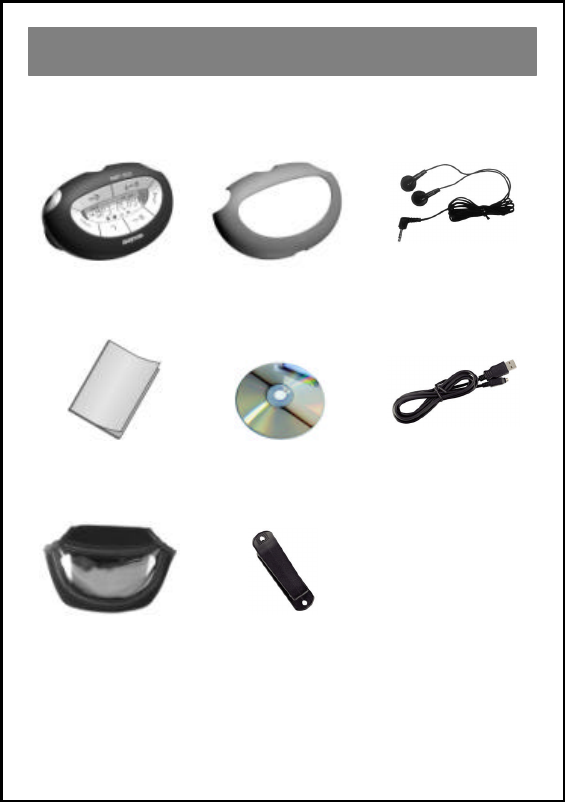
The following components are in the MP-50 Player box:
MP-50 MP3 Player Additional Cover Stereo Headphones
‚
Owner´s Manual CD-Rom USB Cable
Carrying case (Optional) Clip (Optional)
Note: All pictures are symbol pictures only. The actual look of items may vary.
Unpacking your MP-50 Player
7
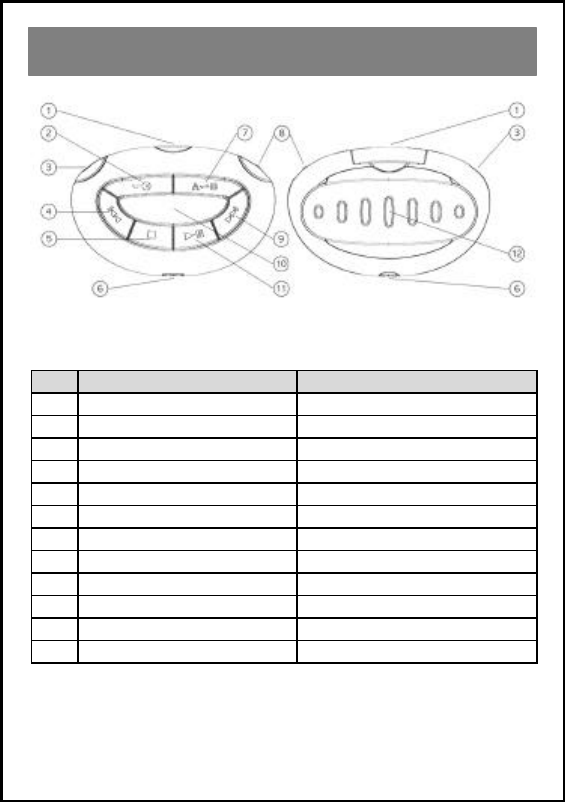
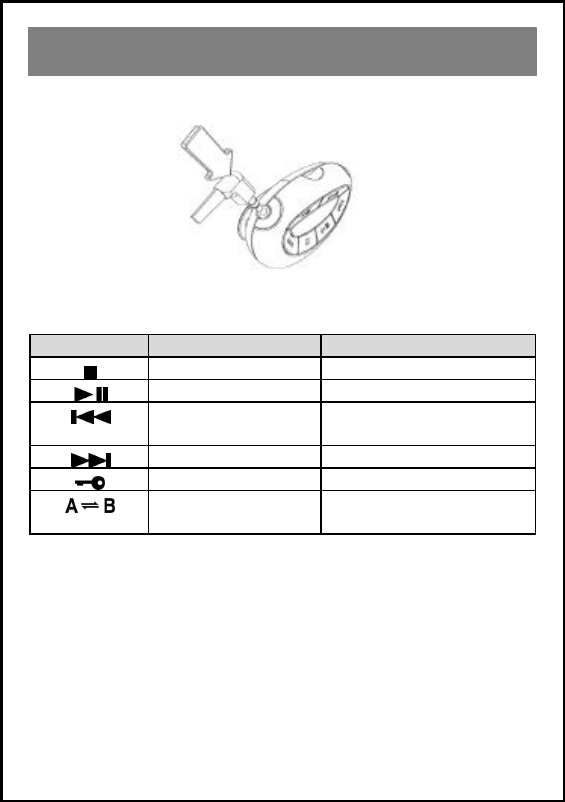
Front view Back view
No Description Key pressed for approx. 2 seconds
1 MMC (MultiMediaCard) Door -
2 Display artist & title (ID3 tags) Activate/Deactivate Keylock
3 Headphones Jack -
4 Previous Track Rewind within track
5 Stop Power On/Off
6 USB Jack -
7 A-B Repeat Format (erase) internal memory
8 Menu Key / Volume up/down -
9 Next Track Fast Forward within track
10 Display Window -
11 Play/Pause Select internal memory/MMC
12 Battery Cover -
At a glance

8
MP-50 Player
• Maximum audio output power: 2x15mW
• Signal to noise ratio: >90dB
• Frequency response: 20 Hz – 20 KHz
• Maximum total harmonic distortion: 0.3%
• Headphone impedance: 16 ohm
• Power consumption at 128 kbps MP3 decoding at volume
level 15, no EQ: approx. 90mA
• Playing time with new set of batteries: approx. 8-10 hours
• Dimensions (mm): W86 x D55 x H32
• Weight without batteries: 52g
• Power Supply: min. 2.4 VDC (2 pcs AAA Batteries or
rechargeable batteries - not included)
• Internal memory: 64 MB
• Maximum supported MP3 bitrate: 256 kbps
• Supported ID3 Tags: v2.2/v2. 3
Minimum system requirements Windows
• Operating system: Windows 98 SE or better
• CPU: Pentium 166 MHz or faster
• RAM: 32 MB or more
• CD-ROM drive
• USB interface
Minimum system requirements Macintosh
• Operating systems: - Mac OS 8.6 or better
- Mac OS X 10.1 or better
• CPU: Mac 604 Processor 120 MHz or faster
• RAM: 32 MB or more
• CD-ROM drive
• USB interface
Specifications
9
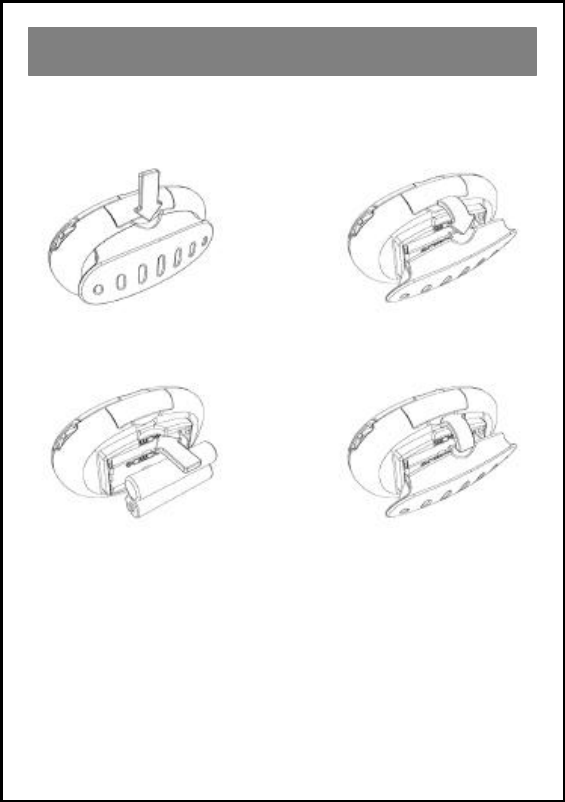
Install 2 AAA batteries* into your MP-50. You may use alkaline
batteries or NiMh rechargable batteries (NOT NiCd).
1) To release battery cover
press down where indicated.
2) Open the cover.
3) Insert batteries according
to polarity diagram. 4) Replace the battery
cover.
A new set of alkaline batteries provides an MP3 play time of
approximately 8-10 hours.
*not included
Installing Batteries
10
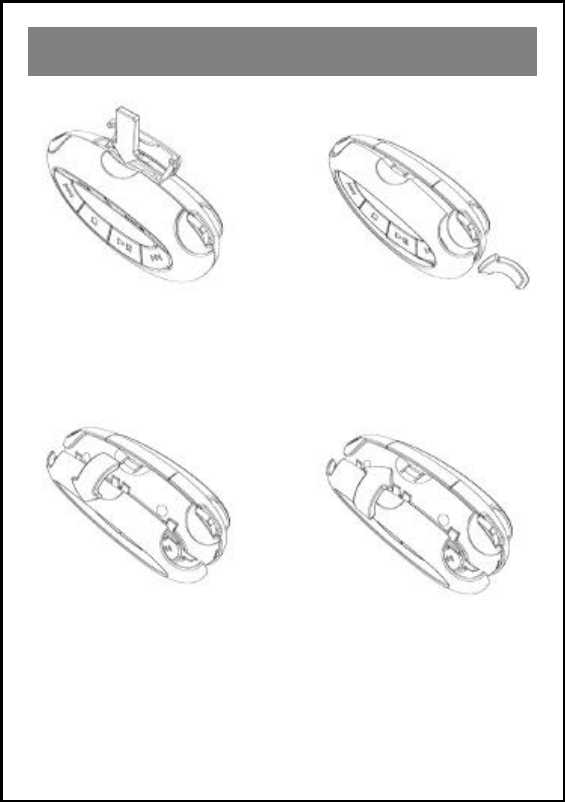
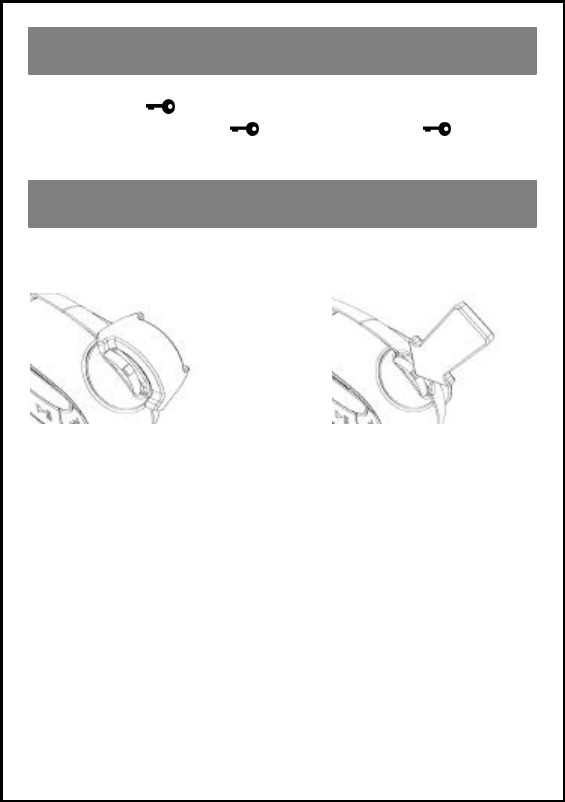
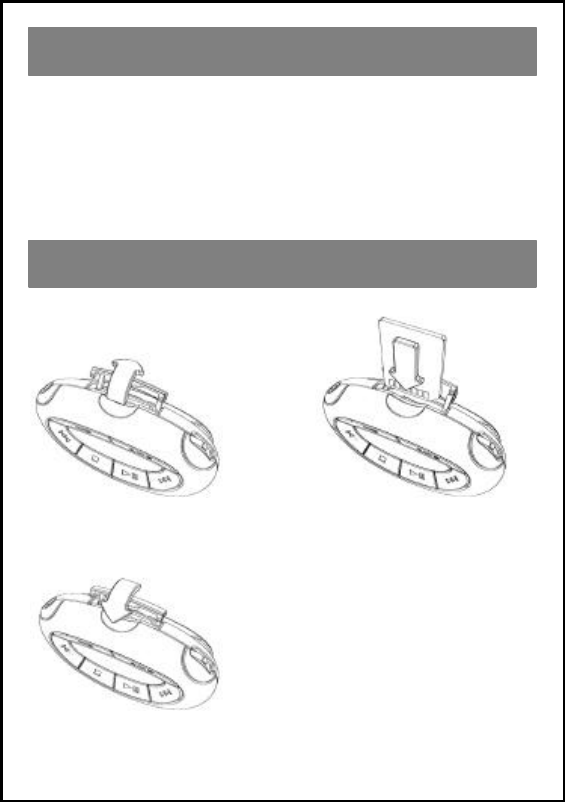
1) Open the MMC door. At
the marking indicated in the
above picture, gently lift the
cover towards you until you
hear a click.
2) Loosen the cover below
the menu key and below the
headphone jack.
3) The cover can now be
removed. 4) To replace the cover
simply snap it into place
over the front of the MP-50
Player.
Never use force to remove the cover. Damaged covers are not
covered by the warranty.
Exchanging Covers
11
1) Turn on your PC and the MP-50 Player.
2) Insert the MP-50 CD-Rom into your CD -Rom drive.
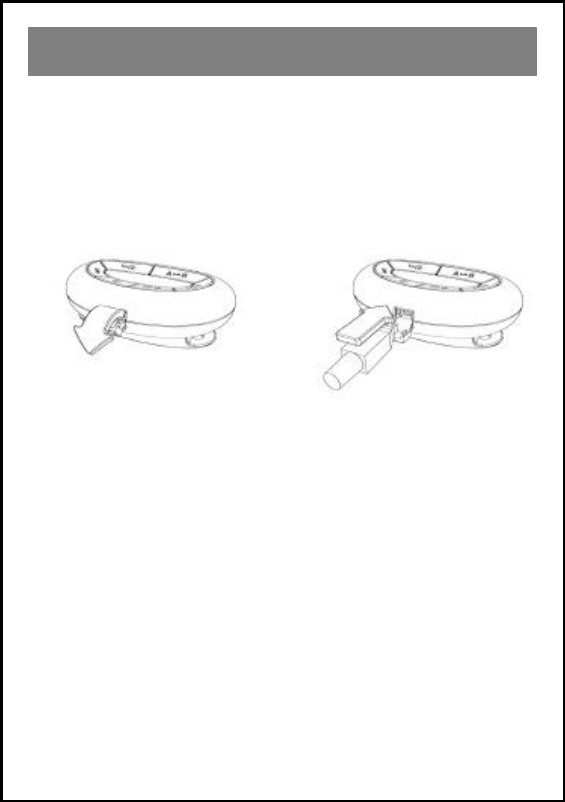
3) Connect the USB cable to your MP-50 Player where
indicated:
Carefully open the USB
door. Plug in the smaller end of
the USB cable.
4) Connect the larger end of the USB cable to your PC USB
port.
5) Your PC will automatically detect MP-50. Depending on
your version of Windows please turn to the appropriate page:
Windows 98 ...................................................................................12
Windows 2000 ..............................................................................14
Windows ME................................................................................ 16
Windows XP .................................................................................16
Installing the USB driver in Windows
12
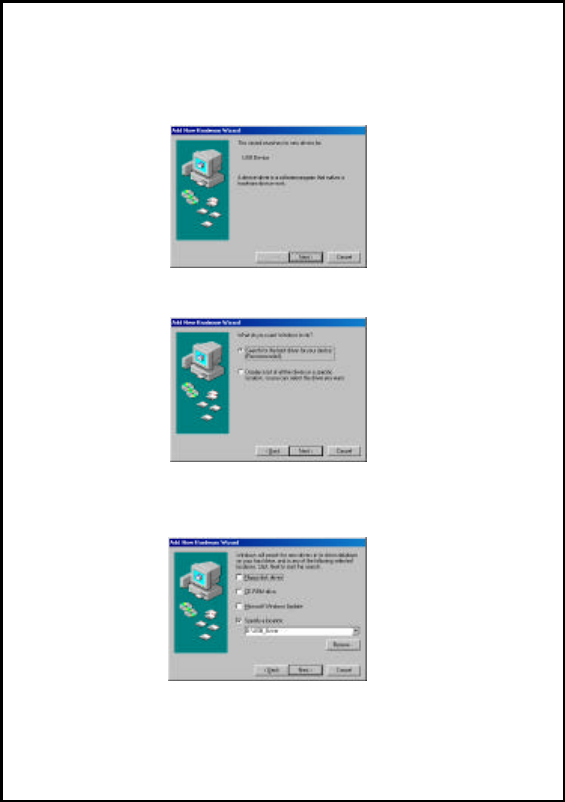
Windows 98
1) Click "Next" to start the installation.
2) Select "Search for the best driver" and click "Next".
3) Select "Specify a location" and browse the CD to locate the
correct path of the driver (e.g. D:\USB_Driver). Click "Next".
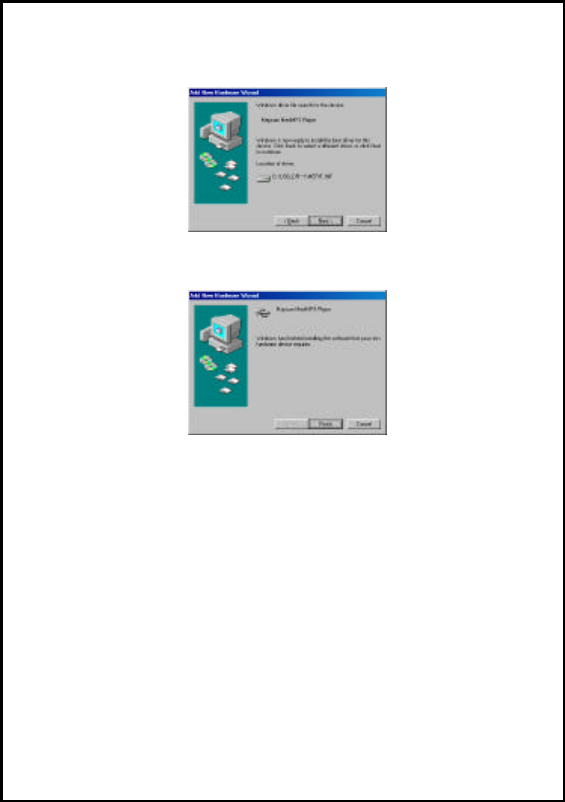
13
4) After locating the driver the system asks for confirmation.
Click "Next".
5) Click "Finish" to complete the installation. Turn to page 17.
14
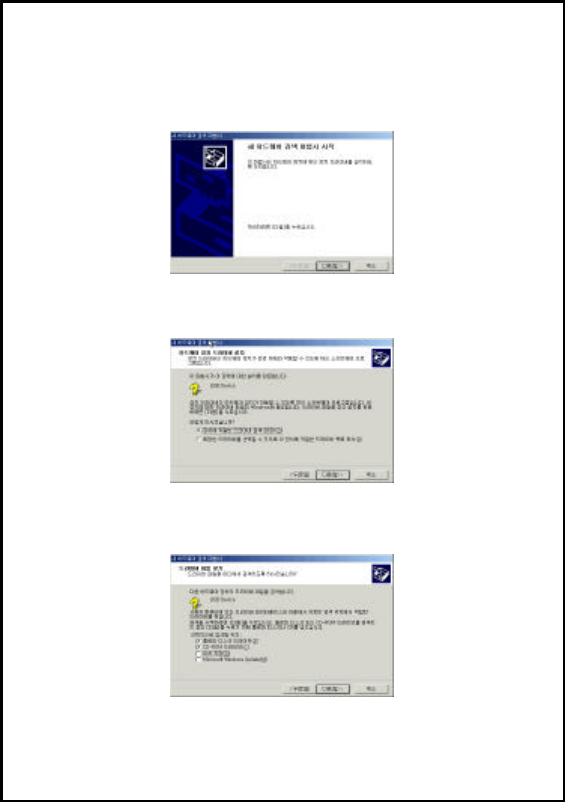
Windows 2000
1) Click "Next" to start the installation.
2) Select "Search for a suitable driver" and click "Next".
3) Select "CD-ROM drives" and click "Next".
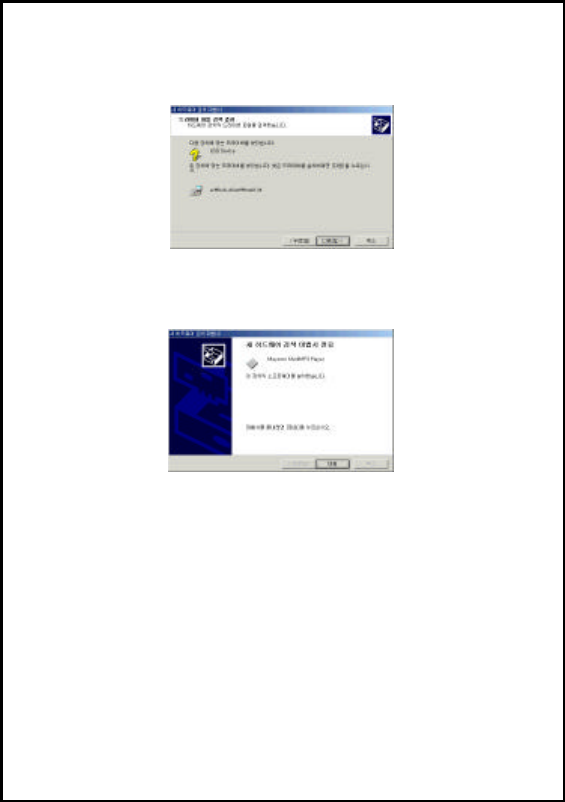
15
4) After locating the driver the system asks for confirmation.
Click "Next".
5) Click "Finish" to complete the installation. Turn to page 17.
16
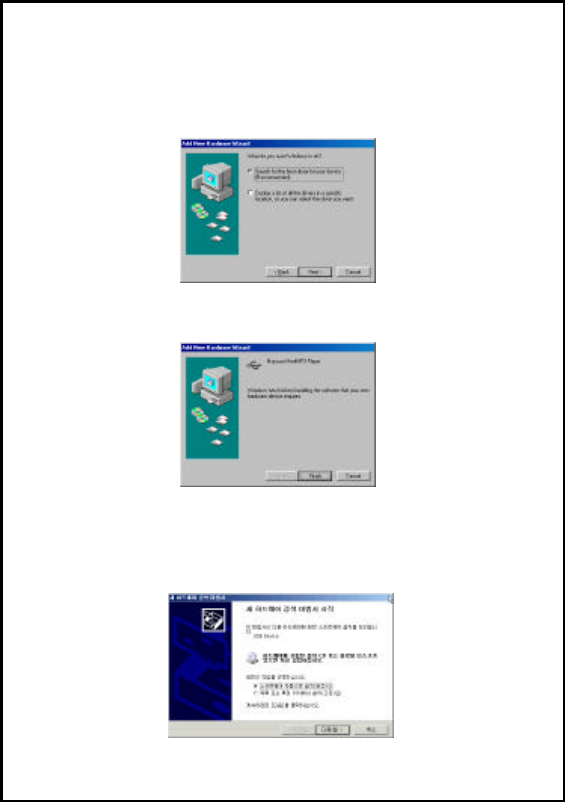
Windows ME
1) Select "Automatic search" and click "Next". Windows ME
will search the CD-ROM drive for the appropriate driver.
2) Click "Finish" to complete the installation. Turn to page 17.
Windows XP
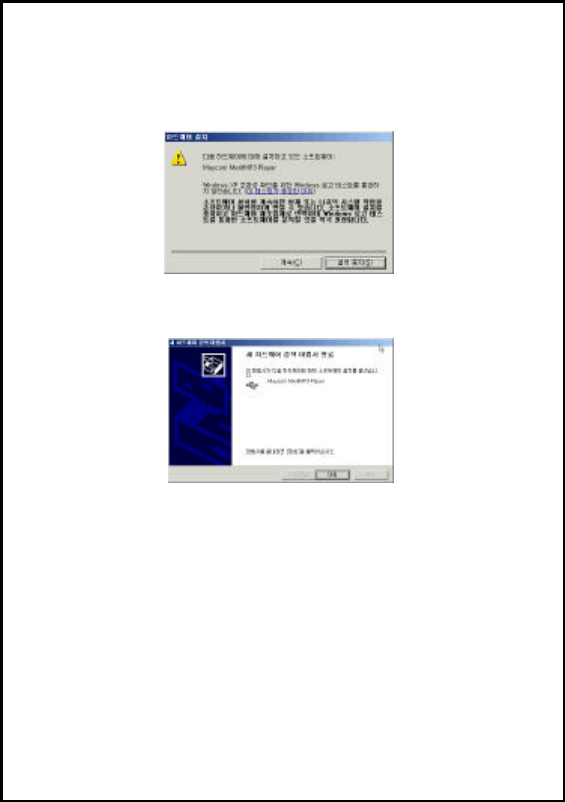
1) Select "Install the software automatically" and click "Next".
17
2) Should the following message appear ignore it and click
"Continue Anyway". Visit the support section of
www.emaycom.com for further information on this message.
3) Click "Finish" to exit the Wizard.
After successful installation:
The driver installation has been completed. For information how to
copy files continue on this page.
To install MusicMatch Jukebox see page 29.
18
Copying files to the MP-50 Player in
Windows
1) Decide whether you want to access the internal memory or an
MMC. To access an MMC, insert it into the MP-50 Player (see
page 26) and switch to it (see page 27).
2) Connect the MP-50 16 Player to your PC.
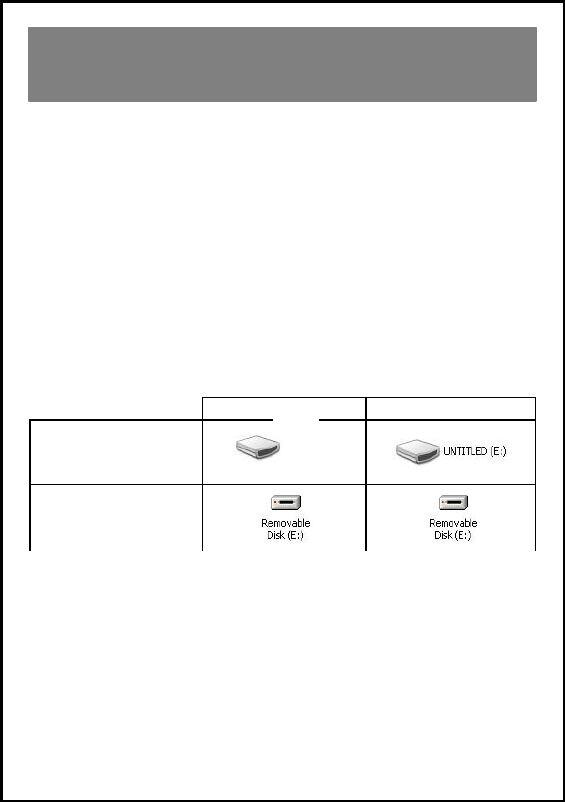
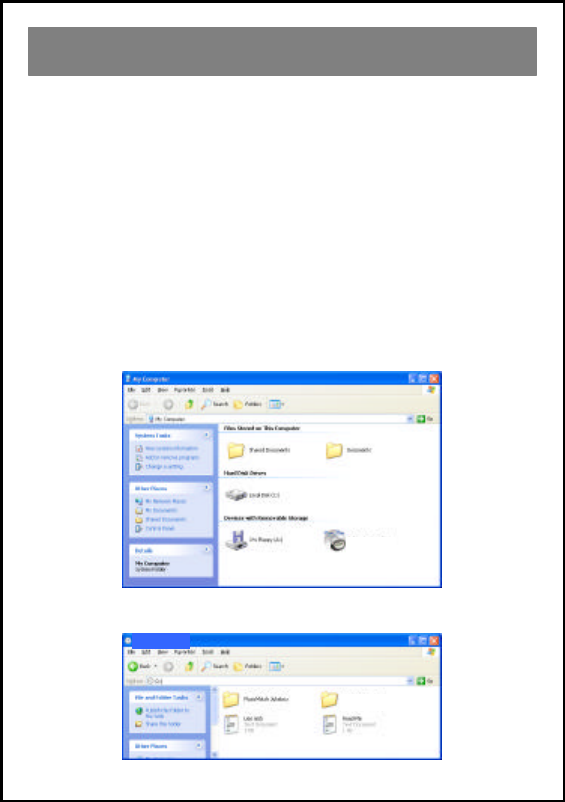
3) In Windows Explorer find the drive letter representing the
removable disk (Drive E: in our example below). If there is an
MMC installed, the icon represents the MMC. If there is no
MMC installed, it represents the internal memory. Some
versions of Windows are able to display "maycom" as the disk
name when the internal memory is being used.
Internal Memory MMC installed
Windows XP
Other versions
4) Use Windows Explorer to copy the MP3 files from your
harddisk to the MP-50 Player internal memory or your MMC.
If you have encoded MP3 files with MusicMatch Jukebox these
can typically be found in C:\My Documents\My Music.
Beware: Never insert or remove an MMC before having
disconnected the MP-50 Player from the PC.
maycom(E:)

19
The MP-50 Player can also be used like a floppy disk. You may
copy all types of files to the internal memory for portability.
However, only MP3 files can be played by the MP-50 Player.
If you are using a MultiMediaCard, the MP-50 Player has the
function of an MMC Reader (similar to a floppy disk drive). You
may use it to read and write any data to or from the MMC.
However, only MP3 files can be played by the MP-50 Player.
20
Since the MP-50 Player is a USB mass storage class device, no
driver needs to be installed.
1) Decide, whether you want to access the internal memory or an
MMC. To access an MMC, insert it into the MP-50 Player
(see page 26) and switch to it (see page 27).
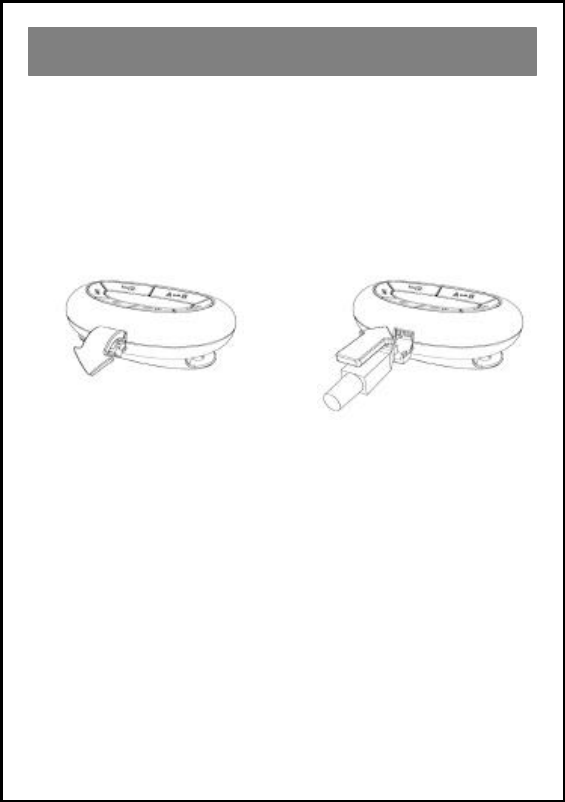
2) Connect the USB cable to your MP-50 Player:
Carefully open the USB
door. Plug in the s
maller end of
the USB cable.
3) Connect the larger end of the USB cable to your Macintosh.
4) A removable disk icon appears on the desktop. If there is an
MMC installed in the MP-50 Player, the icon represents the
MMC. If there is no MMC installed, it represents the internal
memory. See the table on page 21.
5) Copy files by using the drag & drop method. File names of MP3
files must end with .mp3 to be played by the MP-50 Player.
If you use iTunes you may directly drag files from the playlist to
the removable disk icon to copy them.
6) Eject (unmount) the removable disk (drag the icon into the
trash), before disconnecting the MP-50 Player from your
Macintosh.
Macintosh Operation
21
Beware: Never insert or remove an MMC before having ejected
and disconnected the MP-50 Player from the Macintosh.
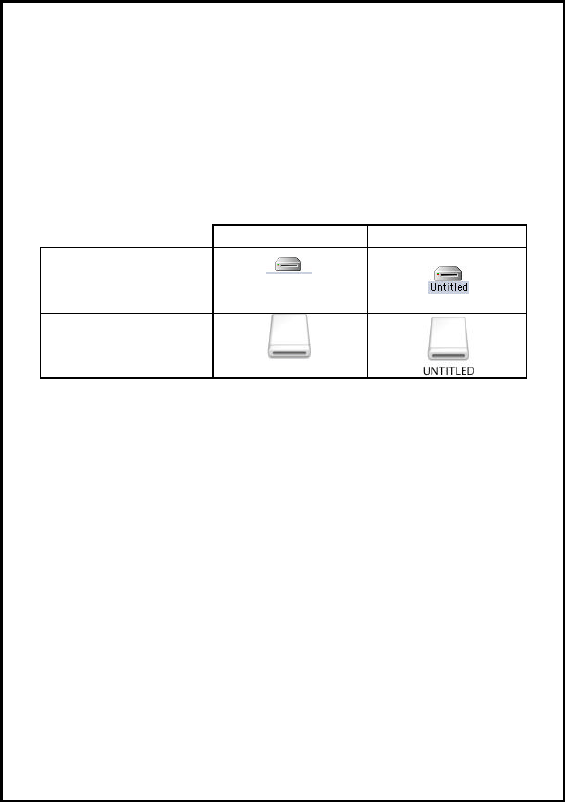
If the internal memory is used, the volume´s name is "maycom". If
the MP-50 Player was connected to your Macintosh with an MMC
installed, the name of the volume is the name of the MMC
("Untitled" in the example below).
Internal Memory MMC installed
Mac OS Classic
Mac OS X
The MP-50 Player can also be used like a floppy disk. You may
copy all types of files to the internal memory for portability.
However, only MP3 files can be played by the MP-50 Player.
If you are using a MultiMediaCard, the MP-50 Player has the
function of an MMC Reader (similar to a floppy disk drive). You
may use it to read and write any data to or from the MMC.
However, only MP3 files can be played by the MP-50 Player.
Visit the MP3 zone at www.emaycom.com for MP3 & Macintosh
MP3 software information.
maycom
maycom
22
Connect your earphone set to the earphone jack.
Use the 6 major keys for basic operation:
Key Short Press Long Press
Stop Power On/Off
Play / Pause Internal memory/MMC*
Skip to previous
song Rewind
Skip to next song Fast Forward
Display artist/title** Keylock On/Off
A-B Repeat*** Format (erase) internal
memory
* see page 27 for details.
** if the file does not contain a supported ID3 tag the filename will
be displayed.
*** see Play Modes on page 25.
Operating the MP-50 Player
23
Push and hold to lock all keys and to protect current settings.
To unlock, push and hold once again until the indication
on the LCD disappears.
Your MP-50 Player is equipped with a menu key. This key is used
for the following functions:
Move the key to adjust the
volume.
Push the key to enter the
menu of the MP-50 Player.
Within the menu use thi
s
same key to browse
through the menu.
Within the menu push this
same key to select the
function displayed.
The Menu Key
Keylock
24
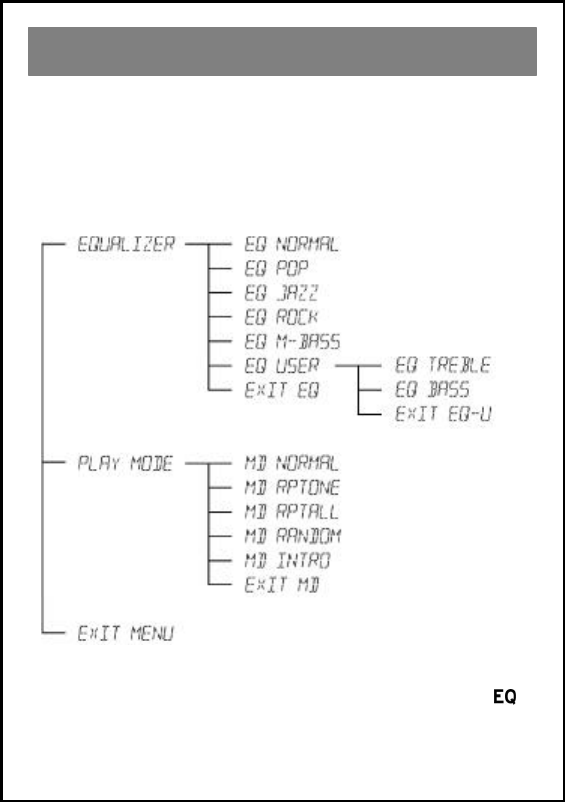
The following functions are controlled through the menu:
• Equalizer
• Play Mode
The menu tree below shows where you can find specific set tings:
Use the Equalizer to adjust the sound to suit your personal
preferences. If a setting other than "NORMAL" is active is
displayed on the LCD.
The Menu / Menu Tree / Equalizer
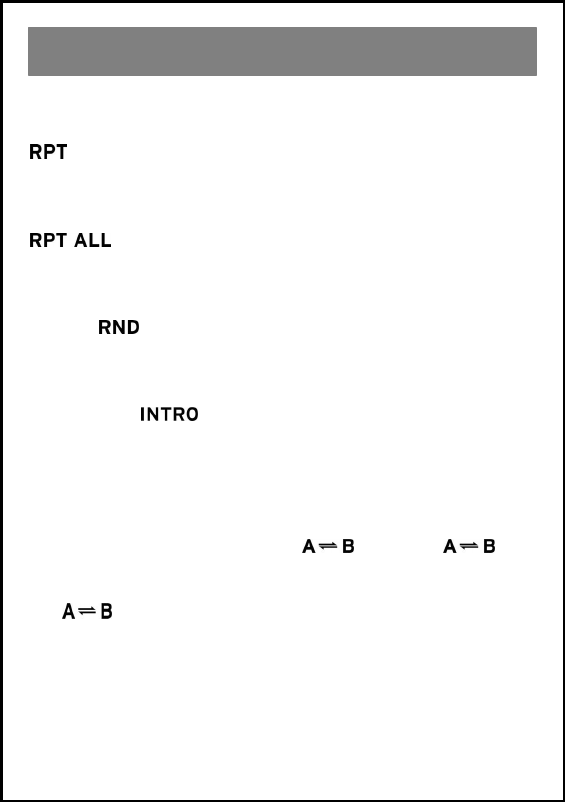
25
• Repeat one (RPT)
Select this function to repeat the current track. The LCD displays
.
• Repeat all (RPT ALL)
Select this function to repeat all the tracks. The LCD displays
.
• Random (RND)
Select this function to switch playback to random mode. The LCD
displays .
• Intro (INTRO)
Select this function to play the first 10 seconds of each track. The
LCD displays .
• Normal
Select "Normal" to reset to normal mode.
• A-B Repeat
This function is controlled by the key. Push once
to set the starting point (A) and push it again to set the end point
(B) of the particular track you want to listen to in a loop. Pressing
the key, a third time cancels the A-B repeat function.
Play Modes
26
The MP-50 Player is equipped with an expansion slot for
additional memory. You may use a MultiMediaCard (MMC) of
any size. If an MMC is installed you can use the MP-50 Player as
an MMC Reader. This means you can read and write files (not
only MP3 files) to and from the MMC while the MP-50 Player is
connected to your computer.
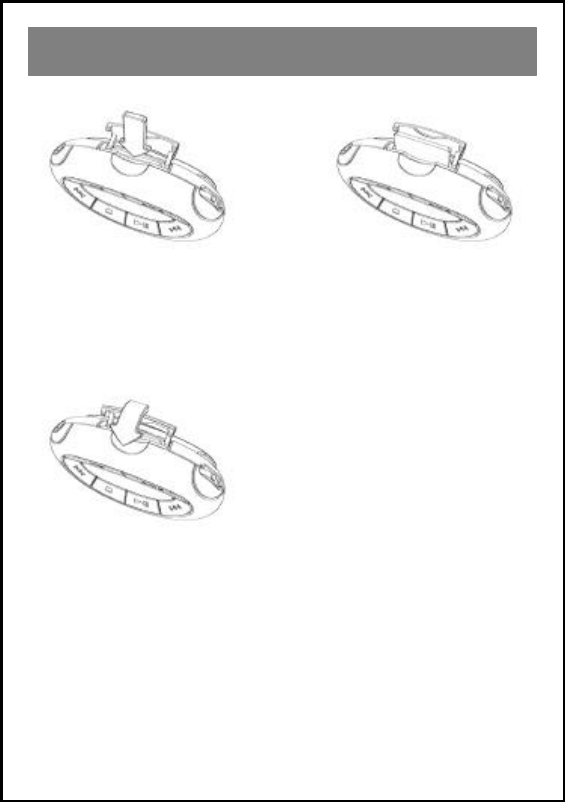
1) Open the MMC door. 2) Insert the MMC as
shown.
3) Close the MMC door.
Using the MMC Expansion Slot
Inserting a MultiMediaCard
27
If you have a MultiMediaCard installed press for 2 seconds
to switch from the internal memory to the MMC and vice versa.
The display indicates which source is currently in use:
Internal memory in
use MMC in use
Selecting the source for playback
28
1) Open the MMC door and
gently press the MMC in the
direction shown.
2) The MMC will be
released and should pop out.
You may now remove the
MMC.
3) Close the MMC door.
Removing a MultiMediaCard
29
Minimum system requirements
Operating system: Windows98 or later
CPU: Pentium 166MHz or better
RAM: 32MB or more
256 colours or better
4x speed CD-ROM drive
USB interface
Sound system: 16 bit or better
1) Turn on your PC.
2) Insert the MP-50 CD-Rom into your CD-Rom drive. Access
the CD by double-clicking the icon representing the CD-Rom
drive.
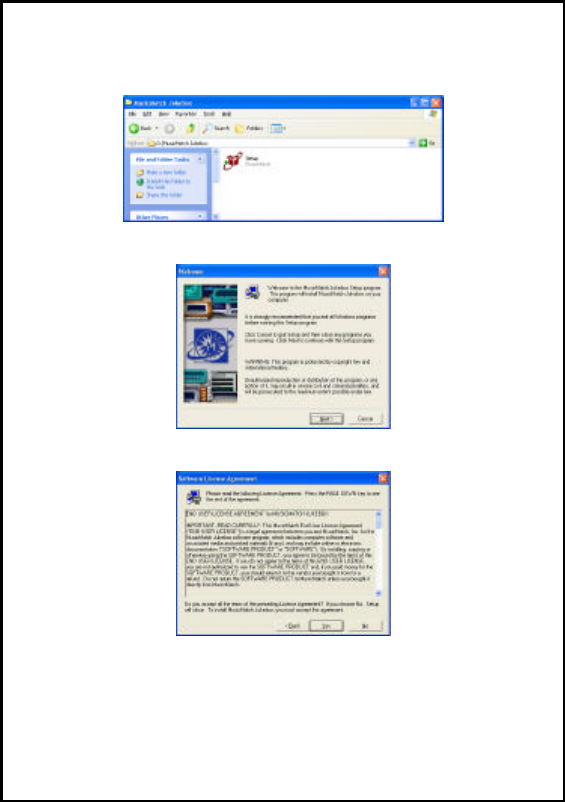
3) Double-click the "MusicMatch Jukebox" folder.
Installing Music Match Jukebox
maycom(D:)
maycom(D:)
maycom drivers
30
4) Within the "MusicMatch Jukebox" folder, highlight the file
"Setup" and double-click to begin the installation.
5) Click "Next".
6) Choose "YES" to accept the license agreement.

31
7) Complete the f orm and click "Next".
8) Choose whether you would like your listening preferences to
be transferred to MusicMatch. Select "Yes" or "No". Then
click "Next" to continue.
32
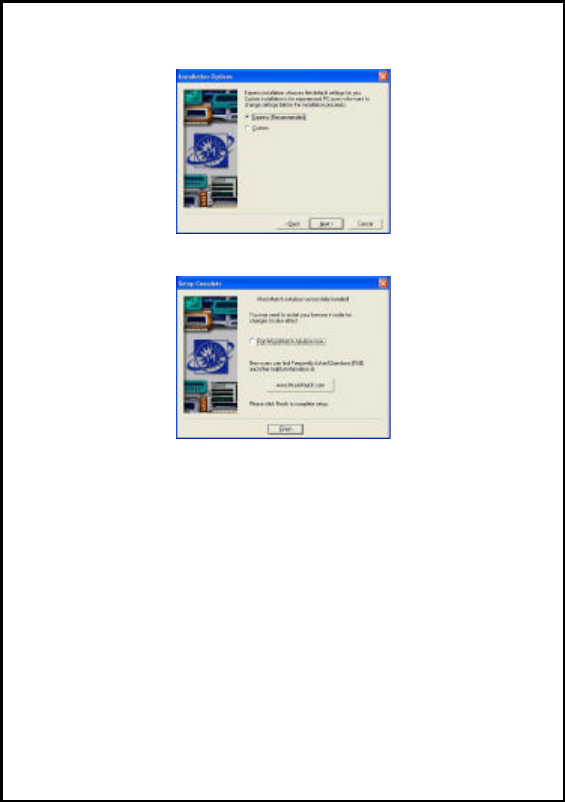
9) Choose "Express" installation, then click "Next".
10) Click "Finish" to complete the installation.

33
1) Start Music Match Jukebox.
2) Insert an Audio CD into your CD-Rom drive.
3) Music Match Jukebox should automatically detect the CD.
(If not, please ensure that MusicMatch Jukebox is selected as
you default CD Player.)
4) Select the tracks in the recording dialog box which you
would like to encode into MP3 files and edit the track
information for identification.
5) Click "REC" to start encoding.
6) After encoding you will find the encoded files located in the
"Music Library" (also in C:\My Documents\My Music). Use
Windows Explorer to copy MP3 files to the MP-50 Player.
See page 18 for details.
We recommend a bitrate of 128 kbps for MP3 encoding (CD
quality) in order to keep the file size small. Your maycom MP-50
Player supports variable bit rates of up to 256 kbps.
If you experience any problem while using Music Match Jukebox,
contact MusicMatch at:
http://www.musicmatch.com/common/contact_us.cgi
To submit an assistance request, visit
http://www.musicmatch.com/form/support/customer/
and send an e-mail describing your problem and including your e-
Mail address.
Visit the MP3 Zone at www.emaycom.com for more MP3
information.
Encoding MP3 files from Audio CDs

34
Your MP-50 Player consists of sophisticated and sensitive circuitry.
There may be occasions when the player is affected by static
discharge.
When you move around, your body naturally builds up some
electricity, which can cause what is known as static discharge.
Should your MP-50 Player at any time appear to freeze operation,
and you have already verified that the batteries are properly
installed it is possible the player has been affected by static
discharge.
To re-enable the unit, try removing and then re-installing the
batteries of your player and then switching it on again.
Static discharge

35
• Keep the MP-50 Player at room temperature .
Direct sunlight or extreme temperatures can damage electronic
products.
• Keep the MP-50 Player away from moisture.
Moisture or humidity may cause the MP-50 Player to short
circuit. If exposed to moisture, immediately dry the player with
a soft cloth.
• Do not use the MP-50 Player outdoors in poor weather
conditions, such as rain or lightning.
• Protect the MP-50 Player from shock.
• Do not expose the MP-50 Player to foreign substances or
dust.
• Clean your MP-50 Player only with soft cloth.
Do not use harsh cleaning agents or water.
• Do not pull on the earphone set.
Stretching the earphone set can lead to a noisy and unclear
connection.
Visit the support area of www.emaycom.com for information on
troubleshooting operating problems.
Storing & Handling
Troubleshooting
36
Maycom B/D, 280-5, Seoksu 2-Dong, Manan-Gu, Anyang-City,
Kyongki-Do, Korea
Tel : +82 (0)31-470-7700 Fax : +82 (0)31-472-3700
http://www.emaycom.com
e-mail : maycom@emaycom.com
Printed in Korea