Maytag A506 User Manual LAUNDRY Manuals And Guides L0811252
MAYTAG Residential Washers Manual L0811252 MAYTAG Residential Washers Owner's Manual, MAYTAG Residential Washers installation guides
User Manual: Maytag A506 A506 MAYTAG MAYTAG LAUNDRY - Manuals and Guides View the owners manual for your MAYTAG MAYTAG LAUNDRY #A506. Home:Laundry & Garment Care Parts:Maytag Parts:Maytag MAYTAG LAUNDRY Manual
Open the PDF directly: View PDF ![]() .
.
Page Count: 8
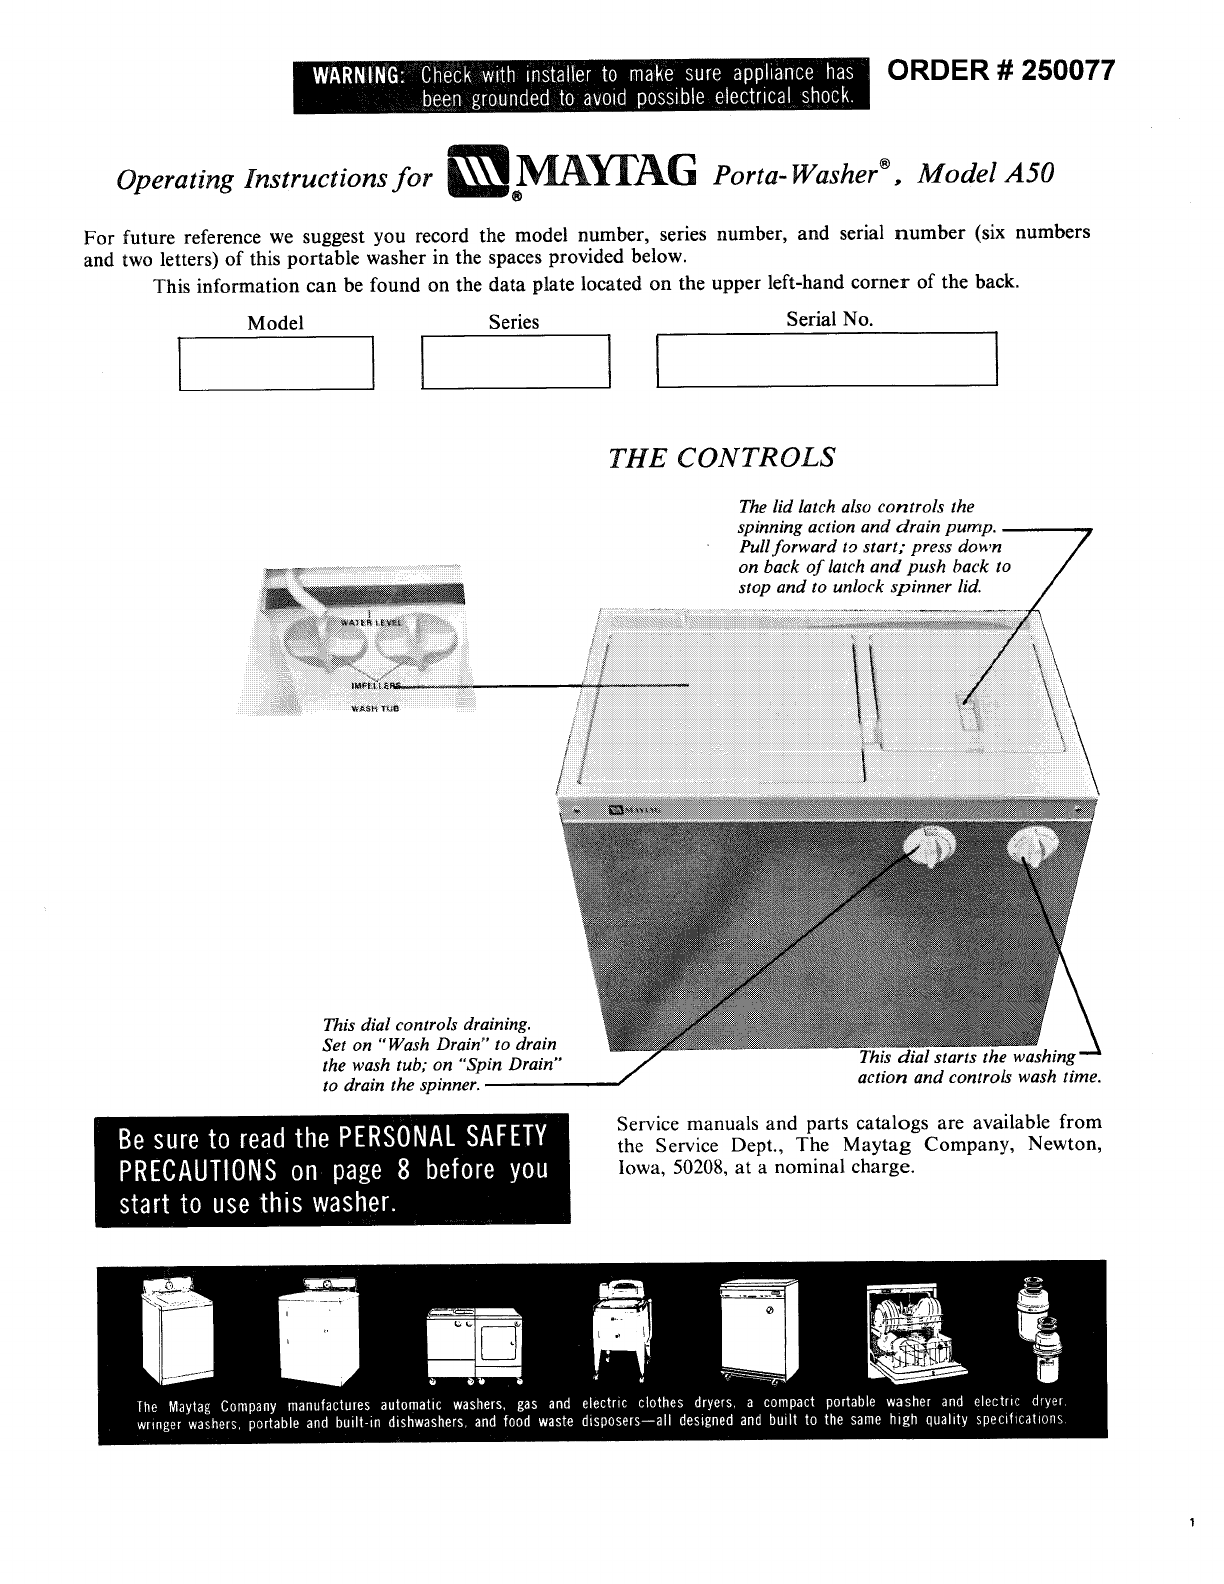
ORDER # 250077
Operating Instructions for MAYI'AG Porta- Washer _, Model A50
®
For future reference we suggest you record the model number, series number, and serial number (six numbers
and two letters) of this portable washer in the spaces provided below.
This information can be found on the data plate located on the upper left-hand corner of the back.
Model Series Serial No.
It I
THE CONTROLS
The lid latch also controls the
spinning action and drain purr_p.
Pull forward to start; press down
on back of latch and push back to
stop and to unlock spinner lid.
This dial controls draining.
Set on "Wash Drain" to drain
the wash tub; on "Spin Drain"
to drain the spinner.
This dial starts the washing
action and controls wash time.
Service manuals and parts catalogs are available from
the Service Dept., The Maytag Company, Newton,
Iowa, 50208, at a nominal charge.
BEFORE WASHING
SORT CLOTHES INTO LOADS.
1. The garments should be properly sorted according
to color--white, light or dark; construction--regular
or delicate; fabric--regular or permanent press; and
amount of soil--heavy or light.
2. When washing more than one load in the same
water, the least soiled, lightest colored load should be
washed first. For best results, additional detergent may
be necessary to maintain a good blanket of suds.
3. The size of the load is very important. The garments
should move freely during washing.
To determine load size: Fill the tub with water, start
washing action, add clothing a piece at a time only as
long as there is free movement of the clothes through
the water. Some typical full loads are:
1 Double sheet, 1 pillowcase, 2 towels, 1 T-shirt,
2 shorts and 2 washcloths.
3 Slacks, 1 sweatshirt, 2 pair socks, 1 dress.
1 Bedspread.
3 Bath towels, 2 hand towels, 2 washcloths, 1
nightgown, 1 pair socks.
2 Work pants, 4 knit shirts, 2 pair socks.
2 Twin sheets, 1 T-shirt, 2 pillowcases, 4 wash-
cloths, 1 tea towel, and 1 pair crew socks.
4. Wash only one very large item, such as a double
sheet, with a number of smaller items per load. Put in
larger items first.
GET EACH LOAD READY TO WASH.
1. Empty all pockets. Shake out any loose dirt. Brush
dirt and lint out of cuffs.
2. Sew up any rips, tears or pulled seams before
washing. If you do not do this, the washing process
may make them worse.
3. Close zippers and hooks; tie loose apron or paja-
ma strings together; remove loose belts. Remove pins,
ornaments, or trim which you know or suspect will
not wash well.
4. Remove spots and stains. Pre-treat by briskly rub-
bing heavily soiled areas with liquid laundry deter-
gent or a paste made of granular laundry detergent
and water; or, pre-soak using a laundry additive con-
mining enzymes. Prewash spray products may be
more convenient to use than rubbing detergent into
the stain. When using a prewash spray, add a little ex-
tra detergent when laundering the stained item. The
spray may soften fingernail polish, so be careful to
avoid rubbing your fingernail polish off the clothes
you are treating.
SPECIFIC WASHING INSTRUCTIONS
iiiiiiiiiiiiiii
iiiiiiiiiiii
TO WASH:
1. Make certain the time control dial is "off." Plug
power cord into adequately grounded, 3-prong recep-
tacle.
2. Connect funnel end of fill hose to the faucet. The
funnel end of the fill hose must be rolled back so that
it will fit tightly on the faucet. You may leave it rolled
back or you may wish to cut off the excess.
3. J'urn on water and adjust for proper temperature.
HOTfor whites and for heavily soiled colorfast articles;
WARM for colorfast articles not heavily soiled, for
delicates, and for permanent press articles if they are
to be dryer dried;
COLD for lightly soiled permanent press articles,
brightly colored articles, and washable woolens to min-
imize shrinking.
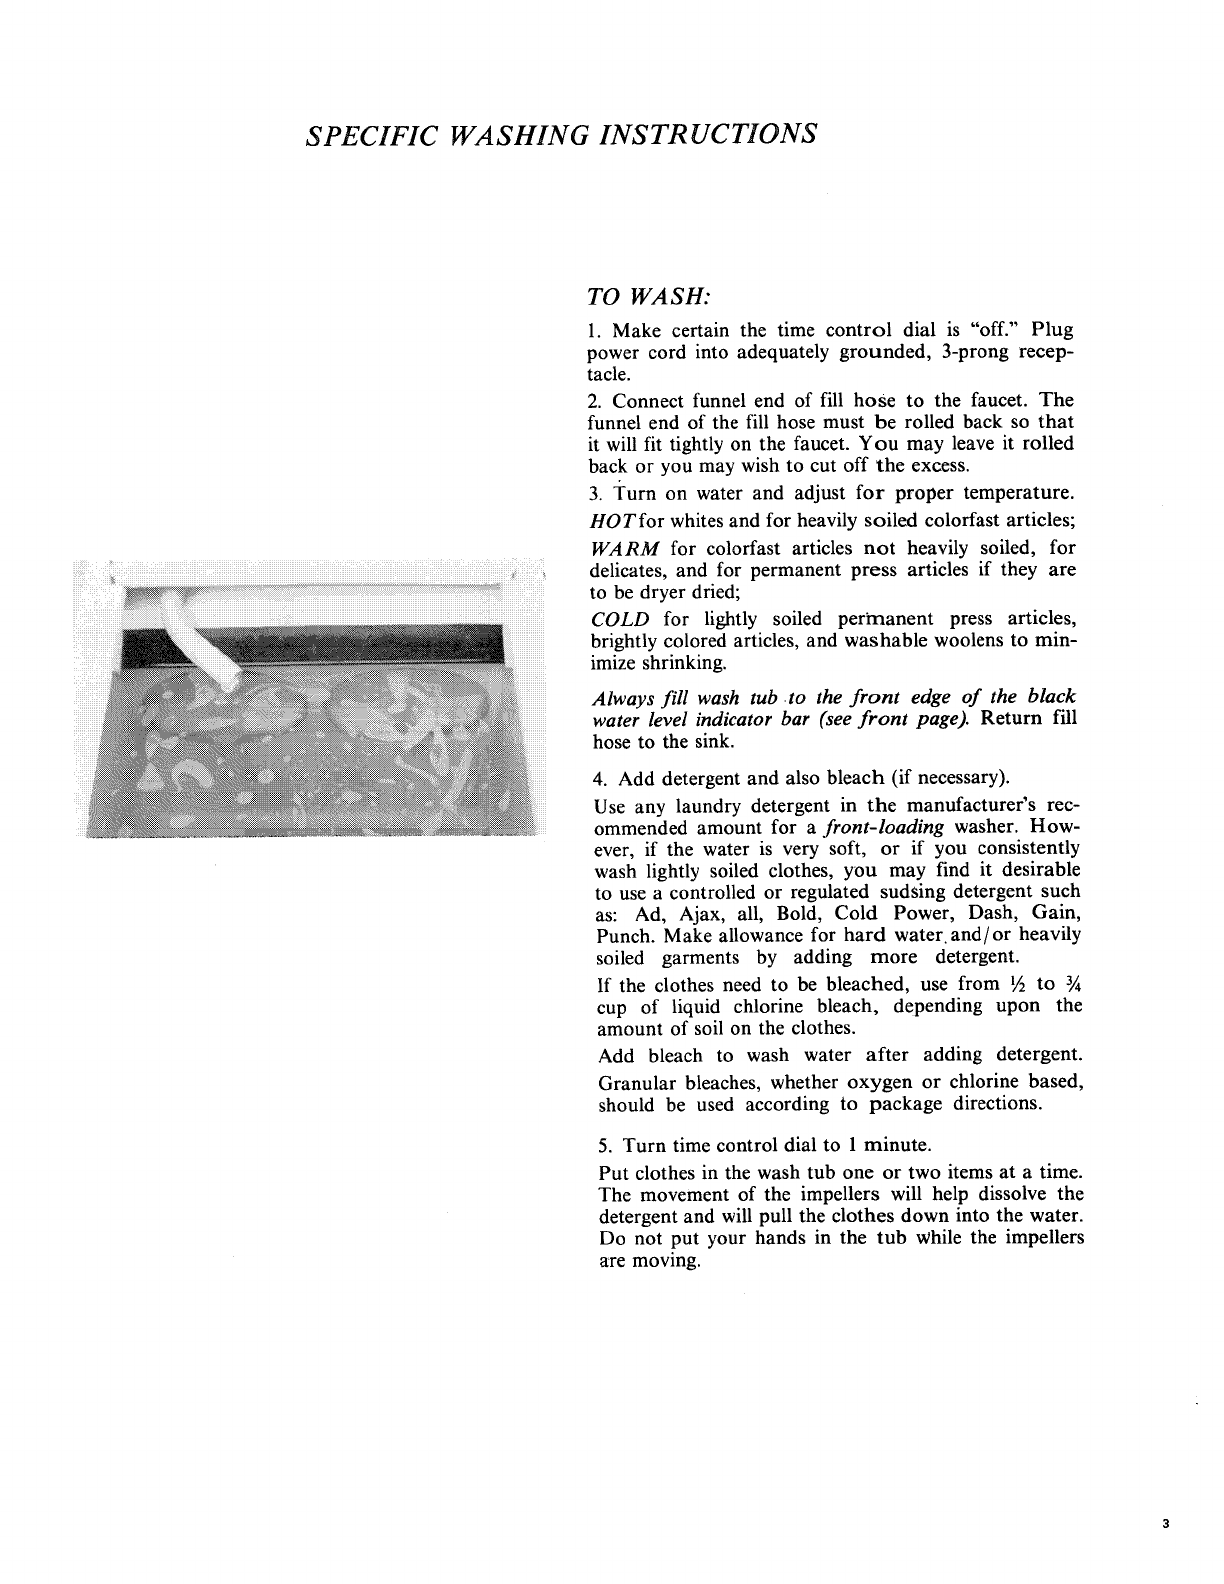
Always fill wash tub to the front edge of the black
water level indicator bar (see front page). Return fill
hose to the sink.
4. Add detergent and also bleach (if necessary).
Use any laundry detergent in the manufacturer's rec-
ommended amount for a front-loading washer. How-
ever, if the water is very soft, or if you consistently
wash lightly soiled clothes, you may find it desirable
to use a controlled or regulated sudsing detergent such
as: Ad, Ajax, all, Bold, Cold Power, Dash, Gain,
Punch. Make allowance for hard water, and/or heavily
soiled garments by adding more detergent.
If the clothes need to be bleached, use from ½ to ¾
cup of liquid chlorine bleach, depending upon the
amount of soil on the clothes.
Add bleach to wash water after adding detergent.
Granular bleaches, whether oxygen or chlorine based,
should be used according to package directions.
5. Turn time control dial to 1 minute.
Put clothes in the wash tub one or two items at a time.
The movement of the impellers will help dissolve the
detergent and will pull the clothes down into the water.
Do not put your hands in the tub while the impellers
are moving.

6. Closelid andresettimecontroldial to thedesired
washingtime:
DELICA TE - This setting is used to wash garments of
delicate construction, sheer fabrics, or for lace-trimmed
garments. It provides up to 1½ minutes of water action.
PERMANENT PRESS - This setting provides 2 to 3
minutes of wash time for permanent press articles,
nylons, acrylics, polyesters, and blends of these with
other fibers.
REGULAR - Use this setting for 4 to 5 minutes of
washing for typical cottons and linens, such as, sheets,
kitchen linens, towels, etc. Heavily soiled, sturdy items
will be washed best on this setting.
7. When the time control dial stops at 0, the load is
ready to put into the spinner.
TO REMOVE WATER
FROM THE CLOTHES:
1. Open lid of spinner and take the rubber cover out.
Take garments from the wash tub and put them in the
spinner. A load that fits in the wash tub will fit in the
spinner.
Place rubber cover in the spinner on top of the load
and press down firmly. For permanent press garments,
put rubber cover on top of the load but do not press
down.
_iiiiiiiiiiiiiiiiiiiiiiiiiiiiiiiii
2. Drain dial should be on "Spin Drain." If you are
washing just one load, drain hose should be in the
sink and clipped to the fill hose. If you are going to
wash more clothes, the drain hose may be left in the
storage position so water will return to the wash tub
from the spinner.
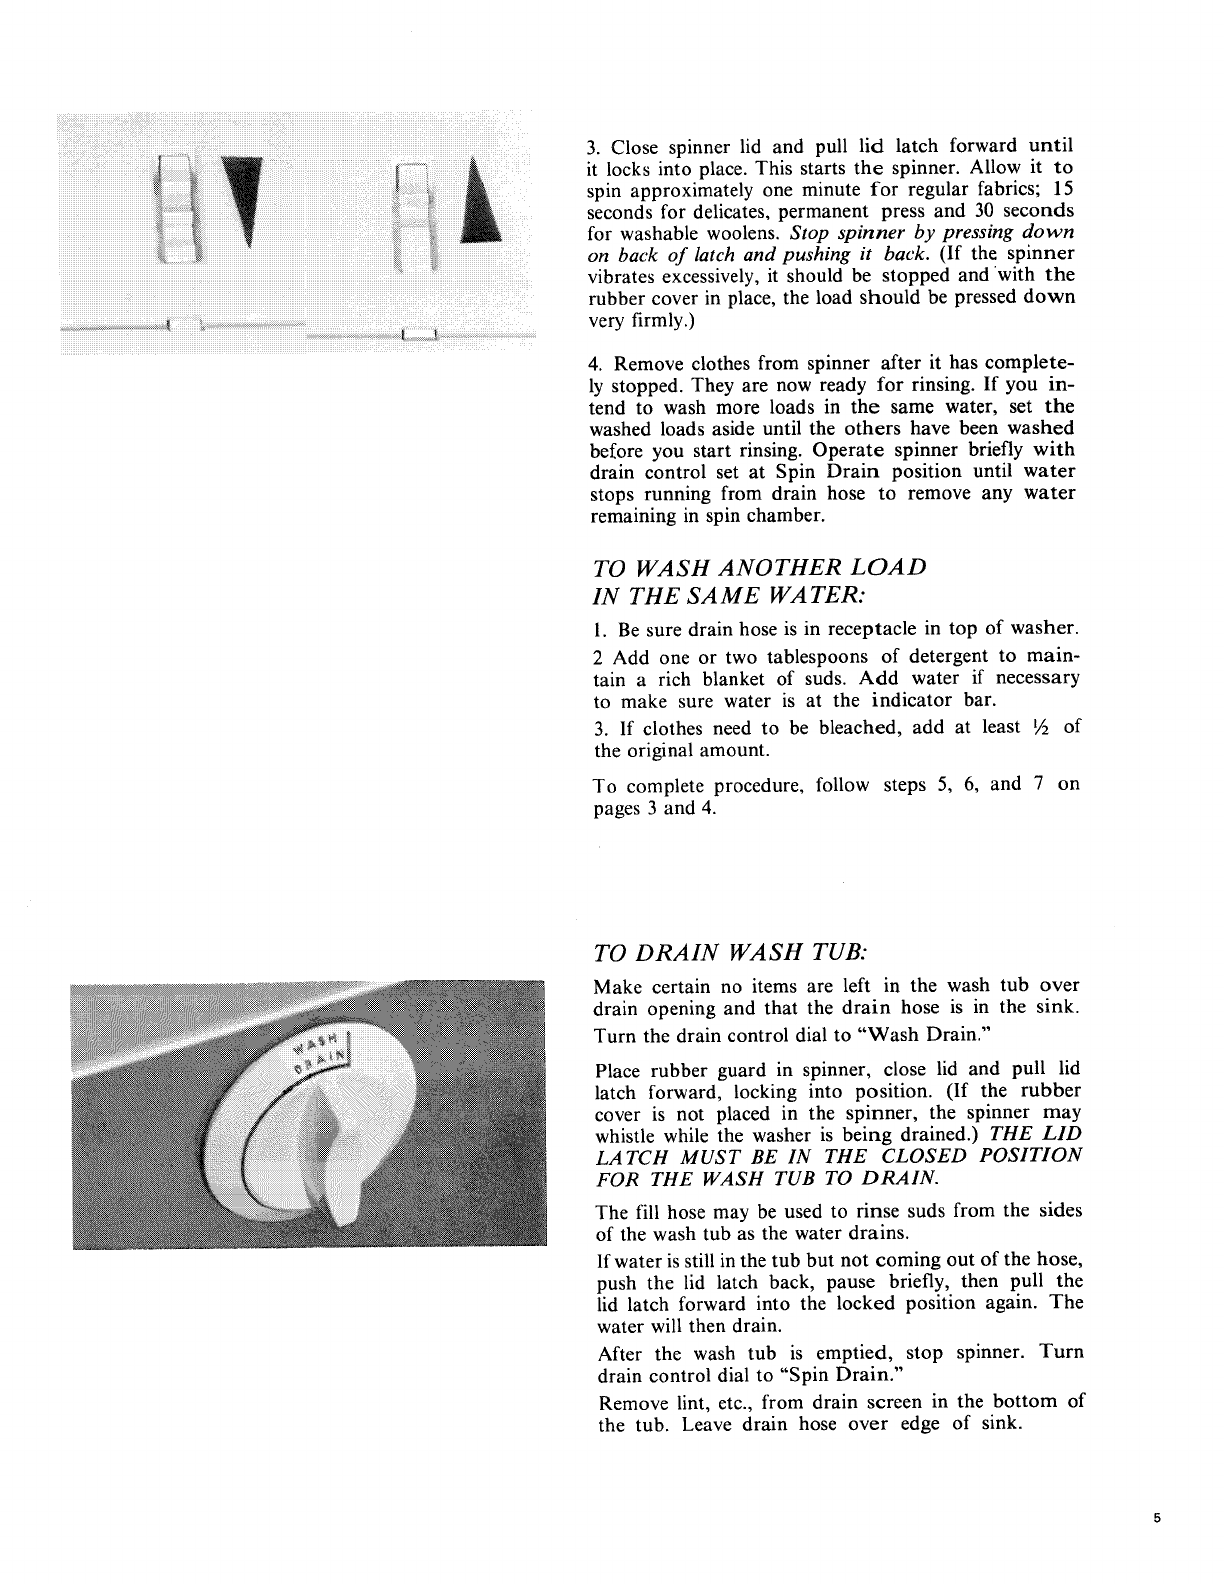
3. Closespinnerlid andpull lid latchforwarduntil
it locksintoplace.Thisstartsthe spinner.Allowit to
spinapproximatelyoneminutefor regularfabrics;15
secondsfor delicates,permanentpressand30seconds
for washablewoolens.Stop spinner by pressing down
on back of latch and pushing it back. (If the spinner
vibrates excessively, it should be stopped and with the
rubber cover in place, the load should be pressed down
very firmly.)
4. Remove clothes from spinner after it has complete-
ly stopped. They are now ready for rinsing. If you in-
tend to wash more loads in the same water, set the
washed loads aside until the others have been washed
before you start rinsing. Operate spinner briefly with
drain control set at Spin Drain position until water
stops running from drain hose to remove any water
remaining in spin chamber.
TO WASH ANOTHER LOAD
IN THE SAME WATER:
1. Be sure drain hose is in receptacle in top of washer.
2 Add one or two tablespoons of detergent to main-
tain a rich blanket of suds. Add water if necessary
to make sure water is at the indicator bar.
3. If clothes need to be bleached, add at least ½ of
the original amount.
To complete procedure, follow steps 5, 6, and 7 on
pages 3 and 4.
TO DRAIN WASH TUB:
Make certain no items are left in the wash tub over
drain opening and that the drain hose is in the sink.
Turn the drain control dial to "Wash Drain."
Place rubber guard in spinner, close lid and pull lid
latch forward, locking into position. (If the rubber
cover is not placed in the spinner, the spinner may
whistle while the washer is being drained.) THE LID
LATCH MUST BE IN THE CLOSED POSITION
FOR THE WASH TUB TO DRAIN.
The fill hose may be used to rinse suds from the sides
of the wash tub as the water drains.
If water is still in the tub but not coming out of the hose,
push the lid latch back, pause briefly, then pull the
lid latch forward into the locked position again. The
water will then drain.
After the wash tub is emptied, stop spinner. Turn
drain control dial to "Spin Drain."
Remove lint, etc., from drain screen in the bottom of
the tub. Leave drain hose over edge of sink.
TO RINSE:
1. Fill wash tub to front edge of black water level
indicator bar.
Loads may be rinsed in the same water but it will be
necessary to add more water for the additional loads.
2. If desired, add fabric softener to rinse water ac-
cording to the manufacturer's instructions.
If reusing rinse water, another capful of softener
must be added before rinsing the second load.
3. Turn time control dial on so that the impellers will
be moving as you add the clothes.
4. Close lid and set time control dial for 1 minute for
regular and permanent press garments; 15 to 30 sec-
onds for delicates and washable woolens.
5. When the time control dial stops at 0, the load is
ready to be put in the spinner. Allow it to spin for
approximately 3 minutes for regular fabrics; approxi-
mately 30 seconds for delicates and permanent press;
and 1 minute forwashable woolens.
6. Remove clothes from spinner after it has completely
stopped. They are ready to be dried. Operate spinner
briefly with drain control in Spin Drain position until
water stops running from drain hose.
SPECIAL PROCEDURES
PERMANENT PRESS
1. Launder lightly soiled permanent press garments in
cold water to minimize wrinkling. Heavily soiled or
stained garments may have to be washed in warm
water. If you have a dryer, all permanent press articles
can be washed in warm water.
2. Do not overload wash tub.
3. After washing, place garments loosely in spinner.
Put the rubber cover on top of the load but do not
press down. Spin for 15 seconds. Remove garments
from spinner.
4. For best results, rinse in cold water, using fabric
softener.
5. Take garments out of spinner after it has completely
stopped. Hang or dryer dry immediately.
WASHABLE WOOLENS
1. Launder washable woolens in cold water to mini-
mize shrinking.
2. Fill wash tub. Turn time control dial on. Add de-
tergent. After detergent is dissolved, turn the time con-
trol dial to "off."
3. Put the articles in the wash tub and push them down
into the water.
4. Close lid and set time control dial for approximately
15 seconds. After the 15-second wash, allow garments
to soak for 10 minutes. Then turn time control dial
on for another 15 seconds.
5. Put the load in the spinner and spin for 30 seconds.
6. Refill wash tub with cold water for rinsing.
7. Put clothes in the wash tub and push them down
into the water. Turn time control dial to 15 seconds.
8. Put clothes in the spinner and spin for 1 minute.
9. Take garments out of spinner after it has com-
pletely stopped, block to shape, air dry on a flat sur-
face. Or, dryer dry if specifically recommended by the
manufacturer.
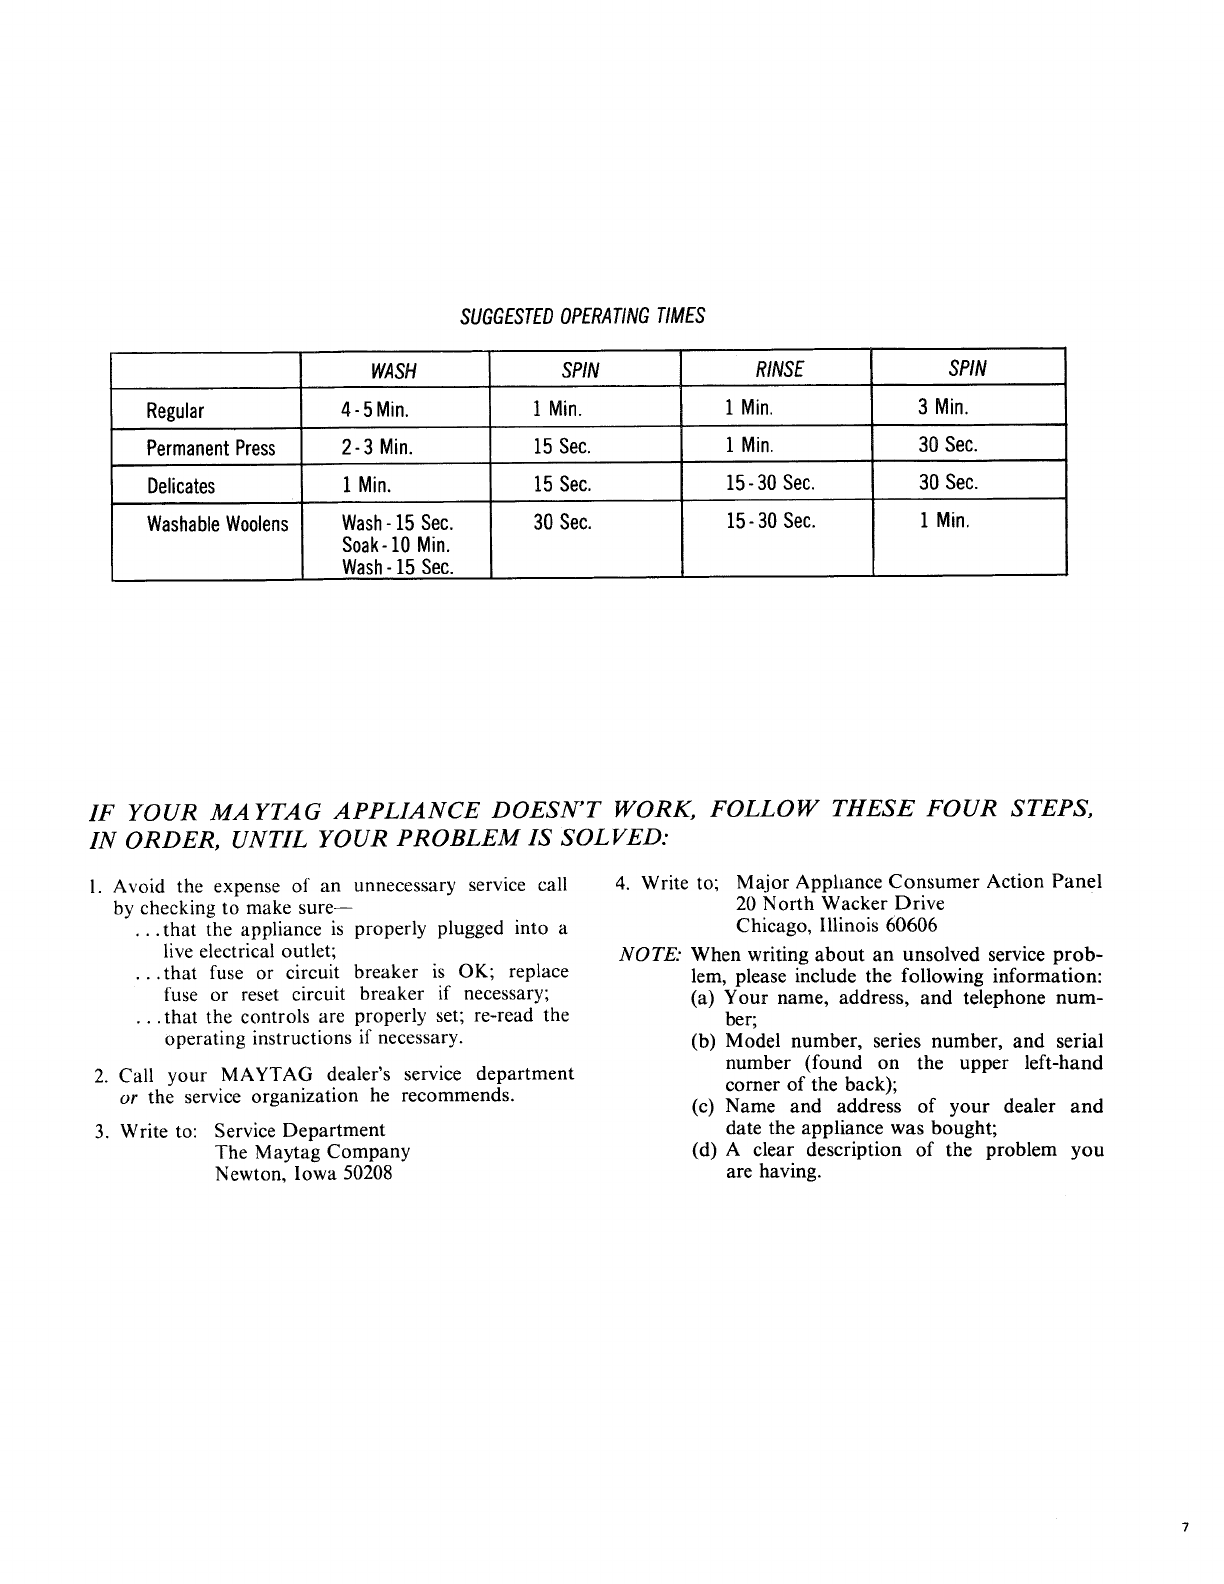
SUGGESTED OPERATINGTIMES
Regular
PermanentPress
Delicates
WashableWoolens
WASH
4-5Min.
2-3 Min.
1Min.
Wash- 15 Sec.
Soak- 10 Min.
Wash-15 Sec.
SPIN
1 Min.
15 Sec.
15 Sec.
30 Sec.
R/NSE
1 Min.
1 Min.
15-30 Sec.
15- 30 Sec.
SPIN
3 Min.
30 Sec.
30 Sec.
1 Min.
IF YOUR MAYTAG APPLIANCE DOESN'T WORK, FOLLOW THESE FOUR STEPS,
IN ORDER, UNTIL YOUR PROBLEM IS SOLVED:
1. Avoid the expense of an unnecessary service call
by checking to make sure--
...that the appliance is properly plugged into a
live electrical outlet;
...that fuse or circuit breaker is OK; replace
fuse or reset circuit breaker if necessary;
...that the controls are properly set; re-read the
operating instructions if necessary.
2. Call your MAYTAG dealer's service department
or the service organization he recommends.
3. Write to: Service Department
The Maytag Company
Newton, Iowa 50208
4. Write to; Major Apphance Consumer Action Panel
20 North Wacker Drive
Chicago, Illinois 60606
NOTE: When writing about an unsolved service prob-
lem, please include the following information:
(a) Your name, address, and telephone num-
ber;
(b) Model number, series number, and serial
number (found on the upper left-hand
comer of the back);
(c) Name and address of your dealer and
date the appliance was bought;
(d) A clear description of the problem you
are having.
Productswitha(_ labelhavebeenlistedwithUnder-
writers'Laboratories,Inc.--thosewithaCSAtaghave
beenlistedwithCanadianStandardsAssociation.Nev-
ertheless,aswith anyequipmentusingelectricaland
movingparts,thereis a potentialhazard.To usethis
appliancesafely,theoperatorshouldbecomefamiliar
withtheinstructionsfor operationof thewasherand
always exercise care while using the appliance.
In use of the appliance, observe the following precau-
tions for personal safety.
1. This washer, as in the case of all other electrical
appliances, must be adequately grounded to avoid the
possibility of electrical shock. It is grounded through
the third prong of the power cord when plugged into
a 3-prong grounded receptacle. Although not recom-
mended, if a 2-prong adapter is used, the green wire
on the adapter must be attached to a proper ground.
When unplugging the appliance, pull the cord from the
grounded adapter leaving the adapter plugged into the
receptacle. ALL WIRING AND GROUNDING
SHOULD BE IN ACCORDANCE WITH LOCAL
AND NATIONAL CODES.
2. After raising the spinner lid, and before reaching
in, BE SURE THE SPINNER BASKET HAS
STOPPED SPINNING COMPLETELY.
This washer is designed so that whenever the spinner
lid is unlatched, the power is cut off, and the tub brake
will bring the spinner to a complete stop within sec-
onds.
3. CHILDREN SHOULD IVEVER BE PERMITTED
TO OPERA TE, OR PLA Y IN, WITH OR AROUND
THIS WASHER.
4. TO A VOID POSSIBILITY OF EXPLOSION, any
material on which you have used a cleaning solvent,
or which is saturated with flammable liquids or solids,
should not be placed in the washer until all traces of
the flammable liquids or solids and their fumes have
been removed. There are many highly flammable items
used in homes, such as: acetone, denatured alcohol,
gasoline, kerosene, some liquid household cleaners,
some spot removers, turpentine, waxes or wax re-
movers.
5. This washer is designed for operation on an ade-
quately wired 115 volt, 60 cycle electric circuit pro-
tected by a 15 amp. fuse (or comparable circuit break-
er). If the washer is to be operated on other than an
individual branch circuit, that is, if other electrical ap-
pliances are to be plugged into the same circuit and
operated at the same time, consult with your Maytag
dealer or electric utility for instructions.
PORTABLEWASHER WARRANTY
Full One-Year Warranty
For one (ll year from the date of original retail purchase any part which fails in normal home use, including a
cabinet which rusts, will be repaired or replaced within a reasonable time free of charge when the appliance is located
in the United States or Canada. Appliances located elsewhere are covered by the limited warranty, including parts
for the first year.
Additional Limited Parts Warranty
After the first year from the dat_ of original retail purchase, through the following time periods, the designated
parts which fail in normal home use will be repaired or replaced within a reasonable time free of charge for the
partitself,with the ownerpayingonly the cost of labor: 2nd year--all parts, includinga cabinetthat rusts;3rd
through5th year-- acabinetthat rusts.
How and Where to Receive Warranty Service
•Call or write the authorized Maytag dealer from whom the appliance was purchased or the authorized service
firm designated by it.
•If the owner movesfrom the selling dealer'sservicingarea after purchase,call or write any authorizedMaytag
dealeror authorizedservicefirm inor nearthenew location.
•Shouldthe ownernotreceivesatisfactory warranty servicefrom oneof the above,callor write ServiceDepartment,
The MaytagCompany,Newton,Iowa50208;and arrangementsfor warrantyservicewill be made.
This Warranty gives you specific legal rights, and you may also have
other rights which vary from state to state.
DTHE MAYTA6 COMPANY, NEWTON, iOWA 50208
8 Form No. 79YG-076 Part No. 2-50077 MP Litho U.S.A.
