MeLE Technologies MG03A Smart TV Box User Manual
ShenZhen Mele Digital Technology Ltd Smart TV Box
User manual
QUICK START GUIDE
<Product Overview>
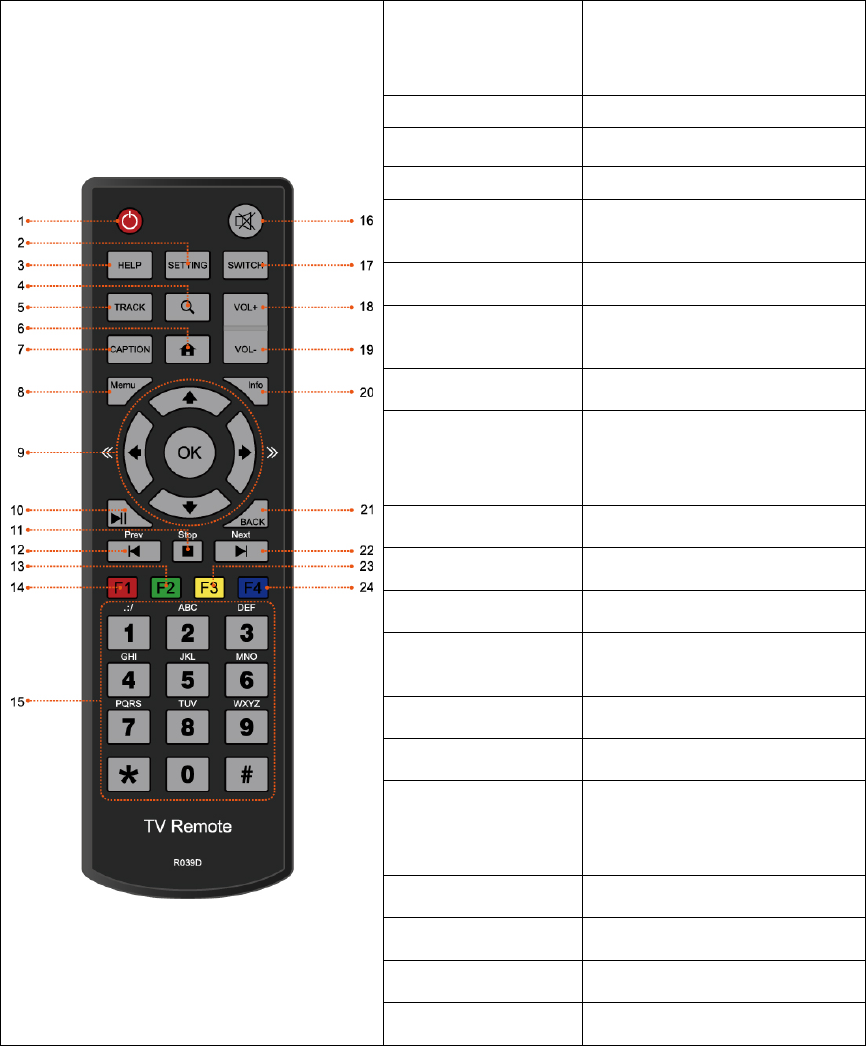
Remote Controller
1. Power Wakeup/standby. To power
on/off the box, please press the
power button in the front panel.
2. Setting Enter setup menu.
3. Help View guide information.
4. Search Start search engine.
5. Track Switch audio track of current
program.
6. Home Return to Home screen.
7. Caption Switch caption of current
program.
8. Menu Show/hide application menu.
9.Navigation buttons Press arrow buttons to select
options, and press OK button to
confirm.
10. Play/Pause Play/pause current playback.
11. Stop Stop current playback.
12. Prev Previous chapter/page up.
13/14/23/24.
F1/F2/F3/F4
Reserved for application.
15. Numeric buttons Input numerical digitals.
16. Mute Mute on/off audio output.
17. Switch Enable/disable mouse mode. In
mouse mode, you can move the
cursor by arrow buttons.
18/19. VOL+/VOL- Turn up/down audio volume.
20. Info Show/hide program information.
21. Back Return to previous page.
22. Next Next chapter/page down.
1. Getting started
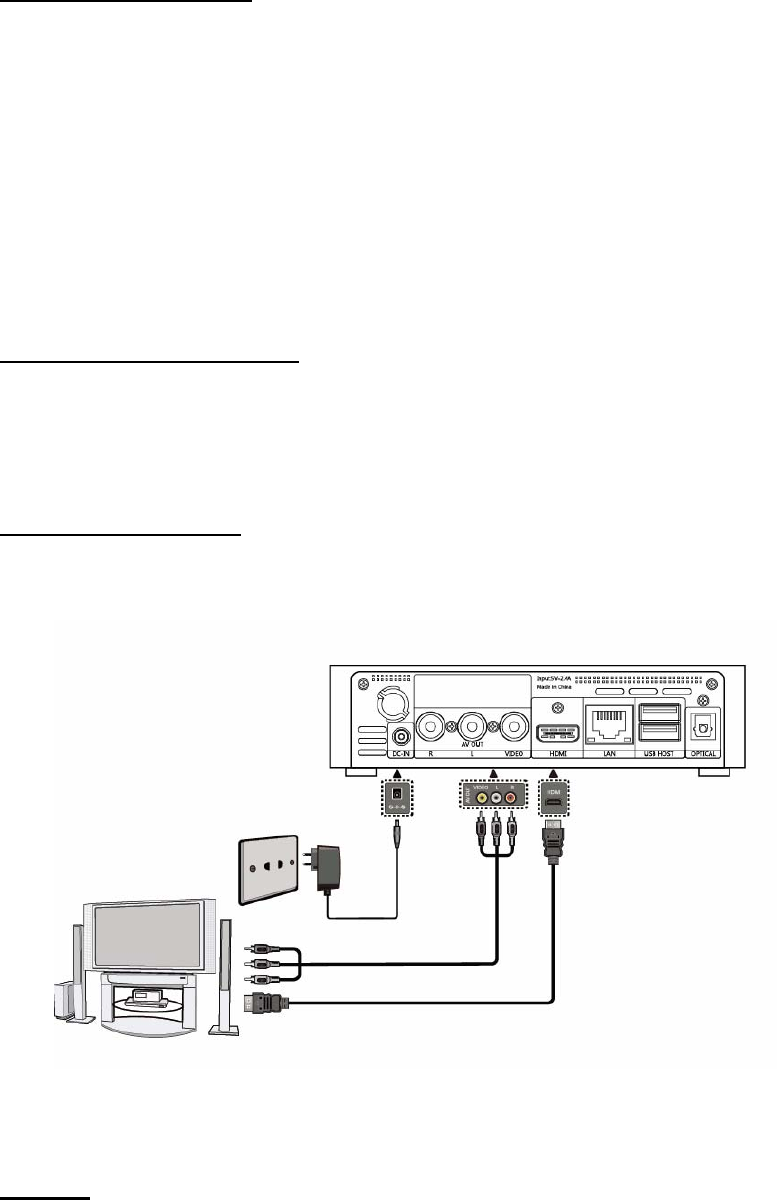
1.1 Connections
Step 1: Connect to TV set
Connect the output of the box to an input of your TV set. HDMI connection (High Definition, up
to 1080p) is preferred; however you can choose AV connection (Standard Definition, NTSC) if
your TV set does not have an HDMI port. Picture quality will be better if using an HDMI
connection.
Make sure the input selection in your TV set matches the connection with your box. This box
can detect HDMI connection automatically. If HDMI is connected, the output is on HDMI and
AV output is suppressed. Disconnecting HDMI connection, the output would change to AV
automatically.
Step 2: Connect to home router
Connect the box to your home route with the Ethernet cable provided in the packing. You can
ignore this step you would like to use a Wi-Fi network. However we do suggest you connect a
wired network, which is usually more stable and reliable than a Wi-Fi network.
Step 3: Connect to power
Connect the box to a power outlet with the power adaptor provided in the packing. The box
would boot automatically and the LED indicator in the front panel would turn blue.
1.2 Power on/off,Standby
Power on
The box will boot automatically after power is connection, the power indicator in the front panel
will turn blue and keep blue while power on;
Standby
Press Power button on the remote controller, the box will enter standby mode and the power
indicator turns red; press the Power button again to wake up the box.
Power off
Press Power button in the front panel to power off the box. The power indicator will turn off
after power down.
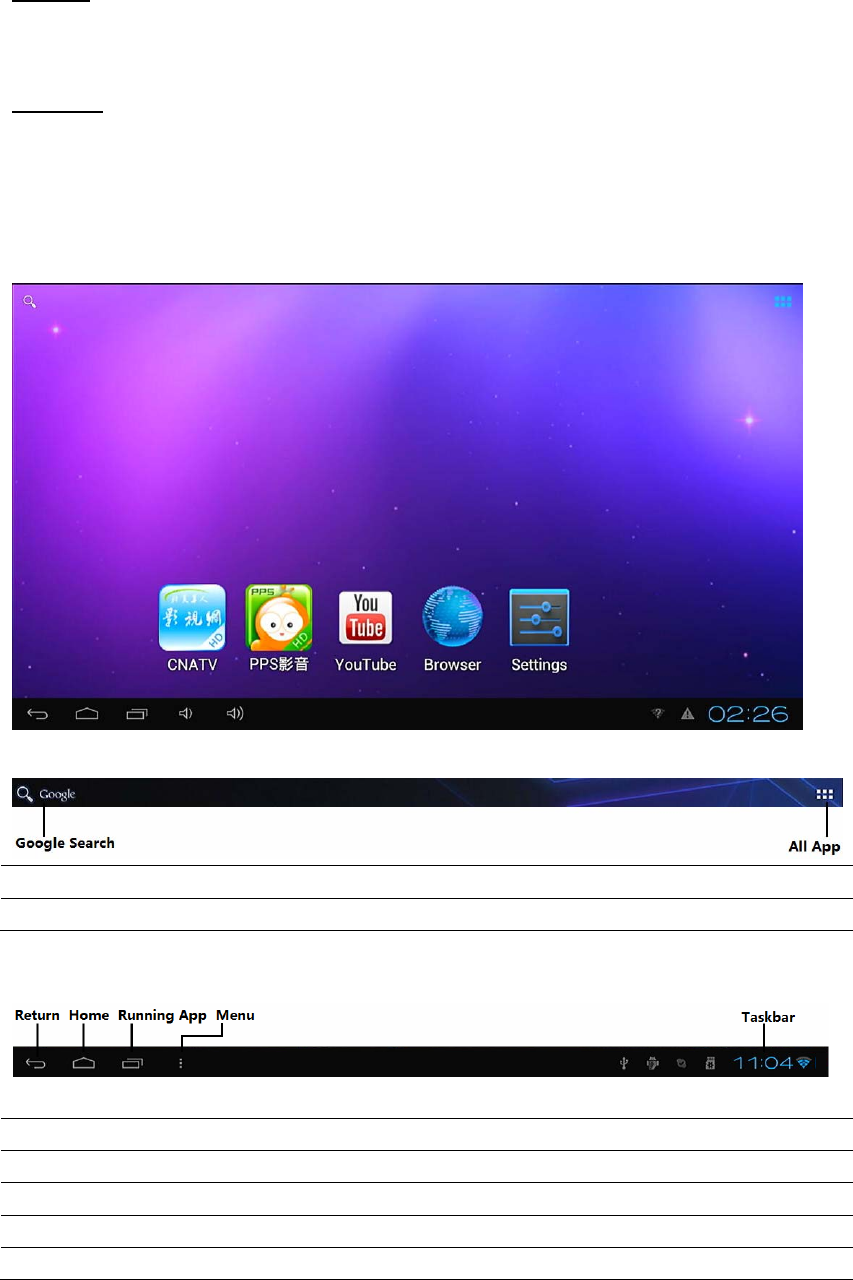
1.3 Home Screen
Buttons on the top of home screen
Google Search Click to search input online.
Application Click to view all installed applications.
Buttons on the bottom of screen
Return Return to previous page.
Home Return to Home screen.
Running App View running apps.
Menu Show menu bar
Taskbar Show time, network connection, USB device status and notifications.
2. Settings
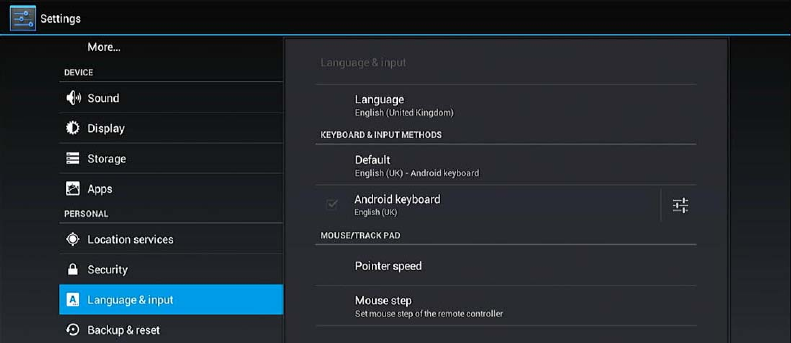
2.1 Set language & input
The system language is set to English by default. You can change it to your favorite. Go to
Settings > Personal > Language & Input > Language, choose your favorite language. The
setting can take effect immediately.
2.2 Set date & time
Go to Settings > System > Date & Time, set the date, time and date format. You can set date &
time through internet (check automatic date & time) or manually. It is recommended to use
network provided date & time. Note that the box can get correct date & time only when internet
is connected if using network provided date & time.
<Picture>
2.3 Set time zone
Go to Settings > System > Date & Time > Select time zone, please select the right time zone of
your area.
<Picture>
2.4 Set screen size and output mode
The default resolution of HDMI output is 720p. You can go to Settings to make an adjustment.
Go to Settings > Display > Screen trimming, adjust the video output size to match the TV
screen.
Go to Settings > Display > Display output mode, select the video output mode to best
match your TV set.
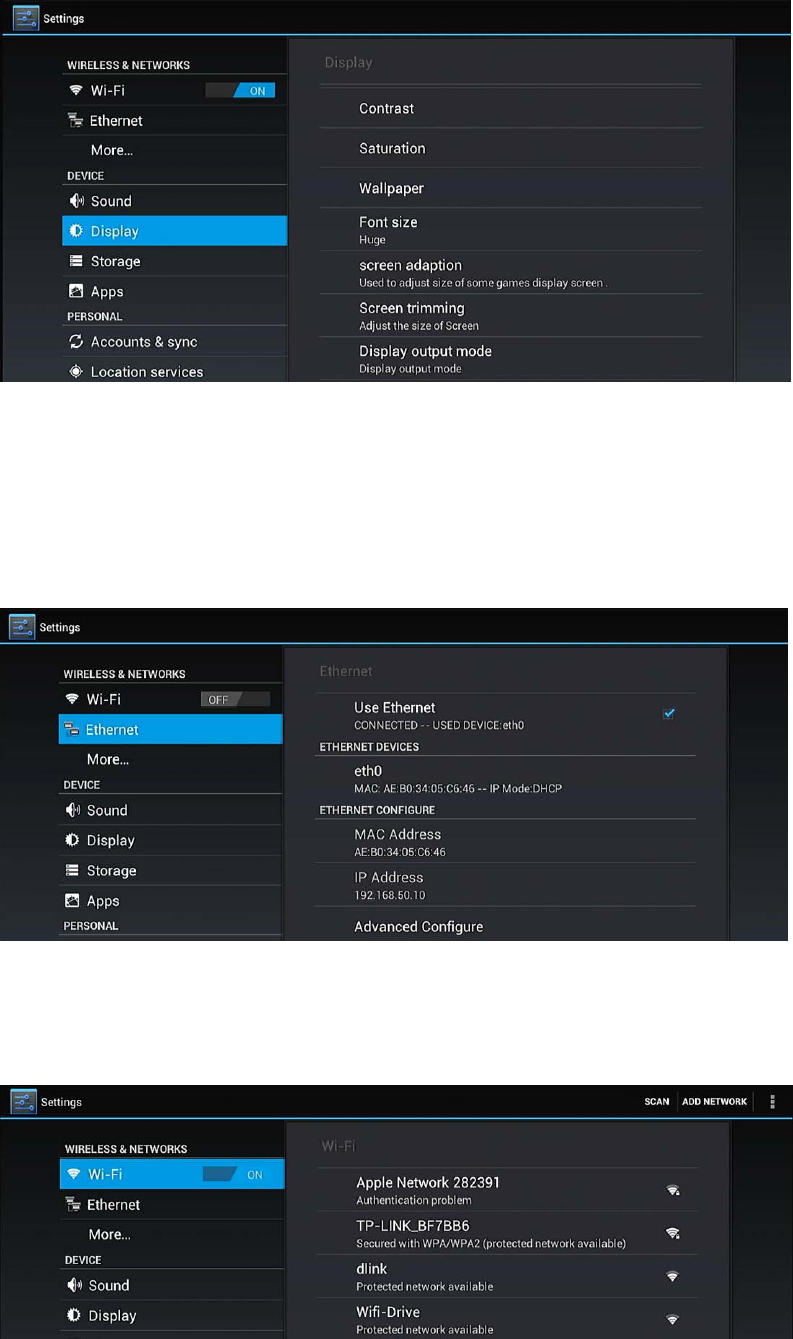
2.5 Join a network
Join a wired network:
Connect your box to the router with Ethernet cable.
Go to Settings > Wi-Fi, turn Wi-Fi off.
Go to Settings, select Ethernet and check “Use Ethernet”.
Join a Wi-Fi network: Go to Settings > Wi-Fi, turn Wi-Fi on. You can see a list of available
access points, please click the proper one and input correct phrase to access a protected
network.
Once you join a Wi-Fi network, it would remember and automatically set up a Wi-Fi connection
whenever the network is in range.
Network connection icon <icon> (Ethernet) or <icon> (Wi-Fi) can be viewed at the right bottom
of the home screen.
3. Applications
Click the app icon at the upper right corner of the Home screen to view all applications.
<Picture>
Open and close an app
You can open an app by click its icon.
Force an app to close: Click ‘Running App’ on home screen, press and hold an app for a
moment, then select ‘Remove from the list’.
Install app from local memory: open FileManager, find your apk file in USB disk or SD card,
click the apk file to start installation.
Install app from online market: you may search and install apps from Google PlayStore,
however you would need a registered Google account.
Manage apps
In Settings > Device > Apps, you can check apps installed, force an app to stop, uninstall an
app, or move an app to SD card etc.
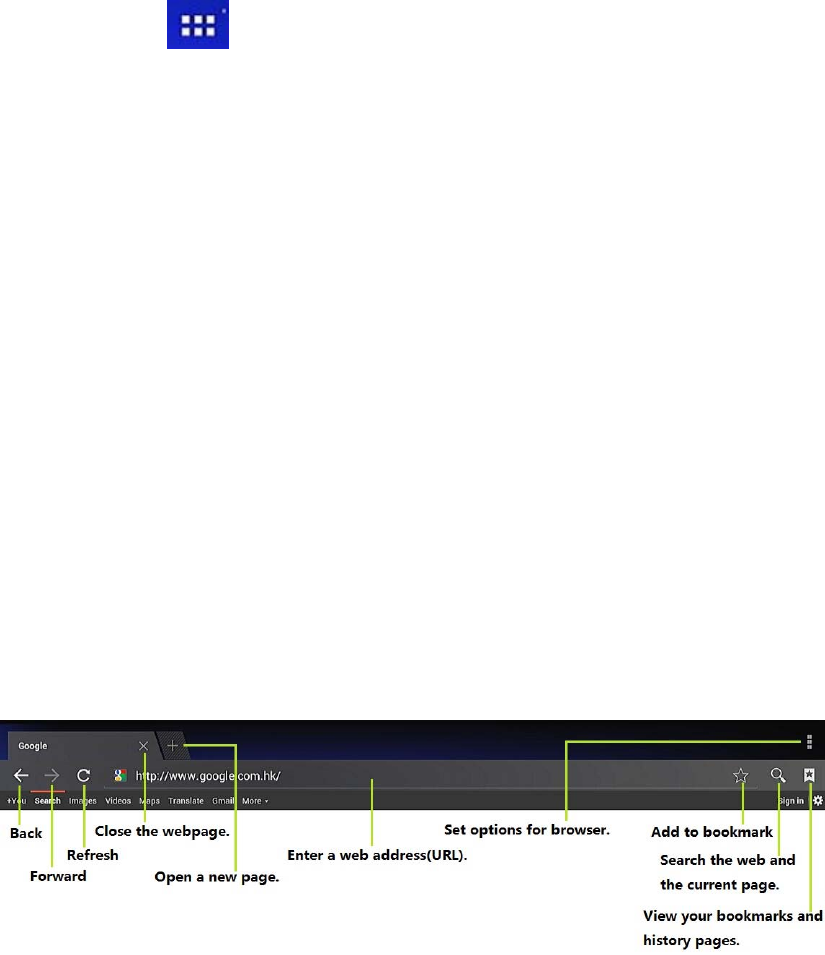
4. Web browsing
Start Browser to view web pages as in a personal computer. You can connect a (wired/wireless)
USB keyboard and/or mouse to facilitate the web surfing.
Set text size: Click the ‘Settings’ button on the upper-right corner of the browser, select
Accessibility, then set the text size for webpage.
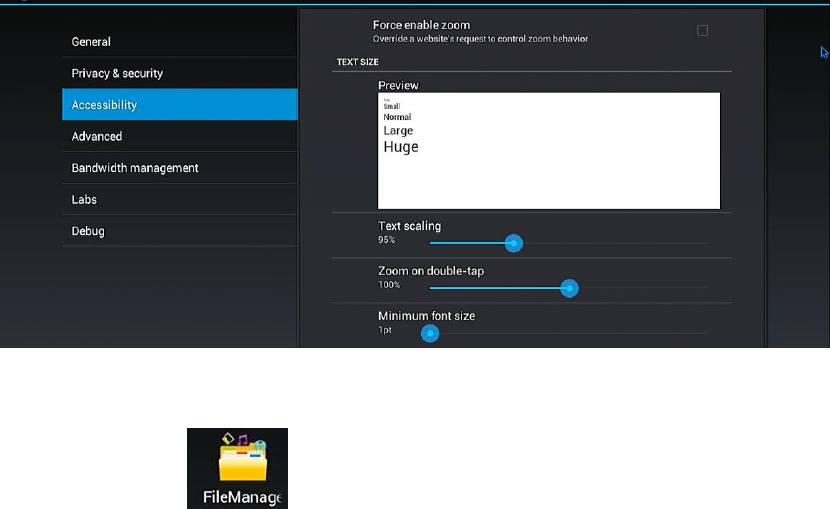
5. File manager and local media playback
Open File manager to view files in local memory or USB disk or SD card. To play
high definition media files, please choose “TvdVideo” as the default video/picture player.
6. User information
In an electrostatic discharge or a strong electromagnetic field, the product will malfunction.
Unplug the power cable to power off the box, and the box will return to normal performance
next time it is powered on.
The product shall not be exposed to dripping or splashing, and no objects filled with liquids,
such as vases, shall be placed on the product.
When you dispose the box, be sure to dispose it appropriately. Some countries may regulate
disposal of electrical device, please consult your local authority.
Where the MAINS plug or an appliance coupler is used as the disconnected device, the
disconnected device shall remain readily operable.
If the box has a problem, you should take it to a repair center and let a specialist check it.
Never repair the box by yourself, or else you might damage the box or endanger you.
You can also view the above information in Applications > Quick Reference Guide.
7. FCC Warning
This equipment has been tested and found to comply with the limits for a Class B digital device,
pursuant to Part 15 of the FCC Rules. These limits are designed to provide reasonable
protection against harmful interference in a residential installation. This equipment generates,
uses and can radiate radio frequency energy and, if not installed and used in accordance with
the instructions, may cause harmful interference to radio communications. However, there is
no guarantee that interference will not occur in a particular installation. If this equipment does
cause harmful interference to radio or television reception, which can be determined by turning
the equipment off and on, the user is encouraged to try to correct the interference by one or
more of the following measures:
-- Reorient or relocate the receiving antenna.
-- Increase the separation between the equipment and receiver.
-- Connect the equipment into an outlet on a circuit different from that to which the receiver is
connected.
-- Consult the dealer or an experienced radio/TV technician for help.
This device complies with part 15 of the FCC Rules. Operation is subject to the following two
conditions:
(1) This device may not cause harmful interference, and (2) this device must accept any
interference received, including interference that may cause undesired operation.
Changes or modifications not expressly approved by the party responsible for compliance
could void the user's authority to operate the equipment.
The antenna(s) used for this transmitter must be installed to provide a separation distance of at
least 20 cm from all persons and must not be co-located or operating in conjunction with any
other antenna or transmitter.