Measurement RPM2 MedHab StepRite insole User Manual
Measurement Ltd MedHab StepRite insole
User Manual

Demo Mode
RPM2 is supported with a "demonstration (Demo) mode" that easily allows you to navigate the app. Demo
mode is intended for navigation purposes only. Data in Demo mode are simply random data points providing
values so you can see what each screen shot contains. We recommend 30 minutes of "Demo mode" before
you pair, connect, and use your app. "Demo mode" can quickly make you an expert!
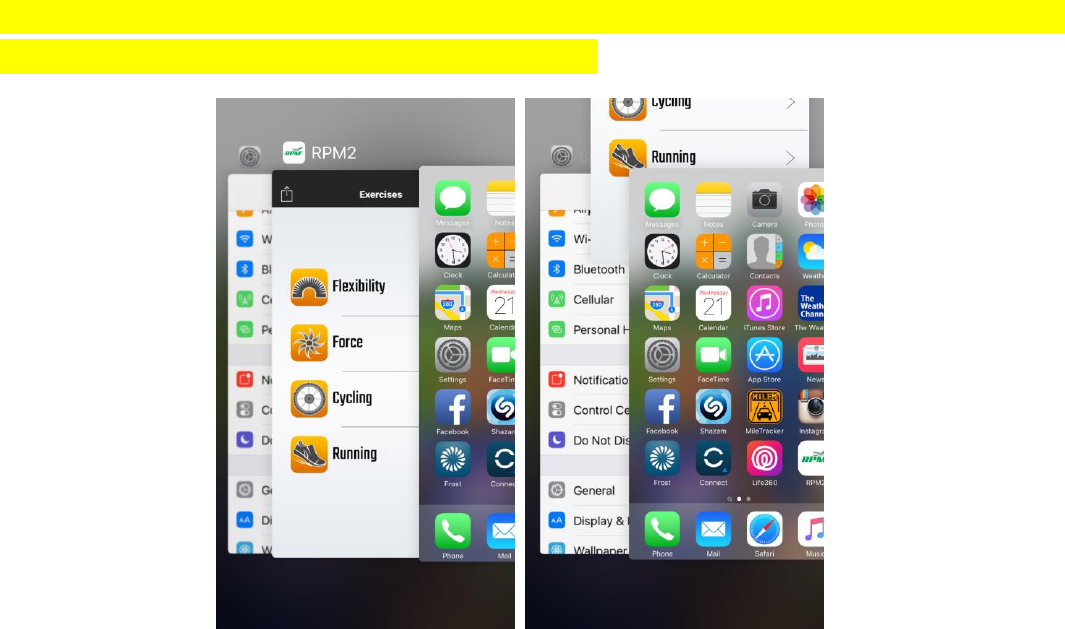
Open the app and click on "Demo" on the screen. You will find the word "demo” directly under the
Registration Code area, or under the black feet icons on the Connect Your Insoles screen. Once clicked, you
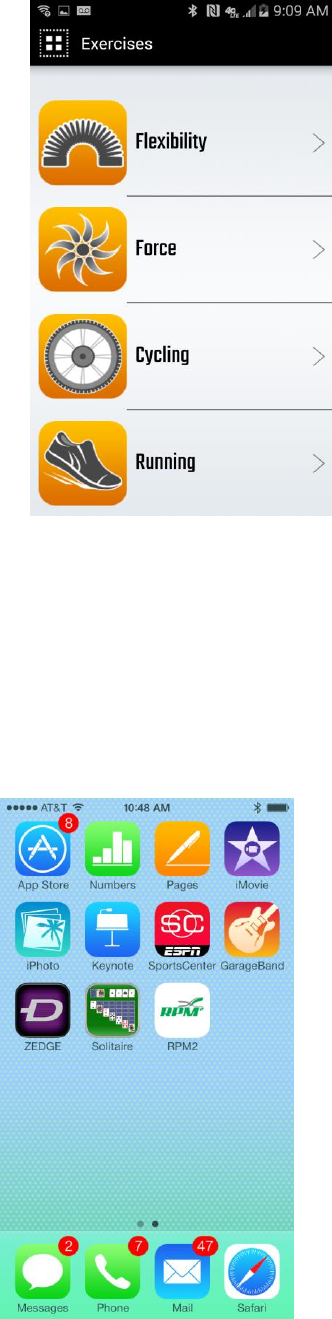
will advance to the main exercise screen where you can click on any book of exercises. For example, click
"Flexibility". This will direct you to the "flexibility" exercises menu. Click on an exercise. This will take you to
the exercise start screen. Before clicking anywhere on the screen, RPM2 recommends you click the “Video”
arrow in the top right corner. This will take you to our YouTube Video demonstrating exact technique of
performing the exercise. Once you have reviewed the YouTube video, you are re-directed to the "flexibility"
start exercise screen where you can anywhere on the screen. The timer will begin and demonstration data will
show you how the live screen operates when inserts are connected. Keep in mind this is demonstration data
and that the intent of the Demo mode is to help you learn how to navigate the RPM2 app. When ready you
can stop the timer by simply touching anywhere on the screen. The app will then take you to the post exercise
dashboard that provides a view of the exercise screen shot. Again, the data is demonstration data. We
recommend that you navigate all of the "Flexibility" exercises, as well as the "force", “Cycling”, and “Running”
Events.
While in "demo mode", we also recommend that you click the top left corner of the screen from the main
exercise menu. This will open the drop down window that contains other options available, Exercises,
Firmware Update, Calibration, History, and where to find Symmetry Scores. It is highly recommended that you
view the calibration exercises specific to standing pressure and cycling and practice them before actually
calibrating your RPM2 inserts. Additionally, it is recommended that you view the calibration videos on the
RPM2 website to learn proper calibration technique.
Once you have taken the time to navigate your RPM2 app in "Demo mode" you should be ready to pair,
connect, and try your inserts.
Instructions for pairing/connecting to iOS/Android
Touch white wire to black wire to reboot the insoles and place back on charger.
The following instructions are specific to iOS users.
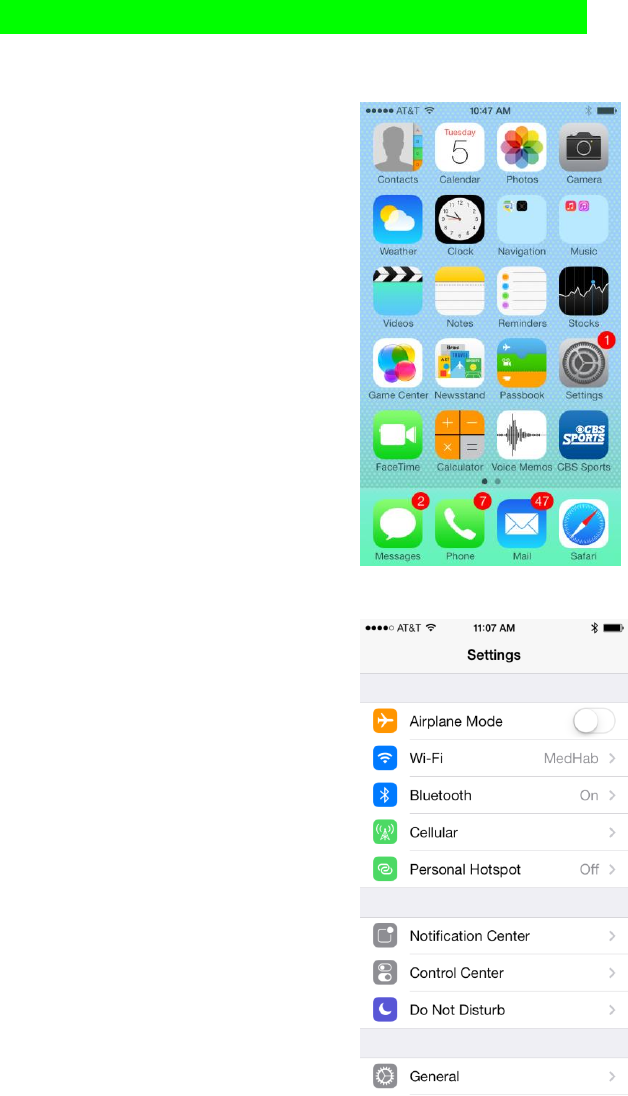
Step 1. When ready to use insoles, tap on your phone settings.
Step 2. Tap on Bluetooth, (make sure your Bluetooth is on).
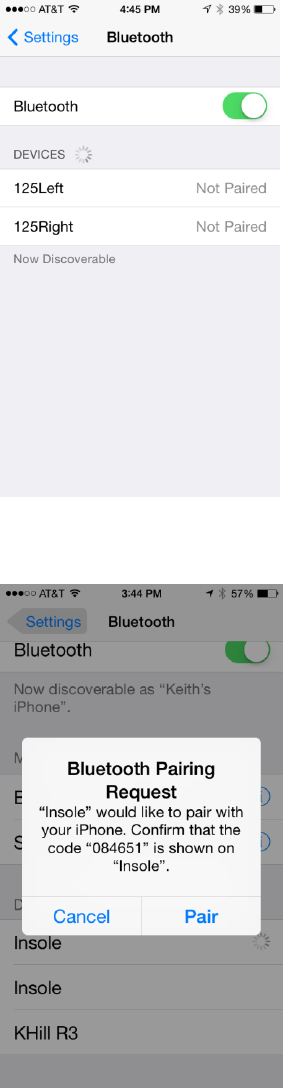
You will see your left and right insoles that are “Not Paired” under “Devices” listed as Insole, Insole.
If you don’t see the insoles, turn your Bluetooth off and back on.
Step 3. Tap on one of your insoles you want to use, i.e. Insole.
You will see a Bluetooth Pairing Request. Tap pair.
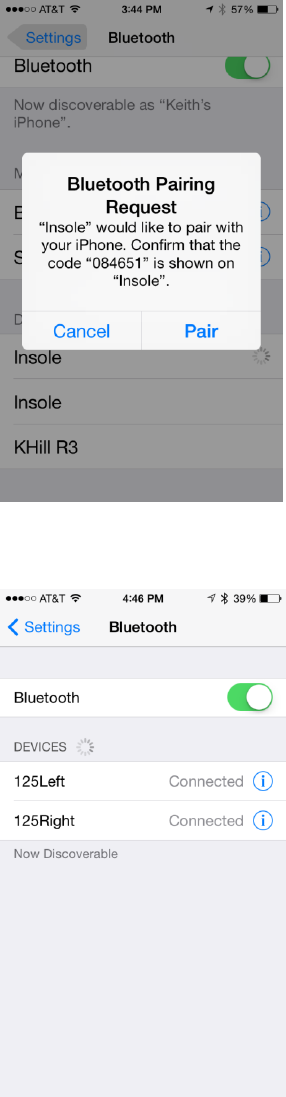
Step 4. Repeat this step for the other insole.
The screen will now show both insole as “Connected”.
Step 5. Tap the home button on your phone to get out of settings.
You are now “Paired” to your insoles in your Bluetooth Setting.
Connecting to the RPM2 App
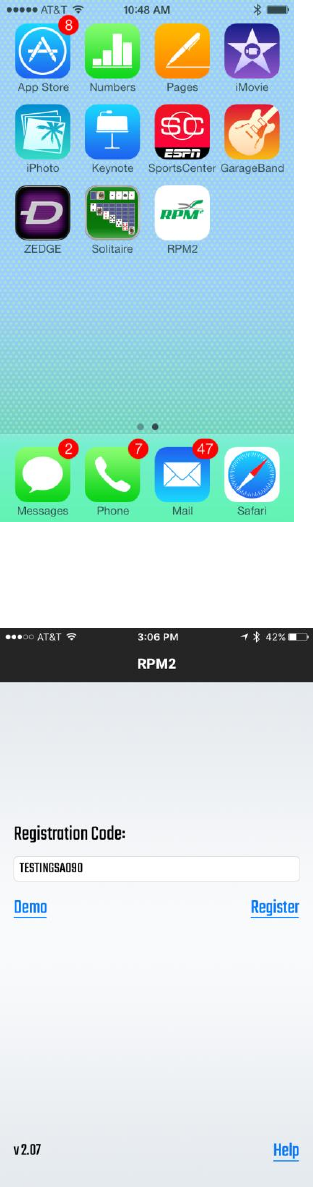
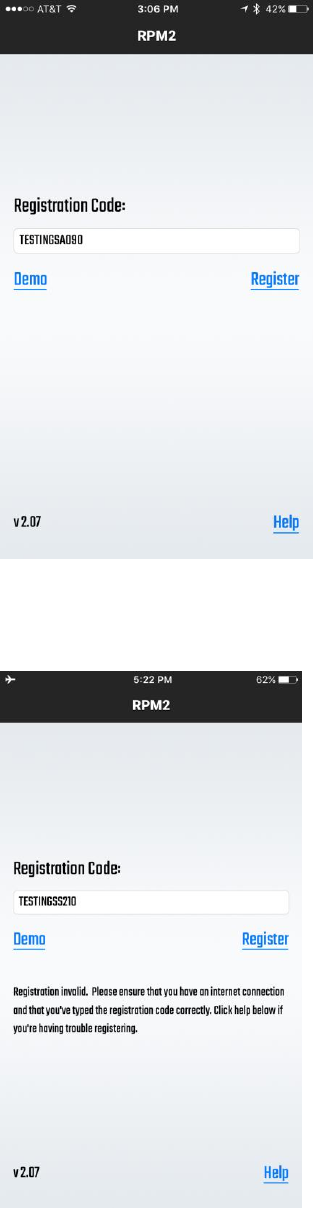
Step 1. Tap on and open the RPM2 App.
Step 2. Enter your Registration Code (It must be in all CAPS) and Tap Register.
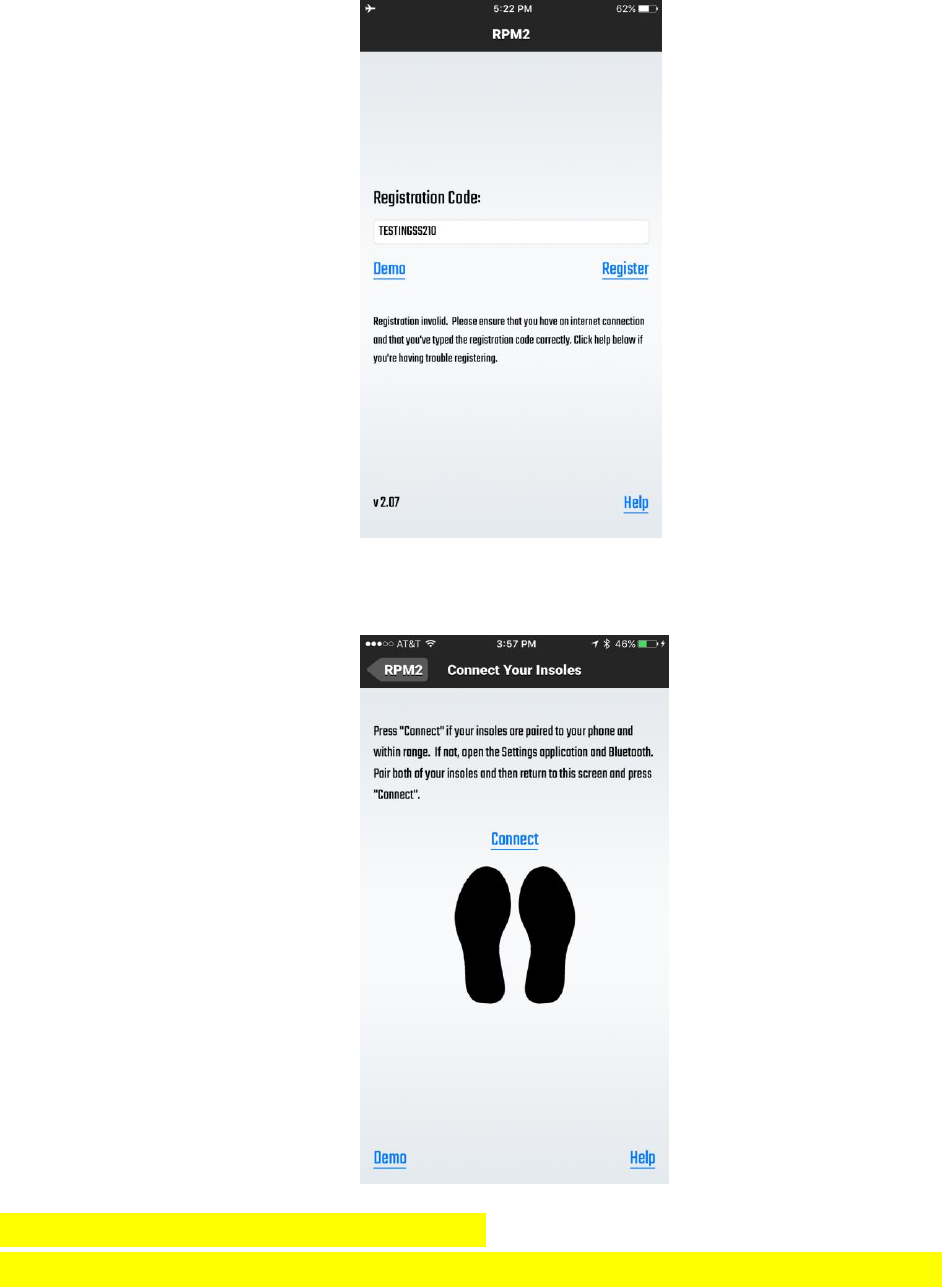
If Registration is Unsuccessful you will see Registration Invalid message.
If Registration Successful, the screen will show black feet and ask you to press “Connect”.
VERY IMPORTANT FOR APPLE (iOS) USERS
Double tap your Home Button and swipe the app upward to clear from your device.
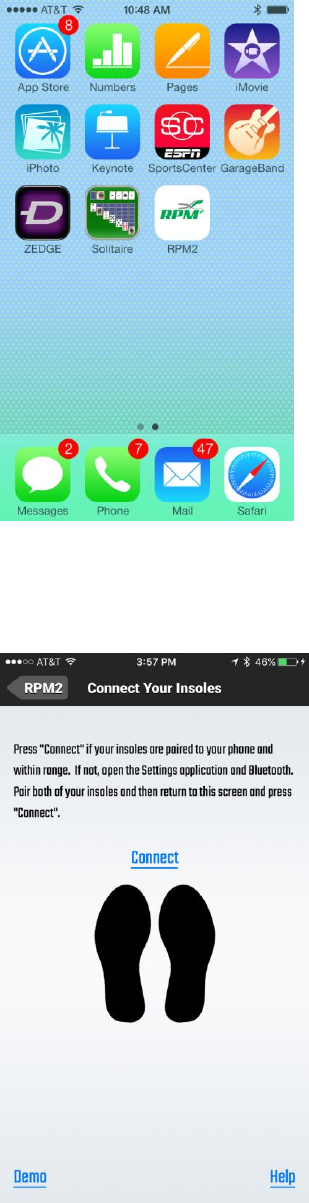
Step 3. Tap on and Re-open the RPM2 App.
Step 4. The screen will appear as follows. Tap “Connect”.
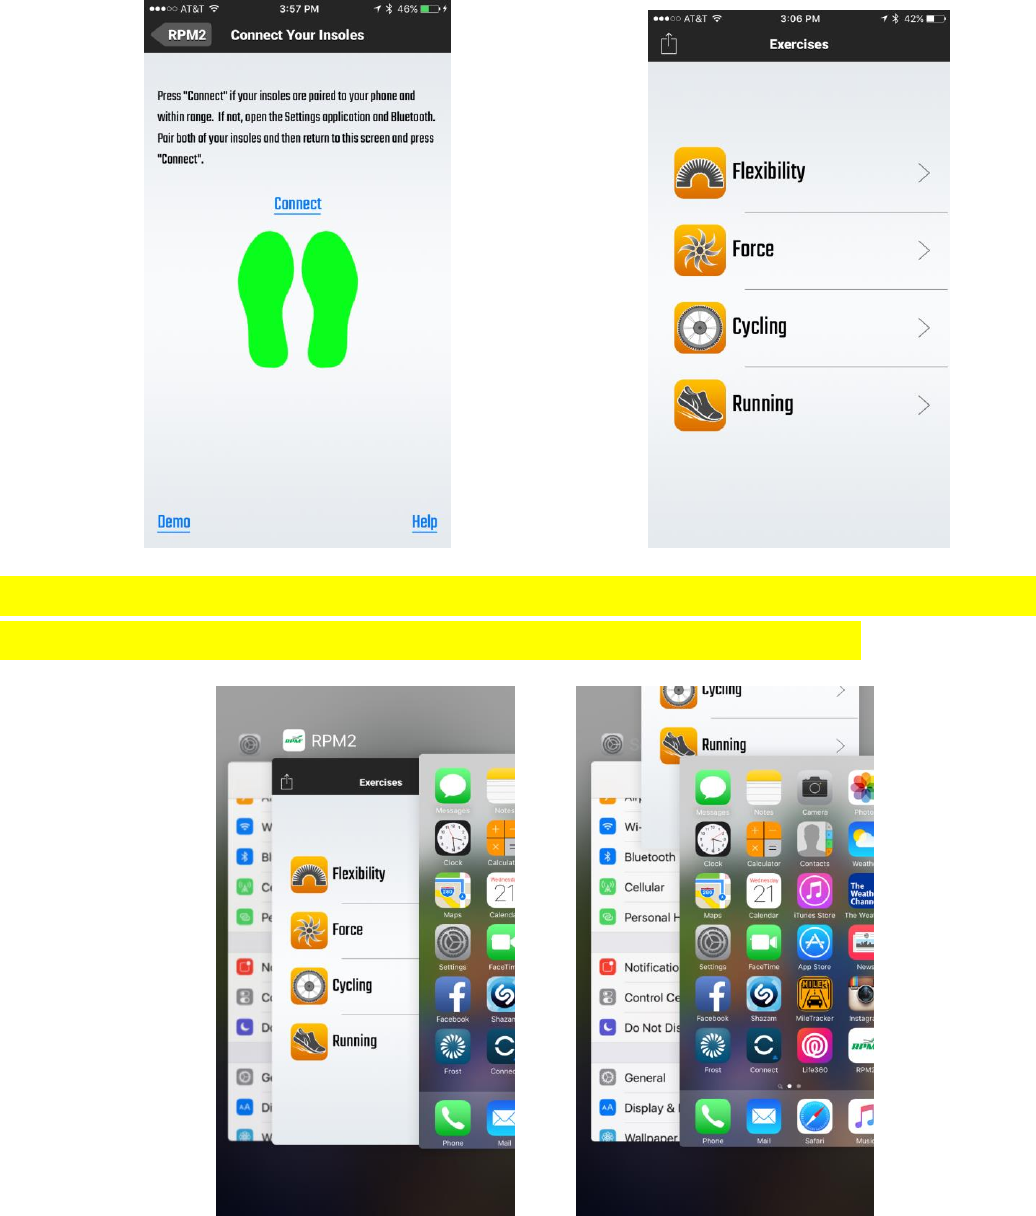
Feet should turn Green. If Connection is Successful, app moves to Main Menu Screen.
If at any time you need to clear the app from your smart device, double tap your
Home Button and swipe the app upward to clear from your device.
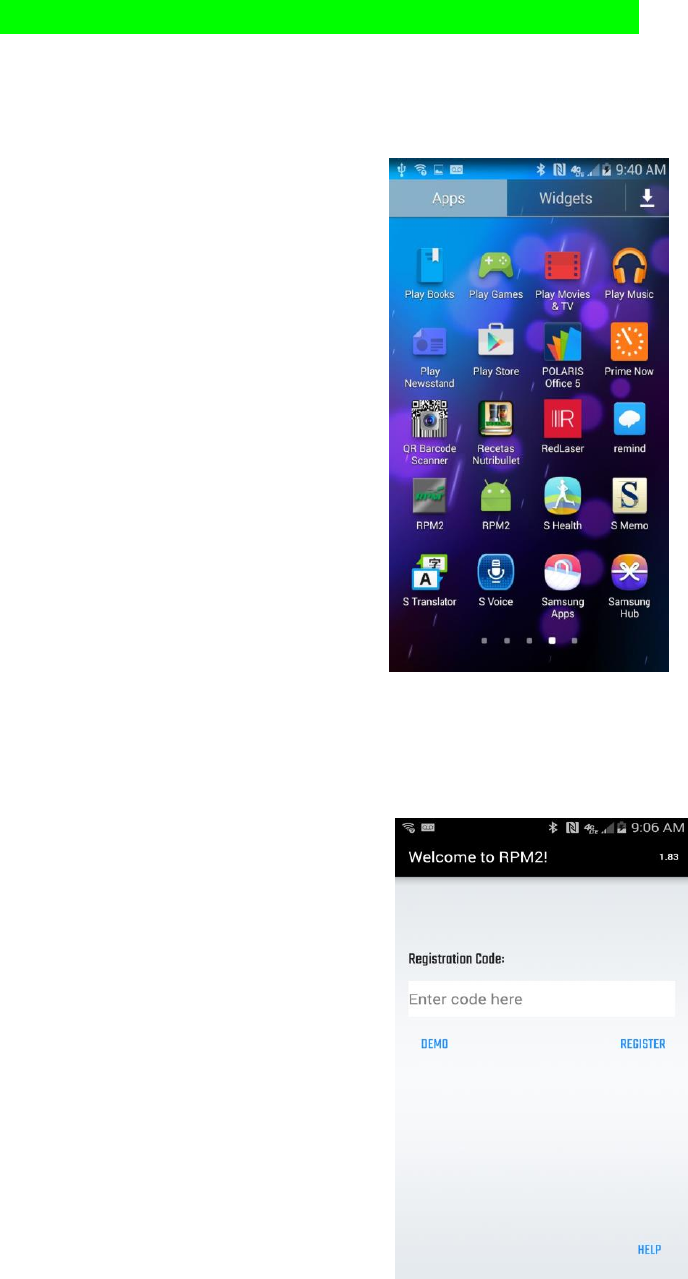
The following instructions are specific to android users:
Step 1. Tap on the icon for RPM2
Step 2. You will see the following screen. Type your registration code (generated on the RPM2 website upon
registration of your insoles).
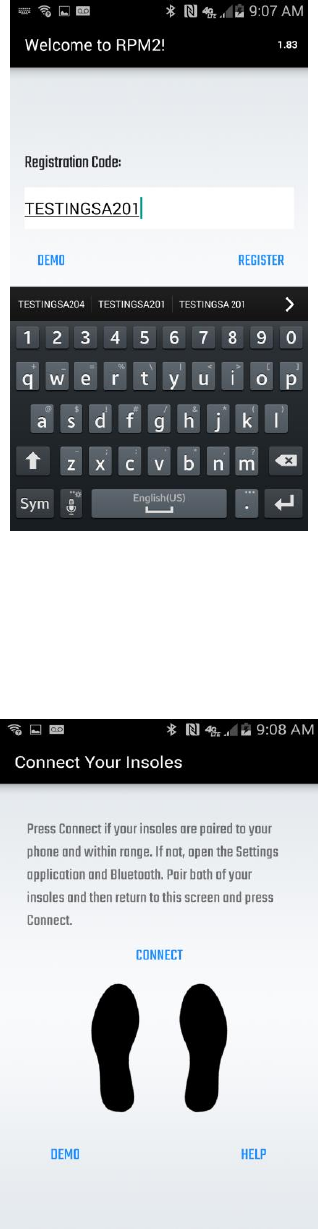
Step 3. The screen will appear as follows once you have typed in your Registration code. Tap on “Register”.
Step 4. The screen will appear as follows. Tap “Connect”.
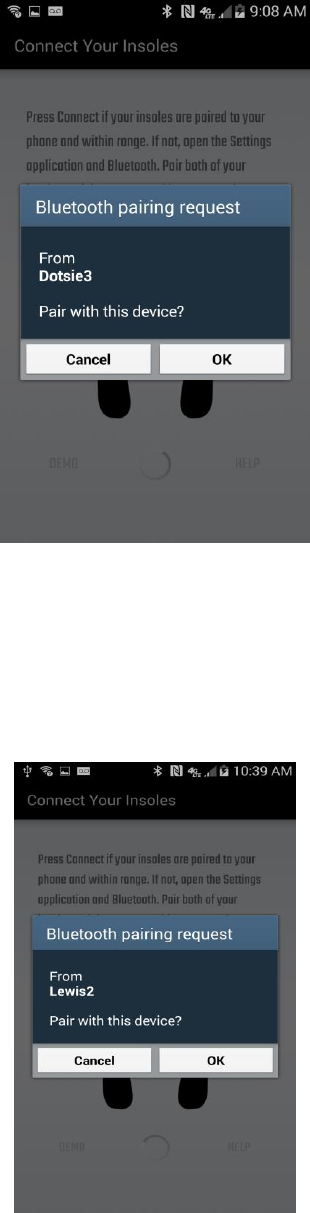
Step 5. A pairing request for the first insole will appear. Tap ok.
Step 6. A second pairing request will appear on the screen for the second insole. Tap ok.
Step 7. When the following screen appears, your insoles are paired and connected and you are ready to begin
using the device.
Instructions used for either iOS/Android Smartphones:
Entering New Registration Code
Step 1. Tap on and open the RPM2 App.
Step 2. Enter your Registration Code (It must be in all CAPS) and Tap Register.
If Registration is Unsuccessful you will see Registration Invalid message.

If Registration Successful, the screen will show black feet and ask you to press “Connect”.
Step 3. Tap “Connect”. Feet should turn Green. If Connection is Successful, app moves to Main Menu Screen.
You are now ready to use the RPM2 App.
If at any time you need to clear the app from your smart device, double tap your Home Button
and swipe the app upward to clear from your device.
Instructions on using the RPM2 App.
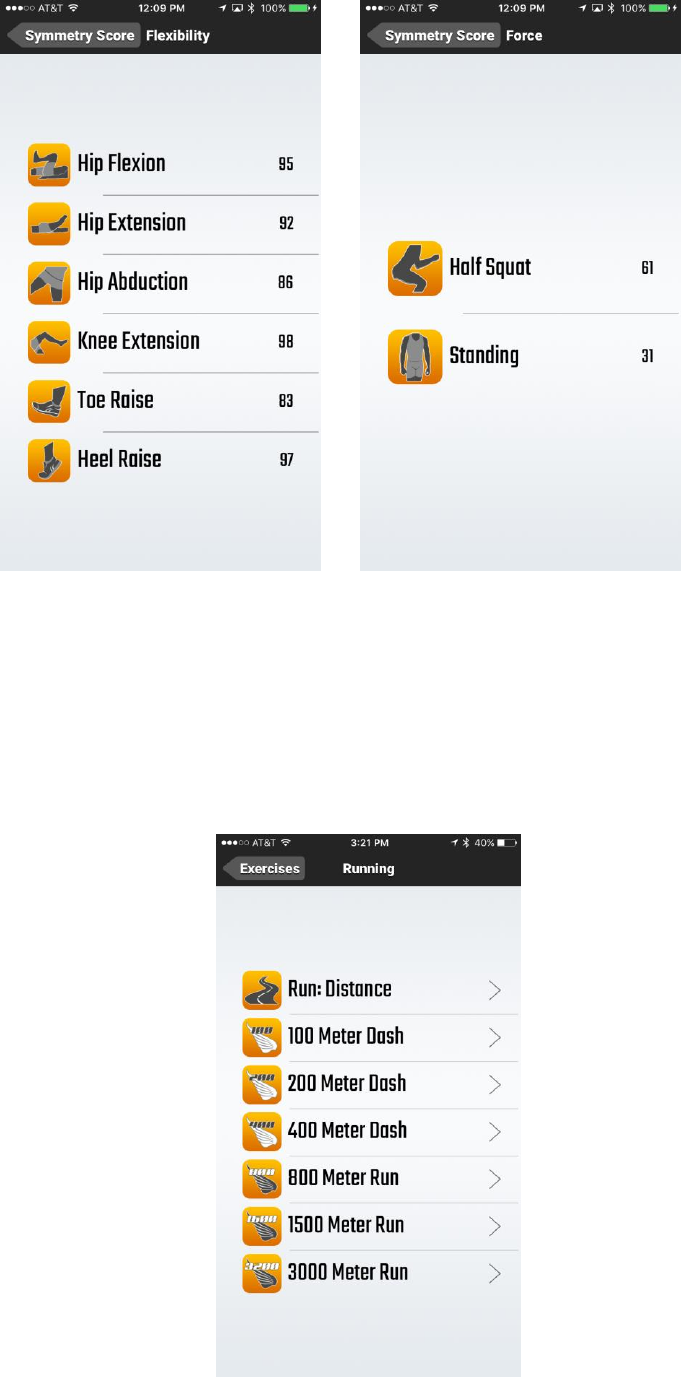
Flexibility Exercises
Step 1. Tap Flexibility.
Step 2. Tap the Flexibility exercise you wish to perform.
Step 3. Tap on the screen to begin exercise.
Step 4. Perform exercise with a 1-2 second hold time with each repetition and 1-2 second hold in neutral
Position between repetitions. You will see the degrees of Flexibility change as you perform each
repetition.
Step 5. Tap on the screen after completing the number of repetitions you wish to perform to stop recording
and review you data.
Step 6. Tap < to return to Main Menu.
Step 7. Repeat steps 1 thru 6 to perform the next Flexibility exercise.

Force Distribution Exercises
Step 1. Tap Force.
Step 2. Tap Standing.
Step 3. Tap on the screen to begin exercise and stand as still as possible with your arms at your side.
Step 4. You will see the standing force distribution change as you stand. The bottom sliding bar is the
bilateral force left leg vs. right leg. The sliding bar under each foot is the pronation/supination of each
foot. You will also see the % of force in each of the 4 quadrants of each foot.
Step 5. Tap on the screen to stop measuring and Review Summary data.
Step 6. Tap <Exercise to return to Main Menu.
Step 7. Tap Force, then tap Half Squat if you wish to perform the Half Squat Force Distribution Exercise.
*Note: You will not see Standing Force Distribution of 100% and 0% when you only stand on one foot. The
reason for this is the residual effect of gravity as well as the idling current of the electronic force sensors in the
inserts
Calibrate Running - Power Meter ON (Default Running Calibration)
RPM2 inserts are pre-loaded with a “Default Running Calibration”.
However, If you would like more specific data during your run, It is necessary to perform the Force Sensitivity
calibration. If you would like even MORE specific data, then also perform the Step Distance calibration for
running exercises.
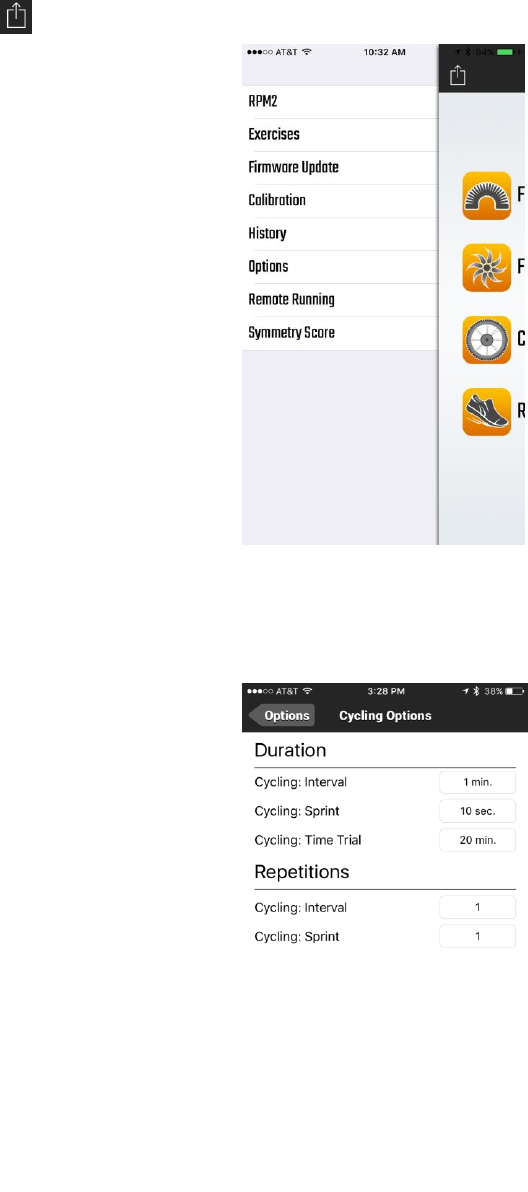
Step 1. Tap to go to Firmware Updates, Calibration, History, Options, Remote Running, & Symmetry Score
Step 2. Tap Calibration.
Step 3. Tap Running Calibration.
Step 4. Tap Force Sensitivity
Step 5. Enter weight and Tap Next. (the app will direct you to the calibration screen)
Step 6. Stand next to wall and place hands on wall for balance only. Do not lean on your hands. You must
Stand only on your right foot and as still as possible.
Step 7. Raise left leg. Tap start and wait for green progress bar to complete.
Step 8. Repeat process with left leg.
If you would like more specific data during your run, then perform the Step Distance Calibration
Step 1. Tap on Step Distance
Step 2. Set the distance (100 Meter, 400 Meter or 800 Meter) tap Next.
Step 3. Tap anywhere on the screen to start run. Shown are Left Power, Right Power, Collective Power &
Cadence.
Step 4. Tap anywhere on the screen to stop after you complete the desired distance. You will see Time
Elapsed, Distance Traveled, Average Cadence, Steps Taken, and Meters per Step.
Step 5. Tap Back and tap Exercises to return to Main Menu. You are now ready to run.
*Note: Initial Calibration is required. Only significant change in your gait data would warrant Re-Calibration.

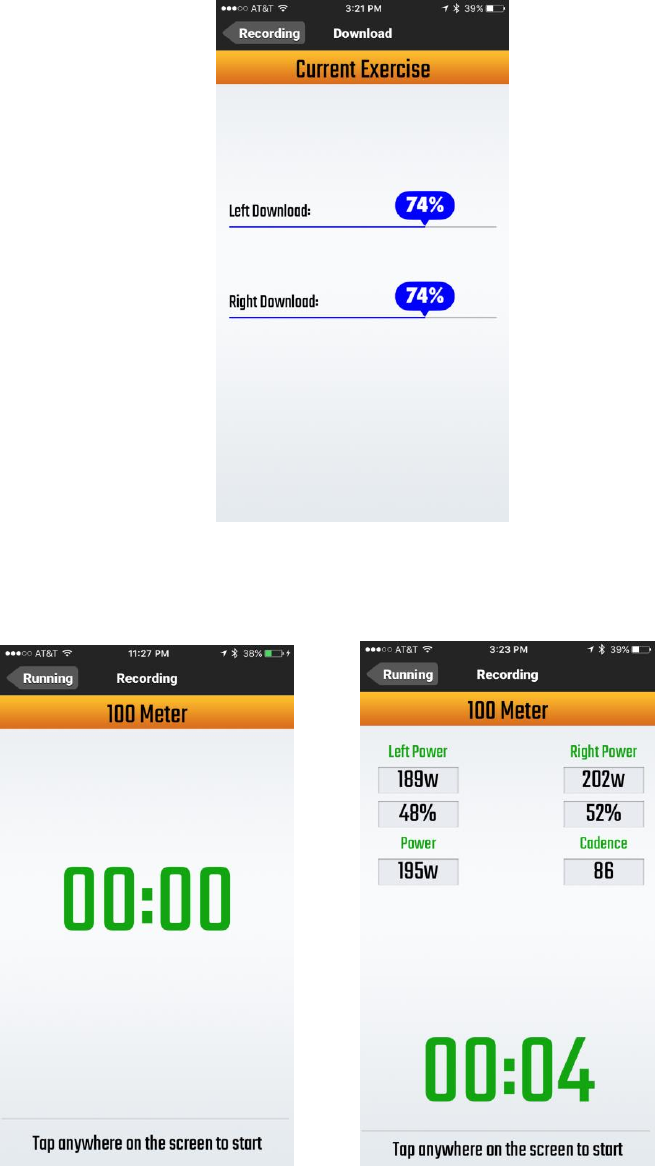
Running – Power Meter ON
Step 1. Tap Running.
Step 2. Choose which run distance you want to perform and click that distance i.e. 100 Meter Dash.
Step 3. Tap anywhere on the screen to start run. Shown are Left Power, Right Power, Collective Power &
Cadence.
Step 4. Tap anywhere on the screen to stop.
Step 5. When exercise is complete, tap any line that has your Cadence and Power numbers to review Step
Time, Flight Time, Ground Time, and Power dashboard.
Step 6. Tap < Exercise to return to Main Menu.
Step 7. Repeat steps 1 thru 5 to perform another Run exercise.
Running – Power Meter OFF
Step 1. Tap Running.
Step 2. Choose which run distance you want to perform and click that distance i.e. 100 Meter Dash.
Step 3. Perform Calibration by pressing Start and following voice prompts to Calibrate.
Voice prompts are: Raise Right Foot, Raise Left Foot, Put Both Feet on the Ground.
Step 4. Tap anywhere on the screen to start your run.
Step 5. Tap anywhere on the screen to stop after you complete the desired distance.
Step 6. Review Cadence, and Step Time data.
Step 7. Tap any line that has your Cadence and Step Time to review Step Time, Flight Time, Ground Time,
Take Off Force, and Force Strike (Heel, Mid or Fore Foot).
Cycling Calibration
Calibration for cycling is necessary for RPM2 to measure right and left leg power accurately.
It is important to use proper form when calibrating.
Step 1. Tap on cycling calibration, enter weight and Tap next. (the app will direct you to the calibration
screen).
Step 2. Wearing your cycling shoes, stand next to wall and place hands on wall for balance only. Do not
lean on your hands. You must stand with your foot flat on the cleat with your heels slightly
elevated. You must also remain still while calibration is in progress.
Step 3. Raise left leg, standing on right cleat. Tap start and wait for green progress bar to complete.
Step 4. Repeat process with left leg.
When calibration is complete a screen pops up informing you that calibration is complete. You will see
corrective coefficient values for left and right leg.
*Note: You will want to calibrate in normal running/athletic shoes if you do not use cycling shoes.
Cycling
Step 1. Tap Cycling.
Step 2. Choose which Cycling event you want to perform and Tap that event i.e. Cycling: Sprint.
Step 3. Tap on the screen to begin exercise.

You will see Right Leg Power, Left Leg Power, Collective Power, Cadence, and the % of power Right to
Left.
Step 4. When exercise is complete, tap on the line that has your Cadence and Power numbers to review
Cadence, Average Peak Power and Bilateral force of each leg around the crank.
Step 5. Tap <Back to return to Cycling Dashboard.
Step 6. Tap <Exercises to return to Main Menu.
Step 7. Repeat steps 1 thru 5 to perform next Cycling event.
Standing Calibration
Step 1. Tap to go to Firmware Updates, Calibration, History, Options, Remote Running, & Symmetry Score
Step 2. Tap Calibration.
Step 3. Tap Standing Calibration.
Step 4. Enter weight and Tap Next. (the app will direct you to the calibration screen)
Step 5. Stand next to wall and place hands on wall for balance only. Do not lean on your hands. You must
Stand only on your right foot and as still as possible.
Step 6. Raise left leg. Tap start and wait for green progress bar to complete.
Step 7. Repeat process with left leg.
Instructions on Sharing the Data
Share Data
Step 1. Tap to go to Firmware Updates, Calibration, History, Options, Remote Running, & Symmetry Score
Step 2. Tap Options.
Step 3. Tap Interface.
Step 4. Tap Share Data and the number of Exercises to Share will automatically populate into an email.
Step 5. Add all addresses you wish to Share the Data with on the To: line.
Step 5. You can add extra text to the body of the email if you wish but not necessary.
Step 6. Tap Send.
Step 7. Tap Options to return to Options Menu.
Step 8. Tap then tap Exercises to go to Main Menu.
Instructions on Adding New Firmware
Step 1. Go to Options Menu
Step 2. Tap Firmware Update
Step 3. Tap “Check for Update”
Step 4. Tap “Install”. You will see each insert upload the firmware from zero to 100%.
Inserts will disconnect from Bluetooth when upload is complete.
Each time new Firmware is loaded, your inserts will need rebooted before Bluetooth will discover them.
If you don’t need to update your Firmware, It will tell you “Your insoles are up to date”.
Instructions on renaming Insoles
Renaming Insoles – This process is VERY IMPORTANT to do!
You need to rename your inserts so you can easily identify which insoles are yours in Bluetooth settings.
Step 1. Tap to go to Firmware Updates, Calibration, History, Options, Remote Running, & Symmetry Score
Step 2. Tap on Options.
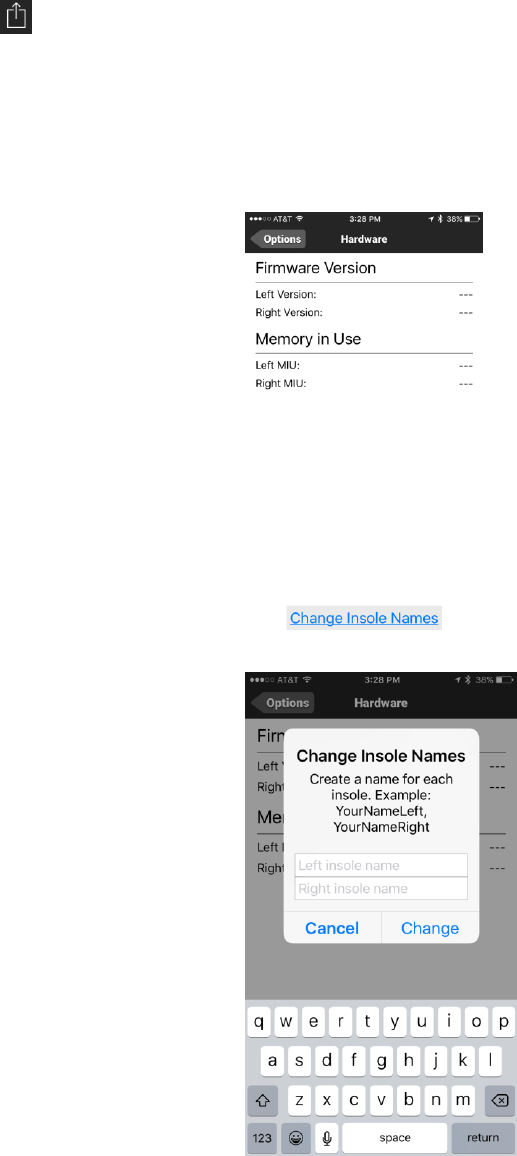
Step 3. Tap Hardware. You will see “Change Insole Names” at bottom.
Step 4. Tap on Change Insole Names.
Step 5. Type in names you wish to call your inserts and tap Change.
Step 6. Check in your Bluetooth settings for new names of inserts. You will need to re-pair to your inserts
after renaming before being able to use them.
Instructions on unpair the insoles.
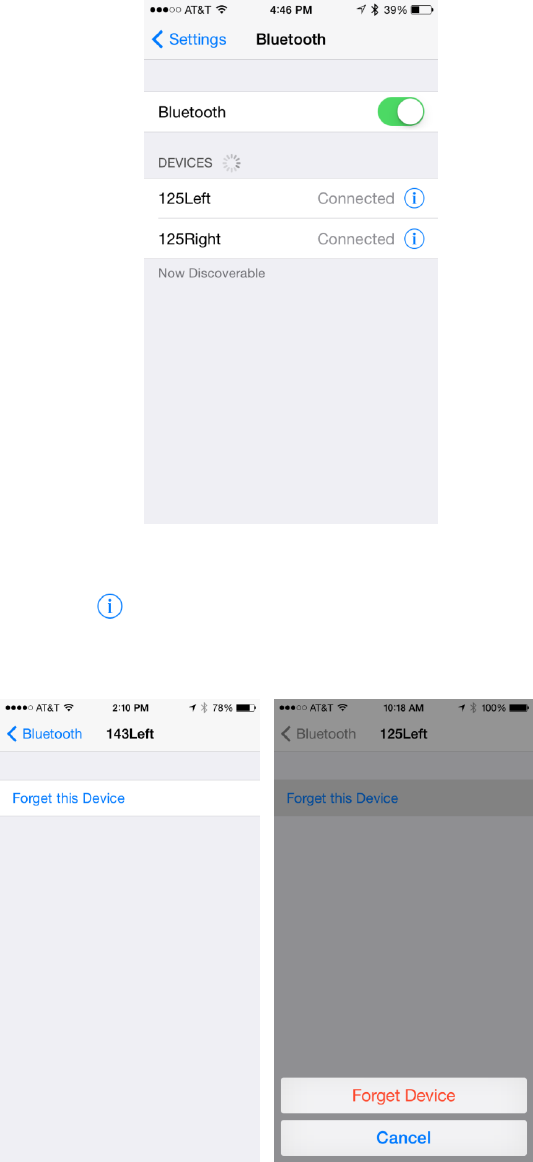
Step 1. Go back to Bluetooth in your phone setting.
The screen will show both insoles as “Connected”.
Step 2. Click on the blue circle
Step 3. Click on “Forget this Device” then on “Forget Device”.
You will need to repeat this process with your other insole.
Your insoles will not show up under My Devices but will show up under Other Devices. If at any time insoles
do not show up under Other Devices you will need to turn your Bluetooth off and back on.
Step 4. Place inserts back on charger and make sure Green light is on.
Set parameters for exercises you wish to perform.
All Cycling and Running parameters (Durations & Repetitions) etc, should be set in advance.
Step 1. Tap to go to Firmware Updates, Calibration, History, Options, Remote Running, & Symmetry Score
Step 2. Tap Options.
Step 3. Tap Cycling to set Cycling options for Interval, Sprint, Time Trial Durations and Interval & Sprint
Repetitions.
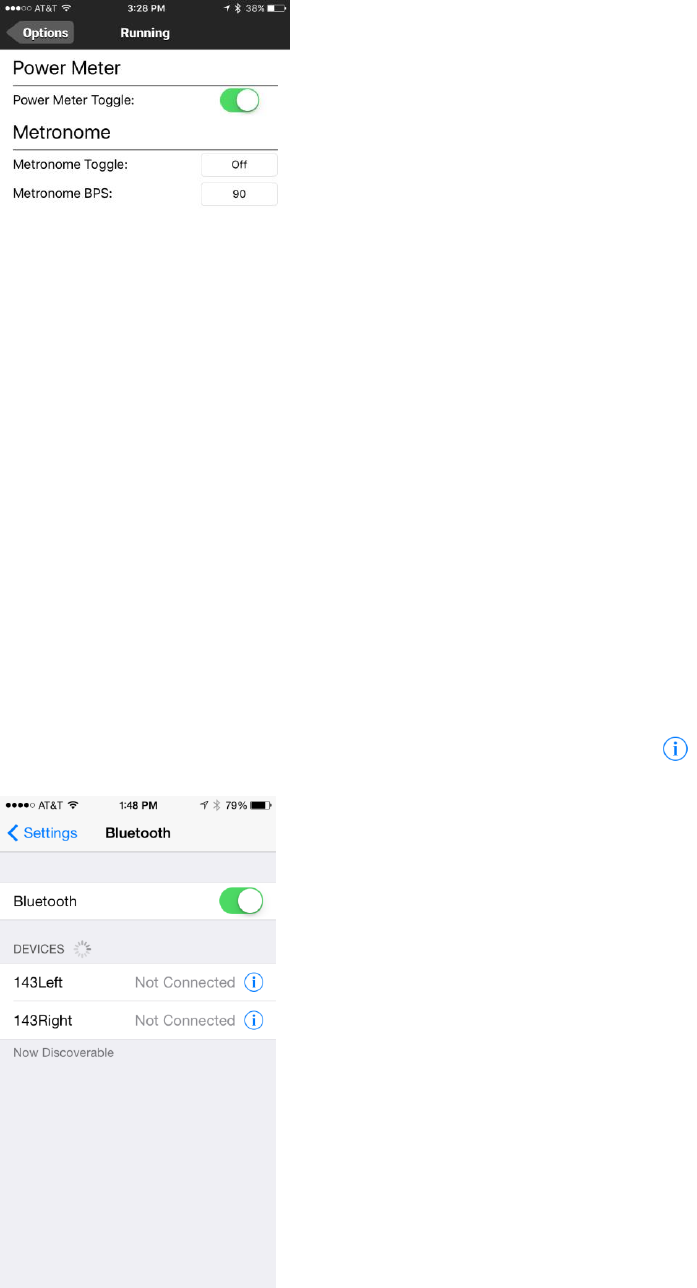
Step 4. Tap Running to toggle Running Power Meter, Metronome off/on and to choose running Cadence.
Instructions if insoles lose Bluetooth pairing
If your insoles lose pairing to your phone, it will show “Not Connected”.
Step 1. Tap on “Not Connected” to re-establish Bluetooth connection. If this fails tap on the blue circle
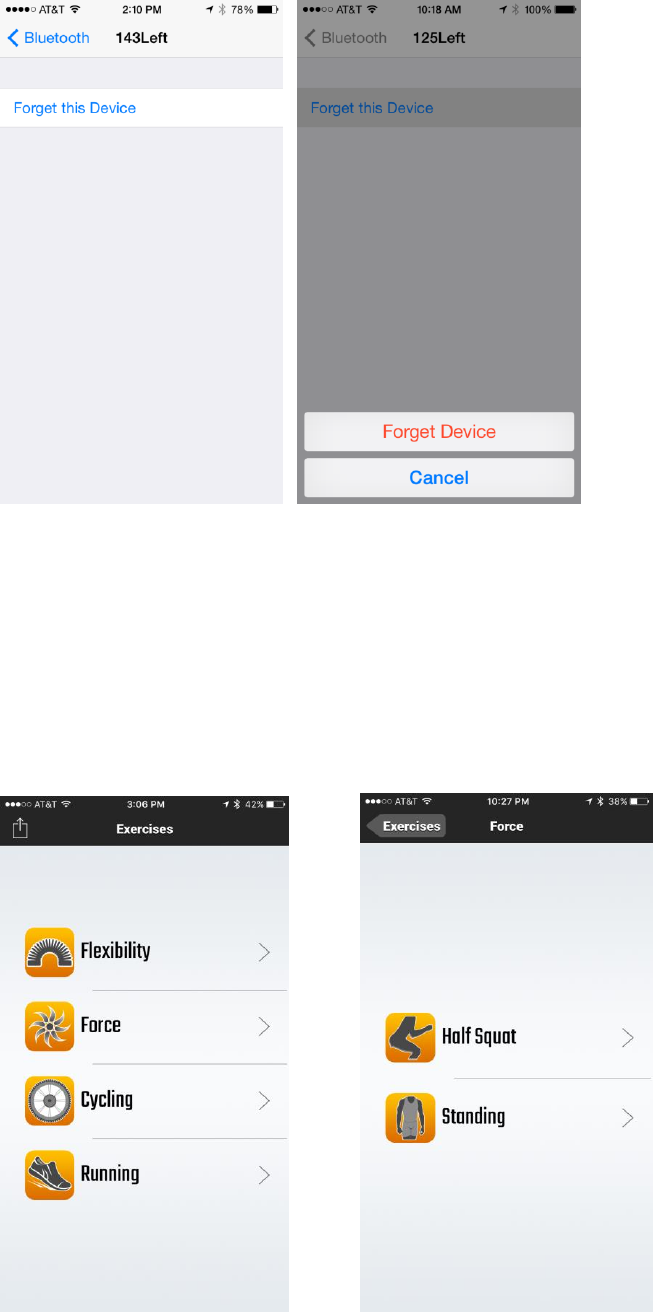
Step 2. Tap on “Forget this Device” then on “Forget Device”.
You will need to repeat this process with your other insole.
Step 3. Repeat Steps 4 – 6 under Instructions for pairing/connecting to iOS.
Example Exercises
For illustrative purposes, we will select “Force” then “Standing”.
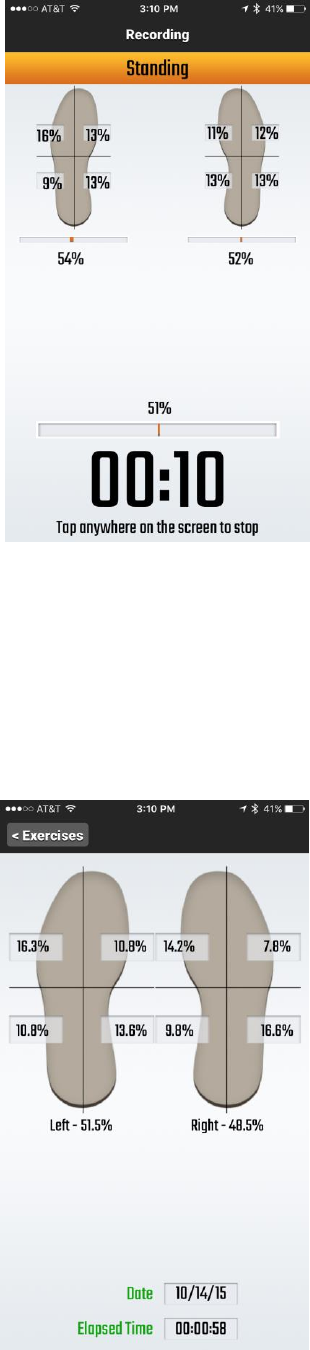
The dashboard opens up and shows your standing pressure, left vs. right insole. It also shows where the
pressure is within the four quadrants of your foot.
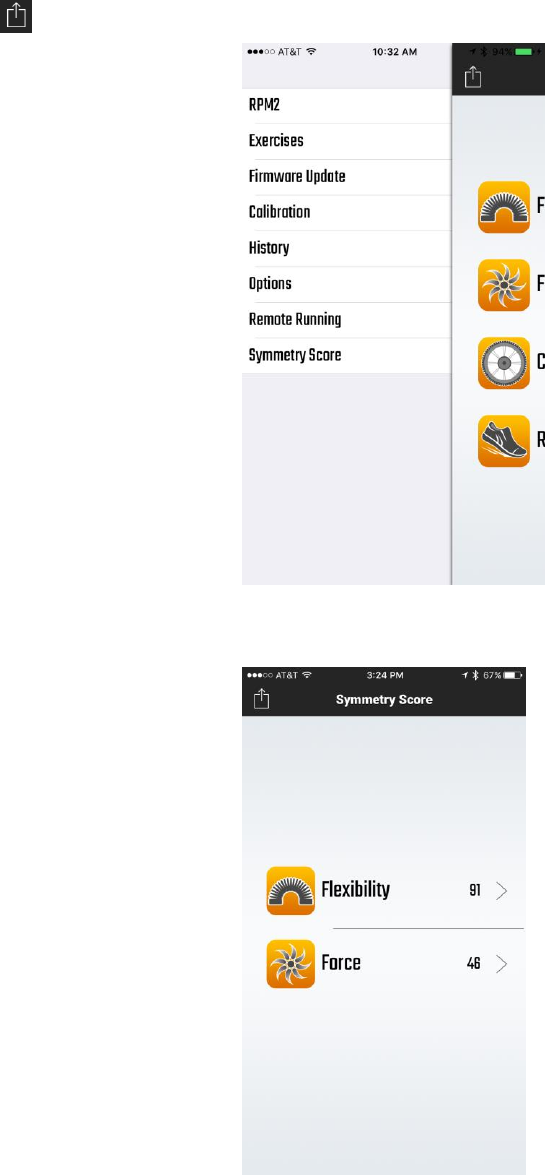
Total Symmetry Score
Step 1. Tap to go to Firmware Updates, Calibration, History, Options, Remote Running, & Symmetry Score
Step 2. Tap on Symmetry Score to see your Total Symmetry Scores with a goal to achieve 100 %.
Step 3. Tap on Flexibility or Force to review Total Symmetry of each Flexibility & Force Distribution exercise.
Now you are ready to attempt other exercises like the 100 Meter run.
You will hear audible commands that take you through a Calibration process (only when Power Meter is
Toggled OFF). Follow the commands. After completion of this calibration, you will see a download screen and
the percentage (%) of data transferred from each insole.
When you are ready to run, “Tap on screen to Start”.
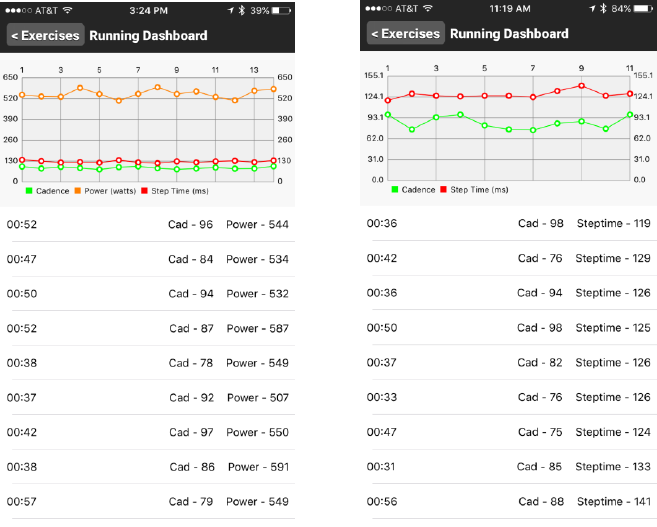
Once download is complete, you will see a dashboard. As for all running exercises, not just the 100 m dash,
you will initially see three data sets (Cadence, Power (watts), and Step Time). If the Power Meter is Toggled
Off you will see two data sets ( Cadence and Step Time).
Tap on any line and you will see another dashboard.
This represents the Step Time, Flight Time, Ground Time and Power Left foot vs. Right Foot when the Power
Meter is Toggled On and Step Time, Flight Time, Ground Time, Take off Force and Force Strike
which indicates the location of impact when you are running, i.e. Heel, Mid, or Fore Foot Striking when Power
Meter is Toggled OFF.
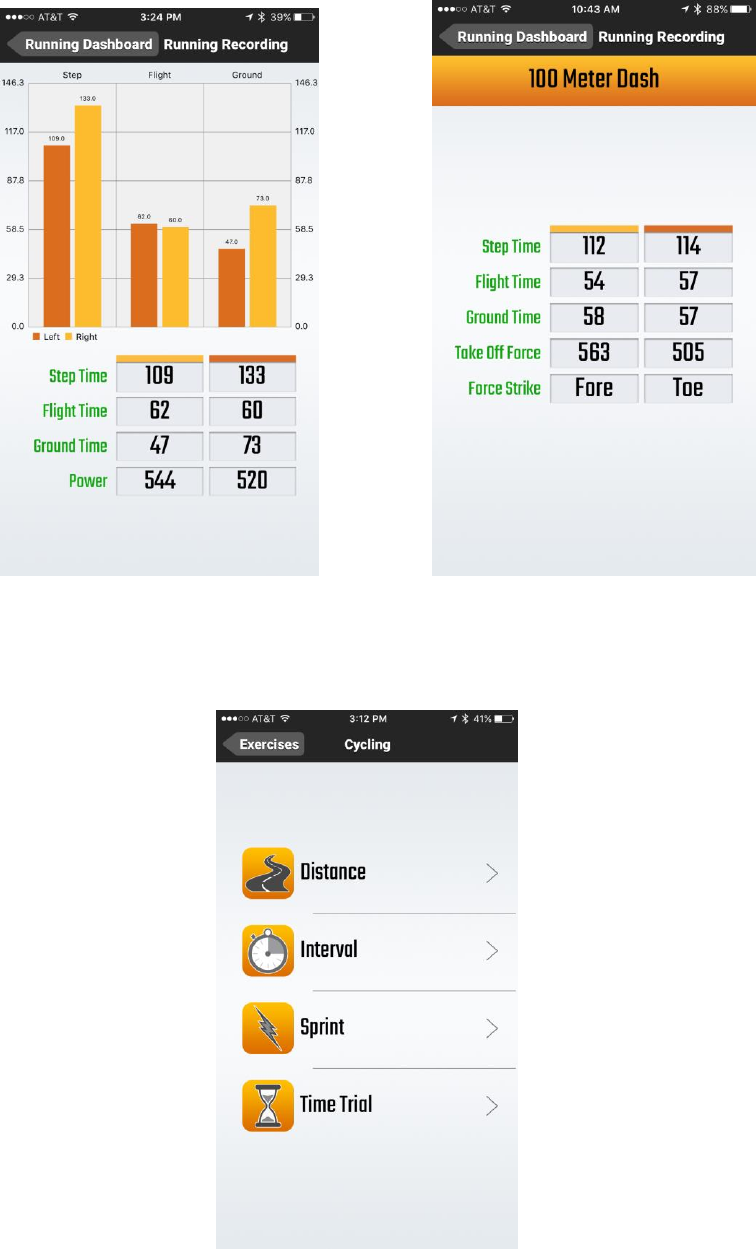
Toggle ON Toggle OFF
Tap “Running Dashboard” on phone to return to the exercise menu screen.
Tap “Cycling”. For illustrative purposes, we will use “Sprint Training”.
Remember, the options can be set for up to 12 reps for Sprint Training, each ranging from 10 seconds to 30
seconds. As you are riding, you simply Tap on screen to “Start” when you are ready to sprint. The application
counts down the seconds for you 3…2…1...
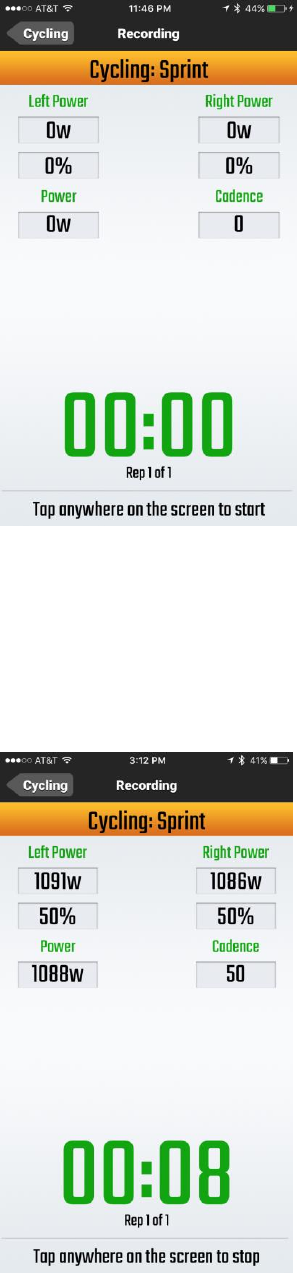
You will see left leg vs. right leg power as well as Collective Power and Cadence and the % left leg vs. right leg.
Don’t touch the screen again until you are ready to do another sprint. Tap on screen to “Start” again.
Once all reps are completed, a dashboard appears showing a number of lines that match the number of reps
performed.
For this dashboard, it is clear that 3 reps were completed.
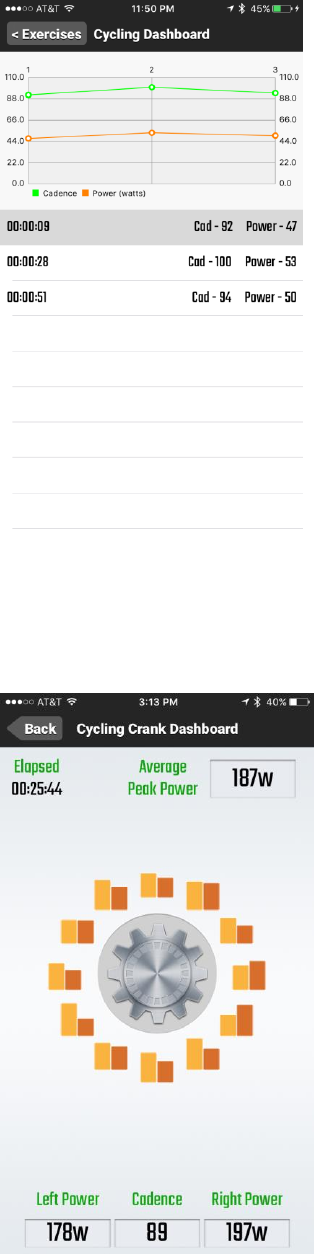
By tapping on each of the lines, more dashboards become available.
The first of these dashboards, represents data from the first sprint. It shows Cadence (revolutions per
minute) Average Peak Power, Left Power vs. Right Power and time Elapsed.
If you would like more information regarding left vs. right force application during the ride and in particular
during the push or pull of the pedal stroke around the crank, tap on any of the bar graphs. The bar graphs on
the right half of the pedal represent push part of the stroke and those on the left half of the pedal represent
the pull part of the stroke.
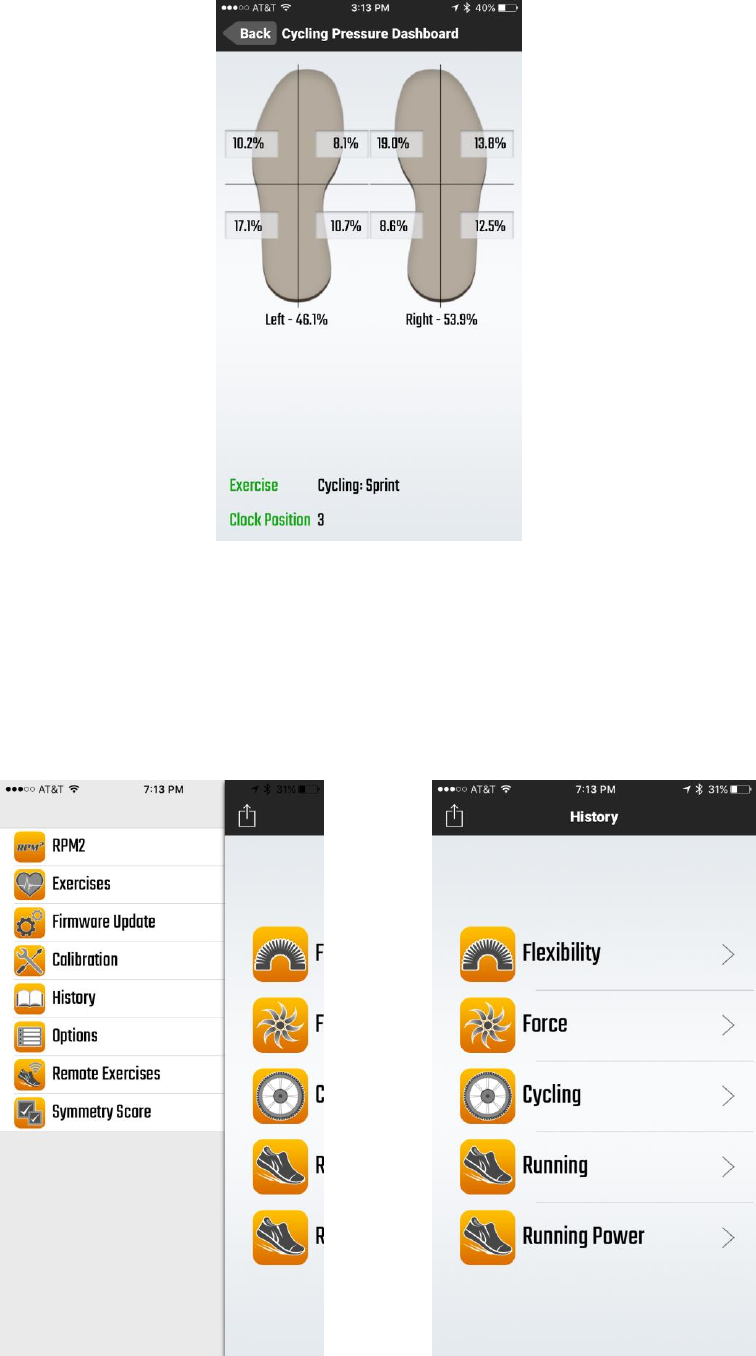
The dashboard appears for that point in time of the stroke and provides comparative information regarding
what is happening left vs. right foot in terms of overall force applied , but also where the force is applied.
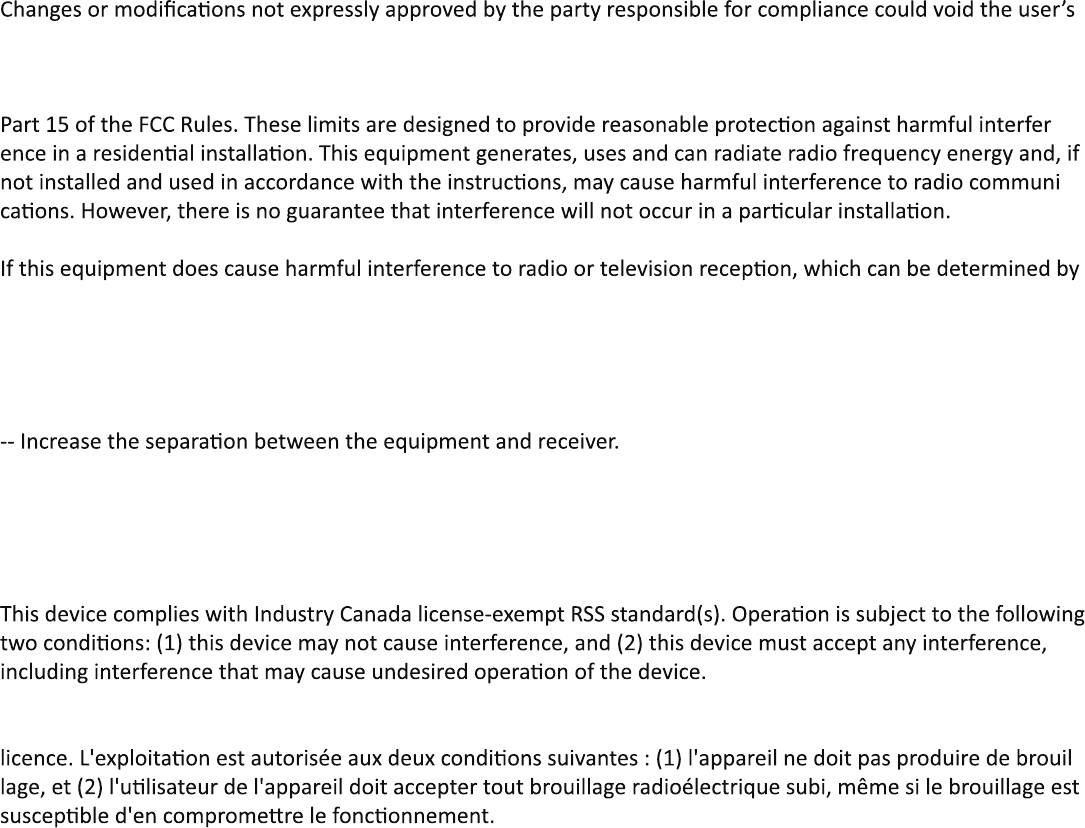
At any point in time, if you want to see a history of the exercises performed you can access this by taping the
back bottom on the top left of the RPM2 screen and tap the History button and then tap on either Flexibility,
Force, Cycling, Running or Running Power.
Warning:
authority to operate the equipment.
This equipment has been tested and found to comply with the limits for a Class B digital device, pursuant to
-
-
turning the equipment off and on, the user is encouraged to try to correct the interference by one or more of
the following measures:
-- Reorient or relocate the receiving antenna.
-- Connect the equipment into an outlet on a circuit different from that to which the receiver is connected.
-- Consult the dealer or an experienced radio/TV technician for help.
Le présent appareil est conforme aux CNR d'Industrie Canada applicables aux appareils radio exempts de
-
FCC Informaon:
This device complies with Part 15 of the FCC Rules. Operaon is subject to the following two condions:
(1) this device may not cause harmful interference, and
(2) this device must accept any interference received, including interference that may cause undesired
operaon.