Measy Electronics RC11 Air Mouse User Manual
Measy Electronics Co., Ltd. Air Mouse Users Manual
User Manual
《
RC11
airmousemanual》
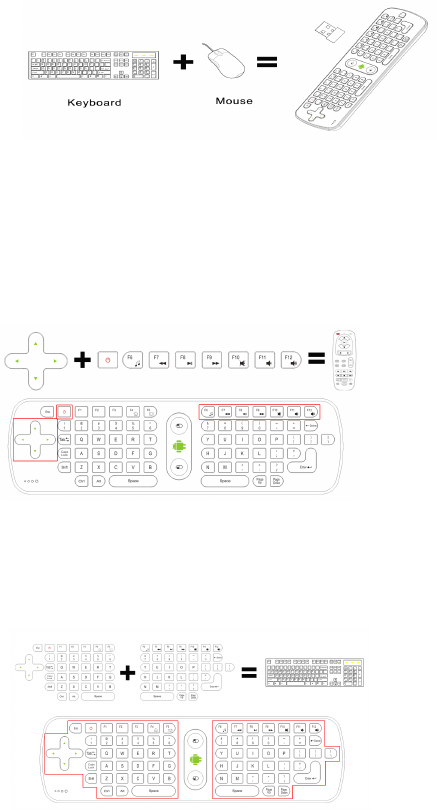
I.Introduction
RC11isanairmousewhichcanrealizethedualfunctionofthe
traditionalkeyboardandmousewhenyouwavingintheair.Youwillfind
itcomfortableandconvenientwhenyoucontrolitinyourhands.Itis
unnecessarytolikeothertraditionalkeyboardandmouse,whichmustrely
onthestationaryflatdesktoptooperate.Itmakesyoueasytocontrol
yourcomputer,Televisionandentertainmentwhenyoulyingdown,or
standing.
Three-in-onefunction
RC12isaremotecontrol?Acomputerkeyboard?Acomputermouse?The
answeristhatRC12athree-in-onemulti-functionalwirelessairmouse
whichhasremotecontrolfunction,computerkeyboardfunctionand
computermousefunction.
1.Remotecontrolfunction
2.Computerkeyboardfunction
3. Computer mouse function
II. C haracteristics :
1. Stand a rd AAA batteries design, can be used in all countries in the
world, also can avoid the drawbacks come from the built-in lithium
battery. (Heavy weight, easy to make the wrist fatigue; limited charging
times ,short lift; long charging time, hard to find the charging address
if need to be charged )
2. Whole-fish-soup-button design, to reduce the impedance of the general
carbon film key from the current, and improves the sensitivity of the
remote control
3. Wireless air mouse reserves storage space for the USB receiver , and
eliminates the worry about losing the receiver completely.
4. Standard keyboard design, make you can output at any time. No generally
omit keyboard and air mouse can match it.
5. The humane design of the artificial mechanics make s t he users fell
extraordinary, comfortable and convenient.
6. The advanced power-saving technology improves the battery life a lot.
It will goes into dormancy in 2 minutes without working. The current of
dormancy is only 10uA.you can press any button to make it go on working.
7. Plug and play, no driver required. It can compatible with USB1.1 and
USB 2.0 interface.
8. Easy to connect, no cables required. Only if insert batteries, plug
the USB receiver into the devices ’ USB interface, then you can use the
keyboard and mouse in the meantime.
9. Support Windows XP/Windows Vista/Windows 7 system ; support Android
2.2/2.3/2.4/4.0/5.0.
10 . Can be used for Computers, projectors, smart TV in sitting room , HDTC,
android tablet PC, android HD media player, Google smart TV player boxes.
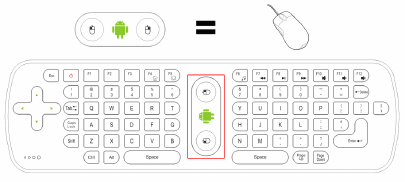
III. The functions of buttons :
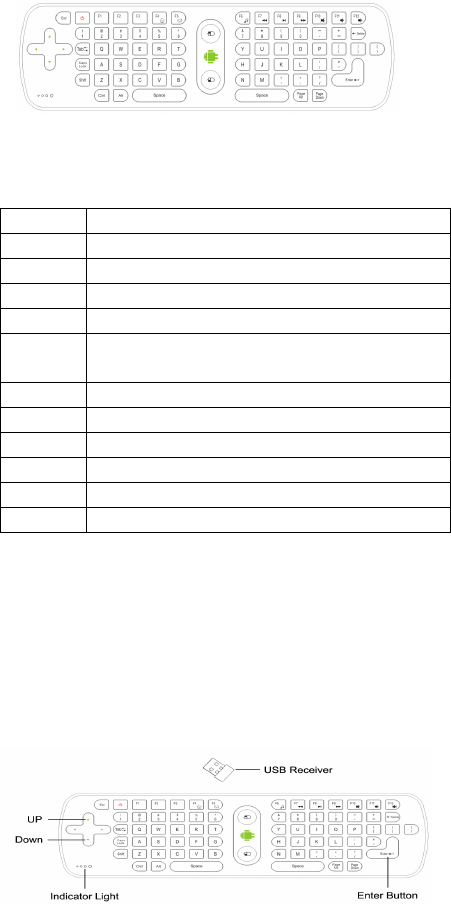
A 、 Shortcut buttons function (the following functions are applied
to MEASY android media players )
Button Function
ESC Press to back or exit
Power Computer dormancy key, press to enter the relevant state
F4 Open the system default web browser home page
F5 Open Outlook Express
F6 Open the system default media player ,such as cool dog,
TT Player and so on
F7 The system default media player to play the last one
F8 The system default media player to play or stop
F9 The system default media player to play the next one
F10 Mute
F11 P ress to increase volume
F12 Press to enter volume
B 、 The other functions of the keys are same as the
standard keyboards 。
IV. Initialize settings
When the cursor appears to drift and can not make it move, please follow
the operations of the air mouse to do initial ize setting .
1. Please put the device on the desktop, press the up arrow and down arrow,
and Enter key sequentially, do not release other keys when you press each
one. While holding down these three keys for 1 second , the LED key of
the air mouse will become flashing state.
2. when the LED key become flashing state ,at the same time plug the USB
receiver into the USB interface of the device ,air mouse will start to
initialize code. The LED key will become lit state after 5 seconds , that
is mean the air mouse do initialize setting successful.
V. The area of the function keys
1. Locating key : press the key ,the cursor is fixed and cannot move,
press again ,then the cursor will be to unlock.
2. The left button of the mouse: same function as the left button of the
standard mouse.
3. T he right button of the mouse: same function as the right button of
the standard mouse.
VI. Installation and connection :
1. Open the back cover of the air mouse, install three new AAA batteries
(Note make sure of the polarity of the batteries are not backwards), then
close the back cover.
2. Plug the USB receiver into USB interface of the computers or android
media players
VII. Using :
1. Using of the air mouse :
According to the printing direction of the green robot , with one
hand to hold the air mouse, make the wrist as the axis, then rotate the
wrist right and left or up and down, you can move the cursor freely.
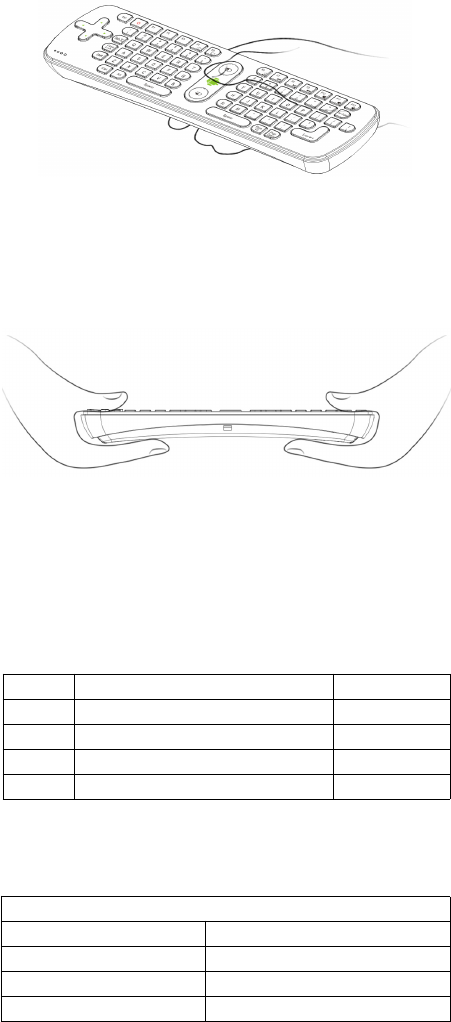
2. Using of the wireless keyboard :
When moving the cursor to the specified location, pressing the locating
key of the mouse one time, the cursor will be locked . Turn ing the air
mouse 90 degrees counter-clockwise, holding both ends of the air mouse
with your hands , then you can use the keyboard to enter any characters
freely
.
VIII. Instruction of the LED light state :
1. It means that it connects failed w hen the LED of the air mouse flashes,
2. The LED keep lighting, means connect well and can work.
3. Press any button, the LED light will flash once.
IX. Packing contents :
NO. Name Quantity ( pc )
1 W ireless keyboard 1
2 USB receiver 1
3 User Manual 1
4 Repairing card 1
X.Product Specifications :
Technical Specifications
Hardware Specifications
RF radio frequency 2.4G RF
Power AAA Batteries.5V
B uttons life 1500,000 times
Main components R emote control+ USB receiver

T he working current of the USB
receiver ( A )
about 21.5 mA
T he working current of the
remote control ( A )
about 20 mA
Features
Signal transmission mode 2.4G RF
K eyboard layout QWERTY American standard keyboard ( can be
modified according to the customers ’
requirements )
S upport operating system Windows XP / Vista / 7 / MAC / Linux /
Android 2.2/2.3/4.0/5.0
Power save time of the
mouse
2 minutes

《 Warranty Card 》
Dear User, first of all, thank you very much for choosing iTARSAM products.
In order to make our service to give you more satisfaction, please read
this warranty card, fill out and keep the card after you purchase our
products
User Name
Address
ZIP code
Contact TET
Product Item
Purchasing
date
Dealer Name
Dealer Address
Sales department ( stamp ) :
《 Warranty Instruction 》
Consumer purchase our products lawful, if you find some performance
fault which caused by non- artificial damage, can enjoy the following
commitments which provided by our company
1. The warranty products must include warranty card, the purchasing
invoice labeled the product model and other documents.
2. The warranty card only can be effective after made seal by the sales.
Warranty cards are kept by the user, we will not make up if lost.
The altered card and expired card are not invalid.
3. From the purchasing date, if you find any performance fault which
caused by non- artificial damage, you can enjoy free warranty
service.
The following circumstances cannot enjoy free warranty service:
1. Damage caused by negligence or accident
2. Damage caused by failing to note the requirements , proper
use , maintenance of the manual
3. Damage cause by using, such as shell breakage.
4. T he machine barcode torn up or destroyed, then we hard to recognize
the goods.
5. D amage caused by force majeure, such as dismantling the machine
without agreement.
6. Burn the software from the third part secretly.
7. Our company or our authorized service centers will get some
materials cost and maintenance costs from you if your device can
not meet the conditions of the warranty card.
Caution!
This device complies with Part 15 of the FCC Rules.
Operation is subject to the following two conditions:
(1) this device may not cause harmful interference, and
(2) this device must accept any interference received, including interference that
may cause undesired operation.
Note: This equipment has been tested and found to comply with the limits for a Class
B digital device, pursuant to Part 15 of the FCC Rules. These limits are designed to
provide reasonable protection against harmful interference in a residential installation.
This equipment generates, uses and can radiate radio frequency energy and, if not
installed and used in accordance with the instructions, may cause harmful
interference to radio communications.
However, there is no guarantee that interference will not occur in a particular
installation. If this equipment does cause harmful interference to radio or television
reception, which can be determined by turning the equipment off and on, the user is
encouraged to try to correct the interference by one or more of the following
measures:
Reorient or relocate the receiving antenna.
Increase the separation between the equipment and receiver.
Connect the equipment into an outlet on a circuit different from that to
which the receiver is connected.
Consult the dealer or an experienced radio/TV technician for help.
Warning:
Warning:
Warning:
Warning: Changes or modifications to this unit not expressly approved by the part
responsible for compliance could void the user
’
s authority to operate the equipment.