MediaTek RT3090-1T1R 11b/g/n 1T1R WLAN MINI CARD User Manual S205 User Guide V1 0 EN
MediaTek Inc. 11b/g/n 1T1R WLAN MINI CARD S205 User Guide V1 0 EN
MediaTek >
Contents
Users Manual 1

IdeaPad S205
Read the safety notices and important tips in the
included manuals before using your computer.
User Guide
User Guide V1.0

First Edition (December 2010)
© Copyright Lenovo 2010.
Before using the product, be sure to read Lenovo Safety and General
Information Guide first.
The features described in this guide are common to most models.
Some features may not be available on your computer and/or your
computer may include features that are not described in this user
guide.
Some instructions in this guide may assume that you are using
Windows® 7. If you are using other Windows operating system, some
operations may be slightly different. If you are using other operating
systems, some operations may not apply to you.
LENOVO products, data, computer software, and services have been developed exclusively at private
expense and are sold to governmental entities as commercial items as defined by 48 C.F.R. 2.101 with
limited and restricted rights to use, reproduction and disclosure. LIMITED AND RESTRICTED
RIGHTS NOTICE: If products, data, computer software, or services are delivered pursuant a General
Services Administration “GSA” contract, use, reproduction, or disclosure is subject to restrictions set
forth in Contract No. GS-35F-05925.
Notes
•
•
•
The illustrations in this manual may differ from the actual product.
Please refer to the actual product.
•
i
Chapter 1. Getting to know your
computer...................................1
Top view..........................................1
Left-side view .................................3
Right-side view...............................4
Bottom view....................................5
Chapter 2. Learning the
basics........................................7
First use............................................7
Using AC adapter and battery .....9
Using the touchpad......................11
Using the keyboard......................12
Connecting external devices.......14
Special keys and buttons.............17
System status indicators..............18
Securing your computer..............19
Chapter 3. Connecting to the
Internet....................................21
Wired connection .........................21
Wireless connection .....................23
Chapter 4. OneKey Rescue
system.....................................28
OneKey Rescue system ...............28
Appendix A. CRU
instructions.............................30
Replacing the battery ..................30
Replacing the hard disk drive.... 31
Replacing memory.......................35
Index........................................40
Contents
1
Chapter 1. Getting to know your computer
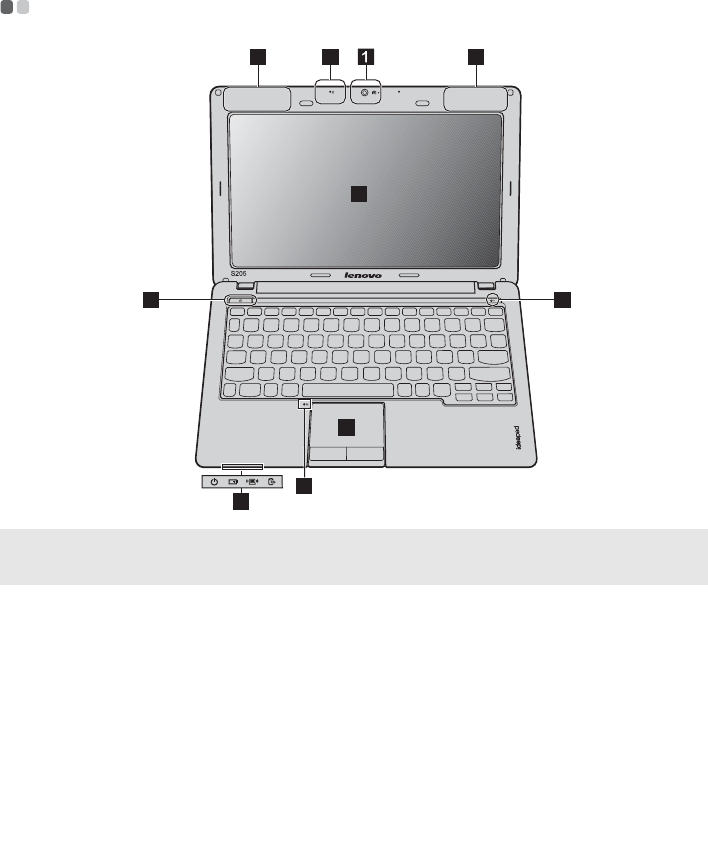
Top view - - - - - - - - - - - - - - - - - - - - - - - - - - - - - - - - - - - - - - - - - - - - - - - - - - - - - - - - - - - - - - - - - - - - - - - - - - - - - - - - - - - - - - - - - - - - - - - - - - -
Note: The illustrations in this manual may differ from the actual product. Please refer to the
actual product.
Attention:
•Do NOT open the display panel beyond 130 degrees. When closing the display panel, be
careful NOT to leave pens or any other objects in between the display panel and the
keyboard. Otherwise, the display panel may be damaged.
Integrated
camera
Use the camera for video communication.
Built-in
microphone
The built-in microphone (with noise reduction) can be
used for video conferencing, voice narration, or simple
audio recordings.
Wireless module
antennas (Select
models only)
The built-in antennas ensure optimal reception of wireless
radio.
33
6
4
5
5
7
8
2
a
b
c

2
Chapter 1. Getting to know your computer
Computer display The LCD display with LED backlight provides brilliant
visual output.
System status
indicators
For details, see “System status indicators” on page 18.
Power button Press this button to turn on the computer.
OneKey Rescue
system button
Press this button to open OneKey Rescue system (If
OneKey Rescue system has been preinstalled) when the
computer is powered off.
Note: For details, see “OneKey Rescue system” on page 28.
Touchpad The touchpad functions as a conventional mouse.
Note: For details, see “Using the touchpad” on page 11.
d
e
f
g
h
Chapter 1. Getting to know your computer
3
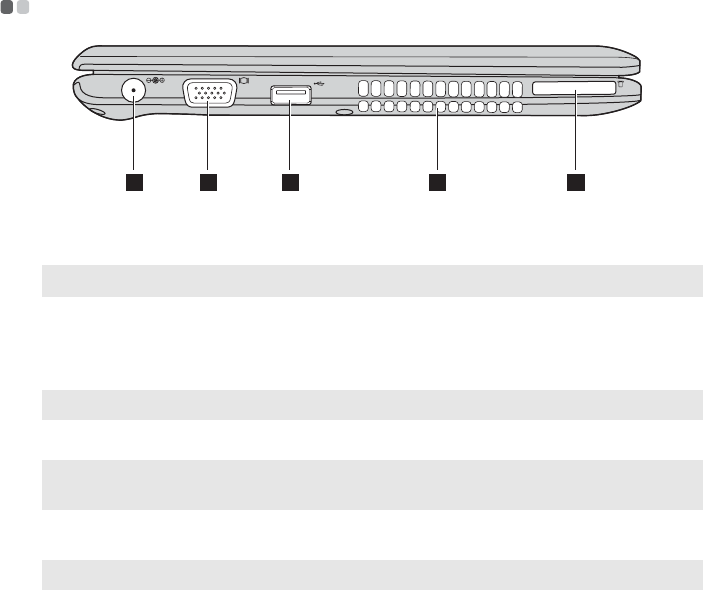
Left-side view - - - - - - - - - - - - - - - - - - - - - - - - - - - - - - - - - - - - - - - - - - - - - - - - - - - - - - - - - - - - - - - - - - - - - - - - - - - - - - - - - - - - - -
AC power
adapter jack Connect the AC adapter here.
Note: For details, see “Using AC adapter and battery” on page 9.
VGA port Connects to external display devices.
USB port Connect to USB devices.
Note: For details, see “Connecting a universal serial bus (USB) device” on page 15.
Fan louvers Dissipate internal heat.
Note: Make sure that none of the fan louvers are blocked or else overheating of the
computer may occur.
Memory card slot Insert memory cards (not supplied) here.
Note: For details, see “Using memory cards (not supplied)” on page 14.
1 2 3 4 5
a
b
c
d
e
4
Chapter 1. Getting to know your computer
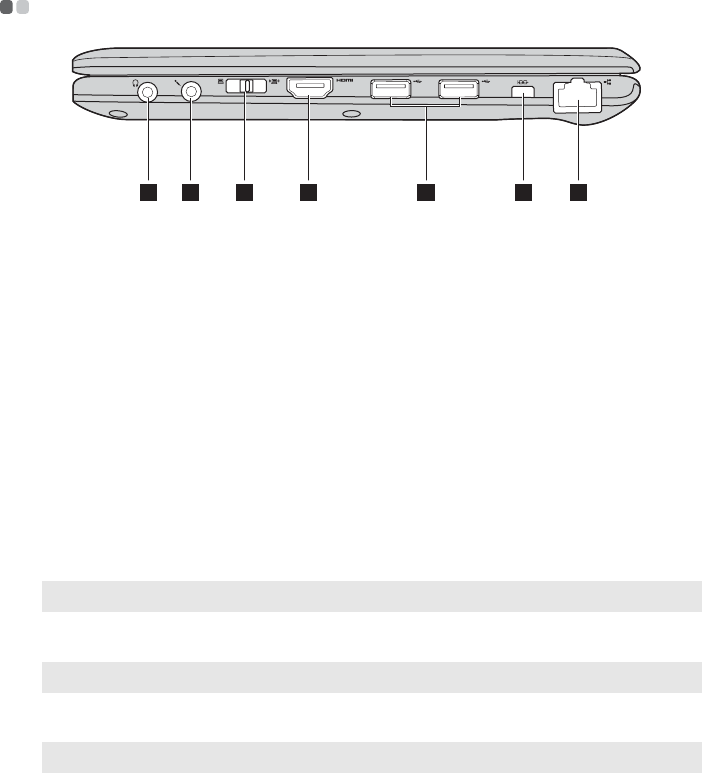
Right-side view - - - - - - - - - - - - - - - - - - - - - - - - - - - - - - - - - - - - - - - - - - - - - - - - - - - - - - - - - - - - - - - - - - - - - - - - - - - - - - - - - -
Headphone jack Connects to external headphones.
Attention:
•Listening to music at high volume over extended periods of time may damage your
hearing.
Microphone jack Connects to external microphones.
Integrated
wireless device
switch (Select
models only)
Use this switch to turn on/off the wireless radio of all
wireless devices on your computer.
HDMI port Connects to devices with HDMI input such as a TV or a
display.
USB port Connects to USB devices.
Note: For details, see “Connecting a universal serial bus (USB) device” on page 15.
Kensington slot Attach a security lock (not supplied) here.
Note: For details, see “Attaching a security lock (not supplied)” on page 19.
RJ-45 port This port connects the computer to an Ethernet network.
Note: For details, see “Wired connection” on page 21.
1 2 3 4 5 6 7
a
b
c
d
e
f
g
Chapter 1. Getting to know your computer
5
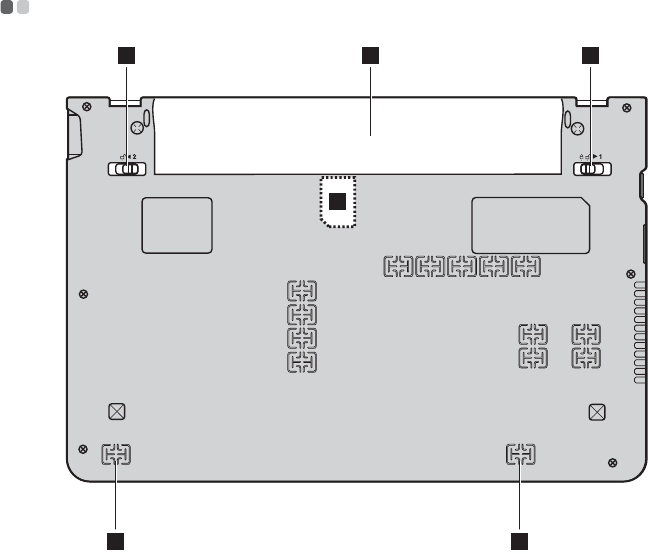
Bottom view - - - - - - - - - - - - - - - - - - - - - - - - - - - - - - - - - - - - - - - - - - - - - - - - - - - - - - - - - - - - - - - - - - - - - - - - - - - - - - - - - - - - - - - - - -
1
4
3
5 5
2

6
Chapter 1. Getting to know your computer
Battery latch -
spring loaded
The spring-loaded battery latch keeps the battery pack
secured in place.
Battery pack
For details, see “Using AC adapter and battery” on page 9.
Battery latch -
manual
The manual battery latch is used to keep the battery pack
secured in place.
SIM card slot
(Select models
only)
Insert a SIM card (not supplied) for using Mobile
Broadband.
Notes:
•In order to be able to insert a SIM card into this slot, you must first disconnect the AC
adapter and remove the battery pack.
•For details, see “Using Mobile Broadband (Select models only)” on page 25.
Speakers The stereo speakers provide rich and powerful sound.
a
b
c
d
e

7
Chapter 2. Learning the basics
First use
- - - - - - - - - - - - - - - - - - - - - - - - - - - - - - - - - - - - - - - - - - - - - - - - - - - - - - - - - - - - - - - - - - - - - - - - - - - - - - - - - - - - - - - - - - - - - - - - - - - - - -
Reading the manuals
Read the supplied manuals before using your computer.
Connecting to the power
The supplied battery pack is not fully charged at purchase.
To charge the battery and begin using your computer, insert the battery pack
and connect the computer to an electrical outlet. The battery is automatically
charged while the computer is running on AC power.
Installing the battery pack
Refer to the supplied Setup Poster to install the battery pack.
Connecting the computer to an electrical outlet
1
Connect the power cord to the AC adapter.
2
Connect the AC adapter to the AC power adapter jack of the computer
firmly.
3
Plug the power cord into an electrical outlet.
Turning on the computer
Press the power button to turn on the computer.
Configuring the operating system
You may need to configure the operating system when it is first used. The
configuration process may include the procedures below.
• Accepting the end user license agreement
• Configuring the Internet connection
• Registering the operating system
• Creating a user account

8
Chapter 2. Learning the basics
Putting your computer into sleep state or shutting it down
When you finish working with your computer, you can put it into sleep state
or shut it down.
Putting your computer into sleep state
If you will be away from your computer for only a short time, put the
computer into sleep state.
When the computer is in sleep state, you can quickly wake it to resume use,
and bypass the startup process.
To put the computer into sleep state, do one of the following.
• Click and select Sleep from the Start menu.
• Press Fn + F1.
To wake the computer, do one of the following.
• Press the power button.
• Press any key on the keyboard.
Shutting down your computer
If you are not going to use your computer for a day or two, shut it down.
To shut down your computer, click and select Shut down from the Start
menu.
Note: Wait until the power indicator light starts blinking (indicating that the computer is in
sleep state) before you move your computer. Moving your computer while the hard
disk is spinning can damage the hard disk, causing loss of data.

Chapter 2. Learning the basics
9
Using AC adapter and battery
- - - - - - - - - - - - - - - - - - - - - - - - - - - - - - - - - - - - - - - - - - - - - - - - - - - - - - - - -
Checking battery status
You can determine the percentage of battery power remaining by checking
the battery icon in the notification area.
Charging the battery
When you find that the battery power is low, you need to charge the battery
or replace it with a fully charged one.
You need to charge the battery in any of the following situations:
• When you purchase a new battery
• If the battery status indicator starts blinking
• If the battery has not been used for a long time
Note: As each computer user has different habits and needs, it is difficult to predict how
long a battery charge will last. There are two main factors:
• The amount of energy stored in the battery when you commence work.
• The way you use your computer: for example, how often you access the hard
disk drive and how bright you make the computer display.
Notes:
•You are advised to insert the battery pack when using your computer to prevent small
particles from entering the inside of your computer.
•To increase the life of the battery pack, the computer does not start recharging the
battery immediately after it drops from fully charged.
•Charge the battery at a temperature between 50 °F and 86 °F (10 °C-30 °C).
•Full charge or discharge is not required.
10
Chapter 2. Learning the basics
Removing the battery pack
If you are not going to use the computer for an extended period of time, or if
you need to send your computer to Lenovo for service, etc. remove the
battery pack from the computer. Before removing the battery pack, make
sure the computer has been shut down.
Handling the battery
If the rechargeable battery pack is replaced with an incorrect type, there may
be danger of an explosion. The battery pack contains a small amount of
harmful substances. To avoid possible injury and detriment to the
environment, pay attention to the following points:
• Replace only with a battery of the type recommended by Lenovo.
• Keep the battery pack away from fire.
• Do not expose the battery pack to water or rain.
• Do not attempt to disassemble the battery pack.
• Do not short-circuit the battery pack.
• Keep the battery pack away from children.
• Do not put the battery pack in trash that is disposed of in landfills. When
disposing of the battery, comply with local ordinances or regulations and
your company’s safety standards.
Chapter 2. Learning the basics
11
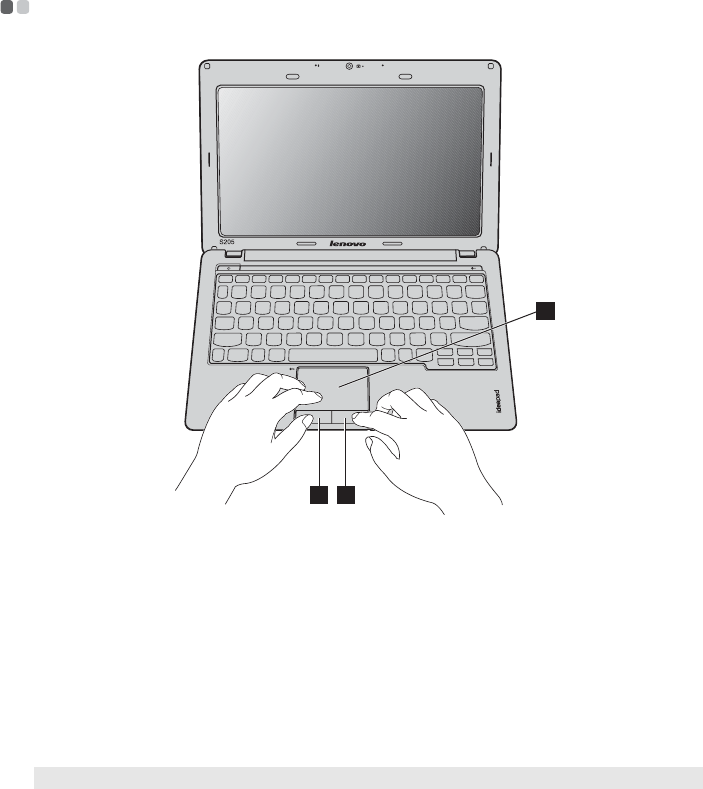
Using the touchpad
- - - - - - - - - - - - - - - - - - - - - - - - - - - - - - - - - - - - - - - - - - - - - - - - - - - - - - - - - - - - - - - - - - - - - - - - - - - - - - -
Touchpad To move the cursor on the screen, slide your
fingertip over the pad in the direction in which
you want the cursor to move.
Left click button The function corresponds to that of the left
mouse button on a conventional mouse.
Right click button The function corresponds to that of the right
mouse button on a conventional mouse.
Note: You can enable/disable the touchpad using Fn+F6.
1
2 3
a
b
c
12
Chapter 2. Learning the basics
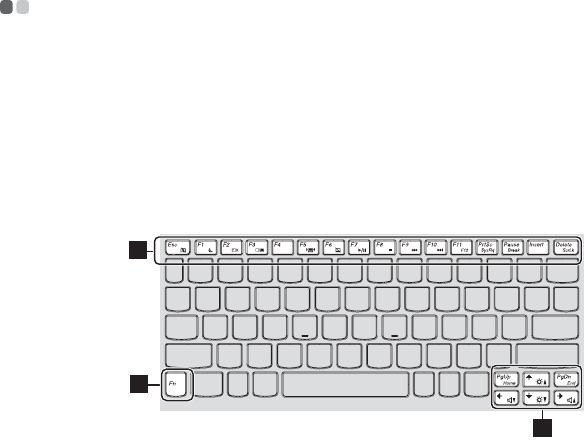
Using the keyboard
- - - - - - - - - - - - - - - - - - - - - - - - - - - - - - - - - - - - - - - - - - - - - - - - - - - - - - - - - - - - - - - - - - - - - - - - - - - - - - -
Your computer has function keys incorporated in its standard keyboard.
Function key combinations
Through the use of the function keys, you can change operational features
instantly. To use this function, press and hold Fn ; then press one of the
function keys .
a
b
2
1
2

Chapter 2. Learning the basics
13
The following describes the features of each function key.
Fn + Esc: Turn on/off the integrated camera.
Fn + F1: Enter sleep mode.
Fn + F2: Turn on/off the backlight of the LCD screen.
Fn + F3: Open the interface for the display device switch
to select this notebook or an external display.
Fn + F5: Open the interface for integrated wireless
devices settings (on/off).
Fn + F6: Enable/Disable the touchpad.
Fn + F7: Start/Pause playback of Windows Media Player.
Fn + F8: Stop playback of Windows Media Player.
Fn + F9: Skip to the previous track.
Fn + F10: Skip to the next track.
Fn + F11:
Activate the F12 function.
* You can press Fn+F11 during computer startup
to open the boot selection menu.
Fn + PrtSc: Activate the system request.
Fn + Pause: Activate the break function.
Fn + Delete: Enable/Disable the scroll lock.
Fn + n/ p:Increase/Decrease display brightness.
Fn + o/ m:Increase/Decrease sound volume.

14
Chapter 2. Learning the basics
Connecting external devices
- - - - - - - - - - - - - - - - - - - - - - - - - - - - - - - - - - - - - - - - - - - - - - - - - - - - - - - - - - - -
Your computer has a wide range of built-in features and connection
capabilities.
Using memory cards (not supplied)
Your computer supports the following types of memory cards:
• Secure Digital (SD) card
• Secure Digital PRO (SD PRO)
• MultiMediaCard (MMC)
• Memory Stick (MS)
• Memory Stick PRO (MS PRO)
• xD-Picture (xD) card
Inserting a memory card
1
Push the dummy card until you hear a click. Gently pull the dummy card
out of the memory card slot.
2
Slide the memory card in until it clicks into place.
Removing a memory card
1
Push the memory card until you hear a click.
2
Gently pull the memory card out of the memory card slot.
Notes:
•Insert ONLY one card in the slot at a time.
•This card reader does not support SDIO devices (e.g., SDIO Bluetooth, etc.).
Note: The dummy card is used for preventing dust and small particles from entering the
inside of your computer when the memory card slot is not in use. Retain the dummy
card for future use.
Note: Before removing the memory card, disable it via Windows safely remove hardware
and eject media utility to avoid data corruption.

Chapter 2. Learning the basics
15
Connecting a universal serial bus (USB) device
Your computer comes with three USB ports compatible with USB devices.
Connecting an ExpressCard device (Select models only)
Your computer comes with an ExpressCard/34 slot used for connecting
ExpressCard devices.
Inserting an ExpressCard/34 device
1
Push the dummy card until you hear a click. Gently pull the dummy card
out of the ExpressCard slot.
2
Slide the ExpressCard device in with the front label facing upward until it
clicks into place.
Removing an ExpressCard/34 device
1
Push the ExpressCard device until you hear a click.
2
Gently pull the ExpressCard device out of the ExpressCard slot.
Note: When using a high power consumption USB device such as USB ODD, use the
external device’s power adapter. Otherwise, the device may not be recognized, and
system shut down may result.
Note: Only use the ExpressCard/34 devices.
Note: The dummy card is used for preventing dust and small particles from entering the
inside of your computer when the ExpressCard slot is not in use. Retain the dummy
card for future use.
Note: Before removing the ExpressCard/34 device, unable it by Windows safely remove
hardware and eject media utility.

16
Chapter 2. Learning the basics
Connecting a Bluetooth device (Select models only)
If your computer has an integrated Bluetooth adapter card, it can connect to
and transfer data wirelessly to other Bluetooth enabled devices, such as
notebook computers, PDAs and cell phones. You can transfer data between
these devices without cables and up to 10 meters range in open space.
Enabling Bluetooth communications on your computer
1
Slide the integrated wireless device switch from to .
2
Press Fn + F5 to make configuration.
Note: The actual maximum range may vary due to interference and transmission barriers.
To get the best possible connection speed, place the device as near your computer as
possible.
Notes:
•When you do not need to use the Bluetooth function, turn it off to save battery power.
•You need to pair the Bluetooth enabled device with your computer before you can transfer
data between them. Read the documentation supplied with the Bluetooth enabled device
for details on how to pair the device with your computer.
Chapter 2. Learning the basics
17
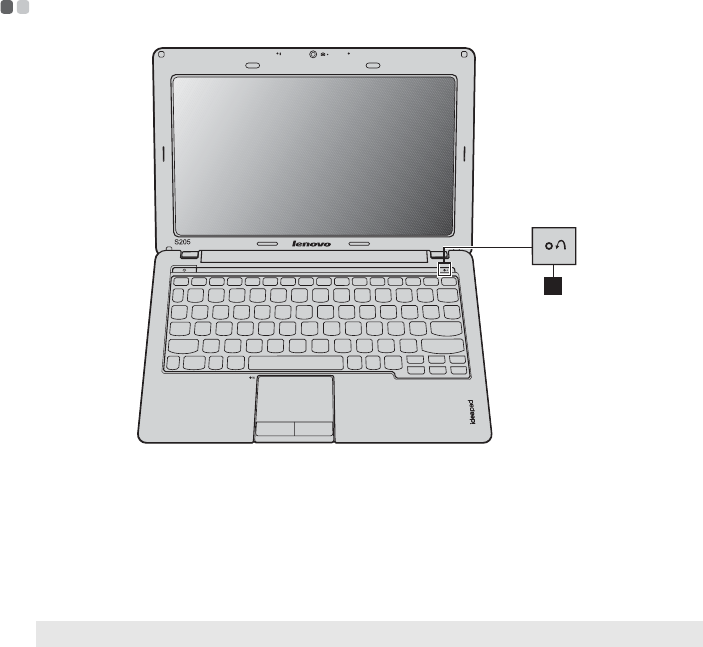
Special keys and buttons
- - - - - - - - - - - - - - - - - - - - - - - - - - - - - - - - - - - - - - - - - - - - - - - - - - - - - - - - - - - - - - - - - - -
OneKey Rescue system button
• When the computer is powered-off, press this button to enter the OneKey
Rescue system if Lenovo OneKey Rescue system has been preinstalled.
• In Windows operating system, press this button to start Lenovo OneKey
Recovery.
Note: For details, see “OneKey Rescue system” on page 28.
1
a
18
Chapter 2. Learning the basics
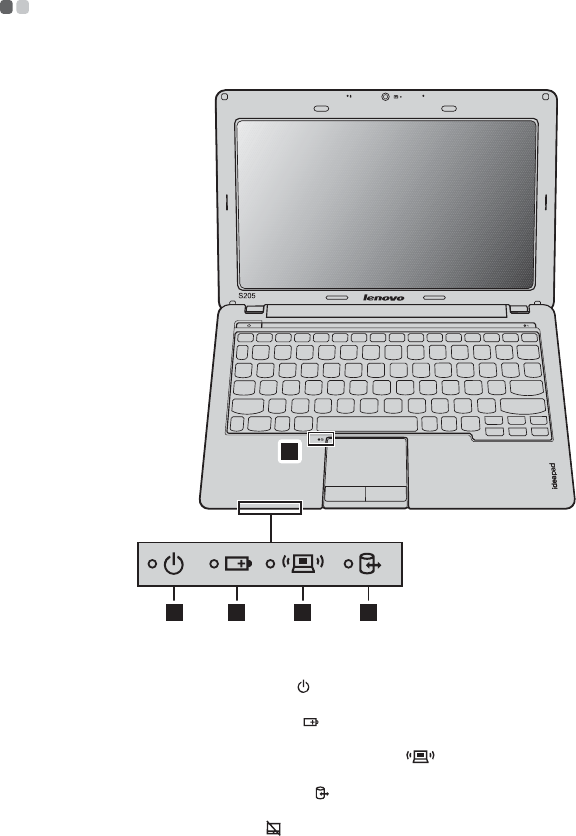
System status indicators
- - - - - - - - - - - - - - - - - - - - - - - - - - - - - - - - - - - - - - - - - - - - - - - - - - - - - - - - - - - - - - - - - - - -
These indicators inform you of the computer status.
1 2 4
5
3
Power status indicator
Battery status indicator
Wireless communication indicator
Hard disk drive indicator
Touchpad indicator
a
b
c
d
e

Chapter 2. Learning the basics
19
Securing your computer
- - - - - - - - - - - - - - - - - - - - - - - - - - - - - - - - - - - - - - - - - - - - - - - - - - - - - - - - - - - - - - - - - - - - -
This section provides information about how to help protect your computer
from theft and unauthorized use.
Attaching a security lock (not supplied)
You can attach a security lock to your computer to help prevent it from being
removed without your permission. For details on installing the security lock,
please refer to the instructions shipped with the security lock that you have
purchased.
Refer to the “Right-side view” on page 4 for the location of the Kensington
slot.
Using VeriFace™
VeriFace is a face recognition software which takes a digital snapshot,
extracts key features of your face, and creates a digital map that becomes the
system’s “password”.
If you want to activate VeriFace for the first time, click the VeriFace icon on
the desktop to register your facial image.
For more details on VeriFace, see the software help.
Notes:
•Before purchasing any security product, verify that it is compatible with this type of
security keyhole.
•You are responsible for evaluating, selecting, and implementing the locking devices and
security features. Lenovo offers no comment judgement or warranty regarding the
function, quality or performance of locking devices and security features.
Notes:
•The face registration and verification works best in an environment with steady and even
light.
•You can determine whether to use this function when you log on the system.

20
Chapter 2. Learning the basics
Using passwords
Using passwords helps prevent your computer from being used by others.
Once you set a password and enable it, a prompt appears on the screen each
time you power on the computer. Enter your password at the prompt. The
computer cannot be used unless you enter the correct password.
For details about how to set the password, see the Help to the right of the
screen in BIOS setup utility.
Note: This password can be from one to seven alphanumeric characters in any combination.
Note: To enter BIOS setup utility, press F2 when the Lenovo logo appears on the screen while
the computer is starting up.

21
Chapter 3. Connecting to the Internet
As a global network, the Internet connects computers worldwide, providing
services such as e-mailing, information searching, electronic commerce, Web
browsing and entertainment.
You can connect the computer to the Internet in the following ways:
Wired connection: use physical wiring to connect.
Wireless network technology: connect without wiring.
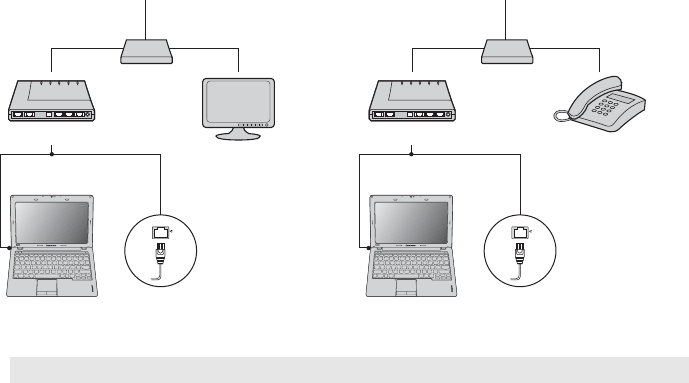
Wired connection - - - - - - - - - - - - - - - - - - - - - - - - - - - - - - - - - - - - - - - - - - - - - - - - - - - - - - - - - - - - - - - - - - - - - - - - - - - - -
Wired connections are a reliable and safe way to connect the computer to the
Internet.
Cable Cable Internet services use a cable modem connected to
the residential cable TV line.
DSL DSL is a family of related technologies that bring high-
speed network access to homes and small businesses
over ordinary telephone lines.
22
Chapter 3. Connecting to the Internet
Hardware connection:
Cable DSL
Software configuration
Consult your Internet Service Provider (ISP) for details on how to configure
your computer.
Note: The above diagrams are for reference only. Actual connection method may vary.
*
*
**
TV cable
Splitter *
Cable modem *
* Not supplied.
Telephone line
Splitter *
DSL modem *

Chapter 3. Connecting to the Internet
23
Wireless connection - - - - - - - - - - - - - - - - - - - - - - - - - - - - - - - - - - - - - - - - - - - - - - - - - - - - - - - - - - - - - - - - - - - - - - - - - - - -
Wireless connections provide mobile access to the Internet, allowing you to
stay online anywhere the wireless signal covers.
Divided by the signal scales, wireless connection to the Internet can be built
based on the following standards.
Wi-Fi Wi-Fi networks cover a small physical area, like a home,
office, or small group of buildings. An access point is
necessary for the connection.
WiMAX WiMAX networks connect several Wireless LAN
systems to cover a metropolitan area, providing high-
speed broadband access without the need for cables.
Mobile Broadband The Mobile Broadband network provides Internet access
to computers, cell phones and other devices over a large
geographic area. Mobile networks are used for data
transmission, and access is usually provided by a mobile
network operator. A Mobile Broadband SIM card is
necessary for the connection.
Note: Your computer may not support all wireless connection methods.
24
Chapter 3. Connecting to the Internet
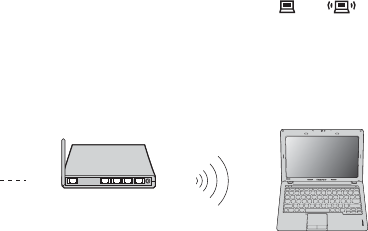
Using Wi-Fi/WiMAX (Select models only)
Enabling wireless connection
To enable wireless communications, do the following:
1
Slide the integrated wireless device switch from to .
2
Press Fn + F5 to make configuration.
Hardware connection
Software configuration
Consult your Internet Service Provider (ISP) and search Windows Help and
Support Center for details on how to configure your computer.
Access point *
Wi-Fi/WiMAX network
* Not supplied

Chapter 3. Connecting to the Internet
25
Using Mobile Broadband (Select models only)
Before getting started with Mobile Broadband, you first need to choose a
mobile network operator and make sure you are in the coverage area of the
network. After that, you also need:
• To activate the Mobile Broadband service through your local mobile
network operator. You will get a Subscriber Identity Module (SIM) card
after activation. For instructions on inserting the SIM card, refer to
“Inserting the SIM card” on page 26.
• A connection management utility to connect/disconnect to your Mobile
Broadband network.
Notes:
•Various standards are in use by mobile operators to provide Mobile Broadband services.
The Lenovo Mobile Broadband module may support one or more of the following
standards:
GSM (Global System for Mobile Communications)
TD-SCDMA (Time Division-Synchronous Code Division Multiple Access)
SCDMA (Synchronous Code Division Multiple Access)
EV-DO (Evolution Data Optimized)
HSPA (High Speed Packet Access)
•Mobile Broadband is a subscription service. Refer to your local mobile network operator
for availability, cost and other information.
•A SIM card is a type of smart card used by mobile network operators to identify their
service subscribers on the mobile network. You will get the SIM card from your mobile
network operator after you have activated the Mobile Broadband service.
Note: In general, your mobile service provider provides this utility.
26
Chapter 3. Connecting to the Internet
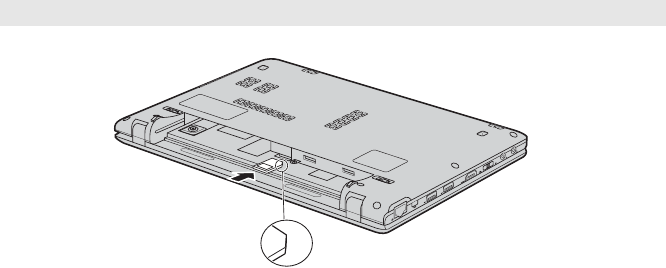
Inserting the SIM card
To insert the SIM card:
1
Turn off the computer; then disconnect the AC adapter and all cables
from the computer.
2
Close the computer display and turn it over.
3
Remove the battery.
4
Insert the SIM card in the card slot until it clicks into place as shown in
the illustration.
5
Put the battery back in place. Turn the computer over and reconnect the
cables.
Note: Inserting the SIM card in the wrong direction may damage the SIM card slot.
Notched Corner
Chapter 3. Connecting to the Internet
27
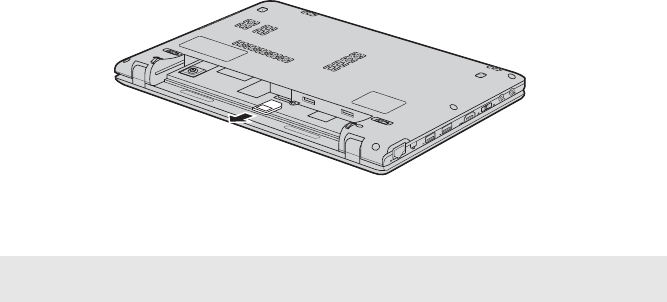
Removing the SIM card
To remove the SIM card:
1
Turn off the computer, then disconnect the AC adapter and all cables
from the computer.
2
Close the computer display and turn it over.
3
Remove the battery.
4
Push the SIM card in until you hear a click, and then pull the SIM card out.
5
Put the battery back in place. Turn the computer over and reconnect the
cables.
Note: Never insert or remove the SIM card while the computer is on. Doing so may cause
permanent damage to the SIM card as well as the SIM card reader.

28
Chapter 4. OneKey Rescue system
OneKey Rescue system
- - - - - - - - - - - - - - - - - - - - - - - - - - - - - - - - - - - - - - - - - - - - - - - - - - - - - - - - - - - - - - - - - - - - - -
Introduction
The Lenovo OneKey Rescue system is an easy-to-use application that can be
used to back up the data on your system partition (C drive) for easy restore
when required. You can run Lenovo OneKey Recovery under the Windows
operating system, and the OneKey Rescue system without starting the
Windows operating system.
Attention:
In order to utilize the features of the OneKey Rescue system, your hard disk
already includes a hidden partition by default to store the system image file
and OneKey Rescue system program files. This default partition is hidden
for security reasons and is the reason the available disk space is less than it
claims. The exact available hard disk space depends on the file size of the
mirror image file (based on the size of operating system and preinstalled
software).
Using Lenovo OneKey Recovery (within Windows operating
system)
In Windows operating system, double click the OneKey Recovery system
Icon on the desktop to launch Lenovo OneKey Recovery.
Within the program, you can back up the system partition on the hard disk
drive, other storage devices, or by creating recovery discs.
For more instructions, see the Help file of Lenovo OneKey Recovery.
Notes:
•The backup process and creation of recovery discs may take some time, connect the AC
adapter and battery pack to your computer.
•After the recovery discs are burned, please number them so that you can use them in the
correct order.
•Computers without an integrated optical drive support the creation of recovery discs;
however an appropriate external optical drive is needed to physically create the recovery
discs.

Chapter 4. OneKey Rescue system
29
Using Lenovo OneKey Rescue system (without Windows
operating system)
In the event that the operating system cannot be loaded, follow the steps
below to access OneKey Rescue system.
•Shut down your computer.
• Press the key to launch OneKey Rescue system.
Within the program, you can choose to restore your system partition to the
original factory status, or to a previously generated backup.
Note: The recovery process is irreversible. Make sure to back up any critical data before
using the recovery feature.
30
Appendix A. CRU instructions
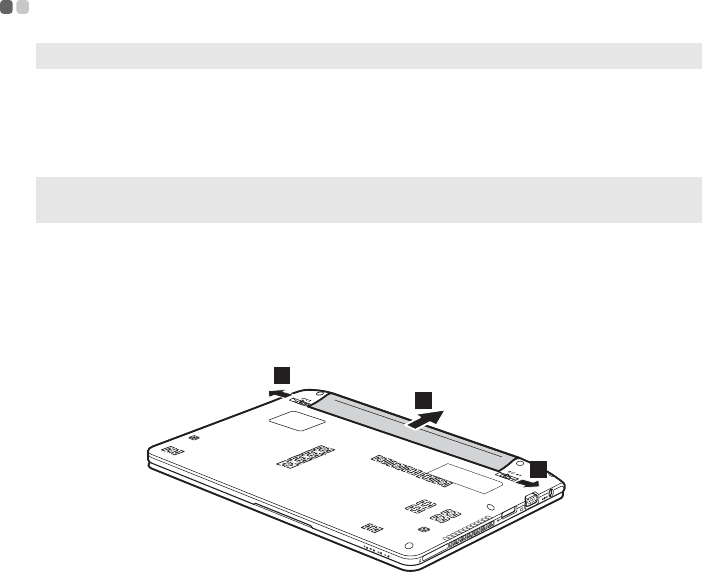
Replacing the battery - - - - - - - - - - - - - - - - - - - - - - - - - - - - - - - - - - - - - - - - - - - - - - - - - - - - - - - - - - - - - - - - - - -
To replace the battery, do the following:
1
Turn off the computer, or enter hibernation mode. Disconnect the AC
adapter and all cables from the computer.
2
Close the computer display, and turn the computer over.
3
Unlock the manual battery latch . Holding the spring-loaded battery
latch in the unlocked position , remove the battery pack in the direc-
tion shown by the arrow .
4
Install a fully charged battery.
5
Slide the manual battery latch to the locked position.
6
Turn the computer over again. Connect the AC adapter and the cables to
the computer again.
Note: Use only the battery provided by Lenovo. Any other battery could ignite or explode.
Note: If you are using an ExpressCard device, the computer might not be able to enter
hibernation mode. If this happens, turn off the computer.
a
b
c
3
2
1

Appendix A. CRU instructions
31
Replacing the hard disk drive - - - - - - - - - - - - - - - - - - - - - - - - - - - - - - - - - - - - - - - - - - - - - - -
You can increase the storage capacity of your computer by replacing the hard
disk drive with one of greater capacity. You can purchase a new hard disk
drive from your reseller or Lenovo marketing representative.
The drive is very sensitive. Incorrect handling can cause damage and perma-
nent loss of data on the hard disk. Before removing the hard disk drive, make
a backup copy of all the information on the hard disk, and then turn the com-
puter off. Never remove the drive while the system is operating, in sleep
mode, or in hibernation mode.
Notes:
•Replace the hard disk drive only if you upgrade it or have it repaired. The connectors and
bay of the hard disk drive were not designed for frequent changes, or drive swapping.
•The preinstalled softwares are not included on an optional hard disk drive.
Handling a hard disk drive
•Do not drop the drive or subject it to physical shocks. Put the drive on a material,
such as soft cloth, that absorbs the physical shock.
•Do not apply pressure to the cover of the drive.
•Do not touch the connector.