Medtronic MiniMed 503 MiniMed Model 503 Remote Transmitter User Manual manual
Medtronic MiniMed, Inc. MiniMed Model 503 Remote Transmitter manual
manual

Remote
transmitter
ACT
SB
TThhee RRFF ooppttiioonnss ffeeaattuurree iiss nnoott eesssseennttiiaall ffoorr ppuummpp uusseerrss..
You may want to explore this option after you have been
completely familiar with the basic functions of your
pump. It is important that you consult with your health-
care professional before using this feature.
Need to Know
To use the remote transmitter,
this feature must be turned
ON, and the Easy Bolus fea-
ture must be ON. You will
need to program a radio fre-
quency code (RF ID) into your
pump to link your pump with
your remote transmitter.
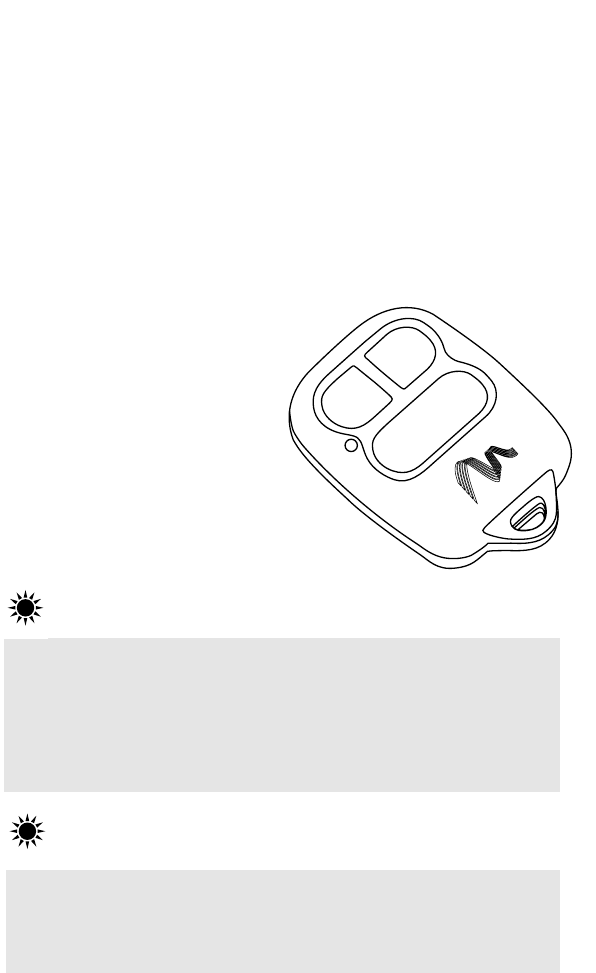
The MiniMed Model 503 Remote Transmitter is an accessory item for
your MiniMed Paradigm Insulin Pump that allows you to program a
bolus or suspend and resume your pump without pressing any of the
pump’s buttons!
The remote transmitter sends signals to a receiver in your pump. This
is designed to add more freedom and flexibility to your daily activi-
ties. Of course, you can still program your pump by using the five
buttons on the pump keypad.
11
TThhee rreemmoottee ttrraannssmmiitttteerr mmaayy nnoott bbee uusseedd aabbooaarrdd aann aaiirrccrraafftt..
Operate your pump using its integral display and keyboard
while the aircraft’s doors are closed.
Need to Know

33
Using the Remote Transmitter
to Deliver a Bolus
1. Turn ON Easy Bolus.
2. Press and hold AACCTTon the remote transmitter for at least three
seconds to ‘wake up’ the pump. When the pump is awake, it will
beep or vibrate. You will now be able to program an easy bolus.
3. Press the BBbutton as many times as you want to select the bolus
amount. Each press will
result in a beep or a vibra-
tion. The beeps will change
in pitch to assist your
counting.
Review Easy Bolus in man-
ual for more info on this
feature
4. Press AACCTT. The pump will beep or vibrate back the amount you
just selected. Count the beeps/vibrations. If this amount is correct,
press AACCTTto deliver.
If the amount is incorrect, let the pump “time out”. (Do not
press any buttons for 30 seconds.) To restart programming, you
will need to wake up the pump again.
ACT
SB
WHY:Allows you to deliver an Easy Bolus using the remote
transmitter
HOW:
22
The remote transmitter is designed to operate within
approximately 2 feet of your pump.
Need to Know
When the remote transmitter is in “sleep mode”, the
green LED light will be off.
After you have awakened your pump by pressing and
holding the AACCTTbutton, the green LED light will glow
and flash rapidly.
When the battery is low, the LED will blink in a series of
three quick flashes until the battery is replaced. When
this happens, replace the battery in the remote transmit-
ter as soon as possible.
If the LED blinks in a series of more than three quick
flashes, call MiniMed.
Need to Know
55
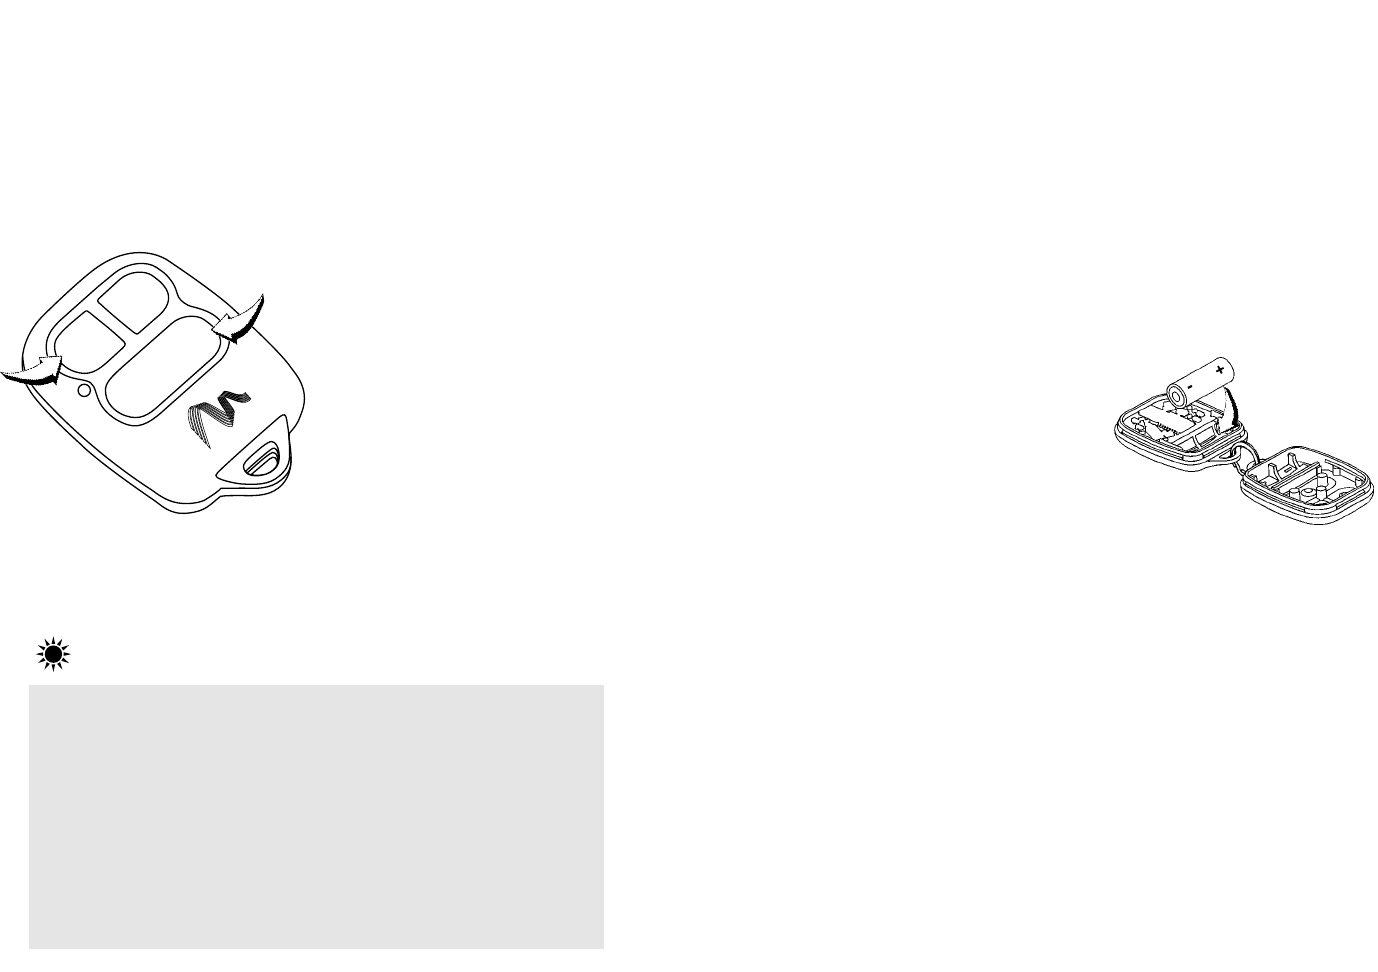
1. Place the remote face down on a secure, flat surface.
2. Unsnap the rear panel by twisting a coin or screwdriver between
the plastic key ring loops. Remove
the used battery and discard
properly.
3. Insert a new A23 battery accord-
ing to the diagram on the remote
transmitter case. When inserting
the new battery, do not touch any
of the exposed electronics.
4. Replace the rear panel and snap
the panels together to assemble
the remote transmitter.
Your remote transmitter should be
able to transmit to the pump as soon
as the battery is inserted.
If this does not happen:
a. Check to see if the battery is inserted properly.
b. If the battery is inserted properly and the remote transmitter
green LED light does not flash, install a new battery.
Remote transmitter Care
and Maintenance
installing a new battery
44
1. Press and hold AACCTTon the remote transmitter for at least three
seconds to ‘wake up’ the pump. When the pump is awake, it will
beep or vibrate.
2. To suspend pump delivery,
press the SSbutton, then press
AACCTT. Three audible
beeps/vibrations will confirm
that the pump is in suspend
mode.
3. To resume basal delivery, press
and hold AACCTTon the remote
transmitter for three seconds.
This will “wake-up” the pump.
Next, press the SS button, then
press AACCTT. The pump will beep/vibrate once and then will resume
basal delivery.
ACT
SB
Using the Remote Transmitter
to Suspend/Restart the Pump
Your pump “looks” for a signal from the remote transmitter
every two to three seconds. This is why you need to press
and hold the AACCTTbutton on the remote transmitter before
you can program.
Continuing to hold the AACCTTbutton after the pump wakes
up may result in the pump returning to sleep mode.
If the wrong button is pressed, simply wait 30 seconds for
the command to time out.
Need to Know

77
66
If the Remote transmitter is Dropped
1. Check that the remote transmitter panels (front and rear) are still
attached.
2. Press and hold the ACT button on the remote transmitter to
check communication with the pump.
If the Remote transmitter is
Submerged
1. Pat the outside of the panels until dry.
2. Following the battery installation procedure on page 9,
unsnap the rear panel, and allow the two sections to dry out.
Do not use hot air to dry your remote transmitter as this may
damage internal electronics.
3. If you need assistance, call MiniMed.
Exposure to Extreme Temperatures
1. Avoid operating your remote transmitter in temperatures above
113 °F (45°C) or below 33°F (0.5°C).
2. Do not steam sterilize or autoclave your remote transmitter.
Cleaning the Remote transmitter
1. Use a damp cloth and mild soap to clean the outside of your
remote transmitter.
2. Never use organic solvents, such as nail polish remover or paint
thinner to clean your remote transmitter.
If the remote transmitter does not “wake up” the pump:
c. Make sure the easy bolus and the remote transmitter on the
pump are turned ON.
d. Make sure the RF ID is correctly entered.
e. If this does not correct the problem, call MiniMed.
The battery in the remote transmitter
usually needs to be changed every two
months, depending on how often you
use the remote.
Need to Know

99
88
This device complies with the United States Federal Communications
Commission and international standards for Electromagnetic
Compatibility regarding its use.
This device complies with Part 15 of the FCC Rules. Operation is
subject to the following two conditions: (1) This device may not
cause harmful interference, and (2) this device must accept any inter-
ference received, including interference that may cause undesirable
operation.
These standards are designed to provide reasonable protection
against excessive radio frequency interference and prevent undesir-
able operation of the device from unwanted electromagnetic interfer-
ence. Operation is subject to the following two conditions:
This device has been tested and found to comply with the regula-
tions governing such devices in your area. For the specific regulation
and test results for you area, please contact your local MiniMed rep-
resentative.
This device generates, uses, and can radiate radio frequency energy
and, if installed and used in accordance with the instruction, may
cause harmful interference to radio communications. If the device
does cause interference to radio or television reception, the user is
encouraged to try to correct the interference by one or more of the
following measures:
•Reorient or relocate the remote transmitter
•Increase the separation between the remote transmitter and
the device that is receiving/emitting interference
•If you have questions, please contact MiniMed.
CCaauuttiioonn: Any changes or modifications to the devices not expressly
approved by MiniMed could void your ability to operate the equip-
ment.
FCC Notice for the
Remote transmitter
Country Current Standard
Austria EN 300-220-1 (1997-11)
Belgium EN 300-220-1 (1997-11)
Denmark EN-300-220-1 (1997-11)
Finland EN-300-220-1 (1997-11)
France EN-300-220-1 (1997-11)
Germany ETS 300-683 6/97
Ireland EN-300-220-1 (1997-11)
Italy EN-300-220-1 (1997-11)
Spain EN-300-220-1 (1997-11)
Netherlands EN-300-220-1 (1997-11)
Sweden EN-300-220-1 (1997-11)
United Kingdom EN-300-220-1 (1997-11)
Portugal EN-300-220-1 (1997-11)
Greece EN-300-220-1 (1997-11)
Norway EN-300-220-1 (1997-11)
Switzerland EN-300-220-1 (1997-11)
Mexico EE-116-091-99
Poland EN-300-220-1 (1997-11)
1111
1100
D9195960-0U1 1/01
Please Read the Instructions for Use:
Manufacture Date:
(year - month)
Reference/Model Number:
example:
REF MMT-115
Device Serial Number:
S N
Storage Temperature Range:
Fragile Product:
Protection Against Moisture:
Watertight: IPX7
+ 55C
C
!
2000-06
-20C +55C
Indications
The MiniMed Model 503 Remote Transmitter is intended for use
with the MiniMed Paradigm Insulin Pump Model 511.
Warnings
The MiniMed Model 503 Remote Transmitter is powered by a sin-
gle A23 battery cell. To help ensure proper operation, change bat-
tery when the LED emits three quick flashes without pressing a
key or fails to flash when a key is pressed.
USA: Northridge, CA
800-826-2099 •818-576-5555
800-843-6687
EUROPE: MiniMed S.A., Paris, France
+33-(0)1-47-59-76-60
www.minimed.com