Medtronic MiniMed 512 Paradigm 512 User Manual mp6024875 012 a
Medtronic MiniMed, Inc. Paradigm 512 mp6024875 012 a
manual
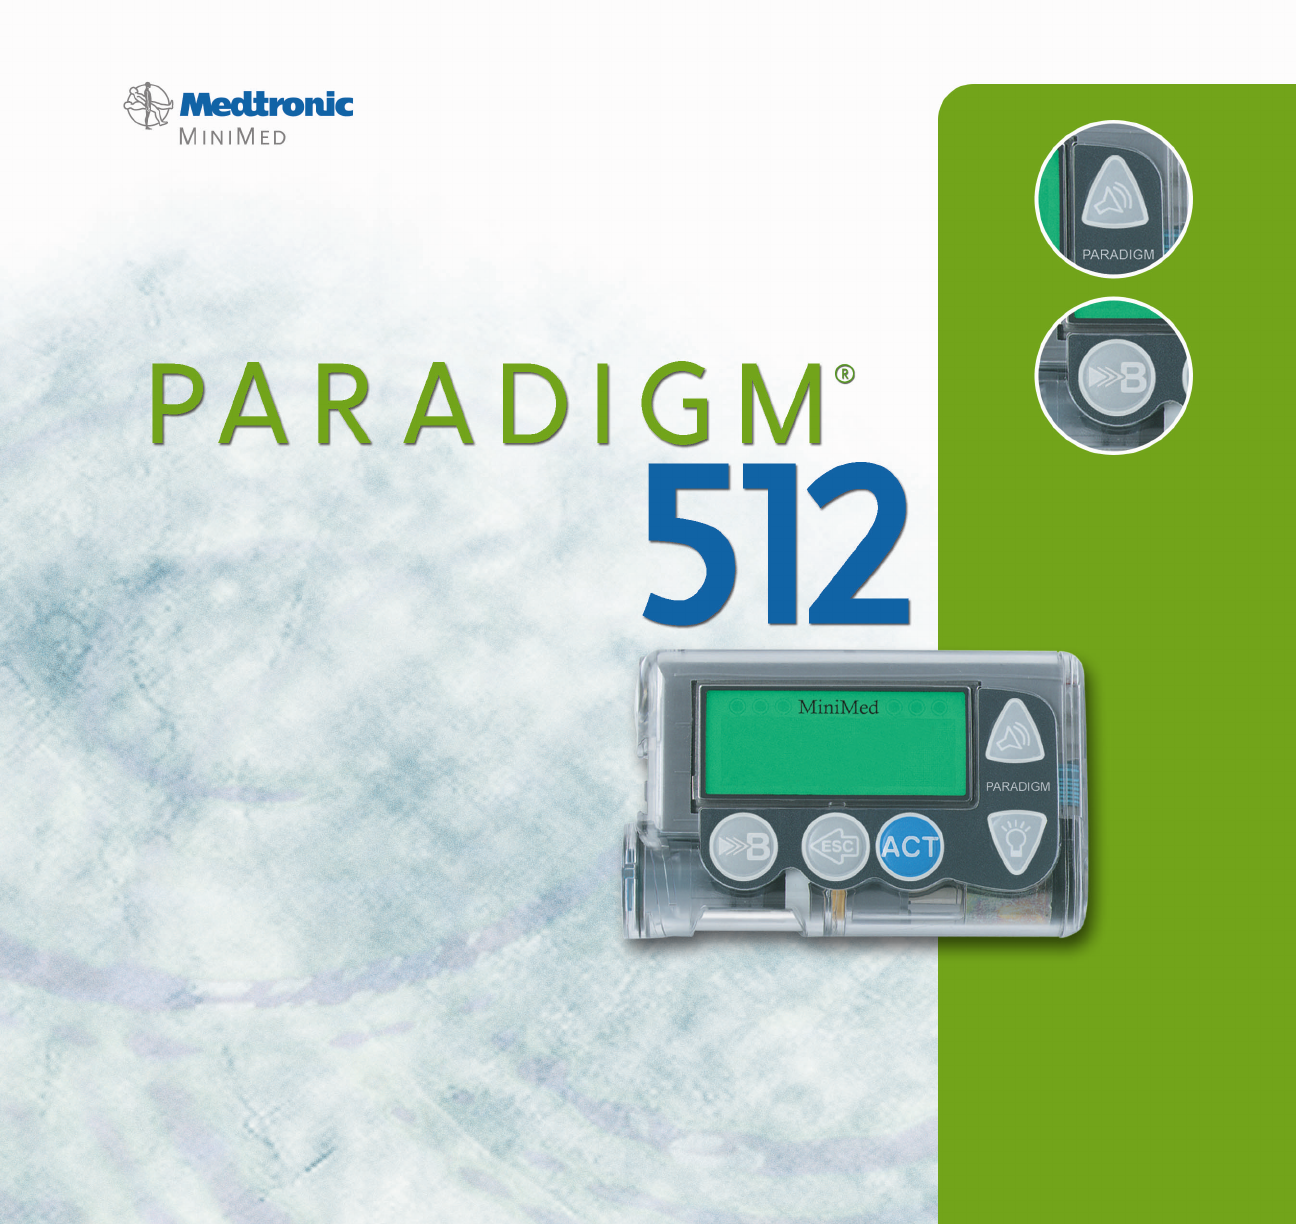
Paradigm® 512
Model MMT-512
User Guide
mp6024875_012_a.book Page 1 Monday, June 23, 2003 10:54 AM

© 2003, Medtronic MiniMed. All rights reserved.
BD Logic™ is a trademark of Becton, Dickinson and Company
Dual Wave™ is a trademark of Medtronic MiniMed.
Easy Bolus™ is a trademark of Medtronic MiniMed.
Energizer® is a trademark of Eveready Battery Company.
Glucagon Emergency Kit® is a trademark of Eli Lilly and Company.
Paradigm® is a trademark of Medtronic MiniMed.
Paradigm Link™ is a trademark of Medtronic MiniMed.
Quick-serter® is a trademark of Medtronic MiniMed.
Quick-set® Plus is a trademark of Medtronic MiniMed.
Silhouette® is a trademark of Medtronic MiniMed.
Sof-set® is a trademark of Medtronic MiniMed.
Square Wave™ is a trademark of Medtronic MiniMed.
U.S., international, and foreign patent applications are pending.
6024875-012 5/03
mp6024875_012_a.book Page 2 Monday, June 23, 2003 10:54 AM
PLEASE READ
THIS ENTIRE USER GUIDE
BEFORE YOU TRY
TO OPERATE YOUR PUMP.
mp6024875_012_a.book Page i Monday, June 23, 2003 10:54 AM
mp6024875_012_a.book Page ii Monday, June 23, 2003 10:54 AM
Table of contents i
Table of contents
Glossary .............................................. i
Your personal information ...........................v
Basal rate ............................................................................................................. v
Insulin type ........................................................................................................ vi
Carb ratios (meal bolus info) ....................................................................... vi
BG targets ......................................................................................................... vi
Insulin sensitivity ............................................................................................ vi
Introduction ...................................... vii
Purpose .............................................................................................................. vii
Accessories ...................................................................................................... vii
How to wear your pump ............................................................................... vii
How to use this guide .................................................................................. viii
Chapter 1 Before you begin... ................... 1
Availability ................................................................................................................ 1
Assistance ............................................................................................................... 1
Emergency kit ........................................................................................................ 1
Reservoir and infusion sets .............................................................................. 2
Practice, practice, practice... .......................................................................... 2
Chapter 2 The basics... ......................... 3
Your pump .......................................................................................................... 3
Install battery .................................................................................................... 4
Pump buttons .................................................................................................... 6
mp6024875_012_a.book Page i Monday, June 23, 2003 10:54 AM
ii Table of contents
The pump screen ..............................................................................................7
Is my pump on? ..................................................................................................... 7
Scroll bar .................................................................................................................. 7
Screen backlight ................................................................................................... 7
Beep/vibrate ......................................................................................................7
HOME screen ..................................................................................................... 8
Operating modes ............................................................................................. 8
Menus ....................................................................................................................9
STATUS screen ...............................................................................................10
Alert conditions ................................................................................................11
What to do.... ......................................................................................................... 11
Low reservoir alert ................................................................................................11
Low battery alert ...................................................................................................11
Alerts for special features ...........................................................................12
If you remove your pump... ..........................................................................12
Pump settings ......................................................................................................12
Insulin .......................................................................................................................12
Chapter 3 Basic programming ...................13
Setting the time and date ............................................................................ 13
BG reminder ......................................................................................................14
Bolus ....................................................................................................................15
Normal bolus .........................................................................................................15
from the menu, or .................................................................................................15
using the EXPRESS BOLUS button .................................................................15
Review your bolus deliveries ......................................................................20
Bolus details ...........................................................................................................21
Maximum bolus limit .....................................................................................22
mp6024875_012_a.book Page ii Monday, June 23, 2003 10:54 AM
Table of contents iii
Basal ....................................................................................................................23
Start and stop times ........................................................................................ 23
Your basal settings ............................................................................................24
Basal programming and delivery ..................................................................24
Basal review .........................................................................................................26
Current basal delivery .........................................................................................26
Daily basal rate(s) .................................................................................................26
Max basal rate .................................................................................................28
Stopping your pump ......................................................................................29
Resume pump delivery ..................................................................................31
Chapter 4 Starting on insulin ................... 33
Prepare your pump for use ......................................................................... 33
Filling the reservoir .......................................................................................34
Changing your infusion set .........................................................................36
Removing the reservoir ................................................................................... 36
Rewinding your pump ...................................................................................... 37
Inserting the reservoir in your pump ......................................................... 38
Manual prime ....................................................................................................... 39
Insert the infusion set ......................................................................................40
Sof-set infusion set .............................................................................................40
Silhouette infusion set ........................................................................................40
Quick-set Plus infusion set (with Quick-serter) .......................................41
Disconnecting Quick-set Plus ............................................................................. 43
Reconnecting Quick-set Plus .............................................................................. 43
Fixed prime ...........................................................................................................44
Prime history ....................................................................................................45
Record keeping for diabetes management ..........................................45
Determining your pump settings .............................................................46
mp6024875_012_a.book Page iii Monday, June 23, 2003 10:54 AM
iv Table of contents
Using your daily journal ................................................................................46
Chapter 5 Using Bolus Wizard ..................49
What is it? .........................................................................................................49
Information you need... ................................................................................49
Food entry .............................................................................................................49
Your BG reading ..................................................................................................49
Your personal Bolus Wizard settings ..........................................................49
How the Bolus Wizard works ..................................................................... 52
More about Bolus Wizard... .............................................................................52
About high or low BG levels... ...........................................................................52
About maximum delivery .................................................................................. 53
About active insulin ............................................................................................. 53
How to program Bolus Wizard .................................................................. 54
Bolus Wizard on/off ..........................................................................................54
Carb units ..............................................................................................................54
Carb/Exch ratios .................................................................................................55
BG units ..................................................................................................................56
Insulin sensitivity .................................................................................................56
BG targets .............................................................................................................57
Review your Bolus Wizard settings ......................................................... 59
Meter option .................................................................................................... 59
Meter rules ...........................................................................................................60
Add, delete, review meter IDs ......................................................................60
Normal bolus using Bolus Wizard ..............................................................62
Chapter 6 Optimizing pump therapy ............67
Square Wave and Dual Wave bolus .......................................................... 67
Dual Wave/Square Wave bolus on-off ......................................................67
mp6024875_012_a.book Page iv Monday, June 23, 2003 10:54 AM
Table of contents v
Square Wave or Dual Wave bolus without Bolus Wizard ................... 68
Using Bolus Wizard for a Square Wave or Dual Wave bolus .............72
Easy bolus ..........................................................................................................74
Easy bolus setup .................................................................................................74
Step value setup ...................................................................................................74
Deliver Easy Bolus .............................................................................................. 75
Basal patterns ..................................................................................................77
Patterns on/off .................................................................................................. 77
Program a pattern ............................................................................................. 78
Select a pattern ................................................................................................. 79
Temp basal rates .............................................................................................81
How does temp basal work? ..........................................................................81
Temp basal types ...............................................................................................81
Insulin rate ...............................................................................................................82
Percent of basal .................................................................................................... 83
Selecting temp basal type .............................................................................84
Deliver a temp basal .........................................................................................84
Verifying temp basal delivery ....................................................................... 85
Canceling a temp basal .................................................................................... 85
Chapter 7 Insulin pump therapy follow-up ..... 89
Chapter 8 Utilities .............................. 91
Alarm review ....................................................................................................91
Alarm details .........................................................................................................91
Setting your alert type ..................................................................................91
Auto-off ............................................................................................................92
Low resv warning (Low reservoir warning) ..........................................92
Review daily insulin totals ............................................................................93
mp6024875_012_a.book Page v Monday, June 23, 2003 10:54 AM
vi Table of contents
Personal reminders ........................................................................................94
Alarm clock ...........................................................................................................94
Remote control option .................................................................................94
Turn on remote control option .....................................................................95
Add, delete, review remote control IDs ...................................................95
Block feature ...................................................................................................96
Turn block on .......................................................................................................96
Selftest ..............................................................................................................98
Clear pump .......................................................................................................99
Select your insulin type .............................................................................. 100
Language setting .......................................................................................... 101
Chapter 9 Troubleshooting and alarms ........ 103
Troubleshooting ............................................................................................103
My pump has a no delivery alarm... ............................................................ 103
What happens if I leave the battery out too long? .............................104
Why doesn’t my pump battery last very long? ....................................104
What is a check settings alarm? .................................................................104
My screen appears distorted... ...................................................................104
I can’t get out of the priming loop... .........................................................105
The pump is asking me to rewind... ........................................................... 105
My bolus stopped... ..........................................................................................105
My pump buttons are not acting right during a bolus... .....................105
My pump won’t display my BG reading from my meter... ................106
Alarms .............................................................................................................. 106
What to do .......................................................................................................... 107
Alarm conditions .......................................................................................... 108
A (Alarm) .............................................................................................................108
mp6024875_012_a.book Page vi Monday, June 23, 2003 10:54 AM
Table of contents vii
Auto off ............................................................................................................... 108
Batt out limit ...................................................................................................... 108
Bolus stopped .................................................................................................... 108
Button error ....................................................................................................... 108
Check settings .................................................................................................. 108
E (Error) ............................................................................................................... 108
Empty reservoir ................................................................................................ 108
Failed batt test ................................................................................................. 109
Is priming complete? ...................................................................................... 109
Max delivery ....................................................................................................... 109
Motor error ........................................................................................................ 109
No delivery ......................................................................................................... 109
No reservoir ...................................................................................................... 109
Off no power .................................................................................................... 109
Reset ..................................................................................................................... 109
Chapter 10 Pump maintenance ................ 111
Battery ............................................................................................................... 111
Storage .............................................................................................................. 111
Cleaning your pump ..................................................................................... 112
Precautions ..................................................................................................... 112
Special circumstances ................................................................................. 113
Chapter 11 User safety ....................... 115
Indications ....................................................................................................... 115
Contraindications .......................................................................................... 115
Warnings .......................................................................................................... 115
Reservoir and infusion sets ........................................................................... 115
X-rays, MRIs and CT scans ............................................................................ 115
mp6024875_012_a.book Page vii Monday, June 23, 2003 10:54 AM
viii Table of contents
Precautions ..................................................................................................... 116
Precautions - infusion sets and sites .........................................................116
Notice ................................................................................................................117
Insulin pump and RF accessories ................................................................. 117
Chapter 12 Pump specifications ............... 119
Alarms and error messages ....................................................................... 119
Alarm history .................................................................................................. 119
Backlight ........................................................................................................... 119
Basal ................................................................................................................... 119
BG target ......................................................................................................... 119
Bolus delivery ................................................................................................ 120
Bolus history .................................................................................................. 120
Bolus units ...................................................................................................... 120
Bolus Wizard .................................................................................................. 120
Carb ratios ...................................................................................................... 120
Carb units ........................................................................................................ 120
Daily totals ...................................................................................................... 120
Default screen .............................................................................................. 120
Delivery accuracy ......................................................................................... 120
Drive motor ..................................................................................................... 121
Dual Wave bolus ............................................................................................ 121
Easy bolus ........................................................................................................ 121
Infusion pressure .......................................................................................... 121
(insulin) sensitivity ........................................................................................ 121
Insulin type ...................................................................................................... 121
Low resv (reservoir) warning .................................................................... 121
Meter value .................................................................................................... 122
Normal bolus .................................................................................................. 122
mp6024875_012_a.book Page viii Monday, June 23, 2003 10:54 AM
Table of contents ix
Occlusion detection .................................................................................... 122
Percent temp basal ..................................................................................... 122
Power supply ................................................................................................. 122
Prime function ............................................................................................... 122
Prime history .................................................................................................. 123
Program safety checks .............................................................................. 123
Pump size ........................................................................................................ 123
Pump weight .................................................................................................. 123
Remote control ............................................................................................. 123
Reservoir ......................................................................................................... 123
Square Wave bolus ...................................................................................... 123
Status screen ................................................................................................. 124
Temporary (temp) basal rate .................................................................. 125
Time and date screen ................................................................................. 125
Water tight ..................................................................................................... 125
Bolus Wizard specifications ...................................................................... 126
Default settings ............................................................................................ 129
Icon table ........................................................................................................ 130
Index ........................................... 131
Menu map ...................................... 135
mp6024875_012_a.book Page ix Monday, June 23, 2003 10:54 AM
x Table of contents
mp6024875_012_a.book Page x Monday, June 23, 2003 10:54 AM
xi
Practice lessons and examples
Bolus examples
Meal bolus
Example #1 Normal meal bolus using the exchange system ................................................ 16
Bolus practice: ................................................................................................................................ 16
Normal meal bolus practice using exchanges: ......................................................................... 16
Example #2: Normal meal bolus using carbohydrate counting ........................................... 17
Normal meal bolus practice using carbohydrate counting: .................................................. 17
Correction bolus
Example #3: Meal bolus, correction bolus and insulin sensitivity ...................................... 18
Practice: Meal bolus ....................................................................................................................... 19
Max bolus
Example #1: Max bolus .................................................................................................................22
Example #2: Max bolus ................................................................................................................22
Basal examples
Basal programming
Practice: Basal programming .......................................................................................................25
Max basal
Example #1: Max Basal .................................................................................................................28
Example #2: Max Basal ................................................................................................................28
Suspend/Resume examples
Example: Suspend function ..........................................................................................................30
Practice: Suspend function ..........................................................................................................30
Practice: Resume basal delivery after a suspend ................................................................... 31
mp6024875_012_a.book Page xi Monday, June 23, 2003 10:54 AM
xii
Bolus Wizard examples
Example #1: Bolus Wizard, BG on target (normal BG) ..........................................................64
Example #2: Bolus Wizard, BG above target (high BG) .......................................................64
Example #3: Bolus Wizard, Blood glucose below target (low BG) .....................................65
Example #4: Bolus Wizard, Blood glucose above target (high BG) with active insulin .65
Square Wave bolus examples
Example #1: Square Wave bolus, Use of a Square Wave bolus while
eating a meal high in fat .........................................................................................................69
Example #2: Square Wave bolus, (gastroparesis) .................................................................69
Your turn: Square Wave bolus practice ....................................................................................69
Dual Wave bolus examples
Example #1: Dual Wave bolus Set a Dual Wave bolus for a barbecue style dinner ......70
Example #2: Dual Wave bolus, Set a Dual Wave bolus for correcting
elevated BG before a meal .....................................................................................................70
Your turn: Dual Wave bolus practice ......................................................................................... 71
Easy bolus examples
Example #1: Easy bolus ................................................................................................................76
Your turn: Easy bolus practice ....................................................................................................76
Basal patterns examples
Example #1: Basal patterns .........................................................................................................80
Example #2: Basal patterns ........................................................................................................80
Your turn: .........................................................................................................................................80
Temp Basal examples
Example #1: Temp Basal for a decreased temporary basal rate .......................................86
Example #2: Temp Basal for an increased temporary basal rate ......................................86
Your turn: .........................................................................................................................................87
Block examples
Example #1: Block ..........................................................................................................................97
Example #2: Block .........................................................................................................................97
mp6024875_012_a.book Page xii Monday, June 23, 2003 10:54 AM

Glossary i
Glossary
A
Accept - Pressing the ACT button to approve the
selection or setting.
Active Insulin -Bolus insulin that has been delivered
to your body, but has not yet been used.
Alarm -Audible or vibrating (silent) notice that indi-
cates the pump is in Attention mode and immediate
attention is required. Alarms are prefixed in the alarm
history with the letter A.
Alarm clock- Feature you can set to go off at speci-
fied times of the day.
ALARM HISTORY- Screen that displays the last
twelve alarms/errors that have occurred on your
pump.
Alert-Audible or vibrating (silent) indicator that noti-
fies you the pump needs attention soon or that you
should be reminded of something. Insulin delivery
continues as programmed.
Attention mode - Operating mode that stops all cur-
rent insulin delivery. This mode indicates an alarm or
condition exists that requires immediate attention.
B
Backlight - Pump screen light. Turns on whenever the
down button is pressed from the HOME screen,
or during an alarm (except LOW BATT).
Basal Rate - The pump setting that provides a con-
tinuous infusion of insulin to keep the blood glucose
stable between meals and during the night. Basal
insulin mimics pancreatic insulin delivery --which
meets all the body’s non-food related insulin needs.
BASAL REVIEW - Screen that shows a record of
your daily basal insulin delivery for the past 14 days.
BG - Blood Glucose
BG reminder - Feature that you can set to remind you
to check your blood glucose after a bolus.
BG target - normal blood glucose level
BG unit - blood glucose unit of measure (mg/dl or
mmol/L)
Block -Feature that restricts access to all programming
except suspend, selftest and the delivery of a bolus
with the remote control.
Bolus - A dose of insulin given to cover an expected
rise in blood glucose (such as the rise after a meal) or
to lower a high blood glucose down to target range.
BOLUS HISTORY - This screen displays the last
twenty-four (24) boluses delivered by your pump.
Bolus Wizard - Feature that calculates the bolus
amount based on personal information of the pump
user.
C
Carb ratio- (Carbohydrate ratio)
Used when counting carbohydrates in grams. The
amount of carbohydrates covered by one unit of insu-
lin. (Also see exch ratio.)
Carb units -The food entry when using the Bolus
Wizard. Entered as (carbohydrate) grams or
exchanges.
CH - Carbohydrate
mp6024875_012_a.book Page i Monday, June 23, 2003 10:54 AM

ii Glossary
Correction bolus - The amount of insulin needed to
return a high blood glucose level back down to target
range.
Correction bolus factor - How much 1.0 unit of
insulin will lower your blood glucose. This factor is
used to calculate a correction bolus amount when
your blood sugar is high.
(BG level) – (BG target) = X.
X ÷ (corr bolus factor) = corr bolus amount
D
Daily totals - Shows the total insulin delivered (basal
and bolus) in the last 24-hours.
Maximum records: 14 days
DKA - Diabetic Ketoacidosis
Dual Wave bolus - Combination of a Normal bolus
that is delivered immediately, then followed by a
Square Wave bolus. The Square Wave portion is deliv-
ered evenly over a period of time.
Duration - Amount of time it takes to administer a
bolus or basal delivery. Also, length of time for an
action or condition.
E
Easy bolus - Method of delivery for a Normal bolus
that using the Easy Bolus button .
Exch ratio - (Exchange ratio)
Used when counting carbohydrates as exchanges.
The amount of insulin required to cover one (1) carbo-
hydrate exchange. (Also see carb ratio.)
Express bolus - Method of delivery for any bolus type
using the express bolus button .
F
Fixed prime - Fills the cannula with insulin. This is
done after you insert the infusion set into your body
and remove the introducer needle.
Food bolus - A dose of insulin given to cover the
expected rise in blood glucose that occurs after eat-
ing.
G
Gastroparesis -A condition of the digestive system
that slows down the emptying of food from the
stomach.
H
HbA1c - Glycosylated hemoglobin
HDL - high-density lipoprotein
A complex of lipids and proteins in approximately
equal amounts that functions as a transporter of
cholesterol in the blood.
I
Idle - The pump is at the HOME screen.
Ins sensitivity - The amount that your blood glucose
(BG) level is reduced by one unit of insulin. (Bolus
Wizard data)
Insulin type -Type of insulin used: U100 fast acting
or U100 regular.
mp6024875_012_a.book Page ii Monday, June 23, 2003 10:54 AM
Glossary iii
L
LDL - low-density lipoprotein
A complex of lipids and proteins, with greater
amounts of lipid than protein, that transports
cholesterol in the blood.
Link -To turn on and setup the meter option that
allows the pump to receive BG readings from the
Paradigm Link meter.
Low resv warning - Programmable warning that
notifies you with an alert when either a specified
number of units remain in the reservoir or a specified
amount of time remains before the reservoir will be
empty.
M
Manual bolus - Selectable item available in the BOLUS
MENU when Bolus Wizard is active. One method of
programming a bolus without Bolus Wizard. (see “Set
bolus”)
Manual prime - Fills the infusion set tubing with insu-
lin before you insert the set into your body. (This
function is available after a rewind)
Max bolus - The maximum amount of bolus insulin
that the pump will deliver at one time. (set by the
user)
Max basal insulin - The maximum amount of basal
insulin that the pump will deliver at one time. (set by
the user)
Meter - The Paradigm Link Blood Glucose Monitor
Powered by BD Logic Technology (Paradigm Link
meter). Your pump can be programmed to receive
your BG readings from this meter.
Meter option - Feature that allows the pump to
receive BG readings from the Paradigm Link meter.
N
Normal mode - Regular operating mode. No special
features are active, no alert or alarm conditions exist.
Insulin delivery is normal during this mode.
Normal bolus - An immediate delivery of a specified
unit amount of insulin.
Now - The “Normal” portion of a Dual Wave bolus. The
now portion delivers immediately and is then followed
by the Square portion.
P
Pattern feature - Extended pump feature that
allows you to program optional basals (Pattern A,
Pattern B) that support activities that are not a part
of your day-to-day routine, but are usual in your life-
style. Such activities could be a sport that you do
once a week or a change in your sleep pattern over
the weekend.
Pattern, standard - Your normal basal that sup-
ports your usual day-to-day activity. When the Pat-
terns feature is off, the pump uses your standard
(basal) pattern.
Press - To push and release a button.
Prime - (see fixed prime or manual prime)
R
Resume - Restarts basal delivery after the pump is
suspended.
Rewind - The pump drive moves back to its starting
position to prepare the pump for a new reservoir.
RF - Radio frequency
mp6024875_012_a.book Page iii Monday, June 23, 2003 10:54 AM
iv Glossary
S
Scroll - Press the up or down arrow buttons to move
through the screen text.
Select - Pressing the up or down arrow buttons to
highlight a desired screen item.
Set bolus - Selectable item available in the BOLUS
MENU when Bolus Wizard is inactive. One method of
programming a bolus without Bolus Wizard. (see
“Manual bolus”)
Special mode - Operating mode that indicates one or
more special functions is active or a condition exists
that requires attention.
Square Wave bolus - Immediate bolus delivered
evenly over a specified time period (30 minutes to
8hours).
Square Wave portion - (Sq) The second part of a
Dual Wave bolus. The Square Wave portion delivers
evenly over a period of time after the NOW portion
delivers.
Status screen - Displays the current operations of
the pump, including active functions, the most
recent basal and bolus deliveries, reservoir informa-
tion, and battery condition.
Step - Measurement of insulin that you set and use for
Easy Bolus delivery.
Suspend - Function that stops all insulin delivery. Any
current bolus and/or prime deliveries are canceled.
The basal delivery is paused until restarted.
T
Temp - Temporary
Temp basal - (Tmp basal) Temporary one-time basal
insulin with a specified amount and duration. Used to
support insulin needs for special activities or condi-
tions that are not part of the normal daily routine.
U
uL - Units per Liter
mp6024875_012_a.book Page iv Monday, June 23, 2003 10:54 AM

Your personal information v
Your personal information
You may need the following information from your healthcare professional before going to your pump start
appointment. If you are unsure, contact your healthcare professional or pump trainer for instructions.
NOTE - This information is not for the Bolus Wizard. Refer to chapter 5 for Bolus Wizard settings.
Basal rate
Basal insulin is required to maintain your target glucose
values when you are not eating. Your pump can be pro-
grammed with up to three (3) basal patterns (standard,
pattern A, pattern B) to accommodate your varying insulin
needs on different days (example: weekday versus week-
end day). Each pattern can have up to 48 basal rates. When
you first start pump therapy, you may only have to pro-
gram one or two basal rates. Get your basal rate settings
from your healthcare professional.
Standard
Basal rate
number Start time Basal rate
(units per hour)
#1 midnight
#2
#3
(additional basal rates)
#4
#5
#6
#7
#8
Pattern A
Basal rate
number Start time Basal rate
(units per hour)
#1 midnight
#2
#3
(additional basal rates)
#4
#5
#6
#7
#8
Pattern B
Basal rate
number Start time Basal rate
(units per hour)
#1 midnight
#2
#3
(additional basal rates)
#4
#5
#6
#7
#8
mp6024875_012_a.book Page v Monday, June 23, 2003 10:54 AM

vi Your personal information
Insulin type
Your pump is sent from the factory with the insulin
type set to U100 fast acting. The insulin type can also
be set to U100 regular acting.
Carb ratios (meal bolus info)
Your carb ratios are used to calculate your meal
boluses.
If you count grams: this ratio is the number of carb
grams covered by one (1) unit of insulin.
If you count exchanges: this ratio is the number of
insulin units you need to cover one carb exchange.
BG targets
BG targets are the levels that your BG (blood
glucose) should be and are required for pump therapy.
Keeping your BG within target range is important for
living well with diabetes. Your healthcare professional
should help you determine these targets.
Insulin sensitivity
Your insulin sensitivity value indicates how much
your blood glucose is reduced by 1 unit of insulin. Your
insulin sensitivity values are used to calculate your cor-
rection boluses for high BG.
My insulin type is: U100 fast acting
U100 regular acting
When (grams/u or u/exch)
breakfast
lunch
dinner
snacks
When BG Target
(mg/dL or mmol/L)
before meals:
2 hours after meals:
bedtime:
before driving:
1 unit of insulin will lower my BG:
mg/dL or mmol/L
mp6024875_012_a.book Page vi Monday, June 23, 2003 10:54 AM
Introduction vii
Introduction
Thank you for choosing Medtronic MiniMed as your partner in helping you gain better control of your diabetes.
Whether you are beginning pump therapy for the first time or upgrading from a previous model, we believe that
the combination of state-of-the-art technology and the simple, menu-driven programming of the pump will pro-
vide many benefits.
Purpose
This user guide is designed to help you to understand pump therapy and the operation of your pump. We
strongly recommend that you work closely with your healthcare professional for a safe and complete pump start.
Your pump is for insulin therapy to help you maintain a stable blood glucose target throughout the day. Based
on your settings, the pump delivers your custom basal automatically and continuously 24-hours a day. It also pro-
vides bolus deliveries to support your immediate insulin needs for food intake and/or high blood glucose. The Bolus
Wizard feature can calculate your bolus amount for you based on your personal settings.
Accessories
➠Meter: Your pump can be used with the optional Paradigm Link Blood Glucose Monitor powered by BD Logic
Technology. You can program your pump to automatically receive your BG reading from this meter.
➠Remote control: The optional Paradigm remote control can be used with the pump to deliver boluses and
suspend the pump from a distant location.
How to wear your pump
There are a different ways to wear your pump. Medtronic MiniMed has accessories that can hide, protect, and
add to the convenience of wearing a pump. Refer to the accessories catalog or the website (www.minimed.com)
for .
➠Holster: to wear the pump on your belt.
➠Pump clip: to wear the pump underneath your clothing.
➠Activity guard: If you are active in sports, or you are a child, use the guard to protect the pump from
disconnecting.
mp6024875_012_a.book Page vii Monday, June 23, 2003 10:54 AM

viii Introduction
How to use this guide
For step-by-step instructions, refer to the applicable sections in this guide. Refer to the Glossary for defin-
tions of terms and functions. The terms and symbols used in the step-by-step instructions are in the table below.
Term / symbol Meaning
“Press” to push and release the button
“Hold” to push and keep pressure on the button
“Select” to press
/
to highlight a screen item you want to select
“Exit the menus” Press ESC until the HOME screen appears
Pump Buttons always bold and uppercase; for example, ESC, ACT
Screen and menu names always uppercase; for example, MAIN MENU, REWIND screen
Menu selections always bold; for example, 12-Hour Setup, On, Off
flashing (blinking)
screen item you can change the value for that item with the
/
buttons
NOTE- and TIP - additional helpful information for the preceding text
CAUTION: warns of a potential hazard which, if not avoided, may result in minor or moderate injury
to the equipment
WARNING: notifies you of a potential hazard which, if not avoided, could result in death or serious
injury. It may also describe potential serious adverse reactions and safety hazards
“Go to the...screen.” when a step instructs you to “Go to” a screen, the path to that screen is shown.
For example:
1. From the MAIN MENU, select Utilities and press ACT.
2. In the UTILITIES MENU, select Alarm and press ACT.
3. The ALARM MENU appears.
Go to the ALARM MENU.
Main > Utilities > Alarm
mp6024875_012_a.book Page viii Monday, June 23, 2003 10:54 AM

Before you begin... 1
Chapter 1
Before you begin...
Availability
The pump and accompanying products are available from Medtronic MiniMed and authorized distributors.
Assistance
Medtronic MiniMed provides a 24-hour Product
Help Line for assistance. The Help Line is staffed with
technicians who are trained in the set-up and opera-
tion of the pump and are able to answer pump-
related questions. When calling the Help Line or your
local Medtronic MiniMed office, please have your
pump and serial number available. The phone number
for the 24-hour Product Help Line is also on the back
of your pump.
Emergency kit
Keep an emergency kit with you at all times to make sure that you always have necessary supplies. Inform a
family member, co-worker, and/or friend where this emergency kit is kept. Please refer to chapter 10, “User
safety” for more information on pump safety. Your emergency kit should include these items:
➠Fast-acting glucose tablets ➠Paradigm Quick Reference Card
➠Blood glucose monitoring supplies ➠Dressing and adhesive
➠Urine ketone monitoring supplies ➠Glucagon Emergency Kit
➠Extra Paradigm infusion set and
Paradigm reservoir
➠Extra AAA Alkaline batteries (Energizer brand is
recommended)
➠Insulin syringe and short-acting insulin
(with dosage instructions from your healthcare professional)
Department Telephone number
24-hour Product Help Line
(calls within the United States)
800.646.4633
(800.MiniMed)
24-hour Product Help Line
(calls outside the United States)
818.576.5555
Web site www.minimed.com
mp6024875_012_a.book Page 1 Monday, June 23, 2003 10:54 AM

2Chapter 1
Reservoir and infusion sets
The Medtronic MiniMed Paradigm infusion system includes the pump, reservoirs and infusion sets. The pump is
intended for use with a Paradigm reservoir. Medtronic MiniMed provides a variety of Paradigm infusion sets to fit
your needs. Installation instructions for Paradigm reservoir and infusion sets are provided in chapter 4.
To order supplies call
800-646-4633 (1-800-MiniMed)
818-576-5555 (outside U.S.)
www.minimed.com
Practice, practice, practice...
Before you begin pump therapy, it is important that you become familiar with your pump.
WARNING: For your protection the pump has undergone extensive testing to confirm appropriate oper-
ation when used with Paradigm reservoirs and Paradigm infusion sets manufactured or dis-
tributed by Medtronic MiniMed. We recommend using Medtronic MiniMed infusion sets and
reservoirs as we cannot guarantee appropriate operation if the pump is used with reservoirs
or infusion sets offered by third-parties and therefore we are not responsible for any injury
or malfunctioning of the pump that may occur in association with such use.
Do Do NOT
➠Read Book 1, “Introduction to Pump Therapy”
➠Watch the instructional video
➠Read this book
➠Complete the practice exercises in this book
(Refer to the table of contents for a list of
practice exercises.)
➠Explore and navigate the pump menus
➠Practice programming a bolus
➠Practice programming a basal rate
➠Practice using the Medtronic MiniMed
Pump school online at
http://pumpschool.minimed.com
➠DO NOT install a reservoir into the pump while
you are practicing
➠DO NOT, under any circumstances, begin insulin
therapy without guidance from your healthcare
professional
mp6024875_012_a.book Page 2 Monday, June 23, 2003 10:54 AM
3
Chapter 2
The basics...
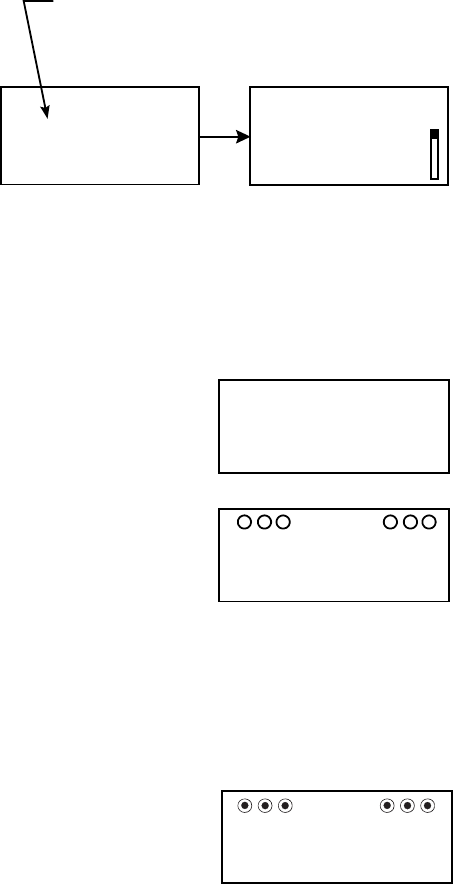
Your pump
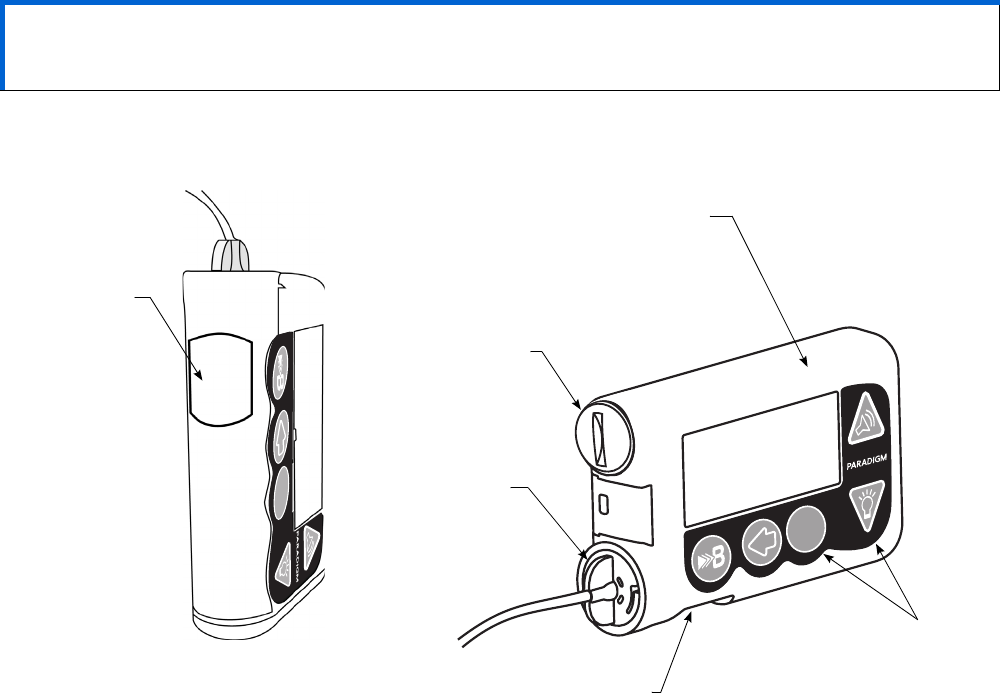
Take a look at your pump. The reservoir window allows you to view the insulin in the reservoir. The reservoir
with the tubing connector attached, is inserted into the reservoir compartment of the pump.
CAUTION: Never use sharp objects to press the buttons on your Paradigm pump as this can damage the but-
tons or compromise the watertight seal of the pump. Some examples of sharp objects that may
damage your keypad are fingernail files, pens or pencils, paperclips, knives, scissors, and keys.
ACT
ESC
ACT
ESC
reservoir
window
screen
battery
compartment
tubing
connector
reservoir
compartment
buttons
mp6024875_012_a.book Page 3 Monday, June 23, 2003 10:54 AM
4Chapter 2
Install battery
Medtronic MiniMed designed the pump to only accept a NEW battery. As a safety measure, if you install a bat-
tery that does not have full power, the “failed batt test” alarm will sound. The pump uses one AAA alkaline bat-
tery.
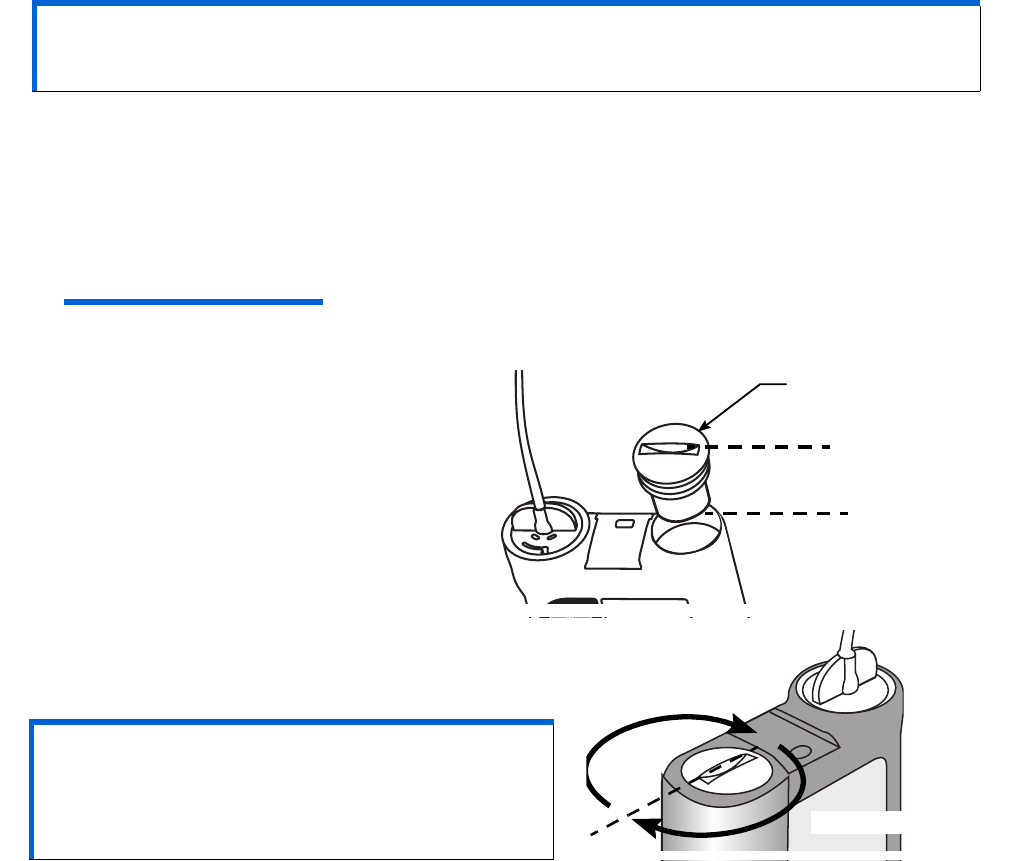
1. Use the edge of a quarter to remove the battery cap. Turn the cap in a counter-clockwise direction.
2. Put the battery in the pump with the negative end [(-) symbol] going in first. Check the label on the back of the
pump to make sure the battery is inserted correctly.
NOTE - Do not use batteries that have been in cold storage (i.e., in the refrigerator or your car in the
winter).
3. Place the battery cap on the pump so that the
slot is aligned in the orientation shown here:
4. Turn the battery cap clockwise 4 half-turns so the slot
is aligned horizontally with the pump as shown here:
Do NOT apply force when you turn the cap.
CAUTION: Do not use a rechargeable or carbon zinc battery in your pump. A new AAA Alkaline Ener-
gizer battery is strongly recommended. The use of any other battery type may not offer
the same battery performance.
CAUTION: Do NOT over-tighten the battery cap.
You should not turn the cap more than four
(4) half-turns. If you over-tighten the cap
you may not be able to remove it, and you
can damage your pump.
Align the cap slot
horizontally with
the pump.
one half-turn
one half-turn
mp6024875_012_a.book Page 4 Monday, June 23, 2003 10:54 AM
The basics... 5
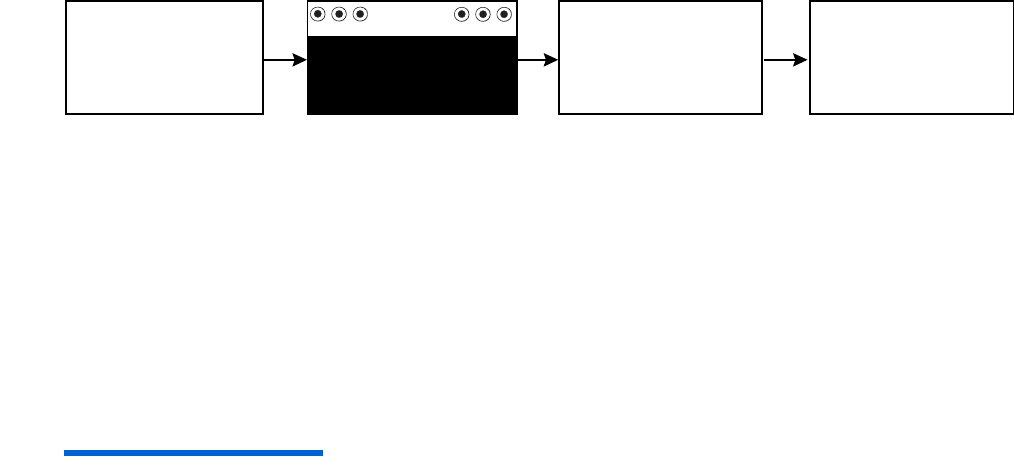
5. While the pump turns on, it will show various screens until the HOME screen appears.
If the HOME screen does not appear, do these steps:
a. Check that the battery is inserted correctly. If the battery has been installed backwards, remove the
battery and install a NEW battery.
b. If your pump still does not turn on or you get a FAILED BATT TEST alarm, remove and replace the bat-
tery with a new one.
c. If the pump is still not on, call the Medtronic MiniMed 24-hour Product Help Line.
6. Check to make sure the time and date are correct. If this is the first battery installed, or if more than 5 minutes
have passed since you removed the battery, you must program the time and date. Refer to the section, “Set-
ting the time and date” in chapter 3 for programming instructions.
NOTE - If you do not program and verify the time and date, the CHECK SETTINGS alarm will occur as a
reminder to check your time and date.
7. Press ESC to view the STATUS screen, making sure no alarms are active. If an alarm is active, follow the
instructions on the screen.
MiniMed MiniMedMiniMed
7
MiniMed
(HOME screen)
Ver 1.2A
mp6024875_012_a.book Page 5 Monday, June 23, 2003 10:54 AM
6Chapter 2
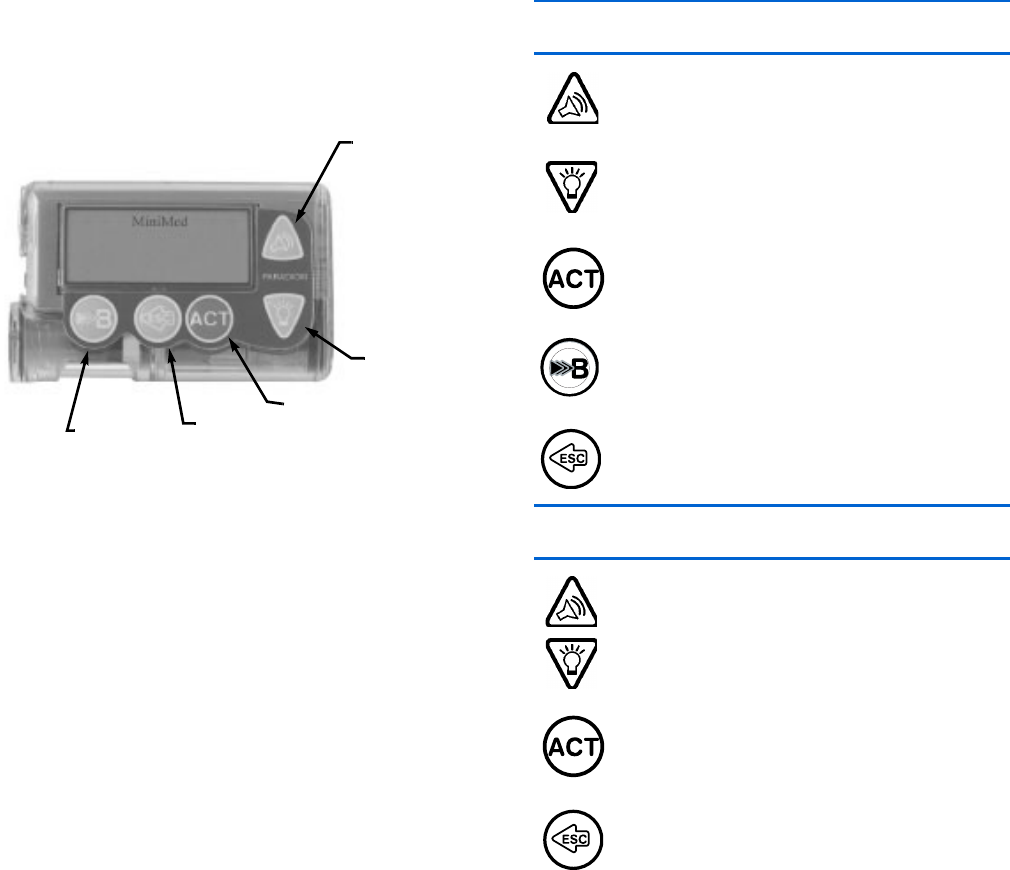
Pump buttons
The buttons on the pump are used to navigate
through the menus and screens, and to program the
features of the pump.
From the HOME screen...
(Easy Bolus button)
Shortcut to set and deliver an Easy Bolus.
Turns the backlight on/off.
Opens the MAIN MENU.
(express bolus button)
Short-cut to the BOLUS MENU to
setup any bolus type.
Opens the STATUS screen.
From the menus and programming screens...
Increases / decreases value of a flashing
item.
Scrolls up and down the items in a list.
Accepts a selected menu item or
activates a selected setting.
Returns the screen to the previous screen.
Backs out of an unintentional menu selection
if the ACT button has not been pressed yet.
EXPRESS
BOLUS
button
ESC
button
ACT
button
DOWN button
UP button
(From the
HOME screen,
this is the
EASY BOLUS
button.)
mp6024875_012_a.book Page 6 Monday, June 23, 2003 10:54 AM

The basics... 7
The pump screen
The screen shows five lines of text at one time. The first is the operating mode. The second is the current
open menu or function. The last three lines show either information or text that you can select for the current
function.
NOTE - The screen text in the examples used in this guide might not exactly match the text on your pump
screen. Please follow your pump screen instructions. If you have any questions, call the Medtronic MiniMed
24-hour Product Help Line.
Is my pump on?
When the pump is on, the word “MiniMed” always appears
across the top of the screen. If “MiniMed” does not appear, the
pump is not operating.
Scroll bar
If there is more text than the screen can show, a scroll bar
appears in the right side of the screen. Press to view any
additional text.
Screen backlight
When you press from the HOME screen, the light on the screen turns on or off. During programming, the
light will stay on while you are pressing any of the pump buttons. It will turn off automatically 30 seconds after the
last button is pressed.
To conserve your battery, the backlight will turn off automatically while the pump is vibrating. After the vibra-
tion is finished, the light will turn back on.
Beep/vibrate
Your pump will beep or vibrate to indicate activity. Refer to the section, “Setting your alert type” in chapter 8
for setup instructions.
indicates
the pump is
operating
MiniMed
scroll bar
MiniMed
mp6024875_012_a.book Page 7 Monday, June 23, 2003 10:54 AM
8Chapter 2
HOME screen
The HOME screen serves as the starting point to
access the programming screens. When no buttons
are pressed for about 30 seconds, the pump returns
to this screen.
When you press ACT from the HOME screen,
the MAIN MENU will appear.
Operating modes
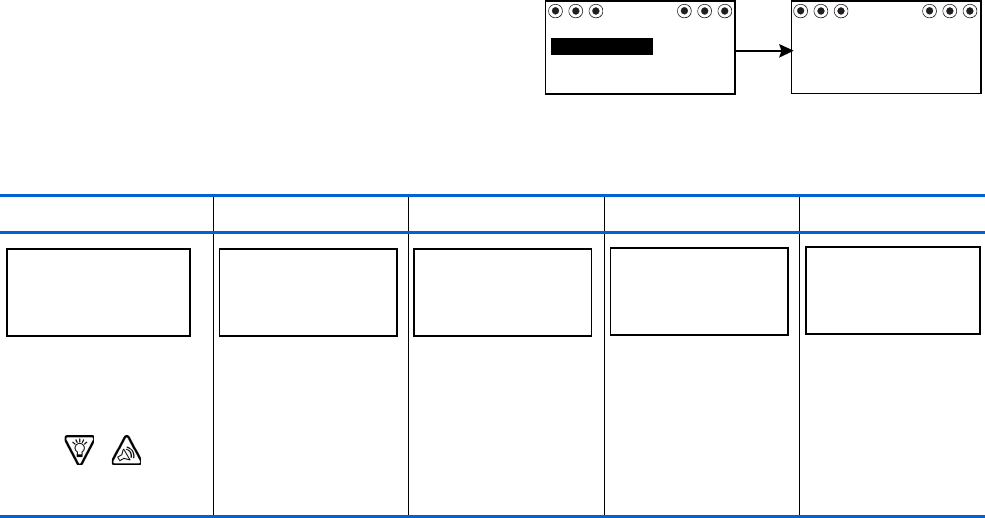
The screen lets you know when a special feature is active or if there is a condition that needs your attention.
The active features and pump status will determine the operating mode. The screens for the three modes are
shown below.
Normal - mode for standard pump operations for normal basal and bolus delivery. No
special features are active (i.e., basal patterns, temp basal, etc.). No alarms and no
alerts exist.
Special - indicates a special feature is active or an alert condition(s) exists. Special
mode does not restrict any of the pump functions. When the pump is in Special
mode, open circles appear across the top of the screen and it will beep/vibrate peri-
odically to remind you of the condition. The conditions and features that will put the
pump in Special mode are:
Attention - indicates insulin delivery has stopped. Either an alarm is active or an alarm
condition exists that needs immediate attention for insulin delivery to resume.
Solid circles appear across the top of the screen and the pump will beep periodically
until the condition is cleared. The screen will show text describing the condition that
put the pump in Attention mode. For example, if the reservoir is empty, “Empty Res-
ervoir” will appear on the screen.
➠Low Reservoir condition
➠Low Battery condition
➠Block feature is on
➠Dual or Square Wave bolus delivery
➠Basal pattern A or B is active
➠Temporary basal delivery
in the HOME screen, the area
below “MiniMed” is blank.
MiniMed MiniMed
ACT MAIN MENU
Bolus
Suspend
Basal
Normal Mode
MiniMed
MiniMed
Special Mode
MiniMed
Attention Mode
mp6024875_012_a.book Page 8 Monday, June 23, 2003 10:54 AM

The basics... 9
When the pump is in Attention mode, it will beep/vibrate periodically to remind you of the condition. The
beep/vibrate frequency varies depending on the condition that caused the alarm. Refer to the section,
“Alarm conditions” in chapter 9 for the conditions that will trigger the Attention mode.
When the pump is in “Attention mode,” all insulin deliveries are stopped.
Menus
The MAIN MENU is the highest level menu. There are submenus, functions, status and programming screens
in the lower menu levels. The menus are described in the following paragraphs. A diagram of the menu structure is
at the back of this user guide.
TIP - If a screen item is flashing (blinking), during programming, press / to change the
value.
MAIN MENU - Highest menu level in the menu system. When you press ACT from the HOME screen, the MAIN
MENU will appear.
BOLUS MENU - Contains the settings and function for bolus deliveries. The button allows direct access to
the BOLUS MENU without having to navigate through the menus.
SUSPEND - Stops all current insulin deliveries (basal, bolus and fixed prime). Refer to section, “Stopping your
pump” in chapter 3 for more information.
BASAL MENU - Contains the functions to setup and deliver your basal. Refer to the section, “Basal” in chapter 3
for more information.
PRIME MENU - Contains the functions required to change your reservoir and fill the infusion set with insulin.
Refer to the section, “Changing your infusion set” in chapter 4 for more information.
UTILITIES MENU - Contains features for your safety and convenience. Refer to chapter 8, “Utilities” for more
information.
mp6024875_012_a.book Page 9 Monday, June 23, 2003 10:54 AM

10 Chapter 2
STATUS screen
The STATUS screen shows information about what your pump is doing. The information that shows on the
STATUS screen depends on the current activities and conditions of your pump. The screen includes information
about:
Refer to chapter 12, “Specifications” for a complete list of the information that is available is in the
STATUS screen.
NOTE - Only check your pump status (press
ESC
)
when you are not programming your pump. If you
press
ESC
during programming, you will cancel
the settings you are trying to enter.
➠recent insulin deliveries (basal and bolus) ➠reservoir status ➠time and date
➠special features that are turned on ➠battery status ➠insulin type
➠To open the STATUS screen................................... Press ESC until the STATUS screen appears.
➠To view more text on the STATUS screen........ Press
/
to scroll and view all of the information.
➠To exit the STATUS screen ..................................... Press ESC until the STATUS screen disappears.
STATUS 10:59A U100fast
Last Bolus: N 3.8U
9:07A 18 MAR
Basal 1: 0.15U/H
Reservoir Started:
13MAR, 12:44P
Units left: 144U
Time left: > 24 Hours
Reminder at 2:04P
MiniMed
Meter: On
Battery: Normal
Auto Off - 12HR
Fri 21 MAR 2003
S/N# 123456
Sample
STATUS screen
Model 512
VER 1.2A 1.1 OB OB
mp6024875_012_a.book Page 10 Monday, June 23, 2003 10:54 AM

The basics... 11
Alert conditions
Your pump has a sophisticated network of safety checks and systems. If it detects an unusual condition that
requires your immediate attention, it will beep or vibrate periodically to alert you. The pump will go into Special
mode (open circles will display), and the backlight will illuminate. Additionally, the alert message will appear on the
screen.
➤
Why are alerts important?
Your pump monitors activities and will alert you if a Special mode is active. Some alerts are a normal part of
pump therapy, such as an active temporary basal. There are alerts that indicate a condition that is outside nor-
mal pump activity. For example, your pump notifies you with an alert when you need to replace the reservoir
(LOW RESERVOIR) or replace your pump battery (LOW BATTERY).
What to do....
When your pump beeps or vibrates notifying you that an alert condition exists:
1. Read and follow the instructions on the screen. Press ESC, ACT to silence an alert.
2. Check the status screen to determine what caused the alert.
3. If the condition is due to a low battery, replace the battery.
4. If the condition is due to a low reservoir, monitor the reservoir volume frequently and change the reservoir
when appropriate. Make sure you have a new reservoir, infusion set and vial of insulin with you.
Low reservoir alert
You can program the pump to sound an alert when either a specified number of
units remains or a specified amount of time remains before the reservoir will be
empty.
Low battery alert
If you get this alert, DO NOT go to sleep without replacing the battery. The back-
light and the remote and Paradigm Link meter functions are disabled during a LOW
BATTERY condition. If the alert type is set to “vibrate,” the pump will change to the
audio alert “beep-medium.” Clear this alert before you replace your battery.
3:36P LOW
RESERVOIR
ESC, ACT to clear
MiniMed
LOW
BATTERY
10:09A
Replace battery now
Use 1 AAA alkaline
ESC, ACT to clear
MiniMed
mp6024875_012_a.book Page 11 Monday, June 23, 2003 10:54 AM

12 Chapter 2
Alerts for special features
Some features put the pump in Special mode, letting you know that an extended
feature is active. When the feature is no longer active, the pump will return to Nor-
mal mode. Your pump will alert you (with open circles) if any of these extended fea-
tures are active:
If you remove your pump...
Pump settings
You may have an occasion when you need or want to remove your pump. If you have to remove and store your
pump, it is recommended that you store it with the battery in place. Keep a record of your current basal rates. To
preserve battery life, reset the basal rates to 0 (zero), turn off the RF options (meter, remote), and set Auto-off
to dashes or zeroes.
NOTE - Your pump keeps a record of the basal and bolus insulin it delivers. Setting your basal to 0.0 while
you are disconnected ensures the insulin delivery records in your pump are accurate.
Insulin
Remember, your body still needs insulin while your pump is removed.
You can remove your pump for up to one (1) hour without taking insulin. If you remove your pump for more
than an hour, you will have to use another way to take your insulin, such as injections of short-acting insulin, or
reconnecting your pump to take boluses. Take the injection or bolus approximately every four (4) hours. Calculate
the amount of insulin to take based on the total of your basal insulin in four (4) hours. Include the amount you need
for meal and correction boluses. If you will have your pump off for several days, you will need to return to a multi-
ple injection regimen. It is important that you consult with your healthcare professional to determine an alternate
method of receiving your insulin.
➠Dual Wave or Square Wave bolus delivery
➠Pattern A or B is active
➠Temp basal delivery
➠Block feature is on
MiniMed
mp6024875_012_a.book Page 12 Monday, June 23, 2003 10:54 AM
13
Chapter 3
Basic programming
Setting the time and date
Setting the correct time and date in your pump is necessary for accurate basal insulin delivery and allows you
to keep an accurate record of your insulin delivery and other pump functions. You can select a 12-hour or 24-hour
clock. You must reset the time and date if you receive a CHECK SETTINGS alarm or you clear your pump (Clear
Pump function).
1. Go to the TIME/DATE SETUP screen.
Main > Utilities > Time/Date
2. Select 12-Hour Setup or 24-Hour Setup and
press ACT.
3. Press ACT again to change the settings.
4. Change each of the settings as follows:
Hour Minutes Year Month Day
Change the hour.
Press ACT.
For 12-hour setups,
press
/
until
the correct A (am) or
P (pm) appears.
Change
the minutes.
Press ACT.
Change the year.
Press ACT.
Change the month.
Press ACT.
Change the day.
Press ACT.
MiniMed
TIME / DATE SETUP
24 Hour Setup
12 Hour Setup ACT
MiniMed
TIME/DATE SET
01JAN2003
12:00A
Press ACT to change
MiniMed
SET HOUR
12:00A
MiniMed
SET MINUTES
9:00A 2003
MiniMed
SET YEAR SET MONTH
01
MiniMed MiniMed
SET DAY
01
mp6024875_012_a.book Page 13 Monday, June 23, 2003 10:54 AM

14 Chapter 3
BG reminder
When you deliver a bolus you may want to check your BG afterwards. The BG reminder is an optional feature
that beeps or vibrates to remind you to check your blood glucose after a bolus. Your pump is set at the factory
with this feature turned off. If the BG reminder is on, during bolus programming your pump will ask for the amount
of time you want to be reminded after your bolus delivers. This time can be from 30 minutes to 5 hours, or NONE.
If you do not want to use the BG Reminder at all, set the option to off
.
1. Go to the BG REMINDER SETUP screen.
Main > Bolus > BG Reminder
2. Select On and press ACT. The BG reminder
is now enabled. Exit the menus.
Now, the next time you program a bolus, your pump will ask you for the amount of
time after your bolus when you want to be reminded to check your BG.
NOTE - If you press
ESC
when the BG Reminder screen appears, your pump will
begin delivering the bolus without setting a reminder. If you program another
bolus with a BG reminder before a previously scheduled BG reminder goes off,
the previous BG reminder will be canceled.
5. The TIME SET AT screen will show the settings
that you programmed. Press ACT and exit the
menus.
Your time/date settings are complete.
When the BG reminder goes
off, your pump will beep or
vibrate and the message
“CHECK BG” will appear on
the screen. Your pump will
beep or vibrate periodically
until it is cleared (ESC, ACT).
When you set a BG reminder after a
bolus, the STATUS screen will show
the amount of time remaining before
the reminder will go off.
Here, the STATUS screen indicates
BG reminder will go off in 18 minutes.
TIME SET AT
8:33 AM
26FEB2003
MiniMed
After a “clear pump” function only:
The TIME DATE CORRECT? screen will appear after
you set the DAY. Select Yes to confirm the settings
and press ACT. Your time/date settings are complete.
You must now rewind your pump as described in the
section, “Rewinding your pump” in chapter 4.
MiniMed
BG REMINDER SETUP
Off
On
MiniMed
BG REMINDER
2:00
(flashing)
CHECK
MiniMed
This is a reminder
12:40P
BG
to test your BG
ESC, ACT to clear
MiniMed
STATUS 2:53P U100fast
BG Reminder in 0:18h
Battery: Normal
Tues 08 APR 2003
mp6024875_012_a.book Page 14 Monday, June 23, 2003 10:54 AM
Basic programming 15
Bolus
There are three bolus types: Normal, Square Wave, and Dual Wave. This section gives instructions for a Nor-
mal bolus using the express bolus button and navigating through the menus. (For information about Square Wave
and Dual Wave boluses, refer to chapter 6, “Optimizing pump therapy.”)
The Normal bolus delivers an immediate food or correction bolus. It can be delivered at any time except during
another Normal bolus. During a Normal bolus, most pump features are disabled until after all the bolus has been
delivered. The suspend function and the STATUS screen, however, are always available.
Normal bolus
Normal bolus can be used to cover the carbohydrate in a meal or snack and/or to correct a blood glucose that
is higher than the target that was chosen for you.
The following instructions are for a Normal bolus without the Bolus Wizard.
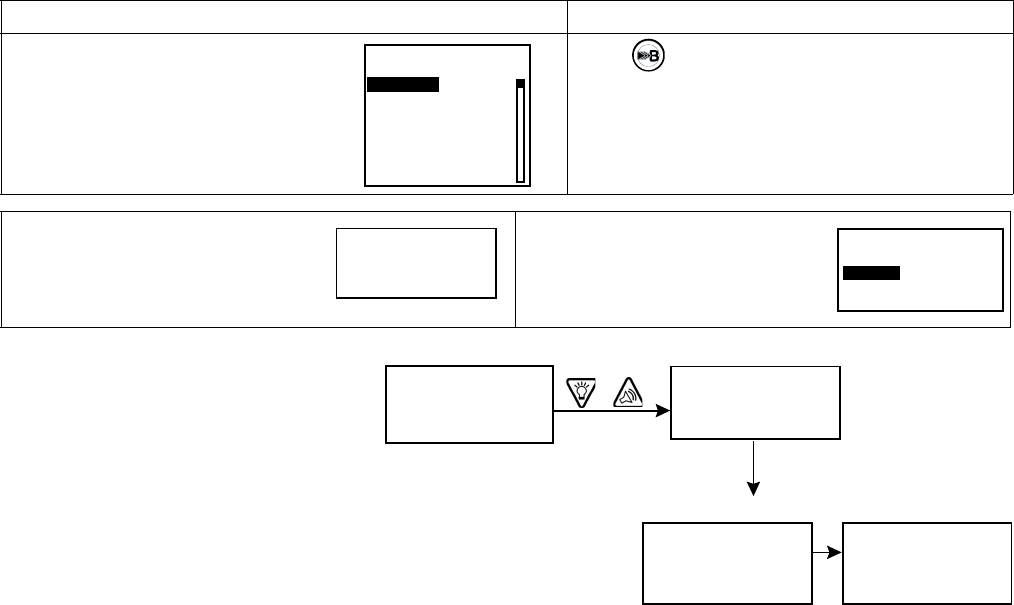
4. Press ACT to accept and deliver the bolus. The Normal bolus will
start. As the bolus delivers, the amount shown on the screen will
increase until the entire bolus has been delivered.
from the menu, or using the EXPRESS BOLUS button
1. Go to the BOLUS MENU.
Main > Bolus
Select Set Bolus and
press ACT. Go to step 2.
Press on your pump. Go to step 2.
2. If the SET BOLUS screen
appears: (Dual/Square Wave
bolus is off)
Go to step 3.
If the BOLUS TYPE screen appears:
(Dual/Square Wave bolus is on)
Select Normal Bolus and
press ACT. Go to step 3.
3. Enter your bolus amount and press
ACT.
MiniMed
BOLUS MENU
Bolus History
Bolus Wizard Setup
Max Bolus
Dual/Square Bolus
Easy Bolus
BG Reminder
Set Bolus
MiniMed
SET BOLUS0.0U
MiniMed
BOLUS TYPE
Square Wave Bolus
Dual Wave Bolus
Normal
MiniMed
SET BOLUS*
0.0U
MiniMed
SET BOLUS*
2.5U
ACT
/
* “SET NORMAL BOLUS”
will show if
Dual/Square Wave is on.
MiniMed
BOLUS DELIVERY
0.1U
11:53A
NORMAL
MiniMed
BOLUS DELIVERY
2.5U
11:53A
NORMAL
mp6024875_012_a.book Page 15 Monday, June 23, 2003 10:54 AM
16 Chapter 3
NOTE - The pump will beep/vibrate at the start of the bolus. When the
bolus is finished, the pump will beep/vibrate again and the HOME
screen will appear.
Example #1
Normal meal bolus using the exchange system
Normal bolus can be used to cover the carbohydrate in a meal or snack and to correct a blood glucose that is
higher than the target that was chosen for you.
Fred has been taught that he needs to take 1 unit of insulin for every carbohydrate exchange that he eats (every
milk, every starch or every fruit). For lunch today he will eat:
Turkey sandwich with two slices of bread 2 starches
1 small apple 1fruit
1 cup of non-fat milk 1milk
_________
Total carbohydrate exchanges = 4
Fred's lunch has a total of 4 carbohydrate exchanges so he will take a meal bolus of 4 units for his lunch.
Bolus practice:
Going through the menus, program a 2.0 unit Normal bolus now.
Check here if you were able to program it.
Using the express bolus button , program a 2.0 unit Normal bolus now.
Check here if you were able to program it.
Normal meal bolus practice using exchanges:
Choose a meal you might eat and fill in the blanks.
Food: ______________ exchange: ______________
______________ exchange: ______________
______________ exchange: ______________
total exchanges: ______________
You will take ________ units of insulin for each exchange. Your total bolus is ____________ for this meal.
MiniMed
mp6024875_012_a.book Page 16 Monday, June 23, 2003 10:54 AM

Basic programming 17
Example #2:
Normal meal bolus using carbohydrate counting
Lydia has been taught that she needs to take 1 unit of insulin for every 10 grams of carbohydrate. This is her
insulin to carbohydrate ratio. For dinner she will have:
4 oz. broiled chicken 0 grams
2/3 cup of rice 30 grams
½ cup cooked broccoli 5 grams
1 oz. Dinner roll 15 grams
1 tsp Margarine 0 grams
____________
total grams of carbohydrates = 50 grams
Lydia's dinner totals 50 grams of carbohydrate. Her insulin to carbohydrate ratio is 1 unit: 10 grams.
She will take a meal bolus of 5 units for her dinner. She determined this by dividing 50 (total grams of
carbohydrate) by 10 (insulin to carbohydrate ratio).
Normal meal bolus practice using carbohydrate counting:
Choose a meal you might eat and fill in the blanks.
Food: ______________ grams of carbohydrate: ______________
______________ grams of carbohydrate: ______________
______________ grams of carbohydrate: ______________
total grams of carbohydrate: ______________
Your insulin to carbohydrate ratio: 1 unit of insulin for ________ grams carbohydrate.
Divide your total carbohydrates by your insulin to carbohydrate ratio and take ______ units of insulin for your meal.
mp6024875_012_a.book Page 17 Monday, June 23, 2003 10:54 AM

18 Chapter 3
* Insulin sensitivity should equal the amount (in mg/dL or mmol/L) that blood glucose will be lowered after taking 1 unit of insulin.
To determine insulin sensitivity, divide 1500 by Total Daily Dose (TDD**) of Insulin . The answer is your “Correction Factor”
(1500 Rule). As always, consult with your healthcare professional for guidance.
**TDD = Total amount of basal and bolus insulin delivered in a 24-hour day.
Example #3:
Meal bolus, correction bolus and insulin sensitivity
3a.
Jason is ready to eat his breakfast. He has calculated that he will need 4.0 units for his food.
He tests his blood glucose and finds that it is 200 mg/dl (11 mmol/L). Jason knows that his blood glucose level is
above his pre-meal blood glucose target and will need additional insulin before he eats.
Jason's healthcare professional has determined the following for him:
pre-meal target BG: 110 mg/dL (6.1 mmol/L)
*Insulin sensitivity: 30 mg/dL (1.7 mmol/L)
3b.
Jason determines that he will need a correction bolus of 3.0 units insulin to lower his elevated blood glucose.
The 3.0 correction bolus will lower his current BG of 200 mg/dL (11 mmol/L) to his pre-meal target of 110 mg/dL
(6.1 mmol/L).
elevated blood glucose: 200 - 110 = 90 mg/dL (11 - 6.1 = 5 mmol/L)
correction bolus: 90 / 30 (insulin sensitivity) = 3.0 units
(He will add this 3.0 correction bolus to the 4.0 units of insulin that he will need for his meal bolus.
Jason will take a total bolus of 7.0 units.)
mp6024875_012_a.book Page 18 Monday, June 23, 2003 10:54 AM

Basic programming 19
Practice: Meal bolus
You have determined your meal bolus as: _______ units.
Your pre-meal target blood glucose range is: _______ to _______ (average is _______ ).
Your current blood glucose level is: _________.
Your correction factor is: 1 unit of insulin will drop your BG _________.
You will take ________ unit(s) of insulin to correct your high BG level.
Your total bolus (meal bolus plus correct bolus is _________.
mp6024875_012_a.book Page 19 Monday, June 23, 2003 10:54 AM
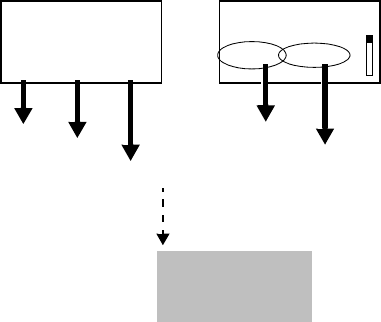
20 Chapter 3
Review your bolus deliveries
You can view a list of your bolus deliveries in the BOLUS HISTORY screen. This screen shows a list of the dates,
times, units, and types for your last 24 boluses. This feature is helpful for record keeping or to check if you bolused
for your last meal.
If a bolus was stopped before delivery was complete, the BOLUS HISTORY screen will show only the amount
actually delivered. Refer to the next section, “Bolus details” for instructions about viewing bolus details.
Do the following steps to view the BOLUS HISTORY screen:
1. Go to the BOLUS HISTORY screen and scroll through the
bolus deliveries.
Main > Bolus > Bolus History
If you used Bolus Wizard to deliver any of these boluses,
the screen shows the carbohydrate/food (CH) and BG values
that Bolus Wizard used to calculate the boluses.
2. Refer to the instructions in the next section, “Bolus details”
to see the details for any of these boluses.
MiniMed
BOLUS HISTORY
Last 12:48P 0.7N
date
05SEP
time
amount/type
05SEP
N = Normal
S = Square Wave
D = Dual Wave
05SEP 01:05P 0.2N
CH: 13 BG: 150
Last 12:48P 0.7N
06:30P
01:05P
4.8S
0.2N
(without Bolus Wizard)
MiniMed
(with Bolus Wizard)
carb value
BG value
BOLUS HISTORY
mp6024875_012_a.book Page 20 Monday, June 23, 2003 10:54 AM