Medtronic MiniMed 7018 The Paradigm Translator allows RF intercommunication between Medtronic Minimed Paradigm series insulin pumps and commercially available smartphones running Medtronic application software. User Manual
Medtronic MiniMed, Inc. The Paradigm Translator allows RF intercommunication between Medtronic Minimed Paradigm series insulin pumps and commercially available smartphones running Medtronic application software. Users Manual
Users Manual

MiniMed® Connect
User Guide

Introduction
Thank you for choosing Medtronic Diabetes (legally known as Medtronic MiniMed,
Inc.) as your diabetes management partner.
MiniMed® Connect is an accessory of a MiniMed® 530G or a MiniMed® Paradigm®
REAL-Time Revel™ sensor-augmented pump system. It is used to provide a
passive, secondary display of sensor-augmented pump information on your mobile
device.
This user guide is designed to help you understand the setup and operation of
MiniMed Connect. For details on using the other system components, please see the
corresponding device user guides.
System components
MinMed® Connect
Uploader
MinMed® Connect
App
USB Charger USB Cable
The MiniMed Connect System includes the following components:
-1-
English
• MiniMed Connect Uploader (MMT-7018)—a device that sends data from your
pump to your mobile device, enabling your mobile device to display pump and sensor
information. To achieve continuous data transmission, the uploader needs to be
within six feet of the pump.
• MiniMed Connect App (MMT-7001)—an app downloaded to your compatible mobile
device. It displays some insulin and continuous glucose monitoring data provided by
the pump, as well as system status information.
Note: The app can be downloaded on a consumer-owned mobile device with a
compatible operating system. A list of compatible operating systems is
available in the app store found on your mobile device.
• USB charger (MMT-7019)—a device that charges the uploader. It uses a separate,
detachable micro-USB cable.
Note: Use only the Medtronic USB charger and cable with your uploader.
User safety
This section includes important safety information such as indications, contraindications,
safety warnings, potential adverse reactions. This section also explains how to protect
the system from radiation exposure damage.
Indications
MiniMed Connect is intended to provide a secondary display of CGM and insulin pump
information on a suitable consumer electronic device to care partners and users of a
MiniMed 530G system or Paradigm REAL-Time Revel system for the purposes of
passive monitoring.
MiniMed Connect is not intended to replace the primary display of continuous glucose
monitoring and insulin pump information on the primary display device. All therapy
decisions should be based on blood glucose measurements obtained from a blood
glucose meter. MiniMed Connect is not intended to receive information directly from the
sensor or transmitter of the sensor-augmented pump system.
Contraindications
This device is not intended for making treatment decisions.
This device is not intended for calculating insulin or other drug doses.
This device is not intended for controlling insulin pumps or other drug delivery systems.
Dosing decisions should not be made based on this device. The user should follow
instructions on the sensor-augmented pump system.
This device is not intended to replace self-monitoring practices advised by the healthcare
professional.
-2-

Warnings
Warning: Any changes or modifications to the devices not expressly
approved by Medtronic Diabetes could interfere with your ability to
operate the equipment, cause injury, and void your warranty.
Uploader
This product contains small parts and may pose a choking hazard for young children.
Precautions
MiniMed Connect App
The MiniMed Connect app cannot tell you about all potential problems. The app does
not provide alarms or notify the user; it is intended only to display information. Refer
to your pump system user guide for additional precautions.
Proper operation of the app relies upon an operating consumer electronic device with
proper settings. A non-functioning mobile device, or improper setting changes on the
mobile device, may prevent the app from functioning properly.
Uploader
Do not allow water, or any other liquid, to come in contact with the uploader. The
uploader is not waterproof.
Always keep the uploader within 6 feet (1.8 meters) of the pump.
Warning: Using or storing the uploader outside the specified ranges of its
operating conditions or storage conditions may damage the
uploader.
Notice
Radio frequency (RF) communication
This device complies with the United States Federal Communications Commission
(FCC) and international standards for electromagnetic compatibility.
The following information is provided in accordance with Federal Communications
Commission (FCC) regulations.
This device complies with Part 15 of the FCC Rules. Operation is subject to the
following two conditions: (1) This device may not cause harmful interference, and (2)
this device must accept any interference received, including interference that may
cause undesirable operation.
-3-
English

This device does not interfere with any radio frequency signals transmitted from outside
sources. These FCC standards are designed to provide reasonable protection against
excessive radio frequency interference and prevent undesirable operation of the device
from unwanted electromagnetic interference.
Radio frequency (RF) interference from other wireless devices
Common consumer electronic devices that transmit in the same frequency band used by
the uploader (MMT-7018) may prevent the uploader from receiving the data sent by
Medtronic Diabetes therapy management devices.
This equipment has been tested and found to comply with the limits for a Class B digital
device, pursuant to part 15 of the FCC Rules. These limits are designed to provide
reasonable protection against harmful interference in a residential installation. This
equipment generates, uses and can radiate radio frequency energy and, if not installed
and used in accordance with the instructions, may cause harmful interference to radio
communications. However, there is no guarantee that interference will not occur in a
particular installation. If this equipment does cause harmful interference to radio or
television reception, which can be determined by turning the equipment off and on, the
user is encouraged to try to correct the interference by increasing the separation between
the equipment and receiver.
Communication problems can typically be resolved by ensuring that the distance
between uploader and receiving device is less than 6 feet (1.8 meters). You can also
reorient or relocate the uploader or pump to try to correct the interference. Note that RF
interference will not cause any incorrect data to be processed and will not cause any
harm to the uploader. If you continue to experience RF interference, please contact the
24 Hour HelpLine.
Assistance
Medtronic Diabetes provides a 24 Hour HelpLine for assistance. The 24 Hour HelpLine is
staffed with representatives who are trained in the setup and operation of MiniMed
Connect and are able to answer related questions.
Department Telephone number
24 Hour HelpLine (calls within the United States) 800 646 4633
24 Hour HelpLine (calls outside the United States) +1 818 576 5555
Web site www.medtronicdiabetes.com
-4-

Emergency kit
Keep an emergency diabetes kit with you at all times to make sure that you always
have necessary supplies. Tell a family member, co-worker, or friend where you keep
your emergency kit.
It is important that you test your blood glucose more frequently while you are
traveling. The routine hassle of travel, including stress, changes in time zones,
schedules and activity levels, meal times and types of food, can all affect your
diabetes control. Be extra attentive to monitoring your blood glucose frequently, and
be prepared to respond if needed.
Your emergency kit should include these items:
• Fast-acting glucose tablets
• Blood glucose monitoring supplies
• Urine or blood ketone monitoring supplies
• Extra MiniMed® infusion set and MiniMed® reservoir
• Insulin syringe and fast-acting insulin (with dosage instructions from your
healthcare professional)
• Wallet card (packaged with your pump system accessories)
• Adhesive dressing
• Glucagon™ emergency kit
• Extra AAA alkaline batteries (Energizer® brand is recommended)
How to use this guide
Note: This user guide shows sample screens only. The screens on your device may
be slightly different.
The following table describes terms and conventions used in this guide.
Convention Description
Bold text To indicate screen items and buttons. For example, "Tap Search to continue."
Pinch and
stretch
Touch the screen with two fingers and slide them toward each other (pinch) or away
from each other (stretch).
Press To push and then release a button.
Press and
hold
To push and keep pressure on a button.
Tap Tap your finger to select or activate an option on your device.
Double-tap Tap the screen or button twice in rapid succession.
Swipe Starting at or near one edge of the screen, slide your finger quickly across the screen
without lifting your finger.
-5-
English

Convention Description
Note Provides additional helpful information.
Caution Notifies you of a potential hazard which, if not avoided, may result in minor or moder-
ate injury or damage to the equipment.
Warning Notifies you of a potential hazard which, if not avoided, could result in death or seri-
ous injury. It may also describe potential serious adverse reactions and safety haz-
ards.
Warranty
During the six-month warranty period, Medtronic Diabetes will, at its discretion, either
repair or replace any defective MiniMed Connect uploader subject to the conditions and
exclusions stated herein. In the event that MiniMed Connect uploader is repaired or
replaced, the warranty period will not be extended.
This warranty is valid only if MiniMed Connect uploader is used in accordance with the
manufacturer’s instructions. This warranty will not apply:
• If damage results from changes or modifications made to the device by the user or
third persons after the date of manufacture;
• If damage results from service or repairs performed by any person or entity other
than the manufacturer;
• If damage results from a Force Majeure or other event beyond the control of the
manufacturer;
• If damage results from negligence or improper use, including but not limited to
improper storage, submersion in or extended exposure to liquids or physical abuse,
such as dropping or otherwise.
This warranty shall be personal to the original user. Any sale, rental, or other transfer or
use of the product covered by this warranty to or by a user other than the original user
shall cause this warranty to immediately terminate. This warranty does not apply to
chargers or accessories.
The remedies provided for in this warranty are the exclusive remedies available for any
breach hereof. Neither Medtronic Diabetes nor its suppliers or distributors shall be liable
for any incidental, consequential, or special damage of any nature or kind caused by or
arising out of a defect in the product.
All other warranties, expressed or implied, are excluded, including the warranties of
merchantability and fitness for a particular purpose.
Caution: Changes or modifications not expressly approved by Medtronic
MiniMed, Inc. could void the user's authority to operate the equipment.
-6-

MiniMed Connect setup
This section walks you through how to set up MiniMed Connect.
Charge your MiniMed Connect Uploader
Before you can begin using MiniMed Connect, you must first charge the uploader.
The uploader can be charged using the USB charger (MMT-7019). The uploader is
charged within three hours when using a standard 120V AC outlet.
A blinking green light indicates that the uploader is charging. A solid green light
indicates that it is fully charged. For more information about the lights that appear on
your uploader, see Uploader LED quick reference, on page 17.
Download the MiniMed Connect App
The app runs on the operating system of your mobile device. Download the app from
the app store on your mobile device.
Note: Check the app store on your mobile device for a list of compatible devices.
Create a user account
You will need your CareLink® username and password when setting up the app.
Create an account for CareLink Personal if you have not already done so.
To create an account, visit the following website from your personal computer or
mobile device:
www.carelink.minimed.com
Open the MiniMed Connect App
Before getting started, make sure that:
• The uploader is charged.
• Bluetooth® on your mobile device is turned on.
• You have an Internet connection.
To open the MiniMed Connect App:
1 On your mobile device, open the MiniMed Connect App.
2 Tap Get Started.
The Sign in to CareLink screen opens.
3 Enter your CareLink account information (username and password).
Note: If you do not have a CareLink account, tap Do not have a CareLink
account yet?.
4 Tap Sign in.
-7-
English
Pair your MiniMed Connect Uploader to your mobile device
Before you can start using the mobile app, you must first pair your uploader to your
mobile device. You must also have Bluetooth® enabled on your mobile device.
After successfully signing in to the app, the Pair Uploader screen appears.
To pair the uploader:
1 Press and hold the button on the uploader for three seconds. A blue light flashes on
the uploader. For more information about lights on your uploader, see Uploader LED
quick reference, on page 17.
2 Tap Search.
The Confirm Serial Number screen appears.
One or more serial numbers could be displayed.
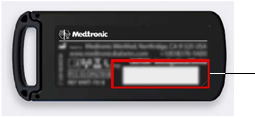
3 Tap the serial number that matches the serial number on the back of your uploader,
as shown.
Serial number location
A check mark appears next to the selected serial number.
4 Tap Pair.
5 Tap Pair again to confirm your selection.
The screen should now indicate that the uploader has been successfully paired with
your mobile device.
After a few seconds, the Pair Pump screen opens to walk you through pairing your
pump with the uploader.
6 Follow the directions on the Pair Pump screen to put your pump in pairing mode.
7 When you see the following message displayed on your pump, return to the app and
tap Next.
Device search
Minutes remaining: 15
Press ESC to quit.
-8-
Press ACT to extend.
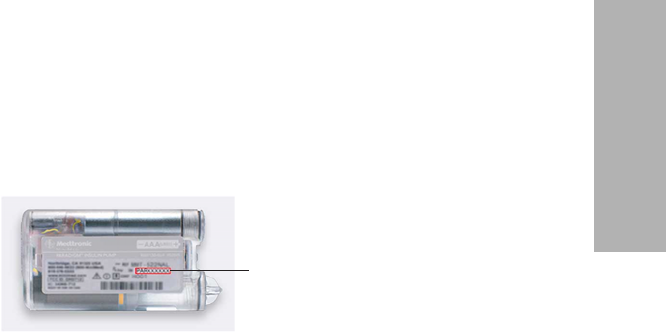
The Pump Serial Number screen appears.
8 Enter your pump serial number in the field provided.
The serial number can be found on the back of your pump.
pump serial number
9 Tap Search.
The Pump Paired screen appears.
10 If the pump cannot find the uploader and the pairing process fails, make sure
that:
• The pump and uploader are within 6 feet (1.8 meters) of each other.
• The pump and uploader are both in pairing mode.
You have completed the system setup. You can now use your app.
Using the MiniMed Connect App
The following sections walk you through the different screens of the app, including
the Home screen, menu, sensor graph, and more.
Note: The app receives data only when the app is running on the mobile device.
Closing the app prevents the app from receiving data. Keep the app open or
running in the background.
-9-
English
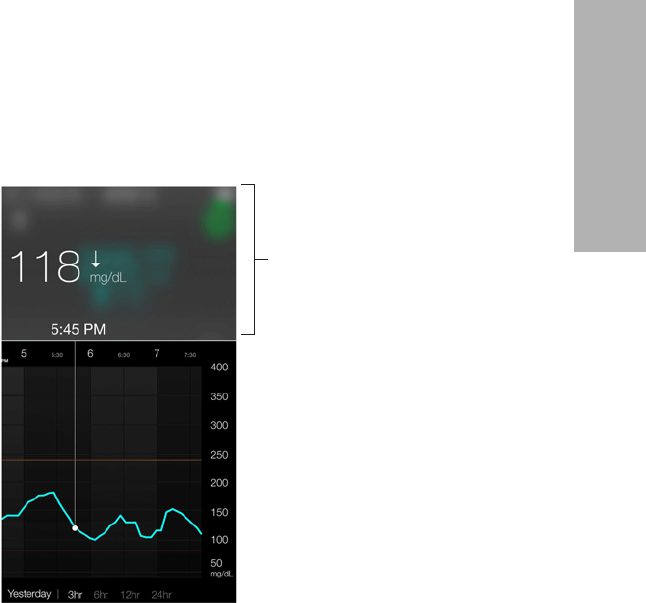
Home screen
The Home screen on the display is the main screen for viewing the sensor-augmented
pump information sent by the pump system.
calibration timer
rate of change arrow
relative time
since last pump
information update
active insulin
menu
current sensor
glucose reading
high glucose limit
continuous sensor
glucose trace
low glucose limit
day indicator
zoom levels
sensor glucose graph
sensor glucose
readings
time
Note: No sensor information displays the first time you see the Home screen. Sensor
glucose readings appear as soon as the pump sends data.
Item Description
Menu Provides access to the Menu screen, which displays information about your up-
loader, your insulin pump, and your glucose sensor.
-10-
Item Description
Calibration timer The color of the ring and the size of its displayed segment indicates calibration sta-
tus and the approximate time left until your next sensor calibration. When your
sensor is calibrated, the ring is solid green. As the time for your next sensor cali-
bration approaches, segments of the ring disappear, and its color changes, until a
red blood drop appears instead of the ring, as shown below:
A full green circle indicates 12 hours remaining. Orange indicates three hours re-
maining. Red indicates one hour remaining. When the red blood drop appears, a
sensor calibration is due on your pump. A full blue circle with a question mark indi-
cates that calibration time has not been communicated to the app.
Tap the Calibration icon to display the time when the next calibration is due.
Relative time The amount of time since the last pump and sensor information update.
Current sensor
glucose reading
Your current sensor glucose reading. The current sensor glucose value appears in
orange if it is above the high glucose limit and appears in red if it is below the low
glucose limit.
Active insulin The amount of bolus insulin that has been delivered but which has not yet been
used by your body.
Rate of change
arrows
Displays the rate of change of your sensor glucose values. See pump system user
guide for more information on rate of change arrows.
Sensor glucose
graph
Displays the sensor glucose value range for the sensor graph at preset intervals.
Double-tap the y-axis labeled with the sensor glucose values to return to the cur-
rent time when you are viewing historical data.
Sensor glucose
reading
Displays the sensor glucose values for the graph
Time Displays the pump time for the selected period on the graph. The axis moves as
you scroll horizontally through the sensor graph.
The time scale changes when you select different zoom levels or when you pinch
or stretch the graph horizontally with your fingers.
Tap the time axis to center the selected time point on the graph. An information
box appears above the graph, with a sensor glucose reading or even details dis-
played for that time. For details, see Graph information boxes, on page 12.
High glucose
limit, low glu-
cose limit
Displayed as orange and red horizontal lines if you have set your high and low lim-
its on your pump. The lines may be straight or stepped, depending on whether you
have defined the same high and low limits for the entire day or different ones for
daytime and nighttime. These limits are set on your pump. For details on setting
limits, see your pump system user guide.
-11-
English

Item Description
Sensor glucose
trace
Displays your current and historical SG readings. Tap any point on the graph to
view the details of the selected sensor glucose reading or event in the information
box that appears above. For more navigating tips, see Navigating sensor glucose
graph, on page 12.
Zoom levels Tap on the any of the numbers below the graph (3, 6, 12, 24 hours) to change the
resolution on the graph.
Day indicator Displays the date of the data shown in the graph.
Navigating sensor glucose graph
Use the following tips to navigate the sensor graph data:
• Swipe the center of the graph right and left to view historical data and to return to the
current graph location.
• Pinch and stretch the center of the graph with your fingers to zoom out and in on the
graph data.
• Double-tap the graph to view the graph at the predefined 3-hour, 6-hour, 12-hour,
and 24-hour zoom levels.
• Tap the horizontal time axis to center the selected time point on the graph. You can
also tap the horizontal time axis to view the details of the selected sensor glucose
reading or event in a box that appears above the graph. For details, see Graph
information boxes, on page 12.
• Double-tap the vertical sensor glucose values axis to return to the current reading on
the graph.
Graph information boxes
When you tap any point on the sensor glucose trace, the selected time is marked by a
vertical cursor on the graph. A graph information box appears. The information box
displays the sensor glucose value, date and time, and rate of change arrows. The
information box changes as you drag your finger along the sensor glucose graph.
-12-
When the sensor glucose value goes above the high glucose limit, the sensor
glucose value is displayed in orange. When the sensor glucose value goes below the
low glucose limit, the sensor glucose value is displayed in red.
graph information box
-13-
English
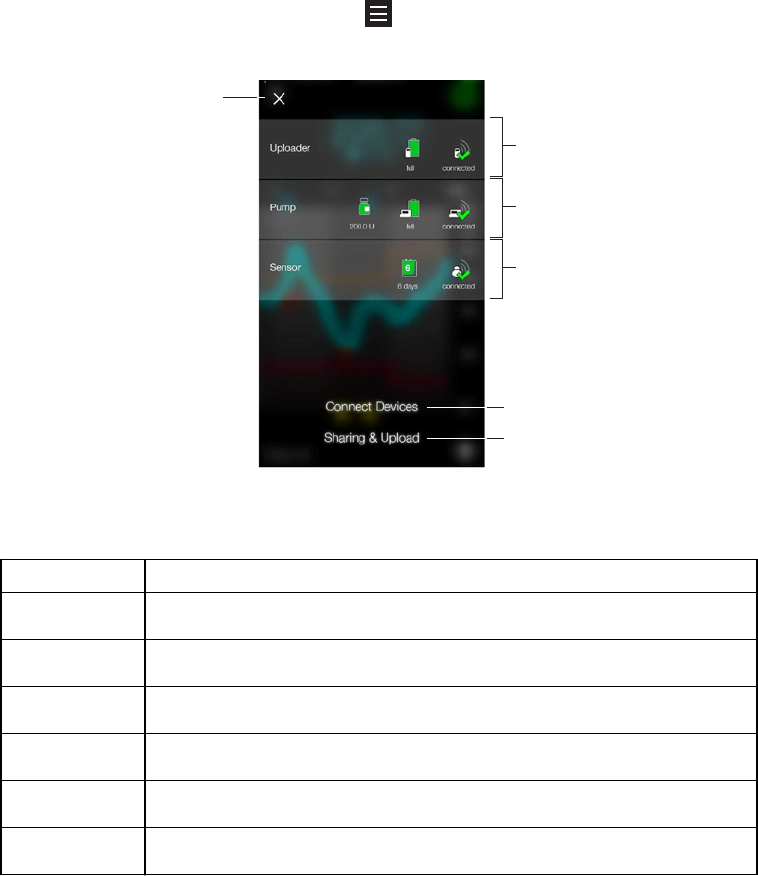
Menu screen
The Menu screen appears when you tap on the Home screen.
Connect Devices menu
Sharing & Upload menu
Close the
Menu screen
uploader status
pump status
sensor status
Item Description
Close the Menu
screen
Closes the menu screen and returns you to the Home screen.
Uploader status Displays the status of the uploader battery and communication between the up-
loader and the mobile device.
Pump status Displays the status of the pump reservoir, pump battery, and communication be-
tween the pump and your uploader.
Sensor status Displays the status of the sensor life and communication between the sensor and
your pump.
Connect Devi-
ces menu
Menu for adjusting and setting up communication between the app, uploader, and
pump.
Sharing & Up-
load menu
Menu for signing in to CareLink and configuring settings for sending data to Care-
Link.
-14-
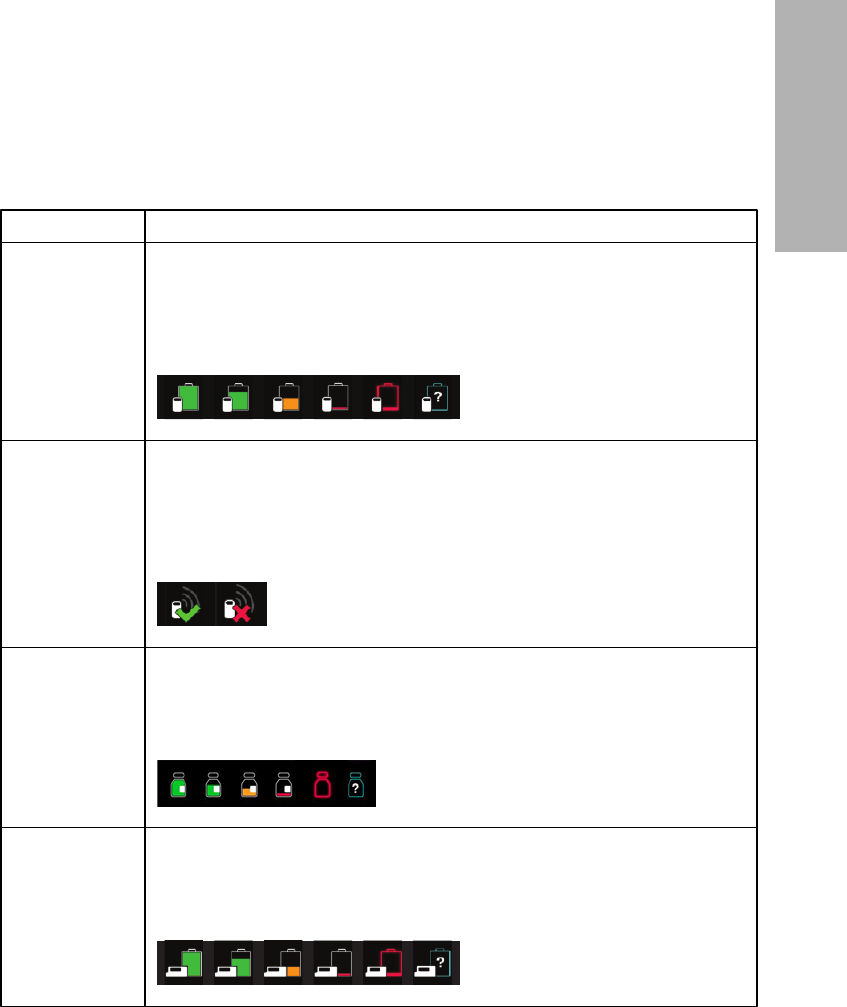
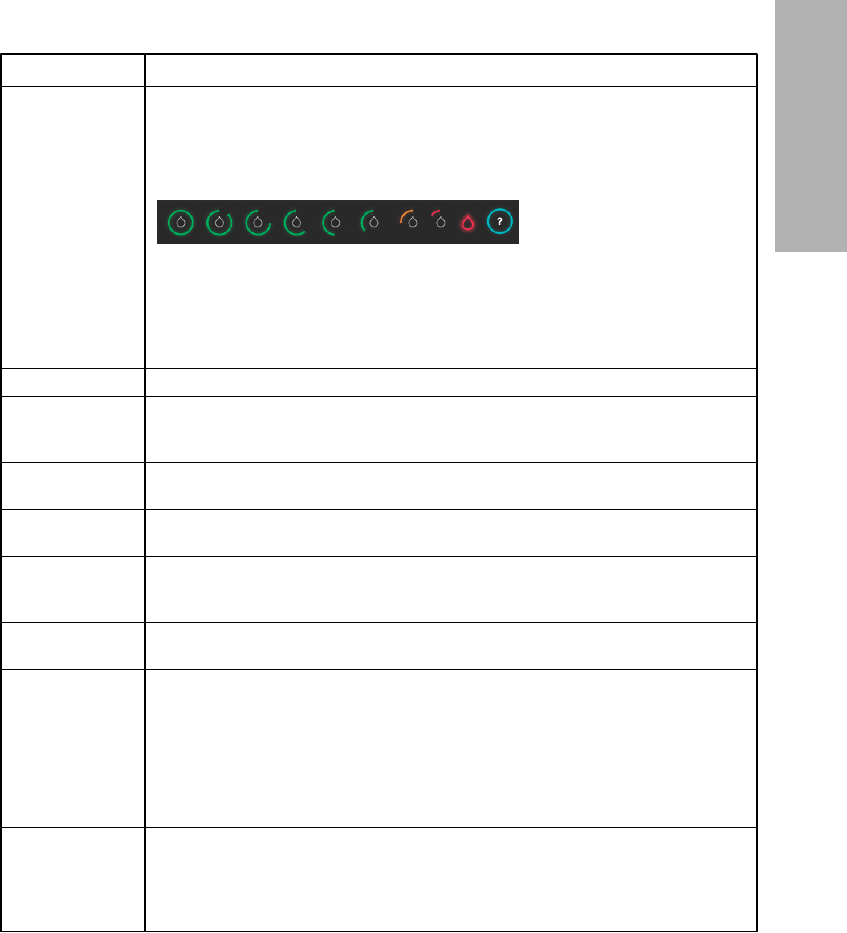
System status icons
The system status icons are located on the Menu screen and allow you to quickly
check the status of your pump, sensor, and uploader. If any condition becomes
critical and requires your immediate attention (for example, the pump battery
becomes depleted), the corresponding status icon displays on the Home screen next
to the Calibration icon.
Icon name Description
Uploader battery The charge level of your uploader battery. The color and the fill level of the icon
indicate the status. When your battery is full, the icon is solid green. As the battery
life is used, the icon changes as shown. The icon with the question mark indicates
that the charge level of the uploader battery is unknown. This happens if your
mobile device is out of range from your uploader or the app does not have a
current status of the battery.
Uploader
communication
The communication status between your uploader and mobile device. The green
checkmark means that you are connected and communicating with your uploader.
The red X indicates that your uploader is not communicating with your mobile
device.
Note: If your uploader is not communicating with your mobile device, your other
system status icons will be unavailable.
Pump reservoir The fill level of your pump reservoir. The color and the fill level of the icon indicate
the status. When your pump reservoir is full, the icon is solid green. As the
reservoir level decreases, the icon changes as shown. The blue icon with the
question mark indicates that the fill level of your pump reservoir is unknown. This
happens if your uploader is out of range of either the pump or your mobile device.
Pump battery The charge level of your pump battery. The color and the fill level of the icon
indicate the status. When your battery is full, the icon is solid green. As the battery
life is used, the icon changes as shown. The blue icon with the question mark
indicates that the charge level of the pump battery is unknown. This happens if
your uploader is out of range of either the pump or your mobile device.
-15-
English
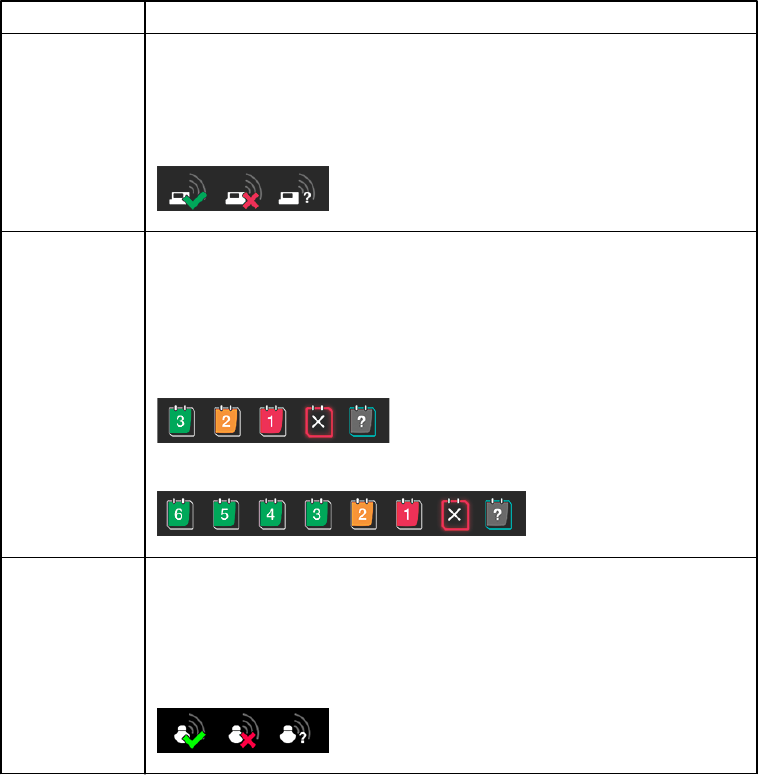
Icon name Description
Pump
communication
The communication status between your pump and your uploader. The green
check mark indicates that your uploader is communicating with your pump. The
red X indicates that your pump is not communicating with your uploader. The icon
with the question mark indicates that the pump communication status is unknown.
This happens if your uploader is out of range of either the pump or your mobile
device.
Sensor life The remaining life of your sensor in days. The color of the icon indicates relative
life, and the number indicates the days of remaining life for your sensor.
The red-outlined icon with the X indicates that your sensor life has expired. The
icon with the question mark indicates that your sensor life is unknown. This
happens if your uploader is out of range of either the pump or your mobile device
or if the pump cannot communicate with the sensor.
Paradigm REAL-Time Revel
MiniMed 530G
Sensor
communication
The communication status between your transmitter and your pump. The icon with
the checkmark indicates that your transmitter is communicating with your pump.
The red X indicates that your transmitter is not communicating with your pump.
The icon with the question mark indicates that the transmitter-to-pump
communication status is unknown. This happens if your uploader is out of range of
either the pump or your mobile device or your pump cannot communicate with the
sensor.
Using the uploader
You can use the uploader button to do the following actions:
Turning on the uploader
Press and hold the button for about two seconds to turn on the uploader.
The green LED, red LED, and blue LED each blink as the uploader turns on.
-16-
Confirming the uploader is turned on
Press the button for one to two seconds.
The green LED will blink every second for three seconds, to confirm that the uploader
is turned on.
Turning off the uploader
Press and hold the button for six seconds to turn off the uploader.
The red LED light appears for at least one second as the uploader turns off.
Pairing mode
Press and hold the button for three seconds to put the uploader into pairing mode.
The blue LED flashes every four seconds when in pairing mode. If the device is not
paired within 20 minutes, the blue LED shuts off.
Charging
You should charge your uploader battery every night. It is recommended to charge
your uploader within range of your mobile device. Charging should take about three
hours.
Uploader LED quick reference
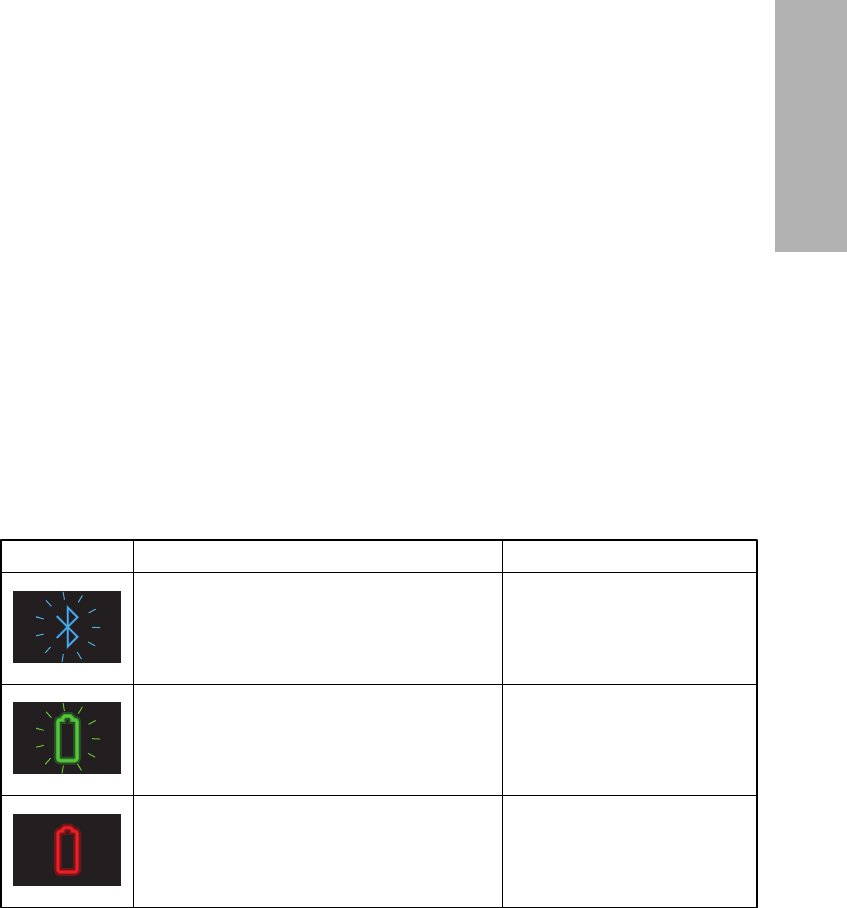
Refer to the following table for LED statuses and their meanings.
LED Status Description What it means
Blue LED blinks every four seconds. Uploader is in pairing mode.
Green LED blinks every four seconds. Uploader battery is charging.
Red LED light appears for at least one second
and then turns off.
Uploader has been turned off.
-17-
English
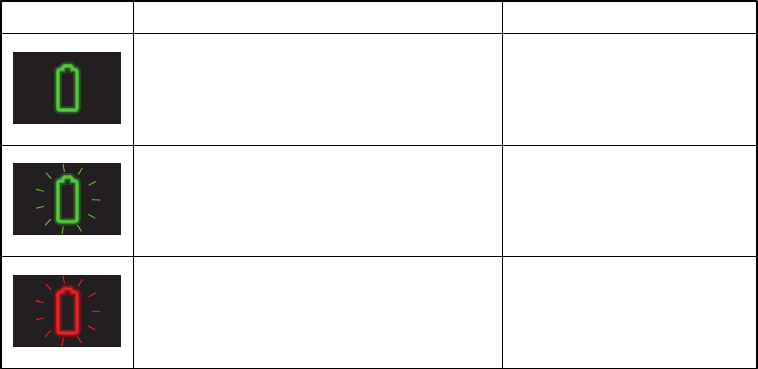
LED Status Description What it means
Green LED shines continuously. Uploader battery is fully
charged.
Green LED blinks every second for three
seconds after the user presses the button for
one to two seconds.
Uploader is on.
Red LED blinks every second. Contact the 24 Hour HelpLine
for assistance.
Air travel
Turn off your uploader when boarding an airplane; it is an RF device and is not certified
for operation aboard aircraft.
Maintenance
Maintaining your MiniMed Connect Uploader
To maintain your uploader:
1 Moisten a clean, soft, lint-free cloth with a 70 percent solution of isopropyl alcohol, or
open a prepackaged 70 percent IPA wipe.
2 Gently wipe the outer surface of the uploader with the moistened cloth or wipe.
3 Let the uploader air dry, or wipe it dry with a soft, dry, lint-free cloth.
Warning: Do not use your uploader in water or wear it during water activities. The
uploader is not water-tight, and it may become damaged if it is used in
the water.
Caution: Dispose of the uploader according to the local regulations for battery
disposal (non-incineration).
FAQ and troubleshooting
Status messages
MiniMed Connect is a secondary display system only. For more detailed information on
pump messages and warnings, see your pump system user guide.
-18-
There may be a number of reasons why you don't see sensor glucose values on the
graph. If you do not see a sensor glucose value, a status message may appear in the
app. The table below describes those possible scenarios.
Message title Message text
Mobile Device
Bluetooth® off Turn on Bluetooth® to see your current sensor information.
Pump
Above 400 mg/dL Sensor glucose value is outside the sensor range.
Below 40 mg/dL Sensor glucose value is outside the sensor range.
Cal error Invalid sensor data or invalid BG value. See your pump system user guide.
Change sensor Sensor can no longer be used. Insert a new sensor.
Lost sensor Sensor values not available. Go to Find Lost Sensor on your pump. See
your pump system user guide.
Meter BG Now Sensor values not available. Enter a new BG now.
Pump weak signal Move uploader closer to pump. See your pump system user guide.
Sensor end Replace sensor. See your pump system user guide.
Sensor error Invalid sensor value. See your pump system user guide.
Sensor off Sensor values not available. Go to the Sensor screen on your pump.
Sensor weak signal Move the uploader closer to the pump. See your pump system user guide
for additional information.
Warm up Warming up sensor. This may take up to two hours. A calibration will be re-
quired at that time.
MiniMed Connect Uploader
Uploader battery empty No longer receiving information from pump. Recharge uploader battery now.
Uploader weak signal Move uploader closer to your mobile device. See your pump system user
guide.
Specifications
Applied parts MiniMed Connect Uploader and USB charger
Atmospheric pressure
range
57.6kPa (16,000’ elevation) to 106kPa (-1300’ elevation)
Bluetooth® Low Energy
(BLE) range from uploader
to mobile device
20 feet in free air and line-of-sight communication
Battery life 24 hours
Charger dimensions 2.28 X 1.85 X 0.39 inches
-19-
English
Charger weight 0.88 oz (25 grams)
Operating conditions Temperature and humidity: 32 °F (0 °C) at 10% RH to 113 °F
(45 °C) at 95% RH
Storage conditions Temperature: -4 °F (-20 °C) to 131 °F (55 °C)
Relative Humidity: Not to exceed 95% (non-condensing) at 131°
F (55° C)
RF communication range
from sensor-augmented
pump to uploader
Six feet in free air and line-of-sight communication
Uploader radio frequency
(RF)
Pump to uploader: ISM 916.5 MHz
Uploader to mobile device: BLE (Bluetooth® Low Energy): 2.4
GHz
Uploader dimensions 2.54 X 1.09 X 0.42 inches
Uploader and charger ex-
pected service life
One year
Uploader weight 0.7 oz (20 grams)
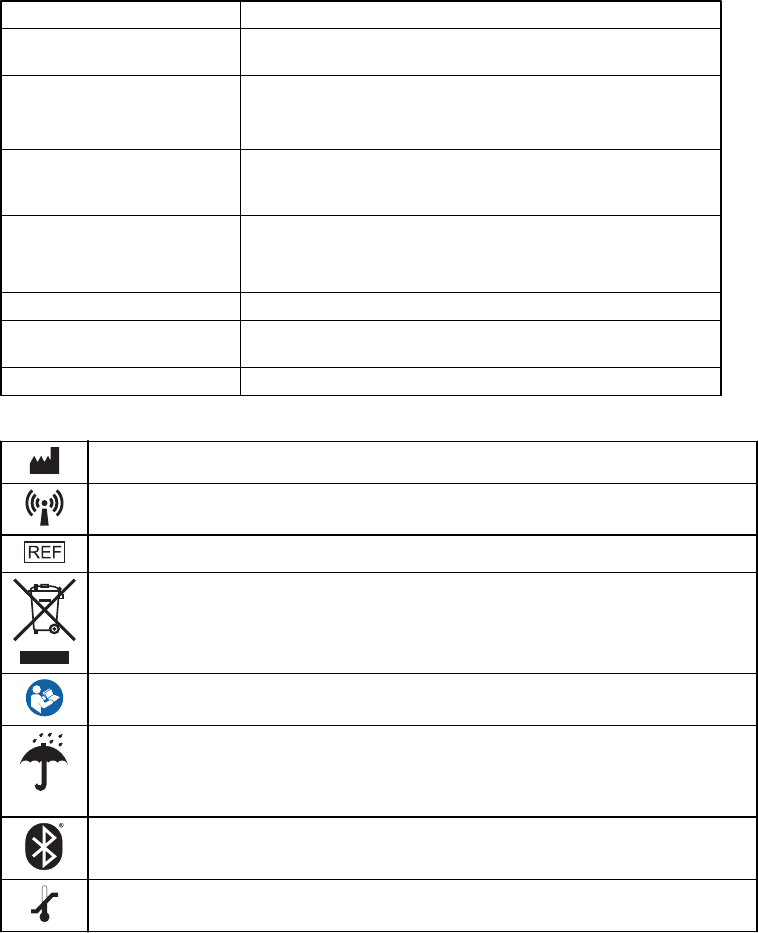
Icon table
Manufacturer
Non-ionizing electromagnetic radiation
Catalogue or Model Number
Electric and electrical waste: Do not dispose of this product in unsorted municipal waste
stream. Recycle device according to local requirements.
Refer to instructions before each use
Keep dry
Bluetooth® wireless technology or Bluetooth® enabled
Storage temperature range
-20-
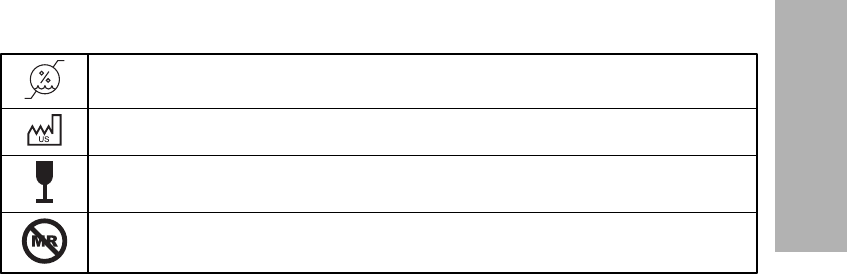
Storage humidity range
Country of Origin
Fragile product
Magnetic Resonance (MR) unsafe
©2015, Medtronic MiniMed, Inc. All rights reserved.
CareLink®, Enlite®, MiniMed®, and Paradigm® are registered trademarks of Medtronic MiniMed, Inc.
Revel™ is a trademark of Medtronic MiniMed, Inc.
Bluetooth® is a registered trademark of Bluetooth SIG, Inc.
Energizer® is a registered trademark of Eveready Battery Company.
Glucagon™ is a trademark of Eli Lilly and Company.
-21-
English
-22-

6026052-011_1
MMT-7018, MMT-7001, MMT-7019