Medtronic 3537 3537 User Manual 1
Medtronic, Inc. 3537 1
Contents
- 1. User Manual 1
- 2. User Manual 2
- 3. User Manual 3
User Manual 1
CONTROLLER 3537
for InterStim® Therapy
Clinician Programming Guide
! USA
Rx only
Filename Date Time
UC2001xxxx EN
4.625 x 6 inches (117 mm x 152 mm)
Medtronic Confidential
PTMClinPrgmManual.xsl - PTMClinPrgmTemplate.fm
Template version: 08-08-2011
M943580A002 Rev X 2012-09

Filename Date Time
UC2001xxxx EN
4.625 x 6 inches (117 mm x 152 mm)
Medtronic Confidential
PTMClinPrgmManual.xsl - PTMClinPrgmTemplate.fm
Template version: 08-08-2011
M943580A002 Rev X 2012-09
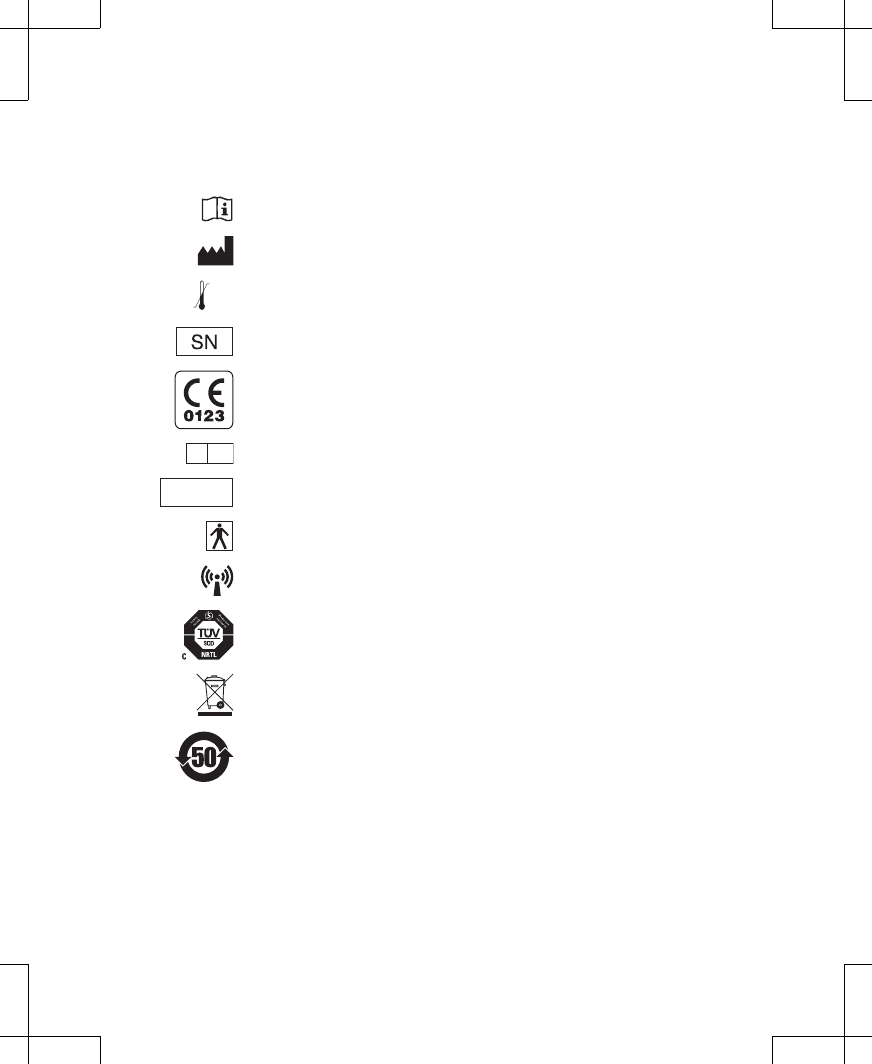
Explanation of symbols on product or package labeling
Refer to the appropriate product for symbols that apply.
Consult instructions for use
Manufacturer
XXX °F
XX °C
-XX °F
-XX °C Temperature limitation
Serial number
Conformité Européenne (European Conformity). This symbol means that the
device fully complies with MDD 93/42//EEC (NB 0123) and R&TTE Directive
1999/5/EC.
EC REP Authorized representative in the European community
! USA
For USA audiences only
IEC 60601-1/EN60601-1, Type BF equipment
Non-ionizing electromagnetic radiation
System meets the applicable Canadian (CAN/CSAC22.2 No. 60601-1) electrical
safety standard requirements.
Do not dispose of this product in the unsorted municipal waste stream. Dispose
of this product according to local regulations. See http://recycling.medtronic.com
for instructions on proper disposal of this product.
Chinese Standard (SJ/T11364-2006) Logo: Electronic Information Products
Pollution Control Symbol. (The date in this logo means the environmental
protection use period of the product.)
3537 2012-09 English 3
Filename Date Time
UC2001xxxx EN
4.625 x 6 inches (117 mm x 152 mm)
Medtronic Confidential
PTMClinPrgmManual.xsl - PTMClinPrgmTemplate.fm
Template version: 08-08-2011
M943580A002 Rev X 2012-09

Medtronic®, and InterStim® are trademarks of Medtronic, Inc., registered in the U.S. and other
countries.
! USA
FCC Information
The following is communications regulation information on the Model 3537 Personal Therapy
Manager.
FCC ID: LF53537
This device complies with Part 15 Rules. Operation is subject to the following two conditions:
(1) this device may not cause harmful interference and (2) this device must accept any
interference received, including interference that may cause undesired operation.
IMPORTANT: Changes or modifications to this product not authorized by Medtronic,
Inc., could void the FCC Certification and negate your authority to operate this product.
This device complies with Industry Canada license-exempt RSS standard(s). Operation is
subject to the following two conditions: (1) this device may not cause interference, and (2) this
device must accept any interference, including interference that may cause undesired
operation of the device.
4 English 3537 2012-09
Filename Date Time
UC2001xxxx EN
4.625 x 6 inches (117 mm x 152 mm)
Medtronic Confidential
PTMClinPrgmManual.xsl - PTMClinPrgmTemplate.fm
Template version: 08-08-2011
M943580A002 Rev X 2012-09

Table of contents
Description 7
Package contents 7
About this manual 7
Instructions for use 8
Setting up the controller 8
Pairing the controller to the external neurostimulator 11
Pairing a new controller to an external neurostimulator 11
Pairing a previously used controller to an external neurostimulator 14
Unlocking and locking the controller 19
Unlocking the controller 19
Locking the controller 21
Turning stimulation on or off 22
Turning stimulation on 22
Turning stimulation off 23
Adjusting stimulation parameters using the Model 3575 Test Stimulation Cable 25
Increasing and decreasing amplitude on the Home screen 25
Adjusting advanced parameters 27
Adjusting stimulation parameters for the Model 3057 Test Stimulation Lead(s) 30
Increasing and decreasing amplitude on the Home screen 30
Changing the active lead (if two leads were placed) 32
Adjusting advanced parameters 33
Refer to the indications sheet for indications and related information.
Refer to the appropriate information for prescribers booklet for contraindications,
warnings, precautions, adverse events summary, individualization of treatment, patient
selection, use in specific populations, resterilization, and component disposal.
Refer to System Eligibility, Battery Longevity, Specifications reference manual for
neurostimulator selection, battery longevity calculations, and specific neurostimulator
specifications.
! USA
Refer to the clinical summary booklet for information on the clinical study results
of the neurostimulation system and individualization of treatment.
3537 2012-09 English 5
Filename Date Time
UC2001xxxx EN
4.625 x 6 inches (117 mm x 152 mm)
Medtronic Confidential
PTMClinPrgmManual.xsl - PTMClinPrgmTemplate.fm
Template version: 08-08-2011
M943580A002 Rev X 2012-09

Adjusting stimulation parameters for the Model 3093 or Model 3889 Tined Lead 37
Adjusting advanced parameters 37
Increasing and decreasing amplitude on the Home screen 41
Usage Log 42
Reset Therapy 44
Changing preferences 46
Changing the vibration settings 46
Changing the brightness of the controller display 48
Changing the time 49
Changing the date 50
Changing the number format 51
Changing the language 52
Viewing information about the controller and the external neurostimulator 54
Checking and replacing batteries 55
Checking the external neurostimulator and controller batteries 55
Replacing the controller batteries 58
Labeling the controller 59
Troubleshooting 59
Troubleshooting reference guide 60
Device specifications 65
Device care and storage 65
6 English 3537 2012-09
Filename Date Time
UC2001xxxx EN
4.625 x 6 inches (117 mm x 152 mm)
Medtronic Confidential
PTMClinPrgmManual.xsl - PTMClinPrgmTemplate.fm
Template version: 08-08-2011
M943580A002 Rev X 2012-09
Description
The Medtronic Model 3537 Controller is a hand-held device intended for use with the Medtronic
Model 3531 External Neurostimulator. The clinician uses the controller to program settings for
the patient. The patient uses the controller to perform the following tasks as directed by the
clinician:
▪Adjust amplitude
▪Switch between active sides (if two leads were placed)
▪Switch programs (if applicable)
Package contents
▪Model 3537 Controller
▪Carrying case
▪Batteries (AA)
▪Product literature
▪
! USA
Warranty card
About this manual
This manual contains the information the physician needs to set up, use, and troubleshoot the
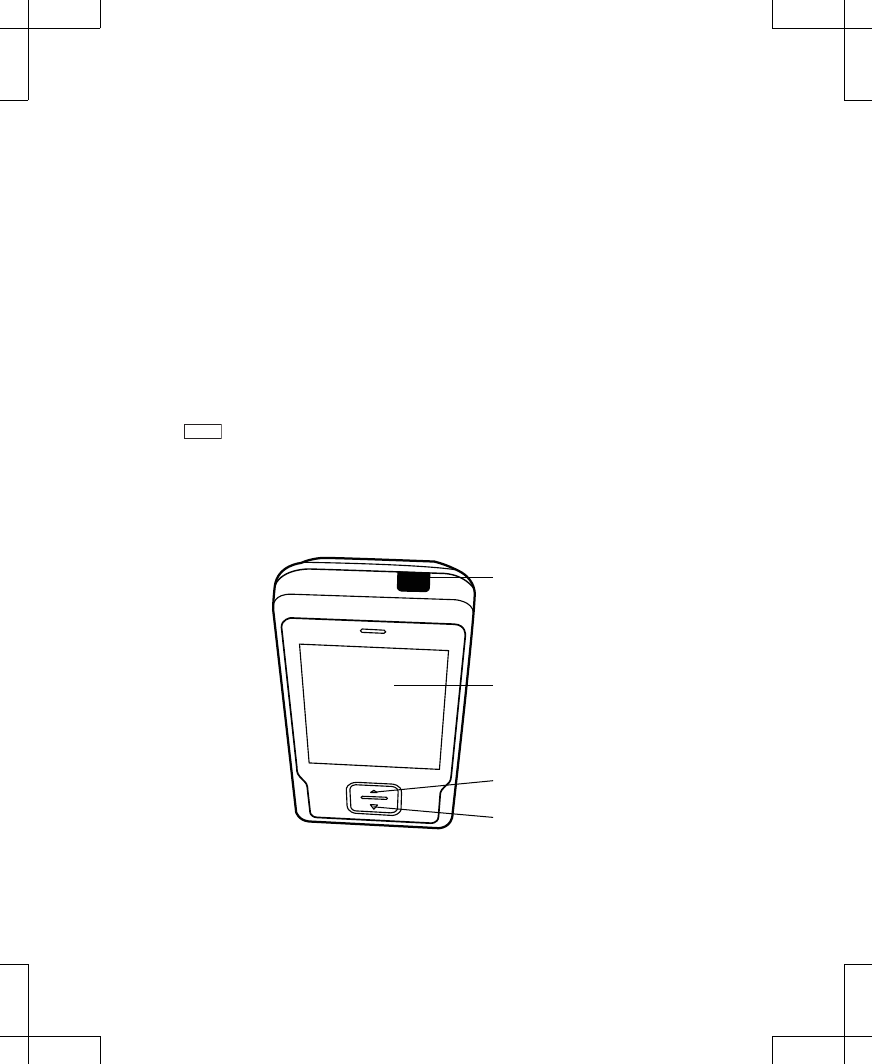
controller (Figure 1).
Stimulation On/Off key
Touchscreen
Increase key
Decrease key
Figure 1. Features of the Model 3537 Controller.
3537 2012-09 English 7
Filename Date Time
UC2001xxxx EN
4.625 x 6 inches (117 mm x 152 mm)
Medtronic Confidential
PTMClinPrgmManual.xsl - PTMClinPrgmTemplate.fm
Template version: 08-08-2011
M943580A002 Rev X 2012-09
All information and instructions that are available to the patient are included in the Model 3537
Controller Patient Test Stimulation Programming Guide and the InterStim Patient Therapy
Guide.
Instructions for use
#Caution: The device is not certified for use in the presence of a flammable anesthetic
mixture with air or with oxygen or nitrous oxide. The consequences of using the device
near flammable atmospheres are unknown.
#Caution: Do not modify this equipment. Modification of this equipment can result in
damage to the device, causing the device to malfunction or become unusable.
#Caution: Do not use the device in the proximity of equipment that generates
electromagnetic interference (EMI). EMI may cause a disruption in device function.
Examples of common medical sources of EMI are magnetic resonance imaging (MRI) and
lithotripsy. Powerful computer monitors, cell phones, x-ray equipment, and other
monitoring equipment may also generate EMI.
Setting up the controller
After inserting batteries into the controller, a splash screen will appear, followed by a series of
steps to set up the controller.
Note: After completing these setup instructions, you can change the settings at any time
using the Menu.
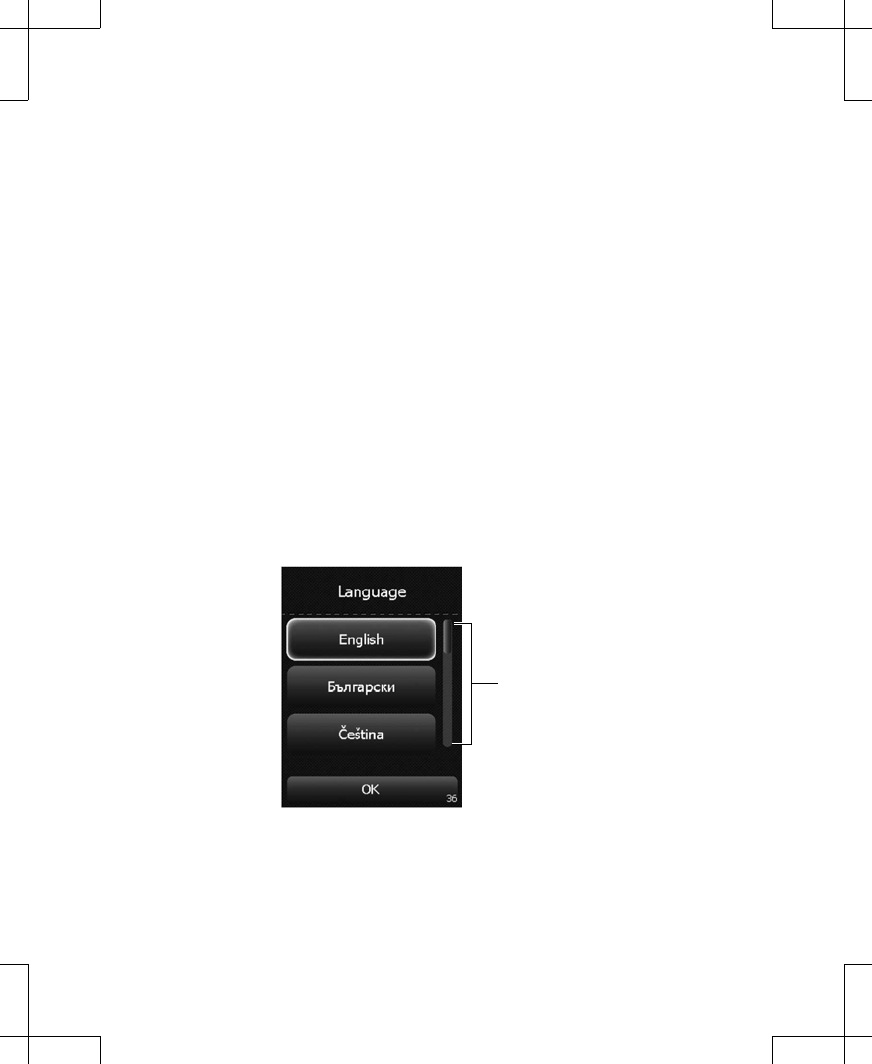
1. Using the touchscreen, select the desired language from the options available, then press
the OK button to continue (Figure 2).
Slider bar
Figure 2. Setting the language.
Note: Use the slider bar or the Increase and Decrease keys to scroll up or down to see
more languages.
2. Using the touchscreen, press the Trial button (Figure 3).
8 English 3537 2012-09
Filename Date Time
UC2001xxxx EN
4.625 x 6 inches (117 mm x 152 mm)
Medtronic Confidential
PTMClinPrgmManual.xsl - PTMClinPrgmTemplate.fm
Template version: 08-08-2011
M943580A002 Rev X 2012-09
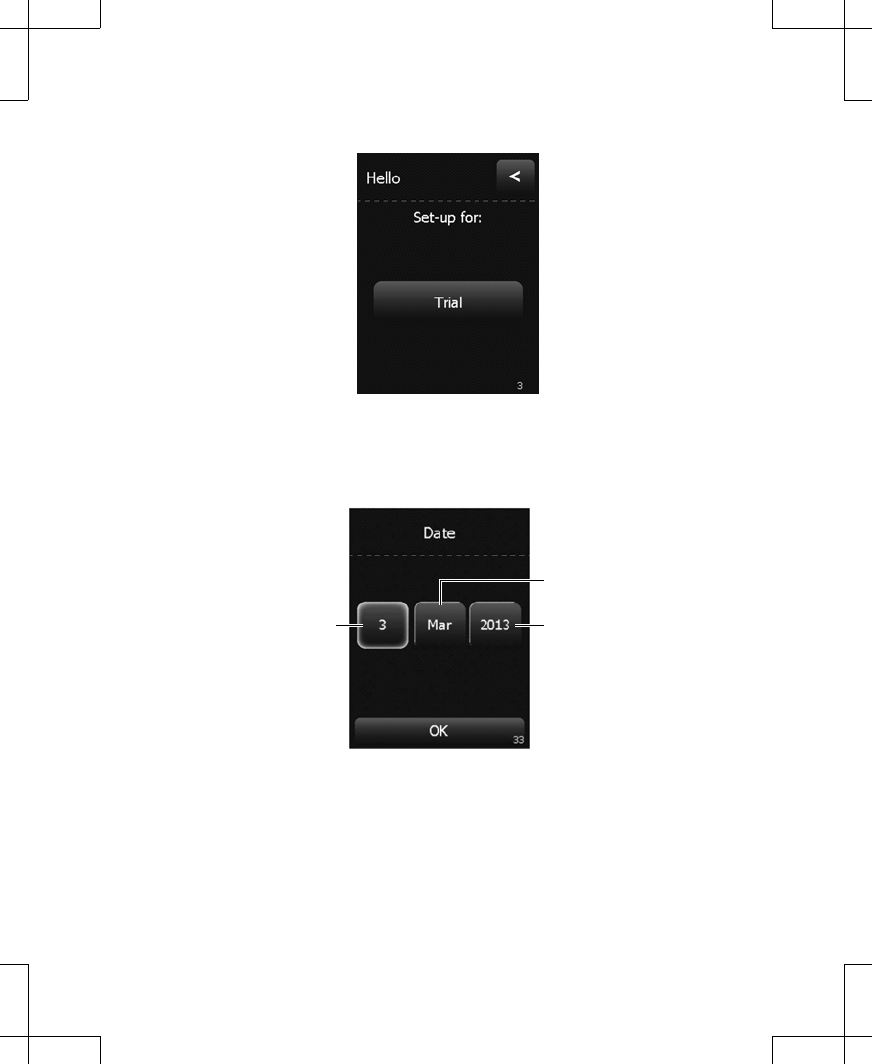
Figure 3. Pressing the Trial button.
3. To change the date, the month, or the year, press the touchscreen button with the incorrect
value, then use the Increase and Decrease keys to change the value. Once the date,
month, and year are set correctly, press the OK button to continue (Figure 4).
Date
Month
Year
Figure 4. Setting the date.
4. To change the hour, the minute, or the time format, press the touchscreen button with the
incorrect value, then use the Increase and Decrease keys to change the value. Once the
hour, minute, and time format are set correctly, press the OK button to continue
(Figure 5).
3537 2012-09 English 9
Filename Date Time
UC2001xxxx EN
4.625 x 6 inches (117 mm x 152 mm)
Medtronic Confidential
PTMClinPrgmManual.xsl - PTMClinPrgmTemplate.fm
Template version: 08-08-2011
M943580A002 Rev X 2012-09
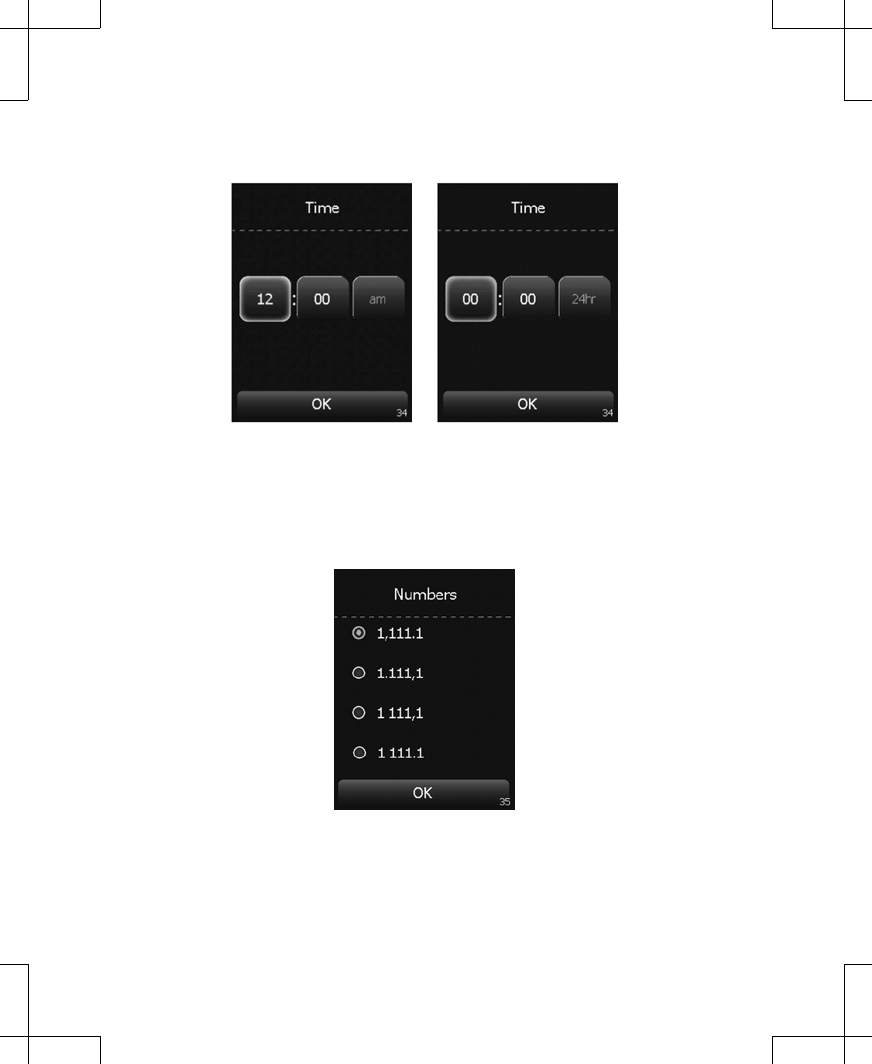
AM/PM format 24-hour format
Figure 5. Setting the time.
5. Using the touchscreen, press the radio button next to the desired number format for the
controller, then press the OK button to continue (Figure 6).
Figure 6. Selecting the number format.
10 English 3537 2012-09
Filename Date Time
UC2001xxxx EN
4.625 x 6 inches (117 mm x 152 mm)
Medtronic Confidential
PTMClinPrgmManual.xsl - PTMClinPrgmTemplate.fm
Template version: 08-08-2011
M943580A002 Rev X 2012-09
Pairing the controller to the external neurostimulator
To ensure correct pairing between the controller and the external neurostimulator, consider the
following recommendations:
▪Ensure that the controller that you provide to the patient is paired with the patient's external
neurostimulator.
▪Ask the patient to bring his or her controller to all follow-up appointments. Use this same
controller during any clinician programming. This will help to avoid pairing the external
neurostimulator with multiple controllers.
▪If the external neurostimulator is paired with a new controller, the connection to the previous
controller will need to be re-established before the previous controller can be used with the
external neurostimulator again.
Pairing a new controller to an external neurostimulator
Note: Ensure you have the external neurostimulator serial number available. You will need to
confirm this information during the pairing procedure. The serial number is located on the back
of the external neurostimulator.
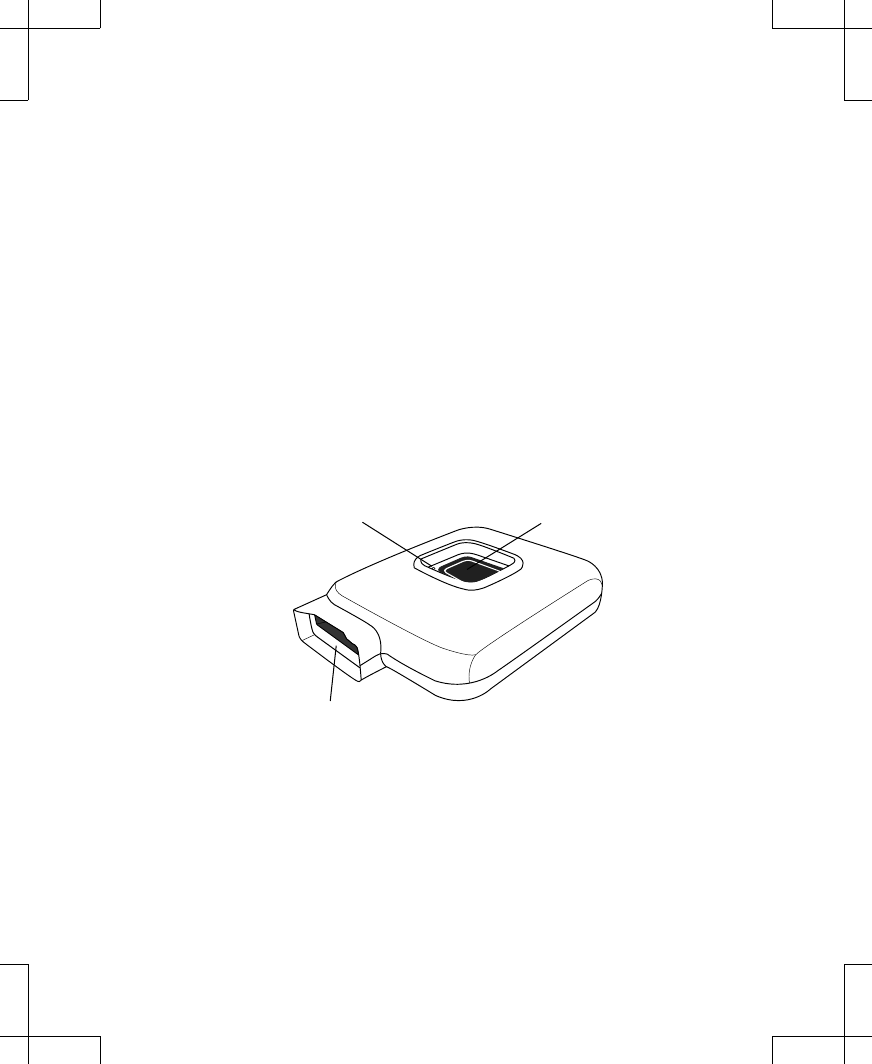
1. Press and hold the ENS button for one second to place the external neurostimulator into
discovery mode (Figure 7). The light on the external neurostimulator will repeatedly blink
for 90 seconds, or until the external neurostimulator has paired with a controller.
Light-emitting diode (LED) ENS button
Output jack
Figure 7. Turn on the external neurostimulator.
2. Press the Continue button on the controller touchscreen (Figure 8). The controller will look
for the external neurostimulator (Figure 9).
3537 2012-09 English 11
Filename Date Time
UC2001xxxx EN
4.625 x 6 inches (117 mm x 152 mm)
Medtronic Confidential
PTMClinPrgmManual.xsl - PTMClinPrgmTemplate.fm
Template version: 08-08-2011
M943580A002 Rev X 2012-09
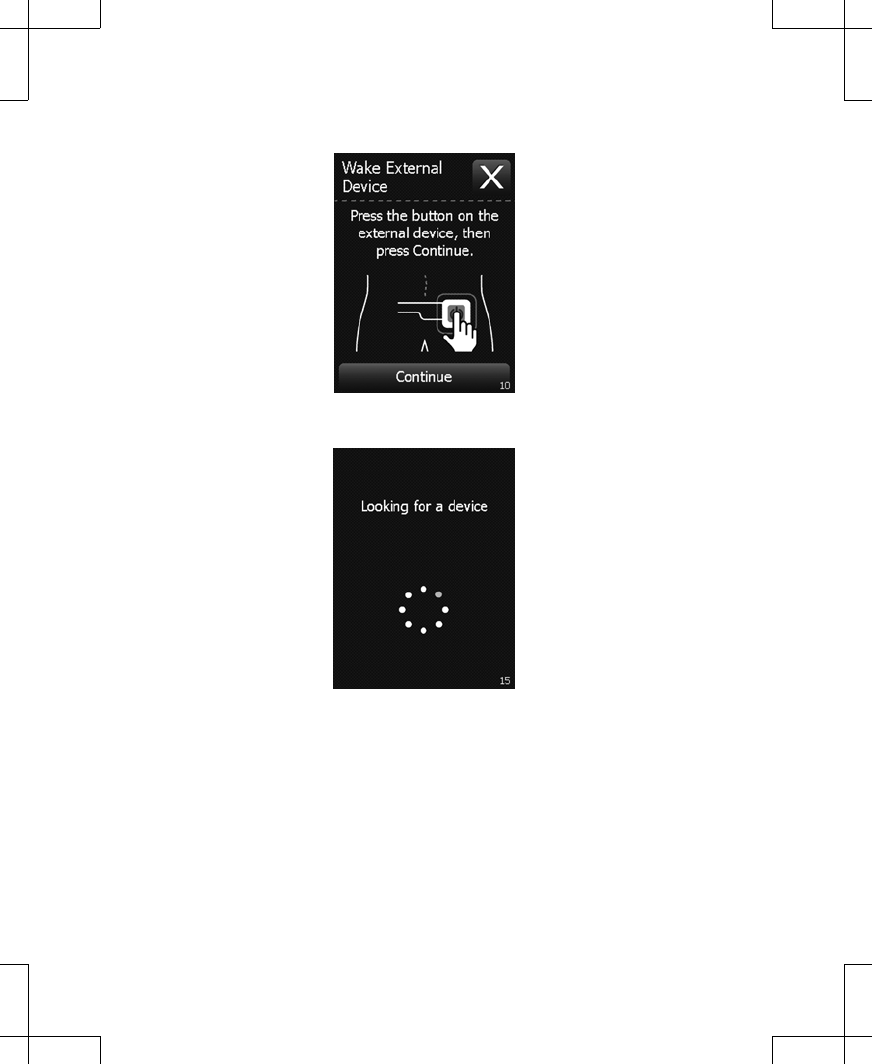
Figure 8. Pressing the Continue button.
Figure 9. Controller looking for the external neurostimulator.
3. Using the touchscreen, select the radio button next to the correct external neurostimulator,
then press the OK button to continue (Figure 10).
Note: The number displayed on the controller screen should match the serial number
printed on the back of the external neurostimulator.
12 English 3537 2012-09
Filename Date Time
UC2001xxxx EN
4.625 x 6 inches (117 mm x 152 mm)
Medtronic Confidential
PTMClinPrgmManual.xsl - PTMClinPrgmTemplate.fm
Template version: 08-08-2011
M943580A002 Rev X 2012-09
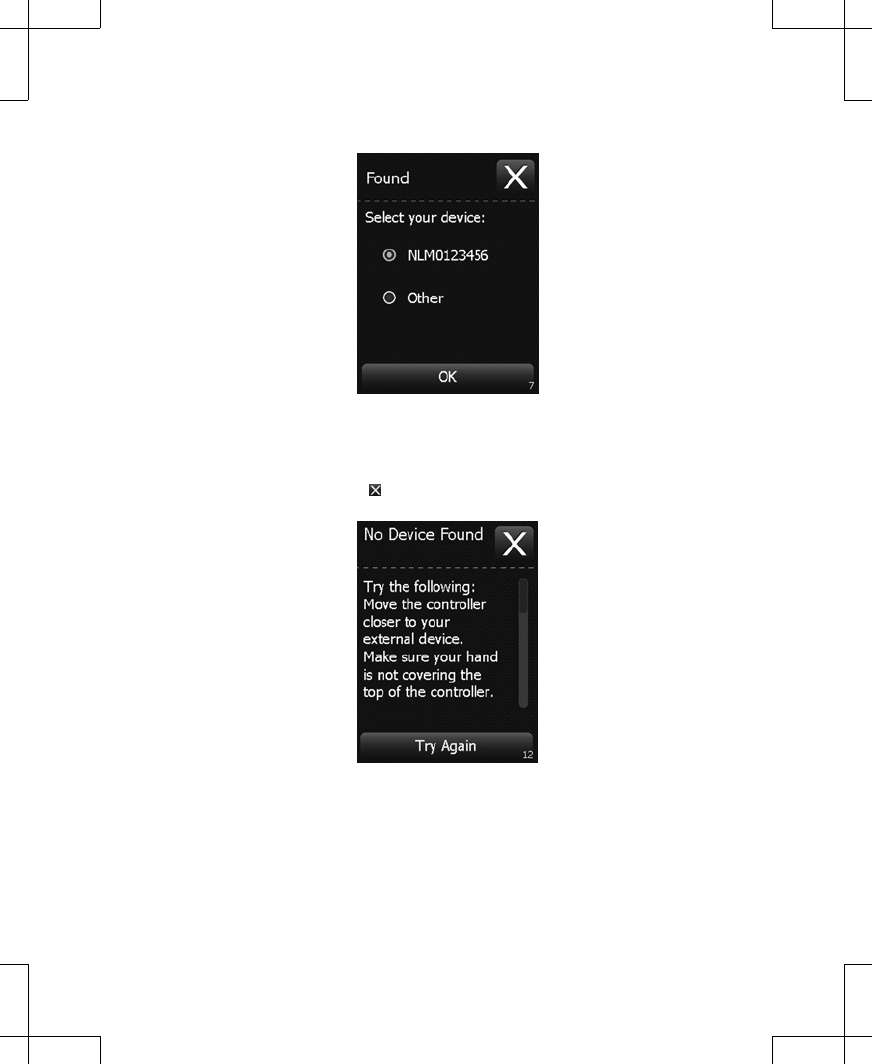
Figure 10. Selecting the device to pair with the controller.
Notes:
▪If the controller fails to pair with the external neurostimulator, repeat step 1, then press
the Try Again button to try this step again (Figure 11).
▪Pressing the Exit button ( ) will abort the pairing process.
Figure 11. Pressing the Try Again button.
4. When the pairing is successful, a confirmation screen will appear (Figure 12). Press the OK
button to continue.
3537 2012-09 English 13
Filename Date Time
UC2001xxxx EN
4.625 x 6 inches (117 mm x 152 mm)
Medtronic Confidential
PTMClinPrgmManual.xsl - PTMClinPrgmTemplate.fm
Template version: 08-08-2011
M943580A002 Rev X 2012-09
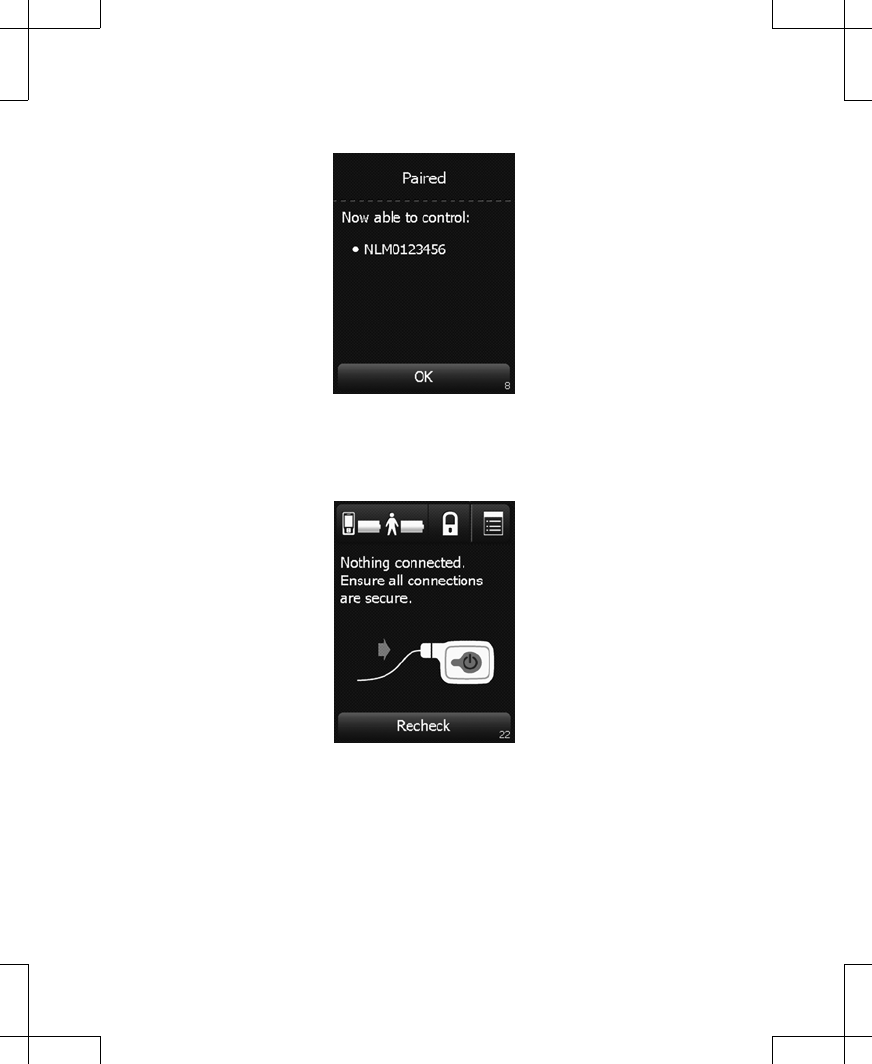
Figure 12. Confirming that the devices are paired.
Note: If there is a connection problem, a screen will appear (Figure 13). Check all
connections between the lead and the external neurostimulator, and press the Recheck
button.
Figure 13. Screen prompt to check connections.
Pairing a previously used controller to an external neurostimulator
When turned on, the previously used controller will automatically attempt to connect to the
external neurostimulator with which it was previously paired.
1. When the controller fails to pair with the previously used external neurostimulator, a screen
appears (Figure 14). Press the Menu button in the top right corner of the touchscreen.
14 English 3537 2012-09
Filename Date Time
UC2001xxxx EN
4.625 x 6 inches (117 mm x 152 mm)
Medtronic Confidential
PTMClinPrgmManual.xsl - PTMClinPrgmTemplate.fm
Template version: 08-08-2011
M943580A002 Rev X 2012-09
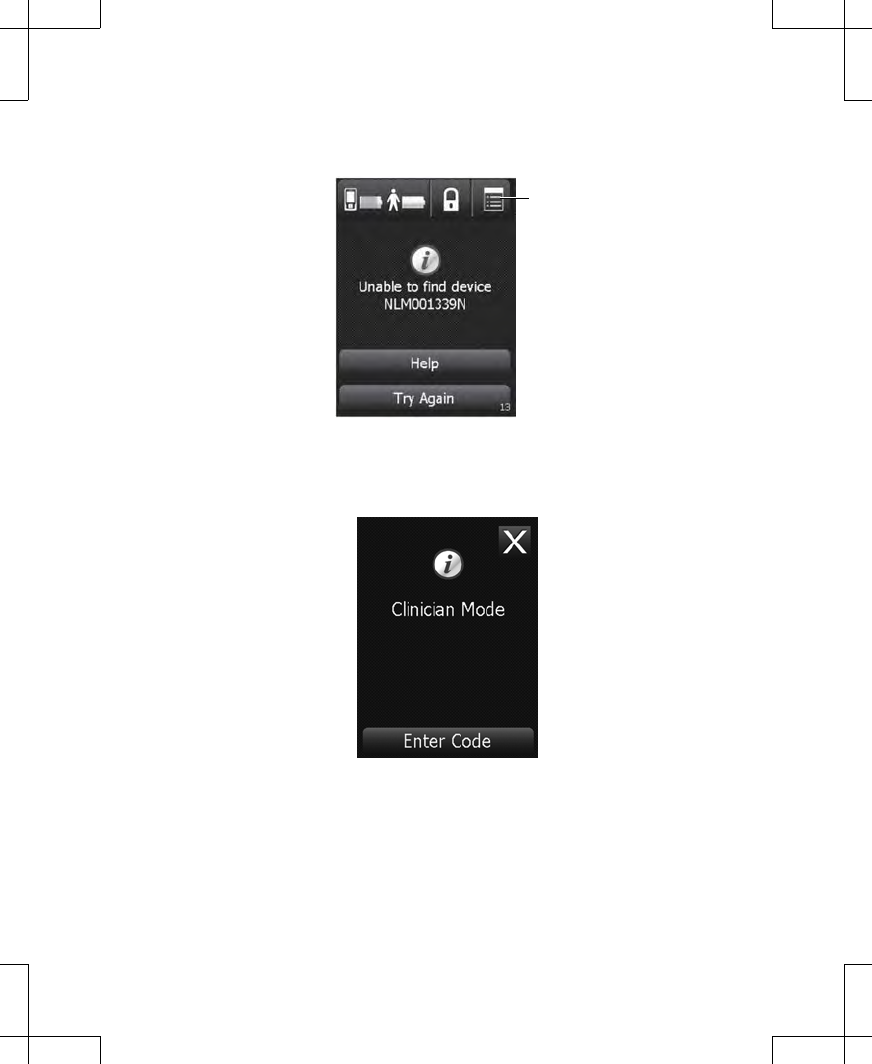
Menu button
Figure 14. Pressing the Menu button.
2. Press the Enter Code button (Figure 15).
Figure 15. Pressing the Enter Code button.
3. Enter the four-digit code by pressing the number buttons on the touchscreen keypad, then
press the Confirm button to confirm and continue to the Menu (Figure 16).
Notes:
▪The code is 1155.
▪If you make an error while entering the code, press the Undo button to delete the entire
code, then re-enter the correct code.
3537 2012-09 English 15
Filename Date Time
UC2001xxxx EN
4.625 x 6 inches (117 mm x 152 mm)
Medtronic Confidential
PTMClinPrgmManual.xsl - PTMClinPrgmTemplate.fm
Template version: 08-08-2011
M943580A002 Rev X 2012-09
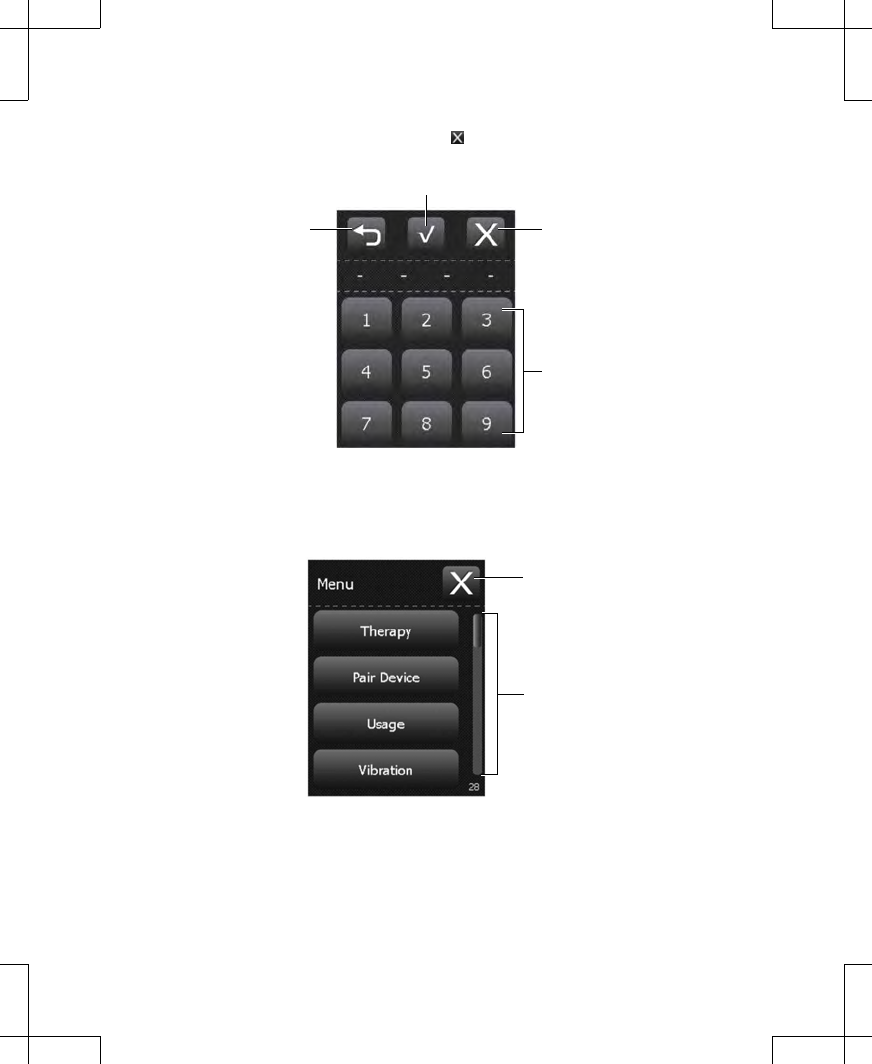
▪To cancel code entry, press the Exit button ( ) to exit and return to the previous screen.
Undo button Exit button
Confirm button
Keypad
Figure 16. Entering the Menu code.
4. From the Menu, select the Pair Device button (Figure 17).
Slider bar
Exit button
Figure 17. Selecting the Pair Device button.
16 English 3537 2012-09
Filename Date Time
UC2001xxxx EN
4.625 x 6 inches (117 mm x 152 mm)
Medtronic Confidential
PTMClinPrgmManual.xsl - PTMClinPrgmTemplate.fm
Template version: 08-08-2011
M943580A002 Rev X 2012-09
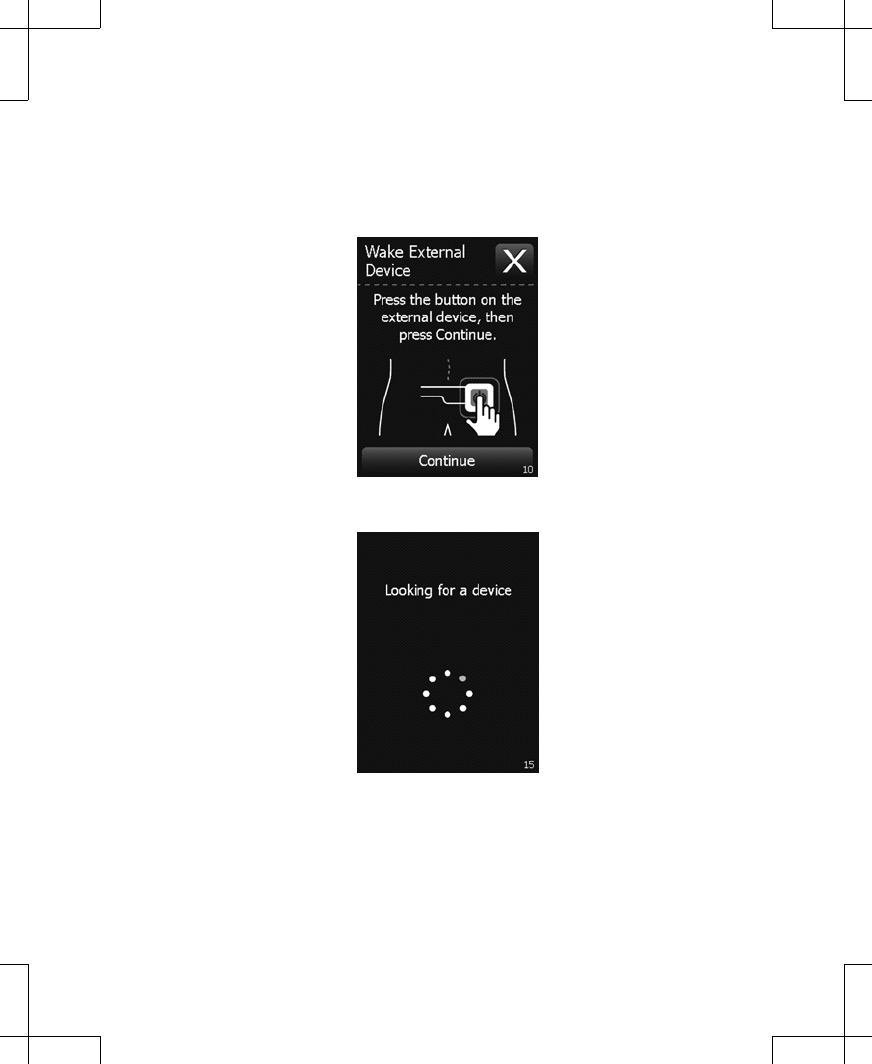
5. Press and hold the ENS button on the external neurostimulator for one second to place
the external neurostimulator into discovery mode. The light on the external neurostimulator
will repeatedly blink for 90 seconds, or until it has paired with a controller.
6. Press the Continue button on the controller touchscreen (Figure 18). The controller will
look for the external neurostimulator (Figure 19).
Figure 18. Pressing the Continue button on the touchscreen.
Figure 19. Controller looking for the external neurostimulator.
7. Using the touchscreen, select the radio button next to the correct external neurostimulator,
then press the OK button to continue (Figure 10).
Note: The number displayed on the controller screen should match the serial number
printed on the back of the external neurostimulator.
3537 2012-09 English 17
Filename Date Time
UC2001xxxx EN
4.625 x 6 inches (117 mm x 152 mm)
Medtronic Confidential
PTMClinPrgmManual.xsl - PTMClinPrgmTemplate.fm
Template version: 08-08-2011
M943580A002 Rev X 2012-09
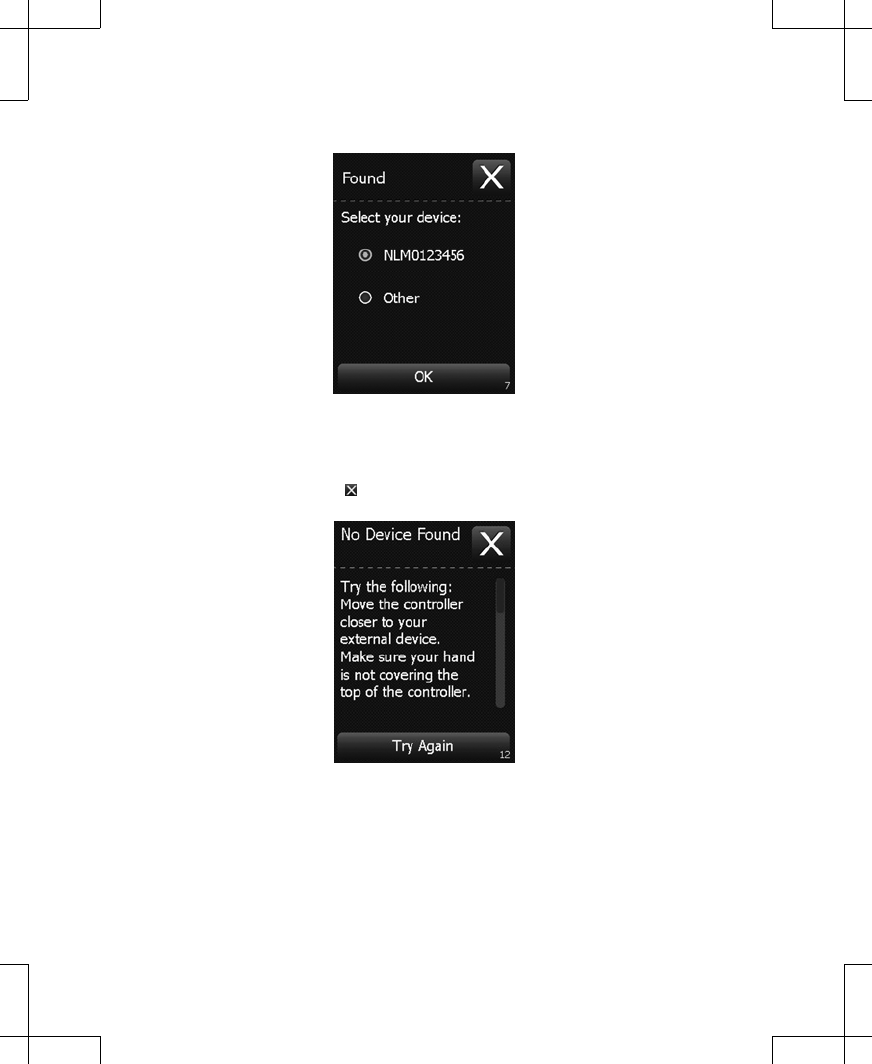
Figure 20. Selecting the correct device from the list.
Notes:
▪If the controller fails to pair with the external neurostimulator, repeat step 5 and press
the Try Again button to continue (Figure 21).
▪Pressing the Exit button ( ) will abort the pairing process.
Figure 21. No Device Found screen.
Note: If there is a connection problem, a screen will appear (Figure 13). Check all
connections between the lead and the external neurostimulator, and press the Recheck
button.
18 English 3537 2012-09
Filename Date Time
UC2001xxxx EN
4.625 x 6 inches (117 mm x 152 mm)
Medtronic Confidential
PTMClinPrgmManual.xsl - PTMClinPrgmTemplate.fm
Template version: 08-08-2011
M943580A002 Rev X 2012-09
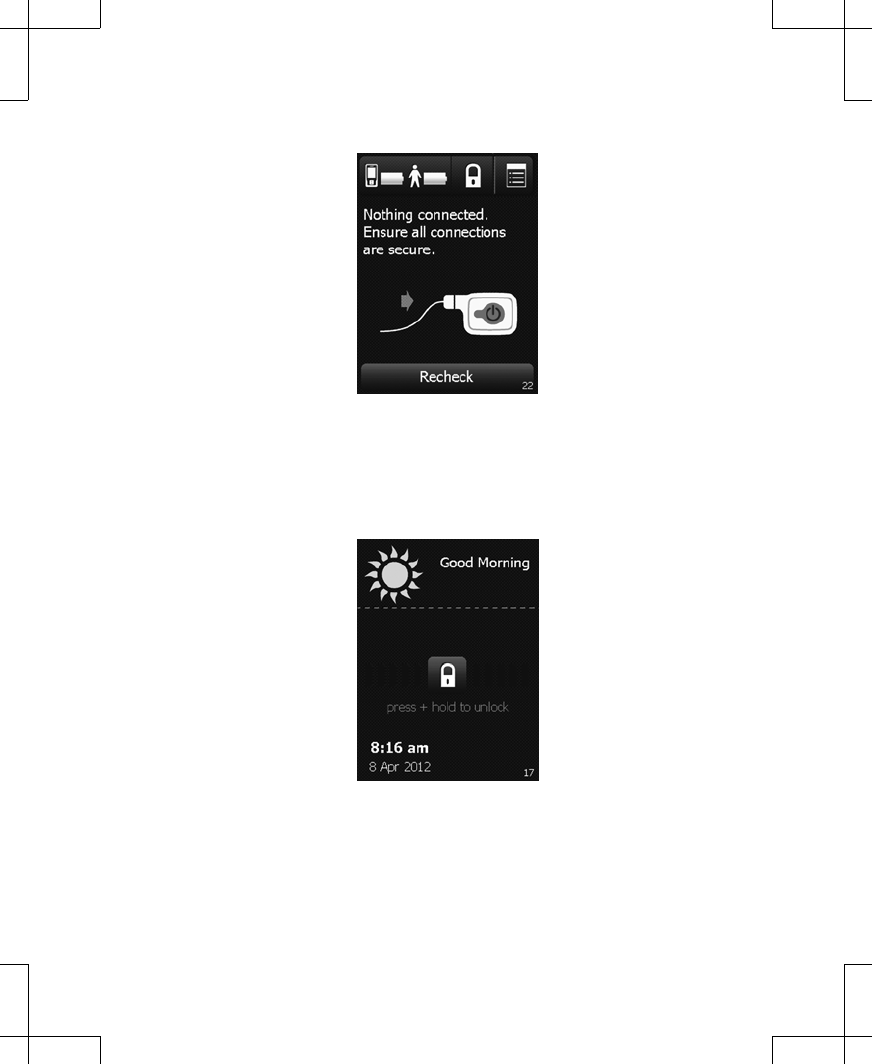
Figure 22. Screen prompt to check connections.
Unlocking and locking the controller
Unlocking the controller
To unlock the controller, press the Increase/Decrease key.
Figure 23. The Unlock screen.
Note: When the controller is locked, pressing the Stimulation On/Off key will provide the option
to bypass the Unlock screen and to turn stimulation on or off.
1. Press and hold the Lock button on the Unlock screen.
3537 2012-09 English 19
Filename Date Time
UC2001xxxx EN
4.625 x 6 inches (117 mm x 152 mm)
Medtronic Confidential
PTMClinPrgmManual.xsl - PTMClinPrgmTemplate.fm
Template version: 08-08-2011
M943580A002 Rev X 2012-09
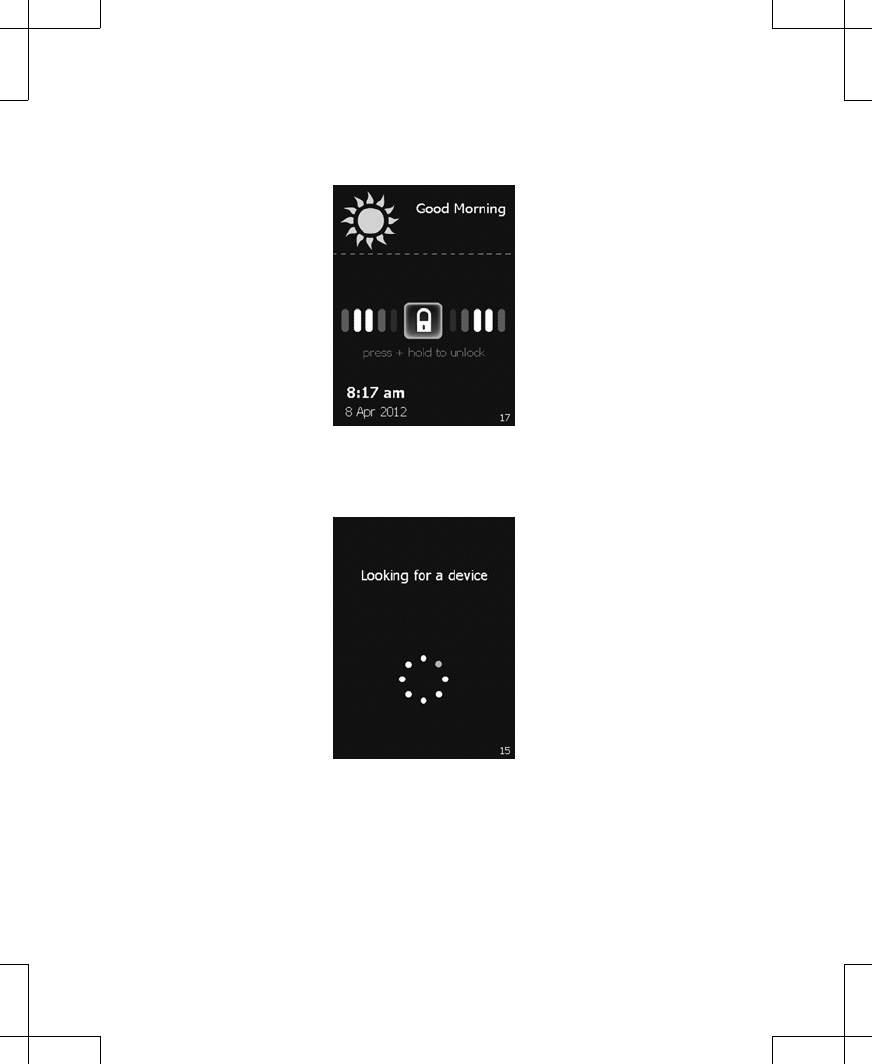
As the Lock button is held, bars appear on the screen and move toward the Lock button
(Figure 24).
Figure 24. Bars appearing on the Unlock screen.
2. Stop pressing the screen when the screen changes to a circle of dots (Figure 25). The
controller is looking for the external neurostimulator.
Figure 25. The controller looking for the external neurostimulator.
The next screen that appears is the Home screen (Figure 26).
20 English 3537 2012-09
Filename Date Time
UC2001xxxx EN
4.625 x 6 inches (117 mm x 152 mm)
Medtronic Confidential
PTMClinPrgmManual.xsl - PTMClinPrgmTemplate.fm
Template version: 08-08-2011
M943580A002 Rev X 2012-09
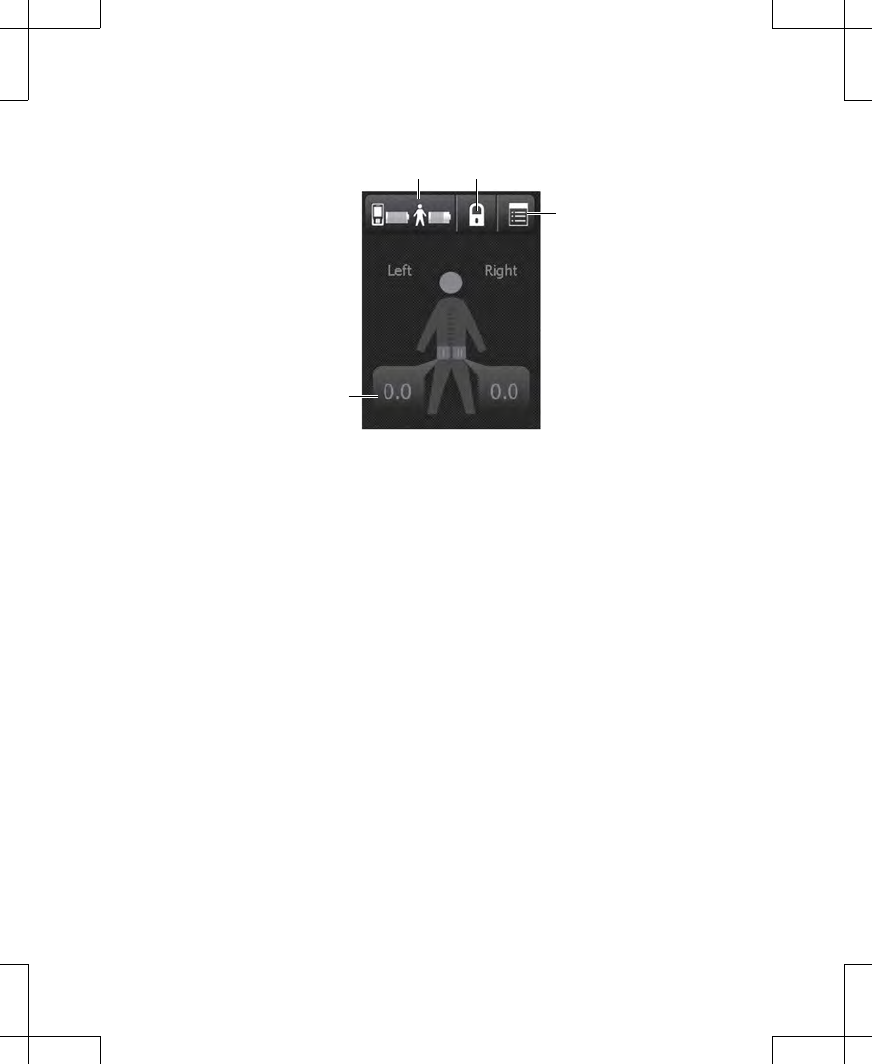
Menu button
Stimulation
value button
Battery status button Lock button
Figure 26. The Home screen.
If the Home screen does not appear, see "Troubleshooting" on page 59.
Locking the controller
The controller can be locked so that when buttons or keys are accidentally pressed there will
not be an unexpected change in stimulation.
Note: The controller screen will dim after 15 seconds of inactivity, and will automatically lock
itself after 2 minutes of inactivity. Pressing the Lock button will lock the controller immediately.
From the Home screen, press the Lock button to lock the controller (Figure 27).
3537 2012-09 English 21
Filename Date Time
UC2001xxxx EN
4.625 x 6 inches (117 mm x 152 mm)
Medtronic Confidential
PTMClinPrgmManual.xsl - PTMClinPrgmTemplate.fm
Template version: 08-08-2011
M943580A002 Rev X 2012-09
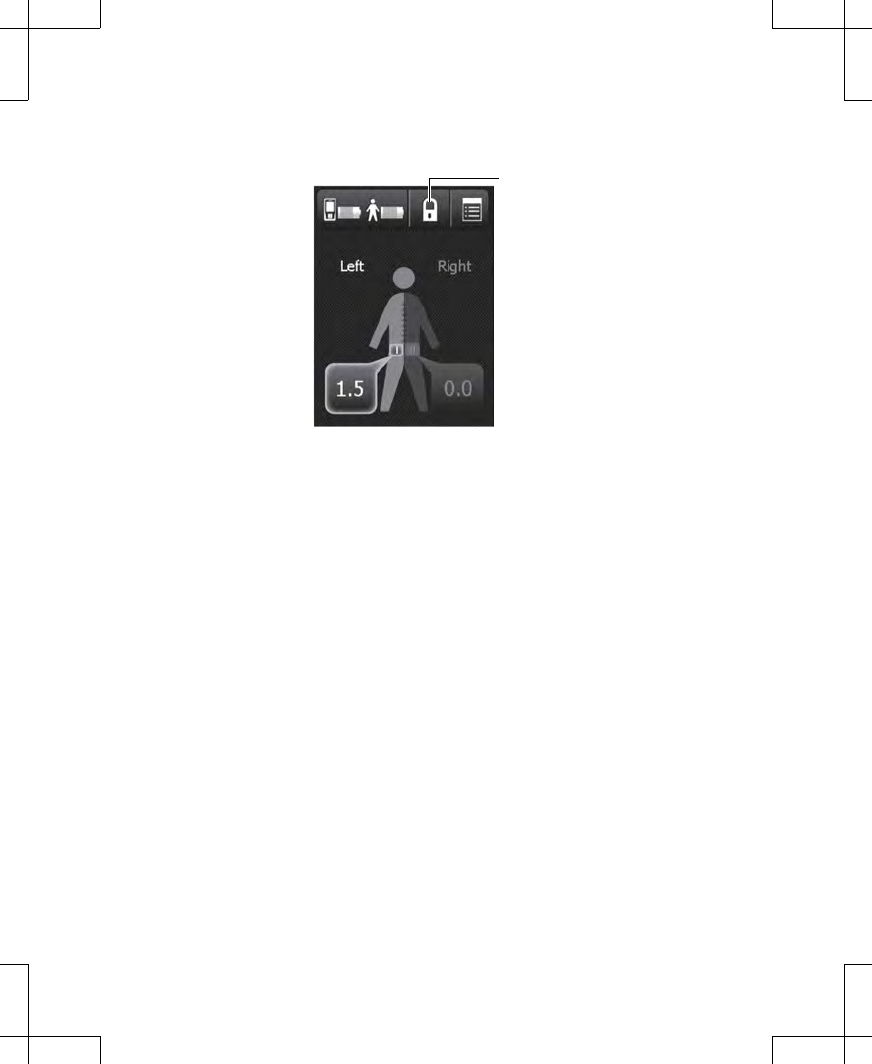
Lock button
Figure 27. Pressing the Lock button.
Turning stimulation on or off
Note: You can turn stimulation on or off at any time.
Turning stimulation on
1. To turn stimulation on, press the Stimulation On/Off key on the top of the controller.
Note: Pressing the Stimulation value button on the Home screen also allows you to turn
stimulation on.
2. A screen appears with the option to turn stimulation on. Press the Stimulation On button
to turn stimulation on (Figure 28).
Notes:
▪To make no change to stimulation and access the Home screen, press the Go To
Unlock button and unlock the controller.
▪To keep stimulation off and continue to the Home screen, press the Stimulation Off
button.
▪Press the Exit button to lock the controller again.
22 English 3537 2012-09
Filename Date Time
UC2001xxxx EN
4.625 x 6 inches (117 mm x 152 mm)
Medtronic Confidential
PTMClinPrgmManual.xsl - PTMClinPrgmTemplate.fm
Template version: 08-08-2011
M943580A002 Rev X 2012-09
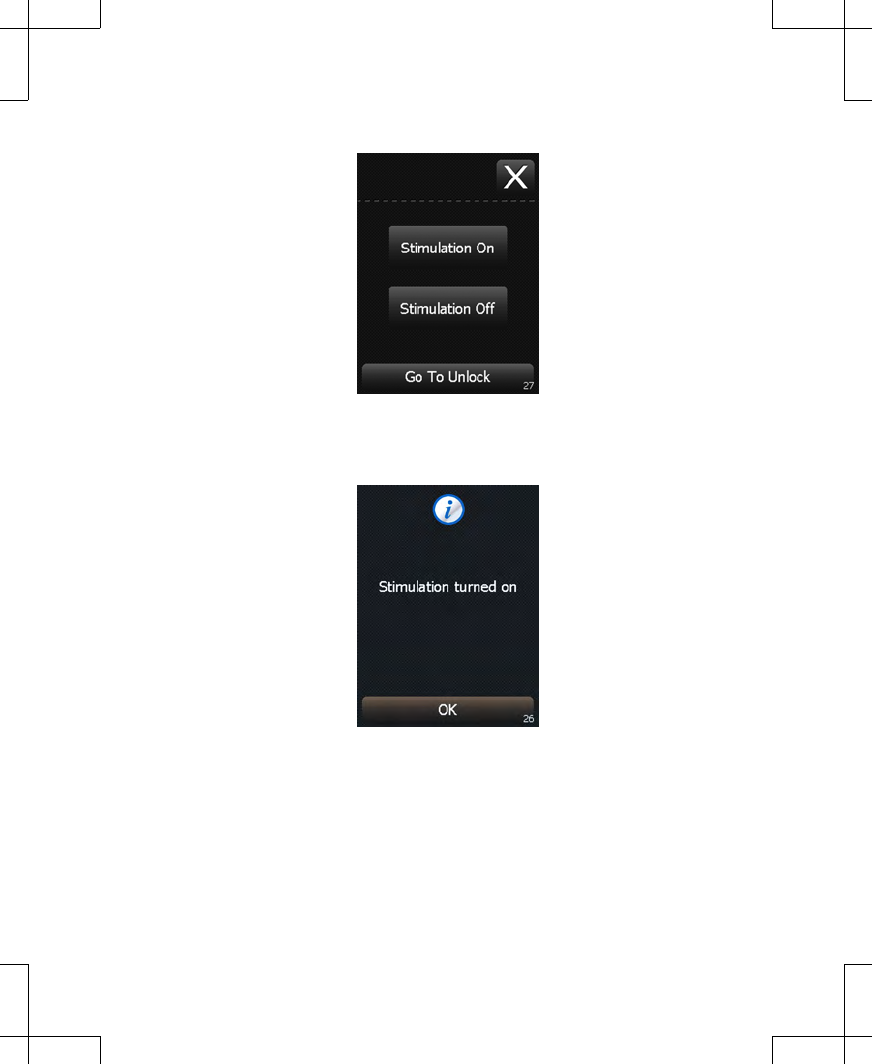
Figure 28. Turning stimulation on.
3. A confirmation screen will appear (Figure 29). Press the OK button to continue to the Home
screen.
Figure 29. Stimulation turned on.
Turning stimulation off
1. To turn stimulation off, press the Stimulation On/Off key on the top of the controller.
2. A screen appears with the option to turn stimulation off. Press the Stimulation Off button
to turn stimulation off (Figure 30).
3537 2012-09 English 23
Filename Date Time
UC2001xxxx EN
4.625 x 6 inches (117 mm x 152 mm)
Medtronic Confidential
PTMClinPrgmManual.xsl - PTMClinPrgmTemplate.fm
Template version: 08-08-2011
M943580A002 Rev X 2012-09
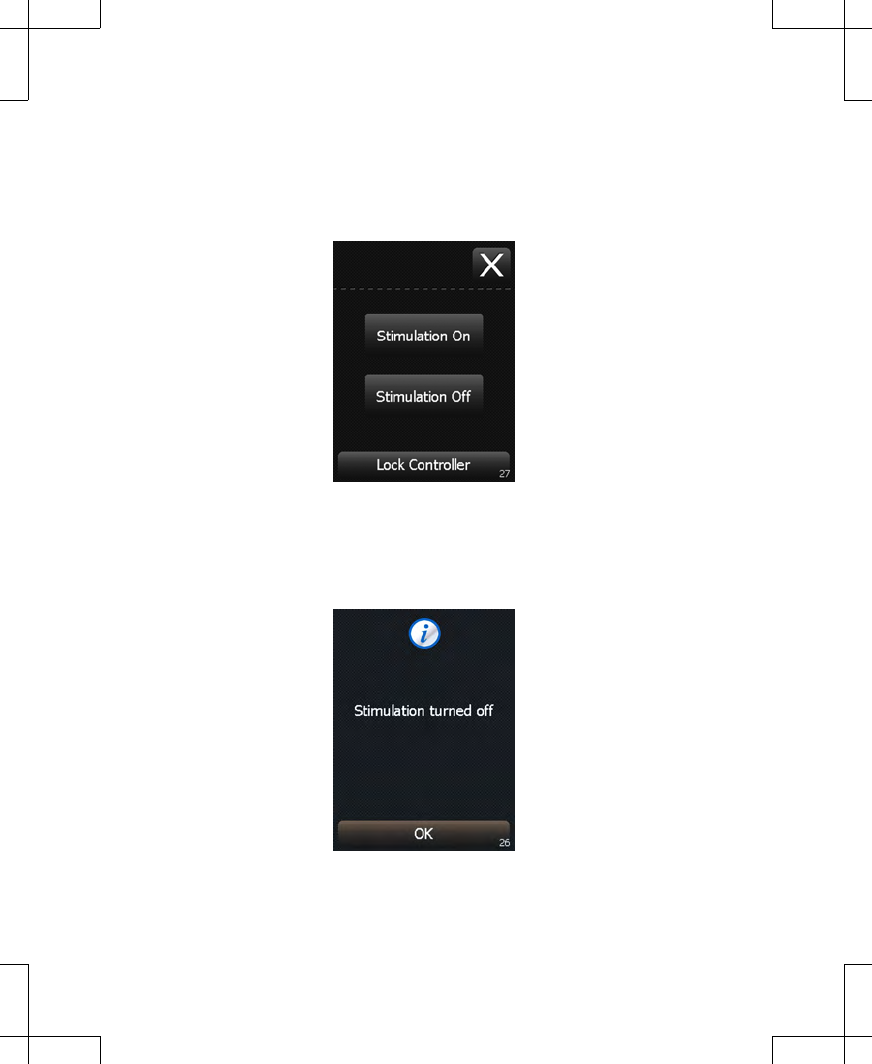
Notes:
▪To make no change to stimulation and lock the controller, press the Lock Controller
button.
▪To keep stimulation on and go to the Home screen, press the Stimulation On button.
▪To make no change to stimulation, press the Exit button.
Figure 30. Turning stimulation off.
Note: If the patient is experiencing discomfort and stimulation must be turned off
immediately, press and hold the ENS button on the external neurostimulator for 3 seconds.
3. A confirmation screen will appear (Figure 31). Press the OK button to continue to the Home
screen.
Figure 31. Stimulation turned off.
24 English 3537 2012-09
Filename Date Time
UC2001xxxx EN
4.625 x 6 inches (117 mm x 152 mm)
Medtronic Confidential
PTMClinPrgmManual.xsl - PTMClinPrgmTemplate.fm
Template version: 08-08-2011
M943580A002 Rev X 2012-09
Adjusting stimulation parameters using the Model 3575 Test Stimulation
Cable
Notes:
▪Before programming, ensure all connections are secure between the external
neurostimulator and the lead(s) or needle.
▪For instructions on intraoperative test stimulation, refer to the appropriate lead manual.
Increasing and decreasing amplitude on the Home screen
When using the test stimulation cable, the external neurostimulator uses the following default
settings:
▪The test stimulation cable is the cathode (-).
▪The ground pad is the anode (+).
▪Amplitude is set to 0 milliamps.
▪Pulse width is set to 210 microseconds.
▪Rate is set to 14 Hertz.
Note: The cathode and anode configuration does not change. To change amplitude, pulse
width, and rate, refer to "Adjusting advanced parameters" on page 27.
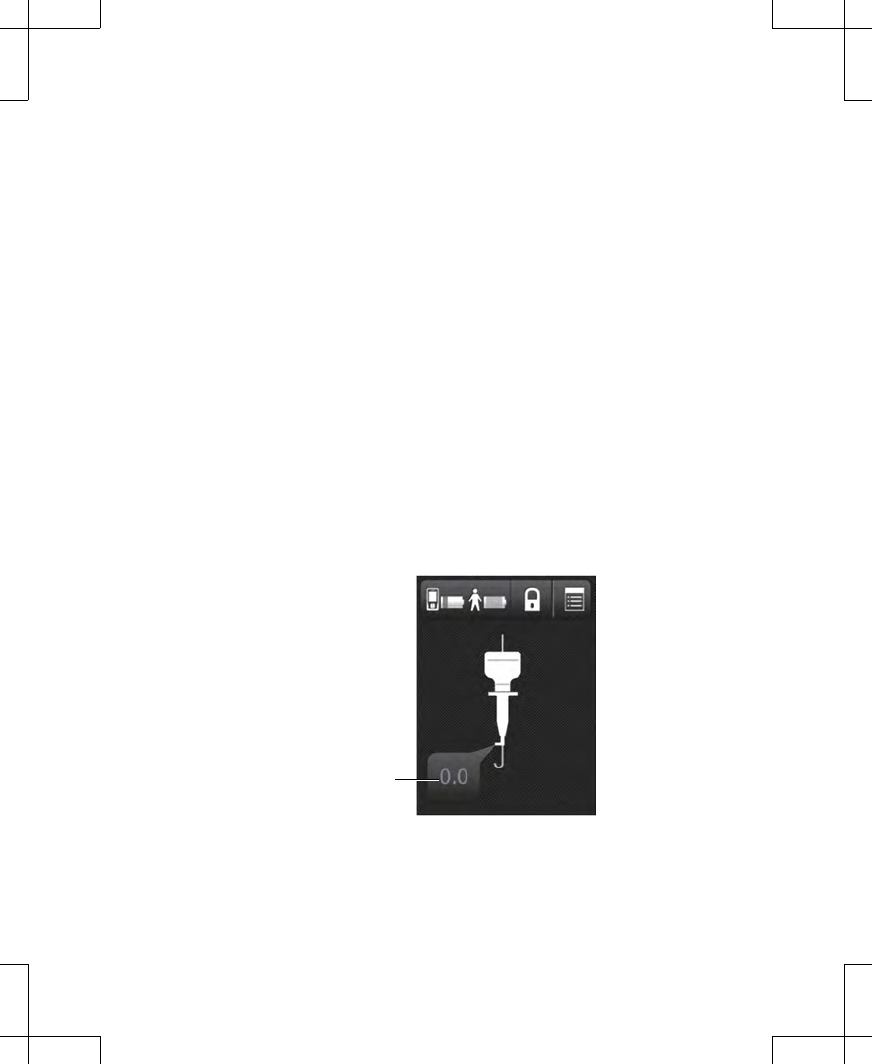
1. Press the Stimulation value button on the Home screen (Figure 32). If stimulation is off,
a new screen will appear.
Note: If stimulation is already on, the Stimulation value button will be outlined in green.
If this happens, proceed to step 3.
Stimulation value button
Figure 32. Pressing the Stimulation value button.
2. Press the Turn On button to turn stimulation on and continue (Figure 33).
3537 2012-09 English 25
Filename Date Time
UC2001xxxx EN
4.625 x 6 inches (117 mm x 152 mm)
Medtronic Confidential
PTMClinPrgmManual.xsl - PTMClinPrgmTemplate.fm
Template version: 08-08-2011
M943580A002 Rev X 2012-09
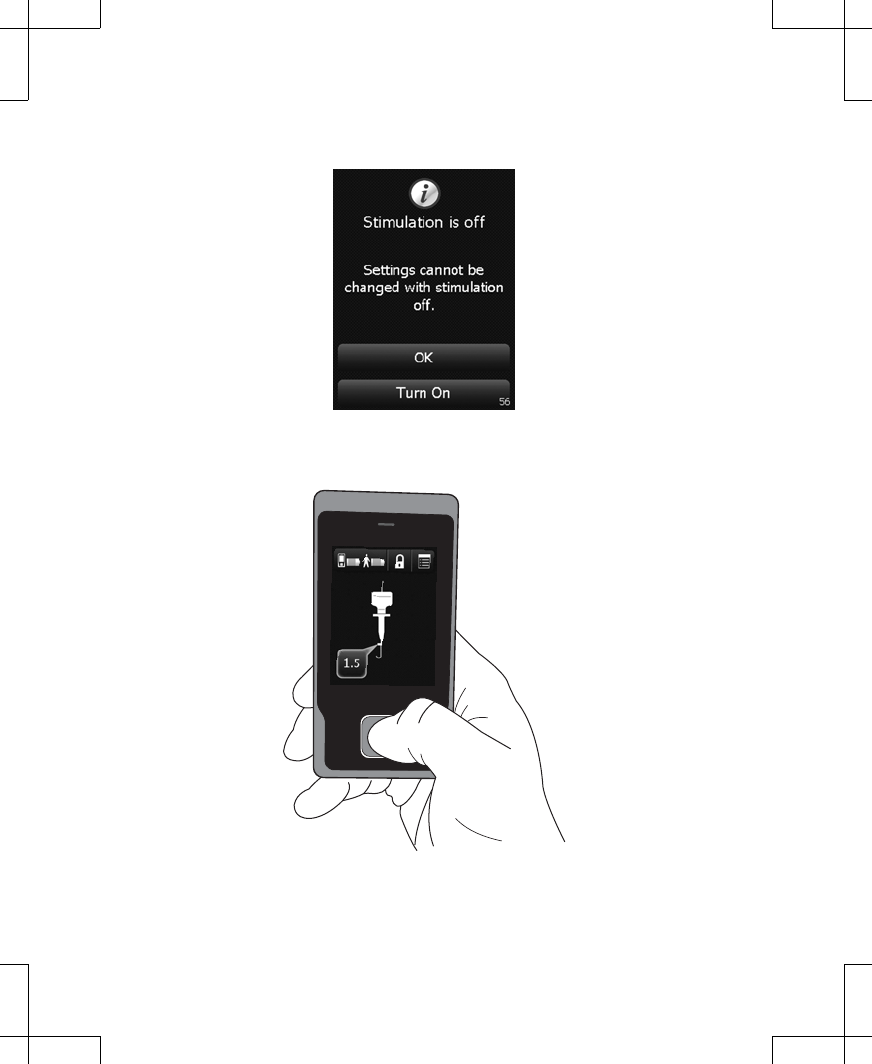
Note: To cancel and go back to the Home screen, press the OK button.
Figure 33. Pressing the Turn On button.
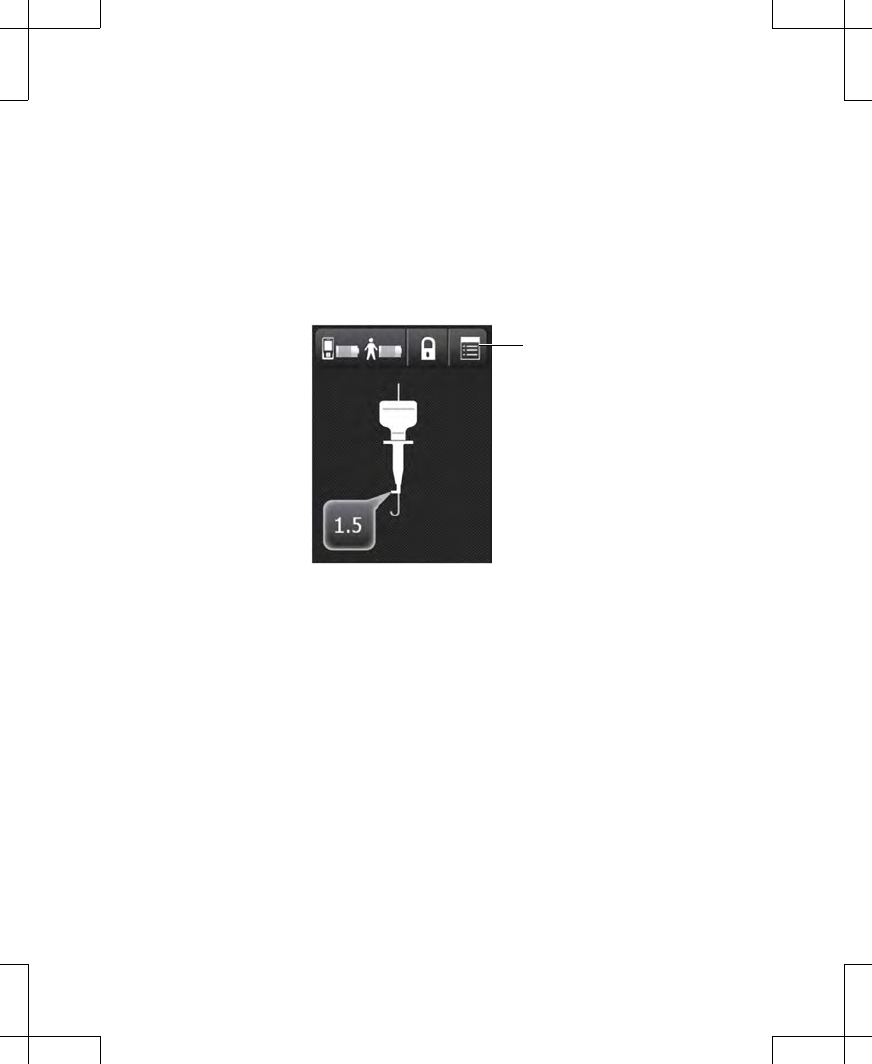
3. Use the Increase and Decrease keys to adjust amplitude (Figure 34).
Figure 34. Adjusting amplitude.
26 English 3537 2012-09
Filename Date Time
UC2001xxxx EN
4.625 x 6 inches (117 mm x 152 mm)
Medtronic Confidential
PTMClinPrgmManual.xsl - PTMClinPrgmTemplate.fm
Template version: 08-08-2011
M943580A002 Rev X 2012-09
Note: Press and release the Increase or Decrease key once to change the parameter
value by 0.1 milliamps. Press and hold to change the parameter value in 0.5-milliamp
increments.
4. To adjust pulse width and rate, refer to "Adjusting advanced parameters".
Adjusting advanced parameters
1. From the Home screen, press the Menu button in the top right corner of the touchscreen
(Figure 35).
Menu button
Figure 35. Pressing the Menu button.
2. Press the Enter Code button (Figure 36).
3537 2012-09 English 27
Filename Date Time
UC2001xxxx EN
4.625 x 6 inches (117 mm x 152 mm)
Medtronic Confidential
PTMClinPrgmManual.xsl - PTMClinPrgmTemplate.fm
Template version: 08-08-2011
M943580A002 Rev X 2012-09
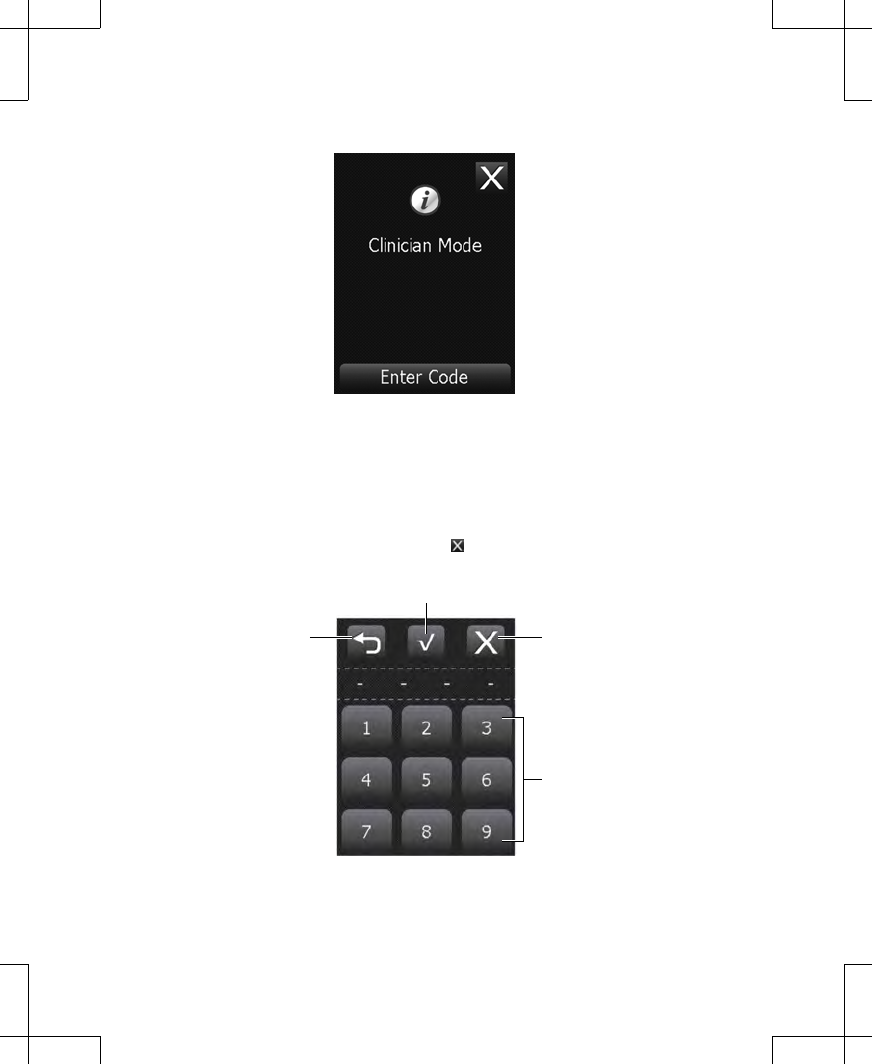
Figure 36. Pressing the Enter Code button.
3. Enter the four-digit code by pressing the number buttons on the touchscreen keypad, then
press the Confirm button to enter the code and continue (Figure 37).
Notes:
▪The code is 1155.
▪If you make an error while entering the code, press the Undo button to delete the entire
code, then re-enter the correct code.
▪To cancel code entry, press the Exit button ( ) to exit and return to the previous screen.
Undo button Exit button
Confirm button
Keypad
Figure 37. Entering the Menu code.
28 English 3537 2012-09
Filename Date Time
UC2001xxxx EN
4.625 x 6 inches (117 mm x 152 mm)
Medtronic Confidential
PTMClinPrgmManual.xsl - PTMClinPrgmTemplate.fm
Template version: 08-08-2011
M943580A002 Rev X 2012-09
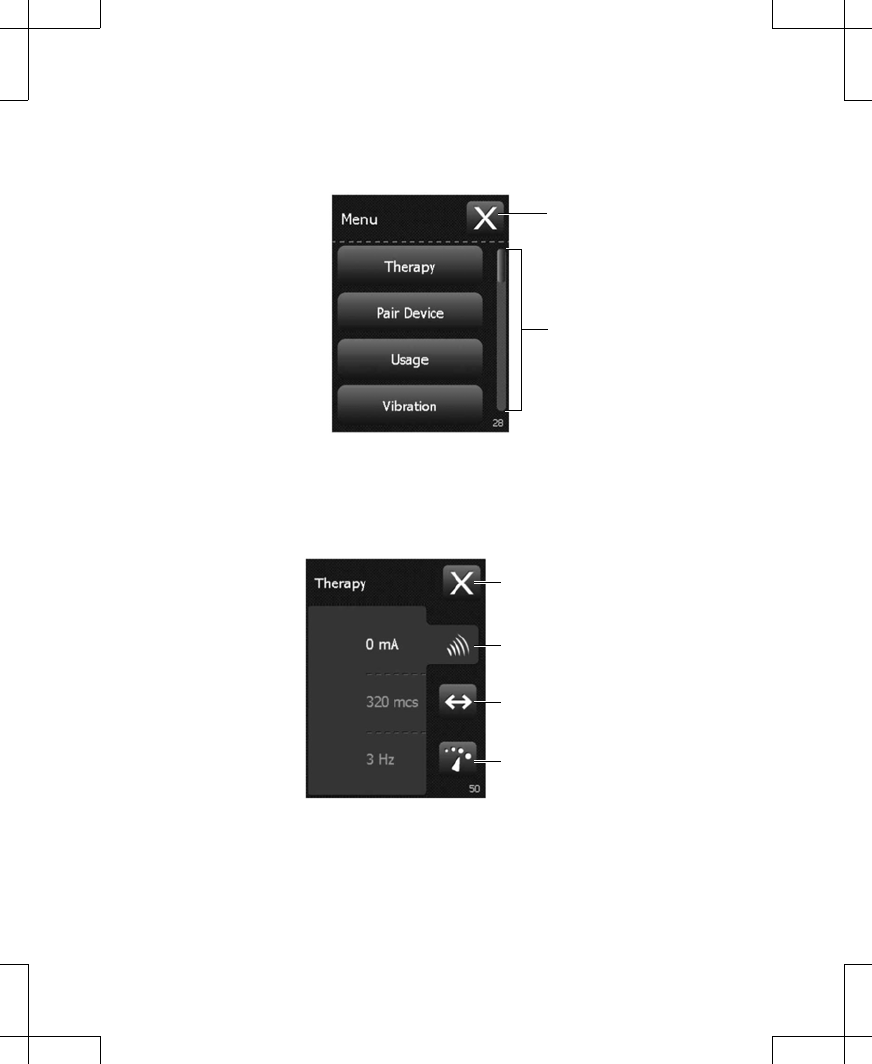
4. Select the Therapy button from the Menu (Figure 38).
Slider bar
Exit button
Figure 38. Selecting the Therapy button.
5. Adjust the amplitude, pulse width, and rate (Figure 39).
Amplitude button
Pulse width button
Rate button
Exit button
Figure 39. Adjusting amplitude, pulse width, and rate.
a. To change the amplitude, press the Amplitude button, then use the Increase and
Decrease keys to adjust the amplitude parameter.
3537 2012-09 English 29
Filename Date Time
UC2001xxxx EN
4.625 x 6 inches (117 mm x 152 mm)
Medtronic Confidential
PTMClinPrgmManual.xsl - PTMClinPrgmTemplate.fm
Template version: 08-08-2011
M943580A002 Rev X 2012-09

Note: Press and release the Increase or Decrease key to change the parameter value
by 0.1 milliamps. Press and hold to change the parameter value in 0.5-milliamp
increments.
b. To change the pulse width, press the Pulse width button, then use the Increase and
Decrease keys to adjust the pulse width parameter.
Note: Press and release the Increase or Decrease key to change the parameter value
by 10 microseconds. Press and hold to quickly adjust the parameter.
c. To change the rate, press the Rate button, then use the Increase and Decrease keys
to adjust the rate parameter.
Note: Press the Increase or Decrease key to change the parameter value by 1 Hertz
(from 3 to 30 Hertz) or by 5 Hertz (from 30 to 130 Hertz). Press and hold to quickly
adjust the parameter.
6. Press the Exit button ( ) at the top right corner of the screen to exit.
If using one or more Model 3057 test stimulation lead(s), refer to "Adjusting stimulation
parameters for the Model 3057 Test Stimulation Lead(s)" on page 30. If using the Model
3093 or Model 3889 Tined Lead, refer to "Adjusting stimulation parameters for the Model
3093 or Model 3889 Tined Lead" on page 37.
Adjusting stimulation parameters for the Model 3057 Test Stimulation
Lead(s)
Notes:
▪Before programming, ensure all connections are secure between the external
neurostimulator and the lead(s).
▪For instructions on intraoperative test stimulation, refer to the appropriate lead manual.
Increasing and decreasing amplitude on the Home screen
When using the test stimulation lead, the external neurostimulator uses the following default
settings:
▪The test stimulation lead is the cathode (-).
▪If the Model 3676 Cable is used, the ground pad is the anode (+). If the Model 3579 Cable
is used, the second test stimulation lead is the anode.
▪Amplitude is set to 0 milliamps.
▪Pulse width is set to 210 microseconds.
▪Rate is set to 14 Hertz.
Note: The cathode and anode configuration does not change. To change amplitude, pulse
width, and rate, refer to "Adjusting advanced parameters" on page 33.
1. Press the Stimulation value button on the Home screen (Figure 40). If stimulation is off,
a new screen will appear.
Notes:
▪If two leads were placed, select a side to stimulate by pressing the Stimulation value
button on that side.
30 English 3537 2012-09
Filename Date Time
UC2001xxxx EN
4.625 x 6 inches (117 mm x 152 mm)
Medtronic Confidential
PTMClinPrgmManual.xsl - PTMClinPrgmTemplate.fm
Template version: 08-08-2011
M943580A002 Rev X 2012-09
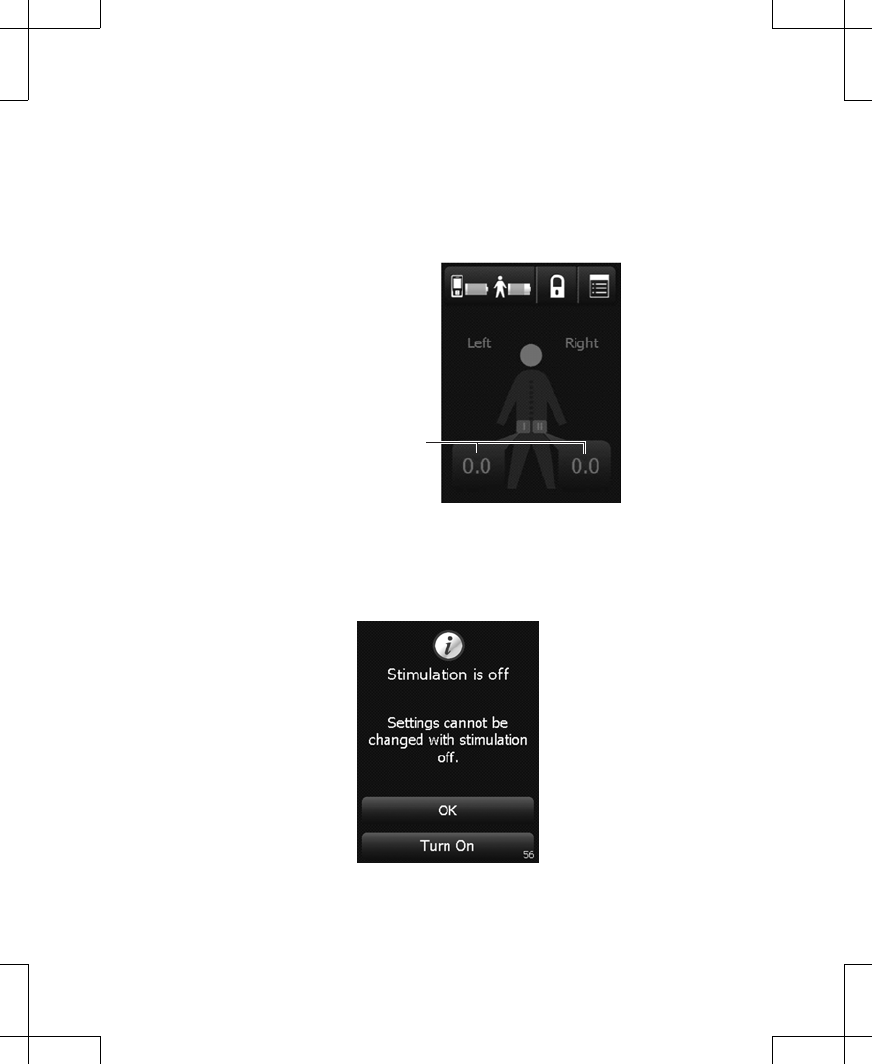
▪The image below shows the Home screen when two test stimulation leads are placed.
If only one test stimulation lead was placed, only one Stimulation value button will be
available.
▪If stimulation is already on, the Stimulation value button will be outlined in green. If
this happens, proceed to step 4.
Stimulation value buttons
Figure 40. Pressing the Stimulation value button on the Home screen.
2. Press the Turn On button to turn stimulation on and continue (Figure 41).
Note: To cancel and go back to the Home screen, press the OK button.
Figure 41. Pressing the Turn On button.
3537 2012-09 English 31
Filename Date Time
UC2001xxxx EN
4.625 x 6 inches (117 mm x 152 mm)
Medtronic Confidential
PTMClinPrgmManual.xsl - PTMClinPrgmTemplate.fm
Template version: 08-08-2011
M943580A002 Rev X 2012-09
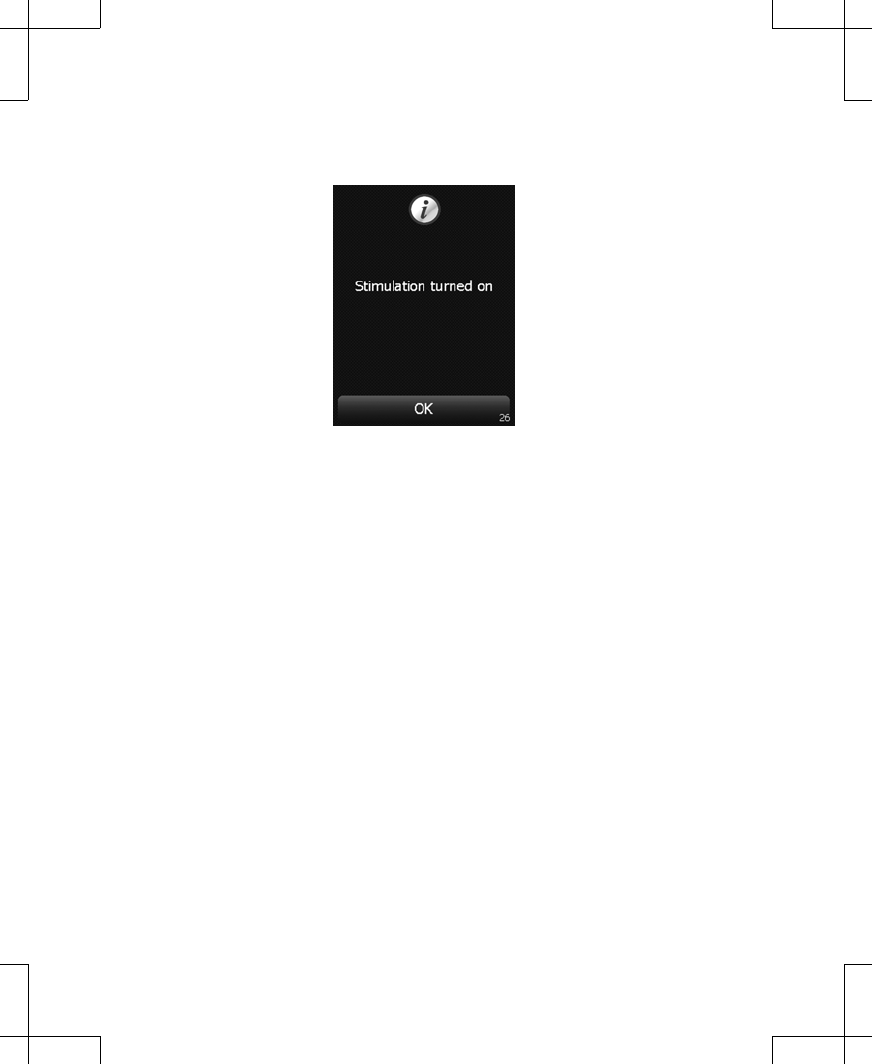
3. A confirmation screen will appear (Figure 42). Press the OK button to continue to the Home
screen.
Figure 42. Stimulation turned on.
4. Use the Increase and Decrease keys to adjust amplitude.
Note: Press and release the Increase or Decrease key once to change the parameter
value by 0.1 milliamps. Press and hold to change the parameter value in 0.5-milliamp
increments.
5. To adjust pulse width and rate, refer to "Adjusting advanced parameters".
Changing the active lead (if two leads were placed)
1. Press the Stimulation value button on the side of the Home screen that corresponds to
the inactive lead.
2. Press the Yes button to continue (Figure 43).
32 English 3537 2012-09
Filename Date Time
UC2001xxxx EN
4.625 x 6 inches (117 mm x 152 mm)
Medtronic Confidential
PTMClinPrgmManual.xsl - PTMClinPrgmTemplate.fm
Template version: 08-08-2011
M943580A002 Rev X 2012-09

Figure 43. Confirming change of therapy side.
3. Press the Yes button to confirm changing sides.
Note: Pressing the No button cancels the change and continues stimulation on the same
side.
4. The active lead will change, and stimulation will be set to zero. Use the Increase/Decrease
key to adjust stimulation (see "Increasing and decreasing amplitude on the Home screen"
on page 30).
Adjusting advanced parameters
1. From the Home screen, press the Menu button in the top right corner of the touchscreen
(Figure 44).
3537 2012-09 English 33
Filename Date Time
UC2001xxxx EN
4.625 x 6 inches (117 mm x 152 mm)
Medtronic Confidential
PTMClinPrgmManual.xsl - PTMClinPrgmTemplate.fm
Template version: 08-08-2011
M943580A002 Rev X 2012-09
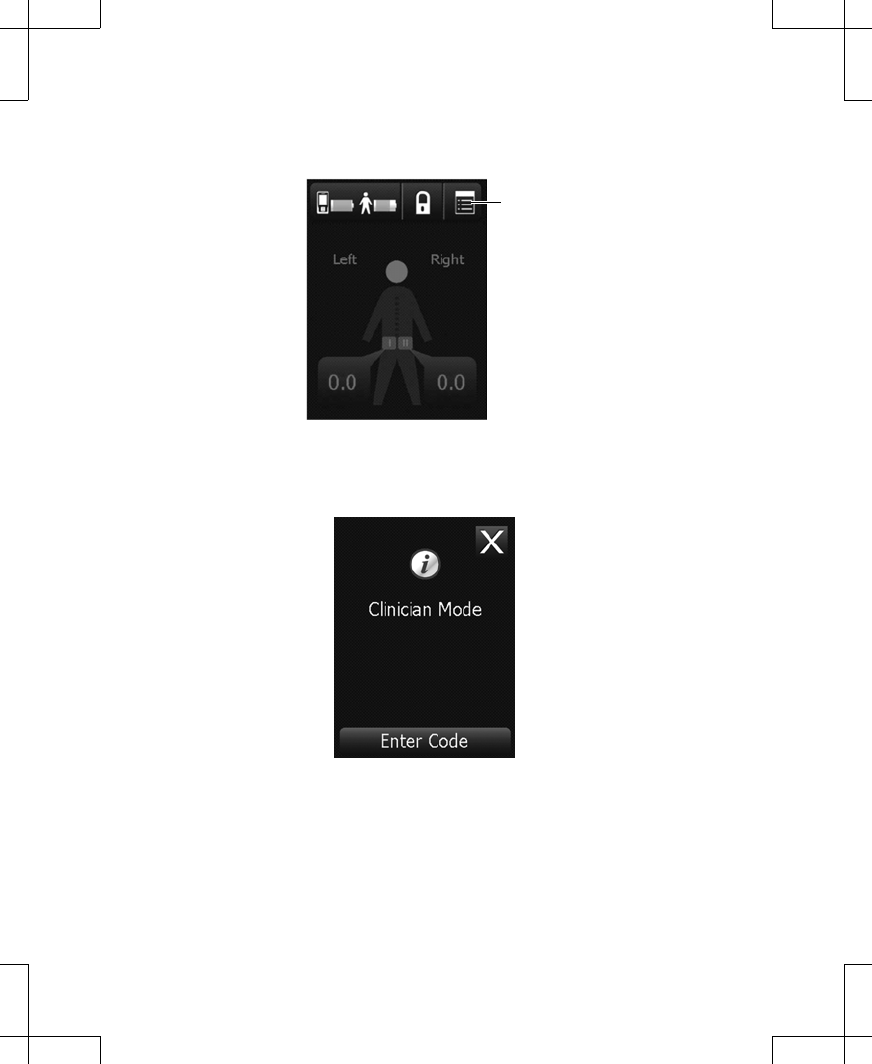
Menu button
Figure 44. Pressing Menu button.
2. Press the Enter Code button (Figure 36).
Figure 45. Pressing the Enter Code button.
3. Enter the four-digit code by pressing the number buttons on the touchscreen keypad, then
press the Confirm button to enter the code and continue (Figure 46).
Notes:
▪The code is 1155.
▪If you make an error while entering the code, press the Undo button to delete the entire
code, then re-enter the correct code.
34 English 3537 2012-09
Filename Date Time
UC2001xxxx EN
4.625 x 6 inches (117 mm x 152 mm)
Medtronic Confidential
PTMClinPrgmManual.xsl - PTMClinPrgmTemplate.fm
Template version: 08-08-2011
M943580A002 Rev X 2012-09
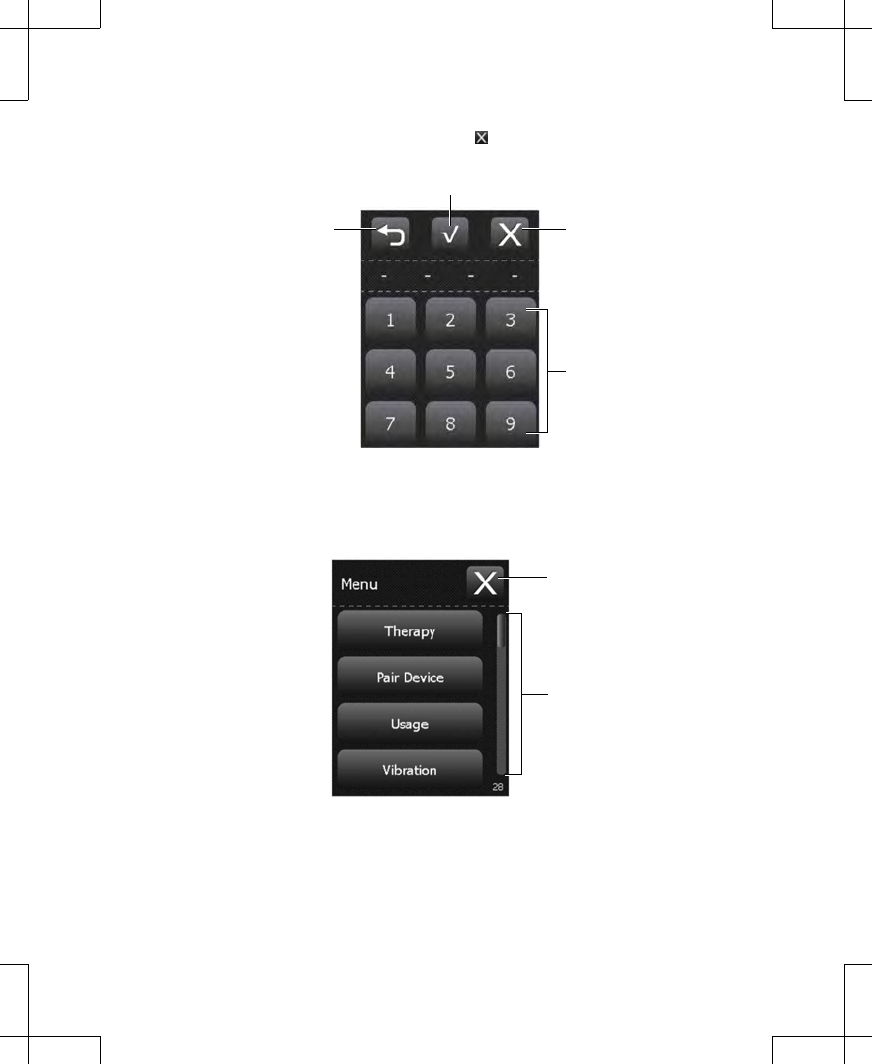
▪To cancel code entry, press the Exit button ( ) to exit and return to the previous screen.
Undo button Exit button
Confirm button
Keypad
Figure 46. Entering the Menu code.
4. Select the Therapy button from the Menu (Figure 47).
Slider bar
Exit button
Figure 47. Selecting the Therapy button.
5. Adjust the amplitude, pulse width, and rate (Figure 48).
3537 2012-09 English 35
Filename Date Time
UC2001xxxx EN
4.625 x 6 inches (117 mm x 152 mm)
Medtronic Confidential
PTMClinPrgmManual.xsl - PTMClinPrgmTemplate.fm
Template version: 08-08-2011
M943580A002 Rev X 2012-09
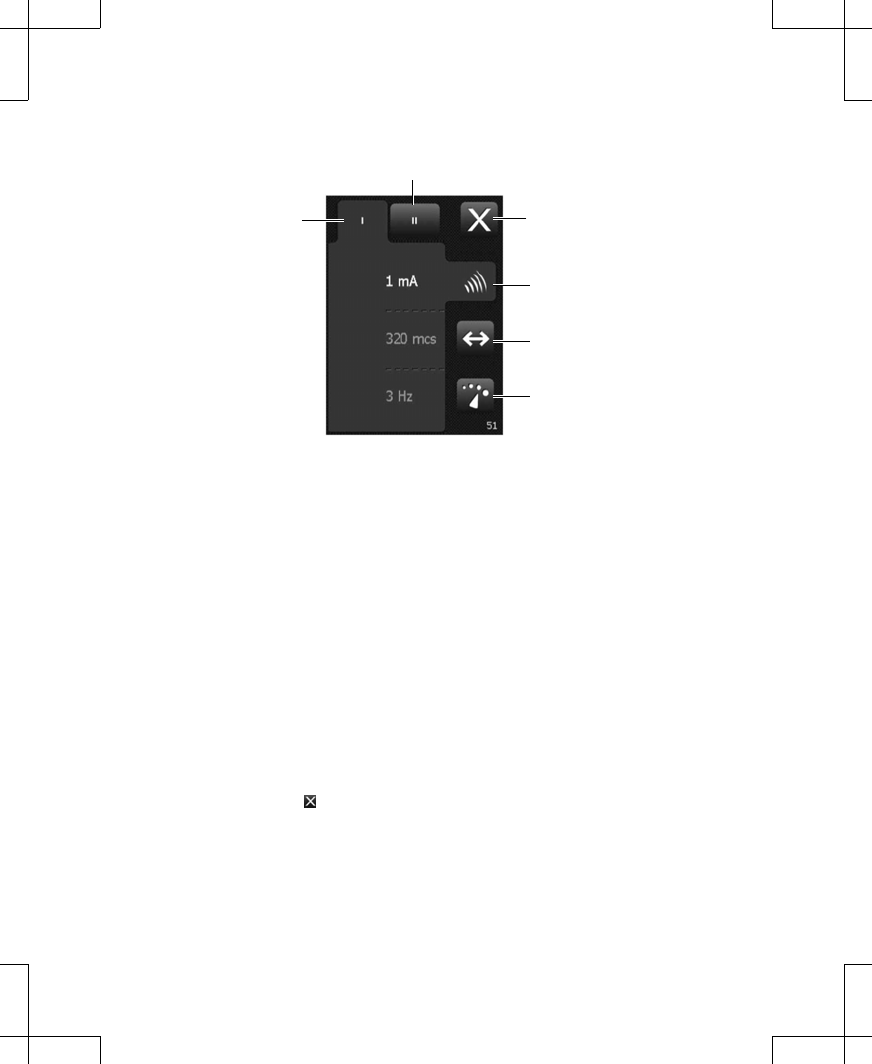
Amplitude button
Lead II button
Pulse width button
Rate button
Lead I button Exit button
Figure 48. Adjusting amplitude, pulse width, and rate.
a. To change the amplitude, press the Amplitude button, then use the Increase and
Decrease keys to adjust the amplitude parameter.
Note: Press and release the Increase or Decrease key to change the parameter value
by 0.1 milliamps. Press and hold to change the parameter value in 0.5-milliamp
increments.
b. To change the pulse width, press the Pulse width button, then use the Increase and
Decrease keys to adjust the pulse width parameter.
Note: Press and release the Increase or Decrease key to change the parameter value
by 10 microseconds. Press and hold to quickly adjust the parameter.
c. To change the rate, press the Rate button, then use the Increase and Decrease keys
to adjust the rate parameter.
Note: Press the Increase or Decrease key to change the parameter value by 1 Hertz
(3 to 30 Hertz) or by 5 Hertz (30 to 130 Hertz). Press and hold to quickly adjust the
parameter.
6. If using two leads, ensure stimulation parameters are reviewed and adjusted for both leads.
a. Press the Lead I or Lead II button at the top of the screen to alternate between lead I
(left side) and lead II (right side).
b. Repeat step 5 to review and adjust stimulation parameters as desired.
7. Press the Exit button ( ) at the top right corner of the touchscreen to exit.
8. When programming is finished, press the Lock button to lock the controller before giving
the controller to the patient ("Locking the controller" on page 21).
36 English 3537 2012-09
Filename Date Time
UC2001xxxx EN
4.625 x 6 inches (117 mm x 152 mm)
Medtronic Confidential
PTMClinPrgmManual.xsl - PTMClinPrgmTemplate.fm
Template version: 08-08-2011
M943580A002 Rev X 2012-09
Adjusting stimulation parameters for the Model 3093 or Model 3889 Tined
Lead
Notes:
▪Before programming, ensure all connections are secure between the external
neurostimulator and the lead.
▪For instructions on intraoperative test stimulation, refer to the appropriate lead manual.
Adjusting advanced parameters
When using a Model 3093 or Model 3889 Tined Lead for test stimulation, advanced settings
must be programmed before adjusting amplitude with the Home screen.
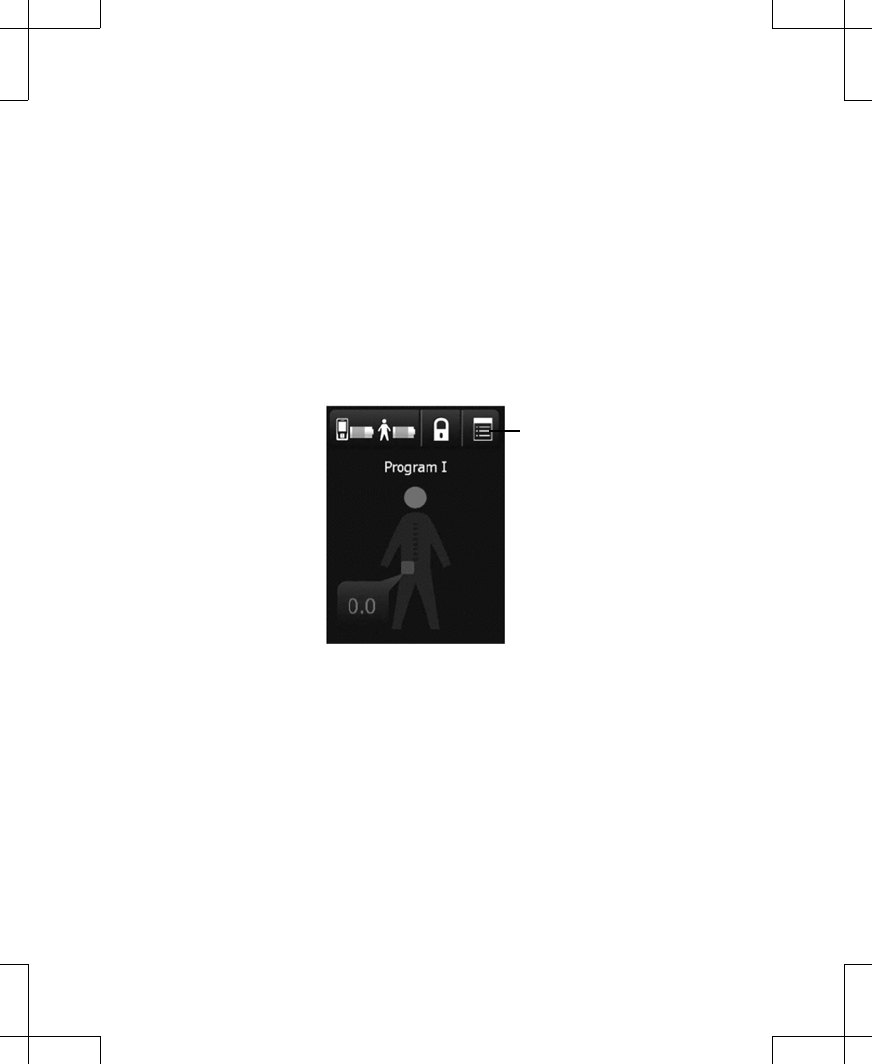
1. From the Home screen, press the Menu button in the top right corner of the touchscreen
(Figure 49).
Menu button
Figure 49. Pressing the Menu button.
2. Press the Clinician Mode button (Figure 50).
3537 2012-09 English 37
Filename Date Time
UC2001xxxx EN
4.625 x 6 inches (117 mm x 152 mm)
Medtronic Confidential
PTMClinPrgmManual.xsl - PTMClinPrgmTemplate.fm
Template version: 08-08-2011
M943580A002 Rev X 2012-09
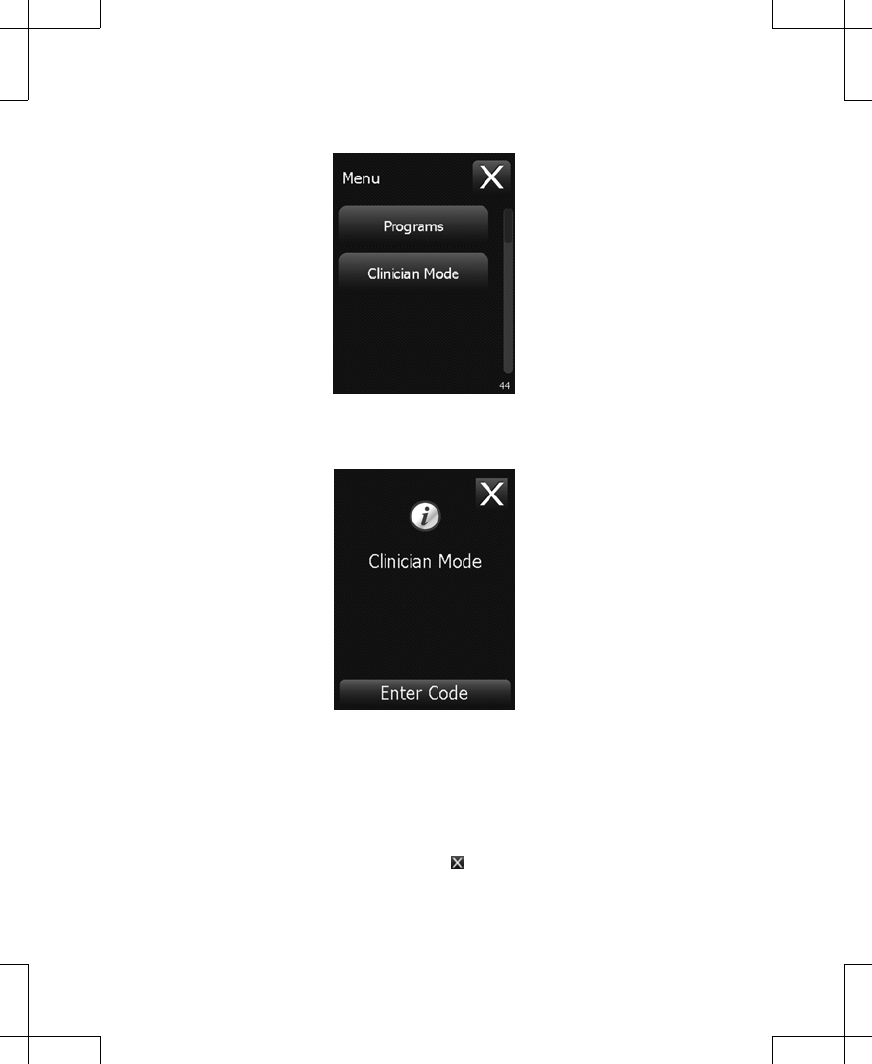
Figure 50. Pressing the Clinician Mode button.
3. Press the Enter Code button (Figure 51).
Figure 51. Pressing the Enter Code button.
4. Enter the four-digit code by pressing the number buttons on the touchscreen keypad, then
press the Confirm button to enter the code and continue (Figure 52).
Notes:
▪The code is 1155.
▪If you make an error while entering the code, press the Undo button to delete the entire
code, then re-enter the correct code.
▪To cancel code entry, press the Exit button ( ) to exit and return to the previous screen.
38 English 3537 2012-09
Filename Date Time
UC2001xxxx EN
4.625 x 6 inches (117 mm x 152 mm)
Medtronic Confidential
PTMClinPrgmManual.xsl - PTMClinPrgmTemplate.fm
Template version: 08-08-2011
M943580A002 Rev X 2012-09
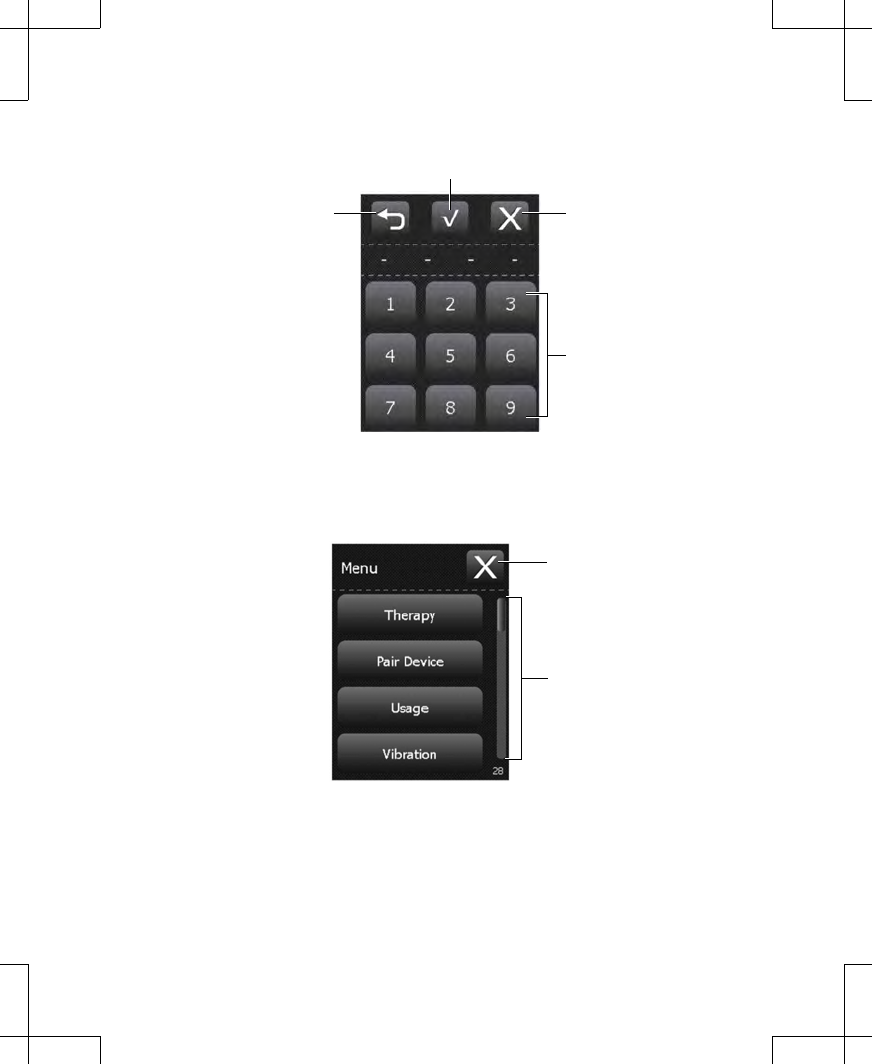
Undo button Exit button
Confirm button
Keypad
Figure 52. Entering the Menu code.
5. Select the Therapy button from the Menu (Figure 53).
Slider bar
Exit button
Figure 53. Selecting the Therapy button.
6. Set up electrode configurations as desired (Figure 54).
a. Press each individual electrode on the touchscreen to alternate between blank (no
polarity), plus (positive), or minus (negative).
3537 2012-09 English 39
Filename Date Time
UC2001xxxx EN
4.625 x 6 inches (117 mm x 152 mm)
Medtronic Confidential
PTMClinPrgmManual.xsl - PTMClinPrgmTemplate.fm
Template version: 08-08-2011
M943580A002 Rev X 2012-09
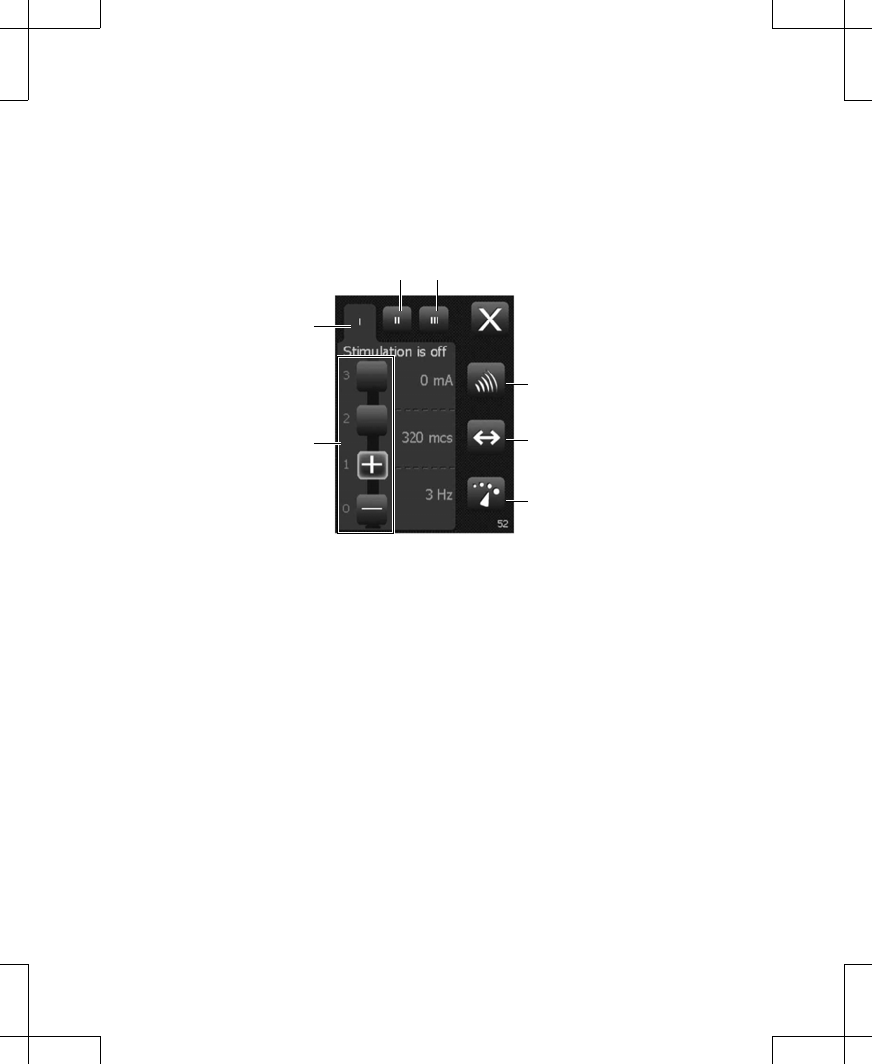
b. To apply stimulation, there must be at least one positive electrode and one negative
electrode. One can exit the screen if all electrodes are blank, but stimulation will not be
turned on.
c. Adjusting the electrode configuration automatically sets the amplitude to zero. Adjust
the amplitude parameter again to the desired value.
7. Adjust the amplitude, pulse width, and rate (Figure 54).
Electrode buttons
Program I button
Program II button Program III button
Amplitude button
Pulse width button
Rate button
Figure 54. Adjusting electrode configuration, amplitude, pulse width, and rate.
a. To change the amplitude, press the Amplitude button, then use the Increase and
Decrease keys to adjust the amplitude parameter.
Note: Press and release the Increase or Decrease key to change the parameter value
by 0.1 milliamps. Press and hold to change the parameter value in 0.5-milliamp
increments.
b. To change the pulse width, press the Pulse width button, then use the Increase and
Decrease keys to adjust the pulse width parameter.
Note: Press and release the Increase or Decrease key to change the parameter value
by 10 microseconds. Press and hold to quickly adjust the parameter.
c. To change the rate, press the Rate button, then use the Increase and Decrease keys
to adjust the rate parameter.
Note: Press the Increase or Decrease key to change the parameter value by 1 Hertz
(3 to 30 Hertz) or by 5 Hertz (30 to 130 Hertz). Press and hold to quickly adjust the
parameter.
8. If using multiple programs, ensure that stimulation parameters and electrode
configurations are reviewed and adjusted for all programs.
a. Press the Program I, Program II, or Program III button at the top of the screen to
alternate between programs.
40 English 3537 2012-09
Filename Date Time
UC2001xxxx EN
4.625 x 6 inches (117 mm x 152 mm)
Medtronic Confidential
PTMClinPrgmManual.xsl - PTMClinPrgmTemplate.fm
Template version: 08-08-2011
M943580A002 Rev X 2012-09
b. Repeat step 6 through step 7 to review and adjust electrode configurations as desired.
9. When programming is finished, press the Exit button ( ) at the top right corner of the
screen to exit to the Menu.
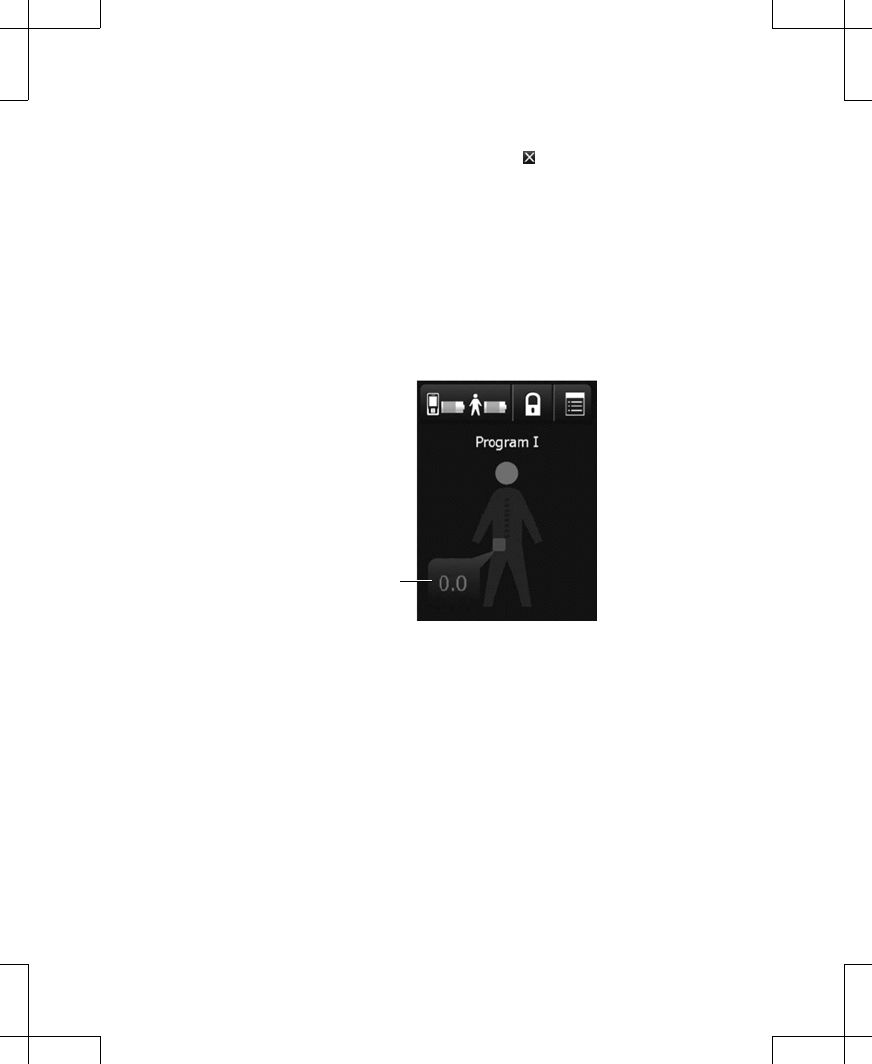
Increasing and decreasing amplitude on the Home screen
When using a Model 3093 or Model 3889 Tined Lead for test stimulation, advanced settings
must be programmed before adjusting amplitude with the Home screen.
1. Press the Stimulation value button on the Home screen (Figure 55). If stimulation is off,
a new screen will appear.
Note: If stimulation is already on, the Stimulation value button will be outlined in green.
If this happens, proceed to step 3.
Stimulation value button
Figure 55. Pressing the Stimulation value button on the Home screen.
2. Press the Turn On button to turn stimulation on and continue (Figure 56).
Note: To cancel and go back to the Home screen, press the OK button.
3537 2012-09 English 41
Filename Date Time
UC2001xxxx EN
4.625 x 6 inches (117 mm x 152 mm)
Medtronic Confidential
PTMClinPrgmManual.xsl - PTMClinPrgmTemplate.fm
Template version: 08-08-2011
M943580A002 Rev X 2012-09
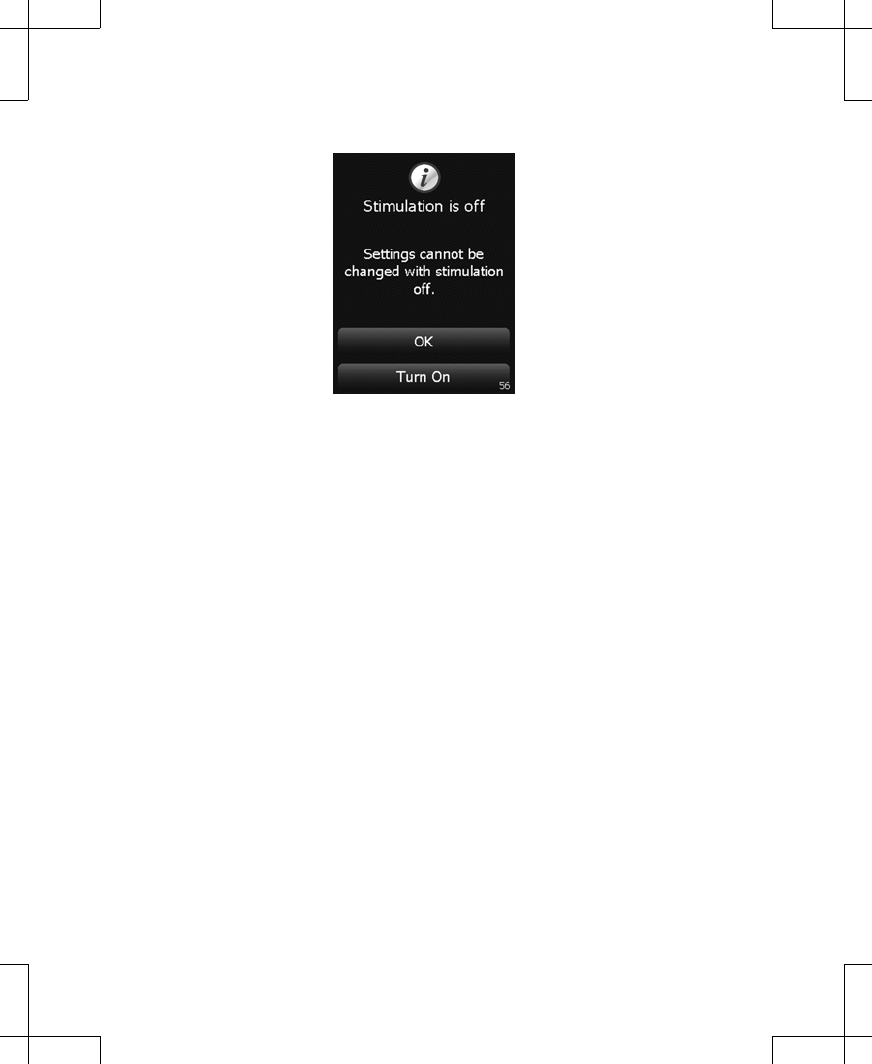
Figure 56. Pressing the Turn On button.
3. Use the Increase and Decrease keys to adjust amplitude.
Note: Press and release the Increase or Decrease key once to change the parameter
value by 0.1 milliamps. Press and hold to change the parameter value in 0.5-milliamp
increments.
4. To adjust pulse width, rate, and electrode configuration, refer to "Adjusting advanced
parameters".
5. When programming is finished, press the Lock button to lock the controller before giving
the controller to the patient ("Locking the controller" on page 21).
Usage Log
The Usage Log contains data on the patient test stimulation period, shown as a bar graph. The
graph displays an approximate timeline of stimulation turned on or off. The graph is shaded in
sections representing time when stimulation was on, and blank in sections representing time
when stimulation was off. The Usage Log also displays information related to the following:
–When the active side was changed.
–When the active program was changed (if applicable).
–When stimulation was on or off.
1. From the Menu, press the Usage button (Figure 57).
42 English 3537 2012-09
Filename Date Time
UC2001xxxx EN
4.625 x 6 inches (117 mm x 152 mm)
Medtronic Confidential
PTMClinPrgmManual.xsl - PTMClinPrgmTemplate.fm
Template version: 08-08-2011
M943580A002 Rev X 2012-09
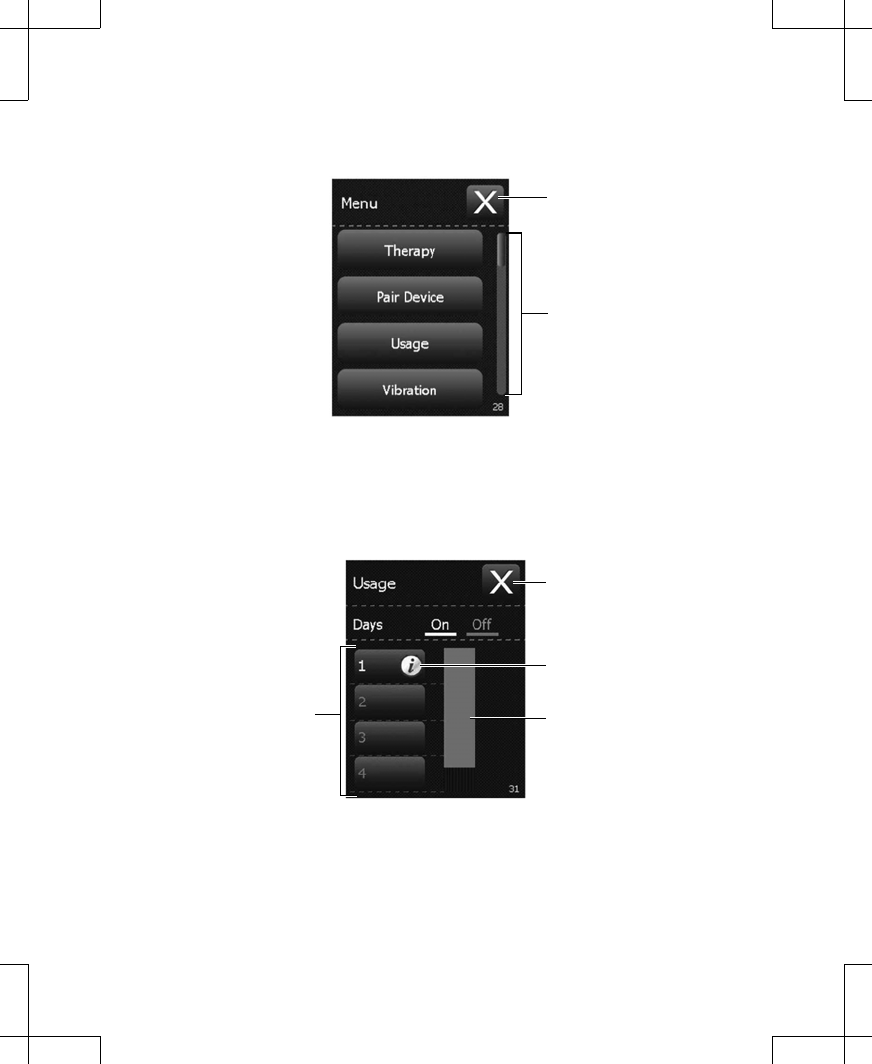
Slider bar
Exit button
Figure 57. Pressing the Usage button.
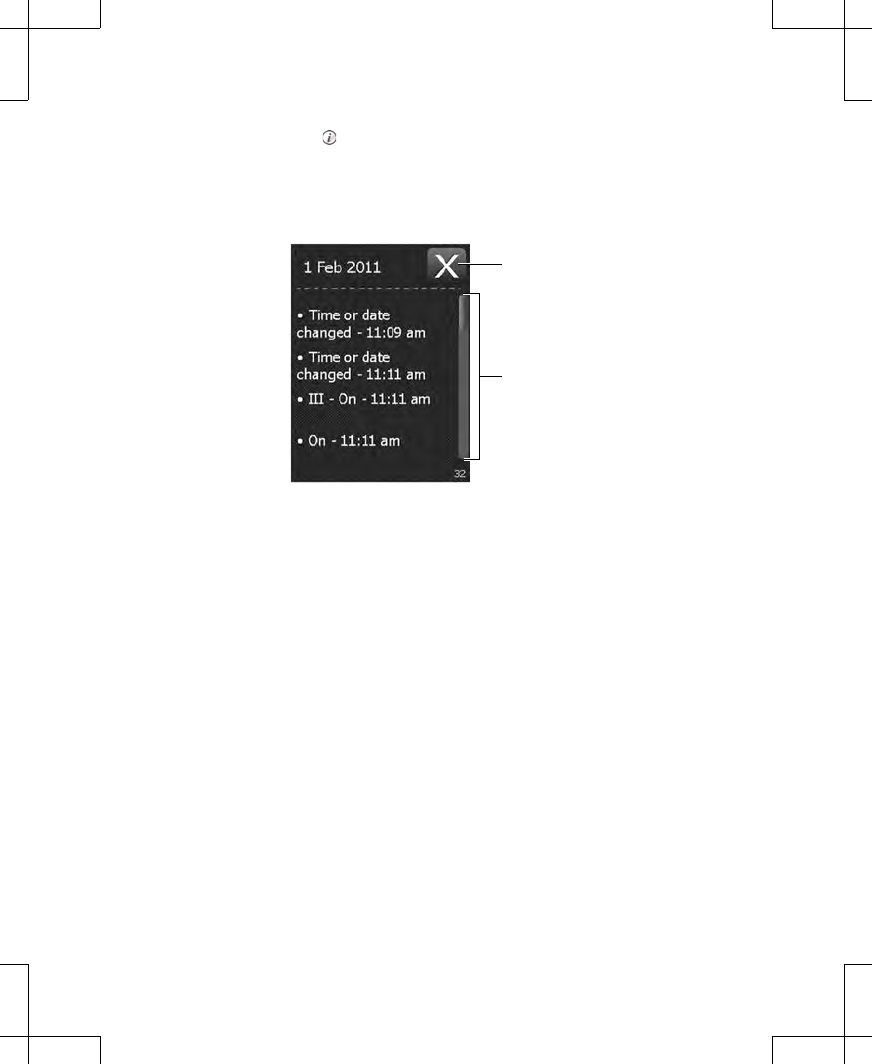
2. The Usage bar shows when stimulation was on or off. When stimulation was on, the Usage
bar is lighter. When stimulation was off, the Usage bar is darker.
Day buttons
Exit button
Notification button
Usage bar
Figure 58. The Usage Log screen.
Note: Scroll down using the touchscreen slider bar to see more days.
3537 2012-09 English 43
Filename Date Time
UC2001xxxx EN
4.625 x 6 inches (117 mm x 152 mm)
Medtronic Confidential
PTMClinPrgmManual.xsl - PTMClinPrgmTemplate.fm
Template version: 08-08-2011
M943580A002 Rev X 2012-09
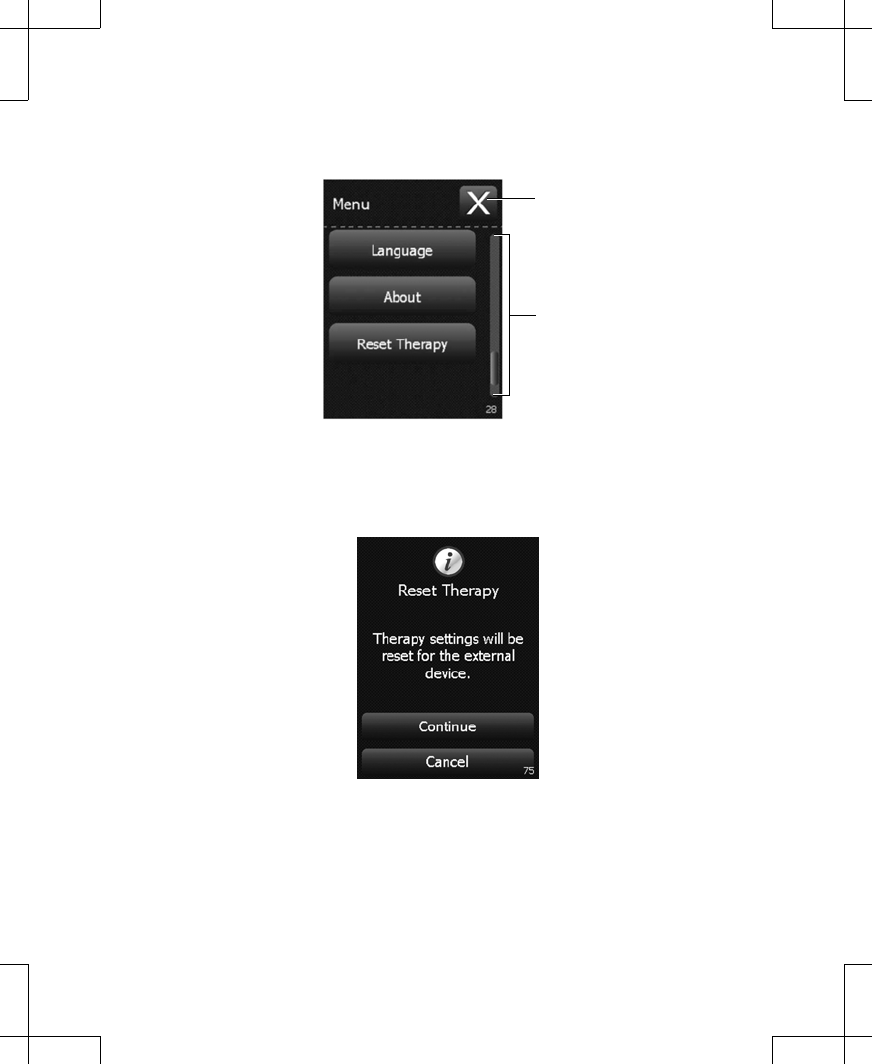
3. A blue Notification icon ( ) will appear next to days during which an event occurred.
Press the Day button that contains the Notification icon for details on events related to
the patient changing lead sides, changing programs, and turning stimulation on or off
(Figure 59).
Exit button
Slider bar
Figure 59. Example of a Usage log notification.
Note: It is possible for the amplitude is set to zero while stimulation is on.
Reset Therapy
The Reset Therapy function allows you to set all stimulation settings to their default values for
any and all programs.
1. From the Menu, press the Reset Therapy button (Figure 60).
44 English 3537 2012-09
Filename Date Time
UC2001xxxx EN
4.625 x 6 inches (117 mm x 152 mm)
Medtronic Confidential
PTMClinPrgmManual.xsl - PTMClinPrgmTemplate.fm
Template version: 08-08-2011
M943580A002 Rev X 2012-09
Slider bar
Exit button
Figure 60. Pressing the Reset Therapy button.
2. Press the Continue button to confirm resetting all stimulation settings (Figure 61).
Note: To cancel the therapy reset, press the Cancel button.
Figure 61. Confirming therapy reset.
The controller will check the lead and cable connections prior to resetting stimulation
settings.
3. If the reset was successful, a confirmation screen will appear (Figure 62). Press the OK
button to continue to the Home screen.
3537 2012-09 English 45
Filename Date Time
UC2001xxxx EN
4.625 x 6 inches (117 mm x 152 mm)
Medtronic Confidential
PTMClinPrgmManual.xsl - PTMClinPrgmTemplate.fm
Template version: 08-08-2011
M943580A002 Rev X 2012-09
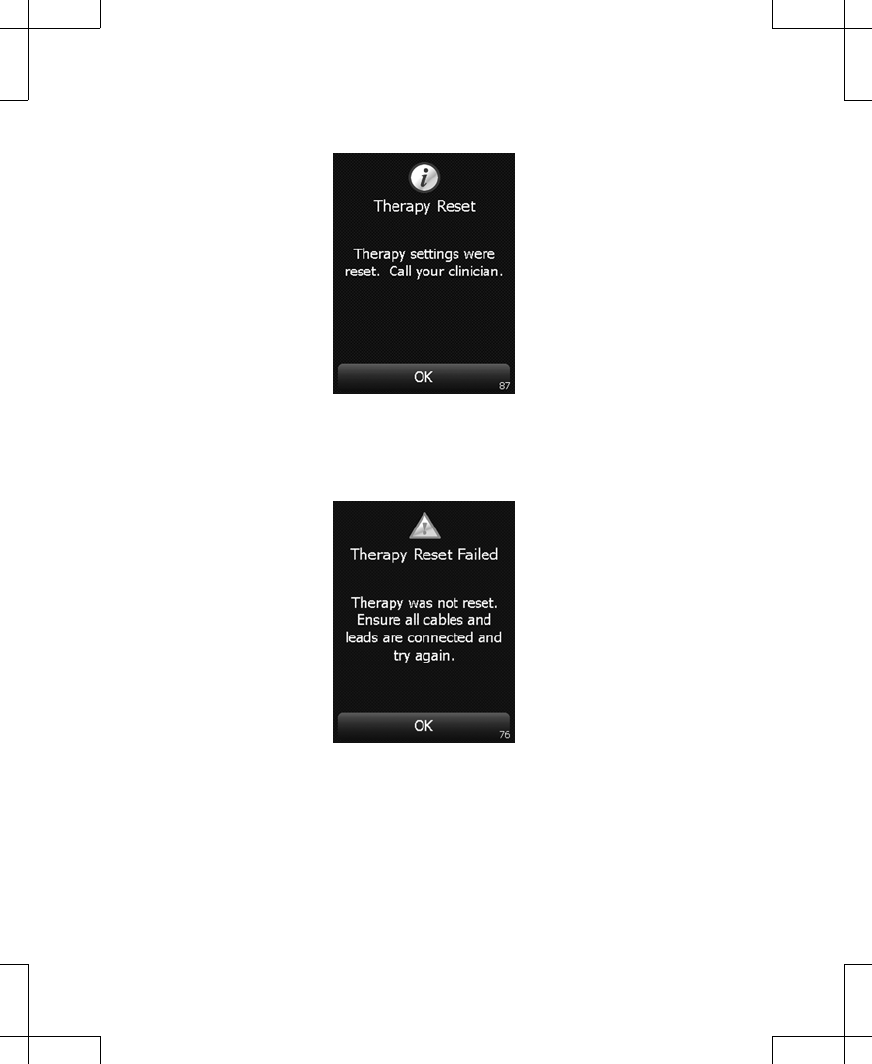
Figure 62. Therapy Reset successful screen.
Note: If the reset was not successful, a warning screen appears (Figure 63). If this screen
appears, check all lead and cable connections, press the OK button, and repeat steps 1
through 3 to try again.
Figure 63. Therapy Reset Failed warning screen.
Changing preferences
Note: In the Menu, use the touchscreen slider bar to view all options (Figure 64).
Changing the vibration settings
1. Select the Vibration button from the Menu (Figure 64).
46 English 3537 2012-09
Filename Date Time
UC2001xxxx EN
4.625 x 6 inches (117 mm x 152 mm)
Medtronic Confidential
PTMClinPrgmManual.xsl - PTMClinPrgmTemplate.fm
Template version: 08-08-2011
M943580A002 Rev X 2012-09
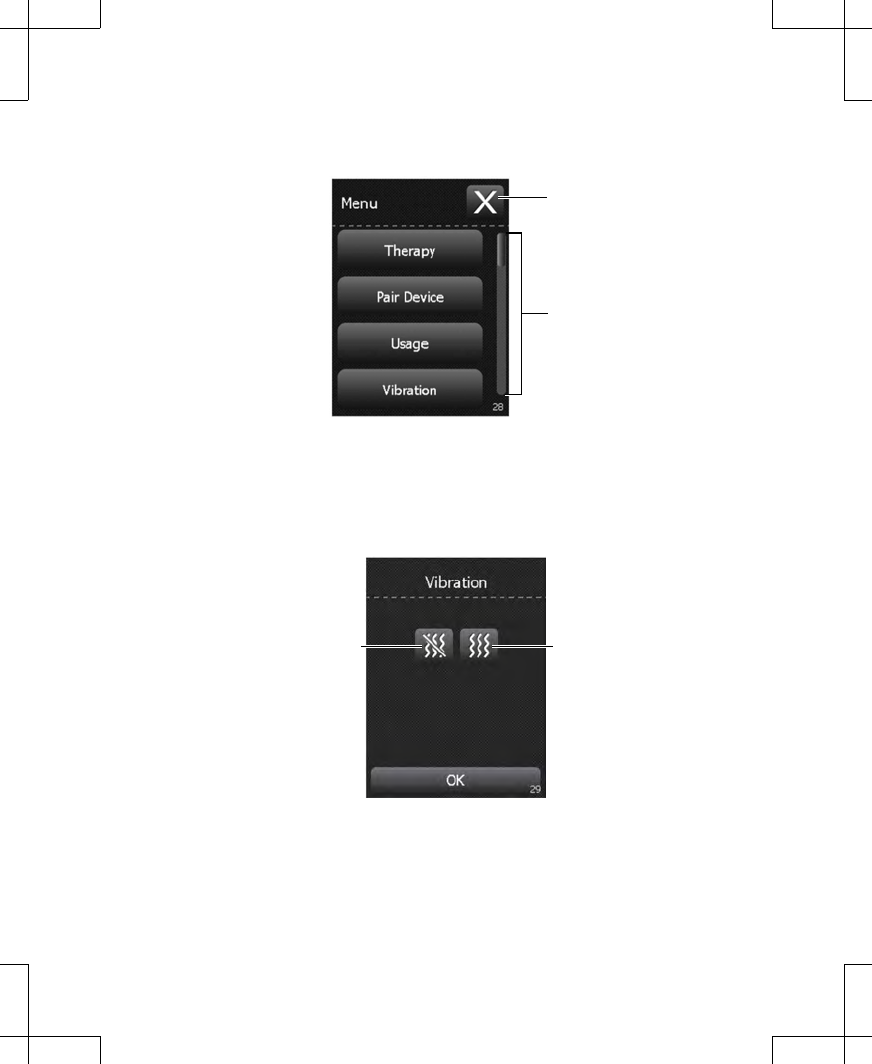
Slider bar
Exit button
Figure 64. Selecting the Vibration button.
2. To change vibration settings using the touchscreen, press either the No vibration button
or the Vibration button (Figure 65).
No vibration button vibration button
Figure 65. Changing the vibration settings on the controller.
3. Press the OK button to exit.
3537 2012-09 English 47
Filename Date Time
UC2001xxxx EN
4.625 x 6 inches (117 mm x 152 mm)
Medtronic Confidential
PTMClinPrgmManual.xsl - PTMClinPrgmTemplate.fm
Template version: 08-08-2011
M943580A002 Rev X 2012-09
Changing the brightness of the controller display
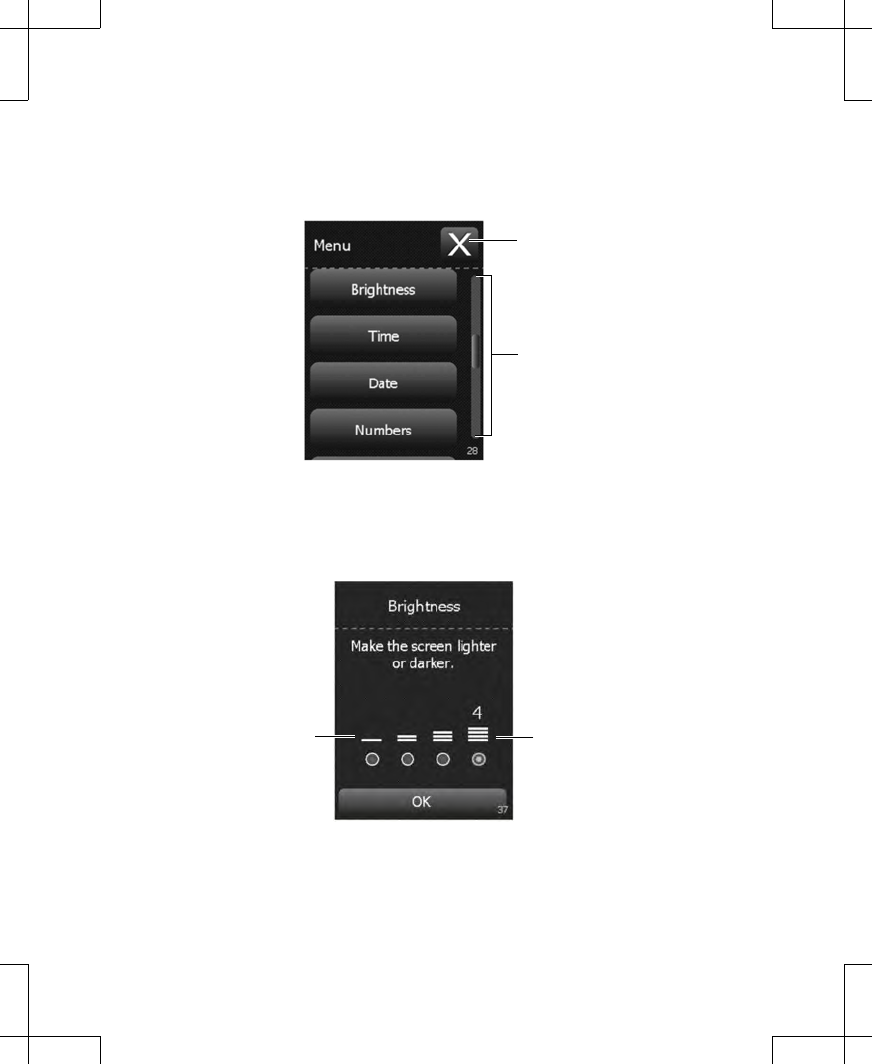
1. Select the Brightness button from the Menu (Figure 66).
Slider bar
Exit button
Figure 66. Selecting the Brightness button.
2. Using the touchscreen, press the radio button below the desired brightness level
(Figure 67).
Dimmest Brightest
Figure 67. Changing the brightness of the controller screen.
3. Press the OK button to exit.
48 English 3537 2012-09
Filename Date Time
UC2001xxxx EN
4.625 x 6 inches (117 mm x 152 mm)
Medtronic Confidential
PTMClinPrgmManual.xsl - PTMClinPrgmTemplate.fm
Template version: 08-08-2011
M943580A002 Rev X 2012-09
Changing the time
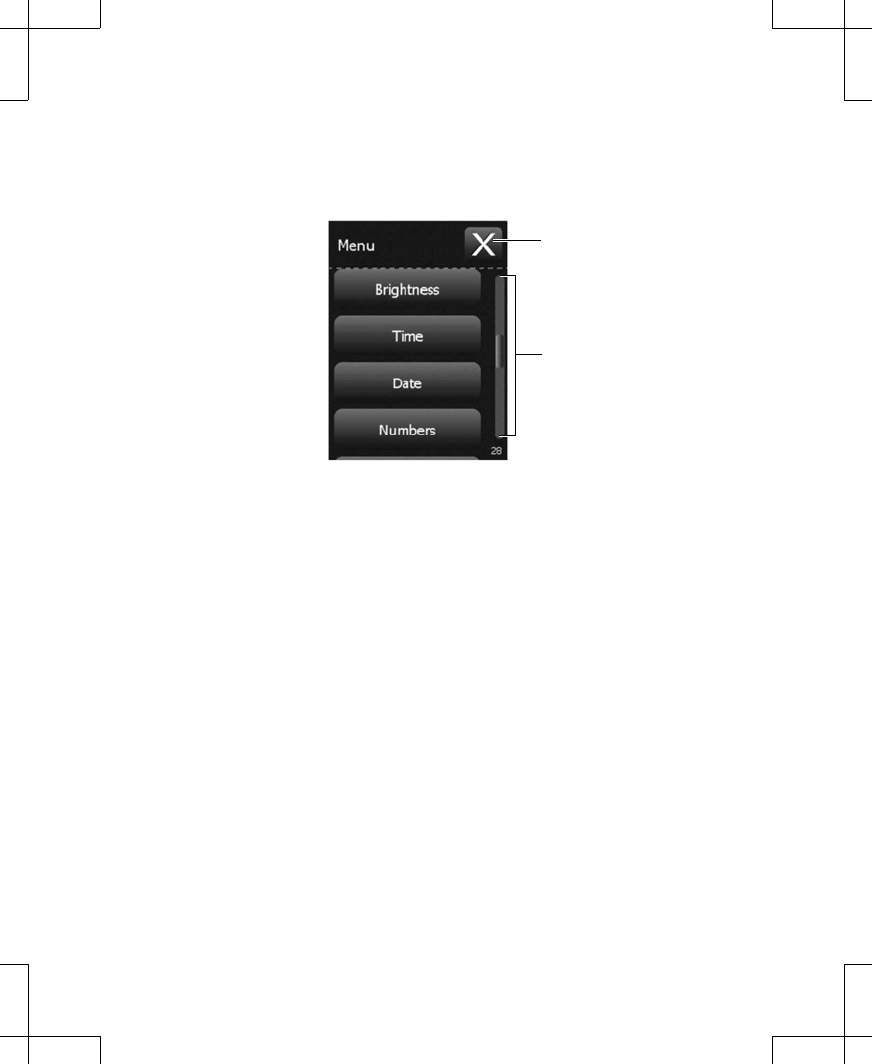
1. Select the Time button from the Menu (Figure 68).
Slider bar
Exit button
Figure 68. Selecting the Time button.
2. To change the hour, the minute, or the time format, press the touchscreen button with the
incorrect value, then use the Increase and Decrease keys to change the value. Once the
hour, minute, and time format are set correctly, press the OK button to exit (Figure 69).
3537 2012-09 English 49
Filename Date Time
UC2001xxxx EN
4.625 x 6 inches (117 mm x 152 mm)
Medtronic Confidential
PTMClinPrgmManual.xsl - PTMClinPrgmTemplate.fm
Template version: 08-08-2011
M943580A002 Rev X 2012-09
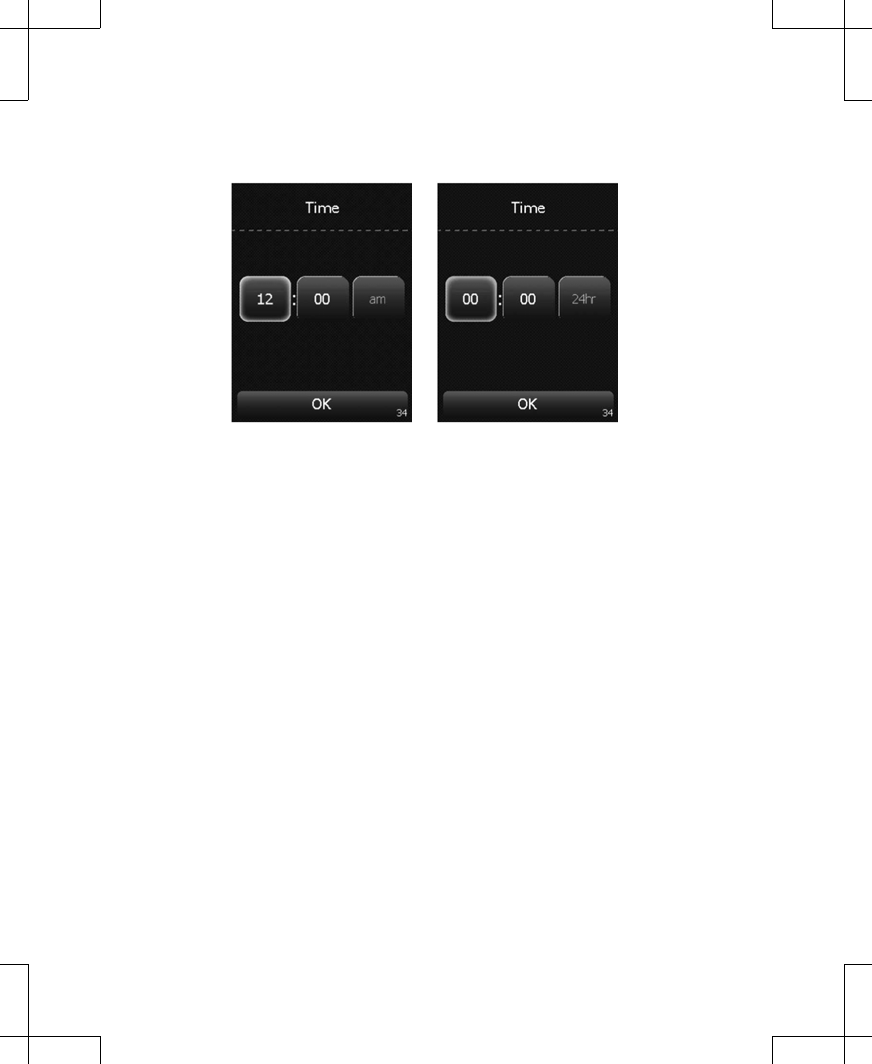
AM/PM format 24-hour format
Figure 69. Changing the time on the controller.
Changing the date
1. Select the Date button from the Menu (Figure 70).
50 English 3537 2012-09
Filename Date Time
UC2001xxxx EN
4.625 x 6 inches (117 mm x 152 mm)
Medtronic Confidential
PTMClinPrgmManual.xsl - PTMClinPrgmTemplate.fm
Template version: 08-08-2011
M943580A002 Rev X 2012-09
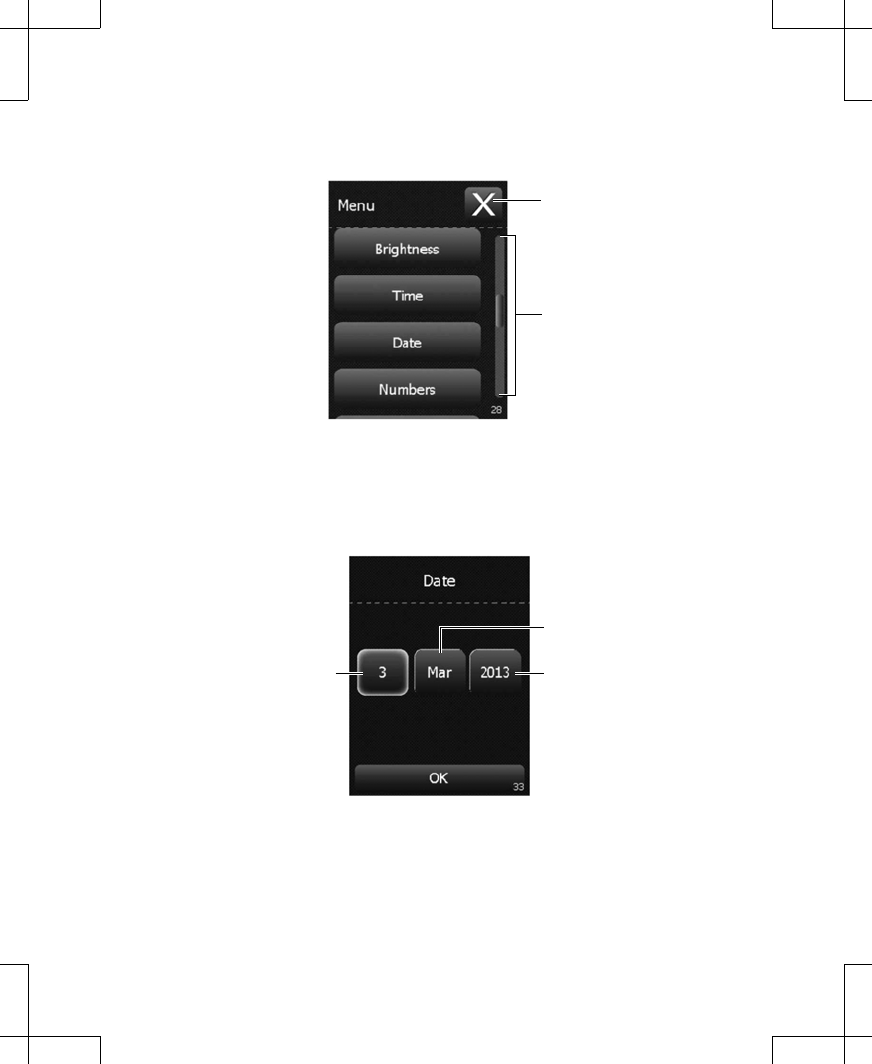
Slider bar
Exit button
Figure 70. Selecting the Date button.
2. To change the date, the month, or the year, press the touchscreen button with the incorrect
value, then use the Increase and Decrease keys to change the value. Once the date,
month, and year are set correctly, press the OK button to exit (Figure 71).
Date
Month
Year
Figure 71. Changing the date on the controller.
Changing the number format
1. Select the Numbers button from the Menu (Figure 72).
3537 2012-09 English 51
Filename Date Time
UC2001xxxx EN
4.625 x 6 inches (117 mm x 152 mm)
Medtronic Confidential
PTMClinPrgmManual.xsl - PTMClinPrgmTemplate.fm
Template version: 08-08-2011
M943580A002 Rev X 2012-09
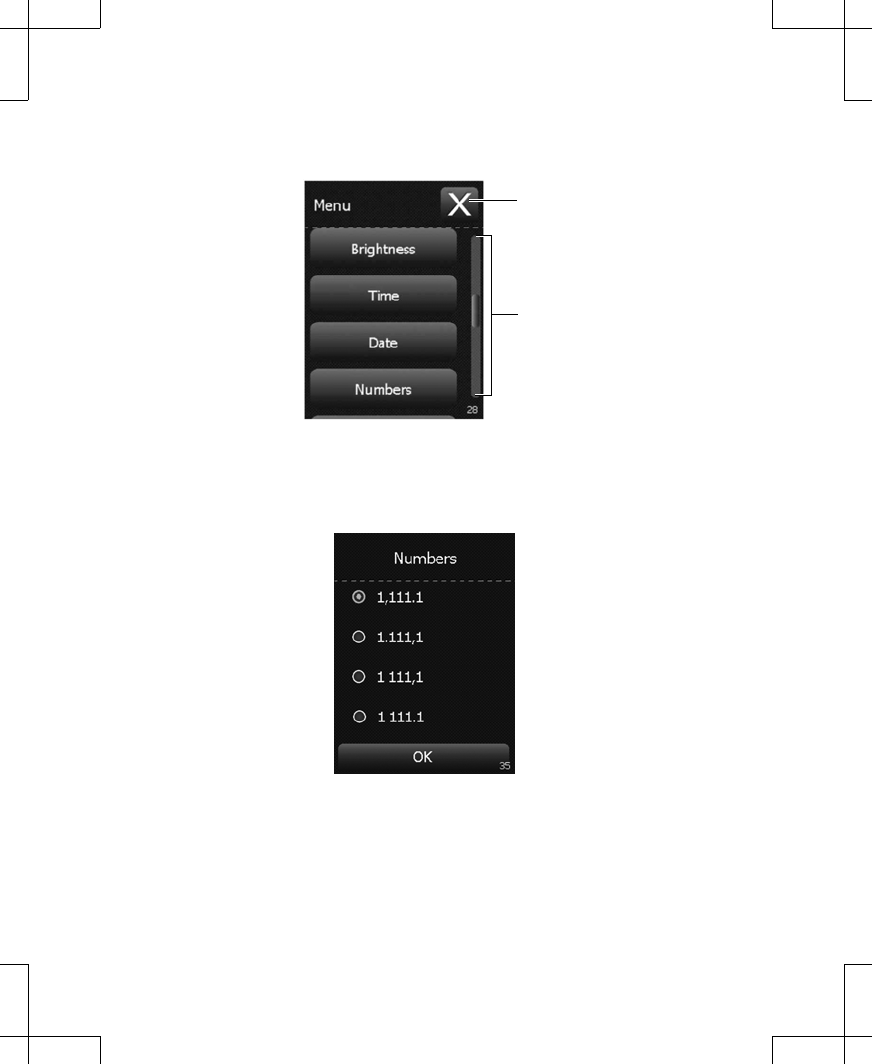
Slider bar
Exit button
Figure 72. Selecting the Numbers button.
2. Using the touchscreen, press the radio button next to the desired number format for the
controller, then press the OK button to exit (Figure 73).
Figure 73. Changing the number format of the controller.
Changing the language
1. Select the Language button from the Menu (Figure 74).
52 English 3537 2012-09
Filename Date Time
UC2001xxxx EN
4.625 x 6 inches (117 mm x 152 mm)
Medtronic Confidential
PTMClinPrgmManual.xsl - PTMClinPrgmTemplate.fm
Template version: 08-08-2011
M943580A002 Rev X 2012-09
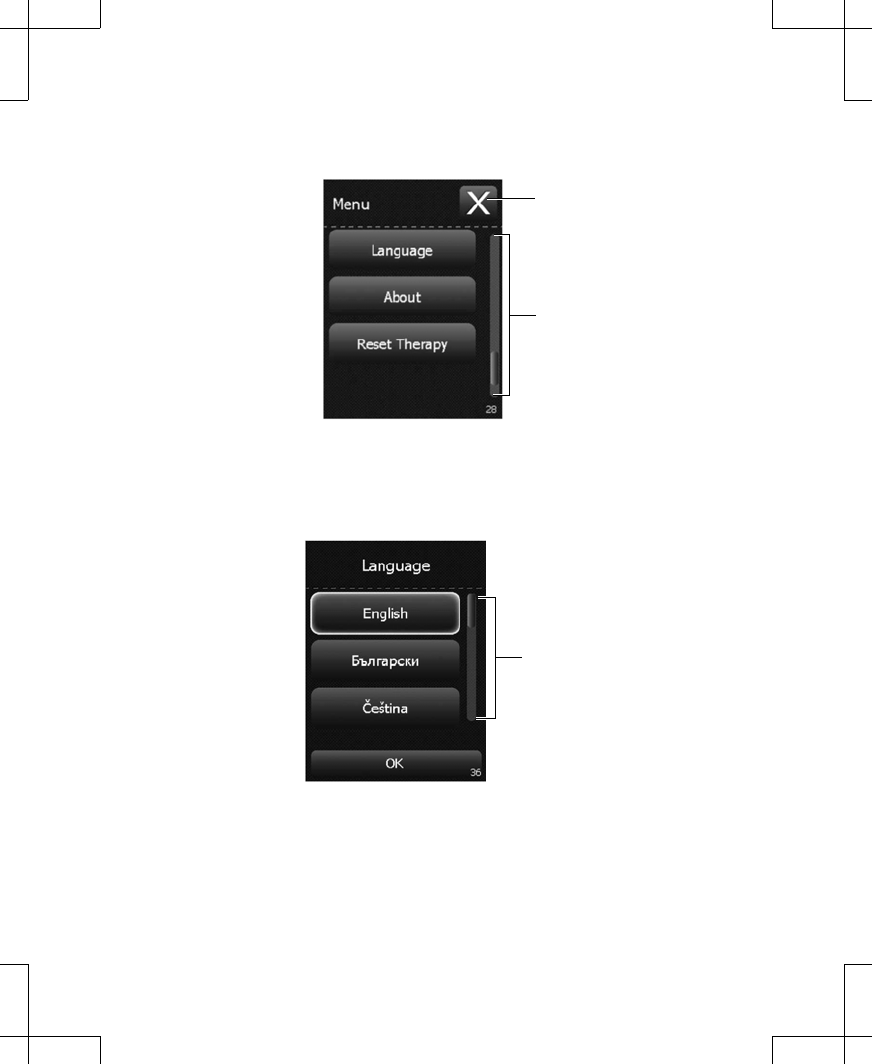
Slider bar
Exit button
Figure 74. Selecting the Language button.
2. Using the touchscreen, select the desired language from the options available, then press
the OK button to exit (Figure 75).
Slider bar
Figure 75. Changing the language on the controller.
Note: Use the slider bar to scroll up or down to see more languages.
3537 2012-09 English 53
Filename Date Time
UC2001xxxx EN
4.625 x 6 inches (117 mm x 152 mm)
Medtronic Confidential
PTMClinPrgmManual.xsl - PTMClinPrgmTemplate.fm
Template version: 08-08-2011
M943580A002 Rev X 2012-09
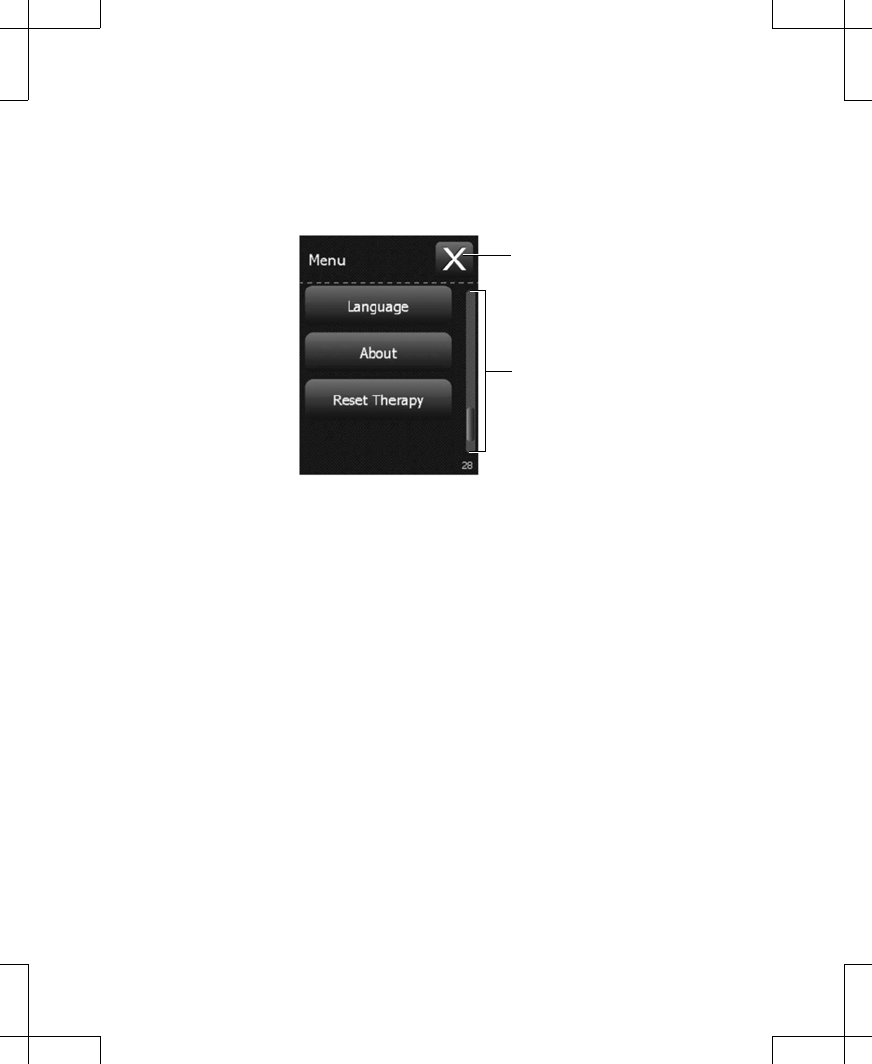
Viewing information about the controller and the external neurostimulator
1. To view information about the controller or the external neurostimulator, use the
touchscreen to select the About button from the Menu (Figure 76).
Slider bar
Exit button
Figure 76. Selecting the About button.
2. When finished reading the information about the controller, press the OK button to exit
(Figure 77).
Note: To view information about the controller, press the Toggle button (Figure 77).
54 English 3537 2012-09
Filename Date Time
UC2001xxxx EN
4.625 x 6 inches (117 mm x 152 mm)
Medtronic Confidential
PTMClinPrgmManual.xsl - PTMClinPrgmTemplate.fm
Template version: 08-08-2011
M943580A002 Rev X 2012-09
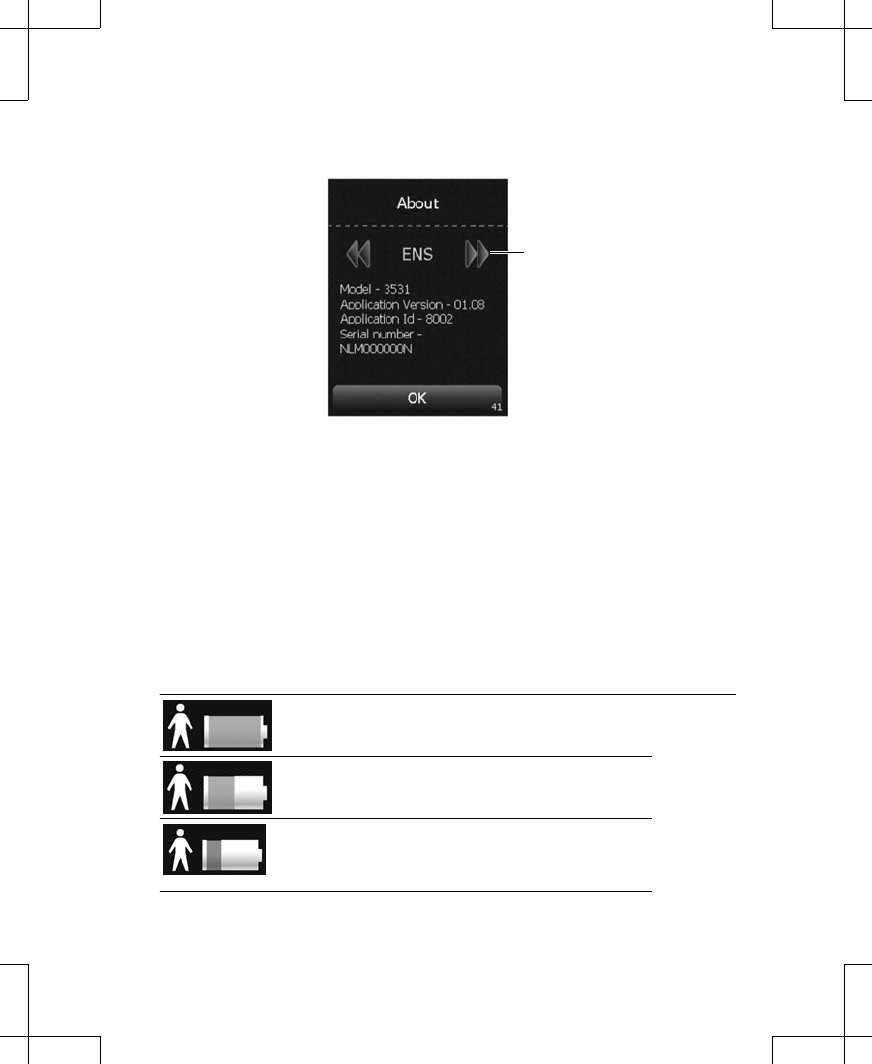
Toggle button
Figure 77. The About screen.
Checking and replacing batteries
Always keep 2 new AA alkaline batteries available for replacement.
Checking the external neurostimulator and controller batteries
Note: You can see the battery levels of the controller and the external neurostimulator at the
top of the Home screen (Figure 78). For more detailed information on battery levels, follow the
steps below.
Table 1 lists several examples of external neurostimulator battery levels and whether action is
required.
Table 1. Battery level definitions for the external neurostimulator
External neurostimulator battery icon is green. Battery
level is full. No action is needed.
External neurostimulator battery icon is green. Con-
sider replacing the external neurostimulator batteries.
External neurostimulator battery icon is orange. Bat-
tery level is low. Do not send a patient home with low
batteries. Replace the external neurostimulator bat-
teries.
3537 2012-09 English 55
Filename Date Time
UC2001xxxx EN
4.625 x 6 inches (117 mm x 152 mm)
Medtronic Confidential
PTMClinPrgmManual.xsl - PTMClinPrgmTemplate.fm
Template version: 08-08-2011
M943580A002 Rev X 2012-09
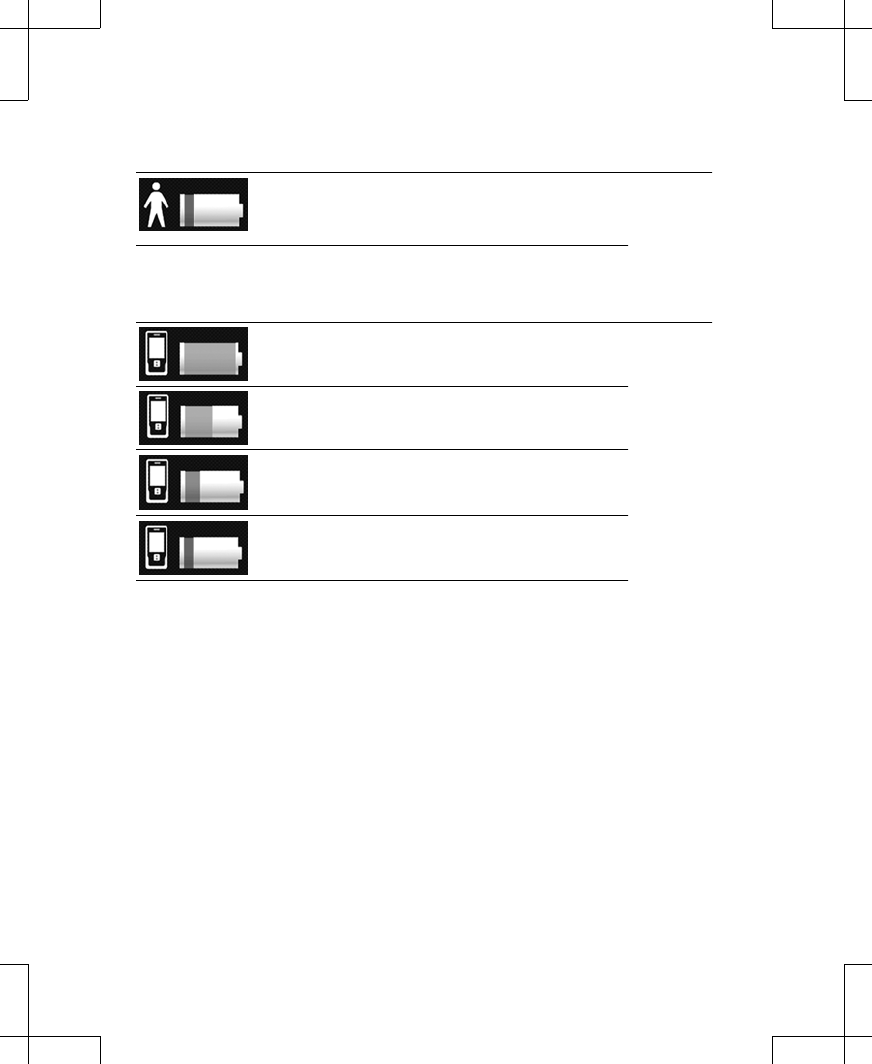
Table 1. Battery level definitions for the external neurostimulator
External neurostimulator battery icon is red. Stimula-
tion may no longer be available. Do not send a pa-
tient home with low batteries. Replace the external
neurostimulator batteries.
Table 2 lists several examples of controller battery levels and whether action is required.
Table 2. Battery level definitions for the controller
Controller battery icon is green. Battery level is full.
No action is needed.
Controller battery icon is green. Battery level is half
full. No action is needed.
Controller battery icon is orange. The controller bat-
teries are low. Consider changing controller batteries
soon.
Controller battery icon is red. The controller batteries
are nearly depleted and programming will not be pos-
sible soon. Replace the controller batteries.
You can check the controller batteries at any time. Complete the following steps to check the
controller batteries.
1. From the Therapy Home screen, press the Battery status button (Figure 78).
56 English 3537 2012-09
Filename Date Time
UC2001xxxx EN
4.625 x 6 inches (117 mm x 152 mm)
Medtronic Confidential
PTMClinPrgmManual.xsl - PTMClinPrgmTemplate.fm
Template version: 08-08-2011
M943580A002 Rev X 2012-09
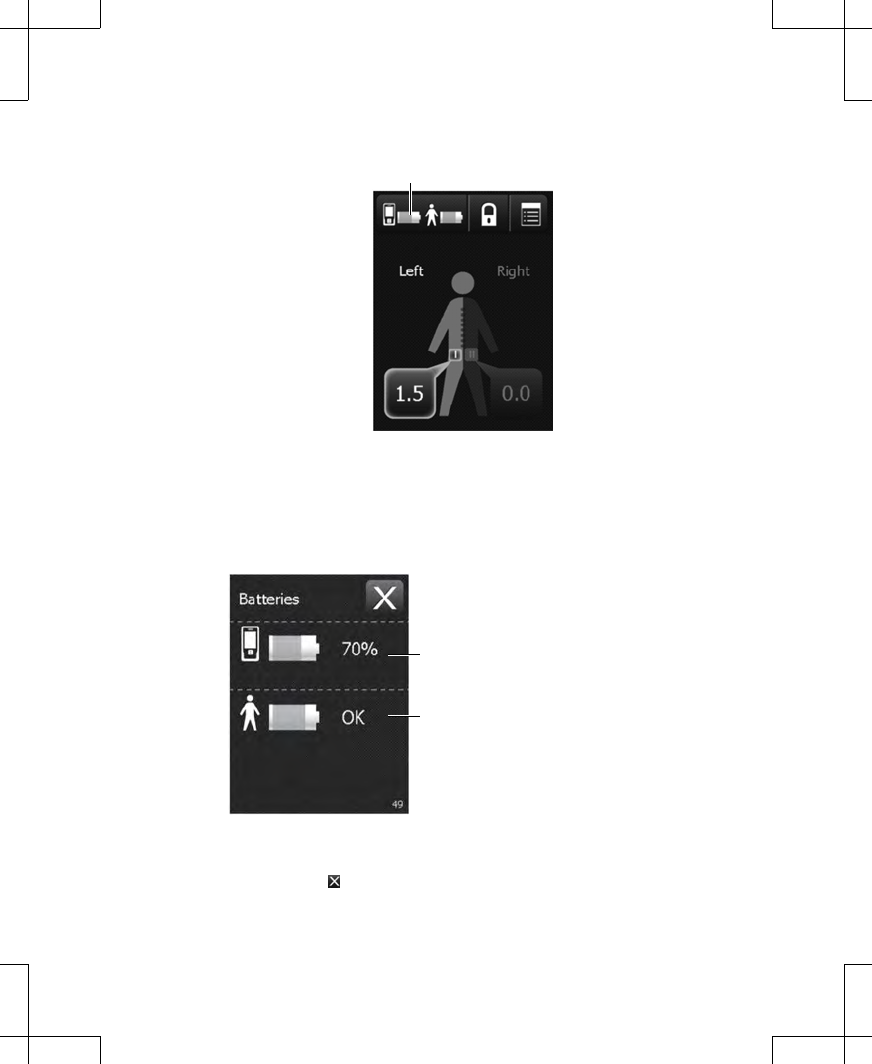
Battery status button
Figure 78. Viewing the battery status on the Home screen.
Note: Two battery icons are displayed (Figure 79). The upper battery icon shows the
battery status of the controller. The lower battery icon shows the battery status of the
external neurostimulator.
Controller battery status
External neurostimulator battery status
Figure 79. Viewing the detailed battery status.
2. Press the Exit button ( ) at the top right corner of the touchscreen to exit.
3537 2012-09 English 57
Filename Date Time
UC2001xxxx EN
4.625 x 6 inches (117 mm x 152 mm)
Medtronic Confidential
PTMClinPrgmManual.xsl - PTMClinPrgmTemplate.fm
Template version: 08-08-2011
M943580A002 Rev X 2012-09
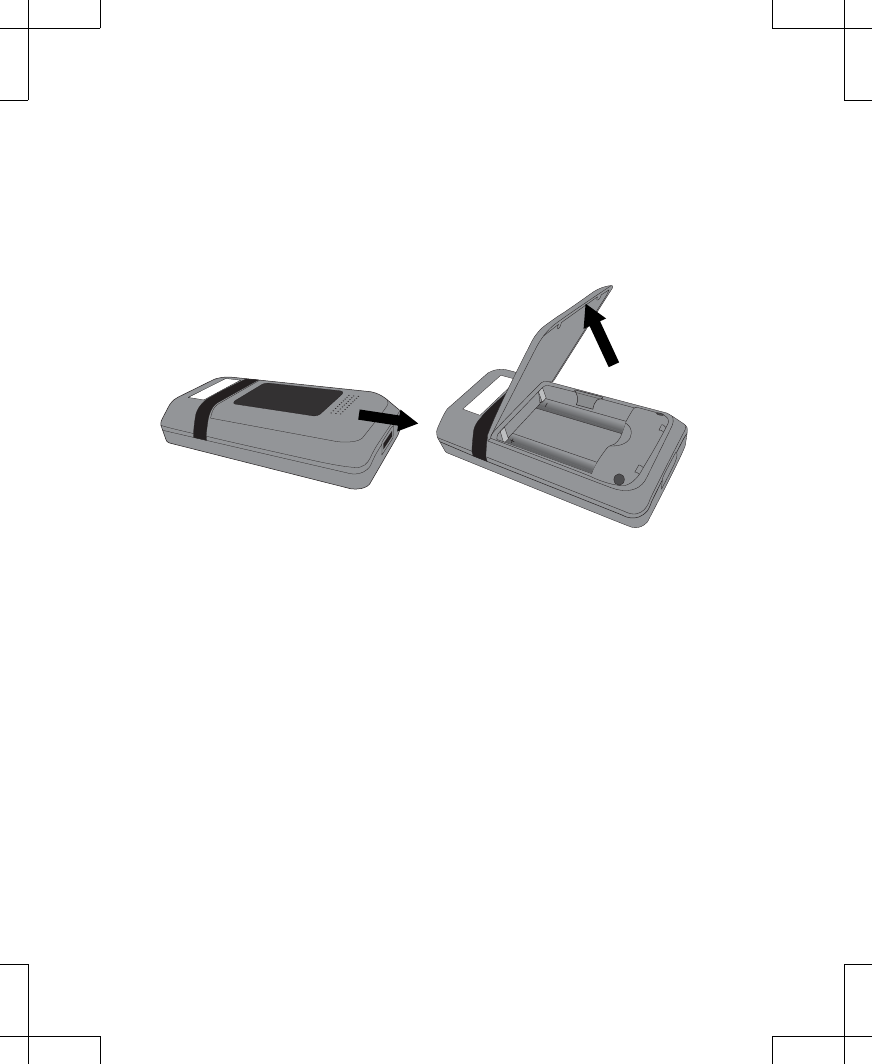
Replacing the controller batteries
Notes:
▪For information on replacing the external neurostimulator batteries, refer to the Model 3531
External Neurostimulator Technical Manual.
▪If not using the controller for an extended period of time, remove the batteries from the
controller to prevent battery depletion.
1. Open the battery compartment cover (Figure 80).
Figure 80. Opening the battery cover.
2. Remove the depleted batteries.
3. Insert the new batteries as shown on the battery compartment label (Figure 81).
58 English 3537 2012-09
Filename Date Time
UC2001xxxx EN
4.625 x 6 inches (117 mm x 152 mm)
Medtronic Confidential
PTMClinPrgmManual.xsl - PTMClinPrgmTemplate.fm
Template version: 08-08-2011
M943580A002 Rev X 2012-09
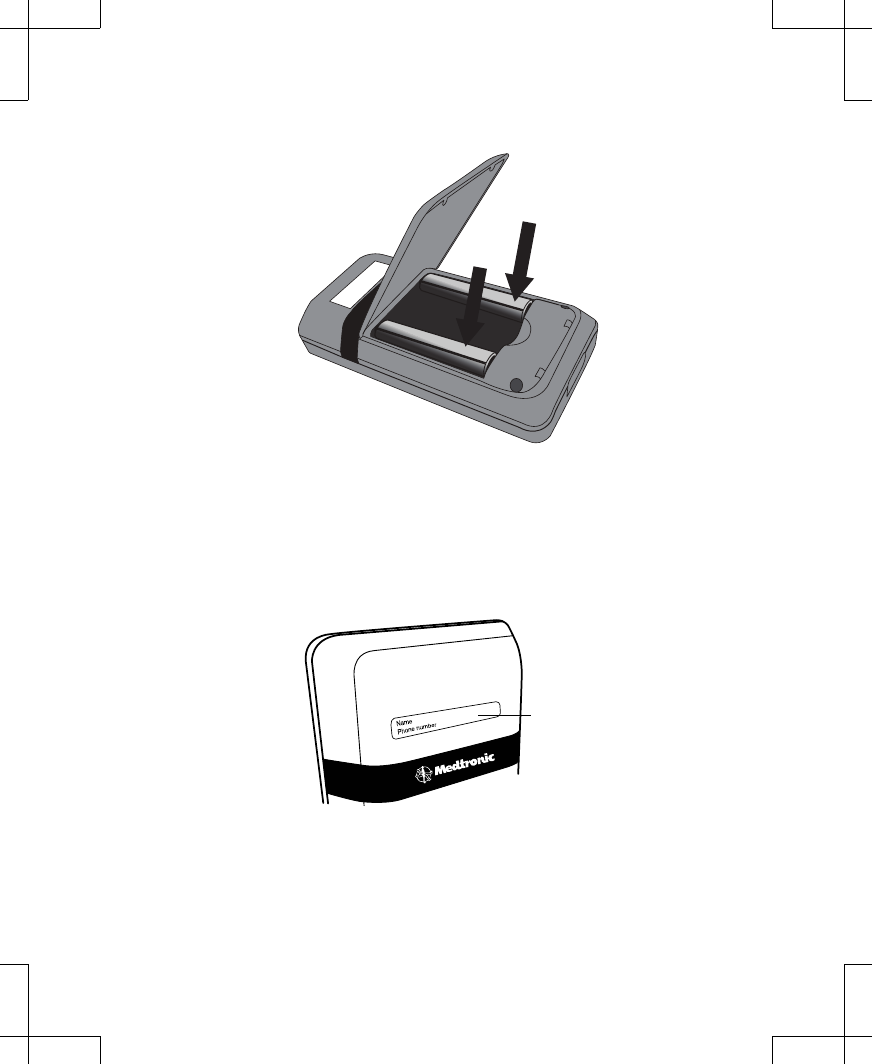
Figure 81. Inserting new batteries.
4. Close the battery compartment cover.
5. Dispose of old batteries according to local requirements.
Labeling the controller
Write your clinic contact information on an identification label and place the label on the back
of the controller so the controller can be returned if lost (Figure 82).
ID label
Figure 82. Place the adhesive label on the back of the controller.
Troubleshooting
This section lists basic troubleshooting for the controller.
3537 2012-09 English 59
Filename Date Time
UC2001xxxx EN
4.625 x 6 inches (117 mm x 152 mm)
Medtronic Confidential
PTMClinPrgmManual.xsl - PTMClinPrgmTemplate.fm
Template version: 08-08-2011
M943580A002 Rev X 2012-09

The controller displays three different types of screens: warning screens, alert screens, and
notification screens. These screens provide you with information about your system, alert you
to a problem with your system, or guide you during controller use.
▪Warning screens display a red triangle at the top with an exclamation point ( ).
▪Alert screens display an orange triangle at the top with an exclamation point ( ).
▪Notification screens display a blue circle at the top with the letter 'i' ( ).
If you experience an issue not described in this section, contact your Medtronic representative.
Troubleshooting reference guide
Table 3. Warning messages
Message Explanation and Solution
System Problem
Cannot continue. Please call
your clinician.
Explanation: The system is not working correctly. Stimula-
tion may have stopped.
1. Remove and reinsert the controller batteries, then
retry the action that caused the error screen to ap-
pear. For instructions on removing and inserting the
controller batteries, refer to "Checking and replac-
ing batteries" on page 55.
2. If the issue persists, remove and reinsert the exter-
nal neurostimulator batteries, then retry the action
that caused the error screen to appear. For instruc-
tions on removing and inserting external neurosti-
mulator batteries, refer to the manual packaged with
the external neurostimulator.
3. If the issue persists and if using the Model 3093/3889
Lead, remove all electrode configurations by setting
all electrodes to blank for all programs, then repro-
gram electrode configurations and retry the action
that caused the error screen to appear. For instruc-
tions on programming electrodes, refer to "Adjust-
ing stimulation parameters for the Model 3093 or
Model 3889 Tined Lead" on page 37.
4. If the steps above do not resolve the issue, the ex-
ternal neurostimulator and/or controller need to be
replaced.
60 English 3537 2012-09
Filename Date Time
UC2001xxxx EN
4.625 x 6 inches (117 mm x 152 mm)
Medtronic Confidential
PTMClinPrgmManual.xsl - PTMClinPrgmTemplate.fm
Template version: 08-08-2011
M943580A002 Rev X 2012-09

Table 3. Warning messages
Message Explanation and Solution
Software Problem
Cannot continue. Please call
your clinician.
Explanation: The software is not working correctly. Stimu-
lation may have stopped.
1. Remove and reinsert the controller batteries, then
retry the action that caused the error screen to ap-
pear. For instructions on removing and inserting the
controller batteries, refer to "Checking and replac-
ing batteries".
2. If the issue persists, replace the controller and refer
to "Pairing a new controller to an external neurosti-
mulator" for instructions on pairing the new control-
ler to the external neurostimulator.
Button Jammed
Cannot provide stimulation.
Release the external device
button.
Explanation: The ENS button on the external neurostimu-
lator is stuck in the pressed position.
Solution: Press and release the ENS button, then press
the OK button. If the problem persists, the external
neurostimulator may need to be replaced.
Batteries Empty (external
device)
External device batteries
need to be changed. Call your
clinician.
Explanation: The external neurostimulator batteries are
depleted and stimulation is not available.
Solution: Replace the external neurostimulator batter-
ies. For more information on replacing the external
neurostimulator batteries, refer to the Model 3531 Ex-
ternal Neurostimulator Technical Manual.
Battery Empty (controller)
Cannot continue. Replace the
controller batteries.
Explanation: The controller batteries are depleted. Pro-
gramming is not available.
Solution: Replace the controller batteries. For instruc-
tions on replacing the controller batteries, see "Check-
ing and replacing batteries" on page 55.
Change External Device
Cannot provide stimulation.
Call your clinician.
Explanation: The external neurostimulator has reached the
end of service. This is related to device function, not to
battery level. This external neurostimulator can no longer
provide stimulation.
Solution: Replace the external neurostimulator.
3537 2012-09 English 61
Filename Date Time
UC2001xxxx EN
4.625 x 6 inches (117 mm x 152 mm)
Medtronic Confidential
PTMClinPrgmManual.xsl - PTMClinPrgmTemplate.fm
Template version: 08-08-2011
M943580A002 Rev X 2012-09

Table 4. Alert messages
Message Explanation
No Device Found
Try the following: Move the
controller closer to the exter-
nal device.
Explanation: The controller cannot find the paired external
neurostimulator. The external neurostimulator may be out
of range or the external neurostimulator batteries may be
depleted.
Solution: Move the controller closer to the external
neurostimulator and make sure your hand is not cov-
ering the top of the controller, then press the Try Again
button.
If the issue persists, the external neurostimulator bat-
teries may need to be replaced. For instructions on re-
placing the external neurostimulator batteries, see the
appropriate technical manual packaged with the exter-
nal neurostimulator.
Change External Device
Call your clinician. Stimulation
hour(s) remaining: XX
Explanation: The external neurostimulator is nearing the
end of service. Stimulation will not be available soon.
Solution: Replace the external neurostimulator.
Batteries Low (external de-
vice)
External device batteries
need to be changed. Call your
clinician.
Explanation: The external neurostimulator batteries are low
and stimulation will not be available soon.
Solution: Replace the external neurostimulator batter-
ies. For more information on replacing the external
neurostimulator batteries, refer to the Model 3531 Ex-
ternal Neurostimulator Technical Manual.
Battery Low (controller)
Replace the controller batter-
ies soon.
Explanation: The controller batteries are low and program-
ming will not be available soon.
Solution: Replace the controller batteries. For instruc-
tions on replacing the controller batteries, see "Check-
ing and replacing batteries" on page 55.
Incomplete Settings
Valid electrodes configura-
tion, pulse width, and rate set-
tings required.
Explanation: One or more stimulation parameters, includ-
ing electrode configuration, was left unprogrammed.
Solution: Check stimulation parameters. Ensure that
at least one electrode is negative and at least one elec-
trode is positive, or that all electrodes are blank.
Incompatible Device
Change external device.
Explanation: You are attempting to connect to an incom-
patible external neurostimulator.
Solution: Replace the external neurostimulator with a
compatible model.
62 English 3537 2012-09
Filename Date Time
UC2001xxxx EN
4.625 x 6 inches (117 mm x 152 mm)
Medtronic Confidential
PTMClinPrgmManual.xsl - PTMClinPrgmTemplate.fm
Template version: 08-08-2011
M943580A002 Rev X 2012-09

Table 4. Alert messages
Message Explanation
Incompatible System Com-
ponent
Ensure batteries and other
system components are com-
patible.
Explanation: You are attempting to connect to an incom-
patible system component.
Solution: Verify that all components are compatible.
Remove any incompatible system components.
If the issue persists, the controller batteries may need
to be replaced. For instructions on replacing the con-
troller batteries, see "Checking and replacing batter-
ies".
Connection Changed
Cable or lead changed. Ther-
apy settings were reset.
Explanation: The external neurostimulator has detected
that a different cable type has been connected.
Solution: Press the OK button. Stimulation parameters
for the new connection need to be programmed to de-
sired settings.
Check Connection
Ensure all cable and lead con-
nections are secure.
Explanation: The external neurostimulator has detected
that either a cable or a lead is not connected.
Solution: Ensure all cable and lead connections are
secure. Press the OK button.
Table 5. Notification messages
Message Explanation and solution
Stimulation is off
Settings cannot be changed
with stimulation off.
Explanation: You tried to adjust stimulation/therapy when
stimulation/therapy was off.
Solution: Turn stimulation/therapy on, then try adjust-
ing stimulation/therapy again.
Upper limit
Settings cannot be increased
any higher.
Explanation: You tried increasing a stimulation parameter
above the highest value allowed. You can not increase the
stimulation any higher.
Solution: Press the OK button and consider adjusting
other stimulation parameters.
Lower limit
Settings cannot be decreased
any lower.
Explanation: You tried decreasing a stimulation parameter
below the lowest value allowed. You can not decrease the
amplitude below zero.
Solution: Press the OK button and consider adjusting
other stimulation parameters.
3537 2012-09 English 63
Filename Date Time
UC2001xxxx EN
4.625 x 6 inches (117 mm x 152 mm)
Medtronic Confidential
PTMClinPrgmManual.xsl - PTMClinPrgmTemplate.fm
Template version: 08-08-2011
M943580A002 Rev X 2012-09

Table 5. Notification messages
Message Explanation and solution
Settings Not Available
Cannot provide your desired
settings. Call your clinician.
Explanation: Your combined settings can not currently be
delivered by the external neurostimulator.
Solution: Press the OK button and try the following:
1) Consider adjusting other stimulation parameters,
including electrode configuration.
2) Ensure that lead and cable connections are secure.
Retry ENS
Unable to find device
Explanation: The controller cannot find the paired external
neurostimulator. The external neurostimulator may be out
of range or the external neurostimulator batteries may be
depleted.
Solution: Move the controller closer to the external
neurostimulator and make sure your hand is not cov-
ering the top of the controller, then press the Try Again
button.
If this does not work, the external neurostimulator bat-
teries may need to be replaced. For instructions on re-
placing the external neurostimulator batteries, see the
appropriate technical manual packaged with the exter-
nal neurostimulator.
Note: If you wish to pair the controller to a new exter-
nal neurostimulator, see "Pairing the controller to the
external neurostimulator" on page 11
Memory Problem
Data has been lost. Repeat
set-up process.
Explanation: Controller settings are not available, but tele-
metry is still available. The controller batteries may have
been removed or depleted for an extended period of time.
Solution: Follow the on-screen prompts to reconfigure
controller settings, including pairing to the external
neurostimulator.
64 English 3537 2012-09
Filename Date Time
UC2001xxxx EN
4.625 x 6 inches (117 mm x 152 mm)
Medtronic Confidential
PTMClinPrgmManual.xsl - PTMClinPrgmTemplate.fm
Template version: 08-08-2011
M943580A002 Rev X 2012-09

Table 6. Additional scenarios
Scenario Explanation
The controller is unrespon-
sive. Explanation: the controller has encountered a problem and
must be reset.
1. Solution: Remove and reinsert the batteries. For in-
struction on battery removal and placement, see
"Replacing the controller batteries" on page 58.
2. If batteries are inserted correctly, the batteries are
depleted. Replace the controller batteries. For in-
structions on replacing controller batteries, see
"Replacing the controller batteries" on page 58.
3. If the issue persists, replace the controller.
The controller screen goes
blank, then returns to the Un-
lock screen.
Explanation: The controller encountered a problem and
has automatically reset.
Solution: Unlock the controller. If necessary, navigate
back to the screen that was in use when the controller
was reset and continue the intended task.
Device specifications
Table 7. Model 3537 Controller specificationsa
Parameter Specification
Power source Two alkaline AA batteries (nonrechargeable)
Operating temperature 9 °C to 43 °C (49 °F to 110 °F)
Temperature limitation -30 °C to 57 °C (-22 °F to +135 °F)
Controller size 12.0 x 6.0 x 2.4 cm (4.7 x 2.4 x 0.9 in)
Controller weight, including batteries 150 g (5.3 oz)
Battery life 4–6 weeks average for alkaline batteries
Operating time Short
a
All measurements are approximate.
Device care and storage
▪Keep new alkaline batteries available.
▪Use the controller to check the battery level daily.
▪Replace low or depleted batteries.
3537 2012-09 English 65
Filename Date Time
UC2001xxxx EN
4.625 x 6 inches (117 mm x 152 mm)
Medtronic Confidential
PTMClinPrgmManual.xsl - PTMClinPrgmTemplate.fm
Template version: 08-08-2011
M943580A002 Rev X 2012-09

▪Handle the device with care. Do not drop, strike or step on the device.
▪Do not dismantle or tamper with the device.
▪Clean the outside of the device with a damp cloth when necessary. Mild household cleaners
will not damage the device or labels.
▪The battery contacts may be cleaned periodically with a cotton swab dampened with
alcohol. Do not use a pencil eraser or sandpaper.
▪Store the device at room temperature. Avoid extreme hot or cold temperatures and direct
sunlight.
▪The device is not waterproof. Do not allow moisture to get inside the device.
▪Dispose of depleted batteries and worn out devices according to local requirements.
66 English 3537 2012-09
Filename Date Time
UC2001xxxx EN
4.625 x 6 inches (117 mm x 152 mm)
Medtronic Confidential
PTMClinPrgmManual.xsl - PTMClinPrgmTemplate.fm
Template version: 08-08-2011
M943580A002 Rev X 2012-09

3537 2012-09 English 67
Filename Date Time
UC2001xxxx EN
4.625 x 6 inches (117 mm x 152 mm)
Medtronic Confidential
PTMClinPrgmManual.xsl - PTMClinPrgmTemplate.fm
Template version: 08-08-2011
M943580A002 Rev X 2012-09

Contacts:
Asia:
Medtronic International Ltd.
Tel. 02919-1362
Fax 02907-3998
Medtronic Asia Ltd.
Tel. (02)-548-1148
Fax (02)-518-4786
Australia:
Medtronic Australasia Pty. Ltd.
97 Waterloo Road
North Ryde, NSW 2113
Australia
Tel. +61-2-9857-9000
Fax +61-2-9878-5100
Toll free 1-800-668-6700
Austria:
Medtronic Österreich GmbH
Tel. 01-240440
Fax 01-24044-100
Belgium:
Medtronic Belgium S.A.
Tel. 02-456-0900
Fax 02-460-2667
Canada:
Medtronic of Canada Ltd.
Tel. (1-905)-460-3800
Fax (1905)-826-6620
Czech Republic:
Medtronic Czechia s.r.o.
Tel. 2-965-795-80
Fax 2-965-795-89
Denmark:
Medtronic Danmark A/S
Tel. 45-32-48-18-00
Fax 45-32-48-18-01
Finland:
Medtronic Finland Oy/LTD
Tel. (09)-755-2500
Fax (09)-755-25018
France:
Medtronic France S.A.S.
Tel. 01-5538-1700
Fax 01-5538-1800
Germany:
Medtronic GmbH
Tel. (02159)-81490
Fax (02159)-8149100
Greece:
Medtronic Hellas S.A.
Tel. 210-67-79-099
Fax 210-67-79-399
Hungary:
Medtronic Hungária Kft.
Tel. 1-889-06-00
Fax 1-889-06-99
Ireland:
Medtronic Ireland Ltd.
Tel. (01)-890-6522
Fax (01)-890-7220
Italy:
Medtronic Italia SpA
Tel. 02-241371
Fax 02-241381
Tel. 06-328141
Fax 06-3215812
Japan:
Medtronic Japan
Tel. 03-6430-2016
Fax 03-6430-7110
Latin America:
Medtronic, Inc.
Tel. (1305)-500-9328
Fax (1786)-709-4244
Norway:
Medtronic Norge AS
Tel. 067-10-32-00
Fax 067-10-32-10
Poland:
Medtronic Poland Sp. z.o.o.
Tel. (022)-465-69-00
Fax (022)-465-69-17
Portugal:
Medtronic Portugal, Lda.
Tel. 21-724-5100
Fax 21-724-5199
Russia:
Medtronic Russia
Tel. (8495) 580-7377
Fax (8495) 580-7378
Slovakia
Medtronic Slovakia, o.z.
Tel. 0268 206 911
Fax 0268 206 999
Filename Date Time
UC2001xxxx EN
4.625 x 6 inches (117 mm x 152 mm)
Medtronic Confidential
PTMClinPrgmManual.xsl - PTMClinPrgmTemplate.fm
Template version: 08-08-2011
M943580A002 Rev X 2012-09

Spain:
Medtronic Ibérica, S.A.
Tel. 91-625-0400
Fax 91-650-7410
Sweden:
Medtronic AB
Tel. 08-568-585-00
Fax 08-568-585-01
Switzerland:
Medtronic (Schweiz) AG
Tel. 031-868-0100
Fax 031-868-0199
The Netherlands:
Medtronic B.V.
Tel. (045)-566-8000
Fax (045)-566-8668
U.K.:
Medtronic U.K. Ltd.
Tel. 01923-212213
Fax 01923-241004
USA:
Medtronic, Inc.
Tel. (1763)-505-5000
Fax (1763)-505-1000
Toll-free: (1-800)-328-0810
Filename Date Time
UC2001xxxx EN
4.625 x 6 inches (117 mm x 152 mm)
Medtronic Confidential
PTMClinPrgmManual.xsl - PTMClinPrgmTemplate.fm
Template version: 08-08-2011
M943580A002 Rev X 2012-09

Manufacturer
Medtronic, Inc.
710 Medtronic Parkway
Minneapolis, MN 55432-5604
USA
www.medtronic.com
Tel. +1-763-505-5000
Fax +1-763-505-1000
Medtronic E.C. Authorized EC REP
Representative/Distributed by
Medtronic B.V.
Earl Bakkenstraat 10
6422 PJ Heerlen
The Netherlands
Tel. +31-45-566-8000
Fax +31-45-566-8668
Europe/Africa/Middle East
Headquarters
Medtronic International Trading Sàrl
Route du Molliau 31
Case Postale 84
CH-1131 Tolochenaz
Switzerland
www.medtronic.eu
Tel. +41-21-802-7000
Fax +41-21-802-7900
Asia-Pacific
Medtronic International Ltd.
Suite 1106-11 16/F, Tower 1, The Gateway
25 Canton Road, Tsimshatsui
Kowloon
Hong Kong
Tel. +852-2919-1362
Fax +852-2907-3998
Contacts for specific countries are listed inside this cover.
*M943580A002*
© Medtronic, Inc. 2012
All Rights Reserved
M943580A002
Filename Date Time
UC2001xxxx EN
4.625 x 6 inches (117 mm x 152 mm)
Medtronic Confidential
PTMClinPrgmManual.xsl - PTMClinPrgmTemplate.fm
Template version: 08-08-2011
M943580A002 Rev X 2012-09