Medtronic MICSW2 Implantable Cardiac Device Monitor User Manual
Medtronic, Inc. Implantable Cardiac Device Monitor Users Manual
Users Manual
Medtronic CareLink® Monitor
Monitor Medtronic CareLink®
Model 2490C Patient Manual
Manual del paciente del Modelo 2490C
Caution: Federal Law (USA) restricts this device to sale by or on
the order of a physician.
Precaución: Según las leyes federales de los Estados Unidos
este dispositivo únicamente puede venderse por prescripción
médica.

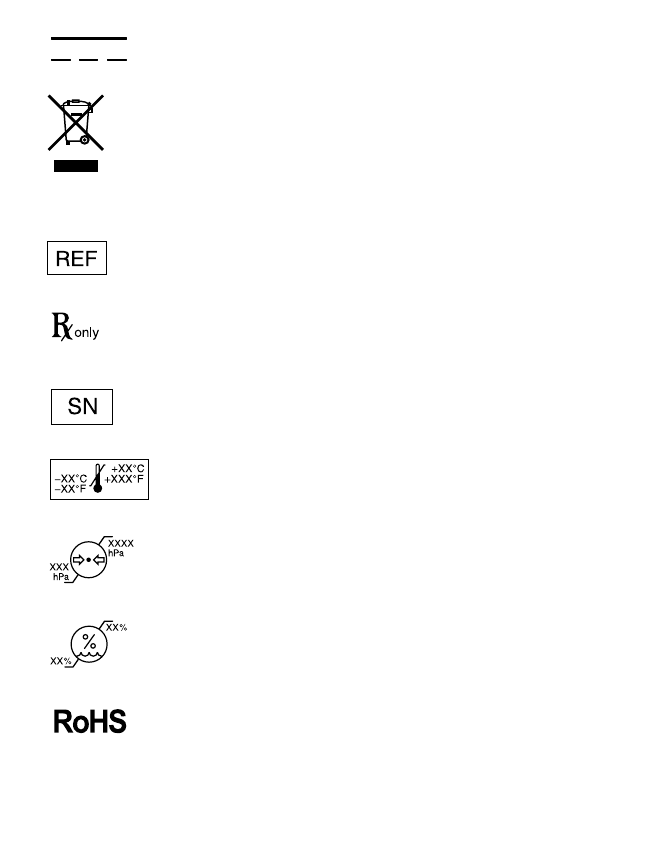
Explanation of symbols on the device
For US audiences only
Medical equipment with respect to electric shock,
fire, and mechanical hazards, only in accordance
with UL60601-1, and CAN/CSA C22.2 no. 601.1
Power cord polarity, center negative
UL Recognized Component Mark for Canada and
the US
Type B Applied Part
Wireless communication enabled
Caution
Consult instructions for use
Class II medical equipment
Direct current
Do not dispose of this product in the unsorted
municipal waste stream. Dispose of this product
according to local regulations. See
http://recycling.medtronic.com
for instructions on
proper disposal of this product.
Re-order number
Caution:
Federal Law (USA) restricts this device to
sale by or on the order of a physician.
Serial number
Temperature limitation
Atmospheric pressure limitation
Humidity limitation
Restriction directive of use of certain hazardous
substances in electrical equipment.
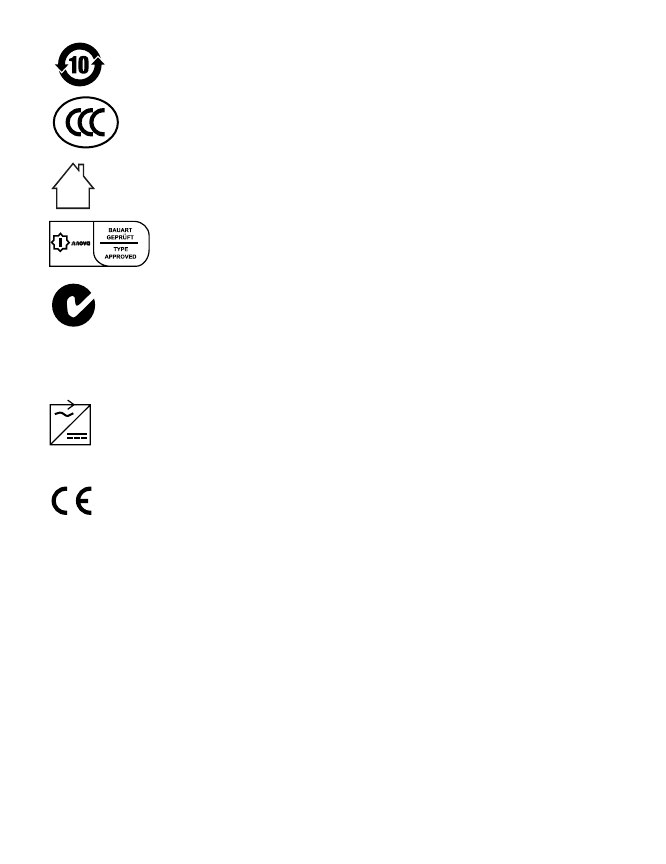
China RoHS
The following are trademarks of Medtronic: Medtronic, Medtronic CareLink
China compulsory certification
Indoor use only
Safety Approval Mark
Device complies with Electromagnetic
Compatibility (EMC) standards recognized by the
Australian Communications Authority (ACA) and
by the New Zealand Radio Spectrum Management
Group (RSM).
Use only the Medtronic furnished power supply
identified as P/N: GS-1569-
C
onformité
E
uropéenne (European Conformity)
N4292


7
Contents
Chapter 1 Introduction 9
About your monitor 9
Sending information at the request of
your doctor or clinic 10
Warnings 11
Precautions 12
Contents of the monitor package 13
Choosing a place to set up your monitor 13
Setting up your monitor 14
Checking the telephone line settings 14
Connecting the monitor to a
telephone wall jack and power outlet 16
Sending information with your monitor 19
Green status lights 24
Orange status lights 25
Antenna Position Status 25
Telephone Line Status 26
Traveling with your monitor 27
Monitor care 27
Monitor specifications 28


9
1
Introduction
This manual is intended to help you use the Medtronic
CareLink Monitor Model 2490C (“monitor”)
If you have any questions that are not answered by this
manual, or if you have any problems with the monitor,
talk to your doctor. Your doctor knows your medical
history and can give you the help you need.
About your monitor
The Medtronic CareLink Monitor Model 2490C is
designed to automatically gather information from your
implanted heart device. This automatic wireless
communication between your heart device and the
monitor takes place at times scheduled by your doctor or
clinic.
Sending heart device information to your clinic using
wireless technology does not require you to interact with
your monitor. The process is silent and invisible. Clinics
typically schedule the automatic process to occur while
you sleep.
The gathered heart device information is sent over a
telephone line to your clinic using a toll-free number. For

10 About your monitor
this reason, the monitor must always be plugged into a
telephone wall jack and a power outlet.
The monitor can also send wireless heart device alerts to
your clinic automatically. The information sent to your
clinic helps your doctor manage your care.
Your phone will be busy while the monitor is sending
information. See “Sending information with your
monitor” on page 19.
The monitor is intended specifically for your use only. It
will not work with other implanted devices and should
be used only by you as directed by your doctor.
Sending information at the request of your doctor
or clinic
You will sometimes need to send information at times
other than those scheduled by your doctor or clinic.
These times are:
•when completing first-time setup, to allow automatic
wireless communication between your monitor and
your heart device
•at the request of your doctor or clinic
See “Sending information with your monitor” on page 19.

11
Warnings
Warn i ng: If you are feeling ill and you think you might
need to go to the hospital, seek medical attention
immediately. If there is an emergency, call 911. If your
doctor has provided other instructions, follow them.
Do not use the monitor to send your heart device
information to your doctor unless you have already
contacted your doctor and your doctor has requested that
you use the monitor.
Warn i ng: To ensure the safe operation of your implanted
device, use the monitor only as described in this manual
and at the times prescribed by your doctor.
Warn i ng: Do not use the monitor if the monitor does not
operate as described in “Sending information with your
monitor” on page 19. If you need further assistance,
contact your clinic.
Warn i ng: No modification of this equipment is allowed.
Warn i ng: Important safety instructions follow. When
using the monitor, basic safety precautions should
always be followed to reduce the risk of fire, electric
shock, and injury to persons, including the following
precautions:

12 Precautions
1. Do not use the monitor near water, for example, near a
bath tub, wash bowl, kitchen sink or laundry tub, in a
wet basement, or near a swimming pool.
2. When completing first-time setup or sending
information at the request of your doctor or clinic,
avoid using the monitor during an electrical storm.
There may be a remote risk of electric shock from
lightning.
3. Do not use the telephone to report a gas leak in the
vicinity of the leak. Do not use the monitor to send
information if you suspect a gas leak.
Save this manual.
Precautions
•Use only the supplied power cord with this monitor.
•Always leave the monitor plugged into a working
power outlet and a telephone wall jack.
•Do not use a mobile phone while using the monitor.
•If possible, avoid using the telephone while using the
monitor. Your phone line will be “busy” while the
monitor is sending data.
Note: In the case of an emergency, you can use your
phone to call for help. If you have an emergency while

13
using the monitor, press the Start/Stop button to stop
the monitor and to ensure your phone line is available.
•Do not get your monitor wet. Liquids can damage the
monitor. If you get your monitor wet, contact your
clinic for instructions.
Contents of the monitor package
You should receive the following:
•Medtronic CareLink Monitor Model 2490C
•power cord
•telephone cord
•carrying case
•patient manual
•patient instructional DVD
•instruction card
•warranty
•electromagnetic compatibility declaration
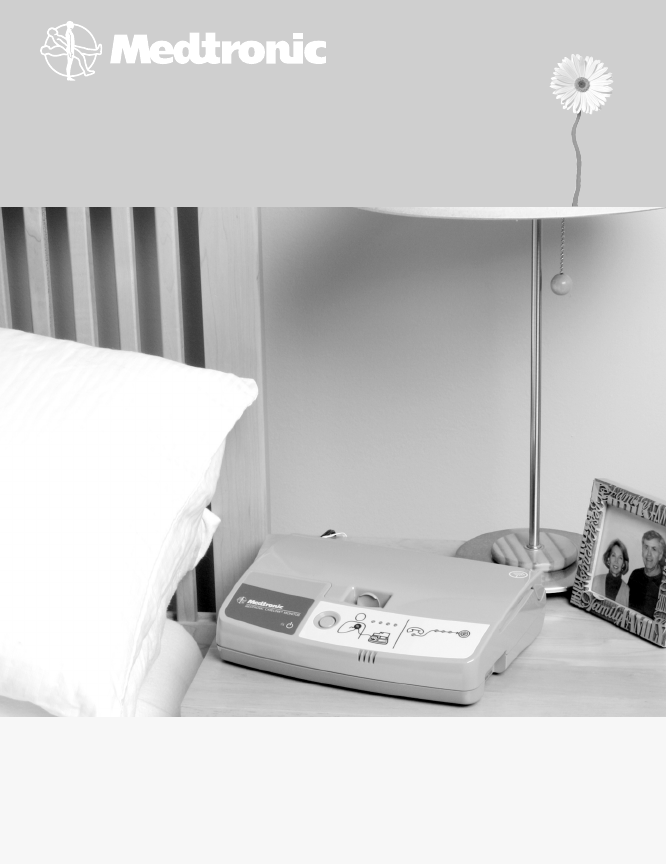
Choosing a place to set up your monitor
Choose a place to set up your monitor. Follow these
recommendations for choosing the right spot:

14 Setting up your monitor
•Place the monitor within ten feet (three meters) of
where you sleep, preferably on a night stand or a table.
•Place the monitor within reach of a telephone wall
jack.
•Place the monitor within reach of a power outlet.
•Do not place the monitor anywhere it can get wet.
Setting up your monitor
Before you use your monitor, you will need to:
1. Check the telephone line settings on the monitor.
2. Connect the monitor to a telephone wall jack.
3. Plug the monitor into a power outlet.
You may connect a telephone to the monitor to make
and receive telephone calls, but this is not required for
the monitor to work correctly. For more information see,
“Connecting the monitor to a telephone wall jack and
power outlet” on page 16.
Note: The monitor will not work with mobile phones.
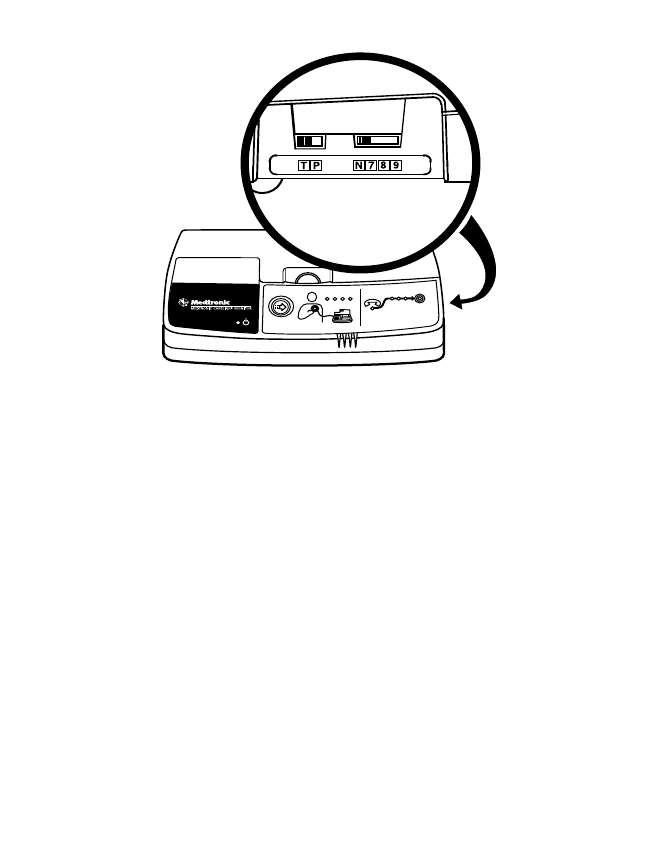
Checking the telephone line settings
Before using the monitor, make sure that the telephone
line settings are correct. There are two telephone line
settings on the monitor, N-7-8-9 and T-P. See Figure 1.

15
Figure 1: Telephone line settings
N-7-8-9 – This setting is used if the number 7, 8, or 9
needs to be dialed to reach an outside telephone line.
Nmeans no number needs to be dialed and is the most
common setting for home use.
Select the setting that is appropriate for the telephone
line you will be using. If you are staying in a hotel, you
may have to set the switch to 7, 8, or 9 to get an outside
line.
T-P – This setting is used to select a tone (T) or pulse (P)
telephone line. T is the most common setting.
16 Setting up your monitor
Select the setting that is appropriate for the telephone
line that you will be using. Telephone line settings may
be selected when the monitor is plugged in.
If you have questions about the telephone line, contact
your local telephone carrier or hotel front desk.
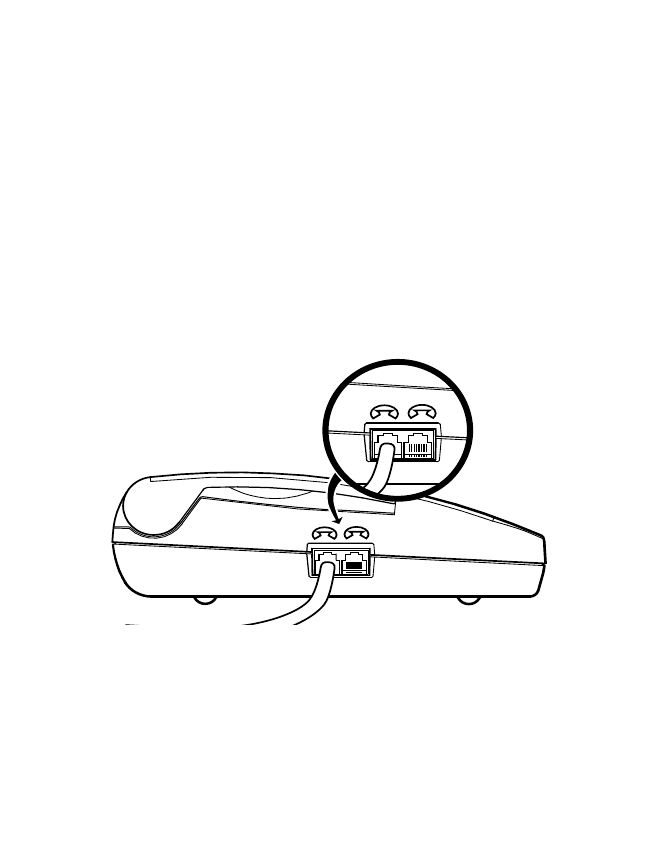
Connecting the monitor to a telephone wall jack
and power outlet
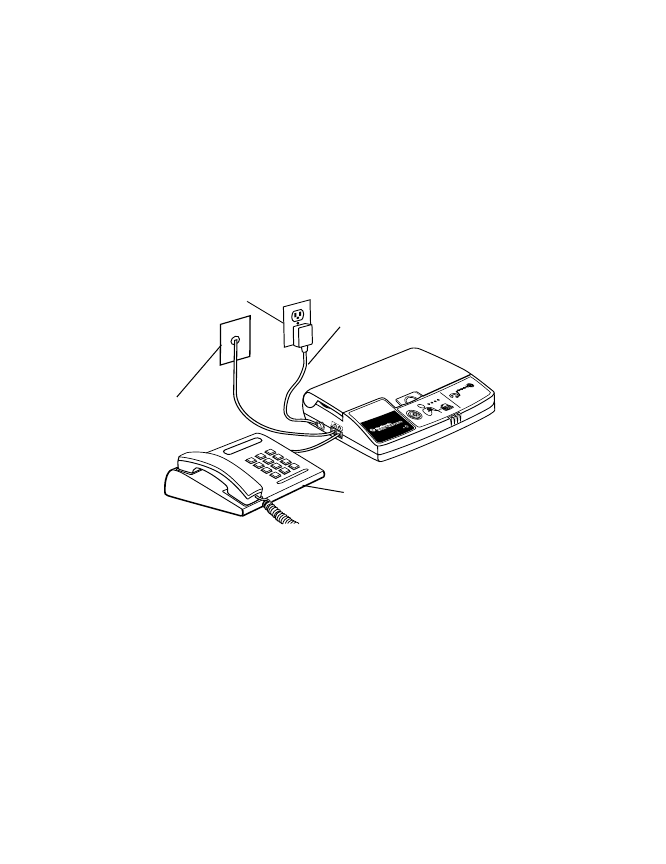
Figure 2: Monitor connected to a telephone wall jack, a
power outlet, and a telephone (connecting a telephone
is optional).
To set up the monitor, you will need to:
1. Make sure that you have the monitor, the telephone
cord, and the power cord supplied with the monitor.
You may use the telephone cord provided with the
Optional
Telephone wall jack
Power cord
Power outlet
17
monitor or any telephone cord with standard
connectors.
Note: If you have a digital subscriber line (DSL) phone
service, you may need a DSL filter from your phone
service provider placed between your telephone wall
jack and the supplied telephone cord.
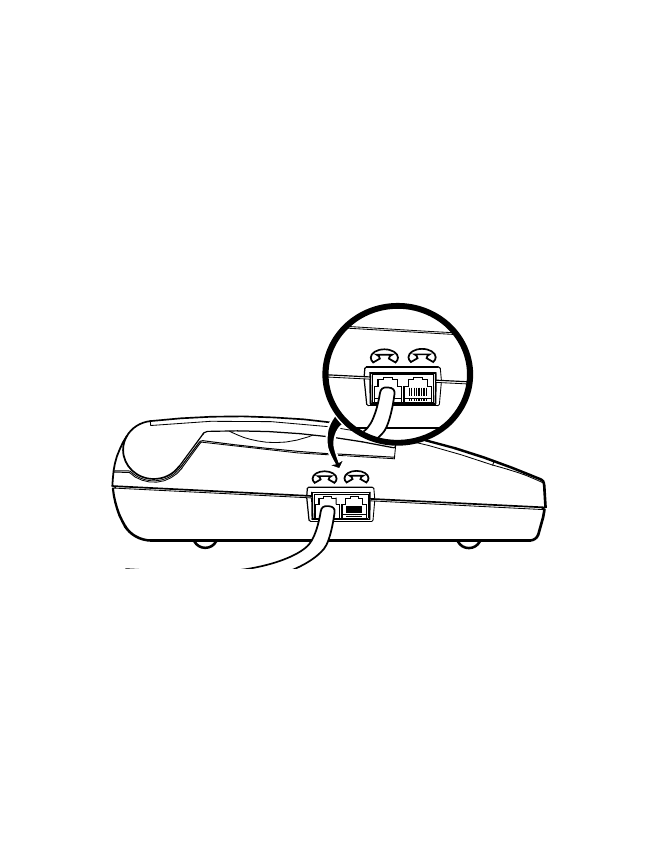
2. Locate the telephone plugs on the left side of the
monitor.
Figure 3: Telephone plugs
3. Plug one end of the telephone cord into either of the
telephone plugs on the side of the monitor. See
Figure 3.
4. Plug the other end of the telephone cord into the
telephone wall jack.
18 Setting up your monitor
Note: You may connect a telephone to the monitor to
make and receive phone calls, but this is not required
for the monitor to work correctly. The set up is
similar to an answering machine.
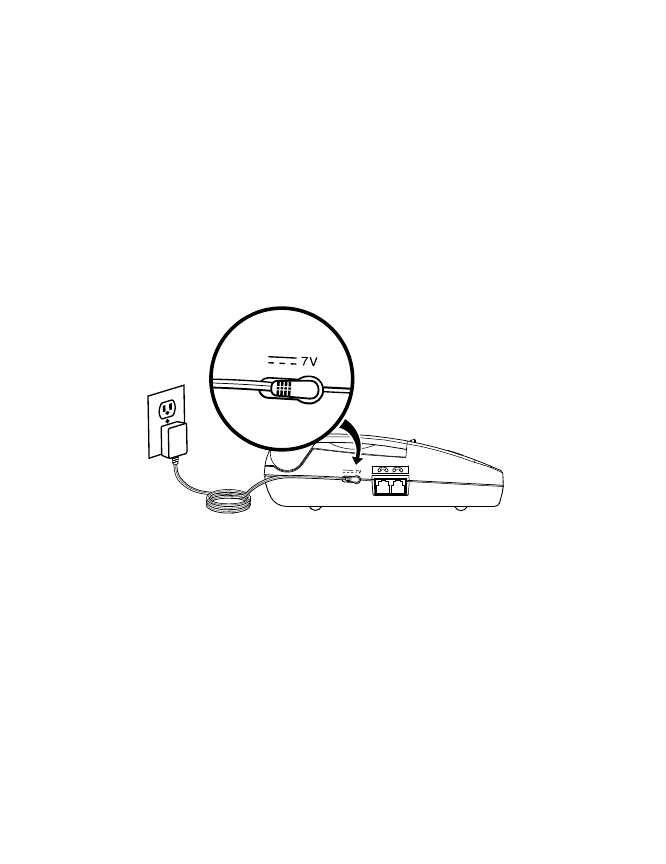
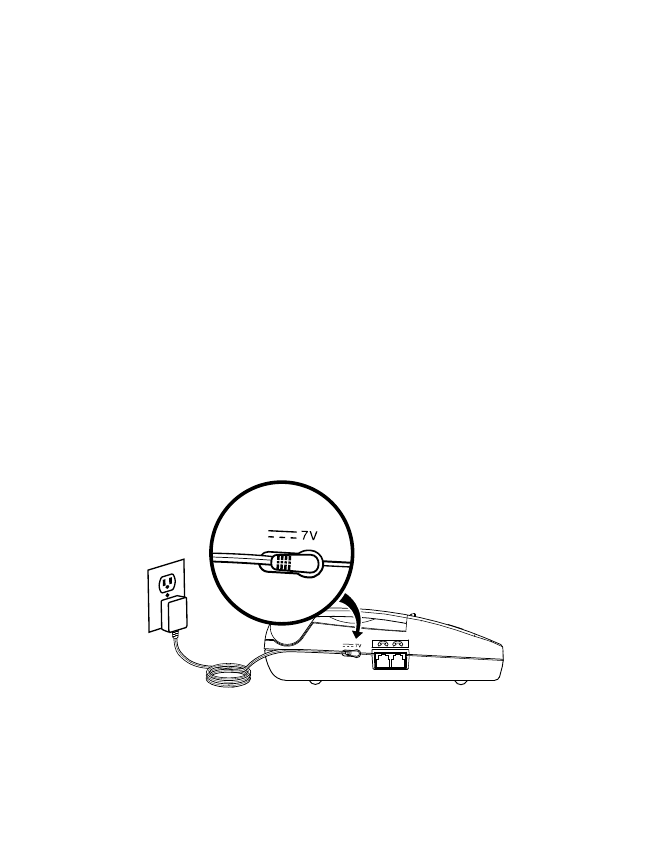
5. Connect the power cord to the monitor. See Figure 4.
Caution: Use only the power cord supplied with the
monitor to plug the monitor into the power outlet.
6. Plug the power cord into the power outlet.
Figure 4: Connecting the power cord
If this is the first time setting up the monitor, you will
need to allow wireless communication between the
monitor and your heart device. To do this, see “Sending
information with your monitor” on page 19. The monitor
is ready for use.

19
Sending information with your monitor
Use this procedure at these times:
•when completing first-time setup, to allow automatic
wireless communication between your monitor and
your heart device
•at the request of your doctor or clinic
Before using your monitor:
•Turn off any television sets within six feet (two
meters) of the monitor.
•Turn off any computer monitors or screens within six
feet (two meters) of the monitor.
•Make sure the monitor Power light is on.

20 Sending information with your monitor
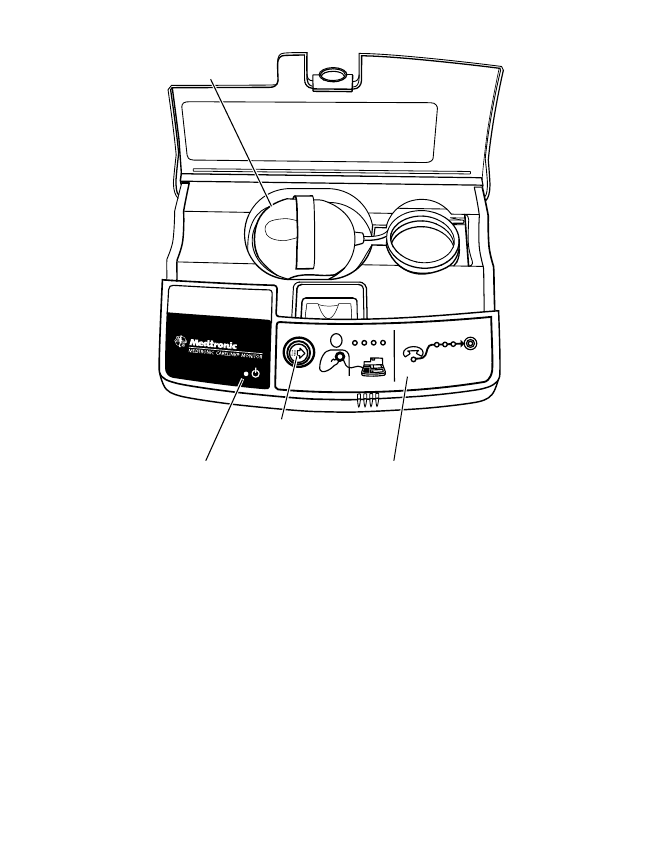
Figure 5: Monitor (front view, approximately 1/4 actual
size)
Perform the following steps:
1. Press the Start/Stop button on the front of the
monitor to send your heart device information to your
clinic. See Figure 5.
2. Place the antenna over your implanted device, holding
it snugly against your clothing. The hand strap on the
antenna should face away from you. See Figure 6.
Display panel
Antenna
Start/Stop button
Power light

21
The Antenna Position Status light will be off if the
antenna is correctly placed. Reposition the antenna
over your heart device if the orange Antenna Position
Status light starts flashing. See Figure 7.
Figure 6: Positioning the antenna
3. Watch the status lights on the display panel on the
front of the monitor. See Figure 7.
Each of these status lights has a different meaning
when you use the monitor to send your heart device
information.

22 Sending information with your monitor
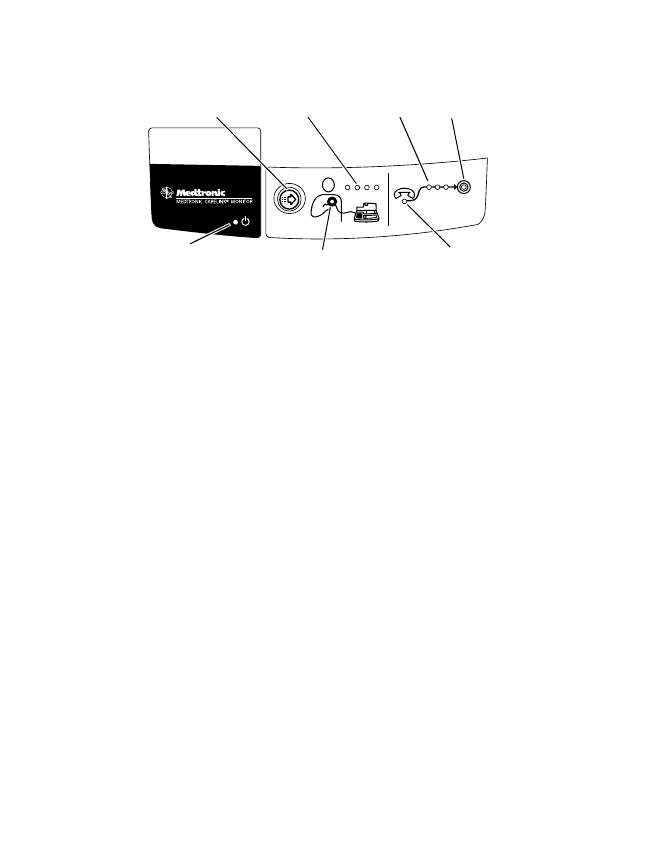
Figure 7: Start/Stop button and status lights
4. The four green Reading Status lights flash and fill as
the monitor gathers information from your implanted
heart device. This process usually takes less than
three minutes.
When the Reading Status lights are flashing, make
sure that the Antenna Position Status light remains
off. When the monitor is finished collecting data from
your heart device, the status lights stop flashing and
turn off. The monitor beeps twice.
5. Remove the antenna from over your implanted device
when you hear the monitor beep. Put the antenna
back into the storage area.
Start/
Stop
button
Power
Status
light
(Green)
Sending
Status
lights
(Green)
Sending
Complete
light
(Green)
Antenna
Position
Status light
(Orange)
Telephone
Line Status
light
(Orange)
Reading
Status
lights
(Green)

23
6. The
monitor automatically dials the preprogrammed,
toll-free number.
Note: The monitor emits high-pitched tones when
dialing the preprogrammed, toll-free number.
7. The three green Sending Status lights start flashing
when the monitor is sending data. This process
typically takes less than three minutes but can take
up to 30 minutes.
Caution: In the case of an emergency, you can use your
phone to call for help. If you have an emergency while
using the monitor, press the Start/Stop button to stop
the monitor and to ensure your phone line is available.
When the monitor is done sending information, the
green Sending Complete light comes on and the
monitor beeps twice.
The monitor automatically returns to resting mode.
You can then use the telephone to make or receive
calls.
Note: If you must stop before the session is complete,
remove the antenna from over your implanted device
and press the Start/Stop button. When you are ready
to restart the session, follow the procedure in “Sending
information with your monitor” on page 19.

24 Green status lights
Green status lights
The green lights indicate the following information (see
Figure 7):
•whether the monitor is plugged in to the power outlet
•the heart device information reading status
•the heart device information sending status
The green Power Status light should always be on. If the
green Power Status light is off, verify that the power cord
is plugged into a power outlet.
When using the monitor to send information, make sure
the Reading Status lights flash and fill.
After the reading is complete, the Sending Status lights
begin to flash.
Note: If all lights on the monitor are flashing, unplug the
monitor and then plug it back in.
Repeat the procedure in “Sending information with your
monitor” on page 19, if:
•the Reading Status lights stop flashing and remain lit
for more than three minutes
•the Sending Status lights flash or remain lit for more
than one hour

25
•you must stop the monitor before your heart device
information is sent
Orange status lights
The two orange lights on the front of the monitor are
status lights (see Figure 7). The status lights are:
•Antenna Position Status
•Telephone Line Status
The orange status lights should not be lit when you are
using the monitor. If either of these status lights remains
on or you hear short beeps after pressing the Start/Stop
button, try the recommendations in the following
paragraphs.
Antenna Position Status
If the orange Antenna Position Status light begins
flashing and you hear short beeps:
•Make sure the hand strap on the top of the antenna is
facing out and away from you. See Figure 6.
•Slowly reposition the antenna over your implanted
device.
When the antenna is repositioned correctly, the orange
Antenna Position Status light will turn off, the green

26 Orange status lights
Reading Status lights will begin flashing, and the
monitor will resume data collection.
Telephone Line Status
If the orange Telephone Line Status light flashes:
•Make sure that the telephone line settings are correct.
See “Setting up your monitor” on page 14. If you need
help determining the type of telephone line you are
using, contact your local telephone carrier.
Note: Telephone line settings may be selected when
the monitor is plugged in.
Note: Verify that your telephone line is analog. The
monitor was designed to work with analog telephone
lines. If you need help determining the type of
telephone line you are using, contact your local
telephone carrier.
Note: If you have a digital subscriber line (DSL) phone
service, you may need a DSL filter from your phone
service provider placed between your telephone wall
jack and the supplied telephone cord.
•Make sure the telephone line connections are intact.
•Test the telephone wall jack to make sure it is
working. Connect a telephone to the telephone wall
jack and make an outside call. If you cannot call out,
connect the monitor to a different telephone wall jack.

27
Note: If the data transmission is interrupted due to Call
Waiting, the monitor automatically redials and sends
your implanted device information. If the monitor does
not begin redialing, check that the telephone connections
are intact.
Traveling with your monitor
When using your monitor away from home:
•Place the monitor within ten feet (three meters) of
where you sleep, preferably on a night stand or a table.
•If you are using a telephone line that requires you to
dial a number to make an outside call (usually 9),
make sure that the telephone line settings are correct.
See “Checking the telephone line settings” on page 14.
•The monitor is designed for use in the continental
United States, Alaska, and Hawaii.
Monitor care
Do not drop your monitor on hard surfaces. Contact your
clinic if the monitor has been dropped.
Clean the outside with a clean, dry cloth.
The monitor does not require any preventative
inspection or maintenance.

28 Monitor specifications
Caution: Do not get your monitor wet. Liquids can
damage the monitor. If you get your monitor wet,
contact your clinic for instructions.
For more information about your monitor see:
http://www.medtronic.com/carelink
Monitor specifications
Standards (The monitor complies with the
following:)
EMC: CFR 47 Part 15
Patient Safety: UL/CUL 60601-1:2003, IEC 60601-1:1988 +
A1:1991 + A2:1995, Type B applied part, ordinary,
continuous operation, Class II, not suitable for use in the
presence of a flammable anaesthetic mixture with air or
with oxygen or nitrous oxide.
Temperature Limits
Operating 49 °F to 110 °F (9 °C to 43 °C)
Storage -40 °F to 150 °F (-40 °C to 65 °C)
Storage and Transport
Relative humidity range within 10% to 85%.
Atmospheric pressure range within 500 to 1060 hPa.

29
Power Requirement
See the label on the supplied power cord.
Power Supply
To assure compliance to the specified standard, use only
the power supply that came with your monitor. Globtek
P/N: GS-1569-
The input of this power supply is rated at: 100-240 VAC,
50-60 Hz, 0.5A.
The power supply is to be used for mains disconnection.
Disposal
Contact Medtronic to dispose of the monitor. Do not
dispose of the monitor in the unsorted municipal waste
stream.
Testing
Electromagnetic Compliance (EMC) testing shows that
the monitor provides reasonable protection against
harmful interference in a typical medical installation.
However, there is no guarantee that interference will not
occur in a particular installation. If the monitor does
cause harmful interference to other devices or is
negatively impacted by other devices, the user is

30 Monitor specifications
encouraged to try to correct the interference by one or
more of the following measures:
•Reorient or relocate the devices.
•Increase the separation between the devices.
•Consult Medtronic for help.
Consumer Information and FCC Requirements
This device complies with Part 15 of the FCC Rules. Operation is
subject to the following two conditions: (1) this device may not
cause harmful interference, and (2) this device must accept any
interference received, including interference that may cause
undesired operations.
The monitor has been tested for compliance to FCC regulations.
Changes or modifications of any kind not expressly approved by
Medtronic could void the user’s authority to operate the
monitor.
1. This transmitter is authorized by rule under the Medical
Implant Communications Service (47 C.F.R. Part 95) and
must not cause harmful interference to stations operating
in the 400.150 - 406.000 MHz band in the Meteorological
Aids (i.e. transmitters and receivers used to communicate
weather data), the Meteorological Satellite, or the Earth
Exploration Satellite Services and must accept interference
that may be caused by such aids, including interference that
may cause undesired operation.

31
2. This transmitter shall be used only in accordance with the
FCC Rules governing the Medical Implant Communications
Service. Analog and digital voice communications are
prohibited. Although this transmitter has been approved by
the Federal Communications Commission, there is no
guarantee that it will not receive interference or that any
particular transmission from this transmitter will be free
from interference.
3. This equipment complies with Part 68 of the FCC rules. On
the bottom of this equipment is a label that contains,
among other information, the FCC registration number and
Ringer Equivalence Number (REN) for this equipment. If
requested, provide information to your telephone company.
4. The REN is useful to determine the quantity of devices you
may connect to your telephone and still have all of those
devices ring when your number is called. In most, but not all
areas, the sum of the RENs of all devices should not exceed
five (5.0). To be certain of the number of devices you may
connect to your line, as determined by the REN, you should
call your local telephone company to determine the
maximum REN for your calling area.
5. If your Model Model 2490C Medtronic CareLink Monitor
causes harm to the telephone network, the Telephone
Company may discontinue your service temporarily. If
possible, the company will notify you in advance. But if
advance notice isn't practical, you will be notified as soon as
possible. You will be advised of your right to file a complaint
with the FCC.

32 Monitor specifications
6. Your telephone company may make changes in its facilities,
equipment, operations, or procedures that could affect the
proper operation of your equipment. If it does, you will be
given advance notice so as to give you an opportunity to
maintain uninterrupted service.
7. If you experience trouble with this equipment, Model
Model 2490C Medtronic CareLink Monitor, please contact
Medtronic, Inc. Minneapolis, MN, 1-800-929-4043, for repair/
warranty information. The telephone company may ask you
to disconnect this equipment from the network until the
problem has been corrected or you are sure that the
equipment is not malfunctioning.
8. There are no repairs that can be made by the customer to
the Model Model 2490C Medtronic CareLink Monitor.
9. This equipment may not be used on coin service provided by
the telephone company. Connection to party lines is subject
to state tariffs. Contact your state public utility commission
or corporation commission for information.
Explicación de los símbolos encontrados en el dispositivo
Válido únicamente para EE.UU.
Equipo médico con respecto a peligros mecánicos,
de descarga eléctrica o de incendio, sólo conforme
a las normas UL60601-1 y CAN/CSA C22.2 nº 601.1
Polaridad del cable de alimentación, centro
negativo
Marca de componente reconocido por UL para
Canadá y los EE.UU.
Parte aplicada tipo B
Comunicación inalámbrica activada
Precaución
Instrucciones de uso
Equipo médico Clase II
Corriente directa
No desechar este producto en los contenedores
municipales para residuos sin clasificar. Aplique
las regulaciones locales para una correcta
eliminación. Consulte
http://recycling.medtronic.com
para obtener instrucciones acerca de la
eliminación adecuada de este producto.
Número de pedido
Precaución:
Según las leyes federales de los
Estados Unidos este dispositivo únicamente puede
venderse por prescripción médica.
Número de serie
Limitación de la temperatura
Limitación de la presión atmosférica
Limitación de la humedad
Directiva de restricción del uso de determinadas
sustancias peligrosas en los equipos eléctricos.
Las marcas incluídas a continuación son marcas comerciales de Medtronic:
Medtronic, Medtronic CareLink
RoHS de China
Certificación obligatoria en China
Sólo para uso en interiores
Marca de aprobación de seguridad
El dispositivo cumple con las normas de
compatibilidad electromagnética (EMC)
reconocidas por la Autoridad de Comunicaciones
Australiana (ACA) y por el Grupo de gestión del
espectro radioeléctrico neozelandés (RSM).
Utilizar solamente la fuente de alimentación
suministrada por Medtronic e identificada como
P/N: GS-1569-
C
onformité
E
uropéenne (European Conformity)
N4292


37
Índice de contenido
Chapter 1 Introducción 39
Acerca de su monitor 39
Envío de información a la petición de su
médico o centro hospitalario 40
Advertencias 41
Precauciones 43
Contenido del envase del Monitor 43
Selección de un lugar para instalar
el monitor 44
Configuración del monitor 44
Verificación de la configuración de la
línea telefónica 45
Conexión del a un
enchufemonitortelefónico y una toma de
alimentación 47
Envío de información con el Monitor 51
Luces del estado verdes 56
Luces del estado anaranjadas 57
Estado de la posición de la antena 58
Estado de la línea telefónica 58
Viajar con el Monitor 59


39
1
Introducción
La finalidad de este manual es ayudarle a utilizar el
Monitor Medtronic CareLink Modelo 2490C
(simplemente denominado "Monitor" a lo largo de este
manual).
Si tiene alguna pregunta que no se responda en este
manual, o experimenta algún problema con el monitor,
consúltelo con su médico. Él conoce su historial médico y
puede ofrecerle la ayuda que usted necesita.
Acerca de su monitor
El Monitor Medtronic CareLink Modelo 2490C se ha
diseñado para recopilar de forma automática
información procedente de su dispositivo cardiaco
implantado. Esta comunicación inalámbrica automática
entre su dispositivo cardiaco y el Monitor tiene lugar a
las horas que han sido programadas anteriormente por
su médico en el centro hospitalario.
No necesita interactuar con su monitor para poder
mandar la información de su dispositivo cardiaco al
centro hospitalario de forma inalámbrica. La transmisión
de datos no se oye ni se puede ver. El centro hospitalario

40 Acerca de su monitor
suele programar la transmisión a la hora que Usted se
encuentra durmiendo.
La información recopilada de su dispositivo cardiaco se
envía por línea telefónica al centro hospitalario
utilizando un número gratuito. Por consiguiente, el
monitor siempre debe estar conectado al enchufe
telefónico y enchufado en la toma de alimentación.
El Monitor también puede enviar alertas inalámbricas
del dispositivo cardiaco de forma automática a su centro
hospitalario. Esta información enviada al centro
hospitalario ayuda a su médico a gestionar mejor su
tratamiento.
El teléfono estará comunicando mientras el Monitor esté
enviando información. Consulte “Envío de información
con el Monitor” en la página 51.
El monitor está diseñado específicamente para un uso
exclusivo. No funcionará con otros dispositivos
implantados, y usted debe utilizarlo sólo siguiendo las
instrucciones de su médico.
Envío de información a la petición de su médico o
centro hospitalario
A veces puede ser necesario enviar información fuera de
las horas programadas por su médico o centro
hospitalario. Se trata de los siguientes momentos:

41
•tras realizar la instalación por primera vez, con el fin
de permitir la comunicación inalámbrica automática
entre el Monitor y el dispositivo cardiaco,
•a petición de su médico o centro hospitalario.
Consulte “Envío de información con el Monitor” en la
página 51.
Advertencias
Advertencia: Si no se encuentra bien y cree que podría
tener que ir al hospital, busque asistencia médica
inmediata. En caso de urgencia, en los EE.UU. llame al 911.
Si su médico le ha dado otras instrucciones, por favor,
sígalas. No utilice el monitor para enviar la información
del dispositivo cardiaco que tiene implantado a su
médico sin haberse puesto en contacto previamente con
él y sin que él le haya pedido que utilice el monitor.
Advertencia: Para garantizar un funcionamiento seguro
de su dispositivo implantado, utilice el monitor sólo del
modo que se describe en este manual y en los momentos
que le haya indicado su médico.
Advertencia: No utilice el monitor si éste no funciona del
modo descrito en “Envío de información con el Monitor”
en la página 51“Envío de información con el Monitor” en

42 Advertencias
la página 51. Si necesita asistencia adicional, póngase en
contacto con el centro hospitalario.
Advertencia: No está permitido realizar modificaciones
en este equipo.
Advertencia: A continuación se ofrecen instrucciones de
seguridad importantes. Durante el uso del Monitor,
siempre se deben seguir las precauciones de seguridad
básicas, incluidas las que se mencionan a continuación,
con el fin de reducir el riesgo de incendio, descarga
eléctrica y lesiones a personas:
1. No utilice el Monitor cerca de fuentes de agua como,
por ejemplo, cerca de un baño, lavabo, fregadero o
lavadero de ropa, en un sótano húmedo, o cerca de una
piscina.
2. Tras realizar la instalación por primera vez o enviar
información a petición de su médico o centro
hospitalario evite utilizar el Monitor durante una
tormenta. Existe un riesgo remoto de descarga
eléctrica por relámpago.
3. No utilice el teléfono para informar de una fuga de gas
desde las proximidades de ésta. No utilice el Monitor
para enviar información si sospecha que hay una fuga
de gas.
Guarde este manual.

43
Precauciones
•Utilice únicamente el cable de alimentación que se
suministra con el monitor.
•Deje siempre el monitor enchufado en una toma de
alimentación que funcione y un enchufe telefónico.
•No utilice un teléfono móvil durante el uso del
monitor.
•Intenta evitar el uso del teléfono mientras utiliza el
monitor. La línea telefónica estará comunicando
mientras el monitor esté enviando datos.
Nota: En caso de urgencia, puede utilizar el teléfono
para pedir ayuda. En caso de emergencia durante el
uso del monitor, pulse el botón de inicio/parada para
parar el monitor y asegurarse de que la línea
telefónica esté disponible.
•No moje su monitor. Los líquidos pueden estropearlo.
Si el Monitor se ha mojado, póngase en contacto con el
centro hospitalario.
Contenido del envase del Monitor
Deberá recibir lo siguiente:
•Monitor Medtronic Carelink Modelo 2490C
•cable de alimentación

44 Selección de un lugar para instalar el monitor
•cable telefónico
•bolsa de transporte
•manual del paciente
•DVD con instrucciones para el paciente
•tarjeta de instrucciones
•garantía
•declaración de compatibilidad electromagnética
Selección de un lugar para instalar el monitor
Elija un lugar para instalar el monitor Siga las siguientes
recomendaciones para elegir un lugar adecuado:
•Coloque el monitor a menos de tres metros del lugar
donde duerme, preferiblemente en una mesilla de
noche o una mesa.
•Coloque el monitor al alcance de un enchufe
telefónico.
•Coloque el monitor al alcance de una toma de
alimentación.
•No coloque el monitor en sitios donde pueda mojarse.
Configuración del monitor
Antes de utilizar su monitor, deberá :

45
1. Verificar de la configuración de la línea telefónica en
el Monitor.
2. Conectar el monitor a un enchufe telefónico.
3. Enchufar el Monitor en una toma de alimentación.
Puede conectar un teléfono al monitor para realizar y
recibir llamadas, sin embargo, no es imprescindible para
un correcto funcionamiento del monitor. Para obtener
más información, consulte “Conexión del a un
enchufemonitortelefónico y una toma de alimentación”
en la página 47.
Nota: El monitor no funciona con teléfonos móviles.
Verificación de la configuración de la línea
telefónica
Antes de usar el monitor, compruebe que la línea
telefónica esté correctamente configurada. El monitor
tiene dos configuraciones para la línea telefónica, N-7-8-9
y T-P. Consulte Figura 1.
46 Configuración del monitor
Figura 1. Configuración de la línea telefónica
N-7-8-9 – Esta configuración se utiliza si hay que marcar
los números 7, 8 ó 9 para acceder a una línea telefónica
exterior. Nsignifica que no hay que marcar ningún
número y es la configuración más común para uso
doméstico.
Seleccione la configuración adecuada para la línea
telefónica que vaya a utilizar. Si está en un hotel, es
posible que tenga que pasar el conmutador a 7, 8 ó 9 para
acceder a una línea exterior.
T-P – Esta configuración se utiliza para seleccionar una
línea telefónica de tonos (T) o de pulsos (P). La línea de
tonos (T) es la configuración más común.

47
Seleccione la configuración adecuada para la línea
telefónica que vaya a utilizar. Se puede seleccionar la
configuración de la línea telefónica con el monitor
enchufado.
Si tiene alguna duda acerca de la línea telefónica, diríjase
a su compañía telefónica, o si se encuentra en un hotel, a
la recepción del mismo.
Conexión del a un enchufemonitortelefónico y
una toma de alimentación
Figura 2. Monitor conectado a un enchufe telefónico, a
una toma de alimentación y a un teléfono (la conexión a un
teléfono es opcional).
Para instalar el monitor deberá:
1. Asegurarse de que tiene el monitor, el cable telefónico
y el cable de alimentación suministrado con el
Opcional
Enchufe telefónico
Cable de alimentación
Toma de alimentación
48 Configuración del monitor
monitor.
Puede utilizar el cable telefónico que se
proporciona con el monitor o cualquier cable telefónico
con conectores estándar.
Nota: Si tiene un servicio telefónico de línea de
suscriptor digital (DSL), puede que su proveedor de
servicio telefónico deba proporcionarle un filtro DSL
para colocarlo entre el enchufe telefónico y el cable
telefónico suministrado.
2. Localizar las salidas telefónicas en el costado izquierdo
del monitor.
Figura 3. Salidas telefónicas
3. Conecte un extremo del cable telefónico a cualquiera
de las salidas telefónicas del costado del monitor.
Consulte Figura 3.
49
4. Conecte el otro extremo del cable telefónico al enchufe
telefónico.
Nota: Puede conectar un teléfono al monitor para
realizar y recibir llamadas, sin embargo, no es
necesario para un correcto funcionamiento del
monitor. La instalación se parece a la de un
contestador automático.
5. Conectar el cable de alimentación al monitor. Consulte
Figura 4.
Precaución: Utilice únicamente el cable de
alimentación que se suministra con el monitor para
enchufar el Monitor en la toma de alimentación.
6. Enchufar el cable de alimentación en la toma de
alimentación.
Figura 4. Conexión del cable de alimentación
Si es la primera vez que instala el Monitor, deberá
permitir la comunicación inalámbrica entre el Monitor y


51
Envío de información con el Monitor
Utilice este procedimiento en las siguientes situaciones:
•tras realizar la instalación por primera vez, con el fin
de permitir la comunicación inalámbrica automática
entre el Monitor y el dispositivo cardiaco,
•a petición de su médico o centro hospitalario.
Antes de utilizar el Monitor:
•Apague cualquier televisor que esté a menos de dos
metros del monitor.
•Apague cualquier pantalla de ordenador que esté a
menos de dos metros del Monitor.
•Compruebe que la luz de alimentación del Monitor
esté encendida.
52 Envío de información con el Monitor
Figura 5. Monitor (vista frontal, aproximadamente 1/4 del
tamaño real)
Realice los siguientes pasos:
1. Pulse el botón de inicio/parada situado en la parte
frontal del monitor para enviar la información del
dispositivo cardiaco a su centro hospitalario. Consulte
Figura 5.
2. Coloque la antena sobre su dispositivo implantado,
manteniéndola bien apoyada sobre la ropa. La correa
Panel de visualización
Antena
Botón de inicio/
parada
Luz de alimentación

53
de mano de la antena deberá estar mirando hacia el
lado opuesto a su cuerpo. Consulte Figura 6.
La luz de estado de posición de la antena está apagada
si la antena esté en la posición correcta. Vuelva a
colocar la antena sobre su dispositivo cardiaco si la luz
anaranjada del estado de la posición de la antena
empieza a parpadear. Consulte Figura 7.
Figura 6. Colocación de la antena
3. Observe las luces del estado en el panel de
visualización de la parte delantera del monitor.
Consulte Figura 7.
Cada una de estas luces de estado tiene un significado
diferente cuando se utiliza el monitor para enviar la
información del dispositivo cardiaco.
54 Envío de información con el Monitor
Figura 7. Botón de inicio/parada y luces de estado
4. Las cuatro luces verdes de estado de lectura parpadean
y se llenan a medida que el monitor recopila
información desde el dispositivo cardiaco implantado.
Este proceso suele durar menos de 3 minutos.
Cuando las luces del estado de la lectura están
parpadeando, compruebe que la luz del estado de la
posición de la antena permanezca apagada. Cuando el
monitor termine de recopilar los datos del dispositivo
cardiaco, las luces del Monitor dejarán de parpadear y
se apagarán. El monitor pitirá dos veces.
5. Retire la antena de encima de su dispositivo
implantado cuando oiga que el monitor emite pitidos.
Botón
de
inicio/
parada
Luz del
estado de
la corriente
(verde)
Luces del
estado del
envío
(verdes)
Luz de
envío
terminado
(verde)
Luz del
estado de la
posición de la
antena
(anaranjada)
Luz del
estado de la
línea
telefónica
(anaranjada)
Luces del
estado de
la lectura
(verdes)

55
Vuelva a colocar la antena en el lugar donde la guarde
normalmente.
6. El
Monitor marcará de forma automática el número
gratuito preprogramado.
Nota: El monitor emitirá tonos agudos mientras se
marca el número gratuito que se ha programado
previamente.
7. Las tres luces verdes del estado del envío empiezan a
parpadear cuando el monitor está enviando datos.
Este proceso dura en general menos de tres minutos,
pero podría durar hasta 30 minutos.
Precaución: En caso de urgencia, puede utilizar el
teléfono para pedir ayuda. En caso de urgencia
durante el uso del monitor, pulse el botón de inicio/
parada para parar el monitor y asegurarse de que la
línea telefónica esté disponible.
Cuando el monitor termina de enviar información, se
encenderá la luz verde que indica que el envío se ha
completado correctamente y el Monitor pitará dos
veces.
El Monitor volverá de forma automática al modo de
reposo. En ese momento ya podrá utilizar el teléfono
para enviar o recibir llamadas.
Nota: Si tiene que interrumpir el proceso antes de la
finalización de la sesión, retire la antena de encima del

56 Luces del estado verdes
dispositivo implantado y pulse el botón de inicio/
parada. Cuando esté preparado para reiniciar la
sesión, siga el procedimiento que se describe en “Envío
de información con el Monitor” en la página 51.
Luces del estado verdes
Las luces verdes indican la siguiente información
(consulte Figura 7):
•si el Monitor está enchufado en la toma de
alimentación
•el estado de lectura de la información del dispositivo
cardiaco
•el estado del envío de la información del dispositivo
cardiaco
La luz verde del estado de la corriente debe estar
encendida siempre. Si la luz verde del estado de la
corriente está apagada, compruebe que el cable de
alimentación está enchufado en una toma de
alimentación.
Cuando se utiliza el Monitor para enviar información,
hay que comprobar que las luces del estado de la lectura
parpadean y se llenan.
Tras la finalización de la lectura, las luces de estado del
envío empiezan a parpadear.

57
Nota: Si todas las luces del Monitor parpadean,
desenchufe el Monitor y después vuelva a enchufarlo.
Repita el procedimiento descrito en “Envío de
información con el Monitor” en la página 51 si:
•las luces de estado de la lectura dejan de parpadear y
permanecen encendidas durante más de tres minutos
•las luces de estado del envío parpadean o permanecen
encendidas durante más de una hora
•hay que apagar el monitor antes de enviar los datos
Luces del estado anaranjadas
Las dos luces anaranjadas de la parte frontal del monitor
son luces de estado (consulte Figura 7). Las luces de
estado son:
•Estado de la posición de la antena.
•Estado de la línea telefónica.
Las luces de estado anaranjadas no deben estar
encendidas durante la utilización del monitor. Si alguna
de estas luces del estado permanece encendida o escucha
pitidos breves después de pulsar el botón de inicio/
parada, siga las recomendaciones que se dan en los
párrafos siguientes.

58 Luces del estado anaranjadas
Estado de la posición de la antena
Si la luz de estado de posición de la antena naranja
comienza a parpadear y escucha tonos breves:
•Asegúrese de que la cinta para la mano de la parte
superior de la antena está mirando hacia fuera y
alejada de usted. Consulte Figura 6.
•Vuelva a colocar lentamente la antena sobre el
dispositivo implantado.
Cuando la antena esté colocada correctamente, la luz de
estado de posición de la antena naranja se apagará, las
luces de estado de la lectura comenzarán a parpadear y el
monitor reanudará la recopilación de datos.
Estado de la línea telefónica
Si la luz anaranjada del estado de la línea telefónica
parpadea:
•Asegúrese de que la configuración de la línea
telefónica sea la correcta. Consulte “Configuración del
monitor” en la página 44. Si necesita ayuda para
determinar el tipo de línea telefónica que se está
usando, póngase en contacto con su compañía
telefónica.
Nota: Se puede seleccionar la configuración de la línea
telefónica con el monitor enchufado.

59
Nota: Compruebe que su línea telefónica es analógica.
El Monitor está diseñado para funcionar con líneas
telefónicas analógicas. Si necesita ayuda para
determinar el tipo de línea telefónica que está usando,
póngase en contacto con su compañía telefónica.
Nota: Si tiene un servicio telefónico de línea de
suscriptor digital (DSL), puede que su proveedor de
servicio telefónico deba proporcionarle un filtro DSL
para colocarlo entre el enchufe telefónico y el cable
telefónico suministrado.
•Compruebe que las conexiones de la línea telefónica
estén bien.
•Revise el enchufe telefónico para comprobar que
funciona. Conecte un teléfono al enchufe telefónico y
haga una llamada exterior. Si no puede realizar una
llamada al exterior, conecte el Monitor a un enchufe
telefónico diferente.
Nota: Si se interrumpe la transmisión de datos a causa
de una llamada en espera, el Monitor vuelve a marcar
automáticamente y envía la información del dispositivo
implantado. Si el monitor no inicia una nueva marcación,
comprobar que las conexiones telefónicas están intactas.
Viajar con el Monitor
Cuando se utiliza el Monitor fuera de casa:

60 Cuidados del Monitor
•Coloque el monitor a menos de tres metros del lugar
donde duerme, preferiblemente en una mesilla de
noche o una mesa.
•Si se utiliza una línea telefónica que exige marcar un
número para realizar una llamada exterior (suele ser
el número 9), compruebe que la configuración de la
línea telefónica sea correcta. Consulte “Verificación de
la configuración de la línea telefónica” en la página 45.
•El monitor está diseñado para utilizarse en Estados
Unidos, Alaska y Hawaii.
Cuidados del Monitor
No deje caer el Monitor en una superficie dura. Póngase
en contacto con la clínica si el monitor se ha caído.
Limpie el exterior con un paño limpio y seco.
El Monitor no requiere una inspección ni un
mantenimiento preventivos.
Precaución: No moje su monitor. Los líquidos pueden
estropear el monitor. Si el Monitor está mojado, póngase
en contacto con el centro hospitalario.
Para obtener más información acerca de su Monitor,
consulte:
http://www.medtronic.com/carelink

61
Especificaciones del Monitor
Normas (el monitor cumple las siguientes
normas:)
EMC: CFR 47 Parte 15
Seguridad del paciente: UL/CUL 60601-1:2003, IEC 60601-
1:1988 + A1:1991 + A2:1995, Tipo B, funcionamiento
continuo normal de partes aplicadas, Clase II, no
adecuado para su uso en presencia de una combinación
de anestésico inflamable con aire, o con oxígeno u óxido
nitroso.
Límites de temperatura
Funcionamiento 9 °C a 43 °C (49 °F a 110 °F)
Conservación -40 °C a 65 °C (-40 °F a 150 °F)
Conservación y transporte
Intervalo de humedad relativa del 10% al 85%.
Intervalo de presión atmosférica de 500 a 1060 hPa.
Requisitos de alimentación
Consulte el etiquetado del cable de alimentación
suministrado.

62 Especificaciones del Monitor
Fuente de alimentación
Para asegurar el cumplimiento de la norma especificada,
utilice exclusivamente la fuente de alimentación que se
incluye con el Monitor. Globtek P/N: GS-1569-
El valor nominal de esta fuente de alimentación es: 100-
240 VCA, 50-60 Hz, 0,5 A.
La fuente de alimentación se debe utilizar en caso de
desconexión de la red eléctrica.
Eliminación
Póngase en contacto con Medtronic para la eliminación
del Monitor. No deseche el Monitor en ningún
contenedor común municipal o conducción de aguas
residuales.
Pruebas
Las pruebas de cumplimiento electromagnético (EMC)
indican que el monitor proporciona una protección
razonable contra las interferencias perjudiciales en una
instalación médica normal. Sin embargo, no hay garantía
de que no se produzcan interferencias en una instalación
específica. Si el monitor causa interferencias nocivas en
otros dispositivos o se ve afectado negativamente por
otros dispositivos, se recomienda intentar corregir las

63
interferencias mediante una o más de las medidas
siguientes:
•Cambiar la orientación o posición de los dispositivos.
•Aumentar la separación entre los dispositivos.
•Consultar a Medtronic para obtener ayuda.
Información para el consumidor y requisitos de la FCC
Este dispositivo cumple con la parte 15 de las normativas de la
FCC. El manejo está supeditado a las siguientes dos condiciones:
(1) este dispositivo no debe causar interferencias dañinas y
(2) este dispositivo debe aceptar cualquier interferencia
recibida, incluso aquellas interferencias que pudiesen causar un
funcionamiento no deseado.
Se ha comprobado que el Monitor cumple las normativas de la
FCC. Los cambios o modificaciones de cualquier tipo que no
hayan sido aprobados expresamente por Medtronic podrían
anular el derecho del usuario a utilizar el Monitor.
1. Este transmisor está autorizado bajo las reglas del Servicio
de comunicaciones de implantes médicos (47 C.F.R. Parte
95) y no deberá ocasionar interferencias nocivas a
estaciones que operen en la banda de 400.150 - 406.000
MHz en los Recursos Meteorológicos (es decir, transmisores
y receptores utilizados para comunicar datos
meteorológicos), el Satélite Meteorológico o los Servicios
Satelitales de Exploración de la Tierra, y deberá aceptar las
interferencias que pudieran ocasionar dichos recursos,
incluidas las que pudieran dar lugar a un funcionamiento
indeseado.

64 Especificaciones del Monitor
2. Este transmisor se debe utilizar únicamente de acuerdo con
las normas de la FCC que rigen el Servicio de
comunicaciones de implantes médicos (Medical Implant
Communications Service). No se permiten las
comunicaciones por voz analógicas y digitales. Si bien este
transmisor ha sido aprobado por la Comisión Federal de
Comunicaciones, no existen garantías de que no sufrirá
interferencias ni de que ninguna transmisión específica
efectuada desde el mismo se verá libre de interferencias.
3. Este equipo cumple con la parte 68 de las normativas de la
FCC. En la parte inferior del equipo hay una etiqueta que
contiene, junto con otra información, el número de registro
de la FCC y el número de equivalencia de timbre (REN)
correspondientes al mismo. Suministre información a la
compañía telefónica si se lo solicitan.
4. El REN es útil para determinar cuántos dispositivos puede
conectar al teléfono de manera tal que todos esos
dispositivos suenen cuando llamen a su número. En la
mayoría de las zonas, aunque no en todas, la suma de los
REN de todos los dispositivos no debe ser superior a cinco
(5,0). Para asegurarse del número de dispositivos que puede
conectar a su línea de acuerdo con el REN, llame a la
compañía telefónica de su localidad para determinar el REN
máximo de su zona.
5. Si su Monitor Medtronic CareLink Modelo Modelo 2490C
ocasiona daños a la red telefónica, la compañía de teléfonos
podrá interrumpir su servicio temporalmente. En la medida
de lo posible, se lo notificarán con anticipación. Si esto no es
posible, lo notificarán tan pronto como puedan. Le
informarán también de su derecho a presentar una queja
ante la FCC.

65
6. La compañía telefónica podría realizar cambios en sus
instalaciones, equipos, operaciones o procedimientos que
afecten al funcionamiento adecuado de su equipo. De ser
así, se lo notificarán por anticipado para darle la oportunidad
de evitar interrupciones en el servicio.
7. Si tiene problemas con este equipo, Monitor Medtronic
CareLink Modelo Modelo 2490C, póngase en contacto con
Medtronic, Inc. Minneapolis, MN, 1-800-929-4043, para
solicitar información sobre reparaciones o la garantía. La
compañía telefónica podría pedirle que desconecte este
equipo de la red hasta que el problema se haya solucionado
o usted esté seguro de que el equipo no está funcionando
incorrectamente.
8. No hay ninguna reparación del Monitor Medtronic CareLink
Modelo Modelo 2490C que pueda realizar el cliente.
9. Este equipo no puede usarse con el servicio con monedas
ofrecido por la compañía telefónica. La conexión a una línea
compartida estará sujeta a las tarifas estatales. Solicite
información a la comisión de servicios públicos o corporativa
de su estado.

66 Especificaciones del Monitor


*M934177A001* © Medtronic, Inc. 2008
M934177A001A
2008-09-30
World Headquarters/Sede
mundial
Medtronic, Inc.
710 Medtronic Parkway
Minneapolis, MN 55432-5604
USA
www.medtronic.com
Tel. +1-763-514-4000
Fax +1-763-514-4879
Medtronic USA, Inc.
Information for
patients/Información para
pacientes:
www.medtronic.com
Tel. 1-800-929-4043
Fax 1-763-367-5809
Monday – Friday,
7 am – 6 pm, Central Time/
de lunes a viernes, 7 a 18 hrs.,
zona horaria central